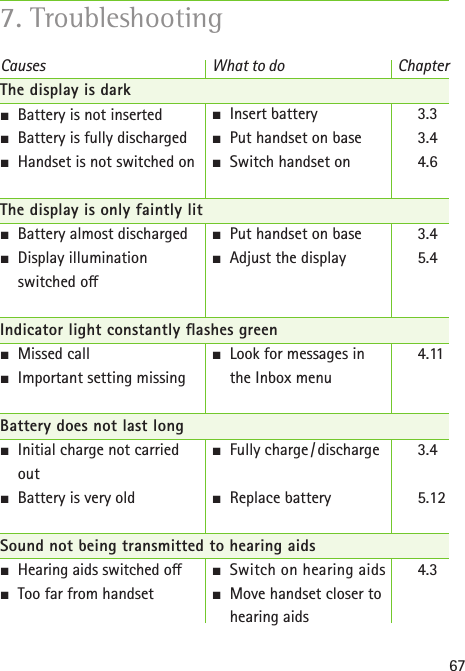
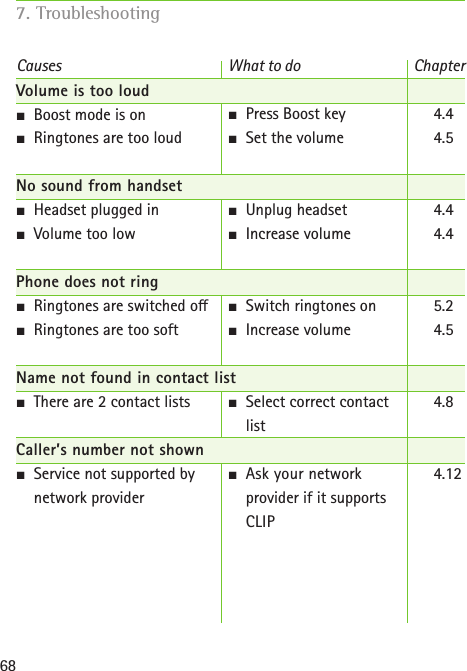
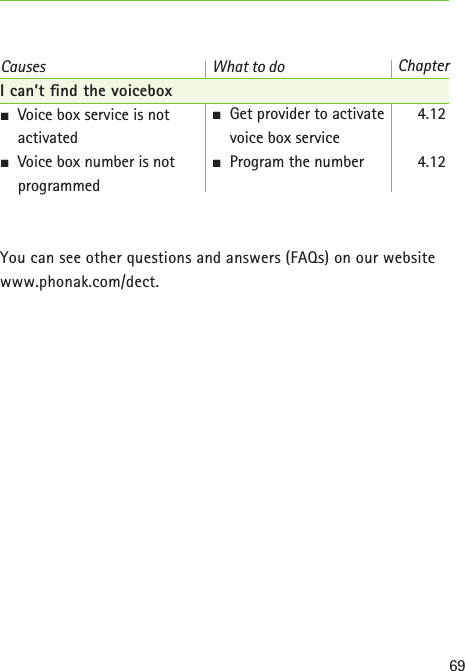
RTX CT8171 DECT-HiBAN Cordless Phone User Manual

RTX Hong Kong Ltd. DECT-HiBAN Cordless Phone Users Manual

Contents

Users Manual

User GuideCordless phonePhonak DECT
2This user guide is valid forPhonak DECT CP1Phonak DECT IIHearing aid compatibilityThis product uses a dedicated wireless link to Phonak hearing aids. Please ask your hearing care professional about your hearing aids compatibility.The compatibility can easily be checked using the demo mode (  Chapter 3.8).
3  1.  Welcome  7  2.  Getting to know the phone 8    2.1 Packaging content  8    2.2 How the phone works  9    2.3 Descriptions of the device  10  3.  Getting started  15    3.1 Setting up the power supply 15    3.2 Connecting the base 16    3.3 Inserting the battery 17    3.4 Charging the handset  18    3.5 Changing the display language 19    3.6 Setting date and time  20    3.7 Setting the location  21    3.8 Testing the connection to your hearing aids  22    3.9 Transferring existing contacts  24 Contents
4  4.  Everyday use  26    4.1 Making and ending a call  26    4.2 Muting the handset microphone  28    4.3 Making a call with Phonak hearing aids  28     4.4 Setting the volume  31    4.5 Setting ringtones  32    4.6 Switching the handset on and o  34    4.7 Entering a contact  35    4.8 Looking up contacts  38    4.9 Finding a lost handset  39     4.10 Using the caller list  41    4.11 Using the Inbox menu  42    4.12 Using the answerphone “Voice box”  42    4.13 Additional features when using the phone  44  5.  Handset settings  45    5.1 Locking the keypad  46    5.2 Switching ring tones on / o  47    5.3 Other contact list functions  48 Contents
5    5.4 Other handset settings  50    5.5 Alarm clock function  53    5.6 Attaching the belt clip  56    5.7 Signal strength indicator  57    5.8 Eco-mode  58     5.9 Battery status display  59    5.10 Multiple handsets for one base  60     5.11 Using an existing base  63    5.12 Changing the battery  64  6.  PIN-codes and resetting your settings   65    6.1 Changing PIN codes  65    6.2 Resetting your settings  65    6.3 Resetting the system PIN  66   7.  Troubleshooting  67  8.  Information on product safety   70
6  9.  Service warranty  72    9.1 Local warranty  72    9.2 International warranty  72    9.3 Warranty limitation  73  10.  Compliance information  74 11.  Information and explanation of symbols  8412.  Important safety information  87Contents
7The Phonak DECT cordless phone is a quality product developed by Phonak, one of the world’s leading companies in the  eld of hearing technology.Please read this user guide thoroughly in order to be able to bene t from all the possibilities this product can o er. If you have any questions, please consult your hearing care professional or go to www.phonak.com/dectPhonak – life is on    www.phonak.com1. Welcome
82.1 Packaging content2. Getting to know the phoneRemovablebelt clipBattery coverRechargeable batteryHandsetPower supply with adaptersPhone cable RJ11 with adaptersDECT base andcharger (“Base“)CHDEUUS / CAN
92.2 How the phone worksThis telephone is used like any  other cordless phone. In addition,  the integrated wireless Phonak  transmission technology makes  telephoning with Phonak hearing aids much easier.The phone signal is sent wirelessly to both hearing aids in digital quality.If you hold the handset close to your head, the hearing aids will automatically switch to the phone program.Of course, you can also use the phone without hearing aids.
102.3 Descriptions of the devicesThe baseThe base is connected to the telephone line and also  serves as the charger for the handset.    The default PIN code for the base is “0000”.  The base and the handset are pre-paired.  Charging contacts  Power supply input  Paging and pairing button   Analog phone line input2. Getting to know the phone
11The handset  To change the display language, follow the  instructions in Chapter 3.5.
12  Receiver  Volume up / down   Volume boost     Press 2 sec. = Hearing aid connectivity test (demo mode)  Hands-free on / o   Talk / repeat call Press and hold   2 sec. = Dial voicemail number Press and hold   2 sec. = All ring tones o / on  Microphone openings Press and hold   2 sec. = Dial international  prex “+” Press and hold   2 sec. = Keypad lock on / o  Number keypad  Navigation keys  End call / back (one menu level up) Press and hold   2 sec. in standby mode = handset on / o  Function key  Display keys  Context menu (use the display keys to select  functions depending on the display)  Display  3.5 mm headset socket  Indicator light2. Getting to know the phone
13Display symbols in standby modeDisplay symbols if call is in progress  The content of the display varies depending on  the settings.      Time  Date  Alarm clock on Battery and charging state  Ringtone o  Keypad locked  Handset name  (visible if more than one handset is used with the same base)  Signal strength from base    Context dependent functions Elapsed time of call Phone number or name Active call indicator Boost mode on Handset microphone muted Hands free on
14Menu  Press   to enter the menu and use the arrow keys  to navigate. Press   to go back.    ContactChapter4.7Chapter5.4Chapter3.8Chapter4.5Chapter5.5Chapter4.1Chapter4.12Calls Voicebox AlarmclockAudio-settingsHearing aidSettings2. Getting to know the phone
2.a.b.3.US EU UK153. Getting started3.1 Setting up the power supply1.  Select your power adapter.2.  Insert the top round end of the  adapter in to the round corner  of the power supply.3.  Click the bottom end of the  adapter in to lock it into  place. Make sure the adapter is  securely locked.To remove the power adapter:a.  Pull back the tab on the power  supply.b.  Pull the adapter upwards to  remove it.
D2.1.CH110 / 220  VPhone line163.2 Connecting the base  Put the base on a non-slip, at surface.1.  Plug the mini-USB plug  into the base and the  power supply into a power  outlet.2.  Connect the phone line  input of the base with  the analog phone socket  using the phone cable.Use the appropriate phone line  adapter if required.  The phone only works when the power supply is plugged into the base and a power socket.3. Getting started
”click“”click“1.2.173.3 Inserting the battery Only use the lithium ion battery provided by Phonak, as otherwise signicant personal injury and damage to property may occur.1.  Make sure the battery contacts  are located as shown.2.  Insert the contacts side rst.3.  Insert the battery completely. You  will hear the startup melody as the  phone switches on automatically.4.  Align the battery cover at on  top of the battery.5.  Slide it gently to click it into place.  To open the battery cover, rst  lift the small latch at the bottom,  then slide the cover open.
183.4 Charging the handset  The handset must only be charged in the base.You may place the handset  into the base after each  call to charge the battery.If the battery symbol shows only  one bar   (<25%), charge the  handset as soon as possible.Initial chargingThe charging status display will only work properly after  the rst full charge followed by a full depletion of the battery. SPlace the handset in the base and charge for  8 hours. S Remove it from the base and only recharge when the battery is completely depleted.  The battery may become warm during charging. 3. Getting started
193.5 Changing the display languageIn order to function properly the language,  country, time and date need to be set. When you use the handset for the rst  time, you will automatically be asked which  language settings you would like: SPress   to choose the language. Confirm with .   Press the back key   each time to go back in the  menu or to cancel an entry.To change the language: S Press the   key to get to the Settings menu.  Press . S Press the   key to get to the sub menu  Language. Press  .  S Press the   key to select your language. Press  .
20  After setting the language for the rst time, you can test the phone with your hearing aids. Please follow the instructions on the display (  Chapter 3.8).3.6 Setting date, time and time format S Press the   key to get to the Settings menu.  Press . SPress the   key to get to the sub menu Date / Time.Press .To set the date / time: SUse the   key to choose the Time and Date  and enter them using keys 0–9.  You can use the   /   keys to overwrite information.To set the time format: SUse the   key to choose Time format, press . SUse the   /   keys to select the time format. SWhen nished, press the display key Save.3. Getting started
21  Date and time are always saved in the base.  After a power cut, you must re-enter the date  and time. 3.7 Setting the locationAttention: To ensure that all functions work properly, you must enter the country where the phone is being used. To set the country: S Press the   key to get to the Settings menu.  Press . SPress the   key to get to the sub menu Location.  Press . SUse the   /   keys to choose your country. Press the display key Save.  You may also enter the Country area code, National area code and International area code if these are not shown correctly.
22  If your country is not listed, choose one with similar telephone conditions or Other country.  If you select a country that uses the am / pm time  format, it will automatically be changed. If you wish to change the time format later, refer to chapter 3.6.3.8 Testing the connection to your hearing aidsIn standby mode, press and hold the  Boost key to start the test. Hold the phone to your ear and the test  message will be wirelessly transmitted  to your hearing aids.You can also start the test using the menu: S Press the   key to get to the Hearing aid menu.  Press . SPress the   key to get to the sub menu Check  connection. Press .3. Getting started
max. 25 cm / 10“23As soon as Playing demo …  appears on the display, hold  the handset close to your  hearing aids (max. 25 cm away  from both aids).  Hold the phone in front of your face to check if you can hear the sound via the wireless transmission and not with the hearing aid microphone.   Changing position or distance may interrupt the transmission. This is normal. S Use the volume buttons to set the volume to a  comfortable level. SPress the display key End to end the test.  The test will automatically stop after 15 minutes.The test is available in English, German, French or Spanish  depending on the language setting for the phone. For any other language setting, it will be played in English.
243.9 Transferring existing contactsIf you already have a DECT-compatible cordless phone,  it may be possible to transfer your contact data to the Phonak DECT phone.To do so, the existing handset must be logged in to the  Phonak base rst. Refer to the user guide of your current handset and log it into the Phonak base (  Chapter 5.10).Transfer the contacts of your existing handset to the  Phonak base.Your contacts can remain on the Phonak base or be transferred to the Phonak handset.  Your existing phone must support the transfer of contact data. Please refer to your phones user guide for more information.3. Getting started
25Your phone is now ready to use. What would you like to do next?Changing the display language  Chapter   3.5Making and ending a call  Chapter   4.1Setting the volume  Chapter   4.4Setting ringtones  Chapter   4.5Entering a contact  Chapter   4.7Using the answerphone ”Voice box“  Chapter   4.12Multiple handsets for one base  Chapter   5.10
264. Everyday use 4.1 Making and ending a callMaking a call S Enter the phone number you would  like to dial on the number keypad.  You can correct a wrong digit by  pressing the display key Delete. S Press the talk key   to make  the call.  Press and hold the talk key   to check the line  before dialing a number.  During the call, the display will show the number you have dialed and the duration of the call. If the number is saved in the contact list, the name will  appear.Ending a callTo end the call, press the end call key .
27Accepting a callIn addition to the ringtone, an incoming call is signaled by the blinking indicator light and vibration (if enabled).To accept an incoming phone call, press the talk key .   When ringing, the phone can be muted using the  display key Mute.Automatic call acceptanceTaking the handset from the base automatically accepts  a call. To switch this function on or o: S Press the   key to get to the Settings menu.  Press . S Press the   key to get to the sub menu Base.  Press . S Use the   /   keys to select On or O. SPress the display key Save to store the settings.
284.2 Muting the handset microphone  You can disable the microphone by using  the display key Mic mute during a phone  call. The person you are speaking to will  no longer be able to hear you.To switch the microphone back on again,  press Mic mute again.4.3 Making a call with Phonak hearing aids  Wireless transmission of the phone call is only  possible with Phonak hearing aids.  No conguration is needed for the hearing aids or  the phone. However, your hearing care professional may ne tune the telephone program.  If you are not able to connect the phone to your  hearing aids, please contact your hearing care  professional.4. Everyday use
29Connecting to your hearing aidsHold the handset close to your hearing aids while making a call (max. 25 cm away from both hearing aids).The hearing aids will automatically switch to the phone program. Depending on the settings of your hearing aids, you will hear a sound indication.  You need to make a call for the wireless connection  of the hearing aids to work. If the handset is in  hands-free mode or used with a headset, the wireless transmisison is disabled.  If your hearing aids do not support wireless Phonak technology, you may use it with a telephone coil  program to improve the sound quality.
max. 25 cm / 10“30Holding the handset correctlyThe microphone openings at  the bottom of the handset pick  up your voice. Hold the handset  close to your mouth.The handset will transfer the call wirelessly through  your hearing aids and through the handset receiver  simultaneously. If you nd the audio quality unpleasant hold the upper part of the handset slightly away from your ear.Breaking the connection with your hearing aidsWhen you move the handset away from your hearing aids, end the call or switch to hands-free mode, the  hearing aids automatically switch back to the last used hearing program.   Switching back takes from 1 to 3 seconds, depending on the hearing aid model.4. Everyday use
314.4 Setting the volumeUse the volume up / down keys +/- on the side  to set the volume during a conversation.The volume setting will be indicated on the  display and saved automatically.  The volume setting controls the acoustic and wireless signal at the same time.The volume Boost keyBy pressing the Boost key on the side during a  phone call, the handset will provide up to  15 dB extra volume in addition to the normal  volume. The Boost symbol will appear on the  display.Set the volume for the Boost-mode using  the volume up / down keys +/- .  This mode is not available in hands-free or  headset mode.
32By pressing the Boost key   again, the handset  switches back to the normal volume range and the  volume Boost symbol disappears.A new telephone conversation always begins in normal volume mode.  Please tell other people using your phone about this setting. People with normal hearing may nd it very loud.4.5 Setting ringtones  Ringtones are not transmitted wirelessly to your  hearing aids.Choose your individual ringtones in the Audio  settings menu: S Press the   key to get to the Audio settings  menu. Press . S Press the   key to get to the sub menu Ring tones. Press . S Press the   key to get to External call. Press .4. Everyday use
33Choose your settings: S Tune Choose a ringtone from the list of 1–12, that you can hear clearly without your hearing aids. SVolume  Select the ringtone volume level 1–5 so it is  comfortable for you and your surroundings. SRising  Choose On for a ringtone that increases in volume  while ringing.  SDelay Select the ringtone delay from the time a call is  received.Press the display key Save to store the settings.  The ringtone volume can be set in  standby mode using the volume  up / down keys + / -. This will not  change the volume of internal  calls from other handsets.
344.6 Switching the handset on and oStandby modePress the back key   until the display  is in standby mode. The handset will automatically go into standby mode  after 1 minute. Switching the handset o S Press and hold the back key   (2 sec) in standby mode until the display shows the Phonak logo.Switching the handset on SPress the end call / back key   or put the handset in the base.  The Phonak logo will appear on the display and you will hear the Phonak start melody.4. Everyday use
354.7 Entering a contactThe phone has 2 contact lists. One in the base  and one in the handset.Handset SAny contacts you have saved under Contacts   Handset are only visible on this handset. SYou can save up to 100 entries with 3 phone numbers each. SYou can set the ringtone and volume individually for each entry.Base SAny contacts you have saved under Contacts  Base are visible to all handsets logged into the base. SYou can save up to 200 entries with 3 phone numbers each.  To make it easier to nd contacts later, we  recommend always saving them in the same  contact list.
36  Recommendation: If you only use one handset with one base, choose Contacts Handset. If you use  dierent handsets with one base (  Chapter 5.10), choose Contacts Base.  You may copy contacts between the contact lists later.Entering a contact SPress the   key to get to the Contacts menu.  Press  . SUse the   key to choose between Contacts Handset  or Contacts Base, press  . SPress the   key to get to + New entry. Press  . SEnter your contact details as required using the numbers and letters A–Z / 0–9. 4. Everyday use
37  If you store the numbers in the handset, you may  set the Tune and the Volume of the ringtone for  this contact   /   (the Default setting means that global settings will be used   Chapter 4.5). SDepending on which eld you are editing, save the entry or any changes directly using the display key Save or use Option  Save.   When entering characters, use the   key to set  upper or lower case. Use keys 1 and 0 to access other special characters.
384.8 Looking up contactsSpeed dialUse the number / letter keypad to go directly to the rst letter of your contact’s name in the contact list by  pressing and holding the corresponding letter while in standby mode. Example: Press and hold key 7 (P, Q, R, S) to get to the contact list for the letter P. Press key 7 again immediately to reach the letters Q, R or S.  Set your default contact list as described in  Chapter 5.3.Access via the Contact menu SPress the   key to get to the Contacts menu.  Press  . SPress the   key to select the contact list (Contacts handset, Contacts base or Internal call, press  .) SUse the arrow keys  /  to nd the contact you are looking for.4. Everyday use
39  You may also look for a name directly, e.g. Mike, by pressing key 6 (for „M“). All names beginning with  „M“ will appear. Press 4 (=G, H, I) 3 times in quick  succession to see „Mi“ displayed. SPress   when you have found the name, press    until it highlights the number you would like to call, press   to dial the number.4.9 Finding a lost handsetIf the handset is switched on and within  range of the base, press the Pair button  on the back of the base. Any connected handset will ring at the same time, even  if the ringtone is switched o. SEnd the ringing individually for each handset using the end call key   . SPress Pair again to stop all the handsets ringing.
404.10 Using the caller listYou can review the last 150 incoming, outgoing  or missed calls in the Calls menu: SPress the   key to get to the Calls menu.  Press . SUse the   key to select Missed, Accepted, Outgoing  or All calls. Press . SUse the   key to choose the desired number.   Press the talk key   to access the list of all calls  directly.   For numbers saved in the contact list, the name will be displayed instead of the number. SPress   to start dialing.   To display the caller list correctly, caller identication (CLIP) must work correctly. Your network provider can give you information about this.4. Everyday use
41You can edit entries using the display keys: SDelete: Deletes the current entry from the caller list (the contact list will not be deleted). SOption  Save: Saves the current entry to the contact list. SOption  Delete all: Deletes all entries from the caller list (the contact list will not be deleted).4.11 Using the Inbox menuIf you have missed calls, voice box messages or other  notications, the menu option Inbox will appear in the main menu and the indicator light will ash.Press  to open the list of notications and follow the instructions on the display.
424.12 Answerphone ”Voice box“Setting up the voice boxVoice box is the answerphone on your  provider’s network.   You can only use the voice box if you have requested it from your network provider. To set it up: SPress the   key to get to the Settings menu,  press . SUse the   key to select the Voice box submenu,  press . SAsk your network provider for the voice box number and enter it in the Number eld. SPress the display key Save to store the settings.   If the number changes later you can overwrite it.4. Everyday use
43Everyday use of the voice boxIf there is a message waiting for you, a  notication with the number of messages  received will be displayed. SPress and hold the   key (2 sec) to dial the voice box number. SYou can now listen to your messages. Follow the voice box instructions from your network provider.   While viewing the display or using the keys, the  transmission to your hearing aids may be interrupted. Switch to the hands-free mode by pressing the  hands-free key   .  The network provider manages your voice box. Please contact your network provider for more information if necessary.
444.13 Additional features when using the phoneHands-freeYou can switch hands-free mode on or  o during a call by pressing the speaker  key   . Use the + / - keys to adjust  the volume.  The conversation is not transmitted to your hearing aids wirelessly when you are in hands-free mode!  If you would like someone else to listen to the  conversation, be sure to tell the caller.  The hands-free mode is terminated if the  Boost key is pressed.4. Everyday use
45Using a headsetYou can make calls using a headphone or headset  plugged into your handset with a 3.5 mm jack.Plug it into the side of your handset. A headset symbol will appear on the display.   When using a headphone without microphone, the handset microphone will be used.  If you are using a headset with a microphone, it must be Apple compatible.  As long as the headset is plugged in, no wireless  transmission will be made to your hearing aids.5. Handset settings
465.1 Locking the keypadKey lock prevents unwanted or accidental use of the handset. To lock: Press and hold the   key (2 sec) in  standby mode until the display shows Unlock  device with #. The lock symbol   on the display shows the handset is  locked.To unlock: Press and hold the   key (2 sec) in  standby mode until the display shows Device  unlocked.   You can still dial emergency numbers when key lock is switched on. Emergency numbers vary depending on the country. Please note that the location must  be set (  Chapter 3.7).   You can still accept incoming calls when key lock is switched on.5. Handset settings
475.2 Switching ring tones on / oRing tone o: Press and hold the   key  (2 sec) in standby mode until the display  shows Ring tone o. Ring tone on: Press and hold the   key  (2 sec) in standby mode until the display  shows Ring tone on.  The tune symbol   on the display shows that the  ring tones are switched o.  You can also use the side buttons + / - or Audio  settings to mute the ring tones. The tune symbol    is not shown in this case.
485.3 Other Contact list functions  Setting the contact list for speed dialUse Settings  Contacts   Speed dial with, to select which contact list (handset, base or internal) you would like to use with speed dial.Setting contact sort order Use Settings  Contacts   Sort order to sort contacts by Last name, rst name or First name, last name.Setting upper and lower caseWhen typing text, you can choose between upper  and lower case. In text mode, press the   key to select the mode you would like. Abc  Only the rst letter is capitalizedABC  All letters are capitalizedabc   Lower case To add a space, use the 0+ key.5. Handset settings
49Editing contactsYou can change saved contacts, copy them from the handset to the base or from the base to the handset or delete them. To do this, nd the contact in the contact  list and choose: SModify to change the contact or add a new number. SOption.  Delete to delete the entry. SOption.  Copy to copy one contact from the handset to the base or from the base to the handset. SOption.  Copy all to copy all contacts from the  handset to the base or from the base to the handset. SOption.  Delete all to delete all contacts from your current contact list.  If you conrm, all contacts in your current contact list will be permanently deleted! Even Phonak will not be able to retrieve them.
505.4 Other handset settings  Adjust the displayYou can adjust the display using Settings  Display: SChoose the background color you prefer via  Design  White or Gray. SIllumination  Inside base and Outside base: This function species whether the display darkens after a minute or stays faintly lit. You can set this separately for when it is in or out of the base.  SChoose Night mode for low illumination that will not disturb you at night.     If illumination is completely switched o, the  battery time is improved by about 10%.5. Handset settings
51Setting the function keyYou can assign a specic function to the function  key via Settings  Function key using the   /   key.  This gives you immediate access to one of the following functions: SSpeed dial: Save an important telephone number and call it directly. SInternal: If several handsets are logged into the base, you can call them directly. SDeactivated: This setting means the function key has no purpose assigned to it. SLine selection: This function is not available with the Phonak DECT base.
52Switching indicator tones on or oUse Audio settings   Indicator tones to switch them on or o: SUse the   key to choose the tones and switch it On or O with the   /   keys. SPress the display key Save. Setting up vibrate modeThe handset vibrates when dierent events take place. You can set this up via Audio settings  Vibration. SUse the   key to choose the event and switch it On or O with the   /   keys. For some options you can select the strength of the vibration. SPress the display key Save. 5. Handset settings
535.5 Alarm clock functionYou can set up to 4 alarm times on your handset.To set an alarm SSelect Alarm clock in the main menu and  press . SChoose one of the 4 alarms using the   key,   press  . SUse the   /   buttons to set the alarm clock Mode:  S Single: The alarm will ring once when the set time is reached. S Recurrent: The alarm will ring every time the set time is reached.  If Recurrent is selected, you can also use the   /   keys to set which day(s) the alarm will ring (Monday to Sunday). S Off: The alarm is switched off.
54 S Time: Use the number keypad to set the alarm time. Change your entries with   /   . S Name: This name will appear in the alarm list and be shown when the alarm is ringing. Add a new name using the letters on the keypad. Press Delete to make a correction. To add letters, use the   /   keys, for a space use the 0 key. S Tune: Use the   /   keys to choose a tune.Press the display key Save to save the settings.  Set the other alarms in the same way.  Please note that the alarm clock function only  works if S the time and date are set correctly, Sthe handset battery is suciently charged  (min. 25%  ).5. Handset settings
55Alarm symbol on the displayIf an alarm is active, the   symbol will appear.The alarm symbol also shows how many alarms  are active.In the list of alarms, active alarms are  checked. If you select an alarm with  the   key, the alarm time will also be  shown. Switching o alarms SSelect the alarm you would like to switch off using Alarm clock  Alarm [1–4]   Mode and set it to O using the   /   keys. SPress the display key Save to save the setting.   When all alarms are switched o, the   symbol on the display will disappear.
1.3.2.4.565.6 Attaching the belt clip  To attach the belt clip, you need a small Phillips-head screwdriver to attach the xing screws. 5. Handset settings
575.7 Signal strength indicatorThe bars next to the antenna symbol show the signal strength between the base and the handset. It depends on the distance and any obstacles or walls between  them. In general, the maximum distance to the base  inside a building is up to 50 m (160 ft) and can reach up to 300 meters (950 ft) outdoors.Strong to weak signal strength         Location with weak reception       ashesNo reception, base not found         (red)Eco-mode active (  Chapter 5.8)  If the signal strength is low, bring the handset  closer to the base.  Choose a central location (similar range to all  handsets) for the base.
585.8 Eco-mode  Eco-mode can only be activated in Europe.  The Eco-mode menu is only available when the  handset is connected to the base. In Eco-mode, radio activity between the base and the handset is switched o when no call is being made. To switch the Eco-mode on and o SPress the   key to get to the Settings menu. Press . SPress the   key to get to ECO mode. Press  . SPress the   key to switch Full ECO mode to On. S Press the display key Save. SInstead of the range symbol  , the display will show the Eco-mode symbol  .  Signal strength is not shown in Eco-mode. Check  the connection with the base by pressing the  Talk key   for 2 seconds. If the base is in range,  you will hear the dialing tone.5. Handset settings
59  When Eco-mode   is switched on, call setup is  delayed by about 2 seconds.  Battery use in standby mode is approx. 50% higher when Eco mode is switched on.  All phones logged into the base must support  Eco-mode. 5.9 Battery status displayThe battery symbol indicates:       Battery charging          100%       75%       50%        25%       Empty  When the battery charge drops below 25%    charge the handset.
605.10 Multiple handsets for one baseUp to 6 handsets can be logged into the base.  The handset and the base that come together in  one package are pre-paired. You do not need to log them on again.Log on with an additional handset SOn the handset, select Settings  Log on / o    Log on. SPress and hold the Pair button (2 sec)  on the back of the base. SWait a few seconds until the display  shows successful login.  The default PIN code for the base is “0000”.  It is possible to log into the base with other GAP-compatible DECT handsets. Phonak only guarantees that original Phonak DECT CP1 and Phonak DECT II handsets will function correctly.5. Handset settings
61  GAP (Generic Access Protocol) is a technical  standard which species that cordless handsets  and a base are compatible with one another.  More than one cordless phone must be logged in  to the base for the following functions! Setting the handset nameAs soon as more than one handset is logged into the same base, the internal name of the handset, e.g. DECT 1, will be shown in standby mode.  SYou can change the names using Settings  Handset   This handset.  You can also specify whether this handset can  take a call in progress or not.Making internal calls SYou can call another handset paired to this base for free via Contacts  Internal call.Consultation during a callDuring a call, using the display key Option  Internal call allows you to call another handset (e.g. ”DECT 5“) on the same base.
62If someone accepts the internal call on handset  ”DECT 5“, the external caller ”Mike“ is put on  hold and does not hear the conversation.Brokering during a callUse the display key Option  Brokering to  switch between ”Mike“ and ”DECT 5“.Transferring a call internallyUse Option  Transfer to connect the 2 lines ”Mike“ and ”DECT 5“ and disconnect your own handset. Conference callsIf all 3 participants would like to speak to  each other, select Option  Conference. All  participants can now hear and speak to one  another.Press the end call key   to end the active conversation.5. Handset settings
635.11 Using an existing baseIf you already have a GAP-compatible DECT base, you can log the Phonak handset into it. To do this, follow the login procedure described in  Chapter 5.10, but hold the pairing button on your existing base. Enter the security code for this base if needed (please consult the instruction manual of the existing base).  The Phonak base for the handset now works as a charger. It must be connected to the main power  cable. You no longer need the telephone cable.
645.12 Changing the batteryIf battery performance decreases noticeably over time, you can change the battery. Only use the original battery  (Li-Ion 3.7V, type: CE-MB 206-5C-01, 1100  mAh).Open the battery cover as described in Chapter 3.3 to  replace the battery.5. Handset settings
656. PIN-codes and resetting  your settings6.1 Changing PIN codes  The default PIN code is „0000“. If you want to change it go to: S Settings   Security   Base PIN, enter the  current PIN „0000“ and conrm by pressing  . SEnter your own PIN and conrm by pressing  . SUsing Settings   Security   Handset PIN, enter  the correct code in the handset and confirm by pressing  .  If you forget the PIN, you can reset it as described  in Chapter 6.3.6.2 Resetting your settingsYou can reset all settings for the base or the handset, in Settings   Reset settings.  The PIN code and the telephone book will not be  aected by the reset.
66 SEnter the original PIN „0000“ or the PIN you set  yourself.6.3 Resetting the system PINIf you forget the system PIN, you must  do a general reset: SPress and hold the Pair button on the  back of the base and reinsert the power  cable into the base at the same time.  SPress and hold the Pair button for at least 5 seconds.  For your phone to work properly again, you must  re-enter the settings described in Chapter 3.5 and following.  Make sure the contact list on the phone is deleted  ( Chapter 5.3) before giving it to anyone else.6. PIN-codes and resetting your settings
677. TroubleshootingThe display is darkS  Battery is not insertedS  Battery is fully dischargedS  Handset is not switched onThe display is only faintly litS  Battery almost dischargedS  Display illumination  switched o Indicator light constantly ashes greenS  Missed callS  Important setting missingBattery does not last longS  Initial charge not carried  outS  Battery is very oldSound not being transmitted to hearing aidsS Hearing aids switched oS  Too far from handsetS  Insert batteryS  Put handset on baseS  Switch handset onS  Put handset on baseS  Adjust the displayS  Look for messages in the Inbox menuS  Fully charge / dischargeS  Replace batteryS Switch on hearing aidsS  Move handset closer to hearing aids3.33.44.63.45.44.113.45.124.3Causes What to do Chapter
68Volume is too loudS  Boost mode is on S  Ringtones are too loudNo sound from handsetS  Headset plugged inS  Volume too lowPhone does not ringS  Ringtones are switched oS  Ringtones are too softName not found in contact listS  There are 2 contact listsCaller’s number not shownS  Service not supported by  network providerS  Press Boost keyS  Set the volumeS  Unplug headsetS  Increase volumeS  Switch ringtones onS  Increase volumeS  Select correct contact  listS Ask your network  provider if it supports CLIP4.44.54.44.45.24.54.84.12Causes What to do7. Troubleshooting    Chapter
69I can’t nd the voiceboxS  Voice box service is not  activatedS  Voice box number is not programmedYou can see other questions and answers (FAQs) on our website www.phonak.com/dect.S  Get provider to activate voice box serviceS  Program the number4.124.12Causes What to do Chapter
70  Protect the device connectors, plugs, charging slot and power supply from dirt and debris.  Never immerse the device in water! Protect it from  excessive moisture. Never use the device in the  shower, bath, or swimming area, as the device  contains sensitive electronic parts.  Protect the device from heat (never leave it near a window). Never use a microwave or other heating equipment to dry the device.  Do not drop the device! Dropping onto a hard  surface can damage it.  Clean device using a damp cloth. Never use household cleaning products (washing powder, soap, etc.) or alcohol to clean it. 8. Information on product safety
71  Special medical or dental examination including  radiation described below, may adversely aect the correct functioning of the device. Keep it outside  the examination room / area before undergoing:    S Medical or dental examination with X-ray  (also CT scan).    S Medical examination with MRI/NMRI scans,  generating magnetic elds.  When operating the device near computer  equipment, larger electronic installations, strong  electromagnetic elds, or metallic structures,  the operating range may signicantly be reduced. It may be necessary to be at least 60 cm (24”) away from the interfering device to ensure proper operation.  If the hearing aids do not respond to the device  because of an unusual eld disturbance, move away from the disturbing eld.
729. Service warranty 9.1 Local warrantyPlease ask the hearing care professional, where you purchased your Phonak DECT phone, about the terms of the local warranty.9.2 International warrantyPhonak oers a one-year limited international warranty, valid as of the date of purchase. This limited warranty covers manufacturing and material defects. The warranty is valid only if proof of purchase is shown.  The international warranty does not aect any legal rights that you might have under applicable national legislation governing sale of consumer goods.
739.3 Warranty limitationThis warranty does not cover damage from improper handling or care, exposure to chemicals, immersion in water or undue stress. Damage caused by third parties or non-authorized service centers renders the warranty null and void. This warranty does not include any services performed by a hearing care professional in their oce.Serial number:   Date of purchase: Authorized hearingcare professional(stamp / signature):
7410. Compliance information  Europe:Declaration of ConformityHereby Phonak AG declares that this Phonak product is in compliance with the essential requirements of the Radio and Telecommunications Terminal Equipment Directive 1999/5/EC. The full text of the Declaration of Conformity can be obtained from the manufacturer  or the local Phonak representative whose address can be taken from the list on http://www.phonak.com (Phonak worldwide locations).US and Canada:1.  This equipment complies with Part 68 of the FCC  rules and the requirements adopted by the ACTA. On the bottom of this equipment is a label that contains, among other information, a product identier in the format US: KWCW4NANCT8171. If requested, this number must be provided to the telephone company.
752.  A plug and jack used to connect this equipment to the premises’ wiring and telephone network must comply with the applicable FCC Part 68 rules and requirements adopted by the ACTA. A compliant telephone cord and modular plug is provided with this product. It is designed to be connected to a compatible modular  jack that is also compliant. See installation instructions for details.3.  If this equipment Phonak DECT causes harm to the telephone network, the telephone company will notify you in advance that temporary discontinuance of service may be required. But if advance notice isn’t practical, the telephone company will notify the customer as soon as possible. Also, you will be advised of your right to le a complaint with the FCC if you believe it is necessary.4.  The telephone company may make changes in its  facilities, equipment, operations or procedures that could aect the operation of the equipment. If  this happens, the telephone company will provide advance notice in order for you to make necessary modications to maintain uninterrupted service.
765. If trouble is experienced with the Phonak DECT phone,  for repair or warranty information, service can be facilitated through our oce at:  Phonak Inc. 4520 Weaver Parkway Warrenville, IL 60555 Tel: 800-777-7333 Fax: 630-393-7400  If the equipment is causing harm to the telephone network, the telephone company may request that you disconnect the device until the problem is resolved.6. Do not alternate or repair any parts of device except specied. For repair procedures, follow the instructions outlined under the limited warranty.7. Connection to party line service is subject to state taris. Contact the state public utility commission, public service commission or corporation commission for information.10. Compliance information
778.  If your home has specially wired alarm equipment connected to the telephone line, ensure the  installation of this 1.9 GHz DECT Product for PSTN does not disable your alarm equipment. If you have questions about what will disable alarm equipment, consult your network provider or a qualied installer.9.  If the telephone company requests information on what equipment is connected to their lines, inform them of:  a)  The ringer equivalence number [00]  b)  The USOC jack required [RJ11C]  c)  Facility Interface Codes (“FIC”) [02LS2]  d)  Service Order Codes (“SOC”) [9.0Y]  e)  The FCC Registration Number:    [KWCW4NANCT8170] for DECT CP 1    [KWCW4NANCT8171] for DECT II
7810. The REN is used to determine the number of devices that may be connected to a telephone line. Excessive RENs on a telephone line may result in the devices not ringing in response to an incoming call. In most but not all areas, the sum of RENs should not exceed ve (5.0). To be certain of the number of devices  that may be connected to a line, as determined by the total RENs, contact the local network provider. The REN for this product is part of the product identier that has the format US:AAAEQ##TXXXX. The digits represented by ## are the REN without a decimal point. For this product the FCC Registration number  is [US: KWCW4NANCT8170 for DECT CP1 and  KWCW4NANCT8171 for DECT II] indicates the REN would be NAN.11.  This product is hearing aid compatible.10. Compliance information
79FCC Caution:Changes or modications made to this device notexpressly approved by Phonak may void the FCCauthorization to operate this device.This device complies with Part 15 of the FCC Rules andwith RSS-210 of Industry Canada. Operation is subjectto the following two conditions:1)  this device may not cause harmful interference, and2)  this device must accept any interference received, including interference that may cause undesired operation.IMPORTANT NOTE:  FCC Radiation Exposure Statement:  This device complies with FCC radiation exposure limits set forth for an uncontrolled environment. This  base should be installed and operated with a minimum distance of 20 cm between the base and your body.  This device must not be co-located or operating in  conjunction with any other antenna or transmitter.
80Note:This device has been tested and found to complywith the limits for a Class B digital device, pursuantto Part 15 of the FCC Rules. These limits are designed to provide reasonableprotection against harmful interference in a residentialinstallation. This device generates, uses and canradiate radio frequency energy and, if not installedand used in accordance with the instructions, maycause harmful interference to radio communications.However, there is no guarantee that interference willnot occur in a particular installation. If this devicedoes cause harmful interference to radio or televisionreception, which can be determined by turning theequipment o and on, the user is encouraged to try tocorrect the interference by one or more of the followingmeasures: SReorient or relocate the receiving antenna. SIncrease the separation between the device and  receiver. SConnect the device into an outlet on a circuit  dierent from that to which the receiver is connected. SConsult the dealer or an experienced radio / TV  technician for help.10. Compliance information
81Specic Absorption Rate (SAR) informationSAR tests are conducted using standard operating  positions accepted by the FCC with the phone  transmitting at its highest certied power level in all tested frequency bands, although the SAR is determined at the highest certied power level, the actual SAR  level of the phone while operating can be well below the maximum value, in general, the closer you are to a  wireless base station antenna, the lower the power output.Before a new model phone is available for sale to the public, it must be tested and certied to the FCC that it does not exceed the exposure limit established by the FCC, Tests for each phone are performed in positions and locations (e.g. at the ear) as required by the FCC.
82Non-compliance with the above restrictions may result in violation of RF exposure guidelines. Privacy of communications may not be ensured when using this telephone!IC WarningCS03:This device meets the applicable Industry Canada  technical specications. RSS (Category I Equipment):This device complies with Industry Canada license-exempt RSS standard(s). Operation is subject to the following two conditions:1) this device may not cause interference, and2) this device must accept any interference, including interference that may cause undesired operation of the device.10. Compliance information
83Under Industry Canada regulations, this radio transmitter may only operate using an antenna of a type and  maximum (or lesser) gain approved for the transmitter by Industry Canada. To reduce potential radio interference to other users, the antenna type and its gain should be so chosen that the equivalent isotropically radiated power (e.i.r.p.) is not more than that necessary for successful communication.
8411.  Information and explanation of symbolsThe CE symbol is a conrmation by Phonak AG that this Phonak product meets the requirements of the  R&TTE Directive 1999/5/EC on Radio  and Telecommunication Terminal  Equipment. This symbol indicates that it is  important for the user to read and take into account the relevant  information in these user guides.This symbol indicates that it is  important for the user to pay  attention to the relevant warning notices in these user guides.Important information for handling and product safety.
85The product is designed such that  it functions without problems  or restrictions if used as intended, unless otherwise noted in these  user guides.Operating  conditionsKeep dry. Temperature transport and storage: –20° to +60° Celsius  (–4° to +140° Fahrenheit) Temperature operation:  0° to 40° Celsius  (+32° to +104° Fahrenheit)Humidity transportation: up to 90% (non condensing). Humidity storage: 0% to 70%, if not in use. Humidity operation: <95% (non  condensing).
86Atmospheric pressure: 200 hPA to 1500 hPA.Indicates the device manufacturer, as dened in EU Directive 93/42/EEC.The symbol with the crossed-out garbage bin is to make you aware that this device may not be thrown away as normal household waste. Please dispose of old or unused devices,  at waste disposal sites intended for electronic waste, or give it to your hearing care professional for  disposal. Proper disposal protects  the environment and health.11. Information and explanation of symbols
8712. Important safety information      Please read the information on the following pages  before using your Phonak DECT phone. These devices may only be repaired by an authorized service center. Changes or modications to the  devices that were not explicitly approved by Phonak are not permitted. Such changes may damage these devices, your ear or the hearing aids.  Opening any of the devices might damage them. If problems occur which cannot be resolved by  following the instructions of this user guide, consult your hearing care professional. Do not use the device in explosive areas (mines  or industrial areas with danger of explosions,  oxygen rich environments or areas where ammable  anesthetics are handled) or where electronic  equipment is prohibited. Phonak DECT US/CAN version must NOT be used in  Europe as it can interfer with the European cellular networks. Illegal use of such products are prohibited by European Telecommunications Authorities.
88 Phonak DECT EU version must NOT be used in the US and Canada as it can interfer with US and Canada cellular networks, and for that reason is deemed illegal to use by the FCC and IC. The handset contains small parts that can cause  choking, if swallowed by children. Keep out of reach of children under 3 years, mentally challenged  people and pets. If swallowed, consult a physician  or hospital immediately. The following is only applicable for persons with  active implantable medical devices (i.e. pacemakers, debrillators, etc.): If you experience any interference, do not use the  device and contact the manufacturer of the active implant (please, note that interference can also  be caused by power lines, electrostatic discharge,  airport metal detectors etc.). Please contact the local recycling facility for removal of the battery and dispose of electrical components in accordance with your local regulations.12. Important safety information
89 External devices may only be connected if they  have been tested in accordance with corresponding IECXXXXX standards. Using the cables in any way contradictory to their  intended purpose (e. g., wearing the phone cable around the neck) can cause injury. The mini-USB port is to be used for the described purpose only. Caution: electric shock. Do not insert power adapter alone into electrical outlets. For safety reasons, only use chargers supplied by  Phonak or USB certied chargers with a rating of 5VDC, min. 1000 mA.
12. Important safety information  90 Never supply the base from a PC or laptop USB port. This may damage your equipment. Do not connect a USB or phone cable exceeding  3 meters (9 ft) in length to the base. Only insert a rechargeable battery that meets the specication in the Phonak DECT data sheet as  inserting wrong batteries can damage the device  or cause serious injuries. Don’t hold the back of the handset to your ear while it is ringing or when hands-free mode is switched on. This can cause severe, permanent damage to your hearing. The handset may cause buzzing noises in analog  hearing aids. If you have any problems, contact your hearing care professional. Only give your Phonak DECT phone to someone else  together with the instruction manual.
91 Please do not use a faulty base, or have it repaired  by the Service Department, since it may disrupt other radio services. Do not use the device in explosive areas (mines or  industrial areas with danger of explosions, oxygen rich environments or areas where ammable  anesthetics are handled) or where electronic equip-ment is prohibited.NoticesSome of the functions described in this user guide are not available in all countries. The phone will not work during a power cut. It cannot  be used for emergency calls either.
www.phonak.comPhonak AGLaubisrütistrasse 28CH-8712 StäfaSwitzerland029-0309-02/V1.00/2014-11/A+W/FO Printed in Switzerland © Phonak AG   All rights reserved

Navigation menu