Radio Shack Md 981 Users Manual
MD-981 to the manual 0d4ef425-0795-45ea-9c5c-dd0fde0b02c5
2015-01-21
: Radio-Shack Radio-Shack-Md-981-Users-Manual-352140 radio-shack-md-981-users-manual-352140 radio-shack pdf
Open the PDF directly: View PDF ![]() .
.
Page Count: 1

Owner’s Manual
Please read before using this equipment.
MD-981 MIDI Keyboard
42-4042.fm Page 1 Friday, April 28, 2000 11:18 AM
2Contents
ˆ
Contents
Features ................................................................................................................... 4
The FCC Wants You to Know ............................................................................. 5
Preparation .............................................................................................................. 5
Connecting Power .............................................................................................. 5
Using Batteries ............................................................................................. 6
Using AC Power ........................................................................................... 6
Using Vehicle Battery Power ........................................................................ 7
Connecting Headphones .................................................................................... 7
Listening Safely ............................................................................................ 7
Connecting an External Amplifier ....................................................................... 7
Using the Sheet Music Stand ............................................................................. 8
A Quick Look at Your Keyboard ............................................................................ 8
Operation ................................................................................................................. 9
Basic Operation .................................................................................................. 9
Cancelling Auto Power Off ........................................................................... 9
Playing the Prerecorded Tunes .......................................................................... 9
Playing Back a Prerecorded Tune ............................................................. 10
Playing Along with a Prerecorded Tune ..................................................... 11
Turning Applause Off/On ........................................................................... 12
Consecutively Playing Back the Tunes ...................................................... 12
Using the Preset Tones .................................................................................... 12
Selecting/Playing a Preset Tone ................................................................ 12
Keyboard Split Tones ................................................................................. 13
Layered Tones ........................................................................................... 13
Percussion Sounds .................................................................................... 13
Using the Preset Auto-Rhythms ....................................................................... 14
Selecting/Playing an Auto-Rhythm ............................................................ 14
Using SYNCHRO ....................................................................................... 15
Using FILL-IN ............................................................................................. 15
Using Auto Accompaniment ............................................................................. 15
Adjusting the Accompaniment Volume ...................................................... 15
Concert Chord ............................................................................................ 16
Standard Fingering .................................................................................... 17
Using the Chord Book ...................................................................................... 18
© 2000 Tandy Corporation.
All Rights Reserved.
RadioShack and RadioShack.com are trademarks used by Tandy Corporation.
42-4042.fm Page 2 Friday, April 28, 2000 11:18 AM
3Contents
Special Features ................................................................................................... 19
Changing Keys ................................................................................................. 19
Tuning the Keyboard ........................................................................................ 20
Using a Sustain Pedal ...................................................................................... 20
Using MIDI ............................................................................................................. 21
About MIDI ....................................................................................................... 21
Making the MIDI Connections .......................................................................... 21
MIDI Data ......................................................................................................... 22
Changing MIDI Settings ................................................................................... 22
Notes About the MIDI Implementation Chart .................................................... 23
Troubleshooting .................................................................................................... 24
Standard Fingering Chord Charts ....................................................................... 26
Note Table .............................................................................................................. 29
MIDI Implementation Chart .................................................................................. 31
Care and Maintenance .......................................................................................... 32
Specifications ....................................................................................................... 33
42-4042.fm Page 3 Friday, April 28, 2000 11:18 AM

4Features
ˆ
Features
Your RadioShack MIDI Keyboard is a
state-of-the-art keyboard with many ex-
citing features. You can set the key-
board to sound like 100 different musical
instruments or sound effects. To accom-
pany your music, the keyboard has 100
rhythms, as well as auto accompani-
ments and percussion sounds.
Your keyboard also includes a MIDI
(Musical Instrument Digital Interface)
feature, which lets you connect it to oth-
er MIDI-equipped musical instruments
or devices — even your personal com-
puter.
This versatile keyboard can provide
hours of fun and is ideal for anyone who
wants to make music, from the beginner
to the experienced musician.
Note: The keyboard conforms to most,
but not all, General MIDI specifications.
Because of this, you might experience
some incompatibility when using the
keyboard with another General MIDI de-
vice. For more information, see “Using
MIDI” on Page 21.
Your keyboard’s features include:
61 Full-Sized Keys — provide the feel
of a fine musical instrument.
LCD Music Information Display —
shows you a ‘staff’ with the notes and
chords as you play them, along with the
fingering, current tone, rhythm, volume,
melody, and tempo. The display also
shows a metronome icon to indicate the
beat.
100 Tones — you can set your key-
board to sound like anything from a
harpsichord to a honky-tonk piano.
100 Auto-Rhythms — give you a
steady beat for many styles of music,
from rhumba to slow rock.
100 Prerecorded Tunes — let you hear
a sample of what you and the keyboard
can do. You can play the tunes either
one at a time or consecutively, and you
can turn off the melody or accompani-
ment portion so you can play along with
the tunes.
12-Note Polyphonic Sound — lets you
play and hear up to 12 notes at the
same time so you can play or create al-
most any type of music.
MIDI In/Out Jacks — let you connect
the keyboard to another MIDI-equipped
device.
Sustain Jack — lets you connect a
sustain pedal (not supplied) to the key-
board so you can sustain your key-
board’s sound.
Headphones/Output Jack — lets you
connect headphones so you can play
without disturbing others, or an external
amplifier so you can play for a crowd.
Tune Control — lets you adjust the
pitch of your keyboard so you can play
in tune with other instruments.
Transpose Function — lets you in-
stantly change the key of the music,
even while you are playing.
42-4042.fm Page 4 Friday, April 28, 2000 11:18 AM
5Preparation
Tempo Control — lets you speed up or
slow down the tempo of any selected
music pattern.
Chord Book — lets you easily see
which keys to press and which fingers to
use to form a chord, as well as a chord’s
name.
Three Power Options — let you power
the keyboard from internal batteries (not
supplied), standard AC power (with an
optional adapter), or your vehicle’s ciga-
rette-lighter socket (with an optional
adapter) so you can make music almost
anywhere.
Notes:
• You can use an optional keyboard
stand (available at your local
RadioShack store) to mount the
keyboard.
• This Owner’s Manual explains how
to use this electronic keyboard. It
does not teach music.
THE FCC WANTS YOU TO
KNOW
This equipment complies with the limits
for a Class B digital device as specified
in Part 15 of
FCC Rules
. These limits
provide reasonable protection against
radio and TV interference in a residential
area. However, your equipment might
cause TV or radio interference even
when it is operating properly. To elimi-
nate interference, you can try one or
more of the following corrective mea-
sures:
• reorient or relocate the receiving
antenna
• increase the distance between the
equipment and the radio or TV
• use outlets on different electrical cir-
cuits for the keyboard and the radio
or TV.
Consult your local RadioShack store if
the problem still exists.
You must use shielded interface cables
with this equipment.
ˆ
Preparation
Note: To connect a MIDI device to your
keyboard, see “Making the MIDI Connec-
tions” on Page 21.
CONNECTING POWER
You can power your keyboard in any of
these ways:
• internal batteries
• standard AC power using an
optional AC adapter
• a vehicle’s cigarette-lighter socket
using an optional DC adapter
Notes:
• Connecting an AC or DC adapter
automatically disconnects any inter-
nal batteries.
• Always disconnect the AC or DC
adapter when you finish using the
keyboard.
42-4042.fm Page 5 Friday, April 28, 2000 11:18 AM
6Preparation
Using Batteries
Your keyboard can use six AA batteries
(not supplied) for power. For the best
performance and longest life, we recom-
mend RadioShack alkaline batteries.
Cautions:
• Use only fresh batteries of the
required size and recommended
type.
• Do not mix old and new batteries,
different types of batteries (stan-
dard, alkaline, or rechargeable), or
rechargeable batteries of different
capacities.
Follow these steps to install batteries.
1. Slide POWER/MODE to OFF.
2. While pressing the tab on the bat-
tery compartment cover on the bot-
tom of the keyboard, pull up the
cover to remove it.
3. Place the batteries in the compart-
ment as indicated by the polarity
symbols (+ and –) marked below the
compartment.
4. Replace the cover.
When the keyboard stops operating
properly, replace the batteries.
Warning: Dispose of old batteries
promptly and properly. Do not burn or
bury them.
Caution: If you do not plan to use the
keyboard with batteries for a week or
more, remove the batteries. Batteries
can leak chemicals that can destroy
electronic parts.
Using AC Power
You can power the keyboard using a 9V,
800-mA AC adapter and a size M
Adaptaplug™ adapter (neither sup-
plied). Both are available at your local
RadioShack store.
Cautions:
You must use a Class 2
power source that supplies
9V DC and delivers at least
800 mA. Its center tip must be set to
negative and its plug must fit the
keyboard's DC 9V jack. Using an
adapter that does not meet these
specifications could damage the
keyboard or the adapter.
• Always connect the AC adapter to
the keyboard before you connect it
to AC power. When you finish, dis-
connect the adapter from AC power
before you disconnect it from the
keyboard.
Follow these steps to connect an AC
adapter to the keyboard.
1. Slide POWER/MODE to OFF.
2. Set the DC adapter’s voltage switch
to 9V.
3. Insert the Adaptaplug adapter into
the adapter’s cord so it reads – TIP.
4. Connect the AC adapter’s barrel
plug to the DC 9V jack on the back of
the keyboard.
!
7Preparation
5. Plug the AC adapter’s other end into
a standard AC outlet.
Using Vehicle Battery Power
You can power the keyboard from a ve-
hicle’s 12V power source (such as a cig-
arette-lighter socket) using a 9V, 800-
mA AC adapter and a size M Adapta-
plug adapter (neither supplied). Both are
available at your local RadioShack
store.
Cautions:
You must use a power
source that supplies 9V DC
and delivers at least 800
mA. Its center tip must be set to
negative and its plug must fit the
keyboard's DC 9V jack. Using an
adapter that does not meet these
specifications could damage the
keyboard or the adapter.
• Always connect the DC adapter to
the keyboard before you connect it
to the power source. When you fin-
ish, disconnect the adapter from the
power source before you disconnect
it from the keyboard.
Follow these steps to connect a DC
adapter to the keyboard.
1. Slide POWER/MODE to OFF.
2. Plug the DC adapter’s barrel plug
into the cable so it reads – TIP.
3. Set the DC adapter’s voltage switch
to 9 volts.
4. Connect the DC adapter’s barrel
plug to the DC 9V jack on the back of
the keyboard.
5. Plug the DC adapter’s other end into
your vehicle’s cigarette-lighter
socket.
CONNECTING
HEADPHONES
To listen to your keyboard without dis-
turbing others, you can connect an op-
tional pair of stereo headphones with a
1/4-inch (6.4-mm) plug. Your local Ra-
dioShack store sells a wide selection of
headphones.
Insert the headphones’ plug into the
PHONES/OUTPUT jack on the back of
the keyboard.
Note: Connecting headphones discon-
nects the keyboard’s built-in speakers.
Listening Safely
To protect your hearing, follow these
guidelines when you use headphones.
• Set the volume to the lowest setting
before you begin listening. After you
begin listening, adjust the volume to
a comfortable level.
• Do not listen at extremely high vol-
ume levels. Extended high-volume
listening can lead to permanent
hearing loss.
• Once you set the volume, do not
increase it. Over time, your ears
adapt to the volume level, so a vol-
ume level that does not cause dis-
comfort might still damage your
hearing.
!
42-4042.fm Page 7 Friday, April 28, 2000 11:18 AM

8A Quick Look at Your Keyboard
CONNECTING AN
EXTERNAL AMPLIFIER
To amplify your keyboard’s sound, you
can connect it to an optional external
amplifier using an audio cable with a 1/4-
inch (6.4-mm) plug (not supplied).
To connect an external amplifier to your
keyboard, insert the cable’s plug into the
PHONES/OUTPUT jack on the back of
the keyboard, and connect the cable’s
other end to the amplifier’s input jack(s)
(such as AUX IN or TAPE IN).
Your local RadioShack store sells a full
line of amplifiers, speakers, and connec-
tion cables.
USING THE SHEET MUSICl
STA12(as)NIER

9Operation
ˆ
Operation
BASIC OPERATION
1. To turn on the keyboard, set
POWER/MODE to NORMAL. The
POWER/MODE indicator lights.
Note: To save power when operat-
ing on batteries, the keyboard auto-
matically turns off after about 6
minutes if you do not press a key. To
turn on the keyboard again, set
POWER/MODE to OFF then back to
NORMAL.
2. To hear a sample of the keyboard’s
many sounds, play a prerecorded
tune (see “Playing the Prerecorded
Tunes”). To make your own music,
simply begin playing the keyboard.
Notes:
• The keyboard automatically
selects the tone PIANO 1 (No. 00)
when you turn the power on. To
select a different tone, see
“Selecting/Playing a Preset Tone”
on Page 12.
• To select an auto-rhythm, see
“Using the Preset Auto-Rhythms”
on Page 14.
• To play auto accompaniment, see
“Using Auto Accompaniment” on
Page 15.
3. Repeatedly press MAIN VOLUME ▲
or ▼ to increase or decrease the
volume. The current setting ap-
pears.
Notes:
• The keyboard’s volume ranges
from 0 (no sound) to 9 (maxi-
mum). Each time you turn on the
keyboard, the volume is set to 7.
• To quickly change the volume set-
ting, hold down MAIN VOLUME ▲
or ▼.
• To quickly return to the default
volume setting of 7, press both
MAIN VOLUME buttons at the
same time.
• The volume level differs depend-
ing on the tone, accompaniment,
or song you selected.
4. To turn off the keyboard, set
POWER/MODE to OFF
. The POWER/
MODE indicator turns off.
Cancelling Auto Power Off
The keyboard automatically turns itself
off when you use batteries to power it.
To have the keyboard not automatically
turn off during a session, turn on the
keyboard while holding down TONE.
The next time you turn the keyboard off
then back on again, it will automatically
turn off after about 6 minutes.
PLAYING THE
PRERECORDED TUNES
You can sit back and listen to the 100
tunes that come prerecorded in the key-
42-4042.fm Page 9 Friday, April 28, 2000 11:18 AM
10 Operation
board, or you can turn off a tune’s melo-
dy or accompaniment and play along on
the keyboard.
Playing Back a Prerecorded
Tune
1. Press SONG. An indicator appears
next to SONG and the number of
the current tune appears.
Note: The keyboard always selects
the tune “A Whole New World” (No.
00) the first time you press SONG
after turning the power on.
2. Choose a tune from the 100
SONGS list and enter its two-digit
number on the keypad.
Or, you can press – or + to move to
the next higher or lower numbered
tune.
Notes:
• Precede a single-digit number
with a 0. For example, to select
07 (“O Christmas Tree”), press 0
7.
• If you enter an incorrect first digit,
press SONG to clear your entry,
then enter the correct digit.
3. Press PLAY/PAUSE or START/STOP
to start playing the tune.
You can change the tune by repeat-
ing Step 2 even while a tune is play-
ing. The new tune immediately
begins to play.
As a tune plays, the display shows:
• a “score” to show you the notes
that are playing (right side of the
display)
• a “keyboard” to show you the fin-
gering and which keys are
pressed (bottom of the display)
• a “metronome” to show you the
selected tempo — the metro-
nome’s bar swings along with the
tempo you selected, and the
black dots above the metronome
show the beat count in the mea-
sure
• the chord name (except for tunes
80 to 99, center right of the dis-
play)
• “hands” that show the fingering to
play the tune and chords
Note: Each tune plays a different
preset tone for the melody, but you
can change to another tone even
while the tune is playing. Follow the
steps under “Selecting/Playing a
Preset Tone” on Page 12 to select a
different tone.
4. Use MAIN VOLUME to adjust the
overall volume as desired.
To adjust only the accompaniment
volume (except tunes 80 to 99),
press
ACCOMP VOLUME then enter
42-4042.fm Page 10 Friday, April 28, 2000 11:18 AM
11Operation
the desired volume level using the
number keys (between 0 and 9) or
press + or – within 5 seconds.
5. To move to a particular section of a
tune, hold down REW or FF during
play. When you think you have
reached the section you want,
release
REW or FF to resume nor-
mal play.
6. To change the tempo, press TEMPO
▼ or ▲. The current tempo setting
appears.
Notes:
• To quickly slow down or speed up
the tempo, hold down TEMPO ▼
or ▲.
• To reset the tempo to its default
(original) speed, press TEMPO ▲
and ▼ at the same time.
• Tunes 80 to 99 are arranged so
the tempo changes during play.
However, if you select a tempo
other than the default tempo,
those tunes play in the newest
tempo.
7. To temporarily stop playing the tune,
press PLAY/PAUSE again. To stop
the tune completely, press STOP.
Playing Along with a
Prerecorded Tune
Follow these steps to have the keyboard
not play the melody of a prerecorded
tune, so you can!
Note: You can find the scores for most
of the prerecorded tunes in the
Play
Guide for the Prerecorded Tunes
, sup-
plied with your keyboard.
1. Select and enter the tune you want
to play.
2. Press ON/OFF RIGHT to turn off the
melody. R disappears from the
“hands,” indicating that the key-
board is not playing the right-hand
portion of the music.
Press ON/OFF LEFT to turn off the
accompaniment. L disappears from
the “hands.”
Notes:
• Tunes 80 to 99 are solo tunes.
You can turn off either the right-
hand or left-hand portion, but not
both.
• If you select tunes 00 through 79
and turn off both the melody and
accompaniment, the keyboard
plays an obligato accompani-
ment (a simple background
accompaniment).
3. Press
PLAY/PAUSE to start play.
4. Adjust the tempo and volume as
desired.
5. Play along with the tune on the key-
board.
Note: You can turn the melody on or
off by repeating Step 2 even while
the current tune is playing.
6. To temporarily stop playing the tune,
press PLAY/PAUSE again. To stop
the tune completely, press STOP.
42-4042.fm Page 11 Friday, April 28, 2000 11:18 AM
12 Operation
Turning Applause Off/On
When you turn off either the melody or
accompaniment and then play a tune,
applause automatically sounds at the
end of the tune. To turn off the applause,
hold down STOP and press either ON/
OFF LEFT or ON/OFF RIGHT. Apls=Off
appears. To turn the applause on again,
press the same buttons. Apls=On ap-
pears.
Consecutively Playing Back
the Tunes
Normally, the tune you selected plays
continuously until you press STOP. To
play all 100 prerecorded tunes consecu-
tively, press either TONE or RHYTHM,
then press PLAY/PAUSE. The keyboard
plays the tunes in sequence starting with
Tune 00.
To stop consecutive playback, press
STOP or START/STOP.
USING THE PRESET
TONES
Your keyboard can sound like 100 differ-
ent musical instruments or sound ef-
fects. The name and two-digit number
for each preset tone is listed on the 100
TONES list on the keyboard’s top panel.
Notes:
• The keyboard has 12-note (maxi-
mum) polyphonic sound. This
means that you can play up to 12
different notes at the same time with
most of the keyboard’s preset tones.
Some of the keyboard’s preset
tones, however, are capable of only
6-note polyphony.
• Most tones on this keyboard have
been recorded and processed using
a technique called digital sampling.
To ensure a high level of tonal qual-
ity, samples are taken in the low,
mid, and high ranges and are then
combined to sound amazingly close
to the originals. You might notice
very slight differences in volume or
sound quality for some tones when
you play them at different positions
on the keyboard. This is an unavoid-
able result of multiple sampling and
is not a malfunction.
• Some sound effect tones, such as
PERCUSSION (No. 99), do not fol-
low the musical scale when played,
but change effect as you play them
in different octaves on the keyboard.
Selecting/Playing a Preset
Tone
1. Press TONE. An indicator appears
next to TONE and the current tone’s
number appears.
Note: Each time you turn the key-
board on, it automatically selects the
tone PIANO 1 (No. 00).
2. To play a different tone, choose a
preset tone from the 100 TONES list
and enter its two-digit number on
the keypad. As you press the keys,
the selected digits appear.
Or, you can use + or – to move to
the next higher or lower numbered
tone.
42-4042.fm Page 12 Friday, April 28, 2000 11:18 AM
13Operation
Notes:
• Precede a single-digit number
with a 0. For example, to select
ELEC PIANO 1 (No. 04), press 0
4.
• If you enter an incorrect first digit,
press TONE to clear your entry,
then enter the correct digit.
3. Play the keyboard to hear the
selected tone and adjust MAIN VOL-
UME to the desired level.
4. To select a different tone, repeat
Steps 1 and 2.
Keyboard Split Tones
The preset tones numbered 90 through
96 on your keyboard let you automati-
cally play two different musical instru-
ments or sound effects independently
on opposite sides of the keyboard.
The instrument listed first in the tone’s
name plays on the left half of the key-
board (below middle C). The instrument
listed next plays on the right half of the
keyboard (above middle C). For exam-
ple, BS/PNO (No. 90) plays a bass tone
on the left half of the keyboard and a pi-
ano tone on the right.
Layered Tones
The preset tones numbered 80 through
89 on your keyboard let you automati-
cally play two different layered tones at
the same time when you press one key.
For example, STR PNO (No. 80) plays
string and piano tones when you press a
key.
Percussion Sounds
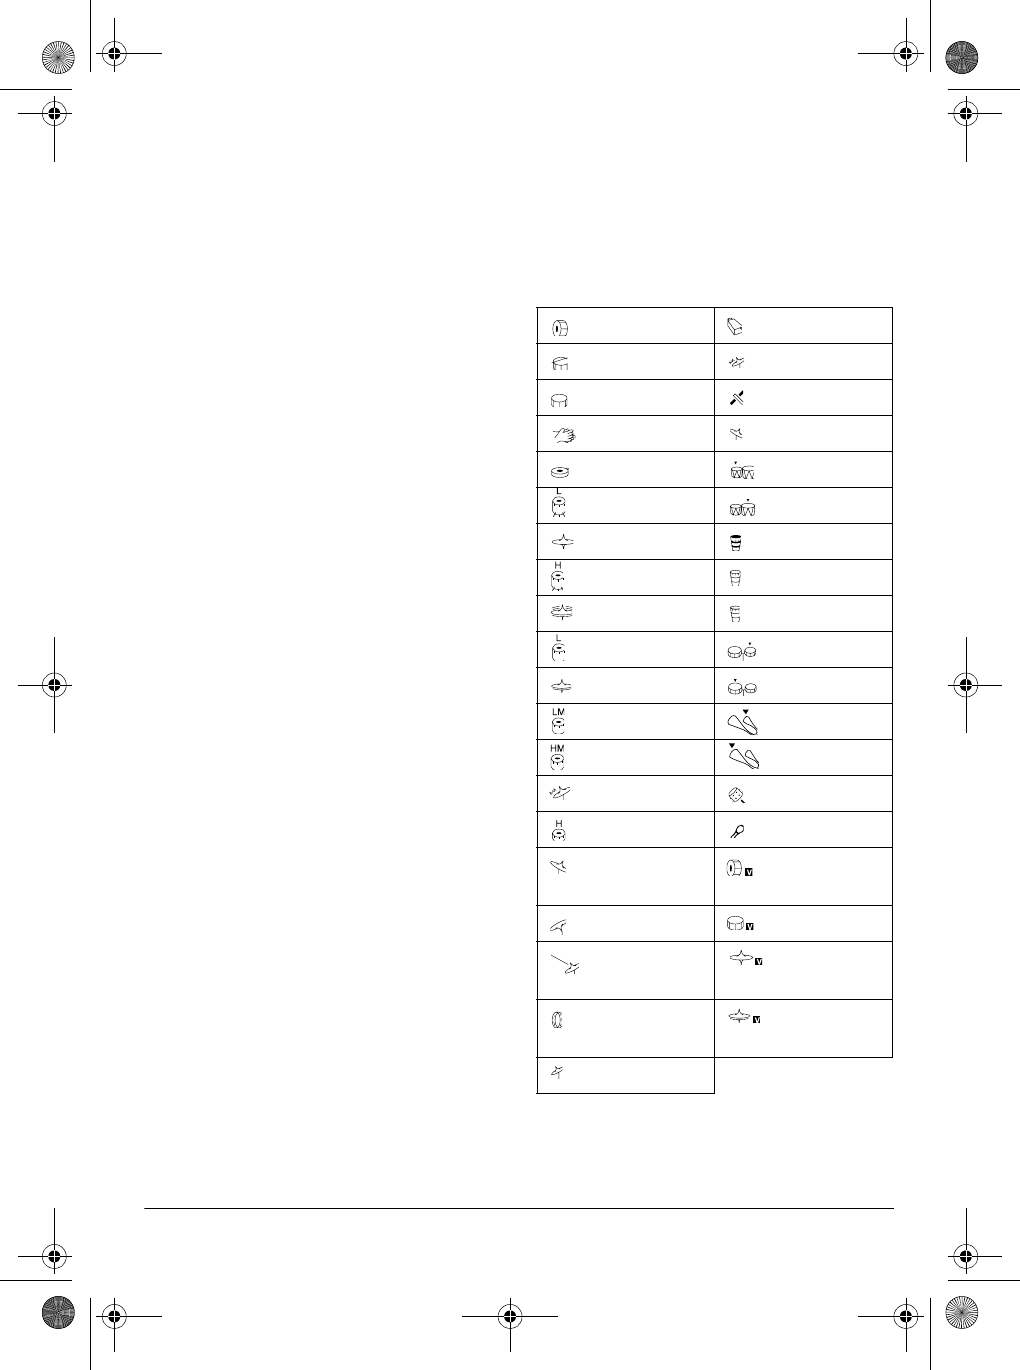
PERCUSSION (No. 99) lets you play the
35 different percussion sounds shown
here. The symbol for each sound ap-
pears above the corresponding key on
the keyboard.
Note: When you select the Fingered or
Concert Chord mode, the keys in the
lower 11/2 octaves become the accom-
Bass Drum Cowbell
Side Stick Crash Cymbal 2
Acoustic Snare Claves
Hand Clap Ride Cymbal 2
Electric Snare High Bongo
Low Floor Tom Low Bongo
Closed Hi-Hat Mute High Conga
High Floor Tom Open High Conga
Pedal Hi-Hat Low Conga
Low Tom High Timbale
Open Hi-Hat Low Timbale
Low-Mid Tom High Agogo
High-Mid Tom Low Agogo
Crash Cymbal 1 Cabasa
High Tom Maracas
Ride Cymbal 1 Voice Bass
Drum
Chinese Cymbal Voice Snare
Ride Bell Voice Closed
Hi-Hat
Tambourine Voice Open
Hi-Hat
Splash Cymbal
42-4042.fm Page 13 Friday, April 28, 2000 11:18 AM

14 Operation
paniment keys and do not produce per-
cussion sounds. See “Using Auto
Accompaniment” on Page 15.
USING THE PRESET
AUTO-RHYTHMS
Your keyboard has 100 preset auto-
rhythms that provide a steady beat for
your music. The name and two-digit
number of each preset auto-rhythm is
listed on the keyboard’s top panel.
You can play a preset auto-rhythm on
the keyboard in any of the following
ways:
• select and play a rhythm (see
“Selecting/Playing an Auto-
Rhythm”)
• synchronize the start of a rhythm
with your music (see “Using SYN-
CHRO” on Page 15)
• briefly vary the pattern of a rhythm
(see “Using FILL-IN” on Page 15)
Selecting/Playing
an Auto-Rhythm
1. Press RHYTHM. An indicator
appears to the right of RHYTHM and
the number of the current auto-
rhythm appears.
Note: Each time you turn on the
keyboard, it automatically selects
the rhythm Club Pop (No. 00).
2. To select a different rhythm, choose
an auto-rhythm from the 100
RHYTHMS list and enter its two-
digit number on the keypad. Or,
repeatedly press + or – to move to
the next higher or lower numbered
rhythm.
Notes:
• Precede a single-digit number
with a 0. For example, press 0 5
to select POP BALLAD (No. 05).
• If you incorrectly enter the first
digit of the rhythm, press RHYTHM
to clear the entry and return to the
last selected auto-rhythm.
3. Press START/STOP to start the
selected auto-rhythm.
4. Adjust MAIN VOLUME and ACCOMP
VOLUME to the desired level (see
“Adjusting the Accompaniment Vol-
ume” on Page 15).
5. To change the auto-rhythm speed,
press TEMPO ▼ or ▲. The current
tempo setting appears.
Notes:
• You can adjust the tempo to play
an auto-rhythm from 20 to 255
beats per minute.
• To quickly slow down or speed up
the tempo, hold down TEMPO ▼
or ▲.
• To reset the tempo to its default
(original) speed, press TEMPO ▲
and ▼ at the same time.
6. Play the keyboard along with the
auto-rhythm.
7. To select a different rhythm, repeat
Steps 1 and 2.
8. To stop the auto-rhythm, press
START/STOP again.
42-4042.fm Page 14 Friday, April 28, 2000 11:18 AM
15Operation
Using SYNCHRO
This feature lets you synchronize the
start of an auto-rhythm with the begin-
ning of your music.
After you select and enter an auto-
rhythm, press SYNCHRO/FILL-IN. The
bars of the metronome flash to show the
keyboard is in a standby mode.
Begin playing the keyboard. The key-
board automatically begins to play the
rhythm when you press any key within
the first 11/2 octaves of the lower end of
the keyboard (the first 18 keys from the
left side of the keyboard).
Using FILL-IN
This feature lets you insert a short (1- to
2-measure) variation in the beat pattern
of a selected auto-rhythm.
Simply press and release SYNCHRO/
FILL-IN while the auto-rhythm is playing.
The keyboard inserts a 1- to 2-measure
variation, then the original rhythm auto-
matically resumes at the end of the cur-
rent measure.
USING AUTO
ACCOMPANIMENT
The 18 keys on the left side of the key-
board with note labels above them are
called
accompaniment keys
.
You can set the keyboard to play two dif-
ferent types of auto accompaniment us-
ing the accompaniment keys.
•
Concert Chord
— lets you play
chords on the accompaniment keys
using chord formations of from one
to four notes. The number of keys
you press determines the type of
chord that plays (see “Concert
Chord” on Page 16).
•
Standard Fingering
— lets you play
chords on the accompaniment keys
using standard chord formations of
three or four notes (see “Standard
Fingering” on Page 17).
Notes:
• You can use the keyboard’s rhythm
controls (FILL-IN and SYNCHRO)
with both types of auto accompani-
ment.
• After you press the auto accompani-
ment keys, the keyboard plays the
same chord until you press other
keys to play a different chord or
press
START/STOP
.
Adjusting the Accompaniment
Volume
The keyboard lets you adjust the volume
of your accompaniment separately from
the overall volume of the keyboard.
1. Press ACCOMP VOLUME. The cur-
rent accompaniment volume setting
appears next to Acomp Vol.
2. Within 5 seconds, enter a number
from 0 (no sound) to 9 (loudest) on
the keypad. The number appears as
you press the key.
Accompaniment
Keyboard
Melody
Keyboard
42-4042.fm Page 15 Friday, April 28, 2000 11:18 AM
16 Operation
Or, press – or + to select the next
lowest or highest accompaniment
volume setting.
To reset the accompaniment volume to
its default value of 7, press – and + at
the same time.
Note: You can adjust the accompani-
ment volume separately for your key-
board play and prerecorded tune
playback.
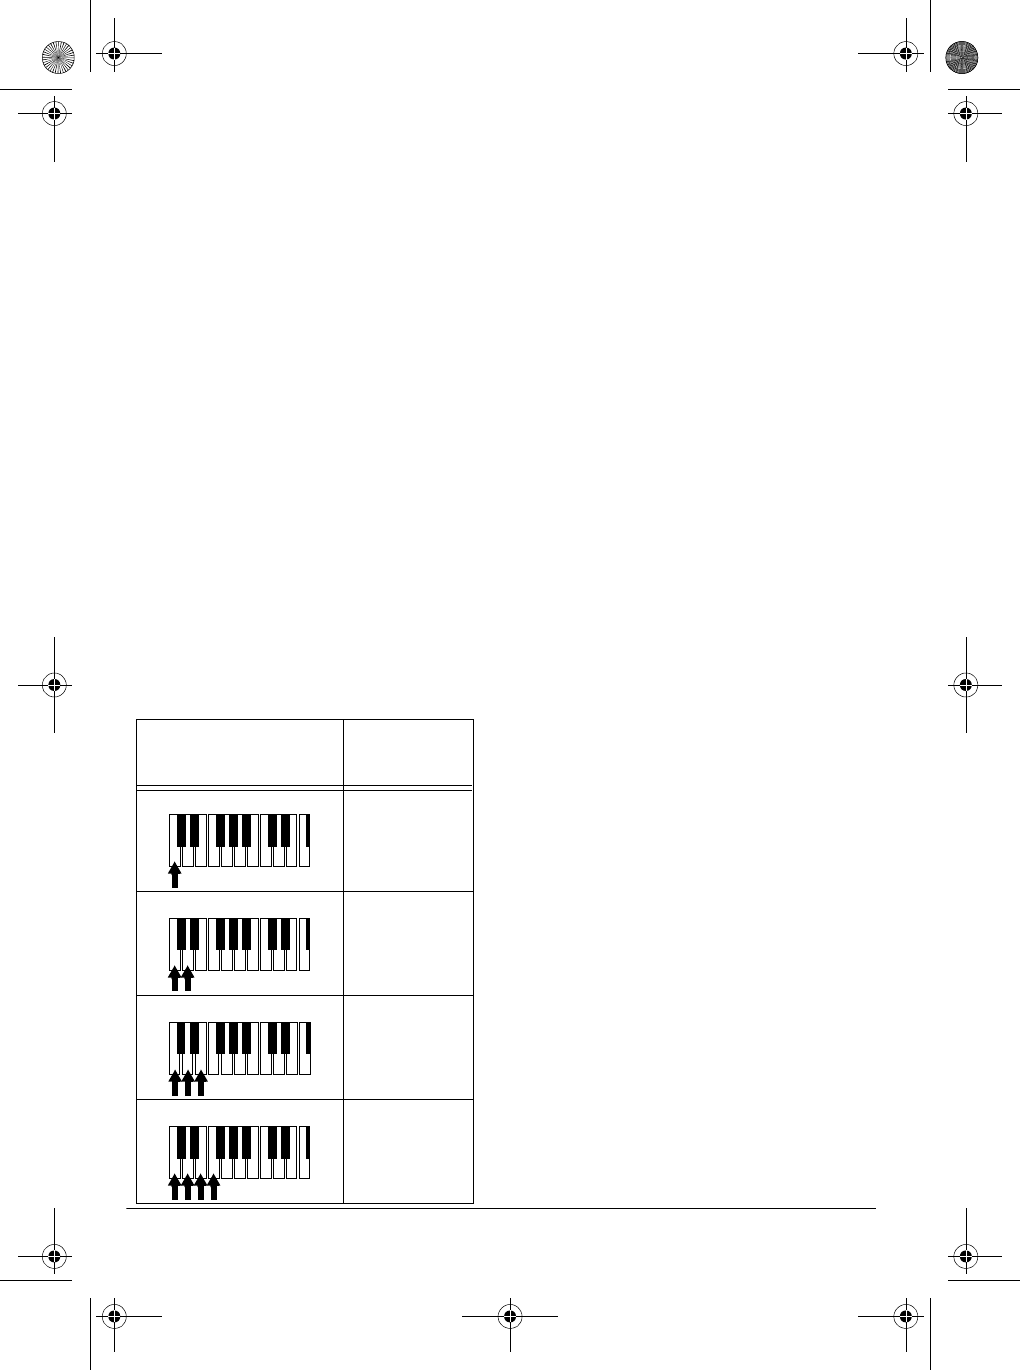
Concert Chord
The concert chord method lets begin-
ning keyboard players easily select and
play a chord.
The number of accompaniment keys
you press determines the type of chord
that plays. This chart shows the chord
type that plays when you press one,
two, three, or four accompaniment keys
at the same time.
The lowest note you play determines the
key of the chord. For example, if the low-
est note is C, the keyboard plays a C
chord.
Note: You can press
any
labeled note(s)
to the right of the lowest note in the
chord to produce a minor, a dominant
seventh, or minor seventh chord.
Follow these steps to start concert chord
auto accompaniment.
1. Set POWER/MODE to CONCERT
CHORD.
2. Enter a two-digit auto-rhythm num-
ber.
3. To start the auto-rhythm before the
auto accompaniment, press START/
STOP.
Or, to synchronize the start of the
selected auto-rhythm with your
accompaniment, press SYNCHRO/
FILL-IN.
4. Begin the accompaniment at the
desired interval by pressing the
desired accompaniment key(s).
To play a melody along with the
accompaniment, press any key(s) to
the right of the accompaniment
keys.
5. Adjust the tempo, MAIN VOLUME,
and ACCOMP VOLUME to the de-
sired levels.
6. To change chords without interrupt-
ing the rhythm, simply press the
auto accompaniment key(s) re-
quired to form the new chord.
7. To stop auto accompaniment and
the auto-rhythm, press START/STOP.
Number of Keys
Pressed Chord Type
Major
Minor (m)
Dominant
Seventh (7)
Minor
Seventh
(m7)
C DEFGABCDEF
C DEFGABCDEF
C D E F G A B C D E F
C DEFGABCDEF
42-4042.fm Page 16 Friday, April 28, 2000 11:18 AM
17Operation
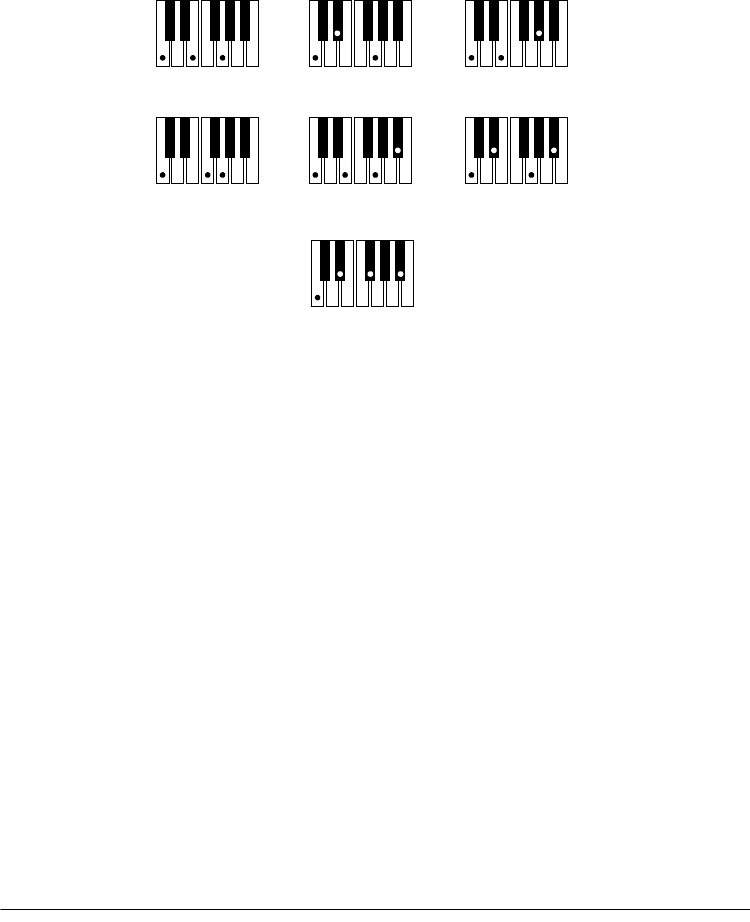
Standard Fingering
The standard fingering method uses standard formations of three or four notes, and
lets the experienced musician play a wider variety of accompaniment chords.
This chart shows the 15 chord types you can play on your keyboard by using stan-
dard fingering.
Notes:
• You do not have to press the key marked with parentheses on the keyboard in
the preceding chart to produce a 7, m7, M7, mM7, 9, or m9 chord.
• This chart shows only one possible fingering position for each chord. It is possi-
ble to play a chord using several different positions. For example, the following
three fingering positions produce the same C chord.
()

18 Operation
• When you play an aug, 7–5, or dim7
chord, the lowest note you play
determines the root of the chord. Be
sure that your fingering correctly
defines the root you want.
Note: See “Standard Fingering Chord
Charts” on Page 26 for a list of all the
chords you can play on your keyboard
using standard fingering accompani-
ment.
Follow these steps to start standard fin-
gering auto accompaniment.
1. Set POWER/MODE to FINGERED.
2. Select and enter an auto-rhythm.
3. To start the auto-rhythm before your
auto accompaniment, press START/
STOP.
Or, to synchronize the start of the
selected auto-rhythm with your
accompaniment, press SYNCHRO/
FILL-IN.
4. Begin the accompaniment at the
desired interval by pressing at least
three accompaniment keys to play
the desired chord.
To play a melody along with the
accompaniment, press any key(s) to
the right of the accompaniment
keys.
5. Adjust the tempo, MAIN VOLUME,
and ACCOMP VOLUME to the de-
sired levels.
6. To change chords without interrupt-
ing the rhythm, simply press the
auto accompaniment keys required
to form the new chord.
7. To stop auto accompaniment and
the auto-rhythm, press START/STOP.
USING THE CHORD BOOK
You can use your keyboard’s chord
book display feature to see which keys
to press and which fingers to use to form
a chord. You can also display the name
of a chord you play.
Follow these steps to use the chord
book feature.
1. Set POWER/MODE to NORMAL or
CONCERT CHORD, then press
CHORD BOOK.
2. Press CLEAR (0) to clear any previ-
ous chord entry.
3. If you want to see information about
a major chord while you play it, skip
to Step 4. Otherwise (if the desired
chord name is a minor chord), enter
the chord’s name using that chord’s
keys on the numeric keypad.
For example, to enter a minor 7–5
chord, press m (8) 7 (9) –5 (2). Or,
to enter 7sus4, press 7 (9) and sus4
(1).
4. Press the root key on the accompa-
niment keyboard to play the chord.
As the chord plays, the display
shows the chord you entered, the
keys to press to form the chord (on
the bottom “keyboard”), the fingers
you need to use to play the chord
(on the center “hands”), and the
notes that make up the chord (on
the staff display).
42-4042.fm Page 18 Friday, April 28, 2000 11:18 AM
19Special Features
5. Use – or + to scroll through the
chords associated with the root
chord you entered in Step 3. Or,
press a different root key to see the
chords based on that key.
Notes:
• If the chord is not recognized by
the keyboard, only a dash ap-
pears.
• Since the keyboard automatically
changes some chords so you can
play them on the accompaniment
keyboard, the keyboard might dis-
play some chords in inverted
form.
• The keyboard does not display
some chords because the chords
cannot be played within the
accompaniment keyboard’s
range. See “Standard Fingering
Chord Charts” on Page 26 for
more information.
6. Using the center “hands” as a guide,
play the displayed chord on the key-
board.
7. You can also display the name of
the chord you play on the accompa-
niment keyboard. Press CHORD
BOOK, press CLEAR to erase any
previous entry, then play the chord
on the accompaniment keyboard.
The name of the chord appears.
8. When you have finished, press
CHORD BOOK to turn off chord
book.
ˆ
Special Features
CHANGING KEYS
The keyboard automatically selects the
key of middle C each time you turn it on.
For added flexibility as you play, the
keyboard lets you change (transpose)
the musical key in which it plays.
Note: You cannot change the key while
a prerecorded tune is selected or play-
ing.
1. Repeatedly press TRANSPOSE/
TUNE/MIDI until Trans and the cur-
rent key setting appear.
Note: The number on the display is
the number of “semitones” to which
the keyboard is set, compared to its
default key. A semitone is a mea-
surement that represents the acous-
tical interval between the tones of
any two keys on the keyboard. For
example, the difference between C
and C or B and B is one semi-
tone. You can transpose the key
down 6 semitones (to an F ) and up
5 semitones (to an F) — a full
octave.
2. Within 5 seconds, press – or + to
lower or raise the key. Each time
you press – or +, the number
decreases or increases by 1 (semi-
tone).
As you raise the key, 1 is C , 2 is D,
and so on. As you lower the key, –1
is B, –2 is B , –3 is A, and so on.
42-4042.fm Page 19 Friday, April 28, 2000 11:18 AM
20 Special Features
Notes:
• You can also use the number key-
pad to quickly raise the key. Simply
press the semitone change value (1
to 5).
• The keyboard automatically resets
the key to the default value of 0
(middle C) each time you play a pre-
recorded tune.
• Each preset tone plays within a
specified range. If a key change
causes a note to exceed its range,
the same note sounds in the nearest
octave.
• When you select preset tones 90
through 96 after changing the key,
the keyboard split point changes
accordingly (see “Keyboard Split
Tones” on Page 13).
• Changing the key does not affect
the PERCUSSION (No. 99) preset
tone.
TUNING THE KEYBOARD
Although your keyboard never goes out
of tune, it does let you adjust its pitch to
match other instruments or musical re-
cordings.
Note: You cannot tune the keyboard
while a prerecorded tune is displayed or
playing.
Follow these steps to tune the keyboard.
1. Repeatedly press TRANSPOSE/
TUNE/MIDI until the display shows
Tune and the current pitch setting.
Note: The number on the display is
the number of “cents” to which the
keyboard is currently tuned, com-
pared to its default pitch. A cent is
the measurement that represents
the acoustical interval between two
tones. 1200 cents equal 1 octave.
You can tune the keyboard to within
50 cents (101 levels) of its default
pitch.
2. Within 5 seconds, repeatedly press
– or + to lower or raise the key-
board’s pitch. Each time you press
the key, the number decreases or
increases by 1 (cent).
Notes:
• You can use the number keypad to
raise the pitch by entering the cent
change value.
• The keyboard automatically resets
the tuning pitch to the default value
of 00 (cents) each time you turn off
the keyboard or play the pre-
recorded tunes.
USING A SUSTAIN PEDAL
For added flexibility and control as you
make music, you can connect an option-
al sustain pedal (available through your
local RadioShack store). A sustain pedal
lets you sustain the keyboard’s sound.
To connect a sustain pedal to your key-
board, insert the plug on the pedal’s
cord into SUSTAIN on the back of the
keyboard.
42-4042.fm Page 20 Friday, April 28, 2000 11:18 AM

21Using MIDI
ˆ
Using MIDI
Your keyboard includes a feature called
MIDI (Musical Instrument Digital Inter-
face). MIDI is the universal standard for
sending and receiving performance data
between all types of electronic musical
instruments, regardless of the manufac-
turer.
Using MIDI, you can play music on your
keyboard and another instrument at the
same time while pressing the keys on
only one, record your music to a se-
quencer, acquire a wider selection of
preset tones from a sound module, and
much more.
ABOUT MIDI
Every MIDI-equipped instrument has
MIDI OUT and IN terminals, and some
also have a MIDI THRU terminal. Each
of these terminals serves a different pur-
pose.
MIDI OUT sends MIDI data to (“talks
to”) the other MIDI instrument(s).
MIDI IN receives (“listens to”) MIDI data
sent by the other MIDI instrument(s).
MIDI THRU lets you connect (“network”)
additional MIDI instruments, and sends
along to other MIDI devices a copy of all
data it receives through its MIDI IN ter-
minal.
Your keyboard has MIDI OUT and MIDI IN
terminals.
The cable that connects MIDI devices
does not actually carry sound between
them, like a speaker wire carries sound
from a receiver to a speaker. Instead,
MIDI-equipped devices communicate
with each other using digital codes (in-
structions). One MIDI device sends digi-
tal instructions representing exactly
what is being played on it. The other
MIDI device receives and translates
those instructions, then produces (or
records) the sound exactly as it was
played on the first device.
Note: Connecting your keyboard to an-
other MIDI device requires a MIDI cable
(not supplied). See “Making the MIDI
Connections.”
MAKING THE MIDI
CONNECTIONS
To connect your keyboard to another
MIDI-equipped device, you must use a
MIDI cable (available at your local Ra-
dioShack store).
Cautions:
• Always turn off power to your key-
board and the other MIDI device
before you connect or disconnect
MIDI cables.
• As you make the cable connections,
be sure to align the MIDI cable pins
with the matching holes on your key-
board’s MIDI OUT and MIDI IN termi-
nals. If you have trouble plugging in
the cable, do not force it! You might
damage the plug or the instrument.
To send MIDI data from your keyboard,
use a MIDI cable to connect the key-
board’s MIDI OUT terminal to the other
device’s MIDI IN terminal.
42-4042.fm Page 21 Friday, April 28, 2000 11:18 AM
22 Using MIDI
To receive MIDI data on your keyboard,
use a MIDI cable to connect the key-
board’s
MIDI IN terminal to the other de-
vice’s MIDI OUT terminal.
Note: You do not need to make both
connections if you are only either send-
ing or receiving.
MIDI DATA
Your keyboard can send and receive
several different types of MIDI data. The
keyboard’s tones, rhythms, and other
types of MIDI data are sent automatical-
ly as you play.
Notes:
• The keyboard’s prerecorded tunes
cannot be sent as MIDI data.
• For detailed specifications of the
MIDI function, see the “MIDI Imple-
mentation Chart” on Page 31.
Note On/Off — specifies which keys are
pressed (Note On) or released (Note
Off). Also includes how loud a note is
played as a value from 0 to 127.
Notes:
• The pitch of a note depends on the
tone that is being used, as shown in
the “Note Table” on Page 29.
• If the keyboard receives a “request”
to play notes outside of its range
(higher or lower), it automatically
selects the same note in the nearest
octave.
Program Change — specifies the tone.
The keyboard sends program change
data in the range of 0 to 99, correspond-
ing to tone numbers. It receives data
within the same range if GM tone map-
ping is set to N, or in the range of 0 to
127 if GM tone mapping is set to G. In
the latter case, tones in the range of 100
to 127 are translated to the closest tone
that the keyboard has.
Pitch Bend — supplies pitch bend infor-
mation. The keyboard’s pitch changes
as it receives a Pitch Bend message
through the MIDI IN terminal.
Control Change — adds effects such
as vibrato and volume changes applied
during keyboard play. The message in-
cludes a control number (the effect type)
and a control value (the on/off and depth
of the effect).
Here is the data that can be received
with this keyboard and the correspond-
ing control number.
The keyboard can send Hold1 Control
Change data only when you connect a
sustain pedal and press it.
CHANGING MIDI
SETTINGS
The keyboard lets you change two MIDI
parameters, Tone Map and Keyboard
Channel.
Keyboard Channel — sets the channel
for sending MIDI data to an external de-
vice (Default: 01). The keyboard receives
Effect Control
Number
Modulation 1
Volume 7
Pan 10
Hold1 (Sustain) 64
42-4042.fm Page 22 Friday, April 28, 2000 11:18 AM

23Using MIDI
MIDI data on channels 1 through 4 and 10
only. The data received on other channels
are ignored. For transmission of MIDI da-
ta, you can use any of 16 channels.
1. Repeatedly press TRANSPOSE/
TUNE/MIDI until Keybd Ch appears.
2. Within 5 seconds, press – or + to
select the channel you want.
Tone Map —sets the range of program
change values received/recognized by
this keyboard.
1. Repeatedly press TRANSPOSE/
TUNE/MIDI until TonMap=N
appears.
2. Within 5 seconds, press – or + to
select the setting you want.
N: Normal Tone Map. This setting
allows receipt of 0 to 99 program
changes. Each program change
corresponds to one of the key-
board’s prerecorded tones.
G: General MIDI Tone Map. This
setting allows receipt of all 0 to 127
program changes. Any data over
100 are translated to the closest
tone the keyboard has. See “Note
Table” on Page 29 for details.
Select G when you listen to General
MIDI data from an external device.
NOTES ABOUT THE MIDI
IMPLEMENTATION
CHART
The “MIDI Implementation Chart” on
Page 31 illustrates the details of the key-
board’s MIDI function. An O in the chart
means that the keyboard has this fea-
ture; X means it does not have this fea-
ture. The following notes explain what
the keyboard can do.
Basic Channel — MIDI uses up to 16
channels to exchange data. As in a TV
broadcast, different channels send dif-
ferent data. The keyboard can send data
in any of 16 channels, but receives data
only on channels 1 through 4 or 10.
Mode — The chart shows that Mode 3
is OMNI OFF, POLY. This means the
keyboard sends and receives polyphon-
ic data on only one channel at a time.
Note Number — This number repre-
sents each key of the keyboard. The
lowest number (0) is five octaves below
middle C. Since the keyboard’s lowest
note is two octaves below middle C and
the highest is three octaves above mid-
dle C, your keyboard can send note
numbers between 36 and 96 and re-
ceive note numbers from 0 through 127.
The keyboard automatically assigns any
key outside its range to a key within its
key range.
Velocity — This number shows how
fast the key was pressed, or how loud
the note should sound. Pianissimo (1) is
the lowest velocity, Fortissimo (127) is
the loudest. A zero (0) means the key is
released. Your keyboard can send vol-
ume level 75 or 100, and receive all vol-
ume levels from 0 through 127.
9n — This means that the Note On
message is 9 hexadecimal, and n is the
channel number.
Pitch Bender — The keyboard receives
(but cannot send) pitch bending signals.
42-4042.fm Page 23 Friday, April 28, 2000 11:18 AM
24 Troubleshooting
Control Change — This feature sends
data on various controllers, each having
its own number. For the details of each
parameter, see “MIDI Data” on Page 22.
Program Change — This feature
changes the preset sounds. Each sound
number corresponds to a program num-
ber between 0 and 127. For more infor-
mation, see “MIDI Data” on Page 22.
ˆ
Troubleshooting
If your keyboard is not performing as it should, these suggestions might help. If you
still cannot solve the problem, take the keyboard to your local RadioShack store for
assistance.
Trouble Possible Cause Remedy
No sound, even if keys
are pressed. The keyboard has turned
off automatically. Set POWER/MODE to OFF
then ON again.
Volume is turned down. Repeatedly press MAIN VOL-
UME ▲ to increase the volume.
Headphones are con-
nected. Disconnect headphones.
Power supply problem. Check the power supply.
Are battery symbols
(+/–) facing correctly?
Are the batteries fresh?
Is the AC or DC adapter con-
nected properly?
You are pressing too few
accompaniment keys
while POWER/MODE is
set to FINGERED.
Set POWER/MODE to NOR-
MAL or CONCERT CHORD.
Press 3 or 4 keys to form a
chord while POWER/MODE is
set to FINGERED.
No sound when con-
nected to an external
amplifier.
Volume is turned down. Repeatedly press MAIN VOL-
UME ▲ to increase the volume.
Defective connection cord. Replace the connection cord.
The key or tuning does
not match when playing
along with another MIDI
instrument.
The tuning or transpose
parameter is set to a value
other than 0 or 00.
Set the tuning or transpose to 0
or 00.
42-4042.fm Page 24 Friday, April 28, 2000 11:18 AM

25Troubleshooting
No sound when receiving
and playing MIDI data. MIDI cables are not con-
nected properly. Check the connection.
Bass notes in General
MIDI data are sent out
one octave lower.
Tone map parameter is set
to N.Set the tone map parameter to
G (see “Changing MIDI Set-
tings” on Page 22).
Sounds sent to another
MIDI device by the key-
board do not sound cor-
rect.
The other device’s MIDI
THRU function is turned
on.
Turn off the MIDI THRU func-
tion on the other device.
Trouble Possible Cause Remedy
42-4042.fm Page 25 Friday, April 28, 2000 11:18 AM

26 Standard Fingering Chord Charts
ˆ
Standard Fingering Chord Charts
These tables show the left-hand fingering for the chords you play most often.
This illustration shows which fingers on your left hand match the num-
bers on the charts. The illustration also appears on your keyboard’s dis-
play.
Note: You cannot play chords marked with an asterisk (*) in the fingered mode on
this keyboard.
27Standard Fingering Chord Charts
42-4042.fm Page 27 Friday, April 28, 2000 11:18 AM
28 Standard Fingering Chord Charts
29Note Table
ˆ
Note Table
Legend:
(1) Tone number
(2) Maximum polyphony
(3) Range type (see Page 30)
(4) Corresponding general MIDI number (see “MIDI Data” on Page 22)
30 Note Table
Legend:
Range of keyboard play
Playable range (when receiving MIDI data)
Range transposed to nearest octave (when receiving MIDI data or using the
keyboard’s transpose function)
(1) The received MIDI data is played one octave lower
(2) The received MIDI data is played one octave higher
31MIDI Implementation Chart
ˆ
MIDI Implementation Chart
FUNCTION TRANSMITTED RECOGNIZED REMARKS
Basic
Channel Default
Changed 1
1–16 1–4, 10
1–4, 10
Mode Default
Messages
Altered
Mode 3
X
❊❊❊❊❊❊❊❊❊❊❊❊❊❊❊❊
Mode 3
X
❊❊❊❊❊❊❊❊❊❊❊❊❊❊❊
Note
Number: True voice 36–96
❊❊❊❊❊❊❊❊❊❊❊❊❊❊❊❊
0–127
36–96 *1
*1 Depends on tone
Velocity Note ON
Note OFF O 9nH v=75,100*2
X 9nH v=0 O 9nH v=1–127
X 9nH v=0, 8nH
v=*3
*2: V(Velocity)=100 when note
on date when the main vol-
ume value of this unit is 9 to 2,
and V=75 when the main vol-
ume value is 1 or 0.
*3 no relation
After
Touch Keys
Channels X
XX
X
Pitch Bender X O
Control
Change 1
6, 38
7
10
11
64
100, 101
120
121
X
X
X
X
X
O
X
X
X
O
X
O
O
X
O
X
X
X
Modulation
Data entry
Volume
Pan
Expression
Hold1
RPN LSB, MSB
All sound off
Reset all controller
Program
Change: True # O 0–99
❊❊❊❊❊❊❊❊❊❊❊❊❊❊❊❊
O 0–127*4
❊❊❊❊❊❊❊❊❊❊❊❊❊❊❊
*4: Depends on GM Tone
Map setting
When set to N, only the
100 normal list tones
from 0 to 99 are
received.
When set to G, tone
numbers 0 to 127 are
received. Those that
most closely match the
100 prerecorded tones of
this keyboard are
mapped to the applicable
tone numbers (0 to 99)
42-4042.fm Page 31 Friday, April 28, 2000 11:18 AM
32 Care and Maintenance
Mode 1: OMNI ON, POLYMode 3: OMNI OFF, POLYO: Yes
Mode 2: OMNI ON, MONOMode 4: OMNI OFF, MONOX: No
ˆ
Care and Maintenance
System Exclusive X X
System
Common : Song Pos
: Song Sel
: Tune
X
X
X
X
X
X
System
Real
Time
: Clock
: Commands X
XX
X
Aux
Mes-
sages
: Local ON/
OFF
: All notes
OFF
: Active
Sense
: Reset
X
X
X
X
X
X
X
X
Your RadioShack MIDI Keyboard is an example of superior design and craftsman-
ship. The following suggestions will help you care for your keyboard so you can en-
joy it for years.
Keep the keyboard dry. If it gets wet, wipe it dry immediately. Liquids
might contain minerals that can corrode the electronic circuits.
Use and store the keyboard only in normal temperature environments.
Temperature extremes can shorten the life of electronic devices, dam-
age batteries, and distort or melt plastic parts.
Keep the keyboard away from dust and dirt, which can cause premature
wear of parts.
Handle the keyboard gently and carefully. Dropping it can damage cir-
cuit boards and cases and can cause the keyboard to work improperly.
FUNCTION TRANSMITTED RECOGNIZED REMARKS
42-4042.fm Page 32 Friday, April 28, 2000 11:18 AM
33Specifications
ˆ
Specifications
Number of Keys ..................................................................................................................... 61
Polyphonic Sound .............................................................................................. 12-note (Max.)
Preset Tones ....................................................................................................................... 100
Auto-Rhythms ...................................................................................................................... 100
Tempo ...................................................................... Adjustable (20–255 Beats Per Minute)
Other ..............................................................................................Fill-in and Synchro Start
Accompaniments ................................................................................ Concert Chord, Fingered
Prerecorded Tunes .................................................................................................... 100 Tunes
Transpose ................................................................................................ (F ~C~F: half-notes)
Tuning ................................................................................. Adjustable A4 = 440 Hz ±50 cents
Built-In Speakers ......................................................... 43/4 Inch (12 cm) × 2 (Output 2W + 2W)
Ter mina ls:
Power Supply .................................................................................................... DC 9V Jack
PHONES/OUTPUT Jack ........................................................ Output Impedance: 78 Ohms
Output Voltage: 4V (RMS) MAX
MIDI IN, OUT
SUSTAIN 1/4-Inch Standard Jack
Power Sources ............................................................................................. DC: 6 AA batteries
AC: 120V, 60Hz, with AC adapter
Vehicle Battery: 9V with DC adapter
Power Consumption ......................................................................................................... 7.7 W
Use only fresh batteries of the required size and recommended type.
Batteries can leak chemicals that damage your keyboard’s electronic
parts.
Wipe the keyboard with a damp cloth occasionally to keep it looking
new. Do not use harsh chemicals, cleaning solvents, or strong deter-
gents to clean the keyboard.
Modifying or tampering with the keyboard’s internal components can cause a mal-
function and might invalidate its warranty and void your FCC authorization to oper-
ate it. If your keyboard is not performing as it should, take it to your local
RadioShack store for assistance.
42-4042.fm Page 33 Friday, April 28, 2000 11:18 AM
34 Specifications
Dimensions (HWD) ...................................................................... 41/4 × 3617/32 × 1215/16 Inches
(108 × 929 × 329 mm)
Weight (Without Batteries) .......................................................................................... 8 lb 14 oz
(4 kg)
Included Accessories ................................................................................... Sheet Music Stand
Play Guide for the Prerecorded Tunes
Specifications are typical; individual units might vary. Specifications are subject to change and
improvement without notice.
42-4042.fm Page 34 Friday, April 28, 2000 11:18 AM
35Notes
ˆ
Notes
42-4042.fm Page 35 Friday, April 28, 2000 11:18 AM
42-4042
MA0005-A
04A00
Printed in Malaysia
MD981E-1
RadioShack
A Division of Tandy Corporation
Fort Worth, Texas 76102
Limited One-Year Warranty
This product is warranted by RadioShack against manufacturing defects in material and workman-
ship under normal use for one (1) year from the date of purchase from RadioShack company-owned
stores and authorized RadioShack franchisees and dealers. EXCEPT AS PROVIDED HEREIN, Ra-
dioShack MAKES NO EXPRESS WARRANTIES AND ANY IMPLIED WARRANTIES, INCLUDING
THOSE OF MERCHANTABILITY AND FITNESS FOR A PARTICULAR PURPOSE, ARE LIMITED
IN DURATION TO THE DURATION OF THE WRITTEN LIMITED WARRANTIES CONTAINED
HEREIN. EXCEPT AS PROVIDED HEREIN, RadioShack SHALL HAVE NO LIABILITY OR RE-
SPONSIBILITY TO CUSTOMER OR ANY OTHER PERSON OR ENTITY WITH RESPECT TO ANY
LIABILITY, LOSS OR DAMAGE CAUSED DIRECTLY OR INDIRECTLY BY USE OR PERFOR-
MANCE OF THE PRODUCT OR ARISING OUT OF ANY BREACH OF THIS WARRANTY, IN-
CLUDING, BUT NOT LIMITED TO, ANY DAMAGES RESULTING FROM INCONVENIENCE, LOSS
OF TIME, DATA, PROPERTY, REVENUE, OR PROFIT OR ANY INDIRECT, SPECIAL, INCIDEN-
TAL, OR CONSEQUENTIAL DAMAGES, EVEN IF RadioShack HAS BEEN ADVISED OF THE
POSSIBILITY OF SUCH DAMAGES.
Some states do not allow limitations on how long an implied warranty lasts or the exclusion or limita-
tion of incidental or consequential damages, so the above limitations or exclusions may not apply to
you.
In the event of a product defect during the warranty period, take the product and the RadioShack
sales receipt as proof of purchase date to any RadioShack store. RadioShack will, at its option, un-
less otherwise provided by law: (a) correct the defect by product repair without charge for parts and
labor; (b) replace the product with one of the same or similar design; or (c) refund the purchase
price. All replaced parts and products, and products on which a refund is made, become the prop-
erty of RadioShack. New or reconditioned parts and products may be used in the performance of
warranty service. Repaired or replaced parts and products are warranted for the remainder of the
original warranty period. You will be charged for repair or replacement of the product made after the
expiration of the warranty period.
This warranty does not cover: (a) damage or failure caused by or attributable to acts of God, abuse,
accident, misuse, improper or abnormal usage, failure to follow instructions, improper installation or
maintenance, alteration, lightning or other incidence of excess voltage or current; (b) any repairs
other than those provided by a RadioShack Authorized Service Facility; (c) consumables such as
fuses or batteries; (d) cosmetic damage; (e) transportation, shipping or insurance costs; or (f) costs
of product removal, installation, set-up service adjustment or reinstallation.
This warranty gives you specific legal rights, and you may also have other rights which vary from
state to state.
RadioShack Customer Relations, 200 Taylor Street, 6th Floor, Fort Worth, TX 76102
We Service What We Sell
12/99
42-4042.fm Page 36 Friday, April 28, 2000 11:18 AM
