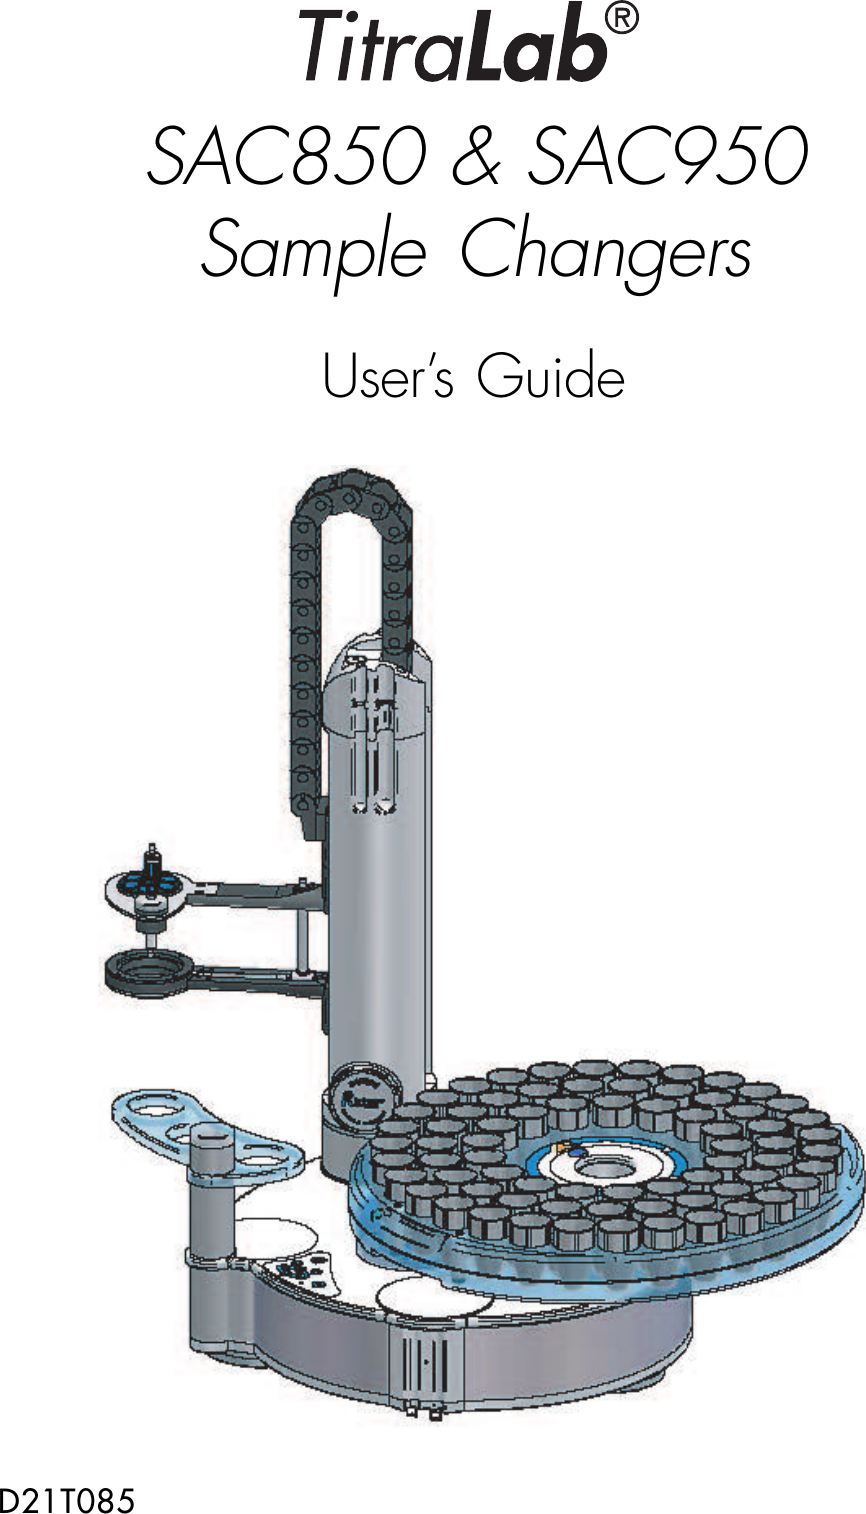
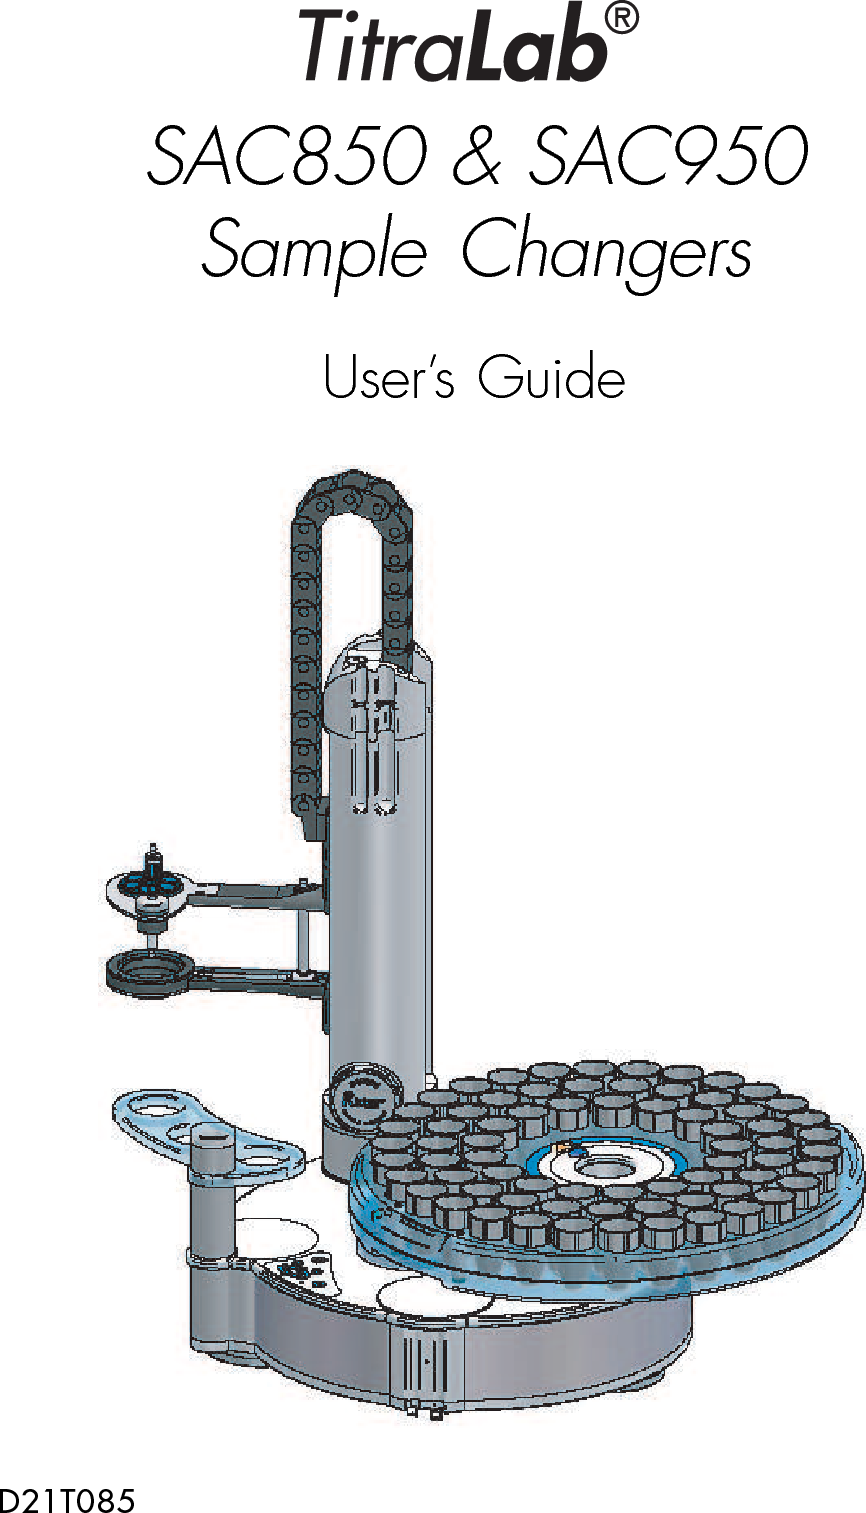
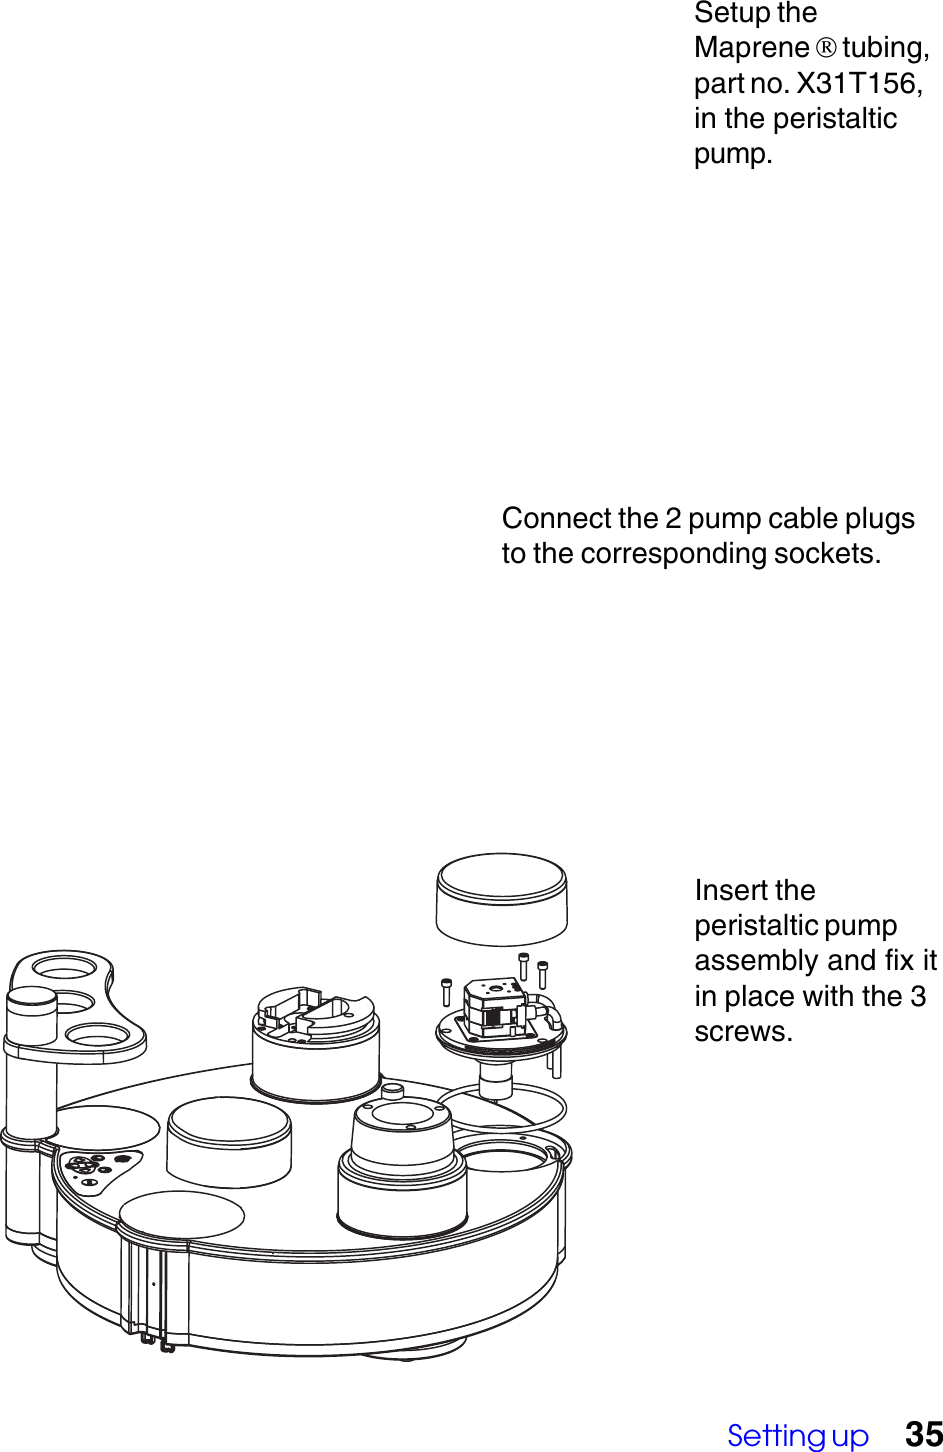
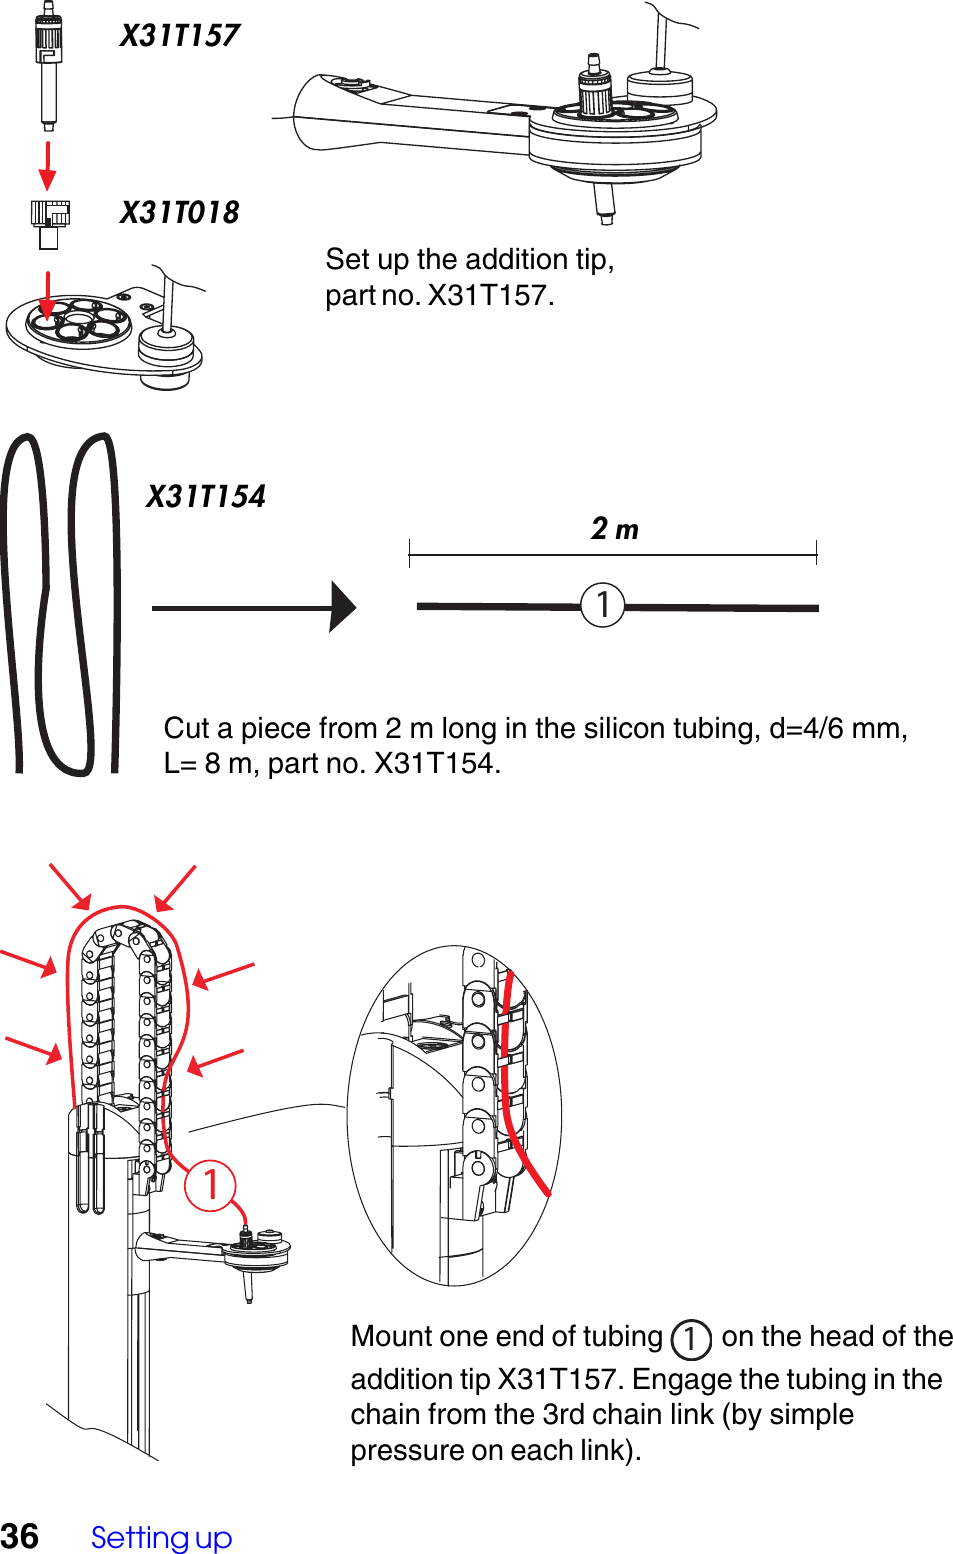
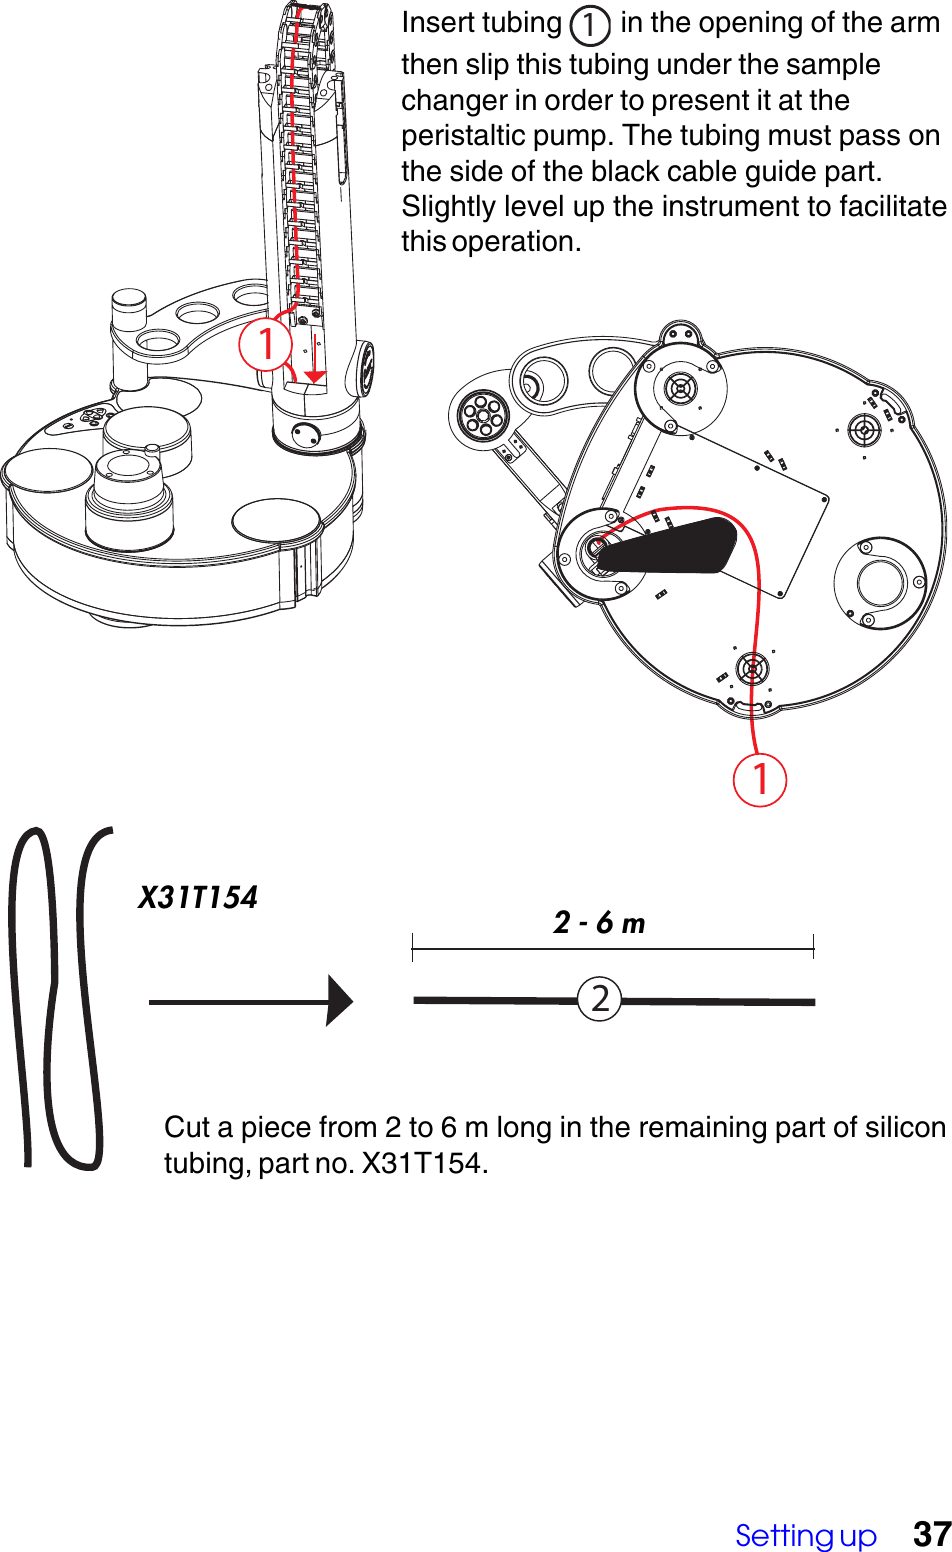
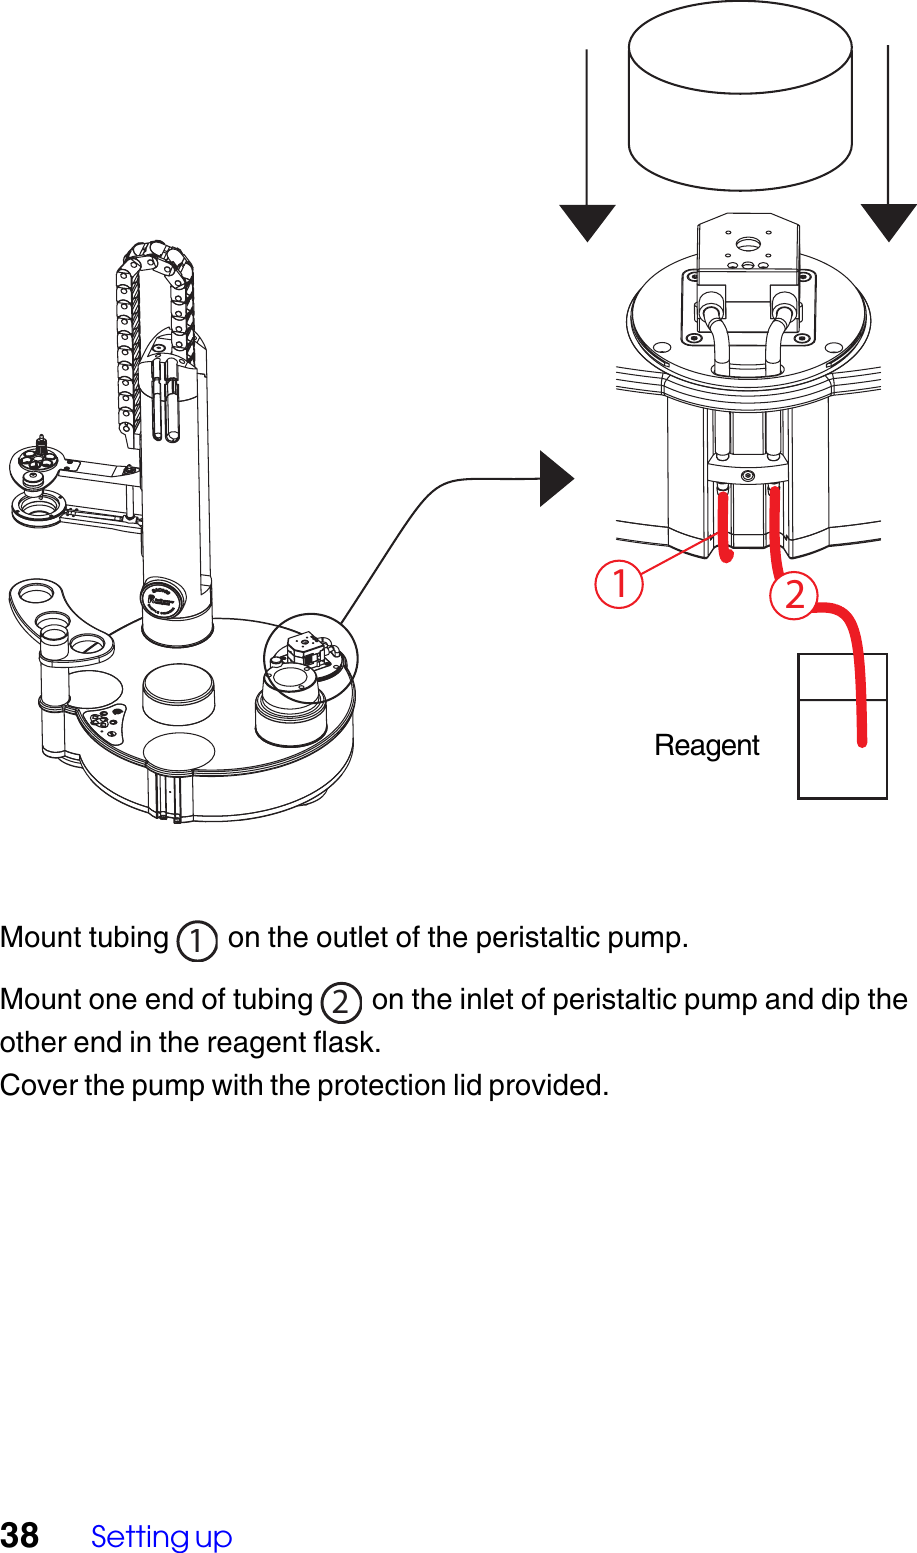
Radiometer analytical TTL075 Sample Changer User Manual D21T085 UG SAC9xx gb

Radiometer analytical S.A.S. Sample Changer D21T085 UG SAC9xx gb
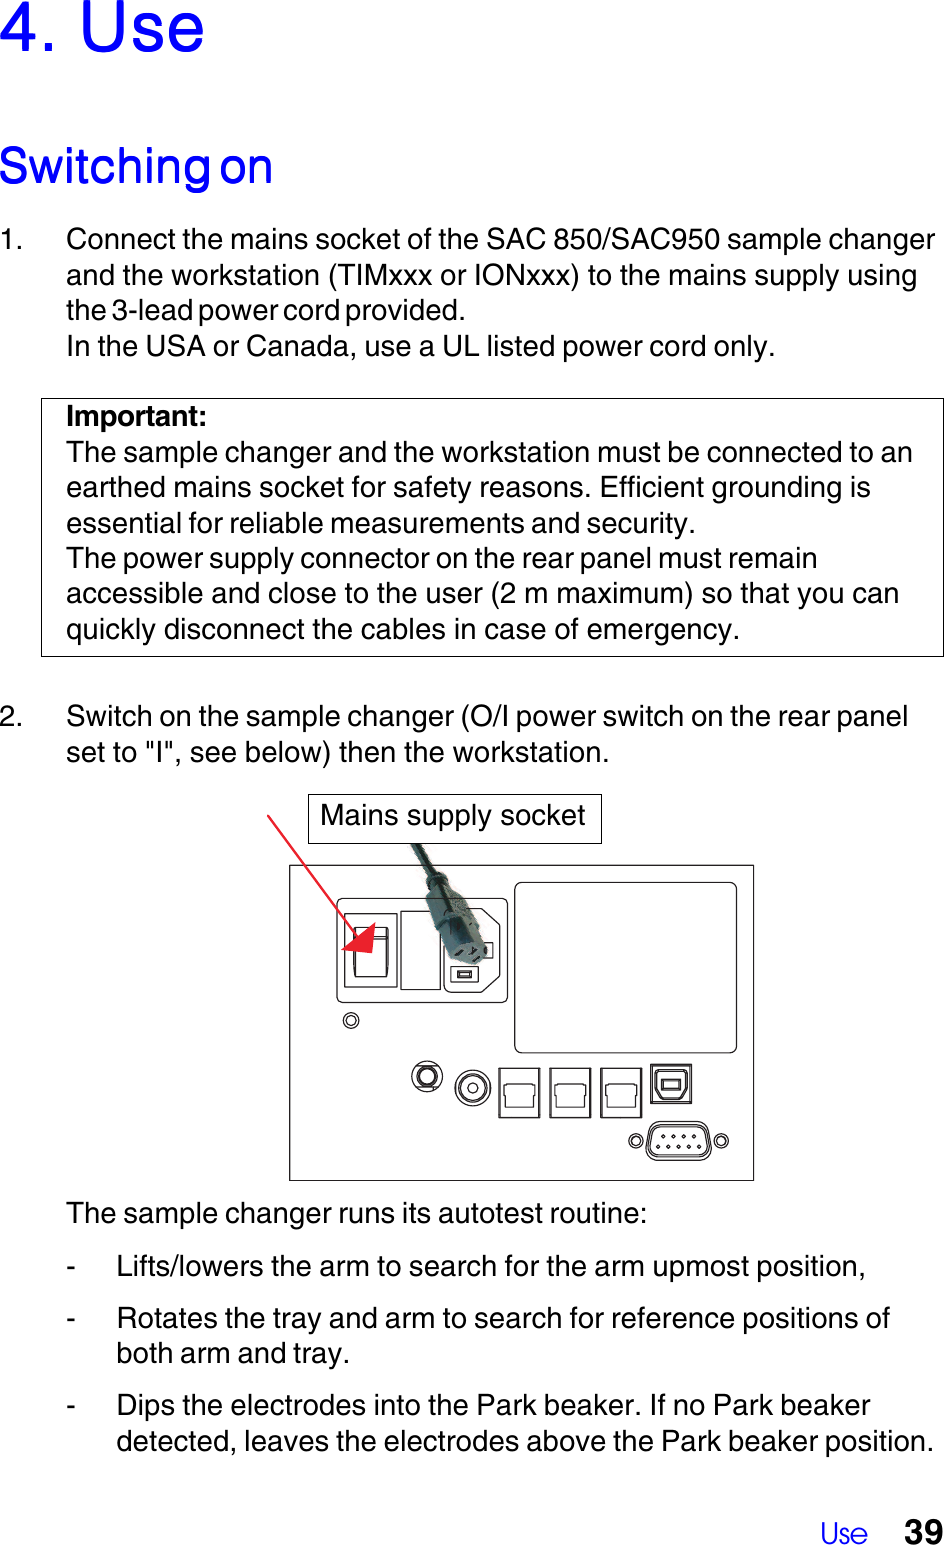
Manual

SAC850 & SAC950Sample ChangersUser’s GuideD21T085
D21T085 • Printed by Radiometer Analytical SAS • 2007-09A
ContentsContentsContentsContentsContentsContentsGeneral information ............................................................... 51. Introduction ........................................................................ 72. Presentation ........................................................................ 9SAC850 ............................................................................................. 9SAC950 ............................................................................................. 11RFID technology on turntables ........................................................... 143. Setting up ............................................................................ 17Mounting the turntable ........................................................................ 18Placing beakers ................................................................................. 19Mounting the beaker presence detector .............................................. 21Assembling the electrode head .......................................................... 21Mounting the propeller stirrer .............................................................. 22Mounting the electrodes and addition tips .......................................... 23Connections ....................................................................................... 24Assembling option accessories .......................................................... 27Dynamic rinse module ........................................................ 27Reagent addition module ..................................................... 344. Use ....................................................................................... 39Switching on ...................................................................................... 39Running sequence with a workstation ................................................. 405. Troubleshooting ................................................................. 45Autotest and manual mode errors ...................................................... 45Errors displayed by the workstation ................................................... 46
Contents6. Maintenance ........................................................................ 49Cleaning ............................................................................................. 49Transporting the instrument ................................................................ 49Servicing ............................................................................................ 49Replacing the fuses ........................................................................... 507. Accessories ........................................................................ 518. Technical specifications ..................................................... 61
General information 5General  inforGeneral  inforGeneral  inforGeneral  inforGeneral  informationmationmationmationmationSafety InformationSafety InformationSafety InformationSafety InformationSafety InformationPlease read this entire manual before unpacking, setting up, or operatingthis equipment. Pay attention to all danger and caution statements.Failure to do so could result in serious injury to the operator or damage tothe equipment. To ensure that the protection provided by this equipmentis not impaired, do not use and do not install this equipment in anymanner other than that specified in this manual.Precautionary LabelsPrecautionary LabelsPrecautionary LabelsPrecautionary LabelsPrecautionary LabelsRead all labels and tags attached to the instrument. Personal injury ordamage to the instrument could occur if not observed.This symbol, if noted on the instrument, references theinstruction manual for operation and/or safety information.Electrical and electronical equipment marked with thissymbol may not be disposed of in European publicdisposal systems after 13 August of 2005. In conformitywith European local and national regulations (EU Directive2002/96/EC), European electrical equipment users mustnow return old or end-of life equipment to the Producer fordisposal at no charge to the user.Note: For equipment supplied or produced by "RadiometerAnalytical", please contact www.hach-lange.com andselect your country for instructions on how to return yourequipment for proper disposal."This symbol, when noted on the product, identifies thelocation of a fuse or current limiting device.
6Warning !The sample changer has been developed to meet the requirements ofvolumetric titration applications. It is therefore aimed at experiencedusers who have the knowledge required to operate the instrument andimplement the security instructions enclosed. Please remember that thesample changer must not, under any circumstances, be used to performtests on living beings.We accept no responsibility for using the sample changer and itsperipheral devices under conditions that are not specified in thisUser's Guide.NOTE: This equipment has been tested and found to comply with thelimits for a Class B digital device, pursuant to part 15 of the FCC Rules.These limits are designed to provide reasonable protection againstharmful interference in a residential installation. This equipmentgenerates, uses and can radiate radio frequency energy and, if notinstalled and used in accordance with the instruction, may cause harmfulinterference to radio communications. However, there is no guaranteethat interference will not occur in a particular installation. If this equipmentdoes cause harmful interference to radio or television reception which canbe determined by turning the equipment off and on, the user isencouraged to try to correct interference by one or more of the followingmeasures:- Reorient or relocate the receiving antenna.- Increase the separation between the equipment and receiver.- Connect the equipment into an outlet on circuit different from that towhich the receiver is connected.- Consult the dealer or an experienced radio/TV technician for help.- Use a shielded RS232 serial cord and a shielded USB cord fittedwith a ferrite.Warning!!Changes and modifications that are not expressly approved by the partyresponsible for compliance could void the user's authority to operate theequipment.
Introduction 71. Intr1. Intr1. Intr1. Intr1. IntroductionoductionoductionoductionoductionThe SAC850 and SAC950 Sample Changers are designed for automaticanalysis in various types of trays.Each tray can hold up to 70 samples depending on the sample volumeand the application to be performed.The SAC850 Basic model is dedicated for small sample seriesautomation. The SAC850 is fitted with a single radius tray and can hold14 to 25 samples.The SAC950 Extended model is dedicated for large sample seriesautomation. The SAC950 is fitted with a 1, 2 or 3-radii tray and can hold14 to 70 samples.The SAC850 and SAC950 Sample Changers are ideal for handlingsamples in TitraLab® or MeterLab® compatible systems.The aim of this User's Guide is to provide you with detailed informationabout setting up and operating your sample changer.For information on how to enter data into your workstation, please refer tothe instructions delivered with the workstation.
8Introduction891011SAC8506713255b5a4
Presentation 92. Pr2. Pr2. Pr2. Pr2. PresentationesentationesentationesentationesentationSAC850SAC850SAC850SAC850SAC8504 locations for spare electrodes and antidiffusion delivery tips(2 locations on each side).Sample/Rinse/Park beakers (1 Park, 0 to 2 Rinses, remainingpositions dedicated for samples).Mono radius turntable. Capacities depend on the beaker size anddiameter : see chapter "Accessories" - Table "Turntables andbeakers (SAC850 and SAC950)".Keypad.Electrodes/Stirrer/Beaker presence detector holder.Beaker presence detector location (5a).Electrodes/stirrer head holder location (5b).Shower rinse holder represented here with the shower headassembly.Optional peristaltic pump (optional).Turntable holder.Optional shower rinse pump/emptying pump module. Comprises 2diaphragm pumps (rinsing and emptying).Magnetic stirrer assembly comprising also a RFID reader devicefor turntable automatic recognition.Status lamp:Blue : Free for operation. Manual operations possible.Purple: Sample changer controlled by the workstation (analysis inprogress). Only the keyboard Stop key is available.Red: An error has been detected.1234567891011
10 PresentationSAC950566b6a5a5c5b1432101278911
Presentation 11SAC950SAC950SAC950SAC950SAC9504 locations for spare electrodes and antidiffusion delivery tips(2 locations on each side).Sample beakers.1, 2 or 3 radii turntable. Capacities depend on the beaker size anddiameter : see chapter "Accessories" - Tables "Turntables andbeakers".Keypad.Beaker extension with Park (5a), Rinse 1 (5b) and Rinse 2 (5c)beaker locations.Electrodes/Stirrer/Beaker presence detector holder.Beaker presence detector location (6a).Electrodes/stirrer head holder location (6b).Optional peristaltic pump.Turntable holder.Optional shower rinse pump/emptying pump module. Comprises 2diaphragm pumps (rinsing and emptying).Magnetic stirrer assembly comprising also a RFID reader device forturntable automatic recognition.Pilot lamp indicating the operating status of the instrument:Blue : Free for operation.Manual operations on keyboard are possiblePurple: The sample changer is controlled by the workstationunit (analysis in progress). Only the keyboard Stop keyis available.Red: An error has been detected.Shower rinse holder represented here with the shower headassembly.123456789101112
12 PresentationKeypad (SAC950 only)Keypad (SAC950 only)Keypad (SAC950 only)Keypad (SAC950 only)Keypad (SAC950 only)Starts adding reagent with peristaltic pump (*). Stops additionwhen the key is latched down.Starts shower rinsing using a membrane pump of the Dynamicrinsing module (**). Stops action when the key is latched down.Starts emptying a beaker using the second membrane pump ofthe Dynamic rinsing module (**). Stops action when the key islatched down.456978123123(*) If a Reagent addition module is installed (see chapter "Setting up")and if the electrode holder is at its downmost position.(**) If a Dynamic rinsing module is installed (see chapter "Setting up")and if the electrode holder is at its downmost position.
Presentation 13Moves to the previous beaker. If the electrodes dip into thebeaker (or are above the beaker) before pressing the key, at theend of the operation, they will dip into the previous beaker (or willbe above the previous beaker). The beakers are ranked asfollows:Rinse beaker 2 (R2)Rinse beaker 1 (R1)Park beakerBeaker no.1 of the turntable...........................Beaker no.n-1 of the turntableBeaker no.n (last beaker) of the turntableRinse beaker 2 (R2)...........................Moves the arm (electrode head holder) downwards.Moves the arm (electrode head holder) upwards or moves theelectrodes above the Park beaker if the electrodes are alreadyon service position (upmost position).Moves to the next beaker. Same observations as for the "Movesto the previous beaker" key (4).Blue pilot lamp. Lights on when a key is pressed and lights offwhen the key is latched down. This lamp blinks when the key isnot available (example: during an analysis, when a key otherthan Stop is pressed).Stop key. Stops the action in progress while a sequence isrunning. Removes an error status (red status pilot lamp).The Stop key is the only active key while a sequence is running.945678
14 PresentationRFID technology on turntablesRFID technology on turntablesRFID technology on turntablesRFID technology on turntablesRFID technology on turntablesWhat’s RFID means and how does it work?What’s RFID means and how does it work?What’s RFID means and how does it work?What’s RFID means and how does it work?What’s RFID means and how does it work?Radio Frequency IDentification (RFID) is a generic term that is used todescribe a system that transmits the identity (in the form of a uniqueserial number) of an object or person wirelessly, using radio waves. It'sgrouped under the broad category of automatic identificationtechnologies.It’s the combination of a “tag” and a “reader”. A typical RFID tag consistsof a microchip attached to a radio antenna mounted on a substrate. Thechip can store data. The reader is used to retrieve the data stored on anRFID tag. A typical reader is a device that has one or more antennas thatemit radio waves and receive signals back from the tag. The reader thenpasses the information in digital form to a computer system.In our assembly an RFID tag is attached inside the turntable at the firstbeaker level position. This tag is clearly visible.RFID tag placed on the turntable
Presentation 15RFID reader mounted inside the Magnetic stirrer assemblySAC850 on the left and SAC950 on the rightThe RFID reader is mounted inside the Magnetic stirrer assembly (seefigure above). When an analysis is started and a turntable is in place, thesample changer rotates the tray (and the arm in the case of a SAC950)so that the tag and the reader are face to face for a moment.Which data contains a turntable RFID tag?Which data contains a turntable RFID tag?Which data contains a turntable RFID tag?Which data contains a turntable RFID tag?Which data contains a turntable RFID tag?The turntable identification data (type of turntable, number of beakers,beaker location and beaker size/height).Benefits of using RFID technology on turntablesBenefits of using RFID technology on turntablesBenefits of using RFID technology on turntablesBenefits of using RFID technology on turntablesBenefits of using RFID technology on turntablesThe Sample Changer knows at any moment if a turntable is installed andwhich turntable is used.Possibility of working with magnetic bars without risks of interferences.
16 Presentation
Setting up 173. Setting up3. Setting up3. Setting up3. Setting up3. Setting upUnless otherwise indicated, the following setting up instructions arecommon to both SAC850 and SAC950 Sample Changers.Set up the instrument on a flat surface and in a properly ventilated place.The power supply connectors on the rear panel must remain accessibleso that you can quickly disconnect the cables in case of emergency. Theroom temperature should not exceed 40°C.The relative humidity must be between 20 and 80%.Minimum space requirements: 80 cm x 60 cm (32" x 24")80 cm60 cm
18 Setting upMounting the turntableMounting the turntableMounting the turntableMounting the turntableMounting the turntableThe turntable is identified onstarting an analysis. The RFIDreader reads the turntable RFID tagSeveral turntables are available foreach model of sample changer:see chapter "Accessories",table "Turntables and beakers".
Setting up 19Placing beakersPlacing beakersPlacing beakersPlacing beakersPlacing beakersPark beakerAt the end of a sample series, the electrodes are dipped in the park beakeror left above the park beaker. The park beaker can also be used to rinsedynamically the electrodes.Positioning of the park beaker (see figures below):SAC850: Last position of the turntableSAC950: On the electrode reconditioning extensionStatic rinse beakersBetween 2 sample runs, the electrodes are dipped once or twice into a rinsesolution under stirring. 1 or 2 static rinse beakers can be used.Positioning of the static rinse beaker(s)SAC850: Last but one (R1) and previous (R2) positions of the turntableSAC950: On the electrode reconditioning extension, positions (R1) and (R2)Position of the beakers on a SAC850Example of a 18-position turntableR1: Static rinse beaker no. 1R2: Static rinse beaker no. 2Other positions: Samplebeakers (15 free position if 2static rinses programmed)3456789101514131211Rotation directionR1R21Park2
20 Setting upSAC850 users:Park, static rinse and sample beaker sizes depend on the type ofturntable used. These beakers are supplied with the turntable kit (seechapter "Accessories").SAC950 users:Park and static rinse beakers are 40-100 ml PP titration vessel, suppliedwith the SAC950, part no.: X91T055 (10 pcs).Sample beaker sizes depend on the type of turntable used. Thesebeakers are supplied with the turntable kit (see chapter "Accessories").28272625242322212019181716151413 41 42 43 44 4546474849505162 63 6465666768123430315453323370552952567891034121135363738394056575859606169Rotation directionParkR1R2Position of the beakers on a SAC950Example of a 70-position turntableR1: Static rinse beaker no. 1R2: Static rinse beaker no. 2Positions 1 to 70:Sample  beakers
Setting up 21MountingMountingMountingMountingMounting the beaker presence detector the beaker presence detector the beaker presence detector the beaker presence detector the beaker presence detectorThe beaker presence detector is an ultrasonic transducer that detectsempty positions on the turntable.Assembling the electrode headAssembling the electrode headAssembling the electrode headAssembling the electrode headAssembling the electrode headB = 12 mmBBBBBBBX31T151X31T151X31T102Assemble the 2parts until awaitinga sound "Click!".Click!Click!Assemble the 2parts until awaitinga sound "Click!".
22 Setting up∅ = 18 mm∅ = 10 mmThe propeller stirrer is supplied with 2propellers 10 & 18 mm.Fit the right propeller according to thesize of the beaker(see chapter "Accessories",table "Turntables and beakers").Mounting the propeller stirrerMounting the propeller stirrerMounting the propeller stirrerMounting the propeller stirrerMounting the propeller stirrerScrew the stirrer inits housing (screwcompletely withouttightening).
Setting up 23ø = 7.5 mm; L = 103 mmø = 12; L = 103 mmø = 12; L = 103mmø = 9.5; L = 103 mmX31T016ø = 12; L = 120 mmX31T015X31T014X31T018X31T018X31T031BBBBBBBBX31T151B956-309842-152842-302842-306842-303X51T011 X51T010X51T012A25B800X31T018X31T013X31T017X31T082A set of adapters for bayonet electrode heads, partno. X91T002 is supplied with the sample changerturntable.Mounting the electrodes and addition tipsMounting the electrodes and addition tipsMounting the electrodes and addition tipsMounting the electrodes and addition tipsMounting the electrodes and addition tips
24 Setting upPress the electrodecable through the slotof the stirrer head.Repeat the sameoperation for thebeaker detector cable.ConnectionsConnectionsConnectionsConnectionsConnections4 locations for spare electrodesand antidiffusion delivery tips (2locations on both side)
Setting up 25Engage the stirrer cable in the chain from the3rd chain link. Repeat the same operation forthe beaker detector and electrode cables.A95A126A95A127Insert the stirrer and beaker detector  cables inthe opening of the arm then slip these cablesunder the sample changer in order to present theplugs at the connection panel of the instrument.Slightly level up the instrument to facilitate thisoperation.Connect the electrode thecorresponding socket ofthe workstation unit.
26 Setting upTo workstation SAC socketSerial Cable, SubD9/SubD9Part no. A95X501To a mains socket.Mains cable, Part no.A95S001 (230 V)A95S002 (115 V)
Setting up 27abSwitch on the sample changerand move the arm at its upmostposition:- SAC850: p ush up under part(b) (see arrow opposite).- SAC950: as for the SAC850 orpress key  (see chapter "Presentation -Keypad", key (7)).Switch off the sample changer.Remove the electrode headholder (a) (2 screws).Assembling option accessoriesAssembling option accessoriesAssembling option accessoriesAssembling option accessoriesAssembling option accessoriesDynamic rinse moduleDynamic rinse moduleDynamic rinse moduleDynamic rinse moduleDynamic rinse moduleThe Dynamic rinse module is used for shower rinsing and emptyingoperations. It consists of a pump assembly (two membrane pumps, onefor rinsing and the other for emptying), a shower head, a suction tip andsilicon tubings.
28 Setting upSeparate part (b) in 2pieces (b1) and (b2) (2screws).Assemble the showerhead (c) and showerhead skirt (d) or (e) (orclip (f)) on part (b1). Theuse of a (d) or (e) showerhead skirt depends onthe diameter of thebeaker used (see chapter"Accessories", table"Turntables andbeakers"). Use a clip (f)if you do not use ashower head skirt.Fit the electrode head (a)onto part (b2) (2 screws).cfedab2b1
Setting up 29Remove the protection sticker.Unscrew the 3 screws thenremove the cover plate.Connect the 2 pump cable plugs tothe corresponding sockets.If not already done,remove the turntable.Locate the housing of thepump assembly.
30 Setting upSetting up of thesuction tip,part no. X31T155.Insert the pumpassembly and fix itin place with the 3screws.Bevelled edgeX31T15548 mm
Setting up 31Cut the silicon tubing, d=4/6 mm, L= 8 m, part no. X31T154,in 4 pieces of 2 meters each.1AMount one end of tubing  1 on the metalrod of the shower head. Form a loop of 5 cmdiameter at the level of the 2nd chain link.Engage the tubing in the chain by simplepressure on each link.ImportantIt is important to check at this stage that the tubing slides well and whenmoving up part  A, this particularly after having set up all tubings andwires. To move up part  A, push up under this part or press key    ofSAC950 keypad.1234X31T154 2 m
32 Setting up121 22Insert tubings  1 and  2 in the opening of the arm then slip thesetubings under the sample changer in order to present them at the rinsing/draining pumps. The tubings must pass on the side of the black cableguide part. Slightly level up the instrument to facilitate this operation.Mount one end of tubing  2 on the head of thesuction tip X31T155. Engage the tubing in thechain from the 3rd chain link.
Setting up 33RINSE WASTE1234Mount tubing  1 on the outlet of the rinsing pump and tubing  2 on theinlet draining pump.Mount one end of tubing  3 on the inlet of rinsing pump and dip the otherend in a can filled with rinsing solvent (demineralised water for example).Mount one end of tubing  4 on the oulet of draining pump and dip theother end into a waste.Cover the pump assembly with the protection lid provided.WasteRinsingsolvent
34 Setting upRemove theprotection sticker,unscrew the 3screws thenremove the coverplate.Reagent addition moduleReagent addition moduleReagent addition moduleReagent addition moduleReagent addition moduleA reagent addition module can be mounted on the SAC850 or SAC950sample changer. This peristaltic pump is used to add reagent as be part ofa sample preparation. Volumes are added with an accuracy around 1%.A reagent addition module consists of a peristaltic pump assembly, areagent addition tip, silicon and Maprene  tubings.If not already done, remove theturntable.Locate thehousing ofperistalticpump.
Setting up 35Insert theperistaltic pumpassembly and fix itin place with the 3screws.Connect the 2 pump cable plugsto the corresponding sockets.Setup theMaprene  tubing,part no. X31T156,in the peristalticpump.
36 Setting upMount one end of tubing 1 on the head of theaddition tip X31T157. Engage the tubing in thechain from the 3rd chain link (by simplepressure on each link).Set up the addition tip,part no. X31T157.Cut a piece from 2 m long in the silicon tubing, d=4/6 mm,L= 8 m, part no. X31T154.11X31T157X31T018X31T1542 m
Setting up 372Cut a piece from 2 to 6 m long in the remaining part of silicontubing, part no. X31T154.11Insert tubing  1 in the opening of the armthen slip this tubing under the samplechanger in order to present it at theperistaltic pump. The tubing must pass onthe side of the black cable guide part.Slightly level up the instrument to facilitatethis operation.X31T1542 - 6 m
38 Setting up12Mount tubing  1 on the outlet of the peristaltic pump.Mount one end of tubing  2 on the inlet of peristaltic pump and dip theother end in the reagent flask.Cover the pump with the protection lid provided.Reagent
Use 39The sample changer runs its autotest routine:- Lifts/lowers the arm to search for the arm upmost position,- Rotates the tray and arm to search for reference positions ofboth arm and tray.- Dips the electrodes into the Park beaker. If no Park beakerdetected, leaves the electrodes above the Park beaker position.4. Use4. Use4. Use4. Use4. UseSwitching onSwitching onSwitching onSwitching onSwitching on1. Connect the mains socket of the SAC 850/SAC950 sample changerand the workstation (TIMxxx or IONxxx) to the mains supply usingthe 3-lead power cord provided.In the USA or Canada, use a UL listed power cord only.Important:The sample changer and the workstation must be connected to anearthed mains socket for safety reasons. Efficient grounding isessential for reliable measurements and security.The power supply connector on the rear panel must remainaccessible and close to the user (2 m maximum) so that you canquickly disconnect the cables in case of emergency.2. Switch on the sample changer (O/I power switch on the rear panelset to "I", see below) then the workstation.Mains supply socket
40 UseRunning sequence with a workstationRunning sequence with a workstationRunning sequence with a workstationRunning sequence with a workstationRunning sequence with a workstationAfter having started a sequence from the workstation or TitraMaster 85,the sample changer performs the following operations if 1 to 9 dynamicrinses and if 2 static rinses R1 and R2 have been programmed (*):1. Moves to Park beaker (**) and starts rinsing dynamically theelectrodes. At the end, the Park beaker is left empty.See paragraph "Dynamic rinsing".2. Moves to R1 beaker (***), dips the electrodes into that beaker andrinses under stirring during a preset delay. See paragraph "Stirring".3. Moves to R2 beaker (***), dips the electrodes into that beaker andrinses under stirring during a preset delay. See paragraph "Stirring".4. Moves to beaker no.1, prepares sample/standard running thesample preparation number attached to the method. During thistime, the workstation displays the message "Sample changerprocessing in beaker 1" message.See paragraph "Sample preparation".5. At the end of analysis, starts rinsing dynamically the electrodes. Atthe end, the beaker no.1 is left nearly empty with a small amount ofsolvent that was used to flush the electrodes and delivery tips.(*) The number of static rinses (0, 1 (R1) or 2 (R1 and R2)), the duration ofstatic rinses and the number of dynamic rinses (0 to 9) are programmedin the Setup > Configuration parameters of the workstation (refer to theReference Manual of the workstation used).(**) A dynamic rinse before first beaker analysis can occur in the Park or inthe R1 beaker if 0 or 1 static rinse has been programmed. Selectionbetween Park and R1 is made in the Setup > Configuration parametersof the workstation (refer to the Reference Manual of the workstationused).(***) R1: Static rinse beaker no.1. R2: Static rinse beaker no.2. The position ofthese beakers is given in chapter "Setting up - Placing beakers".
Use 416. Repeats steps 2 and 3.8. Dips the electrodes in beaker no. 2, prepares sample/standardrunning the sample preparation number attached to the method.7. At end of the sequence (end of analysis in the last beaker of thesequence):- starts rinsing dynamically the electrodes,- repeats steps 2 and 3,- moves the electrodes above the Park beaker,- left the electrodes as is or dip the electrodes into the Park beakerdepending on the selection made in the Setup > Configurationparameters of the workstation (refer to the Reference Manual of theworkstation used).At the position indicated, the vertical axis moving is likely topinch the skin of the user!
42 UseDynamic rinsing1 to 9 Dynamic rinses (or shower rinse/emptying operations) can beperformed between 2 sample runs. A Dynamic rinse is carried out in thejust analysed sample beaker or in the Park beaker (*). At the start of asequence, the dynamic rinse can be performed either in the Park beaker orin R2 (static rinse no.2) beaker (*). Dynamic rinses never take place incalibration beakers. At the end of a calibration beaker analysis, thedynamic rinse is performed in the Park or R2 (static rinse no.2) beaker (*).A Dynamic rinse consists of the following operations:1. The electrode are positioned above the rinse beaker.2. The electrodes move down in the beaker. The beaker is emptied to awaste in the same time. At the end, the electrodes are located in theemptied beaker at their downmost position.3. The electrodes move up slowly. In the same time, the electrodes arewashed with rinse solution (usually demineralised water) and theresulting solution is emptied very slowly to a waste. At the end, theelectrodes are located above a beaker filled with rinse solution andsome remaining impurities.4. The electrodes move down in the beaker. The beaker is emptied to awaste in the same time. At the end, the electrodes are located in theemptied beaker at their downmost position. Then, a last rinsing of theelectrodes and delivery tips is carried out.5. The electrodes move up. At the end, the electrodes are located abovea nearly emptied beaker containing a little solvent that was used toflush the electrodes and delivery tips.Steps 3 and 4 can be repeated up to 8 times as up to 9 dynamic rinses canbe programmed. Steps 2 to 4 are performed under stirring.(*) Depending on the selection made in the Setup > Configurationparameters of the workstation (refer to the Reference Manual of theworkstation  used).
Use 43StirringA magnetic and a propeller stirrer can be used to stir the solutions. Whenthe propeller stirrer is connected (see chapter "Setting up"), it will beautomatically used in place of the built-in magnetic stirrer. The stirrerspeed is set in the Cell menu of the workstation (value adjustablebetween 100 and 1100 rpm by steps of 50 rpm).Dynamic and static rinses are performed under stirring.Magnetic stirring with a SAC950When using a 2 or 3-radii turntable with a SAC950, you must use apropeller stirrer to stir the solutions that are placed on the smallest row (2-radii turntable) or on the 2 smallest rows (3-radii turntable).Green positions : magnetic and propeller stirring possibleRed positions : propeller stirring only
44 UseSample preparationA SAC850 or SAC950 can run up to 10 different sample preparations in asequence. Sample preparations are created and edited fromTitraMaster 85 PC PC software.Each element of a sample changer sequence is associated to a samplepreparation. A sample preparation is a succession of up to 10 elementaryactions required by the sample changer to prepare each sample beakersto be run thereafter.On running a sequence, the workstation sends to the sample changer allsample preparations to be runned for the sequence. The compatibilitybetween the sample preparation and the sample changer used is testedand an error message is displayed in case of failure (example: use of aperistaltic pump that is not installed yet).See TitraMaster 85 on line help, topics "Handling sample preparations".Important:When starting a sample preparation, if you have a solid or powder samplein the beaker or if you have, for some beakers, less liquid than aminimum height limit (see chapter "Accessories - Beakers"), then youmust disable the "beaker presence detection" option before running thesequence. If you keep that option activated, then the sample changer willnot prepare the sample in that beaker and will jump to the next beakerconsidering that the current position is empty.To disable the "beaker presence detection" option in TitraMaster 85 , seeTitraMaster 85 on line help, topics "Editing an application - Configuration".Actions that can be done during a sample preparation:Control peristaltic pump.Start/stop electrode rinsing.Start/stop beaker emptying.Control stirring.Set delay.Control stirrer.TTL command (wait for a TTL IN for a preset time).
Troubleshooting 455. T5. T5. T5. T5. TrrrrroubleshootingoubleshootingoubleshootingoubleshootingoubleshootingA number of tests are automatically performed when the sample changeris switched on and during calibration and sample batch measurements.The errors reported can be divided in two groups:• Autotest errors occuring on switching on the sample changer anderrors occuring while operating the sample changer alone (manualmode without workstation).• Errors displayed by the workstation.Autotest and manual mode errorsAutotest and manual mode errorsAutotest and manual mode errorsAutotest and manual mode errorsAutotest and manual mode errorsIf an error is detected, the sample changer stops the current action andthe status lamp turns to red.Switch off the sample changer, identify the causes of the error (generally,arm or turntable blocked or arm or turntable movement obstructed),correct the error then switch on the instrument.
46 TroubleshootingErrors displayed by the workstationErrors displayed by the workstationErrors displayed by the workstationErrors displayed by the workstationErrors displayed by the workstationMessages Error/ActionARM or TURNTABLE The  arm or turntable has been blocked andOBSTRUCTED cannot function properly. Remove theobstruction and press Resume analysis(key 1) tocontinue the sequence from thepoint it stopped.MISSING TRAY On starting a sequence,the sample changercannot read the RFID tag of the turntable.Check that a turntable is correctly mountedon the sample changer. Check the model ofturntable used. See chapter "Accessories".Restart the sequence.NO BEAKER A rinse beaker is missing or has not beenpositioned properly on the sample changer.Either position a beaker or terminate theoperation and enter the correct number ofrinses.If you want to continue with the next beakerin the analysis, press 1 Resume analysis.SAMPLE CHANGER Either the data transmission betweensample changer and the workstation cannotbe performed properly, in which case youshould check the cable connections, or themeasurement stopped due to a movementerror. Terminate the cycle by pressing keyStop on the SAC950 sample changerkeypad or key Stop of the workstation, andcheck that nothing is obstructing samplechanger's movements.
Troubleshooting 47Messages Error/ActionSAMPLE PREPARATION The sample changer cannot run the sampleIMPOSSIBLE preparation the workstation is asking for.Example:A reagent addition is programmed in thesample preparation and no peristalticpump is installed on the sample changer.Review the Edit method parameters,parameter Sample preparation no and/orinstall missing pumpsFor TitraMaster 85 users only, check and,if necessary, edit the sample preparationroutine.RINSE PROCEDURE The sample changer cannot run the rinseIMPOSSIBLE programmed.Example:You have programmed 2 static rinses and afirst dymamic rinse in the second staticrinse beaker (R2 beaker). Only 1 beaker isavailable for static rinses (beaker R1) if youintend to rinse dynamically the electrodes ina static rinse beaker.Review the Setup > Configurationparameters.
48 Troubleshooting
Maintenance 496. Maintenance6. Maintenance6. Maintenance6. Maintenance6. MaintenanceCleaningCleaningCleaningCleaningCleaningThe sample changer requires minimum maintenance. The exterior surfaceshoudd be cleaned regularly with tepid water or a mild detergent andwiped dry with a soft damp cloth.TTTTTransporransporransporransporransporting the instrumentting the instrumentting the instrumentting the instrumentting the instrumentAlways use the packaging supplied by the manufacturer.IMPORTANT!Remove the tray before transporting the instrument.Never pick-up or carry the instrument by the electrode head holder or bythe arm.ServicingServicingServicingServicingServicingDO NOT ATTEMPT TO SERVICE THIS PRODUCT YOURSELF, exceptas noted in this User's Guide. For servicing, please contact yourRadiometer Analytical service representative at the address given below:RADIOMETER ANALYTICAL SAS72, rue d'Alsace69627 Villeurbanne CEDEX - FranceTel.: +33 (0) 4 78 03 38 38Fax: +33 (0) 4 78 03 38 27E-mail: radiometer@nalytical.comor your local service representative:_____________________________________________________________________________________________________________________________________________________________________
50 MaintenanceReplacing the fusesReplacing the fusesReplacing the fusesReplacing the fusesReplacing the fusesFor continued protection replace the fuse with one of a high interruptingcapacity, same type and rating:2 x fuses, slow blow, T2.5A L250V (5 x 20 mm), part no. X16T017.To replace the fuses:Locate the fuse housing on the rear panel of the sample changer.hook3.  Replace the used fuses with    ones of the same type and rating4.   Put the cap back in place1. Disconnect line cord 2. Remove the fuse holder   (use tweezers)
Accessories 517. Accessories7. Accessories7. Accessories7. Accessories7. AccessoriesDynamic rinse module for SACxxxDynamic rinse module for SACxxxDynamic rinse module for SACxxxDynamic rinse module for SACxxxDynamic rinse module for SACxxxDynamic rinse/waste module for SACxxx, part no. X91T095comprising:1 X31T153 Shower head for SACxxx1 X16T019 Pump membrane assembly for SACxxx1 X31T154 Silicon crystal tube, d=4/6 mm, L= 8 m1 X31T155 Suction tip for SACxxx1 X31T158 Shower head skirt for 22-45 & 8-25 ml PP beakers1 X31T159 Shower head skirt for 100 ml glass beakersReagent Addition Module for SACxxxReagent Addition Module for SACxxxReagent Addition Module for SACxxxReagent Addition Module for SACxxxReagent Addition Module for SACxxxReagent Addition Module for SACxxx, part no. X91T096 comprising:1 X16T020 Peristaltic pump assembly for SACxxx1 X31T156 Maprene  tube, d=4/7,2 mm, L= 2 m1 X31T154 Silicon crystal tube, d=4/6 mm, L= 8 m1 X31T157 Addition Tip for SACxxxKit of cables for SACxxxKit of cables for SACxxxKit of cables for SACxxxKit of cables for SACxxxKit of cables for SACxxxKit of cables for SACxxx, part no. X91T097 comprising:1 A95S001 Line Cord 230V Euro1 A95S002 Line Cord 115V1 A95X501 Serial Cable, SubD9/SubD92 X16T017 Fuse, slow blow, 2.5A (5x20mm)1 X16T018 Beaker detection module - Ultrasonic transducer2 A95A126 Cable, BNC/1m/BNC with Adapter BNC f/f1 A95A127 Cable, Banana-m/1m/Banana-m with Adapter Banana f/f
52 AccessoriesTurntables (SAC850 and SAC950)Turntables (SAC850 and SAC950)Turntables (SAC850 and SAC950)Turntables (SAC850 and SAC950)Turntables (SAC850 and SAC950)Kit 25-position turntable, SAC850, 50 ml glass low form, 22-45 ml & 8-25 ml PP beakers, X91T080 comprising:1 X31T136 25-position turntable, beakers d= 44 mm1 X91T002 Set of bayonet adapters2 842-302 Delivery Tubing Long, 325 cm, for burette stand >=5 ml1 904-488 Titration Vessel PP, 8-25 ml (50 pcs)1 904-489 Titration Vessel PP, 22-45 ml (50 pcs)1 X31T151 SACxxx Electrode Head, standardKit 22-positions, turntable, SAC850, glass 100ml tall form beakers,X91T082 comprising:1 X31T138 22-position turntable, beakers d= 48 mm1 X91T002 Set of bayonet adapters2 842-302 Delivery Tubing Long, 325 cm, for burette stand >=5 ml1 X31T151 SACxxx Electrode Head, standardKit 20-position turntable, SAC850, glass 150ml tall form beakers,40-100 ml PP beakers, X91T084 comprising:1 X31T140 20-position turntable, beakers d= 60 mm1 X91T002 Set of bayonet adapters2 842-302 Delivery Tubing Long, 325 cm, for burette stand >=5 ml1 904-490 Titration Vessel PP, 40-100 ml (50 pcs)1 X31T151 SACxxx Electrode Head, standardKit 20-position turntable, SAC850, GOSSELIN 125-180 ml PP beakers,X91T086 comprising:1 X31T142 20-position turntable, beakers d= 54 mm1 X91T002 Set of bayonet adapters2 842-302 Delivery Tubing Long, 325 cm, for burette stand >=5 ml1 X31T087 Beakers with cover, PP, 125 ml, 50 pcs1 X31V005 Beakers with cover, PP, 180 ml, 50 pcs1 X31T151 SACxxx Electrode Head, standardKit 18-position turntable, SAC850, glass 250ml tall form beakers,X91T088 comprising:1 X31T144 18-position turntable, beakers d= 60 mm1 X91T002 Set of bayonet adapters2 842-302 Delivery Tubing Long, 325 cm, for burette stand >=5 ml1 X31T151 SACxxx Electrode Head, standard
Accessories 53Kit 15-position turntable, SAC850, glass 250ml low form beakers,X91T090 comprising:1 X31T146 15-position turntable, beakers d= 70 mm1 X91T002 Set of bayonet adapters2 842-302 Delivery Tubing Long, 325 cm, for burette stand >=5 ml1 X31T151 SACxxx Electrode Head, standardKit 15-position turntable, SAC850, glass 400ml tall form beakers,X91T092 comprising:1 X31T148 15-position turntable, beakers d= 70 mm1 X91T002 Set of bayonet adapters2 842-302 Delivery Tubing Long, 325 cm, for burette stand >=5 ml1 X31T151 SACxxx Electrode Head, standard
54 AccessoriesTurntables (SAC950 only)Turntables (SAC950 only)Turntables (SAC950 only)Turntables (SAC950 only)Turntables (SAC950 only)Kit 70-position turntable, 50 ml glass low form, 22-45 ml & 8-25 ml PPbeakers, X91T081 comprising:1 X31T137 70-position turntable, beakers d= 44 mm1 X91T002 Set of bayonet adapters2 842-302 Delivery Tubing Long, 325 cm, for burette stand >=5 ml2 904-488 Titration Vessel PP, 8-25 ml (50 pcs)2 904-489 Titration Vessel PP, 22-45 ml (50 pcs)1 X31T151 SACxxx Electrode Head, standardKit 42-position turntable, 100 ml glass tall form beakers, X91T083comprising:1 X31T139 42-position turntable, beakers d= 48 mm1 X91T002 Set of bayonet adapters2 842-302 Delivery Tubing Long, 325 cm, for burette stand >=5 ml1 X31T151 SACxxx Electrode Head, standardKit 36-position turntable, 150 ml glass tall form,40-100 ml PP beakers,X91T085 comprising:1 X31T141 36-position turntable, beakers d= 60 mm1 X91T002 Set of bayonet adapters2 842-302 Delivery Tubing Long, 325 cm, for burette stand >=5 ml1 904-490 Titration Vessel PP, 40-100 ml (50 pcs)1 X31T151 SACxxx Electrode Head, standardKit 36-position turntable, GOSSELIN 125/180 ml PP beakers, X91T087comprising:1 X31T143 36-position turntable, beakers d= 54 mm1 X91T002 Set of bayonet adapters2 842-302 Delivery Tubing Long, 325 cm, for burette stand >=5 ml1 X31T087 Beakers with cover, PP, 125 ml, 50 pcs1 X31V005 Beakers with cover, PP, 180 ml, 50 pcs1 X31T151 SACxxx Electrode Head, standardKit 30-position turntable, 250 ml glass tall form beakers, X91T089comprising:1 X31T145 30-position turntable, beakers d= 60 mm1 X91T002 Set of bayonet adapters2 842-302 Delivery Tubing Long, 325 cm, for burette stand >=5 ml1 X31T151 SACxxx Electrode Head, standard
Accessories 55Kit 25-position turntable, 250 ml glass low form beakers, X91T091comprising:1 X31T147 25-position turntable, beakers d= 70 mm1 X91T002 Set of bayonet adapters2 842-302 Delivery Tubing Long, 325 cm, for burette stand >=5 ml1 X31T151 SACxxx Electrode Head, standardKit 25-position turntable, 400 ml glass tall form beakers, X91T093comprising:1 X31T149 25-position turntable, beakers d= 70 mm1 X91T002 Set of bayonet adapters2 842-302 Delivery Tubing Long, 325 cm, for burette stand >=5 ml1 X31T151 SACxxx Electrode Head, standard
56 AccessoriesBeaker     Volume        Turntable         Dynamic rinsing -      Propeller size part no.    min./max.       to be used         Shower head skirt 400 ml tall form *  300 - 360 ml d = 70 mmX31T148 15 positions250 ml low form *  130 - 225 ml d = 70 mmX31T146 15 positions125 ml Gosselin,  70 - 110 ml d = 54 mm, PP,** X31T087 (50pcs)180 ml Gosselin,  100 - 160 ml d = 54 mm, PP,** X31V005 (50pcs)X31T142 20 positions250 ml tall form *  180 - 225 ml d = 60 mmX31T144 18 positions150 ml tall form *  95 - 135 ml d = 60 mm40 - 100 ml PP  55 - 90 ml904-490 (50 pcs) d = 60 mm X31T140 20 positions100 ml tall form *  50 - 90 ml d = 48 mm50 ml low form *  30 - 45 ml d = 44 mmX31T138 22 positionsX31T136 25 positionsRequired, X31T158Required, X31T158Required, X31T158Required, X31T159Not usedNot usedNot usedNot usedNot usedNot usedNot used904-489 (50 pcs)  22 - 45 ml d = 44 mm904-488 (50 pcs)  10 - 22 ml d = 44 mm*  Standard glass beakers specified in accordance with DIN12331 ISO3819.** Metal covers, X31T129 (for 180 ml beakers) and X31T130 (for 125 ml beakers)     Beakers can be covered/uncovered using the Beaker cover module for SACxxx, X16T016.18 mm 18 mm 18 mm 18 mm 18 mm 18 mm 18 mm 18 mm 18 mm 18 mm 10 mm Turntables and beakers (SAC850 and SAC950)Turntables and beakers (SAC850 and SAC950)Turntables and beakers (SAC850 and SAC950)Turntables and beakers (SAC850 and SAC950)Turntables and beakers (SAC850 and SAC950)
Accessories 57400 ml tall form *  300 - 360 ml d = 70 mmX31T149 25 positions250 ml low form *  130 - 225 ml d = 70 mmX31T147 25 positions125 ml Gosselin,  70 - 110 ml d = 54 mm, PP,** X31T087 (50pcs)180 ml Gosselin,  100 - 160 ml d = 54 mm, PP,** X31V005 (50pcs)X31T143 36 positions250 ml tall form *  180 - 225 ml d = 60 mmX31T145 30 positions150 ml tall form *  95 - 135 ml d = 60 mm40 - 100 ml PP  55 - 90 ml904-490 (50 pcs) d = 60 mm X31T141 36 positions100 ml tall form *  50 - 90 ml d = 48 mm50 ml low form *  30 - 45 ml d = 44 mmX31T139 42 positionsX31T137 70 positionsRequired, X31T158Required, X31T158Required, X31T158Required, X31T159Not usedNot usedNot usedNot usedNot usedNot usedNot used904-489 (50 pcs)  22 - 45 ml d = 44 mm904-488 (50 pcs)  10 - 22 ml d = 44 mm*  Standard glass beakers specified in accordance with DIN12331 ISO3819.** Metal covers, X31T129 (for 180 ml beakers) and X31T130 (for 125 ml beakers)     Beakers can be covered/uncovered using the Beaker cover module for SACxxx, X16T016.18 mm 18 mm 18 mm 18 mm 18 mm 18 mm 18 mm 18 mm 18 mm 18 mm 10 mm Beaker     Volume        Turntable         Dynamic rinsing -      Propeller size part no.    min./max.       to be used         Shower head skirt Turntables and beakers (SAC950 only)Turntables and beakers (SAC950 only)Turntables and beakers (SAC950 only)Turntables and beakers (SAC950 only)Turntables and beakers (SAC950 only)
58 AccessoriesBeaker type   Volume     Detection min.      Part no. Ø x H (mm)    min./max.    height **400 ml tall form *  300 - 360 ml    10 mm 70 x 130          (40 ml)250 ml low form *  130 - 225 ml    0 mm 70 x 95125 ml, Gosselin,  70 - 110 ml    0 mm                  X31T087  PP, 54 x 72                    (pack of 50) 180 ml, Gosselin,  100 - 160 ml    10 mm                X31V005 PP, 54 x 102          (25 ml)         (pack of 50) 40-100 ml, PP  55 - 90 ml    0 mm                  904-490 60 x 80                    (pack of 50) 50 ml low form *  30 - 45 ml    0 mm 42 x 6022-45 ml, PP   22 - 45 ml    0 mm                  904-489 44 x 70                    (pack of 50)100 ml tall form *  50 - 90 ml    0 mm 48 x 80250 ml tall form *  180 - 225 ml    10 mm 60 x 120          (30 ml)150 ml tall form *  95 - 135 ml    0 mm 60 x 80*   Standard glass beakers specified in accordance with DIN12331 ISO3819.**  When starting an analysis, if you have less liquid sample than this       specified value, then the beaker automatic detection can not work.      When working with a workstation, you must clear the option       "Beaker detection" in TitraMaster 85 (refer to the TitraMaster 85,       on-line help, topics "Editing an application - Configuration").8-25 ml, PP    10 - 22 ml    0 mm                  904-488 44 x 70                    (pack of 50)BBBBBeakerseakerseakerseakerseakers
Accessories 59Adapters for Bayonet Electrode HeadAdapters for Bayonet Electrode HeadAdapters for Bayonet Electrode HeadAdapters for Bayonet Electrode HeadAdapters for Bayonet Electrode HeadAdapters for Bayonet Electrode Head, X91T002 comprising:5 X31T031 Bayonet Socket ø 12 mm with washer2 X31T013 Bayonet Adapter for PAF-X3 and D4362 delivery tips2 X31T014 Bayonet Adapter for 103 mm screw cap electrode2 X31T015 Bayonet Adapter for 120 mm screw cap electrode2 X31T016 Bayonet Adapter for ø 9.5 mm electrode, type GK24012 X31T018 Bayonet Adapter ø 12 mm to ø 7.5 mm1 X31T127 Stirring Shaft, PP, L = 96 mm with propellers10&18 mm2 X31T032 Bayonet Stopper ø12 mm2 X31T033 Bayonet Stopper ø7.5 mm
60 Accessories
Technical specifications 618. T8. T8. T8. T8. Technical specificationsechnical specificationsechnical specificationsechnical specificationsechnical specificationsFunctionsFunctionsFunctionsFunctionsFunctionsEasy removable turntables, automatic identification of turntable model byRFID:- SAC850: 1 radius- SAC950:  1, 2 or 3 radiiDip rinse and/or reconditioning: 0 to 2 positions.Service position (electrodes above the park beaker).Automatic detection of empty position by ultrasonic transducer.Stirring: magnetic or propeller stirring. Magnetic stirring if propeller stirrernot connected. 0 to 1100 rpm by steps of 50 rpm.Built-in keypad: lift electrode head up/down, move to next/previousbeaker, start/stop dynamic shower rinse, start/stop emptying to waste,start/stop adding a reagent, stop action.Embedded programmable sample preparation sequences.Unused electrodes and delivery tips storage: 4 positions Ø16 mm, on thetop of the sample changer arm.Optional modulesOptional modulesOptional modulesOptional modulesOptional modulesDynamic shower rinse & Beaker emptying: Shower rinse and emptyingoperations controlled by 2 PTFE membrane pumps, available in anybeaker size. Flow rate: up to 600 ml/min. Pumps can be controlledmanually and individually through keypad.Addition of a reagent with a peristaltic pump to prepare sample. Thepump can be controlled manually through keypad. The pump can beprogrammed individually as part of sample preparation sequence.Beaker cover option (SAC950 only): Remove beaker covers using anelectro-magnet. Covers  are disposed beside the sample changer in adedicated location once removed.
62 Technical specificationsInputs/outputsInputs/outputsInputs/outputsInputs/outputsInputs/outputsUSB-B (Slave) connection to computer for sample preparation programmingsequence.RS232C serial connection to workstation unit.TTL I/O. Start external peripherals (RJ11 socket). Wait for external signalto continue the sample preparation sequence.Electro-magnet input for beaker cover option (RJ11 socket).Propeller stirrer output (RJ11 socket).Temperature input (CINCH socket) for use as input in a sample preparationsequence.Ultrasonic transducer input for beaker detection module(Jack socket 3.5 mm).Casing, keyboardCasing, keyboardCasing, keyboardCasing, keyboardCasing, keyboardPETP – PVC and/or PEProtected against projections, IP54 – For use in a laboratory environmentDimensions (H x W x D)Dimensions (H x W x D)Dimensions (H x W x D)Dimensions (H x W x D)Dimensions (H x W x D)70 x 58 x 68 cm.WeightWeightWeightWeightWeight27 kg.Power requirementsPower requirementsPower requirementsPower requirementsPower requirements47.5 - 63 Hz. 115/230 Vac +15 -18%. 76VAFuses: 2 mains fuses : slow blow T2.5A L250V (230 V)Environmental operating conditionsEnvironmental operating conditionsEnvironmental operating conditionsEnvironmental operating conditionsEnvironmental operating conditionsInterior use only10 to 40°C temperature.20 to 80% relative humidity.Altitude ≤ 2000 m.Variations of the mains voltage do not exceed ± 10% of the nominal value.Level of pollution: 2.Transitory overvoltage: level II.
Technical specifications 63Rear panelRear panelRear panelRear panelRear panelRS232 serial socketWorkstation controlunit  cable  A95X501Jack 3.5 mm socketUltrasonic  sensor(beaker  detectionmodule)CINCH socketTemperature  sensorRJ11 socketTTL I/OStart externalperipheralsRJ11 socketElectromagnet(Beaker cover  module)Line cord:230 V (A95S001)115 V (A95S002)RJ11 socketPropeller  stirrer24VDCFuse holder:2 mains fusesslow blow, T2.5A L250VOn/Off switch PCUSB cable
64 Technical specificationsInternational StandardsInternational StandardsInternational StandardsInternational StandardsInternational StandardsEMC Directive (89/336/CEE)The sample changer complies with following standards:Class A equipment for laboratory use, according to the standardEN 61326-1.Emission:EN 61000-4-2 level 2EN 61000-4-3 level 1EN 61000-4-4 level 2EN 61000-4-5 level 2EN 61000-4-6 level 2EN 61000-4-11Low Voltage Directive (73/83/CEE)The sample changer complies with the following standard:Reference standard: EN 61010-1.The Titration Manager complies with the following standards:UL 61010A - 1CAN / CSA C22 2 N° 1010.1 - 92.
Technical specifications 65The sample changer  complies with part 15 of the FCC Rules. Operationis subject to the following two conditions:(1) This device may not cause harmful interference, and(2) this device must accept any interference received, includinginterference that may cause undesired operation.See "Compliance with FCC rules, part 15 - Information to the user" onpage 6.
66 Technical specifications

Navigation menu