Ray Allen FSERIES TACTICAL K9 DEPLOYMENT HEAT ALERT SYSTEM AND PAGER User Manual
Ray Allen Manufacturing Company, Inc TACTICAL K9 DEPLOYMENT HEAT ALERT SYSTEM AND PAGER Users Manual
Users Manual

USER’S MANUAL
System Serial No.___________________

T
ABLE OF
C
ONTENTS
SECTION PAGE
System Features 2
Starting Your System 3
Accessing System Menu 5
Programming Door Opener 6
Programming Window Drop 6
Programming Heat Alert Function 7
Becoming Familiar w/Interactive Intelligent Remote 8
Powering On Your Remote/Control Pager 9
High Temperature Alert Screens & Signals 10
Engine Stall Monitor – With So Much More 11
Additional Features & Information 12
Product Care & Service 13
1
RAY ALLEN
F3 Tactical Deployment
Heat Alert System with Pager - Features
Heads Up Display (HUD)
• In Vehicle Independent Temperature Read-Outs
• Displays System Status: “OK” & System Condition: “ARMED”
• Backlit Heads up Display (OFF plus 3 Levels of Brightness)
• Fully User Programmable Non-Volatile Memory (System retains your
programmed settings if disconnected from vehicle battery)
• Fan Control Built Right-In (Off plus Low, Med, High)
• Plug to recharge Remote/Control Pager — wire pig-tail included
Interactive Intelligent Remote Control/Pager (RCP)
• No Larger Then a Typical Pager
• K9 Deployment at the Touch of a Button — Will Only Function with
Vehicle in Park or Neutral
• Independent Temperature Read-Outs (Real Time)
• Reset Capability from Remote Control (In the event of a HEAT or
VEHICLE POWER Alert)
• Signal Strength Indicator Bar
• RCP Battery Charge Level Indicator Bar
• System In-range Confirmation (Two (2) Short Vibrations)
• Out of Range Warning (One (1) Long Vibration)
• Backlit Display
• Built In Pager (Tone and Vibration for HEAT or VEHICLE POWER Alert)
• Tone / Mute Capability
• Fully Rechargeable (Wall-plug Charger Included)
• RCP can also be charged from the HUD – wire pigtail included
• Custom Belt Mounted Remote Control Holster Included
Control POD
• “Brain-box” of the system in a small case
• Can be easily mounted anywhere in your vehicle
• Positive-lock wire harnesses – no more loose wires
2
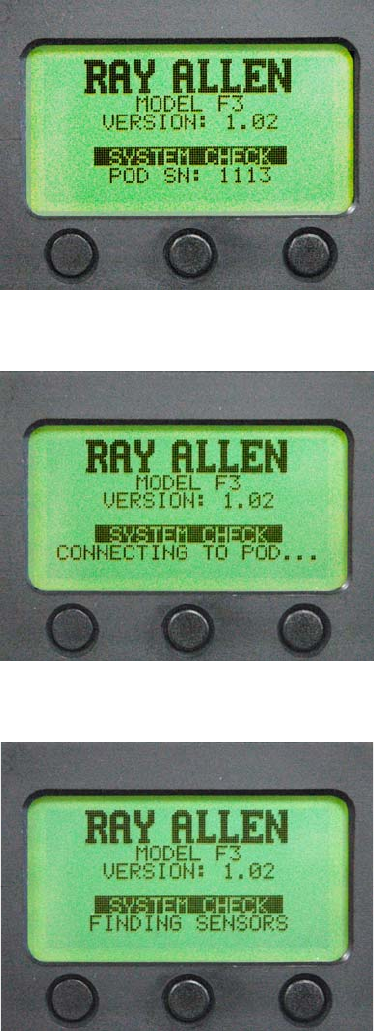
STARTING YOUR SYSTEM
To Power-up the system, hold down the center button located on the Heads Up
Display (HUD). The system will perform a complete self diagnostic and you will
see the following on the display:
Note that Serial Number (POD SN: #) appears here.
System Check displays events taking place.
Model and Version are displayed throughout diagnostic routine.
3
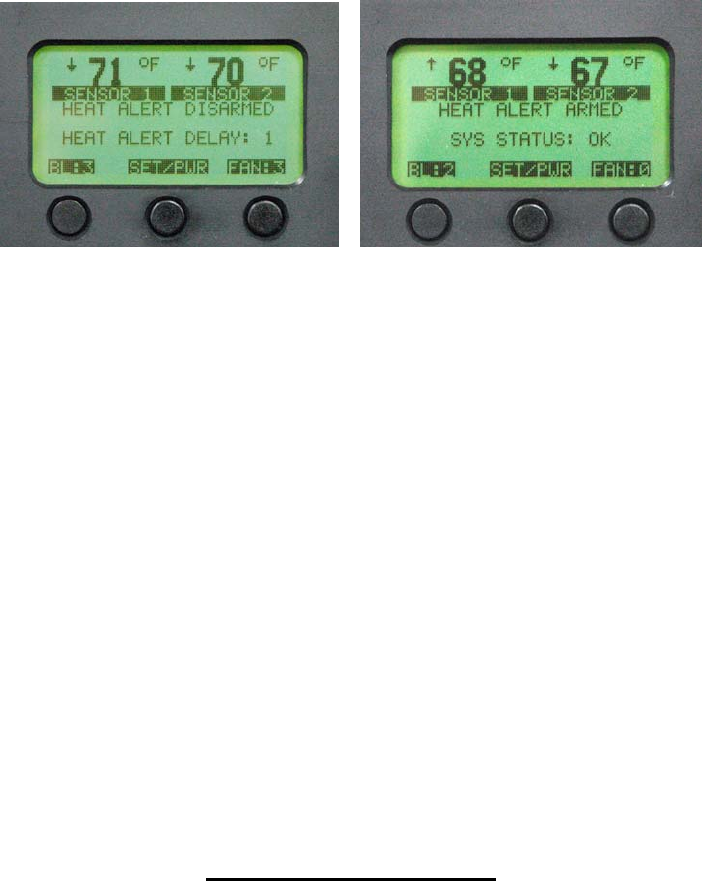
STARTING YOUR SYSTEM (cont.)
Once the diagnostic is complete, the HUD will show displays similar to this:
Initial Display – Default Delay 1 Minute Display After 1 Minute Delay – Ready to Go
After allowing for the 1 minute delay (default), the display will show two
independent temperature readings, HEAT ALERT ARMED, SYS STATUS: OK.
Along the bottom are BL: (Backlight), SET/PWR (menu access and power
on/off), and FAN: 0-OFF, 1-LOW, 2-MED, 3-HIGH).
N
OTE
:
T
HE
DEPLOY
K9
F
UNCTION OPERATES ANY TIME THE SYSTEM IS TURNED ON
AND THE VEHICLE IS IN
P
ARK OR
N
EUTRAL
–
THIS FUNCTION IS NOT AFFECTED BY THE
HEAT
ALERT
DELAY.
Adjusting the Backight
To turn on and adjust the display backlight (BL), press the left button once to
activate. There are three (3) levels of backlight adjustment (1, 2 or 3 — BL:0 is
off). Built In Fan Control
If you have chosen to integrate a fan with your system it is controlled by pressing
the right button on the HUD. There are three (3) speed adjustments available for
your K9’s comfort (1-LOW, 2-MED, 3-HIGH — 0 is off)
Important Information
Your system uses non-volatile memory. That means even if power is lost for long
periods of time your user programmed settings will be retained. This is an
especially handy feature should your vehicle need to have the car battery
disconnected during maintenance.
N
OTE
:
Y
OUR SYSTEM IS POWERED BY DIRECT CONNECTION TO THE VEHICLE BATTERY
AND WILL REMAIN ON AND FUNCTIONING EVEN WHEN THE VEHICLE IS TURNED OFF
.
T
HEREFORE WHEN YOUR VEHICLE IS NOT IN SERVICE AND
/
OR YOU NO LONGER REQUIRE
THIS SYSTEM TO FUNCTION
,
YOU MUST MANUALLY TURN THE SYSTEM
OFF
(
PRESS AND
HOLD THE CENTER BUTTON OF THE
HUD).
4
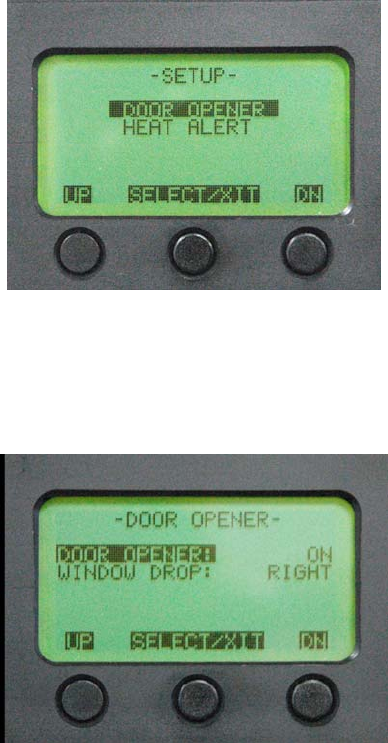
ACCESSING THE SYSTEM MENU
Access the particular system you wish to program by first pressing the center
SET / PWR button on the HUD one (1) time (do not hold the button down). This
brings you to the first level of your System Menu — SETUP.
Pressing SELECT one (1) time to access the DOOR OPENER menu. There are
two (2) options in this menu.
*EXCLUSIVE PROGRAMMABLE FEATURE*
The system also has the ability to roll down either or both of the rear
windows when using Remote Control Deployment. This is especially handy
for situations where a secondary suspect is blocking the deployment door.
N
OTE
:
T
O TAKE FULL ADVANTAGE OF THIS FEATURE THE DEPLOYMENT DOOR MUST NOT
HAVE A WINDOW GUARD INSTALLED
.
5
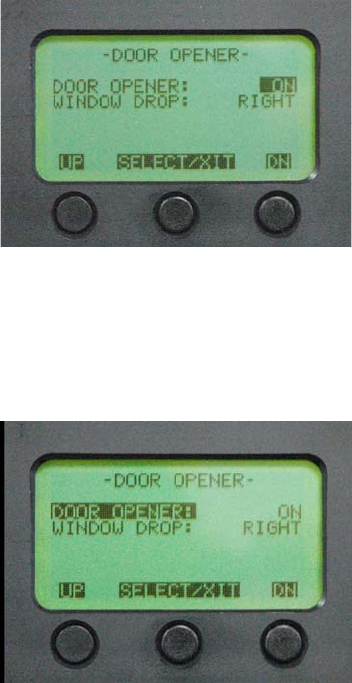
TURNING DOOR OPENER ON/OFF
With the curser on DOOR OPENER:, press the SELECT button one (1) time. The
curser will move to the right (as shown above) and highlight the on/off feature.
Press the DN or UP button to toggle either ON or OFF. When the desired
selection is displayed, press and hold the SELECT button until the curser moves
back to DOOR OPENER: (as shown below).
PROGRAM THE WINDOW DROP
Press the DN button to move the curser to WINDOW DROP. Press the SELECT
button one (1) time to move the curser to the right. The system allows four (4)
WINDOW DROP options when used with DOOR OPENER. These options are
OFF (neither window will drop when the K9 is deployed), LEFT, RIGHT or BOTH
and will scroll using the UP or DN buttons. When the desired selection is
displayed, press and hold the SELECT button until the curser moves back to the
left.
To exit DOOR OPENER menu, press and hold the SELECT button to return to
the SETUP menu.
To DEPLOY your K9 simply press the button on the back of the Remote
Control/Pager.
N
OTE
:
T
HE
DEPLOY
K9
F
UNCTION OPERATES ANY TIME THE SYSTEM IS TURNED ON
AND THE VEHICLE IS IN
P
ARK OR
N
EUTRAL
–
THIS FUNCTION IS NOT AFFECTED BY THE
HEAT
ALERT
DELAY.
6
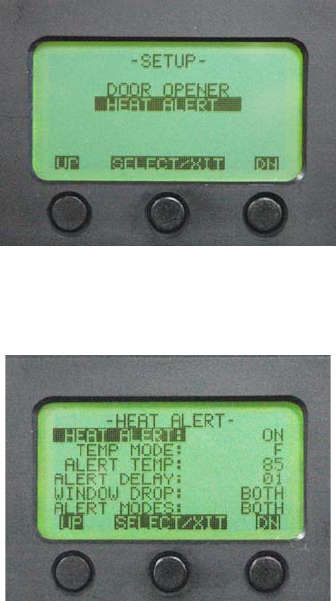
PROGRAMMING HEAT ALERT FUNCTION
In the SETUP Menu, select HEAT ALERT then press the SELECT button one (1)
time.
By manipulating the UP, DN, SELECT/XIT buttons as you did above, the HEAT
ALERT menu allows you to:
Turn on/off the HEAT ALERT SYSTEM
Select TEMPERATURE MODE: F (Fahrenheit) or C (Celsius)
Select the TEMPERATURE at which you wish the system to ALERT
70-99 F or 21-37 C
Select the ALERT DELAY
(This feature prevents the Heat Alert System from activating when
the vehicle is first started and the air conditioning hasn’t yet cooled
the interior of the vehicle. 1-10 minutes selectable)
N
OTE
:
T
HE
DEPLOY
K9
F
UNCTION OPERATES ANY TIME THE SYSTEM IS
TURNED ON AND THE VEHICLE IS IN
P
ARK OR
N
EUTRAL
–
THIS FUNCTION
IS NOT AFFECTED BY THE
HEAT
ALERT
DELAY.
Select rear WINDOW(s) to DROP in the event of a HEAT ALERT
(OFF, LEFT, RIGHT, BOTH)
ALERT MODES
(OFF, HORN, LIGHTS, BOTH)
N
OTE
:
T
HERE IS A
30
SECOND DELAY
(
APPROXIMATELY
)
AFTER A
HEAT
ALERT
BEFORE THE ACTIVATION OF THE LIGHTS AND
/
OR HORN OCCURS
.
7
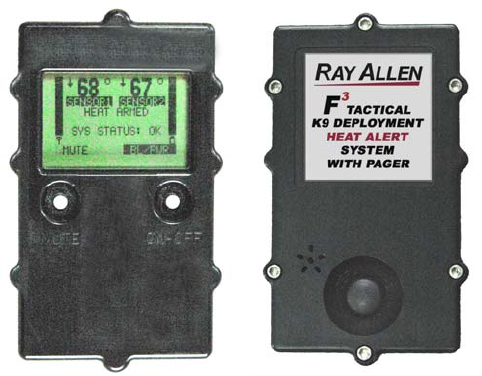
BECOMING FAMILIAR WITH THE
INTERACTIVE INTELLIGENT REMOTE/CONTROL PAGER
Front Back
The front of the Remote Control/Pager (RCP) houses the Interactive Display as
well as the MUTE, ON-OFF buttons. The back of the RCP houses the recessed
“Deploy K-9” remote control deployment button. Located on the side is the RCP
charging port (not shown).
The RCP is designed to be carried on a law enforcement duty belt using the
supplied custom holster. The RCP should be carried with the DEPLOY K-9
Button facing outward (away from the user). The supplied holster has a molded
hole that will align perfectly with the DEPLOY K-9 button.
N
OTE
:
T
HE HOLSTER HAS BEEN CONSTRUCTED OF A SPECIAL POLYMER THAT CAN BE
CUT TO ACCOMMODATE LARGER FINGERS FOR ACCESSING THE
DEPLOY
K-9
B
UTTON
THROUGH THE HOLSTER
.
8
POWERING ON YOUR REMOTE/CONTROL PAGER (RCP)
N
OTE
:
T
HE
HUD
MUST BE POWERED
ON
BEFORE PROCEEDING
.
B
E SURE THE
R
EMOTE
C
ONTROL
/P
AGER
(RCP)
HAS BEEN FULLY CHARGED PRIOR TO ITS FIRST USE
.
To turn on the RCP, press and hold the ON/OFF button until the unit begins to
power up. The RCP will go through a short diagnostic routine before making two
short vibrations signaling connection with the in car system.
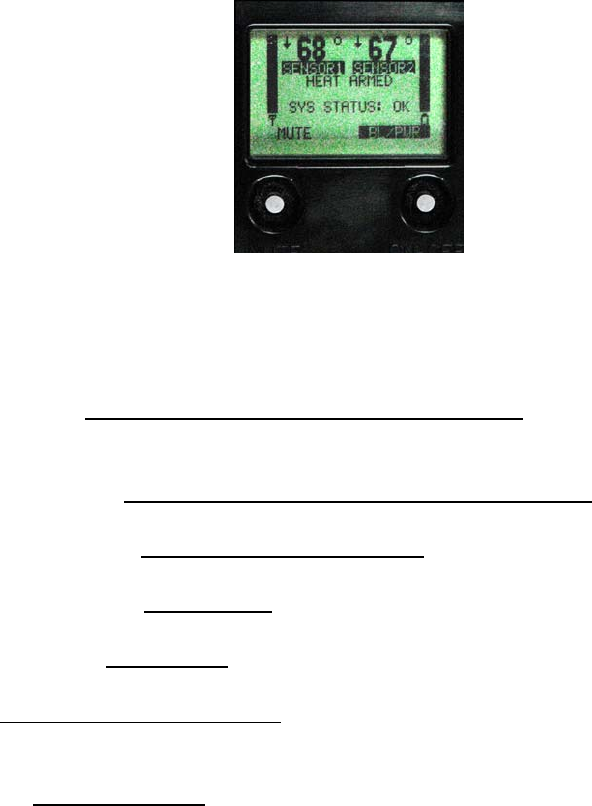
For Reference Only — Actual Display size .80 X 1.25 inches
RCP Display Properties
(* Features Exclusive to Ray Allen)
*Sensor 1 & 2: Two Independent Temperature Readings
Displays real time temperature from inside the vehicle — corresponding
arrows show temperature trends as they occur.
*Left Vertical Bar: Signal Strength - Between RCP and Vehicle
Provides instant verification of signal integrity and strength.
*Right Vertical Bar: RCP Battery Charge Level
Be assured you have the power for communication — and to take action.
*System Condition: Heat Armed
Verifies the HEAT ALERT SYSTEM is online and ready to respond.
*System Status: System OK
The RCP and the HEAT ALERT SYSTEM are 100% all systems go.
MUTE: To MUTE the RCP beeper
When MUTED, the vibration alert will still function to inform you of HEAT
ALERT SYSTEM activation and other features.
BL/PWR: Backlight/Power
Press once to turn on the Backlight (remains lit approximately 15 seconds
then returns to normal). Press and hold to Power-Off the RCP.
* Additional Exclusive Feature:
The RCP will alert you when you are out of range of the vehicle by vibrating for 2
seconds and displaying an OUT OF RANGE message. When you come back
into range of the vehicle, the RCP will give two short vibrations signaling you’re
now back in range and the display will show system information.
9
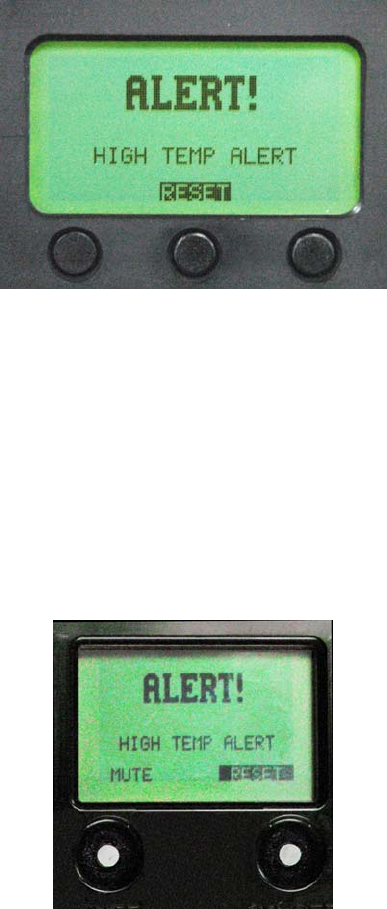
HIGH TEMPERATURE ALERT SCREENS AND SIGNALS
The above message is displayed on the HUD during a high temperature ALERT.
All functions you have programmed into your system will now occur (window(s)
rolling down, fan on high speed — refer to the PROGRAMMING HEAT ALERT
FUNCTION to set these functions). The system will also send an immediate
signal to the RCP alerting you remotely of the situation. To stop the audible and
visual features (horn, lights, etc.), press the RESET button. This will put the
system into Standby Mode for a period of time equal to the ALERT DELAY you
programmed into your system. The windows that were programmed to roll down
will remain down and the fan (if installed) will continue to run at high speed while
the system is in Standby Mode.
Your RCP will alert you of a high temperature ALERT in a variety of ways. When
the RCP first receives the alert, it will alternately vibrate and beep, while the
display shows “ALERT! — HIGH TEMP ALERT”. You can clear the system
remotely if you choose to, by pushing the RESET (ON/OFF button) once. The
system will enter Standby Mode as noted above. This allows you to return to your
vehicle and resolve the issue while silencing the ALERT in your vehicle and on
the RCP.
You may also silence the beeper function of the RCP by pressing the MUTE
button.
10
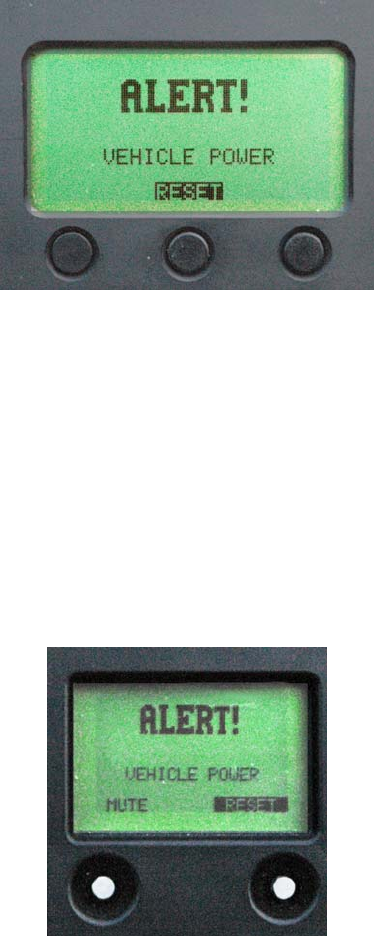
ENGINE STALL MONITOR — WITH SO MUCH MORE!
The above message is displayed on the HUD during a VEHICLE LOW
VOLTAGE condition. This ALERT is caused by the battery voltage falling below
the recommended level for normal operation. The voltage threshold is hard-
coded into the system and cannot be altered. The cause of a VEHICLE POWER
ALERT can be engine stall, over-taxing the vehicle’s electrical system, a faulty
battery or alternator, and/or many other issues.
The system will also send an immediate signal to the RCP alerting you remotely
of the condition. To stop the audible and visual features (horn, lights, etc.), press
the RESET button. This will put the system into Standby Mode for a period of
time equal to the ALERT DELAY you programmed into your system.
Your RCP will alert you of a VEHICLE POWER condition in the same manner as
a HIGH TEMP ALERT. The RCP will alternately vibrate and beep, while the
display shows “ALERT! — VEHICLE POWER”. You can clear the system
remotely if you choose to, by pushing the RESET (ON/OFF button) once. The
SYSTEM will enter Standby Mode. This allows you to return to your vehicle and
resolve the issue while silencing the ALERT in your vehicle and on the RCP.
You may also silence the beeper function of the RCP by pressing the MUTE
button.
11

ADDITIONAL FEATURES AND INFORMATION
ABOUT YOUR HEAT ALERT SYSTEM™
Should a high temperature TEMP ALERT™ occur, your system is designed to be
as purpose-based as possible. The following demonstrates additional features
built into your system:
1. If your system informs you of a TEMP ALERT™ and you choose to
RESET the system remotely from the RCP, the system will enter Standby
Mode for a period of time equal to the ALERT DELAY you have
programmed. If during this Standby Period the interior temperature of the
vehicle drops below the ALERT TEMP setting, the system will reset and
return to normal operation at the end of the Standby Period.
NOTE:
I
F THE VEHICLE WINDOWS WERE PROGRAMMED TO LOWER DURING THE ALERT
,
THEY
WILL REMAIN OPEN UNTIL MANUALLY CLOSED
.
A
LSO
,
IF YOU HAVE ADDED AN OPTIONAL FAN TO
THE SYSTEM
,
IT WILL CONTINUE TO RUN AT HIGH SPEED UNTIL YOU MANUALLY CHANGE THE FAN
SPEED ON THE
HUD.
2. If the temperature does not drop below the ALERT TEMP setting you have
programmed, the system will again ALERT you when the Standby Period
expires.
NOTE:
I
F YOU MUTE THE
RCP,
YOU WILL BE NOTIFIED ONLY BY THE VIBRATION FUNCTION AND
THE
ALERT
SCREEN DISPLAY ON THE REMOTE
—
BUT THE VEHICLE WILL CONTINUE TO REACT
NORMALLY
.
3. The vehicle’s Lights and Horn (if wired into the system and selected in the
ALERT MODE menu) will activate approximately 30 seconds after the
TEMP ALERT™ occurs. The Lights & Horn will alternate when activated.
4. If you are OUT OF RANGE and do not receive a TEMP ALERT™ on your
RCP, your in car system will react normally based on the selections you
made during programming.
5. The moment you are OUT OF RANGE from the vehicle, the RCP will warn
you with a 2 second vibration burst and “OUT OF RANGE” will appear on
the RCP display. When you come back into range, the RCP will give two
(2) short vibration bursts to signal reconnection with the vehicle system
and the display will show system information.
NOTE:
A
S WITH ANY
R
ADIO
F
REQUENCY
(RF)
DEVICE
,
THE ABILITY OF THE
RF
SIGNAL TO
PENETRATE CERTAIN BUILDING MATERIALS VARIES
.
C
ELL PHONE AND PAGER SIGNALS DIMINISH
GREATLY WHEN YOU ENTER BUILDINGS CONSTRUCTED WITH STEEL SUPERSTRUCTURES AND
METAL BUILDINGS IN GENERAL
.
T
HESE SAME BUILDING STRUCTURES WILL AFFECT THIS
SYSTEM
’
S
RCP
IN
.
L
INE
-
OF
-
SIGHT READINGS TAKEN BY
GPS
HAVE SHOWN THE
RF
SIGNAL
WILL WORK IN EXCESS OF
¾
OF A MILE
.
T
HIS
RF
SIGNAL HAS BEEN OPTIMIZED TO PROVIDE THE
BEST POSSIBLE SIGNAL STRENGTH AND QUALITY
,
HOWEVER
,
SOME STRUCTURES WILL STILL
ADVERSELY AFFECT THIS SIGNAL
.
12
PRODUCT CARE AND SERVICE
Your system has been designed to give years of trouble free use. Great effort
was given to the selection of the highest quality components and fixtures.
Following are tips and suggestions that will help keep your system fully
functional.
Heads Up Display
The Heads Up Display (HUD) can be cleaned with a soft, moist cloth. Do not use
abrasive cleansers as they can damage the LCD panel and the housing. Your
HUD requires no additional user maintenance.
Interactive Intelligent Remote Control/Pager
Your Remote Control/Pager (RCP) is designed to be carried on a law
enforcement duty belt. Included with your system is a custom belt holster that is
engineered to offer durability, ease of use, and comfort when carrying the RCP.
The RCP contains a high quality rechargeable memory-free battery. When
connected to the charger for the first time (with the RCP turned OFF) the LCD
display will read CHARGING BATTERY. If the battery is completely discharged it
can take a minute or more for the display to show the CHARGING BATTERY
message. When fully charged, the CHARGING BATTERY message will no
longer be displayed.
Your RCP can be cleaned with a soft, moist cloth. Do not use abrasive cleaners
as they can damage the LCD panel and the case. Do not submerge the RCP in
water. However, if the RCP does become immersed in water, turn it off
immediately. Allow the RCP to completely dry before attempting to turn it on
again.
13
Disclaimer (cont.)
This equipment has been tested and found to comply with the limits for a Class B digital device,
pursuant to part 15 of the FCC Rules. These limits are designed to provide reasonable protection
against harmful interference in a residential installation. This equipment generates, uses and can
radiate radio frequency energy and, if not installed and used in accordance with the instructions,
may cause harmful interference to radio communications. However, there is no guarantee that
Interference will not occur in a particular installation, If this equipment does cause harmful
Interference to radio or television reception, which can he determined by turning the equipment
off and on, the user is encouraged to try to correct the interference by one or more of the fol-
lowing measures:
—Reorient or relocate the receiving antenna
—Increase the separation between the equipment and receiver
—Connect the equipment into an outlet on a circuit different from that to which the receiver is
connected
—Consult an experienced technician for help
This device complies with part 15 of the FCC Rules. Operation is subject to the following two
conditions: (1) This device may not cause harmful interference, and (2) this device must accept
any interference received including interference that may cause undesired operation.
Caution: changes or modifications not expressly approved by Ray Allen Mfg. Co., Inc. could void
the user’s authority to operate the equipment.