User Manual
Revision No. 1.0
Date 2016-03-14
-
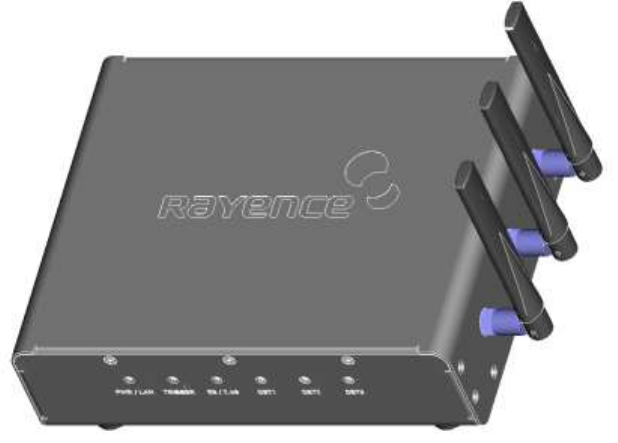
RAP001A
User manual

1
© Copyright 2016, Rayence Co. Ltd.
All pages of this document contain proprietary and confidential information of
Rayence Corporation and are intended for exclusive use by Rayence
Corporation personnel or customers. Copying, disclosure to others or other
use is prohibited without the express written authorization from Rayence
Corporation. Please report any violations of requirement to Rayence
Corporation.
2
Attention
For improvement of product performance, supplementation, or follow-up of information; the
contents of this manual are subject to change without separate prior notice.
Please note that our company has neither responsibility for any accidents nor obligation to do
free repair service for any damage of the equipment due to user's mistake, which resulted from
failure to follow the contents in this manual. Make sure to be familiar with the safety precautions
and usage procedures. Also note that the product may slightly differ from the contents of this
manual depending on specification.
The following marks are used for the effective use of the product in this manual.
Attention, consult accompanying documents.
This is used to emphasize essential information. Be sure to read this
information to avoid incorrect operation.
This indicates hazardous situation which, if not heeded, may result in
minor or moderate injury to you or others, or may result in machine
damage.
This indicates a potentially hazardous situation which, if not heeded, could
result in death or serious injury to you or others.
Federal Law restricts this device to sale by or the order of a radiologist
or any other practitioners licensed by the law of the state in which that
person practices to use or order the use of the device.

3
Contents
1. Specifications ....................................................................................... 4
2. Components .......................................................................................... 5
3. Name of Each Part and Function ......................................................... 6
4. Dimension ............................................................................................. 8
5. Connecting and Using Product ............................................................ 9
5.1. Auto trigger & station mode ..................................................................................... 9
① Product setup ................................................................................................... 9
② Connect the cable ............................................................................................. 9
③ PC setup ........................................................................................................ 10
④ Wireless Access point setup ............................................................................. 11
5.2. Manual trigger & Station mode .............................................................................. 12
① Product setup ................................................................................................. 12
② Connect the Cable .......................................................................................... 12
③ PC setup ........................................................................................................ 14
④ Wireless Access point setup ............................................................................. 15
5.3. Auto trigger & Wired mode .................................................................................... 16
① Product Setup ................................................................................................. 16
② Connect the cable ........................................................................................... 16
③ PC setup ........................................................................................................ 17
5.4. Manual trigger & Wired mode ............................................................................... 19
① Product Setup ................................................................................................. 19
② Connect the cable ........................................................................................... 19
③ PC setup ........................................................................................................ 21
6. Web UI ................................................................................................. 23
6.1. Main Screen ........................................................................................................ 23
6.2. Page Layout ........................................................................................................ 23
① Menu ............................................................................................................. 23
② Upper screen .................................................................................................. 23
③ Main panel ...................................................................................................... 24
6.3. Main Menu .......................................................................................................... 24
① Status Information ........................................................................................... 24
② Network .......................................................................................................... 25
③ 2.4G Wireless LAN Settings ............................................................................. 28
④ 5G WLAN Settings .......................................................................................... 32
⑤ Advanced Settings .......................................................................................... 35

4
1. Specifications
CPU
Qualcomm QCA9558/QCA9880
RAM
128M
Flash
16M
Wireless Standards
802.11 a/b/g/n/ac
Frequency
2.4Ghz/5GHz
Data Rate
802.11a
Maximum 54Mbps
802.11b
Maximum 11Mbps
802.11g
Maximum 54Mbps
802.11n
Maximum 450Mbps
802.11ac
Maximum 1.3Gbps
Wireless Security
WPA, WPA2, WPA/WPA2, WPS button
Transmission Power
22±2dBm (per Path)
Ethernet
10,100,1000 Mbps base Ethernet
Concurrent Connection
(Wire)
Up to 3
Concurrent Connection
(Wireless)
Up to 128
Port
Gigabit LAN x 1, Trigger x 1, Detector x3
Power
Input : AC85~264V 50/60Hz
Output : 24VDC (Max 6.4A)
Maximum
Power Consumption
15W (When the Detector power is not connected)
Antenna
2.4GHz/5GHz 4/6Dbi Dual-band Reverse SMA Antenna (3Txx3Rx)
Major Function
Wire PowerBox, AGI function
Wire Detector DC 24V Power Max 6.4A supply
Size
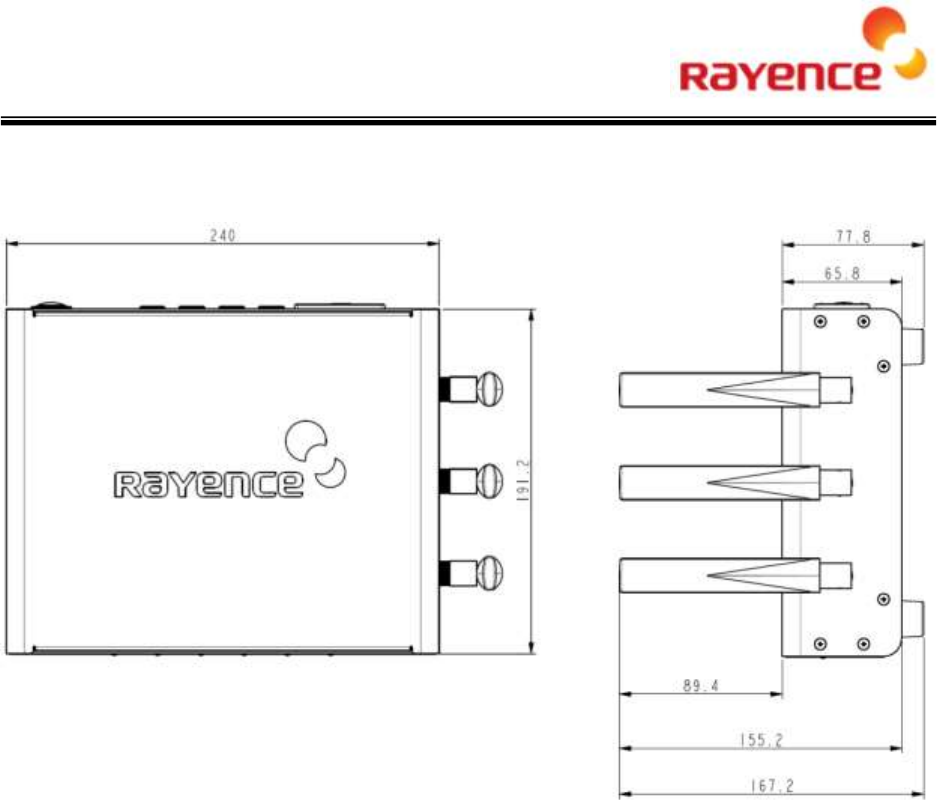
240 x 190 x 75 mm (without antenna)
Weight
1.85kg
Environmental
requirement
Operating : 5 ~ 40 ℃ / 30 ~ 75 % H.R
Storage : -10 ~ 50 ℃ / 10 ~ 80 % H.R

5
2. Components
RAP001A
Antenna x 3
Power cable
LAN cable
Power converter
User manual
6
3. Name of Each Part and Function
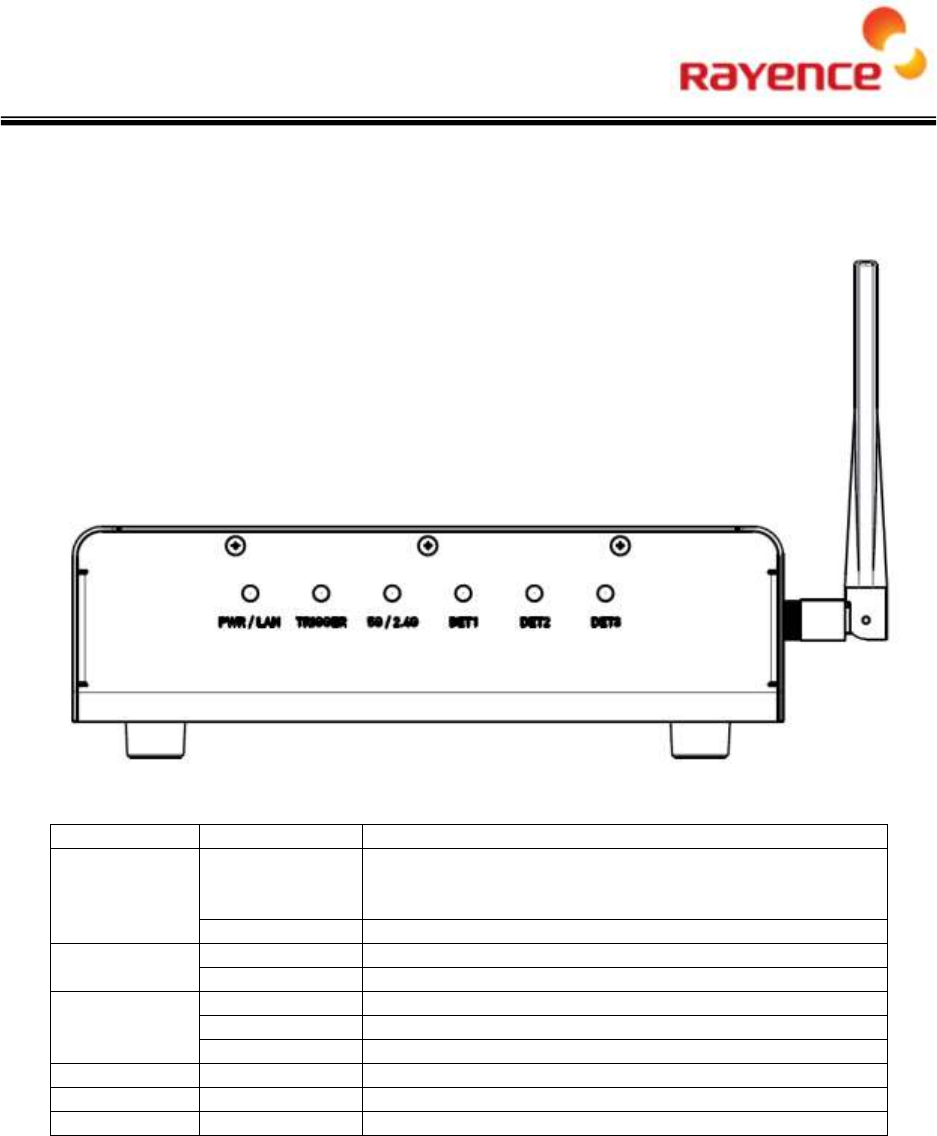
<Front>
LED
LED color
Status
PWR/LAN
Red
Turned on while booting after connecting with power
supply
Turned off upon the completion of booting
Green
Turned off when connecting PC LAN
TRIGGER
Red
Trigger READY DONE
Green
Trigger READY IN
5G/2.4G
Red
Frequency of 2.4GHz
Green
Frequency of 5GHz
Yellow
Frequency of 2.4GHz and 5GHz
DET1
Green
Turned off when connecting with Detector.
DET2
Green
Turned off when connecting with Detector.
DET3
Green
Turned off when connecting with Detector.
7
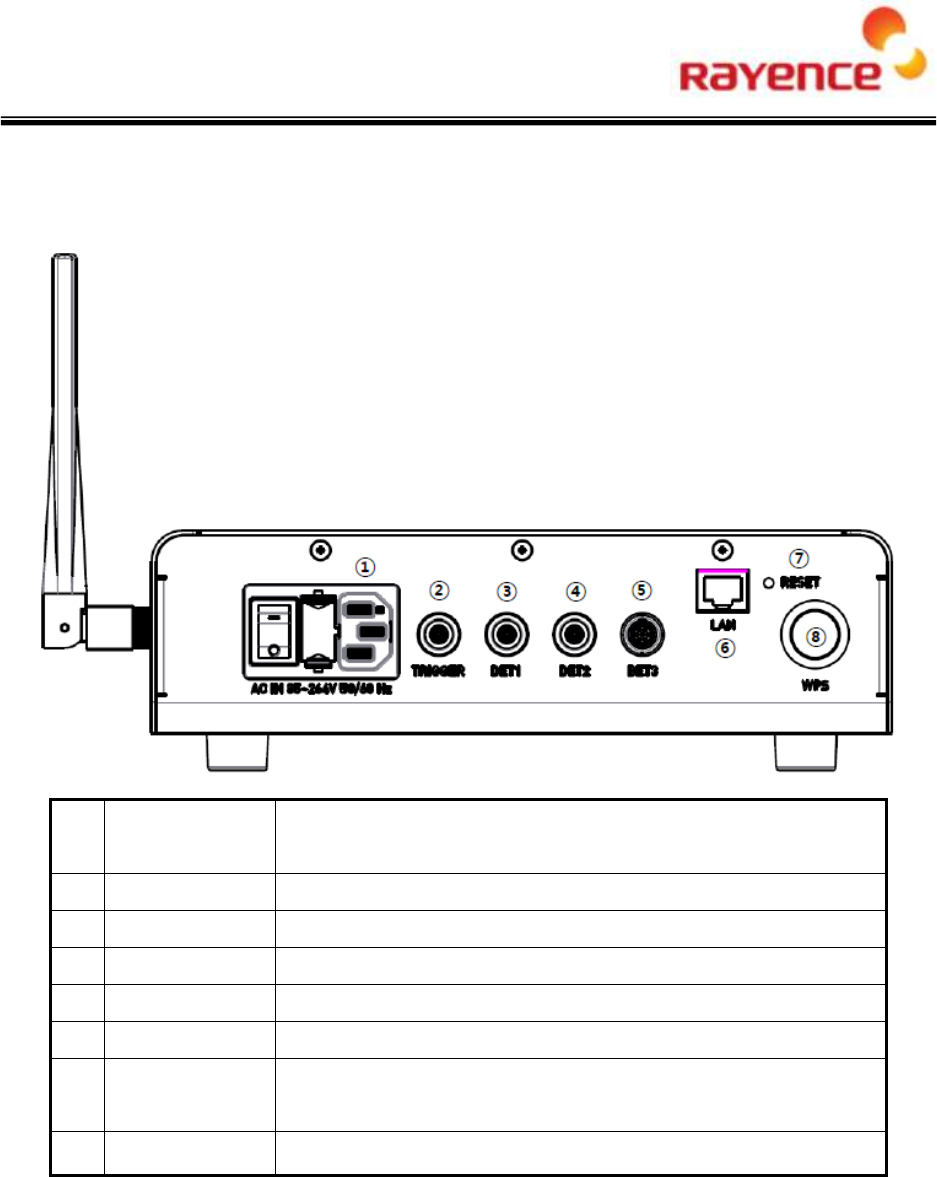
<Back>
①
AC Innet
Power switch, Connecting with fuse box and power cable (Fuse:
T3.15 AL 250V)
②
Trigger Port
7P Generator Linkage Port
③
Detector Port 1
16P Detector Linkage Port (10/100/1000BaseT and for charging)
④
Detector Port 2
16P Detector Linkage Port (10/100/1000BaseT and for charging)
⑤
Detector Port 3
16P Detector Linkage Port (10/100/1000BaseT and for charging)
⑥
PCLAN Port
RJ-45 Port (10/100/1000BaseT)
⑦
Reset Button
Rebooting (press for one second), Factory reset (press for 10
seconds)
⑧
WPS Button
Supporting PBC of WPS
8
4. Dimension
9
5. Connecting and Using Product
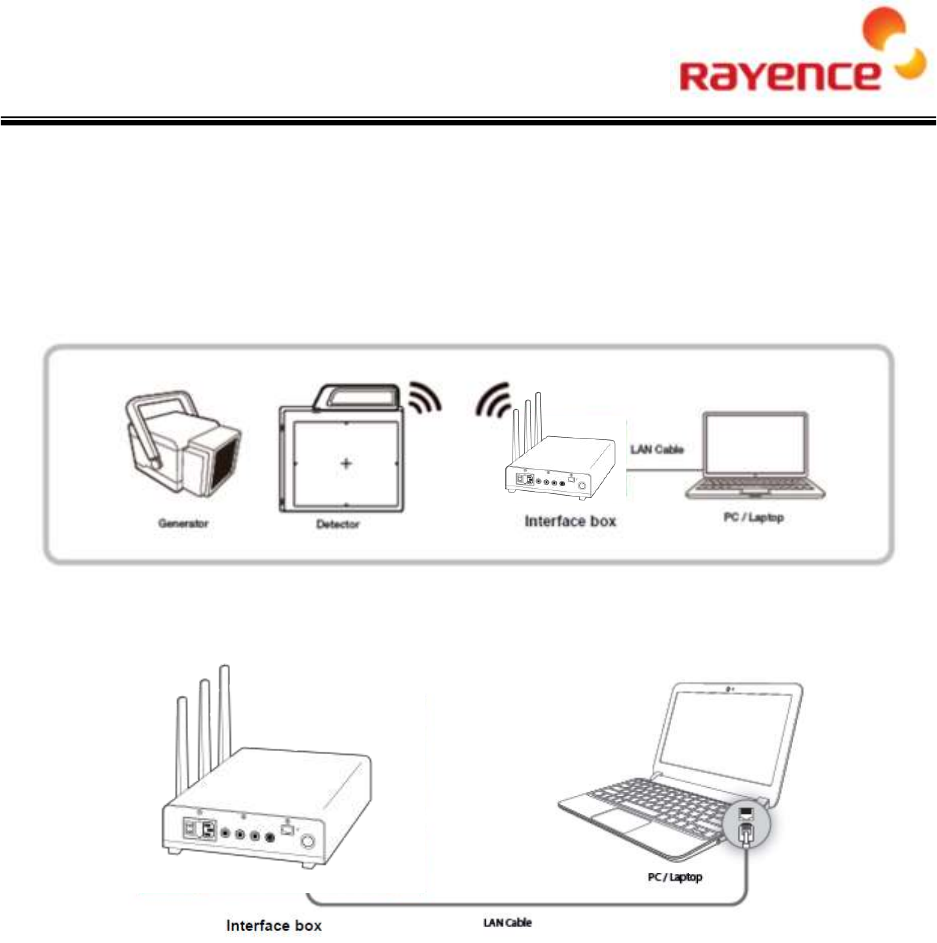
5.1. Auto trigger & station mode
① Product setup
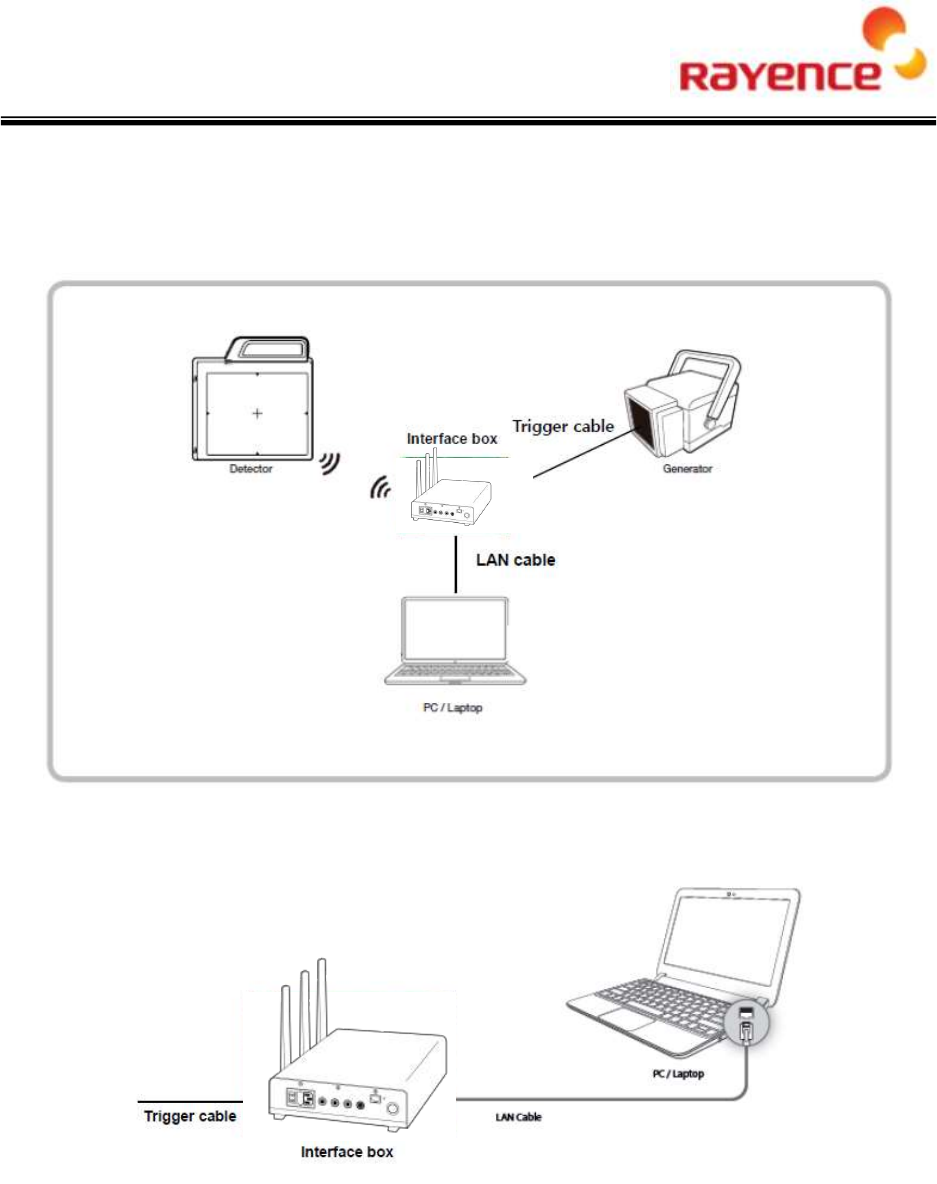
② Connect the cable
10
③ PC setup
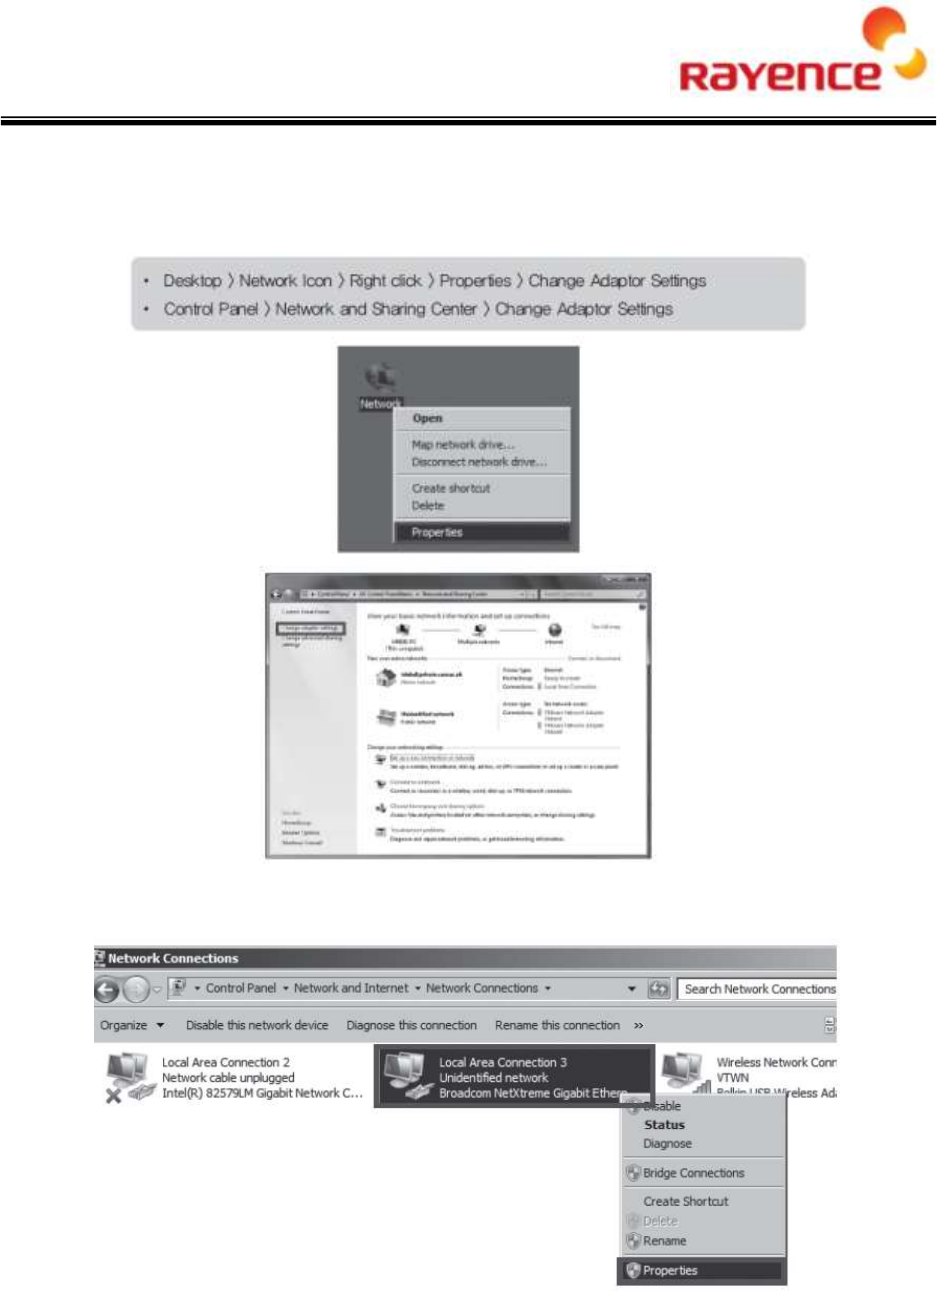
• Set up the Network as below
• To use station mode, right click “Local Area Connection” and click properties
11
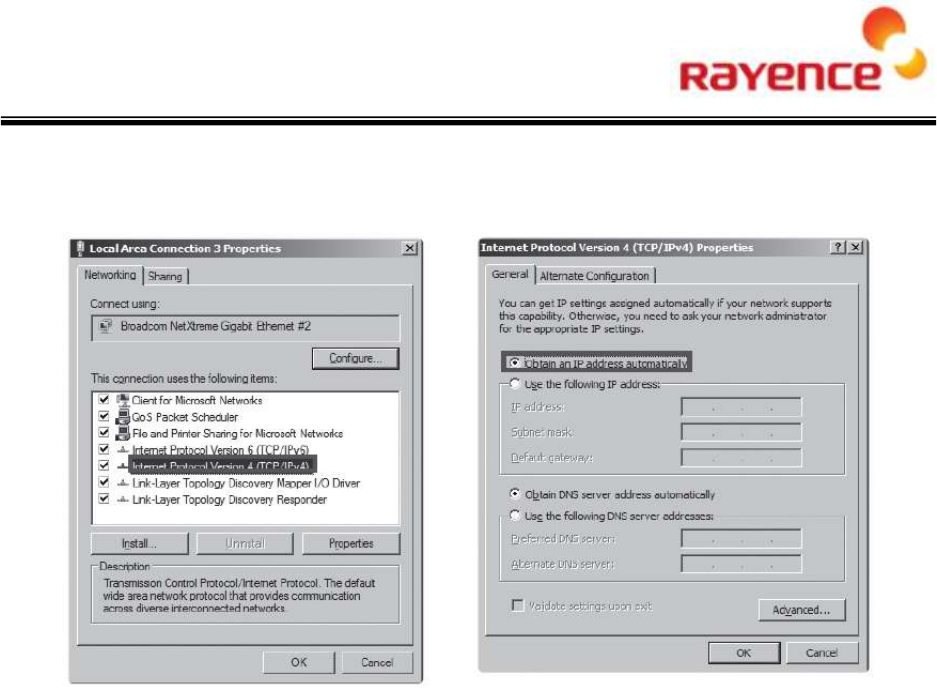
• Double click “ Internet Protocol Version 4 (TCP/IPv4)”
• Select “Obtain an IP address automatically” and click “OK”
④ Wireless Access point setup
• Set up wireless Access point as below
- SSID: Griffon
- Internal network
IP address: 2.2.2.1
Subnet mask: 255.255.255.0
Dynamic IP allocation range: 2.2.2.2~2.2.2.254
- Pre-Shared Key (PSK): project302
Authentication methods: WPAPSK or WPA2PSK
Password methods: TKIP / AES
- Channel (Frequency)
Avoid the crowded channel option
12
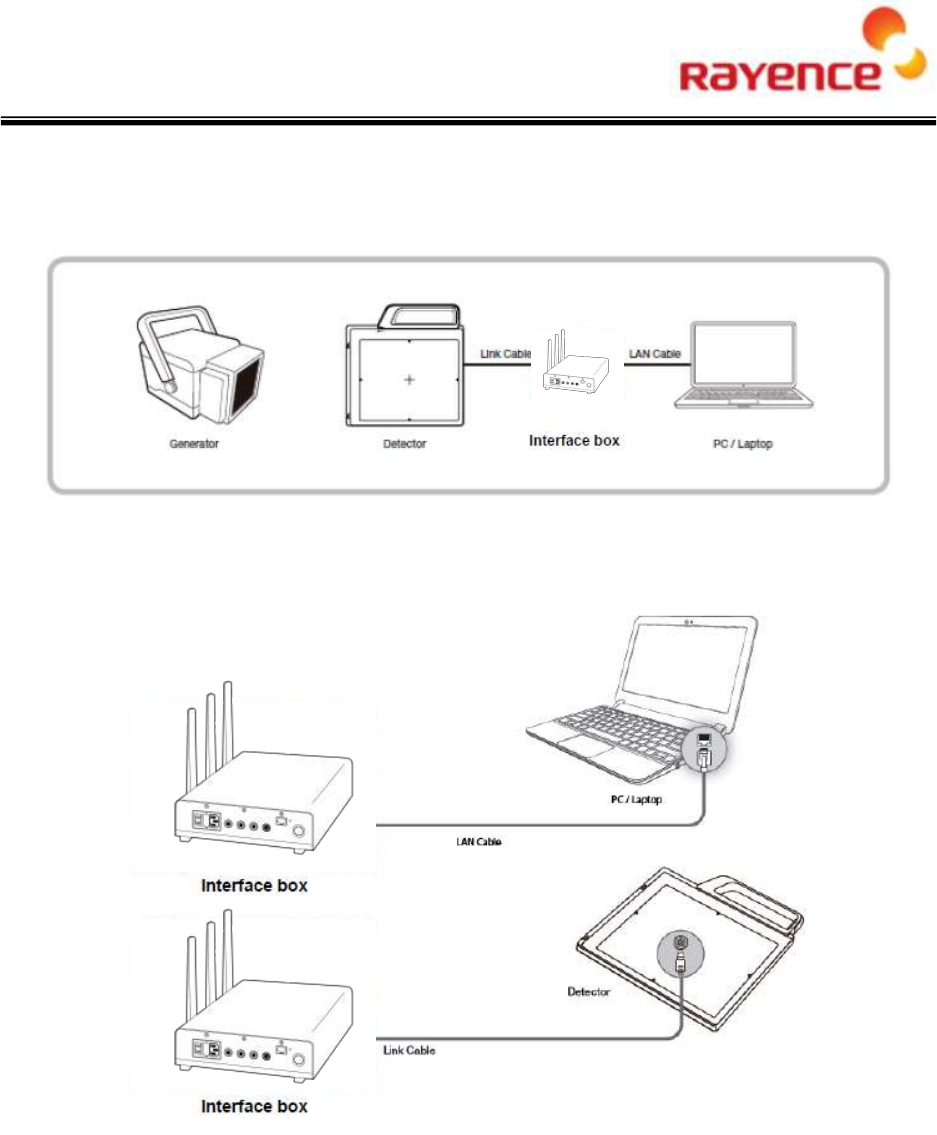
5.2. Manual trigger & Station mode
① Product setup
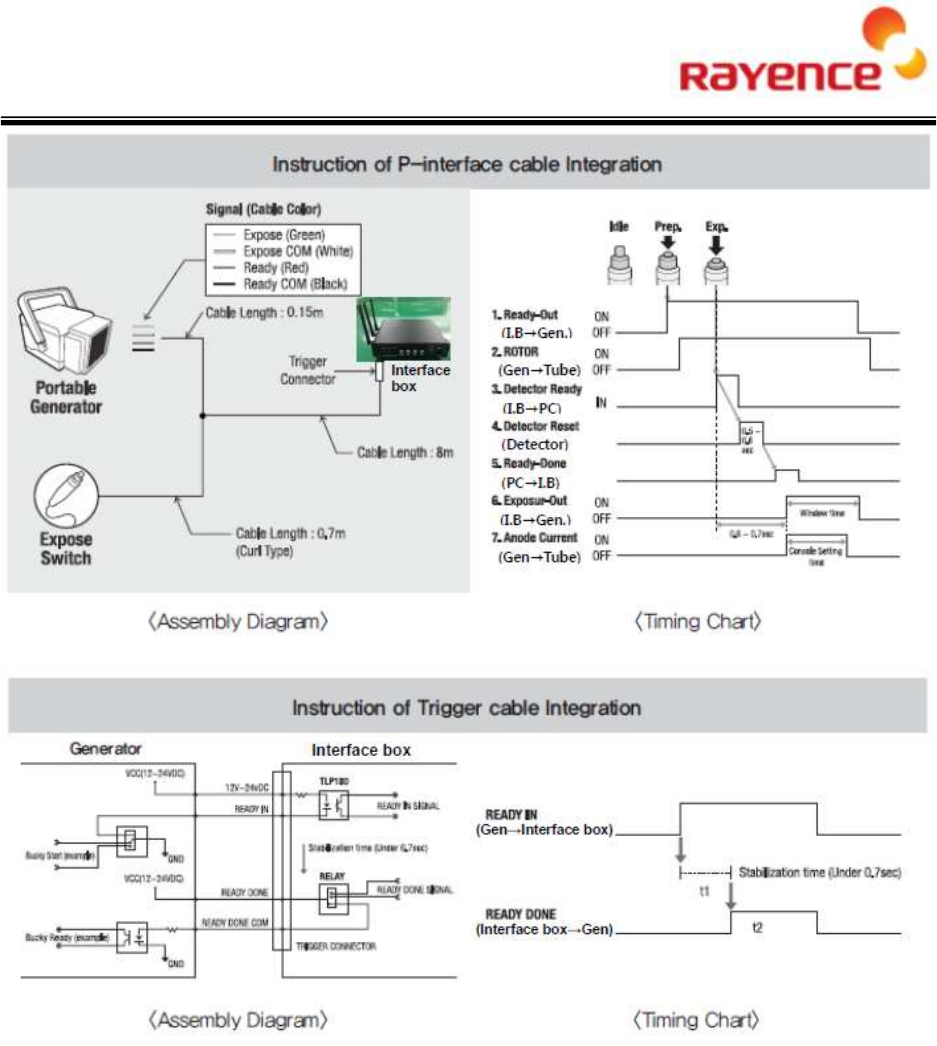
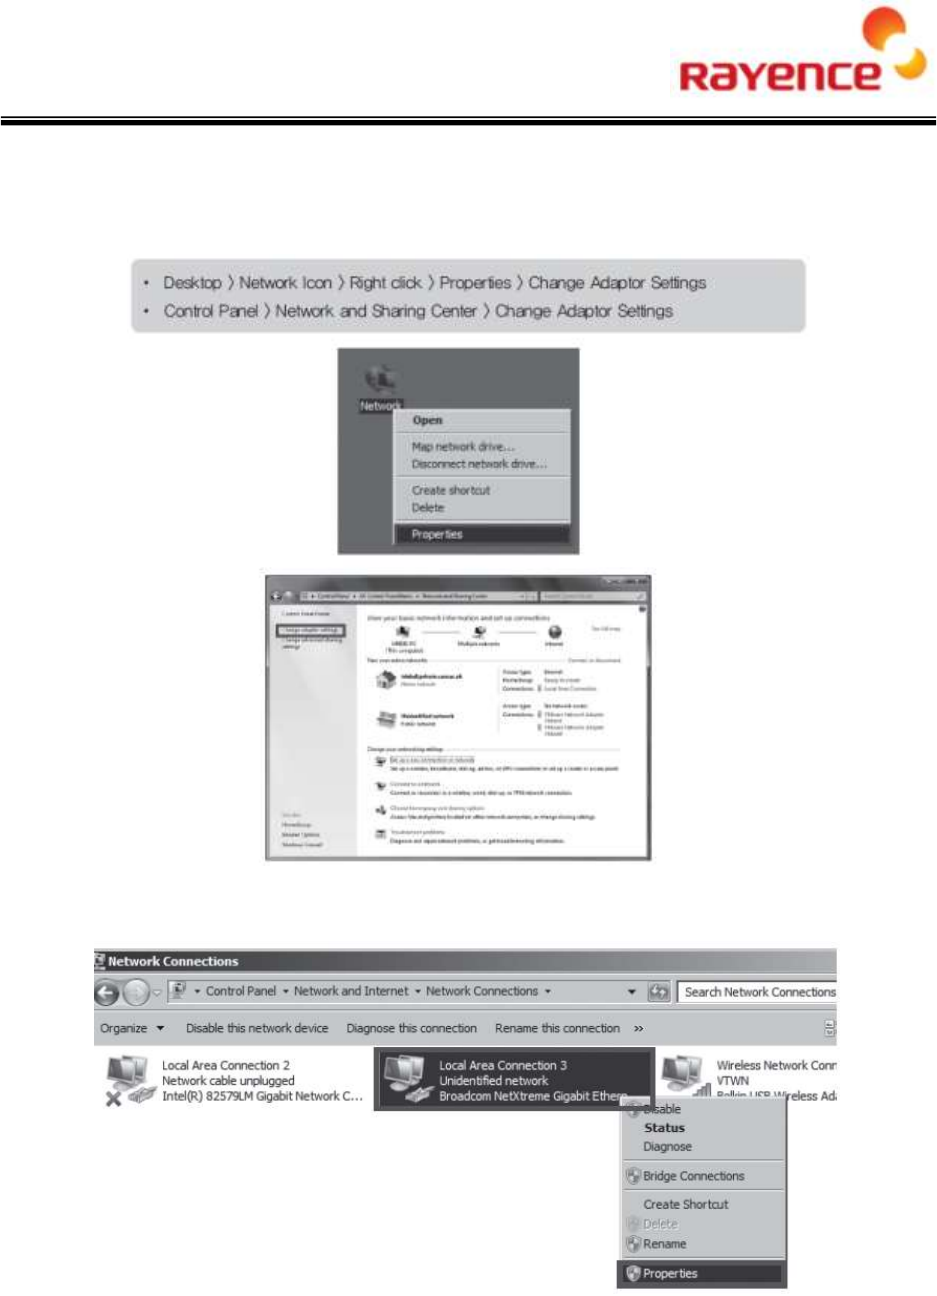
② Connect the Cable
13
14
③ PC setup
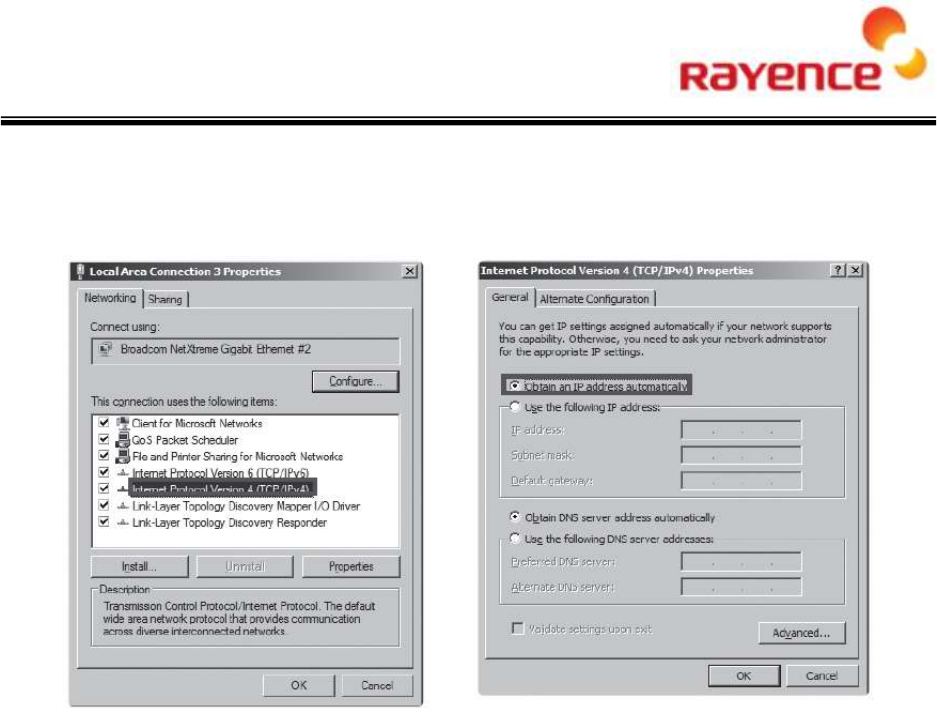
• Set up the Network as below
• To use station mode, right click “Local Area Connection” and click properties
15
• Double click “ Internet Protocol Version 4 (TCP/IPv4)”
• Select “Obtain an IP address automatically” and click “OK”
④ Wireless Access point setup
• Set up wireless Access point as below
- SSID: Griffon
- Internal network
IP address: 2.2.2.1
Subnet mask: 255.255.255.0
Dynamic IP allocation range: 2.2.2.2~2.2.2.254
- Pre-Shared Key (PSK): project302
Authentication methods: WPAPSK or WPA2PSK
Password methods: TKIP / AES
- Channel (Frequency)
Avoid the crowded channel option
16
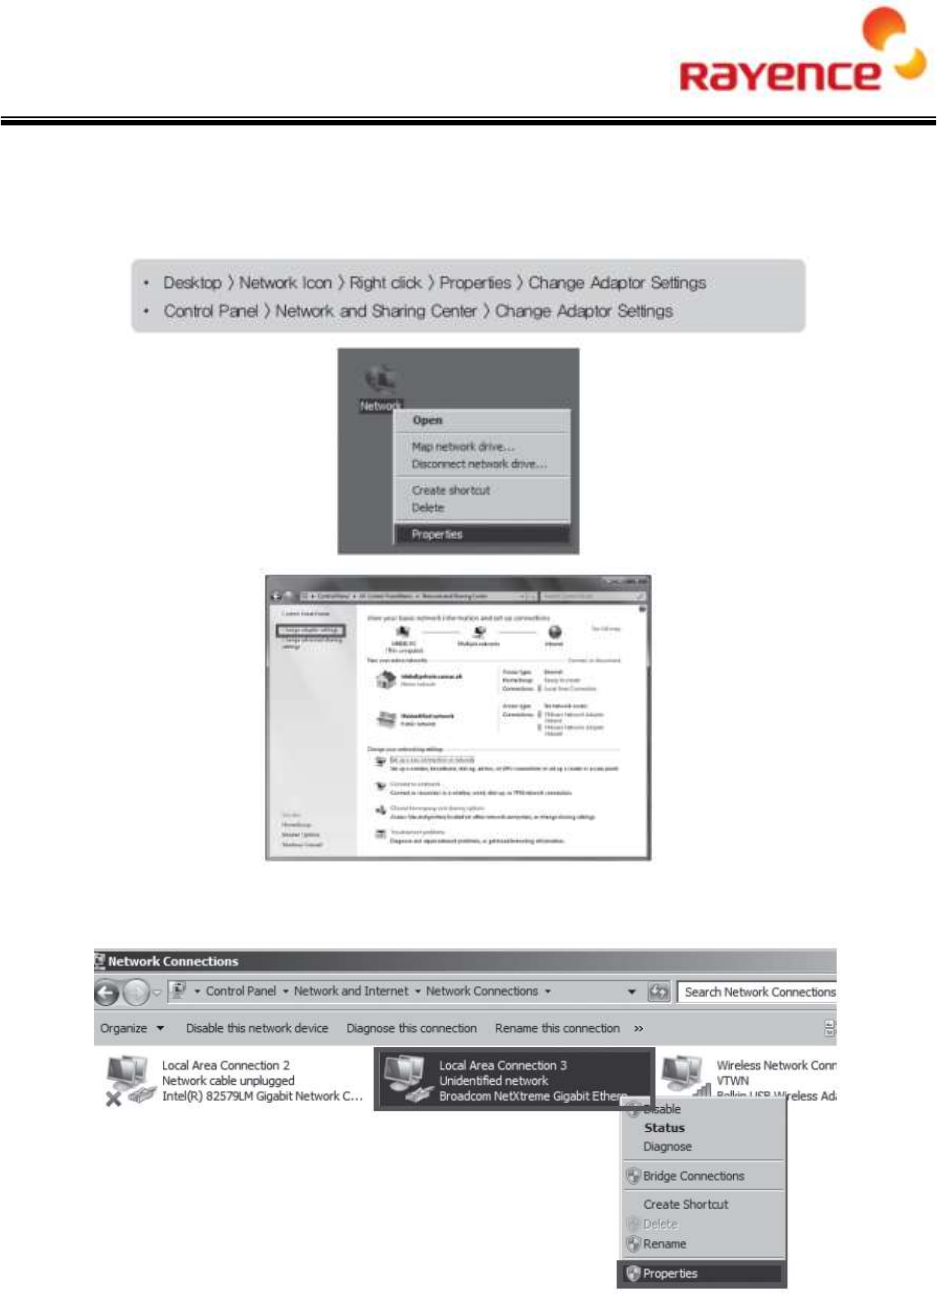
5.3. Auto trigger & Wired mode
① Product Setup
② Connect the cable
17
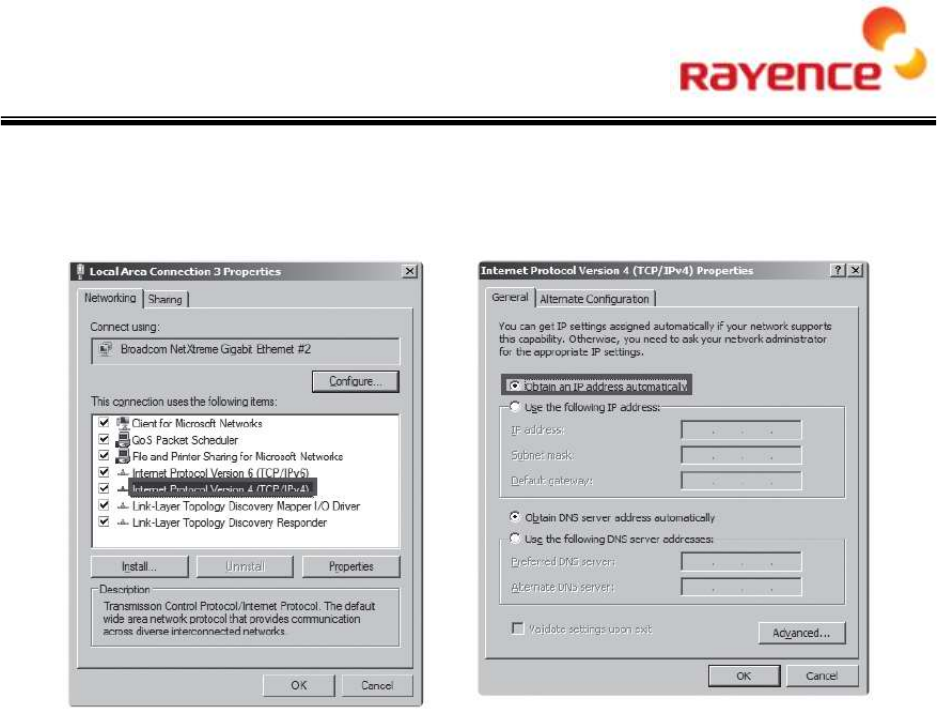
③ PC setup
• Set up the Network as below
• To use wired mode, right click “Local Area Connection” and click properties
18
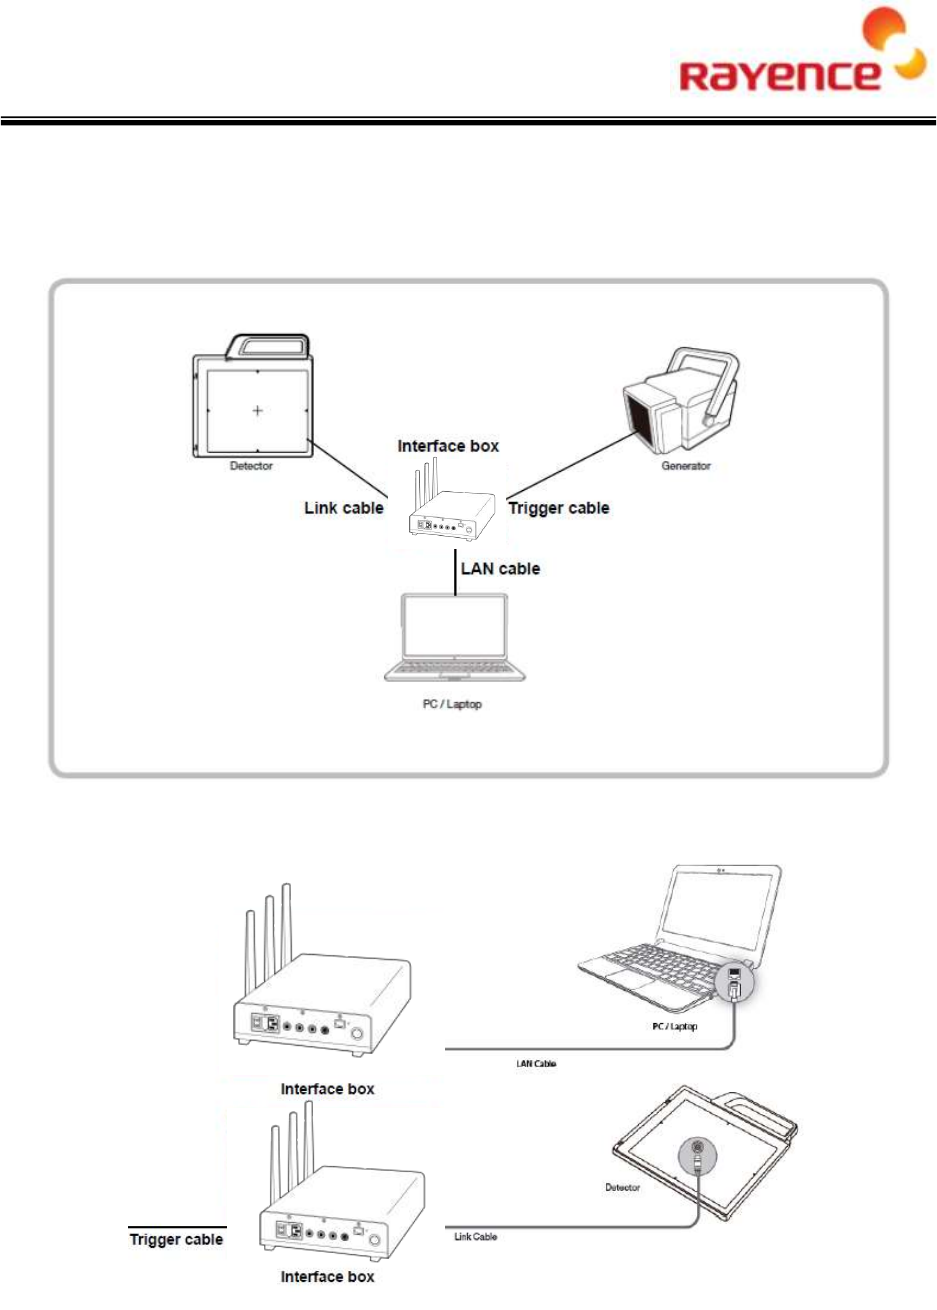
• Double click “ Internet Protocol Version 4 (TCP/IPv4)”
• Select “Obtain an IP address automatically” and click “OK”
19
5.4. Manual trigger & Wired mode
① Product Setup
② Connect the cable
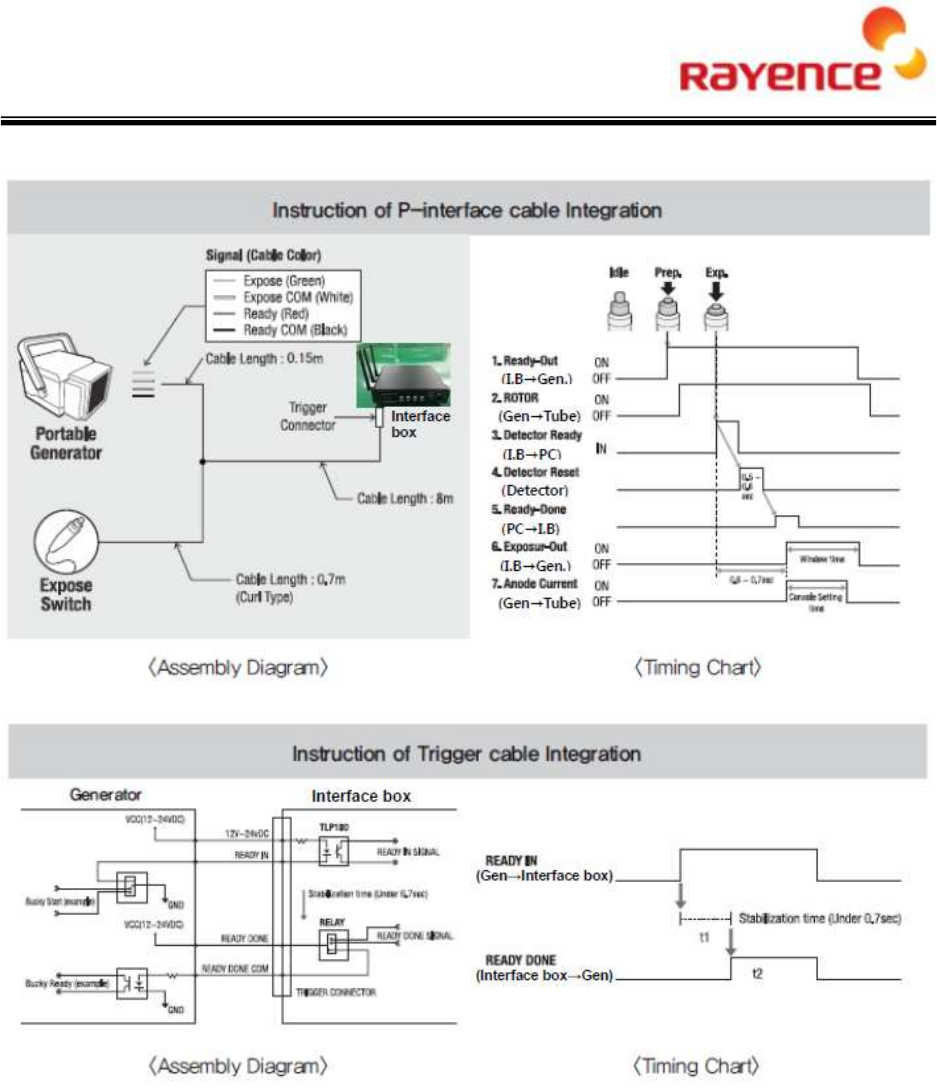
20
21
③ PC setup
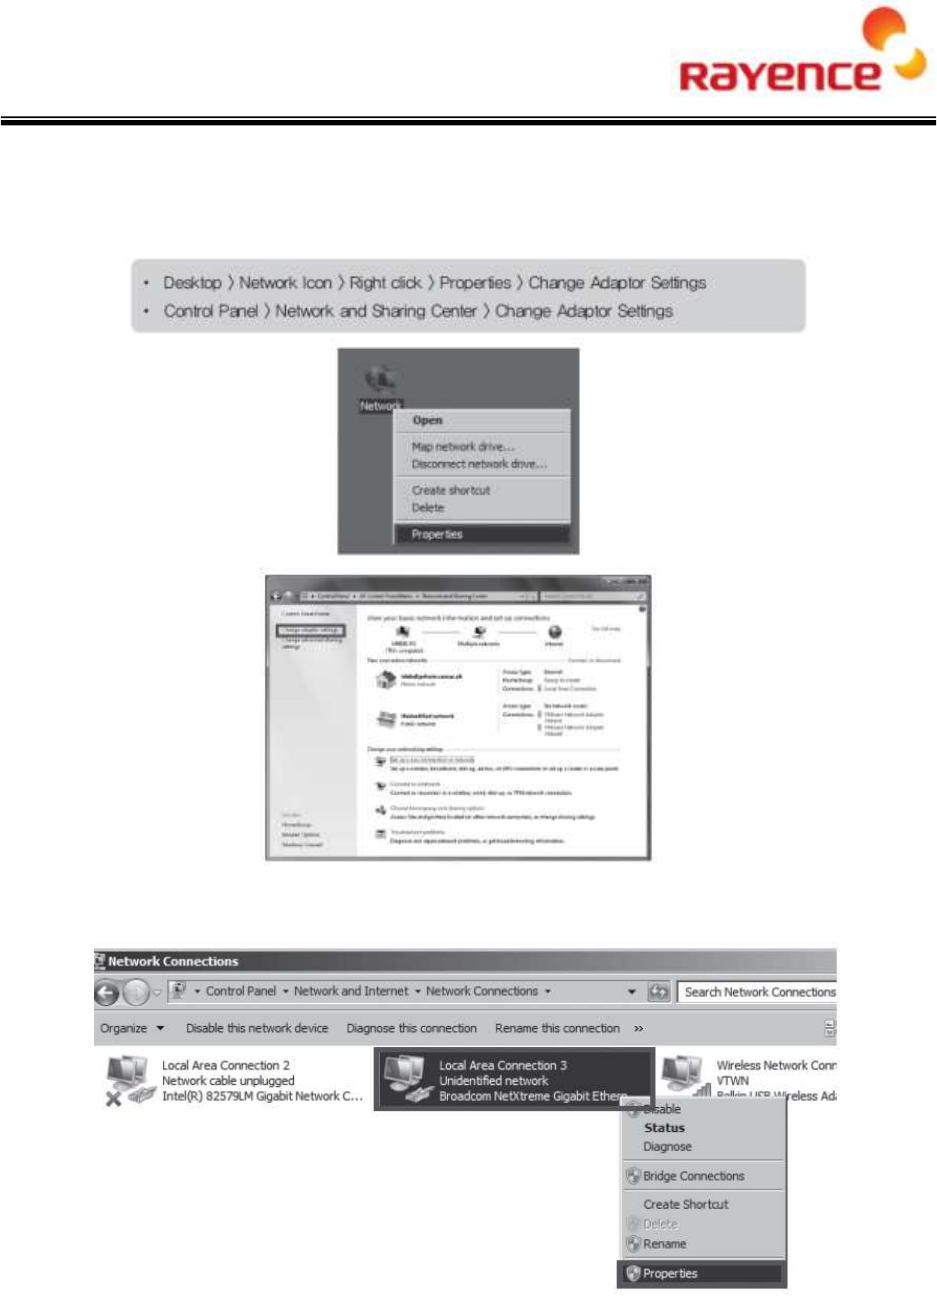
• Set up the Network as below
• To use wired mode, right click “Local Area Connection” and click properties
22
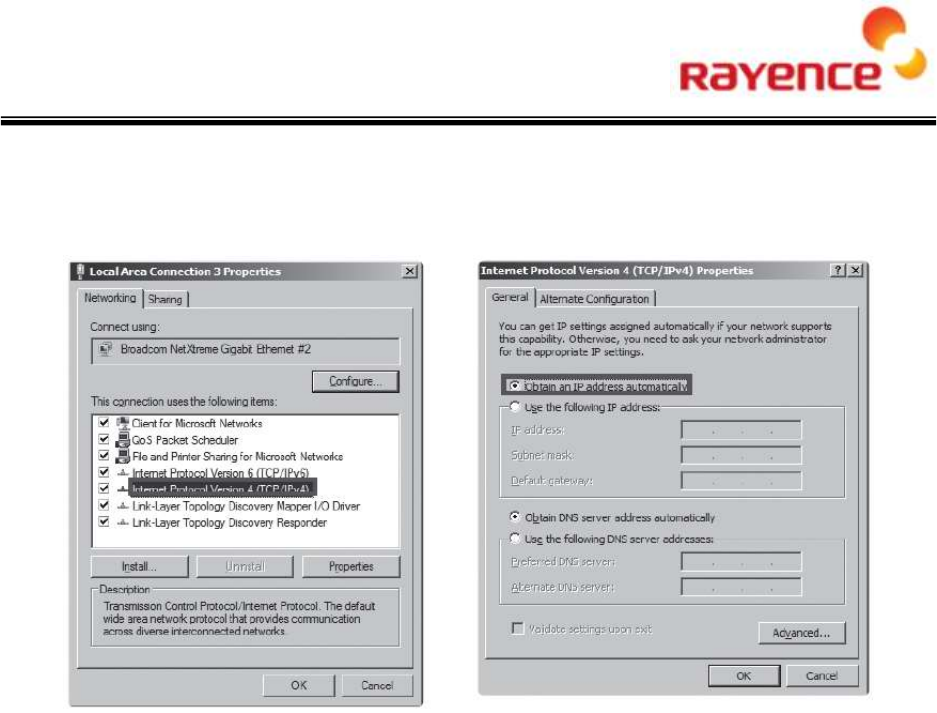
• Double click “ Internet Protocol Version 4 (TCP/IPv4)”
• Select “Obtain an IP address automatically” and click “OK”
23
6. Web UI
6.1. Main Screen
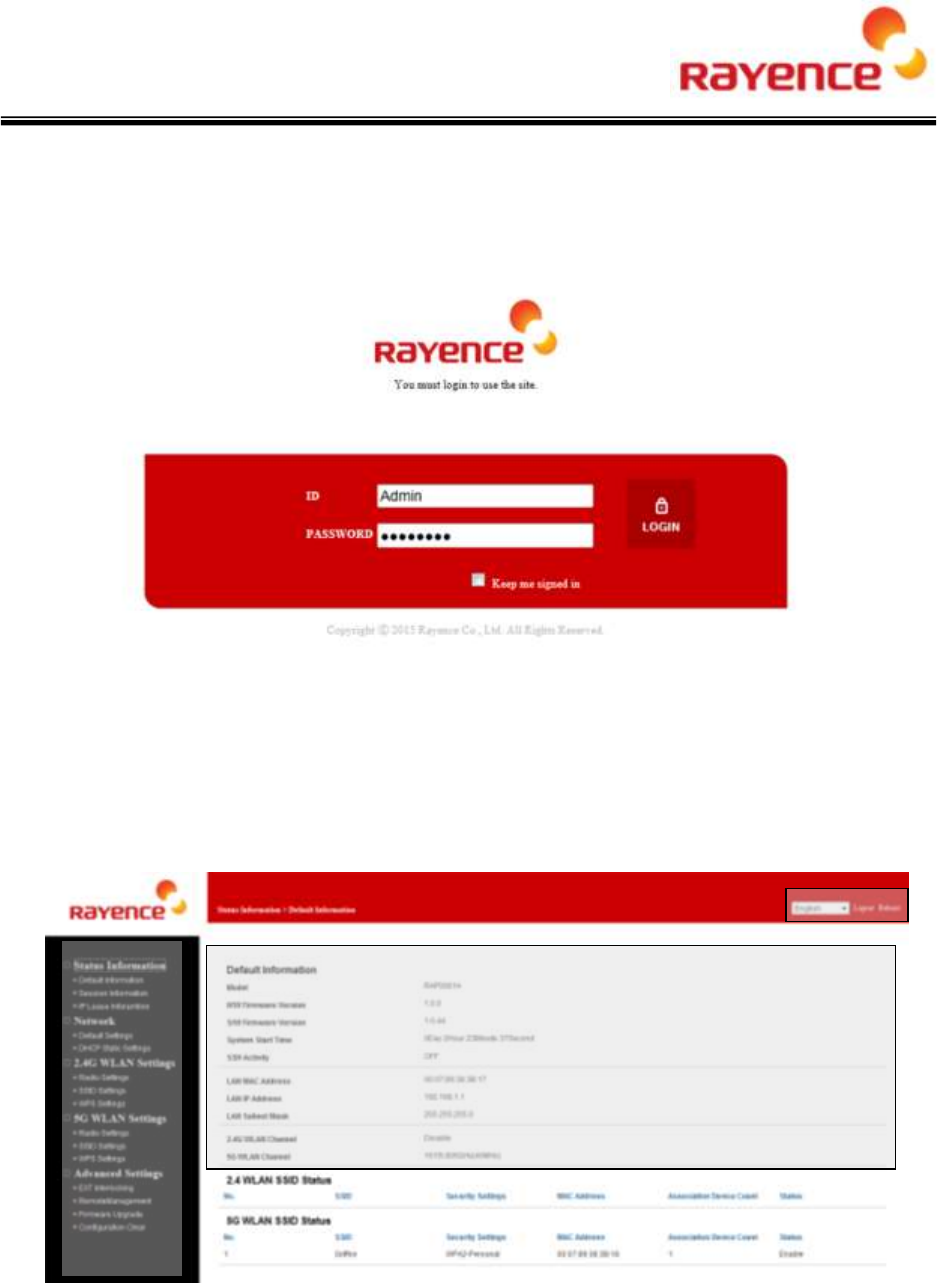
• You can set or view the parameter of RAP001A on the web browser.
• Access to the page using the following information: IP (192.168.1.1) and Port (8080).
• The login ID is “Admin”, and the password is “rayence1”.
• The access address, the port, and the account can be modified on the WEB UI.
6.2. Page Layout
① Menu
• The viewing and settings menu on the left are categorized by the function.
② Upper screen
• Language setting: Can set the display language either in Korean or in English.
24
• LOGOUT: Logout from the Web UI page.
• REBOOT: The system must be rebooted to apply the changes in parameters.
③ Main panel
• The information for each menu can be viewed or configured.
6.3. Main Menu
• The current setting can be viewed or modified.
① Status Information
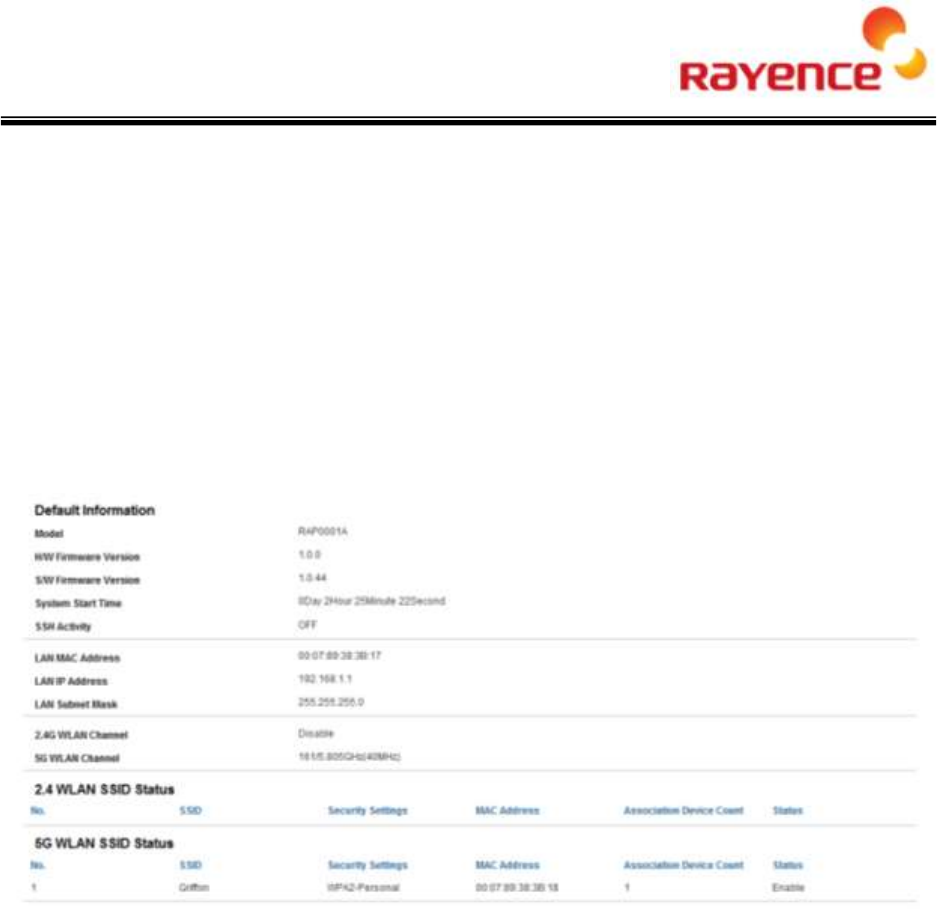
A. Default Information
This menu provides information about the settings and the environment of RAP001A.
i. Default information: Display information about the basic information.
• Model: Display the Model information of the product.
• HW Firmware version / SW Firmware version: Display the Version.
• System Start Time: Display the Service time after Reboot.
• SSH Activity: Display the connection status using the SSH protocol.
• LAN MAC Address: Display the MAC address of LAN cable.
• LAN IP Address: Display the LAN IP address.
• LAN Subnet Mask: Display information about the LAN Subnet Mask.
• 2.4G WLAN Channel: Display the current channel with 2.4G and the bandwidth information.
• 5G WLAN Channel: Display the current channel with 5G and the bandwidth information.
ii. 2.4G WLAN SSID Status: Display information about current 2.4G wireless LAN.
iii. 5G WLAN SSID Status: Display information about current 5G wireless LAN.
25
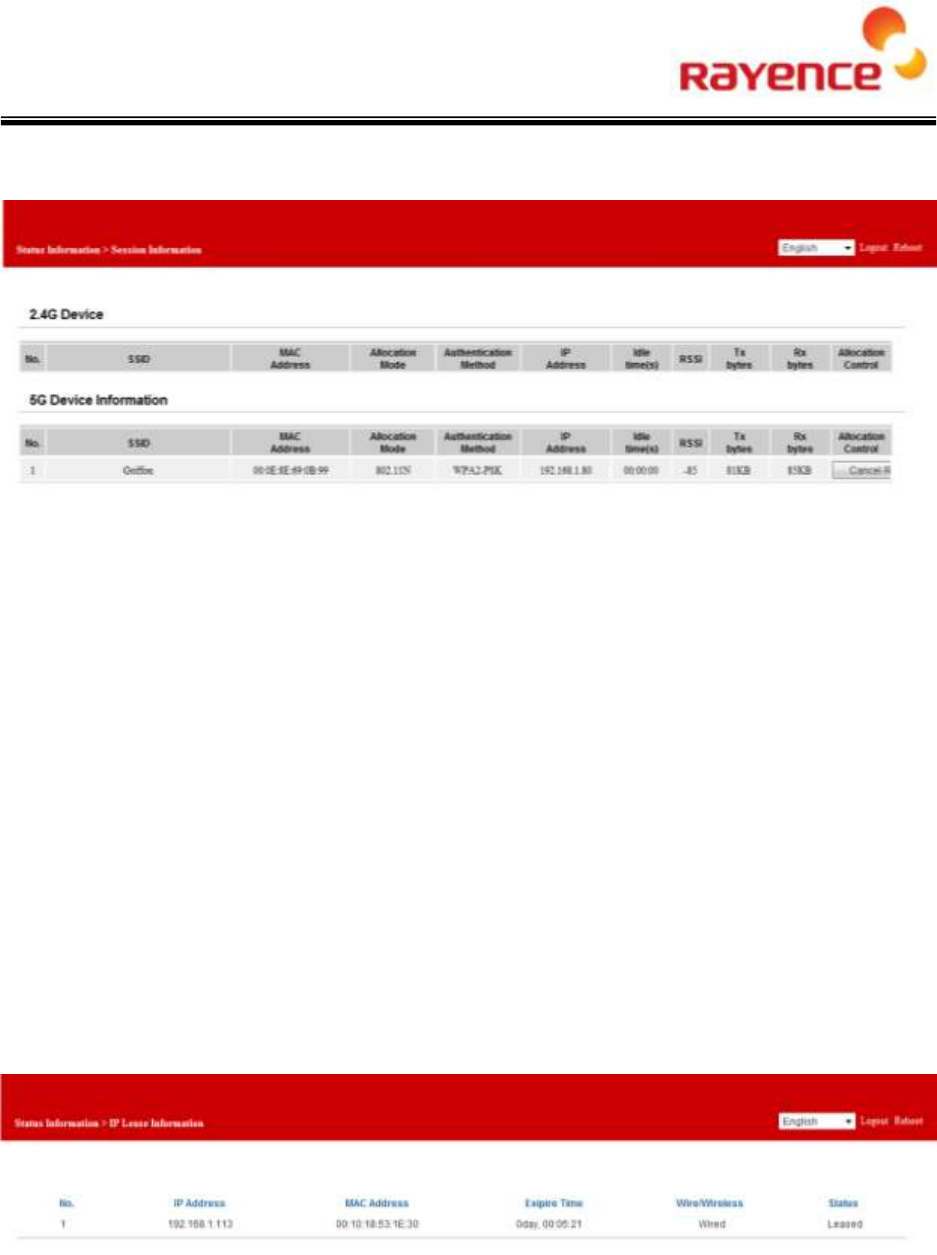
B. Session Information
This menu provides information about the devices connected to the wireless LAN of RAP001A.
i. 2.4G Device information: Display the information and the status of the devices conn
ected to the 2.4G wireless LAN.
ii. 5G Device information: Display the information and the status of the devices conne
cted to the 5G wireless LAN.
• SSID (Service Set Identifier): Display the value that distinguishes the wireless LAN, and this
values allows the connection to the corresponding BSS (basic service set).
• MAC Address: Display the physical address of each device.
• Allocation Mode: Display the wireless mode of each device, such as a/b/g/n/ac.
• Authentication Method: The Authentication status can be divided into the authenticated and the
unauthenticated status, and the Authentication Method changes by the authentication and
security methods.
• IP Address: Display the private IP assigned to the device by the RAP001A.
• Idle Times(s): Display the idle time of the device.
• RSSI: Display the receiving sensitivity.
• Tx bytes: Display the amount of Transfer data.
• Rx bytes: Display the amount of Receive data.
C. IP Lease Information
This menu provides information about the assigned IP for wireless and wire LAN of RAP001A.
② Network
26
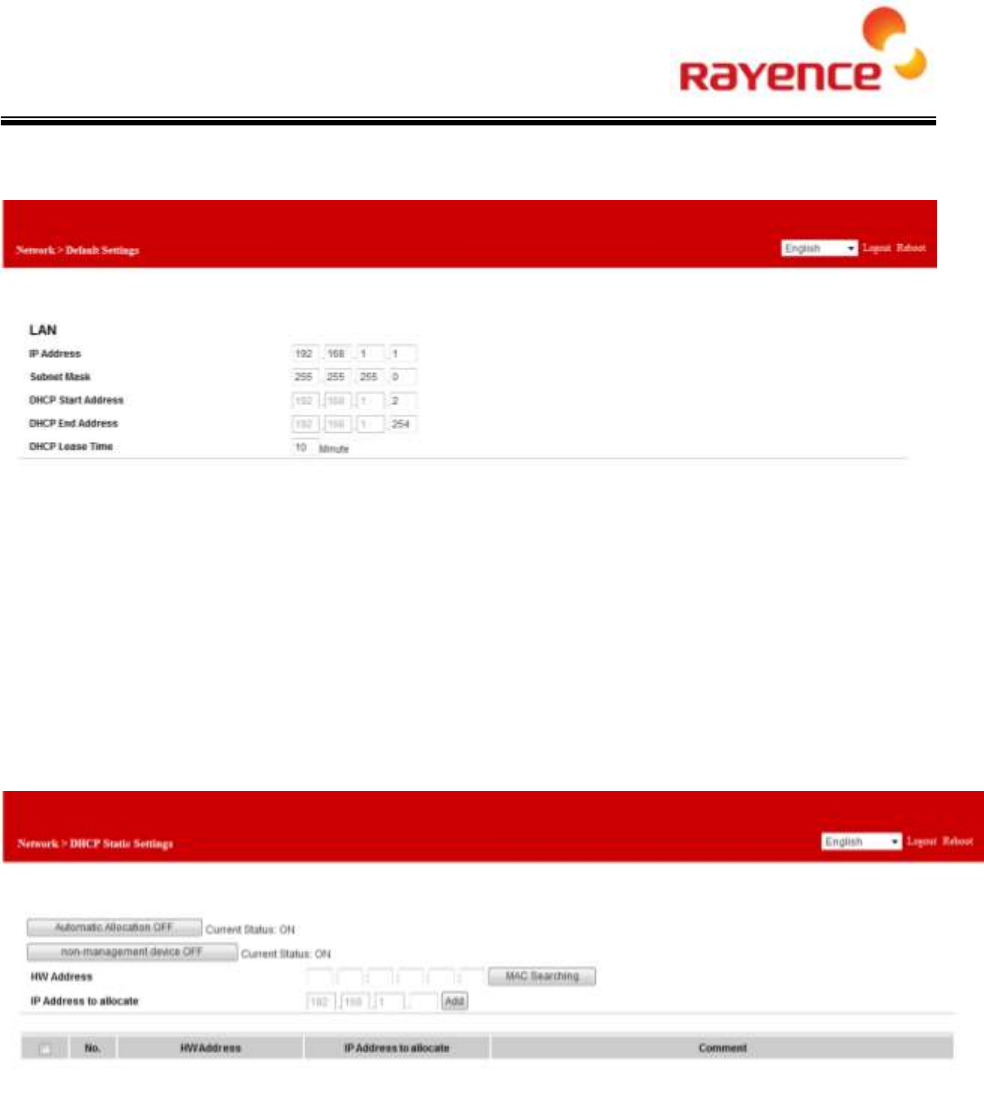
A. Default Settings
The LAN address and the IP bandwidth can be adjusted through this menu.
i. LAN
• IP Address: Display the IP address of RAP001A.
• Subnet Mask: Display the Subnet Mask of RAP001A.
• DHCP Start Address: Display the DHCP Start Address, which is assigned to device by RAP001A.
• DHCP End Address: Display the DHCP End Address, which is assigned to device by RAP001A.
• DHCP Lease Time: Display the DHCP Lease Time, which is assigned to device by RAP001A.
B. DHCP Static Settings
27
It is the filter function that limits the connectable device.
i. DHCP Static Settings
• Automatic Allocation OFF: Display the setting value of automatic IP allocation for devices.
• Non-management device: Display the policy about the registered or unregistered devices to the
WEB UI.
• HW address: Input the 12-digit Hardware address of device to where the IP is assigned.
• IP address to allocate: Input the assigned IP address.
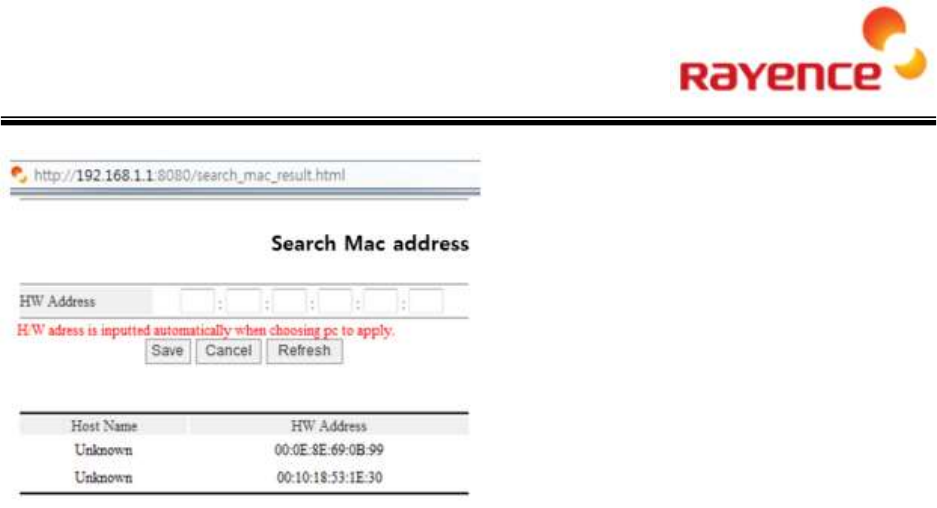
ii. Mac Searching
• HW Address: Input the 12-digit Hardware address directly into the field or using the automatic
search function.
• Table for Device management
• The table shows the hardware address of the devices that the DHCP Static table manages and
the record list of the IP address to be assigned.
28
③ 2.4G Wireless LAN Settings
A. Radio settings
This menu displays the properties of the 2.4G wireless LAN.
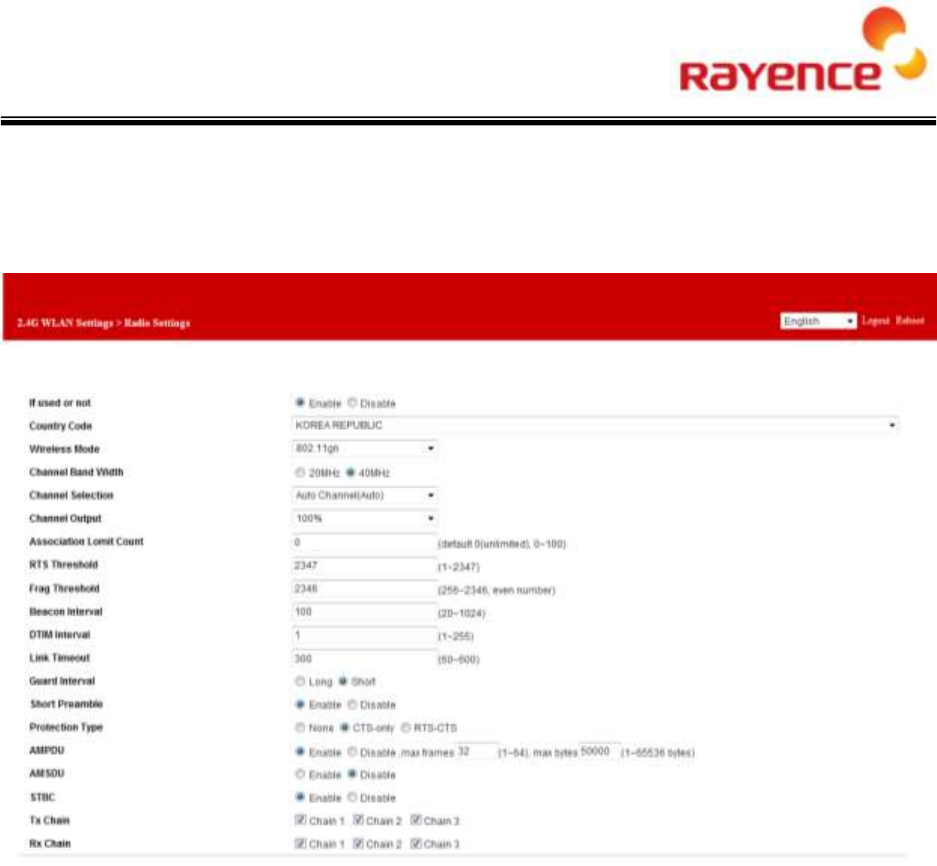
i. Radio settings
• If used or not: Set whether to use the corresponding wireless LAN.
• Country Code: The Country Code setting is required because the allowed RF Channels differ by
countries, and it can be currently set only for America and Korea.
• Wireless Mode: The Wireless Mode can be set to 802.11 b/g/n.
• Channel Width: The wireless bandwidth can be set to BW 20M or 40M.
• Channel Selection: The channel to use can be set to Auto or Manual.
• RTS Threshold: Set the size of the packet considering the Hidden Node.
• Frag Threshold: Transmit by dividing the wireless packet according to the setting value.
• Beacon Interval: It synchronizes the packet sent from RAP001A and the packet the device
receives, and it is the transmission interval.
• DTIM Interval: It is the signal that sounds when there is data to send to device and breaks the
standby status of device.
• Link Timeout: Display the Session time to provide to devices.
• Guard Interval: It is the data length that checks the connection before the wireless transmission.
• Short Preamble: It provides some spare time for receiving device to synchronize the clock of
RAP001A.
• Protection Type: It is type to protect the hidden node issue.
29
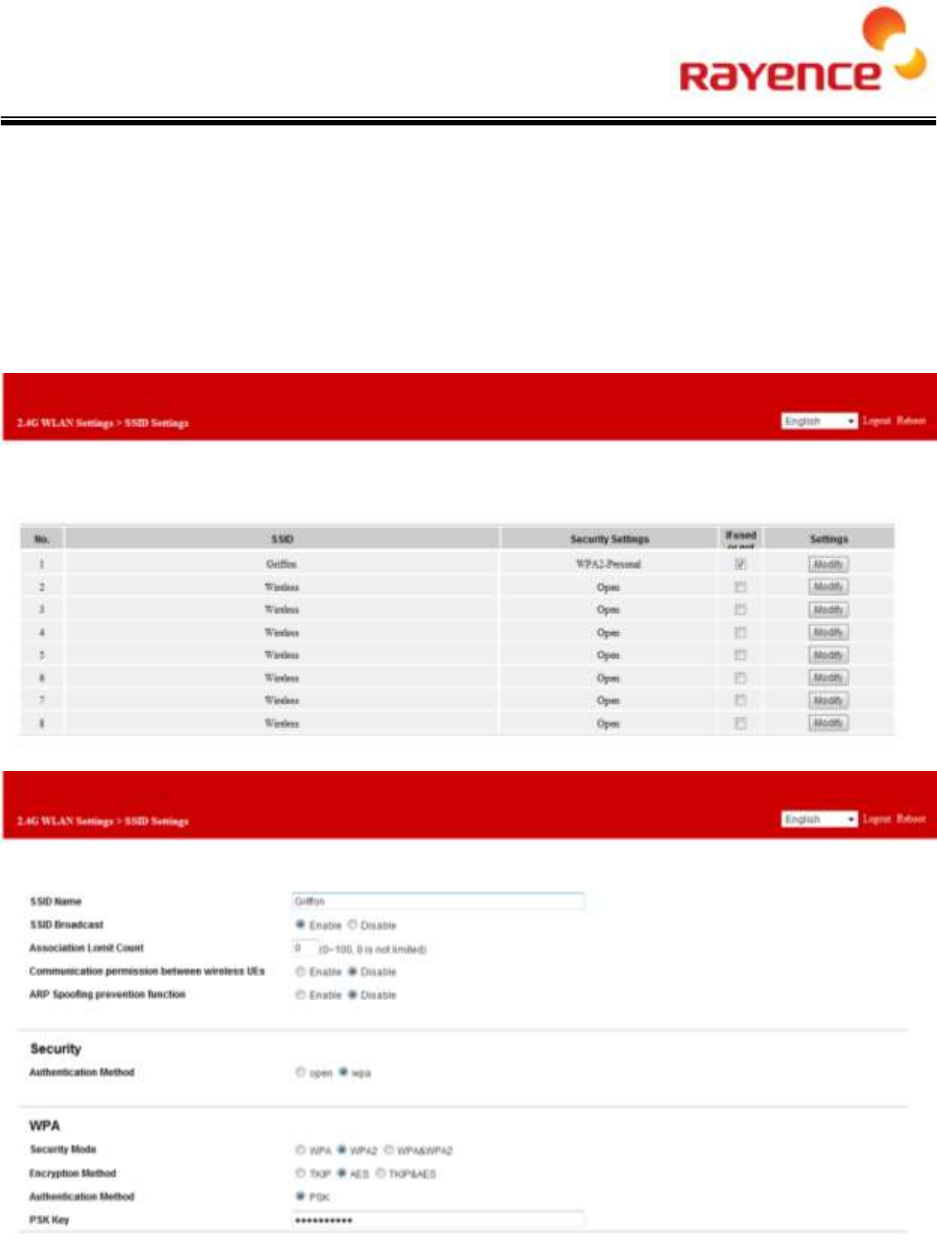
• AMPDU : Aggregate-MAC Protocol Data Unit
• AMSDU : Aggregate-MAC Service Data Unit
• STBC : Space Time Block Coding
• Tx Chain: Check the data Transfer status of 3X3 antenna.
• Rx Chain: Check the data Receive status of 3X3 antenna.
B. SSID Settings
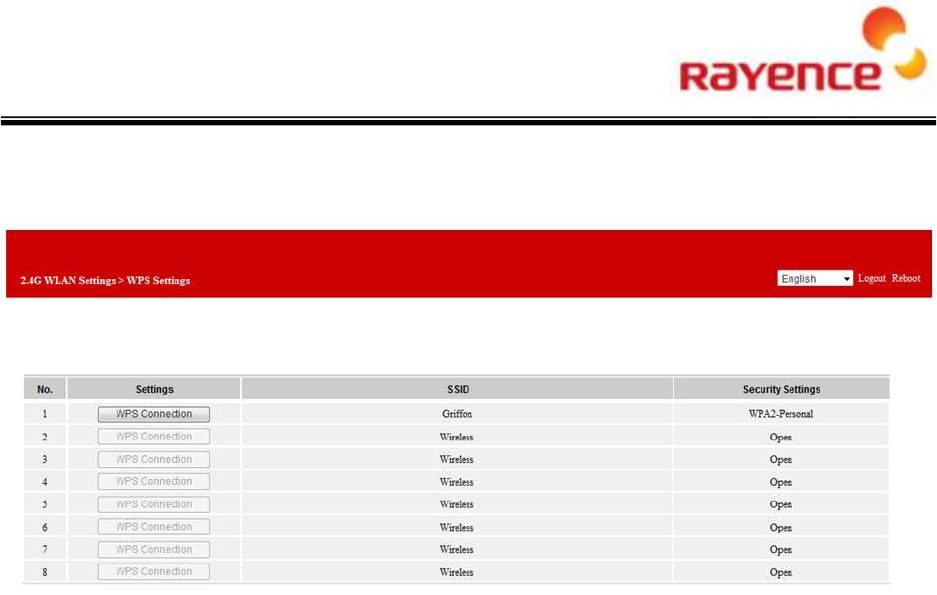
This menu displays the SSID property of the 2.4G wireless LAN.
i. SSID Settings
• SSID name: Defines the SSID name. You can use Korean, English alphabets, number, space,
and symbols for the SSID name.
• SSID Broadcast: Displays the possibility of SSID Broadcast to devices.
• Association Limit Count: Limit the number of devices that can be connected to the corresponding

30
SSID.
• Communication permission between wireless Use: Set whether to allow the connection between
wireless devices.
• ARP Spoofing prevention function: Set whether to use the prevention function against the ARP
Spoofing attack.
ii. Security
• Authentication Method: Set whether to provide the open SSID service or the SSID service with a
password.
iii. WPA
• Security Mode: Display the type of security mode.
• Encryption Method: Display the type of encryption method.
• Authentication Method: Display the authentication method.
• PSK Key: Input the encryption key.
31
C. WPS Settings
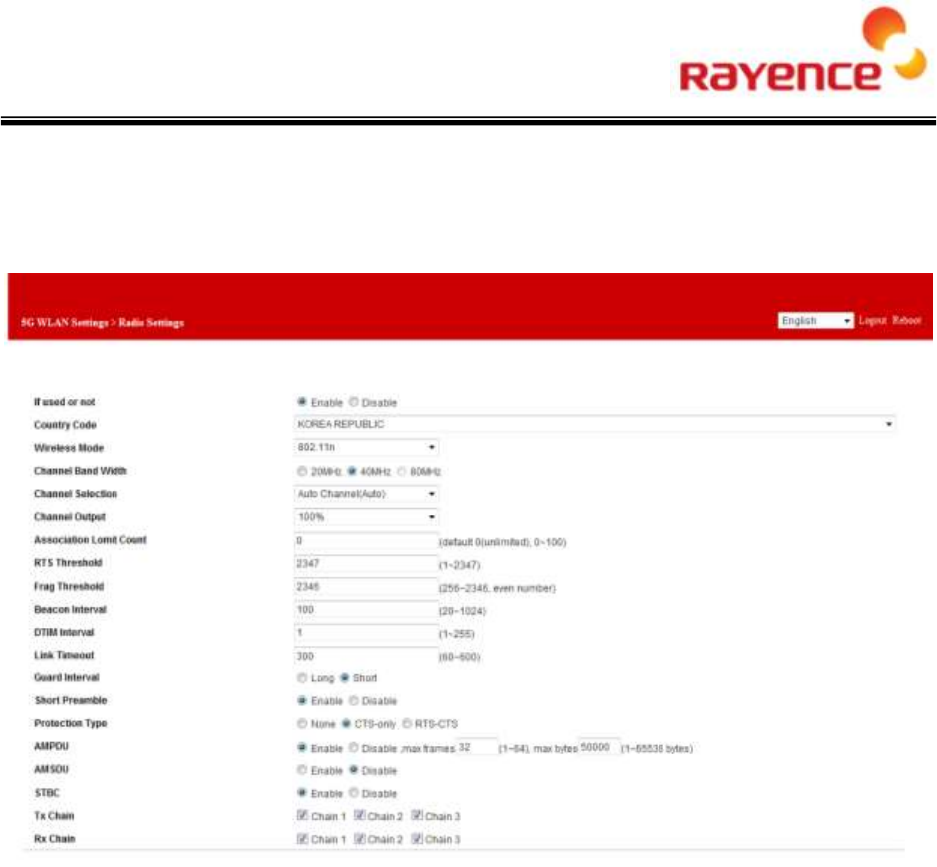
This menu displays the WPS Settings for each SSID (2.4G).
• WPS Connection: Attempts to connect with WPS and the connection to WPS will be successful
when connected within two minutes.
32
④ 5G WLAN Settings
A. Radio Settings
This menu displays the property of the 5G wireless LAN.
i. Radio Settings
• If used or not: Set whether to use the corresponding wireless LAN.
• Country Code: The Country Code setting is required because the allowed RF Channels differ by
countries, and it can be currently set only for America and Korea.
• Wireless Mode: The Wireless Mode can be set to 802.11 a/n/ac.
• Channel Band Width: The wireless bandwidth can be set to BBW 20M, 40M, or 80M.
• Channel Selection: The channel to use can be set to Auto or Manual.
• RTS Threshold: Set the size of the packet considering the Hidden Node.
• Frag Threshold: Transmit by dividing the wireless packet according to the setting value.
• Beacon Interval: It synchronizes the packet sent from RAP001A and the packet the device
receives, and it is the transmission interval.
• DTIM Interval: It is the signal that sounds when there is data to send to device and breaks the
standby status of device.
• Link Timeout: Display the Session time to provide to devices.
• Guard Interval: It is the data length that checks the connection before the wireless transmission.
• Short Preamble: It provides some spare time for receiving device to synchronize the clock of
RAP001A.
• Protection Type: It is type to protect the hidden node issue.
33
• AMPDU : Aggregate-MAC Protocol Data Unit
• AMSDU : Aggregate-MAC Service Data Unit
• STBC : Space Time Block Coding
• Tx Chain: Check the data Transfer status of 3X3 antenna.
• Rx Chain: Check the data Receive status of 3X3 antenna.
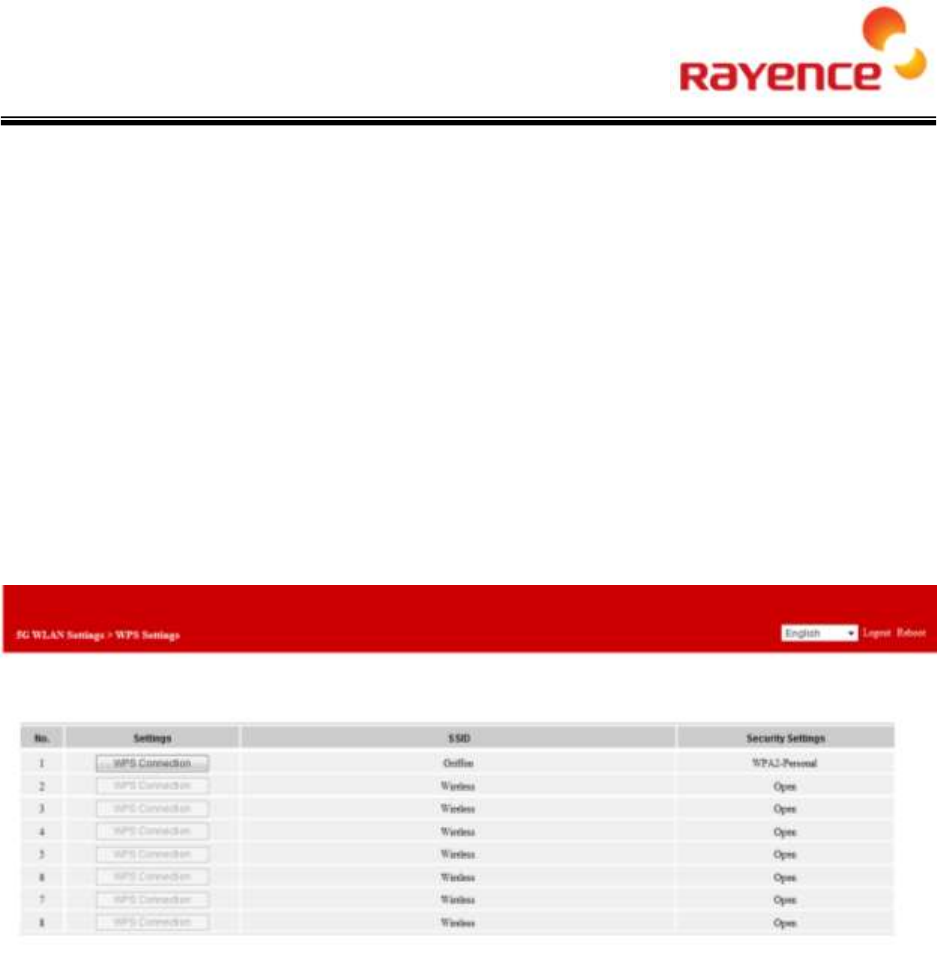
B. SSID Settings
This menu displays the SSID property of the 5G wireless LAN.
i. SSID Settings
• SSID Name: Defines the SSID name. You can use Korean, English alphabets, number, space,
and symbols for the SSID name.
• SSID Broadcast: Displays the possibility of SSID Broadcast to devices.
• Association limit Count: Limit the number of devices that can be connected to the corresponding
34
SSID.
• Communication permission between wireless use: Set whether to allow the connection between
wireless devices.
• ARP Spoofing prevention function: Set whether to use the prevention function against the ARP
Spoofing attack.
ii. Security
• Authentication method: Set whether to provide the open SSID service or the SSID service with a
password.
iii. WPA
• Security Mode: Display the type of security mode.
• Encryption method: Display the type of encryption method.
• Authentication method: Display the authentication method.
• PSK Key: Input the encryption key.
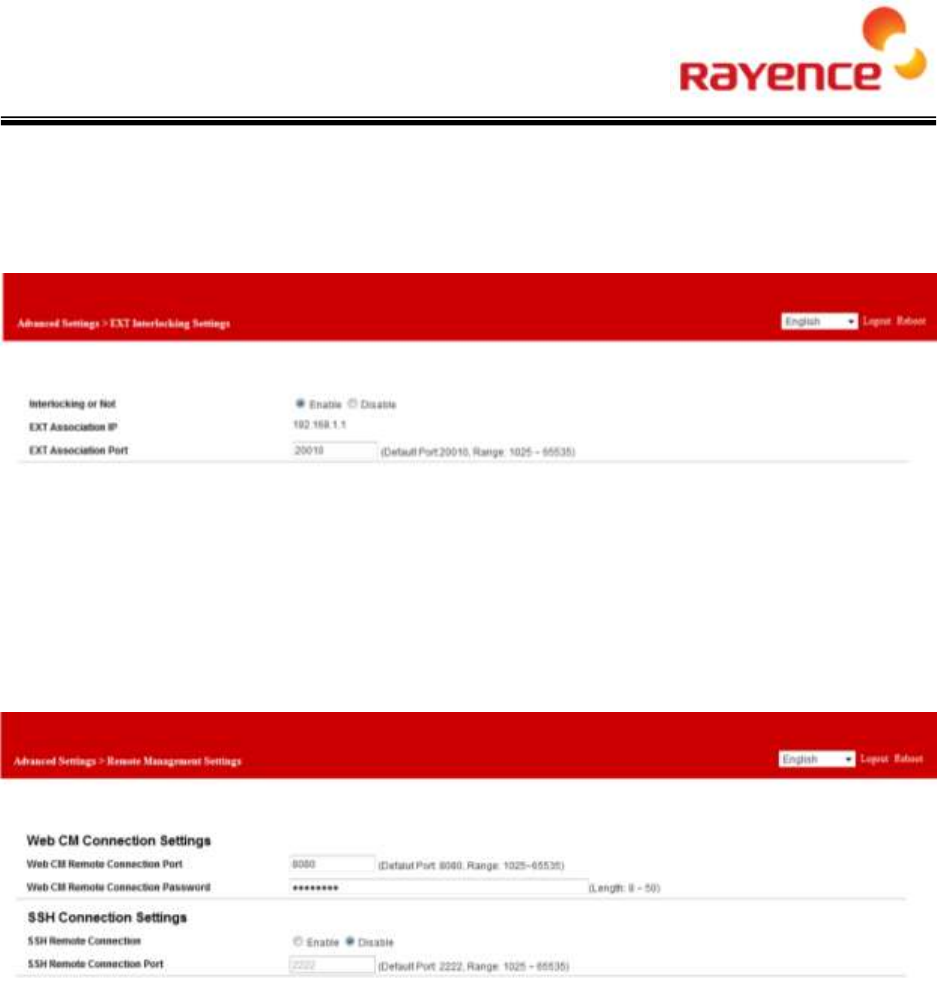
C. WPS Settings
This menu displays the WPS Settings for each SSID (5G).
• WPS Connection: Attempts to connect with WPS and the connection to WPS will be successful
when connected within two minutes.
35
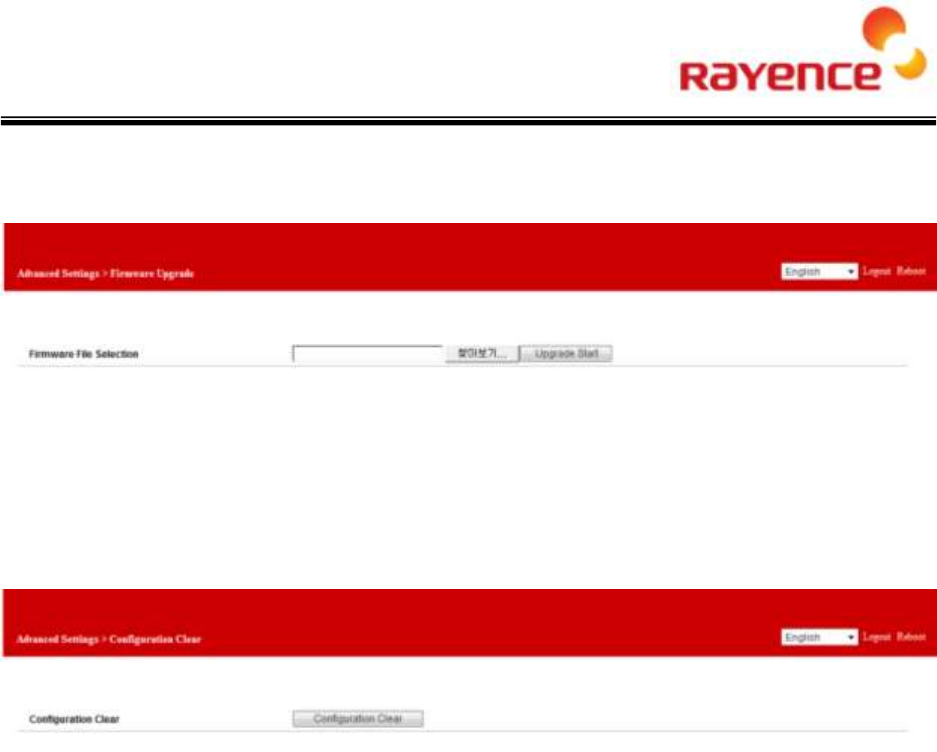
⑤ Advanced Settings
A. EXT Interlocking Settings
The external connection for AGI can be set through this menu.
• Interlocking or Not: Set whether to use the EXT interlocking.
• EXT Association IP: Display the received LAN IP address for corresponding address.
• EXT Association Port: Set the address for EXT Association Port.
B. Remote Management Settings
This menu provides the information about the WEB UI that controls the product or the connection
to the inner terminal.
i. Web CM Connection Settings
• Web CM Remote Connection port: Display the Port number when connecting to the
corresponding WEB UI.
• Web CM Remote Connection Password: Display the login ID and the password.
ii. SSH Connection Settings
• SSH Remote Connection: Set whether to enable the connection using the SSH protocol.
• SSH Remote Connection Port: Set the SSH protocol port number.
36
C. Firmware Upgrade
The firmware of the product can be upgraded.
• Firmware File Selection: Search the Firmware binary inside the locally connected terminal.
• Upgrade Start: Select the normal Firmware binary and click the [Upgrade Start] button.
D. Configuration Clear
• Reset the settings value. At this time, the parameter set by users may be initialized.

37
IC Information to User
“This device complies with Industry Canada licence-exempt RSS standard(s). Operation is subject
to the following two conditions: (1) this device may not cause interference, and (2) this device must
accept any interference, including interference that may cause undesired operation of the device.”
FCC Information to User
This equipment has been tested and found to comply with the limits for a Class B digital device, pursuant
to Part 15 of the FCC Rules. These limits are designed to provide reasonable protection against harmful
interference in a residential installation. This equipment generates, uses and can radiate radio frequency
energy and, if not installed and used in accordance with the instructions, may cause harmful interference
to radio communications. However, there is no guarantee that interference will not occur in a particular
installation. If this equipment does cause harmful interference to radio or television reception, which can
be determined by turning the equipment off and on, the user is encouraged to try to correct the
interference by one of the following measures:
• Reorient or relocate the receiving antenna.
• Increase the separation between the equipment and receiver.
• Connect the equipment into an outlet on a circuit different from that to which the receiver is con-nected.
• Consult the dealer or an experienced radio/TV technician for help.
Caution
Modifications not expressly approved by the party responsible for compliance could void the user’s
authority to operate the equipment.
FCC Compliance Information : This device complies with Part 15 of the FCC Rules. Operation is
subject to the following two conditions: (1) This device may not cause harmful interference, and (2) this
device must accept any interference received, including interference that may cause undesired operation.
IMPORTANT NOTE:
FCC RF Radiation Exposure Statement:
This equipment complies with FCC RF radiation exposure limits set forth for an uncontrolled environment.
This equipment should be installed and operated with a minimum distance of 20 centimeters between the
radiator and your body.This transmitter must not be co-located or operating in conjunction with any other
antenna or transmitter.

38
Rayence Co., Ltd.
14, Samsung 1-ro 1-gil, Hwaseong-si, Gyeonggi-do, Korea
www.rayence.com