User manual.pdf
HMT-1
User Guide (English)

2
Copyright Information
Copyright © 2017 Realwear Technologies, Inc.
Realwear and the Realwear logo are trademarks of Realwear Technologies, Inc. Other company
and product names may be trademarks or registered trade-marks of the respective owners with
whom they are associated.
RealWear may update this guide from time to time. You should ensure you are using the most
current version.
Copyright Information
3
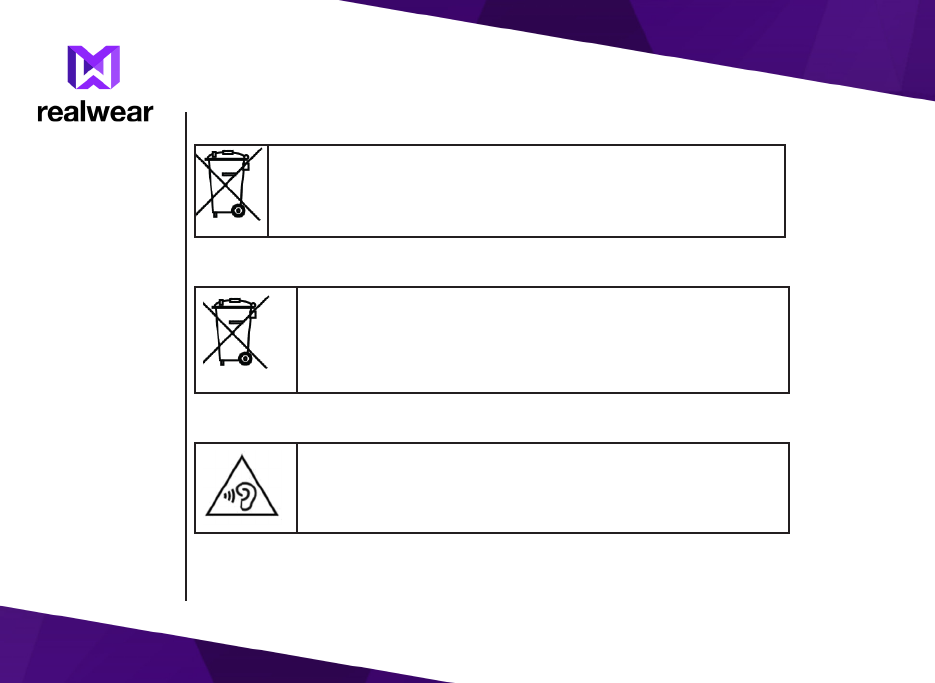
Disposal of Old Electrical and Electronic Equipment
The symbol of the crossed-out wheeled bin indicates that within
the countries in the European Union, this product, and any
enhancements marked with this symbol, can not be disposed as
unsorted waste but must be taken to separate collection at their
end- of-life.
Disposal of Battery
Please check local regulations for disposal of batteries. The
battery should never be placed in municipal waste. Use a battery
disposal facility if available.
Guideline for Headphone and Earphone
To prevent possible hearing damage, please do not listen at high
volume levels for long periods.
A pleine puissance, l’écoute prolongée du baladeur peut
endommager l’oreille de l’utilisateur.
Disposal of Old Electrical
and Electronic
Equipments
Disposal of Battery
Guideline for Headphone
and Earphone

4
General Information
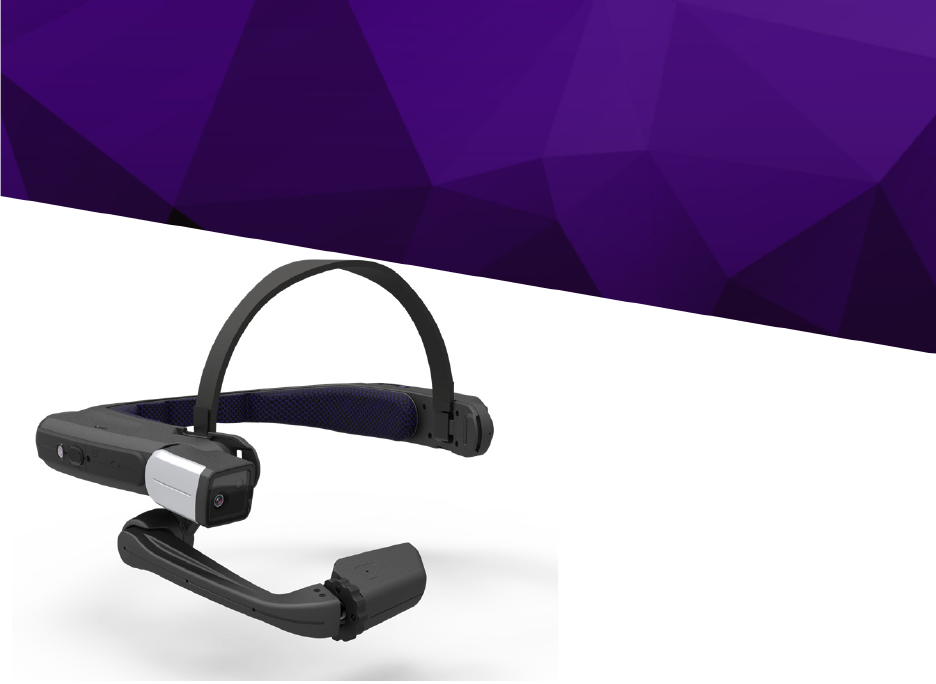
Congratulations on the purchase of a Realwear Head Mounted tablet HMT-1. This tablet is
designed for skilled technicians and engineers employed in eld service, equipment inspection,
maintenance and complex manufacturing assembly units.
Head Mounted Tablet Models Covered
This user guide covers the following Realwear Head Mounted tablet (HMT) model: T1100G
The model name can be read on the tablet label.
Operating frequency band(s) details as follows:
• 802.11a : 14.34dBm
• 802.11b : 13.24dBm
• 802.11g : 12.29dBm
• 802.11n HT20 (2.4GHz) : 11.17dBm
• 802.11n HT40 (2.4GHz) : 10.58dBm
• 802.11n HT20 (5GHz) : 11.2dBm
• 802.11n HT40 (5GHz) : 11.17dBm
• 802.11ac : 12.26dBm
• Bluetooth : 10.55dBm
Head Mounted Tablet
Models Covered
5G WiFi Connection
Information
Realwear Support
Information

5
5G WiFi Connection Information
Operations in the 5.15-5.35GHz band are restricted to indoor usage only.
5.15-5.35GHz は屋内限定.
Realwear Support Information
For additional product and support information,
• E-mail: support@realwear.com
• Website: http://www.realwear.com/support
• Postal address: 1851 McCarthy Boulevard, Suite 120, Milpitas, CA 95035General Information
Head Mounted Tablet
Models Covered
5G WiFi Connection
Information
Realwear Support
Information

6
Safety Guidelines
Battery Performance
A rechargeable battery powers your device. Always use only the original type of Realwear
battery, which came with the device. Use the battery only for its intended purpose . Never use
any charger or battery that is damaged. If the battery is completely discharged, it may take
a few minutes before the charging indicator appears on the display or before any calls can be
made. The full performance of a new battery is achieved only after three to four complete
charge and discharge cycles. The battery can be charged and discharged hundreds of times but it
will eventually wear out. Unplug the charger from the electrical plug and the device when not in
use. Ensure that you do not leave the fully charged battery connected to the charger for longer
time. If left unused, a fully charged battery will lose its charge over time.
There is a risk of explosion while charging if an incorrect battery other than the
specied model is used.
Battery Replacement
When low battery alert is displayed, we recommend to replace the battery with an original
Realwear battery. If a replacement battery is being used for the rst time or if the battery has
not been used for a prolonged period, it may be necessary to connect the charger and then
disconnect and reconnect it to begin charging the battery.
Avoid Short Circuit
Do not short-circuit the battery. An accidental short-circuit can occur when a metallic object
such as a coin, clip, or pen causes direct connection of the positive (+) and negative (-) terminals
Battery Performance
Battery Replacement
Avoid Short Circuit

7
of the battery. (These look like metal strips on the battery.) This might happen, for example,
when you carry a spare battery in your pocket or purse. A short-circuit at the terminals may
damage the battery or the connecting object.
Avoid High Temperatures (check and change)
Leaving the battery in hot or cold places, such as in a closed car in summer or winter conditions,
will reduce the capacity and lifetime of the battery. For the best results, try to keep the battery
between -10°C and +50°C (+14°F and 122°F). A device with a hot or cold battery may not work
temporarily, even when the battery is fully charged. Battery performance is particularly limited
in temperatures well below freezing.
Battery Disposal
Do not dispose o batteries in a re as they may explode. Batteries may also explode if damaged.
Dispose of batteries according to local regulations and recycle when possible. Do not dispose as
household waste. Do not dismantle, open or shred cells or batteries. In the event of a battery
leak, do not allow the liquid to come in contact with the skin or eyes. In the event of leak or a
hazard seek medical help immediately.
Child Safety
Do not allow children to play with your mobile devices or its accessories. Keep it out of their
reach. They could hurt themselves or others, or could accidentally damage the device or
accessories. Your device and its accessories may contain small parts, which could be detached
and create a choking hazard.
Health Hazards
Stop using Realwear HMT or its eyepiece immediatly if you get headache, vertigo, dizziness or
nausea.
Avoid High
Temperature
Battery Disposal
Child Safety
Health Hazards

8
SAR Information
Radiation Exposure Statement - The United States and Canada
This device meets the government’s requirements for exposure to radio waves.
This device is designed and manufactured not to exceed the emission limits for exposure to radio
frequency (RF) energy set by the Federal Communications Commission of the U.S. Government.
The exposure standard for wireless device employs a unit of measurement known as the Specic
Absorption Rate, or SAR. The SAR limit set by the FCC is 1.6W/kg. Tests for SAR are conducted
using standard operating positions accepted by the FCC with the device transmitting at its highest
certied power level in all tested frequency bands.
No minimum separation distance needs to be maintained between the user’s body and the
device, including the antenna during body-worn operation to comply with the RF exposure
requirements in United States and Canada .
The limit recommended by FCC and IC is 1.6 W/kg averaged over one (1) gram of tissue.
The highest SAR value of the HMT-1 for use:
• By the ear is 0.95 W/1g.
Radiation Exposure Statement - Europe
No minimum separation distance needs to be maintained between the user’s body and the
device, including the antenna during body-worn operation to comply with the RF exposure
requirements in Europe.
The limit recommended by RED is 2 W/kg averaged over ten (10) gram of tissue.
The highest SAR value of the HMT-1 for use:
SAR Information
Radiation Exposure
Statement - The United
States and Canada
Radiation Exposure State-
ment - Europe

9
• By the ear is 0.267 W/kg (10g).
Radiation Exposure Statement - Canada
The product comply with the Canada portable RF exposure limit set forth for an uncontrolled
environment and are safe for intended operation as described in this manual. The further RF
exposure reduction can be achieved if the product can be kept as far as possible from the user
body or set the device to lower output power if such function is available.
Déclaration d’exposition aux radiations
Le produit est conforme aux limites d’exposition pour les appareils portables RF pour les
Etats-Unis et le Canada établies pour un environnement non contrôlé. Le produit est sûr pour
un fonctionnement tel que décrit dans ce manuel. La réduction aux expositions RF peut être
augmentée si l’appareil peut être conservé aussi loin que possible du corps de l’utilisateur ou que
le dispositif est réglé sur la puissance de sortie la plus faible si une telle fonction est disponible.
Adapter Charger Usage Safety Instructions
To use the chargers follow the given instructions:
• Make sure that the cable plug is properly connected.
• Do not insert or remove the plug with wet hands.
• Do not open the charger. For any issues, contact support.
• Keep the charger away from liquids.
• In case of strange smell or noise from the charger, disconnect it and contact support.
• This charger is for indoor usage only. Please avoid wet areas.
• Do not cut, break or bend the cable in a knot.
Déclaration d’exposition
aux radiations
SAR Data Information for
residents in Canada
Adapter Charger Usage
Safety Instructions

10
• Do not put any objects on the cable that may let it overheat. It may damage the cable and
cause re or electrocution.
• Before cleaning the cable or charger, disconnect from power supply.
• Disconnect the charger, once the device is fully charged.
• Do not use any cable other than the original cable as it may cause short circuit or
electrocution.
• When using an extension cable, check the integrity of the ground conductor.
Déclaration d’exposition
aux radiations
SAR Data Information for
residents in Canada
Adapter Charger Usage
Safety Instructions

11
Introduction
This section provides information on using your Realwear Head Mounted tablet (HMT).
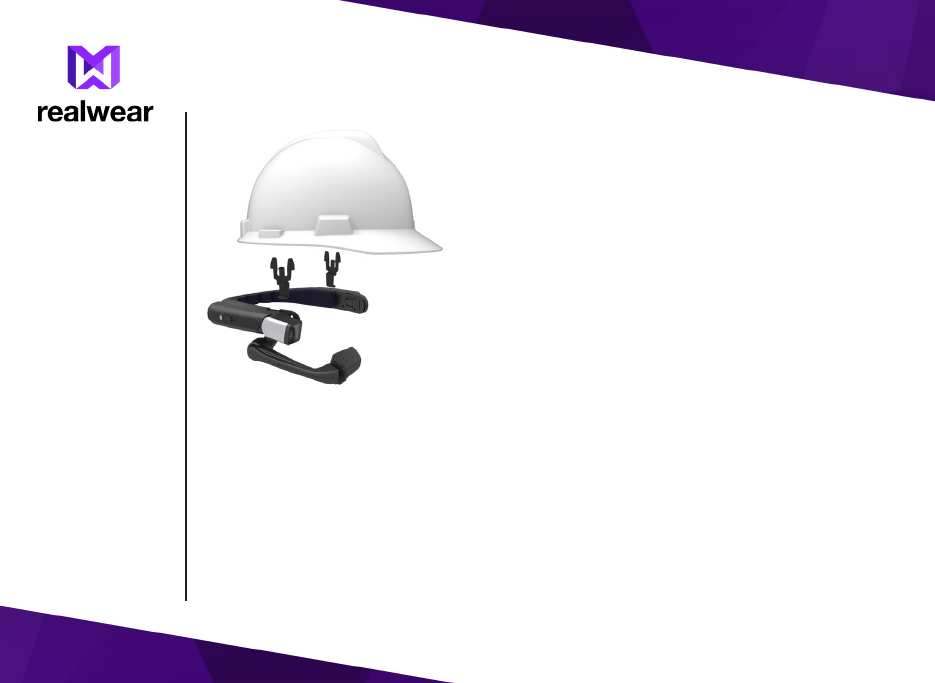
The list of items in the Realwear HMT-1 box are:
• HMT device + Battery (inserted, 30% charge)
• USB cable type C
• Over-head strap
• A pair of hard hat clips (V-gard compatible)
About Realwear Head Mounted Tablet
Realwear HMT-1 is a next generation Head Mounted rugged tablet. You can perform complete
hands-free operation and operate these tablets using voice commands and head gestures. This
hands-free enhancement is done using WearHF™ software, built into every RealWear device.
The HMT device runs on Android 6.0. It is intutive and you can easily understand its usage. For
more information on its features you can refer to this user guide.
About Realwear Head
Mounted Tablet
12
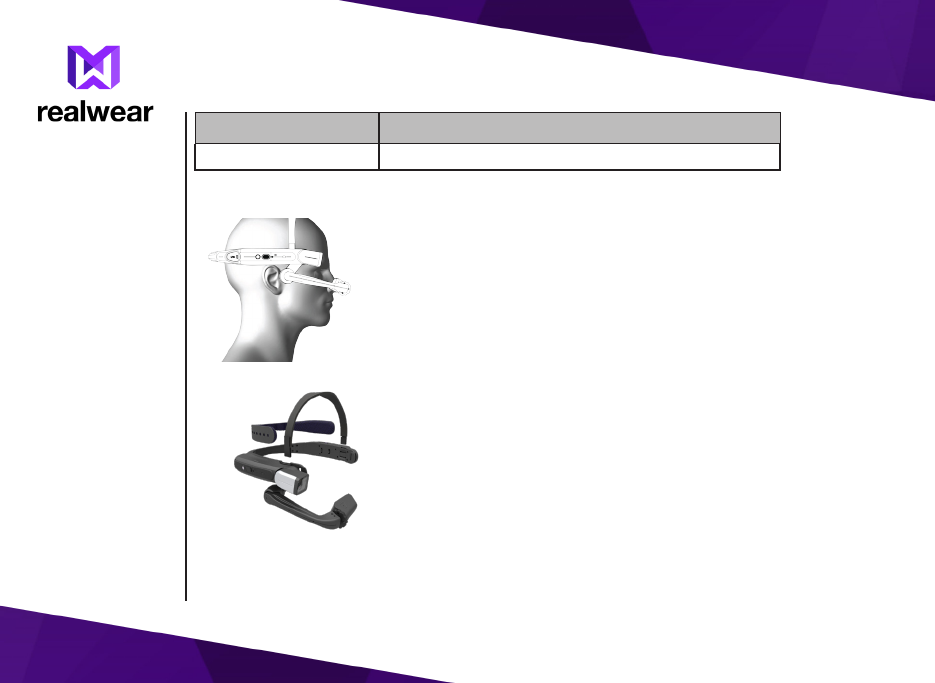
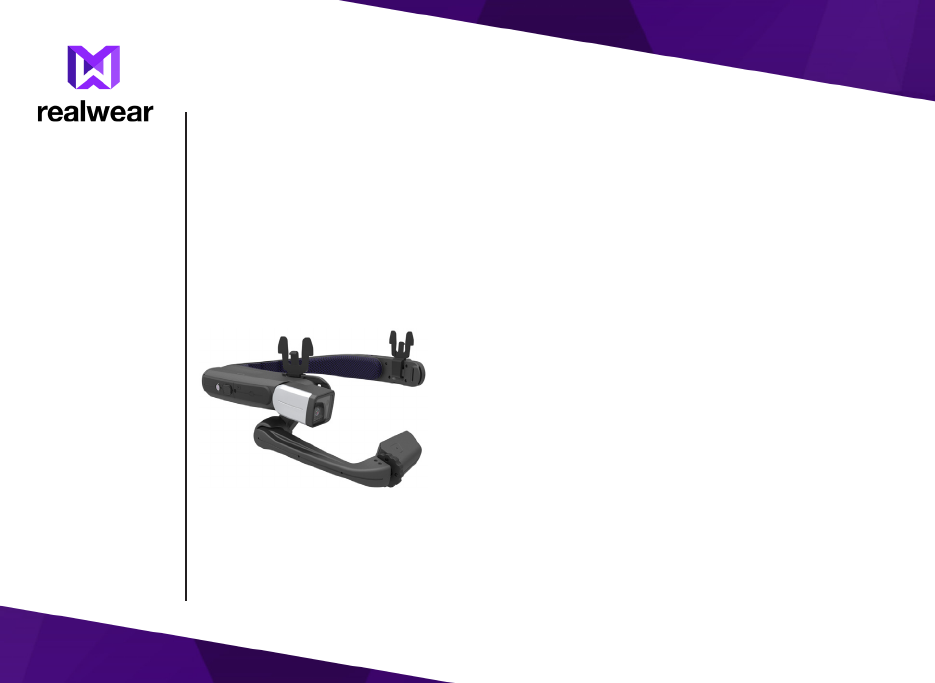
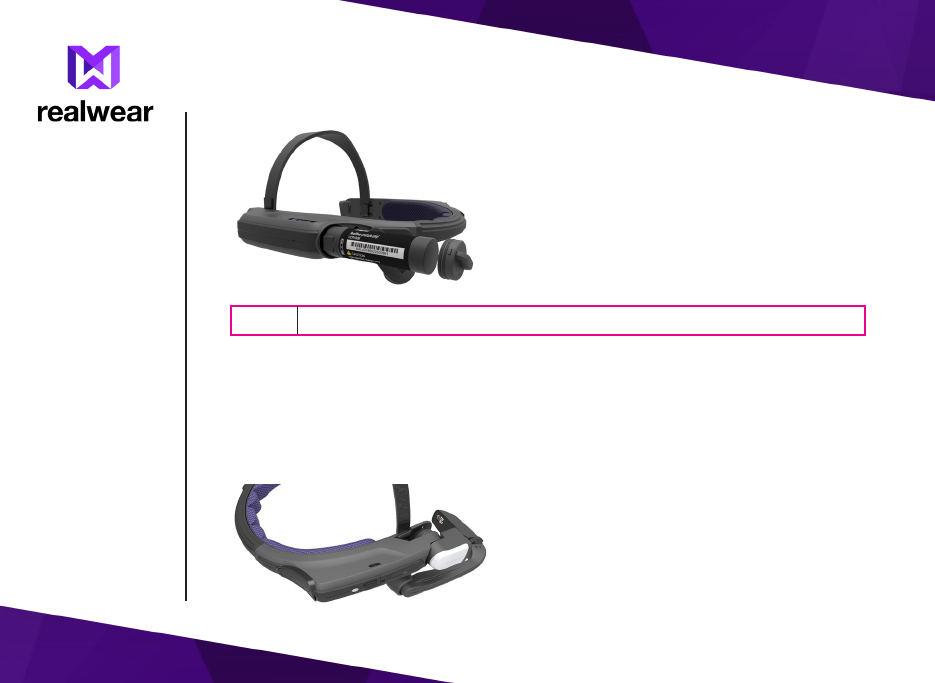
Parts of the Head Mounted Tablet
Parts of Head Mounted
Tablet 1
3
4
5
2
6
8
10
9
7
For HMT part
description, refer
to next page
<include topic
Xref>
11
12 13
13
HMT- 1 Parts and Functions
The following table provides a insight on the various parts of head mounted tablet.
Part Name Action
1 - Head band Supports the device when worn on the head
2 - Camera pod Holds a camera to take photo and video
3 - LCD pod Holds the main LCD display to operate the HMT.
4 - Wrist Supports and helps to reposition the LCD pod
5 - Arm Supports and helps to reposition the LCD pod
6 - Shoulder Supports and helps to reposition the LCD pod
7 - MicroSD card slot Holds microSD card to store
8 - Action button Operates HMT
9 - Power ON button Switches ON/OFF HMT
10 - Main housing Includes all the parts of the HMT
11 - Speaker Outputs audio from HMT
12 - Head frame Supports the HMT
HMT -1 Parts and
Functions
14
Part Name Action
13 - Battery housing Holds the rechargeable battery
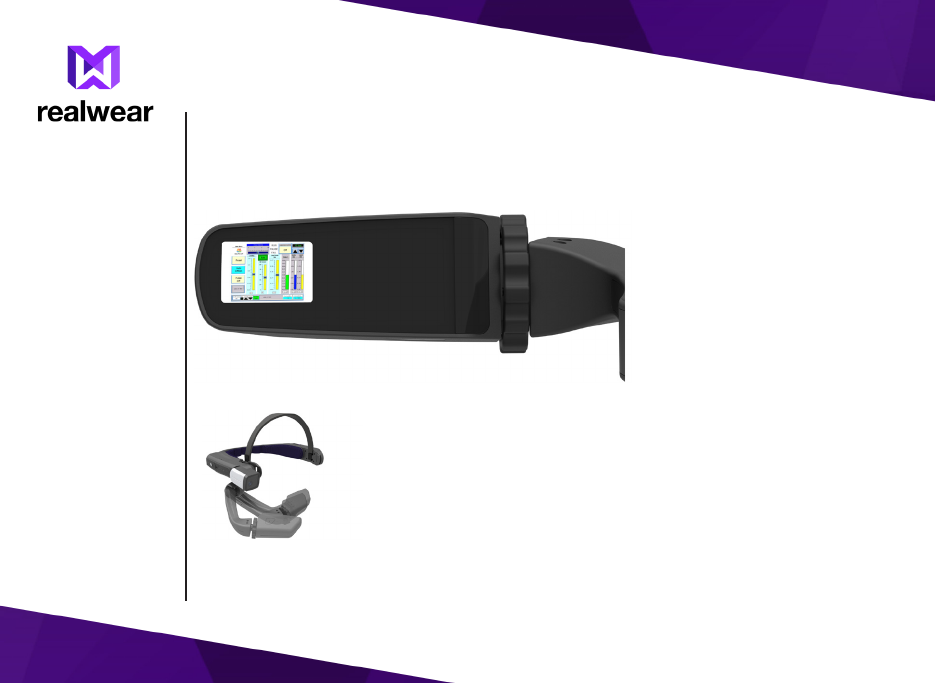
Wearing Realwear Head Mounted Tablet
1. Position the HMT device such that main unit
is positioned on the side of the head and the
LCD pod is aligned in front of your left or
right eye.
2. Position the HMT tightly so that it will not
dislocate when you move your head, by
moving the strap in or out, and collapse the
hinged main main unit inwards Adjust the
back strap and the band located on the top
of the head so that the device is xed tightly
at your comfort level. The back strap and
the top band ensure a comfortable wear all
through the day.
Wearing Realwear Head
Mounted Tablet
15
Adjusting LCD Pod
Adjusting LCD Pod
After xing the main unit, you can adjust the display pod at a distance of about 1-2 inches from
the eye. The display pod should be positioned below the line of sight, for viewing the display
screen, clearly.
1. Move the LCD Pod forward
or backward, to set the
focus of the display screen.
When set correctly the
screen will be bright and
crisp, and you can even
read the smallest text.
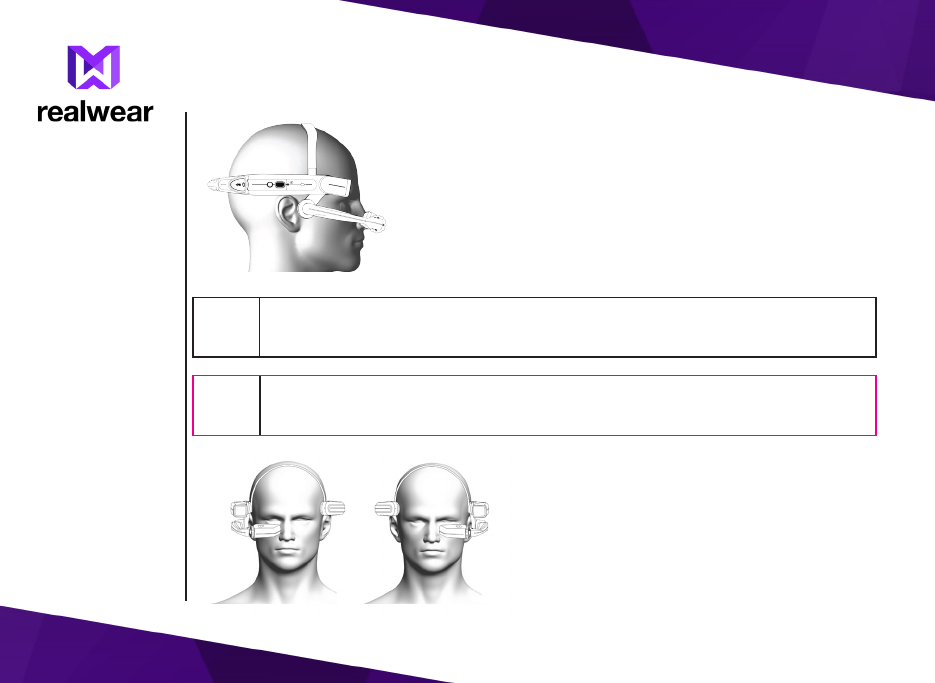
16
2. Adjust the back strap and
the band located on the
top of the head so that the
device is xed tightly at
your comfort level.
NOTE If you wear eye-glasses to operate a computer or protective glasses for your work,
continue to wear the same glasses,while using HMT. HMT is designed to work well
with or without eye-glasses.
NOTE Position the LCD Pod just below your dominant eye. You can switch the HMT from
left-eye to right-eye. For more information, refer to instructions (X ref to be
included>
Adjusting LCD Pod
17
Fine Adjustment -LCD Pod
After adjusting and setting the focus of the LCD Pod, you need to adjust the speaker. The
speaker is a small earring-like piece of plastic hanging around one ear. You can position and x it
above one ear, so that you can receive audible feedback without blocking out other sounds.
Sometimes, you might have to adjust the whole unit on the head either left or right, when part
of the screen is not visible on the left or right side , to get the complete view of the LCD Pod.
Fitting HMT with Safety Equipment
You can wear your safety goggles and hard hat with the HMT.
1. Fix the clip to attach the hard hat, to the
HMT device.
Fine Adjustment - LCD
Pod
18
2. Attach the hard hat to the clip and wear the
device comfortably.
Inserting Rechargeable Battery
The Realwear HMT requires a rechargeable battery to function.
1. Open the rubber lid and unscrew the battery socket located on the back of the Battery
Housing .
2. Insert the battery, screw back the socket and close the rubber lid.
Fitting HMT with Safety
Equipment
19
NOTE Always used only original Realwear chargers.
Charging HMT
To recharge the device:
1. Connect the charger to the charging Type C USB port located on the rear side of the Main
Housing, under the rubber lid.
2. Connect the charger to the power supply. The power button will start blinking RED for a
while. When fully charged, the power button will be lighted in GREEN.
Inserting Rechargeable
Battery
Charging HMT

20
NOTE Always used only original Realwear chargers.

21
Using WearHF™
WearHF™ is an innovative software solution that enables you to use Realwear HMT as an hands-
free device. Its easy to use and loaded with a lot of intuitive functions.
Speech Recognition - Say What You See
WearHF™ software operated based on speech recognition. Instead of pressing/tapping control
button on the screen, all you need to do is speak the name of the respective control. All the
commands associated with the current screen are displayed clearly on the screen.
WearHF™ uses the latest technology for advanced noise cancellation and speech recognition and
works even in the harshest noisy environments . It can recognise the command even if you speak
in a low voice, or in an noisy environment, where you can hear what you say.
WearHF™ recognizes many dierent native languages and accents. You don’t have to undergo any
voice-training or congure voice recognition features.
You can activate the device by speaking the name of any control. For example, the WearHF™
home screen has 3 large icons with respective feature names, to access the key features.
To access the applications, you can say My Apps and the application screen is launched.
Speech Recognition - Say
What You See
22
Global Commands
WearHF ™ can also recognize certain voice commands that can be activated form any screen.
These are known as global commands. The following is a list of global commands in English. For
global commands in other languages, refer to the respective user guide.
Voice Command Action
Navigate Home Navigates to home screen
Navigate Back Navigates to previous screen
My Controls Navigates to system control panel
Global Commands
Anytime Access Help
23
Voice Command Action
Mute Microphone Mutes the microphone temporarily
Show Help Displays pop-up window with the help for commands
associated with the particular screen.
Anytime Access Help
You can access the help information regarding the commands associated with a particular screen,
with Show Help command. The help screen is displayed as a pop-up window. Show Help command
is also displayed on all the screens.
Alternate Speech Recognition
Sometimes,the control on the screen has no name, or the name is unrecognizable/
unpronounceable by WearHF.™ For example, an image button without a label, or a le button
with lename such as 3454-x.pdf, set as the label.
In such scenarios, WearHF™ automatically proposes an alternative speech command, and assigns
a number. This number is displayed next to the respective control on the screen.
To select a specic control, you need to use the number assigned to it. For example, you can say
Select item 1 to select the rst unpronounceable button, or Select item 2, to select the second
unpronounceable button.
Alternate Speech
Recognition
Mute Microphone
24
Mute Microphone
To stop the speech recognizer temporarily for sometime, say Mute microphone. The device will
not respond to your voice commands. While the microphone is muted, a red warning sign is
displayed on the screen.
To restart the speech recognizer, tap the Push-to-Talk button on the side of the device, located
next to the Power button.
If you are a Pioneer Program HDK user, press the big red button on the screen.
Head Gesture - Scroll Up
and Down
Virtual Hands-free
Keyboard
Alphabet keyboard
25
Head Gesture - Scroll Up and Down
You can move your head up and down or right and left, to scroll and view a specic contact in the
contacts list or to view applications in application launcher.
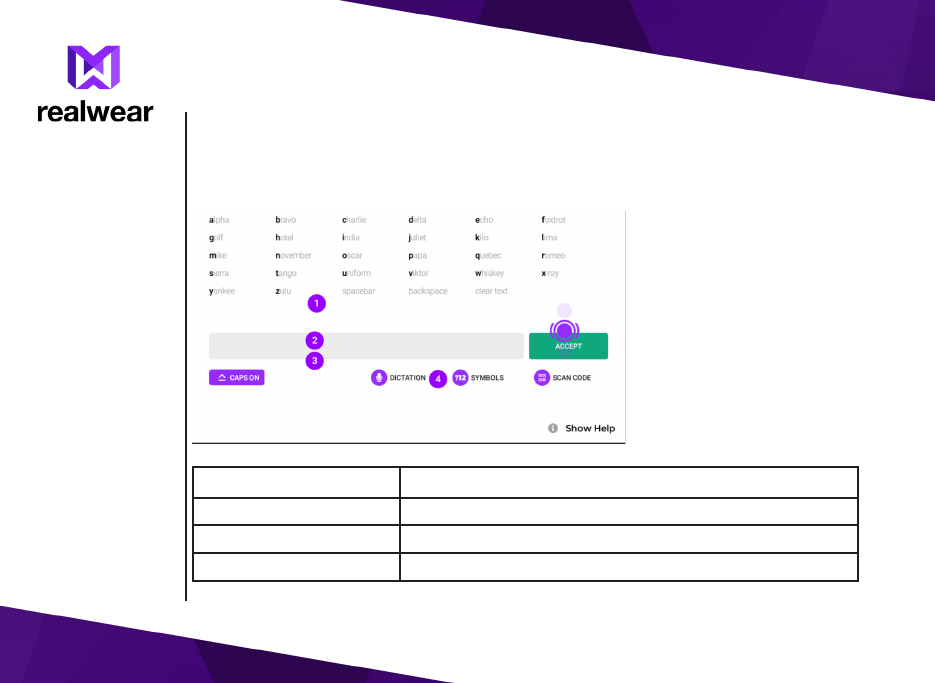
Virtual Hands-free Keyboard
WearHF™ has an integrated virtual keyboard, to enter any text, in any screen. This keyboard
is hands-free and works based on voice recognition. You can use this instead of the standard
Android keyboard.
The two dierent virtual keyboards are
• Alphabet keyboard - to enter alphabets
• Symbol keyboard - to enter numbers and symbols
26
Symbol Keyboard
Alphabet Keyboard
To activate alphabet keyboard, say Alphabet.
The standard WearHF™ keyboard recognizes one alphabet at a time and works based on the
international radio alphabet codes. For example, if you want to type a you must say alpha.
Voice Command Action
Spacebar Inserts a single space
Backspace Deletes the last character
Clear Text Clears the text in the Input box.

27
Symbol Keyboard
Voice Command Action
Caps On Uses capital letter
Caps O Uses small letter
Symbols Switches to Symbol keyboard
Symbol Keyboard
To activate Symbol keyboard, say Symbols.
To type a specic symbol, say the symbol name provided corresponding to the symbol.
To type numbers, say the number name.
To switch to Alphabets keyboard, say Alphabets.
28
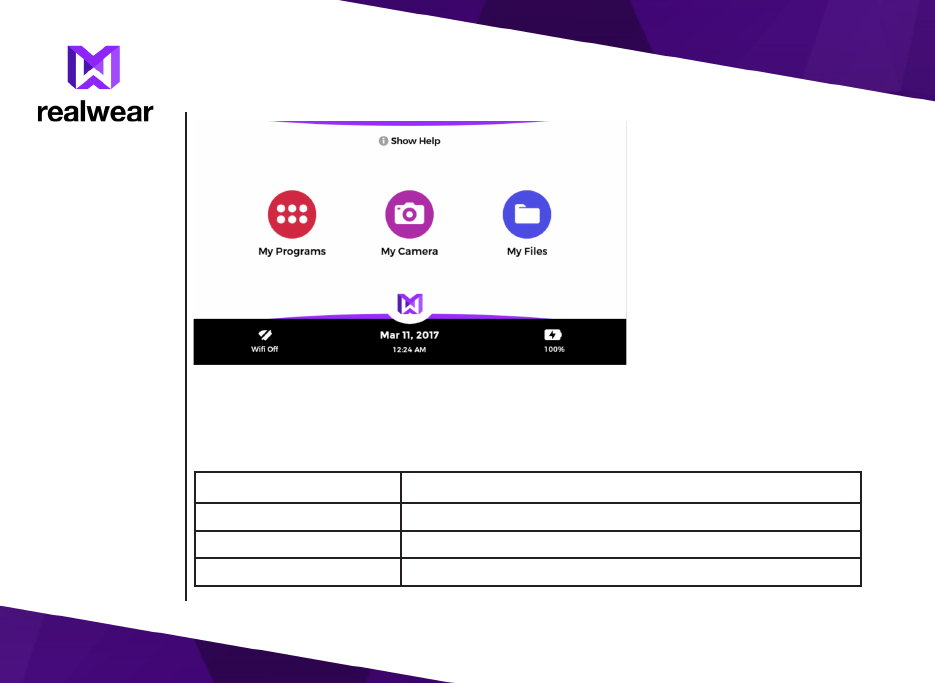
Using Head Mounted Tablet
Switching On
Press and Hold the Power ON/OFF key for 2 seconds to Power ON the HMT device.
Home Screen
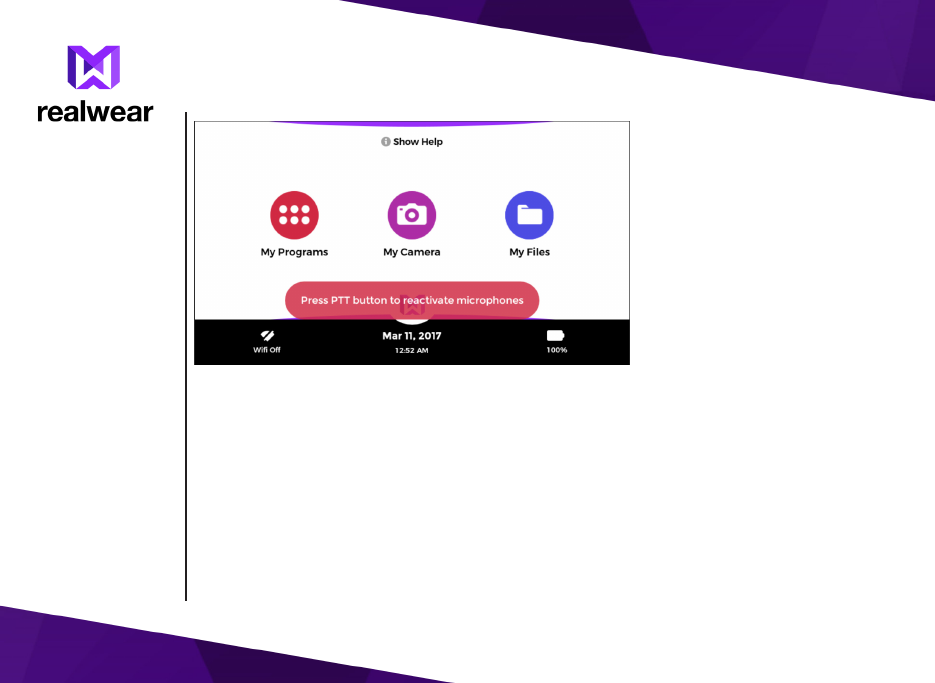
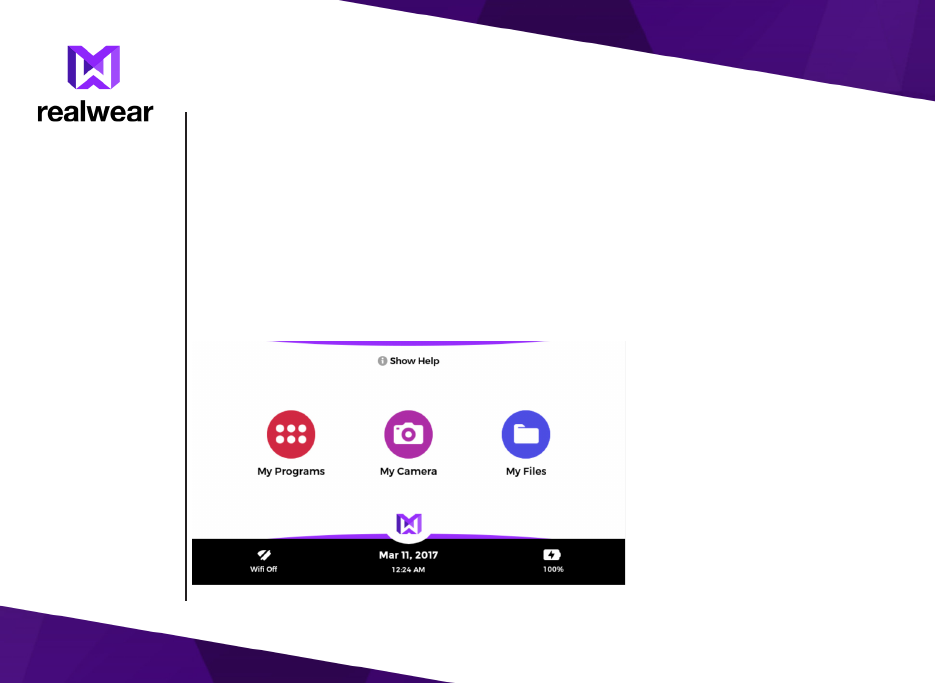
The Home Screen is the main screen to perform all activities using the HMT device.
It allows the user to quickly access les, key applications and at the same time provides useful
information such as the time, date and battery status.
Switching On
Home Screen
Control Buttons in Home
Screen

29
Control Buttons in Home Screen
You can access the various applications, by activating following controls provided in the home
screen.
Voice Command Action
My Apps Launches application launcher, to see and access all the
applications installed in the device.
My Camera Launches camera
My Files Launches les manager to access documents, videos, photos
and other les, easily.
Accessing Home Screen
To access the home screen, say Navigate Home from any application screen
Accessing Application Launcher
You can use application launcher to view and access the applications installed in the HMT device.
You can activate any application by just telling the application name. For example, to start the
camera, you must say Camera.
You can launch applications with unrecognizable or unpronounceable labels, using their index
number. For example, to launch an application with index number 9, you must say Select Item 9.
You can see only upto 8 applications in a single screen. To scroll and view other applications,
move you head to your left/right.
Accessing Home
Screen
Accessing Application
Launcher

30
Accessing My Camera
The camera bundled with WearHF™ is a hands-free application for taking photographs and videos.
You can use this instead of the standard android camera application.
Accessing My
Camera
31
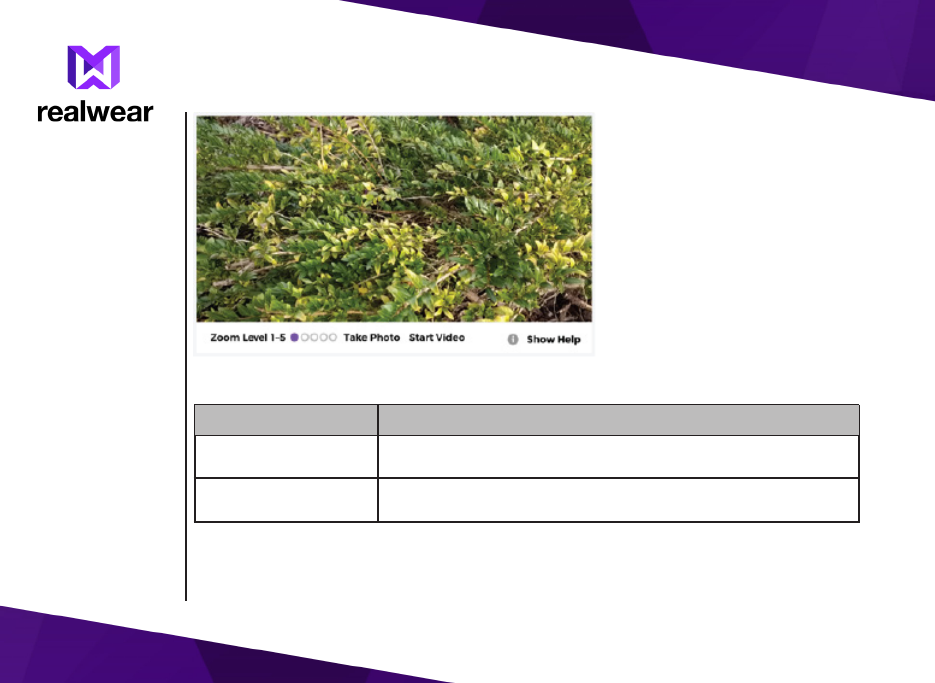
Camera Functions
Voice Command Action
Zoom Level - 1 to 5 Zooms the camera view by setting the level to specic value - 1
to 5.
Take Photo Takes a photo and saves it to My Photos folder as JPEG le. The
le name saved is displayed on screen for reference.
Camera Functions
32
Voice Command Action
Start Video Starts recording a video.
During video recording, the device automatically stops listening
to voice commands. Therefore, you must press the PTT button
or the on screen red button on the HDK, to stop recording.
The recorded video le is saved as an MPEG4 le to My Media
folder and the le name is displayed, for reference.
Auto Focus Sets the camera to auto focus mode. By default, the camera is
set to auto focus mode.
Manual Focus Sets the camera to manual focus mode.
Brightness 1-5 Set the brightness level to specic value - 1 to 5.
Brightness level can be set only in manual focus mode.
Show Help Displays extra commands
To select a specic le, you need to use the number assigned to it. For example, you can say
Select item 1 to select the rst le, or Select item 2, to select the second le. You can also tell
the lename without the extension.
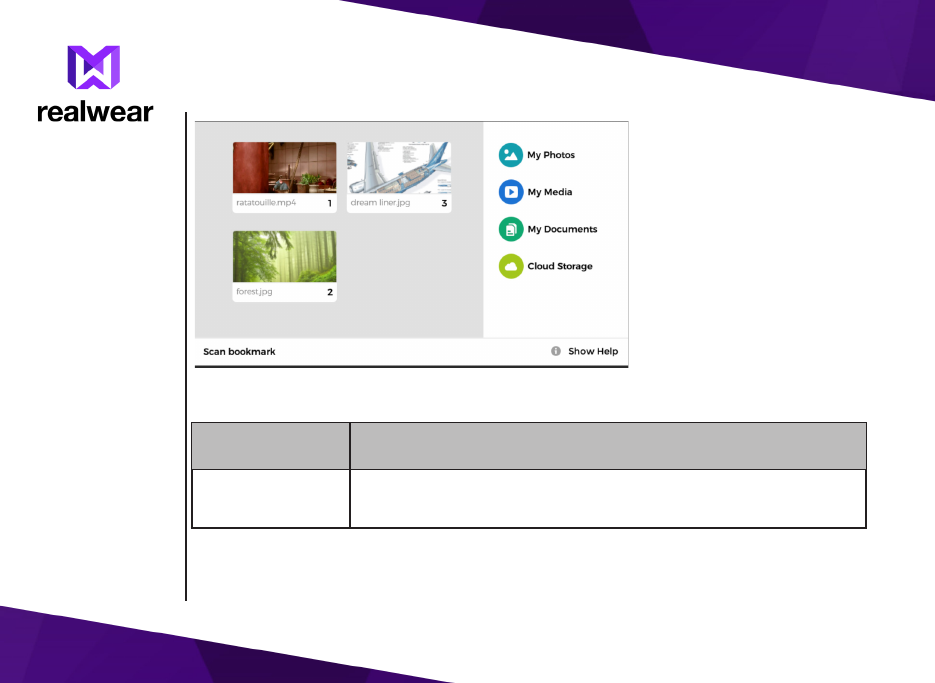
Accessing File Browser
You can view the documents, photos and video les, locally stored in your HMT device, using the
le browser application.
Accessing File
Browser
33
File Manager Functions
Voice
Command Action
My Photos Displays les stored in the Pictures folder and photos taken using
the HMT device camera and stored in DCIM folder.
The supported le formats are: JPG, PNG, BMP, WebdP
File Manager
Functions

34
Voice
Command Action
My Media Displays les stored in the Videos folder and videos recorded using
the HMT device camera and stored in DCIM folder.
The supported le formats are: MP4, 3GP, WEBM, MP3, WAVE and
MIDI
My Documents Displays les stored in the Document folder.
The supported le formats are: PDF
Show Help Displays extra commands
To select a specic le, you need to use the number assigned to it. For example, you can say
Select item 1 to select the rst le, or Select item 2, to select the second le. You can also tell
the lename without the extension.
35
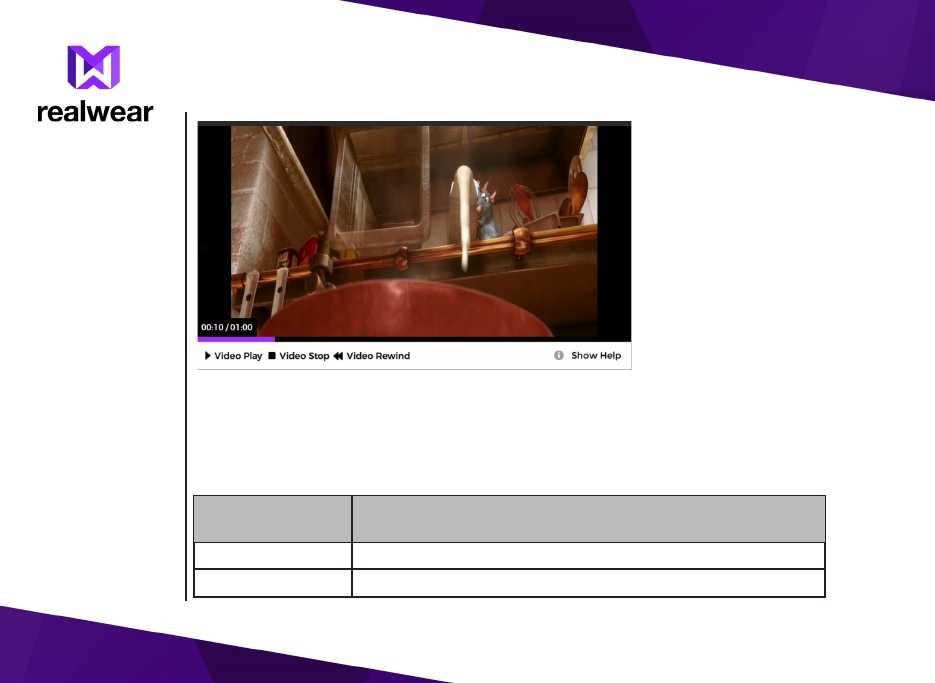
Using Media Player
You can enjoy watching movies and listening to audio tracks using built-in media player with
hands-free control.
If you select an audio or video le from the le manager, it is played using the media player.
Media Player Functions
Voice
Command Action
Video Pause Pauses video while playing
Video Play Plays paused video
Using Media Player
Media Player
Functions

36
Voice
Command Action
Video Stop Stops the video and goes to My Media screen
Video Rewind Rewinds video by 30 seconds.
Show Help Displays extra commands
Using Document Viewer
You can open PDF les and image les using document viewer with hands-free control.
If you select a PDF or image le from the le manager, it is opened using the document viewer.
Using Document
Viewer
37
Document Viewer Functions
Voice
Command Action
Zoom Level - 1
to 5 Zooms the document view size by setting the level to specic
value - 1 to 5.
Freeze Document Prevents the document from scrolling, in response to head
gestures.
Control Document Unfreezes the document and enables document scrolling in
response to head gestures.
Reset Document repositions the document to the center of the screen.
Show Help Displays extra commands.
Using Document Viewer - Multi page Document
To view documents with multiple pages, you need to use the following navigations controls.
Voice
Command Action
Goto page - 1- N Scrolls to the specied page
Next Page/Previous
Page Scrolls to previous/next page
Using Document Viewer -
Multipage Document
38
Voice
Command Action
My Bookmarks Displays the bookmarks for the open document,currently saved in
the device
Add Bookmarks Adds a desired page as a bookmark for easier access. To add a page
as a bookmark, you must go to that page.
Delete Bookmark Deletes the bookmark set to a desired page. To delete a bookmark,
you must go to that page.
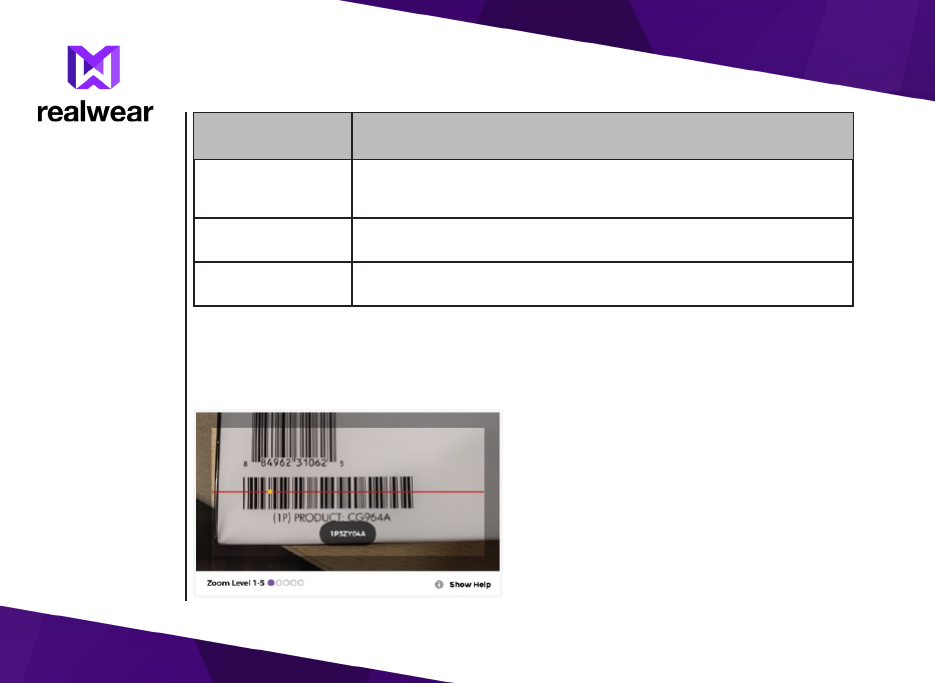
Using Barcode Scanner
You can use the handsfree barcode reader built-in with WearHF™, to scan any barcode.
When launched, the barcode reader scans any barcode that is detected and displays the details,
automatically.
Using Barcode
Scanner

39
Managing HMT Device Controls
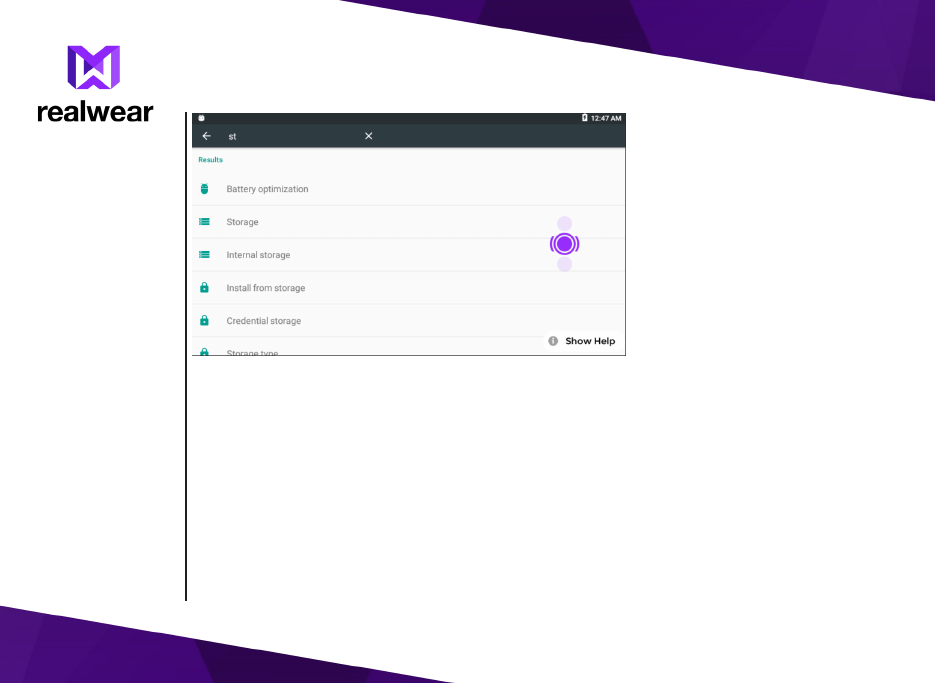
You can use the HMT device control panel to access the common device conguration settings.
You can also use it to access Android system settings.
Using Control Panel
To access the control panel, say My Control. The Settings screen is displayed.
Using Control Panel
40
Device Configuration
Voice
Command Action
Select Volume - 1
to 5 Sets the default volume level of the device to specic value - 1 to
5.
Select Brightness -
1 to 5 Sets the default brightness of the device display to specic value
- 1 to 5.
WiFi Displays the Wi status and the name of Wi network connected to
the device.
You can change the status to On/O.
To access Android WiFi settings, say Set WiFi.
Bluetooth Displays the Bluetooth status and the name of device connected.
You can change the status to On/O.
To access Android Bluetooth settings, say Set Bluetooth.
Lock Screen
Rotation / Unlock
Screen Rotation
Enables/ disables screen rotation when headset is ipped upside
down.
Flashlight On /
Flashlight O Switches On/O ashlight.
More Settings Displays standard Android settings.
Device
Conguration

41
End User License Agreement
Our Warranty
This wireless device, (the “Device”) contains software owned by Realwear Technologies, Inc.
(“Realwear”) and its third party suppliers and licensors (collectively, the “Software”). As user of
this Device, Realwear grants you a non- exclusive, non-transferable, non-assignable license to use
the software solely in conjunction with the Device on which it is installed and/or delivered with.
Nothing herein shall be construed as a sale of the Software to a user of this Device.
You shall not reproduce, modify, distribute, reverse engineer, decompile, otherwise alter or use
any other means to discover the source code of the Software or any component of the Software.
For avoidance of doubt, you are at all times entitled to transfer all rights and obligations to the
Software to a third party, solely together with the Device with which you received the Software,
provided always that such third party agrees in writing to be bound by these rules.
You are granted this license for a term of the life of this Device. If you fail to comply with any of
the terms and conditions set out in this license, it will terminate with immediate eect. Realwear
and its third party suppliers and licensors are the sole and exclusive owner of and retain all rights,
title and interest in and to the Software. Realwear, and, to the extent that the Software contains
material or code of a third party, such third party shall be entitled third party beneciaries of
these terms. The validity, construction and performance of this license shall be governed by the
laws of Delaware, United States.
What We Will Do
If during the warranty period, this product fails to operate in accordance with its specications
under normal use and service, due to defects in design, material or workmanship, Realwear’s
authorized distributors or service partners, in the country/region where you purchased the
product, will repair or replace at the sole discretion of Realwear, with the same or better model
Our Warranty
What We Will Do

42
in the same or better condition as detailed below:
1. If a device is out-of-warranty, then additional repair charges may apply;
2. You will be advised of the charges in advance of any work being performed;
3. You will have the option to approve the charges and have the repair performed, or you may
choose to have your device returned to you unrepaired;
4. Any repair charges will be billed to you through Realwear’s Authorized Distributor.
Please note that some of your personal settings, downloads or other information may be lost when
your Realwear Product is repaired or replaced. Realwear does not take any responsibility for any
lost information of any kind and will not reimburse you for any such loss.
You should always make backup copies of all the information stored on your Realwear Product
such as downloads, calendar and contacts before handing in your Realwear Product for repair or
replacement.
Head Mounted Tablet Care
Each Realwear device has a designated IP class for dust and water protection, according to the
IEC Ingress Protection (IP) Standard 60529. This means that the device is dust protected and can
withstand powerful jetting of water.
Realwear devices are solid and built for heavy duty use. Its design protects against disassembly
or mechanical damage when subjected to forces equal to free fall from the height of 2 meters.
Subjecting the device to stronger impact and forces can damage it and must be avoided.
Conditions
1. The warranty is valid whether or not the product has been registered.
2. The warranty is valid only if the original proof of purchase issued to the original purchaser
Head Mounted Tablet
Care
Conditions

43
by an authorized service provider, specifying the date of purchase and serial number for
this Product, is presented with the Product to be repaired or replaced. Realwear reserves
the right to refuse warranty service if the device is found to be out of warranty under the
conditions as set forth herein.
3. If Realwear repairs or replaces the Product, the repaired or replaced Product shall be
warranted for the remaining time of the original warranty period or for ninety (90) days
from the date of repair, whichever is longer. Repair or replacement may involve the use of
functionally equivalent reconditioned units. Replaced parts or components will become the
property of Realwear.
4. This warranty does not cover any failure of the Product due to normal wear and tear, or due
to misuse or abuse, including but not limited to use in other than the normal and customary
manner, in accordance with the Realwear device specications and instructions for use and
maintenance of the Product. Nor does this warranty cover any failure of the Product due
to software or hardware modication or adjustment, acts of God or damage resulting from
liquid interacting with the product beyond what is described as acceptable in the user guide
for the product. A rechargeable battery can be charged and discharged hundreds of times.
However, it will eventually wear out - this is not a defect. When the talk-time or standby
time is noticeably shorter, it is time to replace your battery. Realwear recommends that you
use only batteries and chargers approved by Realwear. Minor variations in display brightness
and color may occur between devices. There may be tiny bright or dark dots on the display.
These are called defective pixels and occur when individual dots have malfunctioned and
cannot be adjusted. Up to three defective pixels are deemed acceptable.
5. This warranty does not cover Product failures caused by installations, modications, or repair
or opening of the Product performed by a any person other than a Realwear-authorized
person. Tampering with any of the seals on the Product will void the warranty.
6. The warranty does not cover Product failures which have been caused by use of accessories
or other peripheral devices which are not Realwear-branded original accessories intended for
use with the Product.

44
7. The warranty does not cover 3rd party accessories or any 3rd party software applications,
which are instead covered to the extent provided by the original vendor guarantee for these
products.
8. THERE ARE NO EXPRESS WARRANTIES, WHETHER WRITTEN OR ORAL, OTHER THAN THIS
PRINTED LIMITED WARRANTY. ALL IMPLIED WARRANTIES, INCLUDING WITHOUT LIMITATION
THE IMPLIED WARRANTIES OF MERCHANTABILITY OR FITNESS FOR A PARTICULAR PURPOSE,
ARE LIMITED TO THE DURATION OF THIS LIMITED WARRANTY. IN NO EVENT SHALL Realwear
OR ITS LICENSORS BE LIABLE FOR INCIDENTAL OR CONSEQUENTIAL DAMAGES OF ANY NATURE
WHATSOEVER, INCLUDING BUT NOT LIMITED TO LOST PROFITS OR COMMERCIAL LOSS; TO THE
FULL EXTENT THOSE DAMAGES CAN BE DISCLAIMED BY LAW.

45
Regulatory Statements
WARNING: Changes or modications made to this equipment not expressly approved by Realwear
Technologies, Inc. for compliance could void the user’s authority to operate the equipment.
FCC Statement
This device complies with Part 15 of the FCC Rules. Operation is subject to the following two
conditions: (1) This device may not cause harmful interference, and (2) this device must accept
any interference received, including interference that may cause undesired operation.
This equipment has been tested and found to comply with the limits for a Class B digital device,
pursuant to Part 15 of the FCC Rules. These limits are designed to provide reasonable protection
against harmful interference in a residential installation. This equipment generates, uses and can
radiate radio frequency energy and, if not installed and used in accordance with the instructions,
may cause harmful interference to radio communications. However, there is no guarantee that
interference will not occur in a particular installation. If this equipment does cause harmful
interference to radio or television reception, which can be determined by turning the equipment
o and on, the user is encouraged to try to correct the interference by one of the following
measures:
• Reorient or relocate the receiving antenna.
• Increase the separation between the equipment and receiver.
• Connect the equipment into an outlet on a circuit dierent from that to which the receiver
is connected.
• Consult the dealer or an experienced radio/TV technician for help.
FCC Statement
FCC Caution

46
FCC Caution
1. Any changes or modications not expressly approved by the party responsible for compliance
could void the user’s authority to operate this equipment.
2. This transmitter must not be co-located or operating in conjunction with any other antenna
or transmitter.
3. Operations in the 5.15-5.25GHz band are restricted to indoor usage only.
IC Statement
This device complies with Industry Canada license-exempt RSS standard(s). Operation is subject
to the following two conditions:
1. This device may not cause interference.
1. This device must accept any interference, including interference that may cause undesired
operation of the device.
2. This Class B digital apparatus complies with Canadian ICES-003.
3. This device complies with RSS-310 of Industry Canada. Operation is subject to the condition
that this device does not cause harmful interference.
4. This device and its antenna(s) must not be co-located or operating in conjunction with any
other antenna or transmitter, except tested built-in radios.
5. The County Code Selection feature is disabled for products marketed in the US/ Canada.
Le présent appareil est conforme aux CNR d’Industrie Canada applicables aux appareils radio
exempts de licence. L’exploitation est autorisée aux deux conditions suivantes:
1. l’appareil ne doit pas produire de brouillage.
FCC Caution
IC Statement

47
1. l’utilisateur de l’appareil doit accepter tout brouillage radioélectrique subi, même si le
brouillage est susceptible d’en compromettre le fonctionnement.
2. Cet appareil numérique de la classe B est conforme à la norme NMB-003 du Canada.
3. Cet appareil est conforme à la norme RSS-310 d’Industrie Canada. L’opération est soumise à
la condition que cet appareil ne provoque aucune interférence nuisible.
4. Cet appareil et son antenne ne doivent pas être situés ou fonctionner en conjonction avec
une autre antenne ou un autre émetteur, exception faites des radios intégrées qui ont été
testées.
5. La fonction de sélection de l’indicatif du pays est désactivée pour les produits
commercialisés aux États-Unis et au Canada.
IC Statement - FOR WLAN 5GHZ DEVICE
Caution
1. The device for operation in the band 5150-5250 MHz is only for indoor use to reduce the
potential for harmful interference to co-channel mobile satellite systems.
2. The maximum antenna gain permitted for devices in the bands 5250-5350 MHz and 5470-
5725 MHz shall comply with the e.i.r.p. limit.
3. The maximum antenna gain permitted for devices in the band 5725-5825 MHz shall comply
with the e.i.r.p. limits specied for point-to-point and non point-to-point operation as
appropriate.
4. The worst-case tilt angle(s) necessary to remain compliant with the e.i.r.p. elevation mask
requirement set forth in Section 6.2.2(3) shall be clearly indicated.
5. Users should also be advised that high-power radars are allocated as primary users (i.e.
priority users) of the bands 5250-5350 MHz and 5650-5850 MHz and that these radars could
IC Statement - FOR WLAN
5GHZ DEVICE

48
cause interference and/or damage to LE-LAN devices.
Avertissement
1. les dispositifs fonctionnant dans la bande 5150-5250 MHz sont réservés uniquement pour une
utilisation à l’intérieur an de réduire les risques de brouillage préjudiciable aux systèmes
de satellites mobiles utilisant les mêmes canaux.
2. le gain maximal d’antenne permis pour les dispositifs utilisant les bandes 5250-5350 MHz et
5470-5725 MHz doit se conformer à la limite de p.i.r.e.
3. le gain maximal d’antenne permis (pour les dispositifs utilisant la bande 5725-5825 MHz)
doit se conformer à la limite de p.i.r.e. spéciée pour l’exploitation point à point et non
point à point, selon le cas.
4. les pires angles d’inclinaison nécessaires pour rester conforme à l’exigence de la p.i.r.e.
applicable au masque d’élévation, et énoncée à la section 6.2.2 3), doivent être clairement
indiqués.
5. De plus, les utilisateurs devraient aussi être avisés que les utilisateurs de radars de haute
puissance sont désignés utilisateurs principaux (c.-à-d., qu’ils ont la priorité) pour les
bandes 5250-5350 MHz et 5650-5850 MHz et que ces radars pourraient causer du brouillage
et/ou des dommages aux dispositifs LAN-EL.
Avertissement

49
Declaration of Conformity
EU Regulatory Conformance
Hereby,We, RealWear,Inc. declare that the radio equipment type T1100G is in compliance with
Directive 2014/53/EU.
EU Regulatory
Conformance
Europe

50
Declaration of Conformity
Declaration of
Conformity
RealWear, Inc.
1851 McCarthy Boulevard, Suite 120, Milpitas, CA 95035
Date: March 10, 2017
Declaration of Conformity
We, RealWear, Inc.,
Address: 1852 McCarthy Boulevard, Suite 120, Milpitas, CA 95035
Declare under our own responsibility that the product:
Model Name: T1100G
Intended use: Head Mounted Tablet
Complies with the essential requirements of Article 3 of the Radio Equipment Directive 2014/53/EU, if used
for its intended use and that the following standards have been applied:
1. Health (Article 3.1(a) of the RE Directive)
EN 50360: 2001 / A1: 2012
EN 62209-1 : 2006
EN 62479 : 2010
2. Safety (Article 3.1(a) of the RE Directive)
EN 60950-1: 2006 + A11: 2009 + A1: 2010 + A12: 2011 + A2: 2013
EN 50332-2: 2013
3. Electromagnetic compatibility (Article 3.1 (b) of the RE Directive)
Final Draft EN 301 489-1 V2.1.1 / -17 V3.1.1 / Draft EN301489-3 V2.1.0
4. Radio frequency spectrum usage (Article 3.2 of the RE Directive)
EN 300 328 V2.1.1
Commission Draft EN 301 893 V2.0.0
Draft EN 300 440 V2.1.0
Name: Helen Li
Company name: RealWear, Inc.
Tel.: 18600364275
E-mail: helen.li@realwear.com