Realtek Semiconductor RTL8188CEB8 802.11b/g/n RTL8188CE Combo miniCard User Manual
Realtek Semiconductor Corp. 802.11b/g/n RTL8188CE Combo miniCard
Contents
user manual

HP Notebook
Reference Guide
HP Mini 110
Compaq Mini CQ10
HP Mini 1103
© Copyright 2010 Hewlett-Packard
Development Company, L.P.
ATI is a trademark of Advanced Micro
Devices, Inc. Bluetooth is a trademark
owned by its proprietor and used by Hewlett-
Packard Company under license. Microsoft
and Windows are U.S. registered trademarks
of Microsoft Corporation. Java is a U.S.
trademark of Sun Microsystems, Inc.
The information contained herein is subject
to change without notice. The only
warranties for HP products and services are
set forth in the express warranty statements
accompanying such products and services.
Nothing herein should be construed as
constituting an additional warranty. HP shall
not be liable for technical or editorial errors
or omissions contained herein.
Second Edition: May 2010
First Edition: April 2010
Document Part Number: 607194-002
Product notice
This reference guide describes features that
are common to most models. Some features
may not be available on your computer.

Safety warning notice
WARNING! To reduce the possibility of heat-related injuries or of overheating the computer, do not
place the computer directly on your lap or obstruct the computer air vents. Use the computer only on a
hard, flat surface. Do not allow another hard surface, such as an adjoining optional printer, or a soft
surface, such as pillows or rugs or clothing, to block airflow. Also, do not allow the AC adapter to come
into contact with the skin or a soft surface, such as pillows or rugs or clothing, during operation. The
computer and the AC adapter comply with the user-accessible surface temperature limits defined by
the International Standard for Safety of Information Technology Equipment (IEC 60950).
iii
iv Safety warning notice

Table of contents
1 Introduction ..................................................................................................................................................... 1
Finding more information about your new computer ............................................................................ 1
2 Networking (select models only) ................................................................................................................... 2
Creating a wireless connection ............................................................................................................ 2
Identifying wireless and network status icons ...................................................................... 2
Turning wireless devices on or off ....................................................................................... 3
Using the wireless button .................................................................................... 3
Using HP Wireless Assistant (select models only) to turn wireless devices on
or off .................................................................................................................... 4
Using HP Connection Manager (select models only) .......................................................... 4
Using operating system controls .......................................................................................... 5
Using a WLAN ...................................................................................................................................... 5
Connecting to an existing WLAN ......................................................................................... 5
Setting up a new WLAN ....................................................................................................... 6
Protecting your WLAN ......................................................................................................... 6
Roaming to another network ................................................................................................ 7
Using HP Mobile Broadband (select models only) ............................................................................... 7
Inserting a SIM ..................................................................................................................... 7
Removing a SIM .................................................................................................................. 8
Using Bluetooth wireless devices ......................................................................................................... 8
Bluetooth and Internet Connection Sharing (ICS) ............................................................... 8
Using GPS (select models only) ........................................................................................................... 9
Connecting to a wired network ............................................................................................................. 9
Using a modem (select models only) ................................................................................... 9
Connecting a modem cable ................................................................................ 9
Connecting a country- or region-specific modem cable adapter ....................... 10
Selecting a location setting ............................................................................... 10
Viewing the current location selection .............................................. 10
Adding new locations when traveling ............................................... 10
Connecting to a local area network (LAN) (select models only) ........................................ 12
3 Multimedia ..................................................................................................................................................... 14
Using the media activity controls ........................................................................................................ 14
Audio .................................................................................................................................................. 14
Adjusting the volume ......................................................................................................... 14
Checking audio functions on the computer ........................................................................ 15
Webcam (select models only) ............................................................................................................ 16
v
Using SkyRoom (select models only) ................................................................................ 16
Video .................................................................................................................................................. 16
VGA ................................................................................................................................... 16
DisplayPort ........................................................................................................................ 17
HDMI .................................................................................................................................. 17
Configuring audio for HDMI ............................................................................... 18
Using HP MediaSmart (select models only) ....................................................................................... 19
4 Power management ...................................................................................................................................... 20
Shutting down the computer ............................................................................................................... 20
Setting power options ......................................................................................................................... 20
Using power-saving states ................................................................................................. 20
Initiating and exiting Sleep ................................................................................ 21
Initiating and exiting Hibernation ....................................................................... 21
Using the power meter ....................................................................................................... 22
Using power plans ............................................................................................................. 22
Viewing the current power plan ......................................................................... 22
Selecting a different power plan ........................................................................ 22
Customizing power plans .................................................................................. 22
Setting password protection on wakeup ............................................................................ 23
Using battery power ........................................................................................................................... 23
Finding battery information in Help and Support in Windows 7 ......................................... 24
Using Battery Check in Windows 7 .................................................................................... 24
Displaying the remaining battery charge ........................................................................... 24
Maximizing battery discharge time .................................................................................... 24
Managing low battery levels .............................................................................................. 25
Identifying low battery levels ............................................................................. 25
Resolving a low battery level ............................................................................. 25
Resolving a low battery level when external power is available ....... 25
Resolving a low battery level when a charged battery is
available ........................................................................................... 25
Resolving a low battery level when no power source is
available ........................................................................................... 25
Resolving a low battery level when the computer cannot exit
Hibernation ....................................................................................... 26
Conserving battery power .................................................................................................. 26
Storing a battery ................................................................................................................ 26
Disposing of a used battery ............................................................................................... 26
Replacing the battery ......................................................................................................... 26
Using external AC power .................................................................................................................... 27
Testing an AC adapter ....................................................................................................... 28
Switching between graphics modes (select models only) .................................................................. 28
vi
5 External cards and devices .......................................................................................................................... 29
Using Digital Media Slot cards (select models only) .......................................................................... 29
Inserting a digital card ........................................................................................................ 29
Removing a digital card ..................................................................................................... 29
Using PC Cards (select models only) ................................................................................................. 30
Configuring a PC Card ....................................................................................................... 30
Inserting a PC Card ........................................................................................................... 30
Removing a PC Card ......................................................................................................... 32
Using ExpressCards (select models only) .......................................................................................... 32
Configuring an ExpressCard .............................................................................................. 32
Inserting an ExpressCard .................................................................................................. 33
Removing an ExpressCard ................................................................................................ 34
Using smart cards (select models only) ............................................................................................. 34
Inserting a smart card ........................................................................................................ 35
Removing a smart card ...................................................................................................... 35
Using a USB device ........................................................................................................................... 35
Connecting a USB device .................................................................................................. 35
Removing a USB device .................................................................................................... 36
Using 1394 devices (select models only) ........................................................................................... 36
Connecting a 1394 device ................................................................................................. 37
Removing a 1394 device ................................................................................................... 37
Using an eSATA device (select models only) .................................................................................... 37
Connecting an eSATA device ............................................................................................ 37
Removing an eSATA device .............................................................................................. 38
Using optional external devices .......................................................................................................... 39
Using optional external drives ............................................................................................ 39
Using the expansion port (select models only) .................................................................. 39
Using the docking connector (select models only) ............................................................ 40
6 Drives ............................................................................................................................................................. 41
Handling drives ................................................................................................................................... 41
Using hard drives ............................................................................................................................... 41
Improving hard drive performance ..................................................................................... 41
Using Disk Defragmenter .................................................................................. 41
Using Disk Cleanup ........................................................................................... 42
Using HP ProtectSmart Hard Drive Protection in Windows 7 (select models only) ........... 42
Identifying HP ProtectSmart Hard Drive Protection status ................................ 43
Managing power with a parked hard drive ........................................................ 43
Using HP ProtectSmart Hard Drive Protection software ................................... 43
Using optical drives (select models only) ........................................................................................... 44
Identifying the installed optical drive .................................................................................. 44
Inserting an optical disc ..................................................................................................... 45
Tray load ........................................................................................................... 45
vii
Slot load ............................................................................................................ 45
Removing an optical disc ................................................................................................... 46
Tray load ........................................................................................................... 46
When the disc tray opens normally .................................................. 46
When the disc tray fails to open ....................................................... 46
Slot load ............................................................................................................ 47
Sharing optical drives ........................................................................................................ 48
Using RAID (select models only) ........................................................................................................ 48
7 Security .......................................................................................................................................................... 49
Protecting the computer ..................................................................................................................... 49
Using passwords ................................................................................................................................ 49
Setting passwords in Windows .......................................................................................... 50
Setting passwords in Setup Utility ..................................................................................... 50
Managing an administrator password ............................................................... 51
Entering an administrator password .................................................................. 51
Managing a power-on password ....................................................................... 51
Entering a power-on password ......................................................................... 51
Using antivirus software ..................................................................................................................... 52
Using firewall software ....................................................................................................................... 52
Installing critical security updates ....................................................................................................... 52
Installing an optional security cable .................................................................................................... 53
Using the fingerprint reader (select models only) ............................................................................... 53
Locating the fingerprint reader ........................................................................................... 53
8 Setup Utility (BIOS) ....................................................................................................................................... 55
Starting Setup Utility ........................................................................................................................... 55
Using Setup Utility .............................................................................................................................. 55
Changing the language of Setup Utility ............................................................................. 55
Navigating and selecting in Setup Utility ............................................................................ 55
Displaying system information ........................................................................................... 56
Restoring factory default settings in Setup Utility .............................................................. 56
Exiting Setup Utility ............................................................................................................ 56
Updating the BIOS ............................................................................................................................. 57
Determining the BIOS version ........................................................................................... 57
Downloading a BIOS update ............................................................................................. 57
Appendix A Traveling with the computer ...................................................................................................... 59
Appendix B Troubleshooting resources ....................................................................................................... 60
Appendix C Electrostatic Discharge .............................................................................................................. 61
viii
x

1 Introduction
This guide contains general information about HP and Compaq notebook computers, including
connecting to a wireless network, multimedia, power management, security, and so on.
NOTE: Some of the features described in this guide may not be available on your computer.
Finding more information about your new computer
The following user guides and reference material are provided with your computer, either in print, on
the computer hard drive, or on an optical disc or SD Card:
●Quick Setup poster—Guides you through setting up your computer and turning it on. The poster
is located in the computer box.
NOTE: Refer to the poster for the location of your user guides and reference material.
●Getting Started—Contains information about your computer, including product-specific features,
backup and recovery, maintenance, and specifications.
●Help and Support—Contains information about the operating system, drivers, troubleshooting
tools, and technical support. To access Help and Support, select Start > Help and Support. For
country- or region-specific support, go to http://www.hp.com/support, select your country or region,
and follow the on-screen instructions.
●Safety & Comfort Guide—Describes proper workstation setup and proper posture, health, and work
habits for computer users. It also provides important electrical and mechanical safety information.
To access this guide, select Start > Help and Support > User Guides. This guide is also available
on the Web at http://www.hp.com/ergo.
●Regulatory, Safety, and Environmental Notices—Contains safety and regulatory information, and
battery disposal information. To access the notices, select Start > Help and Support > User
Guides.
Finding more information about your new computer 1
2 Networking (select models only)
Your computer supports 2 types of Internet access:
●Wireless—Refer to Creating a wireless connection on page 2.
●Wired—Refer to Connecting to a wired network on page 9.
NOTE: You must set up Internet service before you can connect to the Internet.
Creating a wireless connection
Your computer may be equipped with one or more of the following wireless devices:
●Wireless local area network (WLAN) device
●HP Mobile Broadband Module (wireless wide area network (WWAN))
●Bluetooth® device
For more information on wireless technology, refer to the information and Web site links provided in
Help and Support.
Identifying wireless and network status icons
Windows 7
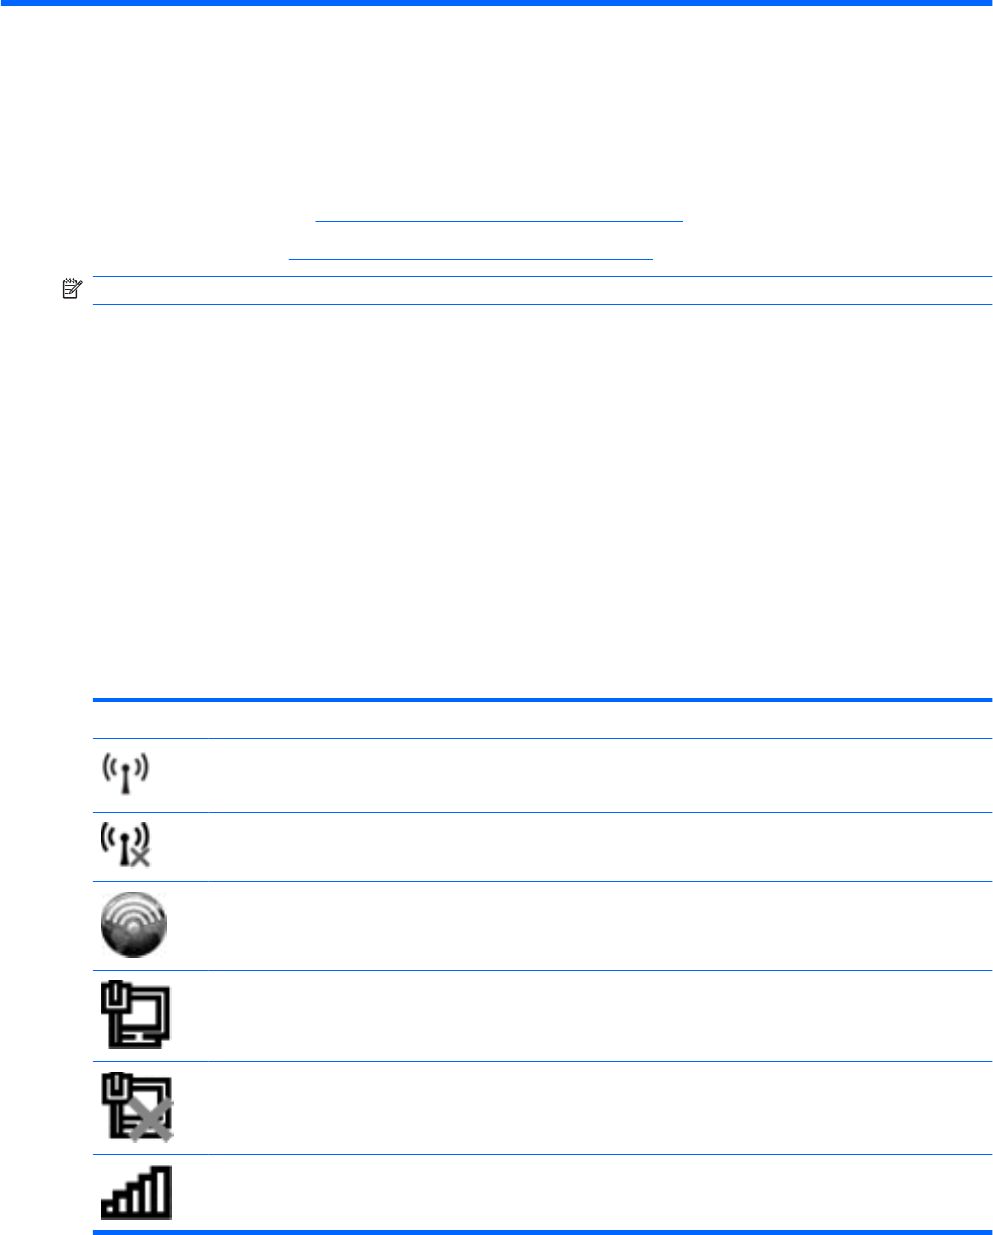
Icon Name Description
Wireless (connected) Indicates that one or more wireless devices are on.
Wireless (disconnected) Indicates that all wireless devices are off.
HP Connection Manager Opens HP Connection Manager, which enables you to create a connection
with an HP Mobile Broadband Module (select models only).
Wired network (connected) Indicates that one or more network devices are connected to the network.
Network (disabled/
disconnected)
Indicates that all network devices are disabled in Windows Control Panel.
Network (connected) Indicates that one or more network devices are connected to a network.
2 Chapter 2 Networking (select models only)
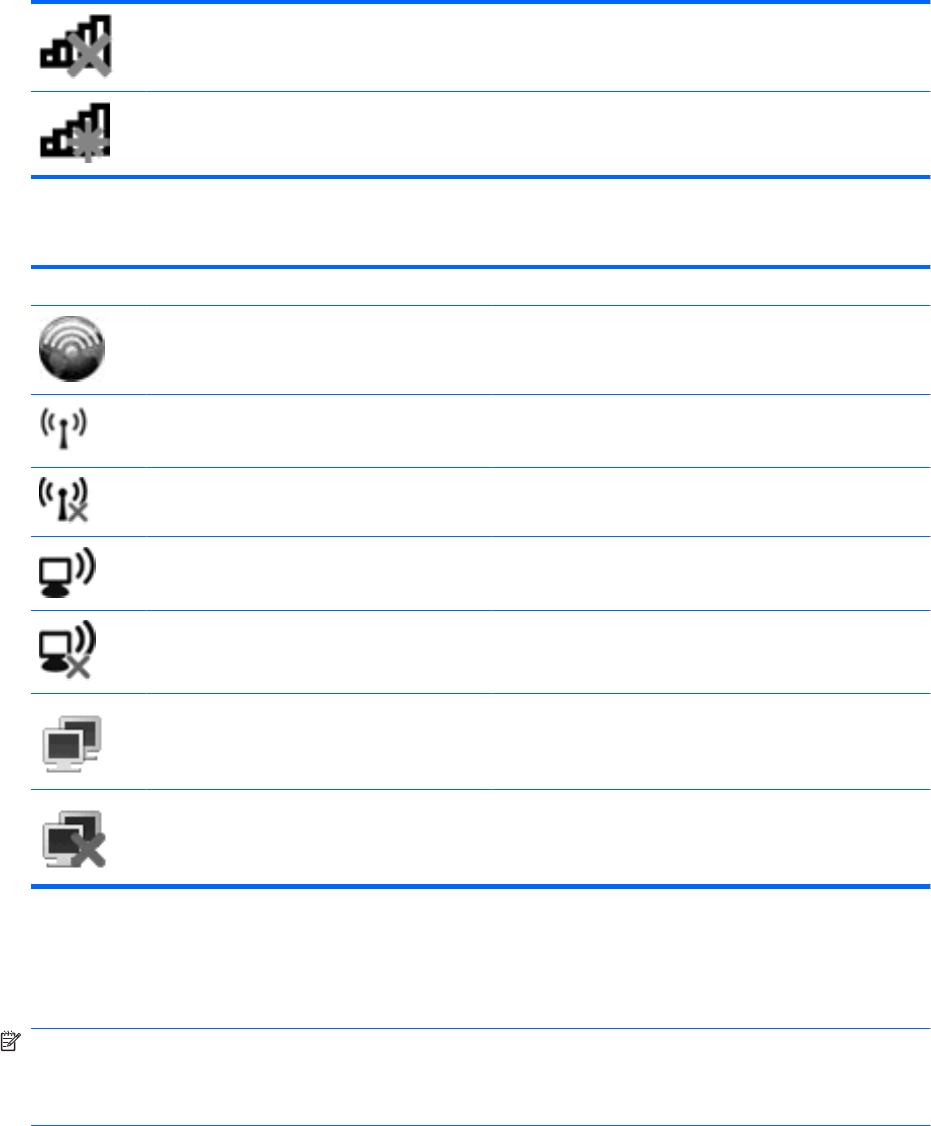
Network (disconnected) Indicates that network devices are not connected to a network.
Network (disabled/
disconnected)
Indicates that no wireless connections are available.
Windows XP
Icon Name Description
HP Connection Manager Opens HP Connection Manager, which enables you to create
a connection with an HP Mobile Broadband Module (select
models only).
Wireless (connected) Indicates that one or more wireless devices are on.
Wireless (disconnected) Indicates that all wireless devices are off.
Wireless network connection (connected) Indicates that one or more WLAN devices are connected to
a network.
Wireless network connection (disconnected) Indicates that one or more WLAN devices are not connected
to a network.
Network status (connected) Connected to the wired network.
Network status (disconnected) Not connected to the wired network.
Turning wireless devices on or off
Using the wireless button
NOTE: A computer may have a wireless button, a wireless switch, or a wireless action key on the
keyboard. The term wireless button is used throughout this guide to refer to all types of wireless controls.
Refer to the Getting Started guide for information on identifying the location of the wireless button on
your computer.
You can use the wireless button to simultaneously turn on or turn off the wireless network controller and
Bluetooth device. These devices can be controlled through Wireless Assistant (select models only).
Creating a wireless connection 3

Using HP Wireless Assistant (select models only) to turn wireless devices on or off
A wireless device can be turned on or off using Wireless Assistant. If a wireless device is disabled in
Setup Utility, it must be reenabled in Setup Utility before it can be turned on or off using Wireless
Assistant.
NOTE: Enabling and turning on a wireless device does not automatically connect the computer to a
network or a Bluetooth-enabled device.
To view the state of the wireless devices, click the Show hidden icons icon, the arrow at the left of the
notification area, and position the mouse pointer over the wireless icon.
▲To open Wireless Assistant, double-click the wireless icon in the notification area.
If the wireless icon is not displayed in the notification area, complete the following steps:
Windows 7
1. Select Start > Control Panel > Hardware and Sound > Windows Mobility Center.
2. Click the wireless icon in the Wireless Assistant tile, which is located in the bottom row of Windows®
Mobility Center.
3. Click Properties.
4. Select the check box next to HP Wireless Assistant icon in notification area.
5. Click Apply.
6. Click Close.
For more information, refer to the Wireless Assistant software Help:
1. Open Wireless Assistant by clicking the wireless icon in Windows Mobility Center.
2. Click the Help button.
Windows XP
1. Select Start > Control Panel > Network and Internet Connections > HP Wireless Assistant.
2. Click Properties.
3. Select the check box next to Wireless Assistant icon in notification area.
4. Click Apply.
Using HP Connection Manager (select models only)
You can use HP Connection Manager to connect to WWANs using the HP Mobile Broadband Module
in your computer (select models only).
▲To start Connection Manager, click the HP Connection Manager icon in the notification area, at
the far right of the taskbar.
– or –
Select Start > All Programs > HP Connection Manager > HP Connection Manager.
For more details about using Connection Manager, refer to the Connection Manager software Help.
4 Chapter 2 Networking (select models only)

Using operating system controls
The Network and Sharing Center allows you to set up a connection or network, connect to a network,
manage wireless networks, and diagnose and repair network problems.
Windows 7
▲Select Start > Control Panel > Network and Internet > Network and Sharing Center.
Windows XP
▲Select Start > Control Panel > Network and Internet Connections > Network Connections.
For more information, select Start > Help and Support.
Using a WLAN
A wireless connection connects the computer to Wi-Fi networks, or WLANs. A WLAN is composed of
other computers and accessories that are linked by a wireless router or a wireless access point.
Connecting to an existing WLAN
Windows 7
1. Be sure that the WLAN device is on. (Refer to Turning wireless devices on or off on page 3).
2. Click the network icon in the notification area, at the far right of the taskbar.
3. Select your WLAN from the list.
4. Click Connect.
If the network is a security-enabled WLAN, you are prompted to enter a network security code.
Type the code, and then click OK to complete the connection.
NOTE: If no WLANs are listed, you are out of range of a wireless router or access point.
NOTE: If you do not see the network you want to connect to, click Open Network and Sharing
Center, and then click Set up a new connection or network. A list of options is displayed. You
can choose to manually search for and connect to a network or to create a new network connection.
Windows XP
1. Be sure that the WLAN device is on. (Refer to Turning wireless devices on or off on page 3.)
2. Select Start > Connect to.
3. Select your WLAN from the list.
●If the network is unsecured, a warning is displayed. Click Connect Anyway to accept the
warning and complete the connection.
●If the network is a security-enabled WLAN, you are prompted to enter a network security code.
Type the code, and then click Connect to complete the connection.
NOTE: If no WLANs are listed, you are out of range of a wireless router or access point.
NOTE: If you do not see the network you want to connect to, click Set up a connection or
network. A list of options is displayed. You can choose to manually search for and connect
to a network or to create a new network connection.
After the connection is made, you can place the mouse pointer over the network icon in the notification
area, at the far right of the taskbar, to verify the name and status of the connection.
Using a WLAN 5
NOTE: The functional range (how far your wireless signals travel) depends on WLAN implementation,
router manufacturer, and interference from other electronic devices or structural barriers such as walls
and floors.
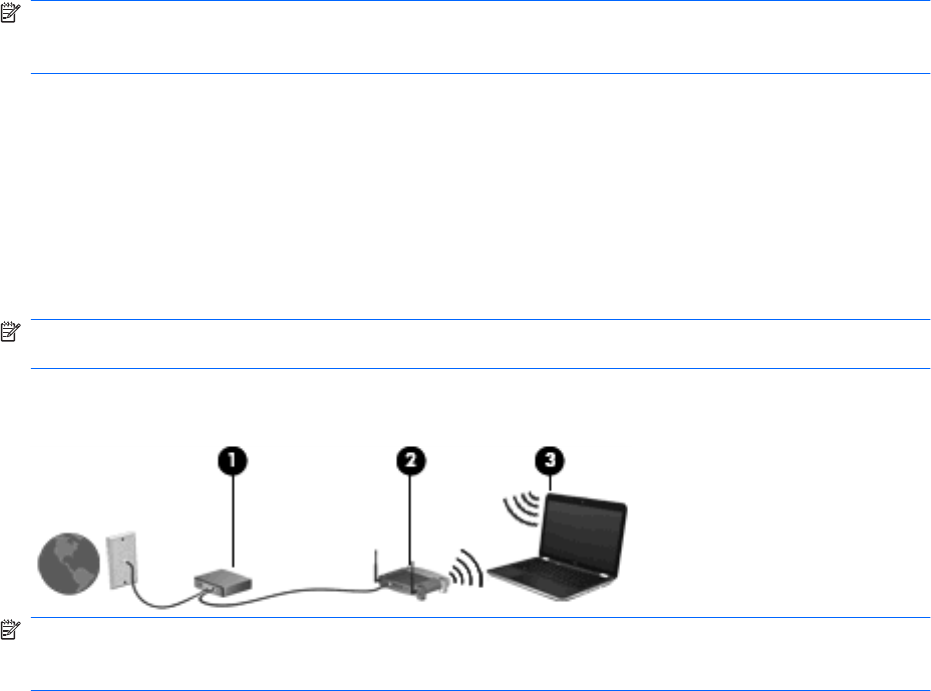
Setting up a new WLAN
Required equipment:
●A broadband modem (either DSL or cable) (1) and high-speed Internet service purchased from an
Internet service provider (ISP)
●A wireless router (purchased separately) (2)
●The wireless computer (3)
NOTE: Some cable modems include a built-in router. Check with your ISP to see if you need a separate
router.
The illustration below shows an example of a wireless network installation that is connected to the
Internet.
NOTE: When setting up a wireless connection, be sure that your computer and wireless router are
synchronized. To synchronize your computer and wireless router, turn your computer and wireless
router off and then back on.
As your network grows, additional wireless and wired computers can be connected to the network to
access the Internet.
For help in setting up your WLAN, refer to the information provided by your router manufacturer or your
ISP.
Protecting your WLAN
When you set up a WLAN or access an existing WLAN, always enable security features to protect your
network from unauthorized access. WLANs in public areas (hotspots) like coffee shops and airports
may not provide any security. If you are concerned about the security of your computer in a hotspot,
limit your network activities to e-mail that is not confidential and basic Internet surfing.
Wireless radio signals travel outside the network, so other WLAN devices can pick up unprotected
signals. You can take the following precautions to protect your WLAN:
●Firewall—Checks both data and requests for data that are sent to your network, and discards any
suspicious items. Firewalls are available in both software and hardware. Some networks use a
combination of both types.
●Wireless encryption—Wi-Fi Protected Access (WPA) uses security settings to encrypt and
decrypt data transmitted over the network. WPA uses Temporal Key Integrity Protocol (TKIP) to
dynamically generate a new key for every packet. It also generates different sets of keys for each
computer on the network.
6 Chapter 2 Networking (select models only)

Roaming to another network
When you move your computer within range of another WLAN, Windows attempts to connect to that
network. If the attempt is successful, your computer is automatically connected to the new network. If
Windows does not recognize the new network, follow the same procedure you used initially to connect
to your WLAN.
Using HP Mobile Broadband (select models only)
HP Mobile Broadband enables your computer to use wireless wide area networks (WWANs) to access
the Internet from more places and over larger areas than it can by using WLANs. Using HP Mobile
Broadband requires a network service provider, which in most cases is a mobile phone network provider.
When used with mobile network provider service, HP Mobile Broadband gives you the freedom to stay
connected to the Internet, send e-mail, or connect to your corporate network whether you are on the
road or outside the range of Wi-Fi hotspots.
NOTE: You may need the HP Mobile Broadband Module serial number to activate mobile broadband
service. Refer to the Getting Started guide for the location of the serial number.
Some mobile network service providers require the use of a subscriber identity module (SIM). A SIM
contains basic information about you, such as a personal identification number (PIN), as well as network
information. Some computers include a preinstalled SIM. If the SIM is not preinstalled, it may be included
with the HP Mobile Broadband information provided with your computer, or it may be provided separately
by the mobile network service provider.
For information on inserting and removing the SIM, refer to Inserting a SIM on page 7 and Removing
a SIM on page 8.
For information on HP Mobile Broadband and how to activate service with a preferred mobile network
service provider, refer to the HP Mobile Broadband information included with your computer. For
additional information, see the HP Web site at http://www.hp.com/go/mobilebroadband (U.S. only).
Inserting a SIM
NOTE: To identify the SIM slot location, refer to the Getting Started guide.
1. Shut down the computer. If you are not sure whether the computer is off or in Hibernation, turn the
computer on by pressing the power button. Then shut down the computer through the operating
system.
2. Close the display.
3. Disconnect all external devices connected to the computer.
4. Unplug the power cord from the AC outlet.
5. Remove the battery.
6. Insert the SIM into the SIM slot, and gently press the SIM into the slot until it is firmly seated.
CAUTION: When inserting a SIM, position the card to match the icon next to the SIM slot on the
computer. If a SIM is inserted incorrectly, it could damage the SIM and the SIM connector.
To reduce the risk of damage to the connector, use minimal force when inserting a SIM.
7. Replace the battery.
NOTE: HP Mobile Broadband is disabled if the battery is not replaced.
Using HP Mobile Broadband (select models only) 7

8. Reconnect external power and external devices.
9. Turn on the computer.
Removing a SIM
NOTE: To identify the SIM slot location, refer to the Getting Started guide.
1. Shut down the computer. If you are not sure whether the computer is off or in Hibernation, turn the
computer on by pressing the power button. Then shut down the computer through the operating
system.
2. Close the display.
3. Disconnect all external devices connected to the computer.
4. Unplug the power cord from the AC outlet.
5. Remove the battery.
6. Press in on the SIM, and then remove it from the slot.
7. Replace the battery.
8. Reconnect external power and external devices.
9. Turn on the computer.
Using Bluetooth wireless devices
A Bluetooth device provides short-range wireless communications that replace the physical cable
connections that traditionally link electronic devices such as the following:
●Computers
●Phones
●Imaging devices (cameras and printers)
●Audio devices
Bluetooth devices provide peer-to-peer capability that allows you to set up a personal area network
(PAN) of Bluetooth devices. For information on configuring and using Bluetooth devices, refer to the
Bluetooth software Help.
Bluetooth and Internet Connection Sharing (ICS)
HP does not recommend setting up one computer with Bluetooth as a host and using it as a gateway
through which other computers may connect to the Internet. When two or more computers are connected
using Bluetooth, and Internet Connection Sharing (ICS) is enabled on one of the computers, the other
computers may not be able to connect to the Internet using the Bluetooth network.
The strength of Bluetooth is in synchronizing information transfers between your computer and wireless
devices including cellular phones, printers, cameras, and PDAs. The inability to consistently connect
two or more computers to share the Internet through Bluetooth is a limitation of Bluetooth and the
Windows operating system.
8 Chapter 2 Networking (select models only)
Using GPS (select models only)
Your computer may be equipped with a Global Positioning System (GPS). GPS satellites deliver
location, speed, and direction information to GPS-equipped systems.
For more information, refer to the HP Connection Manager or HP Wireless Assistant software Help.
Connecting to a wired network
Using a modem (select models only)
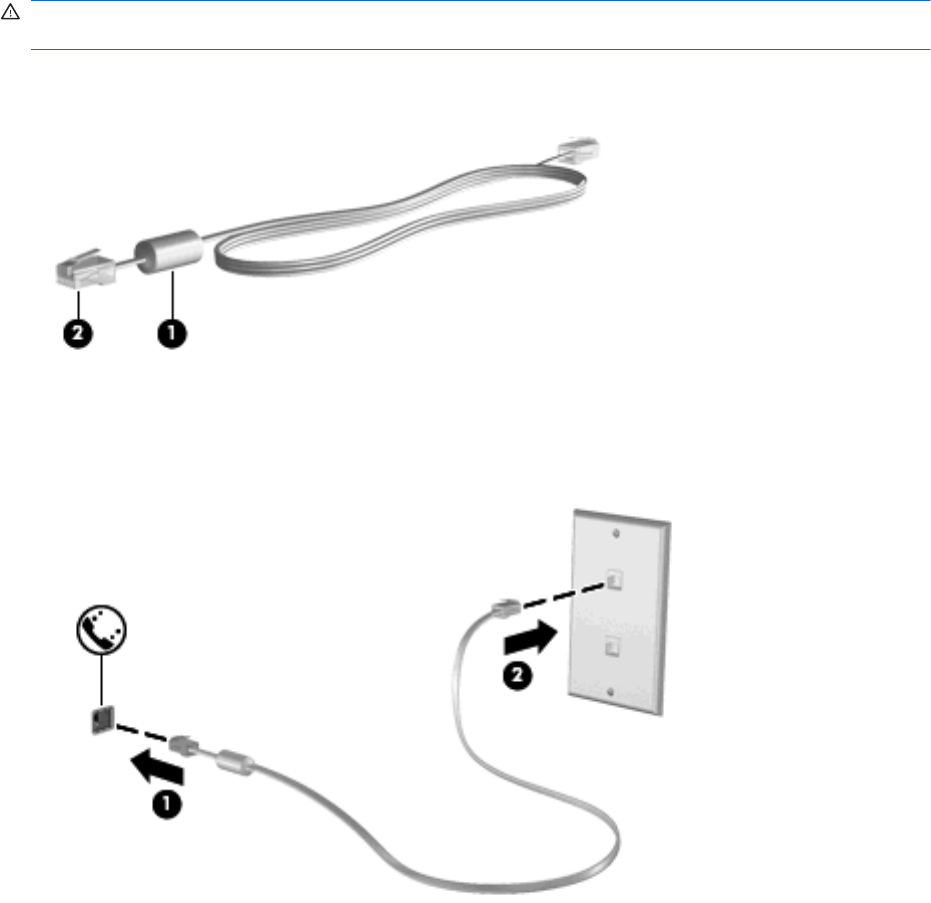
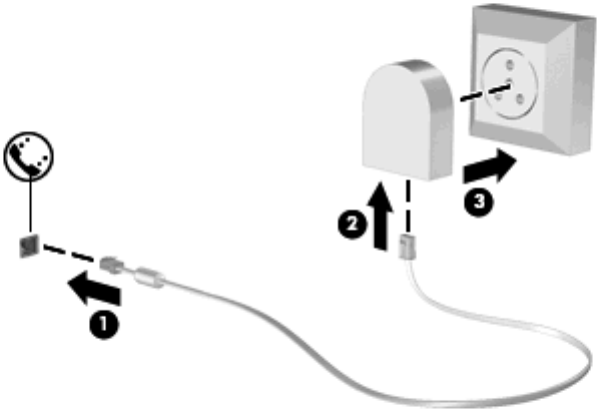
A modem must be connected to an analog telephone line using a 6-pin, RJ-11 modem cable (purchased
separately). In some countries or regions, a specific modem cable adapter is also required. Jacks for
digital PBX systems may resemble analog telephone jacks, but they are not compatible with the modem.
WARNING! To reduce the risk of electric shock, fire, or damage to the equipment, do not plug a modem
or telephone cable into the RJ-45 (network) jack.
If the modem cable contains noise suppression circuitry (1), which prevents interference from TV and
radio reception, orient the circuitry end of the cable (2) toward the computer.
Connecting a modem cable
1. Plug the modem cable into the modem jack (1) on the computer.
2. Plug the modem cable into the RJ-11 telephone wall jack (2).
Using GPS (select models only) 9
Connecting a country- or region-specific modem cable adapter
Telephone jacks vary by country or region. To use the modem and the modem cable outside the country
or region in which you purchased the computer, you must obtain a country- or region-specific modem
cable adapter.
To connect the modem to an analog telephone line that does not have an RJ-11 telephone jack, follow
these steps:
1. Plug the modem cable into the modem jack (1) on the computer.
2. Plug the modem cable into the modem cable adapter (2).
3. Plug the modem cable adapter (3) into the telephone wall jack.
Selecting a location setting
Viewing the current location selection
Windows 7
1. Select Start > Control Panel.
2. Click Clock, Language, and Region.
3. Click Region and Language.
4. Click the Location tab to display your location.
Windows XP
1. Select Start > Control Panel.
2. Click Date, Time, Language, and Regional Options.
3. Click Regional and Language Options.
Your location is displayed under Location.
Adding new locations when traveling
On a new computer, the only location setting available to the modem is a location setting for the country
or region in which you purchased the computer. As you travel to different countries or regions, set the
10 Chapter 2 Networking (select models only)

internal modem to a location setting that meets the operating standards of the country or region in which
you are using the modem.
As you add new location settings, they are saved by the computer so that you can switch among settings
at any time. You can add multiple location settings for any country or region.
CAUTION: To reduce the risk of losing your home country or region settings, do not delete your current
modem country or region settings. To enable modem use in other countries or regions while preserving
your home country or region configuration, add a new configuration for each location in which you will
use the modem.
CAUTION: To reduce the risk of configuring the modem in a way that violates the telecommunications
regulations and laws of the country or region you are visiting, select the country or region in which the
computer is located. The modem may not function properly if the correct country or region selection is
not made.
Windows 7
1. Select Start > Devices and Printers.
2. Right-click the device that represents your computer, and click Modem settings.
NOTE: You must set up an initial (current) location area code before you can view the Dialing
Rules tab. If you do not have a location already set up, you are prompted to enter the location when
you click Modem settings.
3. Click the Dialing Rules tab.
4. Click New. The New Location window opens.
5. In the Location name box, type a name (such as home or work) for the new location setting.
6. Select a country or region from the Country/region list. (If you select a country or region that is
not supported by the modem, the country/region selection for USA or UK is displayed.)
7. Enter the area code, a carrier code (if necessary), and the number for an outside line (if necessary).
8. Next to Dial using, click Tone or Pulse.
9. Click OK to save your new location setting. The Phone and Modem Options window opens.
10. Do one of the following:
●To set your new location setting as the current location, click OK.
●To select another location setting as the current location setting, select your preference from
the settings in the Location list, and then click OK.
NOTE: You can use the preceding procedure to add location settings for places within your
own country or region as well as in other countries or regions. For example, you could add a
setting named “Work” that includes dialing rules for accessing an outside line.
Windows XP
1. Select Start > Control Panel.
2. Click Printers and Other Hardware.
3. Click Phone and Modem Options.
4. Click the Dialing Rules tab.
5. Click New. The New Location window opens.
6. In the Location name box, type a name (such as home or work) for the new location setting.
Connecting to a wired network 11
7. Select a country or region from the Country/region list. (If you select a country or region that is
not supported by the modem, the country/region selection for USA or UK is displayed.)
8. Enter the area code, a carrier code (if necessary), and the number for an outside line (if necessary).
9. Next to Dial using, click Tone or Pulse.
10. Click OK to save your new location setting. The Phone and Modem Options window opens.
11. Do one of the following:
●To set your new location setting as the current location, click OK.
●To select another location setting as the current location setting, select your preference from
the settings in the Location list, and then click OK.
NOTE: You can use the preceding procedure to add location settings for places within your own
country or region as well as in other countries or regions. For example, you could add a setting
named “Work” that includes dialing rules for accessing an outside line.
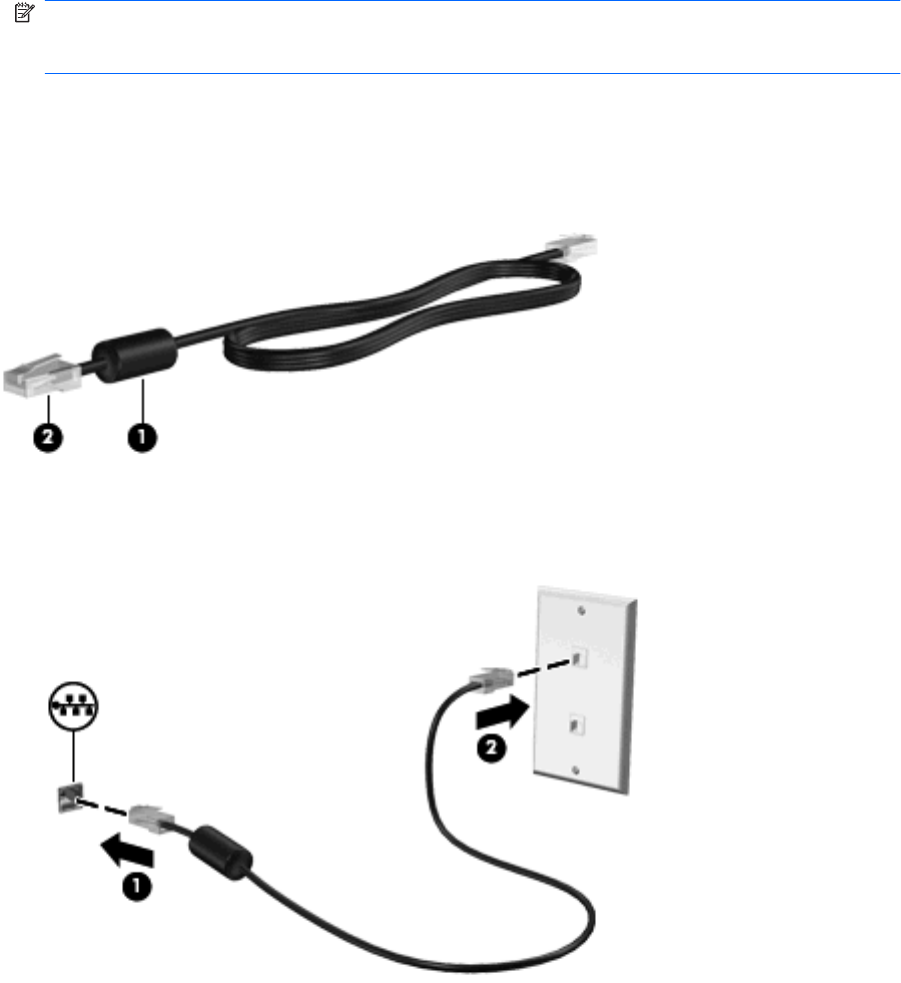
Connecting to a local area network (LAN) (select models only)
Connecting to a local area network (LAN) requires an 8-pin, RJ-45 network cable (purchased
separately). If the network cable contains noise suppression circuitry (1), which prevents interference
from TV and radio reception, orient the circuitry end of the cable (2) toward the computer.
To connect the network cable:
1. Plug the network cable into the network jack (1) on the computer.
2. Plug the other end of the network cable into a network wall jack (2).
12 Chapter 2 Networking (select models only)

WARNING! To reduce the risk of electric shock, fire, or damage to the equipment, do not plug a modem
cable or telephone cable into an RJ-45 (network) jack.
Connecting to a wired network 13

3Multimedia
Your computer may include the following:
●One or two integrated speakers
●One or two integrated microphones
●Integrated webcam
●Preinstalled multimedia software
●Multimedia buttons or keys
Using the media activity controls
Depending on your computer model, you may have the following media activity controls that allow you
to play, pause, fast forward, or rewind a media file:
●Media buttons
●Media hotkeys (specific keys pressed in combination with the fn key)
●Media action keys
Refer to the Getting Started guide for information about your computer's media activity controls.
Audio
Your computer provides a variety of audio-related opportunities:
●Play music.
●Record sound.
●Download music from the Internet.
●Create multimedia presentations.
●Transmit sound and images with instant messaging programs.
●Stream radio programs.
●Create (burn) audio CDs using the installed optical drive (select models only) or on an optional
external optical drive (purchased separately).
Adjusting the volume
Depending on your computer model, you can adjust the volume using the following:
●Volume buttons
●Volume hotkeys
●Volume keys
14 Chapter 3 Multimedia

WARNING! To reduce the risk of personal injury, adjust the volume before putting on headphones,
earbuds, or a headset. For additional safety information, refer to the Regulatory, Safety, and
Environmental Notices.
NOTE: Volume can also be controlled through the operating system and some programs.
NOTE: Refer to the Getting Started guide for information on what type of volume controls your
computer has.
Checking audio functions on the computer
Windows 7
To check the audio functions on your computer, follow these steps:
1. Select Start > Control Panel > Hardware and Sound > Sound.
2. When the Sound window opens, click the Sounds tab. Under Program Events, select any sound
event, such as a beep or alarm, and click the Test button.
You should hear sound through the speakers or through connected headphones.
To check the recording functions on your computer, follow these steps:
1. Select Start > All Programs > Accessories > Sound Recorder.
2. Click Start Recording and speak into the microphone. Save the file to your desktop.
3. Open a multimedia program and play back the sound.
NOTE: For best results when recording, speak directly into the microphone and record sound in a
setting free of background noise.
To confirm or change the audio settings on your computer, select Start > Control Panel > Hardware
and Sound > Sound.
Windows XP
To check the audio functions on your computer, follow these steps:
1. Select Start > Control Panel > Sounds, Speech, and Audio Devices > Sounds and Audio
Devices.
2. When the Sound and Audio Device Properties window opens, click the Sounds tab. Under
Program events, select any sound event, such as a beep or alarm, and click the arrow button to
check the sound.
You should hear sound through the speakers or through connected headphones.
To check the recording functions on your computer, follow these steps:
1. Select Start > All Programs > Accessories > Entertainment > Sound Recorder.
2. Click the recording button and speak into the microphone. Save the file to your desktop.
3. Open a multimedia program and play back the sound.
NOTE: For best results when recording, speak directly into the microphone and record sound in a
setting free of background noise.
To confirm or change the audio settings on your computer, right-click the Volume icon on the taskbar,
or select Start > Control Panel > Sounds, Speech, and Audio Devices > Sounds and Audio
Devices.
Audio 15
Webcam (select models only)
Some computers include an integrated webcam, located at the top of the display. With the preinstalled
software, you can use the webcam to take a photo or record a video. You can preview and save the
photo or video recording.
The webcam software enables you to experiment with the following features:
●Capturing and sharing video
●Streaming video with instant message software
●Taking still photos
For information on how to access the webcam, refer to the Getting Started guide. For information on
using the webcam, select Start > Help and Support.
Using SkyRoom (select models only)
HP SkyRoom is a video tool that allows video conferencing and desktop sharing so that participants
across the world can collaborate in real time.
You can utilize your existing Microsoft Office Communicator or Jabber contact lists or you can create
your own list and add contacts manually. For more information, refer to the SkyRoom software Help.
Video
Your computer may have one or more of the following external video ports:
●VGA
●DisplayPort
●HDMI
VGA
The external monitor port, or VGA port, is an analog display interface that connects an external VGA
display device such as an external VGA monitor or a VGA projector to the computer.
16 Chapter 3 Multimedia
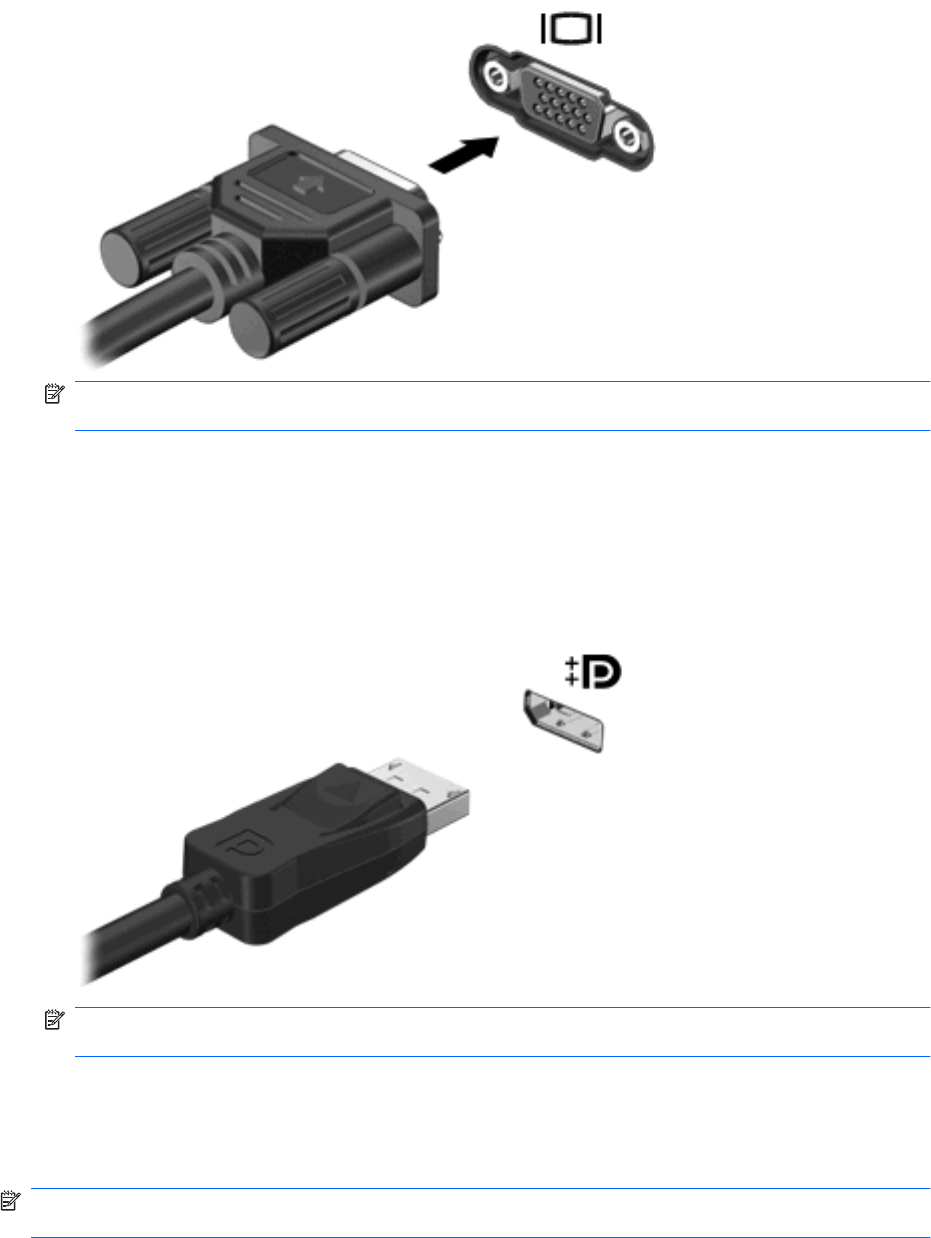
▲To connect a VGA display device, connect the device cable to the external monitor port.
NOTE: For product-specific instructions on switching the screen image, refer to your Getting
Started guide.
DisplayPort
The DisplayPort connects a digital display device such as a high-performance monitor or projector. The
DisplayPort delivers higher performance than the VGA external monitor port and improves digital
connectivity.
▲To connect a digital display device, connect the device cable to the DisplayPort.
NOTE: For product-specific instructions on switching the screen image, refer to your Getting
Started guide.
HDMI
The HDMI (High Definition Multimedia Interface) port connects the computer to an optional video or
audio device, such as a high-definition television, or to any compatible digital or audio component.
NOTE: To transmit video signals through the HDMI port, you need an HDMI cable (purchased
separately).
Video 17
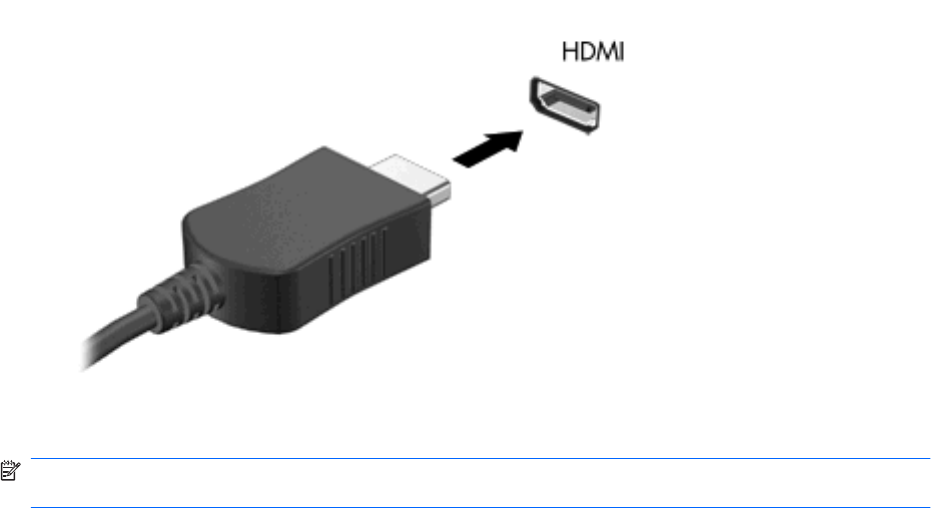
One HDMI device can be connected to the HDMI port on the computer. The information displayed on
the computer screen can be simultaneously displayed on the HDMI device.
To connect a video or audio device to the HDMI port:
1. Connect one end of the HDMI cable to the HDMI port on the computer.
2. Connect the other end of the cable to the video device, and then refer to the device manufacturer’s
instructions for additional information.
NOTE: For product-specific instructions on switching the screen image, refer to your Getting Started
guide.
Configuring audio for HDMI
To configure HDMI audio, first connect an audio or video device, such as a high-definition TV, to the
HDMI port on your computer. Then configure the default audio playback device as follows:
1. Right-click the Speakers icon in the notification area, at the far right of the taskbar, and then click
Playback devices.
2. On the Playback tab, click either Digital Output or Digital Output Device (HDMI).
3. Click Set Default, and then click OK.
To return audio to the computer speakers, follow these steps:
1. Right-click the Speakers icon in the notification area, at the far right of the taskbar, and then click
Playback devices.
2. On the Playback tab, click Speakers.
3. Click Set Default, and then click OK.
18 Chapter 3 Multimedia
Using HP MediaSmart (select models only)
HP MediaSmart turns your computer into a mobile entertainment center. With MediaSmart, you can
enjoy music CDs and DVD and Blu-ray Disc (BD) movies. You can also manage and edit your photo
collections. MediaSmart includes the following features:
●Playlist upload support:
◦Upload your MediaSmart photo playlists to Internet photo albums.
◦Upload your MediaSmart video playlists to YouTube.
◦Export your MediaSmart playlist to the CyberLink DVD Suite.
●Pandora Internet radio (North America only)—Listen to music selected just for you, streamed from
the Internet.
▲To start MediaSmart, select Start > All Programs > HP > HP MediaSmart.
For more information on using MediaSmart, select Start > Help and Support.
Using HP MediaSmart (select models only) 19

4 Power management
NOTE: A computer may have a power button or a power switch. The term power button is used
throughout this guide to refer to both types of power controls.
NOTE: Windows 7 uses Sleep and Windows XP uses Standby. The term Sleep is used throughout
this guide to refer to both. Differences between the operating systems that affect any of the procedures
are noted.
Shutting down the computer
CAUTION: Unsaved information is lost when the computer shuts down.
The Shut down command closes all open programs, including the operating system, and then turns off
the display and computer.
Shut down the computer under any of the following conditions:
●When you need to replace the battery or access components inside the computer
●When you are connecting an external hardware device that does not connect to a USB port
●When the computer will be unused and disconnected from external power for an extended period
Although you can shut down the computer with the power button, the recommended procedure is to use
the Windows Shut down command:
NOTE: If the computer is in the Sleep state or in Hibernation, you must first exit Sleep or Hibernation
before shutdown is possible.
1. Save your work and close all open programs.
2. Windows 7—Select Start > Shut down.
Windows XP—Select Start > Turn Off Computer > Turn Off.
NOTE: If you have been registered to a network domain, the button you click is called Shut Down
instead of Turn Off Computer.
If the computer is unresponsive and you are unable to use the preceding shutdown procedures, try the
following emergency procedures in the sequence provided:
●Windows 7—Press ctrl+alt+delete, and then click the Power button.
Windows XP—Press ctrl+alt+delete. Click Shut Down, and then click Turn Off.
●Press and hold the power button for at least 5 seconds.
●Disconnect the computer from external power and remove the battery.
Setting power options
Using power-saving states
The computer has two power-saving states that are enabled at the factory: Sleep and Hibernation.
20 Chapter 4 Power management

When Sleep is initiated, the power lights blink and the screen clears. Your work is saved to memory,
letting you exit Sleep faster than exiting Hibernation. If the computer is in the Sleep state for an extended
period or if the battery reaches a critical battery level while in the Sleep state, the computer initiates
Hibernation.
When Hibernation is initiated, your work is saved to a hibernation file on the hard drive and the computer
turns off.
CAUTION: To reduce the risk of possible audio and video degradation, loss of audio or video playback
functionality, or loss of information, do not initiate Sleep or Hibernation while reading from or writing to
a disc or an external media card.
NOTE: You cannot initiate any type of networking connection or perform any computer functions while
the computer is in the Sleep state or in Hibernation.
Initiating and exiting Sleep
The system is set at the factory to initiate Sleep after a period of inactivity when running on battery power
or on external power.
Power settings and timeouts can be changed using Power Options in Windows® Control Panel.
With the computer on, you can initiate Sleep in any of the following ways:
●Briefly press the power button.
●Close the display.
●Windows 7—Select Start, click the arrow next to the Shut down button, and then click Sleep.
Windows XP—Select Start > Turn Off Computer > Stand By.
To exit Sleep:
●Briefly press the power button.
●If the display is closed, open the display.
●Press a key on the keyboard.
●Tap or swipe the TouchPad.
When the computer exits Sleep, the power lights turn on and your work returns to the screen where you
stopped working.
NOTE: If you have set a password to be required on wakeup, you must enter your Windows password
before your work will return to the screen.
Initiating and exiting Hibernation
The system is set at the factory to initiate Hibernation after a period of inactivity when running on battery
power or on external power, or when the battery reaches a critical battery level.
Power settings and timeouts can be changed in Windows Control Panel.
To initiate Hibernation:
▲Windows 7—Select Start, click the arrow next to the Shut down button, and then click
Hibernate.
Windows XP—Select Start > Turn Off Computer, and then hold down the shift key and select
Hibernate.
Setting power options 21

To exit Hibernation:
▲Briefly press the power button.
The power lights turn on and your work returns to the screen where you stopped working.
NOTE: If you have set a password to be required on wakeup, you must enter your Windows password
before your work will return to the screen.
Using the power meter
The power meter is located in the notification area, at the far right of the taskbar. The power meter allows
you to quickly access power settings and view the remaining battery charge.
●To display the percentage of remaining battery charge and the current power plan (or power
scheme in Windows XP), move the pointer over the power meter icon.
●To access Power Options, or to change the power plan, click the power meter icon and select an
item from the list.
Different power meter icons indicate whether the computer is running on battery or external power. The
icon also displays a message if the battery has reached a low or critical battery level.
Using power plans
A power plan (or power scheme in Windows XP) is a collection of system settings that manages how
the computer uses power. Power plans can help you conserve power or maximize performance.
Viewing the current power plan
Use any of the following methods:
●Click the power meter icon in the notification area, at the far right of the taskbar.
●Windows 7—Select Start > Control Panel > System and Security > Power Options.
Windows XP—Select Start > Control Panel > Performance and Maintenance > Power
Options.
Selecting a different power plan
Use any of the following methods:
●Click the power meter icon in the notification area, and then select a power plan from the list.
●Windows 7—Select Start > Control Panel > System and Security > Power Options, and then
select an item from the list.
Windows XP—Select Start > Control Panel > Performance and Maintenance > Power
Options, and then select an item from the list.
Customizing power plans
Windows 7
1. Click the power meter icon in the notification area, and then click More power options.
– or –
Select Start > Control Panel > System and Security > Power Options.
2. Select a power plan, and then click Change plan settings.
22 Chapter 4 Power management

3. Change the settings as needed.
4. To change additional settings, click Change advanced power settings and make your changes.
Windows XP
1. Select Start > Control Panel > Performance and Maintenance > Power Options.
2. Select a power scheme from the Power schemes list.
3. Modify the Plugged in and Running on batteries settings as needed.
4. Click OK.
Setting password protection on wakeup
Windows 7
To set the computer to prompt for a password when the computer exits Sleep or Hibernation, follow
these steps:
1. Select Start > Control Panel > System and Security > Power Options.
2. In the left pane, click Require a password on wakeup.
3. Click Change Settings that are currently unavailable.
4. Click Require a password (recommended).
NOTE: If you need to create a user account password or change your current user account
password, click Create or change your user account password, and then follow the on-screen
instructions. If you do not need to create or change a user account password, go to step 5.
5. Click Save changes.
Windows XP
1. Right-click the Power Meter icon in the notification area, and then click Adjust Power
Properties.
2. Click the Advanced tab.
3. Select the Prompt for password when computer resumes from Standby check box.
4. Click Apply.
Using battery power
When a charged battery is in the computer and the computer is not plugged into external power, the
computer runs on battery power. When the computer is plugged into external AC power, the computer
runs on AC power.
If the computer contains a charged battery and is running on external AC power, the computer switches
to battery power if the AC adapter is disconnected from the computer.
NOTE: When you disconnect AC power, the display brightness is automatically decreased to save
battery life. For information on increasing or decreasing display brightness, refer to the Getting
Started guide.
Select computer models can switch between graphic modes to increase battery life. For more
information, refer to Switching between graphics modes (select models only) on page 28.
Using battery power 23

You can keep a battery in the computer or in storage, depending on how you work. Keeping the battery
in the computer whenever the computer is plugged into AC power charges the battery and also protects
your work in case of a power outage. However, a battery in the computer slowly discharges when the
computer is off and unplugged from external power.
WARNING! To reduce potential safety issues, use only the battery provided with the computer, a
replacement battery provided by HP, or a compatible battery purchased from HP.
Computer battery life varies, depending on power management settings, programs running on the
computer, display brightness, external devices connected to the computer, and other factors.
Finding battery information in Help and Support in Windows 7
Help and Support provides the following tools and information about the battery:
●Battery Check tool to test battery performance
●Information on calibration, power management, and proper care and storage to maximize battery
life
●Information on battery types, specifications, life cycles, and capacity
To access battery information:
▲Select Start > Help and Support > Learn > Power Plans: Frequently Asked Questions.
Using Battery Check in Windows 7
Battery Check in Help and Support provides information on the status of the battery installed in the
computer.
To run Battery Check:
1. Connect the AC adapter to the computer.
NOTE: The computer must be connected to external power for Battery Check to work properly.
2. Select Start > Help and Support > Troubleshoot > Power, Thermal and Mechanical.
3. Click the Power tab, and then click Battery Check.
Battery Check examines the battery and its cells to see if they are functioning properly, and then reports
the results of the examination.
Displaying the remaining battery charge
▲Move the pointer over the power meter icon in the notification area, at the far right of the taskbar.
Maximizing battery discharge time
Battery discharge time varies depending on the features you use while on battery power. Maximum
discharge time gradually decreases as the battery storage capacity naturally degrades.
Tips for maximizing battery discharge time:
●Lower the brightness on the display.
●Remove the battery from the computer when it is not being used or charged.
●Store the battery in a cool, dry location.
●Windows 7—Select the Power saver setting in Power Options.
24 Chapter 4 Power management

Managing low battery levels
The information in this section describes the alerts and system responses set at the factory. Some low-
battery alerts and system responses can be changed using Power Options in Windows Control Panel.
Preferences set using Power Options do not affect lights.
Identifying low battery levels
When a battery that is the sole power source for the computer reaches a low or critical battery level, the
following behavior occurs:
●The battery light (select models only) indicates a low or critical battery level.
NOTE: For additional information about the battery light, refer to the Getting Started guide.
– or –
●The power meter icon in the notification area shows a low or critical battery notification.
NOTE: For additional information about the power meter, refer to Using the power meter
on page 22.
The computer takes the following actions for a critical battery level:
●If Hibernation is enabled and the computer is on or in the Sleep state, the computer initiates
Hibernation.
●If Hibernation is disabled and the computer is on or in the Sleep state, the computer remains briefly
in the Sleep state, and then shuts down and loses any unsaved information.
Resolving a low battery level
Resolving a low battery level when external power is available
▲Connect one of the following devices:
●AC adapter
●Optional docking or expansion device
●Optional power adapter purchased as an accessory from HP
Resolving a low battery level when a charged battery is available
1. Turn off the computer or initiate Hibernation.
2. Replace the discharged battery with a charged battery.
3. Turn on the computer.
Resolving a low battery level when no power source is available
●Initiate Hibernation.
●Save your work and shut down the computer.
Using battery power 25

Resolving a low battery level when the computer cannot exit Hibernation
When the computer lacks sufficient power to exit Hibernation, follow these steps:
1. Replace the discharged battery with a charged battery, or connect the AC adapter to the computer
and to external power.
2. Exit Hibernation by pressing the power button.
Conserving battery power
●Select low power-use settings through Power Options in Windows Control Panel.
●Turn off wireless and local area network (LAN) connections and exit modem applications when you
are not using them.
●Disconnect unused external devices that are not plugged into an external power source.
●Stop, disable, or remove any external media cards that you are not using.
●Decrease screen brightness.
●Before you leave your work, initiate Sleep or Hibernation, or shut down the computer.
Storing a battery
CAUTION: To reduce the risk of damage to a battery, do not expose it to high temperatures for
extended periods of time.
If a computer will be unused and unplugged from external power for more than 2 weeks, remove the
battery and store it separately.
To prolong the charge of a stored battery, place it in a cool, dry place.
NOTE: A stored battery should be checked every 6 months. If the capacity is less than 50 percent,
recharge the battery before returning it to storage.
Calibrate a battery before using it if it has been stored for one month or more.
Disposing of a used battery
WARNING! To reduce the risk of fire or burns, do not disassemble, crush, or puncture; do not short
external contacts; do not dispose of in fire or water.
Refer to the Regulatory, Safety, and Environmental Notices for proper battery disposal.
Replacing the battery
In Windows 7, Battery Check in Help and Support notifies you to replace the battery when an internal
cell is not charging properly or when the battery storage capacity has reached a weak condition. If the
battery is possibly covered by an HP warranty, instructions include a warranty ID. A message refers you
to the HP Web site for more information about ordering a replacement battery.
26 Chapter 4 Power management

Using external AC power
NOTE: For information on connecting to AC power, refer to the Quick Setup poster provided in the
computer box.
External AC power is supplied through an approved AC adapter or an optional docking or expansion
device.
WARNING! To reduce potential safety issues, use only the AC adapter provided with the computer,
a replacement AC adapter provided by HP, or a compatible AC adapter purchased from HP.
Connect the computer to external AC power under any of the following conditions:
WARNING! Do not charge the computer battery while you are onboard aircraft.
●When charging or calibrating a battery
●When installing or modifying system software
●When writing information to a CD, a DVD, or a BD (select models only)
●When running Disk Defragmenter
●When performing a backup or recovery
When you connect the computer to external AC power, the following events occur:
●The battery begins to charge.
●If the computer is turned on, the power meter icon in the notification area changes appearance.
When you disconnect external AC power, the following events occur:
●The computer switches to battery power.
●The display brightness is automatically decreased to save battery life.
Using external AC power 27

Testing an AC adapter
Test the AC adapter if the computer exhibits any of the following symptoms when it is connected to AC
power:
●The computer does not turn on.
●The display does not turn on.
●The power lights are off.
To test the AC adapter:
1. Shut down the computer.
2. Remove the battery from the computer.
3. Connect the AC adapter to the computer, and then plug it into an AC outlet.
4. Turn on the computer.
●If the power lights turn on, the AC adapter is working properly.
●If the power lights remain off, the AC adapter is not functioning and should be replaced.
Contact technical support for information on obtaining a replacement AC power adapter.
Switching between graphics modes (select models only)
Select computers are equipped with switchable graphics and have two modes for processing graphics.
When you switch from AC power to battery power, the computer can switch from using the high-
performance mode to using the power-saving mode to conserve battery life. Similarly, when you switch
from battery power to AC power, the computer can switch back to the high-performance mode.
NOTE: In some instances, in order to optimize performance of the computer, the system does not
allow you to switch modes, or it may prompt you to switch. It may also be necessary to close all programs
before switching.
NOTE: HDMI (select models only) only works in the high-performance mode. If you use the power-
saving mode, you can not use HDMI.
When you switch between AC and battery power, you are notified that the computer is about to switch
graphics modes. If you prefer, you can choose to continue using the same graphics mode. While the
computer switches modes, the screen goes blank for a few seconds. When the switch is complete, a
notification appears in the notification area, and the screen image reappears.
NOTE: When select computer models are in slate mode, the screen orientation is reset when you
switch between graphics modes.
To determine which graphics mode you are using:
▲Right-click on a blank area of the computer desktop, and then click Configure Switchable
Graphics or Configure ATI PowerXpress™.
28 Chapter 4 Power management
5 External cards and devices
Using Digital Media Slot cards (select models only)
Optional digital cards provide secure data storage and convenient data sharing. These cards are often
used with digital media–equipped cameras and PDAs as well as with other computers.
To determine the digital card formats that are supported on your computer, refer to the Getting
Started guide.
Inserting a digital card
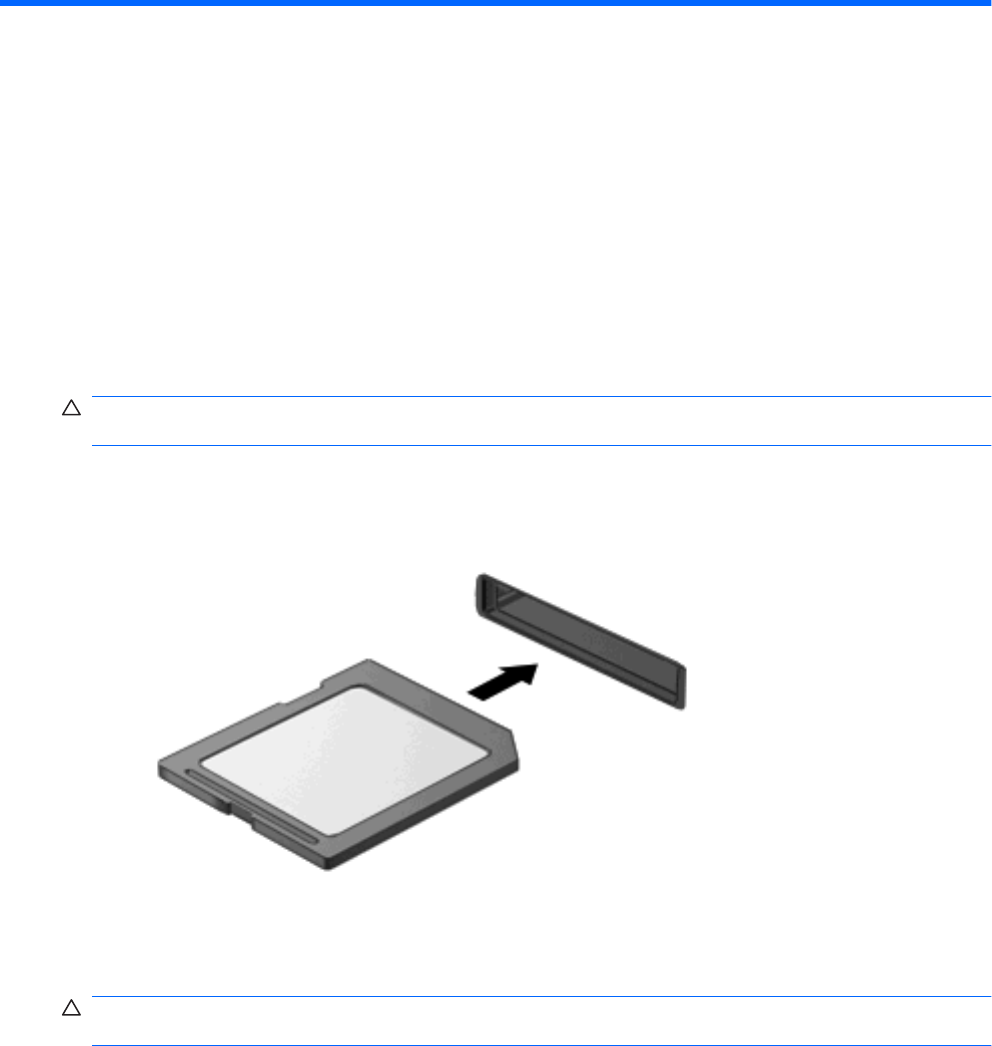
CAUTION: To reduce the risk of damage to the digital card connectors, use minimal force to insert a
digital card.
1. Hold the card label-side up, with the connectors facing the computer.
2. Insert the card into the Digital Media Slot, and then press in on the card until it is firmly seated.
You will hear a sound when the device has been detected, and a menu of options may be displayed.
Removing a digital card
CAUTION: To reduce the risk of loss of data or an unresponsive system, use the following procedure
to safely remove the digital card.
1. Save your information and close all programs associated with the digital card.
2. Click the remove hardware icon in the notification area, at the far right of the taskbar. Then follow
the on-screen instructions.
Using Digital Media Slot cards (select models only) 29
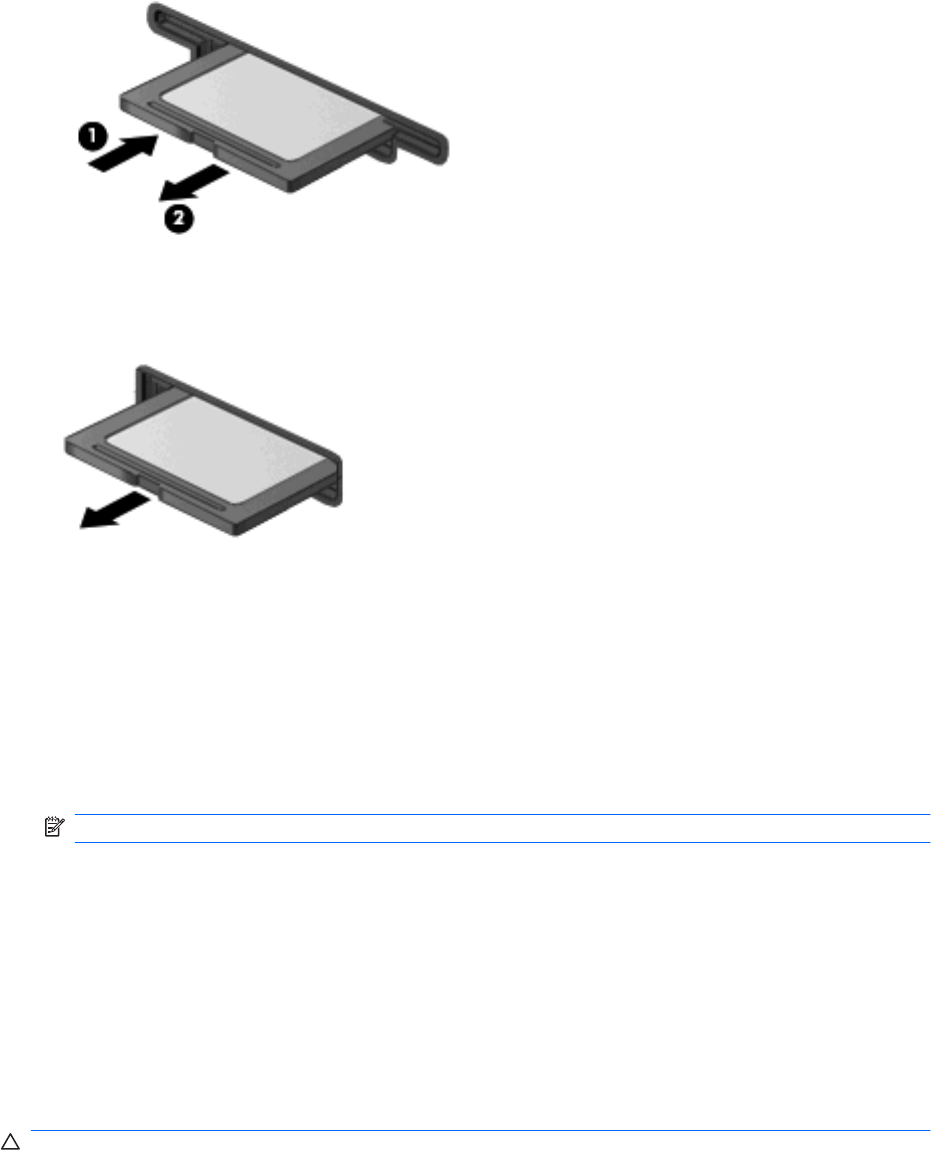
3. Either press in on the card (1), and then remove it from the slot (2).
– or –
Pull the card out of the slot.
Using PC Cards (select models only)
A PC Card is a credit card–sized accessory designed to conform to the standard specifications of the
Personal Computer Memory Card International Association (PCMCIA). The PC Card slot supports the
following types of PC Cards:
●32-bit (CardBus) and 16-bit PC Cards
●Type I and Type II PC Cards
NOTE: Zoomed video PC Cards and 12-V PC Cards are not supported.
Configuring a PC Card
To reduce the risk of loss of support for other PC Cards during configuration, install only the software
required for the device. If you are instructed by the PC Card manufacturer to install device drivers:
●Install only the device drivers for your operating system.
●Do not install other software, such as card services, socket services, or enablers, supplied by the
PC Card manufacturer.
Inserting a PC Card
CAUTION: To prevent damage to the computer and external media cards, do not insert an
ExpressCard into a PC Card slot.
30 Chapter 5 External cards and devices

CAUTION: To reduce the risk of damage to the connectors:
Use minimal force when inserting a PC Card.
Do not move or transport the computer when a PC Card is in use.
The PC Card slot may contain a protective insert. The insert must be removed before you can insert a
PC Card:
1. Press the PC Card eject button (1).
This action extends the button into position for releasing the insert.
2. Press the PC Card eject button again to release the insert.
3. Pull the insert out of the slot (2).
To insert a PC Card:
1. Hold the card label-side up, with the connectors facing the computer.
2. Insert the card into the PC Card slot, and then press in on the card until it is firmly seated.
You will hear a sound when the card has been detected, and a menu of available options may be
displayed.
NOTE: The first time you connect a PC Card, a message in the notification area lets you know
that the device is recognized by the computer.
NOTE: To conserve power, stop or remove a PC Card when it is not in use.
Using PC Cards (select models only) 31
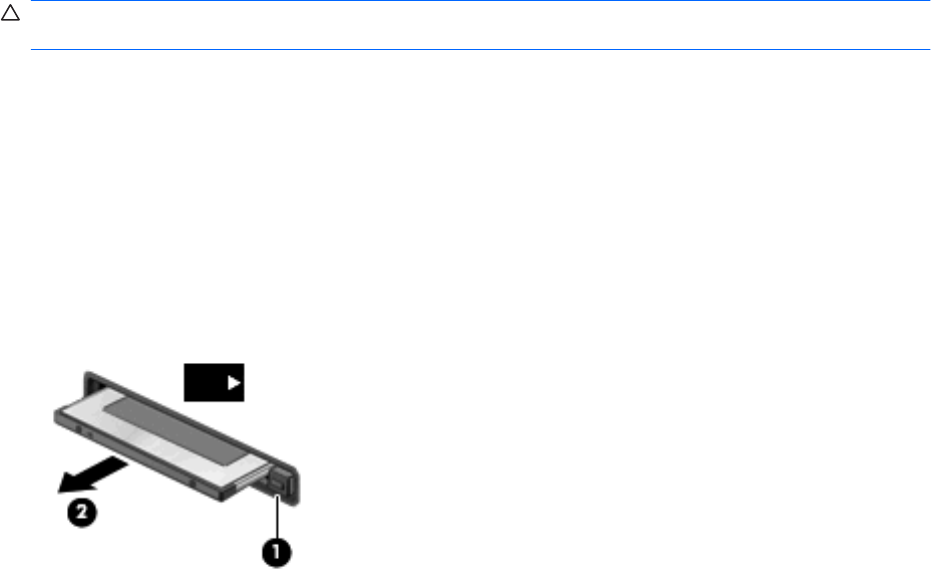
Removing a PC Card
CAUTION: To reduce the risk of loss of data or an unresponsive system, stop a PC Card before
removing it.
1. Save your information and close all programs associated with the PC Card.
2. Click the remove hardware icon in the notification area, at the far right of the taskbar, and then
follow the on-screen instructions.
3. Release and remove the PC Card:
a. Press the PC Card eject button (1).
This action extends the button into position for releasing the PC Card.
b. Press the PC Card eject button again to release the PC Card.
c. Pull the PC Card (2) out of the slot.
Using ExpressCards (select models only)
An ExpressCard is a high-performance PC Card that is inserted into the ExpressCard slot.
Like standard PC Cards, ExpressCards are designed to conform to the standard specifications of the
Personal Computer Memory Card International Association (PCMCIA).
Configuring an ExpressCard
Install only the software required for the card. If you are instructed by the ExpressCard manufacturer to
install device drivers:
●Install only the device drivers for your operating system.
●Do not install additional software, such as card services, socket services, or enablers, that are
supplied by the ExpressCard manufacturer.
32 Chapter 5 External cards and devices
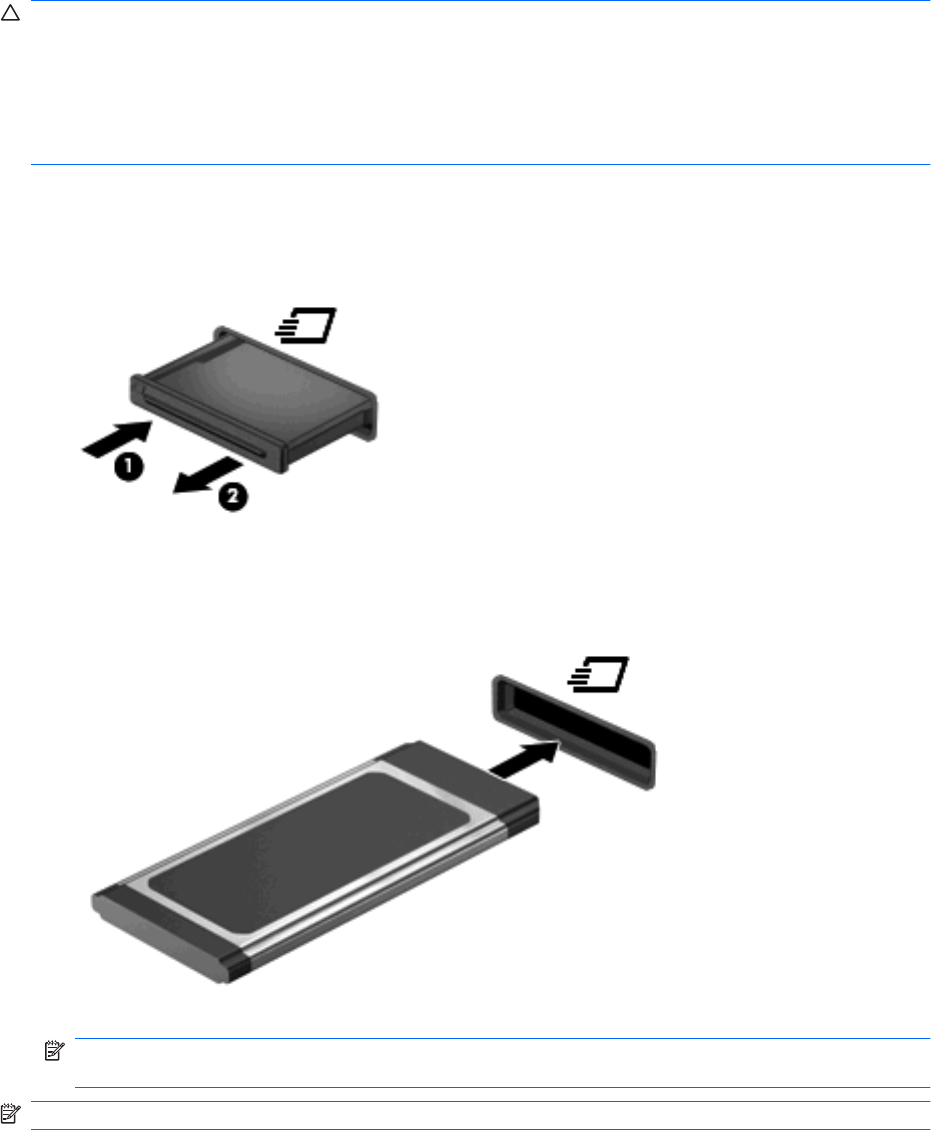
Inserting an ExpressCard
CAUTION: To prevent damage to the computer and external media cards, do not insert a PC Card
into an ExpressCard slot.
CAUTION: To reduce the risk of damage to the connectors:
Use minimal force when inserting an ExpressCard.
Do not move or transport the computer when an ExpressCard is in use.
The ExpressCard slot may contain a protective insert. To remove the insert:
1. Press in on the insert (1) to unlock it.
2. Pull the insert out of the slot (2).
To insert an ExpressCard:
1. Hold the card label-side up, with the connectors facing the computer.
2. Insert the card into the ExpressCard slot, and then press in on the card until it is firmly seated.
You will hear a sound when the card has been detected, and a menu of options may be displayed.
NOTE: The first time you connect an ExpressCard, a message in the notification area lets you
know that the card is recognized by the computer.
NOTE: To conserve power, stop or remove an ExpressCard when it is not in use.
Using ExpressCards (select models only) 33
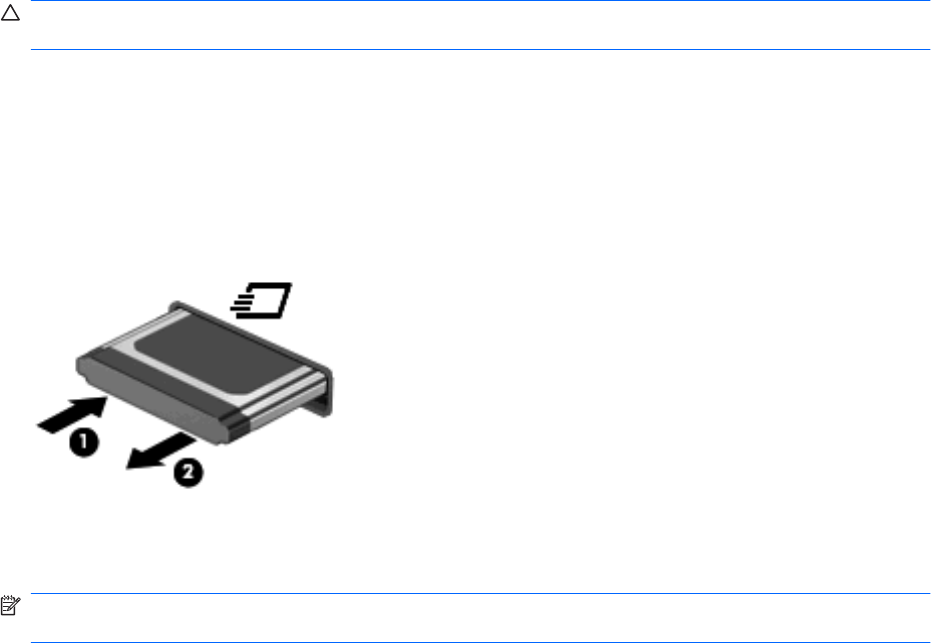
Removing an ExpressCard
CAUTION: To reduce the risk of loss of data or an unresponsive system, use the following procedure
to safely remove the ExpressCard.
1. Save your information and close all programs associated with the ExpressCard.
2. Click the remove hardware icon in the notification area, at the far right of the taskbar, and then
follow the on-screen instructions.
3. Release and remove the ExpressCard:
a. Gently press in on the ExpressCard (1) to unlock it.
b. Pull the ExpressCard out of the slot (2).
Using smart cards (select models only)
NOTE: The term smart card is used throughout this chapter to refer to both smart cards and Java™
Cards.
A smart card is a credit card–sized accessory that carries a microchip containing memory and a
microprocessor. Like personal computers, smart cards have an operating system to manage input and
output, and they include security features to protect against tampering. Industry-standard smart cards
are used with the smart card reader (select models only).
A personal identification number (PIN) is needed to gain access to the contents of the microchip. For
more information about smart card security features, refer to Help and Support.
34 Chapter 5 External cards and devices
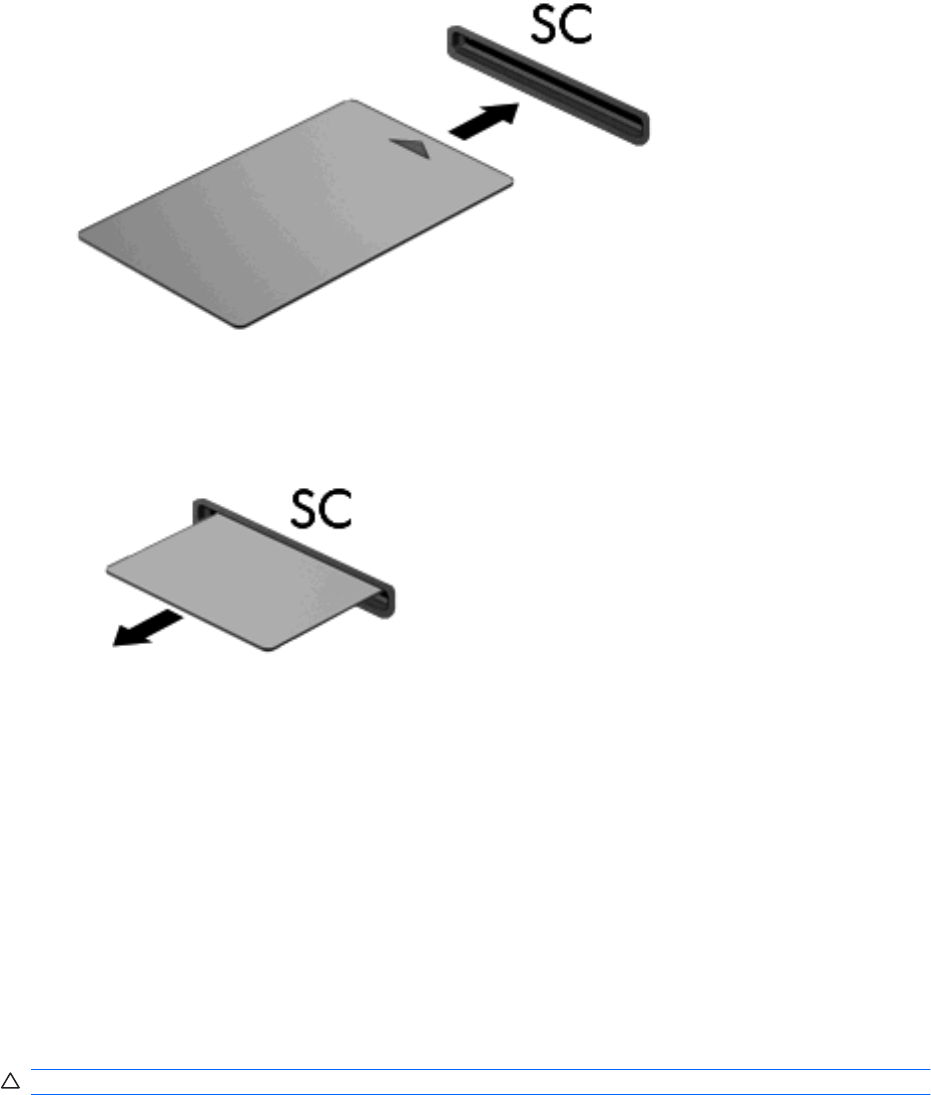
Inserting a smart card
1. Hold the card label-side up, and gently slide the card into the smart card reader until the card is
seated.
2. Follow the on-screen instructions for logging on to the computer using the smart card PIN.
Removing a smart card
▲Grasp the edge of the smart card, and then pull it out of the smart card reader.
Using a USB device
Universal Serial Bus (USB) is a hardware interface that can be used to connect an optional external
device, such as a USB keyboard, mouse, drive, printer, scanner, or hub.
Some USB devices may require additional support software, which is usually included with the device.
For more information about device-specific software, refer to the manufacturer's instructions. These
instructions may be provided with the software, on disc, or on the manufacturer’s Web site.
The computer has at least 1 USB port that supports USB 1.0, 1.1, 2.0, or 3.0 devices. Your computer
may also have a powered USB port that provides power to an external device if it is used with a powered
USB cable. An optional docking device or USB hub provides additional USB ports that can be used with
the computer.
Connecting a USB device
CAUTION: To reduce the risk of damage to a USB connector, use minimal force to connect the device.
Using a USB device 35
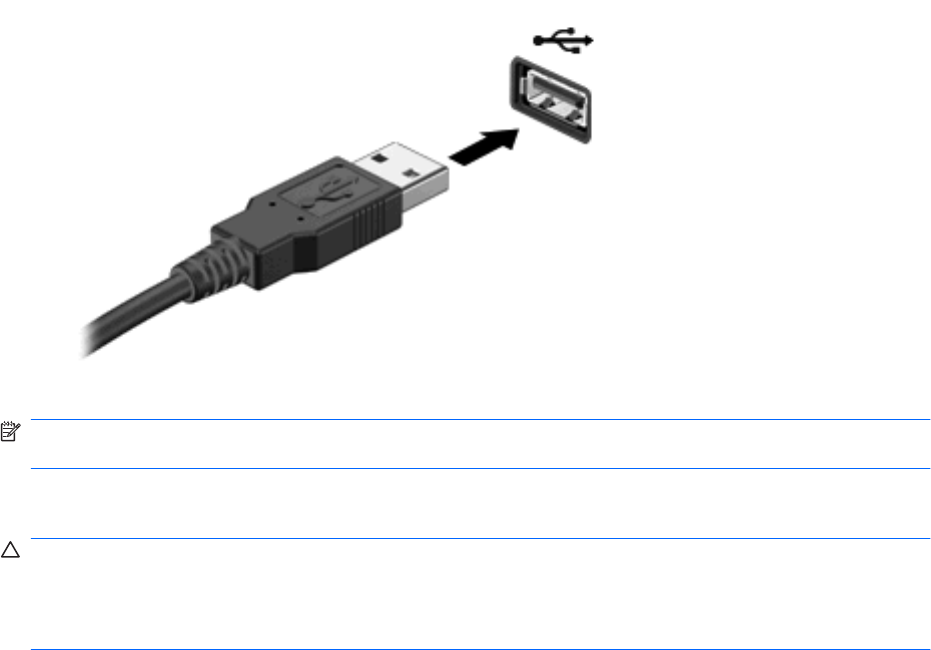
▲Connect the USB cable for the device to the USB port.
You will hear a sound when the device has been detected.
NOTE: The first time you connect a USB device, a message in the notification area lets you know that
the device is recognized by the computer.
Removing a USB device
CAUTION: To reduce the risk of damage to a USB connector, do not pull on the cable to remove the
USB device.
CAUTION: To reduce the risk of loss of information or an unresponsive system, use the following
procedure to safely remove the USB device.
1. To remove a USB device, save your information and close all programs associated with the device.
2. Click the remove hardware icon in the notification area, at the far right of the taskbar, and then
follow the on-screen instructions.
3. Remove the device.
Using 1394 devices (select models only)
IEEE 1394 is a hardware interface that connects a high-speed multimedia or data storage device to the
computer. Scanners, digital cameras, and digital camcorders often require a 1394 connection.
Some 1394 devices may require additional support software, which is usually included with the device.
For more information about device-specific software, refer to the manufacturer's instructions.
The 1394 port also supports IEEE 1394a devices.
36 Chapter 5 External cards and devices
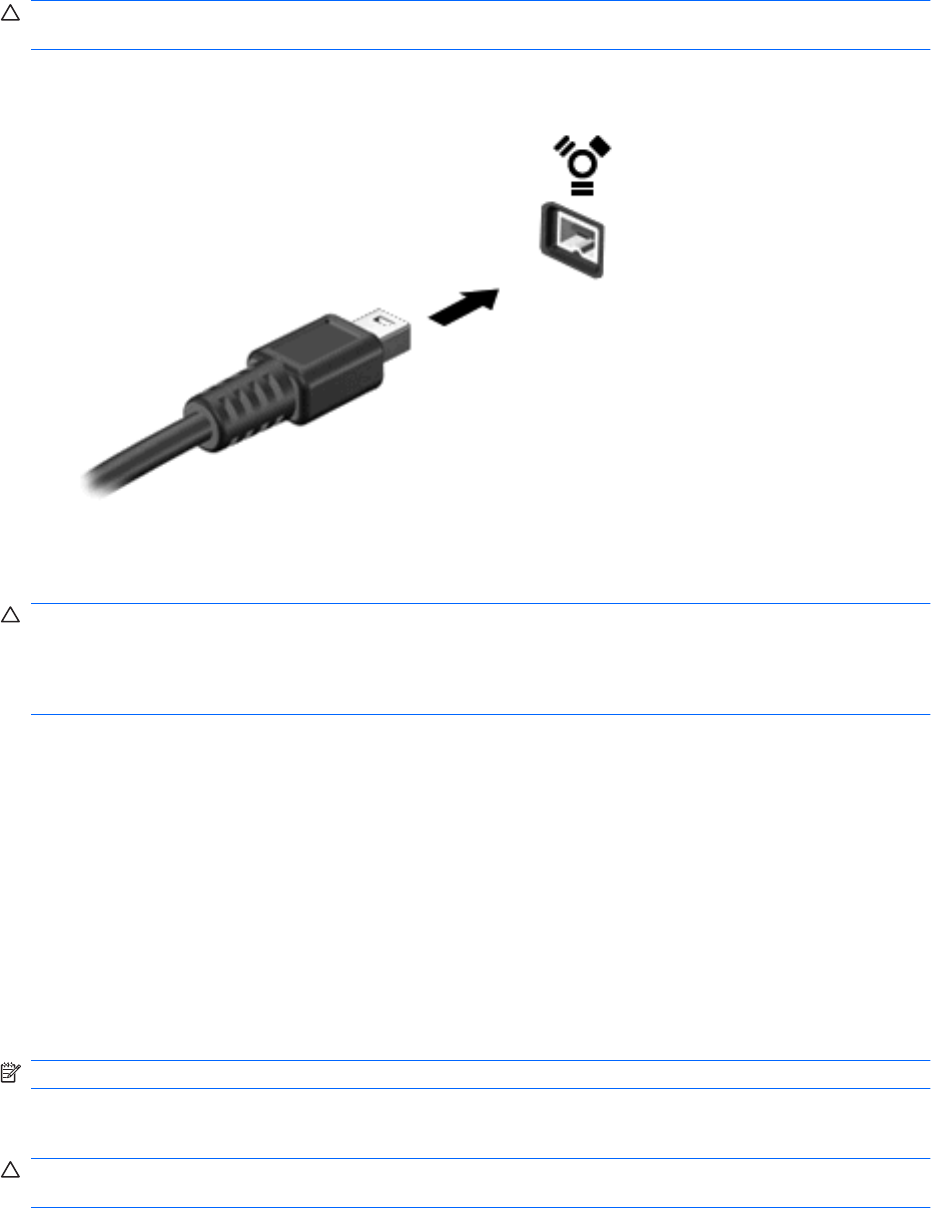
Connecting a 1394 device
CAUTION: To reduce the risk of damage to a 1394 port connector, use minimal force to connect the
device.
▲To connect a 1394 device to the computer, connect the 1394 cable for the device to the 1394
port.
You will hear a sound when the device has been detected.
Removing a 1394 device
CAUTION: To reduce the risk of loss of information or an unresponsive system, stop the 1394 device
before removing it.
CAUTION: To reduce the risk of damage to a 1394 connector, do not pull on the cable to remove the
1394 device.
1. To remove a 1394 device, save your information and close all programs associated with the device.
2. Click the remove hardware icon in the notification area, at the far right of the taskbar, and then
follow the on-screen instructions.
3. Remove the device.
Using an eSATA device (select models only)
An eSATA port connects an optional high-performance eSATA component, such as an eSATA external
hard drive.
Some eSATA devices may require additional support software, which is usually included with the device.
For more information about device-specific software, refer to the manufacturer's instructions.
NOTE: The eSATA port also supports an optional USB device.
Connecting an eSATA device
CAUTION: To reduce the risk of damage to an eSATA port connector, use minimal force to connect
the device.
Using an eSATA device (select models only) 37

▲To connect an eSATA device to the computer, connect the eSATA cable for the device to the
eSATA port.
You will hear a sound when the device has been detected.
Removing an eSATA device
CAUTION: To reduce the risk of damage to an eSATA connector, do not pull on the cable to remove
the eSATA device.
CAUTION: To reduce the risk of loss of information or an unresponsive system, use the following
procedure to safely remove the device.
1. To remove an eSATA device, save your information and close all programs associated with the
device.
2. Click the remove hardware icon in the notification area, at the far right of the taskbar, and then
follow the on-screen instructions.
3. Remove the device.
38 Chapter 5 External cards and devices

Using optional external devices
NOTE: For more information about required software and drivers, or to learn which computer port to
use, refer to the manufacturer's instructions.
To connect an external device to the computer:
CAUTION: To reduce the risk of damage to the equipment when connecting a powered device, be
sure that the device is turned off and the AC power cord is unplugged.
1. Connect the device to the computer.
2. If you are connecting a powered device, plug the device power cord into a grounded AC outlet.
3. Turn on the device.
To disconnect an unpowered external device, turn off the device, and then disconnect it from the
computer. To disconnect a powered external device, turn off the device, disconnect it from the computer,
and then unplug the AC power cord.
Using optional external drives
Removable external drives expand your options for storing and accessing information. A USB drive can
be added by connecting the drive to a USB port on the computer.
NOTE: HP external USB optical drives should be connected to the powered USB port on the computer.
USB drives include the following types:
●1.44-megabyte diskette drive
●Hard drive module (a hard drive with an adapter attached)
●External optical drive (CD, DVD, and Blu-ray)
●MultiBay device
Using the expansion port (select models only)
The expansion port connects the computer to an optional docking or expansion device, so that additional
ports and connectors can be used with the computer.
NOTE: The computer has only one expansion port. The term expansion port 3 describes the type of
expansion port.
Using optional external devices 39
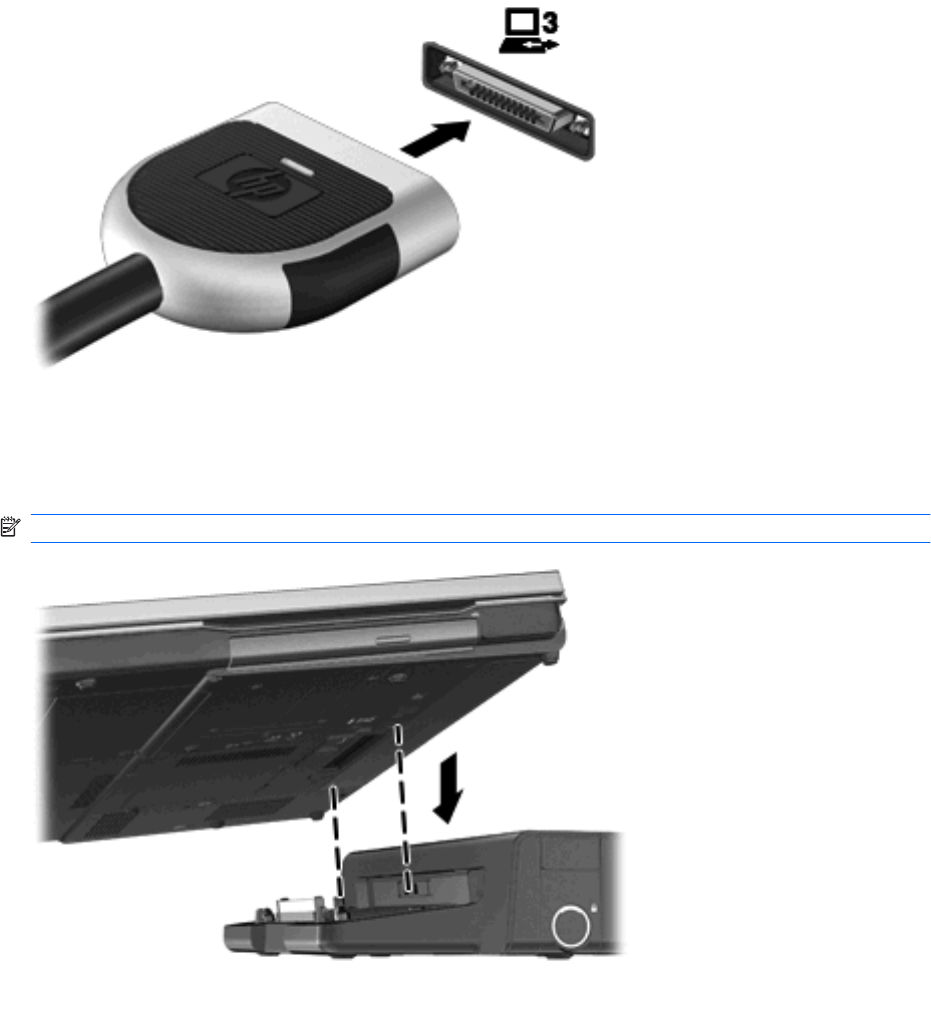
Using the docking connector (select models only)
The docking connector connects the computer to an optional docking device. An optional docking device
provides additional ports and connectors that can be used with the computer.
NOTE: The following image may look slightly different than your computer or docking device.
40 Chapter 5 External cards and devices

6 Drives
Handling drives
Drives are fragile computer components that must be handled with care. Refer to the following cautions
before handling drives. Additional cautions are included with the procedures to which they apply.
Observe these precautions:
●Before you move a computer that is connected to an external hard drive, initiate Sleep and allow
the screen to clear, or properly disconnect the external hard drive.
●Before handling a drive, discharge static electricity by touching the unpainted metal surface of the
drive.
●Do not touch the connector pins on a removable drive or on the computer.
●Handle a drive carefully; do not drop a drive or place items on it.
●Before removing or inserting a drive, shut down the computer. If you are unsure whether the
computer is off, in the Sleep state, or in Hibernation, turn the computer on, and then shut it down
through the operating system.
●Do not use excessive force when inserting a drive into a drive bay.
●Do not type on the keyboard or move the computer while an optical drive is writing to a disc. The
write process is sensitive to vibration.
●When the battery is the only source of power, be sure that the battery is sufficiently charged before
writing to media.
●Avoid exposing a drive to temperature or humidity extremes.
●Avoid exposing a drive to liquids. Do not spray the drive with cleaning products.
●Remove media from a drive before removing the drive from the drive bay, or traveling with, shipping,
or storing a drive.
●If a drive must be mailed, place the drive in a bubble-pack mailer or other suitable protective
packaging and label the package “FRAGILE.”
●Avoid exposing a drive to magnetic fields. Security devices with magnetic fields include airport
walk-through devices and security wands. Airport conveyer belts and similar security devices that
check carry-on baggage use X-rays instead of magnetism and do not damage drives.
Using hard drives
Improving hard drive performance
Using Disk Defragmenter
As you use the computer, files on the hard drive become fragmented. Disk Defragmenter consolidates
the fragmented files and folders on the hard drive so that the system can run more efficiently.
NOTE: It is not necessary to run Disk Defragmenter on solid-state drives.
Handling drives 41

After you start Disk Defragmenter, it works without supervision. Depending on the size of your hard drive
and the number of fragmented files, Disk Defragmenter may take more than an hour to complete. You
may want to set it to run during the night or at another time when you do not need access to your
computer.
HP recommends defragmenting your hard drive at least once a month. You may set Disk Defragmenter
to run on a monthly schedule, but you can defragment your computer manually at any time.
To run Disk Defragmenter:
1. Connect the computer to AC power.
2. Select Start > All Programs > Accessories > System Tools > Disk Defragmenter.
3. Windows 7—Click Defragment disk.
NOTE: Windows includes the User Account Control feature to improve the security of your
computer. You may be prompted for your permission or password for tasks such as installing
software, running utilities, or changing Windows settings. Refer to Help and Support for more
information.
Windows XP— Under Volume, click the listing for the hard drive, usually listed as (C:), and then
click Defragment.
For additional information, access the Disk Defragmenter software Help.
Using Disk Cleanup
Disk Cleanup searches the hard drive for unnecessary files that you can safely delete to free up disk
space and help the computer to run more efficiently.
To run Disk Cleanup:
1. Select Start > All Programs > Accessories > System Tools > Disk Cleanup.
2. Follow the on-screen instructions.
Using HP ProtectSmart Hard Drive Protection in Windows 7 (select models
only)
HP ProtectSmart Hard Drive Protection protects a hard drive by parking the drive and halting data
requests under either of the following conditions:
●You drop the computer.
●You move the computer with the display closed while the computer is running on battery power.
A short time after the end of one of these events, HP ProtectSmart Hard Drive Protection returns the
hard drive to normal operation.
NOTE: Because solid-state drives (SSD) lack moving parts, HP ProtectSmart Hard Drive Protection
is unnecessary.
NOTE: Hard drives in the primary hard drive bay or in the secondary hard drive bay are protected by
HP ProtectSmart Hard Drive Protection. Hard drives connected to USB ports are not covered by HP
ProtectSmart Hard Drive Protection.
For more information, refer to the HP ProtectSmart Hard Drive Protection software Help.
42 Chapter 6 Drives

Identifying HP ProtectSmart Hard Drive Protection status
The drive light on the computer changes color to show that a drive in the primary hard drive bay or a
drive in the secondary hard drive bay (select models only) is parked. To determine whether drives are
currently protected or whether a drive is parked, select Start > Control Panel > Hardware and
Sound > Windows Mobility Center:
●If HP ProtectSmart Hard Drive Protection is enabled, a green check mark is superimposed over
the hard drive icon.
●If HP ProtectSmart Hard Drive Protection is disabled, a red X is superimposed over the hard drive
icon.
●If the drives are parked, a yellow moon is superimposed over the hard drive icon.
The icon in the Mobility Center may not show the most up-to-date status for the drive. For immediate
updates after a change in status, you need to enable the notification area icon.
To enable the notification area icon:
1. Select Start > Control Panel > Hardware and Sound > HP ProtectSmart Hard Drive
Protection.
NOTE: If prompted by User Account Control, click Yes.
2. On the Icon in System Tray row, click Show.
3. Click OK.
Managing power with a parked hard drive
If HP ProtectSmart Hard Drive Protection has parked the drive, the computer behaves in the following
ways:
●The computer will not shut down.
●The computer will not initiate Sleep or Hibernation, except as described in the following Note.
NOTE: If the computer is running on battery power and reaches a critical battery level, HP
ProtectSmart Hard Drive Protection allows the computer to initiate Hibernation.
Before you move the computer, HP recommends that you either shut it down or initiate Sleep or
Hibernation.
Using HP ProtectSmart Hard Drive Protection software
The HP ProtectSmart Hard Drive Protection software can be enabled or disabled by an Administrator.
NOTE: Depending on your user privileges, you may be unable to enable or disable HP ProtectSmart
Hard Drive Protection. Privileges for non-Administrator users can be changed by members of an
Administrator group.
Using hard drives 43

To open the software and change settings, follow these steps:
1. In Mobility Center, click the hard drive icon to open the HP ProtectSmart Hard Drive Protection
window.
– or –
Select Start > Control Panel > Hardware and Sound > HP ProtectSmart Hard Drive
Protection.
NOTE: If prompted by User Account Control, click Yes.
2. Click the appropriate button to change settings.
3. Click OK.
Using optical drives (select models only)
Optical drives include the following:
●CD
●DVD
●Blu-ray (BD)
Identifying the installed optical drive
▲Windows 7—Select Start > Computer.
Windows XP—Select Start > My Computer.
A list of all the devices installed in your computer, including your optical drive, is displayed.
44 Chapter 6 Drives
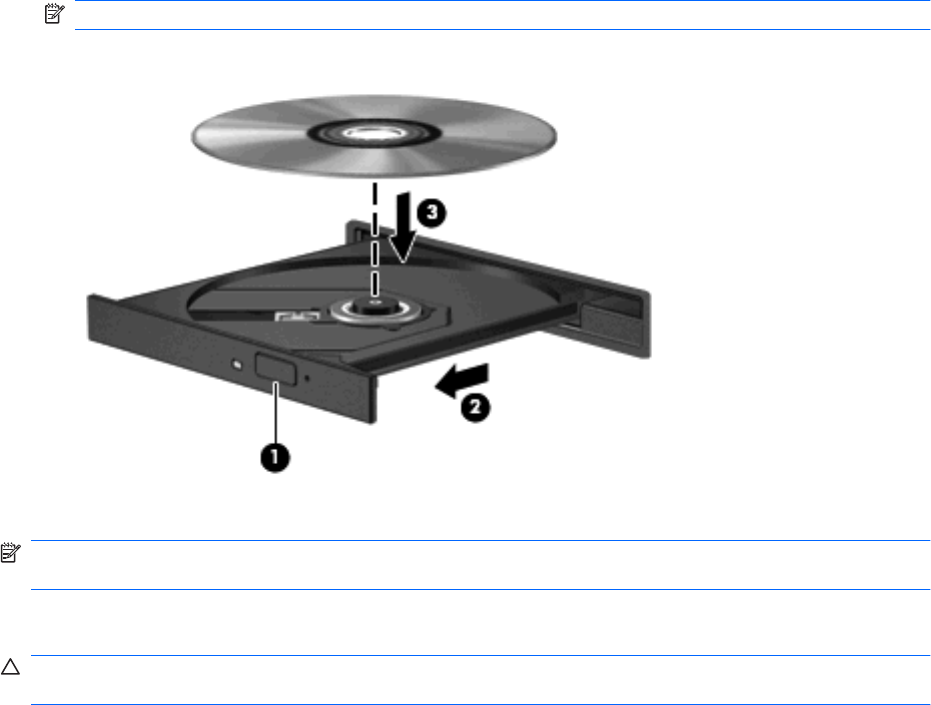
Inserting an optical disc
Tray load
1. Turn on the computer.
2. Press the release button (1) on the drive bezel to release the disc tray.
3. Pull out the tray (2).
4. Hold the disc by the edges to avoid touching the flat surfaces and position the disc label-side up
over the tray spindle.
NOTE: If the tray is not fully accessible, tilt the disc carefully to position it over the spindle.
5. Gently press the disc (3) down onto the tray spindle until the disc snaps into place.
6. Close the disc tray.
NOTE: After you insert a disc, a short pause is normal. If you have not selected a media player, an
AutoPlay dialog box opens. It prompts you to select how you want to use the media content.
Slot load
CAUTION: Do not insert 8-cm optical discs into a slot load optical drive. It may cause damage to the
optical drive.
1. Turn on the computer.
2. Hold the disc by the edges to avoid touching the flat surfaces and position the disc label-side up.
Using optical drives (select models only) 45
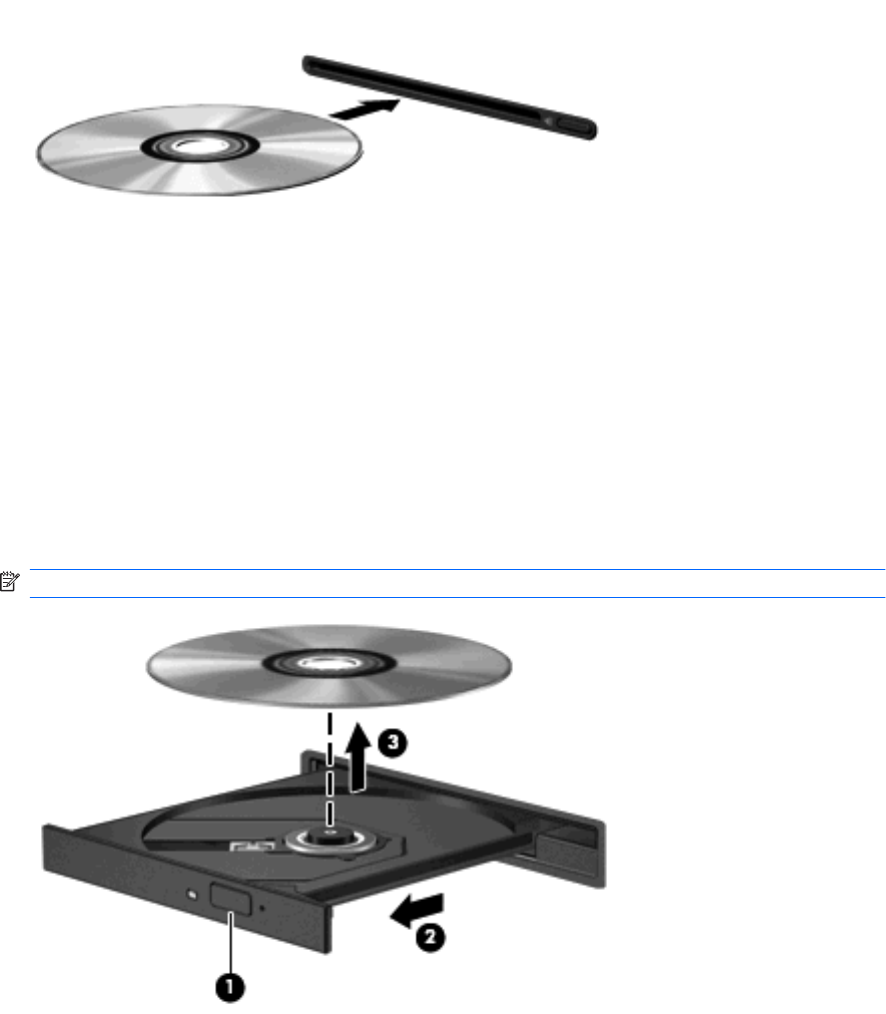
3. Gently slide the disc into the slot load optical drive.
Removing an optical disc
Tray load
There are 2 ways to remove a disc, depending on whether the disc tray opens normally or not.
When the disc tray opens normally
1. Press the release button (1) on the drive bezel to release the disc tray, and then gently pull out the
tray (2) until it stops.
2. Remove the disc (3) from the tray by gently pressing down on the spindle while lifting the outer
edges of the disc. Hold the disc by the edges and avoid touching the flat surfaces.
NOTE: If the tray is not fully accessible, tilt the disc carefully as you remove it.
3. Close the disc tray and place the disc in a protective case.
When the disc tray fails to open
1. Insert the end of a paper clip (1) into the release access in the front bezel of the drive.
2. Press in gently on the paper clip until the tray is released, and then pull out the tray (2) until it stops.
46 Chapter 6 Drives
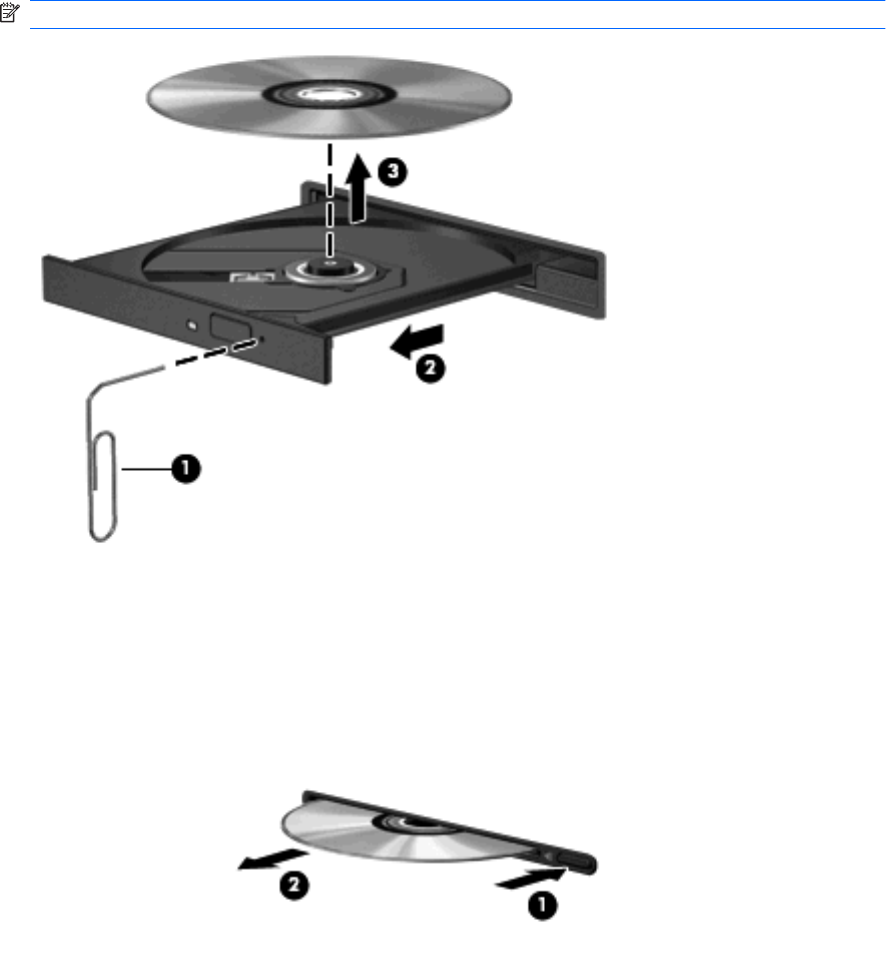
3. Remove the disc (3) from the tray by gently pressing down on the spindle while lifting the outer
edges of the disc. Hold the disc by the edges and avoid touching the flat surfaces.
NOTE: If the tray is not fully accessible, tilt the disc carefully as you remove it.
4. Close the disc tray and place the disc in a protective case.
Slot load
1. Press the release button (1) next to the drive.
2. Remove the disc (2) by holding it by the edges and avoid touching the flat surfaces.
3. Place the disc in a protective case.
Using optical drives (select models only) 47

Sharing optical drives
Although your computer may not have an integrated optical drive, you can access software and data,
and install applications, by sharing an optical drive connected to another computer in your network.
Sharing drives is a feature of the Windows operating system that allows a drive on one computer to be
accessible to other computers on the same network.
NOTE: You must have a network set up in order to share an optical drive; refer to Networking (select
models only) on page 2 for additional information on setting up a network.
NOTE: Some discs, such as DVD movies and game discs, may be copy-protected and therefore
unusable through DVD or CD drive sharing.
To share an optical drive:
1. Windows 7—From the computer with the optical drive you are sharing, select Start >
Computer.
Windows XP—From the computer with the optical drive you are sharing, select Start > My
Computer.
2. Right-click the optical drive you want to share, and click Properties.
3. Windows 7—Select the Sharing tab > Advanced Sharing.
Windows XP—Select the Sharing tab.
4. Select the Share this folder check box.
5. Type a name for the optical drive in the Share name text box.
6. Click Apply, and then click OK.
7. To view the shared optical drive:
Windows 7—Select Start > Control Panel > Network and Internet > Network and Sharing
Center.
Windows XP—Select Start > Control Panel > Network and Internet Connections.
Using RAID (select models only)
Redundant Arrays of Independent Disks (RAID) technology allows a computer to use two or more hard
disks at the same time. RAID treats multiple drives as one contiguous drive, either through hardware or
software settings. If multiple disks are set up to work together in this fashion, they are referred to as a
RAID array.
For additional information about RAID, refer to the HP Web site at http://www.hp.com/support.
48 Chapter 6 Drives

7 Security
Protecting the computer
Standard security features provided by the Windows® operating system and the non-Windows Setup
Utility can protect your personal settings and data from a variety of risks.
NOTE: Security solutions are designed to act as deterrents, but they may not deter software attacks
or prevent the computer from being mishandled or stolen.
NOTE: Before you send your computer for service, back up and delete confidential files, and remove
all password settings.
NOTE: Some features listed in this chapter may not be available on your computer.
Computer risk Security feature
Unauthorized use of the computer ●QuickLock (select models only)
●Power-on password
●Fingerprint reader
Computer viruses Antivirus software
Unauthorized access to data ●Firewall software
●Windows updates
●File encryption
Unauthorized access to Setup Utility, BIOS settings, and other
system identification information
Administrator password
Ongoing or future threats to the computer Critical security updates from Microsoft
Unauthorized access to a Windows user account User password
Unauthorized removal of the computer Security cable slot (used with an optional security cable)
Using passwords
A password is a group of characters that you choose to secure your computer information. Several types
of passwords can be set, depending on how you want to control access to your information. Passwords
can be set in Windows or in the non-Windows Setup Utility that is preinstalled on the computer.
NOTE: To reduce the risk of being locked out of the computer, record each password and store it in
a secure place.
You can use the same password for a Setup Utility feature and for a Windows security feature. You can
also use the same password for more than one Setup Utility feature.
For additional information about Windows passwords, such as screen-saver passwords, select Start
> Help and Support.
Protecting the computer 49

Setting passwords in Windows
Password Function
Administrator password Protects administrator-level access to computer contents.
NOTE: This password cannot be used to access Setup Utility
contents.
User password Protects access to a Windows user account. It also protects
access to the computer contents and must be entered when
you exit Sleep or Hibernation.
QuickLock (select models only) Protects your information by displaying the operating system
Log On window. While the Log On window is displayed, the
computer cannot be accessed until a Windows user password
or a Windows administrator password is entered. After you set
a user or administrator password, follow these steps:
1. Initiate QuickLock.
2. Exit QuickLock by entering your Windows user or
administrator password.
Setting passwords in Setup Utility
Password Function
Administrator password* ●Protects access to Setup Utility.
●After this password is set, it must be entered each time
you access Setup Utility.
CAUTION: If you forget your administrator password, you
cannot access Setup Utility.
NOTE: The administrator password can be used in place of
the power-on password.
NOTE: Your administrator password is not interchangeable
with an administrator password set in Windows, nor is it
displayed as it is set, entered, changed, or deleted.
NOTE: If you enter the power-on password at the first
password check before the “Press the ESC key for Startup
Menu” message is displayed, you must enter the administrator
password to access Setup Utility.
Power-on password* ●Protects access to the computer contents.
●After this password is set, it must be entered each time
you turn on or restart the computer, or exit Hibernation.
CAUTION: If you forget your power-on password, you
cannot turn on or restart the computer, or exit Hibernation.
NOTE: The administrator password can be used in place of
the power-on password.
NOTE: A power-on password is not displayed as it is set,
entered, changed, or deleted.
*For details about each of these passwords, refer to the following topics.
50 Chapter 7 Security
Managing an administrator password
To set, change, or delete this password, follow these steps:
1. Open Setup Utility by turning on or restarting the computer. While the “Press the ESC key for
Startup Menu” message is displayed in the lower-left corner of the screen, press esc. When the
Startup Menu is displayed, press f10.
2. Use the arrow keys to select Security > Set Administrator Password, and then press enter.
●To set an administrator password, type your password in the Enter New Password and
Confirm New Password fields, and then press enter.
●To change an administrator password, type your current password in the Enter Current
Password field, type a new password in the Enter New Password and Confirm New
Password fields, and then press enter.
●To delete an administrator password, type your current password in the Enter Password field,
and then press enter 4 times.
3. To save your changes and exit Setup Utility, use the arrow keys to select Exit > Exit Saving
Changes.
Your changes take effect when the computer restarts.
Entering an administrator password
At the Enter Password prompt, type your administrator password, and then press enter. After 3
unsuccessful attempts to enter the administrator password, you must restart the computer and try again.
Managing a power-on password
To set, change, or delete this password, follow these steps:
1. Open Setup Utility by turning on or restarting the computer. While the “Press the ESC key for
Startup Menu” message is displayed in the lower-left corner of the screen, press esc. When the
Startup Menu is displayed, press f10.
2. Use the arrow keys to select Security > Set Power-On Password, and then press enter.
●To set a power-on password, type your password in the Enter New Password and Confirm
New Password fields, and then press enter.
●To change a power-on password, type your current password in the Enter Current
Password field, type a new password in the Enter New Password and Confirm New
Password fields, and then press enter.
●To delete a power-on password, type your current password in the Enter Current
Password field, and then press enter 4 times.
3. To save your changes and exit Setup Utility, use the arrow keys to select Exit > Exit Saving
Changes.
Your changes take effect when the computer restarts.
Entering a power-on password
At the Enter Password prompt, type your password, and then press enter. After 3 unsuccessful attempts
to enter the password, you must restart the computer and try again.
Using passwords 51

Using antivirus software
When you use the computer to access e-mail, a network, or the Internet, you potentially expose it to
computer viruses. Computer viruses can disable the operating system, programs, or utilities, or cause
them to function abnormally.
Antivirus software can detect most viruses, destroy them, and, in most cases, repair any damage they
have caused. To provide ongoing protection against newly discovered viruses, antivirus software must
be kept up to date.
An antivirus program may be preinstalled on your computer and may include a trial offer. It is strongly
recommended that you upgrade the trial offer or purchase the antivirus program of your choice in order
to fully protect your computer.
For more information about computer viruses, type viruses in the Search box in Help and Support.
Using firewall software
Firewalls are designed to prevent unauthorized access to a system or network. A firewall can be a
software program you install on your computer and/or network, or it can be a solution made up of both
hardware and software.
There are two types of firewalls to consider:
●Host-based firewalls—Software that protects only the computer it is installed on.
●Network-based firewalls—Installed between your DSL or cable modem and your home network to
protect all the computers on the network.
When a firewall is installed on a system, all data sent to and from the system is monitored and compared
with a set of user-defined security criteria. Any data that does not meet those criteria is blocked.
Your computer or networking equipment may already have a firewall installed. If not, firewall software
solutions are available.
NOTE: Under some circumstances a firewall can block access to Internet games, interfere with printer
or file sharing on a network, or block authorized e-mail attachments. To temporarily resolve the problem,
disable the firewall, perform the task that you want to perform, and then reenable the firewall. To
permanently resolve the problem, reconfigure the firewall.
Installing critical security updates
CAUTION: Microsoft sends out alerts regarding critical updates. To protect the computer from security
breaches and computer viruses, install all critical updates from Microsoft as soon as you receive an
alert.
Updates to the operating system and other software may have become available after the computer left
the factory. To be sure that all available updates are installed on the computer, observe these guidelines:
●Run Windows Update as soon as possible after you set up your computer. Use the update link at
Start > All Programs > Windows Update.
●Run Windows Update monthly thereafter.
●Obtain updates to Windows and other Microsoft® programs, as they are released, from the
Microsoft Web site and through the updates link in Help and Support.
52 Chapter 7 Security
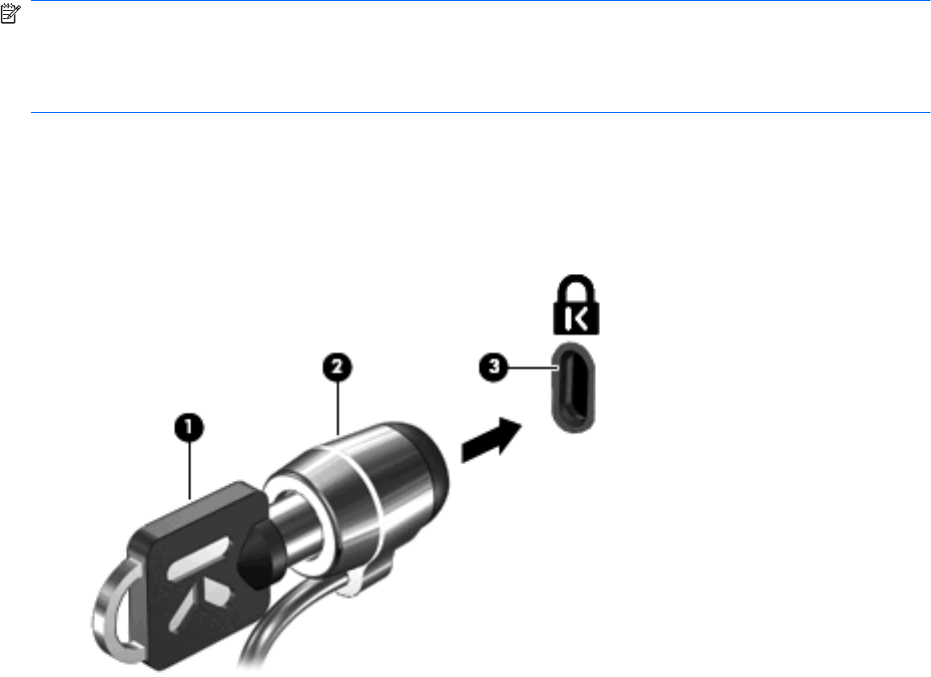
Installing an optional security cable
NOTE: A security cable is designed to act as a deterrent, but it may not prevent the computer from
being mishandled or stolen.
NOTE: The security cable slot on your computer may look slightly different from the illustration in this
section. Refer to the Getting Started guide for the location of the security cable slot on your computer.
1. Loop the security cable around a secured object.
2. Insert the key (1) into the cable lock (2).
3. Insert the cable lock into the security cable slot on the computer (3), and then lock the cable lock
with the key.
4. Remove the key and keep it in a safe place.
Using the fingerprint reader (select models only)
Integrated fingerprint readers are available on select computer models. In order to use the fingerprint
reader, you must set up a user account with a password on the computer. This account allows you to
log on to your computer with a swipe of a designated finger. You may also use the fingerprint reader to
fill in password fields on Web sites and other programs that require a logon. Refer to the fingerprint
software Help for instructions.
After you create your fingerprint identity, you can set up a Single Sign On service that allows you to use
your fingerprint scanner to create credentials for any application that requires a user name and
password.
Locating the fingerprint reader
The fingerprint reader is a small metallic sensor that is located in one of the following areas of your
computer:
●Near the bottom of the TouchPad
●On the right side of the keyboard
Installing an optional security cable 53
●On the upper-right side of the display
●On the left side of the display
Depending on your computer model, the fingerprint reader may be oriented horizontally or vertically.
Both orientations require that you swipe your finger perpendicular to the metallic sensor. Refer to the
Getting Started guide for the location of the fingerprint reader on your computer.
54 Chapter 7 Security

8 Setup Utility (BIOS)
Setup Utility, or Basic Input/Output System (BIOS), controls communication between all the input and
output devices on the system (such as disk drives, display, keyboard, mouse, and printer). Setup Utility
includes settings for the types of peripherals installed, the startup sequence of the computer, and the
amount of system and extended memory.
CAUTION: Use extreme care when making changes in Setup Utility. Errors can prevent the computer
from operating properly.
Starting Setup Utility
NOTE: The fingerprint reader (select models only) cannot be used to access Setup Utility.
▲Turn on or restart the computer. While the “Press the ESC key for Startup Menu” message is
displayed in the lower-left corner of the screen, press esc. When the Startup Menu is displayed,
press f10.
Using Setup Utility
Changing the language of Setup Utility
1. Start Setup Utility.
2. Use the arrow keys to select System Configuration > Language, and then press enter.
3. Use the arrow keys to select a language, and then press enter.
4. When a confirmation prompt with your language selected is displayed, press enter.
5. To save your change and exit Setup Utility, use the arrow keys to select Exit > Exit Saving
Changes, and then press enter.
Your change takes effect immediately.
Navigating and selecting in Setup Utility
Because Setup Utility is not Windows based, it does not support the TouchPad. Navigation and selection
are by keystroke.
●To choose a menu or a menu item, use the arrow keys.
●To choose an item in a list or to toggle a field—for example an Enable/Disable field—use either
the arrow keys or f5 and f6.
●To select an item, press enter.
●To close a text box or return to the menu display, press esc.
●To display additional navigation and selection information while Setup Utility is open, press f1.
Starting Setup Utility 55

Displaying system information
1. Start Setup Utility.
2. Select the Main menu. System information such as the system time and date, and identification
information about the computer is displayed.
3. To exit Setup Utility without changing any settings, use the arrow keys to select Exit > Exit
Discarding Changes, and then press enter.
Restoring factory default settings in Setup Utility
1. Start Setup Utility.
2. Use the arrow keys to select Exit > Load Setup Defaults, and then press enter.
3. When the Setup Confirmation is displayed, press enter.
4. To save your change and exit Setup Utility, use the arrow keys to select Exit > Exit Saving
Changes, and then press enter.
The Setup Utility factory settings take effect when the computer restarts.
NOTE: Your password, security, and language settings are not changed when you restore the factory
settings.
Exiting Setup Utility
●To exit Setup Utility and save your changes from the current session:
If the Setup Utility menus are not visible, press esc to return to the menu display. Then use the
arrow keys to select Exit > Exit Saving Changes, and then press enter.
●To exit Setup Utility without saving your changes from the current session:
If the Setup Utility menus are not visible, press esc to return to the menu display. Then use the
arrow keys to select Exit > Exit Discarding Changes, and then press enter.
56 Chapter 8 Setup Utility (BIOS)

Updating the BIOS
Updated versions of the BIOS may be available on the HP Web site.
Most BIOS updates on the HP Web site are packaged in compressed files called SoftPaqs.
Some download packages contain a file named Readme.txt, which contains information regarding
installing and troubleshooting the file.
Determining the BIOS version
To determine whether available BIOS updates contain later BIOS versions than those currently installed
on the computer, you need to know the version of the system BIOS currently installed.
BIOS version information (also known as ROM date and System BIOS) can be displayed by pressing
fn+esc (if you are already in Windows) or by using Setup Utility.
1. Start Setup Utility.
2. If the system information is not displayed, use the arrow keys to select the Main menu.
BIOS and other system information is displayed.
3. To exit Setup Utility, use the arrow keys to select Exit > Exit Discarding Changes, and then press
enter.
Downloading a BIOS update
CAUTION: To reduce the risk of damage to the computer or an unsuccessful installation, download
and install a BIOS update only when the computer is connected to reliable external power using the AC
adapter. Do not download or install a BIOS update while the computer is running on battery power,
docked in an optional docking device, or connected to an optional power source. During the download
and installation, follow these instructions:
Do not disconnect power from the computer by unplugging the power cord from the AC outlet.
Do not shut down the computer or initiate Sleep or Hibernation.
Do not insert, remove, connect, or disconnect any device, cable, or cord.
1. Access the page on the HP Web site that provides software for your computer:
Windows 7—Select Start > Help and Support > Maintain.
Windows XP—Select Start > Help and Support, and then select the software and drivers update.
2. Follow the on-screen instructions to identify your computer and access the BIOS update you want
to download.
3. At the download area, follow these steps:
a. Identify the BIOS update that is later than the BIOS version currently installed on your
computer. Make a note of the date, name, or other identifier. You may need this information
to locate the update later, after it has been downloaded to your hard drive.
b. Follow the on-screen instructions to download your selection to the hard drive.
Make a note of the path to the location on your hard drive where the BIOS update is
downloaded. You will need to access this path when you are ready to install the update.
NOTE: If you connect your computer to a network, consult the network administrator before
installing any software updates, especially system BIOS updates.
Updating the BIOS 57

BIOS installation procedures vary. Follow any instructions that are displayed on the screen after the
download is complete. If no instructions are displayed, follow these steps:
1. Windows 7—Open Windows Explorer by selecting Start > Computer.
Windows XP—Open Windows Explorer by selecting Start > My Computer.
2. Double-click your hard drive designation. The hard drive designation is typically Local Disk (C:).
3. Using the hard drive path you recorded earlier, open the folder on your hard drive that contains the
update.
4. Double-click the file that has an .exe extension (for example, filename.exe).
The BIOS installation begins.
5. Complete the installation by following the on-screen instructions.
NOTE: After a message on the screen reports a successful installation, you can delete the downloaded
file from your hard drive.
58 Chapter 8 Setup Utility (BIOS)

A Traveling with the computer
For best results, follow these traveling and shipping tips:
●Prepare the computer for traveling or shipping:
◦Back up your information.
◦Remove all discs and all external media cards, such as digital cards.
CAUTION: To reduce the risk of damage to the computer, damage to a drive, or loss of
information, remove the media from a drive before removing the drive from a drive bay and
before shipping, storing, or traveling with a drive.
◦Turn off and then disconnect all external devices.
◦Shut down the computer.
●Take along a backup of your information. Keep the backup separate from the computer.
●When traveling by air, carry the computer as hand luggage; do not check it in with the rest of your
bags.
CAUTION: Avoid exposing a drive to magnetic fields. Security devices with magnetic fields
include airport walk-through devices and security wands. Airport conveyer belts and similar security
devices that check carry-on baggage use X-rays instead of magnetism and do not damage drives.
●In-flight computer use is at the discretion of the airline. If you plan to use the computer during a
flight, check with the airline in advance.
●If the computer will be unused and disconnected from external power for more than 2 weeks,
remove the battery and store it separately.
●If you are shipping the computer or a drive, use suitable protective packaging and label the package
“FRAGILE.”
●If the computer has a wireless device or an HP Mobile Broadband Module installed, such as an
802.11b/g device, a Global System for Mobile Communications (GSM) device, or a General Packet
Radio Service (GPRS) device, the use of these devices may be restricted in some environments.
Such restrictions may apply onboard aircraft, in hospitals, near explosives, and in hazardous
locations. If you are uncertain of the policy that applies to the use of a particular device, ask for
authorization to use it before you turn it on.
●If you are traveling internationally, follow these suggestions:
◦Check the computer-related customs regulations for each country or region on your itinerary.
◦Check the power cord and adapter requirements for each location in which you plan to use
the computer. Voltage, frequency, and plug configurations vary.
WARNING! To reduce the risk of electric shock, fire, or damage to the equipment, do not
attempt to power the computer with a voltage converter kit sold for appliances.
59

B Troubleshooting resources
●Access Web site links and additional information about the computer through Help and Support.
Select Start > Help and Support.
NOTE: Some checkup and repair tools require an Internet connection. HP also provides
additional tools that do not require an Internet connection.
●Contact HP Customer Support at http://www.hp.com/go/contactHP.
NOTE: For worldwide support, click Contact HP worldwide on the left side of the page, or go to
http://welcome.hp.com/country/us/en/wwcontact_us.html.
Choose from the following types of support:
◦Chat online with an HP technician.
NOTE: When chat is not available in a particular language, it is available in English.
◦E-mail HP Customer Support.
◦Find HP Customer Support worldwide telephone numbers.
◦Locate an HP service center.
60 Appendix B Troubleshooting resources

C Electrostatic Discharge
Electrostatic discharge is the release of static electricity when two objects come into contact—for
example, the shock you receive when you walk across the carpet and touch a metal door knob.
A discharge of static electricity from fingers or other electrostatic conductors may damage electronic
components. To prevent damage to the computer, damage to a drive, or loss of information, observe
these precautions:
●If removal or installation instructions direct you to unplug the computer, unplug it after being properly
grounded and before removing a cover.
●Keep components in their electrostatic-safe containers until you are ready to install them.
●Avoid touching pins, leads, and circuitry. Handle electronic components as little as possible.
●Use nonmagnetic tools.
●Before handling components, discharge static electricity by touching an unpainted metal surface
of the component.
●If you remove a component, place it in an electrostatic-safe container.
If you need more information about static electricity or assistance with component removal or installation,
contact Customer Support.
61

Index
Symbols/Numerics
1394 cable, connecting 37
1394 devices
connecting 37
defined 36
removing 37
16-bit PC Cards 30
32-bit PC Cards 30
A
AC adapter, testing 28
action keys
media 14
volume 14
administrator password
creating 51
entering 51
managing 51
airport security devices 41
antivirus software, using 52
audio functions, checking 15
B
battery
conserving power 26
discharging 24
displaying remaining
charge 24
disposing 26
low battery levels 25
replacing 26
storing 26
Battery Check 24
battery information, finding 24
battery power 23
battery temperature 26
BIOS
determining version 57
downloading an update 57
updating 57
Bluetooth device 2, 8
buttons
media 14
power 20
volume 14
wireless 3
C
cables
1394 37
eSATA 38
USB 36
CardBus PC Cards 30
checking audio functions 15
computer, traveling 26, 59
configuring audio for HDMI 18
configuring ExpressCards 32
configuring PC Cards 30
connecting to a wired network 9
connecting to an existing wireless
network 5
Connection Manager 4
connector, docking 40
conservation, power 26
creating a wireless connection 2
critical battery level 21, 25
critical security updates,
installing 52
D
default settings, restoring 56
digital card
inserting 29
removing 29
supported formats 29
Disk Cleanup software 42
Disk Defragmenter software 41
DisplayPort, connecting 17
docking connector 40
drive light 43
drive media 21
drivers 30
drives
external 39
handling 41
hard 39
optical 39
using 41
E
electrostatic discharge 61
entering a power-on
password 51
entering an administrator
password 51
eSATA cable, connecting 38
eSATA devices
connecting 37
defined 37
removing 38
existing wireless network,
connecting to 5
expansion port 39
ExpressCard
configuring 32
defined 32
inserting 33
removing 34
removing insert 33
external AC power, using 27
external devices 39
external drive 39
external monitor port 16
F
factory settings, restoring 56
finding more information 1
fingerprint reader
locating 53
using 53
firewall software 6, 52
G
GPS 9
graphics modes, switching 28
H
hard drive
external 39
HP ProtectSmart Hard Drive
Protection 42
HDMI
configuring audio 18
62 Index
HDMI port, connecting 17
Hibernation
exiting 21
initiated during critical battery
level 25
initiating 21
high-definition devices,
connecting 17
HP Connection Manager 4
HP MediaSmart 19
HP Mobile Broadband
Module 7
HP ProtectSmart Hard Drive
Protection 42
HP SkyRoom 16
HP USB Ethernet Adapter,
connecting 12
HP Wireless Assistant 4
hubs 35
I
icons
network 2
wireless 2
installing
critical security updates 52
optional security cable 53
Internet connection setup 6
J
Java Card
defined 34
inserting 35
removing 35
K
keys
media 14
volume 14
L
lights, drive 43
local area network (LAN)
cable required 12
connecting cable 12
low battery level 25
M
maintenance
Disk Cleanup 42
Disk Defragmenter 41
managing a power-on
password 51
managing an administrator
password 51
media action keys 14
media activity controls 14
media hotkeys 14
MediaSmart 19
modems
connecting a modem cable 9
connecting a modem cable
adapter 10
selecting a location setting 10
N
network cable, connecting 12
network icon 2
O
operating system controls 5
optical disc
inserting 45
removing 46
optical drive 39
optional external devices,
using 39
P
passwords
set in Setup Utility 50
set in Windows 50
PC Cards
configuring 30
description 30
inserting 30
removing 32
removing insert 31
software and drivers 30
supported types 30
ports
DisplayPort 17
expansion 39
external monitor 16
HDMI 17
VGA 16
power
battery 23
conserving 26
options 20
power button 20
power meter 22
power plans
customizing 22
selecting 22
viewing current 22
power switch 20
power-on password
creating 51
entering 51
managing 51
power-saving states 20
protecting the computer 49
protecting your wireless
network 6
Q
QuickLock 49, 50
R
RAID 48
readable media 21
roaming to another network 7
S
security cable, installing 53
security, wireless 6
setting password protection on
wakeup 23
setting power options 20
setup of WLAN 6
Setup Utility
changing the language 55
displaying system
information 56
exiting 56
navigating 55
passwords set in 50
restoring default settings 56
selecting 55
starting 55
sharing optical drives 48
shutdown 20
SIM
inserting 7
removing 8
SkyRoom 16
Sleep
exiting 21
initiating 21
slot-load optical drive 45
smart card
defined 34
Index 63
inserting 35
removing 35
software
Disk Cleanup 42
Disk Defragmenter 41
HP Connection Manager 4
HP MediaSmart 19
HP ProtectSmart Hard Drive
Protection 43
HP SkyRoom 16
HP Wireless Assistant 4
Standby 20
storing a battery 26
switch, power 20
switchable graphics 28
system information, displaying 56
T
temperature 26
testing an AC adapter 28
traveling with the computer 26,
59
tray-load optical drive 45
troubleshooting resources 60
turning off the computer 20
turning wireless devices on or
off 3
U
unresponsive system 20
USB cable, connecting 36
USB devices
connecting 35
description 35
removing 36
USB hubs 35
using a modem 9
using external AC power 27
using passwords 49
using power plans 22
using power-saving states 20
using the power meter 22
V
VGA port, connecting 16
video 16
volume
adjusting 14
buttons 14
keys 14
W
webcam 16
Windows, passwords set in 50
wireless
action key 3
button 3
icons 2
protecting 6
set up 6
switch 3
Wireless Assistant software 4
wireless connection, creating 2
wireless devices, turning on or
off 3
wireless encryption 6
wireless network (WLAN)
connecting to existing 5
equipment needed 6
security 6
writable media 21
WWAN device 7
Z
zoomed video PC Cards 30
64 Index

Regulatory, Safety and
Environmental Notices
User Guide
© Copyright 2008–2011 Hewlett-Packard
Development Company, L.P.
Bluetooth is a trademark owned by its
proprietor and used by Hewlett-Packard
Company under license. ENERGY STAR is
a registered mark owned by the U.S.
government. Java is a trademark of Sun
Microsystems. Microsoft, Windows, and
Windows Vista are U.S. registered
trademarks of Microsoft Corporation.
The information contained herein is subject
to change without notice. The only
warranties for HP products and services are
set forth in the express warranty statements
accompanying such products and services.
Nothing herein should be construed as
constituting an additional warranty. HP shall
not be liable for technical or editorial errors
or omissions contained herein.
First Edition: February 2011
Document Part Number: 653267-001

Table of contents
1 Regulatory notices .......................................................................................................................................... 1
Federal Communications Commission notice ...................................................................................... 2
Modifications ........................................................................................................................ 2
Cables .................................................................................................................................. 2
Declaration of Conformity for products marked with the FCC logo (United States only) ..... 3
Products with wireless LAN devices or HP Mobile Broadband Modules ............................. 3
Brazil notice .......................................................................................................................................... 4
Canada notices .................................................................................................................................... 4
Avis Canadien ...................................................................................................................................... 4
European Union Regulatory notices ..................................................................................................... 4
Products with HP Mobile Broadband Modules .................................................................... 5
Ergonomics notice ............................................................................................................... 6
Germany ............................................................................................................. 6
Japan notices ....................................................................................................................................... 7
Wireless LAN 802.11b devices ............................................................................................ 7
Wireless LAN 802.11g devices ............................................................................................ 7
Bluetooth devices ................................................................................................................ 7
Wireless LAN, Wireless WAN, and Bluetooth certification markings ................................... 8
South Korea notice ............................................................................................................................... 8
Mexico notice ....................................................................................................................................... 8
Singapore wireless notice .................................................................................................................... 8
Thailand WWAN wireless notice .......................................................................................................... 8
Taiwan notices ..................................................................................................................................... 9
Wireless LAN 802.11a devices ............................................................................................ 9
Wireless LAN 802.11b devices ............................................................................................ 9
Vietnam Compliance Marking Notice ................................................................................................... 9
Airline travel notice ............................................................................................................................. 10
Battery notices .................................................................................................................................... 10
ENERGY STAR compliance .............................................................................................................. 10
Laser compliance ............................................................................................................................... 11
Modem notices ................................................................................................................................... 11
Telecommunications device approvals .............................................................................. 11
U.S. modem statements .................................................................................................... 12
U.S. modem declarations .................................................................................................. 12
Canada modem statements ............................................................................................... 15
Japan modem statements ................................................................................................. 15
iii
New Zealand modem statements ...................................................................................... 15
Voice support .................................................................................................... 16
Power cord notice ............................................................................................................................... 16
Japan power cord notice .................................................................................................... 16
DC plug of external HP power supply ................................................................................ 16
Macrovision Corporation notice .......................................................................................................... 16
2 Safety notices ................................................................................................................................................ 17
Heat-related safety warning notice ..................................................................................................... 17
Potential safety conditions notice ....................................................................................................... 17
Battery notices .................................................................................................................................... 17
Headset and earphone volume level notice ....................................................................................... 17
Power cord notices ............................................................................................................................. 18
Cleaning the keyboard ....................................................................................................................... 18
Travel notice ....................................................................................................................................... 18
Norway and Sweden: Cable grounding notice for products with a TV tuner ...................................... 18
3 Environmental notices ................................................................................................................................. 19
Electronic hardware and battery recycling ......................................................................................... 19
Disposal of waste equipment by users in private households in the European Union ....................... 19
Chemical substances ......................................................................................................................... 19
China material content declarations ................................................................................................... 20
Japan material content declaration .................................................................................................... 22
Turkey EEE regulation ....................................................................................................................... 22
Ukraine Restriction of Hazardous Substances ................................................................................... 23
United States mercury disposal .......................................................................................................... 23
Perchlorate material—special handling may apply ............................................................................ 23
Index ................................................................................................................................................................... 24
iv

1 Regulatory notices
This guide provides country- and region-specific non-wireless and wireless regulatory notices and
compliance information for the computer product. Some of these notices may not apply to your
product.
One or more integrated wireless devices may be installed. In some environments, the use of wireless
devices may be restricted. Such restrictions may apply on-board airplanes, in hospitals, near
explosives, in hazardous locations, and so on. If you are uncertain of the policy that applies to the use
of this product, ask for authorization to use it before you turn it on.
To identify a hardware device such as a wireless LAN (WLAN) network device, choose the procedure
below that corresponds to the operating system running on your computer.
For Windows® XP Professional and Windows XP Home, follow these steps:
1. Select Start > My Computer.
2. If the left pane, select View System Information > Hardware tab > Device Manager.
For Windows Vista®, follow these steps:
1. Select Start > Computer > System properties.
2. In the left pane, click Device Manager.
For later Windows operating systems, such as Windows 7, follow these steps:
▲Select Start > Control Panel > System and Security > Device Manager.
For non-Windows operating systems, follow the instructions provided by your operating system to
identify a hardware device such as a wireless LAN (WLAN) network device.
Regulatory markings for your country or region may be located on the bottom of the product, either
under the battery, under a user-removable door (or some other user-accessible location), or on the
wireless or modem module.
To view the FCC IDs for any radio modules in your notebook (Bluetooth®, WLAN, or WWAN), follow
these steps:
1. Turn on or restart the computer, and then press esc while the "Press the ESC key for Startup
Menu" message is displayed at the bottom of the screen.
2. Press f10 to enter BIOS Setup.
3. Select the System Configuration menu.
The FCC IDs are displayed at the bottom of the screen.
CAUTION: Devices not for sale or use in the United States may not have an FCC ID.
1
Federal Communications Commission notice
This equipment has been tested and found to comply with the limits for a Class B digital device,
pursuant to Part 15 of the FCC Rules. These limits are designed to provide reasonable protection
against harmful interference in a residential installation. This equipment generates, uses, and can
radiate radio frequency energy and, if not installed and used in accordance with the instructions, may
cause harmful interference to radio communications. However, there is no guarantee that interference
will not occur in a particular installation.
If this equipment does cause harmful interference to radio or television reception, which can be
determined by turning the equipment off and on, the user is encouraged to try to correct the
interference by one or more of the following measures:
●Reorient or relocate the receiving antenna.
●Increase the separation between the equipment and receiver.
●Connect the equipment to an outlet on a circuit different from that to which the receiver is
connected.
●Consult the dealer or an experienced radio or television technician for help.
Modifications
The FCC requires the user to be notified that any changes or modifications made to this device that
are not expressly approved by HP may void the user's authority to operate the equipment.
Cables
To maintain compliance with FCC Rules and Regulations, connections to this device must be made
with shielded cables having metallic RFI/EMI connector hoods.
2 Chapter 1 Regulatory notices

Declaration of Conformity for products marked with the FCC logo
(United States only)
This device complies with Part 15 of the FCC Rules. Operation is subject to the following 2
conditions:
1. This device may not cause harmful interference.
2. This device must accept any interference received, including interference that may cause
undesired operation.
If you have questions about the product that are not related to this declaration, write to
Hewlett-Packard Company
P. O. Box 692000, Mail Stop 530113
Houston, TX 77269-2000
For questions regarding this FCC declaration, write to
Hewlett-Packard Company
P. O. Box 692000, Mail Stop 510101
Houston, TX 77269-2000
or call HP at 281-514-3333
To identify your product, refer to the part, series, or model number located on the product.
Products with wireless LAN devices or HP Mobile Broadband Modules
This device must not be co-located or operating in conjunction with any other antenna or transmitter.
WARNING! Exposure to Radio Frequency Radiation The radiated output power of this device is
below the FCC radio frequency exposure limits. Nevertheless, the device should be used in such a
manner that the potential for human contact is minimized during normal operation of tablet PCs and
notebook computers.
During normal operation of tablet PCs and notebook computers with displays equal to or less than 12
inches: To avoid the possibility of exceeding the FCC radio frequency exposure limits, human
proximity to the antennas should not be less than 2.5 cm (1 inch). To identify the location of the
wireless antennas, refer to the computer user guides. To access the user guides, select Start > Help
and Support > User Guides.
During normal operation of notebook computers with displays greater than 12 inches: To avoid the
possibility of exceeding the FCC radio frequency exposure limits, human proximity to the antennas
should not be less than 20 cm (8 inches), including when the computer display is closed. To identify
the location of the wireless antennas, refer to the computer user guides. To access the user guides,
select Start > Help and Support > User Guides.
CAUTION: When using IEEE 802.11a wireless LAN, this product is restricted to indoor use, due to
its operation in the 5.15- to 5.25-GHz frequency range. The FCC requires this product to be used
indoors for the frequency range of 5.15 GHz to 5.25 GHz to reduce the potential for harmful
interference to co-channel mobile satellite systems. High-power radar is allocated as the primary user
of the 5.25- to 5.35-GHz and 5.65- to 5.85-GHz bands. These radar stations can cause interference
with and/or damage to this device.
Federal Communications Commission notice 3

Brazil notice
Este equipamento opera em caráter secundário, isto é, não tem direito a proteção contra
interferência prejudicial, mesmo de estações do mesmo tipo, e não pode causar interferência a
sistemas operando em caráter primário.
Este equipamento atende aos limites de Taxa de Absorção Específica referente à exposição a
campos elétricos, magnéticos e eletromagnéticos de radiofreqüências adotados pela ANATEL.
Canada notices
This Class B digital apparatus meets all requirements of the Canadian Interference-Causing
Equipment Regulations. If this device has WLAN or Bluetooth capability, the device complies with
Industry Canada licence-exempt RSS standard(s). Operation is subject to the following two
conditions: (1) this device may not cause interference, and (2) this device must accept any
interference, including interference that may cause undesired operation of the device.
CAUTION: When using IEEE 802.11a wireless LAN, this product is restricted to indoor use, due to
its operation in the 5.15- to 5.25-GHz frequency range. Industry Canada requires this product to be
used indoors for the frequency range of 5.15 GHz to 5.25 GHz to reduce the potential for harmful
interference to co-channel mobile satellite systems. High-power radar is allocated as the primary user
of the 5.25- to 5.35-GHz and 5.65- to 5.85-GHz bands. These radar stations can cause interference
with and/or damage to this device.
The antennas for this device are not replaceable. Any attempt at user access will damage your
computer.
Avis Canadien
Cet appareil numérique de la classe B respecte toutes les exigences du Règlement sur le matériel
brouilleur du Canada.
European Union Regulatory notices
Products bearing the CE marking comply with the following EU Directives:
●Low Voltage Directive 2006/95/EC
●EMC Directive 2004/108/EC
●Ecodesign Directive 2009/125/EC where applicable
CE compliance of this product is valid if powered with the correct CE-marked AC adapter provided by
HP.
If this product has wired and/or wireless telecommunications functionality, it also complies with the
essential requirements of EU Directive R&TTE Directive 1999/5/EC.
Compliance with these directives implies conformity to applicable harmonized European standards
(European Norms) that are listed in the EU Declaration of Conformity issued by HP for this product or
product family and available (in English only) either within the product documentation or at the
following Web site: www.hp.eu/certificates (type the product number in the search box).
The compliance is indicated by one of the following conformity markings placed on the product:
4 Chapter 1 Regulatory notices

For non-telecommunications products and for EU harmonized telecommunications products, such as
Bluetooth®, within power class below 10 mW.
For EU non-harmonized telecommunications products (if applicable, a 4-digit notified body number is
inserted between CE and ! (the exclamation mark).
Please refer to the regulatory label provided on the product.
The telecommunications functionality of this product may be used in the following EU and EFTA
countries: Austria, Belgium, Bulgaria, Cyprus, Czech Republic, Denmark, Estonia, Finland, France,
Germany, Greece, Hungary, Iceland, Ireland, Italy, Latvia, Liechtenstein, Lithuania, Luxembourg,
Malta, Netherlands, Norway, Poland, Portugal, Romania, Slovak Republic, Slovenia, Spain, Sweden,
Switzerland, and United Kingdom.
The telephone connector (not available for all products) is intended for connection to analog
telephone networks.
NOTE: For products with wireless LAN devices, some countries may have specific obligations or
special requirements about the operation of wireless LAN networks such as indoor use only or
restrictions of the channels available. Be sure that the country settings of the wireless network are
correct.
In France, certain restrictions apply for the 2.4-GHz wireless LAN operation of this product. This
product may be used indoors for the entire 2400-MHz to 2483.5-MHz frequency band (channels 1 to
13). For outdoor use, only the 2400-MHz to 2454-MHz frequency band (channels 1 to 7) may be
used. For the latest requirements, see http://www.arcep.fr.
The point of contact for regulatory matters is Hewlett-Packard GmbH, Dept./MS: HQ-TRE,
Herrenberger Strasse 140, 71034 Boeblingen, GERMANY.
Products with HP Mobile Broadband Modules
THIS DEVICE MEETS INTERNATIONAL GUIDELINES FOR EXPOSURE TO RADIO FREQUENCY
RADIATION.
The HP Mobile Broadband Module in your notebook is a radio transmitter and receiver. The device is
designed not to exceed the limits for exposure to radio frequency (RF) recommended by international
guidelines (ICNIRP). These limits are part of comprehensive guidelines that establish permitted levels
of RF radiation for the general population. The guidelines were developed by independent scientific
organizations through periodic and thorough evaluation of scientific studies. The device also meets
the European R&TTE directives, including the protection of the health and the safety of the user and
any other person.
The exposure standard for mobile devices employs a unit of measurement known as the Specific
Absorption Rate (SAR).* The SAR was obtained by testing the device at standard operating positions
European Union Regulatory notices 5
with the device transmitting at its highest certified power level in all tested frequency bands. The
actual SAR of the device while operating can be well below the maximum value, because the device
operates at multiple power levels and uses only the power required to reach the network.
When installed in the notebook computer, this device meets RF exposure guidelines when the
antennas are positioned at a minimum distance from the body. In order to transmit data or messages,
this device requires a quality connection to the network. In some cases, transmission of data or
messages may be delayed until such a connection becomes available. Be sure that the
recommended distance is observed until the transmission is complete.
*The non-FCC, international guidelines state that the SAR limit for mobile devices used by the public
is 2.0 watts/kilogram (W/kg) averaged over 10 grams of body tissue. The guidelines incorporate a
substantial margin of safety to give additional protection for the public and to account for any
variations in measurements. SAR values may vary depending on national reporting requirements and
the network band.
This equipment incorporates a radio transmitting device. In normal use, a separation distance of 20
cm ensures that radio frequency exposure levels comply with the Australian and New Zealand
Standards.
Ergonomics notice
Germany
Mobile computers bearing the "GS" approval mark meet the ergonomic requirements and are suitable
only for short-time use of VDU tasks. When a mobile computer is used for display work tasks where
the Visual Display Unit (VDU) Directive 90/270/EEC is applicable, an adequate external keyboard is
required. Depending on the application and task, an adequate external monitor may also be
necessary to attain working conditions comparable to a workstation setup.
Ref: EK1-ITB 2000:2008
This device is intended for use at visual display workplaces in compliance with BildscharbV, only with
external keyboard and adequate external monitor.
During mobile use with disadvantageous illumination conditions (e.g. direct sun light) reflections may
occur which result in reduced readability.
Mobile Computer, welche das "GS" Zeichen tragen, entsprechen den ergonomischen Anforderungen
und sind nur für kurzzeitige Benutzung von Bildschirmarbeitsaufgaben geeignet. Wird ein mobiler
Computer für Bildschirmarbeitsaufgaben verwendet, wo die Richtlinie 90/270/EEG
(Bildschirmarbeitsrichtlinie) anzuwenden ist, wird eine geeignete externe Tastatur notwendig.
Abhängig von der Anwendung und der Aufgabe kann ein geeigneter externer Monitor erforderlich
sein, um vergleichbare Arbeitsbedingungen zu einem stationären Arbeitsplatz zu erreichen.
Ref: EK1-ITB 2000:2008
Das Gerät ist für die Benutzung am Bildschirmarbeitsplatz gemäß BildscharbV nur mit externer
Tastatur und geeignetem Monitor vorgesehen.
Bei mobiler Nutzung mit ungünstigen Lichtverhältnissen (z.B. direkte Sonneneinstrahlung) kann es zu
Reflexionen und damit zu Einschränkungen der Lesbarkeit der dargestellten Zeichen kommen.
6 Chapter 1 Regulatory notices
Japan notices
Wireless LAN 802.11b devices
Wireless LAN 802.11g devices
Bluetooth devices
Japan notices 7

Wireless LAN, Wireless WAN, and Bluetooth certification markings
This product contains certified radio equipment.
South Korea notice
Mexico notice
La operación de este equipo está sujeta a las siguientes dos condiciones: (1) este equipo puede que
no cause interferencia y (2) este equipo debe aceptar cualquier interferencia, incluyendo interferencia
que pueda ser causada por la operación no deseada.
Singapore wireless notice
Turn off any WWAN devices while you are onboard aircraft. The use of these devices onboard aircraft
is illegal, may be dangerous to the operation of the aircraft, and may disrupt the cellular network.
Failure to observe this instruction may lead to suspension or denial of cellular services to the
offender, or legal action, or both.
Users are reminded to restrict the use of radio equipment in fuel depots, chemical plants, and where
blasting operations are in progress.
As with other mobile radio transmitting equipment, users are advised that for satisfactory operation of
the equipment and for the safety of personnel, no part of the human body should be allowed to come
too close to the antennas during operation of the equipment.
This device has been designed to comply with applicable requirements for exposure to radio waves,
based on scientific guidelines that include margins intended to assure the safety of all people,
regardless of health and age. These radio wave exposure guidelines employ a unit of measurement
known as the specific absorption rate (SAR). Tests for SAR are conducted using standardized
methods, with the phone transmitting at its highest certified power level in all used frequency bands.
The SAR data information is based on CENELEC's standards EN50360 and EN50361, which use the
limit of 2 watts per kilogram, averaged over 10 grams of tissue.
Thailand WWAN wireless notice
This telecom equipment has complied with NTC regulations.
8 Chapter 1 Regulatory notices
Taiwan notices
Wireless LAN 802.11a devices
Wireless LAN 802.11b devices
Vietnam Compliance Marking Notice
This marking is for applicable products only.
Taiwan notices 9

Airline travel notice
Use of electronic equipment onboard commercial aircraft is at the discretion of the airline.
Battery notices
WARNING! Risk of explosion if battery is replaced by an incorrect type. Dispose of used batteries
according to the instructions.
For information about removing a battery, refer to the user guide included with the product.
ENERGY STAR compliance
As an ENERGY STAR Partner, Hewlett-Packard Company has followed the EPA’s enhanced product
qualification and certification process to ensure that the products marked with the ENERGY STAR
logo are ENERGY STAR qualified per the applicable ENERGY STAR guidelines for energy
efficiency. The following logo appears on all ENERGY STAR-qualified computers:
The ENERGY STAR program for computers was created by the EPA to promote energy efficiency
and reduce air pollution through more energy-efficient equipment in homes, offices, and factories.
One way that products achieve this goal is by using the Microsoft® Windows® power management
feature to reduce power consumption when the product is not in use.
The power management feature allows the computer to initiate a low-power or “Sleep” mode after a
period of user inactivity. When used with an external ENERGY STAR qualified monitor, this feature
also supports similar power management features of the monitor. To take advantage of these
potential energy savings, the power management feature has been preset to behave in the following
ways when the system is operating on AC power:
●Turn off the display after 15 minutes
●Initiate Sleep after 30 minutes
The computer exits Sleep when the power/Sleep button is pressed. When the Wake On LAN (WOL)
feature is enabled, the computer can also exit Sleep in response to a network signal.
Additional information on the potential energy and financial savings of the power management feature
can be found on the EPA ENERGY STAR Power Management Web site at
http://www.energystar.gov/powermanagement.
Additional information on the ENERGY STAR program and its environmental benefits are available
on the EPA ENERGY STAR Web site at http://www.energystar.gov.
10 Chapter 1 Regulatory notices

Laser compliance
WARNING! Use of controls or adjustments, or performance of procedures other than those
specified in the laser product installation guide, may result in hazardous radiation exposure. To
reduce the risk of exposure to hazardous radiation:
Do not try to open the module enclosure. There are no user-serviceable components inside.
Do not operate controls, make adjustments, or perform procedures to the laser device other than
those specified in the laser product installation guide.
Allow only authorized service providers to repair the unit.
This product may be provided with an optical storage device (for example, a CD or DVD drive) and/or
a fiber optic transceiver. Each of these devices that contain a laser is classified as a Class 1 Laser
Product in accordance with IEC 60825-1 and meets the requirements for safety of that standard.
Each laser product complies with US FDA regulations of 21 CFR 1040.10 and 1040.11 or complies
with those regulations except for deviations pursuant to Laser Notice No. 50 dated June 24, 2007.
Modem notices
WARNING! To reduce the risk of fire, electric shock, and injury to persons when using this device,
always follow basic safety precautions, including the following:
Do not use this product near water—for example, near a bathtub, wash bowl, kitchen sink or laundry
tub, in a wet basement, or near a swimming pool.
Avoid using this product during an electrical storm. There is a remote risk of electric shock from
lightning.
Do not use this product to report a gas leak while in the vicinity of the leak.
Always disconnect the modem cable before opening the equipment enclosure or touching an
uninsulated modem cable, jack, or internal component.
If this product was not provided with a telephone line cord, use only No. 26 AWG or larger
telecommunication line cord.
Do not plug a modem or telephone cable into the RJ-45 (network) jack.
SAVE THESE INSTRUCTIONS
Telecommunications device approvals
The telecommunications device in the computer is approved for connection to the telephone network
in the countries and regions whose approval markings are indicated on the product label located on
the bottom of the computer or on the modem.
Refer to the user guide included with the product to ensure that the product is configured for the
country or region in which the product is located. Selecting a country or region other than the one in
which it is located may cause the modem to be configured in a way that violates the
telecommunication regulations/laws of that country or region. In addition, the modem may not function
properly if the correct country or region selection is not made. If, when you select a country or region,
a message appears that states that the country or region is not supported, this means that the
modem has not been approved for use in this country or region and thus should not be used.
Laser compliance 11
U.S. modem statements
This equipment complies with Part 68 of the FCC Rules and the requirements adopted by the ACTA.
On the bottom of the computer or on the modem is a label that contains, among other information, a
product identifier in the format US:AAAEQ##TXXXX. Provide this information to the telephone
company if you are requested to do so.
Applicable certification jack USOC = RJ11C. A plug and jack used to connect this equipment to the
premises wiring and telephone network must comply with the applicable FCC Part 68 rules and
requirements adopted by the ACTA. A compliant telephone cord and modular plug is provided with
this product. It is designed to be connected to a compatible modular jack that is also compliant. See
installation instructions for details.
The REN is used to determine the number of devices that may be connected to a telephone line.
Excessive RENs on a telephone line may result in the devices not ringing in response to an incoming
call. In most but not all locations, the sum of RENs should not exceed five (5.0). To be certain of the
number of devices that may be connected to a line, as determined by the total RENs, contact the
local telephone company. For products approved after July 23, 2001, the REN for this product is part
of the product identifier that has the format US:AAAEQ##TXXXX. The digits represented by ## are
the REN without a decimal point (e.g., 03 is a REN of 0.3). For earlier products, the REN is separately
shown on the label.
If this HP equipment causes harm to the telephone network, the telephone company will notify you in
advance that temporary discontinuance of service may be required. But, if advance notice isn't
practical, the telephone company will notify you as soon as possible. Also, you will be advised of your
right to file a complaint with the FCC if you believe it is necessary.
The telephone company may make changes to its facilities, equipment, operations, or procedures
that could affect the operation of the equipment. If this happens, the telephone company will provide
advance notice in order for you to make necessary modifications to maintain uninterrupted telephone
service.
If trouble is experienced with this equipment, call technical support. If the equipment is causing harm
to the telephone network, the telephone company may request that you disconnect the equipment
until the problem is resolved. You should perform repairs only to the equipment specifically discussed
in the “Troubleshooting” section of the user guide, if one is provided.
Connection to party line service is subject to state tariffs. Contact the state public utility commission,
public service commission, or corporation commission for information.
If your home has specially wired alarm equipment connected to the telephone line, ensure that the
installation of this HP equipment does not disable your alarm equipment. If you have questions about
what will disable alarm equipment, consult your telephone company or a qualified installer.
The Telephone Consumer Protection Act of 1991 makes it unlawful for any person to use a computer
or other electronic device, including a fax machine, to send any message unless such message
clearly contains in a margin at the top or bottom of each transmitted page, or on the first page of the
transmission, the date and time it is sent and an identification of the business, other entity, or other
individual sending the message, and the telephone number of the sending machine or such business,
other entity, or individual. (The telephone number provided may not be a 900 number or any other
number for which charges exceed local or long-distance transmission charges).
In order to program this information into your fax machine, you should complete the steps outlined in
the faxing software instructions.
U.S. modem declarations
Refer to the following modem vendor declarations for the modem device installed in your computer:
12 Chapter 1 Regulatory notices

Modem notices 13
14 Chapter 1 Regulatory notices

Canada modem statements
This equipment meets the applicable Industry Canada technical specifications.
The Ringer Equivalence Number, REN, is an indication of the maximum number of devices allowed to
be connected to a telephone interface. The termination on an interface may consist of any
combination of devices, subject only to the requirement that the sum of the RENs of all devices does
not exceed 5. The REN for this terminal equipment is 1.0.
Japan modem statements
If the computer does not have the Japanese certification mark on the bottom of the computer, refer to
the appropriate certification marking below.
The Japanese certification mark for the V.92 56K Data/Fax Modem is below:
New Zealand modem statements
The grant of a Telepermit for any item of terminal equipment indicates only that Telecom has
accepted that the item complies with minimum conditions for connection to its network. It indicates no
endorsement of the product by Telecom, nor does it provide any sort of warranty. Above all, it
provides no assurance that any item will work correctly in all respects with another item of
Telepermitted equipment of a different make or model, nor does it imply that any product is
compatible with all of Telecom's network services.
This equipment is not capable, under all operating conditions, of correct operation at the higher
speeds for which it is designed. Telecom will accept no responsibility should difficulties arise in such
circumstances.
If this device is equipped with pulse dialing, note that there is no guarantee that Telecom lines will
always continue to support pulse dialing.
Use of pulse dialing, when this equipment is connected to the same line as other equipment, may
give rise to bell tinkle or noise and may also cause a false answer condition. Should such problems
occur, the user should not contact the Telecom Faults Service.
Some parameters required for compliance with Telecom's Telepermit requirements are dependent on
the equipment (PC) associated with this device. The associated equipment shall be set to operate
within the following limits for compliance with Telecom's Specifications:
a. There shall be no more than 10 call attempts to the same number within any 30-minute period
for any single manual call initiation.
b. The equipment shall go on-hook for a period of not less than 30 seconds between the end of
one attempt and the beginning of the next attempt.
c. Where automatic calls are made to different numbers, the equipment shall be set to go on-hook
for a period of not less than 5 seconds between the end of one attempt and the beginning of the
next attempt.
d. The equipment shall be set to ensure that calls are answered between 3 and 30 seconds of
receipt of ringing (So set between 2 and 10).
Modem notices 15
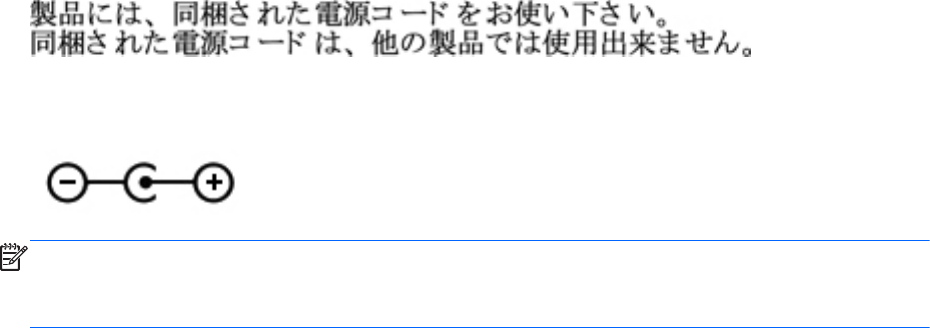
Voice support
All persons using this device for recording telephone conversations shall comply with New Zealand
law. This requires that at least one party to the conversation is aware that it is being recorded. In
addition, the Principles enumerated in the Privacy Act 1993 shall be complied with in respect to the
nature of the personal information collected, the purpose for its collection, how it is to be used, and
what is disclosed to any other party.
This equipment shall not be set to make automatic calls to the Telecom ‘111' Emergency Service.
Power cord notice
If you were not provided with a power cord for the computer or for an external power accessory
intended for use with the computer, you should purchase a power cord that is approved for use in
your country or region.
The power cord must be rated for the product and for the voltage and current marked on the product's
electrical ratings label. The voltage and current rating of the cord should be greater than the voltage
and current rating marked on the product. In addition, the diameter of the wire must be a minimum of
0.75 mm²/18AWG, and the length of the cord must be between 1.5 m (5 ft) and 2 m (6½ ft). If you
have questions about the type of power cord to use, contact your authorized service provider.
A power cord should be routed so that it is not likely to be walked on or pinched by items placed upon
it or against it. Particular attention should be paid to the plug, electrical outlet, and the point where the
cord exits from the product.
Japan power cord notice
DC plug of external HP power supply
NOTE: This product is designed for IT power systems in Norway with phase-to-phase voltage not
exceeding 240 V rms.
NOTE: The computer operating voltage and current can be found on the system regulatory label.
Macrovision Corporation notice
This product incorporates copyright protection technology that is protected by method claims of
certain U.S. patents and other intellectual property rights owned by Macrovision Corporation and
other rights owners. Use of this copyright protection technology must be authorized by Macrovision
Corporation and is intended for home and other limited viewing uses only, unless otherwise
authorized by Macrovision Corporation. Reverse engineering or disassembly is prohibited.
16 Chapter 1 Regulatory notices

2 Safety notices
Heat-related safety warning notice
WARNING! To reduce the possibility of heat-related injuries or of overheating the computer, do not
place the computer directly on your lap or obstruct the computer air vents. Use the computer only on
a hard, flat surface. Do not allow another hard surface, such as an adjoining optional printer, or a soft
surface, such as pillows or rugs or clothing, to block airflow. Also, do not allow the AC adapter to
contact the skin or a soft surface, such as pillows or rugs or clothing, during operation. The computer
and the AC adapter comply with the user-accessible surface temperature limits defined by the
International Standard for Safety of Information Technology Equipment (IEC 60950).
Potential safety conditions notice
If you notice any of the following conditions (or if you have other safety concerns), do not use the
computer: crackling, hissing, or popping sound, or a strong odor or smoke coming from the computer.
It is normal for these conditions to appear when an internal electronic component fails in a safe and
controlled manner. However, these conditions may also indicate a potential safety issue. Do not
assume it is a safe failure. Turn off the computer, disconnect it from its power source, and contact
technical support for assistance.
Battery notices
WARNING! To reduce the risk of fire or burns, do not disassemble, crush, or puncture; do not short
external contacts; do not dispose of in fire or water.
WARNING! Keep the battery away from children.
WARNING! To reduce potential safety issues, only the battery provided with the computer, a
replacement battery provided by HP, or a compatible battery purchased as an accessory from HP
should be used with the computer.
Headset and earphone volume level notice
WARNING! Listening to music at high volume levels and for extended durations can damage one’s
hearing. To reduce the risk of hearing damage, lower the volume to a safe, comfortable level and
reduce the amount of time listening at high levels.
For your own safety, before using headsets or earphones, always reset the volume. Some
headphones are louder than other headphones, even if the volume control setting is the same.
Changing the default audio or equalizer settings might lead to higher volume and should only be done
with caution.
For your own safety, headsets or earphones used with this product should comply with the
headphone limits in EN 50332-2.
If the computer includes a headset or earphones, this combination is in compliance to EN 50332-1.
Heat-related safety warning notice 17

Power cord notices
WARNING! To reduce the risk of electric shock or damage to the equipment:
Plug the power cord into an AC outlet that is easily accessible at all times.
Disconnect power from the computer by unplugging the power cord from the AC outlet (not by
unplugging the power cord from the computer).
If provided with a 3-pin attachment plug on the power cord, plug the cord into a grounded (earthed) 3-
pin outlet. Do not disable the power cord grounding pin, for example, by attaching a 2-pin adapter.
The grounding pin is an important safety feature.
WARNING! To reduce potential safety issues, only the AC adapter provided with the computer, a
replacement AC adapter provided by HP, or an AC adapter purchased as an accessory from HP
should be used with the computer.
Cleaning the keyboard
WARNING! To reduce the risk of electric shock or damage to internal components, do not use a
vacuum cleaner attachment to clean the keyboard. A vacuum cleaner can deposit household debris
on the keyboard surface. Clean the keyboard regularly to prevent keys from sticking and to remove
dust, lint, and particles that can become trapped beneath the keys. A can of compressed air with a
straw extension can be used to blow air around and under the keys to loosen and remove debris.
Travel notice
WARNING! To reduce the risk of electric shock, fire, or damage to the equipment, do not attempt to
power the computer with a voltage converter kit sold for appliances.
Norway and Sweden: Cable grounding notice for
products with a TV tuner
CAUTION: To reduce potential safety issues, use a galvanic isolator when connecting to a cable
distribution system.
18 Chapter 2 Safety notices

3 Environmental notices
This chapter provides country- and region-specific environmental notices and compliance information.
Some of these notices may not apply to your product.
Electronic hardware and battery recycling
HP encourages customers to recycle used electronic hardware, HP original print cartridges, and
rechargeable batteries. For more information about recycling programs, see the HP Web site at
http://www.hp.com/recycle.
Disposal of waste equipment by users in private
households in the European Union
This symbol means do not dispose of your product with your other household waste. Instead, you
should protect human health and the environment by handing over your waste equipment to a
designated collection point for the recycling of waste electrical and electronic equipment. For more
information, please contact your household waste disposal service.
Chemical substances
HP is committed to providing our customers with information about the chemical substances in our
products as needed to comply with legal requirements such as REACH (Regulation EC No
1907/2006 of the European Parliament and the Council). A chemical information report for this
product can be found at http://www.hp.com/go/reach.
Electronic hardware and battery recycling 19
China material content declarations
The Table of Toxic and Hazardous Substances/Elements and their Content
As required by China's Management Methods for Controlling Pollution by Electronic Information
Products
Toxic and Hazardous Substances and Elements
Part Name
Lead
(Pb)
Mercury
(Hg)
Cadmium
(Cd)
Hexavalent
Chromium
(Cr(VI))
Polybrominated
biphenyls (PBB)
Polybrominated
diphenyl ethers
(PBDE)
Battery X O O O O O
Cables X O O O O O
Camera X O O O O O
Chassis/Other X O O O O O
Flash memory card reader X O O O O O
Floppy disk drive X O O O O O
Hard disk drive X O O O O O
Headphones X O O O O O
I/O PCAs X O O O O O
Keyboard X O O O O O
20 Chapter 3 Environmental notices

Toxic and Hazardous Substances and Elements
Part Name
Lead
(Pb)
Mercury
(Hg)
Cadmium
(Cd)
Hexavalent
Chromium
(Cr(VI))
Polybrominated
biphenyls (PBB)
Polybrominated
diphenyl ethers
(PBDE)
Liquid crystal display
(LCD) panel
XX O O O O
Media (CD/DVD/floppy) O O O O O O
Memory X O O O O O
Motherboard, processor,
heat sinks
XO O O O O
Mouse X O O O O O
Optical disk drive X O O O O O
Optional docking device X O O O O O
Power adapter X O O O O O
Power supply X O O O O O
Remote control X O O O O O
Smart card/Java™ card
reader
XO O O O O
Speakers, external X O O O O O
TV tuner X O O O O O
USB flash memory drive X O O O O O
USB hub X O O O O O
Web camera X O O O O O
Wireless receiver X O O O O O
Wireless cards X O O O O O
O: Indicates that this toxic or hazardous substance contained in all of the homogeneous materials for this part is below the
limit requirement in SJ/T11363-2006.
X: Indicates that this toxic or hazardous substance contained in at least one of the homogeneous materials used for this part
is above the limit requirement in SJ/T11363-2006.
All parts named in this table with an X are in compliance with the European Union's RoHS Legislation “Directive 2002/95/EC
of the European Parliament and of the Council of 27 January 2003 on the restriction of the use of certain hazardous
substances in electrical and electronic equipment” and its amendments.
NOTE: The referenced Environmental Protection Use Period Marking was determined according to normal operating use
conditions of the product such as temperature and humidity.
China material content declarations 21
Japan material content declaration
A Japanese regulatory requirement, defined by specification JIS C 0950, 2008, mandates that
manufacturers provide material content declarations for certain categories of electronic products
offered for sale after July 1, 2006. To view the JIS C 0950 material declaration for this product, see
the HP Web site at http://www.hp.com/go/jisc0950.
Turkey EEE regulation
In Conformity with the EEE regulation
EEE Yönetmeliğine Uygundur
22 Chapter 3 Environmental notices

Ukraine Restriction of Hazardous Substances
The equipment complies with requirements of the Technical Regulation, approved by the Resolution
of Cabinet of Ministry of Ukraine as of December 3, 2008 № 1057, in terms of restrictions for the use
of certain dangerous substances in electrical and electronic equipment.
Україна обмеження на наявність небезпечних речовин
Обладнання відповідає вимогам Технічного регламенту щодо обмеження використання деяких
небезпечних речовин в електричному та електронному обладнані, затвердженого постановою
Кабінету Міністрів України від 3 грудня 2008 № 1057.
United States mercury disposal
This HP product contains the following materials that might require special handling at end-of-life:
●Mercury in the fluorescent lamp in the display LCD
Disposal of mercury can be regulated because of environmental considerations. For disposal or
recycling information, please contact your local authorities or the Electronic Industries Alliance (EIA)
http://www.eiae.org.
NOTE: Notebook computers configured with LED backlights do not contain mercury lamps.
Perchlorate material—special handling may apply
See http://www.dtsc.ca.gov/hazardouswaste/perchlorate.
This product’s real-time clock battery or coin cell battery may contain perchlorate and may require
special handling when recycled or disposed of in California.
Ukraine Restriction of Hazardous Substances 23

Index
A
airline travel notice 10
B
battery notice 10, 17, 23
battery recycling 19
Brazil notice 4
C
cable grounding notice 18
Canada modem statement 15
Canada notices 4
Canadian French notices 4
China Material Content
Declarations 20
D
DC plug of external HP power
supply notice 16
Declaration of Conformity 3
disposal notices
battery 10, 23
equipment 19
mercury 23
E
electronic hardware and battery
recycling 19
ENERGY STAR compliance 10
environmental notices 19
equipment disposal notice 19
ergonomics notice 6
European Union notices 4
F
Federal Communications
Commission
cables 2
modifications 2
notice 2
G
GS Notice 6
H
hardware device, identifying 1
headset and earphone volume
level notice 17
J
Japan material content
declaration 22
Japan modem statement 15
Japan notice 7
Japan power cord notice 16
K
keyboard notice 18
L
laser safety notice 11
M
Macrovision Corporation notice
16
mercury disposal notice 23
Mexico wireless notice 8
modem notices 11
modem statements
Canada 15
Japan 15
New Zealand 15
U.S. 12
modifications, Federal
Communications Commission 2
N
New Zealand modem statement
15
notices
airline travel 10
battery 10, 17, 23
Brazil 4
Canada 4
Canadian French 4
DC plug of external HP power
supply 16
environmental 19
equipment disposal 19
ergonomics 6
European Union 4
Federal Communications
Commission 2
headset and earphone volume
level 17
Japan 7
Japan power cord 16
keyboard 18
laser safety 11
Macrovision Corporation 16
mercury disposal 23
Mexico 8
modem 11
perchlorate material 23
power cords 16, 18
Singapore 8
South Korea 8
Taiwan 9
Thailand WWAN wireless
notice 8
travel 18
Ukraine restriction of hazardous
substances 23
Vietnam compliance marking
9
P
power cord notice 16, 18
R
recycling, electronic hardware and
battery 19
S
Singapore wireless notice 8
South Korea notice 8
T
Taiwan notice 9
Thailand WWAN wireless notice
8
travel notice 18
TV tuner, cable grounding notice
18
24 Index