Recon Dynamics AT10A Asset Tracking Transmitter User Manual manual
Recon Dynamics, LLC Asset Tracking Transmitter manual
manual
Asset Tracker © 2010 Recon Dynamics 1
ASSET TRACKER
WARNING:
Read and understand all instructions and warnings for this product. In
addition, read and follow all instructions and warnings provided.
DANGER OF EXPLOSION, INJURY OR FIRE. Carefully follow all instructions and
warnings on the battery label and package
CAUTION:
Never use a damaged or worn out battery
Batteries should be replaced only with the correct rechargeable 3.7V
lithium polymer battery.
Do not peel the label from the housing.
Never dispose of a battery in a fire
Dispose of used batteries in accordance with local regulations.
Always insert batteries correctly with regard to polarity (+ and -) as marked
on the battery and the equipment.
When installing the battery, do not use excessive force. If the battery does
not fit, check to make sure that it matches the polarity markings.
Never expose the battery terminals to any other metal objects. This can
short circuit the battery.
Avoid exposure to temperature extremes
When not in use, store the battery in a cool, dark, dry place.
Keep batteries out of the reach of children.
REGULATORY STATEMENT
This device complies with Part 15 of the FCC rules. Operation subject to the following two
conditions:
1. This device may not cause harmful interference,
and
2. The device must accept any interference received, including interference that may
cause undesired operation.
Asset Tracker
2 © 2010 Recon Dynamics Asset Tracker
Changes or modification to this device may void the user’s authority to operate this
product.
This product is designed for indoor/outdoor use. It is designed to be weather-resistant.
CAUTION:
POTENTIAL EQUIPMENT MALFUNCTION OR FAILURE.
Do not touch the electronic components inside the device, except the reset button and the
battery.
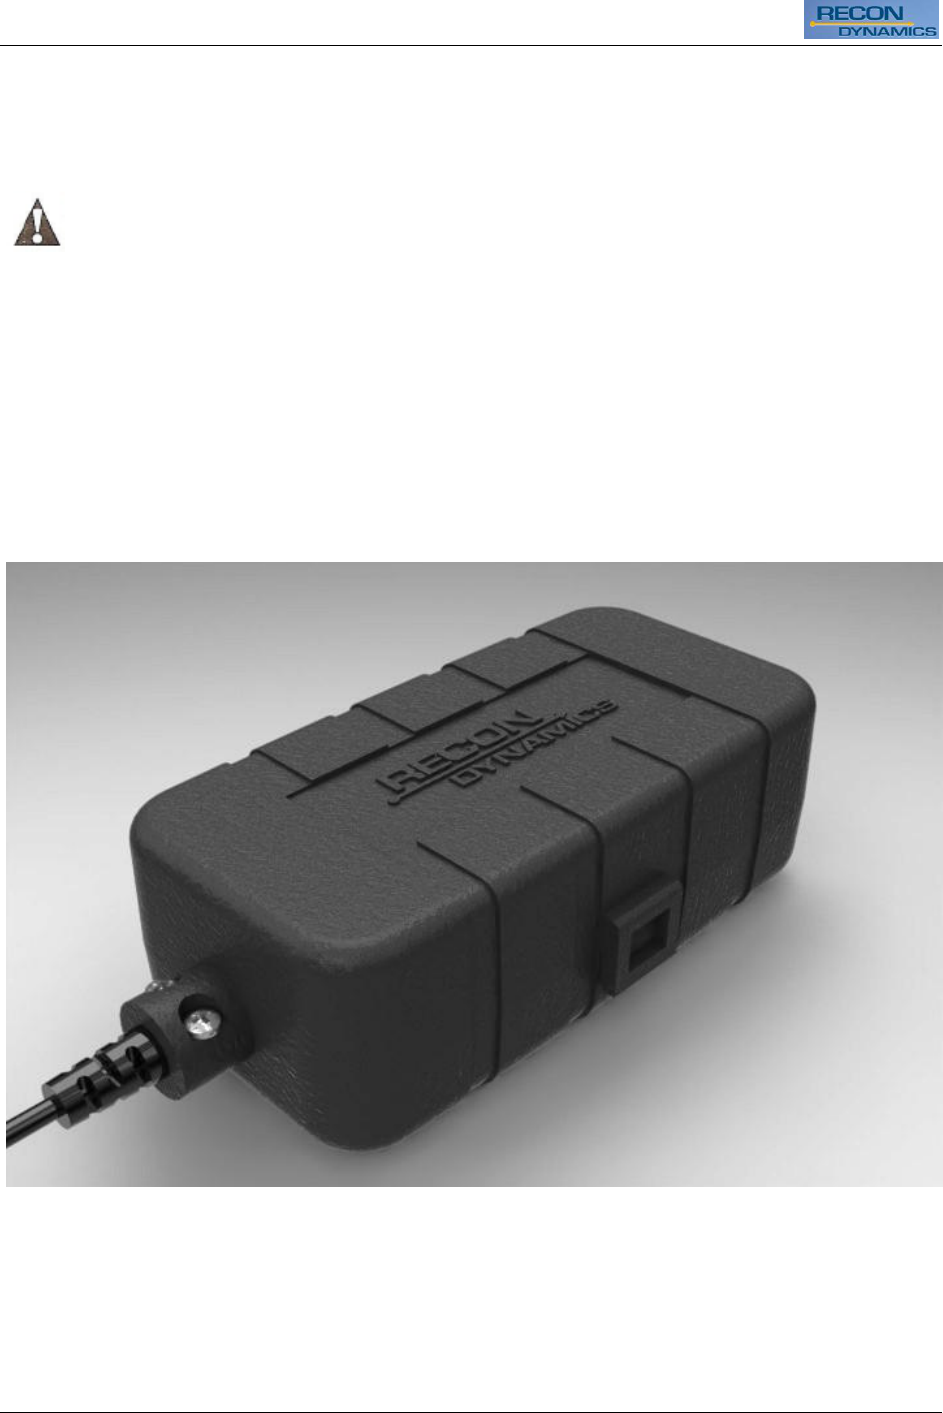
COMPONENTS
Figure 1

Asset Tracker
Asset Tracker © 2010 Recon Dynamics 3
PRODUCT FUNCTION
RECON Dynamics lets you create that invisible fence and set some custom rules for what's
inside it. You'll be able to define specific parameters for location boundaries and crucial
measurements like motion, temperature, altitude, and flow rate - virtually anything you want
to track and monitor. You can rest easy knowing RECON is always keeping an eye out,
ready to alert you at a moment's notice. You'll be notified based on your custom parameters
and event notification priorities.
Supports geo-fencing applications
Built-in telematic sensors - temperature, vibration (motion), barometer (elevation)
Operates up to 2 years between battery charges
Direct sequence spread spectrum (DSSS)
Low data rate, wide bandwidth spreading
Low power, long range
902 – 928 MHz unlicensed spectrum
Highly reliable and secure
Over-determined network topology
NOTE: Metal objects blocking radio frequency (RF) transmission can
affect the range of the sensor.
PRODUCT OPERATION
The Asset Tracker is operated using the push-button reset switch located on the top side of
the circuit board.
To turn the Asset Tracker on:
Open the Asset Tracker housing. Remove the retaining screw if necessary.
Press and hold the reset switch for a few seconds until the LED on the side of the circuit
board illuminates green.
Release the switch and the LED will flash red several times quickly. Then the LED will
flash green every few seconds for a period of about 30 seconds.
The Asset Tracker is now on and has transmitted an initial location signal to the system.
To turn the Asset Tracker off:
Press and hold the reset switch and continue holding it.
The LED on the side of the circuit board will flash red and green for about 10 seconds.
Continue holding the switch until the LED flashes quickly only red.
Release the switch.
The Asset Tracker is now off.

Asset Tracker
4 © 2010 Recon Dynamics Asset Tracker
PREVENTION OF FALSE ALARMS
The majority of alarms that occur are false. These situations happen every day due to user
error, incorrect installation or improper maintenance of the system. False alarms will limit the
responsiveness to the system, and become a general inconvenience. As the number of false
alarms increases, authorities have become less likely to respond to alarm systems due to this
problem. Many of these situations can be avoided by following some very simple practices.
Ensure all users are properly trained on the operation of the system
Lock all protected doors, windows or any other asset attached to a sensor
Check that motion detectors are not obstructed. Do not allow sources of heat or sound in
range of the motion or vibration sensors.
Check that premises are cleared and assets secured before setting the system.
Turn off all noise sources - radios, compressors, generators, heavy equipment, etc.
Know how to cancel an alarm or turn off the system before activating.
If a false alarm is tripped notify the system administrator immediately.
Test the system on a monthly basis to ensure proper functionality.
Recommended Locations
Secure product off the ground [above 3 feet (.91m)] to ensure better communication.
Place as high as possible on the asset to allow unobstructed transmissions to the
system. When possible mount the Asset Tracker with the Recon Dynamics logo oriented
up like is shown in Figure 1. This provides the optimum antenna orientation.
Recommended for use on mobile equipment, containers, gates and remote assets.
Charging the Battery
This wireless sensor contains a rechargeable 3.7V lithium polymer battery. From a single
charge the battery can provide up to two years of device use depending on the amount of use.
To Charge The Battery
1. Locate the charging port on the side of the Asset Tracker.
2. Uncover the charging port by removing the plug from the housing. Do not use excessive
force as the plug is connected to the housing and will need to be replaced when
charging is complete.
3. Plug in the selected charging unit
Note: If the unit is charging correctly, the LED on the circuit board will
be red.
4. Disconnect the charger when the LED on the circuit board turns green,

Asset Tracker
Asset Tracker © 2010 Recon Dynamics 5
Note: If the unit is functioning correctly, the LED will flash
intermittently. The flashing interval may be long enough that
you may not see it.
Securing Equipment
The Asset Tracker unit does not need to be removed before operating the attached
equipment.
To Secure the Equipment using the Asset Tracker
There are many ways to secure the unit to the asset. Recon Dynamics provides a mounting
bracket, but Velcro®, construction adhesives, or even cable ties can be used based on the
situation.
1. If you are using the mounting bracket: Attach the bracket to the asset using screws
provided or appropriate adhesive. Use caution when selecting a location for mounting.
Do not use the screws if doing so will cause irreparable damage to the asset or create a
safety hazard.
2. Insert the bottom of the AT unit into the latch, aligning the snap features with the notches
of the AT unit.
3. Press the AT into the bracket. When you hear it click, the unit is secured.
To release the Equipment from the Asset Tracker
1. If using the provided mounting latch: Grip the AT unit at the top near the latch.
2. Pull gently towards you.
If the unit is reset and operating correctly, the LED will intermittently flash.
Device Registration
To activate the device, it must first be assigned to your AT monitoring application.
NOTE: The system must be disarmed prior to any changes.
1. Locate the corresponding ID for the AT on the label located on the housing of the AT.
IMPORTANT
Write the device description and corresponding device number on the Sensor Location List
included with the Portable Alarm System. Keep this sheet for reference. This information
will be needed during the monitoring service enrollment process. As device changes are
made, be sure to contact customer service to make adjustments to the monitoring service.
2. Using a standard web browser on your computer, type www.recondynamics.com into the
browser’s address bar.
Asset Tracker
6 © 2010 Recon Dynamics Asset Tracker
3. Click on the button labeled “Create New Account”.
4. Enter your email address, password, and other information for your account.
5. Once logged in, near the upper right of the web page, click on the box labeled “Add A
Device”.
6. In the dialog box enter the ID from the AT label and any information you would like to
have associated with the AT or the asset.
7. Click on the Save button to save this device. Repeat this procedure for any other
devices you may have.
Note: If the unit is reset and operating correctly, the LED will
intermittently flash, although it may be several hours between
flashes.
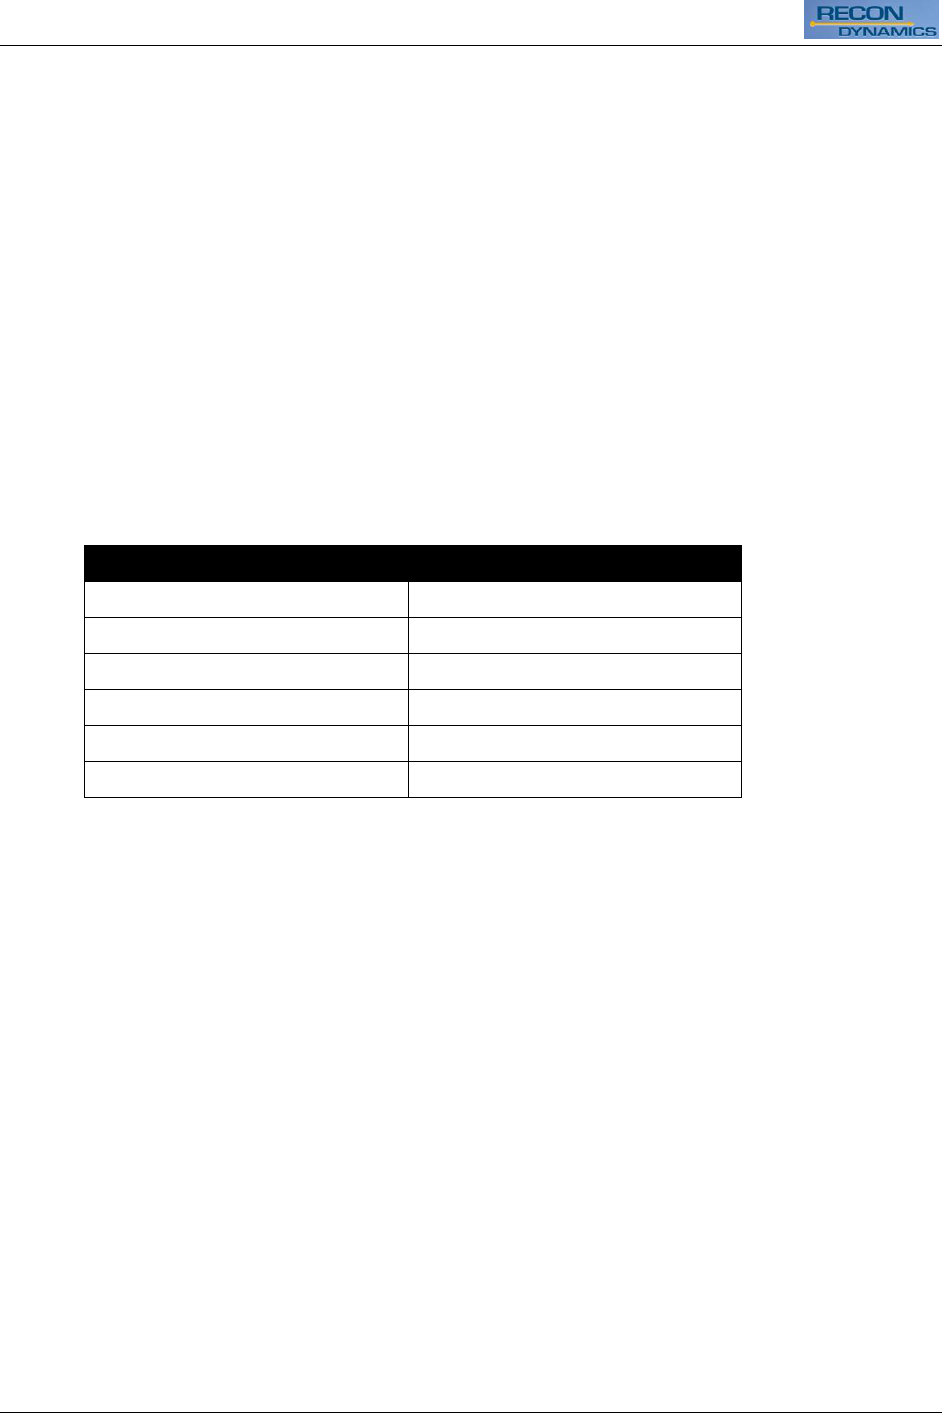
Device Status
The following table lists the LED state and the corresponding device status:
LED State
Device Status
Solid red
Charging
Solid green
Done charging
Flash green
Normal transmission
Flash green then red
Alarm transmission
2 red flashes every 10 seconds
Low battery
Alternating red and green
Battery too low to transmit
Faults
If a fault is present, the system will chime and the Fault screen will be displayed. To silence
the chime, select SILENCE. To display the fault and resolve immediately, select DISPLAY.
Use the up and down arrows to scroll through the faults. Resolve the issue with the action
listed in Description of Fault Codes chart.
TO REMOVE A FAULT
1. To Clear the Fault.
a. Open the Asset Tracker Monitoring application in your web browser.
b. Select DISPLAY.
c. Scroll list of fault(s).
d. Locate the correct External ID (label is located on the unit).
e. Select CLEAR.
f. Select OK.
If the unit is reset and operating correctly, the LED will intermittently flash.

Asset Tracker
Asset Tracker © 2010 Recon Dynamics 7
Full One Year Warranty
The Asset Tracker is warranted for one year from date of purchase. We will repair, without
charge, any defects due to faulty materials or workmanship. For warranty repair information,
visit www.recondynamics.com/warranty.
This warranty does not apply to accessory damage caused where repairs have been made or
attempted by others. This warranty gives you specific legal rights and you may other rights
which vary in certain states or provinces.