User Manual
Getting Started - RedBear Duo
Congratulations on being the owner of a brand new RedBear Duo! Now, you can open the box and follow this guide to play with the
Duo.
This getting started guide will show you how to use the RedBear Duo IoT development board quickily. There are two sections:
Out of the box test
Checking firmware version
Checking device ID
Updating firmware
Assocaiting to an Access Point (AP) or Internet router
Develop an application using WebIDE or Arduino IDE.
Prerequisites for Setup
You need to prepare the following hardware items:
PC with Windows, Linux (e.g. Ubuntu) or Mac with OSX
Tested on: Windows 10, OSX 10.11
Access Point (e.g. an Internet router at your home).
For the Duo to have Internet connection
Micro USB cable
Note: some cables only for power, you need a data+power cable for the Duo.
RBLink (optional, easier with its drag & drop feature)
Software items:
dfu-util
Latest Duo Firmware
https://github.com/redbear/Duo/raw/master/firmware/
For Windows, you also need the following software tools:
PuTTY
or you can use other serial port tool (e.g. HyperTerminal)
Driver
Zadig
Out of the Box Test
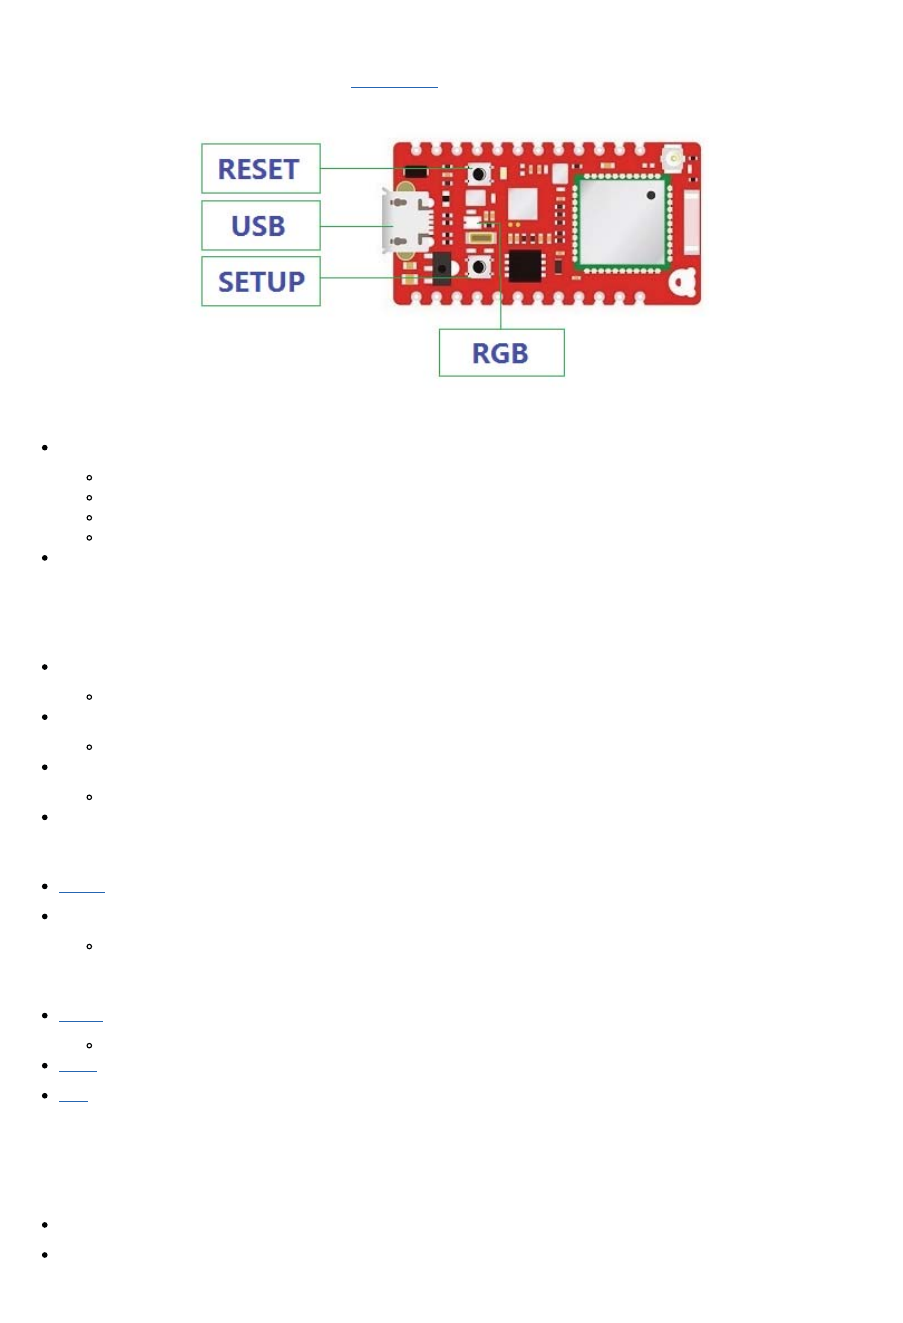
1. Power-Up the Duo
Connect the Duo to your PC via the USB port with a micro USB cable.
The RGB LED will show Blue in color and keep flashing (i.e. Listening Mode).
2. Install Driver (Only required for Windows)
Follow this driver installation guide for details.
3. Install PuTTY (Only required for Windows)
Note: you can also use other Serial port communication software (e.g. HyperTerminal).
Download and unzip PuTTY.
4. Check firmware version and device ID
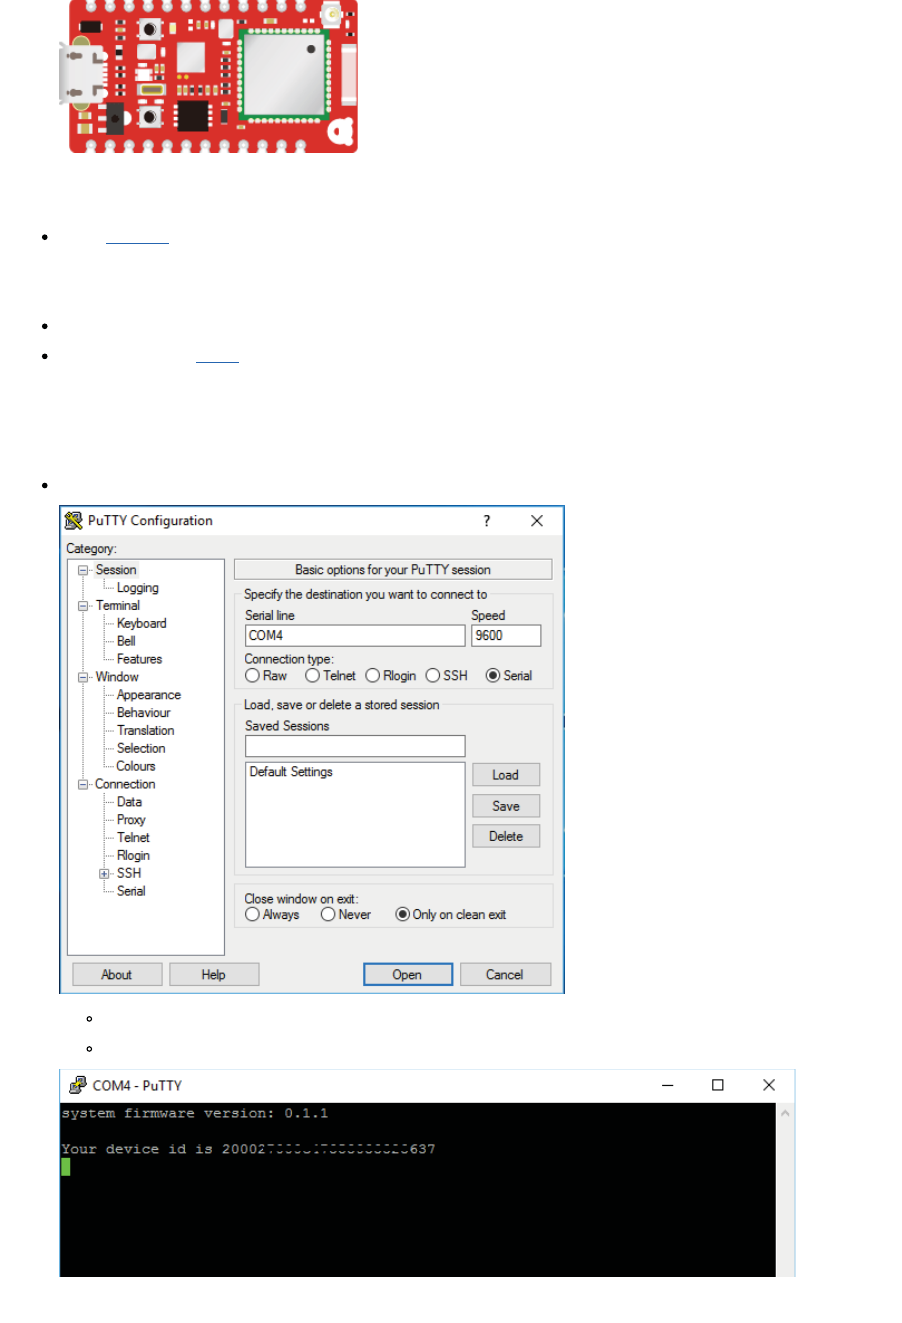
For Windows
Start PuTTY, change the Serial port to your one and press the 'Open' button.
Press 'v' to the terminal screen, you will see the firmware version.
Press 'i', you will see the Device ID of the Duo.
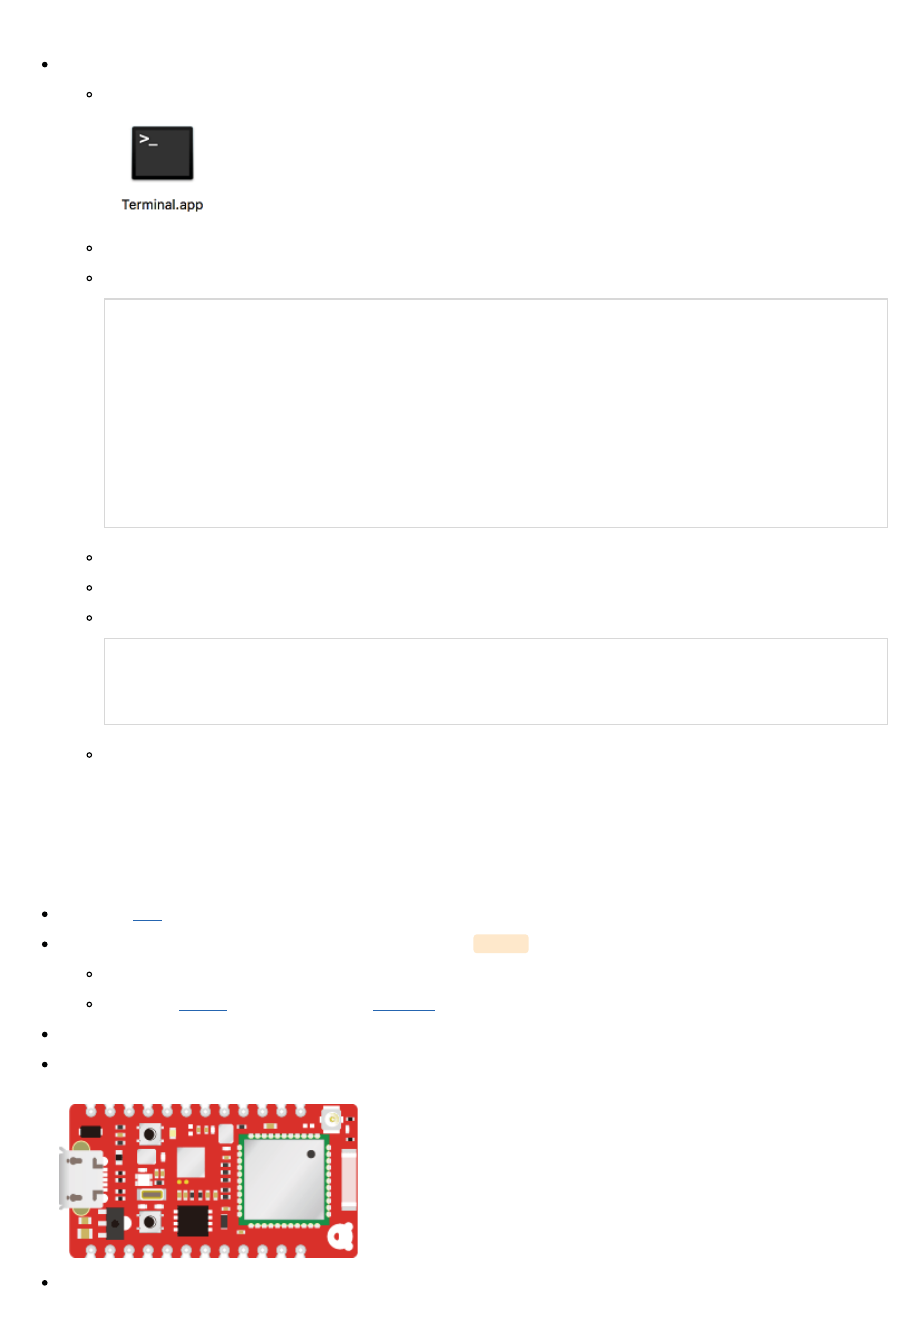
For OSX or Linux
Start the Terminal and use 'screen' command.
For example on OSX, start
Note: on Linux (e.g. Ubuntu), you may need to install screen by '$ sudo apt-get install screen'.
Type:
For OSX:
$ screen /dev/tty.usbmodemXXXXX
where XXXXX is your Duo device serial port.
For Linux:
$ screen /dev/tty.ACMX
where ACMX is your Duo device serial port.
Press 'v' to the terminal screen, you will see the firmware version.
Press 'i', you will see the Device ID of the Duo.
It will show something like the following lines:
system firmware version: 0.1.1
Your device id is 200027FFFc473530FFF23637
Note: after using the 'screen' command, type 'reset' to clear the screen.
5. Updating Firmware
You can use bootloader DFU or the RBLink to update the Duo firmware.
DFU Mode:
Follow this DFU to install the 'dfu-util' tool.
Download the zipped Duo firmware (latest version) for DFU with '_dfu' ending in the filename and unzip it to a folder.
https://github.com/redbear/Duo/raw/master/firmware/
e.g. v0.2.1, browse the firmware folder or click here to download directly.
Start the Command Prompt (Windows) or Terminal (OSX)
If you are not in the DFU Mode, press and hold the 'SETUP' button on the Duo and then press the 'RESET' button, when the
RGB LED shows yellow and flashing, release the 'SETUP' button, the Duo will enter the DFU Mode.
From the command line box:

To update System-Part1, type:
$ dfu-util -d 2b04:d058 -a 0 -s 0x08020000 -D duo-system-part1.bin
To update System-Part2, type:
$ dfu-util -d 2b04:d058 -a 0 -s 0x08040000 -D duo-system-part2.bin
To update User-Part, type:
$ dfu-util -d 2b04:d058 -a 0 -s 0x080C0000 -D duo-user-part.bin
To update factory reset image, type:
$ dfu-util -d 2b04:d058 -a 2 -s 0x140000 -D duo-fac-tinker.bin
Sample output:
dfu-util 0.8
Copyright 2005-2009 Weston Schmidt, Harald Welte and OpenMoko Inc.
Copyright 2010-2014 Tormod Volden and Stefan Schmidt
This program is Free Software and has ABSOLUTELY NO WARRANTY
Please report bugs to dfu-util@lists.gnumonks.org
dfu-util: Invalid DFU suffix signature
dfu-util: A valid DFU suffix will be required in a future dfu-util release!!!
Opening DFU capable USB device...
ID 2b04:d058
Run-time device DFU version 011a
Claiming USB DFU Interface...
Setting Alternate Setting #0 ...
Determining device status: state = dfuIDLE, status = 0
dfuIDLE, continuing
DFU mode device DFU version 011a
Device returned transfer size 4096
DfuSe interface name: "Internal Flash "
Downloading to address = 0x08020000, size = 38492
Download [=========================] 100% 38492 bytes
Download done.
File downloaded successfully
After updating the firmware, press the onboard 'RESET' button to run the new firmware.
RBLink:
Stack the Duo on top of the RBLink through the connectors.
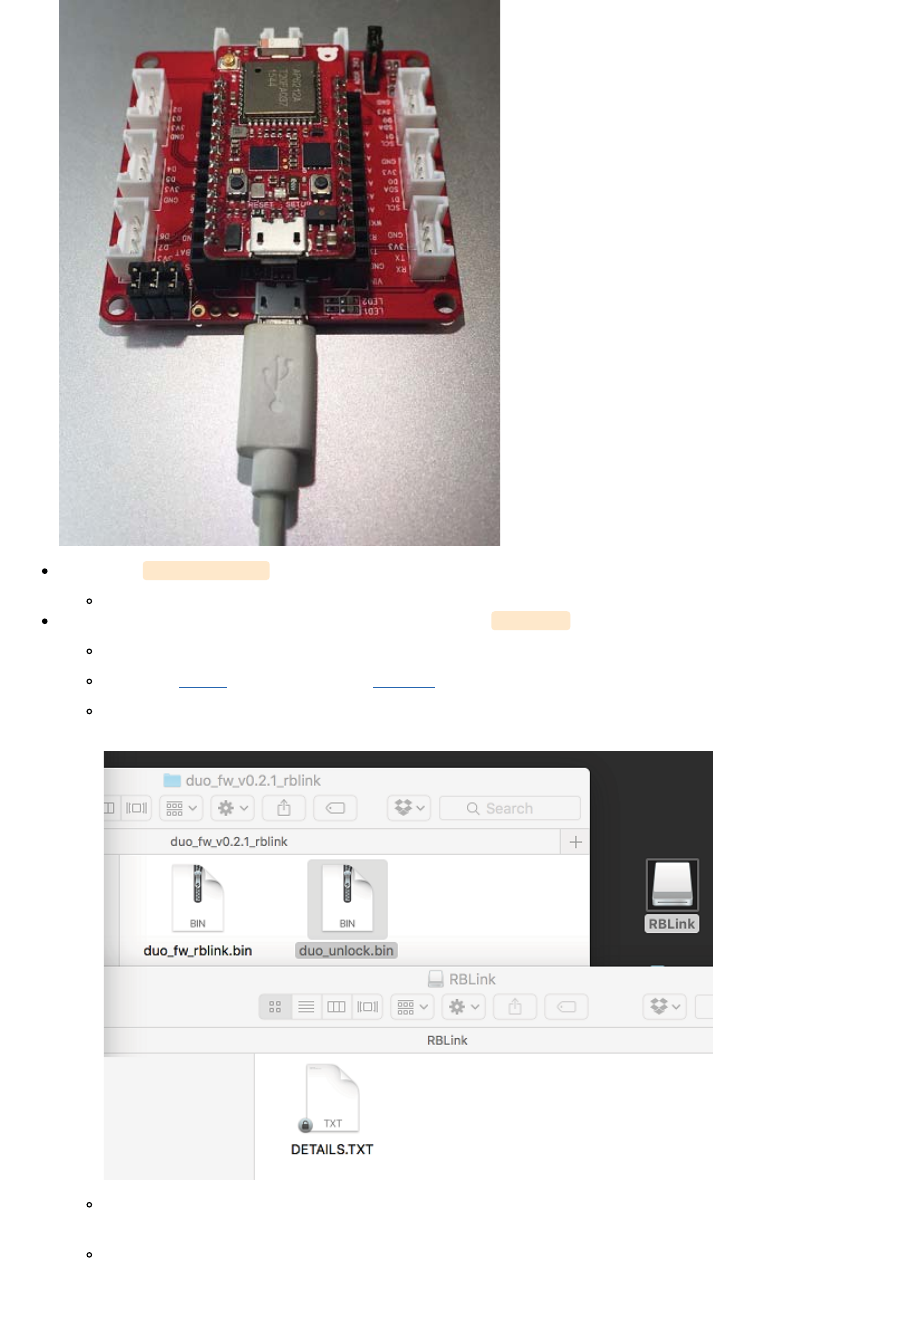
Connect the RBLink USB port to your PC using a micro USB cable.
Note: not the Duo USB port this time
Download the zipped Duo firmware (latest version) for RBLink with '_rblink' ending in the filename and unzip it to a folder.
https://github.com/redbear/Duo/raw/master/firmware/
e.g. v0.2.1, browse the firmware folder or click here to download directly.
The firmware inside the Duo locks the flash for protection, so you need to unlock it first. In your computer, there is a disk
drive call 'RBLink', drag & drop the 'duo_unlock.bin' to the RBLink drive.
After that, the RGB will show in green and flashing very fast. Disconnect the USB from your PC and reconnect it again,
the RBLink drive will appear again.
Now, drag & drop the new firmware (duo_fw_rblink.bin) to the RBLink drive.
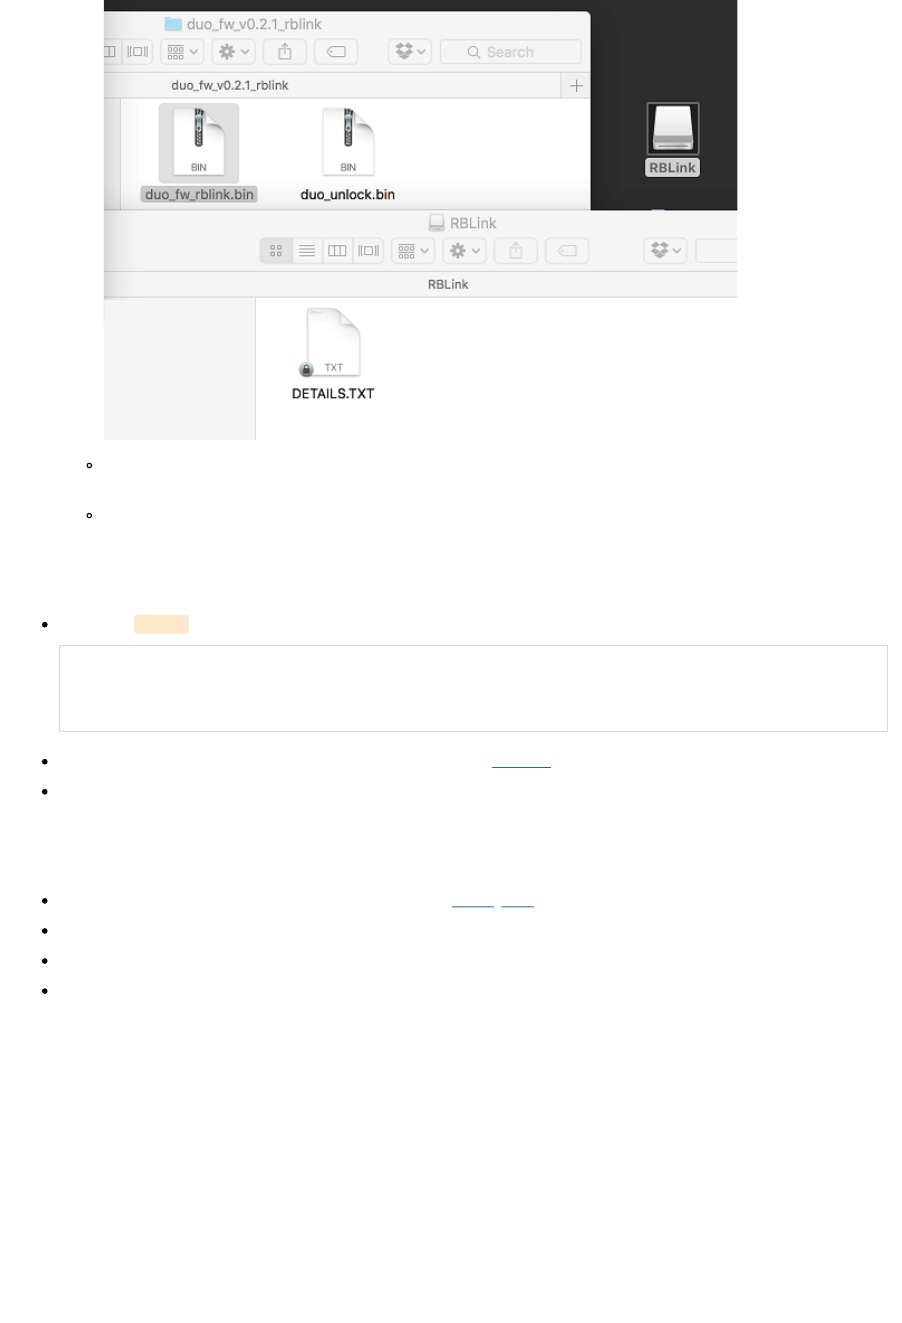
After that, the Duo will start the new firmware and the RGB will show in blue flashing (i.e. Listening mode for WiFi
provisioning).
Note: everytime you use RBLink to updat the firmware, the WiFi settings stored in the DCT will be cleared. So, you need
to do the WiFi setup procedure again.
6. Check Firmware Version Again
Repeat the step 4 again to check the new firmware version. Sample screen output:
system firmware version: 0.2.1
Your device id is 200027FFFc473530FFF23637
For more details about the Duo firmware management, refer to the Firmware folder.
Now, please write down the device ID, it is required to do registration on Particle website in order to use their Cloud service and
online Web IDE for firmware development.
7. Setup WiFi
Assume you are still in the 'Listening Mode' (i.e. RGB LED in flashing blue)
Connect to the Duo using 'PuTTY' tool or 'screen' command.
Type 'w', it will ask you to enter the SSID, Security type and password to associate to your AP (or your Internet router).
Sample input and output:

system firmware version: 0.2.1
Your device id is 200027000c47353033323637
SSID: AP-01
Security 0=unsecured, 1=WEP, 2=WPA, 3=WPA2: 3
Password: YOUR_PIN_ONLY_YOU_KNOW
Thanks! Wait while I save those credentials...
Awesome. Now we'll connect!
If you see a pulsing cyan light, your device
has connected to the Cloud and is ready to go!
If your LED flashes red or you encounter any other problems,
visit https://www.particle.io/support to debug.
Particle <3 you!
If everything is ready, it will try to connect your AP and the RGB will flash in Green and then change to Cyan. RGB Color Status:
Flashing Green : Try to connect the AP you entered.
Breathing Green : Connected to the AP.
Flashing Cyan : Trying to connect to the Particle Cloud.
Breathing Cyan : Connected to the Cloud.
If you have made the input incorrectly, you can press the 'SETUP' button for 3 seconds (you will see the RGB in blue color) at
anytime to start the 'Listening Mode' again.
8. Testing
Now, you can test the board. The user part firmware is a Web Server and there is a mDNS service running.
Reset your board and then use 'PuTTY' or 'screen' to connect it.
The WebServer Firmware will wait your router for an IP address to be assigned via DHCP and it will show the following message
to the USB CDC (serial) port:
Arduino sketch started.
Note: If your Duo hasn't stored a valid WiFi profile, it will enter the listening mode for provisioning
first.
Waiting for an IP address...
Duo's web server IP Address: 192.168.1.11
Make sure your smart device acting as web client is connecting to the same AP as Duo.
Then open the web browser on your smart device and enter the Duo's web server IP address.
setService
mdns.begin
mdns/setup success
Try to use a Web Browser (e.g. Safari or Chrome) to browse the Web Server. If your browser support mDNS, you can just type
'duo.local' as the URL. Otherwisw, type 'http://192.168.1.11' as an example.
Note: this is a sample IP address, it should be your own IP address displayed in the 'PuTTY' or 'screen'.
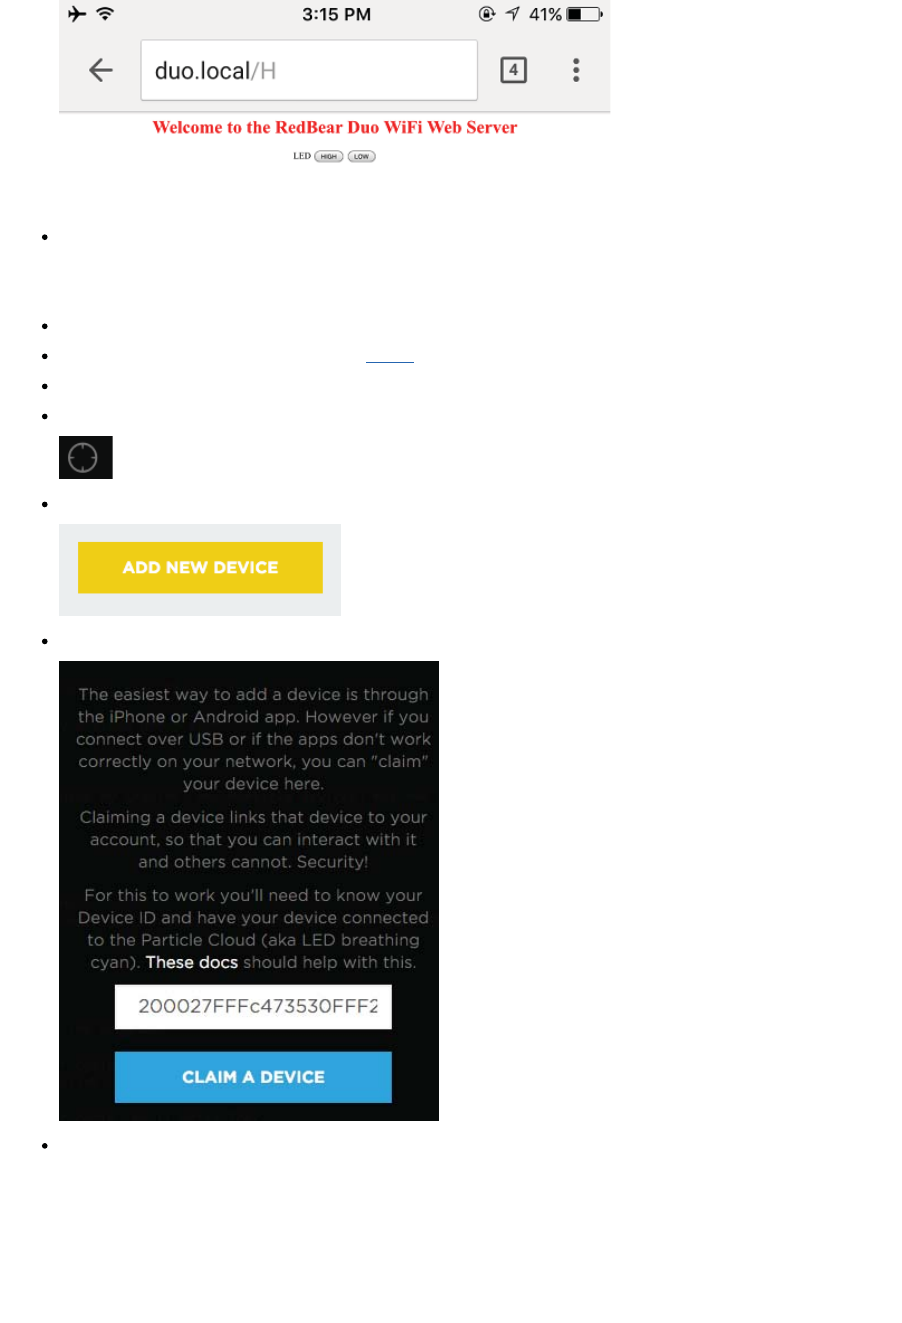
Press the 'HIGH' or 'LOW' button to see any effect on your Duo's blue LED.
WebIDE
Make sure you are connected to the Cloud (RGB in breathing cyan).
From you PC, start a Web Browser, navigate to Particle build website.
Create a Particle account if you do not have one.
Bottom left corner, there is an icon - Devices, click it
And then press 'ADD NEW DEVICE'.
Enter your device ID to the box to claim your Duo.
Give a name to your Duo and then press the 'save' button.
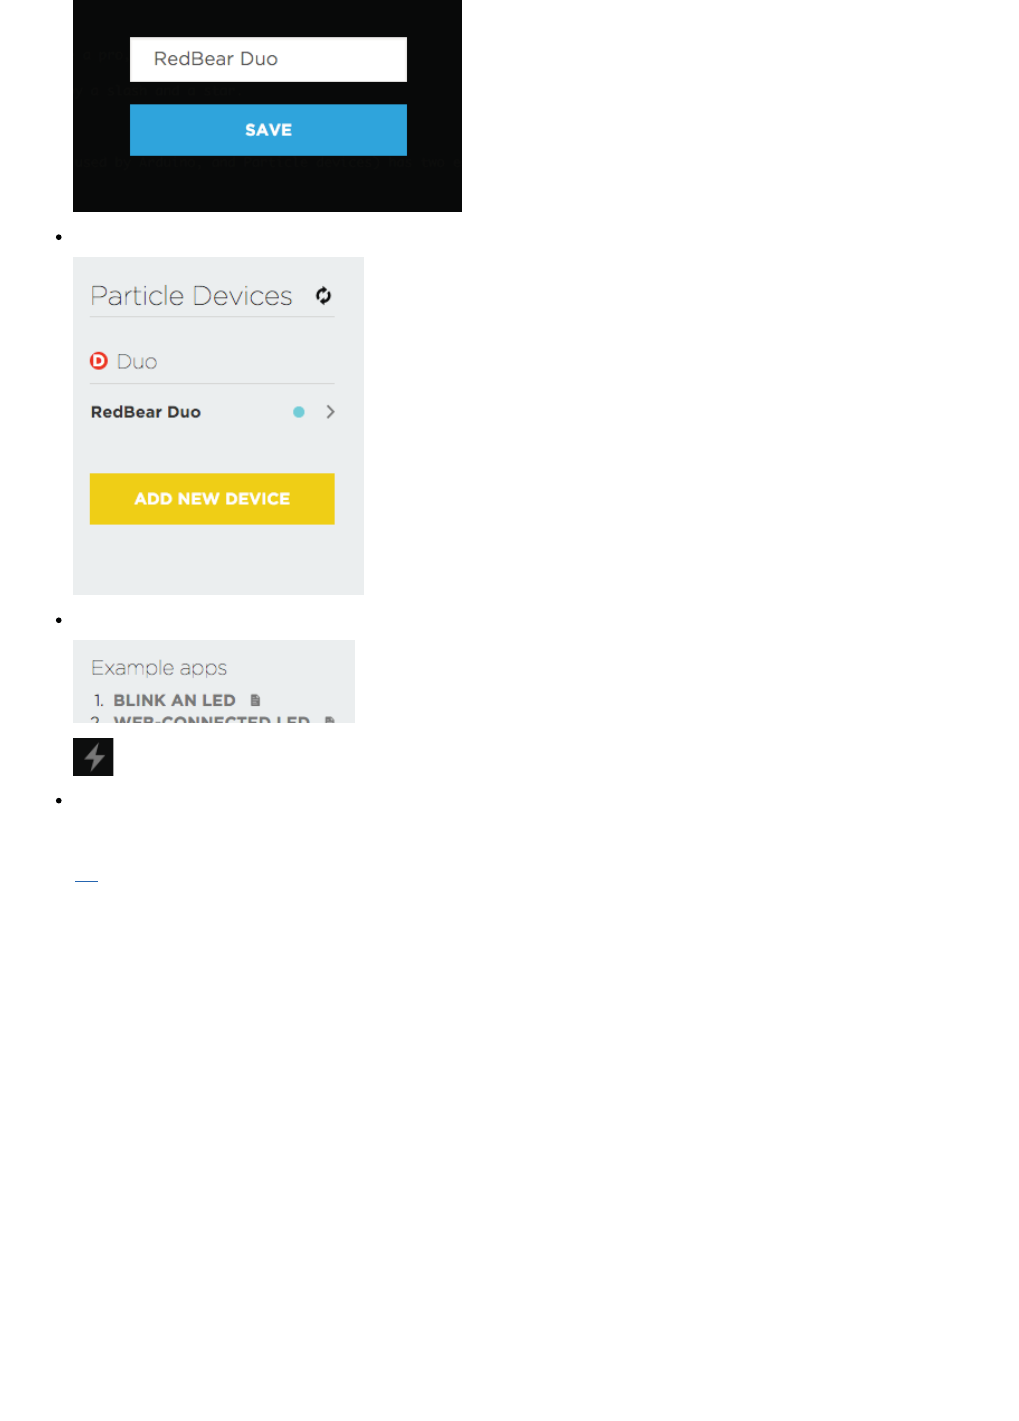
Your Duo will be listed in 'Other Devices', refresh the whole page, you will see it correctly. The cyan dot means it is online.
Now, try to load the Blink example and flash it to your Duo over the Cloud.
Great job! Finally, you can start your own innovative projects!
Arduino IDE
Follow this to use Arudino IDE for programming.
Copyright (c) 2016 Red Bear, All Rights Reserved.
FCC Statement
This equipment has been tested and found to comply with the limits for a Class B digital device, pursuant to Part 15 of the
FCC Rules. These limits are designed to provide reasonable protection against harmful interference in a residential
installation. This equipment generates uses and can radiate radio frequency energy and, if not installed and used in
accordance with the instructions, may cause harmful interference to radio communications. However, there is no
guarantee that interference will not occur in a particular installation. If this equipment does cause harmful interference to
radio or television reception, which can be determined by turning the equipment off and on, the user is encouraged to try
to correct the interference by one or more of the following measures:
-- Reorient or relocate the receiving antenna.
-- Increase the separation between the equipment and receiver.
-- Connect the equipment into an outlet on a circuit different from that to which the receiver is connected.
-- Consult the dealer or an experienced radio/TV technician for help.
This device complies with part 15 of the FCC Rules. Operation is subject to the following two conditions:
(1) This device may not cause harmful interference, and (2) this device must accept any interference received, including
interference that may cause undesired operation.
Changes or modifications not expressly approved by the party responsible for compliance could void the user's authority
to operate the equipment.
FCC Statement
This device complies with part 15 of the FCC Rules. Operation is subject to the following two conditions: (1) This device may not cause harmful interference, and (2) this device must accept any
interference received, including interference that may cause undesired operation.
Changes or modifications not expressly approved by the party responsible for compliance could void the user's authority to operate the equipment.
The modular can be installed or integrated in mobile or fix devices only. This modular cannot be installed in any portable device, for example, USB dongle like transmitters is forbidden.
FCC Radiation Exposure Statement
This modular complies with FCC RF radiation exposure limits set forth for an uncontrolled environment. This transmitter must not be co-located or operating in conjunction with any other
antenna or transmitter. This modular must be installed and operated with a minimum distance of 20 cm between the radiator and user body.
If the FCC identification number is not visible when the module is installed inside another device, then the outside of the device into which the module is installed must also display a label
referring to the enclosed module. This exterior label can use wording such as the following: “Contains Transmitter Module FCC ID: 2ABXJ-DUO Or Contains FCC ID: 2ABXJ-DUOā
When the module is installed inside another device, the user manual of the host must contain below warning statements;
1. This device complies with Part 15 of the FCC Rules. Operation is subject to the following two conditions:
(1) This device may not cause harmful interference.
(2) This device must accept any interference received, including interference that may cause undesired operation.
2. Changes or modifications not expressly approved by the party responsible for compliance could void the user's authority to operate the equipment.
The devices must be installed and used in strict accordance with the manufacturer's instructions as described in the user documentation that comes with the product.
Any company of the host device which install this modular with limit modular approval should perform the test of radiated emission and spurious emission according to FCC part 15C : 15.247
and 15.209 requirement, Only if the test result comply with FCC part 15C : 15.247 and 15.209 requirementˈthen the host can be sold legally.