Remanco a subsidiary of Geac Computers ESPIII Electronic Server Pad User Manual testesp
Remanco International, Inc., a subsidiary of Geac Computers, Inc. Electronic Server Pad testesp
User Manual

The Electronic Server Pad (ESP) System Guide 1
ADVANTAGE SERIES
The Electronic Server
Pad (ESP) System Guide
Geac Computers, Inc. Part # 90102804345

2 The Electronic Server Pad (ESP) System Guide
No part of this document may be reproduced, transmitted, transcribed, stored in retrieval system, or
translated into any language or computer language, in any form or by any means, electronic, mechanical,
manual, or otherwise without the prior written consent of Geac Computers Incorporated.
Geac Computers, Inc. makes no representation or warranties in respect to the contents of this document
and specifically disclaims any implied warranties of merchantability or fitness for any particular purposes.
Furthermore, Geac reserves the right to revise this document and to make changes from time to time
without being obligated to notify any person of such revisions or changes.
The Software described in his document is furnished under a Software License Agreement. The Software
may be used only in accordance with the terms of the license agreement.
It is against the law to copy the Software on tape, disk, or any other medium for purposes other than that
described in the license agreement.
FEDERAL COMMUNICATIONS COMMISSION (FCC)
RADIO FREQUENCY INTERFERENCE STATEMENT
WARNING
NOTE: This equipment has been tested and found to comply with the limits for a Class A digital device,
pursuant to Part 15 of the FCC Rules. These limits are designed to provide reasonable protection against
harmful interference when the equipment is operated in a commercial environment. This equipment
generates, uses and can radiate radio frequency energy and, if not installed and used in accordance with
the instructions, may cause harmful interference to radio communications. Operation of this equipment in
a residential area is likely to cause harmful interference in which case the user will be required to correct
the interference at his own expense.
NOTICE: This documentation may include information about optional ADVANTAGE software packages.
Inclusion of this information does not imply that it is part of the standard ADVANTAGE software. These
option software packages include, but are not excluded to, Hotel Interface, Labor Analysis, Credit
Authorization, Beverage Dispenser Interface, ADVANTAGE Polling Manager, and ADVANTAGE
Communications Manager.
©Copyright 1999, Geac Computers, Inc., Restaurant Systems Division . All rights reserved.
VISION is a trademark Geac Computers, Incorporated.
Epson is a registered trademark of Seiko Epson Corporation.
UNIX is a registered trademark of Bell Telephone Laboratories.
Intel is a registered trademark of Intel Corporation.
SCO is a registered trademark of the Santa Cruz Operation, Inc.

The Electronic Server Pad (ESP) System Guide 3
Introduction to the Electronic Server Pad (ESP) System
Remanco's revolutionary Electronic Server Pad (ESP) is the ultimate in portable, order entry technology
for table service restaurants. Each ESP contains a battery powered radio transmitter and receiver that
sends information back and forth to the system through a radio base station, which operates off a radio
frequency. This compact terminal allows the server to send order s directly from the guest's table to the
kitchen or the bar. The ESP is backlit making the keypad easily accessible in dimly lit environments.
The ESP's single order entry system eliminates waiting in line for stationary terminals and speeds the
delivery of food and drink orders. The result is improved customer service and more table turns.
The ESP reduces entry errors, and there is no need to write down the order before entering it on a
stationary terminal. Add-on sales such as coffee and desserts are always captured. Each course on the
order can be timed by the server, and sent to print when the guest is ready.
Managers with the ESP can discretely open checks to be sure drinks have been added, or to see what a
customer having before approaching a table to ask "How is your Filet Mignon?". ESP's provide more
control for a busy floor manager to effectively manage the restaurant.
Servers can provide more attentive service by spending more time with each customer. A larger number
of guests can be served, tables are turned faster, and servers operate more efficiently. The ESP allows
extra time for upselling that results in more revenues for the restaurant and better tips for the servers.
Drinks can be delivered to the table by a runner before the server has even left the table side. Server can
be notified at the table if an item is out of stock, or about the number of specials left. Alternatives can be
suggested and ordered on the spot.
Each server is assigned a Remanco ESP terminal prior to his/her shift. Ordering capabilities can be
individually programmed. The ESP's server assignments can easily be changed by a manager at any time.
The Remanco ESP is the ultimate tool for hospitality business owners for increasing sales, lowering food,
beverage, and labor costs, enhancing server productivity, and providing repeat business from very satisfied
customers.
Key Features
• Orders are entered quickly using alphabetic, numeric, or price lookups (PLU's).
• If using alpha entry, servers need only enter the first few letters (or a mnemonic abbreviation) of the
item to be ordered (i.e. if ordering coffee, the server might enter "cf..."). The system will search for
an item which matches the alpha-entry.
• Servers are notified right at the table if an item is out of stock, or if the quantity ordered is available.
• The ESP can be configured to print checks at a nearby printer.
• Durable, hand-held unit, can be carried easily.
• The quiet and unobtrusive ESP does not compromise the ambiance of the restaurant.
4 The Electronic Server Pad (ESP) System Guide
ESP Documentation
The ESP Guide provides information on the ESP system hardware, software configuration requirements,
operational information, and some troubleshooting techniques for the most common ESP system
problems.
The ESP Pocket Reference Guides provide quick access to all ESP terminal functions for
servers/bartenders and managers. These reference guides are pocket-sized for easy access.
ADVANTAGE
SERIES
©Copyright 1994 Remanco International, Inc.
Electronic Server Pad (ESP)
Manager Reference
Guide - Release 5.0
©Copyright 1994 Remanco International, Inc.
Electronic Server Pad (ESP)
Server Reference
Guide - Release 5.0
ADVANTAGE
SERIES
The Electronic Server Pad (ESP) System Guide 5
ESP System Hardware
The ESP hardware consists of the Radio Base Station with an attached antenna, the ESP battery powered
units, a battery charger and battery packs.
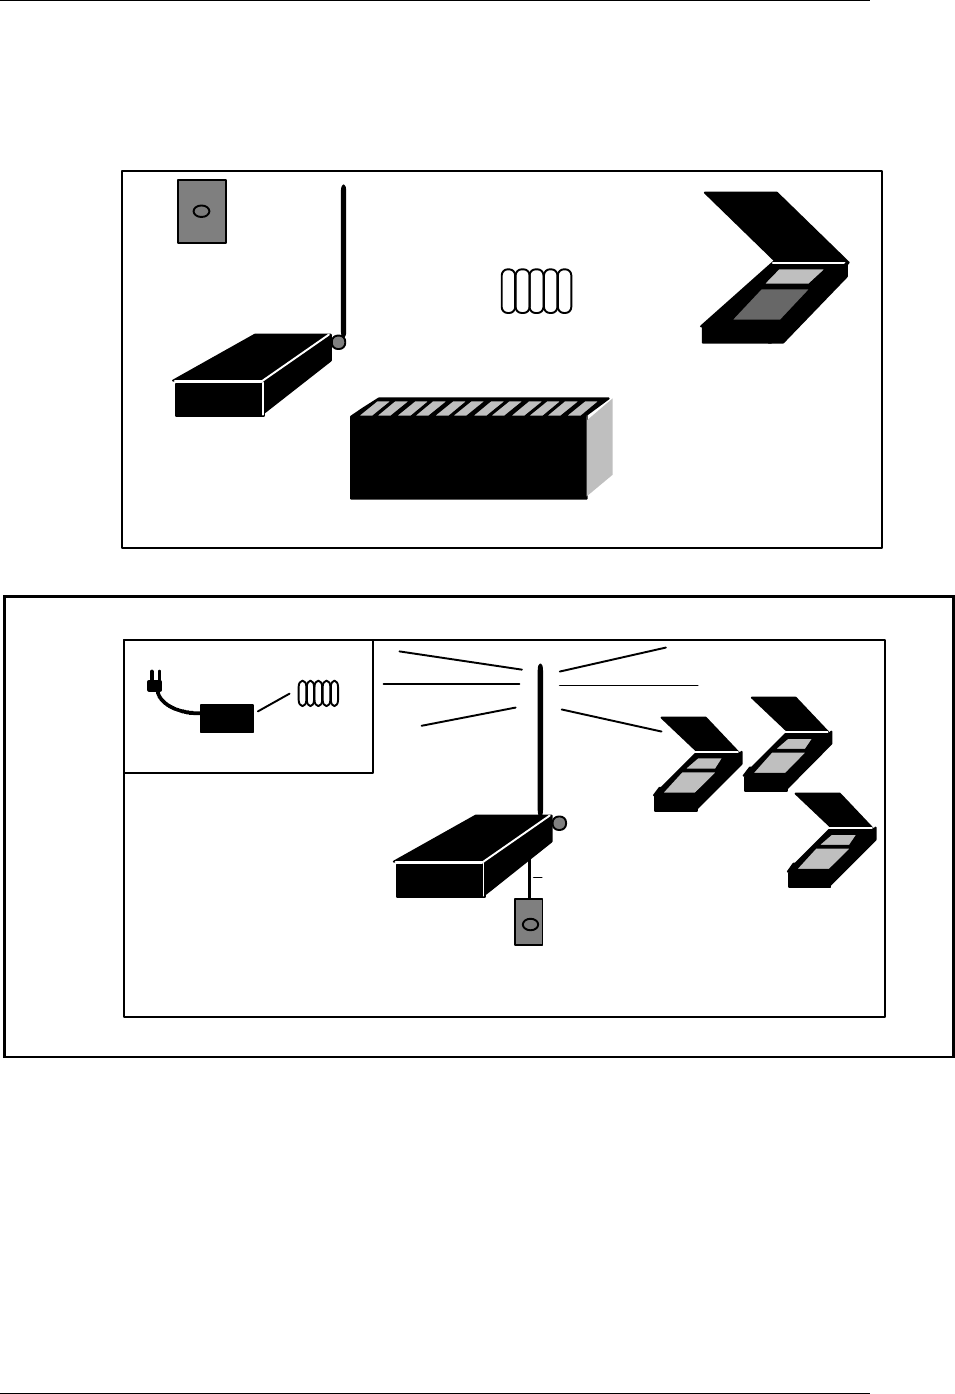
The Electronic Server Pad (ESP) Equipment
Battery Pack
RBS
Battery Charger
ESP
LAN Block Kit
OFFICE
Battery Charger
Battery Pack
RBS
ESP(s)
LAN Block
DINING ROOM
Telco Cable
The Electronic Server Pad (ESP) System

6 The Electronic Server Pad (ESP) System Guide
The Radio Base Station (RBS) and Antenna
The Radio Base Station (RBS) is a 110 (or 220) Volt AC powered radio base station. The frequency range
is 450-470MHz. Each base station covers up to 150,000+ square feet. The RBS can support
approximately 12 ESP's at one time. If necessary, an additional RBS may be used for further coverage or
to increase the number of ESP's. The number of radio base stations required for sufficient coverage and
the number of ESP's that can be supported must be determined by the local hardware support personnel.
The RBS must be centrally located, clear of any large metal objects, for sufficient coverage of all ESP's.
The RBS has a 250 Volt fuse which may need to be replaced from time to time. Call your local hardware
support for replacement fuses.
The flexible "whip style" antenna is designed to operate in the 450-470MHz range. It is connected to the
end of the RBS at a right angle (shown below) so that the antenna can swivel to accommodate either a
horizontal or vertical mounting of the RBS.
"Whip" Style Antenna
Side View of the RBS (Not Actual Size)
The Electronic Server Pad (ESP) System Guide 7
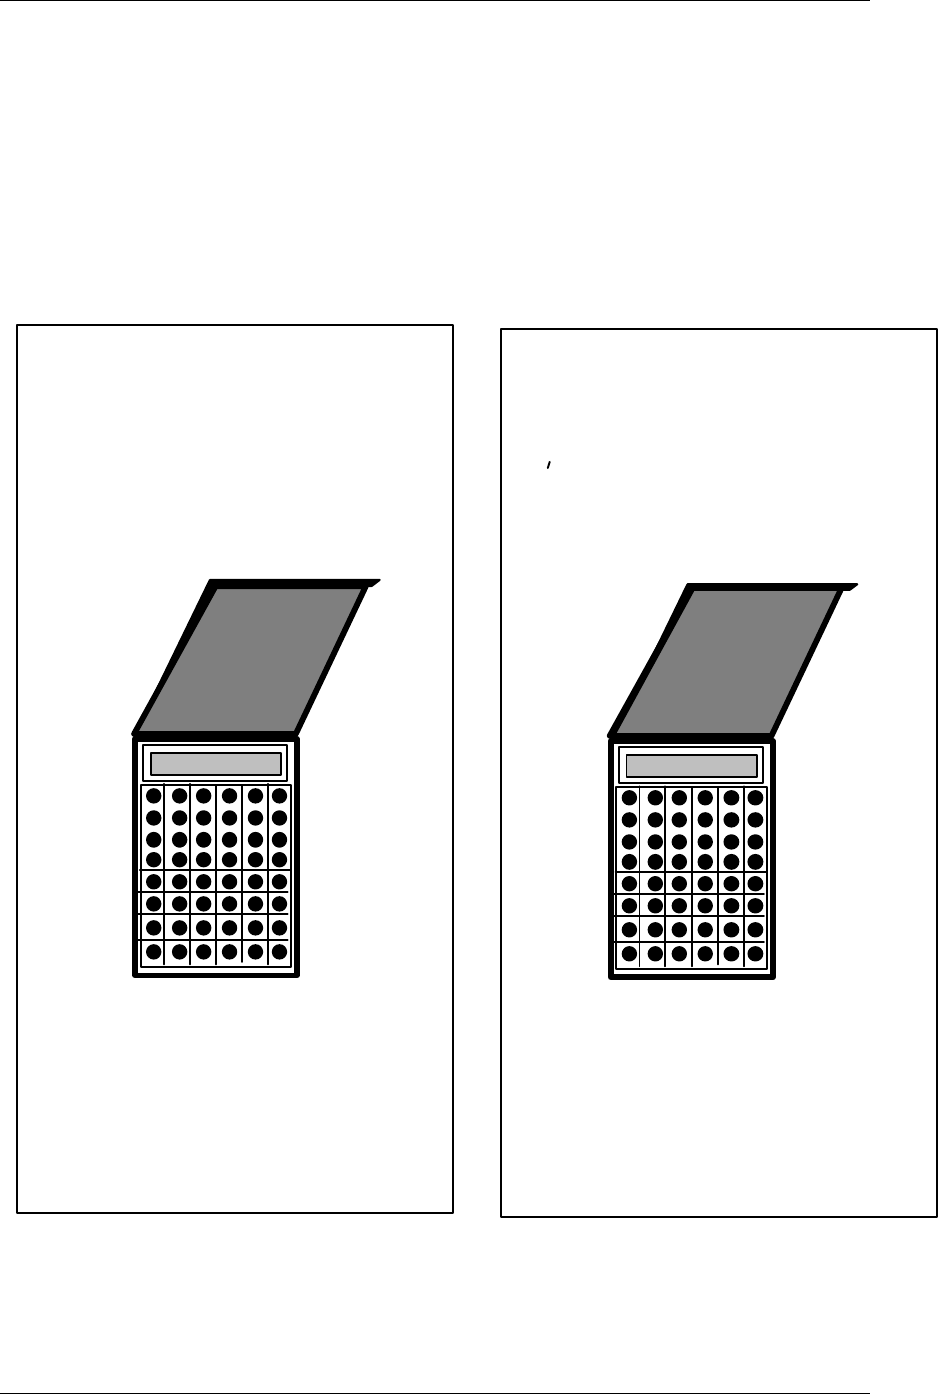
The Electronic Server Pad (ESP)
The ESP cover protects the keypad and display as well as lowering the power to the ESP which saves the
battery pack usage. The ESP cover has an internal antenna. The antenna is positioned so that each time
the cover is opened the antenna is turned away from the server ensuring a clear signal. Preset cards or
menu item lists can be stored inside the cover for easy reference.
The backlit display has a two-line, sixteen characters alphanumeric display. The keyboard is also backlit
so the ESP works well in all lighting environments. The rubber keyboard makes the ESP resistant to
spills.
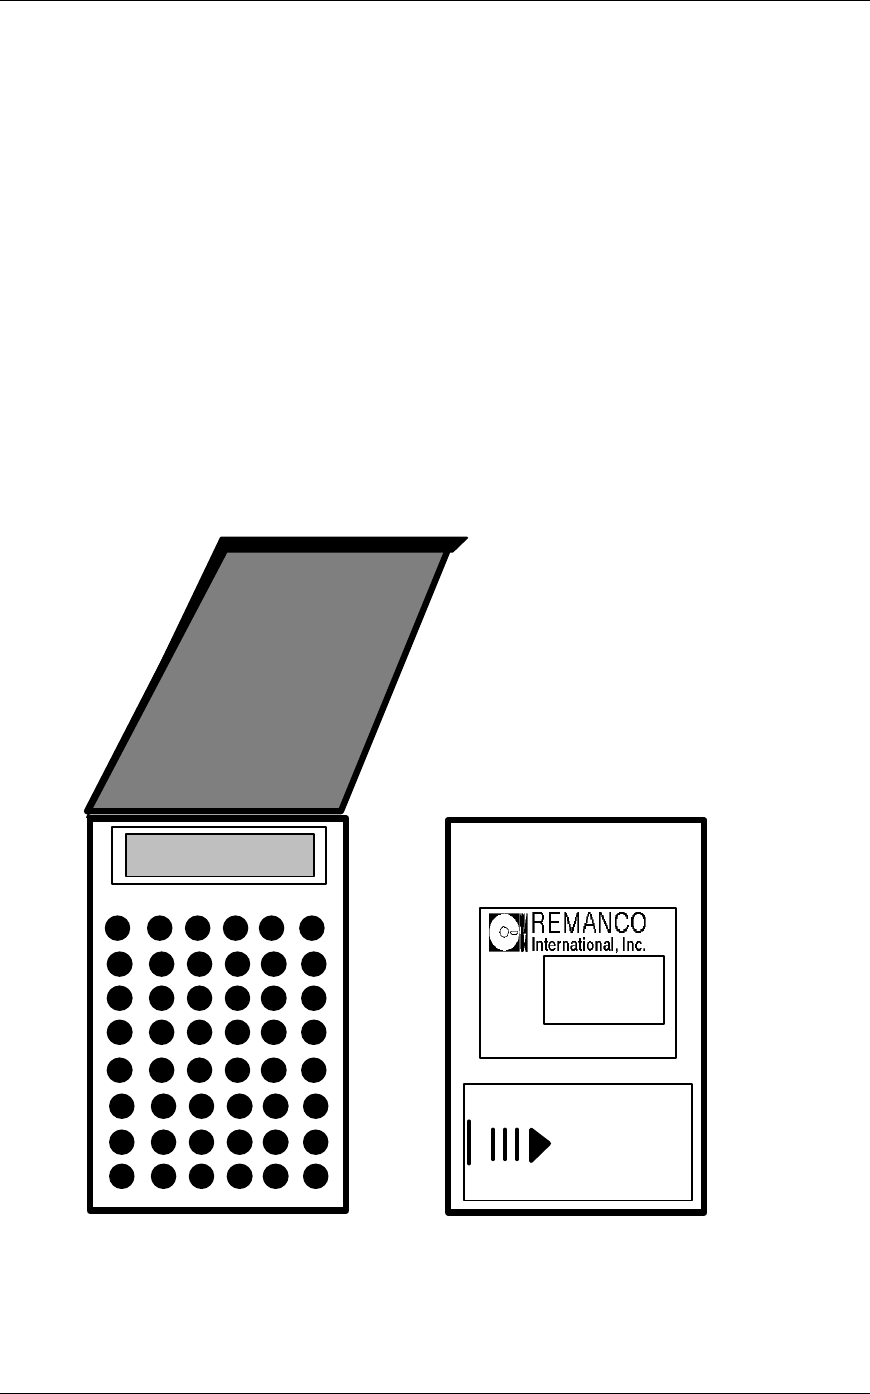
ESP Dimensions: 1.25" x 3.64" x 7.00" (3.18cm x 9.25cm x 17.8cm)
ESP Weight: (with Battery): 20.5 oz. (.58 kg)
Each ESP has a unique serial number located on the back for easy
identification.
MODEL
S/N
FCC ID:
1001AA
(Unique Serial #)
LD8RIIESPII
ESP Back
Battery Door
8 The Electronic Server Pad (ESP) System Guide
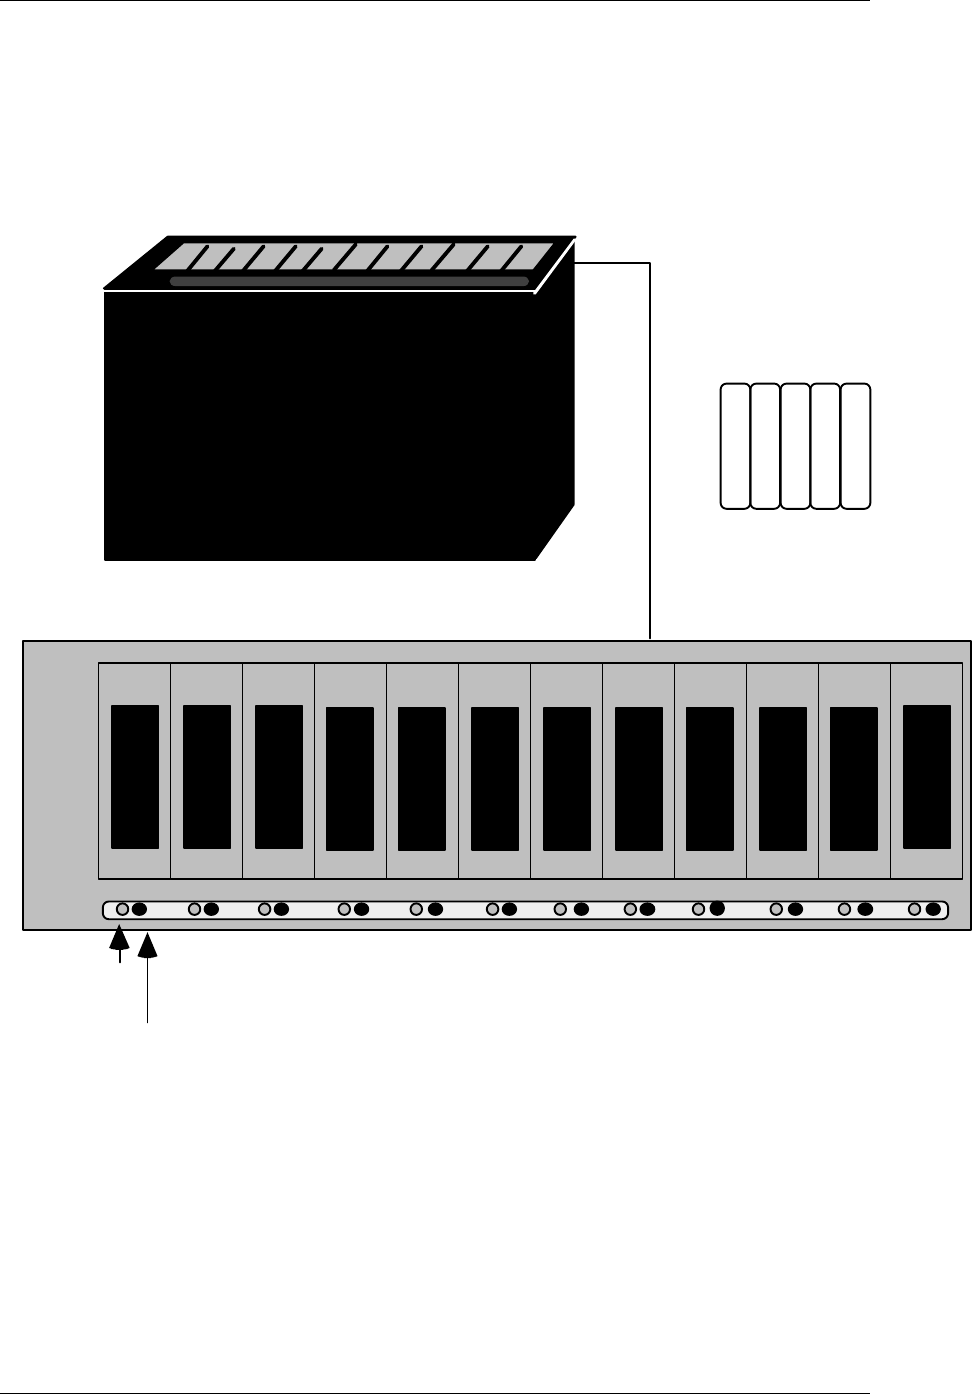
The Battery Charger and Battery Pack(s)
The battery door is located on the back of the ESP and snaps on and off for easy access to the NiCad
battery pack. The pack consists of five 600 milliamp-hour AA size cells which are all shrink-wrapped
together.
Top View of Battery Charger (Shown 1/2 size)
Battery Pack
Green LED
Red LED
(Not actual size)
Each ESP requires a special battery pack which should be purchased through your local hardware support.
When the ESP is displaying a flashing block it is necessary to charge the battery pack. Battery packs are
charged by placing them into the AC powered battery charger. The battery charger will hold up to 12
battery packs at one time, one pack per slot. Once the battery pack has been placed in the charger, the
green LED light will be on solidly.
WARNING!!! Place only Remanco approved battery packs into the battery charger. Non-approved
batteries or battery packs may burst causing personal injury and damage.

The Electronic Server Pad (ESP) System Guide 9
The Battery Charger and Battery Pack(s) (continued)
If the red LED lights up when the battery pack is placed into the charger:
1. Remove and re-insert the battery pack at least 3 times (this will often correct the problem).
2. If the red LED is still lit, discard the battery pack and replace it.
If there is no red or green LED light lit, the contacts between the charger and the battery pack are not
good.
1. Remove and re-insert the battery pack at least 3 times (this will often correct the problem).
2. If there is still no light, try another slot.
3. If no slot will light, discard and replace the battery pack.
The battery pack must remain in the battery charger for a period of about 1 1/2 hours if it needs to be fully
charged (less if it needs only a partial charge). Once the battery pack is fully charged the green LED will
flash.
If the battery charger indicates that a battery pack has been fully charged after only 15 minutes the battery
pack is not fully charged. Therefore, the battery pack will not last very long in the ESP. Do not assume
that there is a problem with the battery charger. Simply recharge the battery and it will receive a full
charge the second time in the battery charger.
Charged battery packs should last the duration of one shift (about 8 hours). The amount of time that a
charged battery pack will last may vary depending on use, therefore, it is recommended that the
battery pack be removed from the ESP and recharged after each shift.
Each battery pack can be charged over and over at least 400-500 times before it should be discarded and
replaced.
If the battery charger indicates a faulty battery pack (either a RED indicator light or no indicator light at
all), remove the battery pack from the charger for a period of 1/2 hour. After 1/2 hour place the battery
pack back into the charger. If there is a RED indicator light or no light at all remove the batter pack
again. Wait 1/2 hour. Place the battery pack into the charger. Perform this procedure for a total of three
times. This procedure will often correct the problem. If not, the battery pack should be discarded.
The ESP System Software Requirements
After the system hardware has been installed it is necessary to make changes to the software from the
Back of House screens. These changes include Screen Security, Download File Definition, and ESP to
Employee ID Assignment.
Screen Security
The screen number shown below must be assigned to each Screen Security Privilege level. If the screen is
not assigned to each Screen Security Privilege level, ESP to Employee ID Assignment will not be
accessible.
Refer to The Feature Guide for instructions on updating Screen Security.
10 The Electronic Server Pad (ESP) System Guide
• f126 ESP to Employee ID Assignment
Download File Definition
Once the node number for the RBS and ESP's has been determined by the local hardware support
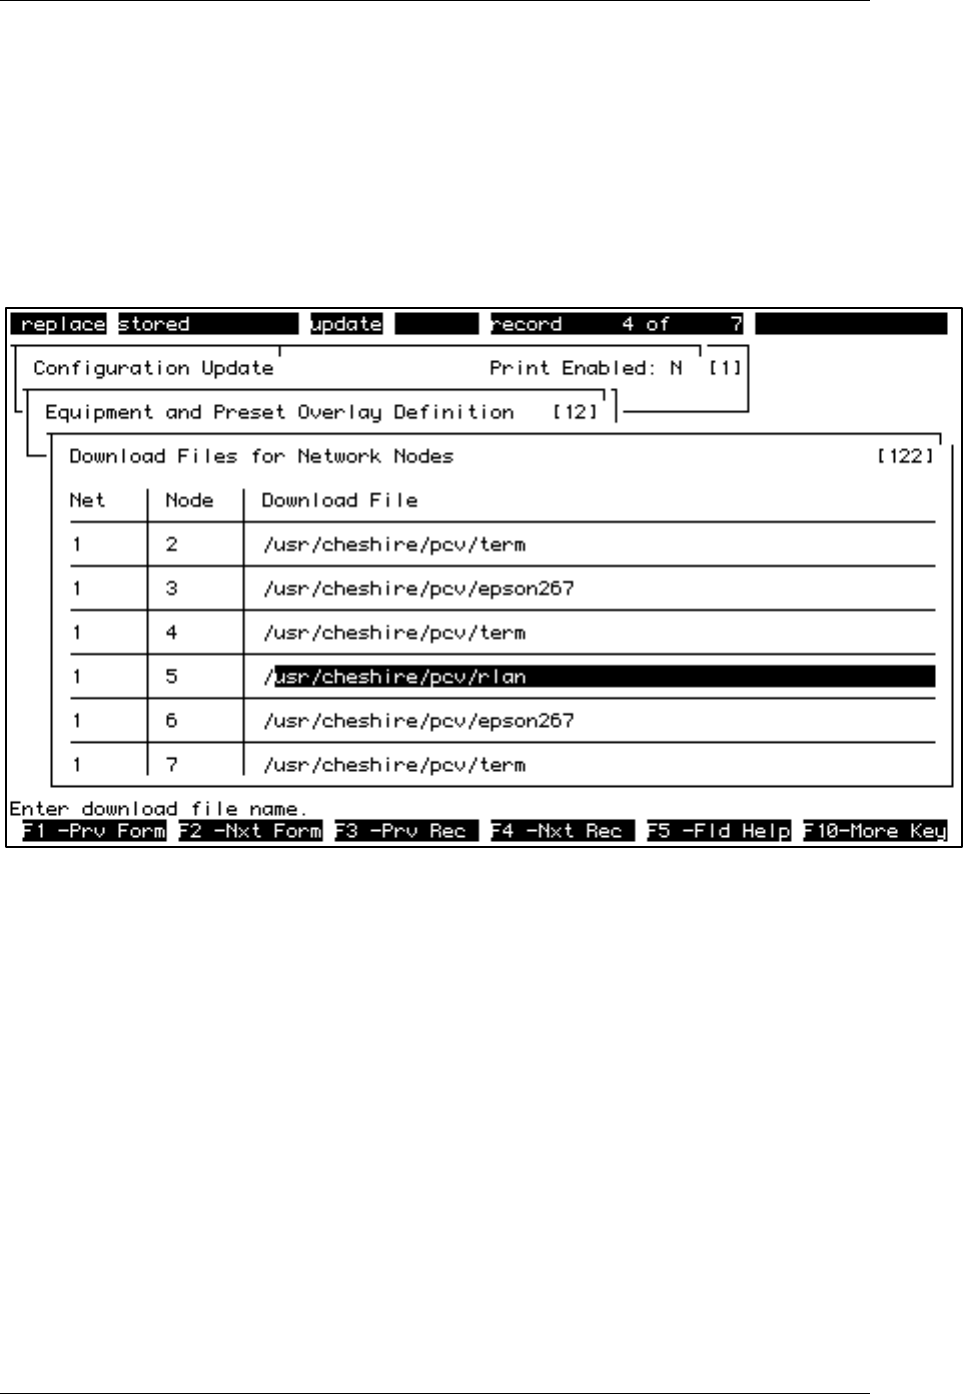
personnel, the node must be configured in Download Files for Network Nodes (screen #122).
1. Select 1, "Configuration Update" from the main menu. Then, select 2, "Equipment and Preset
Overlay Definition". Select 2, "Download Files for Network Nodes" from the equipment
menu.
Download Files for Network Nodes (Screen #122)
1. Press F7 (CLEAR TO ADD) Enter 1in the "Net" field and press RETURN.
2. Enter the appropriate node number in the "Node" field and press RETURN.
3. Type in the download file for the ESP node exactly as follows:
/usr/cheshire/pcv/rlan
4. Press F9 (ADD/UPDATE) to 'save' the change.
Device Definition
Each ESP that is going to be used must be configured as a device in Device Definition (Screen
#123).
To configure an ESP:

The Electronic Server Pad (ESP) System Guide 11
1. Select 1, "Configuration Update" from the main menu. Select 2, "Equipment and Preset
Overlay Definition", from the configuration menu. Then select 3, "Device Definition", from
the equipment menu.
Device Definition (Screen #123)
2. Press F7 (CLEAR TO ADD), enter a unique Device ID# (i.e. "5" for the node number and
any unique number i.e. 30, shown above) and press RETURN.
3. Enter the number of the network in the "Net" field (1 if there is only one network for the
system) and press RETURN.
4. Enter the "Node" number that has been designated by hardware support personnel and press
RETURN (This number must match the node number in Download Files for Network Nodes
(Screen #122).
5. Enter any unique port number (it may be helpful to stay within a range as shown above and/or
to use the unique number from the Device ID) and press RETURN. In the screen
shown above, the ESP Device ID's and the port numbers both start at 30 although this
configuration is not mandatory.
6. Enter 11 for the "Device Type" and press RETURN. All ESP's must have Device Type 11.
7. Enter a unique "Name" for each ESP and press RETURN.
8. Enter 0 for the "Parent" and press F9 (ADD/UPDATE) to 'save' the changes. All ESP's must
have Parent 0.
Ensure that every ESP to be used has a line entry in Device Definition. ESP's without Device
Definition configuration will not be operable.
12 The Electronic Server Pad (ESP) System Guide
Using the ESP
Assigning an Electronic Server Pad (ESP) to an Employee
If servers use Electronic Server Pads (ESP's), one must be assigned to them either prior to their shift, to be
returned at the end of their shift, or at the onset of there employment, to be kept permanently.
The number of ESP assignments depend upon the number of ESP's available and the number of servers
working. Server's employee ID numbers are configured to specific ESP serial numbers. Only one
employee may be assigned to each ESP serial number.
Assigning ESP's to servers should be part of the opening routine. Throughout the business day, it may be
necessary to change ESP assignments. If there are not enough ESP's for all of the servers who will be
working on a given business day, ESP's may be shared by changing the employee ID assigned to an ESP.
To assign Electronic Server Pads:
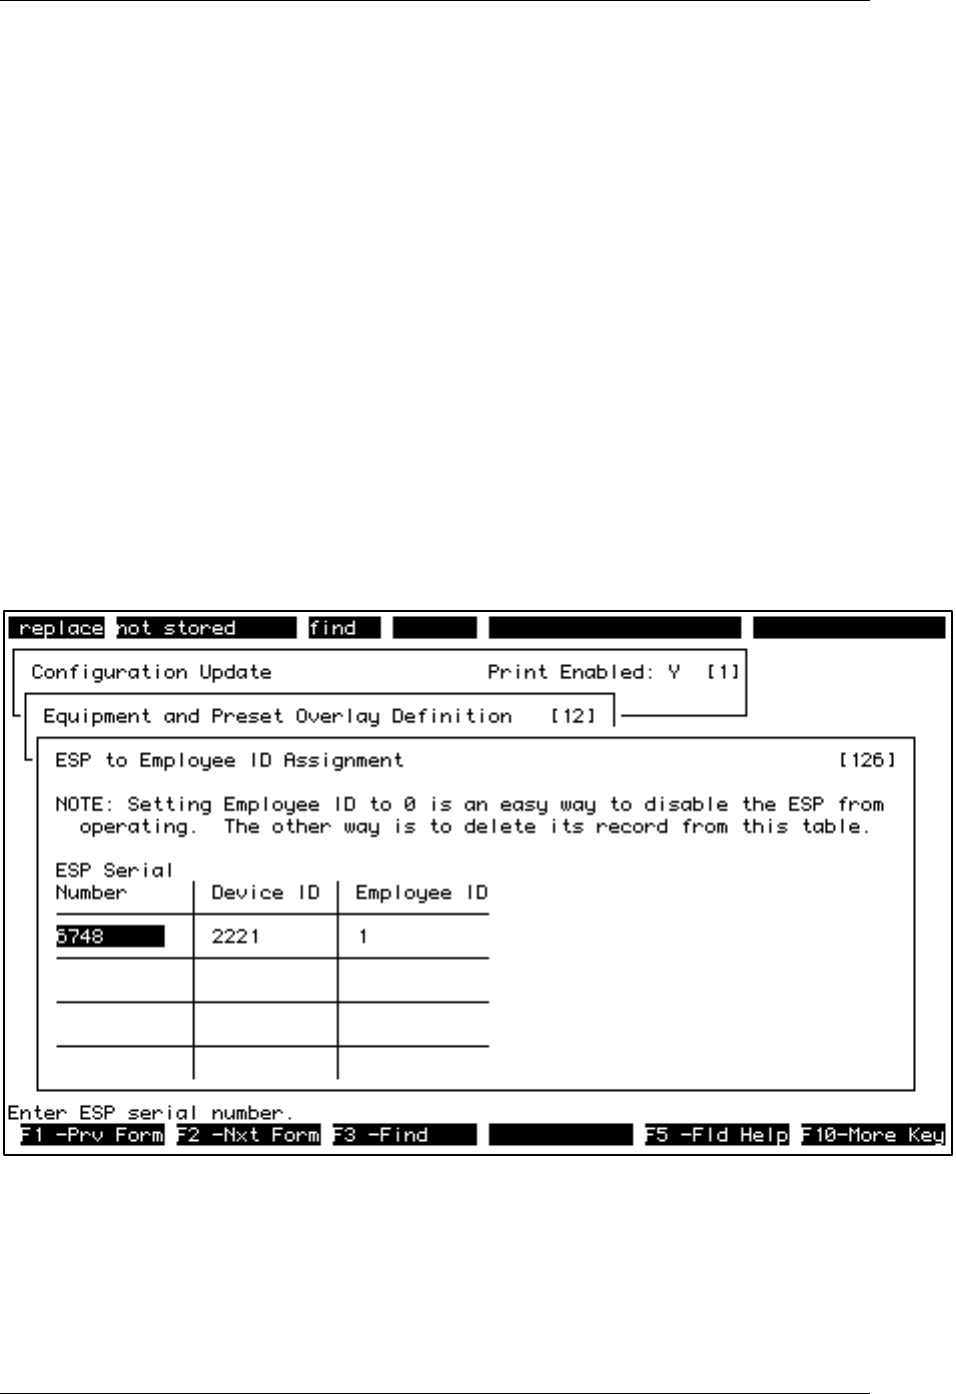
1. Select 1, “Configuration Update”, from the main menu, 2, “Equipment and Preset Overlay
Definition”, from the Configuration Update menu, and 7, “ESP to Employee ID Assignment”, from
the Equipment and Preset Overlay Definition menu.
ESP to Employee Assignment (Screen #126)
2. Assign an ESP to a server by changing the employee ID number configured to an ESP serial number.
Use the arrow keys or F13 (CLEAR TO FIND) and F3 (FIND) to search for the appropriate ESP
serial number.
3. Use RETURN to place the cursor on the employee ID number. Type the new employee ID number
over the existing employee ID number. Press F9 (SAVE) to “save” the change.

The Electronic Server Pad (ESP) System Guide 13
Be sure to configure each ESP serial number to a Device ID so that guest checks and order chits will
print properly. Press F9 (SAVE) to “save” the changes. If an ESP is not being used, configure its
employee ID to be 0.
4. Press F9 (ADD/UPDATE) to “save” the change.
5. Use F1 (PREVIOUS FORM) to return to the Configuration Update menu.
6. To Activate the changes select 12, “Activate Configuration Changes”, from the Configuration Update
menu.
Note: Configure all ESP assignments to "0" prior to configuring new assignments. By doing this, you will
avoid assigning an employee twice or forgetting to assign "0" to an employee that should not have an
assignment.

14 The Electronic Server Pad (ESP) System Guide
ESP to Employee Assignment Sheet Master
Make copies of this sheet to be used for keeping track of the ESP to Employee ID Assignments.
Date:___________
Shift:___________
ESP to Employee ID Assignment
NODE SERIAL NO. SERVER NAME/EMPLOYEE ID # RETURNED
The Electronic Server Pad (ESP) System Guide 15
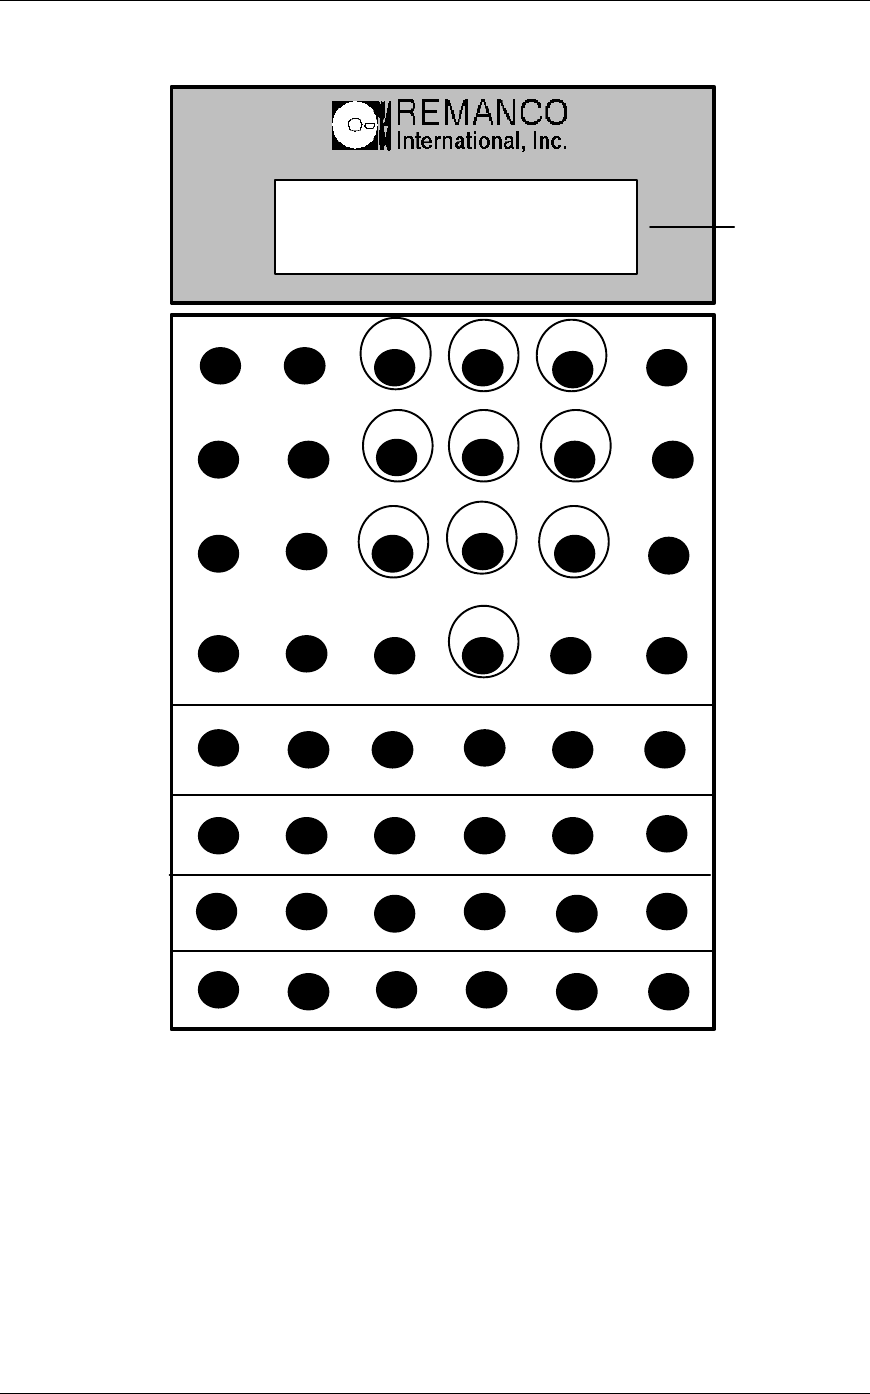
The ESP Keypad
DISP
NEW
OPEN
*
C/CE 1
4
2
5
3
6
SEND
VOID
PAY
MOVE 0
ORD
MOD
YN/-
789
A
G
M
T
B
H
U
C
I
O
D
J
E
V
F
K
R
W
L
S
XZ
QP
P
R
T
S
T
C
K
C
A
L
L
C
A
S
H
F
1
T
O
T
F
2
A
D
J
S
H
I
F
T
Backlit Display
ESP Keypad
S
I
G
N
Many of the ESP keys perform two separate functions. The large horizontal labels are the primary
functions, the small vertical labels are the secondary functions. Secondary functions are performed using
the SHIFT key.
The preset keypad is located on the bottom half of the ESP keypad, letters A-Z. 120 preset keys can be
configured, with a preset card, for the ESP. See Using Preset Cards.
Note: Some keypad labels are the same as the ADVANTAGE Server Terminals (i.e. IN/OUT for SIGN,
MGR for CALL, FIRE for F1, etc.). Commands within this document will reference both.

16 The Electronic Server Pad (ESP) System Guide
ESP Key Definitions
DISP/VIEW Displays any ordered items.
C/CE To clear the last entry performed.
SEND To send the order to the preparation site just as lifting the key on a TST or
AEST. The key must be pressed and released to send the order.
NEW To open a new guest check.
VOID To void the displayed menu item, payment, etc.
ORD To order a menu item.
OPEN To reaccess a guest check.
PAY To pay out a guest check.
MOD To modify an ordered item.
*The asterisk (*) key changes the ESP from Preset mode to Alpha Entry mode.
When the * appears in the lower right corner of the display, the ESP is in
Alpha Entry mode. Nothing but alpha entries will be recognized. In Alpha
Entry mode, the alpha (letter) keys, and the Y and N/- keys, are used for
ordering items and modifiers by Alpha Entry.
You can put the ESP's lower 24 keys in either Preset or Alpha Entry mode. In
Preset mode, the keys correspond to menu items, modifiers, or other server
terminal functions. There are five levels to each of the 24 Preset keys, which
gives you a total of 120 Presets. The layout of your presets will be in the lid of
your ESP. Notice that each level is numbered and each Preset has a letter. If
the item you want to order is in Preset Level 3 and is Key "S", you would enter
3 S and then press ORDER. If other items that you want to order are also in
Level 3, you need only to enter the appropriate letter, as the ESP will remain in
that level until you specify otherwise.
MOVE To move ordered items from one check to another.
SHIFT Key Functions
SHIFT After pressing SHIFT, a small rectangle will appear on the lower right-hand
corner of the display to indicated that the ESP is in "shift mode." Next, press
the desired secondary function indicated by a small vertical label next to they
key. For example, to select the cash function, press SHIFT and then CASH.
The ESP automatically goes back to primary mode after one keystroke in shift
mode.
SIGN/ To sign in/out or print a server summary.
IN/OUT
STCK/ To stock menu items in/out or display a stock quantity.
STK
PRT To print a guest check.

The Electronic Server Pad (ESP) System Guide 17
CALL/MGR The call key is used for manager functions when the ESP is in the "shift" mode.
F1/ To fire a course or change an item's course number.
FIRE
TOT To display the number of guests and the current total of an open guest check.
CASH To cash out employees.
F2/ To clear/change passcodes or display system date and time.
BREAK
ADJ To perform adjustments on guest checks.

18 The Electronic Server Pad (ESP) System Guide
Server Reference Guide for the ESP
Signing In Enter key number, press N/-, enter job class, and press
SHIFT SIGN(IN/OUT).
Creating a Guest Check Enter the table number, press NEW, enter the guest count (if
asked), and press NEW.
Creating Separate Groups Enter the table number, press N/-, enter the group
on a Table number, and press NEW. Enter the guest count (if asked)
and press NEW.
Reaccessing a Check Enter the table number, press OPEN or if groups exist, enter
the table number, press N/-,enter the group number and press
OPEN. (Optional, enter last 4 digits of check number, press
OPEN.
Ordering Items by PLU Access check, enter PLU number, and press ORD. Repeat as
necessary. To order multiple quantities, enter the quantity,
press N/-, enter PLU number and press ORD.
Ordering Items by Alpha Access check, press * to put the ESP into Alpha Entry mode.
Enter letters to spell the item. "If- - ?" displays, press ORD
or MOD, or continue spelling the desired item.
Ordering Items by Preset Find the menu item on the preset card. Determine its
location, (i.e. page # 1-5 and letter A-Z. Press the
corresponding letter A-Z)
Ordering Open Priced Access check, order open priced item, enter price
Items without decimal and press ORD.
Modifying Items Display the item to be modified, enter PLU number for the
modifier and press MOD, find the modifier by spelling it
(Alpha), or find the modifier on the preset card.
Using Forced Modifiers If an item is ordered and displays with a ">", press
DISP/VIEW to view the forced modifiers associated with the
order item. When the desired modifier is displayed, press
MOD. Repeat as necessary. Now, when modifying is
complete press ORD to complete the order. Unforced
modifiers may added well once the forced modifiers have
been selected.
Displaying Items/Check Access check, press DISP/VIEW. To reverse the display
sequence press N/- DISP/VIEW.
Displaying/Changing Guest Access check, press N/- SHIFT TOT to display
Count guest count, or enter new count and press SHIFT TOT to
change.
Displaying Date/Time of Access check and press 99 DISP/VIEW. The
Check check creation time and date is displayed.

The Electronic Server Pad (ESP) System Guide 19
Displaying Check ID Access check, enter 24 and press SHIFT CALL/MGR.
Printing Check Access check and press SHIFT PRT.
Firing Course Access check, enter course number to be fired, press SHIFT
F1/FIRE, enter Y and press SHIFT F1/FIRE.
Changing Course Access check, display item whose course is to be changed.
Press N/- enter new course number, and press SHIFT
F1/FIRE.
Voiding Items Display item and press VOID. When the terminal displays
"VOID ITEM?", press Y VOID.
Voiding Checks Access check and press DISP. Void any items exist on the
check. When the ESP displays "NO ITEMS" press VOID.
Then the terminal displays "VOID CHECK?", press Y
VOID.
Moving Checks Create or open a new check, enter the old table number and
press MOVE.
Moving Items Create or open a new check. Enter the original table number,
press Y, enter the group number and press MOVE. Press
DISP/VIEW to display item to be moved. Press MOVE.
Repeat as needed. If multiple quantities of the same item are
to be moved, enter the quantity and press MOVE. To
complete the order press Y MOVE, Y MOVE.
Displaying Check Total Access the check and press SHIFT TOT.
Displaying Payment Access the check, press N/- , press PAY.
Methods Continue pressing N/- PAY until the desired payment method
is displayed, then press PAY to start the payment sequence.
Performing Cash Payments Access the check, and press SHIFT TOT. Enter the payment
method ID number, press PAY. Enter the payment amount
or Y, if the same, and press PAY. Press Y PAY to close the
check (if prompted).
Performing Other Payments Access the check, and press SHIFT TOT. Enter the payment
method ID number and press PAY. Enter responses to the
terminal prompt(s) and press PAY after each entry. If the
total is correct, press Y PAY. If requested, press Y PAY to
close the check.
Performing Rapid Entry Rapid entry allows items to be ordered without opening a
table. Order items and press SEND. To pay the check, press
SHIFT TOT. Enter the payment method ID number and
press PAY. Enter the card/room number and tip, if necessary,
pressing PAY between entries. Check total, if correct, press
Y PAY. If requested, press Y PAY to close the check.

20 The Electronic Server Pad (ESP) System Guide
Performing Multi-Payments Access the check, and press SHIFT TOT. Enter the first
payment method ID number and press PAY. If necessary,
enter card/room number and tip, pressing PAY between
entries. Enter the payment amount, including tip, to be paid
to this payment method and press PAY. Enter second
payment method ID number and press PAY, if necessary,
enter car/room number and tip, pressing PAY between
entries. The ESP displays the total. (Enter the payment
amount to be paid to the second payment method, continue
payout sequence).
-or-
If the balance is to be paid to cash, press Y PAY. If
requested, press Y PAY to close the check.
Voiding Payments When the "CLOSE CHECK?" prompt displays on the
terminal press N/- PAY then press DISP until the payment
method to be voided displays on the terminal. Press VOID,
the terminal displays "VOID (PAYMENT METHOD)?".
Press Y VOID. Press SHIFT TOT to ensure that the check
total is correct.
Link Inquiry Press 25 SHIFT CALL/MGR. Enter the room number,
press SHIFT CALL/MGR. Enter N/- to abort or Y for
credit detail, press C/CE to abort.
Obtaining a Server Media Press N/- SHIFT SIGN(In/Out). The Server
Report Summary Report Media Summary will print.
Signing Out Press SHIFT SIGN(In/Out). If requested, enter cash tips
and press SHIFT SIGN(In/Out). A verification will print.
Keyless Clockout Enter the key number, press Y, enter the tip amount andpress
SHIFT SIGN(In/Out).
Rapid Cashout Press 7 SHIFT CASH. Enter the amount of tips paid that is
listed on the server summary, press SHIFT CASH. If
requested, enter the cash tip amount and press SHIFT
CASH.
Identifying the ESP Press 17 SHIFT CALL/MGR. The ESP displays the Device
ID number, network, and node number (i.e. 121 1/12).
Printing a Printer Press 104 then press SHIFT CALL/MGR. The
Status Report report will print on the pre-designated printer. (Any printer
that has not been used since Front of House was started will
show as down on this report until it prints something).
To Print Another Press N/-, enter the server's key number and
Employee's Sign-Out press SHIFT SIGN(In/Out).
Summary
To Sign In Another Press N/-, twice, enter the employee's key #,

The Electronic Server Pad (ESP) System Guide 21
Employee and press N/-, enter the employees job class, and press
SHIFT SIGN(In/Out).
To Sign Out Another Press N/- twice, and enter the server's key
Employee number, press SHIFT SIGN(In/Out).
To Change a Pass Code Enter the old pass code, press N/- twice, enter the new pass
code, and press SHIFT F2/BREAK.

22 The Electronic Server Pad (ESP) System Guide
To Reset a Pass Code to Press N/- twice, enter the Employee ID number
the Employee ID Number and press SHIFT F2/BREAK.
To Assign Manager's Press 99 SHIFT CALL/MGR. Enter the
Privileges to a Server manager's ID key number and press SHIFT CALL/MGR.
Enter the manager's pass code and press SHIFT
CALL/MGR. The ESP displays "NEW PRIV".
To Remove Manager's Press 99 SHIFT CALL/MGR.
Privileges from a Server
To Reopen a Closed Check Press N/-, press OPEN, enter the reason code number for
reopening the check and press OPEN. Enter the check
number and press OPEN.
To Stock an Item In Press N/-, enter PLU number to stock in, press SHIFT
STCK/STK, press Y, then SHIFT STCK/STK. When
prompted for a quantity, enter 0 (for unlimited amount) or
enter a number (if the quantity of the item is limited), and
press SHIFT STCK/STK.
To Display a Stock Quantity Enter the PLU number and press SHIFT STCK/STK (There
must be a stock quantity set for this function to work).
To Stock an Item Out Press N/-, enter the PLU number for the item that is to be
stocked out, press SHIFT STCK/STK. Press N/- then
SHIFT STCK/STK. (There must be a stock quantity set for
this function to work).
To Delete a Stock Record Press N/-, twice, enter the PLU number and press SHIFT
STCK/STK.
To Display ESP ID Press 17 SHIFT CALL/MGR. The ESP displays the Device
ID number, network, and node number (i.e. 121 1/12).
To Print a Floor Report Enter 22 and press SHIFT CALL/MGR. Enter the report
number and press SHIFT CALL/MGR, or if an argument is
required, press N/-, enter argument, press SHIFT
CALL/MGR.
To Reprint a Hard Check Access the check, enter 23 and press SHIFT CALL/MGR.
Printing a Printer Press 104 then press SHIFT CALL/MGR. The
Status Report report will print on the pre-designated printer. (Any printer
that has not been used since Front of House was started will
show as down on this report until a print job has been
printed).
To Display Check ID Access the check, enter 24 and press SHIFT CALL/MGR.
To Display Creation Access the check, enter 99 and press DISP/VIEW.
Time of Check
To Check the Press SHIFT F2/BREAK.
Date and Time

The Electronic Server Pad (ESP) System Guide 23

24 The Electronic Server Pad (ESP) System Guide
To Adjust a Check Access the check, enter the adjustment ID number and press
SHIFT ADJ. If an amount is requested, enter the adjustment
amount and press SHIFT ADJ. (Automatic adjustment do
not prompt for an amount).
To Void a Press DISP/VIEW until the item to be voided is
Previously displayed and press VOID. If a passcode is
Ordered Item requested, enter the passcode and press VOID. Enter reason
code and press VOID. Enter Y if correct, and press VOID.
To Void a Payment Press DISP/VIEW until the payment method to be voided is
displayed and press VOID. If a pass code is requested, enter
the pass code and press VOID. Enter Y if correct, and
press VOID.
To Void an Adjustment Press DISP/VIEW until the adjustment to be voided is
displayed and press VOID. If a pass code is requested, enter
the pass code and press VOID. Enter Y if correct, and press
VOID.
To Void a Check Access check and press DISP/VIEW. Void any items exist
on the check. When the ESP displays "NO ITEMS", press
VOID. Then the ESP displays "VOID CHECK?", press Y
VOID.

The Electronic Server Pad (ESP) System Guide 25
Common Alpha Entry Problems
1. Two items are configured with the same item name and the same spelling.
Example: If a Coke is configured in the system once as an order item and again as a modifier, the
system will only find the first item that is configured with that name.
Solution: Enter the order item for Coke as GLASS COKE so that it's spelling is different from
the modifier COKE. -or-
Enter Coke as 'M' Maybe in the "Aln" Alone field in Item Definition. The server can then press
ORD or MOD to differentiate the order item from the modifier.
2. There is more than one item configured whose name starts with the same word.
Example: One item is configured as BURGER and another item is configured as BURGER
FRIES.
Solution: If BURGER is spelled in Alpha Entry mode, the ESP will display "BURGER--?".
Press ORD to order BURGER, or enter 'F' to display "BURGER FRIES--?" then press ORD.
3. Only the numbers 1-9 can be used when configuring a mnemonic.
Example: The menu may include 10 different glasses of wine. The mnemonics for these could be
configured as G1, G2, G3, etc. However, the tenth glass of cannot be configured as G10.
Therefore, a different mnemonic must be used.
4. The system performs alpha searches from the same database configuration whether searching for
the item "Name" or the item "mnemonic".
Example: If "it" is entered as a modifier and "Ice Tea" is entered as an order item with the
mnemonic "it", the system will find "it" only find the modifier and the Iced Tea order item will
not be allowed with that mnemonic.

26 The Electronic Server Pad (ESP) System Guide
Using Preset Cards
If ordering by PLU or Alpha Entry, it may not be necessary to configure preset boards for the ESP.
However, if presets are configured for the ESP, it will be necessary to create preset cards to be used at
reference when ordering. The preset cards can be stored in the ESP cover.
The preset card is divided into five sections, numbered 1-5 which signifies the page number. Each section
contains squares lettered A-Z. The names of the preset items can be typed below the numbers/letters.
To select a menu item from the preset, locate the item on the preset card located inside the ESP cover.
Identify the item's page number (1-5) and letter (A-Z). For example, "coffee" might be located on the
square labeled "1A". Then, select coffee by pressing "1" on the keypad, for page one and "A" for coffee.
Only one item per section, per letter, can be configured.

The Electronic Server Pad (ESP) System Guide 27
1A 1B 1C 1D 1E 1F Use this chart to learn the ESP presets. The
chart can be reduced (65%) so that
it fits inside the cover of the ESP.
1G 1H 1I 1J 1K 1L
1M 1O 1P 1Q 1R 1S
1T 1U 1V 1W 1X 1Z
2A 2B 2C 2D 2E 2F
2G 2H 2I 2J 2K 2L
2M 2O 2P 2Q 2R 2S
2T 2U 2V 2W 2X 2Z
3A 3B 3C 3D 3E 3F
3G 3H 3I 3J 3K 3L
3M 3O 3P 3Q 3R 3S
3T 3U 3V 3W 3X 3Z
4A 4B 4C 4D 4E 4F
4G 4H 4I 4J 4K 4L
4M 4O 4P 4Q 4R 4S
4T 4U 4V 4W 4X 4Z
5A 5B 5C 5D 5E 5F
5G 5H 5I 5J 5K 5L
5M 5O 5P 5Q 5R 5S
5T 5U 5V 5W 5X 5Z

28 The Electronic Server Pad (ESP) System Guide
Use this chart to type in your menu items. The
chart can be reduced (65%) so that
it fits inside the cover of the ESP.

The Electronic Server Pad (ESP) System Guide 29
Troubleshooting the ESP System
Displayed Error Messages
The following error messages may be displayed on the ESP(s). Possible solutions are also listed. If you
have a problem that is not mentioned, or the solution mentioned does not rectify your problem, call your
local support personnel.
No Signal! If displayed on all ESPs, the ESPs are not receiving signals from the RBS.
Solution: Press C/CE. If nothing happens reset the RBS, turn the power switch
to OFF "o" then ON "|". Ensure that the RBS dipswitches are set correctly. See
RBS Dipswitch Settings. in this manual. If the problem persists call your local
support personnel.
No Signal!-If displayed one ESP, the ESP is not receiving signals from the RBS.
Solution: Press C/CE. If nothing happens remove and re-insert the battery
pack. Check configuration of the ESP in Device Definition and ESP to
Employee ID Assignment. If nothing happens call your local support personnel.
Chk System Setup The ESP serial number is not configured in ESP Assignment, or the ESP is not
configured in Device Definition, or there is a hardware problem (i.e. RBS
network cable is disconnected, 1/1 PCV is down). If it is a hardware problem,
more than one ESP would be displaying this message.
Solution: If the message is displayed on one ESP, check that the ESP has been
properly configured in ESP Assignment and Device Definition. If the message
is displayed on more than one ESP call your local hardware support personnel.
Connecting.... The system recognizes the RBS but the ESP is not communicating with the
RBS.
Solution: ESP may respond, otherwise the next message is displayed.
Reposition Unit-The system recognizes the RBS but the ESP is not communicating with the
RBS.
Solution: ESP may respond, if not, reposition the ESP and/or yourself to
receive a better signal from the RBS. The following message may be displayed.
Reposition Unit->C/CE The system recognizes the RBS but the ESP is not communicating with the
RBS.
Solution: Press C/CE. If nothing happens reposition the ESP and/or yourself
to receive a better signal from the RBS. Remove and re-insert the battery pack.
Check configuration of the ESP in Device Definition and ESP to Employee ID
Assignment. If nothing happens call your local hardware support.
Blank Display Could be the battery pack, or the ESP itself.

30 The Electronic Server Pad (ESP) System Guide
Solution: Press C/CE. If no response, remove and re-insert the battery pack.
Replace the battery pack. If no change, call your local support personnel.
Check configuration of the ESP in Device Definition and ESP to Employee ID
Assignment.
Bat Batteries are LOW.
Solution: Replace the battery pack. After 5 minutes, if the battery pack is not
replaced, the next message is displayed.
Change Batteries Batteries are LOW.
Solution: Replace the battery pack.
Test Mode Someone may have inadvertently pressed the top three keys on the left side of
the keypad which puts the ESP into test mode.
Solution: Press SEND to clear the screen. If the problem persists remove and
re-insert the battery pack.
The Electronic Server Pad (ESP) System Guide 31
RBS Dipswitch Settings
Your local hardware support personnel will determine the node number for the Radio Base
Station. Once the node number has been determined and configured in Download Reasons for
Network Nodes (screen #122), the switches on the RBS must be set.
The purpose of these switches is to address the RBS. This is how the node number of the RBS is
designated. In turn, each ESP is configured for that same node number. Therefore, it is
imperative that the configuration and setting are correct.
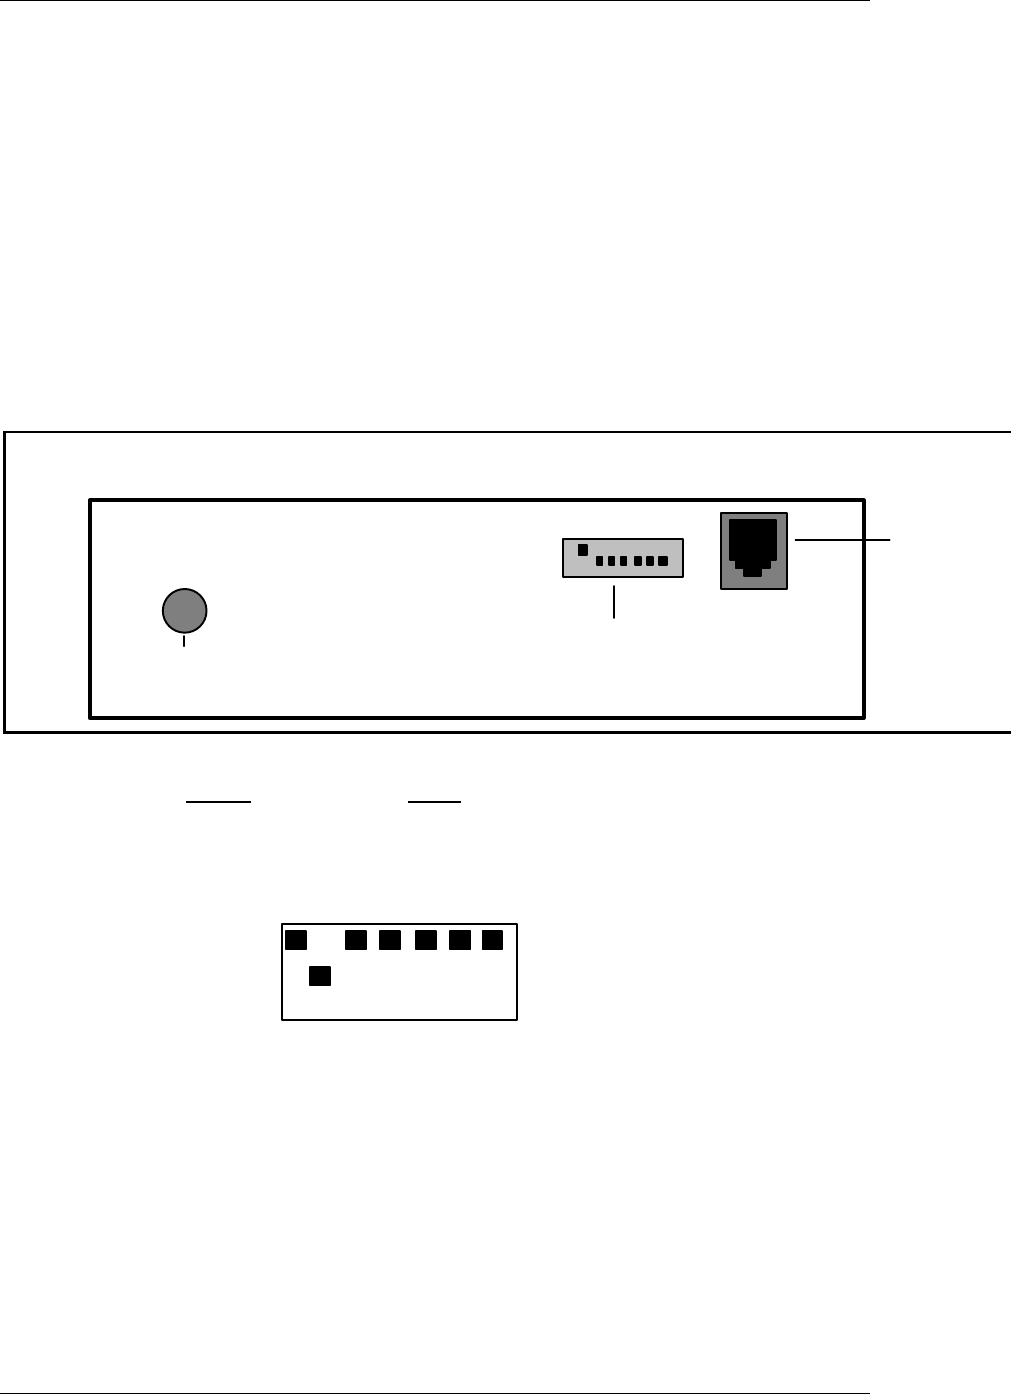
The dipswitch panel is located on the end of the RBS. The same end as the antenna connection.
Switches that are UP are considered to be ON. Switches that are DOWN are considered to be
OFF. Switches 1 and 2 are designated for the network. However, switch 1 is always UP or ON,
and switch 2 is always DOWN or OFF, regardless of the network number. The value of the
remaining switches 3-7 are as follows:
Telco
Port
Dipswitches
Antenna
Connection
Switch Value
3 1
4 2
5 4
6 8
7 16
1 2 3 4 5 6 7
Sample Dipswitch Panel
32 The Electronic Server Pad (ESP) System Guide
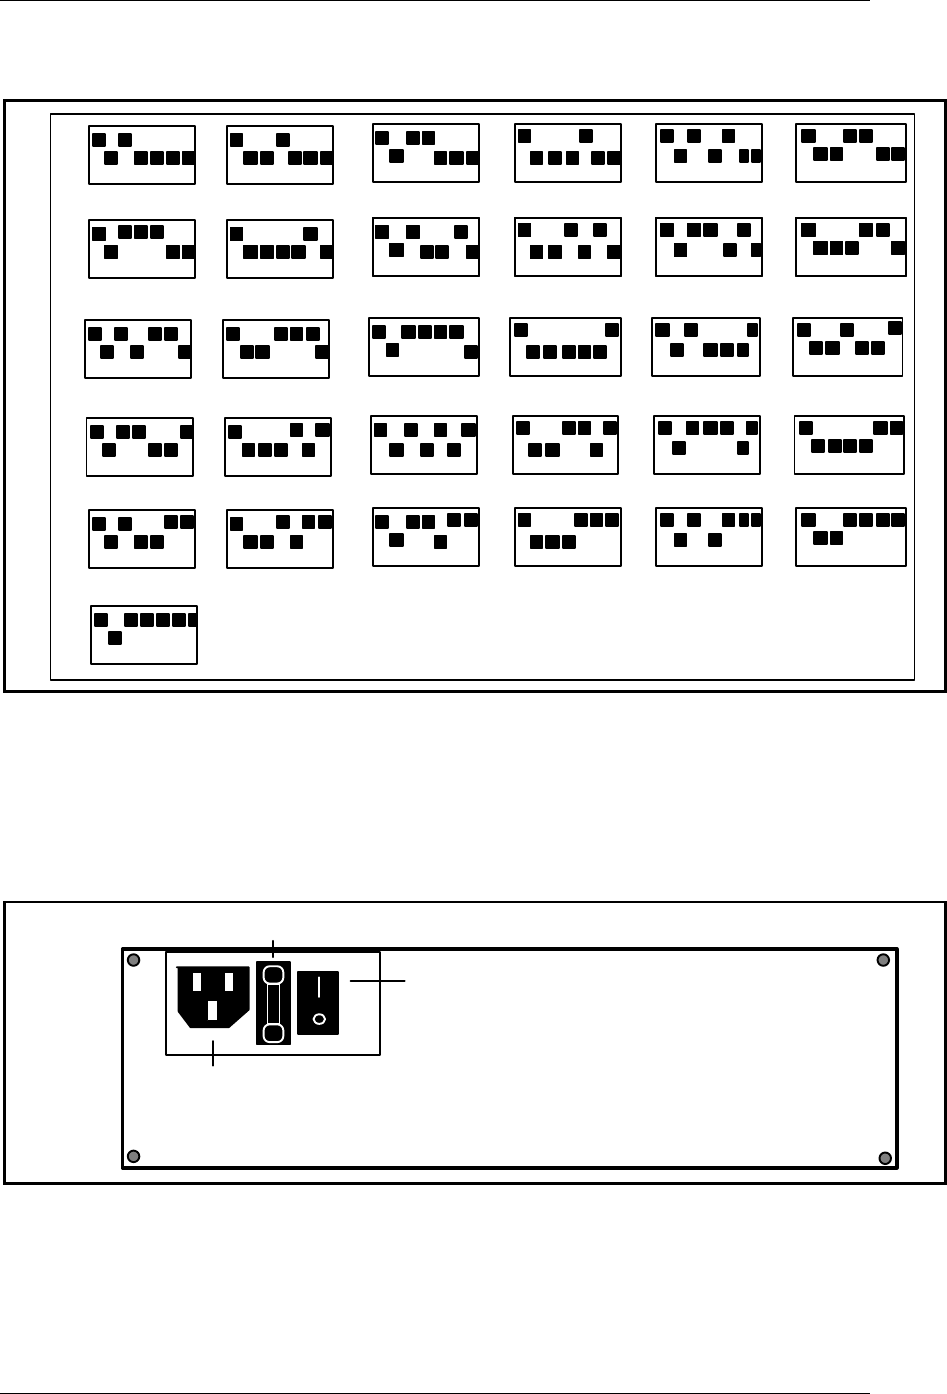
RBS Dipswitch Settings (continued)
12345 6
1 2 3 4 5 6 7 1 2 3 4 5 6 7
1 2 3 4 5 6 71 2 3 4 5 6 71 2 3 4 5 6 71 2 3 4 5 6 7
1 2 3 4 5 6 7 1 2 3 4 5 6 7
1 2 3 4 5 6 71 2 3 4 5 6 71 2 3 4 5 6 71 2 3 4 5 6 7 91 2 3 4 5 6 7
1 2 3 4 5 6 71 2 3 4 5 6 71 2 3 4 5 6 71 2 3 4 5 6 7
7810
16
1 2 3 4 5 6 7
1 2 3 4 5 6 71 2 3 4 5 6 71 2 3 4 5 6 7
1 2 3 4 5 6 7 1 2 3 4 5 6 7
1 2 3 4 5 6 71 2 3 4 5 6 71 2 3 4 5 6 71 2 3 4 5 6 7
1 2 3 4 5 6 7 1 2 3 4 5 6 7
1 2 3 4 5 6 71 2 3 4 5 6 71 2 3 4 5 6 71 2 3 4 5 6 7
1 2 3 4 5 6 7 1 2 3 4 5 6 7
1 2 3 4 5 6 71 2 3 4 5 6 71 2 3 4 5 6 71 2 3 4 5 6 7
13 18
15
14
19
12
17
11
27
20 22 24
25
21 23
26
31
30
2928
1 2 3 4 5 6 7
The first switch is always up, the second switch is
always down, regardless of node number.
RBS Dipswitch Settings
Note: If you are having problems with the ESP's or the RBS verify that the RBS switch settings are
correct. The switches may have been changed inadvertently.
To reset the RBS dipswitches:
1. Using the chart above set the RBS dipswitches according to the node number that is configured in
Download Files for Network Nodes (screen #122) set (or reset) the dipswitches in the correct position.
Power Plug
Power Switch
OFF
ON
Fuse
2. Turn the power switch on the end of the RBS OFF "o" then ON "|".

The Electronic Server Pad (ESP) System Guide 33
Troubleshooting the ESP System (continued)
IF ALL the ESP's on the network stop working.
Check to see that Front of House is running. Are there any printers or server terminals working? If not,
you may need to “Start Front of House operations” from the System Management menu. If Front of House
is running, check to see that the ESP's are assigned:
1. Preset Overlay Definition” then 7, “ESP to Employee ID Assignment”. Press F13 (CLEAR TO
FIND) then F3 (FIND). All of the ESP assignments that have been saved in this screen will be
displayed. Ensure that all of the ESP's that you are currently using appear in the “Device ID” field,
and that they are assigned to an employee in the “Employee 1. Select 1, “Configuration Update”
from the main menu. Select 2, “Equipment and ID” field. If the ESP's are not assigned, follow the
instructions for assigning an ESP to an Employee.
2. Is there anything displayed on the ESP? If so, use the troubleshooting section earlier in this
document.
If you need further assistance, call the Customer Response Center at:
1-800-REMANCO (1-800-736-2626).
If ESP Orders Do Not Chit
Three common reasons for orders not chitting are:
• The ESP case was closed before the ESP was set to the "READY" mode. Make sure that the server
pressed the SEND key BEFORE closing the ESP case. Orders do not chit unless this key is pressed.
Open the case and press the SEND key. Then, close the case. The order should now chit in the
proper preparation area.
Make sure that the server opened a table using a table number that is assigned to an area that chits.
For example, if the server accidentally opened a table assigned to an area that is not supposed to chit,
such as a bar, the order wouldn't chit. Use the Server Media Activity report or the Flash report to see
where the open checks are located.
• The preparation/kitchen printer may not be working properly. The system may have automatically
redirected the server's order to the alternate printer.
• If your restaurant is using the Coursing feature, check to see that all the courses have been fired.