Remidio Innovative Solutions Private FOPNM-10 Fundus on Phone Non Mydriatic FOPNM-10 User Manual FUNDUS ON PHONE
Remidio Innovative Solutions Private Limited Fundus on Phone Non Mydriatic FOPNM-10 FUNDUS ON PHONE
UserManual.wiki
>
Remidio Innovative Solutions Private
>
FOPNM 10 User Manual
Manual
Navigation menu
Upload a User Manual
Namespaces
Wiki Guide
HTML
PDF
Info
Views
User Manual
Discussion / Help
Navigation


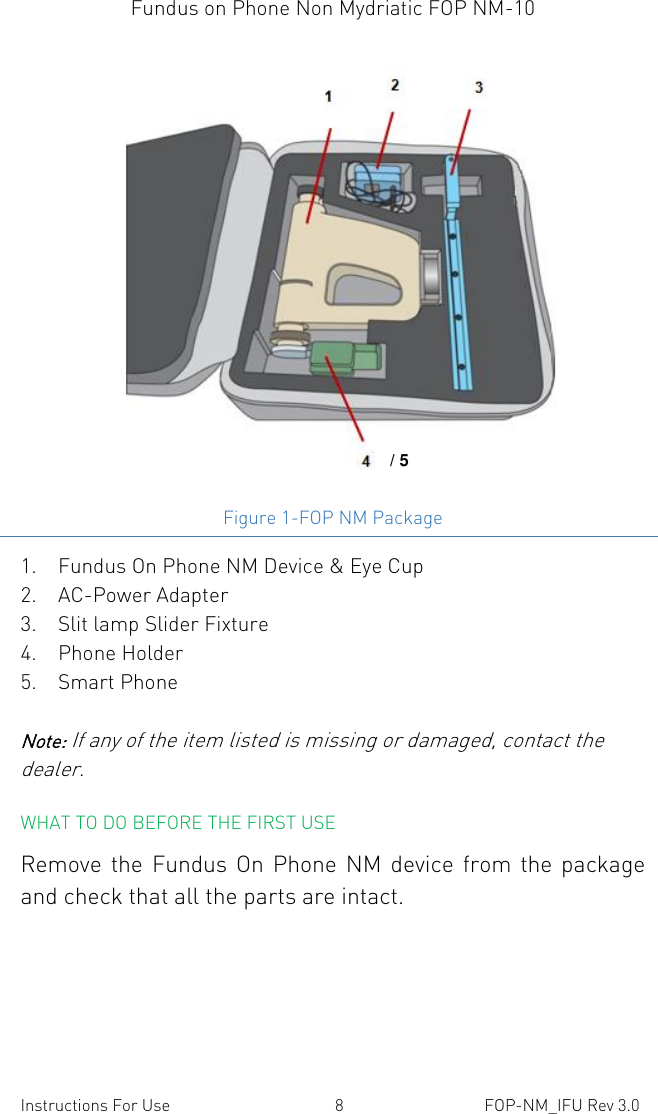
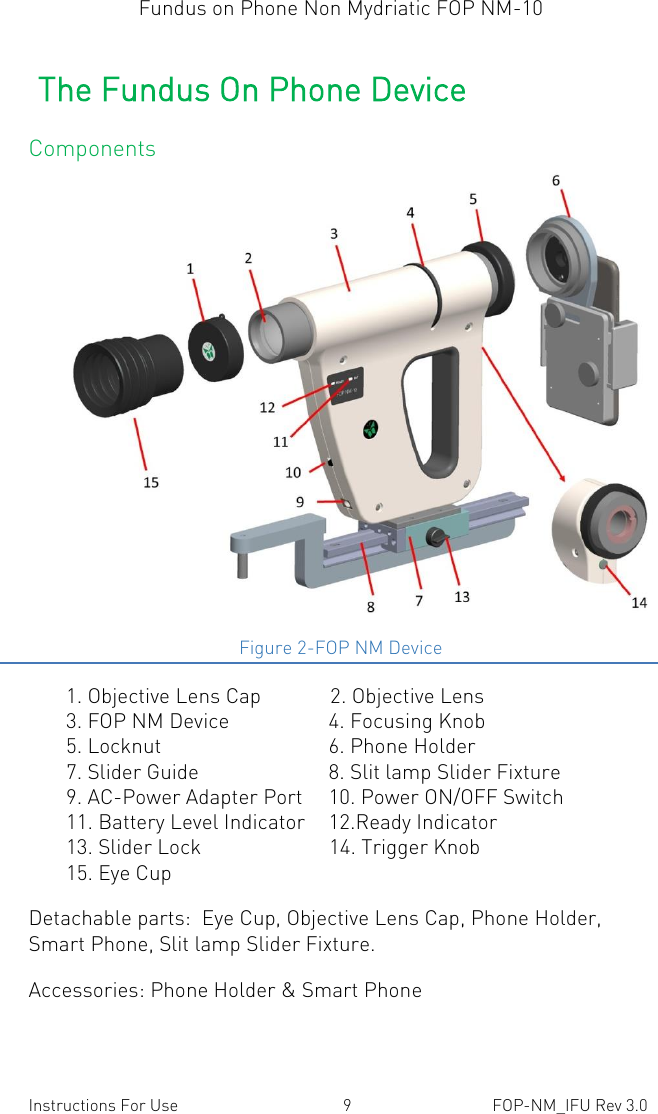
![Fundus on Phone Non Mydriatic FOP NM-10 Instructions For Use 11 FOP-NM_IFU Rev 3.0 Set-up Instructions Pre-requisites Ensure that the battery is completely charged before the initial use. The battery requires approximately three hours of charging and the charge lasts up to 7 hours in Non-Mydriatic mode & 3 hours in Myd-riatic mode. Mounting the Smart phone to the Phone Holder Figure 3- Phone Holder (front and rear view) 1. Top Plate 2.Locator Guide 3. Clamp Spread 4.Bottom Plate 5. Top Plate Adjusting Knob 6. Sliders 7. Bottom Plate Adjusting Knob 1. Loosen the Bottom Plate Adjusting Knob [7] in figure 3) and ex-pand the clamp spread (3) of the Phone Holder.](https://usermanual.wiki/Remidio-Innovative-Solutions-Private/FOPNM-10/User-Guide-3039748-Page-11.png)
![Fundus on Phone Non Mydriatic FOP NM-10 Instructions For Use 12 FOP-NM_IFU Rev 3.0 Figure 4-Phone Holder (front view) Note: This Phone Holder accommodates smart phones of width between 55mm to 75mm. 2. Mount the smartphone between the clamp spread of the bottom plate (Refer [4] in figure 3) and fix the slider (Refer [6] in figure 3). Figure 5- Phone Holder (front view) 3. Use the bottom plate adjusting knob (7] to secure the smart phone.](https://usermanual.wiki/Remidio-Innovative-Solutions-Private/FOPNM-10/User-Guide-3039748-Page-12.png)
![Fundus on Phone Non Mydriatic FOP NM-10 Instructions For Use 13 FOP-NM_IFU Rev 3.0 Figure 6-Phone Holder (rear view) 4. Align the smart phone camera to the locator guide (Refer [2] in figure 3) using top plate (Refer [1] in figure 3). 5. Secure the top plate (Refer [1] in figure 3) using top plate ad-justing knob (Refer [5] in figure 3).Loosen the screw knob on the left hand side. Mounting the Phone Holder to the FOP NM Device 1. Ensure the smart phone is mounted to the Phone Holder. 2. Mount the Phone Holder to the FOP NM device, figure 7). 7](https://usermanual.wiki/Remidio-Innovative-Solutions-Private/FOPNM-10/User-Guide-3039748-Page-13.png)
![Fundus on Phone Non Mydriatic FOP NM-10 Instructions For Use 14 FOP-NM_IFU Rev 3.0 1. Figure 7-FOP NM device and the Phone Holder 1. Lock Nut Turn the locknut [1] in counter-clockwise direction to se-cure the Phone Holder. Note: Tighten the locknut by hand. Avoid over tightening. Mounting of Eye Cup to the FOP NM Device Mount the Eye Cup on the FOP NM device as shown in Fig. 7 by slid-ing it in, for dismounting pull the Eye cup out. Do not rotate the Eye cup while mounting or dismounting it.](https://usermanual.wiki/Remidio-Innovative-Solutions-Private/FOPNM-10/User-Guide-3039748-Page-14.png)
![Fundus on Phone Non Mydriatic FOP NM-10 Instructions For Use 15 FOP-NM_IFU Rev 3.0 Using the FOP Device on the Slit Lamp Fixture Mounting the FOP Device to the Slit Lamp Fixture Figure 8-Sliderand Slit lamp Slider Fixture 1. Slider Guide 2.Slider Rail 3. Slider Pin 4.Slider Rail Support 1. Fix the slider pin (Refer [3] in figure 8) to the hinge point [1]. The Hinge point diameter may vary with Slit Lamps of different manufacturers. In case of any difficulty in inserting the slider pin, please contact the FOP NM distributor or manufacturer. Figure 9-Slit Lamp Fixture 1 3 4 2 1 1. Hinge Point](https://usermanual.wiki/Remidio-Innovative-Solutions-Private/FOPNM-10/User-Guide-3039748-Page-15.png)
![Fundus on Phone Non Mydriatic FOP NM-10 Instructions For Use 16 FOP-NM_IFU Rev 3.0 2. Slide the FOP device slider guide [Refer [1] in figure 8] over the slider rail support (Refer [4] in figure 8). Figure 10- Slit Lamp Fixture with FOP Device (Phone Holder Mounted) 1. FOP NM Device 2.Diopter Correction Wheel 3. Smart phone 4. Slider Rail 5. Slider Lock 6. Slit Lamp Base 7. Hinge Point 3. Rotate the slider lock [3] clockwise to secure the FOP NM de-vice[1] on the slider[2]. 5 6 4 3 1 2 7](https://usermanual.wiki/Remidio-Innovative-Solutions-Private/FOPNM-10/User-Guide-3039748-Page-16.png)