Remidio Innovative Solutions Private FOPNM-10 Fundus on Phone Non Mydriatic FOPNM-10 User Manual FUNDUS ON PHONE
Remidio Innovative Solutions Private Limited Fundus on Phone Non Mydriatic FOPNM-10 FUNDUS ON PHONE
Manual
Instructions For Use 1 FOP-NM_IFU Rev 3.0
Fundus On Phone Non Mydriatic
FOP NM-10
Instructions For Use
Remidio Innovative Solutions Pvt. Ltd.
Instructions For Use 2 FOP-NM_IFU Rev 3.0
Instructions For Use 3 FOP-NM_IFU Rev 3.0
Copyright © 2016. Remidio. All rights reserved.
Reproduction, transfer, distribution or storage of part or all of the
contents in this document in any form without the prior written
permission of Remidio is prohibited.
Copyright protection claimed includes all forms of matters of copy-
rightable materials and information now allowed by statutory or ju-
dicial law or hereinafter granted Reproduction, adaptation, or trans-
lation without prior written permission is prohibited, except as al-
lowed under the copyright laws.
Information is subject to change without notice.
Instructions For Use 4 FOP-NM_IFU Rev 3.0
Instructions For Use 5 FOP-NM_IFU Rev 3.0
Table of Contents
Table of Contents .................................................................................. 5
Introduction ........................................................................................... 7
Package inclusions ............................................................................... 7
The Fundus On Phone Device .............................................................. 9
Components ................................................................................................ 9
Description ................................................................................................. 10
Features ..................................................................................................... 10
Set-up Instructions ............................................................................. 11
Mounting the Smart phone to the Phone Holder ...................................... 11
Mounting the Phone Holder to the FOP NM Device .................................. 13
Mounting the FOP Device to the Slit Lamp Fixture ................................... 15
Procedure for Viewing/Capturing Images of the Retina ........................... 17
Specifications ...................................................................................... 25
Warnings ............................................................................................. 27
Usage and Maintenance ..................................................................... 29
Cleaning of the Lens .................................................................................. 29
Trouble Shooting ................................................................................ 30
Symbols ............................................................................................... 32
Warranty .............................................................................................. 33
Technical Support ............................................................................... 34
Contacts .............................................................................................. 34
Instructions For Use 6 FOP-NM_IFU Rev 3.0

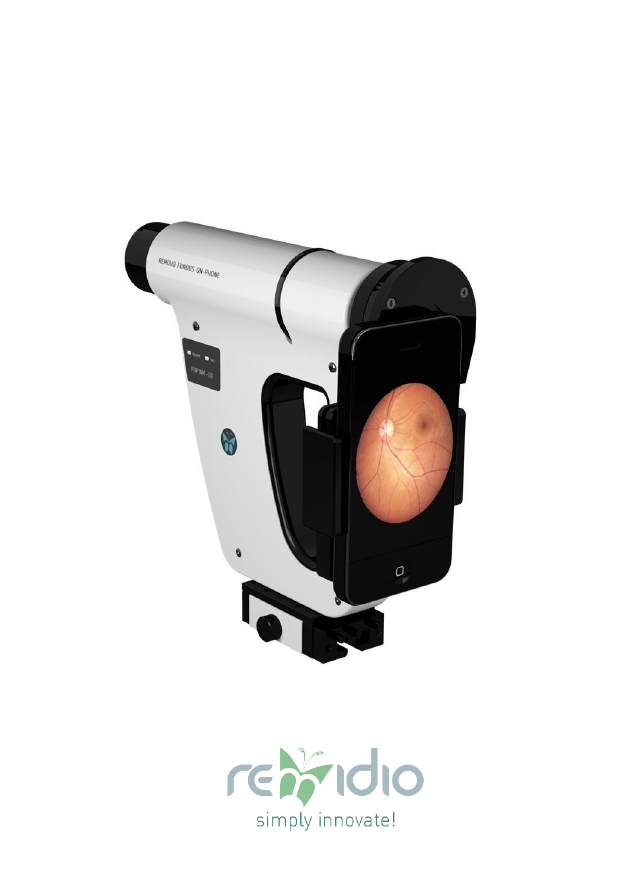
Fundus on Phone Non Mydriatic FOP NM-10
Instructions For Use 7 FOP-NM_IFU Rev 3.0
Introduction
Remidio Fundus On Phone Non Mydriatic (FOP NM) device is
the world's first smartphone enabled, high quality retinal im-
aging system which does not require dilation. The system us-
es high quality, precision optics to illuminate and capture im-
ages of the retina. The Remidio FOP NM device is intended to
be used by certified optometrists, ophthalmologists and pri-
mary care physicians.
As part of the optical design, the device uses LED light
source. This ensures a stress-free experience for the patient,
unlike conventional non-mydriatic desktop fundus cameras.
The Remidio FOP NM device is to be used with the built in
Remidio Fundus Software App to view the retina and it can
capture digital images of the retina when used along with a
smart phone with and without any dilation.
The optical design of the Remidio FOP gives the best Field of
View (FoV) and magnification. A minimum 45° FoV gives up to
10x magnified view of the retina.
Package inclusions
The contents of the package are listed below.
SL. No.
Name of the Unit
No. of Units
1
FOP NM Device
1
2
AC-Power Adapter
1
3
Slit lamp Slider Fixture
1
4
Phone Holder
1
5
Smart Phone
1
Fundus on Phone Non Mydriatic FOP NM-10
Instructions For Use 8 FOP-NM_IFU Rev 3.0
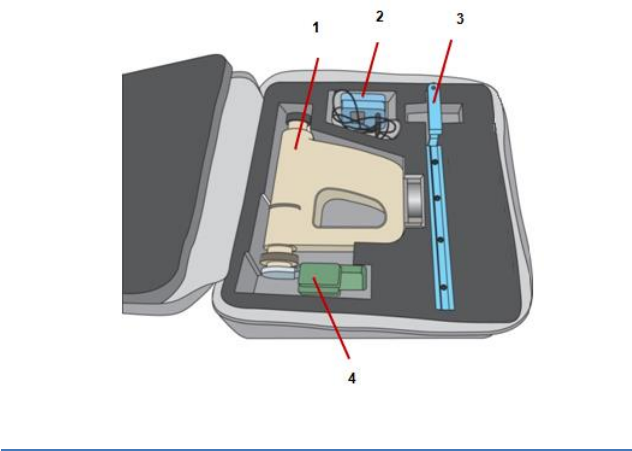
Figure 1-FOP NM Package
1. Fundus On Phone NM Device & Eye Cup
2. AC-Power Adapter
3. Slit lamp Slider Fixture
4. Phone Holder
5. Smart Phone
Note: If any of the item listed is missing or damaged, contact the
dealer.
WHAT TO DO BEFORE THE FIRST USE
Remove the Fundus On Phone NM device from the package
and check that all the parts are intact.
/ 5
Fundus on Phone Non Mydriatic FOP NM-10
Instructions For Use 9 FOP-NM_IFU Rev 3.0
The Fundus On Phone Device
Components
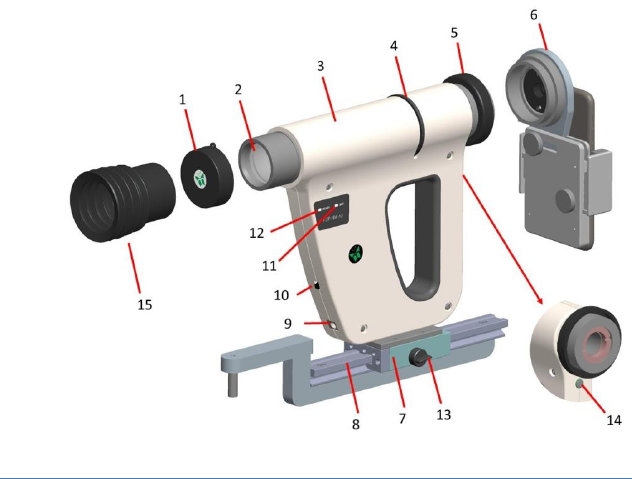
Figure 2-FOP NM Device
1. Objective Lens Cap 2. Objective Lens
3. FOP NM Device 4. Focusing Knob
5. Locknut 6. Phone Holder
7. Slider Guide 8. Slit lamp Slider Fixture
9. AC-Power Adapter Port 10. Power ON/OFF Switch
11. Battery Level Indicator 12.Ready Indicator
13. Slider Lock 14. Trigger Knob
15. Eye Cup
Detachable parts: Eye Cup, Objective Lens Cap, Phone Holder,
Smart Phone, Slit lamp Slider Fixture.
Accessories: Phone Holder & Smart Phone
Fundus on Phone Non Mydriatic FOP NM-10
Instructions For Use 10 FOP-NM_IFU Rev 3.0
Description
1. Objective Lens Cap – Protects the objective lens
2. Objective Lens - Magnifies the retina up to 10x times the origi-
nal size
3. FOP NM Device –Captures the retinal images
4. Focusing Knob – Used for Diopter Correction, gives a clear view
of the retina, when turned towards the plus (+) sign for far-
sighted (hyperopic) eye or the minus (-) sign for near-sighted
(myopic) eye
5. Locknut – Secures the smartphone holder to the FOP device
6. Phone Holder – Holds the smartphone
7. Slider Guide – Used to mount the FOP device on the slider
8. Slider – Used to mount the FOP device on the slit lamp fixture
9. AC-Power Adapter Port – Charge the battery using the AC–
power adapter port
10. Power ON/OFF Switch – Switch ON/OFF the FOP device
11. Battery Level Indicator – Indicates the charge of the battery
12. Ready Indicator –System / device ready indicator
13. Slider Lock – Used to secure the FOP device on the slider
14. Trigger Knob – Additional switch to capture Retinal Images
15. Eye Cup –To be mounted while capturing Retinal Images
Features
Works as Mydriatic and Non Mydriatic system
High quality images of the retina
Wireless App based Intensity controls
45°field of view
Li-ion rechargeable battery, up to 7 hours of backup when
fully charged in Non-Mydriatic mode & 3 hours in Mydriatic
mode
Highly compact and portable
Fundus on Phone Non Mydriatic FOP NM-10
Instructions For Use 11 FOP-NM_IFU Rev 3.0
Set-up Instructions
Pre-requisites
Ensure that the battery is completely charged before the initial use.
The battery requires approximately three hours of charging and the
charge lasts up to 7 hours in Non-Mydriatic mode & 3 hours in Myd-
riatic mode.
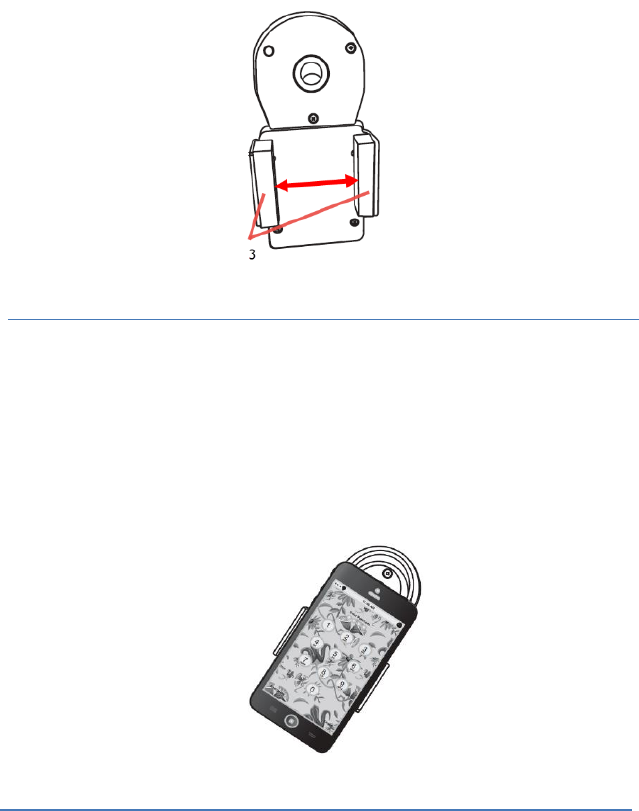
Mounting the Smart phone to the Phone Holder
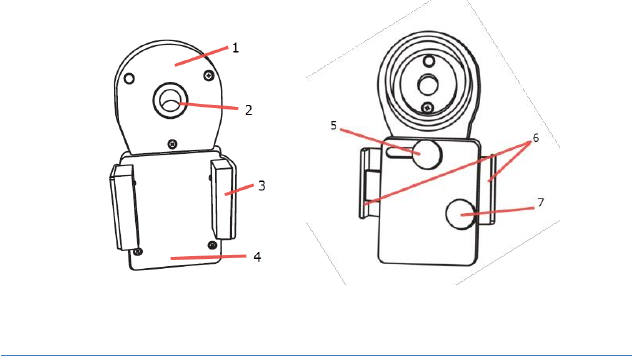
Figure 3- Phone Holder (front and rear view)
1. Top Plate 2.Locator Guide
3. Clamp Spread 4.Bottom Plate
5. Top Plate Adjusting Knob 6. Sliders
7. Bottom Plate Adjusting Knob
1. Loosen the Bottom Plate Adjusting Knob [7] in figure 3) and ex-
pand the clamp spread (3) of the Phone Holder.
Fundus on Phone Non Mydriatic FOP NM-10
Instructions For Use 12 FOP-NM_IFU Rev 3.0
Figure 4-Phone Holder (front view)
Note: This Phone Holder accommodates smart phones of width
between 55mm to 75mm.
2. Mount the smartphone between the clamp spread of the bottom
plate (Refer [4] in figure 3) and fix the slider (Refer [6] in figure
3).
Figure 5- Phone Holder (front view)
3. Use the bottom plate adjusting knob (7] to secure the smart
phone.
Fundus on Phone Non Mydriatic FOP NM-10
Instructions For Use 13 FOP-NM_IFU Rev 3.0
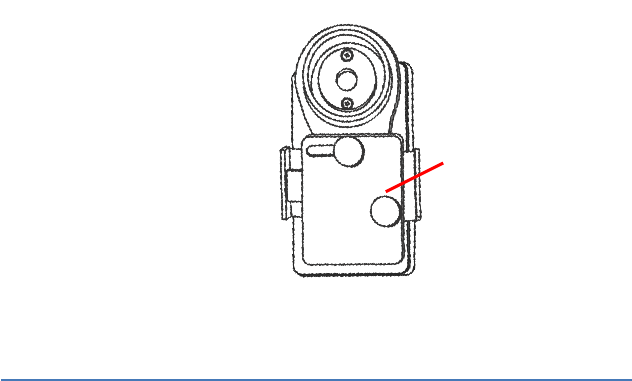
Figure 6-Phone Holder (rear view)
4. Align the smart phone camera to the locator guide (Refer [2] in
figure 3) using top plate (Refer [1] in figure 3).
5. Secure the top plate (Refer [1] in figure 3) using top plate ad-
justing knob (Refer [5] in figure 3).Loosen the screw knob on the
left hand side.
Mounting the Phone Holder to the FOP NM Device
1. Ensure the smart phone is mounted to the Phone Holder.
2. Mount the Phone Holder to the FOP NM device, figure 7).
7
Fundus on Phone Non Mydriatic FOP NM-10
Instructions For Use 14 FOP-NM_IFU Rev 3.0
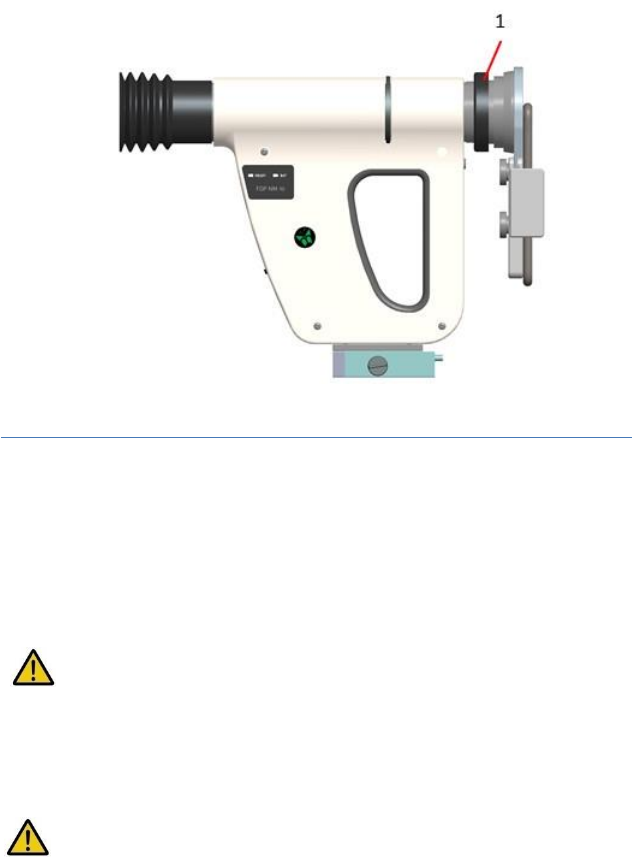
1. Figure 7-FOP NM device and the Phone Holder
1. Lock Nut
Turn the locknut [1] in counter-clockwise direction to se-
cure the Phone Holder.
Note:
Tighten the locknut by hand.
Avoid over tightening.
Mounting of Eye Cup to the FOP NM Device
Mount the Eye Cup on the FOP NM device as shown in Fig. 7 by slid-
ing it in, for dismounting pull the Eye cup out.
Do not rotate the Eye cup while mounting or dismounting it.

Fundus on Phone Non Mydriatic FOP NM-10
Instructions For Use 15 FOP-NM_IFU Rev 3.0
Using the FOP Device on the Slit Lamp Fixture
Mounting the FOP Device to the Slit Lamp Fixture
Figure 8-Sliderand Slit lamp Slider Fixture
1. Slider Guide 2.Slider Rail 3. Slider Pin 4.Slider Rail Support
1. Fix the slider pin (Refer [3] in figure 8) to the hinge point [1]. The
Hinge point diameter may vary with Slit Lamps of different
manufacturers. In case of any difficulty in inserting the slider
pin, please contact the FOP NM distributor or manufacturer.
Figure 9-Slit Lamp Fixture
1
3
4
2
1
1. Hinge Point

Fundus on Phone Non Mydriatic FOP NM-10
Instructions For Use 16 FOP-NM_IFU Rev 3.0
2. Slide the FOP device slider guide [Refer [1] in figure 8] over the
slider rail support (Refer [4] in figure 8).
Figure 10- Slit Lamp Fixture with FOP Device (Phone Holder Mounted)
1. FOP NM Device 2.Diopter Correction Wheel
3. Smart phone 4. Slider Rail
5. Slider Lock 6. Slit Lamp Base
7. Hinge Point
3. Rotate the slider lock [3] clockwise to secure the FOP NM de-
vice[1] on the slider[2].
5
6
4
3
1
2
7
Fundus on Phone Non Mydriatic FOP NM-10
Instructions For Use 17 FOP-NM_IFU Rev 3.0
Procedure for Viewing/Capturing Images of the Retina
1. Preparing the Patient:
Seat the patient in front of the Slit Lamp.
Place the chin on the chinrest. Ensure that the forehead
touches the forehead band.
Align the FOP NM device to view the eye of the patient on
the screen.
2. Capturing Images of the Retina:
The Eye cup ensures the pupil is well dilated to get a better
view of the retina.
In case the pupil size is not getting enlarged when used with
the Eye cup, please instruct the patient to close the other
eye with his hand. In case this also does not work, please
switch off all the lights in the room & take the retinal imag-
es.
The Eye cup is to be cleaned with disinfectant before and af-
ter screening every patient.
Note: Refer Figure 10 for more information.
Fundus on Phone Non Mydriatic FOP NM-10
Instructions For Use 18 FOP-NM_IFU Rev 3.0
Capturing images of the Retina using Smart Phone Camera
The images of the retina can be captured using smart phone with
native camera and the pre-loaded Remidio Fundus app with or
without dilation of the eye. The entire hardware control is driven by
app interface on the phone. The images of the retina can be cap-
tured like any normal photograph after selecting either Non-
Mydriatic (NM) mode or Mydriatic (M) mode.
Figure 11- Images of the Retina
1. Switching ON:
Turn ON the FOP NM-10retinal Imaging System
2. App Signup and Sign In
Start the Fundus app on the smart phone, signup and create the
hospital profile for the first time and sign in for routine use
Figure 12 Remidio App start page screenshot

Fundus on Phone Non Mydriatic FOP NM-10
Instructions For Use 19 FOP-NM_IFU Rev 3.0
3. Patient Profile Creation:
Create patient profile by touching the in app. Fill in appro-
priate details in the fields and save.
Figure 13- Patient profile creation screenshot
Fundus on Phone Non Mydriatic FOP NM-10
Instructions For Use 20 FOP-NM_IFU Rev 3.0
4. Image Capture
Select the mode for mydriatic or non-mydriatic imaging. Toggle be-
tween the two modes by sliding the mode changing slider. In mydri-
atic mode only the white LED icon will appear. In the non mydriatic
mode both the white as well as red LED icons will appear
Figure 14- Myd and Non Myd mode toggle screenshot
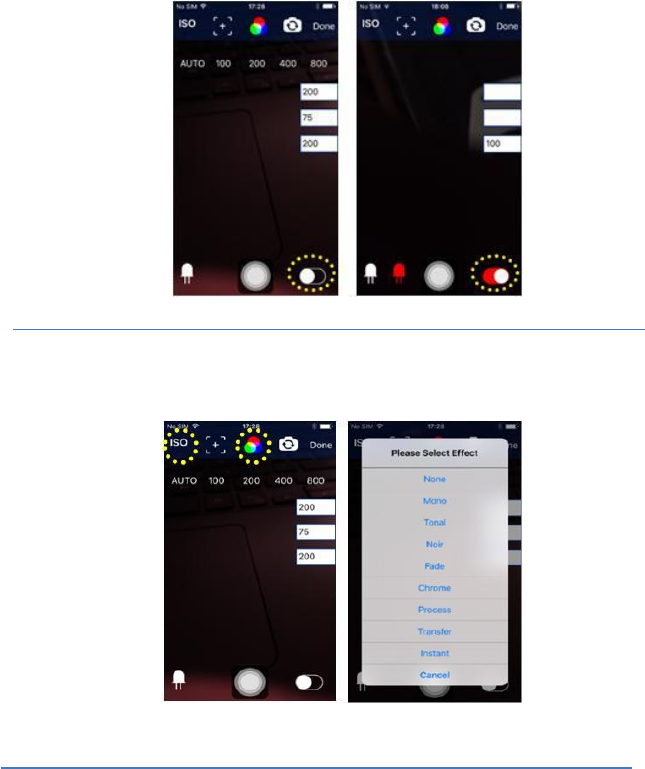
Make desired changes to ISO, Tone, IR/ White LED Intensity settings
to get a clear live view of the retina
Figure 15- ISO and Tone setting screenshot
Fundus on Phone Non Mydriatic FOP NM-10
Instructions For Use 21 FOP-NM_IFU Rev 3.0
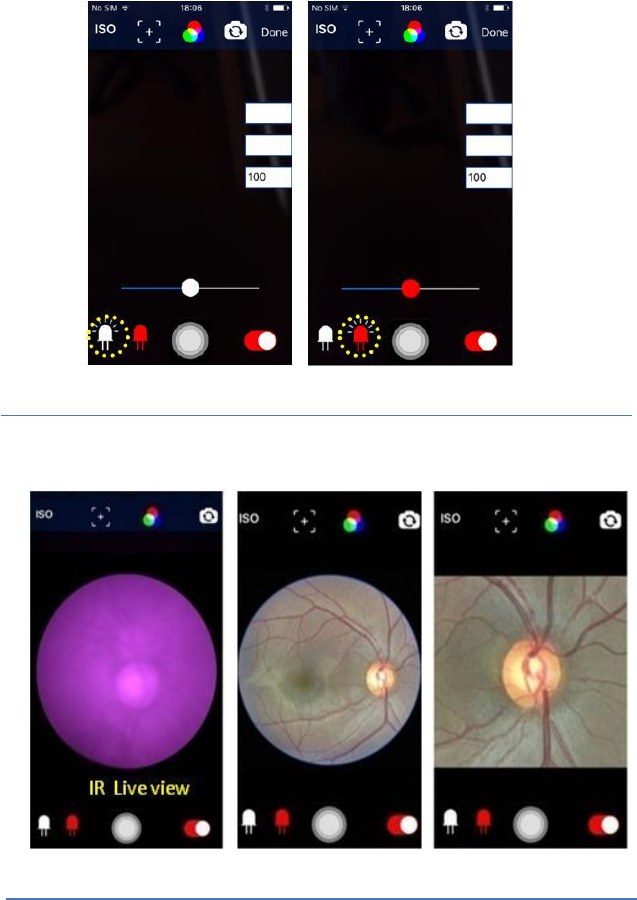
Figure 16- White and IR LED intensity setting Screenshot
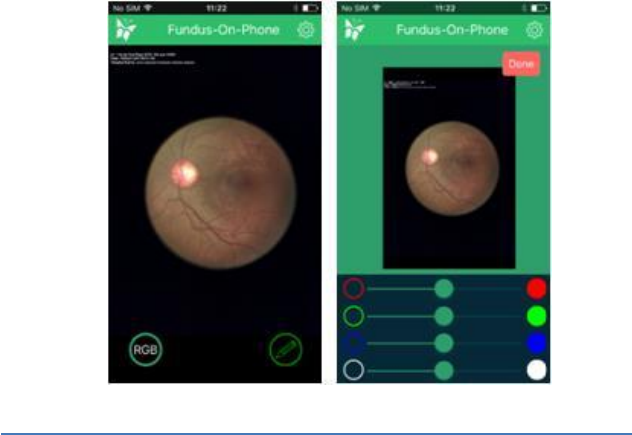
Touch OR pinch zoom the desired area of the retinal image on the
phone screen to auto-focus.
Figure 17- Images of the Retina on Smart Phone
Fundus on Phone Non Mydriatic FOP NM-10
Instructions For Use 22 FOP-NM_IFU Rev 3.0
If required, adjust the diopter correction wheel of the FOP NM de-
vice till a clear focused and sharp view of the retina appears on the
smart phone screen
Capture the photos using the capture toggle on the screen or with
the trigger knob on the system. In case the image seems over or
under exposed, vary the flash intensity using the White LED slider.
To increase or decrease the infrared live view brightness, use the
slider provided in the app with the red LED icon.
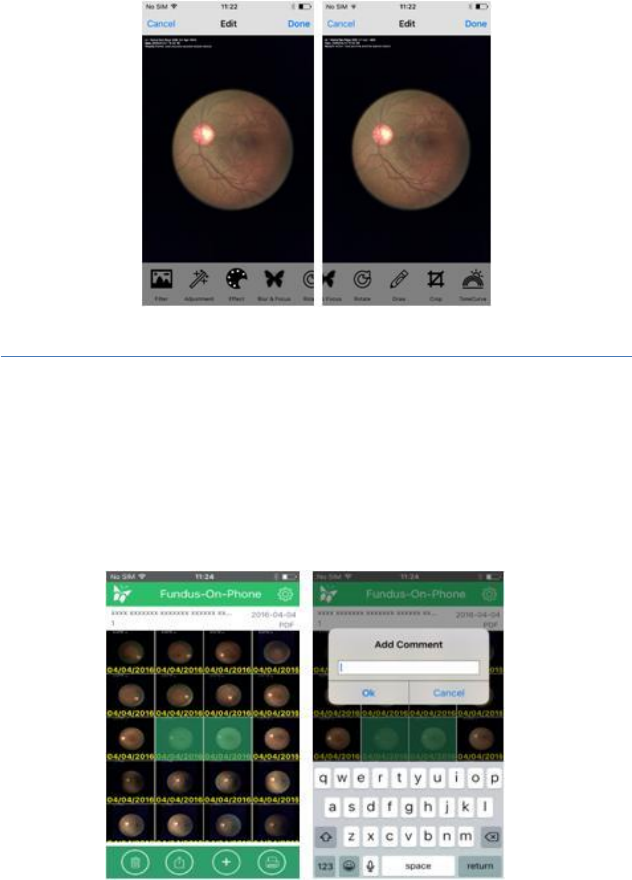
5. Image editing:
Images can be further modified for RGB colour and other edit func-
tions such as Image rotate, focus, blurr, Crop or Draw.
Figure 18- Image RGB EDIT function Screenshot
Fundus on Phone Non Mydriatic FOP NM-10
Instructions For Use 23 FOP-NM_IFU Rev 3.0
Figure 19- Image EDIT function Screenshot
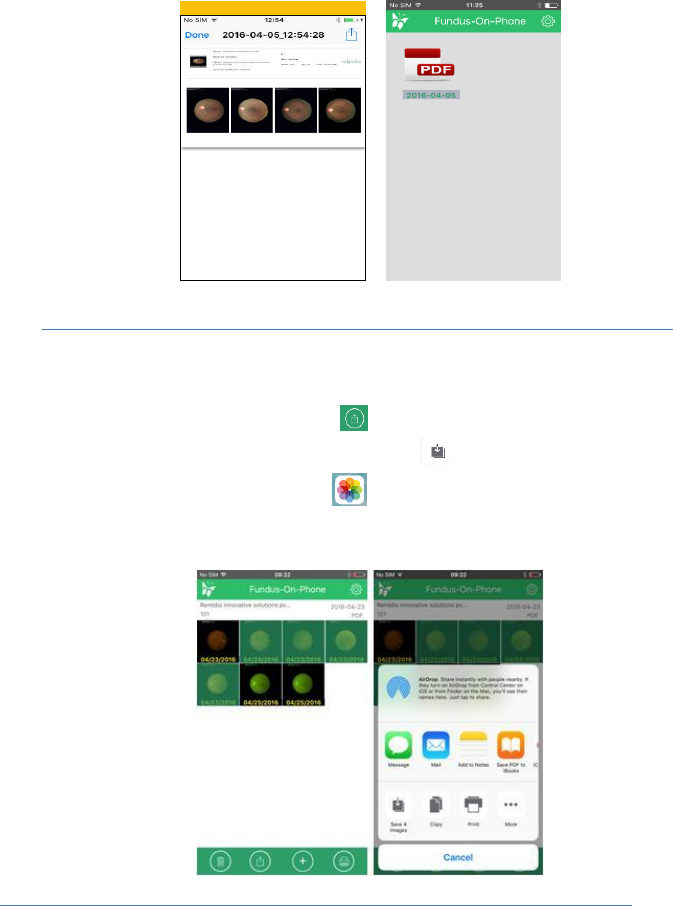
a) Image Print, Share, delete function:
b) Transfer the captured images using USB connection. Touch and
hold the image that needs to be shared.
c) Image highlights upon selection, can be shared or deleted or
printed as report. To create a PDF report, select printer symbol,
add desired comment in the comment field and print. Print the
report using wireless printer.
Fundus on Phone Non Mydriatic FOP NM-10
Instructions For Use 24 FOP-NM_IFU Rev 3.0
Figure 20- Image sharing, report and Print Screenshot
6. Data Backup procedure:
Go to patient folder and select the images that need to be trans-
ferred and select forward ( ), Screen will appear having save
image option, Select Save # Image ( ) Images now will be
present in Photo gallery ( ).Transfer the images to backup
system through Data cable.
Figure 21- Image sharing, report and Print Screenshot

Fundus on Phone Non Mydriatic FOP NM-10
Instructions For Use 25 FOP-NM_IFU Rev 3.0
Specifications
Parameter
Description
Imaging modalities
Non Mydriatic& Mydriatic
Photography modes
Color, Red free & Infrared
Field of view
45º
Optical magnification
10X (Eyepiece retinal view)
Diopter correction
-30D to +30D
Light Source
Infrared &Cool White LED
Infrared LED Intensity 9000 to 12000 Lux;
855nm wavelength
Cool white LED Intensity 6000 to 8000 Lux;
700 nm wavelength
Working Distance
33mm
Focus adjustment
Auto / Manual
ISO Range
ISO 100 to 800
Smart phone
Smart Phone with 8 MP camera and above
Environment
Storage Temperature -10ºC to 70ºC
Operating Temperature 0ºC to 45 ºC
Relative humidity 10% to 95%
Atmospheric Pressure 700 to 1060 h Pa
Operating Altitude upto 3000m
Power Supply
Medical grade external AC power adapter
AC Input: 100-240 Vac 47-63 Hz
DC Output: 9Vdc 2 Amps
Power: 18W Max
Battery
7.4V, 1500mAH Li-ion rechargeable battery
with 7 hours backup in Non-Mydriatic mode
& 3 hours backup in Mydriatic mode, Model
# 2S1P3SWS-003, Rajmane Telectric
Device dimensions
(W x D x H)
68mm x 248mm x 234mm
Weight
1.5kg
Fundus on Phone Non Mydriatic FOP NM-10
Instructions For Use 26 FOP-NM_IFU Rev 3.0

Fundus on Phone Non Mydriatic FOP NM-10
Instructions For Use 27 FOP-NM_IFU Rev 3.0
Warnings
1. Do not use this device in close proximity to heat or open flames.
2. Do not use this device in close proximity less than 33 mm with
the eye.
3. Keep away from dust and moisture.
4. Use only the AC-Power Adapter supplied with this device.
5. Do not use any solvent-based cleaners on the lens. Use only
clean optical grade cloth to clean the lens.
6. Turn ON the FOP NM device before cleaning the lens.
7. Do not touch the lens. Lens temperature can go up to 46º C
when the ambient temp is 45º C
8. Turn off the FOP NM device when it is not in use.
9. The adaptor has to be used on mains sockets with voltages as
specified for the device use only.
10. The FOP NM device contains no user serviceable or replaceable
parts. However, all the information for the Service Personnel
would be shared on request.
11. Ensure that the illumination light is not brighter than necessary.
Excessive discomfort may result in patient discomfort.
12. While using device on patients with media opacity, images may
sometimes have artefacts. User may need to take images in dif-
ferent angles to ensure lack of clinical relevance of the arte-
facts.
13. Do not use mydriatic imaging on undilated eye as this will com-
promise the image quality.
14. AC Power adapter to be disconnected from mains to isolate the
device.
15. Connect the FOP NM device to the AC power adapter when the
Battery Level Indicator LED starts blinking RED.
Fundus on Phone Non Mydriatic FOP NM-10
Instructions For Use 28 FOP-NM_IFU Rev 3.0
16. Replacement of Li-ion battery by inadequately trained personnel
could result in a hazard.
17. No modification of this equipment is allowed.
18. DO NOT USE more than one FOP NM device in the same room
to prevent RF interference.
19. Do not overtighten the phone holder to avoid optical misalign-
ment
20. Do not remove the front lens holder as it will result in dust on
the inner lenses leading to loss of image clarity.
21. Please do not remove the lens cap to prevent fungal growth
22. Only mild / neutral cleaning detergents to be used for cleaning
the plastic casing.
Fundus on Phone Non Mydriatic FOP NM-10
Instructions For Use 29 FOP-NM_IFU Rev 3.0
Usage and Maintenance
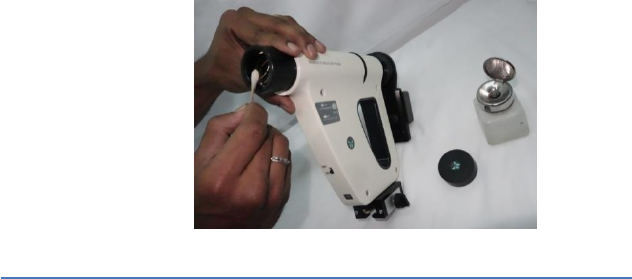
Cleaning of the Lens
1. Remove the lens cap.
2. Switch on the system so as to see the dust particles clearly.
3. Have in place cotton swab bud and acetone to clean the lens.
4. Dip the cotton swab in acetone and clean the lens by rotating
circularly starting from the center to outer diameter of the lens.
Figure 13- Images of the Retina on Smart Phone
5. Continue cleaning till the dust particles are completely re-
moved.
Fundus on Phone Non Mydriatic FOP NM-10
Instructions For Use 30 FOP-NM_IFU Rev 3.0
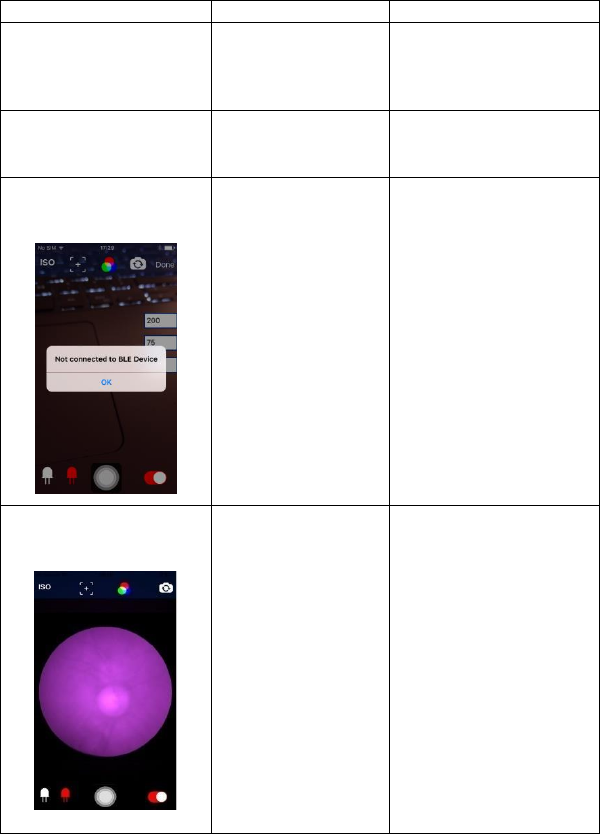
Trouble Shooting
Effect
Cause
Trouble Shooting
Artifacts in the live
view/saved images
Dust or Oil stains
or thumb impres-
sions or nose rubs
on objective lens
Refer the procedure
‘Cleaning of the Lens’
in the section ‘Usage
and Maintenance’
Dark images
Improper place-
ment of phone in
the phone holder
Align the phone
properly in the phone
holder figure 4) to 6)
“Not connected to BLE
device”
Message is dis-
played when FOP-
NM-10 is not con-
nected to smart
phone.
Please switch on the
system and execute the
app after two minutes
Captured Image in Pur-
ple in colour
IR light not syn-
chronized
Please contact the ser-
vice provider

Fundus on Phone Non Mydriatic FOP NM-10
Instructions For Use 31 FOP-NM_IFU Rev 3.0
Eye Safety:
FOP NM-10 has been tested against ISO 15004-2:2007– Ophthalmic Instruments –
Fundamental requirements and test methods Part 2: Light hazard protection. The
illumination levels of the device implementations have been shown to comply with
Group 1 classification as per the referenced standard. Group 1 ophthalmic instru-
ments require no external product labelling for light hazards.
FOP NM 10 is a class IIa product in accordance with MDD Council Directive
93/42/EEC.
Symbols found in the Smartphone device are not included. Please visit the
Smartphone manufacturer website for phone usage instructions.
FCC compliance statements:
(1) This device may not cause harmful interference, and
(2) This device must accept any interference received, including
Interference that may cause undesired operation
FCC Caution!!!
• Any changes or modifications not expressly approved by the party
Responsible for compliance could void the user's authority to operate this
Equipment

Fundus on Phone Non Mydriatic FOP NM-10
Instructions For Use 32 FOP-NM_IFU Rev 3.0
Symbols
Meets essential requirements of European Medical Device
Directive 93/42/EEC.
EC Rep
Manufacturer
Mandatory to refer instructions for use
Warning
Type BF applied part – Eye Cup
Applied part, is a part of the medical device that in normal use
necessarily comes into physical contact with the patient
Fragile, handle with care
Keep Dry
Waste Electrical and Electronics Equipment. Disposal of this
product in an unlawful manner may have a negative impact on human
health and on the environment. Therefore, when disposing of this prod-
uct, be absolutely certain to follow the procedure which conforms with
the laws and regulations applicable to your area.
Fundus on Phone Non Mydriatic FOP NM-10
Instructions For Use 33 FOP-NM_IFU Rev 3.0
Warranty
Remidio Innovative Solutions Pvt. Ltd. warrants the Fundus On
Phone Non Mydriatic (FOP NM) to be free of original defects in ma-
terial and workmanship and to perform in accordance with the
manufacturer's specifications for a period of one year from the date
of purchase. If this instrument or any component thereof is found to
be defective or at variance with the manufacturer's specifications
during the warranty period as solely determined by Remidio,
Remidio will repair or replace the instrument or components at no
extra cost to the purchaser.
This warranty only applies to the instruments purchased from
Remidio or its authorized distributors or representatives. Return the
instrument directly to Remidio or an authorized distributor. The
shipping costs needs to be borne by the shipper.
This warranty does not cover breakage or failure due to tampering,
misuse, neglect, accidents, modification or shipping, Fungal growth
on lens and is void if the instrument is not used in accordance with
manufacturer's recommendations or if opened, repaired or serviced
by any company other than Remidio or an authorized representative
of Remidio.
No other express or implied warranty is given.
Fundus on Phone Non Mydriatic FOP NM-10
Instructions For Use 34 FOP-NM_IFU Rev 3.0
Technical Support
For queries regarding the FOP NM Device, see
http://www.remidio.com/Contact.html
Contacts
Remidio Innovative Solutions Private Limited
No.108/E-3, 6th Main Road, 3rd Phase, Near TVS Cross,
Peenya Industrial Area, Bengaluru – 560058, INDIA
Email: contactus@remidio.com, Tel: +91 7676 759999
CEpartner4U BV
Esdoornlaan 13, 3951 DB Maarn,
THE NETHERLANDS
www.CEpartner4U.com
Part No. 3171560003
Instructions For Use 35 FOP-NM_IFU Rev 3.0

Instructions For Use 36 FOP-NM_IFU Rev 3.0
Remidio Innovative Solutions Pvt. Ltd.