Renaissance Learning RES-1001 Classroom Response System User Manual AccelTest SW man
Renaissance Learning, Inc Classroom Response System AccelTest SW man
Contents
- 1. Users Manual Part 0
- 2. Users Manual Part 1
- 3. Users Manual Part 2
Users Manual Part 2
![Assignment36AssignmentImporting Student Data into AccelTest If you have students in a database already, you may be able to import them into AccelTest. You can import students from three types of files: • Import from a Comma Separated Value (CSV) formatted file• Import from a Renaissance Learning LIS product (FMD) formatted file• Import from another AccelTest database (RBD) formatted file.1. To import students, click on the Gradebook menu and click Import Students.2. The Import Students Wizard (Assistant) opens.3. Click on the type of file you are importing. For example, if you want to import students from your Accelerated Reader database, you would click on “Import from a Renaissance Learning LIS product.” (This imports a .FMD file).Check the Note to ensure that you will not exceed your license capacity limit, when you import your students.Click [Next].4. The Import Students dialog box opens.](https://usermanual.wiki/Renaissance-Learning/RES-1001.Users-Manual-Part-2/User-Guide-588192-Page-1.png)
![Assignment37Assignment5. In the Import Students dialog box, navigate to the drive and folder where your Student.FMD file is located. A typical Renaissance Learning installation places the STUDENT.FMD file in the following location on your local Hard Drive or Network Drive: ALSDATA: COMMON FILES: STUDENT.FMD.Click on STUDENT.FMD and then [Open] or [Select].6. Confirm that the file and location are correct. Click [Next].7. In the Select Students dialog box, you will select the students to import. To import all of the students,click on the [Add All] button, and then the click the [Next] button.If you only want to import some of the students, first hold down the <Ctrl> key (Windows) or the <z> key (Macintosh) and then click on the students you want to import. You can also select a group of students by clicking on the first student name, holding down the <Shift> key, and clicking on the last student name. Click on the [Add] button, then the [Next] button.Note: If you want to add your students to sections as you import them, you must import students from one class at a time. Select students who will be added in the same section.WindowsMacintosh](https://usermanual.wiki/Renaissance-Learning/RES-1001.Users-Manual-Part-2/User-Guide-588192-Page-2.png)
![Assignment38Assignment8. The Add Students to Section dialog box opens. If you want to simply add the students without associating them with a class section, select the “Do not add the students into a section” option.If you have a class section you want to add the students to, select the “Add the students into an existing section” option, and click on the list to select the section.If you want to create a new section, select “Add the students into a new section” option. Click in the box and type in the new section name. After you have made your selection, click [Next].9. Review the information in the Summary dialog box. If it is correct, click the [Finish] button (Windows) or the [Done] button (Macintosh). If not, click the [Back] button and make corrections.](https://usermanual.wiki/Renaissance-Learning/RES-1001.Users-Manual-Part-2/User-Guide-588192-Page-3.png)
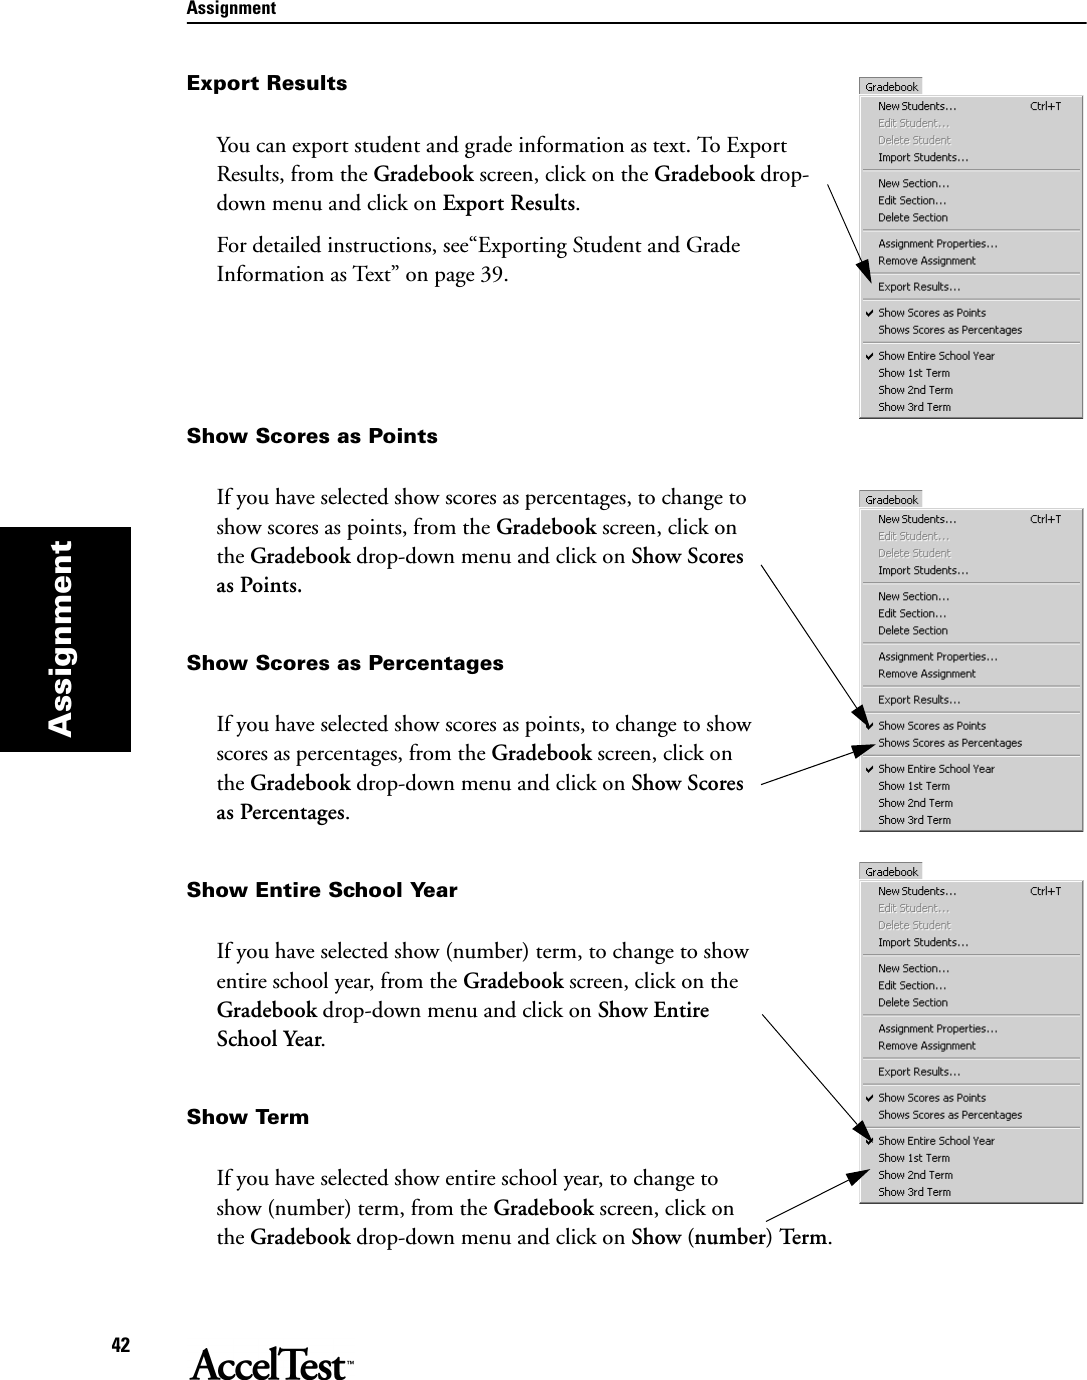
![Assignment39AssignmentExporting Student and Grade Information as TextFollow these steps to export student and grade information as a text file. You must be in the Gradebook to export this information. The text file is tab-delimited so you can use it in a spreadsheet program.1. If you are not already in the Gradebook, open it. From the Getting Started screen, click on [Gradebook]. 2. To export information for an assignment, click in the top of the column for the assignment. Then click in the Gradebook drop-down menu and click Export Results.3. Choose the drive and folder for the export file. Type a name for your file, ending in .txt. Click [Save].4. When the export is complete, the program will notify you. Click the [OK] button.New Section1. If you need to add a new class section, go to the Gradebook menu and click New Section.2. In the New Section dialog box, type the name of the new section in the Name box. 3. You can enroll students in your new section.To enroll all of the students, click on the [Add All] button, and then the [Next] button.If you only want to enroll some of the students, first hold down the <Ctrl> key (Windows) or the <z> key (Macintosh) and then click on the students you want to import. You can also select a group of students by clicking on the first student name, holding down the <Shift> key, and clicking on the last student name. Click on the [Add] button, then the [Next] button.First: Choose the drive and the folder where you want to save the export file. Second: Type a name for the file.Third: Click [Save].](https://usermanual.wiki/Renaissance-Learning/RES-1001.Users-Manual-Part-2/User-Guide-588192-Page-4.png)
![Assignment40AssignmentEdit SectionTo edit a section (add or remove students) from the Gradebook screen, click on the All Sections drop-down menu and select the section you want to edit.In the Gradebook drop-down menu, click on Edit Section.In the Edit Section dialog box, if you are adding students, look in the Students to choose from column. If you are deleting students, look in the Students enrolled in column.To add (or delete) all of the students, click on the [Add All] (or [Delete All]) button, and then click the [OK] button.If you only want to add (or delete) some of the students, first hold down the <Ctrl> key (Windows) or the <z> key (Macintosh) and then click on the students you want to add (or delete). You can also select a group of students by clicking on the first student name, holding down the <Shift> key, and clicking on the last student name. Click on the [Add] button, then the [OK] button.](https://usermanual.wiki/Renaissance-Learning/RES-1001.Users-Manual-Part-2/User-Guide-588192-Page-5.png)
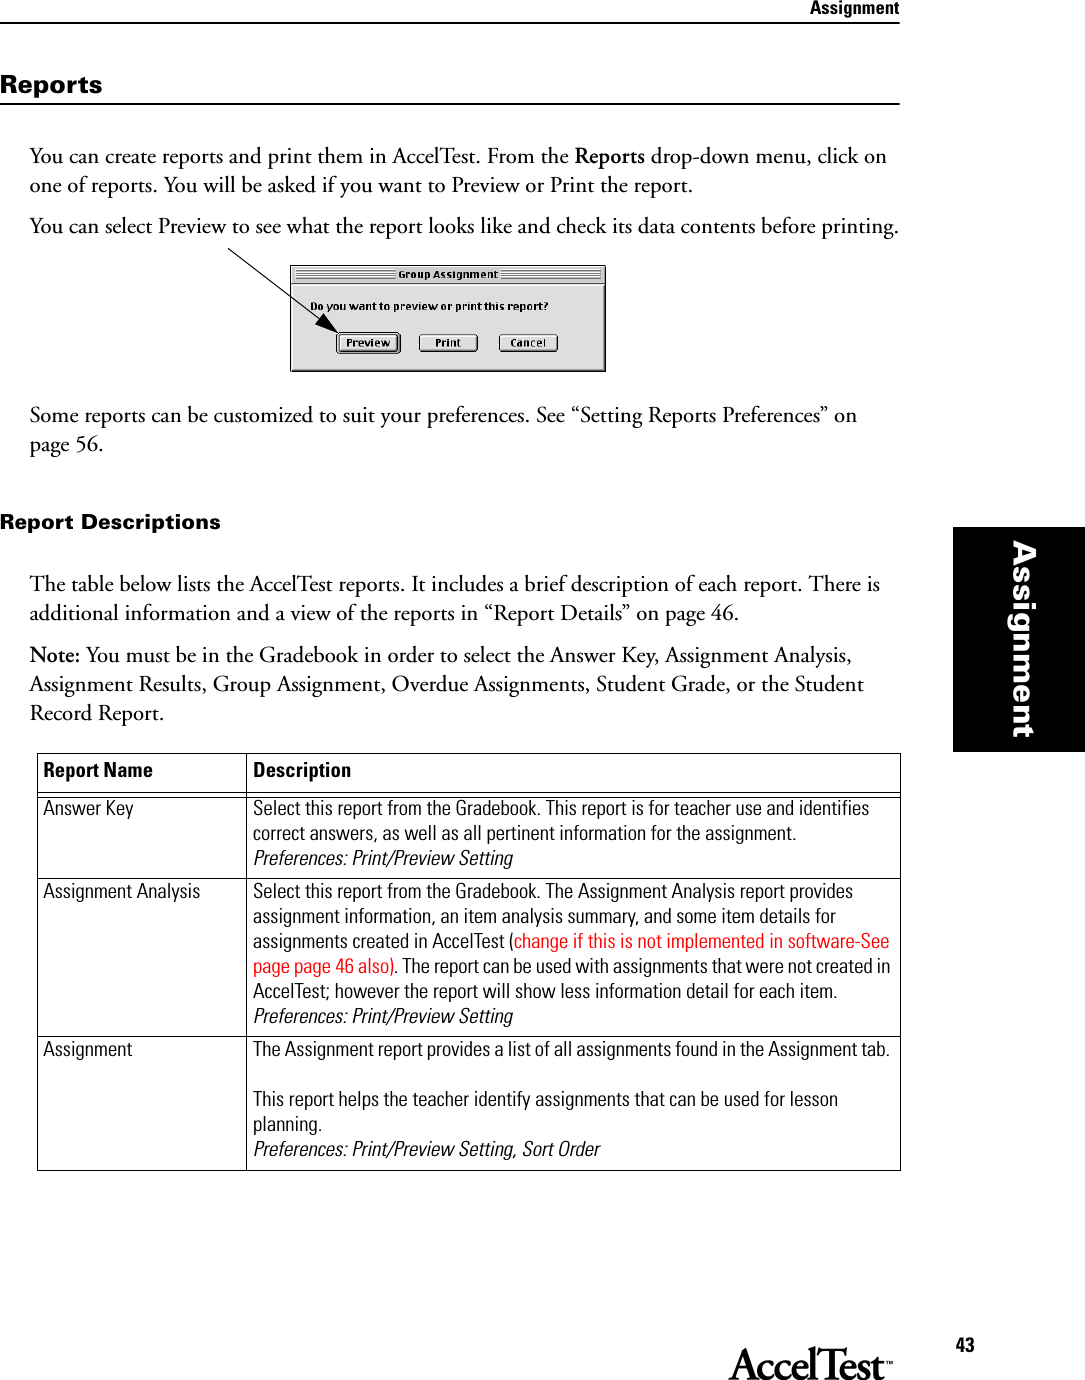
![Assignment41AssignmentDelete SectionTo delete a section from the Gradebook screen, click on the All Sections drop-down menu and select the section you want to delete. (Students and their grades remain in the Gradebook after their section is deleted.)In the Gradebook drop-down menu, click on Delete Section.When asked if you want to delete the section, click [Yes].Assignment PropertiesTo set assignment properties for an assignment, click on the column heading for the assignment in the Gradebook screen. Click on the Gradebook menu and click Assignment Properties. Refer to Assignment Editor Properties information. See page 77 for detailed information and instructions.Remove AssignmentTo remove an assignment, click on the column heading for the assignment in the Gradebook screen. Click on the Gradebook menu and click Remove Assignment. A warning appears stating student records for the assignment will be lost; to remove assignment anyway, click [Yes].](https://usermanual.wiki/Renaissance-Learning/RES-1001.Users-Manual-Part-2/User-Guide-588192-Page-6.png)
![Gradebook50GradebookPreferencesUsing the AccelTest preferences, you can adjust how AccelTest works for your school. The table below lists the preferences in AccelTest and tells you how to change them. The preferences are available in the Preferences menu. Preference What it does How to change itSchool Year Use this preference to enter your school year information, including start and end dates for the school year, number of terms, start and end dates for terms, and, if applicable, number of terms per semester. Changing the school year affects the calculation of student grades. Your school year should be completely set up before you start scoring student assignments. 1. Click on the Preferences menu and select School Year.2. The School Year Assistant (Wizard) dialog box will open. Click [Next].3. Enter the Start and End dates for your school year, and click [Next].4. Select the number of terms in your school year and click [Next].5. Enter the Start and End date for each term and click [Next]. 6. If your terms are grouped into semesters, select the number of terms per semester and click [Next].7. Check the information in the Summary and click on the [Back] button to edit if needed. Click the [Done] button.Subjects Use this preference to add subjects, edit subjects, or delete subjects.1. Click on the Preferences menu and select Subjects.2. The Subjects dialog box will open.• If you are adding a subject, click on the [Add] button and type the name of the subject you want to add. • To edit a subject, scroll down the list until you find the subject, and click on it. Then click the [Edit] button, and make changes.• To delete a subject that is not being used, scroll down the list to find the subject, and click on it. Then click the [Delete] button. Subjects being used cannot be deleted.3. Click the [OK] button.](https://usermanual.wiki/Renaissance-Learning/RES-1001.Users-Manual-Part-2/User-Guide-588192-Page-15.png)
![Gradebook51GradebookCategories Use this preference to create or change categories for assignments you include in your Gradebook.• Create or edit categories• Assign weight to each category• Decide whether or not to drop worst grade for each category• Decide how much extra credit should be worth.• Select Total Points Earned or Category Weights to calculate grades.1. Click on the Preferences menu and select Categories.2. The Categories dialog box will open.• Edit an existing category by clicking the box or Type in a new category in a blank field.• In the Calculate Grades Using section, select “Category Weights” or “Total Points Earned.”• Edit or type in a weight value (if using category weights) and click on the “Drop Worst Score” box, if applicable. 3. When you have finished adding or changing your category preferences, click the [OK] button.Grading Scale Use this preference to select the grading scale used in calculating grades.1. Click on the Preferences menu and select Grading Scale.2. The Grading Scale dialog box will open.3. Select one of the options from the Grading Scale menu. 4. You can change the numerical value(s) for the grading scale option you selected.5. When you have finished changing your grading scale preferences, click the [OK] button.Exams Use this preference to set the percent that the exam weights the grade, and also decide if the grade is the Term Grade, Semester Grade, or Final Grade (default).1. Click on the Preferences menu and select Exams.2. The Exams dialog box will open. Select a Grade option to match your school’s program.3. The default setting is 25 percent of the selected grade. If you want to change the percent, type in a different percent in the “Exams are...” blank.4. When you have finished changing your Exam preferences, click the [OK] button.Preference What it does How to change it](https://usermanual.wiki/Renaissance-Learning/RES-1001.Users-Manual-Part-2/User-Guide-588192-Page-16.png)
![Gradebook52GradebookPassword The password preference lets you change the password to maintain AccelTest security. You should change the default admin password to a password of your choice after AccelTest is installed.1. Click on the Preferences menu and select Password.2. The Change Password dialog box will open. 3. Type in your current password in the Current Password box, then press <Tab>. Type in your new password in the New Password box, press <Tab>, and then type your new password in the Confirm Password box. 4. When you have finished changing and con-firming your Password preference, click the [OK] button.Preference What it does How to change it](https://usermanual.wiki/Renaissance-Learning/RES-1001.Users-Manual-Part-2/User-Guide-588192-Page-17.png)
![Gradebook53GradebookScanner Settings Use this preference to set the scanner port setting, and the scanner sensitivity. Port Setting: First, make certain the scanner is installed according to the instructions in the AccelScan User’s Guide.• Start your computer and AccelTest. If AccelTest does not detect the scanner, you may need to manually set the scanner port setting to the computer port you have connected your AccelScan to.Sensitivity Setting: You may need to adjust scanner sensitivity to allow for differences in the way students mark scan cards. If the AccelScan is too sensitive to stray marks, decrease the sensitivity. If the AccelScan does not recognize some marked answers, increase the sensitivity.• If AccelTest still does not detect the AccelScan scanner, confirm that your computer system specifications meet the requirements in “Where to Find the System Requirements” on page 6. 1. Click on the Preferences menu and select Scanner Settings.2. The Scanner Settings dialog box will open. • To manually set the Port setting, click on the Port drop-down list and click on the appropriate computer port. • To change the scanner sensitivity click on the pointer and move it to change the sensitivity.3. Click the [OK] button.Preference What it does How to change itClick to select a different port.Macintosh: Move the slide to change AccelScan sensitivity.Click to select a different port.Windows: Move the slide to change AccelScan sensitivity.](https://usermanual.wiki/Renaissance-Learning/RES-1001.Users-Manual-Part-2/User-Guide-588192-Page-18.png)
![Gradebook54GradebookReports The following reports have settings you can change:• Answer Key Print/Preview Setting preference• Assignment Analysis Print/Preview Setting preference Display Item Details• Assignment Print/Preview Setting preference Sort Order preference• Assignment Results Print/Preview Setting preference Questions to display Show correct answers Auto print after student score Batch print report• Free Response Grading Worksheet Print/Preview Setting preference• Gradebook Summary Print/Preview Setting preference• Group Assignment Print/Preview Setting preference Sort Order preference• Overdue Assignments Print/Preview Setting preference• Program Information Print/Preview Setting preference• Student Grade Print/Preview Setting preference• Student Record Print/Preview Setting preference Page Break after student preferenceFor more detailed information and instructions, see “Setting Reports Preferences” on page 56.1. Click on the Preferences drop-down menu and go to Reports. 2. Click on the report you want to set preferences for.3. In the Report Options Dialog Box, make your changes and click [OK].Preference What it does How to change it](https://usermanual.wiki/Renaissance-Learning/RES-1001.Users-Manual-Part-2/User-Guide-588192-Page-19.png)
![Gradebook55GradebookAssignment CreationThis preference includes several settings that allow you to customize your assignments.The Assignment Creation preference includes:• Favorite Item Types• Default Fonts• Variations• Multiple Choice• True/False• Yes/No• Matching• Ranking• Modified True/False• Numeric Response• Fill in the Blank• Short Answer• EssayFor more detailed information and instructions, see “Setting Assignment Creation Preferences” on page 58.1. Click on the Preferences drop-down menu and go to Assignment Creation.2. Find the setting in the drop-down menu that you want to change and click on it.3. Make your changes and then click [OK].Preference What it does How to change it](https://usermanual.wiki/Renaissance-Learning/RES-1001.Users-Manual-Part-2/User-Guide-588192-Page-20.png)
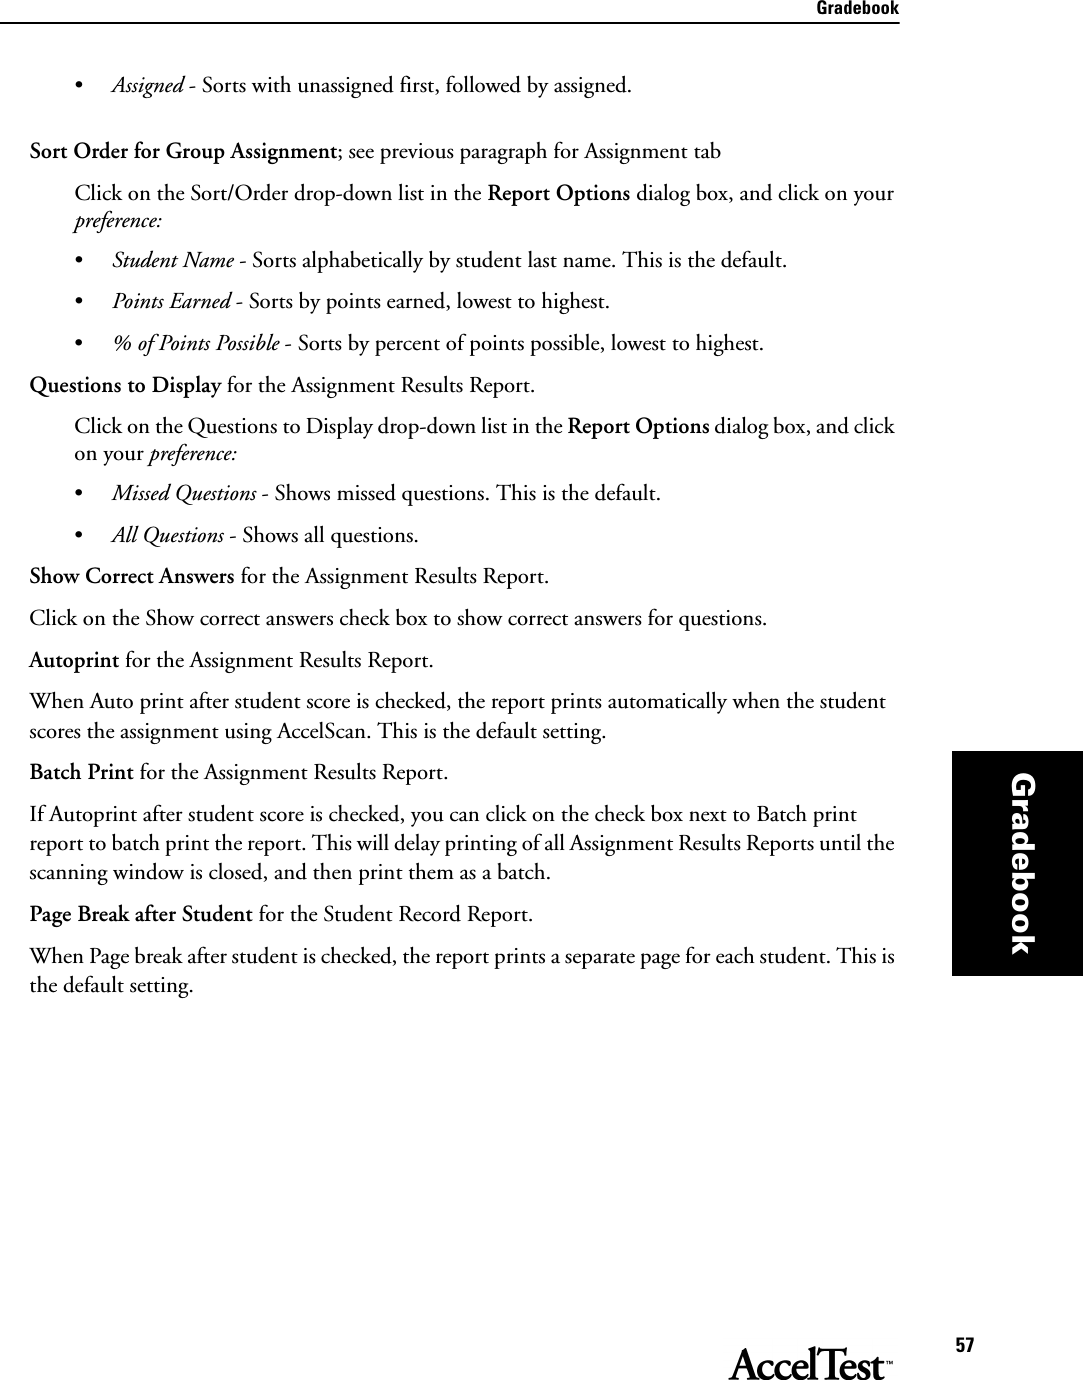
![Gradebook56GradebookSetting Reports PreferencesYou can change your reports preferences. To change your Report Preference settings, follow these steps.1. Start AccelTest. From the Getting Started screen, click on the Preferences drop-down menu and go to Reports.2. Click on the report you want to set preferences for.3. In the Report Options Dialog Box, make your changes and click [OK].Print PreviewOne is Print/Preview setting, available for all reports. Print/Preview determines what happens when you print your report. There are three choices available:•Ask - asks if you want to preview or print the report selected. This is the default.•Always Preview - always shows preview before you start to print.•Always Print - always prints without asking or showing preview first.Sort/OrderAnother option that can be set is for Sort Order. The setting for Sort Order determines how the information in the report is sorted. The Assignment and the Group Assignment reports are the only two reports that allow you to set how they are sorted. Since the reports differ, the options available differ as well. Sort Order for Assignment tab; see Sort Order for Group Assignment, on the following page.Click on the Sort Order drop-down list in the Report Options dialog box, and click on your preference: •Title - sorts list by title. This is the default.•Modification Date - sorts list by modification date, oldest to newest.•Total Points - Sorts list by total points, lowest to highest.](https://usermanual.wiki/Renaissance-Learning/RES-1001.Users-Manual-Part-2/User-Guide-588192-Page-21.png)
![Gradebook58GradebookSetting Assignment Creation PreferencesYou have many options available when you create your assignments in AccelTest. These options range from what item types appear in the opening screen (Favorite Item Types) when you create your assignment, to the instructions, number of points and number of answer lines provided for an essay assignment.The instructions in steps 1-3 apply to every setting. Detailed descriptions for each setting, from Favorite Item Types to Essay, follow step 3.1. Click on the Preferences drop-down menu and go to Assignment Creation.2. Find the setting in the drop-down menu that you want to change and click on it.3. Make your changes and then click [OK].• Favorite Item Types:When you create your New Assignment in the Assignment tab, notice that there are four item types on the New Assignment dialog box. (See “Creating Questions for a New Assignment” on page 64.) To change any of the items in the New Assignment dialog box, use steps 1-3 above and select what four types of items appear using the Favorite Item Types setting. Note: Items you remove can be found by clicking [More Item Types] in the New Assignment window.In the Assignment Creation Options dialog box, click on an item you want to remove under Favorite item types, and click [Remove]. Then click on the item type you want to add under Item types to choose from, and click [Add]. Your choice appears under Favorite Item types. Repeat to change other item types.](https://usermanual.wiki/Renaissance-Learning/RES-1001.Users-Manual-Part-2/User-Guide-588192-Page-23.png)
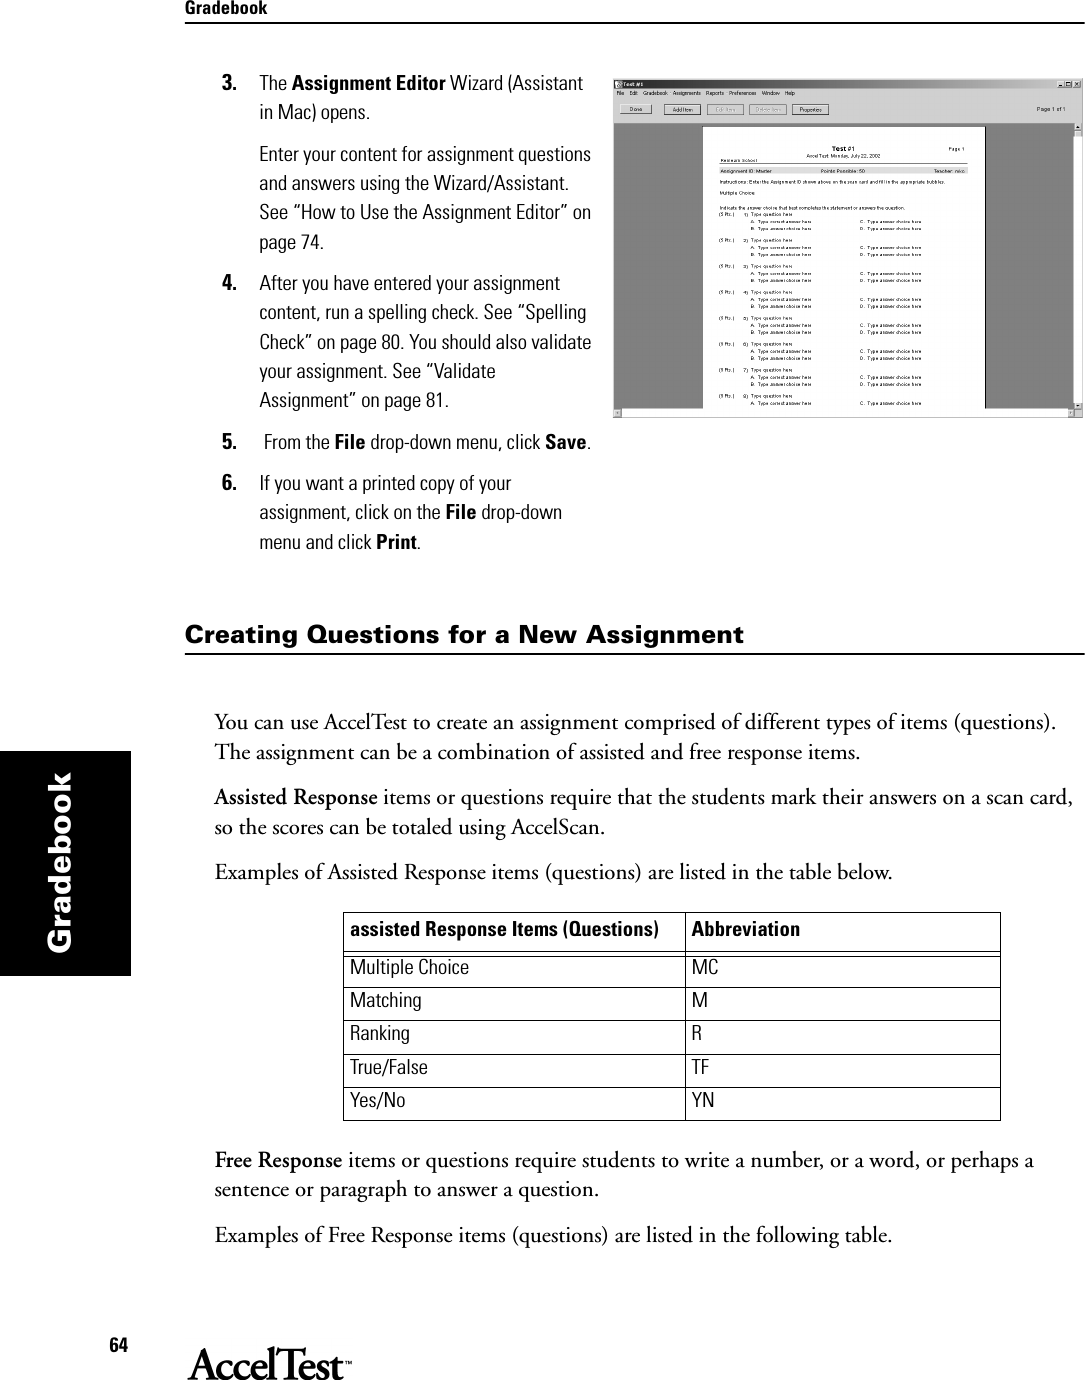
![Gradebook63GradebookUsing Quick Assignment in AccelTest The Quick Assignment feature lets you quickly create multiple choice assignments (tests, homework, etc.) in AccelTest.• You will first enter title, subject, total points and number of items.• You can then enter your question and answer content. 1. To use Quick Assignment, start AccelTest and click on the Assignment tab in the Getting Started screen.In the Assignment tab screen click on the [Quick Assignment] button.In the Quick Assignment screen, type your assignment title in the Title box.In the Subject drop-down list, select your subject.Enter a number for the total assignment points in the Total Points box.In the Multiple Choice Items box, type the number of items (questions) you want.In the Your Assignment Will Have section, you will see the number of items, points per item and total points for your assignment. Click [OK].2. A progress bar appears to indicate AccelTest is creating your assignment. Using AssignmentsReplace with 4 tabs panel](https://usermanual.wiki/Renaissance-Learning/RES-1001.Users-Manual-Part-2/User-Guide-588192-Page-28.png)
![Gradebook65GradebookWhen you create your assignment, you specify the item type and number, as well as the points per question. AccelTest displays a running total of the points for each assignment as you go through the list and select the types of items you want.1. Start AccelTest and click on the Assignment tab button in the Getting?? Started screen.2. In the Assignment dialog box, click on [New Assignment].3. In the New Assignment dialog box, type your title in the Title box.At Subject, click on the drop down list and click on your subject. Under Item Types, find the types of items you want to use. Click [More Item Types] for additional types. Note: You can specify your own favorite Item Types that appear in this screen. See “Setting Assignment Creation Preferences” on page 58.4. In the expanded New Assignment dialog box, fill in the boxes that are applicable for your new assignment.For example, if you will have Matching (or Ranking) Item Types, enter the number of items in the box under “Number of items.” Free Response Items (Questions) AbbreviationEssay EFill in the Blank FModified True/False MTFShort Answer SANumeric Response NRReplace with 4 tabs panel](https://usermanual.wiki/Renaissance-Learning/RES-1001.Users-Manual-Part-2/User-Guide-588192-Page-30.png)
![Gradebook66GradebookThe maximum number of item choices for Matching or Ranking is 9 per group. If the number of items needed is greater than 9, divide the number by 9 to determine the number of groups, rounded up to the nearest whole number. For example, for 15 items, when you divide by 9, you will get 1.66. This means you need 1 group + 1, rounded up to 2 groups. Under Number of Items, enter numbers for Multiple Choice, Matching, Numeric Response, etc., if applicable.Then, enter numbers for points under Points Per Item, where applicable.Note the total Number of Items and the point Total change as you fill in the boxes. 5. When you have entered all of the applicable information, click on [OK]. 6. The Assignment Editor Wizard/Assistant will open. See “How to Use the Assignment Editor” on page 74.Creating New Score Key for Existing AssignmentYou can utilize existing assignments and create a score key for them. For this example, assume that you are using 25 multiple choice questions at the end of Chapter 3 in a History textbook. • If you are going to enter your answers at the computer complete steps 1 and 2, then skip to steps 6 through 7. • If you are going to create a scan card by hand, read the information in the Hint below, then complete steps 1 and 3 through 7.Hint: If you want to create a score key scan card when you are away from your computer, write it up by hand and use AccelScan to scan your answers in to AccelTest when you return. You can use any number of questions from 1 to 25 for the short scan cards, and 1 to 50 for the long scan cards.](https://usermanual.wiki/Renaissance-Learning/RES-1001.Users-Manual-Part-2/User-Guide-588192-Page-31.png)
![Gradebook67GradebookOn an AccelTest scan card, write the name of your Assignment on the Name line. Next, on the same AccelTest card, mark the ANSWERS to the questions by filling in the bubbles with the correct answers. For example, the answer to question 1 is “B” and 2 is “A” and so forth. Fill in the appropriate bubbles for all of your questions. Follow steps 1 and 3 through 7 to use the hand entered card.1. Start AccelTest. In the Getting Started screen, click on Assignment tab. In the Assignment screen, click on [New Score Key].In the New Score Key Assignment dialog box, enter your assignment title in the Title box.In the Subject drop-down list, select your subject.In the Assisted Response and Free Response sections, fill in the boxes applicable for Number of Items and Point Value. Click [OK].2. The CHAPTER 3, 25 QUESTIONS screen appears, showing a blank scan card. a. Indicate the ANSWERS to the questions. At item 1 click on the A, B, C, etc. bubble to indicate the answer that is correct. b. When you click on the bubble to select your answer, the point value for the item appears on the right side. You can set point values for individual items here, by clicking in the value and typing the value you want this question to have. c. When you have selected the answer by clicking on the appropriate bubble, (and, if necessary, adjusted the point value), go on to the next item (question). Go directly to step 6 when all of the assisted response question’s answers have been entered.](https://usermanual.wiki/Renaissance-Learning/RES-1001.Users-Manual-Part-2/User-Guide-588192-Page-32.png)
![Reports68Reports3. If you did fill out the bubbles on a scan card, click on the [Scan Form] button at the top. Then, go to step 4. 3. The Scan Answer Key screen appears.4. Insert the AccelTest scan card you have filled in, with the arrow pointing toward the AccelScan.5. In a moment, the answers that you filled in on your card (or typed on your computer) will show up on the screen.](https://usermanual.wiki/Renaissance-Learning/RES-1001.Users-Manual-Part-2/User-Guide-588192-Page-33.png)
![Reports69Reportsthat per-mits you, the teacher, to If you see errors on the form, correct them. Simply click on the question number needing correction and then click on the incorrect answer, to unselect it. The bubble will become white again. Next click on the bubble for the correct answer to select it (darken the circle). When the card is correct, click [Done]. 6. When you are asked to save changes, click [Yes]. You now have an answer key for grading this assignment. AccelTest will automatically assign a 3-digit number to your assignment when it is assigned in the Gradebook.To prepare AccelTest for students to score their scan cards, see “Preparing AccelTest for Students to Score Scan Cards” on page 16.Note: Only assisted response items are entered on the scan card. Free response items must be graded by the teacher and the scores entered through the gradebook.Combinations of assisted response and free response assignments allow assisted response item scanning by the students or teacher. The scanned, assisted response portion of the assignment gets entered in the Gradebook. AccelTest scores free response items at 100 percent correct, until the teacher grades and adjusts scores.For instructions on editing a score key, see “Teacher Instructions for Editing a Score Key” on page 70.](https://usermanual.wiki/Renaissance-Learning/RES-1001.Users-Manual-Part-2/User-Guide-588192-Page-34.png)
![Reports70ReportsTeacher Instructions for Editing a Score KeyBefore editing a score key you must make certain it is not assigned to any students. Check the Assigned column; Yes indicates it is assigned to one or more students. If No is in the Assigned column, it is not assigned and can be edited. If you want to edit an assignment (and the score key for an assignment) you created in the Assignment tab, go to the Assignment tab and edit the assignment. See “How to Use the Assignment Editor” on page 74. When you save your changes, any changes you made that changed score key answers will be reflected in the score key.If you have a score key for an existing assignment that was not created in the Assignment tab, you can edit the score key. The assignment Type will be Score Key in the Assignment tab. The Score Key is the only part of a Score Key assignment in the Assignment tab.To edit a Score Key assignment, click on the assignment and click [Edit].AccelTest opens your score key.](https://usermanual.wiki/Renaissance-Learning/RES-1001.Users-Manual-Part-2/User-Guide-588192-Page-35.png)
![Reports71Reportsthat per-mits you, the teacher, to When your score key appears you can start editing. If you want to add an item, click on [Add Items]. In the Add Items dialog box, find Assisted Response if you are adding assisted response items. Type in the item numbers in Items to Add box. Then type in the point value in the Point Value box. If you are adding free response items, under Free Response, type in the Items to Add and Point Value there as well. Click on [OK] when finished.To delete an item, click on the item you want to delete, and then click on [Delete Items].](https://usermanual.wiki/Renaissance-Learning/RES-1001.Users-Manual-Part-2/User-Guide-588192-Page-36.png)
![Reports72Reports To correct an incorrect answer for an item, simply click on the item number needing correction and then click on the incorrect answer to unselect it. The bubble will become white again. Next click on the bubble for the correct answer to select it.To set points, click on [Set Points].For Assisted Response items, type the point value in the Point Value box.For Free Response items, type the point value in the Point Value box.Click on [OK] when finished.If you want to edit the title or subject, simply click on the [Properties] button. In the Save Assignment dialog box, type new Title information, and from the Subject drop-down list, select your subject. Click [OK] when done.Creating New Points Only AssignmentPoints Only information can be recorded in this assignment. An example would be oral participation in the class. Only teachers do scoring in the Points Only assignments. Students do not do any scoring of scan cards for this type of assignment.For detailed instructions on creating a Points Only assignment, see steps 1 through 5 on page 73.](https://usermanual.wiki/Renaissance-Learning/RES-1001.Users-Manual-Part-2/User-Guide-588192-Page-37.png)
![Reports73Reportsthat per-mits you, the teacher, to 1. To create a Points Only Assignment, from the Assignment tab click on [New Points Only]. 2. In the New Points Only dialog box, type your assignment title in the Title box.3. Select your subject in the Subject drop-down menu, and then enter the points in the Points box.4. Click [OK]. 5. Your Points Only Assignment will need to be added to the Gradebook. Go to the Gradebook and add this points only assignment. You can enter student scores in the Gradebook.](https://usermanual.wiki/Renaissance-Learning/RES-1001.Users-Manual-Part-2/User-Guide-588192-Page-38.png)
![Reports74ReportsHow to Use the Assignment EditorThe Assignment Editor allows you to input the content of your assignment items (questions). To start entering or editing your item content, click on the first item you want to edit and click [Edit]. Note: Once you have created your assignments, you can use the Assignment Editor to edit and update them, with class and subject content changes. Assignments already given to students cannot be edited, but you can edit a copy.Assignment Editor ButtonsYou can use the buttons at the top of the Assignment Editor to navigate within your assignment, edit content, and adjust your assignment’s appearance.Add Item - Click at the location where you want to add an item and then click on the [Add Item] button.In the Add Item dialog box, select the type of Assisted Response or Free Response item to add. Click [OK].Remember that adding items will change your total points for the assignment. The added items have a default point value of 1, which you can adjust at the same time you edit your item to insert content.Note: Added items may not appear where entered. Items of similar type are kept together. If you add a True/False item in the midst of a number of Multiple Choice items, it will appear after the last Multiple Choice item.Assignment Editor Buttons](https://usermanual.wiki/Renaissance-Learning/RES-1001.Users-Manual-Part-2/User-Guide-588192-Page-39.png)
![Preferences75PreferencesEdit Item - Use the Edit Item button to modify, add and delete information in your assignment. Simply click at the location where you want to make your change.In the area where you click, lines of your assignment content will be highlighted in yellow. You can highlight the type of assignment and instructions, or any individual, numbered item. Enter & Edit Text: When you click on Edit Item, you will go to an edit screen to enter or edit text that is highlighted. Your new text replaces the highlighted text when you type. This is what the edit screen looks like.Moving: To move the highlight forward in the edit screen, use your keyboard <tab> key. Use <Shift> + <Tab> keys to move back. You can also move by clicking on a word or field.Cancelling Changes: If you make a mistake editing an item, and want to go back to your original, click [Done] and then [Don’t Save]. Saving changes & Moving between Items: To save your changes, and move to the next block of text in your assignment, click on the [Next] button. Clicking on [Previous] also saves your changes, and lets you move back to a previous block of text. At the last item you edit, click [Done] and then [Save]. Graphics: To import a graphic in your assignment, click on the [Import Graphic] button. For more information see “Importing Graphics Files in an Assignment Item” on page 78.Text Content: To make a change to the highlighted text, simply type in your new text.Item choices & Columns: Go here to change the number of choices for each item, or select 1, 2, or 3 columns for the item. To Import Graphics click here.Shuffle Item Choices: If you do not want to shuffle an item’s choices, select None. Other options vary with number of answer choices.Text format: Change the font, size and select boldface, italic and underline.](https://usermanual.wiki/Renaissance-Learning/RES-1001.Users-Manual-Part-2/User-Guide-588192-Page-40.png)
![Preferences76PreferencesCorrect Answer at A: Notice as you type in your assignment items, that by default, you always type your correct answer at A. This makes assignment data entry easy. • AccelTest can shuffle your item answers so that the correct answer will not always be A on the assignment the students receive. • The Shuffle drop-down menu allows you to select, for each individual item, None (no shuffle), a-b shuffle, and a-c shuffle (with default 4 answer choices). All (shuffle all) is the default setting.• If you have selected more item answers (click on the Choices drop down menu), your shuffle options increase correspondingly up to 9, and decrease if you selected less than 4.Setting “Type correct answer here” Position: You can change an item’s correct answer position from the default A to B, for example.If you want to change the position of your correct answer to B, for example, click on the answer field for B and type in your correct answer; then, enter a Distracter (incorrect answer) in A. Next, click on the Answer field, below your answer choices, and replace A with B. Changing Item Point Value: To change an item’s point value, click on the Points field, and enter the new point value. The total points for the Assignment will reflect this items point change.Saving Changes: Click on the [Done] button and then [Save] to save changes.To give this assignment to your students, see“Add Assignments to Gradebook and Assign to Students” on page 21. Note: By default, student copy variations will show different positions (letters) for the corrent answer with All selected in the Shuffle drop down menu.](https://usermanual.wiki/Renaissance-Learning/RES-1001.Users-Manual-Part-2/User-Guide-588192-Page-41.png)
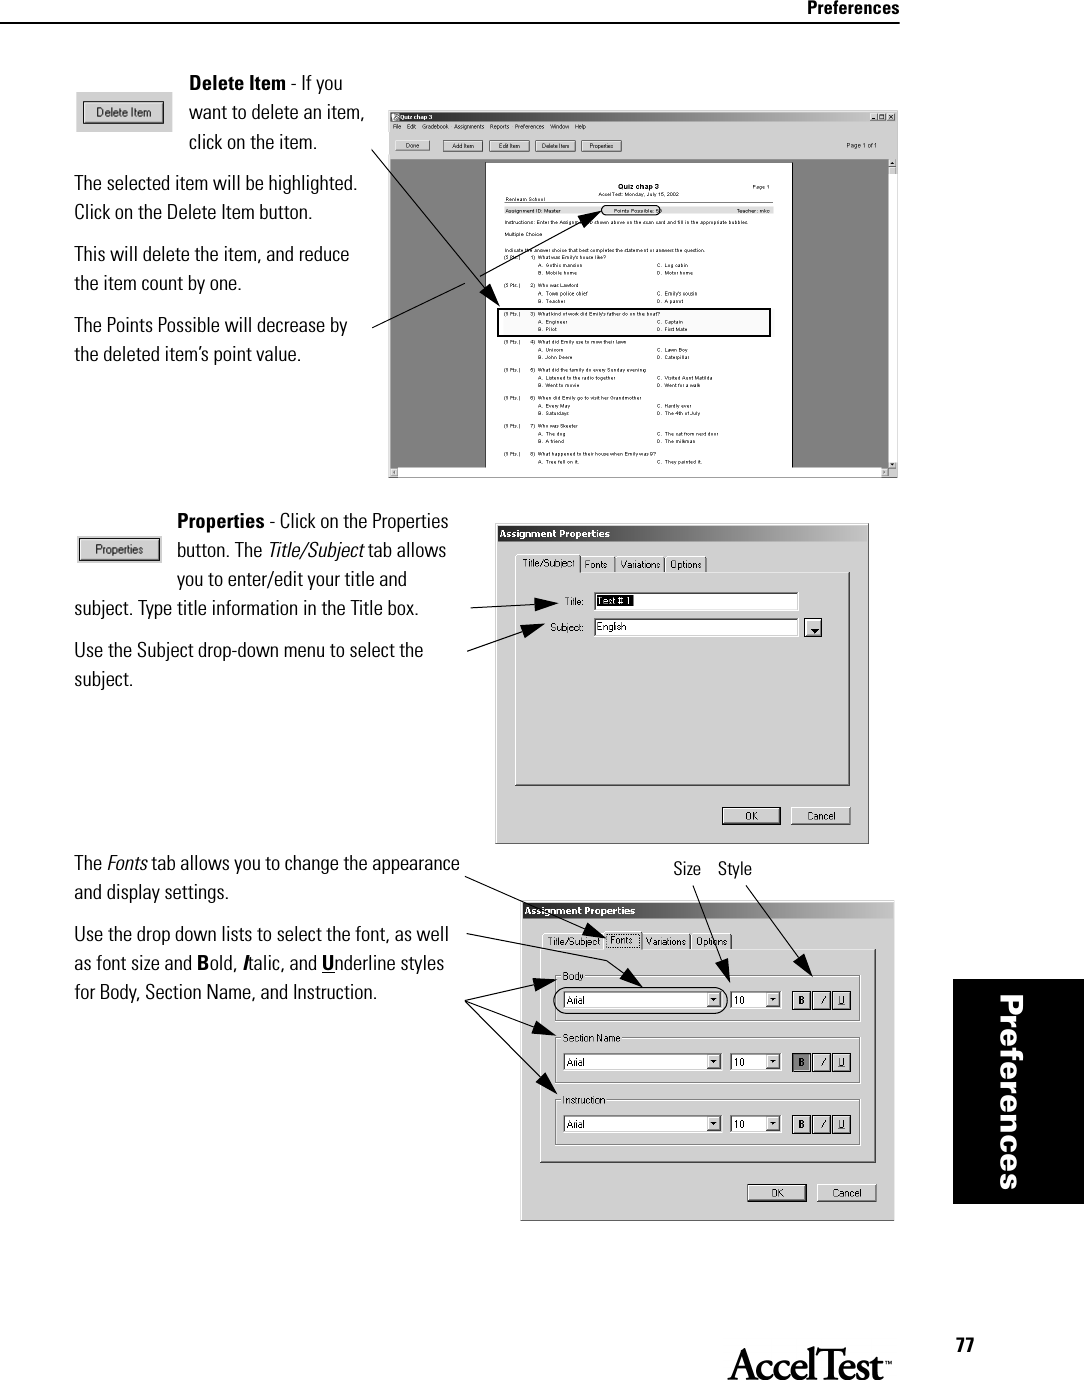
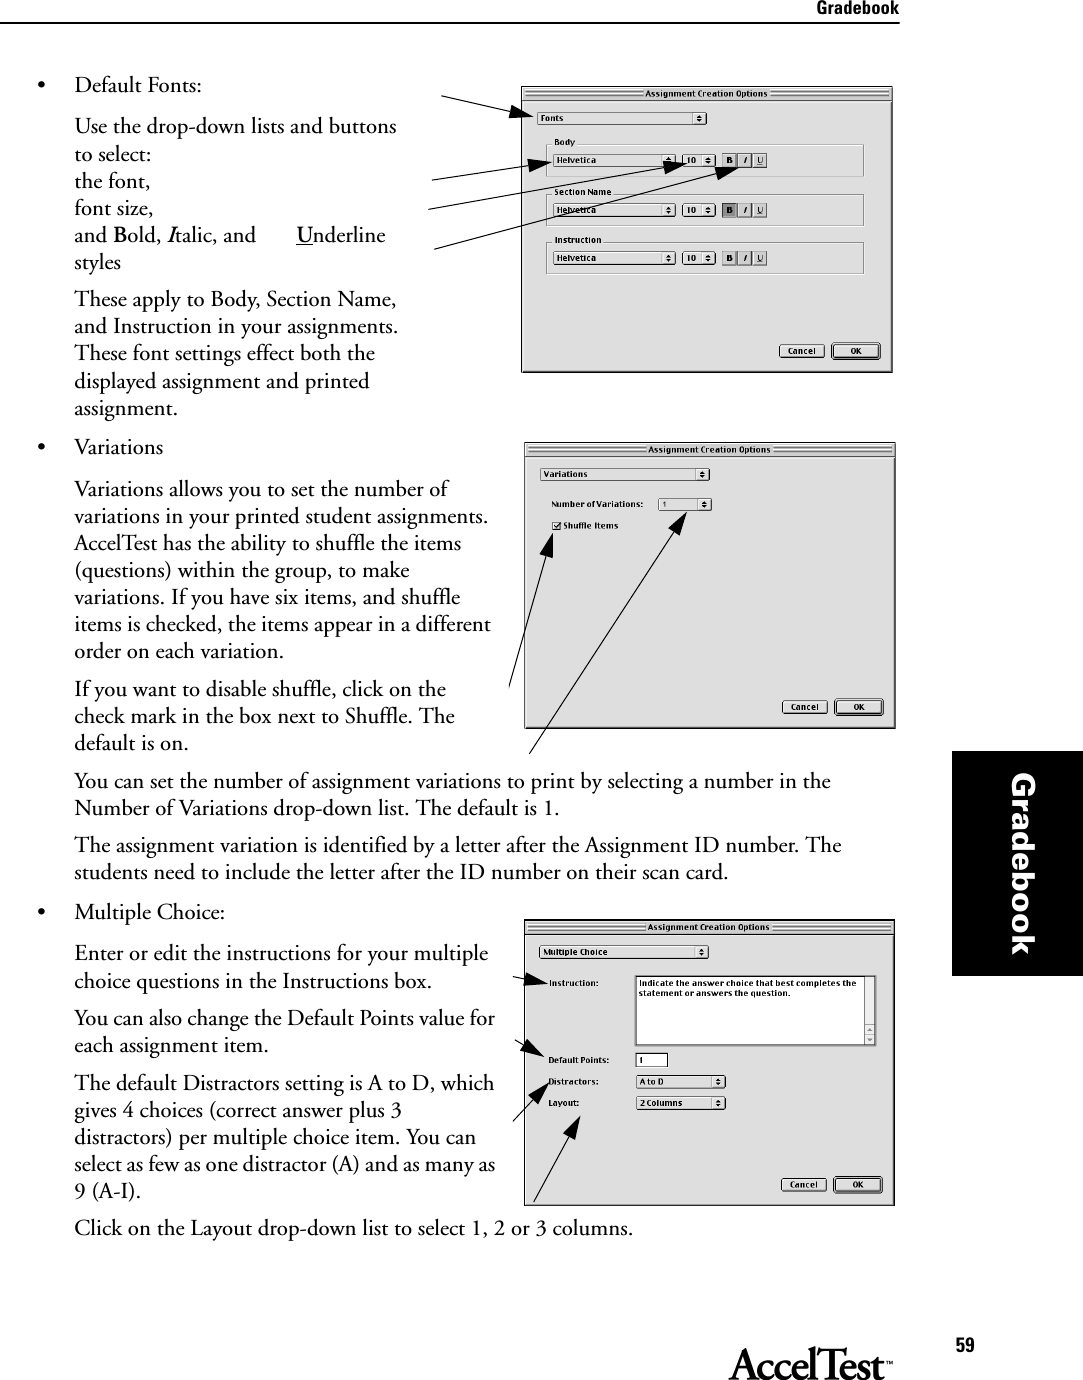
![Preferences78PreferencesThe Variations tab allows you to set the number of variations in your printed student assignments.• Variations allows you to set the number of variations in your printed student assignments. AccelTest has the ability to shuffle the items (questions) within the group, to make variations. If you have six items, and “Shuffle Items” is checked, the items appear in a different order on each variation. • If you want to disable shuffle, click on the check mark in the box next to Shuffle Items. The default is on or enabled.• You can set the number of assignment variations your students receive by clicking, then selecting a number in the Number of Variations drop-down list. The default is 1.• The assignment variation is identified by a letter after the Assignment ID. The students need to include the letter after the ID number on their scan card.The Options tab lets you decide whether to display the points for each item on the assignment. The default is to show item points. Click on the check box to remove the check mark and hide individual item points.Importing Graphics Files in an Assignment ItemAccelTest uses QuickTime™ to handle the graphics files you import. Common graphic files supported are: tif, gif, pict, png, psd, jpg and bmp.1. To import a graphic in your assignment, start AccelTest, click the Assignment tab, and click on the name of your assignment; then, click [Edit]. 2. When the Assignment Editor Wizard or Assistant starts, find the item where you want to place your graphic,](https://usermanual.wiki/Renaissance-Learning/RES-1001.Users-Manual-Part-2/User-Guide-588192-Page-43.png)
![Preferences79Preferencesand double-click on the item. 3. When the Item opens, click on the location where you want to place your graphic. Then, click the [Import Graphic] button.4. Navigate to the drive and folder where your graphics file is located. Double-click on the folder. (In Windows computers, you may need to click on the “Files of type” drop-down menu and select the type of graphic file you are importing.)](https://usermanual.wiki/Renaissance-Learning/RES-1001.Users-Manual-Part-2/User-Guide-588192-Page-44.png)
![Preferences80PreferencesClick on the file name. Click [Open].The image will be imported. Use the scroll bar to go to the bottom of the image if needed.Click on the red square in the corner of the image and drag to resize the image. To delete the image, click on it and press the <Delete> key.If you click and drag the red square at the bottom or side, you will stretch/shrink the image vertically or horizontally, respectively. Click [Done] when finished.If you decide not to use a graphic, click on [Edit] and then [Replace Graphic] to select a new image. When you have finished adjusting your graphic, click [Done] and then [Save] to save your changes.Note: To limit the size of your assignment files, limit the use of imported graphics, and/or import only smaller graphics files.Spelling CheckTo check the spelling in your assignments, in the Assignment tab, click on the assignment name and click [Edit] to open the Assignment Editor.Click on the Assignments drop-down menu and go to Spelling and then click Check. (In Windows press <Ctrl + l> and for Macintosh press <Command + l> to start spelling check.)](https://usermanual.wiki/Renaissance-Learning/RES-1001.Users-Manual-Part-2/User-Guide-588192-Page-45.png)
![Preferences81PreferencesClick on the [Options] button in the Spell Check dialog box or Options in the Assignments drop-down menu to open the Spell Check Options dialog box. To enable an option, click on the check box next to it. The options include:• Suggest word phonetically• Suggest split words• Ignore words in all caps• Ignore words with mixed digitsClick [OK] after you change options.In the Spell Check dialog box, when you see a word in the Not in Dictionary box, you can choose to Ignore (Ignore All), Change (Change All), or Add (to dictionary). Click [Close]. Validate AssignmentWhen you complete work on an assignment, or when you import an assignment, you should check it with AccelTest’s Validate feature. Validate checks for Missing Fonts, Blank Answer Field, and Blank Points Field.To validate an assignment, in the Assignment tab, click on the assignment and click [Edit] to open the Assignment Editor.In the Assignments drop-down menu, click on Validate. When the validation is completed you should see a message stating no problems were found.](https://usermanual.wiki/Renaissance-Learning/RES-1001.Users-Manual-Part-2/User-Guide-588192-Page-46.png)
![Preferences82PreferencesClick [OK] when the message appears.If any problems are found, you will see a message stating that there were problems found and a list, by item, of the problems. Click close and correct the problems listed.Printing a Single Copy of an AssignmentYou may want to check how your assignment looks when it is printed. To print a copy of an assignment, from the Assignment tab, click on the assignment Title. Then, click on the File drop-down menu and click on Print.](https://usermanual.wiki/Renaissance-Learning/RES-1001.Users-Manual-Part-2/User-Guide-588192-Page-47.png)
![Preferences83PreferencesImporting and Exporting AccelTest AssignmentsImporting AssignmentsFollow these steps to import your AccelTest assignments that were created on another computer using AccelTest. (To export assignment information, see “Exporting Assignments” on page 84.) 1. From the Assignment tab, in the Assignments drop-down menu, click on Import.2. In the dialog box that appears, select the location of your assignment data you are going to import. Then, click [Open].Windows computers: Click on the “Look in” drop-down menu and choose the drive (such as a floppy disk drive, your hard drive, or a network drive) where the folder and the file is located. Locate the folder and double-click on it. Click on the import file (the import file extension will be “.ata”), and then click [Open]. Macintosh computers: First, click the [Shortcuts] button. Then, double-click on the drive in the list (such as your hard drive, a floppy disk drive, or a network drive) where the folder and file is located. Scroll to the folder and double-click to open it. Click on the import file (the import file extension will be “.ata”) and then click [Open]. 3. The file will open for editing. Save and close the file if you do not want to edit it at this time. Click on the File drop-down menu and click Save. If you have an existing assignment with the same title, a window will open; click [OK] and type a new title.Click [OK] to save. Click [Done] to close the assignment.First: Choose the drive and then the folder where your import file is located.Second: Click on the file.Third: Click [Open].](https://usermanual.wiki/Renaissance-Learning/RES-1001.Users-Manual-Part-2/User-Guide-588192-Page-48.png)
![Preferences84PreferencesExporting AssignmentsFollow these steps to export your AccelTest assignments. You can use the export file as a backup, or you can use it to import your assignment into AccelTest at another computer. (To import assignment information, see “Importing Assignments” on page 83.) 1. From the Assignment tab, click on the assignment you want to export, then in the Assignments drop-down menu, click on Export.2. In the dialog box that appears, select a location for your exported assignment data. Then, click [Save].Windows computers: Click on the “Save in” drop-down menu and choose the drive where you’d like to save the file (such as a floppy disk drive, your hard drive, or a network drive). If you want to save the file inside of a folder on that drive, double-click on the name of the folder to open it. If needed, create a new folder. By default, the export file extension will be “.ata”. To choose a different name, click in the “File Name” blank and type a new name; be sure to end the name with “.ata”. When you’re ready to save the file, click the [Save] button.Macintosh computers: First, click the [Shortcuts] button. Then, double-click on the drive in the list where you want to save the data (such as your hard drive, a floppy disk drive, or a network drive). If you want to save the file inside of a folder, double-click on the folder name to open it. If needed, create a new folder. Then, click in the Name blank and type the name you want to use for the file. Be sure to end the name with “.ata”. When you are ready to save the file, click the [Save] button.First: Choose the drive. Double click the folder where you want to save the export file. Second: Type a name for the file.Third: Click [Save].](https://usermanual.wiki/Renaissance-Learning/RES-1001.Users-Manual-Part-2/User-Guide-588192-Page-49.png)
![Preferences85PreferencesDeleting AssignmentsYou can delete assignments you will not use again. If the assignment has been added to the Gradebook, you must remove it from the Gradebook before you can delete it from the Assignment tab. See “Removing/Clearing Assignments in the Gradebook” on page 24.To d elete t h e a s s i g n m e n t , g o to the Assignment tab. Click on the assignment you want to delete.Click Delete in the Assignments drop-down menu.You will be asked if you are sure you want to delete the assignment. Click [Yes] to delete.](https://usermanual.wiki/Renaissance-Learning/RES-1001.Users-Manual-Part-2/User-Guide-588192-Page-50.png)