Reo link Digital Technology REOLINKGO IP Camera User Manual Reolink go QSG2 A 20180829
Shenzhen Reo-link Digital Technology Co., Ltd IP Camera Reolink go QSG2 A 20180829
user_manual
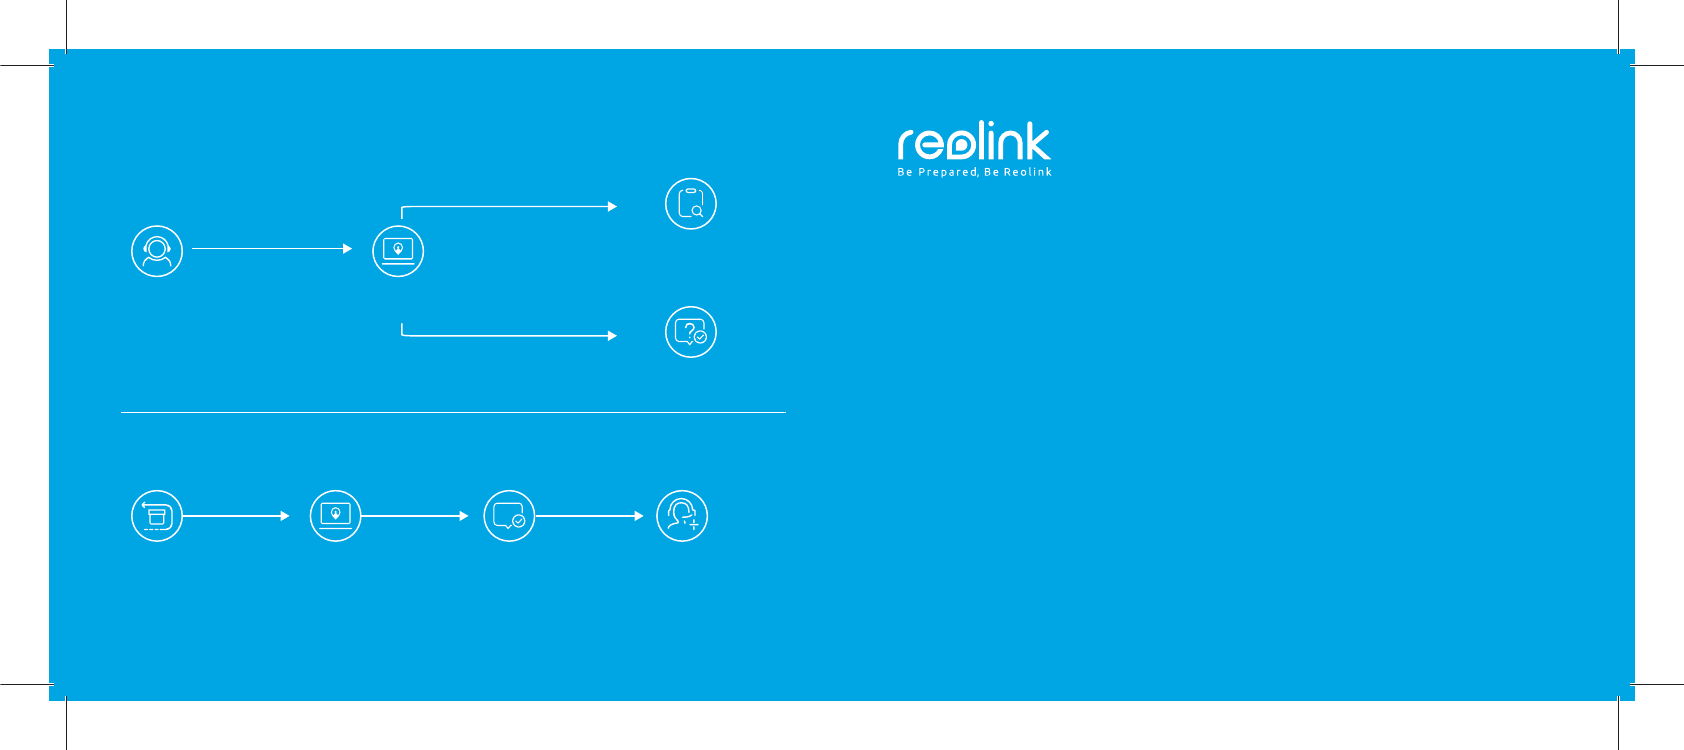
・ RMA Contact
Visit https://support.
reolink.com
Submit a Request with
your Order No.
Reolink After Service
will contact with you
for processing
Order
RMA
・ Technical Support
Submit a Request
Technical
support
Troubleshooting
your problem
Visit https://support.
reolink.com
QSG2_A
Reolink Go
Quick Start Guide
Test Model:Reolink GO

Skin
x1
Rechargeable
Battery
x1
Reset Needle
Pack of Screws
x1
Surveillance Sign
x1
Micro USB
Cable
x1
Reolink go
x1
Outdoor Security
Mount
x1
Quick Start Guide
x1
Mounting
Hole Template
x1
**
The camera and the rechargeable battery are packed separately in the same package.
*
Please dress the camera with the skin for better weatherproof performance when
you install the camera outdoors.
*
What’s in the Box
Contents
English 1
1English
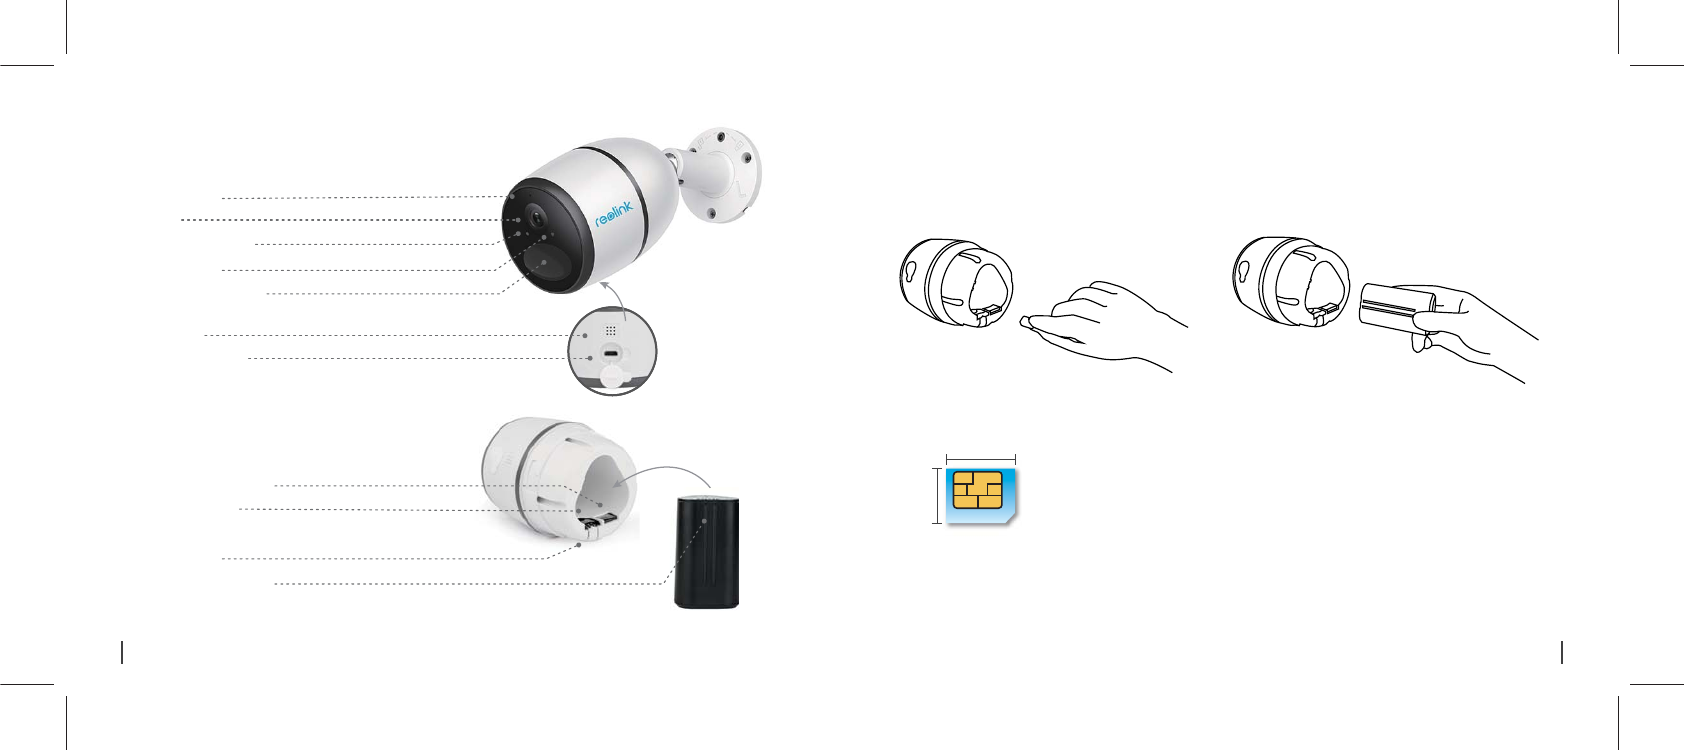
General Introduction
Built-in Mic
Lens
Status LED
Daylight Sensor
Bult-in PIR Sensor
Micro USB Port
Battery Status LED
Speaker
SIM Card Slot
Micro SD Card Slot
Reset Hole
Install the SIM Card and Battery
1. Rotate the back cover counterclockwise,
insert the SIM card into the slot.
2. Insert the battery into the camera and tighten the
back cover.
• Tips for SIM Card
Micro-SIM /3FF
(2004)
•Tip
s
f
or
SIM
C
a
r
Micro-SIM
/
3F
F
(
200
4)
0.59in/15mm
0.47in/12mm
Size of the micro SIM card required is as below
• The SIM card supports WCDMA and FDD LTE.
ɍ±ŲŤĞ±UtĐóƙėơľóǍĞó¦UvĐŲėĞɏƖśĞóơĞȊƙơƭśǔƵơĞǔŲƵƙơŤóƙƭƖľŲŦĞƭŲ
disable the PIN.
• Activate the card through your smartphone or your operator before inserting
it into the camera.
Note:
Please make sure the SIM card can work in your smartphone.
3English
2 English
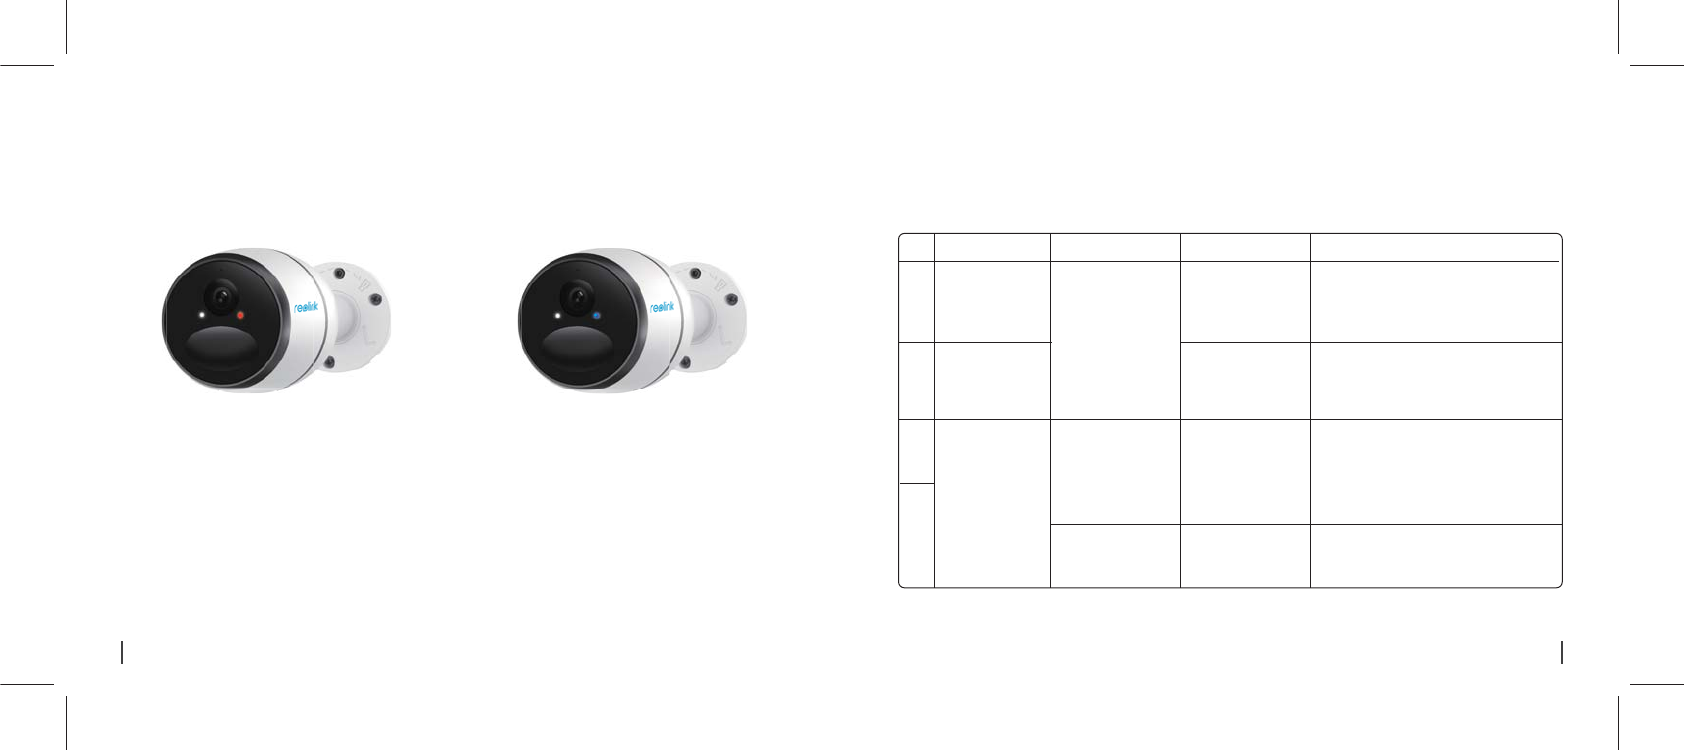
Register Online (Camera Initial Setup)
1. After the SIM card and battery are installed,
a red light will be on, and you will hear the voice
prompt"Camera is starting up, please wait". The
red LED will be solid on for some seconds and
ķŲŲȅɔ
ȑɔďśƵĞj1(ǎŃśśȋóơľĶŲƙơŲŤĞơĞĐŲŦėơóŦė
then go solid before going out, you would
hear"Network connection succeeded”, which
means the camera has been successfully
connected to the network.
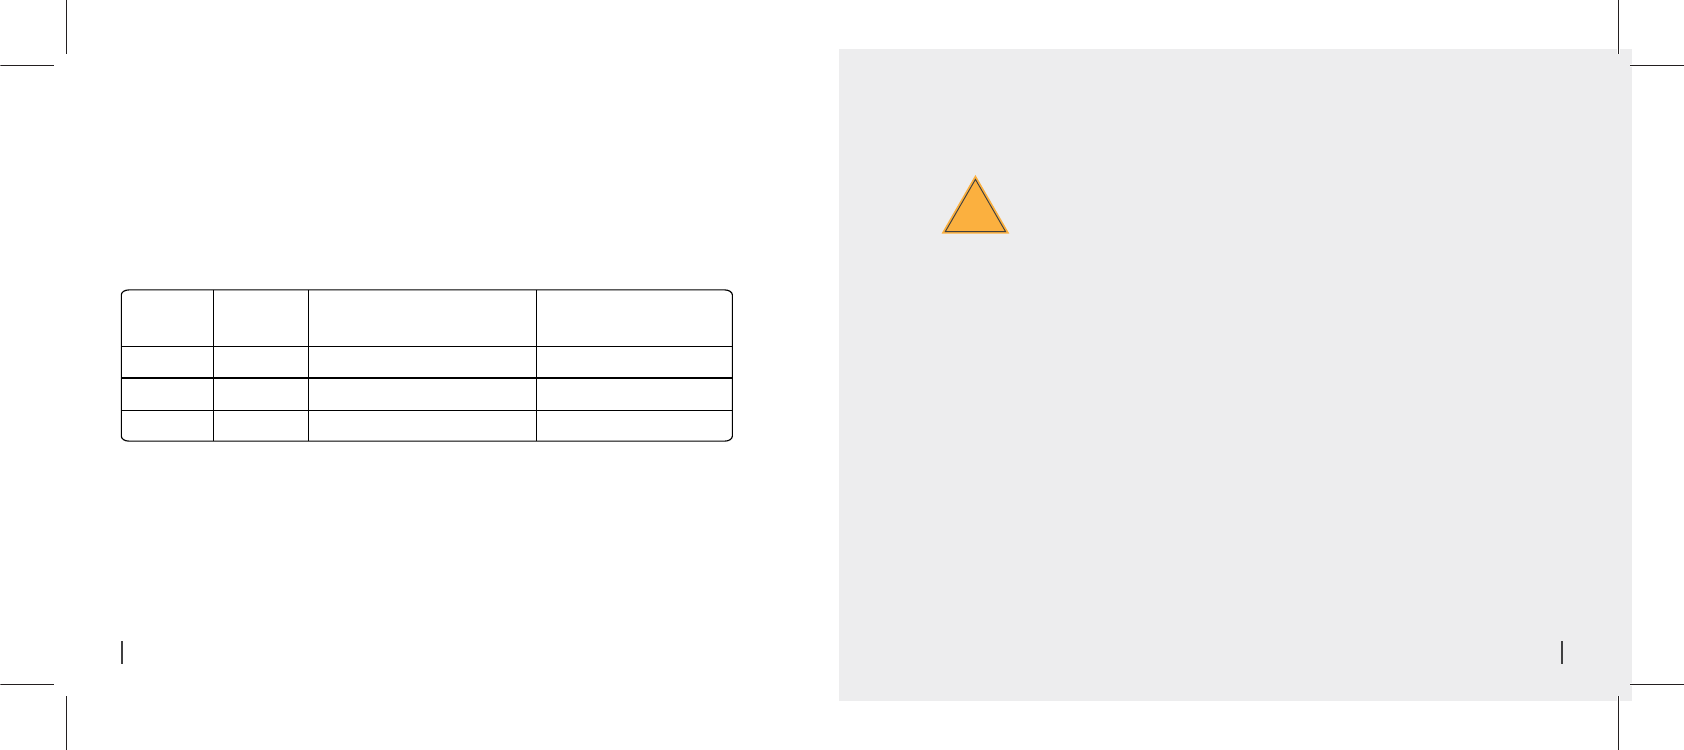
Voice Prompt LED Status Camera Status Solution
3
4
2
1
Red LED is solid on
for some seconds
and then start to
ȋóơľ
Your SIM card
has a PIN
Camera fails to be
registered to the
operator network
Camera fails to
connect to the
Reolink server
Device will go into Standby mode and try to
reconnect later
Blue LED will not
go solid and just
ķŲŲȅ
Red LED is solid on
for some time and
ƭľĞŦķŲŲȅ
completely
Note: You may also run into the below situations:
1.Check whether you made a reverse
direction of SIM card
2.Check if the SIM card is not fully inserted,
please insert it again
1.Check whether your card is activated or
not, if not please call your operator to
activate it
2.Your current location may have a weak
signal, please move the camera to a
location with better signal
"SIM card
cannot be
recognized!"
" The SIM card is
locked with a
PIN. Please
disable it"
"Network
connection failed"
Camera cannot
recognize this
SIM card
Put the SIM card into your mobile phone and
disable the PIN
4 English 5English
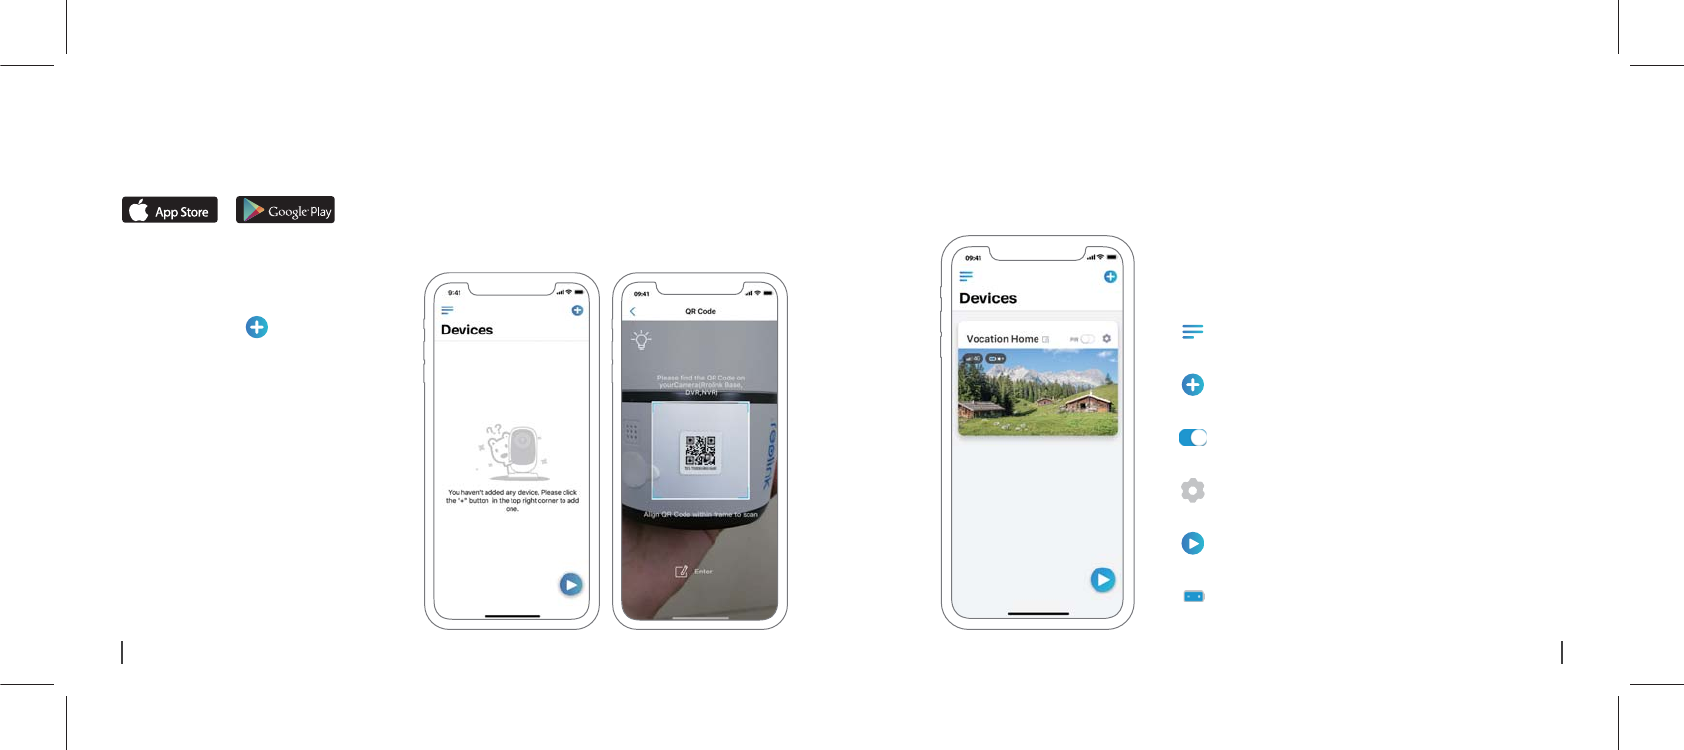
1. Please click the “ ” button in the top
right corner to add the camera.
2. Scan the QR code on the side of the
camera and follow the steps to complete
the setup.
3. After you created a password for your camera, please follow the steps to sync the time, and then
start live view or go to “Device Settings”
Battery Status
Add New Device
Menu
Enable/Disable PIR Motion Sensor
(In default, the PIR sensor is enabled.)
Device Settings
Access the Live View
Download and install the Reolink App in App Store (for iOS) and Google Play (for Android).
Available on the Get it on
Setup Camera on Reolink App (For Smartphone)
6 English 7English
Attention for Camera Installation
• PIR Sensor Detecting Distance
The PIR senor has 3 sensitivity levels for your adjustment: Low/Mid/High.
PŃķľĞƙơĞŦơŃƭŃǍŃƭǔŲȅĞƙơśŲŦķĞƙėĞƭĞĐƭŃŦķėŃơƭóŦĐĞɔ¾ľĞėĞĶóƵśƭơĞŦơŃƭŃǍŃƭǔŲĶƭľĞ¦U©ơĞŦơŲƙŃơóƭɽtŃėɾɔ
Path for adjusting distance in App: Device settings-PIR settings
Note:
Sensitivity Detecting Distance
(For moving vehicles)
High
Mid
Low
Up to 9 meters (30ft)
Up to 6 meters (20ft)
Up to 4 meters (13ft)
Value
81 - 100
51 - 80
0 - 50
To reduce false alarms, please note that:
• Do not install the camera facing any objects with bright lights, including sunshine,
bright lamp lights, etc.
• Do not place the camera too close to a place where there are frequently moving
vehicles. Based on our numerous tests, the recommended distance between the
camera and the vehicle is 16 meters (52ft).
ɍ±ƭóǔóǎóǔĶƙŲŤƭľĞŲƵƭśĞƭơɏŃŦĐśƵėŃŦķƭľĞóŃƙĐŲŦėŃƭŃŲŦĞƙǍĞŦƭơɏľƵŤŃėŃȊĞƙŲƵƭśĞƭơɏƭľĞ
heat transfer vents of projectors, etc.
• Do not install the camera where there are strong winds.
• Do not install the camera facing the mirror.
• Keep the camera at least 1 meter away from any wireless devices, including Wi-Fi
routers and phones in order to avoid wireless interference.
!Important Notes for Reducing
False Alarms
Up to 10 meters (33ft)
Up to 12 meters (40ft)
Up to 16 meters (52ft)
Detecting Distance
(For moving and living things)
8 English 9English
!
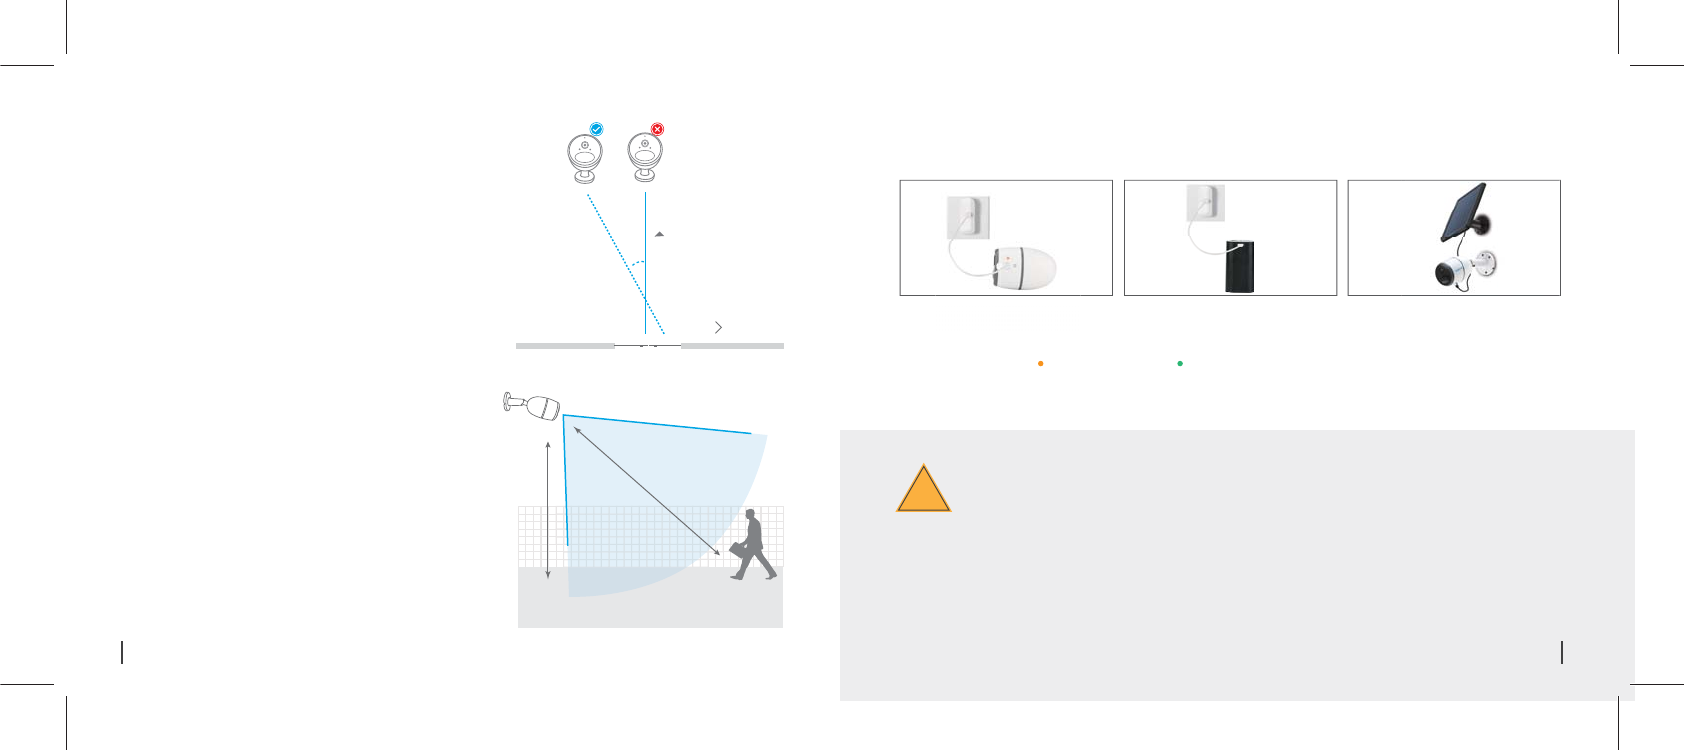
Charge the Battery
Charging indicator: Green LED: Fully charged
Please learn some useful ways to maximize the battery life in this post:
https://reolink.com/faq/extend-battery-life/
Ɋ ¦śĞóơĞŦŲƭĞƭľóƭƭľĞơŲśóƙƖóŦĞśŃơv¾ŃŦĐśƵėĞėŃŦƭľĞƖóĐŘóķĞɔäŲƵĐóŦďƵǔƭľĞơŲśóƙƖóŦĞśŲŦ©ĞŲśŃŦŘŲȆĐŃóśŲŦśŃŦĞ
store.
Reolink Go is not designed for 24/7 full capacity running or around-the-clock live streaming. It’s
designed to record motion events and remotely view live streaming only when you need it.
Important Safeguards on Rechargeable
Battery Use
1. Charge the battery when
it's installed to the camera.
2. Charge the battery separately. 3. Charge the battery with the
Reolink solar panel.
Orange LED: Charging
When installing the camera, please install the camera
angularly (the angle between the sensor and the detected
ŲďŕĞĐƭŃơśóƙķĞƙƭľóŦȐȏˆɧĶŲƙĞȅĞĐƭŃǍĞŤŲƭŃŲŦėĞƭĞĐƭŃŲŦɔUĶ
the moving object approaches the PIR sensor vertically,
the sensor may not detect the motion events.
The ideal viewing distance is 2-10 meters (7-33ft), which
enables you to recognize a human.
Entrance
ÁThe path of the
moving object
FYI:
• The PIR sensor’s detecting distance: 23ft (in default)
• The PIR sensor’s detecting angle: 120° (H)
• Camera Ideal Viewing
Distance
• PIR Sensor Installation Angle
10°
Á
2-3 meters
Ideal Viewing Distance:
2-10 meters (7-33ft)
10 English 11English
1. Please charge the rechargeable battery with a standard and high-quality DC 5V or 9V battery charger.
2. If you want to power the battery via the solar panel, please note that the battery is ONLY compatible with
Reolink solar panel. You cannot charge the battery with other solar panel brands.
3. Please charge the battery in temperatures between 0°C and 45°C.
4. Always use the battery in temperatures between -20°C and 60°C.
5. Please make sure the battery compartment is clean.
6. Please keep the USB charging port dry, clean and free of any debris and make sure the battery contacts
are aligned.
7. Always make sure the USB charging port is clean. Please cover the USB charging port with the rubber
plug after the battery has been fully charged.
ȗɔvĞǍĞƙĐľóƙķĞɏƵơĞŲƙơƭŲƙĞƭľĞďóƭƭĞƙǔŦĞóƙóŦǔŃķŦŃƭŃŲŦơŲƵƙĐĞơɏơƵĐľóơȊƙĞŲƙľĞóƭĞƙơɔ
9. Always store the battery in a cool, dry and ventilated environment.
10. Never store the battery with any hazardous or combustible objects.
11. Do keep the battery away from children.
12. Do not short-circuit the battery by connecting wires or other metal objects to the positive (+) and
negative (-) terminals. Do NOT transport or store the battery with necklaces, hairpins or other metal objects.
ȐȒɔ(Ųv¾ėŃơóơơĞŤďśĞɏĐƵƭɏƖƵŦĐƭƵƙĞɏơľŲƙƭɲĐŃƙĐƵŃƭƭľĞďóƭƭĞƙǔɏŲƙŤóŘĞŃƭėŃơƖŲơĞŲĶŃŦǎóƭĞƙɏȊƙĞɏ
microwave ovens and pressure vessels.
Ȑȓɔ(Ųv¾ƵơĞƭľĞďóƭƭĞƙǔŃĶŃƭķŃǍĞơŲȅóŦŲėŲƙɏķĞŦĞƙóƭĞơľĞóƭɏďĞĐŲŤĞơėŃơĐŲśŲƙĞėŲƙėĞĶŲƙŤĞėɏŲƙ
appears abnormal in any ways. If the battery is being used or charged, remove the battery from the device
or the charger immediately, and stop using it.
15. Always follow the local waste and recycle laws when throwing the used battery away.
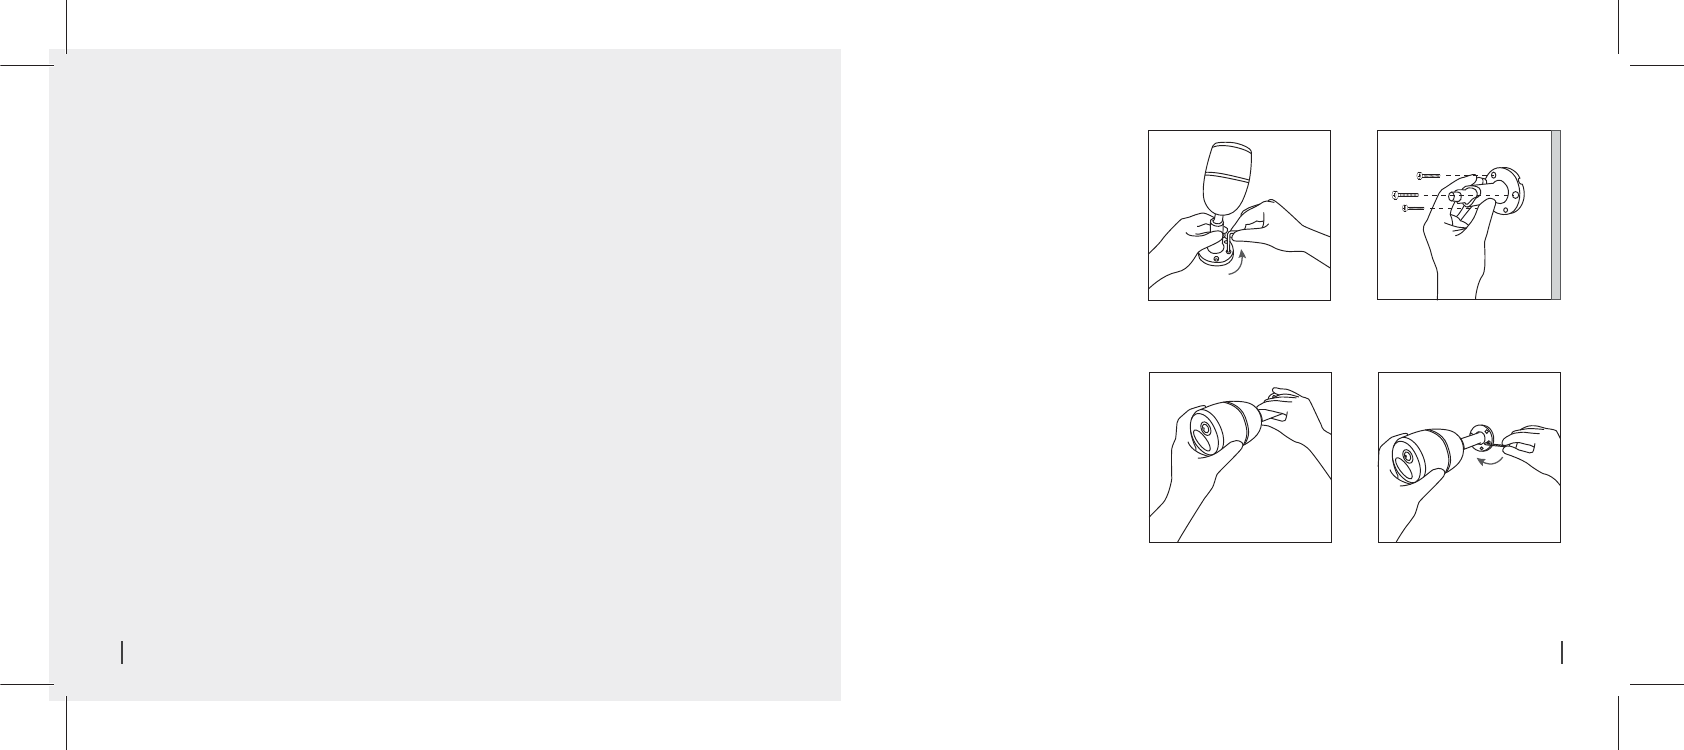
How to Install
Wall Mount
Use the allen wrench to loose the
screw.
Step 1
Screw the wall mount into the wall.
Step 2
Screw the camera to the wall mount
and adjust the camera to the proper
direction.
Step 3
Tighten the screw using the allen
wrench.
Step 4
12 English 13English
20C