Reveal Media D5 Body Worn Camera User Manual D series quickstart 28p 86x126 3bleed 20170322v1 1
Reveal Media Limited Body Worn Camera D series quickstart 28p 86x126 3bleed 20170322v1 1
15_D5 UserMan r1

Quick Start Guide
V 1.1
RVL800-000025
D-Series Quick Start Guide
With you on the front line
D-Series
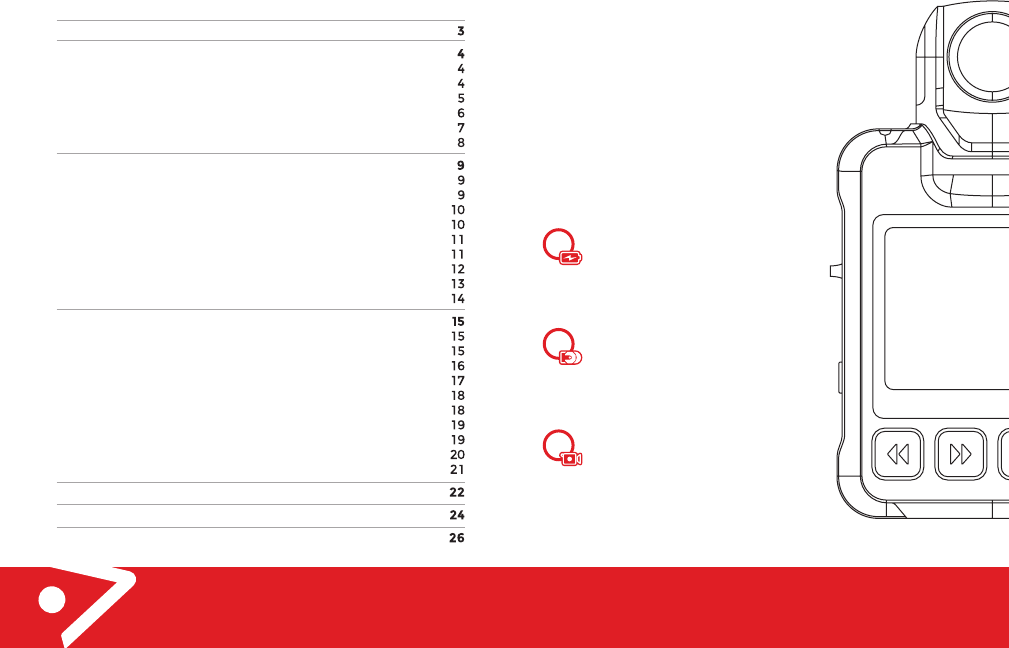
2
D-Series - Quick Start Guide
Contents
Introduction
Quick start
Charge
Choose your Mount
Klickfast stud (using attach & removal tool)
Klickfast stud (attach & removal without tool)
Shirt / pocket clip
Record
Operation
Camera Articulation
Power ON / OFF
Playback (on camera)
Control buttons during Playback
Go back
Mark as Important
Stealth mode
Picture taking mode
LED light notification
Optional camera settings
Through DEMS
Without DEMS
DEMS administration window
Additional LED light notifications
Audio Mute
Allow manual mute
Do not allow manual mute
Always mute
Viewing camera settings
WiFi mode (D5 only)
Product conformance
Technical specifications
Notes
3
D-Series - Quick Start Guide
Congratulations on purchasing the D-Series
next generation body worn camera.
This quick start guide will show you the
basics and get you up and running with
your D-Series camera in 3 easy steps.
NOTE: the reference to D-Series in this
guide covers both the D3 camera, and the
wireless enabled D5, except where
specifically stated otherwise.
Charge
Charge your camera for six hours
until the charging light turns green.
Mount
Choose how to mount your camera
using either a single combination
shirt/pocket clip, or a klickfast stud.
Record
Slide the red switch down to start
recording. To stop recording, slide
the red switch up.
2
1
3
Introduction
4
D-Series - Quick Start Guide
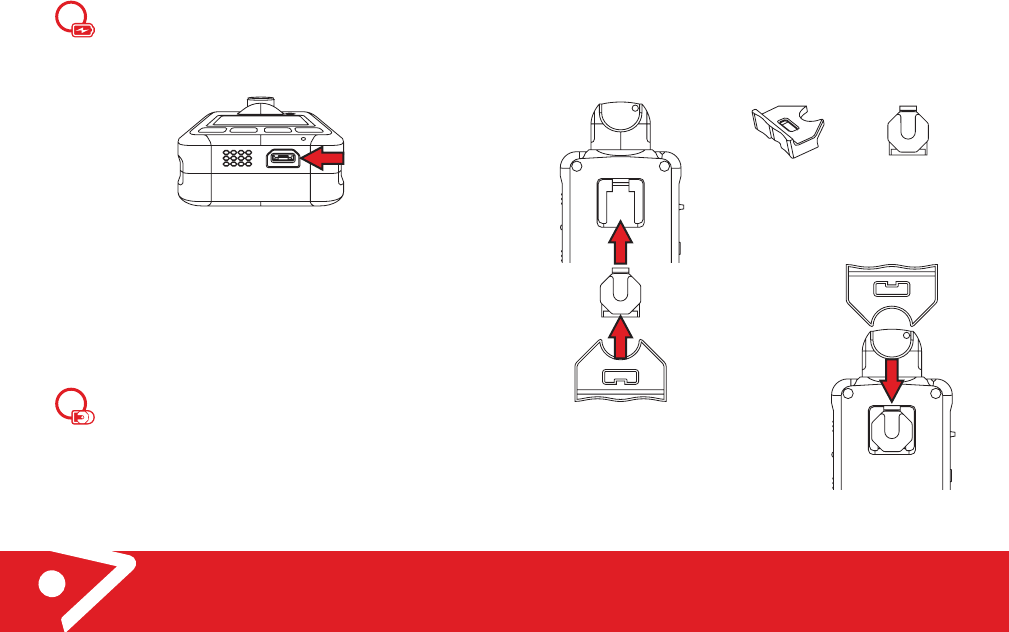
Charge
The USB charging and data connector is located at the
bottom of the camera. Any standard USB wall charger
can be used to charge the D-series with the USB cable
supplied in the box.
Charge your camera until the LED indicator on top of
the unit lights green. The D-Series takes approximately
6 hours with a fast charger. For a standard charger this
would take longer to reach full charge, or shorter
connected to a USB fast charger.
The D-Series can also be charged directly from the
Reveal D-Series docking station for guaranteed fast
charging.
Choose your mount
The rear of the D-Series has a moulded groove slot
which allows the attachment of clip mount accessories
to the camera. Mounting options supplied in the box
are:
1. Klickfast stud
2. Reveal single combination shirt/pocket clip
2
1
Quick start
Waterproof
micro USB
connector
5
D-Series - Quick Start Guide
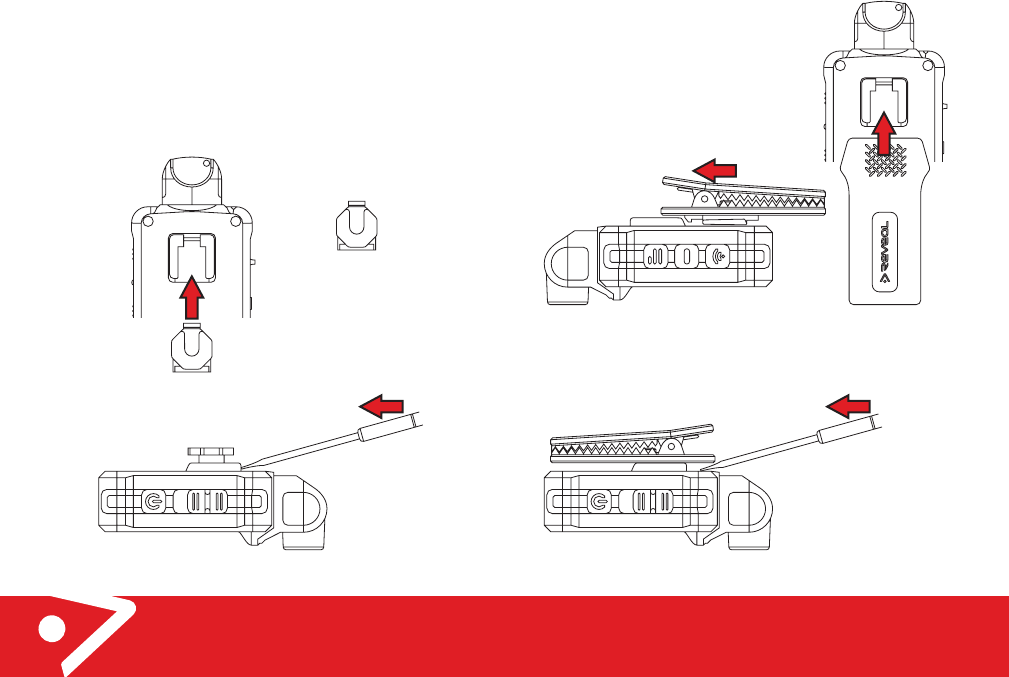
Klickfast stud (using attach & removal tool)
The D-Series camera is supplied with a small tool in box to
assist attachment and removal of the klickfast stud. Simply
align the tool with the klickfast stud and the groove on rear of
D-Series, and push upward to click stud into place.
The same tool can be used to remove the
attached stud from the camera, this time
placing the tool from the top of secured
klickfast and pushing downwards to
release the stud.
Quick Start
Attachment/
Removal tool
Klickfast mount
Attach klickfast
using tool.
Remove klickfast
using tool.
Slide into groove
and click to place
release the stud.
Used for helmet
6
D-Series - Quick Start Guide
Quick start
Klickfast stud (attach & removal without tool)
The klickfast stud can also be attached by pushing the clip
into place without using the tool. Removal of the klickfast
stud requires a flat head screwdriver, which is used to lever
up the clip tongue, and the gently slide downwards to
remove.
Klickfast mount
Remove klickfast
using screwdriver.
Slide into groove
and click to place
7
D-Series - Quick Start Guide
Quick start
Shirt / pocket clip
To attach the shirt clip, simply
align the attachment to the rear
groove on the D-Series and slide
and clip, as per diagrams below.
To remove the shirt clip, use a flat head screw driver to
carefully lever up the clip tongue, and then gently slide
downwards to remove.
Remove shirtclip
using screwdriver.
Slide into groove
and click to place
Slide shirtclip mount
8
D-Series - Quick Start Guide
Quick start
3Record
To record video footage, simply slide the red switch
down to start capturing.
The D-Series will beep 3 times in quick succession to
indicate it has started recording, and the LED on the
shoulder of camera will start flashing red to indicate it
is recording. A flashing red dot on the camera display
will also indicate that the camera is recording.
NOTE: the D-Series does not need to be powered on to
start recording. Simply slide down the red switch to
start recording.
To stop recording, simply slide the red switch up.
9
D-Series - Quick Start Guide
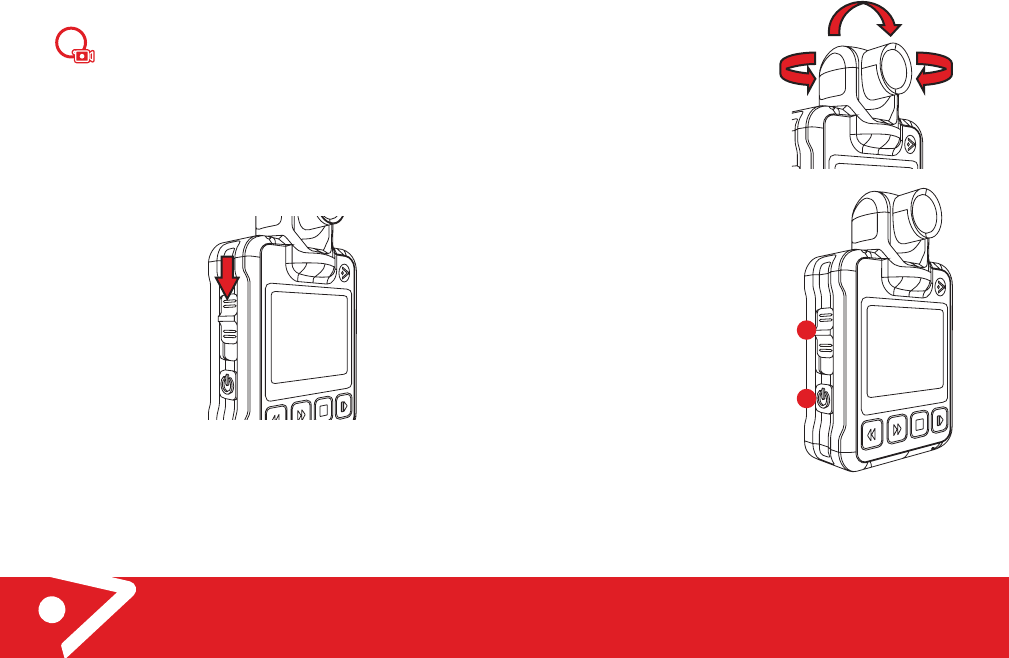
Camera Articulation
The D-Series camera head is able
to rotate horizontally and vertically
within limits. However, DO NOT
OVER ROTATE!
The D-Series camera head does not
rotate 360 degrees. Forcing it will
cause damage to the camera head.
Power ON / OFF
Power ON the unit by pressing the
FUNCTION button (button 2) for 1
second. The D-Series will sound a
welcome chime, and open into
preview mode.
In preview mode you can orientate
the camera head ready for
recording, view display and detail
such as recording resolution, time
and date, storage capacity
Power OFF the unit by pressing and
holding the same FUNCTION button
for 2 seconds.
NOTE: The D-Series can also be powered up from the off
position by sliding down red record slider. This action powers
up the camera and starts recording immediately.
Operation
2
1
10
D-Series - Quick Start Guide
Operation
Playback (on camera)
Press the FUNCTION button to turn the camera on, and then
press the PLAY button (button 9) to open playback mode.
In the playback menu, any recorded video footage in the
camera is displayed as thumbnails on the display screen.
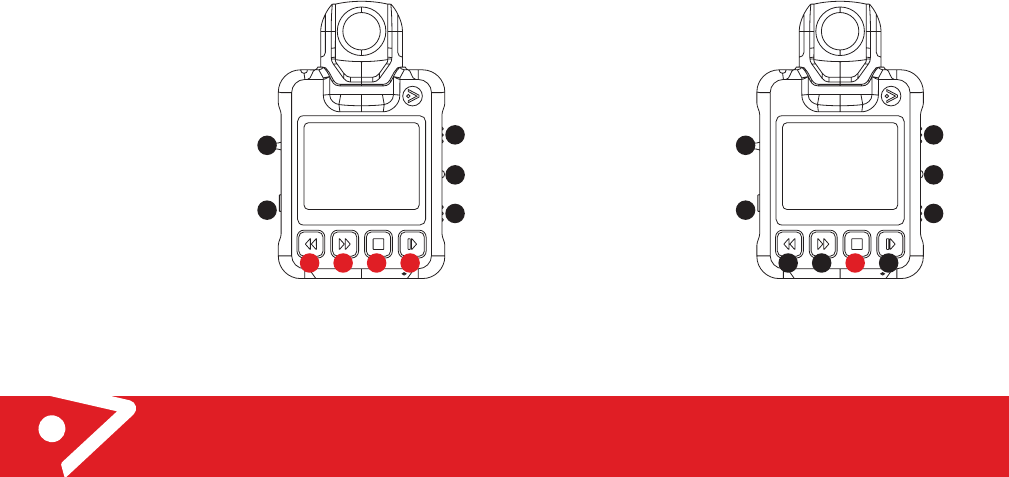
Control buttons during
Playback
• Button 6, is the Rewind button.
• Button 7, is the Fast Forward button
• Button 8, is the Stop button
• Button 9 is the Play button.
In the playback menu, use
the FF and REW buttons to
scroll and highlight
thumbnails (highlighted in
yellow border), then press
PLAY to playback footage on
the D-Series camera.
During playback the user can
Rewind footage by pressing
button 6, and fast forward by
pressing button 7.
Both Rewind and Fast forward can increased in speed
increments from and initial 1x speed to 4x 16x and 64x by
subsequent pressing on REW FFW buttons.
3
4
5
1
2
6 7 8 9
11
D-Series - Quick Start Guide
Go back
Press the FUNCTION button to leave the playback mode and
return to preview screen.
Press the FUNCTION button twice to exit the Enter Pin screen
and return back to preview screen.
Mark as Important
While recording, press the
STOP button once to mark
the video as important.
The symbol will appear in
the bottom right corner of
the screen.
In playback mode, select
the desired thumbnail then
press the STOP button to
mark video as important.
The symbol will appear in
the bottom right corner of
the thumbnail.
Operation
3
4
5
1
2
6 7 8 9
12
D-Series - Quick Start Guide
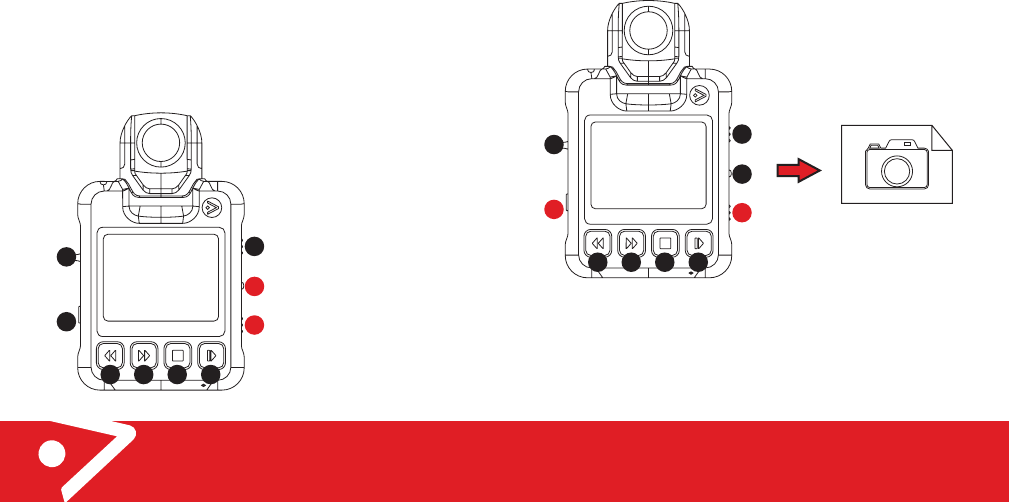
Stealth mode
In this mode, the D-Series displays no image on screen and
the red LED is not lit. The D-Series appears off! There are no
audio alarms except for the power on chime.
To activate stealth mode on the D-Series,
• Press and hold button 4 (i.e. middle button on right hand
side) for TWO seconds.
• To deactivate stealth mode repeat the above step by
pressing and holding button 4 for a further TWO seconds
This activates and deactivates the Stealth mode whilst the
unit is in either recording or record preview mode.
NOTE (D3 only): Button 5 is
also a stealth button, and
long press (i.e. for two
seconds) on either button 4
or 5 will switch camera into
stealth mode.
3
4
5
1
2
6 7 8 9
Operation
13
D-Series - Quick Start Guide
Picture taking mode
The D-Series can take single image photos when in either
preview mode (i.e. not recording) or in pre-record mode (also
not recording) by pressing the FUNCTION button (i.e. button
2) and button 5 on the right of the device screen
simultaneously.
Operation
A picture will be taken and placed in the DCIM folder, and
pictures can be viewed in the playback mode by pressing the
Play button and navigating to the appropriate thumbnail.
Press both buttons
simultaneously
3
4
5
1
2
6 7 8 9
14
D-Series - Quick Start Guide
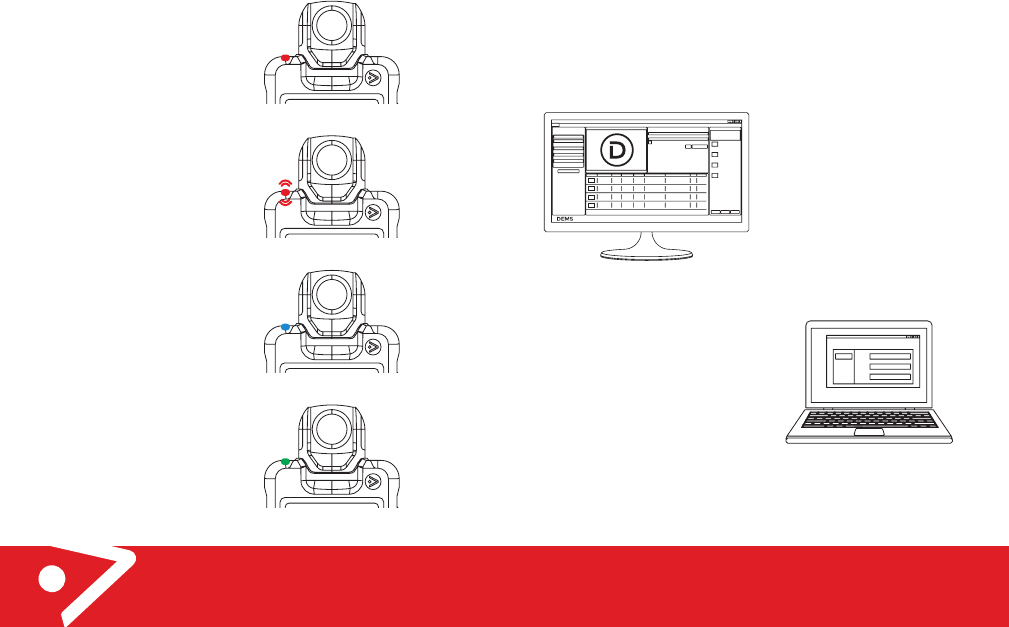
LED Light Notification
Power on
Solid red light
Recording
Flashing red light
Charging
Solid blue light
Fully charged
Solid green light
Operation
15
D-Series - Quick Start Guide
Through DEMS
DEMS is Reveal’s industry leading digital evidence
management platform built to securely store, manage and
export digital evidence, large or small, whilst always
remaining incredibly simple and easy to use.
In the DEMS administration
window select the Reveal
camera settings tab
NOTE:
Requires DEMS 360 or later.
Without DEMS
For users without DEMS, camera
settings can be changed on the
camera using the Reveal Camera
Manager tool.
The tool is designed to work with Microsoft Windows and can
be downloaded from the Reveal website –
http://hub.revealmedia.com/files/clients/rcm/latest-release/
Optional camera settings
16
D-Series - Quick Start Guide
SUBMIT RESTORE DEFAULT SETTINGS
© 2017 Re veal Media Limited. Privacy Policy | Version 4.1.0
(8 DIGITS REQUIRED)
USE R ADMINISTRATIONCASESLIBRARY AUDIT LOG BOOKING LOG NOTIFICATIONS RE PORTS LOGOUT
RETENTION POLICY M EDIA CATEGORIES TEAMS CAMERA SETTINGS USER ROLES DEPARTMENTS LOCATIONS LICENCE ERRORS FILES IN TRANSFER
REVEAL CAMERA ENCRYPTION EMAIL SETTINGS USER P ERMISSIONS SETTINGS
CAMER A SETTING S
ENABLE ALL CAM ERA MENU OPTIONS TO BE CONTROLLED BY D EMS
RECORDING EXTENSION
LANGUAGE
RESOLUTION
WHITE BALANCE
DATE/TIME STAMP
SYNC DATE/TIME WITH PC
AUDIO ALARM
PRE-RECORD
PRE-RECORD MUTE
AUDIO MUTE
LCD OFF
STEALTH MODE
RECORD OFF MODE
PROTECTED MODE
TRUSTED MODE
TRUSTED UNLOCK PASSWORD
CAMERA SCREEN DATA UPPER LEFT
CAMERA SCREEN DATA UPPER RIGHT
CAMERA SCREEN DATA LOWER LEFT
MP4
ENGLISH
1280x720/30F
AUTO
On
On
On
Off
Off
No Manual Mute
Off
Off
Slider
Off
Off
None
None
None
DEMS adminstration window
Optional camera settings
17
D-Series - Quick Start Guide
Optional camera settings
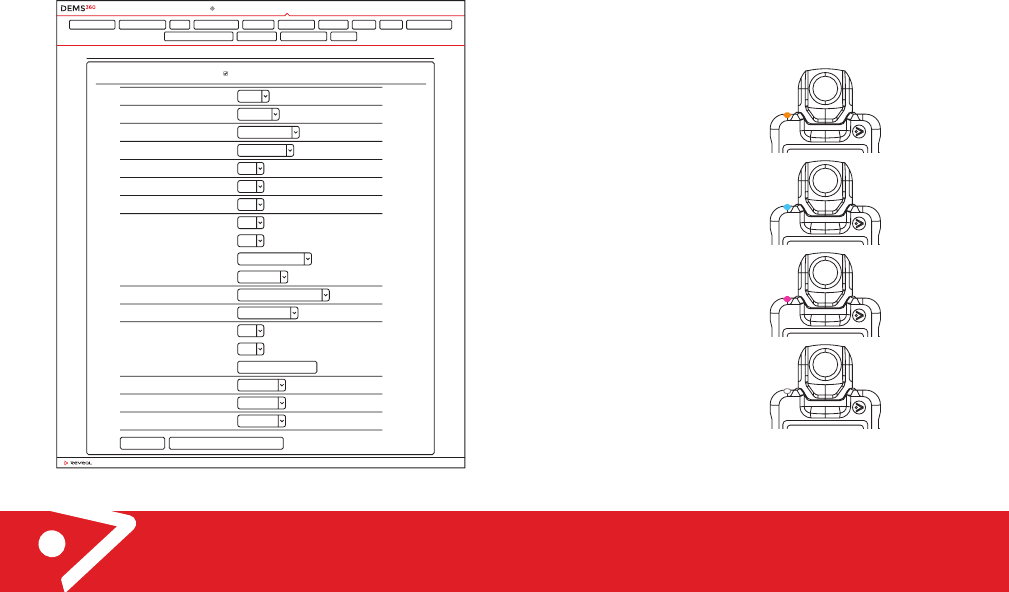
Additional LED Light Notification
The following LED light notifications result from interaction
with the Reveal DEMS software solution (or Reveal Camera
Manager - RCM). Full explanation regarding the features that
utilise these notifications on the D-Series can be found in the
DEMS and RCM User guides.
NOTE: for some notifications the LED will flash alternate
colours depending on the camera state.
Pre-Recording
Orange LED notification
Paired to smartphone
(D5 only)
Cyan LED notification
Connected to WiFi
(D5 only)
Purple LED notification
Camera error reporting
White LED notification
19
D-Series - Quick Start Guide
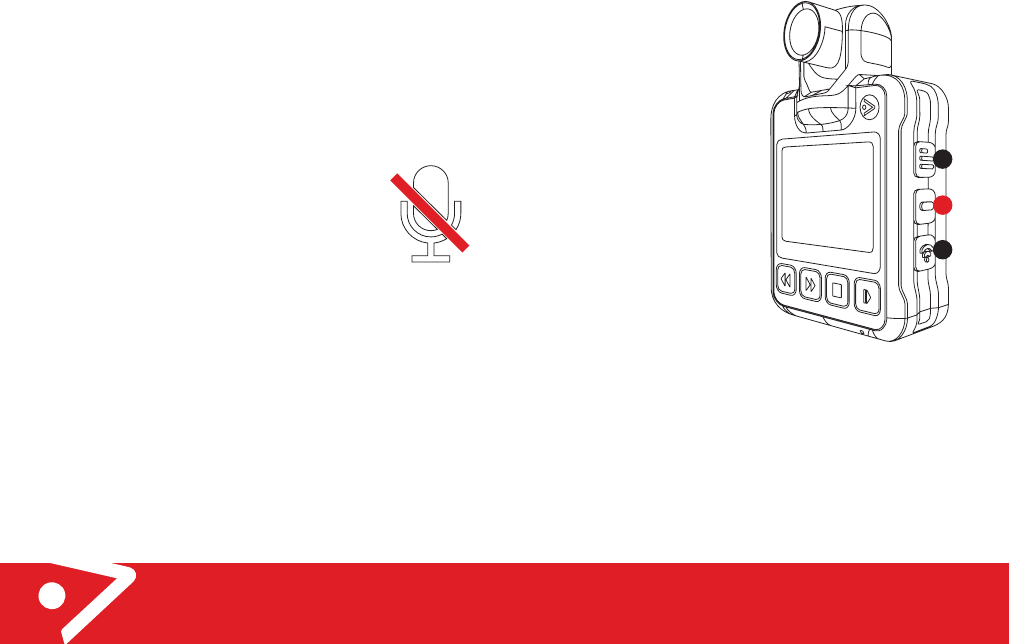
• An Audio beep is heard
(not heard on camera)
• Icon showing a muted
microphone is shown on
screen. See location on
pre-record screens below
for exact placement.
• No audio is recorded
• Pressing the Audio button
unmutes recording and
icon disappears (audio
beep is heard)
Do not allow manual mute
Mute facility cannot be activated through the button on the
device.
Always mute
When in power up (preview) or record audio is always muted.
Optional camera settings
3
4
5
18
D-Series - Quick Start Guide
Optional camera settings
Audio Mute
Audio mute allows users a way to mute the audio while
recording video, and here are three modes in which audio
mute can function. The modes are set through DEMS 360,
or RCM.
1. Allow manual mute
2. Do not allow manual mute
3. Always mute
Allow manual mute: (mute can be
activated/deactivated on camera)
When in power up (preview) or record, the user presses the
Audio button (4) (just a quick press) ) once to toggle the
device between audio mute on and off.
20
D-Series - Quick Start Guide
Optional camera settings
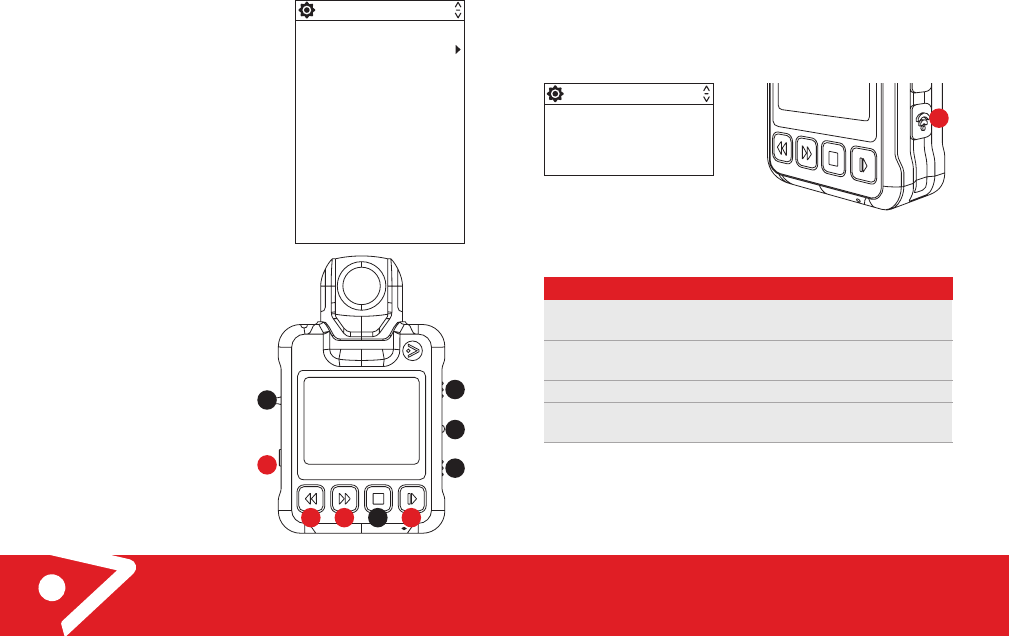
Viewing camera
settings
The D-Series allows you to view
the settings currently active in
the camera. Press the Menu
button (button 3) to display the
menu list of settings currently
set in the camera.
NOTE: menu items cannot be set
directly from the camera, and
must be set remotely using a
computer or mobile application.
Navigating the menu items:
• To move UP and/or DOWN
on menu items press the
FWD/RW buttons (i.e.
buttons 6 and 7)
respectively.
• To expand on a menu item
to check status, press the
PLAY button (button 9).
• To collapse back to menu
items only, press the
FUNCTION button
(button 2).
To exit the menu display,
press the FUNCTION button
(button 2) to return back to
main camera view.
Firmware Version
RESOLUTION
PRE RECORDING
Pre Record Mute
AUDIO ALARMS
Date&Time
Stealth
UnitID
Trusted mode
Record Mode
Audio Mute
Access Point IDs
Stream
3
4
5
1
2
6 7 8 9
21
D-Series - Quick Start Guide
Optional camera settings
Wifi mode (D5 only)
Hold down button 5 to access the wifi mode menu.
The WiFi functionality is set from the camera. The three
modes of operation below defined for this mode:
WIFI MODE
1. WiFi off
2. Upload
3. Phone App
4. Stream
Option
WiFi OFF
Upload
Phone App
Stream
Description
Normal camera operation – WiFi is
switched off.
Upload Mode. WiFi is switched on as a
client.
App mode – WiFi is in Access Point mode.
Streaming mode – WiFi is switched on as a
client device.
5
23
D-Series - Quick Start Guide
Product conformance
The D-Series has been tested and found to comply with the
limits for a Class B digital device, pursuant to Part 15 of the
FCC Rules. These limits are designed to provide reasonable
protection against harmful interference in a residential
installation.
This equipment generates, uses and can radiate radio
frequency energy and, if not installed and used in accordance
with the instructions, may cause harmful interference to radio
communications. However, there is no guarantee that
interference will not occur in a particular installation. If this
equipment does cause harmful interference to radio or
television reception, which can be determined by turning the
equipment off and on, the user is encouraged to try to correct
the interference by one or more of the following measures:
• Reorient or relocate the receiving antenna.
• Increase the separation between the equipment and
receiver.
• Connect the equipment into an outlet on a circuit different
from that to which the receiver is connected.
• Consult the dealer or an experienced radio/TV technician
for help.
Changes or modifications not expressly approved by the party
responsible for compliance could void the user‘s authority to
operate the equipment.
22
D-Series - Quick Start Guide
Product conformance
How to recycle your equipment
The symbol shown here and on the packaging
means that the product is classed as electrical or
electronic equipment, so DO NOT put it in your
normal garbage bin.
It’s all part of the Waste Electrical and Electronic Equipment
(WEEE) directive to recycle products in the best way, and get
rid of dangerous things more safely.
You should contact your retailer, supplier, or local city office
for advice on how to dispose of this product in an
environmentally friendly way.
Reduction of hazardous substances
This product is compliant with the EU Registration,
Evaluation, Authorization and Restriction of Chemicals
(REACH) Regulation (Regulation No 1907/2006/EC) and the
EU Restriction of Hazardous Substances (RoHS) Directive
(Directive 2011/65/EU).
Radio Equipment Directive (RED)
The D-Series product is compliant with the
requirements of the Radio Equipment Directive
(2014/53/EU).
operate the equipment.RF Exposure Information
RF Exposure Information
This equipment complies with FCC radiation exposure limits set forth
This equipment complies with FCC radiation exposure limits set forthfor an uncontrolled environment and can be used/operated in
for an uncontrolled environment and can be used/operated in
portable operating conditions without any restrictions. For detailed
portable operating conditions without any restrictions. For detailed
SAR information, please check the FCC ID: 2AL26-D5 on fcc website.
SAR information, please check the FCC ID: 2AL26-D5 on fcc website.
The face up position for SAR shall be minimum 5mm.
FCC Statement
The D-Series complies with part 15 of the FCC Rules.
Operation is subject to the following two conditions:
(1) This device may not cause harmful interference, and
(2) this device must accept any interference received,
including interference that may cause undesired operation.
25
D-Series - Quick Start Guide
Technical specifications
MicroUSB connector: Waterproof with
metal shield for damage prevention
802.11n (A/B/G/N) 2.4GHz and 5.8GHz
BLE 4.0
Lithium Polymer
480p: up to 12hrs
720p: up to 11hrs
1080p TBC
6 hours (at standard charging rate)
Yes (JPEG)
480p / 720p / 1080p
MPEG-4 (video codec H.264)
32GB or 64GB EMMC
(Non-removable)
AES 256 Encryption
"-10C° to 45C°
Power/Data
connection
Wifi (D5 only)
Bluetooth (D5 only)
Battery type
Battery life
Battery charge time
(from flat)
Still picture capture
Recording
Resolutions
Recording Formats
Storage capacity
Encryption
Working
temperature range
24
D-Series - Quick Start Guide
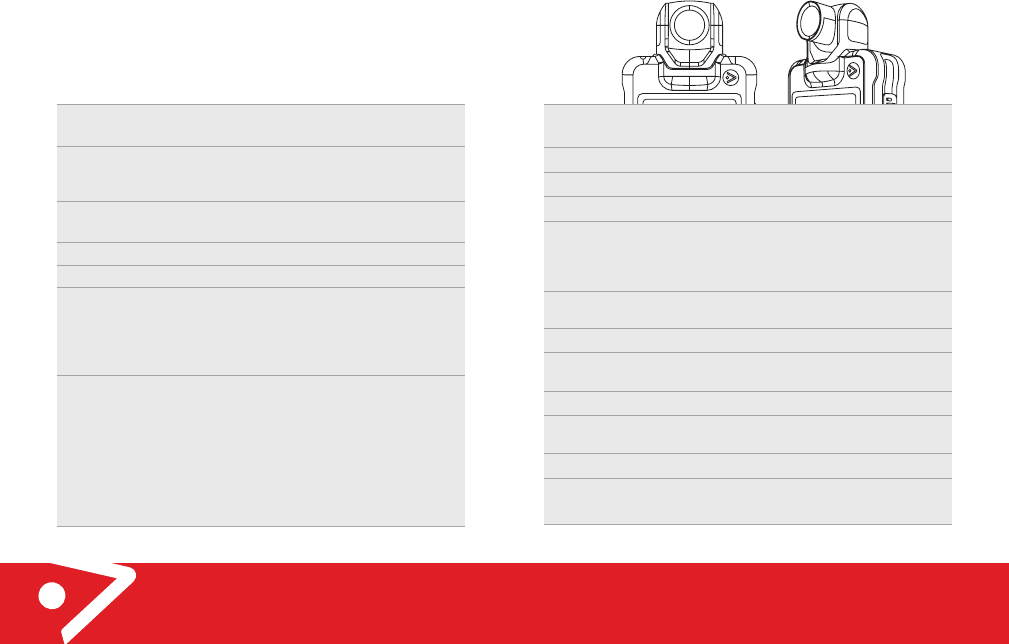
The D-Series is a fully featured camera in the Reveal product
family featuring high performance video capture and
on-board playback and long battery life as well as a host of
connected features.
Technical specifications
Dimensions
LCD display dimensions
Field of View
Vibration notifications
Weight
Camera head
Buttons
H: 100mm W: 60mm D: 26mm
(thickness of device)
2.0” 4x3 262K colors (960x240
pixels), with dimmable
backlight
110 Degrees (Horizontal),
50 Degrees (vertical)
Yes
Max 155g
Total horizontal rotation: 305°
Left rotation: 105°, Right
rotation: 200°
Total vertical rotation: 174°
One record button with
mechanical click on activation,
One Power
(Evidence/Back/Reset) button
and 3 software programmable
buttons on the side, 4 buttons
on the front including a Stop,
Play, Rewind and Fast forward
button

27
D-Series - Quick Start Guide
Notes
26
D-Series - Quick Start Guide
Notes