Ricoh MFSP112SF1 Laser Printer User Manual 2
Ricoh Company Ltd Laser Printer 2
UserManual.wiki
>
Ricoh
>
MFSP112SF1 User Manual
>
user manual 2
Contents
1.
user manual
2.
user manual 2
user manual 2
Navigation menu
Upload a User Manual
Namespaces
Wiki Guide
HTML
PDF
Info
Views
User Manual
Discussion / Help
Navigation
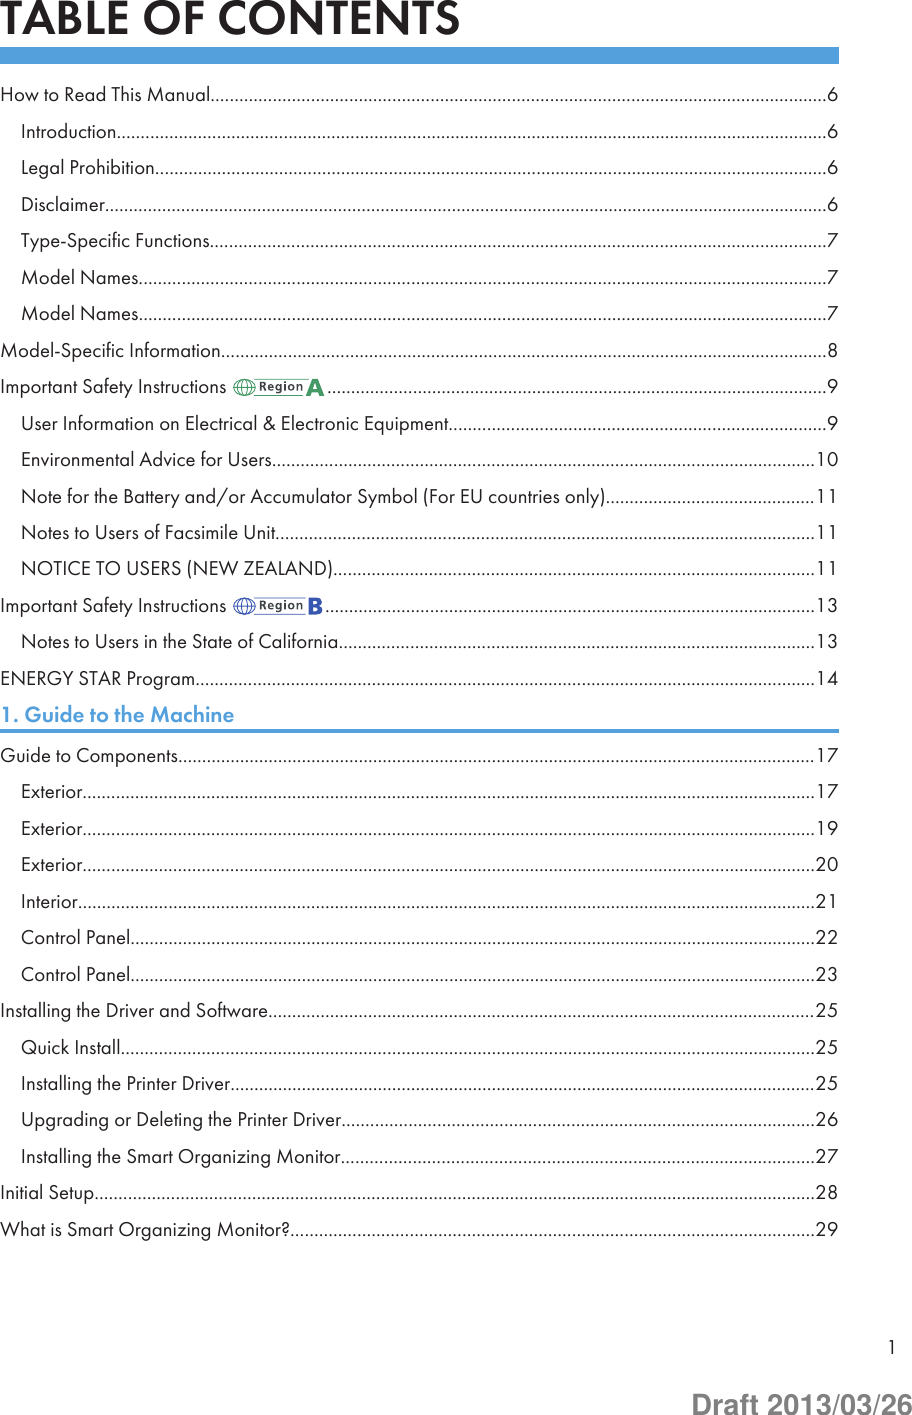
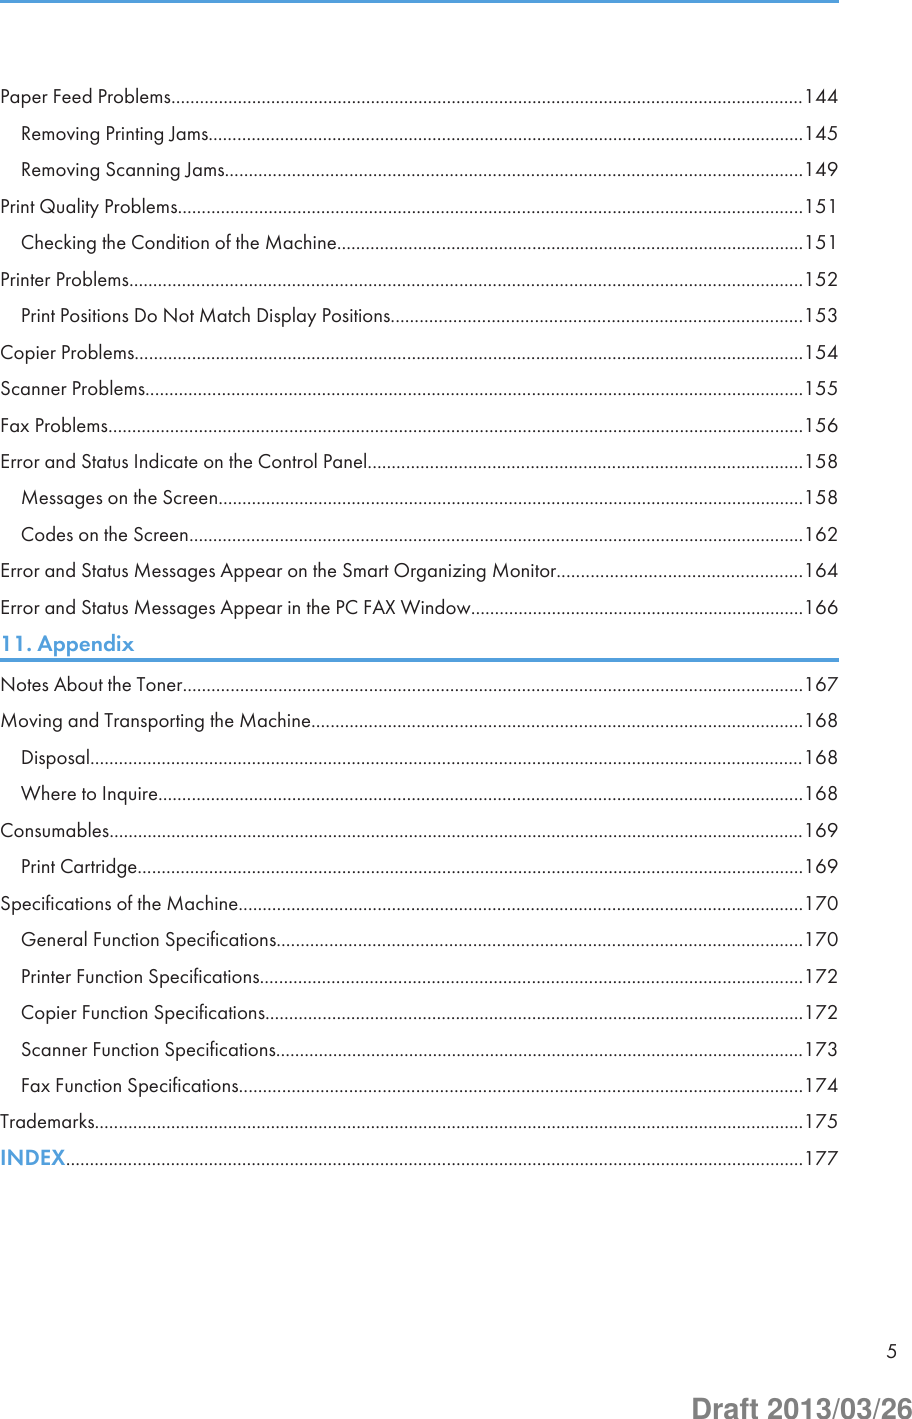

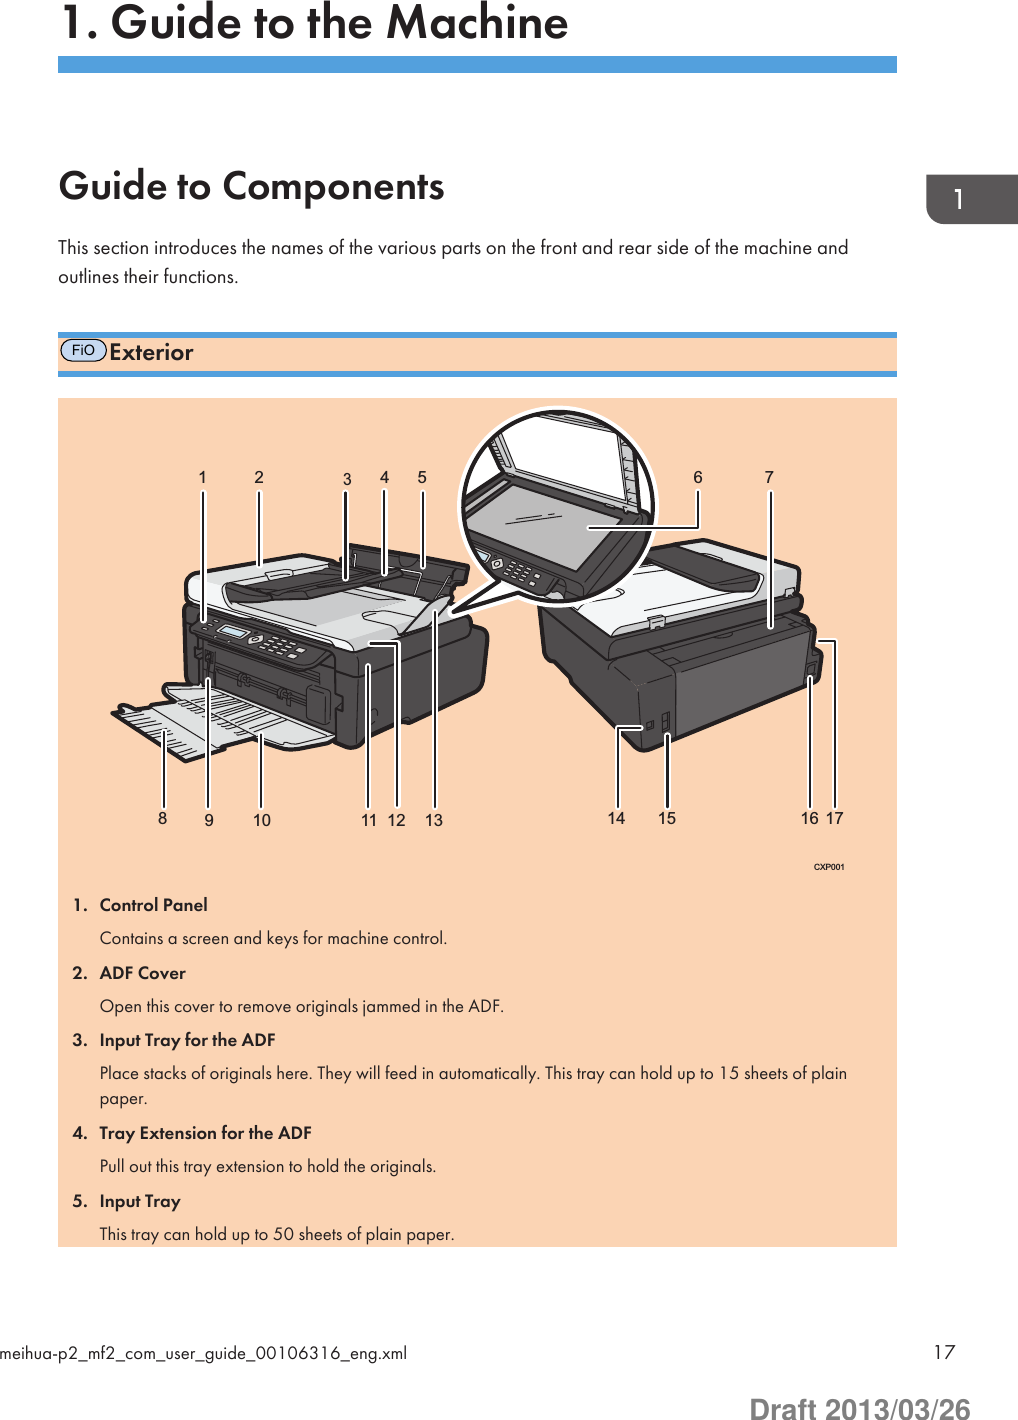
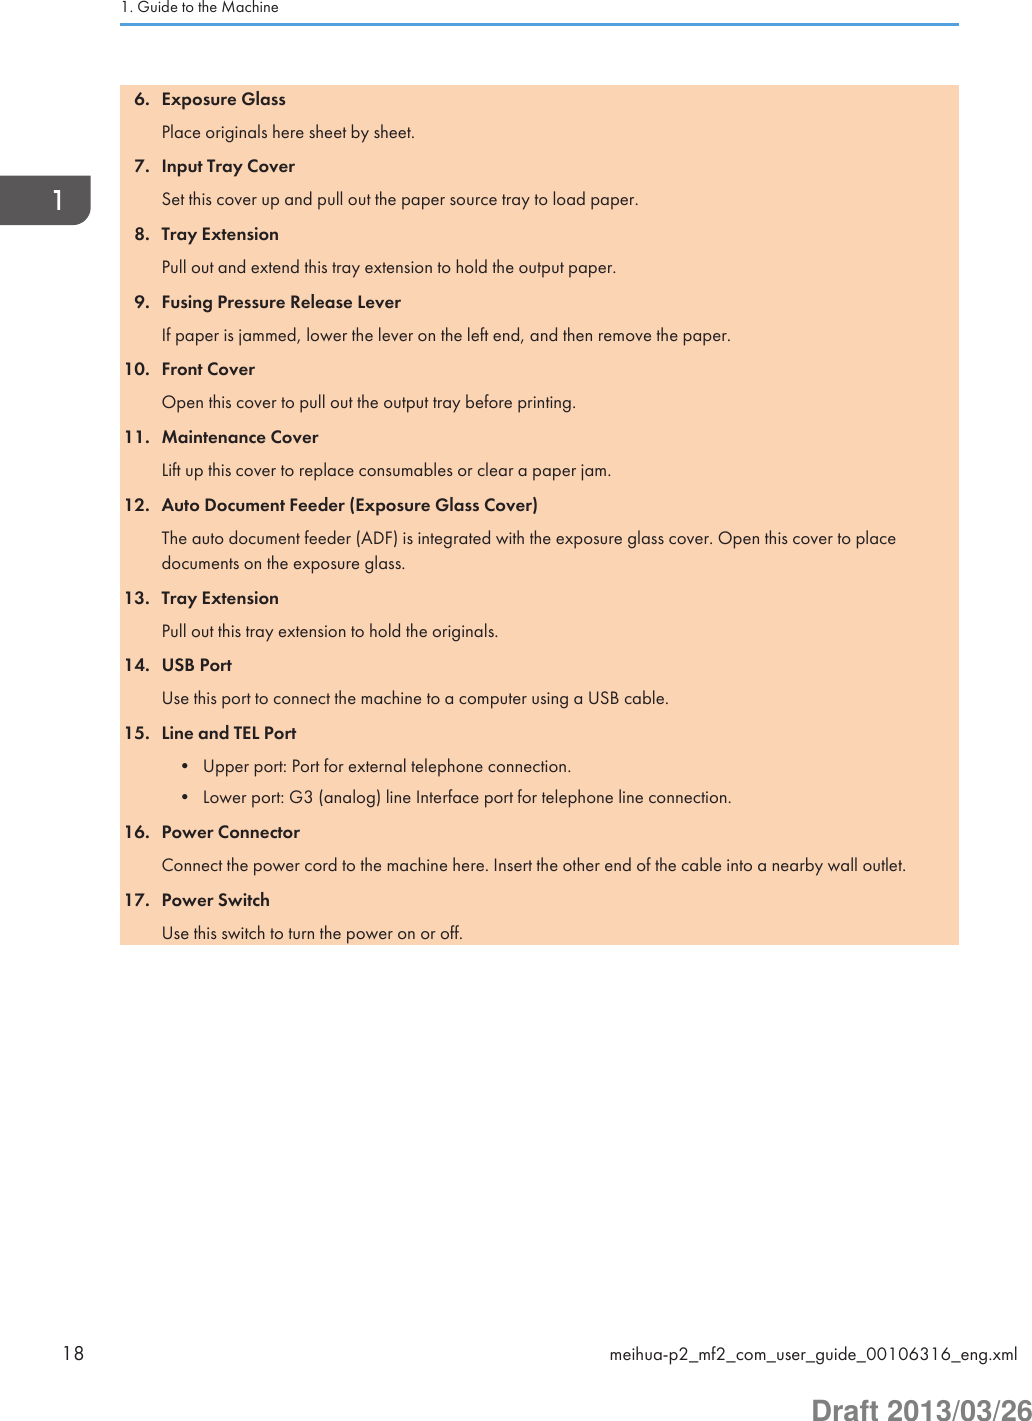
![10. USB PortUse this port to connect the machine to a computer using a USB cable.11. Power ConnectorConnect the power cord to the machine here. Insert the other end of the cable into a nearby wall outlet.12. Power SwitchUse this switch to turn the power on or off.PExteriorCXP0033 4 5 61 21110 12798 131. Maintenance CoverLift up this cover to replace consumables or clear a paper jam.2. Input TrayThis tray can hold up to 50 sheets of plain paper.3. Power IndicatorThis indicator lights up blue when the machine is turned on. It flashes when a print job is received and whileprinting is in progress.4. [Form Feed] keyPress this key to resume printing if printing stops due to paper running out or a paper settings error.You can also press this key to print a test page.5. [Job Reset] keyPress this key to cancel an ongoing print job.1. Guide to the Machine20 meihua-p2_mf2_com_user_guide_00106316_eng.xmlDraft 2013/03/26](https://usermanual.wiki/Ricoh/MFSP112SF1.user-manual-2/User-Guide-1981979-Page-20.png)
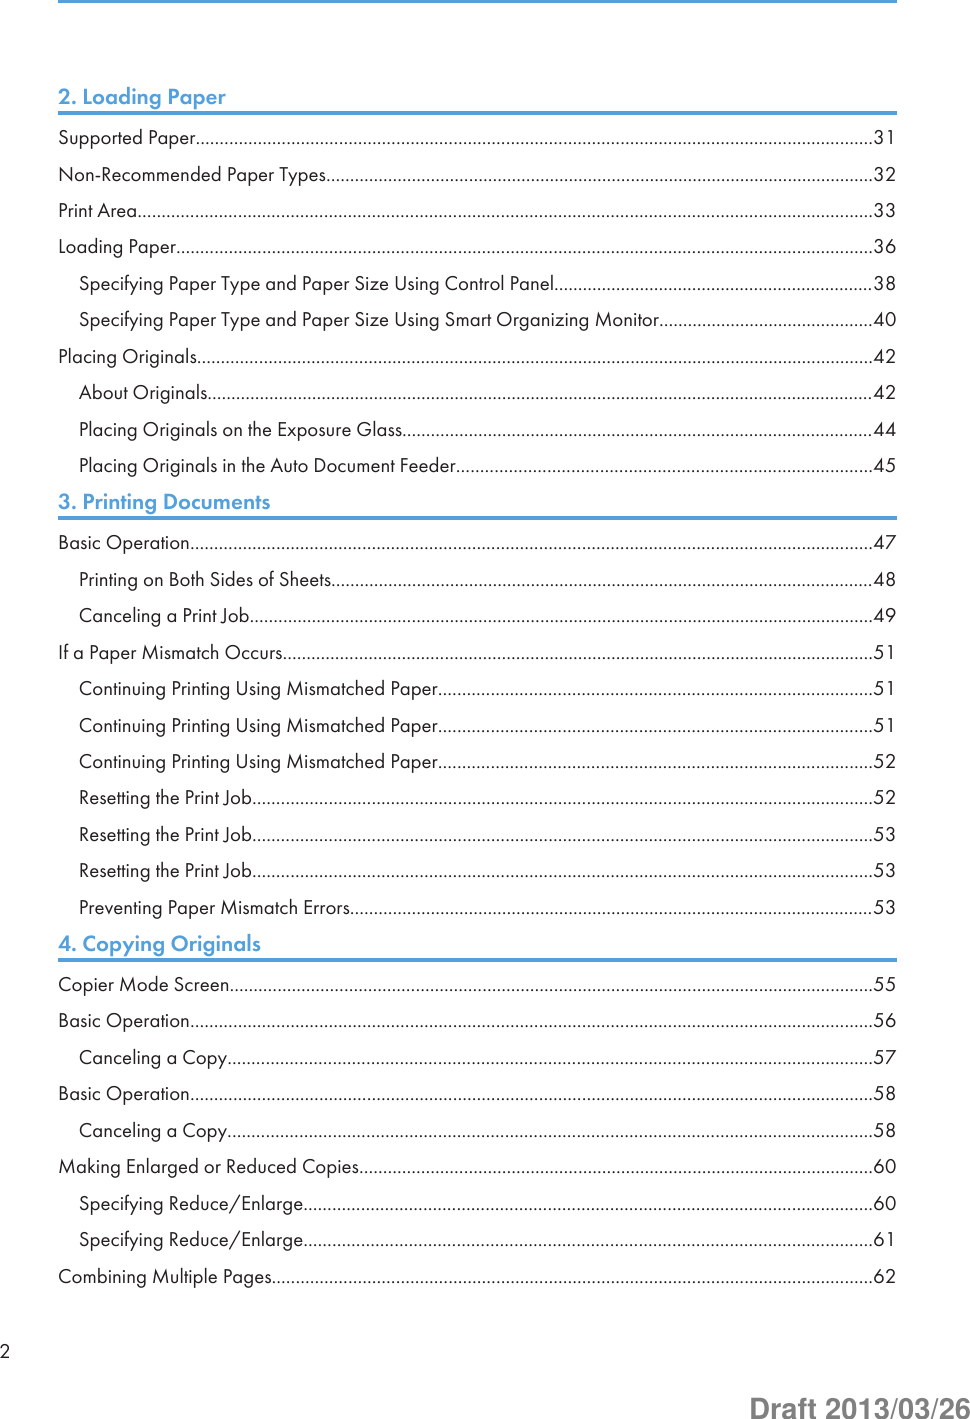
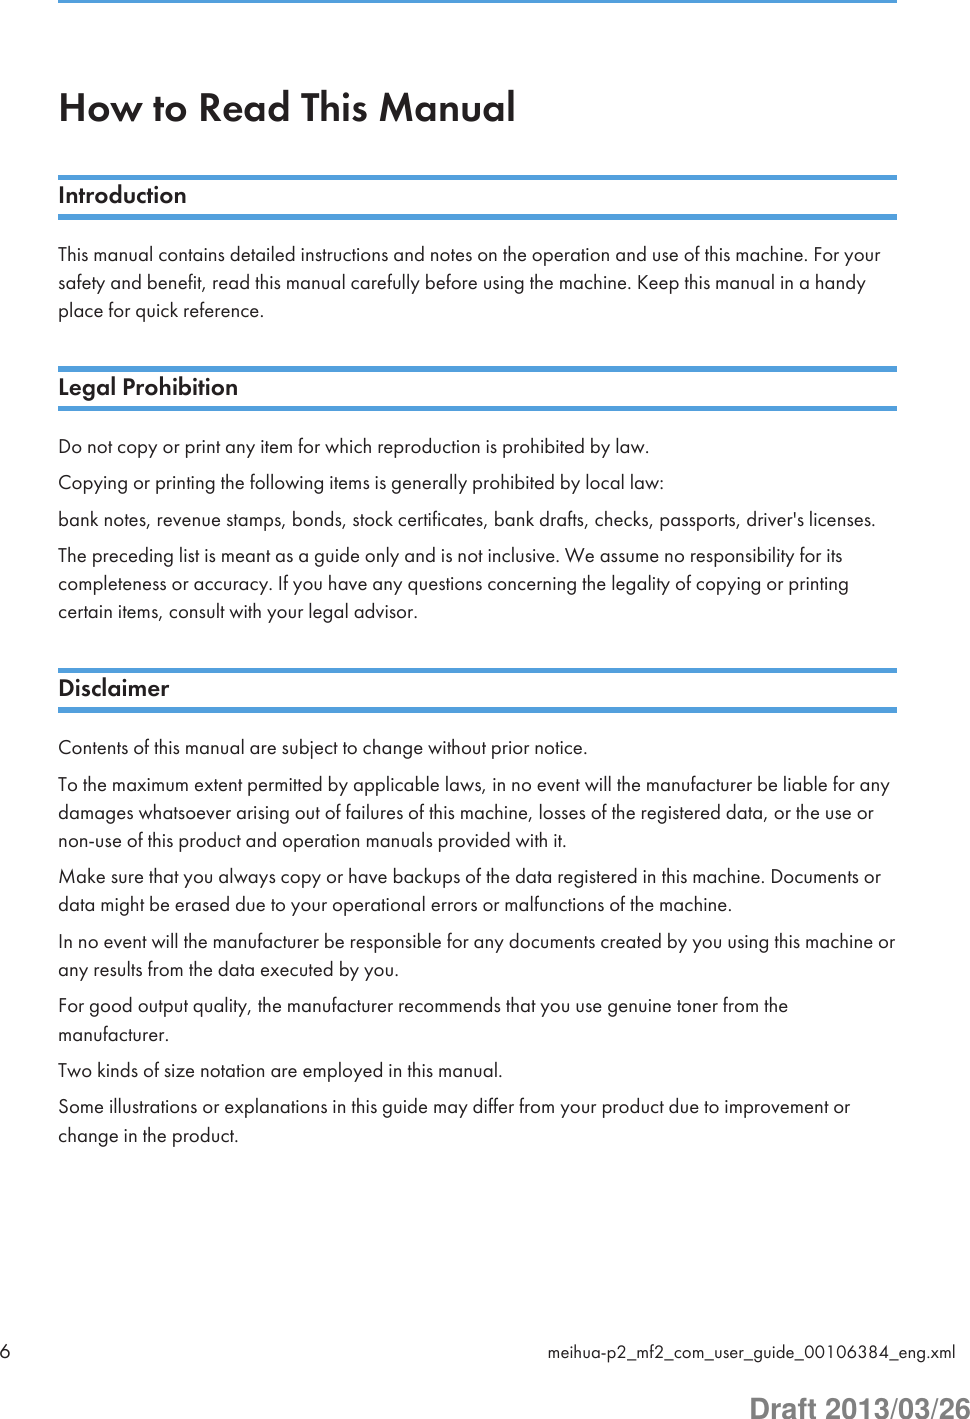
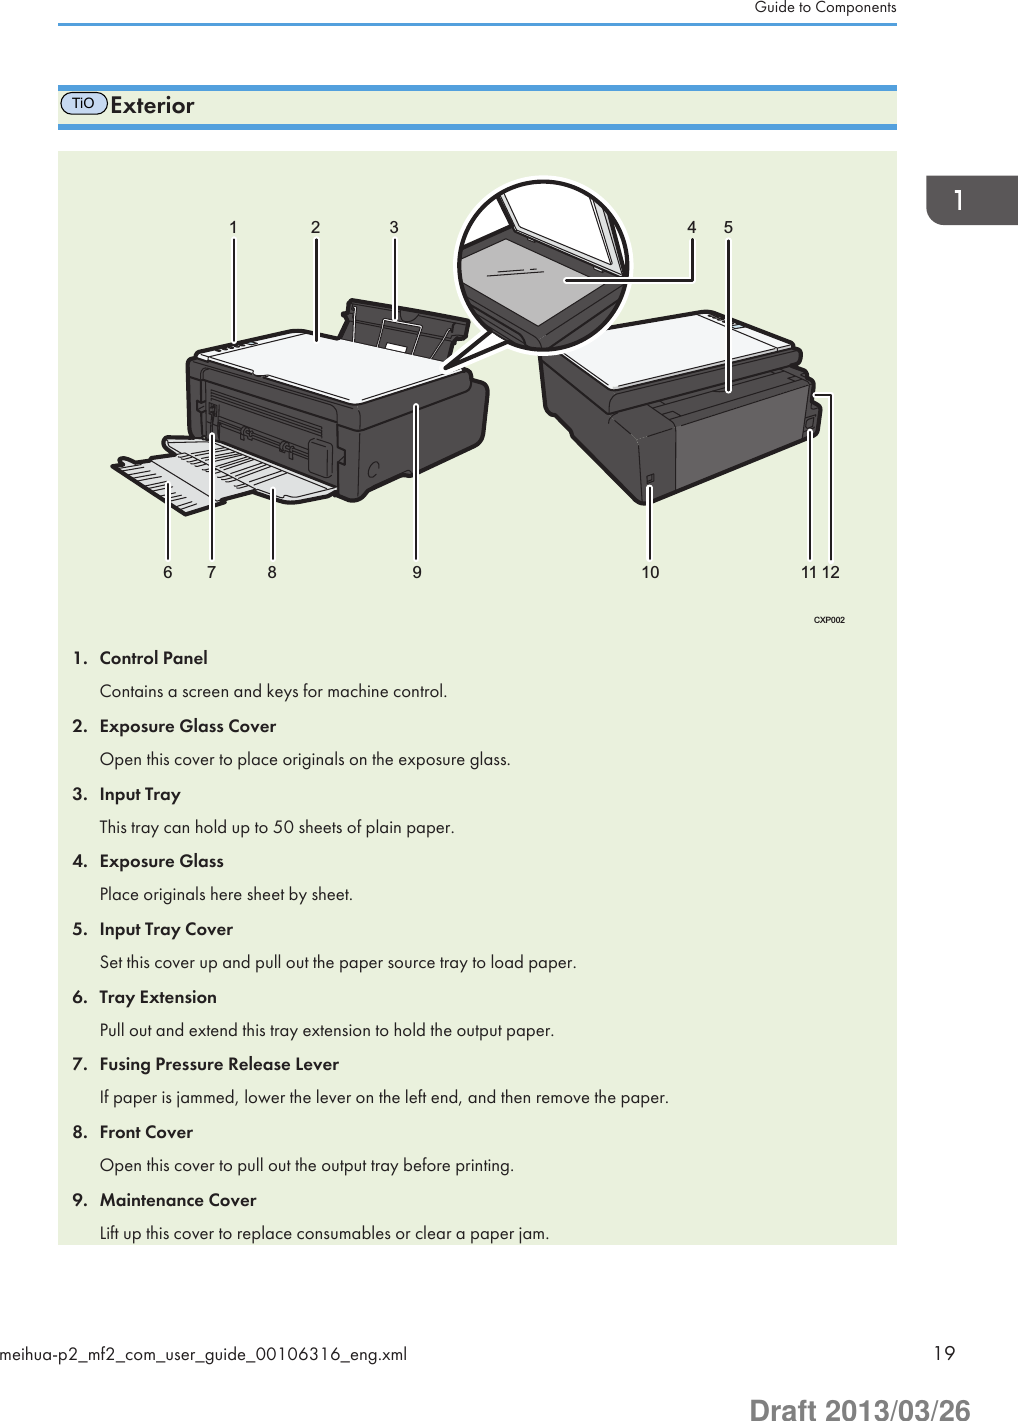
![FiOControl Panel• The actual control panel may look different from the illustration below, depending on the country ofuse.CXP10012 3 4 567891011 121. [Copy/Facsimile] keyUse this key to switch the machine to copier or fax mode.2. [Speed Dial] KeyUse this key to send a fax using a registered speed dial number.3. [User Tools] KeyPress to display the menu for configuring the machine's system settings.4. [OK] KeyUse this key to confirm settings and specified values, or move to the next menu level.5. [Clear/Stop] KeyUse this key to cancel or stop a print job, document copying, fax transmission/reception, and other actions inprogress.6. [Start] KeyUse this button to start fax transmit/receive or copy.7. [ID Card Copy/On Hook Dial] KeyWhen the machine is in copier mode, use this key to perform an ID copy or modify ID copy settings.When the machine is in fax mode, use this key to perform on-hook dialing.8. Power IndicatorThis indicator lights up blue when the machine is turned on. It flashes when a print job is received and whileprinting, scanning, or fax transmission/reception is in progress.9. ScreenDisplays current status and messages.1. Guide to the Machine22 meihua-p2_mf2_com_user_guide_00106316_eng.xmlDraft 2013/03/26](https://usermanual.wiki/Ricoh/MFSP112SF1.user-manual-2/User-Guide-1981979-Page-22.png)
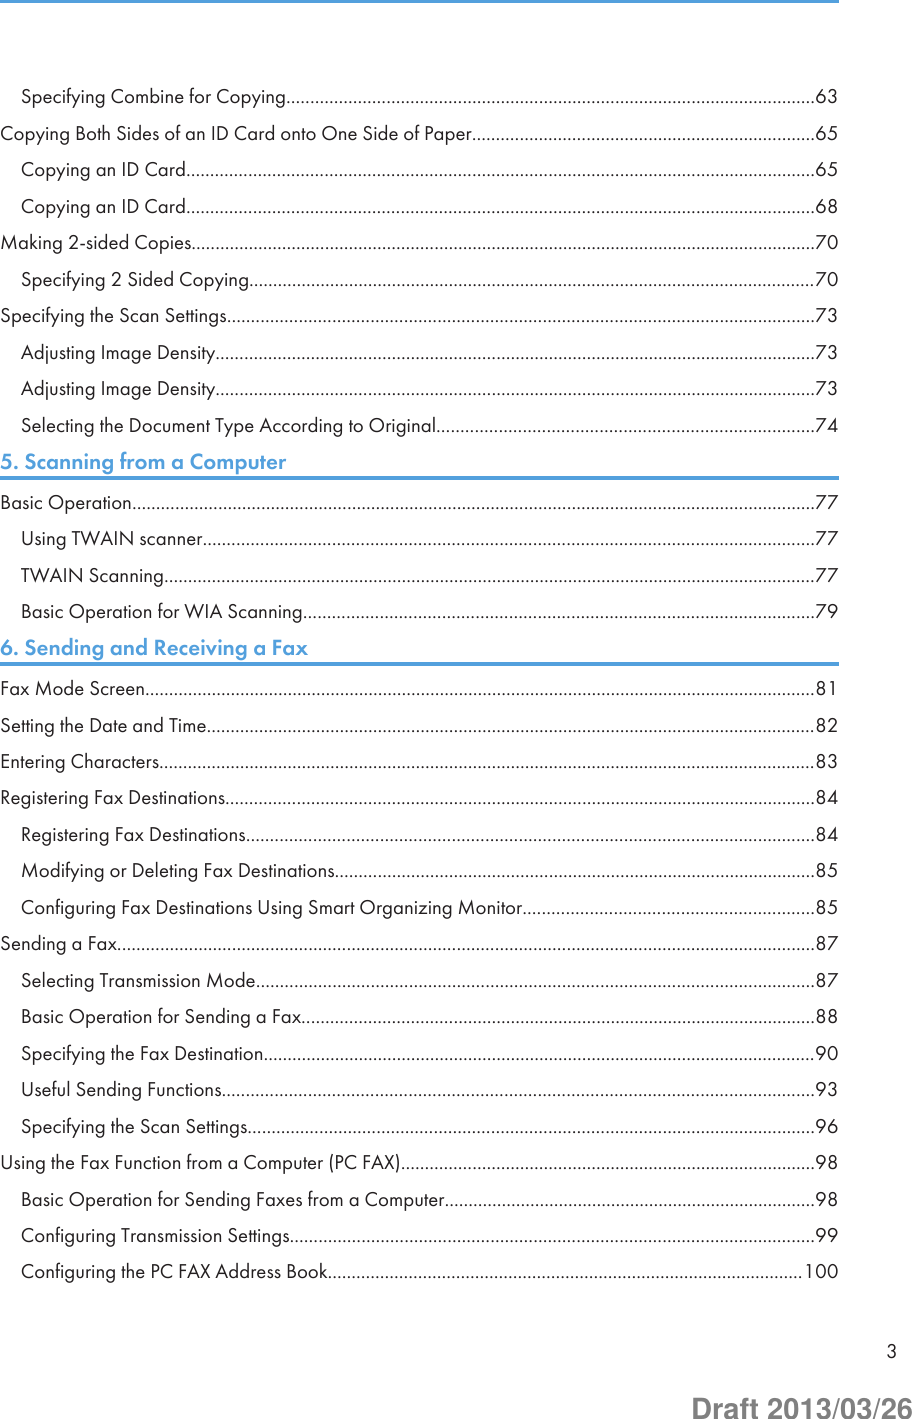
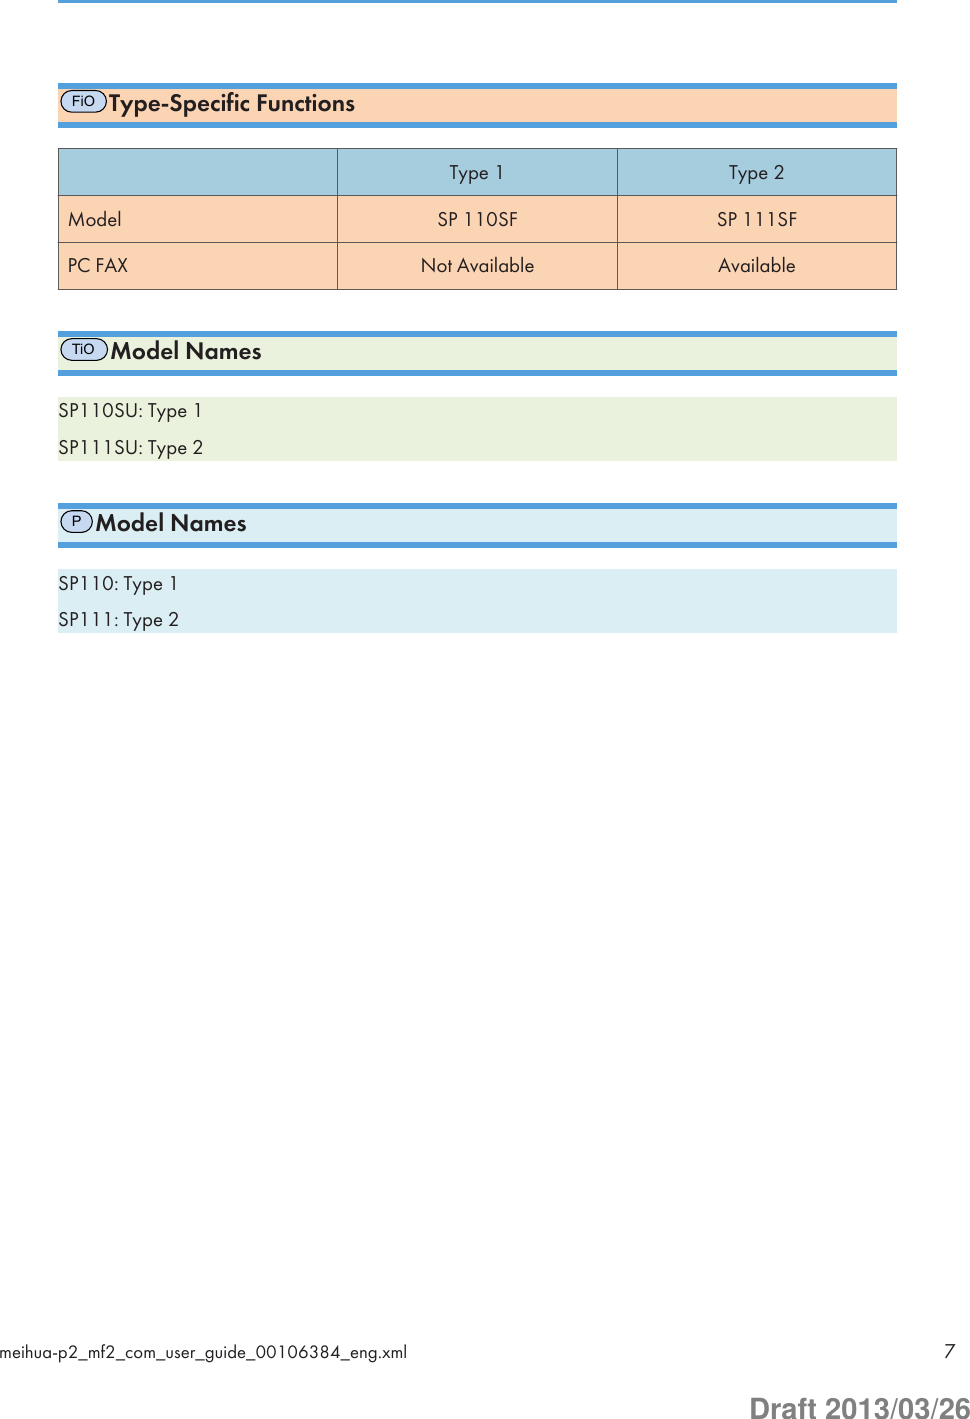
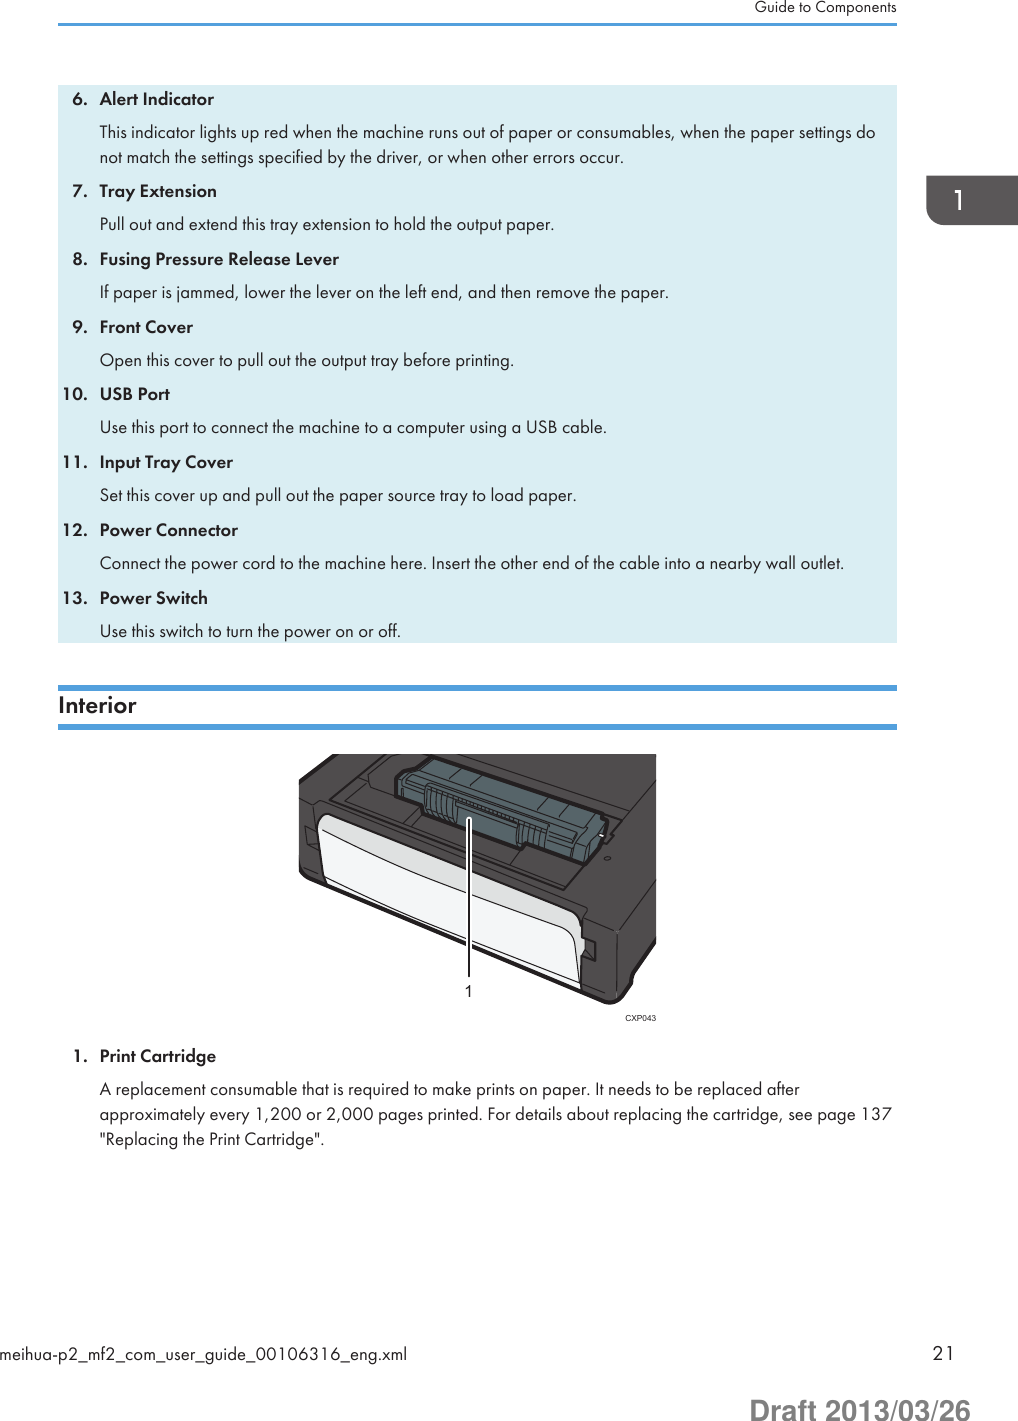
![1. Original Type IndicatorDisplays the original type in three levels.The original type is indicated by which segment is lit on this indicator.• Upper: Text/Photo• Middle: Text• Lower: Photo2. Original Type keyUse this key to select the type of original.3. Density IndicatorDisplays the copy density in three levels.The print density is indicated by which segment is lit on this indicator.• Left: Lighter than normal• Middle: Normal density• Right: Darker than normal4. [Density] KeyUse this key to adjust the copy density.5. [ID Card Copy] KeyUse this key to perform an ID copy.6. ScreenShows the number of copies and the error code.7. [Number of copies] KeyUse this key to change the number of copies.8. [Stop/Clear] KeyWhen the machine is online, press this key to cancel an ongoing print job.9. [Start] KeyUse this key to start copying.10. Power IndicatorThis indicator lights up blue when the machine is turned on. It flashes when a print job is received and whileprinting or scanning is in progress.11. Alert IndicatorThis indicator lights up red when the machine runs out of paper or consumables, when the paper settings donot match the settings specified by the driver, or when other errors occur. It flashes slowly when the machine isalmost out of toner.1. Guide to the Machine24 meihua-p2_mf2_com_user_guide_00106316_eng.xmlDraft 2013/03/26](https://usermanual.wiki/Ricoh/MFSP112SF1.user-manual-2/User-Guide-1981979-Page-24.png)
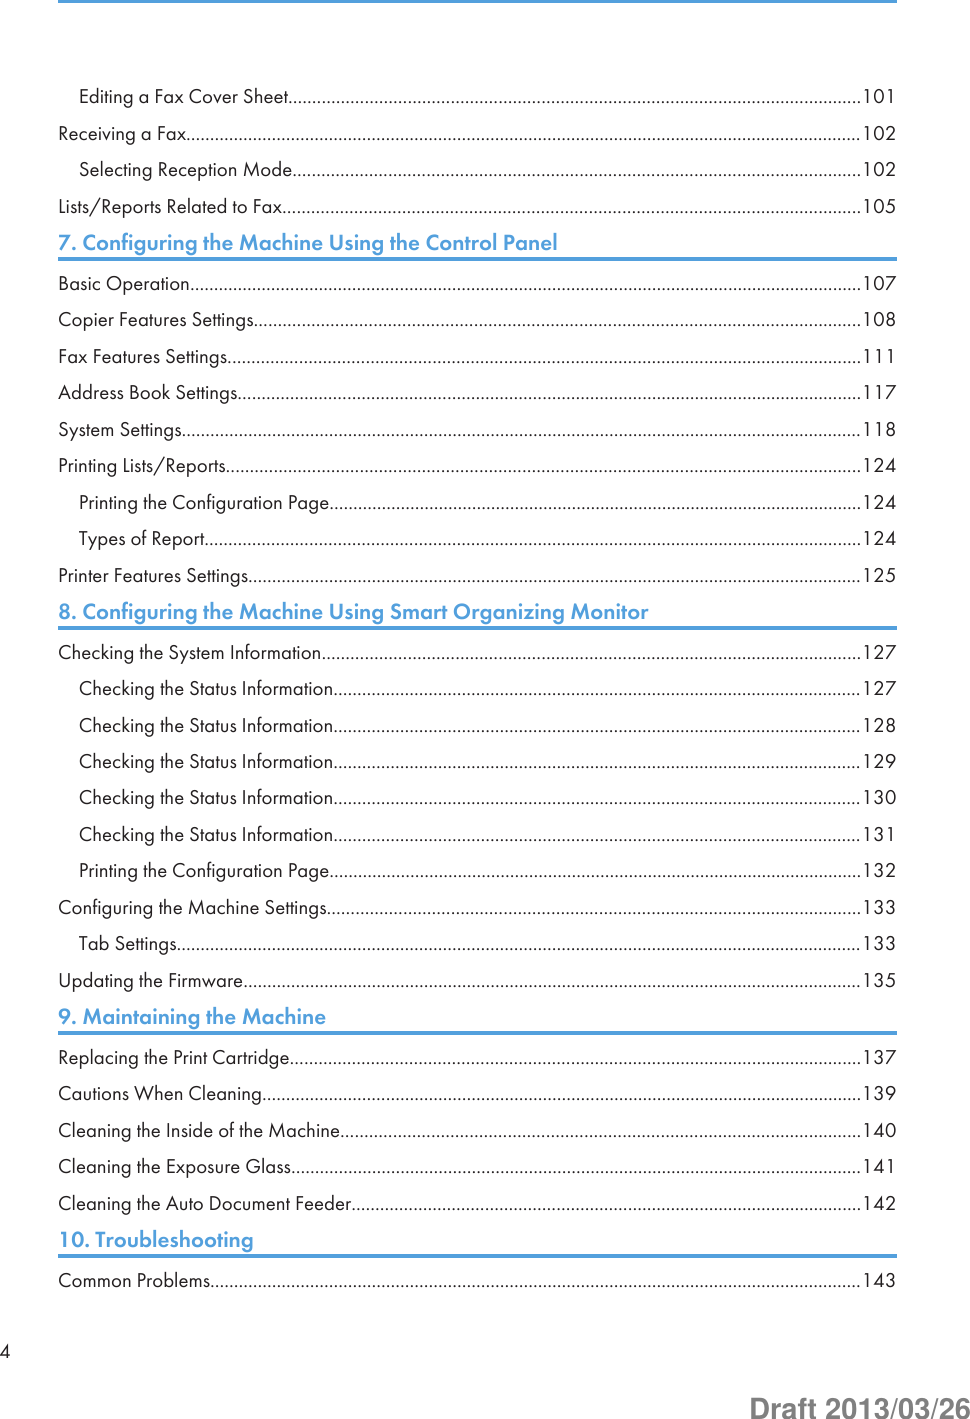
![Installing the Driver and SoftwareYou can install the necessary driver for this machine using the included CD-ROM.The operating systems compatible with the drivers and software for this machine are: Windows XP/Vista/7/8 and Windows Server 2003/2003 R2/2008/2008 R2/2012.The procedure in this section is an example based on Windows 7. The actual procedure may varydepending on the operating system you are using.• Be sure to disconnect the USB cable from the machine and turn the machine off before beginningthe installation.Quick InstallTiOUse Quick Install to install the printer driver, TWAIN driver, WIA driver, and Smart OrganizingMonitor from the CD-ROM.FiOUse Quick Install to install the printer driver, TWAIN driver, WIA driver, and PC FAX driver fromthe CD-ROM.PUse Quick Install to install the printer driver, and Smart Organizing Monitor from the CD-ROM.1. Close all applications except this manual.2. Insert the CD-ROM into the CD-ROM drive.3. From the CD-ROM menu, click [USB Quick Install].4. Follow the instructions in the installation wizard.PInstalling the Printer Driver1. Close all applications except this manual.2. Insert the CD-ROM into the CD-ROM drive.3. From the CD-ROM menu, click [DDST Printer Driver].4. Follow the instructions in the installation wizard.Installing the Driver and Softwaremeihua-p2_mf2_com_user_guide_00106317_eng.xml 25Draft 2013/03/26](https://usermanual.wiki/Ricoh/MFSP112SF1.user-manual-2/User-Guide-1981979-Page-25.png)
![Upgrading or Deleting the Printer DriverUpgrading the printer driver1. On the [Start] menu, click [Devices and Printers].• Windows XP, Windows Server 2003/2003 R2:On the [Start] menu, select [Printers and Faxes].• Windows Vista, Windows Server 2008:On the [Start] menu, select [Control Panel], and then click [Printers] in [Hardware and Sound]category.• Windows 8, Windows Server 2012:Click [Search] on the Charm Bar, and then click [Control Panel]. When the [Control Panel]window appears, click [View devices and printers].2. Right-click the icon of the printer model you want to modify, and then click [Printerproperties].3. Click the [Advanced] tab.4. Click [New Driver...], and then click [Next].5. Click [Have Disk...].6. Click [Browse...], and then select the printer driver location.7. Click [OK], and then specify the printer model.8. Click [Next].9. Click [Finish].10. Click [OK] to close the printer properties window.11. Restart the computer.Deleting the printer driver1. On the [Start] menu, click [Devices and Printers].• Windows XP, Windows Server 2003/2003 R2:On the [Start] menu, select [Printers and Faxes].• Windows Vista, Windows Server 2008:On the [Start] menu, select [Control Panel], and then click [Printers] in [Hardware and Sound]category.• Windows 8, Windows Server 2012:1. Guide to the Machine26 meihua-p2_mf2_com_user_guide_00106317_eng.xmlDraft 2013/03/26](https://usermanual.wiki/Ricoh/MFSP112SF1.user-manual-2/User-Guide-1981979-Page-26.png)
![Click [Search] on the Charm Bar, and then click [Control Panel]. When the [Control Panel]window appears, click [View devices and printers].2. Right-click the icon of the printer you want to delete, and then click [Remove device].3. Click [Yes].4. Click any printer icon, and then click [Print server properties].5. Click the [Drivers] tab.6. Click the [Change Driver Settings] button if it is displayed.7. Click [Remove...].8. Select [Remove driver and driver package.], and then click [OK].9. Click [Yes].10. Click [Delete].11. Click [OK].12. Click [Close] to close the print server properties window.FiOInstalling the Smart Organizing MonitorSmart Organizing Monitor is a utility that allows you to modify the machine’s settings or view themachine’s status from your computer. For details, see page 29 "What is Smart Organizing Monitor?".1. Close all applications except this manual.2. Insert the CD-ROM into the CD-ROM drive.3. From the CD-ROM menu, click [Smart Organizing Monitor].4. Select a language for Smart Organizing Monitor.5. Follow the instructions in the installation wizard.Installing the Driver and Softwaremeihua-p2_mf2_com_user_guide_00106317_eng.xml 27Draft 2013/03/26](https://usermanual.wiki/Ricoh/MFSP112SF1.user-manual-2/User-Guide-1981979-Page-27.png)
![FiOInitial SetupWhen you turn this machine on for the first time, you must set the following items. Select each settingusing the [ ], [ ], or number keys, and then press the [OK] key.• [Language]• [Country Code]• [Year]• [Month]• [Day]• Date format• Time format• [Hour]• [Minute]1. Guide to the Machine28 meihua-p2_mf2_com_user_guide_00106389_eng.xmlDraft 2013/03/26](https://usermanual.wiki/Ricoh/MFSP112SF1.user-manual-2/User-Guide-1981979-Page-28.png)
![What is Smart Organizing Monitor?Install this utility on your computer from the included CD-ROM before using it.Smart Organizing Monitor provides the following functions:• Displays the status of the machineDisplays paper jam messages and other error messages.• Paper size and type settingsDisplays the settings for paper sizes or types available on this machine.• Print test and configuration pagesPrints List/Report to check the list of settings for this machine and other information.• Modify the system settingsUse to change custom paper size settings and other settings on this machine.•TiOModify the printer settingsTiOUse to change print settings such as [Auto Continue:] and [I/O Time Out:] on this machine.•PModify the printer settingsPUse to change this machine's print settings such as [Auto Continue:] and [I/O Time Out:].•TiOModify the copy settingsTiOUse to change the machine’s copy settings such as [Reduce / Enlarge:].•FiOModify the Speed DialFiORegister, change, or delete Speed Dial settings.For details about basic instructions on how to use Smart Organizing Monitor, see page 127"Configuring the Machine Using Smart Organizing Monitor".What is Smart Organizing Monitor?meihua-p2_mf2_com_user_guide_00106318_eng.xml 29Draft 2013/03/26](https://usermanual.wiki/Ricoh/MFSP112SF1.user-manual-2/User-Guide-1981979-Page-29.png)
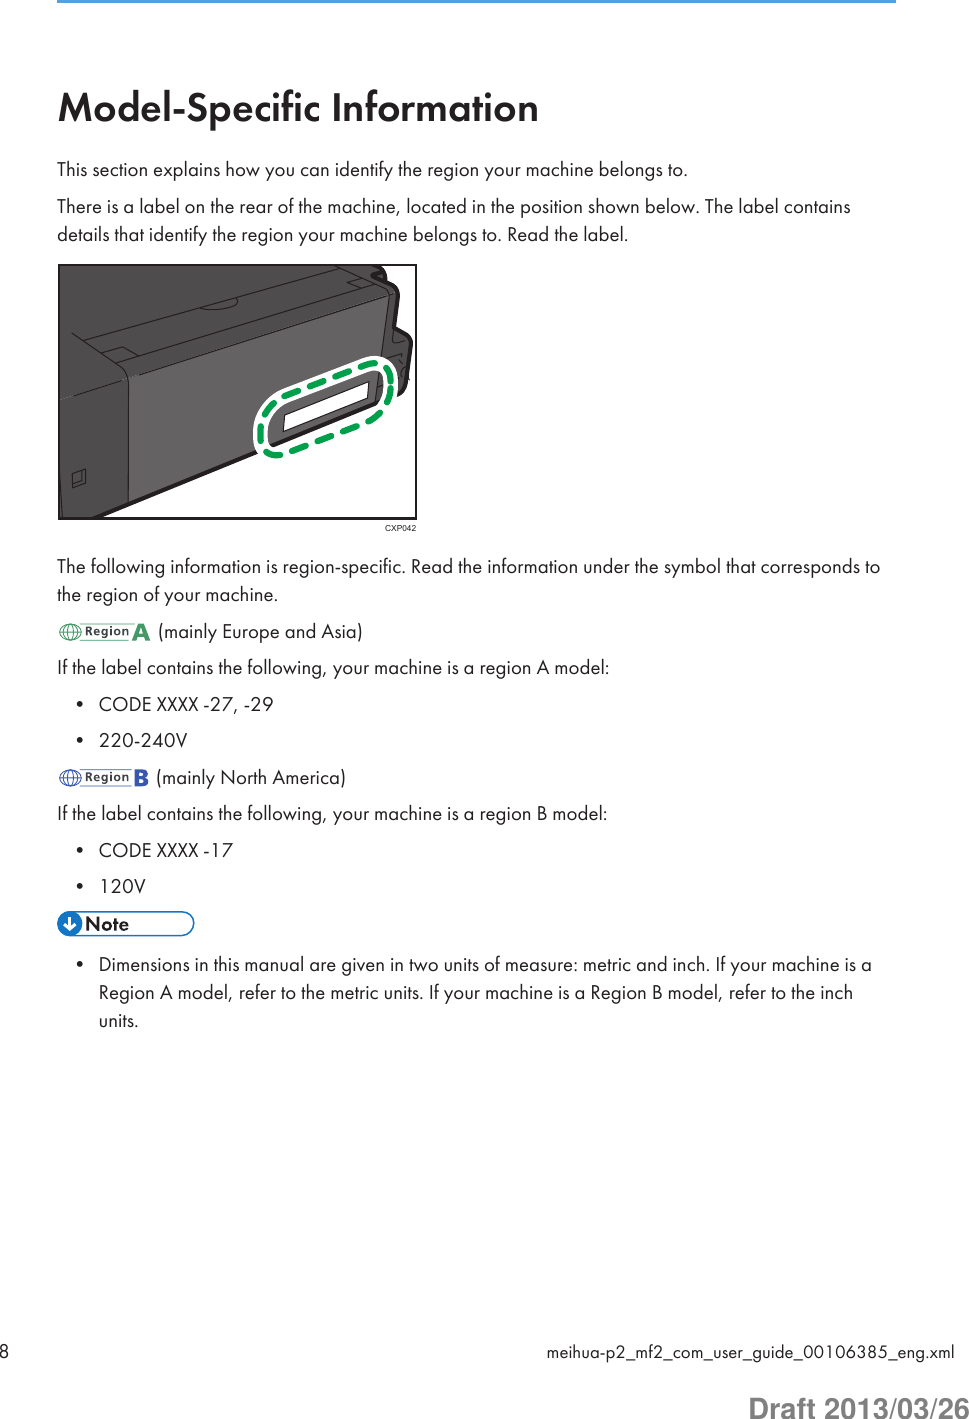
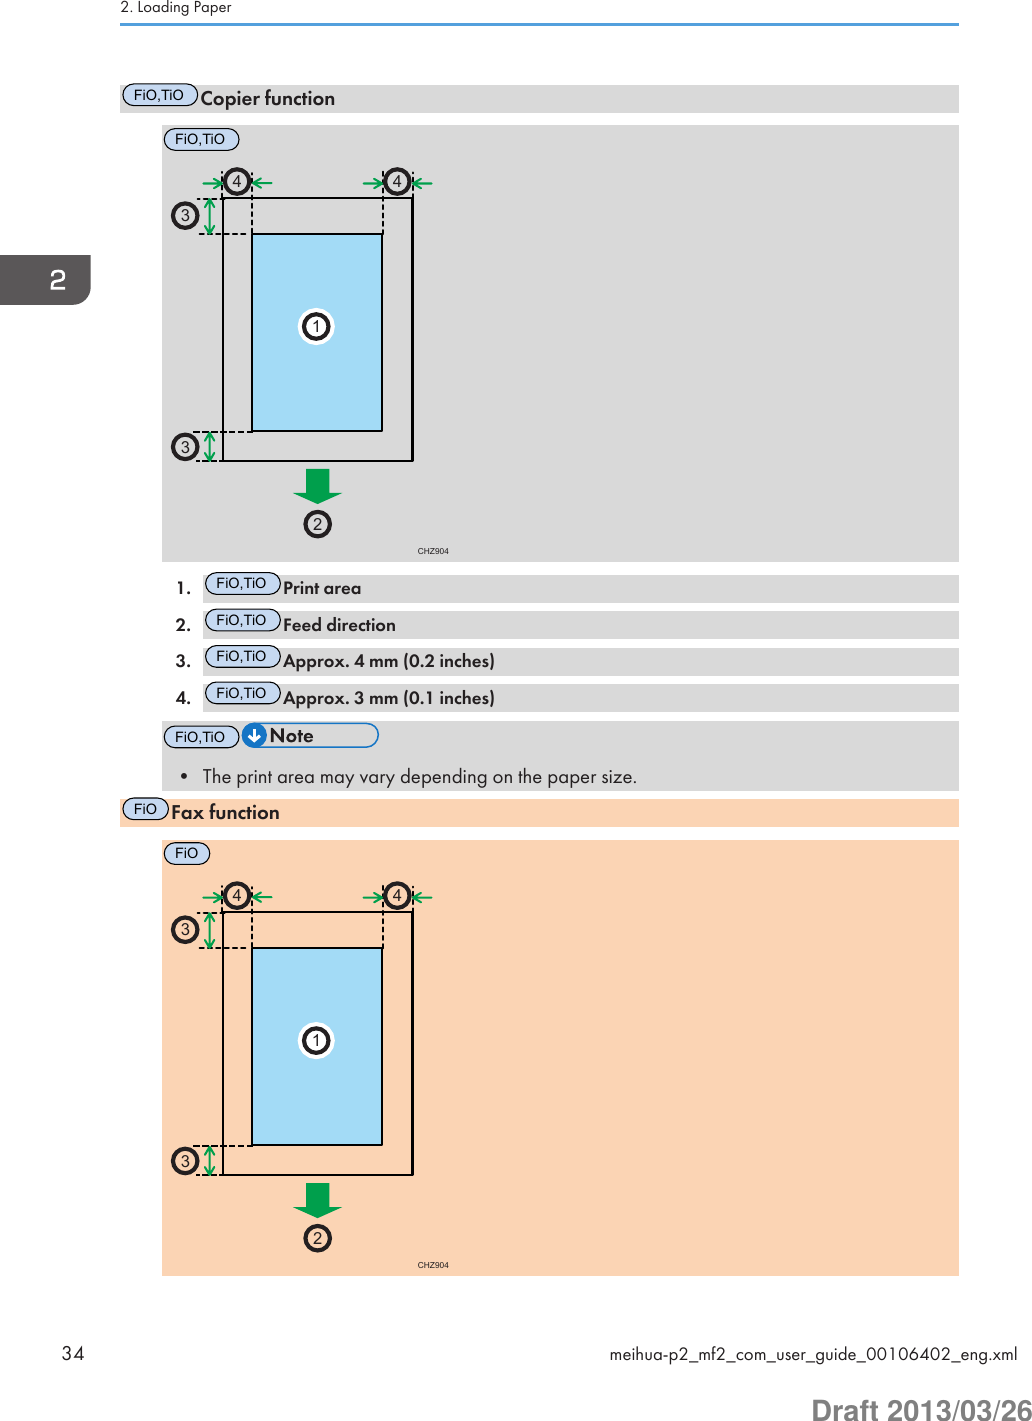
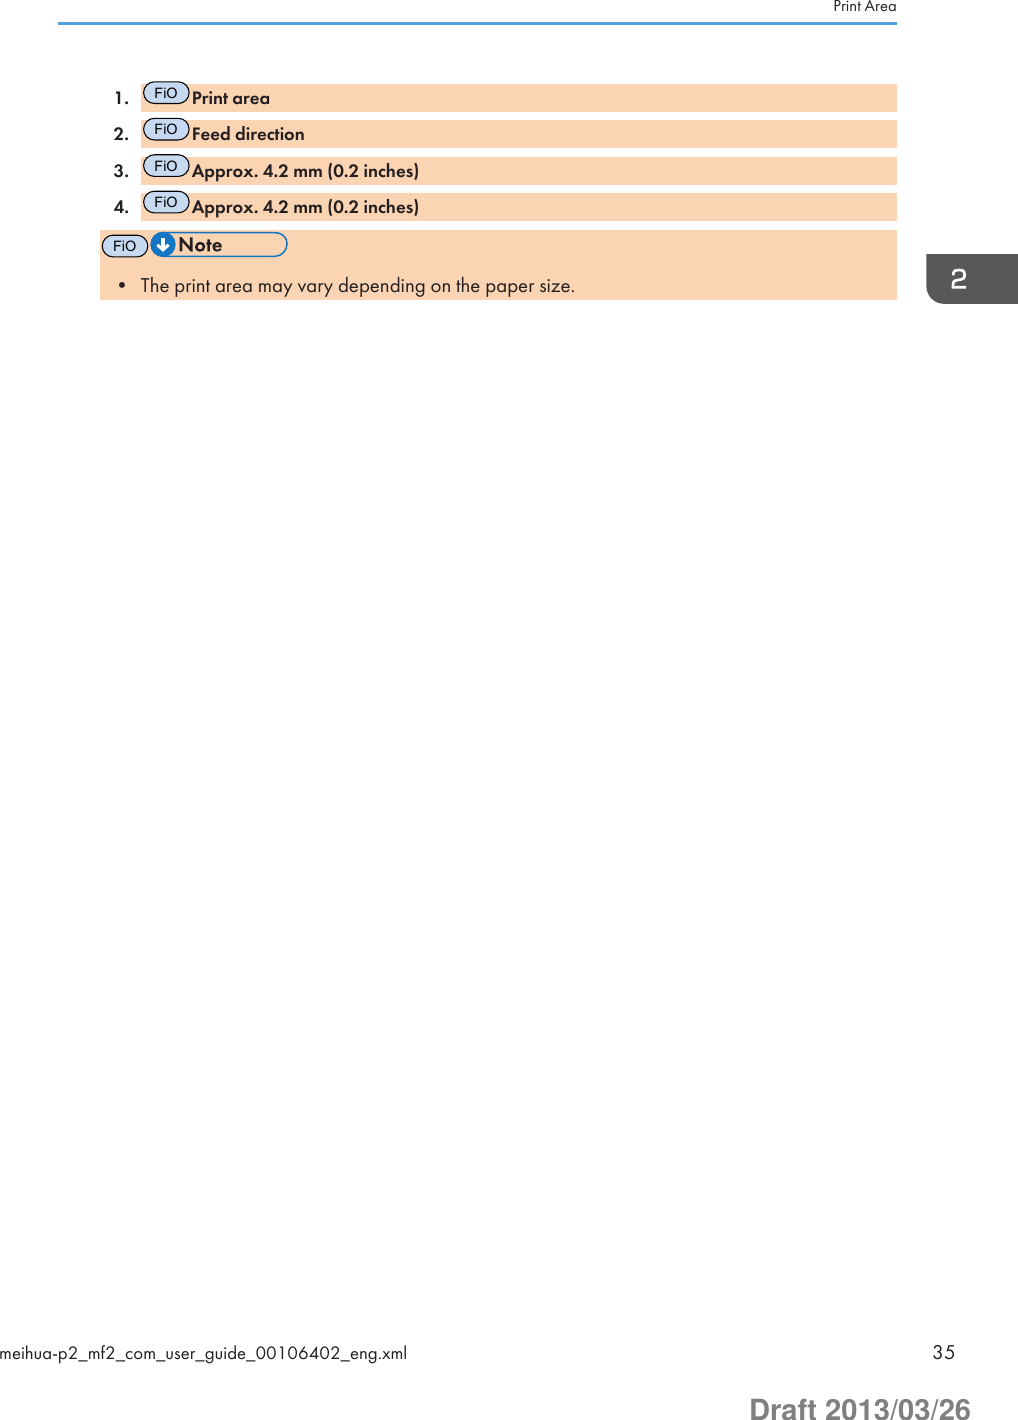
![Print AreaThe diagram below shows the area of the paper that the machine can print on.From the printer driverCHZ9042331441. Print area2. Feed direction3. Approx. 4.2 mm (0.2 inches)4. Approx. 4.2 mm (0.2 inches)• The print area may vary depending on the paper size and printer driver settings.•FiOAdjust the print position by specifying [Registration] in [System Settings].•TiO,PTo adjust the print position, specify [Registration] on the [System] tab in SmartOrganizing Monitor.Print Areameihua-p2_mf2_com_user_guide_00106402_eng.xml 33Draft 2013/03/26](https://usermanual.wiki/Ricoh/MFSP112SF1.user-manual-2/User-Guide-1981979-Page-33.png)
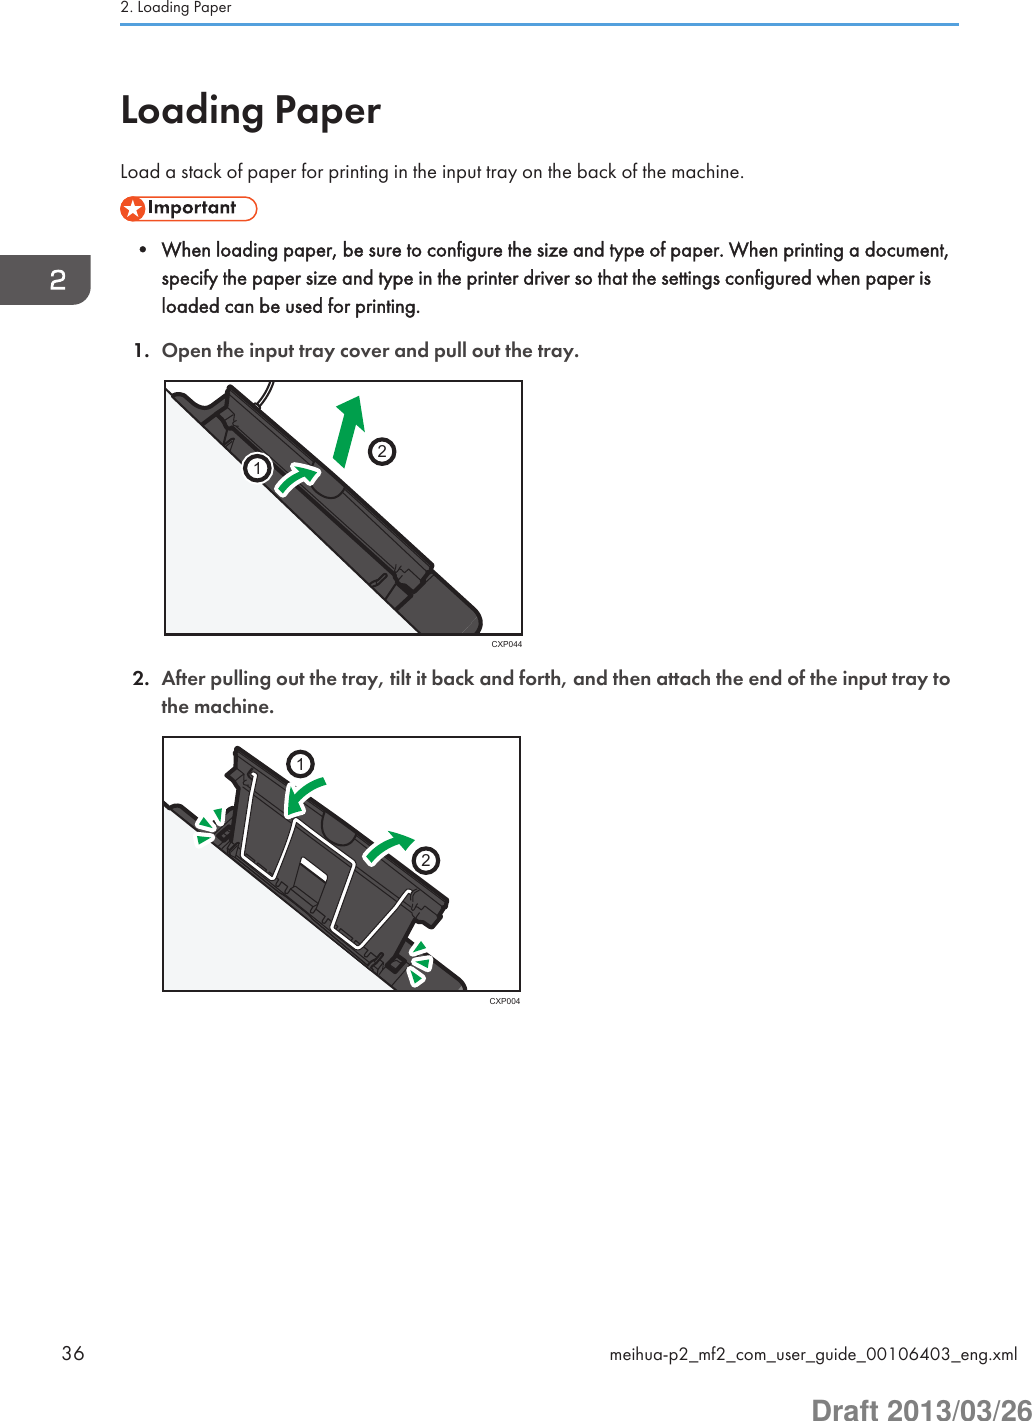
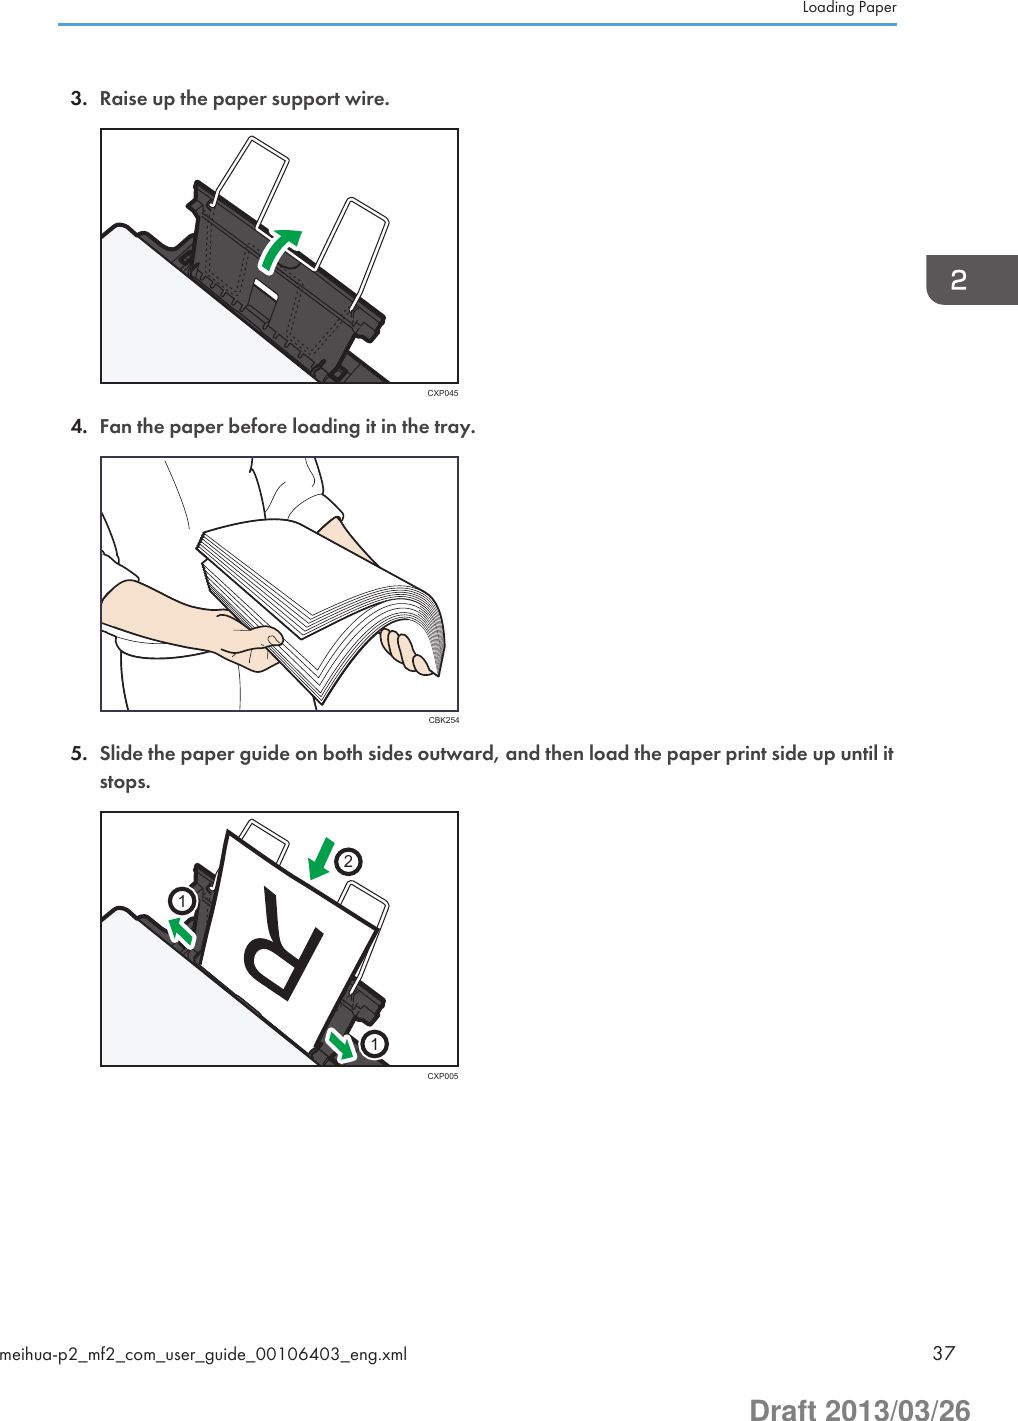
![6. Adjust the paper guide on both sides to fit the paper width.CXP0067. Open the front cover and tray extension.CXP046FiOSpecifying Paper Type and Paper Size Using Control PanelSpecifying the paper type1. Press the [User Tools] key.CXP1012. Press the [ ] or [ ] key to select [System Settings], and then press the [OK] key.2. Loading Paper38 meihua-p2_mf2_com_user_guide_00106403_eng.xmlDraft 2013/03/26](https://usermanual.wiki/Ricoh/MFSP112SF1.user-manual-2/User-Guide-1981979-Page-38.png)
![3. Press the [ ] or [ ] key to select [Tray Paper Settings], and then press the [OK] key.4. Press the [ ] or [ ] key to select [Paper Type], and then press the [OK] key.5. Press the [ ] or [ ] key to select the paper type, and then press the [OK] key.6. Press the [ ] key to return to the initial screen.Specifying the standard paper size1. Press the [User Tools] key.CXP1012. Press the [ ] or [ ] key to select [System Settings], and then press the [OK] key.3. Press the [ ] or [ ] key to select [Tray Paper Settings], and then press the [OK] key.4. Press the [ ] or [ ] key to select [Paper Size], and then press the [OK] key.5. Press the [ ] or [ ] key to select the paper size, and then press the [OK] key.6. Press the [ ] key to return to the initial screen.Specifying a custom paper size1. Press the [User Tools] key.CXP1012. Press the [ ] or [ ] key to select [System Settings], and then press the [OK] key.Loading Papermeihua-p2_mf2_com_user_guide_00106403_eng.xml 39Draft 2013/03/26](https://usermanual.wiki/Ricoh/MFSP112SF1.user-manual-2/User-Guide-1981979-Page-39.png)
![3. Press the [ ] or [ ] key to select [Tray Paper Settings], and then press the [OK] key.4. Press the [ ] or [ ] key to select [Paper Size], and then press the [OK] key.5. Press the [ ] or [ ] key to select [Custom], and then press the [OK] key.6. Press the [ ] or [ ] key to select [mm] or [inch], and then press the [OK] key.7. Press the [ ] or [ ] key to specify the width, and then press the [OK] key.8. Press the [ ] or [ ] key to specify the length, and then press the [OK] key.9. Press the [OK] key.10. Press the [User Tools] key to return to the initial screen.Specifying Paper Type and Paper Size Using Smart Organizing MonitorThe procedure in this section is an example based on Windows 7. The actual procedure may varydepending on the operating system you are using.Specifying the paper type and paper size1. On the [Start] menu, click [All Programs].2. Click [Smart Organizing Monitor for SP xxx Series].3. Click [Smart Organizing Monitor for SP xxx Series Status].4. If the machine you are using is not selected, click [Select Device...], and then select themachine's model.5. Click [OK].6. On the [Status] tab, click [Change...].7. Select the paper type and paper size, and then click [OK].8. Click [Close].Changing the custom paper size1. On the [Start] menu, click [All Programs].2. Click [Smart Organizing Monitor for SP xxx Series].3. Click [Smart Organizing Monitor for SP xxx Series Status].4. If the machine you are using is not selected, click [Select Device...], and then select themachine's model.5. Click [OK].6. On the [User Tool] tab, click [Printer Configuration].2. Loading Paper40 meihua-p2_mf2_com_user_guide_00106403_eng.xmlDraft 2013/03/26](https://usermanual.wiki/Ricoh/MFSP112SF1.user-manual-2/User-Guide-1981979-Page-40.png)
![7. On the [System] tab, select [mm] or [inch] in the [Measurement Unit:] list.8. In the [Horizontal: (90 to 216 mm)] box, enter the width.9. In the [Vertical: (148 to 356 mm)] box, enter the length.10. Click [OK].11. Click [Close].Loading Papermeihua-p2_mf2_com_user_guide_00106403_eng.xml 41Draft 2013/03/26](https://usermanual.wiki/Ricoh/MFSP112SF1.user-manual-2/User-Guide-1981979-Page-41.png)
![3. Printing DocumentsBasic OperationUse the printer driver to print a document from your computer.• Before printing, check that the paper size specified in [Document Size:] on the [Paper/PrintQuality] tab matches the size of the paper in the paper tray.1. After creating a document, open the [Printing Preferences] dialog box in the document'snative application.2. Change any print settings if necessary.The following print settings can be specified using the printer driver:• Printing multiple pages on a sheet• Splitting a single page across multiple sheets• Printing on both sides of sheets• Not having blank pages printed• Having prints sorted• Saving printer driver settings as a file• Recalling and deleting saved printer properties settings• Printing on a custom size paper• Printing a large paper size document on smaller size paper• Reducing and enlarging a document size• Changing the print resolution• Saving on toner when printingmeihua-p2_mf2_com_user_guide_00106406_eng.xml 47Draft 2013/03/26](https://usermanual.wiki/Ricoh/MFSP112SF1.user-manual-2/User-Guide-1981979-Page-47.png)
![• Changing the dithering pattern• Having text stamped on printsFor details about each setting items, click [Help].3. When setting changes are completed, click [OK].4. Print the document using the print function in the document's native application.•FiO,TiOIf a paper jam occurs, printing stops halfway. Open the maintenance cover to removethe jammed paper. Printing will resume automatically after the maintenance cover is closed. If themaintenance cover is not opened to remove jammed paper, press the [Start] key to resumeprinting.•PIf a paper jam occurs, printing stops halfway. Open the maintenance cover to remove thejammed paper. Printing will resume automatically after the maintenance cover is closed. If themaintenance cover is not opened to remove jammed paper, press the [Form Feed] key to resumeprinting.•FiO,TiOIf the paper runs out, replenish it, and then press the [Start] key to resume printing.•PIf the paper runs out, replenish it, and then press the [Form Feed] key to resume printing.Printing on Both Sides of Sheets1. After creating a document, open the [Printing Preferences] dialog box in the document'snative application.2. On the [Setup] tab, in the [Duplex:] list box, select how you want to open the boundoutput.3. After making any additional settings, click [OK].4. Start printing.The machine prints only the one sides of pages first, and then displays on Smart OrganizingMonitor screen a message to reload the outputs turned over.5. Take out all of the prints from the output tray and place them in the input tray.To print on the reverse side of the prints, turn them over so that the blank side faces up and placethem in the input tray.3. Printing Documents48 meihua-p2_mf2_com_user_guide_00106406_eng.xmlDraft 2013/03/26](https://usermanual.wiki/Ricoh/MFSP112SF1.user-manual-2/User-Guide-1981979-Page-48.png)
![PortraitCXP018LandscapeCXP0196.FiOPress the [Start] key.7.TiOPress the [Start] key.8.PPress the [Form Feed] key.Canceling a Print JobYou can cancel print jobs using either the machine's control panel or your computer, depending on thestatus of the job.Canceling a print job before printing has started1. Double-click the printer icon on the task tray of your computer.2. Select the print job you want to cancel, click the [Document] menu, and then click[Cancel].• If you cancel a print job that has already been processed, printing may continue for a few pagesbefore being canceled.Basic Operationmeihua-p2_mf2_com_user_guide_00106406_eng.xml 49Draft 2013/03/26](https://usermanual.wiki/Ricoh/MFSP112SF1.user-manual-2/User-Guide-1981979-Page-49.png)
![• It may take a while to cancel a large print job.FiOCanceling a print job while printing1. Press the [Clear/Stop] key.CXP1022. Press the [1] key.To cancel printing, press the [1] key (1: Yes). To continue printing, press the [2] key (2: No).TiOCanceling a print job while printing1. Press the [Stop/Clear] key.CTT118PCanceling a print job while printing1. Press the [Job Reset] key.3. Printing Documents50 meihua-p2_mf2_com_user_guide_00106406_eng.xmlDraft 2013/03/26](https://usermanual.wiki/Ricoh/MFSP112SF1.user-manual-2/User-Guide-1981979-Page-50.png)
![If a Paper Mismatch OccursIf the paper size or type does not match the print job's settings, the machine reports an error. There aretwo ways to resolve this error:•P,TiOIf [Auto Continue:] is set to [0 sec], no error message appears.•FiOIf [Auto Continue] is set to [0 sec.], no error message appears.Continue printing using mismatched paperUse the form-feed function to ignore the error and print using mismatched paper.Reset the print jobCancel printing.FiOContinuing Printing Using Mismatched PaperIf the paper is too small for the print job, the printed image will be cropped.1. If the error message is displayed, press the [Start] key.CXP103• If the error message appears again, check whether the specified paper size matches the size of thepaper in the paper tray.TiOContinuing Printing Using Mismatched PaperIf the paper is too small for the print job, the printed image will be cropped.If a Paper Mismatch Occursmeihua-p2_mf2_com_user_guide_00106407_eng.xml 51Draft 2013/03/26](https://usermanual.wiki/Ricoh/MFSP112SF1.user-manual-2/User-Guide-1981979-Page-51.png)
![1. If the error code is displayed, press the [Start] key.CTT120• If the error code appears again, check whether the specified paper size matches the size of thepaper in the paper tray.PContinuing Printing Using Mismatched PaperIf the paper is too small for the print job, the printed image will be cropped.1. If the error message is displayed on Smart Organizing Monitor, press the [Form Feed]key.• If the error message appears again, check whether the specified paper size matches the size of thepaper in the paper tray.FiOResetting the Print Job1. If the error message is displayed, press the [Clear/Stop] key.CXP1023. Printing Documents52 meihua-p2_mf2_com_user_guide_00106407_eng.xmlDraft 2013/03/26](https://usermanual.wiki/Ricoh/MFSP112SF1.user-manual-2/User-Guide-1981979-Page-52.png)
![TiOResetting the Print Job1. If the error code is displayed, press the [Stop/Clear] key.CTT118PResetting the Print Job1. If the error message is displayed on Smart Organizing Monitor, press the [Job Reset] key.Preventing Paper Mismatch ErrorsTo prevent paper mismatch errors, use the following procedure to check that the print settings areproperly configured:1. Specify the same paper size in both the application and the printer driver.Application (e.g., WordPad): Click [Page Setup] on the [File] menu.Printer driver (Printer Preferences dialog box): Click the [Paper/Print Quality] tab.If a Paper Mismatch Occursmeihua-p2_mf2_com_user_guide_00106407_eng.xml 53Draft 2013/03/26](https://usermanual.wiki/Ricoh/MFSP112SF1.user-manual-2/User-Guide-1981979-Page-53.png)
![2. If the error persists even after you have performed Step 1, check that the paper sizesetting specified in the printer driver matches the size of paper you are using.Smart Organizing Monitor: On the [Status] tab, click [Change...].• If [Sub Paper Size:] is enabled, the machine treats A4 and Letter-size paper as being equivalentand will not report a paper size mismatch between them.3. Printing Documents54 meihua-p2_mf2_com_user_guide_00106407_eng.xmlDraft 2013/03/26](https://usermanual.wiki/Ricoh/MFSP112SF1.user-manual-2/User-Guide-1981979-Page-54.png)
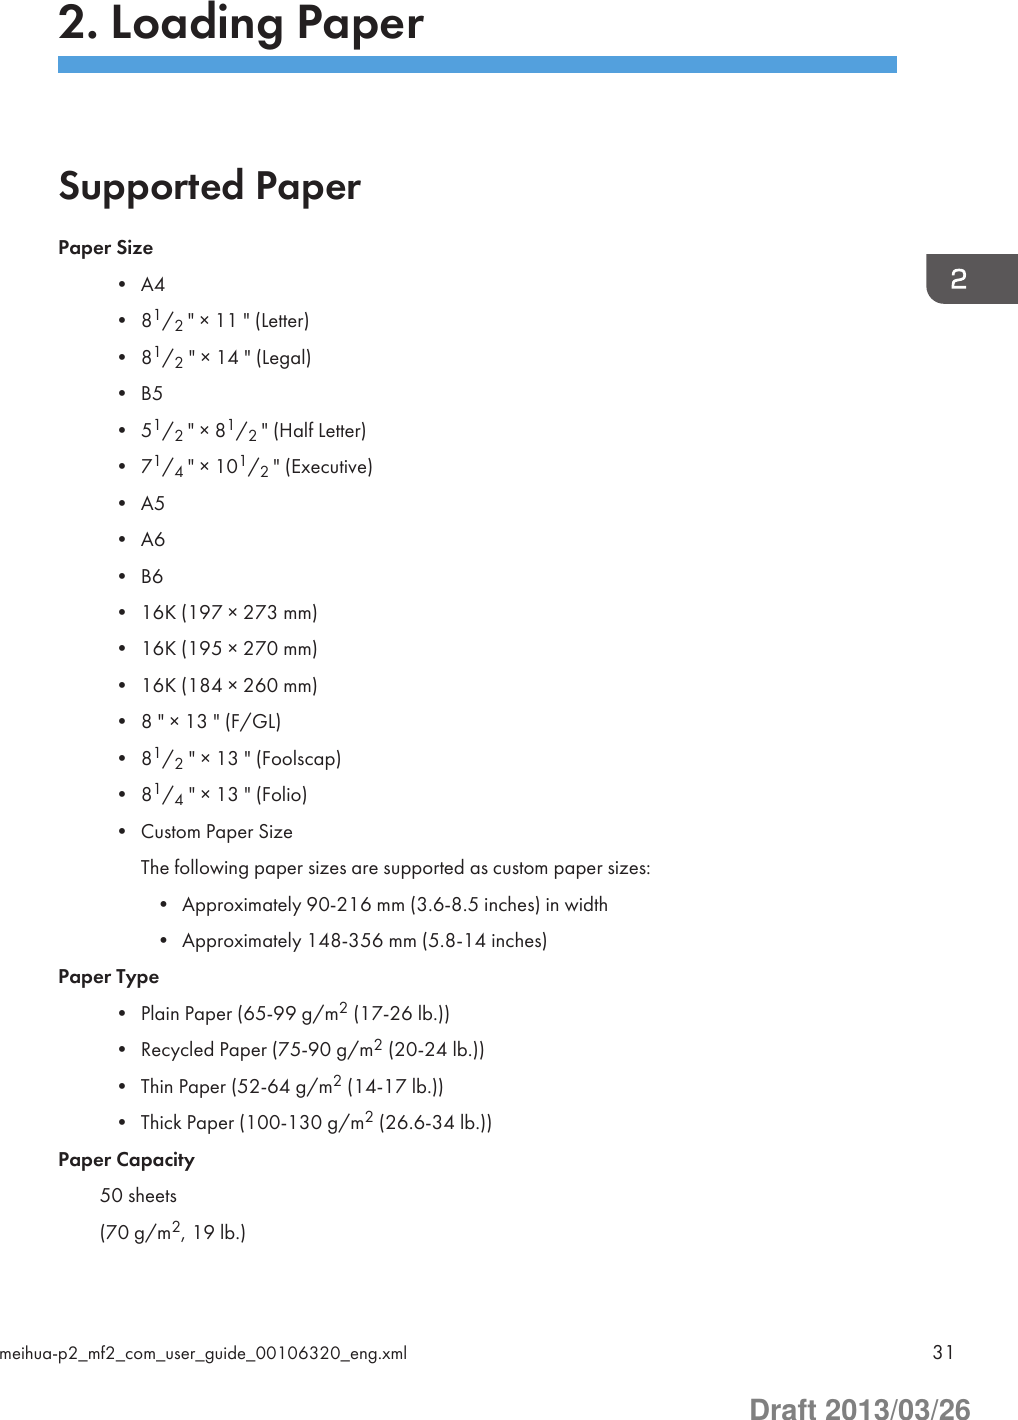
![4. Copying OriginalsFiOCopier Mode ScreenWhen the machine is turned on, the copier screen appears first.When the fax screen is shown on the display, press the [Copy/Facsimile] key on the control panel toswitch to the copier screen.Standby mode screen• First line:Displays the function and paper size specified on the machine. The following five functions areavailable:• Copier, ID Card Copy, Sort, 2 Sided Copy, 2 Sided/Sort• Second line:Displays the copy magnification ratio or combine setting ([2 on 1] or [4 on 1]), documenttype, and the number of copies.Settings that can be specified for the current jobBy pressing the [ ] or [ ] key in the Standby mode screen, you can specify the following settings for thecurrent job.• Tray Paper Settings• Sort• Original Type• Density• Reduce/Enlarge• Combine• 2 Sided Copy• The start-up mode can be specified in the [Function Priority] setting under [System Settings].meihua-p2_mf2_com_user_guide_00106409_eng.xml 55Draft 2013/03/26](https://usermanual.wiki/Ricoh/MFSP112SF1.user-manual-2/User-Guide-1981979-Page-55.png)
![FiOBasic Operation• The original in the ADF takes precedence over the original on the exposure glass if you placeoriginals both in the ADF and on the exposure glass.• When making multiple copies of a multi-page document, you can select whether copies are outputin collated sets, or in page batches in the [Sort] setting under [Copier Features].1. Make sure that the copier mode screen is displayed.When the fax mode screen is displayed, press the [Copy/Facsimile] key to switch to the copiermode screen.CXP1042. Place the original on the exposure glass or in the ADF.3. To make multiple copies, enter the number of copies using the number keys.4. Press the [Start] key.CXP103• If a paper jam occurs, printing stops halfway. Open the maintenance cover to remove the jammedpaper. Printing will resume automatically after the maintenance cover is closed. If the maintenancecover is not opened to remove jammed paper, press the [Start] key to resume printing.4. Copying Originals56 meihua-p2_mf2_com_user_guide_00106410_eng.xmlDraft 2013/03/26](https://usermanual.wiki/Ricoh/MFSP112SF1.user-manual-2/User-Guide-1981979-Page-56.png)
![• If there is a paper jam in the ADF, open the ADF cover, and then remove the jammed paper.Specify the copy setting again from the page where the paper jammed.• If the paper runs out, replenish it, and then press the [Start] key to resume printing.Canceling a CopyIf copying is canceled while scanning an original placed on the exposure glass, copying is canceledimmediately and there is no printout. If copying is canceled while scanning a multiple-page originalplaced in the ADF, scanning stops halfway at the current page.1. Make sure that the copier mode screen is displayed.CXP1042. Press the [Clear/Stop] key.CXP1023. Press the [1] key.To cancel printing, press the [1] key (1: Yes). To continue printing, press the [2] key (2: No).Basic Operationmeihua-p2_mf2_com_user_guide_00106410_eng.xml 57Draft 2013/03/26](https://usermanual.wiki/Ricoh/MFSP112SF1.user-manual-2/User-Guide-1981979-Page-57.png)
![TiOBasic Operation1. Place the original on the exposure glass.2. To print multiple copies, press the [Number of copies] key until the number of copies youwant to print is displayed.CTT119Holding down the [Number of copies] key increases the number in increments of 10.3. Press the [Start] key.CTT120• If a paper jam occurs, printing stops halfway. Open the maintenance cover to remove the jammedpaper. Printing will resume automatically after the maintenance cover is closed. If the maintenancecover is not opened to remove jammed paper, press the [Start] key to resume printing.• If the paper runs out, replenish it, and then press the [Start] key to resume printing.Canceling a CopyIf copying is canceled while the machine is scanning the original, copying is canceled immediately andthere is no printout.4. Copying Originals58 meihua-p2_mf2_com_user_guide_00106411_eng.xmlDraft 2013/03/26](https://usermanual.wiki/Ricoh/MFSP112SF1.user-manual-2/User-Guide-1981979-Page-58.png)
![If copying is canceled during printing, the photocopy process is canceled after the current page hasbeen printed out.1. Press the [Stop/Clear] key.CTT118Basic Operationmeihua-p2_mf2_com_user_guide_00106411_eng.xml 59Draft 2013/03/26](https://usermanual.wiki/Ricoh/MFSP112SF1.user-manual-2/User-Guide-1981979-Page-59.png)
![FiO,TiOMaking Enlarged or Reduced CopiesThere are two ways to set the scaling ratio: using a preset ratio or manually specifying a customizedratio.Preset ratioCES103 (mainly Europe and Asia)50%, 71% A4 A5, 82% B5 JIS A5, 93%, 122% A5 B5 JIS, 141% A5 A4, 200% (mainly North America)50%, 65% LT HLT, 78% LG LT, 93%, 129% HLT LT, 155% HLT LG, 200%Custom ratioCES10625% to 400% in 1% increments.FiOSpecifying Reduce/Enlarge1. Make sure that the copier mode screen is displayed.When the fax mode screen is displayed, press the [Copy/Facsimile] key to switch to the copiermode screen.4. Copying Originals60 meihua-p2_mf2_com_user_guide_00106412_eng.xmlDraft 2013/03/26](https://usermanual.wiki/Ricoh/MFSP112SF1.user-manual-2/User-Guide-1981979-Page-60.png)
![CXP1042. Press the [ ] or [ ] key in the standby mode screen to select [Reduce/Enlarge], and thenpress the [OK] key.3. Press the [ ] or [ ] key to select the ratio, and then press the [OK] key.If [Zoom: 25-400%] has been selected, enter the ratio using the number keys, and then press the[OK] key.4. Press the [ ] key to return to the initial screen.• To apply the specified setting to all jobs, specify [Reduce/Enlarge] in [Copier Features].TiOSpecifying Reduce/EnlargeUse this procedure to specify the reduction or enlargement ratio for the current job from SmartOrganizing Monitor.The procedure in this section is an example based on Windows 7. The actual procedure may varydepending on the operating system you are using.1. On the [Start] menu, click [All Programs].2. Click [Smart Organizing Monitor for SP xxx Series].3. Click [Smart Organizing Monitor for SP xxx Series Status].4. If the machine you are using is not selected, click [Select Device...], and then select themachine's model.5. Click [OK].6. On the [User Tool] tab, click [Printer Configuration].7. On the [Copy] tab, select the ratio in the [Reduce / Enlarge:] list.If [Zoom: (25 to 400%)] has been selected, enter the ratio.8. Click [OK].9. Click [Close].Making Enlarged or Reduced Copiesmeihua-p2_mf2_com_user_guide_00106412_eng.xml 61Draft 2013/03/26](https://usermanual.wiki/Ricoh/MFSP112SF1.user-manual-2/User-Guide-1981979-Page-61.png)
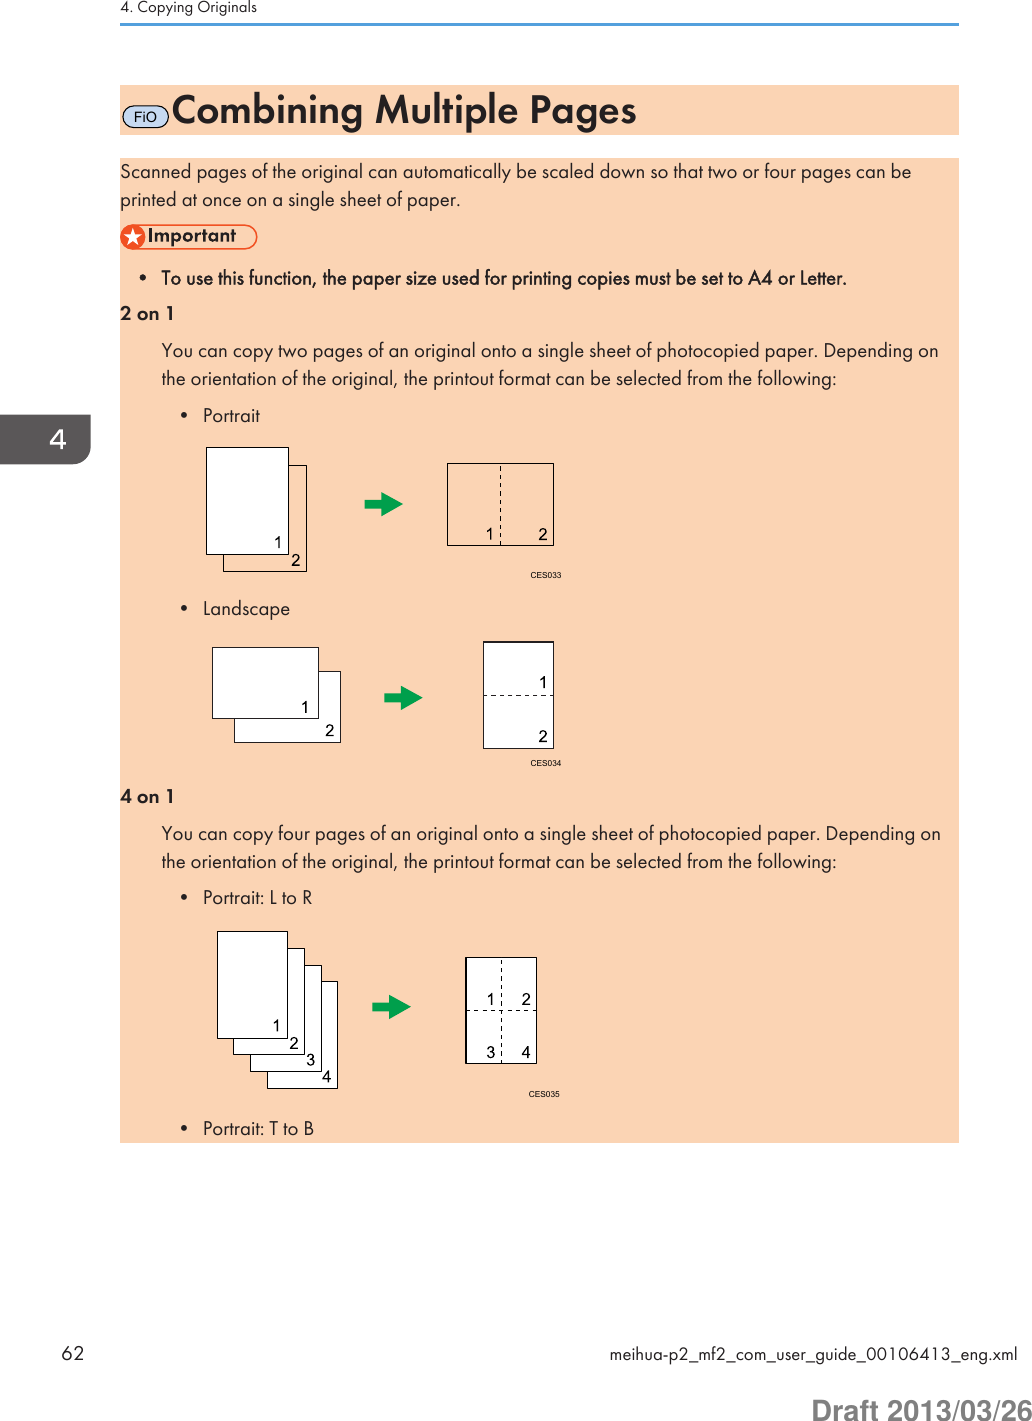
![CES036• Landscape: L to RCES037• Landscape: T to BCES038Specifying Combine for Copying1. Make sure that the copier mode screen is displayed.When the fax mode screen is displayed, press the [Copy/Facsimile] key to switch to the copiermode screen.CXP1042. Press the [ ] or [ ] key in the standby mode screen to select [Combine], and then pressthe [OK] key.3. Press the [ ] or [ ] key to select [2 on 1] or [4 on 1], and then press the [OK] key.Combining Multiple Pagesmeihua-p2_mf2_com_user_guide_00106413_eng.xml 63Draft 2013/03/26](https://usermanual.wiki/Ricoh/MFSP112SF1.user-manual-2/User-Guide-1981979-Page-63.png)
![4. Press the [ ] or [ ] key to select the printout format, and then press the [OK] key.5. Press the [ ] key to return to the initial screen.6. Place the original on the exposure glass or in the ADF.7. To make multiple copies, enter the number of copies using the number keys.8. Press the [Start] key.CXP103When you place the original on the exposure glass, perform the following steps to scan thesubsequent pages of the original.9. When the current page is scanned, place the next page on the exposure glass, and thenpress the [Start] key.10. Repeat Step 9 until all the pages of the original are scanned.When [Sort] is enabled, scan all the pages and then press the [OK] key to start printing copies ofthem.• To apply the specified setting to all jobs, specify [Combine] in [Copier Features].4. Copying Originals64 meihua-p2_mf2_com_user_guide_00106413_eng.xmlDraft 2013/03/26](https://usermanual.wiki/Ricoh/MFSP112SF1.user-manual-2/User-Guide-1981979-Page-64.png)
![FiO,TiOCopying Both Sides of an ID Card ontoOne Side of PaperThis section describes how to copy the front and back sides of an ID card or other small documents ontoeither side of a sheet of paper.When copying onto A4 paper, you can copy documents that are smaller than A5. Likewise, whencopying onto Letter size paper, you can copy documents that are smaller than Half Letter size.• To use this function, the paper size used for printing copies must be set to A6, A5, A4, Half Letter orLetter.CXP020FiOCopying an ID Card1. Make sure that the copier mode screen is displayed.When the fax mode screen appears, press the [Copy/Facsimile] key to switch to the copier modescreen.CXP104Copying Both Sides of an ID Card onto One Side of Papermeihua-p2_mf2_com_user_guide_00106414_eng.xml 65Draft 2013/03/26](https://usermanual.wiki/Ricoh/MFSP112SF1.user-manual-2/User-Guide-1981979-Page-65.png)
![2. Press the [ID Card Copy/On Hook Dial] key.CXP1053. To make multiple copies, enter the number of copies using the number keys.4. Place the original front side down with the top to the rear of the machine on the exposureglass.CXP021The location to place the original depends on the paper size.Position the card so that it is centered at the intersection. (The same position applies to both the frontand back of the ID card.)4. Copying Originals66 meihua-p2_mf2_com_user_guide_00106414_eng.xmlDraft 2013/03/26](https://usermanual.wiki/Ricoh/MFSP112SF1.user-manual-2/User-Guide-1981979-Page-66.png)
![LTHLTLTHLTA6A5Half LetterA4LetterCXP1125. Press the [Start] key.CXP1036. Within 30 seconds, place the original back side down with the top to the rear of themachine on the exposure glass, and then press the [Start] key.• In the ID card copy screen, you can press the [ ] or [ ] key to change the paper size.Copying Both Sides of an ID Card onto One Side of Papermeihua-p2_mf2_com_user_guide_00106414_eng.xml 67Draft 2013/03/26](https://usermanual.wiki/Ricoh/MFSP112SF1.user-manual-2/User-Guide-1981979-Page-67.png)
![TiOCopying an ID Card1. Press the [ID Card Copy] key.CTT1212. To print multiple copies, press the [Number of copies] key until the number of copies youwant is displayed.CTT1193. Place the original front side down with the top to the rear of the machine on the exposureglass.CXP021The location to place the original depends on the paper size.Position the card so that it is centered at the intersection. (The same position applies to both the frontand back of the ID card.)4. Copying Originals68 meihua-p2_mf2_com_user_guide_00106414_eng.xmlDraft 2013/03/26](https://usermanual.wiki/Ricoh/MFSP112SF1.user-manual-2/User-Guide-1981979-Page-68.png)
![LTHLTLTHLTA6A5Half LetterA4LetterCXP1124. Press the [Start] key.CTT1205. Within 30 seconds, place the original back side down with the top to the rear of themachine on the exposure glass, and then press the [Start] key.Copying Both Sides of an ID Card onto One Side of Papermeihua-p2_mf2_com_user_guide_00106414_eng.xml 69Draft 2013/03/26](https://usermanual.wiki/Ricoh/MFSP112SF1.user-manual-2/User-Guide-1981979-Page-69.png)
![FiOMaking 2-sided Copies• To use this function, the paper size used for printing copies must be set to A4 or Letter.You can select top-to-top or top-to-bottom binding, in either portrait or landscape orientation.Top to TopCES125CES126Top to BottomCES127CES128Specifying 2 Sided Copying1. Make sure that the copier mode screen is displayed.When the fax mode screen is displayed, press the [Copy/Facsimile] key to switch to the copiermode screen.4. Copying Originals70 meihua-p2_mf2_com_user_guide_00106415_eng.xmlDraft 2013/03/26](https://usermanual.wiki/Ricoh/MFSP112SF1.user-manual-2/User-Guide-1981979-Page-70.png)
![CXP1042. Press the [ ] or [ ] key in the standby mode screen to select [2 Sided Copy], and thenpress the [OK] key.3. Press the [ ] or [ ] key to select [Top to Top] or [Top to Bottom], and then press the [OK]key.4. Press the [ ] or [ ] key to select the orientation, and then press the [OK] key.5. Press the [ ] key to return to the initial screen.6. Place the original on the exposure glass or in the ADF.7. To make multiple copies, enter the number of copies using the number keys.8. Press the [Start] key.CXP103When you place the original in the ADF, all the pages are automatically scanned and then only thepages on one side are copied sequentially. Proceed to Step 10.When you place the original on the exposure glass, perform the following steps to scan thesubsequent pages.9. When the current page is scanned, place the next page on the exposure glass, and thenpress the [Start] key.When [Sort] is disabled, the machine prints only the one sides of pages first.When [Sort] is enabled, scan all the pages, and then press the [OK] key to start printing copies ofthem.Making 2-sided Copiesmeihua-p2_mf2_com_user_guide_00106415_eng.xml 71Draft 2013/03/26](https://usermanual.wiki/Ricoh/MFSP112SF1.user-manual-2/User-Guide-1981979-Page-71.png)
![10. Take out all of the prints from the output tray and place them in the input tray.To print on the reverse side of the prints, turn them over so that the blank side faces up and placethem in the input tray.PortraitCXP018LandscapeCXP01911. Press the [Start] key.• To apply the specified setting to all jobs, specify [2 Sided Copy] in [Copier Features].4. Copying Originals72 meihua-p2_mf2_com_user_guide_00106415_eng.xmlDraft 2013/03/26](https://usermanual.wiki/Ricoh/MFSP112SF1.user-manual-2/User-Guide-1981979-Page-72.png)
![FiO,TiOSpecifying the Scan SettingsThis section describes how to specify image density and scan quality for the current job.FiOAdjusting Image DensityThere are five image density levels. The higher the density level, the darker the printout.1. Make sure that the copier mode screen is displayed.When the fax mode screen is displayed, press the [Copy/Facsimile] key to switch to the copiermode screen.CXP1042. Press the [ ] or [ ] key in the standby mode screen to select [Density], and then press the[OK] key.3. Press the [ ] or [ ] key to select the density level, and then press the [OK] key.4. Press the [ ] key to return to the initial screen.• To apply the specified setting to all jobs, specify [Density] in [Copier Features].TiOAdjusting Image DensityThere are three image density levels. The higher the density level, the darker the printout.Specifying the Scan Settingsmeihua-p2_mf2_com_user_guide_00106416_eng.xml 73Draft 2013/03/26](https://usermanual.wiki/Ricoh/MFSP112SF1.user-manual-2/User-Guide-1981979-Page-73.png)
![1. Press the [Density] key until the density level you want is displayed.CTT122The print density is indicated by which segment is lit on this indicator.• Left: Lighter than normal• Middle: Normal density• Right: Darker than normalSelecting the Document Type According to OriginalThere are three document types:TextSelect this when the original contains only text and no photographs or images.PhotoSelect this when the original contains only photographs or images. Use this mode for the followingtypes of original:• Photographs• Pages that are entirely or mainly composed of photographs or images, such as magazinepages.Text/PhotoSelect this when the original contains both text and photographs or images.FiOSpecifying the Original Type1. Make sure that the copier mode screen is displayed.When the fax mode screen is displayed, press the [Copy/Facsimile] key to switch to the copiermode screen.4. Copying Originals74 meihua-p2_mf2_com_user_guide_00106416_eng.xmlDraft 2013/03/26](https://usermanual.wiki/Ricoh/MFSP112SF1.user-manual-2/User-Guide-1981979-Page-74.png)
![CXP1042. Press the [ ] or [ ] key in the standby mode screen to select [Original Type], and thenpress the [OK] key.3. Press the [ ] or [ ] key to select the document type, and then press the [OK] key.4. Press the [ ] key to return to the initial screen.• To apply the specified setting to all jobs, specify [Original Type] in [Copier Features].TiOSpecifying the Original Type1. Continue to press the Original Type key until the indicator next to the appropriate originaltype lights up.CTT123Specifying the Scan Settingsmeihua-p2_mf2_com_user_guide_00106416_eng.xml 75Draft 2013/03/26](https://usermanual.wiki/Ricoh/MFSP112SF1.user-manual-2/User-Guide-1981979-Page-75.png)
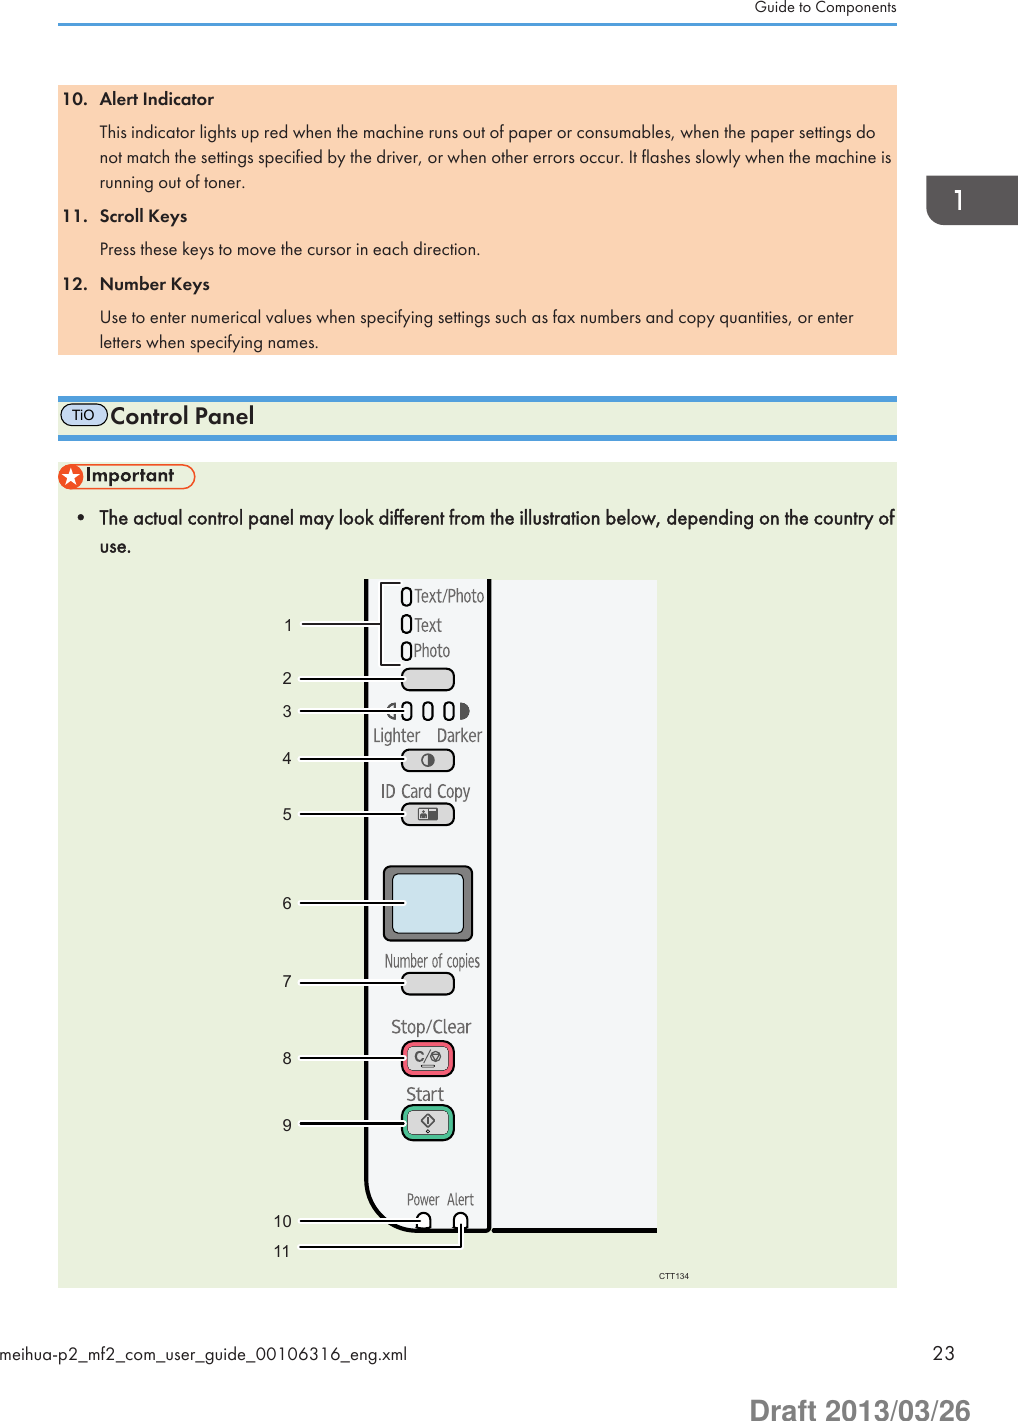
![5. Scanning from a ComputerFiO,TiOBasic OperationScanning from a computer (TWAIN scanning and WIA scanning) allows you to operate the machinefrom your computer and scan originals into your computer directly.CXP022211. Your Computer (TWAIN driver already installed)Instruct the machine to start scanning the original that is set on the machine.2. This MachineThe original that is set on the machine is scanned, and its data is sent to a client computer.Using TWAIN scannerThis section describes the preparations and procedure for using the TWAIN scanner.• To use the TWAIN scanner, you must install the TWAIN driver, which is on the supplied CD-ROM.• To use the TWAIN scanner, a TWAIN-compliant application must be installed.To use the machine as a TWAIN scanner, first do the following:• Install the TWAIN driver.• Install a TWAIN-compliant application.TWAIN ScanningTWAIN scanning is possible if your computer is running a TWAIN-compatible application.1. Place the original.2. Open the properties dialog box for this machine using a TWAIN-compatible application.3. Configure the scan settings as required, and then click [Scan].meihua-p2_mf2_com_user_guide_00106418_eng.xml 77Draft 2013/03/26](https://usermanual.wiki/Ricoh/MFSP112SF1.user-manual-2/User-Guide-1981979-Page-77.png)
![Settings you can configure in the TWAIN dialog boxCXP10912345671. Select ModeUp to ten scan settings can be saved. The default value is applied when [Default] is selected.2. Scan ModeSelect from [Full Color], [Grayscale], [Photo], [Text], or [Text/Photo].3. ResolutionSelect a resolution from the list.If [Text], [Text/Photo], or [Photo] is selected in [Scan Mode], the scan resolution cannot be set 1200 dpi ×1200 dpi or higher.4. Original SizeSelect the scanning size. If you select [Custom Size...], enter the scanning size directly in the edit box.5. Original TypeAccording to your original, select a setting from the list of options detailed below.• [Standard] (Auto change to Full color, 200dpi × 200dpi)• [Photo] (Auto change to Full color, 600dpi × 600dpi)• [Filing] (Auto change to Text, 200dpi × 200dpi)• [OCR] (Auto change to Text, 400dpi × 400dpi)6. Original Scan MethodSpecify the method to scan originals.FiOIf [ADF] is selected in [Original Scan Method], specify the orientation of the original.5. Scanning from a Computer78 meihua-p2_mf2_com_user_guide_00106418_eng.xmlDraft 2013/03/26](https://usermanual.wiki/Ricoh/MFSP112SF1.user-manual-2/User-Guide-1981979-Page-78.png)
![7. Image Quality AdjustmentYou can adjust the image quality. The scan settings that can be adjusted are as follow: Rotation, Curves,Sharpness, Brightness/Contrast, Levels, Color Balance, and Hue/Saturation. When [Auto] is selected, thedefault values will be applied to all settings. When [Manual] is selected, all settings can be adjusted asrequired.• For details, see the TWAIN driver help.Basic Operation for WIA Scanning1. Place the original.2. On the [Start] menu, click [Devices and Printers].3. Right-click the icon of the printer model you want to use, and then click [Start scan].4. Configure the scan settings as required, and then click [Scan].5. Click [Import].Basic Operationmeihua-p2_mf2_com_user_guide_00106418_eng.xml 79Draft 2013/03/26](https://usermanual.wiki/Ricoh/MFSP112SF1.user-manual-2/User-Guide-1981979-Page-79.png)
![6. Sending and Receiving a FaxFiOFax Mode ScreenWhen the machine is turned on, the copier screen appears first.When the copier screen appears, press the [Copy/Facsimile] key on the control panel to switch to thefax screen.Standby mode screen• First lineDisplays the current month and date.• Second lineDisplays the current resolution settings and time.Settings that can be specified for the current jobBy pressing the [ ] or [ ] key in the Standby mode screen, you can specify the following settings for thecurrent job.• Resolution• Density• The start-up mode can be specified in the [Function Priority] setting under [System Settings].meihua-p2_mf2_com_user_guide_00106420_eng.xml 81Draft 2013/03/26](https://usermanual.wiki/Ricoh/MFSP112SF1.user-manual-2/User-Guide-1981979-Page-81.png)
![FiOSetting the Date and Time1. Press the [User Tools] key.2. Press the [ ] or [ ] key to select [System Settings], and then press the [OK] key.3. Press the [ ] or [ ] key to select [Set Date/Time], and then press the [OK] key.4. Press the [ ] or [ ] key to select [Set Date], and then press the [OK] key.5. Enter the current year using the number keys, and then press the [OK] key.6. Enter the current month using the number keys, and then press the [OK] key.7. Enter the current day using the number keys, and then press the [OK] key.8. Press the [ ] or [ ] key to select date format, and then press the [OK] key.9. Press the [ ] key.10. Press the [ ] or [ ] key to select [Set Time], and then press the [OK] key.11. Press the [ ] or [ ] key to select the time format, and then press the [OK] key.If you have selected [24 hours], proceed to Step 13.12. Press the [ ] or [ ] key to select [AM] or [PM], and then press the [OK] key.13. Enter the current hour using the number keys, and then press the [OK] key.14. Enter the current minute using the number keys, and then press the [OK] key.15. Press the [User Tools] key to return to the initial screen.6. Sending and Receiving a Fax82 meihua-p2_mf2_com_user_guide_00106421_eng.xmlDraft 2013/03/26](https://usermanual.wiki/Ricoh/MFSP112SF1.user-manual-2/User-Guide-1981979-Page-82.png)
![FiOEntering CharactersTo enter characters, use keys as follows:To enter a digitPress a number key.To delete a characterPress the [ ] key one second.To enter a fax number• To enter a numberUse the number keys.• To enter characters other than digits" ": Press the [ ] key." ": Press the [ ] key.Pause: Press the [ID Card Copy/On Hook Dial] key.To enter a nameLetters, numbers, and symbols can be entered using the number keys.To enter two characters that use the same number key successively, press the [ ] key after enteringthe first character.CHZ903Space: Press the [ ] key for one second.Entering Charactersmeihua-p2_mf2_com_user_guide_00106422_eng.xml 83Draft 2013/03/26](https://usermanual.wiki/Ricoh/MFSP112SF1.user-manual-2/User-Guide-1981979-Page-83.png)
![FiORegistering Fax DestinationsThis section describes how to register fax destinations in the Address Book using the control panel.The Address Book can also be edited using Smart Organizing Monitor. For details, see the SmartOrganizing Monitor Help.• The Address Book data may become damaged or lost unexpectedly. The manufacturer shall not beheld responsible for any damages resulting from such data loss.Registering Fax Destinations1. Press the [User Tools] key.CXP1012. Press the [ ] or [ ] key to select [Address Book], and then press the [OK] key.3. Press the [ ] or [ ] key to select [Fax Speed Dial Dest.], and then press the [OK] key.4. Press the [ ] or [ ] key to select the Speed Dial number, and then press the [OK] key.5. Enter the fax number using the number keys, and then press the [OK] key.6. Enter the fax name using the number keys, and then press the [OK] key.7. Press the [User Tools] key to return to the initial screen.6. Sending and Receiving a Fax84 meihua-p2_mf2_com_user_guide_00106423_eng.xmlDraft 2013/03/26](https://usermanual.wiki/Ricoh/MFSP112SF1.user-manual-2/User-Guide-1981979-Page-84.png)
![Modifying or Deleting Fax Destinations1. Press the [User Tools] key.CXP1012. Press the [ ] or [ ] key to select [Address Book], and then press the [OK] key.3. Press the [ ] or [ ] key to select [Fax Speed Dial Dest.], and then press the [OK] key.4. Press the [ ] or [ ] key to select the Speed Dial number, and then press the [OK] key.5. Modify the fax number using the [ ], [ ], and number keys, and then press the [OK] key.To delete the fax destination, use the [ ] key to delete all numbers, and then press the [OK] key.Proceed to Step 7.6. Modify the fax name using the [ ], [ ], and number keys, and then press the [OK] key.7. Press the [User Tools] key to return to the initial screen.Configuring Fax Destinations Using Smart Organizing Monitor1. On the [Start] menu, click [All Programs].2. Click [Smart Organizing Monitor for SP xxx Series].3. Click [Smart Organizing Monitor for SP xxx Series Status].4. If the machine you are using is not selected, click [Select Device...], and then select themachine's model.5. Click [OK].6. On the [User Tool] tab, click [Printer Configuration].7. Click the [Fax] tab.8. To add a fax destination, specify [No.: (00 to 99)], [Destination:], and [Fax Number:],and then click [Apply] in the [Speed Dial] area.9. To modify a fax destination, select the destination in [Speed Dial Destination List:], andthen modify [Destination:] or [Fax Number:]. To apply the changes, click [Apply] in the[Speed Dial] area.Registering Fax Destinationsmeihua-p2_mf2_com_user_guide_00106423_eng.xml 85Draft 2013/03/26](https://usermanual.wiki/Ricoh/MFSP112SF1.user-manual-2/User-Guide-1981979-Page-85.png)
![10. To delete a fax destination, select the destination in [Speed Dial Destination List:], andthen click [Delete].11. Click [Apply] located in the lower part of the window.12. Click [OK].13. Click [Close].6. Sending and Receiving a Fax86 meihua-p2_mf2_com_user_guide_00106423_eng.xmlDraft 2013/03/26](https://usermanual.wiki/Ricoh/MFSP112SF1.user-manual-2/User-Guide-1981979-Page-86.png)
![FiOSending a Fax• It is recommended that you call the receiver and confirm that they received the fax after sendingimportant documents.A fax number can contain 0 to 9, pause, " ", and " ".If necessary, insert a pause in the fax number. The machine pauses briefly before it dials the digitsfollowing the pause. You can specify the length of the pause time in the [Pause Time] setting under faxtransmission settings.To use tone services on a pulse-dialing line, insert " " in the fax number. " " switches the dialing modefrom pulse to tone temporarily.If the machine is connected to a telephone network through a PBX, be sure to enter the outside lineaccess number specified in [PBX Access Number] before the fax number.• No separator characters or spaces can be entered before the fax number.Selecting Transmission ModeThere are two transmission modes: Memory Transmission and Immediate Transmission.Memory TransmissionIn this mode, the machine scans several originals into memory and sends them all at once. This isconvenient when you are in a hurry and want to take the document away from the machine. In thismode, you can send a fax to multiple destinations.In Memory Transmission mode, a single job can contain up to 10 pages, and the maximum of 5jobs (include PC Fax job) can be stored in the machine.Immediate TransmissionIn this mode, the machine scans the original and faxes it simultaneously, without storing it inmemory. This is convenient when you want to send an original quickly. In this mode, you can onlyspecify one destination.Sending a Faxmeihua-p2_mf2_com_user_guide_00106424_eng.xml 87Draft 2013/03/26](https://usermanual.wiki/Ricoh/MFSP112SF1.user-manual-2/User-Guide-1981979-Page-87.png)
![1. Press the [User Tools] key.CXP1012. Press the [ ] or [ ] key to select [Fax Features], and then press the [OK] key.3. Press the [ ] or [ ] key to select [TX Settings], and then press the [OK] key.4. Press the [ ] or [ ] key to select [Immediate TX], and then press the [OK] key.5. Press the [ ] or [ ] key to select [Off], [On], or [Next Fax Only], and then press the [OK]key.For Memory Transmission, select [Off].For Immediate Transmission, select [On] or [Next Fax Only].6. Press the [ ] key to return to the initial screen.Basic Operation for Sending a Fax1. Make sure that the fax mode screen is displayed.When the copier mode screen is displayed, press the [Copy/Facsimile] key to switch to the faxmode screen.CXP1042. Place the original on the exposure glass or in the ADF.6. Sending and Receiving a Fax88 meihua-p2_mf2_com_user_guide_00106424_eng.xmlDraft 2013/03/26](https://usermanual.wiki/Ricoh/MFSP112SF1.user-manual-2/User-Guide-1981979-Page-88.png)
![3. Enter the fax number using the number keys.If the machine is connected to a telephone network through a PBX, be sure to enter the outside lineaccess number specified in [PBX Access Number] before the fax number.4. Press the [Start] key.CXP103Depending on the machine's settings, you may be prompted to enter the fax number again if youmanually entered the destination fax number. If the fax numbers do not match, go back to Step 3.When you place original on the exposure glass and Memory Transmission mode is enabled,perform the following steps to scan the subsequent pages of the original.5. If you have more originals to scan, press the [1] key within 60 seconds, place the nextoriginal on the exposure glass, and then press the [OK] key. Repeat this step until alloriginals are scanned.6. When all originals have been scanned, press the [2] key to start sending the fax.• If Memory Transmission mode is enabled, the machine's memory may become full while scanningthe originals. If this happens, the screen prompts you to cancel the transmission or to send only thepages that have been scanned successfully.• When using the exposure glass for Immediate Transmission, you can only send one page at a time.Canceling a faxFollow the procedure below to cancel sending a fax.When in Memory Transmission modeIf you cancel sending a fax while the machine is scanning the original, the machine will not sendthe document.If you cancel sending a fax during transmission, the fax transmission process is canceledimmediately. In this case, an error is displayed on the other party's machine.Sending a Faxmeihua-p2_mf2_com_user_guide_00106424_eng.xml 89Draft 2013/03/26](https://usermanual.wiki/Ricoh/MFSP112SF1.user-manual-2/User-Guide-1981979-Page-89.png)
![When in Immediate Transmission modeIf you cancel sending a fax while the machine is scanning the original, the fax transmission processis canceled immediately. In this case, an error is displayed on the other party's machine.1. Press the [Clear/Stop] key.CXP1022. Press the [1] key.To cancel sending a fax, press the [1] key (1: Yes). To continue sending a fax, press the [2] key (2:No).• If you cancel sending a fax while broadcasting, only the fax to the current destination is canceled.The fax will be sent to the subsequent destinations as normal.• Using [Del. TX Standby File] in [Fax Features], you can delete files waiting to be sent. Select [DeleteFile] to delete the corresponding file. You can also delete a file currently being sent. Select [DeleteAll Files] to delete all files waiting to be sent. This will not affect the file currently being sent.Specifying the Fax DestinationOther than entering the destination fax number using the number keys, you can specify destinationsusing the following functions:• Using Speed Dial• Using the Redial function• Using the Broadcast functionSpecifying the destination using Speed Dial1. Make sure that the fax mode screen is displayed.When the copier mode screen is displayed, press the [Copy/Facsimile] key to switch to the faxmode screen.6. Sending and Receiving a Fax90 meihua-p2_mf2_com_user_guide_00106424_eng.xmlDraft 2013/03/26](https://usermanual.wiki/Ricoh/MFSP112SF1.user-manual-2/User-Guide-1981979-Page-90.png)
![CXP1042. Place the original on the exposure glass or in the ADF.3. Press the [Speed Dial] key.CXP1064. Enter the Speed Dial number using the number keys, and then press the [OK] key.5. Press the [Start] key.CXP103When you place original on the exposure glass and Memory Transmission mode is enabled,perform the following steps to scan the subsequent pages of the original.6. If you have more originals to scan, press the [1] key within 60 seconds, place the nextoriginal on the exposure glass, and then press the [OK] key. Repeat this step until alloriginals are scanned.7. When all originals have been scanned, press the [2] key to start sending the fax.Sending a Faxmeihua-p2_mf2_com_user_guide_00106424_eng.xml 91Draft 2013/03/26](https://usermanual.wiki/Ricoh/MFSP112SF1.user-manual-2/User-Guide-1981979-Page-91.png)
![Specifying the destination using the redial functionThis function saves time when you are sending to the same destination repeatedly, as you do not have toenter the destination each time.1. Make sure that the fax mode screen is displayed.When the copier mode screen is displayed, press the [Copy/Facsimile] key to switch to the faxmode screen.CXP1042. Place the original on the exposure glass or in the ADF.3. Press the [ ] or [ ] key to select [Redial], and then press the [OK] key.4. Press the [Start] key.CXP103Specifying the destination using the broadcast functionYou can send a fax to multiple destinations simultaneously.1. Make sure that the fax mode screen is displayed.When the copier mode screen is displayed, press the [Copy/Facsimile] key to switch to the faxmode screen.6. Sending and Receiving a Fax92 meihua-p2_mf2_com_user_guide_00106424_eng.xmlDraft 2013/03/26](https://usermanual.wiki/Ricoh/MFSP112SF1.user-manual-2/User-Guide-1981979-Page-92.png)
![CXP1042. Place the original on the exposure glass or in the ADF.3. Add a destination by using one of the following methods:To add a Speed Dial destination1. Press the [Speed Dial] key.CXP1062. Select a destination using the number keys, and then press the [OK] key.3. Press the [OK] key.To add a manually-specified destination1. Enter the destination fax number using the number keys.2. Press the [OK] key.4. Go back to Step 3 to add further destinations.5. Press the [Start] key.Useful Sending FunctionsYou can confirm the status of the other party's machine easily before sending a fax by using the OnHook Dial function. If you have an extra telephone, you can talk and send a fax in one call.Sending a Faxmeihua-p2_mf2_com_user_guide_00106424_eng.xml 93Draft 2013/03/26](https://usermanual.wiki/Ricoh/MFSP112SF1.user-manual-2/User-Guide-1981979-Page-93.png)
![Sending a fax using On Hook DialThe On Hook Dial function allows you to check the destination's status while listening to the tone from theinternal speaker. This function is useful when you want to ensure that the fax will be received.• The procedure differs depending on whether [Fax Mode] is set to [Easy Mode] or [AdvancedMode] in [TX Settings] in [Fax Features].• To send faxes using the exposure glass, be sure to first remove any originals loaded in the ADF.1. Make sure that the fax mode screen is displayed.When the copier mode screen is displayed, press the [Copy/Facsimile] key to switch to the faxmode screen.CXP1042. Place the original on the exposure glass or in the ADF.If [Fax Mode] is set to [Easy Mode], you cannot send faxes using the exposure glass.3. Press the [ID Card Copy/On Hook Dial] key.CXP1054. Add a destination by using one of the following methods:To add a Speed Dial destination1. Press the [Speed Dial] key.6. Sending and Receiving a Fax94 meihua-p2_mf2_com_user_guide_00106424_eng.xmlDraft 2013/03/26](https://usermanual.wiki/Ricoh/MFSP112SF1.user-manual-2/User-Guide-1981979-Page-94.png)
![CXP1062. Select a destination using the number keys, and then press the [OK] key.To add a manually-specified destination1. Enter the destination fax number using the number keys.5. If you hear a high pitched tone, press the [Start] key.CXP103If [Fax Mode] is set to [Easy Mode], Step 6 does not apply.6. If the original is placed on the exposure glass, press the [1] key (1: TX).Sending a fax after a conversationAn external telephone allows you to send a fax after finishing your conversation, without having todisconnect and redial. This function is useful when you want to ensure that the fax will be received.• The procedure differs depending on whether [Fax Mode] is set to [Easy Mode] or [AdvancedMode] in [TX Settings] in [Fax Features].• To send faxes using the exposure glass, be sure to first remove any originals loaded in the ADF.1. Place the original on the exposure glass or in the ADF.If [Fax Mode] is set to [Easy Mode], you cannot send faxes using the exposure glass.2. Pick up the handset of the external telephone.Sending a Faxmeihua-p2_mf2_com_user_guide_00106424_eng.xml 95Draft 2013/03/26](https://usermanual.wiki/Ricoh/MFSP112SF1.user-manual-2/User-Guide-1981979-Page-95.png)
![3. Specify the destination using the external telephone.4. When the other party answers, ask them to press their fax start button.5. Press the [Start] key.CXP103If [Fax Mode] is set to [Easy Mode], proceed to Step 7.6. If the original is placed on the exposure glass, press the [1] key (1: TX).7. Replace the handset.Specifying the Scan SettingsAdjusting image densityThere are five image density levels. The darker the density level, the darker the printout.1. Make sure that the fax mode screen is displayed.When the copier mode screen is displayed, press the [Copy/Facsimile] key to switch to the faxmode screen.CXP1042. Press the [ ] or [ ] key in the standby mode screen to select [Density], and then press the[OK] key.6. Sending and Receiving a Fax96 meihua-p2_mf2_com_user_guide_00106424_eng.xmlDraft 2013/03/26](https://usermanual.wiki/Ricoh/MFSP112SF1.user-manual-2/User-Guide-1981979-Page-96.png)
![3. Press the [ ] or [ ] key to select the density level or [Erase Background], and then pressthe [OK] key.4. Press the [ ] key to return to the initial screen.• To apply the specified setting to all jobs, not just the current one, specify [Density] in [Fax Features].Specifying the resolutionStandardSelect this when the original is a printed or typewritten document with normal-sized characters.DetailSelect this when the original is a document with small print.PhotoSelect this when the original contains images such as photographs or shaded drawings.1. Make sure that the fax mode screen is displayed.When the copier mode screen is displayed, press the [Copy/Facsimile] key to switch to the faxmode screen.CXP1042. Press the [ ] or [ ] key in the standby mode screen to select [Resolution], and then pressthe [OK] key.3. Press the [ ] or [ ] key to select the resolution settings, and then press the [OK] key.4. Press the [ ] key to return to the initial screen.Sending a Faxmeihua-p2_mf2_com_user_guide_00106424_eng.xml 97Draft 2013/03/26](https://usermanual.wiki/Ricoh/MFSP112SF1.user-manual-2/User-Guide-1981979-Page-97.png)
![FiOUsing the Fax Function from a Computer (PCFAX)This section describes how to use the fax function of the machine from a computer.You can send a document directly from a computer through this machine to another fax machine,without printing the document.Basic Operation for Sending Faxes from a ComputerThis section describes the basic operation for sending faxes from a computer.You can select a destination from the PC FAX address book or enter a fax number manually. You cansend faxes to up to 100 destinations at one time. (However, if [Attach a Cover Sheet] on the [CoverSheet] tab is checked and [Use Address Book] in the [To:] list is selected, you can send faxes to up tofive destinations at a time.)The procedure in this section is an example based on Windows 7.• Using PC FAX, you can send up to ten pages (including the cover sheet) at a time.1. Open the file you want to send.2. On the [File] menu, click [Print...].3. Select the PC FAX driver as the printer, and then click [Print].4. Specify a destination.• To specify a destination from the PC FAX address book:You can click the [Address Book] tab and select from three previously-used address books the[Address Book File Path:] list. Also, you can click [Browse...] to download the address book(CSV file). Select a destination in the [Address List:], and then click [Set as Destination].Repeat this step to add more destinations.• To enter a fax number directly:Click the [Specify Destination] tab, and enter a fax number (up to 40 digits) in [Fax Number:],and then click [Set as Destination].Repeat this step to add more destinations.5. If you want to attach a fax cover sheet, click [Cover Sheet] tab.6. Click [Send].• For details, see the PC FAX driver help.6. Sending and Receiving a Fax98 meihua-p2_mf2_com_user_guide_00106425_eng.xmlDraft 2013/03/26](https://usermanual.wiki/Ricoh/MFSP112SF1.user-manual-2/User-Guide-1981979-Page-98.png)
![• A fax number can contain 0 to 9, "P" (pause), "T" (tone), " ", and " ".• To use tone services on a pulse-dialing line, insert "T" in a fax number. "T" switches the dialingmode from pulse to tone temporarily.• To delete an entered destination, select the destination in [List of Destinations:], and then click[Delete from List].Canceling a faxYou can cancel sending a fax using either the machine's control panel or your computer, depending onthe status of the job.Canceling while the machine is receiving a fax from the computerIf the machine is shared by multiple computers through a print server, be careful not to cancelanother user's fax.1. Double-click the printer icon on the task bar of your computer.2. Select the print job you want to cancel, click the [Document] menu, and then click[Cancel].Canceling a fax using the control panelCancel the fax using the control panel.1. Make sure that the fax mode screen is displayed.When the copier mode screen is displayed, press the [Copy/Facsimile] key to switch to thefax mode screen.2. Press the [Clear/Stop] key.3. Press the [1] key.To cancel sending a fax, press the [1] key (1: Yes). To continue sending a fax, press the [2]key (2: No).Configuring Transmission SettingsThis section describes how to configure transmission settings in the PC FAX driver's properties.Properties are set separately for each application.1. On the [File] menu, click [Print...].2. Select the PC Fax driver as the printer, and then click a button such as [Preferences].PC FAX driver properties dialog box appears.3. Configure settings as necessary, and then click [OK].Using the Fax Function from a Computer (PC FAX)meihua-p2_mf2_com_user_guide_00106425_eng.xml 99Draft 2013/03/26](https://usermanual.wiki/Ricoh/MFSP112SF1.user-manual-2/User-Guide-1981979-Page-99.png)
![Configuring the PC FAX Address BookThis section describes the PC FAX address book. Configure the PC FAX address book on the computer.The PC FAX address book allows you to specify PC FAX destinations quickly and easily.The PC FAX address book can contain up to 100 entries, including individual destinations and groups ofdestinations.Opening the PC FAX address bookThis section describes how to open the PC FAX address book.1. On the [Start] menu, click [Devices and Printers].2. Right-click the PC FAX driver icon, and then click [Printing Preferences...].3. Click [Edit Address Book...].Registering destinationsThis section describes how to register destinations in the PC FAX address book.1. Open the PC FAX address book.2. Enter the destination information.You must enter a contact name and fax number.3. Click [Add].The destination is added to the destination list.To change the registered information, select the destination you want to change, and then changethe information. After this, click [Update].4. Click [OK].5. If you make changes to a destination, a confirmation message appears. To save thechanges, click [Yes].Registering groupsThis section describes how to register groups of destinations.A group can contain up to 100 individual destinations.1. Open the PC FAX address book.2. Click [Edit Group...].3. Click [New...].6. Sending and Receiving a Fax100 meihua-p2_mf2_com_user_guide_00106425_eng.xmlDraft 2013/03/26](https://usermanual.wiki/Ricoh/MFSP112SF1.user-manual-2/User-Guide-1981979-Page-100.png)
![4. Enter the group name, and then click [OK].Select the destination you want to include in the group from the [Address List:] area, and then click[Add to Group].To delete a destination from a group, select the destination you want to delete from [GroupMembers List:], and then click [Delete Member].5. Click [OK].6. Click [OK].7. If you make changes to a destination, a confirmation message appears. To save thechanges, click [Yes].Editing a Fax Cover SheetThis section describes how to edit a fax cover sheet in the PC FAX driver's properties.1. On the [File] menu, click [Print...].2. Select the PC FAX driver as the printer, and then click [Print].3. Click [Cover Sheet] tab.4. Configure settings as necessary.Using the Fax Function from a Computer (PC FAX)meihua-p2_mf2_com_user_guide_00106425_eng.xml 101Draft 2013/03/26](https://usermanual.wiki/Ricoh/MFSP112SF1.user-manual-2/User-Guide-1981979-Page-101.png)
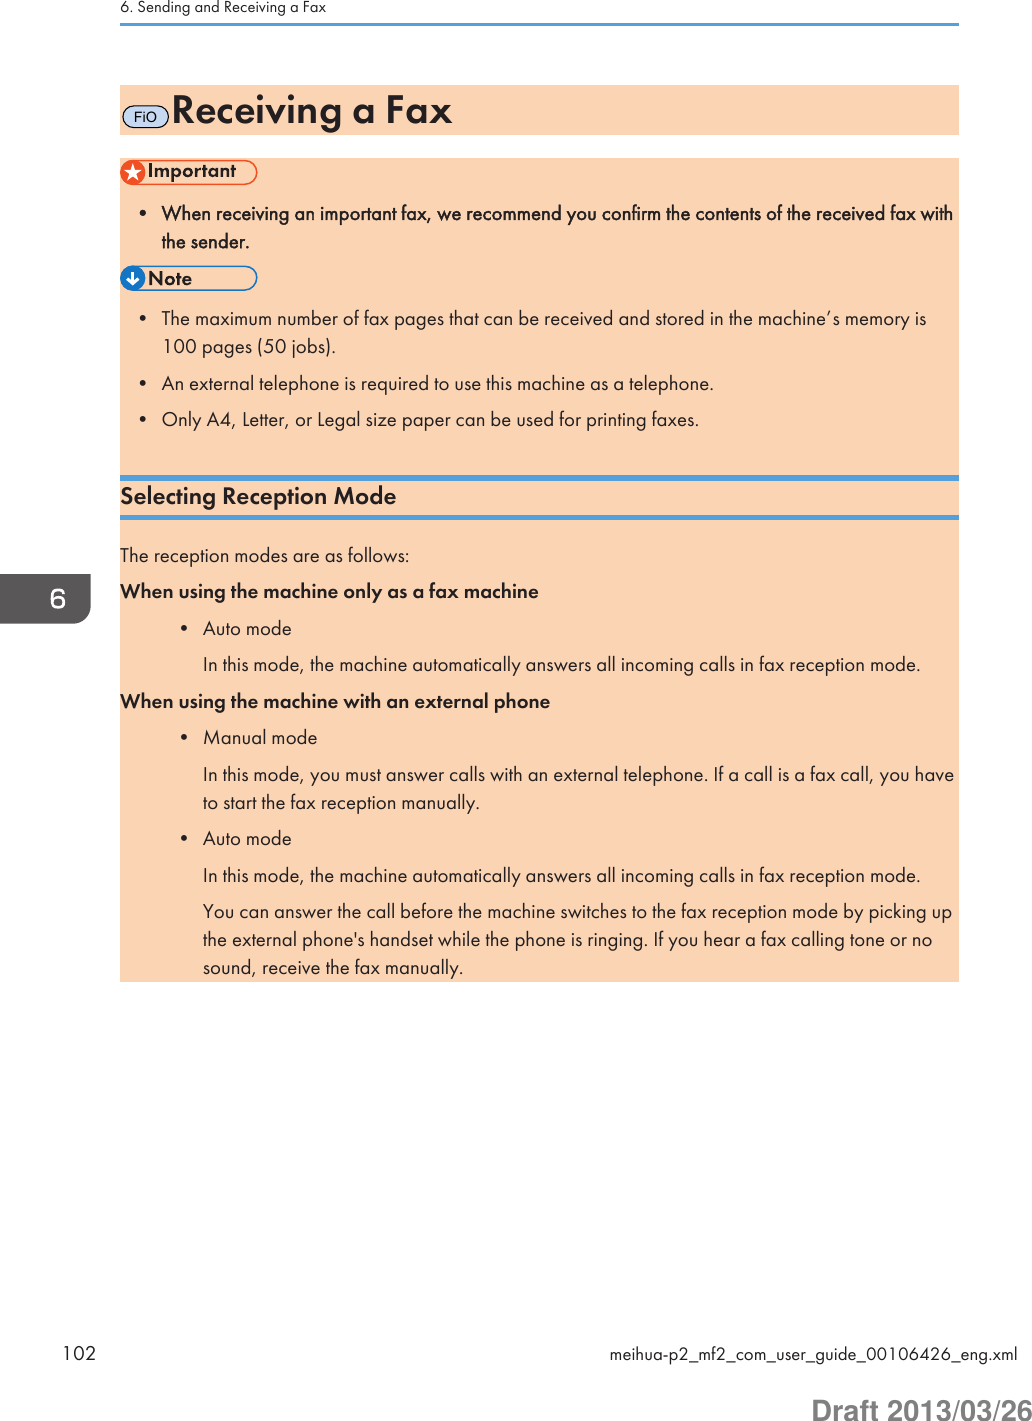
![1. Press the [User Tools] key.CXP1012. Press the [ ] or [ ] keys to select [Fax Features], and then press the [OK] key.3. Press the [ ] or [ ] keys to select [RX Settings], and then press the [OK] key.4. Press the [ ] or [ ] keys to select [Switch RX Mode], and then press the [OK] key.5. Press the [ ] or [ ] keys to select the reception mode, and then press the [OK] key.6. Press the [User Tools] key to return to the initial screen.Receiving a fax in Manual mode• To receive faxes, be sure to first remove any originals loaded in the ADF.• The procedure differs depending on whether [Fax Mode] is set to [Easy Mode] or [AdvancedMode] in [TX Settings] in [Fax Features].1. Pick up the handset of the external telephone to answer the call.2. When you hear a fax calling tone or no sound, switch to fax mode using the [Copy/Facsimile] key, and then press the [Start] key.CXP038If [Fax Mode] is set to [Easy Mode], proceed to Step 4.Receiving a Faxmeihua-p2_mf2_com_user_guide_00106426_eng.xml 103Draft 2013/03/26](https://usermanual.wiki/Ricoh/MFSP112SF1.user-manual-2/User-Guide-1981979-Page-103.png)
![3. Press the [3] key.To receive a fax, press the [3] key. (3: RX)4. Replace the handset.Receiving a fax in Auto modeWhen the reception mode is set to Auto mode, the machine automatically answers all incoming calls infax reception mode.• You can specify how many times the external phone rings before the machine starts to receive a faxby [Number of Rings] in [RX Settings] in [Fax Features].• You can answer the call before the machine switches to the fax reception mode by picking up theexternal phone's handset while the phone is ringing. If you hear a fax calling tone or no sound,receive the fax manually.6. Sending and Receiving a Fax104 meihua-p2_mf2_com_user_guide_00106426_eng.xmlDraft 2013/03/26](https://usermanual.wiki/Ricoh/MFSP112SF1.user-manual-2/User-Guide-1981979-Page-104.png)
![7. Configuring the Machine Using theControl PanelFiOBasic Operation1. If you want to configure the machine's system settings, press the [User Tools] key.CXP1012. Press the [ ] or [ ] key to select the settings you want to use.The machine’s default settings are grouped into the following six categories:• [System Settings], [Printer Features], [Copier Features], [Fax Features], [Address Book], [PrintList/Report].3. To confirm setting items and values displayed, press the [OK] key.4. To go back to the previous item, press the [ ] key.• To return to the initial screen, press the [ ] key the same amount of times as the number of selecteditems.meihua-p2_mf2_com_user_guide_00106429_eng.xml 107Draft 2013/03/26](https://usermanual.wiki/Ricoh/MFSP112SF1.user-manual-2/User-Guide-1981979-Page-107.png)
![FiOCopier Features SettingsSortConfigures the machine to sort the output pages into sets when making multiple copies of a multi-page document (P1, P2, P1, P2...).Default: [Off]• On• OffOriginal TypeSpecifies the original type to optimize the copy quality.Default: [Text/Photo]• TextSelect this when the original contains only text and no photographs or images.• PhotoSelect this when the original contains photographs or images. Use this mode for the followingtypes of original:• Photographs• Pages that are entirely or mainly composed of photographs or images, such asmagazine pages.• Text/PhotoSelect this when the original contains both text and photographs or images.DensitySpecifies the image density for photocopying.Default: • (Lightest)•••• (Darkest)Reduce/EnlargeSpecifies the percentage by which copies are enlarged or reduced.Default: [100%] (mainly Europe and Asia)7. Configuring the Machine Using the Control Panel108 meihua-p2_mf2_com_user_guide_00106430_eng.xmlDraft 2013/03/26](https://usermanual.wiki/Ricoh/MFSP112SF1.user-manual-2/User-Guide-1981979-Page-108.png)
![50%, 71% A4 A5, 82% B5 JIS A5, 93%, 122% A5 B5 JIS, 141% A5 A4, 200%,Zoom: 25-400% (mainly North America)50%, 65% LT HLT, 78% LG LT, 93%, 129% HLT LT, 155% HLT LG, 200%, Zoom:25-400%CombineSelect this to photocopy two or four pages of an original onto a single sheet of paper.Default: [Off]• Off• 2 on 1• Portrait• Landscape• 4 on 1• Portrait: L to R• Portrait: T to B• Landscape: L to R• Landscape: T to BFor details, see page 62 "Combining Multiple Pages".2 Sided CopySets the machine to make 2-sided copies by copying single-sided documents onto the front andback sides of each sheet.Default: [Off]• Off• Top to Top• Portrait• Landscape• Top to Bottom• Portrait• LandscapeFor details, see page 70 "Making 2-sided Copies".Toner SavingReduces toner consumption when printing. When this setting is enabled, print quality may bedegraded.Default: [Off]Copier Features Settingsmeihua-p2_mf2_com_user_guide_00106430_eng.xml 109Draft 2013/03/26](https://usermanual.wiki/Ricoh/MFSP112SF1.user-manual-2/User-Guide-1981979-Page-109.png)
![FiOFax Features SettingsTX SettingsImmediate TXSets the machine to send a fax immediately when the original is scanned.Default: [Off]• OffSelect this when using Memory Transmission.• OnSelect this when using Immediate Transmission.• Next Fax OnlySelect this when using Immediate Transmission for the next transmission only.ResolutionSpecifies the resolution to use for scanning originals.Default: [Standard]• StandardSelect this when the original is a printed or typewritten document with normal-sizedcharacters.• DetailSelect this when the original is a document with small print.• PhotoSelect this when the original contains images such as photographs or shaded drawings.DensitySpecifies the image density to use for scanning originals.[Erase Background] is not available, when [Resolution] is set to [Photo].Default: [Erase Background]• (Lightest)•••• (Darkest)• Erase BackgroundFax Features Settingsmeihua-p2_mf2_com_user_guide_00106431_eng.xml 111Draft 2013/03/26](https://usermanual.wiki/Ricoh/MFSP112SF1.user-manual-2/User-Guide-1981979-Page-111.png)
![Pause TimeSpecifies the length of pause time when a pause is inserted between the digits of a faxnumber.Default: 3 seconds• 1 to 15 seconds, in 1 second incrementsAuto RedialSets the machine to redial the fax destination automatically when the line is busy or atransmission error occurs.Default: [On]• Off• OnPrint Fax HeaderSets the machine to add a header to every fax you send. The header includes the current dateand time, user fax name and number, Session number, and page information.Default: [On]• Off• OnFax ModeYou can simplify the procedure for sending and receiving faxes by disabling the use of theexposure glass. If originals are loaded in the ADF, you can fax them using the ADF in eithermode by pressing the [Start] key.Default: [Advanced Mode]• Easy ModeIf you select [Easy Mode], you can receive faxes by pressing the [Start] key. Theexposure glass cannot be used in this mode.• Advanced ModeIf you select [Advanced Mode], you can specify whether to send or receive faxes afterpressing the [Start] key.RX SettingsSwitch RX ModeSpecifies the reception mode.Default: [Auto]• AutoThe machine automatically answers all incoming calls in fax reception mode.• Manual7. Configuring the Machine Using the Control Panel112 meihua-p2_mf2_com_user_guide_00106431_eng.xmlDraft 2013/03/26](https://usermanual.wiki/Ricoh/MFSP112SF1.user-manual-2/User-Guide-1981979-Page-112.png)
![The machine rings when it receives incoming calls. The machine receives faxes onlywhen you manually operate the machine to receive faxes.Auto ReductionSets the machine to reduce the size of a received fax if it is too large to print on a single sheetof paper.Note that the machine only reduces the size down to maximum by 74%. If further reduction isrequired to fit the fax on a single sheet, it will be printed on separate sheets without beingreduced.Default: [On]• Off• OnSortBegins printing from the last page when the data has been received within the memory.Default: [Off]• Off• OnNumber of RingsSpecifies how many times the external telephone must rings before the machine starts toreceive a fax when [Switch RX Mode] is set to [Auto].Default: 3 times• 3 to 5 times, in increments of 1If you have set [Country Code] to [Japan], you can specify it from 1 to 5 times. Thedefault is 1 times.Add FooterSets the machine to add a footer to every fax you receive.Default: [On]• Off• OnDel. TX Standby FileDeletes unsent fax jobs remaining in the machine's memory.This function is only performed when selected.• Delete FileTo delete a fax job, select the job you want to delete.• Delete All FilesTo delete all fax jobs.Fax Features Settingsmeihua-p2_mf2_com_user_guide_00106431_eng.xml 113Draft 2013/03/26](https://usermanual.wiki/Ricoh/MFSP112SF1.user-manual-2/User-Guide-1981979-Page-113.png)
![Comm. SettingsECM TransmissionSets the machine to automatically resend parts of the data that are lost during transmission.Default: [On]• Off• OnECM ReceptionSets the machine to automatically receive parts of the data that are lost during reception.Default: [On]• Off• OnDial Tone DetectSets the machine to automatically detect a dial tone before dialing the destination.• Detect• Do not DetectThe default depends on the [Country Code] setting.Transmission SpeedSpecifies the transmission speed for the fax modem.Default: [33.6 Kbps]• 33.6 Kbps• 14.4 Kbps• 9.6 Kbps• 7.2 Kbps• 4.8 Kbps• 2.4 KbpsReception SpeedSpecifies the reception speed for the fax modem.Default: [33.6 Kbps]• 33.6 Kbps• 14.4 Kbps• 9.6 Kbps• 7.2 Kbps• 4.8 Kbps7. Configuring the Machine Using the Control Panel114 meihua-p2_mf2_com_user_guide_00106431_eng.xmlDraft 2013/03/26](https://usermanual.wiki/Ricoh/MFSP112SF1.user-manual-2/User-Guide-1981979-Page-114.png)
![• 2.4 KbpsDial/Push PhoneSpecifies the line type of the telephone line.To configure this setting, contact your telephone company and select the setting based onyour telephone line. Selecting the wrong setting may result in transmission errors.If you have set [Country Code] to [Australia], [New Zealand] or [Singapore], [Dial/PushPhone] does not appear because the default is [Push Phone].Default: [Push Phone]• Push Phone• Dial Phone (10PPS)• Dial Phone (20PPS)[Dial Phone (20PPS)] appears only if [Country Code] is set to [Japan] or [Thailand].PSTN / PBXSets the machine to connect to a public switched telephone network (PSTN) or a privatebranch exchange (PBX).Default: [PSTN]• PSTN• PBXPBX Access NumberSpecifies the dial number to access the external line when the machine is connected to a PBX.Make sure that this setting matches your PBX settings. Otherwise, you may not be able to sendfaxes to external destinations.Default: 9• 0 to 999Fax No. ConfirmationIf this setting is enabled, when trying to send a fax by manually entering a fax number, theuser will be prompted to re-enter the number for confirmation. If the numbers do not match,the fax cannot be sent.Default: [Off]• Off• OnReport Print Set.TX Status ReportSets the machine to print a transmission report automatically after a fax transmission.Default: [Error: With Image]Fax Features Settingsmeihua-p2_mf2_com_user_guide_00106431_eng.xml 115Draft 2013/03/26](https://usermanual.wiki/Ricoh/MFSP112SF1.user-manual-2/User-Guide-1981979-Page-115.png)
![• Error OnlyPrints a report when a transmission error occurs.• Error: With ImagePrints a report with an image of the original when transmission error occurs.• Every TXPrints a report for every fax transmission.• EveryTX: With ImagePrints a report with an image of the original for every fax transmission.• Do not PrintFax JournalSets the machine to print a fax journal automatically for every 100 fax jobs (both sent andreceived).Default: [Auto Print]• Auto Print• Do not Auto PrintPC FAX Error ReportSets the machine to print PC FAX error reports automatically.Default: [Auto Print]• Auto Print• Do not Auto Print7. Configuring the Machine Using the Control Panel116 meihua-p2_mf2_com_user_guide_00106431_eng.xmlDraft 2013/03/26](https://usermanual.wiki/Ricoh/MFSP112SF1.user-manual-2/User-Guide-1981979-Page-116.png)
![FiOSystem SettingsTray Paper SettingsPaper SizeSpecifies the paper size.Default: (mainly Europe and Asia)[A4] (mainly North America)[LT (81/2 × 11)]• A4, B5 JIS, A5, B6 JIS, A6, LG ( 8 1/2 x14), LT (8 1/2 x 11), HLT (5 1/2 x 8 1/2),EXE (7 1/4x10 1/2), 16K (197x273mm), 16K (195x270mm), 16K (184x260mm),F/GL (8 x 13), Foolscap (8 1/2 x 13), Folio (8 1/4 x 13), CustomPaper TypeSpecifies the paper type.Default: [Plain Paper]• Plain Paper, Recycled Paper, Thin Paper, Thick PaperAdjust Sound VolumeSpecifies the volume of the sounds produced by the machine.Select the setting for each item from [Off], [Low], [Middle], or [High].Panel Key SoundSpecifies the volume of the beep sound when a key is pressed.Default: [Middle]Alarm VolumeSpecifies the volume of the alarm sound when an operation error occurs.Default: [Middle]On Hook ModeSpecifies the volume of the sound from the speaker during On Hook mode.Default: [Middle]Copy Job End ToneSpecifies the volume of the beep sound when a copy job is complete.Default: [Off]Copy Job Error ToneSpecifies the volume of the beep sound when a copy job error occurs.7. Configuring the Machine Using the Control Panel118 meihua-p2_mf2_com_user_guide_00106433_eng.xmlDraft 2013/03/26](https://usermanual.wiki/Ricoh/MFSP112SF1.user-manual-2/User-Guide-1981979-Page-118.png)
![Default: [Middle]Print Job End ToneSpecifies the volume of the beep sound when a print job is complete.Default: [Off]Print Job Error ToneSpecifies the volume of the beep sound when a print job error occurs.Default: [Middle]Scan Job End ToneSpecifies the volume of the beep sound when a scan job is complete.Default: [Off]Scan Job Error ToneSpecifies the volume of the beep sound when a scan job error occurs.Default: [Middle]Fax TX End ToneSpecifies the volume of the beep sound when a fax transmission is complete.Default: [Middle]Fax TX Error ToneSpecifies the volume of the beep sound when a fax transmission error occurs.Default: [Middle]Fax RX End ToneSpecifies the volume of the beep sound when a fax reception is complete.Default: [Middle]Fax RX Error ToneSpecifies the volume of the beep sound when a fax reception error occurs.Default: [Middle]Set Date/TimeSet DateSets the date of the machine’s internal clock.• Year: 2000 to 2099• Month: 1 to 12• Day: 1 to 31• Date Format: YYYY/MM/DD, MM/DD/YYYY, or DD/MM/YYYYSystem Settingsmeihua-p2_mf2_com_user_guide_00106433_eng.xml 119Draft 2013/03/26](https://usermanual.wiki/Ricoh/MFSP112SF1.user-manual-2/User-Guide-1981979-Page-119.png)
![Set TimeSets the time of the machine’s internal clock.• Time format: 12-hour Format, 24-hour Format• AM/PM stamp: AM, PM (for 12-hour Format)• Hour: 0 to 23 (for 24-hour Format), or 1 to 12 (for 12-hour Format)• Minute: 0 to 59Program Fax Info.Specifies the user information for sending a fax.• Own Fax NumberSpecifies the fax number of the machine using up to 20 characters, including 0 to 9, space,and "+".• Own NameSpecifies the name of the machine using up to 20 characters.Function PrioritySpecifies the mode that is activated when the power is turned on.Default: [Copier]• Copier• FacsimileEnergy Saver ModeSets the machine to enter Energy Saver Mode, Energy Saver Mode 1 or Energy Saver Mode 2, toreduce power consumption. The machine recovers from Energy Saver Mode when it receives aprint job, prints a received fax, receives TWAIN scan directions from the computer, or when anykey is pressed.Energy Saver Mode 1The machine enters Energy Saver Mode 1 if the machine has been idle for about 30 seconds.It takes less time to recover from Energy Saver Mode 1 than from power-off state or EnergySaver Mode 2, but power consumption is higher in Energy Saver Mode 1 than in EnergySaver Mode 2.Default: [Off]• Off• OnEnergy Saver Mode 2The machine enters Energy Saver Mode 2 after the period of time specified for this setting haspassed. The machine consumes less power in Energy Saver Mode 2 than in Energy SaverMode 1, but it takes longer to recover from Energy Saver Mode 2 than from Energy SaverMode 1.7. Configuring the Machine Using the Control Panel120 meihua-p2_mf2_com_user_guide_00106433_eng.xmlDraft 2013/03/26](https://usermanual.wiki/Ricoh/MFSP112SF1.user-manual-2/User-Guide-1981979-Page-120.png)
![Default: [1 minute]The time can be set from 1 to 240 minutes.LanguageSpecifies the language used on the screen and in reports.Default: [English]• English, German, French, Italian, Spanish, Dutch, Swedish, Norwegian, Danish, Finnish,Portuguese, Czech, Hungarian, Polish, Russian, Portuguese (BR), TurkishCountry CodeSelects the country in which the machine is used. The country code you specify determines the timeand date display format and the default values of the fax transmission-related settings.Make sure to select the country code correctly. Selecting a wrong country code may cause failuresin fax transmissions.Default: [USA]Fixed USB PortSpecifies whether the same driver can be used for multiple machines or not under USB connection.Default: [Off]• OnThe same driver you have installed on your computer can be used with any machine otherthan the one originally used for installation as long as the machine is the same model.• OffYou must install the driver separately for individual machines, because a machine that is notthe original will be recognized as a new device upon USB connection.Print CartridgeDisplays information about consumables. This information is displayed only if [Toner End Option]has been set to [Stop Printing].• (New)••••• (Needs replacing)If [Toner End Option] is set to [Continue Printing], "**" is displayed instead of the indicator above.Low Humidity ModeWhen the machine is used in a low humidity environment, black stripes with a few millimeters widthmay appear. Selecting [On] should prevent such black stripes from appearing.System Settingsmeihua-p2_mf2_com_user_guide_00106433_eng.xml 121Draft 2013/03/26](https://usermanual.wiki/Ricoh/MFSP112SF1.user-manual-2/User-Guide-1981979-Page-121.png)
![Default: [Off]• On• OffRegistrationAdjusts the position of the input tray. Adjust the value by using the [ ] or [ ] key.To check the registration, print a test page.Default: 0• Horizontal (-6 to +6 mm, in 1 mm increments)• Vertical (-6 to +6 mm, in 1 mm increments)Adjust Image DensityAdjusts the density of printing.Default: • (Lightest)•••••• (Darkest)Toner End OptionThis setting is used to monitor the toner level.Default: [Stop Printing]• Stop PrintingMonitoring the toner level is enabled. The remaining toner level can be checked in the controlpanel and on the Smart Organizing Monitor.• Continue PrintingThe machine no longer monitors the toner level. Even when the toner runs out, printing willcontinue and no messages will be displayed.• For details about print cartridge and toner, see page 167 "Notes About the Toner".Reset Settings• Reset All SettingsResets all settings to the factory default, except for the language, date and time, and faxSpeed Dialing settings.7. Configuring the Machine Using the Control Panel122 meihua-p2_mf2_com_user_guide_00106433_eng.xmlDraft 2013/03/26](https://usermanual.wiki/Ricoh/MFSP112SF1.user-manual-2/User-Guide-1981979-Page-122.png)
![FiOPrinting Lists/ReportsPrinting the Configuration Page1. Press the [User Tools] key.CXP1012. Press the [ ] or [ ] key to select [Print List/Report], and then press the [OK] key.3. Press the [ ] or [ ] key to select types of report, and then press the [OK] key.Types of Report• When printing the test page, set the paper size to A4 or Letter. When printing other reports, set thepaper size to A4, Letter, F/GL, Foolscap, Folio, or Legal.Configuration PagePrints the machine’s general information and current configuration.Test PageChecks the results of print position adjustment.Fax JournalPrints a fax transmission and reception journal for the last 100 jobs.TX Status ReportPrints the latest transmission report.TX Standby File ListPrints a list of unsent fax jobs remaining in the machine's memory.Fax Speed Dial ListPrints a list of Speed Dial entries.7. Configuring the Machine Using the Control Panel124 meihua-p2_mf2_com_user_guide_00106434_eng.xmlDraft 2013/03/26](https://usermanual.wiki/Ricoh/MFSP112SF1.user-manual-2/User-Guide-1981979-Page-124.png)
![FiOPrinter Features SettingsI/O TimeoutTimeout: USBSpecifies how many seconds the machine waits for print data and if the data is interruptedwhile being sent from the computer via USB. If the machine does not receive any data withinthe specified time, the machine only prints the data it has received.Default: [60 sec.]• Off• 15 sec.• 60 sec.• 300 sec.Auto ContinueSets the machine to ignore errors on paper size or type and continue printing. The printing stopstemporarily if an error is detected, and resumes automatically after the specified time depending onthe settings specified in the control panel. If [Auto Continue] is set to [0 sec.], no error messageappears.Default: [0 sec.]• Off• 0 sec.• 10 sec.• 30 sec.Sub Paper SizeSets the machine to print onto paper of another size if the specified paper is not loaded in tray.Alternative sizes are preset to A4 and Letter.Default: [On]• On• OffPrinter Features Settingsmeihua-p2_mf2_com_user_guide_00106435_eng.xml 125Draft 2013/03/26](https://usermanual.wiki/Ricoh/MFSP112SF1.user-manual-2/User-Guide-1981979-Page-125.png)
![8. Configuring the Machine UsingSmart Organizing MonitorChecking the System InformationThe state and status information of the machine can be checked using Smart Organizing Monitor.FiOChecking the Status InformationCXP11512341. Image areaDisplays the status of this machine with an icon.2. Status area• Paper SizeDisplays the paper size configured on the machine.• Paper TypeDisplays the paper type configured on the machine.• TonerThe remaining toner level is displayed in ten levels, when [Toner End Option] has been set to [StopPrinting]. If [Toner End Option] has been set to [Continue Printing], however, "**" is displayed becausethe remaining toner level is not monitored.• Countermeihua-p2_mf2_com_user_guide_00106437_eng.xml 127Draft 2013/03/26](https://usermanual.wiki/Ricoh/MFSP112SF1.user-manual-2/User-Guide-1981979-Page-127.png)
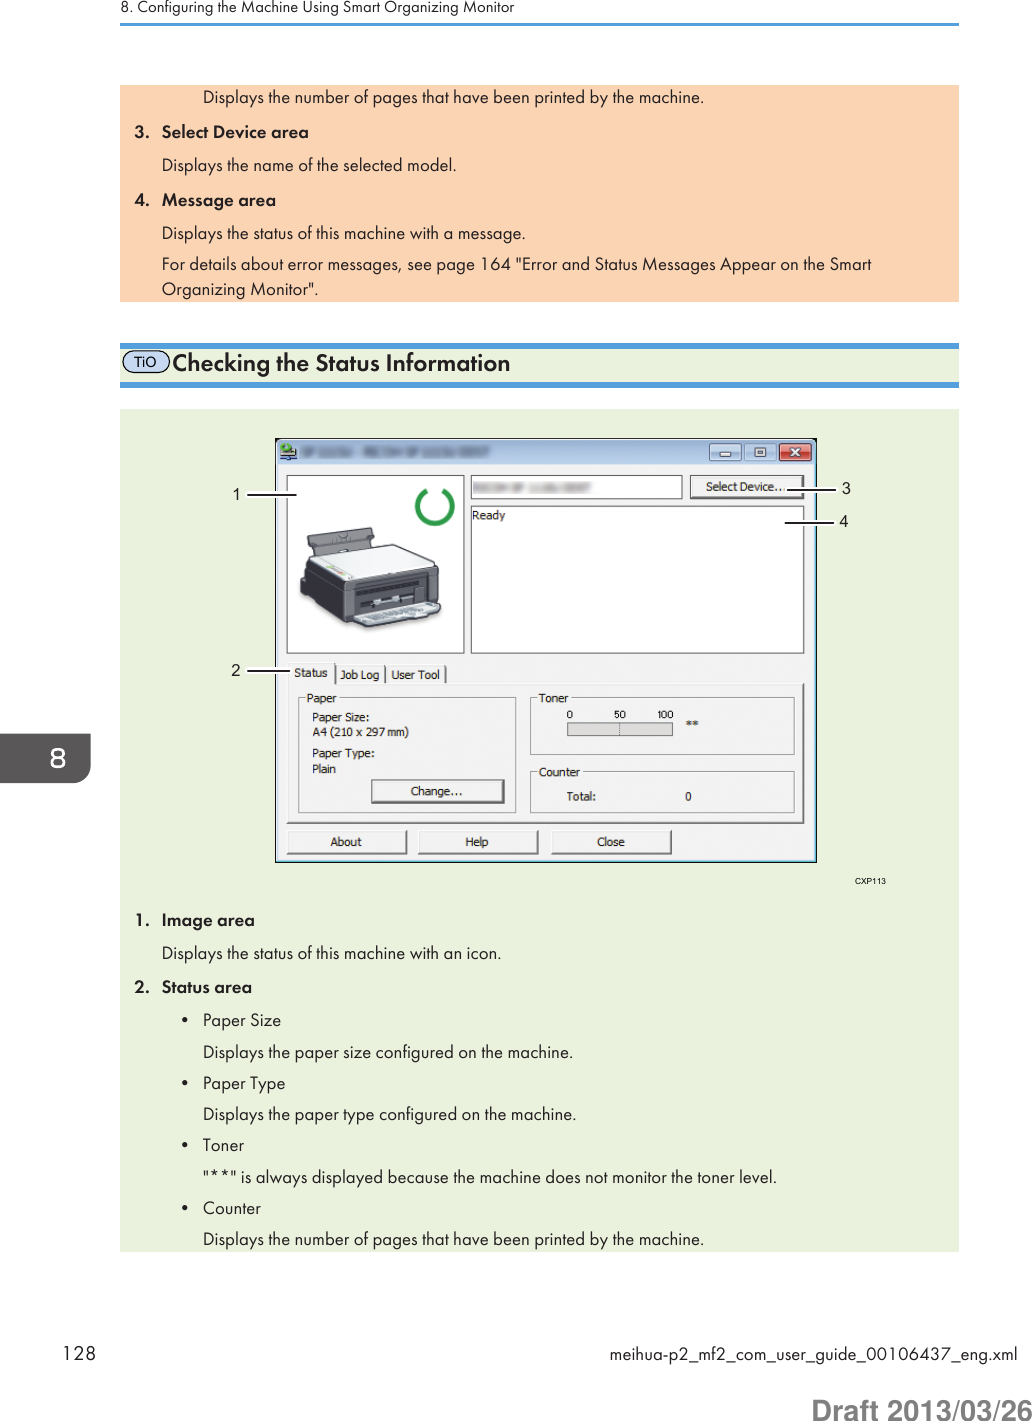
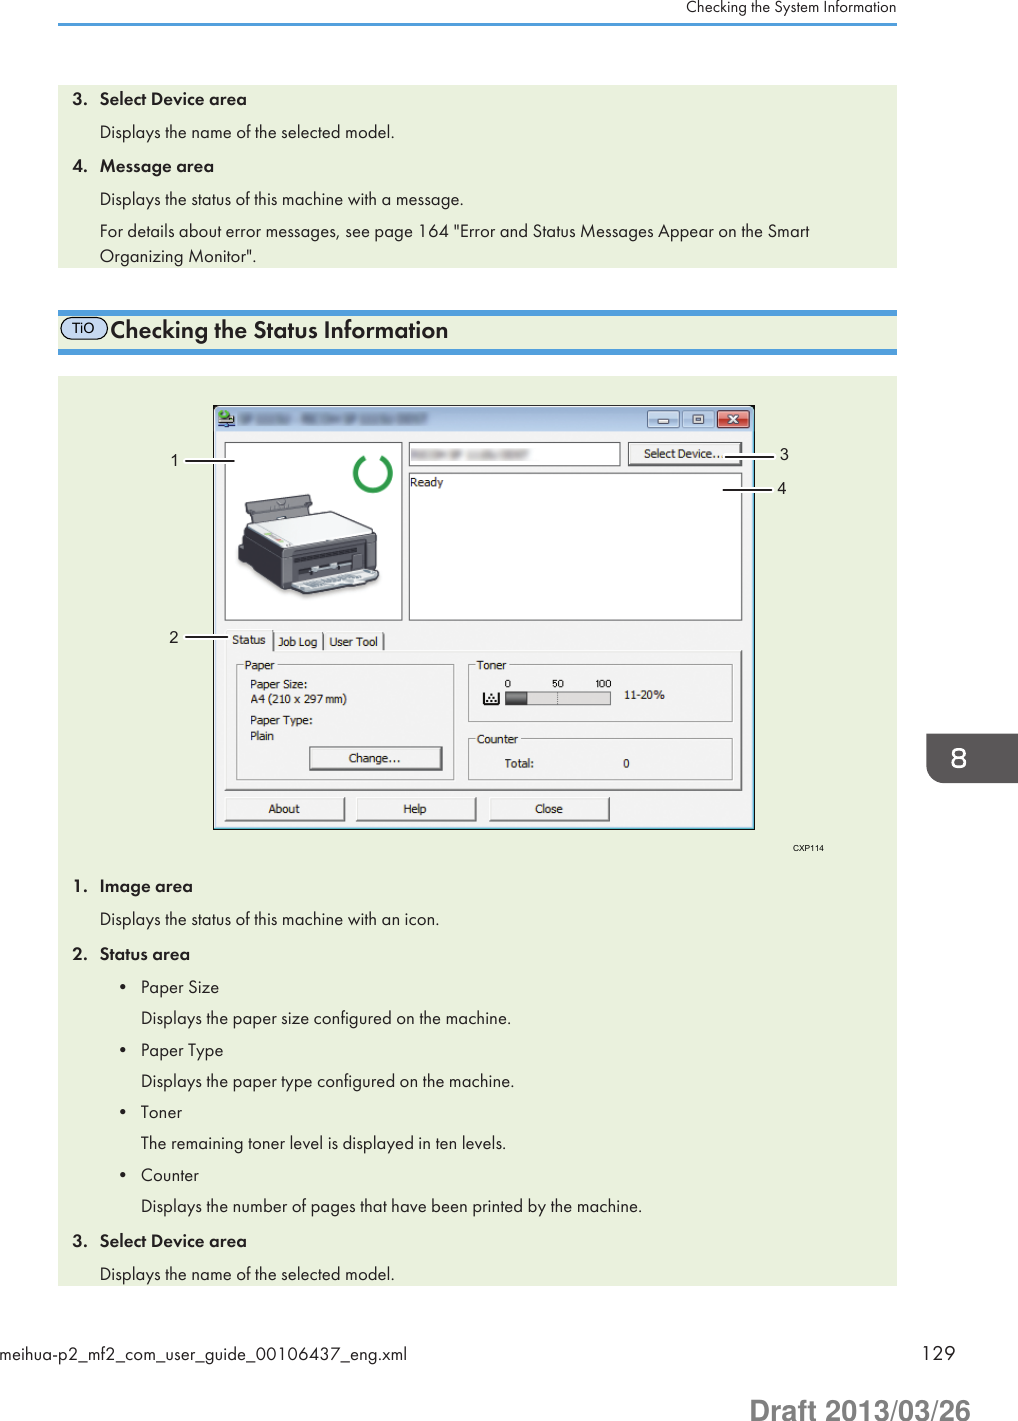
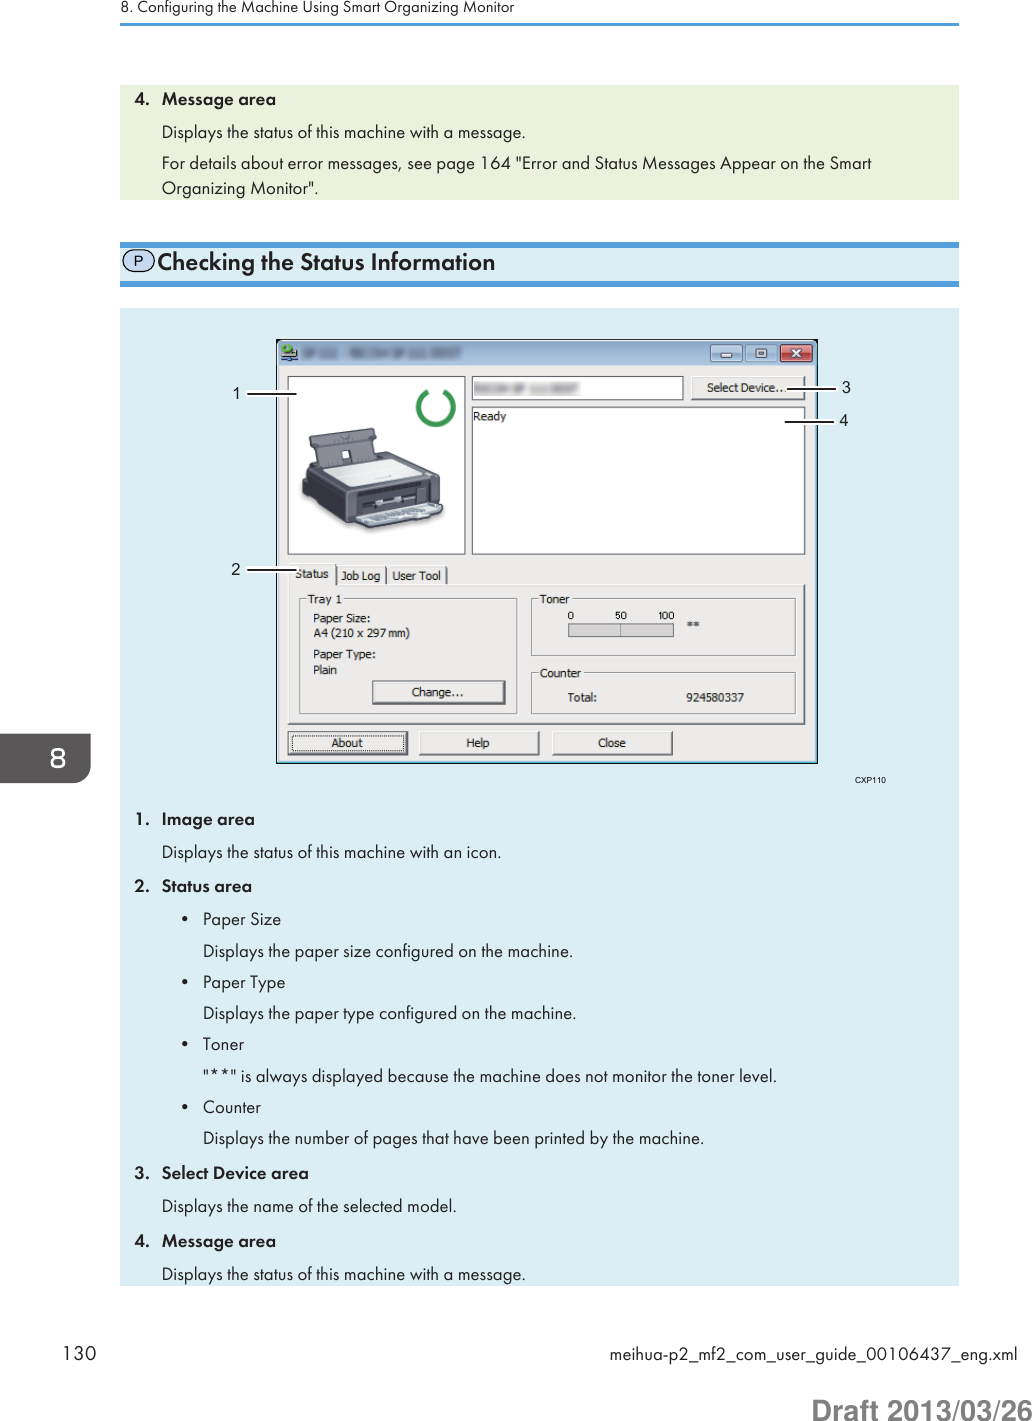
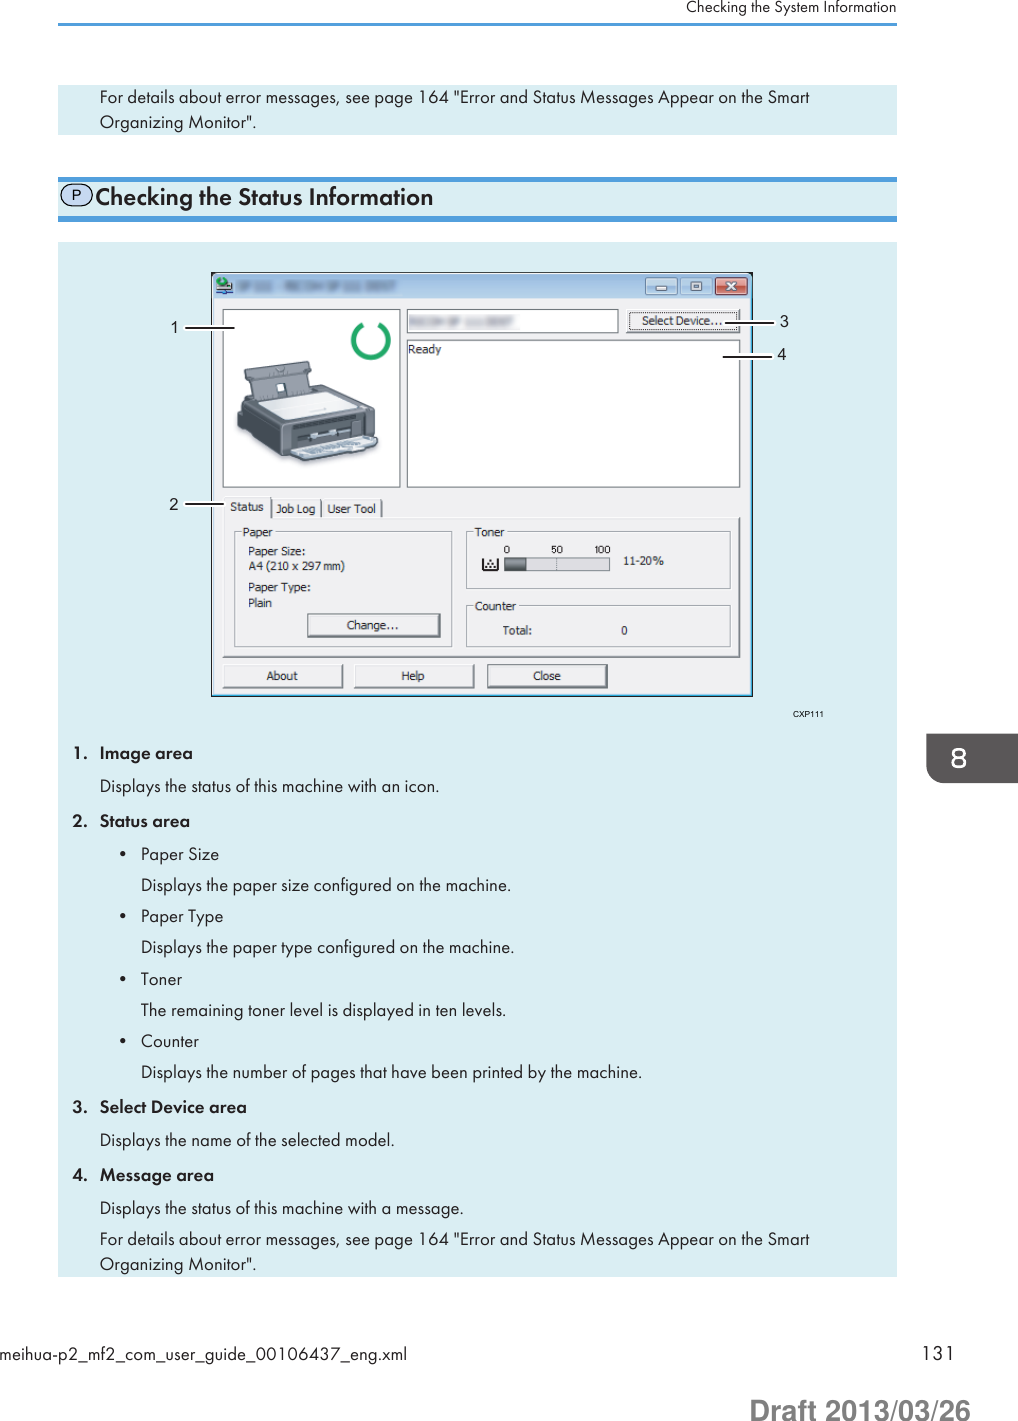
![Printing the Configuration Page• When printing the test page, set the paper size to A4 or Letter. When printing other reports, set thepaper size to A4, Letter, F/GL, Foolscap, Folio, or Legal.1. On the [Start] menu, click [All Programs].2. Click [Smart Organizing Monitor for SP xxx Series].3. Click [Smart Organizing Monitor for SP xxx Series Status].4. If the machine you are using is not selected, click [Select Device...], and then select themachine's model.5. Click [OK].6. On the [User Tool] tab, select [Test Page] or [Configuration Page] in the [List / Test:] list.7. Click [Print].8. Configuring the Machine Using Smart Organizing Monitor132 meihua-p2_mf2_com_user_guide_00106437_eng.xmlDraft 2013/03/26](https://usermanual.wiki/Ricoh/MFSP112SF1.user-manual-2/User-Guide-1981979-Page-132.png)
![Configuring the Machine SettingsSmart Organizing Monitor is used to modify the machine’s settings.1. On the [Start] menu, click [All Programs].2. Click [Smart Organizing Monitor for SP xxx Series].3. Click [Smart Organizing Monitor for SP xxx Series Status].4. If the machine you are using is not selected, click [Select Device...], and then select themachine's model.5. Click [OK].6. On the [User Tool] tab, click [Printer Configuration].7. Change the settings if necessary.8. Click [OK].9. Click [Close].Tab SettingsThis section provides a tab-by-tab overview of the machine settings that can be modified using SmartOrganizing Monitor. For more information on each setting item, see the Smart Organizing MonitorHelp.System tab• Register custom paper sizes.• Adjust the printing position or density to improve the printing quality when printed results arenot satisfactory.• Enable or disable Energy Saver Mode, and specify the amount of time that will elapse beforeswitching to it.• Update the machine firmware.PPrinter tab•PConfigure how the machine behaves when there is an inconsistency in paper size and/ortype settings between the machine and the printer driver.•PSpecify the period of time the machine waits if it fails to receive a print job.TiOPrinter tab•TiOConfigure how the machine behaves when there is an inconsistency in paper sizeand/or type settings between the machine and the printer driver.•TiOSpecify the period of time the machine waits if it fails to receive a print job.Configuring the Machine Settingsmeihua-p2_mf2_com_user_guide_00106438_eng.xml 133Draft 2013/03/26](https://usermanual.wiki/Ricoh/MFSP112SF1.user-manual-2/User-Guide-1981979-Page-133.png)
![Updating the Firmware• To the maximum extent permitted by applicable laws, in no event will the manufacturer be liable forany damages whatsoever arising out of failures of this software, losses of documents or data, or theuse or non-use of this software and operation manuals provided with it.• The company shall also not be held liable for any disputes between the customer and third partiesresulting from any use or loss of use of this software.• To make sure that a firmware update has successfully completed, print the configuration pagebefore and after the update.• Make sure to never disconnect the USB cable during a firmware update.• Disconnect any unnecessary cables from the machine when running a firmware update.• If necessary, modify power management settings on your computer in advance so that thecomputer will not enter standby or sleep mode when during a firmware update.• Download the firmware from the manufacturer's Web site.To update the firmware, use the Smart Organizing Monitor from Windows.1. On the [Start] menu, click [All Programs].2. Click [Smart Organizing Monitor for SP xxx Series].3. Click [Smart Organizing Monitor for SP xxx Series Status].4. If the machine you are using is not selected, click [Select Device...], and then select themachine's model.5. Click [OK].6. On the [User Tool] tab, click [Printer Configuration].7. On the [System] tab, click [Printer Firmware Update...].8. Click [OK].9. Specify the location of the DWN file, and then click [Open].10. After a message is displayed on the Smart Organizing Monitor to indicate that thefirmware update has completed, turn the machine's power Off and then On again.Updating the Firmwaremeihua-p2_mf2_com_user_guide_00106439_eng.xml 135Draft 2013/03/26](https://usermanual.wiki/Ricoh/MFSP112SF1.user-manual-2/User-Guide-1981979-Page-135.png)
![9. Maintaining the MachineReplacing the Print Cartridge•TiOThis machine does not monitor the remaining toner level, and no message will be displayedto prompt the user to replace the print cartridge if the machine runs out of toner. Replace the printcartridge if the printed image suddenly becomes pale or blurred.•PThis machine does not monitor the remaining toner level, and no message will be displayed toprompt the user to replace the print cartridge if the machine runs out of toner. Replace the printcartridge if the printed image suddenly becomes pale or blurred.•FiOIf “Out of Toner / Print Cartridge” is displayed in the control panel, replace the printcartridge by following the procedure described below. However, this message will not bedisplayed if [Toner End Option] has been set to [Continue Printing]. Replace the print cartridge ifthe printed image becomes pale or blurred.• Store print cartridges in a cool dark place.• Actual printable numbers vary depending on image volume and density, number of pages printedat a time, paper type and size, and environmental conditions such as temperature and humidity.Toner quality degrades over time.• For good print quality, the manufacturer recommends that you use genuine toner from themanufacturer.• The manufacturer shall not be responsible for any damage or expense that might result from the useof parts other than genuine parts from the manufacturer with your office products.1. Open the maintenance cover.2. Hold the grips of the print cartridge, and then pull it out of the machine.CXP0073. Take the new print cartridge out of the box, and then take it out of the bag.meihua-p2_mf2_com_user_guide_00106441_eng.xml 137Draft 2013/03/26](https://usermanual.wiki/Ricoh/MFSP112SF1.user-manual-2/User-Guide-1981979-Page-137.png)

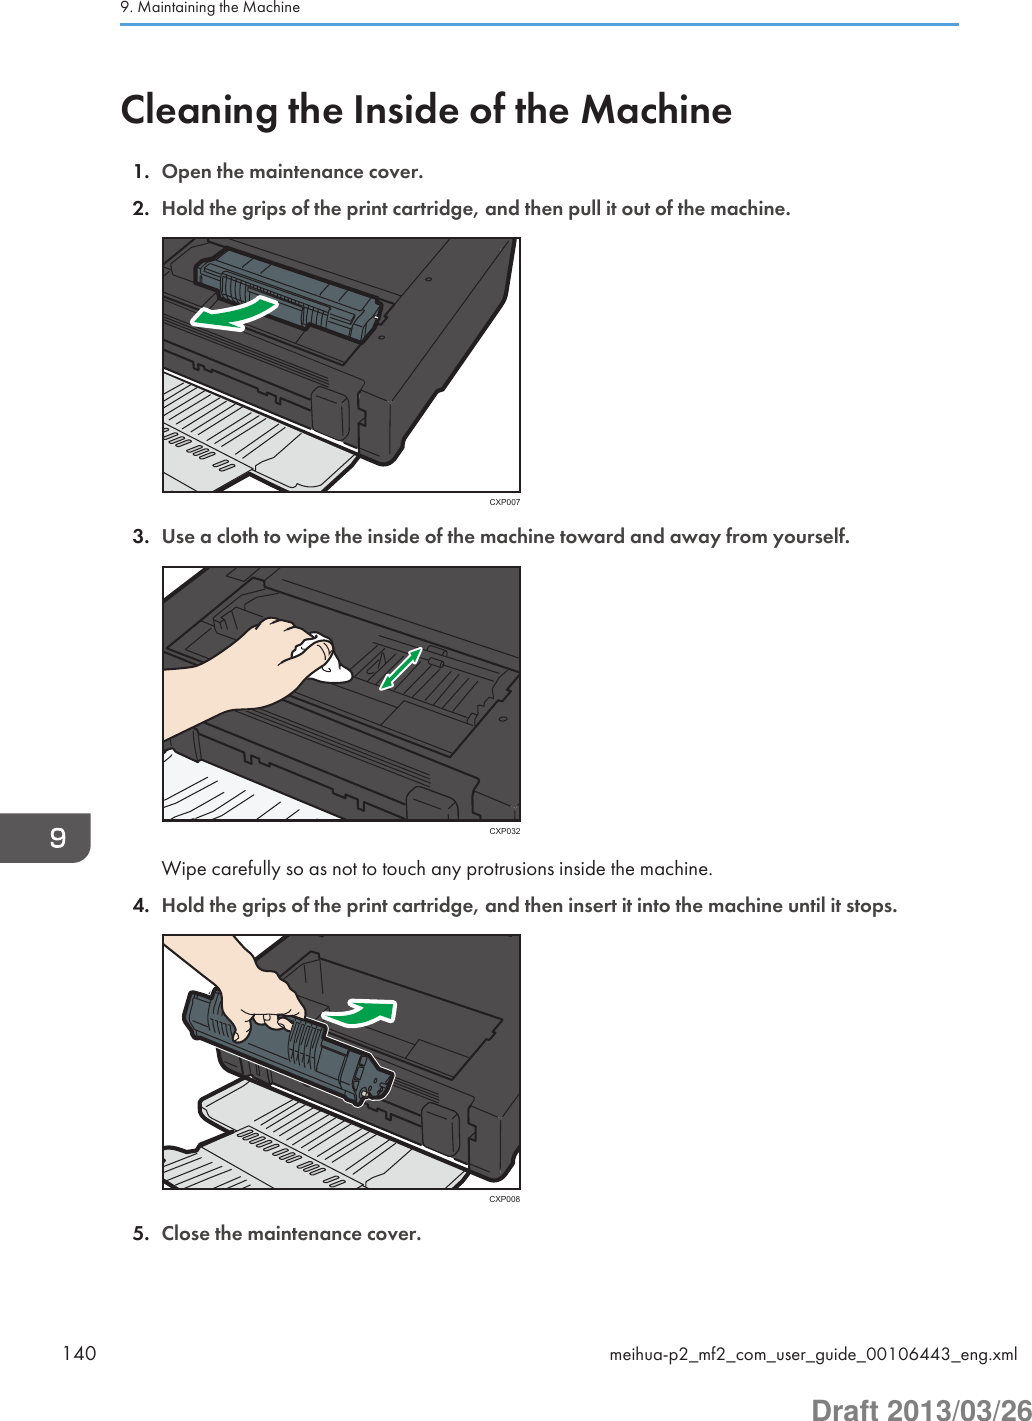
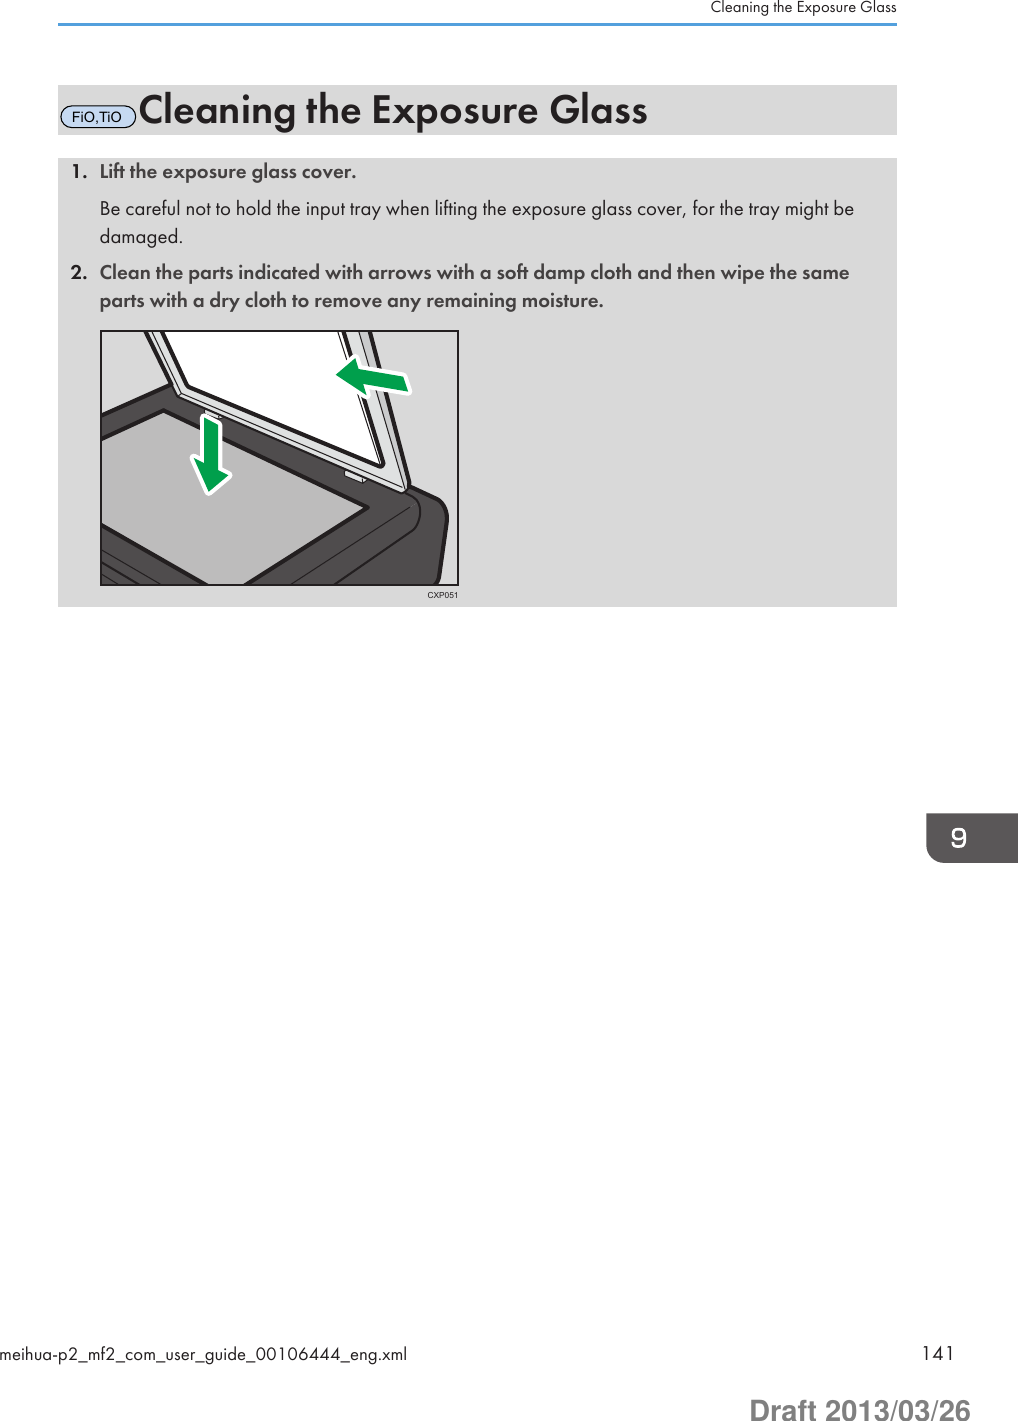
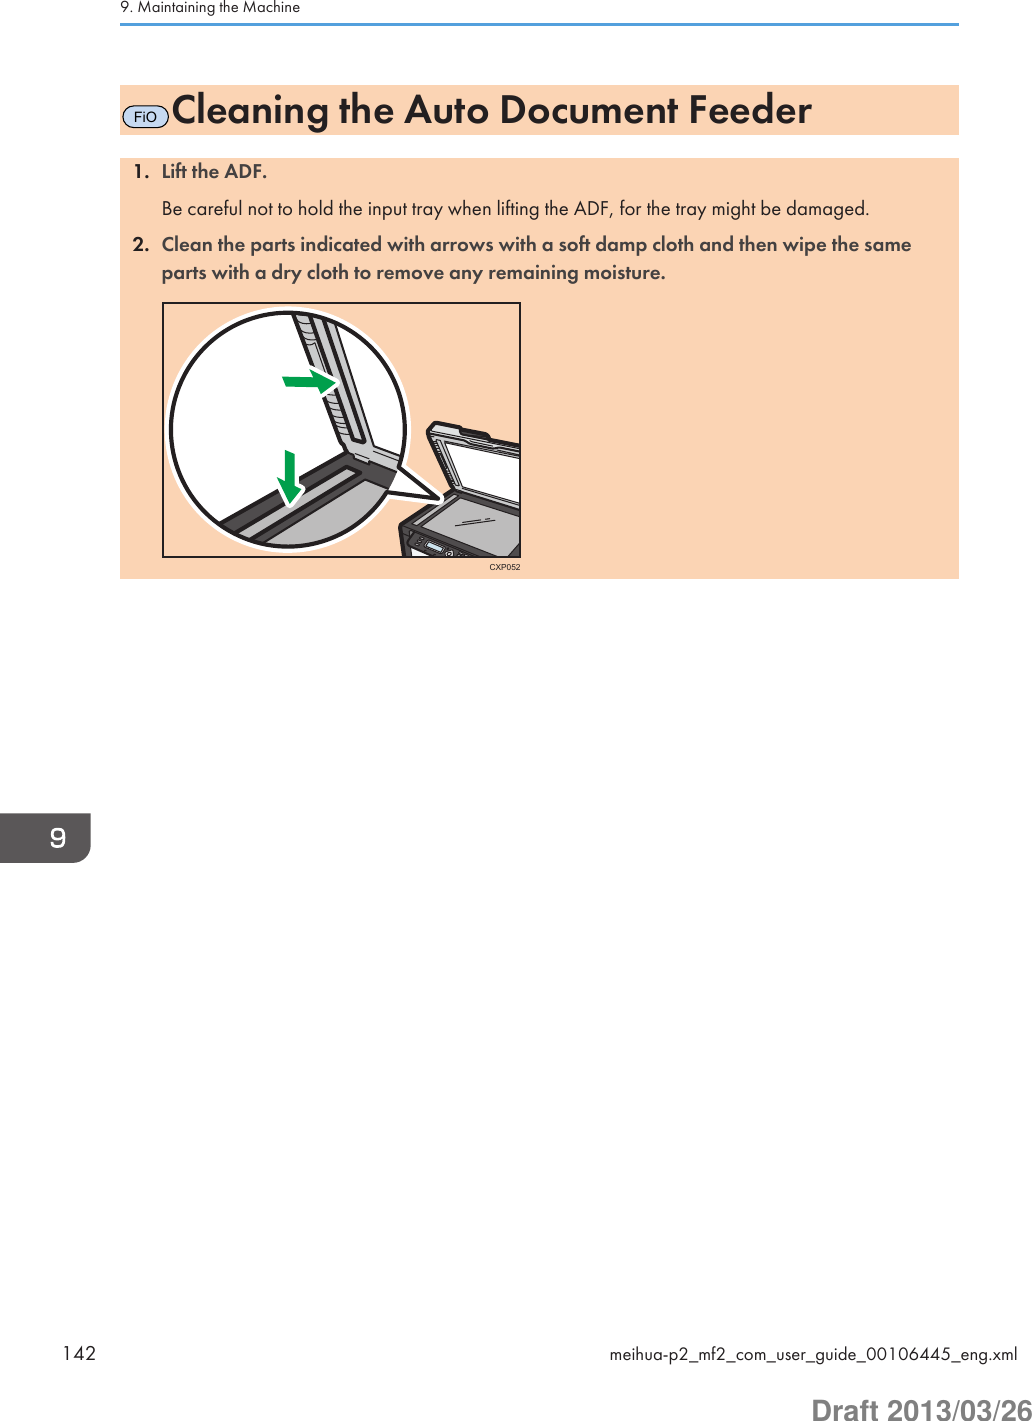
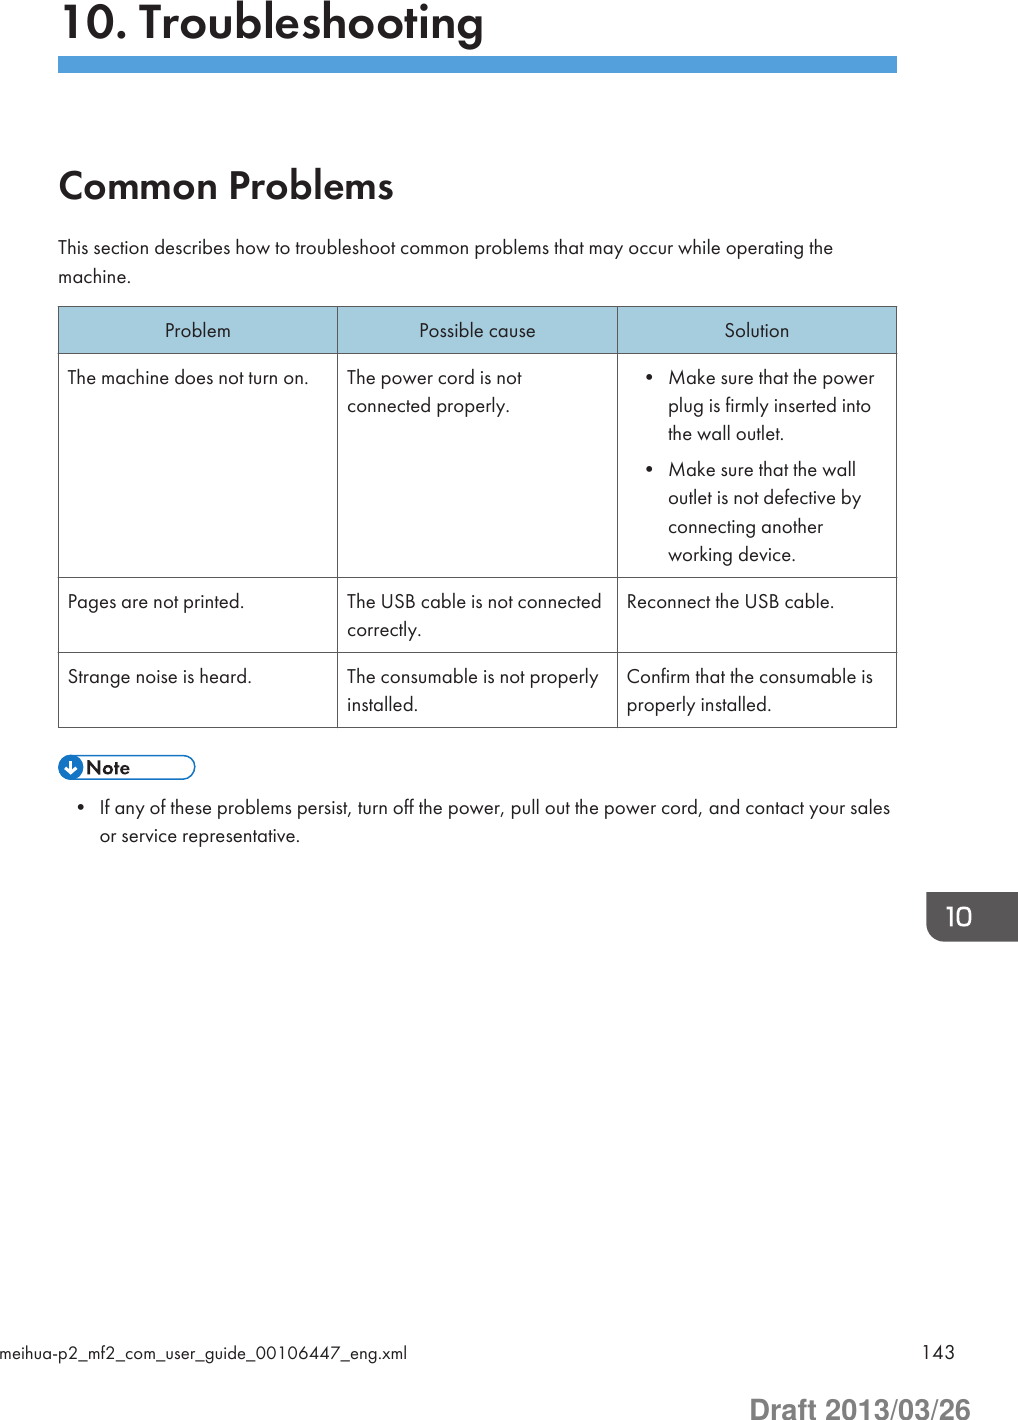
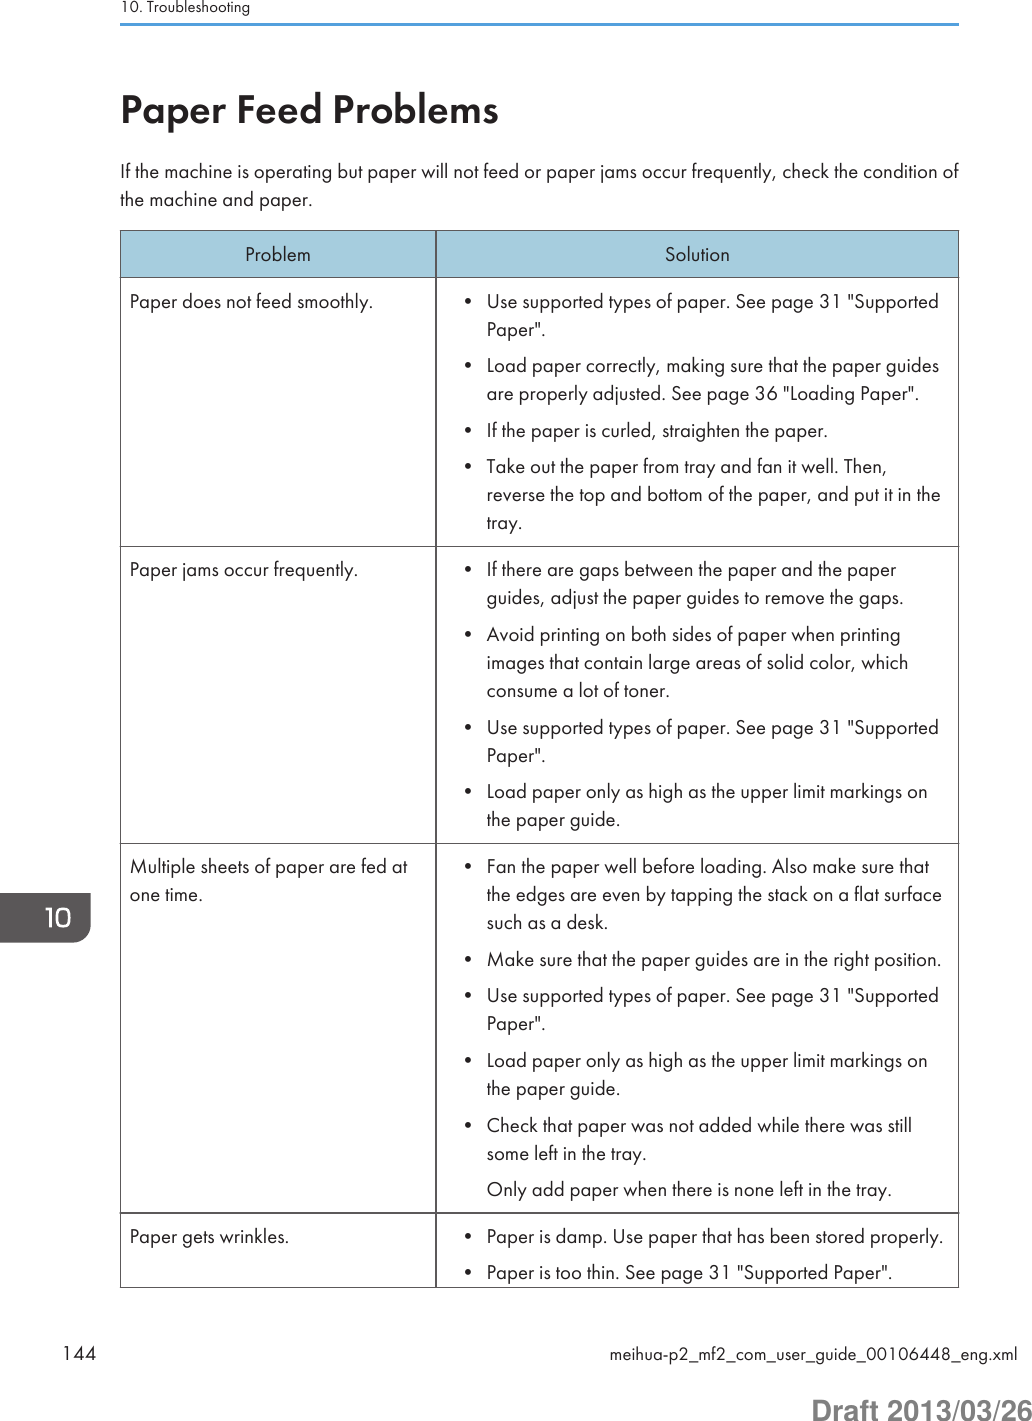
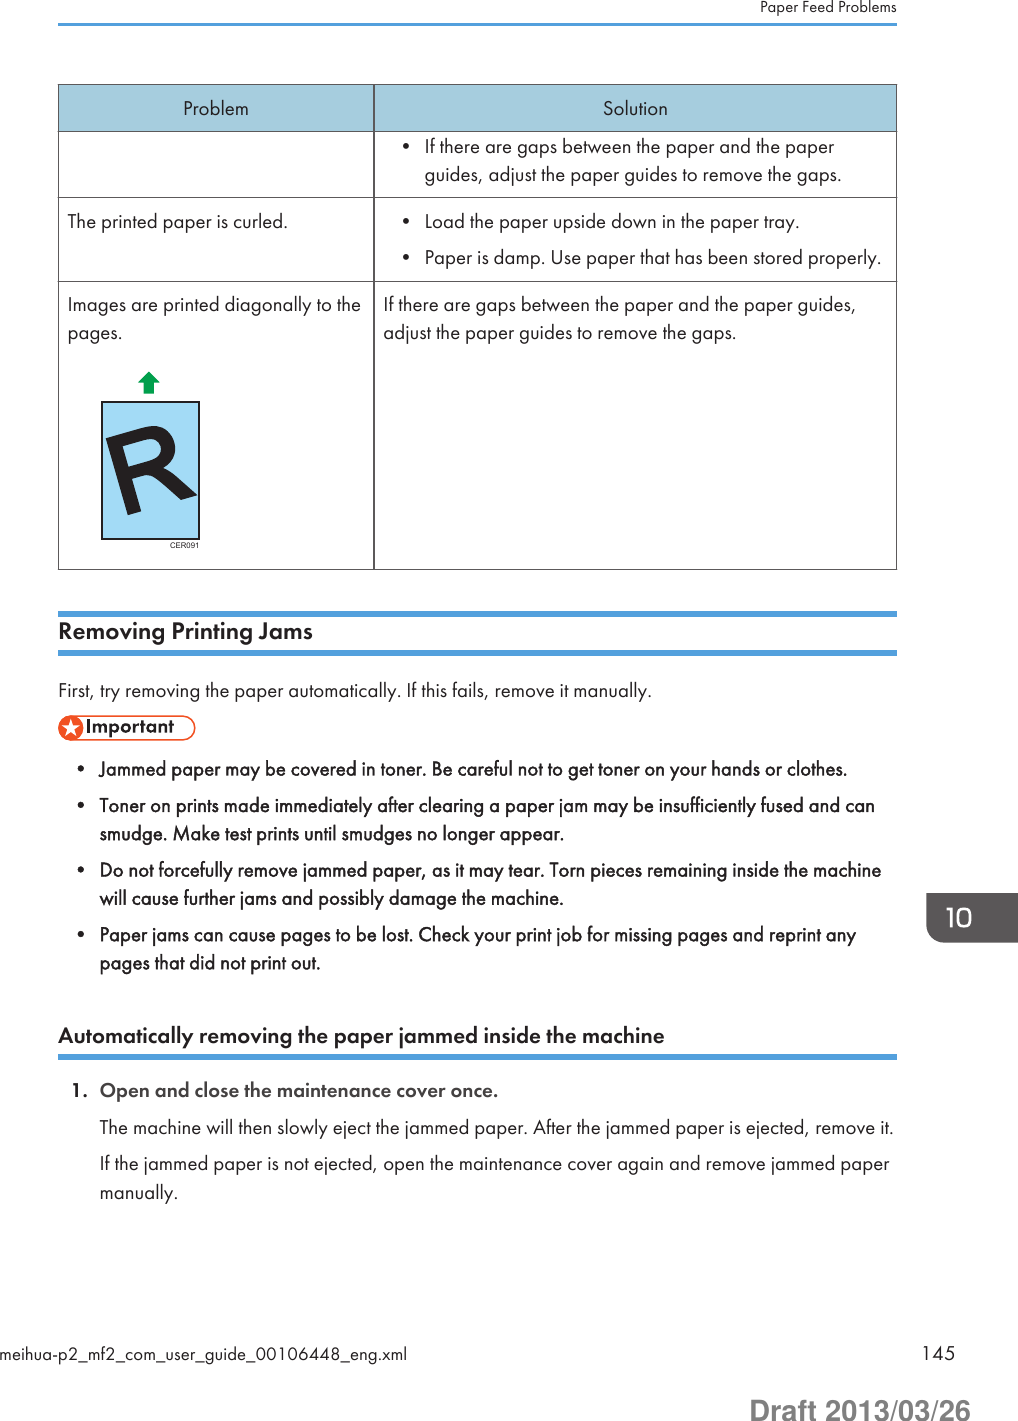
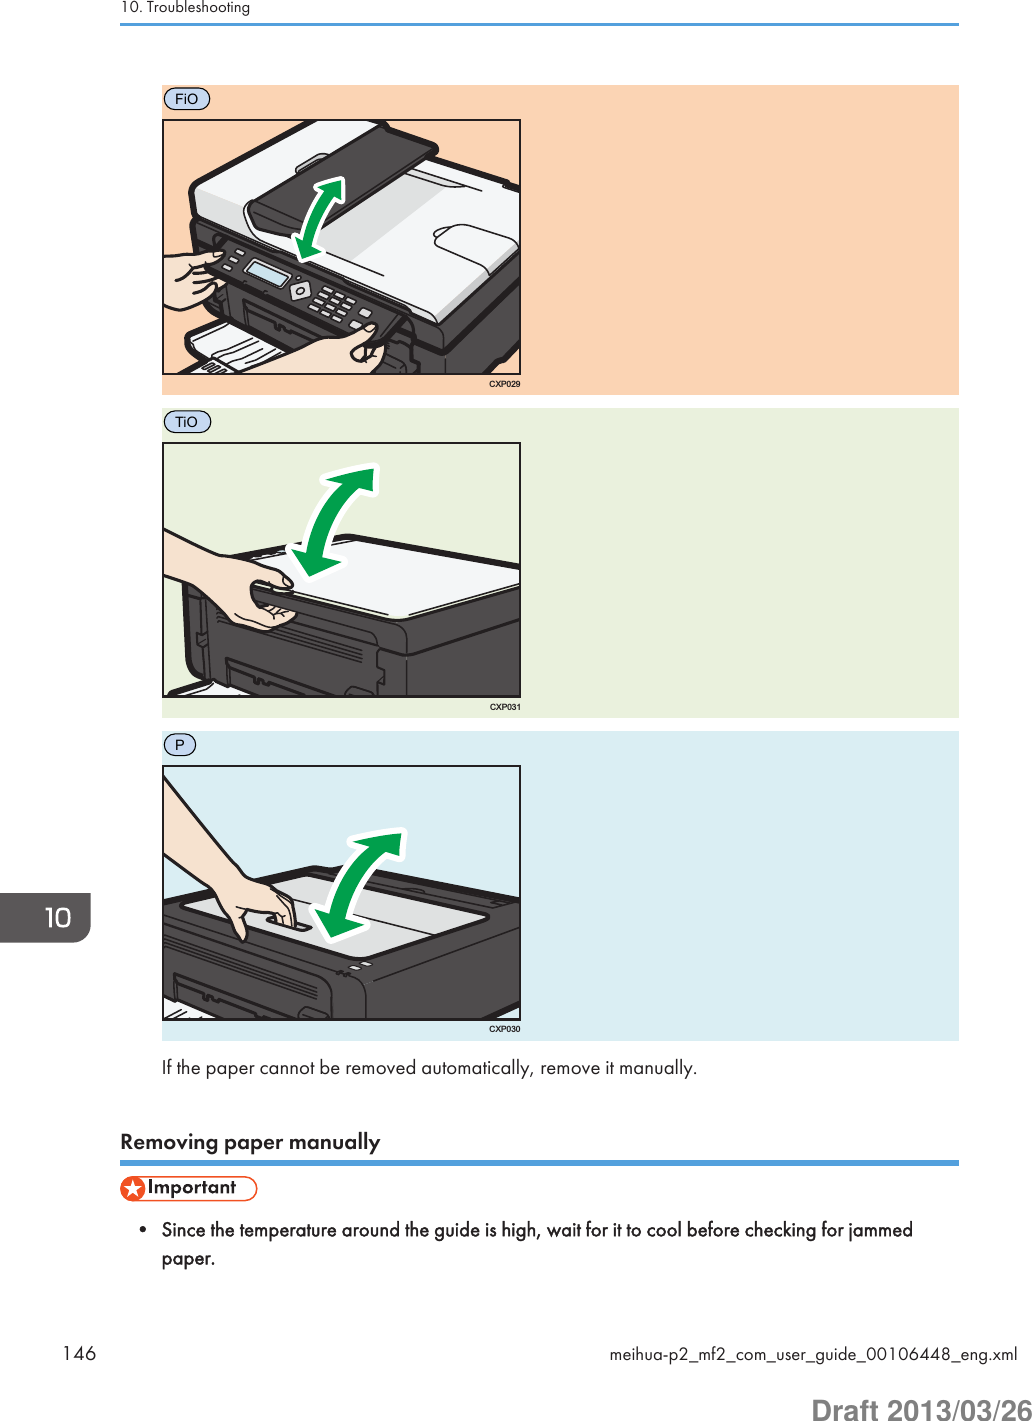
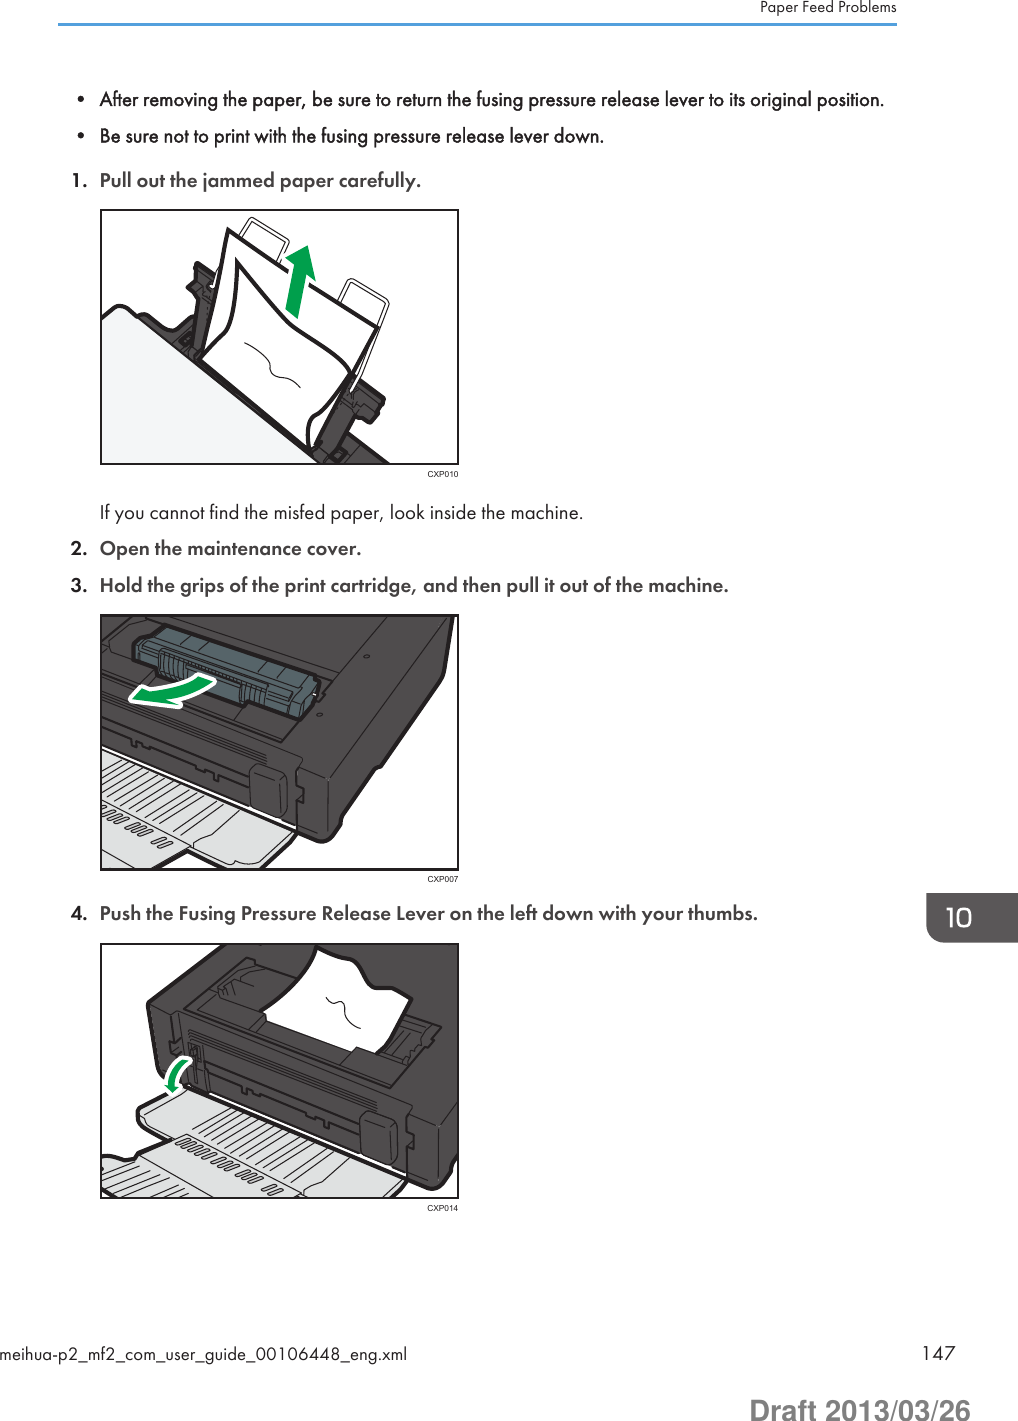
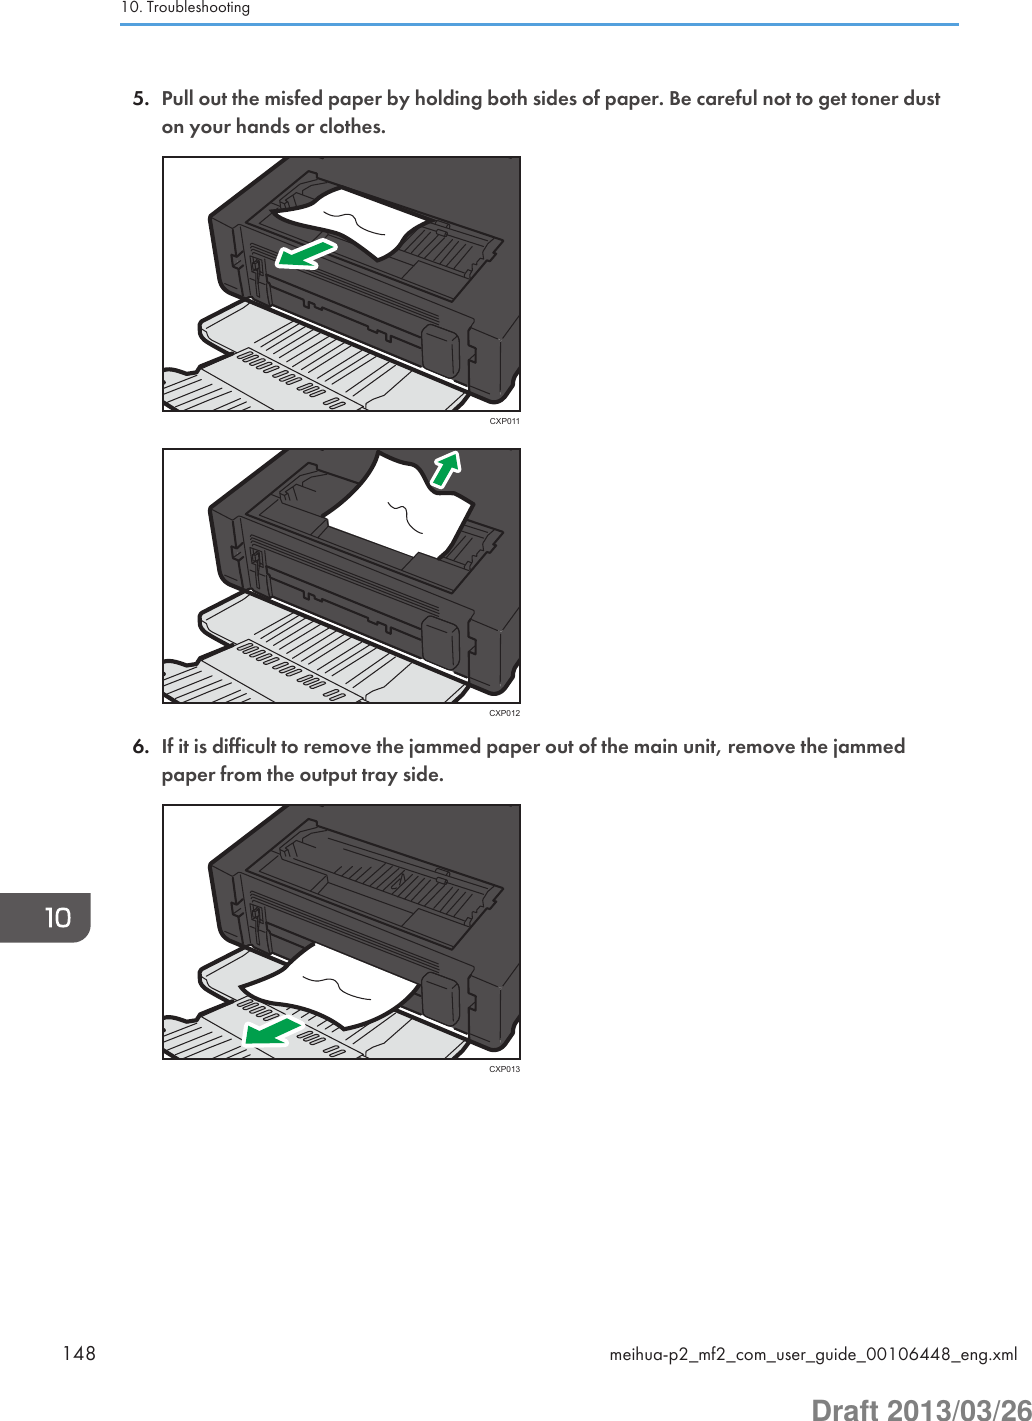
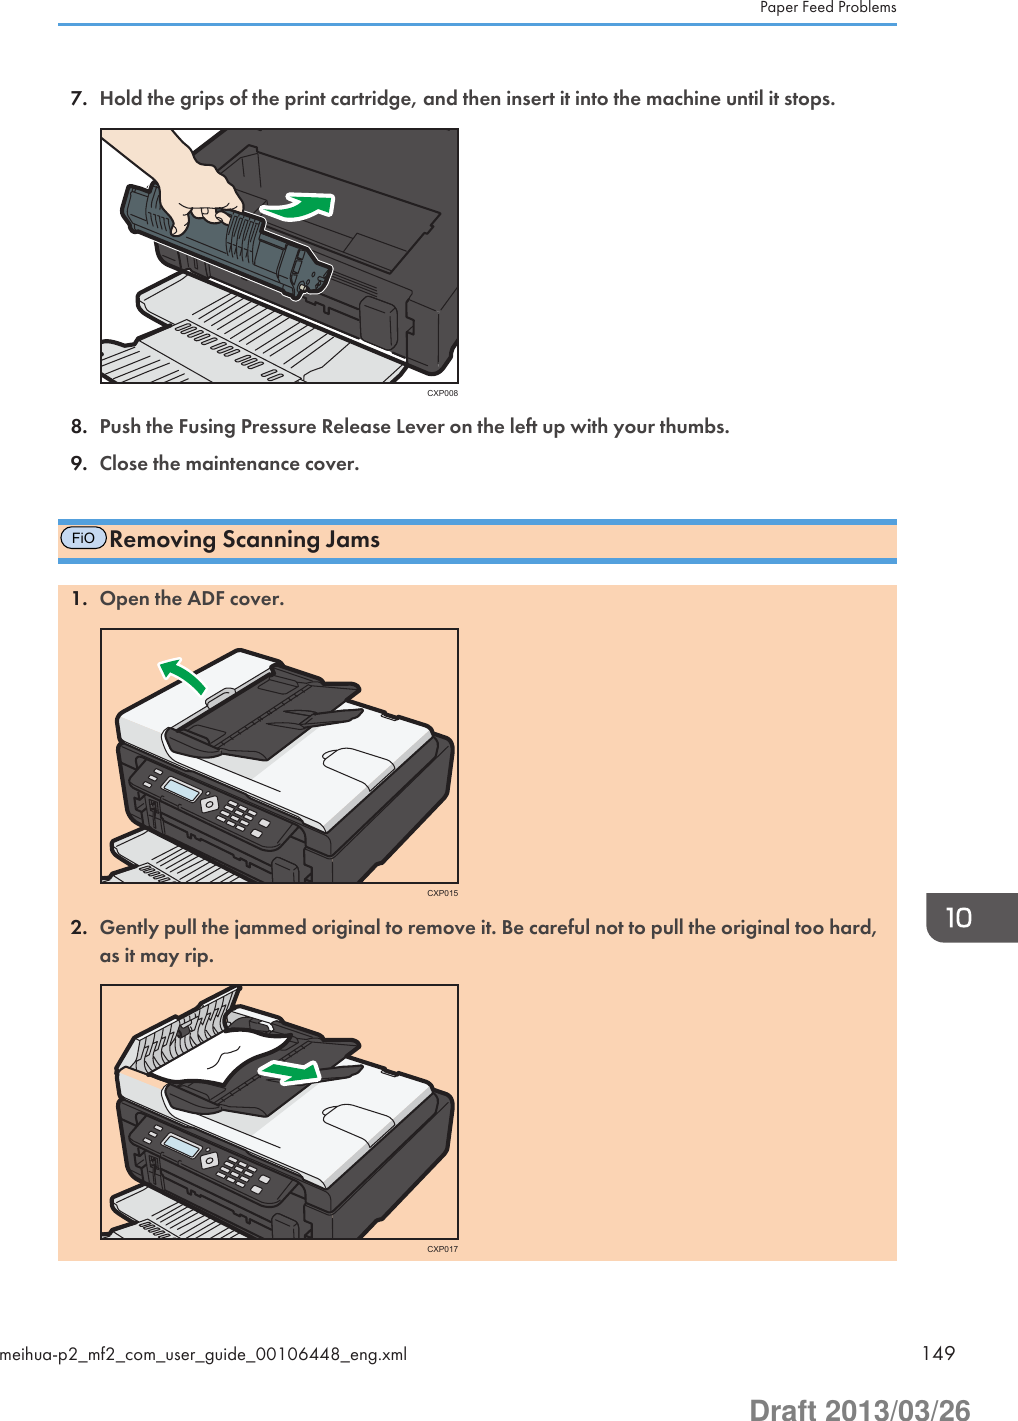
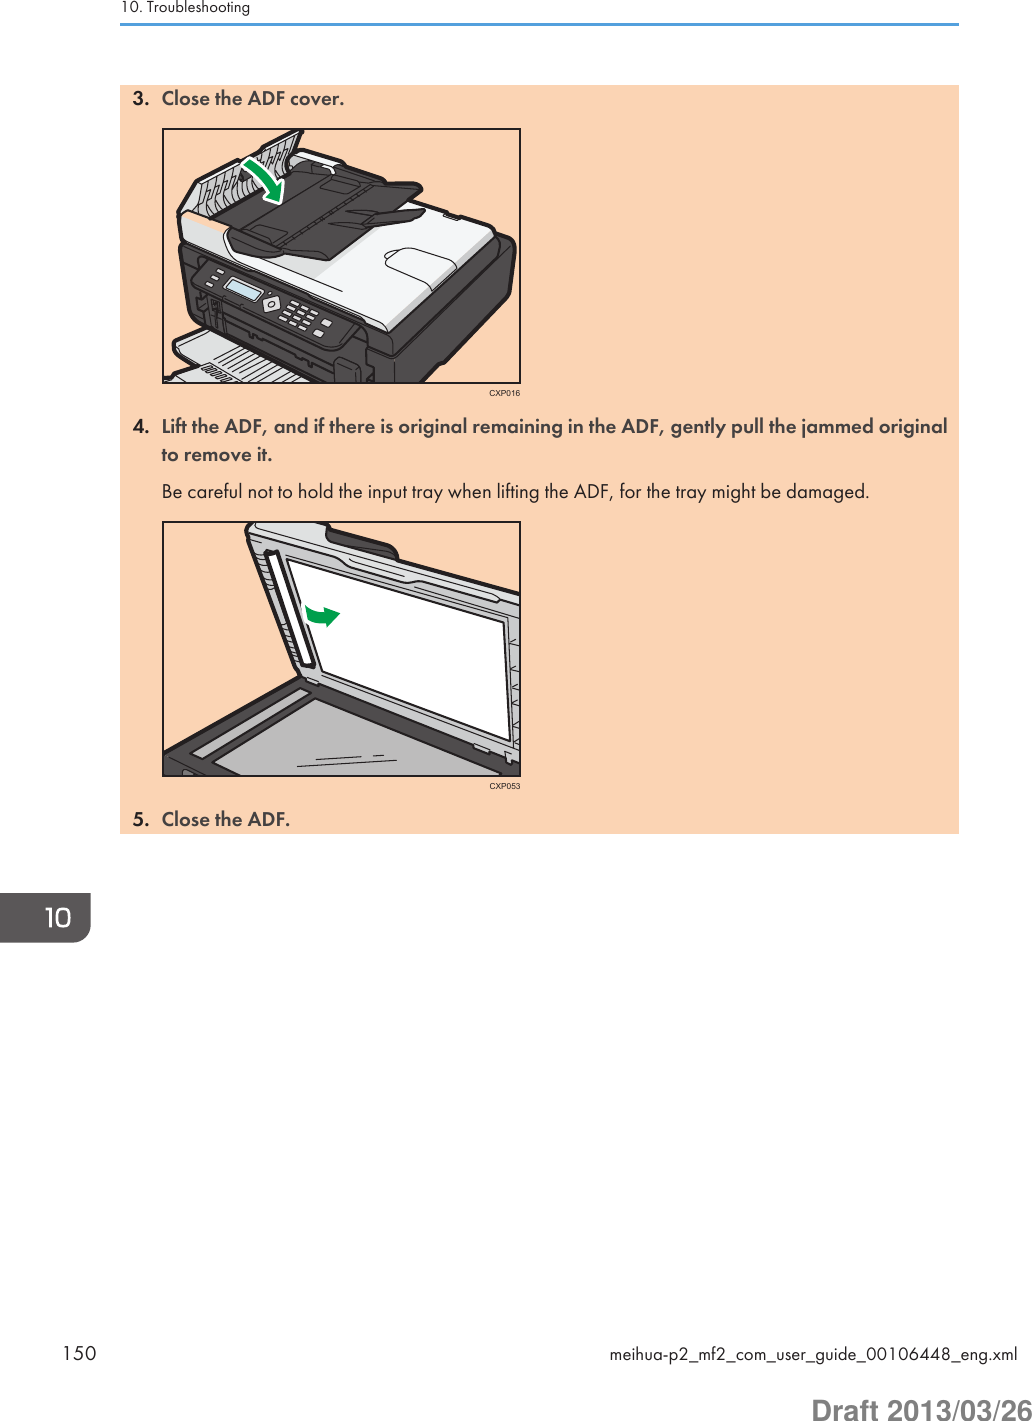
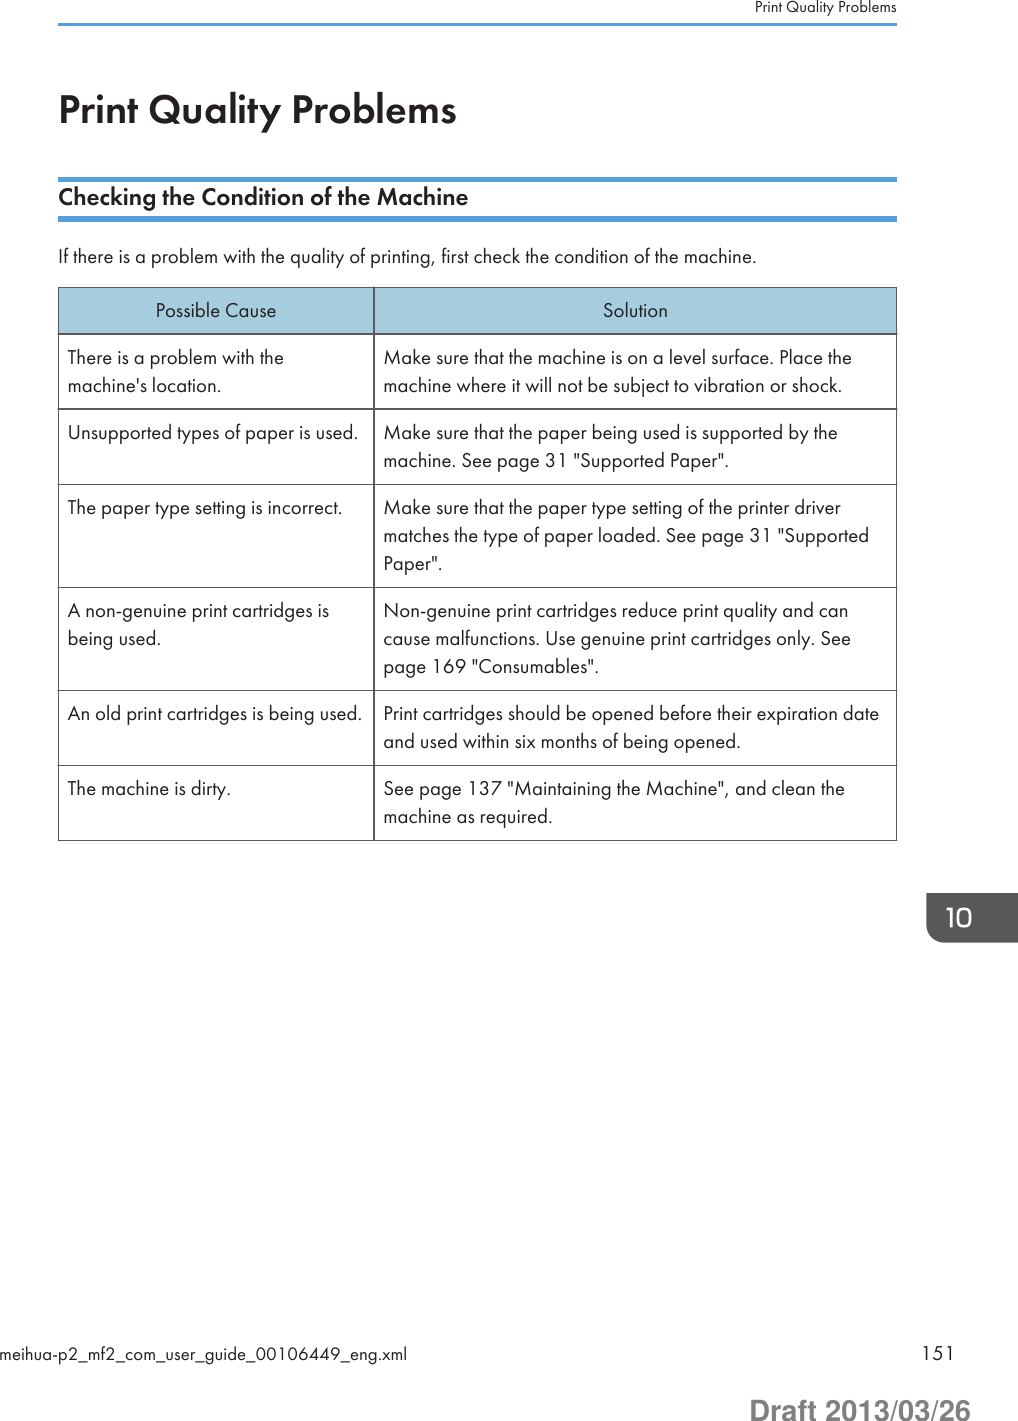
![Printer ProblemsProblem SolutionAn error occurs. If an error occurs when printing, change the computer orprinter driver settings.• Check the printer icon name does not exceed 32alphanumeric characters. If it does, shorten it.• Check whether other applications are operating.Close any other applications, as they may be interferingwith printing. If the problem is not resolved, closeunneeded processes too.• Check that the latest printer driver is being used.A print job is canceled. • Set I/O Timeout to a larger value than the currentsettings.There is considerable delay betweenthe print start command and actualprinting.• Processing time depends on data volume. High volumedata, such as graphics-heavy documents, take longer toprocess. Wait for a while.• To speed up printing, reduce the printing resolution usingthe printer driver.The whole printout is blurred. • Paper is damp. Use paper that has been stored properly.See page 31 "Supported Paper".• If you enable [Toner Save:], printing is generally lessdense.• Condensation may have collected. If rapid change intemperature or humidity occurs, use this machine onlyafter it has acclimatized.Cannot print properly when using acertain application, or cannot printimage data properly.Some characters are printed faintlyor not printed.• Change the print quality settings.The paper size setting does notmatch the paper loaded.Check whether the paper size specified on the machinematches that of the loaded paper.10. Troubleshooting152 meihua-p2_mf2_com_user_guide_00106450_eng.xmlDraft 2013/03/26](https://usermanual.wiki/Ricoh/MFSP112SF1.user-manual-2/User-Guide-1981979-Page-152.png)
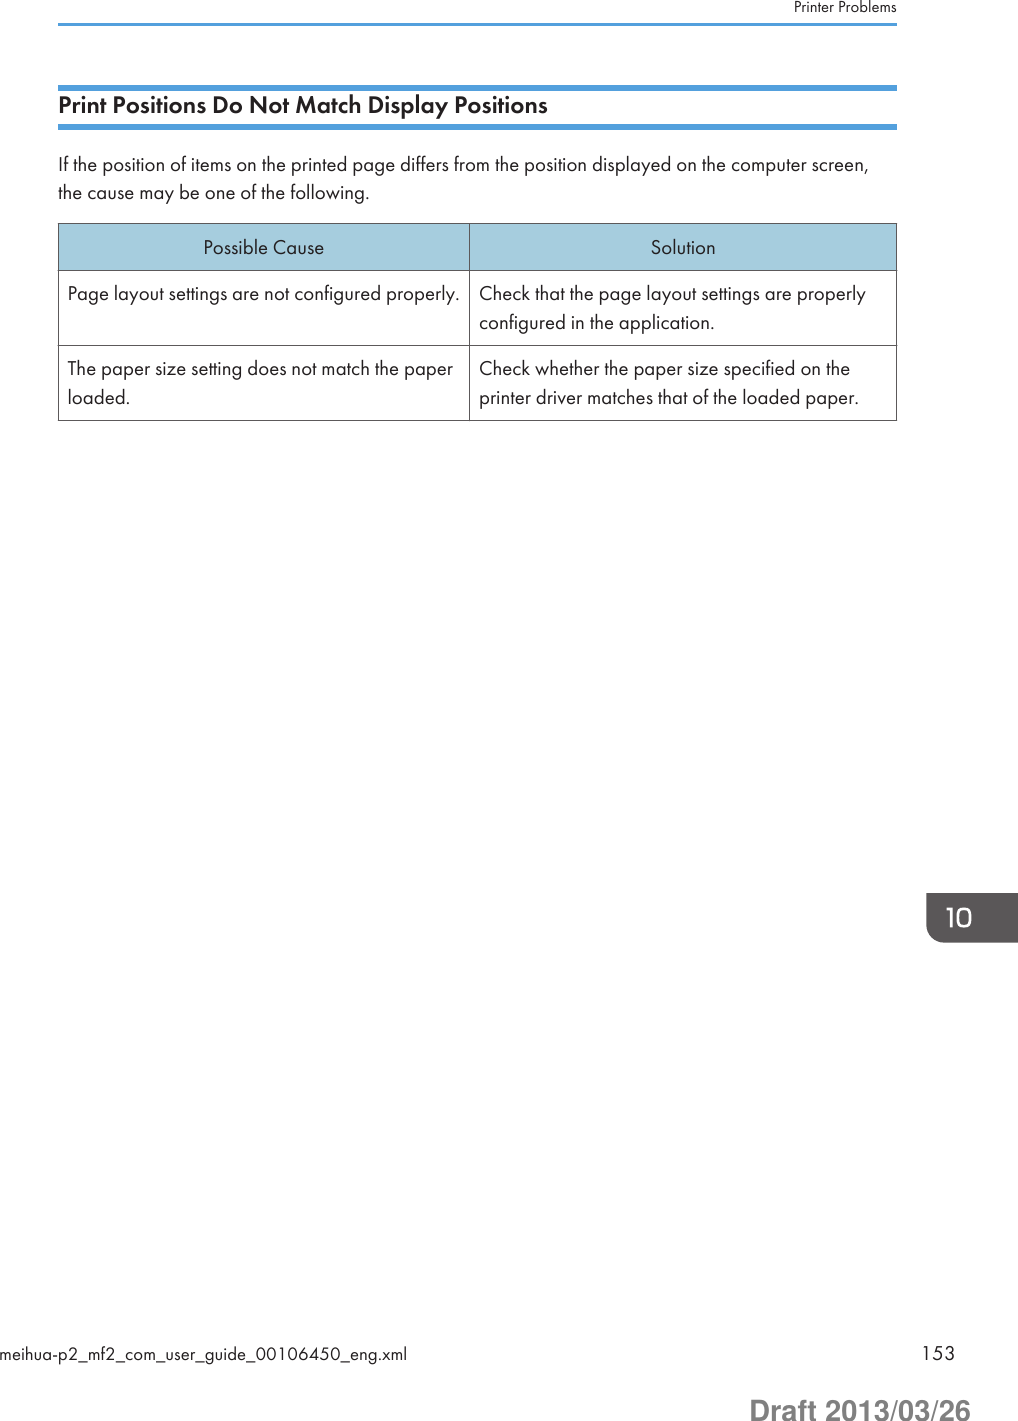
![FiO,TiOCopier ProblemsProblem SolutionPhotocopied paper is blank. The original was placed with the front and back reversed.See page 42 "Placing Originals".Copied pages are too dark or toolight.Adjust the image density.Copied pages do not look the sameas the originals.Select the correct scan mode according to the type of original.Black spots appear whenphotocopying a photographic print.The original may have stuck to the exposure glass due to highhumidity.Place the original on the exposure glass, and then place twoor three sheets of white paper on top of it. Leave the exposureglass cover open when copying.A moire pattern is produced. The original probably has heavily lined or dotted areas.Switching the setting for image quality between [Photo] and[Text/Photo] may eliminate the moire pattern.Photocopied paper is dirty. • Image density is too high.Adjust the image density.• Toner on the printed surface is not dry.Do not touch printed surfaces immediately after copying.Remove freshly printed sheets one by one, taking carenot to touch printed areas.• The scanning part is dirty.• Before placing originals on the exposure glass, makesure that toner or correction fluid is dry.When copying from the exposureglass, the print area of the copy isout of alignment with the original.Place the original copy side down, making sure that it isaligned to the rear left corner and pressed flat against theexposure glass.The paper size setting does notmatch the paper loaded.Check whether the paper size specified on the machinematches that of the loaded paper.10. Troubleshooting154 meihua-p2_mf2_com_user_guide_00106451_eng.xmlDraft 2013/03/26](https://usermanual.wiki/Ricoh/MFSP112SF1.user-manual-2/User-Guide-1981979-Page-154.png)
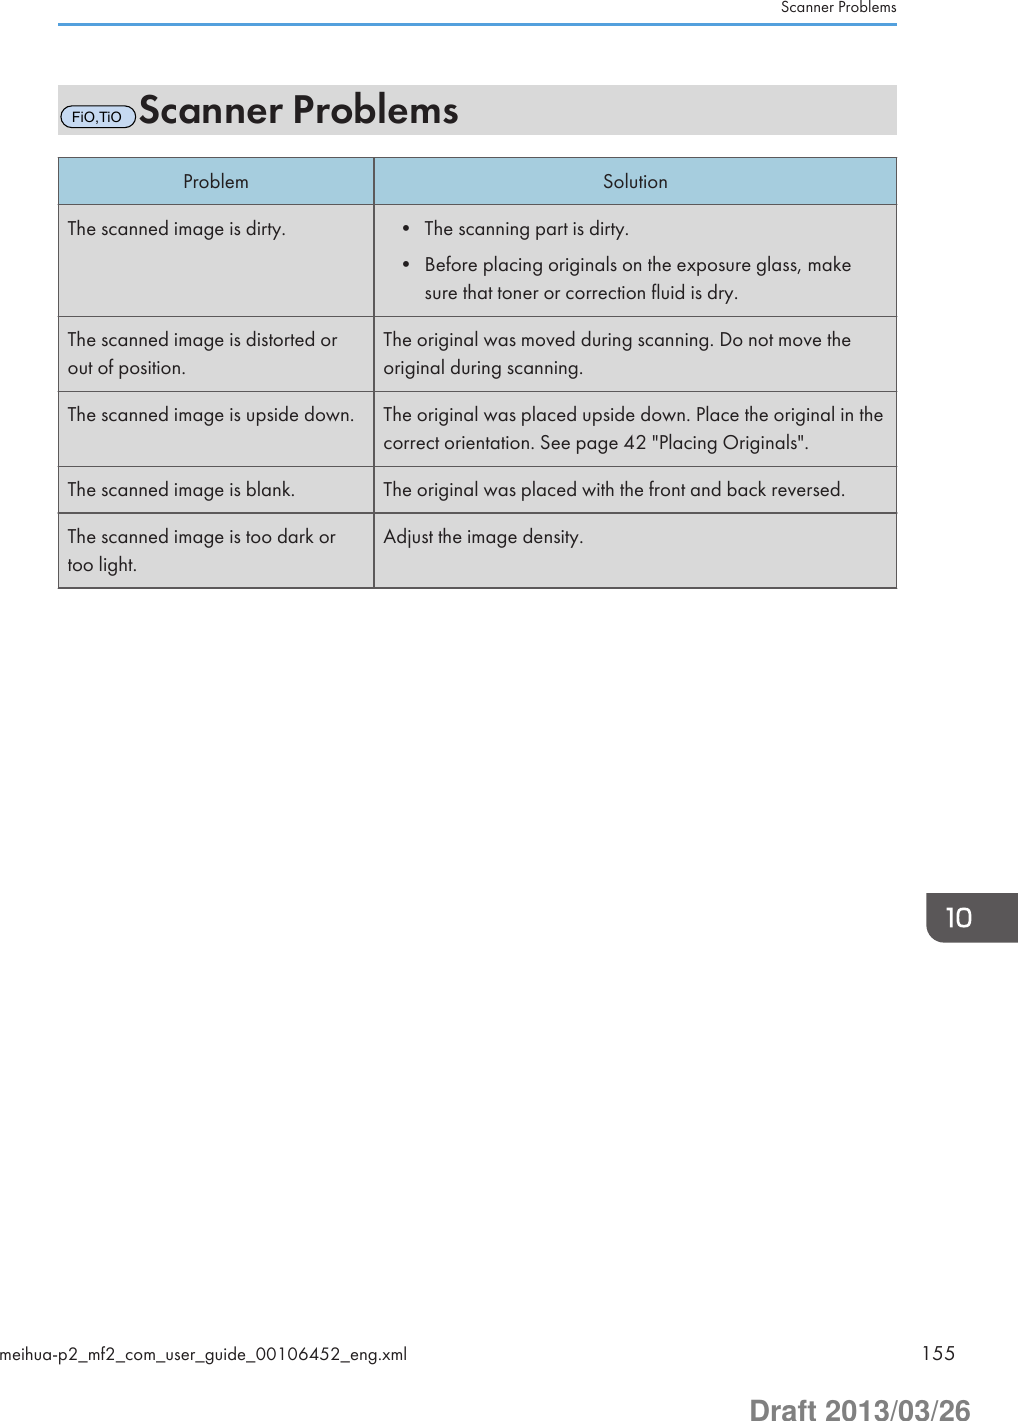
![FiOFax ProblemsWhen an error code appears on the fax journal or TX status reportThe table below describes the meaning of error codes that appear under "Status" on the fax journalor TX status report, and what to do when a particular error code appears."X" indicates a number in an error code that appear differently depending on a specific situation.Error Code SolutionErr:1) The line was not connected correctly. The fax transmissiondid not finish successfully. There was a problem with eitherthe transmission or reception.• Check that the telephone line is properly connected tothe machine.• Disconnect the telephone line from the machine, andconnect a standard telephone in its place. Check thatyou can make calls using the telephone. If you cannotmake calls this way, contact your telephone company.• If the problem persists, contact your sales or servicerepresentative.Dial tone could not be detected.• Set [Dial Tone Detect] to [Do not Detect].Err:2)Err:3)Err:4)Dial fails when trying to send faxes.• Confirm that the fax number you dialed is correct.• Confirm that the destination is a fax machine.• Confirm that the line is not busy.• You may need to insert a pause between dial digits.Press the [ID Card Copy/On Hook Dial] key after, forexample, the area code.• Confirm that [PSTN / PBX] under [Fax Features] is setproperly for your connection method to the telephonenetwork. See page 111 "Fax Features Settings".Err:5) The [Clear/Stop] key has been pressed while transmitting/receiving faxes. Send the fax again. When the errorreoccurs even if the [Clear/Stop] key has not pressed,consult your service representative.10. Troubleshooting156 meihua-p2_mf2_com_user_guide_00106453_eng.xmlDraft 2013/03/26](https://usermanual.wiki/Ricoh/MFSP112SF1.user-manual-2/User-Guide-1981979-Page-156.png)
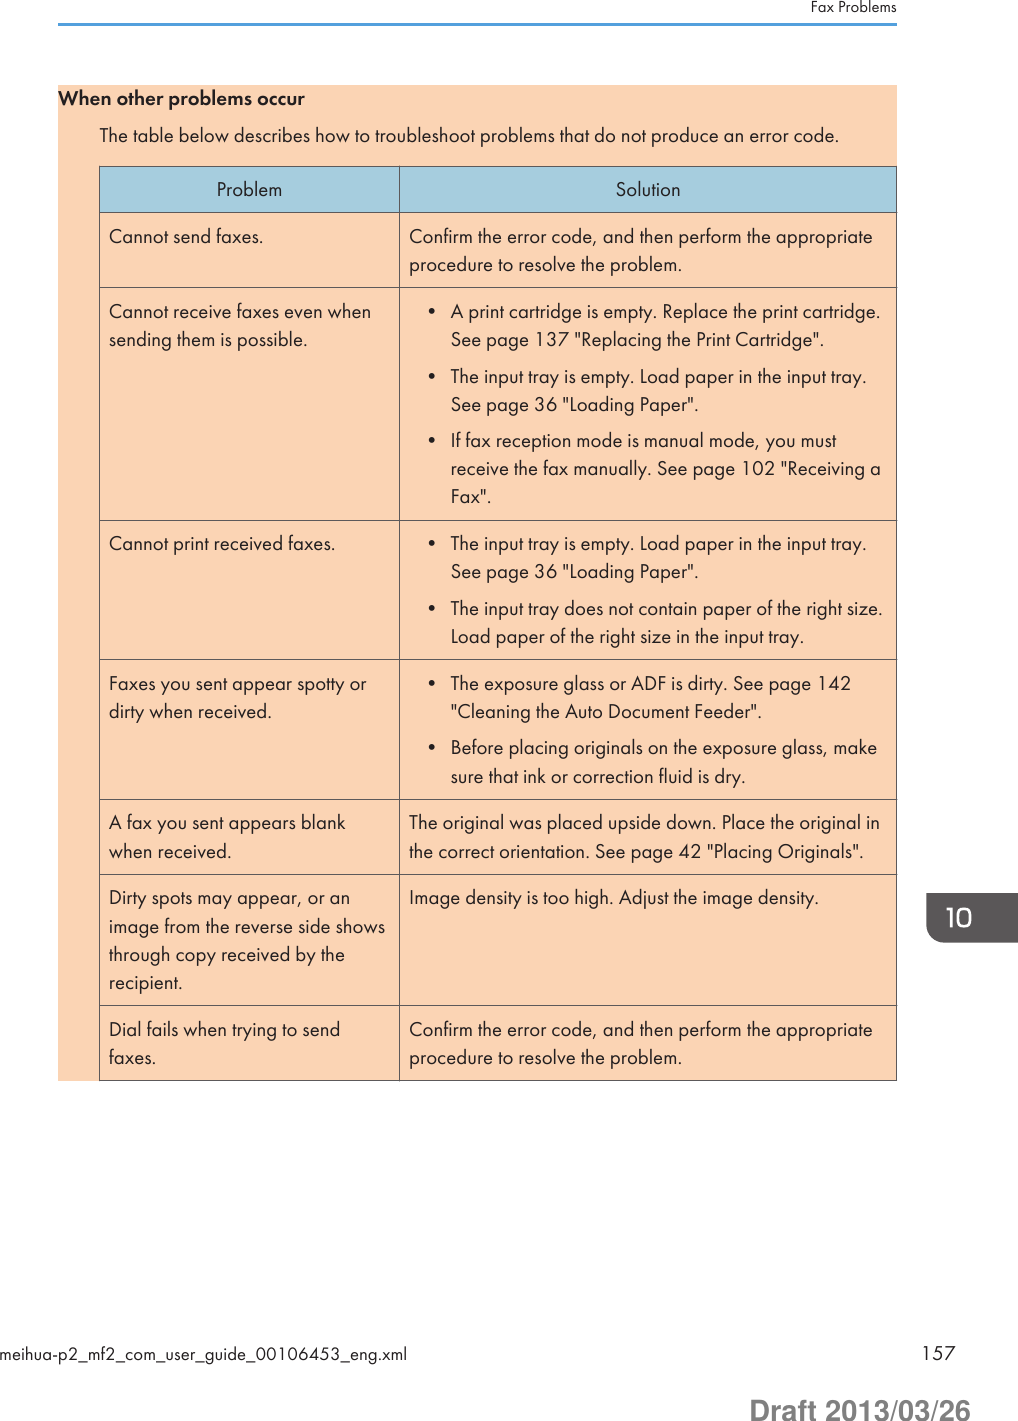
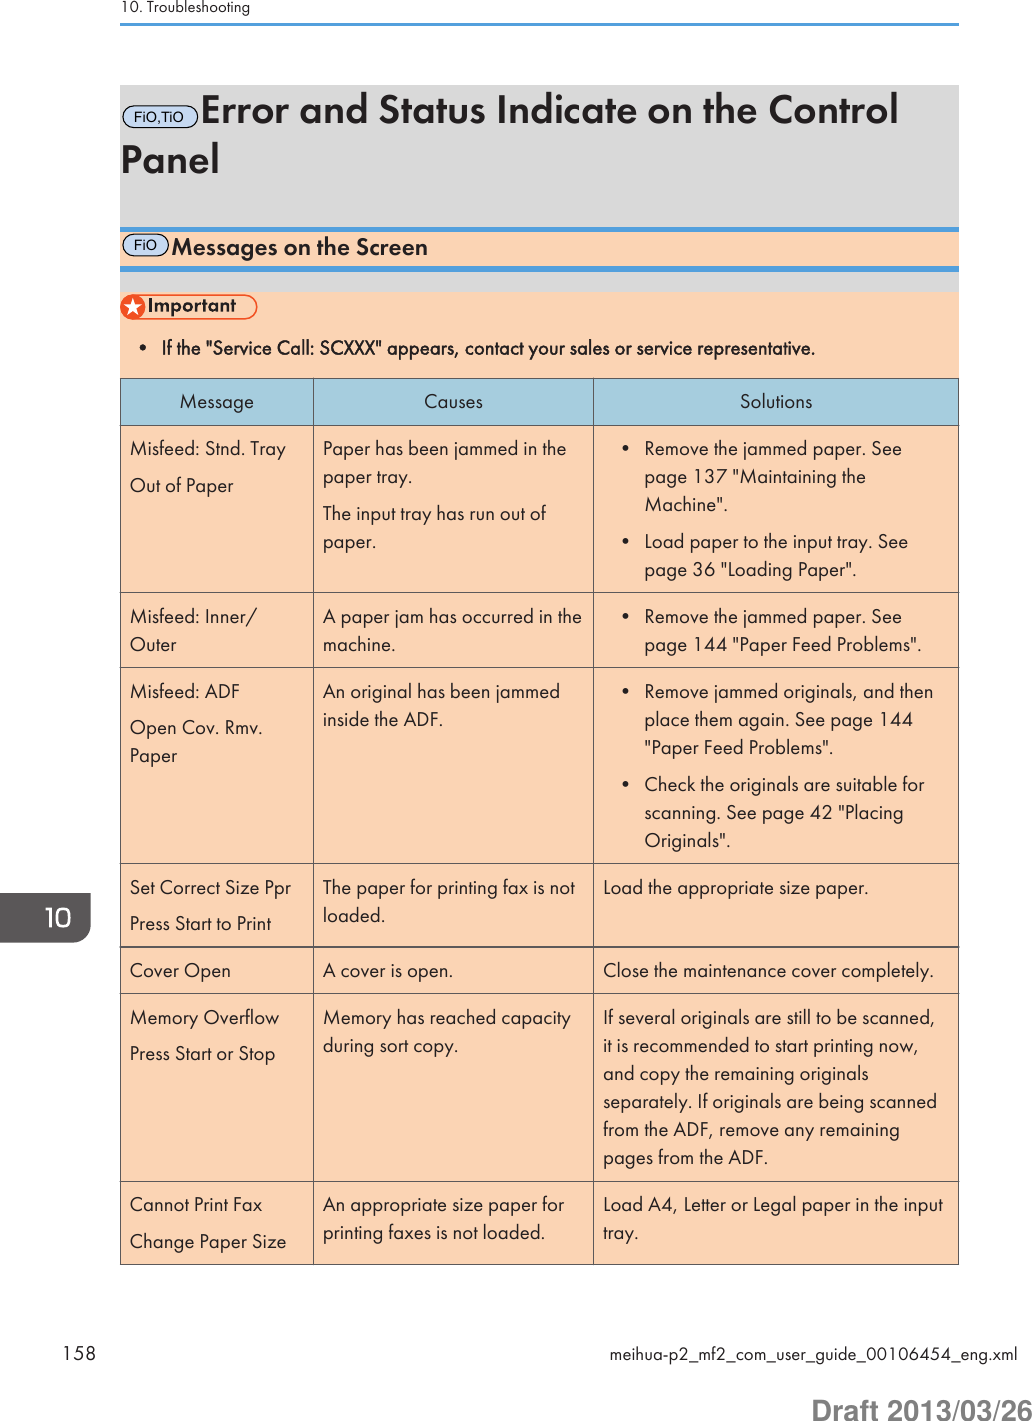
![Message Causes SolutionsCannot Print ReportChange Paper SizeAn appropriate size paper forprinting Report is not loaded.Load the appropriate size paper.Not SetPrint CartridgeThe print cartridge has not beeninstalled.Reinstall the print cartridge. See page 137"Replacing the Print Cartridge".Out of TonerPrint CartridgeThe machine has run out of thetoner.Replace the print cartridge. See page 137"Replacing the Print Cartridge".Toner Almost EmptyPrint CartridgeThe print cartridge is almostempty.Prepare a new print cartridge.Cannot PrintOpen Front CoverFront cover is closed. Open the front cover completely.On Hook The machine has been off-hookfor an extended period of time.Replace the handset.Connection Failed The line could not be connectedcorrectly.• Check that the telephone line isproperly connected to the machine.• Disconnect the telephone line fromthe machine, and connect a standardtelephone in its place. Check that youcan make calls using the telephone. Ifyou cannot make calls this way,contact your telephone company.Dial Failed The fax could not be sent. • Confirm that the fax number youdialed is correct.• Confirm that the destination is a faxmachine.• Confirm that the line is not busy.• You may need to insert a pausebetween dial digits. Press the [IDCard Copy/On Hook Dial] key after,for example, the area code.TX Comm. Error A transmission error occurred,and the fax could not betransmitted correctly.• If the [Auto Redial] setting is enabled,the machine will redial the numberand try again. If all attempts fail, or ifthe machine is in ImmediateError and Status Indicate on the Control Panelmeihua-p2_mf2_com_user_guide_00106454_eng.xml 159Draft 2013/03/26](https://usermanual.wiki/Ricoh/MFSP112SF1.user-manual-2/User-Guide-1981979-Page-159.png)
![Message Causes SolutionsTransmission mode, the fax will notbe transmitted. Try the operationagain.RX Comm. Error A reception error occurred, andthe fax could not be receivedcorrectly.• If possible, contact the sender of thefax and ask them to resend it.Memory Overflow1: TX 2: Cancel• If this occurs on the firstpage:The machine's memoryreached capacity whilestoring a fax in memorybefore transmission.• If this occurs on the secondor a later page:Memory has reachedcapacity while scanningthe second or later pagesof the original when tryingto send a fax in MemoryTransmission mode.• If this occurs on the first page:Resend the fax in parts as severalsmaller individual faxes, or send at alower resolution.• If this occurs on the second or a laterpage:Press the [1] key (TX) to send only thepages that have been scanned inmemory, or press the [2] key(Cancel) to cancel.RX MemoryOverflowThe memory has become full orthe maximum number ofreceivable files has beenreached during fax reception.• The received fax was too large. Askthe sender to resend the document inparts as several smaller individualfaxes, or to send at a lowerresolution.• If an error has occurred because of aproblem such as lack of paper, paperjamming, or toner running out, correctthe problem, and then finish printingthe outstanding files.• If there is a file waiting to be sent,complete the transmission or deletethe file.Memory Data Lost Data in the memory was deleteddue to a memory fault.The machine prints Power Failure Reportand recovers from the error automatically.10. Troubleshooting160 meihua-p2_mf2_com_user_guide_00106454_eng.xmlDraft 2013/03/26](https://usermanual.wiki/Ricoh/MFSP112SF1.user-manual-2/User-Guide-1981979-Page-160.png)
![Message Causes SolutionsCancel PrintingI/O TimeoutThe timeout period set in [I/OTimeout] expires when printingis frequently interrupted by datafrom other ports, or when theprint job is large and takes timefor processing.Set [I/O Timeout] to a larger value thanthe current setting. For details, seepage 125 "Printer Features Settings".Cannot PrintMemory OverflowThe data is too large orcomplex to print.Select [600 x 600 dpi] in [Resolution] toreduce the size of data. For details, see thePrinter Driver Help.Paper Size MismatchPress Start or StopThe paper size set for thedocument differs from the size ofthe paper.Press the [Start] key to begin printing, orpress the [Clear/Stop] key to cancel thejob.If [Auto Continue] is set to [0 sec.], no errormessage appears.Paper TypeMismatchPress Start or StopThe paper type set for thedocument differs from the typeof the paper.Press the [Start] key to begin printing, orpress the [Clear/Stop] key to cancel thejob.If [Auto Continue] is set to [0 sec.], no errormessage appears.Scan USB Disconnect The USB cable wasdisconnected while scanningfrom a computer.Reconnect the USB cable properly, andthen try the operation again.Fax Job MemoryOverThe number of fax jobs inmemory has reached the limit,so new jobs cannot be stored.Wait until pending jobs have beentransmitted or printed.No Destination • No destination isregistered in the selectedSpeed Dial.• You have attempted toredial, but there is no anyredial data (history).Enter the fax number manually.Numbers Do notMatch"Fax No. Confirmation" is set to"On", and the numbers enteredfor confirmation does not matchthe initially-entered numbers.Make sure the numbers match.Error and Status Indicate on the Control Panelmeihua-p2_mf2_com_user_guide_00106454_eng.xml 161Draft 2013/03/26](https://usermanual.wiki/Ricoh/MFSP112SF1.user-manual-2/User-Guide-1981979-Page-161.png)
![Message Causes SolutionsCannot CopyChange Paper SizeThe paper for combine copy,duplex copy or ID Card copy isnot loaded.Load the appropriate size paper.TiOCodes on the Screen• If "C", or "c" appears, contact your sales or service representative.Code Causes SolutionsE0 A paper jam has occurred in themachine.• Remove the jammed paper. Seepage 144 "Paper Feed Problems".E1 Paper has been jammed in the papertray.The input tray has run out of paper.• Remove the jammed paper. Seepage 144 "Paper Feed Problems".• Load paper to the input tray. Seepage 36 "Loading Paper".E3 A maintenance cover is open. Close the maintenance cover completely.E4 Front cover is closed. Open the front cover completely.E5 An appropriate size paper for printingReport is not loaded.Load the appropriate size paper.E6 The print cartridge has not beeninstalled.Reinstall the print cartridge. See page 137"Replacing the Print Cartridge".E7 The machine has run out of the toner. Replace the print cartridge. See page 137"Replacing the Print Cartridge".E8 The print cartridge is almost empty. Prepare a new print cartridge.E9 An appropriate size paper for makingcopies is not loaded.Load the appropriate size paper.P1 The paper size set for the documentdiffers from the size of the paper.Press the [Start] key to begin printing, or pressthe [Stop/Clear] key to cancel the job.If [Auto Continue:] is set to [0 sec], no errormessage appears.10. Troubleshooting162 meihua-p2_mf2_com_user_guide_00106454_eng.xmlDraft 2013/03/26](https://usermanual.wiki/Ricoh/MFSP112SF1.user-manual-2/User-Guide-1981979-Page-162.png)
![Code Causes SolutionsP2 The paper type set for the documentdiffers from the type of the paper.Press the [Start] key to begin printing, or pressthe [Stop/Clear] key to cancel the job.If [Auto Continue:] is set to [0 sec], no errormessage appears.Error and Status Indicate on the Control Panelmeihua-p2_mf2_com_user_guide_00106454_eng.xml 163Draft 2013/03/26](https://usermanual.wiki/Ricoh/MFSP112SF1.user-manual-2/User-Guide-1981979-Page-163.png)
![Error and Status Messages Appear on theSmart Organizing MonitorMessage Causes SolutionsPrinter Power Off(CommunicationError)• The power cable of themachine is not plugged in.• The power of the machineis not turned ON.• The USB cable is notconnected.• Check the printer power cord.• Check the printer power switch is on.• Check the USB cable is properlyconnected.Out of Paper /MisfeedPaper is not loaded in themachine's input tray, or paperjam has occurred.If paper is not loaded, load paper in theinput tray. For details about loadingpaper, see page 36 "Loading Paper".If paper is jammed inside the machine,remove the jammed paper. For detailsabout removing jammed paper, seepage 144 "Paper Feed Problems".Paper Size Mismatch The paper size specified on themachine and the size specifiedin the printer driver do notmatch.For details about specifying the paper sizesetting on the machine, see page 36"Loading Paper". For details aboutchanging the paper size setting in theprinter driver, see the printer driver Help.Tio,PIf [Auto Continue:] is set to [0 sec],no error message appears.Paper TypeMismatchThe paper type specified on themachine and the type specifiedin the printer driver do notmatch.For details about changing the paper typesetting of the machine, see page 36"Loading Paper". For details aboutchanging the paper type setting in theprinter driver, see the printer driver Help.Tio,PIf [Auto Continue:] is set to [0 sec],no error message appears.TiO,PToner AlmostEmptyTiO,PToner Almost EmptyTiO,PPrepare a new print cartridge.TiO,POut of TonerTiO,POut of TonerTiO,PReplace the print cartridge. Seepage 137 "Replacing the Print Cartridge".10. Troubleshooting164 meihua-p2_mf2_com_user_guide_00106455_eng.xmlDraft 2013/03/26](https://usermanual.wiki/Ricoh/MFSP112SF1.user-manual-2/User-Guide-1981979-Page-164.png)
![Message Causes SolutionsMemory Overflow The data is too large orcomplex to print.Select [600 x 600 dpi] in [Resolution:] toreduce the size of data. For details, see theprinter driver Help.Print Cartridge NotDetectedThe print cartridge has not beeninstalled.Reinstall the print cartridge. See page 137"Replacing the Print Cartridge".FiOMessages of the Print CartridgeFiOMessage Causes SolutionsToner Almost Empty The print cartridge is almostempty.Prepare a new print cartridge.Out of Toner The machine has run out of thetoner.Replace the print cartridge. Seepage 137 "Replacing the PrintCartridge".Error and Status Messages Appear on the Smart Organizing Monitormeihua-p2_mf2_com_user_guide_00106455_eng.xml 165Draft 2013/03/26](https://usermanual.wiki/Ricoh/MFSP112SF1.user-manual-2/User-Guide-1981979-Page-165.png)
![FiOError and Status Messages Appear in the PCFAX WindowMessage Causes SolutionsPC FAX has alreadybeen launched.Cannot launch itagain.The [PC FAX] dialog box isalready open.Quit PC FAX once, and then start it upagain.Reached maximumnumber ofdestinations.The number of destinationsspecified exceeds the maximumpossible.The maximum number of destinations thatcan be specified at one time is 100.When the setting"Attach a CoverSheet" is on and "UseAddress Book" isselected, themaximum number ofdestinations cannotbe larger than 5.If [Attach a Cover Sheet] on the[Cover Sheet] tab is selectedand [Use Address Book] in the[To:] list are selected, you cansend faxes to up to fivedestinations at a time.• Specify five or less destinations.• Change the item selected in the [To:]list to something other than [UseAddress Book].• Clear [Attach a Cover Sheet].Cannot send morethan 10 pages.You can send up to ten pagesincluding the cover sheet, at atime.Reduce the number of pages to ten orfewer.10. Troubleshooting166 meihua-p2_mf2_com_user_guide_00106456_eng.xmlDraft 2013/03/26](https://usermanual.wiki/Ricoh/MFSP112SF1.user-manual-2/User-Guide-1981979-Page-166.png)
![11. AppendixNotes About the Toner• Proper operation cannot be guaranteed if any third-party toner is used.• Depending on printing conditions, there are cases where the printer cannot print the number ofsheets indicated in the specifications.•TiOReplace the print cartridge if the printed image suddenly becomes pale or blurred.•PReplace the print cartridge if the printed image suddenly becomes pale or blurred.•FiOWhen operating the machine for the first time, use the print cartridge supplied with thismachine. If this cartridge is not initially used, the following problems may occur:•FiO"Out of Toner" will be displayed before the toner runs out.•FiO"Out of Toner" will not be displayed when the toner runs out, but instead the printedimage suddenly becomes pale or blurred.•FiOTo continue printing after "Out of Toner" is displayed, set [Toner End Option] to [ContinuePrinting]. However, since any trouble caused by using this setup is outside of the scope of themanufacturer's warranty, this setup should be used with care. For details about [Toner End Option],see page 118 "System Settings".•FiOIf [Toner End Option] is first set to [Continue Printing] and then to [Stop Printing], be sure touse a new print cartridge. If a used print cartridge is installed, there will be a discrepancy betweenthe remaining toner level displayed and the actual remaining toner, and accordingly, "Out ofToner" will not be displayed at the appropriate timing.•FiOThe lifetime of the photo conductor, which is built into the print cartridge, is taken intoaccount in displaying "Out of Toner". If the photo conductor stops working before the toner runsout, "Out of Toner" may be displayed.meihua-p2_mf2_com_user_guide_00106458_eng.xml 167Draft 2013/03/26](https://usermanual.wiki/Ricoh/MFSP112SF1.user-manual-2/User-Guide-1981979-Page-167.png)