Ricoh MFSP220SFNW1 Multifunction Digital Product (Copier/Printer/Scanner/Fax) User Manual
Ricoh Company Ltd Multifunction Digital Product (Copier/Printer/Scanner/Fax)
UserManual.wiki
>
Ricoh
>
MFSP220SFNW1 User Manual
User Manual
Navigation menu
Upload a User Manual
Namespaces
Wiki Guide
HTML
PDF
Info
Views
User Manual
Discussion / Help
Navigation

![Loading Paper into Tray 1...........................................................................................................................41Loading Paper into the Bypass Tray...........................................................................................................46Specifying Paper Type and Paper Size Using the Control Panel.................................................................49Specifying the Paper Type.......................................................................................................................... 49Specifying the Standard Paper Size...........................................................................................................50Specifying a Custom Paper Size................................................................................................................ 50Specifying Paper Type and Paper Size Using Smart Organizing Monitor.................................................52Specifying a Custom Paper Size................................................................................................................ 52Specifying Paper Type and Paper Size Using Web Image Monitor...........................................................53Specifying a Custom Paper Size................................................................................................................ 53Specifying Paper Type and Paper Size Using the Printer Driver..................................................................54Supported Paper.............................................................................................................................................. 55Specifications of Paper Types.....................................................................................................................56Non-Recommended Paper Types.............................................................................................................. 58Paper Storage.............................................................................................................................................. 59Print Area......................................................................................................................................................59Placing Originals..............................................................................................................................................62Placing Originals on the Exposure Glass...................................................................................................62Placing Originals in the Auto Document Feeder....................................................................................... 62About Originals............................................................................................................................................633. Printing DocumentsWhat You Can Do with the Printer Function...................................................................................................67Configuring Option Settings and Paper Settings for the Printer....................................................................68When Using Windows................................................................................................................................ 68When Using Mac OS X...............................................................................................................................69Displaying the Printing Preferences Dialog Box.............................................................................................70Displaying the Printing Preferences Dialog Box from the [Start] Menu...................................................70Displaying the Printing Preferences Dialog Box in an Application.......................................................... 70Basic Operation of Printing............................................................................................................................. 72If a Paper Mismatch Occurs....................................................................................................................... 72Canceling a Print Job...................................................................................................................................734. Copying OriginalsWhat You Can Do with the Copier Function..................................................................................................752Draft 2016/05/27](https://usermanual.wiki/Ricoh/MFSP220SFNW1/User-Guide-3076626-Page-3.png)
![Step 1: Configuring SMTP and DNS Settings.........................................................................................113Step 2: Sending Scanned Files to an FTP Server.................................................................................... 113Specifying the Scan Destination Using the One Touch Buttons or [Pause/Redial] Key (only SP 221SF, SP220SFNw, and SP 221SFNw)....................................................................................................................116Basic Procedure for Saving Scan Files on a USB Flash Memory Device..................................................118Basic Operation for TWAIN Scanning........................................................................................................120Using TWAIN scanner..............................................................................................................................120TWAIN scanning.......................................................................................................................................120Settings you can configure in the TWAIN dialog box........................................................................... 121Basic Operation for WIA Scanning............................................................................................................. 123Using SANE scanning................................................................................................................................... 124Specifying the Scan Settings for Scanning.................................................................................................. 125Specifying the Scanning Size According to the Size of the Original....................................................125Adjusting Image Density........................................................................................................................... 125Specifying Resolution................................................................................................................................1266. Sending and Receiving a FaxWhat You Can Do with the Fax Function.....................................................................................................127Fax Settings Workflow.................................................................................................................................. 128Types of Transmission and Reception Modes............................................................................................. 129Transmission Mode Selection...................................................................................................................129Reception Mode Selection....................................................................................................................... 129Fax Mode Screen..........................................................................................................................................131Setting the Date and Time............................................................................................................................. 132Registering Fax Destinations......................................................................................................................... 133Registering Fax Destinations Using the Control Panel............................................................................133Registering Fax Destinations Using Web Image Monitor...................................................................... 135Sending a Fax................................................................................................................................................138Selecting Transmission Mode...................................................................................................................138Basic Operation for Sending a Fax......................................................................................................... 139Specifying the Fax Destination................................................................................................................. 141Useful Sending Functions..........................................................................................................................145Specifying the Scan Settings for Faxing.................................................................................................. 148Using the Fax Function from a Computer (LAN-Fax)..................................................................................1514Draft 2016/05/27](https://usermanual.wiki/Ricoh/MFSP220SFNW1/User-Guide-3076626-Page-5.png)
![How to Find Information about Operationsand TroubleshootingYou can find support information about operating the machine and troubleshooting in the OperatingManual (printed), Operating Manual (digital format), and Help (online).Operating Manual (Printed)The following manuals are provided with this machine.Safety InformationThis manual explains the safety precautions that should be followed when using the machine. Besure to read this manual before using the machine.Setup GuideThis manual explains how to setup this machine.It explains the instructions of taking out the machine from the packing box and connecting it to acomputer.MFInitial Guide for FAX (only SP 221SF, SP 220SFNw, and SP221SFNw)MFThis manual explains how to set up the machine. It also explains how to remove the machinefrom the packaging and how to connect it to a computer.Operating Manual (Digital Format)Operating manuals can be viewed from Ricoh's website or from the provided CD-ROM.Viewing from a web browserAccess the Internet from a web browser.Confirm that the computer or the machine is connected to the network.Download the operating manuals from http://www.ricoh.com/.Viewing from the provided CD-ROMOperating manuals can also be viewed from the provided CD-ROM.• When using Windows1. Insert the CD-ROM into the CD-ROM drive.2. Click [Read Manual] and follow the instructions on the screen.The PDF file manual opens.• When using Mac OS X10 opal-p3_mf3_com_user_guide_gb_00228413_eng.xmlDraft 2016/05/27](https://usermanual.wiki/Ricoh/MFSP220SFNW1/User-Guide-3076626-Page-11.png)
![1. Insert the CD-ROM into the CD-ROM drive.2. Double-click [Manuals.htm] file, located on the CD-ROM root directory.3. Select the language.4. Click [Read PDF manuals].5. Click the manual you want to refer to.The PDF file manual opens.HelpUse the following procedure to open the Help files learn about the printer driver, Web Image Monitor,and Smart Organizing Monitor functions.MFFor details about using Web Image Monitor, see page 201 "Configuring the Machine UsingUtilities".PFor details about using Web Image Monitor, see page 233 "Using Web Image Monitor".Printer driver1. Click [Help] on the printing preferences dialog box.For the procedure on how to open the printing preferences dialog box, see page 70"Displaying the Printing Preferences Dialog Box".PWeb Image Monitor1.PClick on the top right of the screen.PTo display Help, install the help source file beforehand. For details about installing thefile, see page page 233 "Using Web Image Monitor".Smart Organizing Monitor1. Click [Help] on the [Printer Configuration] screen.opal-p3_mf3_com_user_guide_gb_00228413_eng.xml 11Draft 2016/05/27](https://usermanual.wiki/Ricoh/MFSP220SFNW1/User-Guide-3076626-Page-12.png)
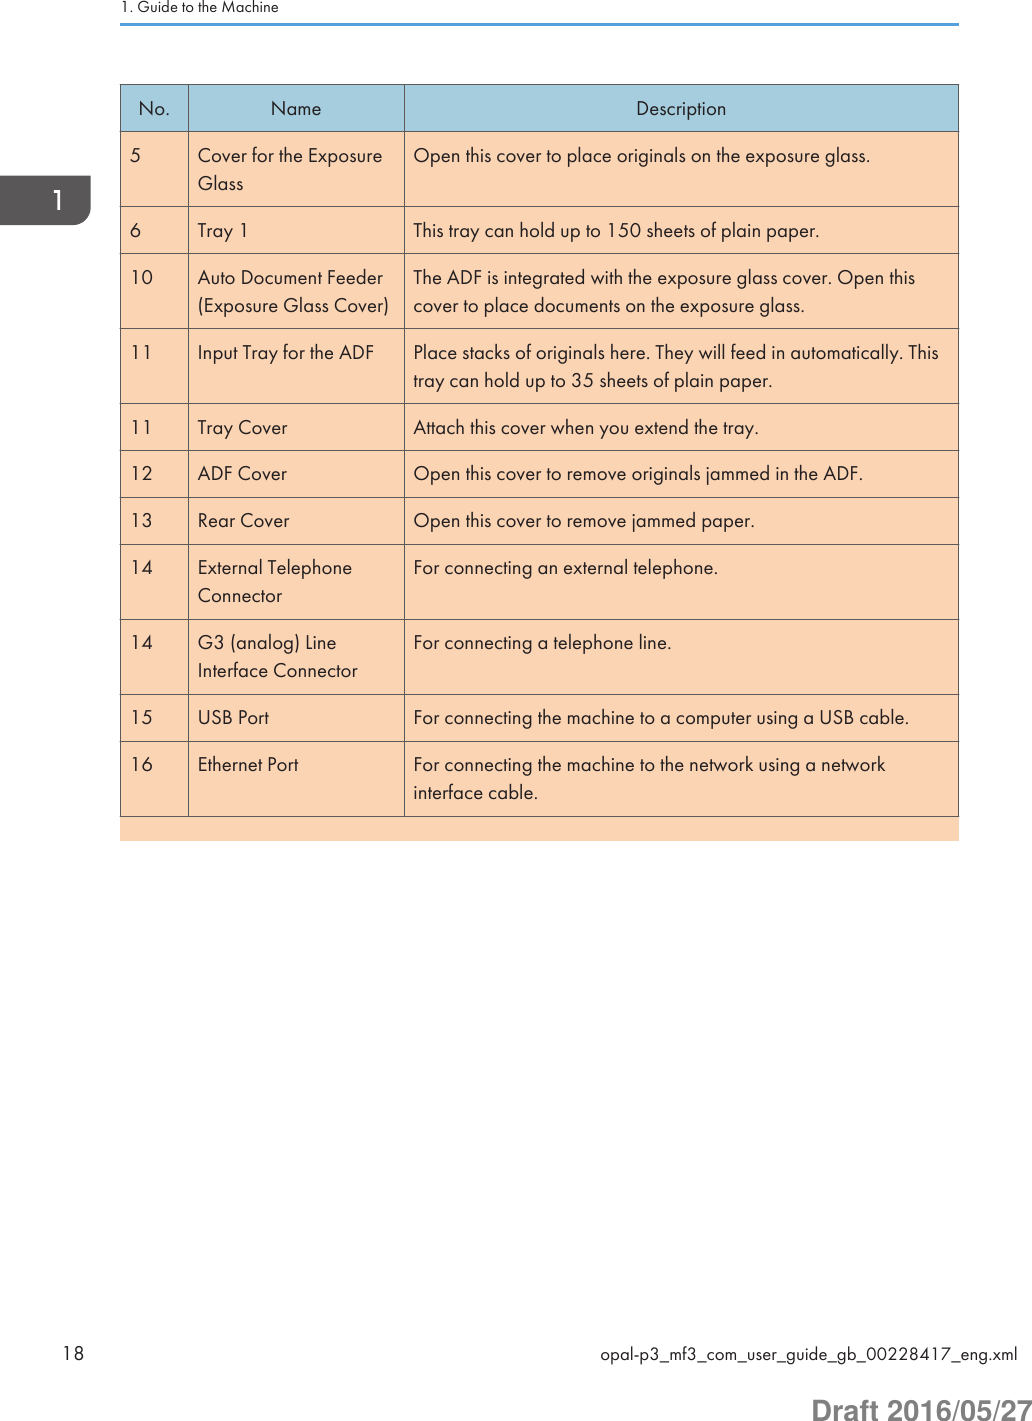
![How to Read This ManualIntroductionThis manual contains detailed instructions and notes on the operation and use of this machine. For yoursafety and benefit, read this manual carefully before using the machine. Keep this manual in a handyplace for quick reference.Symbols Used in This ManualThis manual uses the following symbols:Indicates points to pay attention to when using the machine, and explanations of likely causes of papermisfeeds, damage to originals, or loss of data. Be sure to read these explanations.Indicates supplementary explanations of the machine’s functions, and instructions on resolving usererrors.[ ]Indicates the names of keys on the machine's display or control panels.Model-Specific InformationThis section explains how you can identify the region your machine belongs to.There is a label on the rear of the machine, located in the position shown below. The label containsdetails that identify the region your machine belongs to. Read the label.MFDCT06512 opal-p3_mf3_com_user_guide_gb_00228414_eng.xmlDraft 2016/05/27](https://usermanual.wiki/Ricoh/MFSP220SFNW1/User-Guide-3076626-Page-13.png)
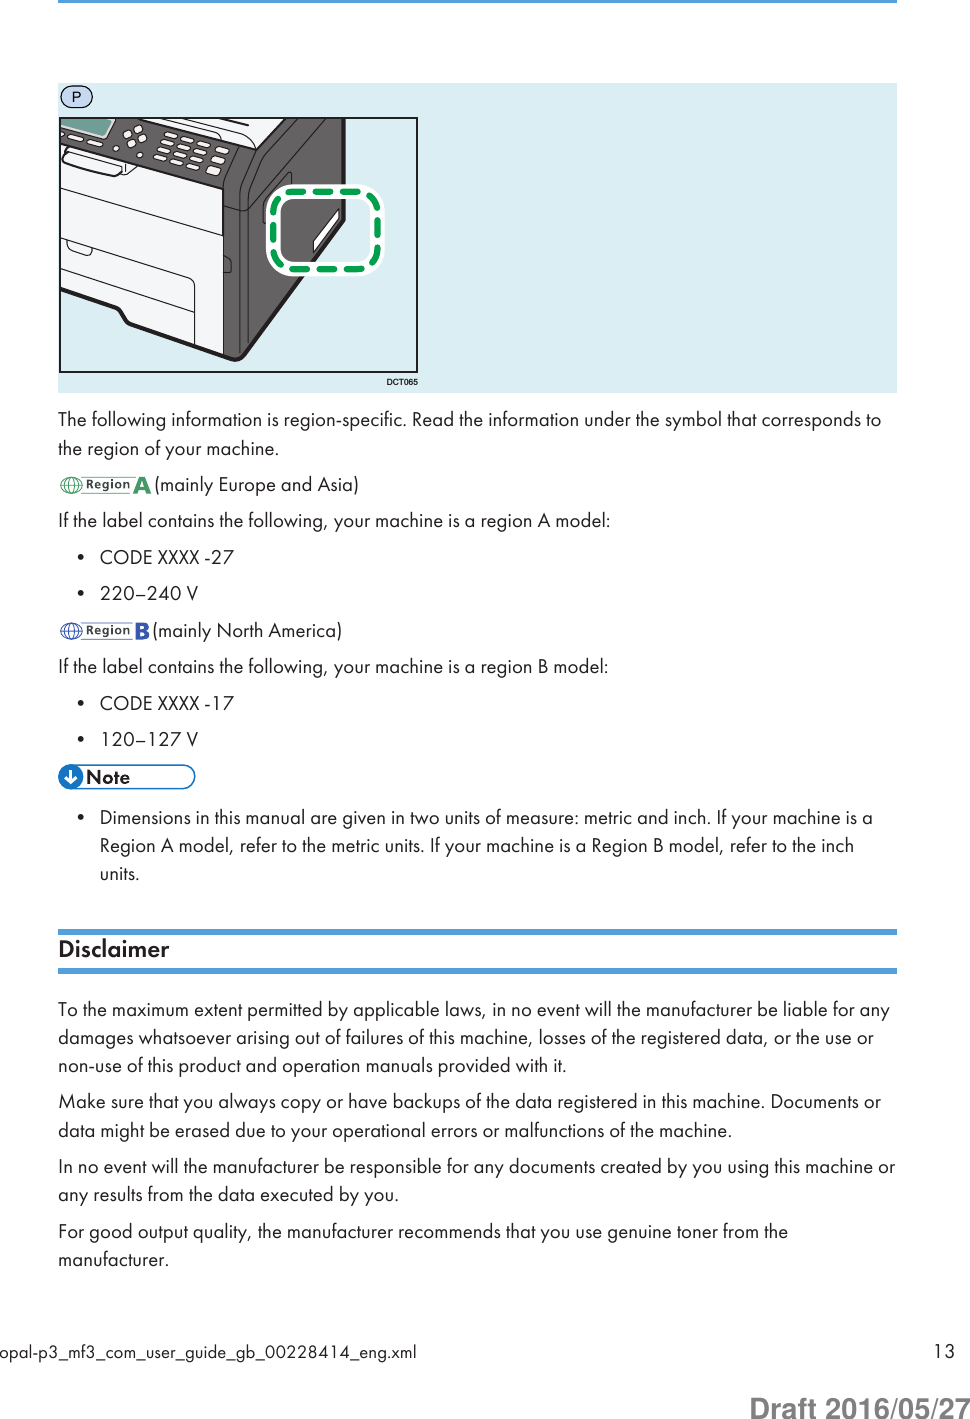
![NotesContents of this manual are subject to change without prior notice.The manufacturer shall not be responsible for any damage or expense that might result from the use ofparts other than genuine parts from the manufacturer with your office products.Some illustrations in this manual might be slightly different from the machine.Note to AdministratorMFPasswordCertain configurations of this machine can be password-protected to prevent unauthorized modificationsby others. We strongly recommend you to create your own password immediately.The following are the operations that can be password-protected:• Entering the [Address Book], [Network Settings], or [Admin. Tools] menu using the control panelYou can access these menus without a password by factory default.The setting for creating a password can be found in [Admin. Tools].• Configuring the machine using Web Image MonitorYou can configure the machine using Web Image Monitor without a password by factory default.The setting for creating a password can be found in [Administrator Settings].For details about creating passwords, see page 189 "Administrator Settings" or page 165"Configuring the Machine Using the Control Panel".PPasswordWhen you log in to this printer, you will be prompted to enter the password. We strongly recommendyou to change the factory default password immediately to prevent information leakage andunauthorized operations by others.You will be prompted to enter your password when you attempt to change printer settings configuredusing Web Image Monitor.To use the factory default password, leave the password blank when using Web Image Monitor.To Change password for Web Image Monitor, you need to log on as an Administrator, and then makethe necessary settings.For details about setting a password, see page 233 "Using Web Image Monitor".14 opal-p3_mf3_com_user_guide_gb_00228414_eng.xmlDraft 2016/05/27](https://usermanual.wiki/Ricoh/MFSP220SFNW1/User-Guide-3076626-Page-15.png)
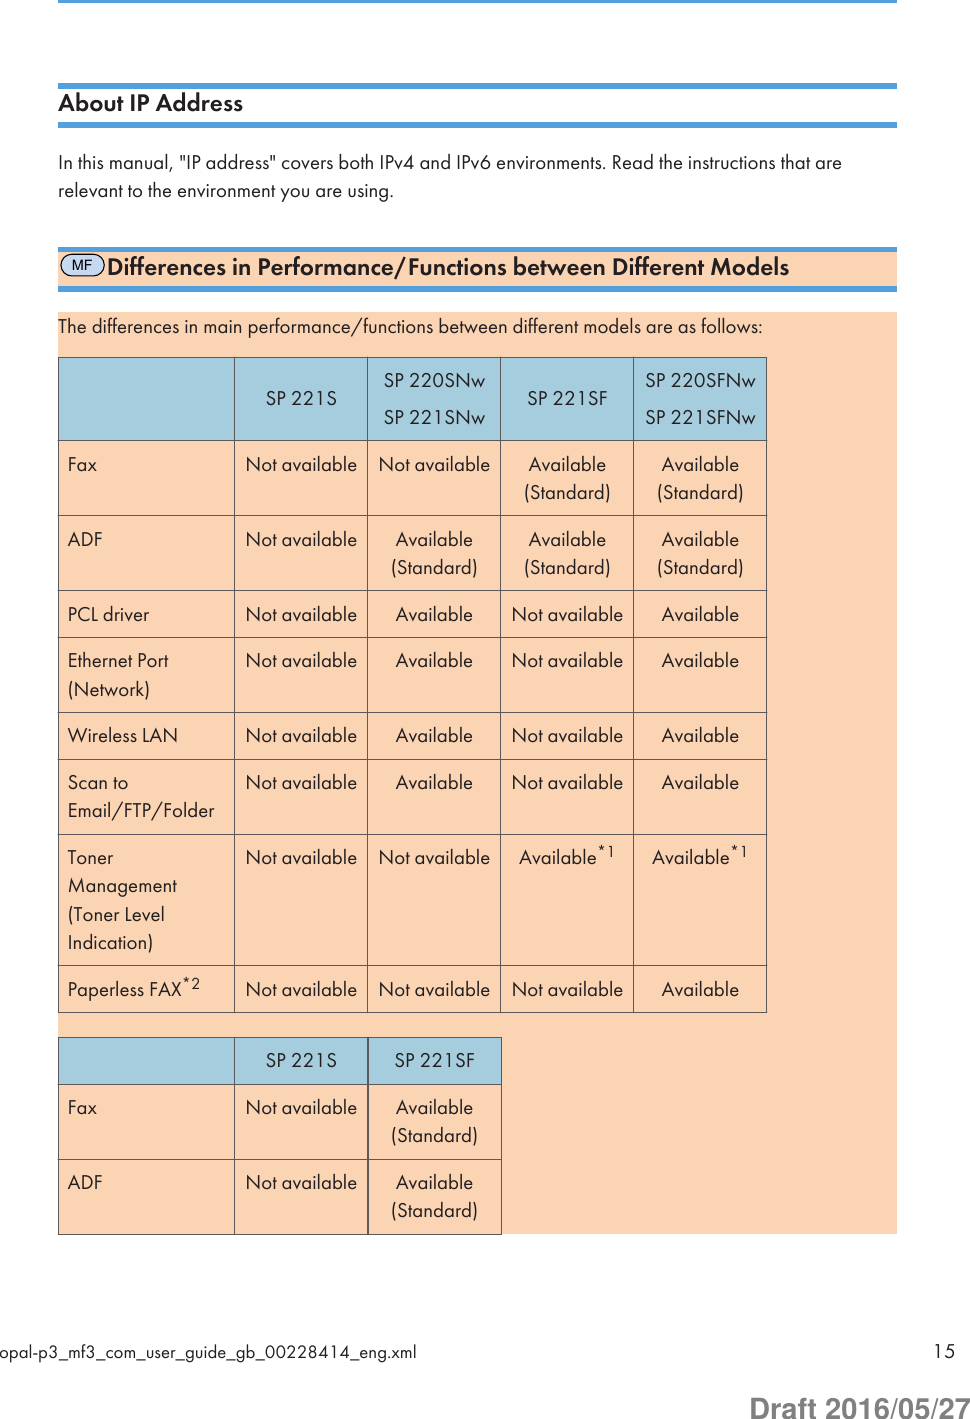
![SP 221S SP 221SFEthernet Port(Network)Not available Not availableWireless LAN Not available Not availableScan toEmail/FTP/FolderNot available Not availableTonerManagement(Toner LevelIndication)Not availableAvailableAvailable*1Paperless FAX*2 Not available Not available*1 Depending on the [Toner End Option] setting, the toner management (toner level indication) function may notbe available. For [Toner End Option], see page 182 "System Settings".*2 "Paperless FAX" refers to the function that allows you to store faxes in memory and print only the ones youwant, thus saving paper. "Paperless FAX" refers to [Reception File Processing] and [Notify Forward Status]that can be specified using the machine's control panel and [Fax Received File Processing] that can bespecified using Web Image Monitor. For details, see page 176 "Fax Features Settings" and page 208"Configuring the System Settings".PDifferences in Performance/Functions between Different ModelsThe differences in main performance/functions between different models are as follows:SP 221 SP 220NwSP 221NwEthernet Port (Network) Not available AvailableWireless LAN Not available Available16 opal-p3_mf3_com_user_guide_gb_00228414_eng.xmlDraft 2016/05/27](https://usermanual.wiki/Ricoh/MFSP220SFNW1/User-Guide-3076626-Page-17.png)
![No. Name Description1 [Image Quality] key Press to select the scan quality for the current job.2 [Shortcut to Func.] key Press to use the function pre-assigned to this key.3 [Density] key Press to adjust the image density for the current job.4 [Copy] key Press to switch the machine to copier mode.5 [Scanner] key Press to switch the machine to scanner mode.6 Screen Displays the current status and messages.7 Scroll Keys Press to move the cursor in the direction indicated by the key.8 Number Keys Press to enter numerical values when specifying settings such asfax numbers and copy quantities or to enter letters when specifyingnames.9 [Clear/Stop] key Press to cancel or stop print jobs, document copying, scanning,fax transmission/reception, and other actions in progress.10 [User Tools] key Press to display the menu for configuring the machine's systemsettings.11 [Power] key This indicator lights up blue when the machine is turned on. Itflashes when a print job is received and during printing, scanning,or fax transmission/reception.12 [Wi-Fi Direct] key (onlySP 220SNw and SP221SNw)Press this key to activate or deactivate the Wi-Fi Direct function.Pressing this key while Wi-Fi is disabled activates Wi-Fi andreboots the machine automatically. This indicator lights blue whenthe Wi-Fi Direct function is active.14 Selection keys Press the key underneath an item shown on the bottom line of thescreen to select it.15 Data In Indicator This indicator lights blue when the machine receives print datafrom the host device.16 [Back] key Press to cancel the last operation or to return to the previous levelof the menu tree.17 Alert Indicator This indicator lights up red when the machine runs out of paper orconsumables, when the paper settings do not match the settingsspecified by the driver, or when other errors occur. It flashes whenthe toner is nearly empty.Guide to Componentsopal-p3_mf3_com_user_guide_gb_00228417_eng.xml 23Draft 2016/05/27](https://usermanual.wiki/Ricoh/MFSP220SFNW1/User-Guide-3076626-Page-24.png)
![No. Name Description18 [OK] Key Press to confirm settings and specified values, or to move to thenext menu level.19 [Start] key Press to start fax transmission/reception, scanning, or copying.MFControl Panel (When Using SP 221SF, SP 220SFNw, or SP221SFNw)1234567 8 9 10 11 12 1314 15 16 17 18 19 20 21 22 24DSH108231234567 8 9 10 11 12 1314 15 16 17 18 19 20 21 22 24DSH10823No. Name Description1 [On Hook Dial] key Press to use on-hook dialing to check the destination's status whensending a fax.2 [Address Book] key Press to select a scan or fax destination from the Address Book.3 [Image Quality] key Press to select the scan quality for the current job.4 [Shortcut to Func.] key Press to use the function pre-assigned to this key.5 [Density] key Press to adjust the image density for the current job.6 [Copy] key Press to switch the machine to copier mode.7 [Scanner] key Press to switch the machine to scanner mode.1. Guide to the Machine24 opal-p3_mf3_com_user_guide_gb_00228417_eng.xmlDraft 2016/05/27](https://usermanual.wiki/Ricoh/MFSP220SFNW1/User-Guide-3076626-Page-25.png)
![No. Name Description8 Screen Displays the current status and messages.9 Scroll Keys Press to move the cursor in the direction indicated by the key.10 Number Keys Press to enter numerical values when specifying settings such asfax numbers and copy quantities or to enter letters when specifyingnames.11 [Clear/Stop] key Press to cancel or stop print jobs, document copying, scanning,fax transmission/reception, and other actions in progress.12 [User Tools] key Press to display the menu for configuring the machine's systemsettings.13 [Power] key This indicator lights up blue when the machine is turned on. Itflashes when a print job is received and during printing, scanning,or fax transmission/reception.14 One Touch buttons Press to select a scan or fax Quick Dial destination.15 [Pause/Redial] key Press to insert a pause in a fax number or to display the last usedscan or fax destination.16 [Shift] key Press to use the Quick Dial numbers 5 to 8 when specifying a scanor fax destination using the One Touch buttons.17 [Wi-Fi Direct] key (onlySP 220SFNw and SP221SFNw)Press this key to activate or deactivate the Wi-Fi Direct function.Pressing this key while Wi-Fi is disabled activates Wi-Fi andreboots the machine automatically. This indicator lights blue whenthe Wi-Fi Direct function is active.19 [Facsimile] key Press to switch the machine to fax mode.20 Selection keys Press the key underneath an item shown on the bottom line of thescreen to select it.21 Data In Indicator This indicator lights blue when the machine receives print datafrom the host device.22 [Back] key Press to cancel the last operation or to return to the previous levelof the menu tree.23 Alert Indicator This indicator lights up red when the machine runs out of paper orconsumables, when the paper settings do not match the settingsGuide to Componentsopal-p3_mf3_com_user_guide_gb_00228417_eng.xml 25Draft 2016/05/27](https://usermanual.wiki/Ricoh/MFSP220SFNW1/User-Guide-3076626-Page-26.png)
![No. Name Descriptionspecified by the driver, or when other errors occur. It flashes whenthe toner is nearly empty.24 [OK] Key Press to confirm settings and specified values, or to move to thenext menu level.25 [Start] key Press to start fax transmission/reception, scanning, or copying.PControl PanelThis section introduces the names of the parts of the control panel and explains their functions.12345678DSH1091. Guide to the Machine26 opal-p3_mf3_com_user_guide_gb_00228417_eng.xmlDraft 2016/05/27](https://usermanual.wiki/Ricoh/MFSP220SFNW1/User-Guide-3076626-Page-27.png)
![12345678DSH109No. Name Description1 [Power] key This indicator lights blue when the machine is turned on. It flasheswhen a print job is received.2 [Wi-Fi Direct] key (onlySP 220Nw and SP221Nw)Press this key to activate or deactivate the Wi-Fi Direct function.Pressing this key while Wi-Fi is disabled activates Wi-Fi andreboots the machine automatically. This indicator lights blue whenthe Wi-Fi Direct function is active.3 Network Indicator(only SP 220Nw andSP 221Nw)This indicator lights blue when the network is connected.4 [Stop] key Press this key once to pause a job that is currently printing. Tocancel a job, press it again.5 [Start] key Press to restart the printing job.6 Data In Indicator This indicator lights blue when the machine receives print datafrom the host device.7 Toner/Paper EndIndicatorThis indicator lights red when the machine runs out of paper ortoner. It flashes when the toner is nearly empty.8 Alert Indicator This indicator flashes red when paper jams occur, and it lightswhen the paper settings do not match the settings specified by thedriver, and when other errors occur.Guide to Componentsopal-p3_mf3_com_user_guide_gb_00228417_eng.xml 27Draft 2016/05/27](https://usermanual.wiki/Ricoh/MFSP220SFNW1/User-Guide-3076626-Page-28.png)
![MFChanging Operation ModesYou can switch between copier, scanner, and fax modes by pressing the corresponding keys.Press the [Copy], [Scanner], or [Facsimile] (only SP 221SF, SP 220SFNw, and SP 221SFNw) key toactivate each mode. While in each mode, the corresponding key lights up.DSH140Function PriorityBy default, copy mode is selected when the machine is turned on, or if the preset [System AutoReset Timer] time passes with no operation while the initial screen of the current mode is displayed.You can change the selected mode using [Function Priority] under [Admin. Tools].For details about [System Auto Reset Timer] or [Function Priority], see page 189 "AdministratorSettings".Changing Operation Modesopal-p3_mf3_com_user_guide_gb_00228418_eng.xml 29Draft 2016/05/27](https://usermanual.wiki/Ricoh/MFSP220SFNW1/User-Guide-3076626-Page-30.png)
![MFAssigning a Setting to the Short Cut KeyYou can access a frequently-used setting with a single keystroke by assigning the setting to the [Shortcutto Func.] key.You can configure settings for the following 3 function:• ID Card Copy Mode• Fax Immediate TX• Select Scanner Dest.Assigning a Setting Using the Control Panel1. Press the [User Tools] key.2. Press the [ ] or [ ] key to select [Admin. Tools], and then press the [OK] key.3. If you are requested to enter a password, enter the password using the number keys,and then press the [OK] key.4. Press the [ ] or [ ] key to select [Shortcut to Function], and then press the [OK] key.5. Press the [ ] or [ ] key to select the setting you want to configure, and then press the[OK] key.6. Press the [User Tools] key to return to the initial screen.• A password for accessing the [Admin. Tools] menu can be specified in [Admin. Tools Lock].Assigning a Setting Using Web Image Monitor1. Start the Web browser, and enter "http://(the machine's IP address or host name)/" inthe address bar.2. Click [System Settings].3. Click the [Shortcut to Function] tab.4. Specify the setting you want to configure from [Shortcut to Function].5. Enter the administrator password.6. Click [OK].7. Close the Web browser.• For details about [Administrator], see page 228 "Configuring the Administrator Settings".Assigning a Setting to the Short Cut Keyopal-p3_mf3_com_user_guide_gb_00228420_eng.xml 33Draft 2016/05/27](https://usermanual.wiki/Ricoh/MFSP220SFNW1/User-Guide-3076626-Page-34.png)
![Accessing the Function Assigned to the Short Cut Key1. Press the [Shortcut to Func.] key.DSH141The function assigned to the [Shortcut to Func.] key is displayed.1. Guide to the Machine34 opal-p3_mf3_com_user_guide_gb_00228420_eng.xmlDraft 2016/05/27](https://usermanual.wiki/Ricoh/MFSP220SFNW1/User-Guide-3076626-Page-35.png)
![MFEntering CharactersTo enter characters, use keys as follows:To enter a digitPress a number key.To delete a characterPress the [ ] key.To enter a fax number• To enter a numberUse the number keys.• To enter characters other than digits" ": Press [ ]." ": Press [ ]." ": Press [ ].Pause: Press the [Pause/Redial] key. "P" appears on the screen.Space: Press the [ ] key.To enter a nameLetters, numbers, and symbols can be entered using the number keys.To enter two characters consecutively that use the same number key, press the [ ] key to move thecursor before entering the second character.DCT843\~• Characters you can enter depend on the setting you are configuring.Entering Charactersopal-p3_mf3_com_user_guide_gb_00228421_eng.xml 35Draft 2016/05/27](https://usermanual.wiki/Ricoh/MFSP220SFNW1/User-Guide-3076626-Page-36.png)
![• If the number you entered is too large or too small for the setting, it will not be accepted. If youpress the [OK] key, the machine will increase or decrease the number to the minimum or maximumvalue for the setting.1. Guide to the Machine36 opal-p3_mf3_com_user_guide_gb_00228421_eng.xmlDraft 2016/05/27](https://usermanual.wiki/Ricoh/MFSP220SFNW1/User-Guide-3076626-Page-37.png)

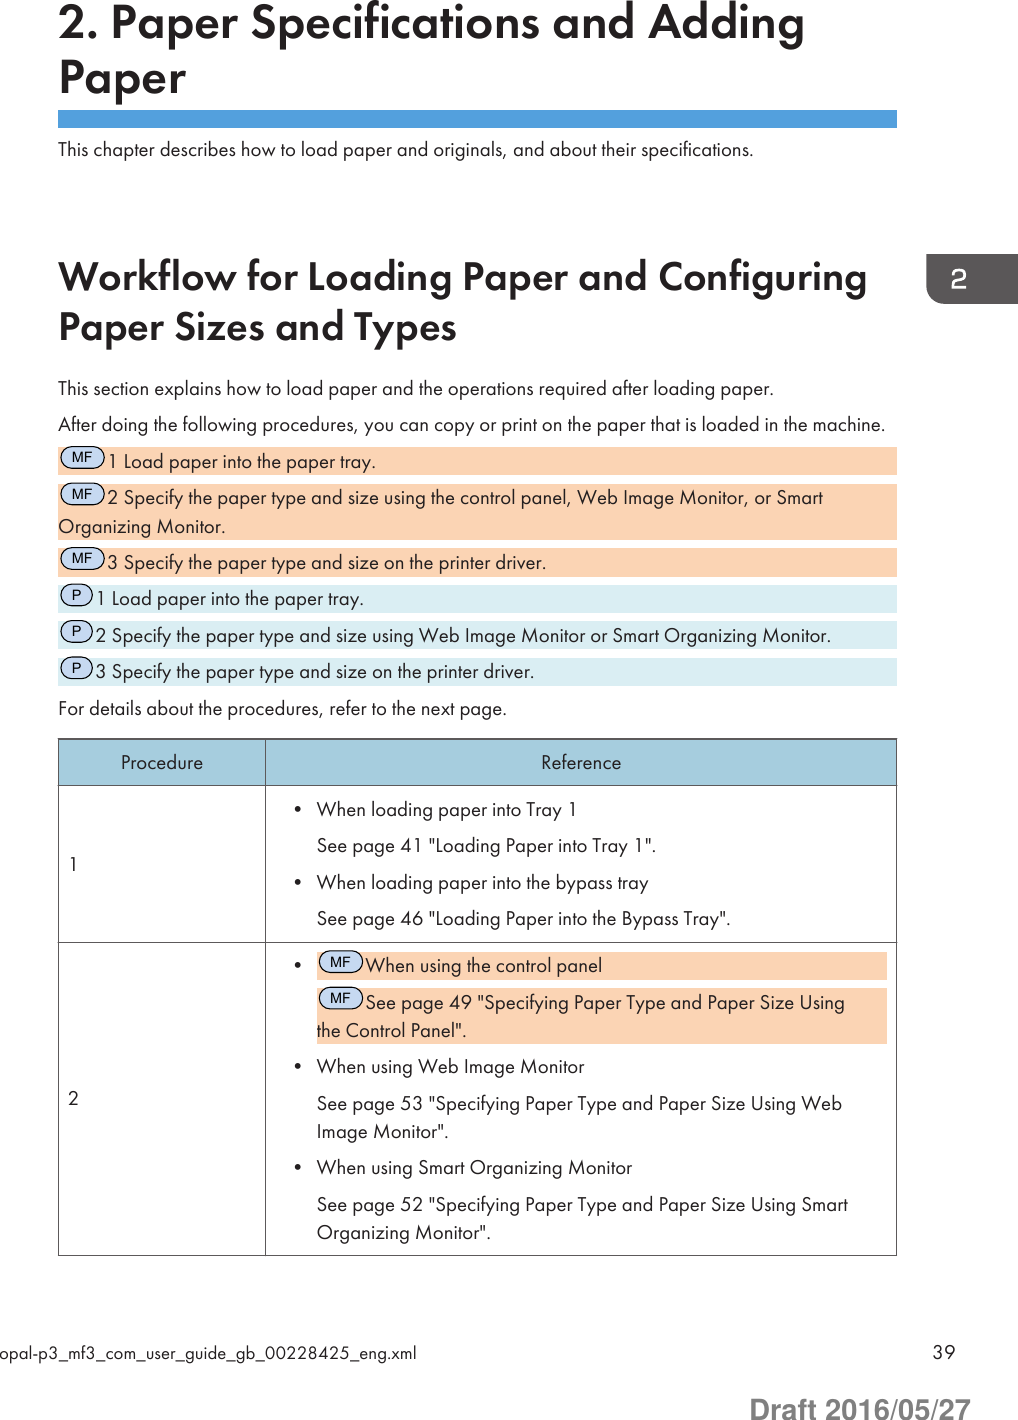
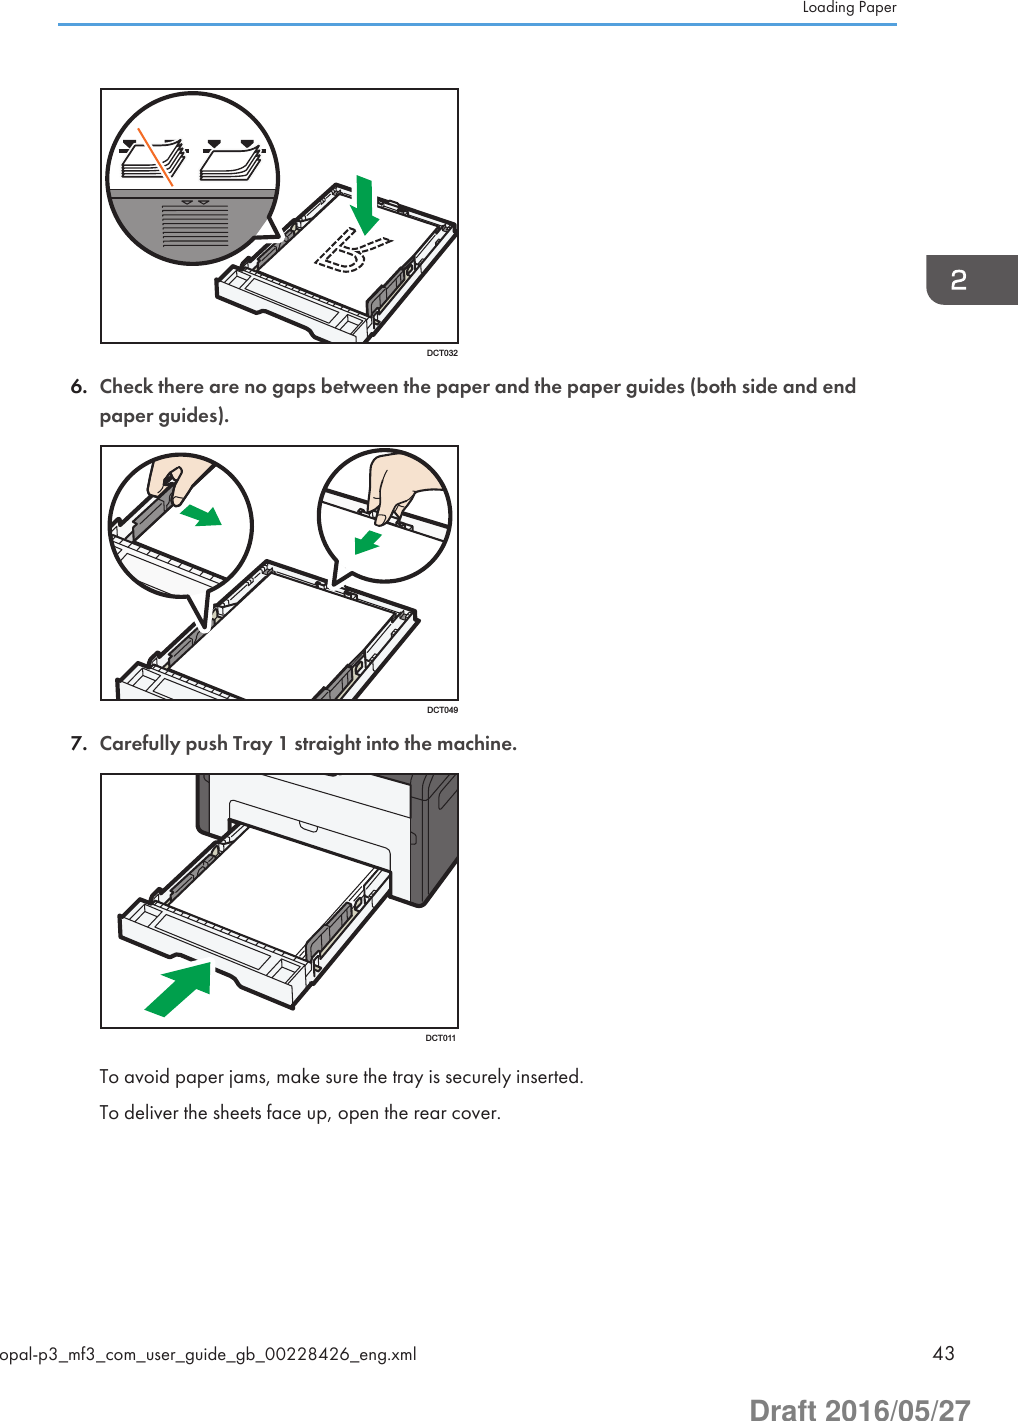
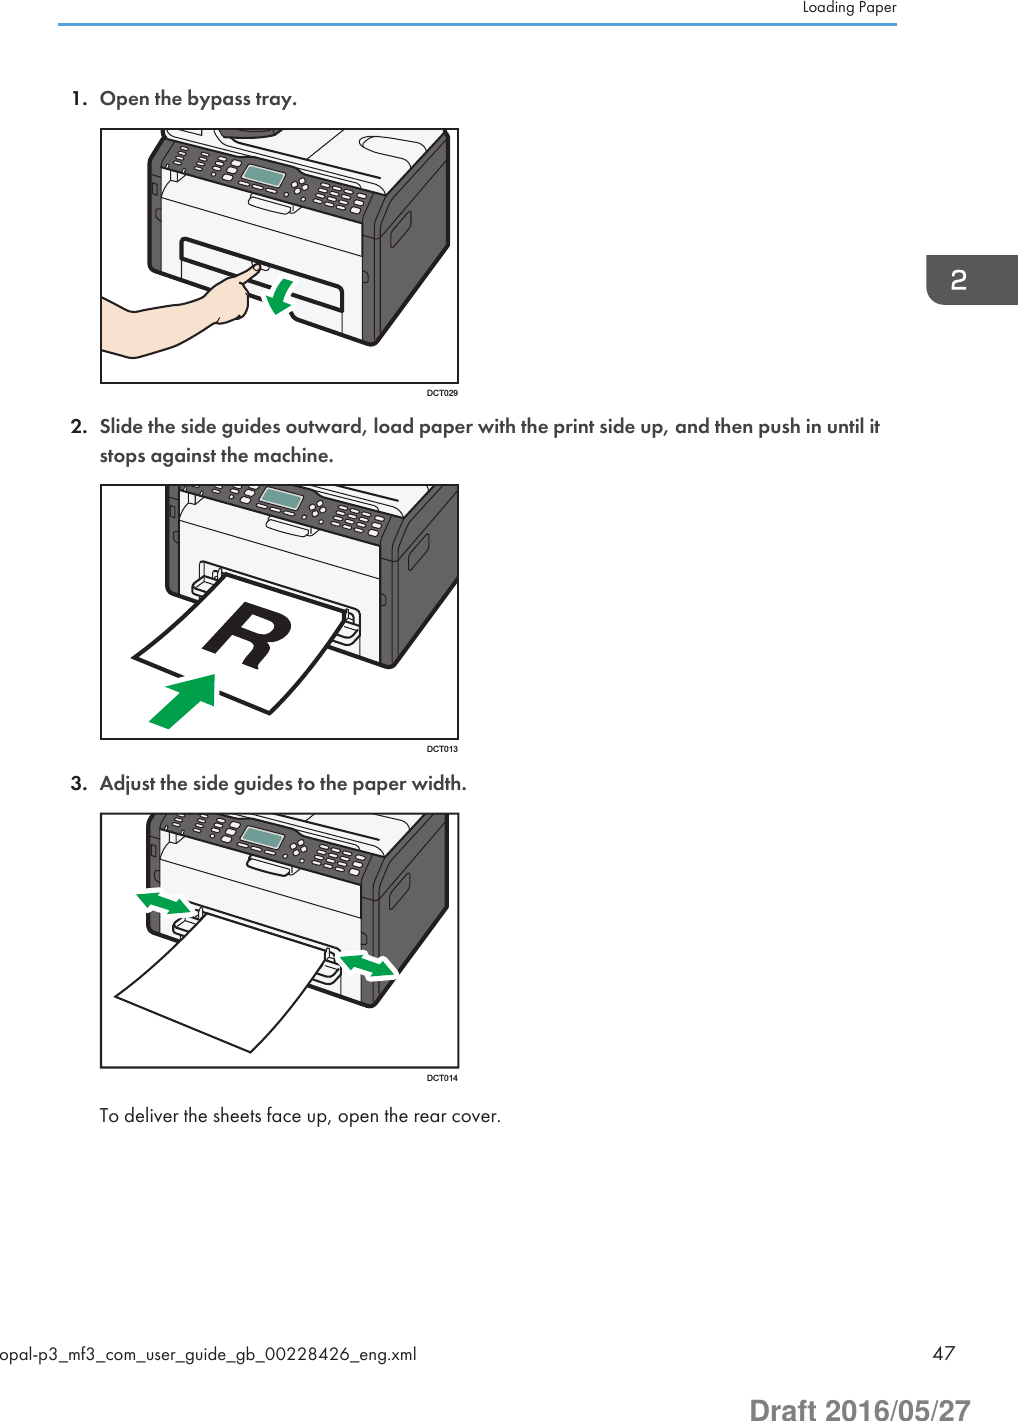
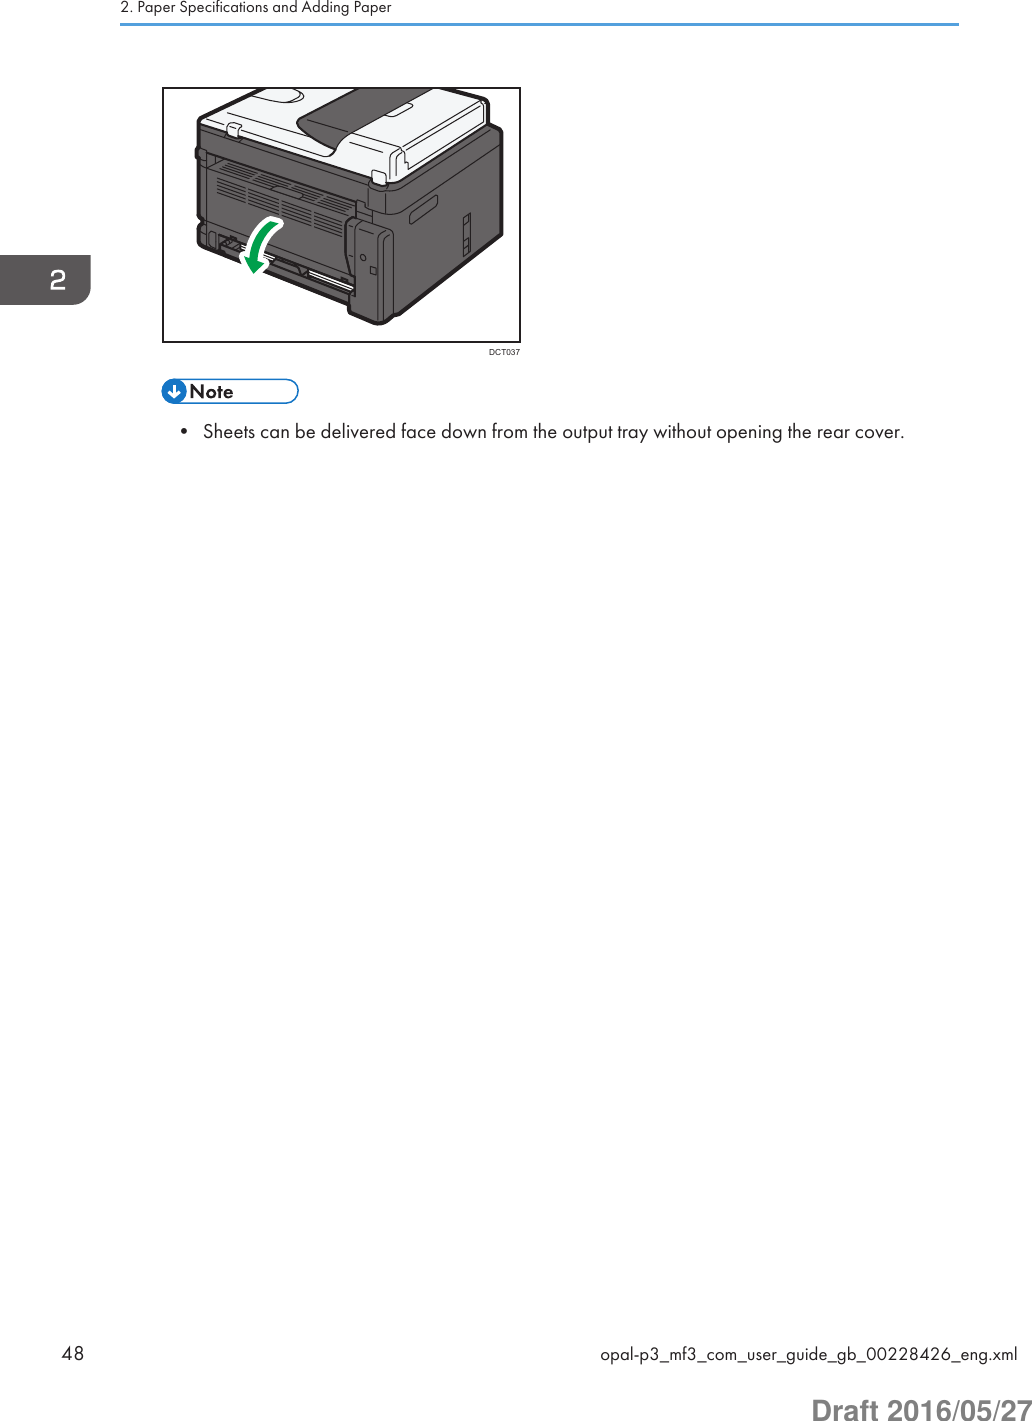
![MFSpecifying Paper Type and Paper Size Usingthe Control PanelThis section describes how to specify the paper size and paper type using the control panel.• Paper type and size can also be specified using the printer driver. For details, see the printer driverHelp.• For prints from the bypass tray, you can select to print according to either the printer driver settingsor the control panel settings with [Bypass Tray Priority] under [Tray Paper Settings]. For detailsabout [Bypass Tray Priority], see page 187 "Tray Paper Settings".• If [Auto Continue] under [System Settings] is enabled, printing stops temporarily if a paper type/size error is detected. The printing restarts automatically with the settings made with the controlpanel after about ten seconds. For details about [Auto Continue], see page 182 "System Settings".Specifying the Paper TypeThis section describes how to specify the paper type.1. Press the [User Tools] key.DSH1422. Press the [ ] or [ ] key to select [Tray Paper Settings], and then press the [OK] key.3. Press the [ ] or [ ] key to select the paper type setting for the desired tray, and thenpress the [OK] key.4. Press the [ ] or [ ] key to select the desired paper type, and then press the [OK] key.5. Press the [User Tools] key to return to the initial screen.• You can press the [Back] key to exit to the previous level of the menu tree.Specifying Paper Type and Paper Size Using the Control Panelopal-p3_mf3_com_user_guide_gb_00228427_eng.xml 49Draft 2016/05/27](https://usermanual.wiki/Ricoh/MFSP220SFNW1/User-Guide-3076626-Page-50.png)
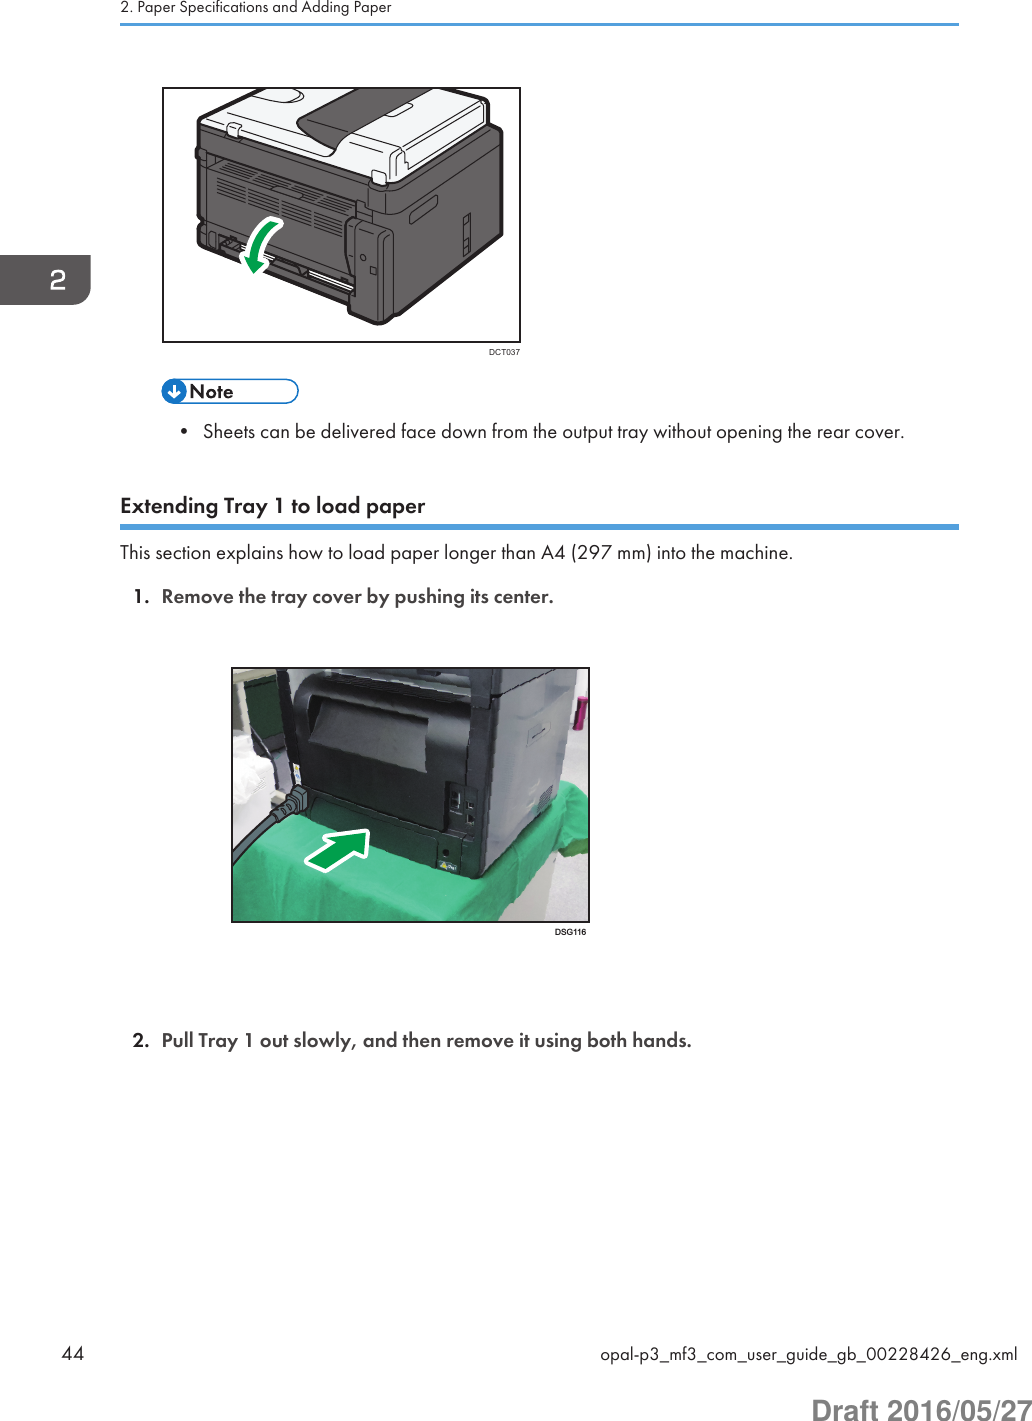
![Specifying the Standard Paper SizeThis section describes how to specify the standard paper size.1. Press the [User Tools] key.DSH1422. Press the [ ] or [ ] key to select [Tray Paper Settings], and then press the [OK] key.3. Press the [ ] or [ ] key to select the paper size setting for the desired tray, and then pressthe [OK] key.4. Press the [ ], [ ],[ ], or [ ] key to select the desired paper size, and then press the [OK]key.5. Press the [User Tools] key to return to the initial screen.• You can press the [Back] key to exit to the previous level of the menu tree.Specifying a Custom Paper SizeThis section describes how to specify a custom paper size.• When you perform printing, make sure that the paper size specified with the printer driver matchesthe paper size specified with the control panel. If a paper size mismatch occurs, a messageappears on the display. To ignore the error and print using mismatched paper, see page 72 "If aPaper Mismatch Occurs".2. Paper Specifications and Adding Paper50 opal-p3_mf3_com_user_guide_gb_00228427_eng.xmlDraft 2016/05/27](https://usermanual.wiki/Ricoh/MFSP220SFNW1/User-Guide-3076626-Page-51.png)
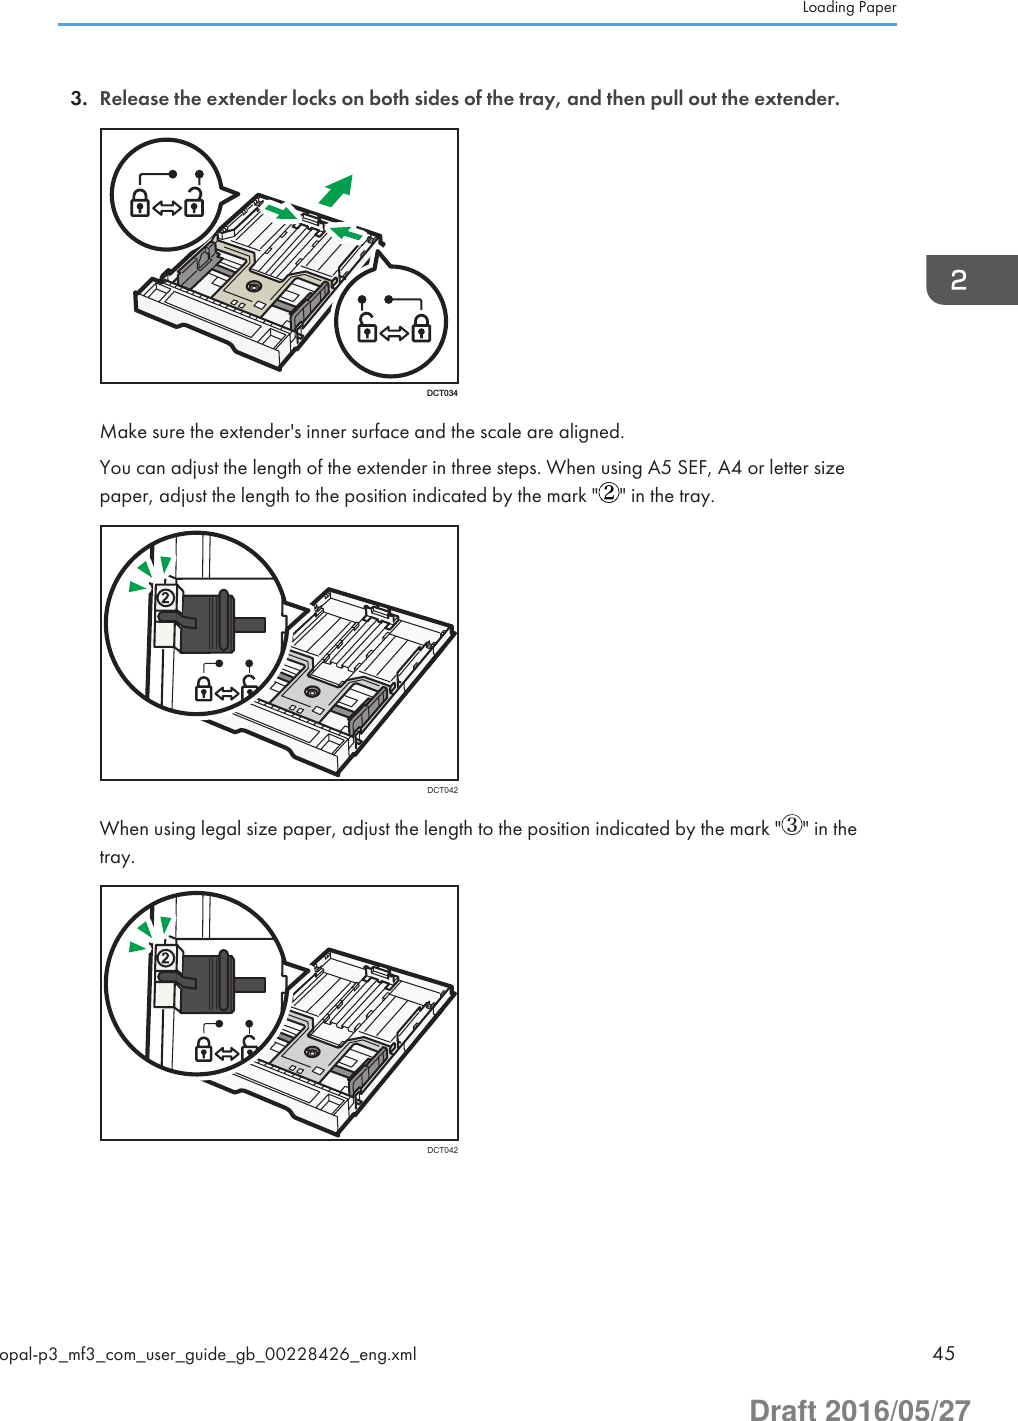
![1. Press the [User Tools] key.DSH1422. Press the [ ] or [ ] key to select [Tray Paper Settings], and then press the [OK] key.3. Press the [ ] or [ ] key to select the paper size setting for the desired tray, and then pressthe [OK] key.4. Press the [ ], [ ], [ ], or [ ] key to select [Custom Size], and then press the [OK] key.5. Press the [ ] or [ ] key to select [mm] or [inch], and then press the [OK] key.6. Enter the width using number keys, and then press the [OK] key.To enter a decimal point, press [ ].7. Enter the length using number keys, and then press the [OK] key.To enter a decimal point, press [ ].8. Press the [User Tools] key to return to the initial screen.• You can press the [Back] key to exit to the previous level of the menu tree.Specifying Paper Type and Paper Size Using the Control Panelopal-p3_mf3_com_user_guide_gb_00228427_eng.xml 51Draft 2016/05/27](https://usermanual.wiki/Ricoh/MFSP220SFNW1/User-Guide-3076626-Page-52.png)
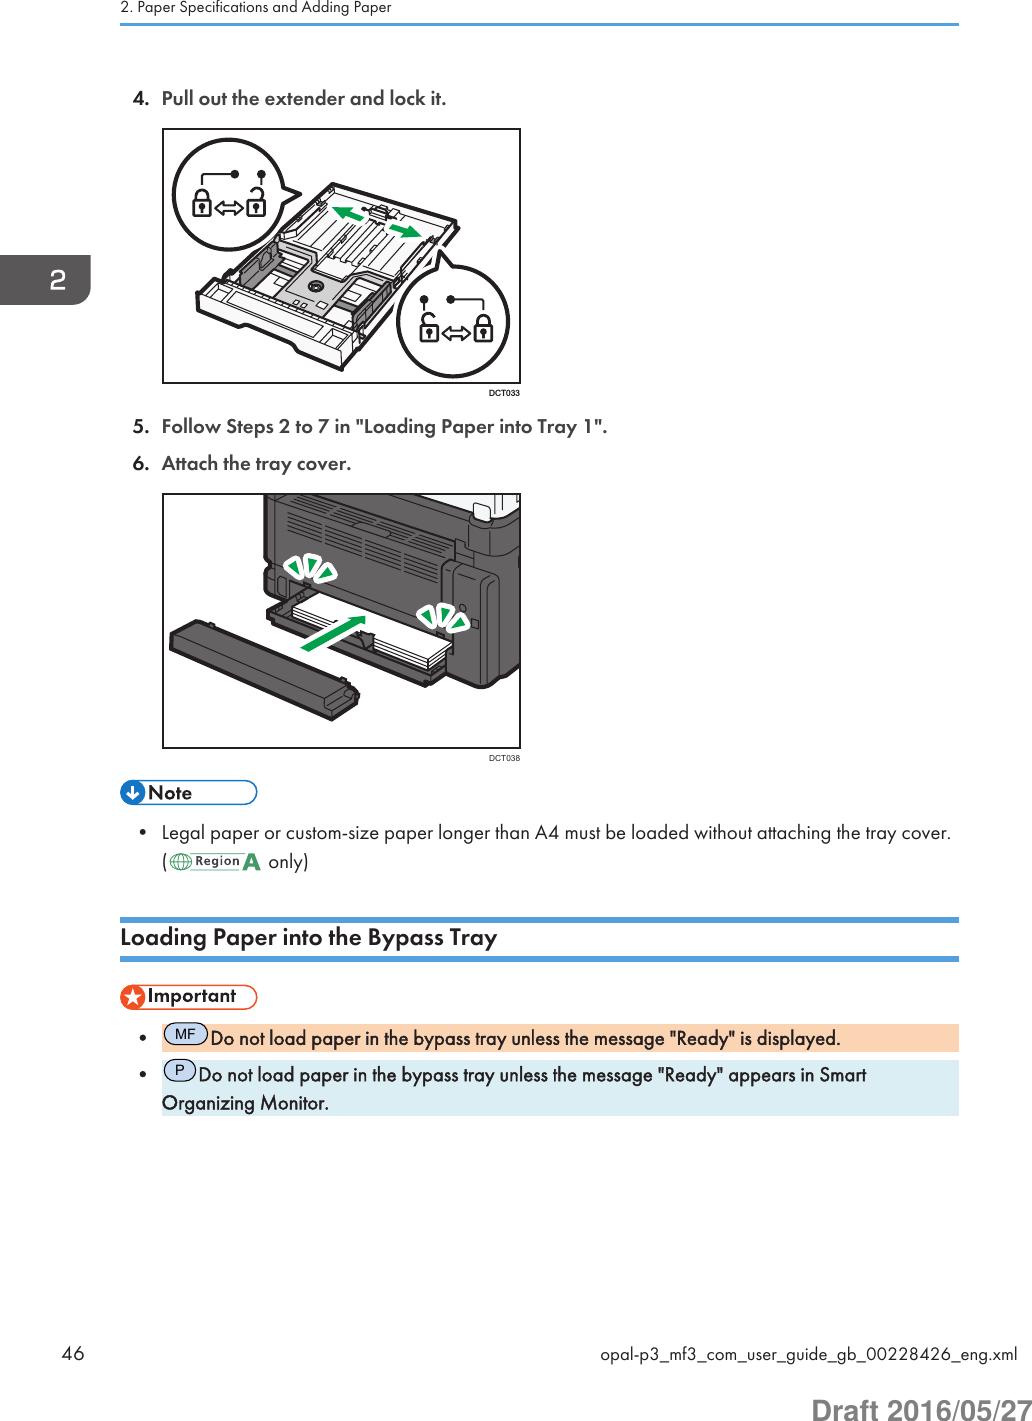
![Specifying Paper Type and Paper Size UsingSmart Organizing MonitorThe procedure in this section is an example based on Windows 7. The actual procedure may varydepending on the operating system you are using.1. On the [Start] menu, click [All Programs].2. Click [Smart Organizing Monitor].3. Click [Smart Organizing Monitor Status].4. If the machine you are using is not selected, click [Connect Printer].5. Click [Search Network Printer] or input the IP Address of the machine, and then select themachine's model.6. Click [OK].7. On the [User Tools] tab, click [Printer Configuration].If you are requested to enter an access code, enter the access code and then click [OK].The default access code is "Admin".8. Select the paper type and paper size, and then click [OK].9. Click [Close].Specifying a Custom Paper Size1. On the [Start] menu, click [All Programs].2. Click [Smart Organizing Monitor].3. Click [Smart Organizing Monitor Status].4. If the machine you are using is not selected, click [Connect Printer], and then select themachine's model.5. Click [OK].6. On the [User Tools] tab, click [Printer Configuration].If you are requested to enter an access code, enter the access code and then click [OK].The default access code is "Admin".7. On the [Paper Input] tab, select [Custom Paper Size] in the [Paper Size] list.8. In the [Unit] list, select [mm] or [inch].9. In the [Horizontal] box and [Vertical] box, specify the width and length.10. Click [OK].11. Click [Close].2. Paper Specifications and Adding Paper52 opal-p3_mf3_com_user_guide_gb_00228428_eng.xmlDraft 2016/05/27](https://usermanual.wiki/Ricoh/MFSP220SFNW1/User-Guide-3076626-Page-53.png)
![Specifying Paper Type and Paper Size UsingWeb Image MonitorThis section describes how to specify the paper size and paper type using Web Image Monitor.1. Start the web browser and access the machine by entering its IP address.2. Click [System Settings].3. Select the paper type and paper size for the desired tray.4. Enter the administrator password if required.5. Click [OK].6. Close the web browser.Specifying a Custom Paper Size1. Start the web browser and access the machine by entering its IP address.2. Click [System Settings].3. Select [Custom Size] in the [Paper Size] list.4. Select [mm] or [inch] and specify the width and length.5. Enter the administrator password if required.6. Click [OK].7. Close the web browser.Specifying Paper Type and Paper Size Using Web Image Monitoropal-p3_mf3_com_user_guide_gb_00229282_eng.xml 53Draft 2016/05/27](https://usermanual.wiki/Ricoh/MFSP220SFNW1/User-Guide-3076626-Page-54.png)
![Specifying Paper Type and Paper Size Usingthe Printer Driver• Make sure that the paper type and size specified with the printer driver matches the paper typeand size loaded in the tray. Since this machine does not detect the paper size automatically, thetype or size of the paper may be mismatched and the print job may not print correctly.1. Open the [Printing Preferences] dialog box from the printer driver.For information of how to open the printer driver properties from [Devices and Printers], seepage 70 "Displaying the Printing Preferences Dialog Box".2. Click the [Paper] tab.3. In the [Input Tray] list, select the paper tray you want to print onto.4. In the [Paper Type] list, select the type of paper that is loaded in the paper tray.5. In the [Document Size] list, select the paper size that is loaded in the paper tray.6. Click [OK].2. Paper Specifications and Adding Paper54 opal-p3_mf3_com_user_guide_gb_00228429_eng.xmlDraft 2016/05/27](https://usermanual.wiki/Ricoh/MFSP220SFNW1/User-Guide-3076626-Page-55.png)
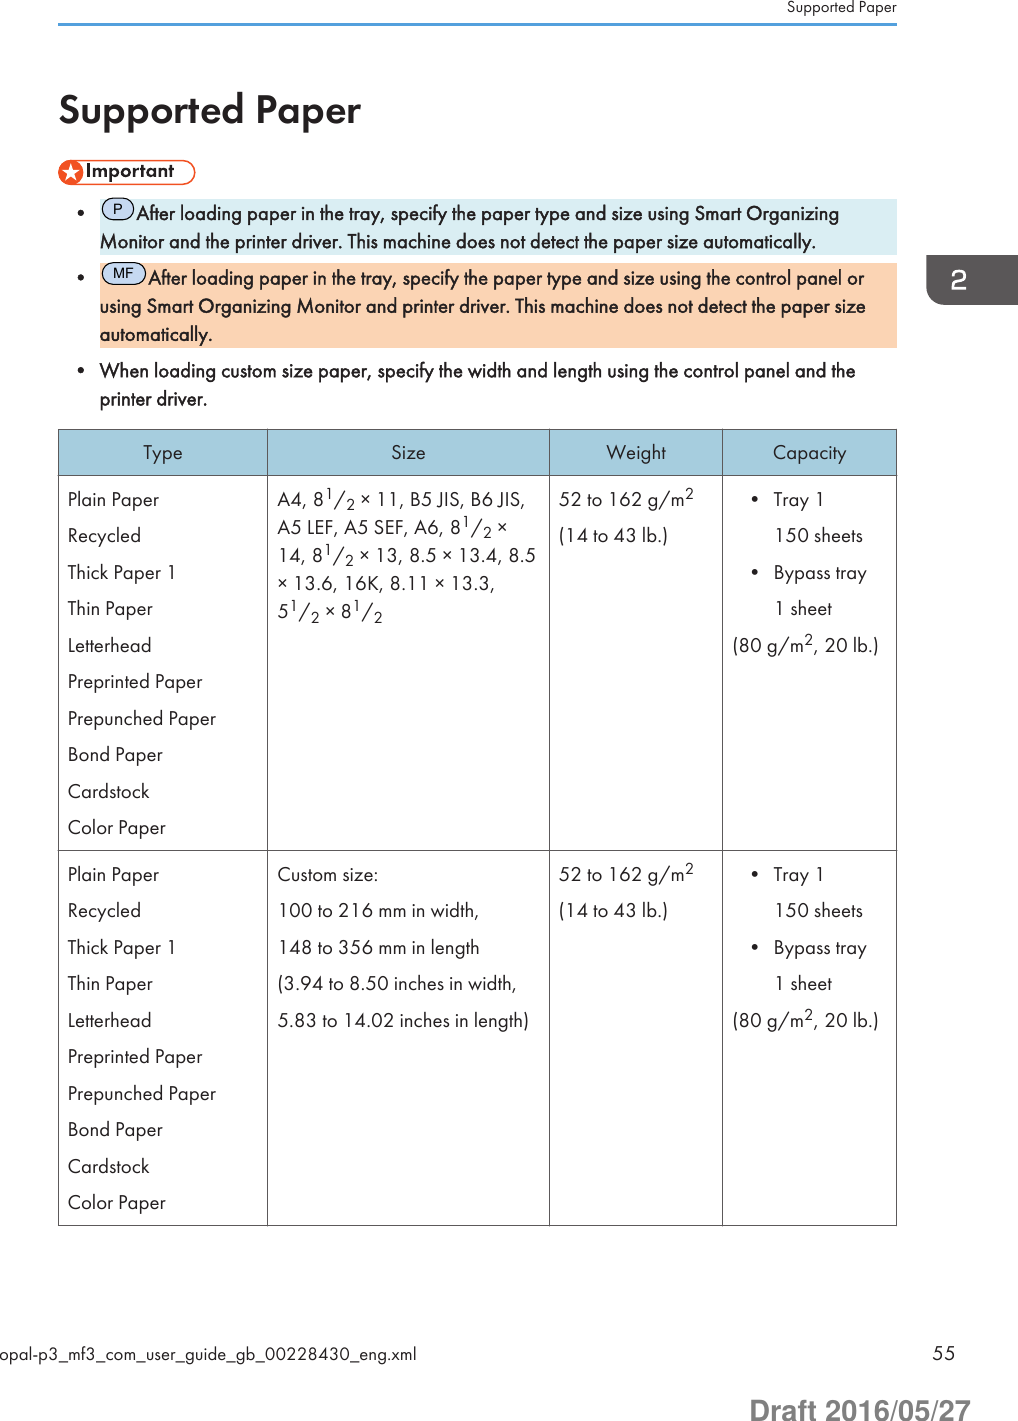
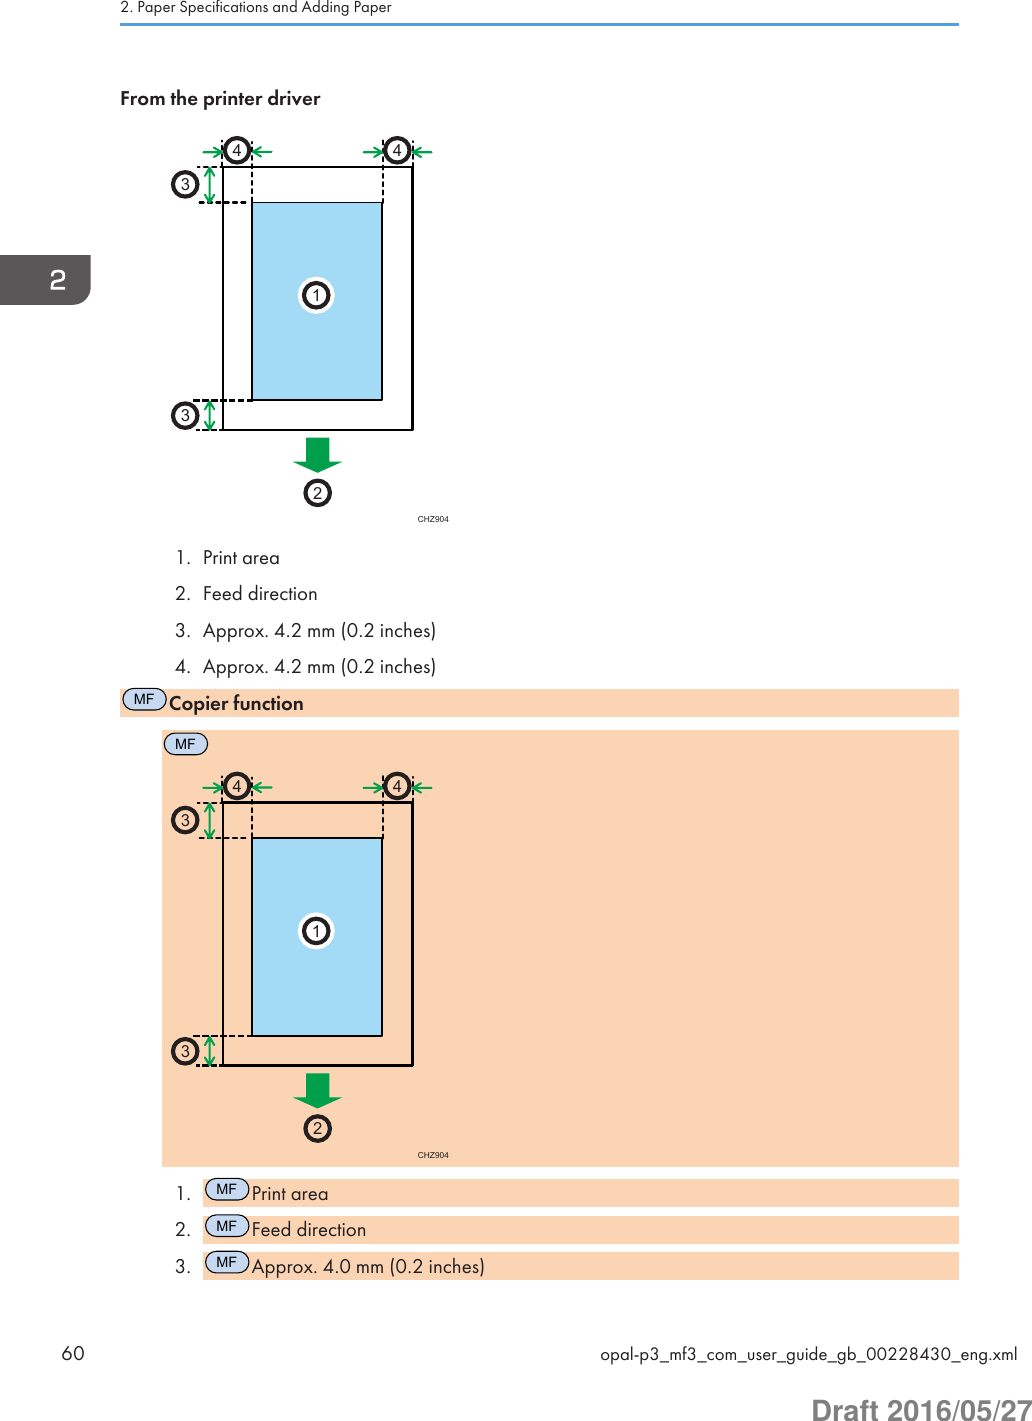
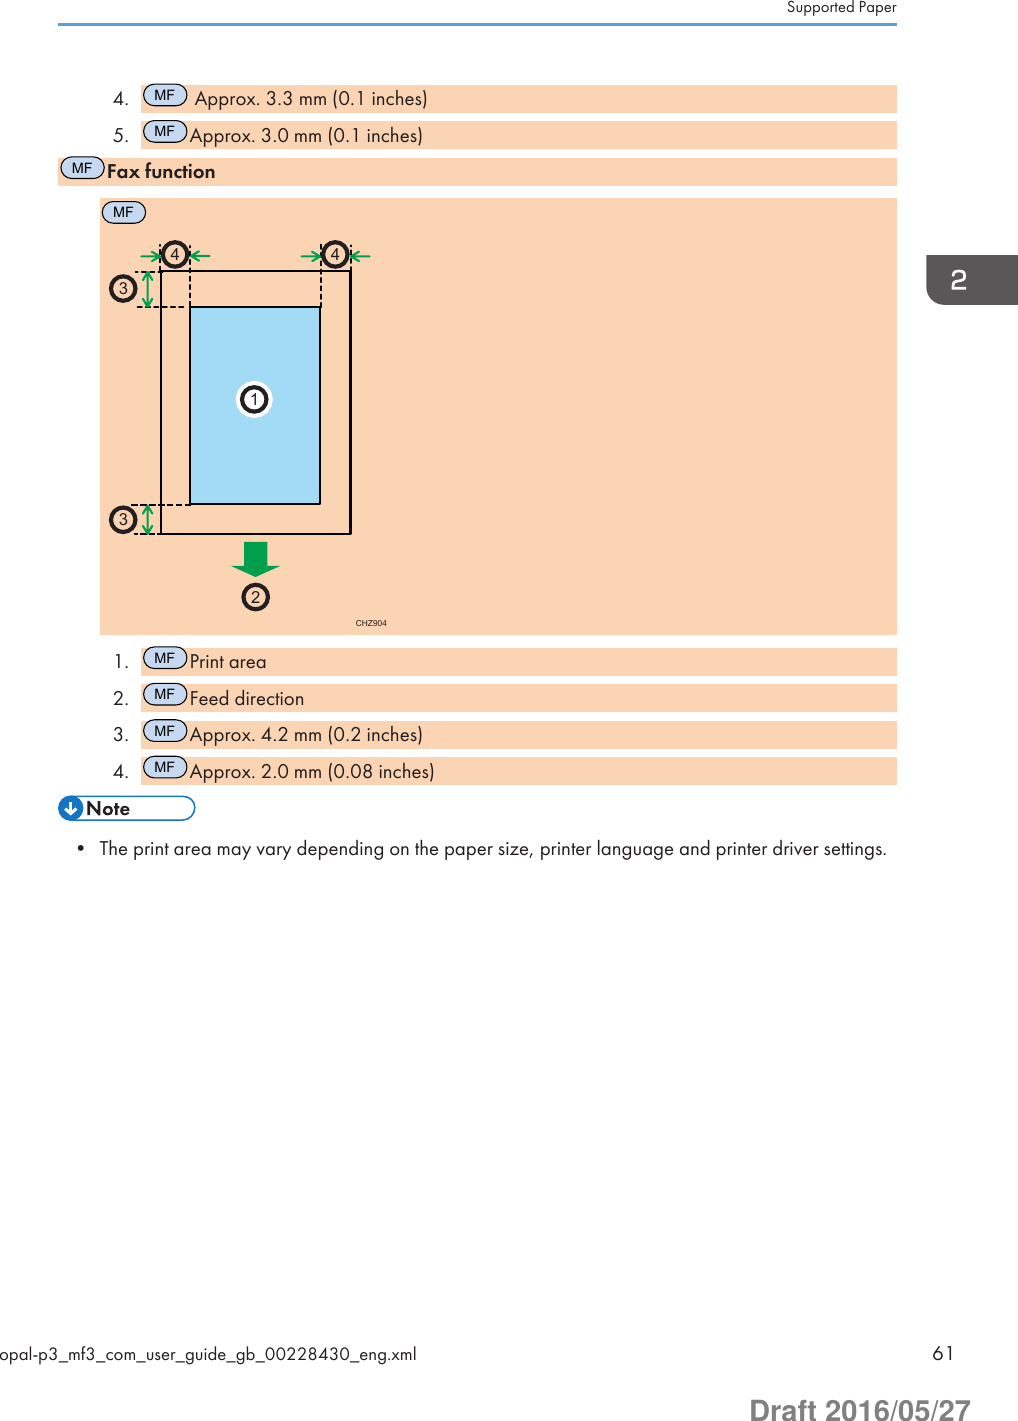
![Item DescriptionSupported paper tray Tray 1 and bypass trayNotes If the paper thickness is outside the specified range, select [Thin Paper],[Plain Paper 1], [Thick Paper 1], or [Thick Paper 2].Color PaperItem DescriptionPaper thickness 75 to 90 g/m2 (20 to 24 lb.)Supported paper tray Tray 1 and bypass trayNotes If the paper thickness is outside the specified range, select [Thin Paper],[Plain Paper 1], [Thick Paper 1], or [Thick Paper 2].Preprinted PaperItem DescriptionPaper thickness 75 to 90 g/m2 (20 to 24 lb.)Supported paper tray Tray 1 and bypass trayNotes If the paper thickness is outside the specified range, select [Thin Paper],[Plain Paper 1], [Thick Paper 1], or [Thick Paper 2].Prepunched PaperItem DescriptionPaper thickness 75 to 90 g/m2 (20 to 24 lb.)Supported paper tray Tray 1 and bypass trayNotes If the paper thickness is outside the specified range, select [Thin Paper],[Plain Paper 1], [Thick Paper 1], or [Thick Paper 2].Supported Paperopal-p3_mf3_com_user_guide_gb_00228430_eng.xml 57Draft 2016/05/27](https://usermanual.wiki/Ricoh/MFSP220SFNW1/User-Guide-3076626-Page-58.png)
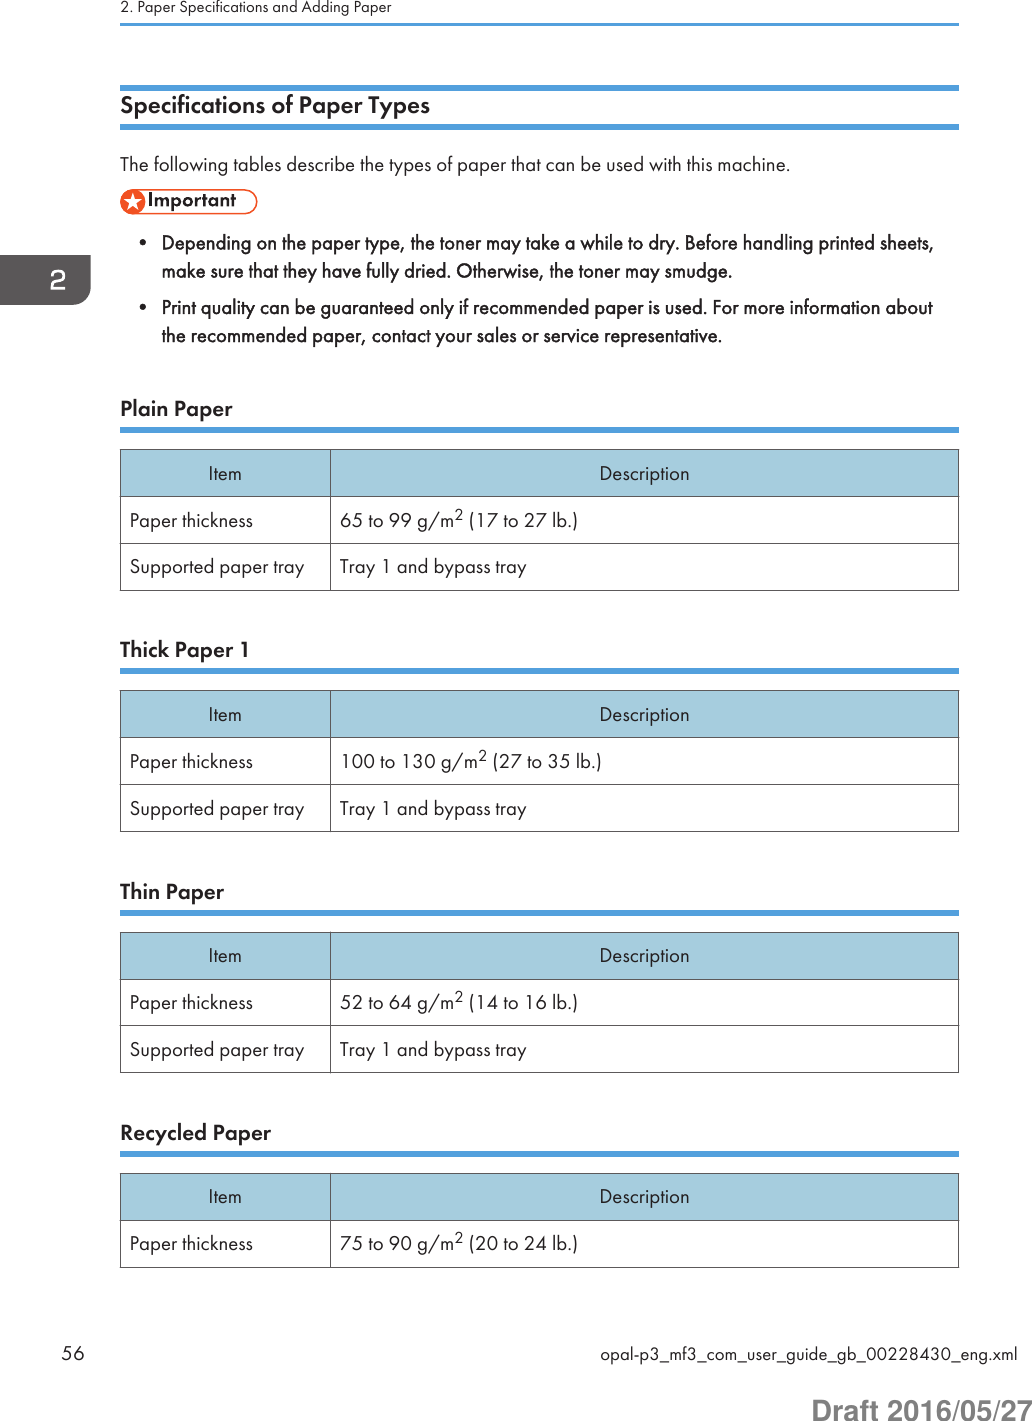
![LetterheadItem DescriptionPaper thickness 100 to 130 g/m2 (27 to 35 lb.)Supported paper tray Tray 1 and bypass trayNotes Paper that has a thickness outside the specified range cannot be printedonto.Bond PaperItem DescriptionPaper thickness 105 to 160 g/m2 (28 to 43 lb.)Supported paper tray Tray 1 and bypass trayNotes If the paper thickness is outside the specified range, select [Thin Paper],[Plain Paper 1], [Thick Paper 1], or [Thick Paper 2].CardstockItem DescriptionPaper thickness 100 to 130 g/m2 (27 to 35 lb.)Supported paper tray Tray 1 and bypass trayNotes If the paper thickness is outside the specified range, select [Thin Paper],[Plain Paper 1], [Thick Paper 1], or [Thick Paper 2].Non-Recommended Paper TypesDo not use the following types of paper:• Ink-jet printer paper• Bent, folded, or creased paper• Curled or twisted paper• Torn paper• Wrinkled paper2. Paper Specifications and Adding Paper58 opal-p3_mf3_com_user_guide_gb_00228430_eng.xmlDraft 2016/05/27](https://usermanual.wiki/Ricoh/MFSP220SFNW1/User-Guide-3076626-Page-59.png)
![Configuring Option Settings and Paper Settingsfor the PrinterThis section explains how to configure settings on the printer driver for the options installed on themachine and for the paper settings for each tray.When bidirectional communication works correctly, your computer obtains information about option,paper size and paper feed direction settings from the machine automatically. Bidirectionalcommunication also allows you to monitor machine status.To support bidirectional communication, the following conditions must be met:Operating systemWindows Vista/7/8/8.1/10, Windows Server 2003/2003R2/2008/2008R2/2012/2012R2When connected with the network• The Standard TCP/IP port must be used.• In addition to the above, one of the following conditions must also be met:• The TCP/IP protocol or the IPP protocol is used. (When using the IPP protocol, the IPPport name must include the IP address.)When connected with USB• The machine must be connected to the computer's USB port using the USB interface cable.• The computer must support bidirectional communication.• [Enable bidirectional support] must be selected, and [Enable printer pooling] must not beselected on the [Ports] tab with the printer driver.When Using WindowsThis section describes how to set up option and setting of paper size for each tray on your computermanually.The following procedure is explained using Windows 7 as an example.• Manage Printers permission is required to change the printer properties. Log on as anAdministrators group member.1. On the [Start] menu, select [Devices and Printers].2. Right-click the machine's icon, and then click [Printer properties].3. Click the [Accessories] tab.4. Select options installed from the [Options] area, and then make the necessary settings.3. Printing Documents68 opal-p3_mf3_com_user_guide_gb_00228435_eng.xmlDraft 2016/05/27](https://usermanual.wiki/Ricoh/MFSP220SFNW1/User-Guide-3076626-Page-69.png)
![5. Click [Paper Size Settings] tab.6. In [Input Tray:] select which trays to use, and then, in [Paper Size:] select the size of thepaper that you want to load in each tray.Click [Update] to apply the setting for each tray.7. Click [Apply].8. Click [OK] to close the printer properties window.When Using Mac OS XThis section describes how to set up option and setting of paper size for each tray on your computermanually. The following procedure is explained using Mac OS X 10.11 as an example.1. Start System Preferences.2. Click [Printers & Scanners].3. Select the printer you are using, and then click [Options & Supplies...].4. Click [Options], and then configure settings as needed.5. Click [OK].6. Quit System Preferences.Configuring Option Settings and Paper Settings for the Printeropal-p3_mf3_com_user_guide_gb_00228435_eng.xml 69Draft 2016/05/27](https://usermanual.wiki/Ricoh/MFSP220SFNW1/User-Guide-3076626-Page-70.png)
![Displaying the Printing Preferences Dialog BoxTo change the default settings of the printer driver, make settings in the [Printing Preferences] dialog box.To change the default settings of all applications, open the [Printing Preferences] dialog box from theOS. For details, see page 70 "Displaying the Printing Preferences Dialog Box from the [Start] Menu".To change the default settings of a specific application, open the [Printing Preferences] dialog box fromthat application. For details, see page 70 "Displaying the Printing Preferences Dialog Box in anApplication".Displaying the Printing Preferences Dialog Box from the [Start] MenuThis section explains how to open the [Printing Preferences] dialog box from [Devices and Printers].• When the printer driver is distributed from the print server, the setting values specified by the serverare displayed as the default for [Printing Defaults...].• You cannot configure different print settings for each user. The settings configured in this dialog boxare used as the default.1. On the [Start] menu, click [Devices and Printers].2. Right-click the icon of the printer you want to use.3. Click [Printing Preferences].Displaying the Printing Preferences Dialog Box in an ApplicationYou can make printer settings for a specific application. To make printer settings for a specificapplication, open the [Printing Preferences] dialog box from that application.The settings displayed in the [Printing Preferences] dialog box opened from the [Devices and Printers]window are applied as the default in the [Printing Preferences] dialog box opened in an application.When printing from an application, modify the settings as required.The screens displayed may differ depending on the application. The following procedure explains howto print documents from an application using WordPad in Windows 7 as an example.Displaying the Printing Preferences Dialog Box in an Application When UsingWindows1. Click the WordPad menu button in the upper left corner of the window, and then click[Print].2. In the [Select Printer] list, select the printer you want to use.3. Printing Documents70 opal-p3_mf3_com_user_guide_gb_00228436_eng.xmlDraft 2016/05/27](https://usermanual.wiki/Ricoh/MFSP220SFNW1/User-Guide-3076626-Page-71.png)
![3. Click [Preferences].• Procedures for opening the [Printing Preferences] dialog box vary depending on the application.For details, see the printer driver Help or the manuals provided with the application.Displaying the Printing Preferences Dialog Box in an Application When Using Mac OSXThe following procedure is explained using Mac OS X 10.11 as an example.1. Open the document to print.2. Select [Print...] on the [File] menu.3. Check that the machine name or IP address you are using is selected in the [Printer:]popup menu.If the machine name or IP address you are using is not selected in the [Printer:] list, click the list, andthen select the machine.Displaying the Printing Preferences Dialog Boxopal-p3_mf3_com_user_guide_gb_00228436_eng.xml 71Draft 2016/05/27](https://usermanual.wiki/Ricoh/MFSP220SFNW1/User-Guide-3076626-Page-72.png)
![Basic Operation of PrintingThe following procedure explains how to perform basic printing.For details of printing options, see the printer driver Help.1. Open the printer properties dialog box in your document's application.For details about each setting, click [Help]. You can also click the information icons to showconfiguration information.2. Set printing options as necessary, and then click [OK].The printer properties dialog box closes.3. Click [Print].• If a paper jam occurs, printing stops after the current page has been printed out. After the jammedpaper is removed, printing restarts from the jammed page automatically. For details about how toremove the jammed paper, see page 273 "Clearing Misfeeds".If a Paper Mismatch OccursThe machine reports an error if the paper size does not match the print job's settings when [SizeMismatch Detection] under [Tray Paper Settings] is enabled.There are two ways to resolve these errors:Continue printing using mismatched paperUse the form-feed function to ignore the error and print using mismatched paper.Cancel the print jobCancel printing.3. Printing Documents72 opal-p3_mf3_com_user_guide_gb_00228437_eng.xmlDraft 2016/05/27](https://usermanual.wiki/Ricoh/MFSP220SFNW1/User-Guide-3076626-Page-73.png)
![MF• For details about [Size Mismatch Detection], see page 187 "Tray Paper Settings".• If [Auto Continue] under [System Settings] is enabled, the machine ignores the paper type and sizesettings and prints on whatever paper is loaded. Printing stops temporarily when the error isdetected, and restarts automatically after about ten seconds using the settings made on the controlpanel.• For details about [Auto Continue], see page 182 "System Settings".MFContinuing printing using mismatched paperIf the paper is too small for the print job, the printed image will be cropped.1. If the error message is displayed, press [FormFeed].PContinuing printing using mismatched paperIf the paper is too small for the print job, the printed image will be cropped.1. If the Alert indicator lights up, press the [Start] key.DSG128Canceling a Print JobYou can cancel print jobs using either the machine's control panel or your computer, depending on thestatus of the job.Canceling a print job before printing has started• Windows1. Double-click the printer icon on the task tray of your computer.Basic Operation of Printingopal-p3_mf3_com_user_guide_gb_00228437_eng.xml 73Draft 2016/05/27](https://usermanual.wiki/Ricoh/MFSP220SFNW1/User-Guide-3076626-Page-74.png)
![2. Select the print job you want to cancel, click the [Document] menu, and then click[Cancel].3. Click [Yes].• If you cancel a print job that has already been processed, printing may continue for a few pagesbefore being canceled.• It may take a while to cancel a large print job.MFCanceling a print job while printing1. Press the [Clear/Stop] key.DSH144PCanceling a print job while printing1. Press the [Stop] key twice.DSG130• The first time you press the [Stop] key pauses the job, the second time cancels the job.3. Printing Documents74 opal-p3_mf3_com_user_guide_gb_00228437_eng.xmlDraft 2016/05/27](https://usermanual.wiki/Ricoh/MFSP220SFNW1/User-Guide-3076626-Page-75.png)
![MFCopier Mode ScreenThis section provides information about the screen when the machine is in copier mode.By default, the display shows the copier screen when the machine is turned on.If the scanner or fax screen is shown on the display, press the [Copy] key on the control panel to switchto the copier screen.DSH146Screen in standby modeCVW2001. Current status or messagesDisplays the current status or messages.2. Current settingsDisplays the current tray, reproduction ratio, and scan settings.3. Selection key itemsDisplays the functions you can use by pressing the corresponding selection keys.4. Copy quantityDisplays the current copy quantity. You can change the copy quantity using the number keys.• The start-up mode can be specified in the [Function Priority] setting under [Admin. Tools]. Fordetails, see page 189 "Administrator Settings".4. Copying Originals76 opal-p3_mf3_com_user_guide_gb_00228441_eng.xmlDraft 2016/05/27](https://usermanual.wiki/Ricoh/MFSP220SFNW1/User-Guide-3076626-Page-77.png)
![MFBasic Operation of Copying• The original in the ADF takes precedence over the original on the exposure glass if you placeoriginals both in the ADF and on the exposure glass.1. Press the [Copy] key.DSH1462. Place the original on the exposure glass or in the ADF. To place the original, see page 62"Placing Originals".If necessary, configure advanced photocopy settings.3. To make multiple copies, enter the number of copies using the number keys.4. Press the [Start] key.DSH147• The maximum number of copies is 99.• You can change the paper tray for the current job by pressing the [ ] or [ ] key. You can alsoselect to change the paper tray automatically according to the paper size (A4, Letter, or 16K).• You can select the paper tray for printing out copies in [Select Paper] under [Copier Features]. Ifyou set the machine to switch between tray 1 and the bypass tray automatically depending on thepaper size in this setting, you can also specify the tray the machine uses first in [Paper Tray Priority]Basic Operation of Copyingopal-p3_mf3_com_user_guide_gb_00228442_eng.xml 77Draft 2016/05/27](https://usermanual.wiki/Ricoh/MFSP220SFNW1/User-Guide-3076626-Page-78.png)
![under [Tray Paper Settings]. For [Select Paper], see page 168 "Copier Features Settings". For[Paper Tray Priority], see page 187 "Tray Paper Settings".• When making multiple copies of a multi-page document, you can select whether copies are outputin collated sets, or in page batches in the [Sort] setting under [Copier Features]. [Sort] cannot beused with the bypass tray. For [Sort], see page 168 "Copier Features Settings".• If a paper jam occurs, printing stops after the current page has been printed out. After the jammedpaper is removed, printing restarts from the jammed page automatically.• If a scanning jam occurs in the ADF, copying is canceled immediately. In this case, copy theoriginals again starting from the jammed page. For the direction to remove the jammed paper, seepage 273 "Clearing Misfeeds".Canceling a CopyWhile scanning the originalIf copying is canceled while the machine is scanning the original, copying is cancelled immediatelyand there is no printout.When the original is set in the ADF, scanning stops immediately but pages that have already beenscanned completely will be copied.While printingIf copying is canceled during printing, the photocopy process is canceled after the current pagehas been printed out.Follow the procedure below to cancel copying.1. Press the [Copy] key.DSH1464. Copying Originals78 opal-p3_mf3_com_user_guide_gb_00228442_eng.xmlDraft 2016/05/27](https://usermanual.wiki/Ricoh/MFSP220SFNW1/User-Guide-3076626-Page-79.png)
![2. Press the [Clear/Stop] key.DSH144Basic Operation of Copyingopal-p3_mf3_com_user_guide_gb_00228442_eng.xml 79Draft 2016/05/27](https://usermanual.wiki/Ricoh/MFSP220SFNW1/User-Guide-3076626-Page-80.png)
![MFMaking Enlarged or Reduced CopiesThere are two ways to set the scaling ratio: using a preset ratio or manually specifying a customizedratio.Preset ratioCES103• (mainly Europe and Asia)50%, 71%, 82%, 93%, 122%, 141%, 200%, 400%• (mainly North America)50%, 65%, 78%, 93%, 129%, 155%, 200%, 400%50%, 71%, 82%, 93%, 122%, 141%, 200%, 400%Custom ratioCES10625% to 400% in 1% increments.Specifying Reduce/Enlarge1. Press [Scale]. 4. Copying Originals80 opal-p3_mf3_com_user_guide_gb_00228443_eng.xmlDraft 2016/05/27](https://usermanual.wiki/Ricoh/MFSP220SFNW1/User-Guide-3076626-Page-81.png)
![2. Press [Reduce], [Enlarge], or [Zoom].For [Reduce] or [Enlarge], press the [ ], [ ], [ ], or [ ] key to select the desired ratio. For [Zoom],specify the desired ratio using the number keys.3. Press the [OK] key.Making Enlarged or Reduced Copiesopal-p3_mf3_com_user_guide_gb_00228443_eng.xml 81Draft 2016/05/27](https://usermanual.wiki/Ricoh/MFSP220SFNW1/User-Guide-3076626-Page-82.png)
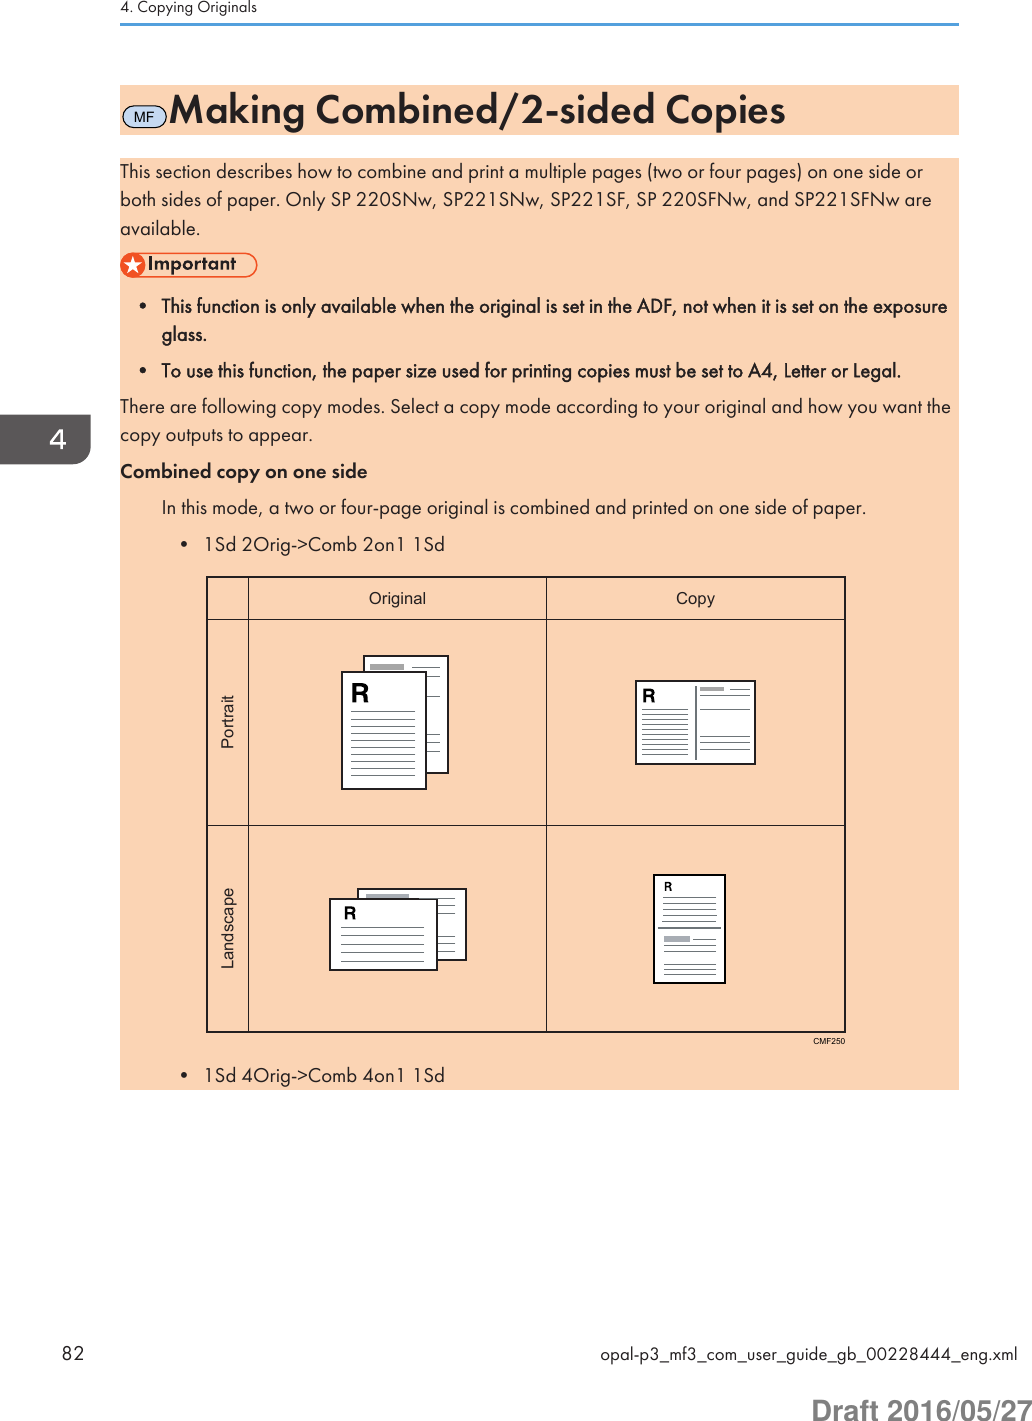
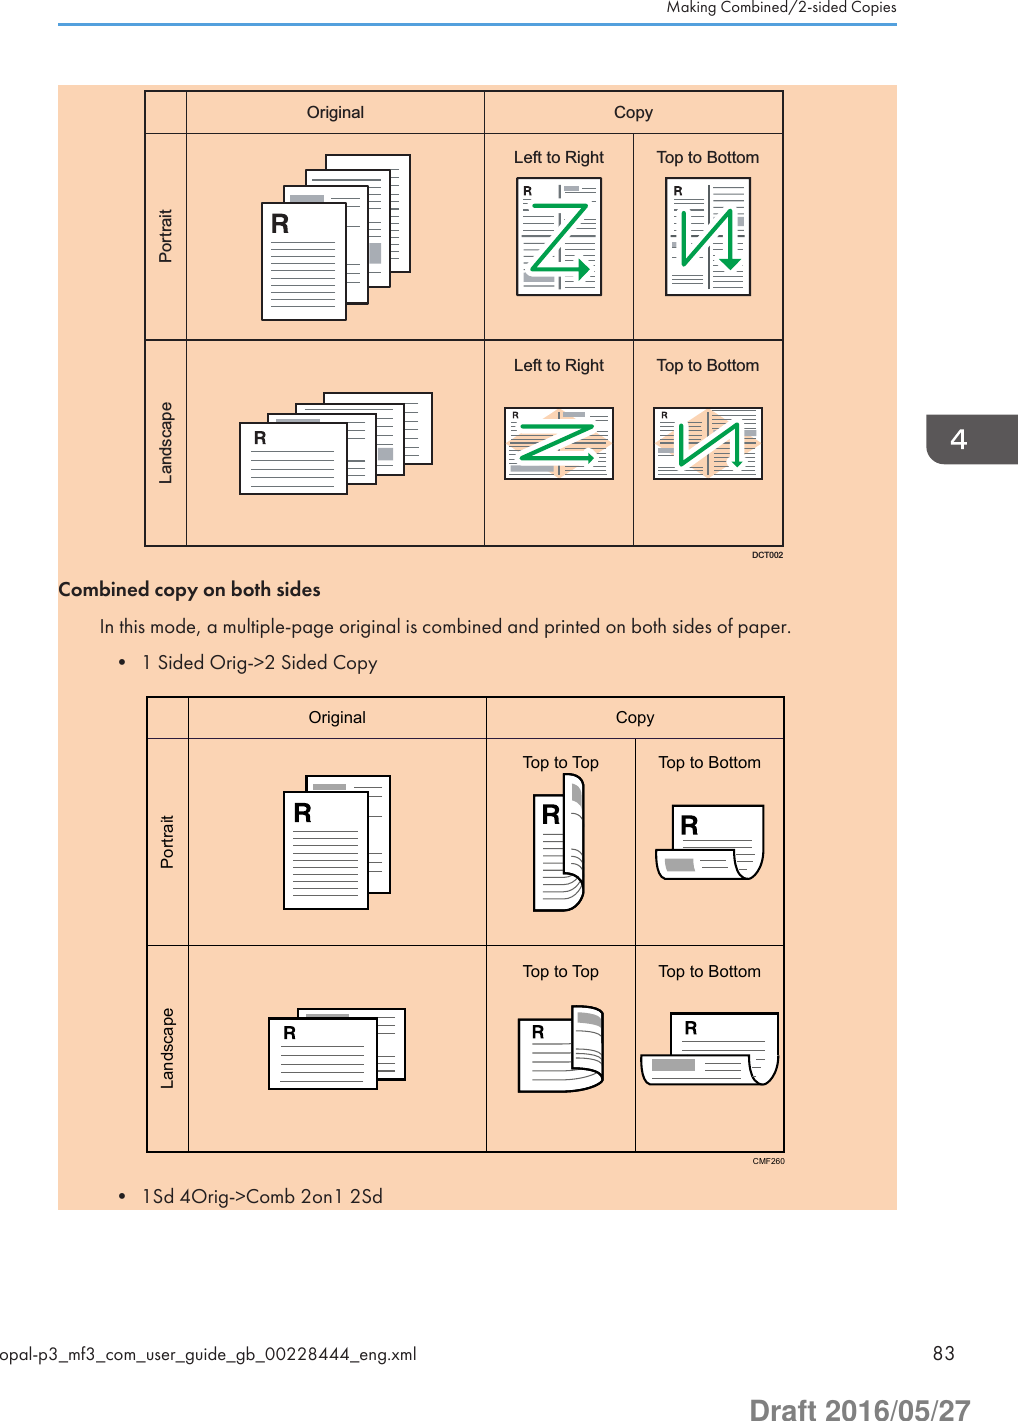
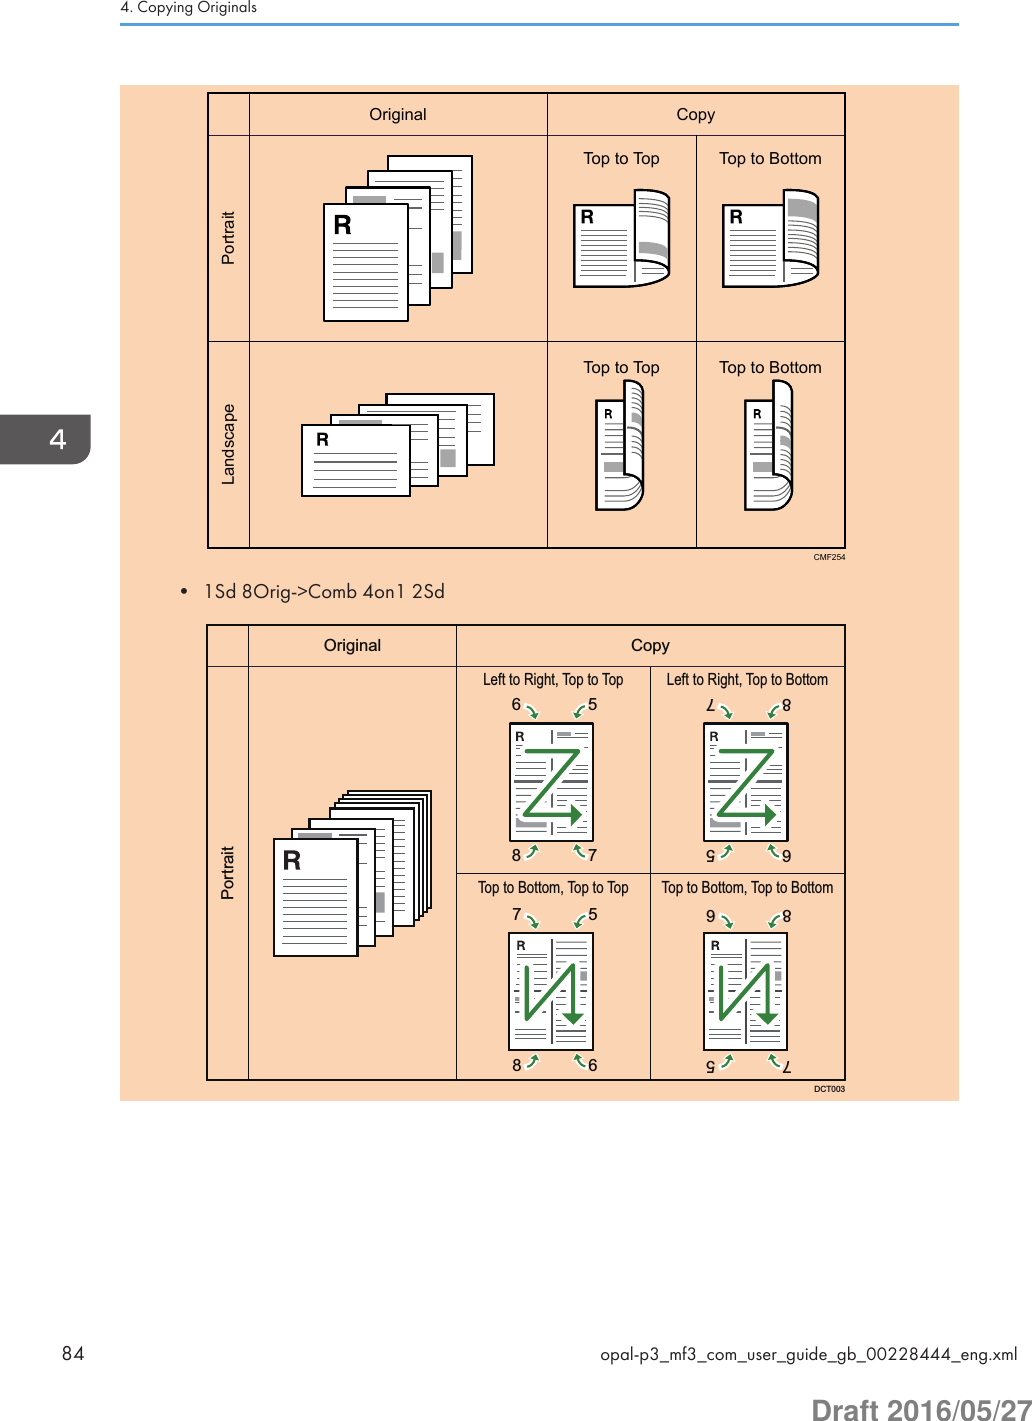
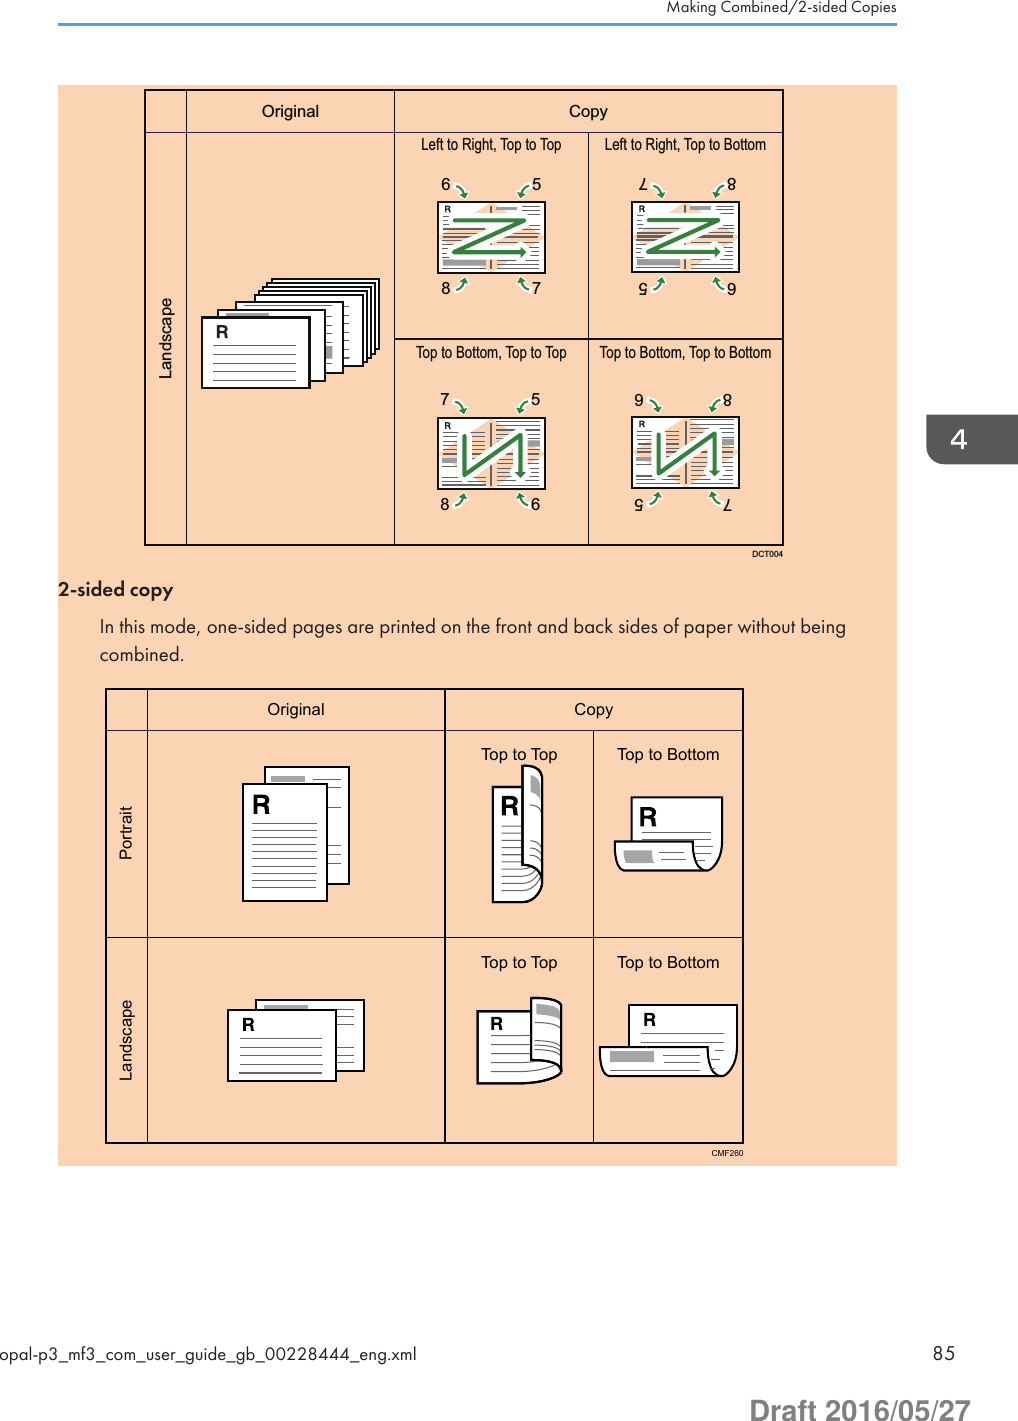
![Specifying Combined and 2-sided Copies1. Press the [Copy] key.DSH146With Type 1 models, start from Step 2. If ID card copy mode is being displayed, press the [Shortcutto Func.] key again to switch to normal copier mode.2. Press the [ ] or [ ] key.3. Press the [ ] or [ ] key to select [Duplex/Combine].4. Press the [ ] or [ ] key to select the desired copy mode, and then press the [OK] key.5. Press the [ ] or [ ] key to select paper orientation and page order, and then press the[OK] key.The screen will show the selected copy mode.• After you place the originals, press the [Start] key within the time specified in [System Auto ResetTimer]. Otherwise, the job is canceled. For details, see page 189 "Administrator Settings".4. Copying Originals86 opal-p3_mf3_com_user_guide_gb_00228444_eng.xmlDraft 2016/05/27](https://usermanual.wiki/Ricoh/MFSP220SFNW1/User-Guide-3076626-Page-87.png)
![MFCopying an ID CardThis section describes how to copy the front and back sides of an ID card or other small documents ontoone side of a sheet of paper.• This function is available only when the original is set on the exposure glass, not when it is set in theADF.• To use this function, the paper size used for printing copies must be set to A6, A5, A4, Half Letter orLetter.Printed paper size Scanned paper sizeA4 A5 (148×210 mm)Letter Half Letter (140×216 mm)A5 A6 (105×148 mm)Half Letter Quarter Letter (108×140 mm)A6 A7 (74×105 mm)CES1651. Press the [Shortcut to Func.] key.DSH141Copying an ID Cardopal-p3_mf3_com_user_guide_gb_00228445_eng.xml 87Draft 2016/05/27](https://usermanual.wiki/Ricoh/MFSP220SFNW1/User-Guide-3076626-Page-88.png)
![To make the [Shortcut to Func.] key enable ID card copy mode for the current job, [Shortcut toFunction] under [Admin. Tools] must be set to [ID Card Copy Mode]. You can also assign thesetting using Web Image Monitor.For [Shortcut to Function], see page 189 "Administrator Settings".2. To make multiple copies, enter the number of copies using the number keys.3. Place the original in the upper-left corner of the exposure glass.DCT8404. Press the [Start] key.A message prompting you to place the original back side down on the exposure glass appears onthe display.5. Place the original on the exposure glass back side down and with the top to the rear ofthe machine within the time specified in [System Auto Reset Timer], and then press the[Start] key again.• For the ID card copy function, you can set the machine to print a line in the middle of the printedpaper. Specify [ID Card Center Line] under [Copier Features].• You can change the scanning size for the ID card function. Specify [ID Card Size] under [CopierFeatures].4. Copying Originals88 opal-p3_mf3_com_user_guide_gb_00228445_eng.xmlDraft 2016/05/27](https://usermanual.wiki/Ricoh/MFSP220SFNW1/User-Guide-3076626-Page-89.png)
![MFSpecifying the Scan Settings for CopyingThis section describes how to specify image density and scan quality for the current job.Adjusting Image DensityThere are five image density levels. The higher the density level, the darker the printout.1. Press the [Density] key.DSH1532. Press the [ ] or [ ] key to select the desired density level, and then press the [OK] key.• You can change the machine's default [Density] setting to always make copies with a specificdensity level. For details, see page 168 "Copier Features Settings".Selecting the Document Type According to OriginalThere are three document types:MixedSelect this when the original contains both text and photographs or pictures.TextSelect this when the original contains only text and no photographs or pictures.PhotoSelect this when the original contains only photographs or pictures. Use this mode for the followingtypes of original:• Photographs• Pages that are entirely or mainly photographs or pictures, such as magazine pages.Specifying the Scan Settings for Copyingopal-p3_mf3_com_user_guide_gb_00228446_eng.xml 89Draft 2016/05/27](https://usermanual.wiki/Ricoh/MFSP220SFNW1/User-Guide-3076626-Page-90.png)
![Vou.Select this when copying a voucher. This function is available only when the original is set on theexposure glass, not when it is set in the ADF.1. Press the [Image Quality] key.DSH1482. Press the [ ] or [ ] key to select the desired document type, and then press the [OK] key.• You can change the machine's default [Original Type] setting to always make copies with aspecific document type. For details, see page 168 "Copier Features Settings".4. Copying Originals90 opal-p3_mf3_com_user_guide_gb_00228446_eng.xmlDraft 2016/05/27](https://usermanual.wiki/Ricoh/MFSP220SFNW1/User-Guide-3076626-Page-91.png)
![MFScanner Mode ScreenThis section provides information about the screen in scanner mode.By default, the display shows the copier screen when the machine is turned on. If the copier or faxscreen is shown on the display, press the [Scanner] key on the control panel to switch to the scannerscreen.DSH149Screen in standby modeDSH150ReadySpecify Dest.A4Scn Size Dest.300 x 300dpi1321. Current status or messagesDisplays the current status or messages.2. Current settingsDisplays the current scanning mode and scan settings.• When "Specify Dest." is displayed:Scan to E-mail, Scan to FTP, or Scan to Folder functions can be used.3. Selection key itemsDisplays the functions you can use by pressing the corresponding selection keys.• The machine's default mode at power on can be specified in the [Function Priority] setting under[Admin. Tools]. For [Function Priority], see page 189 "Administrator Settings".5. Scanning Originals92 opal-p3_mf3_com_user_guide_gb_00228452_eng.xmlDraft 2016/05/27](https://usermanual.wiki/Ricoh/MFSP220SFNW1/User-Guide-3076626-Page-93.png)
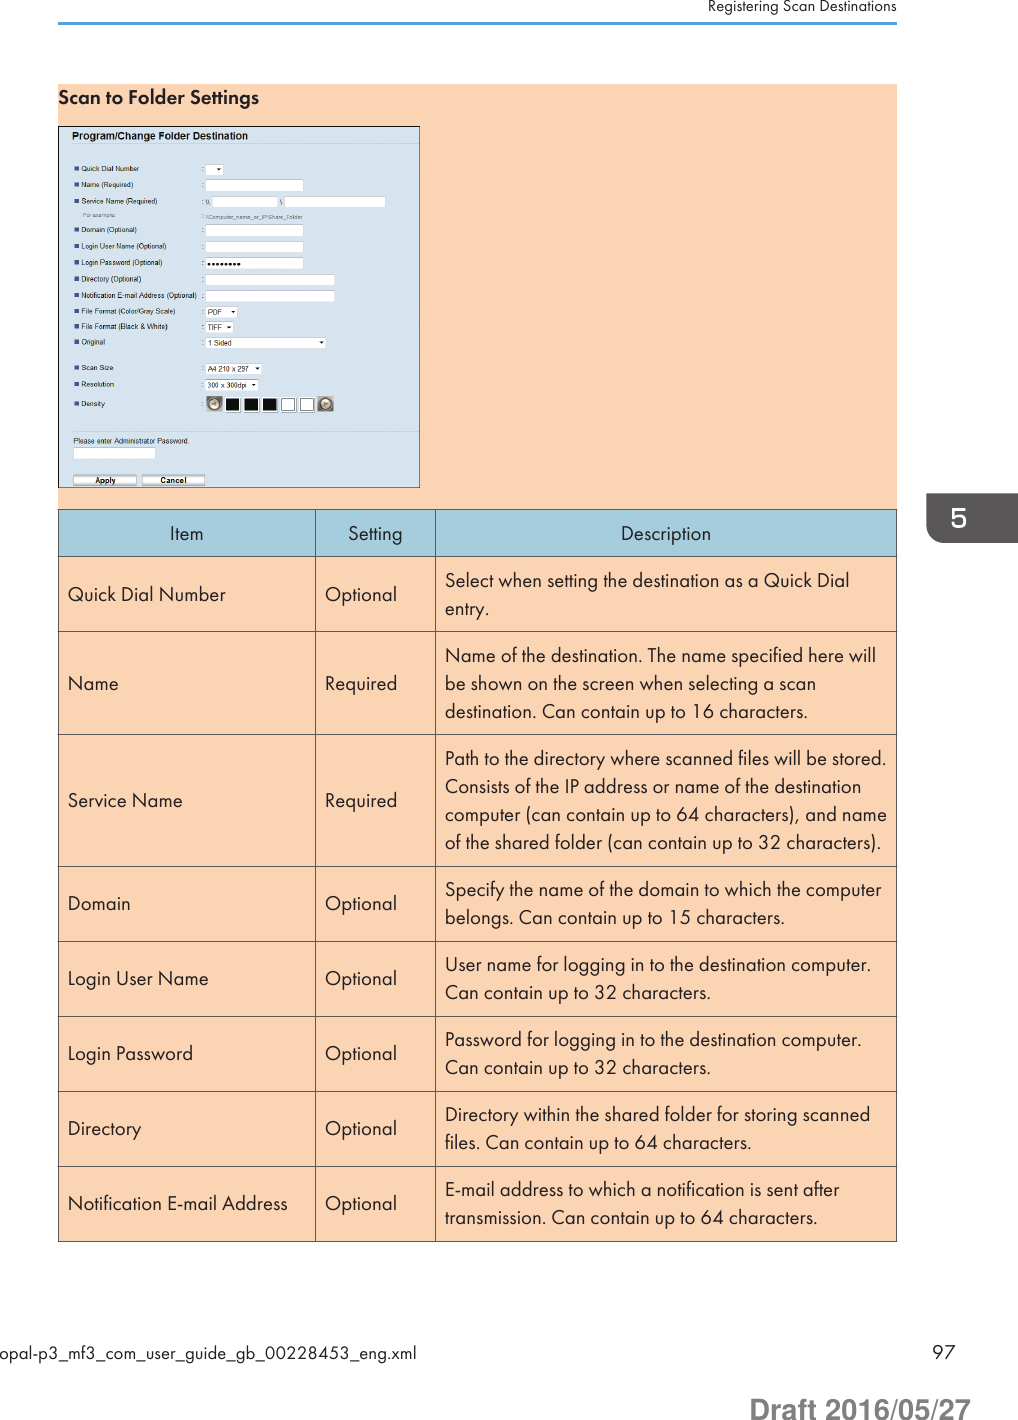
![MFRegistering Scan DestinationsThis section describes how to register scan destinations in the Address Book. To send scanned files to ane-mail address (Scan to E-mail), FTP server (Scan to FTP), or a shared folder on a network computer(Scan to Folder), you must first register the destination in the Address Book using Web Image Monitor.• The Address Book data could be damaged or lost unexpectedly. The manufacturer shall not beresponsible for any damages resulting from such data loss. Be sure to create backup files of theAddress Book data periodically.• Depending on your network environment, the Scan to FTP and Scan to Folder functions mayrequire a user name and password to be correctly entered in the destination information. In suchcases, after registering destinations, check that the user name and password are correctly enteredby sending test documents to those destinations.The Address Book can contain up to 100 entries, including 8 Quick Dial entries.Destinations registered as Quick Dial entries can be selected by pressing the corresponding One Touchbutton (only SP 221SF, SP 220SFNw, and SP 221SFNw).1. Start the web browser and access the machine by entering its IP address.2. Click [Quick Dial Destination] or [Scan Destination].3. From the [Destination Type] list, select [E-mail Address], [FTP], or [Folder].4. Register information as necessary.The information you must register varies depending on the destination type. For details, see thetables below.5. Enter the administrator password if required.6. Click [Apply].7. Close the web browser.Registering Scan Destinationsopal-p3_mf3_com_user_guide_gb_00228453_eng.xml 93Draft 2016/05/27](https://usermanual.wiki/Ricoh/MFSP220SFNW1/User-Guide-3076626-Page-94.png)
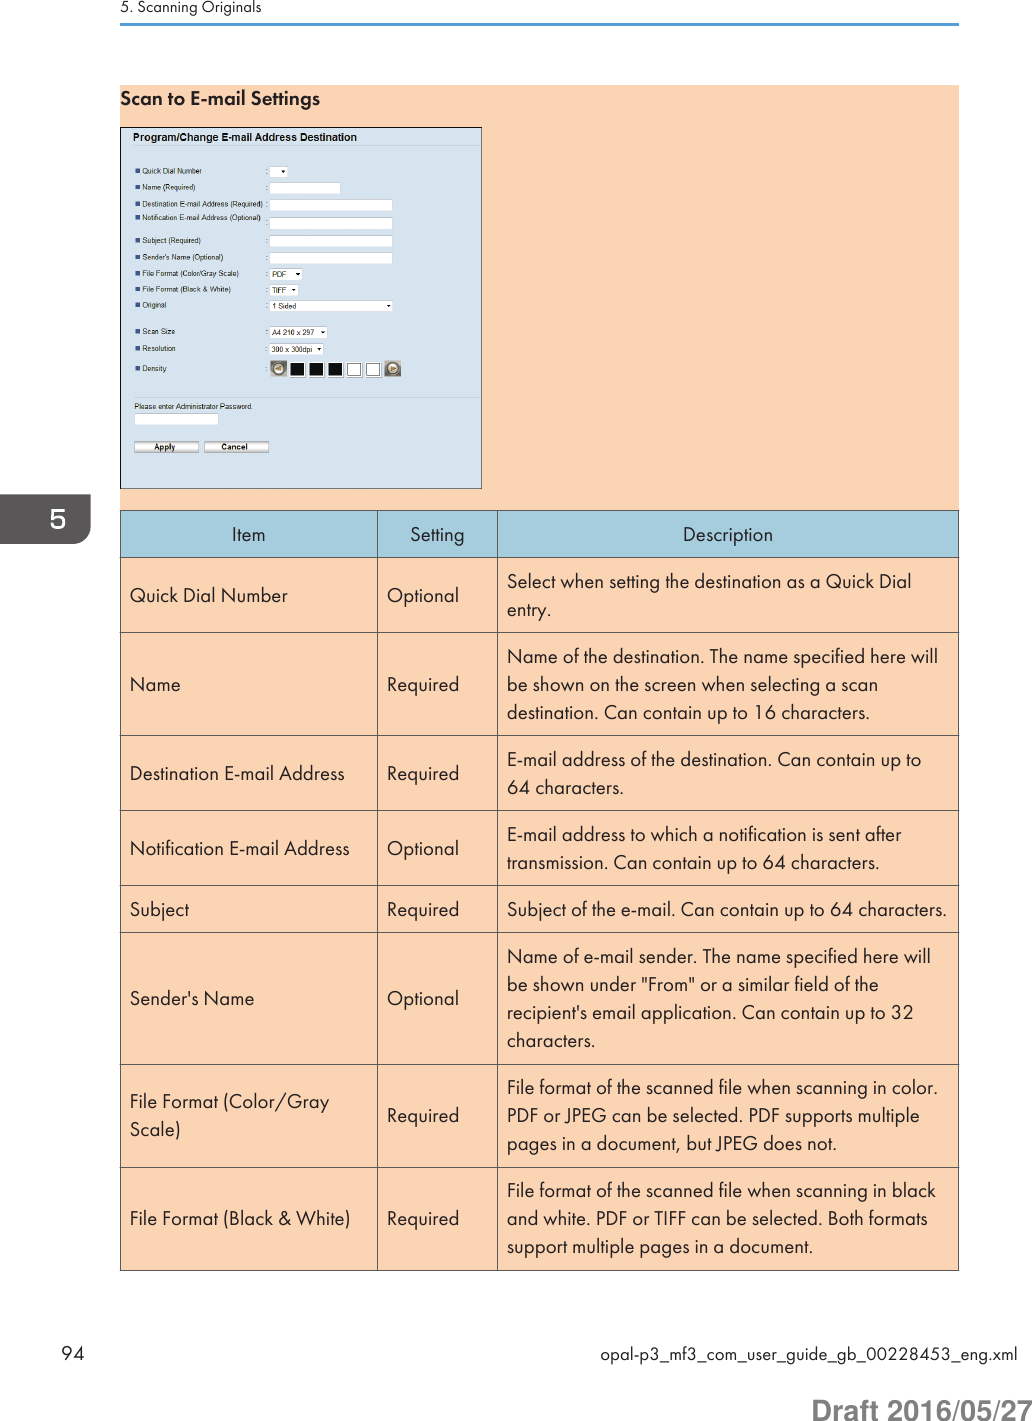
![Item Setting DescriptionScan Size OptionalSelect the scanning size for the original from A5, B5,A4, 71/4 × 101/2, 81/2 × 51/2, 81/2 × 11, 81/2 ×14, 16K, or custom size.If you select custom size, select [mm] or [Inch], andthen specify the width and length.Resolution Optional Select the scan resolution from 100×100, 150×150,200×200, 300×300, 400×400, or 600×600 dpi.Density OptionalSpecify the image density by clicking the right or leftbuttons. is the lightest, and is the darkest.Scan to FTP SettingsItem Setting DescriptionQuick Dial Number Optional Select when setting the destination as a Quick Dialentry.Name RequiredName of the destination. The name specified here willbe shown on the screen when selecting a scandestination. Can contain up to 16 characters.Hostname or IP Address Required Name or IP address of the FTP server. Can contain upto 64 characters.Registering Scan Destinationsopal-p3_mf3_com_user_guide_gb_00228453_eng.xml 95Draft 2016/05/27](https://usermanual.wiki/Ricoh/MFSP220SFNW1/User-Guide-3076626-Page-96.png)
![Item Setting DescriptionFile Format (Color/GrayScale) RequiredFile format of the scanned file when scanning in color.PDF or JPEG can be selected. PDF supports multiplepages in a document, but JPEG does not.File Format (Black & White) RequiredFile format of the scanned file when scanning in blackand white. PDF or TIFF can be selected. Both formatssupport multiple pages in a document.FTP User Name Optional User name for logging in to the FTP server. Cancontain up to 32 characters.FTP Password Optional Password for logging in to the FTP server. Can containup to 32 characters.Directory Optional Name of the FTP server directory where scanned filesare stored. Can contain up to 64 characters.Notification E-mail Address Optional E-mail address to which a notification is sent aftertransmission. Can contain up to 64 characters.Scan Size OptionalSelect the scanning size for the original from A5, B5,A4, 71/4 × 101/2, 81/2 × 51/2, 81/2 × 11, 81/2 ×14, 16K, or custom size.If you select custom size, select [mm] or [Inch], andthen specify the width and length.Resolution Optional Select the scan resolution from 100×100, 150×150,200×200, 300×300, 400×400, or 600×600 dpi.Density OptionalSpecify the image density by clicking the right or leftbuttons. is the lightest, and is the darkest.5. Scanning Originals96 opal-p3_mf3_com_user_guide_gb_00228453_eng.xmlDraft 2016/05/27](https://usermanual.wiki/Ricoh/MFSP220SFNW1/User-Guide-3076626-Page-97.png)
![Item Setting DescriptionFile Format (Color/GrayScale) RequiredFile format of the scanned file when scanning in color.PDF or JPEG can be selected. PDF supports multiplepages in a document, but JPEG does not.File Format (Black & White) RequiredFile format of the scanned file when scanning in blackand white. PDF or TIFF can be selected. Both formatssupport multiple pages in a document.Scan Size OptionalSelect the scanning size for the original from A5, B5,A4, 71/4 × 101/2, 81/2 × 51/2, 81/2 × 11, 81/2 ×14, 16K, or custom size.If you select custom size, select [mm] or [Inch], andthen specify the width and length.Resolution Optional Select the scan resolution from 100×100, 150×150,200×200, 300×300, 400×400, or 600×600 dpi.Density OptionalSpecify the image density by clicking the right or leftbuttons. is the lightest, and is the darkest.• To send files via e-mail, SMTP and DNS settings must be configured properly.• If you are using the Scan to E-mail function, select a time zone according to your geographiclocation to send email with correct transmission date and time.• To send files to an FTP server or computer, the user name, password, and directory must beconfigured properly.• On a network that uses a DNS server, specify a computer name in [Service Name] and the nameof the domain to which the computer belongs in [Domain]. In this case, also configure the DNSrelated settings using Web Image Monitor.• Scan destinations cannot be registered using the control panel.Modifying Scan DestinationsThis section describes how to modify the information of registered destinations.1. Start the web browser and access the machine by entering its IP address.2. Click [Scan Destination].3. Click the [E-mail Address], [FTP], or [Folder] tab.5. Scanning Originals98 opal-p3_mf3_com_user_guide_gb_00228453_eng.xmlDraft 2016/05/27](https://usermanual.wiki/Ricoh/MFSP220SFNW1/User-Guide-3076626-Page-99.png)
![4. Select the entry to modify, and then click [Change].5. Modify settings as necessary.6. Enter the administrator password if required.7. Click [Apply].8. Close the web browser.• You can unassign a Quick Dial entry from a One-touch button from the [Quick Dial Destination]page. (only SP 221SF, SP 220SFNw, and SP 221SFNw) To do this, select the desired entry, click[Delete], and then click [Apply] again on a confirmation page.Deleting Scan DestinationsThis section describes how to delete registered destinations.1. Start the web browser and access the machine by entering its IP address.2. Click [Scan Destination].3. Click the [E-mail Address], [FTP], or [Folder] tab.4. Select the entry to delete, and then click [Delete].5. Confirm that the entry you have selected is the entry that you want to delete.6. Enter the administrator password if required.7. Click [Apply].8. Close the web browser.Testing Transmission• When a USB flash memory device is inserted into the machine, scanned documents will be storedin the USB flash memory device. Confirm that there are no USB flash memory devices inserted intothe machine.1. Place the original on the exposure glass or in the ADF.Registering Scan Destinationsopal-p3_mf3_com_user_guide_gb_00228453_eng.xml 99Draft 2016/05/27](https://usermanual.wiki/Ricoh/MFSP220SFNW1/User-Guide-3076626-Page-100.png)