Ricoh MFSP311SFNW1 Printer User Manual
Ricoh Company Ltd Printer
UserManual.wiki
>
Ricoh
>
MFSP311SFNW1 User Manual
User Manual
Navigation menu
Upload a User Manual
Namespaces
Wiki Guide
HTML
PDF
Info
Views
User Manual
Discussion / Help
Navigation

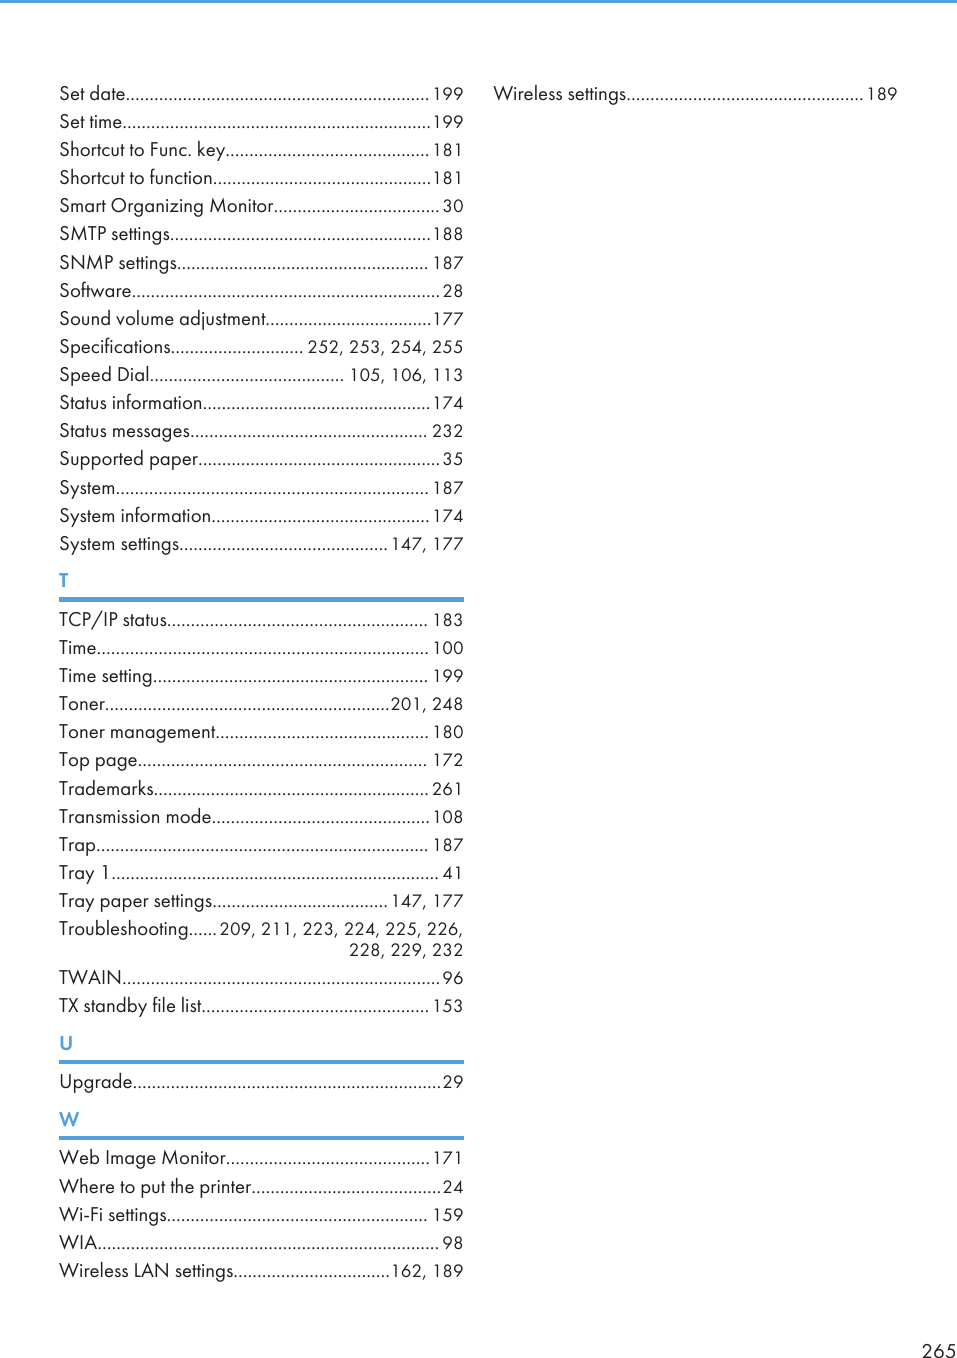
![Note to AdministratorPasswordCertain configurations of this machine can be password-protected to prevent unauthorized modificationsby others. We strongly recommend you to create your own password immediately.The following are the operations that can be password-protected:•Entering the [Address Book], [Network Settings], or [Admin. Tools] menu using the control panelYou can access these menus without a password by factory default.The setting for creating a password can be found in [Admin. Tools].• Configuring the machine using Web Image MonitorYou can configure the machine using Web Image Monitor without a password by factory default.The setting for creating a password can be found in [Administrator Settings].For details about creating passwords, see page 166 "Administrator Settings" or page 197"Configuring the Administrator Settings".About IP AddressIn this manual, "IP address" covers both IPv4 and IPv6 environments. Read the instructions that arerelevant to the environment you are using.Differences in Performance/Functions between Different ModelsThe differences in main performance/functions between different models are as follows:SP 311SFN SP 311SFNwType Type 1 Type 2Wireless LAN Not Available Available (Standard)9](https://usermanual.wiki/Ricoh/MFSP311SFNW1/User-Guide-1915829-Page-11.png)


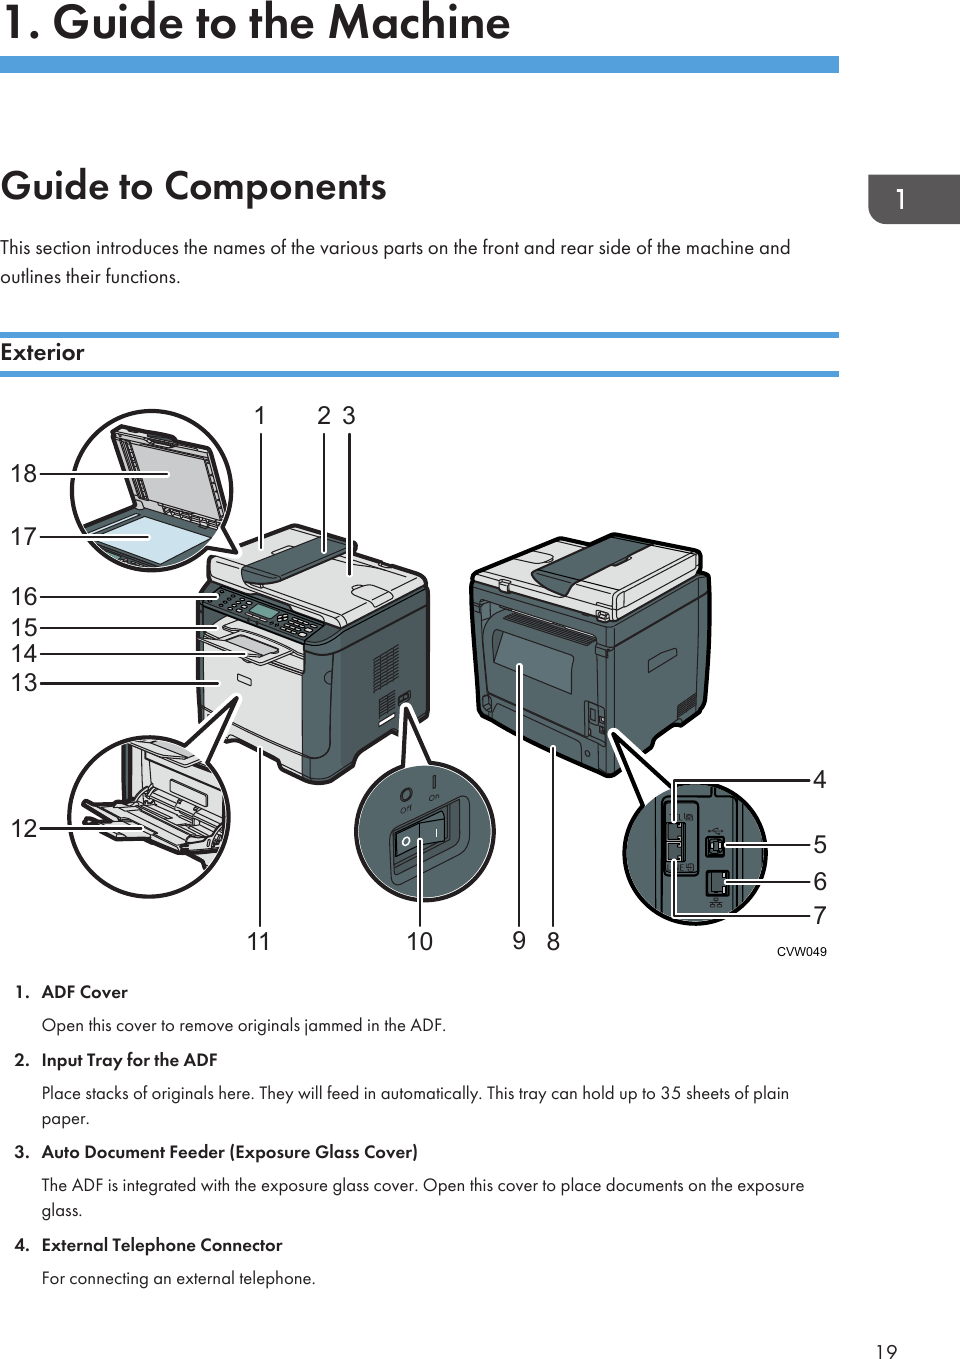
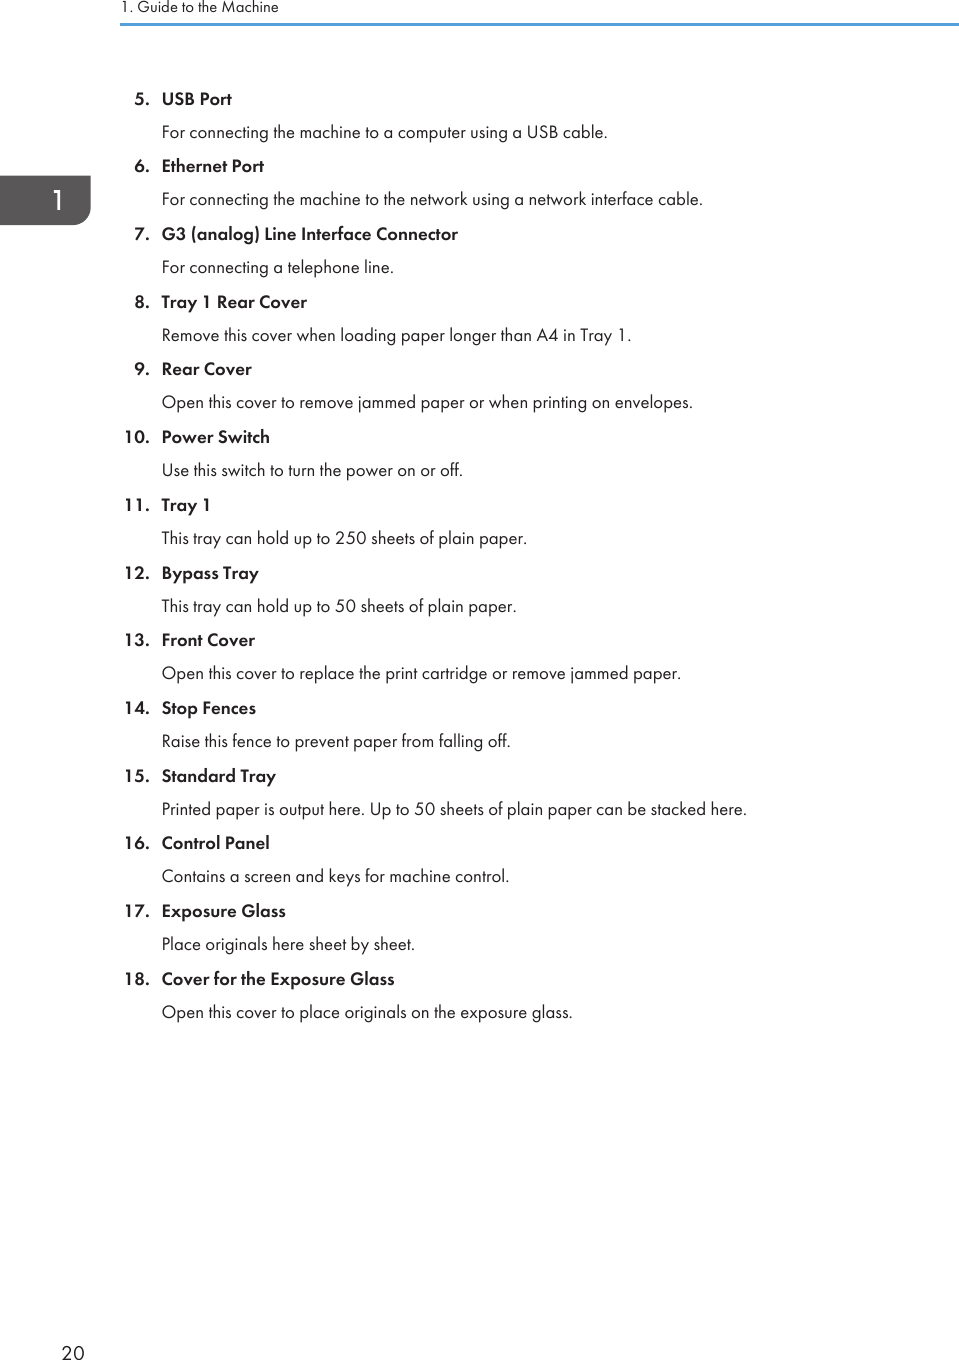
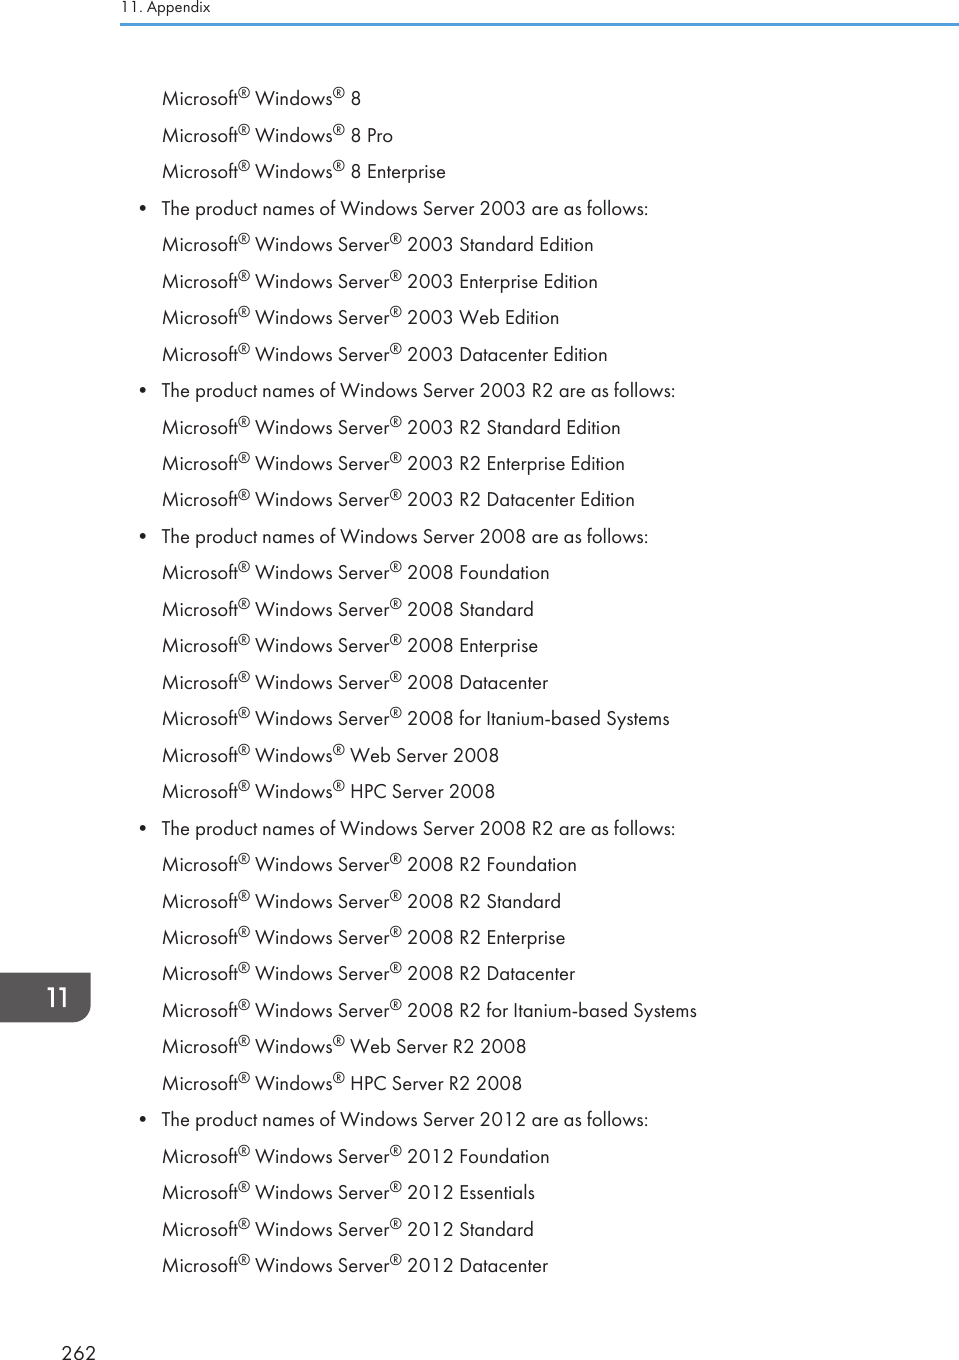
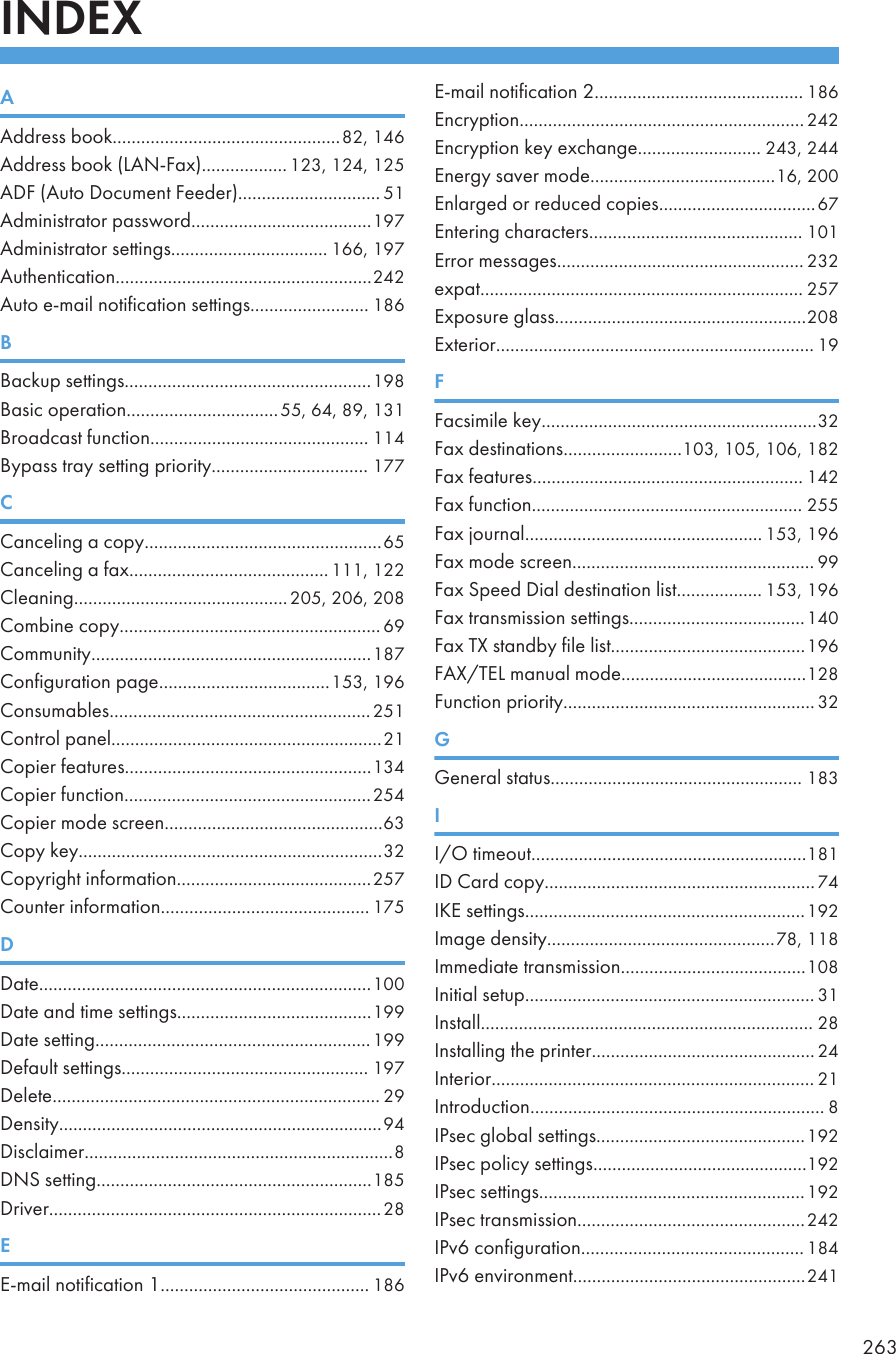
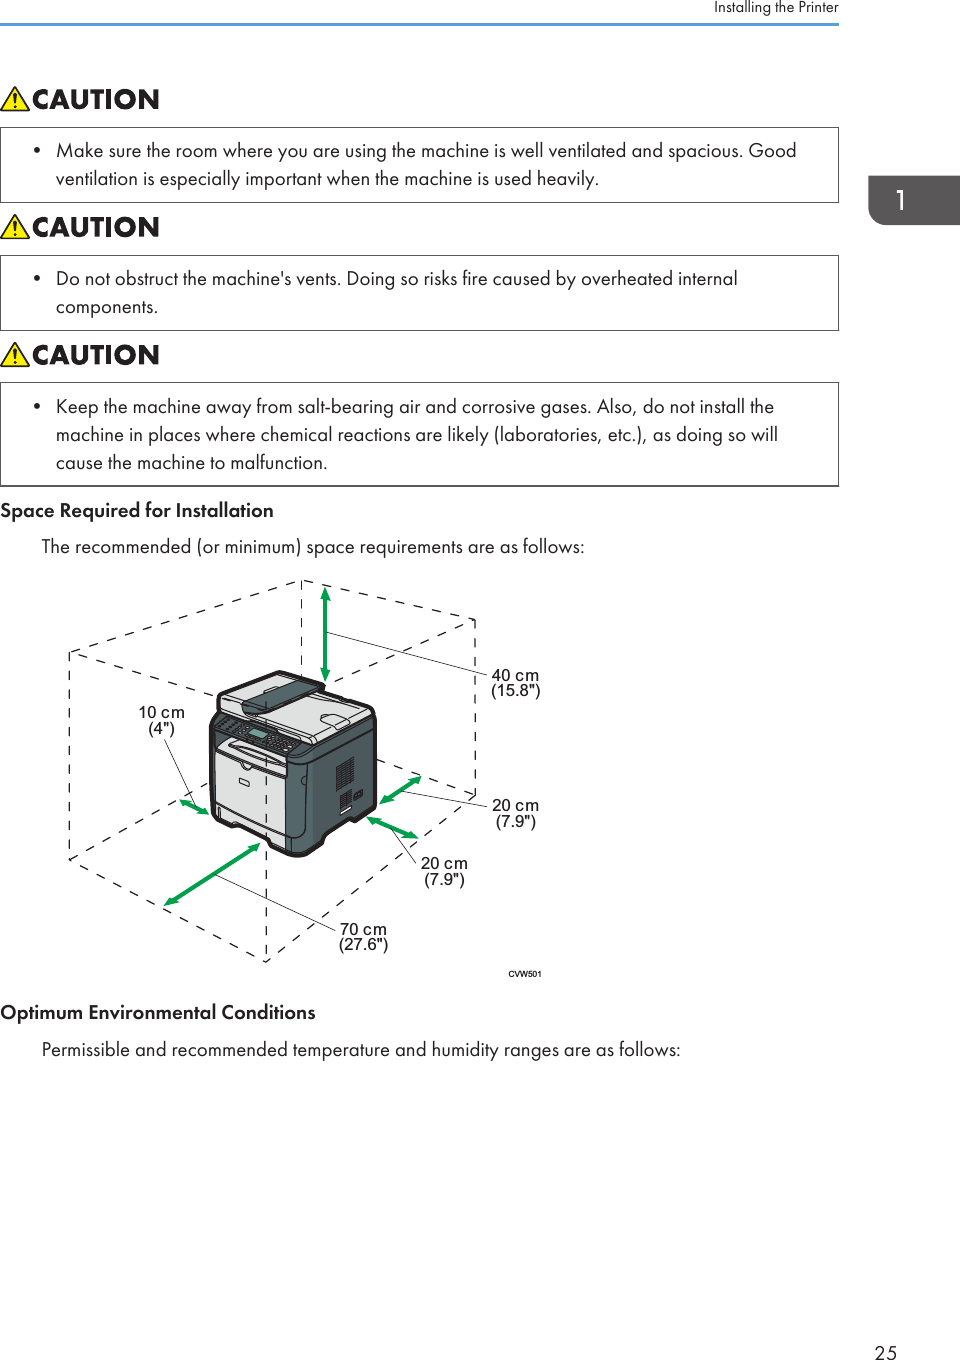
![InteriorCVW03711. Print CartridgeA replacement consumable that is required to make prints on paper. It needs to be replaced when the Toner/Paper End indicator flashes red. For details about replacing the cartridge, see page 201 "Replacing the PrintCartridge".Control PanelCVW1001. [Pause/Redial] keyPress to insert a pause in a fax number or to display the last used scan or fax destination.2. [On Hook Dial] keyPress to use on-hook dialing to check the destination's status when sending a fax.3. [Address Book] keyPress to select a scan or fax destination from the Address Book.4. [Image Quality] keyPress to select the scan quality for the current job.Guide to Components21](https://usermanual.wiki/Ricoh/MFSP311SFNW1/User-Guide-1915829-Page-23.png)
![5. [Shortcut to Func.] keyPress to use the function pre-assigned to this key.6. [Copy] keyPress to switch the machine to copier mode.7. [Facsimile] keyPress to switch the machine to fax mode.8. ScreenDisplays the current status and messages.9. Scroll KeysPress to move the cursor in the direction indicated by the key.10. Number KeysPress to enter numerical values when specifying settings such as fax numbers and copy quantities or to enterletters when specifying names.11. [User Tools] keyPress to display the menu for configuring the machine's system settings.12. [Clear/Stop] keyPress to cancel or stop print jobs, document copying, scanning, fax transmission/reception, and other actionsin progress.13. [Start] keyPress to start fax transmission/reception, scanning, or copying.14. [OK] KeyPress to confirm settings and specified values, or to move to the next menu level.15. [Escape] keyPress to cancel the last operation or to return to the previous level of the menu tree.16. Alert IndicatorThis indicator lights up red when the machine runs out of paper or consumables, when the paper settings donot match the settings specified by the driver, or when other errors occur. It flashes yellow when the toner isnearly empty.17. Selection keysPress the key underneath an item shown on the bottom line of the screen to select it.18. Power IndicatorThis indicator lights up blue when the machine is turned on. It flashes when a print job is received and duringprinting, scanning, or fax transmission/reception.19. [Scanner] keyPress to switch the machine to scanner mode.20. [Duplex] keyPress to print on both sides of paper.1. Guide to the Machine22](https://usermanual.wiki/Ricoh/MFSP311SFNW1/User-Guide-1915829-Page-24.png)
![21. [Density] keyPress to adjust the image density for the current job.22. [Shift] keyPress to use the Quick Dial numbers 5 to 8 when specifying a scan or fax destination using the One Touchbuttons.23. One Touch buttonsPress to select a scan or fax Quick Dial destination.Guide to Components23](https://usermanual.wiki/Ricoh/MFSP311SFNW1/User-Guide-1915829-Page-25.png)
![Installing the Driver and SoftwareYou can install the necessary driver for this machine using the included CD-ROM.The supplied drivers are supported by the following operating systems:•PCL 6 printer driver: Windows XP/Vista/7/8 and Windows Server 2003/ 2003R2/2008/2008 R2/2012• TWAIN driver: Windows XP/Vista/7/8 and Windows Server 2003/ 2003 R2/2008/2008R2/2012• WIA driver: Windows XP/Vista/7/8 and Windows Server 2003/ 2003 R2/2008/2008R2/2012• LAN-Fax driver: Windows XP/Vista/7/8 and Windows Server 2003/ 2003 R2/2008/2008R2/2012The procedure in this section is an example based on Windows 7. The actual procedure may varydepending on the operating system you are using.• Be sure to disconnect the USB cable or Ethernet cable from the machine and turn the machine offbefore beginning the installation.Quick Install for USBUse Quick Install to install the printer driver, TWAIN driver, WIA driver, and LAN-Fax driver from theCD-ROM.1. Close all applications except this manual.2. Insert the CD-ROM into the CD-ROM drive.3. Select a language for the interface, and then click [OK].4. From the CD-ROM menu, click [USB Quick Install].5. Follow the instructions in the installation wizard.Quick Install for NetworkUse Quick Install to install the printer driver, TWAIN driver, WIA driver, and LAN-Fax driver from theCD-ROM.1. Close all applications except this manual.2. Insert the CD-ROM into the CD-ROM drive.3. Select a language for the interface, and then click [OK].1. Guide to the Machine28](https://usermanual.wiki/Ricoh/MFSP311SFNW1/User-Guide-1915829-Page-30.png)
![4. From the CD-ROM menu, click [Network Quick Install].5. Follow the instructions in the installation wizard.Upgrading or Deleting the Printer DriverUpgrading the printer driver1. On the [Start] menu, click [Devices and Printers].2. Right-click the icon of the printer model you want to modify, and then click [Printerproperties].3. Click the [Advanced] tab.4. Click [New Driver...], and then click [Next].5. Click [Have Disk...].6. Click [Browse...], and then select the printer driver location.7. Click [OK], and then specify the printer model.8. Click [Next].9. Click [Finish].10. Click [OK] to close the printer properties window.11. Restart the computer.Deleting the printer driver1. On the [Start] menu, click [Devices and Printers].2. Right-click the icon of the printer you want to delete, and then click [Remove device].3. Click [Yes].4. Click any printer icon, and then click [Print server properties].5. Click the [Drivers] tab.6. Click [Change Driver Settings] if it is displayed.7. Click [Remove...].8. Select [Remove driver and driver package.], and then click [OK].9. Click [Yes].10. Click [Delete].11. Click [OK].12. Click [Close] to close the print server properties window.Installing the Driver and Software29](https://usermanual.wiki/Ricoh/MFSP311SFNW1/User-Guide-1915829-Page-31.png)
![Initial SetupInitial SetupWhen you turn on the machine for the first time, a menu for configuring the settings described below willappear on the display. This section describes how to complete the Initial Setup.• : The fax number code is required by international law. You cannot legally connect afax machine to the telephone system if the fax number code is not programmed. Also, the faxheader code and the date and time of transmission must be included in the header of all pagesfaxed to, from, or within the United States.•Make sure to select the correct code for the country of use. Selecting the wrong country code maycause failures in fax transmissions.Display languageThe language selected here is used for the display.User fax numberThe number entered here is used as the fax number of the machine. The user fax number cancontain 0 to 9, space, and "+".User nameThe name entered here is used as the name of the fax sender.Country codeThe country code selected here is used for configuring the time and date display formats, and thesettings related to fax transmissions with appropriate default values for the country of use.Press the [ ] or [ ] key to select the item you want to configure, and enter the number or name (upto 20 digits or characters) if necessary, then press the [OK] key.For details about entering characters, see page 101 "Entering Characters".• You can change the settings configured during the Initial Setup later under [Admin. Tools]. Inaddition, you can set the machine's time and date under [Admin. Tools]. For details about [Admin.Tools], see page 166 "Administrator Settings".•When the [Print Fax Header] setting under fax transmission settings is turned on, the registered userfax number, user name, and time and date of transmission appear on the header of every fax yousend. For details about [Print Fax Header], see page 140 "Fax Transmission Features Settings".Initial Setup31](https://usermanual.wiki/Ricoh/MFSP311SFNW1/User-Guide-1915829-Page-33.png)
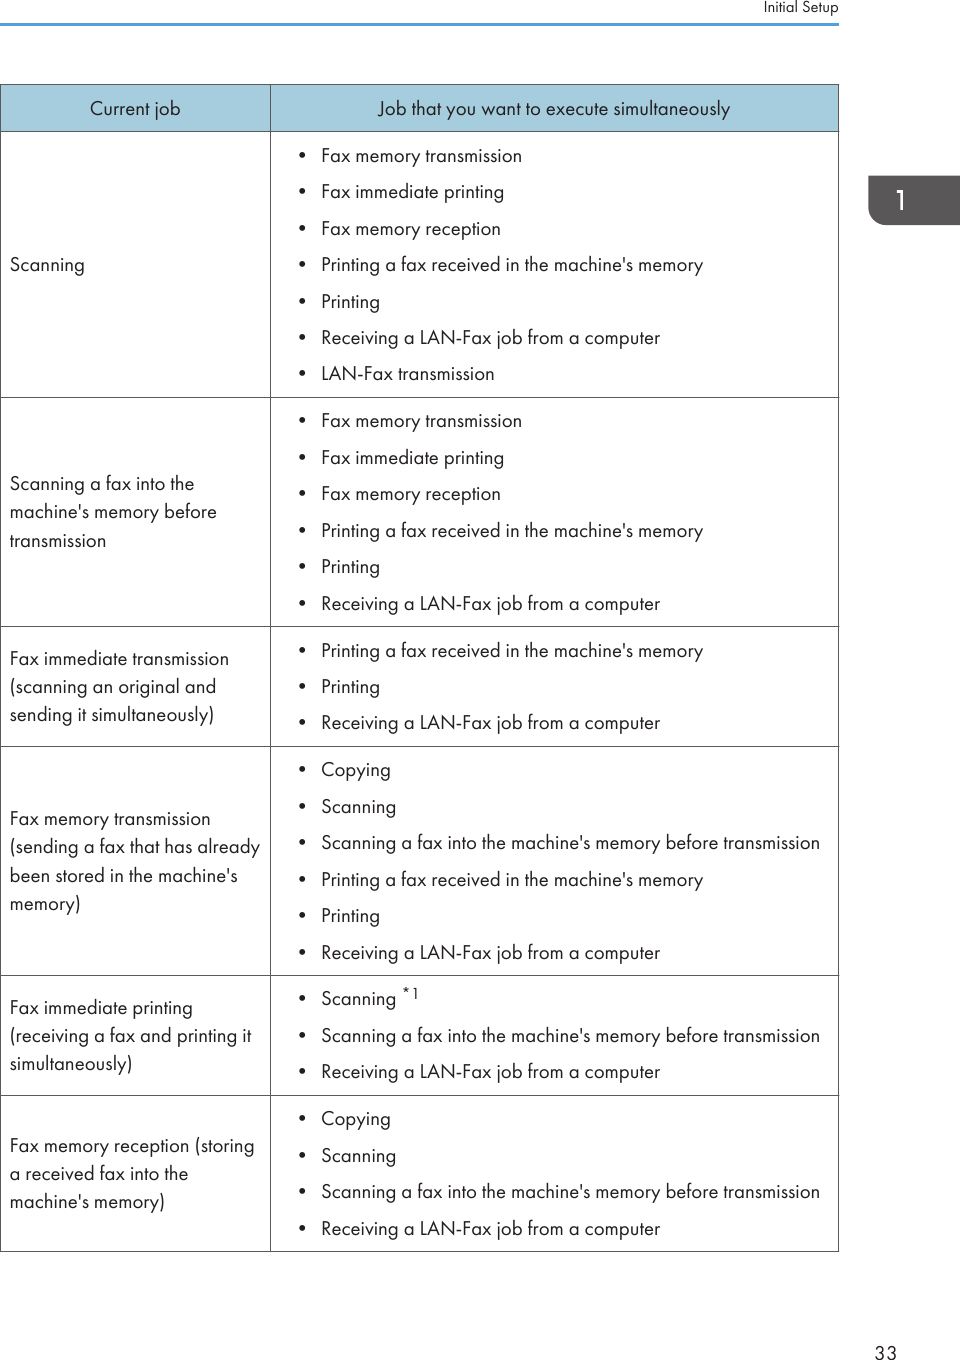
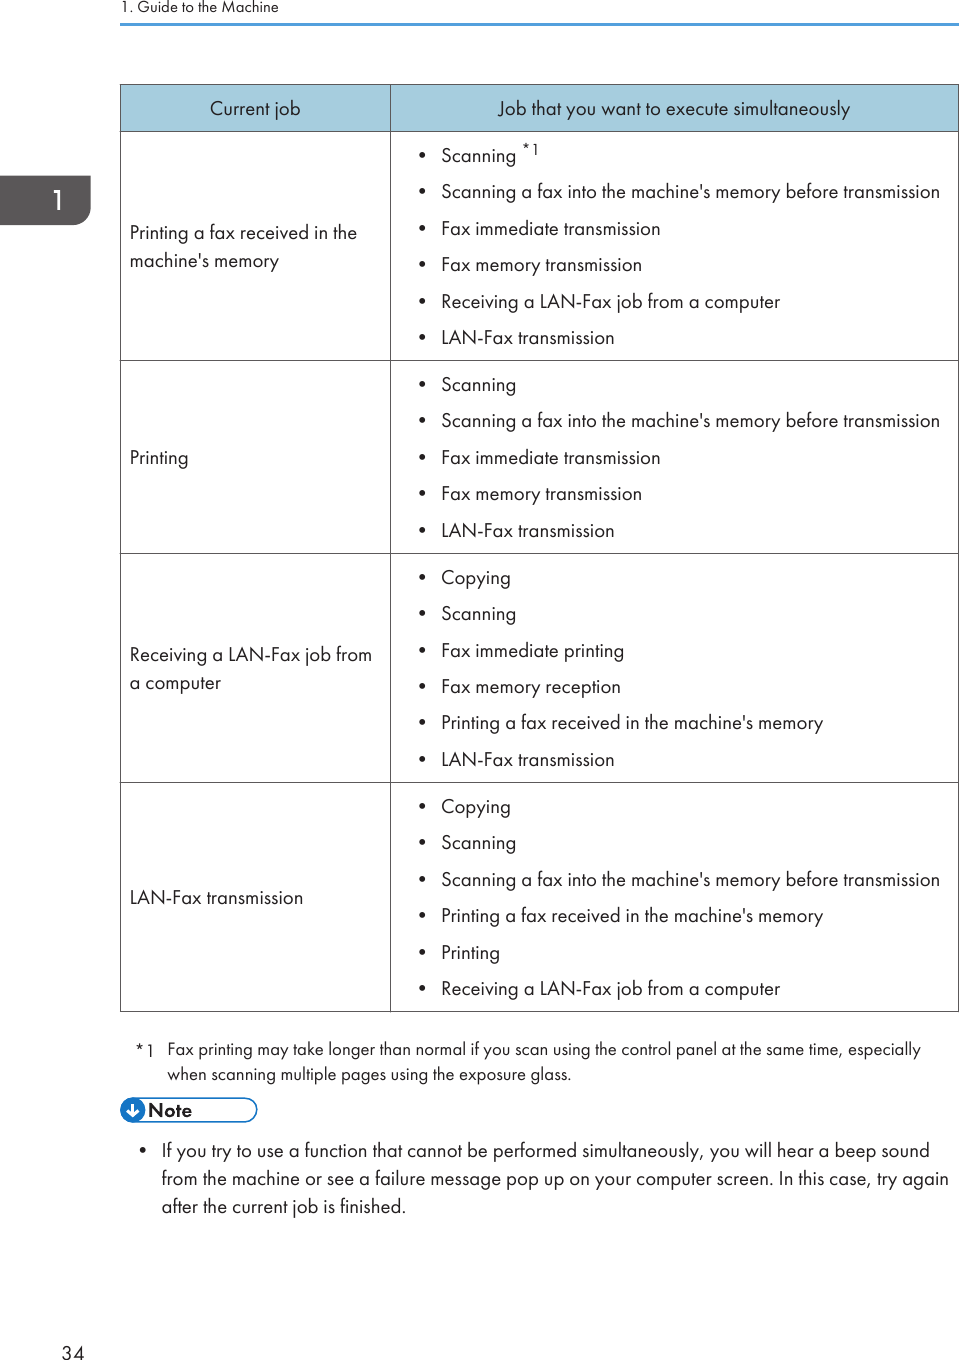
![Changing Operation ModesYou can switch between copier, scanner, and fax modes by pressing the corresponding keys.Press the [Copy], [Scanner], or [Facsimile] key to activate each mode. While in each mode, thecorresponding key lights up.CVW116Function PriorityBy default, copy mode is selected when the machine is turned on, or if the preset [System AutoReset Timer] time passes with no operation while the initial screen of the current mode is displayed.You can change the selected mode using [Function Priority] under [Admin. Tools].For details about [System Auto Reset Timer] or [Function Priority], see page 166 "AdministratorSettings".Multi-accessThis machine can perform multiple jobs using different functions, such as copying and faxing, at thesame time. Performing multiple functions simultaneously is called “Multi-access”.The following table shows the functions that can be performed simultaneously.Current job Job that you want to execute simultaneouslyCopying• Fax memory transmission•Fax memory reception• Receiving a print job from a computer (the actual printing startsafter copying is finished)• Receiving a LAN-Fax job from a computer• LAN-Fax transmission1. Guide to the Machine32](https://usermanual.wiki/Ricoh/MFSP311SFNW1/User-Guide-1915829-Page-34.png)
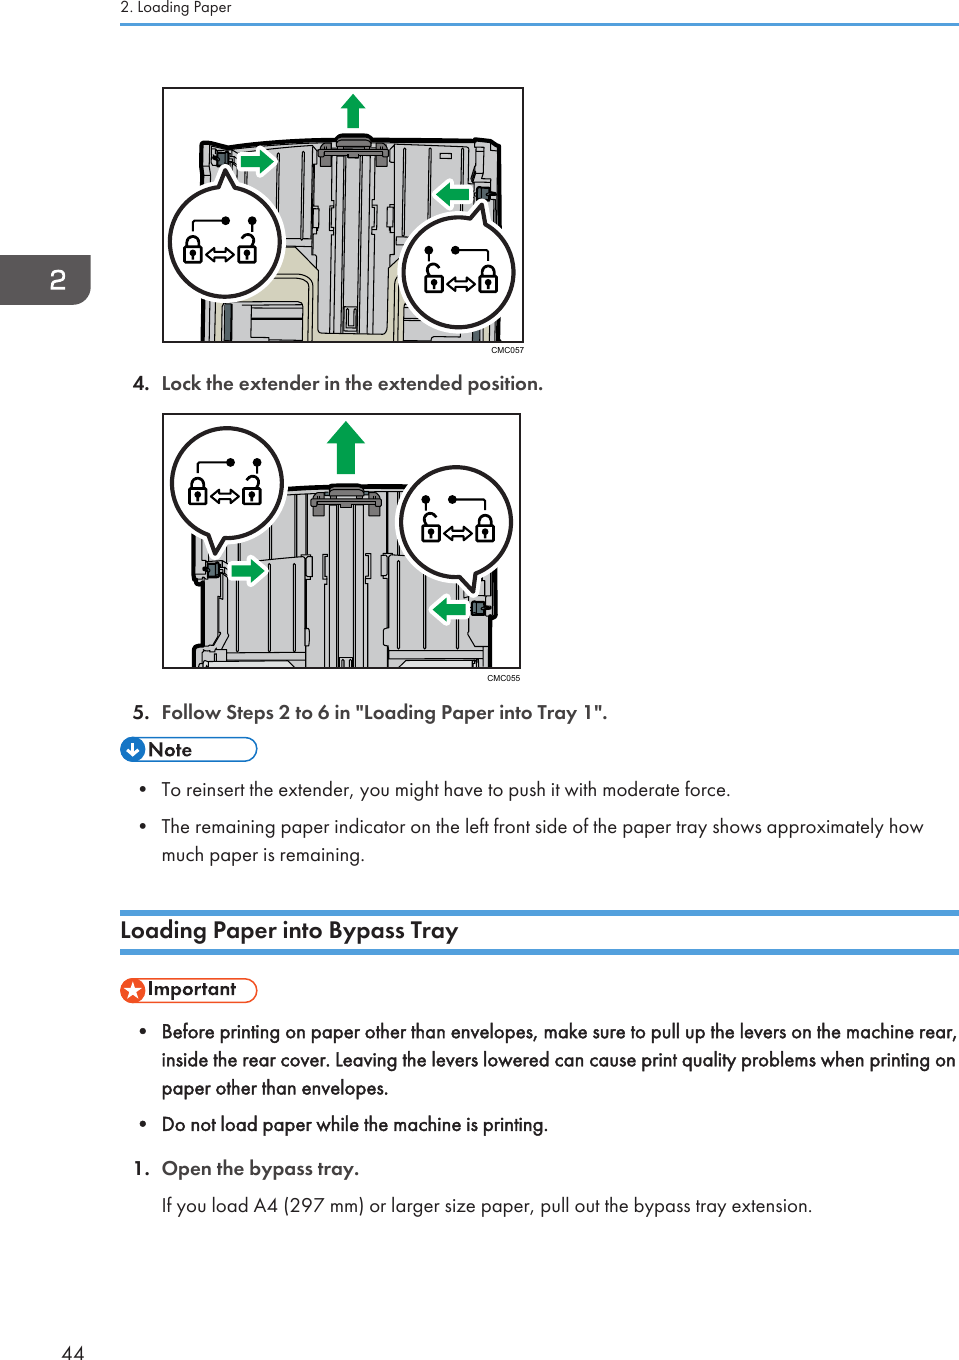
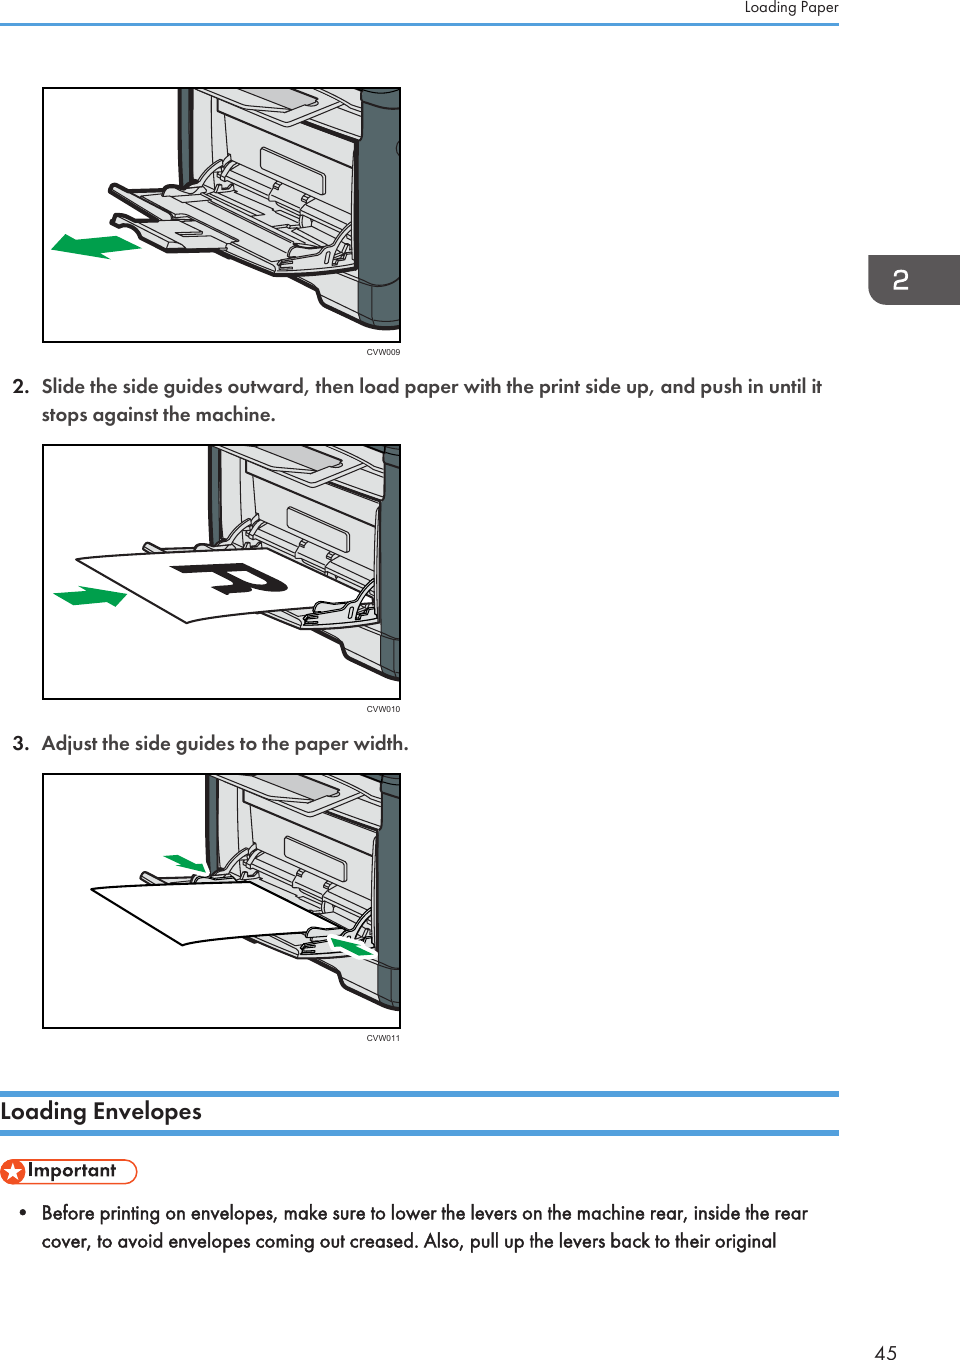
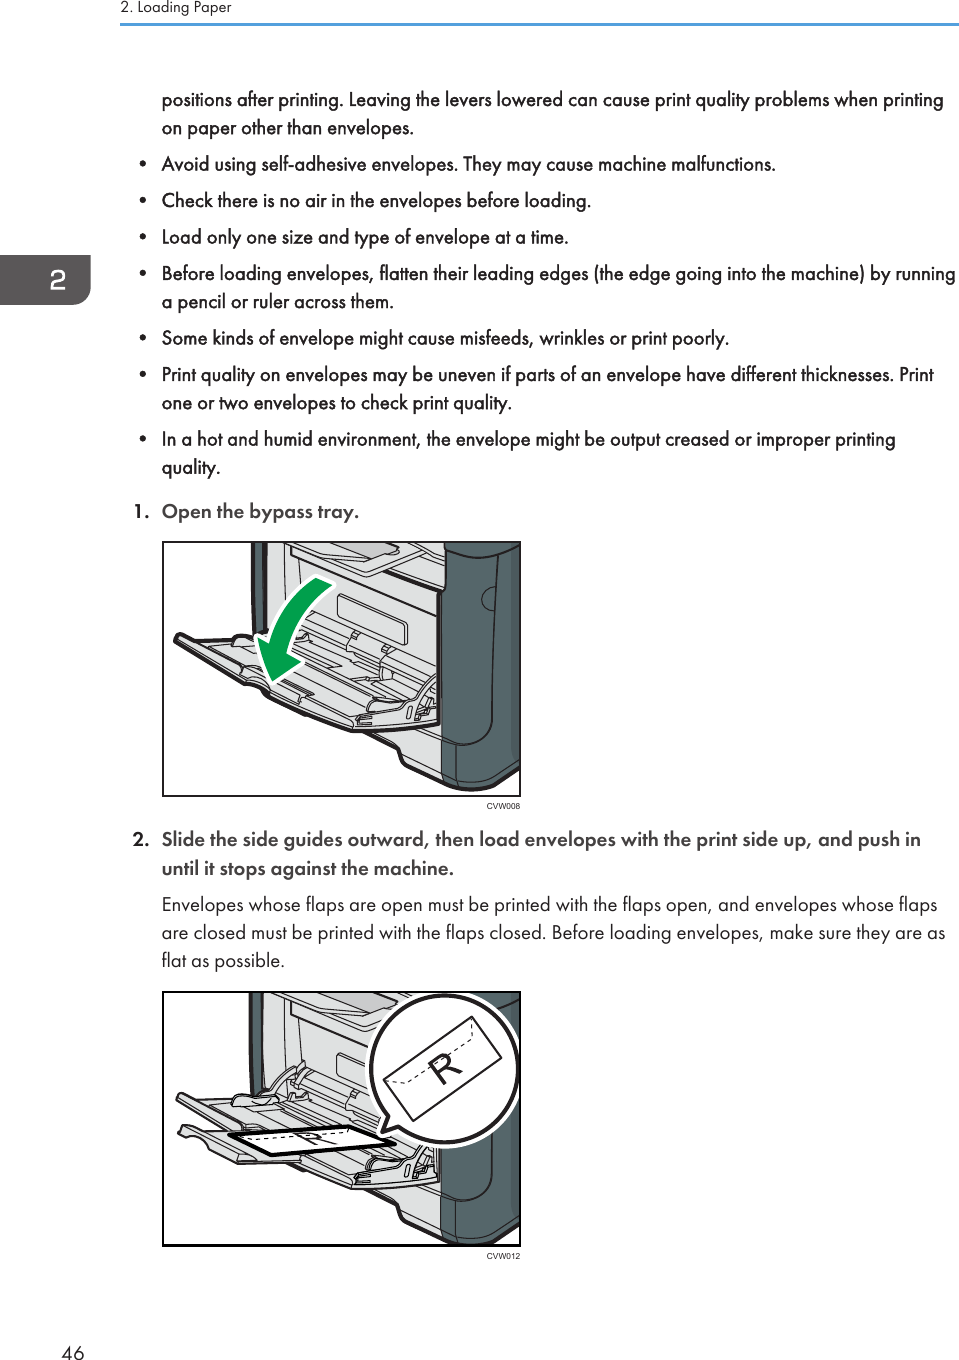
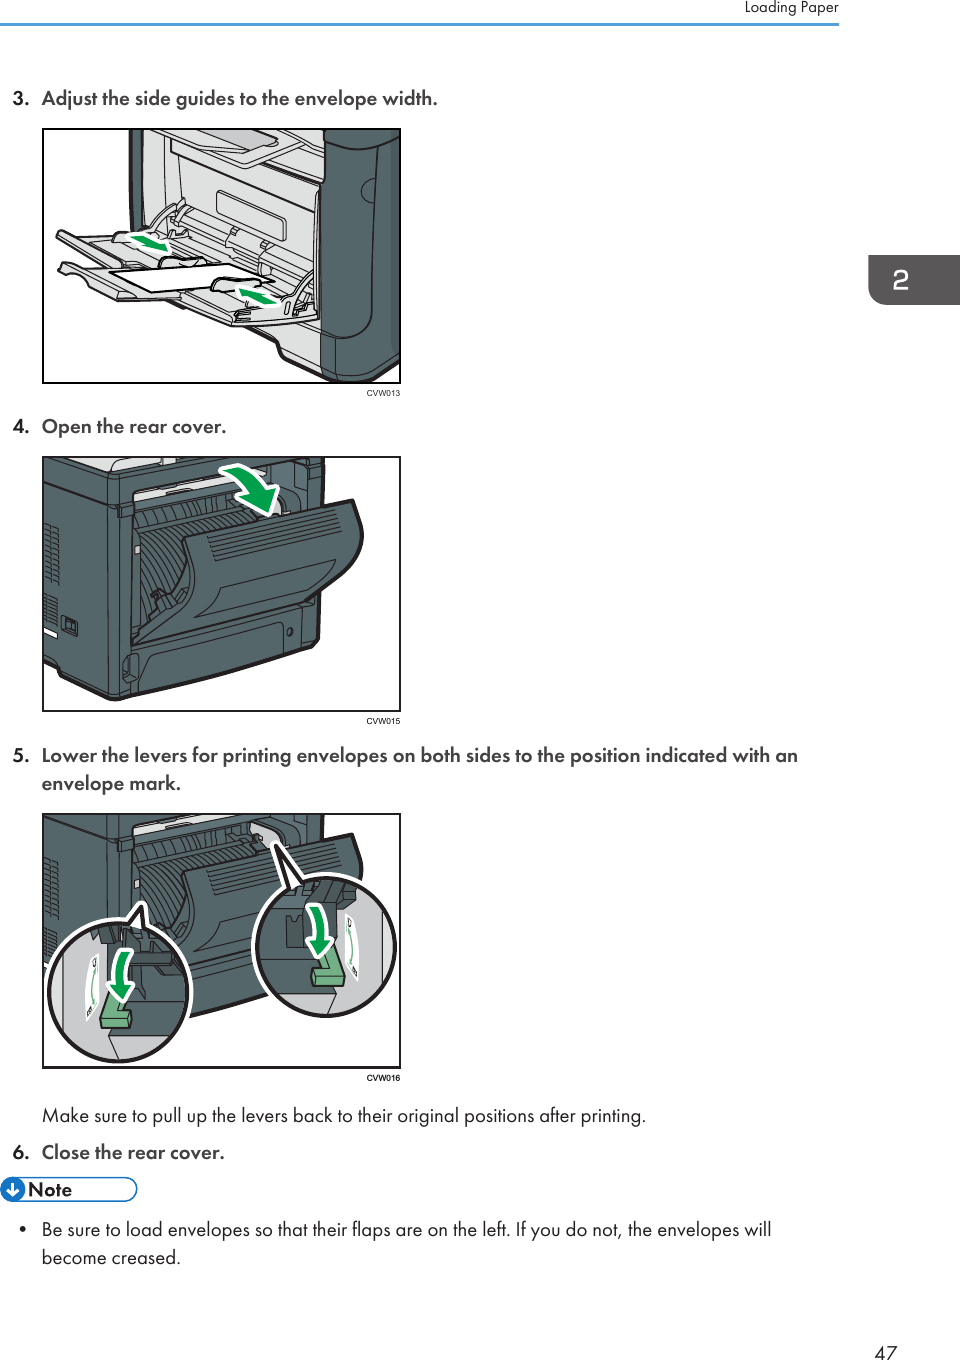
![• If printed envelopes come out badly creased, load the envelopes in the opposite direction, andthen rotate the print object by 180 degrees using the printer driver before printing. For details, seethe printer driver Help.Specifying Paper Type and Paper Size Using Control PanelThis section describes how to specify the paper size and paper type using the control panel.• Paper type and size can also be specified using the printer driver. For details, see the printer driverHelp.•For prints from the bypass tray, you can select to print according to either the printer driver settingsor the control panel settings with [Bypass Tray Priority] under system settings. For details about[Bypass Tray Priority], see page 147 "System Settings".• If [Auto Continue] under system settings is enabled, printing stops temporarily if a paper type/sizeerror is detected. The printing restarts automatically with the settings made with the control panelafter about ten seconds. For details about [Auto Continue], see page 147 "System Settings".Specifying the paper typeThis section describes how to specify the paper type.1. Press the [User Tools] key.cvw1042. Press the [ ] or [ ] key to select [System Settings], and then press the [OK] key.3. Press the [ ] or [ ] key to select [Tray Paper Settings], and then press the [OK] key.4. Press the [ ] or [ ] key to select the paper type setting for the desired tray, and thenpress the [OK] key.5. Press the [ ] or [ ] key to select the desired paper type, and then press the [OK] key.6. Press the [User Tools] key to return to the initial screen.2. Loading Paper48](https://usermanual.wiki/Ricoh/MFSP311SFNW1/User-Guide-1915829-Page-50.png)
![• You can press the [Escape] key to exit to the previous level of the menu tree.Specifying the standard paper sizeThis section describes how to specify the standard paper size.1. Press the [User Tools] key.cvw1042. Press the [ ] or [ ] key to select [System Settings], and then press the [OK] key.3. Press the [ ] or [ ] key to select [Tray Paper Settings], and then press the [OK] key.4. Press the [ ] or [ ] key to select the paper size setting for the desired tray, and then pressthe [OK] key.5. Press the [ ], [ ],[ ], or [ ] key to select the desired paper size, and then press the [OK]key.6. Press the [User Tools] key to return to the initial screen.• You can press the [Escape] key to exit to the previous level of the menu tree.Specifying a custom paper sizeThis section describes how to specify a custom paper size.• When you perform printing, make sure that the paper size specified with the printer driver matchesthe paper size specified with the control panel. If a paper size mismatch occurs, a messageappears on the display. To ignore the error and print using mismatched paper, see page 57 "If aPaper Mismatch Occurs".Loading Paper49](https://usermanual.wiki/Ricoh/MFSP311SFNW1/User-Guide-1915829-Page-51.png)
![1. Press the [User Tools] key.cvw1042. Press the [ ] or [ ] key to select [System Settings], and then press the [OK] key.3. Press the [ ] or [ ] key to select [Tray Paper Settings], and then press the [OK] key.4. Press the [ ] or [ ] key to select the paper size setting for the desired tray, and then pressthe [OK] key.5. Press the [ ], [ ], [ ], or [ ] key to select [Custom Size], and then press the [OK] key.6. Press the [ ] or [ ] key to select [mm] or [inch], and then press the [OK] key.7. Enter the width using number keys, and then press the [OK] key.To enter a decimal point, press [ ].8. Enter the length using number keys, and then press the [OK] key.To enter a decimal point, press [ ].9. Press the [User Tools] key to return to the initial screen.• You can press the [Escape] key to exit to the previous level of the menu tree.2. Loading Paper50](https://usermanual.wiki/Ricoh/MFSP311SFNW1/User-Guide-1915829-Page-52.png)
![3. Printing DocumentsBasic OperationThe following procedure explains how to perform basic printing.1. Open the printer properties dialog box in your document's application.For details about each setting, click [Help]. You can also click the information icons to showconfiguration information.2. Set printing options as necessary, and then click [OK].The printer properties dialog box closes.3. Click [OK].• If a paper jam occurs, printing stops after the current page has been printed out. After the jammedpaper is removed, printing restarts from the jammed page automatically. For details about how toremove the jammed paper, see page 213 "Removing Printing Jams".•After printing on envelopes, make sure to pull up the levers for printing on envelopes back to theiroriginal positions. Leaving the levers lowered can cause print quality problems when printing onpaper other than envelopes. For details about the levers for printing on envelopes, see page 35"Loading Paper".Canceling a Print JobYou can cancel print jobs using either the machine's control panel or your computer, depending on thestatus of the job.55](https://usermanual.wiki/Ricoh/MFSP311SFNW1/User-Guide-1915829-Page-57.png)
![Canceling a print job before printing has started• Windows1. Double-click the printer icon on the task tray of your computer.2. Select the print job you want to cancel, click the [Document] menu, and then click[Cancel].• If you cancel a print job that has already been processed, printing may continue for a few pagesbefore being canceled.•It may take a while to cancel a large print job.Canceling a print job while printing1. Press the [Clear/Stop] key.CVW1053. Printing Documents56](https://usermanual.wiki/Ricoh/MFSP311SFNW1/User-Guide-1915829-Page-58.png)
![If a Paper Mismatch OccursThe machine reports an error if:•The paper type does not match the print job's settings when [Input Tray;] is set to [Auto Tray Select].• The paper size does not match the print job's settings when [Size Mismatch Detection] in [TrayPaper Settings] under system settings is enabled.There are two ways to resolve these errors:Continue printing using mismatched paperUse the form-feed function to ignore the error and print using mismatched paper.Reset the print jobCancel printing.• For details about [Size Mismatch Detection], see page 147 "System Settings".•If [Auto Continue] under system settings is enabled, the machine ignores the paper type and sizesettings and prints on whatever paper is loaded. Printing stops temporarily when the error isdetected, and restarts automatically after about ten seconds using the settings made on the controlpanel.• For details about [Auto Continue], see page 147 "System Settings".Continuing Printing Using Mismatched PaperIf the paper is too small for the print job, the printed image will be cropped.1. If the error message is displayed, press [FormFeed].CVW106If a Paper Mismatch Occurs57](https://usermanual.wiki/Ricoh/MFSP311SFNW1/User-Guide-1915829-Page-59.png)
![Resetting the Print Job1. If the error message is displayed, press the [Clear/Stop] key.CVW1053. Printing Documents58](https://usermanual.wiki/Ricoh/MFSP311SFNW1/User-Guide-1915829-Page-60.png)
![Print Output FunctionsYou can specify the form of print outputs according to your purposes. This section briefly describes someof the settings that you can specify.Printing multiple sets of a documentYou can print multiple sets of the same document.Collating the output in document batchesYou can print complete sets of a multiple-page document one set at a time (P1, P2, P1, P2 ...). If thisfunction is not used when printing multiple sets, prints will be output in page batches (P1, P1, P2,P2 ...). This function is useful when, for example, making presentation materials.Changing orientation or rotating the imageYou can change the orientation of an image to portrait or landscape. You can also rotate theimage by 180 degrees. Use rotation to prevent an image from being printed upside down whenusing paper that a predefined top and bottom (such as letterhead paper).Printing multiple pages per sheetYou can print multiple pages onto one sheet of paper.When using this function, a suitable reduction ratio is selected automatically based on the papersize and the number of pages you want to fit on each sheet.Printing on both sides of paper (duplex printing)You can print on both sides of paper.Reducing or enlarging the documentYou can reduce or enlarge documents by a specific ratio, from 25% to 400% in 1% increments.You can also reduce or enlarge documents automatically to fit a specific paper size. This function isuseful, for example, when printing Web pages.If the [Enable Large Papers] option is selected, A3/11” × 17”/B4/8K documents can be scaledto a size that the machine supports, so it can then be printed out.Suppressing printing of blank pagesIf a print job contains blank pages, they can be prevented from being printed.Note that the printer driver's setting has higher priority than [Blank Page Print] under printer featuresettings of the control panel.Printing with a cover pageYou can add a cover page to the print job.You can select to leave the cover page blank, or print the first page of the document on the coverpage. If a cover page is inserted into a duplex job, you can print on its back side also.Paper for the cover page can either be the same as or different from the remaining pages.3. Printing Documents60](https://usermanual.wiki/Ricoh/MFSP311SFNW1/User-Guide-1915829-Page-62.png)
![Printing on custom size paperYou can print using non-standard size paper by specifying the size of the paper as custom size.To specify a non-standard paper size, select [Custom Paper Size] from the [Document Size:] list,and then click the [Custom Paper Size...] button in the lower part of the dialog box to configure thepaper size.Superimposing text on prints (watermark)You can superimpose watermark text on prints. Various predefined watermarks are provided. Youcan also create your own watermarks.• Some of the functions described above might not be available depending on the printer driver oroperating system. For details, see the printer driver Help.Using Various Print Functions61](https://usermanual.wiki/Ricoh/MFSP311SFNW1/User-Guide-1915829-Page-63.png)

![4. Copying OriginalsCopier Mode ScreenThis section provides information about the screen when the machine is in copier mode.By default, the display shows the copier screen when the machine is turned on.If the scanner or fax screen is shown on the display, press the [Copy] key on the control panel to switchto the copier screen.CVW101Screen in standby modeCVW2001. Current status or messagesDisplays the current status or messages.2. Current settingsDisplays the current tray, reproduction ratio, and scan settings.3. Selection key itemsDisplays the functions you can use by pressing the corresponding selection keys.4. Copy quantityDisplays the current copy quantity. You can change the copy quantity using the number keys.• The start-up mode can be specified in the [Function Priority] setting under [Admin. Tools]. Fordetails, see page 166 "Administrator Settings".63](https://usermanual.wiki/Ricoh/MFSP311SFNW1/User-Guide-1915829-Page-65.png)
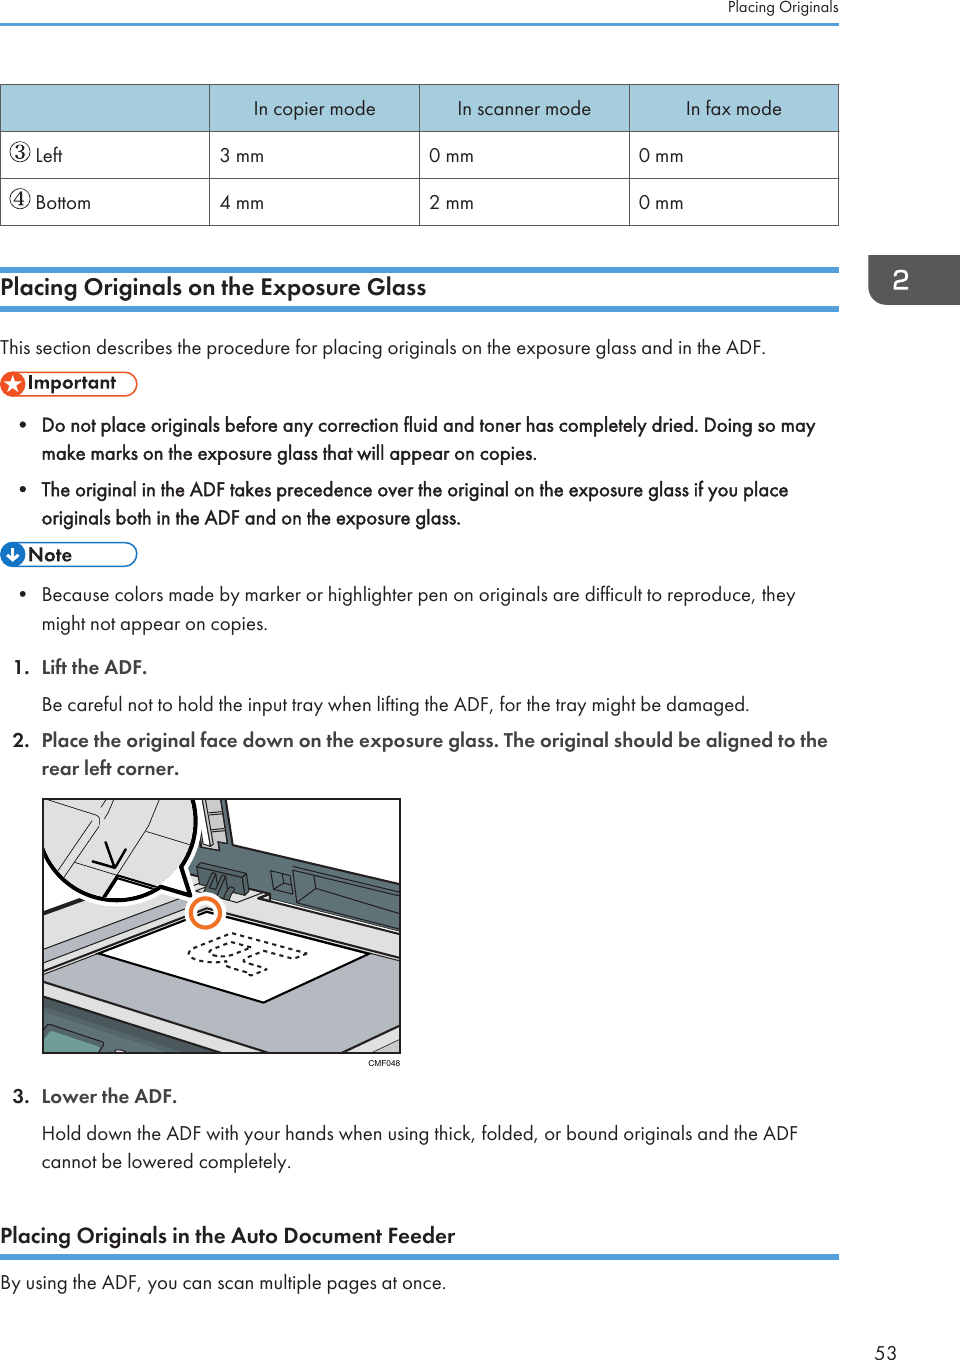
![Basic Operation• The original in the ADF takes precedence over the original on the exposure glass if you placeoriginals both in the ADF and on the exposure glass.1. Press the [Copy] key.CVW1012. Place the original on the exposure glass or in the ADF. To place the original, see page 51"Placing Originals".If necessary, configure advanced photocopy settings.3. To make multiple copies, enter the number of copies using the number keys.4. Press the [Start] key.CVW106• The maximum number of copies is 99.•You can change the paper tray for the current job by pressing the [ ] or [ ] key. You can alsoselect to change the paper tray automatically according to the paper size (A4, Letter, or 16K).•You can select the paper tray for printing out copies in [Select Paper] under copy settings. If you setthe machine to switch between tray 1 and the bypass tray automatically depending on the papersize in this setting, you can also specify the tray the machine uses first in [Paper Tray Priority] under4. Copying Originals64](https://usermanual.wiki/Ricoh/MFSP311SFNW1/User-Guide-1915829-Page-66.png)
![system settings. For [Select Paper], see page 134 "Copier Features Settings". For [Paper TrayPriority], see page 147 "System Settings".•When making multiple copies of a multi-page document, you can select whether copies are outputin collated sets, or in page batches in the [Sort] setting under copy settings. [Sort] cannot be usedwith the bypass tray. For [Sort], see page 134 "Copier Features Settings".• If a paper jam occurs, printing stops after the current page has been printed out. After the jammedpaper is removed, printing restarts from the jammed page automatically.• If a scanning jam occurs in the ADF, copying is canceled immediately. In this case, copy theoriginals again starting from the jammed page. For the direction to remove the jammed paper, seepage 211 "Paper Feed Problems".Canceling a CopyWhile scanning the originalIf copying is canceled while the machine is scanning the original, copying is cancelled immediatelyand there is no printout.When the original is set in the ADF, scanning stops immediately but pages that have already beenscanned completely will be copied.While printingIf copying is canceled during printing, the photocopy process is canceled after the current pagehas been printed out.Follow the procedure below to cancel copying.1. Press the [Copy] key.CVW101Basic Operation65](https://usermanual.wiki/Ricoh/MFSP311SFNW1/User-Guide-1915829-Page-67.png)
![2. Press the [Clear/Stop] key.CVW1054. Copying Originals66](https://usermanual.wiki/Ricoh/MFSP311SFNW1/User-Guide-1915829-Page-68.png)
![Making Enlarged or Reduced CopiesThere are two ways to set the scaling ratio: using a preset ratio or manually specifying a customizedratio.Preset ratioCES10350%, 71%, 82%, 93%, 122%, 141%, 200%, 400%Custom ratioCES10625% to 400% in 1% increments.Specifying Reduce/Enlarge1. Press [Scale]. 2. Press [Reduce], [Enlarge], or [Zoom].For [Reduce] or [Enlarge], press the [ ], [ ], [ ], or [ ] key to select the desired ratio. For [Zoom],specify the desired ratio using the number keys.3. Press the [OK] key.Making Enlarged or Reduced Copies67](https://usermanual.wiki/Ricoh/MFSP311SFNW1/User-Guide-1915829-Page-69.png)
![• You can press the [Escape] key to exit to the previous level of the menu tree.•You can change the machine's default [Reduce/Enlarge] setting to always make photocopies inthe specified ratio. For details, see page 134 "Copier Features Settings".• Temporary job settings are cleared in the following cases:• When no input is received for the period of time specified in [System Auto Reset Timer] whilethe initial screen is displayed. For details, see page 166 "Administrator Settings".• When the [Clear/Stop] key is pressed while the initial screen is displayed.• When the machine's mode is changed.• When the power is turned off.• When the machine's default for the same setting is changed.4. Copying Originals68](https://usermanual.wiki/Ricoh/MFSP311SFNW1/User-Guide-1915829-Page-70.png)
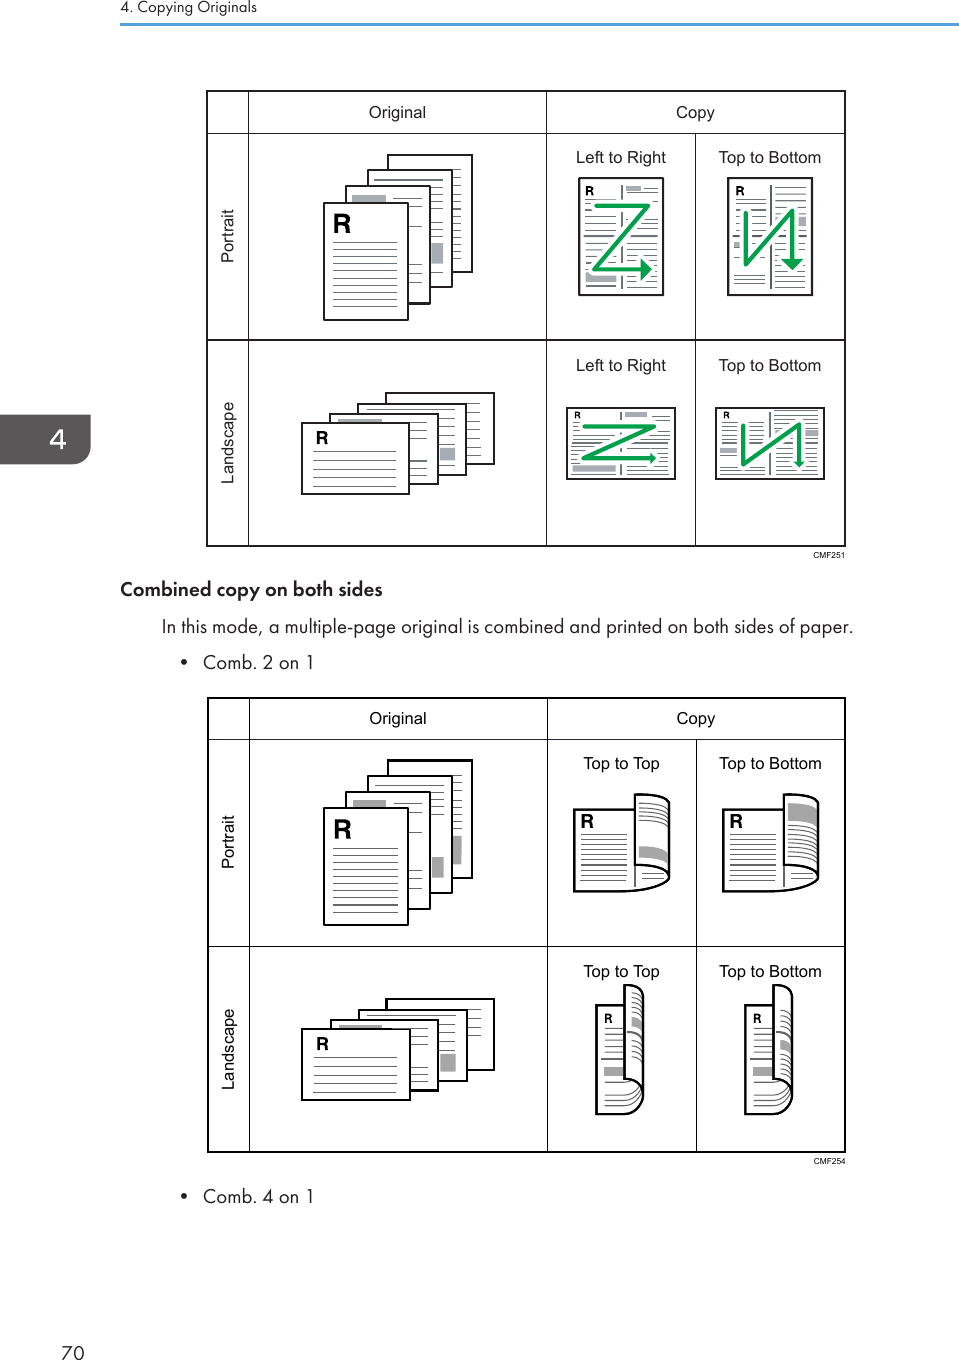
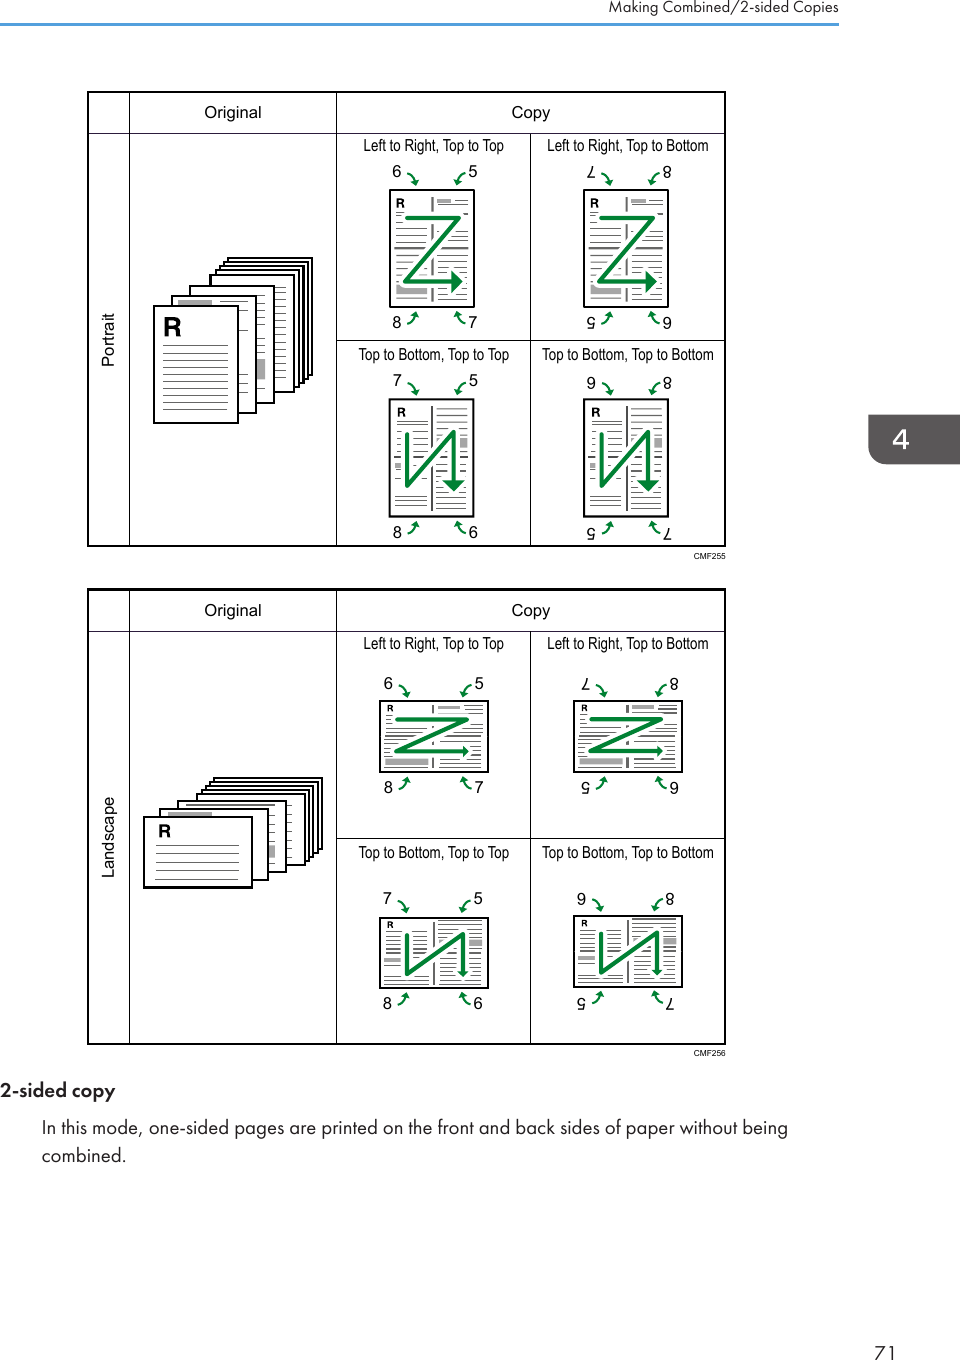
![PortraitLandscapeOriginal CopyCMF260Top to Top Top to BottomTop to Top Top to BottomSpecifying Combined and 2-sided Copies1. Press the [Duplex] key.CVW1102. Press the [ ] or [ ] key to select the desired copy mode, and then press the [OK] key.3. Press the [ ] or [ ] key to select paper orientation and page order, and then press the[OK] key.The screen will show the selected copy mode.• You can press the [Escape] key to exit to the previous level of the menu tree.•You can change the machine's default [Duplex/Combine] setting to always make photocopies incombine mode. For details, see page 134 "Copier Features Settings".4. Copying Originals72](https://usermanual.wiki/Ricoh/MFSP311SFNW1/User-Guide-1915829-Page-74.png)
![• Setting combined copying automatically disables the [ID Card Copy] setting.•Temporary job settings are cleared in the following cases:• Temporary job settings are cleared in the following cases:• When no input is received for the period of time specified in [System Auto Reset Timer] whilethe initial screen is displayed. For details, see page 166 "Administrator Settings".• When the [Clear/Stop] key is pressed while the initial screen is displayed.• When the machine's mode is changed.• When the power is turned off.• When the machine's default for the same setting is changed.Making Combined/2-sided Copies73](https://usermanual.wiki/Ricoh/MFSP311SFNW1/User-Guide-1915829-Page-75.png)
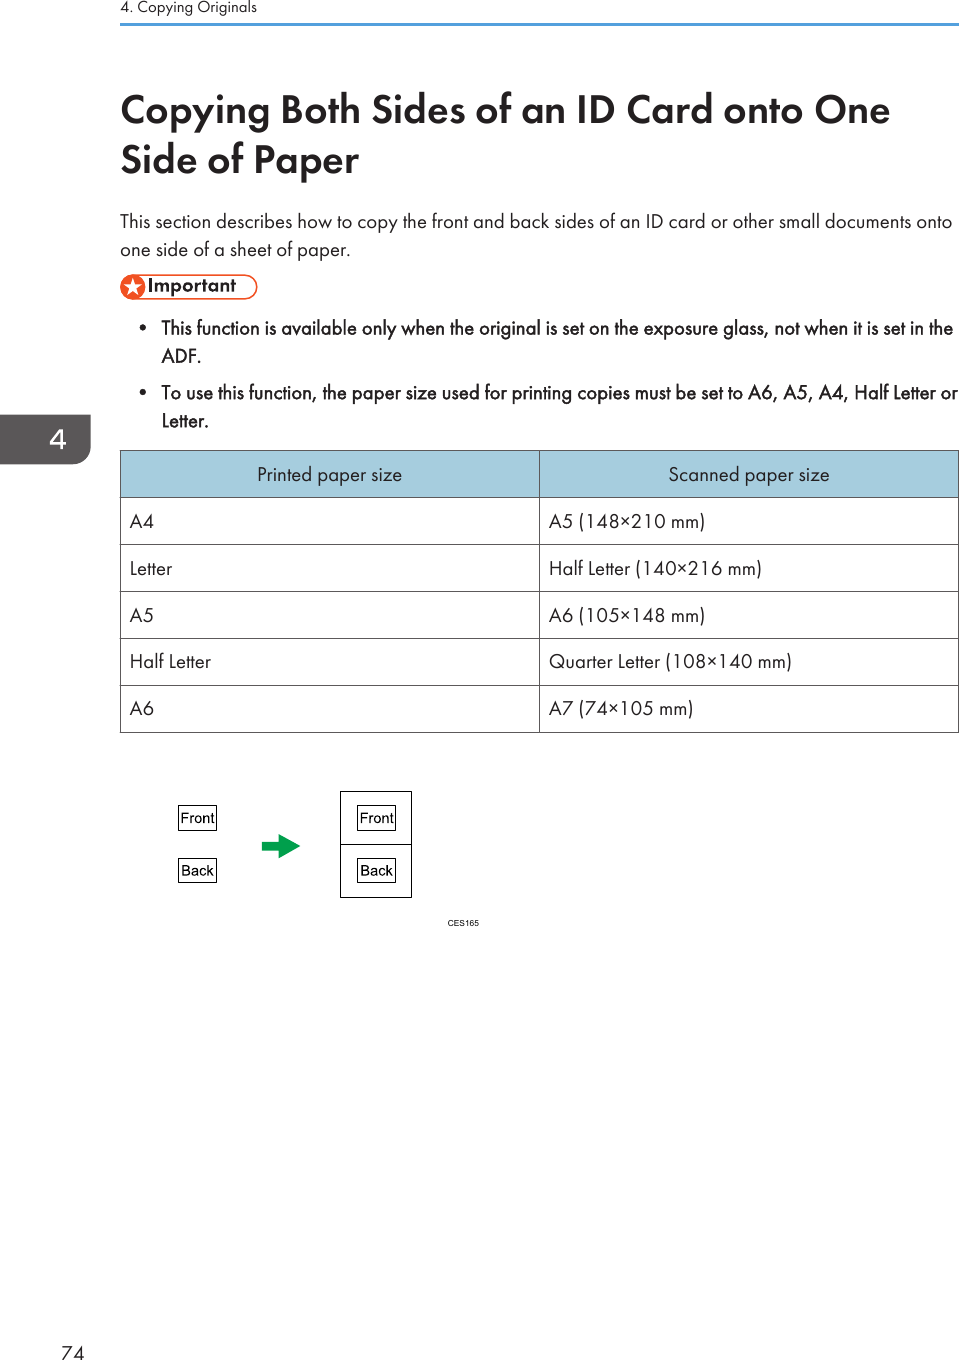
![Copying an ID Card1. Press the [Shortcut to Func.] key.CVW107To make the [Shortcut to Func.] key enable ID card copy mode for the current job, [Shortcut toFunction] under administrator settings must be set to [ID Card Copy Mode].For [Shortcut to Function], see page 166 "Administrator Settings".2. Place the original front side down and top to the machine rear on the exposure glass.Place the original in the center of the specified scan area for sheets that are half the size of thepaper to be printed on. For example, if you are printing on a sheet of A4 paper, place the originalin the center of the A5 scan area.CVW304The location to place the original depends on the paper size.•When printing on a sheet of A4, A5, or A6 paperPosition the card so that it is centered at the intersection. (The same position applies to both thefront and back of the ID card.)Copying Both Sides of an ID Card onto One Side of Paper75](https://usermanual.wiki/Ricoh/MFSP311SFNW1/User-Guide-1915829-Page-77.png)
![A4A5A6CVW302• When printing on a sheet of Letter or Half Letter paperPosition the card so that it is centered at the intersection.(The same position applies to both thefront and back of the ID card.) CVW3033. Press the [Start] key.A message prompting you to place the original back side down on the exposure glass appears onthe display.4. Within 30 seconds, place the original back side down and top to the machine rear on theexposure glass, and then press the [Start] key again.• For the ID card copy function, you can set the machine to print a line in the middle of the printedpaper. Specify [ID Card Center Line] under Copier Features.•You can press the [Escape] key to exit to the previous level of the menu tree.• Regardless of the machine's reduction or enlargement ratio setting, an ID card copy will always bemade at 100%.• You can change the machine's default [Reduce/Enlarge] setting to always make photocopies in IDcard copy mode. In addition, if the [Shortcut to Func.] key is not set to [ID Card Copy Mode], youmust configure the machine's default setting to perform ID card copy. For [Reduce/Enlarge], seepage 134 "Copier Features Settings".4. Copying Originals76](https://usermanual.wiki/Ricoh/MFSP311SFNW1/User-Guide-1915829-Page-78.png)
![• Setting this function for the current job temporarily disables combined copying automatically.However, after the temporary job setting is cleared, the combined copying will be enabled againautomatically.•Temporary job settings are cleared in the following cases:• When no input is received for the period of time specified in [System Auto Reset Timer] whilethe initial screen is displayed. For details, see page 166 "Administrator Settings".• When the [Clear/Stop] key is pressed while the initial screen is displayed.• When the machine's mode is changed.• When the power is turned off.• When the machine's default for the same setting is changed.Copying Both Sides of an ID Card onto One Side of Paper77](https://usermanual.wiki/Ricoh/MFSP311SFNW1/User-Guide-1915829-Page-79.png)
![Specifying the Scan SettingsThis section describes how to specify image density and scan quality for the current job.Adjusting Image DensityThere are five image density levels. The higher the density level, the darker the printout.1. Press the [Density] key.CVW1092. Press the [ ] or [ ] key to select the desired density level, and then press the [OK] key.• Press the [Escape] key to discard the current change and return to the initial screen.•You can change the machine's default [Density] setting to always make copies with a specificdensity level. For details, see page 138 "Scanner Features Settings".• Temporary job settings are cleared in the following cases:• When no input is received for the period of time specified in [System Auto Reset Timer] whilethe initial screen is displayed. For details, see page 166 "Administrator Settings".• When the [Clear/Stop] key is pressed while the initial screen is displayed.• When the machine's mode is changed.• When the power is turned off.• When the machine's default for the same setting is changed.Selecting the Document Type According to OriginalThere are three document types:MixedSelect this when the original contains both text and photographs or pictures.4. Copying Originals78](https://usermanual.wiki/Ricoh/MFSP311SFNW1/User-Guide-1915829-Page-80.png)
![TextSelect this when the original contains only text and no photographs or pictures.PhotoSelect this when the original contains only photographs or pictures. Use this mode for the followingtypes of original:•Photographs• Pages that are entirely or mainly photographs or pictures, such as magazine pages.Specifying the Original Type1. Press the [Image Quality] key.CVW1082. Press the [ ] or [ ] key to select the desired document type, and then press the [OK] key.• Press the [Escape] key to discard the current change and return to the initial screen.•You can change the machine's default [Original Type] setting to always make copies with aspecific document type. For details, see page 134 "Copier Features Settings".• Temporary job settings are cleared in the following cases:• When no input is received for the period of time specified in [System Auto Reset Timer] whilethe initial screen is displayed. For details, see page 166 "Administrator Settings".• When the [Clear/Stop] key is pressed while the initial screen is displayed.• When the machine's mode is changed.• When the power is turned off.• When the machine's default for the same setting is changed.Specifying the Scan Settings79](https://usermanual.wiki/Ricoh/MFSP311SFNW1/User-Guide-1915829-Page-81.png)

![5. Scanning OriginalsScanner Mode ScreenThis section provides information about the screen in scanner mode.By default, the display shows the copier screen when the machine is turned on. If the copier or faxscreen is shown on the display, press the [Scanner] key on the control panel to switch to the scannerscreen.CVW103Screen in standby modeCVW2011. Current status or messagesDisplays the current status or messages.2. Current settingsDisplays the current scanning mode and scan settings.• When "Specify Dest." is displayed:Scan to E-mail, Scan to FTP, or Scan to Folder functions can be used.3. Selection key itemsDisplays the functions you can use by pressing the corresponding selection keys.• The machine's default mode at power on can be specified in the [Function Priority] setting under[Admin. Tools]. For [Function Priority], see page 166 "Administrator Settings".81](https://usermanual.wiki/Ricoh/MFSP311SFNW1/User-Guide-1915829-Page-83.png)
![Registering Scan DestinationsThis section describes how to register scan destinations in the Address Book. To send scanned files to ane-mail address (Scan to E-mail), FTP server (Scan to FTP), or a shared folder on a network computer(Scan to Folder), you must first register the destination in the Address Book using Web Image Monitor.• The Address Book data could be damaged or lost unexpectedly. The manufacturer shall not beresponsible for any damages resulting from such data loss. Be sure to create backup files of theAddress Book data periodically.•Depending on your network environment, the Scan to FTP and Scan to Folder functions mayrequire a user name and password to be correctly entered in the destination information. In suchcases, after registering destinations, check that the user name and password are correctly enteredby sending test documents to those destinations.The Address Book can contain up to 100 entries, including 8 Quick Dial entries.Destinations registered as Quick Dial entries can be selected by pressing the corresponding One Touchbutton.1. Start the Web browser, and access the machine by entering its IP address.2. Click [Quick Dial Destination] or [Scan Destination].3. From the [Destination Type] list, select [E-mail Address], [FTP] or [Folder].4. Register information as necessary.The information you must register varies depending on the destination type. For details, see thetables below.5. Enter the administrator password if required.6. Click [Apply].7. Close the Web browser.5. Scanning Originals82](https://usermanual.wiki/Ricoh/MFSP311SFNW1/User-Guide-1915829-Page-84.png)
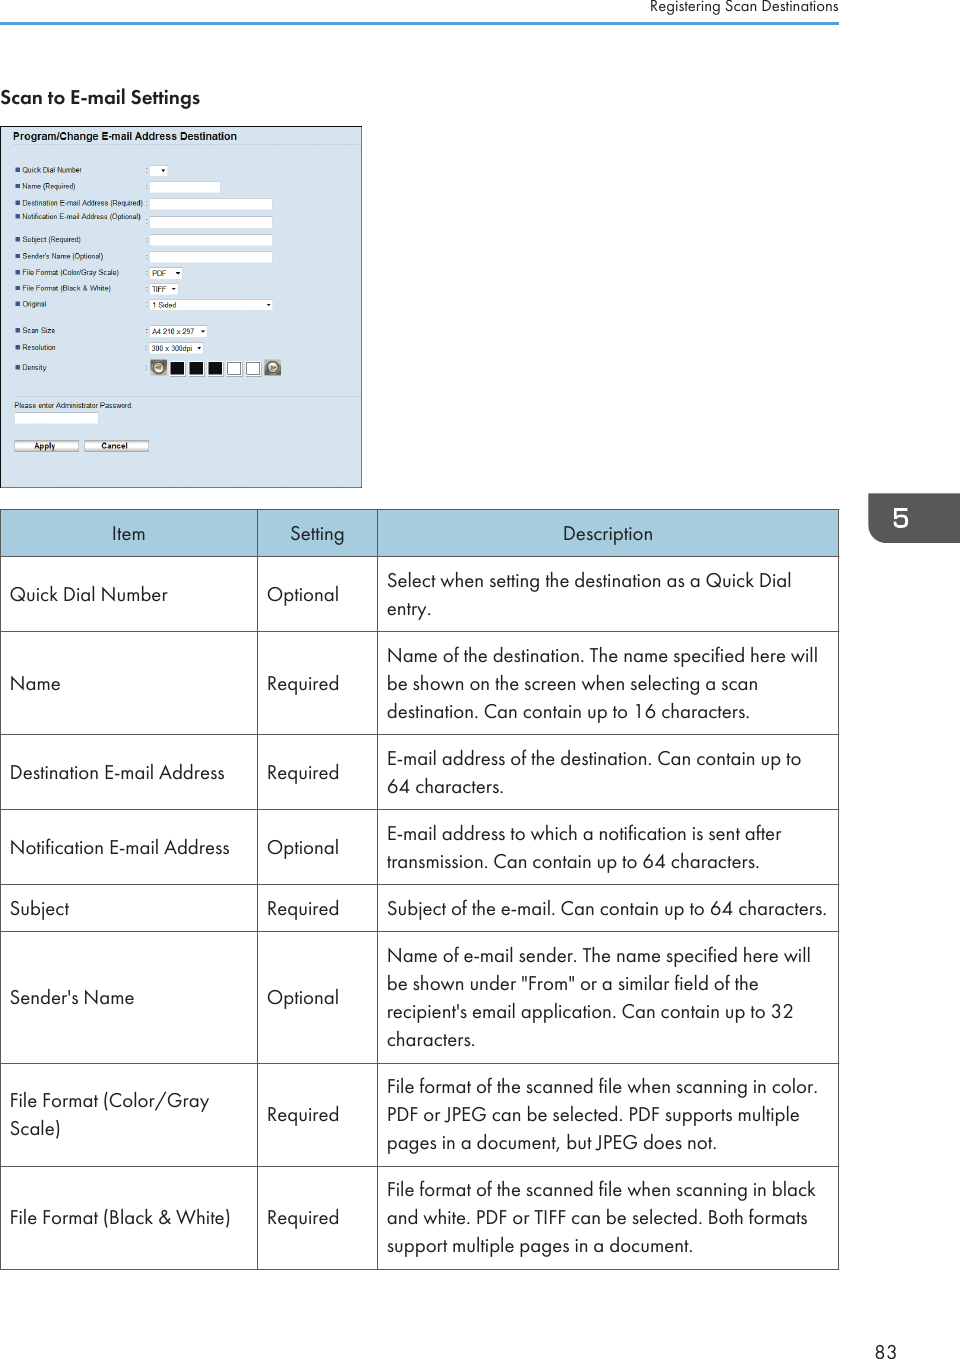
![Item Setting DescriptionOriginal Required Select the sides of the original (1 side or 2-sides) toscan according to the page and binding orientation.Scan Size OptionalSelect the scanning size for the original from A5, B5,A4, Executive, Half Letter, Letter, Legal, 16K, orcustom size.If you select custom size, select [mm] or [Inch], andthen specify the width and length.Resolution Optional Select the scan resolution from 100×100, 150×150,200×200, 300×300, 400×400, or 600×600 dpi.Density OptionalSpecify the image density by clicking the right or leftbuttons. is the lightest, and is the darkest.Scan to FTP SettingsItem Setting DescriptionQuick Dial Number Optional Select when setting the destination as a Quick Dialentry.Name RequiredName of the destination. The name specified here willbe shown on the screen when selecting a scandestination. Can contain up to 16 characters.Hostname or IP Address Required Name or IP address of the FTP server. Can contain upto 64 characters.5. Scanning Originals84](https://usermanual.wiki/Ricoh/MFSP311SFNW1/User-Guide-1915829-Page-86.png)
![Item Setting DescriptionFile Format (Color/GrayScale) RequiredFile format of the scanned file when scanning in color.PDF or JPEG can be selected. PDF supports multiplepages in a document, but JPEG does not.File Format (Black & White) RequiredFile format of the scanned file when scanning in blackand white. PDF or TIFF can be selected. Both formatssupport multiple pages in a document.FTP User Name Optional User name for logging in to the FTP server. Cancontain up to 32 characters.FTP Password Optional Password for logging in to the FTP server. Can containup to 32 characters.Directory Optional Name of the FTP server directory where scanned filesare stored. Can contain up to 64 characters.Notification E-mail Address Optional E-mail address to which a notification is sent aftertransmission. Can contain up to 64 characters.Original Required Select the sides of the original (1 side or 2-sides) toscan according to the page and binding orientation.Scan Size OptionalSelect the scanning size for the original from A5, B5,A4, Executive, Half Letter, Letter, Legal, or custom size.If you select custom size, select [mm] or [Inch], andthen specify the width and length.Resolution Optional Select the scan resolution from 100×100, 150×150,200×200, 300×300, 400×400, or 600×600 dpi.Density OptionalSpecify the image density by clicking the right or leftbuttons. is the lightest, and is the darkest.Registering Scan Destinations85](https://usermanual.wiki/Ricoh/MFSP311SFNW1/User-Guide-1915829-Page-87.png)
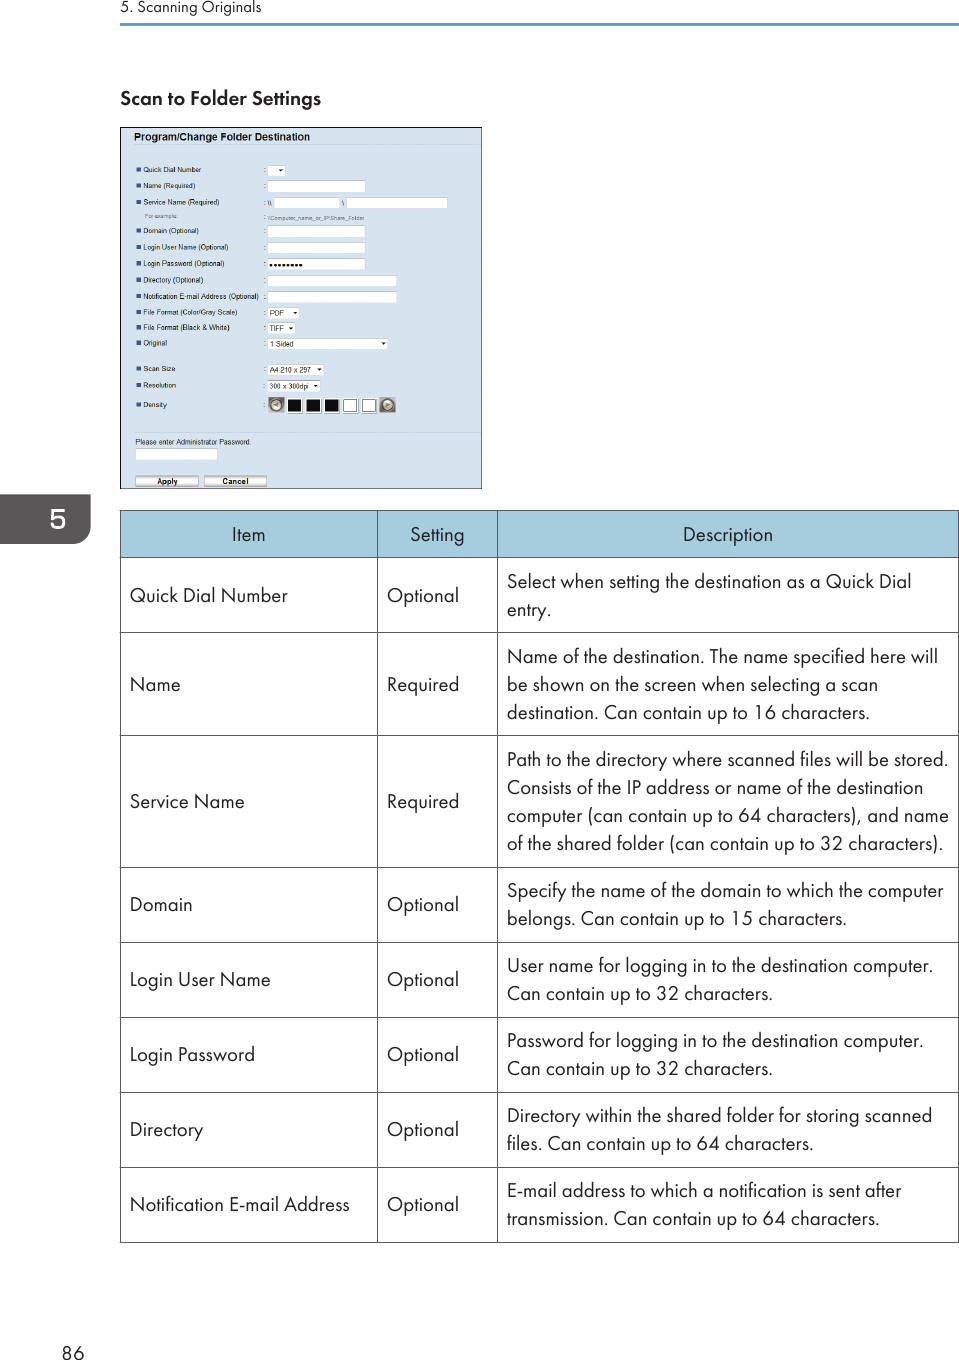
![Item Setting DescriptionFile Format (Color/GrayScale) RequiredFile format of the scanned file when scanning in color.PDF or JPEG can be selected. PDF supports multiplepages in a document, but JPEG does not.File Format (Black & White) RequiredFile format of the scanned file when scanning in blackand white. PDF or TIFF can be selected. Both formatssupport multiple pages in a document.Original Required Select the sides of the original (1 side or 2-sides) toscan according to the page and binding orientation.Scan Size OptionalSelect the scanning size for the original from A5, B5,A4, Executive, Half Letter, Letter, Legal, or custom size.If you select custom size, select [mm] or [Inch], andthen specify the width and length.Resolution Optional Select the scan resolution from 100×100, 150×150,200×200, 300×300, 400×400, or 600×600 dpi.Density OptionalSpecify the image density by clicking the right or leftbuttons. is the lightest, and is the darkest.• To send files via e-mail, SMTP and DNS settings must be configured properly.•If you are using the Scan to E-mail function, select a time zone according to your geographiclocation to send email with correct transmission date and time.• To send files to an FTP server or computer, the user name, password, and directory must beconfigured properly.• On a network that uses a DNS server, specify a computer name in [Service Name] and the nameof the domain to which the computer belongs in [Domain]. In this case, also configure the DNSrelated settings using Web Image Monitor.• Scan destinations cannot be registered using the control panel.Modifying Scan DestinationsThis section describes how to modify the information of registered destinations.1. Start the Web browser, and access the machine by entering its IP address.2. Click [Scan Destination].Registering Scan Destinations87](https://usermanual.wiki/Ricoh/MFSP311SFNW1/User-Guide-1915829-Page-89.png)
![3. Click the [E-mail Address], [FTP], or [Folder] tab.4. Select the entry to modify, and then click [Change].5. Modify settings as necessary.6. Enter the administrator password if required.7. Click [Apply].8. Close the Web browser.• You can unassign a Quick Dial entry from a One-touch button from the [Quick Dial Destination]page. To do this, select the desired entry, click [Delete], and then click [Apply] again on aconfirmation page.Deleting Scan DestinationsThis section describes how to delete registered destinations.1. Start the Web browser, and access the machine by entering its IP address.2. Click [Scan Destination].3. Click the [E-mail Address], [FTP], or [Folder] tab.4. Select the entry to delete, and then click [Delete].5. Confirm that the entry you have selected is the entry that you want to delete.6. Enter the administrator password if required.7. Click [Apply].8. Close the Web browser.5. Scanning Originals88](https://usermanual.wiki/Ricoh/MFSP311SFNW1/User-Guide-1915829-Page-90.png)
![Basic OperationScanning using the control panel allows you to send scanned files via e-mail (Scan to E-mail), to an FTPserver (Scan to FTP), or to the shared folder of a computer on a network (Scan to Folder).The Scan to E-mail, Scan to FTP, and Scan to Folder functions are available only through a networkconnection.Scan to E-mail/FTP/FolderThis section describes the basic operation for sending scanned files via e-mail, to an FTP server, or to acomputer, depending on the specified destination.• The original in the ADF takes precedence over the original on the exposure glass if you placeoriginals both in the ADF and on the exposure glass.•When using the Scan to E-mail, Scan to FTP or Scan to Folder function, you must first register thedestination in the Address Book using Web Image Monitor. For details, see page 82 "RegisteringScan Destinations".1. Place the original on the exposure glass or in the ADF. To place the original, see page 51"Placing Originals".2. Press the [Scanner] key, and then press the [Address Book] key.CVW103Alternatively, you can press the [Shortcut to Func.] key if [Shortcut to Function] under administratorsettings is set to [Select Scanner Dest.]. For [Shortcut to Function], see page 166 "AdministratorSettings".3. Press the [ ] or [ ] key to select [Search Address Book], and then press the [OK] key.If you want to search for a specific entry by its name, enter the first letters of the name using thenumber keys, and then press the [OK] key. Each time you enter a character, the display changes toshow the matching name.Basic Operation89](https://usermanual.wiki/Ricoh/MFSP311SFNW1/User-Guide-1915829-Page-91.png)
![4. Search for the desired destination by pressing the [ ] or [ ] key to scroll the AddressBook, and then press the [OK] key.When you specify a scan destination, the machine's scan settings change automatically accordingto the information registered for that destination in the Address Book. If necessary, you can changethe scan settings using the control panel. For scan settings, see page 93 "Specifying the ScanSettings".5. Press the [Start] key.CVW106Depending on the machine's settings, you may see the following screen on the display whenscanning from the exposure glass.If you see this screen, proceed to the next step.6. If you have more originals to scan, place the next original on the exposure glass, andthen press [Yes]. Repeat this step until all originals are scanned.7. When all originals have been scanned, press [No] to start sending the scanned file.• To cancel scanning, press the [Scanner] key, and then press the [Clear/Stop] key. The scan filesare discarded.•You can configure the machine to scan documents in black and white, color, or grayscale bychanging the [Scanning Mode] setting under scanner settings. For details, see page 93"Specifying the Scan Settings".• You can also specify a destination using the One Touch buttons, [Pause/Redial] key. For details,see page 91.5. Scanning Originals90](https://usermanual.wiki/Ricoh/MFSP311SFNW1/User-Guide-1915829-Page-92.png)
![• If the [Limitless Scan] setting under scanner settings is enabled, you can place originals on theexposure glass repeatedly in a single scan procedure. For details, see page 93 "Specifying theScan Settings".•If [File Type] under scanner settings is set to [Multi-page], you can scan multiple pages to create asingle PDF or TIFF file containing all pages. However, if the file format is JPEG, a single-page filewill be created for every page scanned. For details, see page 93 "Specifying the Scan Settings".• If paper is jammed in the ADF, the scan job will be discarded. Remove the jammed paper and scanthe entire originals again. For the direction to remove paper jammed in the ADF, see page 211"Paper Feed Problems".Specifying the scan destination using the One Touch buttons or [Pause/Redial] keyThis section describes how to specify a destination using the following keys:•One Touch buttonsUse these to specify destinations registered as Quick Dial entries.• [Pause/Redial] keyPress this to specify the last used destination as the destination for the current job.Using the One Touch buttonsPress the One Touch button to which the desired Quick Dial entry is registered.Press the [Shift] key to use the Quick Dial entries Nos. 5 to 8.CVW115Using the [Pause/Redial] keyPress the [Pause/Redial] key to select the last used destination.Basic Operation91](https://usermanual.wiki/Ricoh/MFSP311SFNW1/User-Guide-1915829-Page-93.png)
![CVW113• When you specify a scan destination, the machine's scan settings change automatically accordingto the information registered for that destination in the Address Book. If necessary, you can changethe scan settings using the control panel. For scan settings, see page 93 "Specifying the ScanSettings".•The [Pause/Redial] key is not effective for the first scan job after the machine is turned on.• To select destinations not registered as Quick Dial entries, use the [Address Book] key. Forspecifying destinations using the [Address Book] key, see page 89 "Scan to E-mail/FTP/Folder".5. Scanning Originals92](https://usermanual.wiki/Ricoh/MFSP311SFNW1/User-Guide-1915829-Page-94.png)
![Specifying the Scan SettingsWhen you specify a scan destination, the machine's scan settings change automatically according to theinformation registered for that destination in the Address Book. If necessary, you can change the scansettings for the current job using the control panel.Specifying the Scanning Size According to the Size of the OriginalThis section describes how to specify the scanning size according to the size of the current original.1. Press [Scn Size].2. Press the [ ] or [ ] key to select the size of the original, and then press the [OK] key.If you selected anything other than [Custom Size], you do not need to perform the remaining stepsof the procedure.3. Press the [ ] or [ ] key to select [mm] or [inch], and then press the [OK] key.4. Enter the width using the number keys, and then press the [OK] key.To enter a decimal point, press [ ].5. Enter the length using the number keys, and then press the [OK] key.To enter a decimal point, press [ ].• You can press the [Escape] key to exit to the previous level of the menu tree.•You can change the machine's default [Scan Size] setting to always scan originals with a specificscanning size. For details, see page 138 "Scanner Features Settings".• Temporary job settings are cleared in the following cases:• When no input is received for the period of time specified in [System Auto Reset Timer] whilethe initial screen is displayed. For details, see page 166 "Administrator Settings".• When the [Clear/Stop] key is pressed while the initial screen is displayed.• When the machine's mode is changed.• When the power is turned off.• When the machine's default for the same setting is changedSpecifying the Scan Settings93](https://usermanual.wiki/Ricoh/MFSP311SFNW1/User-Guide-1915829-Page-95.png)
![Adjusting Image DensityThis section describes how to adjust image density for the current job.There are five image density levels. The higher the density level, the darker the scanned image.1. Press the [Density] key.CVW1092. Press the [ ] or [ ] key to select the desired density level, and then press the [OK] key.• Press the [Escape] key to discard the current change and return to the initial screen.•You can change the machine's default [Density] setting to always scan with a specific density level.For details, see page 138 "Scanner Features Settings".• Temporary job settings are cleared in the following cases:• When no input is received for the period of time specified in [System Auto Reset Timer] whilethe initial screen is displayed. For details, see page 138 "Scanner Features Settings".• When the [Clear/Stop] key is pressed while the initial screen is displayed.• When the machine's mode is changed.• When the power is turned off.• When the machine's default for the same setting is changed.Specifying ResolutionThis section describes how to specify the scan resolution for the current job.There are six resolution settings. The higher the resolution, the higher the quality but greater the file size.5. Scanning Originals94](https://usermanual.wiki/Ricoh/MFSP311SFNW1/User-Guide-1915829-Page-96.png)
![1. Press the [Image Quality] key.CVW1082. Press the [ ], [ ], [ ], or [ ] key to select the desired resolution, and then press the [OK]key.• Press the [Escape] key to discard the current change and return to the initial screen.•You can change the machine's default [Resolution] setting to always scan with a specific resolutionlevel. For details, see page 138 "Scanner Features Settings".• Temporary job settings are cleared in the following cases:• When no input is received for the period of time specified in [System Auto Reset Timer] whilethe initial screen is displayed. For details, see page 166 "Administrator Settings".• When the [Clear/Stop] key is pressed while the initial screen is displayed.• When the machine's mode is changed.• When the power is turned off.• When the machine's default for the same setting is changed.Specifying the Scan Settings95](https://usermanual.wiki/Ricoh/MFSP311SFNW1/User-Guide-1915829-Page-97.png)
![Scanning from a ComputerScanning from a computer connected by the network or USB (TWAIN scanning and WIA scanning)allows you to operate the machine from your computer and scan originals into your computer directly.TWAIN ScanningTWAIN scanning is possible if your computer is running a TWAIN-compatible application.1. Place the original on the exposure glass.2. Open the properties dialog box for this machine using a TWAIN-compatible applicationon your computer.3. In the dialog box, configure the scan settings as required, and then click [Scan].Settings you can configure in the TWAIN dialog boxCVW30112345671. Scanner:Select the scanner you want to use. The scanner you select becomes the default scanner. Click [Refresh] todiscover all available scanners connected via USB or the network.2. Original:Select [Reflective] to scan from the exposure glass, or [Automatic Document Feeder] to scan from the ADF.5. Scanning Originals96](https://usermanual.wiki/Ricoh/MFSP311SFNW1/User-Guide-1915829-Page-98.png)
![3. Original typeAccording to your original, select a setting from the list of options detailed below, or select [Custom...] toconfigure your own scan settings. "Mode", "Resolution", and "Size" under "Scan Configuration" will changeaccording to the Original type setting you selected here.•When using the exposure glass:[Editing Text(OCR)][Faxing, Filing, or Copying][Black and White Photo][Color Document - fast][Color Document - Better Quality][Custom...]• When using the ADF:[ADF-Faster][ADF-Better][ADF-gray][Custom...]4. Mode:Select from color, grayscale, or black-and-white.5. Resolution:Select a resolution from the list. If you select [User defined], enter a resolution value directly in the edit box.Note that increasing the resolution also increases the file size and scanning time.Selectable resolutions vary depending on where the original is set.• When using the exposure glass:75, 100, 150, 200, 300, 400, 500, 600, 1200, 2400, 4800, 9600, 19200 dpi, User defined• When using the ADF:75, 100, 150, 200, 300, 400, 500, 600 dpi, User defined6. Size:Select the scanning size. If you select [User defined], enter the scanning size directly in the edit box. Also, youcan change the scanning size with your mouse in the preview area. You can select the unit of measure from[cm], [inches], or [pixels]. Selectable resolutions vary depending on where the original is set. For details, seethe TWAIN help.7. Scan task: (when using the exposure glass)Displays a maximum of 10 previously used scan areas. To remove a scan task, select the number of the task,and then click [Remove]. You can select [AutoCrop] to let the scanner automatically detect the size of youroriginal.• If the scan data is larger than the memory capacity, an error message appears and scanning iscanceled. If this happens, specify a lower resolution and scan the original again.•For details, see the TWAIN help.Scanning from a Computer97](https://usermanual.wiki/Ricoh/MFSP311SFNW1/User-Guide-1915829-Page-99.png)
![Basic Operation for WIA Scanning1. Place the original on the exposure glass.2. On the [Start] menu on your computer, click [Devices and Printers].3. Right-click the icon of the printer model you want to use, and then click [Start scan] toopen the dialog box for the scan settings.4. In the dialog box, configure the scan settings as required, and then click [Scan].5. Click [Import].5. Scanning Originals98](https://usermanual.wiki/Ricoh/MFSP311SFNW1/User-Guide-1915829-Page-100.png)
![6. Sending and Receiving a FaxFax Mode ScreenThis section provides information about the screen in fax mode.By default, the display shows the copier screen when the machine is turned on.If the copy or scanner screen is shown on the display, press the [Facsimile] key on the control panel toswitch to the fax screen.CVW102Screen in standby modeCVW2021. Current status or messagesDisplays the current status or messages.2. Current settingsDisplays the current density and resolution settings.3. Current date and timeShows the current date and time.• The machine's default mode at power on can be specified in the [Function Priority] setting under[Admin. Tools]. For [Function Priority], see page 166 "Administrator Settings".• The display format for time and date can be specified in [Set Date/Time] under [Admin. Tools]. Forsetting the date and time, see page 100 "Setting the Date and Time".99](https://usermanual.wiki/Ricoh/MFSP311SFNW1/User-Guide-1915829-Page-101.png)
![Setting the Date and Time1. Press the [User Tools] key.cvw1042. Press the [ ] or [ ] key to select [Admin. Tools], and then press the [OK] key.3. If you are requested to enter a password, enter the password using the number keys,and then press the [OK] key.4. Press the [ ] or [ ] key to select [Set Date/Time], and then press the [OK] key.5. Press the [ ] or [ ] key to select [Set Date], and then press the [OK] key.6. Press the [ ] or [ ] key to select the desired date format, and then press the [OK] key.For the date and time display format, see page 166 "Administrator Settings".7. Enter the current date using the number keys, and then press the [OK] key.You can press the [ ] or [ ] key to move between fields.8. Press the [ ] or [ ] key to select [Set Time], and then press the [OK] key.9. Press the [ ] or [ ] key to select the desired time format, and then press the [OK] key.10. Enter the current time using the number keys, and then press the [OK] key.If you selected [12-hour Format], press the [ ] or [ ] key to select [AM] or [PM].You can press the [ ] or [ ] key to move between fields.11. Press the [User Tools] key to return to the initial screen.• You can press the [Escape] key to exit to the previous level of the menu tree.•A password for accessing the [Admin. Tools] menu can be specified in [Admin. Tools Lock]. For[Admin. Tools Lock], see page 166 "Administrator Settings".6. Sending and Receiving a Fax100](https://usermanual.wiki/Ricoh/MFSP311SFNW1/User-Guide-1915829-Page-102.png)
![Entering CharactersTo enter characters, use keys as follows:To enter a digitPress a number key.To delete a characterPress the [ ] key.To enter a fax number•To enter a numberUse the number keys.• To enter characters other than digits"": Press [ ]." ": Press [ ]." ": Press [ ].Pause: Press the [Pause/Redial] key. "P" appears on the screen.Space: Press the [ ] key.To enter a nameLetters, numbers, and symbols can be entered using the number keys.To enter two characters consecutively that use the same number key, press the [ ] key to move thecursor before entering the second character.CMF106• Characters you can enter depend on the setting you are configuring.Entering Characters101](https://usermanual.wiki/Ricoh/MFSP311SFNW1/User-Guide-1915829-Page-103.png)
![• If the number you entered is too large or too small for the setting, it will not be accepted. If youpress the [OK] key, the machine will increase or decrease the number to the minimum or maximumvalue for the setting.6. Sending and Receiving a Fax102](https://usermanual.wiki/Ricoh/MFSP311SFNW1/User-Guide-1915829-Page-104.png)
![Registering Fax DestinationsThis section describes how to register fax destinations in the Address Book using the control panel. Forentering characters, see "Entering Characters".The Address Book can also be edited using Web Image Monitor.• The Address Book data could be damaged or lost unexpectedly. The manufacturer shall not beresponsible for any damages resulting from such data loss. Be sure to create backup files of theAddress Book data periodically. For details about creating backup files, see page 197"Configuring the Administrator Settings".The Address Book can contain up to 208 entries (8 Quick Dial entries and 200 Speed Dial entries).Quick Dial entriesDestinations registered as Quick Dial entries can be selected by pressing the corresponding OneTouch button.Speed Dial entriesDestinations registered as Speed Dial entries can be selected from the Address Book. Press the[Address Book] key, select [Search Address Book], and then select the desired entry using the [ ]or [ ] key.Registering Fax Destinations Using the Control Panel1. Press the [User Tools] key.cvw1042. Press the [ ] or [ ] key to select [Address Book], and then press the [OK] key.3. If you are requested to enter a password, enter the password using the number keys,and then press the [OK] key.4. Press the [ ] or [ ] key to select [Quick Dial Dest.] or [Fax Speed Dial Dest.], and thenpress the [OK] key.Registering Fax Destinations103](https://usermanual.wiki/Ricoh/MFSP311SFNW1/User-Guide-1915829-Page-105.png)
![5. Press the [ ] or [ ] key to select [No.], and then enter the desired Quick Dial number (1 to8) or Speed Dial number (1 to 200) using the number keys.If a destination is already registered for the input number, the fax number and fax name registeredfor that number appear.6. Press the [ ] or [ ] key to select [Fax No.], and then enter the fax number (up to 40characters).7. Press the [ ] or [ ] key to select [Name], and then enter the fax name (up to 20characters).8. Confirm the setting, and then press the [OK] key.9. Press the [User Tools] key to return to the initial screen.• For entering characters, see page 101 "Entering Characters".•You can press the [Escape] key to exit to the previous level of the menu tree.• A fax number can contain 0 to 9, pause, " ", " ", and space.•If necessary, insert a pause in the fax number. The machine pauses briefly before it dials the digitsfollowing the pause. You can specify the length of the pause time in the [Pause Time] setting underfax transmission settings. For [Pause Time], see page 140 "Fax Transmission Features Settings".• To use tone services on a pulse-dialing line, insert " " in the fax number. " " switches the dialingmode from pulse to tone temporarily.•If the machine is connected to the telephone network through a PBX, make sure to enter the outsideline access number specified in [PBX Access Number] before the fax number. For [PBX AccessNumber], see page 166 "Administrator Settings".• A password for accessing the [Address Book] menu can be specified in [Admin. Tools Lock]. For[Admin. Tools Lock], see page 166 "Administrator Settings".Modifying or deleting fax destinations1. Press the [User Tools] key.cvw1046. Sending and Receiving a Fax104](https://usermanual.wiki/Ricoh/MFSP311SFNW1/User-Guide-1915829-Page-106.png)
![2. Press the [ ] or [ ] key to select [Address Book], and then press the [OK] key.3. If you are requested to enter a password, enter the password using the number keys,and then press the [OK] key.A password for accessing the [Address Book] menu can be specified in [Admin. Tools Lock]. Fordetails about [Admin. Tools Lock], see page 166 "Administrator Settings".4. Press the [ ] or [ ] key to select [Quick Dial Dest.] or [Fax Speed Dial Dest.], and thenpress the [OK] key.5. Press the [ ] or [ ] key to select [No.], and then enter the desired Quick Dial number (1 to8 or Speed Dial number (1 to 200) using the number keys.The fax number and fax name registered for that number appear.6. Press the [ ] or [ ] key to select [Fax No.], and then modify the fax number (up to 40characters).If you want to delete the fax number, press the [ ] key until the current number is deleted.7. Press the [ ] or [ ] key to select [Name], and then modify the fax name (up to 20characters).If you want to delete the fax name, press the [ ] key until the current name is deleted.8. Confirm the setting, and then press the [OK] key.9. Press the [User Tools] key to return to the initial screen.• For details about entering characters, see page 101 "Entering Characters".•You can press the [Escape] key to exit to the previous level of the menu tree.• A password for accessing the [Address Book] menu can be specified in [Admin. Tools Lock].Registering Fax Destinations Using Web Image Monitor1. Start the Web browser and access the machine by entering its IP address.2. Click [Quick Dial Destination] or [Fax Speed Dial Destination].3. From the [Destination Type] list, select [Fax].4. Select [Quick Dial Number] or [Speed Dial Number], and then select the registrationnumber from the list.5. Register information as necessary.6. Enter the administrator password if required.7. Click [Apply].8. Close the Web browser.Registering Fax Destinations105](https://usermanual.wiki/Ricoh/MFSP311SFNW1/User-Guide-1915829-Page-107.png)
![Fax destination settingsItem Setting DescriptionQuick Dial Number /Speed Dial Number Required Select the number to which you want to register QuickDial or Speed Dial destination.Name OptionalName of the destination. The name specified here willbe shown on the screen when selecting a faxdestination. Can contain up to 20 characters.Fax Number RequiredFax number of the destination. Can contain up to 40characters.If the machine is connected to the telephone networkthrough a PBX, make sure to enter the outside lineaccess number specified in [PBX Access Number]before the fax number. For [PBX Access Number], seepage 166 "Administrator Settings".• A fax number can contain 0 to 9, "P" (pause), " ", " ", "-", and space.•If necessary, insert a pause in the fax number. The machine pauses briefly before it dials the digitsfollowing the pause. You can specify the length of the pause time in the [Pause Time] setting underfax transmission settings. For [Pause Time], see page 140 "Fax Transmission Features Settings".• For details about using Web Image Monitor, see page 171 "Configuring the Machine UsingUtilities".• To use tone services on a pulse-dialing line, insert " " in the fax number. " " switches the dialingmode from pulse to tone temporarily.Modifying fax destinations1. Start the Web browser and access the machine by entering its IP address.6. Sending and Receiving a Fax106](https://usermanual.wiki/Ricoh/MFSP311SFNW1/User-Guide-1915829-Page-108.png)
![2. Click [Quick Dial Destination] or [Fax Speed Dial Destination].If you modify the Speed Dial entry, proceed to Step 4.3. Click [Fax Quick Dial Destination].4. Select the entry to modify, and then click [Change].If you want to delete the entry, click [Delete].5. Modify settings as necessary.To delete the entry, confirm the entry you have selected.6. Enter the administrator password if required.7. Click [Apply].8. Close the Web browser.Registering Fax Destinations107](https://usermanual.wiki/Ricoh/MFSP311SFNW1/User-Guide-1915829-Page-109.png)
![Sending a Fax• It is recommended that you call the receiver and confirm with them when sending importantdocuments.Selecting Transmission ModeThere are two transmission modes: Memory Transmission and Immediate Transmission.Memory TransmissionIn this mode, the machine scans several originals into memory and sends them all at once. This isconvenient when you are in a hurry and want to take the document away from the machine. In thismode, you can send a fax to multiple destinations.Immediate TransmissionIn this mode, the machine scans the original and faxes it simultaneously, without storing it inmemory. This is convenient when you want to send an original quickly. In this mode, you can onlyspecify one destination.1. Press the [Facsimile] key, and then press the [ ] or [ ] key.CVW117Alternatively, you can press the [Shortcut to Func.] key if [Shortcut to Function] under administratorsettings is set to [Fax Immediate TX]. For [Shortcut to Function], see page 166 "AdministratorSettings".2. Press the [ ] or [ ] key to select [Immediate TX], and then press the [OK] key.3. Press the [ ] or [ ] key to select [Off], [On], or [Next Fax Only], and then press the [OK]key.For Memory Transmission, select [Off].For Immediate Transmission, select [On] or [Next Fax Only].4. Press the [User Tools] key to return to the initial screen.6. Sending and Receiving a Fax108](https://usermanual.wiki/Ricoh/MFSP311SFNW1/User-Guide-1915829-Page-110.png)
![• You can press the [Escape] key to exit to the previous level of the menu tree.Basic Operation for Sending a Fax• The original in the ADF takes precedence over the original on the exposure glass if you placeoriginals both in the ADF and on the exposure glass.1. Press the [Facsimile] key.CVW1022. Place the original on the exposure glass or in the ADF. To place the originals, see page 51"Placing Originals".3. Enter the fax number (up to 40 characters) using the number keys, or specify adestination using the One Touch buttons or Speed Dial function. For details about enteringcharacters, see page 101 "Entering Characters". For details about specifying destinationsusing the One Touch buttons or Speed Dial function, see page 112 "Specifying the FaxDestination".•If the machine is connected to the telephone network through a PBX, make sure to enter theoutside line access number specified in [PBX Access Number] before the fax number. For [PBXAccess Number], see page 166 "Administrator Settings".Sending a Fax109](https://usermanual.wiki/Ricoh/MFSP311SFNW1/User-Guide-1915829-Page-111.png)
![4. Press the [Start] key.CVW106• Depending on the machine's settings, you may be prompted to enter the fax number again ifyou manually entered the destination fax number. In this case, re-enter the number within 60seconds, press [OK], and then press the [Start] key. If the fax numbers do not match, go backto Step 3. For fax number confirmation, see page 166 "Administrator Settings".•When using the exposure glass in Memory Transmission mode, you will be prompted to placeanother original. In this case, proceed to the next step.5. If you have more originals to scan, press [Yes] within 60 seconds, place the next originalon the exposure glass, and then press [OK]. Repeat this step until all originals arescanned.If you do not press [Yes] within 60 seconds, the machine will start to dial the destination.6. When all originals have been scanned, press [#] to start sending the fax.• A fax number can contain 0 to 9, pause, " ", " ", and space.•If necessary, insert a pause in a fax number. The machine pauses briefly before it dials the digitsfollowing the pause. You can specify the length of the pause time in the [Pause Time] setting underfax transmission settings. For [Pause Time], see page 140 "Fax Transmission Features Settings".• To use tone services on a pulse-dialing line, insert " " in a fax number. " " switches the dialingmode from pulse to tone temporarily.•You can specify multiple destinations and broadcast the fax you are sending. For sending a faxusing the broadcast function, see page 112 "Specifying the Fax Destination".• The machine prompts you to enter the fax number twice only when you dial the destinationmanually. Destinations specified using the One Touch buttons, Speed Dial function, or [Pause/Redial] key need not be confirmed.• When in Memory Transmission mode, you can enable the [Auto Redial] setting under faxtransmission settings to set the machine to automatically redial the destination if the line is busy oran error occurs during transmission. For [Auto Redial], see page 140 "Fax Transmission FeaturesSettings".6. Sending and Receiving a Fax110](https://usermanual.wiki/Ricoh/MFSP311SFNW1/User-Guide-1915829-Page-112.png)
![• When in Memory Transmission mode, the machine's memory may become full while scanning theoriginals. In this case, the screen prompts you to cancel the transmission or to send only the pagesthat have been scanned successfully.•If paper is jammed in the ADF, the jammed page has not been scanned properly. When themachine is in Immediate Transmission mode, resend the fax starting from the jammed page. Whenin Memory Transmission mode, scan the entire originals again. For details about removing paperjammed in the ADF, see page 211 "Paper Feed Problems".Canceling a faxFollow the procedure below to cancel sending a fax.When in Immediate Transmission modeIf you cancel sending a fax while the machine is scanning the original, the fax transmission processis canceled immediately. In this case, an error is displayed on the other party's machine.When in Memory Transmission modeIf you cancel sending a fax while the machine is scanning the original, the machine will not sendthe document.If you cancel sending a fax during transmission, the fax transmission process is canceledimmediately. In this case, an error is displayed on the other party's machine.1. Press the [Facsimile] key.CVW102Sending a Fax111](https://usermanual.wiki/Ricoh/MFSP311SFNW1/User-Guide-1915829-Page-113.png)
![2. Press the [Clear/Stop] key.CVW105• If you cancel sending a fax while broadcasting, only the fax to the current destination is canceled.The fax will be sent to the subsequent destinations as normal. For details about sending a fax usingthe broadcast function, see page 112 "Specifying the Fax Destination".Specifying the Fax DestinationOther than entering the destination fax number using the number keys, you can specify destinationsusing the following functions:•One Touch buttons• Speed Dial• Broadcast function• Redial functionSpecifying the destination using the One Touch buttons1. Press the [Facsimile] key.CVW1026. Sending and Receiving a Fax112](https://usermanual.wiki/Ricoh/MFSP311SFNW1/User-Guide-1915829-Page-114.png)
![2. Press the One Touch button to which the desired Quick Dial entry is registered. Forregistering the Quick Dial entries, see page 103 "Registering Fax Destinations".Press the [Shift] key if you want to use Quick Dial entries Nos. 5 to 8 before pressing a One Touchbutton.CVW115• You can check the registered names and fax numbers by printing a report. For printing the QuickDial list, see page 153 "Printing Lists/Reports".Specifying the destination using Speed Dial1. Press the [Facsimile] key.CVW102Sending a Fax113](https://usermanual.wiki/Ricoh/MFSP311SFNW1/User-Guide-1915829-Page-115.png)
![2. Press the [Address Book] key.CVW1113. Press the [ ] or [ ] key to select [Search Address Book], and then press the [OK] key.If you want to search for a specific entry by its registration number or name, use the followingprocedure:•Searching by the registration numberPress the [Address Book] key again, enter the number using the number keys, and then pressthe [OK] key.• Searching by the nameEnter the first letters of the name using the number keys, and then press the [OK] key. Eachtime you enter a character, the display changes to show the matching name.4. Press the [ ] or [ ] key to select the desired Speed Dial entry, and then press the [OK]key. For registering the Speed Dial entries, see page 103 "Registering Fax Destinations".• The Address Book shows only the Speed Dial entries. Use the One Touch buttons to specify QuickDial destinations.•You can check the registered names and fax numbers by printing a report. For printing the SpeedDial list, see page 153 "Printing Lists/Reports".Specifying the destination using the broadcast functionYou can send a fax to multiple destinations (up to 100 destinations) simultaneously.Faxes are sent to destinations in the order they were specified.6. Sending and Receiving a Fax114](https://usermanual.wiki/Ricoh/MFSP311SFNW1/User-Guide-1915829-Page-116.png)
![1. Press the [Facsimile] key.CVW1022. Add a destination by using one of the following methods:•To add a Quick Dial destination: press a corresponding One Touch button.• To add a Speed Dial destination: press the [Address Book] key, select [Search AddressBook], select a destination, and then press the [OK] key.• To add a manually-specified destination: confirm that [No.key] is pressed, and then enter thedestination fax number using the number keys.3. Press the [OK] key.Press [List] to see the list of destinations that have been added so far.Go back to Step 2 to add further destinations.• While specifying multiple destinations, you can press the [Clear/Stop] key to clear all destinations.•If you specify multiple destinations in Immediate Transmission mode, the mode switches to MemoryTransmission mode temporarily.• While broadcasting, pressing the [Clear/Stop] key cancels the fax to the current destination only.Specifying the destination using the redial functionYou can specify the last used destination as the destination for the current job.This function saves time when you are sending to the same destination repeatedly, as you do not have toenter the destination each time.Sending a Fax115](https://usermanual.wiki/Ricoh/MFSP311SFNW1/User-Guide-1915829-Page-117.png)
![1. Press the [Facsimile] key.CVW1022. Press the [Pause/Redial] key.CVW113Useful Sending FunctionsYou can check the status of the other party's machine easily before sending a fax by using the On HookDial function. Using an extra telephone, you can talk and send a fax in one call.• This function is available in Immediate Transmission mode only.Sending a fax using On Hook DialThe On Hook Dial function allows you to check the destination's status while listening to the tone from theinternal speaker. This function is useful when you want to ensure that the fax will be received.• The On Hook Dial function cannot be used when [Fax Number Confirmation] under administratorsettings is enabled.1. Place the original.6. Sending and Receiving a Fax116](https://usermanual.wiki/Ricoh/MFSP311SFNW1/User-Guide-1915829-Page-118.png)
![2. Press the [Facsimile] key.CVW1023. Press the [On Hook Dial] key.CVW112"On Hook" appears on the screen.4. Specify the destination using the number keys.5. If you hear a high pitched tone, press the [Start] key.CVW1066. Press [TX], and then press the [Start] key.• For details about selecting the transmission mode, see page 108 "Selecting Transmission Mode".•For details about [Fax Number Confirmation], see page 166 "Administrator Settings".Sending a Fax117](https://usermanual.wiki/Ricoh/MFSP311SFNW1/User-Guide-1915829-Page-119.png)
![Sending a fax after a conversationAn external telephone allows you to send a fax after finishing your conversation without having todisconnect and redial. This function is useful when you want to ensure that the fax has been received.1. Place the original.2. Press the [Facsimile] key.CVW1023. Pick up the handset.4. Specify the destination using the external telephone.5. When the other party answers, ask them to press their fax start button.6. If you hear a high pitched tone, press the [Start] key.CVW1067. Press [TX], and then press the [Start] key.8. Replace the handset.Specifying the Scan SettingsAdjusting image densityThis section describes how to adjust image density for the current job.6. Sending and Receiving a Fax118](https://usermanual.wiki/Ricoh/MFSP311SFNW1/User-Guide-1915829-Page-120.png)
![There are three image density levels. The darker the density level, the darker the printout.1. Press the [Density] key.CVW1092. Press the [ ] or [ ] key to select the desired density level, and then press the [OK] key.• Press the [Escape] key to discard the current change and return to the initial screen.•You can change the machine's default [Density] setting to always scan with a specific density level.For [Density], see page 140 "Fax Transmission Features Settings".• Temporary job settings are cleared in the following cases:• When no input is received for the period of time specified in [System Auto Reset Timer] whilethe initial screen is displayed. For [System Auto Reset Timer], see page 166 "AdministratorSettings".• When the [Clear/Stop] key is pressed while the initial screen is displayed.• When the machine's mode is changed.• When the power is turned off.• When the machine's default for the same setting is changed.Specifying the resolutionThis section describes how to specify the scan resolution for the current job.There are three resolution settings:StandardSelect this when the original is a printed or typewritten document with normal-sized characters.DetailSelect this when the original is a document with small print.PhotoSelect this when the original contains images such as photographs or shaded drawings.Sending a Fax119](https://usermanual.wiki/Ricoh/MFSP311SFNW1/User-Guide-1915829-Page-121.png)
![1. Press the [Image Quality] key.CVW1082. Press the [ ] or [ ] key to select the desired resolution setting, and then press the [OK]key.• Press the [Escape] key to discard the current change and return to the initial screen.•You can change the machine's default [Resolution] setting to always scan with a specific resolutionlevel. For [Resolution], see page 140 "Fax Transmission Features Settings".• Temporary job settings are cleared in the following cases:• When no input is received for the period of time specified in [System Auto Reset Timer] whilethe initial screen is displayed. For [System Auto Reset Timer], see page 166 "AdministratorSettings".• When the [Clear/Stop] key is pressed while the initial screen is displayed.• When the machine's mode is changed.• When the power is turned off.• When the machine's default for the same setting is changed.6. Sending and Receiving a Fax120](https://usermanual.wiki/Ricoh/MFSP311SFNW1/User-Guide-1915829-Page-122.png)
![Using the Fax Function from a Computer (LAN-Fax)This section describes how to use the fax function of the machine from a computer.You can send a document directly from a computer through this machine to another fax machine,without printing the document.Basic Operation for Sending Faxes from a ComputerThis section describes the basic operation for sending faxes from a computer.You can select a destination from the LAN-Fax address book or enter a fax number manually. You cansend faxes to up to 100 destinations at one time.The procedure in this section is an example based on Windows 7.• Using LAN-Fax, you can send up to ten pages (including the cover sheet) at a time.•Before sending a fax, the machine stores all the fax data in memory. If the machine's memorybecomes full while storing this data, the fax transmission will be canceled. If this happens, lower theresolution or reduce the number of pages and try again.1. Open the file you want to send.2. On the [File] menu, click [Print...].3. Select the LAN-Fax driver as the printer, and then click [Print].4. Specify a destination.• To specify a destination from the LAN-Fax address book:Select a destination from [User List:], and then click [Add to List].Repeat this step to add more destinations.• To enter a fax number directly:Click the [Specify Destination] tab, and enter a fax number (up to 40 digits) in [Fax Number:],and then click [Add to List].Repeat this step to add more destinations.5. To attach a cover sheet, click [Edit Cover Sheet] on the [Specify Destination] tab, and thenselect the [Attach a Cover Sheet] check box.Edit the cover sheet as necessary, and then click [OK].For details about editing a fax cover sheet, see page 126 "Editing a Fax Cover Sheet".6. Click [Send].Using the Fax Function from a Computer (LAN-Fax)121](https://usermanual.wiki/Ricoh/MFSP311SFNW1/User-Guide-1915829-Page-123.png)
![• For details, see the LAN-Fax driver help.•A fax number can contain 0 to 9, "P" (pause), " ", " ", "-", and space.•If necessary, insert a pause in a fax number. The machine pauses briefly before it dials the digitsfollowing the pause. You can specify the length of the pause time in the [Pause Time] setting underfax transmission settings. For [Pause Time], see page 140 "Fax Transmission Features Settings".• To use tone services on a pulse-dialing line, insert " " in a fax number. " " switches the dialingmode from pulse to tone temporarily.•To delete an entered destination, select the destination in the [Destination List:], and then click[Delete from List].• You can register the fax number you entered in the [Specify Destination] tab in the LAN-FaxAddress Book. Click [Save to Address Book] to open the dialog box for registering a destination.Canceling a faxYou can cancel sending a fax using either the machine's control panel or your computer, depending onthe status of the job.Canceling while the machine is receiving a fax from the computerIf the machine is shared by multiple computers, be careful not to cancel the fax of another user.1. Double-click the printer icon on the task bar of your computer.2. Select the print job you want to cancel, click the [Document] menu, and then click[Cancel].3. Click [Yes].Canceling while sending a faxCancel the fax using the control panel.1. Press the [Facsimile] key.CVW1026. Sending and Receiving a Fax122](https://usermanual.wiki/Ricoh/MFSP311SFNW1/User-Guide-1915829-Page-124.png)
![2. Press the [Clear/Stop] key.CVW105Configuring Transmission SettingsThis section describes how to configure transmission settings in the LAN-Fax driver's properties.Properties are set separately for each application.1. On the [File] menu, click [Print...].2. Select the LAN-Fax driver as the printer, and then click a button such as [Preferences].LAN-Fax driver properties dialog box appears.3. Click the [Setup] tab.4. Configure settings as necessary, and then click [OK].For details about the settings, see the LAN-Fax driver help.Configuring the LAN-Fax Address BookThis section describes the LAN-Fax address book. Configure the LAN-Fax address book on thecomputer. The LAN-Fax address book allows you to specify LAN-Fax destinations quickly and easily.The LAN-Fax address book can contain up to 1000 entries, including individual destinations andgroups of destinations.Opening the LAN-Fax address book1. On the [Start] menu, click [Devices and Printers].2. Right-click the LAN-Fax driver icon, and then click [Printing Preferences].3. Click the [Address Book] tab.Using the Fax Function from a Computer (LAN-Fax)123](https://usermanual.wiki/Ricoh/MFSP311SFNW1/User-Guide-1915829-Page-125.png)
![Registering destinations1. Open the LAN-Fax address book, and then click [Add User].2. Enter the destination information.You must enter a contact name and fax number.3. Click [OK].Modifying destinations1. Open the LAN-Fax address Book, select the destination you want to modify from the[User List:], and then click [Edit].2. Modify information as necessary, and then click [OK].Click [Save as new User] if you want to register a new destination with similar information. This isuseful when you want to register a series of destinations that contain similar information. To closethe dialog box without modifying the original destination, click [Cancel].Registering groups1. Open the LAN-Fax address Book, and then click [Add Group].2. Enter the group name in [Group Name].3. Select the destination you want to include in the group from [User List:], and then click[Add].To delete a destination from a group, select the destination you want to delete from [List of GroupMembers:], and then click [Delete from List].4. Click [OK]Modifying groups1. Open the LAN-Fax address Book, select the group you want to modify from the [UserList:], and then click [Edit].2. To add a destination to the group, select the destination you want to add from [User List:]and click [Add].3. To delete a destination from the group, select the destination you want to delete from [Listof Group Members:], and then click [Delete from List].4. Click [OK].6. Sending and Receiving a Fax124](https://usermanual.wiki/Ricoh/MFSP311SFNW1/User-Guide-1915829-Page-126.png)
![Deleting individual destinations or groups1. Open the LAN-Fax Address Book, select the destination you want to delete from [UserList:], and then click [Delete].A confirmation message appears.2. Click [Yes].Exporting/Importing LAN-Fax Address Book data• The following procedure is based on Windows 7 as an example. If you are using anotheroperating system, the procedure might vary slightlyExporting LAN-Fax Address Book dataLAN-Fax Address Book data can be exported to a file in CSV (Comma Separated Values) format.Follow this procedure to export LAN-Fax Address Book data.1. Open the LAN-Fax Address Book, and then click [Export].2. Navigate to the location to save the LAN-Fax Address Book data, specify a name forthe file, and then click [Save].Importing LAN-Fax Address Book dataLAN-Fax Address Book data can be imported from files in CSV format. You can import addressbook data from other applications if the data is saved as a CSV file.1. Open the LAN-Fax Address Book, and then click [Import].2. Select the file containing the address book data, and then click [Open].A dialog box for selecting the items to import appears.3. For each field, select an appropriate item from the list.Select [*empty*] for fields for which there is no data to import. Note that [*empty*] cannotbe selected for [Name] and [Fax].4. Click [OK].For details about the settings, see the LAN-Fax driver help.• CSV files are exported using Unicode encoding.•LAN-Fax Address Book data can be imported from CSV files whose character encoding is Unicodeor ASCII.• Group data cannot be exported or imported.Using the Fax Function from a Computer (LAN-Fax)125](https://usermanual.wiki/Ricoh/MFSP311SFNW1/User-Guide-1915829-Page-127.png)
![• Up to 1000 destinations can be registered in the LAN-Fax Address Book. If this limit is exceededduring importing, the remaining destinations will not be imported.Editing a Fax Cover Sheet1. On the [File] menu, click [Print...].2. Select the LAN-Fax driver as the printer, and then click [Print].3. Click the [Specify Destination] tab, and then click [Edit Cover Sheet].4. Configure settings as necessary, and then click [Print].For details about the settings, see the LAN-Fax driver help.6. Sending and Receiving a Fax126](https://usermanual.wiki/Ricoh/MFSP311SFNW1/User-Guide-1915829-Page-128.png)
![1. Press the [User Tools] key.cvw1042. Press the [ ] or [ ] key to select [Fax Features], and then press the [OK] key.3. Press the [ ] or [ ] key to select [Reception Settings], and then press the [OK] key.4. Press the [ ] or [ ] key to select [Switch RX Mode], and then press the [OK] key.5. Press the [ ], [ ], [ ], or [ ] key to select the desired reception mode, and then press the[OK] key.6. Press the [User Tools] key to return to the initial screen.• You can press the [Escape] key to exit to the previous level of the menu tree.•In FAX/TAD mode, the machine automatically starts to receive faxes after the external telephoneanswering device rings the number of times specified in [Total No. of Rings (TAD)] under [FaxFeatures]. Make sure to set the external telephone answering device to answer calls before themachine starts to receive faxes. For [Total No. of Rings (TAD)], see page 142 "Fax FeaturesSettings".Receiving a fax in FAX/TEL Manual mode1. Pick up the handset of the external telephone to answer the call.A normal telephone call starts.2. When you hear a fax calling tone or no sound, press the [Facsimile] key, and then pressthe [Start] key.3. Press [RX].4. Press the [Start] key.5. Replace the handset.6. Sending and Receiving a Fax128](https://usermanual.wiki/Ricoh/MFSP311SFNW1/User-Guide-1915829-Page-130.png)
![Receiving a fax in Fax Only modeWhen the reception mode is set to Fax Only mode, the machine automatically answers all incomingcalls in fax reception mode.• You can specify the number of times the machine rings before answering a call in the [Number ofRings] setting under [Fax Features]. For [Number of Rings], see page 142 "Fax Features Settings".•If you answer a call with the external telephone while the machine is ringing, a normal telephonecall starts. If you hear a fax calling tone or no sound, receive the fax manually. To receive the faxmanually, see page 128 "Receiving a fax in FAX/TEL Manual mode".Receiving a fax in FAX/TAD modeWhen the reception mode is set to FAX/TAD mode, the external telephone answering device answersand records messages when the machine receives telephone calls. If the incoming call is a fax call, themachine receives the fax automatically.1. When there is an incoming call, the external telephone answering device rings the number of timesspecified in [Total No. of Rings (TAD)] under [Fax Features]. For [Total No. of Rings (TAD)], seepage 142 "Fax Features Settings".If the external telephone answering device does not answer, the machine starts to receive the faxautomatically.2. If the external telephone answering device answers, the machine monitors silence on the line for 30seconds (silence detection).• If a fax calling tone or no sound is detected, the machine starts to receive the faxautomatically.• If a voice is detected, a normal telephone call starts. The external telephone answering devicerecords messages.• You can manually receive a fax during silence detection. To receive the fax manually, seepage 128 "Receiving a fax in FAX/TEL Manual mode".•Silence detection does not terminate for 30 seconds even if the external telephone answeringdevice goes on-hook, unless you press the [Clear/Stop] key and disconnect the call.Receiving a Fax129](https://usermanual.wiki/Ricoh/MFSP311SFNW1/User-Guide-1915829-Page-131.png)
![7. Configuring the Machine Using theControl PanelBasic OperationThere are two main ways to access the machine settings:• Press the [User Tools] key to access the System or Network settings.• Press the [ ] or [ ] key to access the Copy, Scan, or Fax settings.To check which category the function you want to configure belongs to, see page 133 "MenuChart".1. If you want to configure the machine's system settings, press the [User Tools] key.cvw104Otherwise, press the [ ] or [ ] key while "Ready" is displayed on the initial screen of the Copy,Scan, and Fax settings.CVW1172. Press the [ ] or [ ] key to select the settings you want to use.For a list of available items, see page 133 "Menu Chart".131](https://usermanual.wiki/Ricoh/MFSP311SFNW1/User-Guide-1915829-Page-133.png)
![If you select [Address Book], [Network Settings], or [Admin. Tools] menu, you might be requestedto enter a password. Enter the four-digit password, and then press the [OK] key. For details aboutthe password, see [Admin. Tools Lock] on page 166 "Administrator Settings".3. To confirm setting items and values displayed, press the [OK] key.4. To go back to the previous item, press the [Escape] key.• To return to the initial screen, press the [Escape] key the same amount of times as the number ofselected items, or press the [User Tools] key once.7. Configuring the Machine Using the Control Panel132](https://usermanual.wiki/Ricoh/MFSP311SFNW1/User-Guide-1915829-Page-134.png)
![Menu ChartThis section lists the parameters included in each menu.For details about configuring the machine using Web Image Monitor, see page 171 "Configuring theMachine Using Utilities".• Some items might not appear depending on the model type or machine's configuration.•Some items can also be configured using Web Image Monitor.Copier Features ([ ] [ ] key setting)[Select Paper], [Sort], [Original Type], [Density], [Reduce/Enlarge], [Duplex/Combine], [ID CardCenter Line]Scan Settings ([ ] [ ] key setting)[Scan Size], [Scanning Mode], [Max. E-mail Size], [Density], [Resolution], [Compression (Color)],[Limitless Scan], [File Type]Fax TX Settings ([ ] [ ] key setting)[Immediate TX], [Resolution], [Density], [Pause Time], [Auto Redial], [Print Fax Header]Fax Features ([User Tools] key setting)[Reception Settings], [Delete TX Standby File], [Communication Settings], [Report Print Settings]Address Book ([User Tools] key setting)[Quick Dial Dest.], [Fax Speed Dial Dest.]System Settings ([User Tools] key setting)[Adjust Sound Volume], [Tray Paper Settings], [I/O Timeout], [Auto Continue], [Toner Saving],[Supplies Status], [Scanner Carriage], [Printer Registration], [Low Humidity Mode], [Image Density]Network Settings ([User Tools] key setting)[Ethernet], [Wi-Fi] (Type 2 model only), [IPv4 Configuration], [IPv6 Configuration]Print List/Report ([User Tools] key setting)[Configuration Page], [Fax Journal], [TX Standby File List], [Quick Dial Dest. List], [Fax Speed DialDest. List], [Scanner Dest. List], [Scanner Journal], [Maintenance Page]Admin. Tools ([User Tools] key setting)[Set Date/Time], [Program Fax Information], [Dial/Push Phone], [PSTN / PBX], [PBX AccessNumber], [Function Priority], [System Auto Reset Timer], [Energy Saver Mode], [Language],[Country], [Reset Settings], [Shortcut to Function], [Admin. Tools Lock], [IPsec], [Fax NumberConfirmation]Printer Features ([User Tools] key setting)[List/Test Print], [System], [PCL Menu]Menu Chart133](https://usermanual.wiki/Ricoh/MFSP311SFNW1/User-Guide-1915829-Page-135.png)
![Copier Features SettingsSelect PaperSpecifies the paper size used for printing copies.When a tray is selected, the machine prints from that tray only.When a paper size is selected, the machine checks the trays for the paper of the specified size inthe order of priority as set in [Paper Tray Priority] under system settings.If multiple trays contain valid paper, the first tray the machine finds will be used for printing; whenthat tray runs out of paper, the machine automatically switches to the next tray to continue printing.Default: [Tray 1]•Tray 1• Bypass Tray• A4• 8 1/2 × 11• 16KSortConfigures the machine to sort the output pages into sets when making multiple copies of a multi-page document (P1, P2, P1, P2...).Default: [Off]• On• OffOriginal TypeSpecifies the content of originals, to optimize copy quality.Default: [Mixed]• MixedSelect this when the original contains both text and photographs or pictures.• TextSelect this when the original contains only text and no photographs or pictures.• PhotoSelect this when the original contains photographs or pictures. Use this mode for the followingtypes of original:• Photographs• Pages that are entirely or mainly photographs or pictures, such as magazine pages.7. Configuring the Machine Using the Control Panel134](https://usermanual.wiki/Ricoh/MFSP311SFNW1/User-Guide-1915829-Page-136.png)
![DensitySpecifies the image density for photocopying.Default: • (Lightest)•••• (Darkest)Reduce/EnlargeSpecifies the percentage by which copies are enlarged or reduced. Also, ID card copying can bespecified.Default: [100%]•50%• 71%• 82%• 93%• 100%• 122%• 141%• 200%• 400%• ID Card CopySets the machine to copy the front and back sides of an ID card, or other small document,onto the front of a single sheet of paper.Note that enabling this setting automatically disables combined copying.• Zoom 25-400%Duplex/CombineSpecifies combined copying. Select a copy mode according to your original and how you wantthe copy outputs to appear. For more details, see page 69 "Making Combined/2-sided Copies".Note that enabling combined copying automatically disables ID card copying.Default: [Off]• Off• 1Sd 2Orig->Comb 2on1 1SdCopy will be made on 1 side, on which 2 pages of 1-sided original will be printed.Copier Features Settings135](https://usermanual.wiki/Ricoh/MFSP311SFNW1/User-Guide-1915829-Page-137.png)
![Scanner Features SettingsScan SizeSpecifies the scanning size according to the size of the original.Default: [A4]•8 1/2 × 14, 8 1/2 × 11, 8 1/2 × 5 1/2, 7 1/4 × 10 1/2, A4, B5, A5, Custom SizeScanning ModeSpecifies the scanning mode using the control panel.Default: [Color]• B&WThe machine creates 1-bit black-and-white images. Images contain only black and whitecolors.• ColorThe machine creates 8-bit color images. Images are full color.• Gray ScaleThe machine creates 8-bit black-and-white images. Images contain black and white, andintermediate gray colors.Max. E-mail SizeSpecifies the maximum size of a file that can be sent by e-mail.Default: [1 MB]• 1 MB• 2 MB• 3 MB• 4 MB• 5 MB• No LimitDensitySpecifies the image density for scanning originals.Default: • (Lightest)•••• (Darkest)7. Configuring the Machine Using the Control Panel138](https://usermanual.wiki/Ricoh/MFSP311SFNW1/User-Guide-1915829-Page-140.png)
![ResolutionSpecifies the resolution for scanning the original.Default: [300 × 300dpi]•100 × 100dpi• 150 × 150dpi• 200 × 200dpi• 300 × 300dpi• 400 × 400dpi• 600 × 600dpiCompression (Color)Specifies the color compression ratio for JPEG files. The lower the compression ratio, the higher thequality but greater the file size.Default: [Medium]• Low• Medium• HighLimitless ScanSets the machine to request next originals when scanning with the exposure glass.Default: [Off]• Off• OnFile TypeSpecifies whether to create a multi-page file containing all pages or separate single-page fileswhen scanning multiple pages.Note that a scanned file can contain multiple pages only when the file format is PDF or TIFF. If thefile format is JPEG, a single-page file is created for each scanned page.Default: [Multi-page]• Multi-page• Single PageScanner Features Settings139](https://usermanual.wiki/Ricoh/MFSP311SFNW1/User-Guide-1915829-Page-141.png)
![Fax Transmission Features SettingsImmediate TXSets the machine to send a fax immediately when the original is scanned.Default: [Off]•OffSelect this when using Memory Transmission.• OnSelect this when using Immediate Transmission.• Next Fax OnlySelect this when using Immediate Transmission for the next transmission only.ResolutionSpecifies the resolution to use for scanning originals.Default: [Standard]• StandardSelect this when the original is a printed or typewritten document with normal-sizedcharacters.• DetailSelect this when the original is a document with small print.• PhotoSelect this when the original contains images such as photographs or shaded drawings.DensitySpecifies the image density to use for scanning originals.Default: [Normal]• Light• Normal• DarkPause TimeSpecifies the length of pause time when a pause is inserted between the digits of a fax number.Default: 3 seconds• 1 to 15 secondsAuto RedialSets the machine to redial the fax destination automatically when the line is busy or a transmissionerror occurs, if the machine is in Memory Transmission mode. The number of redial attempts is7. Configuring the Machine Using the Control Panel140](https://usermanual.wiki/Ricoh/MFSP311SFNW1/User-Guide-1915829-Page-142.png)
![preset to two or three times, depending on the [Country] setting under [Admin. Tools], in five-minuteintervals.Default: [On]•Off• OnPrint Fax HeaderSets the machine to add a header to every fax you send. The header includes the current date andtime, user fax name and fax number of the machine, job ID, and page information.Default: [On]• Off• OnFax Transmission Features Settings141](https://usermanual.wiki/Ricoh/MFSP311SFNW1/User-Guide-1915829-Page-143.png)
![Fax Features SettingsReception SettingsSpecifies the settings for receiving a fax.•Switch RX ModeSpecifies the reception mode.Default: [Fax Only]• Fax OnlyThe machine automatically answers all incoming calls in fax reception mode.• FAX/TEL(Mnl.)The machine rings when it receives incoming calls. The machine receives faxes onlywhen you manually receive faxes.• FAX/TADThe machine receives faxes automatically when a fax call is received. Otherwise, theconnected telephone answering device answers the call.• Auto ReductionSets the machine to reduce the size of a received fax if it is too large to print on a single sheetof paper.Note that the machine only reduces the size down to 74%. If further reduction is required to fitthe fax on a single sheet, it will be printed on separate sheets without being reduced.Default: [On](Default may be [Off] depending on the [Country] setting under [Admin. Tools].)• Off• On• Total No. of Rings (TAD)Specifies the number of times the external telephone answering device rings before themachine starts to receive faxes in FAX/TAD mode.Default: 5 times• 1 to 20 times, in increments of 1• Number of RingsSpecifies the number of times the machine rings before it starts to receive faxes in Fax Onlymode.Default: 1 times• 1 to 5 times• 2 Sided Print7. Configuring the Machine Using the Control Panel142](https://usermanual.wiki/Ricoh/MFSP311SFNW1/User-Guide-1915829-Page-144.png)
![Specifies the 2 sided print.Default: [Off]•Off• 2 Sided Portrait: T to T• 2 Sided Portrait: T to BDelete TX Standby FileDeletes unsent fax jobs remaining in the machine's memory. The machine can store up to 5 unsentfax jobs.This function is only performed when selected.• Delete Selected FileTo delete a fax job, select the desired job, and then select [Yes]. Selecting [No] exits to theprevious level of the menu tree without deleting the fax job.• Delete All FilesTo delete the fax jobs, select [Yes]. Selecting [No] exits to the previous level of the menu treewithout deleting the fax job.Communication Settings• ECM TransmissionSets the machine to automatically resend parts of the data that are lost during transmission.Default: [On]• Off• On• ECM ReceptionSets the machine to automatically receive parts of the data that are lost during reception.Default: [On]• Off• On• Dial Tone DetectSets the machine to detect a dial tone before the machine begins to dial the destinationautomatically.Default: [Detect]• Detect• Not Detect• Transmission SpeedSpecifies the transmission speed for the fax modem.Fax Features Settings143](https://usermanual.wiki/Ricoh/MFSP311SFNW1/User-Guide-1915829-Page-145.png)
![Default: [33.6 Kbps]•33.6 Kbps• 14.4 Kbps• 9.6 Kbps• 7.2 Kbps• 4.8 Kbps• 2.4 Kbps• Reception SpeedSpecifies the reception speed for the fax modem.Default: [33.6 Kbps]• 33.6 Kbps• 14.4 Kbps• 9.6 Kbps• 7.2 Kbps• 4.8 Kbps• 2.4 KbpsReport Print Settings• Print TX Status ReportSets the machine to print a transmission report automatically after a fax transmission.When the machine is in Immediate Transmission mode, the image of the original will not bereproduced on the report, even if [Error Only (Image Attached)] or [Every TX (ImageAttached)] is selected.Note that if a memory error occurs for LAN-Fax transmission, a transmission report will alwaysbe printed regardless of this setting.The transmission report will be printed on A4 or Letter size paper.Default: [Error Only (Image Attached)]• Error OnlyPrints a report when a transmission error occurs.• Error Only (Image Attached)Prints a report with an image of the original when transmission error occurs.• Every TXPrints a report for every fax transmission.• Every TX (Image Attached)Prints a report with an image of the original for every fax transmission.7. Configuring the Machine Using the Control Panel144](https://usermanual.wiki/Ricoh/MFSP311SFNW1/User-Guide-1915829-Page-146.png)
![• Do not Print•Print Fax JournalSets the machine to print a fax journal automatically for every 50 fax jobs (both sent andreceived).The fax journal will be printed on A4 or Letter size paper.Default: [Auto Print]• Auto Print• Do not Auto PrintFax Features Settings145](https://usermanual.wiki/Ricoh/MFSP311SFNW1/User-Guide-1915829-Page-147.png)
![System SettingsAdjust Sound VolumeSpecifies the volume of the sounds produced by the machine.Default: [Low] for [Panel Key Sound], and [Middle] for other parameters.•Panel Key SoundSpecifies the volume of the beep that sounds when a key is pressed.• Off• Low• Middle• High• On Hook ModeSpecifies the volume of the sound from the speaker during on hook mode.• Off• Low• Middle• High• Job End ToneSpecifies the volume of the beep that sounds when a job is complete.• Off• Low• Middle• High• Job Error ToneSpecifies the volume of the beep that sounds when a fax transmission error occurs.• Off• Low• Middle• High• Alarm VolumeSpecifies the volume of the alarm that sounds when an operation error occurs.• Off• LowSystem Settings147](https://usermanual.wiki/Ricoh/MFSP311SFNW1/User-Guide-1915829-Page-149.png)
![• Middle•HighTray Paper Settings• Paper Type: Tray 1Specifies the paper type for tray 1.Default: [Plain Paper]Thin Paper, Plain Paper, Recycled Paper, Color Paper, Letterhead, Preprinted Paper,Prepunched Paper, Label Paper, Bond Paper, Cardstock, Thick Paper 1, Thick Paper 2• Paper Type: Bypass TraySpecifies the paper type for bypass tray.Default: [Plain Paper]Thin Paper, Plain Paper, Recycled Paper, Color Paper, Letterhead, Preprinted Paper,Prepunched Paper, Label Paper, Bond Paper, Cardstock, Envelope, Thick Paper 1, ThickPaper 2, OHP• Paper Size: Tray 1Specifies the paper size for tray 1.Default: [A4], [8 1/2 × 11]A4, B5 JIS, A5, B6 JIS, A6, 8 1/2 × 14, 8 1/2 × 11, 5 1/2 × 8 1/2, 7 1/4 × 10 1/2, 8 ×13, 8 1/2 × 13, 8 1/4 × 13, 16K, Custom Size•Paper Size: Bypass TraySpecifies the paper size for bypass tray.Default: [A4], [8 1/2 × 11]A4, B5 JIS, A5, B6 JIS, A6, 8 1/2 × 14, 8 1/2 × 11, 5 1/2 × 8 1/2, 7 1/4 × 10 1/2,16K, 4 1/8 × 9 1/2, 3 7/8 × 7 1/2, C5 Env, C6 Env, DL Env, Custom Size•Bypass Tray PrioritySpecifies how print jobs using the bypass tray are handled.Default: [Machine Setting(s)]• Machine Setting(s)The machine prints all print jobs according to the machine’s settings.An error will occur if the paper size/type settings of the machine and printer driver donot match.• Any Size/TypeThe machine prints all print jobs according to the printer driver’s settings.7. Configuring the Machine Using the Control Panel148](https://usermanual.wiki/Ricoh/MFSP311SFNW1/User-Guide-1915829-Page-150.png)
![Printing proceeds even if the paper size/type settings of the machine and printer driverdo not match. However, if the paper is too small for the print job, the printed image willbe cropped.•Any Custom Size/TypeThe machine prints custom size print jobs according to the printer driver’s settings andprints standard size print jobs according to the machine’s settings.For custom size print jobs, printing proceeds even if the paper size/type settings of themachine and printer driver do not match. However, if the paper is too small for the printjob, the printed image will be cropped.For standard size print jobs, an error will occur if the paper size/type settings of themachine and printer driver do not match.• Paper Tray PrioritySpecifies the tray that the machine checks first for paper that can be used for the job when atray is set to be selected automatically.If multiple trays contain valid paper, the first tray the machine finds will be used for printing;when that tray runs out of paper, the machine automatically switches to the next tray tocontinue printing.Default for all functions: [Tray 1]• PrinterSelects a tray to check first when automatic tray selection is specified for the print job.• Tray 1• Bypass Tray• CopierSelects a tray to check first when [A4], [8 1/2 × 11], or [16K] is selected for [SelectPaper] under copy settings.• Tray 1• Bypass Tray• Size Mismatch DetectionSets the machine to report an error if the paper size does not match the print job's settings.Default: [Off]• Off• OnI/O Timeout• USBSpecifies how many seconds the machine waits for print data, if the data is interrupted while itis being sent from the computer via USB. If the machine does not receive any more data withinSystem Settings149](https://usermanual.wiki/Ricoh/MFSP311SFNW1/User-Guide-1915829-Page-151.png)
![the time specified here, the machine only prints the data it has received. If printing is frequentlyinterrupted by data from other ports, increase the timeout period.Default: [60 sec.]•15 sec.• 60 sec.• 300 sec.• NetworkSpecifies how many seconds the machine waits for print data, if the data is interrupted while itis being sent from the computer via network. If the machine does not receive any more datawithin the time specified here, the machine only prints the data it has received. If printing isfrequently interrupted by data from other ports, increase the timeout period.Default: [60 sec.]• 15 sec.• 60 sec.• 300 sec.• Fixed USB PortSpecifies whether the same printer/LAN-Fax driver can be used for multiple machines or notunder USB connection.Default: [Off]• OffYou must install the printer/LAN-Fax driver separately for individual machines, becausethe machine other than the original will be recognized as a new device upon USBconnection.• OnThe same printer/LAN-Fax driver you have installed in your computer can be used withany machine other than the one originally used for installation, if the machine is of thesame model.Auto ContinueSets the machine to ignore an error with paper size or type and continue printing. The printing stopstemporarily when an error is detected, and restarts automatically after about ten seconds using thesettings made on the control panel.Default: [Off]• Off• On7. Configuring the Machine Using the Control Panel150](https://usermanual.wiki/Ricoh/MFSP311SFNW1/User-Guide-1915829-Page-152.png)
![Toner SavingSets the machine to print using a reduced amount of toner (for prints made by the copier functiononly).Default: [Off]•Off• OnSupplies StatusDisplays information about consumables. To replace the fusing unit, transfer roller, or paper feedroller, contact your sales or service representative.• Print Cart.:Displays the remaining amount of toner. (New), , , , , (Needs replacing)•Fusing Unit:Displays the remaining life of the fusing unit. (New), , , , , (Needs replacing)•Transfer Roller:Displays the remaining life of the transfer roller. (New), , , , , (Needs replacing)•Paper Feed Roller:Displays the remaining life of the paper feed roller. (New), , , , , (Needs replacing)Scanner Carriage•Lock Scnr. CarriageReturns the scanning unit inside the machine to its original position. Before transporting themachine, use this function to return the scanning unit to its original position.Press [Yes] to return the scanning unit to its original position. Press [No] to exit to the previouslevel of the menu tree without returning the scanning unit to its original position.Printer RegistrationAdjust the registration of each tray if necessary. You can adjust the registration value between -15and +15 (that is, -1.5 and +1.5 mm, in 0.1 mm increments).Default: 0 for all parametersSystem Settings151](https://usermanual.wiki/Ricoh/MFSP311SFNW1/User-Guide-1915829-Page-153.png)
![• Horiz.: Tray 1Select this to adjust the tray 1 registration horizontally.•Vert.: Tray 1Select this to adjust the tray 1 registration vertically.• Horiz.: Bypass TraySelect this to adjust the bypass tray registration horizontally.• Vert.: Bypass TraySelect this to adjust the bypass tray registration vertically.• Horiz.: Duplex: BackSelect this to adjust the registration of the back of duplex printing horizontally.• Vert.: Duplex: BackSelect this to adjust the registration of the back of duplex printing vertically.Low Humidity ModeIf the machine is used in a room where humidity level is low, black lines of a few millimeters thickmay appear on printouts with 75-millimeter spaces in between. Selecting [On] for this setting mayprevent these lines from appearing (wait for about one day until this setting becomes effective).Note that when this setting is enabled, the machine automatically performs self-maintenance inevery 10 minutes.Default: [Off]• On• OffImage DensityAdjusts the density of images on prints.Default: 0• -3 to +37. Configuring the Machine Using the Control Panel152](https://usermanual.wiki/Ricoh/MFSP311SFNW1/User-Guide-1915829-Page-154.png)
![Printing Lists/ReportsPrinting the Configuration Page1. Press the [User Tools] key.cvw1042. Press the [ ] or [ ] key to select [Print List/Report], and then press the [OK] key.3. Press the [ ] or [ ] key to select [Configuration Page], and then press the [OK] key.4. Press [Yes] in the confirmation screen.Types of Lists/Reports• Reports will be printed on A4 or Letter size paper. Load one of these sizes of paper into the traybefore printing reports.Configuration PagePrints general information and the current configurations of the machine.Fax JournalPrints a fax transmission and reception journal for the last 50 jobs.TX Standby File ListPrints a list of fax jobs remaining in the machine's memory to be printed, sent, or forwarded.Quick Dial Dest. ListPrints a list of scan and fax Quick Dial entries.Fax Speed Dial Dest. ListPrints a list of Speed Dial entries.•Sort by Speed Dial No.Printing Lists/Reports153](https://usermanual.wiki/Ricoh/MFSP311SFNW1/User-Guide-1915829-Page-155.png)
![Printer Features SettingsList/Test PrintPrints lists showing configurations on the machine.The lists will be printed on A4 or Letter size paper.•Config. PagePrints general information and the current configurations of the machine.• Menu ListPrints the machine's function menus.• Test PagePrints a test page for checking the single-sided printing condition. The test page containsnetwork settings.• PCL Font ListPrints installed PCL font list.• Duplex Test PagePrints a test page for checking the duplex printing condition.System• CopiesSets the machine to print the specified number of sets.This setting is disabled if the number of pages to print is specified by the printer driver.Default: 1• 1 to 999• Sub Paper SizeSets the machine to print onto paper of another size if the specified paper is not loaded in anytray. Alternative sizes are preset to A4 and Letter.Default: [Off]• Auto• Off• Default Page SizeSpecifies the paper size to be used when the paper size is not specified in the print job.Default: [A4], [8 1/2 × 11]•A4, B5 JIS, A5, B6 JIS, A6, 8 1/2 × 14, 8 1/2 × 11, 5 1/2 × 8 1/2,7 1/4 × 10 1/2, 8 × 13, 8 1/2 × 13, 8 1/4 × 13, 16K, 4 1/8 × 9 1/2,3 7/8 × 7 1/2, C5 Env, C6 Env, DL EnvPrinter Features Settings155](https://usermanual.wiki/Ricoh/MFSP311SFNW1/User-Guide-1915829-Page-157.png)
![• DuplexSets the machine to print on both sides of paper according to the specified binding method.Default: [None]•None• Long Edge Bind• Short Edge Bind• Blank Page PrintSets the machine to print blank pages.When cover sheet printing is enabled from the printer driver, cover sheets are inserted even ifyou select [Off].Note that this setting has lower priority than the printer driver's blank page setting.Default: [On]• On• Off• Print Error ReportSets the machine to print an error page when the machine detects a printer or memory error.Default: [Off]• On• OffPCL MenuSpecifies conditions when using PCL for printing.• OrientationSpecifies the page orientation.Default: [Portrait]• Portrait• Landscape• Form LinesSpecifies the number of lines per page.Default: 64, 60•5 to 128• Font NumberSpecifies the ID of the default font you want to use.Default: 07. Configuring the Machine Using the Control Panel156](https://usermanual.wiki/Ricoh/MFSP311SFNW1/User-Guide-1915829-Page-158.png)
![• 0 to 89•Point SizeSpecifies the point size for the default font.This setting is effective only for a variable-space font.Default: 12.00 points• 4.00 to 999.75 (you can use the [ ] or [ ] key to change the value in 0.25 increments)•Font PitchSpecifies the number of characters per inch for the default font.This setting is effective only for fixed-space fonts.Default: 10.00 pitch• 0.44 to 99.99• Symbol SetSpecifies the character set for the default font. The following sets are available:Default: [PC-8]• Roman-8, Roman-9, ISO L1, ISO L2, ISO L5, PC-8, PC-8 D/N, PC-850, PC-852,PC-858, PC8-TK, Win L1, Win L2, Win L5, Desktop, PS Text, VN Intl, VN US, MS Publ,Math-8, PS Math, VN Math, Pifont, Legal, ISO 4, ISO 6, ISO 11, ISO 15, ISO 17, ISO21, ISO 60, ISO 69, Win 3.0, MC Text, ISO L6, ISO L9, PC-775, PC-1004, WinBaltic• Courier FontSpecifies a courier-type font.Default: [Regular]• Regular• Dark• Ext. A4 WidthSets the machine to extend the width of the printable area of A4 size paper, reducing sidemargin width.Default: [Off]• On• Off• Append CR to LFSets the machine to append a CR code to each LF code to print text data clearly.Default: [Off]• OnPrinter Features Settings157](https://usermanual.wiki/Ricoh/MFSP311SFNW1/User-Guide-1915829-Page-159.png)
![• Off•ResolutionSpecifies the print resolution in dots per inch.Default: [600 × 600 dpi]• 600 × 600 dpi7. Configuring the Machine Using the Control Panel158](https://usermanual.wiki/Ricoh/MFSP311SFNW1/User-Guide-1915829-Page-160.png)
![Network Settings• Depending on the settings you change, the machine might need to be restarted.•Depending on the model you are using, some items might not appear.Ethernet• MAC AddressDisplays the machine's MAC address.• Ethernet SpeedDisplays the current Ethernet speed setting.• 100Mbps Full Duplex• 100Mbps Half Duplex• 10Mbps Full Duplex• 10Mbps Half Duplex• Ethernet UnavailableAppears when a network cable is not connected.• Set Ethernet SpeedSpecifies the speed for Ethernet communication. Select a speed that matches your networkenvironment.For most networks, the default setting is the optimum setting.Default: [Auto Select]• Auto Select• 100Mbps Full Duplex• 100Mbps Half Duplex• 10Mbps Full Duplex• 10Mbps Half DuplexWi-Fi (Type 2 model only)• Wi-Fi EnableSelect whether to enable or disable Wireless LAN.Default: [Enable]• Disable• EnableIf [Disable] is set, [Wi-Fi Status], [MAC Address], [Current Connection], [Setup Wizard], and[WPS] are not displayed.Network Settings159](https://usermanual.wiki/Ricoh/MFSP311SFNW1/User-Guide-1915829-Page-161.png)
![• Wi-Fi StatusDisplays the current connection status.•MAC AddressDisplays the machine's MAC address.• Current ConnectionDisplays detailed information about the connection, such as the SSID and the wireless signalstrength.• Setup WizardDisplays the procedure for manually connecting to a wireless LAN. It leads you step-by-stepthrough configuring the settings for connecting with a wireless LAN.• WPSConnects with one touch using WPS (Wi-Fi Protected Setup). For details, see Wi-Fi SettingsGuide.IPv4 Configuration• DHCPSets the machine to receive its IPv4 address, subnet mask, and default gateway addressautomatically from a DHCP server.Default: [Inactive]• Inactive• Active• IP AddressSpecifies the machine's IPv4 address when DHCP is not used.Use this menu to check the current IP address when DHCP is used.Default: XXX.XXX.XXX.XXXThe numbers represented by "X" vary according to your network environment.• Subnet MaskSpecifies the machine's subnet mask when DHCP is not used.Use this menu to check the current subnet mask when DHCP is used.Default: XXX.XXX.XXX.XXXThe numbers represented by "X" vary according to your network environment.• Gateway AddressSpecifies the machine's default gateway address when DHCP is not used.Use this menu to check the current default gateway address when DHCP is used.Default: XXX.XXX.XXX.XXX7. Configuring the Machine Using the Control Panel160](https://usermanual.wiki/Ricoh/MFSP311SFNW1/User-Guide-1915829-Page-162.png)
![The numbers represented by "X" vary according to your network environment.•IP Address MethodDisplays the IP address acquisition method.• IP Not Ready• DHCP• Manual Config.• Default IPIPv6 Configuration• IPv6Select whether to enable or disable IPv6.Default: [Active]• Active• Inactive• DHCPSets the machine to receive its IPv6 address from a DHCP server.Default: [Inactive]• Active• Inactive• IP Address (DHCP)Displays the IPv6 address obtained from a DHCP server.• Manual Config. Address• Manual Config. AddressSpecifies the machine's IPv6 address when DHCP is not used. Can contain up to 46characters.For details about entering characters, see page 101 "Entering Characters".• Prefix LengthSpecifies the prefix length, using a value between 0 and 128.• Gateway AddressSpecifies the IPv6 address of the default gateway. Can contain up to 46 characters.For details about entering characters, see page 101 "Entering Characters".• Stateless AddressDisplays the IPv6 stateless addresses obtained from a Router Advertisement.• Stateless Address 1Network Settings161](https://usermanual.wiki/Ricoh/MFSP311SFNW1/User-Guide-1915829-Page-163.png)
![• Stateless Address 2•Stateless Address 3• Stateless Address 4• Link-local AddressDisplays the IPv6 link local address.• Contact your network administrator for information about the network configuration.Wireless LAN Setup (Type 2 model only)This section describes how to configure the wireless LAN settings manually using the control panel. Foreasy setup using WPS (Wi-Fi Protected Setup), see Wi-Fi Settings Guide.• If [Disable] is specified for the [Wi-Fi Enable] setting, you cannot use the [Setup Wizard]. Specify[Enable] for the [Wi-Fi Enable] setting first. If you change the [Wi-Fi Enable] setting, the machinemust be restarted.•Ensure that the router, access point, or device equipped with a wireless LAN, etc., is turned on.• Also, check the authentication method and the name of the router, access point, or deviceequipped with a wireless LAN (SSID/IBSS) in advance.Infrastructure modeUse the following procedure to connect to the wireless LAN router or access point manually.1. Press the [User Tools] key.2. Press the [ ] or [ ] key to select [Network Settings], and then press the [OK] key.If you are requested to enter a password, enter the password using the number keys, and thenpress the [OK] key.3. Press the [ ] or [ ] key to select [Wi-Fi], and then press the [OK] key.4. Press the [ ] or [ ] key to select [Setup Wizard], and then press the [OK] key.5. Press the [ ] or [ ] key to select [Infrastructure], and then press the [Next] key.6. Press the [ ] or [ ] key to select the destination SSID, and then press the [Next] key.If you cannot find the destination SSID, check that the device is turned on.When entering the SSID, select [SSID], and then press the [Next] key.The SSID entry screen appears. Enter the SSID using the number keys, and then press the [Next]key.7. Configuring the Machine Using the Control Panel162](https://usermanual.wiki/Ricoh/MFSP311SFNW1/User-Guide-1915829-Page-164.png)
![7. Press the [ ] or [ ] key to select the authentication method, and then press the [Next]key.Select the same method that the router or access point is using.8. Press the [ ] or [ ] key to select the encryption method, and then press the [Next] key.Select the same method that the router or access point is using.9. Enter the encryption key and ID using the number keys, and then press the [Connect] key.• The ID is used for identifying the encryption key. You can register four encryption keys (ID 1 to4).10. Press [Yes] key.Wait for a while. If "Connected" appears, the setting is completed.Ad Hoc modeThis section explains the procedure for connecting directly to devices equipped with a wireless LAN,such as a notebook computer (peer-to-peer).• In Ad Hoc network, every device must be manually assigned an IP address for TCP/IP if there is noDHCP server.•In Ad Hoc mode, only Open System or WEP encryption is supported. WPA2-PSK authentication isnot supported.1. Press the [User Tools] key.2. Press the [ ] or [ ] key to select [Network Settings], and then press the [OK] key.If you are requested to enter a password, enter the password using the number keys, and thenpress the [OK] key.3. Press the [ ] or [ ] key to select [Wi-Fi], and then press the [OK] key.4. Press the [ ] or [ ] key to select [Setup Wizard], and then press the [OK] key.5. Press the [ ] or [ ] key to select [Ad-Hoc], and then press the [Next] key.6. Press the [ ] or [ ] key to select a communication channel, and then press the [Next] key.Select a channel that corresponds to the device that you are going to connect with.7. Press the [ ] or [ ] key to select the destination device name (IBSS), and then press the[Next] key.If you cannot find the destination, check that the device is turned on.When entering the device name, select [SSID], and then press the [Next] key. The SSID entryscreen appears. Enter the device name using the number keys, and then press the [Next] key.Network Settings163](https://usermanual.wiki/Ricoh/MFSP311SFNW1/User-Guide-1915829-Page-165.png)
![8. Press the [ ] or [ ] key to select [Open system], and then press the [Next] key.9. Press the [ ] or [ ] key to select [None] or one of the WEP settings, and then press the[Next] key.10. Enter the encryption key and ID using the number keys, and then press the [Connect] key.• The ID is used for identifying the encryption key. You can register four encryption keys (ID 1 to4).11. Press [Yes] key.Wait for a while. If “"Connected"” appears, the settings are complete.IPv6 Automatic SettingsThis section explains how to set the machine to receive an IPv6 address automatically.• A router with DHCP function or a DHCP server is required.1. Connect the printer to the router or the hub using the Ethernet cable.2. Turn on the machine.3. Press the [User Tools] key.4. Press the [ ] or [ ] key to select [Network Settings], and then press the [OK] key.5. Press the [ ] or [ ] key to select [IPv6 Configuration], and then press the [OK] key.6. Press the [ ] or [ ] key to select [DHCP], and then press the [OK] key.7. Press the [ ] or [ ] key to select [Active], and then press the [OK] key.8. Press the [User Tools] key to return to the initial screen.9. If you are requested to restart the machine, turn off the machine, and then turn it back on.IPv6 Manual SettingsThis section explains how to assign the machine's IPv6 address manually.1. Connect the printer to the router or the hub using the Ethernet cable.2. Turn on the machine.3. Press the [User Tools] key.4. Press the [ ] or [ ] key to select [Network Settings], and then press the [OK] key.5. Press the [ ] or [ ] key to select [IPv6 Configuration], and then press the [OK] key.6. Press the [ ] or [ ] key to select [DHCP], and then press the [OK] key.7. Configuring the Machine Using the Control Panel164](https://usermanual.wiki/Ricoh/MFSP311SFNW1/User-Guide-1915829-Page-166.png)
![7. Press the [ ] or [ ] key to select [Inactive], and then press the [OK] key.8. Press the [ ] or [ ] key to select [Manual Config. Address], and then press the [OK] key.9. Press the [ ] or [ ] key to select [Manual Config. Address], and then press the [OK] key.10. Enter the machine’s IPv6 address using the number keys, and then press the [OK] key.11. Press the [ ] or [ ] key to select [Prefix Length], and then press the [OK] key.12. Enter the prefix length using the number keys, and then press the [OK] key.13. Press the [ ] or [ ] key to select [Gateway Address], and then press the [OK] key.14. Enter the gateway address using the number keys, and then press the [OK] key.15. Press the [User Tools] key to return to the initial screen.16. If you are requested to restart the machine, turn off the machine, and then turn it back on.Network Settings165](https://usermanual.wiki/Ricoh/MFSP311SFNW1/User-Guide-1915829-Page-167.png)
![Administrator SettingsSet Date/TimeSets the date and time of the machine’s internal clock.•Set DateSpecifies the date of the machine’s internal clock.Only dates that correspond with the year and month can be set. Incompatible dates will berefused.Default date format: [Day/Month/Year], [Year/Month/Day]•Date format: Month/Day/Year, Day/Month/Year, or Year/Month/DayYear: 2000 to 2099Month: 1 to 12Day: 1 to 31• Set TimeSets the time of the machine’s internal clock.Default time format: [24-hour Format], [12-hour Format]•Time format: 12-hour Format, 24-hour FormatAM/PM stamp: AM, PM (for 12-hour Format)Hour: 0 to 23 (for 24-hour Format), or 1 to 12 (for 12-hour Format)Minute: 0 to 59Program Fax InformationSpecifies the fax name and fax number of the machine.• Number:Specifies the fax number of the machine using up to 20 characters, including 0 to 9, space,and "+".• Name:Specifies the fax name of the machine using up to 20 alphanumeric characters and symbols.Dial/Push PhoneSpecifies the line type of the telephone line.To configure this setting, contact your telephone company and select the setting based on yourtelephone line. Selecting a wrong setting may cause failures in fax transmissions.[Dial Phone (20PPS)] may not appear depending on the country setting of the machine.Default: [Push Phone]• Push Phone7. Configuring the Machine Using the Control Panel166](https://usermanual.wiki/Ricoh/MFSP311SFNW1/User-Guide-1915829-Page-168.png)
![• Dial Phone (10PPS)•Dial Phone (20PPS)PSTN / PBXSets the machine to connect to the public switched telephone network (PSTN) or a private branchexchange (PBX).Default: [PSTN]• PSTN• PBXPBX Access NumberSpecifies the dial number to access the outside line when the machine is connected to a PBX.Make sure that this setting matches the setting of your PBX. Otherwise, you may not be able to sendfaxes to outside destinations.Default: 0• 0 to 999Function PrioritySpecifies the mode that is activated when the power is turned on, or if the time specified for [SystemAuto Reset Timer] elapses without activity while the initial screen of the current mode is displayed.Default: [Copier]• Copier• Facsimile• ScannerSystem Auto Reset TimerSets the machine to return to the mode specified in [Function Priority].Default: [On] (30 seconds)• On (30 sec., 1 min., 2 min., 3 min., 5 min., 10 min.)• OffEnergy Saver ModeSets the machine to enter Energy Saver mode, Energy Saver mode 1 or Energy Saver mode 2, toreduce power consumption. The machine recovers from Energy Saver mode when it receives aprint job, prints a received fax, or when the [Copy] or [Start] key is pressed.• EnergySaverMode 1The machine enters Energy Saver mode 1 if the machine has been idle for about 30 seconds.It takes less time to recover from Energy Saver mode 1 than from power-off state or EnergySaver mode 2, but power consumption is higher in Energy Saver mode 1 than in EnergySaver mode 2.Administrator Settings167](https://usermanual.wiki/Ricoh/MFSP311SFNW1/User-Guide-1915829-Page-169.png)
![Default: [Off]•Off• On (30 seconds)• EnergySaverMode 2The machine enters Energy Saver mode 2 after the period of time specified for this setting ispassed. The machine consumes less power in Energy Saver mode 2 than in Energy Savermode 1, but it takes longer to recover from Energy Saver mode 2 than from Energy Savermode 1.Default: [On] (1 minute)• On (1 to 240 minutes)• OffLanguageSpecifies the language used on the screen and in reports.The default value for this setting is the language you have specified during the Initial Setup, which isrequired after turning on the machine for the first time.CountrySelects the country in which the machine is used. The country code you specify determines the timeand date display format and the default values of the fax transmission-related settings.Make sure to select the country code correctly. Selecting a wrong country code may cause failuresin fax transmissions.The default value for this setting is the country code you have specified during the Initial Setup,which is required after turning on the machine for the first time.Reset SettingsBe sure not to clear the settings by mistake.• Reset All SettingsResets the machine's settings to their defaults except the following:• Network settings• Fax destinations• [Printer Registration], [Low Humidity Mode], and [Image Density] settings under systemsettings• Scan destinations (configured using Web Image Monitor)• User restriction settings (configured using Web Image Monitor)• IPsec settings (configured using Web Image Monitor)Press [Yes] to execute. Press [No] to exit to the previous level of the menu tree without clearingthe settings.7. Configuring the Machine Using the Control Panel168](https://usermanual.wiki/Ricoh/MFSP311SFNW1/User-Guide-1915829-Page-170.png)
![• Reset Network SettingsResets the network settings to their defaults.Press [Yes] to execute. Press [No] to exit to the previous level of the menu tree without clearingthe settings.•Clear Address BookClears the fax Quick Dial/Speed Dial destinations.Press [Yes] to execute. Press [No] to exit to the previous level of the menu tree without clearingthe destinations.Admin. Tools LockSpecifies a four-digit password for accessing the [Address Book], [Network Settings], and [Admin.Tools] menus.Do not forget this password.• On (0000 to 9999)• OffIPsecSelects whether to enable or disable IPsec.This function appears only when a password is specified under [Admin. Tools Lock].Default: [Inactive]• Active• InactiveFax Number ConfirmationSets the machine to require a fax number to be entered twice when specifying a destinationmanually.When this function is enabled, you cannot use the On Hook Dial function.This function appears only when a password is specified under [Admin. Tools Lock].Default: [Off]• On• OffShrtct to Func.Assigns one of the following functions to the [Shortcut to Func.] key on the control panel.Default: [ID Card Copy Mode]• ID Card Copy Mode• Fax Immediate TX• Select Scanner Dest.Administrator Settings169](https://usermanual.wiki/Ricoh/MFSP311SFNW1/User-Guide-1915829-Page-171.png)
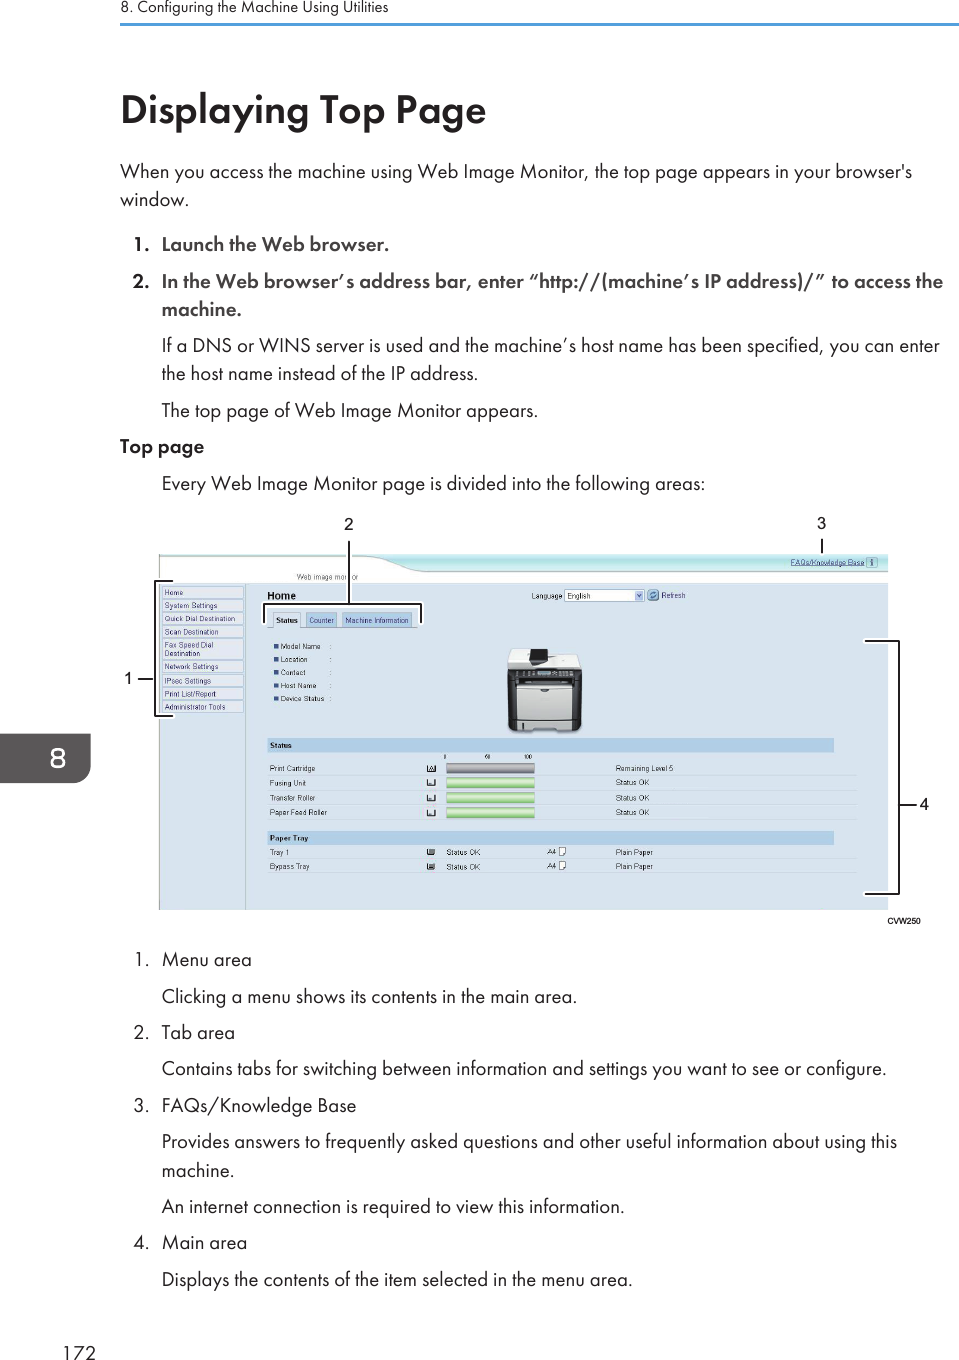
![Information in the main area is not automatically updated. Click [Refresh] at the upper-right in themain area to update the information. Click the Web browser's [Refresh] button to refresh the entirebrowser screen.• If you use an older version of a supported Web browser or the Web browser has JavaScript andcookies disabled, display and operation problems may occur.•If you are using a proxy server, configure the Web browser settings as necessary. For details aboutthe settings, contact your network administrator.• The previous page may not appear even if the back button of the Web browser is clicked. If thishappens, click the refresh button of the Web browser.• The FAQs (Frequently Asked Questions)/Knowledge Base are not available in certain languages.Changing the Interface LanguageSelect the desired interface language from the [Language] list.Displaying Top Page173](https://usermanual.wiki/Ricoh/MFSP311SFNW1/User-Guide-1915829-Page-175.png)
![Checking the System InformationClick [Home] to display the main page of Web Image Monitor. You can check the current systeminformation on this page.This page contains three tabs: [Status], [Counter], and [Machine Information].Status TabItem DescriptionModel Name Shows the name of the machine.Location Shows the location of the machine as registered on the [SNMP] page.Contact Shows the contact information of the machine as registered on the [SNMP]page.Host Name Shows the host name specified in [Host Name] on the [DNS] page.Device Status Shows the current messages on the machine's display.StatusItem DescriptionPrint Cartridge Shows the amount of toner remaining.Fusing Unit Shows the remaining life of the fusing unit, as "Status OK", "ReplacementRequired Soon" or "Replacement Required".For replacing, contact your sales or service representative.Transfer Roller Shows the remaining life of the transfer roller, as "Status OK", "ReplacementRequired Soon" or "Replacement Required".For replacing, contact your sales or service representative.Paper Feed Roller Shows the remaining life of the paper feed roller, as "Status OK","Replacement Required Soon" or "Replacement Required".For replacing, contact your sales or service representative.Paper TrayItem DescriptionTray 1 Shows the current state and paper size/type setting of tray 1.8. Configuring the Machine Using Utilities174](https://usermanual.wiki/Ricoh/MFSP311SFNW1/User-Guide-1915829-Page-176.png)
![Item DescriptionBypass Tray Shows the current state and paper size/type setting of the bypass tray.• If a non-genuine print cartridge is installed, toner life cannot be reliably indicated.Counter TabPage CounterItem DescriptionPrinter Shows the following for pages printed using the printer function:•Total number of pages printed using the printer function, and lists/reports printed from the [List/Test Print] menu under [Printer Features]• Number of color pages (always shows 0)• Number of black-and-white pages printed using the printer functionScanner Shows the following for pages scanned using the scanner function:•Total number of pages• Number of color pages• Number of black-and-white pagesCopier Shows the following for pages printed using the copier function:• Total number of pages• Number of color pages (always shows 0)• Number of black-and-white pagesFax Shows the following for public telephone line faxes:•Total number of pages sent and received• Number of pages sent• Number of pages receivedChecking the System Information175](https://usermanual.wiki/Ricoh/MFSP311SFNW1/User-Guide-1915829-Page-177.png)
![Print CounterItem DescriptionPage Total Shows the total number of all prints from the machine:•Pages printed using the printer, copy, and fax functions• Lists/Reports printed from the [Print List/Report] menu• Lists/Reports printed from the [List/Test Print] menu under [PrinterFeatures]DuplexItem DescriptionDuplex Total Page Shows the total number of sheets printed on both sides.Machine Information TabMachine InformationItem DescriptionFirmware Version Shows the version of firmware installed on the machine.Engine FW Version Shows the version of firmware for the machine engine.Machine ID Shows the identification number of the machine.Fax Card Shows that a fax card is installed.Total Memory Shows the total memory installed on the machine.8. Configuring the Machine Using Utilities176](https://usermanual.wiki/Ricoh/MFSP311SFNW1/User-Guide-1915829-Page-178.png)
![Configuring the System SettingsClick [System Settings] to display the page for configuring the system settings.This page contains the following tabs: [Sound Volume Adjustment], [Tray Paper Settings], [Copier],[Fax], [Priority Tray], [Toner Saving], [I/O Timeout], and [Shortcut to Function].Sound Volume Adjustment TabSound Volume AdjustmentItem DescriptionPanel Key Sound Select the volume of the beep that sounds when a key is pressed from [Off],[Low], [Middle], or [High].On Hook Mode Select the volume of the sound from the speaker during on hook mode from[Off], [Low], [Middle], or [High].Job End Tone Select the volume of the beep that sounds when a job is complete from[Off], [Low], [Middle], or [High].Job Error Tone Select the volume of the beep that sounds when a fax transmission erroroccurs from [Off], [Low], [Middle], or [High].Alarm Volume Select the volume of the alarm that sounds when an operation error occursfrom [Off], [Low], [Middle], or [High].Tray Paper Settings TabTray 1Item DescriptionPaper Size Select the paper size for tray 1 from the following:A4, B5 JIS, A5, B6 JIS, A6, 8 1/2 × 14, 8 1/2 × 11, 5 1/2 × 8 1/2, 71/4 × 10 1/2, 8 × 13, 8 1/2 × 13, 8 1/4 × 13, 16K, Custom SizePaper Type Select the paper type for tray 1 from the following:Thin Paper (52 to 64g/m2), Thick Paper 1 (100 to 130g/m2), ThickPaper 2 (131 to 162g/m2), Plain Paper, Recycled Paper, Color Paper,Preprinted Paper, Prepunched Paper, Letterhead, Bond Paper, Cardstock,Label PaperConfiguring the System Settings177](https://usermanual.wiki/Ricoh/MFSP311SFNW1/User-Guide-1915829-Page-179.png)
![Copier TabSelect PaperItem DescriptionSelect Paper Select the paper size used for printing copies from the following: [Tray 1],[Bypass Tray], [A4], [8 1/2 × 11], or [16K].When a tray is selected, the machine prints from that tray only. When apaper size is selected, the machine checks the trays for the paper of thespecified size in the order of priority as set in [Copier] in the [Priority Tray]page.If multiple trays contain valid paper, the first tray the machine finds will beused for printing; when that tray runs out of paper, the machineautomatically switches to the next tray to continue printing.Separation Line Specify whether to print a line in the middle of the printed paper whenmaking ID card copy or combined copy.Fax TabFax Number ConfirmationItem DescriptionFax NumberConfirmationEnable this setting to configure the machine to require a fax number to beentered twice when specifying a destination manually.This setting appears only when the administrator password is set in the[Administrator] page.2 Sided Print Specify whether to print received faxes on both sides of paper.Configuring the System Settings179](https://usermanual.wiki/Ricoh/MFSP311SFNW1/User-Guide-1915829-Page-181.png)
![Priority Tray TabPriority TrayItem DescriptionPrinter Select the tray that the machine checks first for paper that can be used forthe job from [Tray 1] or [Bypass Tray].If automatic tray selection is specified for the print job and multiple trayscontain valid paper, the first tray the machine finds will be used for printing;when that tray runs out of paper, the machine automatically switches to thenext tray to continue printing.Copier Select the tray that the machine checks first for paper that can be used forthe job from [Tray 1] or [Bypass Tray].If [A4], [8 1/2 × 11], or [16K] is selected for [Select Paper] in the [Copier]page and multiple trays contain valid paper, the first tray the machine findswill be used for printing; when that tray runs out of paper, the machineautomatically switches to the next tray to continue printing.Toner Management TabToner ManagementItem DescriptionToner Saving Enable this setting to print using a reduced amount of toner when printingout copies.8. Configuring the Machine Using Utilities180](https://usermanual.wiki/Ricoh/MFSP311SFNW1/User-Guide-1915829-Page-182.png)
![I/O Timeout TabI/O TimeoutItem DescriptionFixed USB Port Specifies whether the same printer/LAN-Fax driver can be used for multiplemachines or not under USB connection.If this setting is enabled, the same printer/LAN-Fax driver you haveinstalled in your computer can be used with any machine other than the oneoriginally used for installation, if the machine is of the same model.If disabled, you must install the printer/LAN-Fax driver separately forindividual machines, because the machine other than the original will berecognized as a new device upon USB connection.Shortcut to Function TabShortcut to FunctionItem DescriptionShortcut to FunctionSettingsAssigns one of the following functions to the [Shortcut to Func.] key on thecontrol panel.•[ID Card Copy Mode]• [Fax Immediate TX]• [Select Scanner Destination]• [Duplex/Combine Copy]Configuring the System Settings181](https://usermanual.wiki/Ricoh/MFSP311SFNW1/User-Guide-1915829-Page-183.png)
![Configuring the Network SettingsClick [Network Settings] to display the page for configuring the network settings.This page contains the following tabs: [Network Status], [IPv6 Configuration], [Network Application],[DNS], [Auto E-mail Notification], [SNMP], [SMTP], [POP3], and [Wireless] (Type 2 model only).• Depending on the settings you change, the machine might need to be restarted.•Depending on the model you are using, some items might not appear.Network Status TabGeneral StatusItem DescriptionEthernet Speed Shows the type and speed of the network connection.IPP Printer Name Shows the name used to identify the machine on the network.Network Version Shows the version of the machine's network module (a part of the machinefirmware).Ethernet MAC Address Shows the Ethernet MAC address of the machine.Active Interface Shows the active communication method.TCP/IP StatusItem DescriptionDHCP Select whether the machine should receive a dynamic IPv4 addressautomatically using DHCP. To use DHCP, select [Active]. When enabled,the items below cannot be configured.IP Address Enter the IPv4 address for the machine.Subnet Mask Enter the subnet mask of the network.Gateway Enter the IPv4 address of the network gateway.Configuring the Network Settings183](https://usermanual.wiki/Ricoh/MFSP311SFNW1/User-Guide-1915829-Page-185.png)
![IPv6 Configuration TabIPv6Item DescriptionIPv6 Select whether to enable or disable IPv6. You cannot disable IPv6 usingWeb Image Monitor if the machine is currently in use in an IPv6environment. In this case, use the control panel to disable [IPv6] undernetwork settings.When disabled, [DHCP], [Manual Configuration Address], [Prefix Length],and [Gateway Address] below cannot be configured.IPv6 AddressItem DescriptionDHCP Select whether or not the machine obtains its IPv6 address from a DHCPserver.IP Address (DHCP) Displays the IPv6 address obtained from the DHCP server when [DHCP] isset to [Active].Stateless Address Displays up to four stateless auto addresses.Gateway Address Displays the machine's default gateway address.Link-local Address Displays the link local address of the machine. The link local address is anaddress that is valid only inside the local network (local segment).Manual ConfigurationAddressEnter the machine's IPv6 address. Can contain up to 39 characters.Prefix Length Enter the prefix length, using a value between 0 and 128.Gateway Address Enter the default gateway's IPv6 address. Can contain up to 39 characters.Network Application TabScanner Send SettingItem DescriptionE-mail Select to enable the Scan to E-mail feature.8. Configuring the Machine Using Utilities184](https://usermanual.wiki/Ricoh/MFSP311SFNW1/User-Guide-1915829-Page-186.png)
![Item DescriptionMax. E-mail Size Select the maximum size of scan files that can be attached to an e-mailmessage (1 to 5 MB, or no limit).FTP Select to enable the Scan to FTP feature.Folder Select to enable the Scan to Folder feature.Network Print SettingItem DescriptionIPP Select to enable network printing using Internet Print Protocol (via TCP port631/80).FTP Select to enable network printing using an embedded FTP server in themachine (via TCP port 20/21).RAW Select to enable network raw printing.Port No. Enter the TCP port number to use for raw printing. The valid range is 1024to 65535, except 53550 and 49999 (default is 9100).LPR Select to enable network printing using LPR/LPD (via TCP port 515).mDNS SettingItem DescriptionmDNS Select to enable Multicast DNS (via UDP port 5353). If disabled, the itembelow cannot be configured.Printer Name Enter the name of the machine. Can contain up to 32 characters.DNS TabDNSItem DescriptionDNS Method Select whether to specify domain name servers manually or receive DNSinformation from the network automatically. When set to [Auto], [PrimaryDNS Server], [Secondary DNS Server], and [Domain Name] belowbecome unavailable.Primary DNS Server Enter the IPv4 address of the primary DNS.Configuring the Network Settings185](https://usermanual.wiki/Ricoh/MFSP311SFNW1/User-Guide-1915829-Page-187.png)
![Item DescriptionSecondary DNS Server Enter the IPv4 address of the secondary DNS.Domain Name Enter the IPv4 domain name for the machine. Can contain up to 32characters.IPv6 DNS Method Select whether to specify the domain server manually or have the machineobtain its DNS information automatically.When set to [Auto], [Primary IPv6 DNS Server], [Secondary IPv6 DNSServer], and [IPv6 Domain Name] below become unavailable.Primary IPv6 DNSServerEnter the IPv6 address of the primary IPv6 DNS server. Can contain up to39 characters.Secondary IPv6 DNSServerEnter the IPv6 address of the secondary IPv6 DNS server. Can contain upto 39 characters.IPv6 Domain Name Enter the IPv6 domain name of the machine. Can contain up to 32characters.DNS Resolve Priority Select whether to give priority to IPv4 or IPv6 for DNS name resolution.DNS Timeout (seconds) Enter the number of seconds the machine waits before considering a DNSrequest to have timed out (1 to 999 seconds).Host Name Enter a host name for the machine. Can contain up to 15 characters.Auto E-mail Notification TabE-mail Notification 1/E-mail Notification 2Item DescriptionDisplay Name Enter a sender name for notification e-mail. Can contain up to 32characters.E-mail Address Enter the address of the recipient of the alert email. Can contain up to 64characters.Paper Misfeed Select to send an alert e-mail to the specified address if a paper jam occurs.Out of Paper Select to send an alert e-mail to the specified address if paper runs out.Replace Print CartridgeSoonSelect to send an alert e-mail to the specified address if toner becomes low.8. Configuring the Machine Using Utilities186](https://usermanual.wiki/Ricoh/MFSP311SFNW1/User-Guide-1915829-Page-188.png)
![Item DescriptionCall Service Select to send an alert e-mail to the specified address if the machinerequires servicing.Replace Print Cartridge Select to send an alert e-mail to the specified address if toner runs out.Cover Open Select to send an alert e-mail to the specified address if a cover is open.SNMP TabSNMPItem DescriptionSNMP Select whether to enable the machine to use SNMP services.TrapItem DescriptionTarget Trap Select whether to enable the machine to send traps to the management host(NMS).When disabled, [SNMP Management Host 1] and [SNMP ManagementHost 2] below become unavailable.SNMP ManagementHost 1Enter the IP address or host name of a management host. Can contain up to64 characters.SNMP ManagementHost 2Enter the IP address or host name of a management host. Can contain up to64 characters.CommunityItem DescriptionGet Community Enter the community name to use for authentication of Get requests. Cancontain up to 32 characters.Trap Community Enter the community name to use for authentication of Trap requests. Cancontain up to 32 characters.Configuring the Network Settings187](https://usermanual.wiki/Ricoh/MFSP311SFNW1/User-Guide-1915829-Page-189.png)
![SystemItem DescriptionLocation Enter the location of the machine. The location entered here is displayed onthe main page. Can contain up to 64 characters.Contact Enter the contact information of the machine. The contact informationentered here is displayed on the main page. Can contain up to 64characters.SMTP TabSMTPItem DescriptionPrimary SMTP Server Enter the IP address or host name of the SMTP/POP3 server. Can containup to 64 characters.Port No. Enter the port number for SMTP (1 to 65535).Authentication Method Select an authentication method from the following:[Anonymous]: The user name and password are not necessary.[SMTP]: The machine supports NTLM and LOGIN authentication.[POP before SMTP]: The POP3 server is used for authentication. Whensending e-mails to an SMTP server, you can enhance the SMTP serversecurity level by connecting to the POP server for authentication.User Name Enter the user name for logging in to the SMTP server. Can contain up to 32characters.Password Enter the password for logging in to the SMTP server. Can contain up to 32characters.Device E-mail Address Enter the machine’s e-mail address.This address is used as the sender's address of e-mail messages sent fromthis machine, such as notification e-mails. Can contain up to 64 characters.Server Timeout(seconds)Enter the number of seconds the machine waits before considering anSMTP operation to have timed out (1 to 999).8. Configuring the Machine Using Utilities188](https://usermanual.wiki/Ricoh/MFSP311SFNW1/User-Guide-1915829-Page-190.png)
![Item DescriptionTime Zone Select a time zone according to your geographic location. Selecting adifferent time zone may cause transmission date and time to be incorrect foremail sent by the Scan to E-mail function, even when the machine's clock isset correctly.POP3 TabPOP3 SettingsItem DescriptionPOP3 Server Enter the IP address or host name of the POP3 server for e-mail reception.The POP3 server specified here will be used for [POP before SMTP]. Cancontain up to 64 characters.User Account Enter the user name for logging in to the POP3 server. Can contain up to 32characters.User Password Enter the password for logging in to the POP3 server. Can contain up to 32characters.Authentication Select an authentication method from the following:[None]: Password will not be encrypted.[APOP Authentication]: Password will be encrypted.[Auto]: Password will be encrypted or not encrypted according to the POP3server’s settings.Wireless Tab (Type 2 model only)Wireless LAN StatusItem DescriptionWireless LAN Status Displays the status of the connection to the wireless LAN.MAC Address Displays the MAC address.Communication Mode Displays the communication mode that the machine is connecting in.SSID Displays the SSID of the access point that the machine is connected to.Configuring the Network Settings189](https://usermanual.wiki/Ricoh/MFSP311SFNW1/User-Guide-1915829-Page-191.png)
![Item DescriptionChannel Displays the channel information of the current wireless LAN settings if [Ad-Hoc] is selected for [Communication Mode].Wireless Signal Status Displays the strength of the wireless signal that is being received.Wireless Specifies whether or not to use the wireless LAN.Wireless LAN SettingsItem DescriptionSSID Enter the SSID of the access point.The SSID can contain up to 32 characters.When you click [Scan List], a list of available access points is displayed.You can select the SSID from the list.Communication Mode Select the mode to connect in.If the machine will be connected to a wireless router or access point, select[Infrastructure]. If the machine will be connected to a device equipped witha wireless LAN directly, select [Ad-Hoc].Ad-Hoc Channel If [Ad-Hoc] is selected for [Communication Mode], select a channel.Authentication Select an authentication method.If [Ad-Hoc] is selected for [Communication Mode], you can select only[Open System] and [Shared Key].Encryption Select an encryption method.If [Ad-Hoc] is selected for [Communication Mode], you can select only[None ]and [WEP].WPA Passphrase If [WPA2-PSK] or [Mixed Mode WPA/WPA2] is selected for[Authentication], enter the WPA encryption key.WEP Key Length If [WEP] is selected for [Authentication], select 64 bits or 128 bits for thelength of the encryption key.WEP Transmit Key ID Select an ID number to identify each WEP key in case multiple WEPconnections are configured.WEP Key Format Select a format for entering the WEP key.8. Configuring the Machine Using Utilities190](https://usermanual.wiki/Ricoh/MFSP311SFNW1/User-Guide-1915829-Page-192.png)
![Item DescriptionWEP Key Enter the WEP key. The number and type of characters you can enter varydepending on the length and format selected for the key. See the following:•WEP key length: [64bits], Format: [Hexadecimal]WEP key max length: 10 characters (0-9, A-F, a-f)• WEP key length: [64bits], Format: [ASCII]WEP key max length: 5 characters (ASCII characters)• WEP key length: [128bits], Format: [Hexadecimal]WEP key max length: 26 characters (0-9, A-F, a-f)• WEP key length: [128bits], Format: [ASCII]WEP key max length: 13 characters (ASCII characters)• If you are configuring the connection settings manually, check the SSID, authentication method, orencryption key of the access point or wireless router in advance.One-touch connection settings (WPS)Item DescriptionWireless ProtectedSetup (WPS) MethodSelect a method to connect using WPS.WiFi Protected Setup InitiationItem DescriptionWIFI Protected SetupStartWi-Fi setup information will be displayed.Configuring the Network Settings191](https://usermanual.wiki/Ricoh/MFSP311SFNW1/User-Guide-1915829-Page-193.png)
![Configuring the IPsec SettingsClick [IPsec Settings] to display the page for configuring the IPsec settings.This page contains the following tabs: [IPsec Global Settings] and [IPsec Policy List].• This function is available only when an administrator password is specified.IPsec Global Settings TabItem DescriptionIPsec Function Select whether to enable or disable IPsec.Default Policy Select whether to allow for the default IPsec policy.Broadcast andMulticast BypassSelect the services that you do not want to apply IPsec from the following:[DHCPv4], [DHCPv6], [SNMP], [mDNS], [NetBIOS], [UDP Port 53550]All ICMP Bypass Select whether to apply IPsec to ICMP packets (IPv4 and IPv6) from thefollowing:[Active]: All ICMP packets will be bypassed without IPsec protection."ping" command (echo request and echo reply) is not encapsulated byIPsec.[Inactive]: Some ICMP message types will be bypassed without IPsecprotection.• For details about which ICMP message types will be bypassed when setting [All ICMP Bypass] to[Inactive], see Web Image Monitor Help.IPsec Policy List TabItem DescriptionNo. IPsec policy number.Name Displays the name of the IPsec policy.8. Configuring the Machine Using Utilities192](https://usermanual.wiki/Ricoh/MFSP311SFNW1/User-Guide-1915829-Page-194.png)
![Item DescriptionAddress Settings Displays the IP address filter of the IPsec policy as below:Remote address/Prefix lengthAction Displays the action of the IPsec policy as "Allow", "Drop", or "RequireSecurity".Status Displays the status of the IPsec policy as "Active" or "Inactive".To configure IPsec policies, select the desired IPsec policy, and then click [Change] to open the "IPsecPolicy Settings" page. The following settings can be made on the "IPsec Policy Settings" page.IP Policy SettingsItem DescriptionNo. Specify a number between 1 and 10 for the IPsec policy. The number youspecify will determine the position of the policy in the IPsec Policy List. Policysearching is performed according to the order of the list. If the number youspecify is already assigned to another policy, the policy you areconfiguring will take the number of the earlier policy, and the earlier policyand any subsequent policies will be renumbered accordingly.Activity Select whether to enable or disable the policy.Name Enter the name of the policy. Can contain up to 16 characters.Address Type Select IPv4 or IPv6 as the type of IP address to be used in IPseccommunication.Local Address Displays the IP address of this printer.Remote Address Enter the IPv4 or IPv6 address of the device with which to communicate.Can contain up to 39 characters.Prefix Length Enter the prefix length of the Remote Address, using a value between 1 and128. If this setting is left blank, "32" (IPv4) or "128" (IPv6) will beautomatically selected.Configuring the IPsec Settings193](https://usermanual.wiki/Ricoh/MFSP311SFNW1/User-Guide-1915829-Page-195.png)
![Item DescriptionAction Specify how the IP packets are processed from the following:•[Allow]: IP packets are both sent and received without IPsec applied tothem.• [Drop]: IP packets are discarded.• [Require Security]: IPsec is applied to IP packets that are both sent andreceived.If you have selected [Require Security], you must configure [IPsec Settings]and [IKE Settings].IPsec SettingsItem DescriptionEncapsulation Type Specify the encapsulation type from the following:•[Transport]: Select this mode to secure only the payload section ofeach IP packet when communicating with IPsec compliant devices.• [Tunnel]: Select this mode to secure every section of each IP packet.We recommend this type for communication between securitygateways (such as VPN devices).Security Protocol Select the security protocol from the following:•[AH]: Establishes secure communication that supports authenticationonly.• [ESP]: Establishes secure communication that supports bothauthentication and data encryption.• [ESP&AH]: Establishes secure communication that supports both dataencryption and authentication of packets, including packet headers.Note that you cannot specify this protocol when [Tunnel] is selectedfor [Encapsulation Type].AuthenticationAlgorithm for AHSpecify the authentication algorithm to be applied when [AH] or [ESP&AH]is selected for [Security Protocol] from the following:[MD5], [SHA1]Encryption Algorithmfor ESPSpecify the encryption algorithm to be applied when [ESP] or [ESP&AH] isselected for [Security Protocol] from the following:[None], [DES], [3DES], [AES-128], [AES-192], [AES-256]8. Configuring the Machine Using Utilities194](https://usermanual.wiki/Ricoh/MFSP311SFNW1/User-Guide-1915829-Page-196.png)
![Item DescriptionAuthenticationAlgorithm for ESPSpecify the authentication algorithm to be applied when [ESP] is selectedfor [Security Protocol] from the following:[MD5], [SHA1]Life Time Specify the life time of the IPsec SA (Security Association) as a time periodor data volume. The SA will expire when the time period you specifyelapses or the volume of data you specify reaches the volume carried.If you specify both a time period and a data volume, the SA will expire assoon as either is reached, and a new SA will then be obtained bynegotiation.To specify the life time of the SA as a time period, enter a number ofseconds.To specify the life time of the SA as a data volume, enter a number of KBs.Key Perfect ForwardSecrecySelect whether to enable or disable PFS (Perfect Forward Secrecy).IKE SettingsItem DescriptionIKE Version Displays the IKE version.Encryption Algorithm Specify the encryption algorithm from the following:[DES], [3DES], [AES-128], [AES-192], [AES-256]AuthenticationAlgorithmSpecify the authentication algorithm from the following:[MD5], [SHA1]IKE Life Time Specify the life time of the ISAKMP SA as a time period. Enter a number ofseconds.IKE Diffie-HellmanGroupSelect the IKE Diffie-Hellman Group to be used in the generation of the IKEencryption key from the following:[DH1], [DH2]Pre-Shared Key Specify the PSK (Pre-Shared Key) to be used for authentication of acommunicating device. Can contain up to 32 characters.Key Perfect ForwardSecrecySelect whether to enable or disable PFS (Perfect Forward Secrecy).Configuring the IPsec Settings195](https://usermanual.wiki/Ricoh/MFSP311SFNW1/User-Guide-1915829-Page-197.png)
![Printing Lists/ReportsClick [Print List/Report] to display the page for printing reports. Then, select an item and click [Print] toprint out information for that item.Print List/ReportItem DescriptionConfiguration Page Prints general information about the machine and its current configuration.Fax Journal Prints a fax transmission and reception journal for the last 50 jobs. Fordetails about automatic fax journal printing, see page 142 "Fax FeaturesSettings".Fax TX Standby File List Prints a list of fax jobs remaining in the machine's memory to be printed,sent, or forwarded.Quick Dial DestinationListPrints a list of Quick Dial entries.Fax Speed DialDestination ListPrints a list of Speed Dial entries.Scanner Destination List Prints a list of scan destinations.Scanner Journal Prints a scanner journal for the last 100 Scan to E-mail, Scan to FTP, andScan to Folder transmissions.Maintenance Page Prints the maintenance page.• Reports cannot be printed via Web Image Monitor if other jobs are printing. Before printingreports, confirm that machine is not printing.•Reports will be printed on A4 or Letter size paper. Load one of these sizes of paper into the traybefore printing reports.8. Configuring the Machine Using Utilities196](https://usermanual.wiki/Ricoh/MFSP311SFNW1/User-Guide-1915829-Page-198.png)
![Configuring the Administrator SettingsClick [Administrator Tools] to display the page for configuring the administrator settings.This page contains the following tabs: [Administrator], [Reset Settings], [Backup Setting], [RestoreSetting], [Set Date/Time], and [Energy Saver Mode].Administrator TabAdministrator SettingsItem DescriptionNew Password Enter the new administrator password. Can contain up to 16 characters.Confirm New Password Enter the same password again, to confirm.Rest Settings TabReset SettingsItem DescriptionReset Network Settings Select to restore the following settings to their defaults:•Settings under [Network Settings]• Settings under the [Administrator] tab of [Administrator Tools]Reset Menu Settings Select to restore the settings other than the following to their defaults:• Network settings• Scan destinations• User restriction settings• Fax destinations• IPsec settings• [Printer Registration], [Low Humidity Mode], and [Image Density]settings under system settings of the control panel setting menuClear Scan Destination Select to clear the scan destinations.Clear Address Book Select to clear the fax destinations.Reset IPsec Settings Select to clear the IPsec settings.Configuring the Administrator Settings197](https://usermanual.wiki/Ricoh/MFSP311SFNW1/User-Guide-1915829-Page-199.png)
![• [Reset IPsec Settings] appears only when the administrator password is specified.Backup Setting Tab• When sending the machine for repair, it is important that you create backup files in advance. Themachine's settings are returned to the default after repair.Backup SettingItem DescriptionBack up NetworkSettingsBacks up the following settings to a file:•Settings under [Network Settings]• Settings under the [Administrator] tab of [Administrator Tools]Note that, however, [Max. E-mail Size] setting under [NetworkApplication] will not be backed up here; it will be backed up by [Back upMenu Settings] instead.Back up Menu Settings Backs up the settings other than the following to a file:•Network settings• Scan destinations• User restriction settings• Fax destinations• IPsec settings• [Printer Registration], [Low Humidity Mode], and [Image Density]settings under system settings of the control panel setting menuBack up ScanDestinationBacks up scan destinations to a file.Back up Address Book Backs up fax destinations to a file.Back up IPsec Settings Backs up the IPsec settings to a file.Follow the procedure below to create configuration backup files.1. Select the radio button for the type of data you wish to back up.2. Enter the administrator password if required.3. Click [OK].8. Configuring the Machine Using Utilities198](https://usermanual.wiki/Ricoh/MFSP311SFNW1/User-Guide-1915829-Page-200.png)
![4. Click [Save] in the confirmation dialog box.5. Navigate to the location to save the backup file.6. Specify a name for the file, and click [Save].• [Back up IPsec Settings] appears only when the administrator password is specified.Restore Setting Tab• When the machine is returned from repair, it is important that you restore the machine's settingsfrom the backup files. The machine's settings are returned to the default after repair.Restore SettingItem DescriptionFile to Restore Enter the path and name of the file to restore, or click [Browse...] to selectthe file.Follow the procedure below to restore configuration backup files.1. Click [Browse...].2. Navigate to the directory containing the backup file to restore.3. Select the backup file, and click [Open].4. Enter the administrator password if required.5. Click [OK].• If the settings are not restored successfully, an error message appears. Try again to restore the filecompletely.Set Date/Time TabSet DateItem DescriptionYear Enter the current year (2000 to 2099).Month Enter the current month (1 to 12).Configuring the Administrator Settings199](https://usermanual.wiki/Ricoh/MFSP311SFNW1/User-Guide-1915829-Page-201.png)
![Item DescriptionDay Enter the current day (1 to 31).Date Format Select the date format from [MM/DD/YYYY], [DD/MM/YYYY], or[YYYY/MM/DD].Set TimeItem DescriptionTime Format Select 24- or 12-hour time format.Time (AM/PM) Select [AM] or [PM] if 12-hour time format is selected.hour (0-23) Enter the current hour if 24-hour time format is selected (0-23).hour (1-12) Enter the current hour if 12-hour time format is selected (1-12).min. (0-59) Enter the current minute (0-59).Energy Saver Mode TabEnergy Saver ModeItem DescriptionEnergy Saver Mode 1 Select [Active] to set the machine to enter Energy Saver mode 1 if themachine has been idle for about 30 seconds.It takes less time to recover from Energy Saver mode 1 than from power-offstate or Energy Saver mode 2, but power consumption is higher in EnergySaver mode 1 than in Energy Saver mode 2.Energy Saver Mode 2 Select [Active] to set the machine to enter Energy Saver mode 2 after theperiod of time specified for [Waiting Time (1-240)] is passed (1 to 240minutes).The machine consumes less power in Energy Saver mode 2 than in EnergySaver mode 1, but it takes longer to recover from Energy Saver mode 2than from Energy Saver mode 1.• The machine recovers from Energy Saver mode when it receives a print job, prints a received fax,or when the [Copy] or [Start] key is pressed.8. Configuring the Machine Using Utilities200](https://usermanual.wiki/Ricoh/MFSP311SFNW1/User-Guide-1915829-Page-202.png)
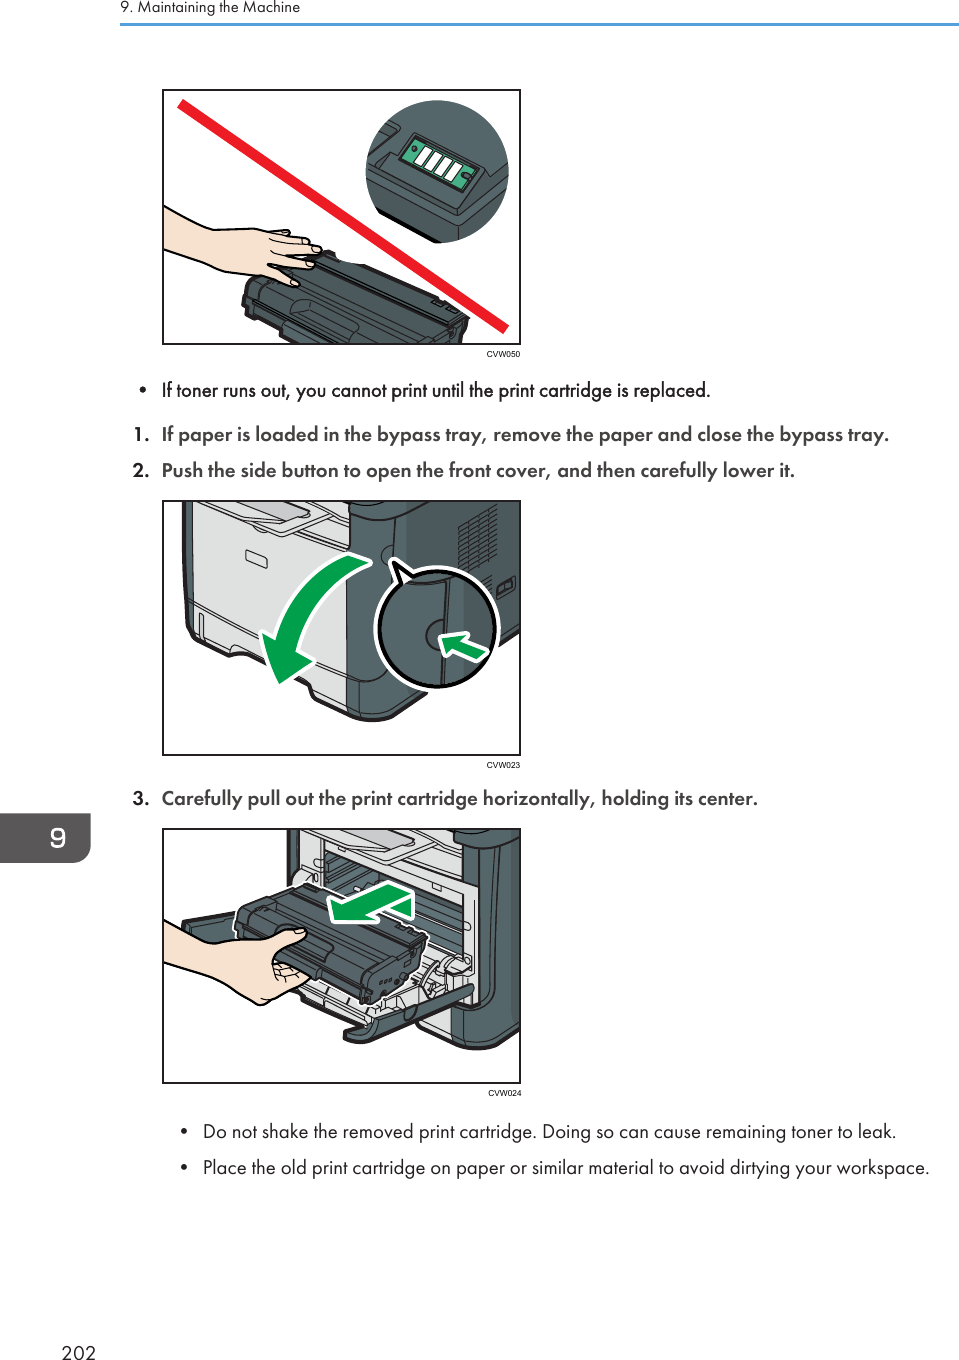
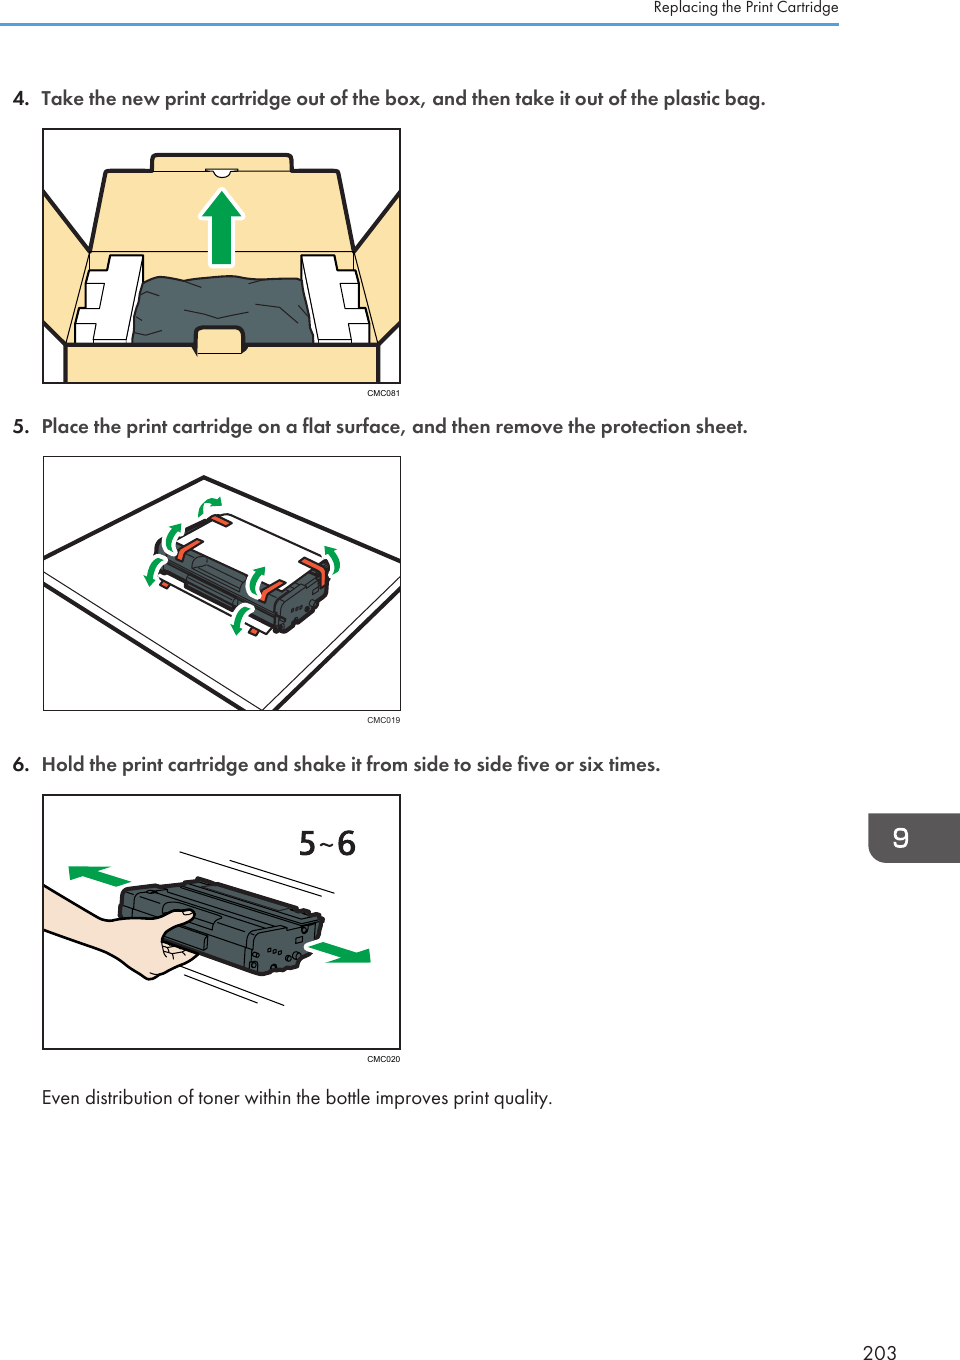
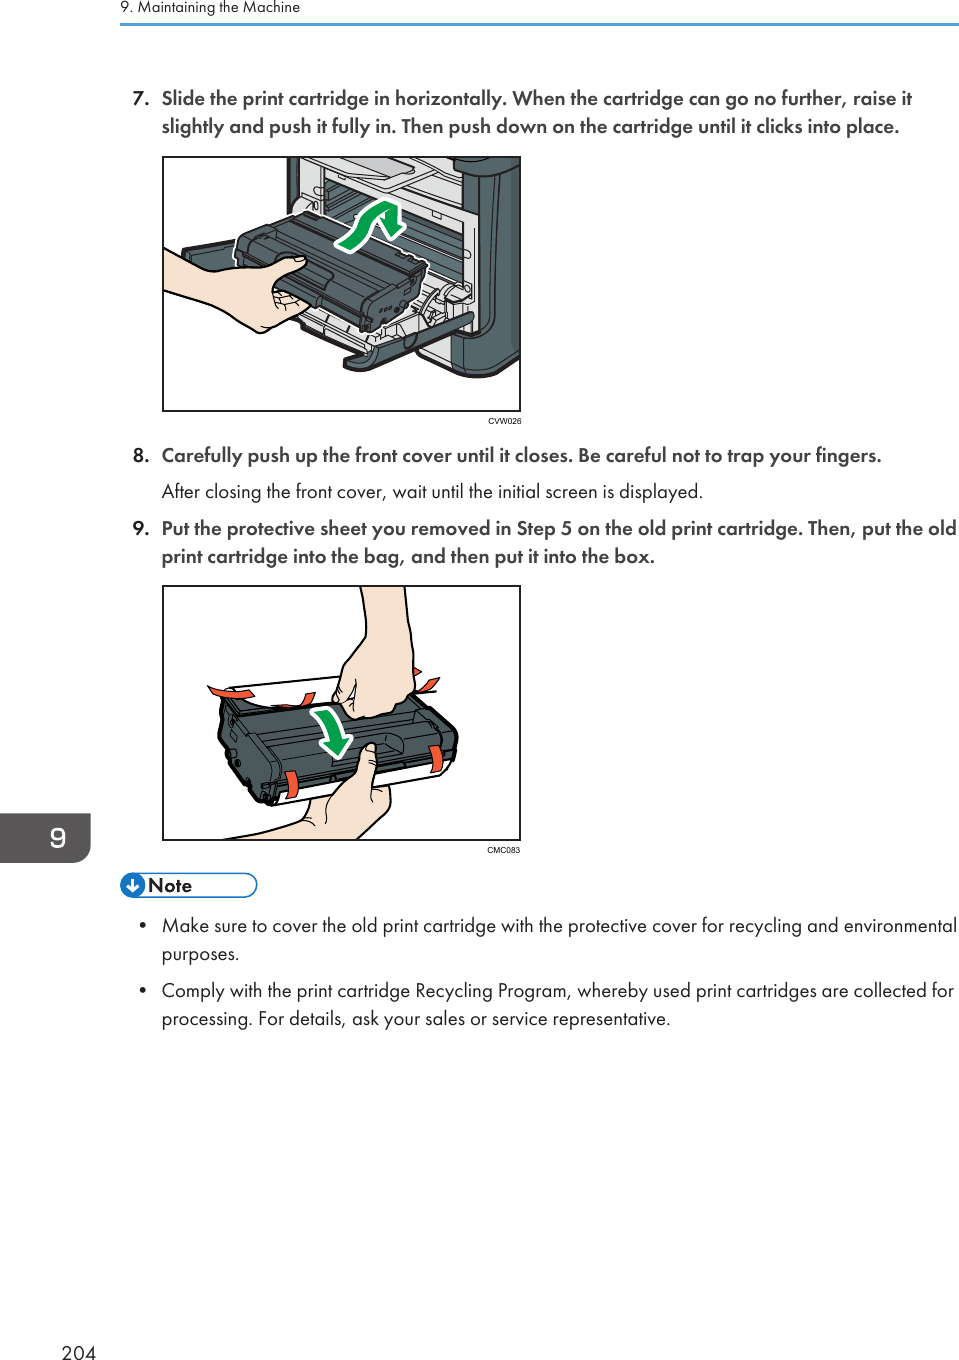
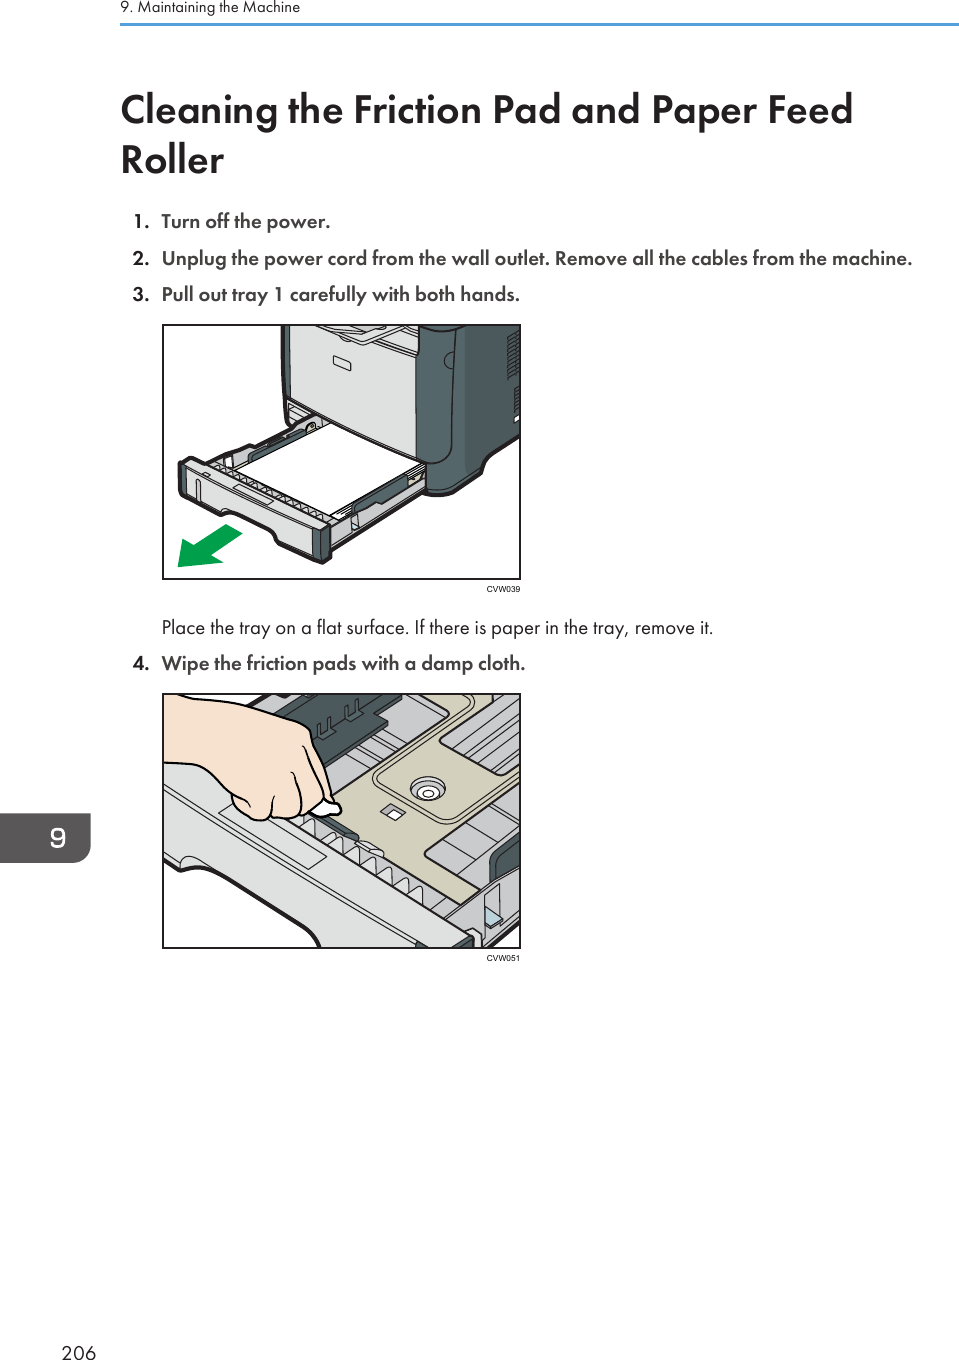
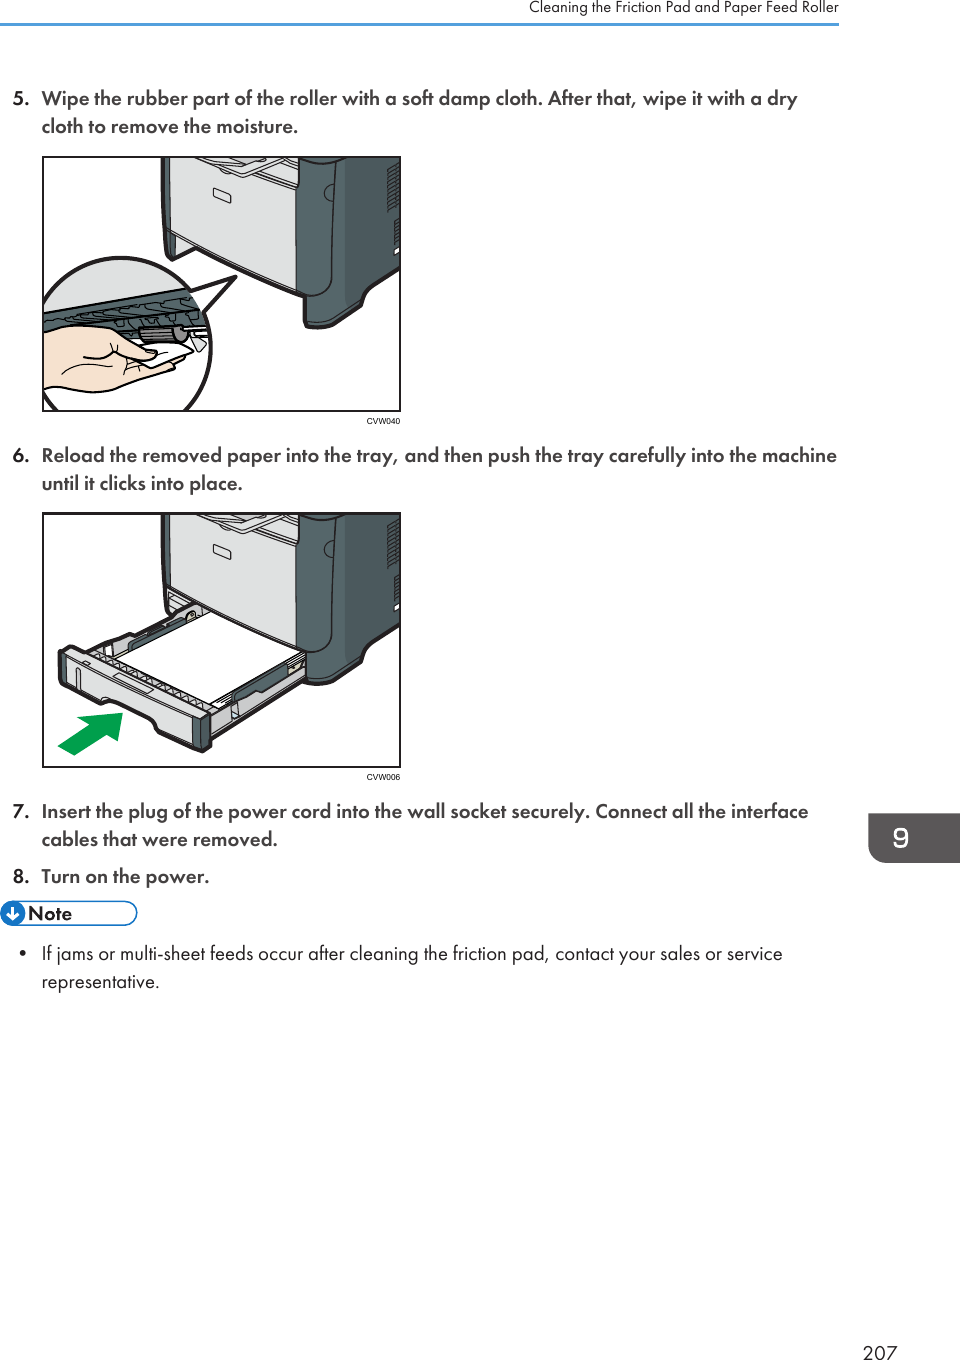
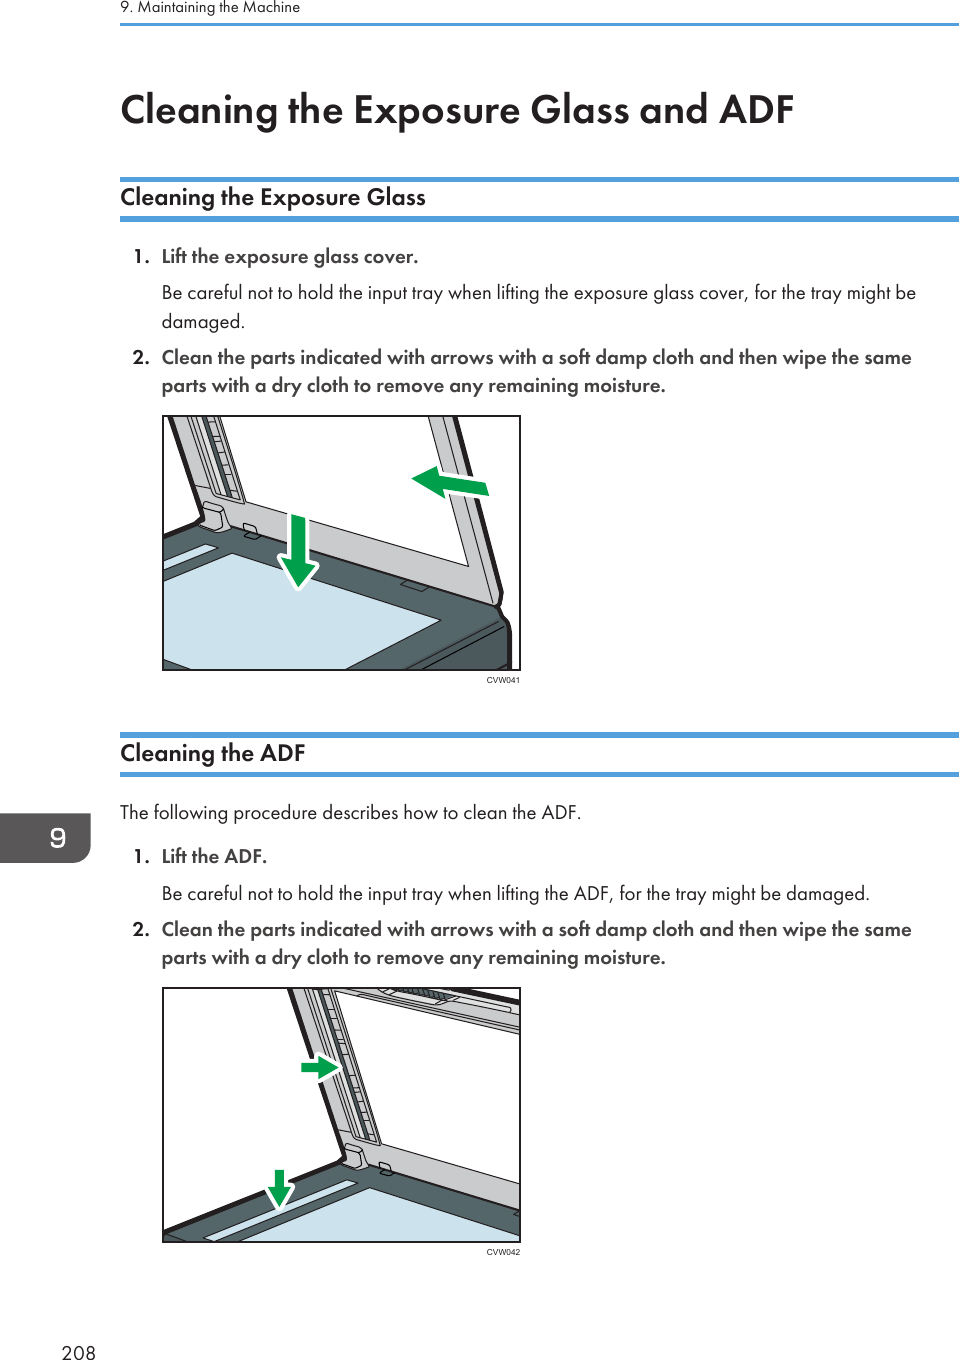
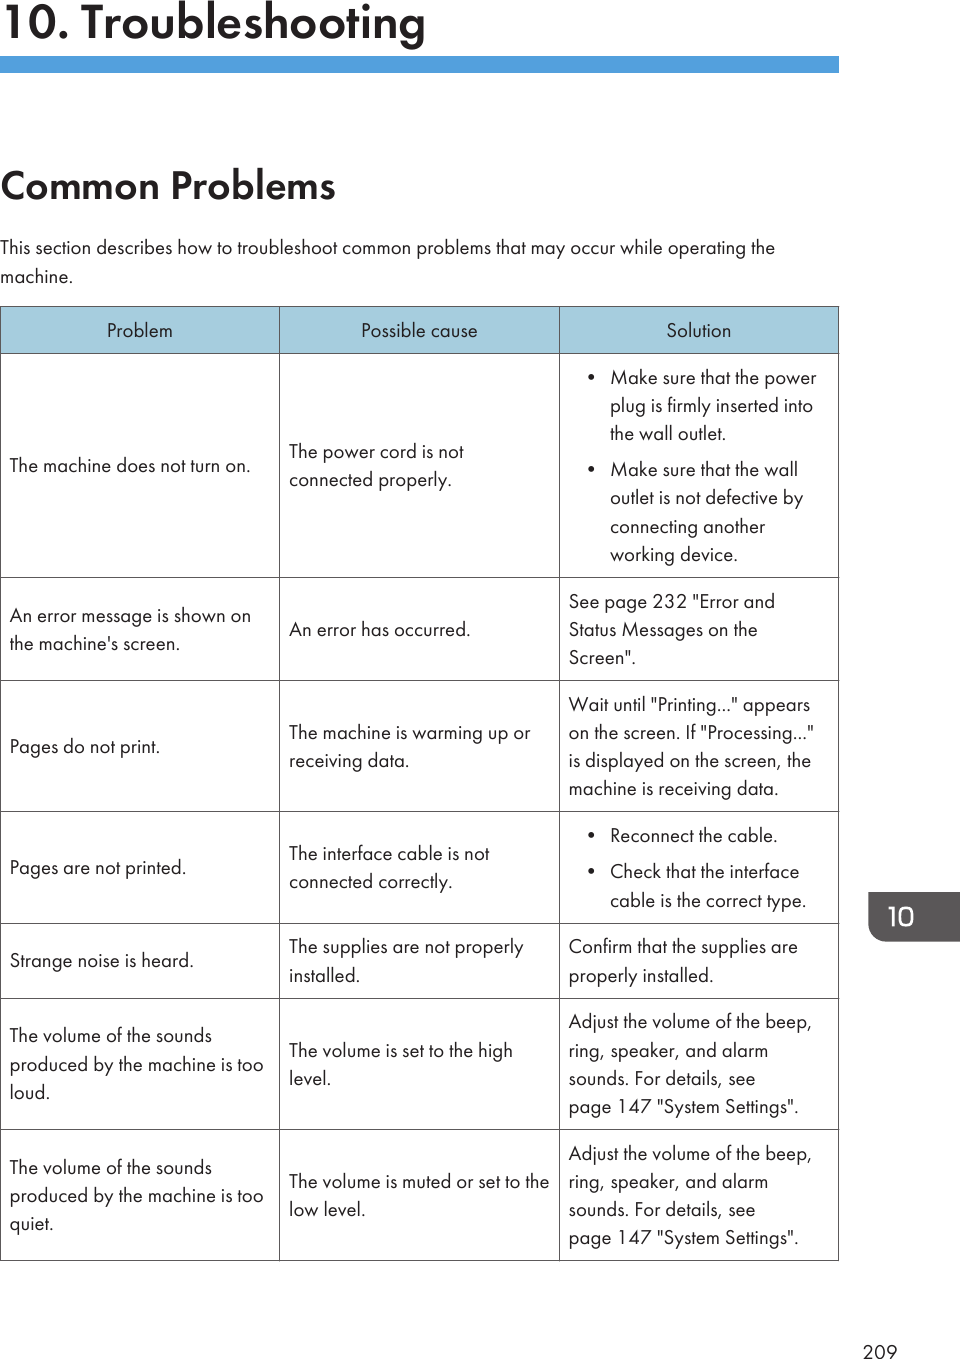
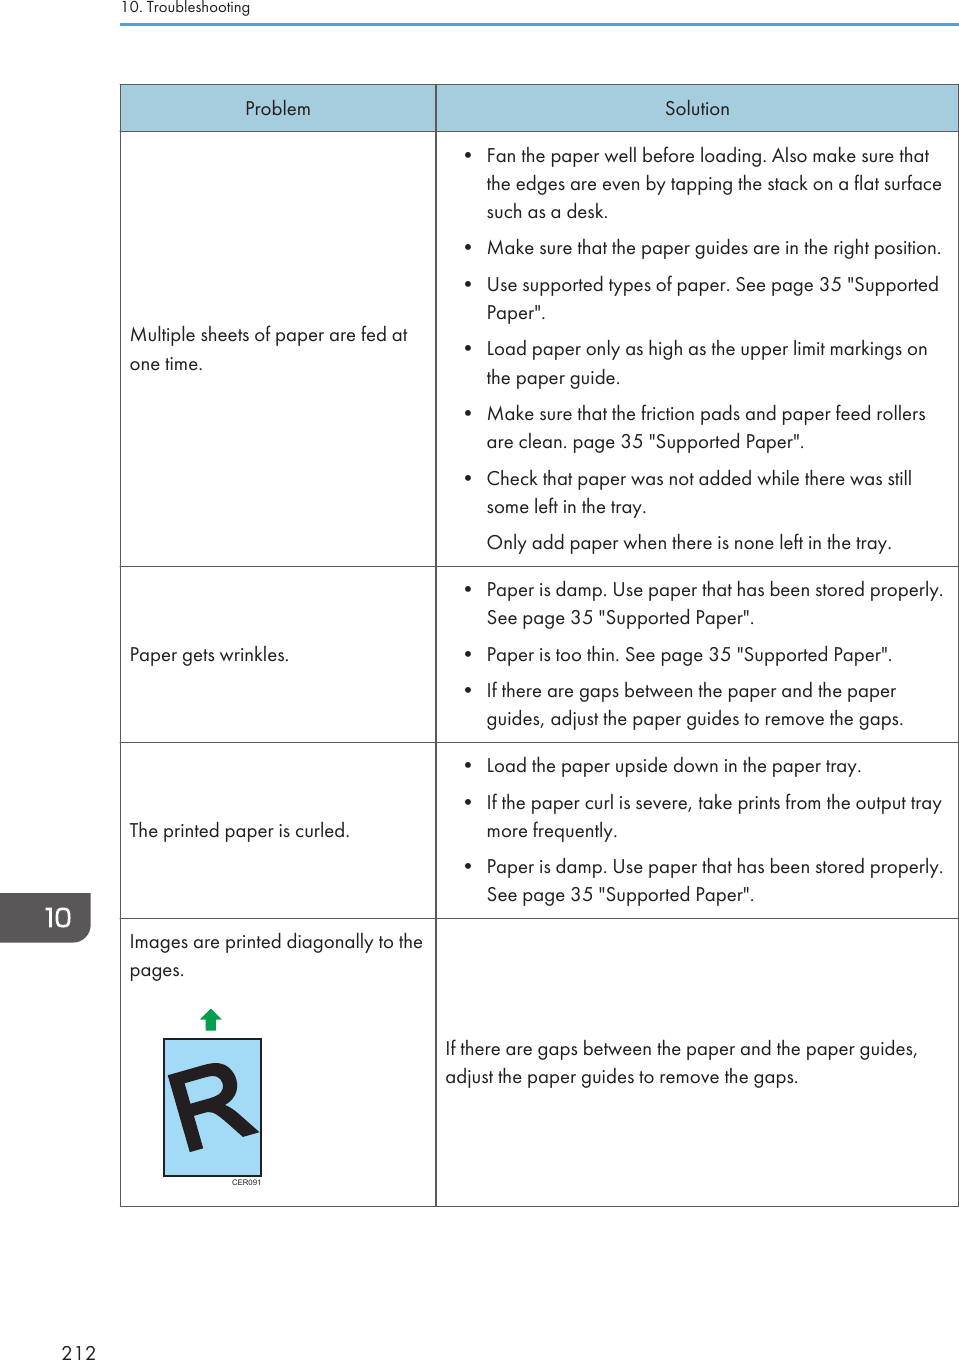
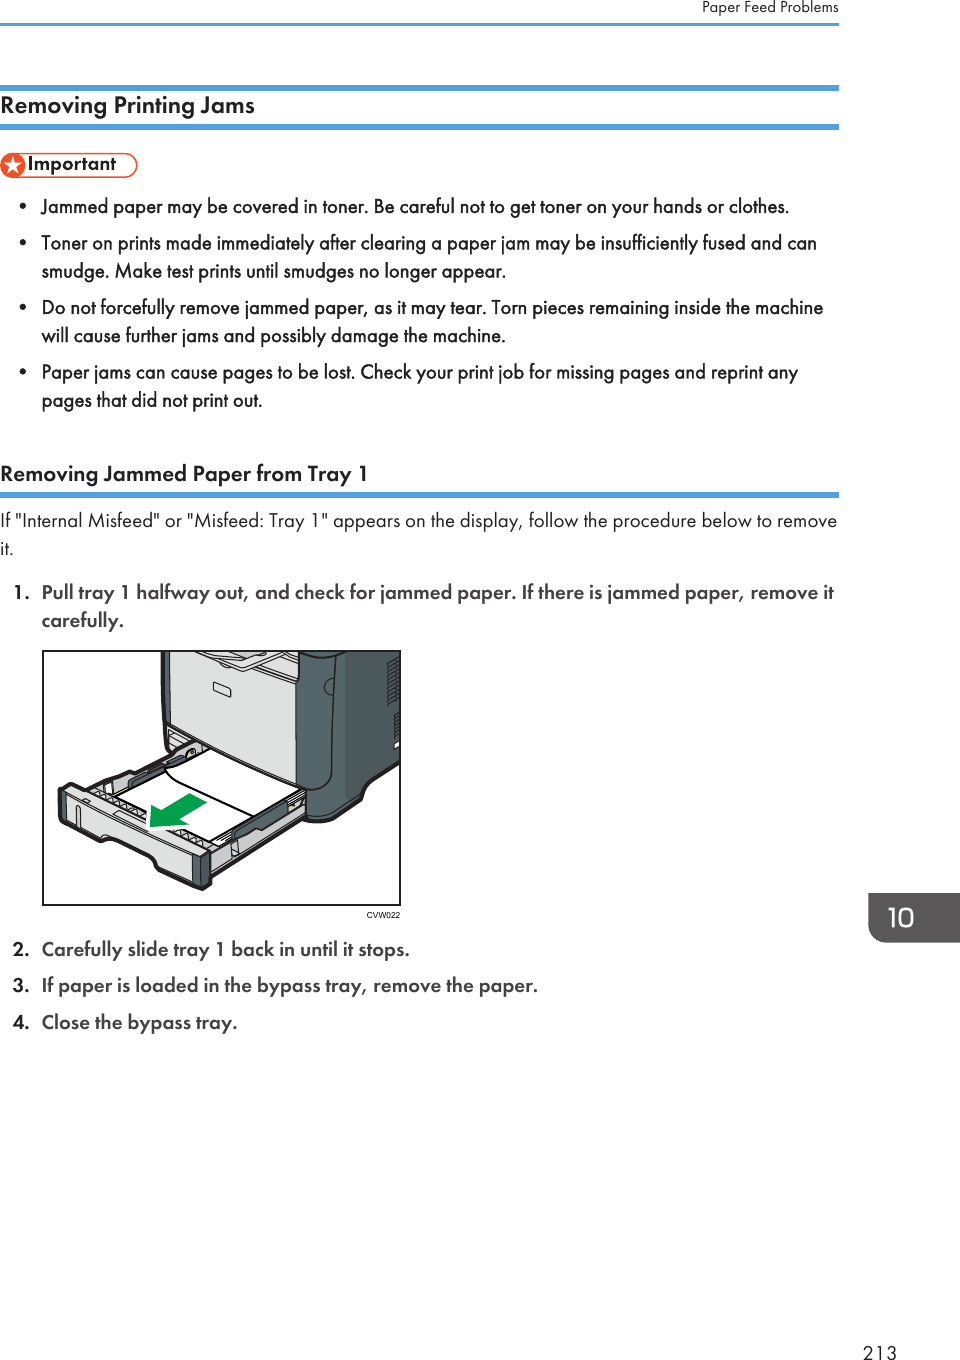
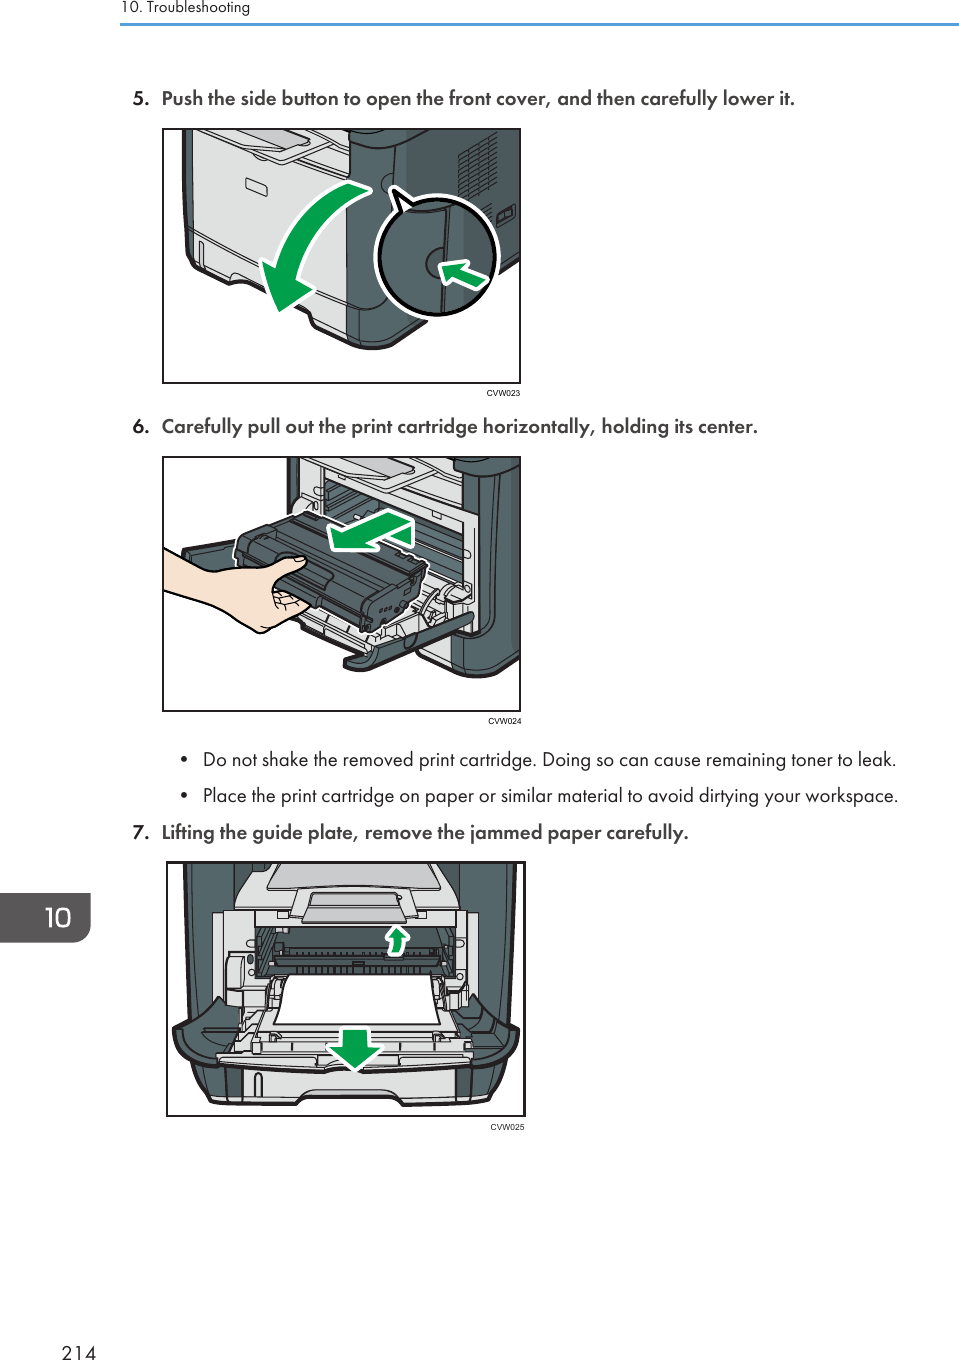
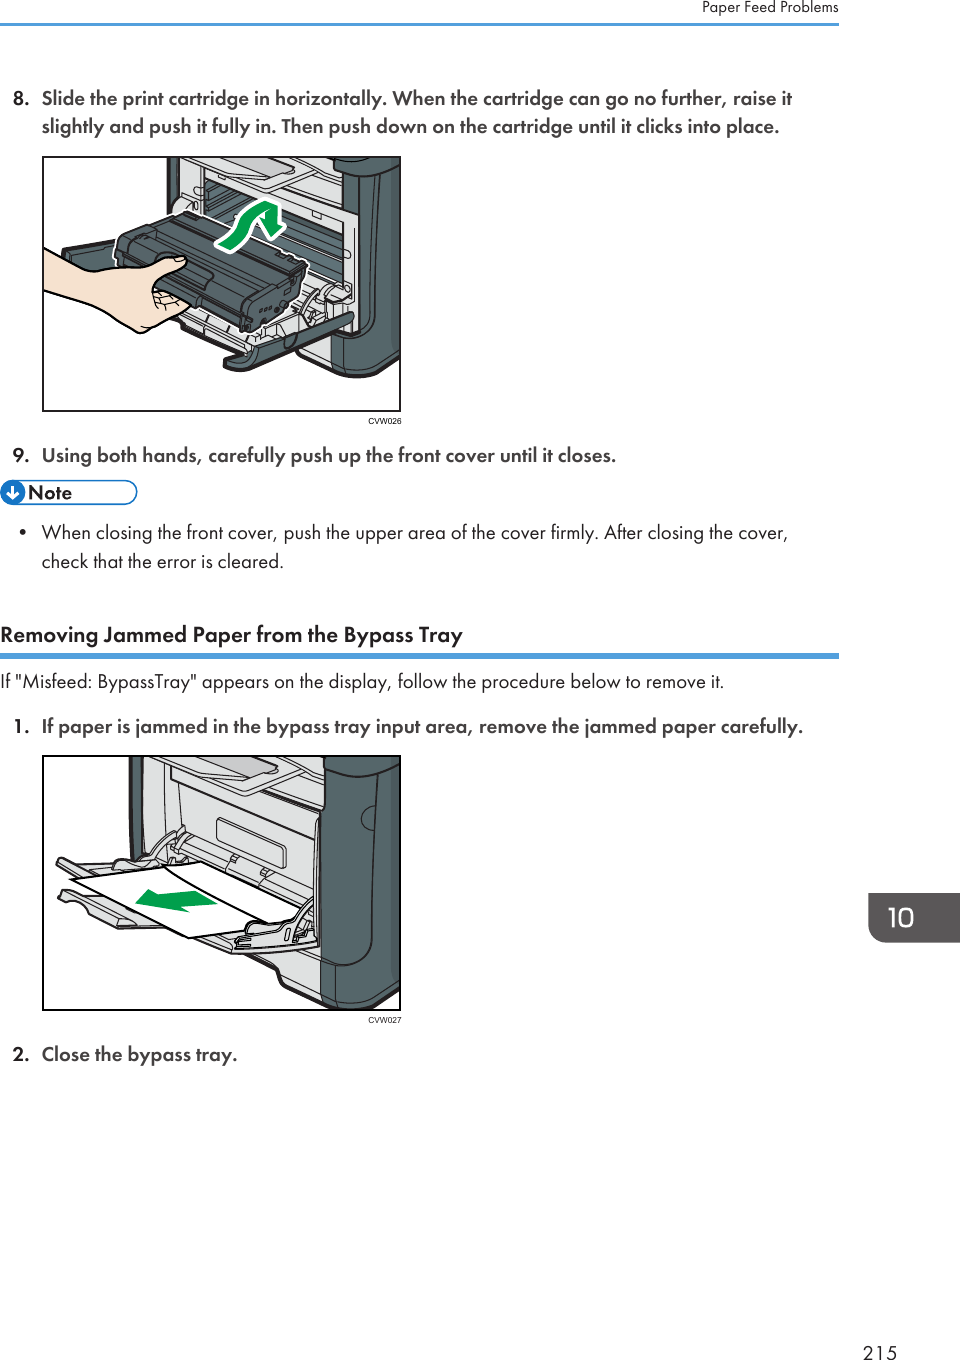

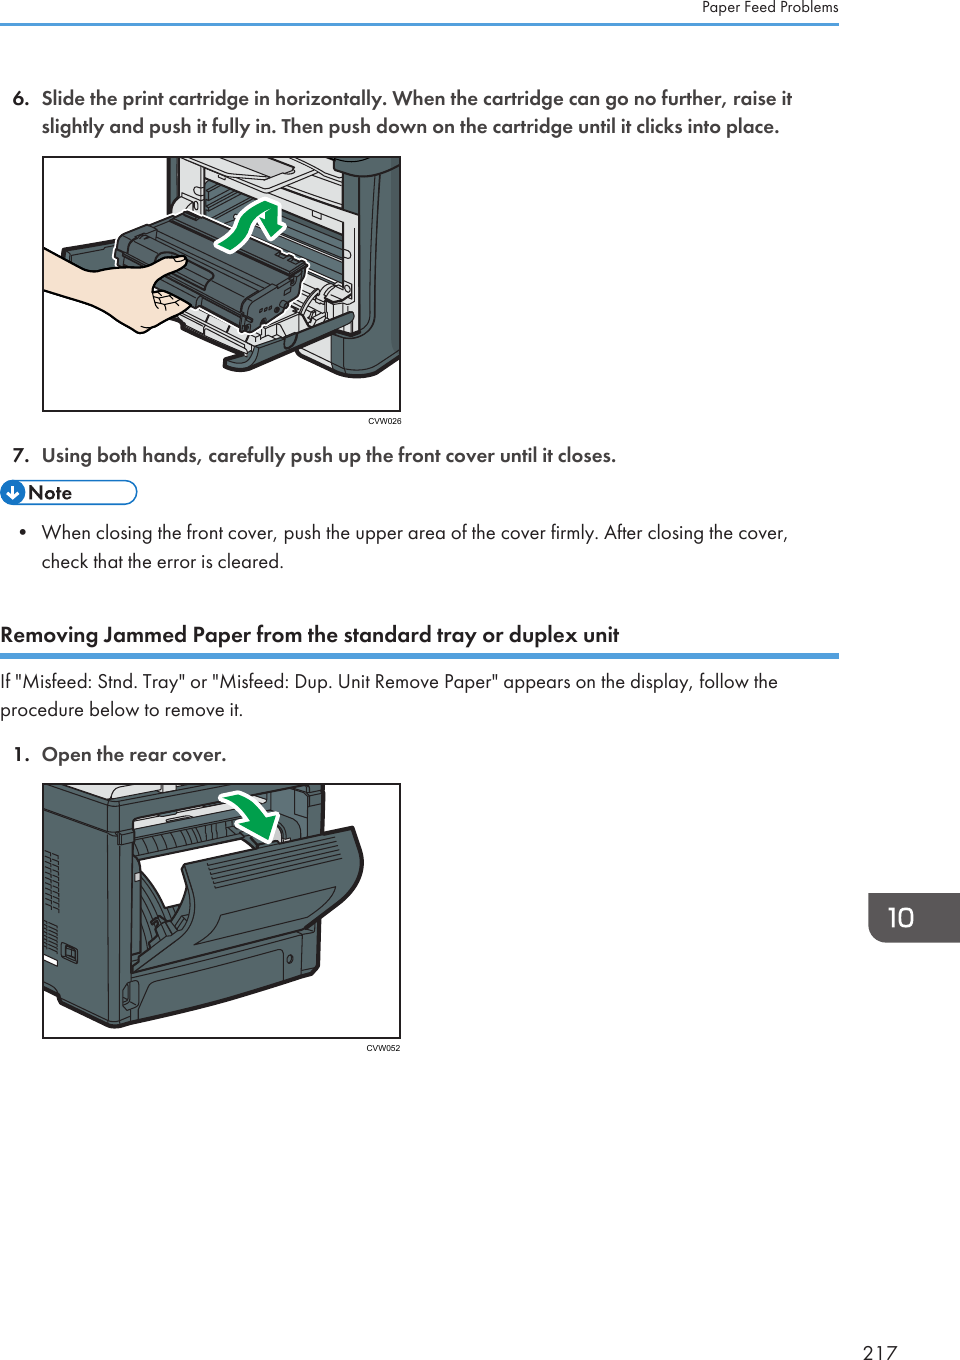
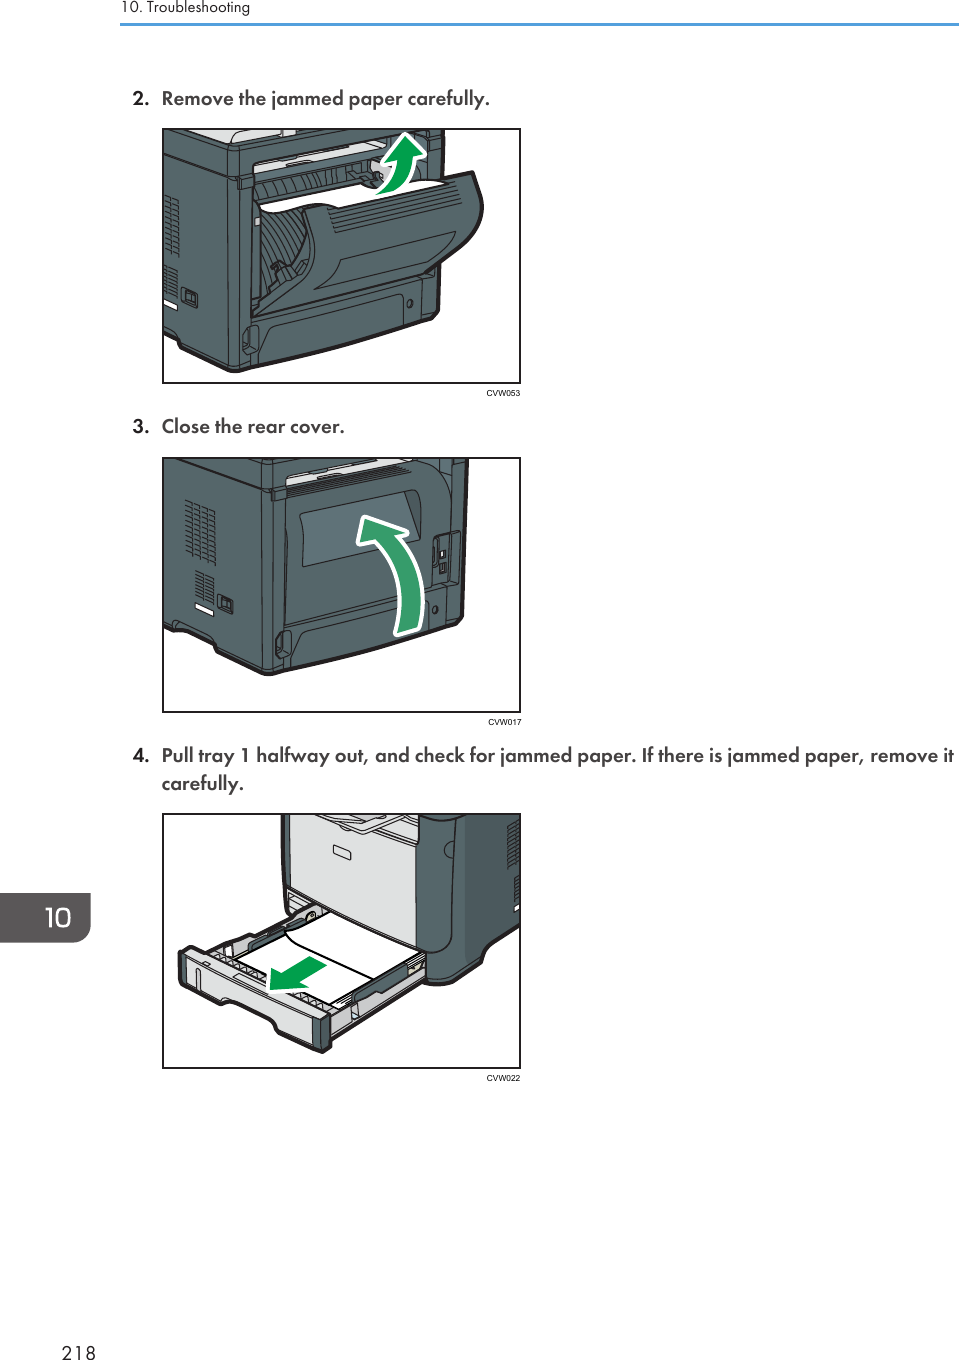
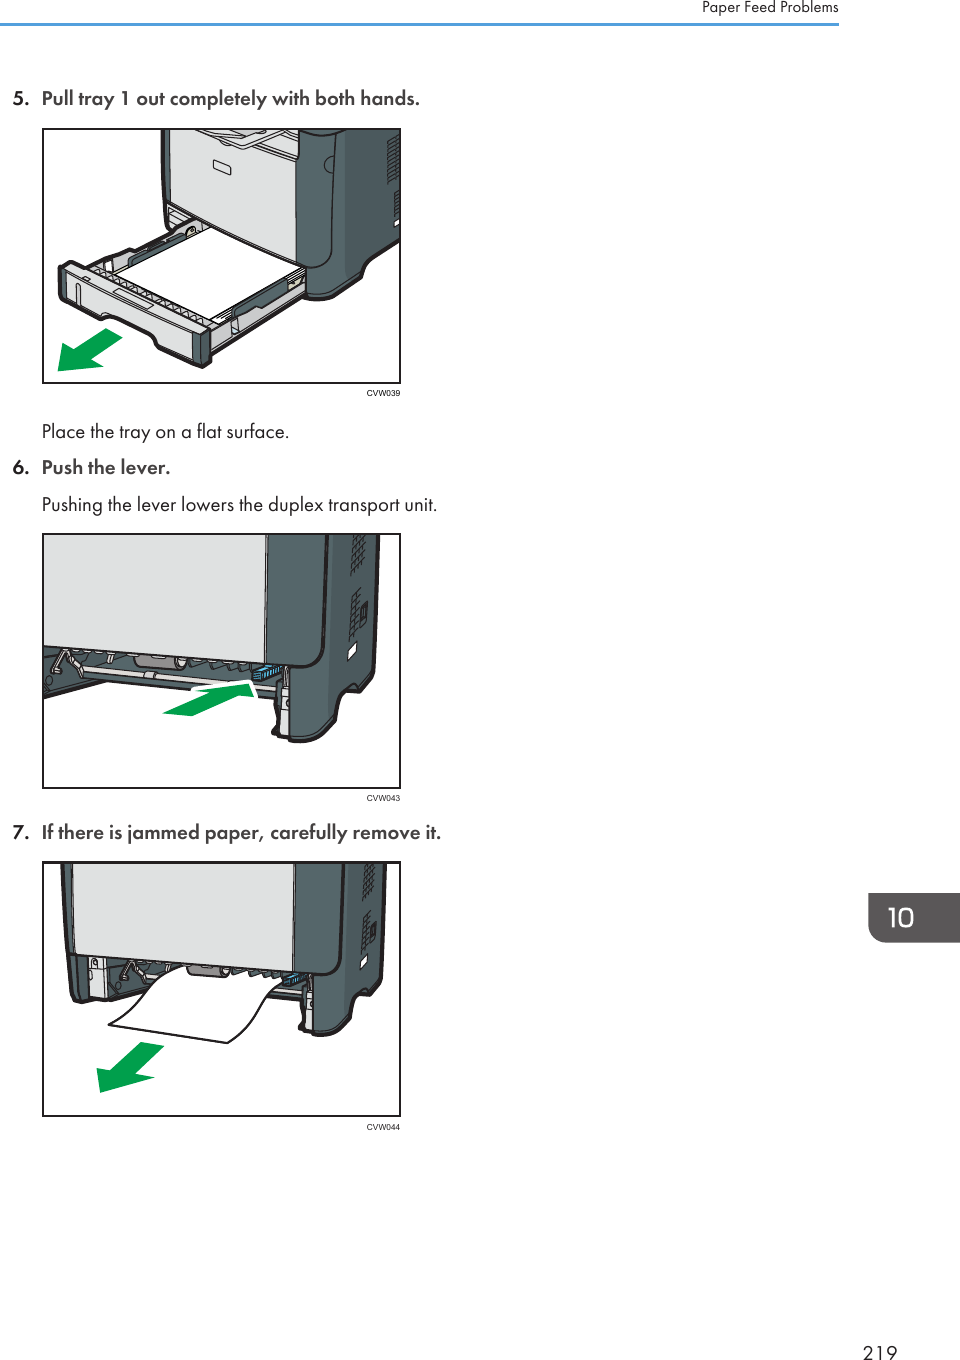
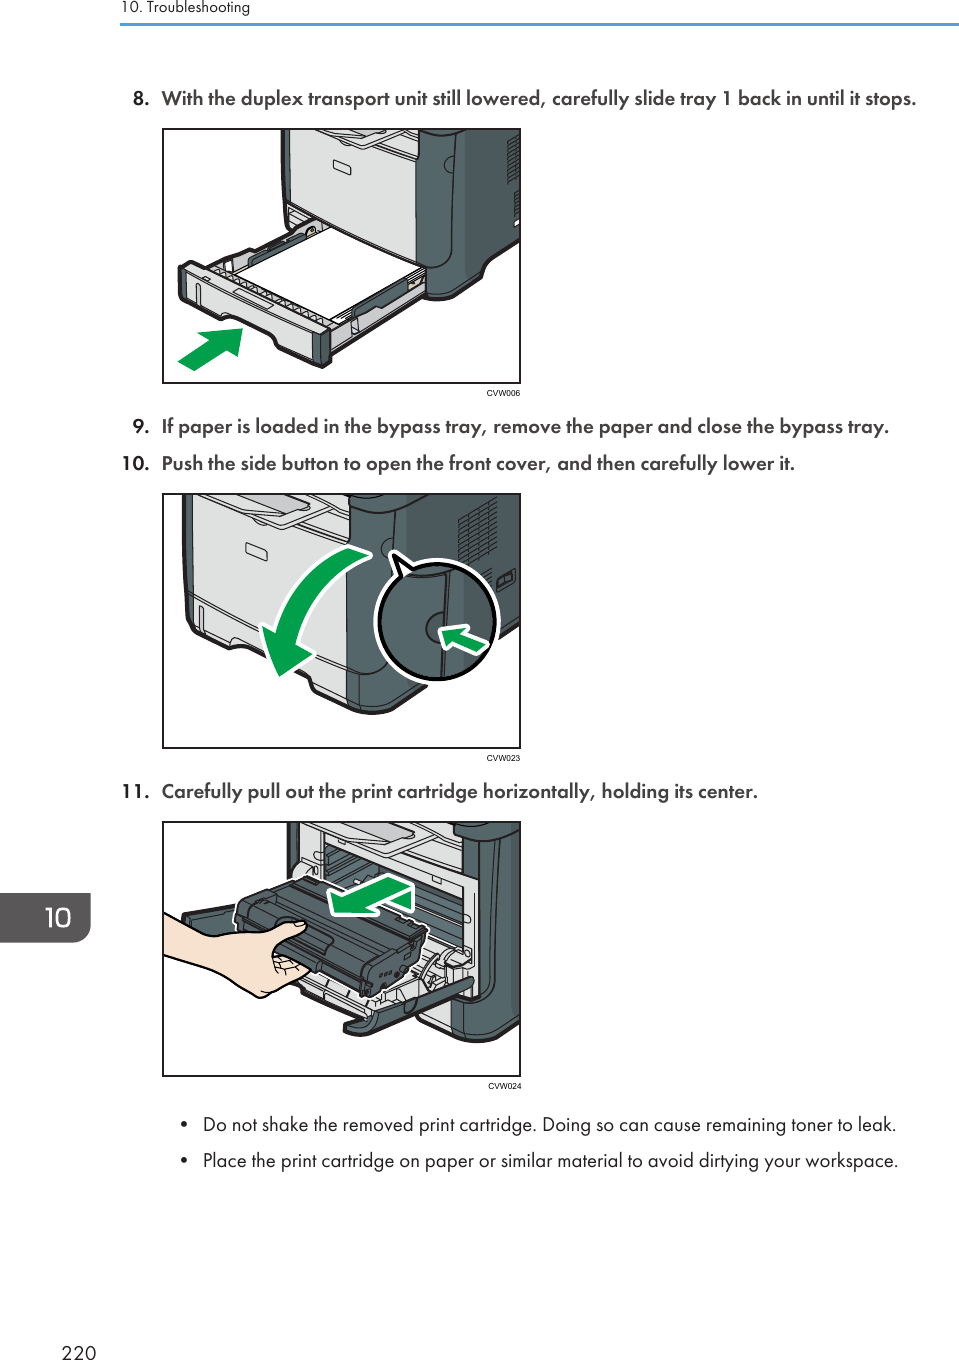
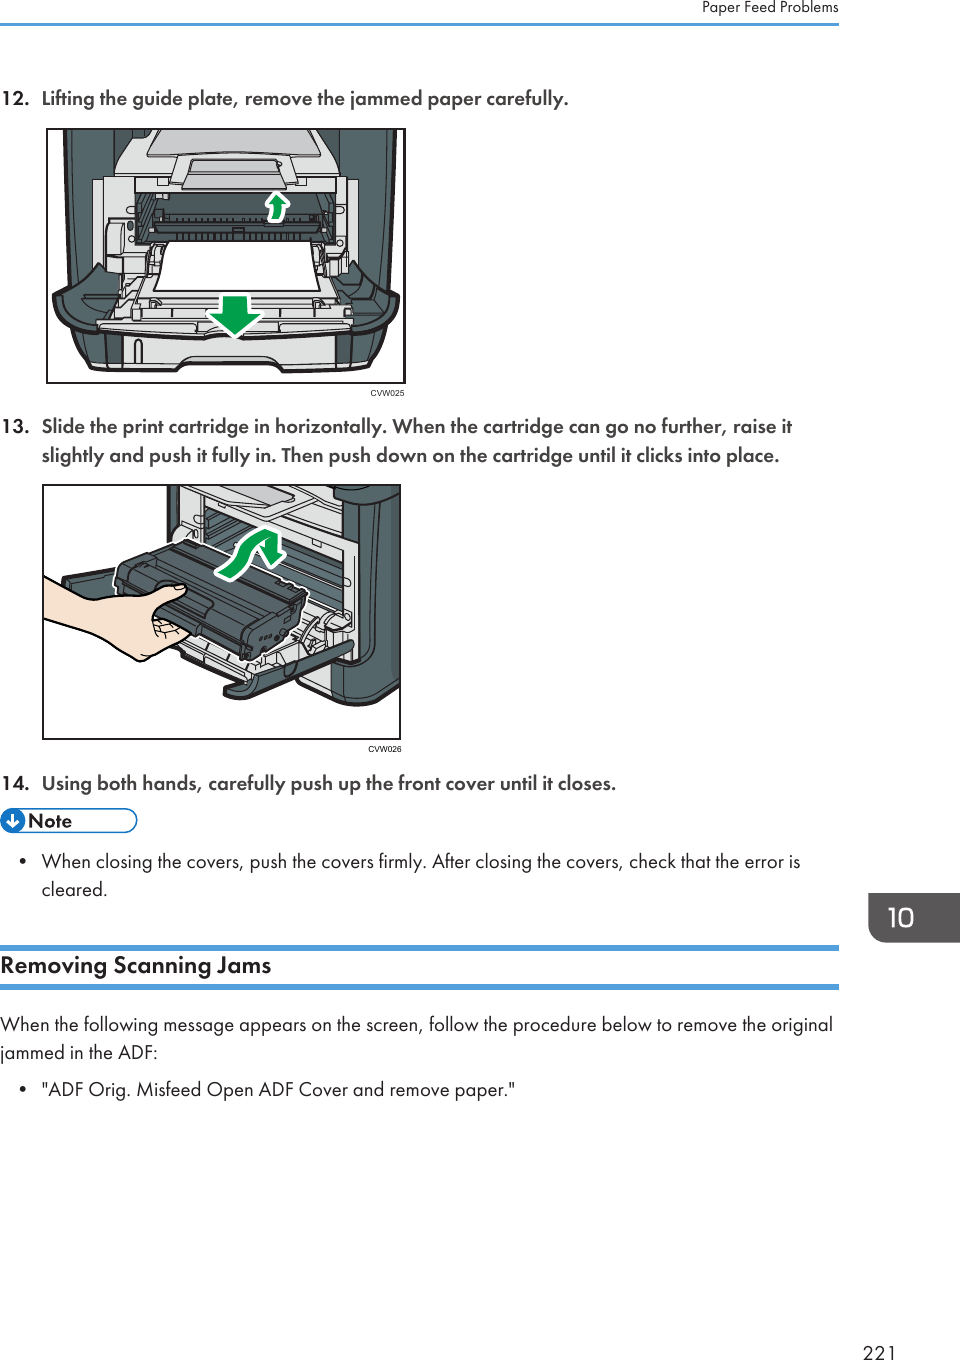
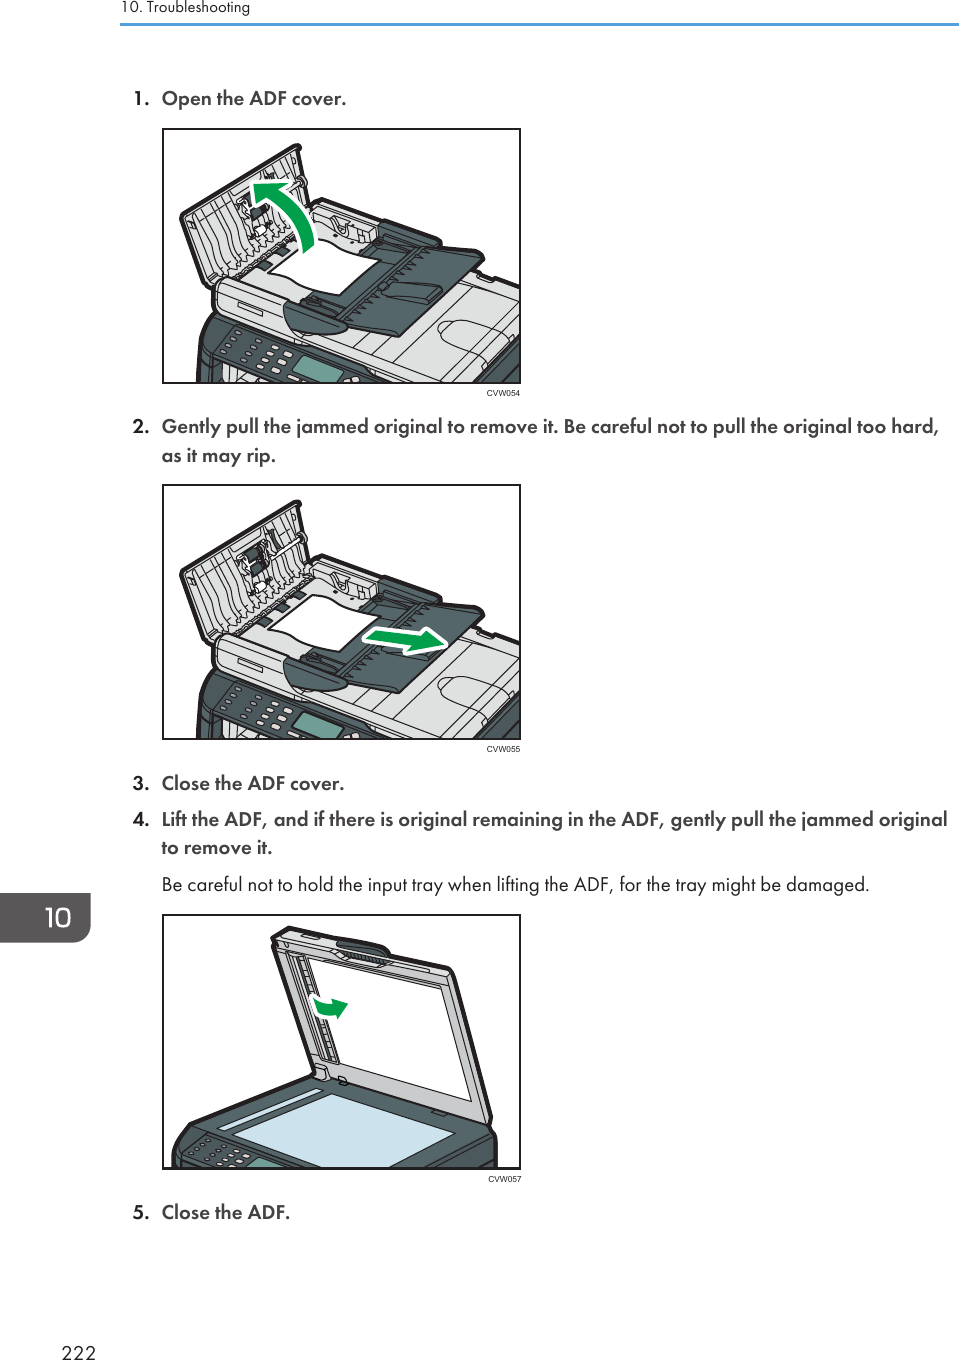
![Print Quality ProblemsChecking the Condition of the MachineIf there is a problem with the quality of printing, first check the condition of the machine.Possible Cause SolutionThere is a problem with themachine's location.Make sure that the machine is on a level surface. Place themachine where it will not be subject to vibration or shock.Unsupported types of paper is used. Make sure that the paper being used is supported by themachine. See page 35 "Supported Paper".The paper type setting is incorrect.Make sure that the paper type setting of the printer drivermatches the type of paper loaded. See page 35 "SupportedPaper".A non-genuine print cartridge isbeing used.Refilled or non-genuine print cartridge reduces print qualityand can cause malfunctions. Use genuine print cartridge only.See page 251 "Consumables".An old print cartridge is being used. Print cartridge should be opened before their expiration dateand used within six months of being opened.The machine is dirty. See page 201 "Maintaining the Machine", and clean themachine as required.Humidity level surrounding themachine may be too low.Using the machine in a room where humidity level is too lowmay cause black lines of a few millimeters thick to appear onprintouts with 75-millimeter spaces in between. In this case, set[Low Humidity Mode] to [On].For details about how to configure the settings, see page 147"System Settings".Print Quality Problems223](https://usermanual.wiki/Ricoh/MFSP311SFNW1/User-Guide-1915829-Page-225.png)
![Printer ProblemsThis section describes printing problems and possible solutions.Problem SolutionAn error occurs.If an error occurs when printing, change the computer orprinter driver settings.•Check the printer icon name does not exceed 32alphanumeric characters. If it does, shorten it.• Check whether other applications are operating.Close any other applications, as they may be interferingwith printing. If the problem is not resolved, closeunneeded processes too.• Check that the latest printer driver is being used.A print job is canceled. Set [I/O Timeout] to a larger value than the current setting.There is considerable delay betweenthe print start command and actualprinting.• Processing time depends on data volume. High volumedata, such as graphics-heavy documents, take longer toprocess.•To speed up printing, reduce the printing resolution usingthe printer driver. For details, see the printer driver Help.Prints fall in front of the machinewhen they are output.Raise the stop fence. See "Loading Paper", Quick InstallationGuide.Prints do not stack properly.• Paper is damp. Use paper that has been stored properly.See page 35 "Supported Paper".•Raise the stop fence. See "Unpacking", Quick InstallationGuide.The whole printout is blurred.• Paper is damp. Use paper that has been stored properly.See page 35 "Supported Paper".• If you enable [Toner Saving], printing is generally lessdense.• Toner is almost depleted. Replace the print cartridge.• Condensation may have collected. If rapid change intemperature or humidity occurs, use this machine onlyafter it has acclimatized.10. Troubleshooting224](https://usermanual.wiki/Ricoh/MFSP311SFNW1/User-Guide-1915829-Page-226.png)
![Copier ProblemsProblem SolutionPhotocopied pages are not incorrect order.On the control panel, change the [Sort] setting under copysettings to collate pages as you require. For details about[Sort], see page 134 "Copier Features Settings".Photocopied paper is blank.The original is not set correctly.When using the exposure glass, place originals copy sidedown. When using the ADF, place them copy side up. Seepage 51 "Placing Originals".The wrong original was copied. If copying from the exposure glass, make sure that there areno originals in the ADF.Copied pages are too dark or toolight.Adjust the image density. See page 93 "Specifying the ScanSettings".Copied pages do not look the sameas the originals.Select the correct scan mode according to the type of original.See page 78 "Specifying the Scan Settings".Black spots appear whenphotocopying a photographic print.The original may have stuck to the exposure glass due to highhumidity.Place the original on the exposure glass, and then place twoor three sheets of white paper on top of it. Leave the ADF openwhen copying.A moire pattern is produced. The original probably has heavily lined or dotted areas.Switching the setting for image quality between [Photo] and[Mixed] may eliminate the moire pattern.See page 93 "Specifying the Scan Settings".10. Troubleshooting226](https://usermanual.wiki/Ricoh/MFSP311SFNW1/User-Guide-1915829-Page-228.png)

![Fax ProblemsWhen an error code appears on the fax journal or transmission status reportThe table below describes the meaning of error codes that appear under "Results" on the faxjournal or transmission status report, and what to do when a particular error code appears."X" indicates a number in an error code that appear differently depending on a specific situation.Error Code Solution1XXX11An original has been jammed inside the ADF while sending afax in Immediate Transmission mode.•Remove jammed originals, and then place them again.See page 211 "Paper Feed Problems".• Check the originals are suitable for scanning. Seepage 51 "Placing Originals".1XXX21The line could not be connected correctly.•Confirm that the telephone line is properly connected tothe machine.• Disconnect the telephone line from the machine, andconnect a standard telephone in its place. Confirm thatyou can make calls using the telephone. If you cannotmake calls this way, contact your telephone company.• If the problem persists, contact your sales or servicerepresentative.1XXX22 to 1XXX23Dial fails when trying to send faxes.• Confirm that the fax number you dialed is correct.• Confirm that the destination is a fax machine.• Confirm that the line is not busy.• You may need to insert a pause between dial digits. Pressthe [Pause/Redial] key after, for example, the area code.• Confirm that [PSTN / PBX] under [Admin. Tools] is setproperly for your connection method to the telephonenetwork. See page 166 "Administrator Settings".Fax Problems229](https://usermanual.wiki/Ricoh/MFSP311SFNW1/User-Guide-1915829-Page-231.png)
![Error Code Solution1XXX32 to 1XXX84An error occurred while sending a fax.•Confirm that the telephone line is properly connected tothe machine.• Disconnect the telephone line from the machine, andconnect a standard telephone in its place. Confirm thatyou can make calls using the telephone. If you cannotmake calls this way, contact your telephone company.• If the problem persists, contact your sales or servicerepresentative.2XXX14The machine was not able to print the received fax, or themachine's memory reached capacity while receiving a faxbecause the document was too large.•The paper tray was empty. Load paper in the paper tray.See page 41 "Loading Paper".• The paper tray did not contain A4, Letter, or Legal sizepaper. Load valid size paper in the tray, and configurethe paper size settings under [System Settings]accordingly.• A cover or tray was open. Close the cover or tray.• There was a paper jam. Remove the jammed paper. Seepage 211 "Paper Feed Problems".• A print cartridge was empty. Replace the print cartridge.See page 201 "Replacing the Print Cartridge".• The received fax was too large. Ask the sender to re-sendthe document in parts as several smaller individual faxes,or to send at a lower resolution.2XXX32 to 2XXX84An error occurred while receiving a fax.• Confirm that the telephone line is properly connected tothe machine.• Disconnect the telephone line from the machine, andconnect a standard telephone in its place. Confirm thatyou can make calls using the telephone. If you cannotmake calls this way, contact your telephone company.• If the problem persists, contact your sales or servicerepresentative.10. Troubleshooting230](https://usermanual.wiki/Ricoh/MFSP311SFNW1/User-Guide-1915829-Page-232.png)
![When other problems occurThe table below describes how to troubleshoot problems that do not produce an error code.Problem SolutionCannot send faxes.• See the solutions provided for errors 1XXX32 to 1XXX84in the above table.•The machine cannot accept a new fax job because thereare 5 unsent faxes in memory already. Wait until any ofthose faxes is transmitted completely, or use the [DeleteTX Standby File] function to delete unnecessary faxes. Fordetails, see page 142 "Fax Features Settings".Cannot receive faxes. See the solutions provided for errors 2XXX32 to 2XXX84 in theabove table.Cannot receive faxes even whensending them is possible.• A print cartridge is empty. Replace the print cartridge.See page 201 "Replacing the Print Cartridge".•The paper tray is empty. Load paper in the paper tray.See page 41 "Loading Paper".• If fax reception mode is FAX/TEL Manual mode, youmust receive the fax manually. See page 127 "Receivinga Fax".Cannot print received faxes.• The paper tray is empty. Load paper in the paper tray.See page 41 "Loading Paper".•The paper tray does not contain paper of the right size.Load paper of the right size in the paper tray.Faxes you sent appear spotty ordirty when received.• The exposure glass or ADF is dirty. See page 201"Maintaining the Machine".•Before placing originals on the exposure glass, makesure that ink or correction fluid is dry.A fax you sent appears blank whenreceived.The original was placed upside down. Place the original in thecorrect orientation. See page 51 "Placing Originals".The background of received imagesis dirty, or images from the rear sideof the originals are visible.Image density is too high. Adjust the image density.Dial fails when trying to send faxes. See the solutions provided for errors 1XXX22 to 1XXX23 in theabove table.Fax Problems231](https://usermanual.wiki/Ricoh/MFSP311SFNW1/User-Guide-1915829-Page-233.png)
![Error and Status Messages on the ScreenMessages are listed in alphabetical order in the table below."X" indicates the parts of the messages that appear differently depending on a specific situation, such asthe paper sizes, paper types, or tray names.Message Causes Solutions2XXX14The machine was not able toprint the received fax, or themachine's memory reachedcapacity while receiving a faxbecause the document was toolarge.• The paper tray was empty. Loadpaper in the paper tray. See page 41"Loading Paper".•The paper tray did not contain A4,Letter, or Legal size paper. Load validsize paper in the tray, and configurethe paper size settings under [SystemSettings] accordingly.• A cover or tray was open. Close thecover or tray.• There was a paper jam. Remove thejammed paper. See page 211"Paper Feed Problems".• A print cartridge was empty. Replacethe print cartridge. See page 201"Replacing the Print Cartridge".• The received fax was too large. Askthe sender to resend the document inparts as several smaller individualfaxes, or to send at a lowerresolution.ADF Cover OpenClose ADF Cover The ADF cover is open. • Close the cover completely.ADF Orig. MisfeedOpen ADF Coverand remove paper.An original has been jammedinside the ADF.• Remove jammed originals, and thenplace them again. See page 211"Paper Feed Problems".•Check the originals are suitable forscanning. See page 51 "PlacingOriginals".10. Troubleshooting232](https://usermanual.wiki/Ricoh/MFSP311SFNW1/User-Guide-1915829-Page-234.png)
![Message Causes SolutionsAvailable: IDCardCopy A4 or 8 1/2 x11ID card copy could not beperformed because the traydoes not contain the valid sizepaper, which are A4 or Lettersize.• Set the machine to print copies usingthe A4 or Letter size paper in the[Select Paper] setting. See page 134"Copier Features Settings".•Specify the A4 or Letter size paper forthe tray selected for printing copies.See page 147 "System Settings".BusyFax transmission could not becompleted because thedestination's line was busy.Wait for a while and send the fax again.Cannot Copy ThisSettingComb.: 2 on 1 / 4on 1Combined copying could not beperformed because the traydoes not contain the valid sizepaper, which are A4, Letter, orLegal size.• Set the machine to print copies usingthe A4, Letter, or Legal size paper inthe [Select Paper] setting. Seepage 134 "Copier Features Settings".•Specify the A4, Letter, or Legal sizepaper for the tray selected for printingcopies. See page 147 "SystemSettings".Cannot copy.Set original to ADF.Combined copying could not beperformed because the originalswere not placed in the ADF.• Use the ADF, even when copying asingle sheet.•If you need to use the exposure glass,turn off combined copying in[Duplex/Combine] under copysettings, and then try again. Seepage 134 "Copier Features Settings".Check Paper SizeThe paper size set for thedocument differs from the size ofthe paper in the indicated tray.Press [FormFeed] to begin printing, orpress [JobReset] to cancel the job.Check Paper TypeThe paper type set for thedocument differs from the typeof the paper in the indicatedtray.Press [FormFeed] to begin printing, orpress [JobReset] to cancel the job.Error and Status Messages on the Screen233](https://usermanual.wiki/Ricoh/MFSP311SFNW1/User-Guide-1915829-Page-235.png)
![Message Causes SolutionsConnection Failed The line could not be connectedcorrectly.• Confirm that the telephone line isproperly connected to the machine.•Disconnect the telephone line fromthe machine, and connect a standardtelephone in its place. Confirm thatyou can make calls using thetelephone. If you cannot make callsthis way, contact your telephonecompany.Cover open A cover is open. Close the cover completely.Dest. is notProgrammedNo Quick Dial entry isassociated with the One Touchbutton you pressed.• Press a different One Touch button.•Assign a registered destination to theOne Touch button. See page 82"Registering Scan Destinations".Dial Failed The fax could not be sent.• Confirm that the fax number youdialed is correct.•Confirm that the destination is a faxmachine.• Confirm that the line is not busy.• You may need to insert a pausebetween dial digits. Press the [Pause/Redial] key after, for example, thearea code.Exceeded Max.E-mail SizeThe scan file exceeds the sizelimit for files that can be sentthrough e-mail.• Configure [Resolution] under scannersettings to reduce the scanningresolution. See page 138 "ScannerFeatures Settings".•Configure [Max. E-mail Size] underscanner settings to increase theallowed size. See page 138"Scanner Features Settings".Fax Job MemoryOverflowThe number of fax jobs inmemory (unsent or unprintedfaxes) has reached maximum,so new jobs cannot be stored.Wait until pending jobs have beentransmitted or printed.10. Troubleshooting234](https://usermanual.wiki/Ricoh/MFSP311SFNW1/User-Guide-1915829-Page-236.png)
![Message Causes SolutionsI-Fax POP3 fails Connection to the POP3 serverfailed.• Confirm that the network cable isproperly connected to the machine.•Confirm that the network settings suchas IP address, DNS, and POP3settings have been configuredproperly (make sure that no double-byte character is used). Seepage 183 "Configuring the NetworkSettings".Indep.Sply.Prt.Cart. A non-supported print cartridgeis installed.Remove and replace it with a printcartridge specified by an authorizeddealer.Internal Misfeed Paper has been jammed in themachine.Remove the jammed paper. See page 211"Paper Feed Problems".Memory Almost Full Memory has almost reachedcapacity during sort copy.If several originals are still to be scanned,it is recommended to start printing now,and copy the remaining originalsseparately. If originals are being scannedfrom the ADF, remove any remainingpages from the ADF.Memory Overflow The data is too large orcomplex to print.• Select [600 × 600 dpi] in[Resolution] under [Printer Features]to reduce the size of data. Seepage 155 "Printer Features Settings".•If using the PCL6 printer driver, set[Resolution] in [Print Quality] to [600× 600 dpi].Error and Status Messages on the Screen235](https://usermanual.wiki/Ricoh/MFSP311SFNW1/User-Guide-1915829-Page-237.png)
![Message Causes SolutionsMemory Overflow• The machine's memoryreached capacity whilescanning the first page ofthe original to store a faxjob in memory beforetransmission.•The machine's memoryreached capacity whilestoring a fax in memory inMemory Transmissionmode.Resend the fax in parts as several smallerindividual faxes, or send at a lowerresolution.Memory OverflowTXCancelMemory has reached capacitywhile scanning the second orlater pages of the original whentrying to send a fax in MemoryTransmission mode.Press [TX] to send only the pages that havebeen scanned in memory, or press[Cancel] to cancel.Misfeed: BypassTray Paper has been jammed in thebypass tray.Remove the jammed paper. See page 211"Paper Feed Problems".Misfeed: Dup. UnitRemove PaperPaper has been jammed in theduplex unit.Remove the jammed paper. See page 211"Paper Feed Problems".Misfeed: Stnd. Tray Paper has been jammed in thepaper exit area.Remove the jammed paper. See page 211"Paper Feed Problems".Misfeed: Tray 1 Paper has been jammed in thetray 1 paper input area.Remove the jammed paper. See page 211"Paper Feed Problems".Net CommunicationErrorConnection with the server waslost while sending or receivingdata.Contact the network administrator.Network is not ReadyA scanned file could not be sentbecause the machine has notreceived IP address informationfrom the DHCP servercompletely.Wait until the machine receives the IPaddress information completely, and thentry the operation again.On Hook or Stop key The machine has been off-hookfor an extended period of time.Put down the handset or press the [Clear/Stop] key.10. Troubleshooting236](https://usermanual.wiki/Ricoh/MFSP311SFNW1/User-Guide-1915829-Page-238.png)

![Message Causes SolutionsScan (NW)DisconnectedA scanned file could not be sentbecause the Ethernet cable wasnot connected properly.Reconnect the Ethernet cable properly,and then try the operation again.Scan (USB)DisconnectedThe USB cable wasdisconnected while scanningfrom a computer.Reconnect the USB cable properly, andthen try the operation again.Server ConnectionFailedA scanned file could not be sentbecause the destination couldnot be reached.Confirm that the destination is registeredcorrectly, and then try the operation again.Server ResponseErrorAn error occurred incommunication with the serverbefore beginning transmission.Confirm that the destination is registeredcorrectly, and then try the operation again.If the problem could not be solved, contactthe network administrator.Service call - XA fatal hardware error hasoccurred, and the machinecannot function.Contact your sales or servicerepresentative.Set Correct Paper The paper tray does not containA4, Letter, or Legal size paper.While the message is displayed, press the[OK] key. A menu for changing the papersize of the current tray appears.Load A4/Letter/ Legal size paper in thetray, and then select the correspondingpaper size using [ ] or [ ] key and pressthe [OK] key. The machine will then printout the fax.Note that the paper size setting for the trayunder system settings will be changed. Seepage 147 "System Settings".Set Original to ADFCannot use exposureglasswith set. in [ScanSize].Scanning could not beperformed because the originalswere not placed in the ADF,even though the machine is setto scan originals larger thanA4/Letter size.• Use the ADF, even when scanningA4/Letter or smaller size originals.•If you need to use the exposure glass,set A4/Letter or smaller size in [ScanSize] under scanner settings, and thentry again. See page 93 "Specifyingthe Scan Settings".10. Troubleshooting238](https://usermanual.wiki/Ricoh/MFSP311SFNW1/User-Guide-1915829-Page-240.png)
![Message Causes SolutionsSort Copy wasCancelledThe machine's memory reachedcapacity while originals werebeing scanned from the ADF toperform sort copying.Press [Exit] to print the originals that weresuccessfully scanned into memory. Then,copy again the originals left in the ADF.TX Comm. ErrorA transmission error occurred,and the fax could not betransmitted correctly.If the [Auto Redial] setting is enabled, themachine will redial the number and tryagain. If all attempts fail, or if the machineis in Immediate Transmission mode, the faxwill not be transmitted. Try the operationagain.Error and Status Messages on the Screen239](https://usermanual.wiki/Ricoh/MFSP311SFNW1/User-Guide-1915829-Page-241.png)

![Transmission Using IPsecFor securer communications, this machine supports the IPsec protocol. When applied, IPsec encryptsdata packets at the network layer using shared key encryption. The machine uses encryption keyexchange to create a shared key for both sender and receiver. To achieve even higher security, you canalso renew the shared key on a validity period basis.• IPsec is not applied to data obtained through DHCP, DNS, or WINS.•IPsec compatible operating systems are Windows XP SP2, Windows Vista/7, Windows Server2003/2003 R2/2008/2008 R2, Red Hat Enterprise Linux WS 4.0, and Solaris 10. However,some setting items are not supported depending on the operating system. Make sure the IPsecsettings you specify are consistent with the operating system's IPsec settings.• If you cannot access Web Image Monitor due to IPsec configuration problems, disable IPsec under[Admin. Tools] on the control panel, and then access Web Image Monitor.• For details about specifying the IPsec settings using Web Image Monitor, see page 171"Configuring the Machine Using Utilities".• For details about enabling and disabling IPsec using the control panel, see page 159 "NetworkSettings".Encryption and Authentication by IPsecIPsec consists of two main functions: the encryption function, which ensures the confidentiality of data,and the authentication function, which verifies the sender of the data and the data's integrity. Thismachine's IPsec function supports two security protocols: the ESP protocol, which enables both of theIPsec functions at the same time, and the AH protocol, which enables only the authentication function.ESP ProtocolThe ESP protocol provides secure transmission through both encryption and authentication. Thisprotocol does not provide header authentication.•For successful encryption, both the sender and receiver must specify the same encryptionalgorithm and encryption key. The encryption algorithm and encryption key are specifiedautomatically.• For successful authentication, the sender and receiver must specify the same authenticationalgorithm and authentication key. The authentication algorithm and authentication key arespecified automatically.AH ProtocolThe AH protocol provides secure transmission through authentication of packets only, includingheaders.11. Appendix242](https://usermanual.wiki/Ricoh/MFSP311SFNW1/User-Guide-1915829-Page-244.png)
![• For successful authentication, the sender and receiver must specify the same authenticationalgorithm and authentication key. The authentication algorithm and authentication key arespecified automatically.AH Protocol + ESP ProtocolWhen combined, the ESP and AH protocols provide secure transmission through both encryptionand authentication. These protocols provide header authentication.•For successful encryption, both the sender and receiver must specify the same encryptionalgorithm and encryption key. The encryption algorithm and encryption key are specifiedautomatically.• For successful authentication, the sender and receiver must specify the same authenticationalgorithm and authentication key. The authentication algorithm and authentication key arespecified automatically.• Some operating systems use the term "Compliance" in place of "Authentication".Security AssociationThis machine uses encryption key exchange as the key setting method. With this method, agreementssuch as the IPsec algorithm and key must be specified for both sender and receiver. Such agreementsform what is known as an SA (Security Association). IPsec communication is possible only if thereceiver's and sender's SA settings are identical.The SA settings are auto configured on both parties' machines. However, before the IPsec SA can beestablished, the ISAKMP SA (Phase 1) settings must be auto configured. When this is done, the IPsec SA(Phase 2) settings, which allow actual IPsec transmission, will be auto configured.Also, for further security, the SA can be periodically auto updated by applying a validity period (timelimit) for its settings. This machine only supports IKEv1 for encryption key exchange.Multiple settings can be configured in the SA.Settings 1-10You can configure ten separate sets of SA details (such as different shared keys and IPsecalgorithms).IPsec policies are searched through one by one, starting at [No.1].Encryption Key Exchange Settings Configuration FlowThis section explains the procedure for specifying encryption key exchange settings.Transmission Using IPsec243](https://usermanual.wiki/Ricoh/MFSP311SFNW1/User-Guide-1915829-Page-245.png)
![Machine PC1. Set the IPsec settings on Web Image Monitor. 1. Set the same IPsec settings as the machine onPC.2. Enable IPsec settings. 2. Enable IPsec settings.3. Confirm IPsec transmission.• After configuring IPsec, you can use "ping" command to check if the connection is establishedcorrectly. Because the response is slow during initial key exchange, it may take some time toconfirm that transmission has been established.•If you cannot access Web Image Monitor due to IPsec configuration problems, disable IPsec onthe control panel, and then access Web Image Monitor.• For details about disabling IPsec using the control panel, see page 159 "Network Settings".Specifying Encryption Key Exchange Settings1. Start the Web browser, and access the machine by entering its IP address.2. Click [IPsec Settings].3. Click the [IPsec Policy List] tab.4. Select the number of the setting you want to modify in the list, and then click [Change].5. Modify the IPsec related settings as necessary.6. Enter the administrator password, and then click [Apply].7. Click the [IPsec Global Settings] tab, and then select [Active] in [IPsec Function].8. If necessary, specify [Default Policy], [Broadcast and Multicast Bypass], and [All ICMPBypass] also.9. Enter the administrator password, and then click [Apply].Specifying IPsec Settings on the ComputerSpecify exactly the same settings for IPsec SA settings on your computer as are specified for the IPsecSettings on the machine. Setting methods differ according to the computer's operating system. Thefollowing procedure is based on Windows 7 in an IPv4 environment as an example.1. On the [Start] menu, click [Control Panel], [System and Security], and then click[Administrative Tools].11. Appendix244](https://usermanual.wiki/Ricoh/MFSP311SFNW1/User-Guide-1915829-Page-246.png)
![2. Double-click [Local Security Policy], and then click [IP Security Policies on LocalComputer].3. In the "Action" menu, click [Create IP Security Policy...].The IP Security Policy Wizard appears.4. Click [Next].5. Enter a security policy name in "Name", and then click [Next].6. Clear the "Activate the default response rule (earlier versions of Windows only)." checkbox, and then click [Next].7. Select "Edit properties", and then click [Finish].8. In the "General" tab, click [Settings...].9. In "Authenticate and generate a new key after every", enter the same validity period (inminutes) that is specified on the machine in [IKE Life Time], and then click [Methods...].10. Confirm that the Encryption Algorithm ("Encryption"), Hash Algorithm ("Integrity"), andIKE Diffie-Hellman Group ("Diffie-Hellman Group") settings in "Security methodpreference order" all match those specified on the machine in [IKE Settings].If the settings are not displayed, click [Add...].11. Click [OK] twice.12. Click [Add...] in the "Rules" tab.The Security Rule Wizard appears.13. Click [Next].14. Select "This rule does not specify a tunnel", and then click [Next].15. Select the type of network for IPsec, and then click [Next].16. Click [Add...] in the IP Filter List.17. In [Name], enter an IP Filter name, and then click [Add...].The IP Filter Wizard appears.18. Click [Next].19. In [Description:], enter a name or a detailed explanation of the IP filter, and then click[Next].You may click [Next] and proceed to the next step without entering any information in this field.20. Select "My IP Address" in "Source address", and then click [Next].21. Select "A specific IP Address or Subnet" in "Destination address", enter the machine's IPaddress, and then click [Next].22. For the IPsec protocol type, select "Any", and then click [Next].23. Click [Finish], and then click [OK].24. Select the IP filter that you have just created, and then click [Next].Transmission Using IPsec245](https://usermanual.wiki/Ricoh/MFSP311SFNW1/User-Guide-1915829-Page-247.png)
![25. Click [Add...] in the Filter Action.The Filter Action Wizard appears.26. Click [Next].27. In [Name], enter a Filter Action name, and then click [Next].28. Select "Negotiate security", and then click [Next].29. Select one of options for computers allowed to communicate with, and then click [Next].30. Select "Custom" and click [Settings...].31. When [ESP] is selected for the machine in [Security Protocol] under [IPsec Settings], select[Data integrity and encryption (ESP)], and configure the following settings:Set the value of [Integrity algorithm] to the same value as the [Authentication Algorithm for ESP]specified on the machine.Set the value of [Encryption algorithm] to the same value as the [Encryption Algorithm for ESP]specified on the machine.32. When [AH] is selected for the machine in [Security Protocol] under [IPsec Settings], select[Data and address integrity without encryption (AH)], and configure the followingsettings:Set the value of [Integrity algorithm] to the same value as the [Authentication Algorithm for AH]specified on the machine.Clear the [Data integrity and encryption (ESP)] check box.33. When [ESP&AH] is selected for the machine in [Security Protocol] under [IPsec Settings],select [Data and address integrity without encryption (AH)], and configure the followingsettings:Set the value of [Integrity algorithm] under [Data and address integrity without encryption (AH)] tothe same value as [Authentication Algorithm for AH] specified on the machine.Set the value of [Encryption algorithm] under [Data integrity and encryption (ESP)] to the samevalue as [Encryption Algorithm for ESP] specified on the machine.34. In the Session key settings, select "Generate a new key every", and enter the samevalidity period (in seconds or Kbytes) as that specified for [Life Time] on the machine.35. Click [OK], and then click [Next].36. Click [Finish].If you are using IPv6 under Windows Vista or a newer version of Windows, you must repeat thisprocedure from Step 12 and specify ICMPv6 as an exception. When you reach Step 22, select[58] as the protocol number for the "Other" target protocol type, and then set [Negotiate security]to [Permit].37. Select the filter action that you have just created, and then click [Next].38. Select one of options for an authentication method, and then click [Next].11. Appendix246](https://usermanual.wiki/Ricoh/MFSP311SFNW1/User-Guide-1915829-Page-248.png)
![39. Click [Finish], and then click [OK] twice.The new IP security policy (IPsec settings) is specified.40. Select the security policy that you have just created, right click on it, and then click[Assign].IPsec settings on the computer are enabled.• To disable the computer's IPsec settings, select the security policy, right click, and then click [Un-assign].Enabling and Disabling IPsec Using the Control Panel1. Press the [User Tools] key.2. Press the [ ] or [ ] key to select [Admin. Tools], and then press the [OK] key.3. If you are requested to enter a password, enter the password using the number keys,and then press the [OK] key.4. Press the [ ] or [ ] key to select [IPsec], and then press the [OK] key.5. Press the [ ] or [ ] key to select [Active] or [Inactive], and then press the [OK] key.6. Press the [Clear/Stop] key to return to the initial screen.• A password for accessing the [Admin. Tools] menu can be specified in [Admin. Tools Lock]. Fordetails about [Admin. Tools Lock], see page 166 "Administrator Settings".•You can press the [Escape] key to exit to the previous level of the menu tree.Transmission Using IPsec247](https://usermanual.wiki/Ricoh/MFSP311SFNW1/User-Guide-1915829-Page-249.png)

![Moving and Transporting the MachineThis section provides cautions that you must follow when moving the machine both short and longdistances.Repack the machine in its original packing materials when moving it over a long distance.• Be sure to disconnect all cables from the machine before transporting it.•The machine is a precision piece of machinery. Be sure to handle it carefully when moving it.• Make sure to move the machine horizontally. Take extra caution when carrying the machine up ordown stairs.• Do not remove the print cartridge when moving the machine.• Be sure to hold the machine level while carrying it. To prevent toner from spilling, move themachine carefully.1. Be sure to check the following points:• The power switch is turned off.• The power cord is unplugged from the wall outlet.• All other cables are unplugged from the machine.2. Return the scanning unit inside the machine to its original position using [ScannerCarriage] under [System Settings]. For details about [Scanner Carriage], see page 147"System Settings".3. Lift the machine using the inset grips on both sides of the machine, and then move ithorizontally to the place where you want to use it.• To move the machine over a long distance, pack it well and empty all the paper trays. Take carenot to tip or tilt the machine during transit.•Toner might spill inside the machine if the machine is not kept level during transit.• For more information about moving the machine, contact your sales or service representative.DisposalAsk your sales or service representative for information about correct disposal of this machine.Moving and Transporting the Machine249](https://usermanual.wiki/Ricoh/MFSP311SFNW1/User-Guide-1915829-Page-251.png)
![If this package is used in a product, Eric Young should be given attribution as the author of theparts of the library used.This can be in the form of a textual message at program startup or in documentation (online ortextual) provided with the package.Redistribution and use in source and binary forms, with or without modification, are permittedprovided that the following conditions are met:1. Redistributions of source code must retain the copyright notice, this list of conditions and thefollowing disclaimer.2. Redistributions in binary form must reproduce the above copyright notice, this list of conditionsand the following disclaimer in the documentation and/or other materials provided with thedistribution.3. All advertising materials mentioning features or use of this software must display the followingacknowledgement:"This product includes cryptographic software written by Eric Young (eay@cryptsoft.com)"The word 'cryptographic' can be left out if the rouines from the library being used are notcryptographic related :-).4. If you include any Windows specific code (or a derivative thereof) from the apps directory(application code) you must include an acknowledgement:"This product includes software written by Tim Hudson (tjh@cryptsoft.com)"THIS SOFTWARE IS PROVIDED BY ERIC YOUNG “AS IS” AND ANY EXPRESS OR IMPLIEDWARRANTIES, INCLUDING, BUT NOT LIMITED TO, THE IMPLIED WARRANTIES OFMERCHANTABILITY AND FITNESS FOR A PARTICULAR PURPOSE ARE DISCLAIMED. IN NOEVENT SHALL THE AUTHOR OR CONTRIBUTORS BE LIABLE FOR ANY DIRECT, INDIRECT,INCIDENTAL, SPECIAL, EXEMPLARY, OR CONSEQUENTIAL DAMAGES (INCLUDING, BUTNOT LIMITED TO, PROCUREMENT OF SUBSTITUTE GOODS OR SERVICES; LOSS OF USE,DATA, OR PROFITS; OR BUSINESS INTERRUPTION) HOWEVER CAUSED AND ON ANYTHEORY OF LIABILITY, WHETHER IN CONTRACT, STRICT LIABILITY, OR TORT (INCLUDINGNEGLIGENCE OR OTHERWISE) ARISING IN ANY WAY OUT OF THE USE OF THISSOFTWARE, EVEN IF ADVISED OF THE POSSIBILITY OF SUCH DAMAGE.The licence and distribution terms for any publically available version or derivative of this codecannot be changed. i.e. this code cannot simply be copied and put under another distributionlicence [including the GNU Public Licence.]11. Appendix260](https://usermanual.wiki/Ricoh/MFSP311SFNW1/User-Guide-1915829-Page-262.png)