Ricoh PRSP213NW1 Printer User Manual BBP PRSP213NW1 Rev0
Ricoh Company Ltd Printer BBP PRSP213NW1 Rev0
UserManual.wiki
>
Ricoh
>
PRSP213NW1 User Manual
BBP-PRSP213NW1_User manual-Rev0
Navigation menu
Upload a User Manual
Namespaces
Wiki Guide
HTML
PDF
Info
Views
User Manual
Discussion / Help
Navigation
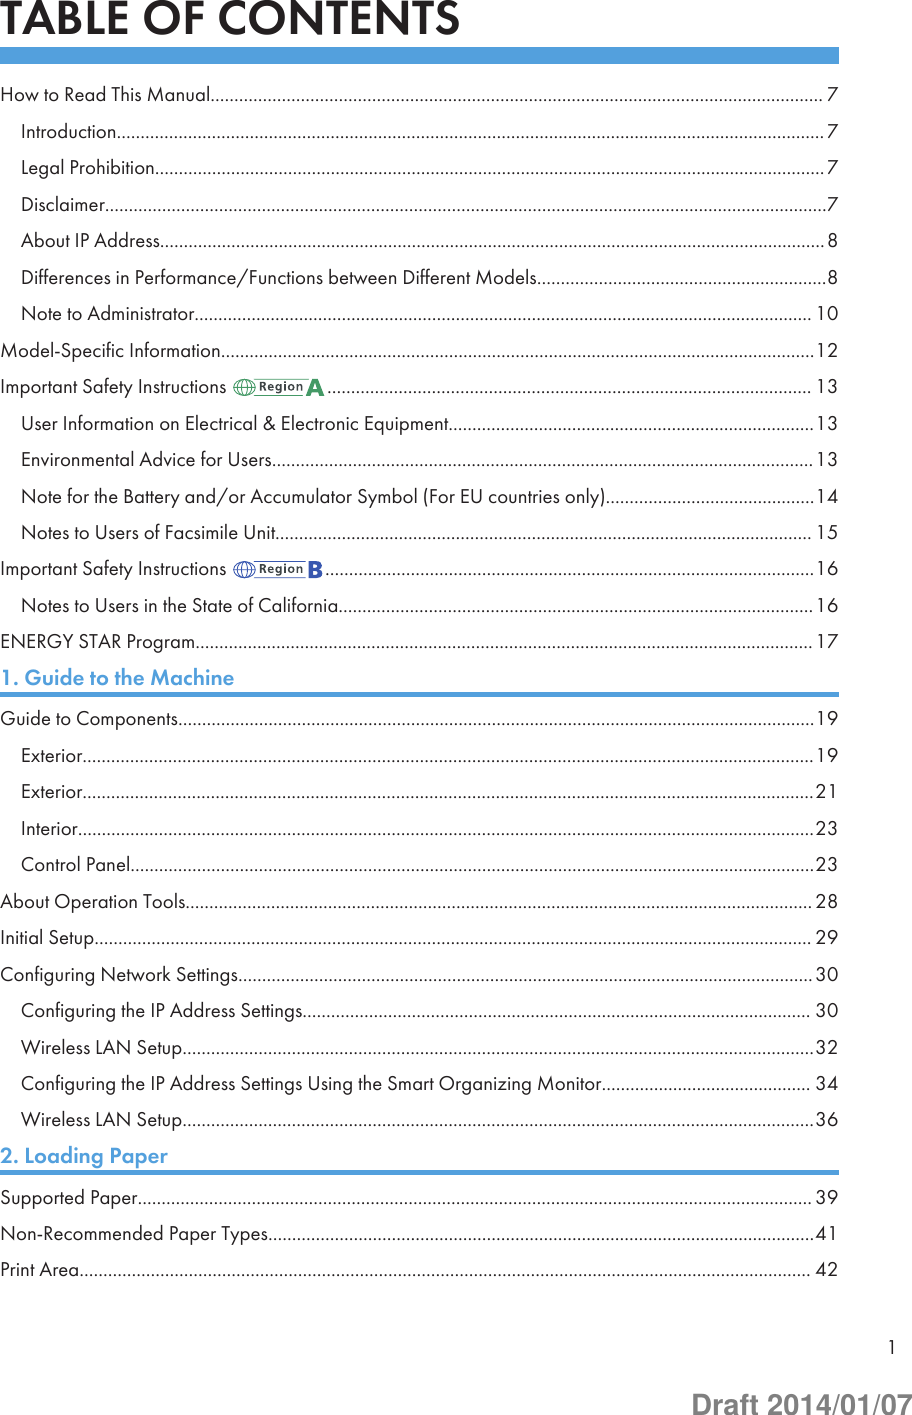
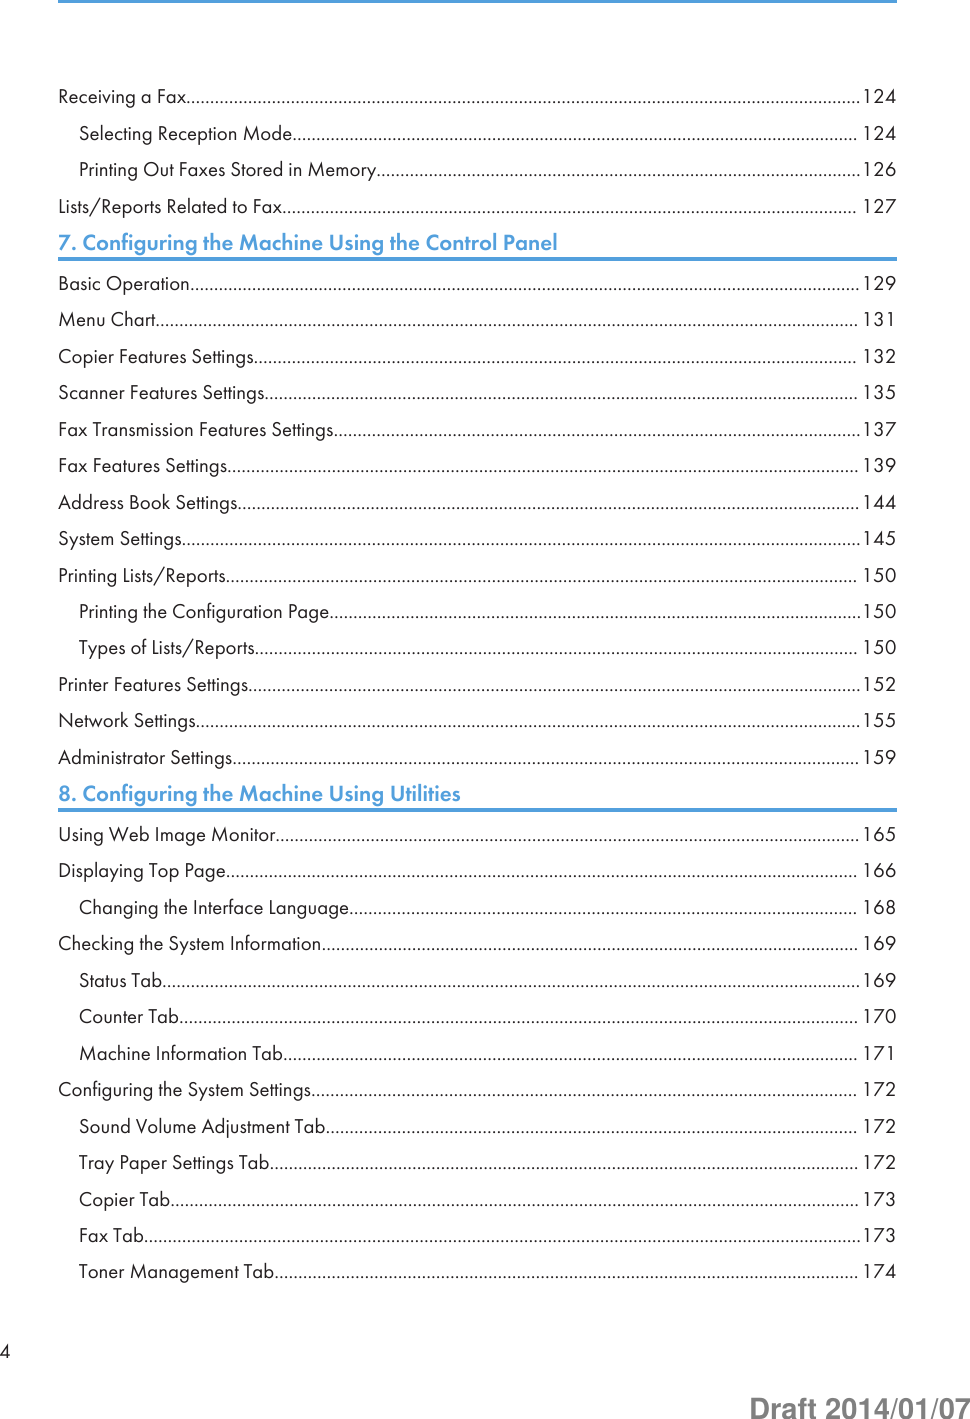
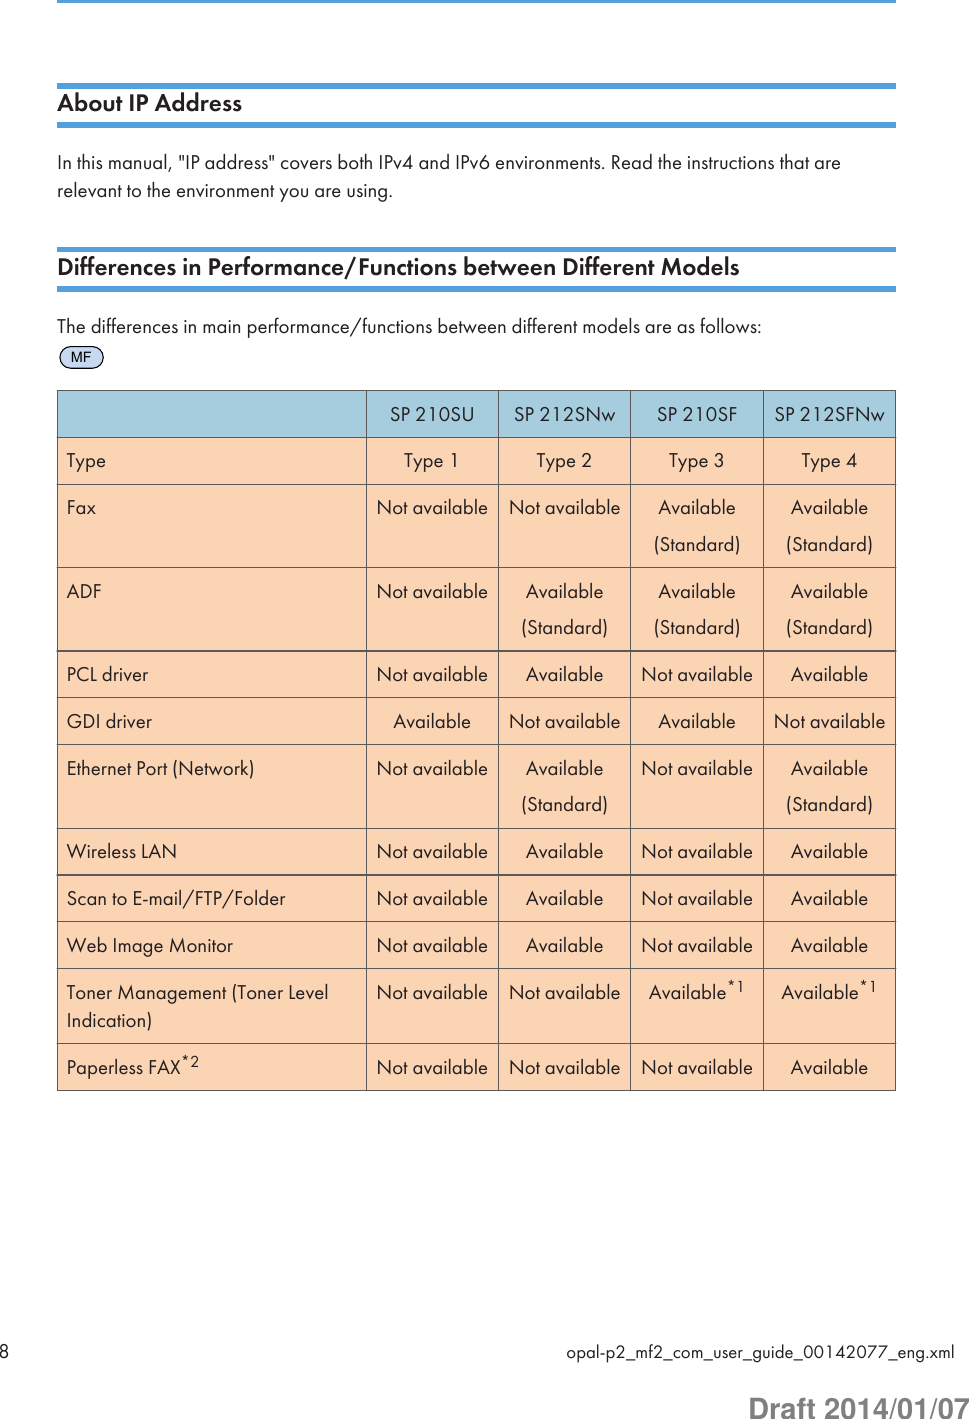
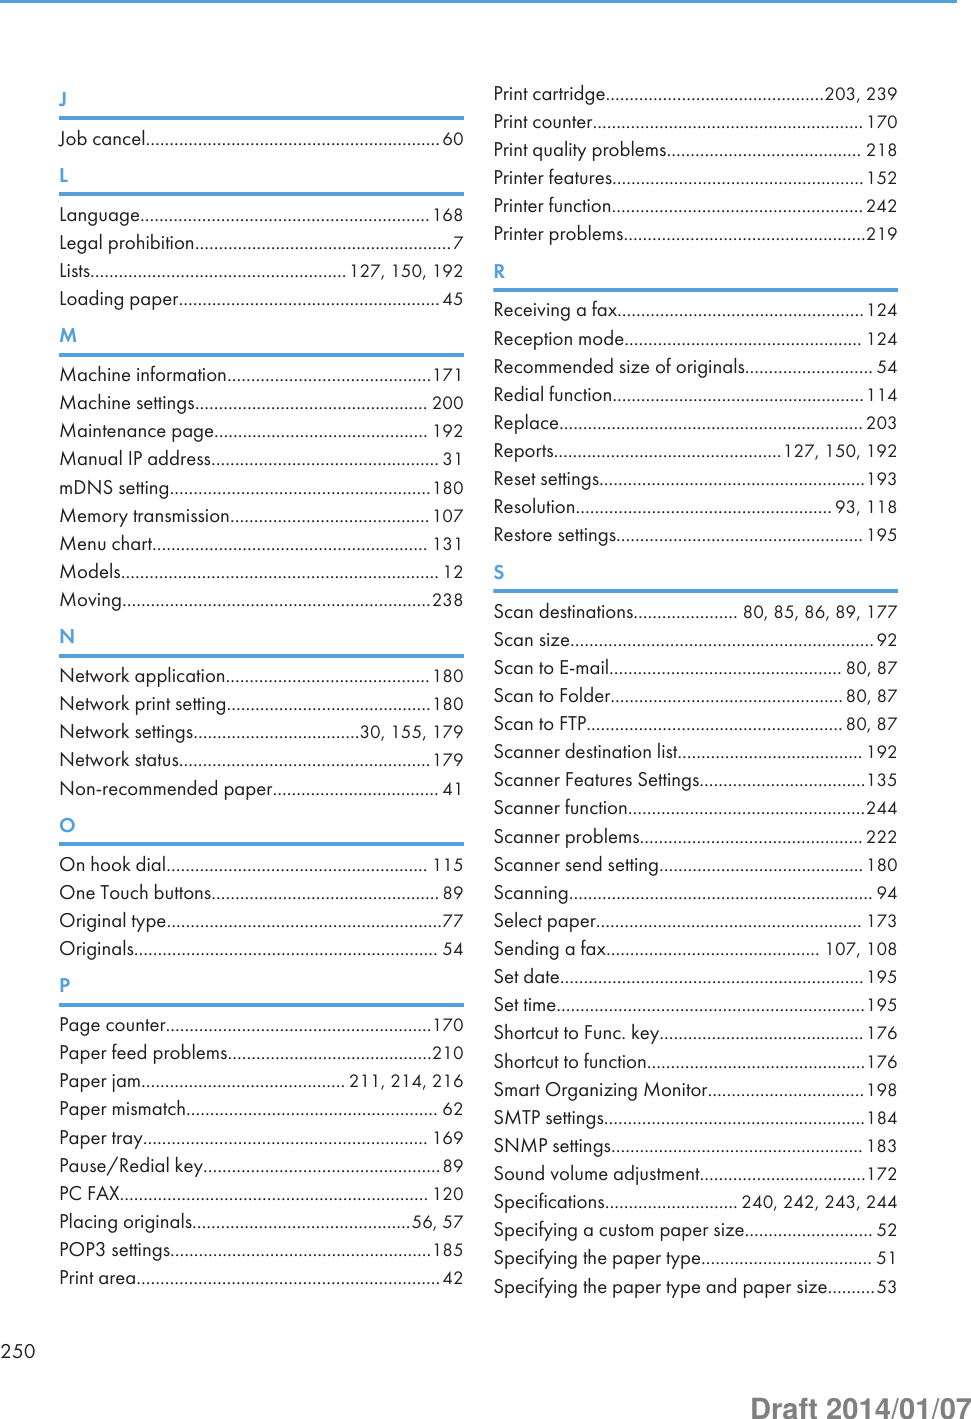
![MFSP 211SU SP 213SNw SP 211SF SP 213SFNwSP 211S(mainly NorthAmerica) onlyType Type 1 Type 2 Type 3 Type 4 Type 5Fax Not available Not available Available(Standard)Available(Standard)Not availableADF Not available Available(Standard)Available(Standard)Available(Standard)Available(Standard)PCL driver Not available Available Not available Available Not availableGDI driver Available Not available Available Not available AvailableEthernet Port(Network)Not available Available Not available Available Not availableWireless LAN Not available Available Not available Available Not availableScan toEmail/FTP/FolderNot available Available Not available Available Not availableWeb ImageMonitorNot available Available Not available Available Not availableTonerManagement(Toner LevelIndication)Available Available Available*1 Available*1 AvailablePaperless FAX*2 Not available Not available Not available Available Not availableMF*1 Depending on the [Toner End Option Settings] setting, the toner management (toner level indication) functionmay not be available. For [Toner End Option Settings], see page 145 "System Settings".MF*2 "Paperless FAX" refers to the function that allows you to store faxes in memory and print only the ones youwant, thus saving paper. "Paperless FAX" refers to [Reception File Setting] and [Notify Forward Status] thatcan be specified using the machine's control panel and [Fax Received File Processing] that can be specifiedusing Web Image Monitor. For details, see page 139 "Fax Features Settings" and see page 172"Configuring the System Settings".opal-p2_mf2_com_user_guide_00142077_eng.xml 9Draft 2014/01/07](https://usermanual.wiki/Ricoh/PRSP213NW1/User-Guide-2199680-Page-9.png)
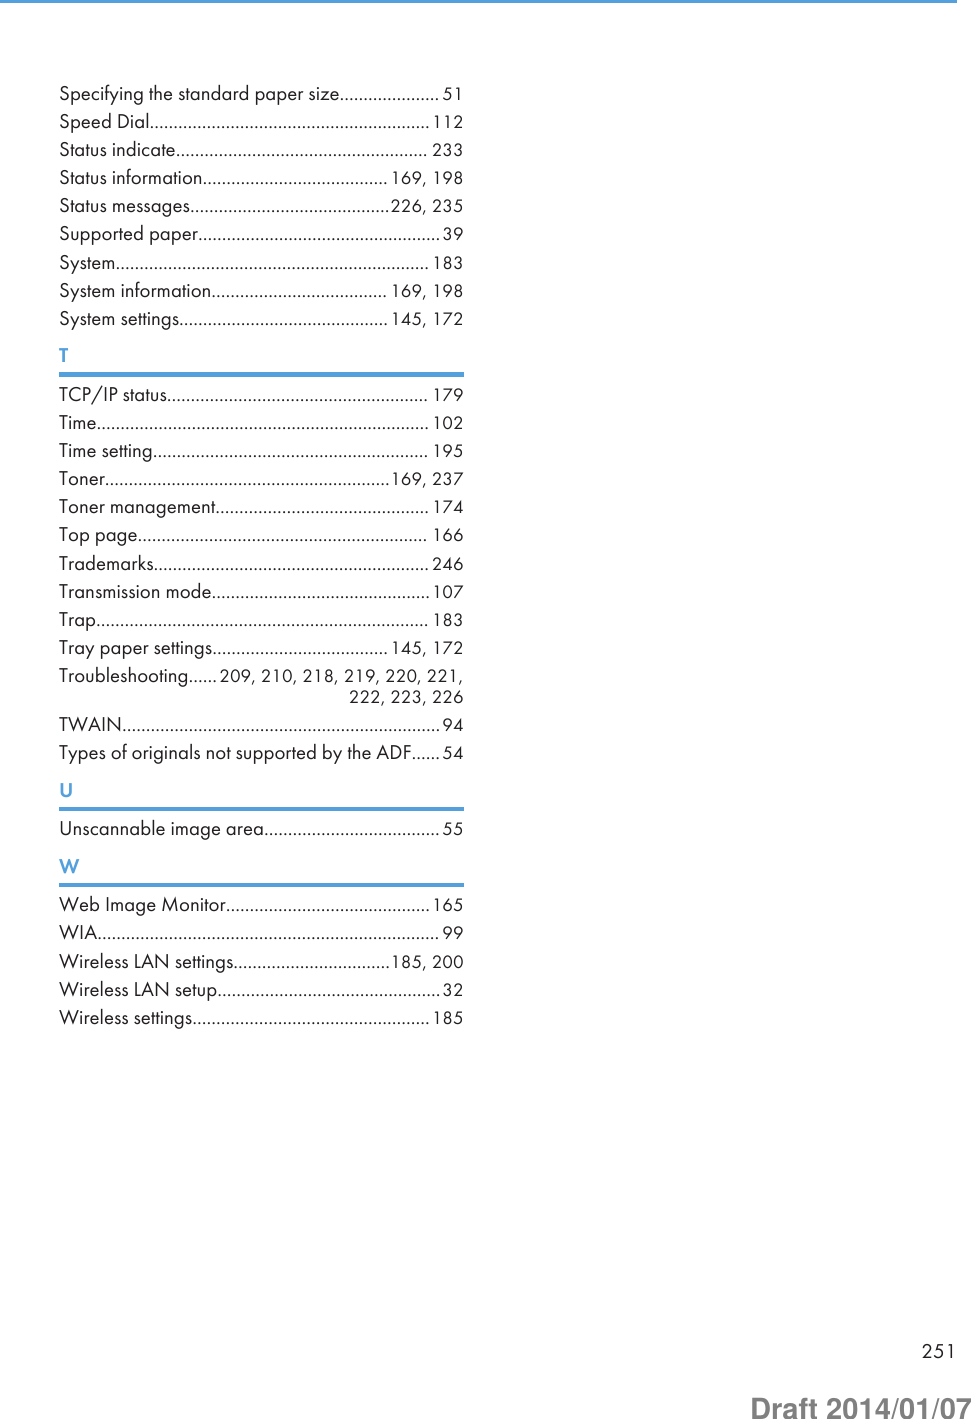
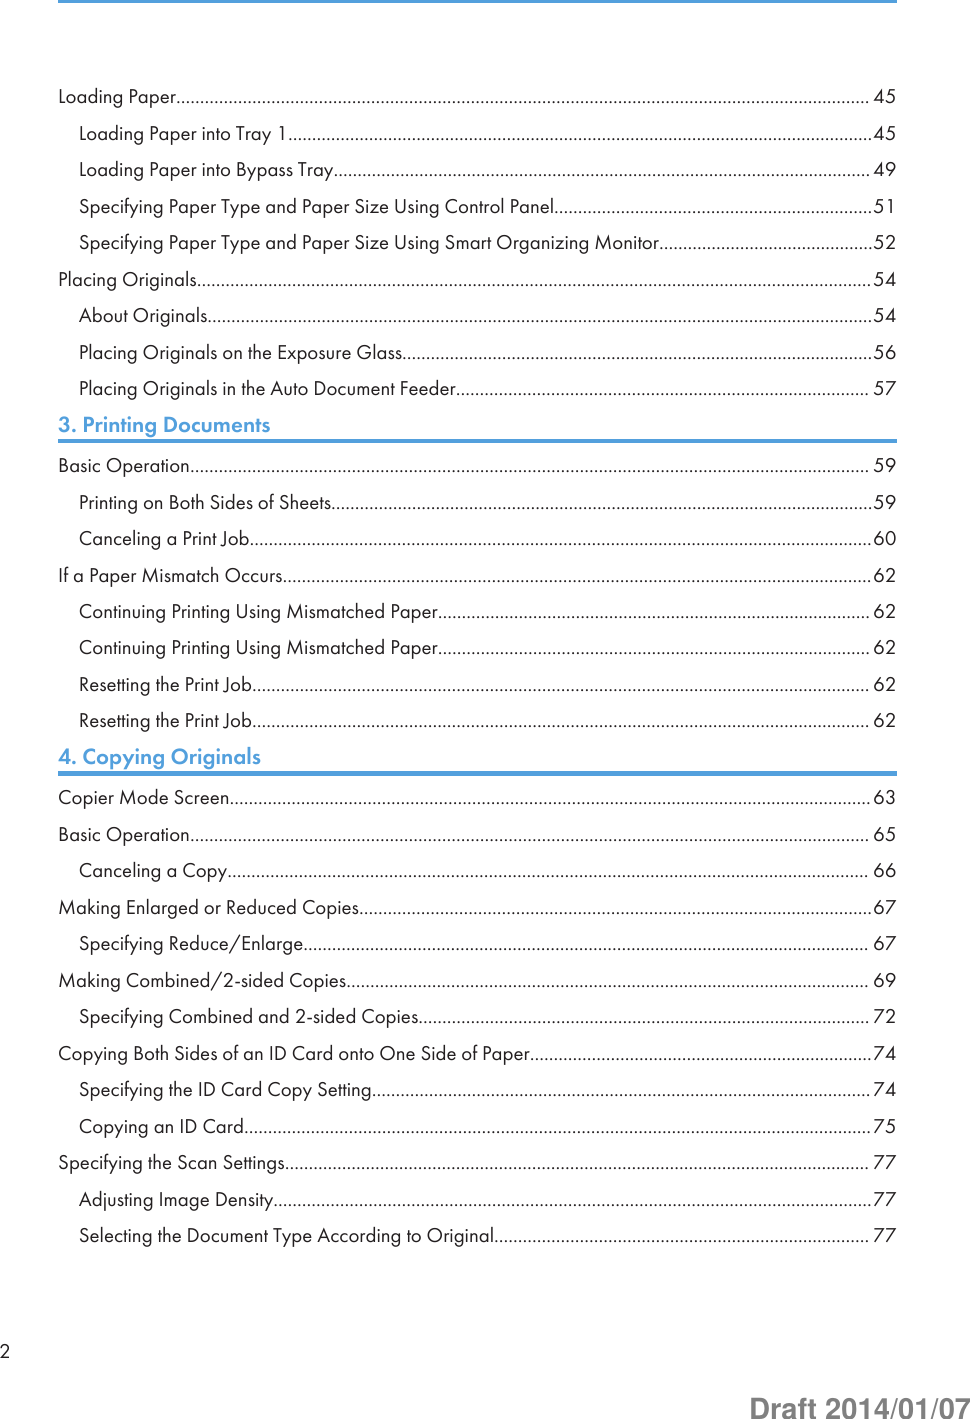
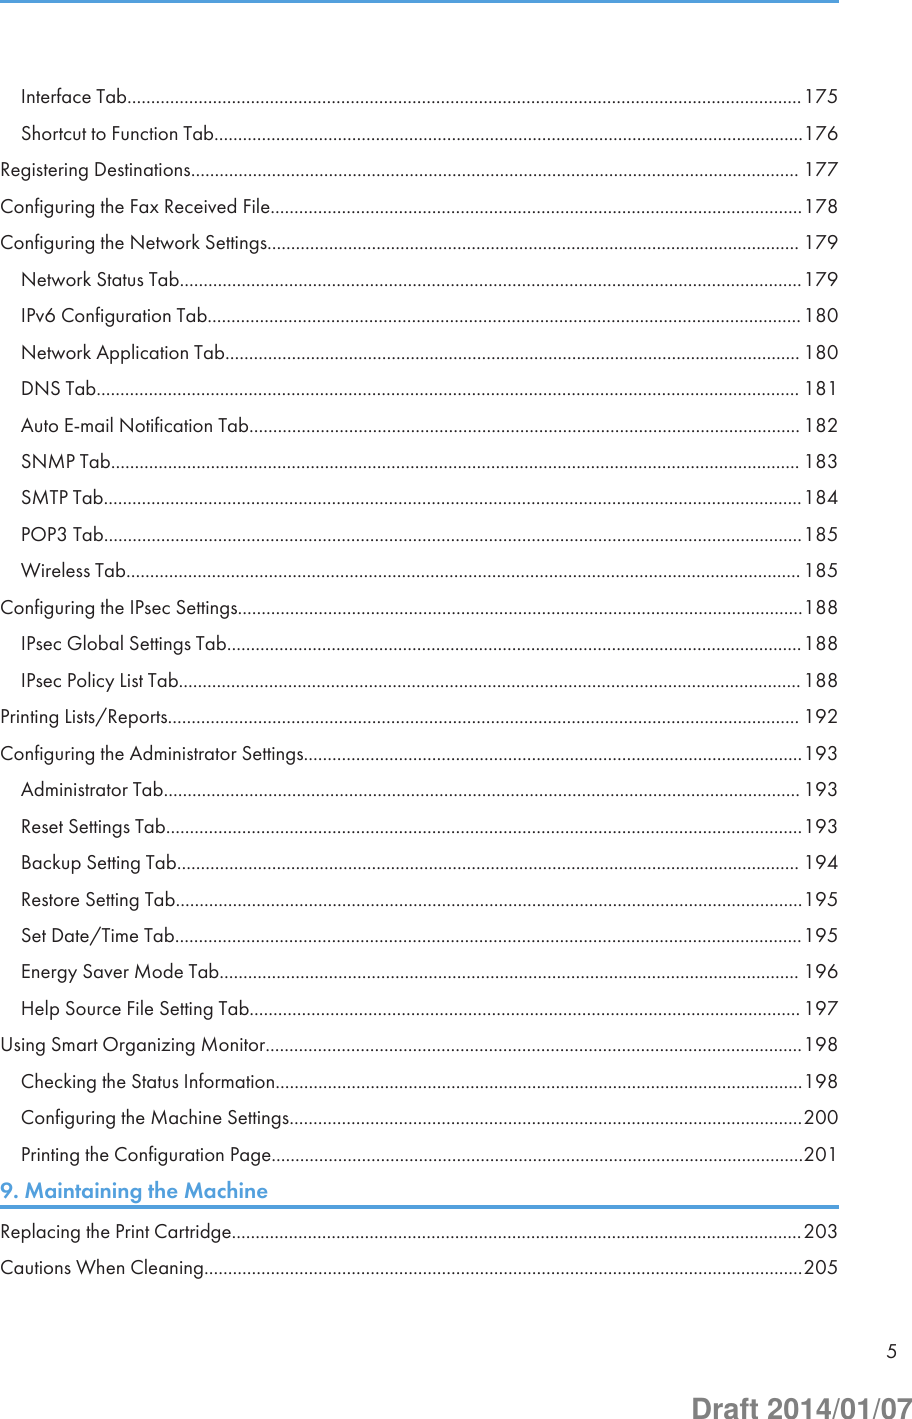
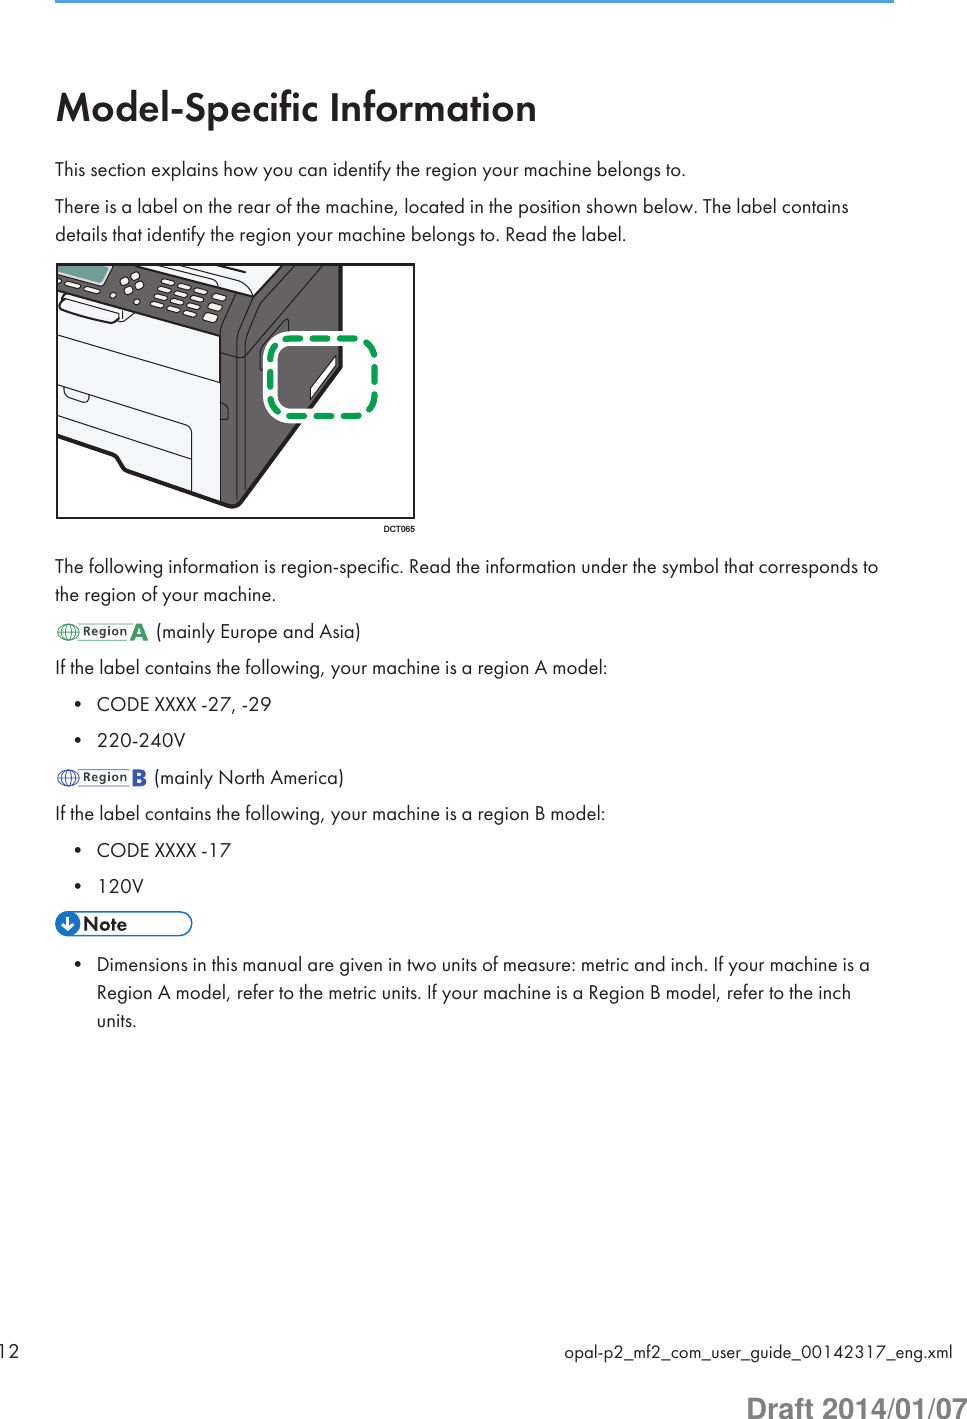
![PSP 210SP 211SP 212NSP 213NSP 212NwSP 213NwType Type 1 Type 2 Type 3PCL driver Not available Available AvailableGDI driver Available Not available Not availableEthernet Port (Network) Not available Available AvailableWireless LAN Not available Not available AvailableWeb Image Monitor Not available Available AvailableNote to AdministratorMFPasswordCertain configurations of this machine can be password-protected to prevent unauthorized modificationsby others. We strongly recommend you to create your own password immediately.The following are the operations that can be password-protected:• Configuring the [Address Book], [Network Settings], or [Admin. Tools] menu using the controlpanelYou can access these menus without a password by factory default.The setting for creating a password can be found in [Admin. Tools].• Configuring the [System Settings], [Quick Dial Destination], [Scan Destination], [Fax Speed DialDestination], [Fax Received File], [Network Settings], [IPsec Settings], or [Administrator Tools]menu using Web Image MonitorBy default, the access to the machine via Web Image Monitor is not password-protected.The setting for configuring the password can be found in [Administrator Settings].• For details about creating passwords, see page 159 "Administrator Settings" or page 193"Configuring the Administrator Settings".10 opal-p2_mf2_com_user_guide_00142077_eng.xmlDraft 2014/01/07](https://usermanual.wiki/Ricoh/PRSP213NW1/User-Guide-2199680-Page-10.png)
![PPasswordCertain configurations of this machine can be password-protected to prevent unauthorized modificationsby others. We strongly recommend you to create your own password immediately.The following are the operations that can be password-protected:• Configuring the [System Settings], [Network Settings], [IPsec Settings], or [Administrator Tools]menu using Web Image MonitorBy default, the access to the machine via Web Image Monitor is not password-protected.The setting for configuring the password can be found in [Administrator Settings].• For details about setting a password, see page 193 "Configuring the Administrator Settings".opal-p2_mf2_com_user_guide_00142077_eng.xml 11Draft 2014/01/07](https://usermanual.wiki/Ricoh/PRSP213NW1/User-Guide-2199680-Page-11.png)

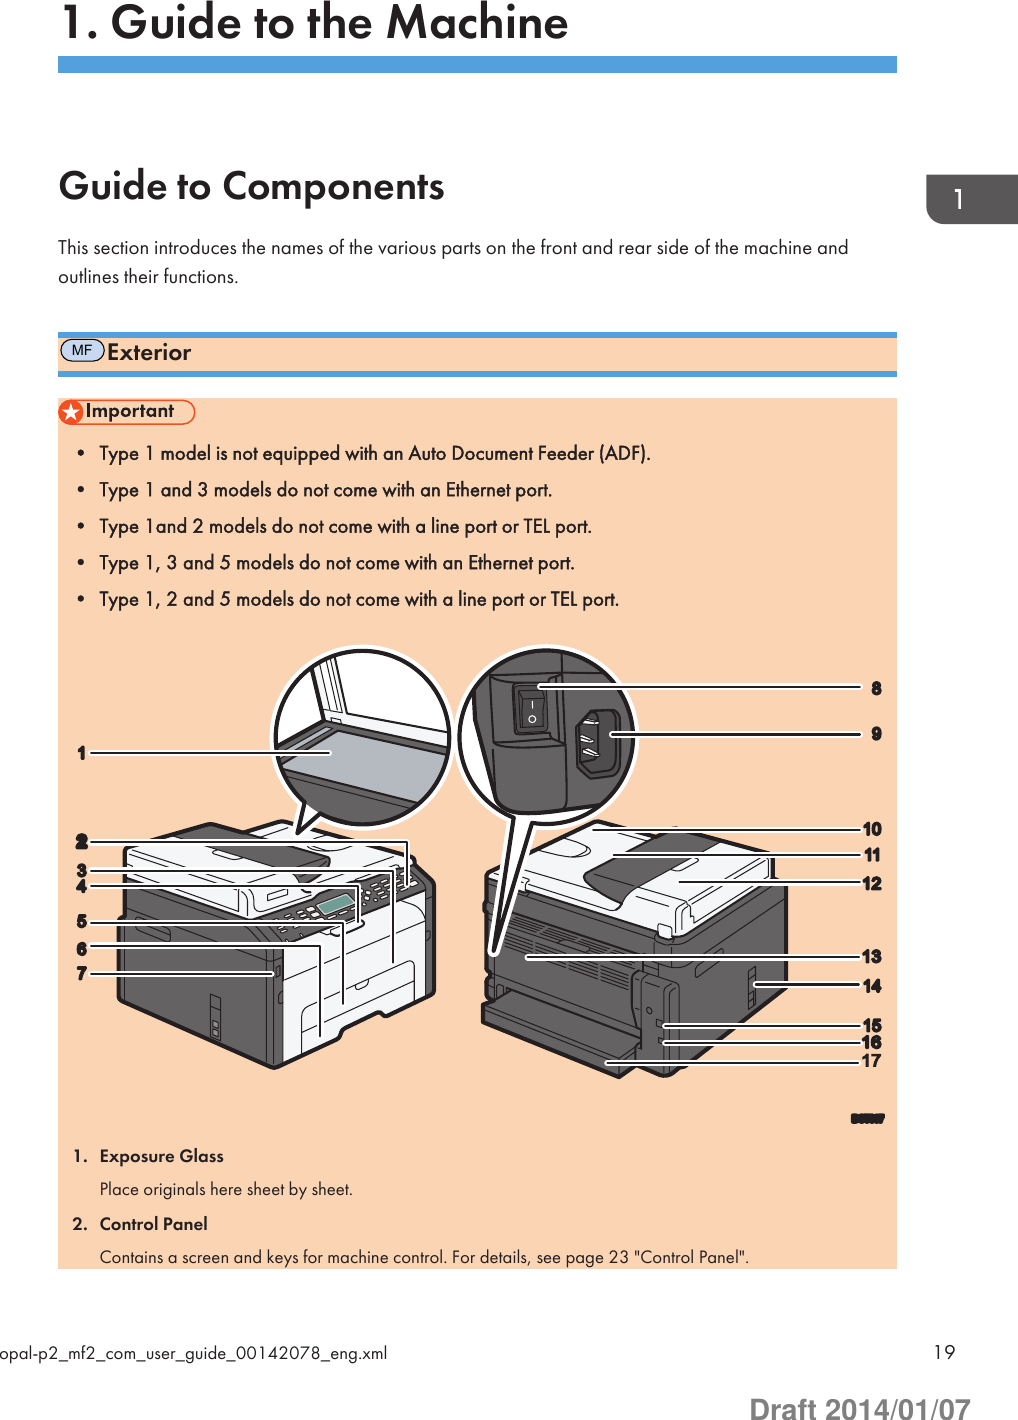
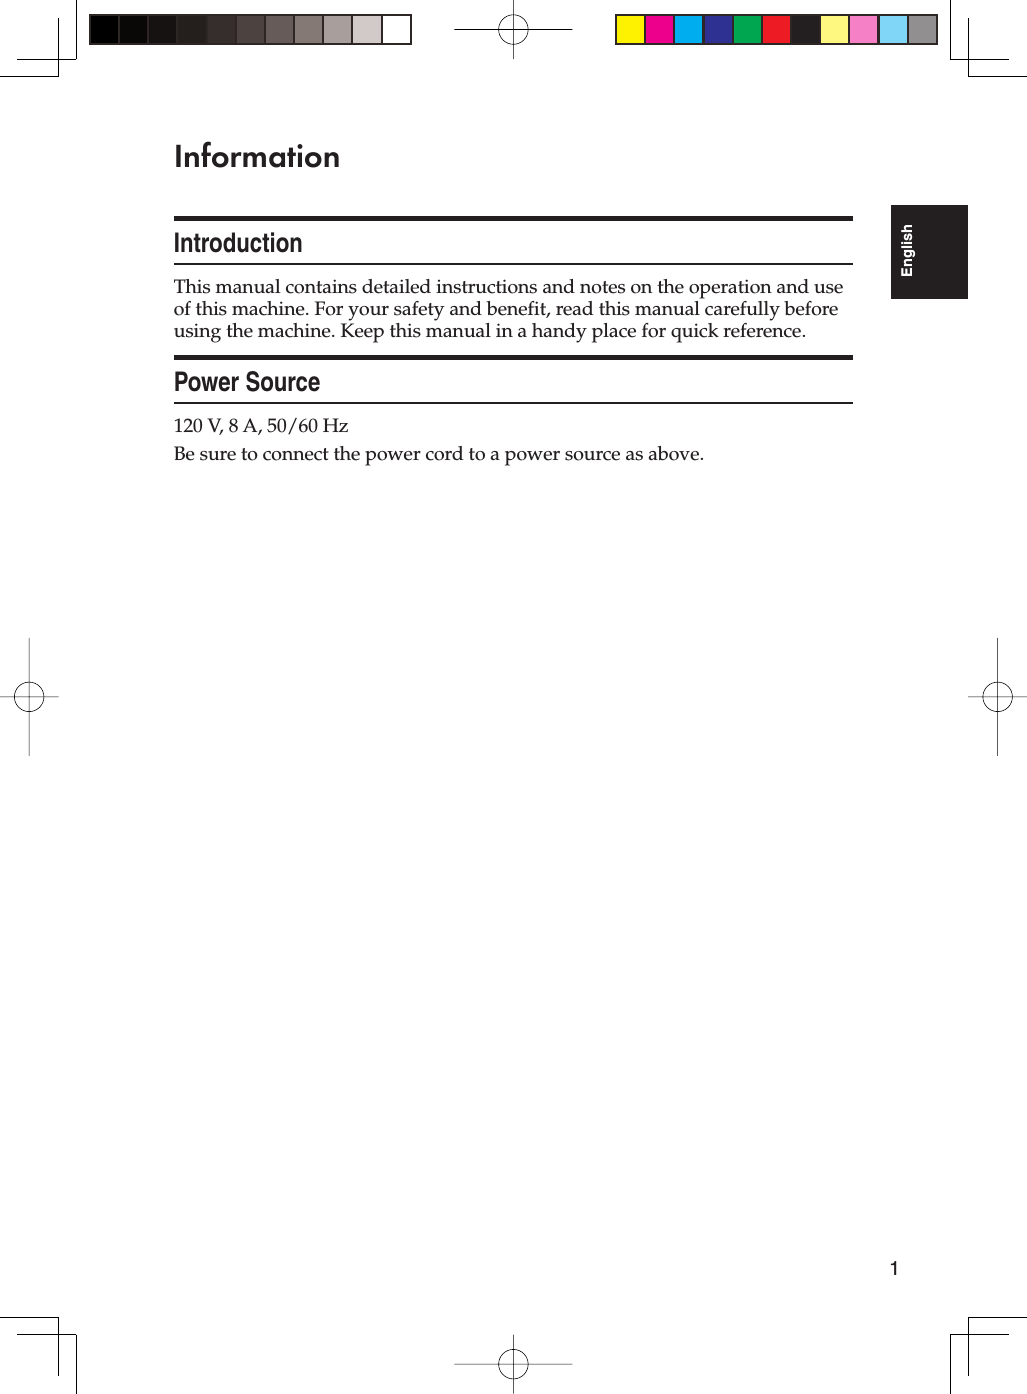
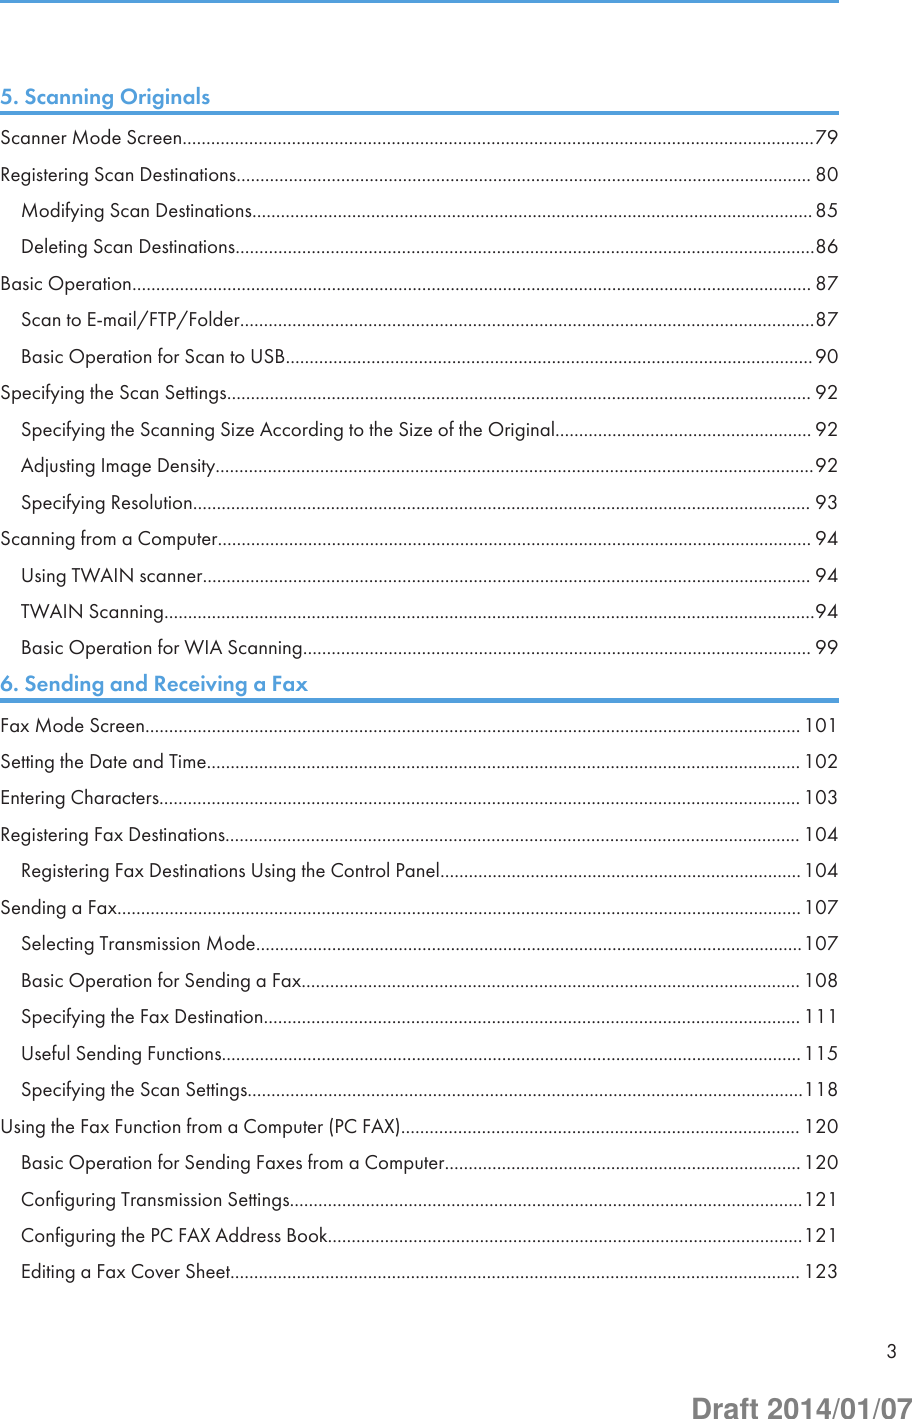
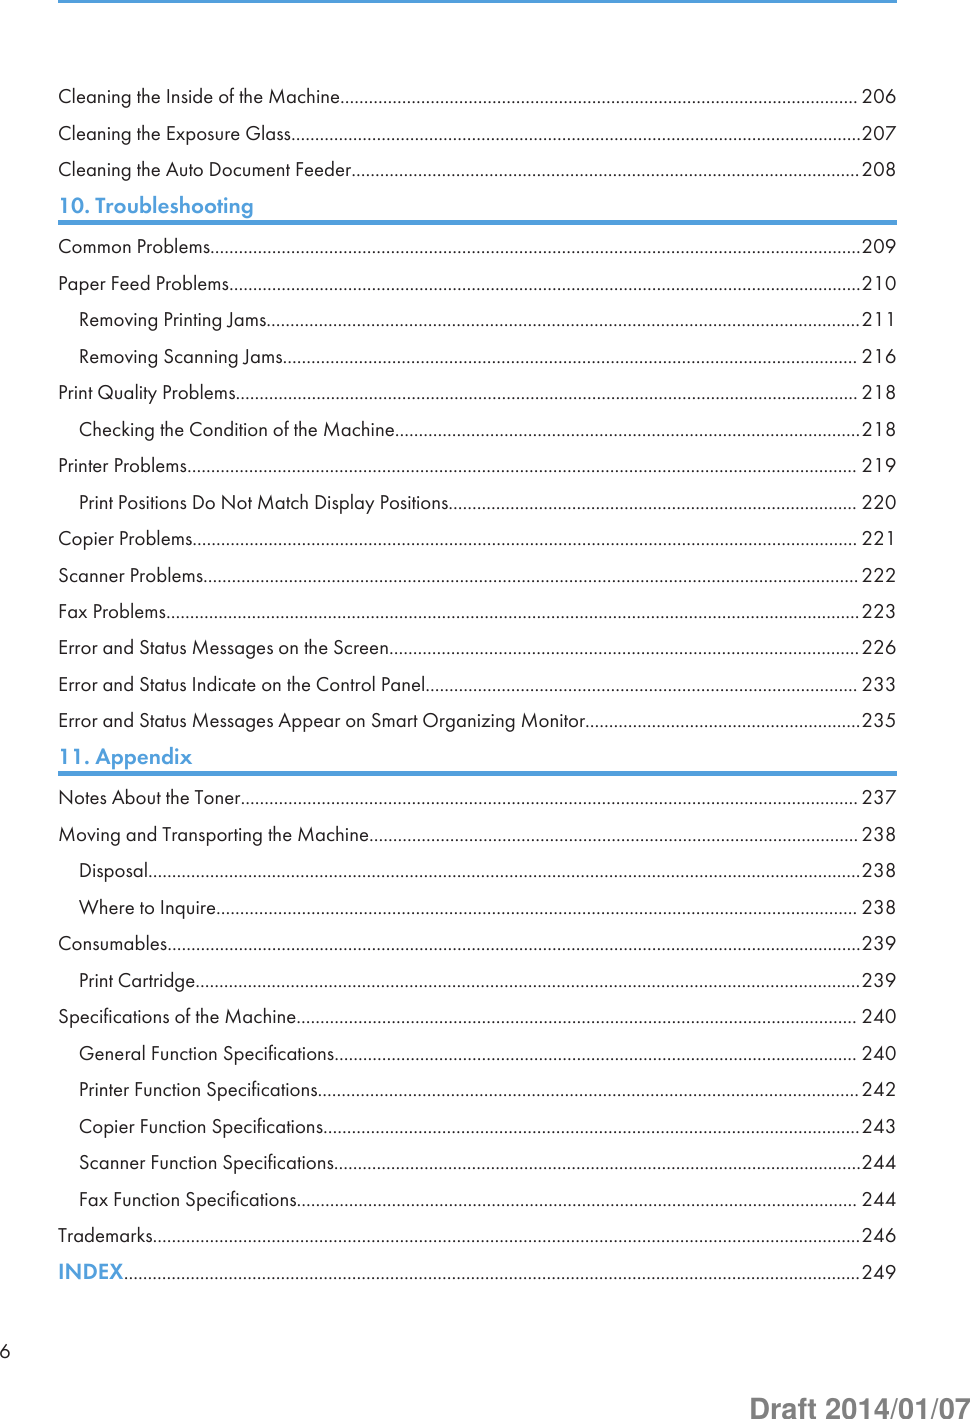
![PExterior• Type 1 models do not come with an Ethernet port.• Type 1 and 2 models do not have the [WIFI/LAN] key.• Only Type 2 and 3 models can print the test page using the [Job Reset] key.DCT83121115678910 1213151416431. [WIFI/LAN] keyPress this key to switch between wireless and wired LAN connection.2. [Job Reset] keyPress this key to cancel an ongoing print job. By holding down the key for 13 seconds, you can print the testpage.3. [Start] keyYou can use this key to print on the back of paper in duplex printing and to execute forced printing.By holding down the key for 13 seconds, the configuration page or maintenance page can be printed. Themaintenance page is printed with Type 1 model and the configuration page is printed with Type 2 or Type 3model.4. Power IndicatorThis indicator lights up blue when the machine is turned on. It flashes when a print job is received and whileprinting is in progress.Guide to Componentsopal-p2_mf2_com_user_guide_00142078_eng.xml 21Draft 2014/01/07](https://usermanual.wiki/Ricoh/PRSP213NW1/User-Guide-2199680-Page-21.png)

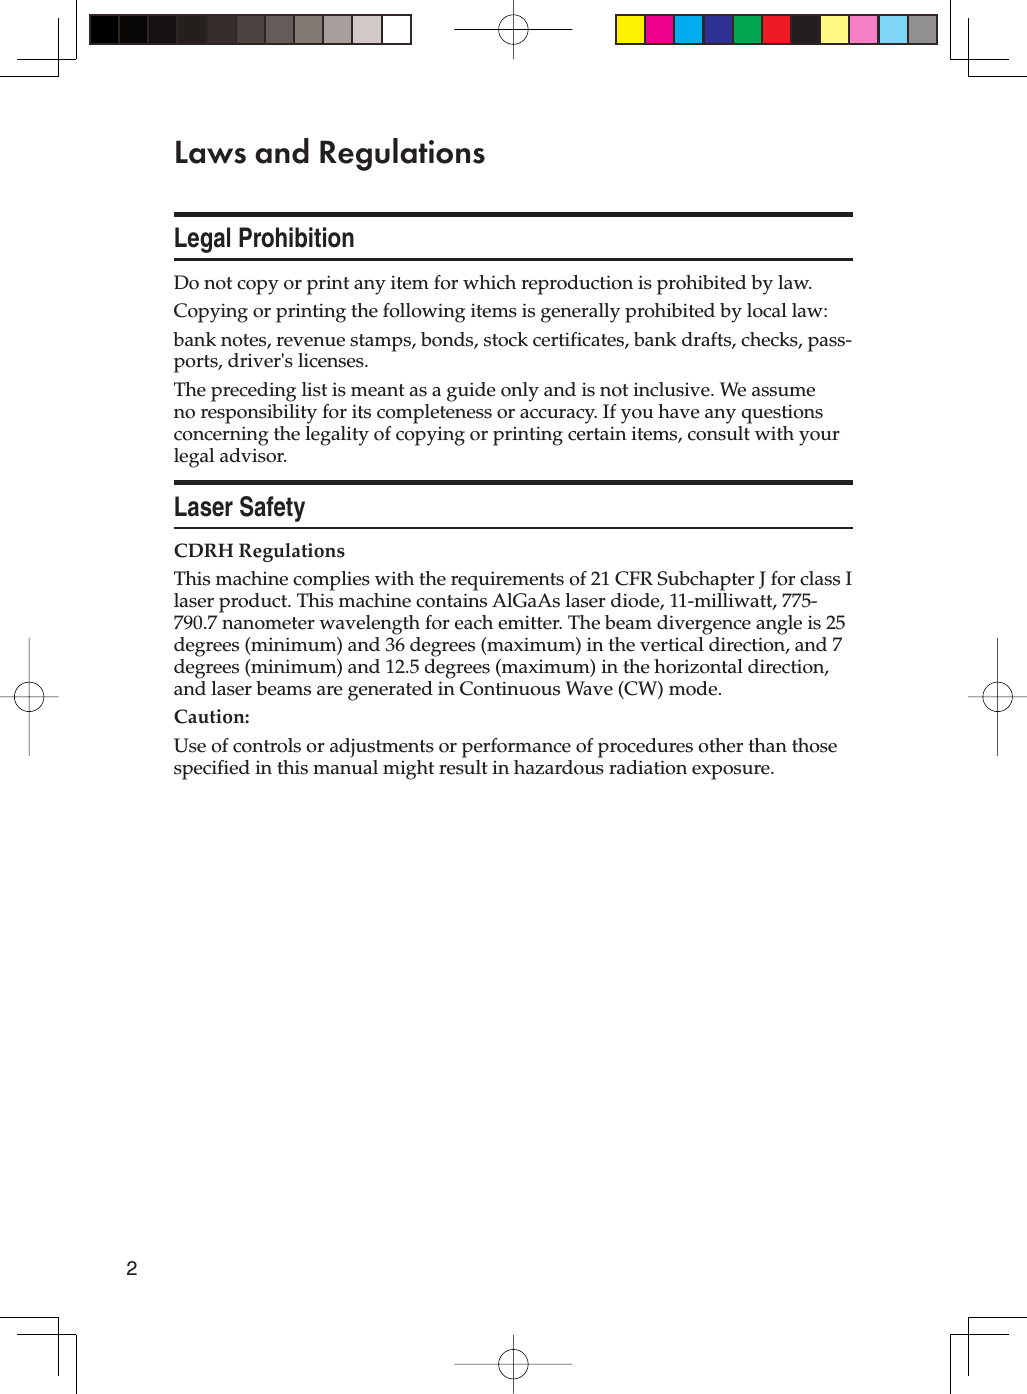
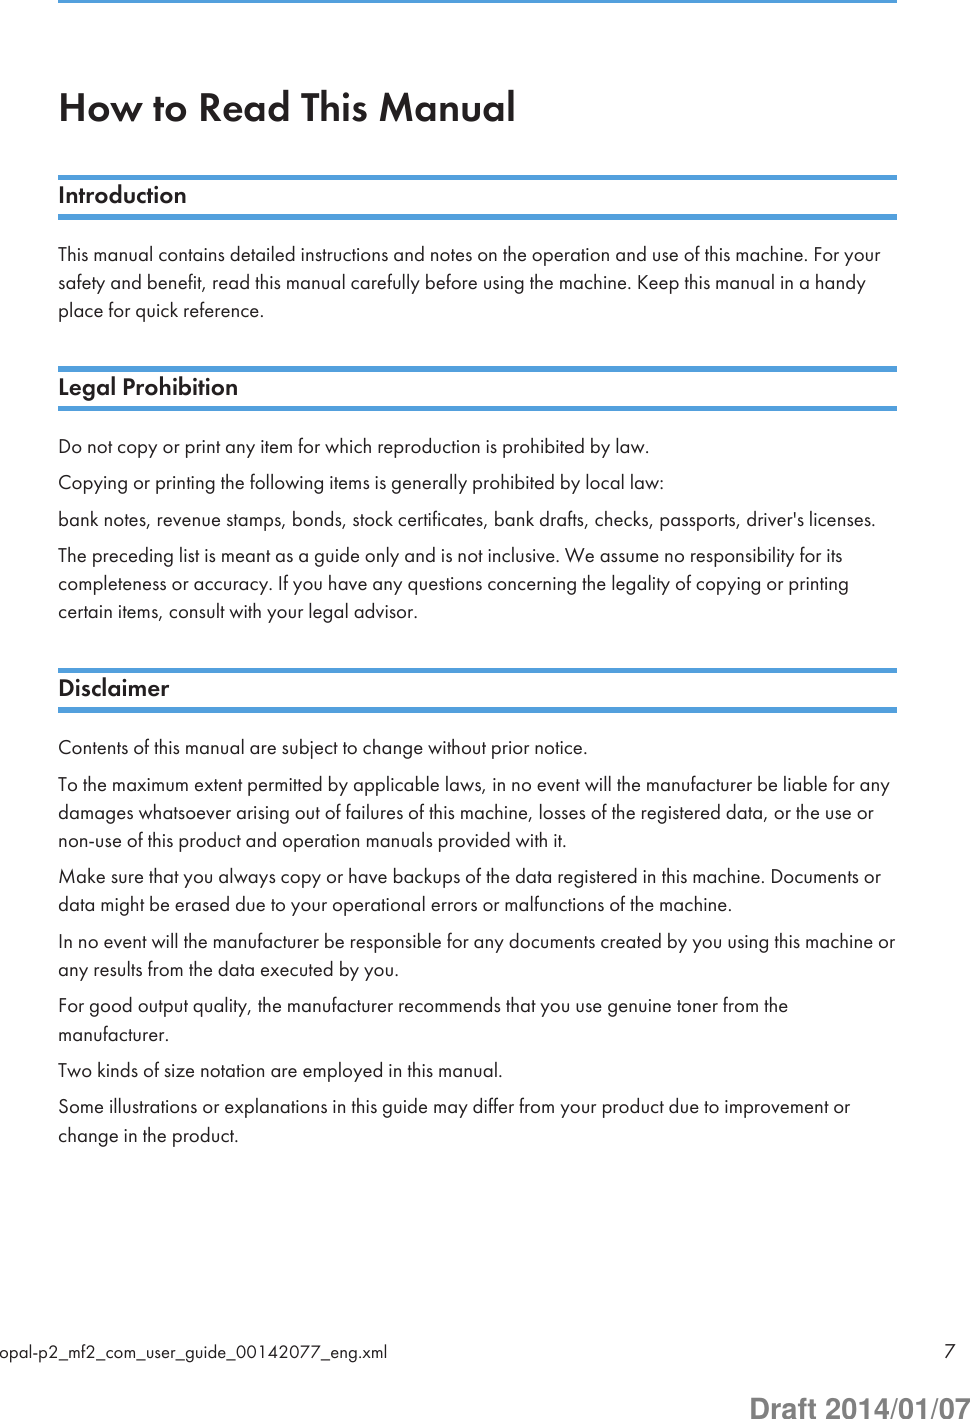
![3. Number KeysUse to enter numerical values when specifying settings such as fax numbers and copy quantities, or enterletters when specifying names.4. [User Tools] keyPress to display the menu for configuring the machine's system settings.5. [Clear/Stop] keyUse this key to cancel or stop a print job, document copying, scanning, fax transmission/reception, and otheractions in progress.6. Selection keysPress the key that corresponds to an item shown on the bottom line of the screen to select it.7. [Escape] keyPress to cancel the last operation or exit to the previous level of the menu tree.8. [OK] KeyUse this key to confirm settings and specified values, or move to the next menu level.9. [Start] keyUse this key to start fax transmission/reception, scan, or copy.On the Left• Depending on the model, the position of the keys may differ.Type1, Type2, Type5 4 5 67 812 3DCT8921. Guide to the Machine24 opal-p2_mf2_com_user_guide_00142078_eng.xmlDraft 2014/01/07](https://usermanual.wiki/Ricoh/PRSP213NW1/User-Guide-2199680-Page-24.png)
![1. [Shortcut to Func.] keyPress to enter ID card copy mode for the current job.If you do not use the ID card copy mode frequently, configure [Shortcut to Function] in [Admin. Tools] to makethis key available for sending faxes immediately or displaying scan file destinations. For [Shortcut to Function],see page 159 "Administrator Settings".2. [Image Quality] keyPress to select the image quality for the current job.• Copier mode: select Text, Photo, Mixed, or Vou.• Scanner mode: select the resolution.3. [Copy] key (Type2 only)Use this key to switch the machine to copier mode.4. Power IndicatorThis indicator lights up blue when the machine is turned on. It flashes when a print job is received and whileprinting, scanning, or fax transmission/reception is in progress.5. Alert IndicatorThis indicator lights up red when the machine runs out of paper or consumables, when the paper settings donot match the settings specified by the driver, or when other errors occur. It flashes slowly when the machine isrunning out of toner.6. [Density] keyPress to adjust image density for the current job.• Copier mode: select from 5 levels of density.• Scanner mode: select from 5 levels of density.7. [WIFI/LAN] key (Type2 only)Press this key to switch between wireless and wired LAN connection.Press this key to display the menu for manually configuring the settings in Infrastructure or Ad-Hoc modeselected in [Wi-Fi/LAN Key]. By holding down the key, you can display the menu for configuring the WPSusing the PIN code or in PBC mode. This key cannot be used if [Wi-Fi Enable] is set to [Disable].8. [Scanner] key (Type2 only)Use this key to switch the machine to scanner mode.Guide to Componentsopal-p2_mf2_com_user_guide_00142078_eng.xml 25Draft 2014/01/07](https://usermanual.wiki/Ricoh/PRSP213NW1/User-Guide-2199680-Page-25.png)
![Type3, Type4 9101112131412345678DCT8911. One Touch buttonsPress to select a scan or fax Quick Dial destination.2. [Pause/Redial] key• PausePress to insert a pause in a fax number. The pause is indicated by "P".• RedialPress to display the last used scan or fax destination.3. [On Hook Dial] keyPress to use on-hook dialing to check the destination's status when sending a fax.4. [Address Book] keyPress to select a scan or fax destination from the Address Book.5. [Image Quality] keyPress to select the image quality for the current job.• Copier mode: select Text, Photo, Mixed, or Vou.• Scanner mode: select the resolution.• Fax mode: select Standard, Detail, or Photo.6. [Shortcut to Func.] keyPress to enter ID card copy mode for the current job.If you do not use the ID card copy mode frequently, configure [Shortcut to Function] in [Admin. Tools] to makethis key available for sending faxes immediately or displaying scan file destinations. For [Shortcut to Function],see page 159 "Administrator Settings".7. [Facsimile] keyUse this key to switch the machine to fax mode.1. Guide to the Machine26 opal-p2_mf2_com_user_guide_00142078_eng.xmlDraft 2014/01/07](https://usermanual.wiki/Ricoh/PRSP213NW1/User-Guide-2199680-Page-26.png)
![8. [Copy] keyUse this key to switch the machine to copier mode.9. Power IndicatorThis indicator lights up blue when the machine is turned on. It flashes when a print job is received and whileprinting, scanning, or fax transmission/reception is in progress.10. Alert IndicatorThis indicator lights up red when the machine runs out of paper or consumables, when the paper settings donot match the settings specified by the driver, or when other errors occur. It flashes slowly when the machine isrunning out of toner.11. [Shift] keyPress to switch between Quick Dial numbers 1 to 4 and 5 to 8 when specifying a scan or fax destination usingthe One Touch buttons.12. [WIFI/LAN] key (Type4 only)Press this key to switch between wireless and wired LAN connection.Press this key to display the menu for manually configuring the settings in Infrastructure or Ad-Hoc modeselected in [Wi-Fi/LAN Key]. By holding down the key, you can display the menu for configuring the WPSusing the PIN code or in PBC mode. This key cannot be used if [Wi-Fi Enable] is set to [Disable].13. [Density] keyPress to adjust image density for the current job.• Copier mode: select from 5 levels of density.• Scanner mode: select from 5 levels of density.• Fax mode: select from 3 levels of density.14. [Scanner] key (Type4 only)Use this key to switch the machine to scanner mode.Guide to Componentsopal-p2_mf2_com_user_guide_00142078_eng.xml 27Draft 2014/01/07](https://usermanual.wiki/Ricoh/PRSP213NW1/User-Guide-2199680-Page-27.png)
![MFInitial SetupWhen you turn this machine on for the first time, you must set the following items. Select each settingusing the [ ], [ ], or number keys, and then press the [OK] key.Display languageThe selected language here is used for displaying messages, etc.Country*3The selected country is used for configuring the settings related to fax transmissions withappropriate default values for the country of use.User fax number*1The registered number is used as the fax number of the machine. The user fax number can contain0 to 9, spaces, and "+".User name*1The name entered here is used as the name of the fax sender.Date/TimeThe time and date entered here are used for the machine's internal clock.Area*2 *3By selecting the area in which the machine is being used, you can narrow down the choice ofdisplay language and other settings.*1 This setting is only available with Type 3 and 4 models.*2 This setting is only available with Type 1 and 2 models.*3 This setting may not be available depending on the region in which the machine is being used.Initial Setupopal-p2_mf2_com_user_guide_00142321_eng.xml 29Draft 2014/01/07](https://usermanual.wiki/Ricoh/PRSP213NW1/User-Guide-2199680-Page-29.png)
![Configuring Network SettingsThis section explains how to configure network settings.• Ethernet and wireless LAN settings cannot be enabled at the same time.MFConfiguring the IP Address SettingsThe procedure for configuring network settings differs depending on whether the IP address is assignedautomatically by the network (DHCP), is specified manually.• The password for accessing the [Admin. Tools] menu can be specified in [Admin. Tools Lock].• Using the supplied CD-ROM, you can install drivers and configure the network settings. For details,see Setup Guide.• For details about configuring the IPv4 address, see the Setup Guide.• For details about printing the configuration page, see page 150 "Printing Lists/Reports".Specifying settings to receive an IPv6 address automatically• A DHCP server is required on the network for the machine to receive an IPv6 addressautomatically.1. Press the [User Tools] key.DCT8452. Press the [ ] or [ ] key to select [Network Settings], and then press the [OK] key.3. If you are requested to enter a password, enter the password using the number keys,and then press the [OK] key.4. Press the [ ] or [ ] key to select [IPv6 Configuration], and then press the [OK] key.1. Guide to the Machine30 opal-p2_mf2_com_user_guide_00142080_eng.xmlDraft 2014/01/07](https://usermanual.wiki/Ricoh/PRSP213NW1/User-Guide-2199680-Page-30.png)
![5. Press the [ ] or [ ] key to select [IPv6], and then press the [OK] key.6. Press the [ ] or [ ] key to select [Active], and then press the [OK] key.7. Press the [ ] or [ ] key to select [DHCP], and then press the [OK] key.8. Press the [ ] or [ ] key to select [Active], and then press the [OK] key.9. Press the [User Tools] key to return to the initial screen.10. If you are requested to reboot the machine, turn off the machine, and then turn it back on.11. Print the configuration page to confirm the setting.The IPv6 address setting will appear under "IPv6 Configuration" on the configuration page.Assigning the machine's IPv6 address manually• The IPv6 address assigned to the machine must not be used by any other device on the samenetwork.1. Press the [User Tools] key.DCT8452. Press the [ ] or [ ] key to select [Network Settings], and then press the [OK] key.3. If you are requested to enter a password, enter the password using the number keys,and then press the [OK] key.4. Press the [ ] or [ ] key to select [IPv6 Configuration], and then press the [OK] key.5. Press the [ ] or [ ] key to select [IPv6], and then press the [OK] key.6. Press the [ ] or [ ] key to select [Active], and then press the [OK] key.7. Press the [ ] or [ ] key to select [DHCP], and then press the [OK] key.8. Press the [ ] or [ ] key to select [Inactive], and then press the [OK] key.9. Press the [ ] or [ ] key to select [Manual Config. Address], and then press the [OK] key.10. Press the [ ] or [ ] key to select [Manual Config. Address], and then press the [OK] key.11. Enter the machine’s IPv6 address using the number keys, and then press the [OK] key.Configuring Network Settingsopal-p2_mf2_com_user_guide_00142080_eng.xml 31Draft 2014/01/07](https://usermanual.wiki/Ricoh/PRSP213NW1/User-Guide-2199680-Page-31.png)
![12. Press the [ ] or [ ] key to select [Prefix Length], and then press the [OK] key.13. Enter the prefix length using the number keys, and then press the [OK] key.14. Press the [ ] or [ ] key to select [Gateway Address], and then press the [OK] key.15. Enter the gateway address using the number keys, and then press the [OK] key.16. Press the [User Tools] key to return to the initial screen.17. If you are requested to reboot the machine, turn off the machine, and then turn it back on.18. Print the configuration page to confirm the setting.The IPv6 address setting will appear under "IPv6 Configuration" on the configuration page.MFWireless LAN SetupThis section explains how to configure the wireless LAN settings manually using the control panel. Foreasy setup using WPS (Wi-Fi Protected Setup), see Wi-Fi Settings Guide.• If [Disable] is specified for the [Wi-Fi Enable] setting, you cannot use the [Setup Wizard]. Specify[Enable] for the [Wi-Fi Enable] setting first. If you change the [Wi-Fi Enable] setting, the machinemust be restarted.Infrastructure modeUse the following procedure to connect to the wireless LAN router or access point manually.• Ensure that the router, access point, or device equipped with a wireless LAN, etc., is turned on.• Check the authentication method and the name of the router, access point, or device equippedwith a wireless LAN (SSID/IBSS) in advance.1. Press the [User Tools] key.DCT8452. Press the [ ] or [ ] key to select [Network Settings], and then press the [OK] key.1. Guide to the Machine32 opal-p2_mf2_com_user_guide_00142080_eng.xmlDraft 2014/01/07](https://usermanual.wiki/Ricoh/PRSP213NW1/User-Guide-2199680-Page-32.png)
![3. If you are requested to enter a password, enter the password using the number keys,and then press the [OK] key.4. Press the [ ] or [ ] key to select [Wi-Fi], and then press the [OK] key.5. Press the [ ] or [ ] key to select [Setup Wizard], and then press the [OK] key.6. Select [Infrastructure], and then press [Next].7. Press the [ ] or [ ] key to select the destination SSID, and then press [Next].If you cannot find the destination SSID, check if the device is turned on.When entering the SSID, select [Input SSID], and then press [Next].The SSID entry screen appears. Enter the SSID using the number keys, and then press [Next].8. Press the [ ] or [ ] key to select the authentication method, and then press [Next].Select the same method that the router or access point is using.If you have selected [WPA2-PSK] or [Mix Mode WPA2/WPA], proceed to Step 10.9. Press the [ ] or [ ] key to select the encryption method, and then press [Next].Select the same method that the router or access point is using.10. Enter the encryption key using the number keys, and then press [Connect].If you selected [Shared Key] or [Open System] in Step 8, it is necessary to enter the ID. The ID isused for identifying the encryption key. You can register four encryption keys (ID 1 to 4). Use the[ ] or [ ] key to switch between the encryption key and ID settings.11. Press [Yes].After connecting to the network, the Wi-Fi screen is displayed.12. Press the [ ] or [ ] key to select [Wi-Fi Status], and then press the [OK] key.When "Connected" is displayed, the connection has been established.When "Disconnected" is displayed, the connection has not been established. Start again from thebeginning.Ad Hoc modeThis section explains how to connect directly to devices equipped with a wireless LAN, such ascomputers on a peer-to-peer network.• Make sure [Wi-Fi/LAN Key] is set to [Ad-Hoc Mode]. For [Wi-Fi/LAN Key], see page 155"Network Settings".• In Ad Hoc network, every device must be manually assigned an IP address for TCP/IP if there is noDHCP server.• In Ad Hoc mode, only Open System or WEP encryption is supported. WPA2-PSK and Mix ModeWPA2/WPA authentication methods are not supported.Configuring Network Settingsopal-p2_mf2_com_user_guide_00142080_eng.xml 33Draft 2014/01/07](https://usermanual.wiki/Ricoh/PRSP213NW1/User-Guide-2199680-Page-33.png)
![1. Press the [WIFI/LAN] key.DCT853If [Disable] is specified for the [Wi-Fi Enable] setting, you cannot use the [WIFI/LAN] key.2. Press the [ ] or [ ] key to select a communication channel, and then press [Next].Select a channel that corresponds to the device that you are going to connect with.3. Press the [ ] or [ ] key to select the destination device name (IBSS), and then press[Next].If you cannot find the destination, check that the device is turned on.When entering the device name, select [Input SSID], and then press [Next]. The SSID entry screenappears. Enter the device name using the number keys, and then press [Next].4. Press the [ ] or [ ] key to select the authentication method, and then press [Next].5. Press the [ ] or [ ] key to select the encryption method, and then press [Next].6. Enter the encryption key and ID using the number keys, and then press [Connect].The ID is used for identifying the encryption key. You can register four encryption keys (ID 1 to 4).7. Press [Yes].8. Check the connection using [Wi-Fi Status].When "Connected" is displayed, the connection has been established.When "Disconnected" is displayed, the connection has not been established. Start again from thebeginning.PConfiguring the IP Address Settings Using the Smart Organizing MonitorThe procedure for configuring network settings differs depending on whether IP address information isassigned automatically by the network (DHCP), or manually.• Using the supplied CD-ROM, you can install drivers and configure the network settings. For details,see Setup Guide.1. Guide to the Machine34 opal-p2_mf2_com_user_guide_00142080_eng.xmlDraft 2014/01/07](https://usermanual.wiki/Ricoh/PRSP213NW1/User-Guide-2199680-Page-34.png)
![• For details about configuring the IPv4 address, see the Setup Guide.• For details about printing the configuration page, see page 198 "Using Smart OrganizingMonitor".Specifying settings to receive an IPv6 address automatically• A DHCP server is required on the network for the machine to receive an IPv6 addressautomatically.1. On the [Start] menu, click [All Programs].2. Click [Smart Organizing Monitor for SP xxx Series].3. Click [Smart Organizing Monitor Status].If the machine you are using is not selected, click [Connect Printer], and then select the machine'smodel.4. Click the [User Tools] tab.5. Click [Printer Configuration].6. Enter the access code, and then click [OK].The default access code is "Admin". Enter "Admin" if it has not been changed. Case is significant.7. Click the [IPv6] tab.8. Select [Enable] in [IPv6 DHCP:].9. Select [Enable] in [IPv6], and the click [OK].10. Click [Close].Assigning the machine's IPv6 address manually• The IPv6 address assigned to the machine must not be used by any other device on the samenetwork.1. On the [Start] menu, click [All Programs].2. Click [Smart Organizing Monitor for SP xxx Series].3. Click [Smart Organizing Monitor Status].If the machine you are using is not selected, click [Connect Printer], and then select the machine'smodel.4. Click the [User Tools] tab.5. Click [Printer Configuration].Configuring Network Settingsopal-p2_mf2_com_user_guide_00142080_eng.xml 35Draft 2014/01/07](https://usermanual.wiki/Ricoh/PRSP213NW1/User-Guide-2199680-Page-35.png)
![6. Enter the access code, and then click [OK].The default access code is "Admin". Enter "Admin" if it has not been changed. Case is significant.7. Click the [IPv6] tab.8. Select [Disable] in [IPv6 DHCP:].9. Select [Enable] in [IPv6].10. Enter values in [Manual address:], [Prefix length:], and [Gateway:], and then click [OK].11. Click [Close].PWireless LAN SetupThis section explains how to configure the wireless LAN settings manually using Smart OrganizingMonitor. For easy setup using WPS (Wi-Fi Protected Setup), see Wi-Fi Settings Guide.Configuring the Infrastructure mode using Smart Organizing Monitor• Ensure that the router, access point, or device equipped with a wireless LAN, etc., is turned on.• Check the authentication method and the name of the router, access point, or device equippedwith a wireless LAN (SSID/IBSS) in advance.1. On the [Start] menu, click [All Programs].2. Click [Smart Organizing Monitor for SP xxx Series].3. Click [Smart Organizing Monitor Status].If the machine you are using is not selected, click [Connect Printer], and then select the machine'smodel.4. Click the [User Tools] tab.5. Click [Printer Configuration].6. Enter the access code, and then click [OK].The default access code is "Admin". Enter "Admin" if it has not been changed. Case is significant.7. On the [Network 1] tab, set [Wireless Function:] to [Active].8. On the [Wireless] tab, set [Manual Setup] to [Configuration Method].9. In [SSID], enter the SSID.10. Set [Communication Mode] to [Infrastructure].11. In the [Authentication] box, select the authentication method.1. Guide to the Machine36 opal-p2_mf2_com_user_guide_00142080_eng.xmlDraft 2014/01/07](https://usermanual.wiki/Ricoh/PRSP213NW1/User-Guide-2199680-Page-36.png)
![12. In the [Encryption] box, select the encryption method.If you have selected [WPA2-PSK] or [Mix Mode WPA/WPA2] in [Authentication], proceed toStep 17.13. In the [WEP Key Length] box, select [64 bit] or [128 bit].14. In the [WEP Transmit Key ID] box, select the ID.15. In the [WEP Key Format] box, select [Hexadecimal] or [ASCII].16. In [WEP Key], enter the password.If you have specified [WEP key], proceed to Step 18.17. In [WPA Passphrase], enter the password.18. Click [Connect].19. Click [OK].20. Click [Close].Configuring the Ad hoc mode using Smart Organizing Monitor• In Ad Hoc network, every device must be manually assigned an IP address for TCP/IP if there is noDHCP server.• In Ad Hoc mode, only Open System or WEP encryption is supported. WPA2-PSK and Mix ModeWPA2/WPA authentication methods are not supported.1. On the [Start] menu, click [All Programs].2. Click [Smart Organizing Monitor for SP xxx Series].3. Click [Smart Organizing Monitor Status].If the machine you are using is not selected, click [Connect Printer], and then select the machine'smodel.4. Click the [User Tools] tab.5. Click [Printer Configuration].6. Enter the access code, and then click [OK].The default access code is "Admin". Enter "Admin" if it has not been changed. Case is significant.7. On the [Network 1] tab, set [Wireless Function:] to [Active].8. On the [Wireless] tab, set [Manual Setup] to [Configuration Method].9. In [SSID], enter the SSID.10. Set [Communication Mode] to [Ad-Hoc].11. In the [Ad-Hoc Channel] box, select the channel number.12. In the [Authentication] box, select the authentication method.Configuring Network Settingsopal-p2_mf2_com_user_guide_00142080_eng.xml 37Draft 2014/01/07](https://usermanual.wiki/Ricoh/PRSP213NW1/User-Guide-2199680-Page-37.png)
![13. In the [Encryption] box, select the encryption method.14. In the [WEP Key Length] box, select [64 bit] or [128 bit].15. In the [WEP Transmit Key ID] box, select the ID.16. In the [WEP Key Format] box, select [Hexadecimal] or [ASCII].17. In [WEP Key], enter the password.18. Click [Connect].19. Click [OK].20. Click [Close].• For details about how to use Smart Organizing Monitor, see page 198 "Using Smart OrganizingMonitor".1. Guide to the Machine38 opal-p2_mf2_com_user_guide_00142080_eng.xmlDraft 2014/01/07](https://usermanual.wiki/Ricoh/PRSP213NW1/User-Guide-2199680-Page-38.png)
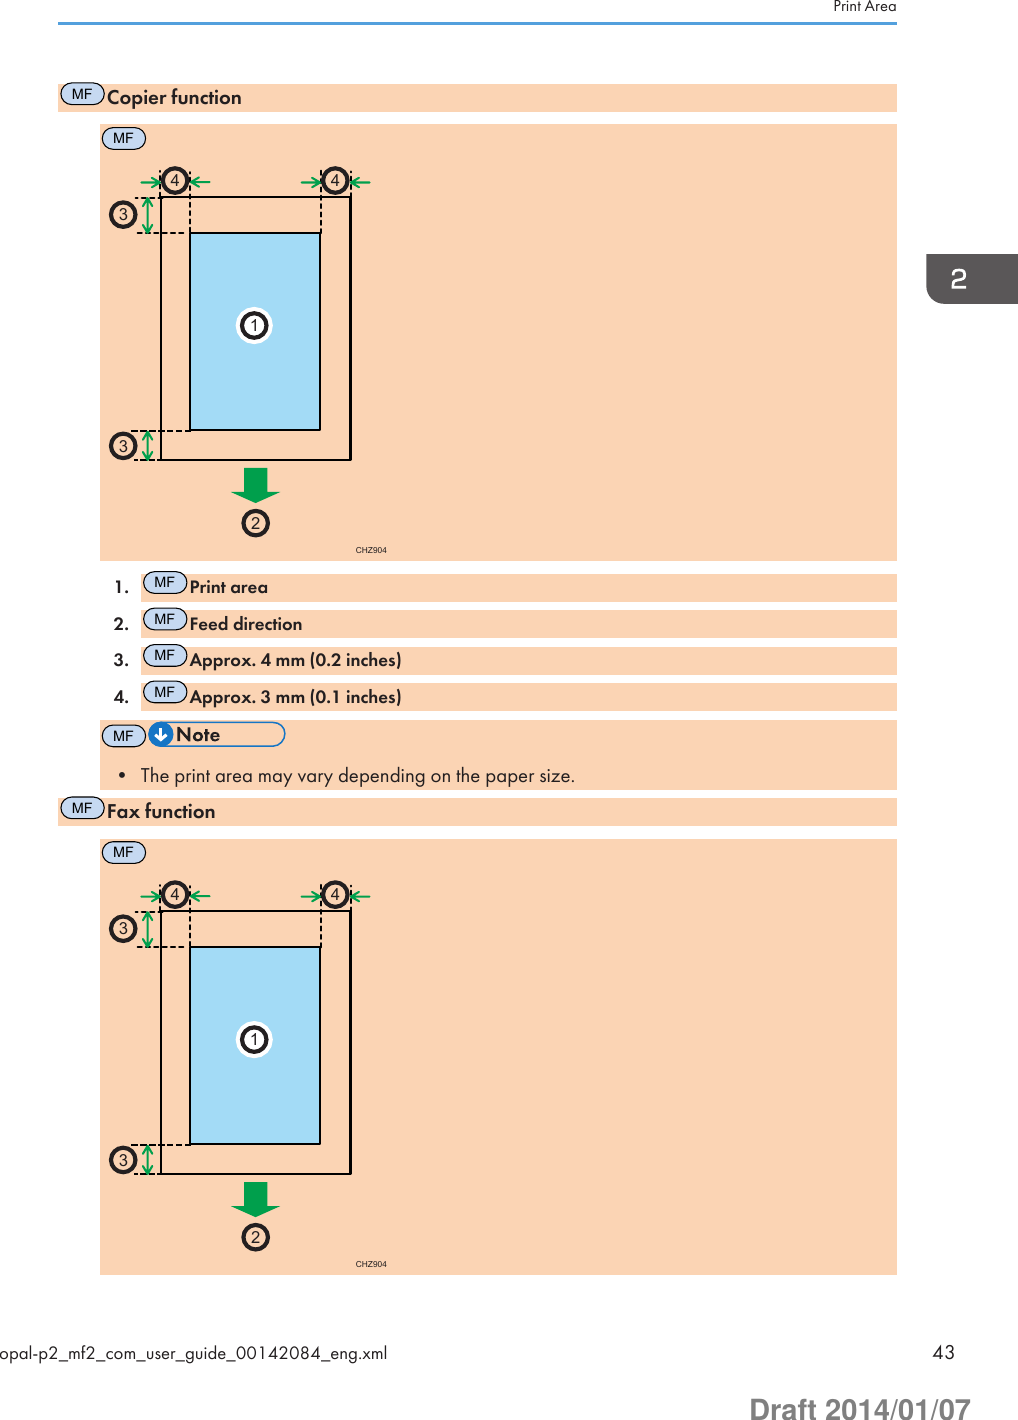
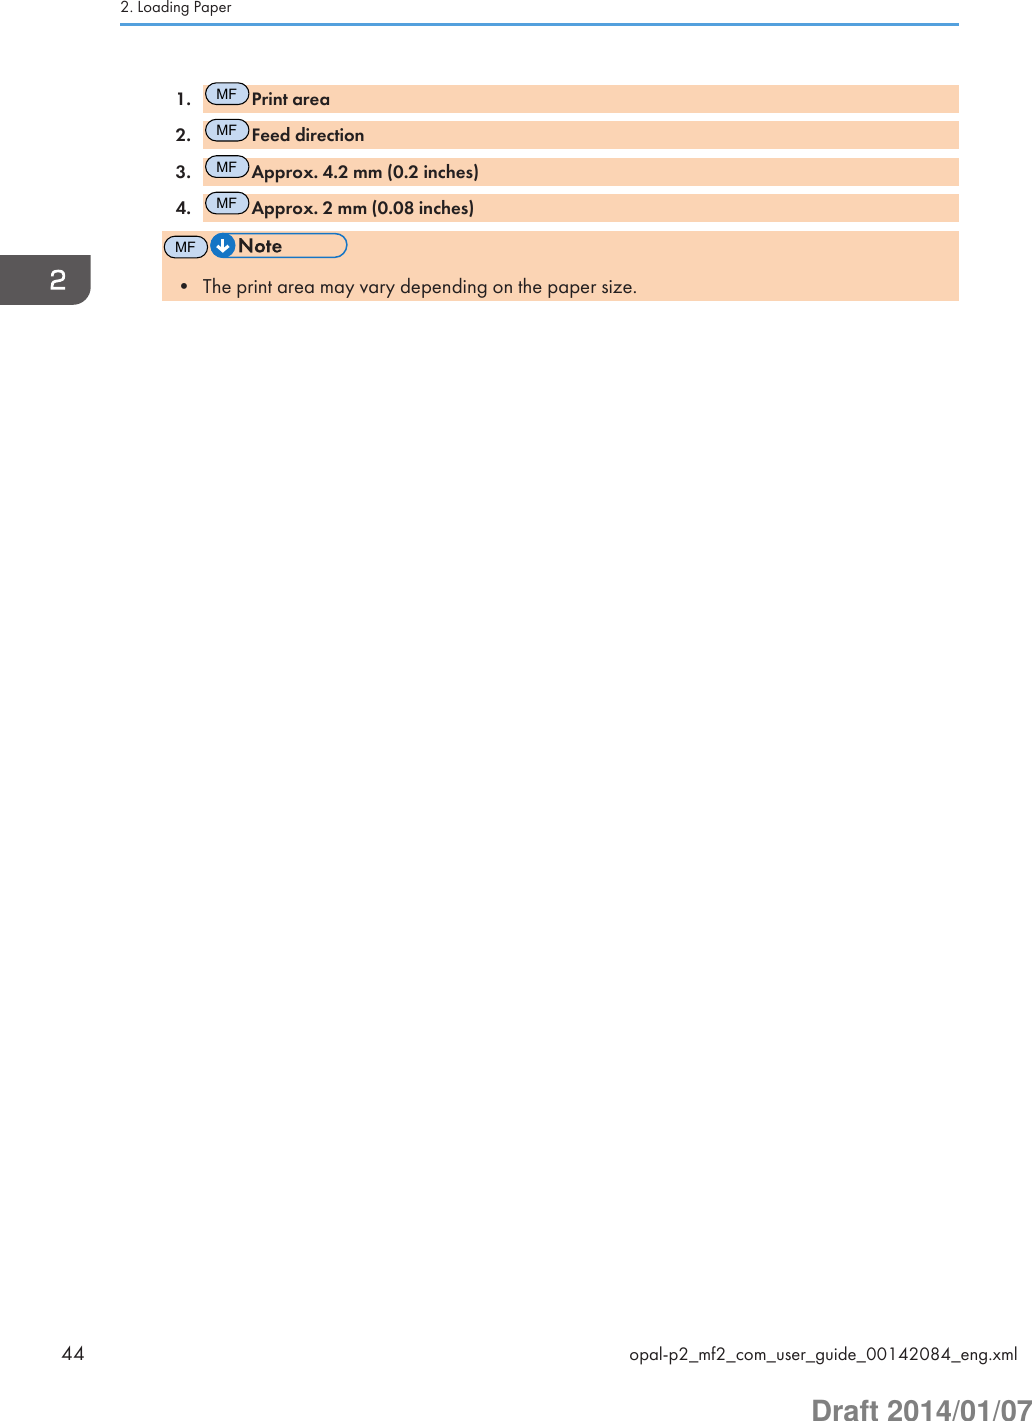
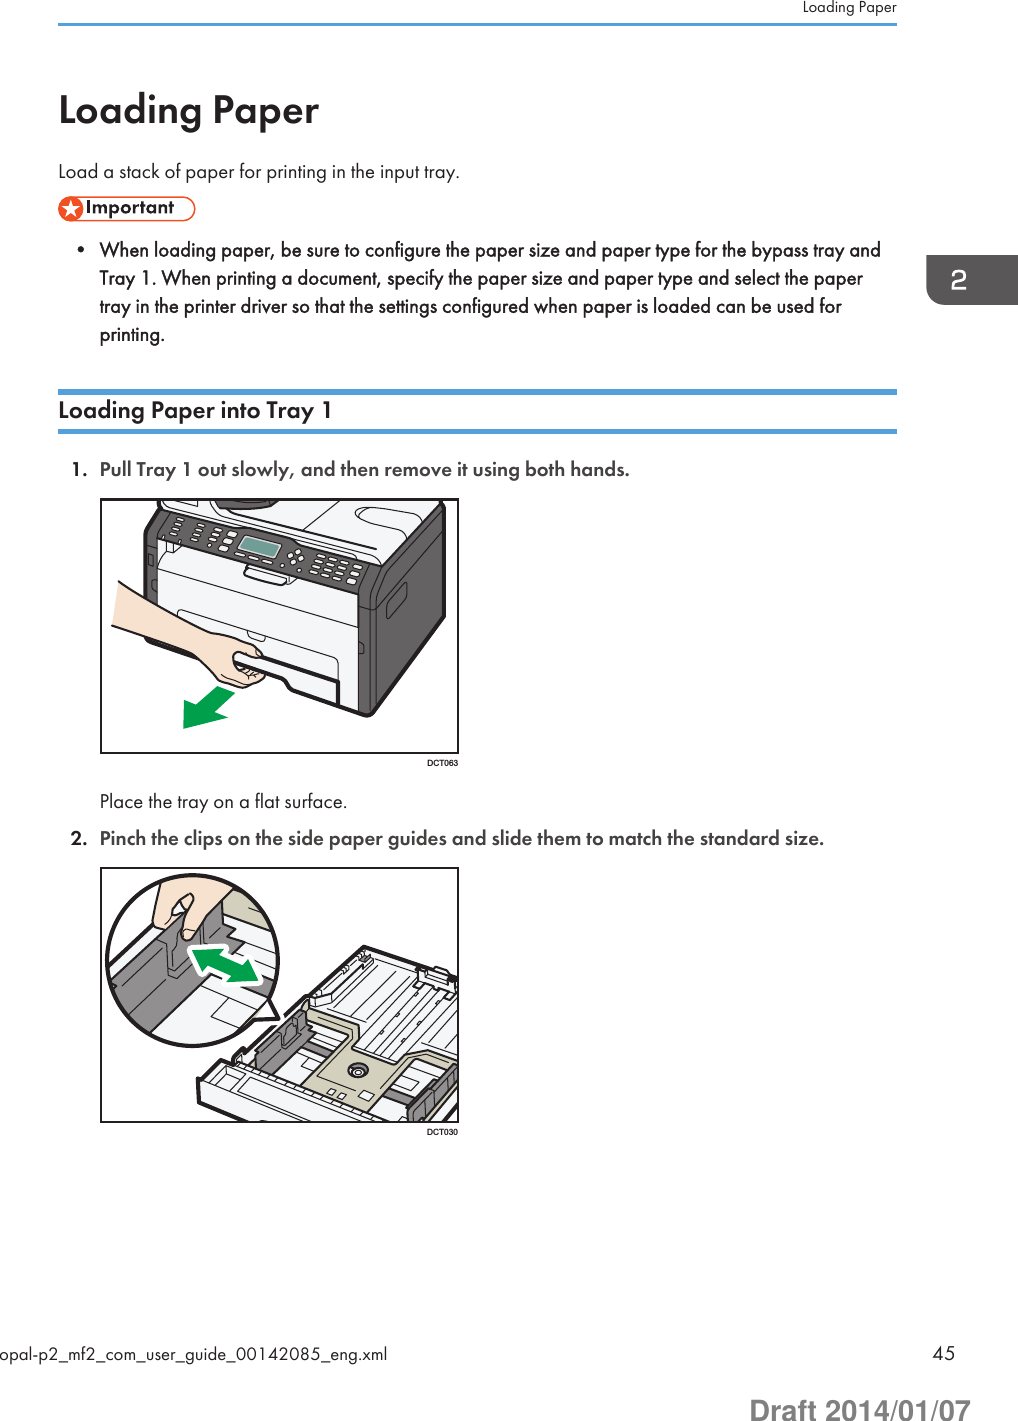
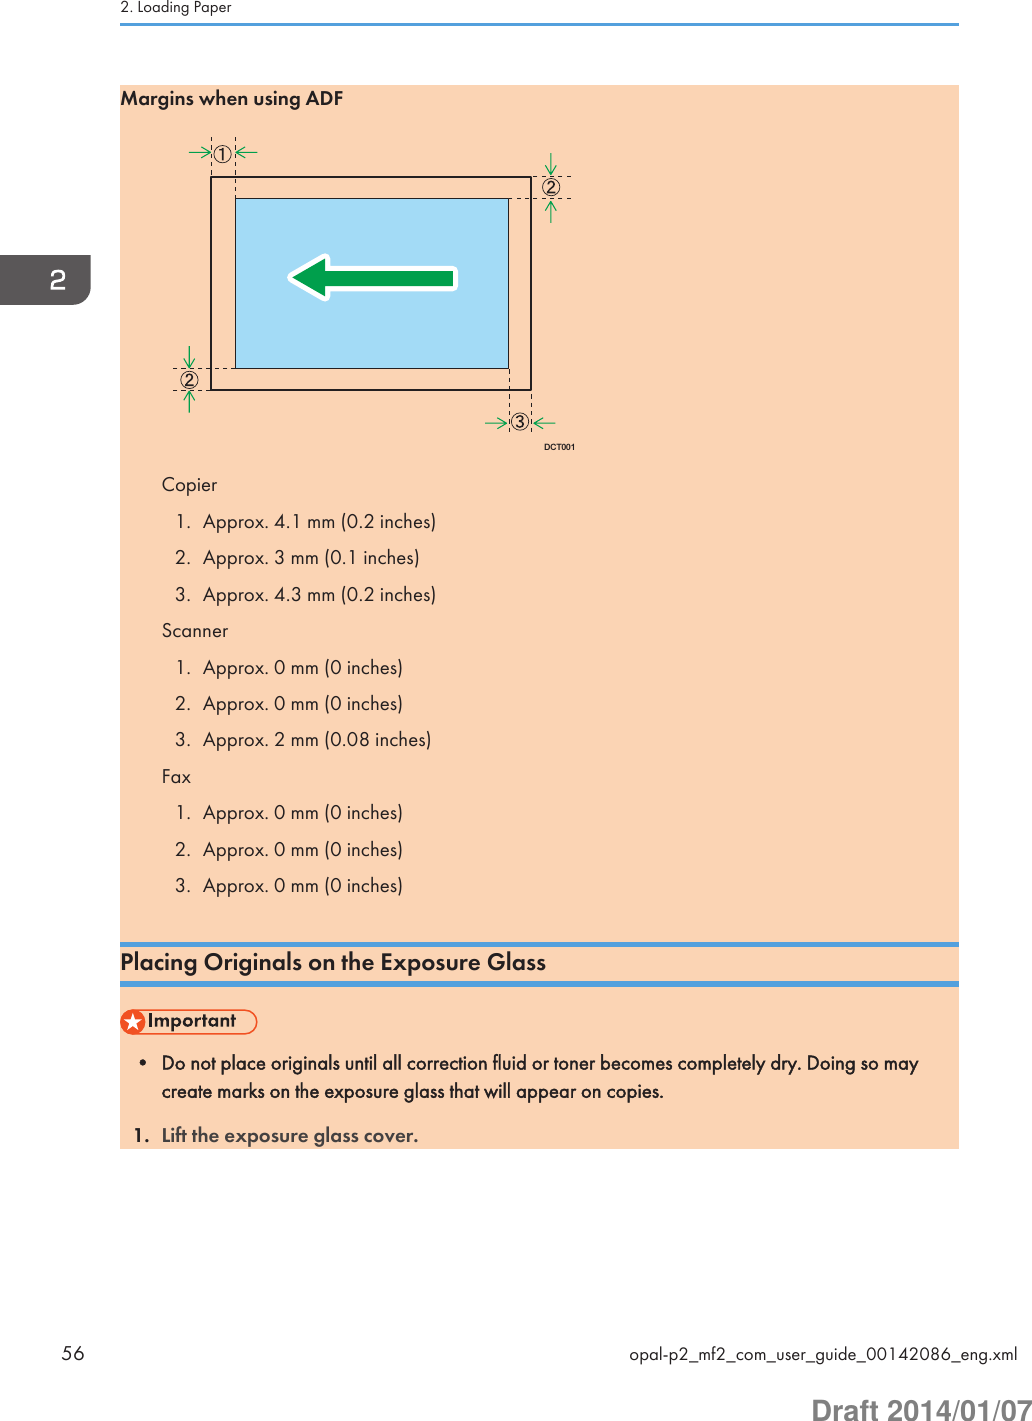
![Print AreaThe diagram below shows the area of the paper that the machine can print on.From the printer driverCHZ9042331441. Print area2. Feed direction3. Approx. 4.2 mm (0.2 inches)4. Approx. 4.2 mm (0.2 inches)• The print area may vary depending on the paper size and printer driver settings.•MFAdjust the print position by specifying [Printer Registration] in [System Settings].•PTo adjust the print position, specify [Registration: Tray 1] or [Registration: Bypass Tray] onthe [Maintenance] tab in Smart Organizing Monitor.2. Loading Paper42 opal-p2_mf2_com_user_guide_00142084_eng.xmlDraft 2014/01/07](https://usermanual.wiki/Ricoh/PRSP213NW1/User-Guide-2199680-Page-42.png)
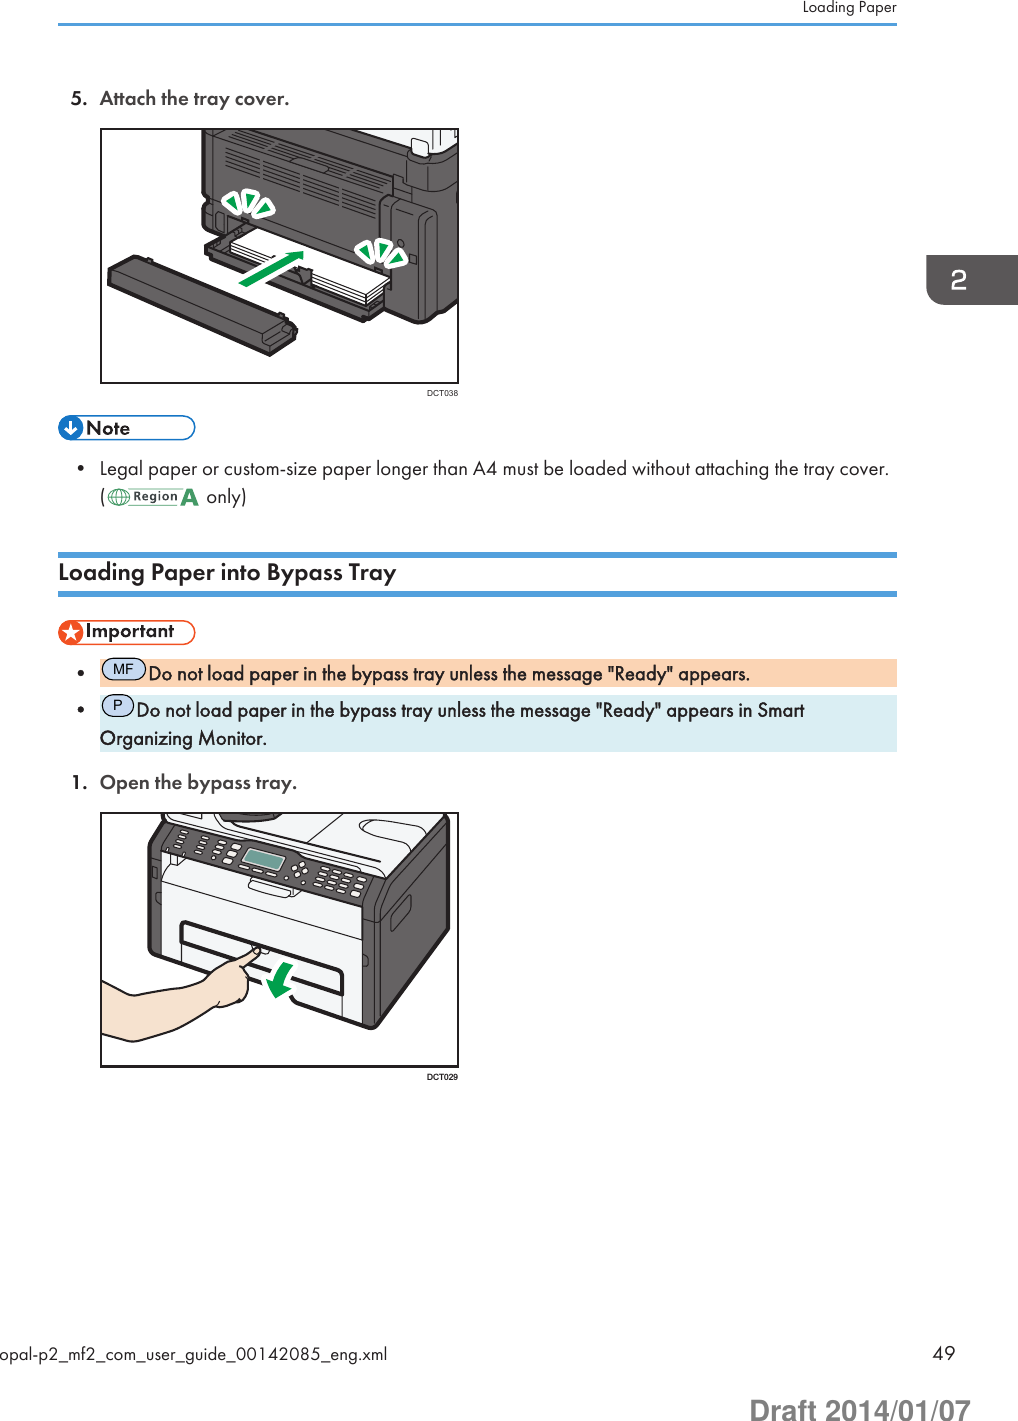
![MFSpecifying Paper Type and Paper Size Using Control PanelSpecifying the paper type1. Press the [User Tools] key.DCT8452. Press the [ ] or [ ] key to select [System Settings], and then press the [OK] key.3. Press the [ ] or [ ] key to select [Tray Paper Settings], and then press the [OK] key.4. Press the [ ] or [ ] key to select the paper type setting for the desired tray, and thenpress the [OK] key.5. Press the [ ] or [ ] key to select the desired paper type, and then press the [OK] key.6. Press the [User Tools] key to return to the initial screen.Specifying the standard paper size1. Press the [User Tools] key.DCT8452. Press the [ ] or [ ] key to select [System Settings], and then press the [OK] key.3. Press the [ ] or [ ] key to select [Tray Paper Settings], and then press the [OK] key.Loading Paperopal-p2_mf2_com_user_guide_00142085_eng.xml 51Draft 2014/01/07](https://usermanual.wiki/Ricoh/PRSP213NW1/User-Guide-2199680-Page-51.png)
![4. Press the [ ] or [ ] key to select the paper size setting for the desired tray, and then pressthe [OK] key.5. Press the [ ], [ ], [ ], or [ ] key to select the desired paper size, and then press the [OK]key.6. Press the [User Tools] key to return to the initial screen.Specifying a custom paper size1. Press the [User Tools] key.DCT8452. Press the [ ] or [ ] key to select [System Settings], and then press the [OK] key.3. Press the [ ] or [ ] key to select [Tray Paper Settings], and then press the [OK] key.4. Press the [ ] or [ ] key to select the paper size setting for the desired tray, and then pressthe [OK] key.5. Press the [ ], [ ], [ ], or [ ] key to select [Custom Size], and then press the [OK] key.6. Press the [ ] or [ ] key to select [mm] or [inch], and then press the [OK] key.7. Enter the width using number keys, and then press the [OK] key.To enter a decimal point, press the [ ] key.8. Enter the length using number keys, and then press the [OK] key.To enter a decimal point, press the [ ] key.9. Press the [User Tools] key to return to the initial screen.PSpecifying Paper Type and Paper Size Using Smart Organizing MonitorThe procedure in this section is an example based on Windows 7. The actual procedure may varydepending on the operating system you are using.2. Loading Paper52 opal-p2_mf2_com_user_guide_00142085_eng.xmlDraft 2014/01/07](https://usermanual.wiki/Ricoh/PRSP213NW1/User-Guide-2199680-Page-52.png)
![Specifying the paper type and paper size1. On the [Start] menu, click [All Programs].2. Click [Smart Organizing Monitor for SP xxx Series].3. Click [Smart Organizing Monitor Status].If the machine you are using is not selected, click [Connect Printer], and then select the machine'smodel.4. On the [User Tools] tab, click [Printer Configuration].5. Click the [Paper Input] tab.6. Select the paper type and paper size setting for the desired tray, and then click [OK].7. Click [Close].Changing the custom paper size1. On the [Start] menu, click [All Programs].2. Click [Smart Organizing Monitor for SP xxx Series].3. Click [Smart Organizing Monitor Status].If the machine you are using is not selected, click [Connect Printer], and then select the machine'smodel.4. On the [User Tools] tab, click [Printer Configuration].5. On the [Paper Input] tab, select [Custom Paper Size] in the [Paper Size:] list of the papertray in use.6. In the [Unit:] list, select [mm] or [inch].7. In the [Horizontal:] box and [Vertical:] box, specify the width and length.8. Click [OK].9. Click [Close].Loading Paperopal-p2_mf2_com_user_guide_00142085_eng.xml 53Draft 2014/01/07](https://usermanual.wiki/Ricoh/PRSP213NW1/User-Guide-2199680-Page-53.png)
![3. Printing DocumentsBasic OperationUse the printer driver to print a document from your computer.1. After creating a document, open the [Printing Preferences] dialog box in the document'snative application.2. Change any print settings if necessary.For details about each setting items, click [Help].3. When setting changes are completed, click [OK].4. Print the document using the print function in the document's native application.• If a paper jam occurs, printing stops halfway. Open the front cover, remove the print cartridge, andthen remove the jammed paper. If the paper cannot be removed in this way, remove it by openingthe fusing cover. Printing will resume automatically once the cover is closed.Printing on Both Sides of Sheets• This function cannot be available with the bypass tray.1. After creating a document, open the [Printing Preferences] dialog box in the document'snative application.2. On the [Setup] tab, in the [Duplex:] list box, select how you want to open the boundoutput.3. After making any additional settings, click [OK].opal-p2_mf2_com_user_guide_00142088_eng.xml 59Draft 2014/01/07](https://usermanual.wiki/Ricoh/PRSP213NW1/User-Guide-2199680-Page-59.png)
![4. Start printing.PThe machine prints only the one sides of pages first, and then displays on Smart OrganizingMonitor screen a message to reload the outputs turned over.5. Take out all of the prints from the output tray and place them in Tray 1.To print on the reverse side of the prints, turn them over so that the blank side faces down andplace them in Tray 1. Fan the paper well before loading it.PortraitDCT005LandscapeDCT0066.MFPress [Continue].7.PPress the [Start] key.• If the rear cover is open, the paper is delivered face up from the rear. Rearrange the printed sheetsin the correct order.Canceling a Print JobYou can cancel print jobs using either the machine's control panel or your computer, depending on thestatus of the job.3. Printing Documents60 opal-p2_mf2_com_user_guide_00142088_eng.xmlDraft 2014/01/07](https://usermanual.wiki/Ricoh/PRSP213NW1/User-Guide-2199680-Page-60.png)
![Canceling a print job before printing has started1. Double-click the printer icon on the task tray of your computer.2. Select the print job you want to cancel, click the [Document] menu, and then click[Cancel].• If you cancel a print job that has already been processed, printing may continue for a few pagesbefore being canceled.• It may take a while to cancel a large print job.MFCanceling a print job while printing1. Press the [Clear/Stop] key.DCT846PCanceling a print job while printing1. Press the [Job Reset] key.Basic Operationopal-p2_mf2_com_user_guide_00142088_eng.xml 61Draft 2014/01/07](https://usermanual.wiki/Ricoh/PRSP213NW1/User-Guide-2199680-Page-61.png)
![If a Paper Mismatch OccursIf the paper size does not match the print job's settings, the machine reports an error. There are twoways to resolve this error:Continue printing using mismatched paperUse the form-feed function to ignore the error and print using mismatched paper.Reset the print jobCancel printing.MFContinuing Printing Using Mismatched PaperIf the paper is too small for the print job, the printed image will be cropped.1. If the error message is displayed, press [FormFeed].PContinuing Printing Using Mismatched PaperIf the paper is too small for the print job, the printed image will be cropped.1. If the Alert indicator lights up, press the [Start] key.MFResetting the Print Job1. If the error message is displayed, press [JobReset].PResetting the Print Job1. If the Alert indicator lights up, press the [Job Reset] key.3. Printing Documents62 opal-p2_mf2_com_user_guide_00142089_eng.xmlDraft 2014/01/07](https://usermanual.wiki/Ricoh/PRSP213NW1/User-Guide-2199680-Page-62.png)
![4. Copying OriginalsMFCopier Mode ScreenThis section provides information about the screen when the machine is in copier mode.By default, the display shows the copier screen when the machine is turned on.If the scanner or fax screen is shown on the display, press the [Copy] key on the control panel to switchto the copier screen.Type 1 models do not have the [Copy] key. If ID card copy mode is being displayed, press the [Shortcutto Func.] key again to switch to normal copier mode.Type 1 and 5 models do not have the [Copy] key. If ID card copy mode is being displayed, press the[Shortcut to Func.] key again to switch to normal copier mode.DCT848Standby mode screenCVW2001. Current status or messagesDisplays the current status or messages.2. Current settingsDisplays the current tray, reproduction ratio, and scan settings.3. Selection key itemsDisplays the functions you can use by pressing the corresponding selection keys.4. Copy quantityDisplays the current copy quantity. You can change the copy quantity using the number keys.opal-p2_mf2_com_user_guide_00142091_eng.xml 63Draft 2014/01/07](https://usermanual.wiki/Ricoh/PRSP213NW1/User-Guide-2199680-Page-63.png)
![• The start-up mode can be specified in the [Function Priority] setting under [Admin. Tools]. Fordetails, see page 159 "Administrator Settings".4. Copying Originals64 opal-p2_mf2_com_user_guide_00142091_eng.xmlDraft 2014/01/07](https://usermanual.wiki/Ricoh/PRSP213NW1/User-Guide-2199680-Page-64.png)
![MFBasic Operation• The original in the ADF takes precedence over the original on the exposure glass if you placeoriginals both in the ADF and on the exposure glass.1. Press the [Copy] key.DCT848With Type 1 models, start from Step 2. If ID card copy mode is being displayed, press the [Shortcutto Func.] key again to switch to normal copier mode.With Type 1 or 5 models, start from Step 2. If ID card copy mode is being displayed, press the[Shortcut to Func.] key again to switch to normal copier mode.2. Place the original on the exposure glass or in the ADF.3. To make multiple copies, enter the number of copies using the number keys.4. Press the [Start] key.DCT847• If a paper jam occurs, printing stops halfway. Open the front cover, remove the print cartridge, andthen remove the jammed paper. If the paper cannot be removed in this way, remove it by openingthe fusing cover. Printing will resume automatically once the cover is closed.Basic Operationopal-p2_mf2_com_user_guide_00142092_eng.xml 65Draft 2014/01/07](https://usermanual.wiki/Ricoh/PRSP213NW1/User-Guide-2199680-Page-65.png)
![• If there is a paper jam in the ADF, open the ADF cover, and then remove the jammed paper.Specify the copy setting again from the page where the paper jammed.• To print on paper fed from Tray 1, remove the paper loaded in the bypass tray. Otherwise, thepaper in the bypass tray is fed first.• [Sort] and [Duplex/Combine] cannot be used with the bypass tray.• When making multiple copies of a multi-page document, you can select whether copies are outputin collated sets, or in page batches in the [Sort] setting under [Copier Features].Canceling a CopyIf copying is canceled while scanning an original placed on the exposure glass, copying is canceledimmediately and there is no printout. If copying is canceled while scanning a multiple-page originalplaced in the ADF, scanning stops halfway at the current page.1. Press the [Copy] key.With Type 1 models, start from Step 2.With Type 1 or 5 models, start from Step 2.2. Press the [Clear/Stop] key.DCT8464. Copying Originals66 opal-p2_mf2_com_user_guide_00142092_eng.xmlDraft 2014/01/07](https://usermanual.wiki/Ricoh/PRSP213NW1/User-Guide-2199680-Page-66.png)
![MFMaking Enlarged or Reduced CopiesThere are two ways to set the scaling ratio: using a preset ratio or manually specifying a customizedratio.Preset ratioCES103(mainly Europe and Asia)50%, 71% A4 A5, 82% B5 JIS A5, 93%, 122% A5 B5 JIS, 141% A5 A4, 200%,400% (mainly North America)50%, 65% LT HLT, 78% LG LT, 93%, 129% HLT LT, 155% HLT LG, 200%, 400%Custom ratioCES10625% to 400% in 1% increments.Specifying Reduce/Enlarge1. Press [Scale]. Making Enlarged or Reduced Copiesopal-p2_mf2_com_user_guide_00142093_eng.xml 67Draft 2014/01/07](https://usermanual.wiki/Ricoh/PRSP213NW1/User-Guide-2199680-Page-67.png)
![2. Press [Reduce], [Enlarge], or [Zoom].For [Reduce] or [Enlarge], press the [ ], [ ], [ ], or [ ] key to select the desired ratio. For [Zoom],specify the desired ratio using the number keys.3. Press the [OK] key.4. Copying Originals68 opal-p2_mf2_com_user_guide_00142093_eng.xmlDraft 2014/01/07](https://usermanual.wiki/Ricoh/PRSP213NW1/User-Guide-2199680-Page-68.png)
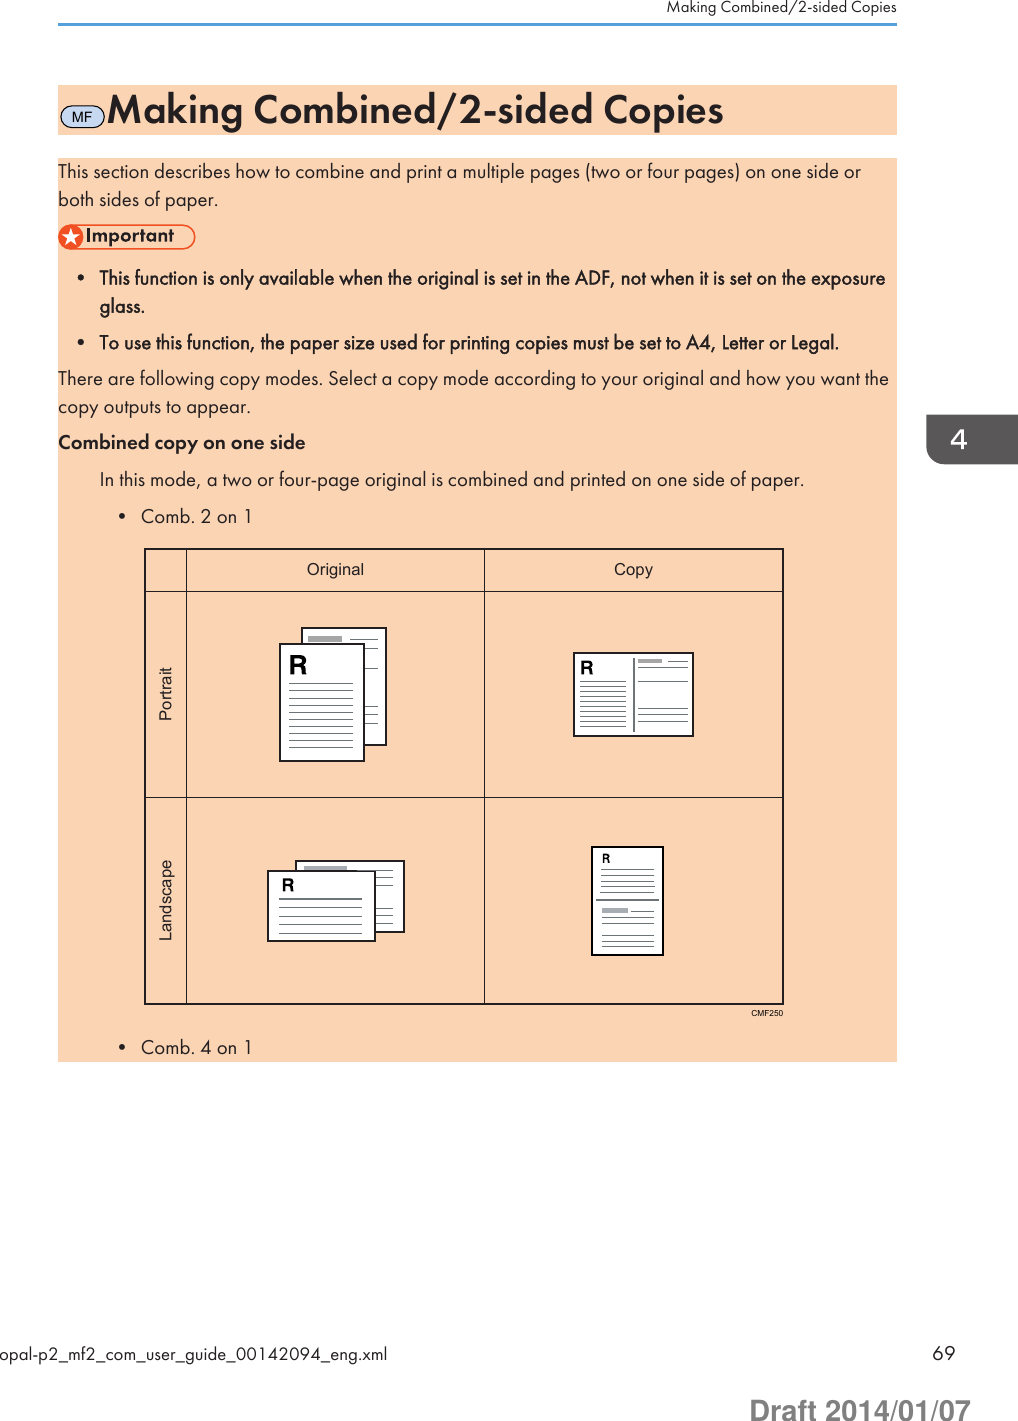

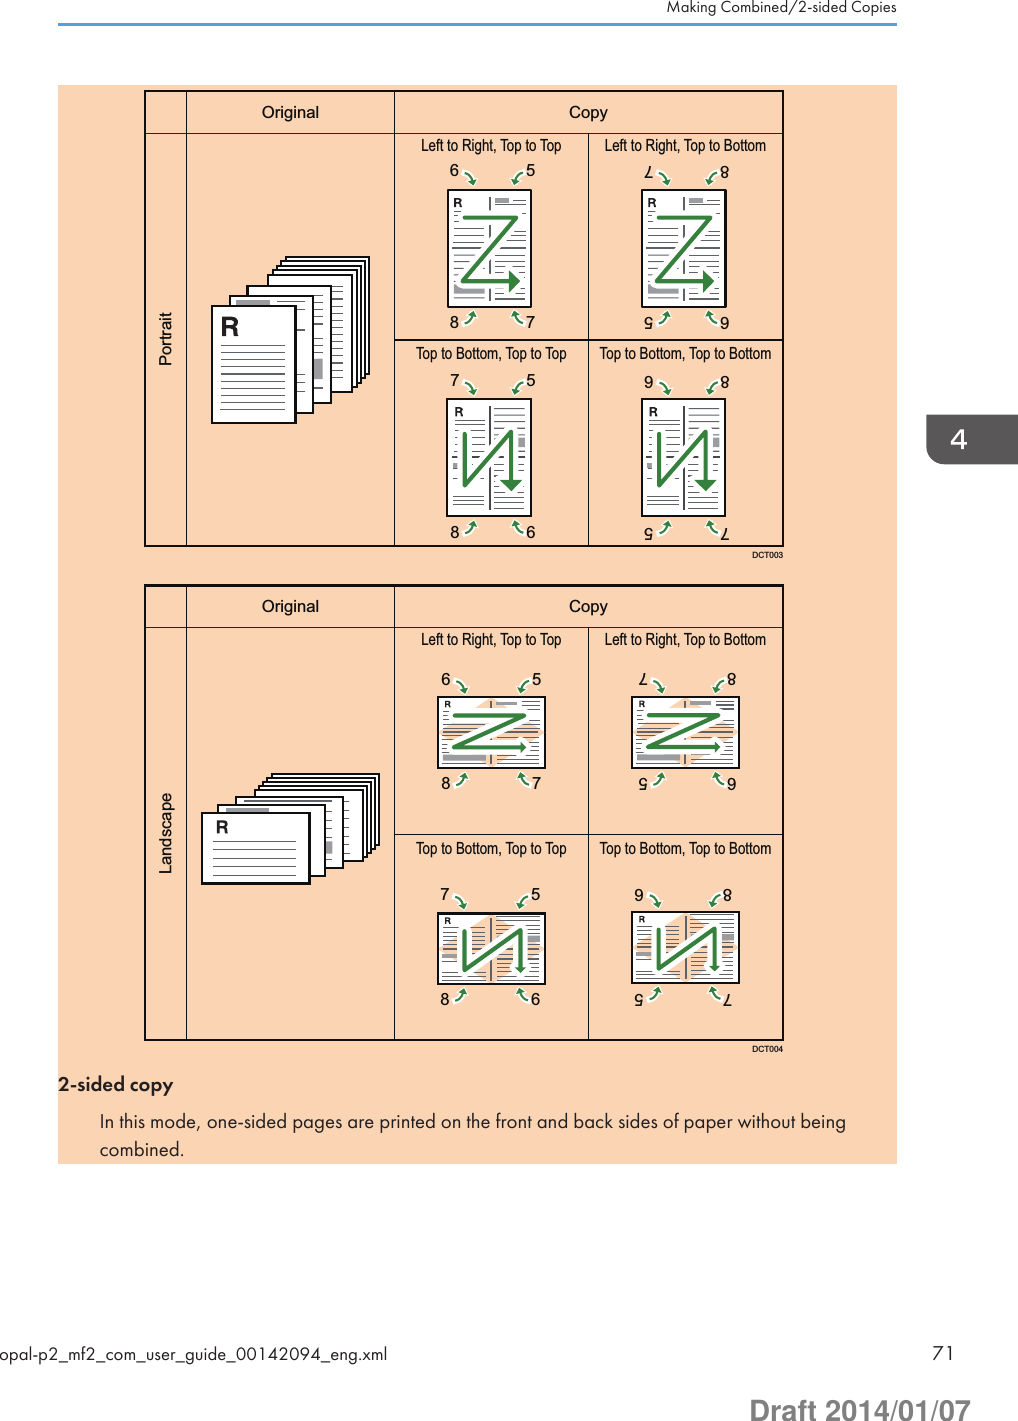
![PortraitLandscapeOriginal CopyCMF261Top to Top Top to BottomTop to Top Top to BottomSpecifying Combined and 2-sided Copies1. Press the [Copy] key.DCT848With Type 1 models, start from Step 2. If ID card copy mode is being displayed, press the [Shortcutto Func.] key again to switch to normal copier mode.With Type 1 or 5 models, start from Step 2. If ID card copy mode is being displayed, press the[Shortcut to Func.] key again to switch to normal copier mode.2. Press the [ ] or [ ] key.3. Press [Duplex/Combine].4. Press the [ ] or [ ] key to select the desired copy mode, and then press the [OK] key.4. Copying Originals72 opal-p2_mf2_com_user_guide_00142094_eng.xmlDraft 2014/01/07](https://usermanual.wiki/Ricoh/PRSP213NW1/User-Guide-2199680-Page-72.png)
![5. Press the [ ] or [ ] key to select paper orientation and page order, and then press the[OK] key.The screen will show the selected copy mode.• After you place the originals, press the [Start] key within the time specified in [System Auto ResetTimer]. Otherwise, the job is canceled. For details, see page 159 "Administrator Settings".Making Combined/2-sided Copiesopal-p2_mf2_com_user_guide_00142094_eng.xml 73Draft 2014/01/07](https://usermanual.wiki/Ricoh/PRSP213NW1/User-Guide-2199680-Page-73.png)
![MFCopying Both Sides of an ID Card onto OneSide of PaperThis section describes how to copy the front and back sides of an ID card or other small documents ontoeither side of a sheet of paper.When copying onto A4 paper, you can copy documents that are smaller than A5. Likewise, whencopying onto Letter size paper, you can copy documents that are smaller than Half Letter size.• To use this function, the paper size used for printing copies must be set to A6, A5, A4, Half Letter,or Letter.CES165Specifying the ID Card Copy SettingYou can specify the ID Card copy setting.• Be sure to check the size of the card to copy before specifying [ID Card Size].1. Press the [Copy] key.With Type 1 model, start from Step 2.With Type 1 or 5 model, start from Step 2.2. Press the [ ] or [ ] key.3. Press the [ ] or [ ] key to select [ID Card Copy Settings], and then press the [OK] key.For [ID Card Copy Settings], see page 132 "Copier Features Settings".4. Press the [ ] or [ ] key to select [ID Card Copy], and then press the [OK] key.5. Press the [ ] or [ ] key to select [On], and then press the [OK] key.6. Press the [ ] or [ ] key to select [ID Card Center Line], and then press the [OK] key.Select [Print] to print the center line; otherwise select [Do not Print], and then press the [OK] key.7. Press the [ ] or [ ] key to select [ID Card Size], and then press the [OK] key.8. Press the [ ] or [ ] key to select [mm] or [inch], and then press the [OK] key.4. Copying Originals74 opal-p2_mf2_com_user_guide_00142095_eng.xmlDraft 2014/01/07](https://usermanual.wiki/Ricoh/PRSP213NW1/User-Guide-2199680-Page-74.png)
![9. Enter the horizontal length (Horiz.) of the card to be placed on the exposure glass, andthen press the [OK] key.10. Enter the vertical length (Vert.) of the card to be placed on the exposure glass, and thenpress the [OK] key.Copying an ID Card1. Press the [Shortcut to Func.] key.DCT851With Type 1 model, if normal copier mode is being displayed, press the [Shortcut to Func.] keyagain to switch to ID card copy mode.With Type 1 and 5 models, if normal copier mode is being displayed, press the [Shortcut to Func.]key again to switch to ID card copy mode.If the ID card copy mode does not appear even though you have pressed the [Shortcut to Func.]key, set [Shortcut to Function] to [ID Card Copy Mode], and then press the [Shortcut to Func.] keyagain, or set [ID Card Copy] to [On] in [ID Card Copy Settings] in [Copier Features].2. To make multiple copies, enter the number of copies using the number keys.3. Place the original in the upper-left corner of the exposure glass.DCT840Copying Both Sides of an ID Card onto One Side of Paperopal-p2_mf2_com_user_guide_00142095_eng.xml 75Draft 2014/01/07](https://usermanual.wiki/Ricoh/PRSP213NW1/User-Guide-2199680-Page-75.png)
![4. Press the [Start] key.DCT8475. Within 60 seconds, place the original back side down with the upper-left corner on theexposure glass, and then press the [Start] key.• After you place the originals, press the [Start] key within the time specified in [System Auto ResetTimer]. Otherwise, the job is canceled. For details, see page 159 "Administrator Settings".4. Copying Originals76 opal-p2_mf2_com_user_guide_00142095_eng.xmlDraft 2014/01/07](https://usermanual.wiki/Ricoh/PRSP213NW1/User-Guide-2199680-Page-76.png)
![MFSpecifying the Scan SettingsThis section describes how to specify image density and scan quality for the current job.Adjusting Image DensityThere are five image density levels. The higher the density level, the darker the printout.1. Press the [Density] key.DCT8742. Press the [ ] or [ ] key to select the desired density level, and then press the [OK] key.• You can change the machine's default [Density] setting to always make copies with a specificdensity level. For details, see page 132 "Copier Features Settings".Selecting the Document Type According to OriginalThere are three document types:TextSelect this when the original contains only text and no photographs or images.PhotoSelect this when the original contains only photographs or images. Use this mode for the followingtypes of original:• Photographs• Pages that are entirely or mainly composed of photographs or images, such as magazinepages.MixedSelect this when the original contains both text and photographs or images.Specifying the Scan Settingsopal-p2_mf2_com_user_guide_00142096_eng.xml 77Draft 2014/01/07](https://usermanual.wiki/Ricoh/PRSP213NW1/User-Guide-2199680-Page-77.png)
![Vou.Select this to scan with the appropriate setting for vouchers. This is available only if using theexposure glass.Specifying the Original Type1. Press the [Image Quality] key.DCT8752. Press the [ ], [ ], [ ], or [ ] key to select the desired document type, and then press the[OK] key.• You can change the machine's default [Original Type] setting to always make copies with aspecific document type. For details, see page 132 "Copier Features Settings".4. Copying Originals78 opal-p2_mf2_com_user_guide_00142096_eng.xmlDraft 2014/01/07](https://usermanual.wiki/Ricoh/PRSP213NW1/User-Guide-2199680-Page-78.png)
![5. Scanning OriginalsMFScanner Mode ScreenThis section provides information about the screen in scanner mode.By default, the display shows the copier screen when the machine is turned on. If the copier or faxscreen is shown on the display, press the [Scanner] key on the control panel to switch to the scannerscreen.DCT850Screen in standby modeDCT8571. Current status or messagesDisplays the current status or messages.2. Current settingsDisplays the current scanning mode and scan settings.• When "Specify Dest." is displayed:Scan to E-mail, Scan to FTP, or Scan to Folder functions can be used.3. Selection key itemsDisplays the functions you can use by pressing the corresponding selection keys.• The machine's default mode at power on can be specified in the [Function Priority] setting under[Admin. Tools]. For [Function Priority], see page 159 "Administrator Settings".opal-p2_mf2_com_user_guide_00142098_eng.xml 79Draft 2014/01/07](https://usermanual.wiki/Ricoh/PRSP213NW1/User-Guide-2199680-Page-79.png)
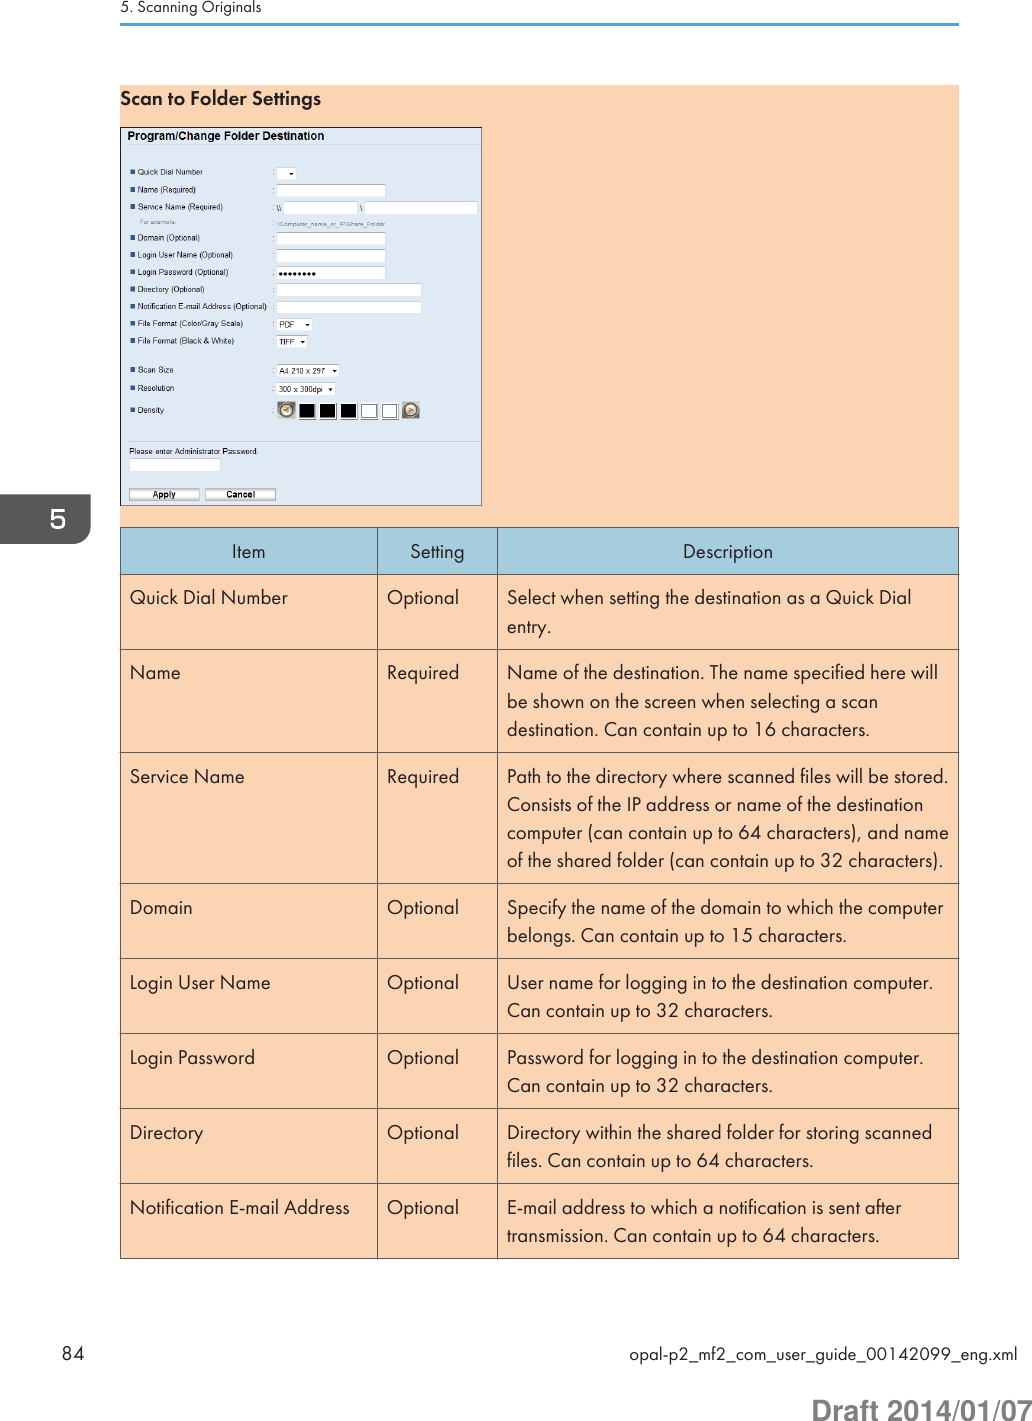
![MFRegistering Scan DestinationsThis section describes how to register scan destinations in the Address Book. To send scanned files to ane-mail address (Scan to E-mail), FTP server (Scan to FTP), or a shared folder on a network computer(Scan to Folder), you must first register the destination in the Address Book using Web Image Monitor.• The Address Book data could be damaged or lost unexpectedly. The manufacturer shall not beresponsible for any damages resulting from such data loss. Be sure to create backup files of theAddress Book data periodically.• Depending on your network environment, the Scan to FTP and Scan to Folder functions mayrequire a user name and password to be correctly entered in the destination information. In suchcases, after registering destinations, check that the user name and password are correctly enteredby sending test documents to those destinations.The Address Book can contain up to 100 entries, including 8 Quick Dial entries.Destinations registered as Quick Dial entries can be selected by pressing the corresponding One Touchbutton.1. Start the Web browser, and access the machine by entering its IP address.2. Click [Quick Dial Destination] or [Scan Destination].3. From the [Destination Type] list, select [E-mail Address], [FTP] or [Folder].4. Register information as necessary.The information you must register varies depending on the destination type. For details, see thetables below.5. Enter the administrator password if required.6. Click [Apply].7. Close the Web browser.5. Scanning Originals80 opal-p2_mf2_com_user_guide_00142099_eng.xmlDraft 2014/01/07](https://usermanual.wiki/Ricoh/PRSP213NW1/User-Guide-2199680-Page-80.png)
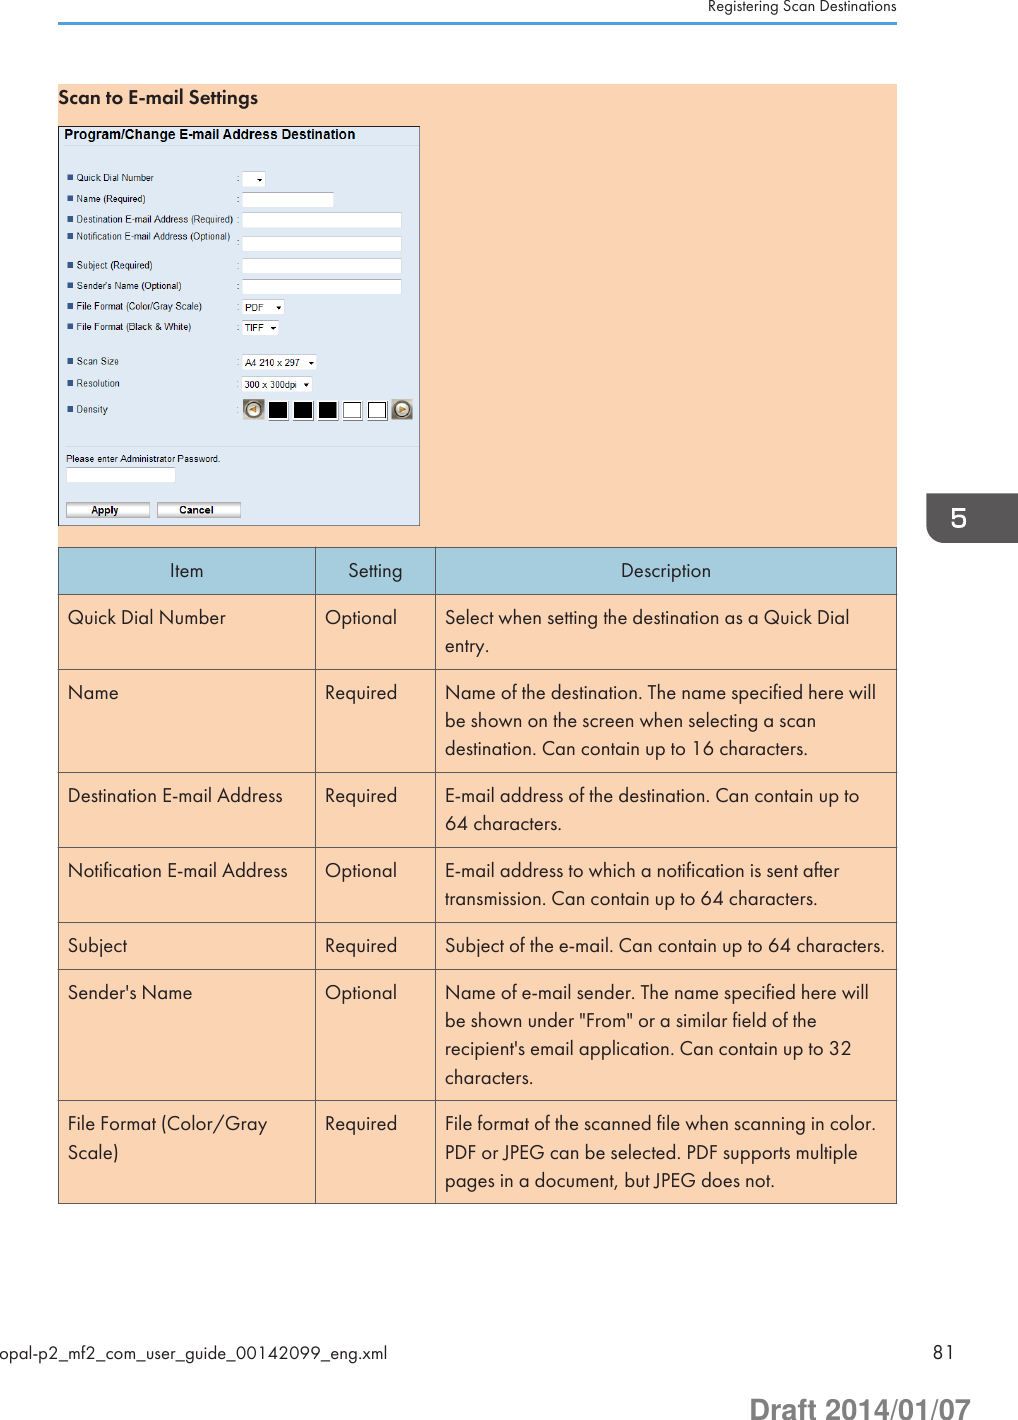
![Item Setting DescriptionFile Format (Black & White) Required File format of the scanned file when scanning in blackand white. PDF or TIFF can be selected. Both formatssupport multiple pages in a document.Scan Size Optional Select the scanning size for the original from A5, B5,A4, Executive, Half Letter, Letter, Legal, 16K, orcustom size.If you select custom size, select [mm] or [Inch], andthen specify the width and length.Resolution Optional Select the scan resolution from 100×100, 150×150,200×200, 300×300, 400×400, or 600×600 dpi.Density Optional Specify the image density by clicking the right or leftbuttons. These keys increase or decrease the imagedensity in single increments up to 5.Scan to FTP SettingsItem Setting DescriptionQuick Dial Number Optional Select when setting the destination as a Quick Dialentry.5. Scanning Originals82 opal-p2_mf2_com_user_guide_00142099_eng.xmlDraft 2014/01/07](https://usermanual.wiki/Ricoh/PRSP213NW1/User-Guide-2199680-Page-82.png)
![Item Setting DescriptionName Required Name of the destination. The name specified here willbe shown on the screen when selecting a scandestination. Can contain up to 16 characters.Hostname or IP Address Required Name or IP address of the FTP server. Can contain upto 64 characters.File Format (Color/GrayScale)Required File format of the scanned file when scanning in color.PDF or JPEG can be selected. PDF supports multiplepages in a document, but JPEG does not.File Format (Black & White) Required File format of the scanned file when scanning in blackand white. PDF or TIFF can be selected. Both formatssupport multiple pages in a document.FTP User Name Optional User name for logging in to the FTP server. Cancontain up to 32 characters.FTP Password Optional Password for logging in to the FTP server. Can containup to 32 characters.Directory Optional Name of the FTP server directory where scanned filesare stored. Can contain up to 64 characters.Notification E-mail Address Optional E-mail address to which a notification is sent aftertransmission. Can contain up to 64 characters.Scan Size Optional Select the scanning size for the original from A5, B5,A4, Executive, Half Letter, Letter, Legal, 16K, orcustom size.If you select custom size, select [mm] or [Inch], andthen specify the width and length.Resolution Optional Select the scan resolution from 100×100, 150×150,200×200, 300×300, 400×400, or 600×600 dpi.Density Optional Specify the image density by clicking the right or leftbuttons. These keys increase or decrease the imagedensity in single increments up to 5.Registering Scan Destinationsopal-p2_mf2_com_user_guide_00142099_eng.xml 83Draft 2014/01/07](https://usermanual.wiki/Ricoh/PRSP213NW1/User-Guide-2199680-Page-83.png)
![Item Setting DescriptionFile Format (Color/GrayScale)Required File format of the scanned file when scanning in color.PDF or JPEG can be selected. PDF supports multiplepages in a document, but JPEG does not.File Format (Black & White) Required File format of the scanned file when scanning in blackand white. PDF or TIFF can be selected. Both formatssupport multiple pages in a document.Scan Size Optional Select the scanning size for the original from A5, B5,A4, Executive, Half Letter, Letter, Legal, 16K, orcustom size.If you select custom size, select [mm] or [Inch], andthen specify the width and length.Resolution Optional Select the scan resolution from 100×100, 150×150,200×200, 300×300, 400×400, or 600×600 dpi.Density Optional Specify the image density by clicking the right or leftbuttons. These keys increase or decrease the imagedensity in single increments up to 5.• To send files via e-mail, SMTP and DNS settings must be configured properly.• If you are using the Scan to E-mail function, select a time zone according to your geographiclocation to send email with correct transmission date and time.• To send files to an FTP server or computer, the user name, password, and directory must beconfigured properly.• On a network that uses a DNS server, specify a computer name in [Service Name] and the nameof the domain to which the computer belongs in [Domain]. In this case, also configure the DNSrelated settings using Web Image Monitor.• Scan destinations cannot be registered using the control panel.Modifying Scan DestinationsThis section describes how to modify the information of registered destinations.1. Start the Web browser, and access the machine by entering its IP address.2. Click [Scan Destination].3. Click the [E-mail Address], [FTP], or [Folder] tab.Registering Scan Destinationsopal-p2_mf2_com_user_guide_00142099_eng.xml 85Draft 2014/01/07](https://usermanual.wiki/Ricoh/PRSP213NW1/User-Guide-2199680-Page-85.png)
![4. Select the entry to modify, and then click [Change].5. Modify settings as necessary.6. Enter the administrator password if required.7. Click [Apply].8. Close the Web browser.• You can unassign a Quick Dial entry from a One-touch button from the [Quick Dial Destination]page. To do this, select the desired entry, click [Delete], and then click [Apply] again on aconfirmation page.Deleting Scan DestinationsThis section describes how to delete registered destinations.1. Start the Web browser, and access the machine by entering its IP address.2. Click [Scan Destination].3. Click the [E-mail Address], [FTP], or [Folder] tab.4. Select the entry to delete, and then click [Delete].5. Confirm that the entry you have selected is the entry that you want to delete.6. Enter the administrator password if required.7. Click [Apply].8. Close the Web browser.5. Scanning Originals86 opal-p2_mf2_com_user_guide_00142099_eng.xmlDraft 2014/01/07](https://usermanual.wiki/Ricoh/PRSP213NW1/User-Guide-2199680-Page-86.png)
![MFBasic OperationScanning using the control panel allows you to send scanned files via e-mail (Scan to E-mail), to an FTPserver (Scan to FTP), or to the shared folder of a computer on a network (Scan to Folder), or to a USBflash disk (Scan to USB).The Scan to E-mail, Scan to FTP, and Scan to Folder functions are available only through a networkconnection. No network connection is required for the Scan to USB function; you can send scanned filesdirectly to a USB flash disk inserted into the front of the machine.Scan to E-mail/FTP/FolderThis section describes the basic operation for sending scanned files via e-mail, to an FTP server, or to acomputer, depending on the specified destination.• The original in the ADF takes precedence over the original on the exposure glass if you placeoriginals both in the ADF and on the exposure glass.• When using the Scan to E-mail, Scan to FTP or Scan to Folder function, you must first register thedestination in the Address Book using Web Image Monitor. For details, see page 80 "RegisteringScan Destinations".• Depending on the model, the Scan to E-mail/FTP/Folder function may not be available. For detailsabout the differences between models, see page 8 "Differences in Performance/Functions betweenDifferent Models".1. Place the original on the exposure glass or in the ADF.To place the original, see page 54 "Placing Originals".2. Press the [Scanner] key.DCT850Basic Operationopal-p2_mf2_com_user_guide_00142100_eng.xml 87Draft 2014/01/07](https://usermanual.wiki/Ricoh/PRSP213NW1/User-Guide-2199680-Page-87.png)
![3. Press the [Address Book] key or [Dest.].Alternatively, you can press the [Shortcut to Func.] key if [Shortcut to Function] under administratorsettings is set to [Select Scanner Dest.]. For [Shortcut to Function], see page 159 "AdministratorSettings".4. Press the [ ] or [ ] key to select [Search Address Book], and then press the [OK] key.If you want to search for a specific entry by its name, enter the first letters of the name using thenumber keys, and then press the [OK] key. Each time you enter a character, the display changes toshow the matching name.5. Search for the desired destination by pressing the [ ] or [ ] key to scroll the AddressBook, and then press the [OK] key.When you specify a scan destination, the machine's scan settings change automatically accordingto the information registered for that destination in the Address Book. If necessary, you can changethe scan settings using the control panel. For scan settings, see page 92 "Specifying the ScanSettings".6. Press the [Start] key.DCT847Depending on the machine's settings, you may see the following screen on the display whenscanning from the exposure glass.If you see this screen, proceed to the next step.7. If you have more originals to scan, place the next original on the exposure glass, andthen press [Yes]. Repeat this step until all originals are scanned.8. When all originals have been scanned, press [No] to start sending the scanned file.5. Scanning Originals88 opal-p2_mf2_com_user_guide_00142100_eng.xmlDraft 2014/01/07](https://usermanual.wiki/Ricoh/PRSP213NW1/User-Guide-2199680-Page-88.png)
![• To cancel scanning, press the [Scanner] key, and then press the [Clear/Stop] key. The scan filesare discarded.• You can configure the machine to scan documents in black and white, color, or grayscale bychanging the [Scanning Mode] setting under scan settings. For details, see page 135 "ScannerFeatures Settings".• You can also specify a destination using the One Touch buttons, [Pause/Redial] key.• If the [Limitless Scan] setting under scan settings is enabled, you can place originals on theexposure glass repeatedly in a single scan procedure. For details, see page 135 "ScannerFeatures Settings".• If [File Type] under scan settings is set to [Multi-page], you can scan multiple pages to create asingle PDF or TIFF file containing all pages. However, if the file format is JPEG, a single-page filewill be created for every page scanned. For details, see page 135 "Scanner Features Settings".• If paper is jammed in the ADF, the scan job will be discarded. Remove the jammed paper and scanthe entire originals again. For the direction to remove paper jammed in the ADF, see page 210"Paper Feed Problems".Specifying the scan destination using the One Touch buttons or [Pause/Redial] keyThis section describes how to specify a destination using the following keys:• One Touch buttonsUse these to specify destinations registered as Quick Dial entries.• [Pause/Redial] keyPress this to specify the last used destination as the destination for the current job.Using the One Touch buttonsPress the One Touch button to which the desired Quick Dial entry is registered.Press the [Shift] key to use the Quick Dial entries Nos. 5 to 8.DCT878Basic Operationopal-p2_mf2_com_user_guide_00142100_eng.xml 89Draft 2014/01/07](https://usermanual.wiki/Ricoh/PRSP213NW1/User-Guide-2199680-Page-89.png)
![Using the [Pause/Redial] keyPress the [Pause/Redial] key to select the last used destination.DCT877• When you specify a scan destination, the machine's scan settings change automatically accordingto the information registered for that destination in the Address Book. If necessary, you can changethe scan settings using the control panel. For scan settings, see page 92 "Specifying the ScanSettings".• The [Pause/Redial] key is not effective for the first scan job after the machine is turned on.• To select destinations not registered as Quick Dial entries, use the [Address Book] key. Forspecifying destinations using the [Address Book] key, see page 87 "Scan to E-mail/FTP/Folder".Basic Operation for Scan to USBThis section describes the basic operation for sending scanned files to a USB flash disk.• With the Type 1 models, the copier and fax functions are not available if the USB flash disk isinserted.• With the Type 1 and 5 models, the copier and fax functions are not available if the USB flash diskis inserted.• If the machine fails to switch to the Scan to USB mode even after the USB flash disk is inserted, set[Save Scn Data to USB] to [Active].• The original in the ADF takes precedence over the original on the exposure glass if you placeoriginals both in the ADF and on the exposure glass.• This machine does not support the use of USB flash disks connected to external USB hubs. Insertyour USB flash disk directly into the USB flash disk port located at the top left corner of themachine.• Certain types of USB flash disks cannot be used.5. Scanning Originals90 opal-p2_mf2_com_user_guide_00142100_eng.xmlDraft 2014/01/07](https://usermanual.wiki/Ricoh/PRSP213NW1/User-Guide-2199680-Page-90.png)
![1. Insert your USB flash disk into the USB flash disk port.DCT039"Loading..." appears on the display. Wait until the display changes to show "Save Scn Data toUSB" (the duration depends on your USB flash disk).2. Place the original on the exposure glass or in the ADF.If necessary, configure advanced scan settings. For details, see page 92 "Specifying the ScanSettings".3. Press the [Start] key.4. Select file format.5. If you have more originals to scan, place the next original on the exposure glass, andthen press [Yes]. Repeat this step until all originals are scanned.6. When all originals have been scanned, press [No] to start sending the scanned file.7. Confirm that "Ready" appears on the display.The scanned file is created in the root directory of the USB flash disk.8. Remove the USB flash disk from the machine.• To cancel scanning, press the [Scanner] key, and then press the [Clear/Stop] key. The scan filesare discarded.Basic Operationopal-p2_mf2_com_user_guide_00142100_eng.xml 91Draft 2014/01/07](https://usermanual.wiki/Ricoh/PRSP213NW1/User-Guide-2199680-Page-91.png)
![MFSpecifying the Scan SettingsWhen you specify a scan destination, the machine's scan settings change automatically according to theinformation registered for that destination in the Address Book. If necessary, you can change the scansettings for the current job using the control panel.Specifying the Scanning Size According to the Size of the OriginalThis section describes how to specify the scanning size according to the size of the current original.1. Press [Scn Size].2. Press the [ ] or [ ] key to select the size of the original, and then press the [OK] key.If you selected anything other than [Custom Size], you do not need to perform the remaining stepsof the procedure.3. Press the [ ] or [ ] key to select [mm] or [inch], and then press the [OK] key.4. Enter the width using the number keys, and then press the [OK] key.To enter a decimal point, press the [ ] key.5. Enter the length using the number keys, and then press the [OK] key.To enter a decimal point, press the [ ] key.• You can change the machine's default [Scan Size] setting to always scan originals with a specificscanning size. For details, see page 135 "Scanner Features Settings".Adjusting Image DensityThis section describes how to adjust image density for the current job.There are five image density levels. The higher the density level, the darker the scanned image.5. Scanning Originals92 opal-p2_mf2_com_user_guide_00142102_eng.xmlDraft 2014/01/07](https://usermanual.wiki/Ricoh/PRSP213NW1/User-Guide-2199680-Page-92.png)
![1. Press the [Density] key.DCT8742. Press the [ ] or [ ] key to select the desired density level, and then press the [OK] key.• You can change the machine's default [Density] setting to always scan with a specific density level.For details, see page 135 "Scanner Features Settings".Specifying ResolutionThis section describes how to specify the scan resolution for the current job.There are six resolution settings. The higher the resolution, the higher the quality but greater the file size.1. Press the [Image Quality] key.DCT8752. Press the [ ], [ ], [ ], or [ ] key to select the desired resolution, and then press the [OK]key.• You can change the machine's default [Resolution] setting to always scan with a specific resolutionlevel. For details, see page 135 "Scanner Features Settings".Specifying the Scan Settingsopal-p2_mf2_com_user_guide_00142102_eng.xml 93Draft 2014/01/07](https://usermanual.wiki/Ricoh/PRSP213NW1/User-Guide-2199680-Page-93.png)
![2. On the [Start] menu, point to [All Programs], point to [Microsoft Office], point to[Microsoft Office Tools], and then click [Microsoft Office Document Scanning].3. Click [Scanner…].Scanning from a Computeropal-p2_mf2_com_user_guide_00142103_eng.xml 95Draft 2014/01/07](https://usermanual.wiki/Ricoh/PRSP213NW1/User-Guide-2199680-Page-95.png)
![4. Select the scanner you want to use.5. Select the [Show scanner driver dialog before scanning] check box.6. Click [OK].7. Click the [Scan] button.The scanner driver dialog box appears.5. Scanning Originals96 opal-p2_mf2_com_user_guide_00142103_eng.xmlDraft 2014/01/07](https://usermanual.wiki/Ricoh/PRSP213NW1/User-Guide-2199680-Page-96.png)
![8. Click [Scan].9. Click [Close].Settings you can configure in the TWAIN dialog boxDAC52512345671. Scanner:Select the scanner you want to use. The scanner you select becomes the default scanner. Click [Refresh] todiscover all available scanners connected via USB or the network.2. Original:Select [Reflective] to scan from the exposure glass, or [Automatic Document Feeder] to scan from the ADF.Scanning from a Computeropal-p2_mf2_com_user_guide_00142103_eng.xml 97Draft 2014/01/07](https://usermanual.wiki/Ricoh/PRSP213NW1/User-Guide-2199680-Page-97.png)
![3. Original typeAccording to your original, select a setting from the list of options detailed below, or select [Custom...] toconfigure your own scan settings. "Mode:", "Resolution:", and "Size:" under "Scan Configuration" will changeaccording to the Original type setting you selected here.• When using the exposure glass:[Editing Text(OCR)][Faxing, Filing, or Copying][Black and White Photo][Color Document - Fast][Color Document - Better Quality][Custom...]• When using the ADF:[ADF-Faster][ADF-Better][ADF - Gray][Custom...]4. Mode:Select from color, grayscale, or black-and-white.5. Resolution:Select a resolution from the list. If you select [User defined], enter a resolution value directly in the edit box.Note that increasing the resolution also increases the file size and scanning time.Selectable resolutions vary depending on where the original is set.• When using the exposure glass:75, 100, 150, 200, 300, 400, 500, 600, 1200, 2400, 4800, 9600, 19200 dpi, User defined• When using the ADF:75, 100, 150, 200, 300, 400, 500, 600 dpi, User defined6. Size:Select the scanning size. If you select [User defined], enter the scanning size directly in the edit box. Also, youcan change the scanning size with your mouse in the preview area. You can select the unit of measure from[cm], [inches], or [pixels]. Selectable resolutions vary depending on where the original is set. For details, seethe TWAIN Help.7. Scan task: (when using the exposure glass)Displays up to 10 previously used scan areas. To remove a scan task, select the number of the task, and thenclick [Remove]. You can select [AutoCrop] to let the scanner automatically detect the size of your original.• For details, see the TWAIN driver Help.5. Scanning Originals98 opal-p2_mf2_com_user_guide_00142103_eng.xmlDraft 2014/01/07](https://usermanual.wiki/Ricoh/PRSP213NW1/User-Guide-2199680-Page-98.png)
![Basic Operation for WIA Scanning1. Place the original.2. On the [Start] menu, click [Devices and Printers].3. Right-click the icon of the printer model you want to use, and then click [Start scan].4. Configure the scan settings as required, and then click [Scan].Scanning from a Computeropal-p2_mf2_com_user_guide_00142103_eng.xml 99Draft 2014/01/07](https://usermanual.wiki/Ricoh/PRSP213NW1/User-Guide-2199680-Page-99.png)
![6. Sending and Receiving a FaxMFFax Mode ScreenThis section provides information about the screen in fax mode.By default, the display shows the copier screen when the machine is turned on.If the copy or scanner screen is shown on the display, press the [Facsimile] key on the control panel toswitch to the fax screen.Standby mode screenDCT8591. Current status or messagesDisplays the current status or messages.2. Current settingsDisplays the current density and resolution settings.3. Current date and timeShows the current date and time.• The machine's default mode at power on can be specified in the [Function Priority] setting under[Admin. Tools]. For [Function Priority], see page 159 "Administrator Settings".• The display format for time and date can be specified in [Set Date/Time] under [Admin. Tools]. Forsetting the date and time, see page 102 "Setting the Date and Time".opal-p2_mf2_com_user_guide_00142105_eng.xml 101Draft 2014/01/07](https://usermanual.wiki/Ricoh/PRSP213NW1/User-Guide-2199680-Page-101.png)
![MFSetting the Date and Time1. Press the [User Tools] key.2. Press the [ ] or [ ] key to select [Admin. Tools], and then press the [OK] key.3. If you are requested to enter a password, enter the password using the number keys,and then press the [OK] key.4. Press the [ ] or [ ] key to select [Set Date/Time], and then press the [OK] key.5. Press the [ ] or [ ] key to select [Set Date], and then press the [OK] key.6. Press the [ ] or [ ] key to select the desired date format, and then press the [OK] key.For the date and time display format, see page 159 "Administrator Settings".7. Enter the current date using the number keys, and then press the [OK] key.You can press the [ ] or [ ] key to move between fields.8. Press the [ ] or [ ] key to select [Set Time], and then press the [OK] key.9. Press the [ ] or [ ] key to select the desired time format, and then press the [OK] key.10. Enter the current time using the number keys, and then press the [OK] key.If you selected [12-hour Format], press the [ ] or [ ] key to select [AM] or [PM].You can press the [ ] or [ ] key to move between fields.11. Press the [User Tools] key to return to the initial screen.• A password for accessing the [Admin. Tools] menu can be specified in [Admin. Tools Lock]. For[Admin. Tools Lock], see page 159 "Administrator Settings".6. Sending and Receiving a Fax102 opal-p2_mf2_com_user_guide_00142106_eng.xmlDraft 2014/01/07](https://usermanual.wiki/Ricoh/PRSP213NW1/User-Guide-2199680-Page-102.png)
![MFEntering CharactersTo enter characters, use keys as follows:To enter a digitPress a number key.To delete a characterPress the [ ] key.To enter a fax number• To enter a numberUse the number keys.• To enter characters other than digits" ": Press the [ ] key." ": Press the [ ] key."P"(Pause): Press the [Pause/Redial] key.To enter a nameLetters, numbers, and symbols can be entered using the number keys.To enter two characters that use the same number key successively, press the [ ] key after enteringthe first character.DCT843\~Entering Charactersopal-p2_mf2_com_user_guide_00142107_eng.xml 103Draft 2014/01/07](https://usermanual.wiki/Ricoh/PRSP213NW1/User-Guide-2199680-Page-103.png)
![MFRegistering Fax DestinationsThis section describes how to register fax destinations in the Address Book using the control panel. Forentering characters, see "Entering Characters".The Address Book can also be edited using Web Image Monitor.• The Address Book data could be damaged or lost unexpectedly. The manufacturer shall not beresponsible for any damages resulting from such data loss. Be sure to create backup files of theAddress Book data periodically. For details about creating backup files, see page 193"Configuring the Administrator Settings".The Address Book can contain up to 108 entries (8 Quick Dial entries and 100 Speed Dial entries).Quick Dial entriesDestinations registered as Quick Dial entries can be selected by pressing the corresponding OneTouch button.Speed Dial entriesDestinations registered as Speed Dial entries can be selected from the Address Book. Press the[Address Book] key, select [Search Address Book], and then select the desired entry using the [ ]or [ ] key.Registering Fax Destinations Using the Control Panel1. Press the [User Tools] key.DCT8452. Press the [ ] or [ ] key to select [Address Book], and then press the [OK] key.3. If you are requested to enter a password, enter the password using the number keys,and then press the [OK] key.4. Press the [ ] or [ ] key to select [Quick Dial Dest.] or [Fax Speed Dial Dest.], and thenpress the [OK] key.6. Sending and Receiving a Fax104 opal-p2_mf2_com_user_guide_00142108_eng.xmlDraft 2014/01/07](https://usermanual.wiki/Ricoh/PRSP213NW1/User-Guide-2199680-Page-104.png)
![5. Press the [ ] or [ ] key to select [No.], and then enter the desired Quick Dial number (1 to8) or Speed Dial number (1 to 100) using the number keys.If a destination is already registered for the input number, the fax number and fax name registeredfor that number appear.6. Press the [ ] or [ ] key to select [Fax No.], and then enter the fax number (up to 40characters).7. Press the [ ] or [ ] key to select [Name], and then enter the fax name (up to 20characters).8. Confirm the setting, and then press the [OK] key.9. Press the [User Tools] key to return to the initial screen.• For entering characters, see page 103 "Entering Characters".• A fax number can contain 0 to 9, pause, " ", " ", and space.• If necessary, insert a pause in the fax number. The machine pauses briefly before it dials the digitsfollowing the pause. You can specify the length of the pause time in the [Pause Time] setting underfax transmission settings. For [Pause Time], see page 137 "Fax Transmission Features Settings".• To use tone services on a pulse-dialing line, insert " " in the fax number. " " switches the dialingmode from pulse to tone temporarily.• If the machine is connected to the telephone network through a PBX, make sure to enter the outsideline access number specified in [PBX Access Number] before the fax number. For [PBX AccessNumber], see page 159 "Administrator Settings".• A password for accessing the [Address Book] menu can be specified in [Admin. Tools Lock]. For[Admin. Tools Lock], see page 159 "Administrator Settings".Modifying or deleting fax destinations1. Press the [User Tools] key.2. Press the [ ] or [ ] key to select [Address Book], and then press the [OK] key.3. If you are requested to enter a password, enter the password using the number keys,and then press the [OK] key.4. Press the [ ] or [ ] key to select [Quick Dial Dest.] or [Fax Speed Dial Dest.], and thenpress the [OK] key.5. Press the [ ] or [ ] key to select [No.], and then enter the desired Quick Dial number (1 to8) or Speed Dial number (1 to 100) using the number keys.The fax number and fax name registered for that number appear.Registering Fax Destinationsopal-p2_mf2_com_user_guide_00142108_eng.xml 105Draft 2014/01/07](https://usermanual.wiki/Ricoh/PRSP213NW1/User-Guide-2199680-Page-105.png)
![6. Press the [ ] or [ ] key to select [Fax No.], and then modify the fax number (up to 40characters).If you want to delete the fax number, press the [ ] key until the current number is deleted.7. Press the [ ] or [ ] key to select [Name], and then modify the fax name (up to 20characters).If you want to delete the fax name, press the [ ] key until the current name is deleted.8. Confirm the setting, and then press the [OK] key.9. Press the [User Tools] key to return to the initial screen.• For details about entering characters, see page 103 "Entering Characters".• A password for accessing the [Address Book] menu can be specified in [Admin. Tools Lock].6. Sending and Receiving a Fax106 opal-p2_mf2_com_user_guide_00142108_eng.xmlDraft 2014/01/07](https://usermanual.wiki/Ricoh/PRSP213NW1/User-Guide-2199680-Page-106.png)
![MFSending a Fax• It is recommended that you call the receiver and confirm with them when sending importantdocuments.Selecting Transmission ModeThere are two transmission modes: Memory Transmission and Immediate Transmission.Memory TransmissionIn this mode, the machine scans several originals into memory and sends them all at once. This isconvenient when you are in a hurry and want to take the document away from the machine. In thismode, you can send a fax to multiple destinations.The number of redial attempts is preset to two or three times, depending on the [Country] settingunder [Admin. Tools], in five-minute intervals. For details, see page 137 "Fax TransmissionFeatures Settings".Immediate TransmissionIn this mode, the machine scans the original and faxes it simultaneously, without storing it inmemory. This is convenient when you want to send an original quickly. In this mode, you can onlyspecify one destination.1. Press the [Facsimile] key, and then press the [ ] or [ ] key.DCT849Alternatively, you can press the [Shortcut to Func.] key if [Shortcut to Function] under administratorsettings is set to [Fax Immediate TX]. For [Shortcut to Function], see page 159 "AdministratorSettings".2. Press the [ ] or [ ] key to select [Immediate TX], and then press the [OK] key.Sending a Faxopal-p2_mf2_com_user_guide_00142109_eng.xml 107Draft 2014/01/07](https://usermanual.wiki/Ricoh/PRSP213NW1/User-Guide-2199680-Page-107.png)
![3. Press the [ ] or [ ] key to select [Off], [On], or [Next Fax Only], and then press the [OK]key.For Memory Transmission, select [Off].For Immediate Transmission, select [On] or [Next Fax Only].4. Press the [User Tools] key to return to the initial screen.Basic Operation for Sending a Fax• The original in the ADF takes precedence over the original on the exposure glass if you placeoriginals both in the ADF and on the exposure glass.1. Press the [Facsimile] key.DCT8492. Place the original on the exposure glass or in the ADF.To place the originals, see page 54 "Placing Originals".3. Enter the fax number (up to 40 characters) using the number keys, or specify adestination using the One Touch buttons or Speed Dial function.For details about entering characters, see page 103 "Entering Characters". For details aboutspecifying destinations using the One Touch buttons or Speed Dial function, see page 111"Specifying the Fax Destination".• If the machine is connected to the telephone network through a PBX, make sure to enter theoutside line access number specified in [PBX Access Number] before the fax number. For [PBXAccess Number], see page 159 "Administrator Settings".6. Sending and Receiving a Fax108 opal-p2_mf2_com_user_guide_00142109_eng.xmlDraft 2014/01/07](https://usermanual.wiki/Ricoh/PRSP213NW1/User-Guide-2199680-Page-108.png)
![4. Press the [Start] key.DCT847• Depending on the machine's settings, you may be prompted to enter the fax number again ifyou manually entered the destination fax number. In this case, re-enter the number within 60seconds, press [OK], and then press the [Start] key. If the fax numbers do not match, go backto Step 3. For fax number confirmation, see page 159 "Administrator Settings".• When using the exposure glass in Memory Transmission mode, you will be prompted to placeanother original. In this case, proceed to the next step.5. If you have more originals to scan, press [Yes] within 60 seconds, place the next originalon the exposure glass, and then press [OK]. Repeat this step until all originals arescanned.If you do not press [Yes] within 60 seconds, the machine will start to dial the destination.6. When all originals have been scanned, press # to start sending the fax.• A fax number can contain 0 to 9, pause, " ", " ", and space.• If necessary, insert a pause in a fax number. The machine pauses briefly before it dials the digitsfollowing the pause. You can specify the length of the pause time in the [Pause Time] setting underfax transmission settings. For [Pause Time], see page 137 "Fax Transmission Features Settings".• To use tone services on a pulse-dialing line, insert " " in a fax number. " " switches the dialingmode from pulse to tone temporarily.• You can specify multiple destinations and broadcast the fax you are sending. For sending a faxusing the broadcast function, see page 111 "Specifying the Fax Destination".• The machine prompts you to enter the fax number twice only when you dial the destinationmanually. Destinations specified using the One Touch buttons, Speed Dial function, or [Pause/Redial] key need not be confirmed.• When in Memory Transmission mode, you can enable the [Auto Redial] setting under faxtransmission settings to set the machine to automatically redial the destination if the line is busy oran error occurs during transmission. For [Auto Redial], see page 137 "Fax Transmission FeaturesSettings".Sending a Faxopal-p2_mf2_com_user_guide_00142109_eng.xml 109Draft 2014/01/07](https://usermanual.wiki/Ricoh/PRSP213NW1/User-Guide-2199680-Page-109.png)
![• When in Memory Transmission mode, the machine's memory may become full while scanning theoriginals. In this case, the screen prompts you to cancel the transmission or to send only the pagesthat have been scanned successfully.• If paper is jammed in the ADF, the jammed page has not been scanned properly. When themachine is in Immediate Transmission mode, resend the fax starting from the jammed page. Whenin Memory Transmission mode, scan the entire originals again. For details about removing paperjammed in the ADF, see page 210 "Paper Feed Problems".Canceling a faxFollow the procedure below to cancel sending a fax.When in Immediate Transmission modeIf you cancel sending a fax while the machine is scanning the original, the fax transmission processis canceled immediately. In this case, an error is displayed on the other party's machine.When in Memory Transmission modeIf you cancel sending a fax while the machine is scanning the original, the machine will not sendthe document.If you cancel sending a fax during transmission, the fax transmission process is canceledimmediately. In this case, an error is displayed on the other party's machine.1. Press the [Facsimile] key.DCT8496. Sending and Receiving a Fax110 opal-p2_mf2_com_user_guide_00142109_eng.xmlDraft 2014/01/07](https://usermanual.wiki/Ricoh/PRSP213NW1/User-Guide-2199680-Page-110.png)
![2. Press the [Clear/Stop] key.DCT846• If you cancel sending a fax while broadcasting, only the fax to the current destination is canceled.The fax will be sent to the subsequent destinations as normal. For details about sending a fax usingthe broadcast function, see page 111 "Specifying the Fax Destination".Specifying the Fax DestinationOther than entering the destination fax number using the number keys, you can specify destinationsusing the following functions:• One Touch buttons• Speed Dial• Broadcast function• Redial functionSpecifying the destination using the One Touch buttons1. Press the [Facsimile] key.DCT849Sending a Faxopal-p2_mf2_com_user_guide_00142109_eng.xml 111Draft 2014/01/07](https://usermanual.wiki/Ricoh/PRSP213NW1/User-Guide-2199680-Page-111.png)
![2. Press the One Touch button to which the desired Quick Dial entry is registered.For registering the Quick Dial entries, see page 104 "Registering Fax Destinations".Press the [Shift] key if you want to use Quick Dial entries Nos. 5 to 8 before pressing a One Touchbutton.DCT878• You can check the registered names and fax numbers by printing a report. For printing the QuickDial list, see page 150 "Printing Lists/Reports".Specifying the destination using Speed Dial1. Press the [Facsimile] key.DCT8496. Sending and Receiving a Fax112 opal-p2_mf2_com_user_guide_00142109_eng.xmlDraft 2014/01/07](https://usermanual.wiki/Ricoh/PRSP213NW1/User-Guide-2199680-Page-112.png)
![2. Press the [Address Book] key.DCT8763. Press the [ ] or [ ] key to select [Search Address Book], and then press the [OK] key.If you want to search for a specific entry by its registration number or name, use the followingprocedure:• Searching by the registration numberPress the [Address Book] key again, enter the number using the number keys, and then pressthe [OK] key.• Searching by the nameEnter the first letters of the name using the number keys, and then press the [OK] key. Eachtime you enter a character, the display changes to show the matching name.4. Press the [ ] or [ ] key to select the desired Speed Dial entry, and then press the [OK]key.For registering the Speed Dial entries, see page 104 "Registering Fax Destinations".• The Address Book shows only the Speed Dial entries. Use the One Touch buttons to specify QuickDial destinations.• You can check the registered names and fax numbers by printing a report. For printing the SpeedDial list, see page 150 "Printing Lists/Reports".Specifying the destination using the broadcast functionYou can send a fax to multiple destinations (up to 100 destinations) simultaneously.Faxes are sent to destinations in the order they were specified.Sending a Faxopal-p2_mf2_com_user_guide_00142109_eng.xml 113Draft 2014/01/07](https://usermanual.wiki/Ricoh/PRSP213NW1/User-Guide-2199680-Page-113.png)
![1. Press the [Facsimile] key.DCT8492. Add a destination by using one of the following methods:• To add a Quick Dial destination: press a corresponding One Touch button.• To add a Speed Dial destination: press the [Address Book] key, select [Search AddressBook], select a destination, and then press the [OK] key.• To add a manually-specified destination: confirm that [No.key] is pressed, and then enter thedestination fax number using the number keys.3. Press the [OK] key.Press [List] to see the list of destinations that have been added so far.Go back to Step 2 to add further destinations.• While specifying multiple destinations, you can press the [Clear/Stop] key to clear all destinations.• If you specify multiple destinations in Immediate Transmission mode, the mode switches to MemoryTransmission mode temporarily.• While broadcasting, pressing the [Clear/Stop] key cancels the fax to the current destination only.Specifying the destination using the redial functionYou can specify the last used destination as the destination for the current job.This function saves time when you are sending to the same destination repeatedly, as you do not have toenter the destination each time.6. Sending and Receiving a Fax114 opal-p2_mf2_com_user_guide_00142109_eng.xmlDraft 2014/01/07](https://usermanual.wiki/Ricoh/PRSP213NW1/User-Guide-2199680-Page-114.png)
![1. Press the [Facsimile] key.DCT8492. Press the [Pause/Redial] key.DCT877Useful Sending FunctionsYou can check the status of the other party's machine easily before sending a fax by using the On HookDial function. Using an extra telephone, you can talk and send a fax in one call.• This function is available in Immediate Transmission mode only.The procedure differs depending on whether [Operation] is set to [Easy Mode] or [Advanced Mode] in[Fax Features].Sending a fax using On Hook DialThe On Hook Dial function allows you to check the destination's status while listening to the tone from theinternal speaker. This function is useful when you want to ensure that the fax will be received.• The On Hook Dial function cannot be used when [Fax Number Confirmation] under administratorsettings is enabled.Sending a Faxopal-p2_mf2_com_user_guide_00142109_eng.xml 115Draft 2014/01/07](https://usermanual.wiki/Ricoh/PRSP213NW1/User-Guide-2199680-Page-115.png)
![1. Place the original on the exposure glass or in the ADF.If [Operation] is set to [Easy Mode], you cannot send faxes using the exposure glass.2. Press the [Facsimile] key.DCT8493. Press the [On Hook Dial] key.DCT852"On Hook" appears on the screen.4. Specify the destination using the number keys.5. If you hear a high pitched tone, press the [Start] key.DCT847If [Operation] is set to [Easy Mode], Step 6 does not apply.If the original is placed on the exposure glass, press [TX], and then press the [Start] key.6. Sending and Receiving a Fax116 opal-p2_mf2_com_user_guide_00142109_eng.xmlDraft 2014/01/07](https://usermanual.wiki/Ricoh/PRSP213NW1/User-Guide-2199680-Page-116.png)
![• For details about selecting the transmission mode, see page 107 "Selecting Transmission Mode".• For details about [Fax Number Confirmation], see page 159 "Administrator Settings".Sending a fax after a conversationAn external telephone allows you to send a fax after finishing your conversation without having todisconnect and redial. This function is useful when you want to ensure that the fax has been received.1. Place the original on the exposure glass or in the ADF.If [Operation] is set to [Easy Mode], you cannot send faxes using the exposure glass.2. Press the [Facsimile] key.DCT8493. Pick up the handset of the external telephone.4. Specify the destination using the external telephone.5. When the other party answers, ask them to press their fax start button.6. If you hear a high pitched tone, press the [Start] key.DCT847If [Operation] is set to [Easy Mode], proceed to Step 7.7. If the original is placed on the exposure glass, press [TX], and then press the [Start] key.8. Replace the handset.Sending a Faxopal-p2_mf2_com_user_guide_00142109_eng.xml 117Draft 2014/01/07](https://usermanual.wiki/Ricoh/PRSP213NW1/User-Guide-2199680-Page-117.png)
![Specifying the Scan SettingsAdjusting image densityThis section describes how to adjust image density for the current job.There are three image density levels. The darker the density level, the darker the printout.1. Press the [Density] key.DCT8742. Press the [ ] or [ ] key to select the desired density level, and then press the [OK] key.• You can change the machine's default [Density] setting to always scan with a specific density level.For [Density], see page 137 "Fax Transmission Features Settings".Specifying the resolutionThis section describes how to specify the scan resolution for the current job.There are three resolution settings:StandardSelect this when the original is a printed or typewritten document with normal-sized characters.DetailSelect this when the original is a document with small print.PhotoSelect this when the original contains images such as photographs or shaded drawings.6. Sending and Receiving a Fax118 opal-p2_mf2_com_user_guide_00142109_eng.xmlDraft 2014/01/07](https://usermanual.wiki/Ricoh/PRSP213NW1/User-Guide-2199680-Page-118.png)
![1. Press the [Image Quality] key.DCT8752. Press the [ ] or [ ] key to select the desired resolution setting, and then press the [OK]key.• You can change the machine's default [Resolution] setting to always scan with a specific resolutionlevel. For [Resolution], see page 137 "Fax Transmission Features Settings".Sending a Faxopal-p2_mf2_com_user_guide_00142109_eng.xml 119Draft 2014/01/07](https://usermanual.wiki/Ricoh/PRSP213NW1/User-Guide-2199680-Page-119.png)
![MFUsing the Fax Function from a Computer (PCFAX)This section describes how to use the fax function of the machine from a computer.You can send a document directly from a computer through this machine to another fax machine,without printing the document.Basic Operation for Sending Faxes from a ComputerThis section describes the basic operation for sending faxes from a computer.You can select a destination from the PC Fax address book or enter a fax number manually. You cansend faxes to up to 100 destinations at once.The procedure in this section is an example based on Windows 7.• Using PC FAX, you can send up to ten pages (including the cover sheet) at a time.1. Open the file you want to send.2. On the [File] menu, click [Print...].3. Select the PC FAX driver as the printer, and then click [Print].4. Specify a destination.• To specify a destination from the PC FAX address book:Select a destination from [User List:], and then click [Add to List].Repeat this step to add more destinations.• To enter a fax number directly:Click the [Specify Destination] tab, and enter a fax number (up to 40 digits) in [Fax Number:],and then click [Add to List].Repeat this step to add more destinations.5. To attach a cover sheet, click [Edit Cover Sheet] on the [Specify Destination] tab, and thenselect the [Attach a Cover Sheet] check box.6. Click [Send].• For details, see the PC FAX driver Help.• A fax number can contain 0 to 9, "P" (pause), "T" (tone), " ", and " ".• To use tone services on a pulse-dialing line, insert "T" in a fax number. "T" switches the dialingmode from pulse to tone temporarily.6. Sending and Receiving a Fax120 opal-p2_mf2_com_user_guide_00142112_eng.xmlDraft 2014/01/07](https://usermanual.wiki/Ricoh/PRSP213NW1/User-Guide-2199680-Page-120.png)
![• To delete an entered destination, select the destination in [Destination List:], and then click [Deletefrom List].Canceling a faxYou can cancel sending a fax using either the machine's control panel or your computer, depending onthe status of the job.Canceling while the machine is receiving a fax from the computerIf the machine is shared by multiple computers through a print server, be careful not to cancelanother user's fax.1. Double-click the printer icon on the task bar of your computer.2. Select the print job you want to cancel, click the [Document] menu, and then click[Cancel].Canceling a fax using the control panelCancel the fax using the control panel.1. Press the [Facsimile] key.2. Press the [Clear/Stop] key.Configuring Transmission SettingsThis section describes how to configure transmission settings in the PC FAX driver's properties.Properties are set separately for each application.1. On the [File] menu, click [Print...].2. Select the PC Fax driver as the printer, and then click a button such as [Preferences].PC FAX driver properties dialog box appears.3. Configure settings as necessary, and then click [OK].Configuring the PC FAX Address BookThis section describes the PC FAX address book. Configure the PC FAX address book on the computer.The PC FAX address book allows you to specify PC FAX destinations quickly and easily.The PC FAX address book can contain up to 1000 entries, including individual destinations and groupsof destinations.Using the Fax Function from a Computer (PC FAX)opal-p2_mf2_com_user_guide_00142112_eng.xml 121Draft 2014/01/07](https://usermanual.wiki/Ricoh/PRSP213NW1/User-Guide-2199680-Page-121.png)
![Opening the PC FAX address bookThis section describes how to open the PC FAX address book.1. On the [Start] menu, click [Devices and Printers].2. Right-click the PC FAX driver icon, and then click [Printing Preferences...].3. Click the [Address Book] tab.Registering destinationsThis section describes how to register destinations in the PC FAX address book.1. Open the PC Fax address book, and then click [Add User].2. Enter the destination information.You must enter a contact name and fax number.3. Click [OK].Registering groupsThis section describes how to register groups of destinations.A group can contain up to 100 individual destinations.1. Open the PC Fax address Book, and then click [Add Group].2. Enter the group name in [Group Name].3. Select the destination you want to include in the group from [User List:], and then click[Add].4. Click [OK].Exporting/Importing PC-Fax Address Book data• The following procedure is based on Windows 7 as an example. If you are using anotheroperating system, the procedure might vary slightly.Exporting PC-Fax Address Book dataPC-Fax Address Book data can be exported to a file in CSV (Comma Separated Values) format.Follow this procedure to export PC-Fax Address Book data.1. Open the PC-Fax Address Book, and then click [Export].2. Navigate to the location to save the PC-Fax Address Book data, specify a name forthe file, and then click [Save].6. Sending and Receiving a Fax122 opal-p2_mf2_com_user_guide_00142112_eng.xmlDraft 2014/01/07](https://usermanual.wiki/Ricoh/PRSP213NW1/User-Guide-2199680-Page-122.png)
![Importing PC-Fax Address Book dataPC-Fax Address Book data can be imported from files in CSV format. You can import address bookdata from other applications if the data is saved as a CSV file.Follow this procedure to import PC-Fax Address Book data. To import address book data fromother applications, you must select the appropriate items to import.1. Open the PC-Fax Address Book, and then click [Import].2. Select the file containing the address book data, and then click [Open].A dialog box for selecting the items to import appears.3. For each field, select an appropriate item from the list.Select [*empty*] for fields for which there is no data to import. Note that [*empty*] cannotbe selected for [Name] and [Fax].4. Click [OK].For details about the settings, see the PC-Fax driver Help.• CSV files are exported using Unicode encoding.• PC-Fax Address Book data can be imported from CSV files whose character encoding is Unicodeor ASCII.• Group data cannot be exported or imported.• Up to 1000 destinations can be registered in the PC-Fax Address Book. If this limit is exceededduring importing, the remaining destinations will not be imported.Editing a Fax Cover SheetThis section describes how to edit a fax cover sheet in the PC FAX driver's properties.1. On the [File] menu, click [Print...].2. Select the PC Fax driver as the printer, and then click [Print].3. Click the [Specify Destination] tab, and then click [Edit Cover Sheet].4. Configure settings as necessary, and then click [Print].For details about the settings, see the PC Fax driver Help.Using the Fax Function from a Computer (PC FAX)opal-p2_mf2_com_user_guide_00142112_eng.xml 123Draft 2014/01/07](https://usermanual.wiki/Ricoh/PRSP213NW1/User-Guide-2199680-Page-123.png)
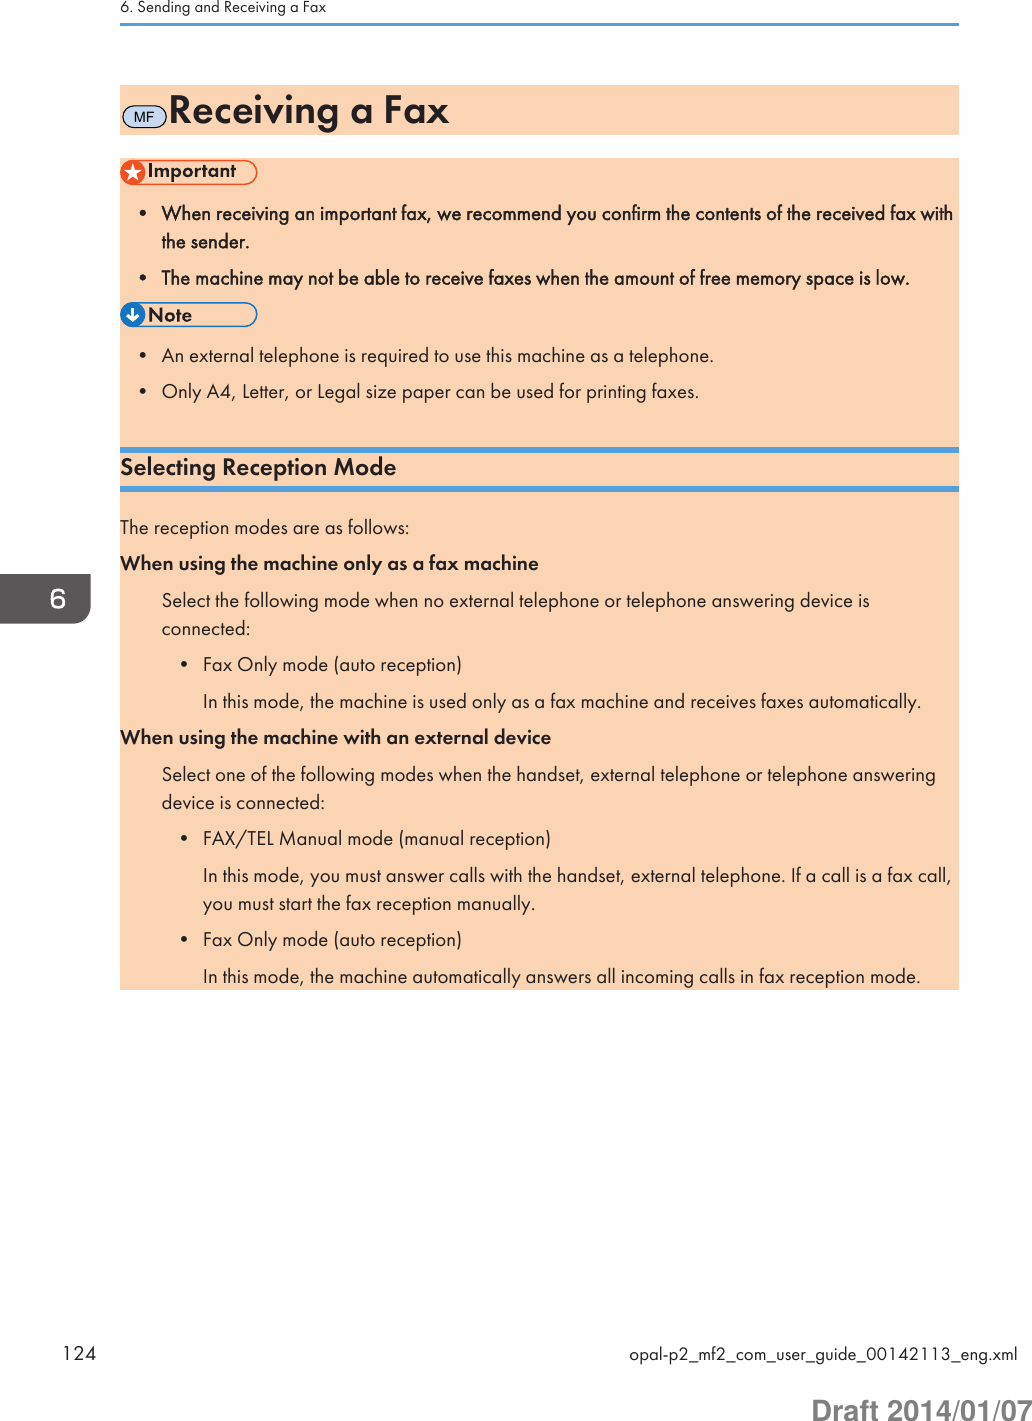
![1. Press the [User Tools] key.DCT8452. Press the [ ] or [ ] key to select [Fax Features], and then press the [OK] key.3. Press the [ ] or [ ] key to select [Reception Settings], and then press the [OK] key.4. Press the [ ] or [ ] key to select [Switch Reception Mode], and then press the [OK] key.5. Press the [ ], [ ], [ ], or [ ] key to select the desired reception mode, and then press the[OK] key.6. Press the [User Tools] key to return to the initial screen.Receiving a fax in FAX/TEL Manual mode• The procedure differs depending on whether [Operation] is set to [Easy Mode] or [AdvancedMode] in [Fax Features].1. Pick up the handset of the external telephone to answer the call.The sender tells you that they will send a fax.A normal telephone call starts.2. When you hear a fax calling tone or no sound, press the [Facsimile] key.3. Press the [Start] key.If [Operation] is set to [Easy Mode], proceed to Step 4.4. Press [RX].5. Press the [Start] key.6. Replace the handset.Receiving a fax in Fax Only modeWhen the reception mode is set to Fax Only mode, the machine automatically answers all incomingcalls in fax reception mode.Receiving a Faxopal-p2_mf2_com_user_guide_00142113_eng.xml 125Draft 2014/01/07](https://usermanual.wiki/Ricoh/PRSP213NW1/User-Guide-2199680-Page-125.png)
![• You can specify the number of times the machine rings before answering a call in the [Number ofRings] setting under [Fax Features]. For [Number of Rings], see page 139 "Fax Features Settings".• If you answer a call with the external telephone while the machine is ringing, a normal telephonecall starts. If you hear a fax calling tone or no sound, receive the fax manually. To receive the faxmanually, see page 125 "Receiving a fax in FAX/TEL Manual mode".Printing Out Faxes Stored in MemoryThis section explains how to print out received faxes stored in the machine's memory.When the Fax Received indicator is lit, there is a fax stored in machine’s memory. Follow the procedurebelow to print the fax.1. Press the [Facsimile] key.2. Press [RX File].//3. Press the [ ] or [ ] keys to select [Automatic], and then press the [OK] key.The machine prints out the stored fax and deletes it from memory.6. Sending and Receiving a Fax126 opal-p2_mf2_com_user_guide_00142113_eng.xmlDraft 2014/01/07](https://usermanual.wiki/Ricoh/PRSP213NW1/User-Guide-2199680-Page-126.png)
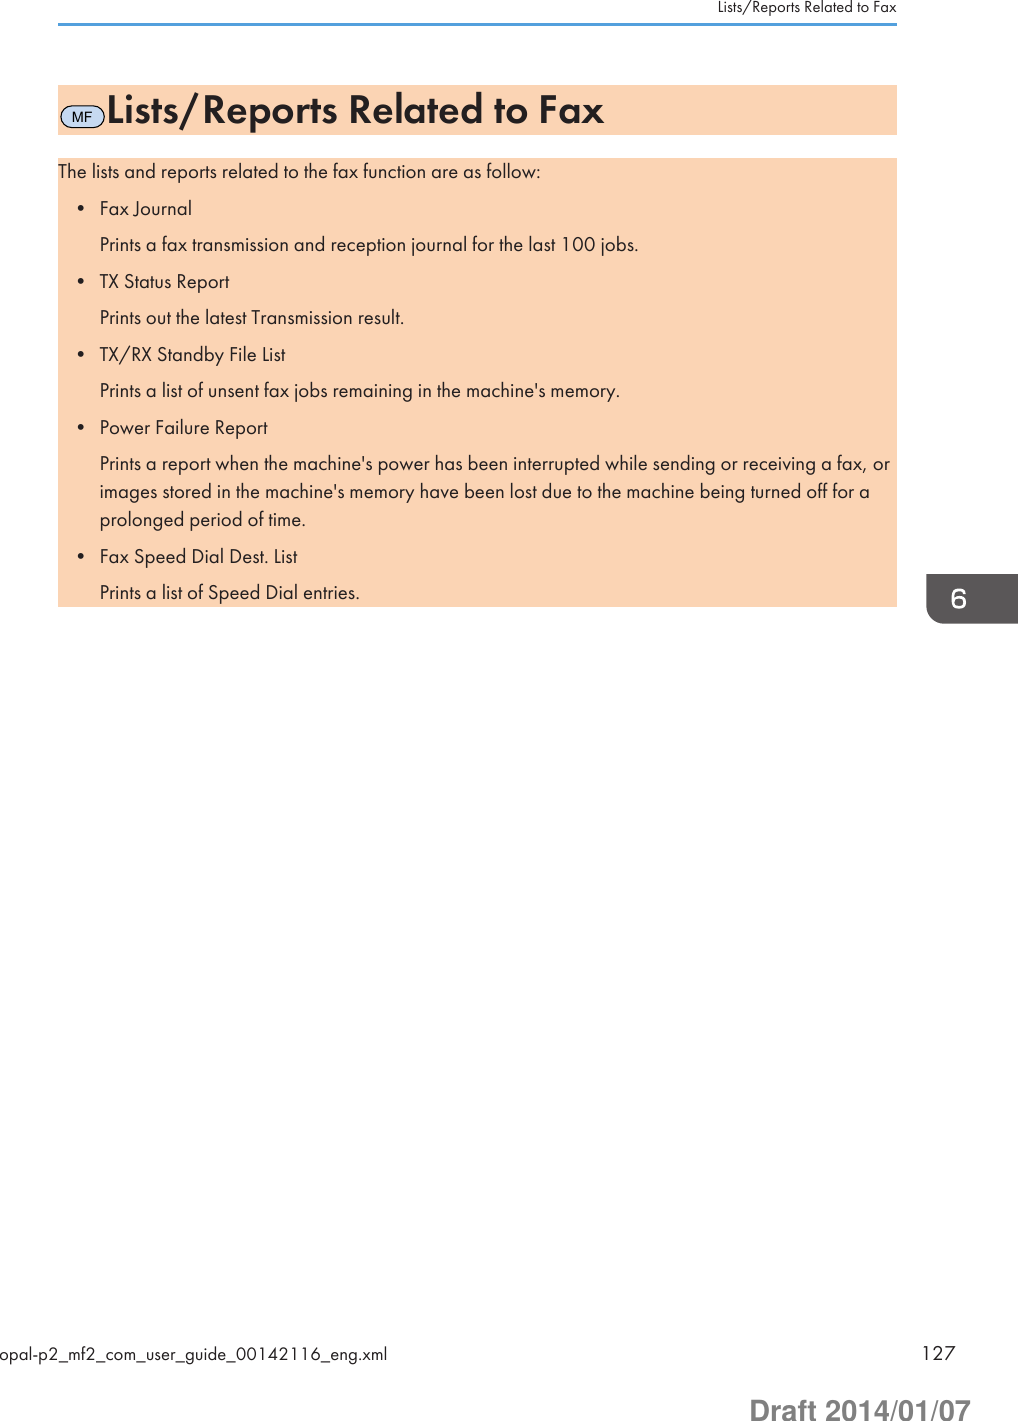
![7. Configuring the Machine Using theControl PanelMFBasic OperationThere are two main ways to access the machine settings:• Press the [User Tools] key to access the System or Network settings.• Press the [ ] or [ ] key to access the Copy, Scan, or Fax settings.To check which category the function you want to configure belongs to, see page 131 "MenuChart".1. If you want to configure the machine's system settings, press the [User Tools] key.DCT845Otherwise, press the [ ] or [ ] key while "Ready" is displayed on the initial screen of the Copy,Scan, and Fax settings.DCT8792. Press the [ ] or [ ] key to select the settings you want to use.If you select [Address Book], [Network Settings], or [Admin. Tools] menu, you might be requestedto enter a password. Enter the four-digit password, and then press the [OK] key. For details aboutthe password, see [Admin. Tools Lock] on page 159 "Administrator Settings".opal-p2_mf2_com_user_guide_00142118_eng.xml 129Draft 2014/01/07](https://usermanual.wiki/Ricoh/PRSP213NW1/User-Guide-2199680-Page-129.png)
![3. To confirm setting items and values displayed, press the [OK] key.4. To go back to the previous item, press the [Escape] key.• To return to the initial screen, press the [Escape] key the same amount of times as the number ofselected items, or press the [User Tools] key once.• With Type 1 models, press the [ ] or [ ] key to access the Copy setting. To specify [Scan Settings],insert the USB flash drive and select the settings using the [ ] or [ ] key.• With Type 1 or 5 models, press the [ ] or [ ] key to access the Copy setting. To specify [ScanSettings], insert the USB flash drive and select the settings using the [ ] or [ ] key.7. Configuring the Machine Using the Control Panel130 opal-p2_mf2_com_user_guide_00142118_eng.xmlDraft 2014/01/07](https://usermanual.wiki/Ricoh/PRSP213NW1/User-Guide-2199680-Page-130.png)
![MFMenu ChartThis section lists the parameters included in each menu.For details about configuring the machine using Web Image Monitor, see page 165 "Configuring theMachine Using Utilities".• Some items might not appear depending on the model type or machine's configuration.• Some items can also be configured using Web Image Monitor.Copier Features ([ ] [ ] key setting)For details, see page 132 "Copier Features Settings"Scan Settings ([ ] [ ] key setting)For details, see page 135 "Scanner Features Settings"Fax TX Settings ([ ] [ ] key setting)For details, see page 137 "Fax Transmission Features Settings"Fax Features ([User Tools] key setting)For details, see page 139 "Fax Features Settings"Address Book ([User Tools] key setting)For details, see page 144 "Address Book Settings"System Settings ([User Tools] key setting)For details, see page 145 "System Settings"Network Settings ([User Tools] key setting)For details, see page 155 "Network Settings"Print List/Report ([User Tools] key setting)For details, see page 150 "Printing Lists/Reports"Admin. Tools ([User Tools] key setting)For details, see page 159 "Administrator Settings"Printer Features ([User Tools] key setting)For details, see page 152 "Printer Features Settings"Menu Chartopal-p2_mf2_com_user_guide_00142119_eng.xml 131Draft 2014/01/07](https://usermanual.wiki/Ricoh/PRSP213NW1/User-Guide-2199680-Page-131.png)
![MFCopier Features SettingsSelect Paper TraySelect the paper tray used for copying.Default: [Tray 1]• Tray 1• Bypass TraySortConfigures the machine to sort the output pages into sets when making multiple copies of a multi-page document (P1, P2, P1, P2...).Default: [Off]• On• OffOriginal TypeSpecifies the content of originals, to optimize copy quality.Default: [Mixed]• MixedSelect this when the original contains both text and photographs or pictures.• TextSelect this when the original contains only text and no photographs or pictures.• PhotoSelect this when the original contains photographs or pictures. Use this mode for the followingtypes of original:• Photographs• Pages that are entirely or mainly photographs or pictures, such as magazine pages.• Vou.Select this to scan with the appropriate setting for vouchers. This is available only if using theexposure glass.DensitySpecifies the image density for photocopying.Increase the level (black squares) to increase the density.Default: The default setting is the middle of 5 adjustment levels.Reduce/EnlargeSpecifies the percentage by which copies are enlarged or reduced.7. Configuring the Machine Using the Control Panel132 opal-p2_mf2_com_user_guide_00142120_eng.xmlDraft 2014/01/07](https://usermanual.wiki/Ricoh/PRSP213NW1/User-Guide-2199680-Page-132.png)
50%, 71% (A4->A5), 82% (B5J->A5), 93%, 100%, 122% (A5->B5J), 141% (A5->A4), 200%,400% (mainly North America)50%, 65% LT->HLT, 78% LG->LT, 93%, 100%, 129% HLT->LT, 155% HLT->LG, 200%, 400%• Zoom 25-400%Duplex/CombineSpecifies combined copying. Select a copy mode according to your original and how you wantthe copy outputs to appear. For more details, see page 69 "Making Combined/2-sided Copies".Note that enabling combined copying automatically disables ID card copying.Default: [Off]• Off• 1Sd 2Orig->Comb 2on1 1SdCopy will be made on 1 side, on which 2 pages of 1-sided original will be printed.• Portrait• Landscape• 1Sd 4Orig->Comb 4on1 1SdCopy will be made on 1 side, on which 4 pages of 1-sided original will be printed.• Portrait: L to R• Portrait: T to B• Landscape: L to R• Landscape: T to B• 1 Sided Orig->2 Sided CopyCopies two 1-sided pages on one 2-sided page.• Portrait: T to T• Portrait: T to B• Landscape: T to T• Landscape: T to B• 1Sd 4Orig->Comb 2on1 2SdCopies four 1-sided pages on two 2-sided pages.• Portrait: T to T• Portrait: T to B• Landscape: T to TCopier Features Settingsopal-p2_mf2_com_user_guide_00142120_eng.xml 133Draft 2014/01/07](https://usermanual.wiki/Ricoh/PRSP213NW1/User-Guide-2199680-Page-133.png)
![• Landscape: T to B• 1Sd 8Orig->Comb 4on1 2SdCopies eight 1-sided pages on four 2-sided pages.• Portrait: L to R, T to T• Portrait: L to R, T to B• Portrait: T to B, T to T• Portrait: T to B, T to B• Landscape: L to R, T to T• Landscape: L to R, T to B• Landscape: T to B, T to T• Landscape: T to B, T to BID Card Copy SettingsYou can specify the ID Card Copy setting.• ID Card CopyIf you set this to [On], the settings specified in [ID Card Copy Settings] are applied to printedcopies.Default: [Off]• On• Off• ID Card Center LineSpecify whether to draw a center line when making ID card copy.Default: [Do not Print]• Print• Do not Print• ID Card SizeYou can change the ID card copy scanning size.Default: (mainly Europe and Asia)Horiz: 86 mmVert: 54 mm (mainly North America)Horiz: 3.38 inchVert: 2.12 inch7. Configuring the Machine Using the Control Panel134 opal-p2_mf2_com_user_guide_00142120_eng.xmlDraft 2014/01/07](https://usermanual.wiki/Ricoh/PRSP213NW1/User-Guide-2199680-Page-134.png)
![MFScanner Features SettingsScan SizeSpecifies the scanning size according to the size of the original.Default: (mainly Europe and Asia)[A4] (mainly North America)[8 1/2 × 11]• 8 1/2 × 14, 8 1/2 × 11, 8 1/2 × 5 1/2, 7 1/4 × 10 1/2, A4, B5, A5, 16K, Custom SizeScanning ModeSpecifies the scanning mode using the control panel.Default: [Color]• B&WThe machine creates 1-bit black-and-white images. Images contain only black and whitecolors.• ColorThe machine creates 8-bit color images. Images are full color.• Gray ScaleThe machine creates 8-bit black-and-white images. Images contain black and white, andintermediate gray colors.Max. E-mail SizeSpecifies the maximum size of a file that can be sent by e-mail.Default: [1 MB]• 1 MB• 2 MB• 3 MB• 4 MB• 5 MB• No LimitDensitySpecifies the image density for scanning originals.Increase the level (black squares) to increase the density.Default: The default setting is the middle of 5 adjustment levels.Scanner Features Settingsopal-p2_mf2_com_user_guide_00142121_eng.xml 135Draft 2014/01/07](https://usermanual.wiki/Ricoh/PRSP213NW1/User-Guide-2199680-Page-135.png)
![ResolutionSpecifies the resolution for scanning the original.Default: [300 × 300dpi]• 100 × 100dpi• 150 × 150dpi• 200 × 200dpi• 300 × 300dpi• 400 × 400dpi• 600 × 600dpiCompression (Color)Specifies the color compression ratio for JPEG files. The lower the compression ratio, the higher thequality but greater the file size.Default: [Medium]• Low• Medium• HighLimitless ScanSets the machine to request next originals when scanning with the exposure glass.Default: [Off]• Off• OnFile TypeSpecifies whether to create a multi-page file containing all pages or separate single-page fileswhen scanning multiple pages.Note that a scanned file can contain multiple pages only when the file format is PDF or TIFF. If thefile format is JPEG, a single-page file is created for each scanned page.Default: [Multi-page]• Multi-pageA multi-page file containing all pages is created.• Single PageA single-page file is created for each page.7. Configuring the Machine Using the Control Panel136 opal-p2_mf2_com_user_guide_00142121_eng.xmlDraft 2014/01/07](https://usermanual.wiki/Ricoh/PRSP213NW1/User-Guide-2199680-Page-136.png)
![MFFax Transmission Features SettingsImmediate TXSets the machine to send a fax immediately when the original is scanned.Default: [Off]• OffSelect this when using Memory Transmission.• OnSelect this when using Immediate Transmission.• Next Fax OnlySelect this when using Immediate Transmission for the next transmission only.ResolutionSpecifies the resolution to use for scanning originals.Default: [Standard]• StandardSelect this when the original is a printed or typewritten document with normal-sizedcharacters.• DetailSelect this when the original is a document with small print.• PhotoSelect this when the original contains images such as photographs or shaded drawings.DensitySpecifies the image density to use for scanning originals.Default: [Normal]• Light• Normal• DarkPause TimeSpecifies the length of pause time when a pause is inserted between the digits of a fax number.Default: 3 seconds• 1 to 15 secondsAuto RedialSets the machine to redial the fax destination automatically when the line is busy or a transmissionerror occurs, if the machine is in Memory Transmission mode. The number of redial attempts isFax Transmission Features Settingsopal-p2_mf2_com_user_guide_00142122_eng.xml 137Draft 2014/01/07](https://usermanual.wiki/Ricoh/PRSP213NW1/User-Guide-2199680-Page-137.png)
![preset to two or three times, depending on the [Country] setting under [Admin. Tools], in five-minuteintervals.Default: [On]• Off• OnPrint Fax HeaderSets the machine to add a header to every fax you send. The header includes the current date andtime, user fax name and fax number of the machine, job ID, and page information.Default: [On]• Off• On7. Configuring the Machine Using the Control Panel138 opal-p2_mf2_com_user_guide_00142122_eng.xmlDraft 2014/01/07](https://usermanual.wiki/Ricoh/PRSP213NW1/User-Guide-2199680-Page-138.png)
![MFFax Features SettingsReception SettingsSpecifies the settings for receiving a fax.• Switch Reception ModeSpecifies the reception mode.Default: [Fax Only]• Fax OnlyThe machine automatically answers all incoming calls in fax reception mode.• FAX/TEL(Mnl.)The machine rings when it receives incoming calls. The machine receives faxes onlywhen you manually receive faxes.• FAX/TADThe machine receives faxes automatically when a fax call is received. Otherwise, theconnected telephone answering device answers the call.• Auto ReductionSets the machine to reduce the size of a received fax if it is too large to print on a single sheetof paper.Note that the machine only reduces the size down to 74%. If further reduction is required to fitthe fax on a single sheet, it will be printed on separate sheets without being reduced.Default: [On](Default may be [Off] depending on the [Country] setting under [Admin. Tools].)• Off• On• Number of RingsSpecifies the number of times the machine rings before it starts to receive faxes in Fax Onlymode.Default: 3 times• 3 to 5 times, in increments of 1• RX Store FileYou can print or delete received faxes.• Print Selected FileYou can select and print received faxes.• Delete Selected FileFax Features Settingsopal-p2_mf2_com_user_guide_00142123_eng.xml 139Draft 2014/01/07](https://usermanual.wiki/Ricoh/PRSP213NW1/User-Guide-2199680-Page-139.png)
![You can select and delete received faxes.• Delete All File• Reception File SettingSets the machine to store received faxes into memory for printing or forward them to a presetdestination.Use Web Image Monitor to specify the forwarding destination (for details, see page 172"Configuring the System Settings").Default: [Print]• Print• Forward• Print Received FileSets the machine to automatically print the faxes received into memory or store them for latermanual printing.Default: [Automatic]• AutomaticAutomatically print out the received faxes and delete from memory.• ManualStore the received faxes in memory for manual printing.• Notify Forward StatusSets the machine to send e-mail notifications after faxes are forwarded. The e-mail notificationdestination depends on how the forwarding destination is configured using Web ImageMonitor (for details, see page 172 "Configuring the System Settings").Default: [Off]• On• OffDelete TX Standby FileDeletes unsent fax jobs remaining in the machine's memory. The machine can store up to 5 unsentfax jobs.This function is only performed when selected.• Delete Selected FileTo delete a fax job, select the desired job, and then select [Yes]. Selecting [No] exits to theprevious level of the menu tree without deleting the fax job.• Delete All FilesTo delete the fax jobs, select [Yes]. Selecting [No] exits to the previous level of the menu treewithout deleting the fax job.7. Configuring the Machine Using the Control Panel140 opal-p2_mf2_com_user_guide_00142123_eng.xmlDraft 2014/01/07](https://usermanual.wiki/Ricoh/PRSP213NW1/User-Guide-2199680-Page-140.png)
![Communication Settings• ECM TransmissionSets the machine to automatically resend parts of the data that are lost during transmission.Default: [On]• Off• On• ECM ReceptionSets the machine to automatically receive parts of the data that are lost during reception.Default: [On]• Off• On• Dial Tone DetectSets the machine to detect a dial tone before the machine begins to dial the destinationautomatically.Default: [Detect](Default may be [Not Detect] depending on the [Country] setting under [Admin. Tools].)• Detect• Not Detect• Transmission SpeedSpecifies the transmission speed for the fax modem.Default: [33.6 Kbps]• 33.6 Kbps• 14.4 Kbps• 9.6 Kbps• 7.2 Kbps• 4.8 Kbps• 2.4 Kbps• Reception SpeedSpecifies the reception speed for the fax modem.Default: [33.6 Kbps]• 33.6 Kbps• 14.4 Kbps• 9.6 KbpsFax Features Settingsopal-p2_mf2_com_user_guide_00142123_eng.xml 141Draft 2014/01/07](https://usermanual.wiki/Ricoh/PRSP213NW1/User-Guide-2199680-Page-141.png)
![• 7.2 Kbps• 4.8 Kbps• 2.4 KbpsReport Print Settings• Print TX Status ReportSets the machine to print a transmission report automatically after a fax transmission.When the machine is in Immediate Transmission mode, the image of the original will not bereproduced on the report, even if [Error Only (Image Attached)] or [Every TX (ImageAttached)] is selected.Note that if a memory error occurs for PC-Fax transmission, a transmission report will alwaysbe printed regardless of this setting.The transmission report will be printed on A4 or Letter size paper.Default: [Error Only (Image Attached)]• Error OnlyPrints a report when a transmission error occurs.• Error Only (Image Attached)Prints a report with an image of the original when transmission error occurs.• Every TXPrints a report for every fax transmission.• Every TX (Image Attached)Prints a report with an image of the original for every fax transmission.• Do not Print• Print Fax JournalSets the machine to print a fax journal automatically for every 50 fax jobs (both sent andreceived).Default: [Auto Print]• Auto Print• Do not Auto PrintOperationYou can simplify the procedure for sending and receiving faxes by disabling the use of theexposure glass. If originals are loaded in the ADF, you can fax them using the ADF in either modeby pressing the [Start] key.Default: [Advanced Mode]• Easy Mode7. Configuring the Machine Using the Control Panel142 opal-p2_mf2_com_user_guide_00142123_eng.xmlDraft 2014/01/07](https://usermanual.wiki/Ricoh/PRSP213NW1/User-Guide-2199680-Page-142.png)
![If you select [Easy Mode], you can receive faxes by pressing the [Start] key. The exposureglass cannot be used in this mode.• Advanced ModeIf you select [Advanced Mode], you can specify whether to send or receive faxes afterpressing the [Start] key.Fax Features Settingsopal-p2_mf2_com_user_guide_00142123_eng.xml 143Draft 2014/01/07](https://usermanual.wiki/Ricoh/PRSP213NW1/User-Guide-2199680-Page-143.png)
![MFSystem SettingsAdjust Sound VolumeSpecifies the volume of the sounds produced by the machine.Default: [Low] for [Panel Key Sound], and [Middle] for other parameters.• Panel Key SoundSpecifies the volume of the beep that sounds when a key is pressed.• Off• Low• Middle• High• On Hook ModeSpecifies the volume of the sound from the speaker during on hook mode.• Off• Low• Middle• High• Job End ToneSpecifies the volume of the beep that sounds when a job is complete.• Off• Low• Middle• High• Job Error ToneSpecifies the volume of the beep that sounds when a fax transmission error occurs.• Off• Low• Middle• High• Alarm VolumeSpecifies the volume of the alarm that sounds when an operation error occurs.• Off• LowSystem Settingsopal-p2_mf2_com_user_guide_00142125_eng.xml 145Draft 2014/01/07](https://usermanual.wiki/Ricoh/PRSP213NW1/User-Guide-2199680-Page-145.png)
![• Middle• HighTray Paper SettingsPaper Size: Tray 1Specifies the paper size for Tray 1.Default: (mainly Europe and Asia)[A4] (mainly North America)[81/2 × 11]• A4, B5 JIS, A5, B6 JIS, A6, 8 1/2 × 14, 8 1/2 × 11, 5 1/2 × 8 1/2, 7 1/4 × 10 1/2,16K (197 × 273), 16K (195 × 270), 16K (184 × 260), CustomPaper Size: Bypass TraySpecifies the paper size for bypass tray.Default: (mainly Europe and Asia)[A4] (mainly North America)[81/2 × 11]• A4, B5 JIS, A5, B6 JIS, A6, 8 1/2 × 14, 8 1/2 × 11, 5 1/2 × 8 1/2, EXE (7 1/4 × 101/2), 16K (197 × 273mm), 16K (195 × 270mm), 16K (184 × 260mm), CustomPaper Type: Tray 1Specifies the paper type for Tray 1.Default: [Plain Paper]• Plain Paper, Recycled Paper, Thick Paper, Thin PaperPaper Type: Bypass TraySpecifies the paper type for bypass tray.Default: [Plain Paper]• Plain Paper, Recycled Paper, Thick Paper, Thin PaperSize Mismatch DetectionSets the machine to report an error if the paper size does not match the print job's settings.Default: [Off]• Off• On7. Configuring the Machine Using the Control Panel146 opal-p2_mf2_com_user_guide_00142125_eng.xmlDraft 2014/01/07](https://usermanual.wiki/Ricoh/PRSP213NW1/User-Guide-2199680-Page-146.png)
![I/O Timeout• USBSpecifies how many seconds the machine waits for print data, if the data is interrupted while itis being sent from the computer via USB. If the machine does not receive any more data withinthe time specified here, the machine only prints the data it has received. If printing is frequentlyinterrupted by data from other ports, increase the timeout period.Default: [60 sec.]• 15 sec.• 60 sec.• 300 sec.• NetworkSpecifies how many seconds the machine waits for print data, if the data is interrupted while itis being sent from the computer via network. If the machine does not receive any more datawithin the time specified here, the machine only prints the data it has received. If printing isfrequently interrupted by data from other ports, increase the timeout period.Default: [60 sec.]• 15 sec.• 60 sec.• 300 sec.• Fixed USB PortSpecifies whether the same printer/PC-Fax driver can be used for multiple machines or notunder USB connection.Default: [Off]• OffYou must install the printer/PC-Fax driver separately for individual machines, becausethe machine other than the original will be recognized as a new device upon USBconnection.• OnThe same printer/PC-Fax driver you have installed in your computer can be used withany machine other than the one originally used for installation, if the machine is of thesame model.Auto ContinueSets the machine to ignore an error with paper size or type and continue printing. The printing stopstemporarily when an error is detected, and restarts automatically after about ten seconds using thesettings made on the control panel. However, if the size of paper specified on the control paneland that of the paper loaded in the paper tray or the paper size specified for the print job do notmatch when printing restarts, it may cause a paper jam.System Settingsopal-p2_mf2_com_user_guide_00142125_eng.xml 147Draft 2014/01/07](https://usermanual.wiki/Ricoh/PRSP213NW1/User-Guide-2199680-Page-147.png)
![Default: [On]• Off• OnToner SavingSets the machine to print using a reduced amount of toner (for prints made by the copier functiononly).Default: [Off]• Off• OnToner End Option SettingsThis setting is used to monitor the toner level.Default: [Stop Printing]• Stop PrintingMonitoring the toner level is enabled. The remaining toner level can be checked in the controlpanel and on the Web Image Monitor.• Continue PrintingThe machine no longer monitors the toner level. Even when the toner runs out, printing willcontinue and no messages will be displayed.[Toner End Option Settings] is not displayed for Type 1 and 2 models.[Toner End Option Settings] is not displayed for Type 1, 2 and 5 models.Supplies Status• Print CartridgeDisplays information about consumables. This information is displayed only if [Toner EndOption Settings] has been set to [Stop Printing].If [Toner End Option Settings] is set to [Continue Printing], "**" is displayed instead of theindicator above.Toner levels are not displayed for Type 1 and 2 models.Toner levels are not displayed for Type 1, 2 and 5 models.Printer RegistrationAdjusts the position of the input tray. Adjust the value by using the [ ] or [ ] key.To check the registration, print a test page.Default: [0]• Horiz.: Tray 1 (-6 to +6 mm, in 1 mm increments)• Vert.: Tray 1 (-6 to +6 mm, in 1 mm increments)7. Configuring the Machine Using the Control Panel148 opal-p2_mf2_com_user_guide_00142125_eng.xmlDraft 2014/01/07](https://usermanual.wiki/Ricoh/PRSP213NW1/User-Guide-2199680-Page-148.png)
![• Horiz.: Bypass Tray (-6 to +6 mm, in 1 mm increments)• Vert.: Bypass Tray (-6 to +6 mm, in 1 mm increments)Low Humidity ModeWhen the machine is used in a low humidity environment, black stripes with a few millimeters widthmay appear. Selecting [On] should prevent such black stripes from appearing.Default: [Off]• On• OffImage DensityAdjusts the density of printing.Default: 0• -3 to +3Fusing Unit Amelrtn.ModeIf the toner is not transferred properly, causing the paper to be stained, select [On] to improvetransferability.Default: [Off]• Off• OnSystem Settingsopal-p2_mf2_com_user_guide_00142125_eng.xml 149Draft 2014/01/07](https://usermanual.wiki/Ricoh/PRSP213NW1/User-Guide-2199680-Page-149.png)
![MFPrinting Lists/ReportsPrinting the Configuration Page1. Press the [User Tools] key.DCT8452. Press the [ ] or [ ] key to select [Print List/Report], and then press the [OK] key.3. Press the [ ] or [ ] key to select [Configuration Page], and then press the [OK] key.4. Press [Yes] in the confirmation screen.Types of Lists/Reports• Reports will be printed on A4 or Letter size paper. Load one of these sizes of paper into the traybefore printing reports.Configuration PagePrints general information and the current configurations of the machine.You can check the firmware version on the configuration page.By updating the firmware, you can correct problems as well as adding a number of new functions.For details about updating the firmware, see the Firmware Update Guide.The Firmware Update Guide can be downloaded from our Web site.Fax JournalPrints a fax transmission and reception journal for the last 50 jobs.TX/RX Standby File ListPrints a list of fax jobs remaining in the machine's memory to be printed, sent, or forwarded.Quick Dial Dest. ListPrints a list of scan and fax Quick Dial entries.7. Configuring the Machine Using the Control Panel150 opal-p2_mf2_com_user_guide_00142126_eng.xmlDraft 2014/01/07](https://usermanual.wiki/Ricoh/PRSP213NW1/User-Guide-2199680-Page-150.png)
![MFPrinter Features SettingsList/Test PrintPrints lists showing configurations on the machine.• Config. PagePrints general information and the current configurations of the machine.• Menu ListPrints the machine's function menus.• Test PagePrints a test page for checking the single-sided printing condition. The test page containsnetwork settings.• PCL Font ListPrints installed PCL font list.System• CopiesSets the machine to print the specified number of sets.This setting is disabled if the number of pages to print is specified by the printer driver.Default: 1• 1 to 999• Sub Paper SizeSets the machine to print onto paper of another size if the specified paper is not loaded in anytray. Alternative sizes are preset to A4 and Letter.Default: [Auto]• Auto• Off• Default Page SizeSpecifies the paper size to be used when the paper size is not specified in the print job.Default: (mainly Europe and Asia)[A4] (mainly North America)[8 1/2 × 11]• A4, B5 JIS, A5, B6 JIS, A6, 8 1/2 × 14, 8 1/2 × 11, 5 1/2 × 8 1/2,7 1/4 × 10 1/2, 16K (197 × 273), 16K (195 × 270), 16K (184 × 260)7. Configuring the Machine Using the Control Panel152 opal-p2_mf2_com_user_guide_00142127_eng.xmlDraft 2014/01/07](https://usermanual.wiki/Ricoh/PRSP213NW1/User-Guide-2199680-Page-152.png)
![• Blank Page PrintSets the machine to print blank pages.When cover sheet printing is enabled from the printer driver, cover sheets are inserted even ifyou select [Off].Note that this setting has lower priority than the printer driver's blank page setting.Default: [On]• On• Off• Print Error ReportSets the machine to print an error page when the machine detects a printer or memory error.Default: [Off]• On• OffPCL MenuSpecifies conditions when using PCL for printing.• OrientationSpecifies the page orientation.Default: [Portrait]• Portrait• Landscape• Form LinesSpecifies the number of lines per page between 5 and 128.Default: (mainly Europe and Asia)[64] (mainly North America)[60]• Font NumberSpecifies the ID of the default font you want to use between 0 and 89.Default: 0• Point SizeSpecifies the point size you want to use for the default font between 4.00 and 999.75 in 0.25increments.Default: 12.00 pointsPrinter Features Settingsopal-p2_mf2_com_user_guide_00142127_eng.xml 153Draft 2014/01/07](https://usermanual.wiki/Ricoh/PRSP213NW1/User-Guide-2199680-Page-153.png)
![• Font PitchSpecifies the number of characters per inch you want to use for the default font between 0.44and 99.99 in 0.01 increments.This setting is effective only for fixed-space fonts.Default: 10.00 pitch• Symbol SetSpecifies the character set for the default font. The following sets are available:Default: [PC-8]• Roman-8, Roman-9, ISO L1, ISO L2, ISO L5, PC-8, PC-8 D/N, PC-850, PC-852,PC-858, PC8-TK, Win L1, Win L2, Win L5, Desktop, PS Text, VN Intl, VN US, MS Publ,Math-8, PS Math, VN Math, Pifont, Legal, ISO 4, ISO 6, ISO 11, ISO 15, ISO 17, ISO21, ISO 60, ISO 69, Win 3.0, MC Text, ISO L6, ISO L9, PC-775, PC-1004, WinBaltic• Courier FontSpecifies a courier-type font.Default: [Regular]• Regular• Dark• Ext. A4 WidthSets the machine to extend the width of the printable area of A4 size paper, reducing sidemargin width.Default: [Off]• On• Off• Append CR to LFSets the machine to append a CR code to each LF code to print text data clearly.Default: [Off]• On• Off• ResolutionSpecifies the print resolution in dots per inch.Default: [600 × 600 dpi]7. Configuring the Machine Using the Control Panel154 opal-p2_mf2_com_user_guide_00142127_eng.xmlDraft 2014/01/07](https://usermanual.wiki/Ricoh/PRSP213NW1/User-Guide-2199680-Page-154.png)
![MFNetwork Settings• Depending on the settings you change, the machine might need to be restarted.Ethernet• MAC AddressDisplays the machine's MAC address.• Ethernet SpeedDisplays the current Ethernet speed setting.• 100Mbps Full Duplex• 100Mbps Half Duplex• 10Mbps Full Duplex• 10Mbps Half Duplex• Ethernet UnavailableAppears when a network cable is not connected.• Set Ethernet SpeedSpecifies the speed for Ethernet communication. Select a speed that matches your networkenvironment.For most networks, the default setting is the optimum setting.Default: [Auto Select]• Auto Select• 100Mbps Full Duplex• 100Mbps Half Duplex• 10Mbps Full Duplex• 10Mbps Half DuplexWi-Fi• Wi-Fi EnableSelect whether to enable or disable Wireless LAN.Default: [Enable]• Disable• EnableIf [Disable] is set, [Wi-Fi/LAN Key], [Wi-Fi Status], [MAC Address], [Current Connection],and [Setup Wizard] are not displayed.• Wi-Fi/LAN KeyNetwork Settingsopal-p2_mf2_com_user_guide_00142128_eng.xml 155Draft 2014/01/07](https://usermanual.wiki/Ricoh/PRSP213NW1/User-Guide-2199680-Page-155.png)
![Select the mode that appears if the [WIFI/LAN] key is pressed.Default: [Infrastructure Mode]• Infrastructure Mode• Ad-Hoc Mode• Wi-Fi StatusDisplays the current connection status.• MAC AddressDisplays the machine's MAC address.• Current ConnectionDisplays detailed information about the connection, such as the SSID and the wireless signalstrength.• Setup WizardDisplays the procedure for manually connecting to a wireless LAN. It leads you step-by-stepthrough configuring the settings for connecting with a wireless LAN.IPv4 Configuration• DHCPSets the machine to receive its IPv4 address, subnet mask, and default gateway addressautomatically from a DHCP server.Default: [Active]• Inactive• Active• IP AddressSpecifies the machine's IPv4 address when DHCP is not used.Use this menu to check the current IP address when DHCP is used.Default: XXX.XXX.XXX.XXXThe numbers represented by "X" vary according to your network environment.• Subnet MaskSpecifies the machine's subnet mask when DHCP is not used.Use this menu to check the current subnet mask when DHCP is used.Default: XXX.XXX.XXX.XXXThe numbers represented by "X" vary according to your network environment.• Gateway AddressSpecifies the machine's default gateway address when DHCP is not used.Use this menu to check the current default gateway address when DHCP is used.7. Configuring the Machine Using the Control Panel156 opal-p2_mf2_com_user_guide_00142128_eng.xmlDraft 2014/01/07](https://usermanual.wiki/Ricoh/PRSP213NW1/User-Guide-2199680-Page-156.png)
![Default: XXX.XXX.XXX.XXXThe numbers represented by "X" vary according to your network environment.• IP Address MethodDisplays the IP address acquisition method.• IP Not Ready• DHCP• Manual Config.• Default IPIPv6 Configuration• IPv6Select whether to enable or disable IPv6.Default: [Inactive]• Active• Inactive• DHCPSets the machine to receive its IPv6 address from a DHCP server.Default: [Active]• Active• Inactive• IP Address (DHCP)Displays the IPv6 address obtained from a DHCP server.• Manual Config. Address• Manual Config. AddressSpecifies the machine's IPv6 address when DHCP is not used. Can contain up to 39characters.For details about entering characters, see page 103 "Entering Characters".• Prefix LengthSpecifies the prefix length, using a value between 0 and 128.• Gateway AddressSpecifies the IPv6 address of the default gateway. Can contain up to 39 characters.For details about entering characters, see page 103 "Entering Characters".• Stateless AddressDisplays the IPv6 stateless addresses obtained from a Router Advertisement.Network Settingsopal-p2_mf2_com_user_guide_00142128_eng.xml 157Draft 2014/01/07](https://usermanual.wiki/Ricoh/PRSP213NW1/User-Guide-2199680-Page-157.png)
![MFAdministrator SettingsSet Date/TimeSets the date and time of the machine’s internal clock.• Set DateSpecifies the date of the machine’s internal clock.Only dates that correspond with the year and month can be set. Incompatible dates will berefused.DefaultDate format: (mainly Europe and Asia) [Day/Month/Year], (mainlyNorth America) [Year/Month/Day]• Date format: Month/Day/Year, Day/Month/Year, or Year/Month/DayYear: 2000 to 2099Month: 1 to 12Day: 1 to 31• Set TimeSets the time of the machine's internal clock.DefaultTime format: (mainly Europe and Asia) [24-hour Format], (mainlyNorth America) [12-hour Format]• Time format: 12-hour Format, 24-hour FormatAM/PM stamp: AM, PM (for 12-hour Format)Hour: 0 to 23 (for 24-hour Format), or 1 to 12 (for 12-hour Format)Minute: 0 to 59Program Fax InformationSpecifies the fax name and fax number of the machine.• Number:Specifies the fax number of the machine using up to 20 characters, including 0 to 9, space,and "+".• Name:Specifies the fax name of the machine using up to 20 alphanumeric characters and symbols.Dial/Push PhoneSpecifies the line type of the telephone line.Administrator Settingsopal-p2_mf2_com_user_guide_00142129_eng.xml 159Draft 2014/01/07](https://usermanual.wiki/Ricoh/PRSP213NW1/User-Guide-2199680-Page-159.png)
![To configure this setting, contact your telephone company and select the setting based on yourtelephone line. Selecting a wrong setting may cause failures in fax transmissions.[Dial Phone (20PPS)] may not appear depending on the country setting of the machine.Default: [Push Phone]• Push Phone• Dial Phone (10PPS)• Dial Phone (20PPS)PSTN / PBXSets the machine to connect to the public switched telephone network (PSTN) or a private branchexchange (PBX).Default: [PSTN]• PSTN• PBXPBX Access NumberSpecifies the dial number to access the outside line when the machine is connected to a PBX.Make sure that this setting matches the setting of your PBX. Otherwise, you may not be able to sendfaxes to outside destinations.Default: 9• 0 to 999Function PrioritySpecifies the mode that is activated when the power is turned on, or if the time specified for [SystemAuto Reset Timer] elapses without activity while the initial screen of the current mode is displayed.Default: [Copier]• Copier• Facsimile• ScannerSystem Auto Reset TimerSets the machine to return to the mode specified in [Function Priority].This setting is also applied to the timeout for copying the next document while ID card copy.Default: [On] (30 sec.)• On (30 sec., 1 min., 2 min., 3 min., 5 min., 10 min.)• Off7. Configuring the Machine Using the Control Panel160 opal-p2_mf2_com_user_guide_00142129_eng.xmlDraft 2014/01/07](https://usermanual.wiki/Ricoh/PRSP213NW1/User-Guide-2199680-Page-160.png)
![Energy Saver ModeSets the machine to enter Energy Saver mode, Energy Saver mode 1 or Energy Saver mode 2, toreduce power consumption. The machine recovers from Energy Saver mode when it receives aprint job, prints a received fax, or when [Copy] or [Start] key is pressed.• EnergySaverMode 1The machine enters Energy Saver mode 1 if the machine has been idle for about 30 seconds.It takes less time to recover from Energy Saver mode 1 than from power-off state or EnergySaver mode 2, but power consumption is higher in Energy Saver mode 1 than in EnergySaver mode 2.Default: [Off]• Off• On (30 seconds)• EnergySaverMode 2The machine enters Energy Saver mode 2 after the period of time specified for this setting ispassed. The machine consumes less power in Energy Saver mode 2 than in Energy Savermode 1, but it takes longer to recover from Energy Saver mode 2 than from Energy Savermode 1.• EuropeDefault: [1 minute]The time can be set from 1 to 30 minutes.• Countries other than European countriesDefault: [On] (1 minute)• On (1 to 240 minutes, in 1 minute increments)• OffLanguageSpecifies the language used on the screen and in reports.Area (Europe only)By selecting the area in which the machine is being used, you can narrow down the choice ofdisplay language and other settings.You can also specify this setting during the initial setup after turning the power on for the first time.Default: [Europe]• Europe• Asia• Oceania• AmericasAdministrator Settingsopal-p2_mf2_com_user_guide_00142129_eng.xml 161Draft 2014/01/07](https://usermanual.wiki/Ricoh/PRSP213NW1/User-Guide-2199680-Page-161.png)
![• AfricaCountrySelects the country in which the machine is used. The country you specify determines the time anddate display format and the default values of the fax transmission-related settings.Make sure to select the country code correctly. Selecting a wrong country may cause failures in faxtransmissions.The default value for this setting is the country code you have specified during the Initial Setup,which is required after turning on the machine for the first time.Reset SettingsBe sure not to clear the settings by mistake.• Reset All SettingsResets the machine's settings to their defaults except the following: language for the screen,country setting, network settings, and fax Quick Dial/Speed Dial destinations.Press [Yes] to execute. Press [No] to exit to the previous level of the menu tree without clearingthe settings.• Reset Network SettingsResets the network settings to their defaults.Press [Yes] to execute. Press [No] to exit to the previous level of the menu tree without clearingthe settings.• Clear Address BookClears the fax Quick Dial/Speed Dial destinations.Press [Yes] to execute. Press [No] to exit to the previous level of the menu tree without clearingthe destinations.Shortcut to FunctionAssigns one of the following functions to the [Shortcut to Func.] key on the control panel.Default: [ID Card Copy Mode]• ID Card Copy ModePress the key to switch to the ID card copy mode.• Fax Immediate TXPress the key to switch to the [Immediate TX] menu.• Select Scanner Dest.Press the key to switch to the scanner destination selection menu.Admin. Tools LockSpecifies a four-digit password for accessing the [Address Book], [Network Settings], and [Admin.Tools] menus.7. Configuring the Machine Using the Control Panel162 opal-p2_mf2_com_user_guide_00142129_eng.xmlDraft 2014/01/07](https://usermanual.wiki/Ricoh/PRSP213NW1/User-Guide-2199680-Page-162.png)
![Do not forget this password.• On (0000 to 9999)• OffIPsecSelects whether to enable or disable IPsec.This function appears only when a password is specified under [Admin. Tools Lock].Default: [Inactive]• Active• InactiveFax Number ConfirmationSets the machine to require a fax number to be entered twice when specifying a destinationmanually.When this function is enabled, you cannot use the On Hook Dial function.This function appears only when a password is specified under [Admin. Tools Lock].Default: [Off]• On• OffSave Scn Data to USBSpecify whether to enable or disable Scan to USB.This function appears only when a password is specified under [Admin. Tools Lock].Default: [Active]• Active• InactiveAdministrator Settingsopal-p2_mf2_com_user_guide_00142129_eng.xml 163Draft 2014/01/07](https://usermanual.wiki/Ricoh/PRSP213NW1/User-Guide-2199680-Page-163.png)
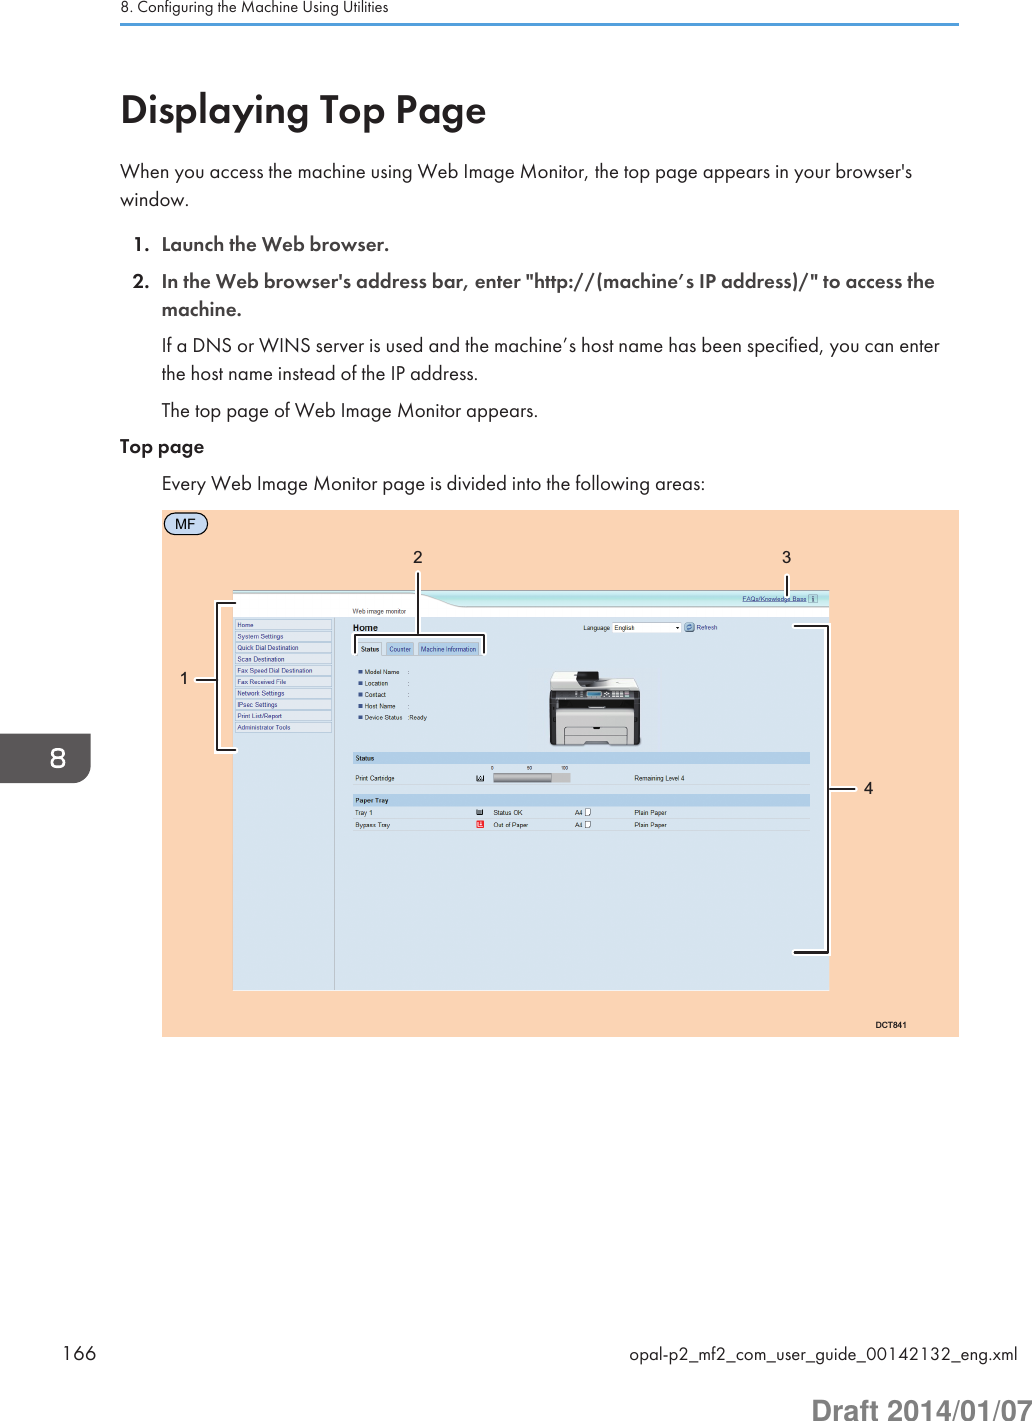
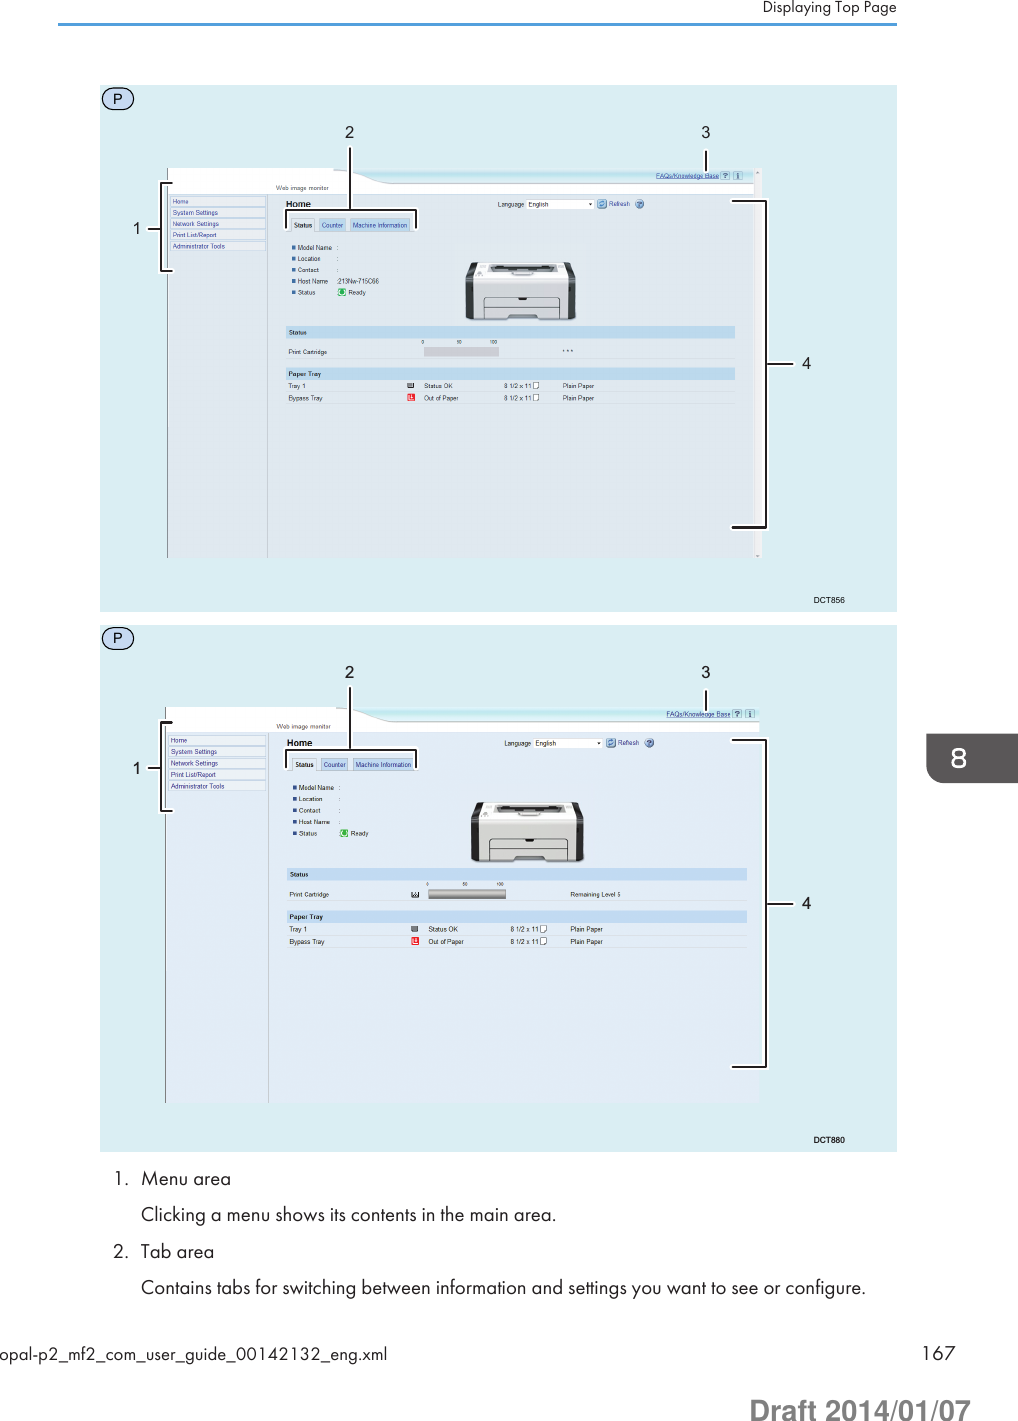
![3. FAQs/Knowledge BaseProvides answers to frequently asked questions and other useful information about using thismachine.An internet connection is required to view this information.4. Main areaDisplays the contents of the item selected in the menu area.Information in the main area is not automatically updated. Click [Refresh] at the upper-right inthe main area to update the information. Click the Web browser's [Refresh] button to refreshthe entire browser screen.• If you use an older version of a supported Web browser or the Web browser has JavaScript andcookies disabled, display and operation problems may occur.• If you are using a proxy server, configure the Web browser settings as necessary. For details aboutthe settings, contact your network administrator.• The previous page may not appear even if the back button of the Web browser is clicked. If thishappens, click the refresh button of the Web browser.• The FAQs (Frequently Asked Questions)/Knowledge Base are not available in certain languages.Changing the Interface LanguageSelect the desired interface language from the [Language] list.8. Configuring the Machine Using Utilities168 opal-p2_mf2_com_user_guide_00142132_eng.xmlDraft 2014/01/07](https://usermanual.wiki/Ricoh/PRSP213NW1/User-Guide-2199680-Page-168.png)
![Checking the System InformationClick [Home] to display the main page of Web Image Monitor. You can check the current systeminformation on this page.This page contains three tabs: [Status], [Counter], and [Machine Information].Status TabItem DescriptionModel Name Shows the name of the machine.Location Shows the location of the machine as registered on the [SNMP] page.Contact Shows the contact information of the machine as registered on the [SNMP]page.Host Name Shows the host name specified in [Host Name] on the [DNS] page.MFDevice StatusMFShows the current messages on the machine's display.PStatusPShows the current messages on the machine's display.StatusItem DescriptionPrint CartridgeMFDisplays the remaining toner level.MFToner levels are not displayed for Type 1 and 2 models.PToner level status may not be displayed.PDisplays the remaining toner level.Paper TrayItem DescriptionTray 1 Shows the current state and paper size/type setting of Tray 1.Bypass Tray Shows the current state and paper size/type setting of the bypass tray.• If a non-genuine print cartridge is installed, toner life cannot be reliably indicated.Checking the System Informationopal-p2_mf2_com_user_guide_00142133_eng.xml 169Draft 2014/01/07](https://usermanual.wiki/Ricoh/PRSP213NW1/User-Guide-2199680-Page-169.png)
![Counter TabPage CounterMFItem DescriptionPrinter Shows the following for pages printed using the printer function:• Total number of pages printed using the printer function, and lists/reports printed from the [List/Test Print] menu under [Printer Features]• Number of color pages (always shows 0)• Number of black-and-white pages printed using the printer functionScanner Shows the following for pages scanned using the scanner function:• Total number of pages• Number of color pages• Number of black-and-white pagesCopier Shows the following for pages printed using the copier function:• Total number of pages• Number of color pages (always shows 0)• Number of black-and-white pagesFax Shows the following for telephone line faxes:• Total number of pages sent and received• Number of pages sent• Number of pages receivedPrint CounterItem DescriptionPage TotalMFShows the total number of all prints from the machine:•MFPages printed using the printer, copy, and fax functions•MFLists/Reports printed from the [Print List/Report] menu•MFLists/Reports printed from the [List/Test Print] menu under[Printer Features]PDisplays the total number of pages printed.8. Configuring the Machine Using Utilities170 opal-p2_mf2_com_user_guide_00142133_eng.xmlDraft 2014/01/07](https://usermanual.wiki/Ricoh/PRSP213NW1/User-Guide-2199680-Page-170.png)
![Configuring the System SettingsClick [System Settings] to display the page for configuring the system settings.MFThis page contains the following tabs: [Sound Volume Adjustment], [Tray Paper Settings],[Copier], [Fax], [Toner Management], [Interface] and [Shortcut to Function].PThis page contains the following tabs: [Tray Paper Settings] and [Interface].MFSound Volume Adjustment TabSound Volume AdjustmentItem DescriptionPanel Key Sound Select the volume of the beep that sounds when a key is pressed from [Off],[Low], [Middle], or [High].On Hook Mode Select the volume of the sound from the speaker during on hook mode from[Off], [Low], [Middle], or [High].Job End Tone Select the volume of the beep that sounds when a job is complete from[Off], [Low], [Middle], or [High].Job Error Tone Select the volume of the beep that sounds when a fax transmission erroroccurs from [Off], [Low], [Middle], or [High].Alarm Volume Select the volume of the alarm that sounds when an operation error occursfrom [Off], [Low], [Middle], or [High].Tray Paper Settings TabTray 1Item DescriptionPaper Size Select the paper size for Tray 1 from the following:A4, B5 JIS, A5, B6 JIS, A6, 8 1/2 × 14, 8 1/2 × 11, 5 1/2 × 8 1/2, 71/4 × 10 1/2, 16K (197 × 273mm), 16K (195 × 270mm), 16K (184 ×260mm), Custom SizePaper Type Select the paper type for Tray 1 from the following:Plain Paper, Recycled Paper, Thick Paper, Thin Paper8. Configuring the Machine Using Utilities172 opal-p2_mf2_com_user_guide_00142134_eng.xmlDraft 2014/01/07](https://usermanual.wiki/Ricoh/PRSP213NW1/User-Guide-2199680-Page-172.png)
![Bypass TrayItem DescriptionPaper Size Select the paper size for the bypass tray from the following:A4, B5 JIS, A5, B6 JIS, A6, 8 1/2 × 14, 8 1/2 × 11, 5 1/2 × 8 1/2, 71/4 × 10 1/2, 16K (197 × 273mm), 16K (195 × 270mm), 16K (184 ×260mm), Custom SizePaper Type Select the paper type for the bypass tray from the following:Plain Paper, Recycled Paper, Thick Paper, Thin PaperSize mismatch detectionItem DescriptionSize mismatchdetectionSelect whether to set the machine to report an error if the paper size doesnot match the print job's settings.MFCopier TabSelect PaperItem DescriptionSelect Paper Select the paper tray used for copying.Separation LineItem DescriptionSeparation Line Specify whether to print a line in the middle of the printed paper whenmaking ID card copy or combined copy.MFFax TabFax Number ConfirmationItem DescriptionFax NumberConfirmationEnable this setting to configure the machine to require a fax number to beentered twice when specifying a destination manually.This setting appears only when the administrator password is set in the[Administrator] page.Configuring the System Settingsopal-p2_mf2_com_user_guide_00142134_eng.xml 173Draft 2014/01/07](https://usermanual.wiki/Ricoh/PRSP213NW1/User-Guide-2199680-Page-173.png)
![Fax Received File ProcessingItem DescriptionReceived FileProcessingSelect whether received faxes are stored into the machine's memory forprinting or forwarded to a destination specified for [ForwardingDestination].Print Automatically Select whether the faxes received into the machine's memory are printedautomatically or stored for later manual printing.Notify Forward Status Select whether e-mail notifications are sent after forwarding faxes or not.Email notification destination depends on how [Forwarding Destination] isspecified:• If specified with [E-mail Address]: the notification will be sent to theadministrator e-mail address specified in [Administrator E-mailAddress] in the [Administrator] page.• If specified with [Scan Destination]: the notification will be sent to thenotification destination specified for the selected scan destination.Note that if a destination e-mail address is not specified, no notification willbe sent even if this setting is enabled.Forwarding Destination Specifies the forwarding destination.• [E-mail Address]: Enter a destination e-mail address. Can contain upto 64 characters.• [Scan Destination]: Select a scan destination as a forwardingdestination.Number of Trials ofForwarding (time)Specifies how many times the machine attempts to forward a fax (1 to 255times).Interval of ForwardingTrial (min.)Specifies how many minutes the machine waits between forwardingattempts (1 to 255 minutes).MFToner Management TabToner SavingItem DescriptionToner Saving Enable this setting to print using a reduced amount of toner when printingout copies.8. Configuring the Machine Using Utilities174 opal-p2_mf2_com_user_guide_00142134_eng.xmlDraft 2014/01/07](https://usermanual.wiki/Ricoh/PRSP213NW1/User-Guide-2199680-Page-174.png)
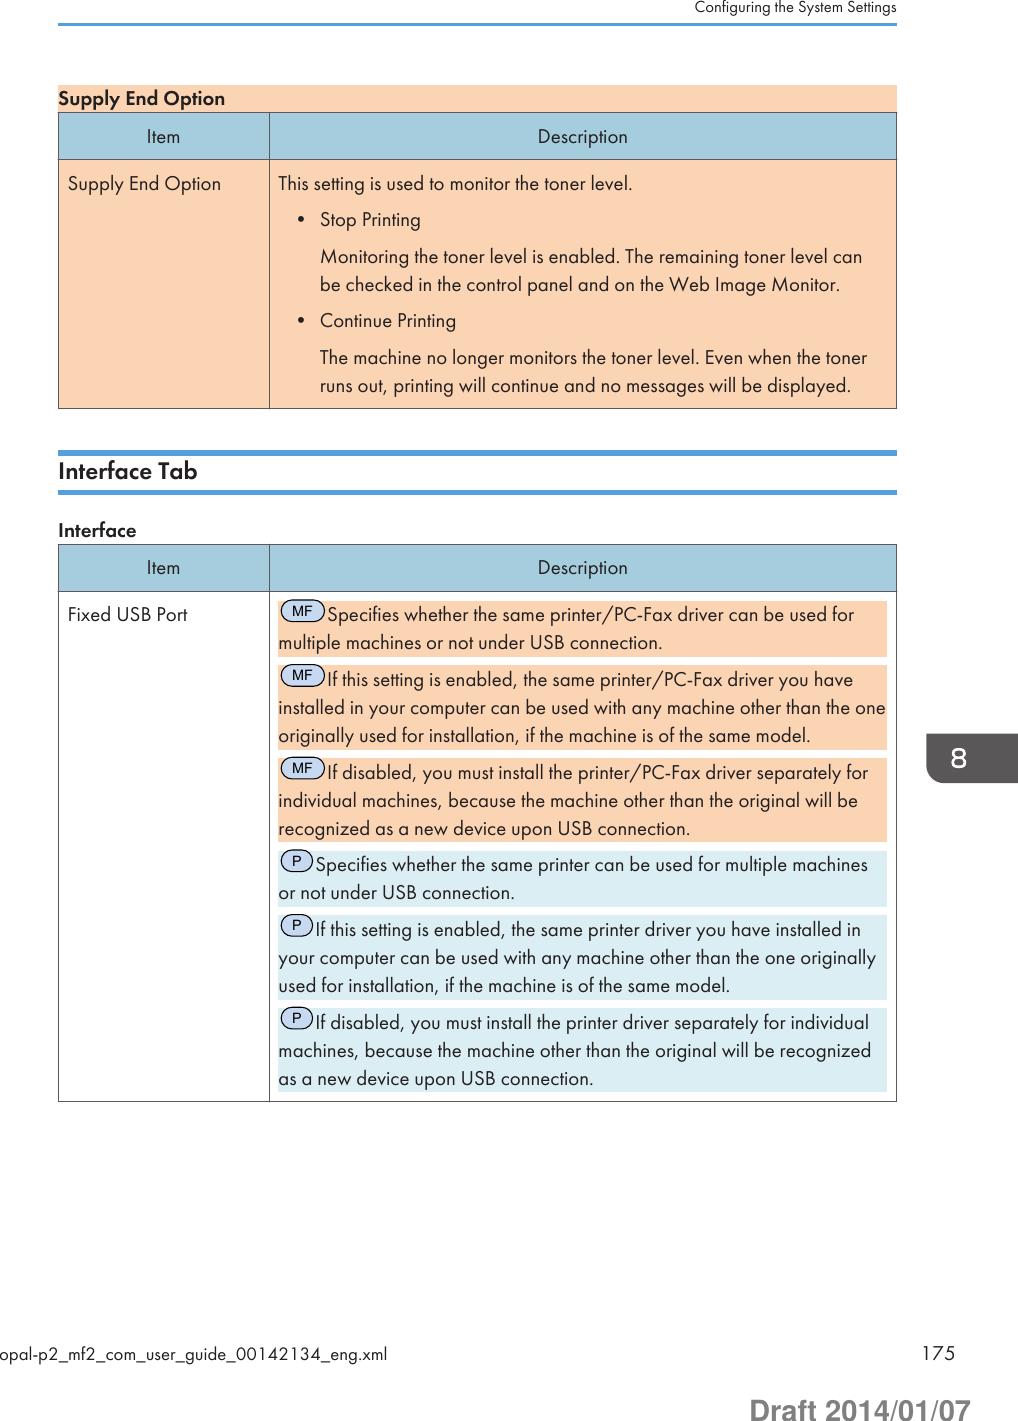
![MFShortcut to Function TabShortcut to FunctionItem DescriptionShortcut to FunctionSettingsAssigns one of the following functions to the [Shortcut to Func.] key on thecontrol panel.• [ID Card Copy Mode]• [Fax Immediate TX]• [Select Scanner Destination]8. Configuring the Machine Using Utilities176 opal-p2_mf2_com_user_guide_00142134_eng.xmlDraft 2014/01/07](https://usermanual.wiki/Ricoh/PRSP213NW1/User-Guide-2199680-Page-176.png)
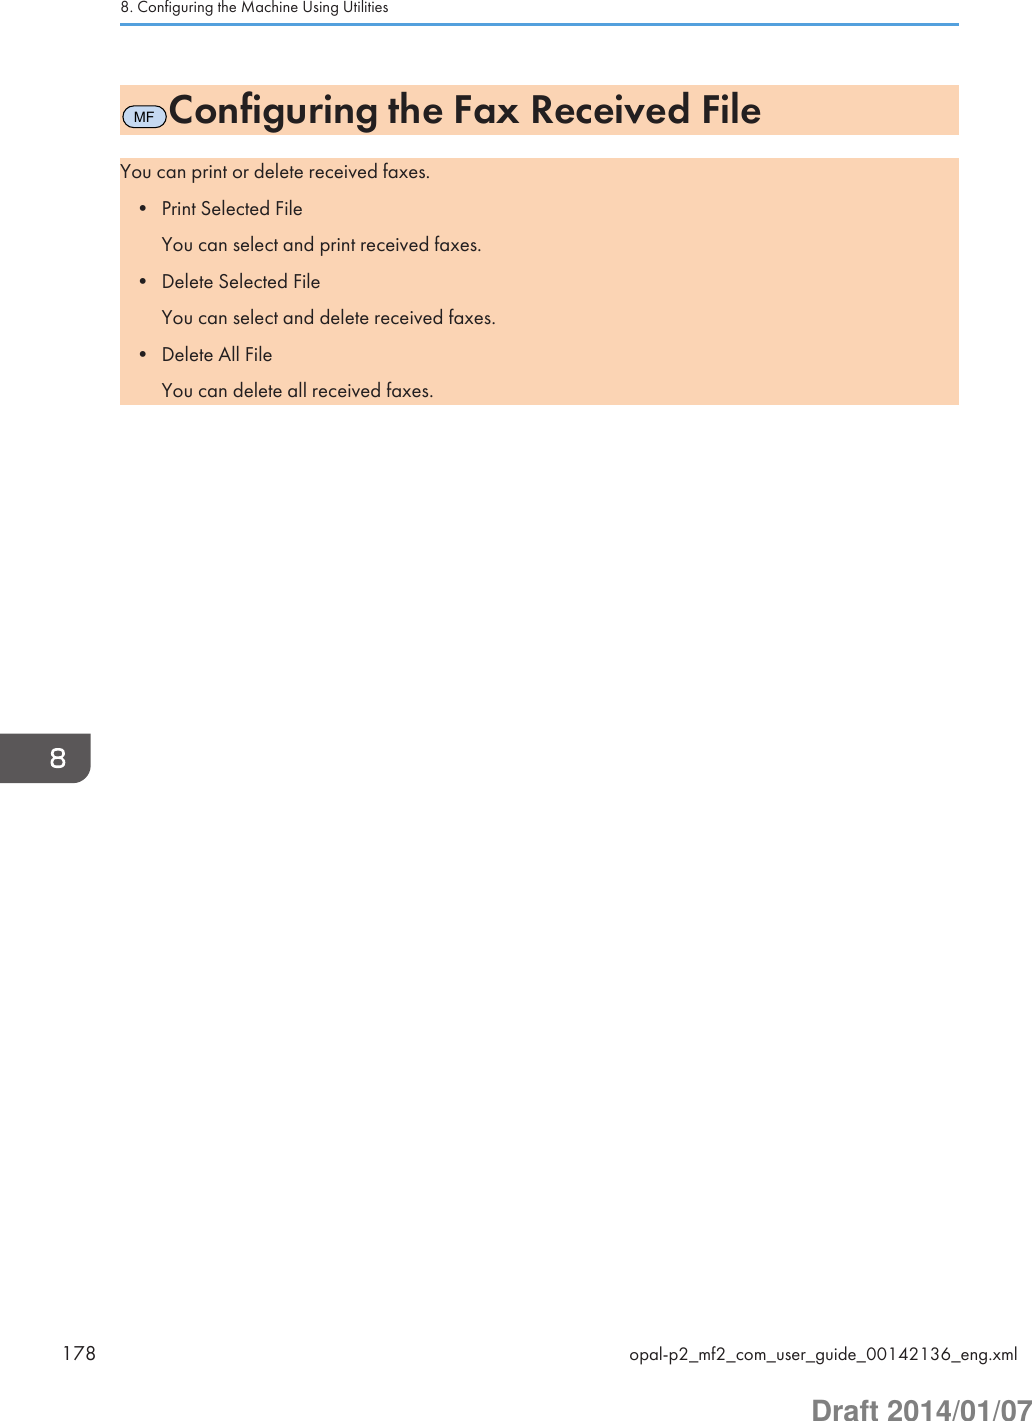
![Configuring the Network SettingsClick [Network Settings] to display the page for configuring the network settings.This page contains the following tabs: [Network Status], [IPv6 Configuration], [Network Application],[DNS], [Auto E-mail Notification], [SNMP], [SMTP], [POP3], and [Wireless].• Depending on the settings you change, the machine might need to be restarted.• Depending on the model you are using, some items might not appear.Network Status TabGeneral StatusItem DescriptionEthernet Speed Shows the type and speed of the network connection.IPP Printer Name Shows the name used to identify the machine on the network.Network Version Shows the version of the machine's network module (a part of the machinefirmware).Ethernet MAC Address Shows the Ethernet MAC address of the machine.Active Interface Shows the active communication method.TCP/IP StatusItem DescriptionDHCP Select whether the machine should receive a dynamic IPv4 addressautomatically using DHCP. To use DHCP, select [Active]. When enabled,the items below cannot be configured.IP Address Enter the IPv4 address for the machine.Subnet Mask Enter the subnet mask of the network.Gateway Enter the IPv4 address of the network gateway.Configuring the Network Settingsopal-p2_mf2_com_user_guide_00142137_eng.xml 179Draft 2014/01/07](https://usermanual.wiki/Ricoh/PRSP213NW1/User-Guide-2199680-Page-179.png)
![IPv6 Configuration TabIPv6Item DescriptionIPv6 Select whether to enable or disable IPv6. You cannot disable IPv6 usingWeb Image Monitor if the machine is currently in use in an IPv6environment. In this case, use the control panel to disable [IPv6] undernetwork settings.When disabled, [DHCP], [Manual Configuration Address], [Prefix Length],and [Gateway Address] below cannot be configured.IPv6 AddressItem DescriptionDHCP Select whether or not the machine obtains its IPv6 address from a DHCPserver.IP Address (DHCP) Displays the IPv6 address obtained from the DHCP server when [DHCP] isset to [Active].Stateless Address Displays up to four stateless auto addresses.Gateway Address Displays the machine's default gateway address.Link-local Address Displays the link local address of the machine. The link local address is anaddress that is valid only inside the local network (local segment).Manual ConfigurationAddressEnter the machine's IPv6 address. Can contain up to 39 characters.Prefix Length Enter the prefix length, using a value between 0 and 128.Gateway Address Enter the default gateway's IPv6 address. Can contain up to 39 characters.Network Application TabScanner Send SettingMFItem DescriptionE-mail Select to enable the Scan to E-mail feature.8. Configuring the Machine Using Utilities180 opal-p2_mf2_com_user_guide_00142137_eng.xmlDraft 2014/01/07](https://usermanual.wiki/Ricoh/PRSP213NW1/User-Guide-2199680-Page-180.png)
![Item DescriptionMax. E-mail Size Select the maximum size of scan files that can be attached to an e-mailmessage (1 to 5 MB, or no limit).FTP Select to enable the Scan to FTP feature.Folder Select to enable the Scan to Folder feature.Network Print SettingItem DescriptionIPP Select to enable network printing using Internet Print Protocol (via TCP port631/80).FTP Select to enable network printing using an embedded FTP server in themachine (via TCP port 20/21).RAW Select to enable network raw printing.Port No. Enter the TCP port number to use for raw printing. The valid range is 1024to 65535, except 53550 and 49999 (default is 9100).LPR Select to enable network printing using LPR/LPD (via TCP port 515).mDNS SettingItem DescriptionmDNS Select to enable Multicast DNS (via UDP port 5353). If disabled, the itembelow cannot be configured.Printer Name Enter the name of the machine. Can contain up to 32 characters.DNS TabDNSItem DescriptionDNS Method Select whether to specify domain name servers manually or receive DNSinformation from the network automatically. When set to [Auto-Obtain(DHCP)], [Primary DNS Server], [Secondary DNS Server], and [DomainName] below become unavailable.Primary DNS Server Enter the IPv4 address of the primary DNS.Configuring the Network Settingsopal-p2_mf2_com_user_guide_00142137_eng.xml 181Draft 2014/01/07](https://usermanual.wiki/Ricoh/PRSP213NW1/User-Guide-2199680-Page-181.png)
![Item DescriptionSecondary DNS Server Enter the IPv4 address of the secondary DNS.Domain Name Enter the IPv4 domain name for the machine. Can contain up to 32characters.IPv6 DNS Method Select whether to specify the domain server manually or have the machineobtain its DNS information automatically.When set to [Auto-Obtain (DHCP)], [Primary IPv6 DNS Server],[Secondary IPv6 DNS Server], and [IPv6 Domain Name] below becomeunavailable.Primary IPv6 DNSServerEnter the IPv6 address of the primary IPv6 DNS server. Can contain up to39 characters.Secondary IPv6 DNSServerEnter the IPv6 address of the secondary IPv6 DNS server. Can contain upto 39 characters.IPv6 Domain Name Enter the IPv6 domain name of the machine. Can contain up to 32characters.DNS Resolve Priority Select whether to give priority to IPv4 or IPv6 for DNS name resolution.DNS Timeout (seconds) Enter the number of seconds the machine waits before considering a DNSrequest to have timed out (1 to 999 seconds).Host Name Enter a host name for the machine. Can contain up to 15 characters.Auto E-mail Notification TabE-mail Notification 1/E-mail Notification 2Item DescriptionDisplay Name Enter a sender name for notification e-mail. Can contain up to 32characters.E-mail Address Enter the address of the recipient of the alert email. Can contain up to 64characters.Paper Misfeed Select to send an alert e-mail to the specified address if a paper jam occurs.Replace Print CartridgeSoonSelect to send an alert e-mail to the specified address if toner becomes low.8. Configuring the Machine Using Utilities182 opal-p2_mf2_com_user_guide_00142137_eng.xmlDraft 2014/01/07](https://usermanual.wiki/Ricoh/PRSP213NW1/User-Guide-2199680-Page-182.png)
![Item DescriptionReplace Print Cartridge Select to send an alert e-mail to the specified address if toner runs out.Out of Paper Select to send an alert e-mail to the specified address if paper runs out.Call Service Select to send an alert e-mail to the specified address if the machinerequires servicing.Cover Open Select to send an alert e-mail to the specified address if a cover is open.SNMP TabSNMPItem DescriptionSNMP Select whether to enable the machine to use SNMP services.TrapItem DescriptionTarget Trap Select whether to enable the machine to send traps to the management host(NMS).When disabled, [SNMP Management Host 1] and [SNMP ManagementHost 2] below become unavailable.SNMP ManagementHost 1Enter the IP address or host name of a management host. Can contain up to64 characters.SNMP ManagementHost 2Enter the IP address or host name of a management host. Can contain up to64 characters.CommunityItem DescriptionGet Community Enter the community name to use for authentication of Get requests. Cancontain up to 32 characters.Trap Community Enter the community name to use for authentication of Trap requests. Cancontain up to 32 characters.Configuring the Network Settingsopal-p2_mf2_com_user_guide_00142137_eng.xml 183Draft 2014/01/07](https://usermanual.wiki/Ricoh/PRSP213NW1/User-Guide-2199680-Page-183.png)
![SystemItem DescriptionLocation Enter the location of the machine. The location entered here is displayed onthe main page. Can contain up to 64 characters.Contact Enter the contact information of the machine. The contact informationentered here is displayed on the main page. Can contain up to 64characters.SMTP TabSMTPItem DescriptionPrimary SMTP Server Enter the IP address or host name of the SMTP/POP3 server. Can containup to 64 characters.Port No. Enter the port number for SMTP (1 to 65535).Authentication Method Select an authentication method from the following:[Anonymous]: The user name and password are not necessary.[SMTP]: The machine supports NTLM and LOGIN authentication.[POP before SMTP]: The POP3 server is used for authentication. Whensending e-mails to an SMTP server, you can enhance the SMTP serversecurity level by connecting to the POP server for authentication.User Name Enter the user name for logging in to the SMTP server. Can contain up to 32characters.Password Enter the password for logging in to the SMTP server. Can contain up to 32characters.Device E-mail Address Enter the machine’s e-mail address.This address is used as the sender's address of e-mail messages sent fromthis machine, such as notification e-mails. Can contain up to 64 characters.Server Timeout(seconds)Enter the number of seconds the machine waits before considering anSMTP operation to have timed out (1 to 999).MFTime ZoneMFSelect a time zone according to your geographic location. Selectinga different time zone may cause transmission date and time to be incorrect8. Configuring the Machine Using Utilities184 opal-p2_mf2_com_user_guide_00142137_eng.xmlDraft 2014/01/07](https://usermanual.wiki/Ricoh/PRSP213NW1/User-Guide-2199680-Page-184.png)
![Item Descriptionfor email sent by the Scan to E-mail function, even when the machine'sclock is set correctly.POP3 TabPOP3 SettingsItem DescriptionPOP3 Server Enter the IP address or host name of the POP3 server for e-mail reception.The POP3 server specified here will be used for [POP before SMTP]. Cancontain up to 64 characters.User Account Enter the user name for logging in to the POP3 server. Can contain up to 32characters.User Password Enter the password for logging in to the POP3 server. Can contain up to 32characters.Authentication Select an authentication method from the following:[None]: Password will not be encrypted.[APOP Authentication]: Password will be encrypted.[Auto]: Password will be encrypted or not encrypted according to the POP3server’s settings.Wireless TabWireless LAN StatusItem DescriptionWireless LAN Status Displays the status of the connection to the wireless LAN.MAC Address Displays the MAC address.Communication Mode Displays the communication mode that the machine is connecting in.SSID Displays the SSID of the access point that the machine is connected to.Channel Displays the channel information of the current wireless LAN settings if [Ad-Hoc] is selected for [Communication Mode].Configuring the Network Settingsopal-p2_mf2_com_user_guide_00142137_eng.xml 185Draft 2014/01/07](https://usermanual.wiki/Ricoh/PRSP213NW1/User-Guide-2199680-Page-185.png)
![Item DescriptionWireless Signal Status Displays the strength of the wireless signal that is being received.Wireless Specifies whether or not to use the wireless LAN.Wireless LAN SettingsItem DescriptionSSID Enter the SSID of the access point.The SSID can contain up to 32 characters.When you click [Scan List], a list of available access points is displayed.You can select the SSID from the list.Communication Mode Select the mode to connect in.If the machine will be connected to a wireless router or access point, select[Infrastructure]. If the machine will be connected to a device equipped witha wireless LAN directly, select [Ad-Hoc].Ad-Hoc Channel If [Ad-Hoc] is selected for [Communication Mode], select a channel.Authentication Select an authentication method.If [Ad-Hoc] is selected for [Communication Mode], you can select only[Open System] and [Shared Key].Encryption Select an encryption method.If [Ad-Hoc] is selected for [Communication Mode], you can select only[None] and [WEP].WPA Passphrase If [WPA2-PSK] or [Mixed Mode WPA/WPA2] is selected for[Authentication], enter the WPA encryption key.WEP Key Length If [WEP] is selected for [Encryption], select 64 bits or 128 bits for the lengthof the encryption key.WEP Transmit Key ID Select an ID number to identify each WEP key in case multiple WEPconnections are configured.WEP Key Format Select a format for entering the WEP key.WEP Key Enter the WEP key. The number and type of characters you can enter varydepending on the length and format selected for the key. See the following:• WEP key length: [64bit], Format: [Hexadecimal]WEP key max length: 10 characters (0-9, A-F, a-f)8. Configuring the Machine Using Utilities186 opal-p2_mf2_com_user_guide_00142137_eng.xmlDraft 2014/01/07](https://usermanual.wiki/Ricoh/PRSP213NW1/User-Guide-2199680-Page-186.png)
![Item Description• WEP key length: [64bit], Format: [ASCII]WEP key max length: 5 characters (0x20-0x7e)• WEP key length: [128bit], Format: [Hexadecimal]WEP key max length: 26 characters (0-9, A-F, a-f)• WEP key length: [128bit], Format: [ASCII]WEP key max length: 13 characters (0x20-0x7e)• If you are configuring the connection settings manually, check the SSID, authentication method, orencryption key of the access point or wireless router in advance.Configuring the Network Settingsopal-p2_mf2_com_user_guide_00142137_eng.xml 187Draft 2014/01/07](https://usermanual.wiki/Ricoh/PRSP213NW1/User-Guide-2199680-Page-187.png)
![Configuring the IPsec SettingsClick [IPsec Settings] to display the page for configuring the IPsec settings.This page contains the following tabs: [IPsec Global Settings] and [IPsec Policy List].• This function is available only when an administrator password is specified.IPsec Global Settings TabItem DescriptionIPsec Function Select whether to enable or disable IPsec.Default Policy Select whether to allow for the default IPsec policy.Broadcast andMulticast BypassSelect the services that you do not want to apply IPsec from the following:[DHCPv4], [DHCPv6], [SNMP], [mDNS], [NetBIOS], [UDP Port 53550]All ICMP Bypass Select whether to apply IPsec to ICMP packets (IPv4 and IPv6) from thefollowing:[Active]: All ICMP packets will be bypassed without IPsec protection."ping" command (echo request and echo reply) is not encapsulated byIPsec.[Inactive]: Some ICMP message types will be bypassed without IPsecprotection.IPsec Policy List TabItem DescriptionNo. IPsec policy number.Name Displays the name of the IPsec policy.Address Settings Displays the IP address filter of the IPsec policy as below:Remote address/Prefix lengthAction Displays the action of the IPsec policy as "Allow", "Drop", or "RequireSecurity".8. Configuring the Machine Using Utilities188 opal-p2_mf2_com_user_guide_00142138_eng.xmlDraft 2014/01/07](https://usermanual.wiki/Ricoh/PRSP213NW1/User-Guide-2199680-Page-188.png)
![Item DescriptionStatus Displays the status of the IPsec policy as "Active" or "Inactive".To configure IPsec policies, select the desired IPsec policy, and then click [Change] to open the "IPsecPolicy Settings" page. The following settings can be made on the "IPsec Policy Settings" page.IP Policy SettingsItem DescriptionNo. Specify a number between 1 and 10 for the IPsec policy. The number youspecify will determine the position of the policy in the IPsec Policy List. Policysearching is performed according to the order of the list. If the number youspecify is already assigned to another policy, the policy you areconfiguring will take the number of the earlier policy, and the earlier policyand any subsequent policies will be renumbered accordingly.Activity Select whether to enable or disable the policy.Name Enter the name of the policy. Can contain up to 16 characters.Address Type Select IPv4 or IPv6 as the type of IP address to be used in IPseccommunication.Local Address Displays the IP address of this printer.Remote Address Enter the IPv4 or IPv6 address of the device with which to communicate.Can contain up to 39 characters.Prefix Length Enter the prefix length of the Remote Address, using a value between 1 and128. If this setting is left blank, "32" (IPv4) or "128" (IPv6) will beautomatically selected.Action Specify how the IP packets are processed from the following:• [Allow]: IP packets are both sent and received without IPsec applied tothem.• [Drop]: IP packets are discarded.• [Require Security]: IPsec is applied to IP packets that are both sent andreceived.If you have selected [Require Security], you must configure [IPsec Settings]and [IKE Settings].Configuring the IPsec Settingsopal-p2_mf2_com_user_guide_00142138_eng.xml 189Draft 2014/01/07](https://usermanual.wiki/Ricoh/PRSP213NW1/User-Guide-2199680-Page-189.png)
![IPsec SettingsItem DescriptionEncapsulation Type Specify the encapsulation type from the following:• [Transport]: Select this mode to secure only the payload section ofeach IP packet when communicating with IPsec compliant devices.• [Tunnel]: Select this mode to secure every section of each IP packet.We recommend this type for communication between securitygateways (such as VPN devices).Security Protocol Select the security protocol from the following:• [AH]: Establishes secure communication that supports authenticationonly.• [ESP]: Establishes secure communication that supports bothauthentication and data encryption.• [ESP&AH]: Establishes secure communication that supports both dataencryption and authentication of packets, including packet headers.Note that you cannot specify this protocol when [Tunnel] is selectedfor [Encapsulation Type].AuthenticationAlgorithm for AHSpecify the authentication algorithm to be applied when [AH] or [ESP&AH]is selected for [Security Protocol] from the following:[MD5], [SHA1]Encryption Algorithmfor ESPSpecify the encryption algorithm to be applied when [ESP] or [ESP&AH] isselected for [Security Protocol] from the following:[None], [DES], [3DES], [AES-128], [AES-192], [AES-256]AuthenticationAlgorithm for ESPSpecify the authentication algorithm to be applied when [ESP] is selectedfor [Security Protocol] from the following:[MD5], [SHA1]Life Time Specify the life time of the IPsec SA (Security Association) as a time periodor data volume. The SA will expire when the time period you specifyelapses or the volume of data you specify reaches the volume carried.If you specify both a time period and a data volume, the SA will expire assoon as either is reached, and a new SA will then be obtained bynegotiation.To specify the life time of the SA as a time period, enter a number ofseconds.To specify the life time of the SA as a data volume, enter a number of KBs.8. Configuring the Machine Using Utilities190 opal-p2_mf2_com_user_guide_00142138_eng.xmlDraft 2014/01/07](https://usermanual.wiki/Ricoh/PRSP213NW1/User-Guide-2199680-Page-190.png)
![Item DescriptionKey Perfect ForwardSecrecySelect whether to enable or disable PFS (Perfect Forward Secrecy).IKE SettingsItem DescriptionIKE Version Displays the IKE version.Encryption Algorithm Specify the encryption algorithm from the following:[DES], [3DES], [AES-128], [AES-192], [AES-256]AuthenticationAlgorithmSpecify the authentication algorithm from the following:[MD5], [SHA1]IKE Life Time Specify the life time of the ISAKMP SA as a time period. Enter a number ofseconds.IKE Diffie-HellmanGroupSelect the IKE Diffie-Hellman Group to be used in the generation of the IKEencryption key from the following:[DH1], [DH2]Pre-Shared Key Specify the PSK (Pre-Shared Key) to be used for authentication of acommunicating device. Can contain up to 32 characters.Key Perfect ForwardSecrecySelect whether to enable or disable PFS (Perfect Forward Secrecy).Configuring the IPsec Settingsopal-p2_mf2_com_user_guide_00142138_eng.xml 191Draft 2014/01/07](https://usermanual.wiki/Ricoh/PRSP213NW1/User-Guide-2199680-Page-191.png)
![Printing Lists/ReportsClick [Print List/Report] to display the page for printing reports. Then, select an item and click [Print] toprint out information for that item.Print List/ReportItem DescriptionConfiguration Page Prints general information about the machine and its current configuration.MFFax JournalMFPrints a fax transmission and reception journal for the last 50 jobs. Fordetails about automatic fax journal printing, see page 139 "Fax FeaturesSettings".MFFax TX/RXStandby File ListMFPrints a list of fax jobs remaining in the machine's memory to beprinted, sent, or forwarded.MFQuick DialDestination ListMFPrints a list of Quick Dial entries.MFFax Speed DialDestination ListMFPrints a list of Speed Dial entries.MFScannerDestination ListMFPrints a list of scan destinations.MFScanner JournalMFPrints a scanner journal for the last 100 Scan to E-mail, Scan to FTP,and Scan to Folder transmissions.PTest PagePPrints a test page for checking the printing condition.PPCL Font ListPPrints the current configuration and installed PCL font list.Maintenance Page Prints the maintenance page.• Reports cannot be printed via Web Image Monitor if other jobs are printing. Before printingreports, confirm that machine is not printing.• Reports will be printed on A4 or Letter size paper. Load one of these sizes of paper into the traybefore printing reports.8. Configuring the Machine Using Utilities192 opal-p2_mf2_com_user_guide_00142139_eng.xmlDraft 2014/01/07](https://usermanual.wiki/Ricoh/PRSP213NW1/User-Guide-2199680-Page-192.png)
![Configuring the Administrator SettingsClick [Administrator Tools] to display the page for configuring the administrator settings.MFThis page contains the following tabs: [Administrator], [Reset Settings], [Backup Setting], [RestoreSetting], [Set Date/Time], and [Energy Saver Mode].PThis page contains the following tabs: [Administrator], [Reset Settings], [Backup Setting], [RestoreSetting], and [Help Source File Setting].Administrator TabAdministrator SettingsItem DescriptionMFChangePasswordMFCheck this to configure the administrator password.New Password Enter the new administrator password. Can contain up to 16 characters.Confirm New Password Enter the same password again, to confirm.MFChange E-mailAddressMFCheck this to configure the administrator e-mail address.MFAdministrator E-mail AddressMFEnter the administrator e-mail address.MFIf the machine's e-mail address is not configured in the [SMTP] page,this address will be used as the sender's address of e-mails sent from thismachine, such as notification e-mails. Can contain up to 64 characters.Reset Settings TabReset SettingsItem DescriptionReset Network Settings Select to restore settings configured under the [Network Settings] and[Administrator Tools].Reset Menu Settings Select to restore settings that are not related to the network to their defaults.MFClear ScanDestinationMFSelect to clear the scan destinations.Configuring the Administrator Settingsopal-p2_mf2_com_user_guide_00142140_eng.xml 193Draft 2014/01/07](https://usermanual.wiki/Ricoh/PRSP213NW1/User-Guide-2199680-Page-193.png)
![Item DescriptionMFClear AddressBookMFSelect to clear the fax destinations.Reset IPsec Settings Select to clear the IPsec settings.• [Reset IPsec Settings] appears only when the administrator password is specified.Backup Setting Tab• When sending the machine for repair, it is important that you create backup files in advance. Themachine's settings are returned to the default after repair.Backup SettingItem DescriptionBack up NetworkSettingsBacks up settings configured under the [Network Settings] and[Administrator Tools].MFNote that, however, [Max. E-mail Size] setting under [NetworkApplication] will not be backed up here; it will be backed up by [Back upMenu Settings] instead.Back up Menu Settings Backs up settings that are not related to the network.MFBack up ScanDestinationMFBacks up scan destinations to a file.MFBack up AddressBookMFBacks up fax destinations to a file.Back up IPsec Settings Backs up the IPsec settings to a file.Follow the procedure below to create configuration backup files.1. Select the radio button for the type of data you wish to back up.2. Enter the administrator password if required.3. Click [OK].4. Click [Save] in the confirmation dialog box.5. Navigate to the location to save the backup file.8. Configuring the Machine Using Utilities194 opal-p2_mf2_com_user_guide_00142140_eng.xmlDraft 2014/01/07](https://usermanual.wiki/Ricoh/PRSP213NW1/User-Guide-2199680-Page-194.png)
![6. Specify a name for the file, and click [Save].• [Back up IPsec Settings] appears only when the administrator password is specified.Restore Setting Tab• When the machine is returned from repair, it is important that you restore the machine's settingsfrom the backup files. The machine's settings are returned to the default after repair.Restore SettingItem DescriptionFile to Restore Enter the path and name of the file to restore, or click [Browse...] to selectthe file.Follow the procedure below to restore configuration backup files.1. Click [Browse...].2. Navigate to the directory containing the backup file to restore.3. Select the backup file, and click [Open].4. Enter the administrator password if required.5. Click [OK].• If the settings are not restored successfully, an error message appears. Try again to restore the filecompletely.MFSet Date/Time TabSet DateItem DescriptionYear Enter the current year (2000 to 2099).Month Enter the current month (1 to 12).Day Enter the current day (1 to 31).Configuring the Administrator Settingsopal-p2_mf2_com_user_guide_00142140_eng.xml 195Draft 2014/01/07](https://usermanual.wiki/Ricoh/PRSP213NW1/User-Guide-2199680-Page-195.png)
![Item DescriptionDate Format Select the date format from [MM/DD/YYYY], [DD/MM/YYYY], or[YYYY/MM/DD].Set TimeItem DescriptionTime Format Select 24- or 12-hour time format.Time (AM/PM) Select [AM] or [PM] if 12-hour time format is selected.hour (0-23) Enter the current hour if 24-hour time format is selected (0-23).hour (1-12) Enter the current hour if 12-hour time format is selected (1-12).min. (0-59) Enter the current minute (0-59).MFEnergy Saver Mode TabEnergy Saver ModeItem DescriptionEnergy Saver Mode 1 Select [Active] to set the machine to enter Energy Saver mode 1 if themachine has been idle for about 30 seconds.It takes less time to recover from Energy Saver mode 1 than from power-offstate or Energy Saver mode 2, but power consumption is higher in EnergySaver mode 1 than in Energy Saver mode 2.Energy Saver Mode 2 Select [Active] to set the machine to enter Energy Saver mode 2 after theperiod of time specified for [Waiting Time (1 min. - 240 min.)] is passed (1to 240 minutes).The machine consumes less power in Energy Saver mode 2 than in EnergySaver mode 1, but it takes longer to recover from Energy Saver mode 2than from Energy Saver mode 1.8. Configuring the Machine Using Utilities196 opal-p2_mf2_com_user_guide_00142140_eng.xmlDraft 2014/01/07](https://usermanual.wiki/Ricoh/PRSP213NW1/User-Guide-2199680-Page-196.png)
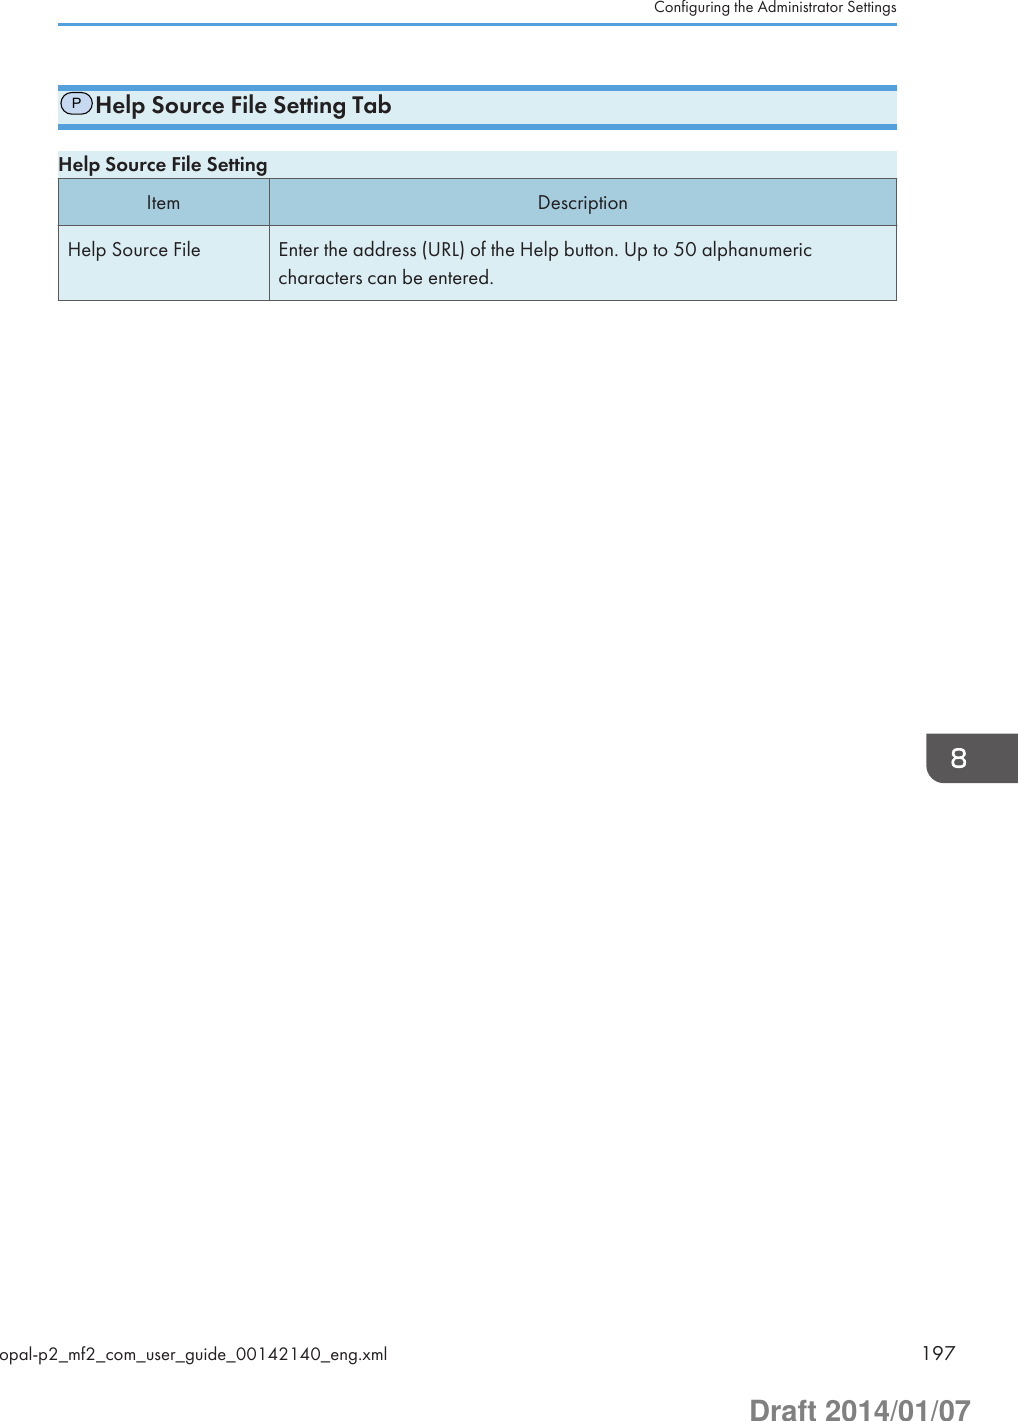
![PUsing Smart Organizing MonitorThe state and status information of the machine can be checked using Smart Organizing Monitor.• Some items might not appear, depending on the model type you are using.Checking the Status InformationDCT865123451. Image areaDisplays the status of this machine with an icon.2. Status area• Printer Name• Print CartridgeToner level status may not be displayed.• Input TrayYou can check the following information about the input trays.[Tray], [Status], [Paper Size], [Paper Type]Displays the type of the paper loaded into each input tray.• SystemDisplays the system information about the printer, such as the model name, system version, and memorysize.• Counter8. Configuring the Machine Using Utilities198 opal-p2_mf2_com_user_guide_00142141_eng.xmlDraft 2014/01/07](https://usermanual.wiki/Ricoh/PRSP213NW1/User-Guide-2199680-Page-198.png)
![Displays information about the counters.• NetworkDisplays network details such as the printer's IP address and network-related comments.3. Message areaDisplays the status of this machine with a message.For details about error messages, see page 235 "Error and Status Messages Appear on Smart OrganizingMonitor".4. [Connect Printer] buttonClick to select a printer driver.5. [Refresh:]Specify the automatic update of the display.DCT881123451. Image areaDisplays the status of this machine with an icon.2. Status area• Printer Name• Print CartridgeDisplays the following messages to indicate remaining toner levels: Remaining Level 1 to 5, "AlmostEmpty" and "Empty"• Input TrayYou can check the following information about the input trays.[Tray], [Status], [Paper Size], [Paper Type]Displays the type of the paper loaded into each input tray.Using Smart Organizing Monitoropal-p2_mf2_com_user_guide_00142141_eng.xml 199Draft 2014/01/07](https://usermanual.wiki/Ricoh/PRSP213NW1/User-Guide-2199680-Page-199.png)
![• SystemDisplays the system information about the printer, such as the model name, system version, and memorysize.• CounterDisplays information about the counters.• NetworkDisplays network details such as the printer's IP address and network-related comments.3. Message areaDisplays the status of this machine with a message.For details about error messages, see page 235 "Error and Status Messages Appear on Smart OrganizingMonitor".4. [Connect Printer] buttonClick to select a printer driver.5. [Refresh:]Specify the automatic update of the display.Configuring the Machine SettingsSmart Organizing Monitor is used to modify the machine’s settings.1. On the [Start] menu, click [All Programs].2. Click [Smart Organizing Monitor for SP xxx Series].3. Click [Smart Organizing Monitor Status].If the machine you are using is not selected, click [Connect Printer], and then select the machine'smodel.4. On the [User Tools] tab, click [Printer Configuration].5. Enter the access code.The default access code is "Admin".6. Change the settings if necessary.7. Click [OK].8. Click [Close].Access CodeThe configurable functions depend on the authority of the access code you enter.• AdministratorAll tabs in the [Printer Configuration] dialog box are available.• General usersOnly the [Paper Input] tab is available.8. Configuring the Machine Using Utilities200 opal-p2_mf2_com_user_guide_00142141_eng.xmlDraft 2014/01/07](https://usermanual.wiki/Ricoh/PRSP213NW1/User-Guide-2199680-Page-200.png)
![Tab SettingsThis section provides a tab-by-tab overview of the machine settings that can be modified using SmartOrganizing Monitor. For more information on each setting item, see the Smart Organizing MonitorHelp.Paper Input tab• You can change paper size and other paper settings.Maintenance tab• You can adjust print starting positions.System tab• You can set basic functions required to use the printer. The printer can be used on factory-setdefaults, but the configuration can be changed depending on the condition of the user.• The changed condition holds even if the printer is turned off.• The access code can be changed on this tab.IPv6, Network 1, Network 2 and Network 3 tabs• You can set configurations about network connection and communication.• The following operations are possible on these tabs:• Checking the printer name, active protocol, and other printer information• Making interface settings, including the timeout setting and protocol settings• Checking or making TCP/IP settings• Checking or making SMTP and SNMP settings• Checking or making Alert settingsWireless LAN Settings tab• You can set configurations about wireless LAN network connection and communication.• The following operations are possible on the tab:• Checking the wireless LAN status• Connecting wireless LAN manually• Connecting with one touch using WPSPrinter Tab• You can set configurations about PCL.Printing the Configuration Page1. On the [Start] menu, click [All Programs].2. Click [Smart Organizing Monitor for SP xxx Series].Using Smart Organizing Monitoropal-p2_mf2_com_user_guide_00142141_eng.xml 201Draft 2014/01/07](https://usermanual.wiki/Ricoh/PRSP213NW1/User-Guide-2199680-Page-201.png)
![3. Click [Smart Organizing Monitor Status].If the machine you are using is not selected, click [Connect Printer], and then select the machine'smodel.4. On the [User Tools] tab, select [Configuration Page] in the [List/Test Print] list.5. Click [Print].• You can check the firmware version on the configuration page. By updating the firmware, you cancorrect problems as well as adding a number of new functions. For details about updating thefirmware, see the Firmware Update Guide. The Firmware Update Guide can be downloaded fromour Web site.8. Configuring the Machine Using Utilities202 opal-p2_mf2_com_user_guide_00142141_eng.xmlDraft 2014/01/07](https://usermanual.wiki/Ricoh/PRSP213NW1/User-Guide-2199680-Page-202.png)
![9. Maintaining the MachineReplacing the Print Cartridge•PThis machine does not monitor the remaining toner level, and no message will be displayed toprompt the user to replace the print cartridge if the machine runs out of toner. Replace the printcartridge if the printed image suddenly becomes pale or blurred.•MFToner levels are not displayed for Type 1 and 2 models. Replace the print cartridge if theprinted image becomes pale or blurred.•MFIf "Replacement Required: Print Cartridge" is displayed in the control panel, replace the printcartridge by following the procedure described below. However, this message will not bedisplayed if [Toner End Option Settings] has been set to [Continue Printing]. Replace the printcartridge if the printed image becomes pale or blurred.• Store print cartridges in a cool dark place.• Actual printable numbers vary depending on image volume and density, number of pages printedat a time, paper type and size, and environmental conditions such as temperature and humidity.Toner quality degrades over time.• For good print quality, the manufacturer recommends that you use genuine toner from themanufacturer.• The manufacturer shall not be responsible for any damage or expense that might result from the useof parts other than genuine parts from the manufacturer with your office products.1. Open the front cover, and then carefully lower it.2. Carefully pull out the print cartridge horizontally, holding its center.DCT0243. Take the new print cartridge out of the box, and then take it out of the plastic bag.opal-p2_mf2_com_user_guide_00142143_eng.xml 203Draft 2014/01/07](https://usermanual.wiki/Ricoh/PRSP213NW1/User-Guide-2199680-Page-203.png)
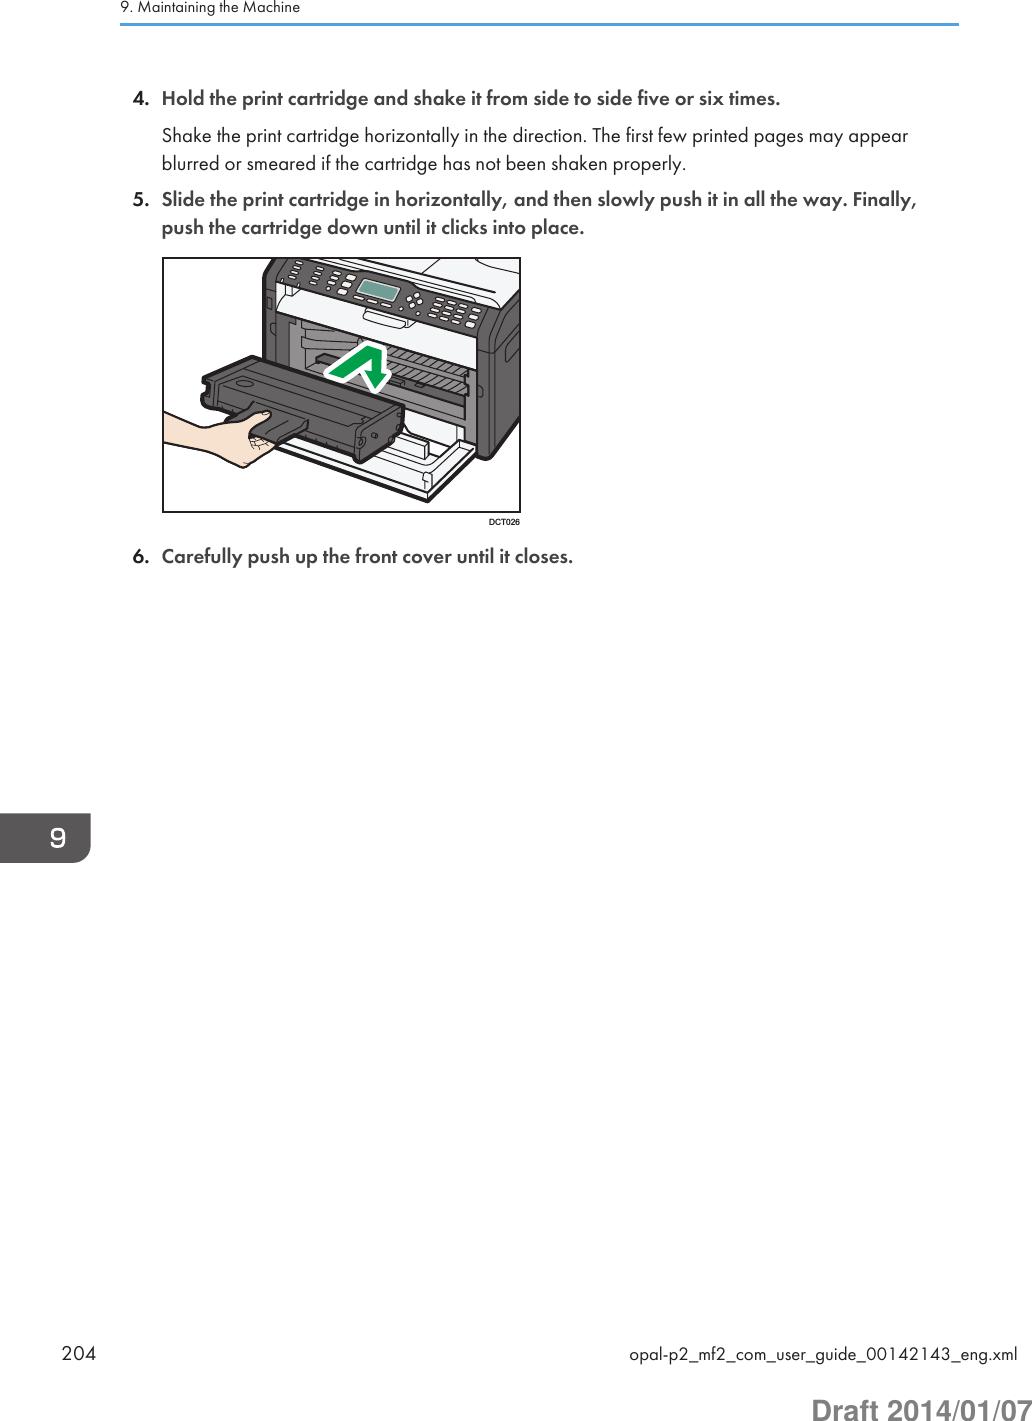
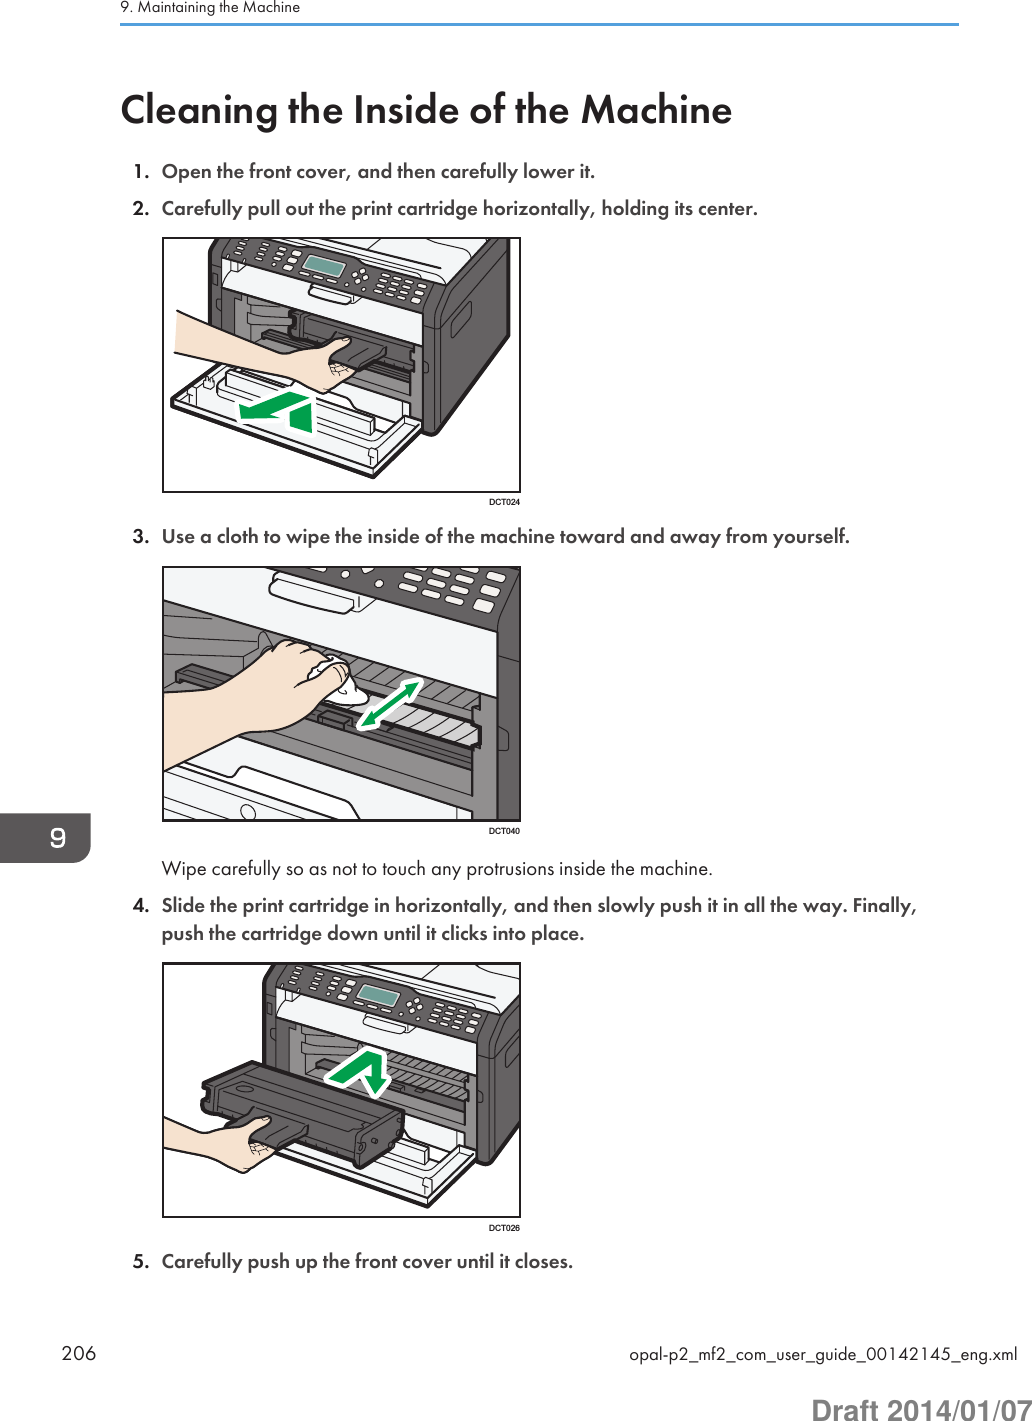
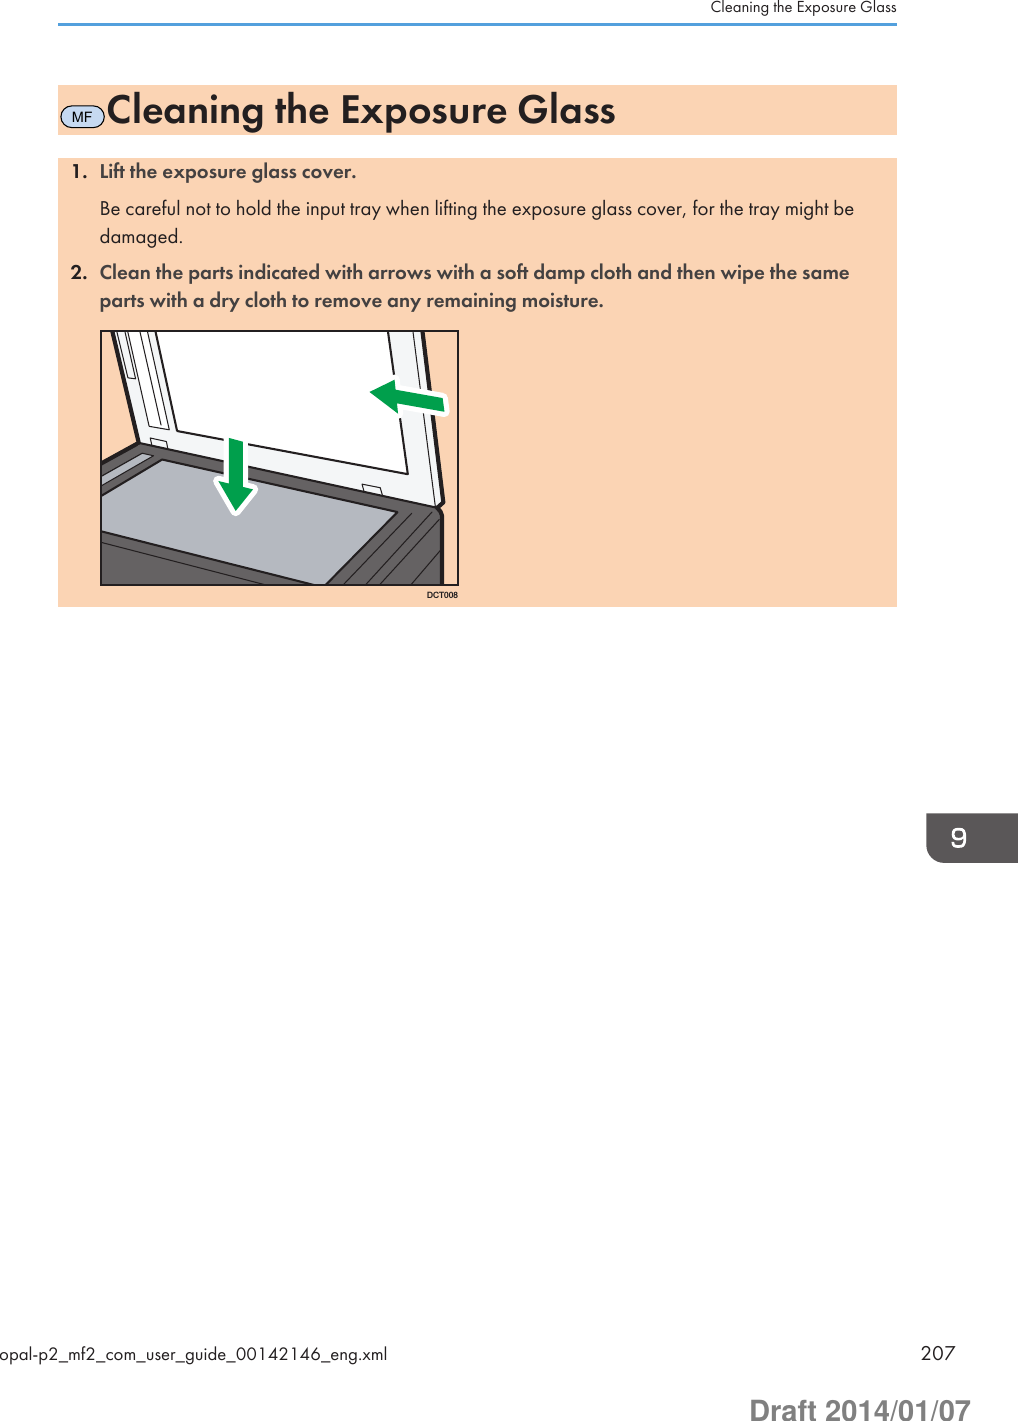
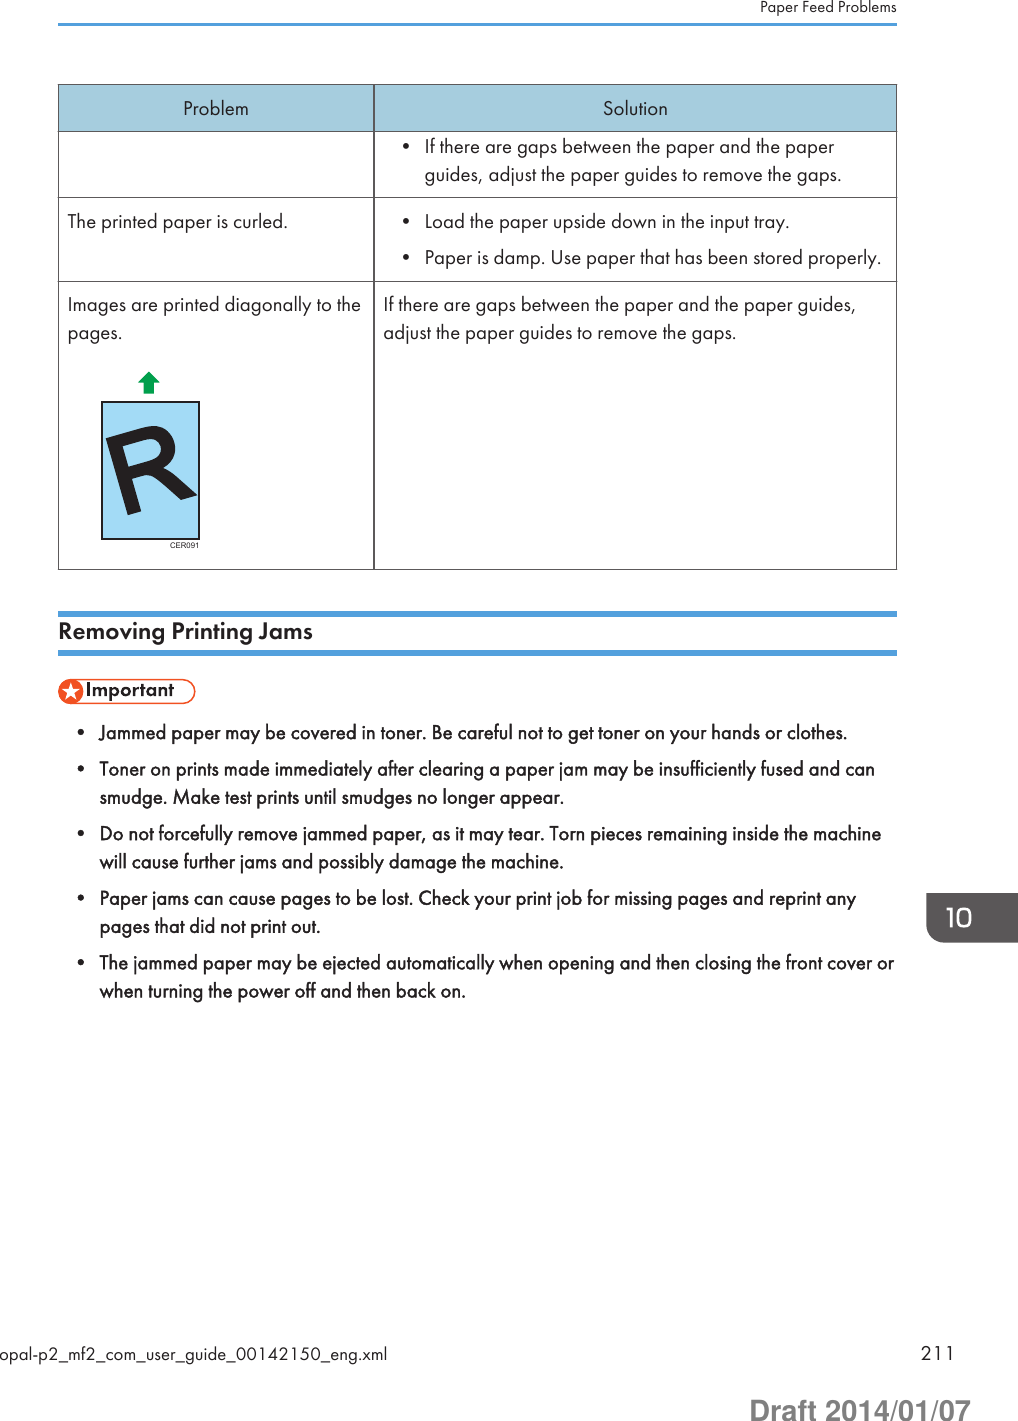
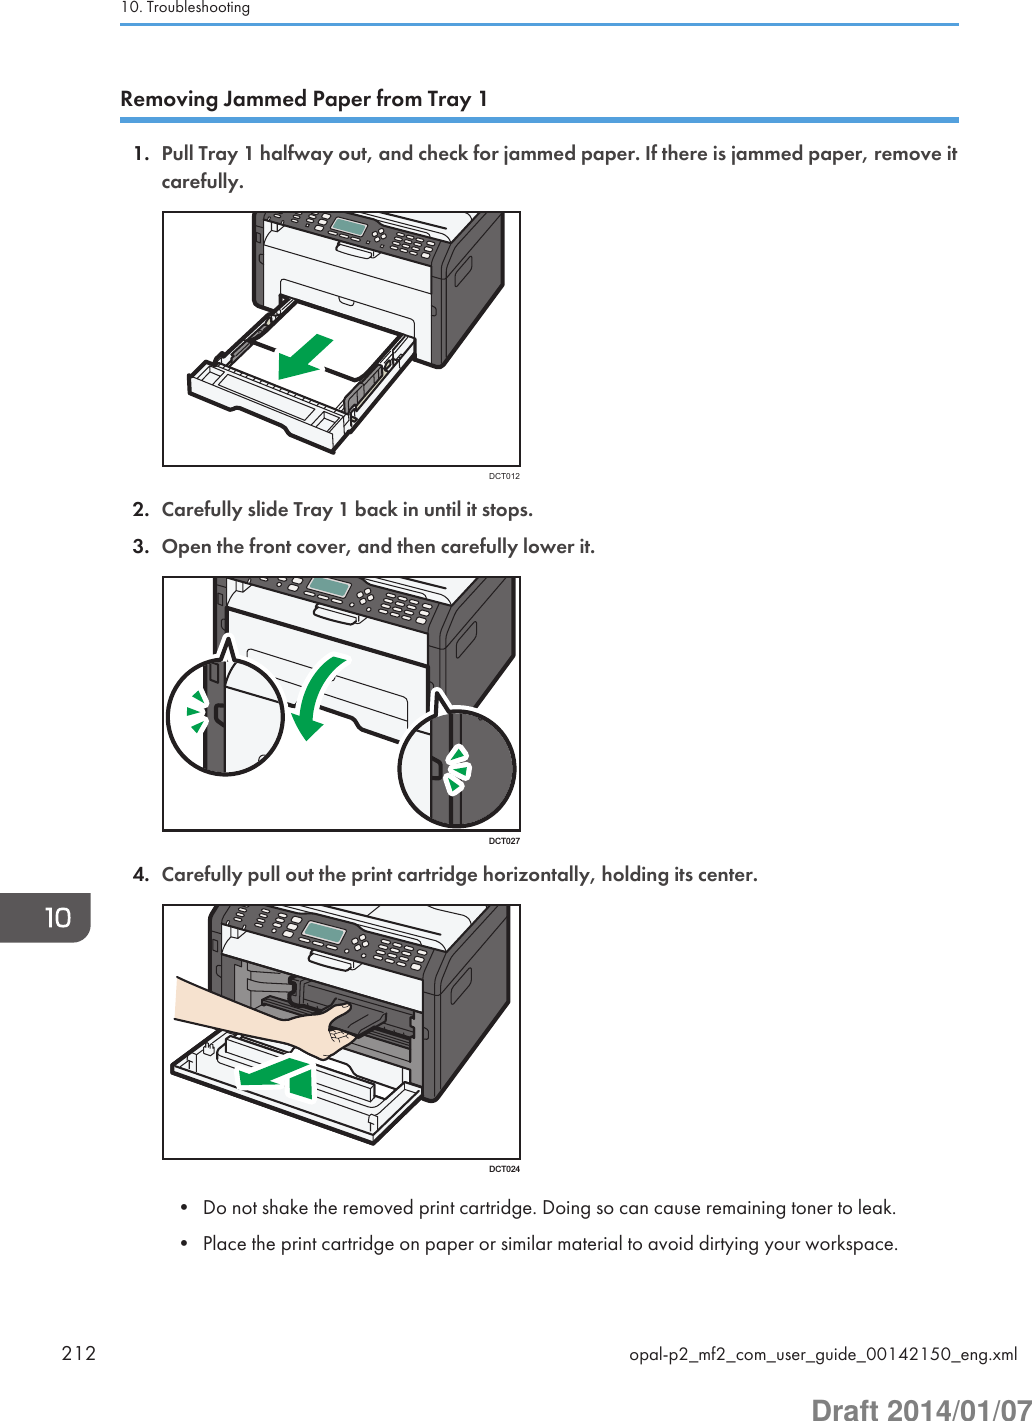
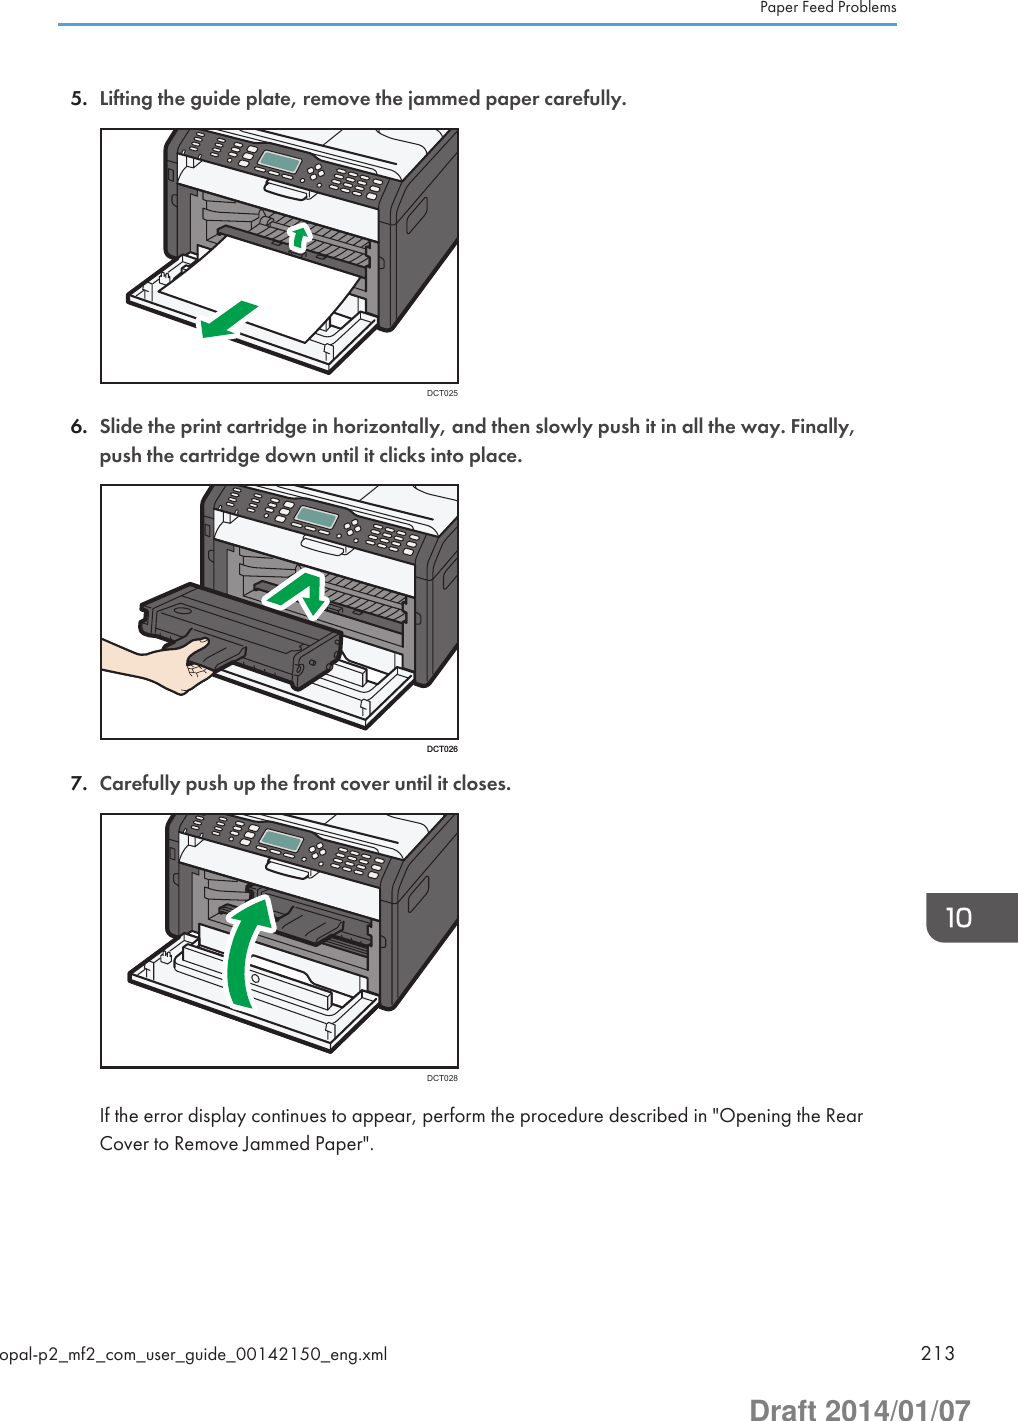
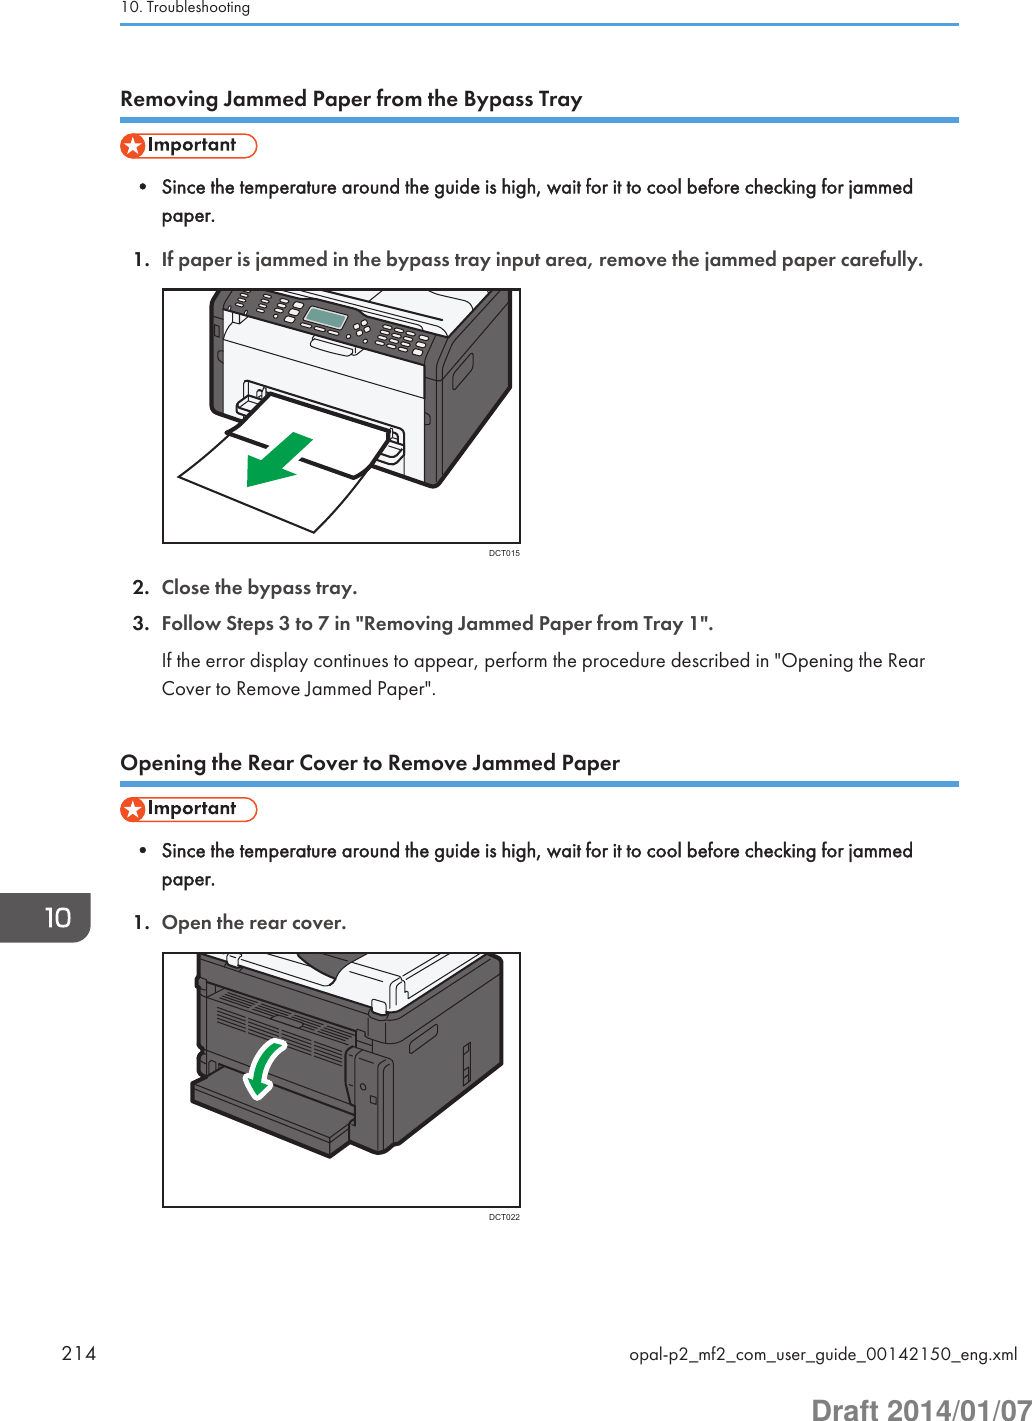
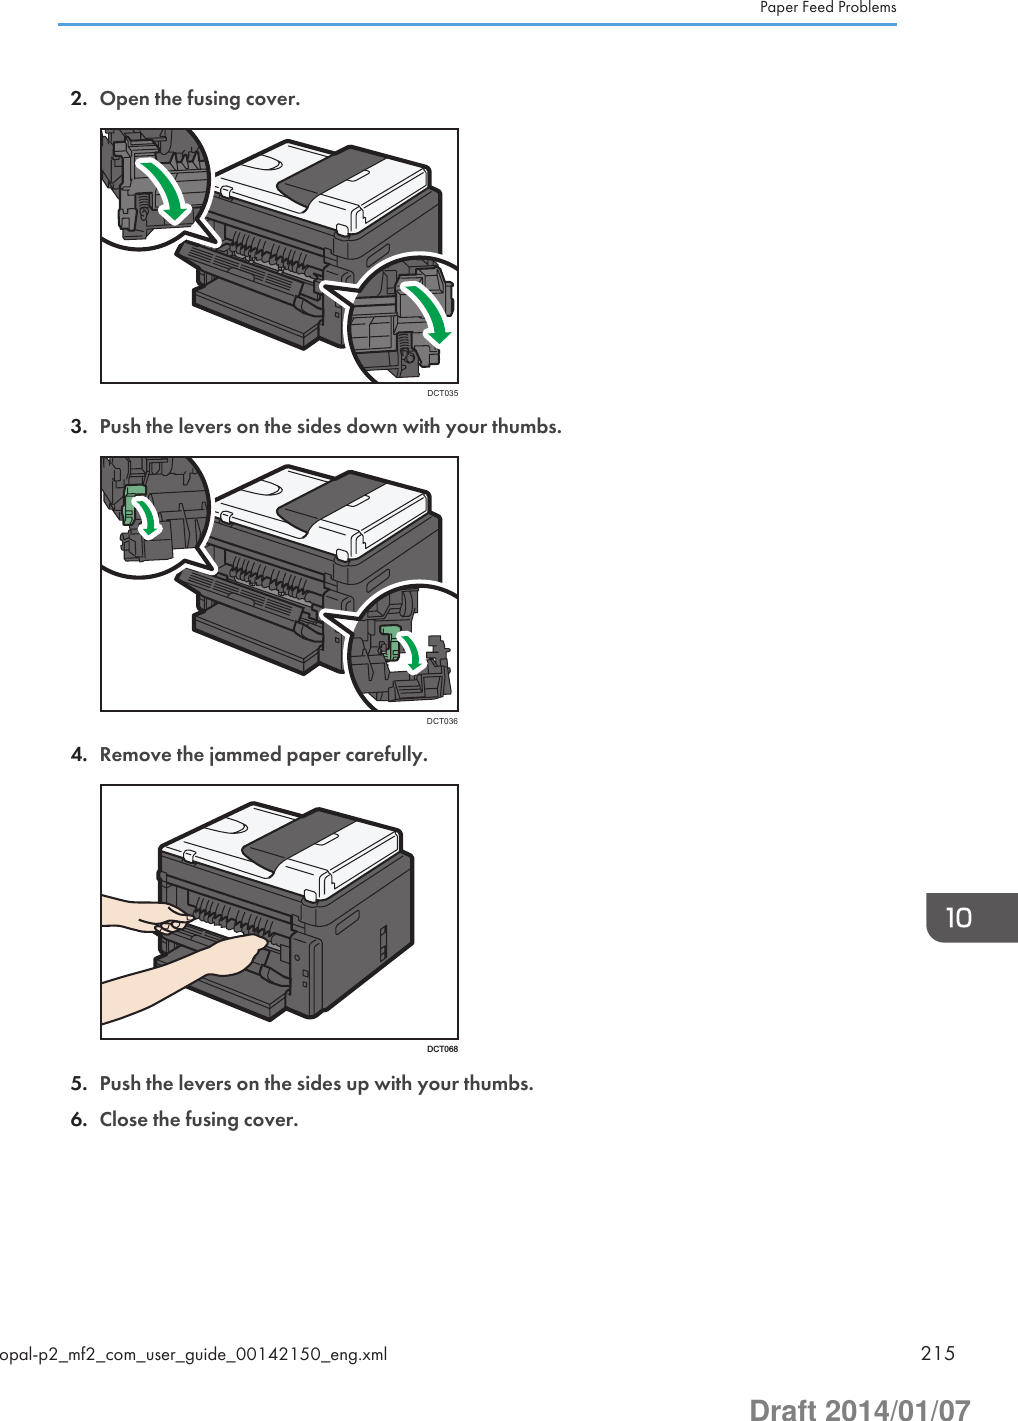
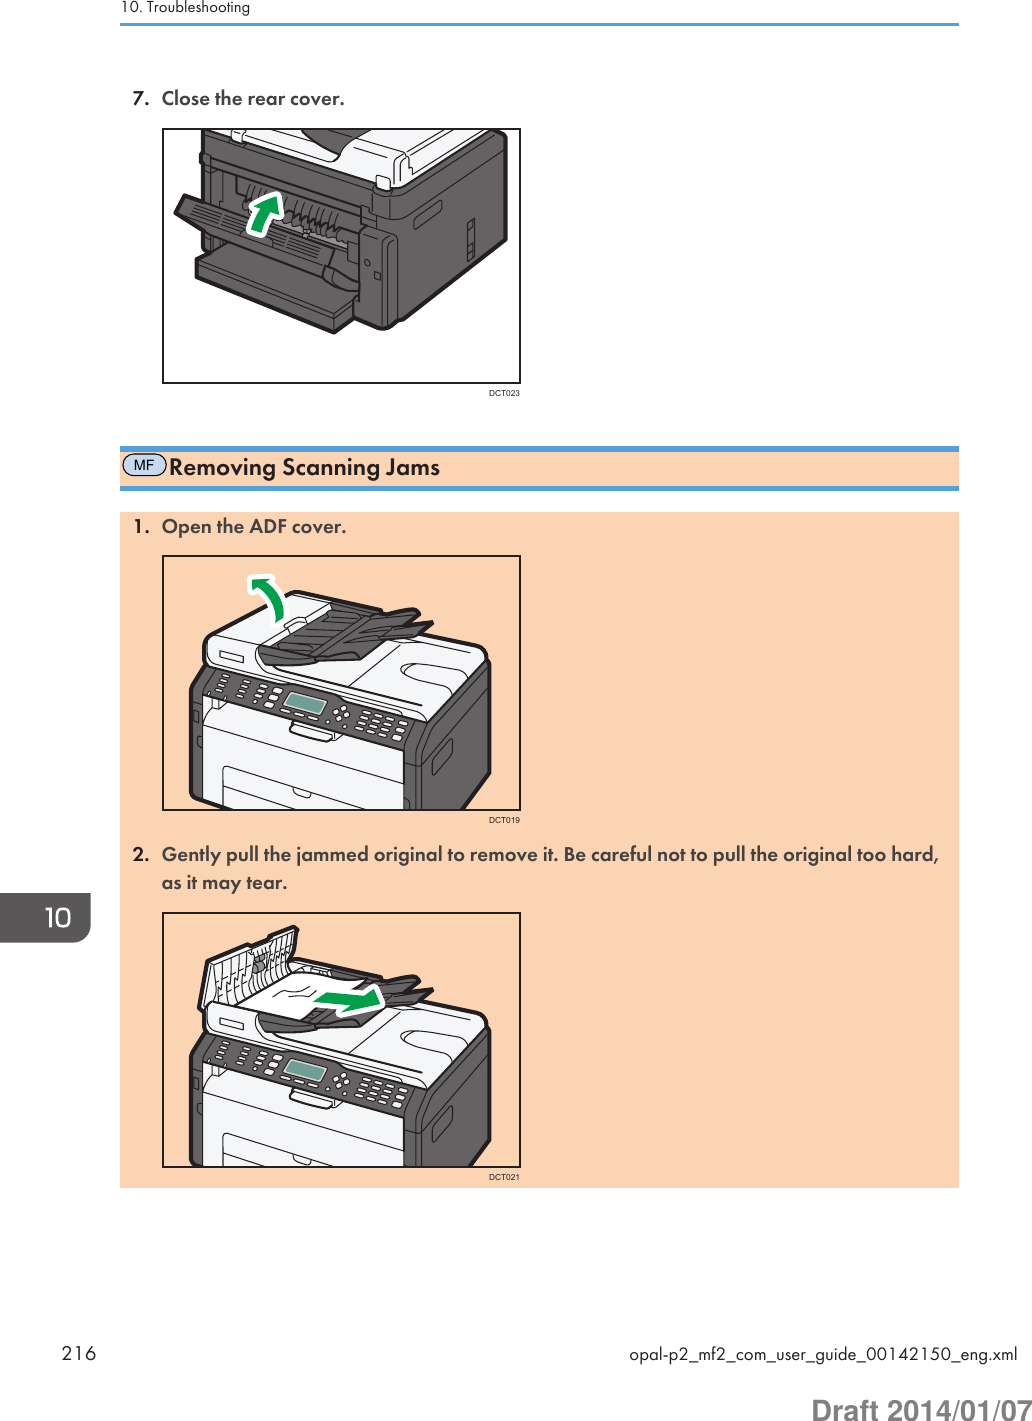
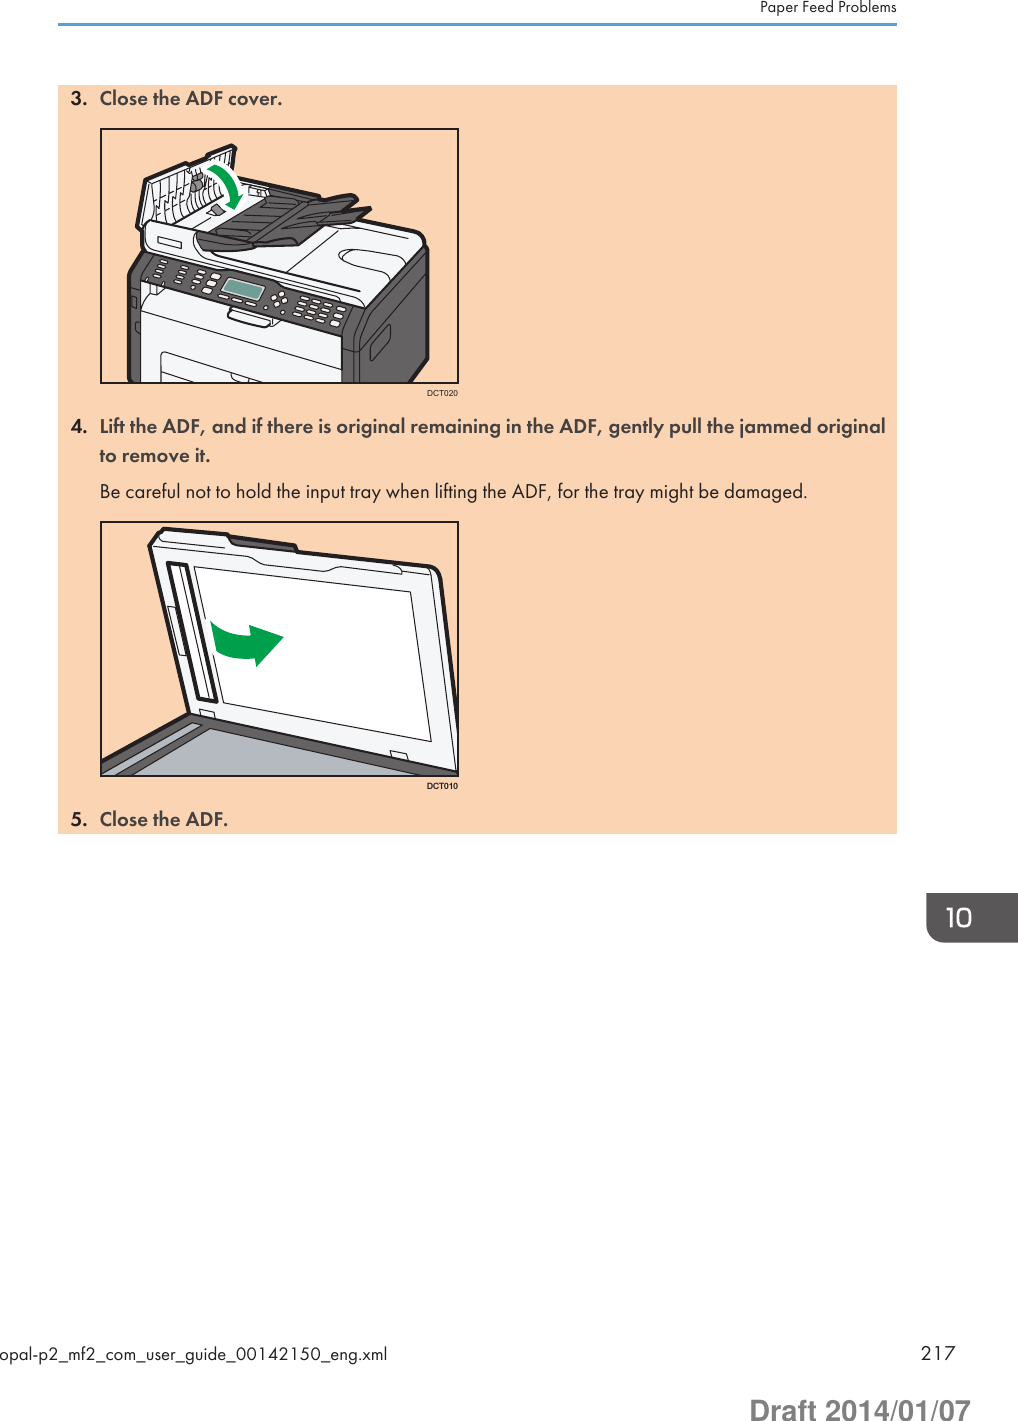
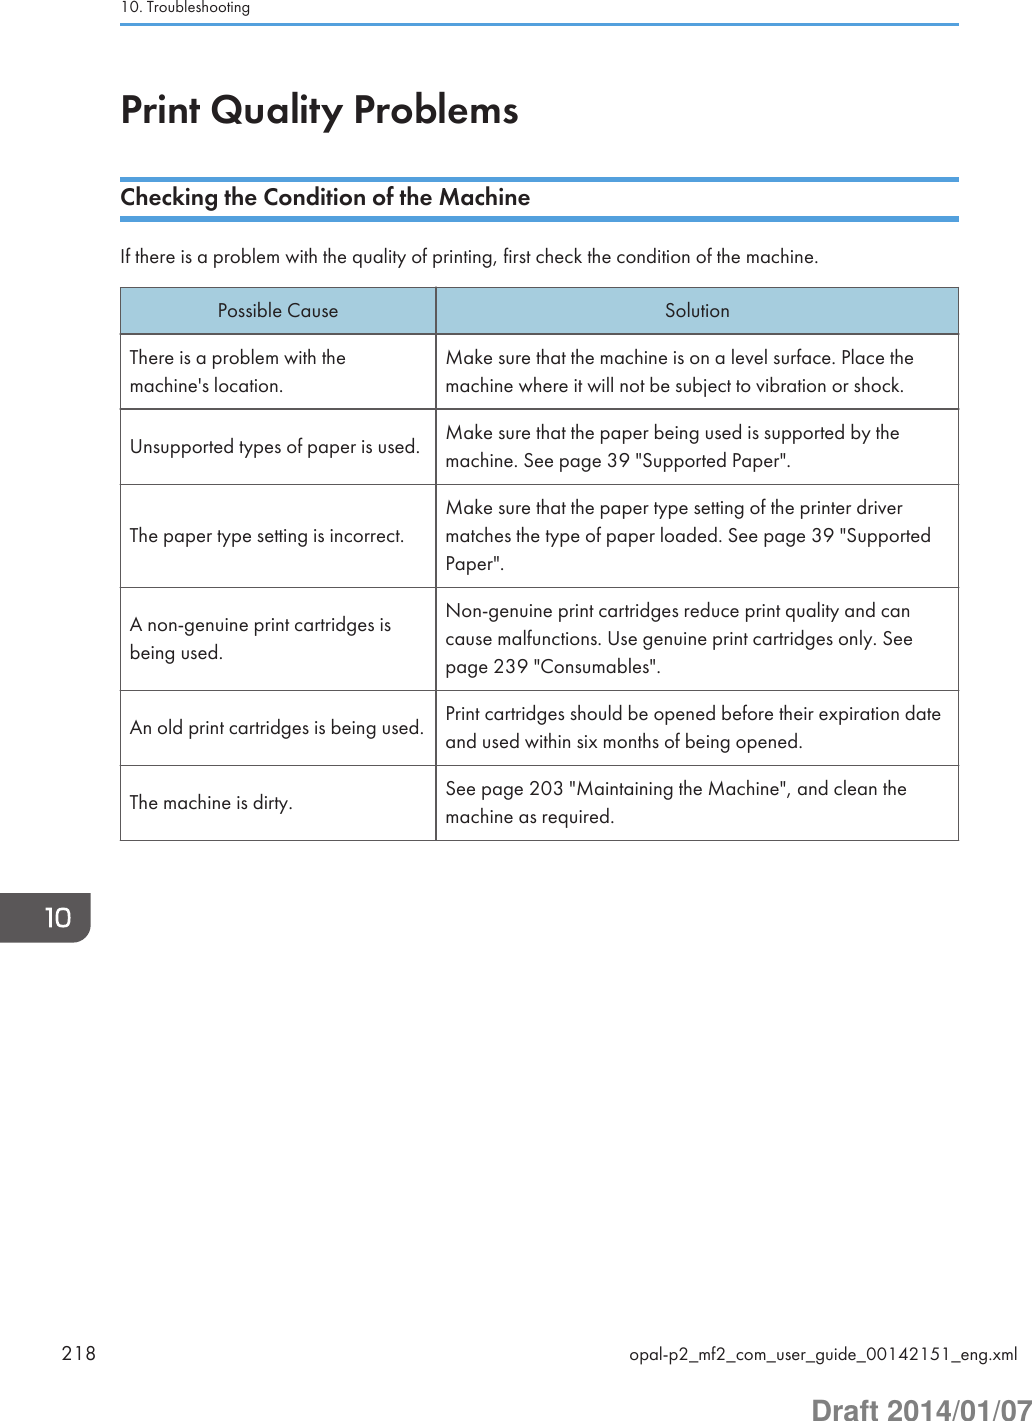
![Printer ProblemsProblem SolutionAn error occurs. If an error occurs when printing, change the computer orprinter driver settings.• Check the printer icon name does not exceed 32alphanumeric characters. If it does, shorten it.• Check whether other applications are operating.Close any other applications, as they may be interferingwith printing. If the problem is not resolved, closeunneeded processes too.• Check that the latest printer driver is being used.A print job is canceled. • Set [I/O Timeout] to a larger value than the currentsettings.There is considerable delay betweenthe print start command and actualprinting.• Processing time depends on data volume. High volumedata, such as graphics-heavy documents, take longer toprocess. Wait for a while.• To speed up printing, reduce the printing resolution usingthe printer driver.The whole printout is blurred. • Paper is damp. Use paper that has been stored properly.See page 39 "Supported Paper".• If you enable [Toner Save:], printing is generally lessdense.• Condensation may have collected. If rapid change intemperature or humidity occurs, use this machine onlyafter it has acclimatized.Cannot print properly when using acertain application, or cannot printimage data properly.Some characters are printed faintlyor not printed.• Change the print quality settings.The print position is misaligned.MFSpecify [Printer Registration] in [System Settings] toadjust the print position.Printer Problemsopal-p2_mf2_com_user_guide_00142152_eng.xml 219Draft 2014/01/07](https://usermanual.wiki/Ricoh/PRSP213NW1/User-Guide-2199680-Page-219.png)
![Problem SolutionPAdjust the print position by specifying [Registration: Tray1] or [Registration: Bypass Tray] on the [Maintenance] tab inSmart Organizing Monitor.Print Positions Do Not Match Display PositionsIf the position of items on the printed page differs from the position displayed on the computer screen,the cause may be one of the following.Possible Cause SolutionPage layout settings are not configured properly. Check that the page layout settings are properlyconfigured in the application.The paper size setting does not match the paperloaded.Check whether the paper size specified on theprinter driver matches that of the loaded paper.10. Troubleshooting220 opal-p2_mf2_com_user_guide_00142152_eng.xmlDraft 2014/01/07](https://usermanual.wiki/Ricoh/PRSP213NW1/User-Guide-2199680-Page-220.png)
![MFCopier ProblemsProblem SolutionPhotocopied paper is blank. The original was placed with the front and back reversed.See page 54 "Placing Originals".Copied pages are too dark or toolight.Adjust the image density.Copied pages do not look the sameas the originals.Select the correct scan mode according to the type of original.Black spots appear whenphotocopying a photographic print.The original may have stuck to the exposure glass due to highhumidity.Place the original on the exposure glass, and then place twoor three sheets of white paper on top of it. Leave the exposureglass cover open when copying.A moire pattern is produced. The original probably has heavily lined or dotted areas.Switching the setting for image quality between [Photo] and[Mixed] may eliminate the moire pattern.Photocopied paper is dirty. • Image density is too high.Adjust the image density.• Toner on the printed surface is not dry.Do not touch printed surfaces immediately after copying.Remove freshly printed sheets one by one, taking carenot to touch printed areas.• The scanning part is dirty.• Before placing originals on the exposure glass, makesure that toner or correction fluid is dry.When copying from the exposureglass, the print area of the copy isout of alignment with the original.Place the original copy side down, making sure that it isaligned to the rear left corner and pressed flat against theexposure glass.The paper size setting does notmatch the paper loaded.Check whether the paper size specified on the machinematches that of the loaded paper.Copier Problemsopal-p2_mf2_com_user_guide_00142153_eng.xml 221Draft 2014/01/07](https://usermanual.wiki/Ricoh/PRSP213NW1/User-Guide-2199680-Page-221.png)
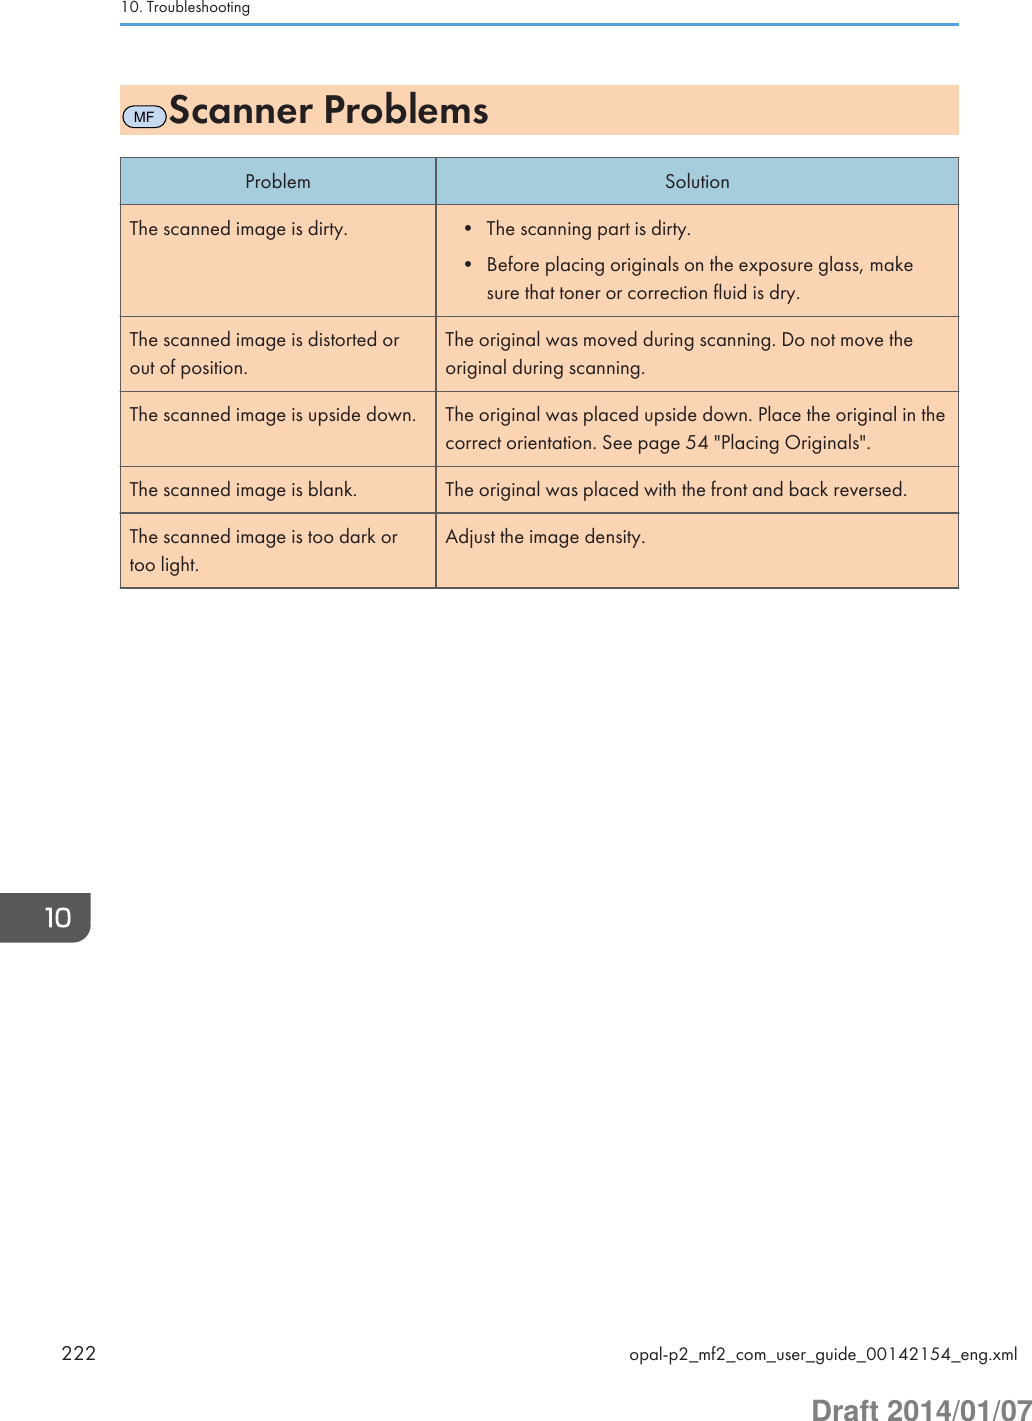
![MFFax ProblemsWhen an error code appears on the fax journal or TX status reportThe table below describes the meaning of error codes that appear under "Status" on the fax journalor TX status report, and what to do when a particular error code appears.TX Status ReportError Code SolutionErr:1) The line was not connected correctly. The fax transmissiondid not finish successfully. There was a problem with eitherthe transmission or reception.• Check that the telephone line is properly connected tothe machine.• Disconnect the telephone line from the machine, andconnect a standard telephone in its place. Check thatyou can make calls using the telephone. If you cannotmake calls this way, contact your telephone company.• If the problem persists, contact your sales or servicerepresentative.Dial tone could not be detected.• Set [Dial Tone Detect] to [Do not Detect].Err:2)Err:3)Err:4)Dial fails when trying to send faxes.• Check that the fax number you dialed is correct.• Check that the destination is a fax machine.• Check that the line is not busy.• You may need to insert a pause between dial digits.Press the [Pause/Redial] key after, for example, thearea code.• Check that [PSTN / PBX] under [Admin. Tools] is setproperly for your connection method to the telephonenetwork. See page 159 "Administrator Settings".Err:5) The [Clear/Stop] key has been pressed while transmitting/receiving faxes. Send the fax again. When the errorreoccurs even if the [Clear/Stop] key has not beenpressed, consult your service representative.Fax Problemsopal-p2_mf2_com_user_guide_00142155_eng.xml 223Draft 2014/01/07](https://usermanual.wiki/Ricoh/PRSP213NW1/User-Guide-2199680-Page-223.png)
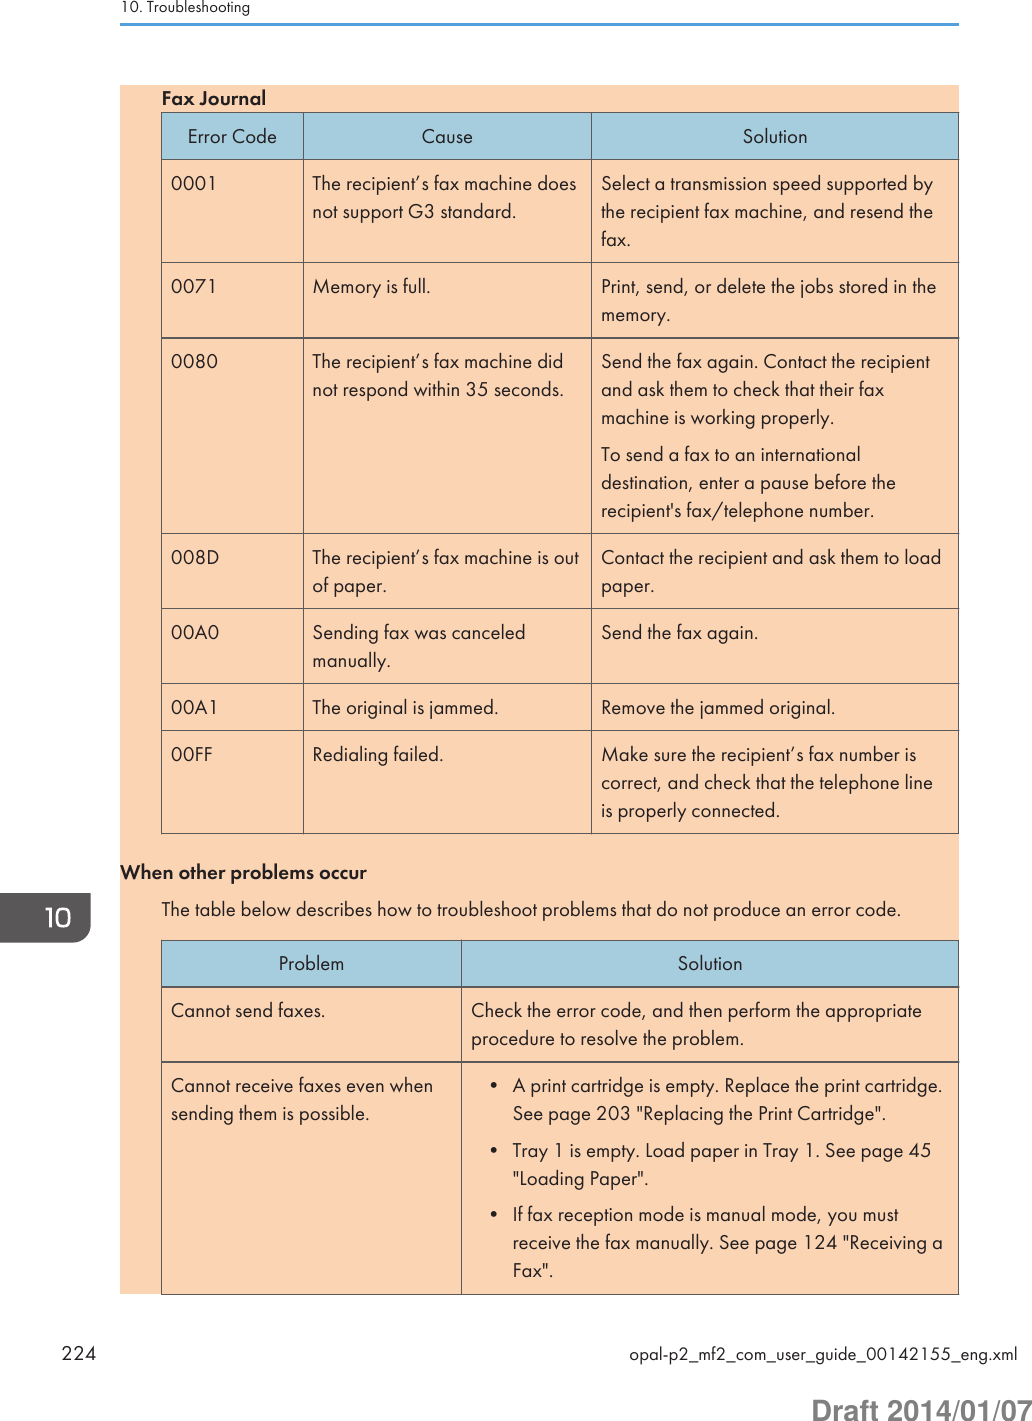
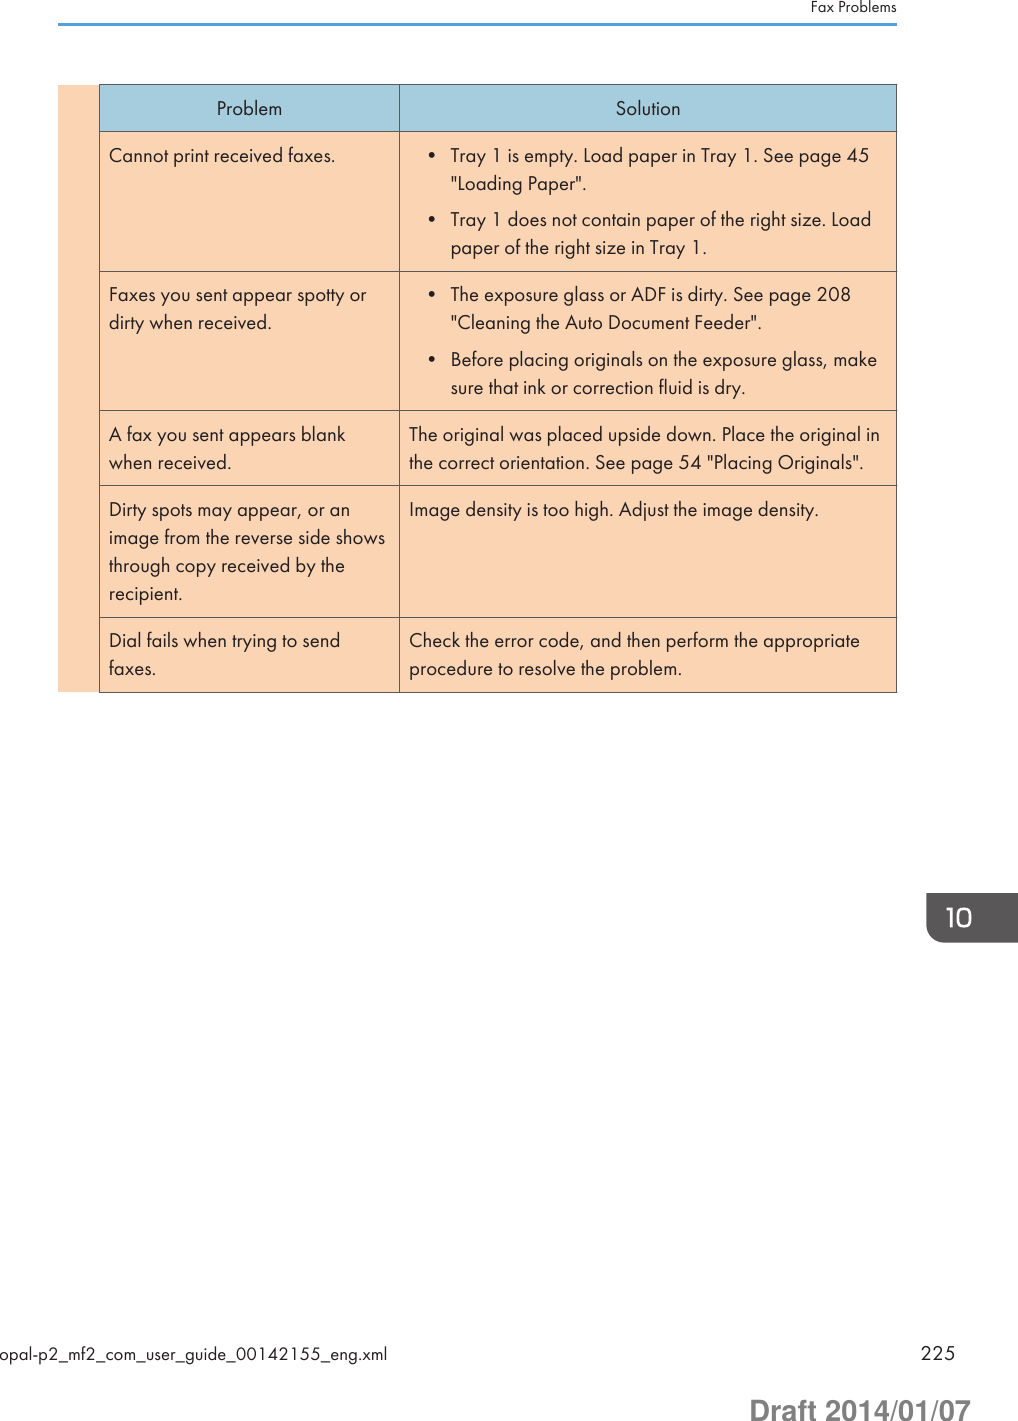
![MFError and Status Messages on the ScreenMessages are listed in alphabetical order in the table below."X" indicates the parts of the messages that appear differently depending on a specific situation, such asthe paper sizes, paper types, or tray names.Message Causes Solutions2XXX14 The machine was not able toprint the received fax, or themachine's memory reachedcapacity while receiving a faxbecause the document was toolarge.• The paper tray was empty. Loadpaper in the paper tray. See page 45"Loading Paper".• The paper tray did not contain A4,Letter, or Legal size paper. Load validsize paper in the tray, and configurethe paper size settings under [SystemSettings] accordingly.• A cover or tray was open. Close thecover or tray.• There was a paper jam. Remove thejammed paper. See page 210"Paper Feed Problems".• A print cartridge was empty. Replacethe print cartridge. See page 203"Replacing the Print Cartridge".• The received fax was too large. Askthe sender to resend the document inparts as several smaller individualfaxes, or to send at a lowerresolution.ADF Orig. MisfeedOpen ADF Coverand remove paper.An original has been jammedinside the ADF.• Remove jammed originals, and thenplace them again. See page 210"Paper Feed Problems".• Check the originals are suitable forscanning. See page 54 "PlacingOriginals".Available: IDCardCopy A4/A5/A6/8.5x11/5.5x8.5ID card copy could not beperformed because the traydoes not contain the valid sizeSpecify the A4, A5, A6, 8.5 × 11 or5.5x8.5 or Letter size paper for the trayselected for printing copies. See page 145"System Settings".10. Troubleshooting226 opal-p2_mf2_com_user_guide_00142156_eng.xmlDraft 2014/01/07](https://usermanual.wiki/Ricoh/PRSP213NW1/User-Guide-2199680-Page-226.png)
![Message Causes Solutionspaper, which are A4, A5, A6,8.5 × 11 or 5.5 × 8.5 size.Busy Fax transmission could not becompleted because thedestination's line was busy.Wait for a while and send the fax again.Cannot Copy ThisSettingComb.: 2 on 1 / 4on 1Combined copying could not beperformed because the traydoes not contain the valid sizepaper, which are A4, Letter, orLegal size.Specify the A4, Letter, or Legal size paperfor the tray selected for printing copies.See page 145 "System Settings".Cannot copy.Set original to ADF.Combined copying could not beperformed because the originalswere not placed in the ADF.• Use the ADF, even when copying asingle sheet.• If you need to use the exposure glass,turn off combined copying in[Duplex/Combine] under copysettings, and then try again. Seepage 132 "Copier Features Settings".Check Paper Size The paper size set for thedocument differs from the size ofthe paper in the indicated tray.Press [FormFeed] to begin printing, orpress [JobReset] to cancel the job.Check Paper Type The paper type set for thedocument differs from the typeof the paper in the indicatedtray.Press [FormFeed] to begin printing, orpress [JobReset] to cancel the job.Connection Failed The line could not be connectedcorrectly.• Confirm that the telephone line isproperly connected to the machine.• Disconnect the telephone line fromthe machine, and connect a standardtelephone in its place. Confirm thatyou can make calls using thetelephone. If you cannot make callsthis way, contact your telephonecompany.Cooling down... The engine has overheated. Wait until the message disappears.Cover open A cover is open. Close the cover completely.Error and Status Messages on the Screenopal-p2_mf2_com_user_guide_00142156_eng.xml 227Draft 2014/01/07](https://usermanual.wiki/Ricoh/PRSP213NW1/User-Guide-2199680-Page-227.png)
![Message Causes SolutionsDest. is notProgrammedNo Quick Dial entry isassociated with the One Touchbutton you pressed.• Press a different One Touch button.• Assign a registered destination to theOne Touch button. See page 80"Registering Scan Destinations".Dial Failed The fax could not be sent. • Confirm that the fax number youdialed is correct.• Confirm that the destination is a faxmachine.• Confirm that the line is not busy.• You may need to insert a pausebetween dial digits. Press the [Pause/Redial] key after, for example, thearea code.Exceeded Max.E-mail SizeThe scan file exceeds the sizelimit for files that can be sentthrough e-mail.• Configure [Resolution] under scansettings to reduce the scanningresolution. See page 135 "ScannerFeatures Settings".• Configure [Max. E-mail Size] underscan settings to increase the allowedsize. See page 135 "ScannerFeatures Settings".Fax Job MemoryOverflowThe number of fax jobs inmemory (unsent or unprintedfaxes) has reached maximum,so new jobs cannot be stored.Wait until pending jobs have beentransmitted or printed.Indep.Sply.Prt.Cart. A non-supported print cartridgeis installed.Remove and replace it with a printcartridge specified by an authorizeddealer.Internal Misfeed Paper has been jammed in themachine.Remove the jammed paper. See page 210"Paper Feed Problems".Memory Almost Full Memory has almost reachedcapacity during sort copy.If several originals are still to be scanned,it is recommended to start printing now,and copy the remaining originalsseparately. If originals are being scanned10. Troubleshooting228 opal-p2_mf2_com_user_guide_00142156_eng.xmlDraft 2014/01/07](https://usermanual.wiki/Ricoh/PRSP213NW1/User-Guide-2199680-Page-228.png)
![Message Causes Solutionsfrom the ADF, remove any remainingpages from the ADF.Memory Overflow The data is too large orcomplex to print.• Select [600 × 600 dpi] in[Resolution] under [Printer Features]to reduce the size of data. Seepage 152 "Printer Features Settings".• If using the PCL printer driver, set[Resolution] in [Print Quality] to [600× 600 dpi].Memory Overflow • The machine's memoryreached capacity whilescanning the first page ofthe original to store a faxjob in memory beforetransmission.• The machine's memoryreached capacity whilestoring a fax in memory inMemory Transmissionmode.Resend the fax in parts as several smallerindividual faxes, or send at a lowerresolution.Memory OverflowTXCancelMemory has reached capacitywhile scanning the second orlater pages of the original whentrying to send a fax in MemoryTransmission mode.Press [TX] to send only the pages that havebeen scanned in memory, or press[Cancel] to cancel.Misfeed: BypassTray Paper has been jammed in thebypass tray.Remove the jammed paper. See page 210"Paper Feed Problems".Misfeed: Stnd. Tray Paper has been jammed in thepaper exit area.Remove the jammed paper. See page 210"Paper Feed Problems".Misfeed: Tray 1 Paper has been jammed in thetray 1 paper input area.Remove the jammed paper. See page 210"Paper Feed Problems".Net CommunicationErrorConnection with the server waslost while sending or receivingdata.Contact the network administrator.Error and Status Messages on the Screenopal-p2_mf2_com_user_guide_00142156_eng.xml 229Draft 2014/01/07](https://usermanual.wiki/Ricoh/PRSP213NW1/User-Guide-2199680-Page-229.png)
![Message Causes SolutionsNetwork is not Ready A scanned file could not be sentbecause the machine has notreceived IP address informationfrom the DHCP servercompletely.Wait until the machine receives the IPaddress information completely, and thentry the operation again.On Hook or Stop key The machine has been off-hookfor an extended period of time.Put down the handset or press the [Clear/Stop] key.Out of Paper: X The indicated tray has run out ofpaper.Load paper to the indicated tray. Seepage 45 "Loading Paper".Please RestartMachineThe machine needs to berestarted.Turn off the power, and then turn it backon.Print Cart. Set Error The print cartridge has not beeninstalled or has not beeninstalled correctly.Reinstall the print cartridge. See page 203"Replacing the Print Cartridge".Remove Paper:Bypass TrayThe machine failed to proceedwith the print job, because tray1 was specified as the input traybut paper was set in the bypasstray.Remove paper from the bypass tray.Replace RequiredSoon:Print CartridgeThe print cartridge is almostempty.Prepare a new print cartridge.ReplacementRequired:Print CartridgeThe machine has run out oftoner.Replace the print cartridge. See page 203"Replacing the Print Cartridge".RX Comm. Error A reception error occurred, andthe fax could not be receivedcorrectly.If possible, contact the sender of the faxand ask them to resend it.Scan (NW)DisconnectedA scanned file could not be sentbecause the Ethernet cable wasnot connected properly.Reconnect the Ethernet cable properly,and then try the operation again.10. Troubleshooting230 opal-p2_mf2_com_user_guide_00142156_eng.xmlDraft 2014/01/07](https://usermanual.wiki/Ricoh/PRSP213NW1/User-Guide-2199680-Page-230.png)
![Message Causes SolutionsScan (USB)DisconnectedThe USB cable wasdisconnected while scanningfrom a computer.Reconnect the USB cable properly, andthen try the operation again.Server ConnectionFailedA scanned file could not be sentbecause the destination couldnot be reached.Confirm that the destination is registeredcorrectly, and then try the operation again.Server ResponseErrorAn error occurred incommunication with the serverbefore beginning transmission.Confirm that the destination is registeredcorrectly, and then try the operation again.If the problem could not be solved, contactthe network administrator.Service call - X A fatal hardware error hasoccurred, and the machinecannot function.Contact your sales or servicerepresentative.Set Correct Paper The paper tray does not containA4, Letter, or Legal size paper.While the message is displayed, press the[OK] key. A menu for changing the papersize of the current tray appears.Load A4/Letter/ Legal size paper in thetray, and then select the correspondingpaper size using [ ] or [ ] key and pressthe [OK] key. The machine will then printout the fax.Note that the paper size setting for the trayunder system settings will be changed. Seepage 145 "System Settings".Set Original to ADFCannot use exposureglasswith set. in [ScanSize].Scanning could not beperformed because the originalswere not placed in the ADF,even though the machine is setto scan originals larger thanA4/Letter size.• Use the ADF, even when scanningA4/Letter or smaller size originals.• If you need to use the exposure glass,set A4/Letter or smaller size in [ScanSize] under scan settings, and then tryagain. See page 92 "Specifying theScan Settings".Sort Copy wasCancelledThe machine's memory reachedcapacity while originals werebeing scanned from the ADF toperform sort copying.Press [Exit] to print the originals that weresuccessfully scanned into memory. Then,copy again the originals left in the ADF.Error and Status Messages on the Screenopal-p2_mf2_com_user_guide_00142156_eng.xml 231Draft 2014/01/07](https://usermanual.wiki/Ricoh/PRSP213NW1/User-Guide-2199680-Page-231.png)
![Message Causes SolutionsTX Comm. Error A transmission error occurred,and the fax could not betransmitted correctly.If the [Auto Redial] setting is enabled, themachine will redial the number and tryagain. If all attempts fail, or if the machineis in Immediate Transmission mode, the faxwill not be transmitted. Try the operationagain.10. Troubleshooting232 opal-p2_mf2_com_user_guide_00142156_eng.xmlDraft 2014/01/07](https://usermanual.wiki/Ricoh/PRSP213NW1/User-Guide-2199680-Page-232.png)
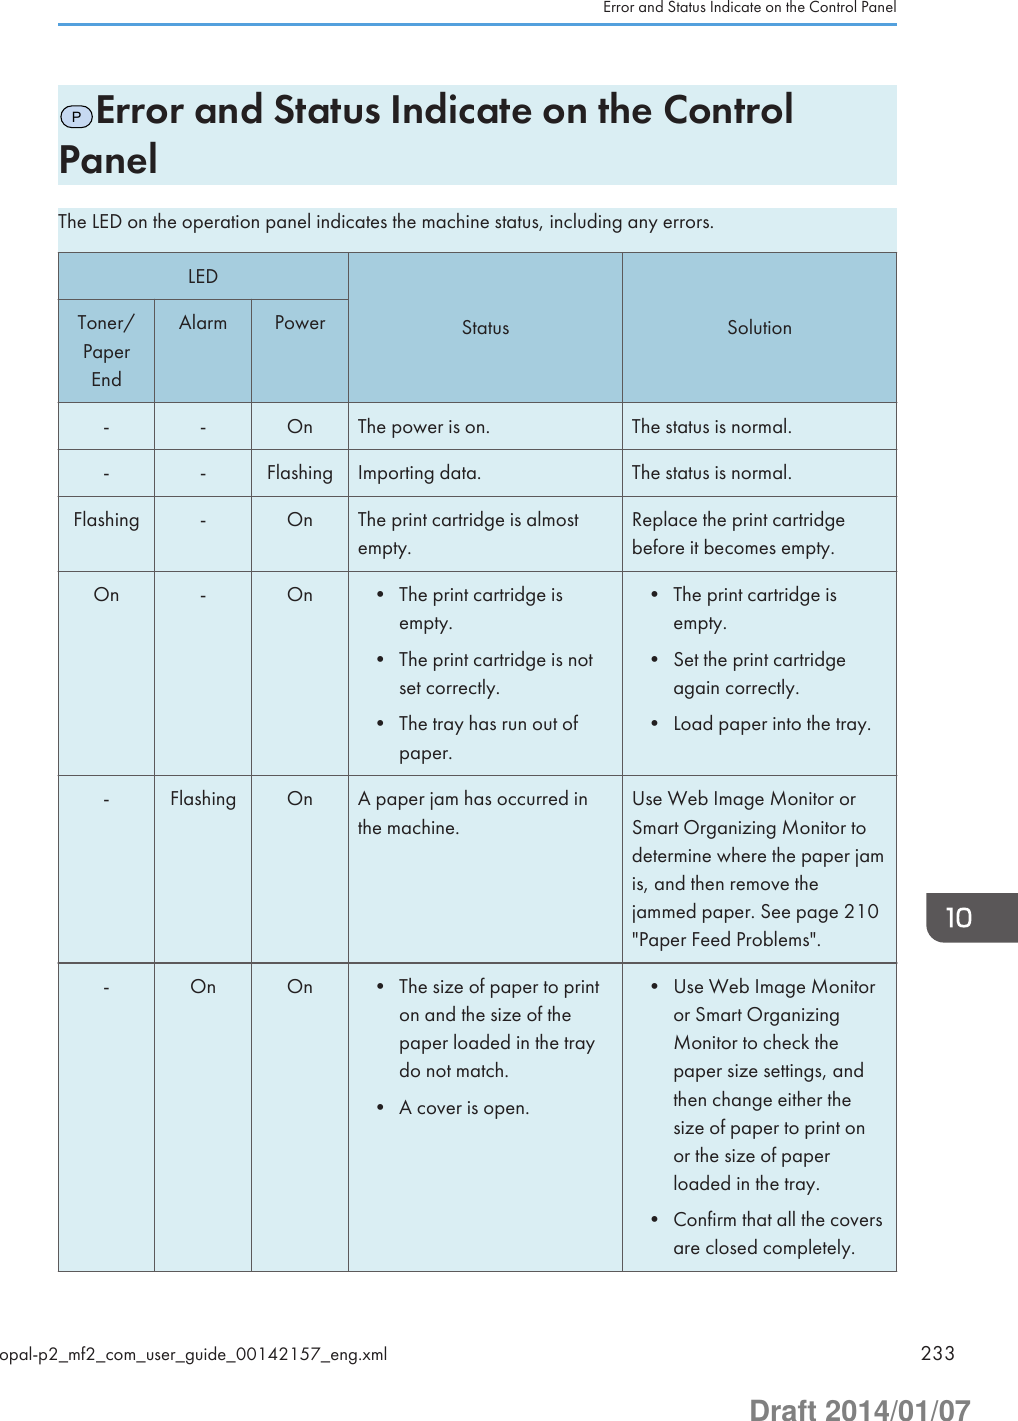
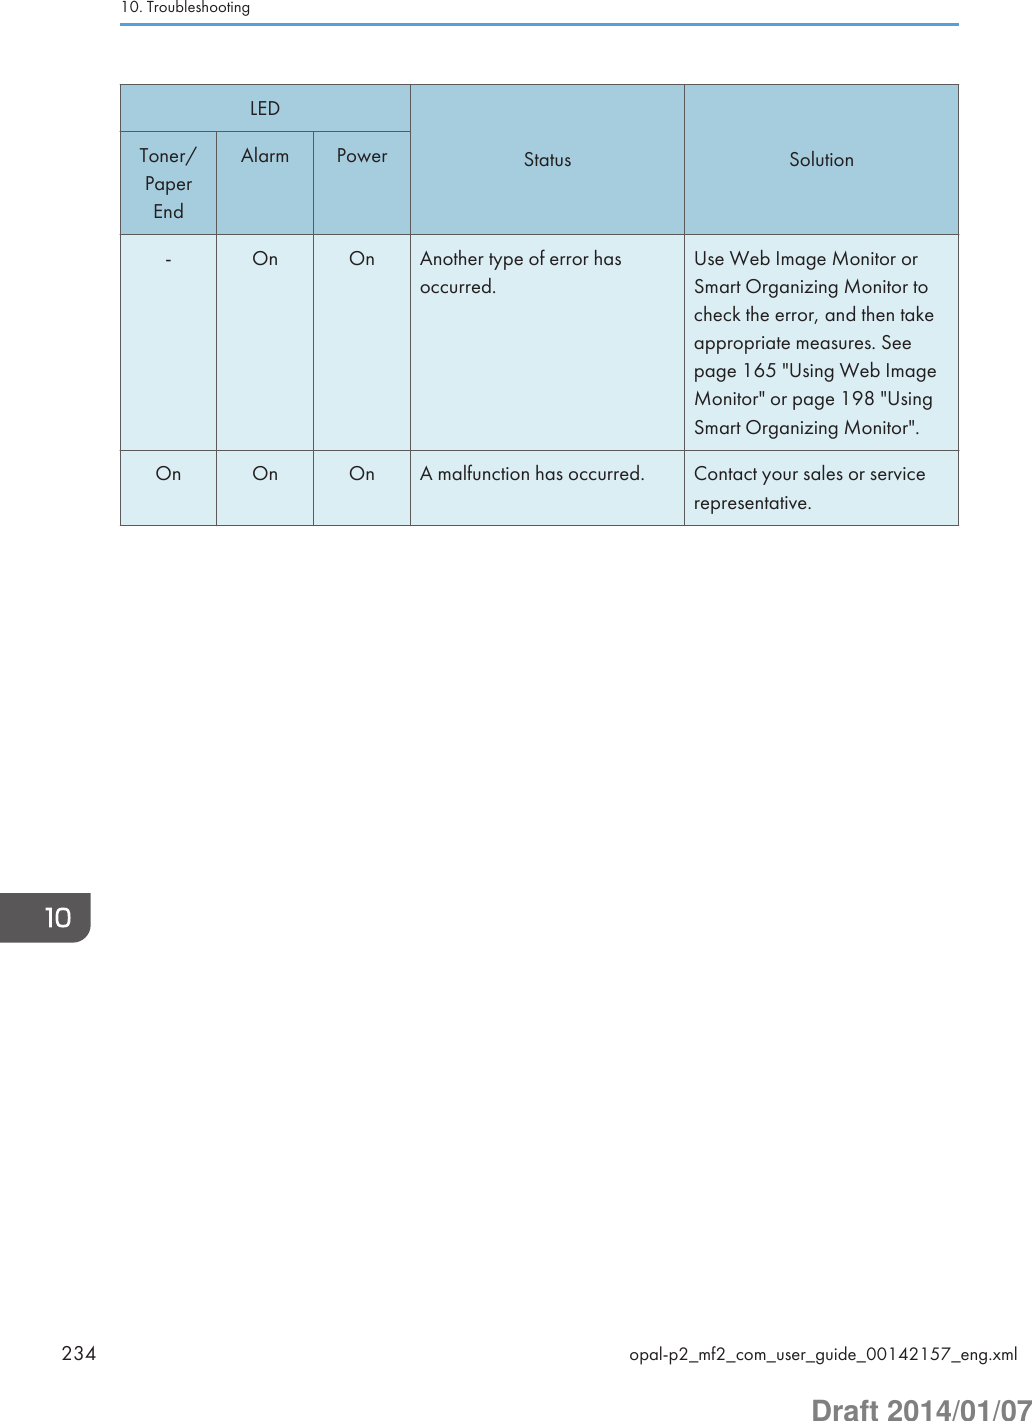
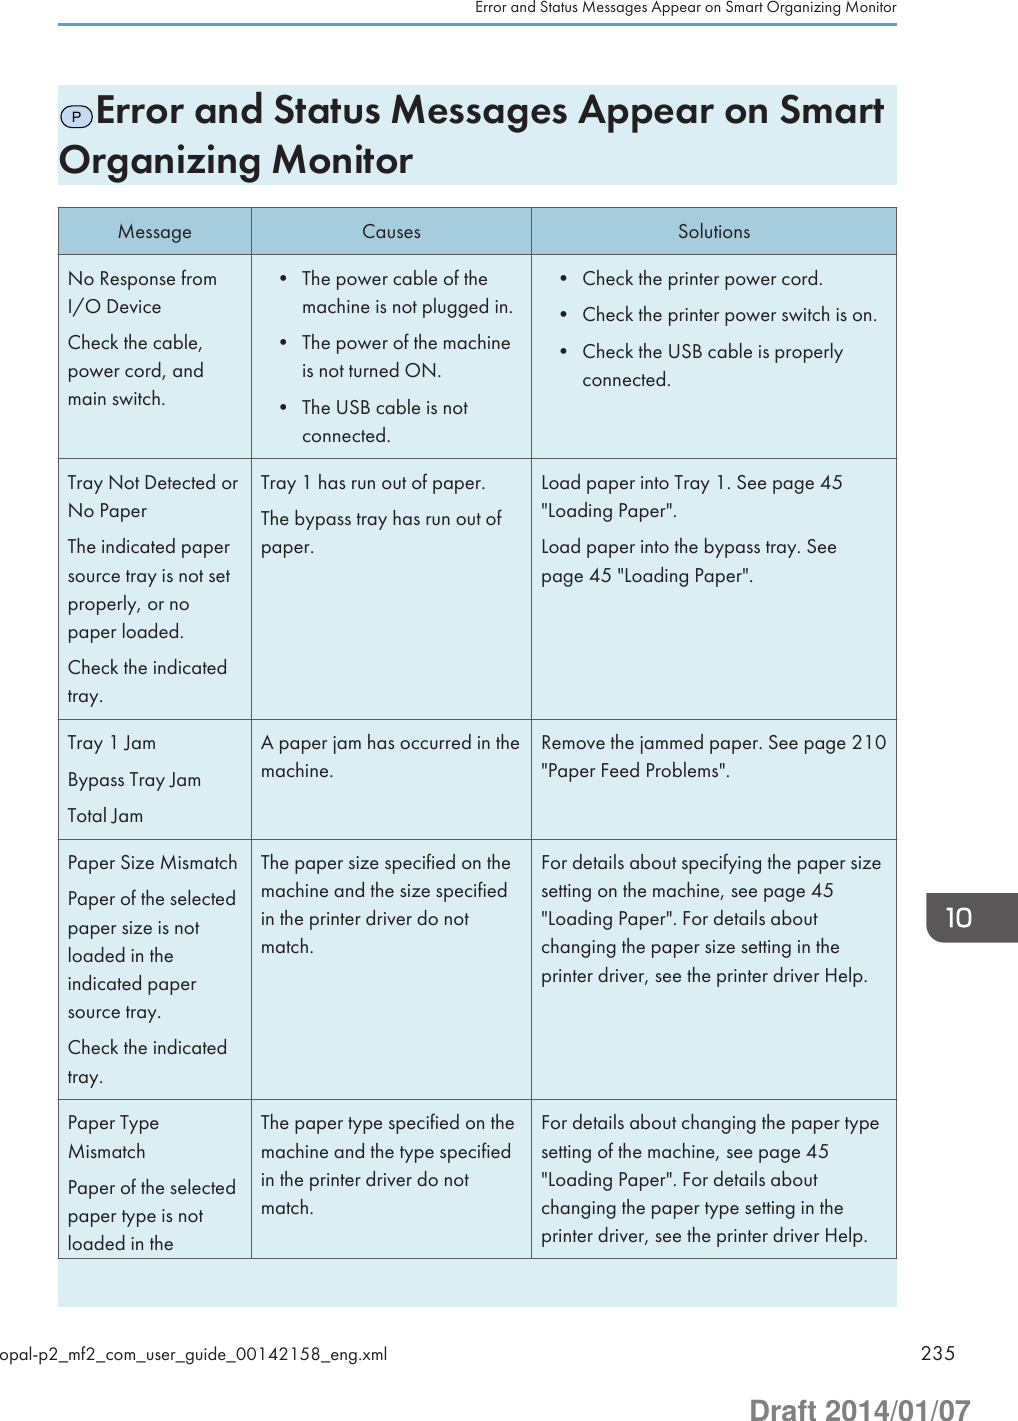
![Message Causes Solutionsindicated papersource tray.Check the indicatedtray.Print Cartridge isnear empty.The print cartridge is almostempty.The print cartridge is almost empty.Shortly printingbecomes notavailable. Pleasekeep Print Cartridgehandy.The machine has run out of thetoner.Replace the print cartridge. See page 203"Replacing the Print Cartridge".Printing has beeninterrupted becauseof the memoryoverflow.The data is too large orcomplex to print.Select [600 x 600 dpi] in [Resolution:] toreduce the size of data. For details, see theprinter driver Help.Waste Toner fullNo printing isavailable.Open the indicatedcover, and thenreplace PrintCartridge.The waste toner bottle is full. Replace the print cartridge.No Toner or WasteToner fullNo printing isavailable.Open the indicatedcover, and thenreplace PrintCartridge.The print cartridge has not beeninstalled.Reinstall the print cartridge. See page 203"Replacing the Print Cartridge".10. Troubleshooting236 opal-p2_mf2_com_user_guide_00142158_eng.xmlDraft 2014/01/07](https://usermanual.wiki/Ricoh/PRSP213NW1/User-Guide-2199680-Page-236.png)
![11. AppendixNotes About the Toner• Proper operation cannot be guaranteed if any third-party toner is used.• Depending on printing conditions, there are cases where the printer cannot print the number ofsheets indicated in the specifications.•PReplace the print cartridge if the printed image suddenly becomes pale or blurred.•MFWhen operating the machine for the first time, use the print cartridge supplied with thismachine. If this cartridge is not initially used, the following problems may occur:•MF"Replacement Required: Print Cartridge" will be displayed before the toner runs out.•MF"Replacement Required: Print Cartridge" will not be displayed when the toner runs out,but instead the printed image suddenly becomes pale or blurred.•MFTo continue printing after "Replacement Required: Print Cartridge" is displayed, set [TonerEnd Option Settings] to [Continue Printing]. However, since any trouble caused by using this setupis outside of the scope of the manufacturer's warranty, this setup should be used with care. Fordetails about [Toner End Option Settings], see page 145 "System Settings".•MFIf [Toner End Option Settings] is first set to [Continue Printing] and then to [Stop Printing], besure to use a new print cartridge. If a used print cartridge is installed, there will be a discrepancybetween the remaining toner level displayed and the actual remaining toner, and accordingly,"Replacement Required: Print Cartridge" will not be displayed at the appropriate timing.•MFThe lifetime of the photo conductor, which is built into the print cartridge, is taken into accountin displaying "Replacement Required: Print Cartridge". If the photo conductor stops working beforethe toner runs out, "Replacement Required: Print Cartridge" may be displayed.opal-p2_mf2_com_user_guide_00142161_eng.xml 237Draft 2014/01/07](https://usermanual.wiki/Ricoh/PRSP213NW1/User-Guide-2199680-Page-237.png)