Ridgid Eb44241 Users Manual
EB44241 to the manual 5083e71e-f319-4557-b908-d5251985614d
2015-02-04
: Ridgid Ridgid-Eb44241-Users-Manual-387840 ridgid-eb44241-users-manual-387840 ridgid pdf
Open the PDF directly: View PDF ![]() .
.
Page Count: 36

OSCILLATING
EDGE BELT/SPINDLE
SANDER

2
Table of Contents
Section Page
Table of Contents .................................2
Safety Instructions For Oscillating
Edge Belt/ Spindle Sander .................. 3
Safety Signal Words ............................3
Before Using The Sander ....................3
When Installing Or Moving The
Sander ...............................................4
Before Each Use .................................5
Plan Ahead To Protect Your Eyes,
Hands, Face and Ears .......................5
When Sander is Running ....................7
Before Leaving The Sander ................7
Precautions To Take When Sanding
Metals ...............................................7
Precautions To Take When Sanding
Paint ..................................................7
Motor Specifications and Electrical
Requirements .................................. 8
General Electrical Connections ...........8
Power Supply and Motor
Specifications .................................... 8
110-120 Volt, 60 Hz. Tool Information .9
Motor Safety Protection .....................10
Wire Sizes .........................................10
Unpacking and Checking Contents . 11
List of Loose Parts .............................11
Loose Parts .......................................11
Assembly ............................................12
Mounting Rubber Feet To Base ........12
Parts Storage ....................................12
Removing the Sanding Belt Assembly 13
Installing the Sanding Belt Assembly 13
Installing Sanding Sleeves Larger
than 1/2" Diameter ...........................14
Installing Sanding Sleeves for the 1/2"
Diameter Sanding Drum ..................15
Selection Of Spacer Ring Inserts And
Upper Spindle Washers ..................15
Bolting Oscillating Edge Belt/Spindle
Sander To Workbench ....................16
Section Page
Supporting Oscillating Edge Belt/
Spindle Sander to Sawhorses ......... 17
Alignment ........................................... 17
Squaring Front Table ........................ 17
Aligning Belt To Miter Gauge Slot ..... 18
Removing/Installing the Sanding Belt 19
Tensioning and Tracking ................... 19
Getting to Know Your Spindle
Sander ............................................ 20
On-Off Switch .................................... 21
Safety Instructions for Oscillating Edge
Belt/Spindle Sander ...................... 22
Before Using The Sander .................. 22
When Installing Or Moving The
Sander ............................................. 22
Before Each Use ............................... 22
Plan Ahead To Protect Your Eyes,
Hands, Face and Ears .................... 23
When Sander is Running .................. 24
Before Leaving The Sander .............. 25
Precautions To Take When Sanding
Metals ............................................. 25
Precautions To Take When Sanding
Paint ............................................... 25
Basic Sanding Operation .................. 26
Sandpaper Selection ......................... 26
Surface Sanding on the Sanding Belt 27
End Sanding on the Sanding Belt ..... 27
Sanding Curved Edges ..................... 27
Feed Direction ................................... 28
Dust Collection Capability ................. 28
Transporting Sander ......................... 28
Maintenance ....................................... 29
Lubrication ......................................... 29
RIDGID Recommends the Following
Accessories ................................... 29
Wiring Diagram .................................. 29
Troubleshooting ................................ 30
Repair Parts ....................................... 32
Notes .................................................. 35

3
Safety Instructions For Oscillating Edge Belt/
Spindle Sander
Safety is a combination of common
sense, staying alert and knowing how
your oscillating edge belt/spindle
sander works. Read this manual to
understand this sander.
Safety Signal Words
DANGER: means if the safety infor-
mation is not followed someone will
be seriously injured or killed.
WARNING: means if the safety infor-
mation is not followed someone
could be seriously injured or killed.
CAUTION: means if the safety infor-
mation is not followed someone may
be injured.
Before Using The Sander
WARNING: Some dust created by power sanding, sawing, grinding,
drilling, and other construction activities contains chemicals known
(to the State of California) to cause cancer, birth defects or other
reproductive harm. Some examples of these chemicals are:
• Lead from lead-based paints,
• Crystalline silica from bricks and cement and other masonry prod-
ucts, and
• Arsenic and chromium from chemically-treated lumber.
Your risk from these exposures varies, depending on how often you
do this type of work. To reduce your exposure to these chemicals:
work in a well ventilated area, and work with approved safety equip-
ment, such as those dust masks that are specially designed to filter
out microscopic particles.
WARNING: To reduce the risk of
mistakes that could cause seri-
ous, permanent injury, do not
plug the sander in until the fol-
lowing steps are completed.
• Assembly. (See pages 12-19)
• Learn the use and function of the
ON-OFF switch. (See page 21)
• Review and understanding of all
safety instructions and operating
procedures in this manual.
• Review of the maintenance meth-
ods for this sander. (See page 29)

4
Safety Instructions for Oscillating Edge Belt/
Spindle Sander (continued)
Read the following WARNING labels found on the sander:
When Installing Or Moving The Sander
Avoid dangerous environment.
Use the sander in a dry, indoor place
protected from rain. Keep work area
well lighted.
To reduce the risk of burns or other
fire damage, never use the sander
near flammable liquids, vapors or
gasses.
To reduce the risk of injury or
death from electrical shock:
• Ground the sander. This sander has
an approved 3-conductor cord and a
3-prong grounding type plug. Use
only 3-wire, grounded outlets rated
120 volts, 15 amperes (amps). The
green conductor in the cord is the
grounding wire. To reduce the risk of
electrocution, Never connect the
green wire to a live terminal.
• Make sure your fingers do not touch
the plug’s metal prongs when plug-
ging or unplugging the sander.
• Never use this or any power sander
for wet sanding. Doing so could
cause electrocution, serious injury
or worse.
To reduce the risk of injury from
unexpected sander movement:
• Always unplug the sander before
moving it.
• Put the sander on a firm level sur-
face where there is plenty of room
for handling and properly supporting
the workpiece.
• Attach rubber feet.
• Support the sander so it does not
rock.
• Bolt the sander to its work surface.
Use the fasteners and method
shown in “Assembly.” (See page
16.)
•Never stand on tool. Serious injury
could occur if the tool tips. Do not
store anything above or near the
tool where anyone might stand on
the tool to reach it.

5
Before Each Use
Inspect your sander. Check for:
• alignment of moving parts,
• binding of moving parts,
• broken or damaged parts,
• work parts that cause a gap larger
than 1/16" between work support
and sanding surface,
• sanding belt narrower than 4 inches.
Narrower belts uncover parts that
could trap your fingers,
• worn or damaged electric cords,
• stable mounting, and
• any other conditions that may affect
the way the sander works.
• Remove adjusting keys and
wrenches. Form a habit of checking
for and removing keys and adjusting
wrenches from table top before turn-
ing sander on.
If any part is missing, bent, or broken
in any way, or any electrical parts
don’t work properly, turn the sander
off and unplug the sander. Replace
damaged, missing, or failed parts
before using the sander again.
Disconnect the sander to reduce
the risk of injury from accidental start-
ing. Turn switch off, unplug sander
and remove the switch key before
changing the setup or sanding drum.
Maintain tools with care. Keep the
sander clean for maximum and safest
performance.
To reduce the risk of injury from
jams, slips or thrown pieces:
• Use only recommended accessories.
•Use the correct spacer ring insert.
The opening between the sanding
sleeve and insert must be 5/32 of an
inch or less. (See page 15)
•All sanding drums, washers and
knobs are tight. No parts should
have excessive play prior to operat-
ing unit.
•Keep work area clean. Cluttered
work surfaces invite accidents. Floor
must be clean and dry for stable
footing.
Plan Ahead To Protect Your Eyes, Hands, Face and Ears
Dress for Safety
• Any power sander can throw foreign
objects into the eyes. This can result
in permanent eye damage. Always
wear safety goggles, not glasses
complying with ANSI Z87.1 (or in
Canada CSA Z94.3-99) shown on
package. Everyday eyeglasses
have only impact resistant lenses.
They are not safety glasses. Safety
goggles are available at many local
retail stores. Glasses or goggles not
in compliance with ANSI or CSA
could seriously hurt you when they
break.
• Sanding operations are usually
dusty. Wear a dust mask along with
the safety goggles.
• Wear nonslip footwear.
• Tie back long hair.
• Roll long sleeves above the elbow.
• Noise levels vary widely. To reduce
the risk of possible hearing damage,
wear ear plugs or muffs when using
sander for hours at a time.

6
Safety Instructions for Oscillating Edge Belt/
Spindle Sander (continued)
• Do not wear loose clothing, gloves,
neckties or jewelry (rings, wrist
watches). They can get caught and
draw you into moving parts.
Know your sander. Read and under-
stand the owner’s manual and labels
affixed to the tool. Learn its applica-
tion and limitations as well as the spe-
cific potential hazards.
Plan your work. Think through how
you will hold and maneuver the work-
piece against the sanding drum or
belt.
Use the right tool. Don’t force tool or
attachment to do a job it was not
designed to do.
To reduce the risk of injury from
accidental contact with moving
parts:
• Do not layout, assemble, or setup
work on the sander while any parts
are moving.
•Reduce the risk of accidental
starting. Make sure switch is “OFF”
before plugging sander into a power
outlet.
Inspect your workpiece. Make sure
there are no nails or foreign objects in
the part of the workpiece to be
sanded.
Plan the way you will hold the work-
piece from start to finish. Reduce the
risk of awkward operations and hand
positions where a sudden slip could
cause finger or hand to move into a
sanding surface.
Don’t overreach. Maintain balance
and footing.
Keep face and body to one side.
Stay out of line of a possible throw-
back.
Plan your work to reduce the risk
of THROWBACKS - when the work-
piece catches the sanding drum
and is torn from your hands:
• Make sure there is no debris
between the workpiece and its sup-
ports.
• When sanding irregularly shaped
workpieces, plan your work support
so it will not slip and be pulled from
your hands.
• Use extra caution with large, very
small or awkward workpieces.
• Never use this tool to finish pieces
too small to hold by hand.
• Use extra supports (tables, saw
horses, blocks, etc.) for any work-
pieces large enough to tip when not
secured to the work surface.
•Never use another person as a sub-
stitute for a table extension, or as
additional support for a workpiece
that is longer or wider that the basic
sander table, or to help feed, sup-
port or pull the workpiece.
• Sand only one workpiece at a time.
• Clear everything except the work-
piece and related support devices
off the table before turning the
sander on.
• Always feed workpiece from right to
left against the direction the sanding
sleeve or belt is rotating.
• Do not use drums, sanding sleeves
or sanding belts which show visual
signs of wear such as grooves,
tears or rips.
WARNING: Don’t let familiarity
(gained from frequent use of
your sander) cause a careless
mistake. A careless fraction of a
second is enough to cause a
severe injury.

7
When Sander is Running
Before starting your work, watch the
sander while it runs. If it makes an
unfamiliar noise or vibrates exces-
sively, Stop Immediately. Turn the
sander off. Unplug the sander. Do not
restart until identifying and correcting
the problem.
Never leave tool running unat-
tended.
Before using the sander, make sure
the sanding belt turns clockwise,
when viewed from above.
Keep children away. Keep all visi-
tors a safe distance from the sander
and workpiece.
Don’t force tool. It will perform better
and safer at its designed rate. Press
workpiece against the sanding sleeve
hard enough to begin sanding without
bogging down or binding spindle or
belt.
Before freeing any jammed mate-
rial:
• Turn switch “OFF”.
• Unplug the sander.
• Wait for all moving parts to stop.
Before Leaving The Sander
Turn switch off. Don’t leave tool until
the unit comes to a complete stop.
Make workshop child-proof.
Remove the yellow switch key. Store
it away from children and others not
qualified to use the tool. Disconnect
master switches. Lock the shop.
Precautions To Take When Sanding Metals
When sanding metals, sparks or hot
fragments could cause a fire. To
reduce the risk of this:
1. Disconnect any dust collecting
hose from the sander.
2. Remove all traces of wood dust
from inside the unit before sanding
metals.
3. Remove all traces of metal dust
from inside the unit before sanding
wood again.
Precautions To Take When Sanding Paint
Sanding of lead based paint is not
recommended. It is difficult to control
the contaminated dust that could
cause lead poisoning.
It is also difficult to identify whether or
not a paint contains lead. Therefore,
we recommend the following precau-
tions when sanding all paints:
1. Protect your lungs. Wear a dust
mask or respirator at all times.
Wear only dust masks that are suit-
able for working in lead paint sand-
ing environments. Ordinary
painting masks do not offer this
protection.
2. Do not allow children or pregnant
women to enter the work area until
paint sanding job is complete and
work area is clean.
3. To prevent ingesting contaminated
paint particles: Do not eat, drink, or
smoke in a work area where paint
is being sanded. After sanding
paint, wash and clean up before
eating, drinking or smoking. Do not
leave food, drinks, or tobacco prod-
ucts in the work area where dust
can settle on them.

8
Precautions To Take When Sanding Paint
(continued)
4. Protect the environment when
sanding paint. Use a dust collection
system if possible. Seal the work
area with plastic if necessary. Do
not track paint dust outside the
work area.
5. Thoroughly clean the work area
upon completion of paint sanding
project. If project lasts for an
extended period of time, clean
work area often. Items such as
sanding dust, vacuum filter bags,
plastic drop cloths, etc. should be
placed in a sealed container and
disposed of properly. Clean all
items exposed to sanding dust.
Motor Specifications and Electrical Requirements
General Electrical Connections
DANGER: To reduce the risk of
electrocution:
1. Use only identical replace-
ment parts when servicing.
Servicing should be per-
formed by a qualified service
technician.
2. Do not use in rain or where
floor is wet.
This tool is intended for indoor
use only.
WARNING: Do not touch the ter-
minals of plug when installing or
removing the plug to or from the
outlet.
If power cord is worn or cut, or damaged
in any way, have it replaced immediately.
Power Supply and Motor Specifications
WARNING: To reduce the risk of
electrical hazards, fire hazards
or damage to the tool, use
proper circuit protection. Your
tool is wired at the factory for
operation using the voltage
shown. Connect tool to a power
line with the appropriate voltage
and a 15-amp branch circuit. To
reduce the risk of shock or fire,
if power cord is worn or cut, or
damaged in any way, have it
replaced immediately.
The A-C motor used on this tool is a relay
start motor, having the following specifica-
tions: It is wired at the factory for opera-
tion on 110-120V AC, 60 Hz. operation.
Rated H.P. 3/8
Voltage 110-120
Amperes 5.0
Hertz (Cycles) 60
Phase Single
RPM 1725
Rotation of Shaft Clockwise
9
110-120 Volt, 60 Hz. Tool
Information
NOTE: The plug supplied on your tool
may not fit into the outlet you are planning
to use. Your local electrical code may
require slightly different power cord plug
connections. If these differences exist
refer to and make the proper adjustments
per your local code before your tool is
plugged in and turned on.
In the event of a malfunction or break-
down, grounding provides a path of least
resistance for electric current to reduce
the risk of electric shock. This tool is
equipped with an electric cord having an
equipment grounding conductor and a
grounding plug, as shown. The plug must
be plugged into a matching outlet that is
properly installed and grounded in accor-
dance with all local codes and ordi-
nances.
Do not modify the plug provided. If it will
not fit the outlet, have the proper outlet
installed by a qualified electrician.
A temporary adapter may be used to con-
nect this plug to a 2-pole outlet, as shown,
if a properly grounded outlet is not avail-
able. This temporary adapter should be
used only until a properly grounded outlet
can be installed by a qualified electrician.
The green colored rigid ear, lug and the
like, extension from the adapter must be
connected to a permanent ground such
as a properly grounded outlet box.
Improper connection of the equipment
grounding conductor could result in a risk
of electric shock. The conductor with insu-
lation having an outer surface that is
green with or without yellow stripes is the
equipment grounding conductor. If repair
or replacement of the electric cord or plug
is necessary, do not connect the equip-
ment-grounding conductor to a live termi-
nal.
If the grounding instructions are not com-
pletely understood, or if you are in doubt
as to whether the tool is properly
grounded, check with a qualified electri-
cian or service personnel.
WARNING: If not properly
grounded, this tool can cause an
electrical shock, particularly
when used in damp locations, in
proximity to plumbing, or out of
doors. If an electrical shock
occurs there is the potential of a
secondary hazard, such as your
hands contacting the sanding
belt/spindle.
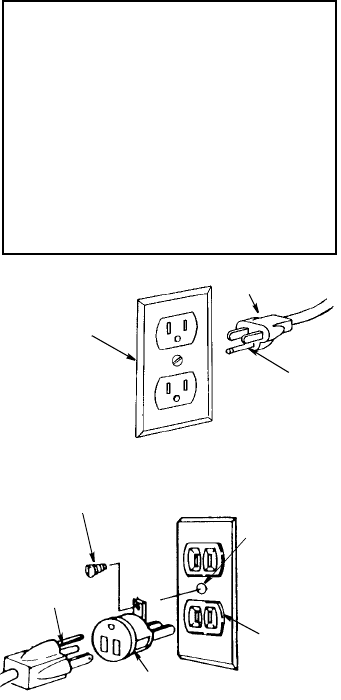
NOTE: The adapter illustrated is for use
only if you have a properly grounded 2-
prong outlet.
NOTE: In Canada the use of a temporary
adapter is not permitted by the Canadian
Electrical Code.
3-Prong
Adapter
2-Prong
Outlet
Make sure this
Is Connected
Ground
Plug
to a Known
Grounding Lug
Properly
Grounded 3-Prong Plug
Grounding
Prong
3-Prong Outlet

10
Motor Specifications and Electrical Requirements
(continued)
Motor Safety Protection
IMPORTANT: To reduce the risk of motor
damage, the motor should be blown out
or vacuumed frequently to keep sawdust
from interfering with normal motor ventila-
tion.
1. Connect this tool to a power source
with the appropriate voltage for your
model and a 15-amp branch circuit with
a 15-amp fuse or circuit breaker. Using
the wrong size fuse can damage the
motor.
2. If the motor won't start, turn off the
power switch immediately and unplug
the tool. Check the spindle to make
sure it turns freely. If the spindle is free,
try to start the motor again. If the motor
still does not start, refer to the "Trouble-
shooting” chart.
3. If the motor suddenly stalls while sand-
ing, turn off the power switch, unplug
the tool, and remove the workpiece
from the belt/drum. The motor may now
be restarted and the sanding finished.
4. Fuses may "blow" or circuit breakers
may trip frequently if:
a. Motor Is Overloaded-Overloading
can occur if you sand too rapidly or
make too many start/stops in a short
time.
b. Line voltages should not be more
than 10% above or below the name-
plate voltage. For heavy loads, how-
ever, the voltage at motor terminals
must equal the voltage specified for
your model.
5. Most motor troubles may be traced to
loose or incorrect connections, over-
load, low voltage (such as small size
wire in the supply circuit) or to overly
long supply circuit wire. Always check
the connections, the load and supply
circuit whenever motor doesn't work
well. Check wire sizes and extension
cord length with the Wire Size Chart.
Wire Sizes
NOTE: Make sure the proper extension
cord is used and is in good condition.
The use of any extension cord will cause
loss of power. To keep this to a minimum
and to prevent overheating and motor
burn-out, use the table shown to deter-
mine the minimum wire size (A.W.G.)
extension cord.
Use only 3-wire extension cords with 3-
prong grounding type plugs and 3-pole
receptacles.
Extension Cord
Length Gauge (A.W.G.)
0-25 Ft.
26-50 Ft.
16
14
11
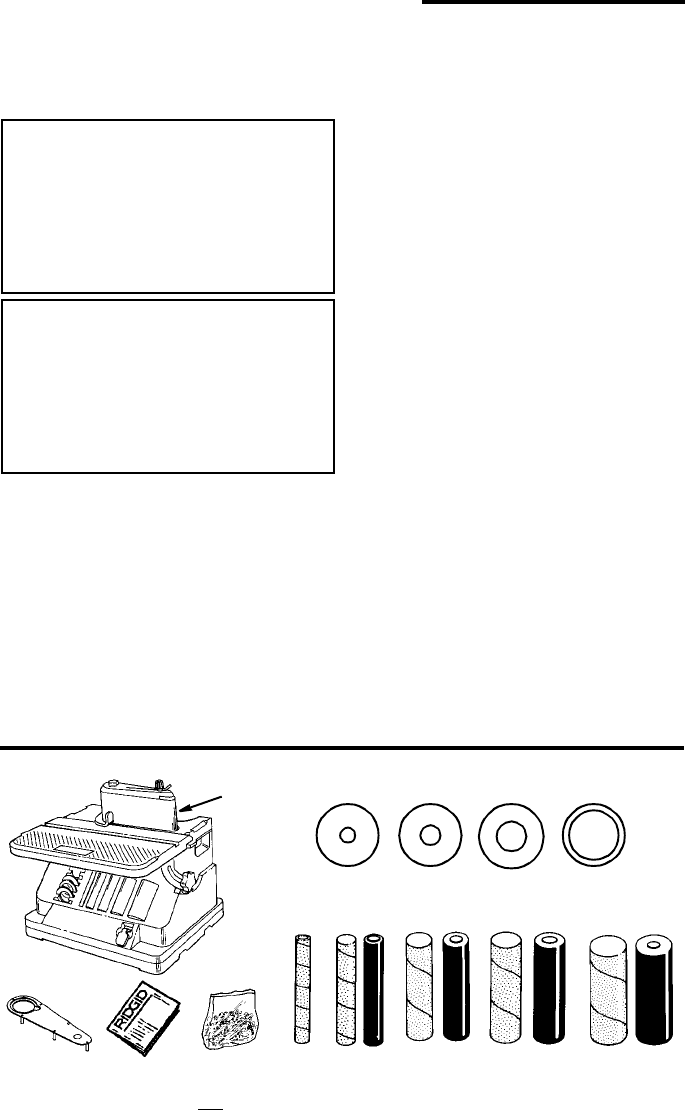
Unpacking and Checking Contents
1. Remove tool from carton by lifting unit.
2. Place the tool on a secure, stationary
work surface and look the tool over
carefully.
WARNING: For your own safety,
never connect plug to power
source outlet, or insert switch
key until all assembly steps are
complete and until you have read
and understood the entire own-
ers manual.
WARNING: To reduce the risk of
injury, if any parts are missing,
do not attempt to assemble the
sander, plug in the power cord,
or turn the switch on until the
missing parts are obtained and
installed correctly.
List of Loose Parts
NOTE: Before beginning assembly, check
that all parts are included. If you are miss-
ing any part, do not assemble the sander.
Call 1-866-539-1710 or E-mail us at
info@ridgidwoodworking.com if any parts
are damaged or missing. Sometimes
small parts can get lost in packaging
material. Do not throw away any packag-
ing until sander is put together. Check
packaging for missing parts before con-
tacting RIDGID.
Item Description Qty.
A Oscillating Edge Belt/
Spindle Sander................................ 1
B Spacer Ring Inserts
1/2" I.D. ........................................... 1
1" I.D. .............................................. 1
1-1/2" I.D. ........................................ 1
2" I.D. .............................................. 1
CDrums
3/4" x 4-1/2"..................................... 1
1" x 4-1/2"........................................ 1
1-1/2" x 4-1/2" ................................. 1
2" x 4-1/2"........................................ 1
D Sandpaper Sleeves
1/2" x 4-1/2"..................................... 1
3/4" x 4-1/2"..................................... 1
1" x 4-1/2"........................................ 1
1-1/2" x 4-1/2" ................................. 1
2" x 4-1/2"........................................ 1
E Sanding Belt (Installed)
4" x 24"............................................ 1
F Insert ............................................... 1
G Operators Manual ........................... 1
H Bag of Loose Parts
Containing the following parts:
Rubber feet ........................................ 4
Washer, Flat 21/64 x 1-3/4 x 1/8 ........ 1
Washer, Flat 21/64 x 7/8 x 3/64 ......... 1
Washer, Flat 21/64 x 5/8 x 1/32 ......... 1
Switch Key ......................................... 1
Hex “L” Wrench 3/32 .......................... 1
Hex “L” Wrench 5/32 .......................... 1
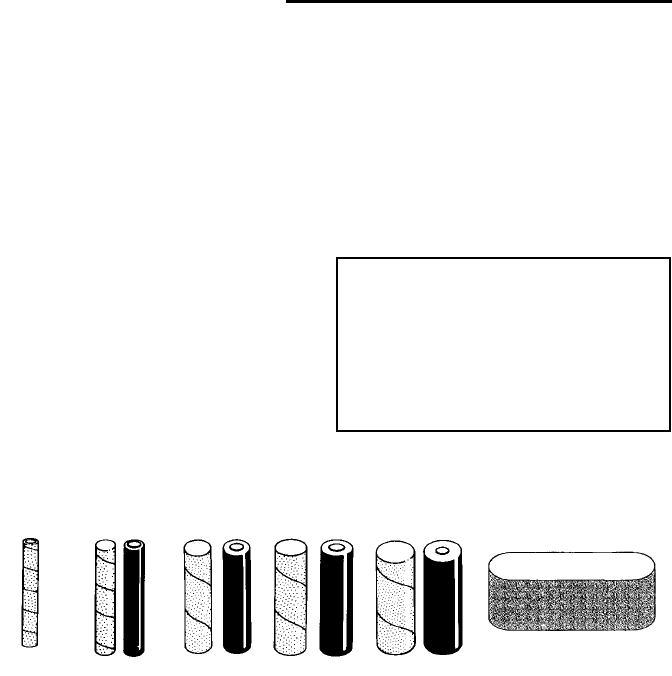
Loose Parts
NOTE: The sander is shipped with the 4" x 24" sanding belt attached.
NOTE: Parts shown are not actual size.
A
1/2"
ESpacer Ring Inserts
1" 1-1/2" 2"
B
Drums and Sandpaper Sleeves
1/2" 3/4" 1" 1-1/2"2"
CD
GH
F
12
Assembly
NOTE: The sander is preassembled
except for the attachment of the rubber
feet.
Mounting Rubber Feet To Base
Place the sander directly on the table sur-
face.
1. From the parts bag locate the four rub-
ber feet.
2. Place the sander on its side so the bot-
tom of the base is facing toward the
front.
3. Locate the four holes in each corner of
the base and place one of the rubber
feet in each of these holes.
4. Position sander in the upright position
and apply pressure in the downward
position to ensure the feet are inserted
securely.
CAUTION: To reduce the risk of
injury from tool movement, the
supporting surface where sander
is mounted should be examined
carefully after mounting to insure
no movement during use can
result. If any tipping or walking is
noticed, secure to workbench or
supporting surface before oper-
ating sander.
Parts Storage
On board storage has been provided for
all washers, spacers, drums, sleeves and
hex “L” wrenches. All front loaded parts
can be protected from incidental dislodg-
ing by lowering the table all the way down
until it rests against the base and tighten-
ing the knob.
Storage for the sanding belt assembly and
table insert is provided in the pocket on
the rear of the base.
Rubber Feet
13
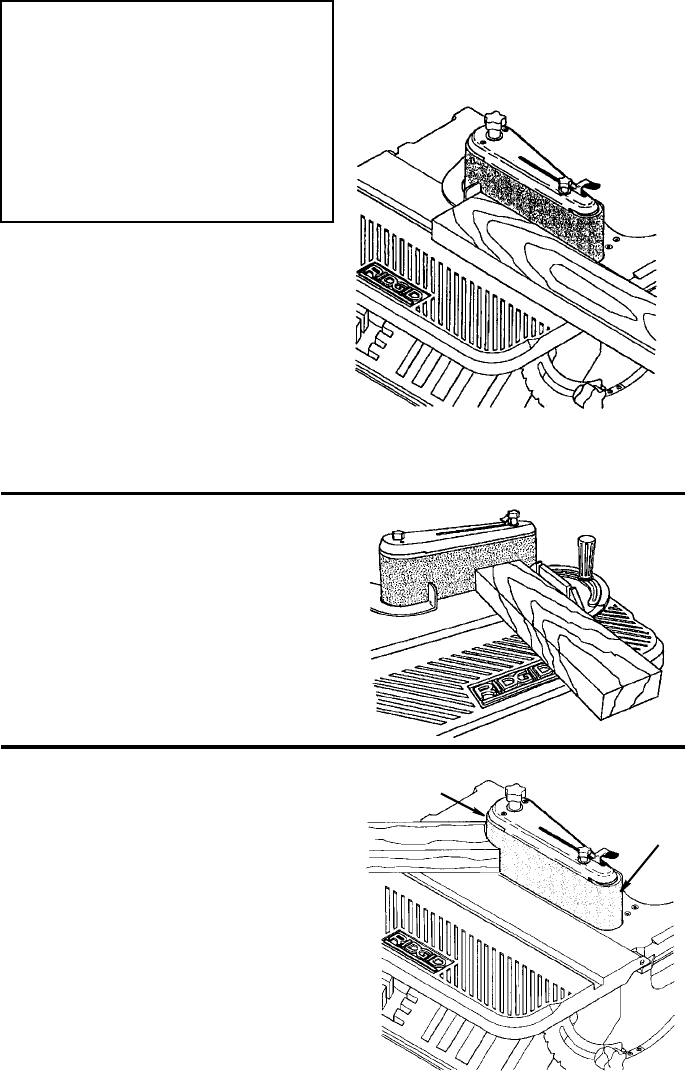
Removing the Sanding Belt
Assembly
WARNING: To reduce the risk of
injury from accidental start, make
sure tool is unplugged before
removing the sanding belt
assembly.
1. Loosen the backstop knob and pivot
the backstop out of the way. Tighten the
backstop knob.
2. Remove the spindle knob and lift off the
sanding belt assembly. NOTE: Knob
turns clockwise to loosen.
3. Store assembly in pocket in rear of
base.
Installing the Sanding Belt
Assembly
1. Remove the fan and clean sawdust
from inside table recess.
2. Slide the fan onto the motor shaft
(vanes face down) aligning slot with roll
pin as shown. The fan is used in all
sanding operations.
3. Slide bed assembly down motor shaft.
Align drive drum splines with the slots
in the fan. Place bed assembly into the
wear plate opening as shown.
4. Tighten spindle knob. Do not over-
tighten. NOTE: Knob turns counter-
clockwise to tighten.
5. Install sanding belt (see “Removing/
Installing the Sanding Belt”, page 19).
6. Plug the power cord into the power
source and install the key.
Sanding Belt
Assembly
Backstop
Knob
Spindle
Knob
Wear
Plate
Fan
Motor
Slot
Roll Pin
Shaft
Fan
Slots
Splines
14
Assembly (continued)
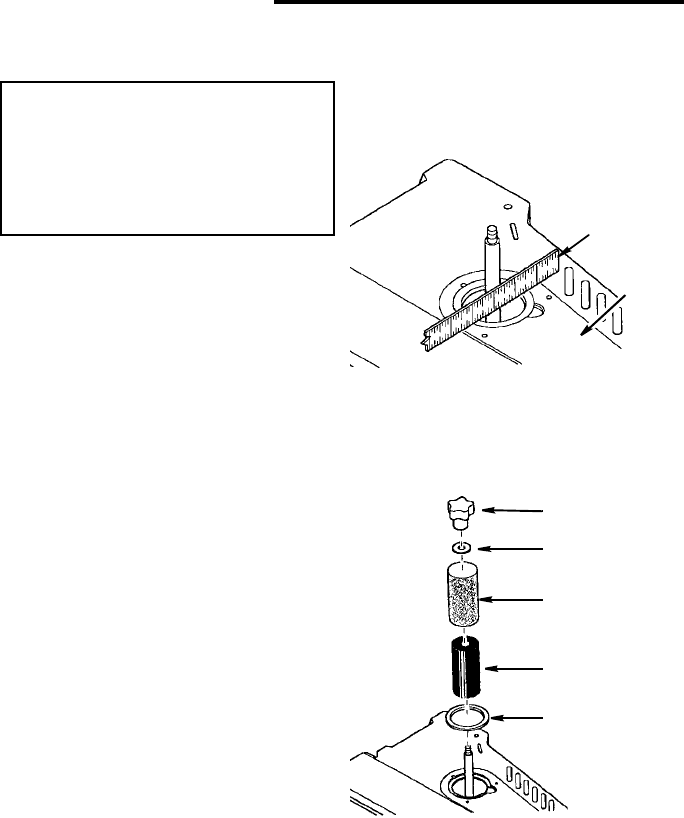
Installing Sanding Sleeves Larger
than 1/2" Diameter
WARNING: To reduce the risk of
injury from accidental starting,
always turn switch “OFF” and
remove switch key before remov-
ing or replacing the spacer ring
inserts, sleeves and drums.
1. Remove the fan and clean sawdust
from inside table recess.
2. Slide the fan onto the motor shaft
(vanes face down) aligning slot with roll
pin. The fan is used with all drums and
sleeves.
3. Install the table insert.
4. Use a straight edge as shown to make
sure the table insert is flush with the
table.
If necessary adjust the set screws in
the table insert with the 3/32 hex “L”
wrench provided.
5. Slide the sanding sleeve-rubber drum
onto the spindle. NOTE: If the drum is
difficult to slide over the spindle, apply
talcum powder to the spindle.
6. Position spacer ring insert in the table
recess. (See recommended spacer ring
insert selection area from table on page
15). Use the smallest spacer ring insert
that will fit over the drum.
7. Place desired sanding sleeve on cor-
rect drum. NOTE: If the sanding sleeve
is difficult to slide over the drum, apply
talcum powder to the outside surface of
the rubber drum.
8. Install the correct upper spindle washer
and tighten the knob. Do not over-
tighten. NOTE: Knob turns counter-
clockwise to tighten.
9. Plug power cord in the power source
and install the yellow switch key.
Knob
Washer
Sanding Sleeve
Sanding Drum
Spacer Ring
Insert
Straightedge
Table
Insert
15
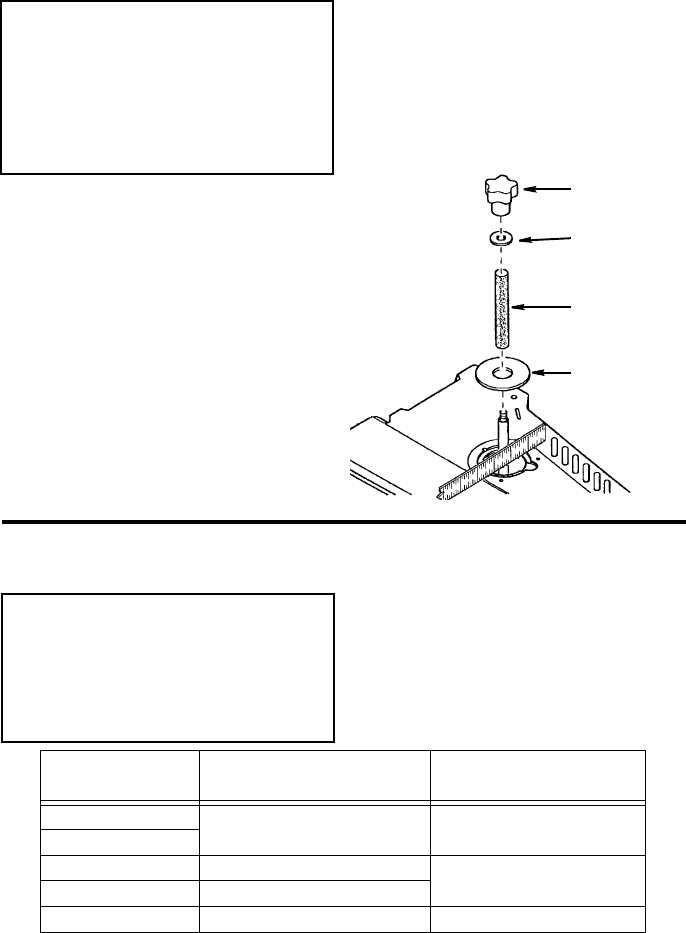
Installing Sanding Sleeves for the
1/2" Diameter Sanding Drum
WARNING: To reduce the risk of
injury from accidental starting,
always turn switch “OFF”,
unplug the sander and remove
switch key before removing or
replacing the spacer ring inserts,
sleeves and drums.
1. Remove the fan and clean sawdust
from inside table recess.
2. Slide the fan onto the motor shaft
(vanes face down) aligning slot with roll
pin. The fan is used with all sanding
operations.
3. Install the table insert.
4. Use a straight edge as shown to make
sure the table insert is flush with the
table
If necessary adjust the set screws in
the table insert with the 3/32 hex “L”
wrench provided.
5. Position 15/16" inside diameter spacer
ring insert in the table recess.
6. Locate 1/2" sanding sleeve and slide it
on the spindle. (Rubber drum is not
used.)
7. Install the upper spindle washer and
tighten the knob. Do not overtighten.
NOTE: Knob turns counterclockwise to
tighten.
8. Plug the power cord in the power
source and install the yellow switch key.
Selection Of Spacer Ring Inserts
And Upper Spindle Washers
WARNING: Using the wrong
spacer ring insert may permit
small pieces of wood or finger
tips to become wedged between
the abrasive surface and the
insert.
• Use the smallest spacer ring insert that
will fit over the drum.
• Use the largest upper spindle washer
that will not protrude past sanding
sleeve.
Knob
5/8" O.D.
1/2" Sanding
15/16" I.D.
Sleeve
Spacer Ring
Washer
Sanding Sleeve
Diameter
Spacer Ring Insert
Opening Inside Diameter Upper Spindle Washer
Outside Diameter
1/2 Inch 15/16 Inch 5/8"
3/4 Inch
1 Inch 1-3/16 Inch 7/8"
1-1/2 Inch 1-11/16 Inch
2 Inch 2-3/16 Inch 1-3/4"
16
Assembly (continued)
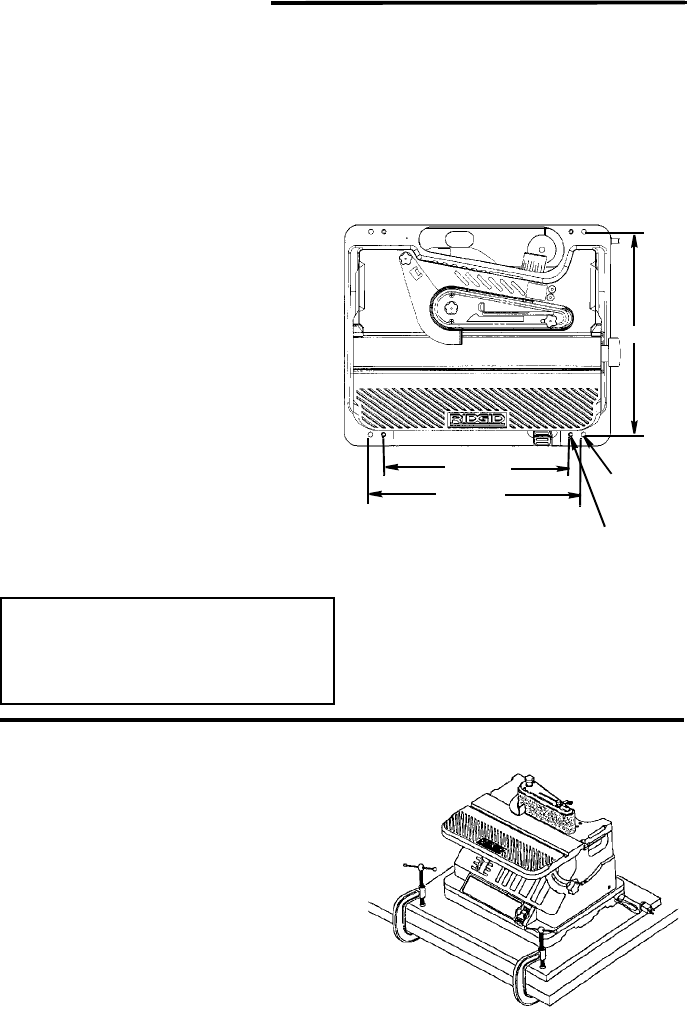
Bolting Oscillating Edge Belt/
Spindle Sander To Workbench
If sander is to be used in a permanent
location, it should be fastened securely to
a firm supporting surface such as a work-
bench, with either bolts or drywall screws.
Fastening with bolts
1. Use 1/4" bolts, washers, and nuts (not
included). The bolt length should be
1-1/2" plus the thickness of the work-
bench.
2. Locate and mark the holes where the
sander is to be mounted.
3. Drill (4) 3/8" diameter holes through
workbench.
4. Place sander on workbench, aligning
holes in base with holes drilled in work-
bench.
5. Insert (4) 1/4" diameter bolts and wash-
ers and attach nuts securely.
Fastening with screws
Drive (4) 2-1/2" long screws through the
holes in the base and through the work-
bench. Do not overtighten the screws.
CAUTION: To reduce the risk of
injury from tool movement, use
either 1/4" diameter screws and
nuts or 2-1/2" long screws.
Clamping Oscillating Edge Belt/Spin-
dle Sander To Workbench
An alternative method of mounting is to
fasten the sander to a mounting board.
The board should be sufficient size to
avoid tipping while in use. Any good
grade of plywood or chipboard with a 3/4"
thickness is recommended. (Thinner chip-
board can break.)
NOTE: For proper stability, holes must be
countersunk so screw heads are flush
with the surface of supporting board.
15-3/8"
14-1/4"
16-1/4" 1/4 Dia. Bolt
Holes
Screws Holes
17
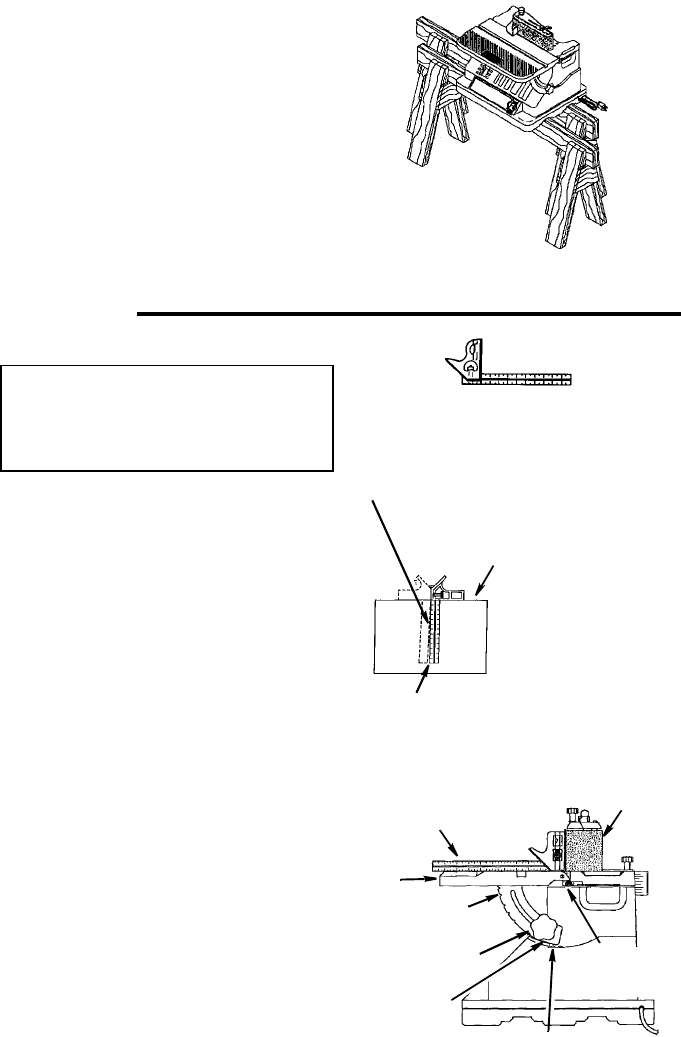
Supporting Oscillating Edge Belt/
Spindle Sander to Sawhorses
The sander has provisions for being sup-
ported by sawhorses. The sawhorse can
be built with the crosspiece either vertical
or horizontal. Make sure the sawhorses
are secure.
Alignment
Squaring Front Table
WARNING: To reduce the risk of
injury from accidental start, make
sure tool is unplugged before
aligning.
Tools Needed
1. Use a combination square to check the
angle of the front table with the sanding
belt. (NOTE: Combination square is not
supplied.)
2. If the front table is not 90° to the sand-
ing belt:
a. Use the hex wrench provided and
“back out” both #10 set screws
located on each side of the table.
b. Loosen the front table lock knob and
adjust the front table 90° to the sand-
ing belt.
c. Tighten the front table lock knob.
d. Adjust both set screws to contact the
front table.
3. Adjust detent if necessary
a. Loosen the two pan head screws
that secure the detent.
b. Adjust detent so that it engages the
notches in the bracket table lock.
c. Tighten the two pan head screws.
Combination Square Must be True
Draw Light Line on
Board Along This Edge
Should be no Gap or Overlap when Square
is Flipped Over in Dotted Position
Combination
Square
Pan Head
Lock Knob
Screws
Straight Edge of Board
3/4" Thick, This Edge Must
Be Perfectly Straight
Detent
Combination Square
#10 Set
Screw
Table
Bracket
Table Lock
Front
Table
Sanding
Belt
18
Alignment (continued)
Aligning Belt To Miter Gauge Slot
The sanding belt is installed at the factory;
however, check and make sure the belt is
parallel to the miter gauge groove:
1. Use a combination square to check the
distance from the miter gauge groove
to the belt assembly as shown.
2. If adjustment is required, use a 5/32
inch hex “L” wrench provided with unit
to loosen the two flat head socket
recess screws on the table.
3. Adjust the bed assembly as needed to
make it parallel or same distance to the
miter gauge slot.
4. Tighten two screws.
Adjust Bed Socket Recess
Screws
Assembly
Parallel to
Miter Gauge
Slot
19
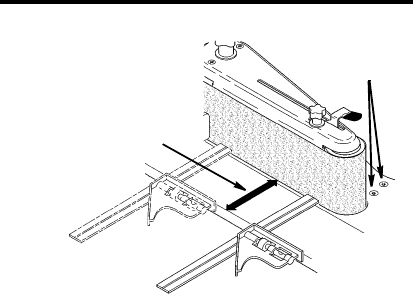
Removing/Installing the Sanding
Belt
Tensioning and Tracking
WARNING: To reduce the risk of
injury from accidental start, make
sure tool is unplugged before
removing or installing sanding
belt.
Some sanding belts have a “directional
arrow” on the inside or smooth side. If
there is an arrow, the belt must run in the
direction of the arrow so the splice will not
come apart. If there is no arrow the belt
may be put on either direction.
1. Slide the tension lever to the left to
release the belt tension.
2. Remove the sanding belt.
3. Place the replacement sanding belt
over the drums as shown. Make sure
the belt is centered on both drums.
4. Slide the tension lever to the right to
apply belt tension.
5. Plug in the power cord. Insert the yel-
low switch key and turn the unit “ON”
and immediately “OFF”, noting if the
belt tends to slide off the drums. If it did
not tend to slide off, it is tracking prop-
erly.
6. If the sanding belt runs down towards
the table, turn the tracking knob clock-
wise 1/4 turn.
7. If the sanding belt, runs up away from
the table, turn the tracking knob coun-
terclockwise 1/4 turn.
8. Turn switch “ON” and immediately
“OFF” again, noting belt movement.
Readjust tracking knob if necessary.
Clockwise
Belt
Tracking
Tensioning
Lever
(Moves Belt Up)
Counterclockwise
(Moves Belt
Down)
20
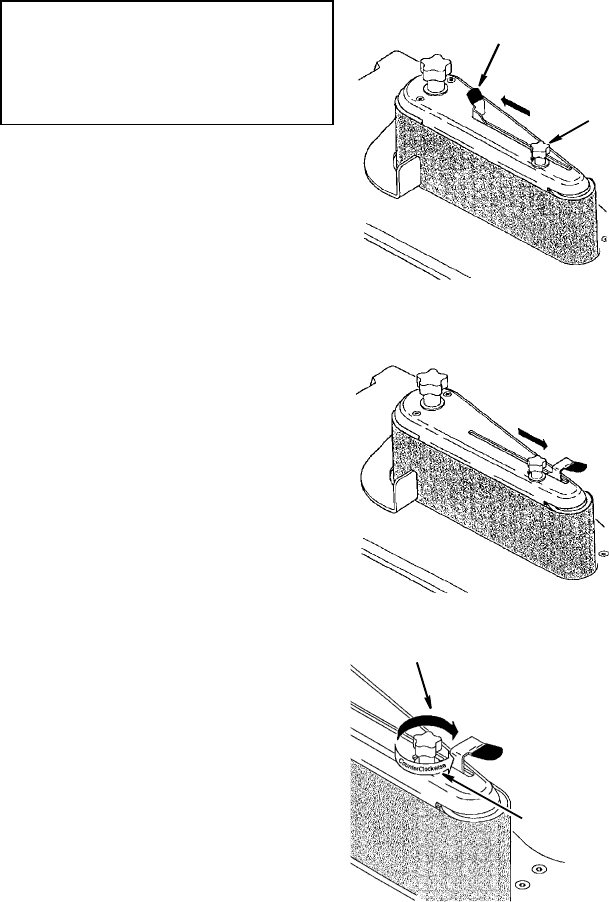
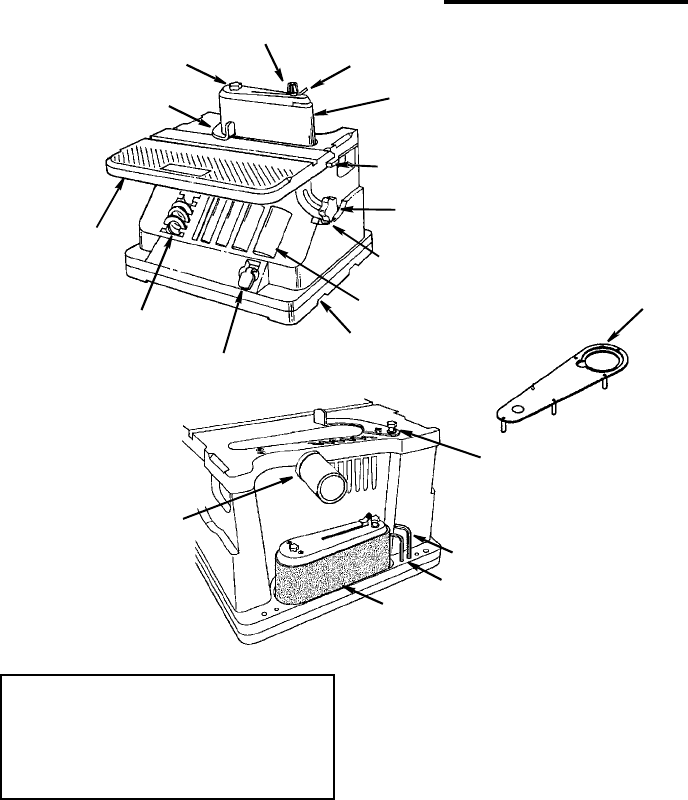
Getting to Know Your Spindle Sander
WARNING: To reduce the risk of
injury from accidental start, turn
switch “OFF” and remove plug
from power source outlet before
making any adjustments.
1. Sanding Belt. Removes material from
wood. Oscillates (3/4") up and down to
sand faster and prevents burning of
the workpiece.
2. Belt Tension Lever. Slide lever left to
release the sanding belt tension; slide
right to apply belt tension.
3. Tracking Knob. Turning knob coun-
terclockwise causes sanding belt to
move towards the table; turning knob
clockwise causes sanding belt to
move away from the table.
4. Spindle Knob. Loosen knob to
remove sanding belt assembly (or
sanding drum) and change to spindle
sanding (or belt sanding). NOTE:
Knob has left hand threads. Turn knob
clockwise to loosen and counterclock-
wise to tighten.
5. Backstop. Supports the workpiece on
the sanding belt.
6. Front Table. Supports the workpiece.
Can also be tilted for bevel sanding.
7. Spacer Ring. Fits around drum to
help support workpiece.
8. Sanding Sleeve/Drum. Removes
material from wood. Oscillates up and
down to sand faster and prevents
burning the workpiece.
9. Table Lock Knob. Loosening knob
allows the front table to be tilted for
bevel sanding.
1 Sanding Belt
2 Belt Tension Lever
4 Spindle Knob
6 Front Table
11 Backstop Knob
5 Backstop
3 Tracking Knob
8 Sanding Drum(s)/
9 Front Table
10 On-Off Switch
Lock Knob
Sleeves(s)
Slots for
“Saw Horse”
Mounting
12 Dust Collection
13 Table Insert/
Port
7 Spacer Rings
14 3/32 Hex “L” Wrench
Detent
Sanding Belt
Storage
15 Table Insert
5/32 Hex “L” Wrench
Table Adjustment Screws
(Left and Right Side)
21
10. On-Off Switch
11. Backstop Knob. Loosening knob
allows backstop to be pivoted.
12. Dust Collection Port. 2-1/2" opening
for wet/dry vac hook-up.
13. Table Insert/Sanding Belt Storage.
Holds table insert or sanding belt
when not being used.
14. Hex “L” Wrench. Use 3/32" wrench
to adjust front table and table insert.
Use 5/32" wrench to adjust belt to
miter gauge slot.
15. Table Insert. Helps to support work-
piece when drum sanding.
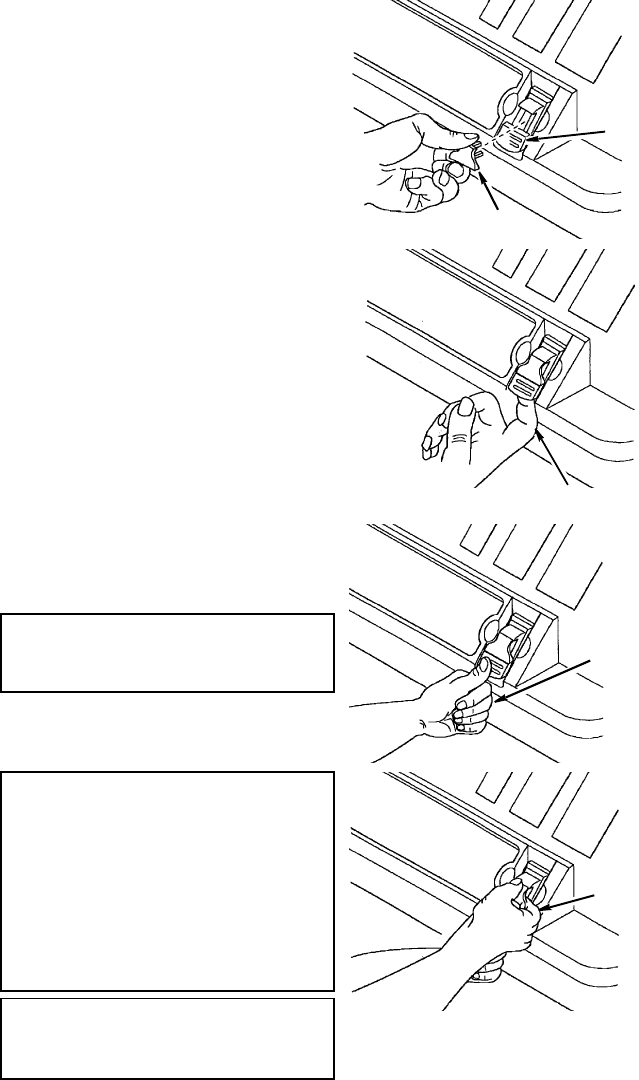
On-Off Switch
The On-Off switch has a locking feature.
This Feature Is Intended To Help Pre-
vent Unauthorized And Possible Haz-
ardous Use By Children And Others.
1. To turn sander “ON” insert key into
switch.
NOTE: Key is made of yellow plastic,
located in loose parts bag.
2. Insert finger under switch lever and
Pull end of switch out.
3. To turn sander “OFF”. Push lever in.
WARNING: Never leave the
sander unattended until it has
come to a complete stop.
4. To lock switch in “OFF” position, hold
switch “IN” with one hand. Remove key
with other hand.
WARNING: For your own safety,
always lock the switch “OFF”
when sander is not in use.
Remove key and keep it in a safe
place. Also, in the event of a
power failure (all of your lights
go out) turn switch off, remove
the key and store it remote from
sander.
CAUTION: Before turning switch
on, make sure the belt or drum
and sleeve are properly installed.
Yellow
Switch Key
On-Off
Switch
Turning
Sander On
Turning
Sander Off
Remove
Yellow Key

22
Safety Instructions for Oscillating Edge Belt/Spindle Sander
Before Using The Sander
WARNING: To reduce the risk of
mistakes that could cause seri-
ous, permanent injury, do not
plug the sander in until the fol-
lowing steps are completed.
• Assembly. (See pages 12-19)
• Learn the use and function of the
ON-OFF switch. (See page 21)
• Review and understanding of all
safety instructions and operating
procedures in this manual.
• Review of the maintenance meth-
ods for this sander. (See page 29)
When Installing Or Moving The Sander
Avoid dangerous environment.
Use the sander in a dry, indoor place
protected from rain. Keep work area
well lighted.
To reduce the risk of burns or other
fire damage, never use the sander
near flammable liquids, vapors or
gasses.
To reduce the risk of injury or
death from electrical shock:
• Ground the sander. This sander has
an approved 3-conductor cord and a
3-prong grounding type plug. Use
only 3-wire, grounded outlets rated
120 volts, 15 amperes (amps). The
green conductor in the cord is the
grounding wire. To reduce the risk of
electrocution, Never connect the
green wire to a live terminal.
• Make sure your fingers do not touch
the plug’s metal prongs when plug-
ging or unplugging the sander.
• Never use this or any power sander
for wet sanding. Doing so could
cause electrocution, serious injury
or worse.
To reduce the risk of injury from
unexpected sander movement:
• Always unplug the sander before
moving it.
• Put the sander on a firm level sur-
face where there is plenty of room
for handling and properly supporting
the workpiece.
• Attach rubber feet.
• Support the sander so it does not
rock.
• Bolt the sander to its work surface.
Use the fasteners and method
shown in “Assembly.” (page 16)
•Never stand on tool. Serious injury
could occur if the tool tips. Do not
store anything above or near the
tool where anyone might stand on
the tool to reach them.
Before Each Use
Inspect your sander. Check for:
• alignment of moving parts,
• binding of moving parts,
• broken or damaged parts,
• work parts that cause a gap larger
than 1/16" between work support
and sanding surface,
• sanding belt narrower than 4 inches.
Narrower belts uncover parts that
could trap your fingers,
• worn or damaged electric cords,
• stable mounting, and
• any other conditions that may affect
the way the sander works.
• Remove adjusting keys and
wrenches. Form a habit of checking
for and removing keys and adjusting
wrenches from table top before turn-
ing sander on.

23
If any part is missing, bent, or broken
in any way, or any electrical parts
don’t work properly, turn the sander
off and unplug the sander. Replace
damaged, missing, or failed parts
before using the sander again.
Disconnect the sander to reduce
the risk of injury from accidental start-
ing. Turn switch off, unplug sander
and remove the switch key before
changing the setup or sanding drum.
Maintain tools with care. Keep the
sander clean for maximum and safest
performance.
To reduce the risk of injury from
jams, slips or thrown pieces:
•Use only recommended accesso-
ries.
•Use the correct spacer ring
insert. The opening between the
sanding sleeve and insert must be
5/32 of an inch or less. (See page
15)
•All sanding drums, washers and
knobs are tight. No parts should
have excessive play prior to operat-
ing unit.
•Keep work area clean. Cluttered
work surfaces invite accidents. Floor
must be clean and dry for stable
footing.
Plan Ahead To Protect Your Eyes, Hands, Face and Ears
Dress for Safety
• Any power sander can throw foreign
objects into the eyes. This can result
in permanent eye damage. Always
wear safety goggles, not glasses
complying with ANSI Z87.1 (or in
Canada CSA Z94.3-99) shown on
package. Everyday eyeglasses
have only impact resistant lenses.
They are not safety glasses. Safety
goggles are available at many local
retail stores. Glasses or goggles not
in compliance with ANSI or CSA
could seriously hurt you when they
break.
• For dusty operations, wear a dust
mask along with safety goggles.
• Wear nonslip footwear.
• Tie back long hair.
• Roll long sleeves above the elbow.
• Noise levels vary widely. To reduce
the risk of possible hearing damage,
wear ear plugs or muffs when using
sander for hours at a time.
• Sanding operations are usually
dusty. Wear a dust mask along with
the safety goggles.
• Do not wear loose clothing, gloves,
neckties or jewelry (rings, wrist
watches). They can get caught and
draw you into moving parts.
Know your sander. Read and under-
stand the owner’s manual and labels
affixed to the tool. Learn its applica-
tion and limitations as well as the spe-
cific potential hazards.
Plan your work. Think through how
you will hold and maneuver the work-
piece against the sanding drum or
belt.
Use the right tool. Don’t force tool or
attachment to do a job it was not
designed to do.
To reduce the risk of injury from
accidental contact with moving
parts:
• Do not layout, assemble, or setup
work on the sander while any parts
are moving.
•Reduce the risk of accidental
starting. Make sure switch is “OFF”
before plugging sander into a power
outlet.

24
Safety Instructions for Oscillating Edge Belt/ Spindle
Sander (continued)
Inspect your workpiece make sure
there are no nails or foreign objects in
the part of the workpiece to be
sanded.
Plan the way you will hold the
workpiece from start to finish.
Reduce the risk of awkward opera-
tions and hand positions where a
sudden slip could cause finger or
hand to move into a sanding surface.
Don’t overreach. Maintain balance
and footing.
Keep face and body to one side.
Stay out of line with a possible throw-
back.
Plan your work to reduce the risk of
THROWBACKS - when the work-
piece catches the sanding drum and
is torn from your hands:
• Make sure there’s no debris
between the workpiece and its sup-
ports.
• When sanding irregularly shaped
workpieces, plan your work support
so it will not slip and be pulled from
your hands.
• Use extra caution with large, very
small or awkward workpieces.
• Never use this tool to finish pieces
too small to hold by hand.
• Use extra supports (tables, saw
horses, blocks, etc.) for any work-
pieces large enough to tip when not
secured to the work surface.
•Never use another person as a sub-
stitute for a table extension, or as
additional support for a workpiece
that is longer or wider that the basic
sander table, or to help feed, sup-
port or pull the workpiece.
• Sand only one workpiece at a time.
• Clear everything except the work-
piece and related support devices
off the table before turning the
sander on.
• Always feed workpiece from left to
right against the direction the drum
sleeve is rotating.
• Do not use drums, sanding sleeves
or belts which show visual signs of
wear such as grooves, tears or rips.
WARNING: Don’t let familiarity
(gained from frequent use of
your sander) cause a careless
mistake. A careless fraction of a
second is enough to cause a
severe injury.
When Sander is Running
Before starting your work, watch the
sander while it runs. If it makes an
unfamiliar noise or vibrates exces-
sively, Stop Immediately. Turn the
sander off. Unplug the sander. Do not
restart until identifying and correcting
the problem.
Never leave tool running unat-
tended.
Before using the sander, make sure
the sanding belt turns clockwise,
when viewed from above.
Keep children away. Keep all visi-
tors a safe distance from the sander
and workpiece.
Don’t force tool. It will perform better
and safer at its designed rate. Press
workpiece against the sanding sleeve
or belt hard enough to begin sanding
without bogging down or binding spin-
dle.

25
Before freeing any jammed mate-
rial:
• Turn switch “OFF”.
• Unplug the sander.
• Wait for all moving parts to stop.
Before Leaving The Sander
Turn switch off. Don’t leave tool until
the unit comes to a complete stop.
Make workshop child-proof.
Remove the yellow switch key. Store
it away from children and others not
qualified to use the tool. Disconnect
master switches. Lock the shop.
Precautions To Take When Sanding Metals
When sanding metals, sparks or hot
fragments could cause a fire. To
reduce the risk of this:
1. Disconnect any dust collecting hose
from the sander.
2. Remove all traces of wood dust from
inside the unit before sanding metals.
3.Remove all traces of metal dust from
inside the unit before sanding wood
again.
Precautions To Take When Sanding Paint
Sanding of lead based paint is not rec-
ommended. It is difficult to control the
contaminated dust that could cause lead
poisoning.
It is also difficult to identify whether or not
a paint contains lead. Therefore, we rec-
ommend the following precautions when
sanding all paints:
1. Protect your lungs. Wear a dust mask
or respirator at all times. Wear only
dust masks that are suitable for working
in lead paint sanding environments.
Ordinary painting masks do not offer
this protection.
2. Do not allow children or pregnant
women to enter the work area until
paint sanding job is complete and work
area is clean.
3. To prevent ingesting contaminated
paint particles: Do not eat, drink, or
smoke in a work area where paint is
being sanded. After sanding paint,
wash and clean up before eating, drink-
ing or smoking. Do not leave food,
drinks, or tobacco products in the work
area where dust can settle on them.
4.Protect the environment when sanding
paint. Use a dust collection system if
possible. Seal the work area with plas-
tic if necessary. Do not track paint dust
outside the work area.
5.Thoroughly clean the work area upon
completion of paint sanding project. If
project lasts for an extended period of
time, clean work area often. Items such
as sanding dust, vacuum filter bags,
plastic drop cloths, etc. should be
placed in a sealed container and dis-
posed of properly. Clean all items
exposed to sanding dust.
26
Basic Sanding Operation
Sandpaper Selection
Selecting the correct size diameter, cor-
rect size grit, and correct type sandpaper
is an extremely important step in achiev-
ing a high quality sanded finish. Aluminum
oxide, silicon carbide, and other synthetic
abrasives are best for power sanding.
Natural abrasives, such as flint and gar-
net, are too soft for economical use in
power sanding.
In general, coarse grit will remove the
most material and finer grit will produce
the best finish in all sanding operations.
The condition of the surface to be sanded
will determine which grit will do the job. If
the surface is rough, start with a coarse
grit and sand until the surface is uniform.
Medium grit may then be used to remove
scratches left by the coarser grit and finer
grit used for finishing of the surface.
Always continue sanding with each grit
until surface is uniform.
NOTE: Do Not use sander without sand-
paper. Doing so will damage the rubber
drum.
Select and install the desired sanding
sleeve for your particular application.
Sanding sleeves from 1/2" to 2" can be
used with this sander. Choose one that is
close in size to the workpiece you are
sanding. Also install the appropriate
spacer ring insert (page 15).
WARNING: Failure to use the cor-
rect size spacer ring insert with
its matching sanding sleeve
could result in fingers being
pinched or the workpiece being
pulled down between the spacer
ring insert and sanding sleeve.
NOTE: The correct size sanding belt is 4"
x 24". These belts are available in coarse,
medium and fine grits.
4" x 24" Sanding Belt
1/2" 3/4" 1" 1-1/2" 2"
27
Surface Sanding on the Sanding
Belt
WARNING: To reduce the risk of
injury from slips, jams or thrown
pieces, adjust the backstop to
clear the sanding surface by no
more than 1/16 of an inch. When
checking clearance between the
sanding belt and backstop, press
the sanding belt flat against the
metal bed beneath it.
Hold the workpiece firmly with both
hands, keeping fingers away from the
sanding belt.
Keep the end butted against the backstop
and move the work evenly across the
sanding belt. Use caution when sanding
very thin pieces.
For sanding long pieces the backstop can
be rotated out of the way.
Apply only enough pressure to allow the
sanding belt to remove material.
End Sanding on the Sanding Belt
Move the work evenly across the sanding
belt. For accuracy, use a miter gauge
accessory (not included).
Sanding Curved Edges
Inside curves are best sanded with the
sander assembled in the spindle mode.
However, inside curves larger than 1-1/2"
may be sanded on the drive drum when in
the belt sander mode.
Although it is possible to lightly sand on
the idler drum end of the belt sanding
assembly, it is not recommended. The
idler drum is an integral part of the belt
tracking mechanism. It is spring loaded to
maintain proper tension. Use of the idler
drum to sand curves may cause belt to
track improperly.
Drive Drum
Idler
Drum
28
Basic Sanding Operation (continued)
Feed Direction
WARNING: To prevent thrown
workpiece, feed workpiece
against sanding sleeve from left
to right as shown.
The sanding sleeve rotates clockwise.
Feed the workpiece against the sanding
sleeve from left to right as shown. When
fed from left to right, the rotation of the
sanding sleeve sands against the work-
piece. If fed in the opposite direction, the
rotation forces of the spinning sanding
sleeve will tend to throw or bounce the
workpiece away from the sanding sleeve.
This could cause loss of control of work-
piece or injury.
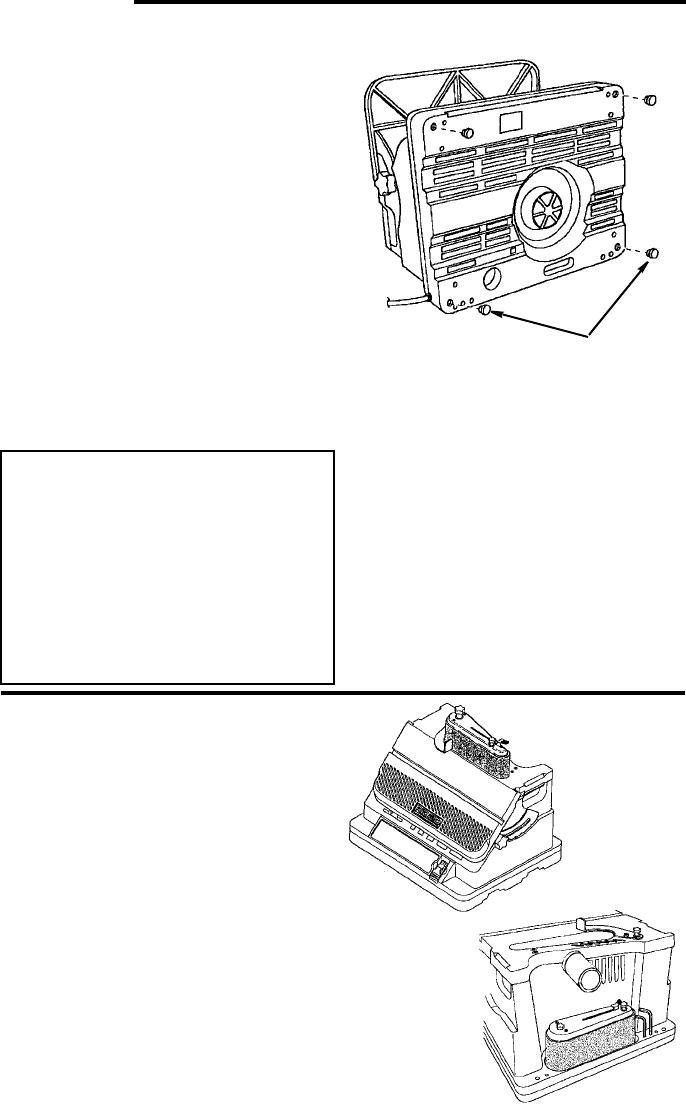
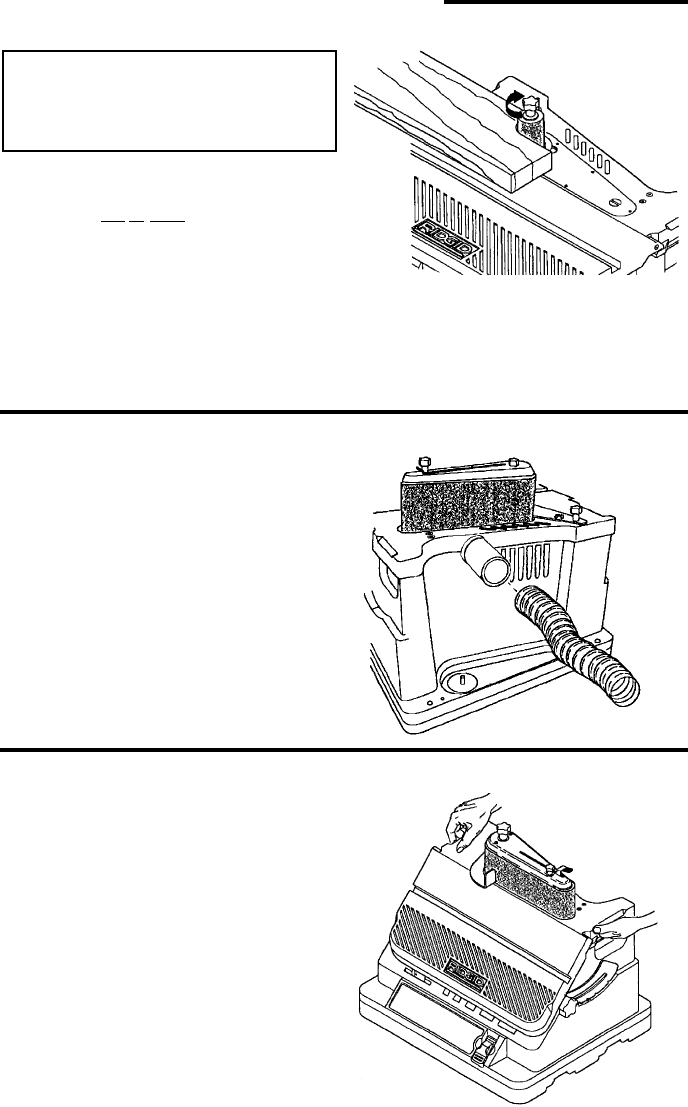
Dust Collection Capability
A standard 2-1/2" dust exhaust port has
been provided to make dustless sanding
possible. It is on the rear of your sander
as shown. The pickup adapter end of a
vacuum hose fits inside the dust exhaust
port with a wedge fit.
Even with a dust collection system, it is
necessary to periodically clean sanding
dust from the recess in the table. Sawdust
buildup in the table recess may prevent
the belt or spindle from making a com-
plete oscillation, which may cause prema-
ture wear.
Transporting Sander
When using your sander in a portable
application, it is acceptable to lift and
carry sander by the table top by the carry
handles. Be careful when transporting to
reduce the risk of dislodging accessories,
spacer ring inserts, wrench, and upper
spindle washers from their respective
storage areas.
29
Maintenance
WARNING: For your own safety,
turn switch “OFF” and remove
plug from power source outlet
before adjusting or maintaining
your sander.
WARNING: To reduce the risk of
electrocution or fire, any repairs
to electrical systems should be
done only by qualified service
technicians. Unit must be reas-
sembled exactly to factory speci-
fications.
If power cord is worn or cut, or damaged
in anyway, have it replaced immediately.
Frequently blow out or vacuum out any
dust that may accumulate inside the
motor.
Lubrication
All bearings in tool are self-lubricating.
They require no further lubrication.
RIDGID
Recommends the Following Accessories
WARNING: Use only accesso-
ries recommended for this
sander. Using other accessories
may be dangerous.
Item SKU No.
Miter Gauge................................. AC1021
Switch Key................................... AC1000
Universal Legset.......................... AC9910
Replacement Sanding
Sleeves, 2 pk................. See Chart Below
Do not use any accessory unless you
have received and read complete instruc-
tions for its use.
NOTE: 4" x 24" Replacement sanding
belts are available at you local Home
Depot Store.
Wiring Diagram
Size Grit SKU No. Size Grit SKU No.
1/2" Fine
Medium
Coarse
AC7001
AC7002
AC7003
1-1/2" Fine
Medium
Coarse
AC7010
AC7011
AC7012
3/4" Fine
Medium
Coarse
AC7004
AC7005
AC7006
2" Fine
Medium
Coarse
AC7013
AC7014
AC7015
1" Fine
Medium
Coarse
AC7007
AC7008
AC7009
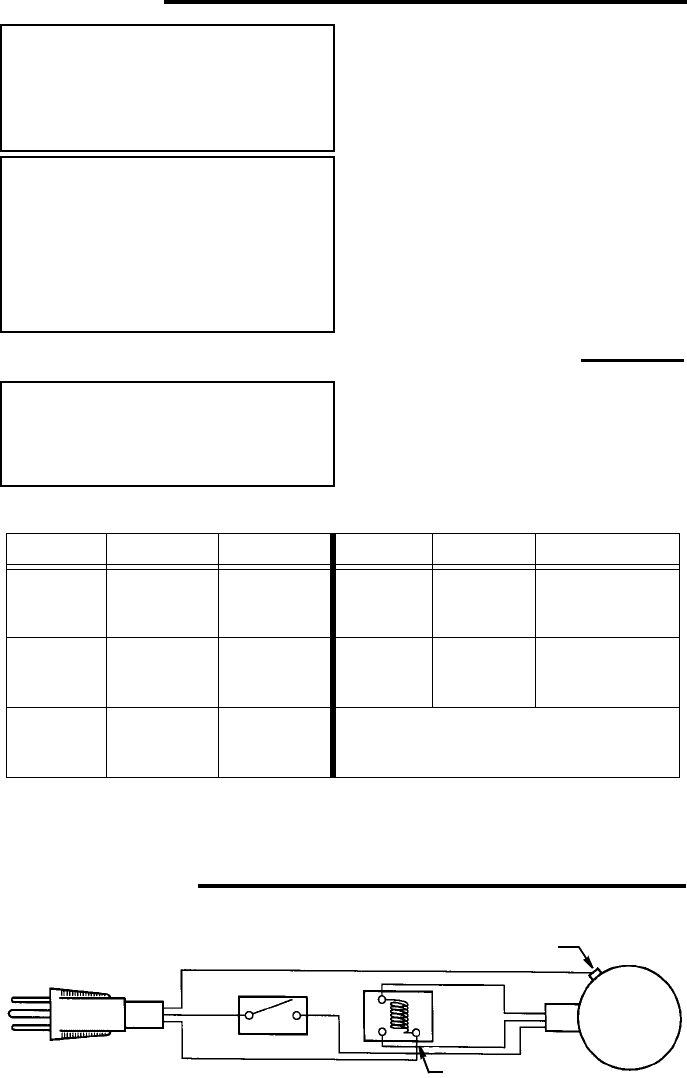
Motor
Ground
Screw
Black
Red
Relay
White
Switch
White
Black
Green
M
AL

30
Troubleshooting
WARNING: For your own safety,
turn switch “OFF”, and remove
plug from power source outlet
before troubleshooting your
sander.
TROUBLE PROBABLE CAUSE REMEDY
Excessive noise
NOTE: The sander will
make some noise when
it is operating normally
1. Motor gearbox not oper-
ating correctly. 1. Consult Authorized Service
Center, any attempt to repair
this motor or gearbox may
create a hazard unless
repair is done by a qualified
service technician.
Motor fails to develop
full power, starts slowly,
or fails to come up to full
speed.
NOTE: Low voltage
1. Circuit overloaded with
lights, appliances and
other motor.
2. General overloading of
power company facili-
ties.
3. Motor relay not operat-
ing.
1. Do not use sander on
heavily loaded circuits
2. Request a voltage check by
qualified electrician
3. Have relay replaced. Con-
sult Authorized Service
Center. Any attempt to
repair this relay may create
a hazard unless repair is
done by a qualified service
technician.
Motor overheats 1. Motor overloaded. 1. Reduce pressure on work-
piece.
Motor stalls (resulting in
blown fuses or circuit
breakers)
1. Motor relay not operat-
ing.
2. Voltage too low. Circuit
overloaded or general
overloading of power
company facilities.
3. Incorrect fuses or circuit
breakers in power line.
1. Have relay replaced.Con-
sult Authorized Service
Center. Any attempt to
repair this relay may create
a hazard unless repair is
done by a qualified service
technician.
2. Request voltage check by
qualified electrician
3. Install correct fuse or circuit
breaker.

31
Frequent opening of
fuse or circuits breaker
1. Motor overloaded.
2. Incorrect fuses or circuit
breaker in power line.
3. Relay not operating.
1. Feed work slower
2. Install correct fuse or circuit
breakers.
3. Have relay replaced. Con-
sult Authorized Service
Center. Any attempt to
repair this relay may create
a hazard unless repair is
done by a qualified service
technician.
Motor will not run 1. Damaged On-Off
Switch/Cord.
2. Burned out motor, no
power to motor or low
voltage.
1. Replace damaged parts
before using sander.
2. Consult Authorized Service
Center. Any attempt to
repair this motor may cre-
ate a hazard unless repair
is done by a qualified ser-
vice technician.
Sanding drum or belt
slips or slows down
easily
1. Applying too much pres-
sure to workpiece.
2. Spindle knob too loose.
1. Reduce pressure on work-
piece.
2. Tighten spindle knob.
Wood burns while sand-
ing
1. Sanding drum is glazed
with sap.
1. Replace sandpaper.
Sandpaper doesn’t
remove material
1. Sandpaper is com-
pacted with sawdust.
1. Replace sandpaper.
Spindle doesn’t go
through full 3/4” travel 1. Sawdust is compacted
under lower drum
washer.
2. Fan not installed.
3. Damaged gearbox.
1. Vacuum sawdust from area
of lower drum washer.
2. Ensure that fan is installed
with vanes face down.
3. Consult Authorized Service
Center. Any attempt to
repair this gearbox may
create a hazard unless
repair is done by a quali-
fied service technician.
TROUBLE PROBABLE CAUSE REMEDY
32
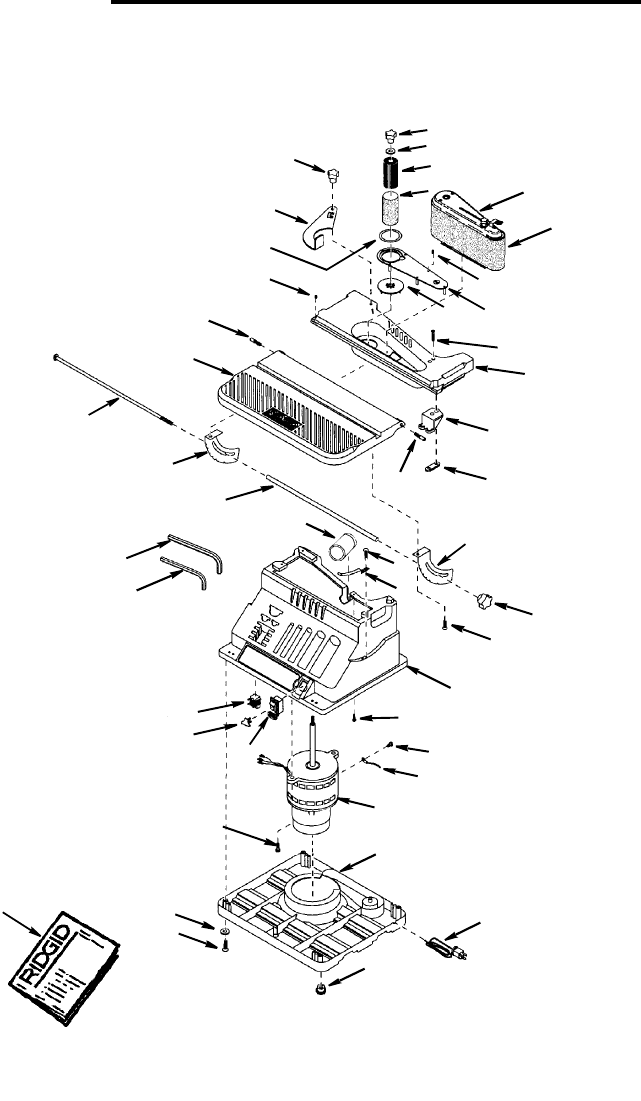
Repair Parts
Parts List For RIDGID Oscillating Edge Belt/Spindle Sander
Model EB44241
RIDGID parts are available on-line at www.ridgidparts.com
Figure 1
2, 44, 45
3, 46, 47, 48
4
5, 49, 50, 51
6
8
9
10
11
12
13
14
16
17
18
20
21
22
23
24
25
26
27
28
29
30
31
32
33 19
34
35
36
7
Ground Lead
19
37
38
39
40
14
42
43
41
1
15

33
Repair Parts
Parts List For RIDGID Oscillating Edge Belt/Spindle Sander
Model EB44241
RIDGID parts are available on-line at www.ridgidparts.com
Figure 1
Always order by Part Number—Not by Key Number
* Standard Hardware Item - May be purchased locally
† These parts are available where you purchased your sander.
• Any attempt to repair this motor may create a hazard unless repair is done by a qual-
ified service technician. Repair service is available at your nearest Authorized Ser-
vice Center.
Key
No. Part No. Description
1
2
3
4
5
6
7
8
9
10
11
12
13
14
15
16
17
18
19
20
21
22
23
24
25
826358-1
805553-2
822304
See pg. 29
825808
See pg. 29
810993-2
825841
830291
805297-9
825523
825548
825844
825842
830246
825537
825852
159572-138
808380-7
825840
830456
159572-186
824604
830290
805549-22
Knob, Spindle
Washer
21/64 x 5/8 x 1/32
Drum, Sanding 3/4"
†Drum, Sandpaper
Plate, Throat 2"
†Belt, Sanding 4" x 24"
Screw, Set Half Dog
10/32 x 1/2
Adapter, Throat Plate
Fan
Screw, Flat Hd
1/4-20 x 5/8
Table, Rear
Plate, Wear
Nut, Special Twin 1/4-20
Screw, Shoulder 1/4-20
Chute, Sawdust
Bracket, Table Lock
Knob, 1/4-20 x 3/4
Screw, Wash/Hd
Ty “T” 10-32 x 3/8
Screw, Pan Hd 10-14 x 1/2
Spring, Detent
Base
Screw, Hex Hd
Ty “T” 1/4-20 x 1
Screw, Hex Wash/Hd
Ty “T” 8-32 x 3/8
• Motor/Drive Asm
Washer
13/64 x 3/8 x .031
Key
No. Part No. Description
26
27
28
29
30
31
32
33
34
35
36
37
38
39
40
41
42
43
44
45
46
47
48
49
50
51
826801
825854
819012
9416630
829785
AC1000
817399-11
37837
825549
825537-1
825543
825524
803309-2
825525
825539-1
SP6496
37836
—
805553-30
805553-24
822304-1
822304-2
822304-3
825808-1
825808-2
825808-3
Enclosure
Cord w/Plug
Foot
Screw, Hex Hd Ty “T”
5/16-18 x 1
Switch, Locking
†Key, Switch
Relay
Wrench, Hex “L” 5/32
Spacer, Table Lock
Bracket, Table Lock Left
Bolt, Table Lock
Table, Front
Screw, Soc Set Lock
10-32 x 3/8
Plate, Stop
Knob 1/4-20
Owners Manual
Wrench, Hex “L” 3/32
Belt Sanding Assembly
(See Fig. 2)
* Washer 5/8 x 1-3/4 x 1/8
Washer
21/64 x 7/8 x 3/64
Drum, Sanding 1"
Drum, Sanding 1-1/2"
Drum, Sanding 2"
Plate, Throat 1-1/2"
Plate, Throat 1"
Plate, Throat 1/2"
34
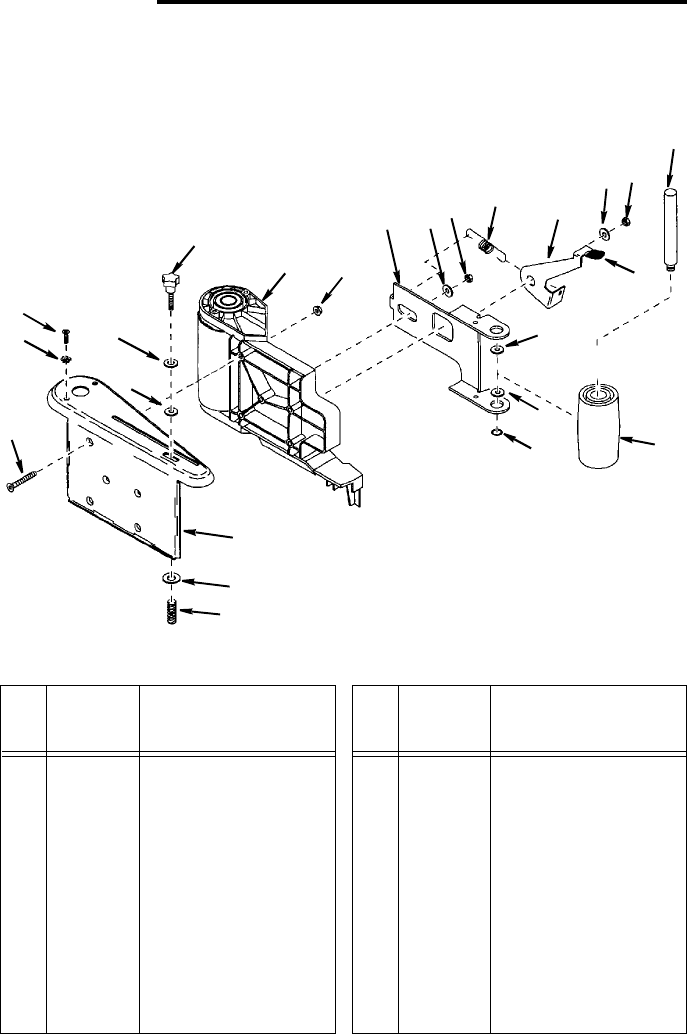
Repair Parts
Parts List For RIDGID Oscillating Edge Belt/ Spindle Sander
Model EB44241
RIDGID parts are available on-line at www.ridgidparts.com
Figure 2
Always order by Part Number—Not by Key Number
* Standard Hardware Item - May be purchased locally
2
5
6
9
10
11
12
14
15
16
7
1
34
4
4
18
17
8
19
13
8
2
19
Key
No. Part No. Description
1
2
3
4
5
6
7
8
9
10
11
825539
830306
830453
37482
830305
825531
825529
805549-4
830304
826163-2
830454
Knob 10-32 x 1-1/4
Washer 12 mm 1.0.
Drum/Drive Asm.
Nut, Lock
Guide
Spring, Extension
Lever
* Washer
13/64 x 1/2 x 3/64
Shaft, Idle
Cap, Grip
Drum, Idle Asm
Key
No. Part No. Description
12
13
14
15
16
17
18
19
817453
826802
30521
821166-1
809169-9
820175
9416712
114603
Ring, Retaining 5160-50
Platen
Spring, Swivel
Screw, Flat Hd Hex
10/32 x 1-1/2
Screw, Pan Cr Ty T
8-32 x 3/4
Washer, Rubber
* Washer
3/16 x 5/8 x 1/16
* Lockwasher, Ext. #10

35
Notes

QUESTIONS OR COMMENTS?
CALL 1-866-539-1710
www.ridgidwoodworking.com
Please have your Model Number and Serial
Number on hand when calling.
© 2003 RIDGID,INC.
This product is manufactured under license from Ridgid, Inc. by One World
Technologies, Inc.. All warranty communications should be directed to One
World Technologies, Inc. at (toll free) 1-866-539-1710.
90-Day Satisfaction GuaranteePolicy
During the first 90 days after the date of purchase, if you are dissatisfied
with the performance of this Ridgid® tool for any reason, you may return
the tool to the dealer from which it was purchased for a full refund or
exchange. To receive a replacement tool you must present proof of pur-
chase and return all original equipment packaged with the original product.
The replacement tool will be covered by the limited warranty for the bal-
ance of the three year warranty period.
What is covered under the Limited Three Year Warranty
This warranty covers all defects in workmanship or materials in this
RIDGID® tool for the three year period from the date of purchase. This war-
ranty is specific to this tool. Warranties for other RIDGID® products may
vary.
How to obtain service
To obtain service for this RIDGID® tool you must return it, freight prepaid, to
an authorized RIDGID® service center for hand held and stationary power
tools. You may obtain the location of the authorized service center nearest
you by calling (toll free) 1-866-539-1710 or by logging on to the RIDGID®
website at www.ridgidwoodworking.com. When requesting warranty ser-
vice, you must present the proof of purchase documentation, which
includes a date of purchase. The authorized service center will repair any
faulty workmanship, and either repair or replace any defective part, at our
optioon at no charge to you.
What is not covered
This warranty applies only to the original purchaser at retail and may not be
transferred. This warranty only covers defects arising under normal usage
and does not cover any malfunction, failure or defect resulting from misuse,
abuse, neglect, alteration, modification or repair by other than authorized
RIDGID® service center for hand held and stationary power tools. One
World Technoligies, Inc. makes no warranties, representations or promises
as to the quality or performance of its power tools other than those specifi-
cally stated in this warranty.
Additional Limitations
To the extent permitted by applicable law, all implied warranties, including
warranties of MERCHANTABILITY or FITNESS FOR A PARTICULAR PUR-
POSE, are disclaimed. Any implied warranties, including warranties of mer-
chantability or fitness for a particular purpose, that cannot be disclaimed
under state law are limited to three years from the date of purchase. One
World Technologies, Inc. is not responsible for direct, indirect, incidental or
consequential damages. Some states do not allow limitations on how long
an implied warranty lasts and/or do not allow the exclusion or limitation of
incidental or consequential damages, so the above limitations may not
apply to you. This warranty gives you specific legal rights, and you may
also have other rights which vary from state to state.
RIDGID® HAND HELD AND STATIONARY POWER TOOL
LIMITED THREE YEAR WARRANTY AND
90 DAY SATISFACTION GUARANTEE POLICY
Part No. SP6496 Form No. SP6496 Printed in Taiwan 4/03
Catalog No. EB4424
Model No. EB44241 Serial No. ________
The model and serial numbers may be found on the back side
of the base. You should record both model and serial number in
a safe place for future use.
