Rimage CDPR6 Optical Disc Label Printer with RFID User Manual Rimage CDPR6 Users Guide ST CONFIDENTIAL
Rimage Corporation Optical Disc Label Printer with RFID Rimage CDPR6 Users Guide ST CONFIDENTIAL
Rimage >
Rimage CDPR6 Users Guide-ST CONFIDENTIAL

Prism III Printer User Guide
SHORT TERM CONFIDENTIAL
For more information visit rimage.com/support
2002605_A
Rimage Corporaon reserves the right to make improvements to the equipment and soware described in this document at any me without any
prior noce. Rimage Corporaon reserves the right to revise this publicaon and to make changes from me to me in the content hereof without
obligaon of Rimage Corporaon to nofy any person or organizaon of such revisions or changes.
This document may contain links to web sites that were current at the me of publicaon, but may have moved or become inacve since. This
document may contain links to sites on the Internet that are owned and operated by third pares. Rimage Corporaon is not responsible for the
content of any such third-party site.
© 2012, Rimage Corporaon
Rimage® is a registered trademark of the Rimage Corporaon. Rimage Prism III, AutoPrism™, and CD Designer™ are trademarks of the Rimage
Corporaon. Dell™ is trademark of Dell Computer Corporaon. FireWire™ is a trademark of Apple Computer, Inc. Windows® is a registered
trademark of Microso Corporaon
All other trademarks and registered trademarks are the property of their respecve owners
The most recent version of this document can be found at www.rimage.com/support.
Corporate Headquarters:
Rimage Corporaon
7725 Washington Avenue South
Minneapolis, MN 55439
USA
800-553-8312 (North America)
Service: +1 952-946-0004
(Mexico/Lan America)
Fax: +1 952-944-6956
European Headquarters:
Rimage Europe GmbH
Albert-Einstein-Str. 26
63128 Dietzenbach
Germany
Tel: +49 6074-8521-14
Fax: +49 6074-8521-100
Asia/Pacic Headquarters:
Rimage Japan Co., Ltd.
2F., WIND Bldg.
7-4-8 Roppongi Minato-ku,
Tokyo 106-0032 JAPAN
Tel: +81-3-5771-7181
Fax: +81-3-5771-7185
SHORT TERM CONFIDENTIAL

Contents
2002605_A For more information visit rimage.com/support
Introducon .................................................................................... 1
About this User Guide .............................................................................................. 1
About the Prism III Printer ....................................................................................... 1
Unpacking and Setup Instrucons ........................................................................... 1
Important Informaon .................................................................... 2
Support Contact Informaon ................................................................................... 2
Learn More Online ................................................................................................... 2
Technical Support .................................................................................................... 2
Opcal Disc Recording Soware Disclaimer ............................................................ 2
Safety and Compliance Informaon ........................................................................ 3
Safety Precauons .............................................................................................................. 3
Compliance Informaon ..................................................................................................... 4
Prism III Printer Requirements ......................................................... 5
Ribbon Requirements .............................................................................................. 5
Label Design Requirements ..................................................................................... 5
Print Requirements .................................................................................................. 5
Idenfy the Parts of the Prism III Printer .......................................... 6
Front View ................................................................................................................ 6
Top View .................................................................................................................. 6
Back View ................................................................................................................. 6
Idenfy the Parts of the Prism III Printer .......................................... 7
Operator Panel ......................................................................................................... 7
Operator Buon ....................................................................................................... 7
Indicator Lights ........................................................................................................ 7
Operate the Prism III Printer ............................................................ 8
Power On and O the Prism Printer ........................................................................ 8
Power On or O a Standalone Printer ................................................................................ 8
Power On or O a Printer Connected to an Autoloader or AutoPrinter............................. 8
Place a Disc on the Printer Tray ............................................................................... 8
Set your Prinng Preferences........................................................... 9
Set your Prinng Preferences .................................................................................. 9
Access Print Preferences .................................................................................................... 9
Access Print Properes ....................................................................................................... 9
Layout and Paper/Quality Preferences ............................................................................... 9
Change Masking Sengs .................................................................................................... 9
Service Opons ................................................................................................................. 10
Print PRN Files ................................................................................................................................ 10
Center the Image on a Disc ............................................................................................................ 10
Update the Firmware ..................................................................................................................... 12
Set Device Sengs for Monochrome or CMY Ribbons .................................................... 12
Print in Monocolor ......................................................................................................................... 12
Set your Prinng Preferences......................................................... 12
Print in Color .................................................................................................................................. 13
Strobe Sengs .............................................................................................................................. 14
Maintain the Prism III Printer ........................................................ 15
Overview ................................................................................................................ 15
Cauonary Informaon .................................................................................................... 15
Preventave Maintenance Schedule ................................................................................ 15
Maintain the Prism III Printer ........................................................ 16
Clean the Print Head .............................................................................................. 16
Clean the Prism III Print Head Using a Prism Cleaning Kit ................................................ 16
Clean the Print Head – Alternate Method ........................................................................ 17
Change the Print Ribbon ........................................................................................ 18
SHORT TERM CONFIDENTIAL

1
For more information visit rimage.com/support
2002605_A
Introduction
This manual provides the informaon needed to congure, operate, and
maintain the Rimage Prism III printer.
For informaon specic to your autoloader or Rimage AutoPrinter refer
to the product’s User Guide found at www.rimage.com/support. From the
Support page select Prism III then the User Manuals tab.
Important! Your Prism III printer may not look exactly like the model
featured in this user guide.
About this User Guide
• While we try to maintain all versions of our manuals and
documentaons, please note that the English version found on our web
site always contains the most up-to-date informaon.
• Unless otherwise indicated, all Windows navigaon statements are
Windows 7 paths. Other Windows operang system navigaon may
dier slightly.
• These notes and symbols are used throughout the manual to help clarify
informaon:
Tip: A Tip suggests alternave methods that may not be obvious and helps
you understand the benets and capabilies of the product.
Important!
• An Important note provides informaon essenal to the compleon of a
task.
• Important supplemental informaon.
• You can disregard informaon in a Tip and sll complete a task, but do
not disregard an Important note.
nCauon: A Cauon indicates that failure to observe this guideline could
result in loss or damage to the equipment, product, soware, or data.
nWarning! A Warning indicates that failure to follow this guideline
could result in bodily injury to personnel operang or maintaining the
equipment.
About the Prism III Printer
The Prism III printer is part of the Rimage series of printers. The Prism
III printer is a high speed printer used to print monochrome or color
informaon on CDs, DVDs, or Blu-ray DiscTM.
The printer can be used as a stand alone printer for manual operaon, or
with a Rimage autoloader or Rimage AutoPrinter.
Unpacking and Setup Instrucons
Unpacking and installaon instrucons are included with the Prism III
printer. Refer to the Rimage Prism III Setup and Installaon Guide, as well as
the setup and installaon guide included with your Rimage autoloader or
AutoPrinter.
SHORT TERM CONFIDENTIAL

2
For more information visit rimage.com/support
2002605_A
Important Information
This secon provides support contact informaon, and cauons and
warnings, for the Prism III printer.
Technical Specicaons for this product can be found at www.rimage.
com/support. From the Support page select: Printer Series > Prism > User
Manuals tab.
Support Contact Informaon
US, Canada, Lan America
Rimage Corporaon
7725 Washington Avenue South
Minneapolis, MN 55439
USA
An: Rimage Services
Email: support@rimage.com
Telephone:
North America: 800-553-8312
Mexico/Lan America: 952-944-8144
Fax: 952-944-7808
Europe
Rimage Europe GmbH
Albert-Einstein-Str. 26
63128 Dietzenbach
Germany
Email: support@rimage.de
Telephone: +49 6074-8521-14
Fax: +49 6074-8521-100
Asia/Pacic
Rimage Japan Co., Ltd.
2F., WIND Bldg.
7-4-8 Roppongi Minato-ku,
Tokyo 106-0032 JAPAN
Email: apsupport@rimage.co.jp
Telephone: +81-3-5771-7181
Fax: +81-3-5771-7185
Contact Rimage Services
Website: www.rimage.com/support
Knowledge Base: hp://rimage.custhelp.com
Log in and select the Ask a Queson tab
When you contact Rimage
Services, please provide:
• System serial number and soware
version
• Funconal and technical
descripon of the problem
• Exact error message received
Copy this informaon from your Rimage product
for future reference.
Note: Make sure you update the Serial Number
here anyme you receive a replacement system.
Serial Number:
Product Name:
Date of Purchase:
Learn More Online
At www.rimage.com/support, you can experience Rimage’s world-class
Support and Services.
From the Support home page:
1. Select your product series.
2. Select your product.
3. Learn more on the product page.
From your product page you can access:
• Informaon about the latest
soware and rmware updates
• Product specicaons
• The latest documents
• Current rmware and driver
downloads
Technical Support
Rimage oers a variety of service and support opons for the Prism III
printer including Exchange Services. Please contact your Rimage Value
Added Reseller or Rimage for addional informaon and pricing.
Important! Make sure you register your autoloader so you are eligible for
parts and labor covered for 1 year and priority phone support. Registraon
is available at hp://www.rimage.com/support/warranty-registraon.
Opcal Disc Recording Soware Disclaimer
This Product, Soware, or Documentaon may be designed to assist you
in reproducing material in which you own the copyright or have obtained
permission to copy from the copyright owner. Unless you own the copyright
or have permission to copy from the copyright owner, you may be violang
copyright law and be subject to payment of damages and other remedies. If
you are uncertain about your rights, you should contact your legal advisor. If
you are neither in possession of the copyright nor have authorizaon from
the owner of the copyright, unauthorized copying of copyrighted material
on an opcal disc or any other media violates naonal and internaonal
legislaon and can result in severe penales.
SHORT TERM CONFIDENTIAL

3
Important Information
For more information visit rimage.com/support
2002605_A
Safety and Compliance Informaon
This manual and the indicaons on the product allow proper and safe
operaon. The indicaon marks below help protect you and other persons
from injury, and equipment from damage.
Refer to the Safety Precauons secon below and the Compliance
Informaon secon on page 4 for more informaon.
Safety Precauons
To ensure safety, read these precauons and familiarize yourself with their
meaning before using the equipment.
nWarning!
• Use of controls or adjustments or performance of procedures
other than those specied herein may result in hazardous radiant
exposure.
• Do not disassemble or use tools on the printer. All service procedures
should be performed by a Rimage-authorized technician, or sent in
for Rimage-authorized repair.
• Do not service the printer with the power cord plugged in the AC
outlet.
• The interior of the printer contains sharp edges.
• The front bezel of the printer can be opened by hand. Do not insert
your ngers.
• Do not touch the heat roller.
nCauon:
• All equipment with AC line voltage, or low DC voltages, such as
switches, power supplies, fuses, fans, and non-stepper motors, must
be replaced with Rimage-approved components to maintain the
safety approval issued by UL.
• Use only the supplied AC power cord. Fore more informaon or to
order a new power cord, contact Rimage Customer Service.
• This product is designed for an oce environment.
• Do not use the printer if it is overheang or an abnormal smell is
detected. This may result in a re and an electric shock. In case of
heang or abnormal smell, immediately disconnect the cable from
the outlet. Contact your Rimage-authorized dealer for repairs.
• Allow sucient free space for opening the printer tray. Do not touch
the printer tray while it is in moon.
• If the side cover is opened while power is supplied, the printer will
stop. Do not reach into the printer while it is in operaon. Do not
aempt to bypass the door interlock.
• Please do not use any voltage other than 110VAC or 220VAC. This
could result in a re and an electric shock.
SHORT TERM CONFIDENTIAL

4
Important Information
For more information visit rimage.com/support
2002605_A
Compliance Informaon
Product Prism III printer
Model CDPR6
Noce for USA NOTE: This equipment has been tested and found to comply with the limits for a Class A digital device, pursuant to part 15 of
the FCC Rules. These limits are designed to provide reasonable protecon against harmful interference when this equipment
is operated in a commercial environment. This equipment generates, uses and can radiate radio frequency energy and, if
not installed and used in accordance with the instrucon manual, may cause harmful interference to radio communicaons.
Operaon of this equipment in a residenal area is likely to cause harmful interference, in which case the user will be
required to correct the interference at his own expense.
This product complies with UL 60950-1, 2nd edion.
Noce for Canada This Class A digital apparatus complies with Canadian ICES-003 Issue 4:2004. Cet appareil numerigue de la classe A est
conforme a la norme NMB-003 du Canade.
This product complies with CAN/CSA C22.2 No. 60950-1-07 2nd Edion.
Noce for Europe This product is in conformity with the EMC Direcve (89/336/EEC) and the Low-Voltage Direcve (73/23/EEC)
through compliance with the following European standards: EN 55022: 2006 + A1: 2007 Class A Limit; EN 55024:
1998+A1:2001+A2:2003; EN 61000-3-2:2006; EN 61000-3-3:1995 + A1:2001+A2:2005; EN 60950-1:2006 + A11:2009. The CE
mark has been axed in accordance with the CE Marking Direcve 93/68/EEC.
Noce for Japan This is a Class A product based on the standard of the Voluntary Control Council for Interference by Informaon Technology
Equipment (VCCI). If this equipment is used in a domesc environment, radio interference may occur, in which case, the user
may be required to take correcve acon.
Translaon:
この装置は、情報処理装置等電波障害自主規制協議会(VCCI)の基準に基づくクラス
A 情報技術装置です。この装置を家庭環境で使用すると電波妨害を引き起こすことがありま
す。この場合には使用者が適切な対策を講ずるよう要求されることがあります。
Noce for Australia This product complies with AS/NZS CISPR22:2004.
Noce for Korea It is cered that foregoing equipment has been cercated under the Framework Act on Telecommunicaons and Radio
Waves Act.
위 기기는 전기통신기본법, 전파법 에 따라 인증되었음을 증명 합니다.
SHORT TERM CONFIDENTIAL

5
For more information visit rimage.com/support
2002605_A
Prism III Printer Requirements
This secon describes the ink, label design, and print requirements for the
Prism printer.
Ribbon Requirements
Important!
• Rimage supports only the use of Rimage brand ribbons in the Prism
printer. Printer issues that occur as a result of using ribbons by
manufacturers other than Rimage are not included under your Rimage
warranty or maintenance agreement.
• For opmum results, store the Prism III ribbons at a temperature 23° to
104° F (-5° to 40° C) and at a relave humidity of 30% to 80% non-
condensing.
• Avoid moisture and direct sunlight.
• Do not reuse ribbons.
• Use only ribbons designed for the Prism III printer. Refer to the table
below.
The Prism printer requires ribbons designed specically for use with the
printer. The Prism III printer will only operate with the following Rimage
ribbons:
Ribbon Type Number of Discs Printed
2002364 Black 2100
2002366 Red 2100
2002367 Midnight Blue 2100
2002365 Mulcolor (CMY) 500
Label Design Requirements
The Rimage Windows-compable CD Designer™ label editor soware
ships with each printer. CD Designer is installed on your PC during a typical
installaon of the Rimage soware. If you have a Windows-based PC, you
can use CD Designer to design your labels.
If you are using a Macintosh, or prefer to design labels in a soware
applicaon other than CD Designer, use the following criteria.
Important! CD Designer is not Macintosh-compable.
• File format: For best results, save your labels as JPEG or TIFF les.
However, these le formats must be converted before prinng. If you
use CD Designer to print labels, you must import the labels and save
them as CD Designer les (.btw) before prinng. If you do not use CD
Designer to print labels, you must convert the labels to PDF les before
prinng.
• Color mode: Labels that are imported into CD Designer must be in RGB
color mode.
• Resoluon: Use pictures or logos set to
300x300 dpi (Dots Per Inch) or 300x600
dpi.
• Label Design Size: The width is 5.12”
(1536 pixels) and the height is 4.52”
(1356 pixels).
• Printable Area: The printable area of a
disc when using a Prism printer is 116
mm (4.567”) and the hub is 38 mm
(1.496”).
Print Requirements
All labels created and saved through CD Designer are in the correct le
format (.btw) for prinng with the Prism printer. If you are creang and
saving labels with a soware applicaon other than CD Designer, save
your labels as PDF les before prinng with the Prism printer. If you use a
standalone Prism printer or an AutoPrism AutoPrinter, you can print directly
from any applicaon with print capability.
Printable Area
116 mm
Hub Size
38 mm
SHORT TERM CONFIDENTIAL
6
For more information visit rimage.com/support
2002605_A
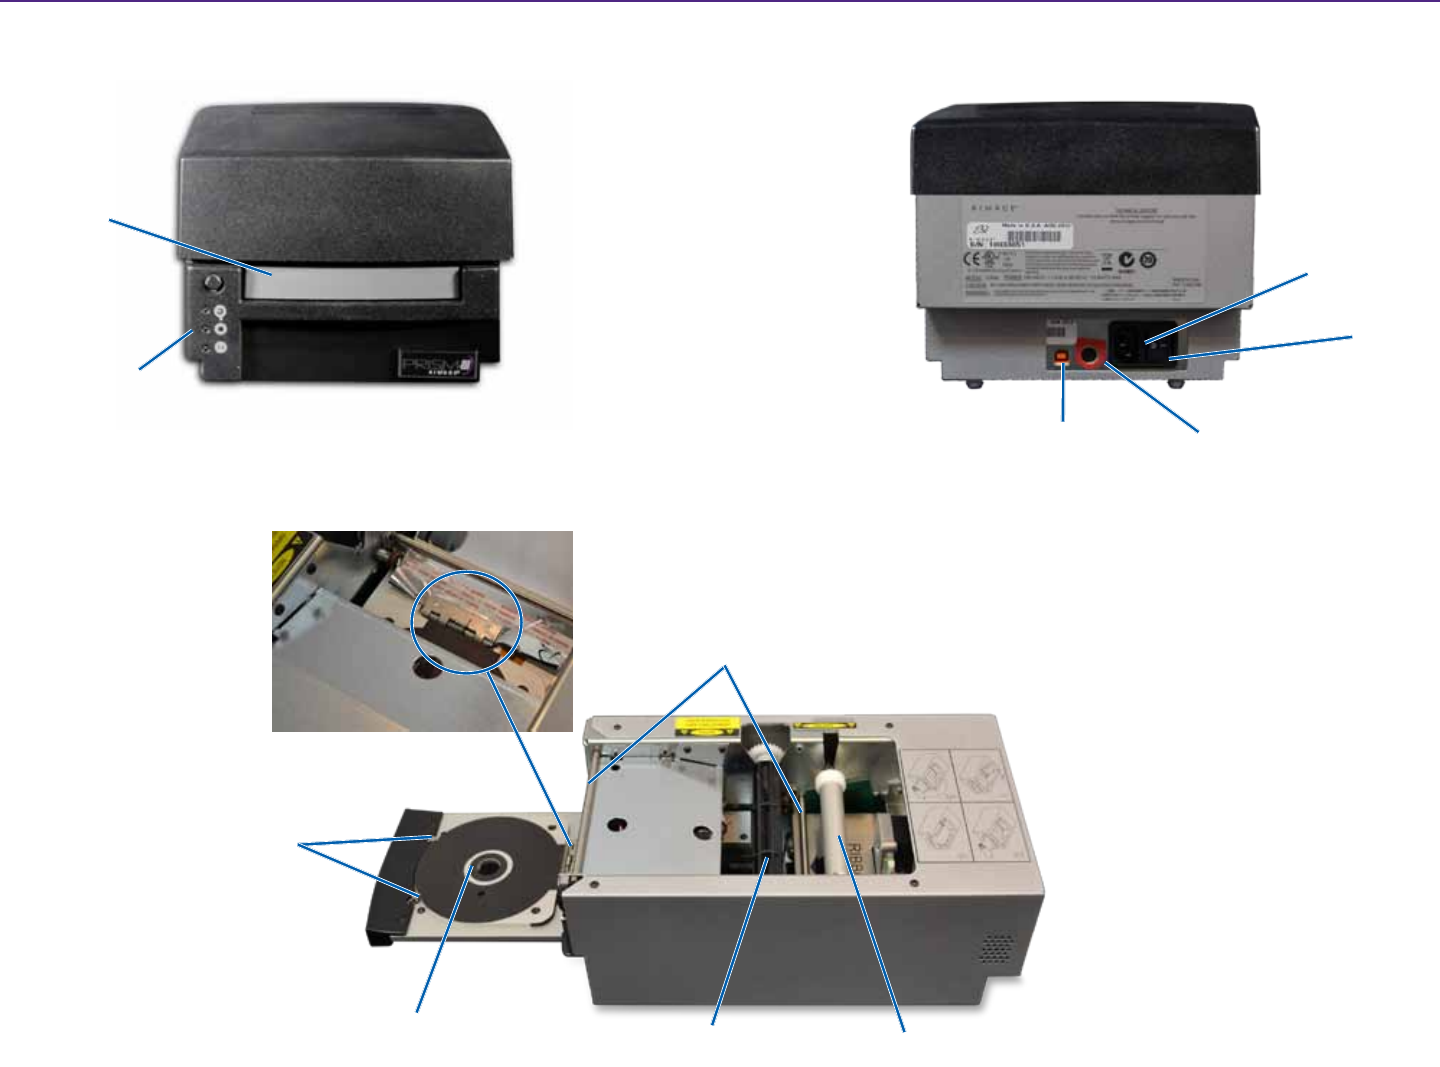
Identify the Parts of the Prism III Printer
Top View
AC Power
Connecon
Power
Switch
AutoPrinter/AutoLoader
Control Connecon
USB Cable
Port
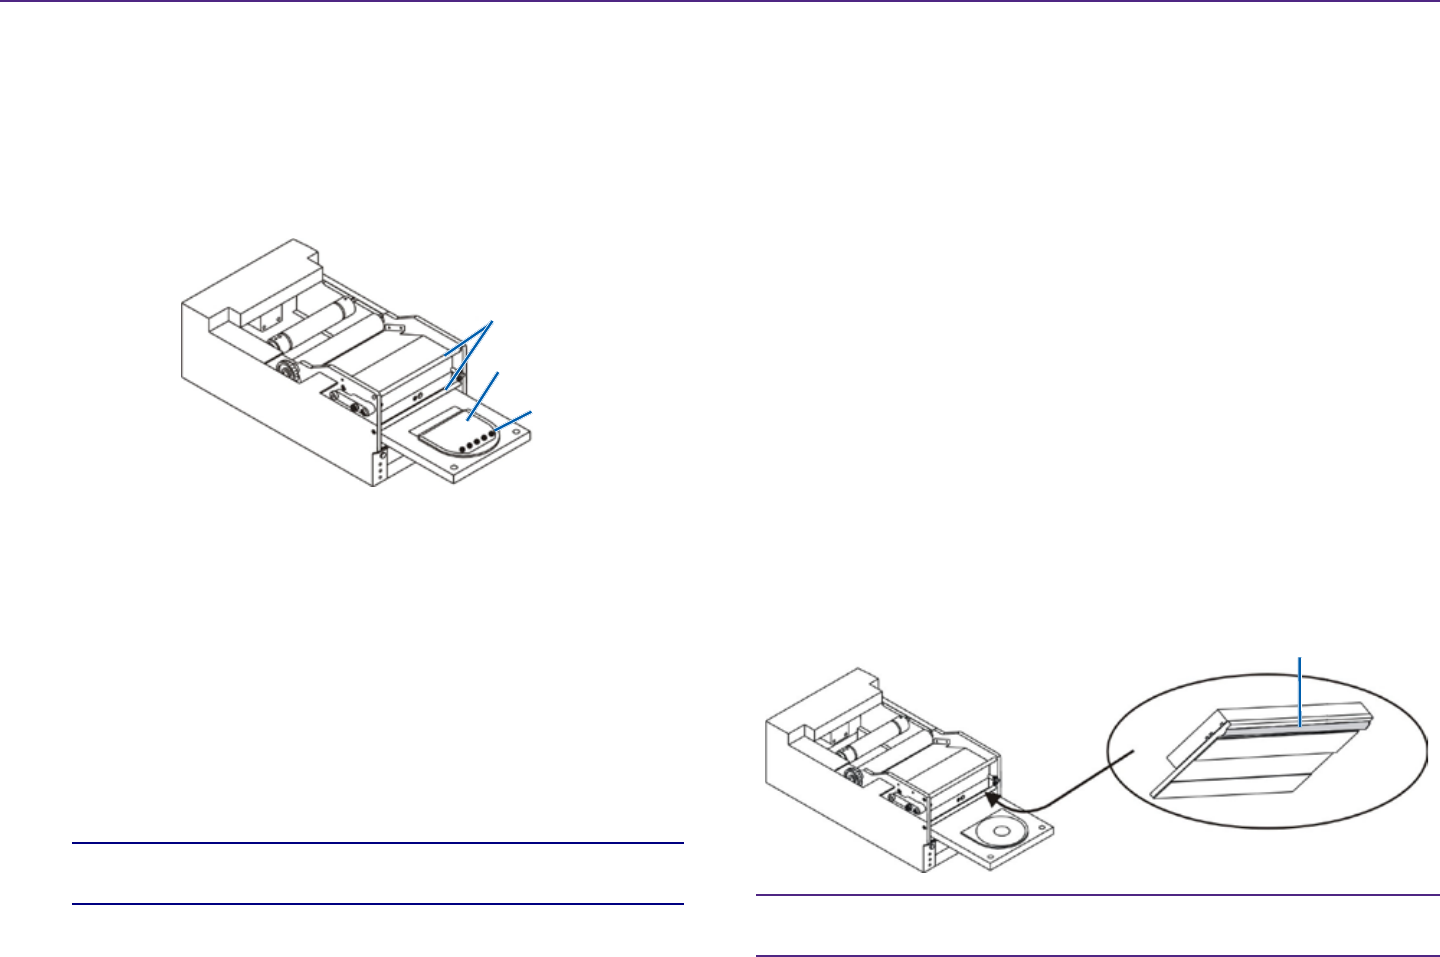
Back View
Ribbon Clamp
Printer Tray and
Centering Pin Take-up Roller Supply Roller
Retaining Pins
Front View
Operator Panel
Ribbon Guides
Printer Tray
SHORT TERM CONFIDENTIAL
7
Identify the Parts of the Prism III Printer
For more information visit rimage.com/support
2001809_A
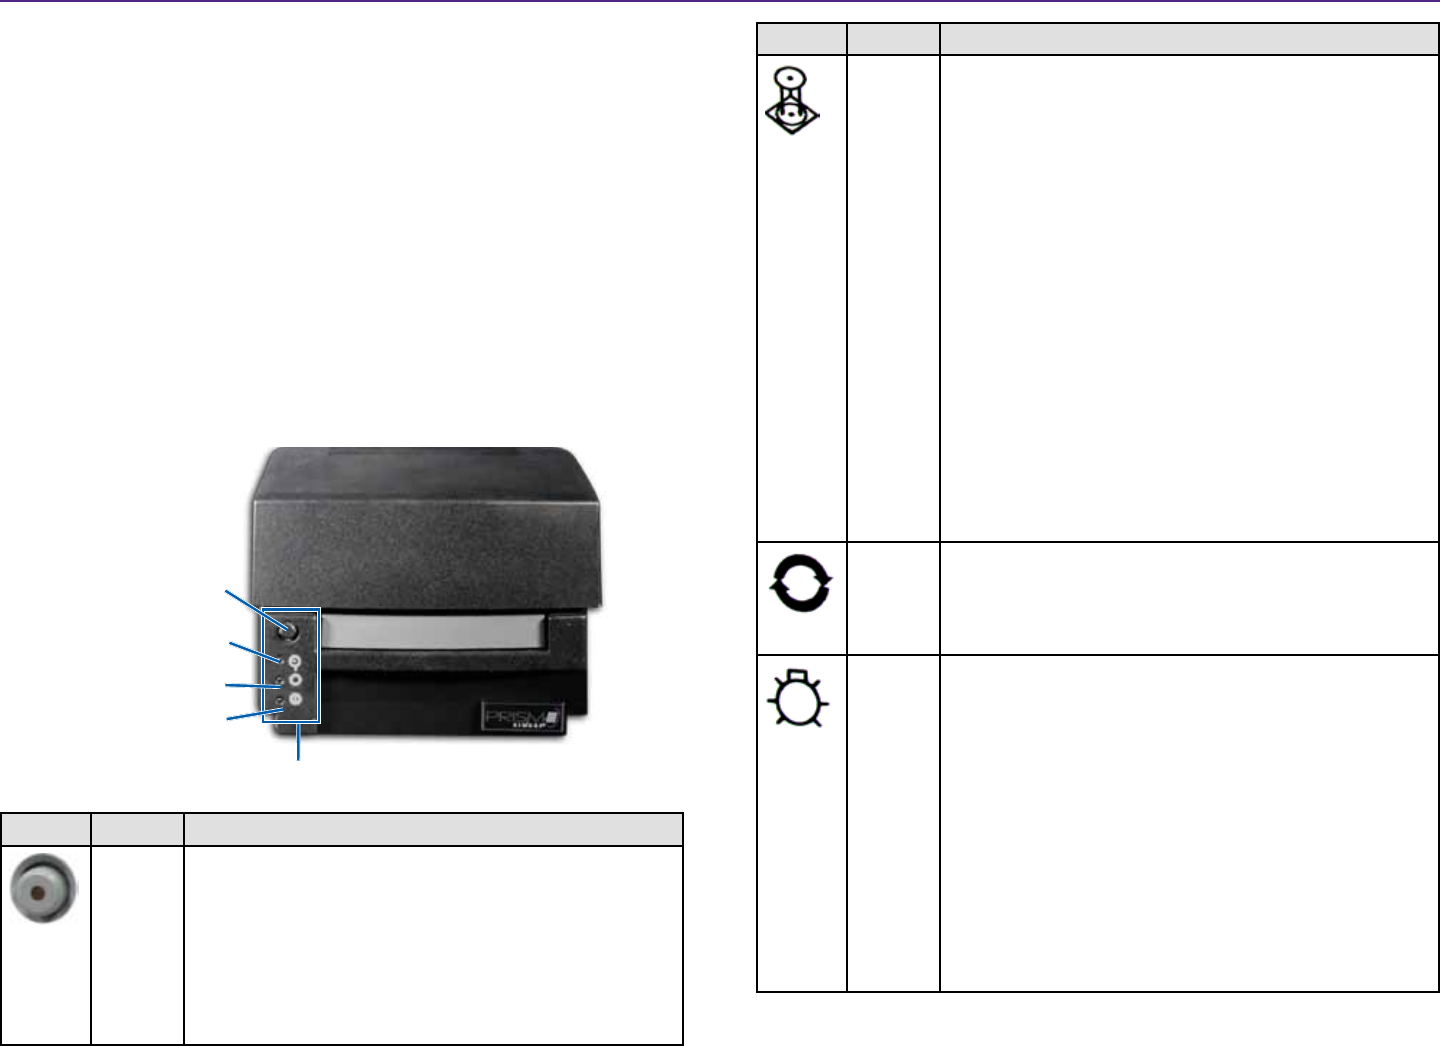
Operator Panel
The operator panel is located on the front of the printer. There are four
indicator lights and an operator buon on the operator panel.
Operator Buon
Press the operator buon to open and close the printer tray. The Error
indicator light is in the center of the operator buon. Refer to the Indicator
Lights secon below for more informaon.
Indicator Lights
The name and funcon of each indicator light is described below. Each
indicator light reects dierent condions on the Standalone Prism printer.
Prism printers that are mounted on autoloaders or AutoPrism AutoPrinters
have dierent condions.
Image Name Funconality
Error
indicator
light
• The Error indicator light on the operator buon
illuminates when an error occurs during prinng.
• The Error indicator light and the Disc Not Present
indicator light ash when the printer is in cleaning
mode.
• The Error indicator light illuminates and the Disc Not
Present indicator light ashes at a slow rate when the
ribbon is out.
Operator Panel
Operator Buon with
Error Indicator Light
Disc Not Present
Indicator Light
Acve Indicator Light
Power Indicator Light
Image Name Funconality
Disc Not
Present
indicator
light
• The Disc Not Present indicator light ashes a fault code
when an error occurs. Aer the error is resolved, press
the operator buon to turn o the indicator light.
• The Disc Not Present indicator light illuminates when
the tray is empty or when the disc is not properly
clamped. When a disc is placed on the tray, the Disc
Not Present indicator light turns o.
• In Mulple Copy mode, the Disc Not Present indicator
light illuminates unl the disc is removed from the
pad.
• The Disc Not Present indicator light ashes
connuously at slow rate when the remaining ribbon
capacity is below 100 discs for monocolor ribbons and
25 discs for CMY ribbons.
• The Disc Not Present indicator light ashes at a slow
rate and the Error indicator light illuminates when the
ribbon is out.
• The Disc Not Present indicator light and the Error
indicator light ash when the printer is in cleaning
mode.
Acve
indicator
light
• The Acve indicator light ashes when the printer is
operang.
• The Acve indicator light ashes connuously at a slow
rate when the printer is in AutoPrinter mode.
Power
indicator
light
• The Power indicator light illuminates when the printer
is powered on.
• The Power indicator light ashes when the system
board has detected a fatal error.
• The Power indicator light turns o when the printer
detects a bad pixel element in the print head. The
Power indicator light turns back on when a disc is
placed on the tray and you can connue to print discs.
If you connue to print, small lines may occur in your
print jobs. This is an indicaon that the print head may
require replacement.
• The Power indicator light turns o when the printer is
powered o.
SHORT TERM CONFIDENTIAL
8
Operate the Prism III Printer
For more information visit rimage.com/support
2001809_A
This secon provides informaon needed to operate your Prism printer.
Power On and O the Prism Printer
Power On or O a Standalone Printer
1. Press the power switch on the rear of the printer. The printer powers on
and inializes.
2. Press the power switch again. The printer powers o.
Power On or O a Printer Connected to an Autoloader or
AutoPrinter
Follow these steps if your Prism III printer is connected to an autoloader or
AutoPrinter:
Tip: The power switch on the printer must remain in the ‘on’ posion.
1. Power on the autoloader or AutoPrinter. The printer powers on and
inializes.
2. Power o the autoloader or AutoPrinter. The printer powers o.
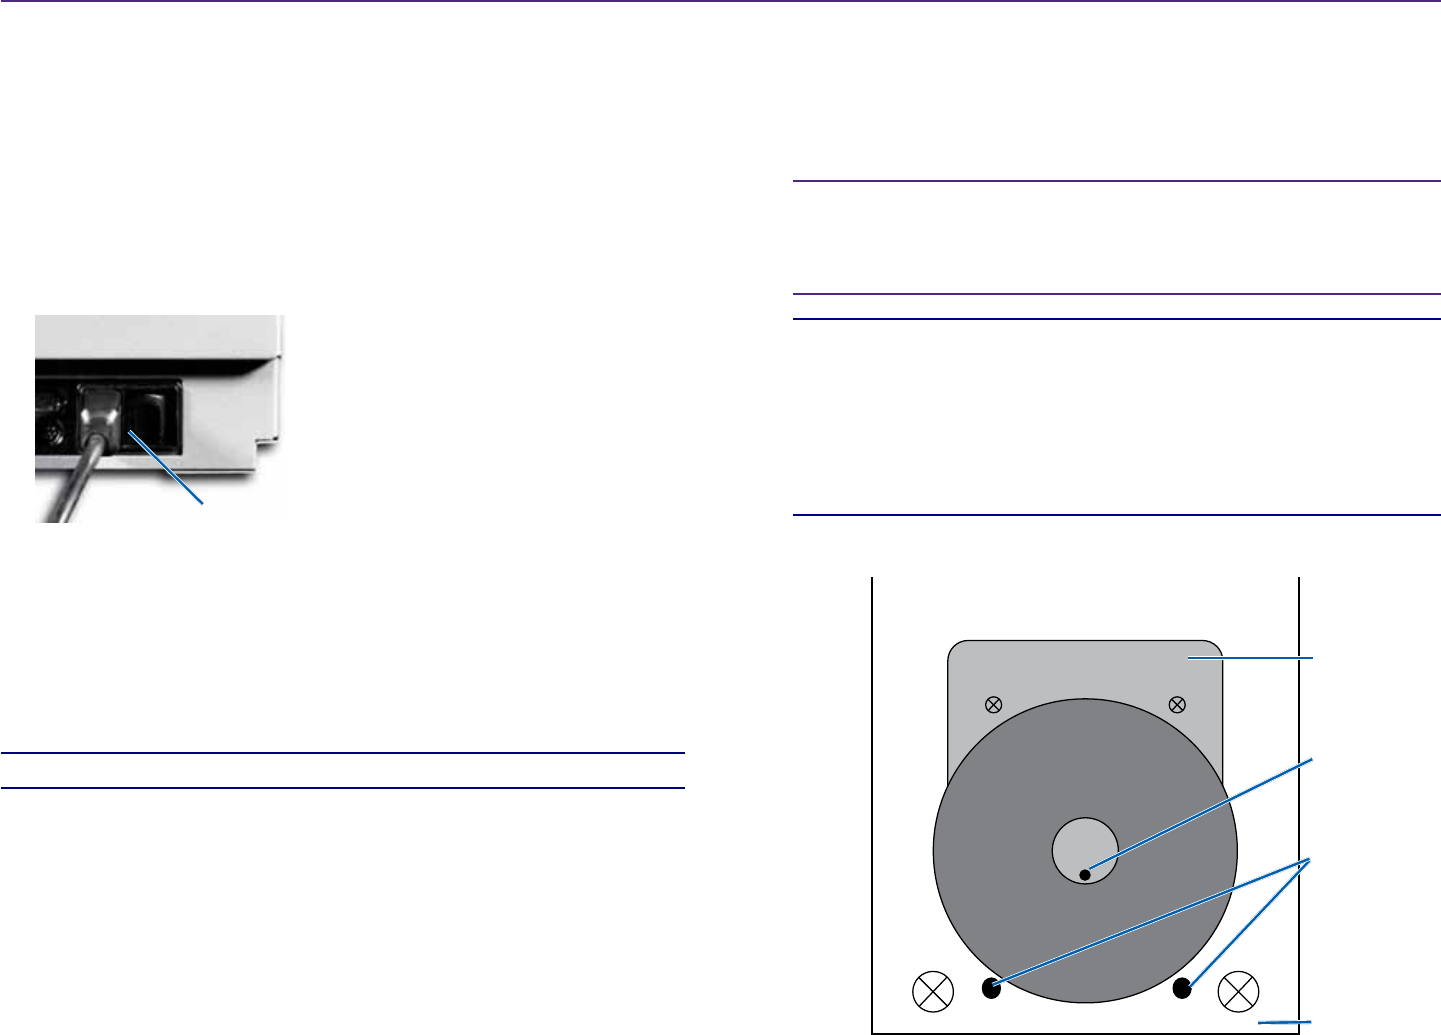
Power Switch
Place a Disc on the Printer Tray
1. Press the operator buon to open the printer tray.
2. Place one disc on the rubber pad between the two retaining pins and
the centering pin.
Important! Place the disc with the recording side facing down. The
recording side has a raised stacking ring close to the hub. If a disc
is inserted with the stacking ring facing up, the print head could be
damaged.
Tips:
• If the disc is resng on the retaining pins, the printer tray will not
close.
• The characteriscs of the print pad and plate vary between the
standalone and automated models. The automated model has a
hole through the center of the plate; the standalone model does
not. All models have a centering pin.
3. Press the operator buon. The printer tray moves to the disc clamped
posion.
Plate
Retaining Pins
Centering Pin
Printer Tray
SHORT TERM CONFIDENTIAL

9
Set your Printing Preferences
For more information visit rimage.com/support
2001809_A
Set your Prinng Preferences
Important: Unless otherwise indicated, all Windows navigaon statements
are Windows 7 paths. Other Windows operang systems’ navigaon may
dier slightly.
Access Print Preferences
1. Select: Start > Devices and Printers. The Devices and Printers dialog box
opens.
2. Right-click on Rimage Prism III.
3. Select Prinng preferences from the dropdown list. The Rimage Prism III
Preferences window displays.
Access Print Properes
1. Select: Start > Devices and Printers. The Devices and Printers dialog box
opens.
2. Right-click on Rimage Prism III.
3. Select Prinng properes from the dropdown list. The Rimage Prism III
Properes window displays.
Layout and Paper/Quality Preferences
Opons found under the Layout and Paper/Quality tabs typically do not
need adjustments. Rimage Technical Support will idenfy when these
sengs need adjustment and can assist with adjusng the sengs found
under these tabs.
Change Masking Sengs
The Rimage CD Designer soware is intended to print on 120mm opcal
discs and will mask out areas that are not printable, such as inside the disc
hole and outside the outer circumference.
Some discs do not have a suitable print coang around the stacking ring.
Change the mask sengs to accomodate prinng on these discs.
Masked (no print)
Areas
Masked (no print)
Areas
SHORT TERM CONFIDENTIAL
10
Set your Printing Preferences
For more information visit rimage.com/support
2001809_A
1. Access Print Preferences. Refer to page 9.
2. Select the Masking Sengs tab.
3. Select the Print on Hub opon.
4. Measure the inner and outer diameters of the printable surface.
5. Enter the diameters in the Hub Sengs secon.
6. Select OK to save your changes.
Service Opons
The Service tab provides informaon on your Prism III printer and oers a
series of tools to keep your printer current and funconing properly.
1. Access Print Preferences. Refer to page 9.
2. Select the Service tab.
The window that displays features informaon about your Prism III
printer.
• Driver: Displays informaon about the printer driver including the
name and version number.
• Printer: Displays informaon about the printer including the printer
name, serial number, and rmware version.
• Printer Status: Displays the status of the printer.
• Ribbon Status: Displays the ribbon type, the percentage of ribbon
used, the ribbon part number and color code, and the serial number
of the ribbon that is installed.
Print PRN Files
1. Access Print Preferences. Refer to page 9.
2. Select the Service tab.
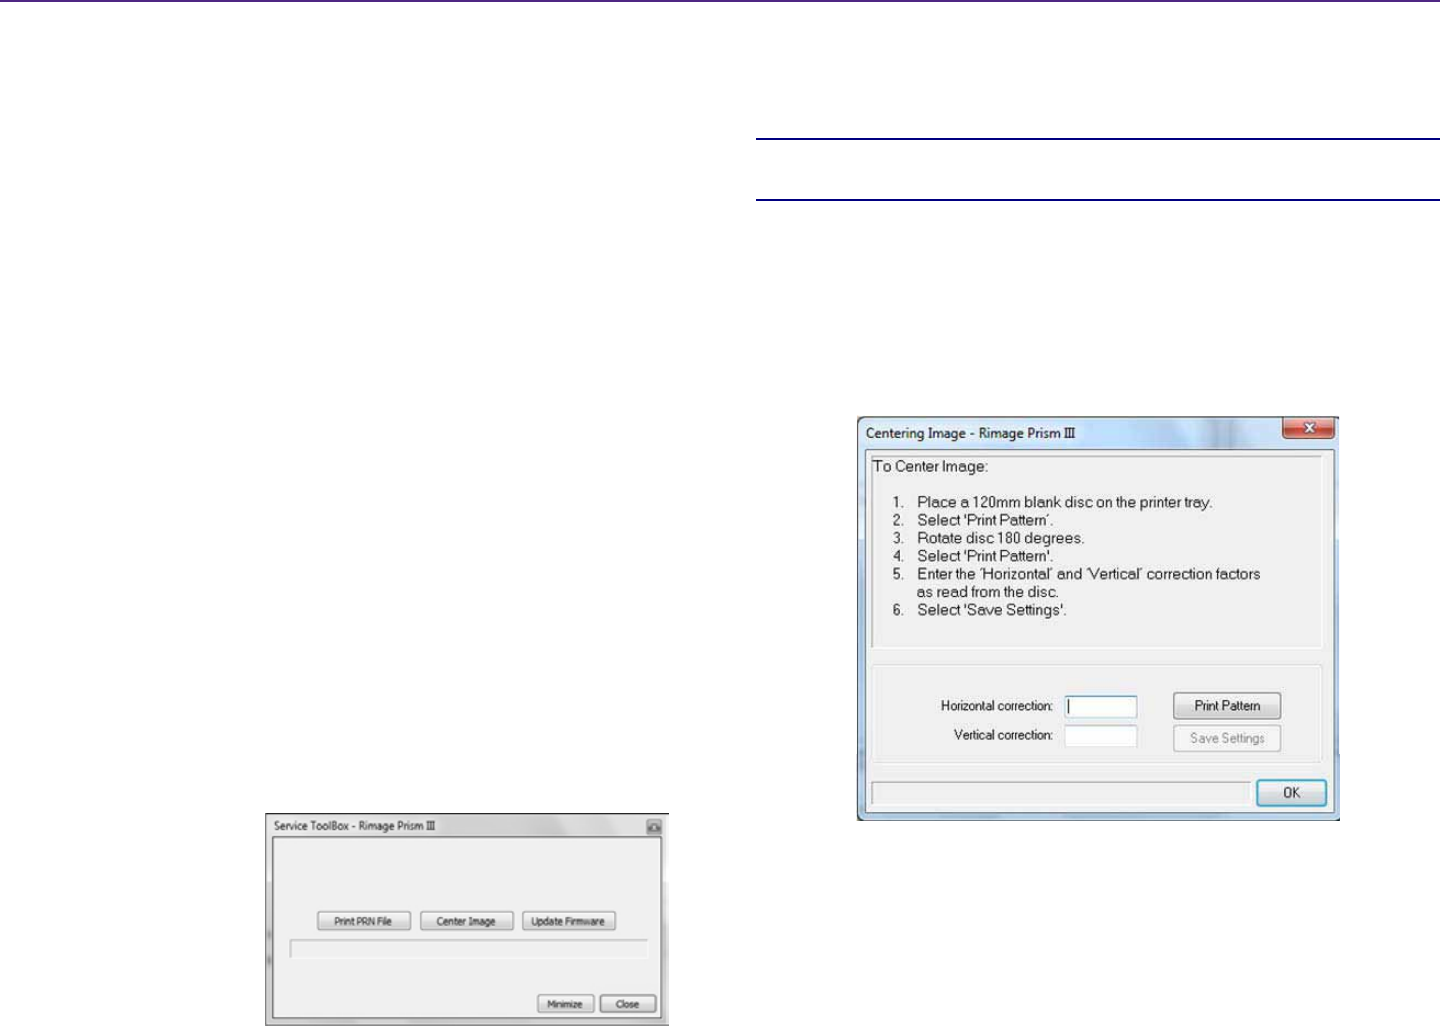
3. Select Service Toolbox.
The Service Toolbox
dialog box opens.
4. Select Print PRN File.
A dialog box launches
that allowes users to
print selected PRN les.
Center the Image on a Disc
The centering image tool is used to adjust the mechanical center of the
printer to match the standard CD Designer template.
Tip: Readjustment is typically not needed unless printer components are
replaced.
1. Access Print Preferences. Refer to page 9.
2. Select the Service tab.
3. Select Service Toolbox.
The Service Toolbox dialog box opens.
4. Select Center Image.
The Centering Image dialog box displays.
SHORT TERM CONFIDENTIAL
11
Set your Printing Preferences
For more information visit rimage.com/support
2001809_A
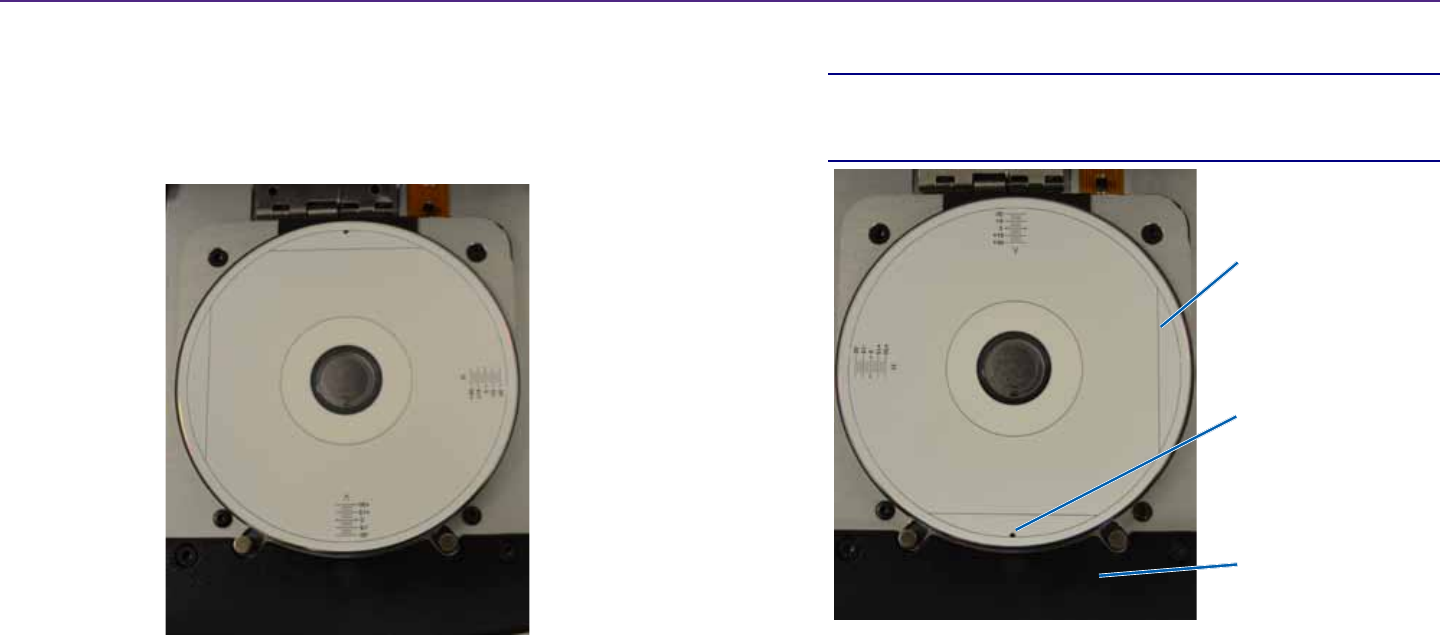
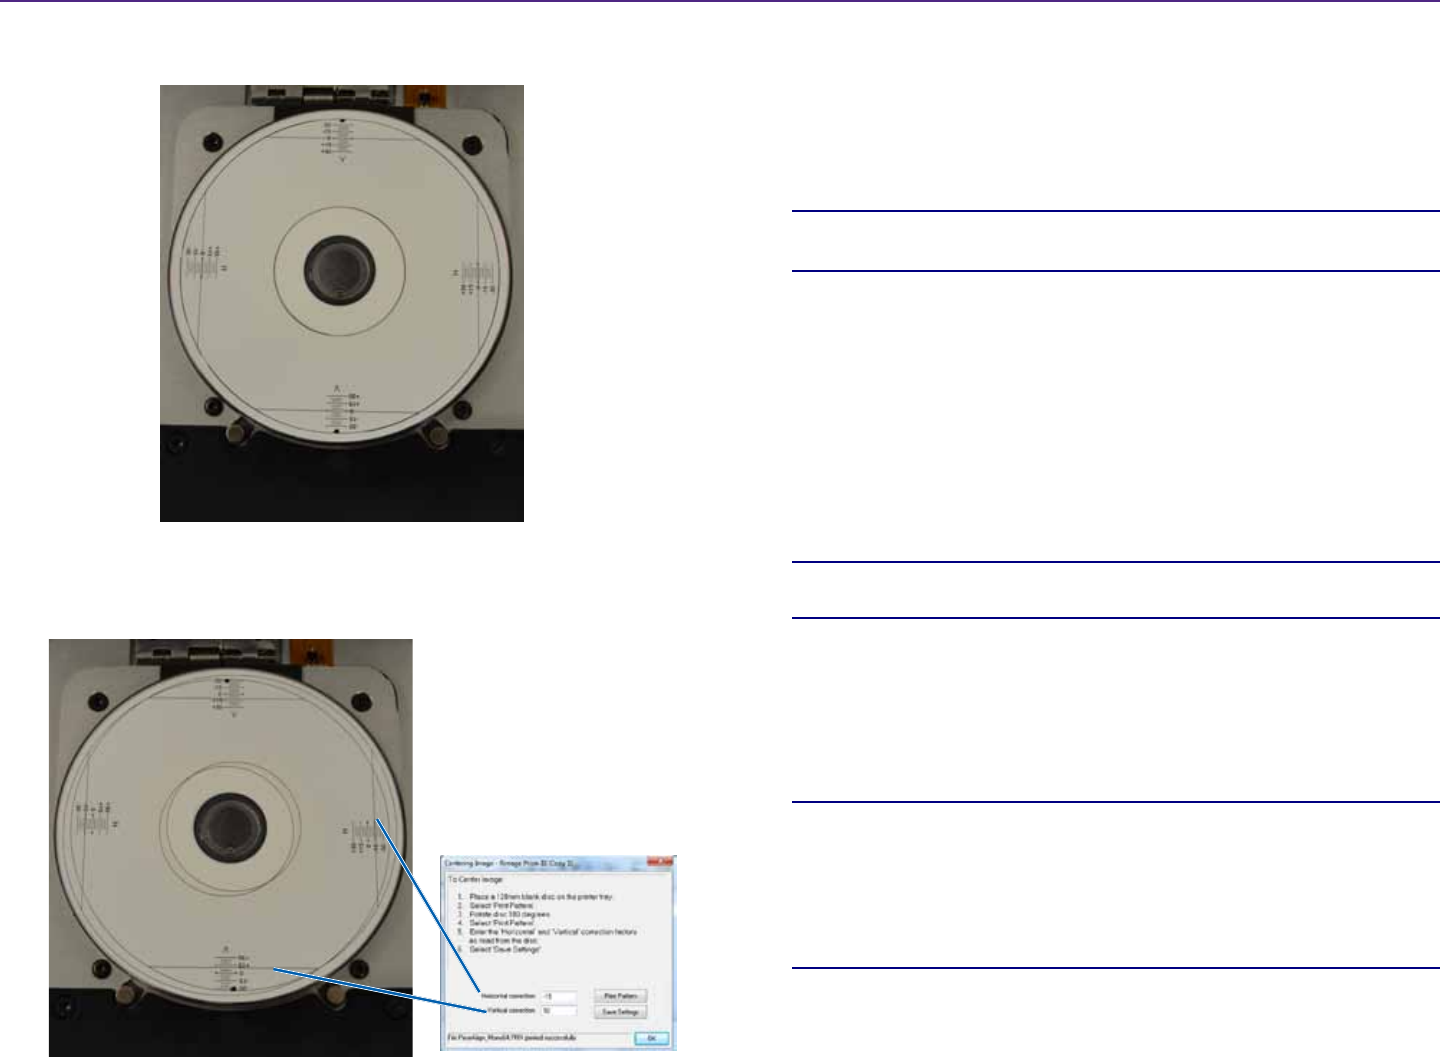
5. Follow the steps outlined on the Centering Image dialog box:
a. Open the printer tray and place one 120mm white disc on the tray.
b. Select the Print Paern buon located on the Centering Image
dialog box.
A paern prints on the disc.
c. Rotate the disc 180 degrees.
Tip: Aer you rotate the disc, the arrow that printed should be in
the center of the bezel and the printed line should align with the
edge of the printer tray.
Align with Edge
of Printer Tray
Bezel
Arrow
SHORT TERM CONFIDENTIAL
12
Set your Printing Preferences
For more information visit rimage.com/support
2001809_A
i. If the lines cross the horizontal and vercal scales at 0, no
adjustment is needed. Press OK.
d. If at least one line crosses away from 0, enter the horizontal and
vercal correcon factors read from the disc. Select Save Sengs.
Update the Firmware
1. Access Print Preferences. Refer to page 9.
2. Select the Service tab.
3. Select Service Toolbox. The Service Toolbox dialog box opens.
4. Select Update Firmware.
Tip: Refer to the Update Firmware for the Rimage Prism III Printer
document for more informaon on updang your rmware version.
Set Device Sengs for Monochrome or CMY Ribbons
You can print in one (monocolor) or more colors. Use these procedures to
set up the Prism to print in color or monocolor and adjust device sengs for
the type of ribbon used.
Print in Monocolor
1. Install a monocolor ribbon in the printer. Refer to the Change the Print
Ribbon secon on page 18.
Tip: The print color is automacally detected and set based on the type
of ribbon installed in the printer.
2. Access Print Properes. Refer to page 9.
3. Select the Device Sengs tab.
4. Select Halone Setup Properes to make changes that aect color
intensity, color balance, or paern sengs.
5. Select Media Type.
Tip: Some DVD media has a raised stacking ring on the printable side of
the disc. The direct thermal print process used in the Prism III printer
cannot print in this area. The DVD with Top Stacking Ring seng causes
the printer to skip over the stacking ring which results in an unprinted
band on the disc. Rimage recomends using discs without the stacking
ring on the printable surface.
6. Set the Master Print Strobe. Refer to the Strobe Sengs secon for
more informaon.
SHORT TERM CONFIDENTIAL

13
Set your Printing Preferences
For more information visit rimage.com/support
2001809_A
7. Select Yes or No under the Double Print opon. The default is No.
Tips:
• If you select Yes under the Double Print opon, the printer will print
each disc twice to darken the image.
• The Double Print opon is only available for monocolor prinng.
8. Select Yes or No under the Detect Media Change opon. The default is
No. Retain the default seng for AutoPrinter or AutoLoader use.
Tip: If you select Yes, the printer will wait for the user to change the disc
before prinng another disc.
9. If you have a standalone Prism III printer, disable the Perfect
Print opon. The Perfect Print opon is only available on Rimage
AutoPrinters.
Tip: Refer to the Rimage AutoPrinter user guide for more informaon on
the Perfect Print opon.
10. Select OK to save the changes and close the Device Sengs window.
Print in Color
1. Install a mulcolor ribbon in the printer. Refer to the Change the Print
Ribbon secon on page 18.
Tip: The print color is automacally detected and set based on the type
of ribbon installed in the printer.
2. Access Print Properes. Refer to page 9.
3. Select the Device Sengs tab.
4. Select Halone Setup Properes to make changes that aect color
intensity, color balance, or paern sengs.
5. Select Media Type.
Tip: Some DVD media has a raised stacking ring on the printable side of
the disc. The direct thermal print process used in the Prism III printer
cannot print in this area. The DVD with Top Stacking Ring seng causes
the printer to skip over the stacking ring which results in an unprinted
band on the disc. Rimage recomends using discs without the stacking
ring on the printable surface.
6. Set the Master Print Strobe. Refer to the Strobe Sengs secon for
more informaon.
7. Enable Color Sub-Strobes. Refer to the Strobe Sengs secon for more
informaon.
Important! Color Sub-Strobes are only available with CMY ribbons and
are disabled by default. The Master Print Strobe has no eect when
Color Sub-Strobes are enabled.
8. Select Yes or No under the Detect Media Change opon. The default is
No.
Tip: If you select Yes, the printer will wait for the user to change the disc
before prinng another disc.
9. If you have a standalone Prism III printer, disable the Perfect
Print opon. The Perfect Print opon is only available on Rimage
AutoPrinters.
Tip: Refer to the Rimage AutoPrinter user guide for more informaon on
the Perfect Print opon.
10. Select OK to save the changes and close the Device Sengs window.
SHORT TERM CONFIDENTIAL

14
Set your Printing Preferences
For more information visit rimage.com/support
2001809_A
Strobe Sengs
Strobe sengs control the amount of energy used to print a pixel. Higher
sengs use more energy. As the sengs increase, the image becomes more
intense and the print-head life decreases. Rimage recommends using the the
lowest strobe seng that provides the desired image quality.
Notes:
• These are recommended sengs for Rimage brand media.
• This may require mulple test prinngs on discs to ne-tune the color
hue. Set Enable Color Sub-Strobes to Enabled to lower an individual
color’s print strobe. For example, this seng can be used to lower the
Yellow Print Strobe seng when trying to eliminate a halo eect on a
printed disc.
1. Select
2. Set the Master Print Strobe seng.
Note: Rimage recommends the following sengs for Rimage-brand
media:
• Media surface: Thermal-printable media
• Print strobe seng for black ribbon: 325 - 400
• Print strobe seng for red ribbon: 375 - 425
• Print strobe seng for blue ribbon: 350 - 400
3. Select Enabled to Enable Color Sub-Strobes.
Important! Color Sub-Strobe sengs are only available with CMY
ribbons.
4. Select OK to save the changes and close the Device Sengs window.
SHORT TERM CONFIDENTIAL

15
Maintain the Prism III Printer
For more information visit rimage.com/support
2001809_A
Use the informaon in this secon to keep your Prism III printer in opmal
operang condion.
Overview
Regular preventave maintenance of your Prism III printer can help to
always produce clearly printed labels. Maintenance
involves cleaning the system.
Cauonary Informaon
nCauon: To avoid damaging the Prism III printer during maintenance:
• Never use oils, silicone, or other lubricants on any part of the Prism.
• Use only non-abrasive cleaners to wipe down the surfaces of your
Prism printer.
• Avoid pouring cleaners directly onto the Prism printer. Instead, apply
the cleaner to a lint-free cloth.
Preventave Maintenance Schedule
Use the following table as a guideline for how oen to perform preventave
maintenance tasks.
Important! Failure to follow the maintenance schedule outlined to the right
may void your warranty.
Tools Task Frequency Instrucons
• Lint-free
cloth
• Non-
abrasive,
all-
purpose
cleaner
Clean the
printer
exterior.
Weekly 1. Power o the Prism.
2. Disconnect the power
cord.
3. Wipe down the
exterior of the printer.
• New print
ribbon
Change
the print
ribbon.
Monochrome black:
2100 discs
Monochrome red:
2100 discs
Monochrome blue:
2100 discs
3-color panel (CMY):
500 discs
Refer to the Change the
Print Ribbon secon on
page 18.
Print head
cleaning kit
Clean
the print
head.
At every ribbon change
or as needed
Refer to the Clean the
Print Head secon on
page 16.
SHORT TERM CONFIDENTIAL

16
Maintain the Prism III Printer
For more information visit rimage.com/support
2001809_A
Clean the Print Head
Clean the print head at every ribbon change, or more oen if streaks start to
appear or the ribbon has torn.
There are two methods for cleaning the Prism III print head—the Prism
cleaning kit method, and the alternate method. The alternate method
can be used when a cleaning kit is not available. This secon provides
instrucons for both methods.
Note: If the Prism printer is connected to an autoloader or AutoPrinter, it
may be easier to remove the printer from the system before you begin the
cleaning process.
• Power o the printer.
• Remove all cables and cords from the back of the printer. Refer to the
Idenfy the Parts of the Prism Printer secon on page 6.
• Remove the printer from the system and place it on a at surface near a
power outlet.
• Connect a separate power cord from the back of the printer to a power
outlet.
Clean the Prism III Print Head Using a Prism Cleaning Kit
If you have a Prism cleaning kit, use the following procedure to clean the
print head.
#Required tools:
• Prism cleaning kit (PN 210555-001)
• One disc
• 99% Isopropyl alcohol
• Coon swabs
1. Prepare the Prism for cleaning.
a. Power o the Prism.
b. Remove the top cover.
c. Remove the ribbon. Refer to the Change the Print Ribbon secon on
page 18.
2. Begin cleaning mode.
a. While pressing and holding the operator buon, press the power
switch to power on the Prism.
b. When the Disc Not Present indicator light (the second light on the
operator panel) ashes, release the operator buon. The printer
tray opens.
The printer is in cleaning mode when the operator buon and Disc
Not Present indicator lights (the top two indicator lights on the
control panel) blink rapidly.
3. Prepare the cleaning pad.
Note: The cleaning pad is included in the Prism cleaning kit.
a. Remove the adhesive backing from the cleaning pad.
b. Aach the cleaning pad to the top of a disc.
c. Make sure that the edges of the pad are aligned with the disc.
d. Place the cleaning pad with the aached disc on the printer tray.
Make sure the disc is aligned with the retaining pins on the printer
tray.
e. Press the pad down and over the sensor on the printer tray.
f. Place 5 drops of isopropyl alcohol on the cleaning pad.
Pad Pressed Down Over
Sensor
Cleaning Pad with Aached
Disc
Printer Tray
SHORT TERM CONFIDENTIAL
17
Maintain the Prism III Printer
For more information visit rimage.com/support
2001809_A
4. Clean the print head.
a. Press the operator buon to close the printer tray and start the
cleaning cycle. When the cleaning cycle is complete, the printer tray
opens.
b. If necessary, repeat step a to begin the cleaning cycle again.
c. When the print head is clean, remove the cleaning pad and
aached disc from the printer tray.
5. Clean the front two ribbon guides.
a. Apply isopropyl alcohol to a clean coon swab.
b. Run the swab against the ribbon guides to clean them.
6. Prepare the Prism for use.
a. Press the power switch o and on to exit cleaning mode and reset
the printer.
b. Reinstall the ribbon. Refer to the Change the Print Ribbon secon on
page 18.
c. If you removed the printer form an autoloader or AutoPrinter, place
the printer on the system and connect all cables and cords. Refer to
the Idenfy the Parts of the Prism III Printer secon on page 6
Note: If the prinng pad on the tray is wet from cleaning, allow the
prinng pad to completely dry before using the Prism.
Front Ribbon
Guides
Cleaning Pad
Cleaning
Soluon
Clean the Print Head – Alternate Method
If a cleaning kit is not available, use the following procedure to clean the
Prism print head.
#Required tools:
• 99% Isopropyl alcohol
• Coon swabs
1. Prepare the Prism III.
a. Power on the Prism III.
b. Press the operator buon to open the printer tray.
c. Power o the Prism III.
d. Remove the top cover.
e. Remove the ribbon. Refer to the Change the Print Ribbon secon on
page 18.
2. Clean the print head.
a. Apply isopropyl alcohol to a coon swab.
b. Insert the coon swab into the drawer opening.
c. Li the swab upward as you run the swab against the convex
surface of the print head.
Convex Surface of Print Head
Important! The boom of the print head is shown to illustrate the area to
clean. Do not remove the print head from the printer.
SHORT TERM CONFIDENTIAL
18
Maintain the Prism III Printer
For more information visit rimage.com/support
2001809_A
3. Clean the front two ribbon guides.
a. Apply isopropyl alcohol to a clean coon swab.
b. Run the swab against the ribbon guides to clean them.
4. Aer the alcohol on the print head dries, prepare the Prism for use.
a. Install the ribbon. Refer to the Change the Print Ribbon secon on
page 18.
b. If your removed the printer from an autoloader or AutoPrinter,
place the printer on the system and connect all cables and cords to
the back of the printer. Refer to the Idenfy the Parts of the Prism
Printer secon on page 6.
Change the Print Ribbon
Important! The Prism III printer only operates with genuine Rimage ribbons.
Rimage supports only the use of Rimage brand ribbons in our printers.
Printer issues that occur as a result of using ribbons by manufacturers other
than Rimage are not included under your Rimage warranty or maintenance
agreement.
Tip: If ribbons are stored in an environment much dierent from that of the
printer, allow me for them to become acclimated to the new environment.
Allow more me for greater temperature and/or humidity dierences.
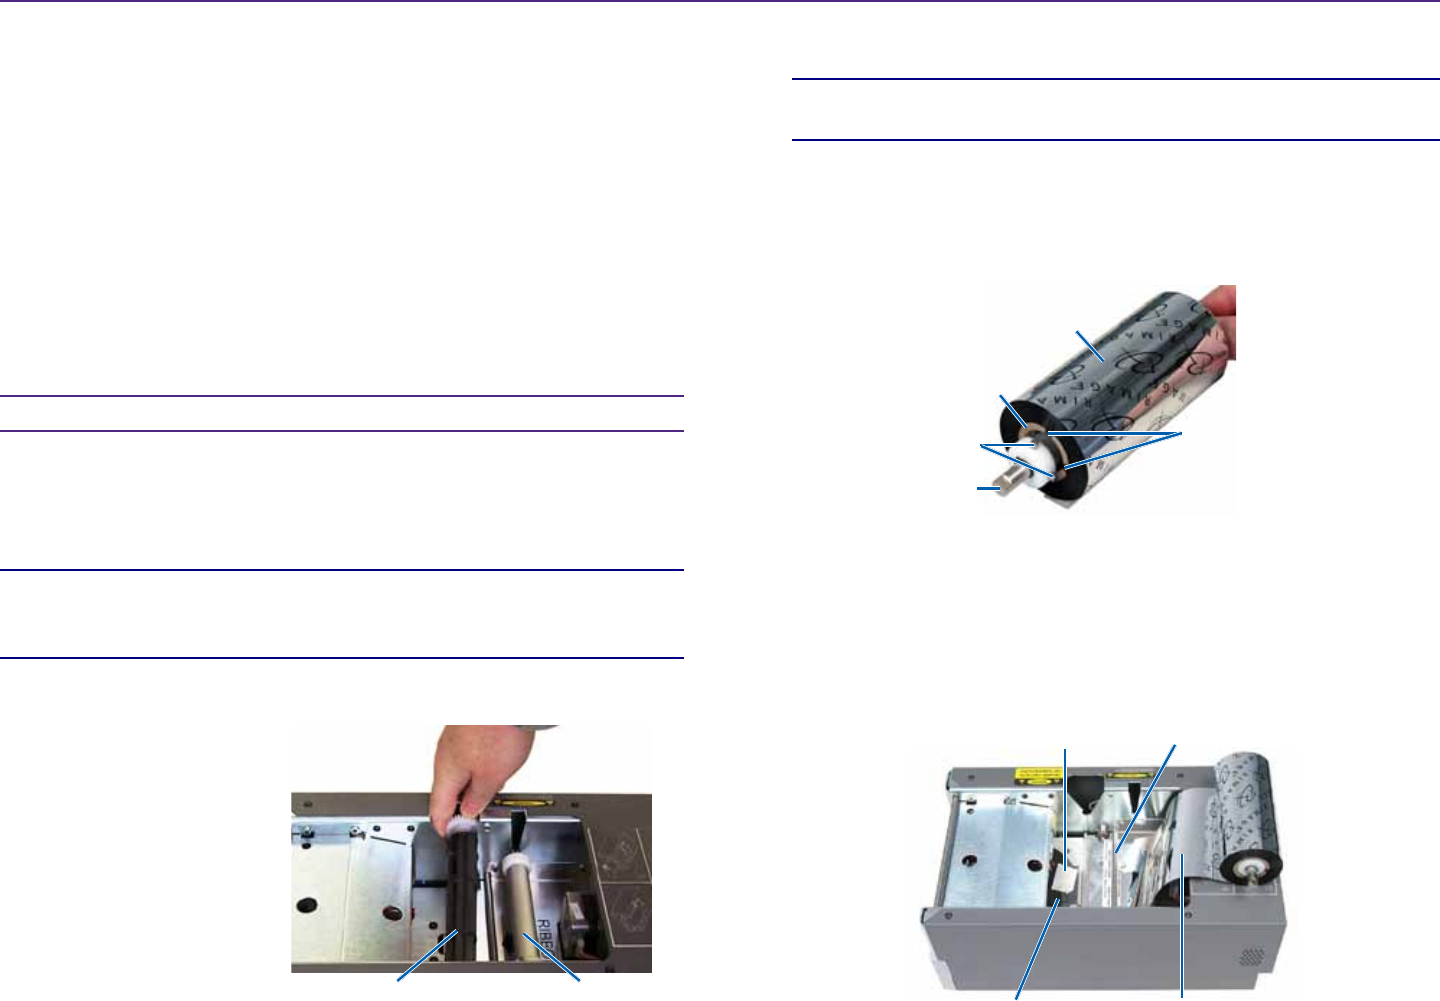
1. Access the ribbon area.
a. Power on the Prism.
b. Remove the top
cover from the
printer.
c. Li up the take-up
roller so that the
end with the gear
comes up rst,
then li the take-
up roller out of the
printer. Take-up Roller Supply Roller
d. Li up the supply roller to remove it.
Note: If you are replacing the ribbon, now is a good me to clean the
print head. Refer to the Clean the Print Head secon on page 16
2. Load the print ribbon.
a. Slide the print ribbon onto the supply roller.
b. Align the two notches of the cardboard core with the metal pins on
the supply roller.
c. Press the operator buon to close the print tray.
d. Peel the ribbon leader from the supply ribbon.
e. Slide the ribbon leader under the ribbon guide and into the ribbon
installaon clamp.
Print Ribbon
Notches
Cardboard Core
Metal Pins
Supply Roller
Ribbon Installaon
Clamp Ribbon Guide
Ribbon LeaderPrinter Tray
SHORT TERM CONFIDENTIAL

19
Maintain the Prism III Printer
For more information visit rimage.com/support
2001809_A
3. Install the supply roller as shown. Leave some slack in the ribbon leader.
a. Press the operator
buon unl the printer
tray comes out. The
ribbon is threaded to the
front of the Prism.
b. Remove the ribbon
leader from the
installaon clamp.
c. Remove the adhesive
strip from the ribbon
leader.
4. Load the take-up roller.
a. Place the new empty cardboard core on the take-up roller. It is
designed to t only one way.
b. Place the take-up roller on top of the ribbon leader as shown.
Important! The gear must be on the correct side.
Supply Roller
Cardboard Core
Ribbon Leader
Gear
Adhesive Strip
c. Pull the ribbon leader up over the cardboard core.
d. Aach the adhesive strip to the cardboard core so that the edges
on the ribbon leader are aligned to the edges of the cardboard core.
Note: The arrow in the
photo illustrates the
wrap direcon.
e. Roll the ribbon leader
so that it is wrapped
only once around the
roller.
Important! Do not roll past the marking on the leader that states
STOP - Wind Leader Onto Take-up Core Stopping Here for
monocolor ribbons. If you are using a CMY ribbon, roll up to the end
of the yellow leader.
SHORT TERM CONFIDENTIAL

20
Maintain the Prism III Printer
For more information visit rimage.com/support
2001809_A
5. Install the take-up roller in the Prism and press down rmly unl the
take-up roller snaps into place. The ribbon should be ght and there
should be no creases in the ribbon.
Important! Do not roll the STOP – Wind Leader Onto Take-up Core
Stopping Here marking on the ribbon leader onto the take-up roller.
The marking should not be past the point shown in the picture. If the
marking is on the roller, pull the take-up roller out and roll back the
ribbon. Roll the supply roller back to take up the slack.
6. Press the operator buon and hold for 5 seconds to allow the printer to
validate the ribbon. If the ribbon is valid the printer advances and the
Error indicator light stops blinking.
Note: During the ribbon validaon process, the ribbon cycles past the
ribbon leader. Aer the ribbon validaon process is complete, make sure
that the ribbon is wound ght.
7. Install the top cover.
Ribbon Leader
Take-up Roller
Marking
SHORT TERM CONFIDENTIAL