Ring BHARG031 Ring User Manual Ring Doorbell Users Manual 10 13
Bot Home Automation, Inc. Ring Ring Doorbell Users Manual 10 13
Ring >
User manual

VIDEO DOORBELL
Quick Install Guide
TABLE OF CONTENTS
COMPONENTS................................................... 3
BATTERY CHARGING....................................... 6
WI-FI SETUP ...................................................... 7
INSTALLATION................................................... 7
HARDWIRING .................................................... 8
ANSWERING A CALL....................................... 9
MAC ID: XXXXXXXXXXX
S/N: XXXXXXXXXXX
Product name: Ring
FCC ID: 2AEUPBHARG031
Model name: Video Doorbell
Power input: 8-24 VAC, 5Vdc 1 A
1
3
4
6
7
8
1. Wide Angle HD Camera
2. Microphone
3. LED Ring
4. Push Button
5. Speakers
2
5
6. Setup Button
7. Micro USB Charging Port
8. MAC Address
FRONT BACK2 3 4
With Ring, you’re
always home.
9
10
11
9. Doorbell Wire Terminals
10. Mounting Hooks
11. Wire Management Hooks
MOUNTING BRACKET 5
WI-FI SETUP
Download the Ring app from the App Store
Google Play or Windows Store. Open the
Ring app and select Setup Device. Follow
the in-app instructions to set up your Ring.
You will need your network information
(SSID and password) to complete your
Ring setup.
INSTALLATION
1. Remove doorbell button and power off your
transformer (for wired installation only).
2. Line up the mounting bracket using the provided
mounting level.
4. Install the mounting bracket using the provided
screwdriver bit, handle and drill bit.
Brick - use provided screws and anchors
Concrete - use provided screws and anchors
Stucco - use provided screws and anchors
Wood - use provided screws
Vinyl - use provided screws
5. Remove the mounting level.
6. Connect your doorbell wiring to the terminal screws
located on the mounting bracket
(for wired installation only).
7. Place the device on the mounting bracket.
8. Tighten the security screws at the bottom of the device
using the proprietary screwdriver bit. Please do not
over-tighten the security screws.
9. Provide power back to your transformer
(for wired installation only).
HARDWIRING REQUIREMENTS
If powering off doorbell wiring, the wiring
must be connected to a transformer and a
doorbell with a voltage of 8VAC - 24VAC to
ring your doorbell chime.
BATTERY CHARGING
Charge your device using a USB-compatible wall charger
or laptop. To ensure your device is fully charged, charge
the device prior to Wi-Fi setup and installation.
LED RING LIGHTING SEQUENCES
Battery Charging
Battery Charging
Complete
Call Initiated
Call Connected
Hardwired
Setup Mode
Software Update
Factory Reset
LED Ring
spins blue.
LED Ring stays
fully lit blue.
LED Ring spins
blue, then white.
LED Ring stays
fully lit blue.
LED Ring
spins white.
LED Ring
blinks white.
LED Ring
blinks blue.
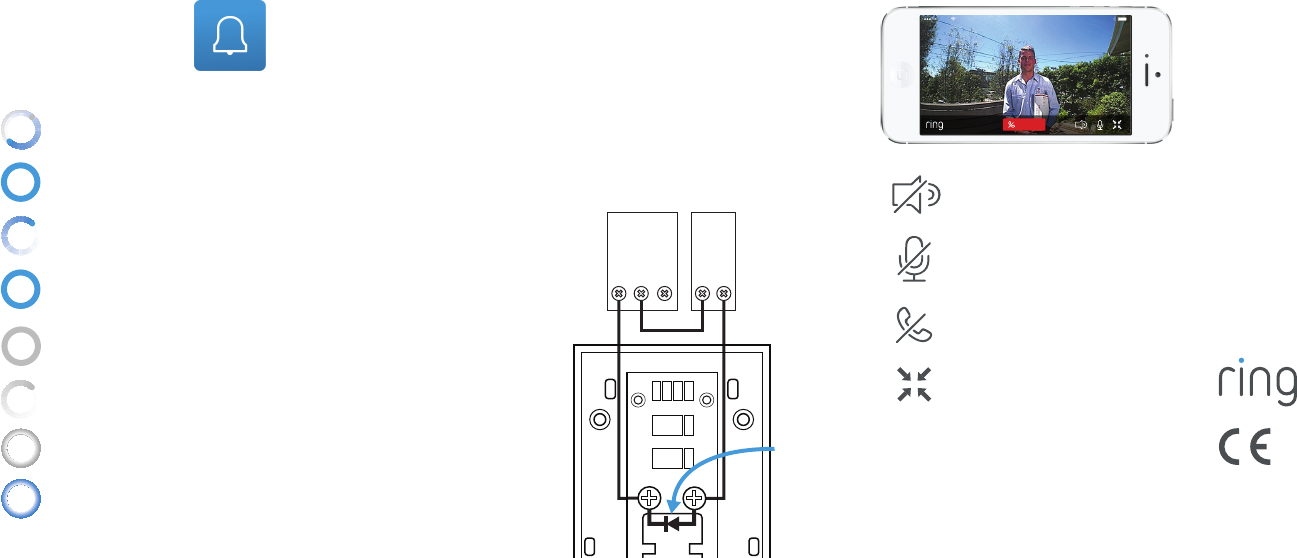
ANSWERING A CALL
Mute Volume
Disable Microphone
End Call
Call Zoom
To disable notications for your Ring device,
select it from “My Devices”. Select “Device
Settings” and toggle notications off.
6 7 8 9
If your chime is electronic (e.g. plays a melody), you
may need to install a diode, which is commonly found
inside your current doorbell button, or check with your
doorbell manufacturer.
Connect the diode to the terminals with the arrow
on the diode facing towards the doorbell chime as
shown below.
LED Ring stays
dimly lit white.
For additional product information and
helpful tips, check out our support
forum at:
http://ring.com/help
For immediate assistance,
please call us at:
DOMESTIC: 1-800-656-1918
INTERNATIONAL: +1 310-929-7085
7 days a week
CUSTOMER SUPPORT
1523 26th St.
Santa Monica, CA 90404
10
Protect the device from direct sunlight. Install the device at dry locations and protect it
against rain and humidity. The device may not get contact to salt water or other
conductive liquids. The device must be charged only within a building in a dry state.
Hereby, Bot Home Automation, declares that this consumer
electronic is in compliance with the essential requirements
and other relevant provisions of Directive 1999/5/EC. The
declaration of conformity may be consulted at
www.ring.com/DoC.pdf.
AT&T
11:56 AM
END CALL
Front
Transformer
Rear
TransformerElectronic
Chime
AC
IN
Diode
FCC Statement
This equipment has been tested and found to comply with the limits for a Class B digital device, pursuant to part 15 of the FCC Rules. These limits are designed to provide reasonable protection against harmful interference in a
residential installation. This equipment generates, uses and can radiate radio frequency energy and, if not installed and used in accordance with the instructions, may cause harmful interference to radio communications. However,
there is no guarantee that interference will not occur in a particular installation. If this equipment does cause harmful interference to radio or television reception, which can be determined by turning the equipment off and on, the
user is encouraged to try to correct the interference by one or more of the following measures:
—Reorient or relocate the receiving antenna.
—Increase the separation between the equipment and receiver.
—Connect the equipment into an outlet on a circuit different from that to which the receiver is connected.
—Consult the dealer or an experienced radio/TV technician for help.
FCC Radiation Exposure Statement
This device complies with FCC radiation exposure limits set forth for an uncontrolled environment and it also complies with Part 15 of the FCC RF Rules. This equipment must be installed and operated in accordance with
provided instructions and the antenna(s) used for this transmitter must be installed to provide a separation distance of at least 20 cm from all persons and must not be co-located or operating in conjunction with any other antenna
or transmitter. End-users and installers must be provided with antenna installation instructions and consider removing the no-collocation statement.
This device complies with Part 15 of the FCC Rules. Operation is subject to the following two conditions:
(1) this device may not cause harmful interference, and
(2) this device must accept any interference received, including interference that may cause undesired operation.
Caution!
Any changes or modifications not expressly approved by the party responsible for compliance could void the user's authority to operate the equipment.