Ringway Tech AG-50 DIGITAL PIANO User Manual AG 30
Ringway Tech(Jiangsu) Co.,Ltd. DIGITAL PIANO AG 30
UserManual.wiki
>
Ringway Tech
>
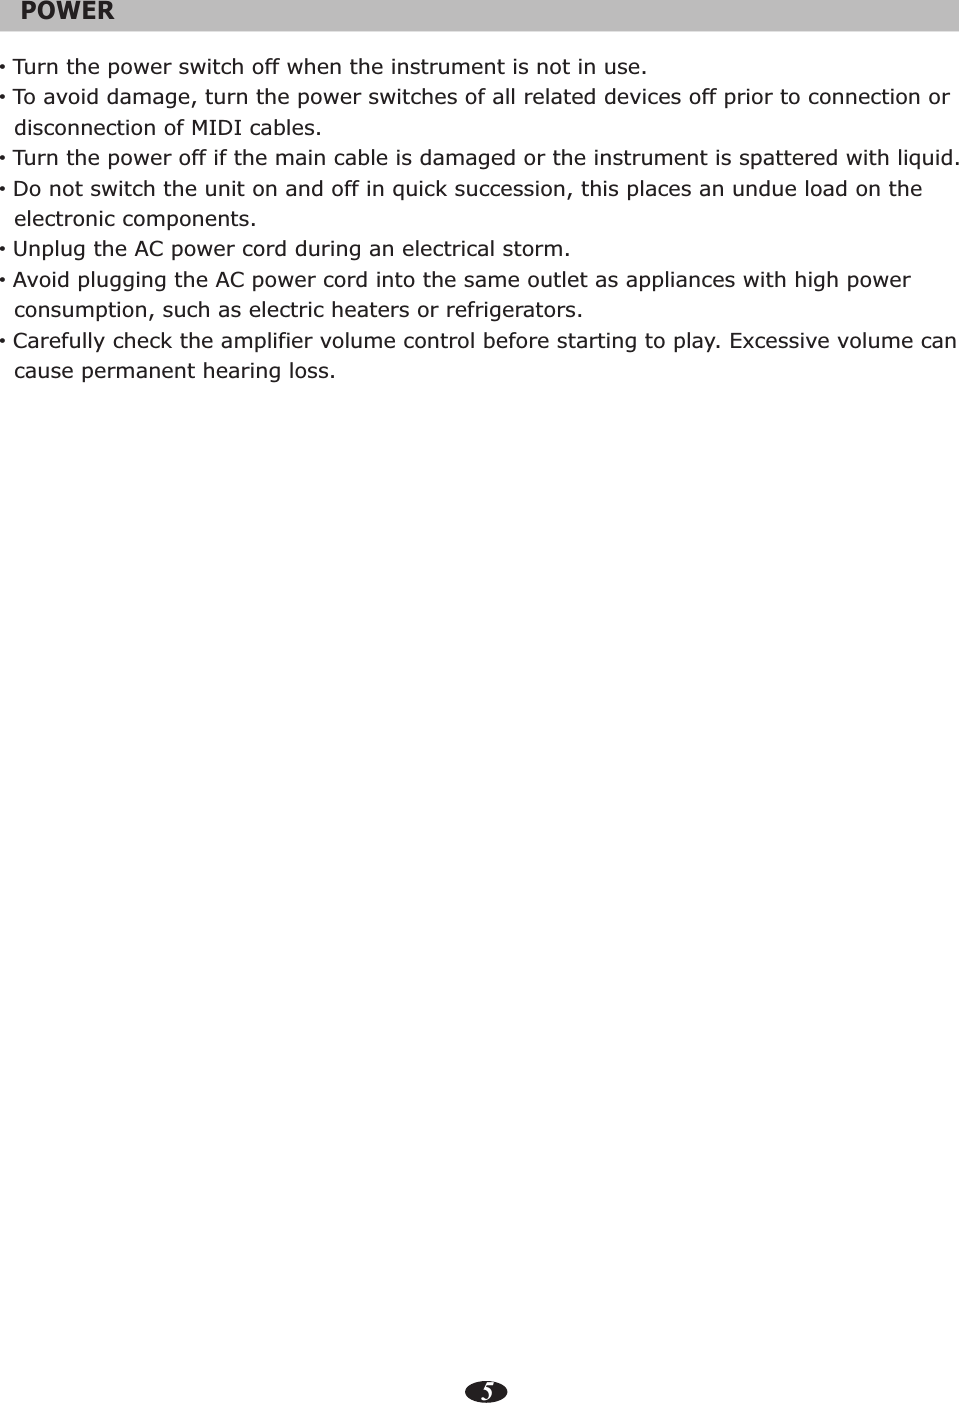
AG 50 User Manual
User Manual
Navigation menu
Upload a User Manual
Namespaces
Wiki Guide
HTML
PDF
Info
Views
User Manual
Discussion / Help
Navigation
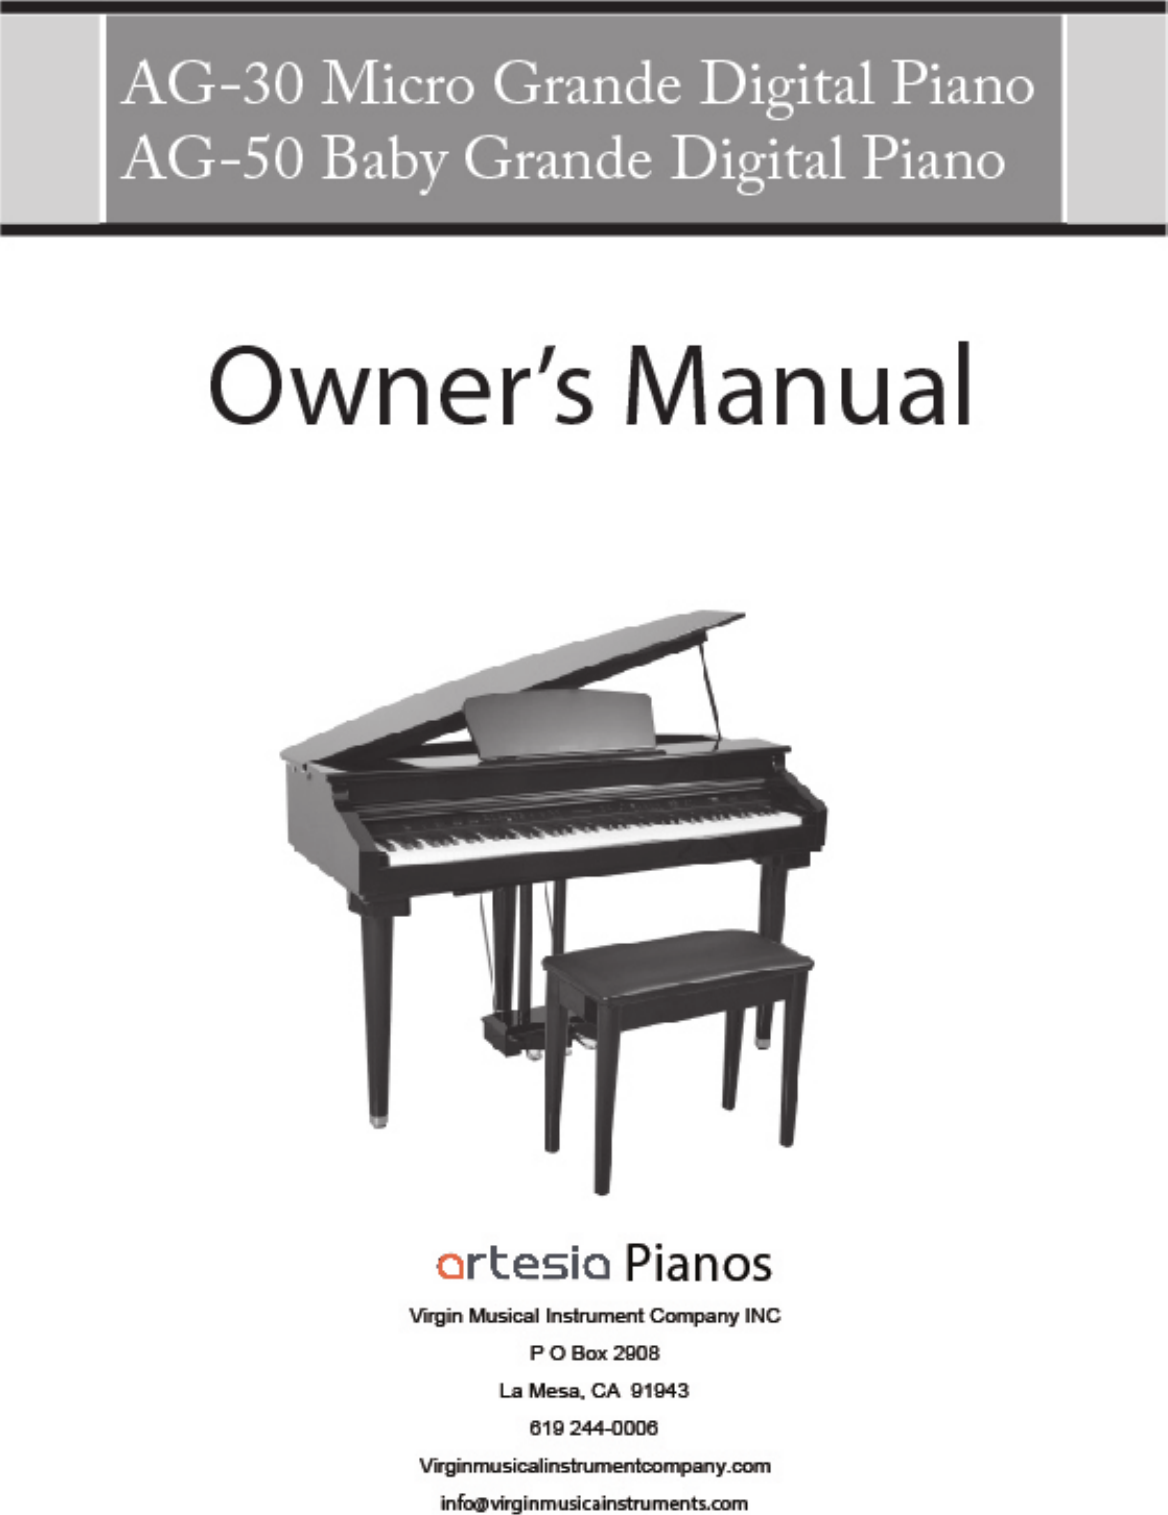


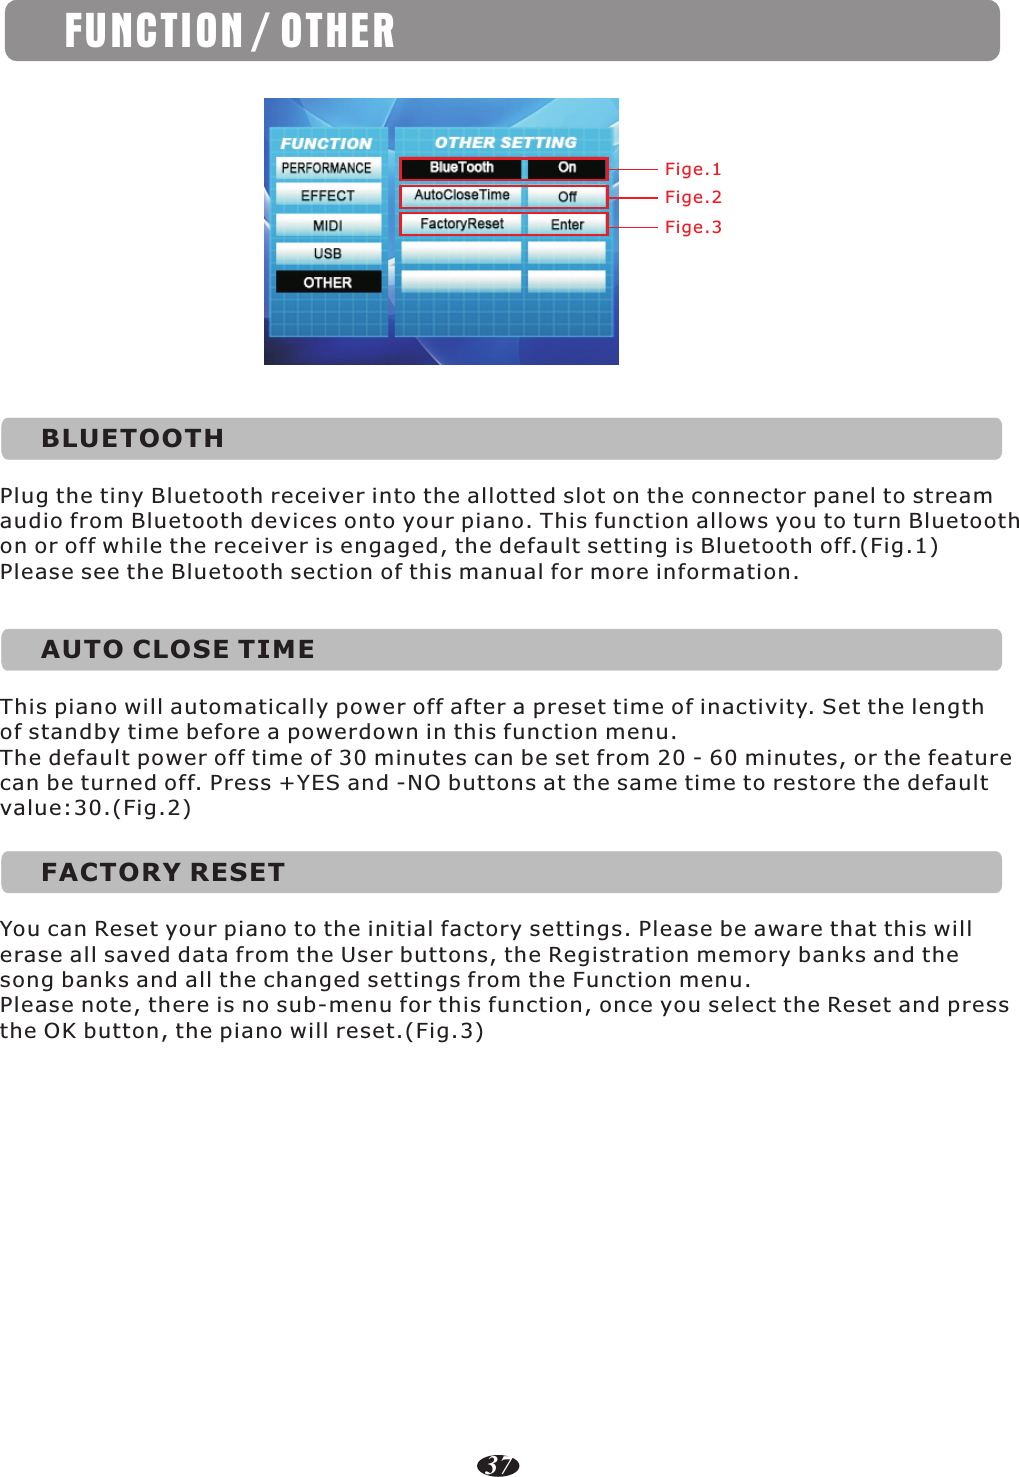
![USB PLAY MODEThis function allows you to select the mode for the USB playback of the piano.You can select Single, Play All or Random. The default value is Play All Songs.(Fig.1)Fige.1Fige.2Fige.3Fige.4Fige.5USB PLAY SPEEDThis function allows you to select the play back speed for USB on the piano.You can select a speed of 50 to 200%, press +YES and -NO buttons at the same time to restore the default value:100.(Fig.2)AUTO RECORD TRACKRECORD MAIN TRACKRECORD SPLIT TRACKFige.6Fige.7RECORD DUAL TRACKUSB MUTE TRACKThis function allows you to mute a track on the USB play back of the piano. You can mute any track from 01-16 by selecting it in this function menu. The default is all tracks no.Please note, this sub-menu does require an additional confirmation of the track to mute.Use the +YES/ -NO buttons to select a track from 01-16 tracks.Press the OK button to select the YES or NO.(Fig.7)FUNCTION / USB36This function allows you to turn on or turn off the auto record track.You can select the track on/off by presspress +YES and -NO buttons.You can press [+/YES] or [-/NO] buttons to select the main track(1-16,off ).You can select the track on/off by presspress +YES and -NO buttons .You can press [+/YES] or [-/NO] buttons to select the split track(1-16,off).You can select the track on/off by presspress +YES and -NO buttons.You can press [+/YES] or [-/NO] buttons to select the dual track(1-16,off ).](https://usermanual.wiki/Ringway-Tech/AG-50/User-Guide-3099312-Page-39.png)
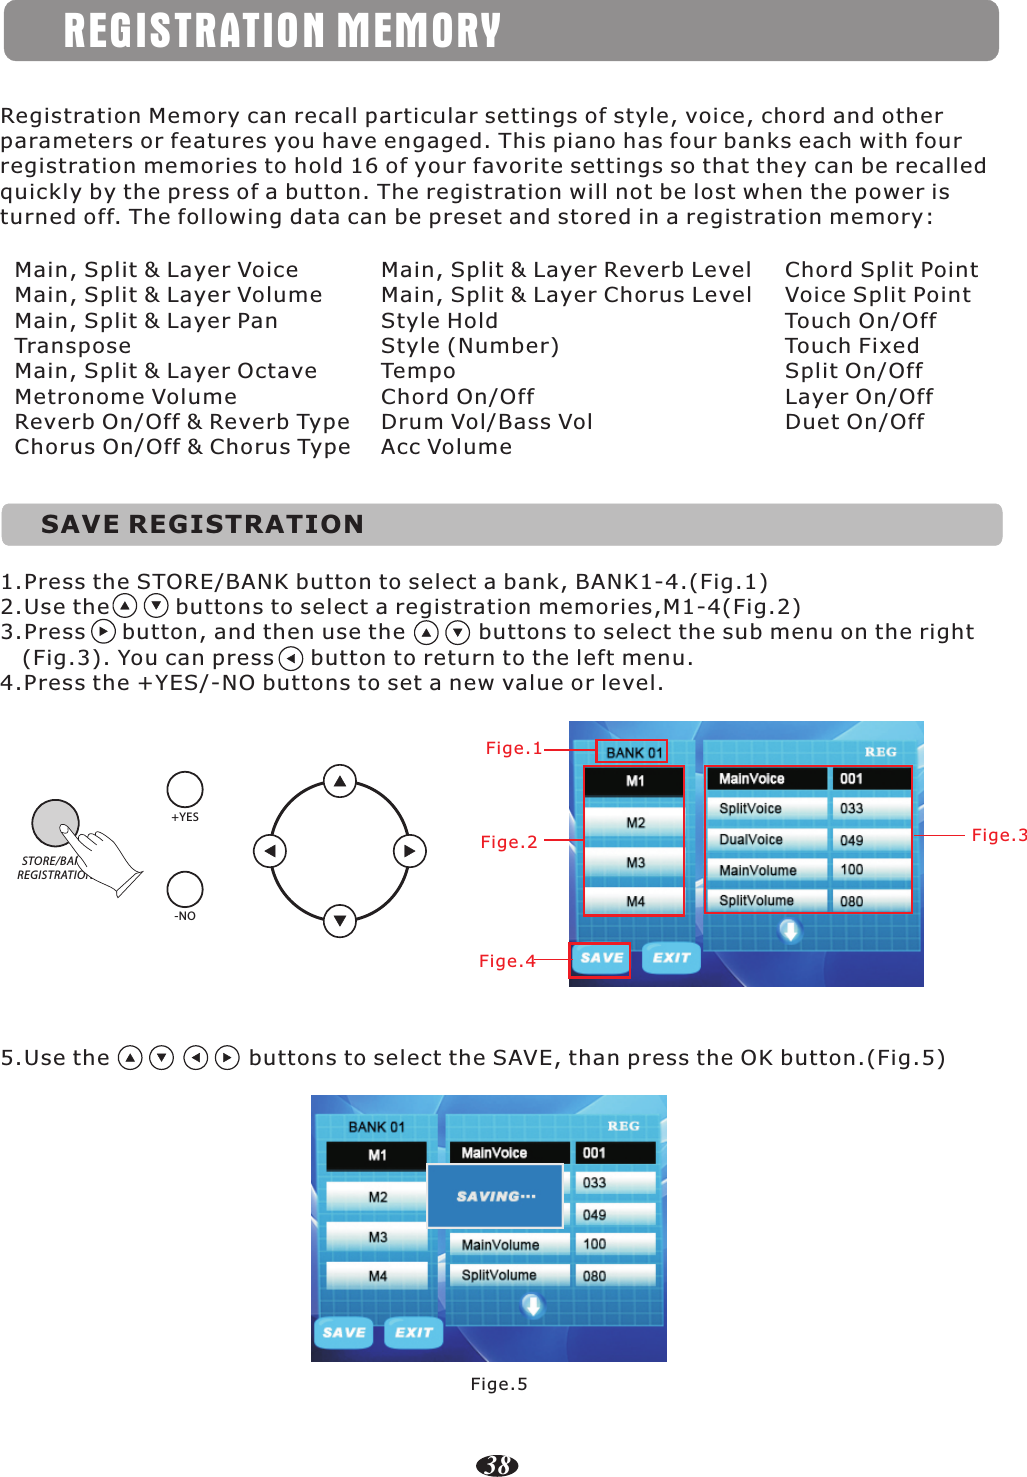
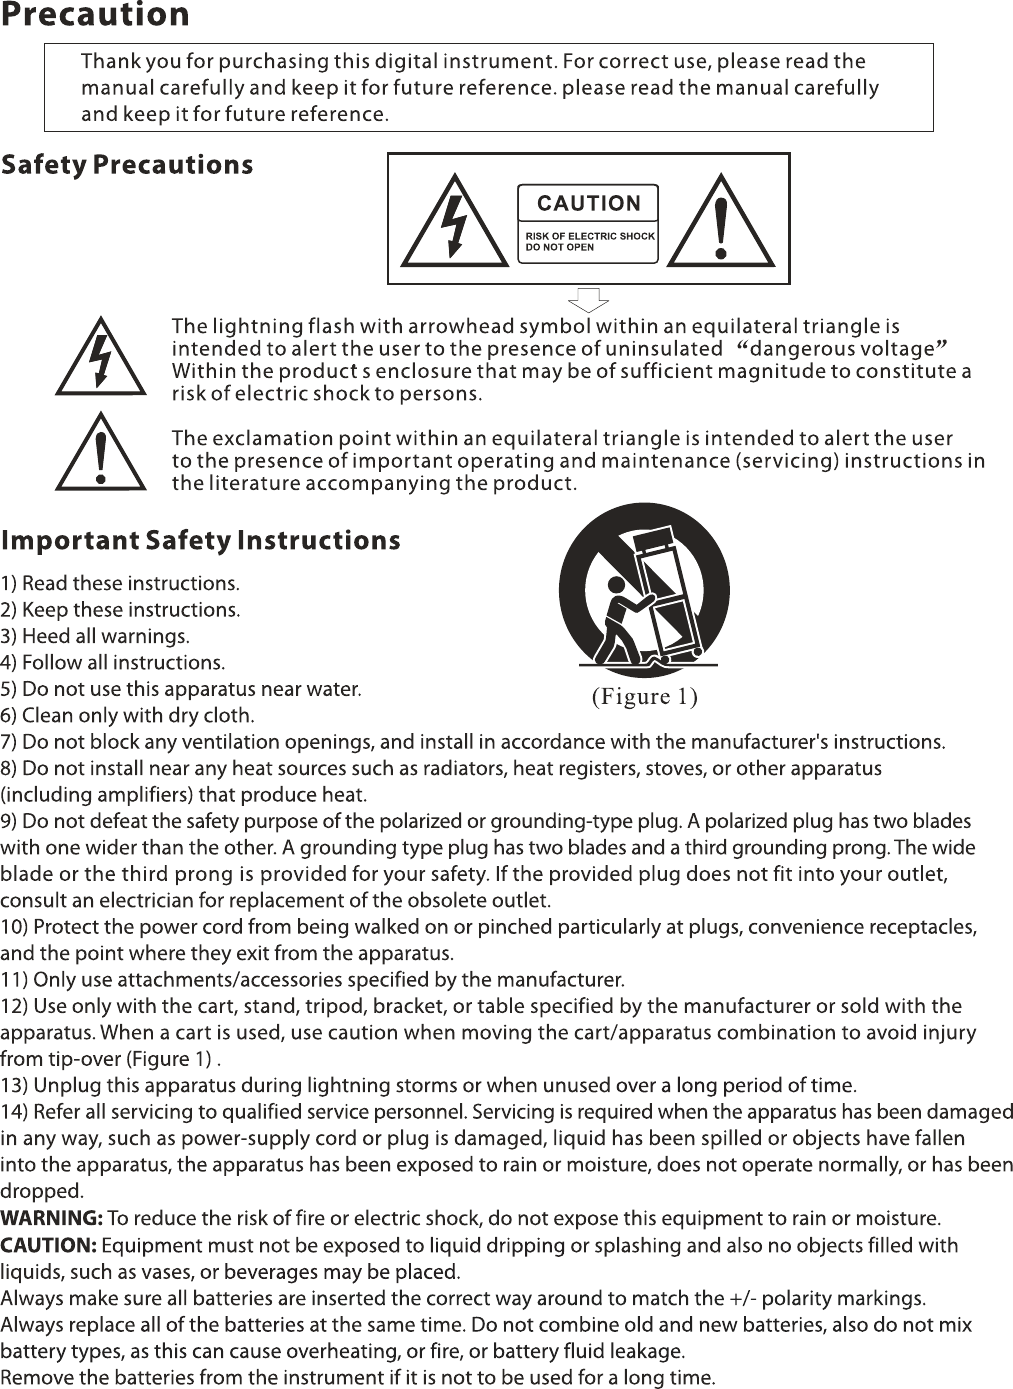
![RECORDRECORDThis digital piano lets you record your performances and Registration setting to a USBDisk.Each user song lets you record up to sixteen independent tracks. These include notonly the voices for the keyboard performance,but also the auto accompaniment parts.It provides two different ways to record: USB Recording and Melody Track Recording.Melody Track Recording, which can save into local memory.Two Tracks recording can be save into USB disk as a MIDI File and the MIDI file in the USBdisk can be load to local memory.■ USB Recording1.Insert the USB Disk into the USB Terminal and the indicator of the [MEMORY] button will light up.If your USB disk is plugged in, but the [MEMORY] button indicator is turned off, then you can press the [MEMORY] button again to restore the USB mode.TRACK 1 TRACK 2DELETEMULTIRECORD SELECTIONLEFT RIGHTSONGRECORDMEMORYPLAY/STOPTRACKTEMPO METROPress the [RECORD] button and the buttons indicator is flashing, then you can start recording.402.Start RecordingPress [RECORD] button again to stop recording and the indicator will be light.Recording stops and your performance is written to the song. The song to which yourperformance is recorded is automatically named”XXX:SONG XXX” (XXX indicates this file`s sequence Num in USB Disk.XXX indicates the recording file number). You can editthe song as desired by computer or midi edit soft.3.Stop RecordingDELETEMULTIRECORD SELECTIONRECORDMEMORYPLAY/STOPTRACK](https://usermanual.wiki/Ringway-Tech/AG-50/User-Guide-3099312-Page-43.png)
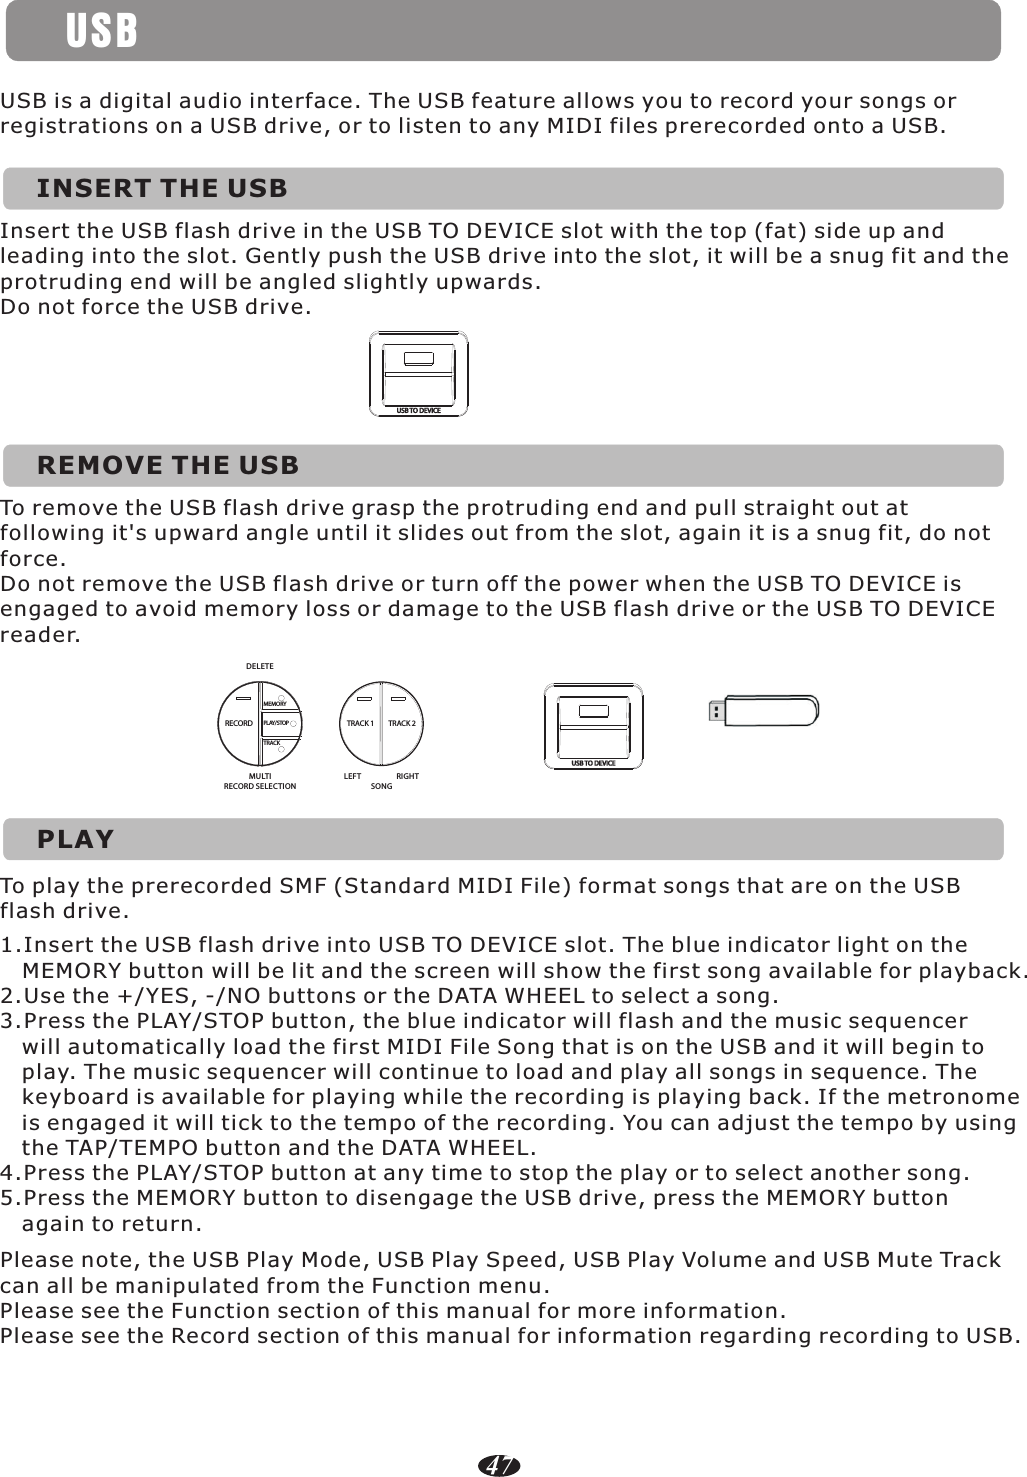
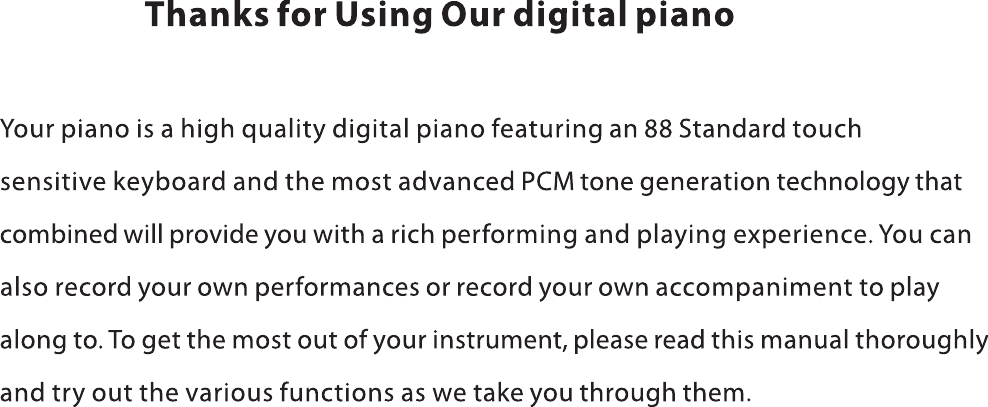
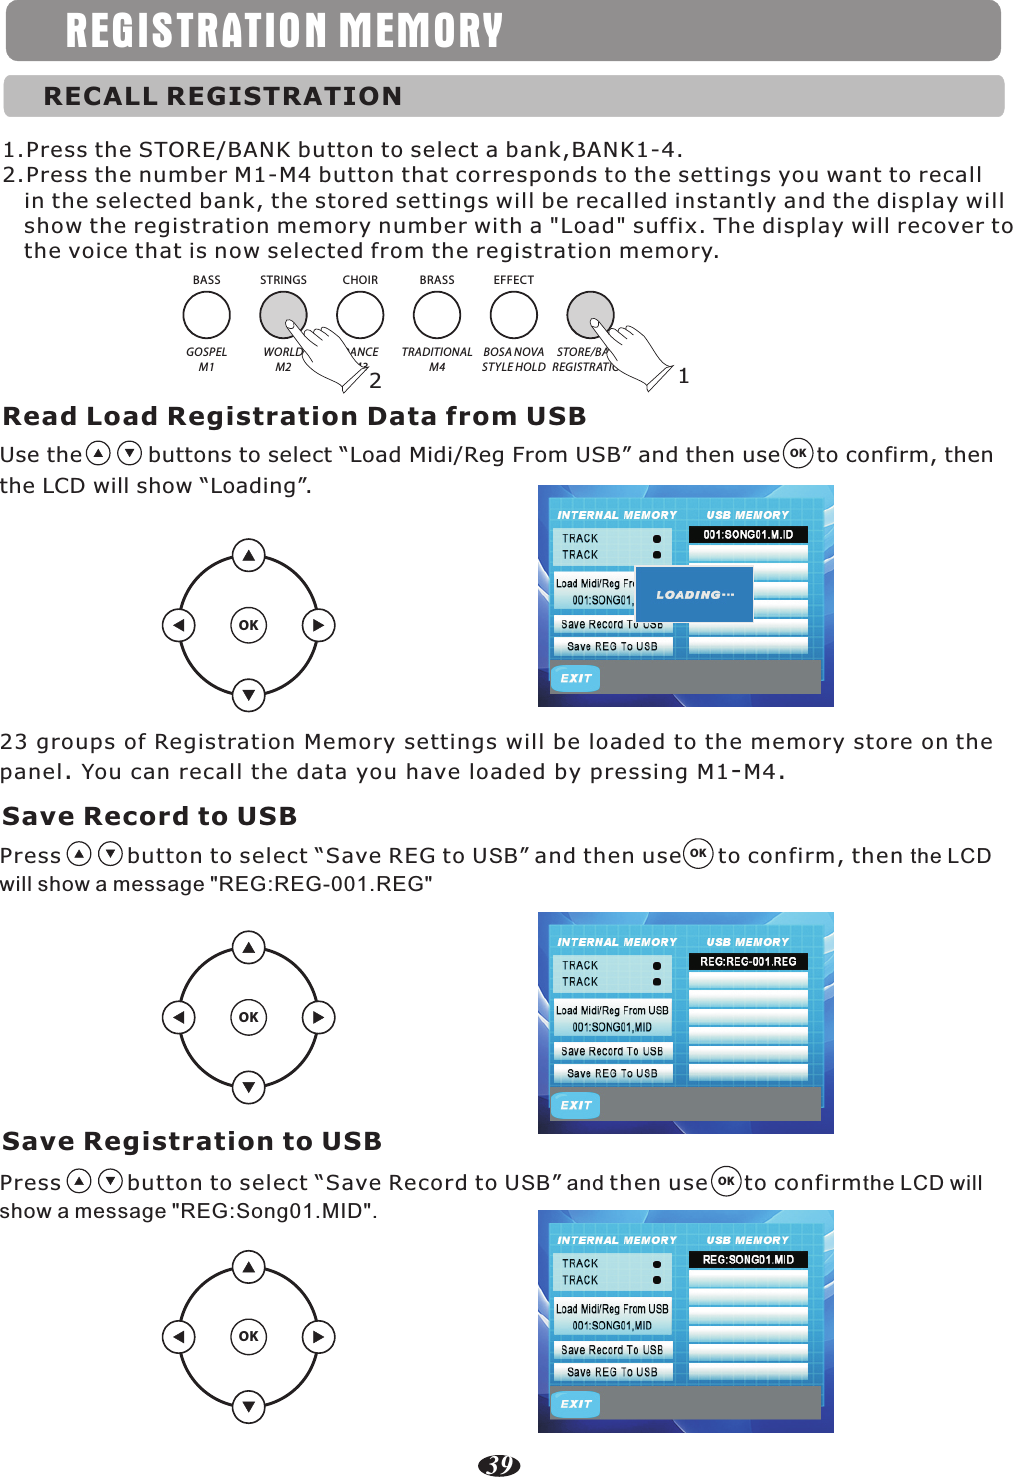
![RECORD1.Insert the USB Disk into the USB Terminal and the indicator of the [MEMORY] buttonwill be light.2.You can use the [+/YES] and [+/NO] buttons knob to select the base file.Press the [PLAY/STOP] button again to stop playing the song and the indicator will be unlighted.USB TO DEVICETRACK 1 TRACK 2DELETEMULTIRECORD SELECTIONLEFT RIGHTSONGRECORDMEMORYPLAY/STOPTRACKTRACK 1 TRACK 2RECORDMEMORYPLAY/STOPTRACK● Auto Recording Track can change automatically● Main voice recording track set (After setting the main voice recording track, separationvoice and layer-voice recording track will change into main-voice recording track+1and main-voice recording track +2. For example:If the main voice recording set is 3,then separation voice recording track will change into 4 automatically and double-voicerecording track will change into 5 automatically)● Split voice recording track set (Main voice and layer-voice recording track will not changeautomatically)● Layer voice recording track set (Main-voice and split voice recording track will not change automatically)41■ Multi Recording Press [RECORD] button and the [TRACK] button simultaneously to start recording, the[RECORD] buttons indicator is flashing and the [TRACK] button indicator will be light.Press [RECORD] button again to stop recording and the indicator will be unlighted. The Name of the New File Will be Saved in Sequence■ Play ButtonYou can use the [+/YES] and [+/NO] buttons knob to select your desired MIDI file.Press the [PLAY/STOP] button to play the song of the USB disk.■ Select Recording TrackPress the [TRACK] button repeatedly can select 4 Track modes: Auto RecTrack(default),M.RecTrack, S. RecTrack, L.TecTrack.](https://usermanual.wiki/Ringway-Tech/AG-50/User-Guide-3099312-Page-44.png)
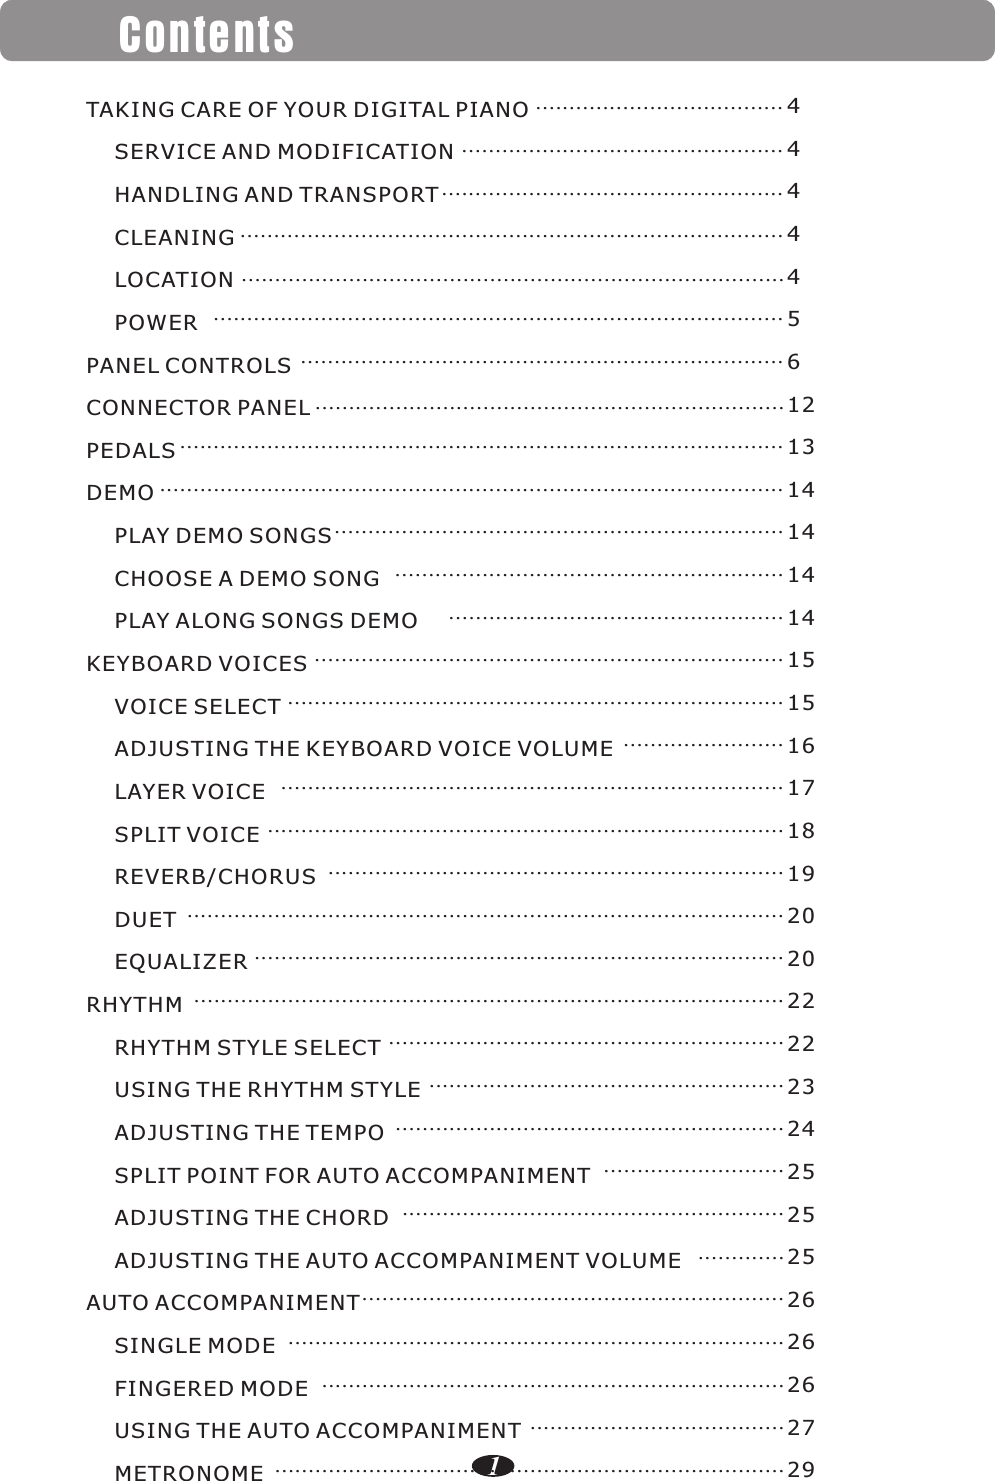
![RECORDInsert the USB Disk into the USB terminal.Use the [+/YES] and [-/NO] buttons to select“XXX:SONGXXX” file you want to delete, then hold down the [RECORD] button and pressthe [MEMORY] button. LCD shows: Delete?USB TO DEVICE42■ Delete SongPress the [+/YES] button to confirm delete the file.Press the [-/NO] button to cancel.■ Melody Track Recording Hold down the [RECORD] button, and then press the [TRACK1] button, the [TRACK1] and the [RECORD] indicator flashes to indicate ready to record. You can start recordingsimply by playing the key board or playing styles.Melody Track1 Recording Press the [RECORD] button again to stop recording and the data will save to localmemory track.NOTE:If the TRACK 2 has data recorded, the indicator will light and it will play when the record is started. You can press the [TRACK 2] button to mute it, then the indicatorwill be unlighted.TRACK 1 TRACK 2RECORDMEMORYPLAY/STOPTRACKDELETEMULTIRECORD SELECTIONRECORDMEMORYPLAY/STOPTRACK+YES-NO](https://usermanual.wiki/Ringway-Tech/AG-50/User-Guide-3099312-Page-45.png)
![RECORD43Hold down the [RECORD] button, and then press the [TRACK2] button, the [TRACK2]and the [RECORD] indicator flashes to indicate ready to record. You can start recordingsimply by playing the key board.Melody Track2 RecordingPress the [RECORD] button again to stop recording and the data will save to local memorytrack 2.NOTE:If the TRACK 1 has data recorded, the indicator will light and it will play when the [TRACK 2] is started. You can press the [TRACK 1] button to mute it, then the indicator will be unlighted.■ Play the Local Track RecordingDuring song playback,if the [MEMORY] button is light, you should press the [MEMORY]button again to turn off it.Press the [PLAY] to play the local recording. During song playback you can select whichtrack you wish to hear by press the [TRACK 1] or [TRACK 2] button.Press the [PLAY/STOP] button again to stop playing the song.■ Delete local recordingIf the TRACK 1 has data recorded, hold the [TRACK 1] button for 3 seconds and the LCDwill display: Delete Track1. Then press the [+/YES] to delete the file.Press [-/NO] buttonto cancel.If the TRACK 2 has data recorded, hold the [TRACK 2] button for 3 seconds and the LCDwill display: Delete Track2. Then press the [+/YES] to delete the file.Press [-/NO] buttonto cancel.You also can press the [RECORD] and [MEMORY] button simultaneously to delete two tracks.](https://usermanual.wiki/Ringway-Tech/AG-50/User-Guide-3099312-Page-46.png)