Ringway Tech AG-50 DIGITAL PIANO User Manual AG 30
Ringway Tech(Jiangsu) Co.,Ltd. DIGITAL PIANO AG 30
User Manual

1
Contents
TAKING CARE OF YOUR DIGITAL PIANO
SERVICE AND MODIFICATION
HANDLING AND TRANSPORT
CLEANING
LOCATION
POWER
PANEL CONTROLS
CONNECTOR PANEL
PEDALS
DEMO
PLAY DEMO SONGS
CHOOSE A DEMO SONG
PLAY ALONG SONGS DEMO
KEYBOARD VOICES
VOICE SELECT
ADJUSTING THE KEYBOARD VOICE VOLUME
LAYER VOICE
SPLIT VOICE
REVERB/CHORUS
DUET
EQUALIZER
RHYTHM
RHYTHM STYLE SELECT
USING THE RHYTHM STYLE
ADJUSTING THE TEMPO
SPLIT POINT FOR AUTO ACCOMPANIMENT
ADJUSTING THE CHORD
ADJUSTING THE AUTO ACCOMPANIMENT VOLUME
AUTO ACCOMPANIMENT
SINGLE MODE
FINGERED MODE
USING THE AUTO ACCOMPANIMENT
METRONOME
.....................................4
4
4
4
4
5
6
12
13
14
14
14
14
15
15
16
17
18
19
20
20
22
22
23
24
25
25
25
26
26
26
27
29
................................................
...................................................
.................................................................................
.....................................................................................
........................................................................
..........................................................................................
.............................................................................................
...................................................................
..........................................................
..................................................
......................................................................
..........................................................................
........................
...........................................................................
.............................................................................
....................................................................
.........................................................................................
...............................................................................
........................................................................................
...........................................................
.....................................................
..........................................................
...........................
.........................................................
...............................................................
..........................................................................
.....................................................................
......................................
............................................................................
.............
......................................................................
.................................................................................

Contents
2
FUNCTION
ADJUSTING THE KEYBOARD VOICE VOLUME
TRANSPOSE
MASTER TUNE
TOUCH CURE
MAIN OCTAVE
SPLIT OCTAVE
DUAL OCTAVE
SPLIT POINT
CHORD POINT
CHORD TYPE
MAIN/SPLIT/DUAL PAN
REVERB TYPE
REVERB LEVEL
CHORUS TYPE
CHORUS LEVEL
USB MIDI IN
MIDI OUT
LOCAL
USB PLAY MODE
USB PLAY SPEED
AUTO RECORD TRACK
USB MUTE TRACK
BLUETOOTH
AUTO CLOSE TIME
FACTORY RESET
REGISTRATION MEMORY
SAVE REGISTRATION
RECALL REGISTRATION
STYLE HOLD
........................................................................................ 30
30
31
31
31
31
31
32
32
32
32
32
33
33
33
34
35
35
35
36
36
36
36
37
37
37
38
38
38
39
............................
.................................................................................
..............................................................................
...............................................................................
..............................................................................
................................................................................
..............................................................................
................................................................................
...............................................................
................................................................................
.............................................................................
............................................................................
............................................................................
.................................................................................
...........................................................................................
..........................................................................
..........................................................................
................................................................
........................................................................
.................................................................................
......................................................................
................................................................
.................................................................
............................................................
...............................................................................
..........................................................................
.............................................................................
..............................................................................
......................................................................................

Contents
3
RECORD
LOCAL RECORDING
PLAY BACK
DELECTING TRACKS
USB RECORDING
PLAY BACK
DELECTING TRACKS
PLAY ALONG SONGS
SELECT AND LISTEN TO A SONG
PRACTICING THE RIGHT HAND MELODY OF THE SONG
PRACTICING THE LEFT HAND MELODY OF THE SONG
PRACTICING BOTH HANDS OF THE SONG
USB
INSERT THE USB
REMOVE THE USB
PLAY
BLUETOOTH
BT-1 ARTESIA BLUETOOTH CONNECTION
BLUETOOTH CONNECTION
MIDI
MIDI CONNECTION
MIDI OUT
LOCAL ON/OFF
MIDI IMPLEMENTATION CHART
AUTO BASS CHORD FINGERING GUIDE
VOICE LIST
STYLE LIST
TROUBLESHOOTING
SPECIFICATIONS
............................................................................................40
40
41
41
42
42
43
44
44
45
45
46
47
47
47
48
48
48
50
50
50
50
51
52
53
54
55
56
57
......................................................................
..................................................................................
....................................................................
........................................................................
...................................................................................
................................................
...........
.................................
...................................................................
........................................................................
......................................................................
........................................................................
..............................................................................................
.......................................................................................
................................
.......................................................
....................................................................
....................................................................................
...........................................................................
................................................
........................................
...................................................................................
...................................................................................
.......................................................................
.......................................................................
............................................................................................
....................................................................................................
...........

4
TAKING CARE OF YOUR DIGITAL PIANO
SERVICE AND MODIFICATION
This digital piano will supply you with years of musical enjoyment if you follow the simple rules
listed below.
Do not attempt to open the piano or make any change in the circuits or parts of the unit. This
product should be serviced by qualified service personnel when;
·The power supply cord or the plug has been damaged,
·Liquid has been spattered into the unit or it has been exposed to rain,
·The instrument does not appear to operate normally or exhibits a marked change in
performance,
·The instrument has been dropped or the cabinet has damaged.
HANDLING AND TRANSPORT
·Never apply excessive force th the controls, connectors or other parts of the instrument.
·Always unplug cables by gripping the plug firmly, not by pulling on the cable.
·Disconnect all cables before moving the instrument.
·Physical shocks caused by dropping, bumping, or placing heavy objects on the instrument
can result in scratches and/or more serious damage.
·Avoid placing vinyl objects on top of the instrument, vinyl can stick to and discolor the surface.
CLEANING
·Clean the cabinet and panel with a soft, nonabrasive, dry cloth. A wax based polish may be
used on the cabinet. Do not use paint thinner or chemical based polishes.
·To maintain the luster of the keys and buttons wipe with a clean, slightly damp cloth, and
then polish with a soft dry cloth.
LOCATION
·Direct sunlight (near a window)
·High temperatures (near a heat source, outside, or near a window)
·Excessive humidity
·Excessive dust
·Strong vibration
·Leave enough space around the piano for it to be properly ventilated.
·This instrument contains digital circuitry and may cause interference if placed too close to
radio or television receivers. If interference occurs, move the instrument further away from
the affected equipment.

5
POWER
·Turn the power switch off when the instrument is not in use.
·To avoid damage, turn the power switches of all related devices off prior to connection or
disconnection of MIDI cables.
·Turn the power off if the main cable is damaged or the instrument is spattered with liquid.
·Do not switch the unit on and off in quick succession, this places an undue load on the
electronic components.
·Unplug the AC power cord during an electrical storm.
·Avoid plugging the AC power cord into the same outlet as appliances with high power
consumption, such as electric heaters or refrigerators.
·Carefully check the amplifier volume control before starting to play. Excessive volume can
cause permanent hearing loss.
PANEL CONTROLS
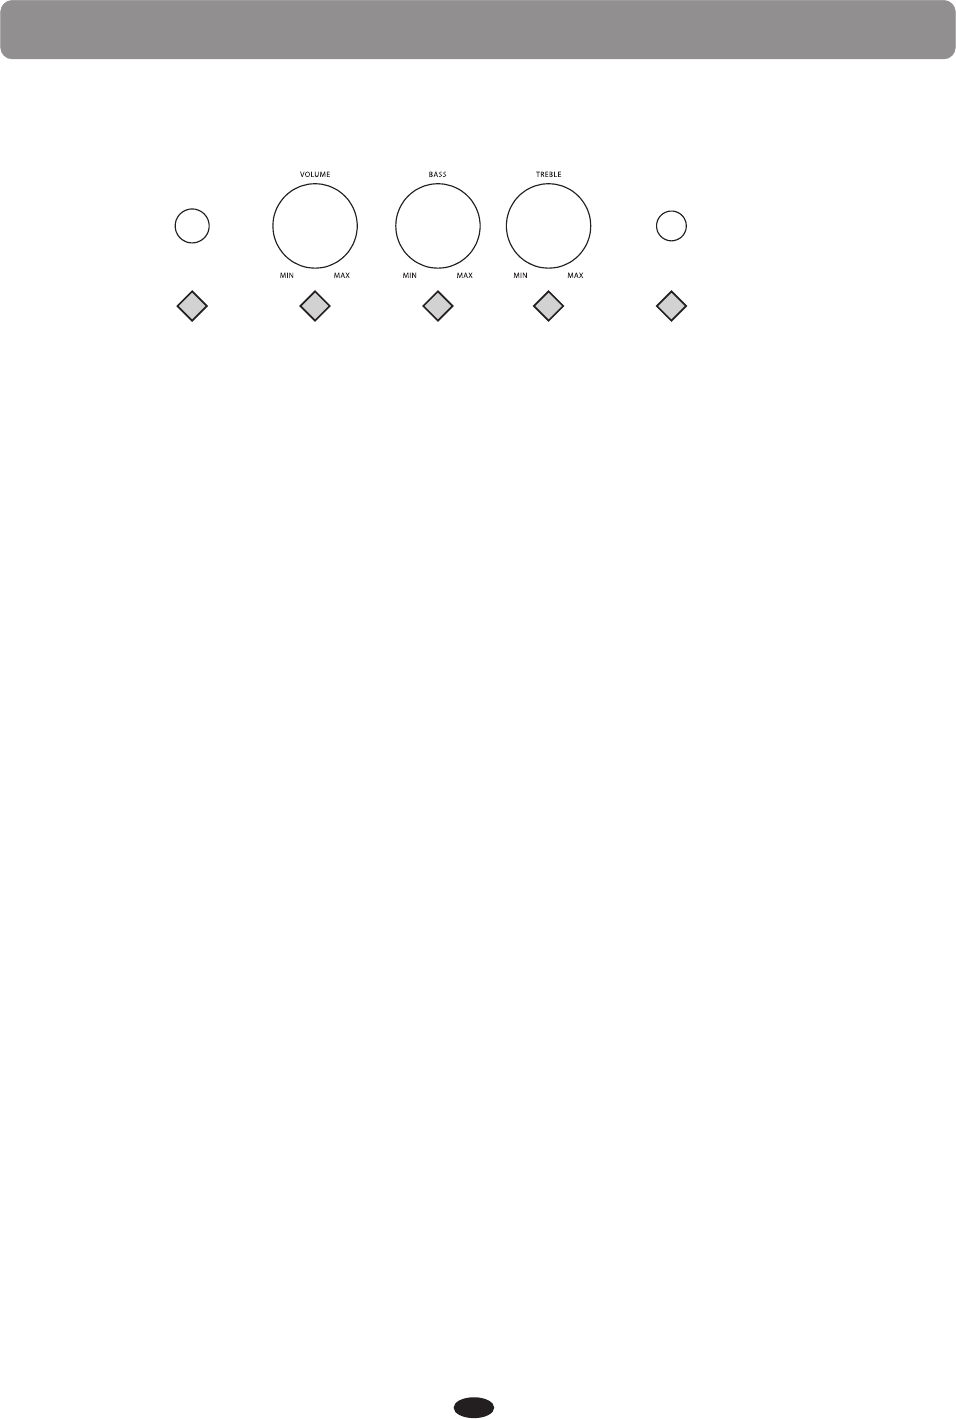
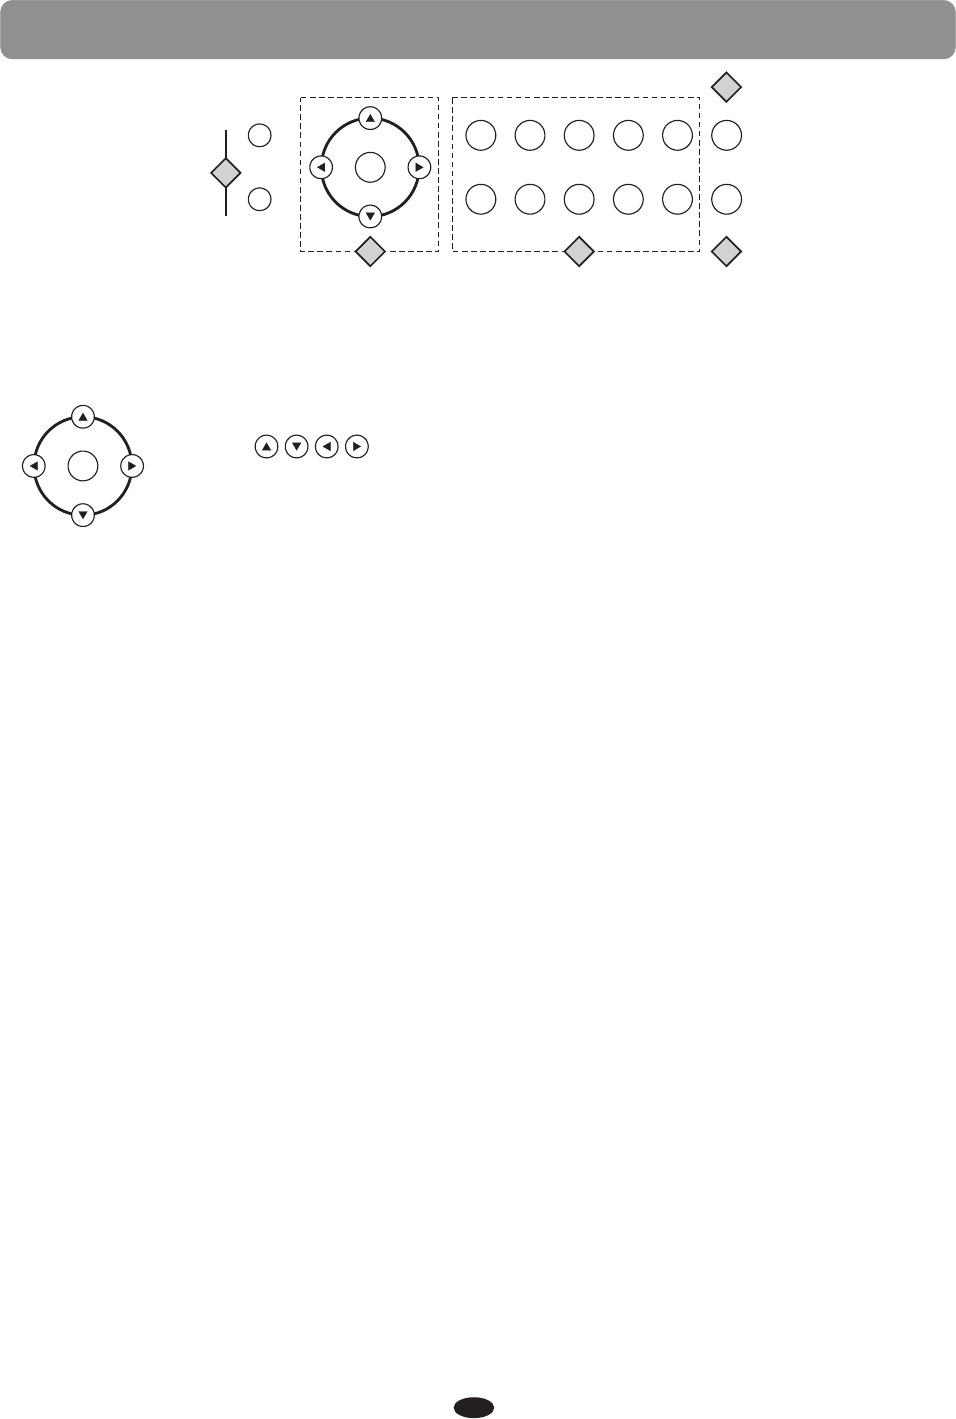
The elegant control panel is divided into several distinct sections. The following is a
brief description of all the features located on the control panel.
1.POWER / STANDBY:
The power switch is located to the left of the keys. Press the button to turn the power
on and off. The LCD screen, and the indicator lights for the start up settings, will light
up when the power is turned on.
This piano is equipped with an automatic power off feature, the piano will shut off
automatically after a set time of inactivity. The default time setting is off,the Auto
Power Off Time canbe changed in the Function menu.
Please see the Function section of this manual for more information.
Please note, when you turn the power off, do not turn it back on immediately. Wait at
least five seconds to turn the power back on so that the electronic circuits can properly
reset.
POWER/
STANDBY
DEMO
2.VOLUME:
1 Use this button to adjust the overall master volume of the keyboard to your desired
level. Turn to the right to increase the volume and turn to the left to decrease the volume.
Please note, at higher volumes there may be audio "clipping" or distortion depending on
the frequencies being played. Please reduce the volume if this occurs.
Please also note, the keyboard and accompaniment volumes can adjusted independently
from each other by using the KB.VOL and ACCOMP buttons.
3.BASS:
With the bass tone knob you can adjust the sound of your piano to the room or
according to your preferences. As a starting point, set both controls to their neutral
12 o'clock position. If you want more bass sound turn the bass control to the right and
if you want less bass sound turn it to the left.
4.TREBLE:
With the treble tone knob you can adjust the sound of your piano to the room or to your
taste. As a starting point, set both controls to their neutral 12 o'clock position. If you
prefer a brighter sound turn the treble control to the right, if you prefer a more
"rounded" tone turn the treble control to the left.
5.DEMO:
Press the DEMO button, the indicator turns on and the first of the ten different demonstration songs
will play.
Please see the Demo section of this manual for more information.
123 4 5
6
PANEL CONTROLS
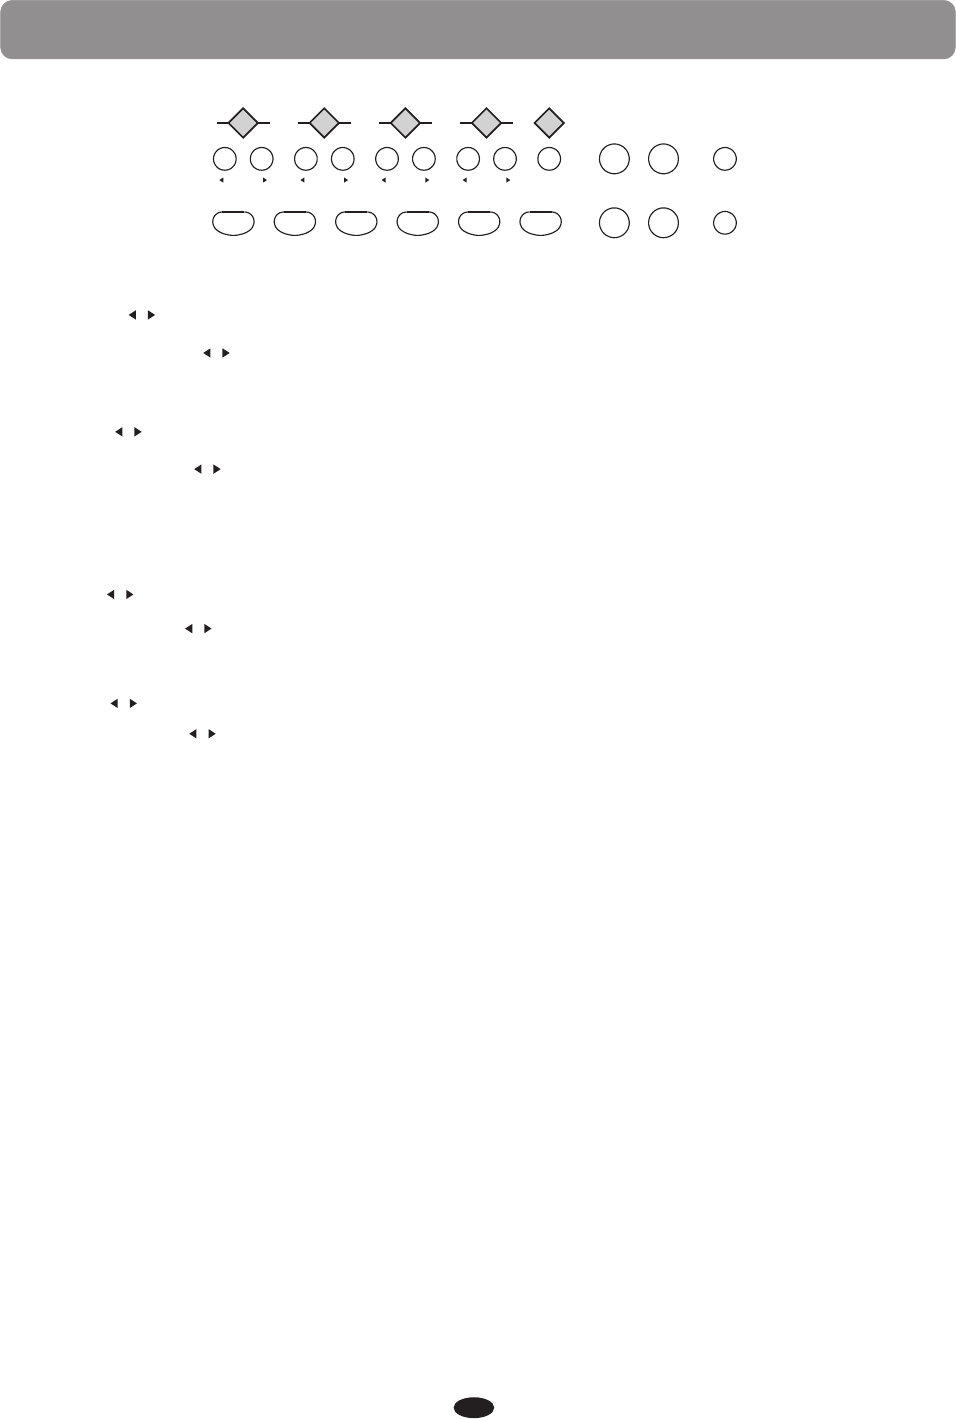
6.ACCOMP :
Press the TEMPO buttons to select the , the current tempo value will
appear on the display.
Please note, there is a virtual four-dot beat indicator In the LCD screen. It flashes in
time to indicate the tempo and beat for the selected rhythm style.
Please see the Rhythm section of the manual for more information.
tempo value
7.KB.VOL :
8.TRANS :
9.TEMPO :
The metronome is a convenient feature for practice, and can also provide a solid
rhythmic guide when recording. The METRONOME button toggles the metronome
feature on and off. Press the metronome button to hear the tempo & beat.
Use the FUNCTION button and the +/YES and the -/NO buttons to select the beat of
your choice;1/4, 2/4, 3/4, 4/4, 5/4, 6/4, 6/8,7/8,9/8 or12/8.
Please see the Function section for more information.
10.METRO:
/
/
/
/
/
Press the ACCOMP buttons to adjust the volume of rhythm style and the auto
accompaniment only, the keyboard instrument voice will not be affected.
/
67 8 910
ACCOMP KB.VOL TRANS TEMPO METRO LAYER REVERB/
CHORUS
FUNCTION
SYNCHRO START/STOP INTRO/ENDING FILLIN1 FILLIN2
VARIATION
ACCOMP SPLIT DUET E Q
7
Press the KB.VOL buttons to adjust the main volume, you can also adjust the
split/ layer/ learn and USB song volume.
Please see the ADJUSTING THE KEYBOARD VOICE VOLUME.
/
Press the TRANS buttons to adjust the transpose.
Please see the function section of the manual for more information.
/
PANEL CONTROLS
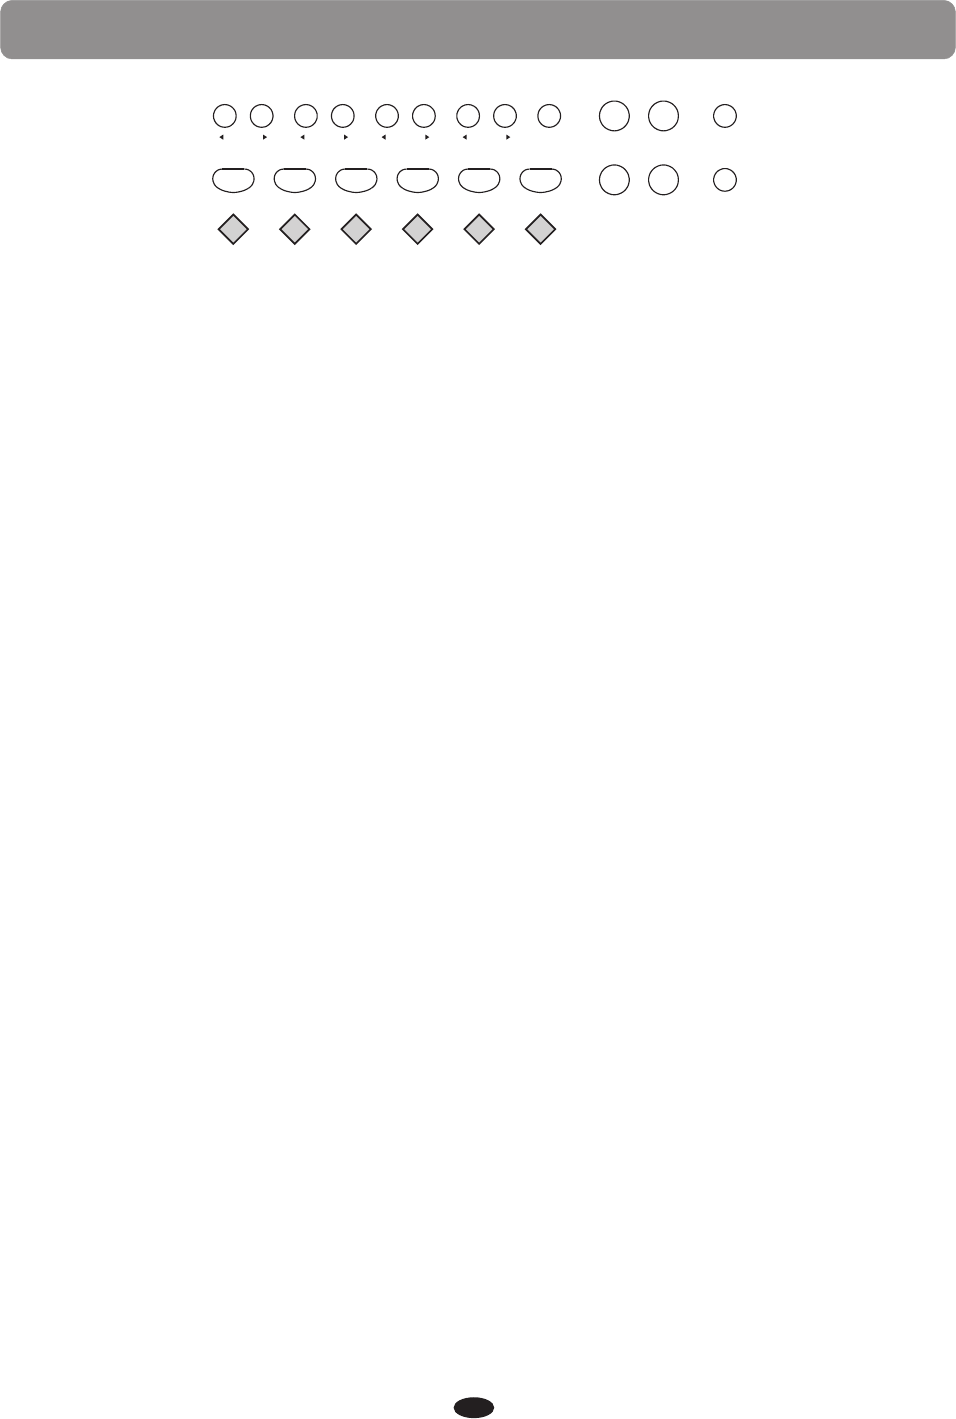
11.SYNCHRO:
Synchronized Start sets the auto accompaniment into standby mode.
The rhythm style will start as soon as you play on the left hand side of the keyboard.
With auto accompaniment engaged the rhythm style will start as soon as you play on
the left hand side of the keyboard and the auto accompaniment will start with the first
recognized chord played, depending on which fingering mode is selected.
Pressing the SYNC START button again will stop the auto accompaniment and put the
keyboard back on standby mode.
12.START/STOP:
The START/STOP button immediately starts or stops the selected rhythm style.
The auto accompaniment will start with the first recognized chord played depending on
the fingering mode selected.
13.INTRO/ENDING:
Each of the 100 rhythm styles can be started or finished with a detailed introduction
and/or ending pattern.
When INTRO/ENDING is engaged, an introduction of rhythm pattern will sound followed
by the main pattern. When a rhythm or accompaniment pattern is already playing, the
accompaniment will be professionally completed with an ending pattern from the next
measure by pressing the INTRO/ENDING button.
14.FILL IN 1:
The fill-in feature provides the accompaniment with a short rhythm pattern of one or
two measures for each style.
Press the FILL IN button at any time while the accompaniment is playing to add a fill.
If you holddown the FILL IN button, the fill pattern will repeat until the button is
released, and then the mainpattern will resume from the beginning of the next measure.
The FILL buttons can also be usedto start a rhythm style.
15.FILL IN 2 VARIATION:
The 100 rhythm styles and their corresponding auto accompaniments all include a
variation of that style and accompaniment that can be heard simply by engaging the
FILL IN 2 VARIATION button. Press the FILL IN 2 VARIATION button and the fill variation
will play followed by the variation of the selected rhythm style. The FILL buttons can also
be used to start a rhythm style.
Press the FILL IN 1 button again to disengage the variation and return to the main
pattern after the fill.
16.ACCOMP:
ACCOMP KB.VOL TRANS TEMPO METRO LAYER REVERB/
CHORUS
FUNCTION
SYNCHRO START/STOP INTRO/ENDING FILLIN1 FILLIN2
VARIATION
ACCOMP SPLIT DUET E Q
11 12 13 14 15 16
8
Press this button to close or open the chord.
PANEL CONTROLS
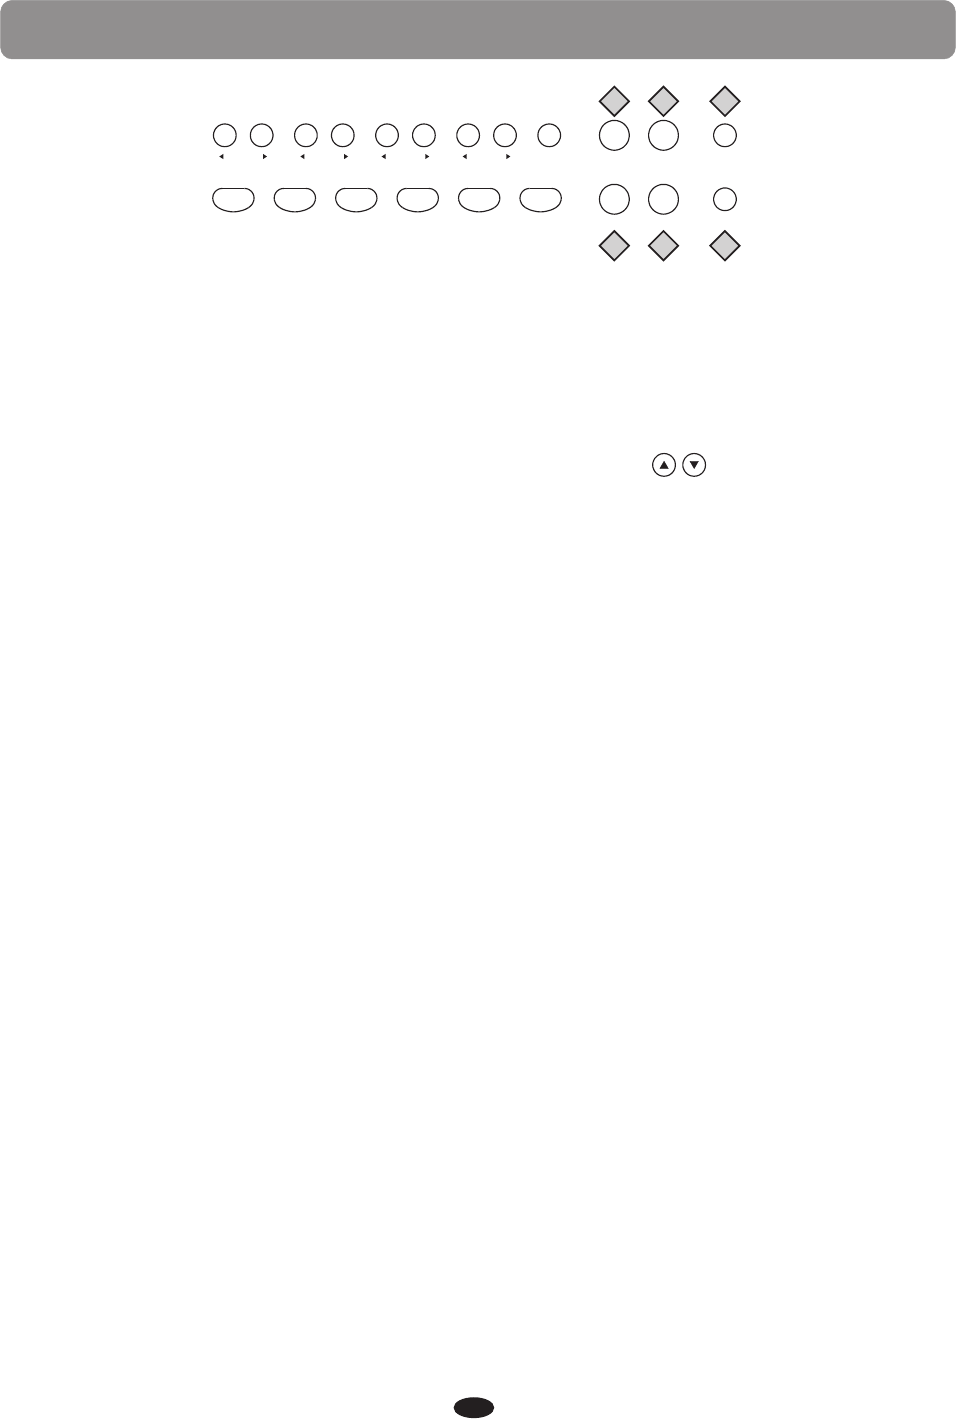
17.LAYER:
Pressing the LAYER button will put the keyboard in the layer or dual mode. Layer refers
to an additional voice that is tone mixed with the main selected keyboard voice. The
assigned layer voice will be heard with the original voice when the keys are played.
Please see the Keyboard Voices section of this manual for more information.
18.REVERB/CHORUS:
19.FUNCTION:
20.SPLIT:
21.DUET:
22.EQ:
With the split feature engaged the keyboard operates in the split or lower mode.
In the split mode the keyboard is divided into two sections. In the right hand section
the main or layered voice will sound, and in the left hand section a different voice can
be assigned to sound when the keys are played.
Please see the Keyboard Voices section for more information.
Wth the duet feature engaged the keyboard is divided into two sections, left A1-C3 and
right C#3-C7 that have the exact same notes. The two sections will share the same
voice and volume. This is a great feature for teaching or when two people want the play
the pianosimultaneously.
Please see the Keyboard Voices section for more information.
Please note, engaging the DUET feature will disable the Layer, the Split and the Auto
Accompaniment modes.
The FUNCTION button is used to access the function menu. The function menu can be
used to adjust or change the values of a number of settings.
Please see the Function section of this manual for more information.
ACCOMP KB.VOL TRANS TEMPO METRO LAYER REVERB/
CHORUS
FUNCTION
SYNCHRO START/STOP INTRO/ENDING FILLIN1 FILLIN2
VARIATION
ACCOMP SPLIT DUET E Q
17 18 19
20 21 22
Press REVERB/CHORUS enter the effect setting, than press buttons to select a Sub
interface, use the +YES/-NO to change the value.
Please see the Function section of this manual for more information.
9
Press this button enter the equalizer interface.
Please see the Equalizer section for more information.
PANEL CONTROLS
23.+YES/-NO:
Use the +/YES or-/NO buttons to access different options of selected features and functions.
OK
Use the buttons to selected features and functions.
Use the OK button to confirm a selection of a feature button and to
confirm selections within the function menu.
+YES
-NO
R&B SWING BALLAD POP LATI N ST YLE
GOSPEL
M1
WORLD
M2
DANCE
M3
TRADITIONAL
M4
BOSA NOVA
ST YLE HOLD
STO RE/BANK
REGISTRATION
GRAND PIAN O
BASS
E. PIANO VIBES ORGAN N. GUITAR VOICE
STRINGS CHOIR BRASS EFFECT
OK
23
24 25
26
27
24.
25.QUICK SELECT VOICE/STYLE:
There are 10 instrument voices that can be selected quickly by pressing one of the quick
select voice/style buttons, 9 preset voices and 1 user defined. The voice name is
printed above the select button and the style name is printed under the select button.
Press the select button, the indicator will light and the selected voice or style name and
its number will be shown on the display.
26.VIOCE/STYLE:
Press VOICE/STYLE button to switch between voice and style, the light not bright is said
to choose the voice, the light bright is said to choose the style.
There is a complete list of all 137 voices and 100 styles listed in the back of the manual.
27.STORE/BANK REGISTRATION:
Press STORE/BANK REGISTRATION button enter registration memory interface.
Please see the Registration memory section for more information.
10
USB TO DEVICE
TRACK 1 TRACK 2
DELETE
MULTI
RECORD SELECTION
LEFT RIGHT
SONG
RECORD
MEMORY
PLAY/STOP
TRACK
PANEL CONTROLS
28
29
30
31
32 33
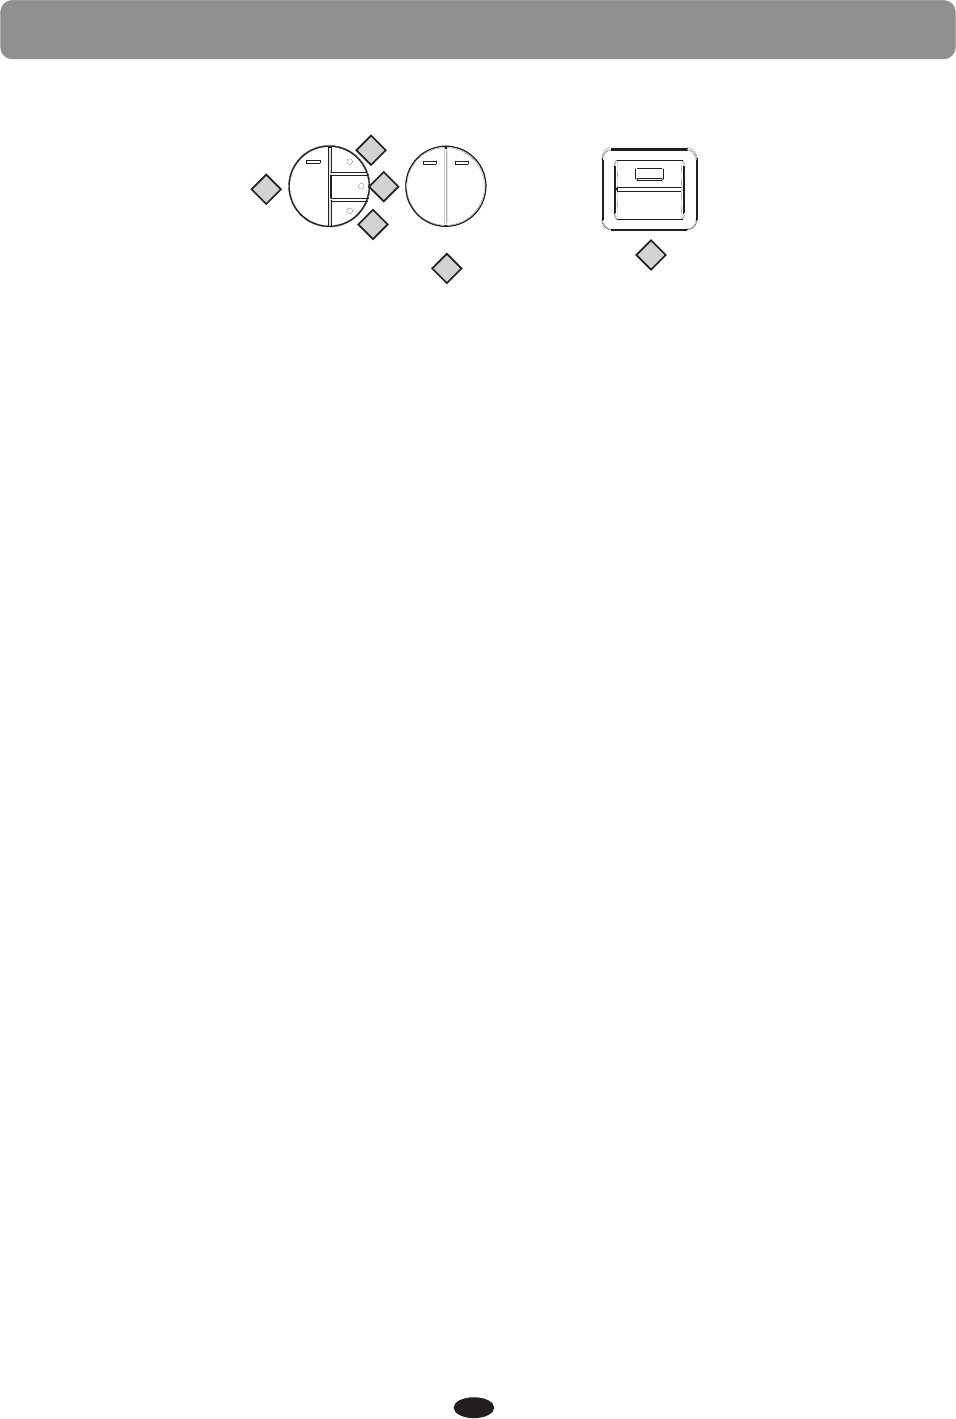
28.RECORD:
The REC button is used to engage the recording mode to record your playing. This unit
is able to record one song internally, with a 2-melody track sequencer. All note events
will be recorded exactly as they are performed. This recorded information will not be
lost when the power is turned off and can be saved to a USB drive.
Please see the Record section of this manual for more information
29.MEMORY:
The MEMORY button is used to access and engaged USB flash drive.
Please see the USB section of this manual for more information.
30.PLAY/STOP:
Press the PLAY/STOP button to hear your selected recorded tracks when in the Record
mode, the Play Along Songs when in the Play Along Songs Music Teacher mode and the
recorded USB data when the MEMORY button is engaged and a USB drive with MIDI files
is connected. Press the PLAY/STOP button again to stop any playback.
31.TRACK:
When recording to USB use this TRACK button to select recording tracks.
Please see the Record and USB section of this manual for more information
32.TRACK 1/SONG LEFT, TRACK 2/SONG RIGHT:
When in the melody recording mode these indicators will be lit when the corresponding
tracks are selected. Use the TRACK button(s) to choose which track(s) to record in or
to playback.
Please see the Record section of this manual for more information These buttons are
also used in conjunction with the play along songs music teacher. When the SONG LEFT
and SONG RIGHT buttons are pressed simultaneously the Play Along Song music teacher
mode will be engaged or disengaged. This feature can be used as an aid to learn the 55
songs built into the piano. These songs are split into left hand accompaniment and right
hand melody portions. The SONG LEFT and SONG RIGHT buttons are used to choose
which portion(s) of the song to play.
Please see the Play Along Song section of this manual for more information.
Please note, indiscriminate pressing of the RECORD SELECTION and the
SONG/TRACK buttons can overload the piano and cause the circuits to jam. In the
event of that occurrence you may need to turn the piano off to reset the circuits.
33.USB TO DEVICE:
On the far right side of the piano is the USB TO DEVICE port. When you insert your USB
flash drive into this USB terminal you can record your performances and save your
registrations to the USB drive, or play MIDI songs from a USB.
11
CONNECTOR PANEL
Headphones
MIDI
Out
1
2
USB
to Host
Aux In
Line Out
Input
LevelBluetooth
1
2
3
4 5 6
7
12
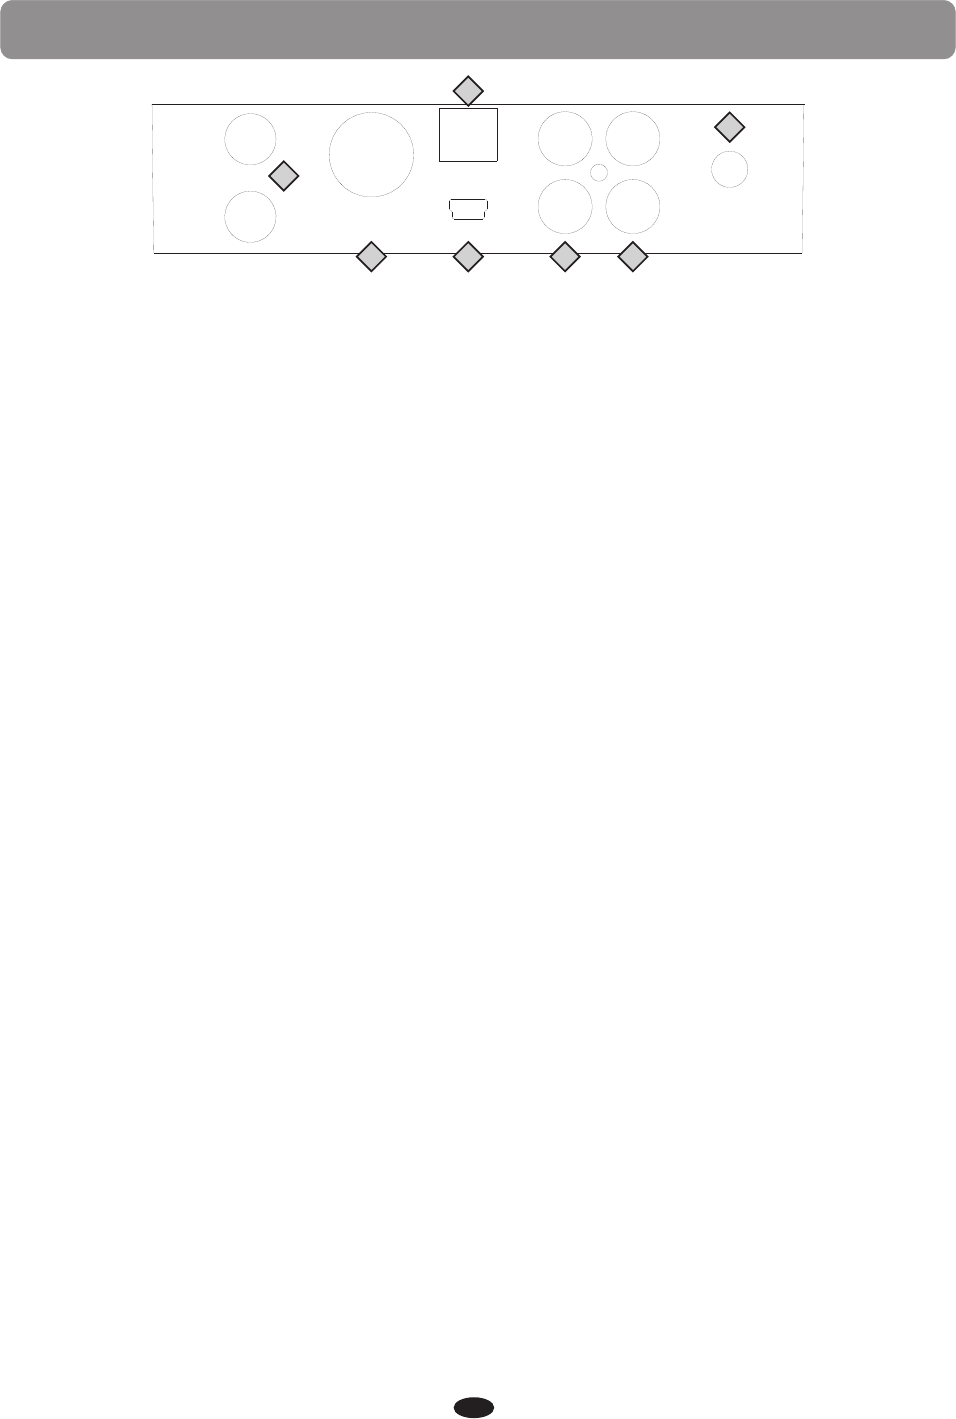
1 HEADPHONES 1 & 2: You can play in total silence, without disturbing others in the room,
by plugging a set of headphones into one of the appropriate sockets. When headphones are
plugged into either of these jacks the internal speaker system is turned off. Two sets of
headphones may be used simultaneously.
♫Please note, using headphones at high volume levels may cause permanent hearing
damage.
2 MIDI OUT: This piano contains a MIDI output port that transmits MIDI data to another
MIDI device allowing communication with other products equipped with MIDI interfaces.
Connect the piano's MIDI Out to another device's MIDI In to transmit MIDI data to that
device. Please see the MIDI section of this manual for further details.
3 USB TO HOST: USB is a digital audio interface. The USB connector allows you to connect
the piano directly to your computer’s USB port by USB cable. This allows you transfer MIDI
information over USB to a computer. This piano is USB Class Compliant, therefore there is
no need to install a driver. Just plug it in and the OS will do the rest. The piano will work with
all standard MIDI based computer software.
♫Please note, for recording and listening to MIDI files use the USB TO DEVICE dock
located on the right side of the control panel.
♪Please also note, do not turn on the piano with the USB cable connected to the computer to
avoid having to restart your computer. It can be connected without driver installation under
the Windows XP, Windows 7 and MAC OSX environment. The piano will be recognized as USB
audio device to receive and transmit MIDI messages.
4 BLUETOOTH: Plug the tiny Bluetooth receiver unit into the allotted slot on the connector
panel to stream audio from any Bluetooth device.
Turn the Bluetooth capability on and off in the Function menu.
Please see the Bluetooth section of this manual for more information.
5 AUX IN: These stereo RCA audio input jacks will amplify the supplied signal through the
internal sound delivery system. They can be used to hook up items such as CD players, MP3
player or Cassette player. The audio output from the other sound system can be mixed with
the sound of the piano, this function is convenient for playing along to a favorite song.
6 LINE OUT: These stereo RCA line audio output jacks supplies the piano’s output signal
to externalamplification, such as home stereo, PA system or keyboard amplifier or to send
to a mixing console or tape recorder. The piano's internal sound system will remain on unless
headphones are plugged into either headphone jack.
7 INPUT LEVEL: Use this control knob adjusts the Aux In signal level for the piano. Turn the
knob clockwise to increase the level and counterclockwise to decrease the level.
PEDALS
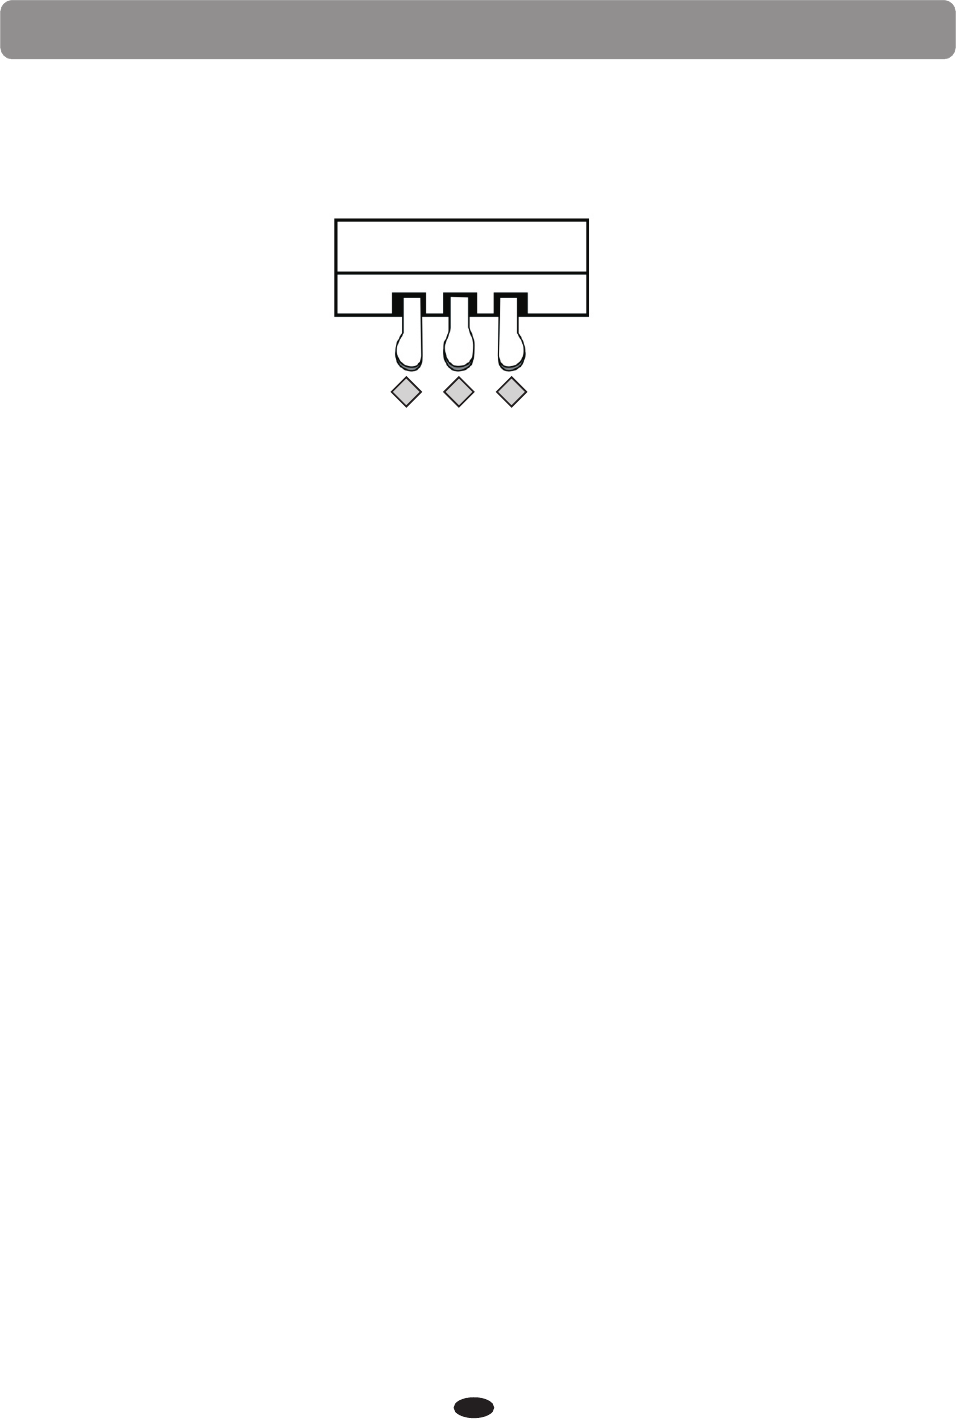
1.SOFT PEDAL:
This piano is complete with three function pedals.
When the left soft pedal is engaged the piano volume is reduced and the timbre slightly
altered on the notes that are played.
2.SOSTENUTO PEDAL:
When the center pedal is engaged, the keys that are pressed and already sounding will
continue to sustain and the notes will decay gradually after they are released. Keys that
are played after the pedal has been pressed are not affected.
3.SUSTAIN PEDAL:
Like the damper pedal on an acoustic piano the the right sustain, or damper, pedal will
sustain the sound of the piano voice after releasing the piano keys while engaged. The
length of sustain time is determined by the amount of pressure used to depress the pedal.
This piano also has a Half Sustain feature that can be turned on and off in the Function
menu.
Please see the Function section of this manual for more information.
13
123
DEMO
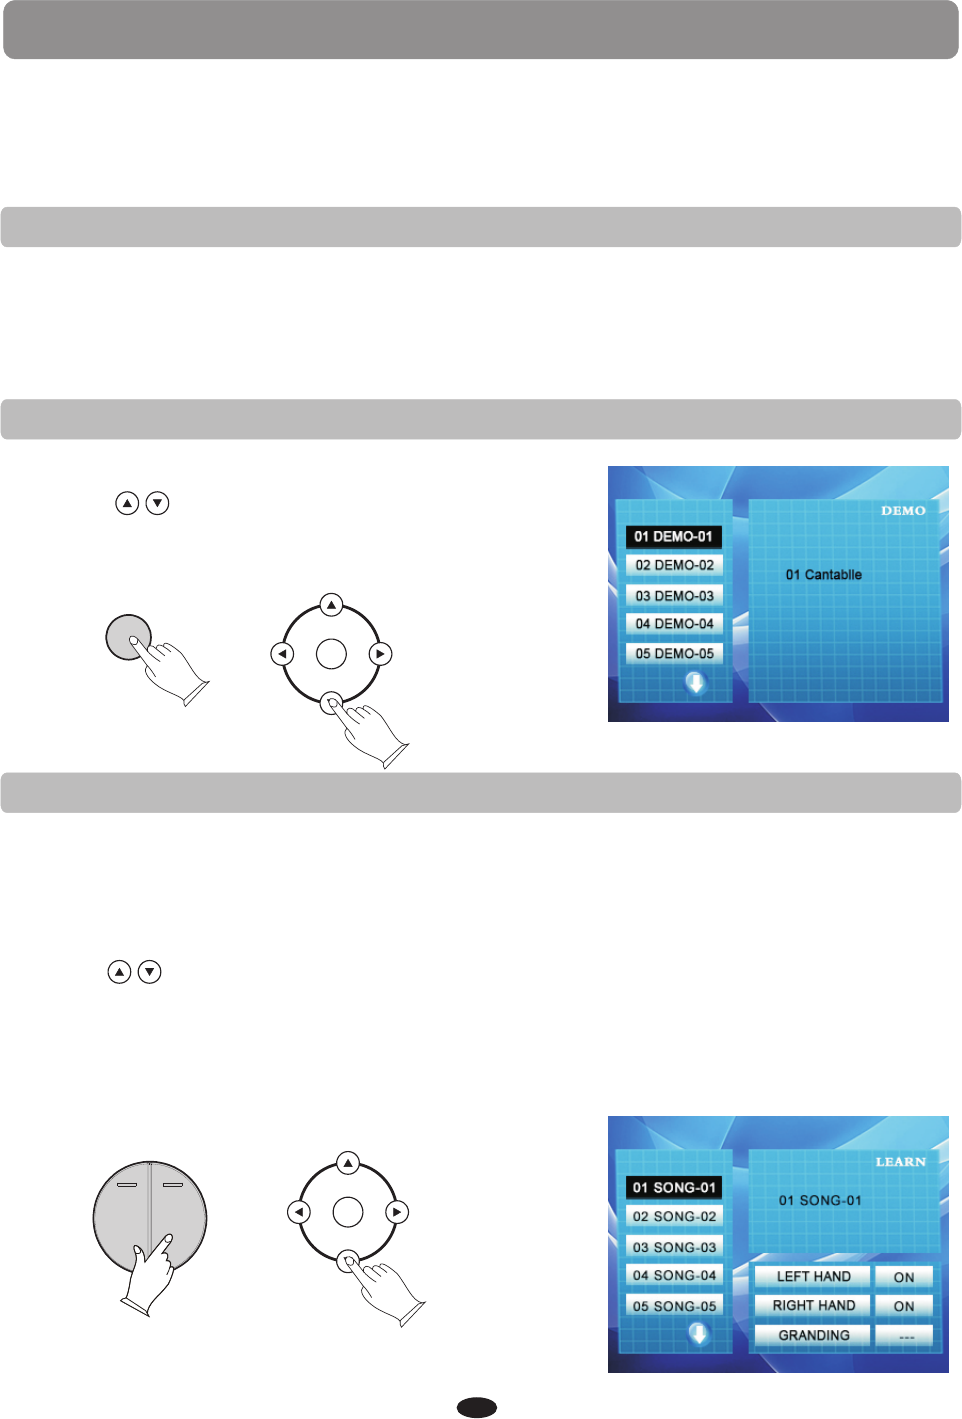
PLAY DEMO SONGS
This piano has ten different demonstration or demo songs that are designed to
showcase the different sampled voices that are available.
1.Press the DEMO button, the indicator light will turn on and the first demo song will
play. The demo song and number will appear on the display and will change as the
subsequent songs play. This piano has ten demo songs that will all play in sequence.
2.Press the DEMO button again to stop the demonstration.
CHOOSE A DEMO SONG
1.Press the DEMO button.
2.Use the buttons to change songs while
the demo is playing.
3.Press the DEMO button again to stop the
demonstration.
PLAY ALONG SONGS DEMO
1.Press the LEFT and RIGHT SONG buttons simultaneously to enter the music teacher
feature. The PLAY/STOP and DEMO button indicator lights will flash and the display
will show the first play along song.
2.Use the buttons to change songs (before or while the demo is playing).
3.Press the DEMO button to start the song.
4.Press the DEMO button again to stop the demonstration, and press the LEFT and
RIGHT SONG buttons simultaneously again to exit the play along song music teacher
mode.
Please see the Play Along Song section of the manual for more information.
OK
DEMO
There are 55 songs for the Play Along Song music teacher feature that can also be
played back for demonstration.
TRACK 1 TRACK 2
LEFT RIGHT
SONG
OK
14
KEYBOARD VOICES
VOICE SELECT
This piano offers 137 GM (General MIDI) authentic acoustic instrument voices offering
unmatched realism with digital effects to further enhance the sound.
Please see the complete list of all 137 voices in the Voice List at the back of this manual.
Please note, the keyboard and accompaniment volumes can adjusted independently
from each other and the master volume by using the KB.VOL and/or ACCOMP buttons .
1.If needed press the VOICE/STYLE button to select voice.(The indicator will be unlit
when VOICE is selected)
2.Press the voice select button that corresponds to the desired voice. The voice name
and its number will show on the display and the newly selected voice is available for
playing.
There are ten voices that can be selected quickly by pressing one of the voice select
buttons: GRAND PIANO/ E.PIANO/ VIBES/ ORGAN/ N.GUITAR/ BASS/ STRINGS/ CHOIR
/ BRASS/ EFFECT. The voice name is printed above the select button.
QUICK SELECT VOICE BUTTONS
R&B SWING BALLAD POP LATIN ST YLE
GOSPEL
M1
WORLD
M2
DANCE
M3
TRADITIONAL
M4
BOSA NOVA
ST YLE HOLD
STORE/BANK
REGISTRATION
GRAND PIANO
BASS
E. PIANO VIBES ORGAN N. GUITAR VOICE
STRINGS CHOIR BRASS EFFECT
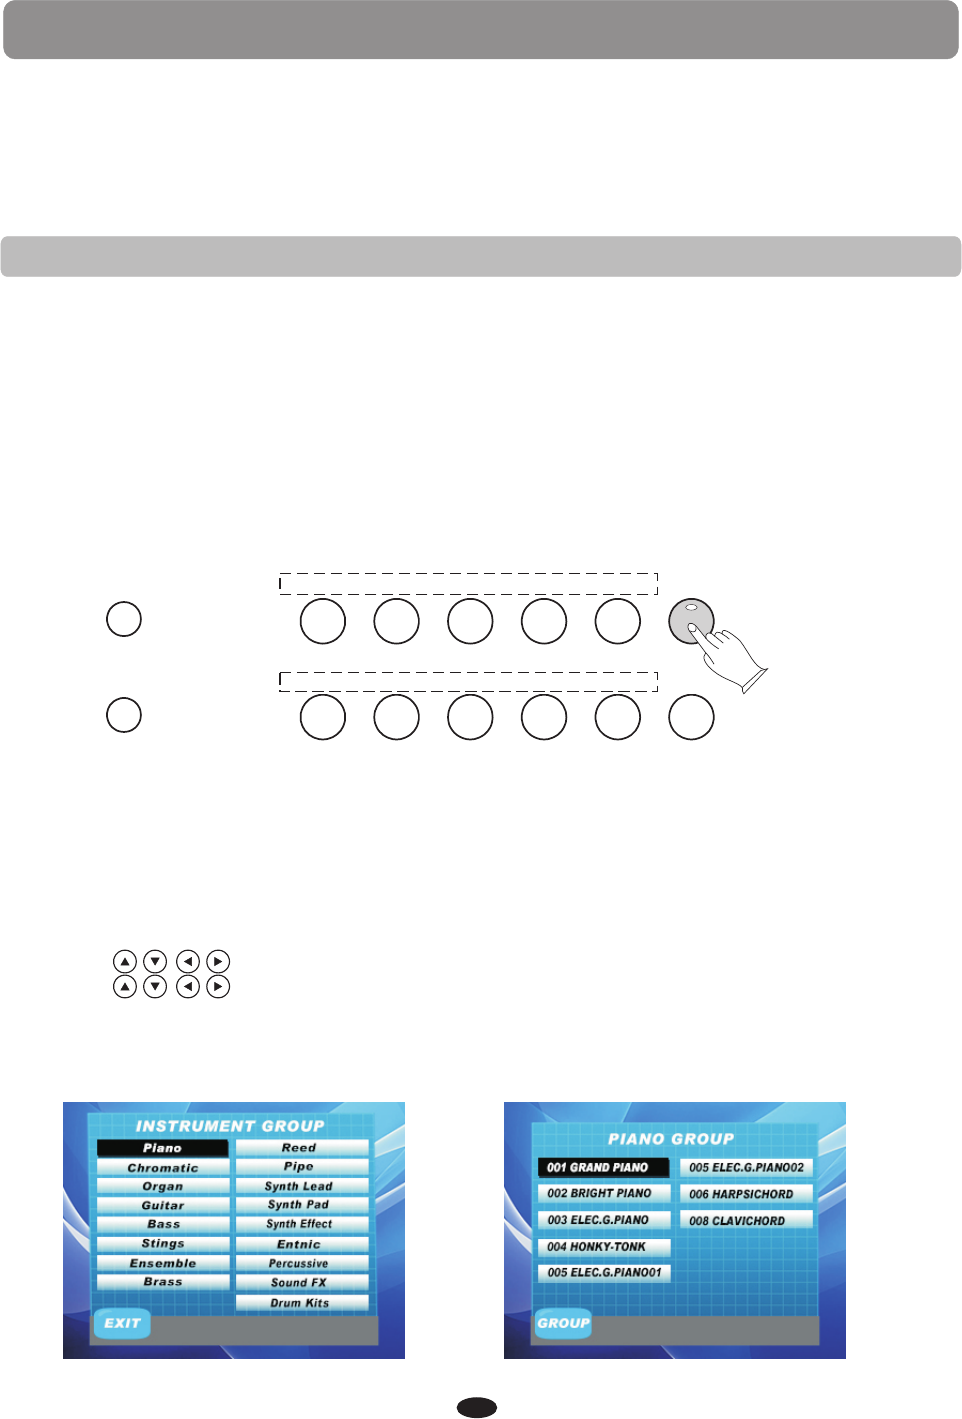
1.Press the VOICE/STYLE button to select voice.(The indicator will be unlit when VOICE
is selected)
2.Press the OK button.
3.Use the buttons to select a voice group(Fig.1), press OK button again.
4.Use the buttons to select the voice(Fig.2), press OK button to enter.
The newly selected voice name and number will be on the screen and that voice is
selected for playing on the keyboard.
Please refer to the Voice List at the back of the manual for a list of all available voices.
SELECTING ONE OF THE 137 VOICES
Fig.1 Fig.2
15
+YES
-NO
3.You can also use the +/YES,-/NO buttons to select voice.
KEYBOARD VOICES
ADJUSTING THE KEYBOARD VOICE VOLUME
There are tow ways to adjust the keyboard voice volume.
First method
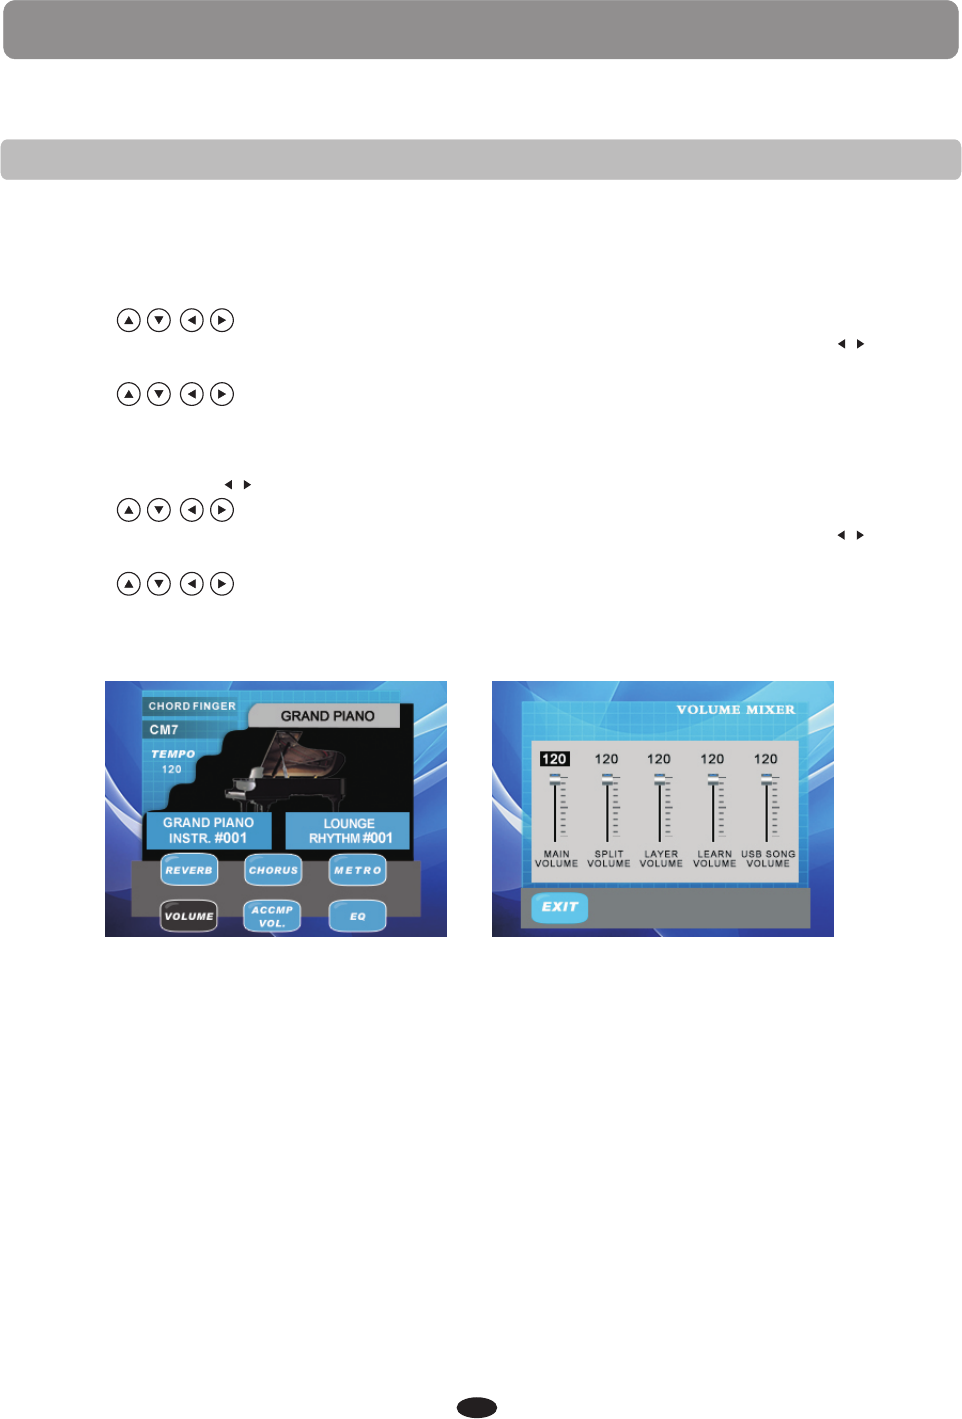
1.Select the VOLUME module on the main interface(Fig.1), press OK button to enter.
2.Use the buttons to select main volume / split volume/ layer volume/
learn volume/ USB song volume. Than use +YES/-NO buttons or KB.VOL buttons
to adjust the volume(Fig.2).
3.Use the buttons to select the EXIT and press OK button to return to the
main interface.
Second method
1.Press the KB.VOL buttons to enter the VOLUME MIXER interface.
2.Use the buttons to select main volume / split volume/ layer volume/
learn volume/ USB song volume. Than use +YES/-NO buttons or KB.VOL buttons
to adjust the volume.
3.Use the buttons to select the EXIT and press OK button to return to the
main interface.
/
/
/
Fig.1 Fig.2
16
KEYBOARD VOICES
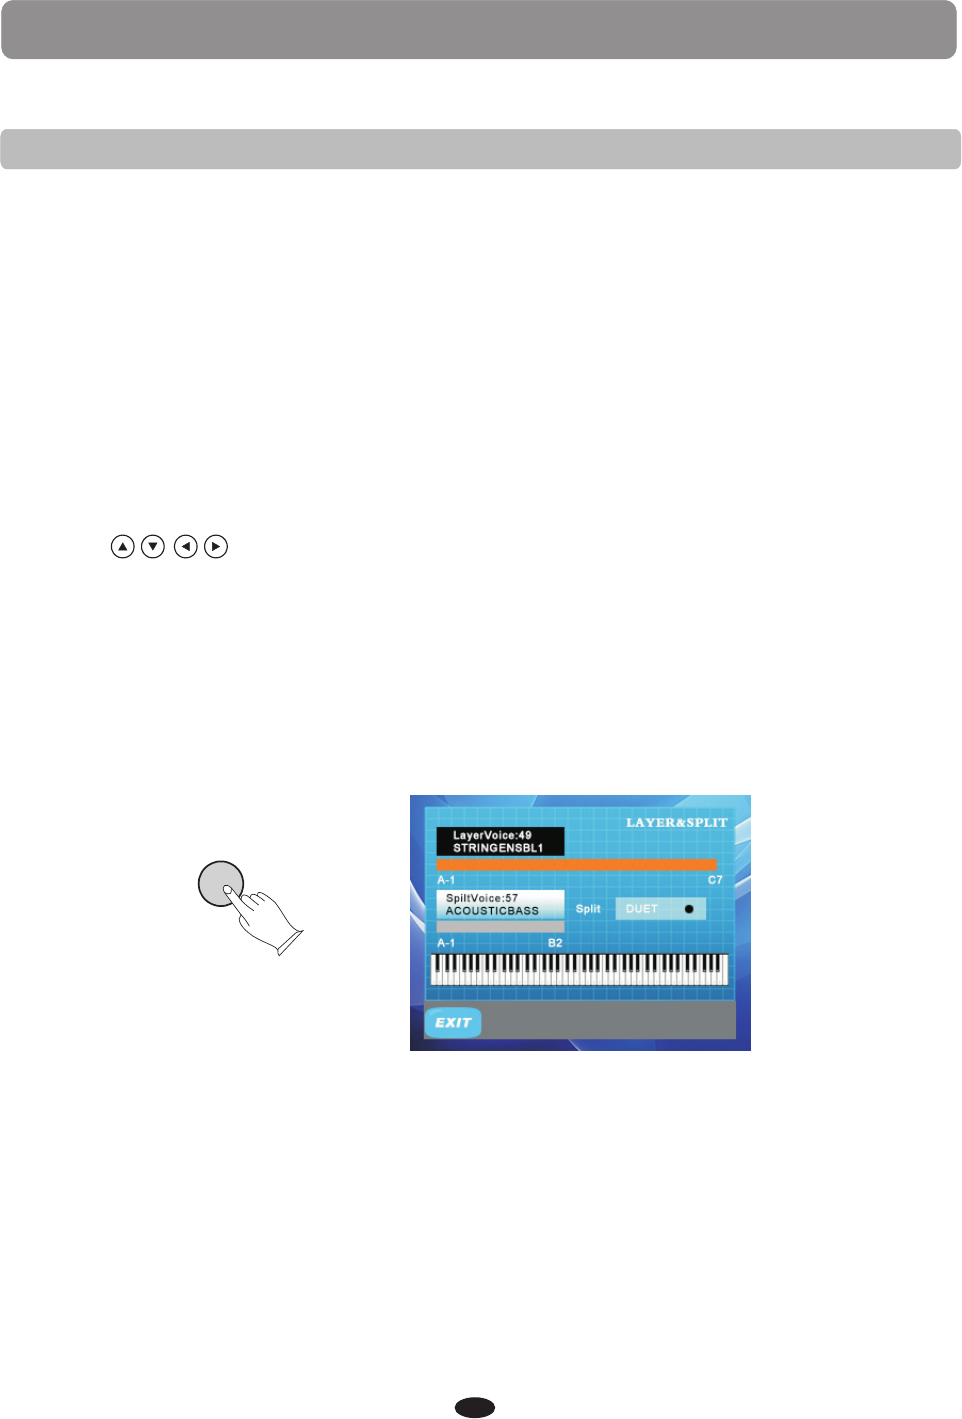
1.Press the LAYER button, the currently assigned layer voice will show on the display,
and the indicator will light up signaling that the layer feature is engaged(Fig.1).
2.Use the +/YES, -/NO buttons to select the desired layer voice.
3.Use the buttons to select the EXIT and press OK button to return to the
main interface.
4.Press the LATER button to turn the layer feature off, the indicator will go out.
If the LAYER button indicator is lit, the layer feature is engaged.
Please also note, engaging the DUET feature will disable the Layer and Split modes.
LAYER
LAYER VOICE
Layer or dual refers to an additional voice that is tone mixed with the selected
keyboard voice. The assigned layer voice will be heard with the original voice when the
layer feature is engaged. If you need to adjust ratio of the layered to main voice
volume, adjust the main voice volume using the KB. VOL button, this will not affect the
layer voice.
17
KEYBOARD VOICES
SPLIT VOICE
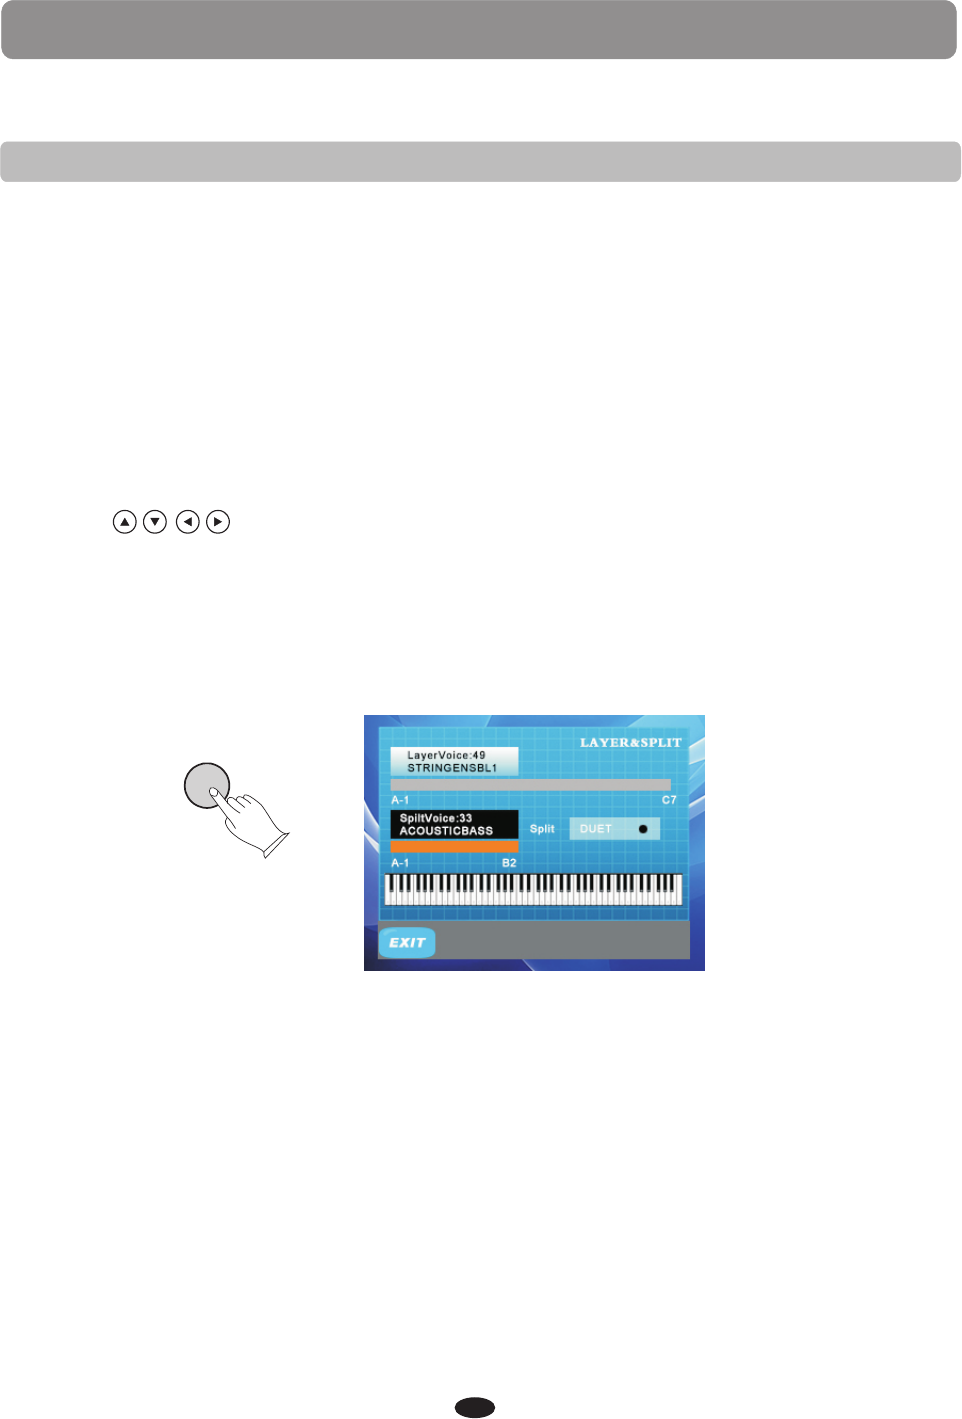
In the split or lower mode the keyboard is divided into two sections. To the right of the
split point the currently selected main voice or the layered voices, will sound. The keys
to the left of the split point can be assigned to play a different instrument voice. If you
need to adjust ratio of the split to main voice volume, adjust the main voice volume using
the KB. VOL button, this will not affect the split voice.
The default split point for voice is the G2 key. It can be changed in the Function menu,
please see the Function section for more informations.
SPLIT
1.Press the SPLIT button, the currently assigned split voice will show on the display.
2.While the indicator is lit, use the +/YES, -/NO buttons to select the desired split voice
or use one of the quick select voice buttons. The display will show the split voice
number and name.
3.Use the buttons to select the EXIT and press OK button to return to the
main interface.
4.Press the SPLIT button to turn the split feature off, the indicator will go out.
If the SPLIT button indicator is lit, the split (lower) feature is engaged.
18
KEYBOARD VOICES
REVERB/CHORUS
This piano has two digital effects to further enhance the keyboard voice sounds, reverb
and chorus.
Reverb simulates the effect of playing in a big room or a hall where the sound
reverberates off the walls and ceiling. The reverb effect is engaged automatically when
the piano is turned on.
Press the REVERB/CHORUS button to turn the reverb effect off and the indicator will go
out. Switch the reverb feature on and off by pressing the REVERB button.
There are eight reverb effects available:1-Hall1, 2-Hall2, 3-Room1, 4-Room2, 5-Room3,
6-Stage1, 7-Stage2 and 8-Plate.
REVERB
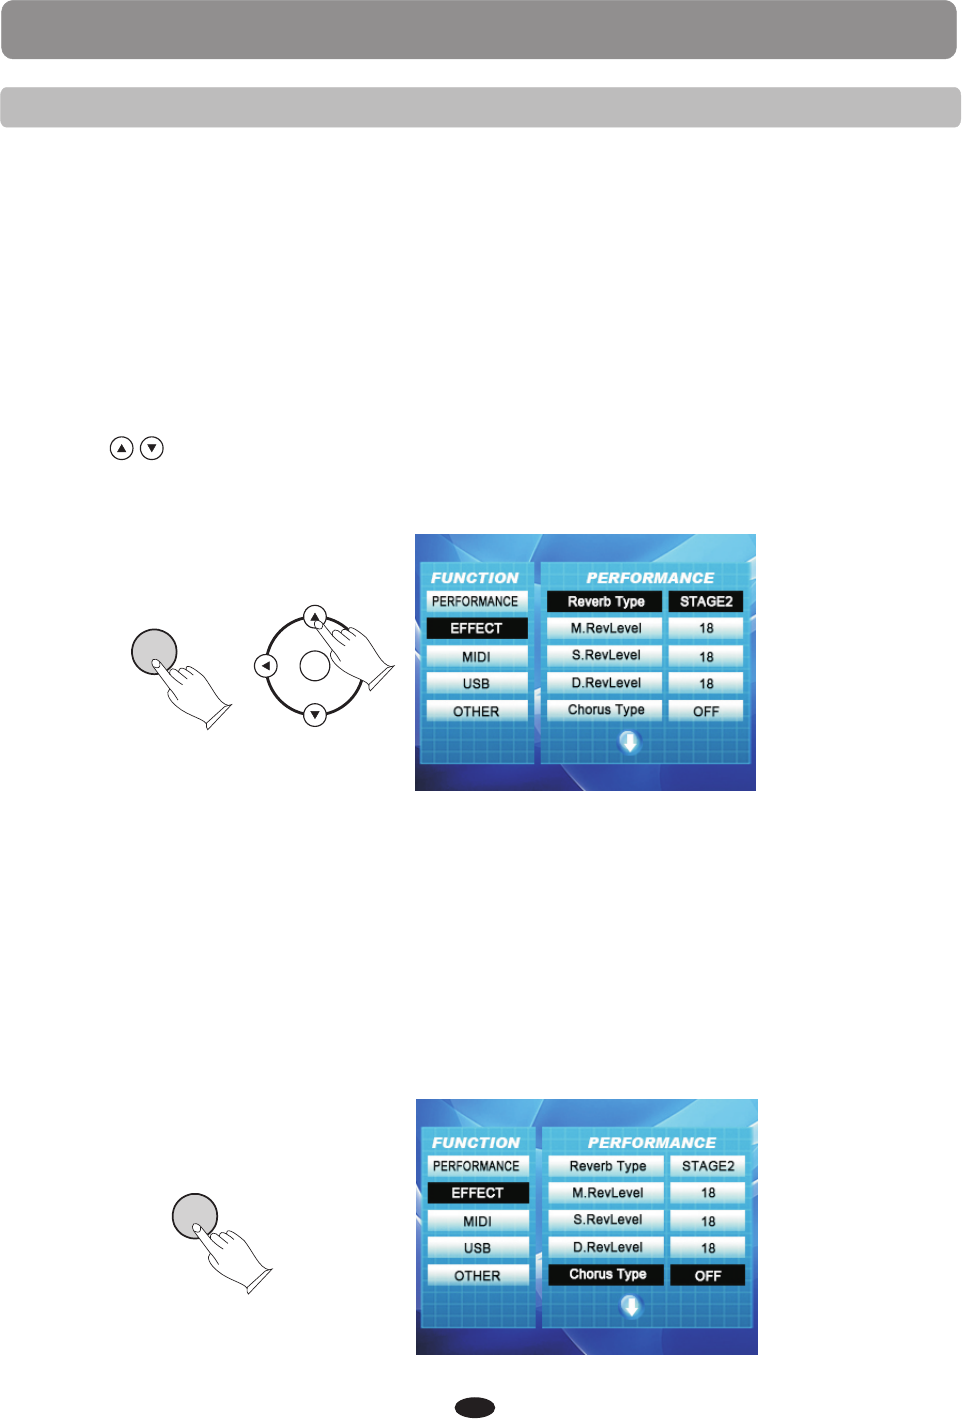
1.Press the REVERB/CHORUS button twice, so that the EFFECT type is shown in the display.
2.Use the buttons to select REVERB TYPE (Fig.1).
3.Use the +/YES, -/NO buttons to select a reverb type.
The reverb level for the main, split and layer voices can be changed in the unction menu.
Please see the Function section for more information.
(Fig.1)
The Chorus effect adds depth and spaciousness to the selected keyboard voice. Press
the REVERB/CHORUS button to engage the chorus effect and the indicator will light up.
Press the button again to turn off the chorus effect. The chorus setting does not affect
the auto accompaniment.
There are eight reverb effects available: 1-Chorus1,2-Chorus2, 3-Chorus3, 4-Chorus4,
5-Feedback, 6-Flanger1,7-SHRTDELY, and 8-SHRTDLFB.
CHORUS
1.Press the REVERB/CHORUS button, so that the EFFECT type is shown in the display(Fig.2).
2.Use the +/YES, -/NO buttons to select a chorus type.
REVERB/
CHORUS
OK
The chorus level for the main, split and layer voices can be changed in the function menu.
Please see the Function section for more information
(Fig.2)
REVERB/
CHORUS
19
KEYBOARD VOICES
DUET
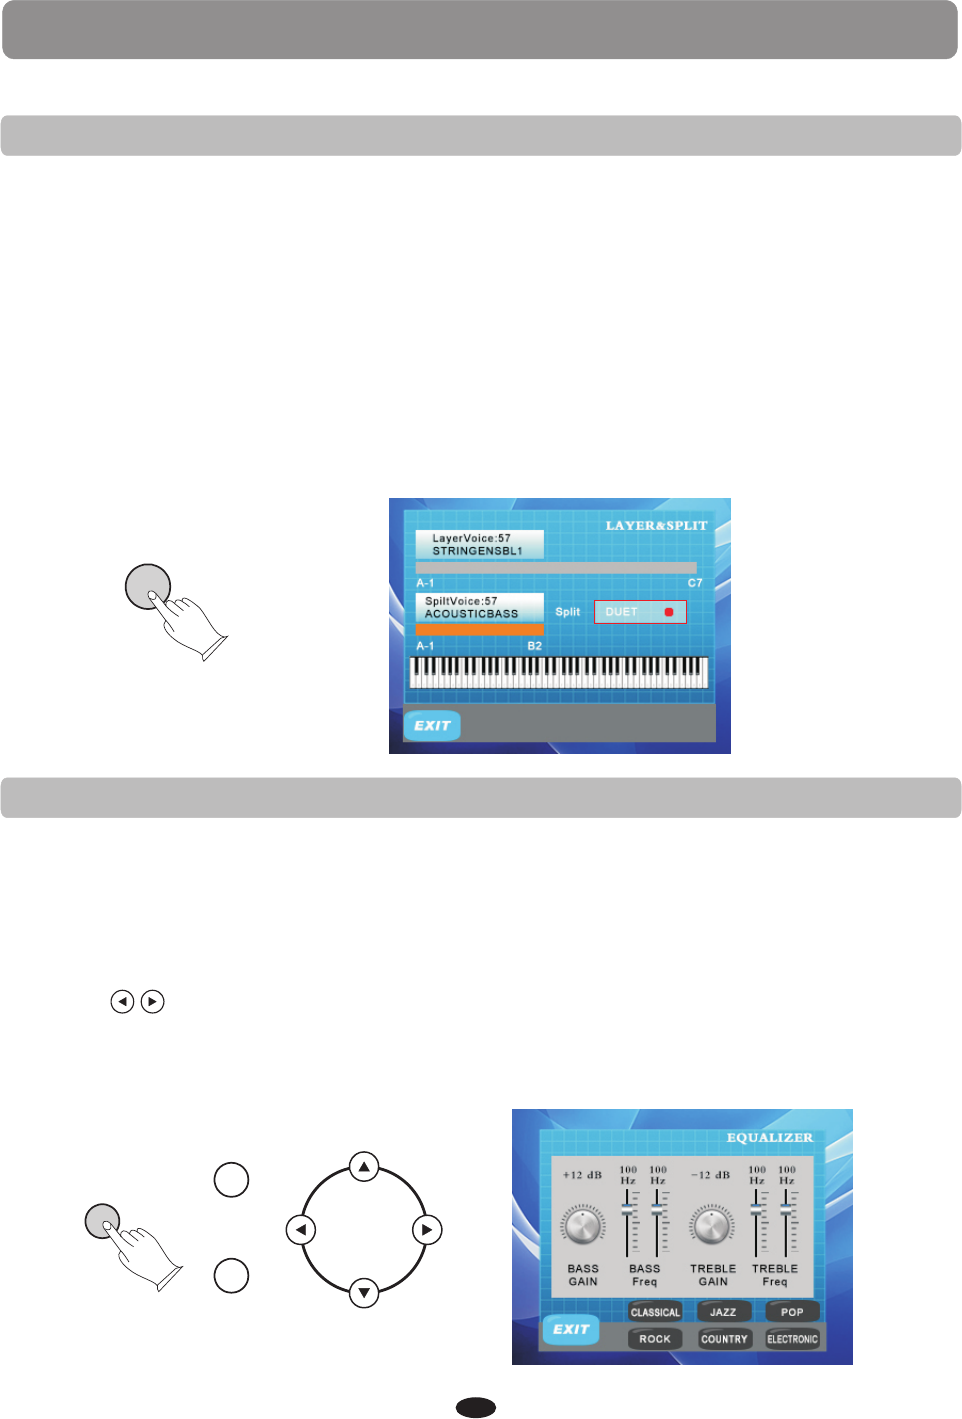
With the duet feature engaged the keyboard is divided into two sections that play the
same notes. The two sections, left A1-C3 and right C#3-C7 have the exact same notes
and share the same voice, octaves and volume. This is a great feature for teaching or
when two people want the play the piano simultaneously.
When the duet feature is engaged, the pedals will automatically change configuration
so there are two sustain pedals, one for each portion of the keyboards.
1.Press the DUET button, the status of the duet feature will be shown in the display,
and the indicator will light up.
2.To turn the duet feature off press the DUET button so that the indicator goes out.
Please note, engaging the DUET feature will disable the Layer and Split modes and the
Auto Accompaniment feature.
DUET
EQUALIZER
20
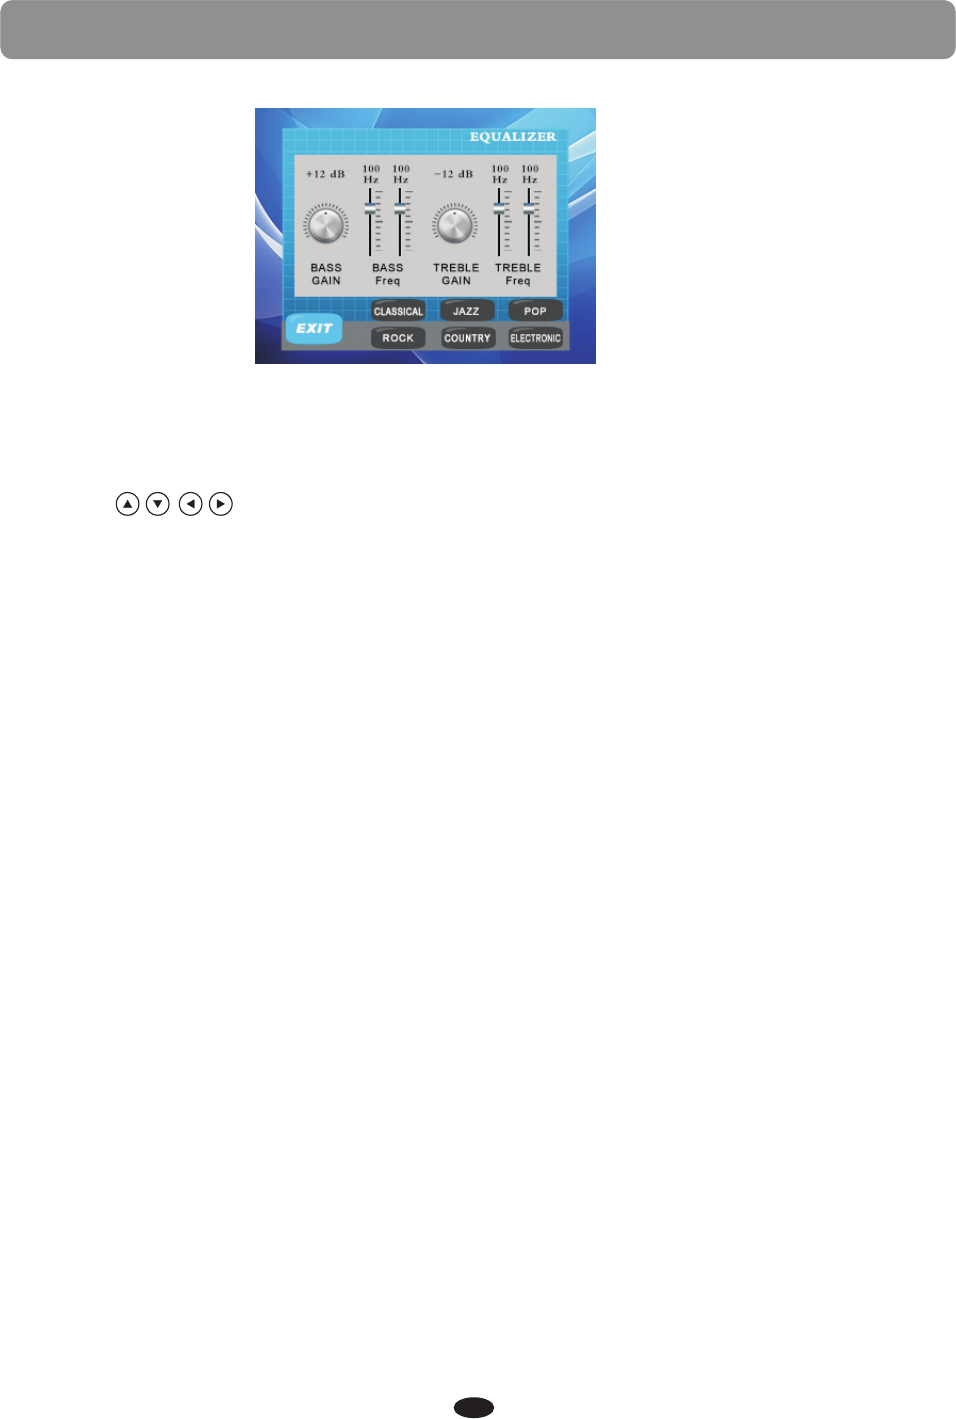
You can change the Overall EQ settings for the piano to increase or decrease the high
and low frequencies. Normally the piano is set at a flat EQ. However certain types of
rooms may affect the sound quality of your piano. By adjusting the EQ settings you can
make the piano fit the room’s sound better.
1.Press EQ button enter the EQUALIZER interface.
2.Use the buttons to select the BASS Freq/TREBLE Freq.
3.Use the +YES/-NO buttons to change the value.
4.Use the data wheel of the BASS and TREBLE to select the BASS GAIN and TREBLE GAIN.
5.Press the EQ button again to exit.
EQ
+YES
-NO
KEYBOARD VOICES
21
There are 6 sets of fixed settings for you to choose: CLASSICAL/ JAZZ/ POP/ RCCK/
COUNTRY/ ELECTRONIC.(Fig.1)
IN the EQUALIZER interface,
1.Use the buttons to select a set of fixed setting.
2.Press OK button to confirm.
3.Press EQ button to exit.
RHYTHM
This piano offers 100 rhythm styles and a variation of each of those style patterns to
choose from. The rhythm section of the keyboard is assigned by the auto accompaniment
split point. The keys on the left of the split point are reserved for the auto accompaniment.
The keys to the right are available for normal playing Each rhythm style includes an
introduction, the main pattern, two fill-ins, a variation and an ending pattern.
Please see the complete list of all 100 rhythm styles in the back of the manual.
Please note, the keyboard and accompaniment volumes can adjusted independently
from each other and the master volume by using the KB.VOL and ACCOMP buttons.
/ /
RHYTHM STYLE SELECT
QUICK SELECT RHYTHM STYLE BUTTONS
1.Press the VOICE/STYLE button to select style.(The indicator will be lit when
STYLE is selected)
2.Press the style select button that corresponds to the desired style. The style name
and its number will show on the display and the newly selected style is available for
playing.
There are ten styles that can be selected quickly by pressing one of the voice select
buttons: R&B/ SWING/ BALLAD/ POP/ LATIN/ GOSPEL/ WORLD/ DANCE/ TRADITIONAL
/ BOSA NOVA STYLE HOLD. The voice name is printed under the select button.
R&B SWING BALLAD POP LATIN ST YLE
GOSPEL
M1
WORLD
M2
DANCE
M3
TRADITIONAL
M4
BOSA NOVA
ST YLE HOLD
STORE/BANK
REGISTRATION
GRAND PIANO
BASS
E. PIANO VIBES ORGAN N. GUITAR VOICE
STRINGS CHOIR BRASS EFFECT
1.Press the VOICE/STYLE button to select voice.(The indicator will be lit when STYLE
is selected)
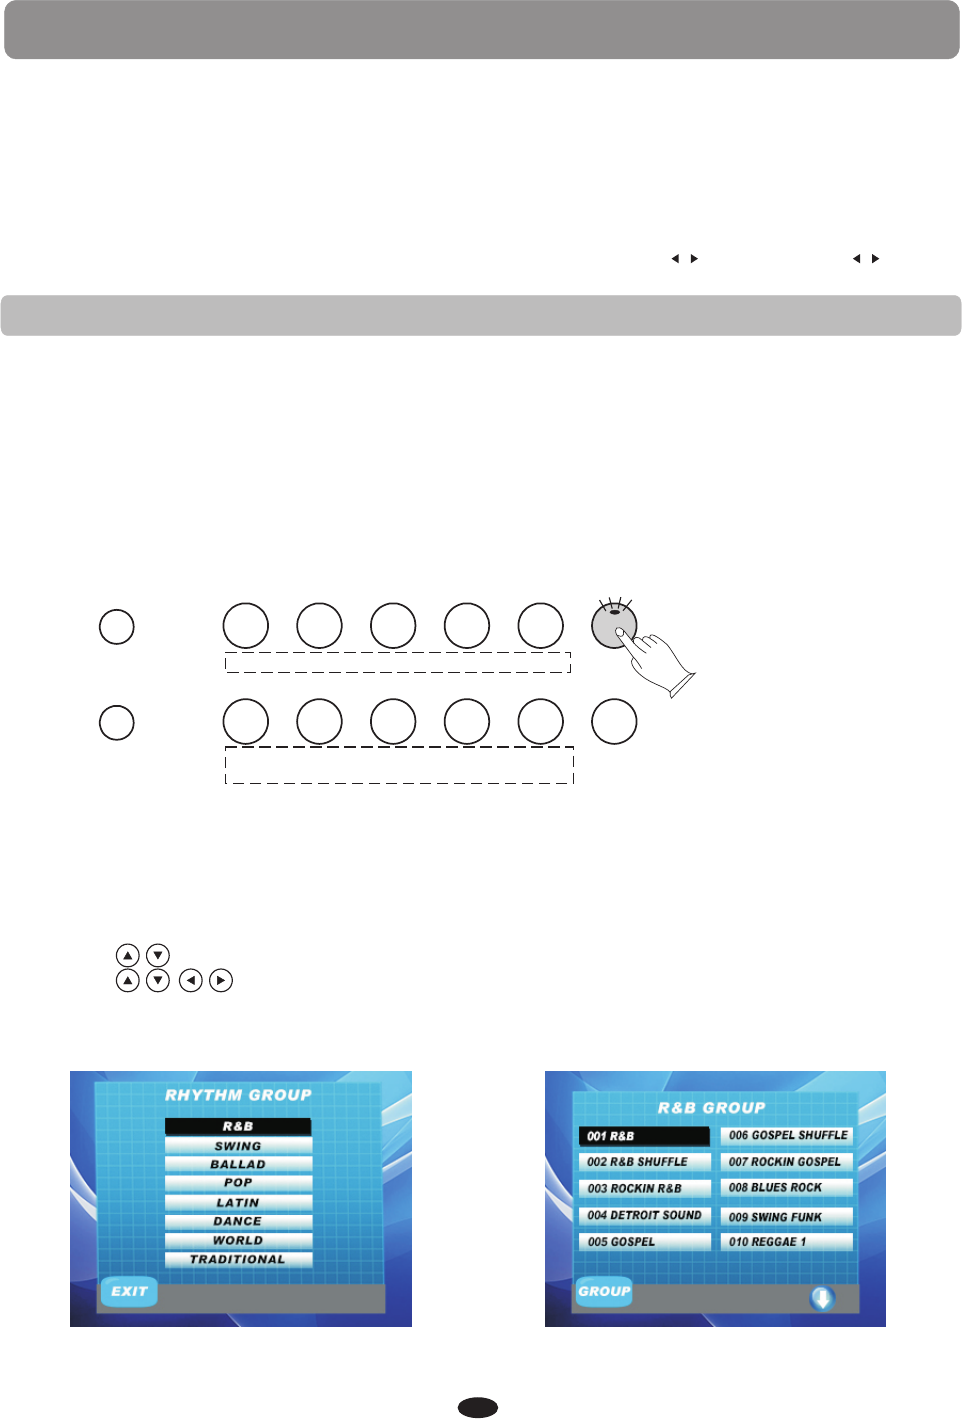
2.Press the OK button.
3.Use the buttons to select a style group(Fig.1), press OK button again.
4.Use the buttons to select the style(Fig.2), press OK button to enter.
The newly selected style name and number will be on the screen.
Please refer to the style List at the back of the manual for a list of all available styles.
SELECTING ONE OF THE 100 RHYTHM STYLES
Fig.1 Fig.2
22
+YES
-NO
3.You can also use the +/YES,-/NO buttons to select style.
RHYTHM
USING THE RHYTHM STYLE
There are three ways to start the rhythm style; straight start, synchronized start, or
with an introduction. You can stop your rhythm style with a finishing ending pattern.
STRAIGHT START
The START/STOP button starts the percussive rhythm immediately.
1.Press the START/STOP button, the selected rhythm style will play.
2.Press the START/STOP button again to stop. START/STOP
SYNCHRONIZED START
Synchronized Start puts the accompaniment in the standby mode.
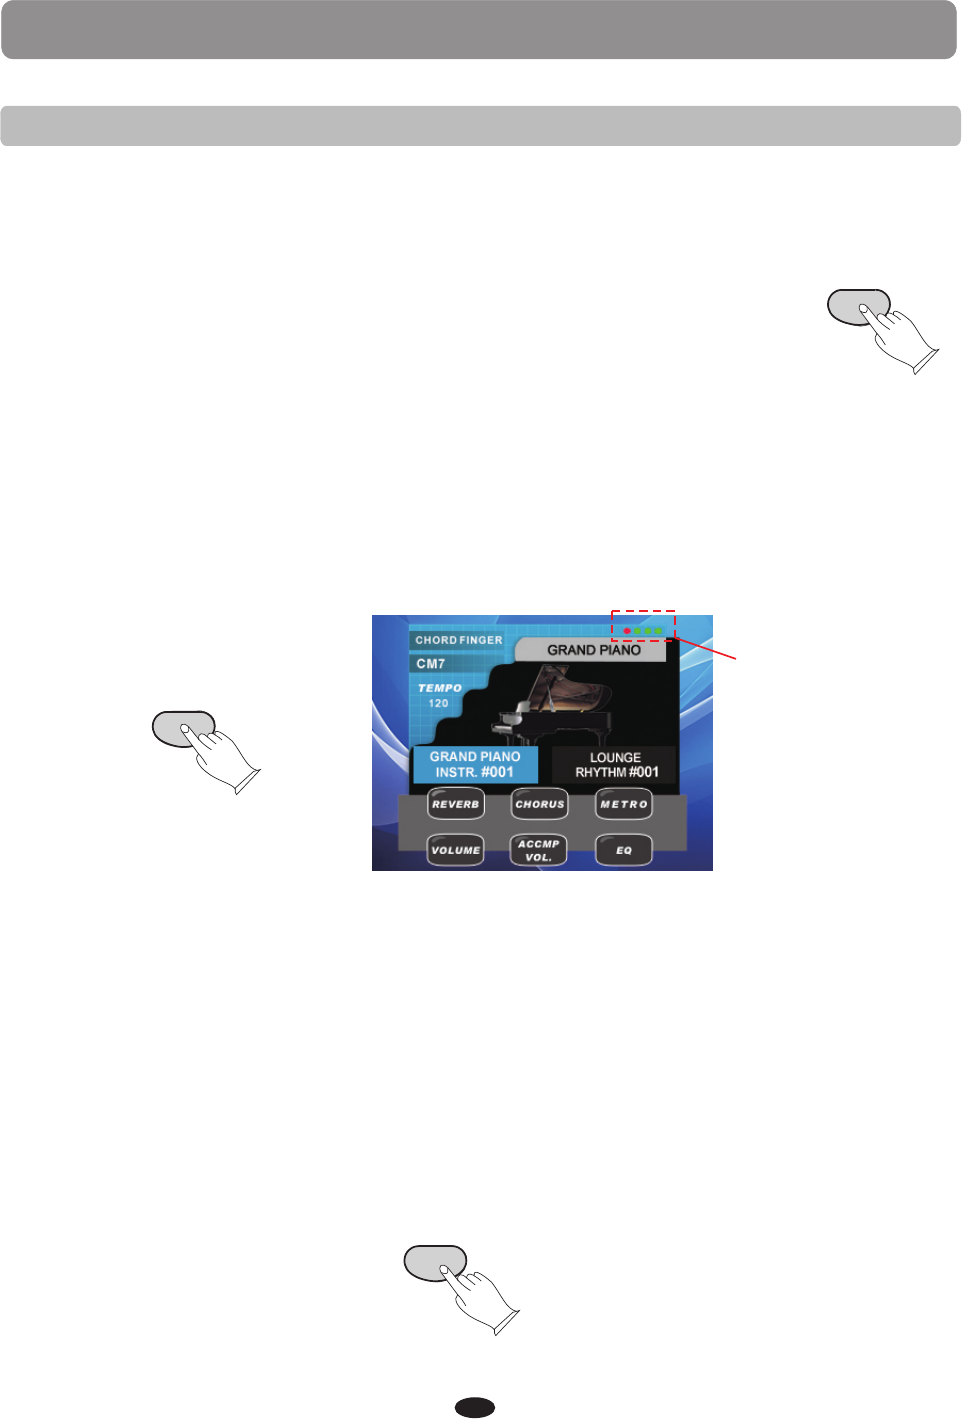
1.Press the SYNCHRO button, the first point of the virtual rhythm indicator on the
LCD screen will turn red(Fig.2). showing that the synchronized start mode is ready.
The rhythm style will start as soon as you play in the left hand, accompaniment,
section of the keyboard.
2.Press the START/STOP or the SYNCHRO button again to stop the rhythm style.
If the SYNCHRO button is used, the synchronized start mode will be put back on
standby.
SYNCHRO
Fig.2
INTRODUCTION AND ENDING PATTERNS
All of the 100 styles and their variations can be started with an appropriate introduction.
1.Press the INTRO/ENDING button, the rhythm of the introduction will start followed
by the main rhythm pattern.
2.Press the SYNC START button before pressing the INTRO/ ENDING button to add an
introduction.
The introduction, followed by the rhythm style will start as soon as you play in the
left hand section of the keyboard.
3.Press the START/ STOP button to stop the accompaniment or press the INTRO/ENDING
button again to stop with an ending pattern. An ending pattern can be used at any
time regardless of whether you started with an introduction.
INTRO/ENDING
23
RHYTHM
FILL IN
The fill in feature will insert a short rhythmic pattern of one to two measures in length,
depending on the rhythm style selected. There is a fill-in for both the main pattern and
the variation. The FILL buttons can also be used to start a rhythm style.
1.Press the FILL IN 1 or the FILL IN 2 VARIATION buttons at any time while the rhythm
style is playing to add a fill.
2.Press and hold down either FILL IN button to extend the fill indefinitely. If you hold
down a FILL IN button, the fill pattern will repeat until the button is released, and
then the pattern will resume from the beginning of the next measure.
FILLIN1 FILLIN2
VARIATION
VARIATION
1.Press the FILL IN 2 VARIATION button at any time to select the variation of any of the
rhythm styles. The indicator will light up and the variation pattern will be selected.
If the rhythm style is playing the variation will start at the beginning of the next
measure after the variation fill.
2.Press the FILL IN 1 button to revert to the main pattern from the beginning of the
next measure after the fill pattern.
FILLIN2
VARIATION
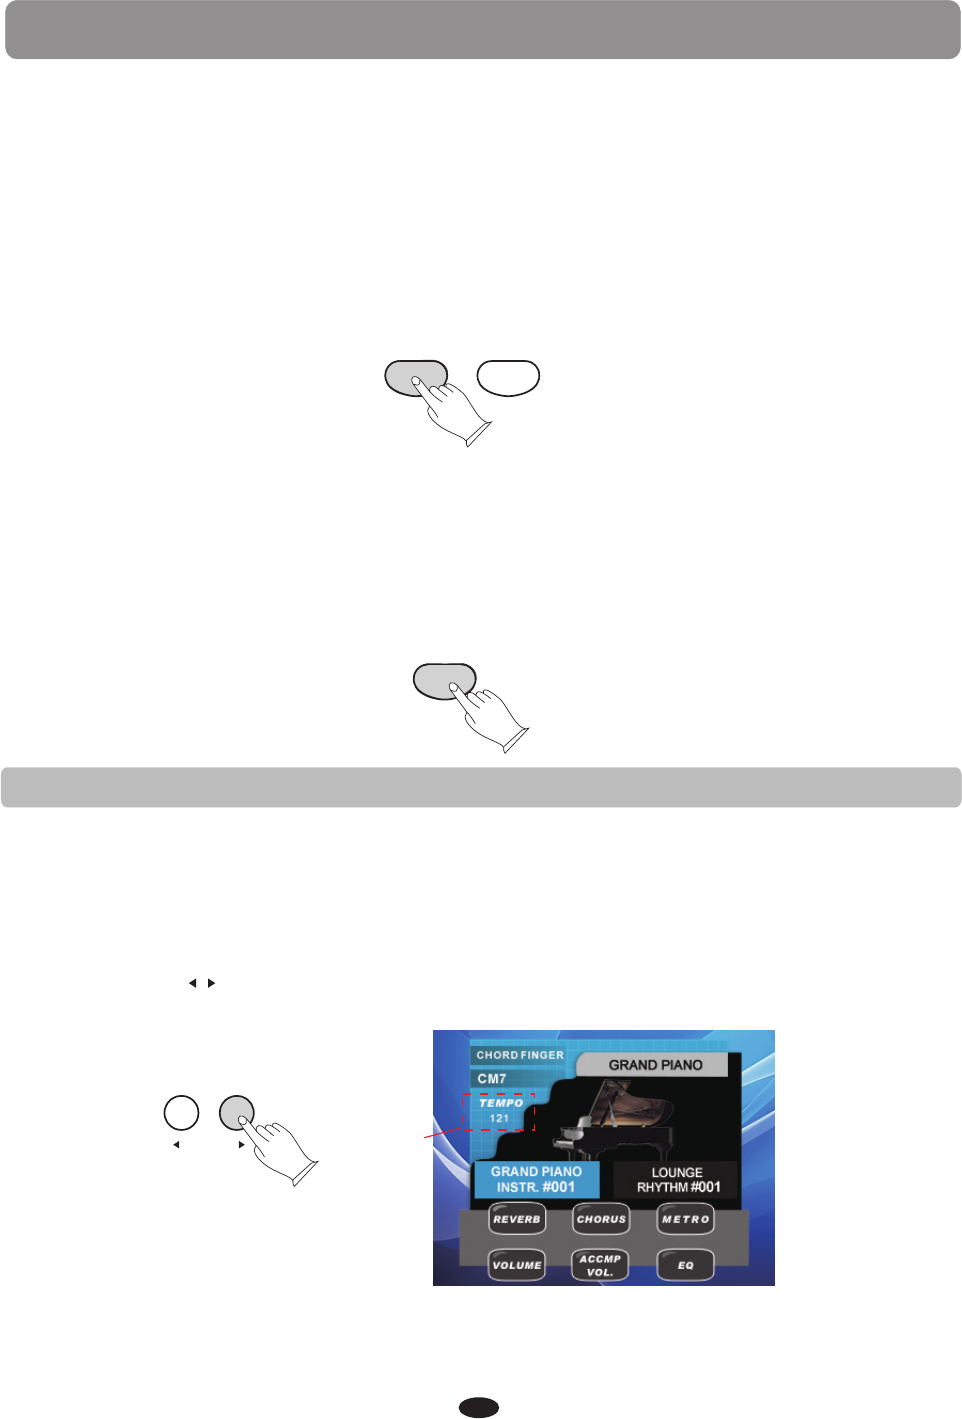
There is a virtual four-beat indicator, within the LCD screen, that flashes with the
tempo and the beat for the rhythm style playing. Each style has its own preset tempo.
The tempo can be adjusted before or during rhythm style play.
If you change rhythm styles while a rhythm style is playing, the tempo will stay at the
initial styles value.
Please note, if the METRONOME button is engaged, the metronome tick will sound at
the selected rhythm style tempo.
Press the TEMPO buttons to change the tempo.
/
TEMPO Fig.1
ADJUSTING THE TEMPO
24
AUTO ACCOMPANIMENT
Each of the 100 percussive rhythm styles has its own auto accompaniment, dedicated
to that style. These auto accompaniment patterns create fully orchestrated rhythm,
bass and chord progressions based on the chords that you play with your left hand.
The selected rhythm style determines the characteristics of the auto accompaniment.
The accompaniment produced is perfectly matched to the selected rhythm style.
For auto accompaniment modes the keys are divided into two sections at the auto
accompaniment split point. The keys to the left of this point are defined as the
accompaniment section of the keyboard.
//
Please note, the keyboard and accompaniment volumes can adjusted independently
from each other and the master volume by using the KB.VOL and ACCOMP buttons.
SPLIT POINT FOR AUTO ACCOMPANIMENT
For auto accompaniment, the keyboard is split into two sections. The default split point
is the G2 key. A different split point for the auto accompaniment can be assigned in the
Function menu.
Please see the Function section of this manual for more information.
ADJUSTING THE CHORD
The ACCOMP button must be engaged for the auto accompaniment to be available.
Press the ACCOMP button so the indicator is lit to engage the auto accompaniment mode.
Please see Using the Auto Accompaniment.
ADJUSTING THE AUTO ACCOMPANIMENT VOLUME
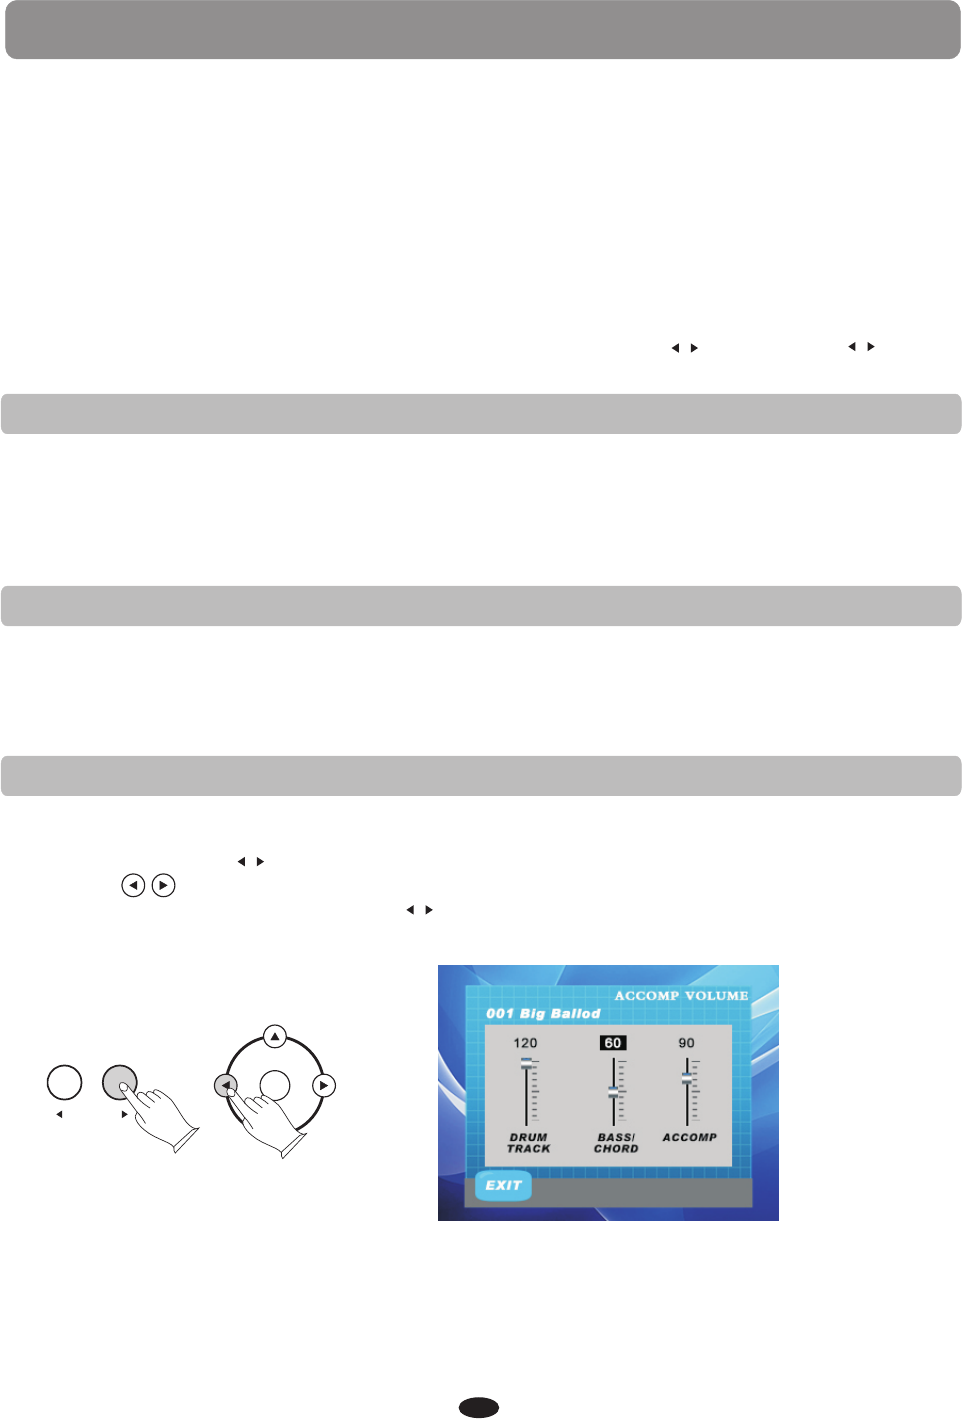
To adjust the volume of only the rhythm style.
1.Press the ACCOMP buttons.
2. Use the buttons to select the ACCOMP/ BASS CHORD/ DRUM TRACK(Fig.1).
3.Use the +/YES or -/NO or ACCOMP buttons to adjust the volume, the keyboard voice
will not be affected.
/
Fig.1
ACCOMP
OK
/
25
AUTO ACCOMPANIMENT
SINGLE MODE
Single, or intelligent, fingering mode makes it simple to produce four types of
orchestrated accompaniment chords using a minimum of fingers, while playing in the
auto accompaniment section of the keyboard.
In this mode, keys in the auto accompaniment section of the keyboard are used to
produce major, seventh, minor, and minor-seventh chords, the keys are not available
for normal playing. The auto accompaniment will start with the percussive rhythm as
soon as a key in the auto accompaniment section is played.
Please refer to Using the Auto Accompaniment.
The auto accompaniment, or auto bass chord, fingering modes of this piano are single
or fingered. The default setting is the fingered mode. The fingering mode is assigned
in the Function menu.
Please see the Function section of this manual for more information.
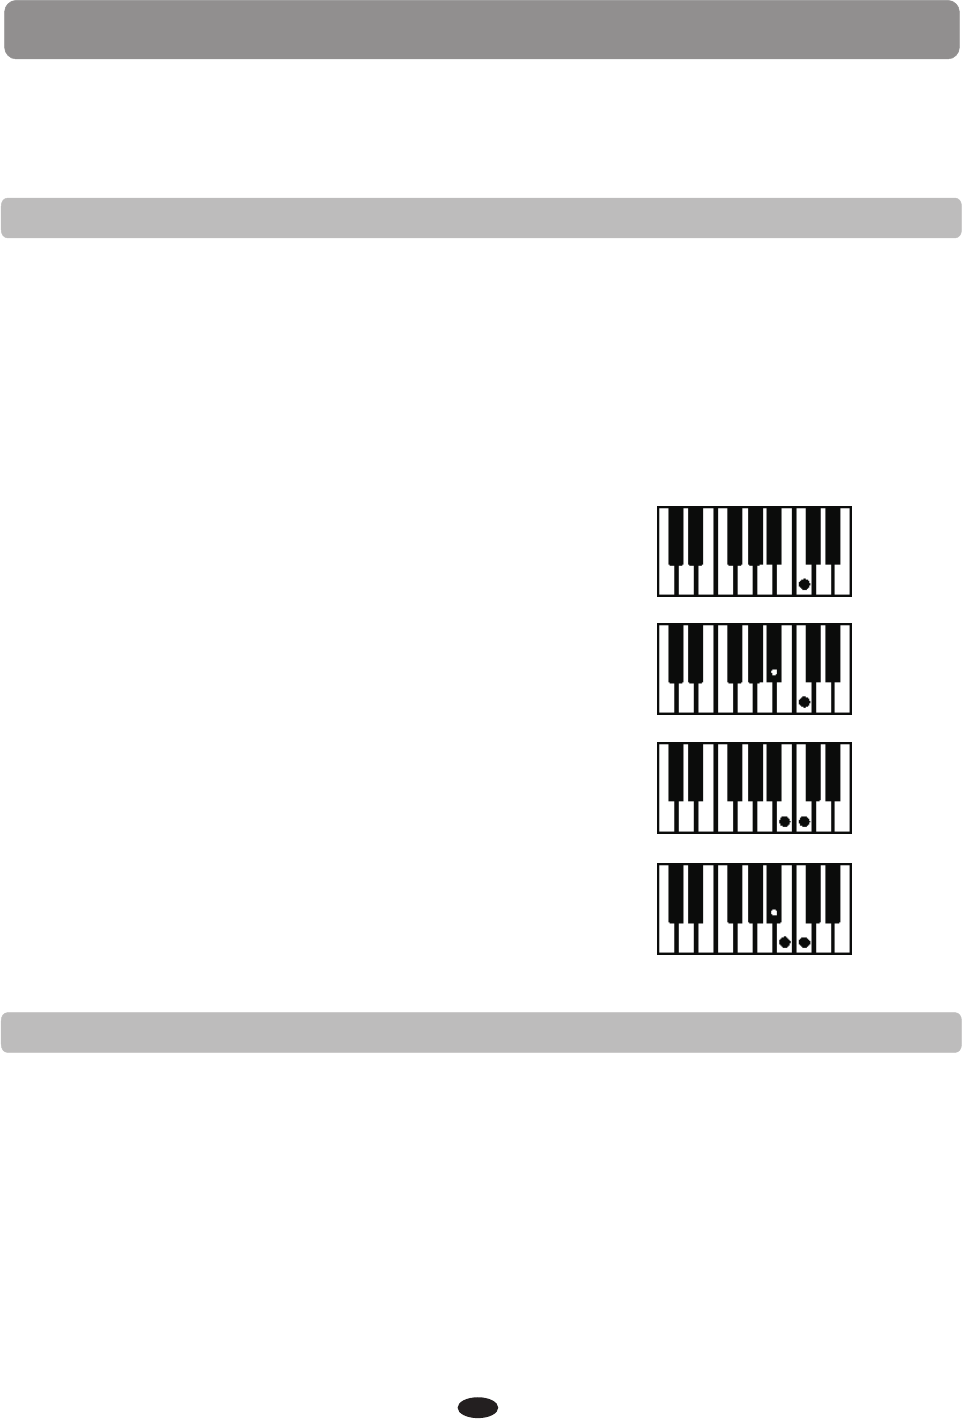
Major Chord: Press any key in the auto
accompaniment section of the keyboard. The
key you press determines the root note of the
major chord.
Minor Chord: Press the root key and any black
key to its left in the auto accompaniment
section of the keyboard simultaneously to
produce the minor chord.
Seventh Chord: Press the root key and any
white key to its left (7th key) in the auto
accompaniment section of the keyboard
simultaneously.
Minor-Seventh Chord: Press the root key and
both a black key and a white to its left in the
auto accompaniment section of the keyboard
simultaneously
C
Cm
C7
Cm7
FINGERED MODE
The fingered mode is ideal if you already know how to play chords on the keyboard. It
allows you to play the chords in the auto accompaniment section of the keyboard that
produce the selected auto accompaniment pattern. The auto accompaniment will start
as soon as a recognized chord is played in the auto accompaniment section of the
keyboard, the keys are not available for normal playing.
Please refer to Using the Auto Accompaniment.
Please note, if a chord played cannot be recognized (fingered beyond the table), the
previous chord will keep playing. An unrecognized chord cannot start the auto
accompaniment.
Please see the Auto Accompaniment Fingering Guide table at the back of this manual
for a list of all the 32 playable chords of this mode.
26

AUTO ACCOMPANIMENT
USING THE AUTO ACCOMPANIMENT
The rhythm style and corresponding auto accompaniment can be started as a straight
start or set for a synchronized start. An introduction can be added and an ending
pattern can be used when stopping.
Please note, if the ACCOMP button is not engaged only the rhythm style will play.
STRAIGHT START
1.Select a rhythm style. Please refer to RHYTHM STYLE SELECT.
2.Select a fingering mode. Please refer to SINGLE MODE.
3.Press ACCOMP button to engage the auto accompaniment mode, the indicator will
be lit.
4.Press the START/STOP button. The START/STOP button will start the rhythm style
immediately for both fingering modes. Depending on the fingering mode selected
the auto accompaniment will start as follows:
·Single: Auto accompaniment will start as soon as a note is struck in the auto
accompaniment section of the keyboard.
·Fingered: Auto accompaniment will start as soon as a recognized chord is played
in the auto accompaniment section of the keyboard.
5.Press the START/STOP button again to stop the rhythm style and auto accompaniment.
SYNCHRONIZED START
Synchronized Start mode puts the piano auto accompaniment on standby. It allows you
to start the rhythm style and its auto accompaniment by playing on the keyboard.
·Single: The rhythm style and auto accompaniment will start as soon as a note is
struck in the auto accompaniment section of the keyboard.
·Fingered: The rhythm style and auto accompaniment will start as soon as a
recognized chord is played in the auto accompaniment section of the
keyboard.
1.Select a rhythm style. Please refer to RHYTHM STYLE SELECT.
2.Select a fingering mode. Please refer to SINGLE MODE.
3.Press the ACCOMP button to engage the auto accompaniment mode, the indicator
will be lit.
4.Press the SYNCHRO button, the beat indicator will light up, indicating that the
synchronized start mode is engaged. If you want to start the accompaniment with a
introduction, press the INTRO/ENDING button, or with either fill pattern press the
FILL IN button for that now. Depending on the fingering mode selected, the SYNCHRO
button will start the rhythm and the auto accompaniment as follows:
5.Press the START/STOP button to stop the rhythm style and auto accompaniment.
Please note, if the ACCOMP button is not engaged only the rhythm style will play.
27

AUTO ACCOMPANIMENT
INTRODUCTION AND ENDING PATTERNS
All of the auto accompaniments can be started with an appropriate introduction and
stopped with a finishing ending.
1.Select a rhythm style. Please refer to Select One of the 100 Rhythm Styles.
2.Select a fingering mode. Please refer to Select the Auto Accompaniment Fingering.
3.Press the ACCOMP button to engage the auto accompaniment mode, the
indicator will be lit.
4.Press the SYNCHOR button, the indicator will light up, indicating that the
synchronized start mode is engaged.
Please note, to hear the auto accompaniment introduction the SYNCHRO button must
be used, otherwise the rhythm style introduction will begin immediately and the auto
accompaniment introduction will not sound.
5.Press the INTRO/ENDING button. Depending on the fingering mode selected, the
SYNCHRO button will start the rhythm and the auto accompaniment with an
appropriate introduction as follows:
·Single: The rhythm style and auto accompaniment with introduction will start as
soon as a note is struck in the auto accompaniment section of the keyboard.
·Fingered: The rhythm style and auto accompaniment will start as soon as a
recognized chord is played in the auto accompaniment section of the keyboard.
6.Press the START/STOP button to stop the rhythm style and auto accompaniment. Or
press the INTRO/ENDING button again to stop the auto accompaniment after a
finishing ending pattern. The ending pattern can be engaged anytime an auto
accompaniment is playing, whether or not it was started with an introduction.
The fill feature will insert a short rhythmic pattern of one to two measures in length,
depending on the auto accompaniment selected. There is a fill in for both the main
pattern and the variation. The FILL buttons can also be used to start a rhythm style
and the auto accompaniment if used with the SYNCHRO button.
FILL-IN
1.Press the either FILL IN button at any time while the accompaniment is playing to
add a fill.
2.Press and hold down a FILL IN button to extend the fill indefinitely. If you hold down
a FILL IN button, the fill pattern will repeat until the button is released, and then the
pattern will resume from the beginning of the next measure after the fill.
1.Press the FILL IN 2 VARIATION button at any time to select the variation of any of the
auto accompaniments. The indicator will light up and the variation pattern will be
elected. If the auto accompaniment is playing the variation will start at the beginning
of the next measure after the variation fill.
Please refer to the Starting and Stopping the Auto Accompaniment.
2.Press the FILL IN 1 button, the auto accompaniment will revert to the main auto
accompaniment pattern selected after the main fill.
VARIATION
28
AUTO ACCOMPANIMENT
METRONOME
The built in metronome is a timing device. It is used as reference to aid with practice or
performance.
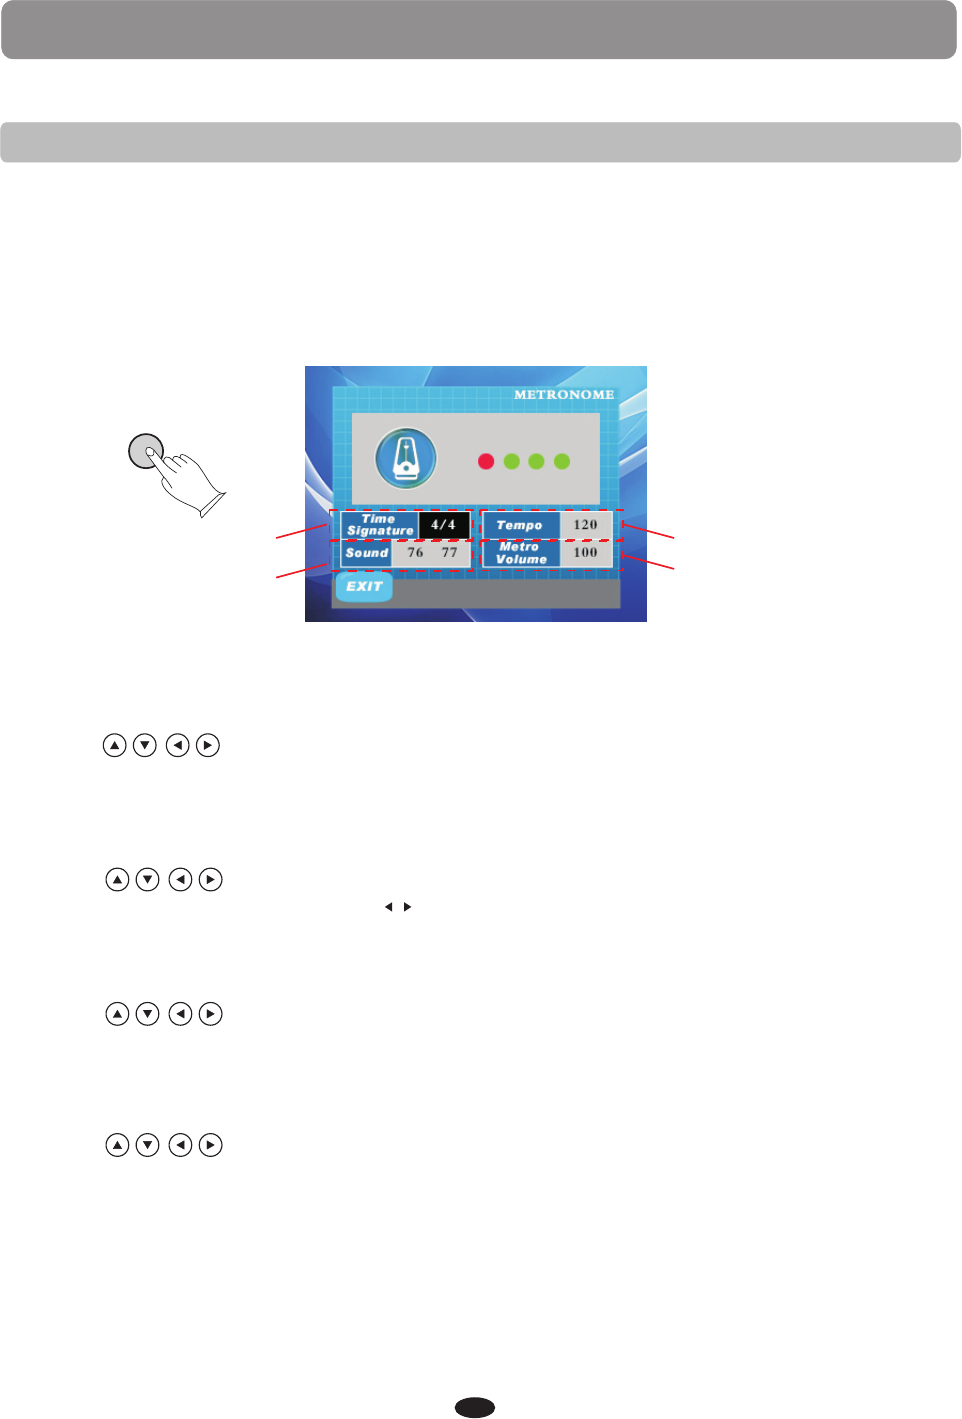
1.Press the METRONOME button to engage the metronome feature. The button's
Indicator will turnon, the display screen will show the selected time signature and
tempo, the metronome tick sound will start immediately.
2.Press the metronome button again to turn off the metronome.
ME TRO
The TIME SIGNATURE can be set to the following measures:1/4, 2/4, 3/4, 4/4, 5/4, 6/4,
3/8, 6/8, 7/8,9/8 or 12/8.
1.Use the buttons to select the TIME SIGNATURE(Fig.1).
2.Use the +YES or -NO buttons to change the time signature.
At the same time press +YES and -NO buttons to restore the default value:4/4.
TIME SIGNATURE
1.Use the buttons to select the TEMPO(Fig.2).
2.Use the +YES/ -NO or the TEMPO buttons to change the value, Range: 20-280.
At the same time press +YES and -NO buttons to restore the default value.
TEMPO
/
1.Use the buttons to select the sound(Fig.3).
2.Use the +YES/ -NO buttons to change the sound(76 77, 75 76, 67 68, 81 34).
At the same time press +YES and -NO buttons to restore the default value.
SOUND
Fig.1
Fig.3
Fig.2
Fig.4
1.Use the buttons to select the metro volume(Fig.4).
2.Use the +YES/ -NO buttons to change the value, Range: 0-127.
At the same time press +YES and -NO buttons to restore the default value.
METRO VOLUME
29
FUNCTION
The Function menu is used to set up or to adjust values or levels of various features
related to the operation of this keyboard. This wide range of functions give the piano
extraordinary versatility. With the FUNCTION button engaged you may access the
sub-menus for the following:
Transpose
Master Tune
Touch Cure
Main Octare
Split Octare
Dual Octare
Split Point
Chord Point
Chord Type
Main Pan
Split Pan
Dual Pan
PERFORMANCE
Reverb Type
Main Rev Lvl
Split Rev Lvl
Duet Rev Lvl
Chorus Type
Main Chr Lvl
Split Chr Lvl
Duet Chr Lvl
EFFECT
USB Midi In
Midi Out
Local
MIDI
USB Play Mode
USB Play Speed
Auto Rec Track
Rec Main Track
Rec Split Track
Rec Dual Track
USB Mute Track
USB
Blue Tooth
Auto Close Time
Factory Reset
OTHER
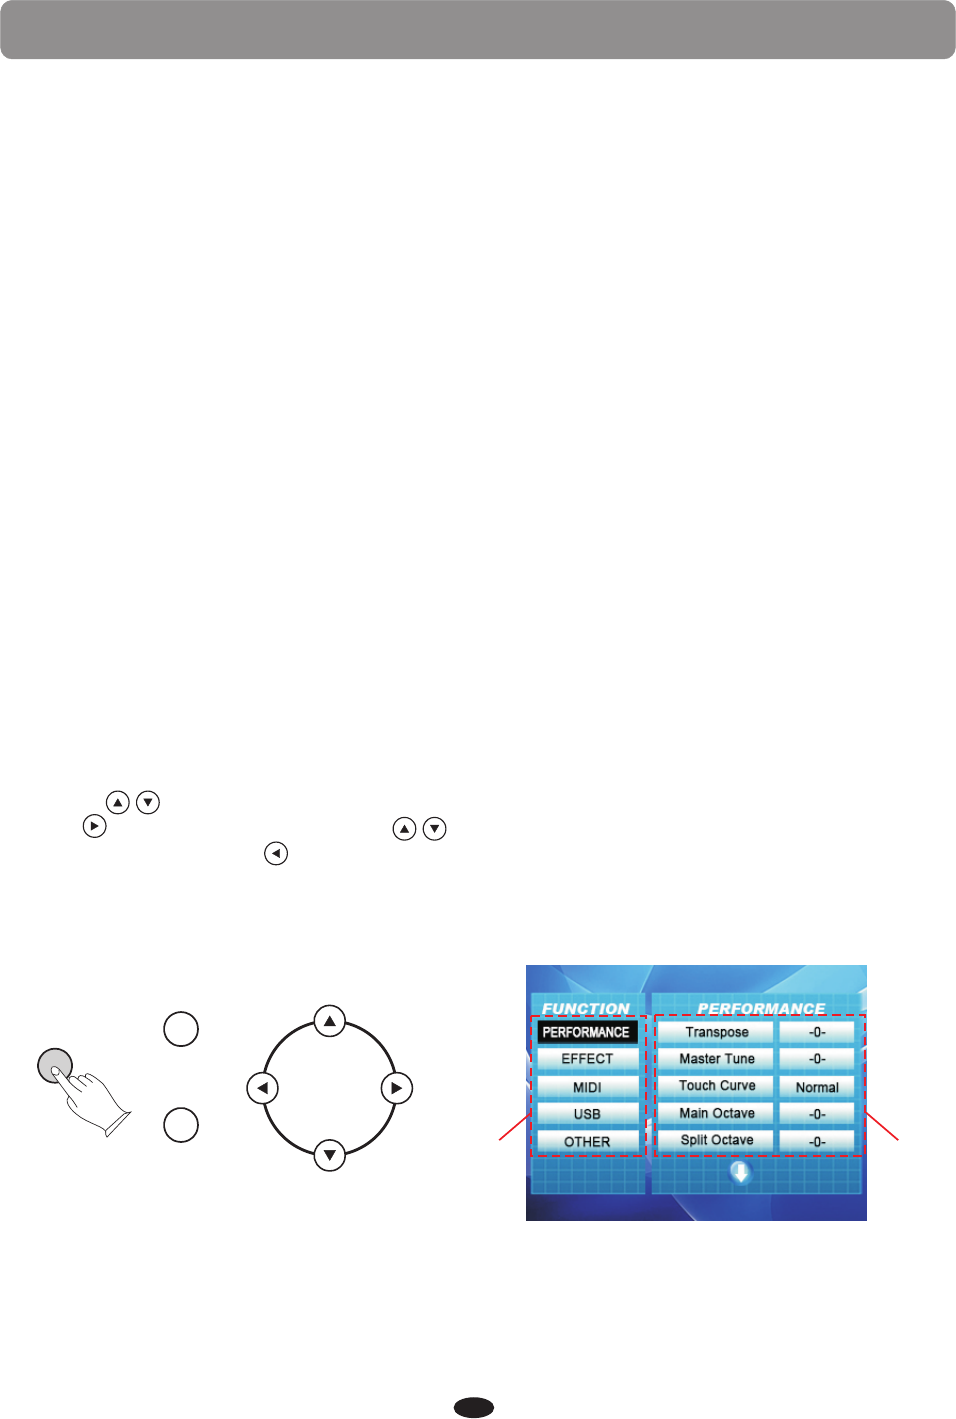
All of the above listed Function Menus are accessed and adjusted as described below.
1.Press the FUNCTION button. The menu item that can be manipulated, will appear on
the display.
2.Use the buttons to select the left function menu(Fig.1).
3.Press button, and then use the buttons to select the sub menu on the right
(Fig.2). You can press button to return to the left function menu
4.Use the+YES/-NO buttons to set a new value or level.
5.Press the function button again to confirm your selection and exit the function mode.
FUNCTION
+YES
-NO Fig.1 Fig.2
30
TRANSPOSE
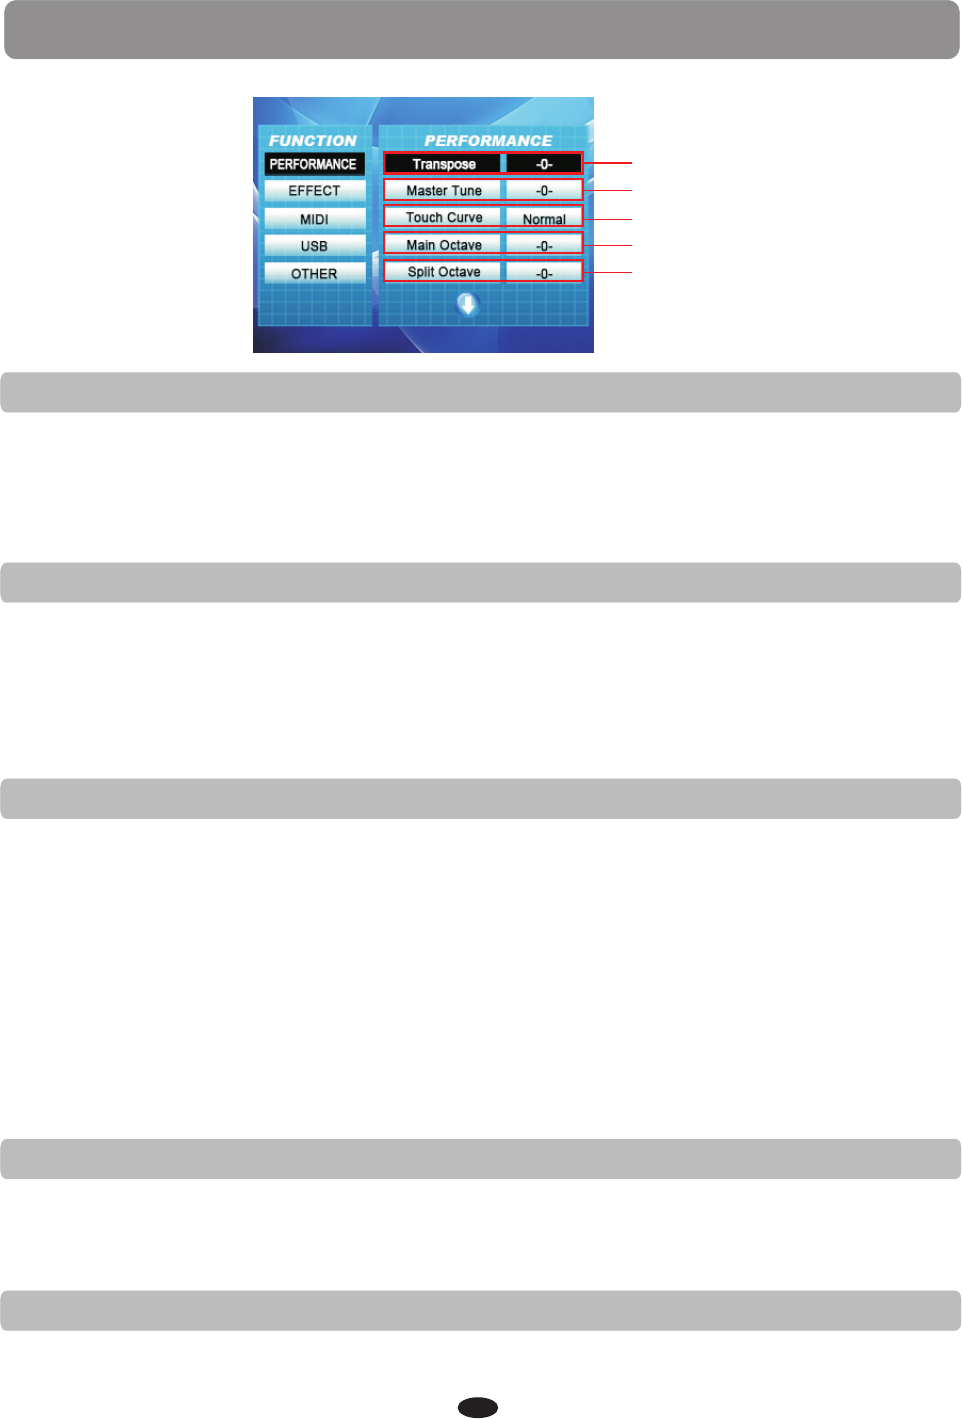
The Transpose function can shift the pitch of the keyboard up or down in semi-tone
intervals up to a maximum of 24 semi-tones. Transpose does not affect the percussion.
The transpose value range can be adjusted -12, one octave lower to 12, one octave
higher. Press +YES and-NO buttons at the same time to restore the default value:0.
(Fig.1)
Fige.1
Fige.2
Fige.3
Fige.4
Fige.5
MASTER TUNE
The pitch of this piano is very accurate and stable; it is automatically set to standard
A440 pitch when the piano is turned on. If necessary, you can alter the piano pitch, the
tuning feature makes it possible to tune the pitch of the instrument in fine intervals to
match other instruments. You can adjust the master tune value from: -64 to 63.
Press +YES and-NO buttons at the same time to restore the default value:0.
(Fig.2)
TOUCH CURVE
The touch function provides four types of keyboard sensitivity to match different playing
styles: Touch Soft, Touch Normal, Touch Hard, Fixed?, the default is Normal.(Fig.3)
1.Touch Soft, the most sensitive keyboard response which permits maximum sound
levels with a light touch.
2.Touch Normal, an intermediate response suitable for most styles of music. Normal
is the default setting.
3.Touch Hard, a less sensitive keyboard response which requires a heavier touch to
obtain maximum sound levels.
4.Fixed?, the keyboard will transmit at a constant velocity and the sound will be the
same volume. You can press the OK button than use the +YES/-NO buttons to adjust
the value from:0-127, press +YES and-NO buttons at the same time to restore the
default value:100.
MAIN OCTAVE
The Octave function makes it possible to shift all the keys on the piano one or two
octaves up or down. With this Function menu you can shift the Main voice from: -2 to +2
octaves, press +YES and-NO buttons at the same time to restore the default value:0.
(Fig.4)
SPLIT OCTAVE
With this Function menu you can shift the Split voice from: -2 to +2 octaves, press
+YES and-NO buttons at the same time to restore the default value:0.(Fig.5)
FUNCTION / PERFORMANCE
31
Fige.1
Fige.2
Fige.3
Fige.4
Fige.5
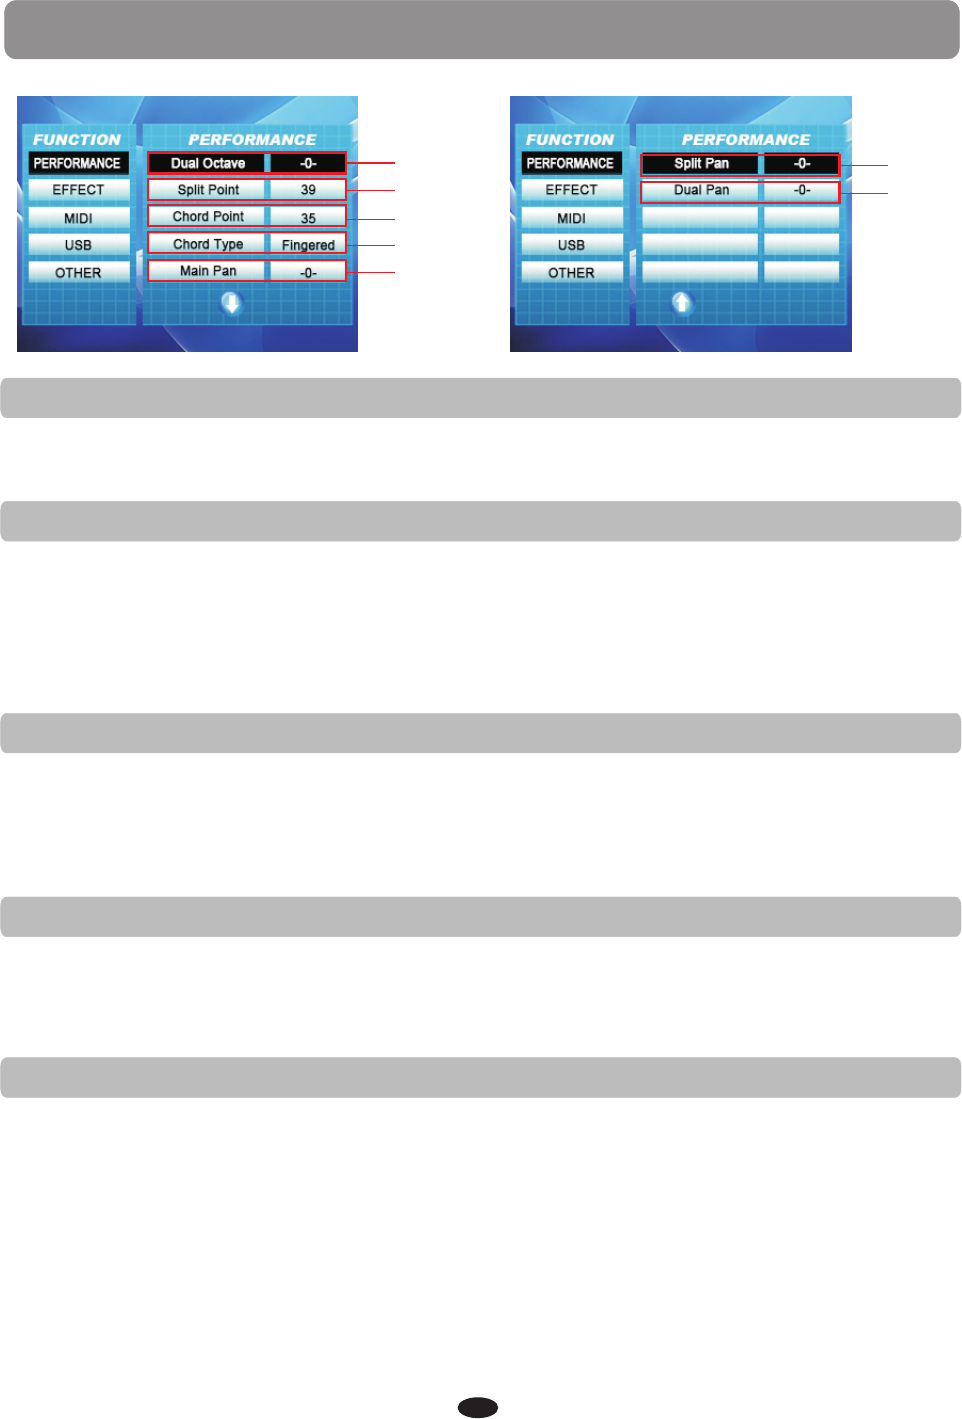
DUAL OCTAVE
With this Function menu you can shift the Dual voice from: -2 to +2 octaves, press
+YES and-NO buttons at the same time to restore the default value:0.
SPLIT POINT
When the split mode is engaged the keyboard is divided into two parts at the split point.
In the left hand section a different instrument voice can be assigned, the split, or lower,
voice. In this menu the default split point of G2 for the voice section can be changed
from Key 0 to Key 87 (A-1 to C-7), with a default value of #A2.
You can adjust the split point value from: 01-88.
Press +YES and-NO buttons at the same time to restore the default value:39.
CHORD POINT
CHORD TYPE
The auto accompaniment, or auto bass chord, fingering modes of this piano are: single
or fingered. Select a fingering mode: 01: Single, 02: Fingered, using this function menu.
The default value is fingered.
MAIN PAN/SPLIT PAN/DUAL PAN
This function allows you to set the stereo position of each orchestration part to create a
board stereo image to your sound. It can move one part of the piano sound to the left or
right speakers to create more of a stage sound.
Fige.6
Fige.7
The split voice pan value can be set from: -64 to 63. Press +YES and-NO buttons at the
same time to restore the default value:0.(Fig.6)
The main voice pan value can be set from: -64 to 63. Press +YES and-NO buttons at the
same time to restore the default value:0.(Fig.5)
The dual voice pan value can be set from: -64 to 63. Press +YES and-NO buttons at the
same time to restore the default value:0.(Fig.7)
For the auto accompaniment the keyboard is split into two sections at the default split
point G2 key. A different split point for the auto accompaniment can be assigned in the
Function menu from Key 0 to Key 87 (A-1 to C-7), with a default value of #F2.
You can adjust the chord point value from: 01-88.
Press +YES and-NO buttons at the same time to restore the default value:35.
FUNCTION / PERFORMANCE
32
Fige.1
Fige.2
Fige.3
Fige.4
Fige.5
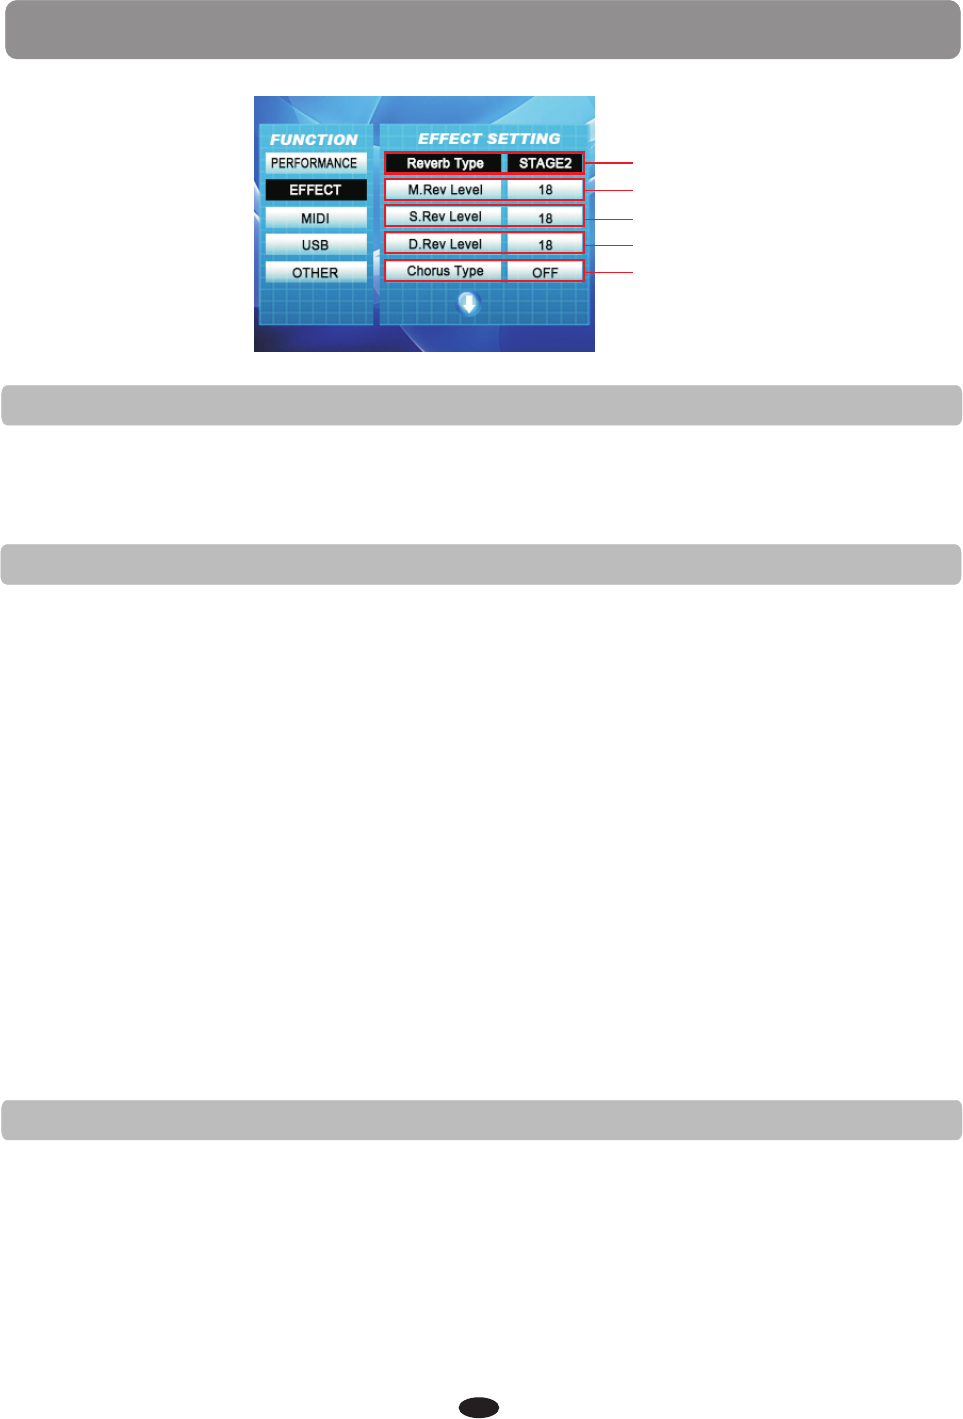
REVERB TYPE
There are eight reverb effects available: 1-Hall1, 2-Hall2, 3-Room1,4-Room2, 5-Room3,
6-Stage1, 7-Stage2 and 8-Plate.(Fig.1)
Please refer to REVERB/CHORUS.
REVERB LEVEL
Reverb simulates the effect of playing in a big room or a hall where the sound
reverberates off the walls and ceiling. The reverb effect is engaged automatically when
the piano is turned on.
SPLIT REVERB LEVEL
In this function you can adjust the reverb depth for the split, or lower, voice.
The Reverb Level value can be adjusted from 0-127, press +YES and -NO buttons at
the same time to restore the default value:18.(Fig.3)
DUAL REVERB LEVEL
In this function you can adjust the reverb depth for the layer, or dual, voice.
The Reverb Level value can be adjusted from 0-127, press +YES and -NO buttons at
the same time to restore the default value:18.(Fig.4)
CHORUS TYPE
There are eight reverb effects available: 1-Chorus1,2-Chorus2, 3-Chorus3, 4-Chorus4,
5-Feedback, 6-Flanger1,7-SHRTDELY, and 8-SHRTDLFB.(Fig.5)
Please refer to REVERB/CHORUS.
MAIN REVERB LEVEL
In this function you can adjust the reverb depth for the main voice.
The main reverb Level value can be adjusted from 0-127, press +YES and -NO buttons at
the same time to restore the default value:18.(Fig.2)
FUNCTION / EFFECT
33
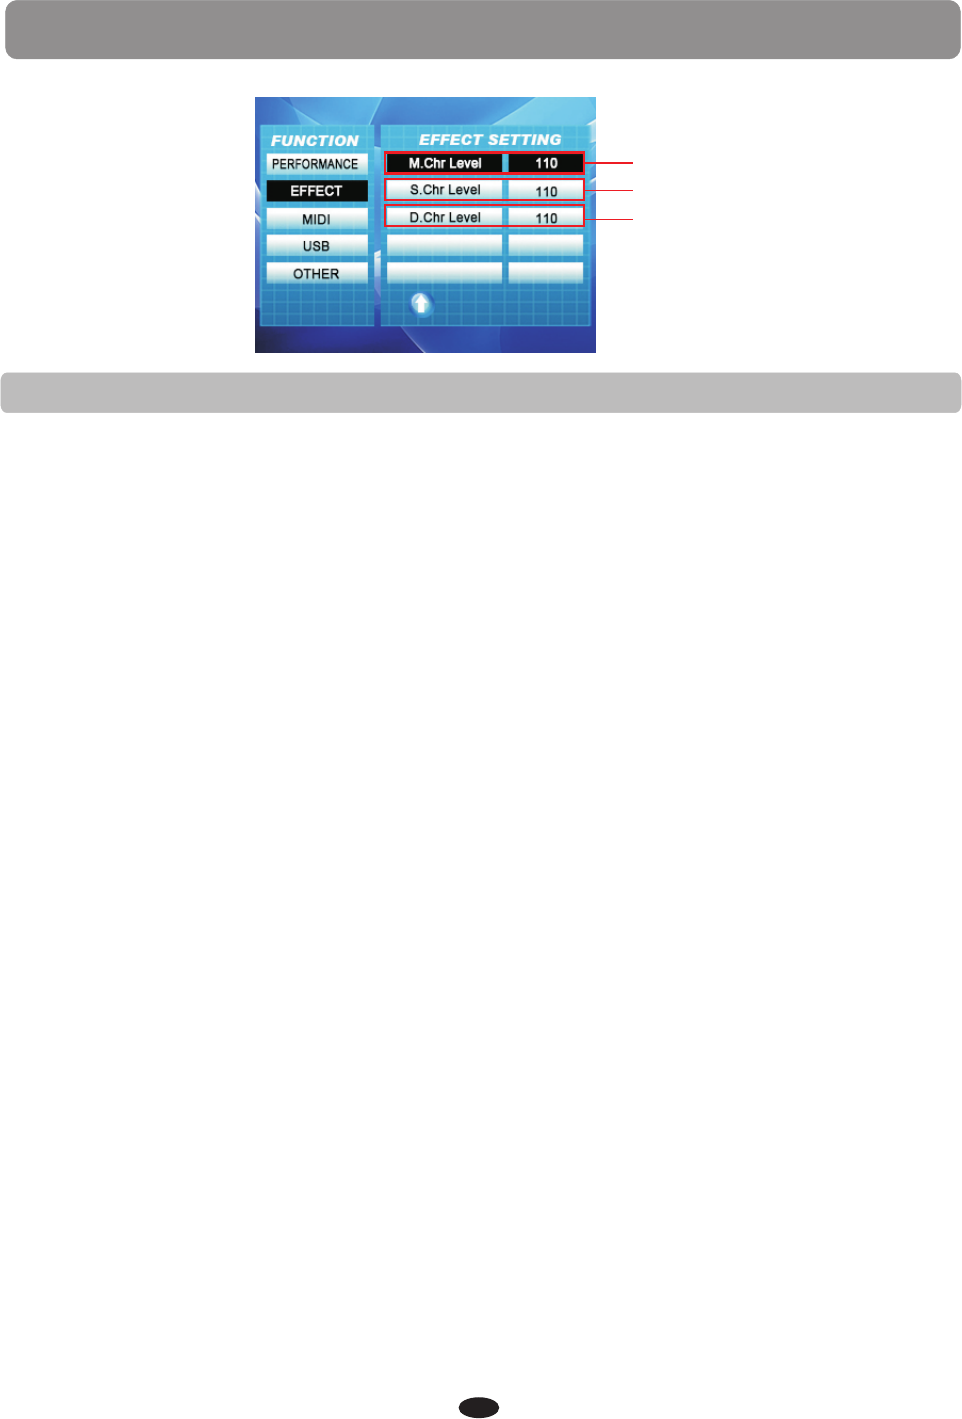
CHORUS LEVEL
The Chorus effect adds depth and spaciousness to the selected keyboard voice.
Fige.1
Fige.2
Fige.3
In this function you can adjust the chorus depth for the main voice.
The main chorus Level value can be adjusted from 0-127, press +YES and -NO buttons
at the same time to restore the default value:110.(Fig.1)
MAIN CHORUS LEVEL
In this function you can adjust the chorus depth for the split, or lower, voice.
The split chorus Level value can be adjusted from 0-127, press +YES and -NO buttons
at the same time to restore the default value:110.(Fig.2)
SPLIT CHORUS LEVEL
In this function you can adjust the chorus depth for the layer voice.
The dual chorus Level value can be adjusted from 0-127, press +YES and -NO buttons
at the same time to restore the default value:110.(Fig.3)
DUAL CHORUS LEVEL
FUNCTION / EFFECT
34
Fige.1
Fige.2
Fige.3
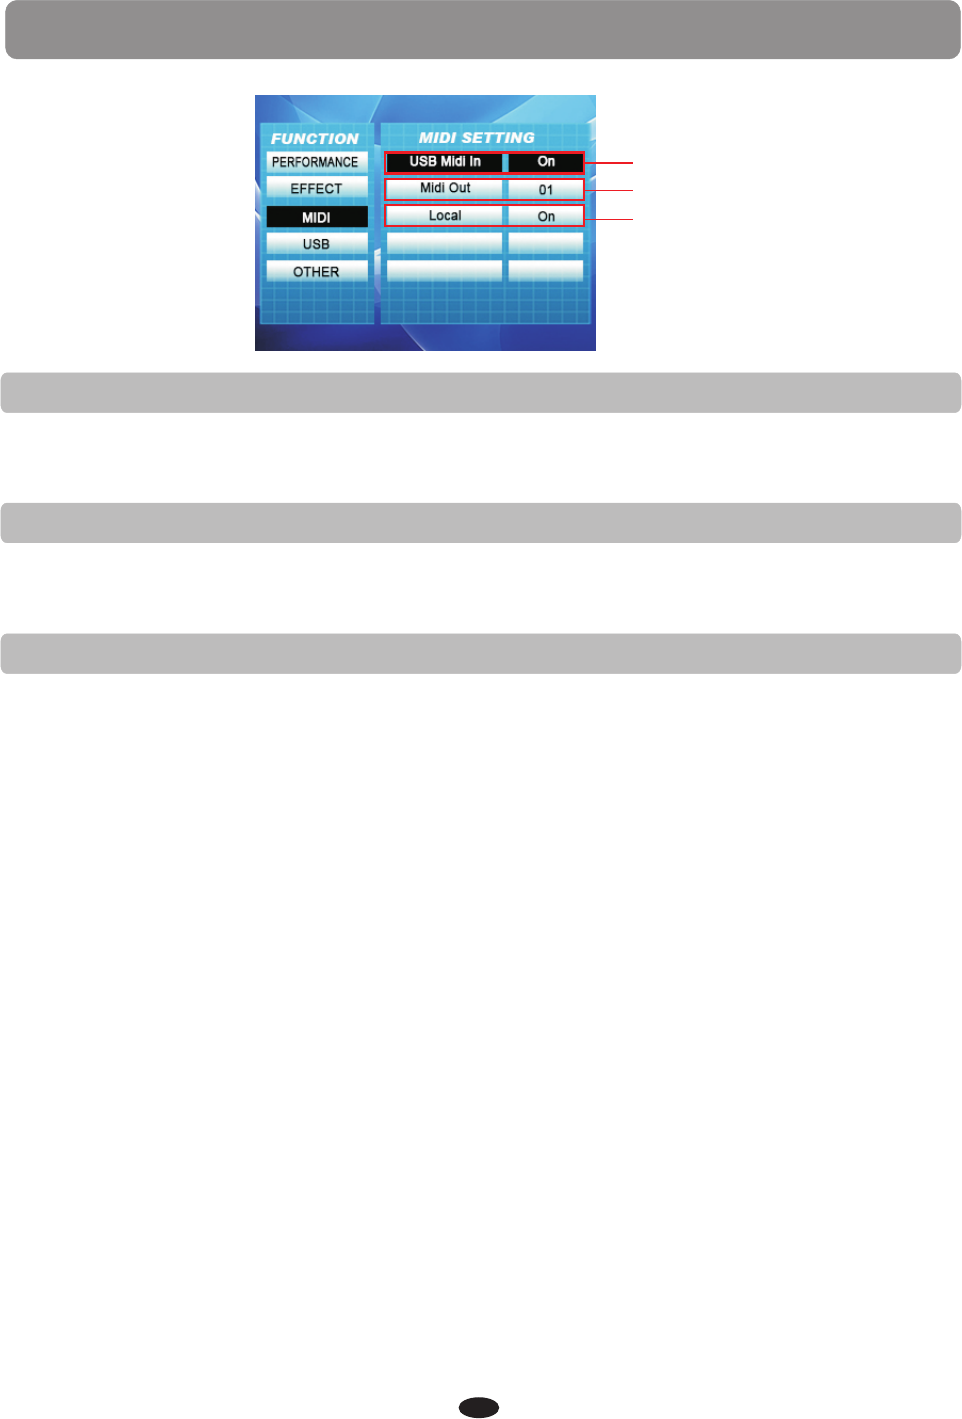
USB MIDI IN
This function allows you to turn on or off the speaker system of the piano. Normally,
playing on the keyboard generates sound while it sends MIDI messages via the MIDI
connector or USB. This mode is called Local On and is the default value. You can mute
the piano sounds while still sending out the MIDI messages.
This mode is called Local Off.(Fig.3)
MIDI OUT
This function allow you to turn on or off the MIDI function, the default is MIDI on.(Fig.1)
Please note, if the Local is off there will be no sound from your keyboard.
LOCAL
This function allow you to select the MIDI transmission track from 01 -16 or to turn the
MIDI transmission function off, the default track is channel 1.(Fig.2)
FUNCTION / MIDI
35
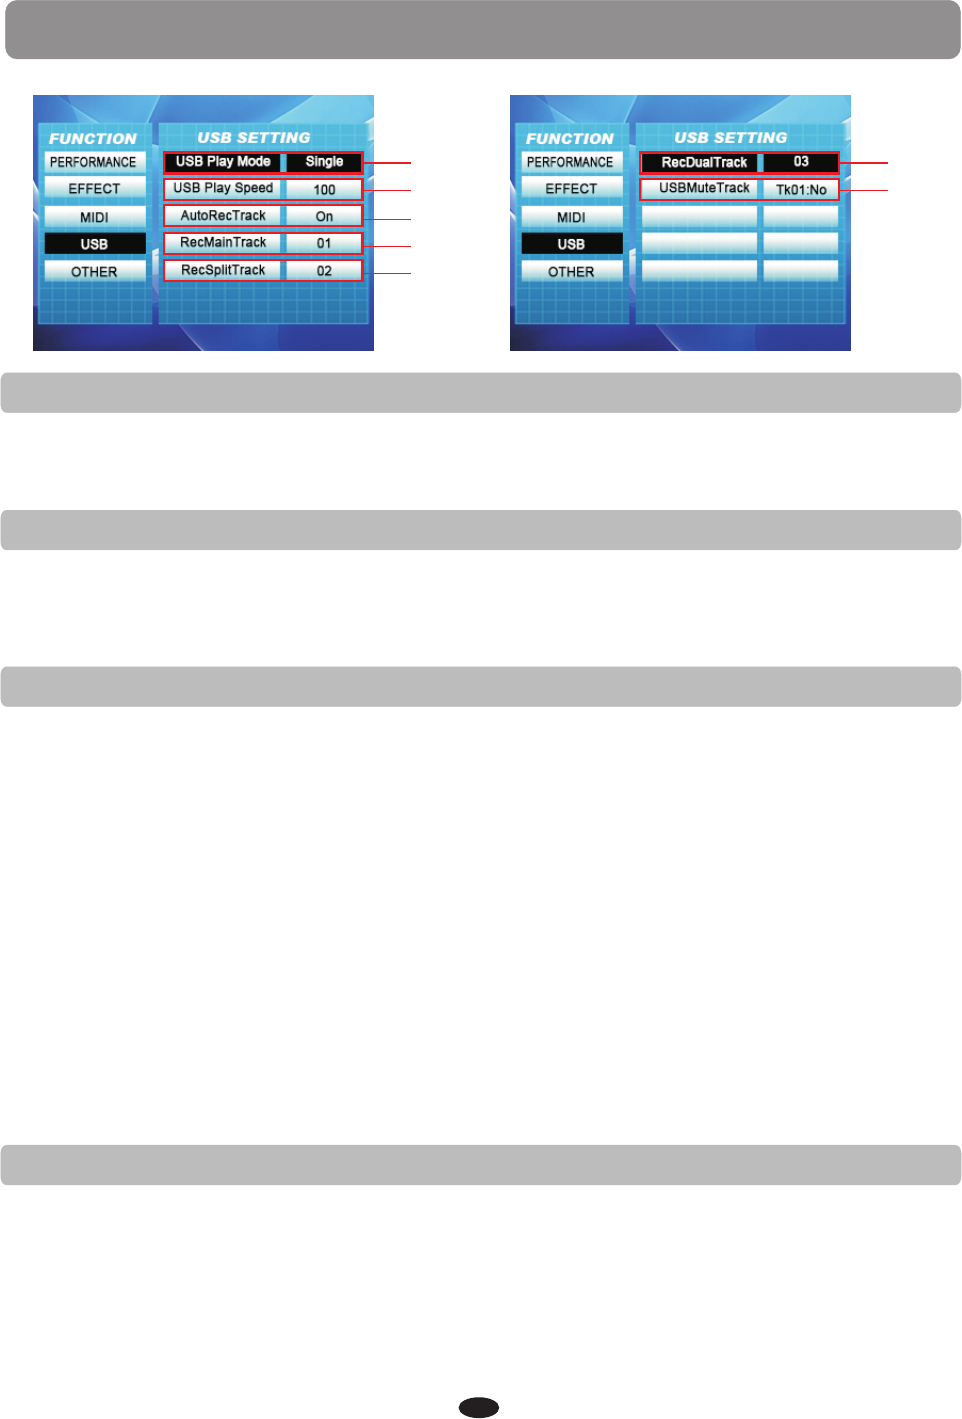
USB PLAY MODE
This function allows you to select the mode for the USB playback of the piano.
You can select Single, Play All or Random. The default value is Play All Songs.(Fig.1)
Fige.1
Fige.2
Fige.3
Fige.4
Fige.5
USB PLAY SPEED
This function allows you to select the play back speed for USB on the piano.
You can select a speed of 50 to 200%, press +YES and -NO buttons at the same time to
restore the default value:100.(Fig.2)
AUTO RECORD TRACK
RECORD MAIN TRACK
RECORD SPLIT TRACK
Fige.6
Fige.7
RECORD DUAL TRACK
USB MUTE TRACK
This function allows you to mute a track on the USB play back of the piano. You can
mute any track from 01-16 by selecting it in this function menu. The default is all
tracks no.
Please note, this sub-menu does require an additional confirmation of the track to mute.
Use the +YES/ -NO buttons to select a track from 01-16 tracks.
Press the OK button to select the YES or NO.(Fig.7)
FUNCTION / USB
36
This function allows you to turn on or turn off the auto record track.
You can select the track on/off by presspress +YES and -NO buttons.
You can press [+/YES] or [-/NO] buttons to select the main track(1-16,off ).
You can select the track on/off by presspress +YES and -NO buttons .
You can press [+/YES] or [-/NO] buttons to select the split track(1-16,off).
You can select the track on/off by presspress +YES and -NO buttons.
You can press [+/YES] or [-/NO] buttons to select the dual track(1-16,off ).
Fige.1
Fige.2
Fige.3
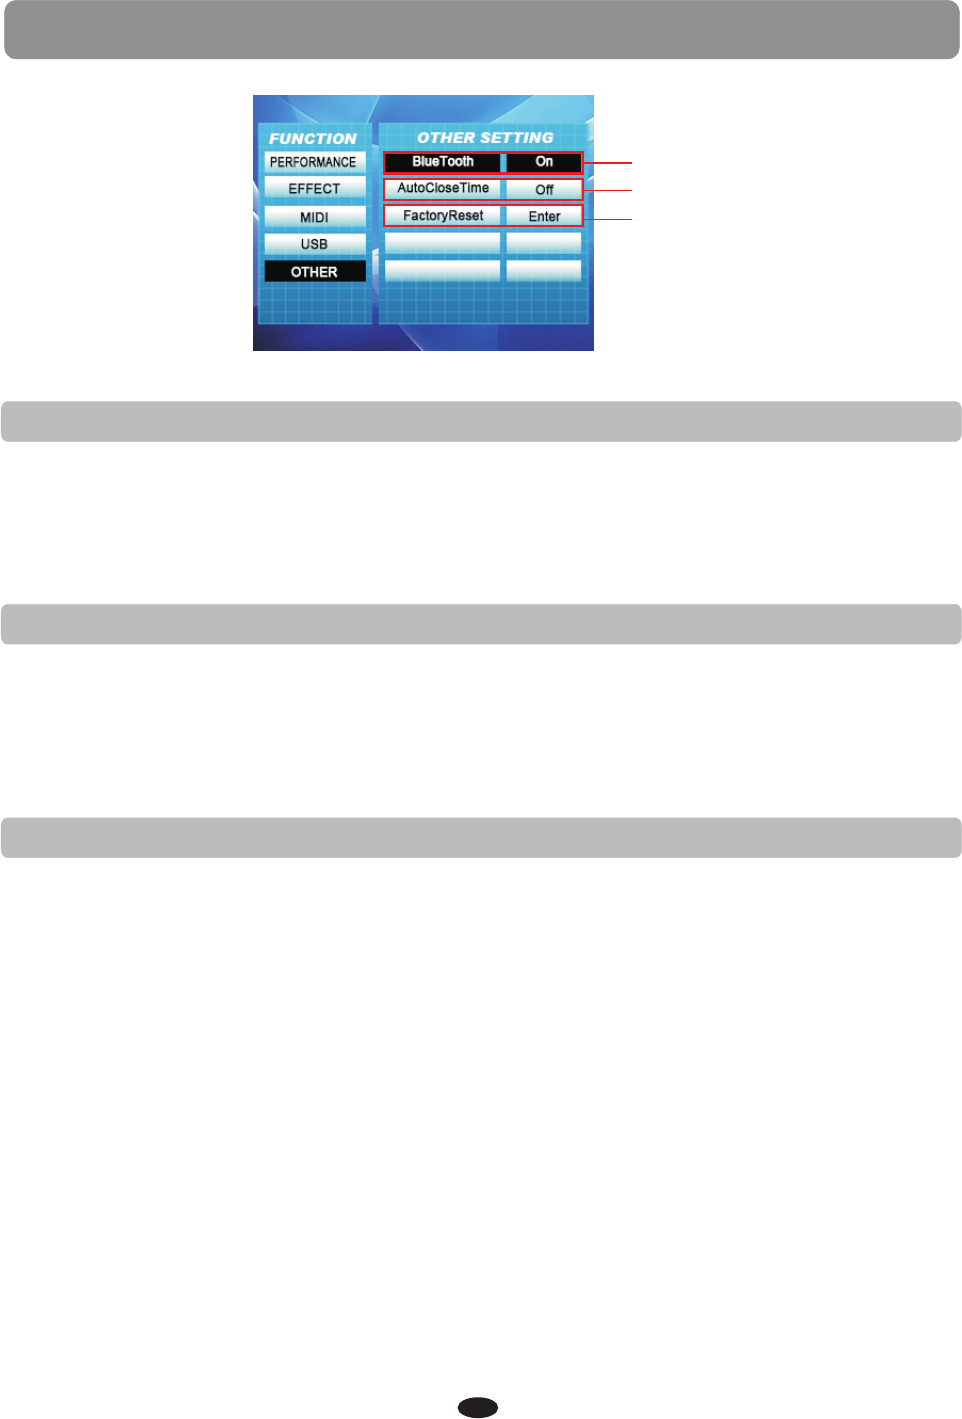
BLUETOOTH
Plug the tiny Bluetooth receiver into the allotted slot on the connector panel to stream
audio from Bluetooth devices onto your piano. This function allows you to turn Bluetooth
on or off while the receiver is engaged, the default setting is Bluetooth off.(Fig.1)
Please see the Bluetooth section of this manual for more information.
AUTO CLOSE TIME
This piano will automatically power off after a preset time of inactivity. Set the length
of standby time before a powerdown in this function menu.
The default power off time of 30 minutes can be set from 20 - 60 minutes, or the feature
can be turned off. Press +YES and -NO buttons at the same time to restore the default
value:30.(Fig.2)
FACTORY RESET
You can Reset your piano to the initial factory settings. Please be aware that this will
erase all saved data from the User buttons, the Registration memory banks and the
song banks and all the changed settings from the Function menu.
Please note, there is no sub-menu for this function, once you select the Reset and press
the OK button, the piano will reset.(Fig.3)
FUNCTION / OTHER
37
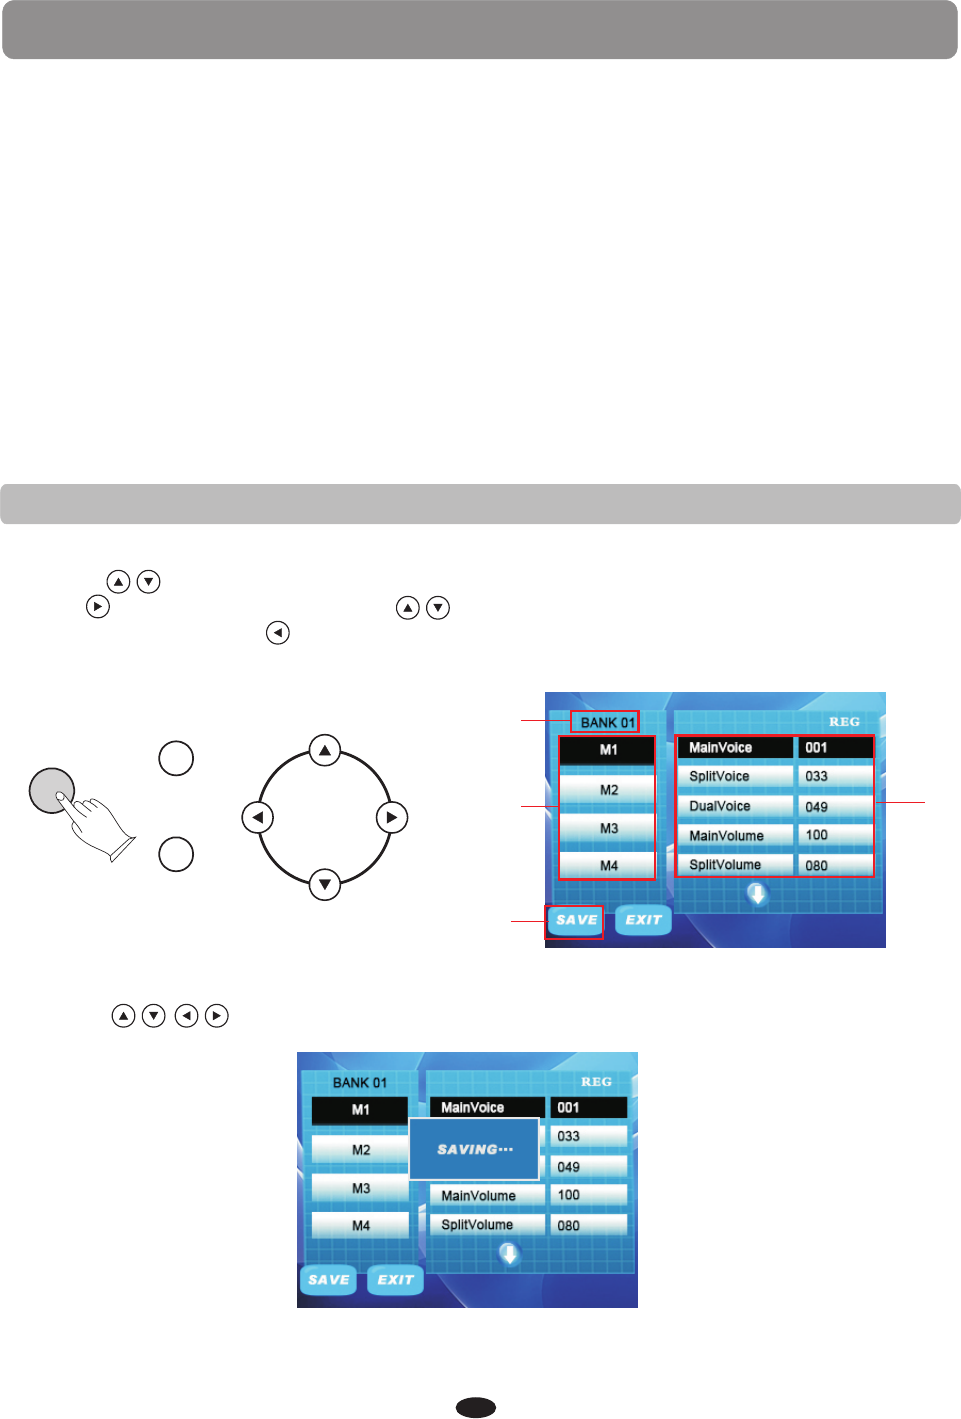
SAVE REGISTRATION
1.Press the STORE/BANK button to select a bank, BANK1-4.(Fig.1)
2.Use the buttons to select a registration memories,M1-4(Fig.2)
3.Press button, and then use the buttons to select the sub menu on the right
(Fig.3). You can press button to return to the left menu.
4.Press the +YES/-NO buttons to set a new value or level.
Registration Memory can recall particular settings of style, voice, chord and other
parameters or features you have engaged. This piano has four banks each with four
registration memories to hold 16 of your favorite settings so that they can be recalled
quickly by the press of a button. The registration will not be lost when the power is
turned off. The following data can be preset and stored in a registration memory:
Main, Split & Layer Voice
Main, Split & Layer Volume
Main, Split & Layer Pan
Transpose
Main, Split & Layer Octave
Metronome Volume
Reverb On/Off & Reverb Type
Chorus On/Off & Chorus Type
Main, Split & Layer Reverb Level
Main, Split & Layer Chorus Level
Style Hold
Style (Number)
Tempo
Chord On/Off
Drum Vol/Bass Vol
Acc Volume
Chord Split Point
Voice Split Point
Touch On/Off
Touch Fixed
Split On/Off
Layer On/Off
Duet On/Off
Fige.1
Fige.2 Fige.3
STORE/BANK
REGISTRATION
+YES
-NO
REGISTRATION MEMORY
38
5.Use the buttons to select the SAVE, than press the OK button.(Fig.5)
Fige.5
Fige.4
GOSPEL
M1
WORLD
M2
DANCE
M3
TRADITIONAL
M4
BOSA NOVA
ST YLE HOLD
STORE/BANK
REGISTRATION
BASS STRINGS CHOIR BRASS EFFECT
1
2
REGISTRATION MEMORY
39
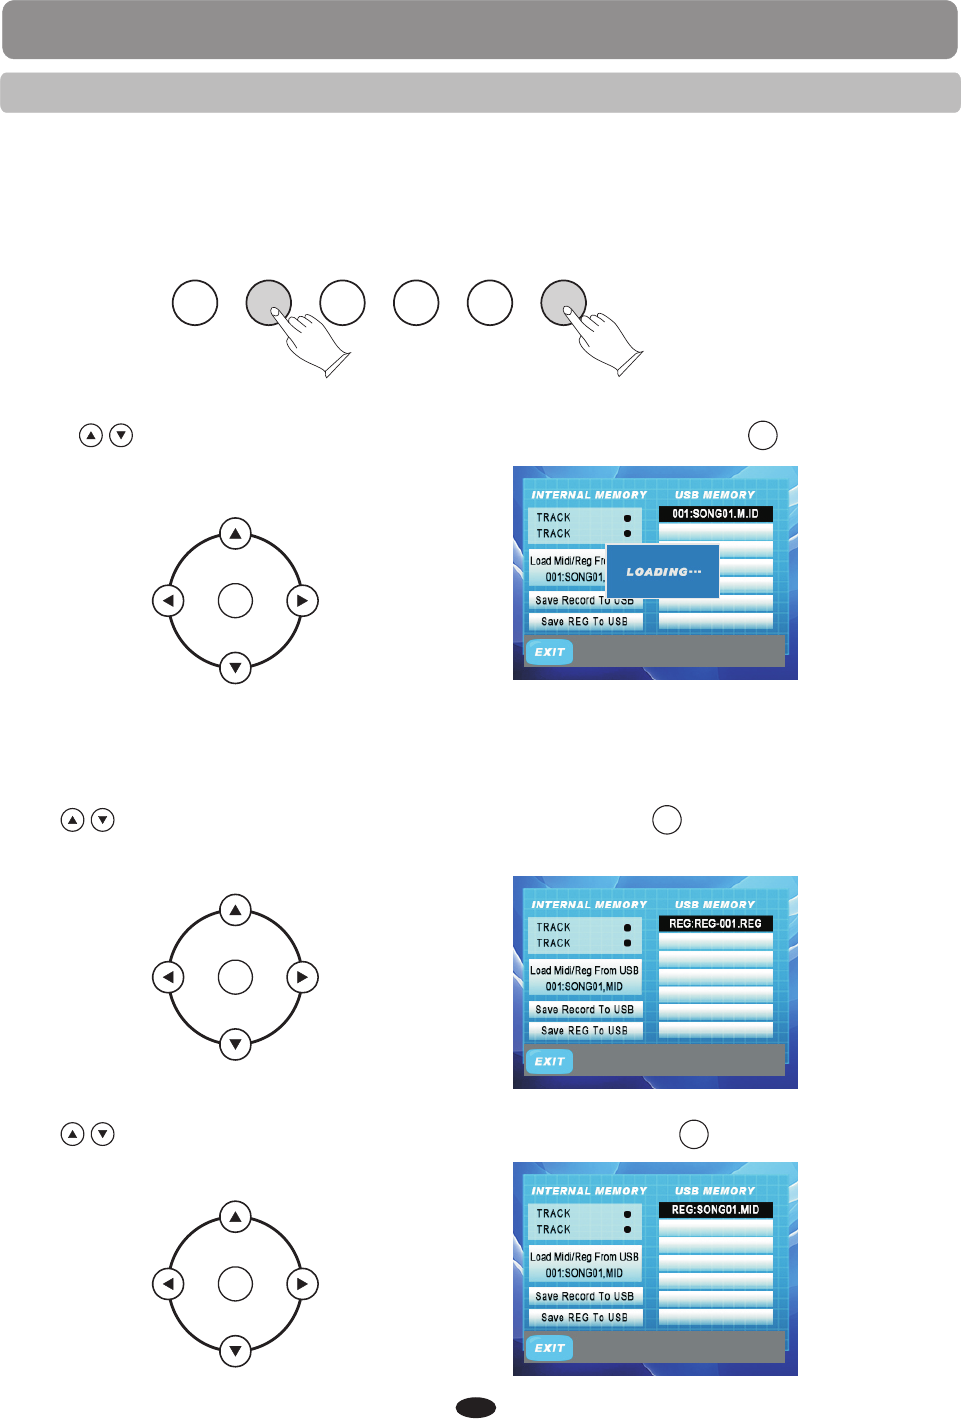
Read Load Registration Data from USB
Use the buttons to select “Load Midi/Reg From USB” and then use to confirm, then
the LCD will show “Loading”.
23 groups of Registration Memory settings will be loaded to the memory store on the
panel. You can recall the data you have loaded by pressing M1-M4.
Save Record to USB
Save Registration to USB
Press button to select “Save REG to USB” the LCD
will show a message "REG:REG-001.REG"
and then use to confirm, then
Press button to select “Save Record to USB” and the LCD will
show a message "REG:Song01.MID".
then use to confirm
OK
OK
OK
OK
OK
OK
RECALL REGISTRATION
1.Press the STORE/BANK button to select a bank,BANK1-4.
2.Press the number M1-M4 button that corresponds to the settings you want to recall
in the selected bank, the stored settings will be recalled instantly and the display will
show the registration memory number with a "Load" suffix. The display will recover to
the voice that is now selected from the registration memory.
RECORD
RECORD
This digital piano lets you record your performances and Registration setting to a USB
Disk.Each user song lets you record up to sixteen independent tracks. These include not
only the voices for the keyboard performance,but also the auto accompaniment parts.
It provides two different ways to record: USB Recording and Melody Track Recording.
Melody Track Recording, which can save into local memory.
Two Tracks recording can be save into USB disk as a MIDI File and the MIDI file in the USB
disk can be load to local memory.
■ USB Recording
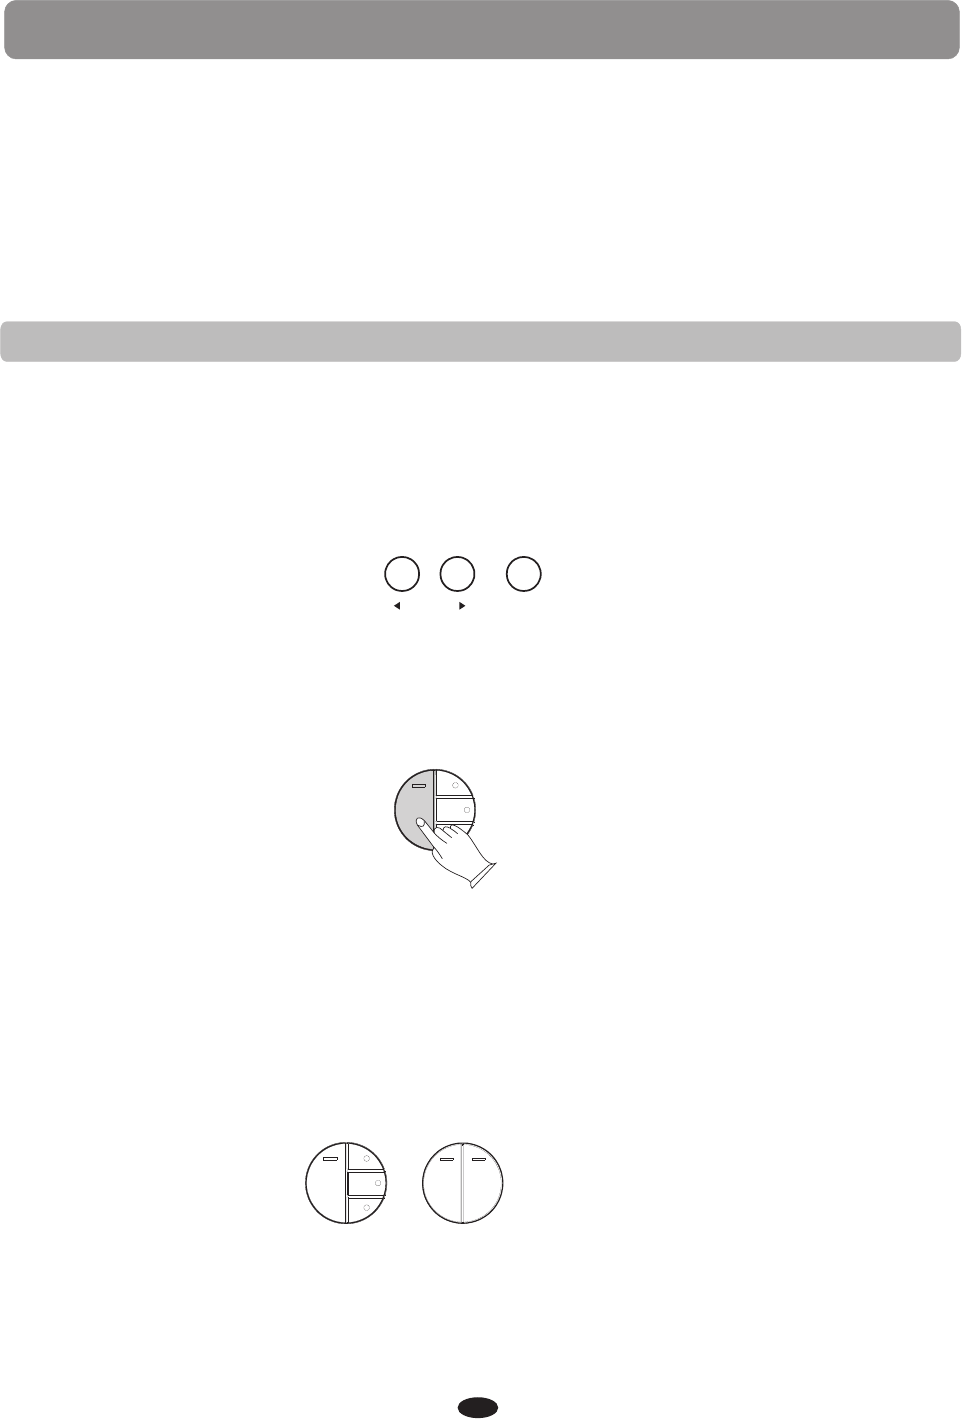
1.Insert the USB Disk into the USB Terminal and the indicator of the [MEMORY]
button will light up.
If your USB disk is plugged in, but the [MEMORY] button indicator is turned off, then you
can press the [MEMORY] button again to restore the USB mode.
TRACK 1 TRACK 2
DELETE
MULTI
RECORD SELECTION
LEFT RIGHT
SONG
RECORD
MEMORY
PLAY/STOP
TRACK
TEMPO METRO
Press the [RECORD] button and the buttons indicator is flashing, then you can start
recording.
40
2.Start Recording
Press [RECORD] button again to stop recording and the indicator will be light.
Recording stops and your performance is written to the song. The song to which your
performance is recorded is automatically named”XXX:SONG XXX” (XXX indicates this
file`s sequence Num in USB Disk.XXX indicates the recording file number). You can edit
the song as desired by computer or midi edit soft.
3.Stop Recording
DELETE
MULTI
RECORD SELECTION
RECORD
MEMORY
PLAY/STOP
TRACK
RECORD
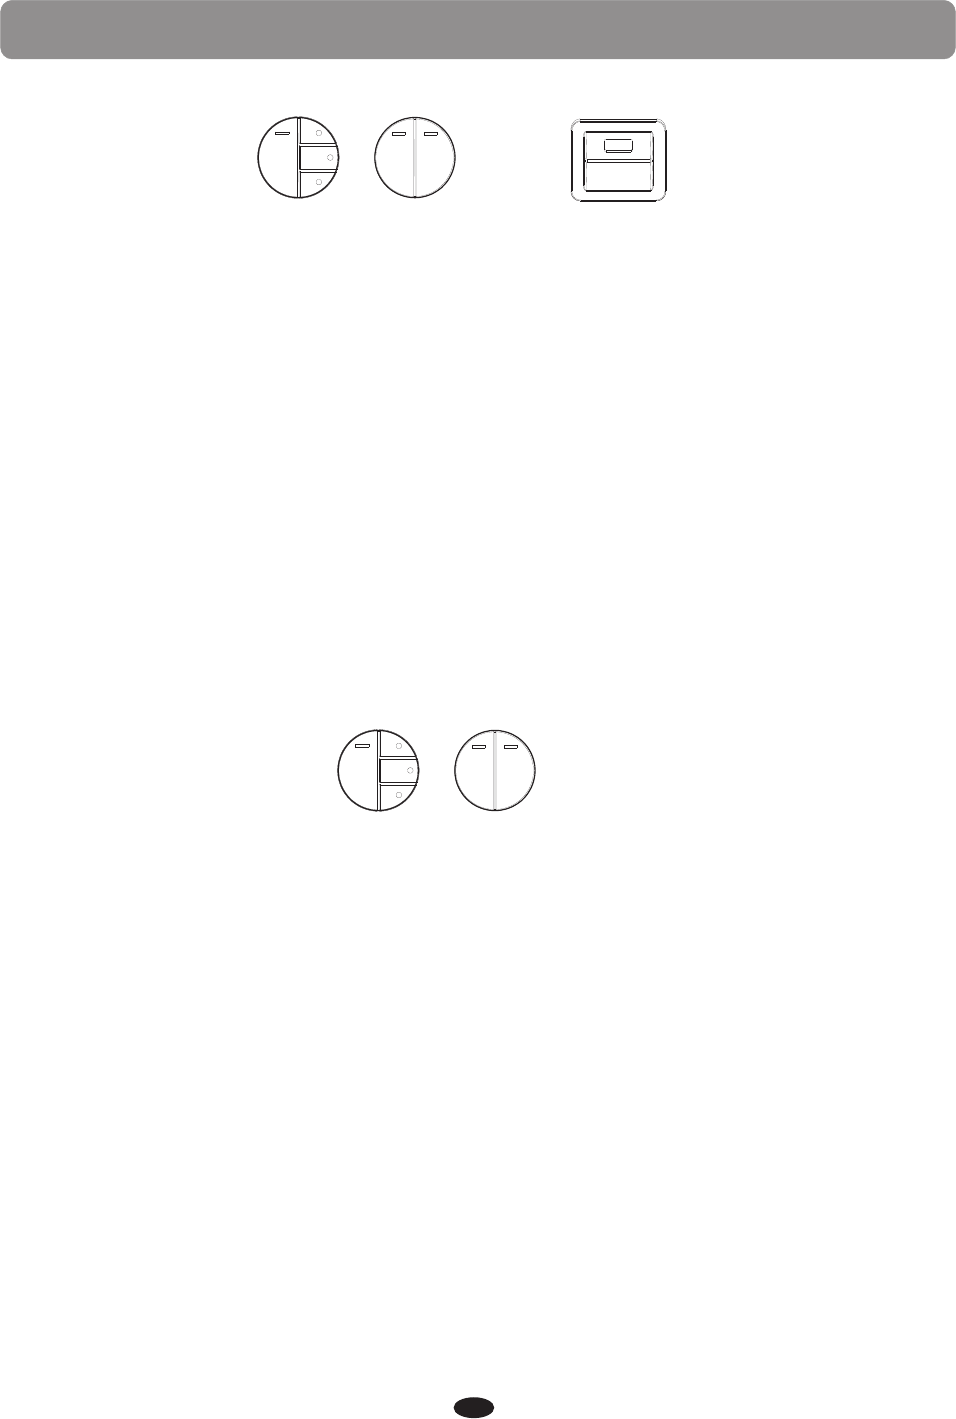
1.Insert the USB Disk into the USB Terminal and the indicator of the [MEMORY] button
will be light.
2.You can use the [+/YES] and [+/NO] buttons knob to select the base file.
Press the [PLAY/STOP] button again to stop playing the song and the indicator will be
unlighted.
USB TO DEVICE
TRACK 1 TRACK 2
DELETE
MULTI
RECORD SELECTION
LEFT RIGHT
SONG
RECORD
MEMORY
PLAY/STOP
TRACK
TRACK 1 TRACK 2
RECORD
MEMORY
PLAY/STOP
TRACK
● Auto Recording Track can change automatically
● Main voice recording track set (After setting the main voice recording track, separation
voice and layer-voice recording track will change into main-voice recording track+1
and main-voice recording track +2. For example:If the main voice recording set is 3,
then separation voice recording track will change into 4 automatically and double-voice
recording track will change into 5 automatically)
● Split voice recording track set (Main voice and layer-voice recording track will not change
automatically)
● Layer voice recording track set (Main-voice and split voice recording track will
not change automatically)
41
■ Multi Recording
Press [RECORD] button and the [TRACK] button simultaneously to start recording, the
[RECORD] buttons indicator is flashing and the [TRACK] button indicator will be light.
Press [RECORD] button again to stop recording and the indicator will be unlighted.
The Name of the New File Will be Saved in Sequence
■ Play Button
You can use the [+/YES] and [+/NO] buttons knob to select your desired MIDI file.
Press the [PLAY/STOP] button to play the song of the USB disk.
■ Select Recording Track
Press the [TRACK] button repeatedly can select 4 Track modes: Auto RecTrack(default),
M.RecTrack, S. RecTrack, L.TecTrack.
RECORD
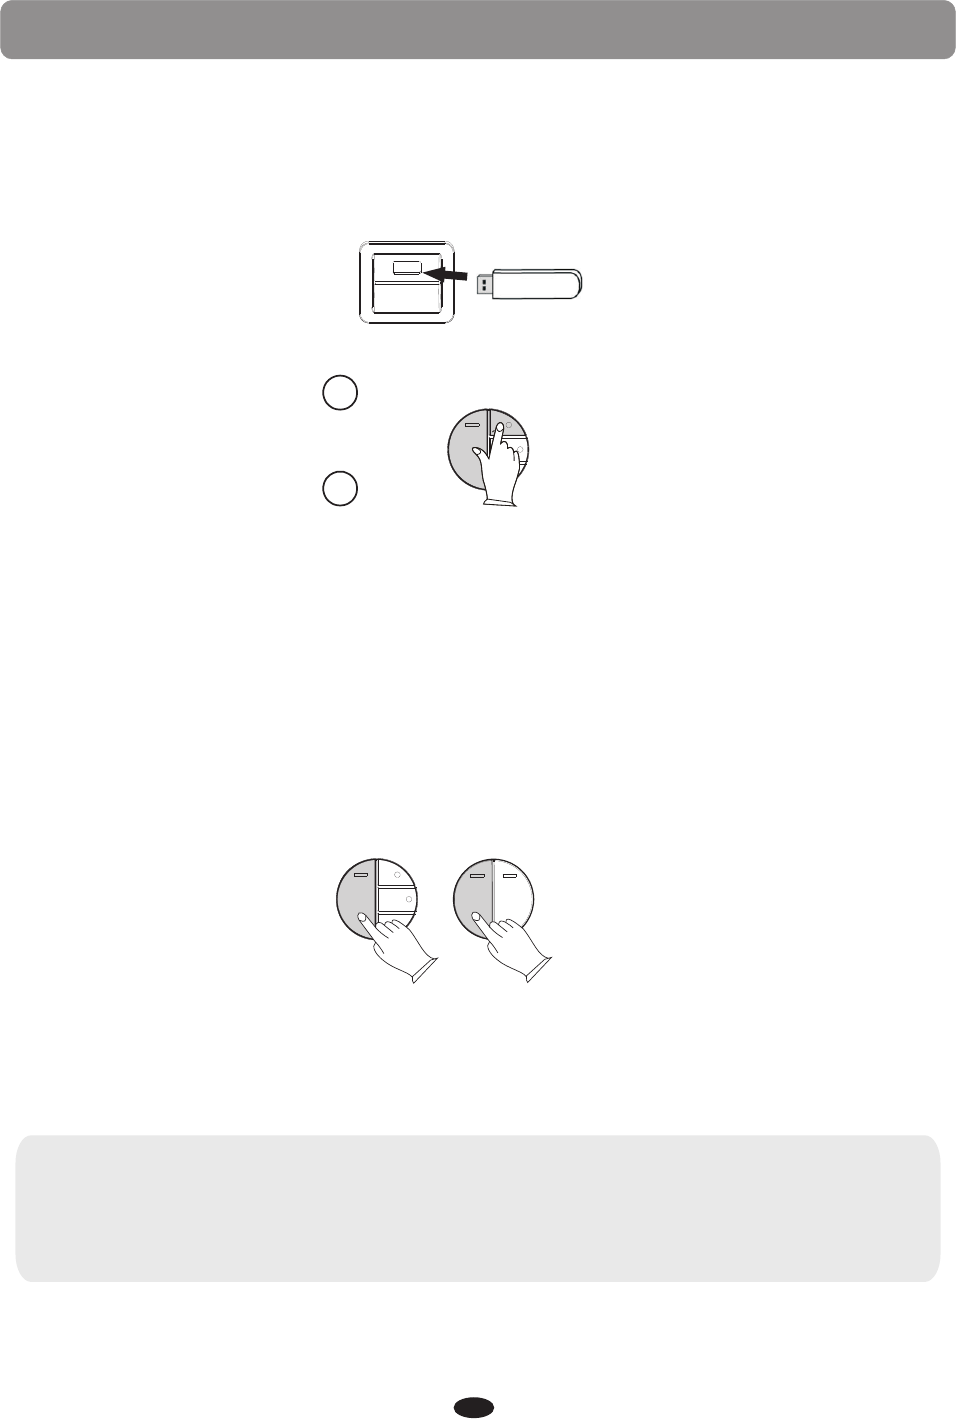
Insert the USB Disk into the USB terminal.Use the [+/YES] and [-/NO] buttons to select
“XXX:SONGXXX” file you want to delete, then hold down the [RECORD] button and press
the [MEMORY] button. LCD shows: Delete?
USB TO DEVICE
42
■ Delete Song
Press the [+/YES] button to confirm delete the file.
Press the [-/NO] button to cancel.
■ Melody Track Recording
Hold down the [RECORD] button, and then press the [TRACK1] button, the [TRACK1]
and the [RECORD] indicator flashes to indicate ready to record. You can start recording
simply by playing the key board or playing styles.
Melody Track1 Recording
Press the [RECORD] button again to stop recording and the data will save to local
memory track.
NOTE:
If the TRACK 2 has data recorded, the indicator will light and it will play when the
record is started. You can press the [TRACK 2] button to mute it, then the indicator
will be unlighted.
TRACK 1 TRACK 2
RECORD
MEMORY
PLAY/STOP
TRACK
DELETE
MULTI
RECORD SELECTION
RECORD
MEMORY
PLAY/STOP
TRACK
+YES
-NO

RECORD
43
Hold down the [RECORD] button, and then press the [TRACK2] button, the [TRACK2]
and the [RECORD] indicator flashes to indicate ready to record. You can start recording
simply by playing the key board.
Melody Track2 Recording
Press the [RECORD] button again to stop recording and the data will save to local memory
track 2.
NOTE:
If the TRACK 1 has data recorded, the indicator will light and it will play when the
[TRACK 2] is started. You can press the [TRACK 1] button to mute it, then the
indicator will be unlighted.
■ Play the Local Track Recording
During song playback,if the [MEMORY] button is light, you should press the [MEMORY]
button again to turn off it.
Press the [PLAY] to play the local recording. During song playback you can select which
track you wish to hear by press the [TRACK 1] or [TRACK 2] button.
Press the [PLAY/STOP] button again to stop playing the song.
■ Delete local recording
If the TRACK 1 has data recorded, hold the [TRACK 1] button for 3 seconds and the LCD
will display: Delete Track1. Then press the [+/YES] to delete the file.Press [-/NO] button
to cancel.
If the TRACK 2 has data recorded, hold the [TRACK 2] button for 3 seconds and the LCD
will display: Delete Track2. Then press the [+/YES] to delete the file.Press [-/NO] button
to cancel.
You also can press the [RECORD] and [MEMORY] button simultaneously to delete two
tracks.
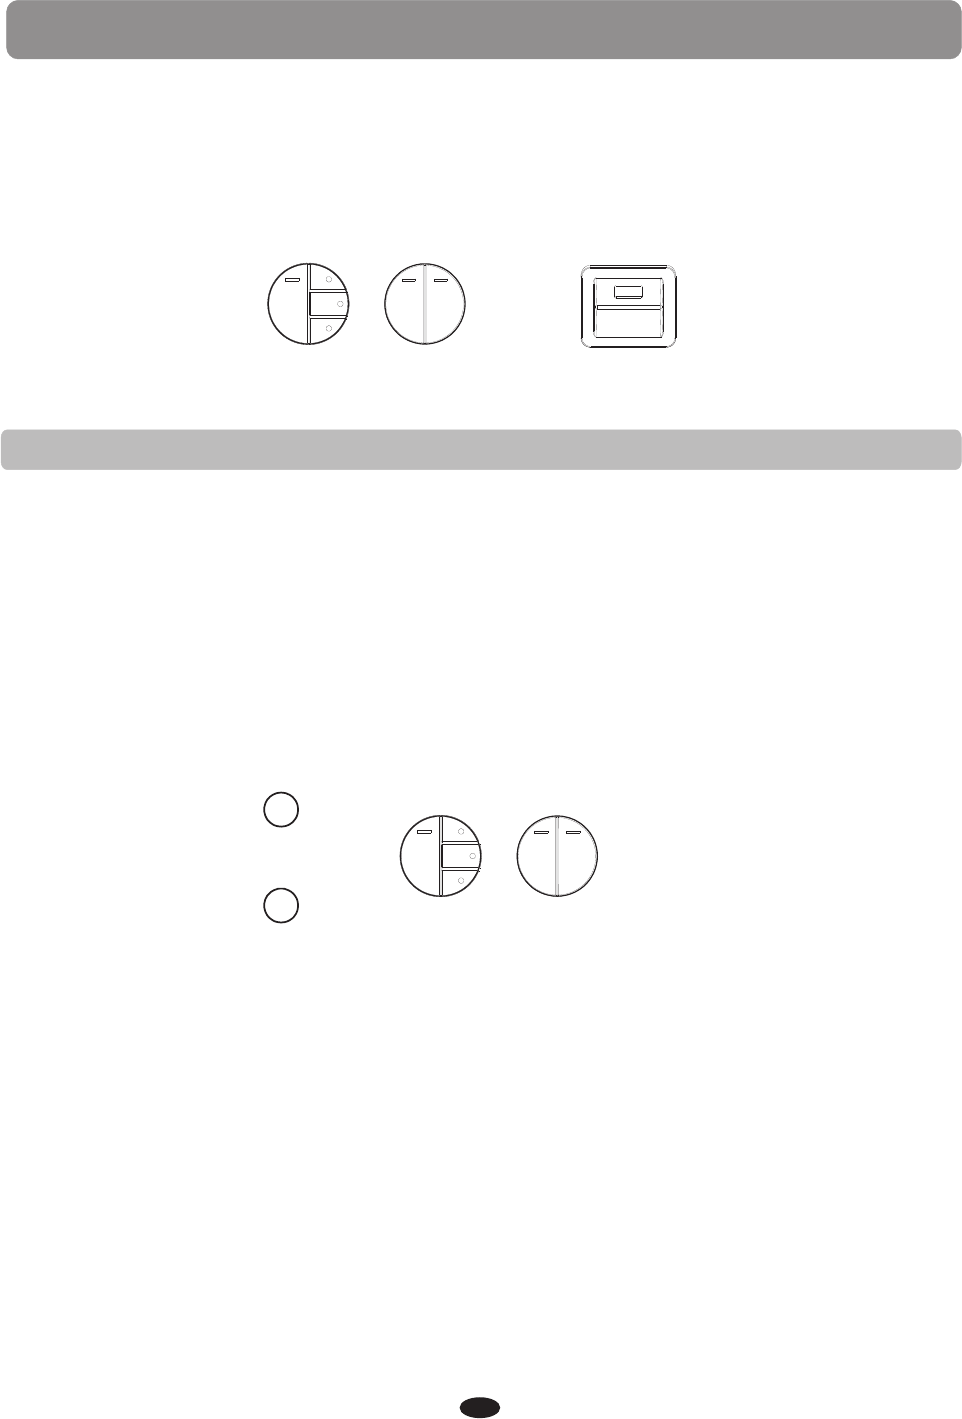
PLAY ALONG SONGS
SELECT AND LISTEN TO A SONG
1 Press the TRACK 1/SONG LEFT and the TRACK 2/SONG RIGHT buttons simultaneously,
the PLAY/STOP indicator will flash blue and the first play along song will appear on the
display. Both SONG LEFT and SONG RIGHT indicators will be off.
2 You can use the +/YES, –/NO buttons to select a song. The song number and title will
appear on the display.
3 Press the PLAY/STOP button to listen to both hand portions of the selected song. The song
will start after a four beat count in.
4 The song will stop automatically when it is finished, or press the PLAY/STOP button at any
time to stop the playback. The Play Along Song feature will return to standby for you to
listen again,choose another song or try the Play Along Song Left Hand, Right Hand or Both
Hands.
5 Press the SONG LEFT and the SONG RIGHT buttons simultaneously to exit the play along
song mode, the PLAY/STOP indicator will go out, then press both track buttons, one at a time,
so the indicator lights turn off.
There are 55 songs, of varying difficulty, built into the piano for you to practice and learn
how to play. These songs have separate left hand or accompaniment, and right hand or
melody, parts that can be turned on and off independently, so you can learn right, left
and both hand portions as you progress in skill.
USB TO DEVICE
TRACK 1 TRACK 2
DELETE
MULTI
RECORD SELECTION
LEFT RIGHT
SONG
RECORD
MEMORY
PLAY/STOP
TRACK
44
TRACK 1 TRACK 2
DELETE
MULTI
RECORD SELECTION
LEFT RIGHT
SONG
RECORD
MEMORY
PLAY/STOP
TRACK
+YES
-NO

PRACTICING THE RIGHT HAND MELODY OF THE SONG
1 Press the SONG LEFT and the SONG RIGHT buttons simultaneously, the PLAY/STOP
indicator will flash blue and the first play along song will appear on the display. Both
SONG LEFT and SONG RIGHT indicators will be off.
2 Use the +/YES, –/NO buttons or to select a song. The song number and title will appear
on the display.
3 Press the SONG RIGHT button. The indicator will turn on.
4 Press the PLAY/STOP button, after the metronome sound counts in, the auto
accompaniment will play, and you can play the right hand melody notes.
5 The song will stop automatically when it is finished, or you can press the PLAY/STOP
button at anytime to return to Play Along Song standby.
If the Song Grading feature is turned on, you will have a percentage grade displayed in
the LCD screen when the song is finished, if you stop the song early there will be no grade.
Song Grading can be turned on and off in the function menu. You need to exit the Play
Along Song music teacher mode to access the Function menu.
6 Press the PLAY/STOP button to try again, or next try the Left Hand, or press the SONG
LEFT and the SONG RIGHT buttons simultaneously to exit the play along song mode,
the PLAY/STOP indicator will go out, then press both track buttons, one at a time, so the
indicator lights turn off.
PLAY ALONG SONGS
PRACTICING THE LEFT HAND ACCOMPANIMENT OF THE SONG
1 Press the SONG LEFT and the SONG RIGHT buttons simultaneously, the PLAY/STOP
indicator will flash blue and the first play along song will appear on the display. Both
SONG LEFT and SONG RIGHT indicators will be off.
2 Use the +/YES, –/NO buttons to select a song. The song number and title will appear on
the display.
3 Press the SONG LEFT button. The indicator will turn on.
4 Press the PLAY/STOP button, after the metronome sound counts in, the melody notes
will play, and you can play the left hand auto accompaniment.
5 The song will stop automatically when it is finished, or you can press the PLAY/STOP
button at anytime to return to Play Along Song standby.
If the Song Grading feature is turned on, you will have a percentage grade displayed in
the LCD screen when the song is finished, if you stop the song early there will be no grade.
Song Grading can be turned on and off in the function menu. You need to exit the Play
Along Song music teacher mode to access the Function menu.
6 Press the PLAY/STOP button to try again, or next try Both Hands, or press the SONG
LEFT and the SONG RIGHT buttons simultaneously to exit the play along song mode,
the PLAY/STOP indicator will go out, then press both track buttons, one at a time, so
the indicator lights turn off.
45

PLAY ALONG SONGS
PRACTICING BOTH HANDS OF THE SONG
1 Press the SONG LEFT and the SONG RIGHT buttons simultaneously, the PLAY/STOP
indicator will flash blue and the first play along song will appear on the display. Both
SONG LEFT and SONG RIGHT indicators will be off.
2 Use the +/YES, –/NO buttons to select a song. The song number and title will appear on
the display.
3 Press the SONG LEFT and the SONG RIGHT buttons, one at a time, if you press them both
you will exit the Play Along Song mode. Both indicators will turn on.
4 Press the PLAY/STOP button, after the metronome sound counts in, you can play the left
hand auto accompaniment and the right hand melody notes.
5 The song will stop automatically when it is finished, or you can press the PLAY/STOP
button at anytime to return to Play Along Song standby.
If the Song Grading feature is turned on, you will have a percentage grade displayed in
the LCD screen when the song is finished, if you stop the song early there will be no grade.
Song Grading can be turned on and off in the function menu. You need to exit the Play
Along Song music teacher mode to access the Function menu.
6 Press the PLAY/STOP button to try again, or press the SONG LEFT and the SONG RIGHT
buttons simultaneously to exit the play along song mode, the PLAY/STOP indicator will
go out, then press both track buttons, one at a time, so the indicator lights turn off.
46
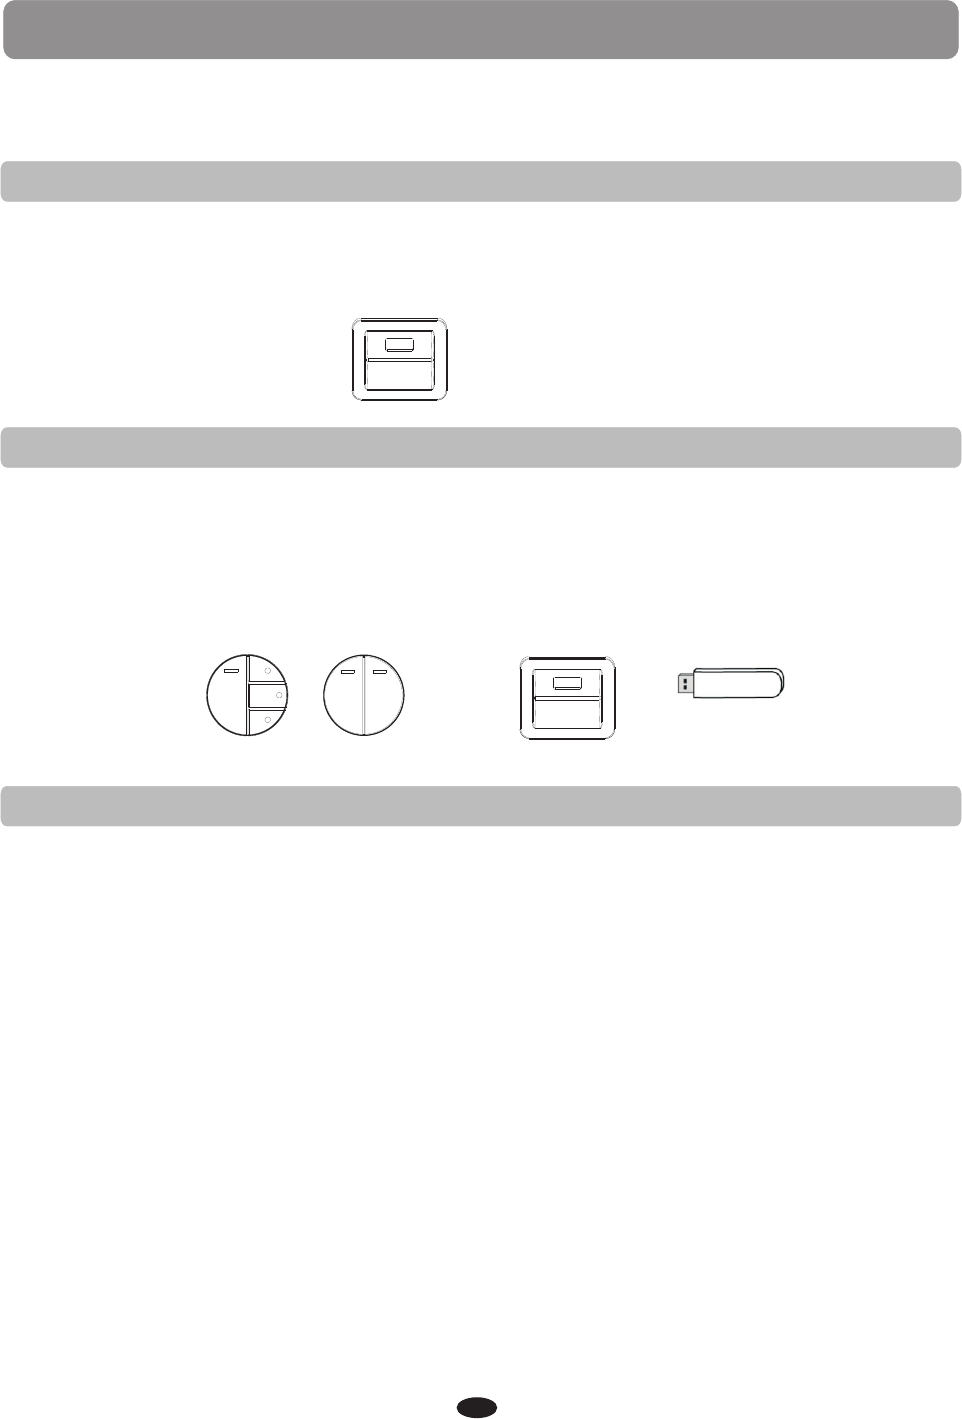
USB
INSERT THE USB
USB is a digital audio interface. The USB feature allows you to record your songs or
registrations on a USB drive, or to listen to any MIDI files prerecorded onto a USB.
Insert the USB flash drive in the USB TO DEVICE slot with the top (fat) side up and
leading into the slot. Gently push the USB drive into the slot, it will be a snug fit and the
protruding end will be angled slightly upwards.
Do not force the USB drive.
USB TO DEVICE
REMOVE THE USB
To remove the USB flash drive grasp the protruding end and pull straight out at
following it's upward angle until it slides out from the slot, again it is a snug fit, do not
force.
Do not remove the USB flash drive or turn off the power when the USB TO DEVICE is
engaged to avoid memory loss or damage to the USB flash drive or the USB TO DEVICE
reader.
USB TO DEVICE
TRACK 1 TRACK 2
DELETE
MULTI
RECORD SELECTION
LEFT RIGHT
SONG
RECORD
MEMORY
PLAY/STOP
TRACK
PLAY
To play the prerecorded SMF (Standard MIDI File) format songs that are on the USB
flash drive.
1.Insert the USB flash drive into USB TO DEVICE slot. The blue indicator light on the
MEMORY button will be lit and the screen will show the first song available for playback.
2.Use the +/YES, -/NO buttons or the DATA WHEEL to select a song.
3.Press the PLAY/STOP button, the blue indicator will flash and the music sequencer
will automatically load the first MIDI File Song that is on the USB and it will begin to
play. The music sequencer will continue to load and play all songs in sequence. The
keyboard is available for playing while the recording is playing back. If the metronome
is engaged it will tick to the tempo of the recording. You can adjust the tempo by using
the TAP/TEMPO button and the DATA WHEEL.
4.Press the PLAY/STOP button at any time to stop the play or to select another song.
5.Press the MEMORY button to disengage the USB drive, press the MEMORY button
again to return.
Please note, the USB Play Mode, USB Play Speed, USB Play Volume and USB Mute Track
can all be manipulated from the Function menu.
Please see the Function section of this manual for more information.
Please see the Record section of this manual for information regarding recording to USB.
47
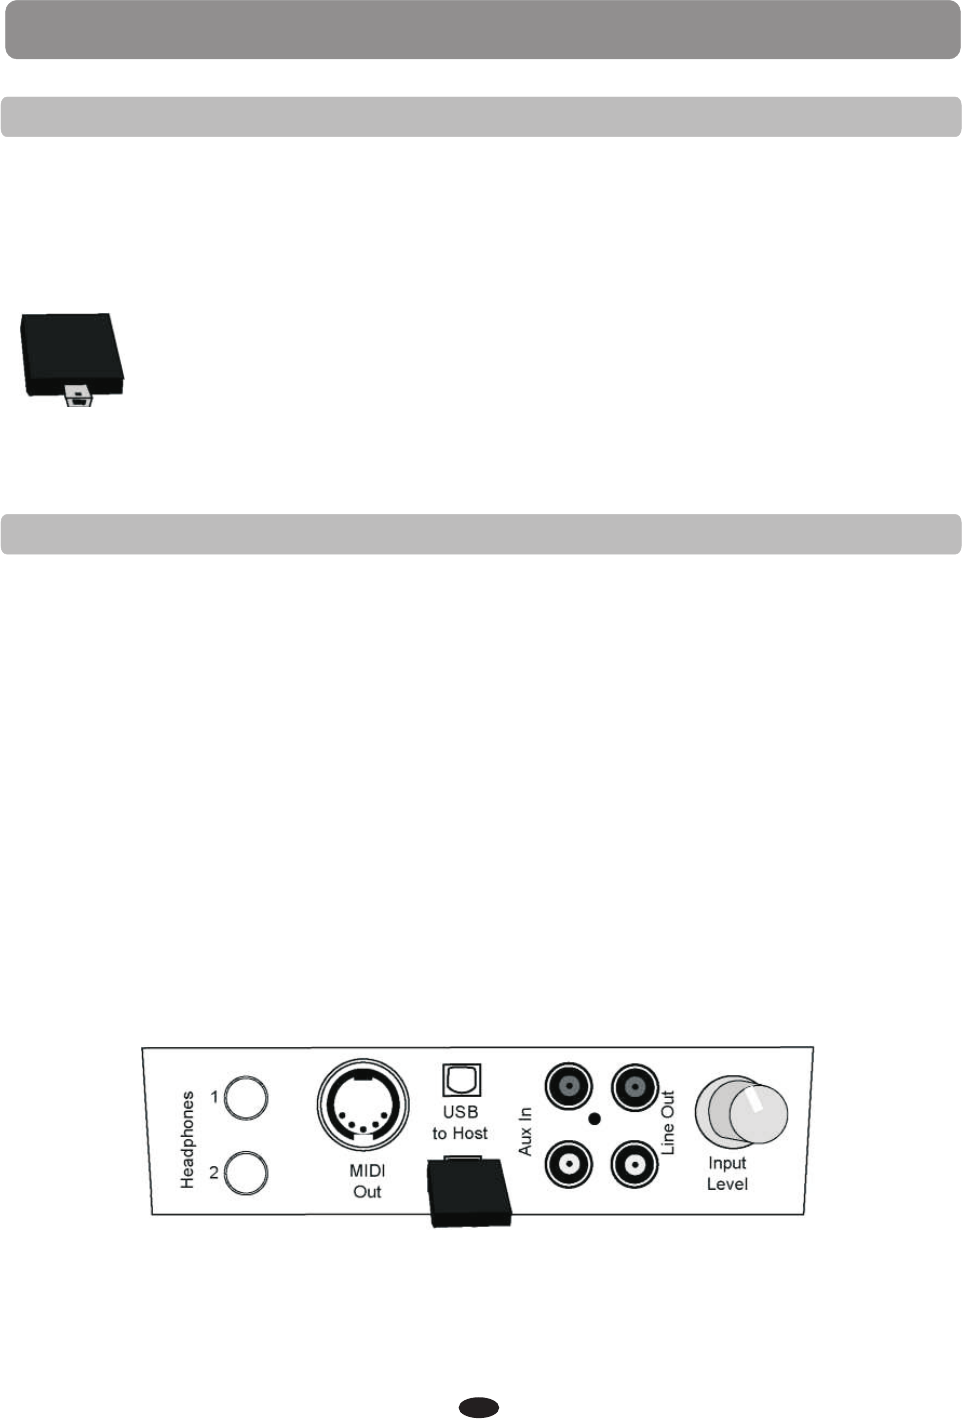
BLUETOOTH
Artesia adds Bluetooth to your digital piano! Plug this tiny unit into the allotted slot on
the connector panel and stream high-quality audio from Bluetooth devices like your
smartphone, tablet or computer. Now you will be able to listen to music files and music
apps from your Bluetooth-enabled devices on your piano.
This receiver is compatible with most A2DP stereo Bluetooth-enabled devices.
BT-1 ARTESIA BLUETOOTH CONNECTION
SPECIFICATIONS
Compliant with Bluetooth 2.1 +EDR specs 4dBm output max power
Operates in 2.402-2.480 GHz ISM band 80dBm receiver sensitivity
The included Artesia BT-1 Bluetooth receiver turns your piano into a home entertainment
center for the entire family and allows you to play along with your favorite hits.
BLUETOOTH CONNECTION
1.Make sure that the piano is powered off, if not please press the POWER button to do
so. Insert the Bluetooth receiver into the Bluetooth slot located on the connector
panel on the left side of the piano underneath the key-bed.
2.Press the POWER button to turn the piano on. The blue indicator light on the Bluetooth
receiver will flash.
3.Press the FUNCTION button and use the +/YES, -/NO buttons or the DATA WHEEL to
select The Bluetooth Menu.
4.From the sub-menu, turn the Bluetooth feature on by pressing the +/YES button and
then the ENTER button. The blue indicator will begin to flash quickly, it will continue
to flash, once every .7 second, while connecting to another Bluetooth device.
5.You will find the Artesia BT-1 as an option on your Bluetooth device's settings, select
the BT-1 from your device to connect. When the BT-1 receiver has successfully
connected the blue indicator light on the receiver will remain on. Use your Bluetooth
device to access the information that you want to hear through the piano. The
keyboard is available for playing while the recording is playing back. Play along with
your favorite band!
6.Use the Function Bluetooth menu again to turn Bluetooth off.
48

BLUETOOTH
Please note, Bluetooth devices should be placed near and in direct view of the Bluetooth
receiver when initially set up. The distance and strength of the signal will depend on
environmental conditions. Please make sure the volume of the piano and the Bluetooth
device is turned up.
If you are unable to connect to your Bluetooth device, please make sure that any other
previously connected device has been disconnected.
If you are still unable to connect, please turn the Bluetooth function on your device off,
and then back on to attempt to connect.
To change Bluetooth devices during normal operation disconnect the first Bluetooth and
then reconnect to the new device following the above instructions.
Please also note, due to differences in Bluetooth technology, some Bluetooth enabled
devices may be incompatible, function improperly, or may not support all features when
used with the wireless receiver.
Please make sure the volume of the piano and the Bluetooth device is turned up.
If you are unable to connect to your Bluetooth device, please make sure that any other
previously connected device has been disconnected.
If you are still unable to connect, please turn the Bluetooth function on your device off,
and then back on to attempt to connect.
To change Bluetooth devices during normal operation disconnect the first Bluetooth and
reconnect to the new device following the above instructions.
TROUBLESHOOTING
49
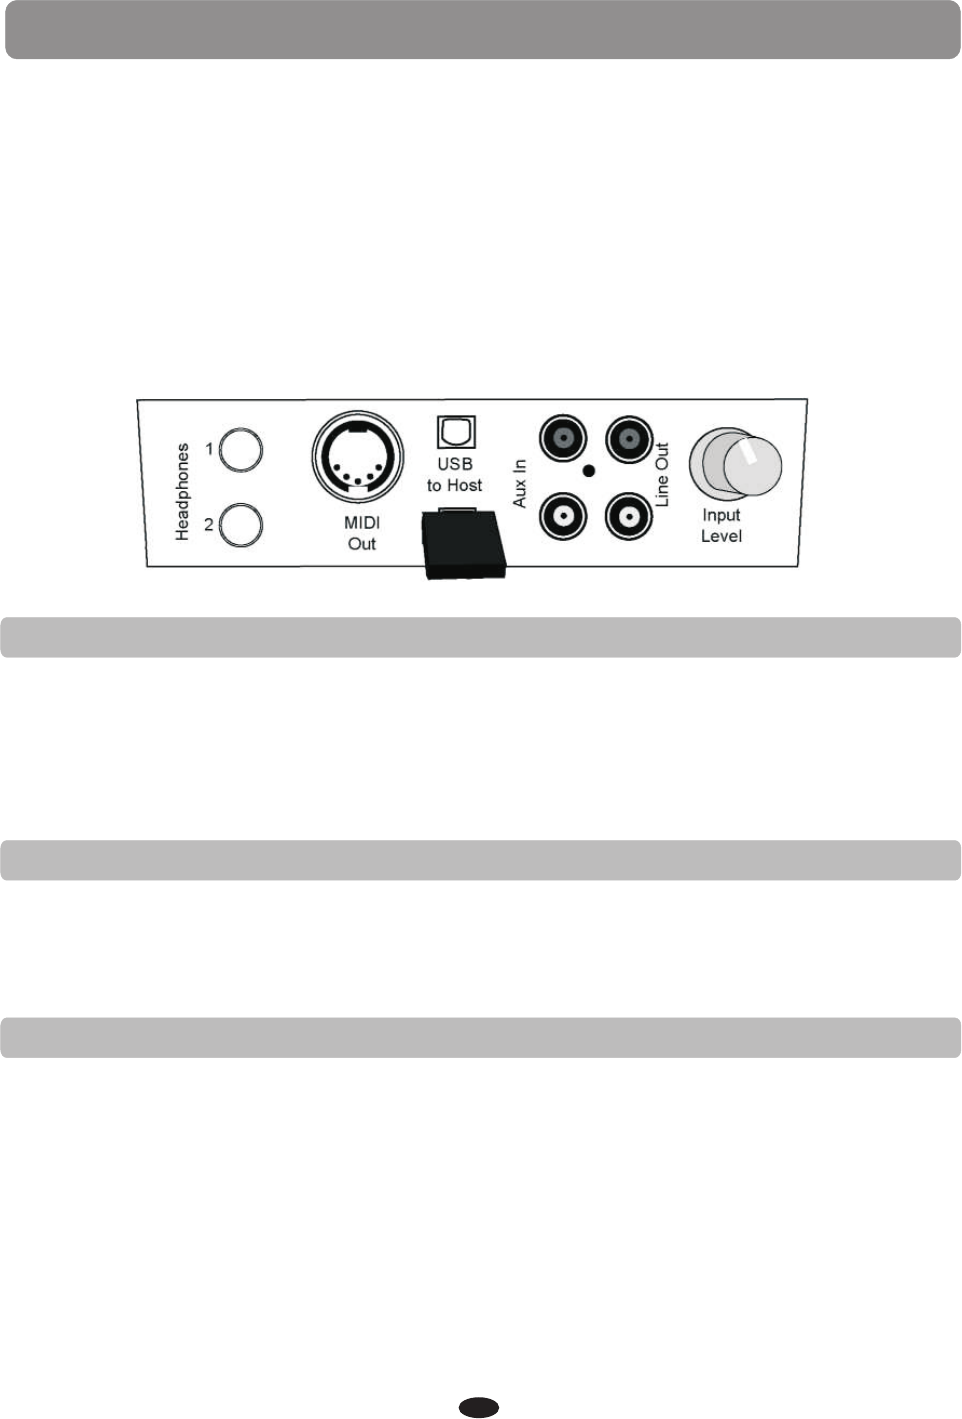
MIDI
MIDI stands for Musical Instrument Digital Interface. This is a worldwide standard
communication interface that enables electronic musical instruments and computers
of all brands to communicate with each other so that data can pass between them.
This exchange of information makes it possible to create a system of MIDI instruments
and devices that offers far greater versatility and control than is available with isolated
instruments. Whether you interface with computers, sequencers, expanders or other
keyboards, your musical horizons will be greatly enhanced.
If you are an advanced MIDI user, this section will help you to access the MIDI controller
capabilities of the piano. If you already know that you need this specialized functionality,
then this section is for you. However, this information is not necessary in order to enjoy
playing the piano.
MIDI CONNECTION
The MIDI terminal is located on the left side of the piano, under the key-bed. For more
information regarding transmitted MIDI data please see the MIDI implementation chart
at the back of this manual.
The MIDI Local, USB MIDI In and the MIDI Out are turned adjusted using the Function
menu.
Please see the Function section of this manual for more information.
MIDI OUT
This terminal transmits data from this instrument to other MIDI devices. The
transmitted data includes the note and touch velocity produced while playing on the
keyboard, as well as voice changes, wheel operation, and recorded playback for the
melody tracks. Demo songs and auto accompaniment are not transmitted.
LOCAL ON/OFF
This function allows you to turn on or off the speaker system of the piano, local is the
MIDI Channel message that sets whether your keyboard is going to trigger its internal
sounds (Local ON) or not (Local OFF). Normally, playing on the keyboard generates
sound while it sends MIDI messages via the MIDI connector or USB. This mode is called
Local On. You can mute the piano sounds while still sending out the MIDI messages.
This mode is called Local Off. Turning the Local On/Off function to off, will disconnect
the keyboard from the internal sound engine of the piano. This means you can use the
piano as a MIDI controller to control other MIDI devices or virtual instrument software
running on your computer without playing the internal sounds of the piano.
You may also find other occasions such as when you are using MIDI sequencing software
on your computer, where it is useful to turn the Local Off. Local On/Off is found in the
Function menu.
Please see the Function section of this manual for more information.
50
MIDI
MIDI IMPLEMENTATION CHART
Function
Basic Channel
Channel changed
Default Mode
Note Number 9-120 0-127
Velocity: Note On
Velocity: Note Off
Pitch Bender
Control Change: 0
1
5
7, 10
11
64, 66, 67
65
80, 81
91
98, 99
100 ,101
121
123
Program Change
System Exclusive
Sys. Common: Song
Select
Sys. Common: Song
Position
System: Clock
Real Time: Commands
Transmitted
1 CH
1-16 CH
3
·
X
·
·
X
X
·
X
·
X
·
·
X
X
·
·
0-127
X
X
X
X
X
X
Recognized
1-16 CH
1-16 CH
3
X
X
X
X
X
X
0-127
X
X
X
X
X
X
Remark
Variation page
Modulation
Portamento value
Volume, Pan
Expression
Sustain. Sostenuto, Soft Pedal
Portamento yes/no
Reverb, Chorus program
Reverb, Chorus send level
NRPNL, NRPHH
RPNL, RPNH
Reset all controllers
All notes off
Mode 1: OMNI ON, POLY
Mode 2: OMNI ON, MONO
Mode 3: OMNI OFF, POLY
Mode 4: OMNI OFF, MONO
MIDI CHANNELS
The MIDI system in this unit has 16 channels numbered from 1-16. Each of the
channels is responsible for a voice. When the instrument receives from an external
device, the active channel is determined by the control message. The transmission
channels on this keyboard are fixed as follows:
Channel 1:
Channel 2:
Channel 3:
Channel 4:
Channel 7:
Channel 10:
Master voice
Layer voice
Split voice
Bass in manual bass chord mode
Chord in manual bass chord mode
Percussion sound
Please see the MIDI Implementation Chart for more details
51
AUTO BASS CHORD FINGERING GUIDE
FINGERING GUIDE
CHORD DISPLAY INTERVALS
Major
Major sixth
Major seventh
Major seventh sharp eleventh
Major add ninth
Major seventh ninth
Major sixth add ninth
Augmented
Minor
Minor sixth
Minor seventh
Minor seventh flatten fifth
Minor add ninth
Minor seventh add ninth
Minor seventh add eleventh
Minor major seventh
Minor major seventh add ninth
Diminished
Diminished seventh
Seventh
Seventh suspend fourth
Seventh add ninth
Seventh sharp eleventh
Seventh thirteenth
Seventh flatted fifth
Seventh flatted ninth
Seventh flatted thirteenth
Seventh sharp ninth
Major seventh augmented
Seventh augmented
Suspended fourth
Seventh suspend fourth
M
M6
M7
M7 #11
M 9
M7 9
M6 9
Aug
m
m6
m7
m7b5
m 9
m7 9
m7 11
mM7
mM7 9
Dim
Dim7
7
7sus4
7 9
7 #11
7 13
7 b5
7 b9
7 b13
7 #9
M7aug
7aug
Sus4
7sus4
1-3-5
1-3-5-6
1-3-(5)-7
1-(2)-3-#4-(5)-7
1-2-3-5
1-2-3-(5)-7
1-2-3-(5)-6
1 -3-#5
1-b3-5
1 -b3-5-6
1-b3-(5)-b7
1-b3-b5-b7
1-2-b3-5
1 -2-b3-(5)-b7
1-(2)-b3-4-5-(b7)
1-b3-(5)-7
1 -2-b3-(5)-7
1-b3-b5
1-b3-b5-6
1 -3-(5)-b7
1-4-5-b7
1-2-3-(5)-b7
1-(2)-3#4-(5)-b7
1-3-(5)-6-b7
1-3-b5-b7
1-b2-3-(5)-b7
1-3-5-b6-b7
1-#2-3-(5)-b7
1 -3-#5-7
1-3-#5-b7
1-4-5
1-4-5b7
The Fingering Guide table above lists all of the 32 playable chords of the Fingered Mode.
Please note, the intervals listed in parentheses an be omitted. The listed chord fingerings
are all in root note position, other inversions can be used with the exception of:
·The M6 chords are only recognized in root note position. All other inversions are
interpreted as m7.
·The 69 chords are only recognized in root note position. All other inversions are
interpreted as m11
·The m6 chords are only recognized in root note position. All other inversions are
interpreted as m7b5.
·With aug and dim7 chords, the lowest note played is assumed to be the root.
·These inversions do not apply to the Piano mode.
52
VOICE LIST
PIANO
1
2
3
4
5
6
7
8
CHROMATIC PERCUS
9
10
11
12
13
14
15
16
ORGAN
17
18
19
20
21
22
23
24
GUITAR
25
26
27
28
29
30
31
32
BASS
33
34
Acoustic Grand
Bright Acoustic
Electric Grand
Honky-Tonk Piano
Electric Piano 1
Electric Piano 2
Harpsichord
Clavichord
Celesta
Glockenspiel
Music box
Vibraphone
Marimba
Xylophone
Tubular Bells
Dulcimer
Drawbar Organ
Percussive Organ
Rock Organ
Church Organ
Reed Organ
Accordion
Harmonica
Tango Accordion
Acoustic Nylon
Acoustic Steel
Electric Jazz
Electric Clean
Electric Muted
Overdriven Guitar
Distortion Guitar
Guitar Harmonics
Upright Bass
Electric (finger)
35
36
37
38
39
40
STRINGS
41
42
43
44
45
46
47
48
ENSEMBLE
49
50
51
52
53
54
55
56
BRASS
57
58
59
60
61
62
63
64
REED
65
66
67
68
69
Electric (pick)
Fretless Bass
Slap Bass 1
Slap Bass 2
Synth Bass 1
Synth Bass 2
Violin
Viola
Cello
Contrabass
Tremolo Strings
Pizzicato Strings
Orchestral Harp
Timpani
Strings
String Ensemble 2
Synth Strings 1
Synth Strings 2
Choir Aahs
Voice Oohs
Synth Voice
Orchestra Hit
Trumpet
Trombone
Tuba
Muted Trumpet
French Horn
Brass Section
Synth Brass 1
Synth Brass 2
Soprano Sax
Alto Sax
Tenor Sax
Baritone Sax
Oboe
70
71
72
PIPE
73
74
75
76
77
78
79
80
SYNTH LEAD
81
82
83
84
85
86
87
88
SYNTH PAD
89
90
91
92
93
94
95
96
SYNTH EFFECT
97
98
99
100
101
102
103
104
English Horn
Bassoon
Clarinet
Piccolo
Flute
Recorder
Pan Flute
Bottle Blow
Shakuhachi
Whistle
Ocarina
Lead 1 (square)
Lead 2 (sawtooth)
Lead 3 (calliope)
Lead 4 (chiff)
Lead 5 (charang)
Lead 6 (voice)
Lead 7 (fifths)
8 (bass + lead)
Pad 1 (new age)
Pad 2 (warm)
Pad 3 (polysynth)
Pad 4 (choir)
Pad 5 (bowed)
Pad 6 (metallic)
Pad 7 (halo)
Pad 8 (sweep)
FX 1 (rain)
FX 2 (soundtrack)
FX 3 (crystal)
FX 4 (atmosphere)
FX 5 (brightness)
FX 6 (goblins)
FX 7 (echoes)
Sci-Fi
ETHNIC
105
106
107
108
109
110
111
12
PERCUSSIVE
113
114
115
116
117
118
119
120
SOUND EFFECT
121
122
123
124
125
126
127
128
DRUM LIST
129
130
131
132
133
134
135
136
137
Sitar
Banjo
Shamisen
Koto
Kalimba
Bagpipe
Fiddle
Shanai
Tinkle Bell
Agogo
Steel Drums
Woodblock
Taiko Drum
Melodic Tom
Synth Drum
Reverse Cymbal
Guitar Fret Noise
Breath Noise
Seashore
Bird Tweet
Telephone Ring
Helicopter
Applause
Gunshot
Standard
Room
Power
Eletroni
Synth
Jazz
Brush
Classic
Effect
Please note, for voices from 001 - 128 in the table, the NO. is the displayed voice number.
The MIDI program number for any voice listed is one less than the display number.
For example voice 001 Acoustic Grand Piano Midi program number is 000,
voice 002 Bright Acoustic Piano MIDI program number is 001, and so forth.
53
VSTYLE LIST
BALLAD
1
2
3
4
5
6
7
8
9
10
11
12
13
14
15
POP
16
17
18
19
20
21
22
23
24
25
26
27
28
29
30
31
32
33
Piano Ballad
Latin Ballad
Love Song
Pop Ballad
Big Band Ballad
Jazz Ballad
16Beat Ballad
6/8 Slow Rock
16Beat 1
16Beat 2
Country Ballad
Slow Gospel
Slow Country
Modern Ballad
Show Ballad
POP
Mersey Beat
Popville
Jazz Rock
Pop Rock
Pop Shuffle
Guitar Pop
Swing Funk
Pop's Feel
Surf Pop
8 Beat
60's Rock
Rock
Shuffle Rock
Synth Pop
Soul
Detroit Pop
Rhythm & Blues
Soul 1968
16 BEAT
34
35
36
37
38
39
40
41
42
43
44
45
46
47
48
49
50
51
52
53
54
55
56
57
58
59
60
COMBO
61
62
63
64
65
66
Twist
Early Rock
Boogie Woogie
6/8 Blues
Gospel Shuffle
Dance
Dance Pop
House
Swing House
Club Dance
Club Latin
Garage
Techno
Dance 8Beat
Hip Hop
Chill Out
70's Disco
Latin Disco
Disco
Disco Party
Disco Fever
New York Disco
Country Pop
Country Swing
Country 2Step
Bluegrass
Country Waltz
Modern Jazz
Cocktails
Combo Place
Jazz Club
Swing
Big Band Jam
67
68
69
70
71
72
73
74
75
76
77
78
79
80
81
82
83
84
85
LATIN
86
87
88
89
90
91
92
93
94
95
96
97
98
99
100
Big Band
Dixie
Big Band Dance
Quick Fox Trot
Quick Step
Jive
Ragtime
Stride Piano
2/4 March
6/8 March
Foxtrot
English Waltz
Vienna Waltz
Swing Waltz
Jazz Waltz
Waltz
Island Fever
2/4 Polka
6/8 Polka
Brasil
Merengue
Mambo
Rhumba
Salsa
Samba
Beguine
Bossanova
Tango
Tango Habenera
Pasodoble
Cha Cha
Swing Reggae
Tarntela
Mariachi
54

TROUBLESHOOTING
When the instrument is turned on or off, a
popping sound is heard.
This is normal and indicates that the
instrument is receiving electrical power.
When using a mobile phone, noise is
produced
Using a mobile phone is close proximity to
the instrument may produce interference.
To prevent this, turn off the mobile phone
or use it further away from the instrument.
Not all of the voices seem to sound, or the
sound seems to cut off.
The instrument is polyphonic up to a
maximum of 32 notes, including the layer
voice, split voice, auto accompaniment and
metronome.
Notes exceeding this limit will not sound.
The auto accompaniment does not sound
properly.
Make sure that the accompaniment volume
is set to a appropriate level. Check that the
split point is set to an appropriate key for
the chords you are playing. Make sure that
the CHORD button for is engaged.
No sound is produced by the keyboard,
but the lights and screen work.
Check the master volume control. Check
that nothing is plugged into the headphone
socket or that LOCAL has been turned off in
the Function menu.
The sound of the voice changes from note
to note.
This is normal. The digital toe generation
uses multiple recordings, samples, of an
instrument across the range of the keyboard.
The actual sound of the voice may be slightly
different from note to note.
The volume is too soft.
The sound quality is poor.
The rhythm stops unexpectedly or will
not play
The recorded data of the song does not
playcorrectly.
The LCD display suddenly goes dark and
all panel settings are reset.
An incorrect AC adapter which is not rated
sufficiently can cause malfunction or damage.
If you have lost or damaged your AC adapter,
please contact your nearest dealer for the
correct replacement adapter.
To completely restore all setting as set by
the factory.
Perform a factory reset from the Function
menu, all of the user settings will be erased
and the default factory settings will be applied
to the instrument.
Power suddenly and unexpectedly turns
off after a period of inactivity.
This is normal outcome of the Auto Power Off
feature. You can disable the Auto Power Off, in
the Function menu.
The sustain pedal seems to produce the
opposite effect, so that pressing the pedal
deactivates the sustain and releasing the
pedal triggers the sustain.
The polarity of the switch needs to be changed.
Make sure the jack plug for the pedal is
connected correctly and do not press the pedal
while turning the piano on.
55
SPECIFICATIONS
Keyboards:
Display:
Polyphony:
Voices:
Voice Control:
Pedal:
Effect:
Styles:
Style Features:
Song recording:
Registration Memory:
Keyboard Control:
Demo and Coach :
Others:
Interface:
88 weighted,velocity-sensitive keys
Full Color Graphic LCD display
128 notes max
128PCM Voices+ 9 drum kits
Transpose, Tune, Pan, Octave, Volume for Main
voice、Split voice and Layer voice
Soft, Sostenuto, Sustain(support halfpedal)
8 Reverb Types and Reverb Level
8 Chorus Types and Chorus Level
EQ Bass Level
EQ Treble Level
100
Synchro Start, Intro, Ending, Fill In1,Fill in 2,
Variation, Startstop, Accompaniment. Volume,
Metronome
Real Time Recording and Playback with U disk.
Local two tracks recording.
Save local recording to U disk or Load U disk midi
song to Local Recording track
4 x 4 per reg file.
Save/Load reg file to/from U disk.
Split, Layer, Duet Piano
3 touch sensitivity and fixed touch select
10 demos + 55 lessons
Left/Right part On/Off
Score for Learning Level
Bluetooth
U Disk for recording, play demo,save/load reg file.
USB MIDI
USB AUDIO to Play/Record Audio with Computer
DC, Aux In, Line Out, USB,midiout,Pedal
2 Headphones,Bluetooth
56
