Ringway Tech AM-3 DIGITAL PIANO User Manual 10506217 V1 0 am 3
Ringway Tech(Jiangsu) Co.,Ltd. DIGITAL PIANO 10506217 V1 0 am 3
UserManual.wiki
>
Ringway Tech
>
AM 3 User Manual
User Manual
Navigation menu
Upload a User Manual
Namespaces
Wiki Guide
HTML
PDF
Info
Views
User Manual
Discussion / Help
Navigation

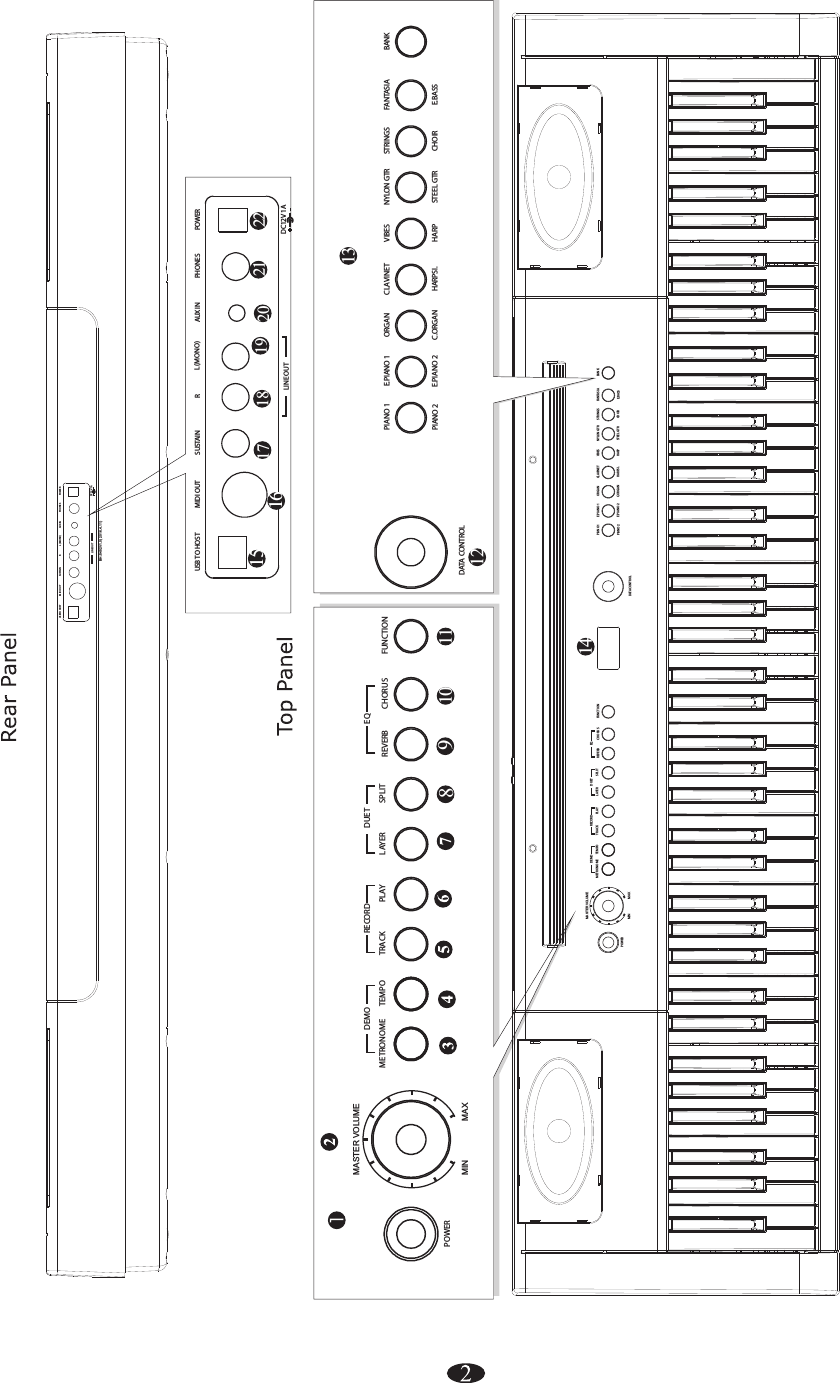
![4Getting StartedBefore playing turn the power on by pressing the POWER switch, the panel LCD will turn on.POWER This piano has an auto off function. If you don't engage in any operations, the piano will turn off after 30 minutes.NOTETurn on the powerSet the VolumeInitially set the [MASTER VOLUME] about half way between the "MIN" and "MAX" settings. You can adjust the volume to accommodate your playing style.Using HeadphonesOne standard stereo headphones can be plugged in here for private practice or late-night playing. The internal speaker system is automatically shut off when a pair of headphones is plugged into PHONES jacks.PHONES MASTER VOLUMEMIN MAXRL(MONO)Using External Sound SystemThe Line Out jack(R) and can be used to deliver the output of the piano to a keyboard amplifier, stereo sound system, mixing console or tape recorder.Line Out jack(L)(MONO)LINE OUTLUSB DISKSONG](https://usermanual.wiki/Ringway-Tech/AM-3/User-Guide-3234968-Page-8.png)

![7Demo SongsThere are 16 Demo songs in the piano. Each demo song will demonstrate a different voice. Here's how you can select and play the Demo songs.During playback, another song may be chosen by pressing a different voice selectbutton. You can also press the [BANK] button then press a voice button to select a Demo song in the bottom line. You can turn the Data Control to select the desired song.To stop the Demo song. Press the again. To replay the current song from the beginning, press the lighting voice select button. [METRONOME] and [TEMPO] buttons together Stop the Demo songThe Demo songs may be selected by pressing the [METRONOME] and [TEMPO] buttons together simultaneously. The [METRONOME] button and the [TEMPO] buttons will flash . The first Demo song will play.Select the Demo songPIANO 1 E.PIANO 1 ORGAN CLAVINET VIBES NYLON GTR STRINGSE.PIANO 2 C.ORGAN HARPSI. HARP STEEL GTRPIANO 2 CHOIRFANTASIAE.BASSBANKLUSB DISKSONGTEMPOMETRONOMEDEMOTEMPOMETRONOMEDEMO](https://usermanual.wiki/Ringway-Tech/AM-3/User-Guide-3234968-Page-11.png)
![8Selecting a VoicePress the [BANK] button and it's indicator will turn on, then when you press an instrument select button the instrument that you hear is the instrument listed on the bottom of the voice button. You also can turn the Data Control knob to select the desired voice. NOTEThe piano has 16 built-in voices, which include several pianos as well as other instruments. These digitally-sampled musical instrument sounds may be selected one at a time, layered to produce two voices at once.To select an instrument voice (Main voice), press the appropriate Voice Select button on the front panel.LUSB DISKSONGLUSB DISKSONGPIANO 1 E.PIANO 1 ORGAN CLAVINET VIBES NYLON GTR STRINGSE.PIANO 2 C.ORGAN HARPSI. HARP STEEL GTRPIANO 2 CHOIRFANTASIAE.BASSBANK](https://usermanual.wiki/Ringway-Tech/AM-3/User-Guide-3234968-Page-12.png)
![9Layer Mode Press the [LAYER] button to select layer voice mode, two voices will sound simultaneously when you play keyboards. 1. Select Layer VoicePress the [LAYER] button , the Layer indicator is flashing, turn the Data Control knobto select the second voice.2. Exit the Layer ModePress the [LAYER] again, the Layer turns off and the Layer mode is nolonger active.indicatorTo change the layer voice Pan、 Octave, please see the details in [FUNCTION] section (P.22、P.23).To change the layer voice volume, hold down the [LAYER] button and turn the Data Control knob to set the value or please see the details in [FUNCTION] section (P.18).NOTESPLITLAYERDUETSPLITLAYERDUETLUSB DISKSONG](https://usermanual.wiki/Ringway-Tech/AM-3/User-Guide-3234968-Page-13.png)
![102. Changing the Split PointHold down the [SPLIT] button for about 2 seconds, then play any of the keys on the keyboard to select the split point.3. Exit the Split Mode Press [SPLIT] again, the Split turns off and the Split mode is no longer active. indicatorTo change the split voice Pan Octave, please see the details in [FUNCTION] section (P.23、P21).To change the split voice volume, hold down the [SPLIT] button and turn the Data Control knob to set the value or please see the details in [FUNCTION] section (P.17).、NOTESPLITLAYERDUETSPLITLAYERDUETLUSB DISKSONGSplit ModePress the [SPLIT] button to select split mode, your keyboard will be split into two sections which means different voices can be played with the left and right hands at the same time.1. Select Split VoicePress [SPLIT] button, the Split indicator is flashing, turn the Data control toselect the left voice.LUSB DISKSONG](https://usermanual.wiki/Ringway-Tech/AM-3/User-Guide-3234968-Page-14.png)
![11EffectThis function allows you to perform the overall sound in a realistic style.The [REVERB] button selects a number of digital reverb effects that you can use for extra depth and expressive power.Press [REVERB] button can turn off or turn on the reverb effect.Press [REVERB] button, turn the DATA control knob to select reverb type. 1 2 3 4 5 6 7 8 Hall1 Hall2 Room1 Room2 Room3 Stage1 Stage2 PlatePress [REVERB] button repeatedly turn on or turn off the reverb effect.to NOTEAdjusting Reverb DepthHold down the [REVERB] button and turn the Data Control knob to set the value. You also can reference: Reverb Level (P.19). " " The reverb types in the list below can be selected from the reverb display.ReverbLUSB DISKSONGREVERB CHORUSEQ](https://usermanual.wiki/Ringway-Tech/AM-3/User-Guide-3234968-Page-15.png)
![12Shimmering, broadening effect. Press [CHORUS] button, to select chorus type.turn the Data Control knob ChorusThe chorus types in the list below can be selected from the chorus display. 1 2 3 4 5 6 7 8 Chorus1 Chorus2 Chorus3 Chorus4 Feedback Flanger1 ShrtDely ShrtDlFbPress [CHORUS] button to turn on or turn off the chorus effect.repeatedly NOTEAdjusting Chorus DepthHold down the [CHORUS] button and turn the Data Control knob to set the value. You also can Reference: Chorus Level (P.19). " " LUSB DISKSONGREVERB CHORUSEQ 9 10 11 12 13 Flanger2 Celeste 1 Flanger3 Celeste 2 Celeste 3](https://usermanual.wiki/Ringway-Tech/AM-3/User-Guide-3234968-Page-16.png)
![13MetronomeMetronome is a convenient feature for practice, and it can also provide a solid rhythmic guide when recording.The time signature of the metronome can be set by turning the Data Control knob while turning on the metronome function. Time signature: 2/2,1/4, 2/4, 3/4, 4/4,5/4, 6/4, 3/8, 6/8,7/8, 9/8,12/8.Press the metronome button to turn the metronome on.TEMPOMETRONOMEDEMOLUSB DISKSONGand turn the Data Control knob to set the value or please see the detailsin [FUNCTION] section (P.18).To change the Metronome volume, hold down the [METRONOME] button NOTETempoPress the [TEMPO] button to turn on the function. Turn the Data Control knob, you can adjust the speed from 20 to 280. TEMPOMETRONOMEDEMOLUSB DISKSONG](https://usermanual.wiki/Ringway-Tech/AM-3/User-Guide-3234968-Page-17.png)
![14Duet Mode Press the [LAYER] and [SPLIT] buttons together repeatedly to turn on or turn off Duet mode. Press the [LAYER] and [SPLIT] buttons together again to exit the Duet mode.LUSB DISKSONGSPLITLAYERDUETWith the duet feature engaged the keyboard is divided into two sections that play the same notes. The two sections, left A1-C3 and right C#3-C7 have the exact same notes and share the same voice, octaves and volume. This is a great feature for teaching or when two people want the play the piano simultaneously. When the duet feature is engaged, the pedals will automatically change configuration so there are two sustain pedals, one for each portion of the keyboards.Engaging the DUET feature will disable the Layer and Split modes.NOTE](https://usermanual.wiki/Ringway-Tech/AM-3/User-Guide-3234968-Page-18.png)
![15EQ Bass Level SettingPress the [REVERB] and [CHORUS] buttons together to enter the EQ mode. You can turn the Data Control to select the EQ Bass.Press the [REVERB] and [CHORUS] buttons together and the indicators will flash, turn the Data control to set the value:-12-012.LUSB DISKSONGREVERB CHORUSEQEQ Treble Level SettingPress the [REVERB] and [CHORUS] buttons together to enter the EQ mode. You can turn the Data Control to select the EQ Treble.Press the [REVERB] and [CHORUS] buttons together and the indicators will flash, turn the Data control to set the value:-12-012.LUSB DISKSONGREVERB CHORUSEQEQ Mode Press the [REVERB] and [CHORUS] buttons together to enter the EQ mode. You can turn the Data Control to select the EQ Bass or EQ Treble.REVERB CHORUSEQLUSB DISKSONG](https://usermanual.wiki/Ringway-Tech/AM-3/User-Guide-3234968-Page-19.png)
![Edit Functions16Press [FUNCTION] button to enter the function menu. Turn the [ ] knob to select the function . Press the [FUNCTION] button again into the option, turn the [DATA CONTROL] to set the parameter. The option and the parameters are as the follows:DATA CONTROL Display Content Range DefaultFunction100036036-64~063-64~063-64~063](https://usermanual.wiki/Ringway-Tech/AM-3/User-Guide-3234968-Page-20.png)
![17TransposeLR 1 2USB DISKSONGLR 1 2USB DISKSONGLR 1 2USB DISKSONGLR 1 2USB DISKSONGTuneLR 1 2USB DISKSONGLR 1 2USB DISKSONGLR 1 2USB DISKSONGLR 1 2USB DISKSONGTurn the Data Control knob to select Press [FUNCTION] button to enter the function menu."Transp". Press the [FUNCTION] button to confirm and the button will flash. Turn the Data Control knob to set the transpose value: -12~012 (Default: 000). Turn the Data Control knob to select Press [FUNCTION] button to enter the function menu."Tune". Press the [FUNCTION] button to confirm and the button will flash. Turn the Data Control knob to set the tune value: -64~063 (Default: 000).PLAYTRACKRECORDFUNCTIONPLAYTRACKRECORDFUNCTION](https://usermanual.wiki/Ringway-Tech/AM-3/User-Guide-3234968-Page-21.png)
![18Main Voice OctaveLR 1 2USB DISKSONGLR 1 2USB DISKSONGLR 1 2USB DISKSONGLR 1 2USB DISKSONGSplit Voice OctaveLR 1 2USB DISKSONGLR 1 2USB DISKSONGLR 1 2USB DISKSONGLR 1 2USB DISKSONG Turn the Data Control knob to select Press [FUNCTION] button to enter the function menu."S.Oct". Press the [FUNCTION] button to confirm and the button will flash. Turn the Data Control knob to set the split voice octave value: -02~002 (Default: 000). Turn the Data Control knob to select Press [FUNCTION] button to enter the function menu."M.Oct". Press the [FUNCTION] button to confirm and the button will flash. Turn the Data Control knob to set the main voice octave value: -02~002(Default: 000).PLAYTRACKRECORDFUNCTIONPLAYTRACKRECORDFUNCTION](https://usermanual.wiki/Ringway-Tech/AM-3/User-Guide-3234968-Page-22.png)
![19Layer Voice OctaveLR 1 2USB DISKSONGLR 1 2USB DISKSONGLR 1 2USB DISKSONGLR 1 2USB DISKSONGMain Voice PanLR 1 2USB DISKSONGLR 1 2USB DISKSONGLR 1 2USB DISKSONGLR 1 2USB DISKSONG Turn the Data Control knob to select Press [FUNCTION] button to enter the function menu."L.Oct". PLAYTRACKRECORDFUNCTIONPLAYTRACKRECORDFUNCTION Turn the Data Control knob to select Press [FUNCTION] button to enter the function menu."M.Pan". Press the [FUNCTION] button to confirm and the button will flash. Turn the Data Control knob to set the main voice pan value:-64~063 (Default: 000).Press the [FUNCTION] button to confirm and the button will flash. Turn the Data Control knob to set the layer voice octave value: -02~002(Default: 000).](https://usermanual.wiki/Ringway-Tech/AM-3/User-Guide-3234968-Page-23.png)
![20LR 1 2USB DISKSONGLR 1 2USB DISKSONGSplit Voice PanLR 1 2USB DISKSONGLR 1 2USB DISKSONGLayer Voice PanLR 1 2USB DISKSONGLR 1 2USB DISKSONGLR 1 2USB DISKSONGLR 1 2USB DISKSONGTurn the Data Control knob to select Press [FUNCTION] button to enter the function menu."L.Pan". Press the [FUNCTION] button to confirm and the button will flash. Turn the Data Control knob to set the layer voice pan value: -64~063 (Default: 000).Turn the Data Control knob to select Press [FUNCTION] button to enter the function menu."S.Pan". Press the [FUNCTION] button to confirm and the button will flash. Turn the Data Control knob to set the split voice pan value: -064~063(Default: 000).PLAYTRACKRECORDFUNCTIONPLAYTRACKRECORDFUNCTION](https://usermanual.wiki/Ringway-Tech/AM-3/User-Guide-3234968-Page-24.png)
![21LocalLR 1 2USB DISKSONGLR 1 2USB DISKSONGLR 1 2USB DISKSONGLR 1 2USB DISKSONGPLAYTRACKRECORDFUNCTION Turn the Data Control knob to select Press [FUNCTION] button to enter the function menu."LocalOn". Press the [FUNCTION] button to confirm and the button will flash. Turn the Data Control knob to set local on or off.TouchLR 1 2USB DISKSONGLR 1 2USB DISKSONGLR 1 2USB DISKSONGLR 1 2USB DISKSONGPLAYTRACKRECORDFUNCTION Turn the Data Control knob to select Press [FUNCTION] button to enter the function menu."T Normal". Press the [FUNCTION] button to confirm and the button will flash. Turn the Data Control knob to set the touch types: Normal,Low,High.(Default: Normal).](https://usermanual.wiki/Ringway-Tech/AM-3/User-Guide-3234968-Page-25.png)
![22Main Voice VolumeSplit Voice VolumeLR 1 2USB DISKSONGLR 1 2USB DISKSONG Turn the Data Control knob to select Press [FUNCTION] button to enter the function menu."M.Vol". Press the [FUNCTION] button to confirm and the button will flash. Turn the Data Control knob to set the main voice volume value: 000~127 (Default: 127). Turn the Data Control knob to select Press [FUNCTION] button to enter the function menu."S.Vol". Press the [FUNCTION] button to confirm and the button will flash. Turn the Data Control knob to set the split voice volume value: 000~127 (Default: 127).LR 1 2USB DISKSONGLR 1 2USB DISKSONGPLAYTRACKRECORDFUNCTIONLR 1 2USB DISKSONGLR 1 2USB DISKSONGLR 1 2USB DISKSONGLR 1 2USB DISKSONGPLAYTRACKRECORDFUNCTION](https://usermanual.wiki/Ringway-Tech/AM-3/User-Guide-3234968-Page-26.png)
![23Layer Voice VolumeLR 1 2USB DISKSONGLR 1 2USB DISKSONGLR 1 2USB DISKSONGLR 1 2USB DISKSONGMetronome VolumeLR 1 2USB DISKSONGLR 1 2USB DISKSONGLR 1 2USB DISKSONGLR 1 2USB DISKSONG Turn the Data Control knob to select Press [FUNCTION] button to enter the function menu."L.Vol". Press the [FUNCTION] button to confirm and the button will flash. Turn the Data Control knob to set the Layer voice volume value: 000~127 (Default: 075).PLAYTRACKRECORDFUNCTION Turn the Data Control knob to select Press [FUNCTION] button to enter the function menu."MetroVol". Press the [FUNCTION] button to confirm and the button will flash. Turn the Data Control knob to set the metronome volume value: 000~127 (Default: 100).PLAYTRACKRECORDFUNCTION](https://usermanual.wiki/Ringway-Tech/AM-3/User-Guide-3234968-Page-27.png)
![24LR 1 2USB DISKSONGLR 1 2USB DISKSONGLR 1 2USB DISKSONGLR 1 2USB DISKSONGLR 1 2USB DISKSONGLR 1 2USB DISKSONGLR 1 2USB DISKSONGLR 1 2USB DISKSONGChorus LevelReverb Level Turn the Data Control knob to select Press [FUNCTION] button to enter the function menu."R Lvl". Press the [FUNCTION] button to confirm and the button will flash. Turn the Data Control knob to set the reverb value: 000~127 (Default: 036).PLAYTRACKRECORDFUNCTIONPLAYTRACKRECORDFUNCTION Turn the Data Control knob to select Press [FUNCTION] button to enter the function menu."C Lvl". Press the [FUNCTION] button to confirm and the button will flash. Turn the Data Control knob to set the Chorus value: 000~127 (Default: 036).](https://usermanual.wiki/Ringway-Tech/AM-3/User-Guide-3234968-Page-28.png)
![RecordingRecordingPLAYTRACKRECORDFUNCTIONLUSB DISKSONG25The recording function features a two track recorder that lets you record what you play on the keyboard and then play it back. Two tracks mean that you can“overdub”one part on top of another, using a different voice if you like.The recorder feature is a useful addition to any keyboard study program since it lets you hear exactly how you sound from the listener's perspective. It can also be just plain fun. This recorded information is nonvolatile and therefore will not be lost when the power is turned off. The record function records all settings exactly as you selected and performed them.PLAYTRACKRECORDFUNCTION1). Prepare to record by setting the voice, tempo, reverb level, or other parameters as desired.2). Select a track: There are two tracks available for recording. Press the [TRACK] repeatedly to select track 1 or track 2. Select the desired voice and press the [TRACK] and the [PLAY] buttons together to enter the recording mode and the track button indicator will flash. If you already have recorded on the other track, the recorded music will play as a reference for you while you record the new track. NOTE](https://usermanual.wiki/Ringway-Tech/AM-3/User-Guide-3234968-Page-29.png)
![263). Metronome: Press the [METRONOME] button to enable the metronome as a reference, if so desired. The metronome sounds without any beat pattern, just giving the tempo. You can adjust the metronome's beat pattern and tempo as usual before recording. The metronome sound will not be recorded. If one track has been recorded, when recording another track, its tempo and beat pattern will be the same as the first track recorded. If you change the tempo on the second track, the new tempo will be applied for both tracks. NOTE4). Record: If the track 1or track 2 are selected and the [TRACK] button blinking, the recording will begin as soon as you play the keyboard . While recording, the recording track indicator will be flashing. 5).Stop recording to the track.Recording stops when pressing the .[TRACK] buttonNOTEIf the track 1 or track 2 has data recorded, the TRACK indicator will light and it will play when the record is started. [ ] TEMPOMETRONOMEDEMO](https://usermanual.wiki/Ringway-Tech/AM-3/User-Guide-3234968-Page-30.png)
![ClearingPLAYTRACKRECORDFUNCTIONLUSB DISKSONGTo erase the music recorded on the tracks, just record over the track you want to erase. Hold the the current recorded track. [TRACK] button and the recorded data is deletedWhen you recorded a new song into a track, old data is deleted in the track.Backing Up the recorded song. Even if the power turns off, the recorded song memory is not deleted. In step 2, you can change the tempo of the track that is playing back temporarily. You could also change the tempo for the recorded tracks (Reference: Tempo P.13)Tracks will playback at the new tempo and this tempo will be set for the tracks. Beat pattern cannot be changed. 1). Press the [PLAY] button to hear the recorded track(s). "None"You can change the tempo of your recorded track by pressing the [TEMPO] button while the recording is being played back. You may also accompany the recorded tracks on the keyboard while the recording is playing back. 2). Press the [PLAY] button to stop the playback. Playback will also stop automatically when the recording reaches its end. If there is no data in the track, the LCD will display .PlayingLUSB DISKSONGPLAYTRACKRECORDFUNCTION27](https://usermanual.wiki/Ringway-Tech/AM-3/User-Guide-3234968-Page-31.png)
![281. Turn the Power Off.2. Hold down the [PIANO1] and the [E.PIANO1] buttons while powering on the piano.It can restore function to the factory defaults.Performing a Factory Reset will clear all battery backed memory and restoreall functions to their factory default settings, just like they were when you used this piano for the first time.Factory ResetPIANO 1 E.PIANO 1E.PIANO 2PIANO 2LUSB DISKSONG](https://usermanual.wiki/Ringway-Tech/AM-3/User-Guide-3234968-Page-32.png)