Ringway Tech HD-10 ELECTRONIC DRUM User Manual HD 10
Ringway Tech(Jiangsu) Co.,Ltd. ELECTRONIC DRUM HD 10
UserManual.wiki
>
Ringway Tech
>
HD 10 User Manual
User Manual
Navigation menu
Upload a User Manual
Namespaces
Wiki Guide
HTML
PDF
Info
Views
User Manual
Discussion / Help
Navigation
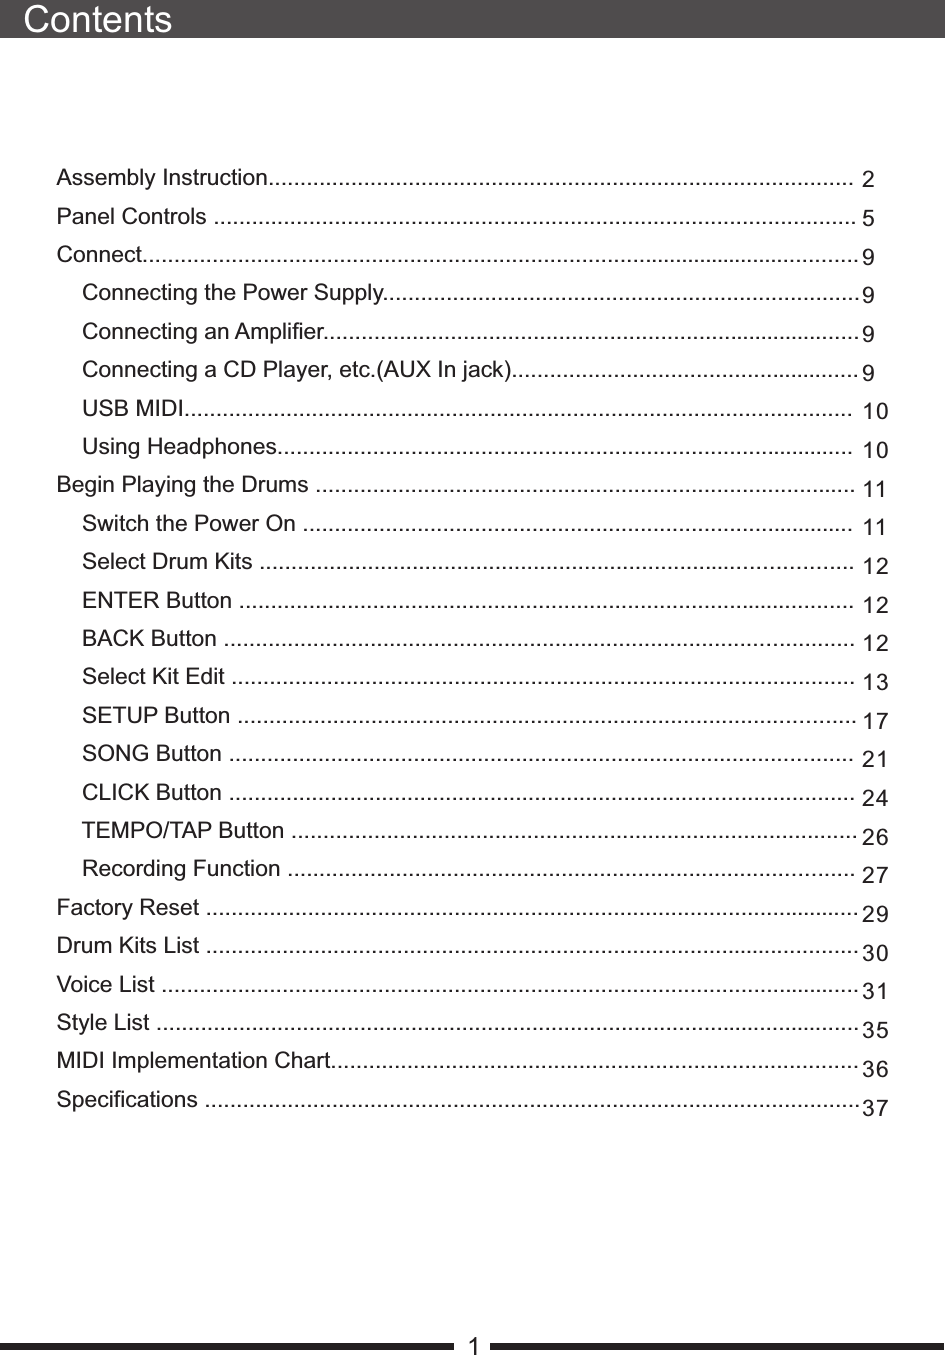
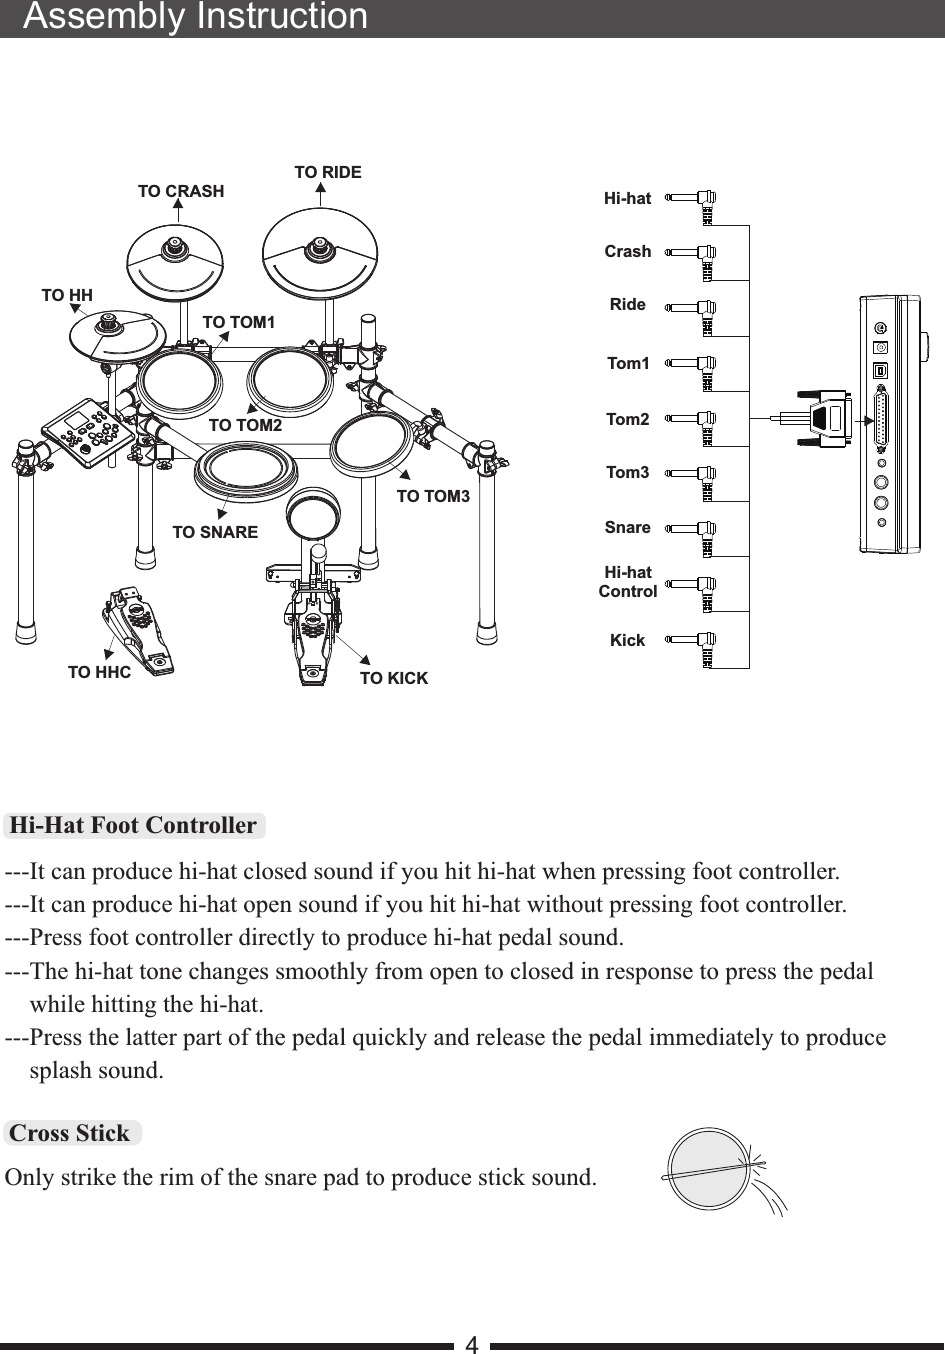
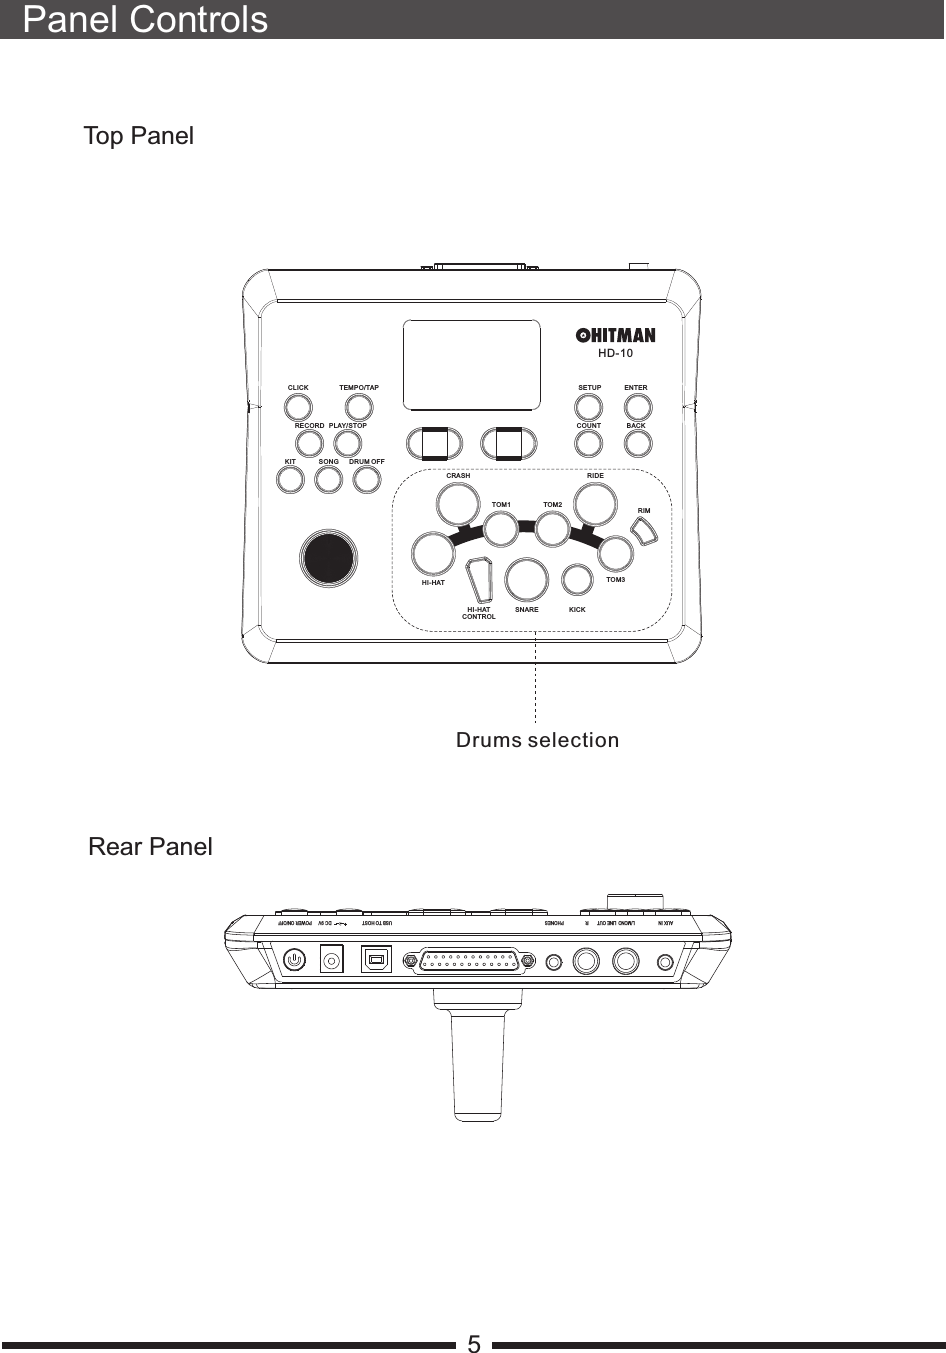
![6Panel Controls1. MASTER VOLUME Adjust the overall volume of the drum module with this pot. It controls the line outputs and the headphone output.2.[CLICK] BUTTON This button turns the metronome on and off at any time, 3.[TEMPO/TAP] BUTTON You can adjust the tempo of the built-in metronome, the practice songs, or the song you are recording by pressing You can also set the tempo by hitting the drum pads.4.[RECORD] BUTTON Gives you the option to record your own song.5.[PLAY/STOP] BUTTON Star or stop playing song and recording, Press button of drums selection to star auditi on function.6.[KIT] BUTTON select which instrument (drum sound) is played by each pad and adjust its volume or effects settings, etc.7.[SONG] BUTTON Press this button to play the song and also lets you adjust the relative volumes of the drum and accompaniment tracks.8.[DRUM OFF] BUTTON Turn on or off the sound of the drum in a song.9.[+/- ] BUTTONS Use these buttons to navigate through the 50 drum kits, switch menu selections, or change parameter values. Pressing them both at once will reset the value of the current parameter to its default.10.[SETUP] BUTTON parameters that affect all of the kit presets in the drum module equally, such as the sensitivity, threshold, and velocity curve for each pad.11.[ENTER] BUTTON This button will confirm and save the parameter changes you have made. It is also used to access the sub-pages of each menu.12.[COUNT] BUTTON Count the number of hitting drums in the certain period.13.[BACK] BUTTON Pressing this button takes the drum module to the previous menu. From the highest Edit menu it will exit to the Kit Select menu, except in Song mode where it will exit to the Song Select menu.14.DRUMS SELECTION Corresponding button of the drum pads, include: HI-HAT, CRASH, TOM1, TOM2, TOM3, RIDE, RIM, HI-HAT CONTROL, SNARE, KICK.except from within the top level of Click Edit mode.[Tempo/Tap]. Kit Edit mode enables you toPress [Setup] to access](https://usermanual.wiki/Ringway-Tech/HD-10/User-Guide-2783857-Page-9.png)
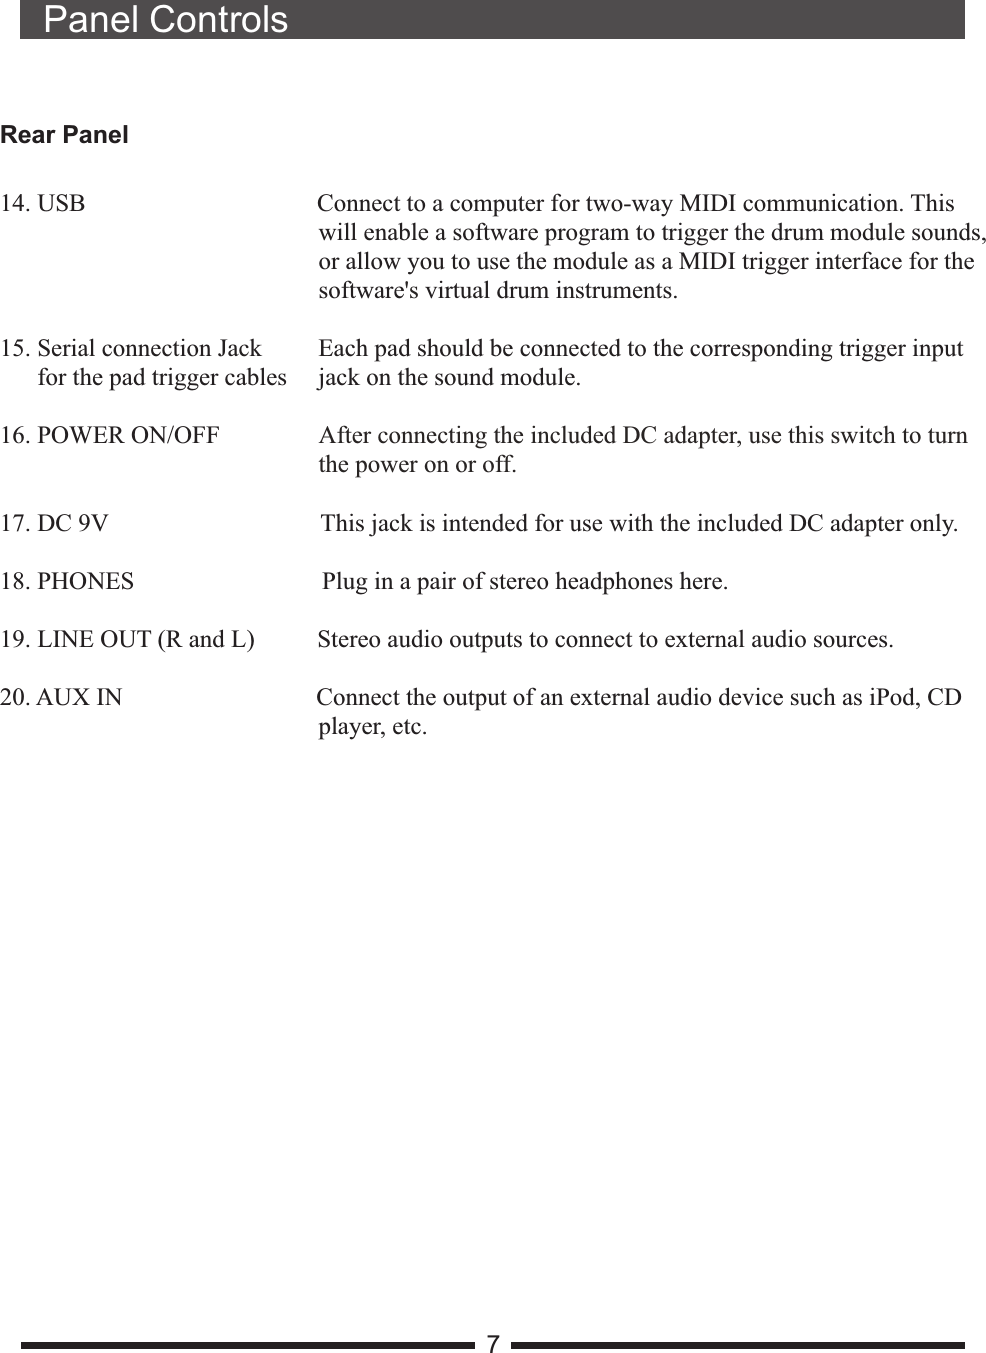
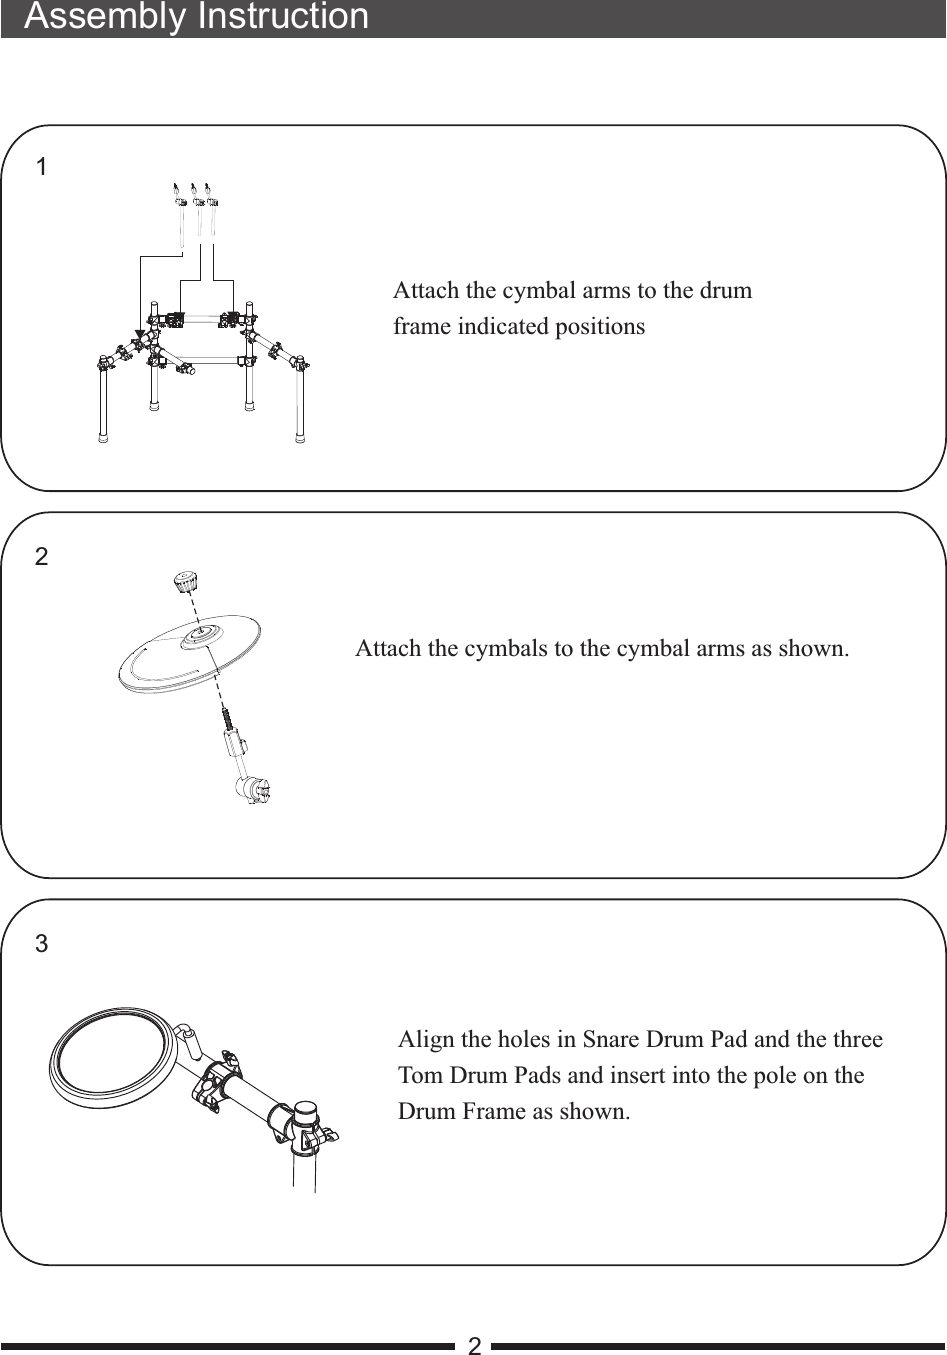
![ConnectUSB MIDIUsing HeadphonesAn optional set of stereo headphones can be connected to the PHONES jack located to the left side of the unit. Use the [MASTER VOLUME] to adjust the headphone volume.PHONES Note: Never use headphones in high volume, as it may hurt your ears.10Your drum module is USB class-compliant. This means you can plug it into a USB class-compliant host (for example, a computer running OS X, Windows XP, Vista or Windows 7) and it should be recognized immediately. There are no drivers to install;simply plug n' play. If you connect the drum module to a computer, you can trigger drum libraries on the computer or record your performance into a MIDI sequencing application. Check the operation and setup instructions for the software you intend to use for more details.](https://usermanual.wiki/Ringway-Tech/HD-10/User-Guide-2783857-Page-13.png)
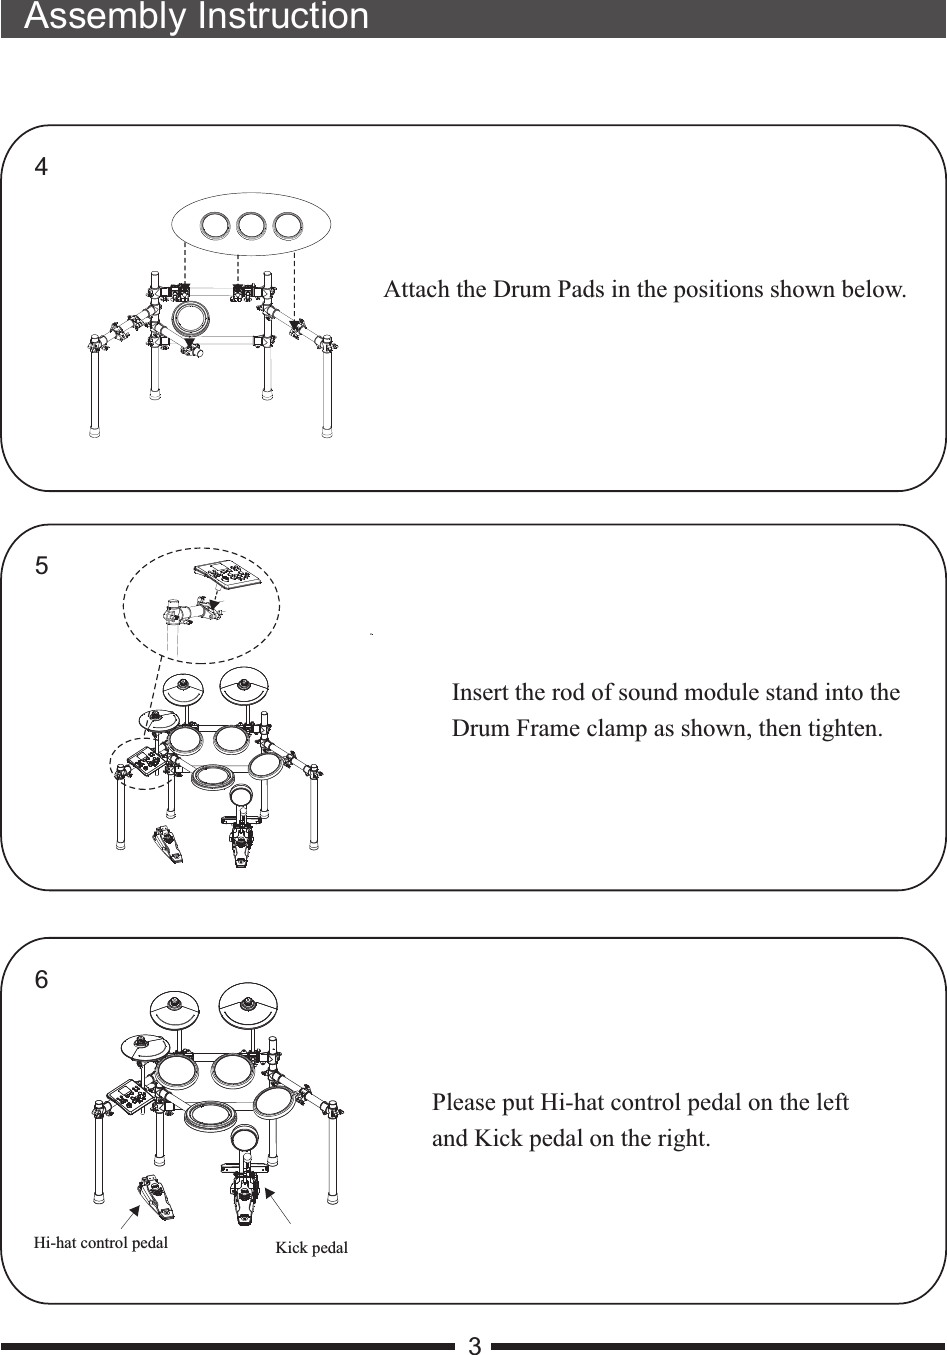
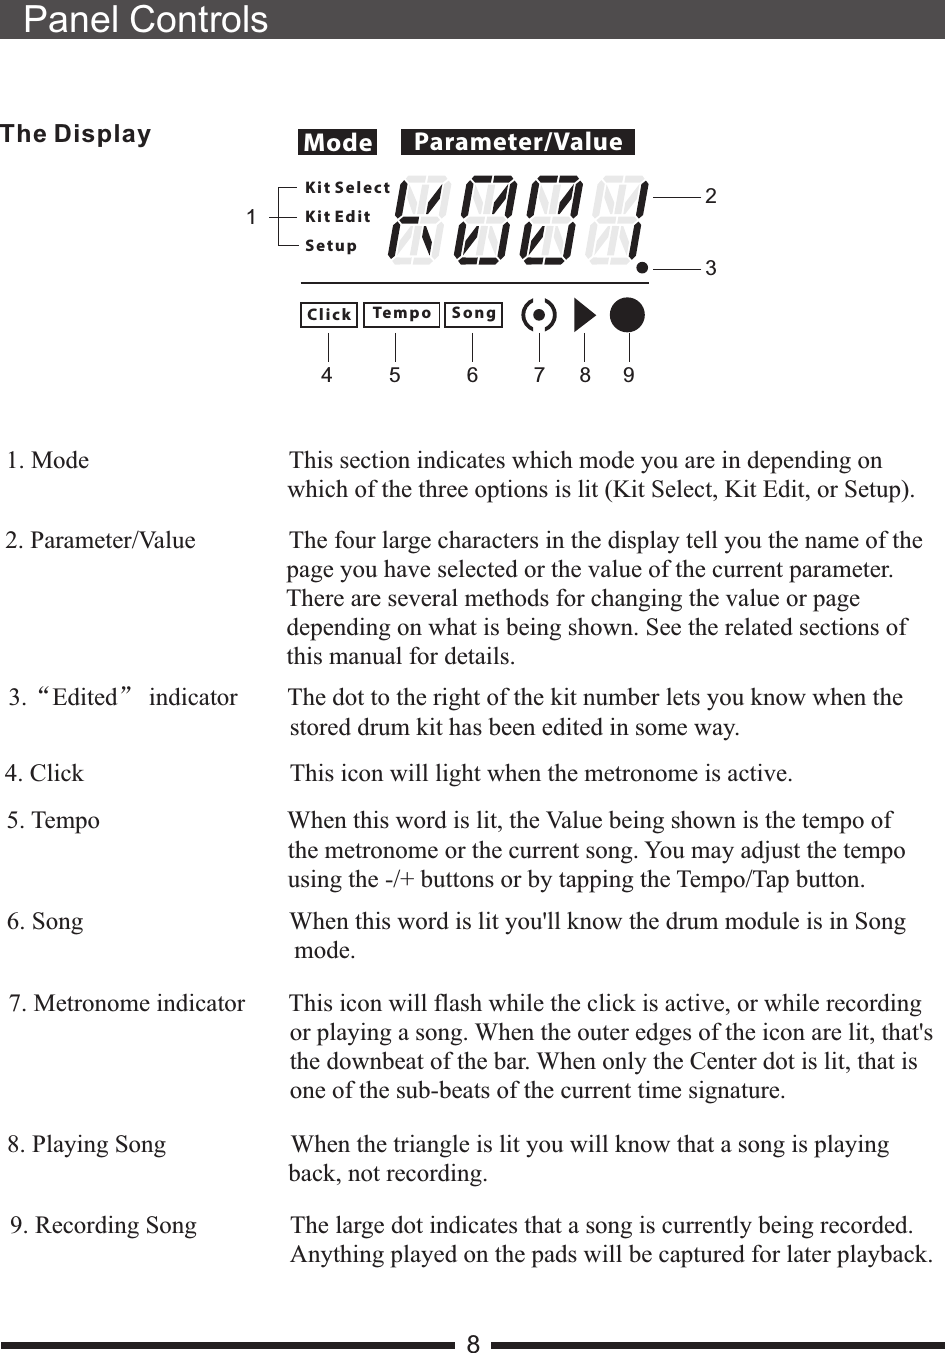
![Begin Playing the Drums11Switch the Power OnWith everything set up and ready to go, it's time to start playing the drum kit. Locate the on/offpower switch on the drum module and switch the power on. The drum module is ready tooperate when the display shown below appears. This is the location from which you select thedrum kit you want to play or edit.Next, connect headphones or a speaker system as described on the previous two pages. Startwith the MASTER VOLUME set to MIN and press the [Start/Stop] button on the drummodule. Gradually increase the volume until you hear a song playing through your speakersystem or headphones. If you hear no sound, please check all of the cables connecting thedrum module to your speakers and repeat the procedure. When the levels are set to acomfortable level, press the [Start/Stop] button again to stop the song.Once you have established that your sound system or headphones are connected correctly tothe drum module, play each of the pads, cymbals, and kick and hi-hat pedals. You shouldhear a sound for every hit. If one pad or cymbal does not play a sound, check the cableconnection from that pad to the sound module.With everything set up and the kit sounding from all pads, it time to start playing! Whenyou are ready to learn more about your new drum system, pick up the manual again andcontinue with the next page.'sMode Parameter/ValueK i t S e l e c tK i t E d i tS e t u pC l i c k S o n gTe m p o](https://usermanual.wiki/Ringway-Tech/HD-10/User-Guide-2783857-Page-14.png)
![Selecting Drum Kits'“ ” “ ”see page 30 Ready to explore the sound module some more? Then let's cover the rest of the features.The unit comes with 45 preset drum kits, any of which may be edited to suit your tastes. Ifyou re not already at the Kit Select display, press the buttons marked [Back] and [Enter] to get there. You will see the number of the current kit appear in the LCD display along with theletter K (for Kit ). The display should look something like the image pictured below.You can use the [-/+] buttons to step through any of the 50 kits. For a complete list of thepreset kits, please of this manual.Begin Playing the Drums12Think of the [Enter] button as similar to the Enter or Return keyon a computer. It has two main functions:· To take the unit down another menu level in one of the modes (Kit Edit, Setup, and Song)· To confirm and save the new value or function of an edited parameter.Once the selection has been confirmed, the displaywill return to the previous menu.Press the [Back] button if you want to quit the currentmenu.[ENTER] button[BACK] buttonOnce pressed the LCD display will take you back to theprevious menu.Mode Parameter/ValueK i t S e l e c tK i t E d i tS e t u pC l i c k S o n gTe m p oBACKENTERBACKENTERBACKENTER](https://usermanual.wiki/Ringway-Tech/HD-10/User-Guide-2783857-Page-15.png)
![Selecting Kit EditIn kit mode press the [ENTER] button, the LCD will display “ ” (Instrument), now, you can use the [+/-] buttons to select “VOL”(Pad Volume), “RVRB”(Reverb Level),“CHRS”(Chrous Level),“PAN”(Pan),“PICH”(Pitch),“DCAY”(Decay),“COPY” (Copy), and “RSET”(Reset).INSTA. In kit model press the [ENTER] buttonENTER bSelecting an Instrument (INST): the LCD will display “INST”Press [ ] button again.2 There are two ways to choose a drum at this point: a. Through the following button to select the desired pad.. Hit the drum that you want to set.1. . For example: to select snare voiceENTER “ ”ENTER“ ”1. Press [ ] button, 2. Press [ ] button again, use the [SNARE] button or hit the snare pad forcefully to select the voice, the LCD will display 20013. Press the corresponding button of the drums to audition. 4. the LCD will display INST . Use the [-/+] buttons to select new snare voice.Press [ENTER] button to confirm or press [BACK] button to return.13Begin Playing the DrumsMode Parameter/ValueK i t S e l e c tK i t E d i tS e t u pC l i c k S o n gTe m p oENTERCRASHTOM1 TOM2RIDERIMHI-HATHI-HATCONTROLSNARE KICKTOM3](https://usermanual.wiki/Ringway-Tech/HD-10/User-Guide-2783857-Page-16.png)
![B. In kit mode press the [ENTER] button bPad Volume (VOL): the LCD will display “INST”Use the [-/+] buttons to select“VOL”.2. Press [ENTER] button again.3 There are two ways to choose a drum at this point: a. Through the following button to select the desired pad.. Hit the drum that you want to set.1. . 14Begin Playing the DrumsC. In kit mode press the [ENTER] buttonPress [ ] button again, use the pad buttons to select a pad (For example: SNARE). U Range: 000-127 )Reverb level (RVRB): the LCD will display “INST”.Use the [-/+] buttons to select the “RVRB”Enterse the [-/+] buttons to set a value( .Press [Enter] button to confirm or press [Back] button to return. D. In the k mode, press the [ ] button, use the [+/-] buttons to select“CHRS” Press [ ] button, use the pad buttons to select a pad (For example: SNARE). U Range: 000-127 )Chorus level (CHRS)it EnterEnterse the [-/+] buttons to set a value( .Press [Enter] button to confirm or press [Back] button to return. CRASHTOM1 TOM2RIDERIMHI-HATHI-HATCONTROLSNARE KICKTOM3For example: to select snare voiceENTER “ ”ENTER1. Press [ ] button, . 3. Press [ ] button again, use the [SNARE] button or hit the snare pad forcefully to select the voice.4. Press the corresponding button of the drums to audition.5. the LCD will display INST .2. Use the [-/+] buttons to select the “LEVL” menu Use the [-/+] buttons to select new snare voice.Press [ENTER] button to confirm or press [BACK] button to return.](https://usermanual.wiki/Ringway-Tech/HD-10/User-Guide-2783857-Page-17.png)
![E. PanIn the k mode, press the [ ] button, use the [+/-] buttons to select“PAN” Press [ ] button, use the pad buttons to select a pad (For example: SNARE). U Range: 000~016 ) (PAN)it EnterEnterse the [-/+] buttons to set a value( .Press [Enter] button to confirm or press [Back] button to return. 15Begin Playing the DrumsF. PitchIn the k mode, press the [ ] button, use the [+/-] buttons to select“PICH” Press [ ] button, use the pad buttons to select a pad (For example: SNARE). U Range: -008~008 ) (PICH)it EnterEnterse the [-/+] buttons to set a value( .Press [Enter] button to confirm or press [Back] button to return. G. DecayIn the k mode, press the [ ] button, use the [+/-] buttons to select“DCAY” Press [ ] button, use the pad buttons to select a pad (For example: SNARE). U Range: -005~000 ) (DCAY)it EnterEnterse the [-/+] buttons to set a value( .Press [Enter] button to confirm or press [Back] button to return. H. Copy Drum Kit to New Location (COPY)Any drum kit can be copied from any one of the 45 kit locations. This is handy if you want tochange the order in which the kits appear for a live performance, for example.To copy the current drum kit to another location:1. it Enter2. Press [Enter] button and use the [-/+] buttons to select one of the drum kit numbers as the destination. The display will flash the number of the targeted kit(USE1~USE5).In the k mode, press the [ ] button, use the [+/-] buttons to select“COPY”.Note: the next step will overwrite the destination kit. Be sure you have chosen the rightone before you proceed!Press [Enter] to confirm the destination kit to be overwritten or press [Back] to exit the Copy function without making any changes.“ ”button button If you pressed [Enter] to execute the Copy function in the previous step, the display will flash END and exit to the Kit Select page with the new location selected.](https://usermanual.wiki/Ringway-Tech/HD-10/User-Guide-2783857-Page-18.png)
![16Begin Playing the DrumsI. Resetting the Drum Kit(RSET)If you have made changes to the current drum kit and decide you want to get back to thefactory starting point, we provided a way to do this.'veThe procedure has been divided into two parts: resetting the instrument/pad assignments andresetting the effects. We ll cover how to reset the effects in the next section. If you want toreset the instrument/pad assignments for the current drum kit, here what to do:''s1. it Enter2. Press [Enter] button, and . 3. Press [Enter] button again, the display will flash “END” and return to the previous menu.In the k mode, press the [ ] button, use the [+/-] buttons to select“RSET”.use the [+/-] buttons to select“CURT” or “ALL”“CURT”-----Reset current drum“ALL”-----Reset all drums](https://usermanual.wiki/Ringway-Tech/HD-10/User-Guide-2783857-Page-19.png)
![17Begin Playing the Drums[SETUP] ButtonIn this mode, you can set the Pad Trigger, Local On/Off, Channel selection, Power On/Off and Resetting functions. Effects, A. Trigger Setting The trigger functions allow you to adapt how the drum module responds to your playing style.Adjustable parameters include sensitivity, threshold, We will explain each function in detail, but first, let's go through the basic process of changing theseparameters.velocity curve and crosstalk.For example, if you would like to adjust the trigger settings for the snare drum pad:1. Press the [Setup] button: the display will “TRIG”3. Press [Enter] button and use the [-/+] buttons to select one of the options (CANC, THRS, CURV and XTLK). displayNote: the Open and Closed hi-hat triggers share the same set of trigger parameters, so you willsee the same label in the display for both. The Snare and Snare Rim triggers share the same set of CANC parameters, but their THRS,CURV and XTLK parameters are independent.5. Use the [-/+] buttons to select a new value.6. Press [Enter] button to confirm the choice or press [Back] button to retain the original value.4. Press [Enter] button and through the following button to select the desired pad.SETUPMode Parameter/ValueK i t S e le ctK i t E d i tS e t u pC l i c k S o n gTe m p oCRASHTOM1 TOM2RIDERIMHI-HATHI-HATCONTROLSNARE KICKTOM3](https://usermanual.wiki/Ringway-Tech/HD-10/User-Guide-2783857-Page-20.png)
![19Begin Playing the Drums1. Press the [Setup] button: the LCD will display“TRIG”2. Use the [-/+] buttons to select the“ EFCT” menu. 3. Press [Enter] button and use the [-/+] buttons to select the “REVB” or “CHRS”4. Press [Enter] and use the [-/+] buttons to select one of the following options: REVB: “OFF”“ HAL1”“ HAL2”“ROM1”“ROM2”“ ROM3”“ STG1” “ STG2”“ PLAT”“ DLAY”“ECHO”. CHRS: “OFF”“CHR1”“CHR2”“CHR3”“CHR4”“FDBK”“FLG1” “SDLY”“SDFB”“FLG2”“FLG3”“CLS1”“CHR2”“CHR3”5. Press [Enter] button again to confirm your choice or press [Back] button to exit to the previous menu without having changed anything. B. Defeating the Effects for All Drum Kits (EFCT)We have added reverb effects to many of the drum kits. However, it's possible you might wantto turn off the reverb for all of the drum kits and process the audio with an external effects unit. To do this:Mode Parameter/ValueK i t S e l e c tK i t E d i tS e t u pC l i c k S o n gTe m p oC. Using the Drum Pads as MIDI Triggers Only (LOCL)You might want to use the pads to trigger another sound source over USB but not hear the drum module's internal sounds at the same time. This condition is known as "Local Off." To configure the drum module in this way, do the following:It can also beuseful if you are triggering the drum module's sounds via USB MIDI and want to eliminate any double triggering. 1. Press the [Setup] button: the LCD will “TRIG”2. Use the [-/+] buttons to select the “LOCL” menu. 3. Press [Enter] and use the [-/+] buttons to select either “Off” or “On” depending on what you want to do. “On” is the normal operating mode: when you play the pads the internal sounds will trigger. “Off” will not trigger the internal sounds directly. 4. Press [Enter] to confirm the choice, or press [Back] to exit without making any changes.displayMode Parameter/ValueK i t S e l e c tK i t E d i tS e t u pC l i c k S o n gTe m p oSETUPSETUP](https://usermanual.wiki/Ringway-Tech/HD-10/User-Guide-2783857-Page-22.png)
![20Begin Playing the DrumsD. (CHAN)Select MIDI output channel(01-16)1. Press the [Setup] button: the LCD will “TRIG”2. Use the [-/+] buttons to select the “CHAN” menu. 3. Press [Enter] and use the [-/+] buttons to select 001-016 and OFF. 4. Press [Enter] to confirm the choice, or press [Back] to exit without making any changes.displayMode Parameter/ValueK i t S e l e c tK i t E d i tS e t u pC l i c k S o n gTe m p oSETUPE. Auto Power Off Mode Parameter/ValueK i t S e l e c tK i t E d i tS e t u pC l i c k S o n gTe m p o“ON” Mode: When the “ ”function is on and there is no operation within thirty minutes, the drum will auto power off.“OFF” Mode: Turns the “ff ” function off. Auto Power OAuto Power Off Press the [SETUP] button and use the [+/-] button to select “POWR”, then press [ENTER] button, use [+/-] button to select “ON” or “OFF”. Press the [ENTER] button to confirm.SETUP](https://usermanual.wiki/Ringway-Tech/HD-10/User-Guide-2783857-Page-23.png)
![21Begin Playing the DrumsF. Restoring All Trigger Settings to the Factory Defaults (RSET)If you have set up your drum kit in a new location, such as on a stage with a drum riser, you may find that you need to readjust your trigger crosstalk settings, for example. If you would prefer to start over from the factory trigger settings, follow this procedure:1. Press the [Setup] button: the LCD will “TRIG”.2. Use the [-/+] buttons to select the “RSET” menu. 3. Press [Enter] button and use the [-/+] buttons to select “TRIG”or“ALL”.4.Press [Enter] button again, the display will flash “END” and the settings will have been restored to their factory defaults. display Mode Parameter/ValueK i t S e l e c tK i t E d i tS e t u pC l i c k S o n gTe m p o“TRIG”-----Reset “TRIG” in “SETUP”“ALL”-----Reset all the setting in “SETUP”SETUP](https://usermanual.wiki/Ringway-Tech/HD-10/User-Guide-2783857-Page-24.png)
![Begin Playing the Drums22[SONG] ButtonSong SelectionHere how to select and listen to the songs:'s1. Press the [SONG] button. The display will show the number of the last song selected.2. Use the [-/+] buttons to select one of the songs you like to listen to.3. Press the [PLAY/STOP] button to start or stop the song.'dMode Parameter/ValueK i t S e l e c tK i t E d i tS e t u pC l i c k S o n gTe m p oYour drum provides 50 (001-050) preset songs, and 2 (DEM1/DEM2) song demos.SONGA. Drum Part Volume (DVOL)If you d like to adjust the volume of the pre-recorded drums while listening to or playingalong with the songs, here is how to do that:'1. 2. Press [Enter] and use the [-/+] buttons to select the “DVOL” menu3. Press [Enter] and use the [-/+] buttons to adjust the volume up or down. Press both [–] and [+] at the same time to reset the drum part volume to the default value of 028. Range: 000-0324. Press [Enter] to confirm the new value. “ ”Press the [Song] button the the LCD will display “S001”The change is not permanent, though; the value will be returned to the default value of 028 on power-down.Note: The drum part volume setting of 000 will silence the drum parts, but a quicker way to do that is to use the Drum On/Off feature described on the previous page.Mode Parameter/ValueK i t S e l e c tK i t E d i tS e t u pC l i c k S o n gTe m p oENTER](https://usermanual.wiki/Ringway-Tech/HD-10/User-Guide-2783857-Page-25.png)
![Begin Playing the Drums23B. Accompaniment Part Volume (ACCV)If you d like to adjust the volume of the pre-recorded accompaniment instruments whilelistening to or playing along with the songs, here is what to do:'1. 2. Press [Enter] button and use the [-/+] buttons to select the “ACCV” menu3. Press [Enter] button and use the [-/+] buttons to adjust the volume up or down. Press both [-] and [+] at the same time to reset the accompaniment part volume to the default value of 028. Range: 000-0324. Press [Enter] button to confirm the new value.Press the [Song] button the the LCD will display “S001”Mode Parameter/ValueK i t S e l e c tK i t E d i tS e t u pC l i c k S o n gTe m p oENTERC. (LINK)1. 2. Press [Enter] button and use the [-/+] buttons to select the “LINK” menu3. Press [Enter] button and use the [-/+] buttons to select “ON”or“OFF”.4. Press [Enter] button to confirm the new value.Press the [Song] button the the LCD will display “S001”Mode Parameter/ValueK i t S e l e c tK i t E d i tS e t u pC l i c k S o n gTe m p oENTER“ON”-----Kit will be automatically jumped to the corresponding kit set when you select the tempo.“OFF”-----Kit doesn t change with the song mode.'](https://usermanual.wiki/Ringway-Tech/HD-10/User-Guide-2783857-Page-26.png)
![Begin Playing the Drums24D. Reset All Mix Parameters (REST)If you d like to restore the default values for all of the Mix parameters, follow these steps:1. Press the [Song] button the the LCD will display “S001”2. Press [Enter] button and use the [-/+] buttons to select the “RSET” menu3. Press [Enter] to execute the procedure. The display will flash “END” indicating that the setting of the songs have been restored.'Mode Parameter/ValueK i t S e l e c tK i t E d i tS e t u pC l i c k S o n gTe m p oENTERE. Drum On/Off (DRUM OFF)If you would like to play along to these songs without listening to the pre-recorded drum andpercussion parts, here is the method for disabling those parts:If you want to mute the pre-recorded drums, press [DRUM OFF] button and the light will be lighted.Note: The value will be returned to On on power-down.“ ”DRUM OFF](https://usermanual.wiki/Ringway-Tech/HD-10/User-Guide-2783857-Page-27.png)
![Begin Playing the Drums25[CLICK] ButtonClick editIt is possible to adjust the metronome volume, change its assigned instrument, or select adifferent time signature. To access these parameters you will need to press button for two seconds. After you have done this, the following options become available to you:[CLICK]A. Click Volume (LEVL)To adjust the metronome volume, follow these steps:1. P . The LCD will display “LEVL” 2. Press [Enter] and use the [-/+] buttons to adjust the click volume up or down. Pressing both [–] and [+] at the same time will reset the click volume to the default value of 020. Range: 000-0323. Press [Enter] to confirm the choice.ress button for two seconds[CLICK]Mode Parameter/ValueK i t S e l e c tK i t E d i tS e t u pC l i c k S o n gTe m p oB. Changing the Time Signature (TYPE)The metronome settings can be changed to accommodate a number of different timesignatures. To change the time signature, follow these steps:1. 2. Use the [-/+] buttons to select the “TYPE” menu3. Press [Enter] again and use the [-/+] buttons to select the new time signature. Pressing both [–] and [+] at the same time will reset the click to the default value of 4-4. Range: 1-4, 2-4, 3-4, 4-4, 6-4,3-8,6-8,12-8..4. Press [Enter] to confirm the choice. Press button for two seconds. The LCD will display “LEVL”[CLICK]Press [CLICK] button to turn on or turn off metronome.CLICK](https://usermanual.wiki/Ringway-Tech/HD-10/User-Guide-2783857-Page-28.png)
![Begin Playing the Drums26C. Selecting the Click Sound (SOND)It is possible to select one of three different sounds for the metronome click. If you d like toexperiment with the options to see which one is best for you, here is what to do:'1. 2. Use the [-/+] buttons to select the SOND menu3. Press [Enter] button and use the [-/+] buttons to select one of the three sounds.(001-003)4. Press [Enter] button to confirm the choice. Press button for two seconds. The LCD will display “LEVL”“ ”[CLICK] D. Restoring Factory Click Settings (REST)There s a quick way to return all of the click settings to their factory defaults. If you wouldlike to do this, follow this procedure:'1. 2. Use the [-/+] buttons to select the “REST” menu3. Press [Enter] button to execute the reset procedure. The display will flash END and return to the “REST” menu.Press button for two seconds. The LCD will display “LEVL”“ ”[CLICK]Mode Parameter/ValueK i t S e l e c tK i t E d i tS e t u pC l i c k S o n gTe m p oMode Parameter/ValueK i t S e l e c tK i t E d i tS e t u pC l i c k S o n gTe m p oMode Parameter/ValueK i t S e l e c tK i t E d i tS e t u pC l i c k S o n gTe m p o](https://usermanual.wiki/Ringway-Tech/HD-10/User-Guide-2783857-Page-29.png)
![27[TEMPO/TAP] ButtonThe tempo of the click or the current song may be set by using one of several methods.Each of these procedures is detailed in the paragraphs ahead:A. Setting the Tempo with the [-/+] ButtonsFor making precise adjustments to the tempo, use this procedure:1. Press the [Tempo/Tap] button: the current tempo value will be shown2. Use the [-/+] buttons to change the tempo value. Range: 020-240 Pressing both [–] and [+] at the same time will reset the tempo to the default value of 135B. Setting the Tempo by TappingYou can also enter the tempo by tapping it out on the [Tempo/Tap] button or by using one ofthe pads. Here s how:1. Press the [Tempo/Tap] button: the current tempo value will be shown2. 3. Tap on one of the pads four times. Those four taps will be used to calculate the new tempo value. Range: 020-240'Press the [Enter] button: the tempo value will flashMode Parameter/ValueK i t S e l e c tK i t E d i tS e t u pC l i c k S o n gTe m p oBegin Playing the DrumsTEMPO/TAPTEMPO/TAP ENTER4](https://usermanual.wiki/Ringway-Tech/HD-10/User-Guide-2783857-Page-30.png)
![28Recording FunctionMode Parameter/ValueK i t S e l e c tK i t E d i tS e t u pC l i c k S o n gTe m p oMode Parameter/ValueK i t S e l e c tK i t E d i tS e t u pC l i c k S o n gTe m p oBegin Playing the DrumsPress the [RECORD] button to enter the record mode,then use the [+/-] buttonsto change the menu. A. “RECD”(Record)Press the [RECORD] button t then press [ENTER] button to start recording, press [BACK] or [RECORD] button to end recording. he LCD will display “RECD”, B. “PLAY”Press the [RECORD] button t ress the [PLAY/STOP] button or use [+/-] buttons to select PLAY and press [ENTER] button to start playing the song , press [PLAY/STOP] button again to stop playing. he LCD will display “RECD”, now you can p“ ”C. “CLER”(Clear)Press the [RECORD] button t use [+/-] buttons to selectCLER . CLERhe LCD will display “RECD”, then “ ” Press [Enter] button to confirm. The display will flash “END” and return to the “ ” menu.Mode Parameter/ValueK i t S e l e c tK i t E d i tS e t u pC l i c k S o n gTe m p oRECORD Mode Parameter/ValueK i t S e l e c tK i t E d i tS e t u pC l i c k S o n gTe m p oPLAY/STOPPLAY/STOP](https://usermanual.wiki/Ringway-Tech/HD-10/User-Guide-2783857-Page-31.png)
![29Begin Playing the DrumsMode Parameter/ValueK i t S e l e c tK i t E d i tS e t u pC l i c k S o n gTe m p oD. “RMOD”Press the [RECORD] button t Use the [+/-] button to select“RMOD”, then press the [ENTER] button and use the [+/-] button to select“SYNC”or“AUTM”.he LCD will display “RECD”, SYNC ------ If you use Syn mode ,it will start recording when you start playing the instrument.AUTM ------ Means that After four beats it will automatically start recording. RECORD](https://usermanual.wiki/Ringway-Tech/HD-10/User-Guide-2783857-Page-32.png)
![30Begin Playing the Drums[COUNT] ButtonCount the number of hitting drums in the certain period.1. Press the [COUNT] button, the LCD will display“CONT”.2. Press the [ENTER] button, and use the [-/+] buttons to select“1MIT”,“2MIT”and“3MIT”(“1MIT”: One minute, “2MIT”: Two minutes, “3MIT”: Three minutes)3. Press [ENTER] button again, the LCD will display “RADY”. 4. It starts counting by hitting the drum.5. When time is out, the number of hitting drum will be displayed on the LCD and return to the“KIT” menu.Mode Parameter/ValueK i t S e l e c tK i t E d i tS e t u pC l i c k S o n gTe m p oCOUNTENTERMode Parameter/ValueK i t S e l e c tK i t E d i tS e t u pC l i c k S o n gTe m p oENTERMode Parameter/ValueK i t S e l e c tK i t E d i tS e t u pC l i c k S o n gTe m p o](https://usermanual.wiki/Ringway-Tech/HD-10/User-Guide-2783857-Page-33.png)
![There is a simple way to restore everything in the drum module to the factory settings. Thisincludes all trigger settings, drum kits, effects, and the song you recorded. If you are certainyou want to do this, follow these steps:1. Turn the power switch to OFF2. Hold down the [-/+] buttons and turn the power switch to ON. The display will show “RSET”, which means all of the parameters in the drum module have been restored to their factory settings.Start to Play the DrumConnectAssembly InstructionFactory Reset31Mode Parameter/ValueK i t S e l e c tK i t E d i tS e t u pC l i c k S o n gTe m p o](https://usermanual.wiki/Ringway-Tech/HD-10/User-Guide-2783857-Page-34.png)