Ringway Tech PA-88H DIGITAL PIANO User Manual
Ringway Tech(Jiangsu) Co.,Ltd. DIGITAL PIANO
UserManual.wiki
>
Ringway Tech
>
PA 88H User Manual
User Manual
Navigation menu
Upload a User Manual
Namespaces
Wiki Guide
HTML
PDF
Info
Views
User Manual
Discussion / Help
Navigation

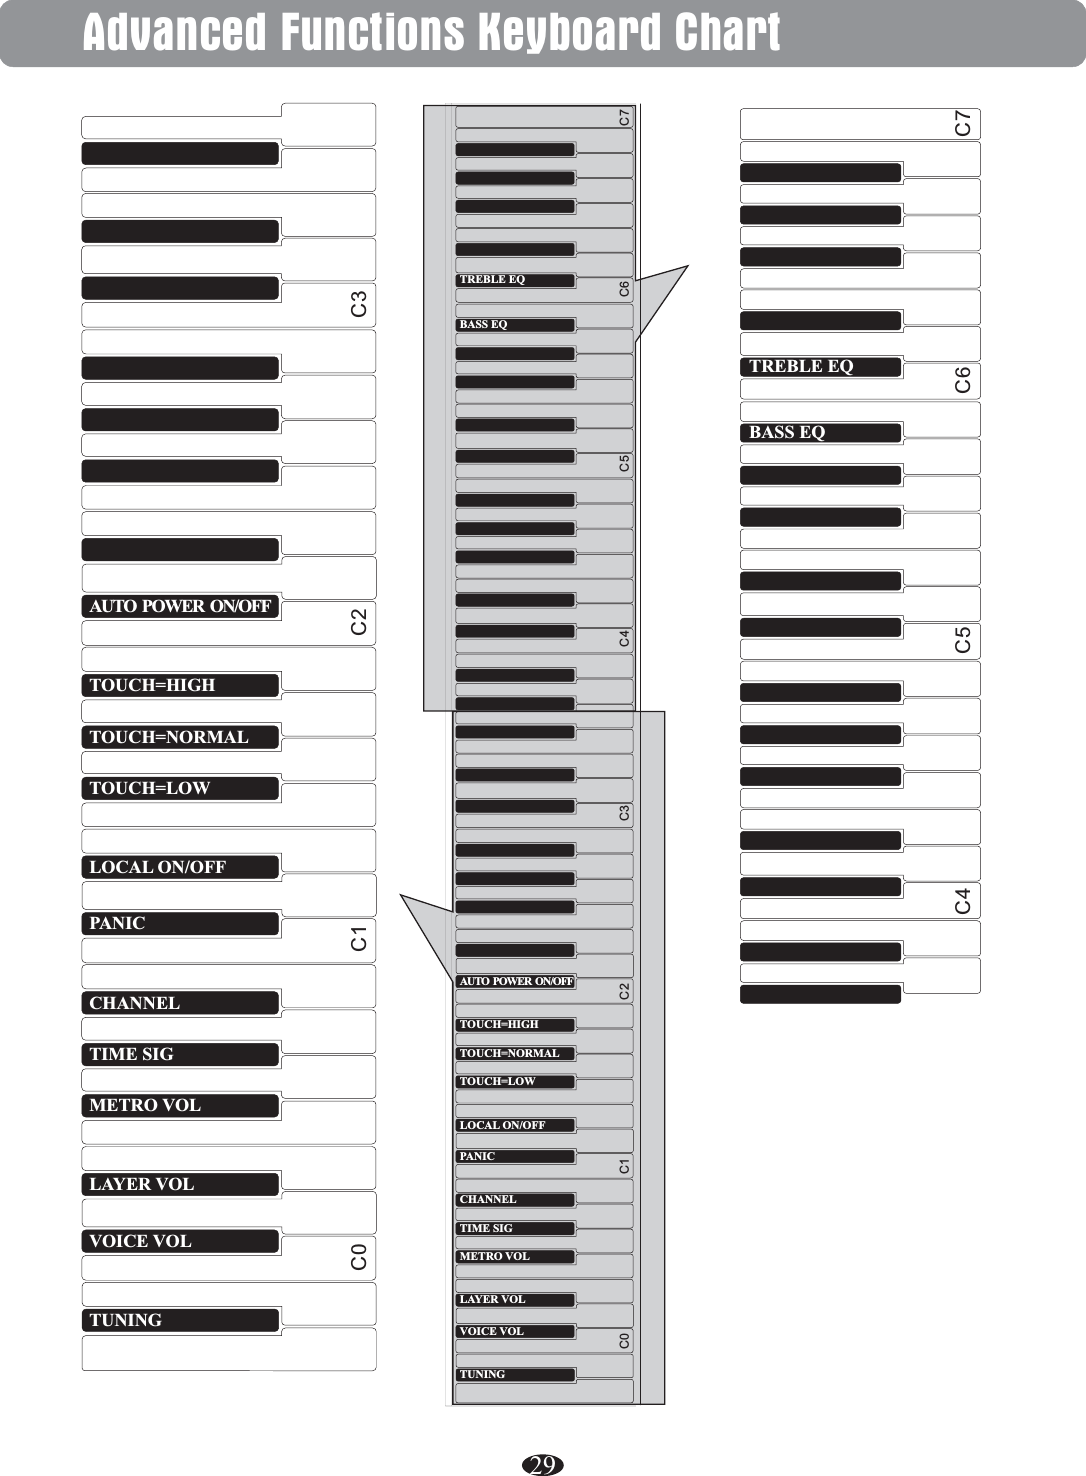
![4Getting StartedBefore playing turn the power on by pressing the POWER switch, the panel LED will turn on.POWER This piano has an auto off function. If you don't engage in any operations, the piano will turn off after 30 minutes.NOTETurn on the powerAuto Power On/OffPress the [METRONOME] and the [TEMPO] buttons together again to exit the Function Mode.FUNCTIONTEMPOMETRONOMEPress the [METRONOME] and the [TEMPO] buttons together to enter the Function Mode.Pressing the C#2 piano key allows the user to switch auto Power On or Off. While holding down the C#2 piano key, play the C3 Key once for Auto Power On and twice for Auto Power Off. TUNINGTOUCH=HIGHAUTO POWER ON/OFFTOUCH=NORMALTOUCH=LOWLOCAL ON/OFFPANICCHANNELTIME SIGMETRO VOLLAYER VOLVOICE VOLC#2](https://usermanual.wiki/Ringway-Tech/PA-88H/User-Guide-2685572-Page-8.png)
![5RL(MONO)Using External Sound SystemThe Line Out jack(R) and can be used to deliver the output of the piano to a keyboard amplifier, stereo sound system, mixing console or tape recorder.Line Out jack(L)(MONO)Set the VolumeInitially set the [VOLUME] about half way between the"MIN" and "MAX" settings. You can adjust the volume to accommodate your playing style.Using HeadphonesOne standard stereo headphones can be plugged in here for private practice or late-night playing. The internal speaker system is automatically shut off when a pair of headphones is plugged into PHONES jacks.PHONES VOLUMEMIN MAXNOTEIf the AUTO OFF Function is on, it means the unit will Auto Power Off after 30 minutes of inactivity.LINE OUTMIDI OUT JackMIDI (Musical Instrument Digital Interface) is a world-standard communica-tion interface which allows electronic musical instruments to communicate with each other, by sending and receiving compatible note, program change and other types of MIDI data.This terminal transmits data from this instrument to other MIDI devices. The transmitted data includes the note and touch velocity produced while playing on the keyboard, as well as voice changes. Demo songs are not transmitted.Using USB-MIDIThis piano allows the transfer of MIDI over USB. There is a specific way in which the MIDI signals are routed for maximum flexibility. In a standard Digital Piano, the built-in keyboard sends MIDI signals to the internal sound bank as well as the 5-pin MIDI output. In this digital piano, the keyboard not only sends MIDI signals to the internal sound bank (just like normal) but also sends MIDI signals simultaneously to theinternal MIDI connection which hooks up inside the device to the Audio Interface. It is the Audio Interface that is used to control the USB-MIDI.USB TO HOST](https://usermanual.wiki/Ringway-Tech/PA-88H/User-Guide-2685572-Page-9.png)
![7Selecting a VoicePress the [BANK] button and it's indicator will turn on, then when you press an instrument select button the instrument that you hear is the instrument listed on the bottom of the voice button. NOTEThe piano has 16 built-in voices, which include several pianos as well as other instruments. These digitally-sampled musical instrument sounds may be selected one at a time, layered to produce two voices at once.To select an instrument voice (Main voice), press the appropriate Voice Select button on the front panel.PIANO 1 E.PIANO 1 ORGAN CLAVINET VIBES NYLON GTR STRINGSE.PIANO 2 CHURCH ORGAN HARPSICHORD HARP STEEL GTRPIANO 2 CHOIRFANTASIAE.BASSBANK](https://usermanual.wiki/Ringway-Tech/PA-88H/User-Guide-2685572-Page-11.png)
![8Demo SongsThere are 16 demo songs in the piano. Each demo song will demonstrate a different voice. Here's how you can select and play the demo songs.REVERB CHORUSDEMODuring playback, another song may be chosen by pressing a different voice selectbutton. You can also press the [BANK] button then press a voice button to select a demo song in the bottom line.REVERB CHORUSDEMOTo stop the demo song. Press the again. To replay the current song from the beginning, press the flashing voice select button.[REVERB] button and the [CHORUS] button together Stop the Demo SongThe demo songs may be selected by pressing the [REVERB] and [CHORUS] buttons together simultaneously. The [REVERB] button, the [CHORUS] button and voice buttons will flash . The first demo song is the Piano.Select the Demo SongPIANO 1 E.PIANO 1 ORGAN CLAVINET VIBES NYLON GTR STRINGSE.PIANO 2 CHURCH ORGAN HARPSICHORD HARP STEEL GTRPIANO 2 CHOIRFANTASIAE.BASSBANK](https://usermanual.wiki/Ringway-Tech/PA-88H/User-Guide-2685572-Page-12.png)
![104. Play the keyboard to hear the new setting with the sound selected.[CHORUS]) [CHORUS])5. To exit the [REVERB]( function, press the [REVERB] ( button again.](https://usermanual.wiki/Ringway-Tech/PA-88H/User-Guide-2685572-Page-14.png)
![11Layer ModeIn Layer mode two voices may be played simultaneously, each at individual selected volume levels.To enter the Layer mode, press and hold the voice select button to select the MAIN sound, then press the another voice select button that you would like to add for the LAYER sound, and release. Both the buttons LED will remain on while layered. To layer two sounds in different banks, press and hold simultaneously the voice button required in the first bank and the bank button. The bank button LED will flash and the first voice button will be lit. Once the bank button is flashing you can remove your hands from the buttons. Next, select the layered button from the second bank by pressing the corresponding button. Once selected this button will blink to indicate it is from the second bank while the instrument from the first bank stays lit. If two voices in the first and second bank, but on the same button are selected, the buttons should merely blink. These can also be layered by double-pressing the button in which case again the button will blink.FUNCTIONTEMPOMETRONOMETo Adjust the Volume of Main Voice in Layer Mode Press the [METRONOME] and the [TEMPO] buttons together to enter Edit ModeThe LEDs for both buttons will become lit.,To turn Layer Mode off, select a single voice button and the other Voice LED light will turn off.PIANO 1PIANO 1E.PIANO 1E.PIANO 1ORGANORGANCLAVINETCLAVINETVIBESVIBESNYLON GTRNYLON GTRSTRINGSSTRINGSE.PIANO 2E.PIANO 2CHURCH ORGANCHURCH ORGANHARPSICHORDHARPSICHORDHARPHARPSTEEL GTRSTEEL GTRPIANO 2PIANO 2CHOIRCHOIRFANTASIAFANTASIAE.BASSE.BASSBANKBANK](https://usermanual.wiki/Ringway-Tech/PA-88H/User-Guide-2685572-Page-15.png)
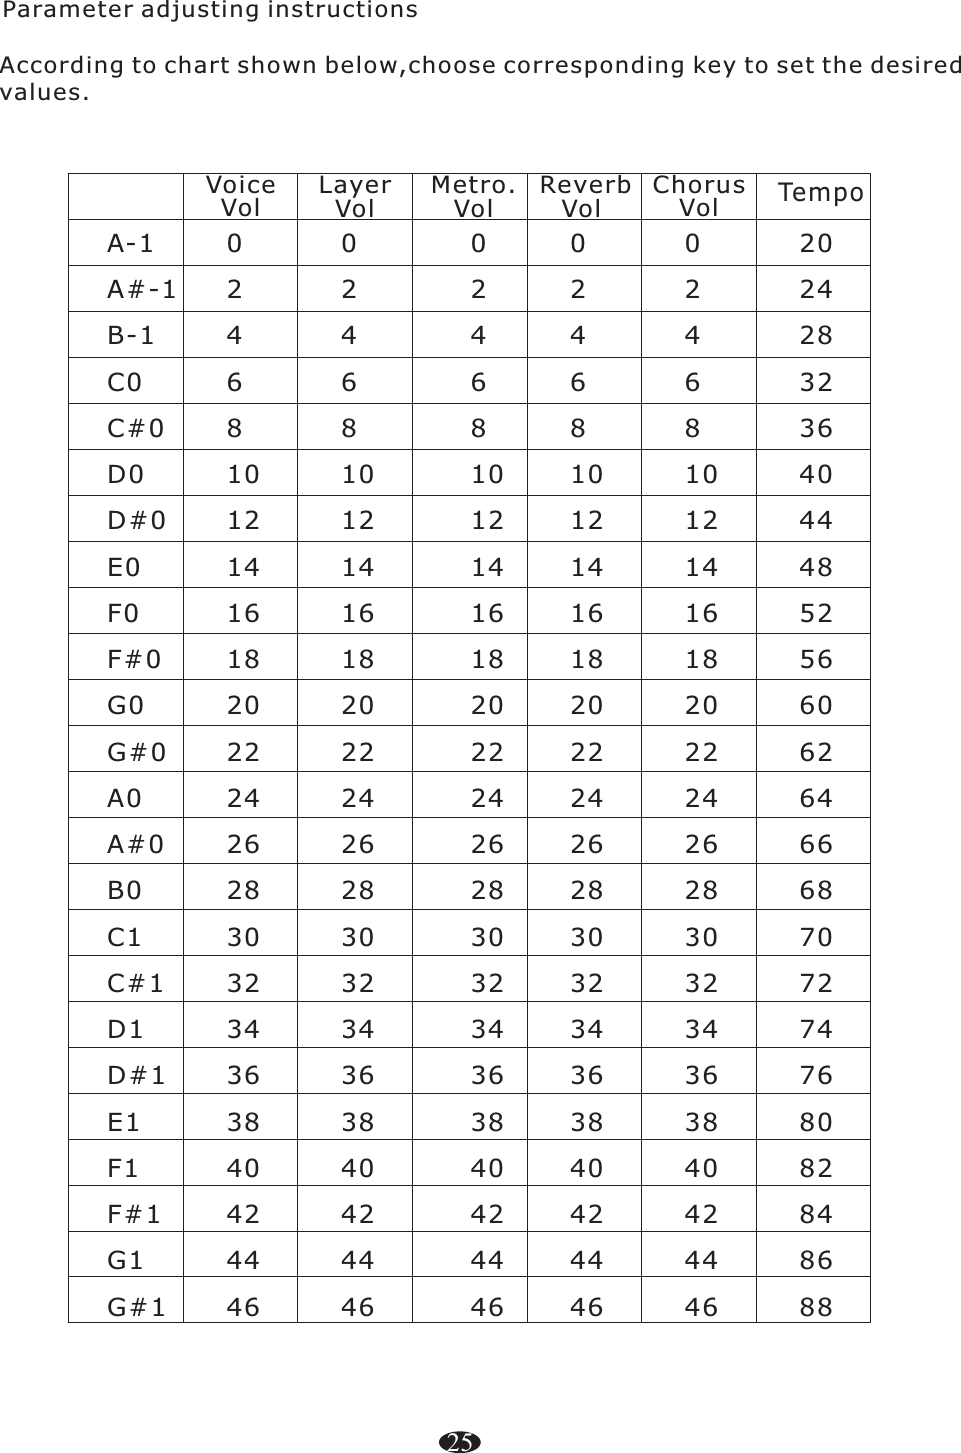
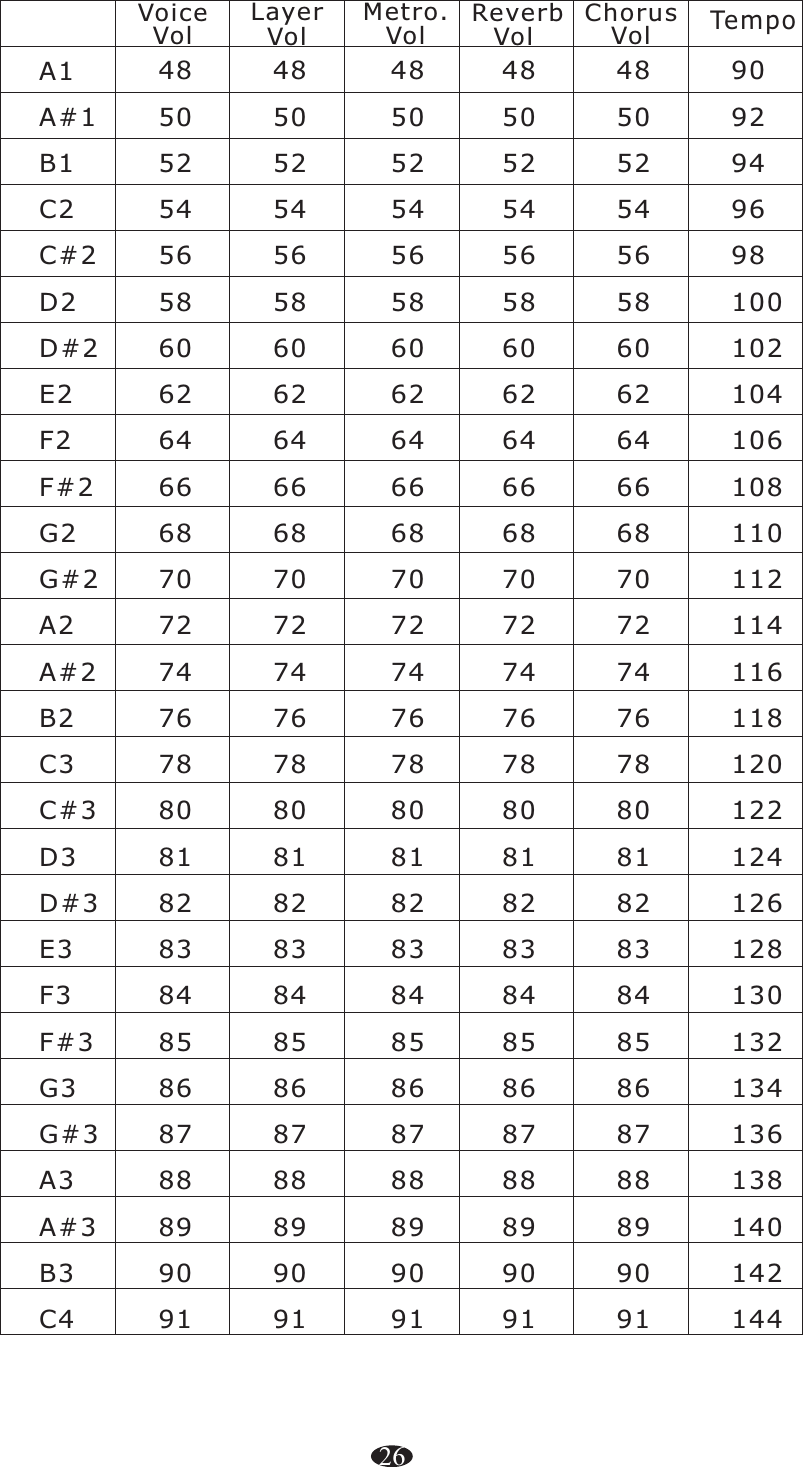
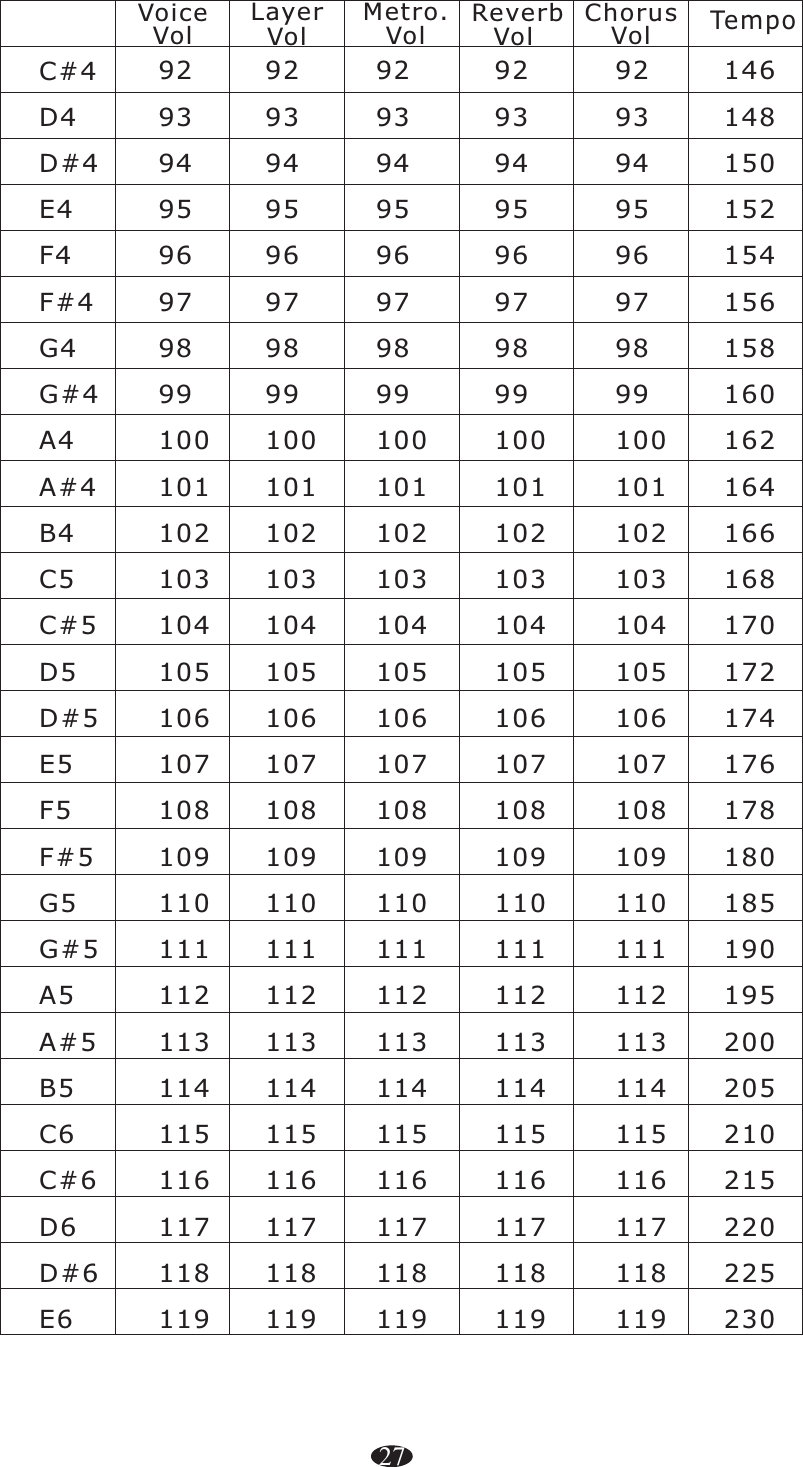
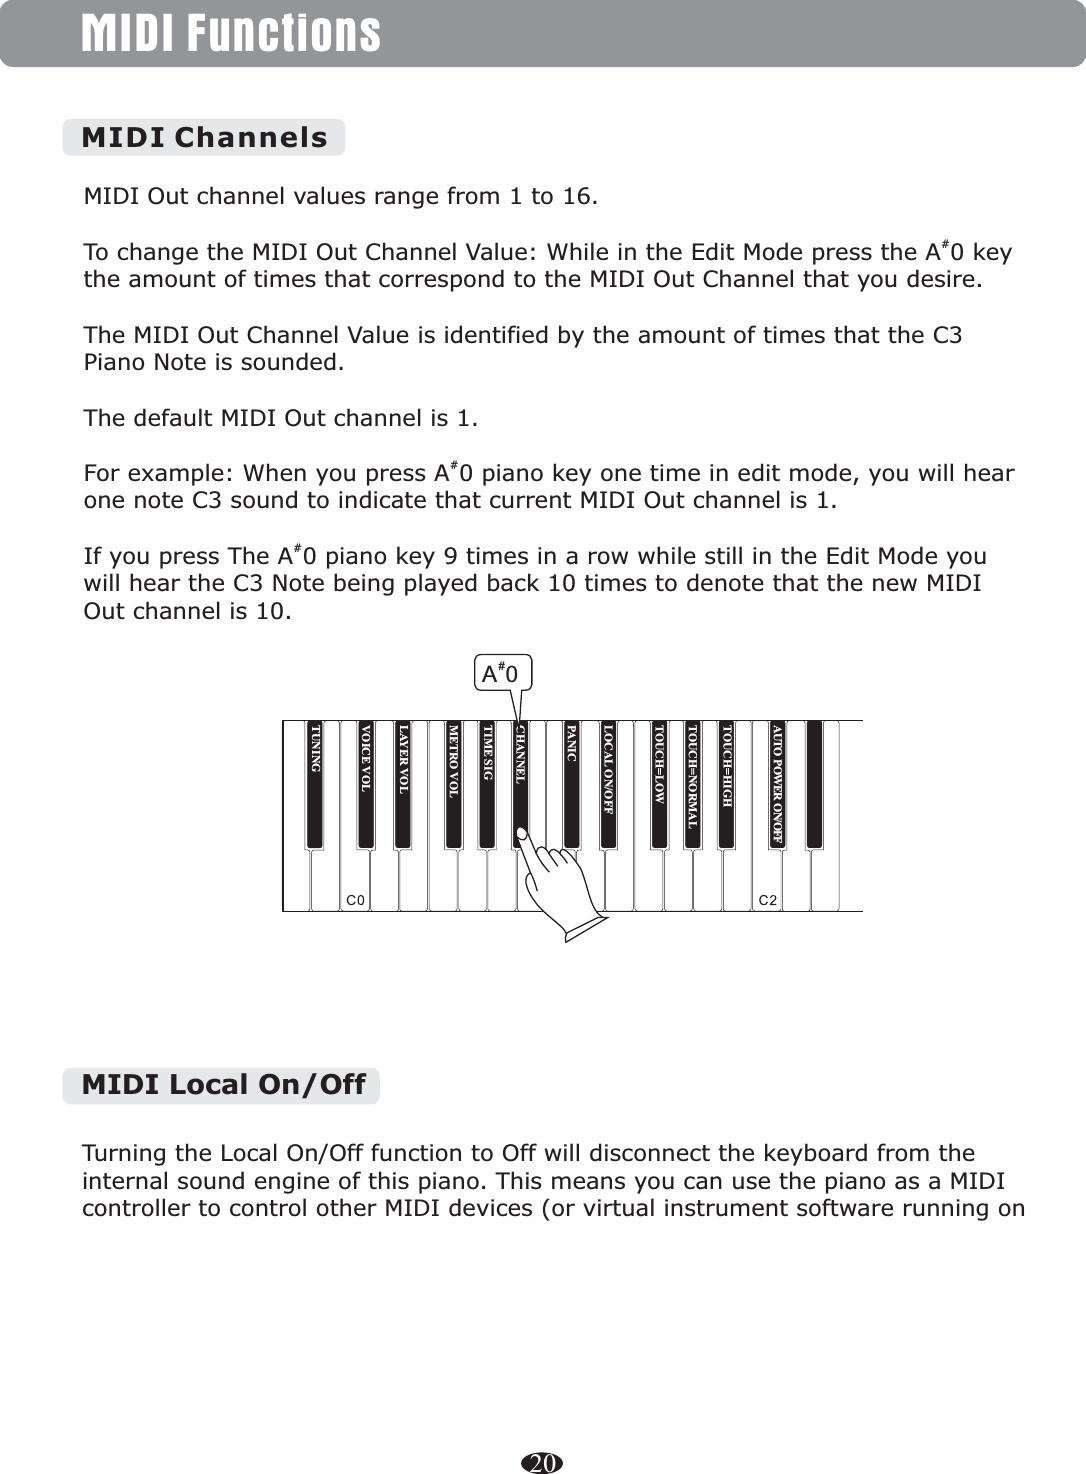
![TUNINGTOUCH=HIGHTOUCH=NORMALTOUCH=LOWLOCAL ON/OFFPANICCHANNELTIME SIGMETRO VOLLAYER VOLVOICE VOL12#Press the (D 0) key activates the voice volume menu. The volume can be changed in 88 note steps from 0-127 where C7=127 and A-1=0. To exit the Voice Volume function, press the [METRONOME] and [TEMPO] buttons at the same time again.The volume can be changed in 88 note steps from 0-127 where C7=127 and A-1=0. Pressing a key will play C3 of the currently selected voice sound at the volume corresponding to the key value.C4 C5 C6 C7FUNCTIONTEMPOMETRONOMETo Adjust the Volume of the Layer Voice Press the [METRONOME] button and the [TEMPO] button to enter Edit Mode.Pressing C#0 activates the voice volume menu. #C0AUTO POWER ON/OFF](https://usermanual.wiki/Ringway-Tech/PA-88H/User-Guide-2685572-Page-16.png)
![TUNINGTOUCH=HIGHTOUCH=NORMALTOUCH=LOWLOCAL ON/OFFPANICCHANNELTIME SIGMETRO VOLLAYER VOLVOICE VOLC4 C5 C6 C7 Press the [METRONOME] and the [TEMPO] again to exit Edit mode.13Press a key will play C3 of the currently selected layered sound at the volume corresponding to the key value.#D0AUTO POWER ON/OFF](https://usermanual.wiki/Ringway-Tech/PA-88H/User-Guide-2685572-Page-17.png)
![TUNINGTOUCH=HIGHTOUCH=NORMALTOUCH=LOWLOCAL ON/OFFPANICCHANNELTIME SIGMETRO VOLLAYER VOLVOICE VOLTUNINGTOUCH=HIGHTOUCH=NORMALTOUCH=LOWLOCAL ON/OFFPANICCHANNELTIME SIGMETRO VOLLAYER VOLVOICE VOLMetronomePress the metronome button to turn the metronome on.FUNCTIONTEMPOMETRONOMEMetronome VolumePress the [METRONOME] and [TEMPO] buttons together to enter edit mode.Pressing F 0 activates the metronome volume menu. the volume can be changed in 88 note steps from 0-127 where C7=127 and A-1=0. Pressing a key will play the metronome sound at the volume corresponding to the key value.#14Press the [METRONOME ] again to exit Edit Mode. and the [TEMPO] buttonsPressing the [METRONOME] and the [TEMPO] buttons allows you to change the time signature for the metronome. When this menu is selected the metronome starts playing at the current tempo setting. Pressing G#0 toggles through the time signature options starting with the current setting. Default is 4/4 and the following options are available to toggle through: 2/4, 3/4, 4/4, 5/4, 6/8, 9/8, 12/8.Changing the Metronome Time Signature#G0When the Metronome button is activated its LED will light and you will hear the click in the headphones or through the speakers.#F0AUTO POWER ON/OFF AUTO POWER ON/OFF](https://usermanual.wiki/Ringway-Tech/PA-88H/User-Guide-2685572-Page-18.png)
![TUNINGTOUCH=HIGHTOUCH=NORMALTOUCH=LOWLOCAL ON/OFFPANICCHANNELTIME SIGMETRO VOLLAYER VOLVOICE VOLTUNINGTOUCH=HIGHTOUCH=NORMALTOUCH=LOWLOCAL ON/OFFPANICCHANNELTIME SIGMETRO VOLLAYER VOLVOICE VOLEdit FunctionsPlease refer to pages 11 and 14 for information about editing the Metronome and Layer functions.The piano is tuned to A440 when the power is turned on and does not require tuning. However, if desired, the tuning may be adjusted in small increments from -50 to +50 cents (one semitone).Master TuningFunction Key AssignmentsTo change the Master Tuning:Press the [METRONOME] and [TEMPO] button together to enter Edit Mode.In the Edit Mode the keys on the keyboard are used for selecting the Functionto be edited. To enter the Edit Mode, press the Metronome and Tempo buttons at the same time.16FUNCTIONTEMPOMETRONOME#Press the Tunning key A -1 to select the Master Tuning Function. The keyboard will now play middle C piano 1 voice (C3) on every note across the keyboard. #Playing C3=C3. Pressing any key downwards to A -1 will play C3 but change the tuning setting proportionately to tune down by a whole semi tone. #-1AAUTO POWER ON/OFF AUTO POWER ON/OFF](https://usermanual.wiki/Ringway-Tech/PA-88H/User-Guide-2685572-Page-20.png)
![TUNINGTOUCH=HIGHTOUCH=NORMALTOUCH=LOWLOCAL ON/OFFPANICCHANNELTIME SIGMETRO VOLLAYER VOLVOICE VOLTouch C4 C5 C6 C717Press the [METRONOME ] and the [TEMPO] buttons again to exit Edit Mode. Pressing any key from C3 and up will play the C3 note but at tuningsettings proportionately so that its possible tune up by a whole semi tone.Please listen as you proceed to determine the correct tuning setting.The Touch Select function allows the choice of 3 keyboard sensitivity settings for different playing styles: Low Sensitivity, Normal Sensitivity and High Sensitivity. This affects the volume of the piano as you play the keys. To Set the Keyboard SensitivityPress the Metronome and Tempo Buttons together to enter the Edit mode.FUNCTIONTEMPOMETRONOMEPress the desired Touch Select key (F 1, G 1, A 1) to select between Low,Normal and High Keyboard Sensitivity. When selecting F#1 low, Piano 1 C3 willplay at velocity value 30. When G#1 Normal is selected, Piano 1 C3 will playat velocity value 70. When A#1 High is selected, Piano 1 C3 will play atvelocity value 127 and the piano will exit Function Mode automatically.###LowSensitivityNormalSensitivityHighSensitivityAUTO POWER ON/OFF](https://usermanual.wiki/Ringway-Tech/PA-88H/User-Guide-2685572-Page-21.png)
![18EQ AdjustmentTo change the sound of your piano's amplifier you can adjust the EQ to add more Bass or to remove some of the Treble.To Change the Bass Response1. Press the [METRONOME] and [TEMPO] Buttons together to enter the Function Edit mode.#2. Press the A5 piano key activates the Bass EQ Function The Bass EQ can be changed by pressing white piano keys only from the A-1 piano key to D3 piano key. Pressing the F1 Piano Key sets the Bass EQ to its center point EQ Setting. Pressing the A-1 Piano Key will reduce the Bass response by 12dB. Pressing the D3 Piano Key therefore increases the Bass response by 12 dB. For Example to set the Bass EQ setting to 10 dB you would press the B2 white piano key. To set the BASS EQ to -8 dB you would press the E0 piano key. For the Keyboard Chart of the piano key numbers and listings please page 29 of the Advanced Keyboard Functions.4. Press the [METRONOME] and [TEMPO] Buttons together again to exit the Function Mode. Then play the lower half of the piano to hear the bass response increase for the changes that you have made in the Bass EQ settings. To change the Treble Response1. Press the [METRONOME] and [TEMPO] Buttons together to enter the Function Edit Mode.#2. Press the C 6 piano key activates the Treble EQ Function. C4 C5 C7C6BASS EQ#A5](https://usermanual.wiki/Ringway-Tech/PA-88H/User-Guide-2685572-Page-22.png)
![3. The Treble EQ can be changed by pressing white piano keys only from the A-1 piano key to D3 piano key. Pressing the F1 Piano Key sets the Treble EQ to its center point EQ Setting. Pressing the A-1 Piano Key will reduce the Treble response by 12dB. Pressing the D3 Piano Key therefore increases the Treble response by 12 dB. For Example to set the Treble EQ setting to 10 dB you would press the B2 white piano key. To set the Treble EQ to -8 dB you would press the E0 piano key. For the Keyboard Chart of the piano key numbers and listings please page 29 of the Advanced Keyboard Functions. 4. Press the [METRONOME] and [TEMPO] Buttons together again to exit the Function mode.Then play the keyboard in the upper half of the piano keys to test the changes that you made in the TREBLE EQ Setting.To set the piano to its Default Settings press and hold the [REVERB] and [CHORUS] buttons while turning the piano's power switch on. C4 C5 C7C6TREBLE EQBass and Treble EQ settings will be stored in the pianos memory and the latest setting will be used when the piano is powered up again. NOTE19#C6](https://usermanual.wiki/Ringway-Tech/PA-88H/User-Guide-2685572-Page-23.png)
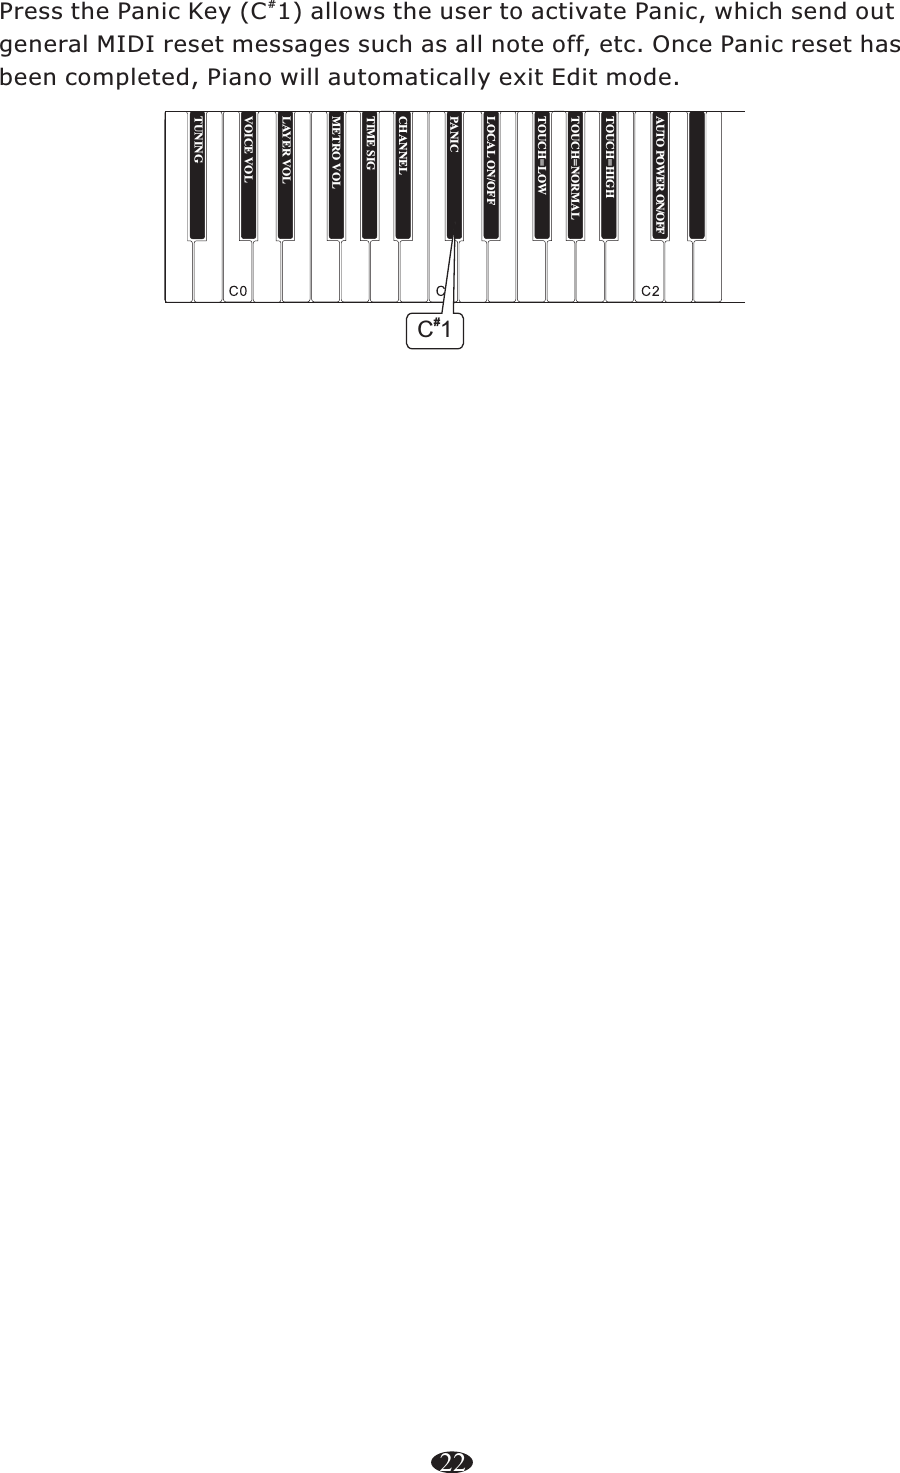
![TUNINGTOUCH=HIGHTOUCH=NORMALTOUCH=LOWLOCAL ON/OFFPANICCHANNELTIME SIGMETRO VOLLAYER VOLVOICE VOL21Press the Local On/Off key (D 1) to switch local on or off. When the D 1 key is first pressed the current setting is confirmed by playing the C3 piano key once for on and twice for off. If you press the D 1 key again you will need to re-enter your desired settings.# ## FUNCTIONTEMPOMETRONOMEPress the [METRONOME] and the [TEMPO] Buttons together to enter the edit mode.Press the [METRONOME] and the [TEMPO] Buttons again to exit the edit mode.your computer) without playing the internal sounds of this piano. You may also find other occasions (such as when you are using MIDI sequencing software on your computer) where it is useful to turn Local off.MIDI Panic Key“”“”“”Pressing the Panic key will send out a Reset All Controllers and All Notes Off MIDI Message on ALL MIDI Channels 1 - 16. This can be especially useful for clearing stuck notes when controlling external MIDI devices or software. “”“”To use the Panic key to send out a Reset All Controllers and All Notes Off MIDI Message on ALL MIDI Channels 1 - 16:Press the to enter Edit Mode. [METRONOME] and [TEMPO] button together FUNCTIONTEMPOMETRONOME#D1AUTO POWER ON/OFF](https://usermanual.wiki/Ringway-Tech/PA-88H/User-Guide-2685572-Page-25.png)
![1. Turn the Power Off.2. Hold down the [REVERB] and the [CHORUS] buttons while powering on the piano.All LEDs on the device will light while these buttons are held down. Once this has happened, you can release the [REVERB] and [CHORUS] buttons.When the [REVERB] and the [CHORUS] buttons are released, this pianowill return to normal operation Mode (ready-to-play). All button LEDs will return to their default states.This piano will now function normally and as if powered on for the first time.Performing a Factory Reset will clear all battery backed memory and restoreall functions to their factory default settings, just like they were when you used this piano for the first time.REVERB CHORUSDEMOFactory Reset23](https://usermanual.wiki/Ringway-Tech/PA-88H/User-Guide-2685572-Page-27.png)