Riso Kagaku RFMHL00 RFID TAG Reader/Writer User Manual fm
Riso Kagaku Corporation RFID TAG Reader/Writer fm
UserManual.wiki
>
Riso Kagaku
>
RFMHL00 User Manual
>
Host Manual 1
Contents
1.
User Manual
2.
Host Manual 1
3.
Host Manual 2
4.
Host manual 1
5.
Host manual 2
Host Manual 1
Navigation menu
Upload a User Manual
Namespaces
Wiki Guide
HTML
PDF
Info
Views
User Manual
Discussion / Help
Navigation

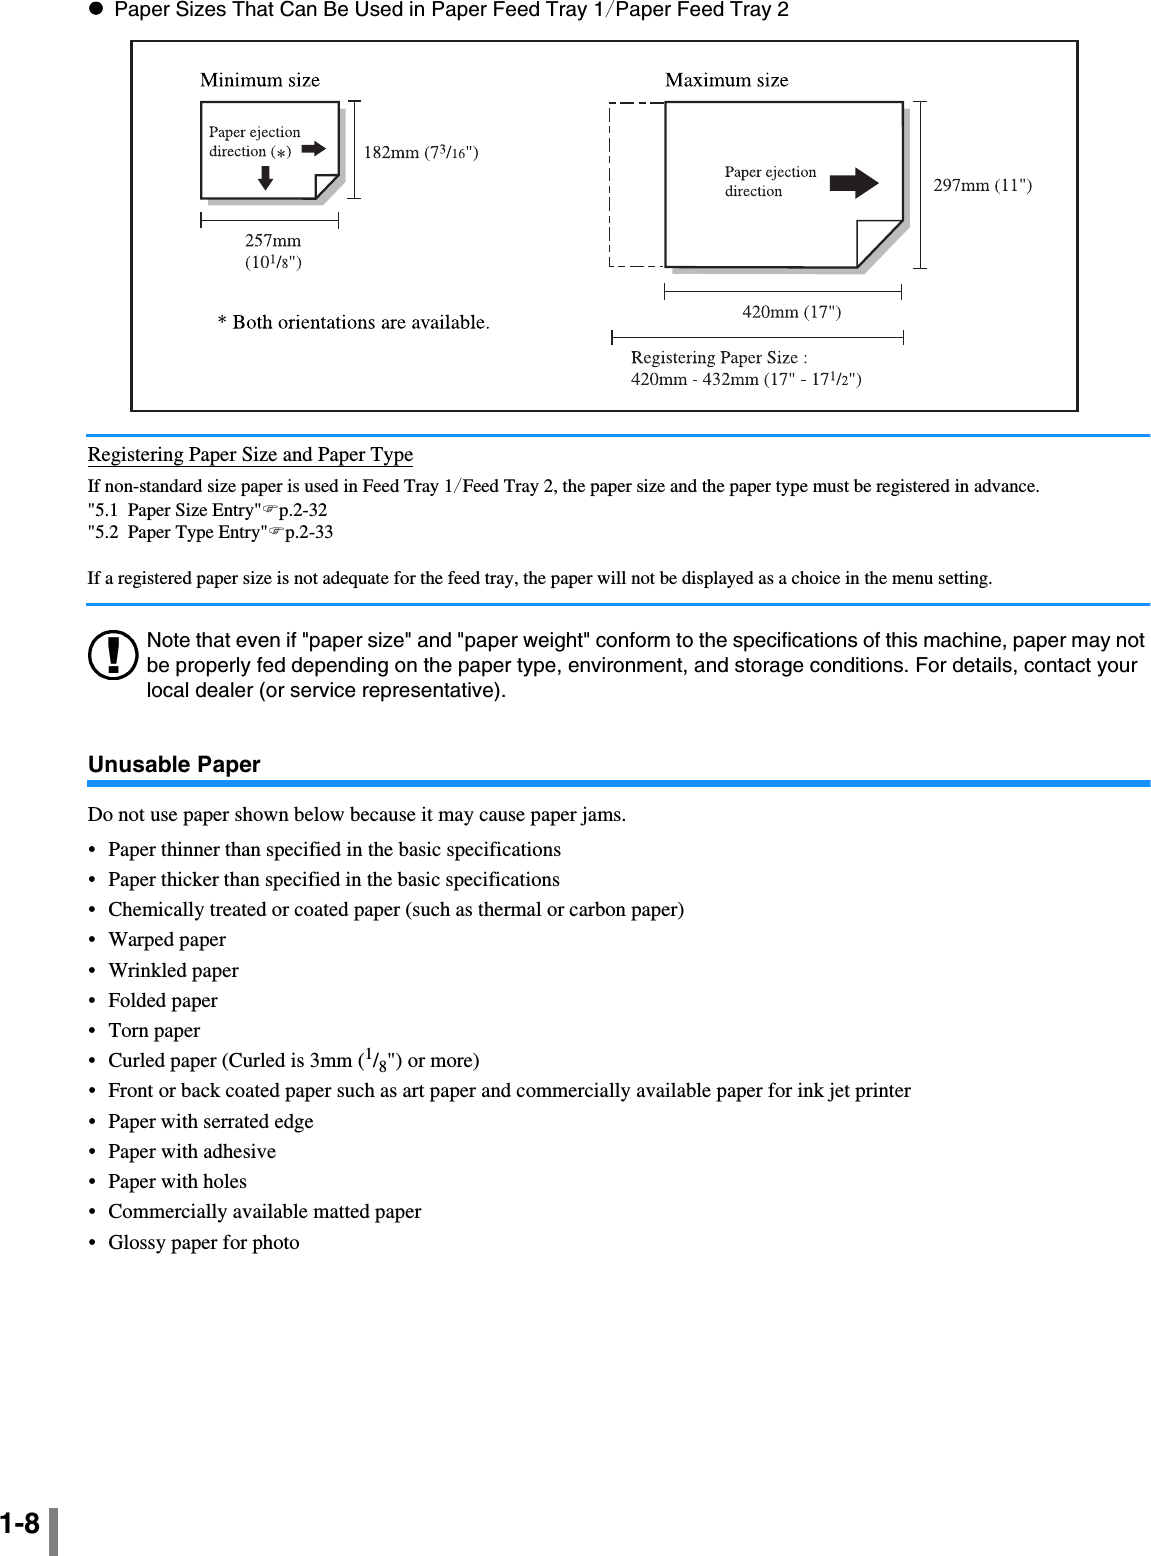

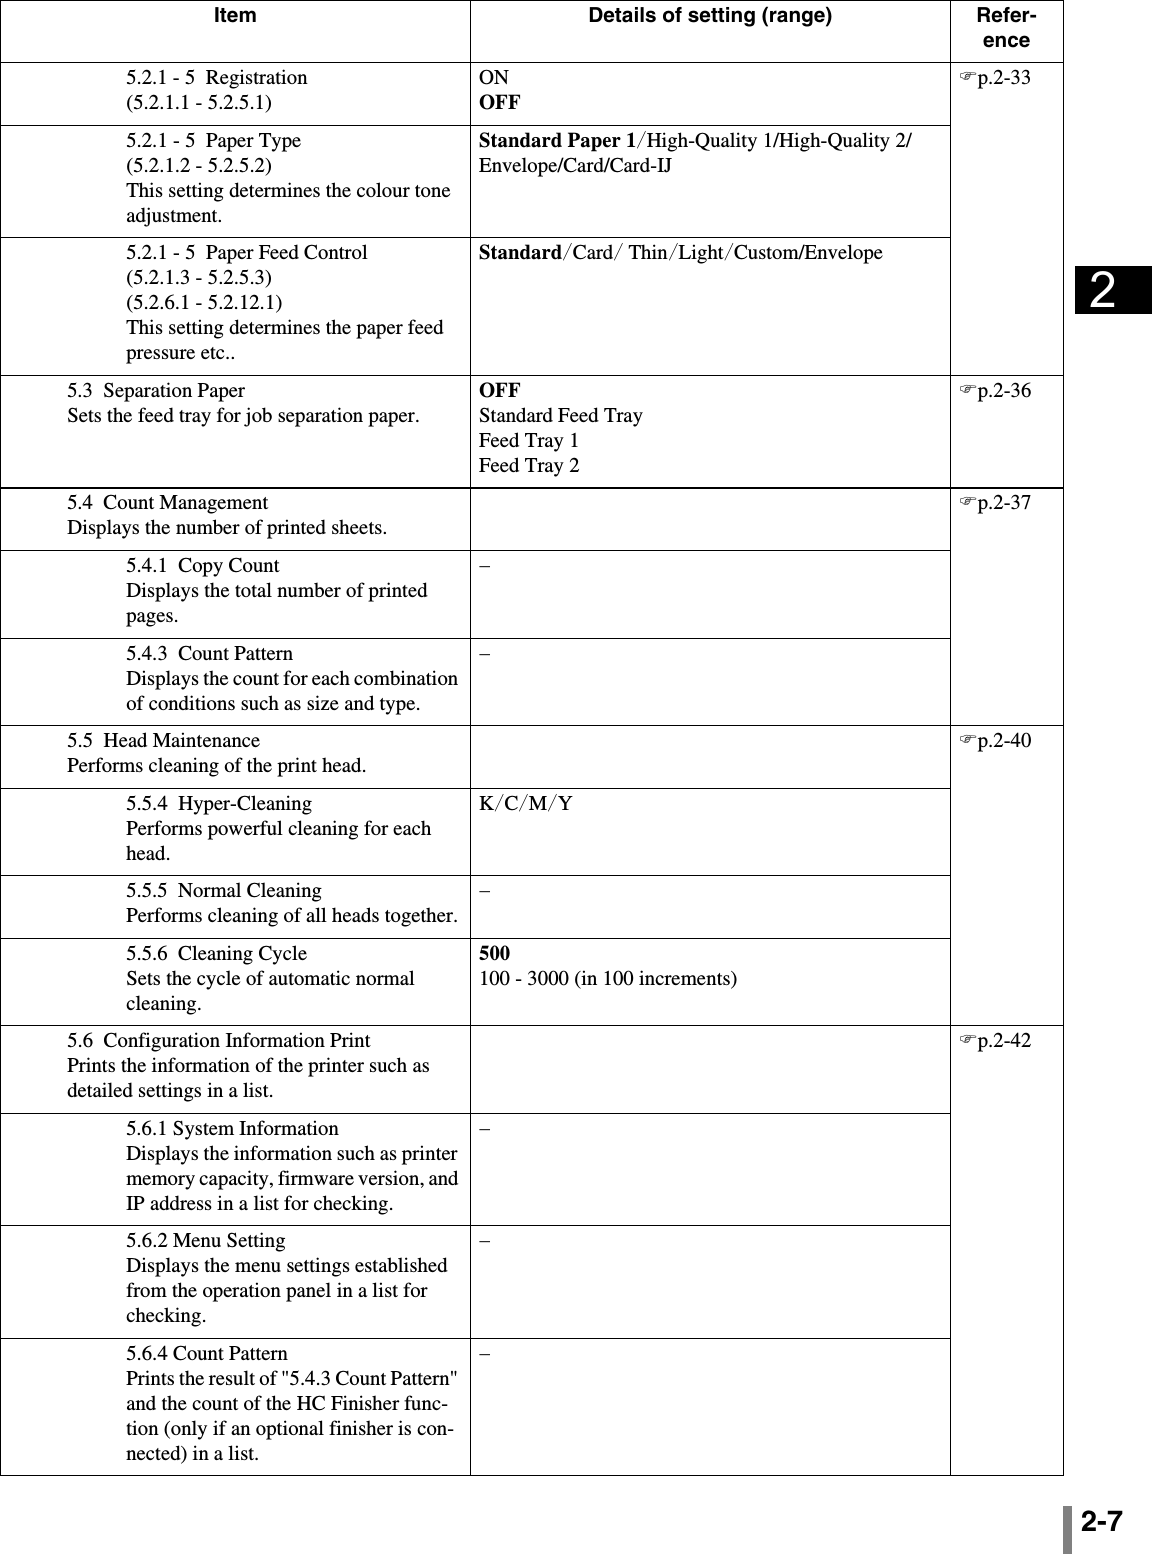
![1-111Loading PaperThe method of loading paper in the Paper Feed Trays and the Standard Paper Feed Tray is described below.####Number of Sheets That Can Be LoadedThe number of sheets* that can be loaded in the Feed Trays and the Paper Feed Tray are shown below.The number of sheets that can be loaded varies with the thickness of paper.*When 85g/m2 (22.6-lb bond) is used:####Paper to Be Loaded in the Standard Paper Feed TrayWhen using paper shown below for printing, load the paper in the Standard Paper Feed Tray with the print face up.•Special paper such as thick paper•Paper for which printing has been performed onto the back side•Paper larger than A3/Ledger size•Paper smaller than B5 size such as postcard•Envelope When using the Standard Paper Feed Tray, be sure to load paper just after opening the package. (We recommend you to use good conditioned paper such as no-curl.) After printing, return paper remaining on the Standard Paper Feed Tray to the original package. Leaving paper on the tray may cause curling, possibly resulting in paper jam.####Registration of the paperAfter loading paper in the Standard Paper Feed Tray / Paper Feed Tray 1/ Paper Feed Tray 2, you must register the charac-teristics of paper. For registration, use "4.1 Standard Feed Tray"/ "4.2 Feed Tray 1"/ "4.3 Feed Tray 2" of the menu setting according to the location of paper setting.The details of setting are shown below.•Paper size•Paper type•Double feed checkWhen loading paper for which printing has been performed onto the back side, envelopes or paper with a dark ground colour, select "OFF."If these items are not set properly, printing cannot be performed appropriately. [No Paper] error may occur or the printing quality may not be good.When you change paper of the tray, please be sure to change the setting of the tray with the menu operation."Menu 4 Configuration""p.2-18OFFSleep Key: Not litWAKE-UP Key: Not litTurn the Main Power Switch on and press the Sleep Key.Paper Feed Tray 1 1,000 sheetsPaper Feed Tray 2 500 sheetsStandardPaper Feed Tray 1,000 sheetsStatus Indicator on the operation panel](https://usermanual.wiki/Riso-Kagaku/RFMHL00.Host-Manual-1/User-Guide-708274-Page-25.png)
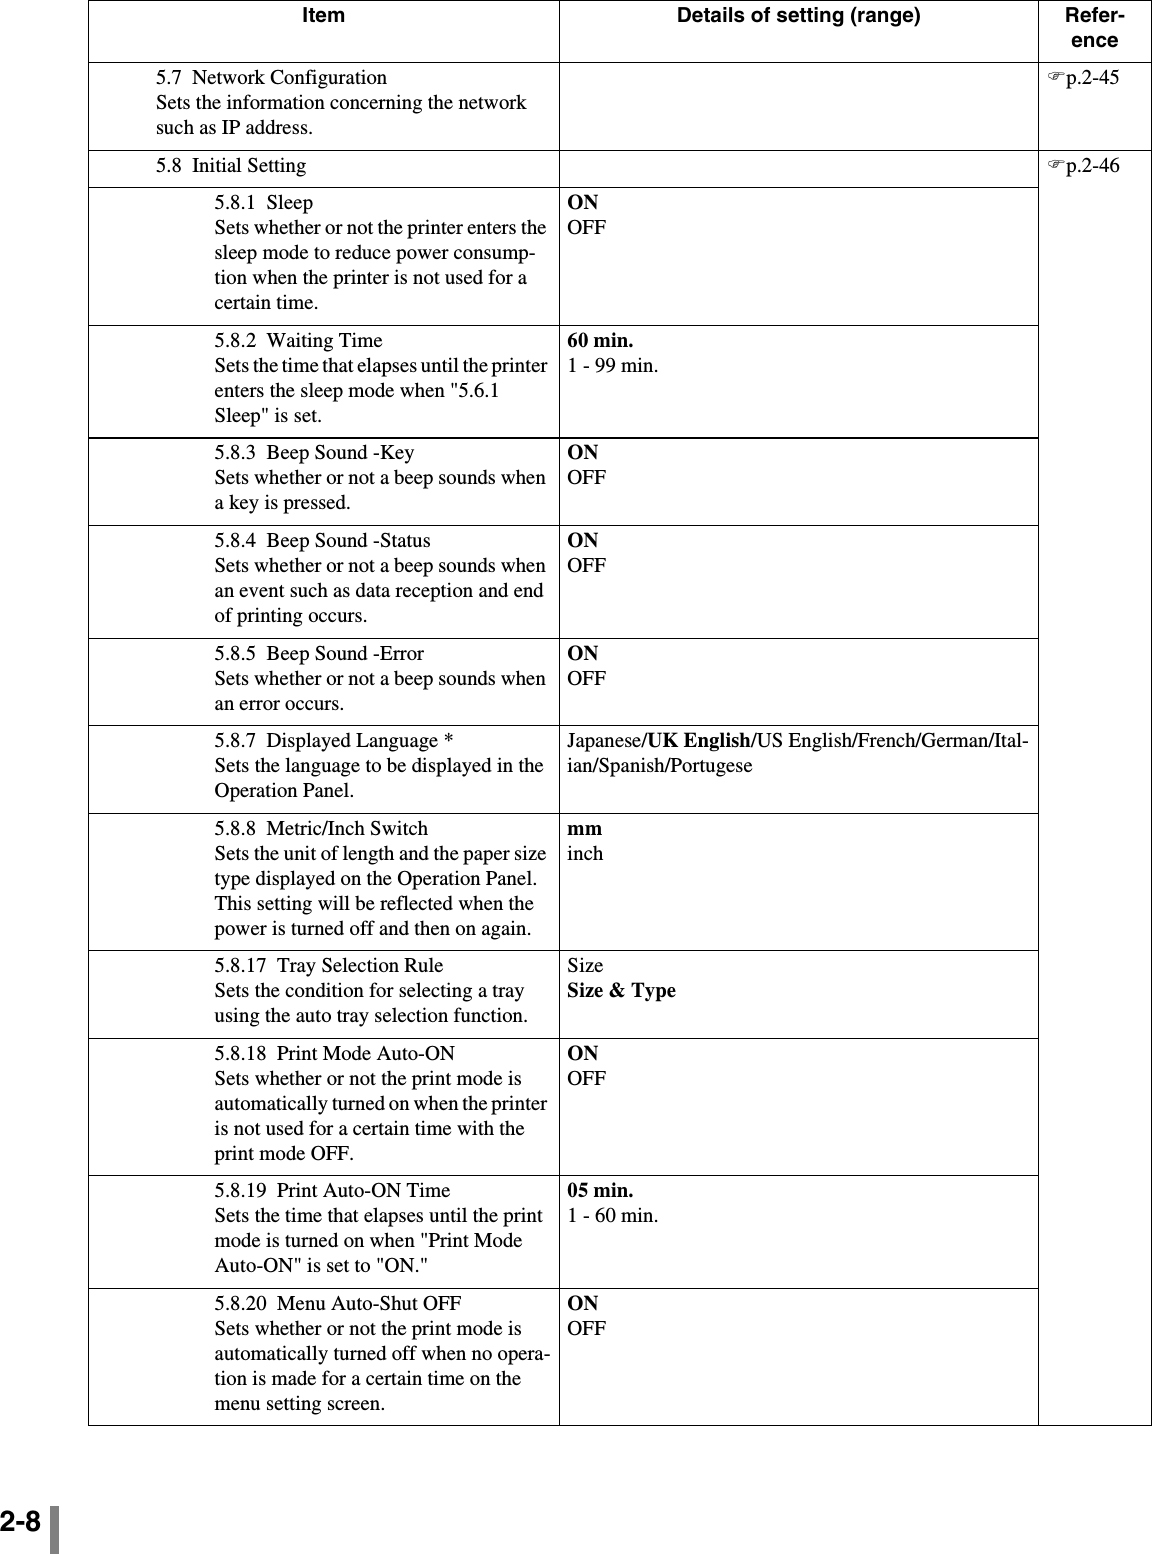
![1-14Paper Feed Pressure in Standard Paper Feed TrayIn the Standard Paper Feed Tray, the paper feed pressure can be adjusted with the Paper Feed Pressure Adjustment Lever according to the paper that has been loaded. Set the lever to " (NORMAL)" or " (CARD)" according to the paper quality. If " (CARD)" is selected, paper is fed with higher pressure.####Paper Feed Pressure Adjustment Lever and PaperSupported paper qualities are shown below.*If paper is not fed properly, set the lever to " (NORMAL)."Lever position Paper quality Supported printing paper[ (NORMAL)] Standard or Thin/Light •Fine•RISO PAPER IJ•RISO PAPER IJ MATTE•RISO IJ Double-Sided Matte Paper•Commercially available copy paper[ (CARD)] Card or Special •Drawing paper (*)•Postcard (*)•Envelope (*)](https://usermanual.wiki/Riso-Kagaku/RFMHL00.Host-Manual-1/User-Guide-708274-Page-28.png)
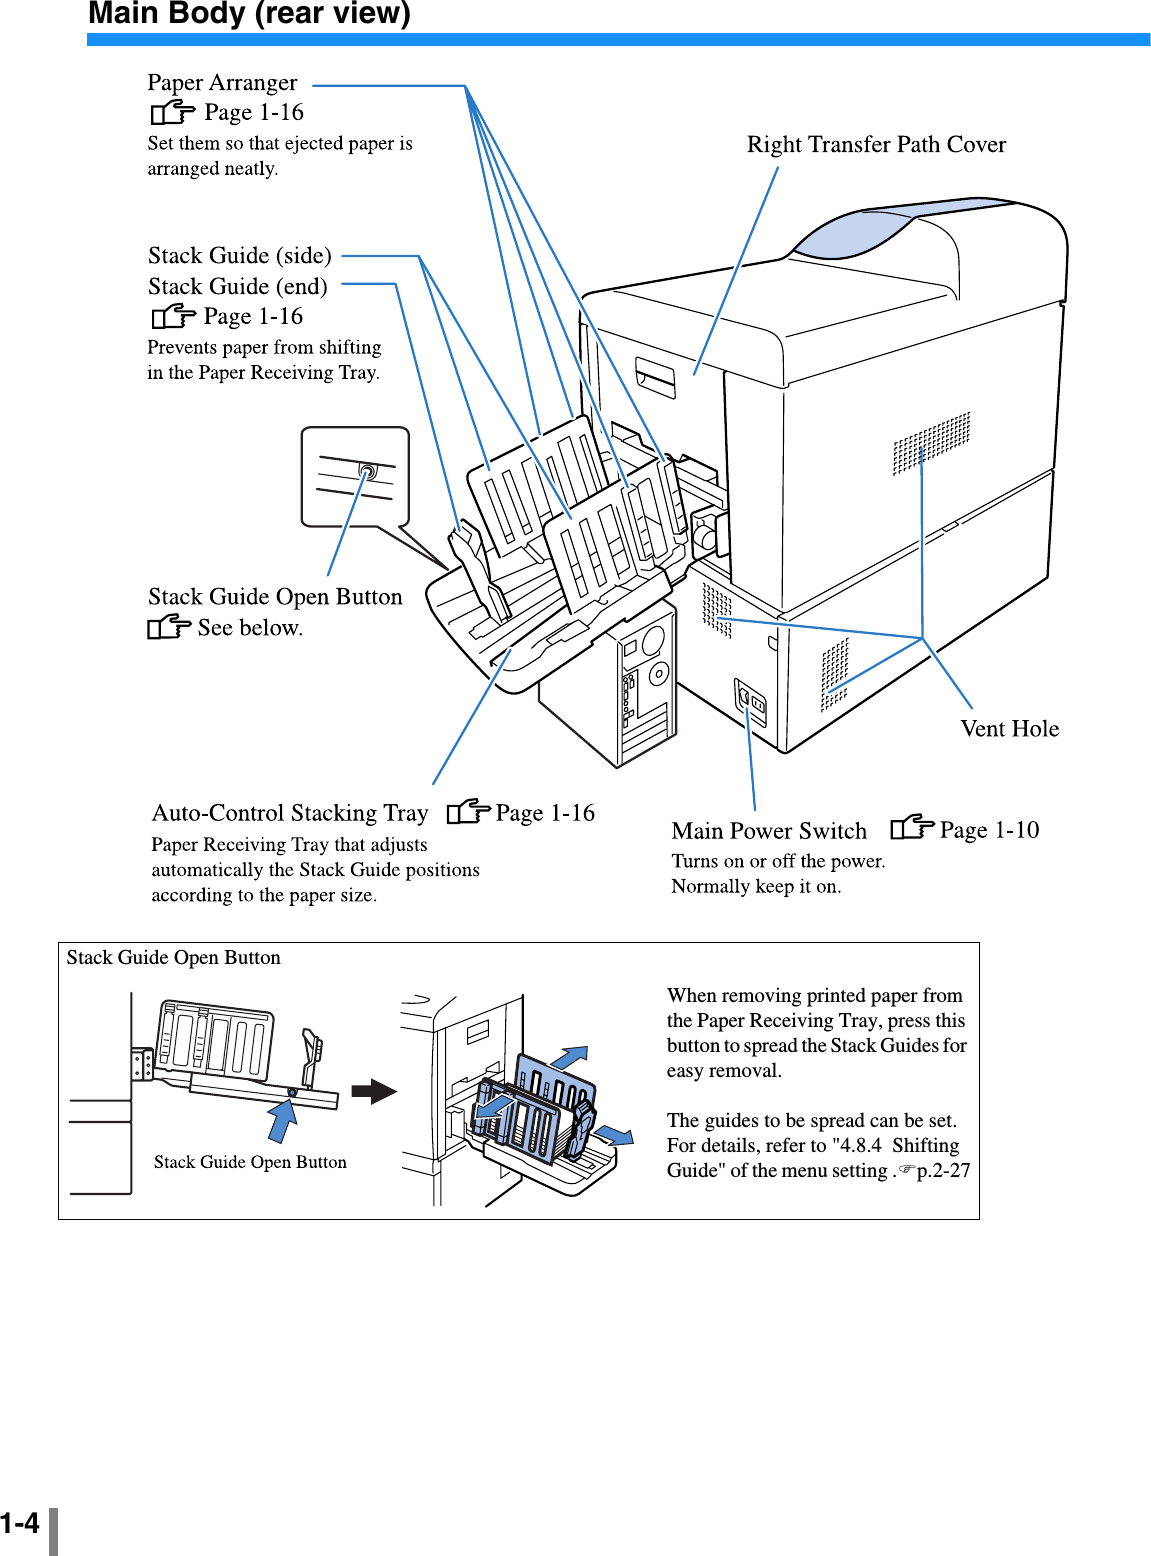
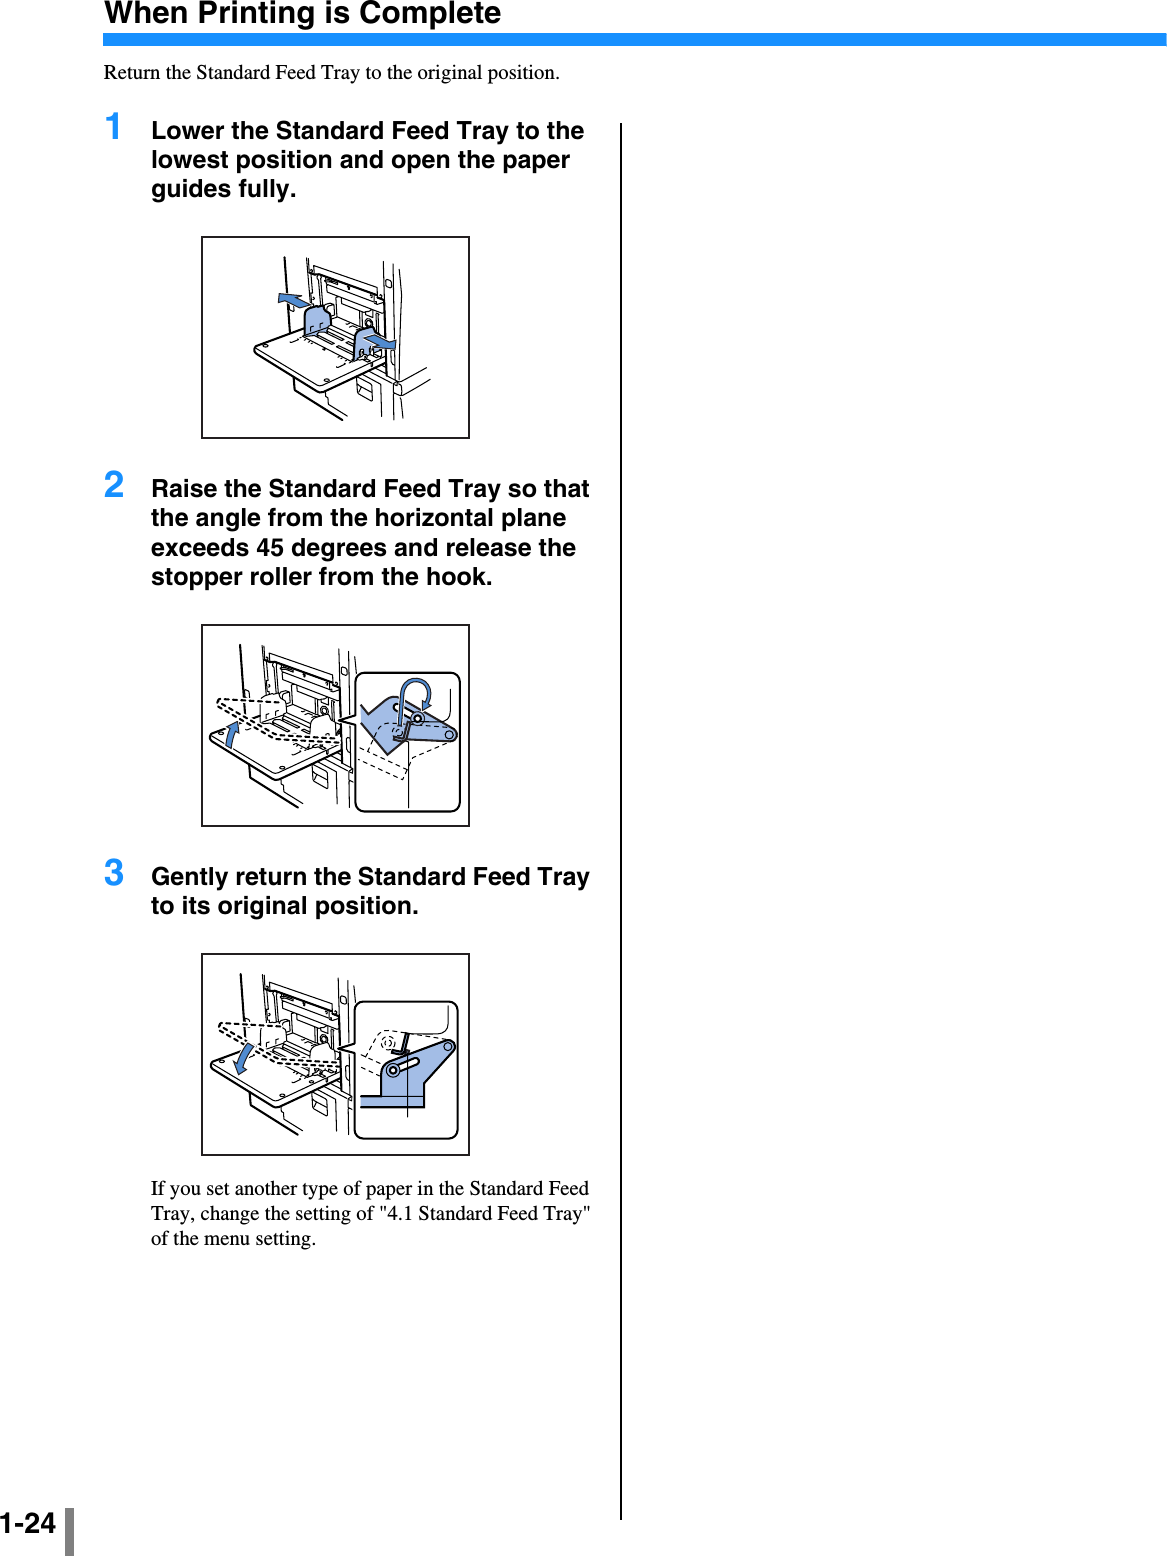
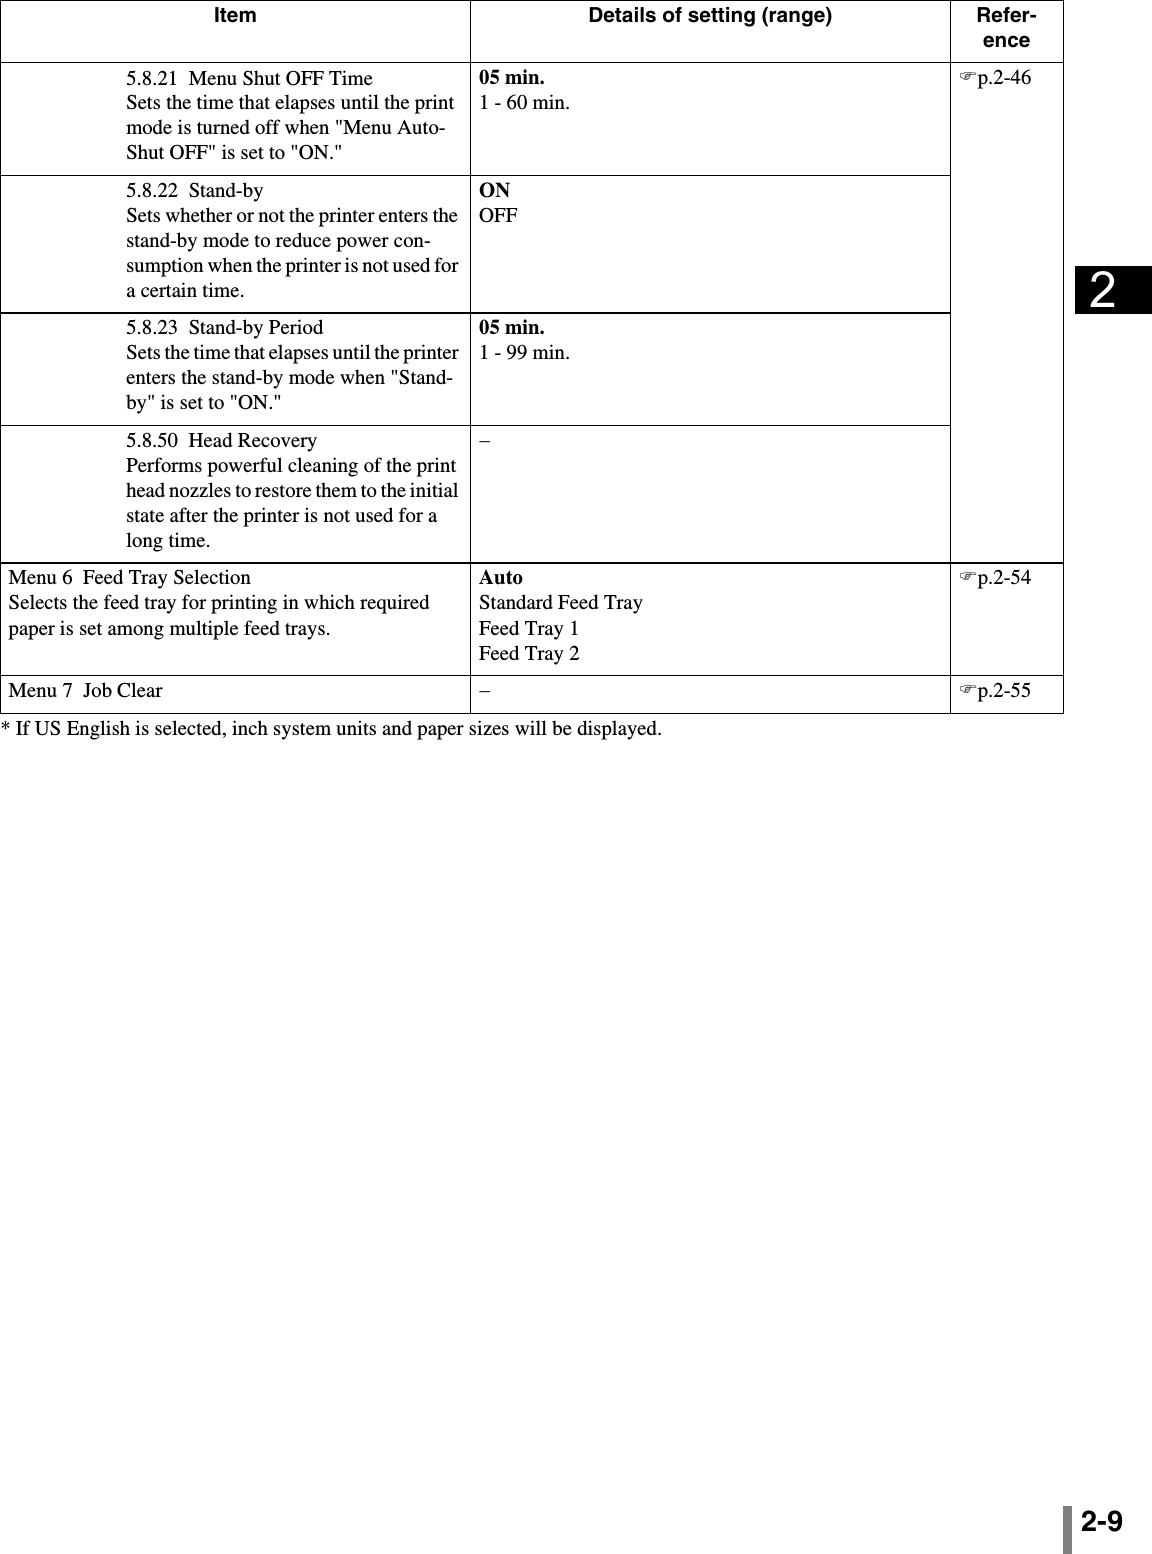
![1-16Setting Up the Paper Receiving TraySet the Paper Receiving Tray.(This procedure is not required when a finisher is connected.) The Side Guides and the End Guide move automatically to the optimum positions according to the printing paper size. Fine position adjustment can be performed on the Control Panel. For details, refer to "4.8 Paper Ejection""p.2-25 of the menu setting.1 Open the Paper Receiving Tray in the direction shown by the arrow until it stops.2 Raise the Side Guides.3 Adjust the Arrangers.Normally, when printing onto B4 or larger paper, take out the Paper Arrangers. Paper arrangement depends on the paper firmness and so on. Adjust the Paper Arrangers as needed.4 Raise the End Guide.5 Adjust the position of the End Guide Cushion.Use the Paper Feed Pressure Adjustment Lever to set the cushion to [NORMAL] or [CARD] according to the paper quality.Do not pull out the Cushion from the Cushion Stand."Paper Feed Pressure in Standard Feed Tray""p.1-14! When printing onto paper larger than 320 × 432 mm (125/8" × 17"), fold all the guides.At this time, set "4.8.2 Stack Guide" ("p.2-26) of the menu setting to "OFF."](https://usermanual.wiki/Riso-Kagaku/RFMHL00.Host-Manual-1/User-Guide-708274-Page-30.png)
![1-171How to Close the Paper Receiving TrayClose the Paper Receiving Tray as described below.1 Check that no print remains and press the [Stack Guide Open Button].The Stack Guide (side) and the Stack Guide (End) move to their storage positions.2 Fold in the Stack Guide (End) out-ward.3 Pull up the Arrangers.4 Fold in the Stack Guide (Side).5 Close the Paper Receiving Tray.](https://usermanual.wiki/Riso-Kagaku/RFMHL00.Host-Manual-1/User-Guide-708274-Page-31.png)
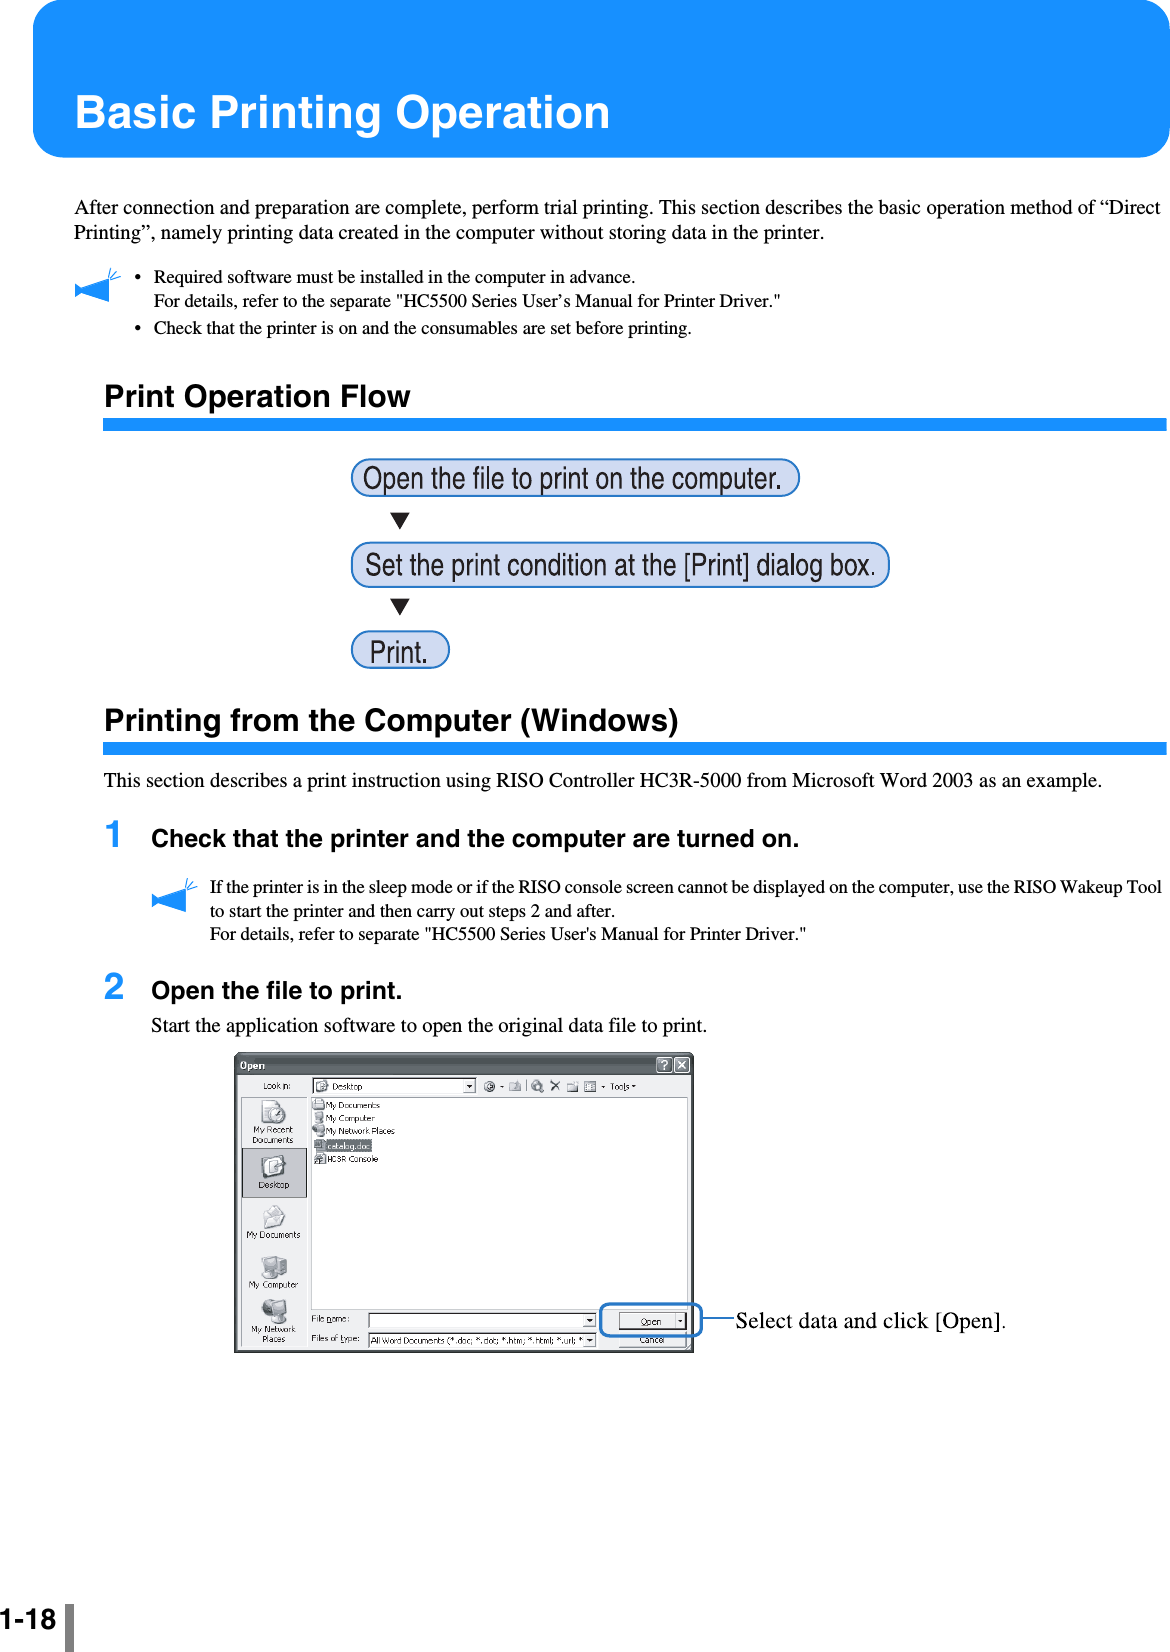
![1-1913 Display the [Print] dialog box.Select [Print] from the [File] menu.4 Check the [Printer name].As the printer name, select the name set when the printer driver was installed.5 Check the following items.! If you click the [Properties] button, you can set the various conditions on the printer driver screen. The set-tings of [Original image] on the [Main setting] tab and [Paper type] on the [Main setting] tab affect seriously the print quality. When using conditions other than the default settings, click the [Properties] button and adjust the settings."Chapter 2 Printer Driver Operation for HC3R-5000" of "HC5500 Series User’s Manual for Printer Driver" "p.2-1"Chapter 3 Printer Driver Operation for PS7R-9000/5000" of "HC5500 Series User’s Manual for Printer Driver" "p.3-1](https://usermanual.wiki/Riso-Kagaku/RFMHL00.Host-Manual-1/User-Guide-708274-Page-33.png)
![1-20 Print data can be protected with the security function."HC5500 Series User's Manual for Printer Driver" "Chapter 2 Printer Driver Operation for HC3R-5000" "p.2-27"Chapter 3 Printer Driver Operation for PS7R-9000/5000" "p.3-276 Click the [OK] button.When the printer receives data sent from the computer, the DATA indicator blinks and message "Receiving Data" is dis-played on the Display. When reception is complete, the DATA indicator lights up, message "Printing" is displayed, and printing starts."p.2-2 If a message indicating that printing cannot be performed is displayed on the screen, the printer may be in the sleep mode. Press the Sleep Key on the operation panel of the printer or use the Wakeup Tool from the computer to start the printer.7 Press the Stack Guide Open Button and remove the prints from the Paper Receiving Tray.If the button is pressed, the Stack Guides is spread to allow easy removal of prints. The guides to be spread when the Stack Guide Open Button is pressed can be selected."4.8.4 Shifting Guide""p.2-27](https://usermanual.wiki/Riso-Kagaku/RFMHL00.Host-Manual-1/User-Guide-708274-Page-34.png)
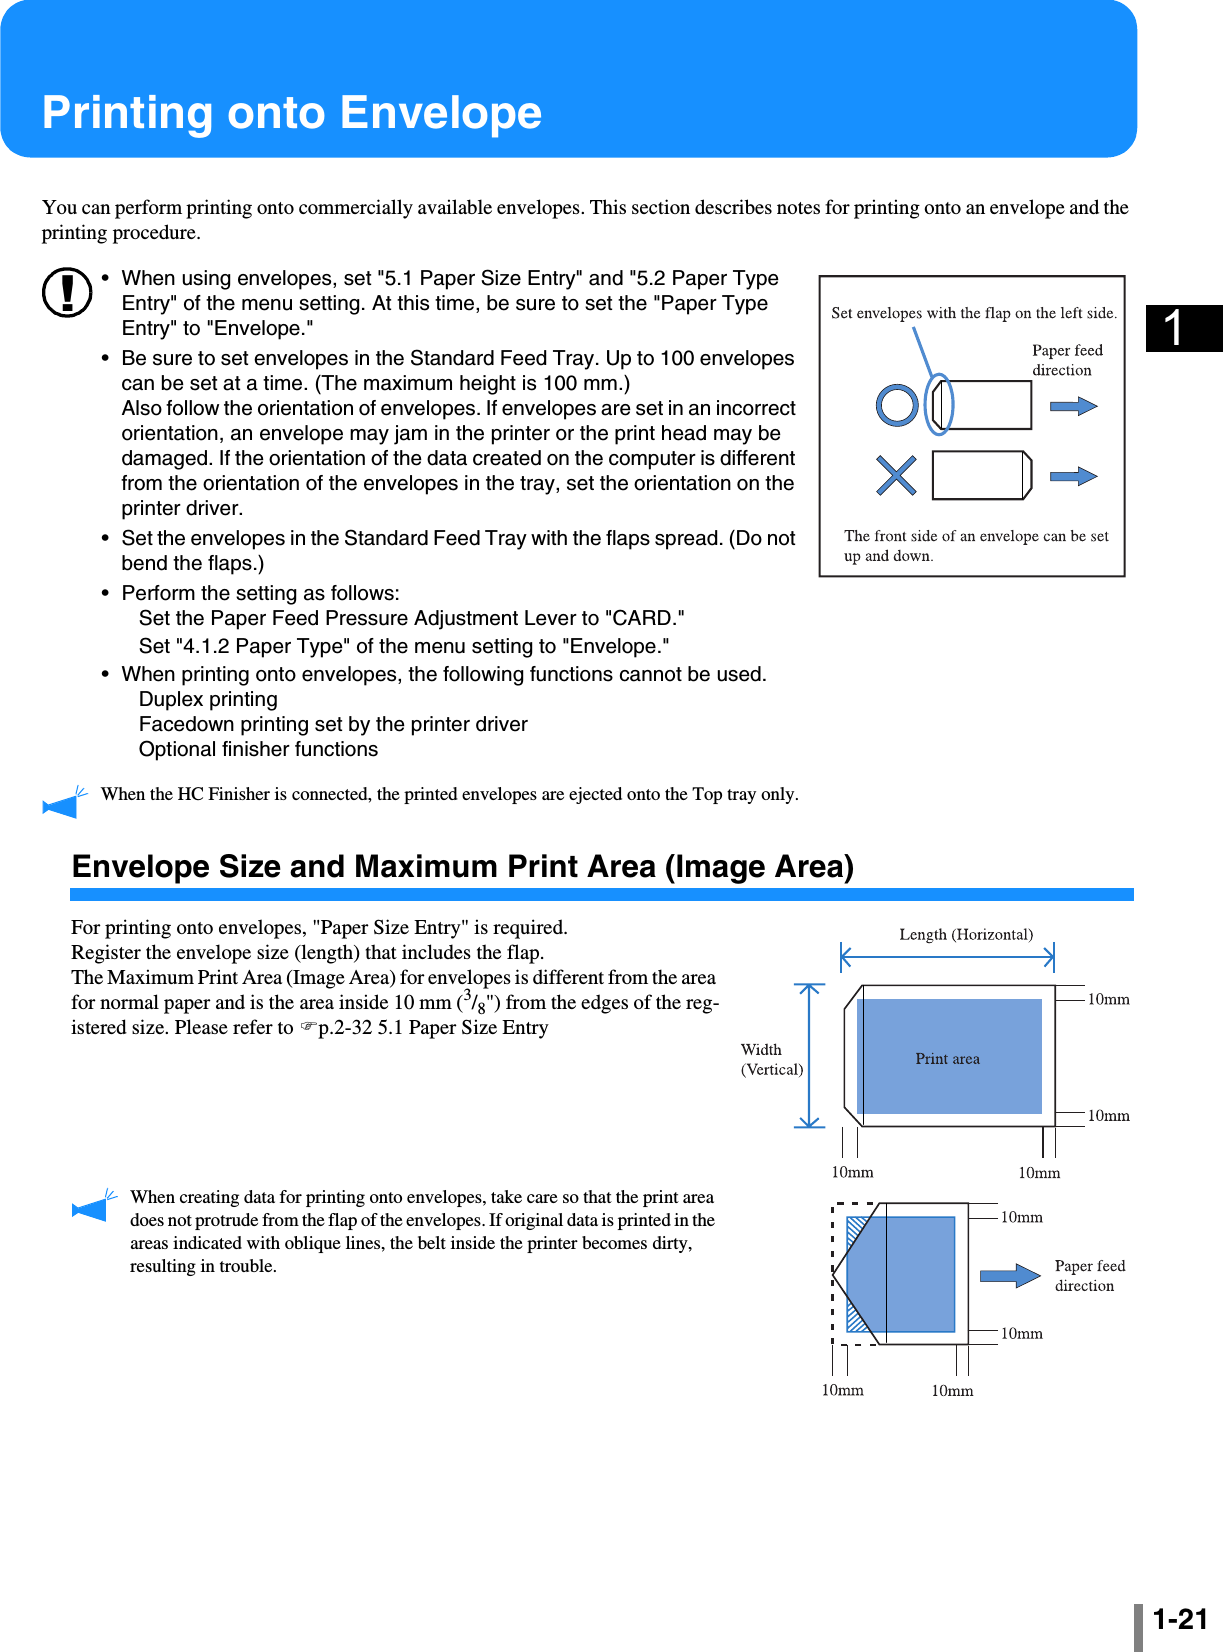
![1-22How to Print1 Set "4.1 Standard Feed Tray" of the menu setting."4.1 Standard Feed Tray" "p.2-192 Lower the Standard Feed Tray to the lowest position and open the paper guides fully.3 Raise the end of the Standard Feed Tray and hang the stopper roller in the main unit side on the hook.The Standard Feed Tray is fixed in an inclined state.4 Set the envelopes in the Standard Feed Tray.Set the envelopes with the flap on the left side.5 Adjust the paper guides according to the envelopes and lock them.6 Set the Paper Feed Pressure Adjust-ment Lever to [ (CARD)].7 From the computer, open the file to print.8 Display the [Print] dialog box.From the [File] menu, select [Print].9 Click the [Properties] button.10 Select [Envelope] at [Paper Type] on the [Main setting] tab.Paper Size Registered Paper Size 1 - 5Paper Type EnvelopeDouble Feed Check OFF](https://usermanual.wiki/Riso-Kagaku/RFMHL00.Host-Manual-1/User-Guide-708274-Page-36.png)
![1-23111 Select [Standard Feed Tray] at [Paper feed tray] on the [Main setting] tab.12 Click the [OK] button.The printer driver screen is closed.13 Click the [OK] button in the [Print] dia-log box.Printing starts.If a check mark is placed at [Pause after a proof] in step 10, printing stops temporarily after one copy is printed. Check the print result and then press the PRINT/PAUSE key. •If the envelopes cannot be fed properly, return the Paper Feed Pressure Adjustment Lever to [NOR-MAL] and perform printing.•If double feed or misfeed occurs frequently, adjust the front end of the envelopes (to be fed first) down and set them in the Standard Feed Tray.](https://usermanual.wiki/Riso-Kagaku/RFMHL00.Host-Manual-1/User-Guide-708274-Page-37.png)


![2-172Menu 3 Temp Data RetrieveThe data currently retained in the printer can be retrieved and printed again by specifying the number of copies (additional printing).! Retained data can be retrieved if a check mark is placed at [Keep the last page of the job in the printer.] in [Con-troller setting 2] - [Initial setting] of [Administrator] of RISO Console. For details, refer to "HC-5500 Series User's Manual for Console." •The retained data is the last page of the latest printing. In the case of duplex printing, the data of the last sheet (two pages) is retained.•When the printer enters the sleep mode, retained data will be cleared (not retained).•The maximum number of copies that can be set for additional printing is "9999."•If "4.9 Temp Data Clear" of the menu setting has been performed, message "No Temp Data" is displayed.1 Press the MENU Key.2 Press the or key to display "Temp Data Retrieve."3 Press the OK Key.4 Press the keys to move the cursor, and press the keys to input the number of copies for printing.5 Press the OK Key.6 Press the PRINT//// PAUSE Key.Printing of the set number of copies starts.](https://usermanual.wiki/Riso-Kagaku/RFMHL00.Host-Manual-1/User-Guide-708274-Page-55.png)
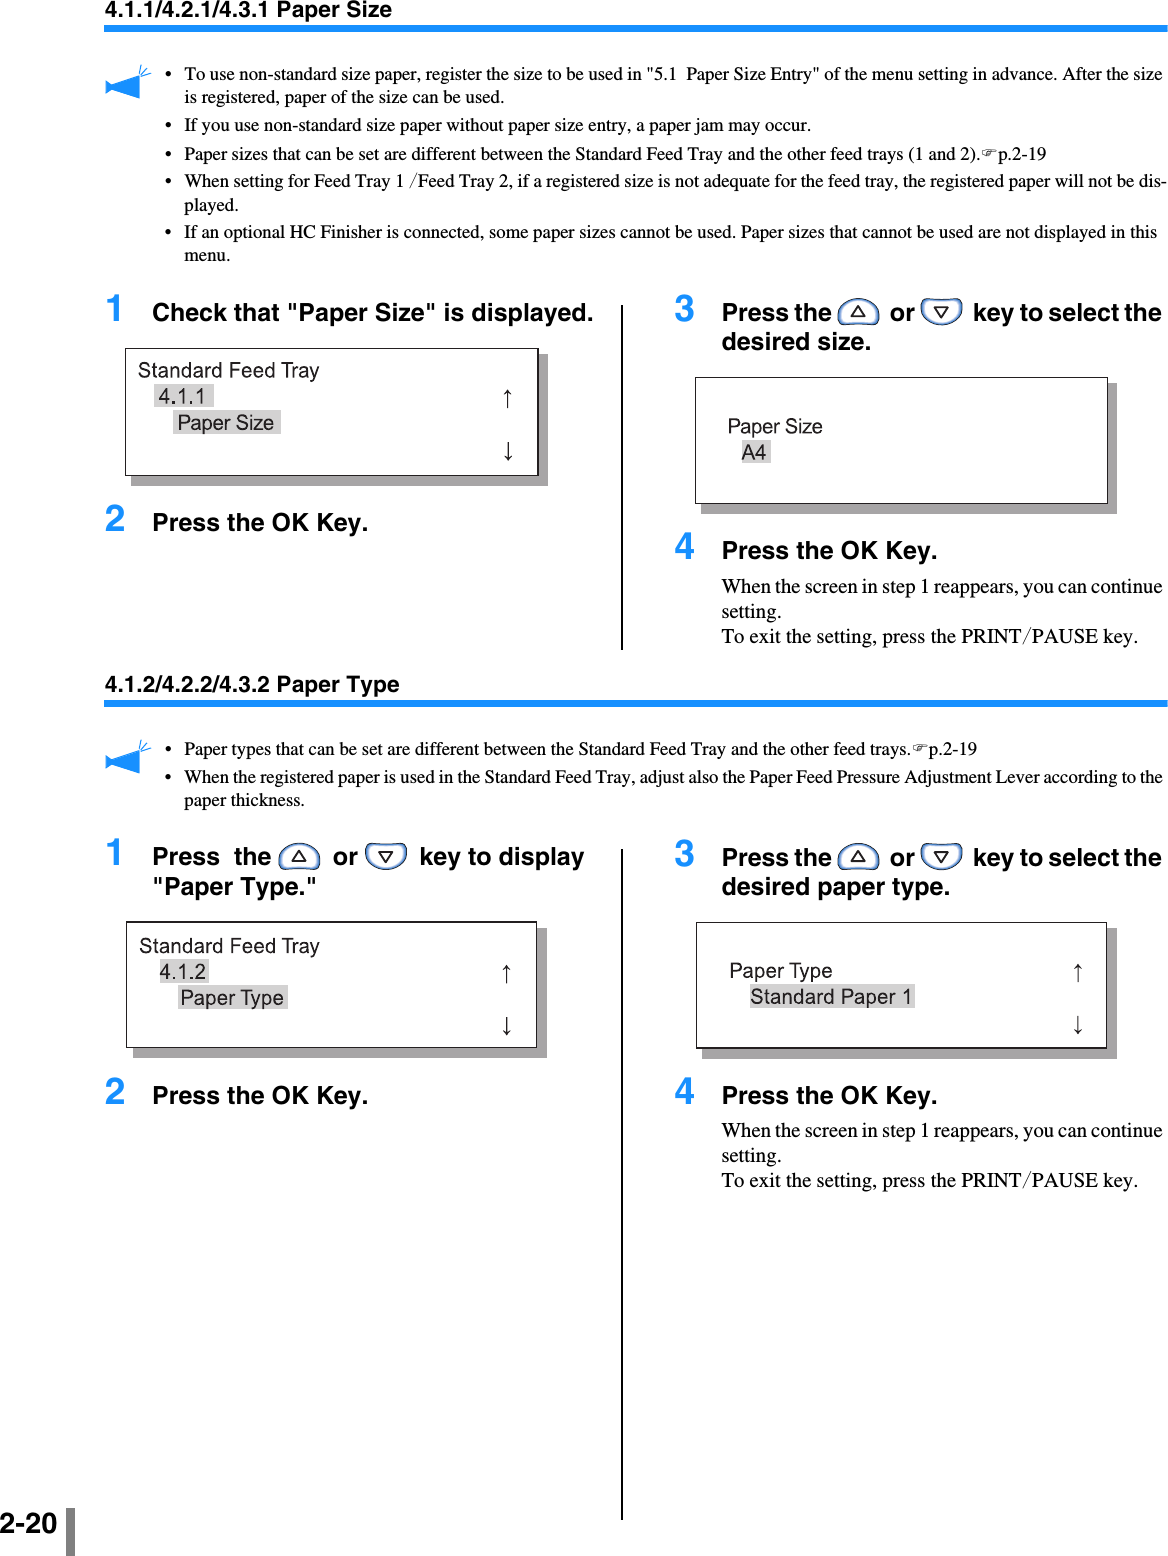
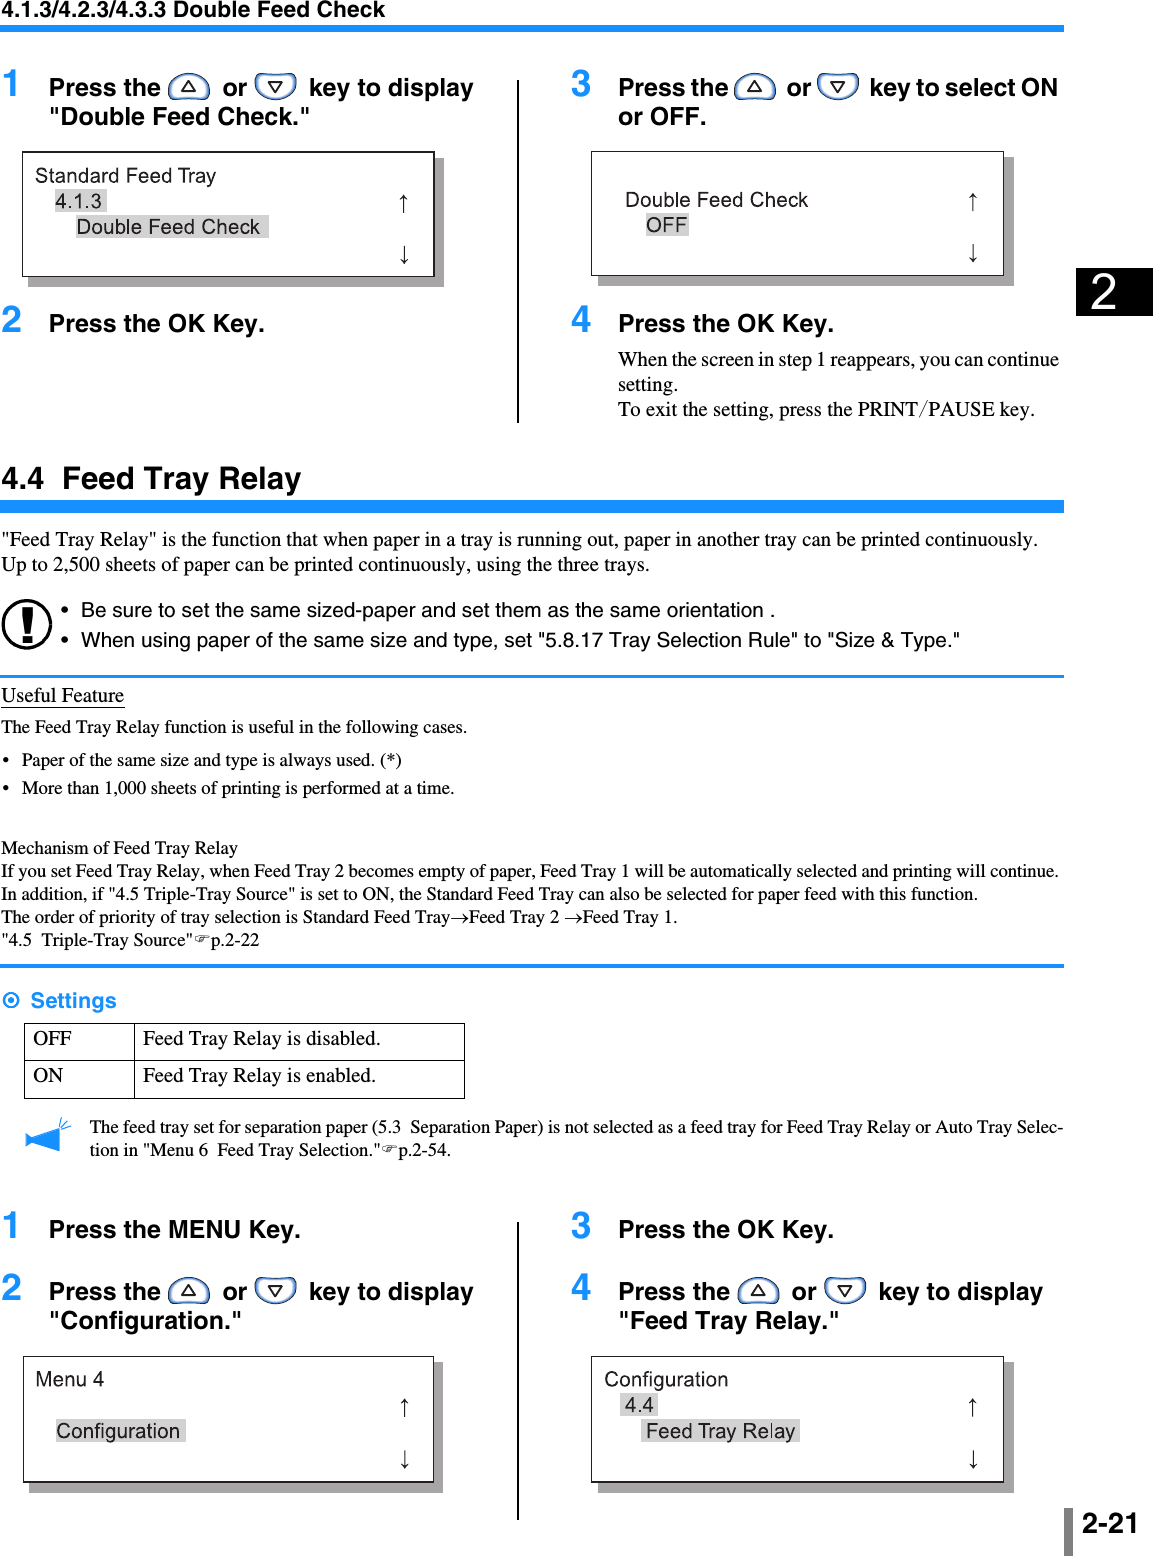
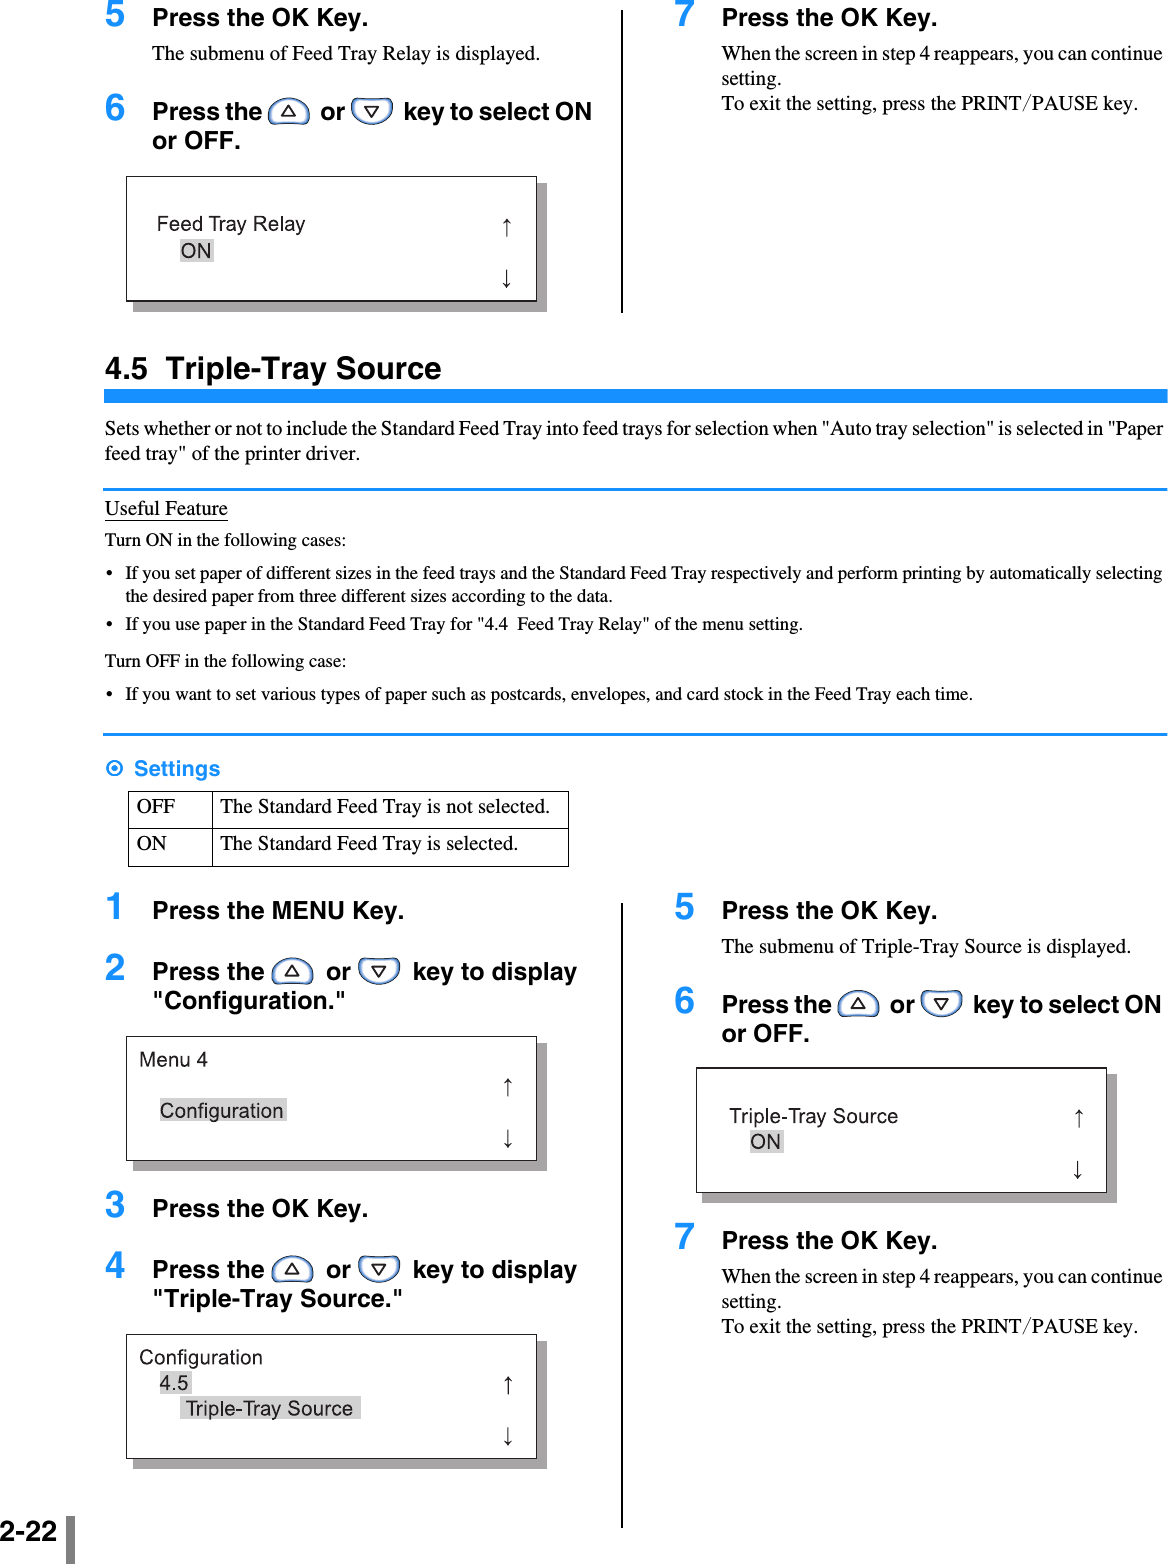
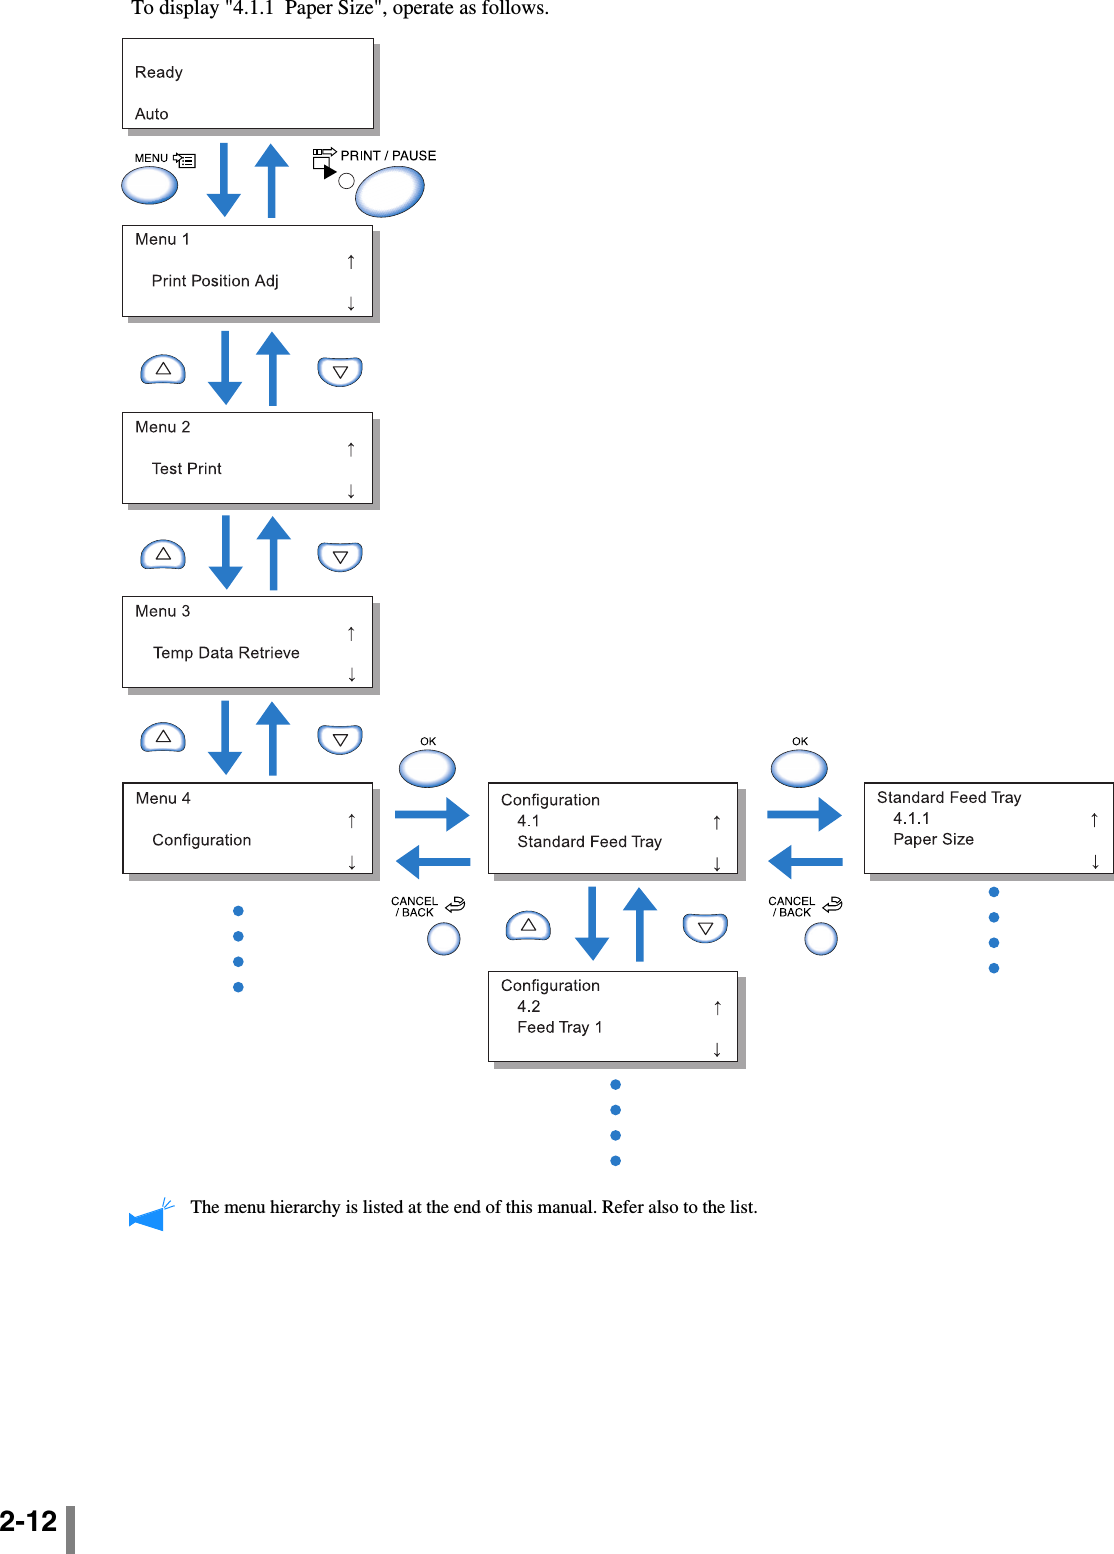
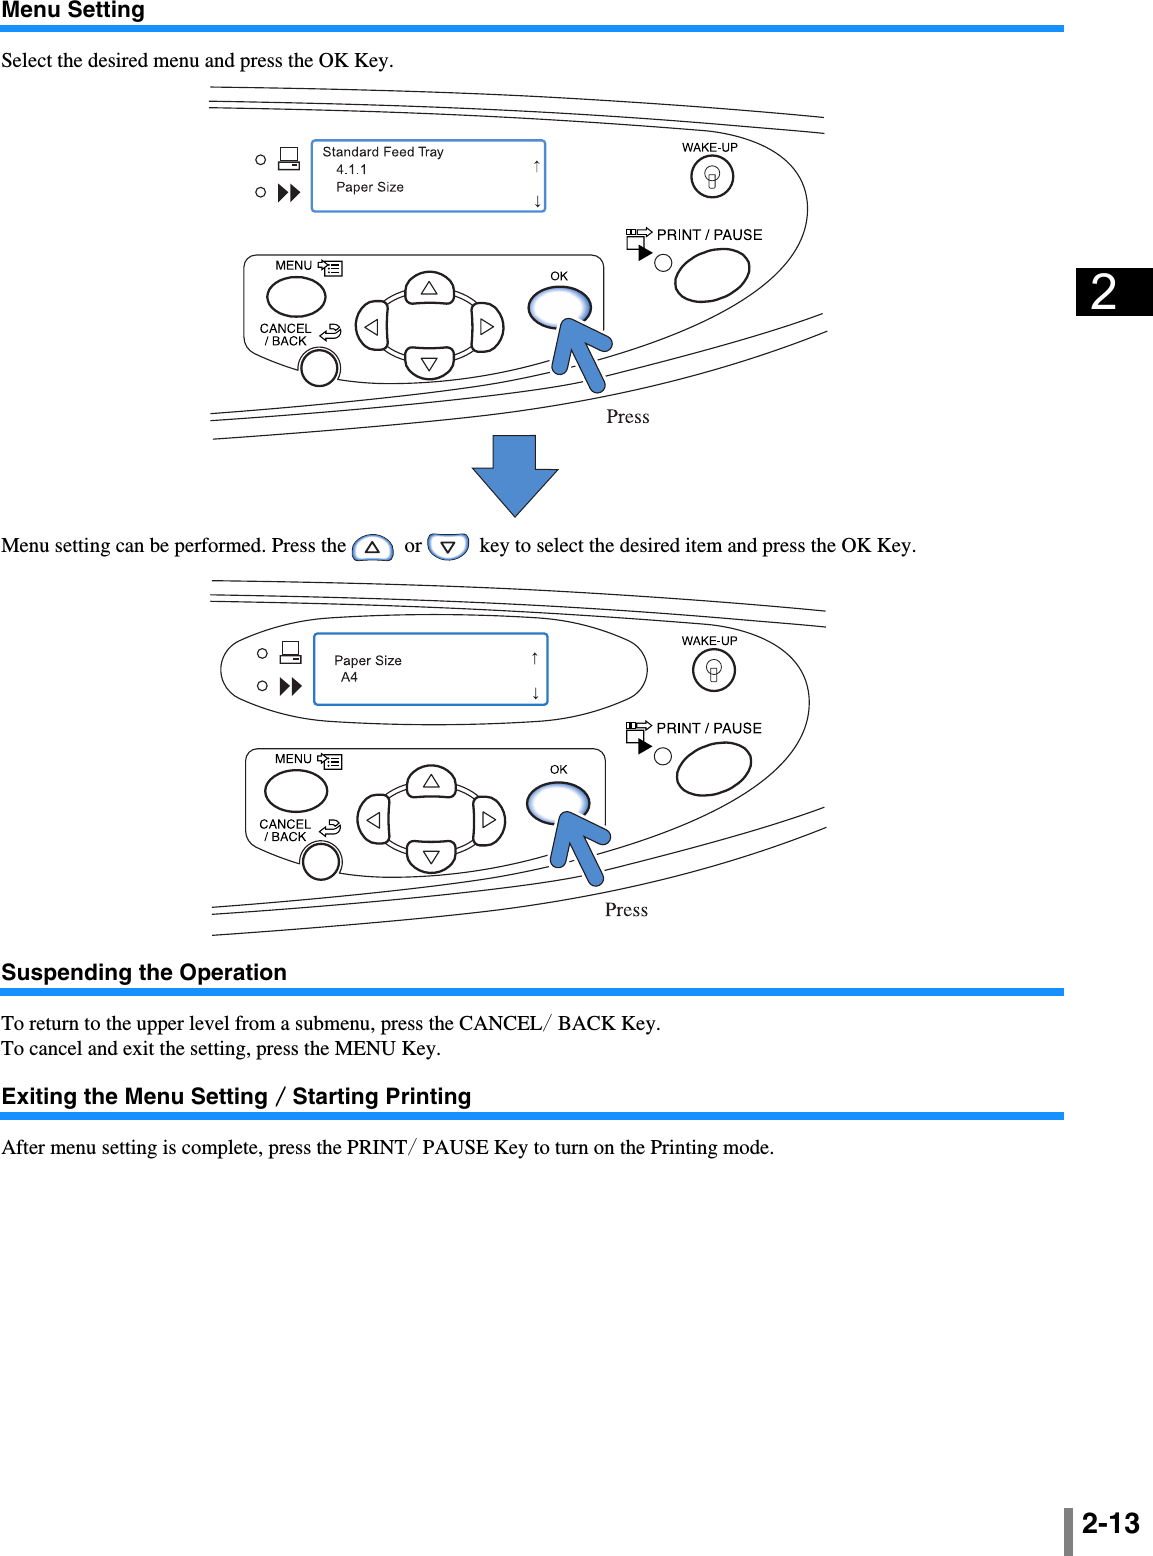
![2-1924.1 Standard Feed Tray//// 4.2 Feed Tray 1//// 4.3 Feed Tray 2Set the size and type of paper to be loaded in the Standard Paper Feed Tray and the other Paper Feed Trays and turn on or off the Double Feed Check function.Be sure to set when you have changed the type or size of paper.####Settings*1 Sizes that have been registered in "5.1 Paper Size Entry" are displayed.*2 Types that have been registered in "5.2 Paper Type Entry" are displayed.! “Paper Type” setting determines the colour tone adjustment. If what is selected at [Paper Type] differs from what is loaded really, print quality is not best. Be sure to select the same paper type with what is loaded actually.An example of method of setting the Standard Feed Tray is used for explanation in the procedure below. For Feed Tray 1 or Feed Tray 2, display "Feed Tray 1" or "Feed Tray 2" in step 4.1 Press the MENU Key.2 Press the or key to display "Configuration."3 Press the OK Key.4 Press the or key to display "Standard Feed Tray."5 Press the OK Key.The submenu for the Standard Feed Tray (Feed tray) is displayed.Menu (Item) Selection4.1 Stadard Feed Tray 4.1.1 Paper Size Auto/A3/B4/A4/B5/A4-R/B5-R/ Foolscap/(Ledger/Legal/Letter/Letter-R/Statement)Registered paper size *1 000x000mm4.1.2 Paper Type Standard paper 1/High-Quality 1/High-Quality 2/Registered paper type*2 1-5/Card/Card-IJ4.1.3 Double Feed Check OFF/ONSelects the detecting of "double feed"(feeding of multiple sheets of paper at a time).Select OFF, when paper described below is used.-Paper printed on one side already -Dark-coloured paper-envelopes4.2 Feed Tray 1 4.2.1 Paper Size Auto/A3/B4/A4/B5/A4-R/B5-R/ Foolscap(Ledger/Legal/Letter/Letter-R/Statement)Registered paper size 1-5*14.2.2 Paper Type Standard paper 1/High-Quality 1/High-Quality 2Registered paper type*2 1-54.2.3 Double Feed Check Same as 4.1.34.3 Feed Tray 2 4.3.1 Paper Size Same as 4.2.14.3.2 Paper Type Same as 4.2.24.3.3 Double Feed Check Same as 4.2.3](https://usermanual.wiki/Riso-Kagaku/RFMHL00.Host-Manual-1/User-Guide-708274-Page-57.png)