Riso Kagaku RFMHL00 RFID TAG Reader/Writer User Manual fm
Riso Kagaku Corporation RFID TAG Reader/Writer fm
UserManual.wiki
>
Riso Kagaku
>
RFMHL00 User Manual
>
Host manual 2
Contents
1.
User Manual
2.
Host Manual 1
3.
Host Manual 2
4.
Host manual 1
5.
Host manual 2
Host manual 2
Navigation menu
Upload a User Manual
Namespaces
Wiki Guide
HTML
PDF
Info
Views
User Manual
Discussion / Help
Navigation
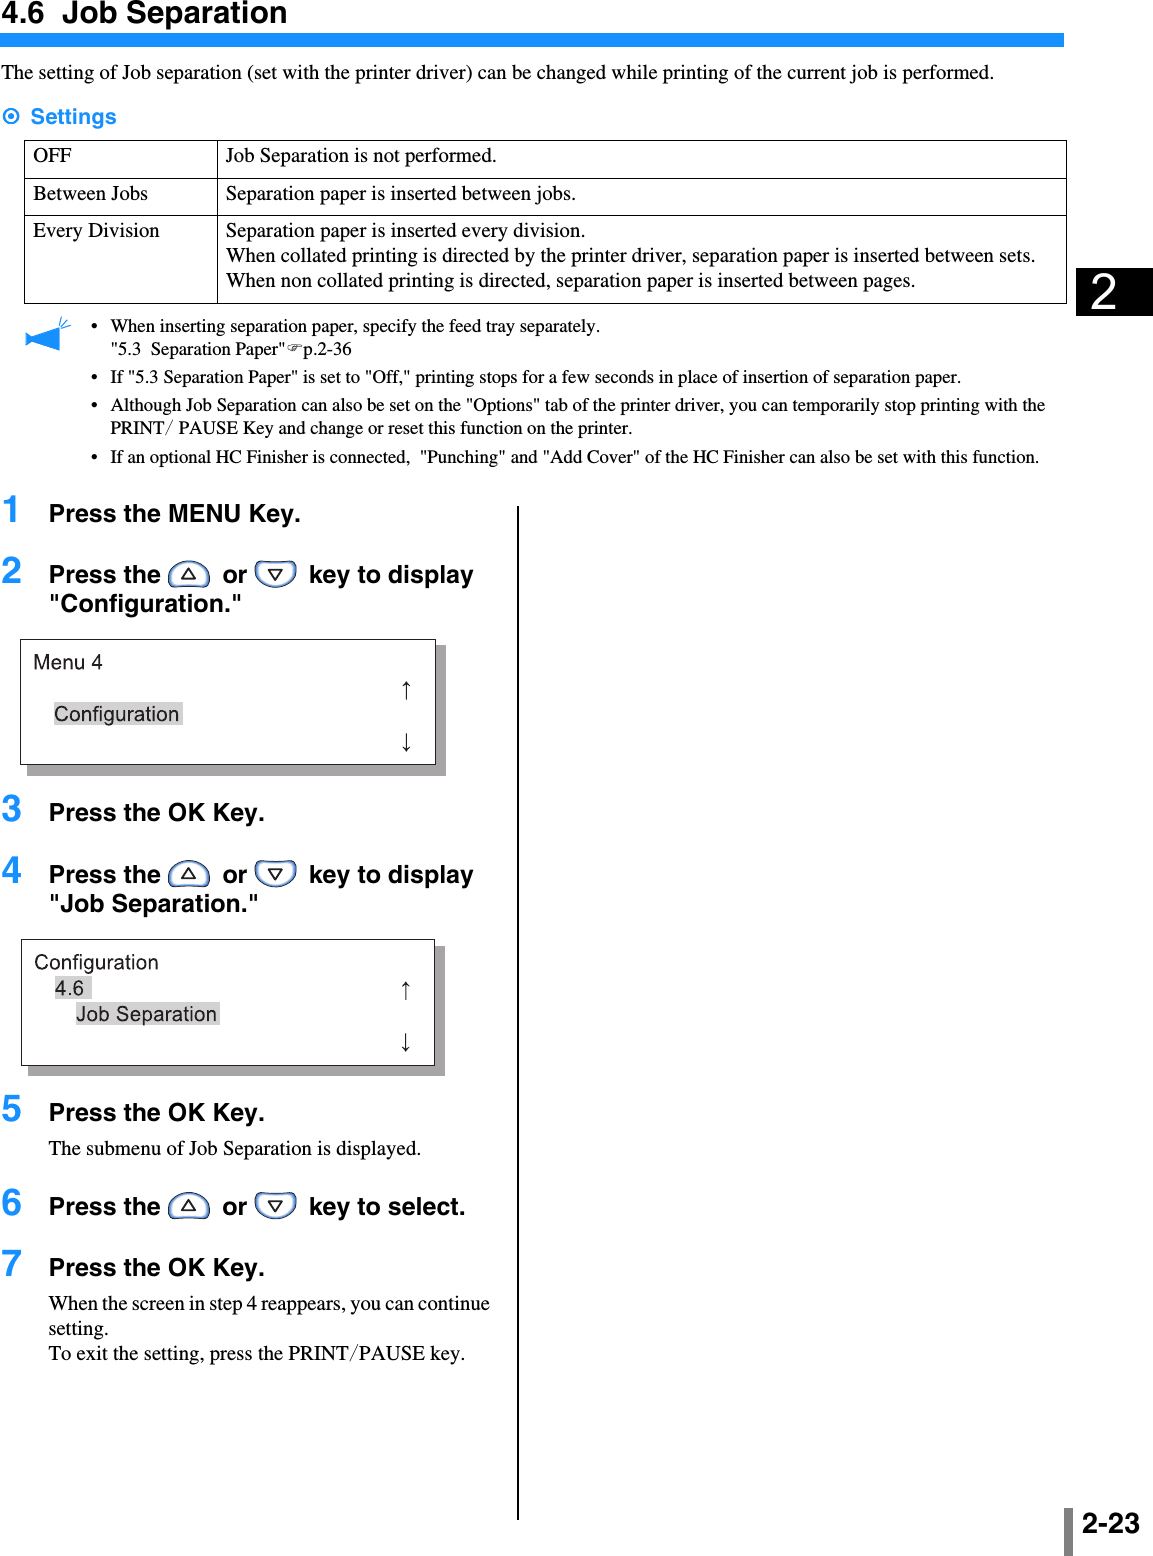
![2-284.9 Temp Data ClearIf a check mark is placed at [Keep the last page of the job in the printer.] in [Controller setting 2] - [Initial setting] of [Adminis-trator] of RISO Console, the last page of previous printing (last sheet in case of duplex printing) is left in the controller as retained data. If retention of data after printing is not desired because of a confidential document, the data can be cleared. To clear the temporary data when printing stops temporarily, use "Menu 7 Job Clear" to clear the current job and then clear the tem-porary data."Menu 7 Job Clear""p.2-551 Press the MENU Key.2 Press the or key to display "Configuration."3 Press the OK Key.4 Press the or key to display "Temp Data Clear."5 Press the OK Key.6 Check the message. To clear the data, press the OK Key.Message "Executing ..." is displayed and the data is cleared and the screen returns to the Step 4. If the CANCEL Key is pressed, the screen returns to the step 4.To exit the setting, press the PRINT/ PAUSE Key.](https://usermanual.wiki/Riso-Kagaku/RFMHL00.Host-manual-2/User-Guide-708299-Page-6.png)
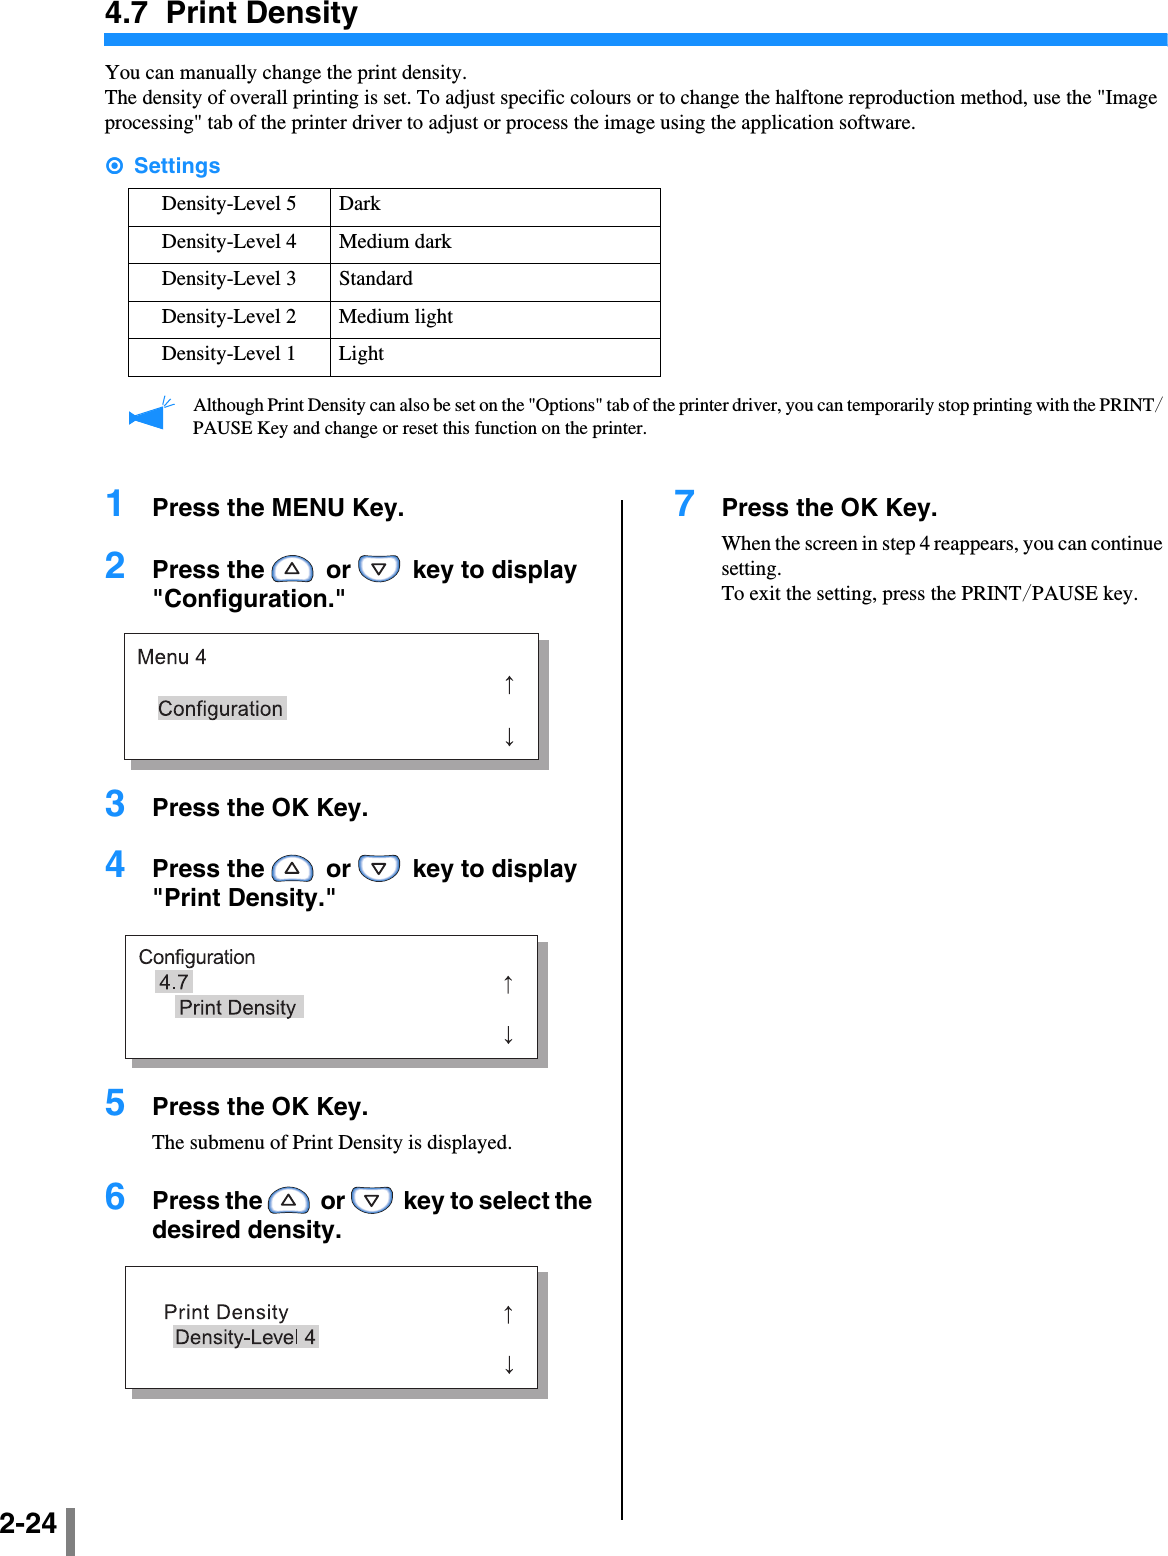
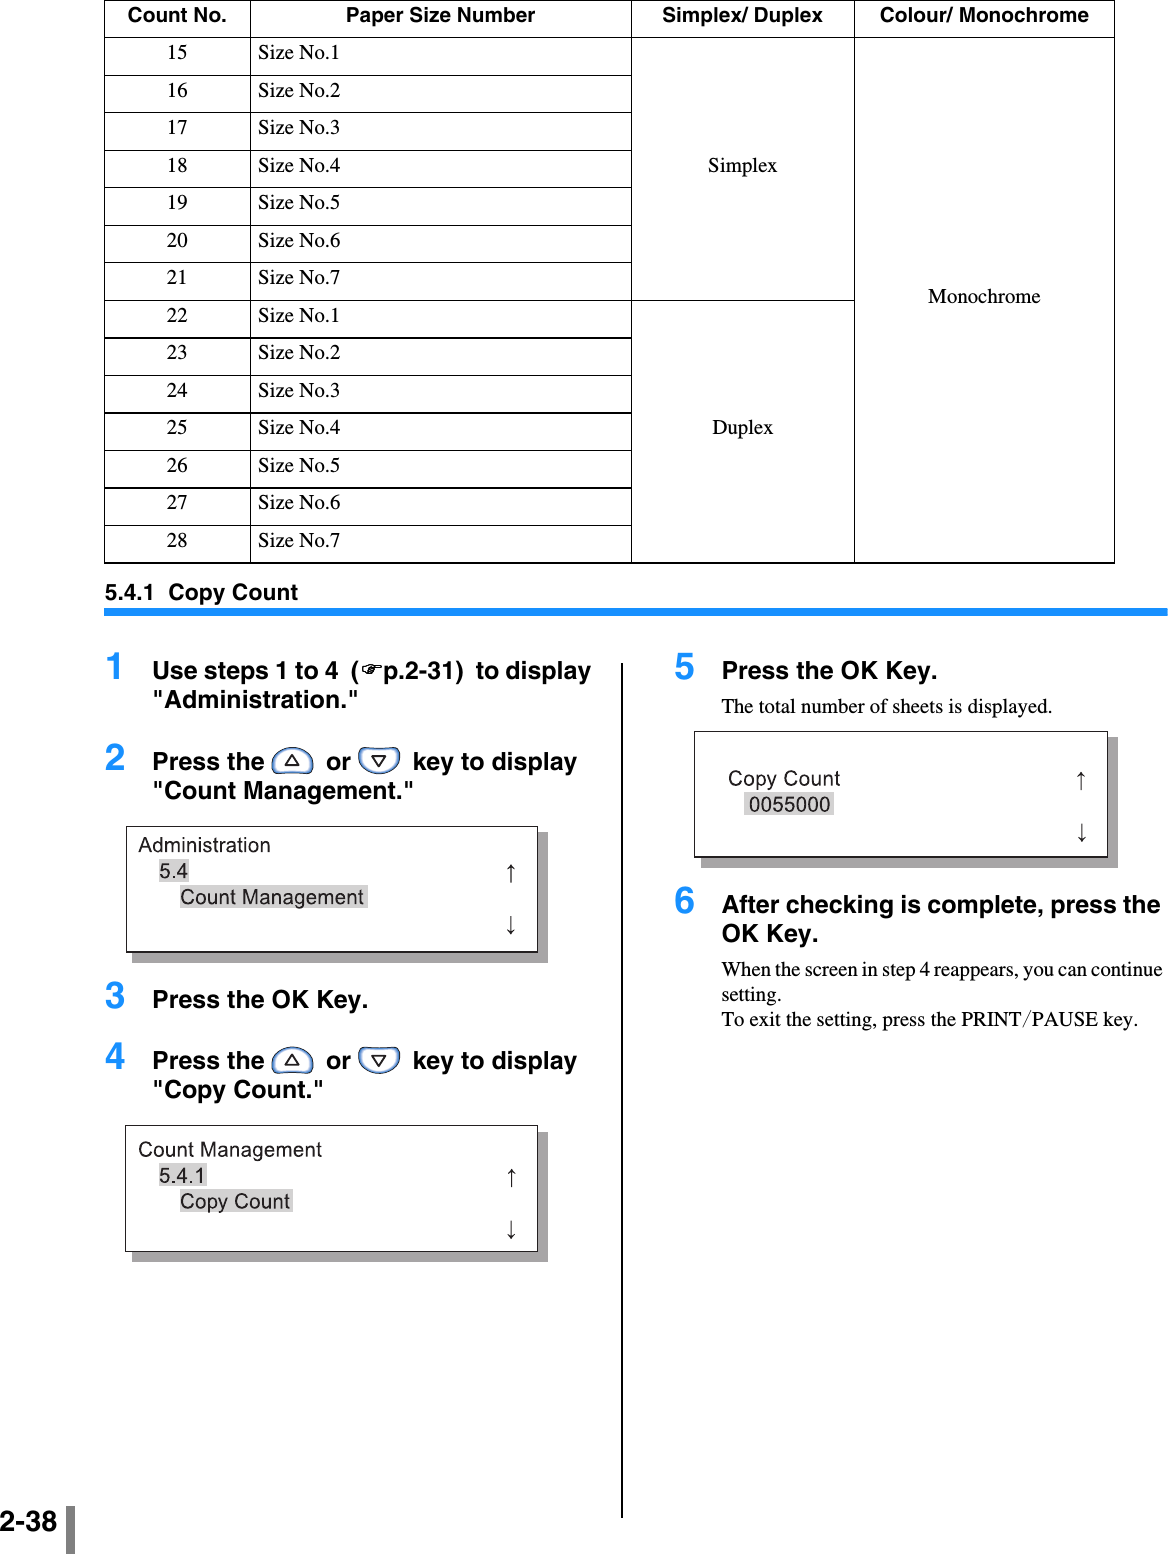
![2-3325.2 Paper Type EntryIf any paper other than printer recommended paper is used or paper is not fed properly, it could result in poor print quality. You should register the paper type and feeding according to the paper type specifications. The registered setting is displayed in Paper Type of "4.1.2 Standard Feed Tray," "4.2.2 Feed Tray 1," and "4.3.2 Feed Tray 2."Also if printer recommended paper is used and paper is not fed properly because of operating environment or the like, the setting can be changed.When changing the setting or registering paper other than printer recommended paper, contact your local dealer (or service rep-resentative) for consultation. Advice on proper setting will be given.####Settings If the following settings are made concerning the paper, the paper type is not displayed at "4.2.2 Feed Tray 1" and "4.3.2 Feed Tray 2." (These types of paper cannot be used in these trays.)•Paper Type: Envelope, Card, Card-IJ•Paper Feed Control: Envelope, PostcardPaper Type 1 - 5 Register required information on the paper type and paper feed for paper of which a new size is regis-tered in "5.1 Paper Size Entry" or paper other than recommended paper.!!!!RegistrationSets whether or not the registered paper type is displayed as a choice when setting a paper type in "4.1.2," "4.2.2" or "4.3.2."ON: This item is displayed.OFF: This item is not displayed.!!!!Paper TypeDetermine the image quality (colour matching) by selecting the paper type. Select the same item as the paper to be used for printing. When printing, specify the same item in [Paper type] of the [Main setting] tab of the printer driver screen.•Standard Paper 1•High-Quality 1•High-Quality 2•Envelope•Card•Card-IJ!!!!Paper Feed ControlSelect the paper thickness.•Standard•Card•Thin/Light•Envelope•Custom:Can be set in advance. For details, contact your local dealer (or service representative) for inquiry.Standard Paper 1High-Quality 1High-Quality 2EnvelopeCardCard-IJIf paper load in the Standard Feed Tray or another feed tray is not fed properly, change the Paper Feed Control for the relevant paper. If the paper type is Envelope, Card or Card IJ, Paper Feed Control cannot be changed.!!!!Paper Feed ControlSelect paper thickness.•Standard•Card•Thin/Light•Envelope•Custom:Can be set in advance. For details, contact your local dealer (or service representative) for inquiry.](https://usermanual.wiki/Riso-Kagaku/RFMHL00.Host-manual-2/User-Guide-708299-Page-11.png)

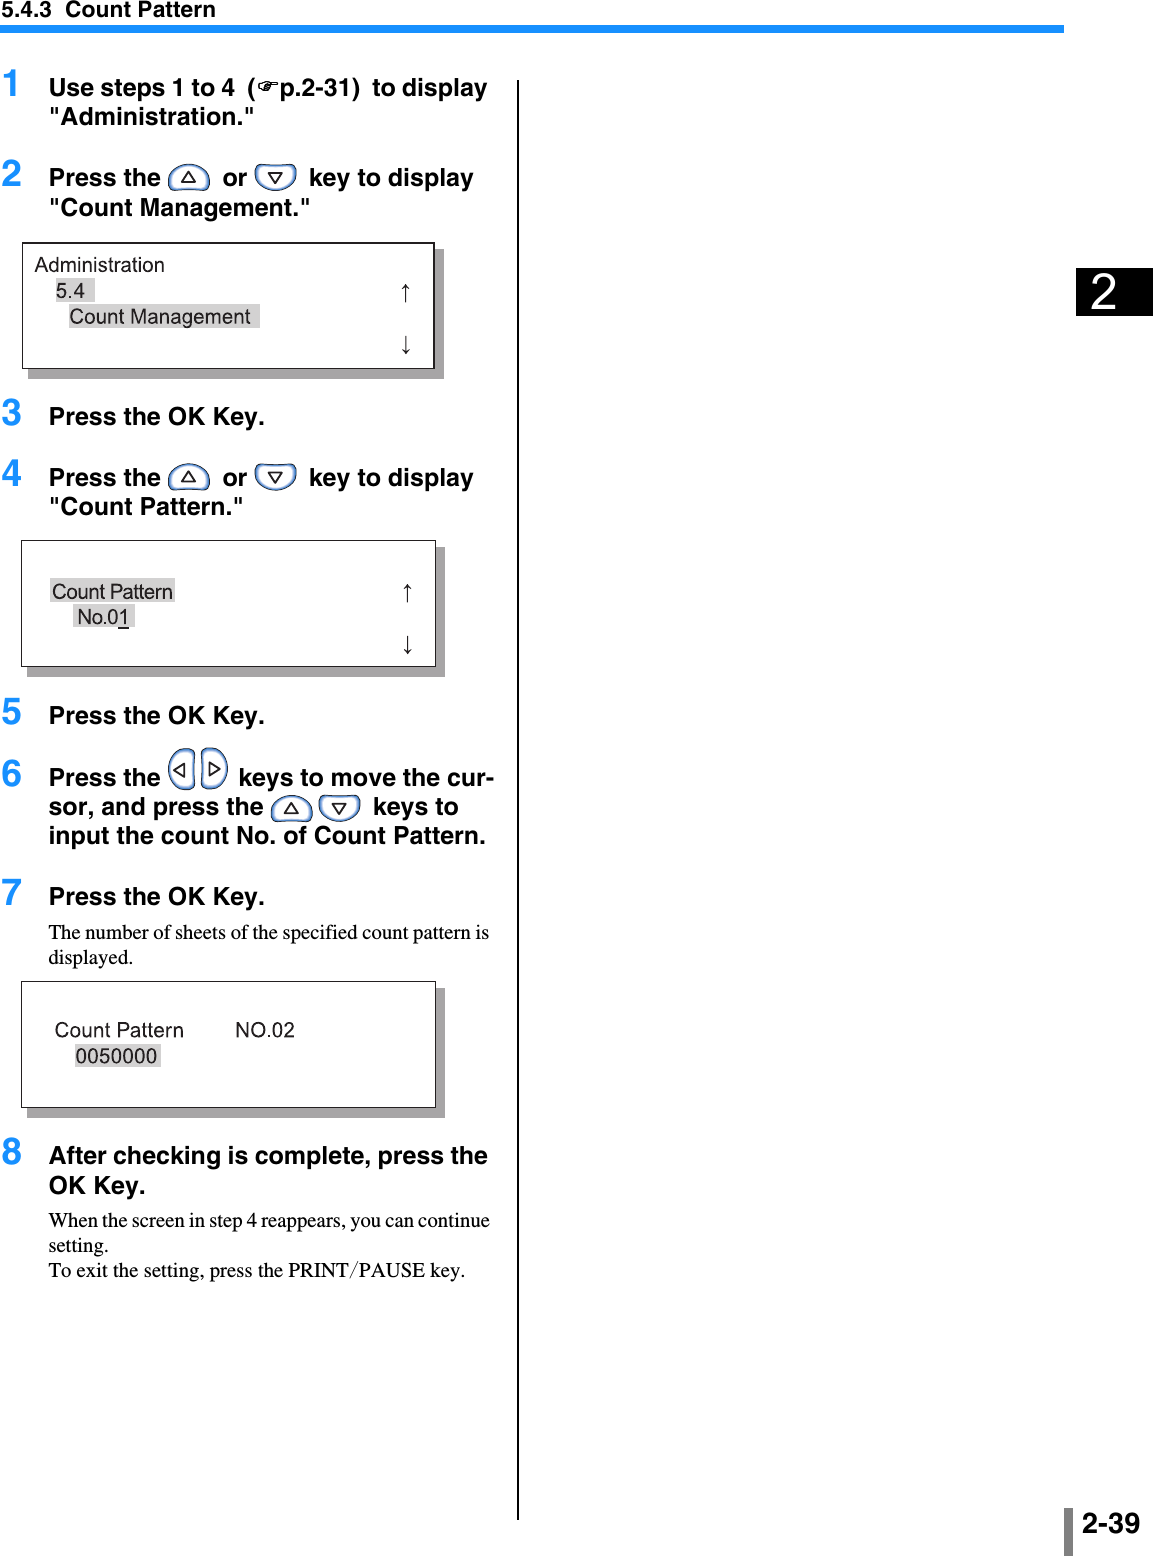
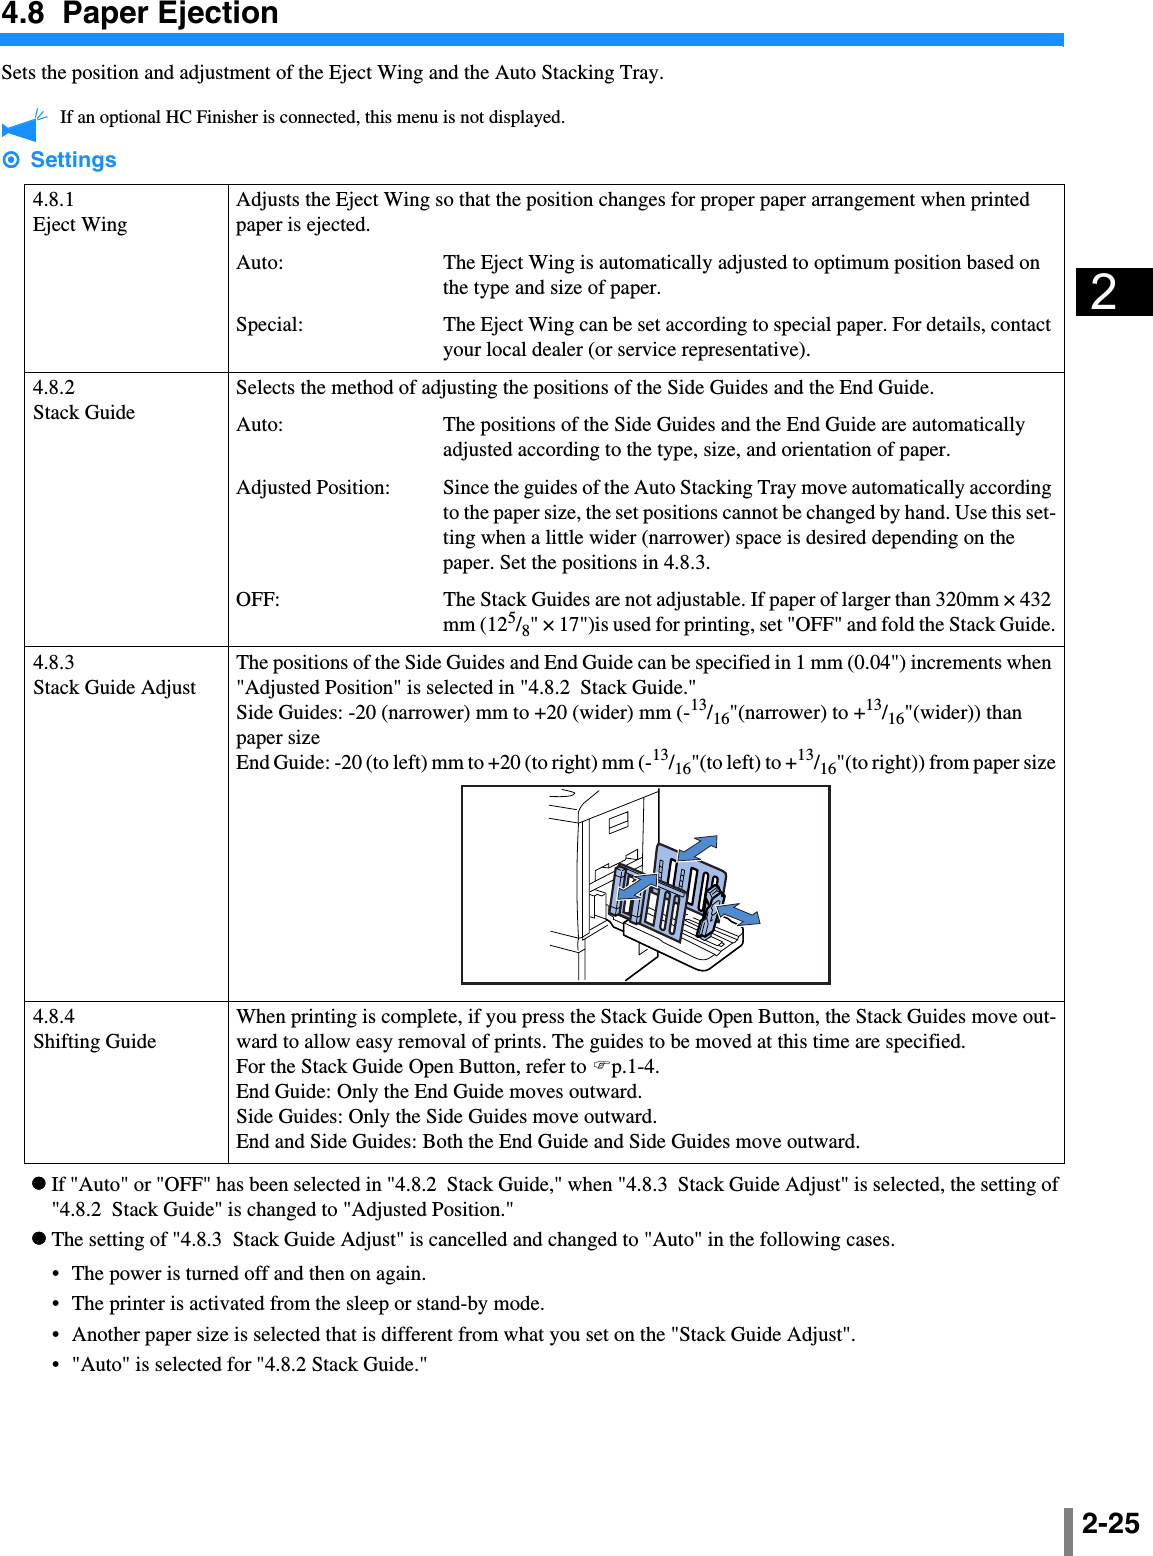
![2-425.6 Configuration Information PrintConfiguration settings are printed in a list. Current printer settings and menu settings can be checked in a list.####Settings Restrictions in configuration information print•Perform configuration information print when printing is not being performed, for exammple, when "Ready" is displayed.•Configuration Information Print can be printed only on paper loaded on the Standard Feed Tray.("Menu 6 Feed Tray Selection" is automatically set to Standard Feed Tray.)•For Configuration Information Print, A4-sized paper is required. When "No Paper" is displayed, load A4-sized paper onto the Stan-dard Feed Tray.The counter of the finisher functions is composed of the Finisher Counter number and the number of times. Finisher Counter number means the finisher function. (Only when the HC Finisher is connected.) When the number of times is printed as [ ***], it means that finisher function is not available with your finisher.5.6.1System InformationInformation such as printer memory capacity, firmware version, and IP address can be checked in a list.5.6.2Menu SettingThe menu settings made on the operation panel can be checked in a list.5.6.4Count PatternThe result of "5.4.3 Count Pattern" and the count of the finisher function (only if an optional finisher is connected) can be checked in a list.Finisher Count number Meaning (function)Finisher Counter1 Punching / 2 holesFinisher Counter2 Punching / 3 or 4 holesFinisher Counter3 Stapler / Rear 1 positionFinisher Counter4 Stapler / Front 1 positionFinisher Counter5 Stapler / 2 positionsFinisher Counter6 Booklet / Fold and stapleFinisher Counter7 Booklet / FoldFinisher Counter8 N/AFinisher Counter9 Cover Sheet Tray feeding](https://usermanual.wiki/Riso-Kagaku/RFMHL00.Host-manual-2/User-Guide-708299-Page-20.png)


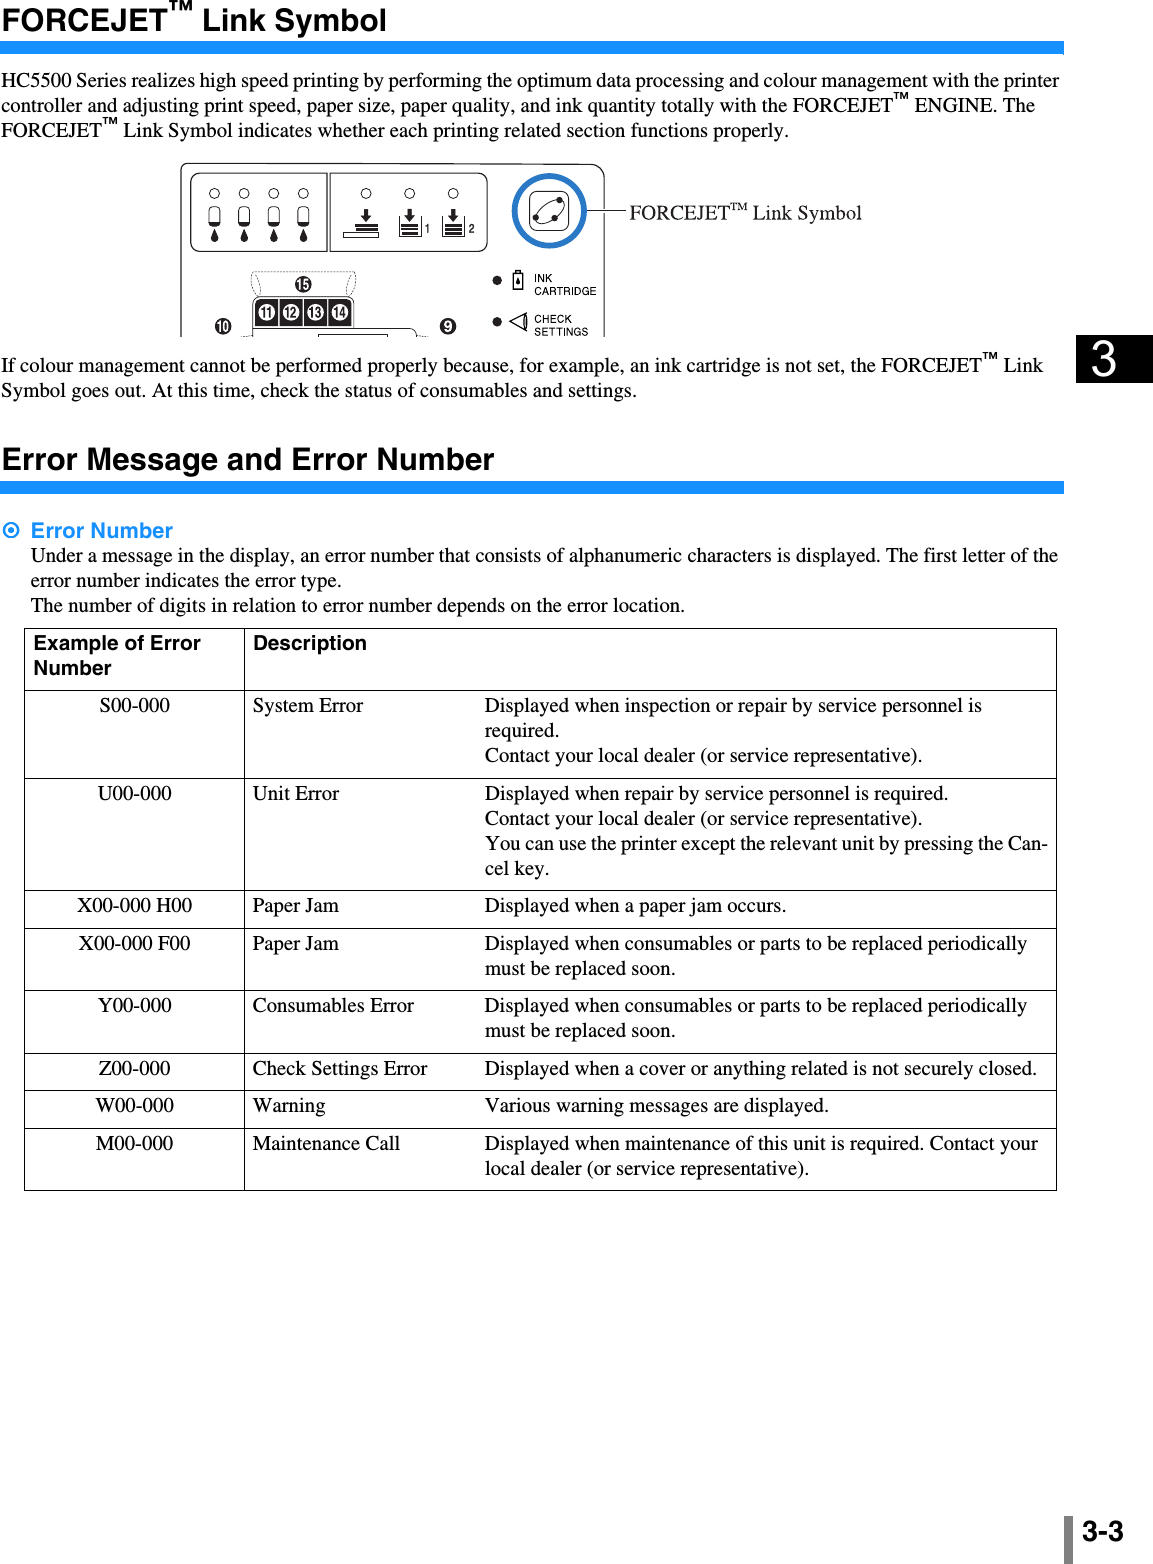
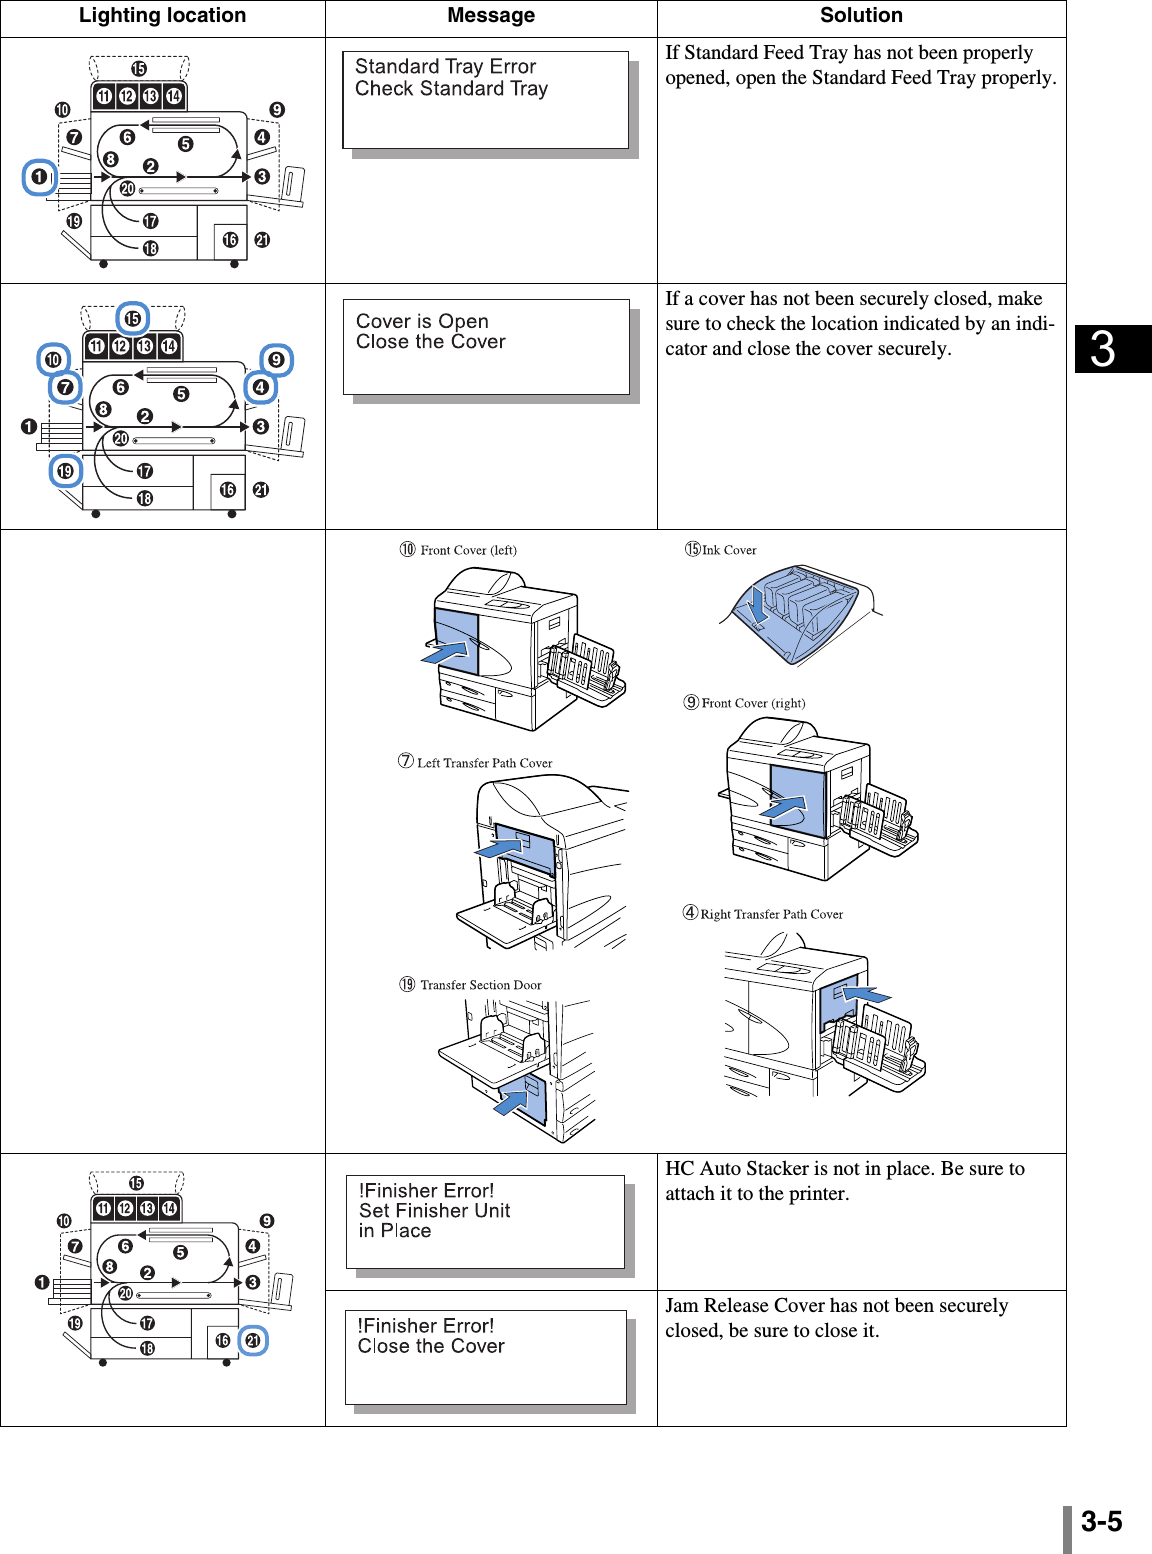
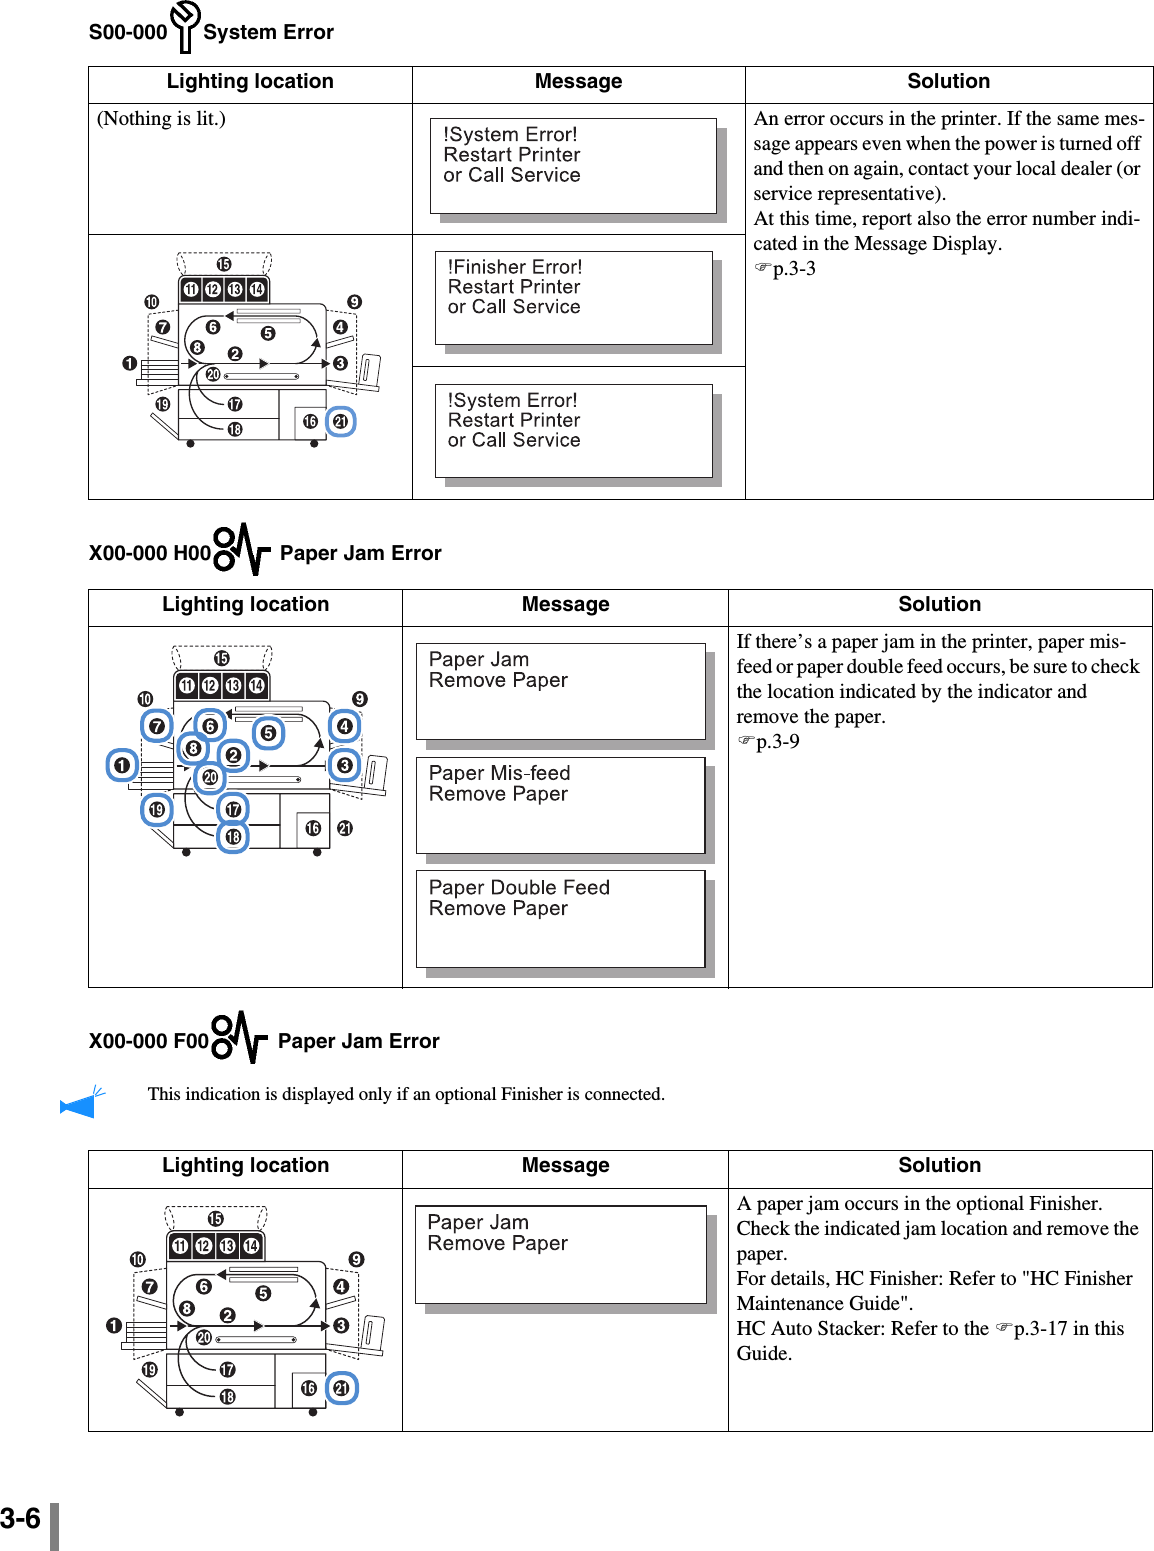
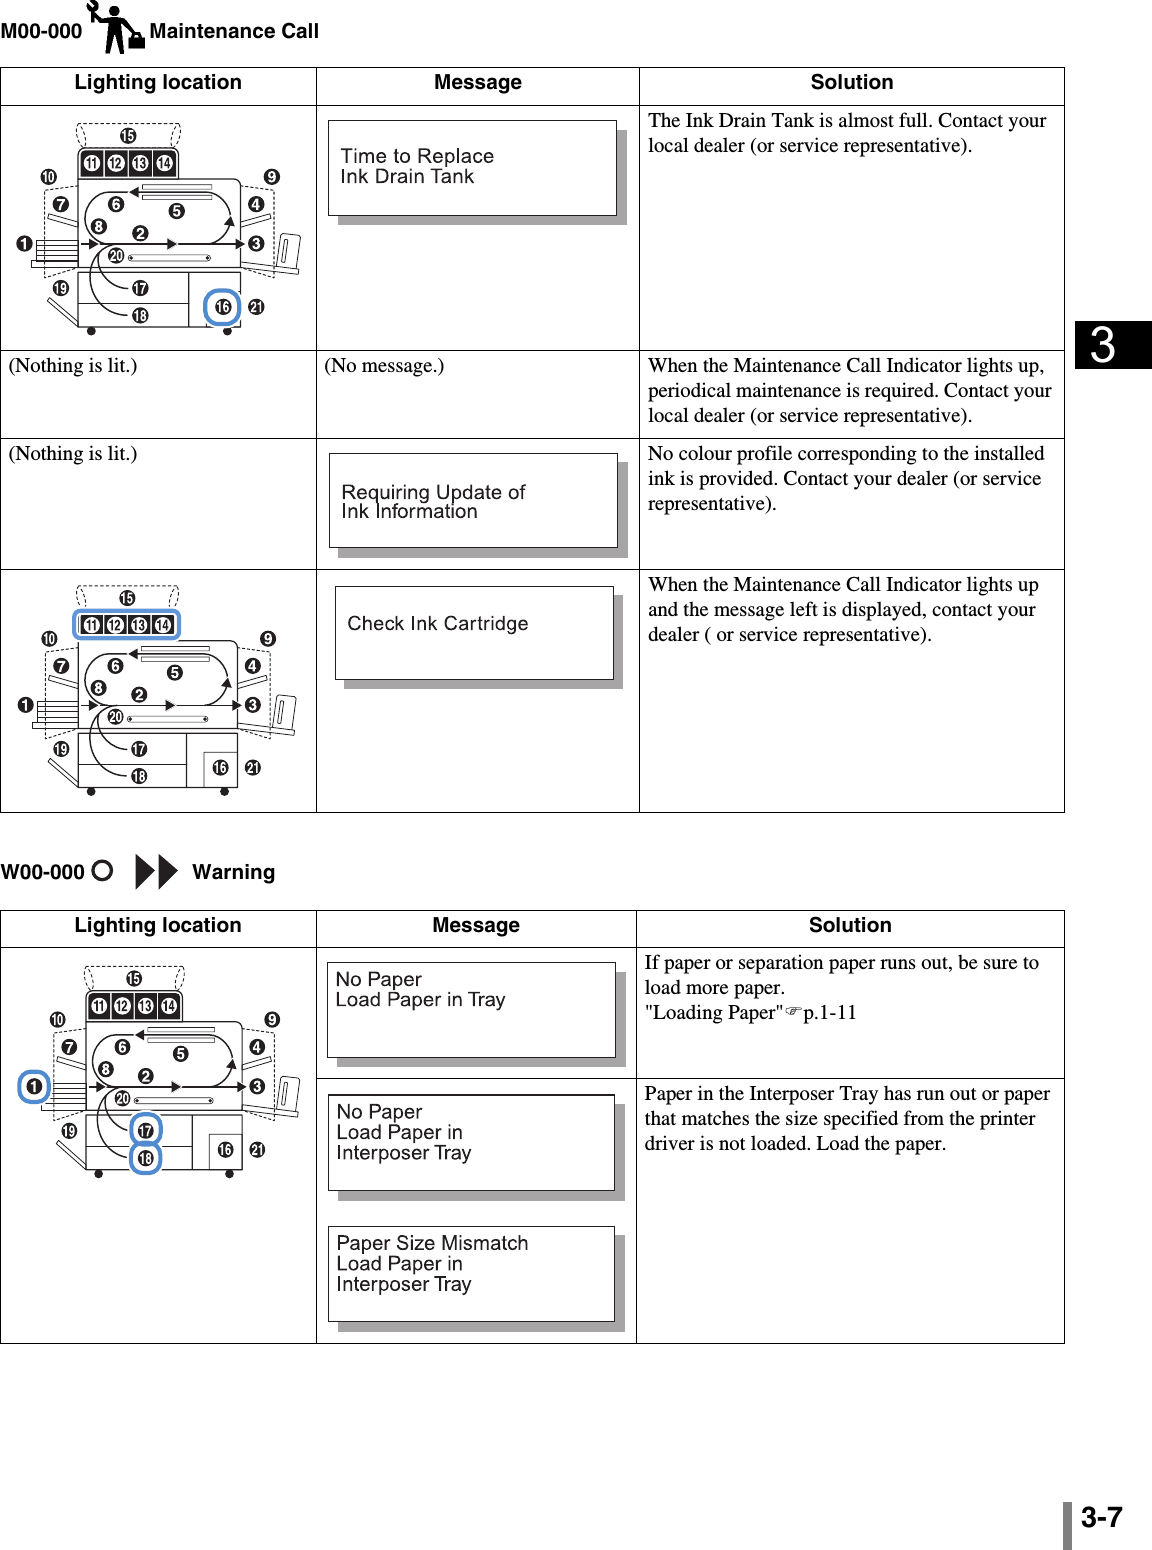
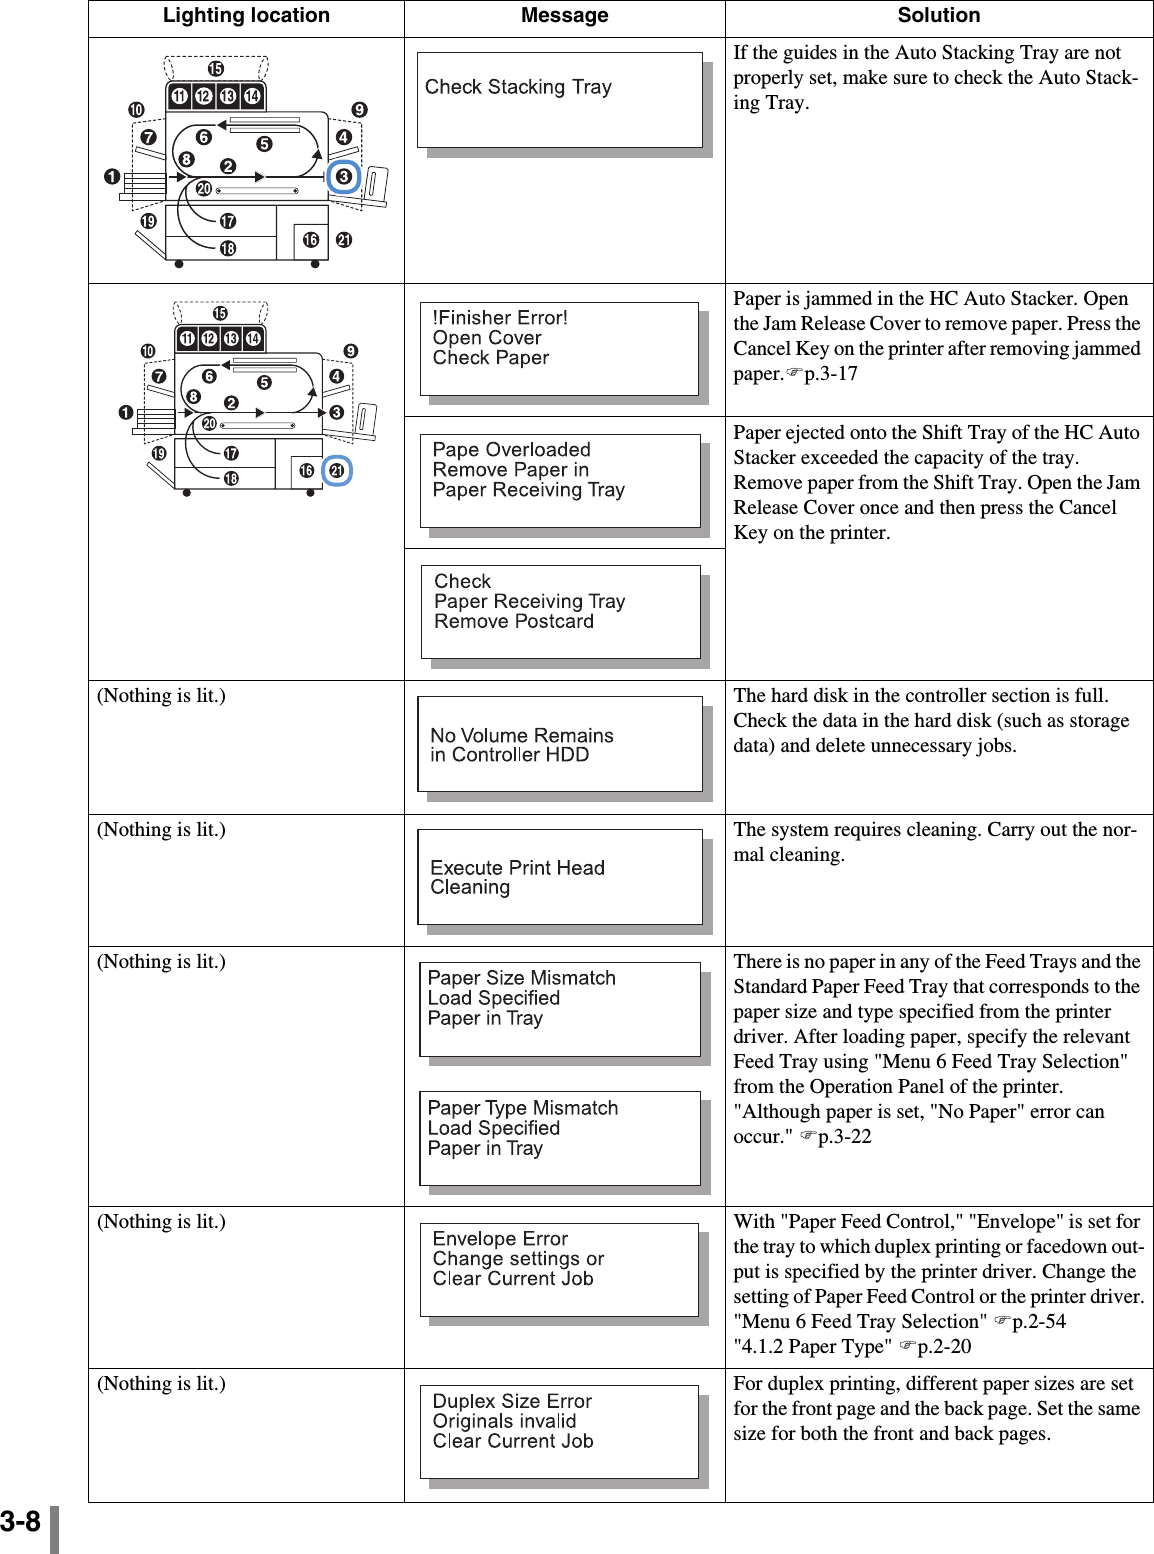
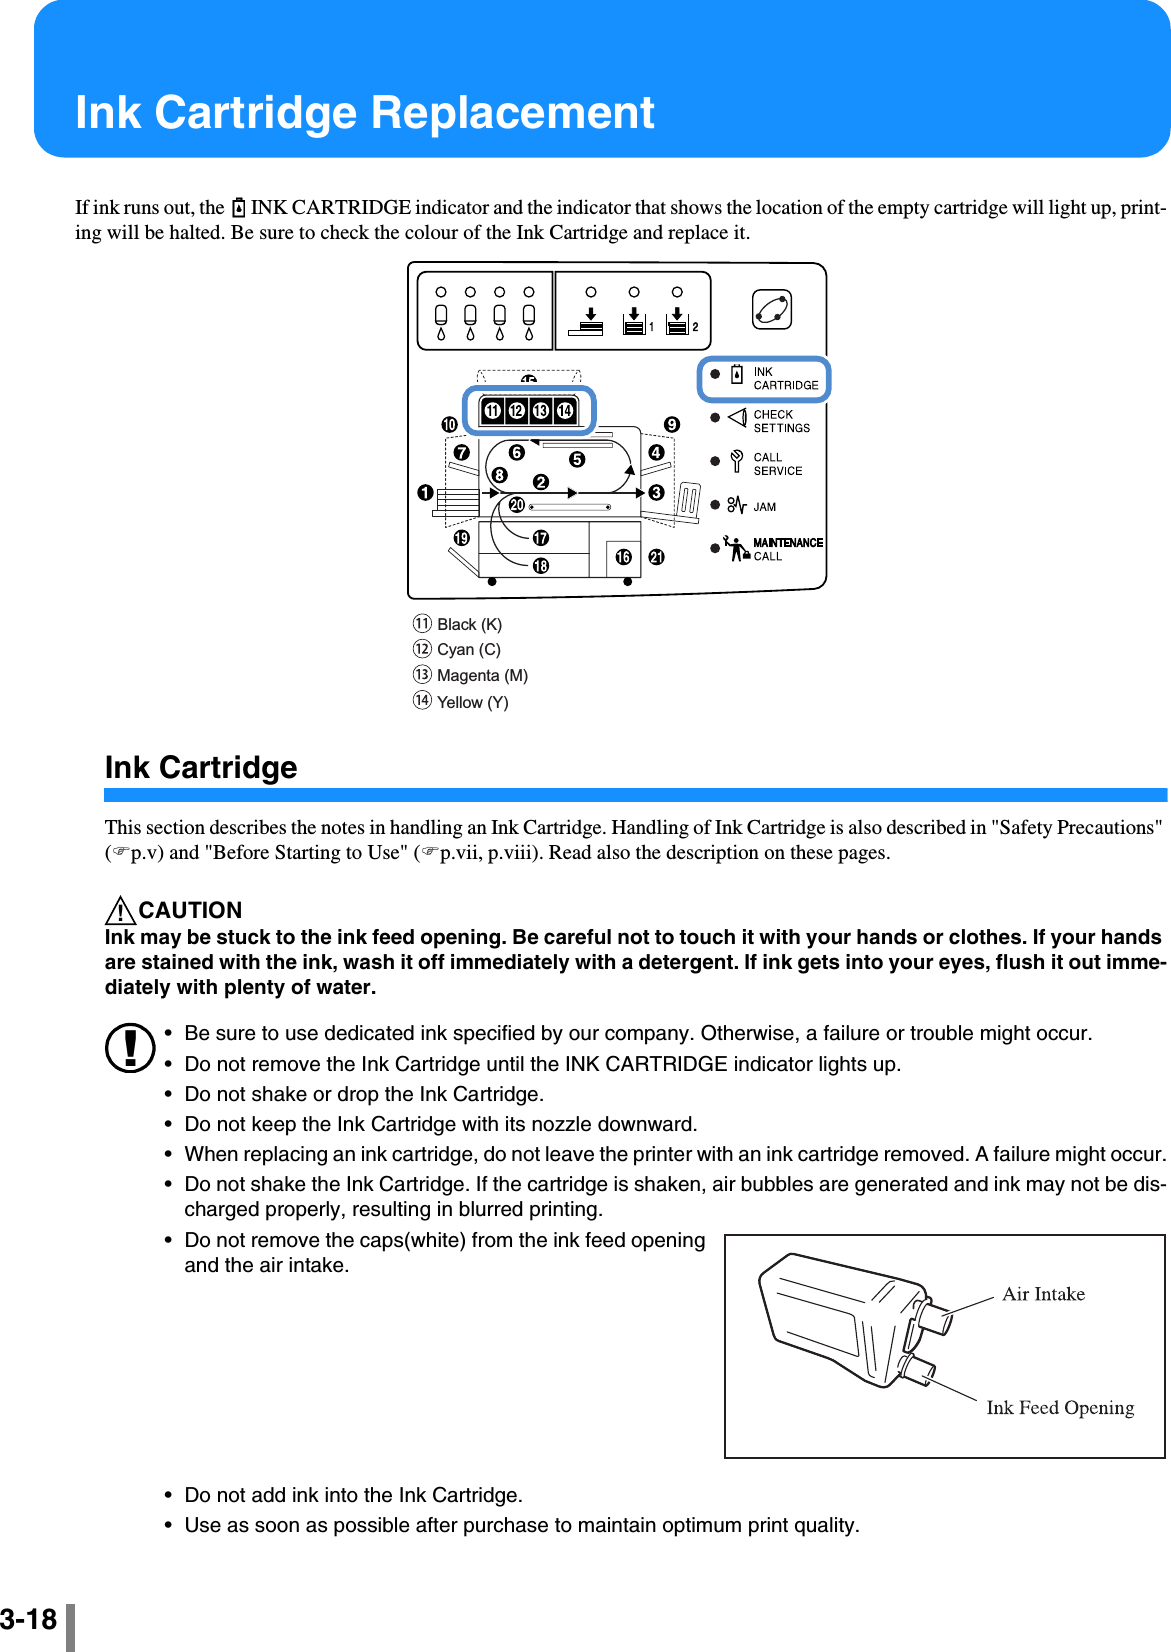
![3-2Explanation of Set Error DisplayIf trouble occurs during printing, printing stops and a symbol lights up on the Operation Panel or an error message appears in the dis-play.You can check the location based on the symbol or number and see the information from the message in the display.Symbol Display on Operation PanelA symbol indicating the relevant portion or type lights up. It may indicate a paper jam or ink cartridge replacement.Error MessageA message indicating the detail of the error and the solution appears in the display. If [21] in the panel is lit, an error occurs in the optional Finisher.HC Finisher: Refer to "HC Finisher Maintenance Guide". HC Auto Stacker: Refer to the following page and subsequent ones in this Guide.Remaining Volume Notice IndicatorsIf remaining volume of paper in the Feed Trays (Standard Feed Tray) or when ink is low (approximately 30%), the relevant Remaining Volume Notice Indicator will light up.After the indicator lights up, printing can be continued. When the ink runs out, the INK CARTRIDGE Indicator and the car-tridge number in which the ink runs out will light up which will cause printing to halt. When paper runs out, a message indicating to add paper will appear in the display and will be stopped. If the indicator lights up, prepare ink cartridges or paper for replace-ment."Ink Cartridge Replacement""p.3-18 "Loading Paper""p.1-11](https://usermanual.wiki/Riso-Kagaku/RFMHL00.Host-manual-2/User-Guide-708299-Page-36.png)
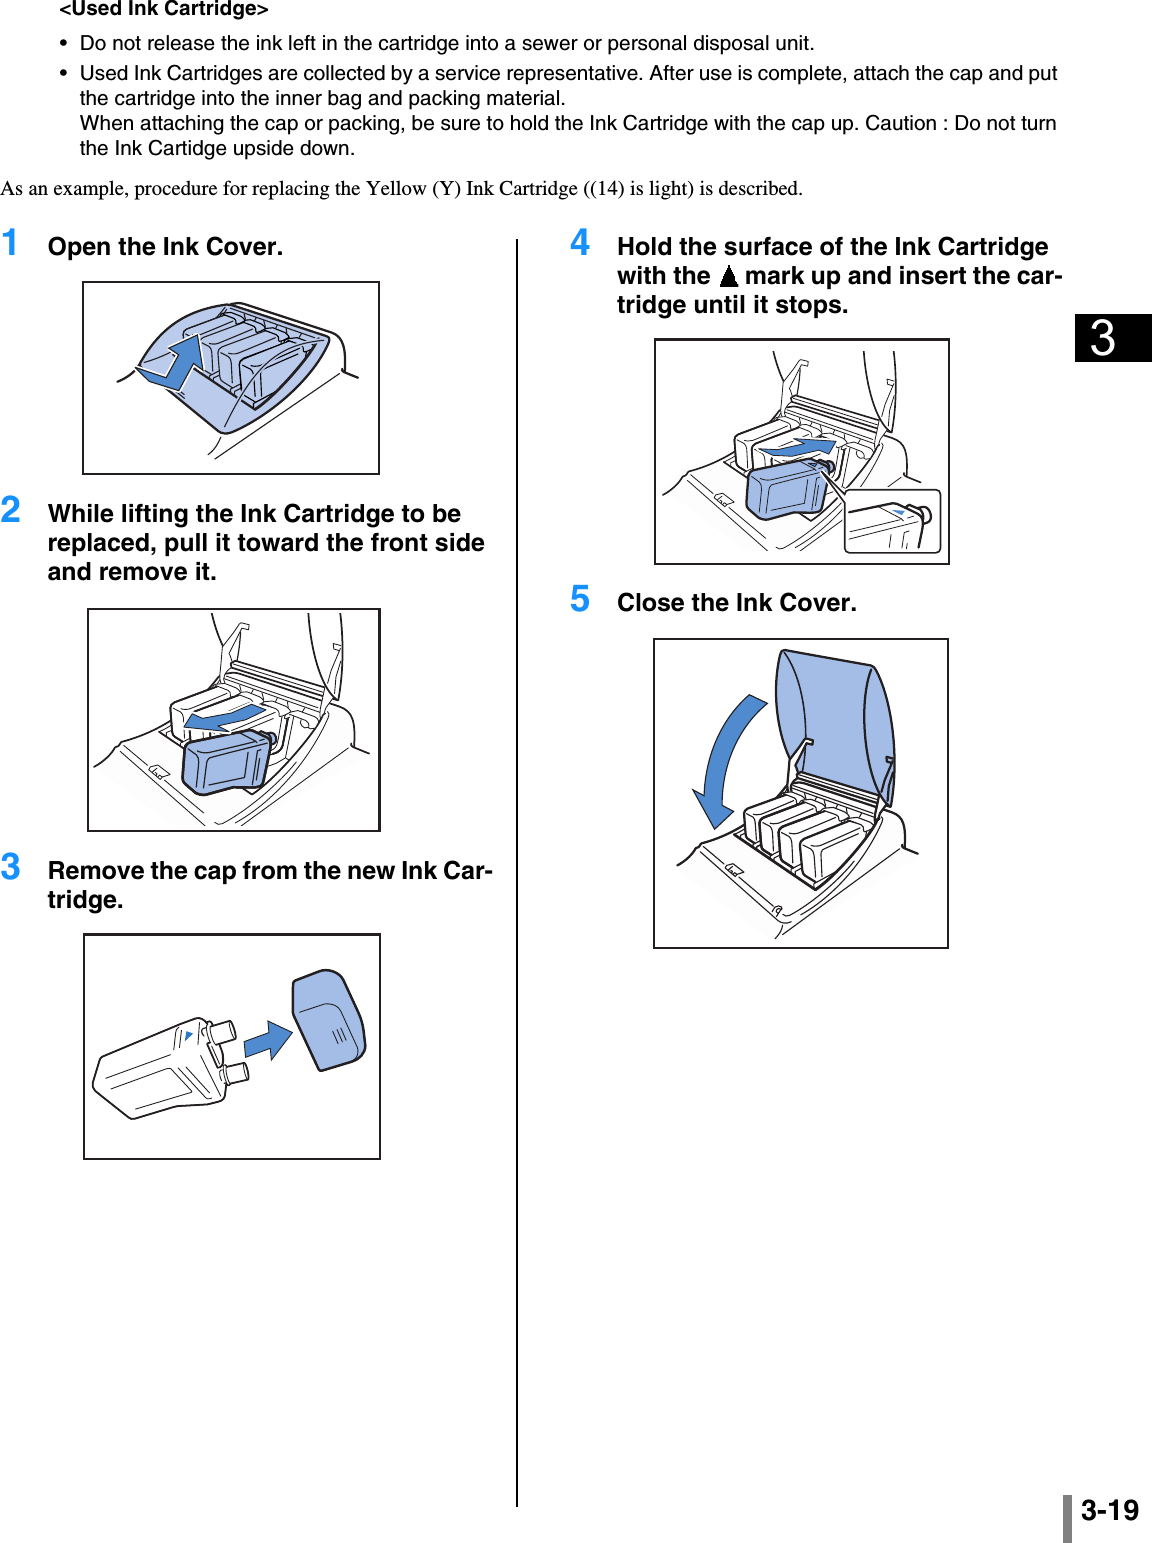
![3-213The printer does not operate according to the setting.Printing is not clean.Problem Cause and Solution"Job separation" is set in the printer driver screen but job separation cannot be performed."Separation Paper" is set to "OFF" in the menu setting.If "5.3 Separation Paper" of the menu setting is set to "OFF," job separation paper is not inserted. (If "OFF" is set, printing stops for a few seconds at the time of sepa-ration.)To insert job separation paper, select the desired tray at "5.3 Separation Paper" of the menu setting."4.6 Job Separation" "p.2-23"5.3 Separation Paper""p.2-36Unable to print onto paper in the Stan-dard Feed Tray.The Standard Feed Tray is not set as a tray for "Auto tray selection."Set "4.5 Triple-Tray Source" of the menu setting."4.5 Triple-Tray Source""p.2-22Alternatively, set "6 Feed Tray Selection" of the menu setting to "Standard Feed Tray." "Menu 6 Feed Tray Selection""p.2-54Problem Cause and SolutionPrinted image is light or blurred. Type of paper loaded for a Feed Tray (or the Standard Feed Tray) is not correct.Load the correct paper type at [Paper Type] of the menu setting.Print density setting is light.In the printer driver screen or the printer menu setting, set darker print density."Prinr density" of "HC5500 User’s Manual for Printer Driver""p.2-24When setting in the printer menu setting: "p.2-24The print head is clogged.Perform "Normal Cleaning" from the menu setting.If the problem cannot be solved with the method above, specify particularly the head of a lighter colour and perform "Hyper-Cleaning.""5.5 Head Maintenance""p.2-40Printed image is too dark. Type of paper loaded for a Feed Tray (or Standard Feed Tray) is not correct.Load the correct paper type at [Paper Type] of the menu setting.White stripes appear on images. The print head is clogged.First, perform "Normal Cleaning" from the menu setting.If the problem cannot be solved even if normal cleaning is performed several times, perform "Head Recovery.""5.5 Head Maintenance""p.2-40"5.8.50 Head Recovery""p.2-53Paper is stained. Paper that cannot be used is loaded.Check the paper types that can be loaded in the Standard Feed Tray and the other Feed Trays."Usable Paper""p.1-7Edge of paper is stained. Curled paper is used.The curled portion hits the print head and is stained. Since the print head may be damaged, do not use curled paper.Performing duplex printingNote that the edges of paper may be stained depending on the original.](https://usermanual.wiki/Riso-Kagaku/RFMHL00.Host-manual-2/User-Guide-708299-Page-55.png)
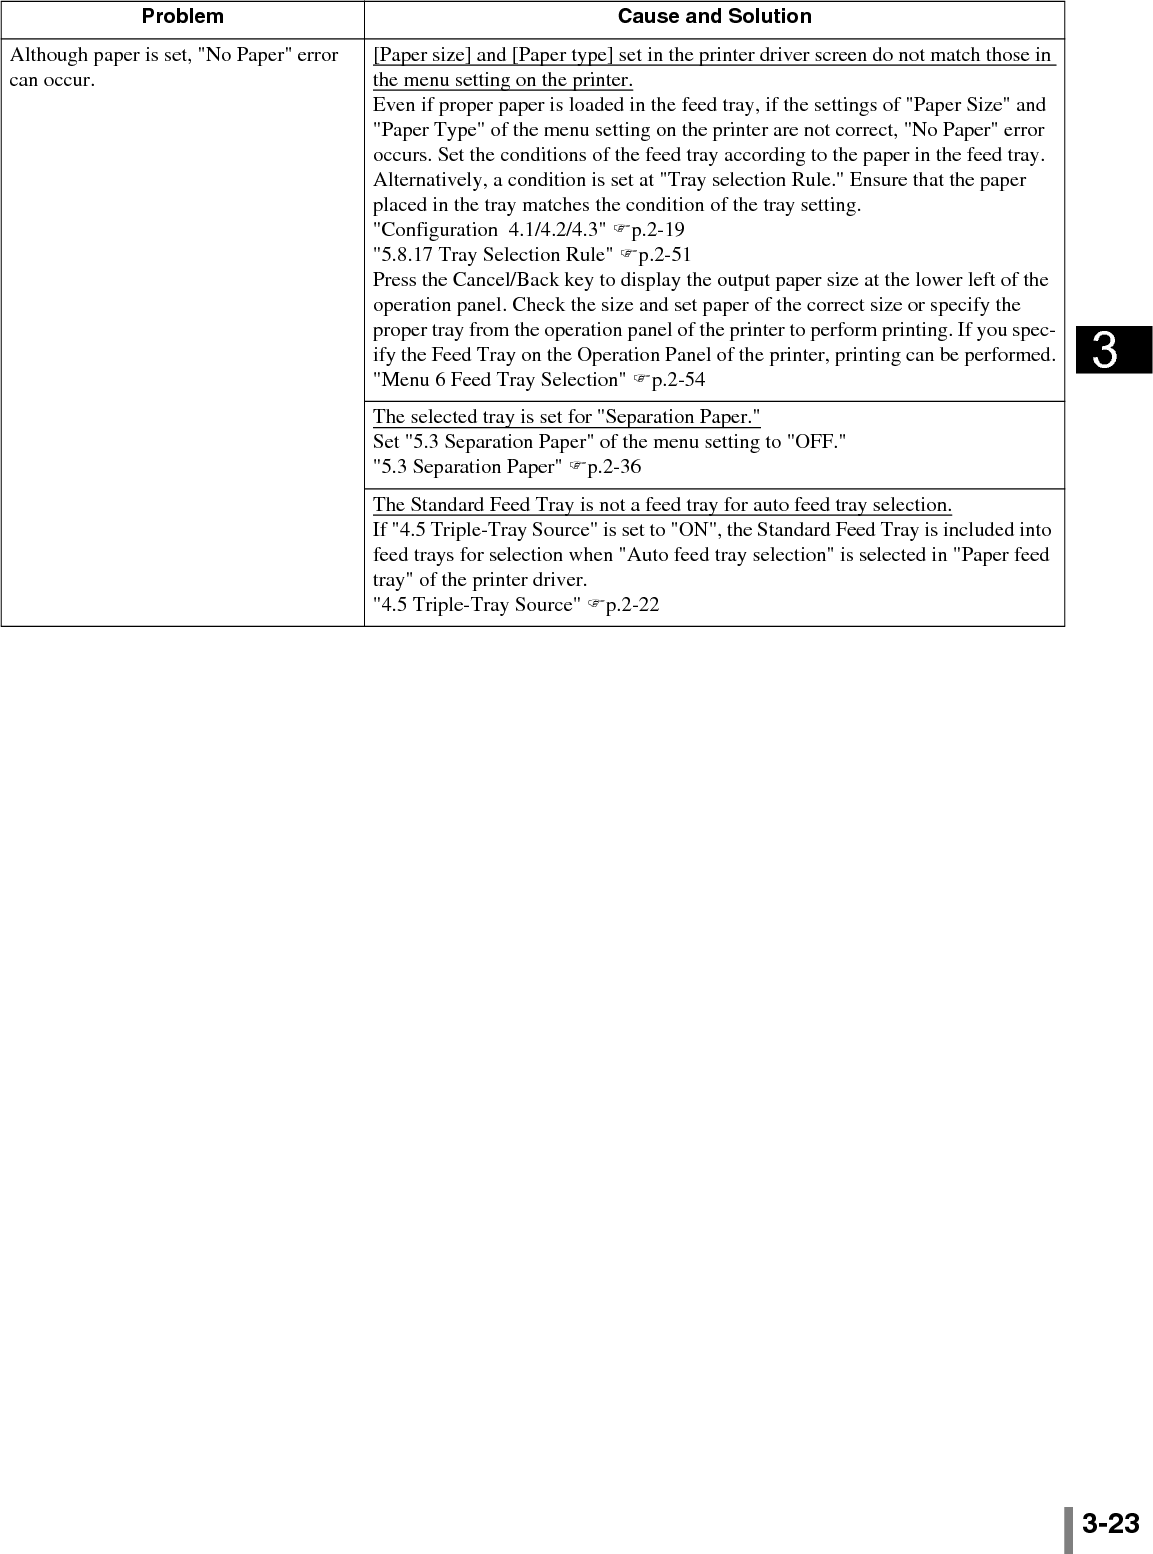
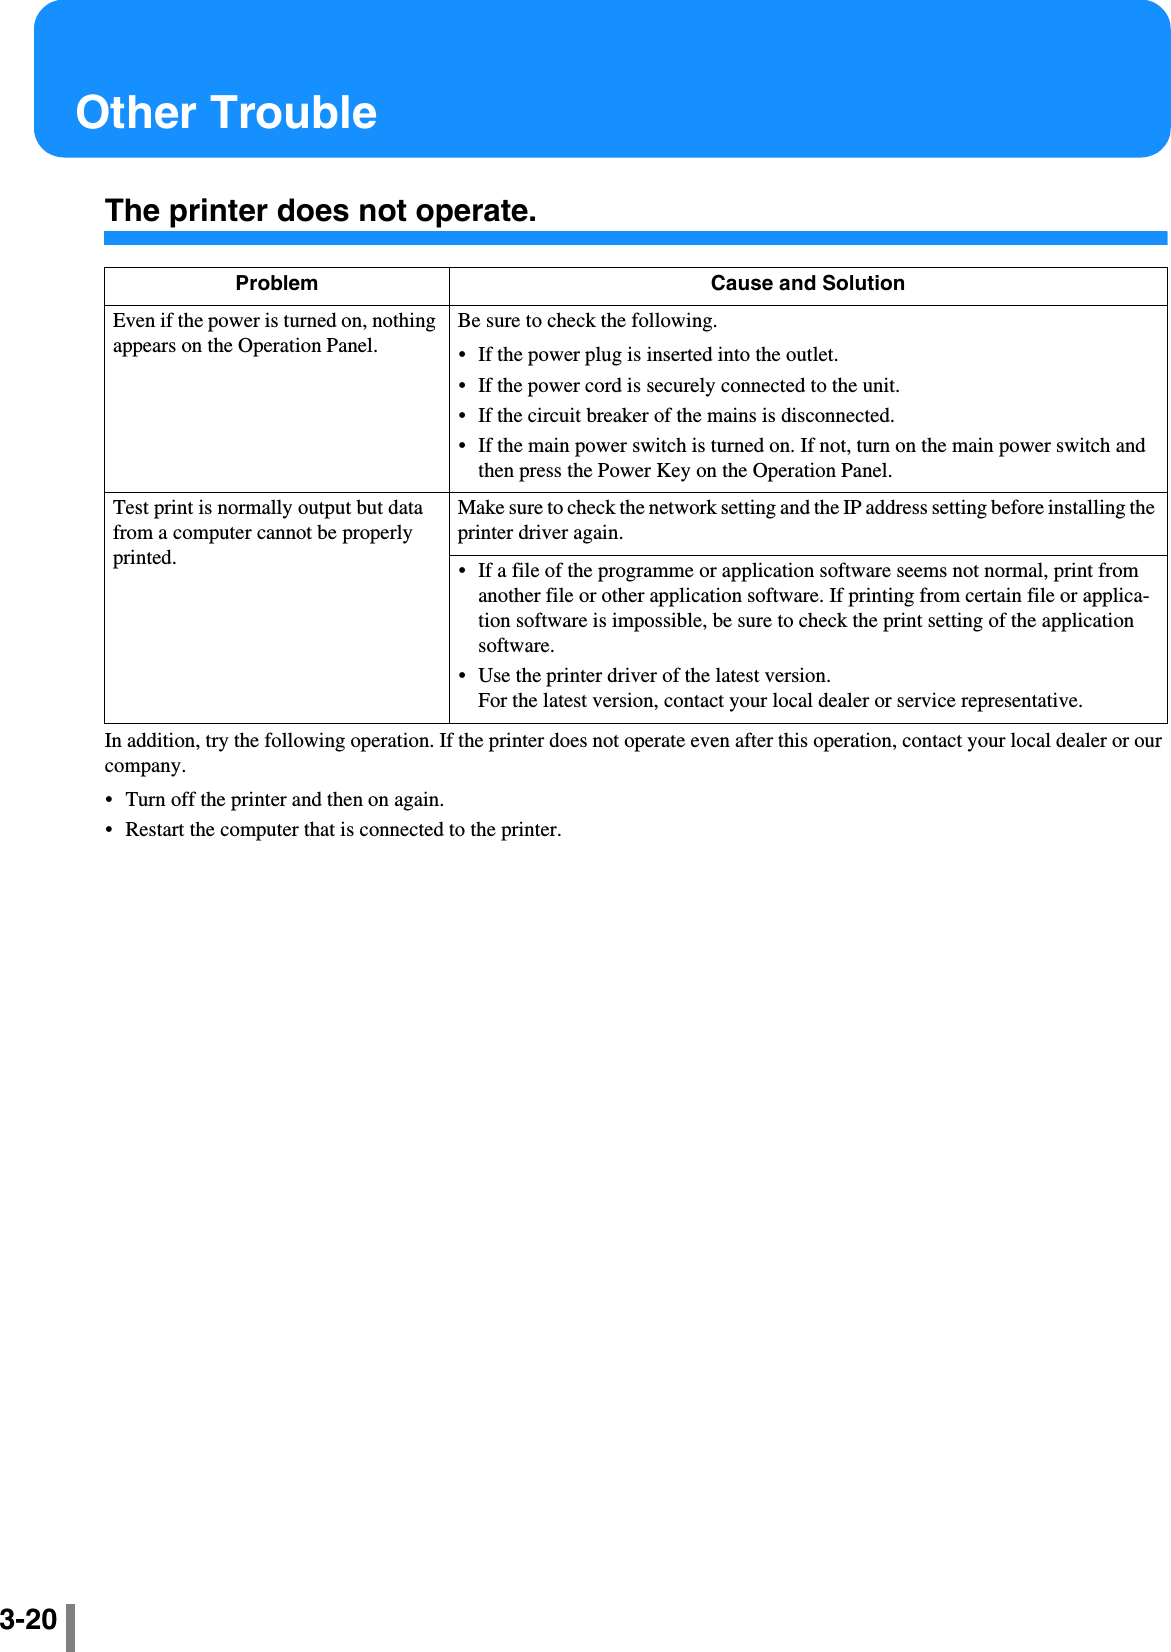
![3-233Although paper is set, "No Paper" error can occur.[Paper size] and [Paper type] set in the printer driver screen do not match those in the menu setting on the printer.Even if proper paper is loaded in the feed tray, if the settings of "Paper Size" and "Paper Type" of the menu setting on the printer are not correct, "No Paper" error occurs. Set the conditions of the feed tray according to the paper in the feed tray.Alternatively, a condition is set at "Tray selection Rule." Ensure that the paper placed in the tray matches the condition of the tray setting."Configuration 4.1/4.2/4.3" "p.2-19"5.8.17 Tray Selection Rule" "p.2-51Press the Cancel/Back key to display the output paper size at the lower left of the operation panel. Check the size and set paper of the correct size or specify the proper tray from the operation panel of the printer to perform printing. If you spec-ify the Feed Tray on the Operation Panel of the printer, printing can be performed."Menu 6 Feed Tray Selection" "p.2-54The selected tray is set for "Separation Paper."Set "5.3 Separation Paper" of the menu setting to "OFF.""5.3 Separation Paper" "p.2-36The Standard Feed Tray is not a feed tray for auto feed tray selection.If "4.5 Triple-Tray Source" is set to "ON", the Standard Feed Tray is included into feed trays for selection when "Auto feed tray selection" is selected in "Paper feed tray" of the printer driver."4.5 Triple-Tray Source" "p.2-22Problem Cause and Solution](https://usermanual.wiki/Riso-Kagaku/RFMHL00.Host-manual-2/User-Guide-708299-Page-57.png)