Roche Diabetes Care 816 Hand Held Blood Glucose Meter User Manual manual pt 1
Roche Diagnostics Operations, Inc. Hand Held Blood Glucose Meter manual pt 1
Contents
- 1. manual pt 1
- 2. manual pt 2
manual pt 1
User’s Manual
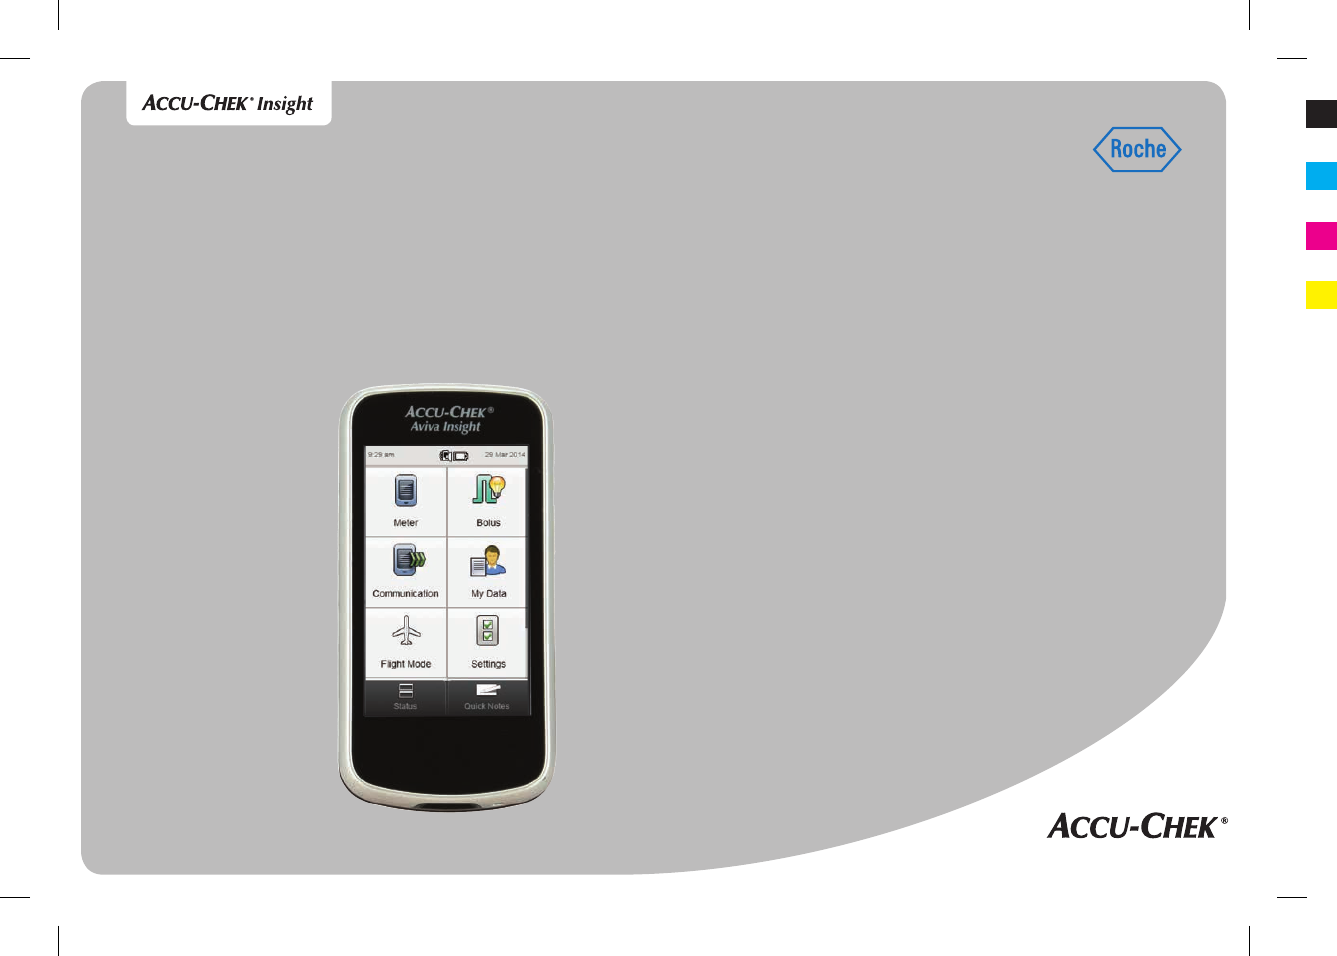
ACCU-CHEK® Aviva Insight Diabetes Manager
Roche USA – 52297
V6/1 – 07167776001 – Black
Roche USA – 52297
V6/2 – 07167776001 – Cyan
Roche USA – 52297
V6/3 – 07167776001 – Magenta
Roche USA – 52297
V6/4 – 07167776001 – Yellow
52297_07167776001.indb 1 10/20/14 11:17 AM

52297_07167776001.indb 2 10/20/14 11:17 AM

I
Contents
1 Important Safety Information 1
1.1 The ACCU-CHEK Aviva Insight System 1
1.2 Special Information for Caregivers 8
1.3 Before You Start Testing 9
2 Understanding Your Diabetes Manager 11
2.1 About This User’s Manual 11
2.2 The ACCU-CHEK Aviva Insight Diabetes Manager at a
Glance 12
2.3 Home Screen 16
2.4 Turning the Meter On or Off and Power Management 21
2.5 Navigation 24
2.6 Quick Notes Screen 29
2.7 Using the Test Strips 30
2.8 Summary of Features 33
3 Startup 35
3.1 Before You Get Started 35
3.2 Charging the Battery 36
3.3 Setup Wizard 41
3.4 Completing the Setup Wizard 43
3.5 Important Information 50
4 Control Testing 57
4.1 When to Perform a Control Test 57
4.2 About the Control Solutions 58
4.3 Performing a Control Test 59
4.4 Out-of-Range Control Results 63
5 Testing Your Blood Glucose 67
5.1 Performing a Blood Glucose Test 67
5.2 Adding Information to a Blood Glucose Result 73
5.3 Delivering a Bolus Without Bolus Advice 76
5.4 Understanding Blood Glucose Results 79
5.5 Unusual Blood Glucose Results 83
5.6 Symptoms of Low or High Blood Glucose 85
52297_07167776001.indb 1 10/20/14 11:17 AM

II
6 Bolus Advice 87
6.1 Overview 87
6.2 Before Using Bolus Advice 88
6.3 Delivering a Bolus Using Bolus Advice 91
7 Changing Bolus Advice Settings 101
7.1 Overview 101
7.2 Setting Up Bolus Advice 103
7.3 Bolus Advice: Time Block Settings 109
7.4 Bolus Advice: Adding a Time Block 113
7.5 Bolus Advice: Deleting Time Blocks 119
7.6 Bolus Advice: Resetting All Time Blocks 128
7.7 Health Event Percentages 134
7.8 Advice Options: Meal Rise, Snack Size, Acting Time, Offset
Time 136
7.9 Turning Off Bolus Advice 138
8 Changing Meter Settings 139
8.1 Overview 139
8.2 Date, Time, and Time Format 141
8.3 Mode Settings: Sound, Vibration 142
8.4 Mode Settings: Signal Suspension 144
8.5 Home Screen Default 146
8.6 Touchscreen: Tone, Vibration 147
8.7 Brightness 148
8.8 Background Color 149
8.9 Language 150
8.10 Time Block Settings 151
8.11 Adding a Time Block 154
8.12 Deleting Time Blocks 159
8.13 Resetting All Time Blocks 168
8.14 Warning Limits: Hypo, Hyper 173
8.15 Insulin Increment 175
8.16 Max Bolus Amount 176
8.17 Carbohydrate Unit 178
52297_07167776001.indb 2 10/20/14 11:17 AM

III
9 Meter Reminders 179
9.1 Overview 179
9.2 Blood Glucose Test Reminder: After Meal 182
9.3 Blood Glucose Test Reminder: After High Blood Glucose
Result 184
9.4 Blood Glucose Test Reminder: After Low Blood Glucose
Result 186
9.5 Doctor Visit Reminder 188
9.6 Lab Test Reminder 190
9.7 Customized Reminder 192
9.8 Alarm Clock Reminder 195
9.9 Medication Reminder 199
10 Communication 203
10.1 Overview 203
10.2 Connecting the Meter to a PC using a USB Cable 204
10.3 Changing USB Cable Connection Settings 207
11 Travel Settings 209
11.1 Overview 209
11.2 Turning On Flight Mode 210
11.3 Turning Off Flight Mode 211
12 My Data 213
12.1 Overview 213
12.2 The Logbook 214
12.3 The Trend Graph 229
12.4 The Standard Week 237
12.5 The Standard Day 244
12.6 Target Data 250
12.7 The bG Averages Table 255
13 Cleaning and Disinfecting the Meter and
Lancing Device 261
13.1 Overview 261
13.2 Cleaning and Disinfecting the Meter 263
13.3 Cleaning and Disinfecting the Lancing Device 267
14 Care and Maintenance 271
14.1 Overview 271
14.2 Charging the Battery 271
14.3 Power-Saving Tips 272
14.4 Changing the Battery 273
14.5 Touchscreen Calibration 276
14.6 Meter Function Test 278
52297_07167776001.indb 3 10/20/14 11:17 AM

IV
15 Troubleshooting 281
15.1 Overview 281
15.2 Troubleshooting the Meter 282
16 Technical Information 299
16.1 Product Limitations 299
16.2 Specifications 299
16.3 Product Safety Information 304
16.4 Discarding the Meter, Test Strips, Lancing Devices,
Lancets, and Batteries 305
16.5 List of Icons 307
16.6 Warranty and Limited License 316
16.7 Additional Supplies 320
16.8 Information for Healthcare Professionals 320
16.9 Meter Information 321
16.10 Error Log 322
16.11 Radio Frequency (RF) Signal 324
16.12 Meter Range Limits and Defaults 326
Appendix A: Bolus Advice Overview 331
Appendix B: Bolus Advice Calculations 343
Glossary 349
Index 357
52297_07167776001.indb 4 10/20/14 11:17 AM

1
1
1 Important Safety Information
Please read this user’s manual carefully before you use your
ACCU-CHEK Aviva Insight Diabetes Manager (hereafter referred to
as the meter). To use it correctly and dependably, you need to
understand the meter’s operation, screen displays, and all
individual features.
The ACCU-CHEK Aviva Insight meter is indicated as an aid in the
treatment of insulin requiring diabetes. The ACCU-CHEK Aviva
Insight system consists of the ACCU-CHEK Aviva Insight meter,
ACCU-CHEK Aviva Plus test strips, ACCU-CHEK Aviva control
solutions, and ACCU-CHEK Bolus Advisor. The ACCU-CHEK Aviva
Insight meter is intended to facilitate the optimization of glycemic
control in patients who are trained in multiple daily insulin
injection therapy and are under the supervision of healthcare
professionals experienced in managing insulin treated patients.
1.1 The ACCU-CHEK Aviva Insight System
52297_07167776001.indb 1 10/20/14 11:17 AM

2
The ACCU-CHEK Aviva Insight blood glucose monitoring system is
intended to be used for the quantitative measurement of glucose
in fresh capillary whole blood samples drawn from the fingertips.
The ACCU-CHEK Aviva Insight blood glucose monitoring system is
intended for self-testing outside the body (in vitro diagnostic use)
by people with diabetes. The ACCU-CHEK Aviva Insight blood
glucose monitoring system is intended to be used by a single
person and should not be shared. The ACCU-CHEK Aviva Insight
blood glucose monitoring system should not be used for the
diagnosis or screening of diabetes or for neonatal use. Alternative
site testing should NOT be used with the ACCU-CHEK Aviva Insight
blood glucose monitoring system. The ACCU-CHEK Aviva Insight
system is intended for prescription home use only.
The ACCU-CHEK Aviva Insight meter is also indicated for the
calculation of an insulin dose or carbohydrate intake based on
user-entered data. The ACCU-CHEK Bolus Advisor, as a component
of ACCU-CHEK Aviva Insight meter, is intended for use in providing
insulin dose recommendations in response to blood glucose,
health events, and carbohydrate input. The ACCU-CHEK Bolus
Advisor is intended to provide direction for insulin adjustment
within the scope of a pre-planned treatment program from a
healthcare professional. Before its use, a physician or healthcare
professional must prescribe the ACCU-CHEK Aviva Insight system
and provide the patient-specific target blood glucose, insulin-to-
carbohydrate ratio, and insulin sensitivity parameters to be
programmed into the ACCU-CHEK Bolus Advisor. Once
programmed, a patient must consult with his/her physician or
healthcare professional before making any changes to these
ACCU-CHEK Bolus Advisor settings.
52297_07167776001.indb 2 10/20/14 11:17 AM
NOTE
jThe term “blood glucose” is used when referring to
“blood sugar.”
jSample data displays are shown throughout the
manual. Your data will dier.
1
3
The ACCU-CHEK Aviva Insight system includes:
jACCU-CHEK Aviva Insight Diabetes Manager with rechargeable
battery and code chip
jUSB cable
jPower adapter with plug
jACCU-CHEK Aviva Plus test strips*
jACCU-CHEK Aviva control solutions*
jACCU-CHEK FastClix lancing device*
jACCU-CHEK FastClix lancet drums*
*Some items may not be included in the kit. They are a separate purchase.
w WARNING
Choking hazard. Small parts. Keep away from children under
the age of 3 years.
52297_07167776001.indb 3 10/20/14 11:17 AM

Need Help?
For questions, contact the ACCU-CHEK Customer Care Service
Center toll free at 1-800-688-4578. We offer assistance in many
languages. You can also visit http:\\www.ACCU-CHEK.com for
diabetes management tools and product demonstrations.
Please complete the warranty card and mail it, so you receive the
best customer service possible and product update news.
4
52297_07167776001.indb 4 10/20/14 11:17 AM

w WARNING
jDO NOT CHANGE YOUR THERAPY BASED ON A TEST RESULT THAT DOES NOT MATCH HOW YOU FEEL OR IF YOU BELIEVE THAT
YOUR TEST RESULT COULD BE INCORRECT.
jIt is always a good idea to have a back-up testing method available. Failure to test could cause a delay in therapy decisions and
lead to a serious medical condition. Examples of back-up testing methods include a back-up meter or testing by a laboratory.
Ask your healthcare professional or pharmacist about other possible back-up methods.
jIf your blood glucose result does not match how you feel and you have followed the instructions in this user’s manual, follow
your healthcare professional’s instructions, or contact your healthcare professional.
jDuring normal testing, any blood glucose meter or lancing device may come in contact with blood. All parts of the kit are
considered biohazardous and can potentially transmit infectious diseases from bloodborne pathogens, even after you have
performed cleaning and disinfecting.1,2
About Testing Yourself or Others
1
5
52297_07167776001.indb 5 10/20/14 11:17 AM

1
FDA Public Health Notification: “Use of Fingerstick Devices on More than One Person Poses Risk for Transmitting Bloodborne Pathogens: Initial Communication, (2010).
Update 11/29/2010” http://www.fda.gov/MedicalDevices/Safety/AlertsandNotices/ucm224025.htm. Accessed March 20, 2012.
2
CDC Clinical Reminder: “Use of Fingerstick Devices on More than One Person Poses Risk for Transmitting Bloodborne Pathogens, (2010).” http://www.cdc.gov/
injectionsafety/Fingerstick-DevicesBGM.html. Accessed March 20, 2012
3
Healthcare Infection Control Practices Advisory Committee (HICPAC), WilliamA.Rutala,Ph.D.,M.P.H., and DavidJ.Weber,M.D., M.P.H. Centers for Disease Control and
Prevention, 2008. “Guideline for Disinfection and Sterilization in Healthcare Facilities. Atlanta.”
w WARNING
jThe meter and lancing device should never be used by more than one person. Do not share the meter and lancing device with
anyone, including family members, due to the risk of infection from bloodborne pathogens.1,2
jCleaning and disinfecting the meter and lancing device destroys most, but not necessarily all, bloodborne pathogens.3
jIf the meter is being operated by a second person who is providing testing assistance to the user, the meter and lancing device
should be cleaned and disinfected prior to use by the second person.
jDisinfect the meter and lancing device before allowing anyone else to handle them. Do not allow anyone else to test with the
meter or lancing device.
jIt is important to keep the meter and lancing device clean and disinfected. For instructions on how to clean and disinfect the
meter and lancing device, see the chapter Cleaning and Disinfecting the Meter and Lancing Device in this manual.
jWash hands thoroughly before and after handling the meter, lancing device, or test strips.
6
52297_07167776001.indb 6 10/20/14 11:17 AM

NOTE
jPerform a control test when you open a new test strip box or if you think that a test
result is incorrect. Performing a control test lets you know that the meter and test strips
are working properly.
jRefer to the test strip and control solution package inserts for additional health-related
information.
jThis user’s manual shows sample screens. The screens in this manual may look
slightly dierent from the screens on the meter. If you have any questions about the
meter screens, contact the ACCU-CHEK Customer Care Service Center toll free at
1-800-688-4578.
jBlood glucose is sometimes shortened to bG, but it means the same thing.
1
7
52297_07167776001.indb 7 10/20/14 11:17 AM

1.2 Special Information for Caregivers
jDo not use the meter system to measure blood glucose in
people who are experiencing cardiovascular collapse (severe
shock) or decreased peripheral blood flow.
jConsult your healthcare professional to determine if it is
appropriate for your child to be taught how to use the meter
system or any other medical products.
jSome people with diabetes do not experience symptoms of low
blood glucose (hypoglycemia). Others, such as children or
people who are unconscious or have certain disabilities, may
not be able to communicate their symptoms to caregivers. For
these reasons, do not change any therapy without first talking
to a healthcare professional.
jNot for use on critically ill patients, patients in shock,
dehydrated patients, or hyperosmolar patients.
8
52297_07167776001.indb 8 10/20/14 11:17 AM
1.3 Before You Start Testing
w WARNING
jCarefully read and follow the instructions in this manual and package inserts for the test strips and control solutions. Not
following the instructions may lead to a wrong result or improper treatment, causing you health problems.
jInspect the test strip container before using the test strips for the first time. If you see any damage to the container cap or if
anything prevents the cap from closing properly, do not use the test strips. Contact ACCU-CHEK Customer Care Service Center at
1-800-688-4578. Damaged test strips can cause inaccurate results, which could lead to improper therapy.
jThe meter, test strips, and control solution are only for use outside the body (in vitro). Do not eat the test strips. Do not swallow or
inject the control solution or use the control solution for any purpose other than testing the ACCU-CHEK Aviva Insight system.
1
9
52297_07167776001.indb 9 10/20/14 11:17 AM

NOTE
jThe Setup Wizard activates every time you turn the
meter on until you complete the process.
jCheck the time and date on the meter before you
begin testing. Adjust the time and date if necessary.
10
52297_07167776001.indb 10 10/20/14 11:17 AM
w WARNING
A Warning is safety information that requires your careful
attention and informs you about risks to your health. Neglecting
this information may lead to life-threatening situations.
NOTE
A Note contains important information relating
to the efficient and smooth operation of the
meter.
2
11
2 Understanding Your Diabetes Manager
To help you fully benefit from your ACCU-CHEK Aviva Insight
Diabetes Manager, the functions and features of this product are
assigned as Basic and Optional.
jBasic functions are essential for the intended purpose of this
product and it is highly recommended to learn how to use them
before you start using this product.
jOptional functions help you get the maximum benefit from this
product. Together with your healthcare professional you can
choose to learn about and use these features at your own
discretion and your own pace.
This user’s manual includes the following for the safe and
convenient use of the meter:
2.1 About This User’s Manual
52297_07167776001.indb 11 10/20/14 11:17 AM
1
6
7
2
3
4
5
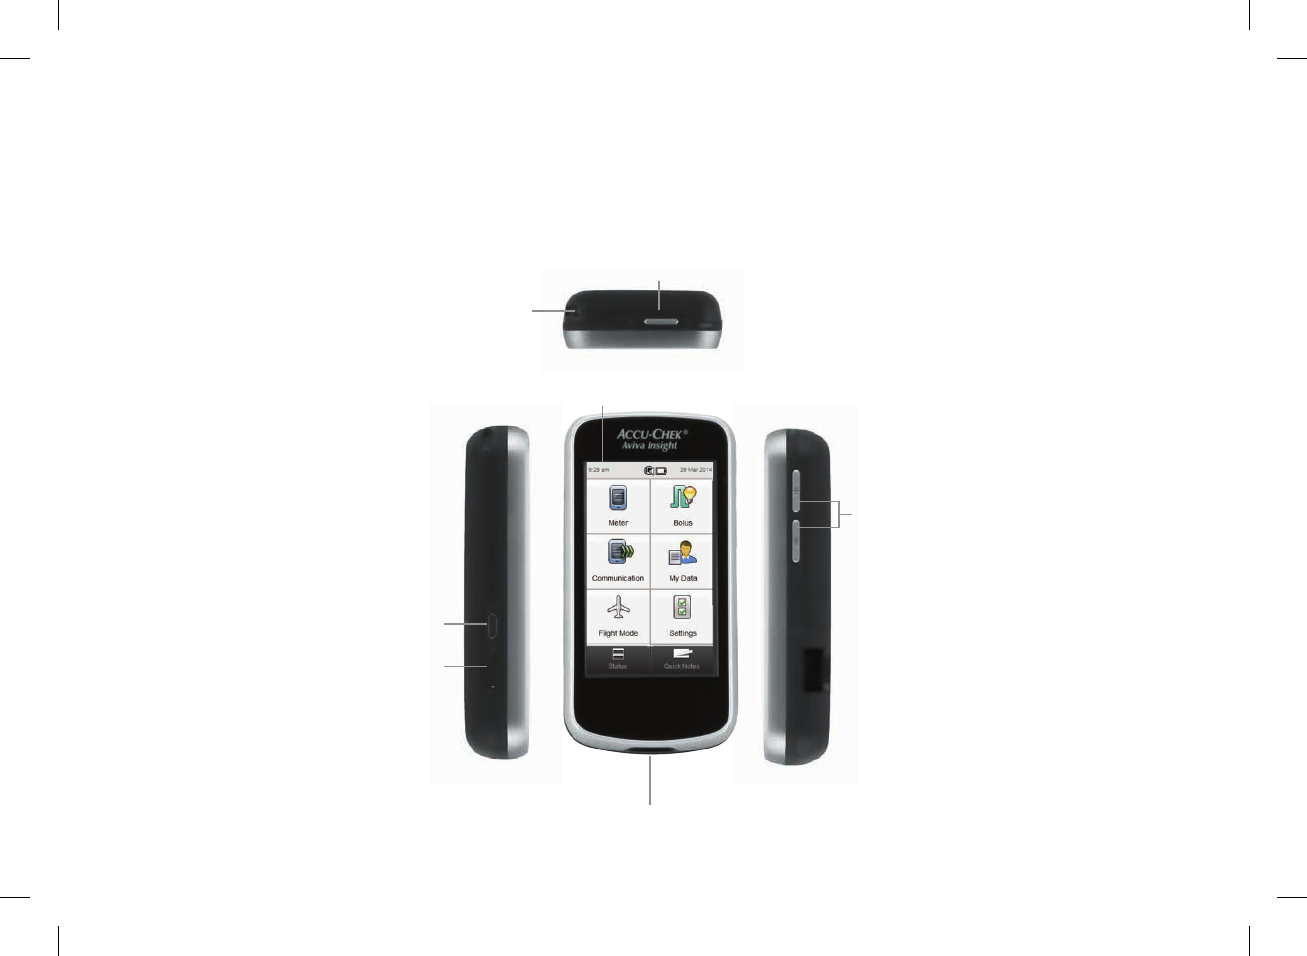
2.2 The ACCU-CHEK Aviva Insight Diabetes Manager at a Glance
12
52297_07167776001.indb 12 10/20/14 11:17 AM

5 Touchscreen
Display
Touchscreen with a color display for
navigating through meter menus and for
viewing information.
6 Volume
Buttons
Changes the volume of a message, for
example a Reminder. To mute the sound,
press the Volume Down button until the
sound is completely o.
7 Test Strip Slot Location for inserting the test strip for
blood glucose testing and control testing.
1 Power Button
Turns the meter on or o. See the
Turning the Meter On or O and Power
Management section in this chapter.
2
Lanyard
Attachment
Point
Location for attaching a lanyard.
3 Micro USB
Connector
Plug the small end of the USB cable to this
connector to recharge the battery or to
communicate with a PC.
4
Memory
Expansion
Port
Holds a memory card (included) which
contains software for the meter. Do not
remove the memory card. Roche will not
replace a removed memory card.
2
13
52297_07167776001.indb 13 10/20/14 11:17 AM
8
9
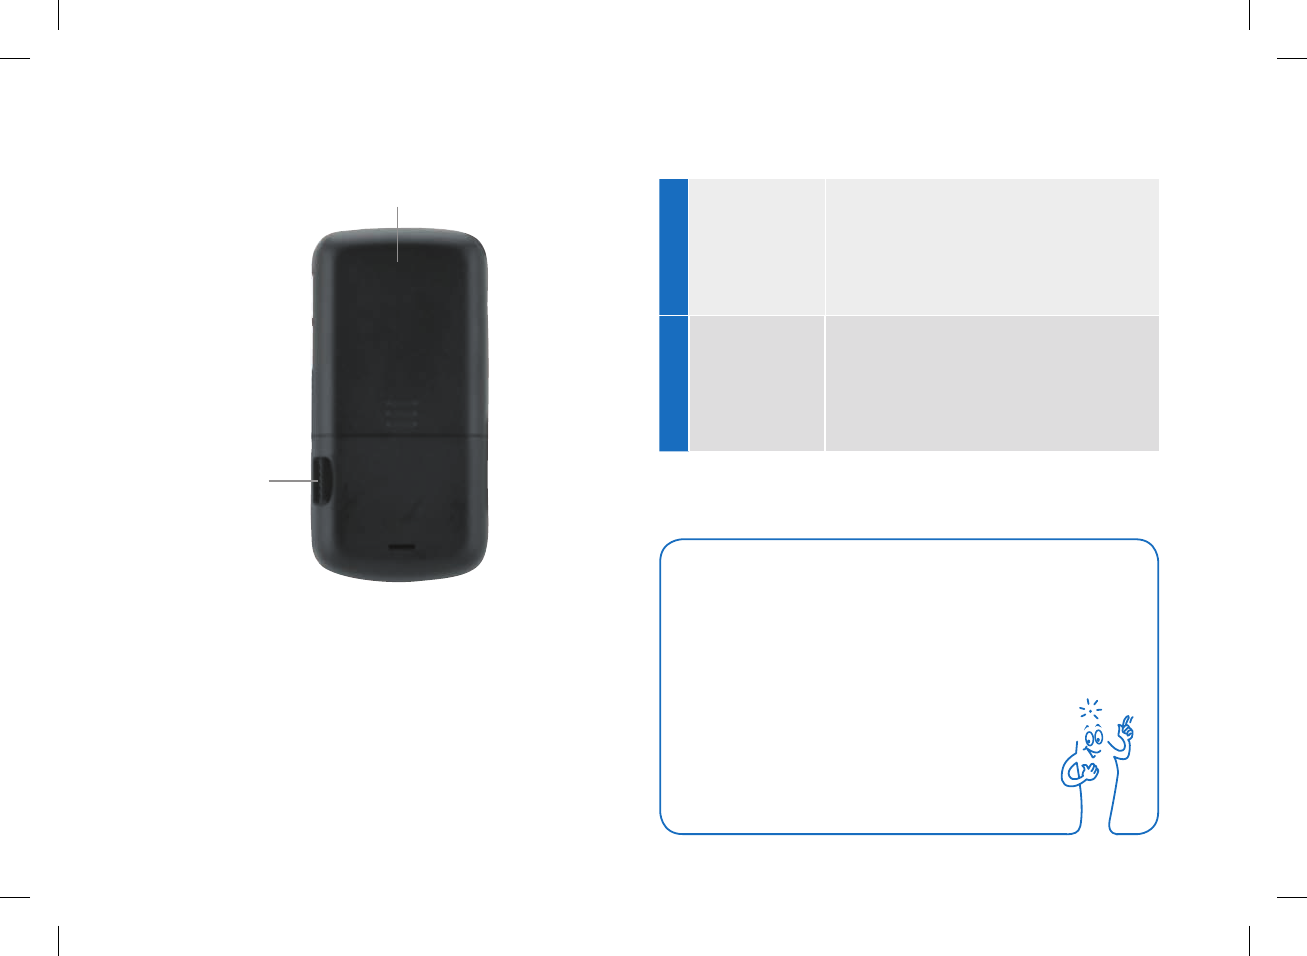
NOTE
The meter is already coded and comes with a pre-inserted
black code chip. You never need to change this code chip
even if you use test strips from boxes that
contain another code chip.
8 Code Chip
The meter is provided with a black code
chip. Do not remove the code chip. If the
code chip is missing, contact ACCU-CHEK
Customer Care Service Center at
1-800-688-4578.
9 Battery Door
Only remove the battery door to
replace the battery. See the Changing
the Battery section in the Care and
Maintenance chapter in this user’s
manual.
14
52297_07167776001.indb 14 10/20/14 11:17 AM
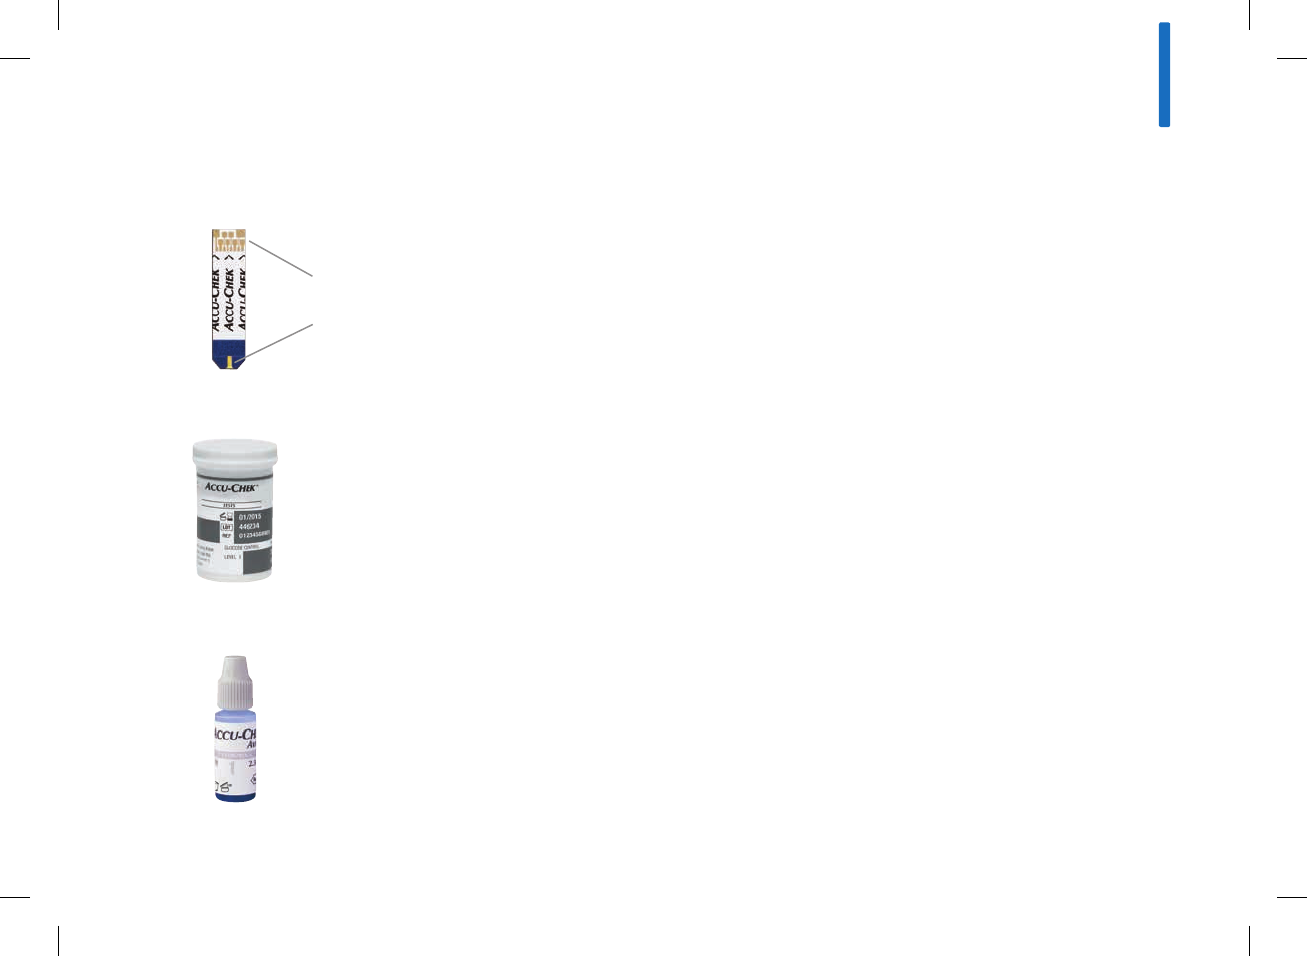
Test Strip Container
(for example)
Control Solution Bottle
(for example)
Test Strip
Yellow Window - Touch blood drop or
control solution here.
Metallic End - Insert this end into the
meter.
2
15
52297_07167776001.indb 15 10/20/14 11:17 AM

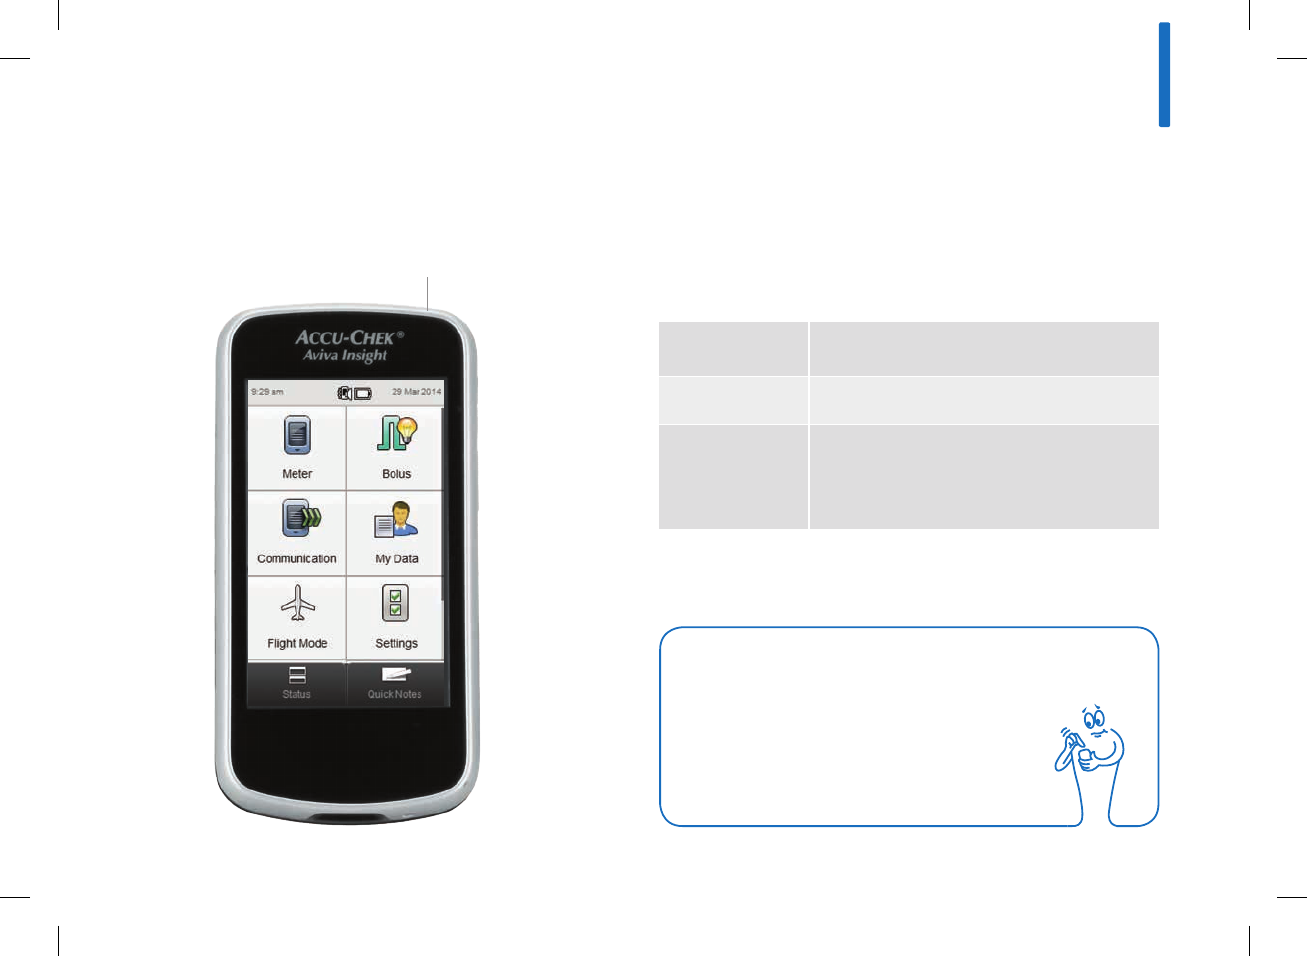
2.3 Home Screen
Home screen refers to the screen that is displayed when the
meter is powered on. Home screen can be either the Main Menu
or Status screen. To change the Home screen default, see the
Home Screen Default section in the Changing Meter Settings
chapter in this user’s manual.
16
52297_07167776001.indb 16 10/20/14 11:17 AM
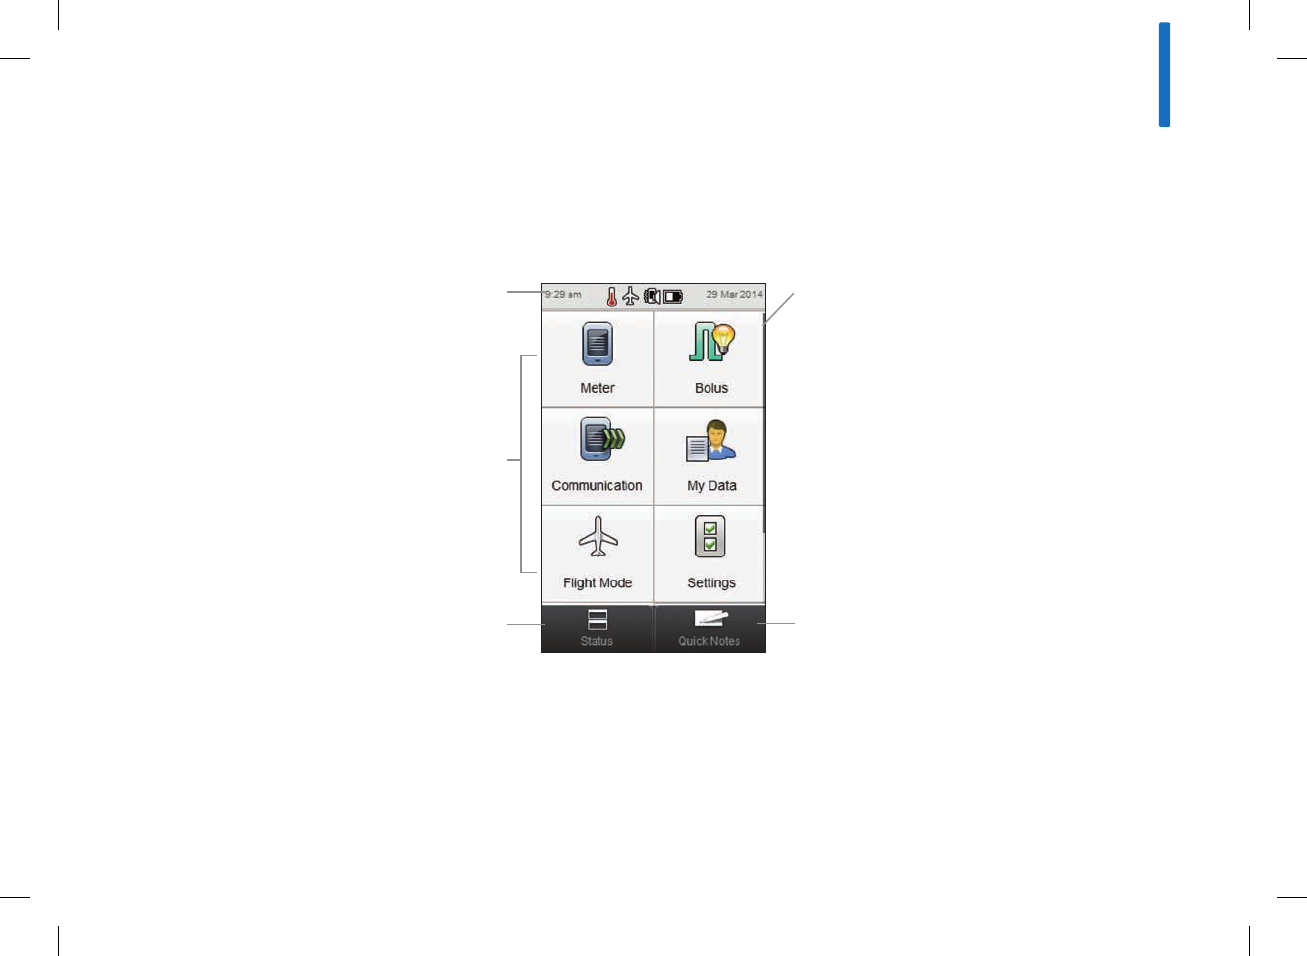
Menu Selections
2.3.1 Main Menu Screen
Title Bar
Displays meter information. See the
following table.
Scroll Bar
Appears when there is more information
than fits on the screen.
Go to Status Screen
See the Status Screen section in this
chapter.
Go to Quick Notes Screen
See the Quick Notes Screen section in this
chapter.
2
17
52297_07167776001.indb 17 10/20/14 11:17 AM
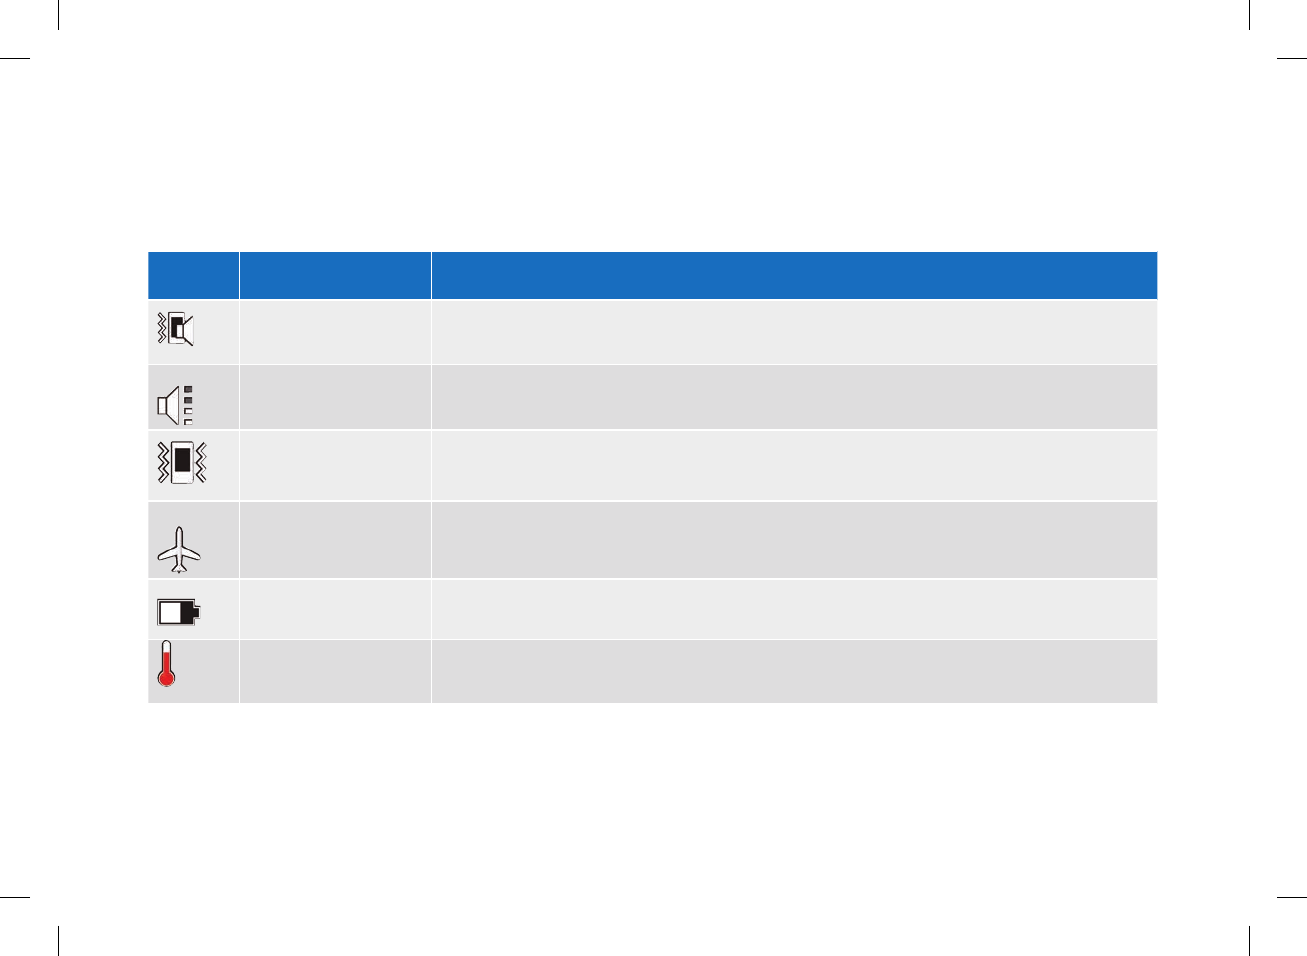
The Title Bar shows the time of day and date. In addition, the following icons may be displayed.
Icon Name Description
Sound / Vibrate Displayed when both sound and vibrate are turned on.
Sound Displayed when only sound is turned on.
Vibrate Displayed when only vibrate is turned on.
Flight Mode Displayed when flight mode is turned on.
Battery Displays the current battery charge condition.
Temperature Displayed when the meter’s temperature is outside of the allowable temperature for performing
a blood glucose test.
18
52297_07167776001.indb 18 10/20/14 11:17 AM
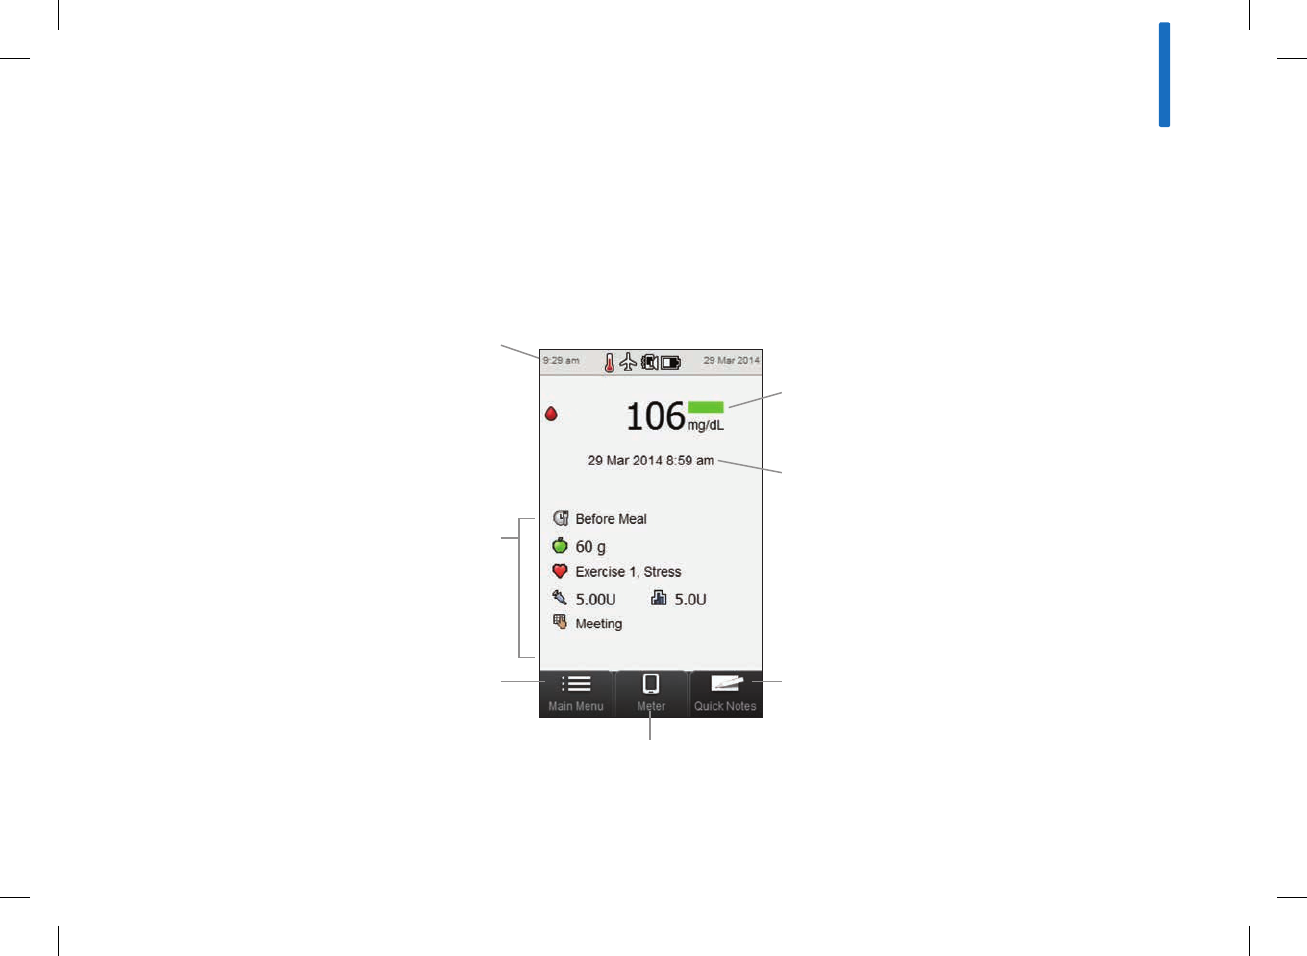
2.3.2 Status Screen
The Status screen displays information for the most recent valid
blood glucose test.
Title Bar
Displays meter information.
Last blood glucose test date and time
Blood glucose result with color status bar
Additional information
See the next page.
Go to Main Menu
See the Main Menu Screen section
in this chapter. Go to Meter Menu
Go to Quick Notes
See the Quick Notes Screen section
in this chapter.
2
19
52297_07167776001.indb 19 10/20/14 11:17 AM

Additional Information
The following shows possible additional information and is stored
in the electronic logbook with the blood glucose test:
jMeal time icon with description (for example, BeforeMeal)
jCarbohydrates icon with the carbohydrate amount (for example,
60g), or the carbohydrates accepted icon or
carbohydrates not accepted icon may be displayed.
jHealth event icon with description (for example, Exercise1)
jType of bolus icon with the total bolus insulin amount (for
example, Pen/Syringe Bolus 5.00U)
jBasal insulin icon with the basal insulin value (for example,
5.0U)
jNote icon with note text (for example, Meeting)
20
52297_07167776001.indb 20 10/20/14 11:17 AM
2.4 Turning the Meter On or O and Power Management
Turn meter on Press and release the power button.
Turn meter off Press and release the power button.
Reset the meter
Press and hold the power button for at least
5seconds until the meter screen goes blank.
Release the power button.
Power Button
NOTE
Reset the meter if the display freezes or
does not respond.
2
21
52297_07167776001.indb 21 10/20/14 11:17 AM
Power Management
When the meter is on and the touchscreen is not touched, the
meter automatically dims the brightness of the display after
15seconds and completely powers off after 2minutes, unless
you are performing either a blood glucose test or a control test.
To conserve battery power, turn the meter off when you are
finished rather than utilizing the automatic power off feature. For
more on conserving battery power, see the Power-Saving Tips
section in the Care and Maintenance chapter in this user’s
manual.
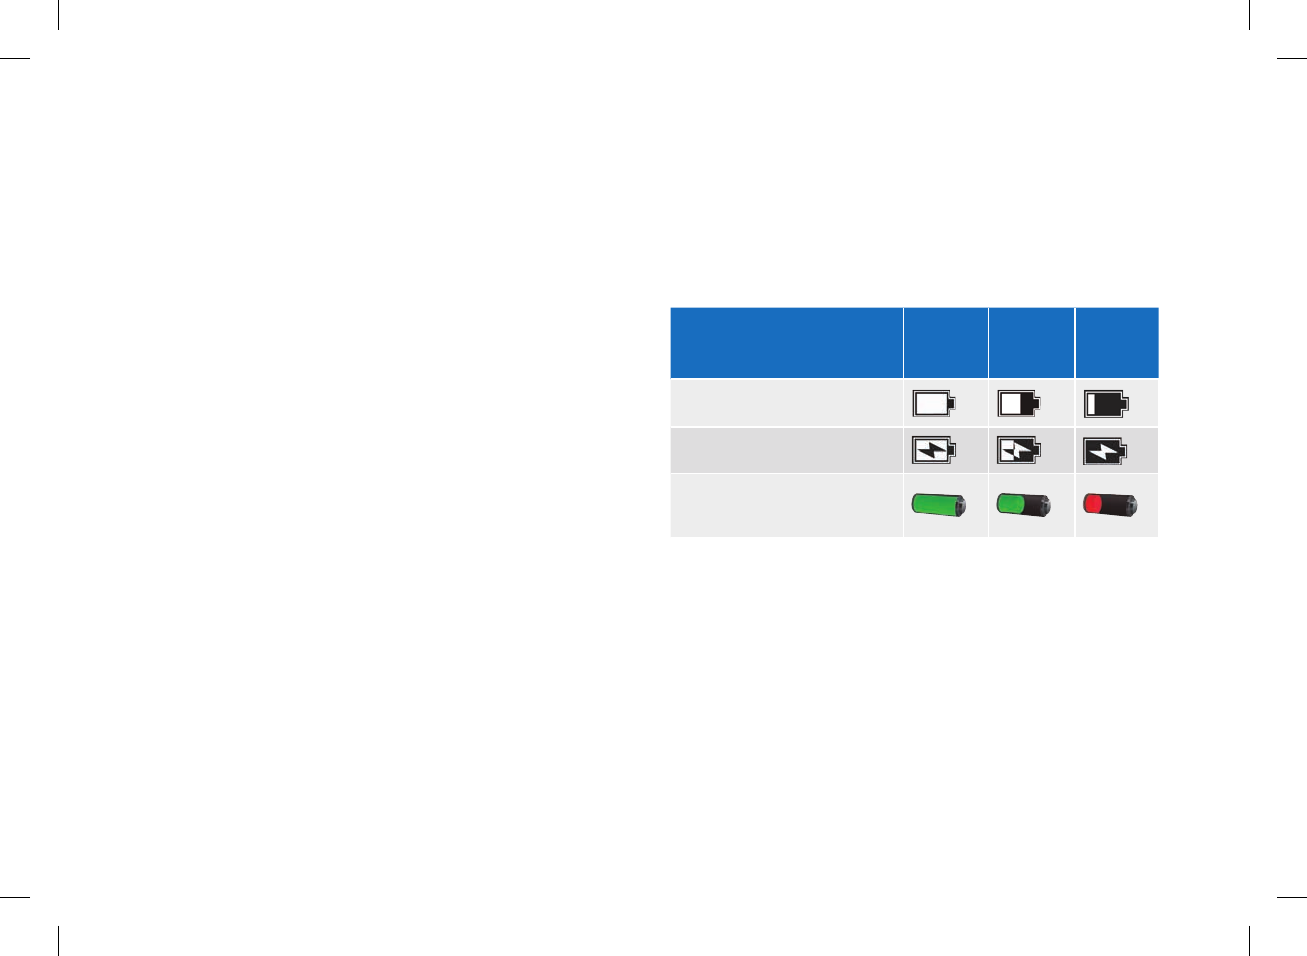
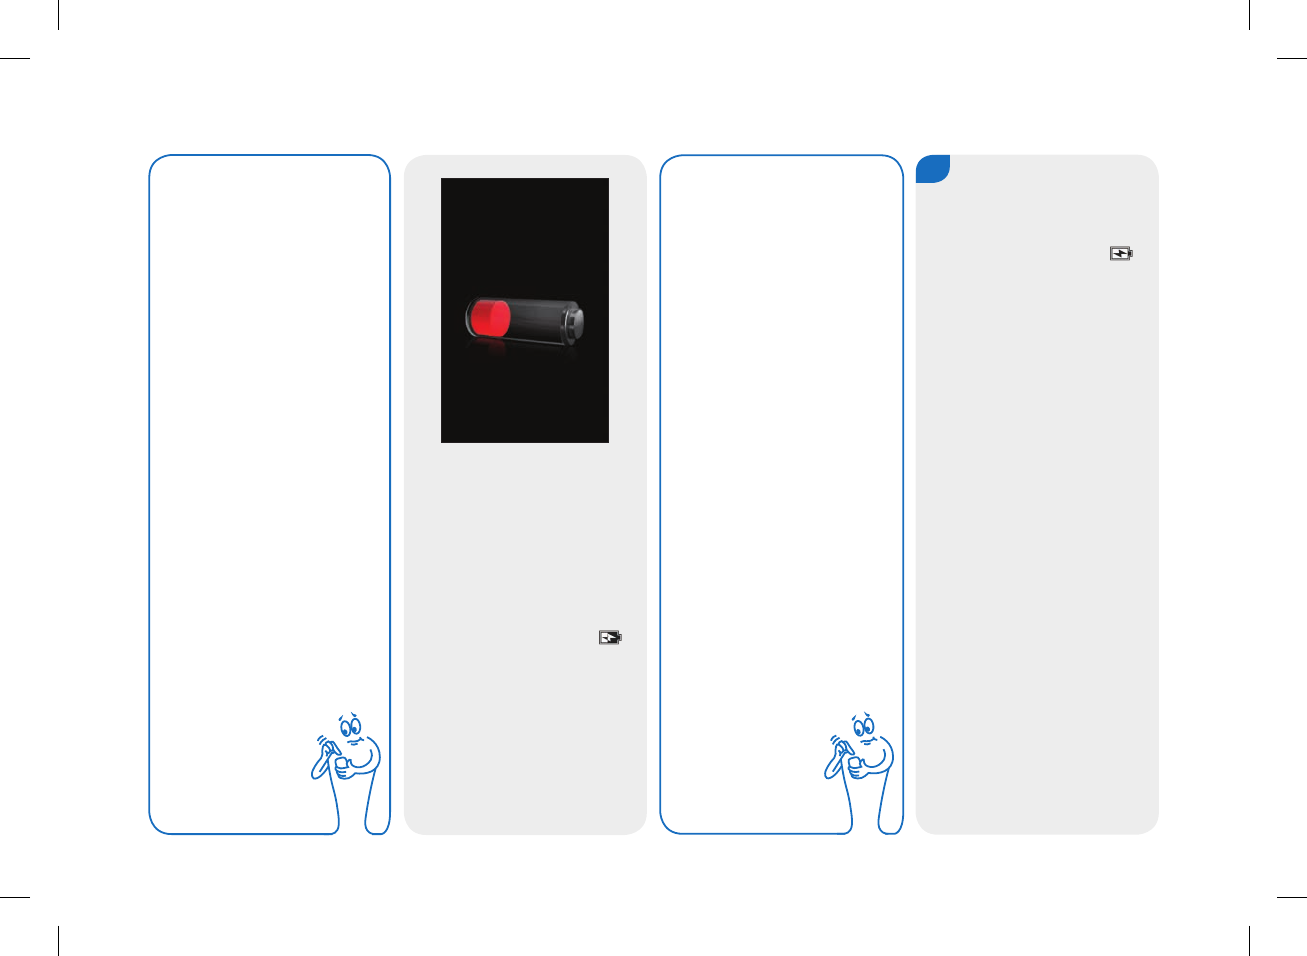
The meter has a rechargeable battery. The battery icon on the
Main Menu and the Status screens shows the battery power level
or the charging status.
The following table shows the different states of battery power
level:
Full
Charge
Partial
Charge
Low
Charge
Power level icon
Charging status icon
Battery charging screen
22
52297_07167776001.indb 22 10/20/14 11:17 AM

When the battery power level is low, the meter displays a
message to recharge. Allowing the battery to fully drain reduces
the ability of the battery to hold its charge. It is suggested to
recharge the battery on a regular basis, for example, once every
day. Keeping the meter plugged in to charge does not harm the
battery. Included with the meter is a USB cable and a power
adapter to be used for recharging the battery. See the Charging
the Battery section in the Startup chapter in this user’s manual.
The rechargeable battery has a limited number of charge cycles.
If you notice that the meter must be charged more often than it
did when it was new, you may need to change the battery. See
the Changing the Battery section in the Care and Maintenance
chapter in this user’s manual.
2
23
52297_07167776001.indb 23 10/20/14 11:17 AM
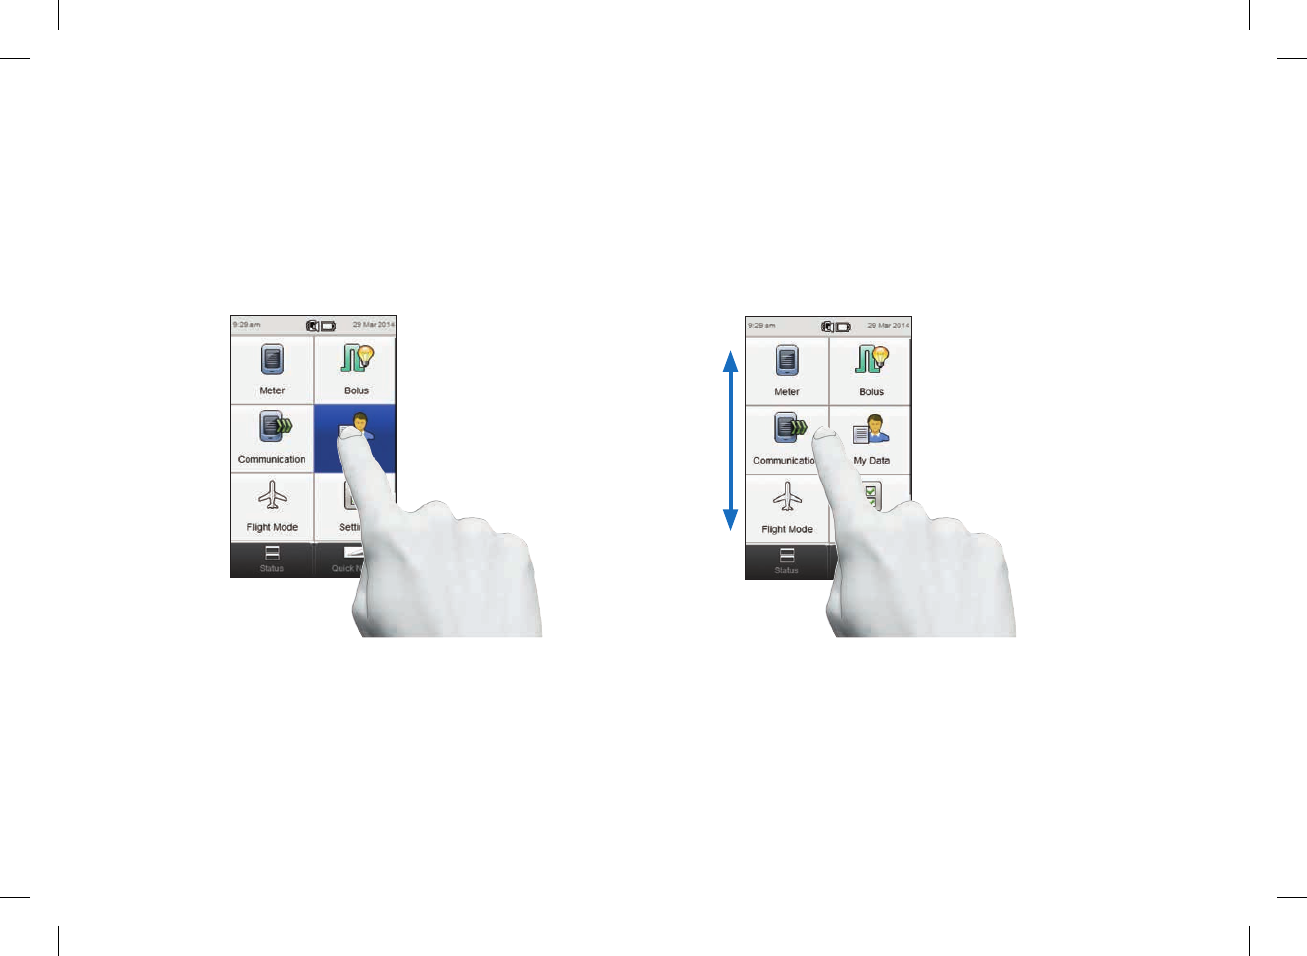
2.5 Navigation
Making a Selection
Press a selection until it is highlighted in blue, then release.
To help you know when a selection is made, set up the
touchscreen to emit a tone, vibrate, or do both. See the
Touchscreen: Tone, Vibration section in the Changing Meter
Settings chapter in this user’s manual.
Scrolling the Screen
Press and hold your finger anywhere in the middle of the screen
and then move your finger up or down to scroll the screen.
The meter has a full color display utilizing touchscreen
technology.
24
52297_07167776001.indb 24 10/20/14 11:17 AM
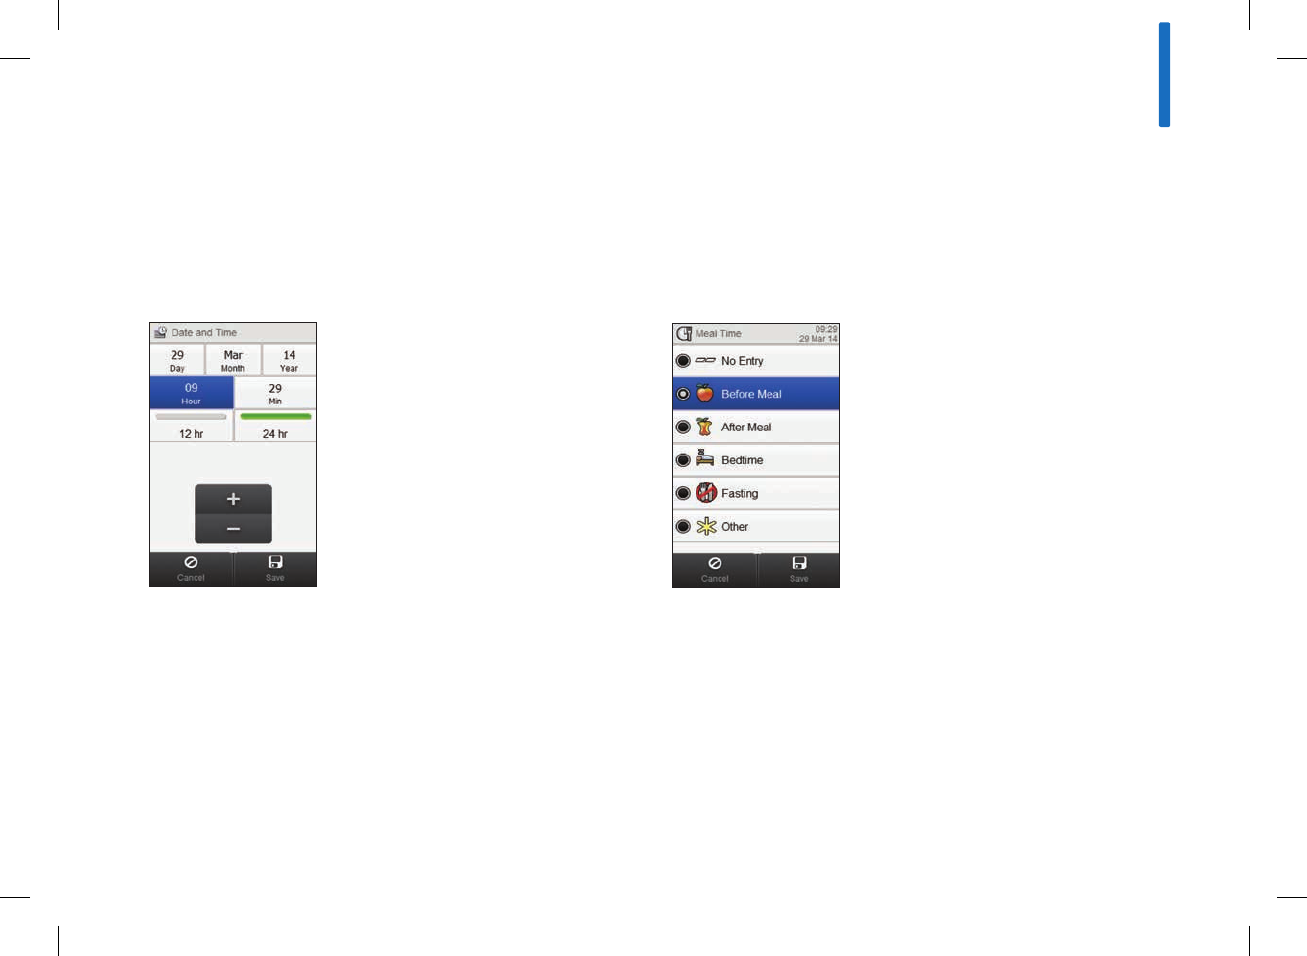
Setting a Value
Select the value to be changed (Hour is selected).
Press and release + to increase, or press and release - to
decrease. Press and hold + or - to change the value quickly.
Choosing from a List
Select an item on the list. The radio button on the left side of the
screen indicates the choice (Before Meal is chosen).
2
25
52297_07167776001.indb 25 10/20/14 11:17 AM
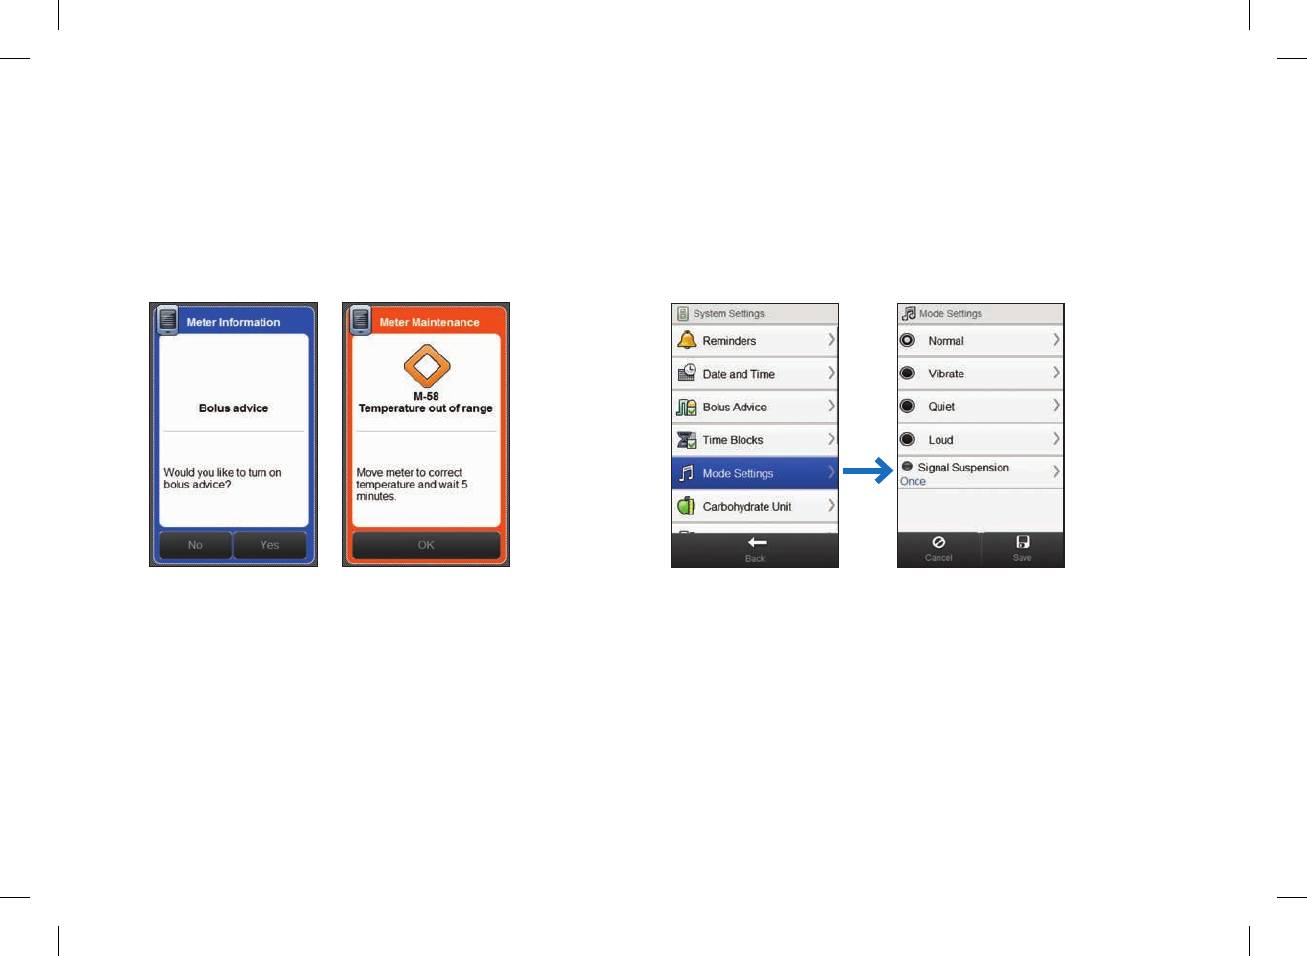
Message Screens
When a message screen appears, the selection choice
(for example, No, Yes, and OK) is shaded and is inactive
for 3seconds. This prevents accidental confirmation of
the message before you read it.
The
>
symbol on the right side of the screen indicates
the selection displays another screen.
26
52297_07167776001.indb 26 10/20/14 11:17 AM
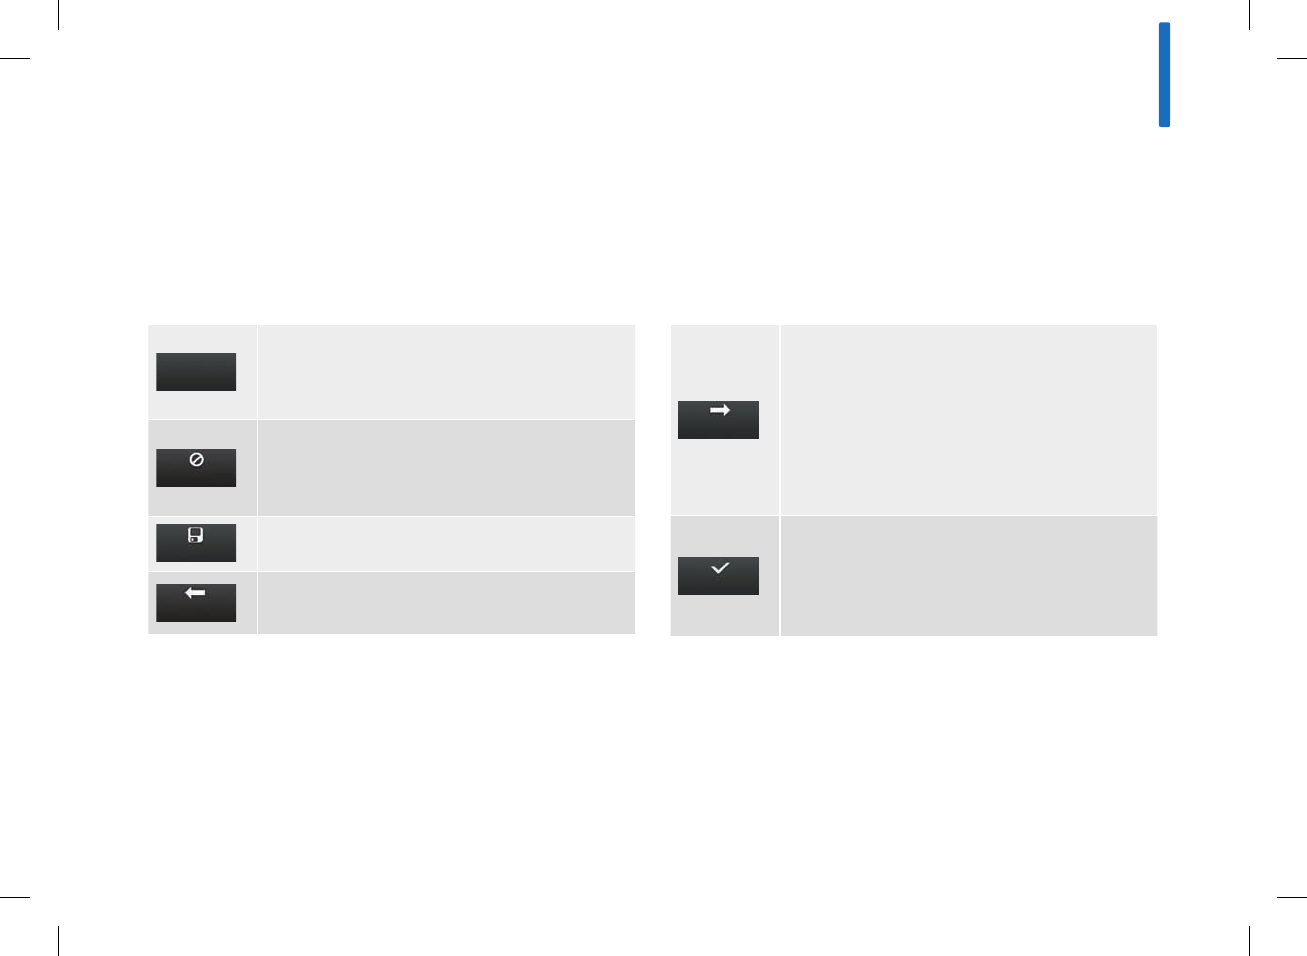
Navigation Selections
OK
The screen displayed requires your
acknowledgement (for example, confirmation to
deliver a bolus).
Cancel
Do not save or leave an activity without
completing the action (for example, do not deliver
a bolus).
Save Save settings or data.
Back
Return to the previous screen without saving any
settings or data.
Next
Proceed to the next screen without saving
settings or data. Next is used when there are
multiple steps or screens (for example, startup
screens for setting up the meter). The settings or
data remain available when Back is used and are
saved once Done is selected.
Done
Save settings or data. Done usually occurs at the
end of a series of screens (for example, Setup
Wizard screens for setting up the meter).
2
27
52297_07167776001.indb 27 10/20/14 11:17 AM
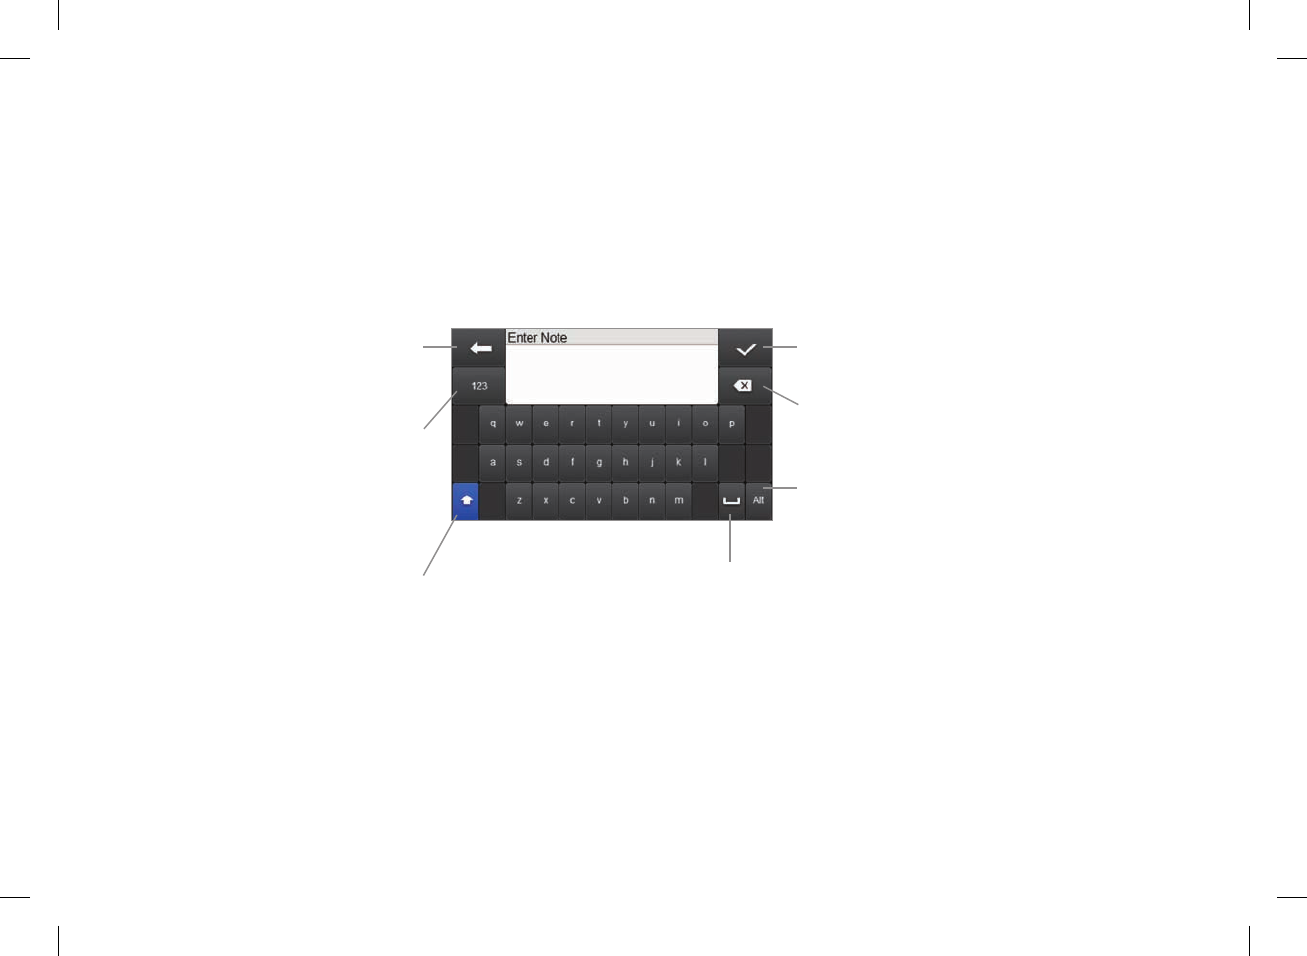
Keyboard
Return to the previous
screen without saving
Change between a keyboard
with letters and a keyboard
with numbers, punctuation, and
characters
Change between lower case
letters and capital letters
Save and return to the previous screen
Backspace to erase
Change between a keyboard with letters
and a keyboard with additional selections
Insert a space
28
52297_07167776001.indb 28 10/20/14 11:17 AM

2.6 Quick Notes Screen
An event (for example, Snack) may have an impact upon your
blood glucose results or collected data. The Quick Notes feature
is a convenient way to record events as they occur and are useful
during data analysis. A Quick Notes record is not linked to a blood
glucose result, nor does it influence the data used in calculating
bolus advice.
Choose up to 4 events. Scroll the screen for more choices. Select
Save to store a Quick Notes record into the logbook with the
current date / time stamp.
You are able to change the event choices for a saved Quick Notes
record by selecting it in the Logbook. You are also able to type a
note to save with a Quick Notes record. See The Logbook section
in the My Data chapter in this user’s manual.
2
29
52297_07167776001.indb 29 10/20/14 11:17 AM

2.7 Using the Test Strips
jUse only ACCU-CHEK Aviva Plus test strips.
jUse the test strip immediately after removing it from the test
strip container.
jDo not apply blood or control solution to the test strip before
inserting it into the meter. If you applied blood or control
solution before inserting the test strip into the meter, retest with
a new test strip. If a result appears before applying blood or
control solution, do not act on that result.
jClose the test strip container tightly immediately after removing
a test strip. Moisture can damage the test strips and produce
incorrect results.
jStore the unused test strips in their original container with the
cap tightly closed.
30
52297_07167776001.indb 30 10/20/14 11:17 AM

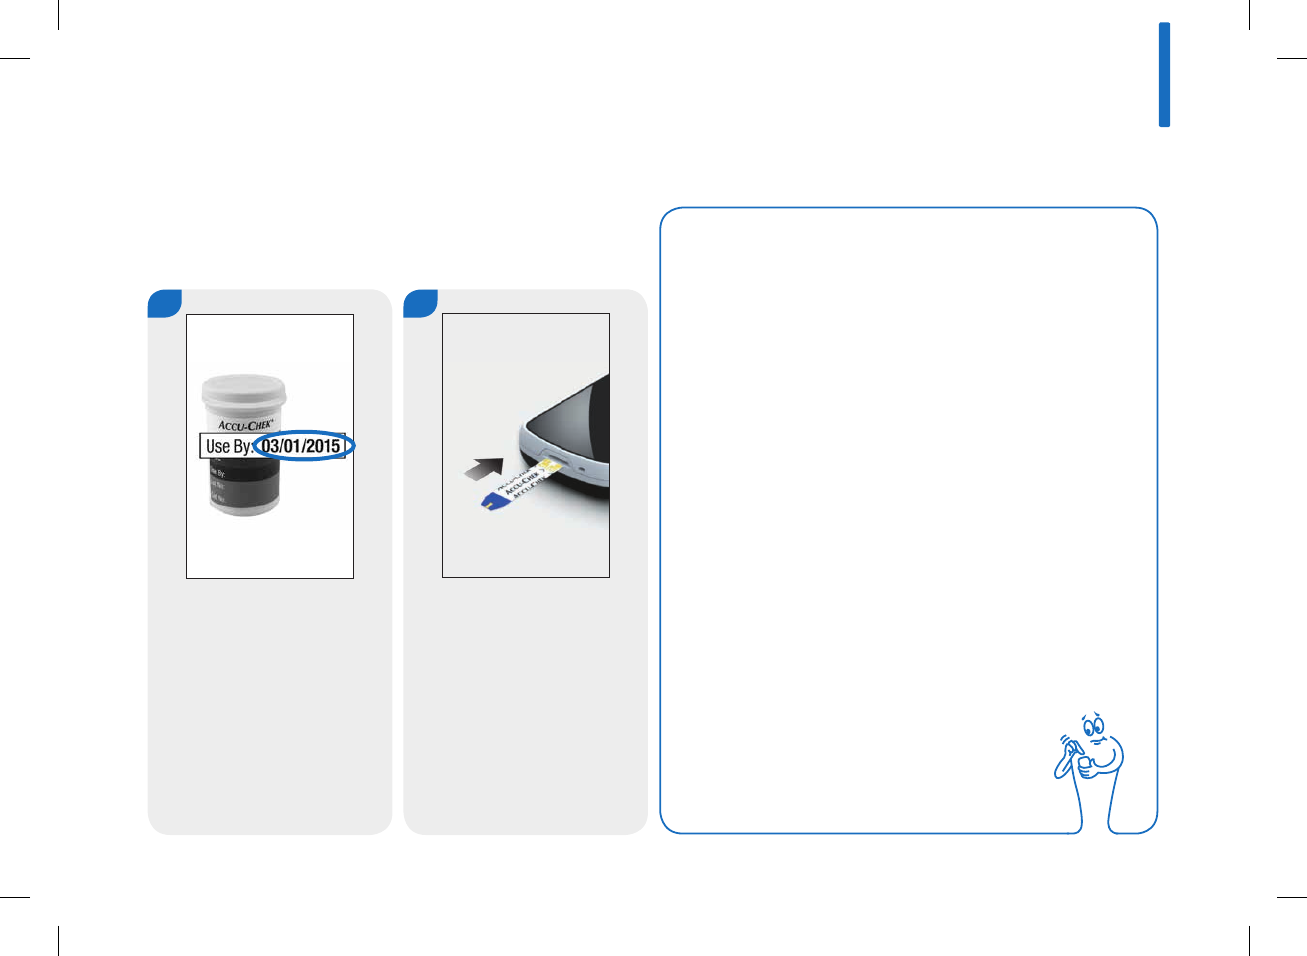
jDiscard the test strips if they are past the Use By date printed
on the test strip container. If the Use By date is missing or
cannot be read, do not use the test strips. Contact the
ACCU-CHEK Customer Care Service Center at 1-800-688-4578.
jRefer to the test strip package insert for test strip storage and
system operating conditions.
jDo not remove test strips from the test strip container and put
them into another container, such as a plastic bag, pocket,
purse, wallet, etc.
jDo not reuse test strips. Once control solution or blood has
been applied to a test strip, discard it. If a retest is necessary,
use a new test strip.
jPerform a control test every time you open a new test strip box.
2
31
52297_07167776001.indb 31 10/20/14 11:17 AM

w WARNING
To prevent inaccurate results:
jDO NOT expose test strips to heat, moisture, or humidity.
Temperatures outside the required range, as well as
moisture and humidity, can damage the test strips and lead
to inaccurate results.
jDO NOT bend, cut, or alter the test strips.
jDO NOT get dirt, food, or other material on the test strip.
NOTE
The meter is already coded and comes with a pre-inserted
black code chip. You never need to change this code chip
even if you use test strips from boxes that contain another
code chip.
32
52297_07167776001.indb 32 10/20/14 11:17 AM

2.8 Summary of Features
jThe Status screen gives you quick access to information about
your most recent blood glucose test.
jBolus advice is optional and it calculates an insulin bolus for
you that is customized for the time of day and your changing
situations.
jDaily time blocks allow you to divide a day into different time
periods and can be adjusted to fit your lifestyle.
jData management:
• Electronic logbook containing the record of each blood
glucose result, including meal time, carbohydrates, health
events, bolus, basal, and notes.
• View, modify, or add information to the logbook.
• View data (for example, blood glucose test averages) in a
graph or table format for a specified time period (for
example, the last 30days).
• Transfer data between devices, such as the meter and a
computer.
2
33
52297_07167776001.indb 33 10/20/14 11:17 AM

jReminders:
• Alarm clock reminders for when to test throughout the day.
• Reminders for testing after a high blood glucose result, after
a low blood glucose result, or after a meal.
• Appointments with your healthcare professional or for a
laboratory test.
• Unique tones for dierent reminders.
jHealth events can be selected to indicate how you are feeling
or what you are doing that might affect your blood glucose
level. You have the option of setting a percentage for each
health event which adjusts the bolus advice recommendation if
you set up bolus advice.
jHypo (low) and hyper (high) blood glucose limits that best fit
your needs. Whenever a blood glucose result is above or below
this range, the meter displays a warning.
jFull color visual display utilizing touchscreen technology.
34
52297_07167776001.indb 34 10/20/14 11:17 AM

3 Startup
3.1 Before You Get Started
Remove and discard the tab
from the back of the meter.
Continue to the next section,
Charging the Battery.
1
Before you can use the meter, it must be prepared as follows:
3
35
52297_07167776001.indb 35 10/20/14 11:17 AM

3.2 Charging the Battery
Charge the battery with the USB cable by utilizing either a power
outlet or a computer. The preferred method is to use a power
outlet since this is faster and takes about 3.5hours to charge a
fully drained battery. Charging the meter from a computer takes
much longer.
NOTE
jAllowing the battery to fully drain reduces the ability
of the battery to hold its charge. It is suggested to
recharge the battery on a regular basis, for example
once every day. Keeping the meter plugged in to
charge does not harm the battery.
jA blood glucose test cannot be performed while the
meter is plugged in.
36
52297_07167776001.indb 36 10/20/14 11:17 AM
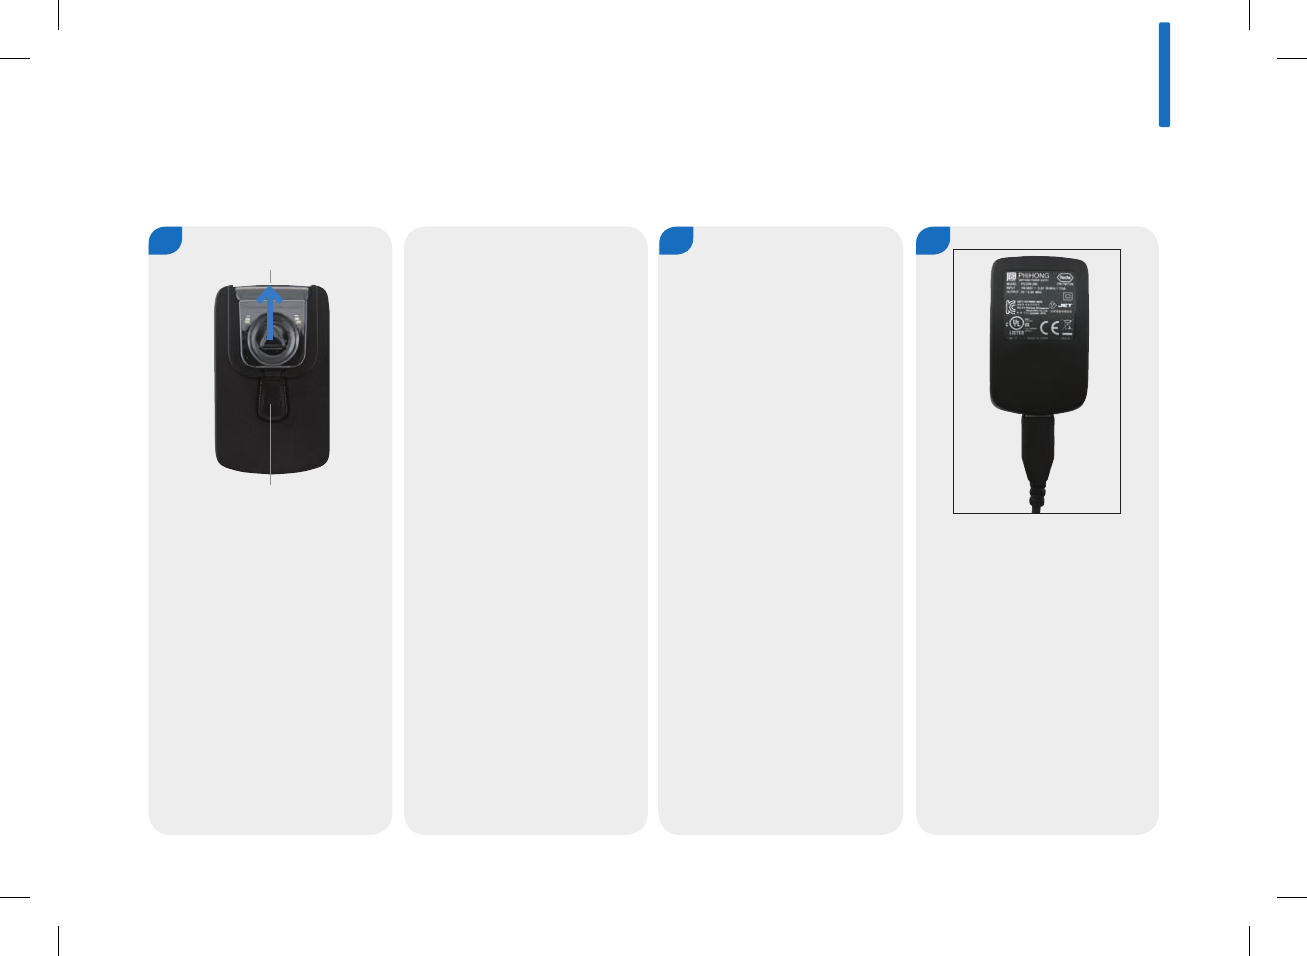
Charging the Battery Using a Power Outlet
1
If the power adapter is already
assembled, proceed to Step4.
2
Slide on the pronged plug
where the clear plastic cover
was located until it firmly
clicks into place. Do not try to
force the pronged plug. It only
goes on one way.
3
Plug the large end of the USB
cable into the power adapter.
To assemble the power
adapter, remove the clear
plastic cover by pressing the
center of the release button.
Slide the clear plastic cover
o in the direction of the
arrow.
Clear Plastic Cover
Release Button
3
37
52297_07167776001.indb 37 10/20/14 11:17 AM
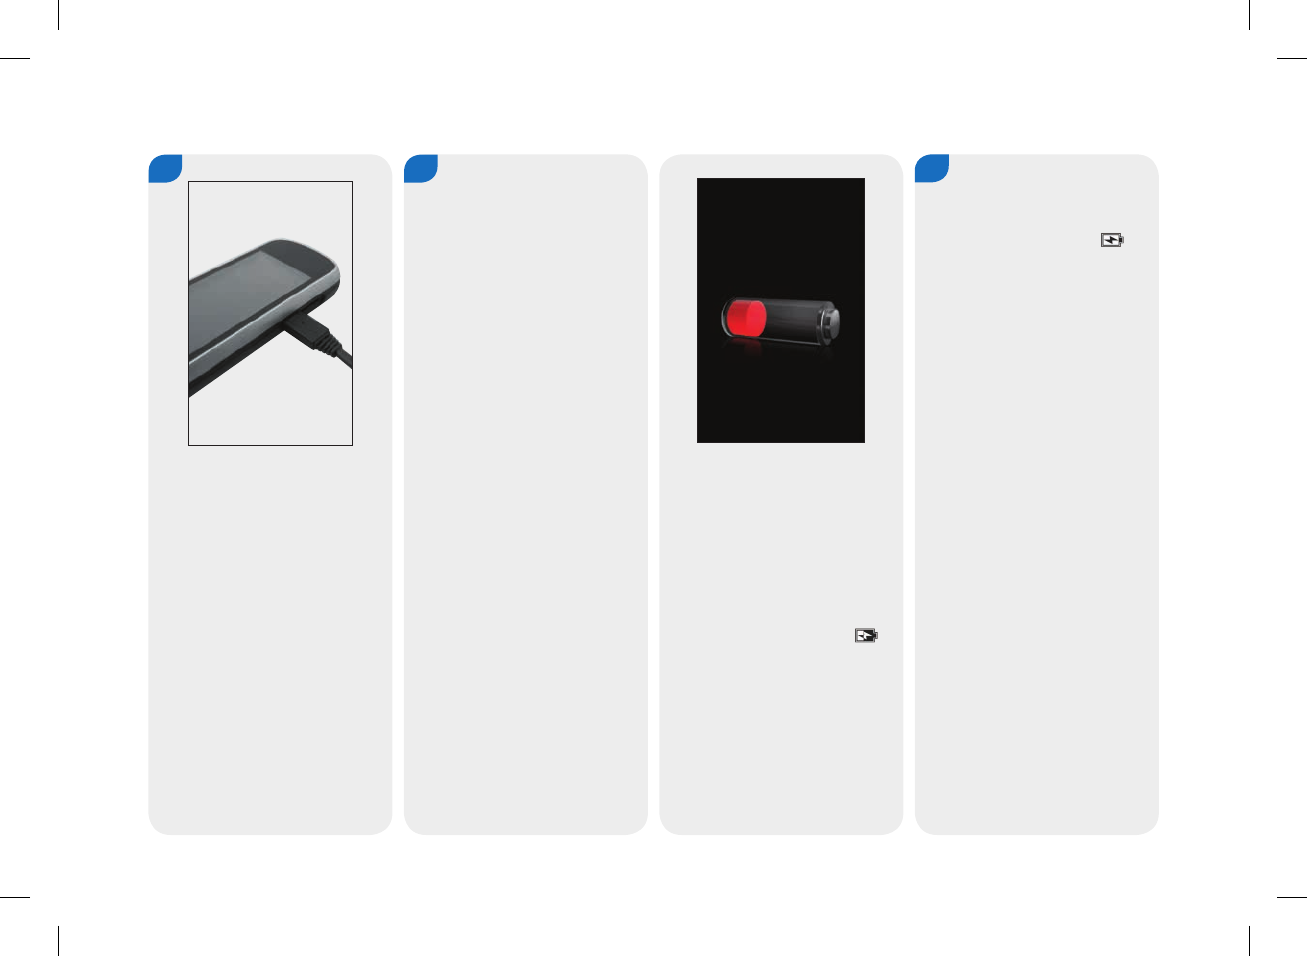
5
Plug the power adapter into a
power outlet.
When the connection is
successful, the meter displays
the battery charging screen
for 3seconds.
The next screen (either the
Main Menu or Status screen)
displays the battery icon
in charging mode.
When the battery icon is
shown as fully charged
you can unplug the meter.
6
4
Plug the small end of the USB
cable into the meter.
38
52297_07167776001.indb 38 10/20/14 11:17 AM
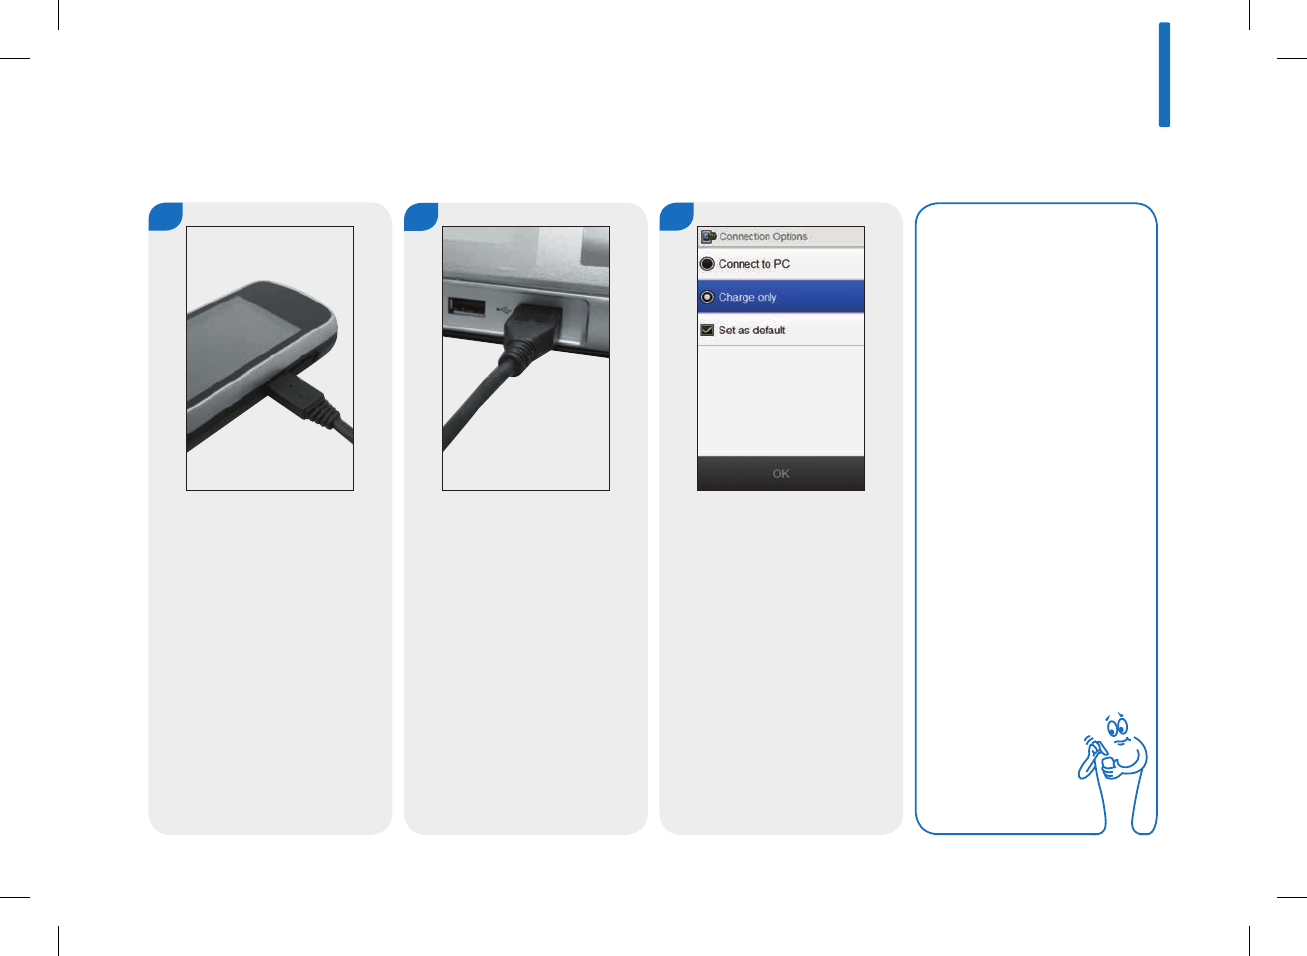
Charging the Battery Using a Computer
1
Plug the small end of the USB
cable into the meter.
2
Plug the large end of the USB
cable into an available USB
port on the PC.
3
Choose Charge only. As an
option, choose Set as default
to keep this screen from
appearing each time you
connect the USB cable to a
PC. Select OK.
NOTE
jThe Connection
Options screen
does not appear if
Set as default was
chosen previously.
jTo remove the
default, go to
the Main Menu
and select
Communication >
Settings. Choose
Prompt upon USB
connect. Select
Save.
3
39
52297_07167776001.indb 39 10/20/14 11:17 AM
When the connection is
successful, the meter displays
the battery charging screen
for 3seconds.
The next screen (either the
Main Menu or Status screen)
displays the battery icon
in charging mode.
NOTE
The computer is not
charging the battery if
the meter does not
display the battery
charging screen or the
battery charging icon,
or if the Information
screen Recharge meter
soon is displayed.
Charge the battery
using a power outlet.
4
When the battery icon is
shown as fully charged ,
you can unplug the meter.
NOTE
The PC must be turned
on and not in sleep or
standby mode to
charge the battery.
40
52297_07167776001.indb 40 10/20/14 11:17 AM

3.3 Setup Wizard
w WARNING
It is important to discuss your individual settings for warning
limits, time blocks, bolus advice, and bG test reminders with your
healthcare professional.
The first time you turn the meter on, the Setup Wizard is
activated. You must complete the Setup Wizard before performing
a blood glucose test for the first time.
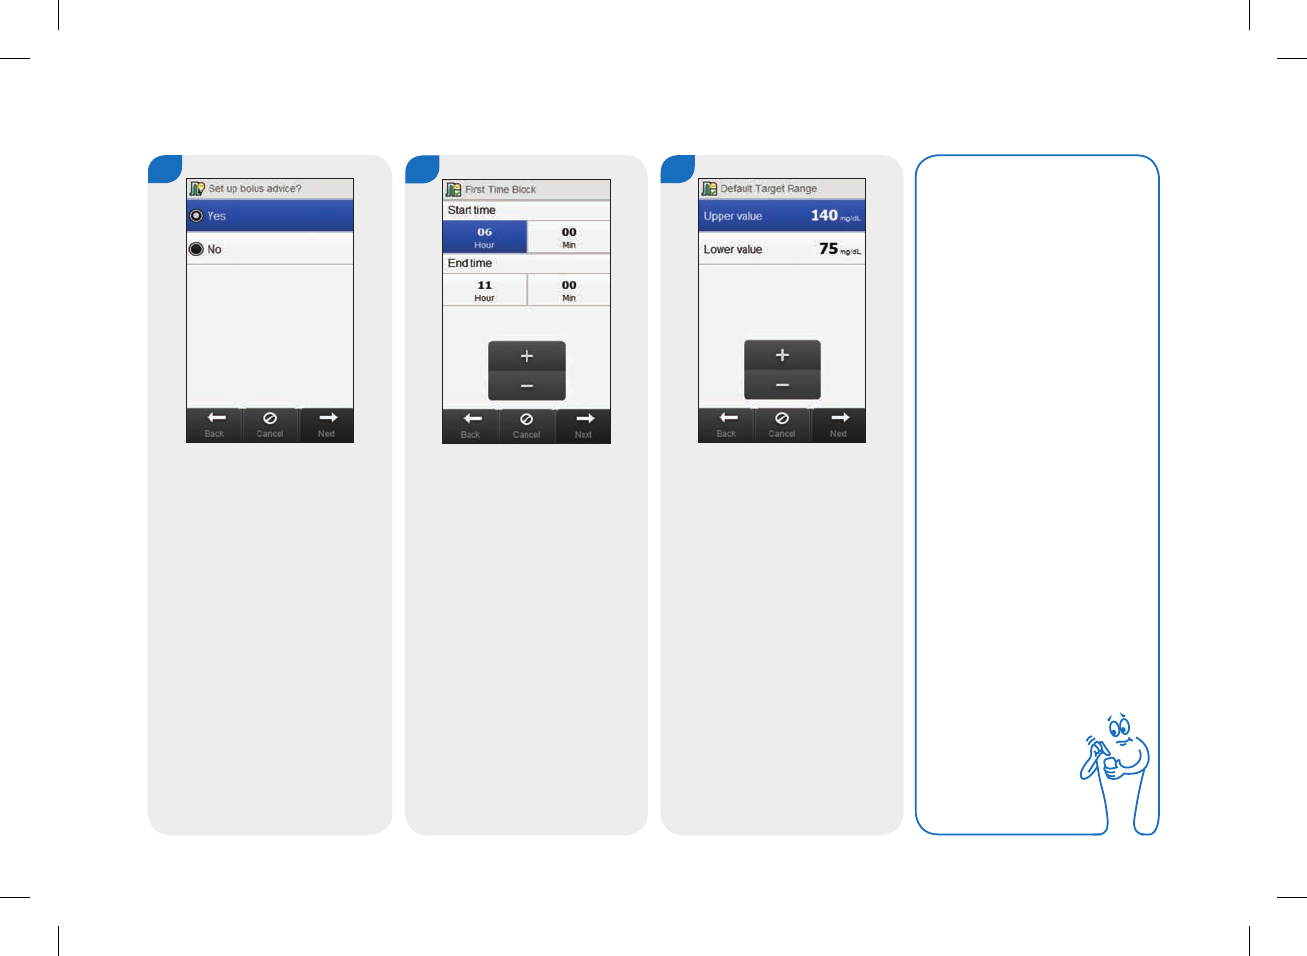
The Setup Wizard assists you in selecting settings for:
jMeter language
jTime and date
jUnits (carbohydrate)
jWarning limits for hypo (low) and hyper (high) blood glucose
levels
jTime blocks
jBolus advice (optional)
jbG test reminders (optional)
3
41
52297_07167776001.indb 41 10/20/14 11:17 AM

NOTE
jThe Setup Wizard activates every time you turn the meter on until you complete the
process.
jIf you turn the meter o during the Setup Wizard, you must reconfirm all of the settings
in order to complete the Setup Wizard.
jTo return to a previous screen in the Setup Wizard, select Back.
jIf you choose not to set up bolus advice and bG test reminders as part of the Setup
Wizard, these features can be set up later. For information on how to set up these
features after completion of the Setup Wizard, see the Setting Up Bolus Advice section
in the Changing Bolus Advice Settings chapter and the Meter Reminders chapter in
this user’s manual.
jThe default settings in the meter and the settings illustrated in this user’s manual are for
example only.
42
52297_07167776001.indb 42 10/20/14 11:17 AM
3.4 Completing the Setup Wizard
Refer to the Important Information section of this user’s manual
for detailed explanations of the various settings in the Setup
Wizard.
1Power Button
Starting with the meter turned
off, press the power button to
turn on the meter.
2
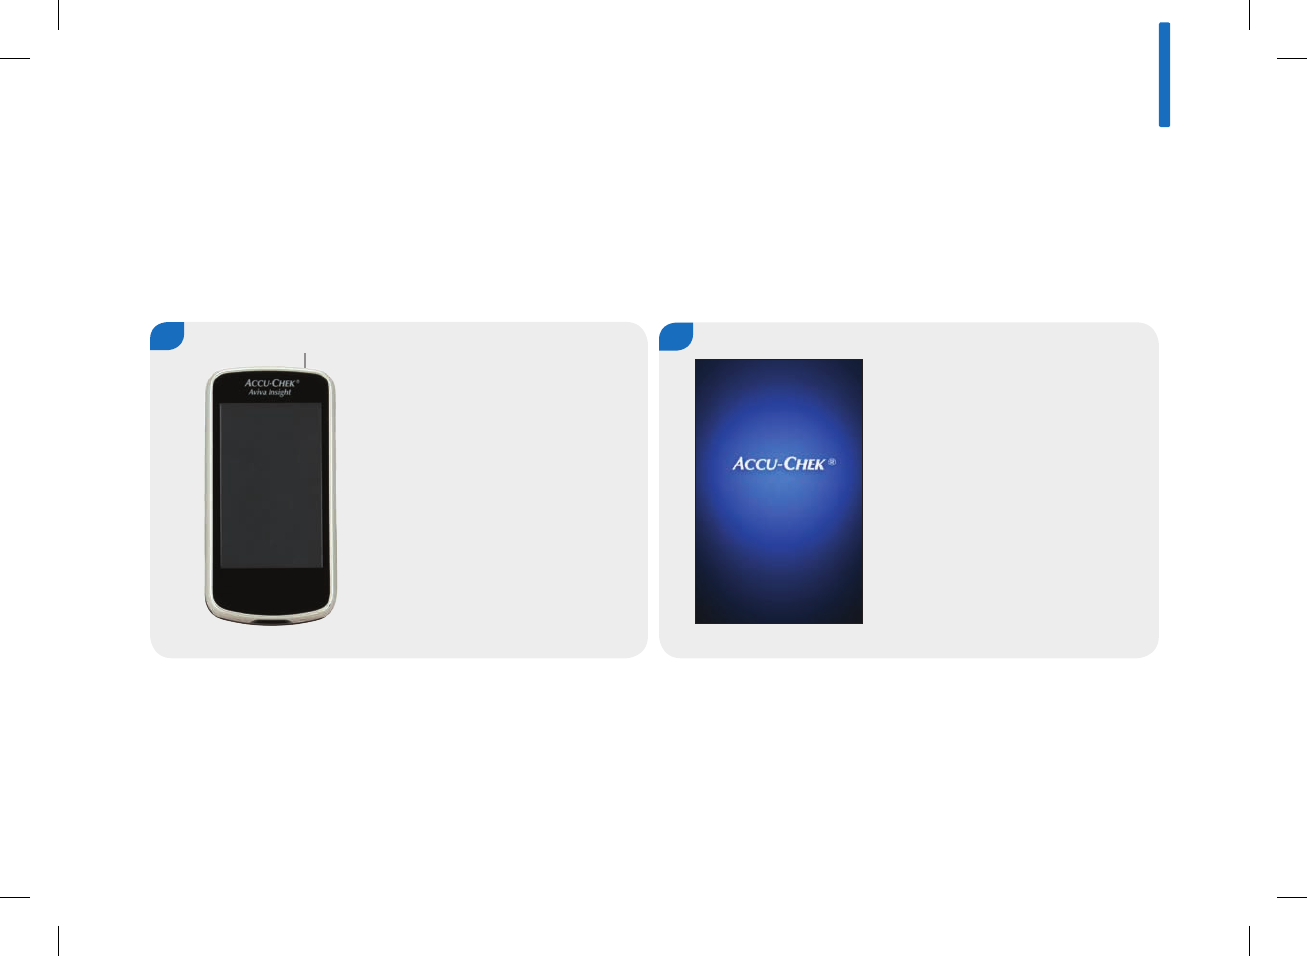
The meter vibrates, beeps,
and displays this splash
screen for a short period of
time (this screen appears each
time the meter is turned on).
3
43
52297_07167776001.indb 43 10/20/14 11:17 AM
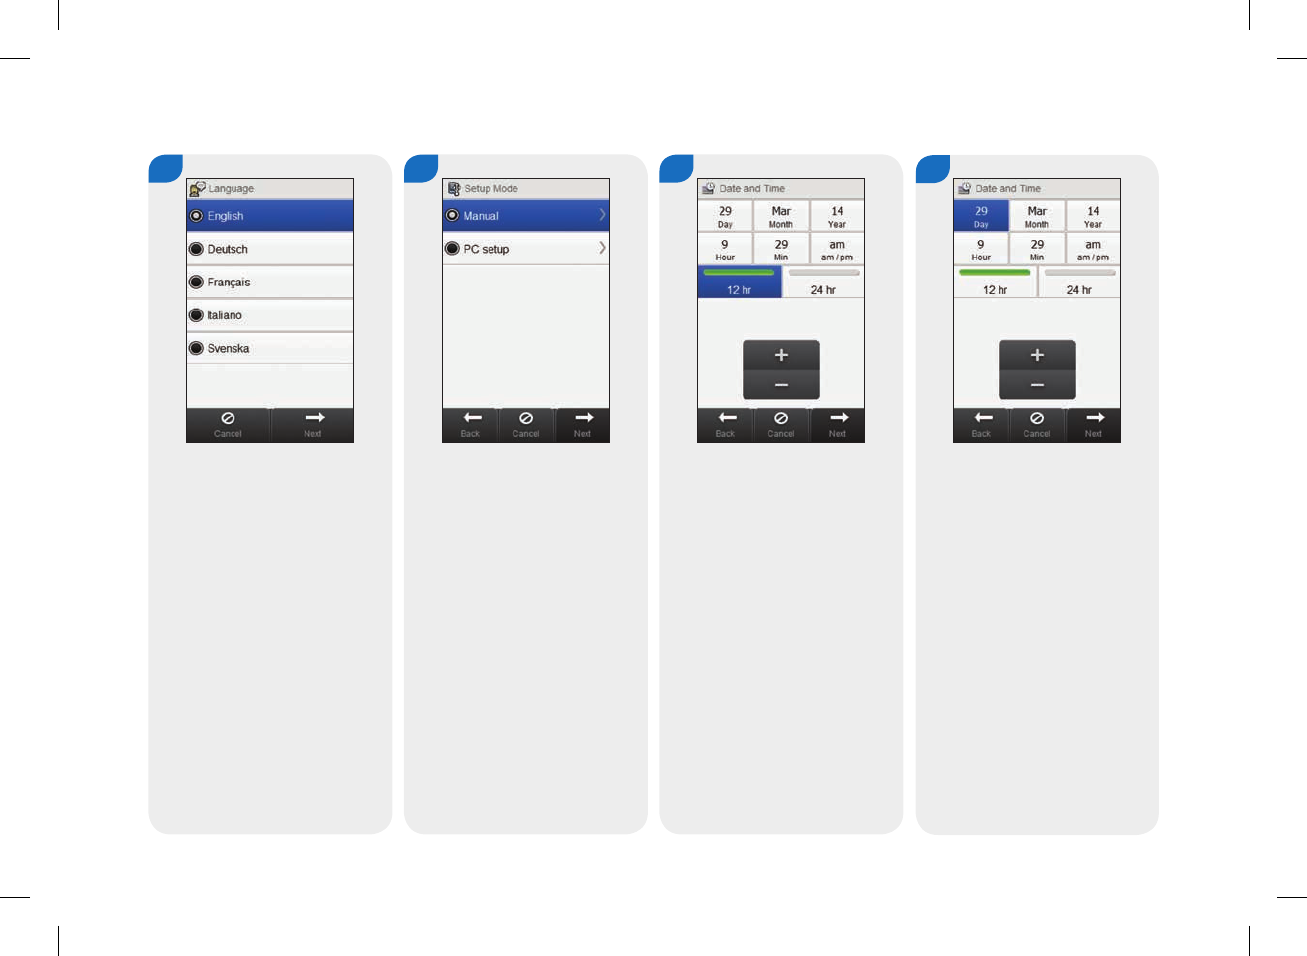
3
Choose the desired language
from the list. Select Next.
4 5
Select 12hr or 24hr to set
the time format, if necessary.
6
Set the date and time. Select
Next.
Choose Manual. Select Next.
44
52297_07167776001.indb 44 10/20/14 11:17 AM
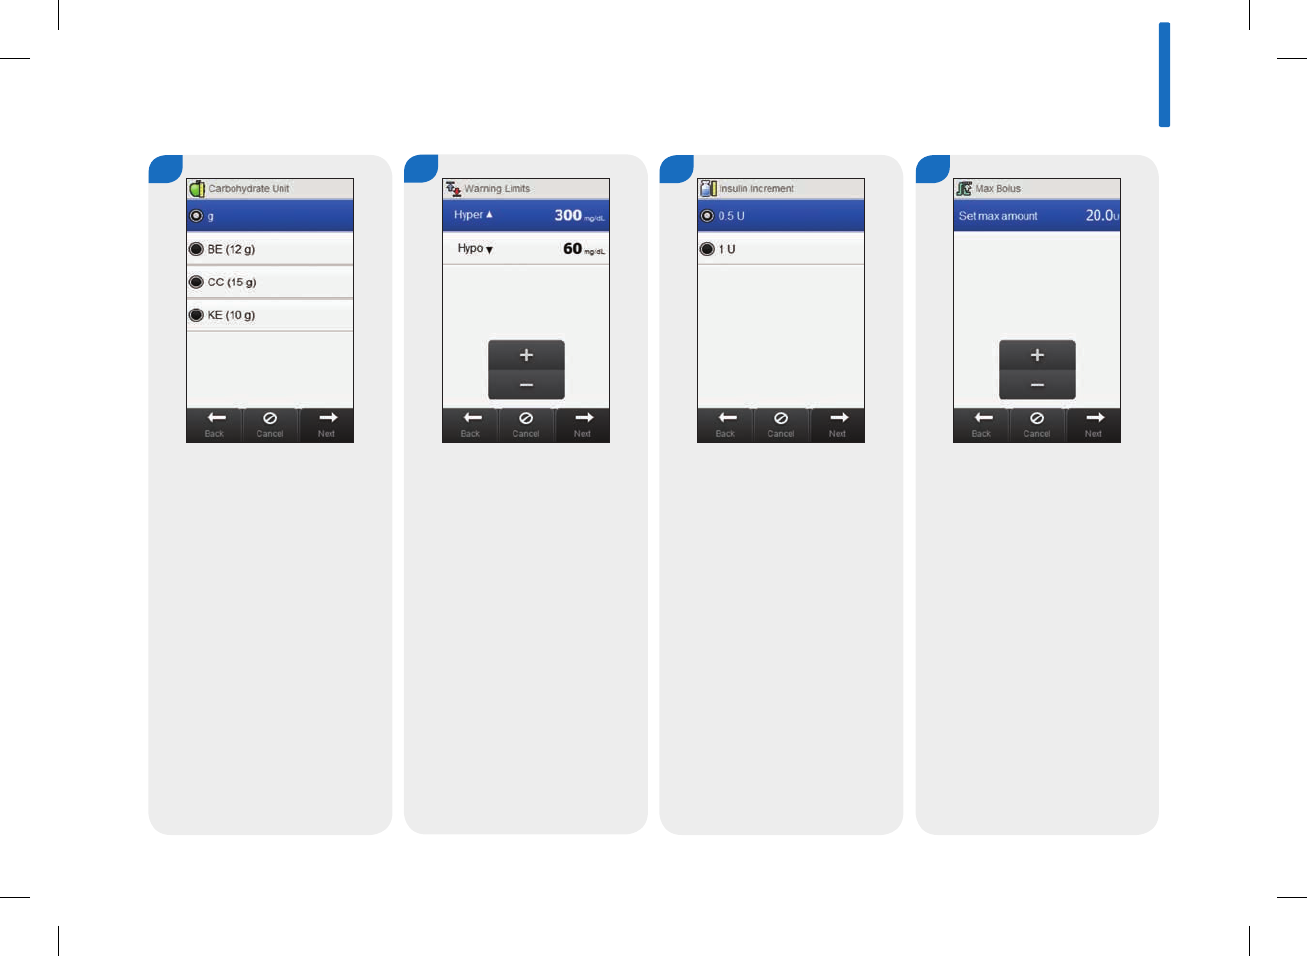
7
Choose the appropriate
carbohydrate unit. Select
Next.
8
Set the Hyper (upper) and
Hypo (lower) warning limits.
Select Next.
9
Choose the appropriate insulin
increment. Select Next.
10
Set the maximum amount for
any single bolus. Select Next.
3
45
52297_07167776001.indb 45 10/20/14 11:17 AM
11
Choose Yes to receive bolus
advice. Choose No to not
receive bolus advice. Select
Next.
12
Set the start time and end
time for the first time block.
Select Next.
13
Set the target range. Select
Next.
NOTE
If you choose not to
receive bolus advice,
the Setup Wizard skips
Step14.
46
52297_07167776001.indb 46 10/20/14 11:17 AM
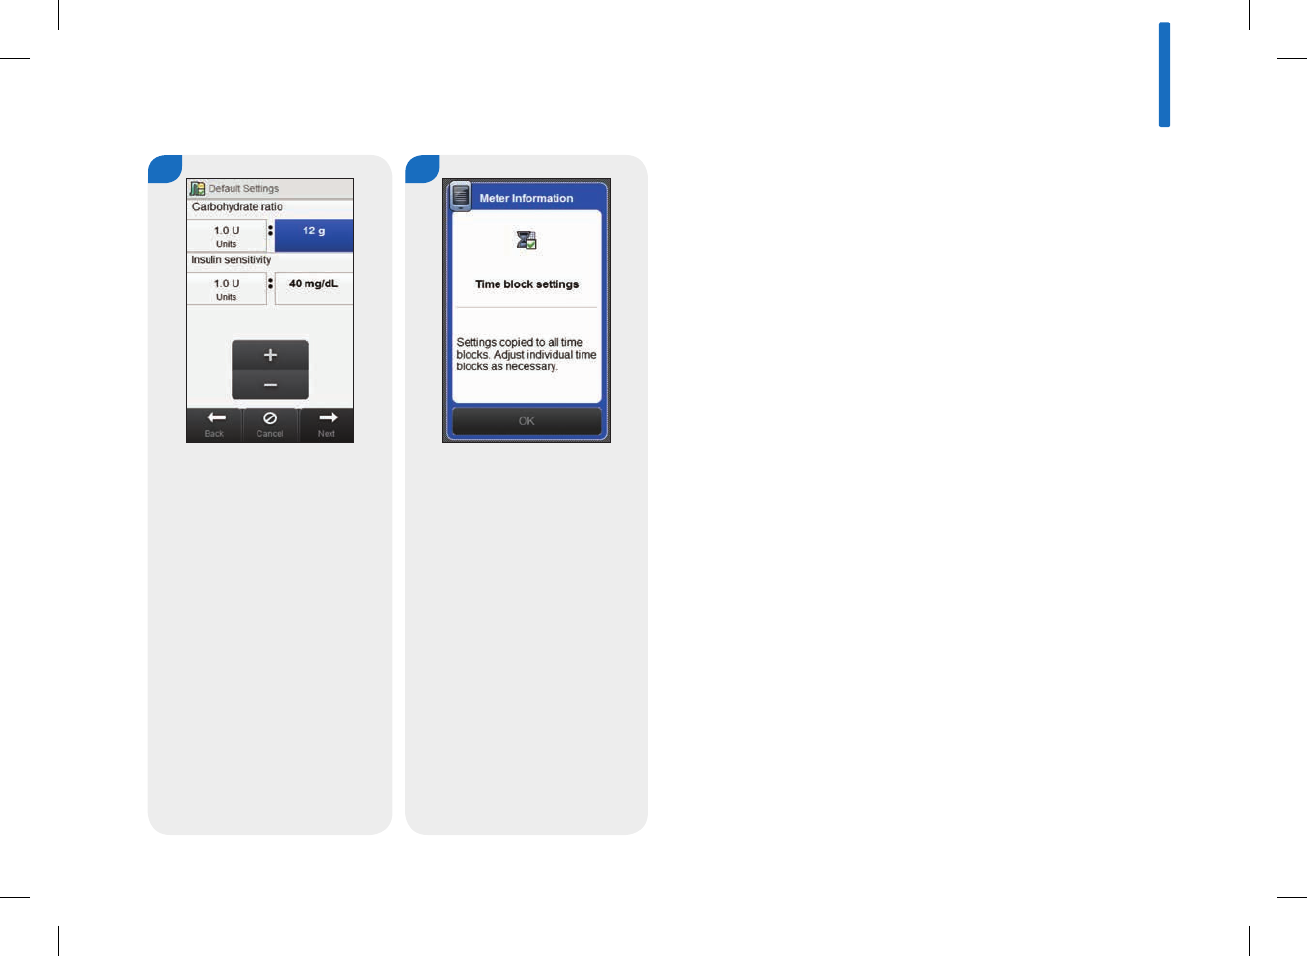
14
Set the Carbohydrate ratio and
Insulin sensitivity. Select Next.
15
Select OK.
3
47
52297_07167776001.indb 47 10/20/14 11:17 AM
NOTE
jIf bolus advice is on, you can also set the
carbohydrate ratio and insulin sensitivity for each
time block.
jTo reset all edited time blocks to their default values,
select Cancel and then Yes. This restarts the meter
setup process.
jIf you chose not to receive bolus advice, Done
appears instead of Next on the screen. Select Done to
complete the Setup Wizard.
17
Set the percentage for any
desired health events. Scroll
to view additional options.
Select Next.
16
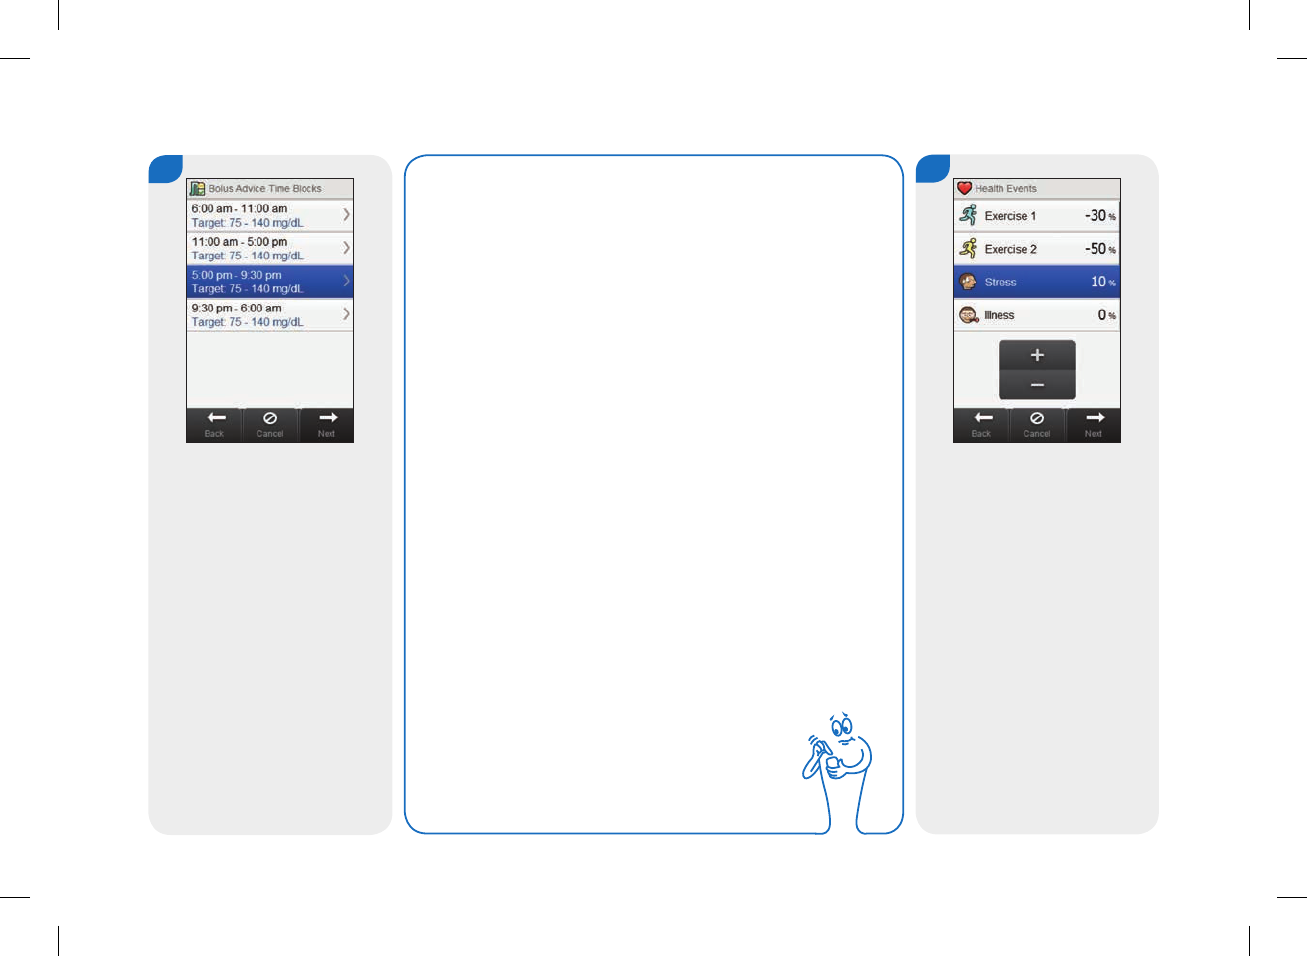
Select any additional time
block to edit the End time,
Upper value, and Lower value.
Select Next when you are
finished editing the time
blocks.
48
52297_07167776001.indb 48 10/20/14 11:17 AM
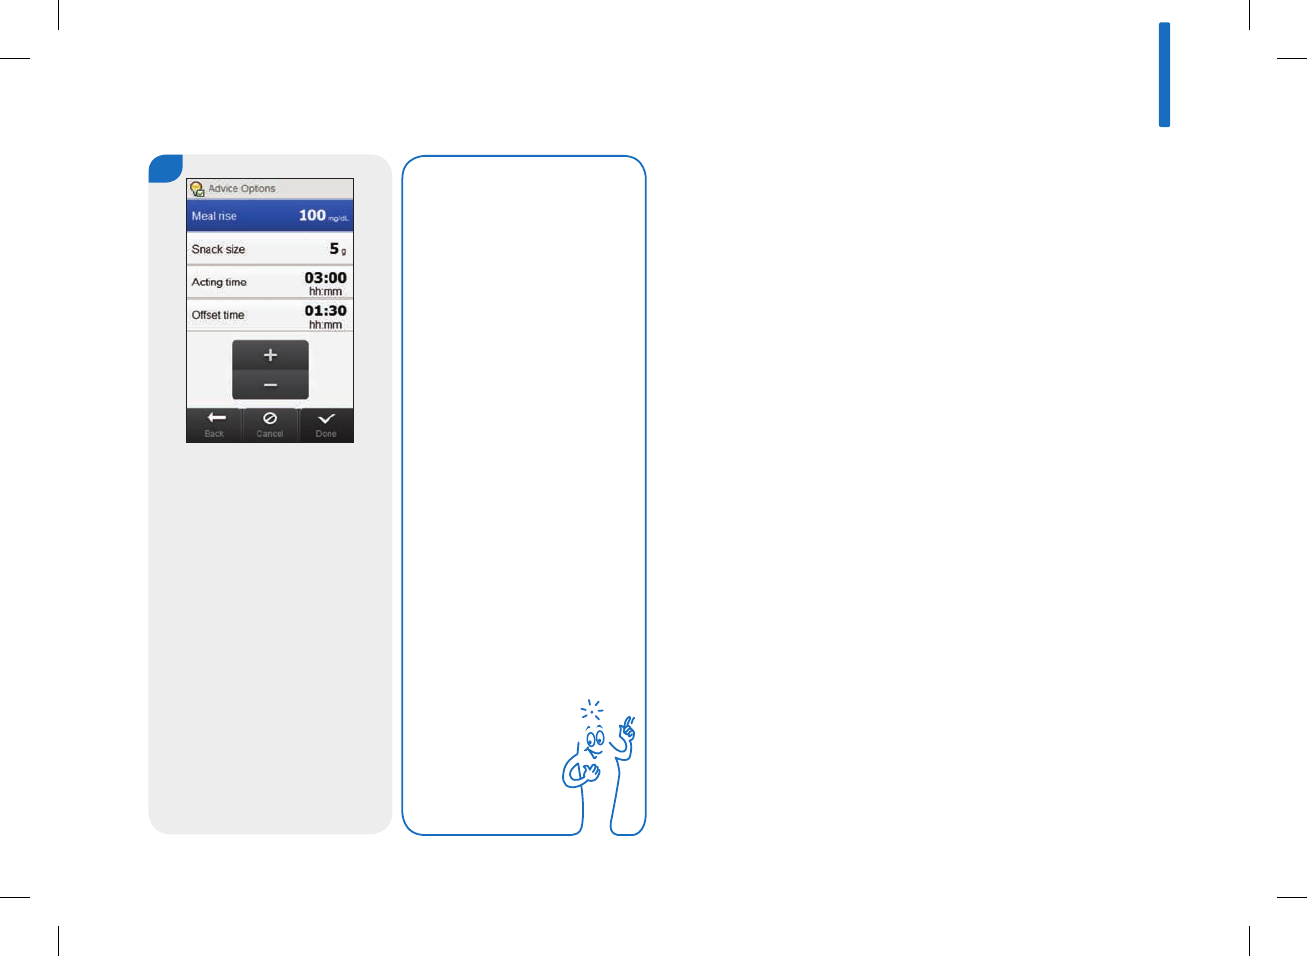
18
Set the Meal rise, Snack size,
Acting time, and Offset time.
Select Done to complete the
Setup Wizard.
NOTE
Consult your healthcare
professional and read
the next section
Important Information
for help with the
settings in the Setup
Wizard. For additional
assistance with the
bolus advice settings,
read the Bolus Advice
chapter of this user’s
manual.
3
49
52297_07167776001.indb 49 10/20/14 11:17 AM

3.5 Important Information
3.5.1 Carbohydrate Unit
You have a choice among dierent carbohydrate units in the
meter that best fit your needs. The following carbohydrate units
are available:
Abbreviation Unit of Measurement Gram Equivalent
g*Grams 1gram
KE Kohlenhydrateinheit
(Carbohydrate Unit) 10grams
BE Bread Equivalent 12grams
CC Carbohydrate Choice 15grams
* Standard unit of measure in the U.S.
50
52297_07167776001.indb 50 10/20/14 11:17 AM

3.5.2 Warning Limits
You can select hyper (high) and hypo (low) blood glucose warning
limits that best fit your needs.
Whenever a blood glucose result is above the hyper warning limit
or below the hypo warning limit, the meter displays a warning.
jSet the hyper warning limit greater than the target range of all
time blocks.
jSet the hypo warning limit less than the target range of all time
blocks.
3.5.3 Insulin Increment
Insulin increment is the amount in units(U) by which your insulin
dose is adjusted when programming a bolus or when entering a
manual Logbook entry.
The meter rounds off the insulin amount to be delivered, which
the meter calculates if bolus advice is set up, or when you
manually enter the bolus and basal insulin data into the logbook.
The insulin increment can be set to 0.5 or 1U.
3.5.4 Max Bolus
Max bolus serves as a safety measure against unintended large
boluses. It is a meter setting that specifies a maximum bolus
insulin amount. A bolus that is larger than the max bolus amount
requires an additional confirmation.
Max bolus can be set to a maximum of 25U in increments of 1U
or 0.5U (per the insulin increment value).
3
51
52297_07167776001.indb 51 10/20/14 11:17 AM

3.5.5 Time Blocks
Setting time blocks to fit your own schedule helps you and your
healthcare professional see how patterns in your blood glucose
levels may be affected by your daily activities and lifestyle.
Time blocks combine to cover a 24-hour time period.
The meter comes with 4default time blocks. You may set up to
8time blocks. You can change the time period for any of the
default time blocks.
To complete the Setup Wizard, you must complete and save the
default settings for the time blocks. Each time block must be at
least 15minutes long and can only be set in 15-minute
increments. When you set the end time for a time block, the
meter automatically sets this end time as the start time for the
next time block.
You can set a different blood glucose target range for each time
block. The target range for each time block must be within the
hypo and hyper warning limits.
When the default time blocks are set up, the settings are applied
to all of the other time blocks. If bolus advice is set up, you must
also set the carbohydrate ratio and insulin sensitivity for the
default time block. You can set a different carbohydrate ratio and
insulin sensitivity for each time block.
Talk to your healthcare professional about setting up time blocks.
52
52297_07167776001.indb 52 10/20/14 11:17 AM

3.5.6 Bolus Advice
The bolus advice feature calculates a bolus for you that is
customized to the time of day and your changing situations. This
function is activated only if you set up bolus advice on your
meter.
Bolus advice provided by the meter is intended solely as advice.
For more detailed information on bolus advice, see the Bolus
Advice chapter in this user’s manual.
Carbohydrate Ratio
The carbohydrate ratio is the amount of insulin necessary to
account for a certain amount of carbohydrates.
Talk with your healthcare professional to determine the
appropriate carbohydrate ratio for you.
3
53
52297_07167776001.indb 53 10/20/14 11:17 AM

Insulin Sensitivity
The insulin sensitivity is the amount of insulin necessary to lower
your blood glucose by a certain amount.
Talk with your healthcare professional to determine the
appropriate insulin sensitivity settings for you.
Health Events
Health events can be selected to indicate how you are feeling or
what you are doing that might affect your blood glucose level. You
have the option of setting a percentage for each health event
which adjusts the bolus advice recommendation if you set up
bolus advice.
Health events available on the meter are:
jExercise 1
jExercise 2
jStress
jIllness
jPremenstrual
jCustomized (1 - 3)
A positive percentage increases the bolus amount and a negative
percentage(-) decreases the bolus amount. Talk with your
healthcare professional to determine the appropriate percentage
for each health event for you.
54
52297_07167776001.indb 54 10/20/14 11:17 AM

Advice Options
Meal rise, snack size, acting time, and offset time are advice
options. Below are detailed descriptions of each of these settings.
Meal Rise
During or after meals, an increase in blood glucose level is
considered normal within a certain range, even though a bolus
has been delivered.
Enter the maximum increase in your blood glucose level that is to
be tolerated after a meal without an additional correction bolus.
Snack Size
The snack size defines a threshold of carbohydrates above which
a meal rise is triggered.
Acting Time
The period of time from the start of bolus until your blood glucose
level is expected to return to the target level.
You can adjust the length of the acting time to fit your individual
needs within a specified time interval (1½hours to 8hours). If
you are unsure of your insulin acting time, check with your
healthcare professional.
The total acting time includes the offset time.
Offset Time
The expected amount of time before the insulin begins to lower
blood glucose levels in the body.
3
55
52297_07167776001.indb 55 10/20/14 11:17 AM

56
52297_07167776001.indb 56 10/20/14 11:17 AM

4
57
4 Control Testing
4.1 When to Perform a Control Test
Performing a control test lets you know the meter and test strips
are working properly. You should perform a control test when:
jyou open a new test strip box.
jyou left the test strip container open.
jyou think the test strips are damaged.
jyou want to check the meter and test strips.
jthe test strips were stored in extreme temperatures, humidity,
or both.
jyou dropped the meter.
jyour test result does not match how you feel.
jyou want to check if you are performing the test correctly.
52297_07167776001.indb 57 10/20/14 11:17 AM

58
4.2 About the Control Solutions
jUse only ACCU-CHEK Aviva control solutions.
jClose the control solution bottle tightly after use.
jWrite the date you open the control solution bottle on the bottle
label. The control solution must be discarded 3 months from
the date the control solution bottle was opened (discard date)
or on the Use By date on the bottle label, whichever comes
first.
jDo not use control solution that is past the Use By or discard
date.
jRefer to the control solution package insert for control solution
storage conditions.
jThe meter automatically recognizes the difference between the
control solution and blood.
jThe control results are not displayed in memory.
jThe control solution can stain fabric. Remove stains by washing
with soap and water.
jControl solution is available for purchase. To order the control
solution, talk to your pharmacist or visit accu-chek.com to
order online.
52297_07167776001.indb 58 10/20/14 11:17 AM
4
59
NOTE
jBe careful not to put any fluids into the test strip slot.
jIf a test strip error occurs, remove and discard the
test strip and repeat the test with a new test strip.
jDo not apply the control solution to the test strip
before you insert it into the meter.
jWhen a test strip is in the meter the buttons and
touchscreen selections are inactive, including the
power button. The buttons become active when you
remove the test strip or when the test is complete.
jAnother way to start a control test is from the Main
Menu. Select Meter > bG Test and insert a test strip
into the meter.
1
Check the Use By date on the
test strip container. Do not
use test strips past the Use
By date.
2
Insert the test strip into the
meter in the direction of the
arrow. The meter turns on.
4.3 Performing a Control Test
You need the meter, a test strip, and control solution Level1,
Level2, or both. The control level is printed on the bottle label.
52297_07167776001.indb 59 10/20/14 11:17 AM

60
This screen only applies when
the meter has a white code
chip. If the meter has a black
code chip, do not match the
code to the container;
continue to the next step.
The Apply Drop screen
appears. The test strip is
ready for testing.
4
Select the control solution to
test. You will enter the level
later in the test.
5
Put the meter on a flat
surface, such as a table.
3
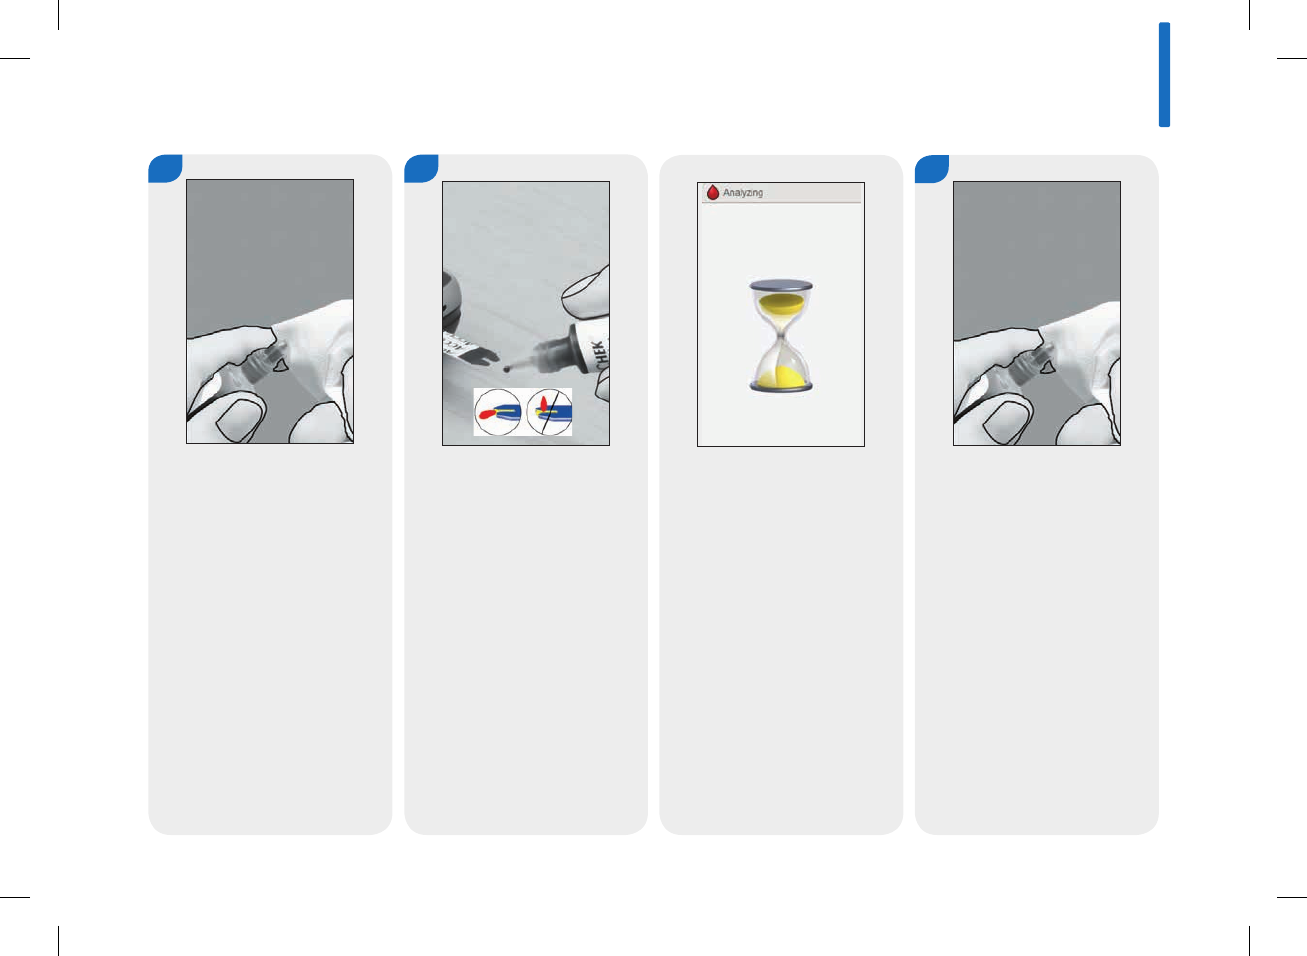
52297_07167776001.indb 60 10/20/14 11:17 AM
4
61
6
Remove the bottle cap. Wipe
the tip of the bottle with a
tissue.
7
Squeeze the bottle until a tiny
drop forms at the tip. Touch
the drop to the front edge of
the yellow window of the test
strip. Do not put control
solution on top of the test
strip.
The Analyzing screen appears
when there is enough control
solution in the test strip.
8
Wipe the tip of the bottle with
a tissue. Cap the bottle tightly.
52297_07167776001.indb 61 10/20/14 11:17 AM
62
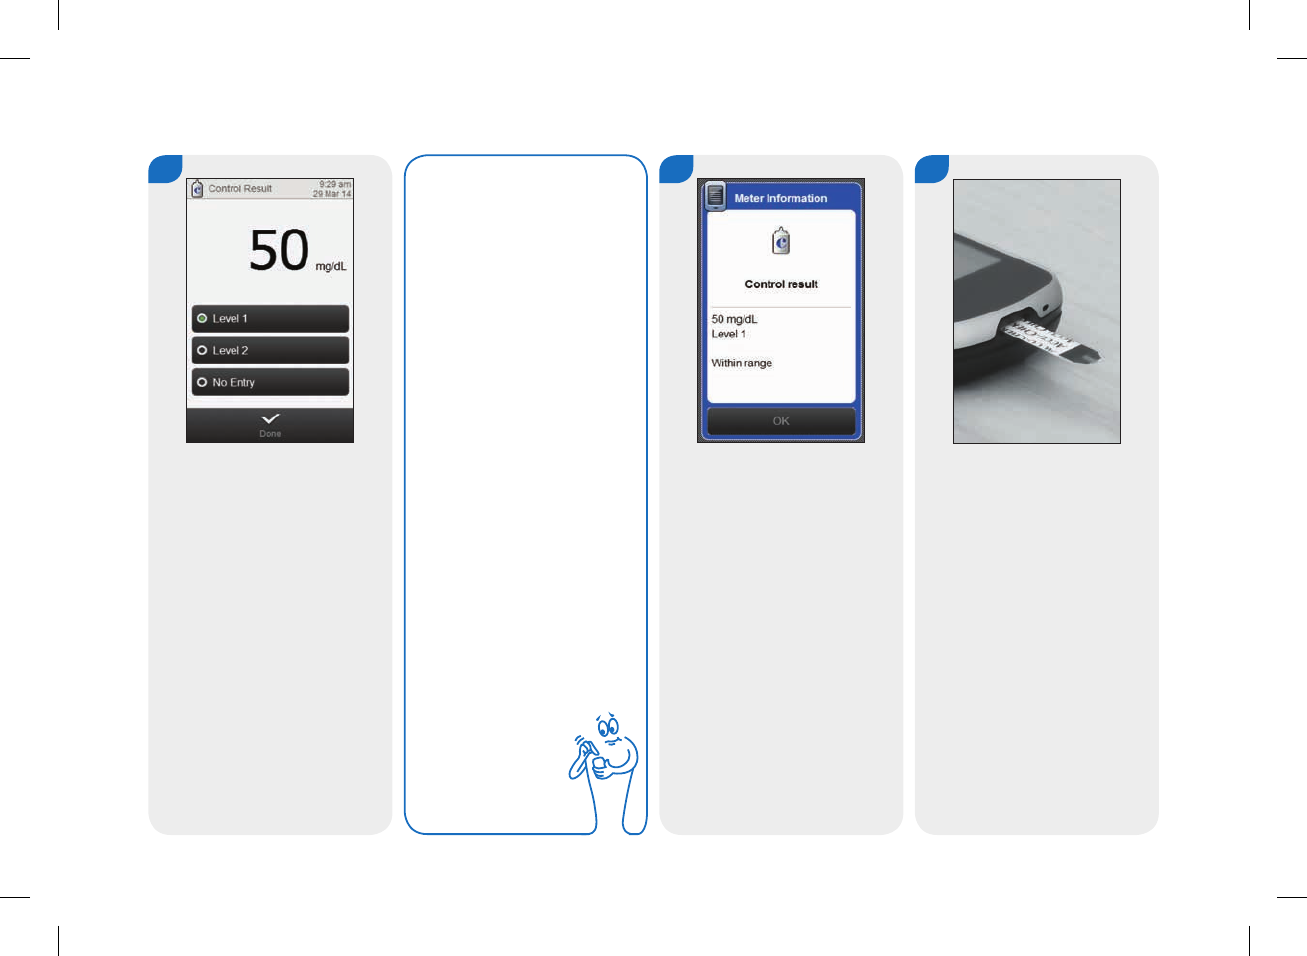
9 10
The control result appears on
the display. Choose the
control solution level and
select Done.
Within range means that the
meter and test strips are
working properly. Out of
range, LO, or HI means that
the control result is outside of
the acceptable range; see the
Out-of-Range Control
Results section in this
chapter. Select OK.
11
Remove and discard the used
test strip.
NOTE
If you choose No Entry
and select Done, the
Control result screen
shown in Step10 is not
displayed. Go to
Step11.
52297_07167776001.indb 62 10/20/14 11:17 AM

4
63
4.4 Out-of-Range Control Results
w WARNING
jThe control range applies only to a control result. It only
indicates that the test strips and meter are working
properly. Do not use a control result to interpret blood
glucose results.
jIf the control result is out of range, do not use the meter
until you solve the problem. Check this list in the following
table to help solve the problem.
52297_07167776001.indb 63 10/20/14 11:17 AM
64
Troubleshooting Checks Actions
1. Are either the test strips or control solutions expired? Discard the test strips or control solutions if either is past the Use
By date. If the control solution was opened more than 3months
ago, discard it. Repeat the control test with an unexpired test
strip and an unexpired control solution.
2. Did you wipe the tip of the control solution bottle before use? Wipe the tip of the bottle with a tissue. Repeat the control test
with a new test strip and a fresh drop of control solution.
3. Were the caps on the test strip container and the control
solution bottle always closed tightly?
Replace the test strips or control solutions if you think either was
uncapped for some time. Repeat the control test.
52297_07167776001.indb 64 10/20/14 11:17 AM
4
65
Troubleshooting Checks Actions
4. Was the test strip used immediately after it was removed from
the test strip container?
Repeat the control test with a new test strip and a fresh drop of
control solution.
5. Were the test strips and control solutions stored in a cool, dry
place?
Repeat the control test with a properly stored test strip and
control solution.
6. Did you follow the directions? Read the Control Testing chapter and repeat the control test.
7. Did you choose the correct control solution level, either 1or2,
when you performed the control test?
If you chose the wrong control solution level, you can still
compare the control result to the range printed on the test strip
container.
8. Are you still unsure of the problem? Contact the ACCU-CHEK Customer Care Service Center at
1-800-688-4578.
52297_07167776001.indb 65 10/20/14 11:17 AM

66
52297_07167776001.indb 66 10/20/14 11:17 AM

5 Testing Your Blood Glucose
5.1 Performing a Blood Glucose Test
Refer to the Important Safety Information chapter at the
beginning of this manual.
NOTE
jYou need the meter, a test strip, a lancing device, and
a lancet.
jBefore you perform your first blood glucose test, set
up the meter correctly and perform a control test.
jA blood glucose test cannot be performed while the
meter is plugged in.
jBlood glucose is sometimes shortened to bG, but it
means the same thing.
w WARNING
jDo not change your treatment because of one blood glucose
test result.
jNEVER ignore symptoms of high or low blood glucose.
5
67
52297_07167776001.indb 67 10/20/14 11:17 AM
1
Wash and dry your hands.
Prepare the lancing device.
Always use a new lancet with
each test.
2
Check the Use By date on the
test strip container. Do not
use test strips past the Use
By date.
3
Insert the test strip into the
meter in the direction of the
arrow. The meter turns on.
68
52297_07167776001.indb 68 10/20/14 11:17 AM
NOTE
jBe careful not to put any fluids into the test strip slot.
jIf a test strip error occurs, remove and discard the test strip. Repeat the test with a new
test strip.
jDo not apply a blood drop to the test strip before you insert it into the meter.
jWhen a test strip is in the meter, the buttons and touchscreen selections are inactive,
including the power button. The buttons become active when you remove the test strip
or when the test is complete.
jOther ways to start a blood glucose test:
• From the Main Menu, select Meter > bG Test or select Bolus > bG Test. Insert a test
strip into the meter.
• When a bG test reminder notification is displayed, insert a test strip into the meter.
This screen only applies when
the meter has a white code
chip. If the meter has a black
code chip, do not match the
code to the container;
continue to the next step.
5
69
52297_07167776001.indb 69 10/20/14 11:17 AM
4
The Apply Drop screen
appears. The test strip is
ready for testing.
5
Perform a fingerstick with the
lancing device.
6
Gently squeeze your finger to
assist the flow of blood. This
helps you get a blood drop.
7
Touch the blood drop to the
front edge of the yellow
window of the test strip. Do
not put blood on top of the
test strip.
70
52297_07167776001.indb 70 10/20/14 11:17 AM
The Analyzing screen appears
when there is enough blood in
the test strip.
NOTE
jFor information
about blood
glucose
results, see the
Understanding
Blood Glucose
Results and
Unusual Blood
Glucose Results
sections in this
chapter.
jThe blood glucose
result must be
used within
10minutes for
bolus advice.
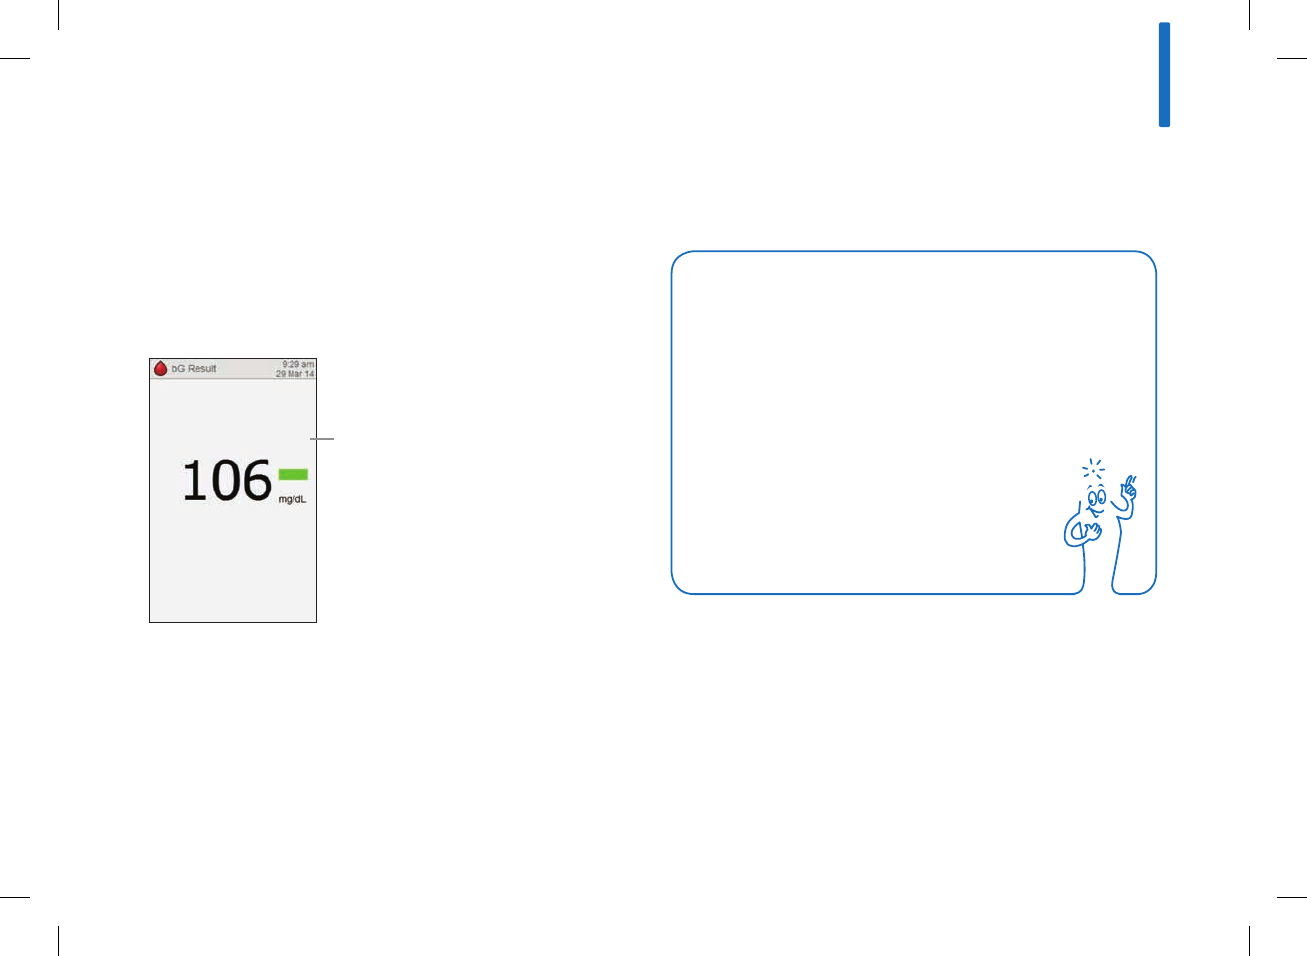
The result appears on the
display.
w WARNING
The meter is designed to
display blood glucose results
from 10 to 600mg/dL. If a
result below 10mg/dL or over
600mg/dL appears on the
display, call ACCU-CHEK
Customer Care Service Center
at 1-800-688-4578.
5
71
52297_07167776001.indb 71 10/20/14 11:18 AM

8
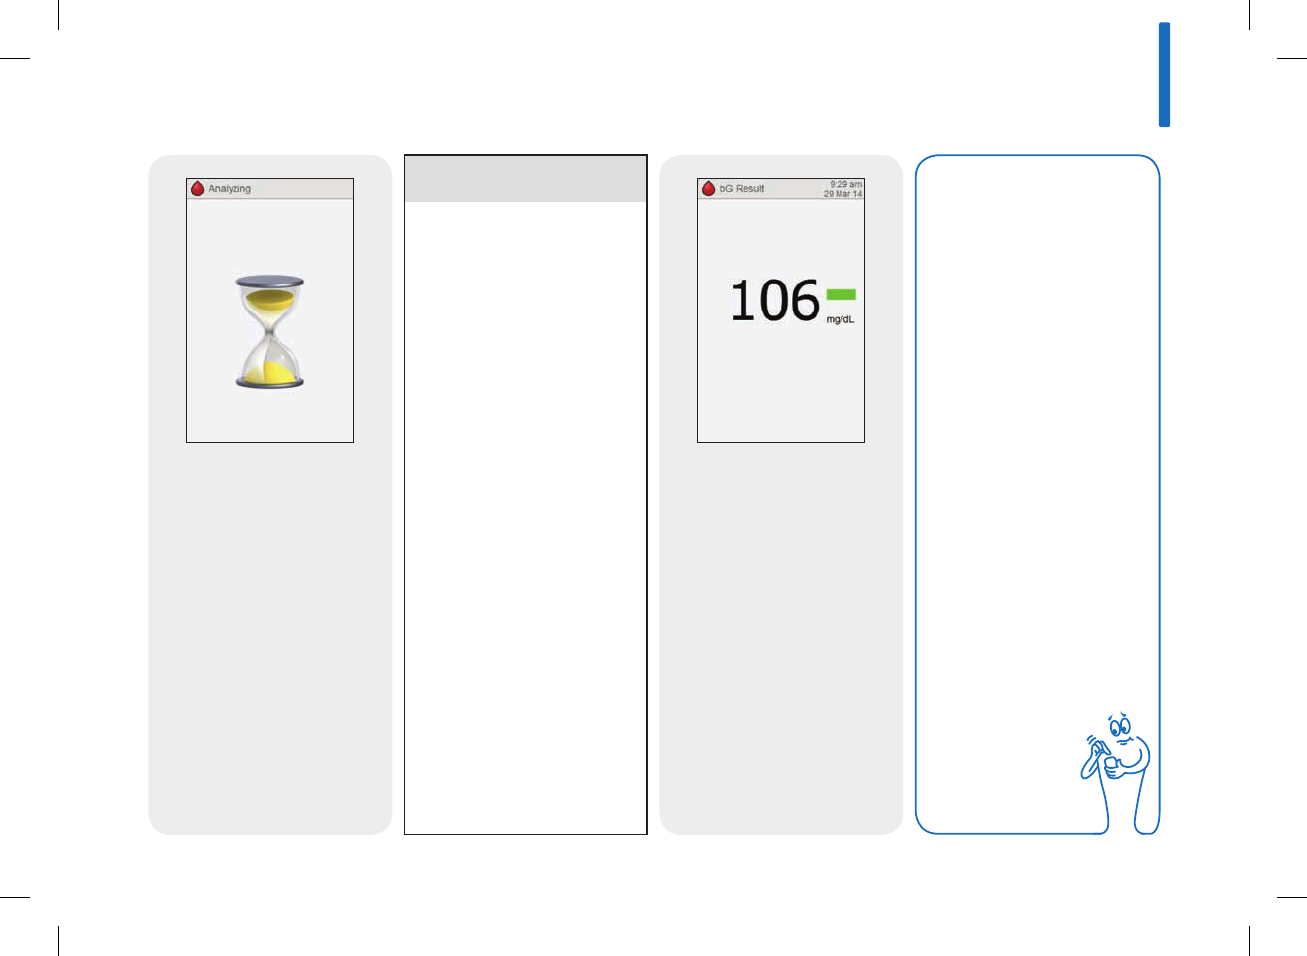
In approximately 3seconds
the Detailed bG Result screen
appears. Remove and discard
the used test strip. Perform
one of the following:
jComplete the blood glucose
test without adding
information or delivering a
bolus: Select Done.
jIf bolus advice is enabled:
Go to the Delivering a
Bolus Using Bolus Advice
section in the Bolus
Advice Administering
Boluses chapter in this
user’s manual.
jIf bolus advice is not
enabled:
• Add information to be
saved with the blood
glucose result: Continue
to the next section
Adding Information to a
Blood Glucose Result. A
bolus can be delivered
after adding the
information.
• Deliver a bolus without
adding information: Select
Bolus and go to the
Delivering a Bolus
Without Bolus Advice
section in this chapter.
72
52297_07167776001.indb 72 10/20/14 11:18 AM
5.2 Adding Information to a Blood Glucose Result
1To add an entry, select it and
refer to the instructions on the
following pages.
Adding information to the entry fields provides you with a record
of the circumstances surrounding your blood glucose result. This
information is helpful later for determining patterns in your blood
glucose levels. The steps in this section only apply if the bolus
advice feature is not being used. If bolus advice is enabled, go to
the Delivering a Bolus Using Bolus Advice section in the Bolus
Advice chapter in this user’s manual.
5
73
52297_07167776001.indb 73 10/20/14 11:18 AM
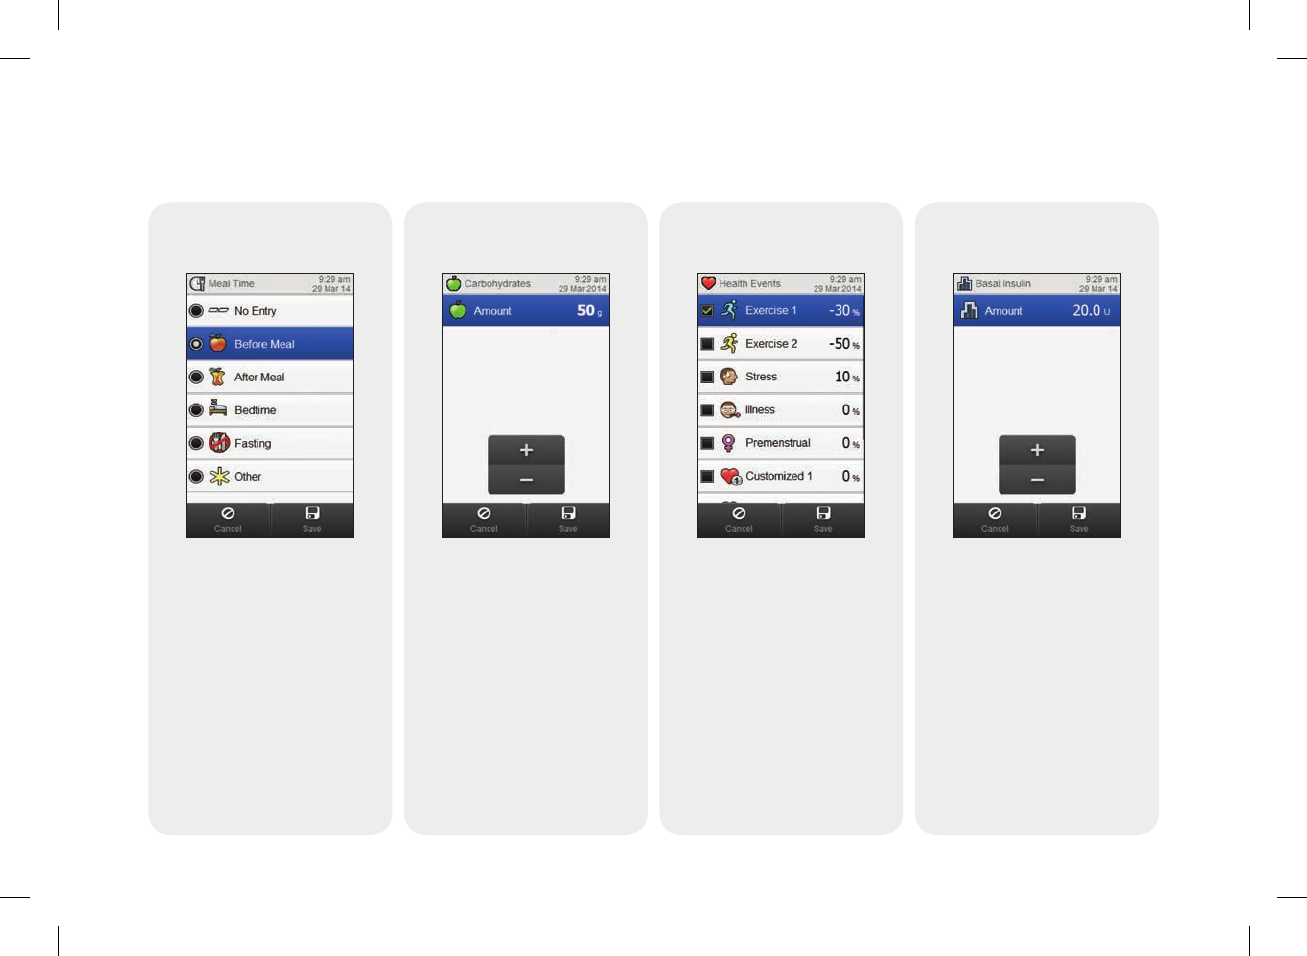
Screens for Adding Entries for Detailed bG Result
Meal Time
Choose the meal time. Select
Save.
Carbohydrates
Set the amount of
carbohydrates consumed.
Select Save.
Health Events
Choose up to 4 health events.
Select Save.
Basal Insulin
Set the basal insulin amount.
Select Save.
74
52297_07167776001.indb 74 10/20/14 11:18 AM
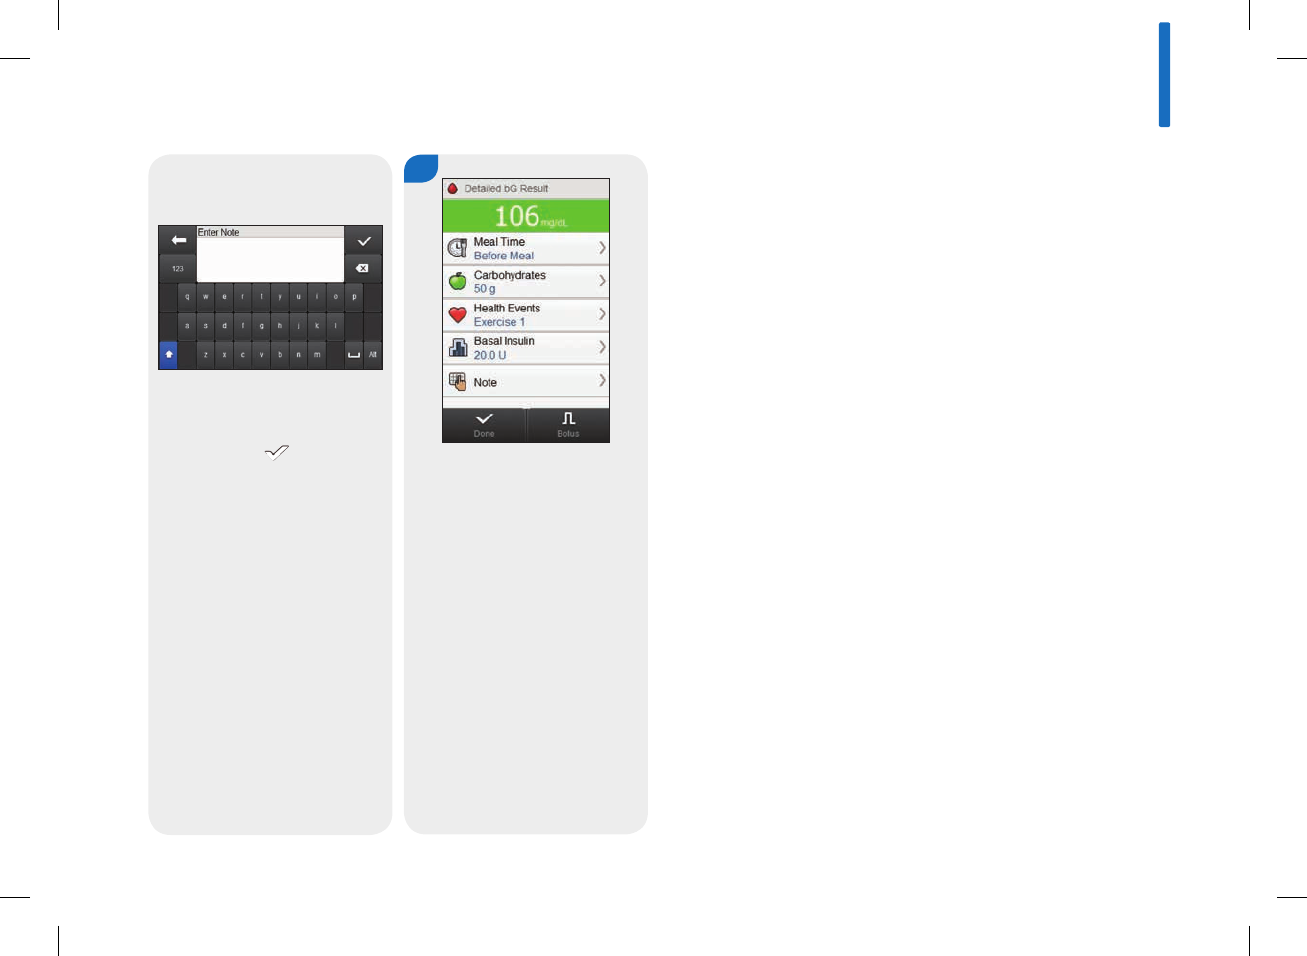
2
Note
Type a note (up to 60
characters) to save with this
record. Select .
Perform one of the following:
jSave the entries and
proceed with bolus delivery:
Select Bolus and continue
to Delivering a Bolus
Without Bolus Advice.
jSave the entries and do not
proceed with bolus delivery:
Select Done.
5
75
52297_07167776001.indb 75 10/20/14 11:18 AM
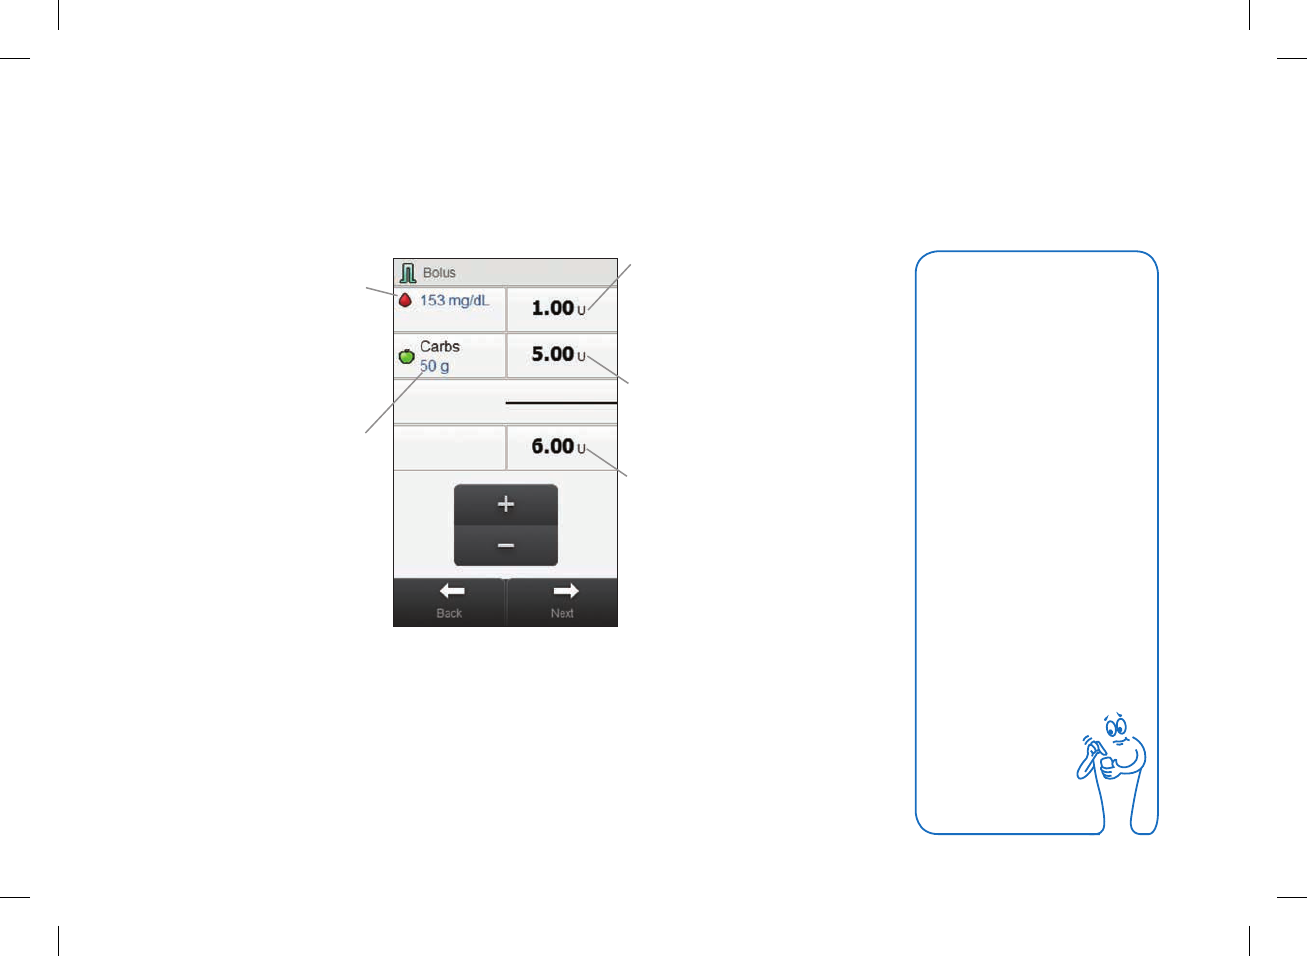
5.3 Delivering a Bolus Without Bolus Advice
bG Result
No bG Test is displayed if
there is no current bG result.
Correction Bolus
Insulin to return an out-of-target
blood glucose result to a target
value.
Carbohydrate Bolus
Insulin to account for the food you
eat.
Total Bolus
Sum of the Correction Bolus and
Carbohydrate Bolus amounts.
Carbohydrate Amount
No Entry is displayed if no
amount is entered.
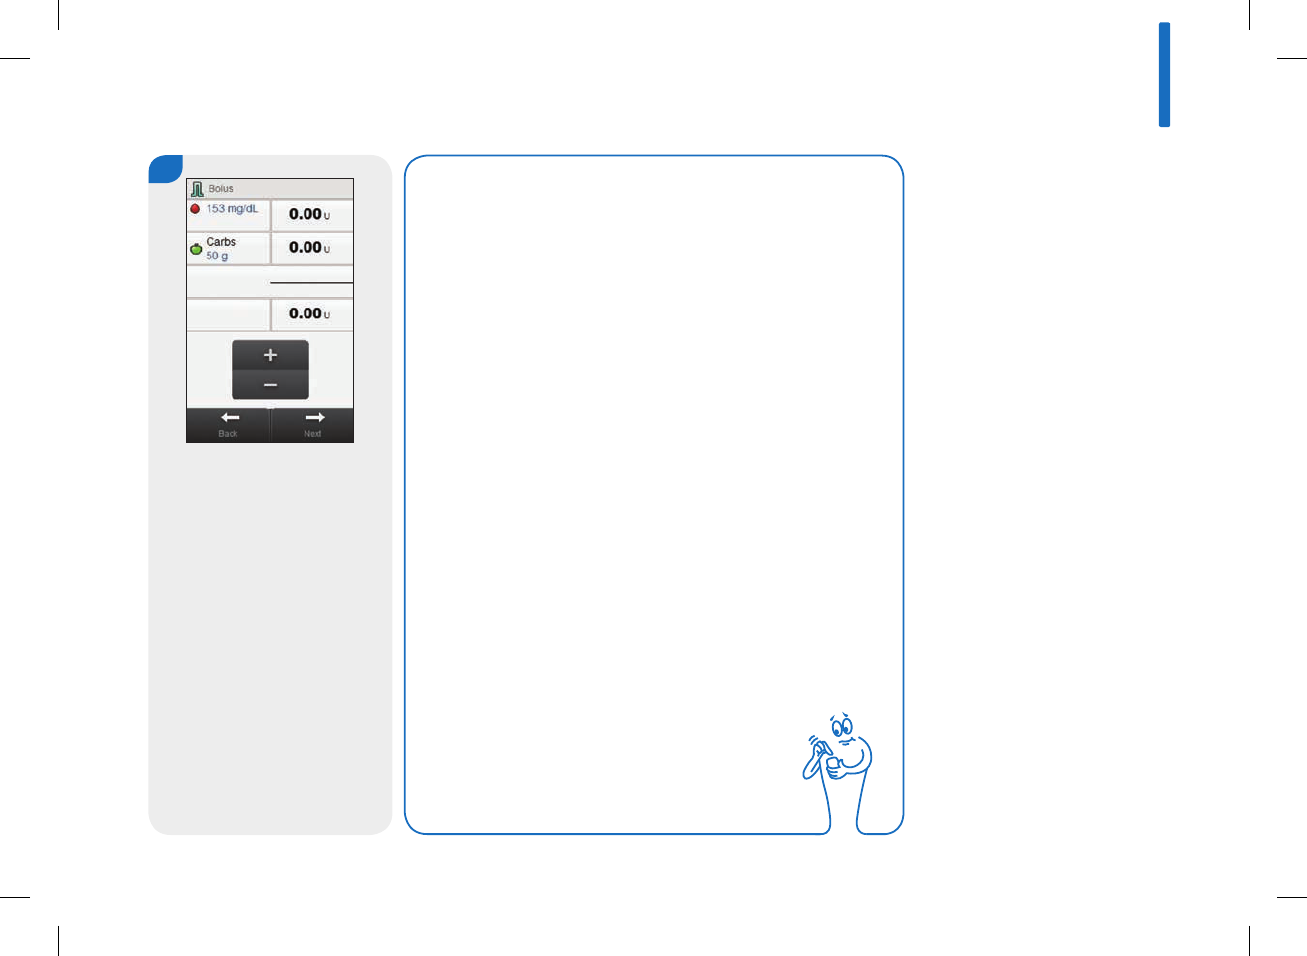
NOTE
When the Bolus screen
first appears there are
no bolus amounts. The
bolus amounts are
entered by you.
76
52297_07167776001.indb 76 10/20/14 11:18 AM
1
Enter the bolus amounts, as
necessary. To input a bolus
amount, select the entry field
for Correction Bolus,
Carbohydrate Bolus, or Total
Bolus and set the amount.
NOTE
jIf you set either the Correction Bolus or Carbohydrate
Bolus first: The Total Bolus is disabled and cannot
be adjusted; however, the Total Bolus updates
accordingly.
jIf you set the Total Bolus first: The Correction Bolus
and Carbohydrate Bolus are disabled and cannot
be adjusted; however, the Correction Bolus updates
accordingly.
jIf a Carbohydrate Bolus is entered and no
Carbohydrate Amount has been entered (Carbs
displays No Entry), you should consider entering an
amount for carbohydrates. Select Back to enter an
amount. An amount is not required, but the more
complete the data the more accurate any future
bolus advice recommendations are when using bolus
advice.
5
77
52297_07167776001.indb 77 10/20/14 11:18 AM
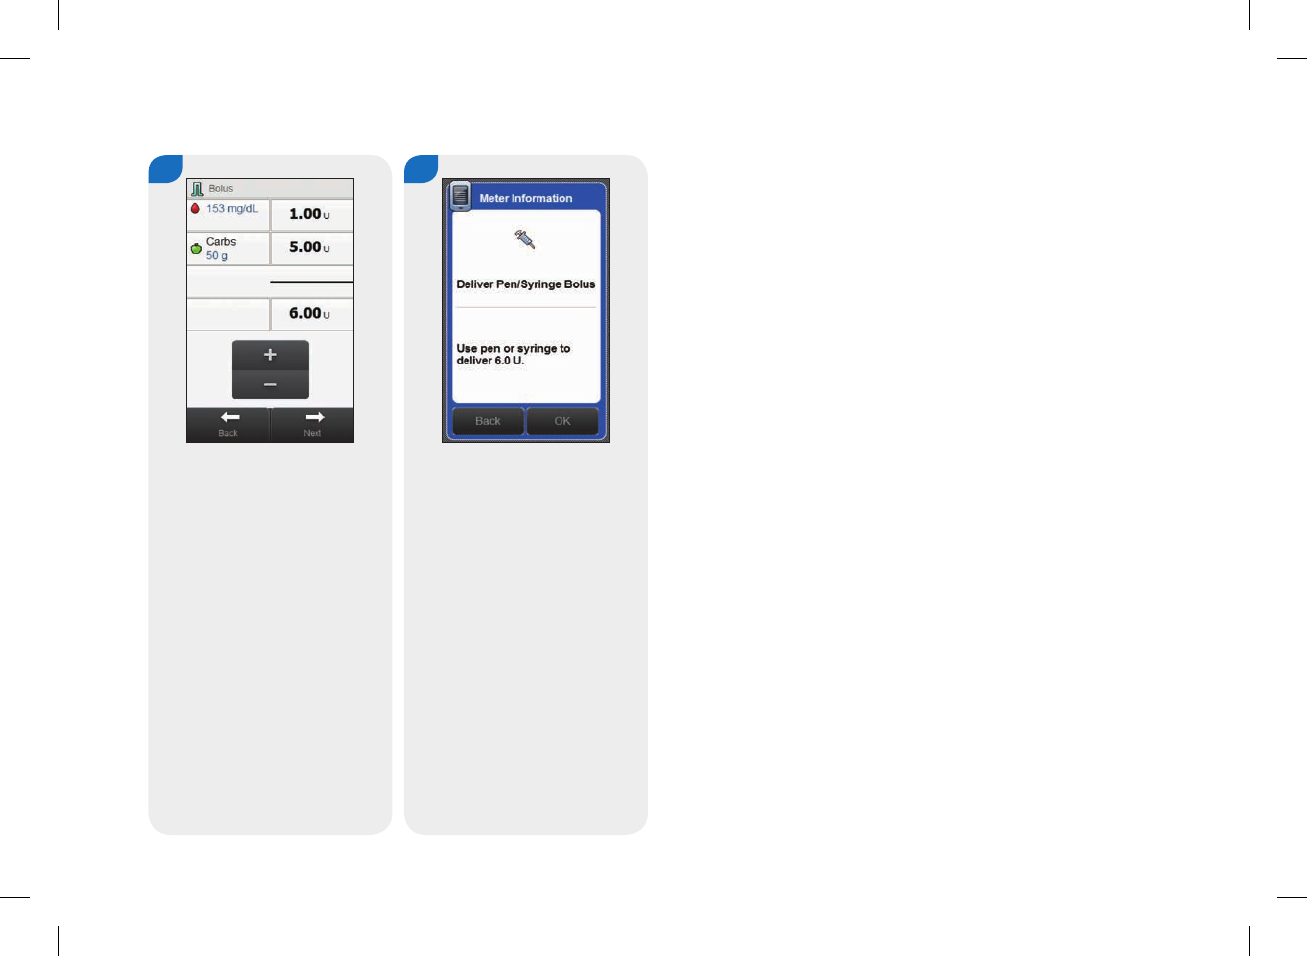
2
Select Next.
3
Review the bolus amount.
Select Back to adjust or select
OK to record the bolus.
Deliver the bolus using your
pen or syringe.
78
52297_07167776001.indb 78 10/20/14 11:18 AM
5.4 Understanding Blood Glucose Results
The status bar indicates how the blood glucose result compares
to the target blood glucose range for the current time block.
Status Bar
NOTE
Treat low or high blood glucose as recommended by
your healthcare professional.
5
79
52297_07167776001.indb 79 10/20/14 11:18 AM
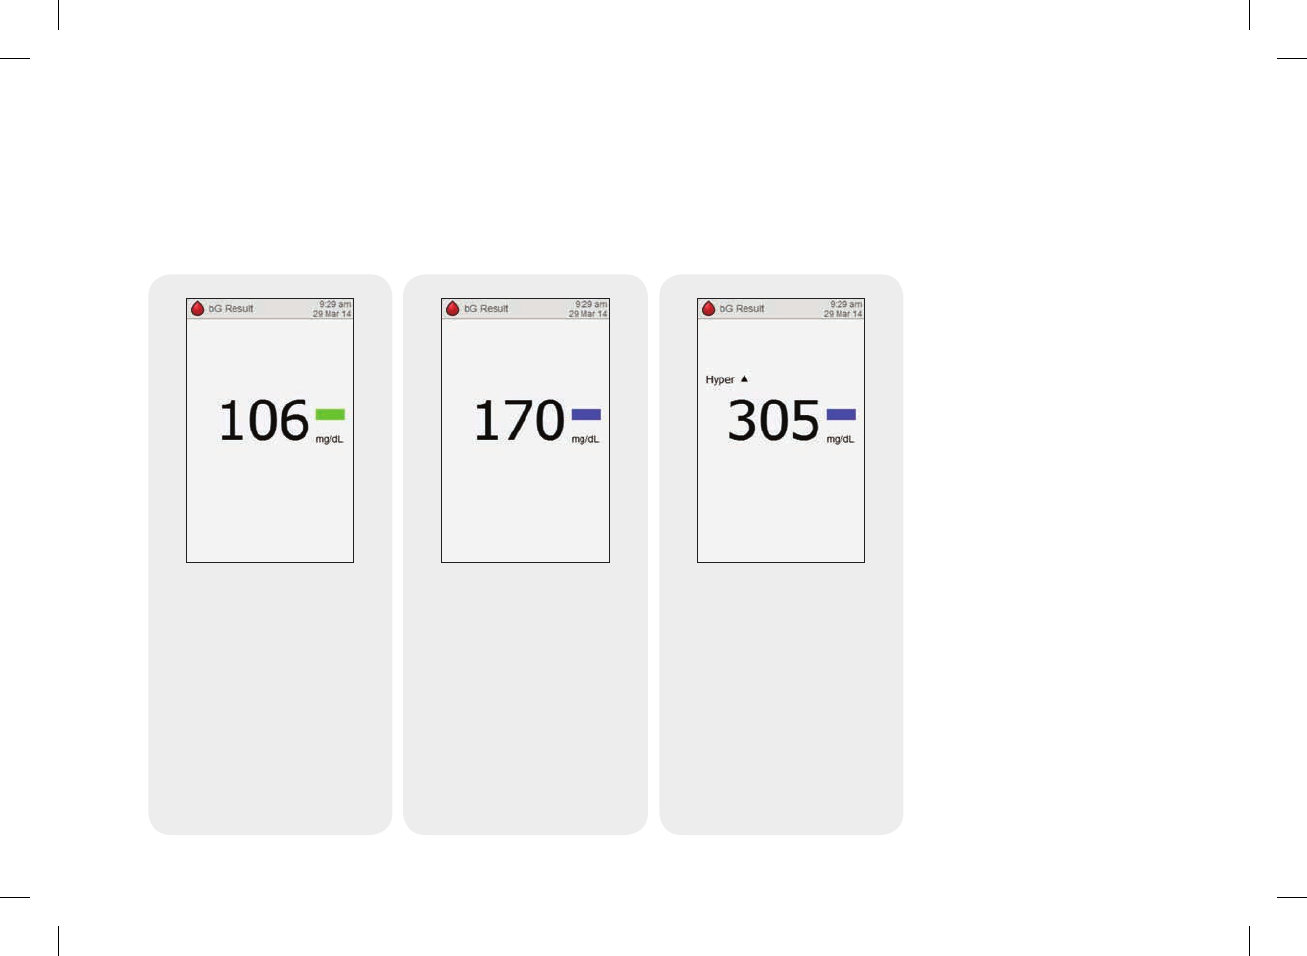
Status Bar Descriptions
The following are status bar descriptions with sample displays:
Green indicates the result is
within the target range for the
current time block.
Blue indicates the result is
above the target range for the
current time block. The result
is not above the hyper
warning limit.
Blue with Hyper indicates the
result is above the hyper
warning limit.
80
52297_07167776001.indb 80 10/20/14 11:18 AM
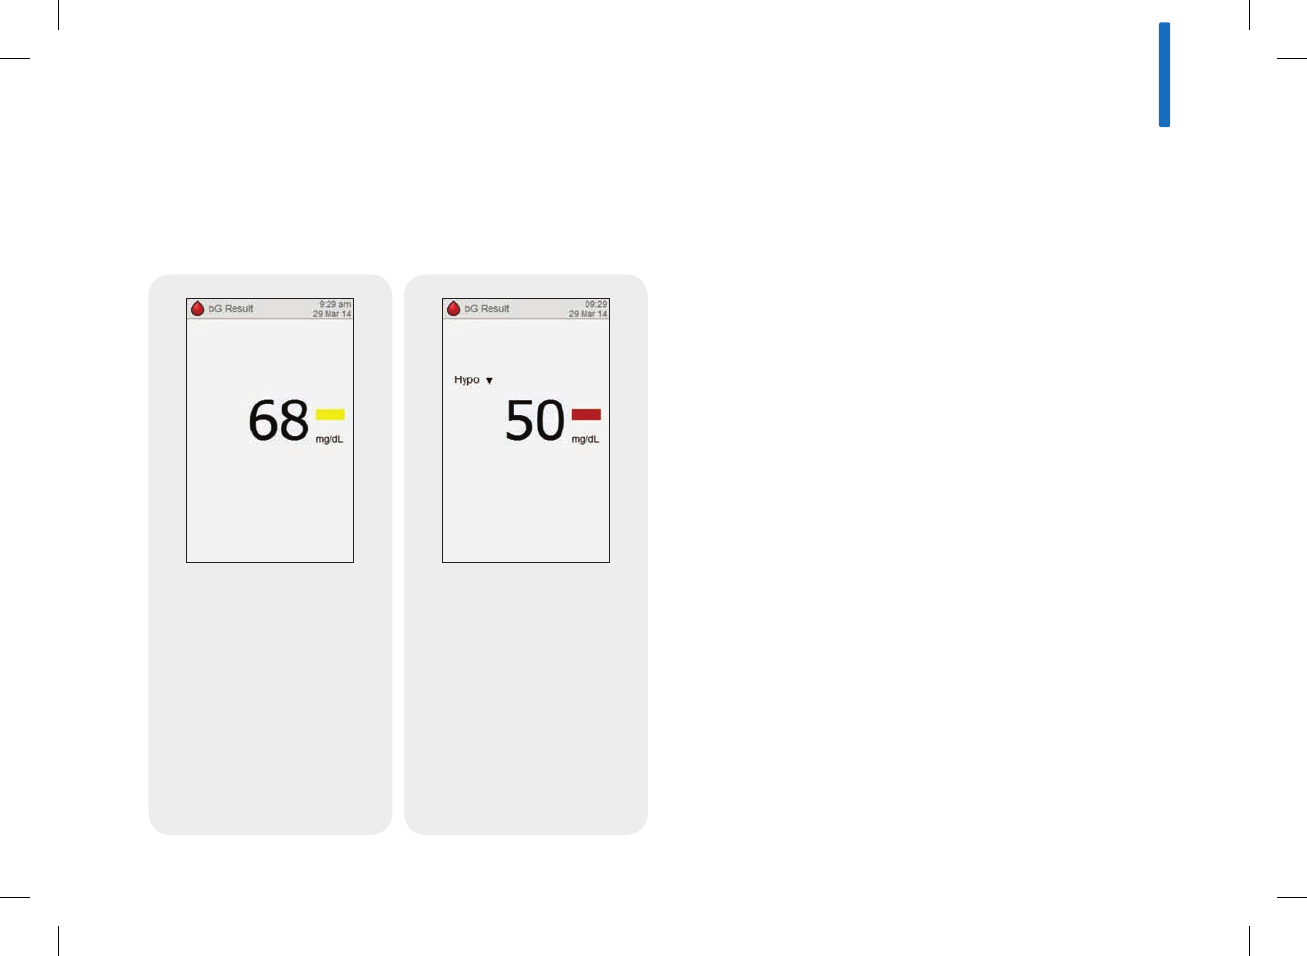
Yellow indicates the result is
below the target range for the
current time block. The blood
glucose result is not below the
hypo warning limit.
Red with Hypo indicates the
result is below the hypo
warning limit.
5
81
52297_07167776001.indb 81 10/20/14 11:18 AM

LO or HI Display
The blood glucose result may be below the measuring range of
the meter. If you are experiencing any of the common symptoms
of low blood glucose, contact your healthcare professional
immediately. Treat low blood glucose as recommended by your
healthcare professional.
The blood glucose result may be above the measuring range of
the meter. If you are experiencing any of the common symptoms
of high blood glucose, contact your healthcare professional
immediately. Treat high blood glucose as recommended by your
healthcare professional.
82
52297_07167776001.indb 82 10/20/14 11:18 AM
5.5 Unusual Blood Glucose Results
If your blood glucose result does not match the way you feel,
follow these steps:
Troubleshooting Checks Actions
1. Are the test strips expired? Discard the test strips if they are past the use by date. Repeat the
blood glucose test with an unexpired test strip.
2. Has the cap on the test strip container always been closed
tightly?
Replace the test strips if you think the test strip container was
uncapped for some time. Repeat the blood glucose test.
3. Was the test strip used immediately after it was removed from
the test strip container?
Repeat the blood glucose test with a new test strip.
4. Were the test strips stored in a cool, dry place? Repeat the blood glucose test with a properly stored test strip.
5
83
52297_07167776001.indb 83 10/20/14 11:18 AM
Troubleshooting Checks Actions
5. Did you follow the directions? Read the Performing a Blood Glucose Test section in this
chapter and repeat the blood glucose test. Contact ACCU-CHEK
Customer Care Service Center at 1-800-688-4578 if you still have
problems.
6. Are the meter and test strips working properly? Perform a control test. See the Performing a Control Test
section in the Control Testing chapter in this user’s manual.
7. Are you still unsure of the problem? Contact ACCU-CHEK Customer Care Service Center at
1-800-688-4578.
84
52297_07167776001.indb 84 10/20/14 11:18 AM

Being aware of the symptoms of low or high blood glucose can
help you understand your test results and decide what to do if
they seem unusual.
Symptoms of low blood glucose (hypoglycemia) may include, but
are not limited to: anxiety, shakiness, sweating, headache,
increased hunger, dizziness, pale skin color, sudden change in
mood or irritability, fatigue, difficulty concentrating, clumsiness,
palpitations, and/or confusion.
Symptoms of high blood glucose (hyperglycemia) may include,
but are not limited to: increased thirst, frequent urination, blurred
vision, drowsiness, and/or unexplained weight loss.
w WARNING
If you are experiencing any of these symptoms, test your blood
glucose. If your blood glucose result is displayed as hypo, LO,
hyper, or HI, contact your healthcare professional immediately.
5.6 Symptoms of Low or High Blood Glucose
5
85
52297_07167776001.indb 85 10/20/14 11:18 AM

Comparing Your Meter Result to a Lab Result
A common question is how the blood glucose results on your
meter compare to the lab results. Your blood glucose can change
quickly, especially after eating, taking medication, or physical
activity. If you test yourself in the morning and then go to the
healthcare professional’s office for a blood glucose test, your
results will probably not match, even if you are fasting. This is
typically not a problem with your meter, it just means that time
has elapsed and your blood glucose has changed.
If you want to compare your meter result to the lab result, you
must be fasting. Take your meter to the healthcare professional’s
office, and test yourself by fingerstick within five minutes of
having blood drawn from your arm by a healthcare professional.
Keep in mind that the lab uses different technology than the
meter, and that blood glucose meter for self testing generally
read somewhat lower than the lab result.
jIf you are fasting and you do a fingerstick test within 5 minutes
of having your blood drawn, here are the general guidelines to
compare your meter to the lab result: If your blood glucose is
below 75mg/dL, your results generally should fall within
±15mg/dL of the lab result.
jIf your blood glucose is equal to or over 75mg/dL, your results
generally should fall within ±20% of the lab result.
86
52297_07167776001.indb 86 10/20/14 11:18 AM

6 Bolus Advice
6.1 Overview
Important information regarding the use of bolus advice is
presented in Overview and Before Using Bolus Advice in this
chapter.
jBolus advice is intended exclusively for use by well-trained
individuals who carry out their own insulin therapy with
multiple daily injections(MDI) and who are using bolus and
basal insulin separately. It is recommended you discuss your
bolus advice settings with your healthcare professional prior to
setting up this feature.
jBolus advice is only available if it is set up in the initial meter
startup (see the Startup chapter in this user’s manual) or
through Settings on the Main Menu (see the Setting Up Bolus
Advice section in the Changing Bolus Advice Settings
chapter in this user’s manual).
jDefinitions of the bolus advice settings are in the Important
Information section in the Startup chapter in this user’s
manual.
jAfter it is set up, bolus advice may be turned off. See the
Turning Off Bolus Advice section in the Changing Bolus
Advice Settings chapter in this user’s manual.
jBolus advice calculates insulin doses for you based on many
dierent pieces of information, such as:
• The values you entered in the setup of bolus advice
• Your current blood glucose result
• The amount of carbohydrates you estimated for a meal
• Your current health event status
• Bolus and/or meal history
6
87
52297_07167776001.indb 87 10/20/14 11:18 AM

6.2 Before Using Bolus Advice
w WARNING
jAlways compare the recommendation with how you
actually feel and adjust the recommended bolus, if
necessary.
jAlways carry out the actions entered into bolus advice in a
timely fashion. Eat the carbohydrate amount you entered
and administer the insulin amount you confirmed.
jBolus advice should not be used if you are using an
intermediate-acting insulin like Neutral Protamine
Hagedorn(NPH) insulin or any other intermediate-acting
insulin.
jRemember, long-acting insulin should not be used as a
meal or correction bolus.
6.2.1 Intended Users
For safe use, you need to understand certain information in order
to use bolus advice. Working closely with your healthcare
professional, you must be very familiar with your diabetes
therapy. Bolus advice calculates recommended boluses for you.
This can help you determine the amount of insulin you currently
require. You provide the information on which the bolus advice
recommendations are based.
Bolus advice is not able to judge your current situation
independent of your own estimation. It cannot correct possible
input errors. This is particularly true for the carbohydrate amount
entered. Warnings are displayed for entries that exceed possible
limits. You are prompted to check these entries and make
corrections, if necessary. No warning message is displayed if the
data is possible (within the acceptable ranges) but incorrect.
Therefore, it is important to carefully review all of your entries.
88
52297_07167776001.indb 88 10/20/14 11:18 AM

6.2.2 Information not taken into account when bolus
advice is used
jIt is possible that the values entered when setting up bolus
advice do not match how you actually feel. In this case, you
can increase or decrease the recommended bolus amount to
your needs.
jBolus amounts and meals that were consumed but not entered
into the meter cannot be reflected in the calculation.
jIf you delivered a bolus without using bolus advice, you can
enter the bolus information into the electronic logbook. It is
important that you enter bolus and carbohydrate information
into the logbook in order to obtain accurate bolus advice
recommendations. See The Logbook section in the My Data
chapter in this user’s manual.
jThe basal insulin doses you record do not influence the bolus
advice.
6.2.3 Warning messages
After performing a blood glucose test, warning messages about
your blood glucose result may be displayed. Please take careful
note of these messages.
jIf your blood glucose result is too low, you are prompted to eat
a certain amount of fast acting carbohydrates. A bolus will not
be recommended in this situation. Treat your low blood glucose
as recommended by your healthcare professional.
jIf your blood glucose result is high and above the hyper
warning limit, you are prompted to consider checking bG,
ketones, and insulin until your blood glucose is below the hyper
warning limit.
6
89
52297_07167776001.indb 89 10/20/14 11:18 AM

6.2.4 Summary
jIt is recommended you set up bolus advice with your healthcare
professional.
jCarefully check all of your entries.
jMake sure meals and boluses are recorded in the meter for
accurate bolus advice recommendations.
jTake note of all warning messages, especially those regarding
low or high blood glucose results. Immediate action may be
necessary.
jAlways compare the recommendation with how you actually
feel and adjust the bolus, if necessary.
jAlways carry out the actions entered in bolus advice in a timely
fashion.
jIf your blood glucose result is outside the meter’s measurement
range, the meter displays a message of either LO or HI. No
bolus advice will be recommended for a LO or HI result. Retest
your blood glucose and contact your healthcare professional if
you need more assistance.
jSee the Troubleshooting chapter in this user’s manual for
more information regarding blood glucose warning messages.
90
52297_07167776001.indb 90 10/20/14 11:18 AM
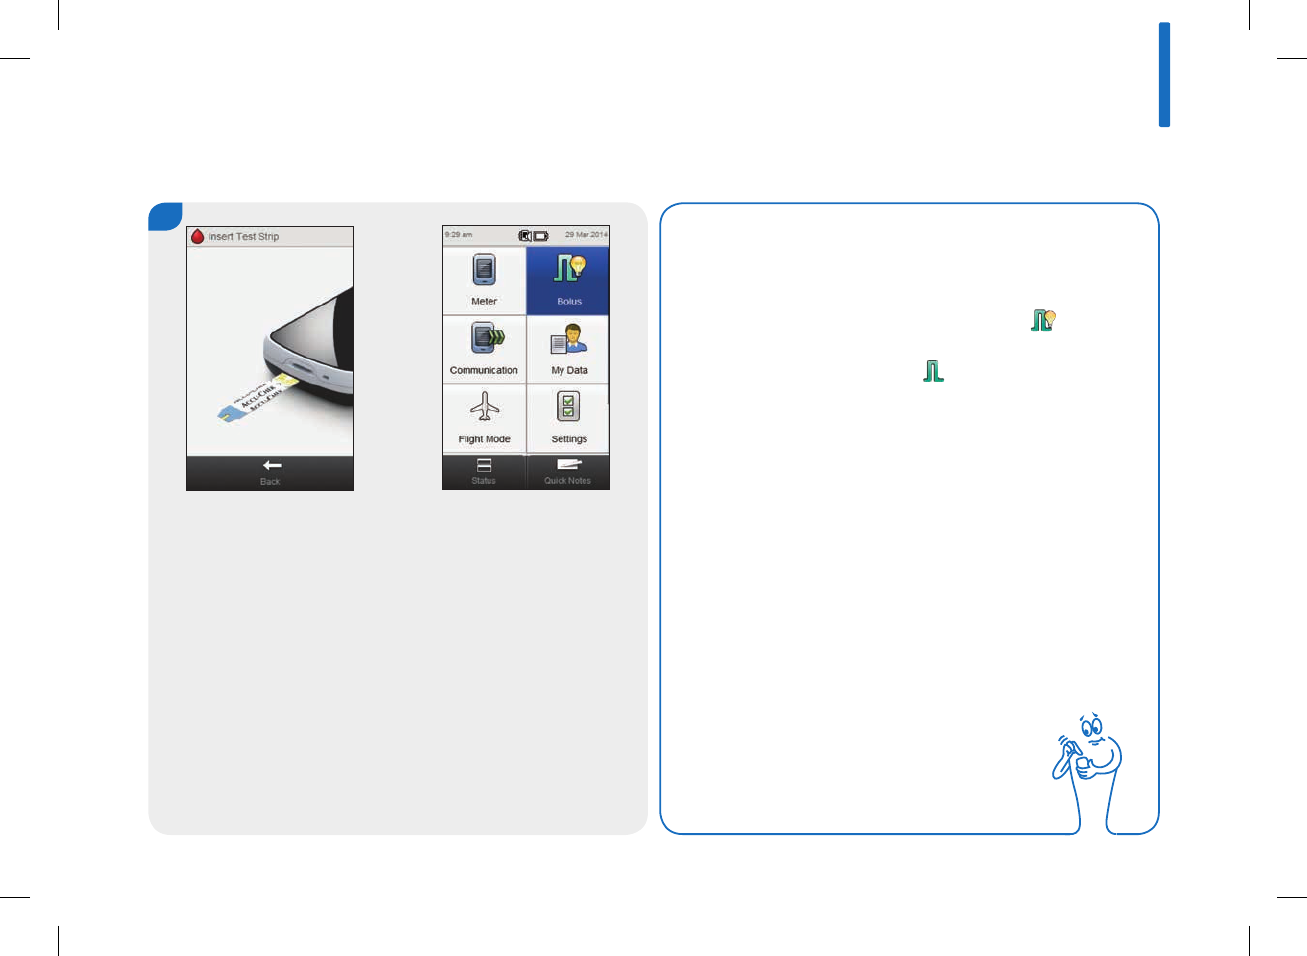
6.3 Delivering a Bolus Using Bolus Advice
1
Perform a blood glucose test.
See the Testing Your Blood
Glucose chapter in this user’s
manual.
Select Bolus on the Main
Menu.
or
NOTE
jBolus advice is only available if it has been set up,
which is indicated by this icon for the Bolus selection
on the Main Menu and on other screens: . If bolus
advice has not been set up or it has been turned
o, this icon is displayed: . See the Setting
Up Bolus Advice section in the Changing Bolus
Advice Settings chapter in this user’s manual for
instructions on how to set up bolus advice.
jBlood glucose is sometimes shortened to bG, but it
means the same thing.
6
91
52297_07167776001.indb 91 10/20/14 11:18 AM
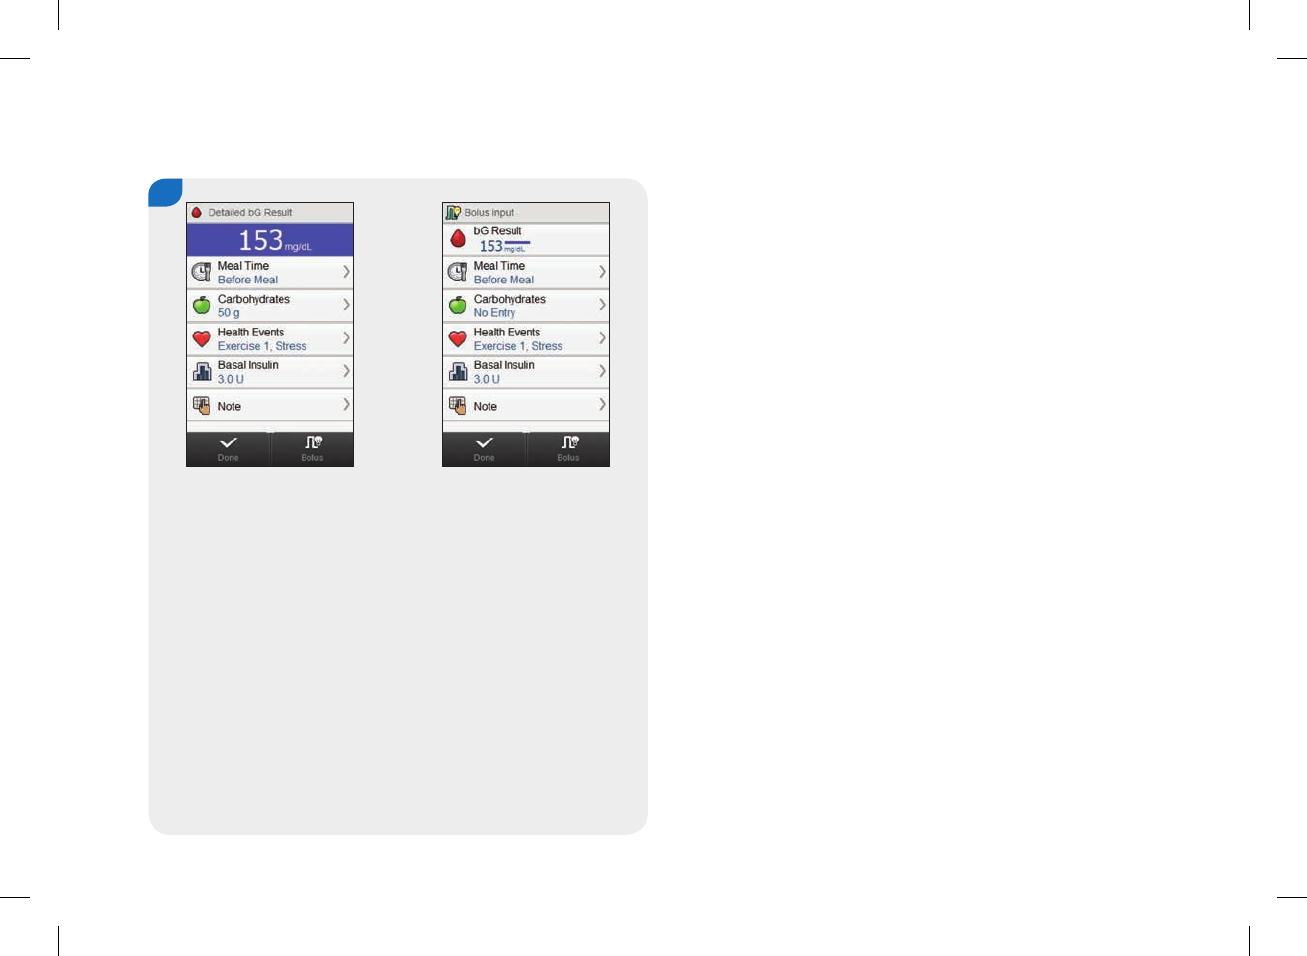
2
To add or adjust an entry, select it and refer to the instructions
on the following pages. When the entries are complete, choose
one of the following:
jSelect Bolus to proceed with bolus advice (go to Step3).
jSelect Done to save the entries and not proceed with bolus
advice.
or
92
52297_07167776001.indb 92 10/20/14 11:18 AM

NOTE
jThe Detailed bG Result screen is displayed if a bG test was performed in Step1. The Bolus Input screen is displayed if
Bolus was selected on the Main Menu in Step1.
jThe bG Result, Carbohydrates, and Health Events entries are used in the calculation of the bolus advice recommendation.
All of the entries are saved as a record.
jOn the Bolus Input screen, if the bG Test text is displayed instead of bG Result, there is no current blood glucose result that
can be used for bolus advice. Continue with bolus advice with one of the following:
• Perform a blood glucose test by selecting bG Test. See the Testing Your Blood Glucose chapter in this user’s manual.
After testing your blood glucose, return to this step.
• Do not perform a blood glucose test, but add entries as described in Step2. If a Carbohydrates amount is entered and
you proceed with selecting Bolus, a Carbohydrate Bolus is recommended. Proceed to Step3.
6
93
52297_07167776001.indb 93 10/20/14 11:18 AM

NOTE
jThe latest blood glucose result can only be used for bolus advice within 10minutes after the test. At 2minutes, a
countdown timer appears on the top of the screen displaying the remaining time. Once the 10minutes have elapsed, it is
not possible to proceed with bolus advice and the selection on the screen is deactivated. When the countdown timer has
elapsed, continue with one of the following:
• Begin again with bolus advice: Remove all entries and select Done. Return to Step1 in this chapter.
• Do not use bolus advice, but save the record: Complete all entries and select Done.
jIf the displayed blood glucose result is below your hypo warning limit (indicated by the Below hypo warning limit Warning
after your blood glucose test), it is not possible to proceed to obtain a bolus advice recommendation. The Bolus selection
on the Bolus Input screen is deactivated. Select Done.
94
52297_07167776001.indb 94 10/20/14 11:18 AM
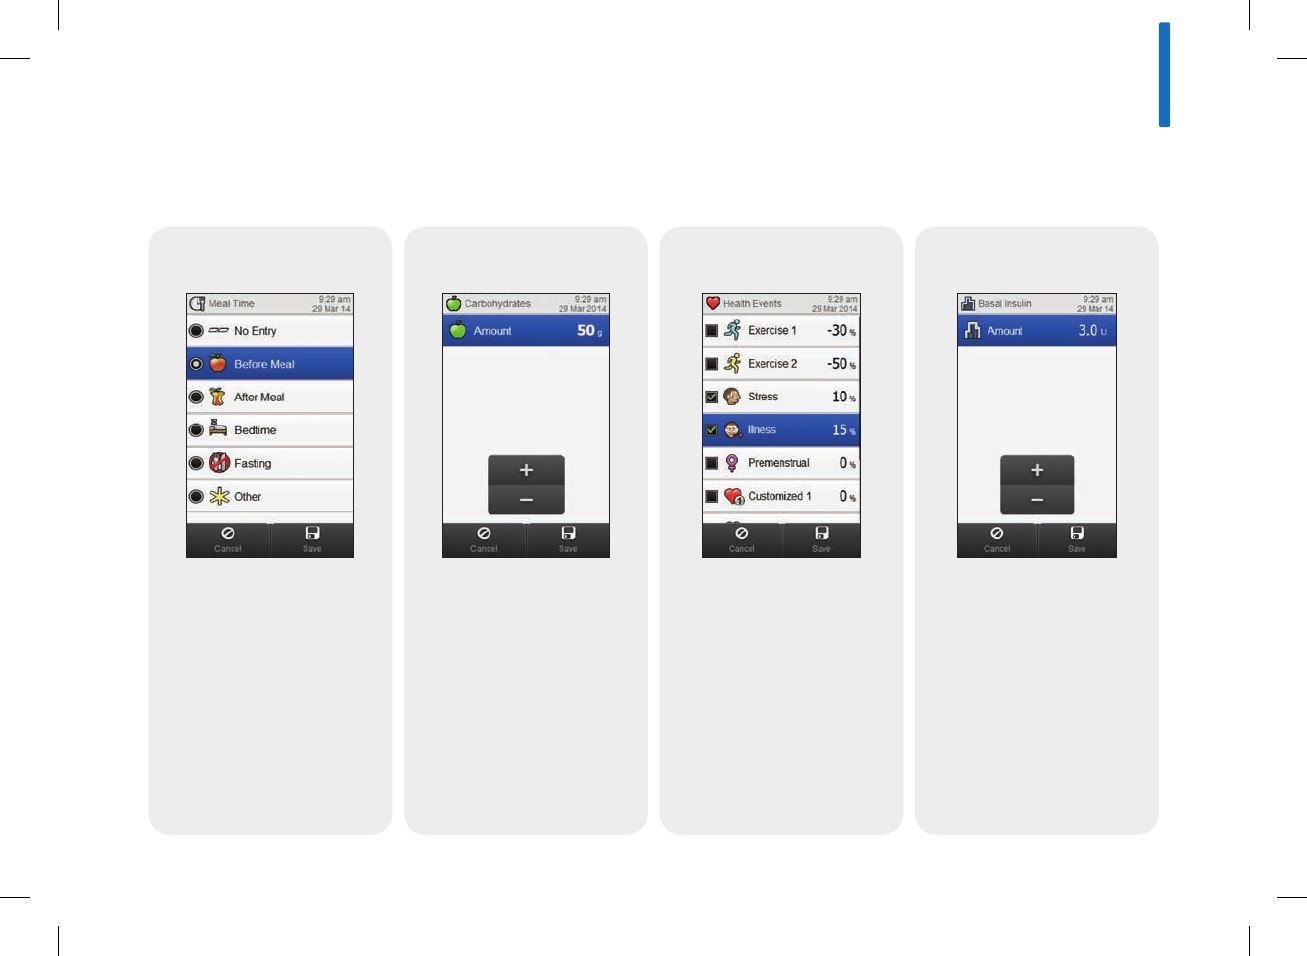
Basal Insulin
Set the basal insulin amount.
Select Save.
Meal Time Health Events
Choose up to 4 health events.
Select Save.
Choose an applicable meal
time. Select Save.
Carbohydrates
Screens for Adding or Adjusting Entries for Bolus Advice
Set the amount of
carbohydrates consumed.
Select Save.
6
95
52297_07167776001.indb 95 10/20/14 11:18 AM
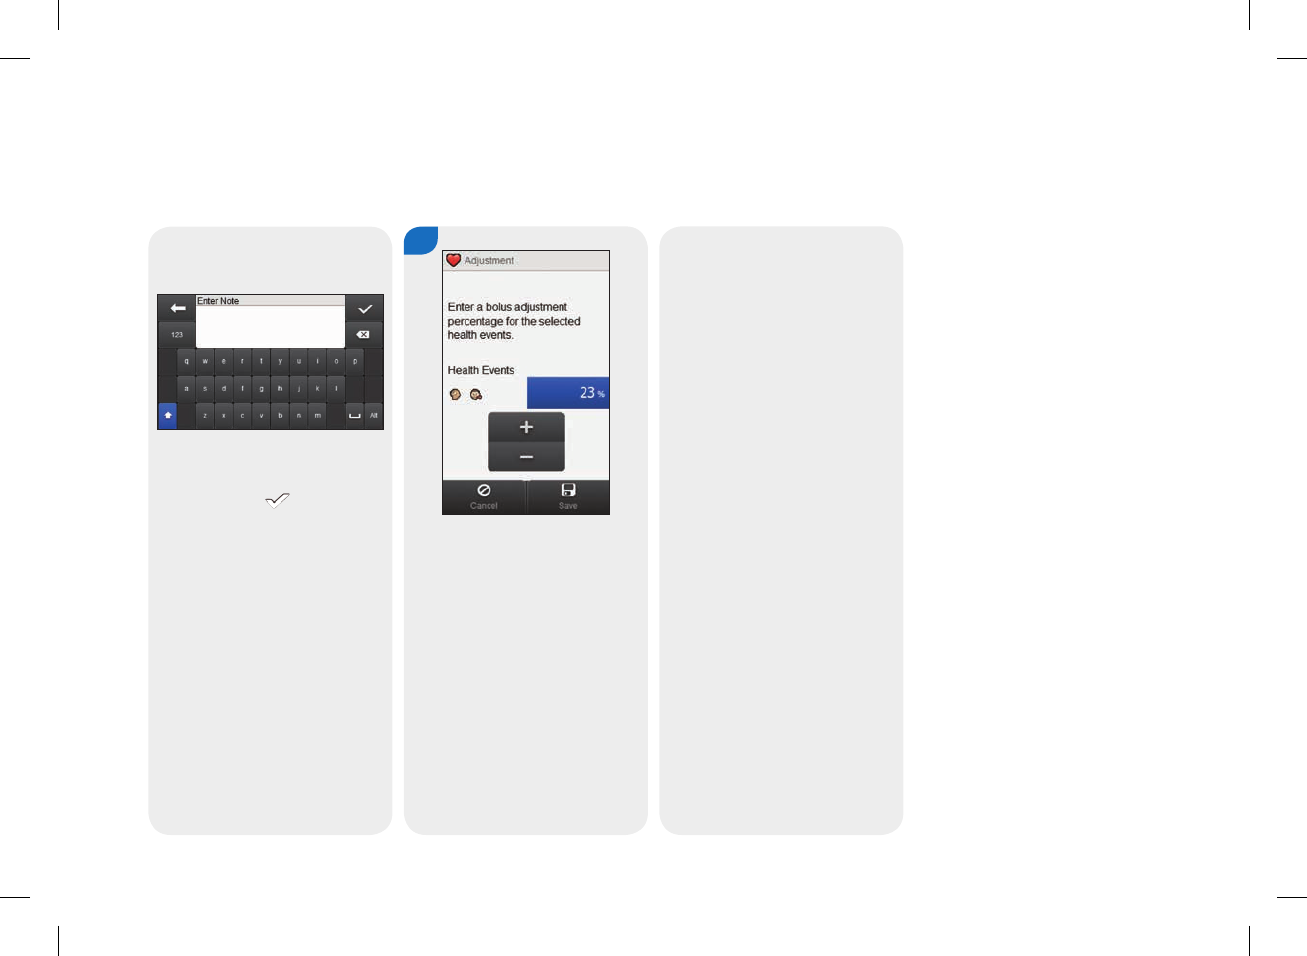
Note
Type a note (up to 60
characters) to save with this
record. Select .
3
If multiple health events have
been chosen, this screen is
displayed; otherwise proceed
to the next step.
Set a single, summarized
health event percentage to
cover the impact of the
chosen health events. Select
Save.
96
52297_07167776001.indb 96 10/20/14 11:18 AM
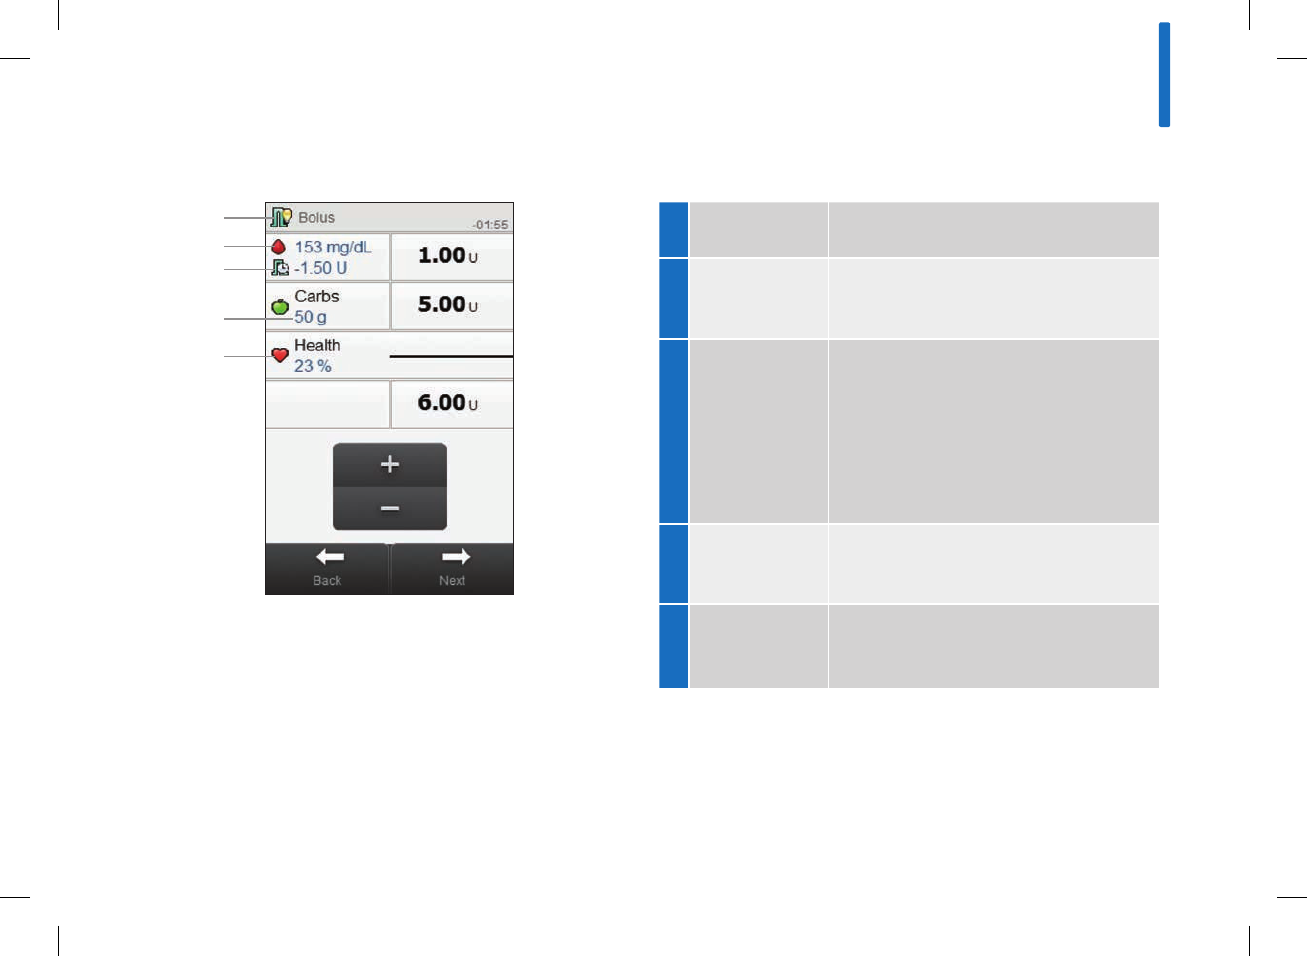
1
2
3
4
5
1 Icon Indicates if bolus advice is enabled or
disabled.
2 bG Result
Current bG result. No bG Test is
displayed if there is no current blood
glucose result.
3 Active Insulin
A calculated value representing the
eective amount of insulin currently in
the body that is working to lower blood
glucose. This amount does not include
any insulin that is working to account
for carbohydrate intake. It also does
not include basal insulin.
4 Carbohydrate
Amount
No Entry is displayed if no amount is
entered.
5 Health Event
Percentage
Percentage based upon 1 to 4 chosen
health events. No Entry is displayed if
no health event is chosen.
6
97
52297_07167776001.indb 97 10/20/14 11:18 AM
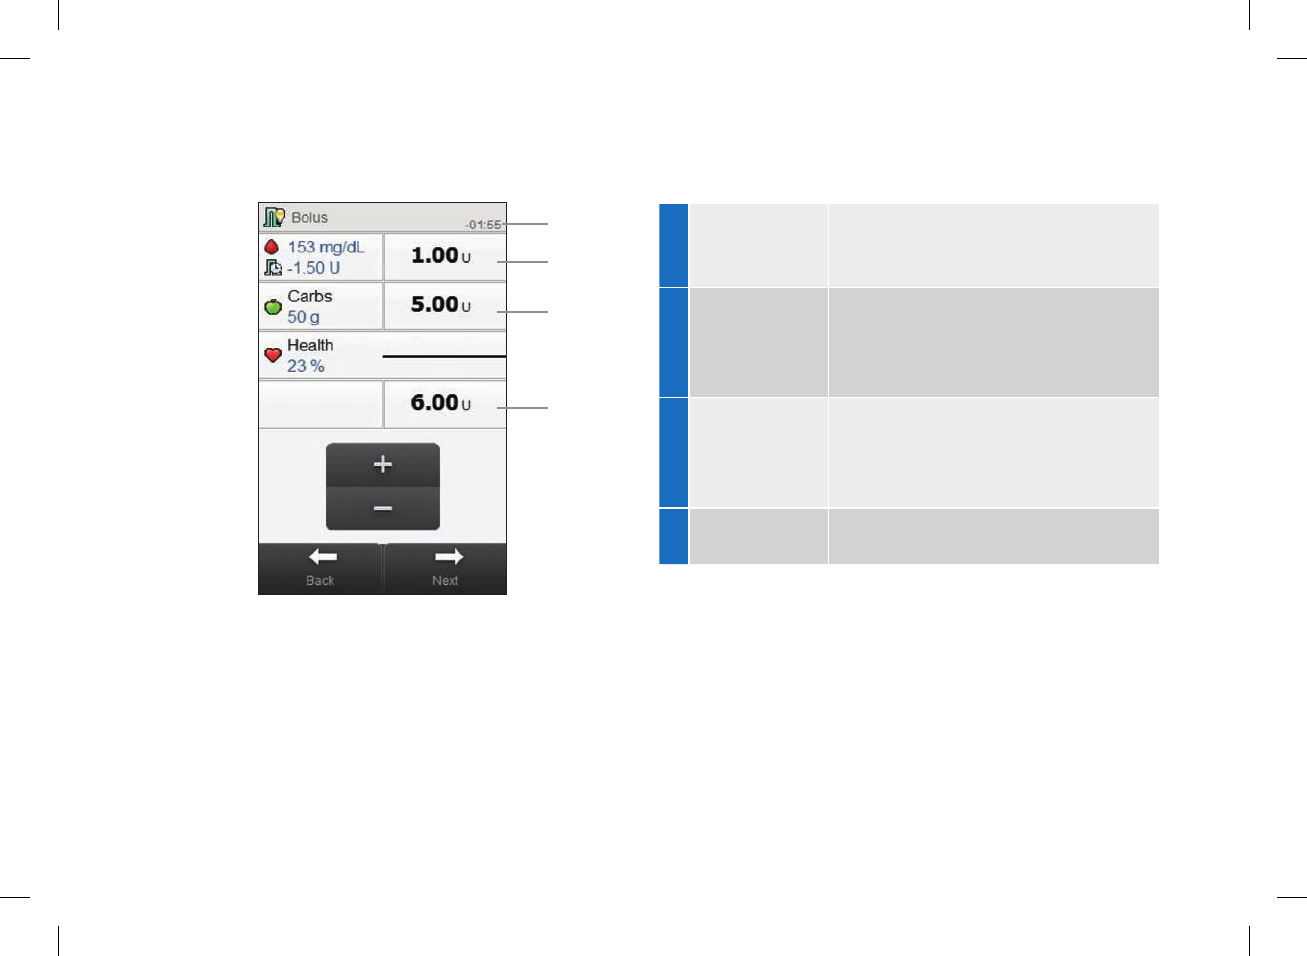
6 Countdown
Timer
Only displayed if less than 2minutes
are remaining to use the bG result for
bolus advice.
7 Correction
Bolus
Insulin to return an out-of-target blood
glucose to a target value. The amount
displayed has been adjusted by the
Health Event Percentage.
8 Carbohydrate
Bolus
Insulin to account for the food you
eat. The amount displayed has
been adjusted by the Health Event
Percentage.
9 Total Bolus Sum of items 7 and 8.
6
7
8
9
98
52297_07167776001.indb 98 10/20/14 11:18 AM
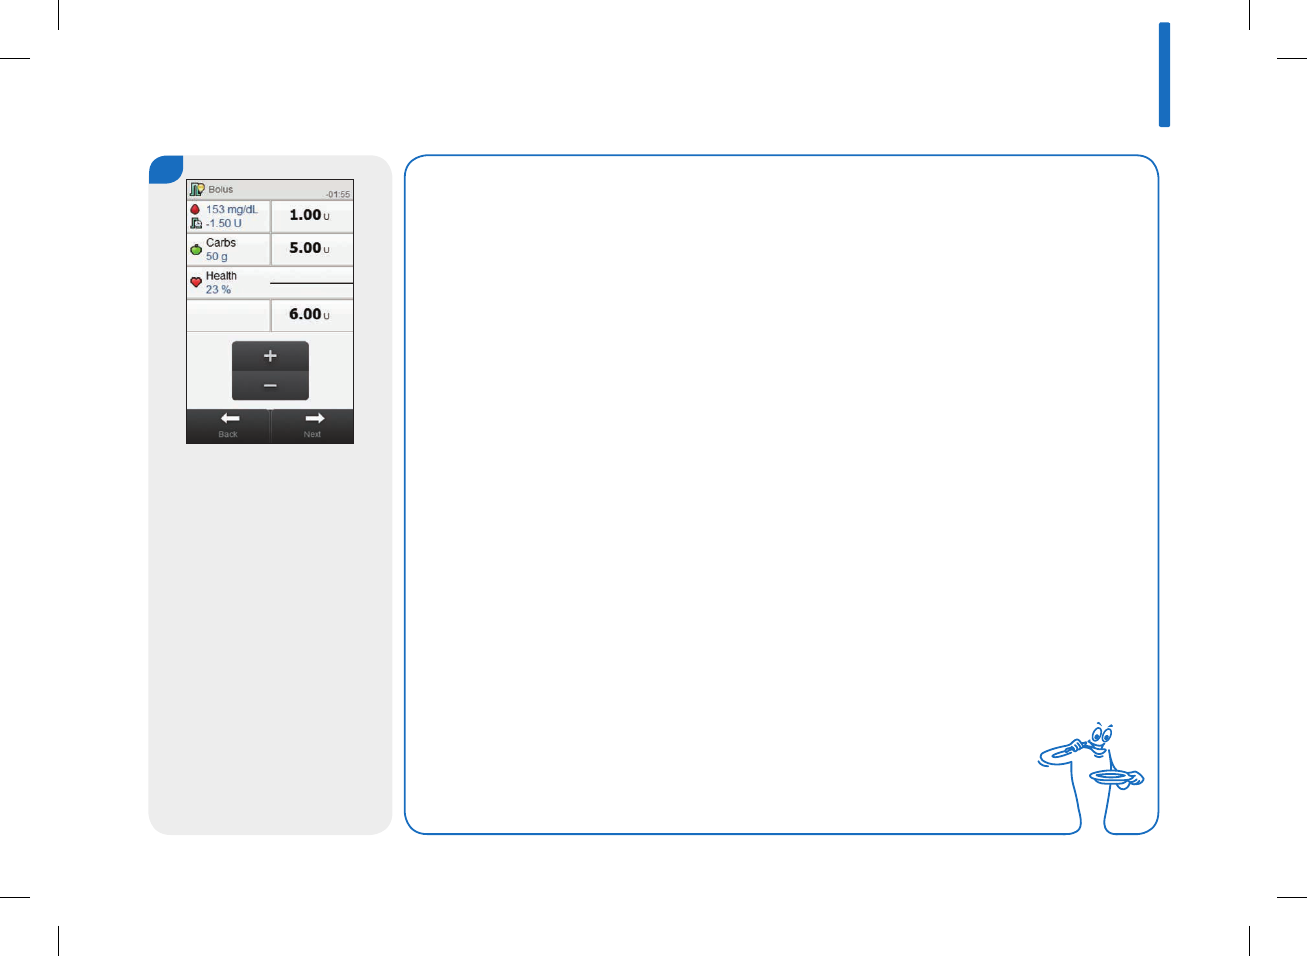
NOTE
jIf a Carbohydrate Bolus (callout 8) is entered and no Carbohydrate Amount has
been entered (Carbs displays No Entry), you should consider entering an amount for
carbohydrates. Select Back to enter an amount. An amount is not required, but the more
complete the data the more accurate any future bolus advice recommendations are
when using bolus advice.
jIf you adjust either the Correction Bolus or Carbohydrate Bolus first: The ability to edit
the Total Bolus is disabled; however, the Total Bolus updates accordingly.
jIf you adjust the Total Bolus first: The ability to edit the Correction Bolus and
Carbohydrate Bolus is disabled.
• If Total Bolus is increased: The Correction Bolus is increased accordingly.
• If Total Bolus is decreased: The Carbohydrate Bolus is decreased accordingly;
once the Carbohydrate Bolus becomes 0, then the Correction Bolus is decreased
accordingly.
4
Review the bolus amounts
(see the next page for more
information). To adjust a bolus
amount, select it and set the
amount. Select Next to
proceed with bolus delivery.
6
99
52297_07167776001.indb 99 10/20/14 11:18 AM

5
Review the bolus amount.
Select Back to adjust or select
OK to record the bolus.
Deliver the bolus using your
pen or syringe.
100
52297_07167776001.indb 100 10/20/14 11:18 AM
7.1 Overview
You can make changes to bolus advice to adjust for your
individual therapy requirements:
Bolus advice settings
jSet up bolus advice
jHealth event percentages
jAdvice options: meal rise, snack size, acting time, and offset
time
jTurn off bolus advice
Time blocks
jStart times, end times, target ranges, carbohydrate ratio, and
insulin sensitivity for time blocks
jAdd or delete a time block
jReset all time blocks
7 Changing Bolus Advice Settings
w WARNING
It is strongly recommended that you discuss possible updates
to your bolus advice settings with your healthcare professional
prior to making changes.
7
101
52297_07167776001.indb 101 10/20/14 11:18 AM

NOTE
jWhen editing a setting, any unsaved changes are
discarded if the meter turns o or if a test strip is
inserted into the meter.
jIf bolus advice is turned o, see the Changing Meter
Settings chapter in this user’s manual to change the
time blocks and other meter settings.
102
52297_07167776001.indb 102 10/20/14 11:18 AM

Bolus advice provides recommendations for the amount of insulin
to be delivered for food intake and to correct blood glucose levels.
Proceed with this section if you did not set up bolus advice when
you completed the Setup Wizard (see the Startup chapter in this
user’s manual) or if you have turned off bolus advice.
Review the following in this user’s manual:
jOverview section in the Bolus Advice chapter
jBefore Using Bolus Advice section in the Bolus Advice
chapter
jImportant Information section in the Startup chapter
7.2 Setting Up Bolus Advice
w WARNING
jThe bolus advice feature should not be used if you are
using an intermediate-acting insulin like Neutral Protamine
Hagedorn (NPH) insulin or any other intermediate-acting
insulin.
jIt is strongly recommended that you discuss bolus advice
with your healthcare professional prior to setting up bolus
advice.
Before setting up bolus advice, have the following information
available:
jThe number of time blocks with start and end times
jThe blood glucose target range, carbohydrate ratio, and insulin
sensitivity for each time block
jThe percentage for each health event
jThe meal rise, snack size, acting time, and offset time
7
103
52297_07167776001.indb 103 10/20/14 11:18 AM

NOTE
After bolus advice is set up the settings can be changed,
or bolus advice can be turned off. If bolus advice is turned
off, the settings are discarded.
104
52297_07167776001.indb 104 10/20/14 11:18 AM
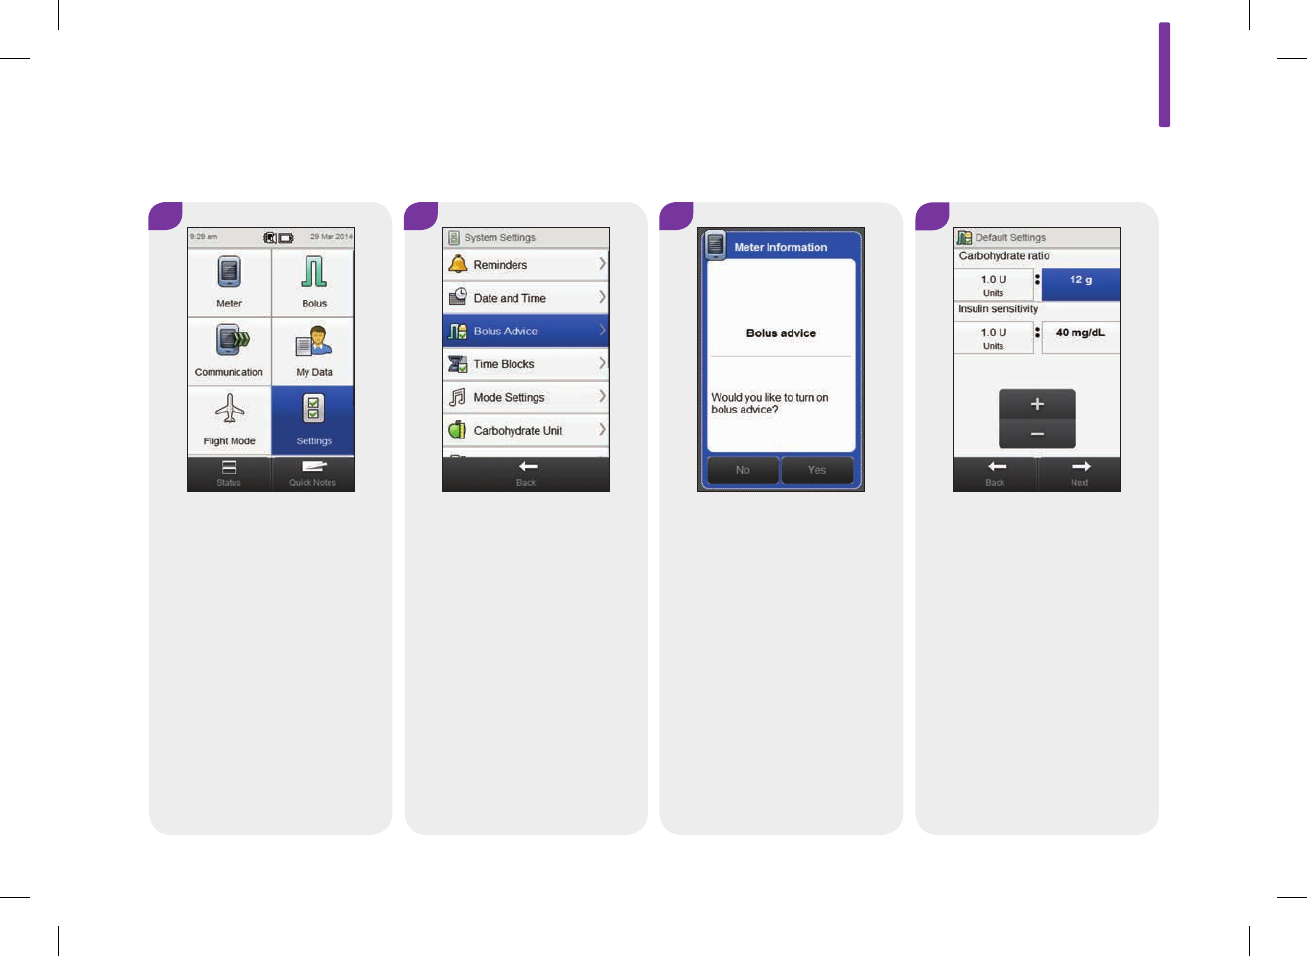
Main Menu > Settings > Bolus Advice
1 3
From the Main Menu, select
Settings.
Select Yes.
24
Select Bolus Advice. Set the default Carbohydrate
ratio and Insulin sensitivity.
Select Next.
7
105
52297_07167776001.indb 105 10/20/14 11:18 AM
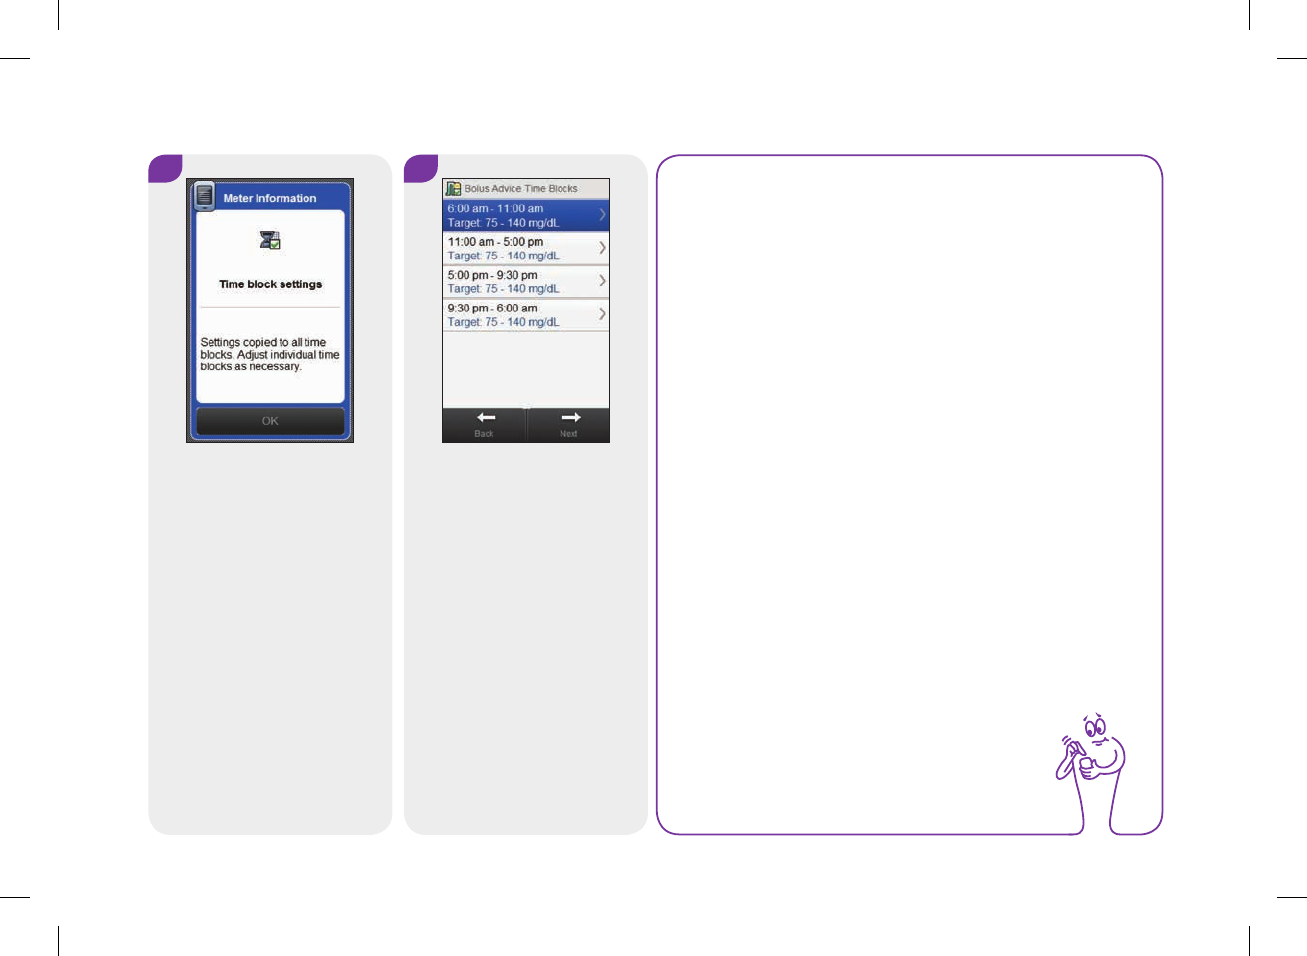
5
Select OK.
6
Select a time block to edit and
continue to Step7, or if you
do not need to make any
changes, select Next and go
to Step11.
NOTE
jThe End time of a time block is the same as the Start
time of its following time block. Only an End time
can be changed, which changes the Start time of the
following time block.
jChanging the End time of the last time block does
not change the Start time of the first time block, but
it creates a new time block. See the Bolus Advice:
Adding a Time Block section in this chapter.
jTo change the Start time of the first time block, the
time blocks must be reset. See the Bolus Advice:
Resetting All Time Blocks section in this chapter.
jIf the End time of a time block is decreased until it is
the same as its Start time, the time block is deleted.
See the Bolus Advice: Deleting Time Blocks section
in this chapter.
106
52297_07167776001.indb 106 10/20/14 11:18 AM
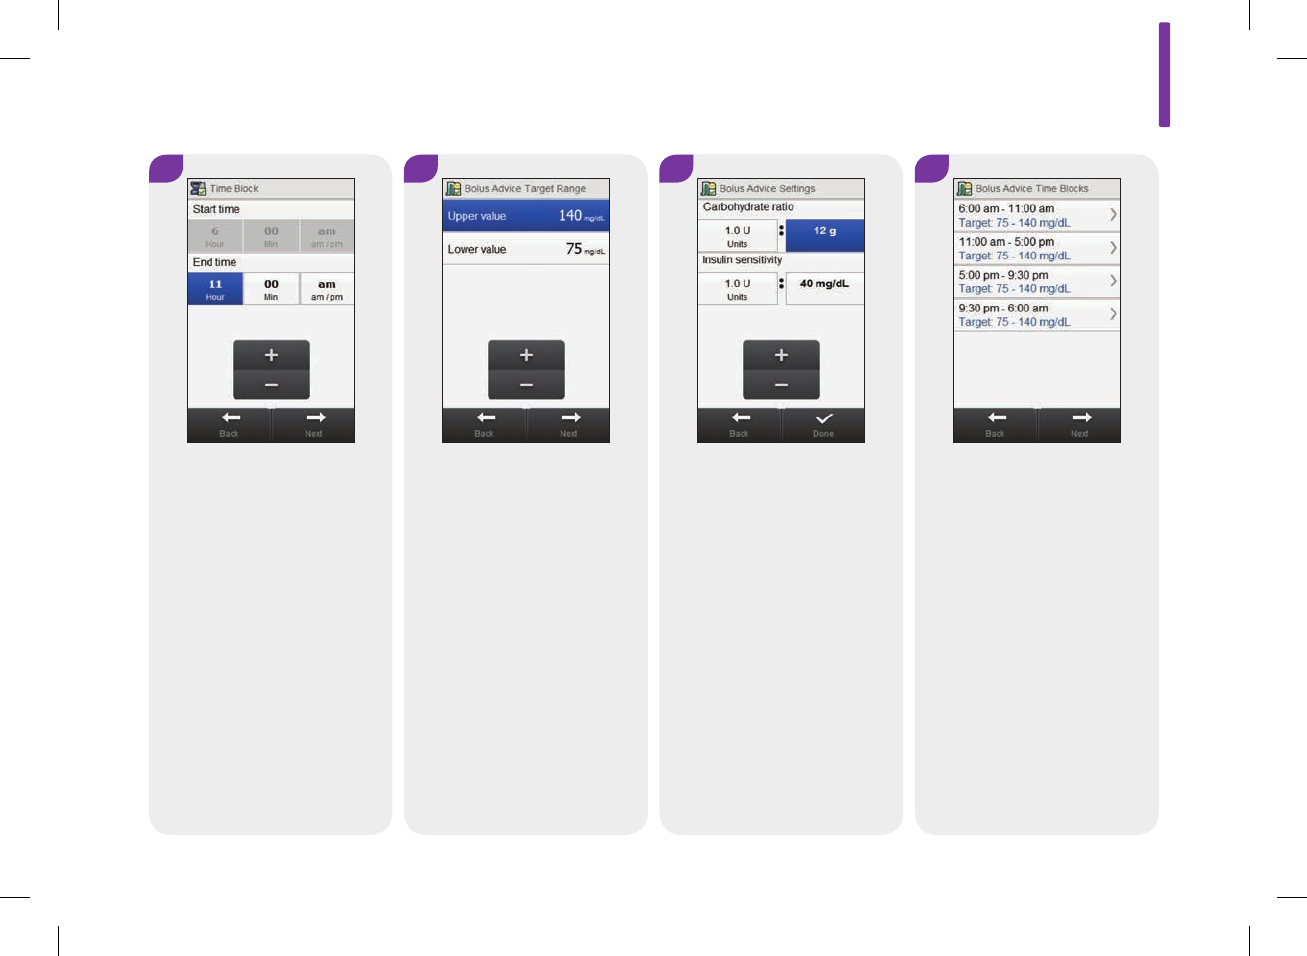
7 9
Set the End time. Select Next. Set the Carbohydrate ratio and
Insulin sensitivity. Select Done.
8 10
Set the Upper value and
Lower value. Select Next.
Edit any other time block
(reference Step6). Once all
time blocks are complete,
select Next and continue to
Step11.
7
107
52297_07167776001.indb 107 10/20/14 11:18 AM
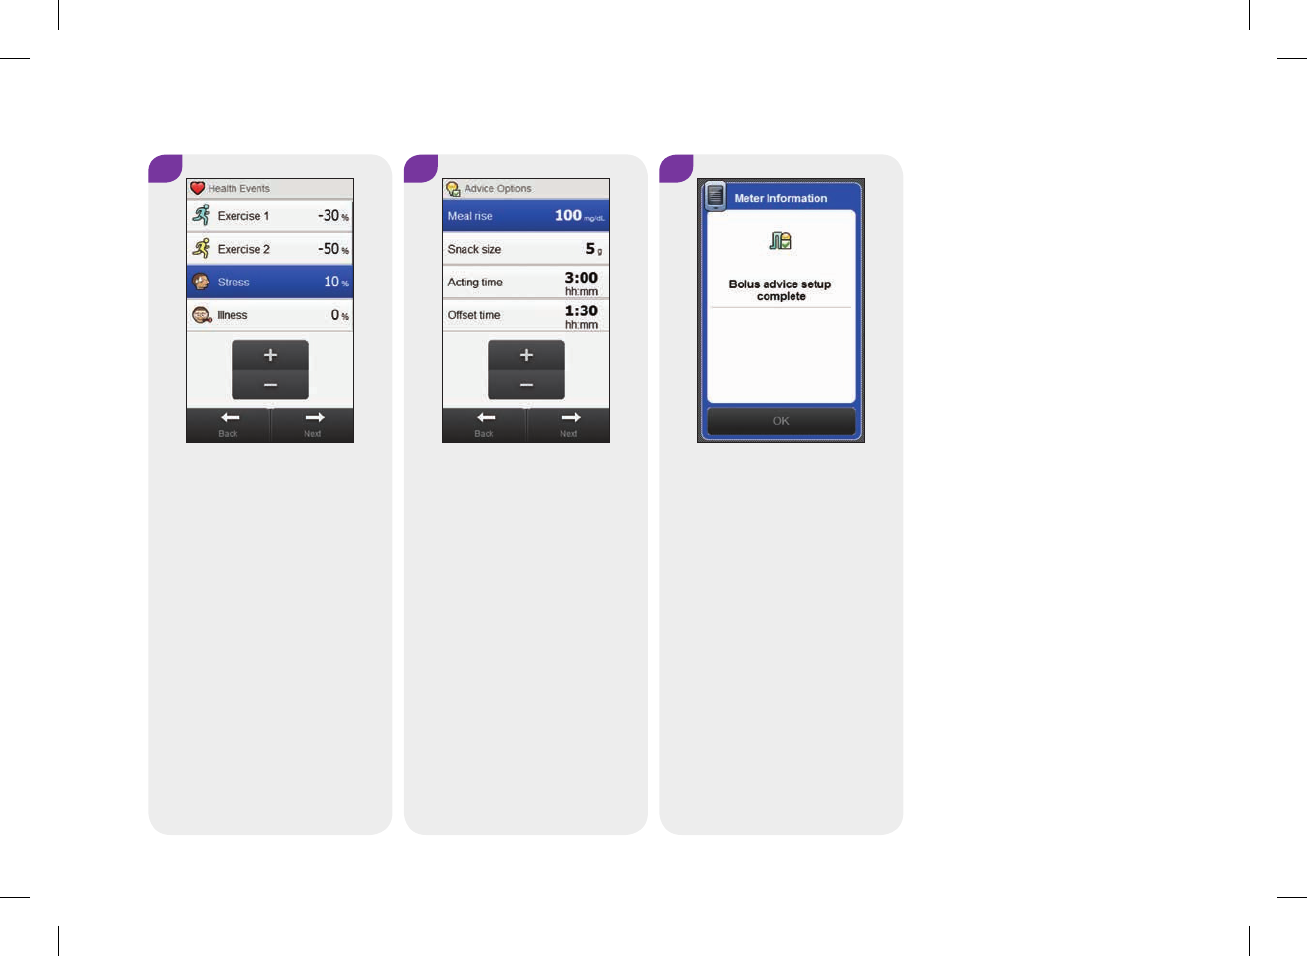
12
Set the Meal rise, Snack size,
Acting time, and Offset time.
Select Next.
11 13
Set the percentages for health
events. Scroll the screen to
see more health events.
Select Next.
Select OK.
108
52297_07167776001.indb 108 10/20/14 11:18 AM
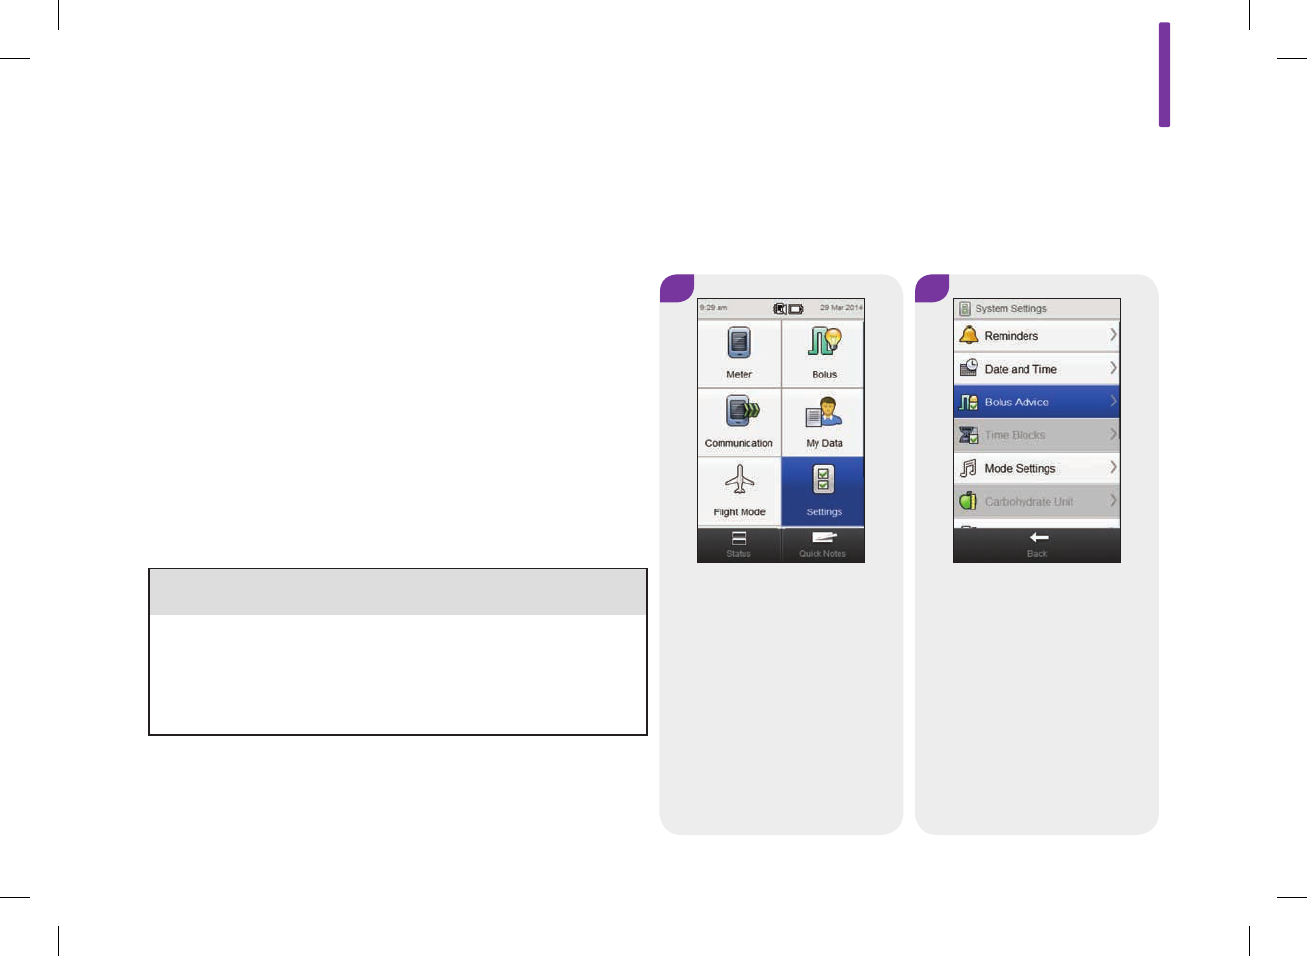
Main Menu > Settings > Bolus Advice > Time Blocks
1
From the Main Menu, select
Settings.
2
Select Bolus Advice.
7.3 Bolus Advice: Time Block Settings
This section is for changing the settings for individual time blocks
if bolus advice has been set up. These time block settings
include:
jStart time
jEnd time
jTarget range
jCarbohydrate ratio
jInsulin sensitivity
w WARNING
It is strongly recommended that you discuss possible updates
to your bolus advice settings with your healthcare professional
prior to making changes.
7
109
52297_07167776001.indb 109 10/20/14 11:18 AM

3
Select Time Blocks.
4
Select a time block to edit.
110
52297_07167776001.indb 110 10/20/14 11:18 AM
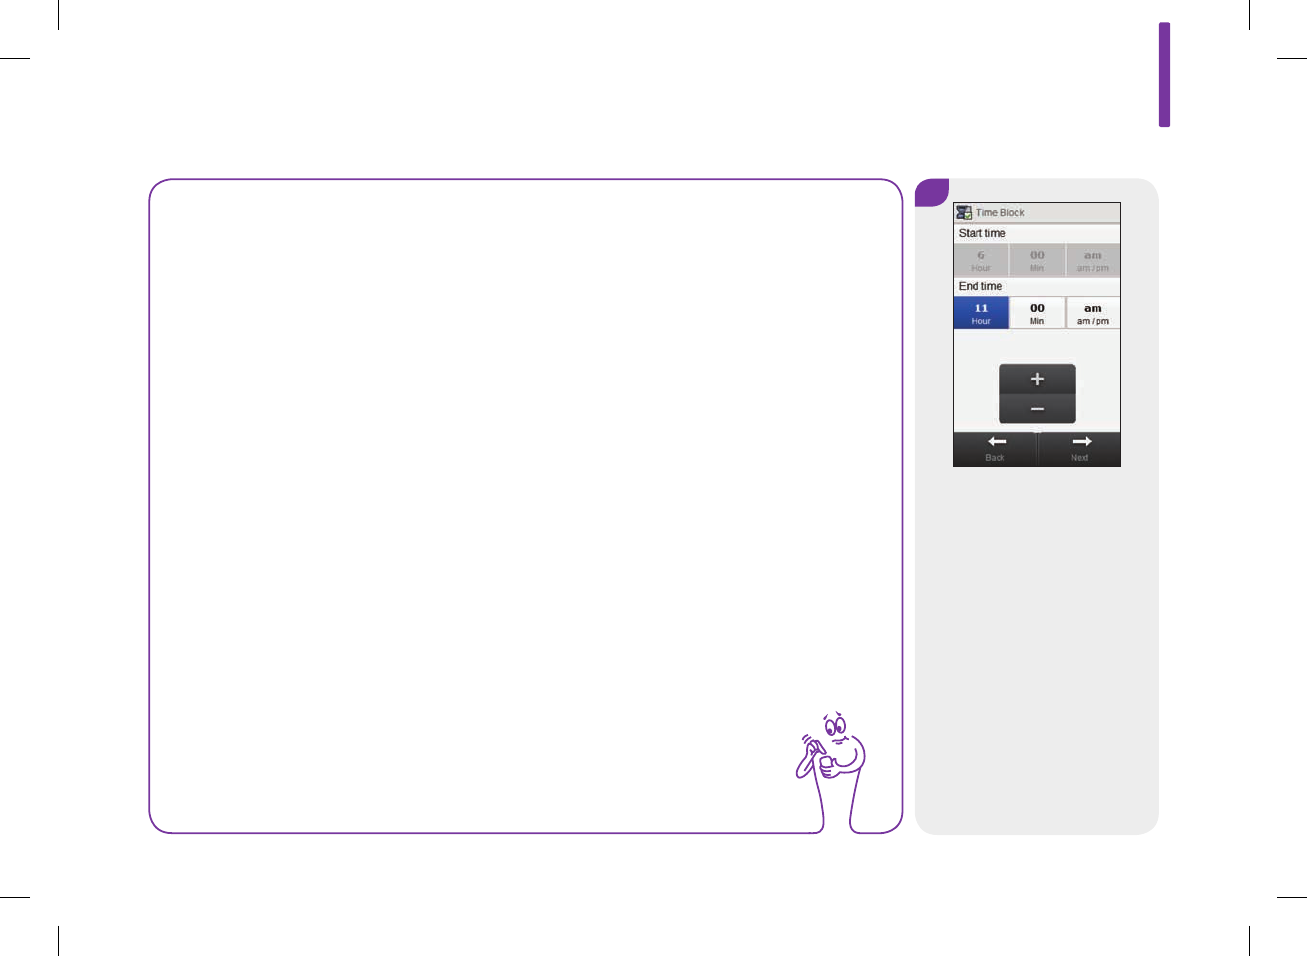
5
Set the End time. Select Next.
NOTE
jThe End time of a time block is the same as the Start time of its following time block.
Only an End time can be changed, which changes the Start time of the following time
block.
jChanging the End time of the last time block does not change the Start time of the
first time block, but it creates a new time block. See the Bolus Advice: Adding a Time
Block section in this chapter.
jTo change the Start time of the first time block, the time blocks must be reset. See the
Bolus Advice: Resetting All Time Blocks section in this chapter.
jIf the End time of a time block is decreased until it is the same as its Start time, the time
block is deleted. See the Bolus Advice: Deleting Time Blocks section in this chapter.
7
111
52297_07167776001.indb 111 10/20/14 11:18 AM
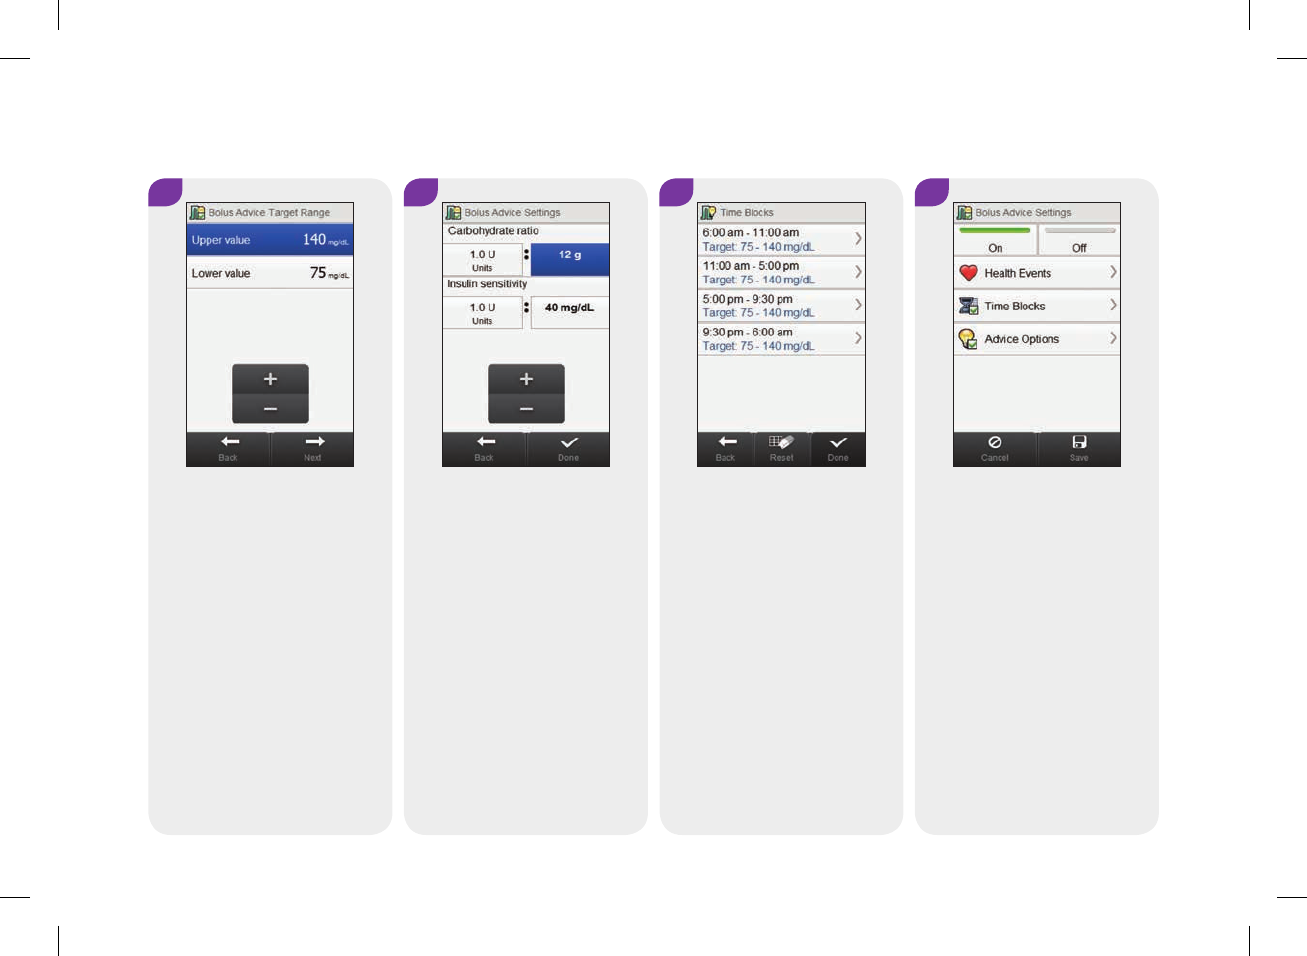
9
Select Save.
7
Set the Carbohydrate ratio and
Insulin sensitivity. Select
Done.
8
Edit any other time block
(reference Step4). Once all
time blocks are complete,
select Done and continue to
Step9.
6
Set the Upper value and Lower
value. Select Next.
112
52297_07167776001.indb 112 10/20/14 11:18 AM
7.4 Bolus Advice: Adding a Time Block
This section is for adding a time block if bolus advice has been
set up.
Before adding a time block, have the following information
available:
jThe number of time blocks you need with the start and end
times for each
jThe blood glucose target range, carbohydrate ratio, and insulin
sensitivity for each time block
To add a time block, decrease the last time block’s end time.
After the time block is created, it may be necessary to change the
end time and other information for each time block until all of the
time blocks are set up the way you want them.
w WARNING
It is strongly recommended that you discuss possible updates
to your bolus advice settings with your healthcare professional
prior to making changes.
7
113
52297_07167776001.indb 113 10/20/14 11:18 AM
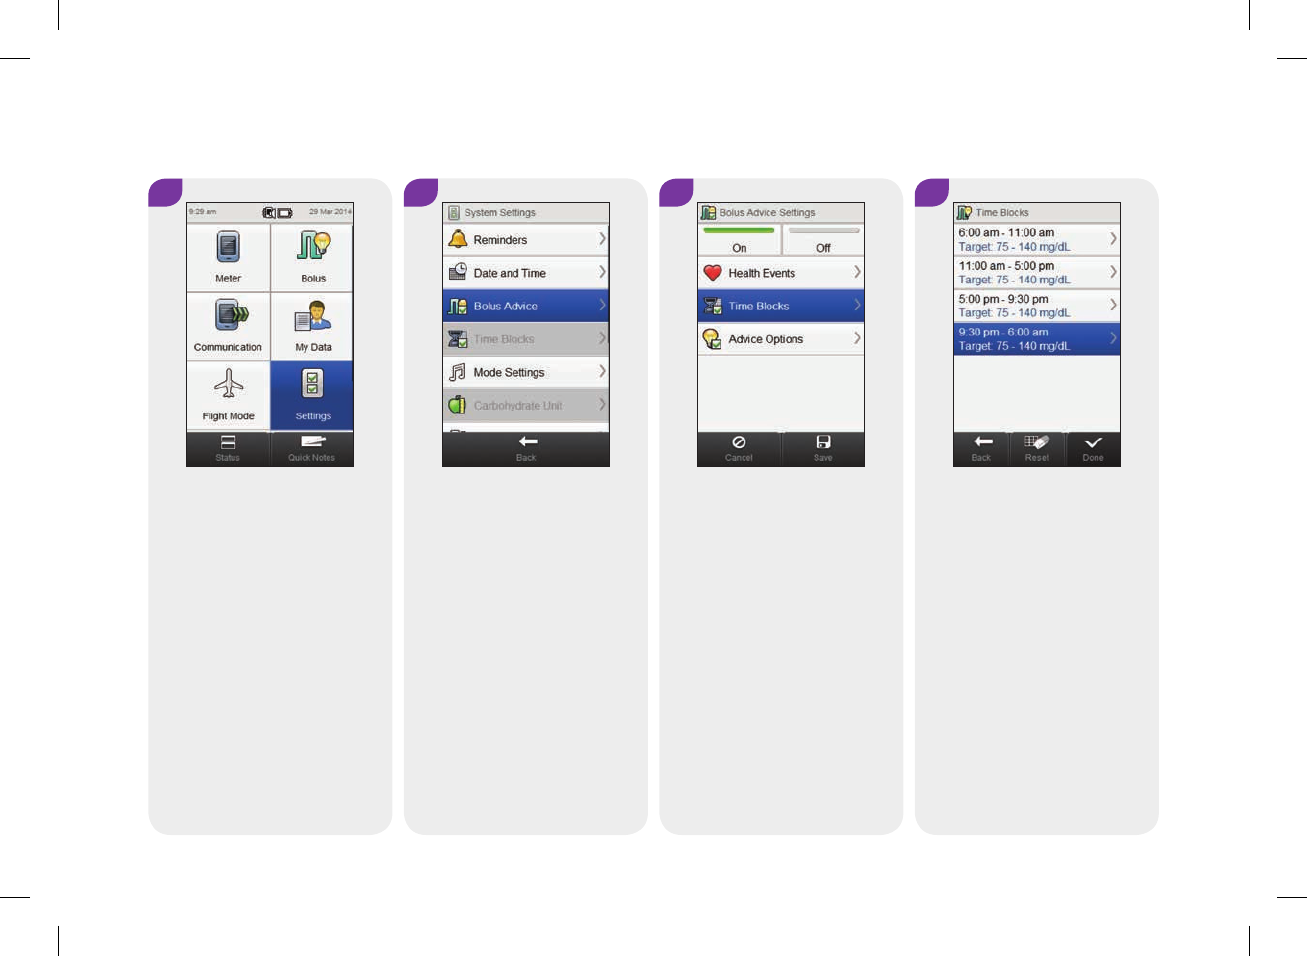
3 4
Select Time Blocks. Select the last time block.
2
Select Bolus Advice.
1
From the Main Menu, select
Settings.
Main Menu > Settings > Bolus Advice > Time Blocks
114
52297_07167776001.indb 114 10/20/14 11:18 AM
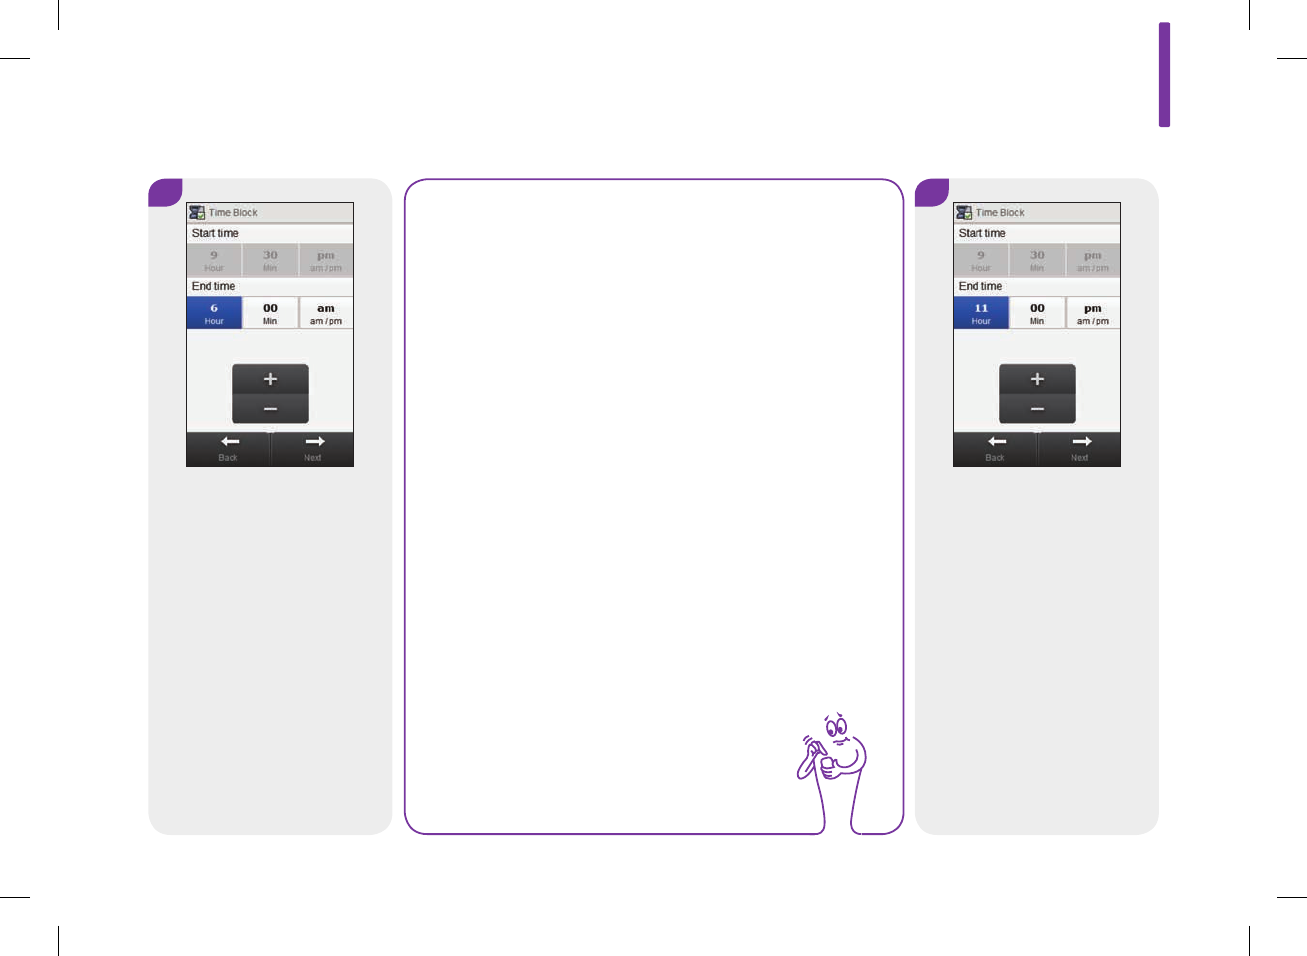
5
Decrease the End time.
NOTE
jDecrease the End time for the last time block by any
amount in order to create a new time block. This
creates a time block by splitting the last time block
into 2 time blocks.
jDo not decrease the End time until it equals the Start
time because the meter deletes the time block when
you select Next.
jOnce the new time block is created, you can change
the End time for all appropriate time blocks.
jFor this example, a time block is added with a Start
time of 9:30 pm and an End time of 11:00 pm.
6
Select Next.
7
115
52297_07167776001.indb 115 10/20/14 11:18 AM
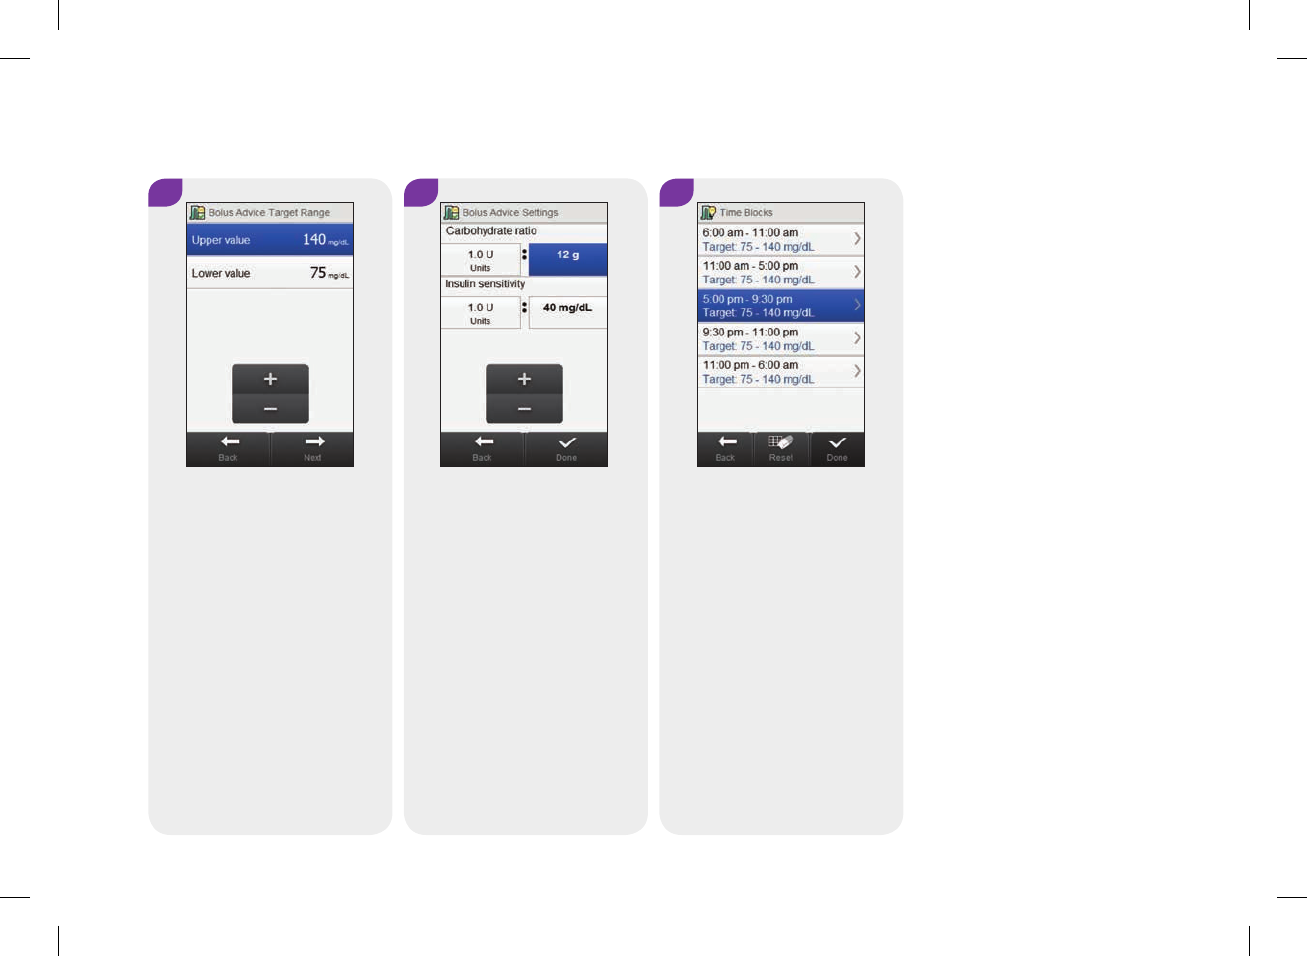
98
Set the Carbohydrate ratio and
Insulin sensitivity for the new
time block. Select Done.
IIt may be necessary to
change the end times and
settings of other time blocks.
Select a time block to edit and
continue to Step10, or if you
do not need to make any
changes, select Done and go
to Step14.
7
Set the Upper value and
Lower value for the new time
block. Select Next.
116
52297_07167776001.indb 116 10/20/14 11:18 AM
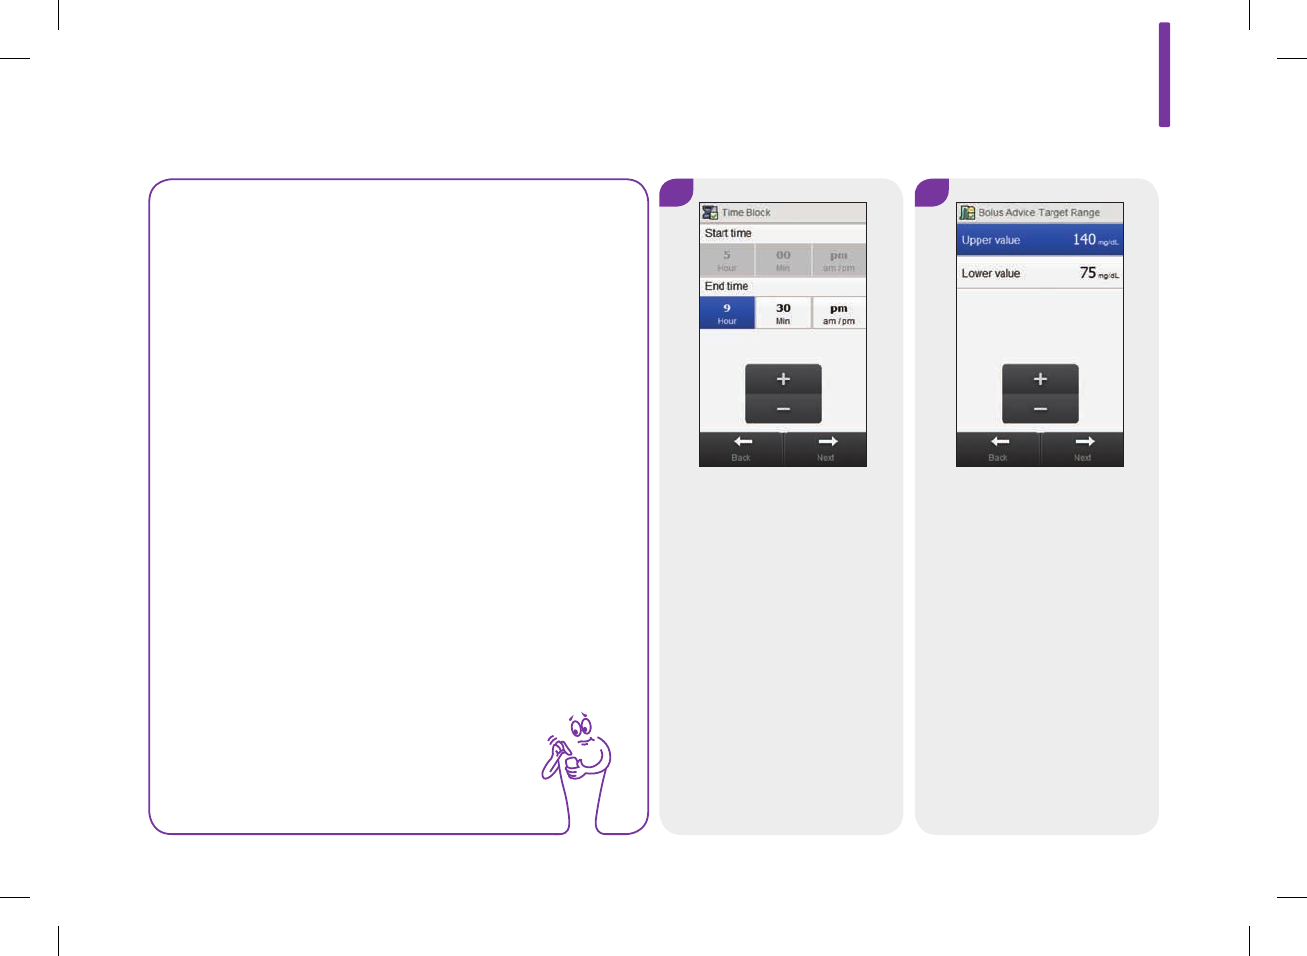
NOTE
jThe End time of a time block is the same as the Start
time of its following time block. Only an End time
can be changed, which changes the Start time of the
following time block.
jTo change the Start time of the first time block, the
time blocks must be reset. See the Bolus Advice:
Resetting All Time Blocks section in this chapter.
jIf the End time of a time block is decreased until it is
the same as its Start time, the time block is deleted.
See the Bolus Advice: Deleting Time Blocks section
in this chapter.
10
Set the End time. Select Next.
11
Set the Upper value and
Lower value. Select Next.
7
117
52297_07167776001.indb 117 10/20/14 11:18 AM
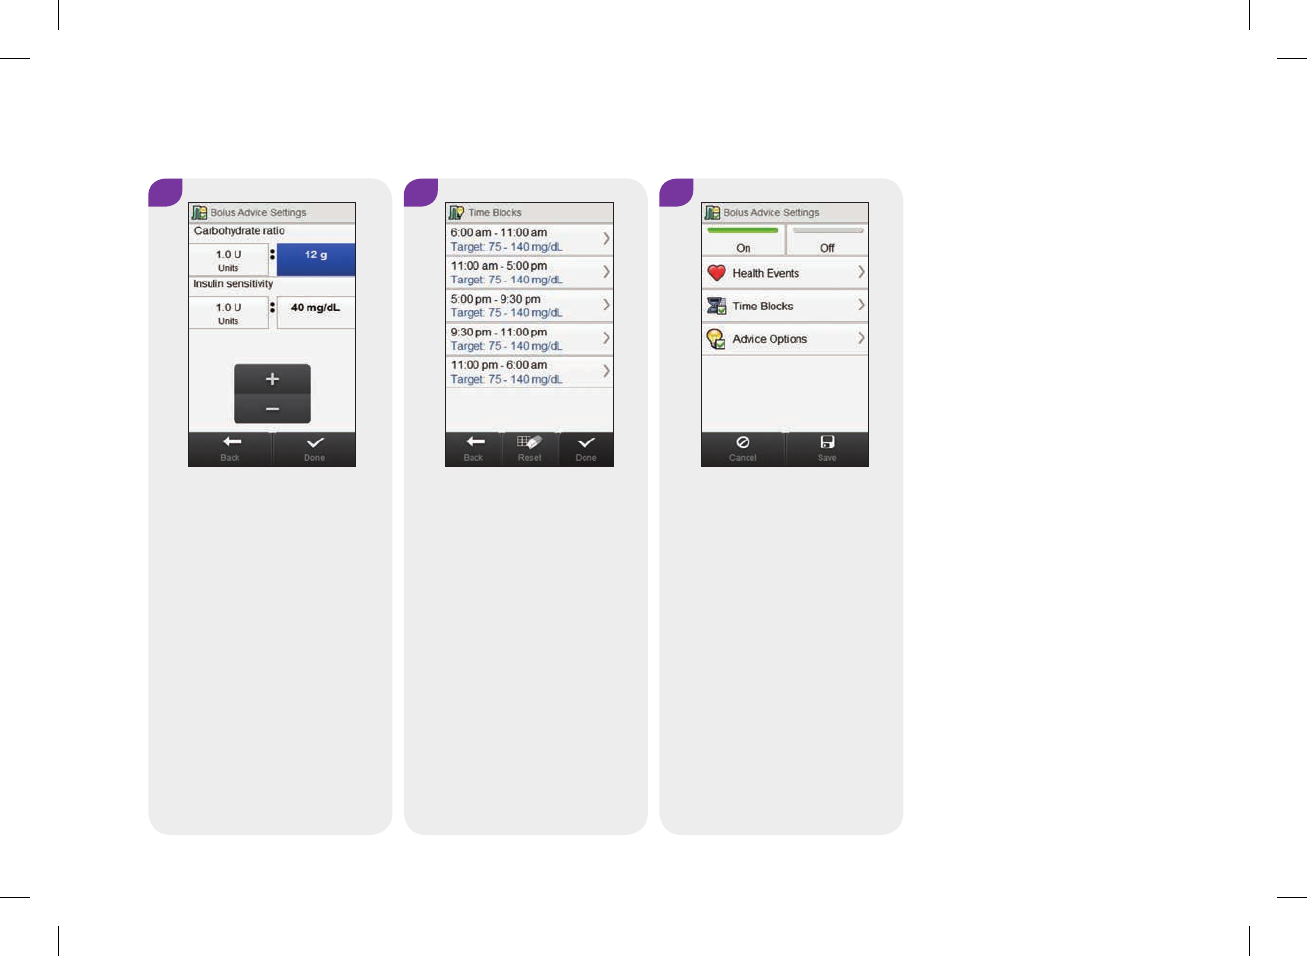
14
Select Save.
12
Set the Carbohydrate ratio and
Insulin sensitivity. Select
Done.
13
Edit any other time block
(reference Step9). Once all
time blocks are complete,
select Done and continue to
Step14.
118
52297_07167776001.indb 118 10/20/14 11:18 AM
7.5 Bolus Advice: Deleting Time Blocks
This section is for deleting time blocks if bolus advice has been
set up. There are 2 different methods for deleting time blocks.
The first method deletes one or more time blocks by combining
time blocks. The alternative method deletes a single time block.
Before deleting time blocks, have the following information
available:
jThe number of time blocks you need with the start and end
times for each
jThe blood glucose target range, carbohydrate ratio, and insulin
sensitivity for each time block
After time blocks are deleted, it may be necessary to change the
end times and other information for the remaining time blocks
until all of the time blocks are set up the way you want them.
w WARNING
It is strongly recommended that you discuss possible updates
to your bolus advice settings with your healthcare professional
prior to making changes.
7
119
52297_07167776001.indb 119 10/20/14 11:18 AM
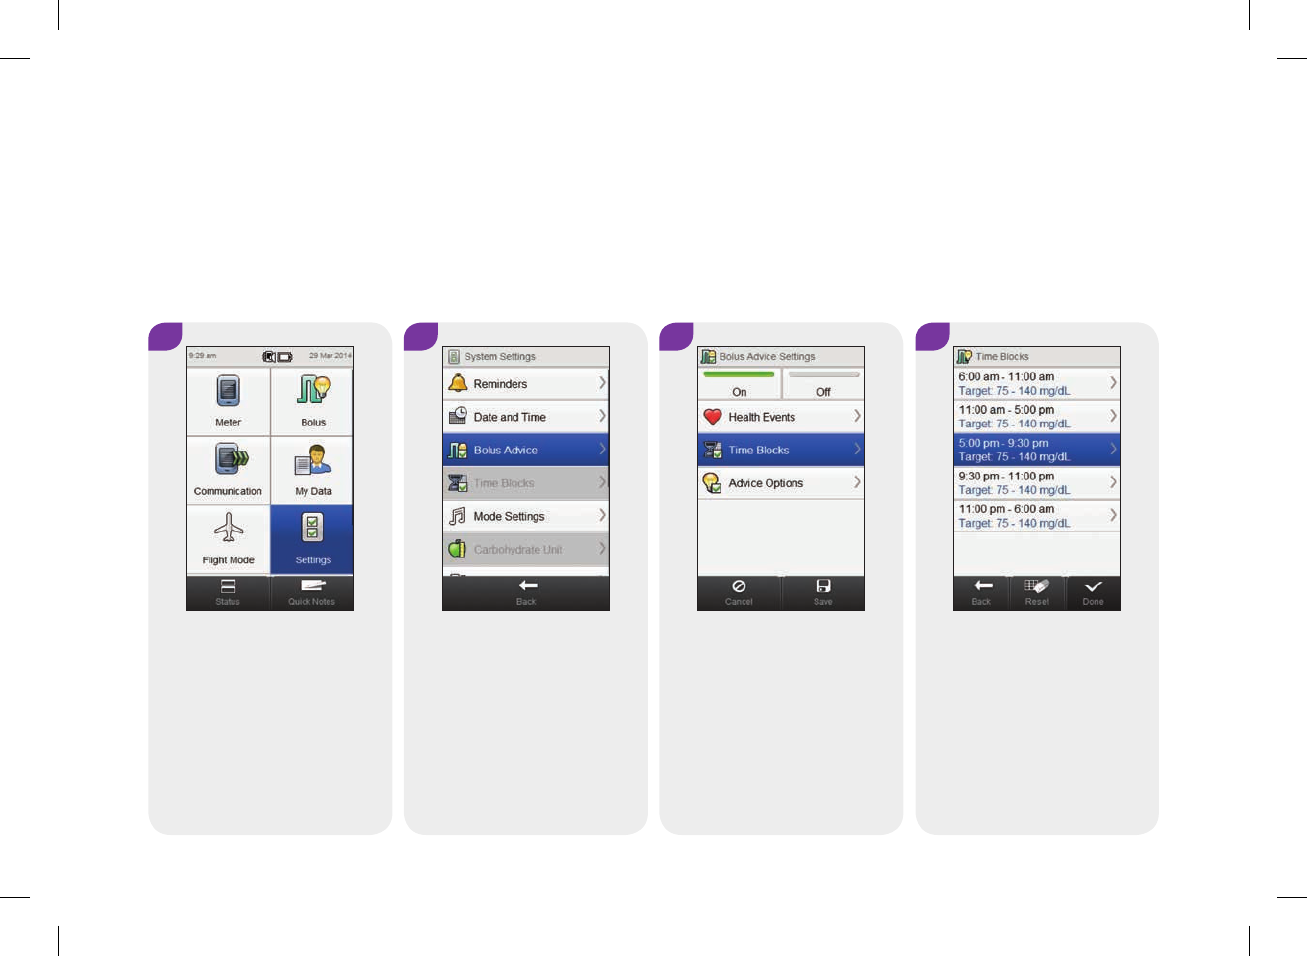
1 2 3 4
From the Main Menu, select
Settings.
Select Bolus Advice. Select Time Blocks. Select the first time block that
is to be combined.
7.5.1 Bolus Advice: Deleting One or More Time Blocks
This method of deleting one or more time blocks is accomplished
by combining time blocks.
Main Menu > Settings > Bolus Advice > Time Blocks
120
52297_07167776001.indb 120 10/20/14 11:18 AM
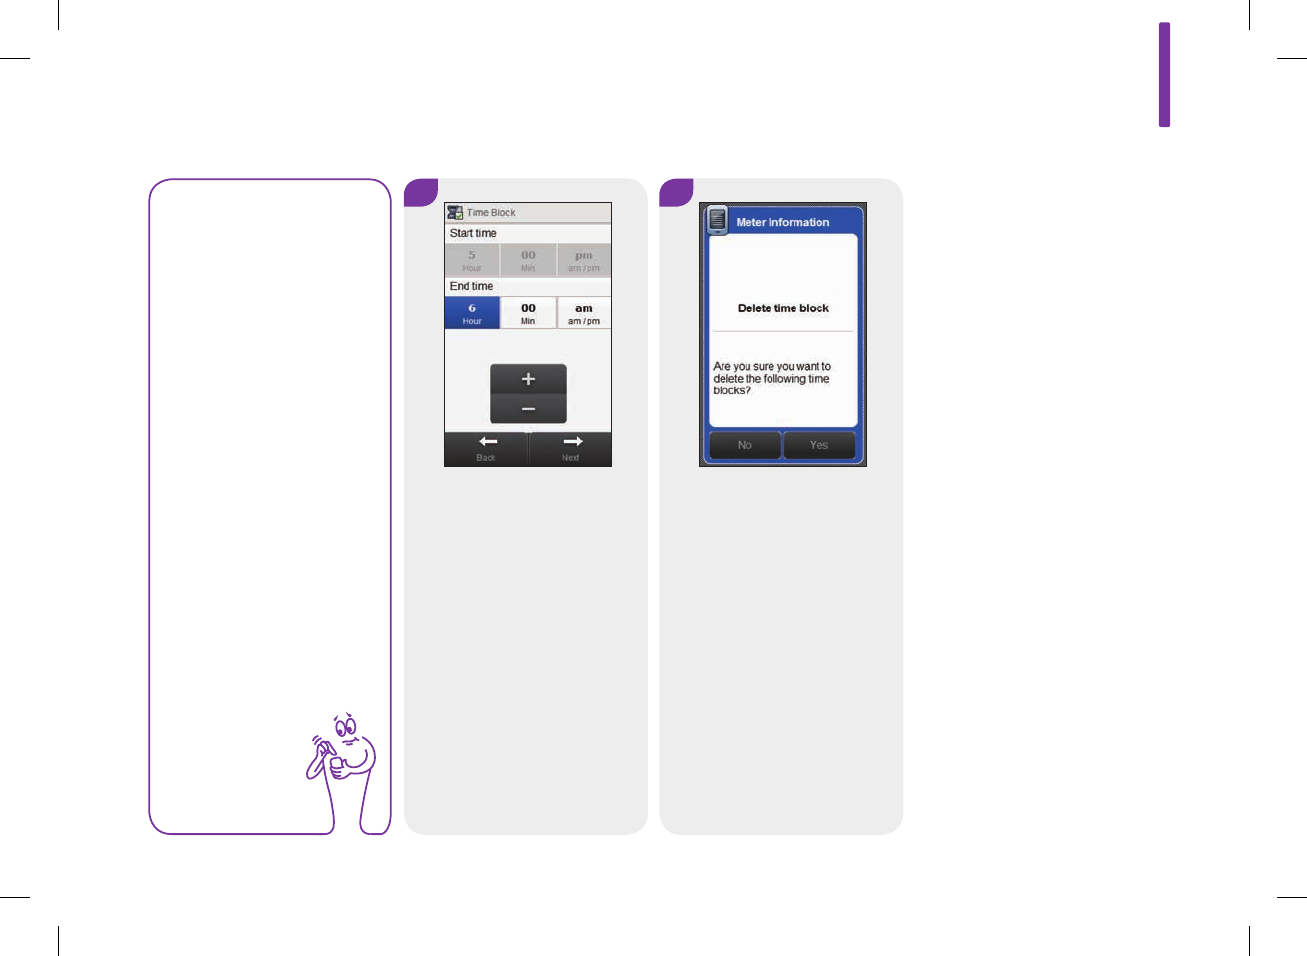
NOTE
jFor this example,
the last 3 time
blocks are
combined into one
time block.
jThe target range,
carbohydrate
ratio, and insulin
sensitivity values
in this first time
block selected
are used in the
resulting time
block.
5 6
Increase the End time until it
equals the End time of the last
time block to be deleted.
Select Next.
Select Yes.
7
121
52297_07167776001.indb 121 10/20/14 11:18 AM
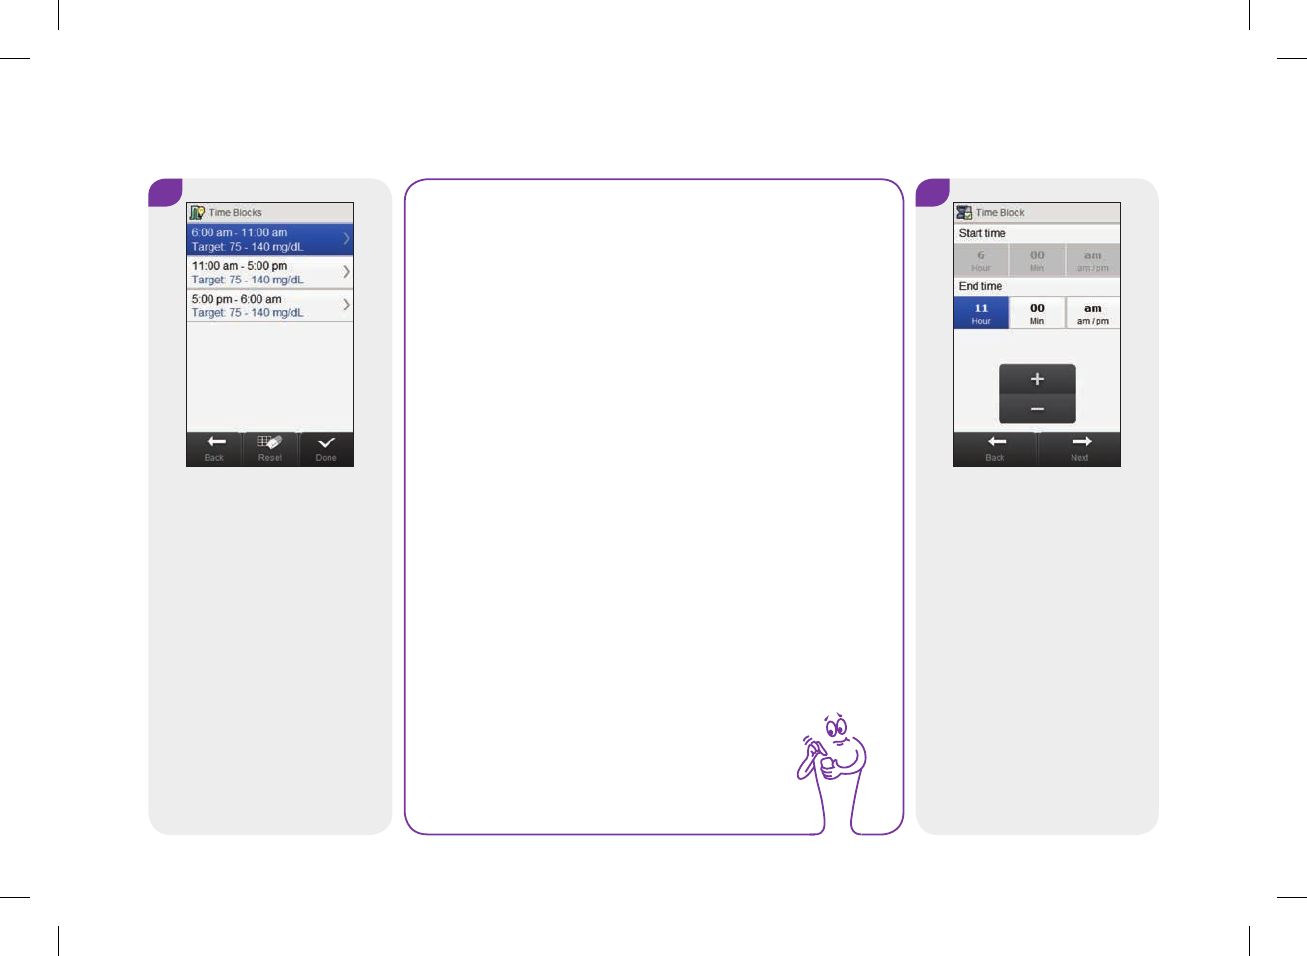
NOTE
jThe End time of a time block is the same as the Start
time of its following time block. Only an End time
can be changed, which changes the Start time of the
following time block.
jChanging the End time of the last time block does
not change the Start time of the first time block, but
it creates a new time block. See the Bolus Advice:
Adding a Time Block section in this chapter.
jTo change the Start time of the first time block, the
time blocks must be reset. See the Bolus Advice:
Resetting All Time Blocks section in this chapter.
8
Set the End time. Select Next.
7
It may be necessary to change
the end times and other
information for the remaining
time blocks. Select a time
block to edit and continue to
Step8, or if you do not need
to make any changes, select
Done and go to Step12.
122
52297_07167776001.indb 122 10/20/14 11:18 AM
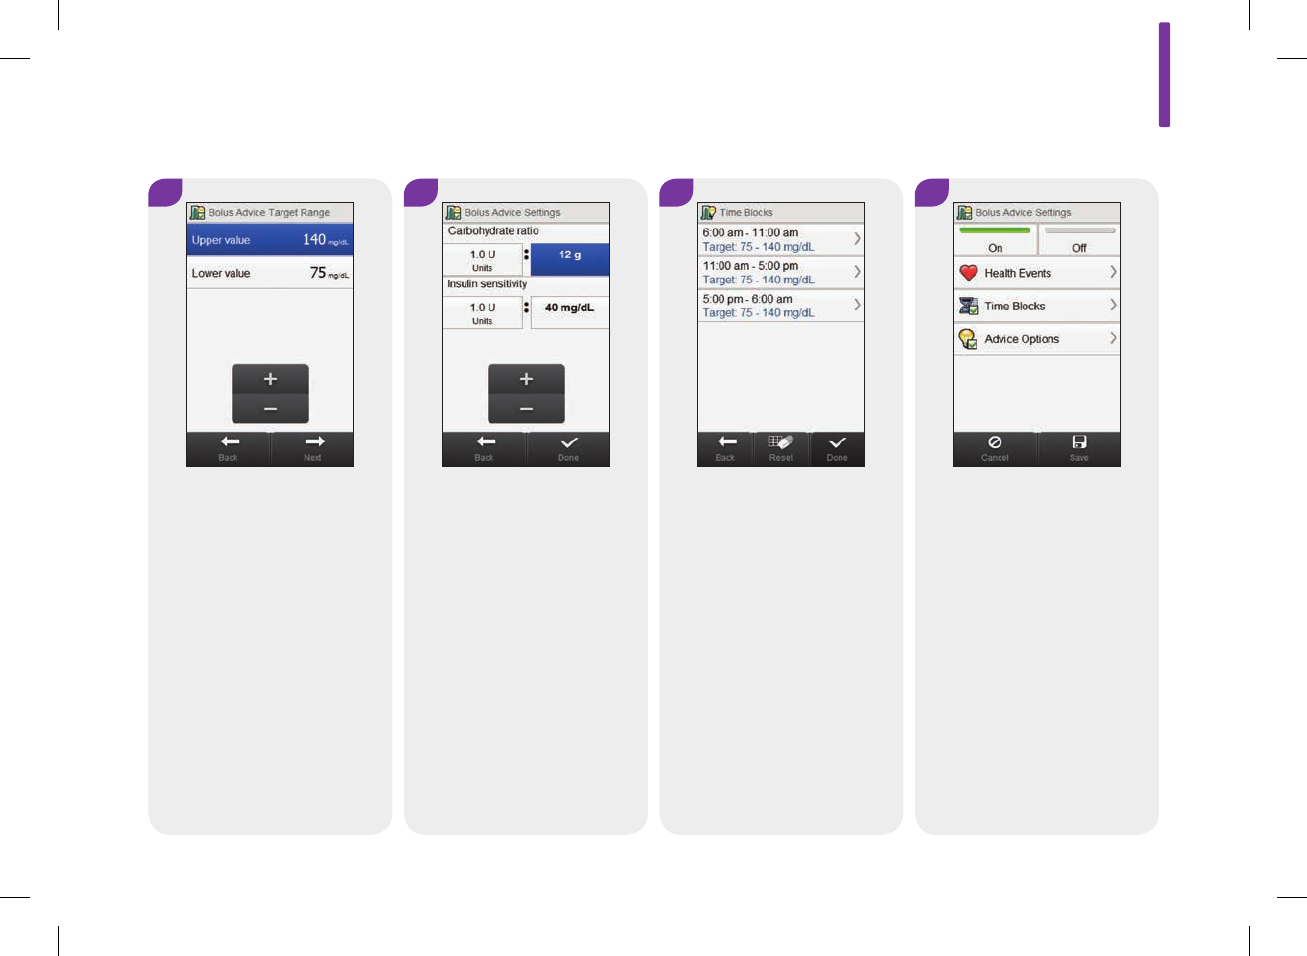
9
Set the Upper value and
Lower value. Select Next.
10
Set the Carbohydrate ratio and
Insulin sensitivity. Select
Done.
11
Edit any other time block
(reference Step7). Once all
time blocks are complete,
select Done and continue to
Step12.
12
Select Save.
7
123
52297_07167776001.indb 123 10/20/14 11:18 AM
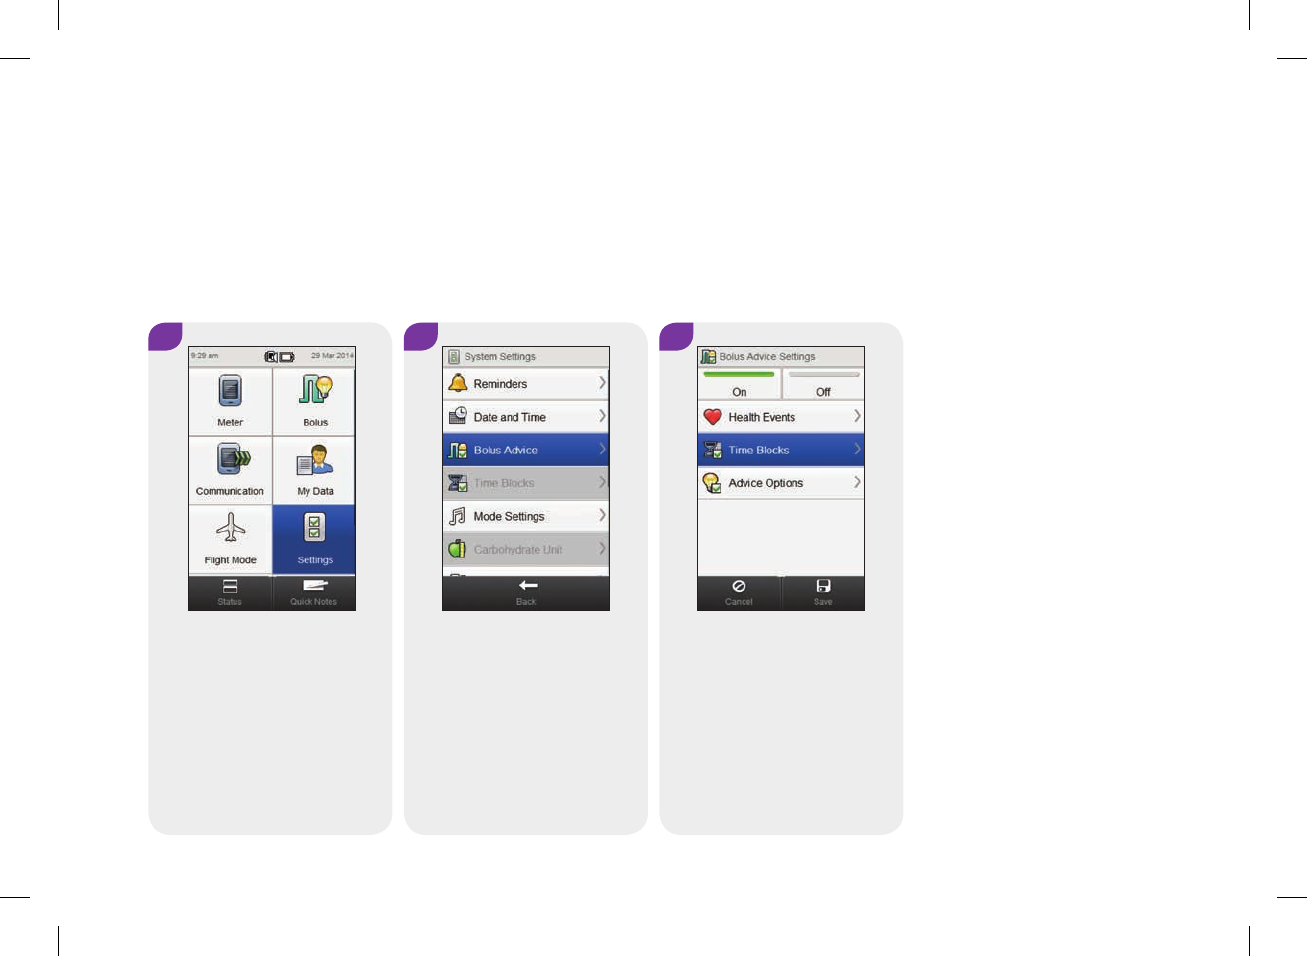
2
Select Bolus Advice.
1
From the Main Menu, select
Settings.
7.5.2 Bolus Advice: Deleting a Single Time Block
3
Select Time Blocks.
To delete a time block, decrease the time block’s end time until it
equals its start time.
Main Menu > Settings > Bolus Advice > Time Blocks
124
52297_07167776001.indb 124 10/20/14 11:18 AM
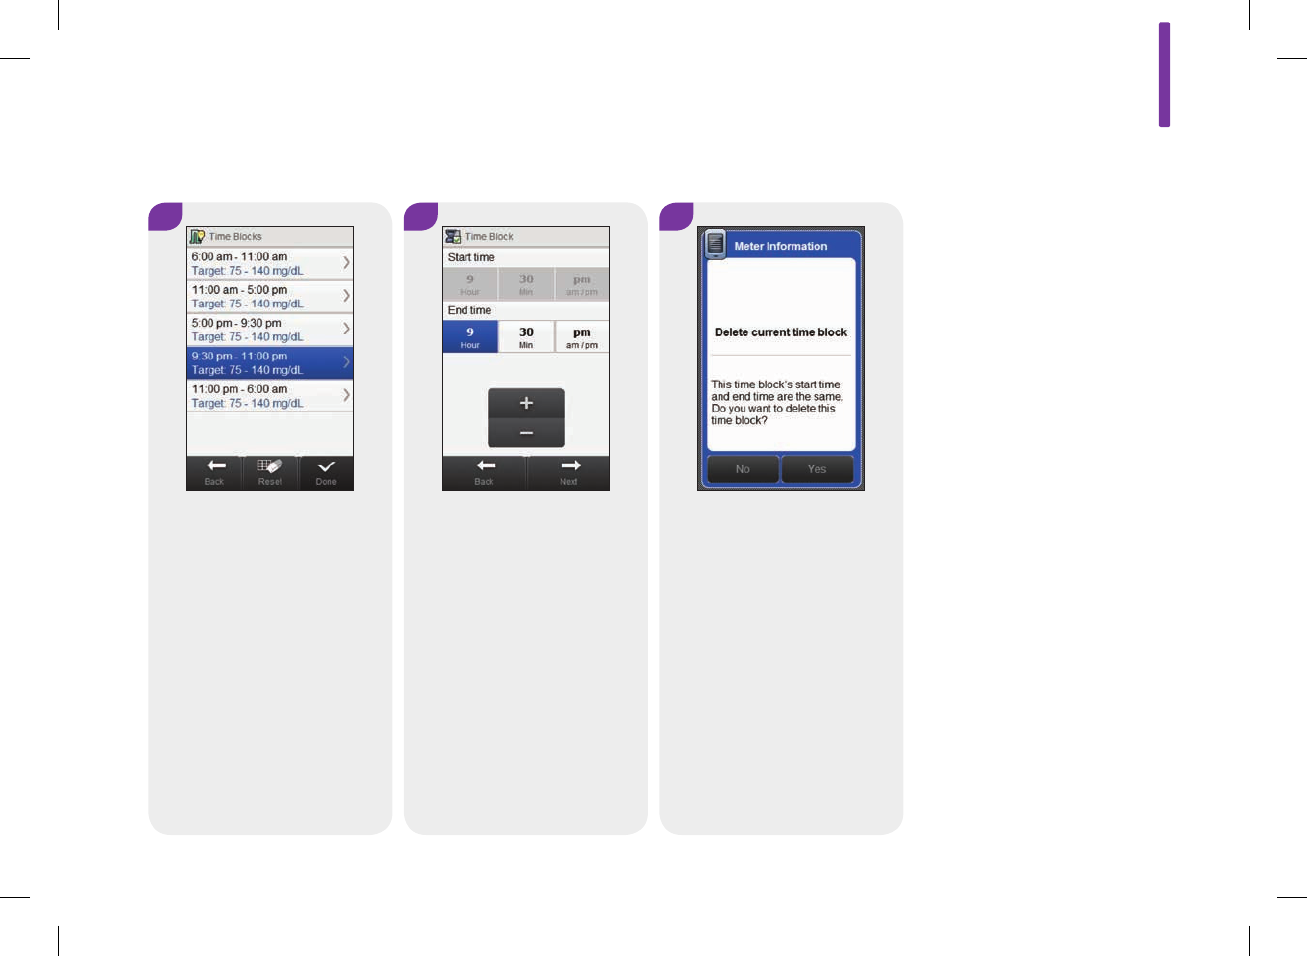
6
Select Yes.
5
Decrease the End time until it
equals the Start time. Select
Next.
4
Select the time block to
delete.
7
125
52297_07167776001.indb 125 10/20/14 11:18 AM
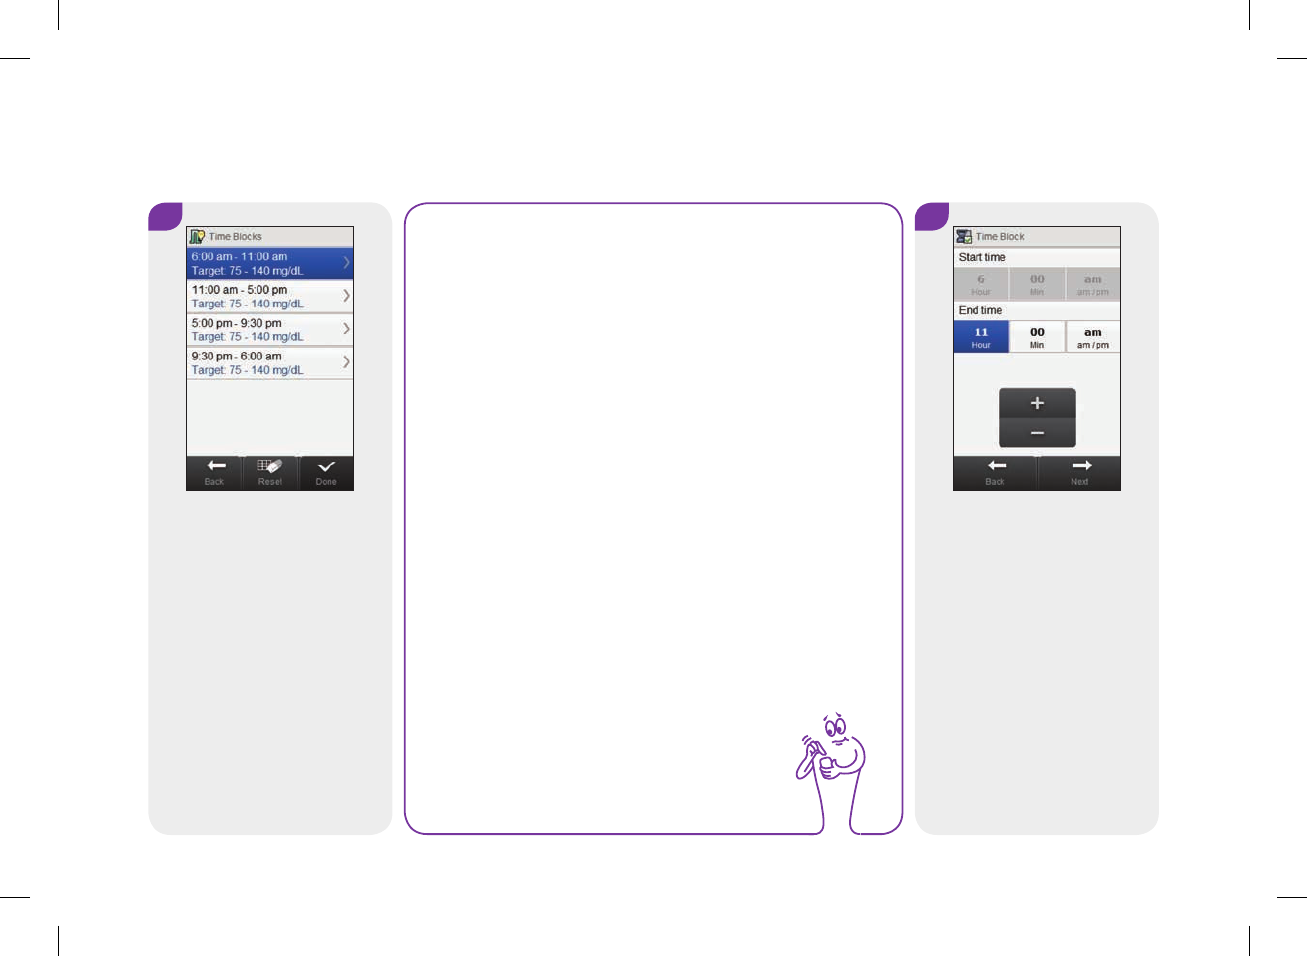
8
Set the End time. Select Next.
NOTE
jThe End time of a time block is the same as the Start
time of its following time block. Only an End time
can be changed, which changes the Start time of the
following time block.
jChanging the End time of the last time block does
not change the Start time of the first time block, but
it creates a new time block. See the Bolus Advice:
Adding a Time Block section in this chapter.
jTo change the Start time of the first time block, the
time blocks must be reset. See the Bolus Advice:
Resetting All Time Blocks section in this chapter.
7
It may be necessary to change
the end times and other
information for the remaining
time blocks. Select a time
block to edit and continue to
Step8, or if you do not need
to make any changes, select
Done and go to Step12.
126
52297_07167776001.indb 126 10/20/14 11:18 AM
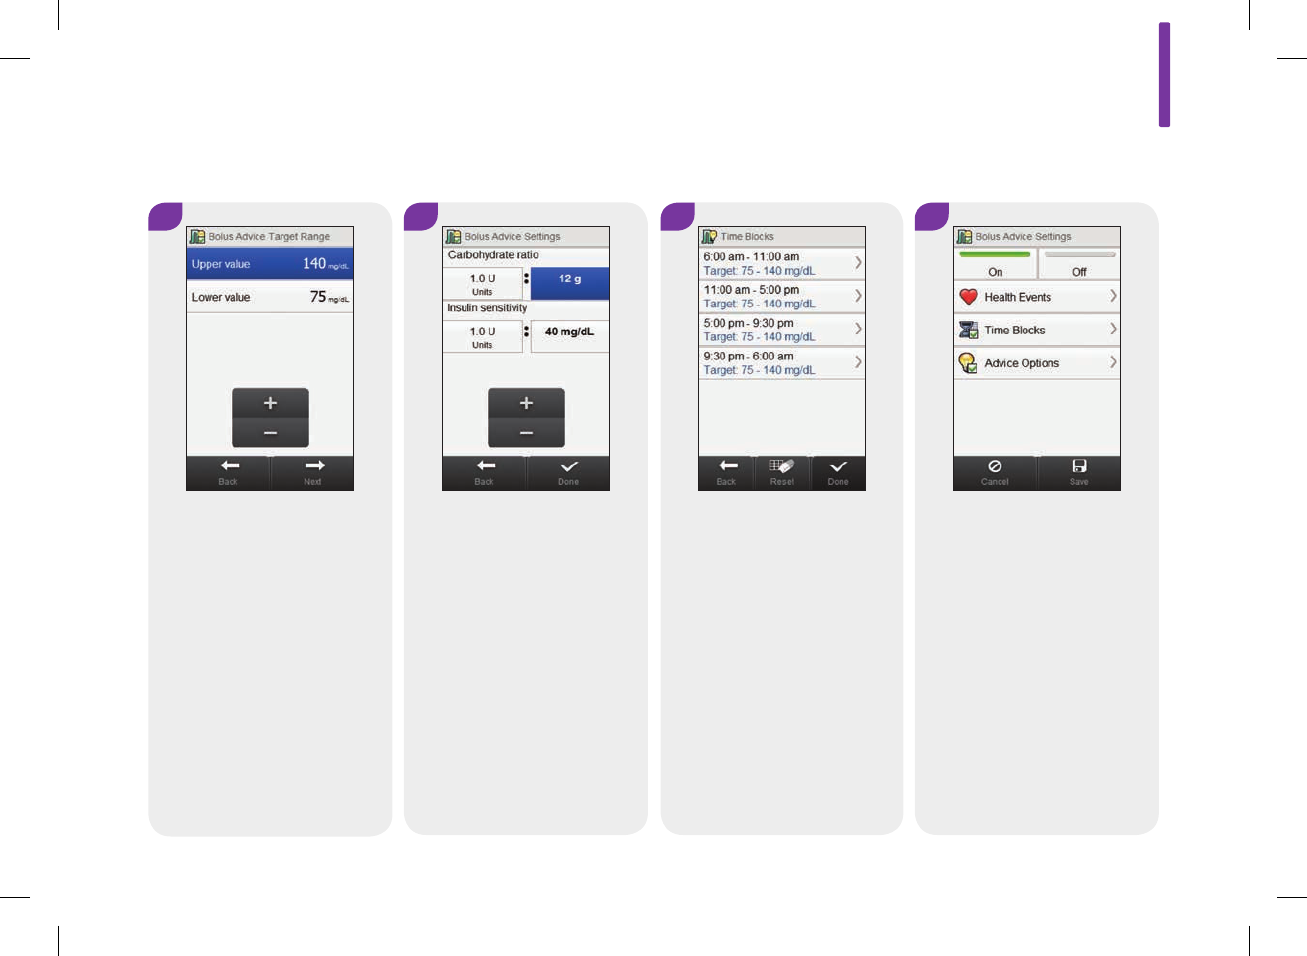
11
Edit any other time block
(reference Step7). Once all
time blocks are complete,
select Done and continue to
Step12.
10 12
Set the Carbohydrate ratio and
Insulin sensitivity. Select
Done.
Select Save.
9
Set the Upper value and
Lower value. Select Next.
7
127
52297_07167776001.indb 127 10/20/14 11:18 AM

7.6 Bolus Advice: Resetting All Time Blocks
This section is for resetting and re-entering the settings for all of
the time blocks if bolus advice has been set up. One reason for
resetting the time blocks is to change the start time of the first
time block.
Before you reset the time blocks, have the following information
available:
jThe number of time blocks you need with start and end times
for each
jThe blood glucose target range, carbohydrate ratio, and insulin
sensitivity for each time block
The health event percentages and the advice options (meal rise,
snack size, acting time, and offset time) are not reset.
w WARNING
It is strongly recommended that you discuss possible updates
to your bolus advice settings with your healthcare professional
prior to making changes.
128
52297_07167776001.indb 128 10/20/14 11:18 AM
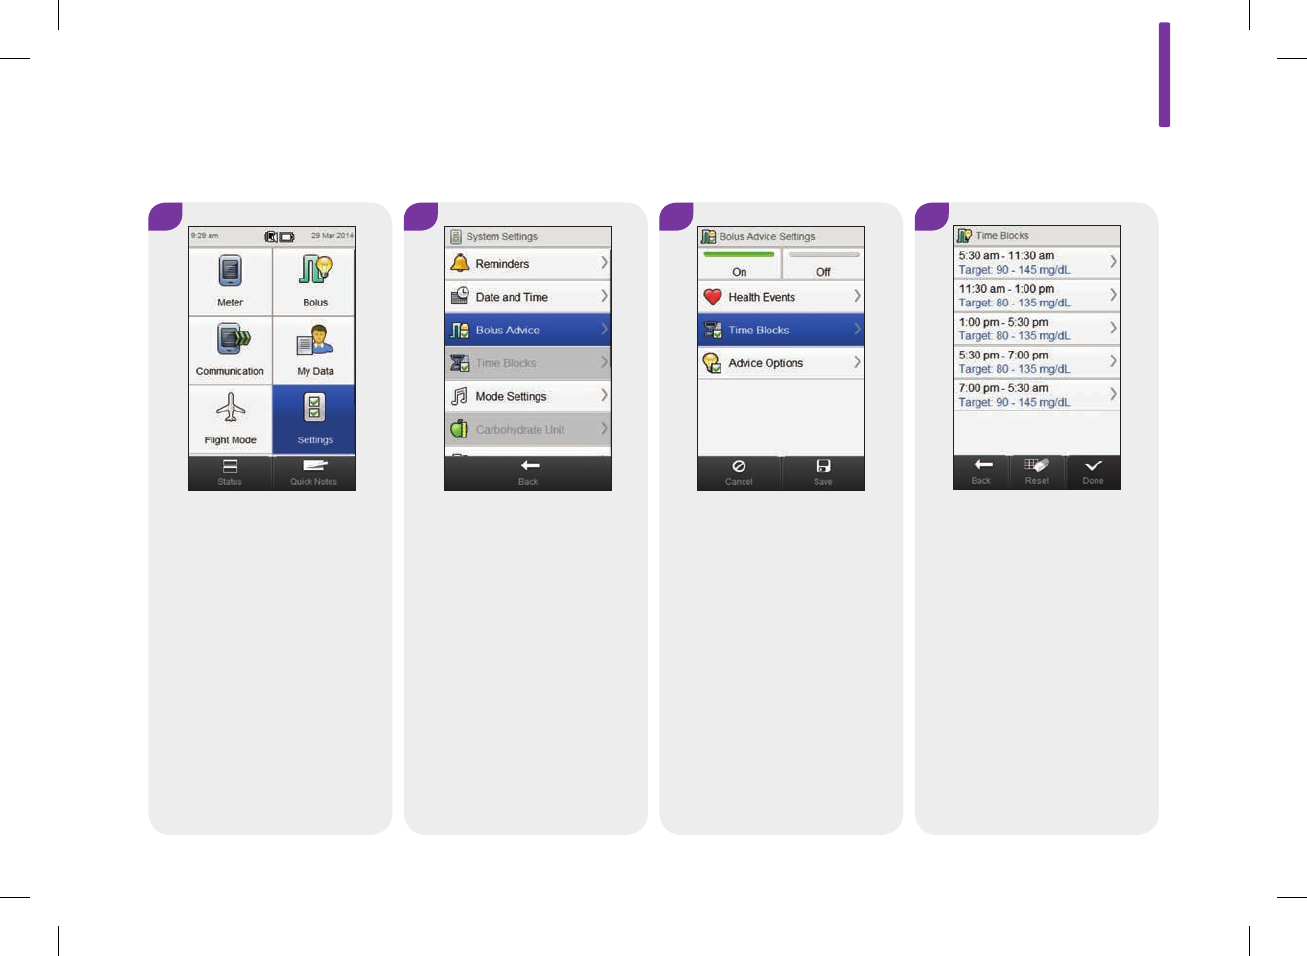
Main Menu > Settings > Bolus Advice > Time Blocks
2
Select Bolus Advice.
1
From the Main Menu, select
Settings.
4
Select Reset.
3
Select Time Blocks.
7
129
52297_07167776001.indb 129 10/20/14 11:18 AM
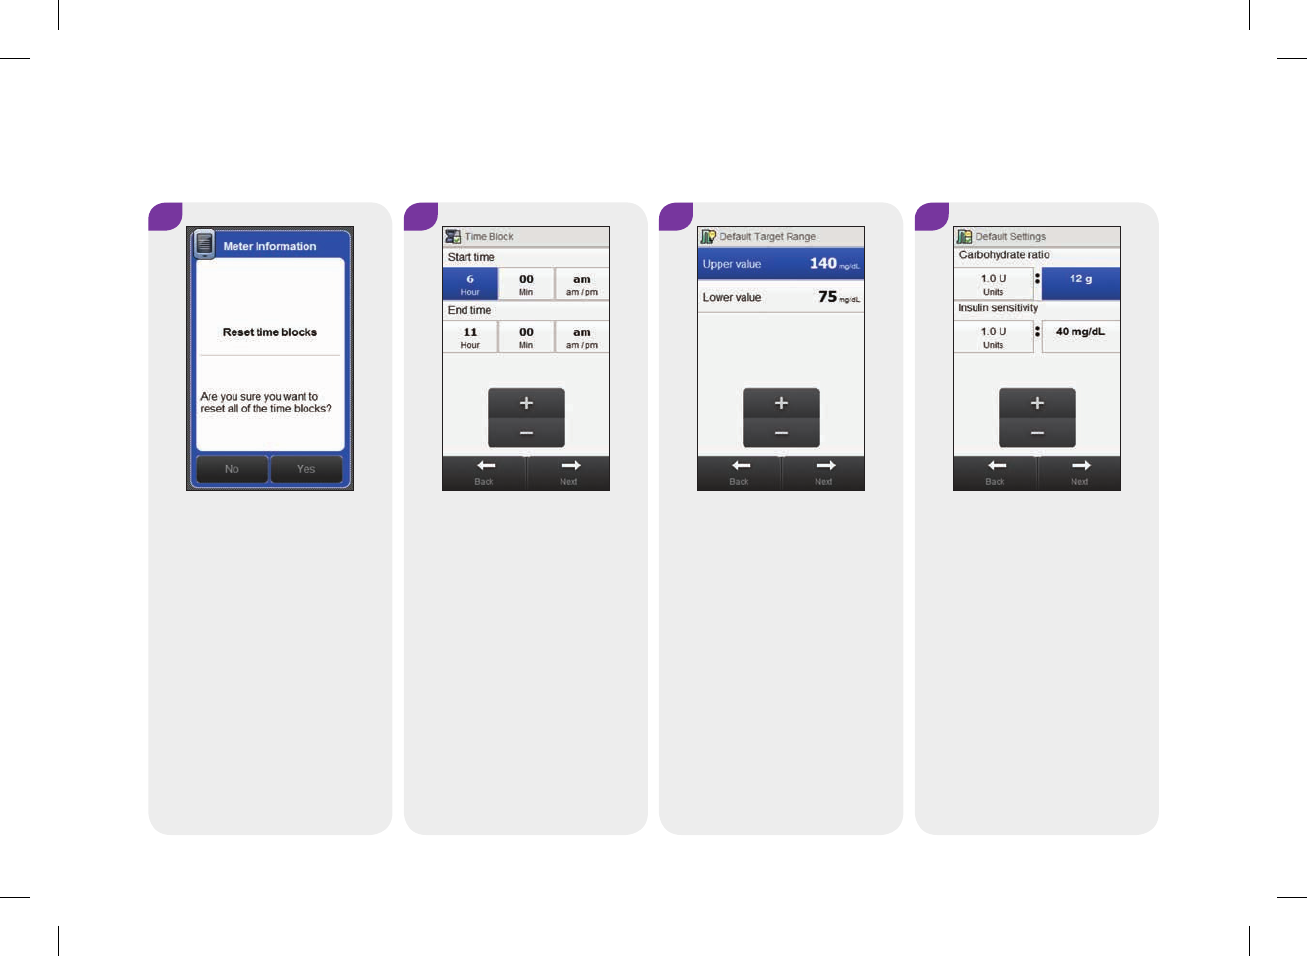
6
Set the Start time and End
time for the first time block.
Select Next.
5
Select Yes.
7
Set the default Upper value
and Lower value. Select Next.
8
Set the default Carbohydrate
ratio and Insulin sensitivity.
Select Next.
130
52297_07167776001.indb 130 10/20/14 11:18 AM
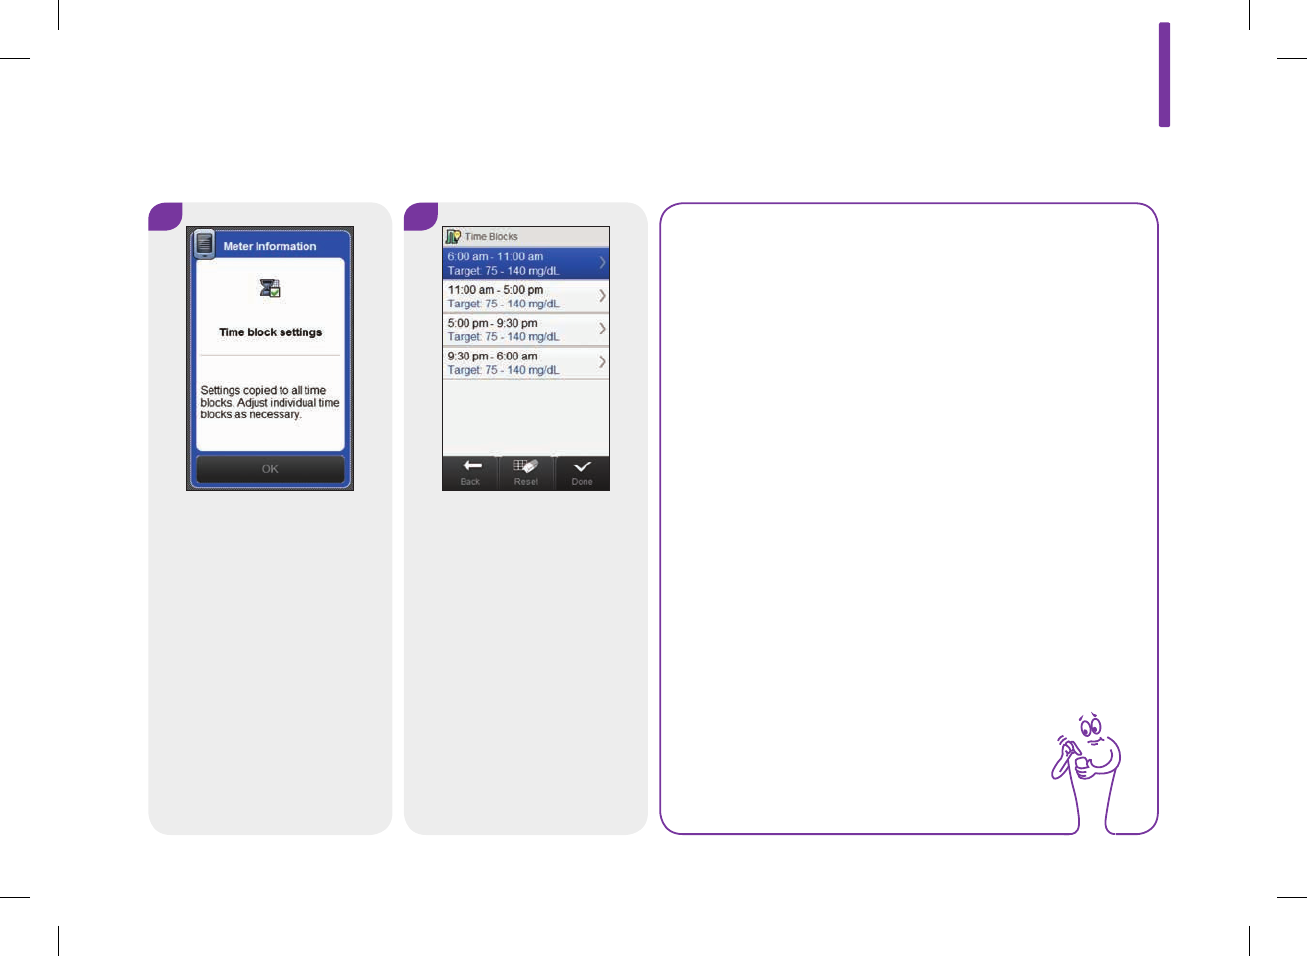
9
Select OK.
10
Select a time block to edit and
continue to Step11, or if you
do not need to make any
changes, select Done and go
to Step15.
NOTE
jThe End time of a time block is the same as the Start
time of its following time block. Only an End time
can be changed, which changes the Start time of the
following time block.
jChanging the End time of the last time block does
not change the Start time of the first time block, but
it creates a new time block. See the Bolus Advice:
Adding a Time Block section in this chapter.
jIf the End time of a time block is decreased until it is
the same as its Start time, the time block is deleted.
See the Bolus Advice: Deleting Time Blocks section
in this chapter.
7
131
52297_07167776001.indb 131 10/20/14 11:18 AM
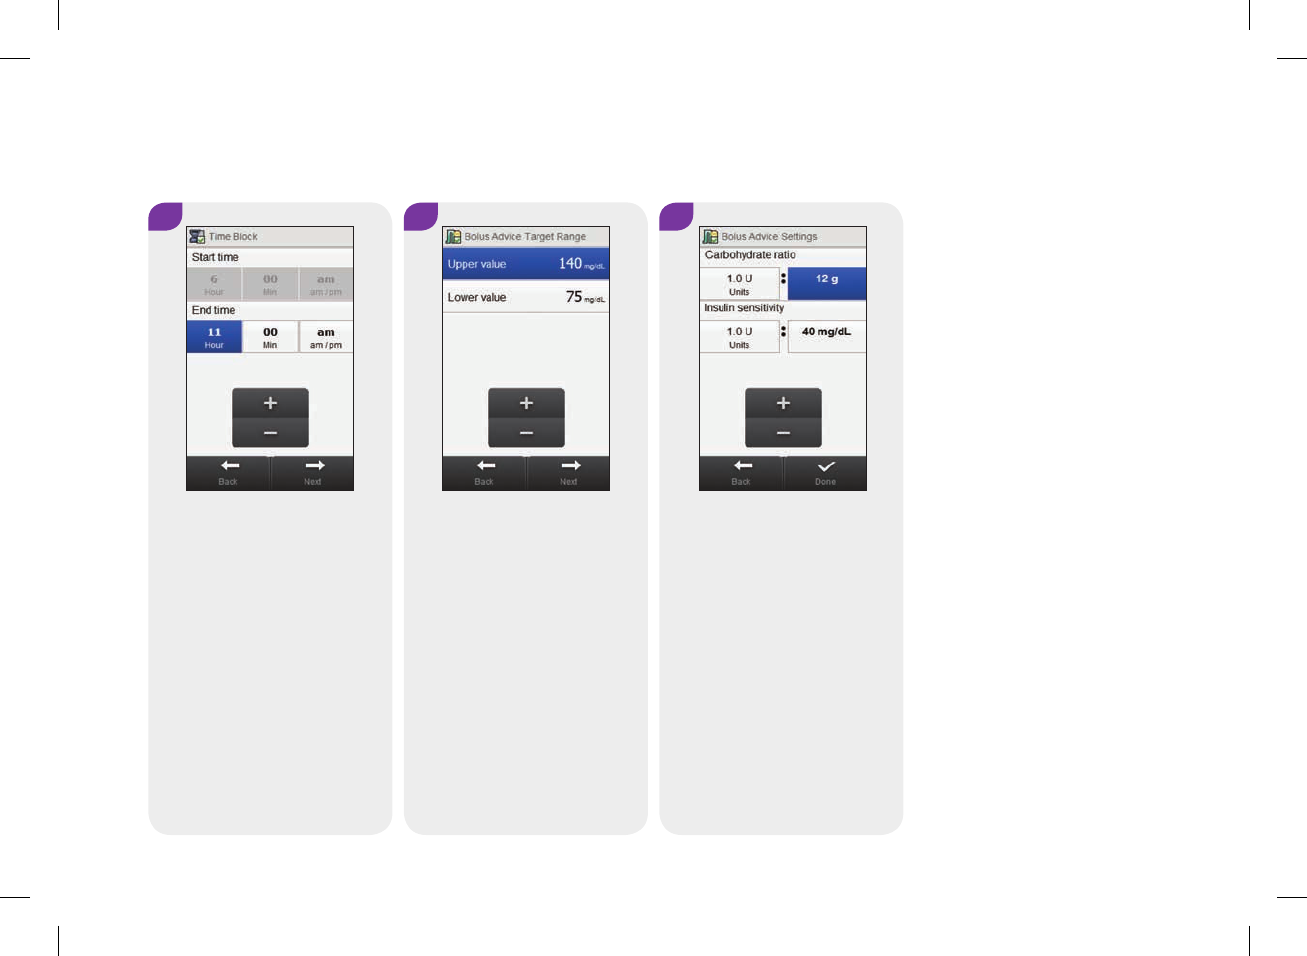
11
Set the End time. Select Next.
12
Set the Upper value and
Lower value. Select Next.
13
Set the Carbohydrate ratio and
Insulin sensitivity. Select Done.
132
52297_07167776001.indb 132 10/20/14 11:18 AM
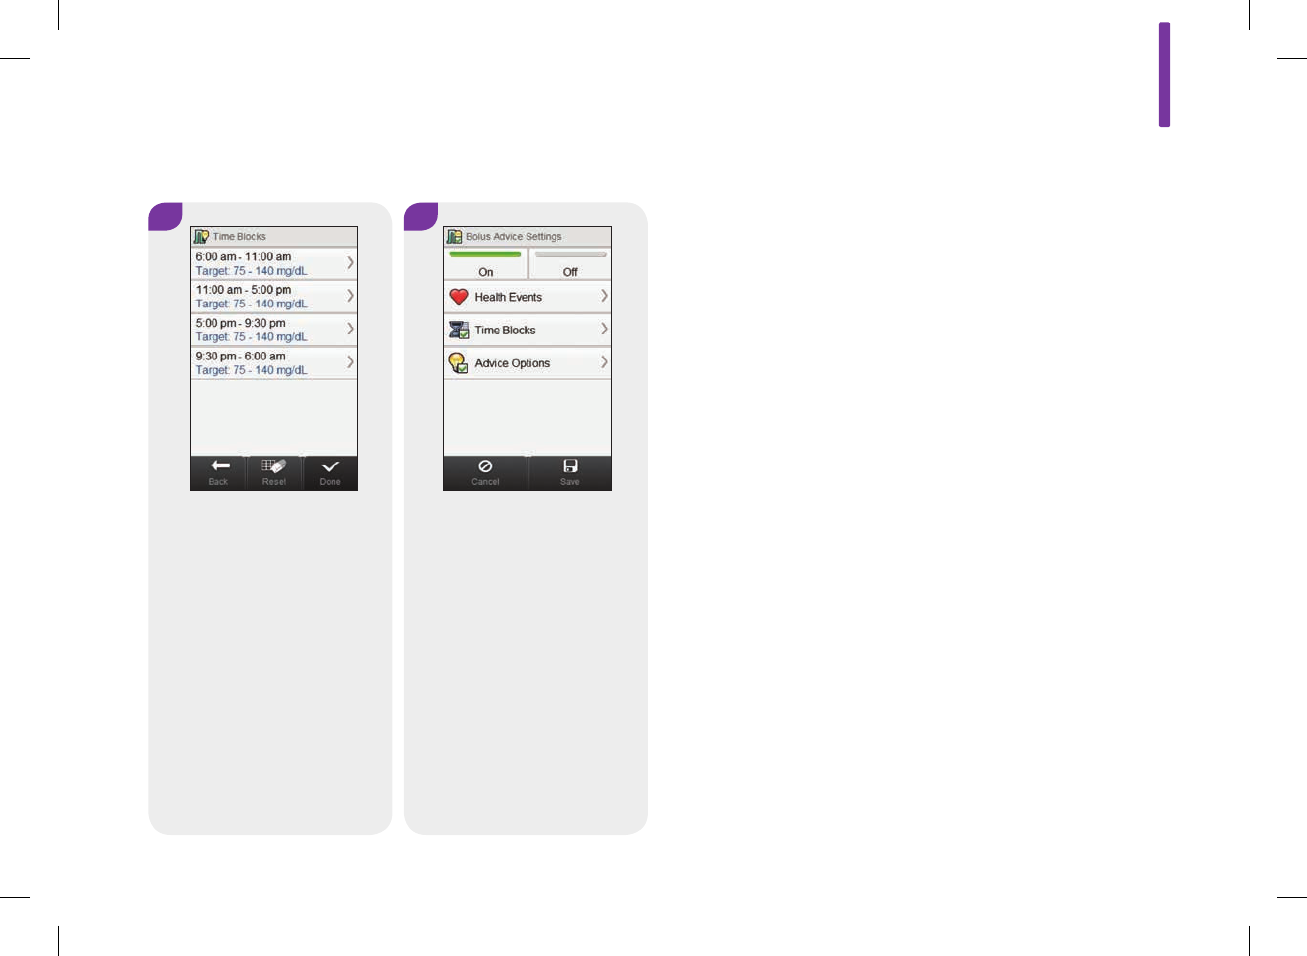
15
Select Save.
14
Edit any other time block
(reference Step10). Once all
time blocks are complete,
select Done and continue to
Step15.
7
133
52297_07167776001.indb 133 10/20/14 11:18 AM

Main Menu > Settings > Bolus Advice > Health Events
2
Select Bolus Advice.
1
From the Main Menu, select
Settings.
7.7 Health Event Percentages
This section is for changing Health Event percentages if bolus
advice has been set up.
w WARNING
It is strongly recommended that you discuss possible updates
to your bolus advice settings with your healthcare professional
prior to making changes.
134
52297_07167776001.indb 134 10/20/14 11:18 AM

3
Select Health Events.
4
Set the percentages for health
events. Scroll the screen to
see more health events.
Select Save.
5
Select Save.
7
135
52297_07167776001.indb 135 10/20/14 11:18 AM
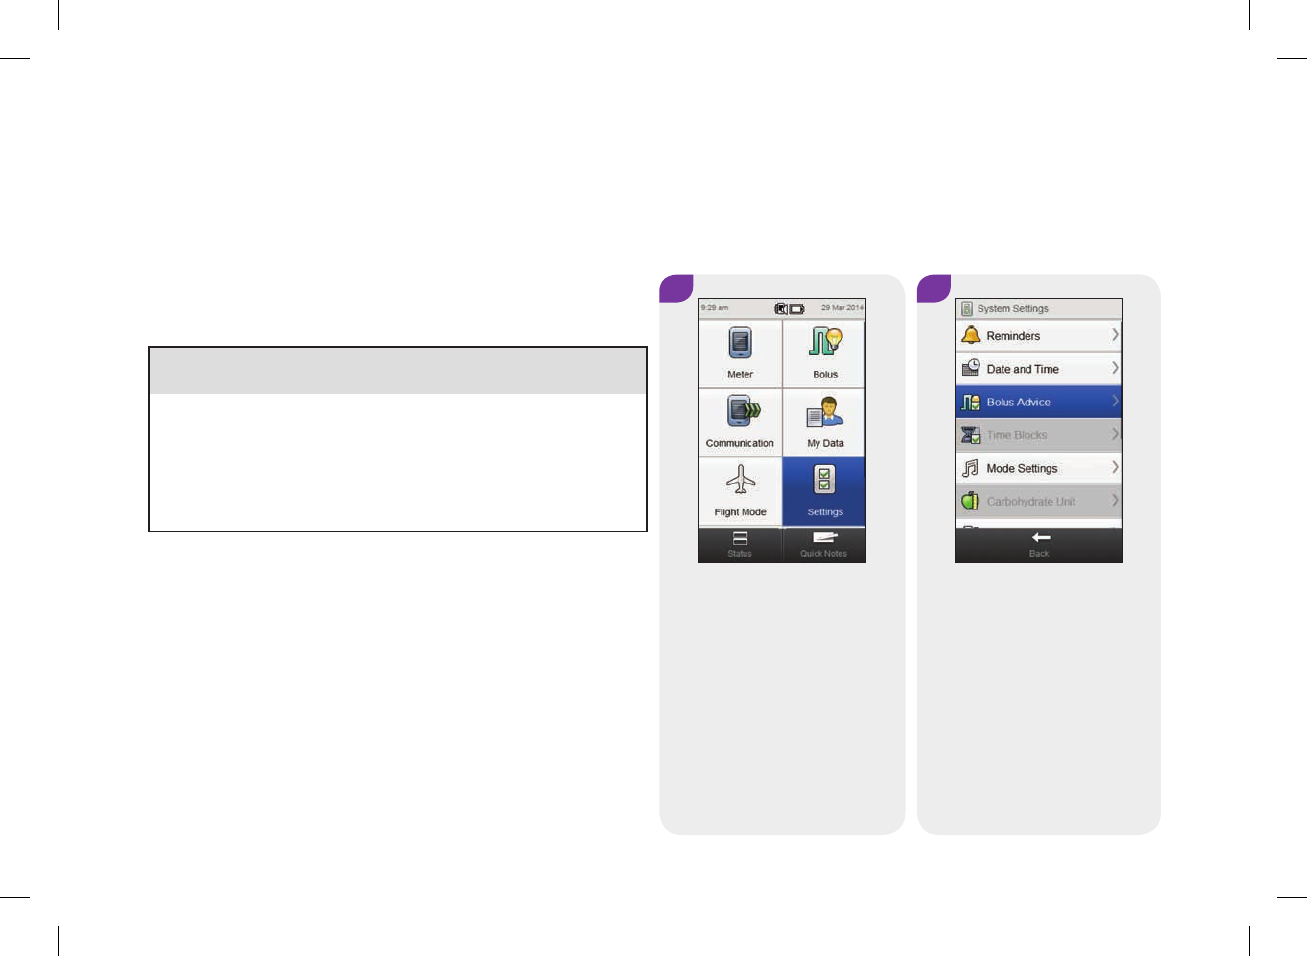
Main Menu > Settings > Bolus Advice > Advice Options
2
Select Bolus Advice.
1
From the Main Menu, select
Settings.
7.8 Advice Options: Meal Rise, Snack Size, Acting Time, Offset Time
This section is for changing the values for meal rise, snack size,
acting time, and offset time if bolus advice has been set up.
w WARNING
It is strongly recommended that you discuss possible updates
to your bolus advice settings with your healthcare professional
prior to making changes.
136
52297_07167776001.indb 136 10/20/14 11:18 AM
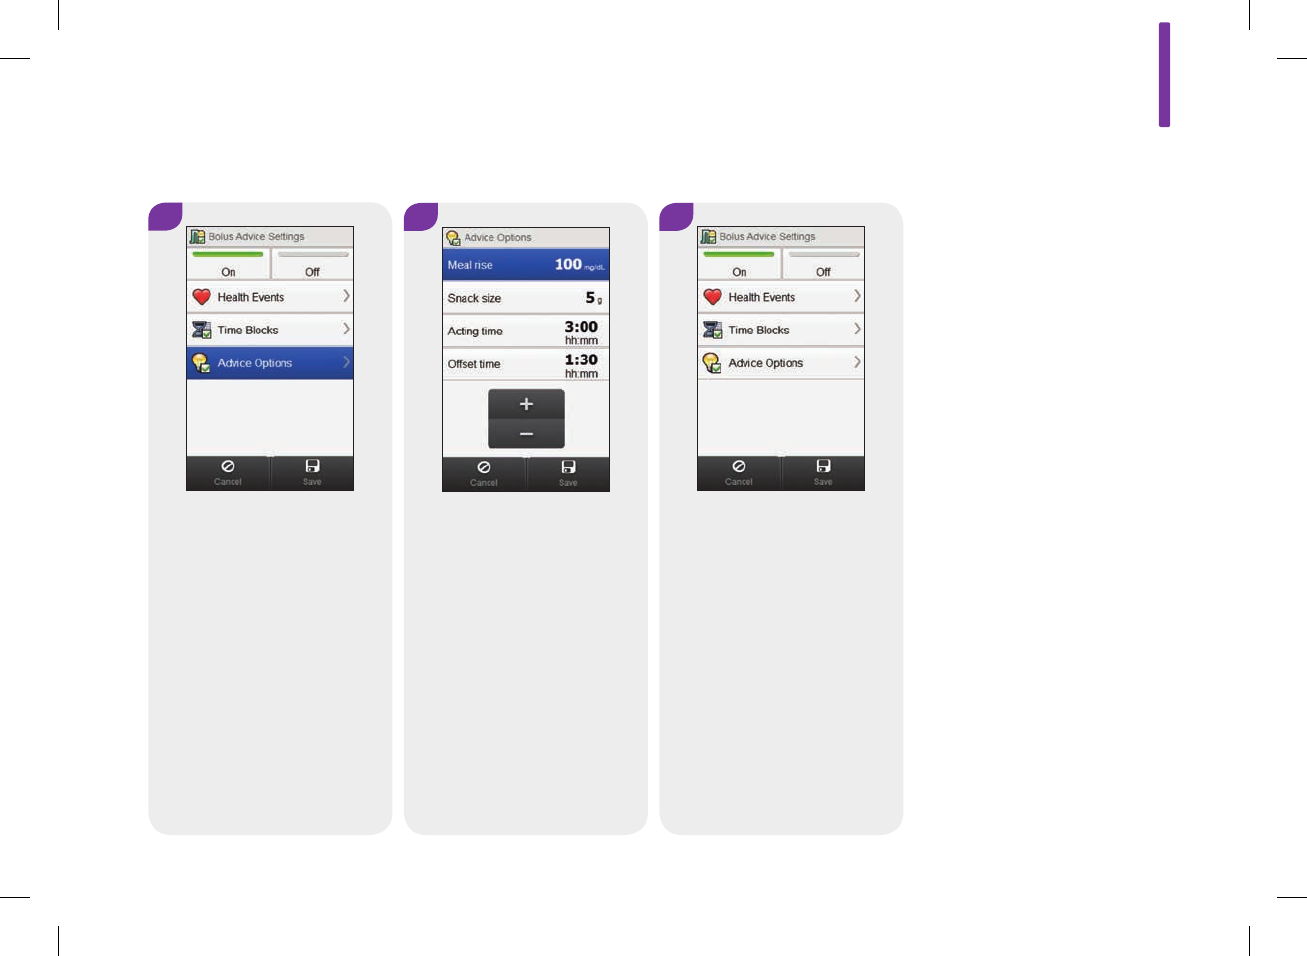
5
Select Save.
3
Select Advice Options.
4
Set the Meal rise, Snack size,
Acting time, and Offset time.
Select Save.
7
137
52297_07167776001.indb 137 10/20/14 11:18 AM
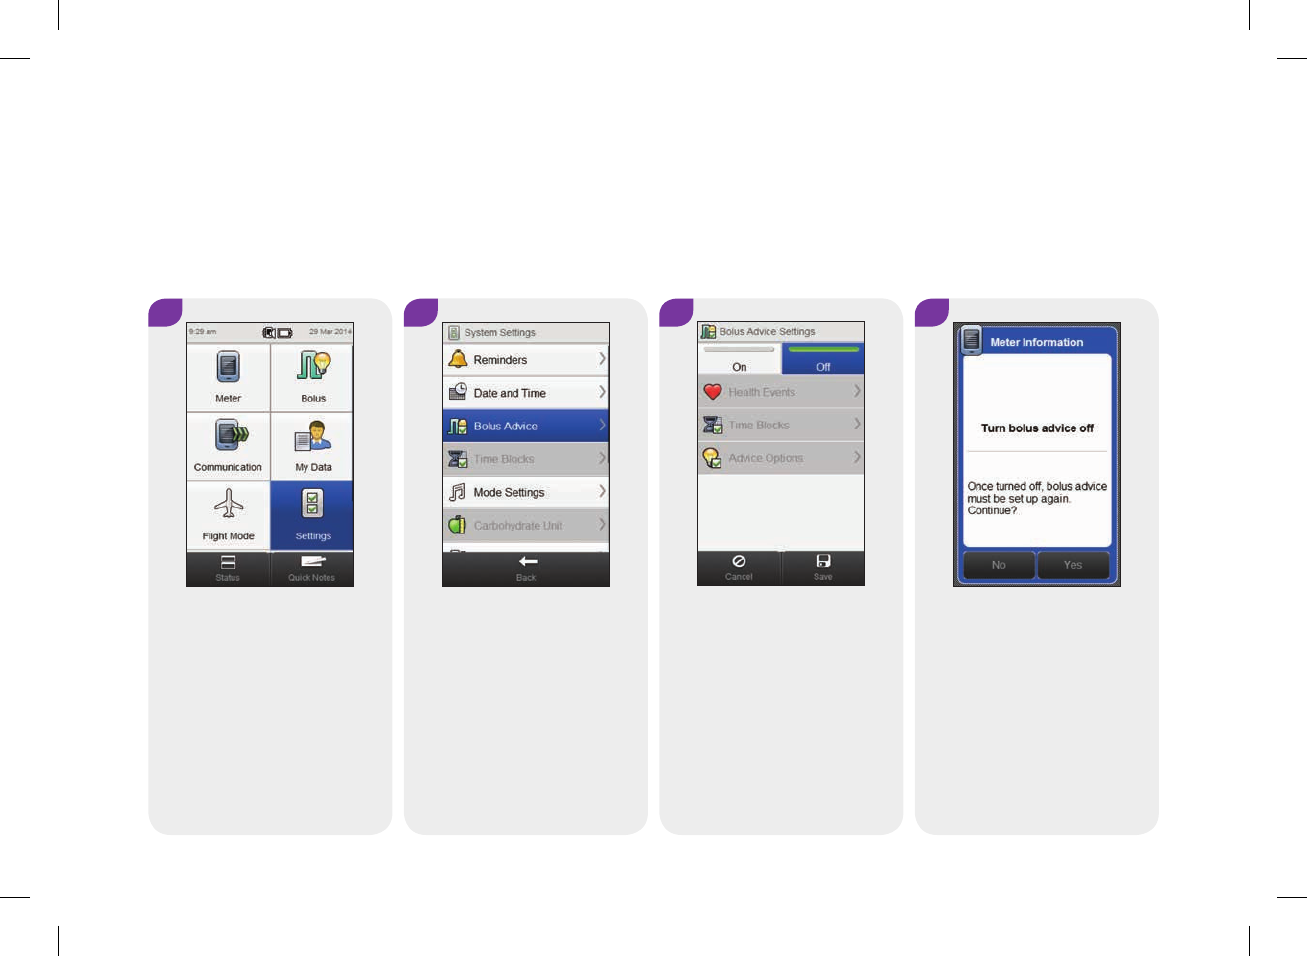
1
From the Main Menu, select
Settings.
2
Select Bolus Advice.
3 4
Select Off. Select Save. All bolus advice settings are
deleted if you continue. Select
Yes to turn off bolus advice.
7.9 Turning Off Bolus Advice
Once turned off, bolus advice must be set up to be used again.
Main Menu > Settings > Bolus Advice > Bolus Advice Settings
138
52297_07167776001.indb 138 10/20/14 11:18 AM

8
139
8.1 Overview
You can make the following changes to the meter to adjust it to
your individual therapy requirements and personal preferences.
Consult with your healthcare professional to ensure the
appropriate settings are selected.
Device settings
jDate and time
jMode settings: sound, vibration, and signal suspension
jHome screen default
jTouchscreen: tone and vibration
jDisplay brightness
jBackground color
jLanguage
Time blocks
jStart times, end times, and target ranges for time blocks
jAdd or delete a time block
jReset all time blocks
Therapy settings
jWarning limits: Hyper and Hypo
jInsulin increment
jMax bolus amount
jCarbohydrate unit
8 Changing Meter Settings
52297_07167776001.indb 139 10/20/14 11:18 AM

NOTE
jWhen editing a setting, any unsaved changes are
discarded if the meter turns o or if a test strip is
inserted into the meter.
jIf bolus advice is turned on, see the Changing Bolus
Advice Settings chapter in this user’s manual to
change the time blocks, health events, and advice
options (meal rise, snack size, acting time, and oset
time).
140
52297_07167776001.indb 140 10/20/14 11:18 AM
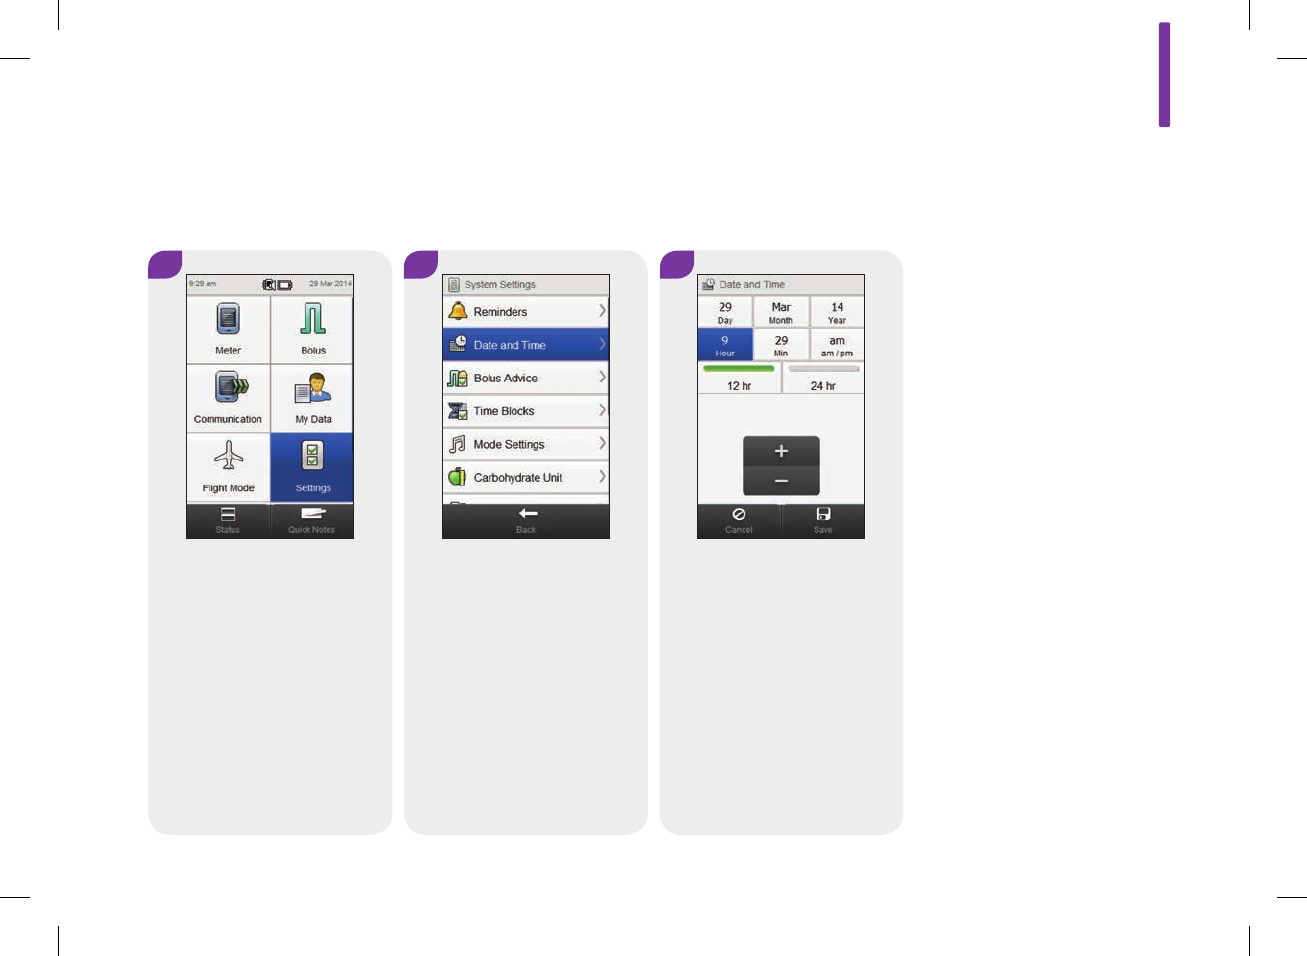
8.2 Date, Time, and Time Format
Main Menu > Settings > Date and Time
1 3
From the Main Menu, select
Settings.
Date and Time: Select and
set the appropriate fields.
Time Format: Choose 12hr
or 24hr. Select Save.
2
Select Date and Time.
8
141
52297_07167776001.indb 141 10/20/14 11:18 AM
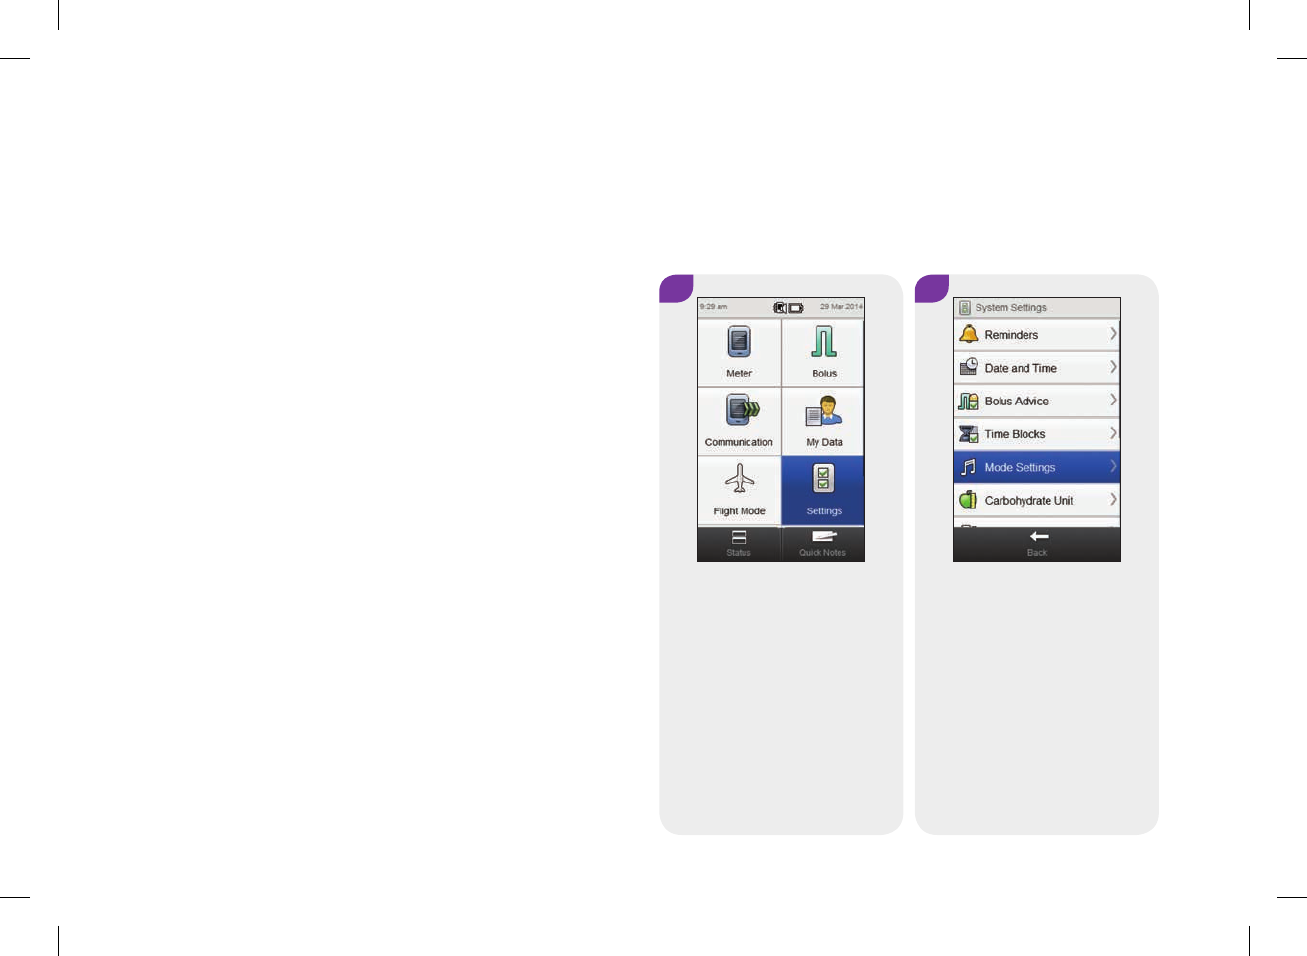
1 2
8.3 Mode Settings: Sound, Vibration
From the Main Menu, select
Settings.
Select Mode Settings.
You can choose whether you want the meter to sound, vibrate, or
do both at the same time as an event occurs (such as a Warning).
You can adjust the sound volume.
Main Menu > Settings > Mode Settings
142
52297_07167776001.indb 142 10/20/14 11:18 AM
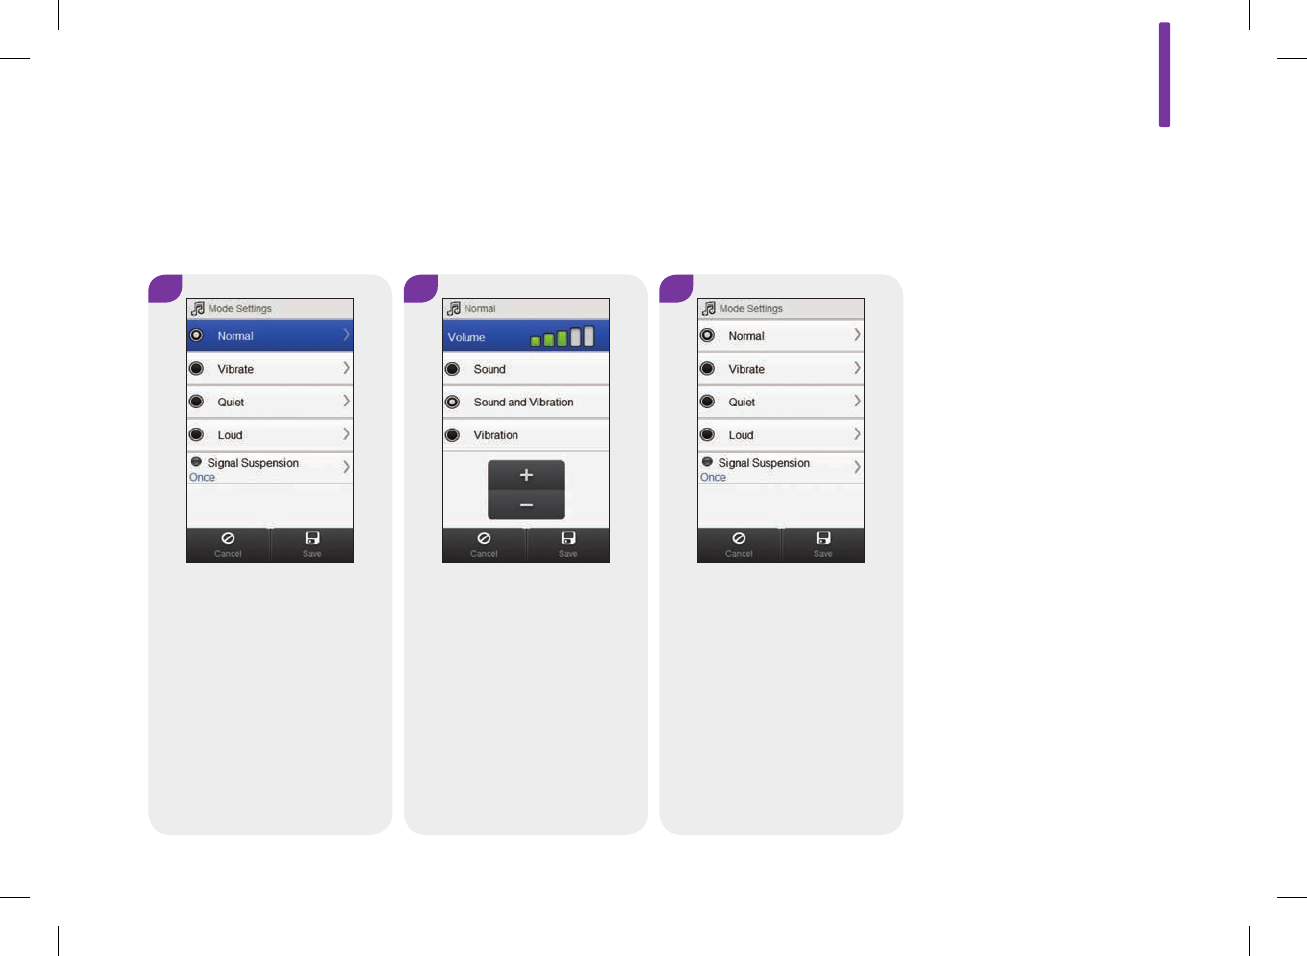
3
Choose a mode.
4 5
Choose the desired mode
setting. Set the volume, if
applicable. Select Save.
Select Save.
8
143
52297_07167776001.indb 143 10/20/14 11:18 AM
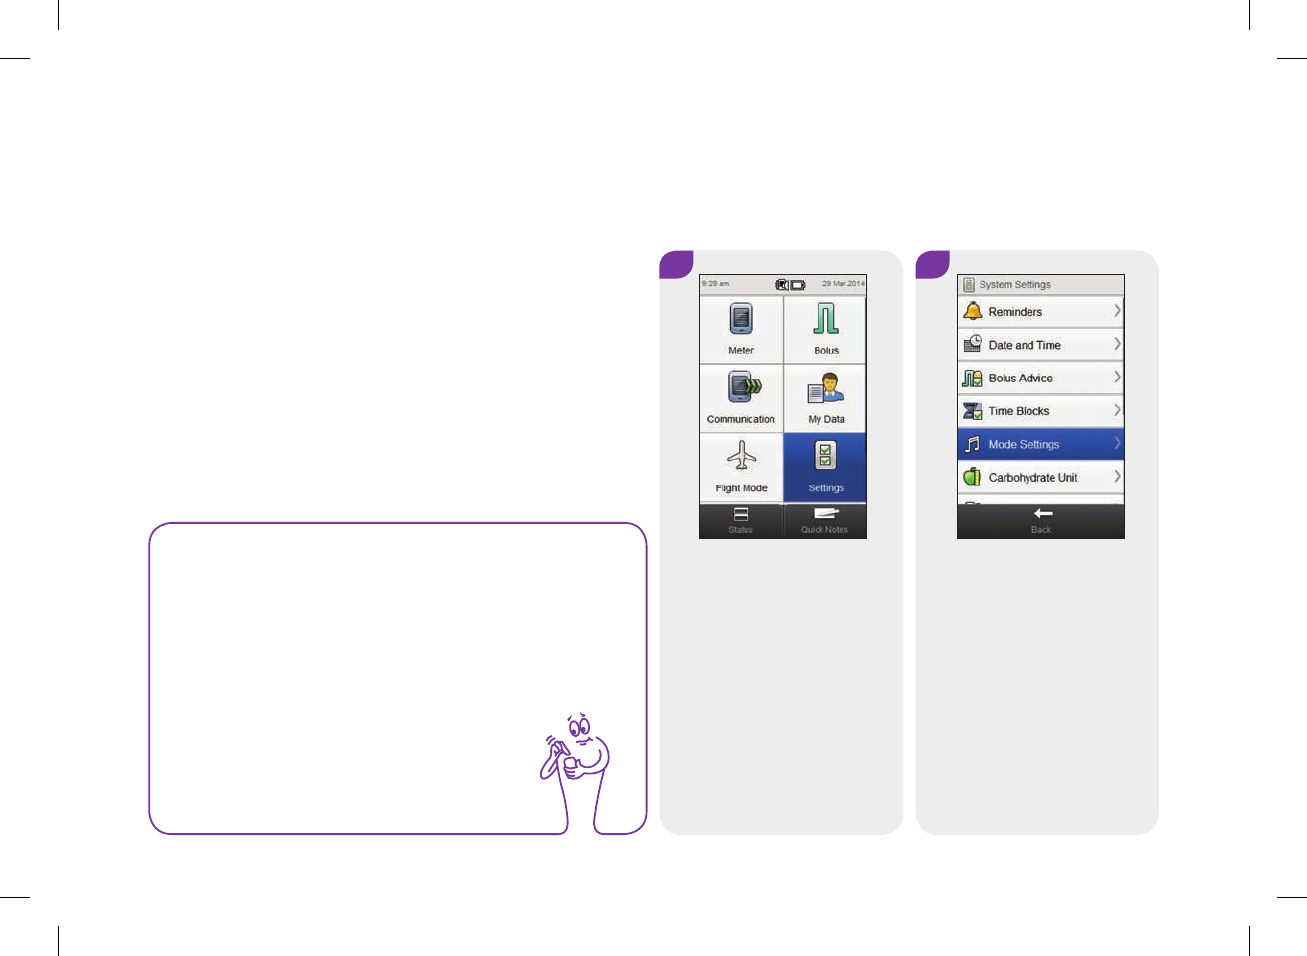
1
8.4 Mode Settings: Signal Suspension
Main Menu > Settings > Mode Settings > Signal Suspension
2
Select Mode Settings.
NOTE
Warnings that occur during the signal suspension period
are displayed when the meter turns on, or when the signal
suspension period ends.
From the Main Menu, select
Settings.
You can suspend the signals for Warnings for a specified period
of time. However, since Error and Maintenance messages require
your immediate attention, you cannot suspend these event
signals. Also, the Reminders you programmed will not be
suspended.
A signal suspension can be set to occur once or it can be set to
repeat at the same time every day.
144
52297_07167776001.indb 144 10/20/14 11:18 AM
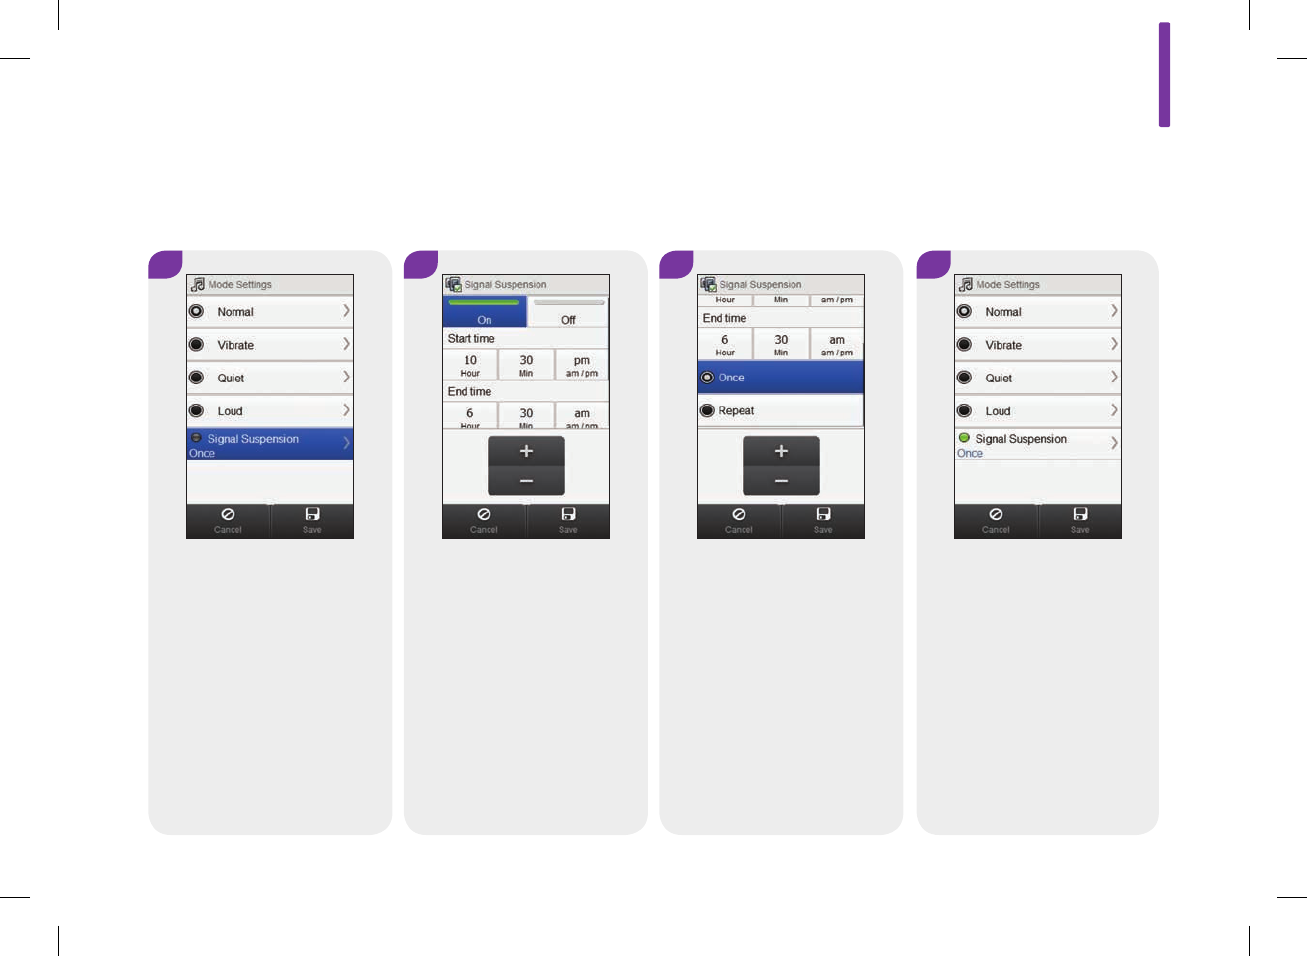
3
Select Signal Suspension.
4 5 6
Select On: Set the Start time
and End time. Continue to
Step5.
Select Off: Select Save. Go to
Step6.
If On is selected, scroll the
screen and choose either
Once or Repeat. Select Save.
Select Save.
8
145
52297_07167776001.indb 145 10/20/14 11:18 AM
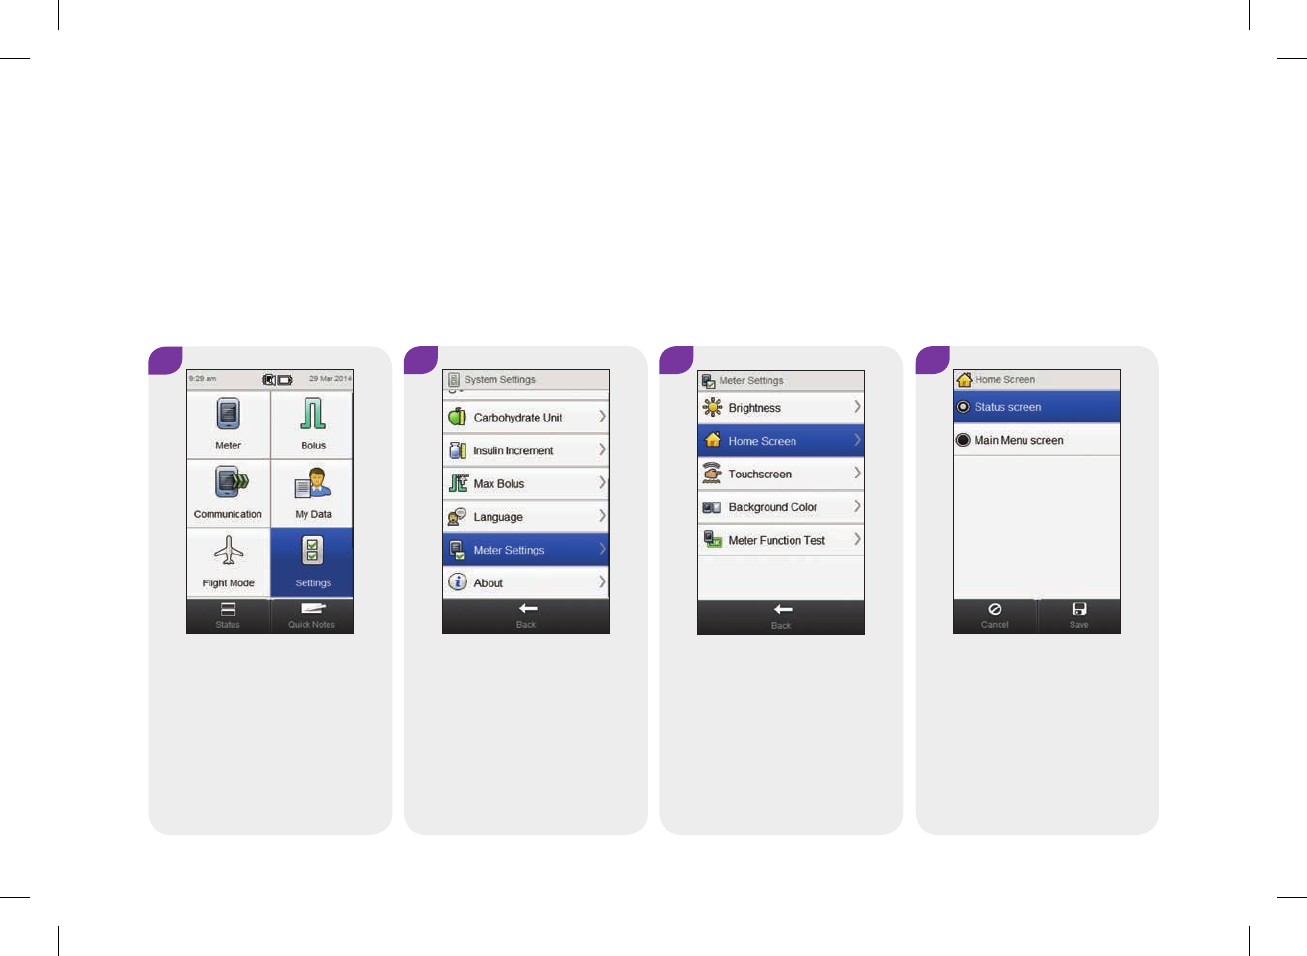
2
8.5 Home Screen Default
1
From the Main Menu, select
Settings.
Scroll the screen and select
Meter Settings.
4
Choose a screen. Select Save.
3
Select Home Screen.
The Home screen is the screen displayed when the meter is powered on or
after you complete a meter function, like delivering a bolus or changing a
setting. You can choose either the Main Menu or Status screen to be the Home
screen.
Main Menu > Settings > Meter Settings > Home Screen
146
52297_07167776001.indb 146 10/20/14 11:18 AM
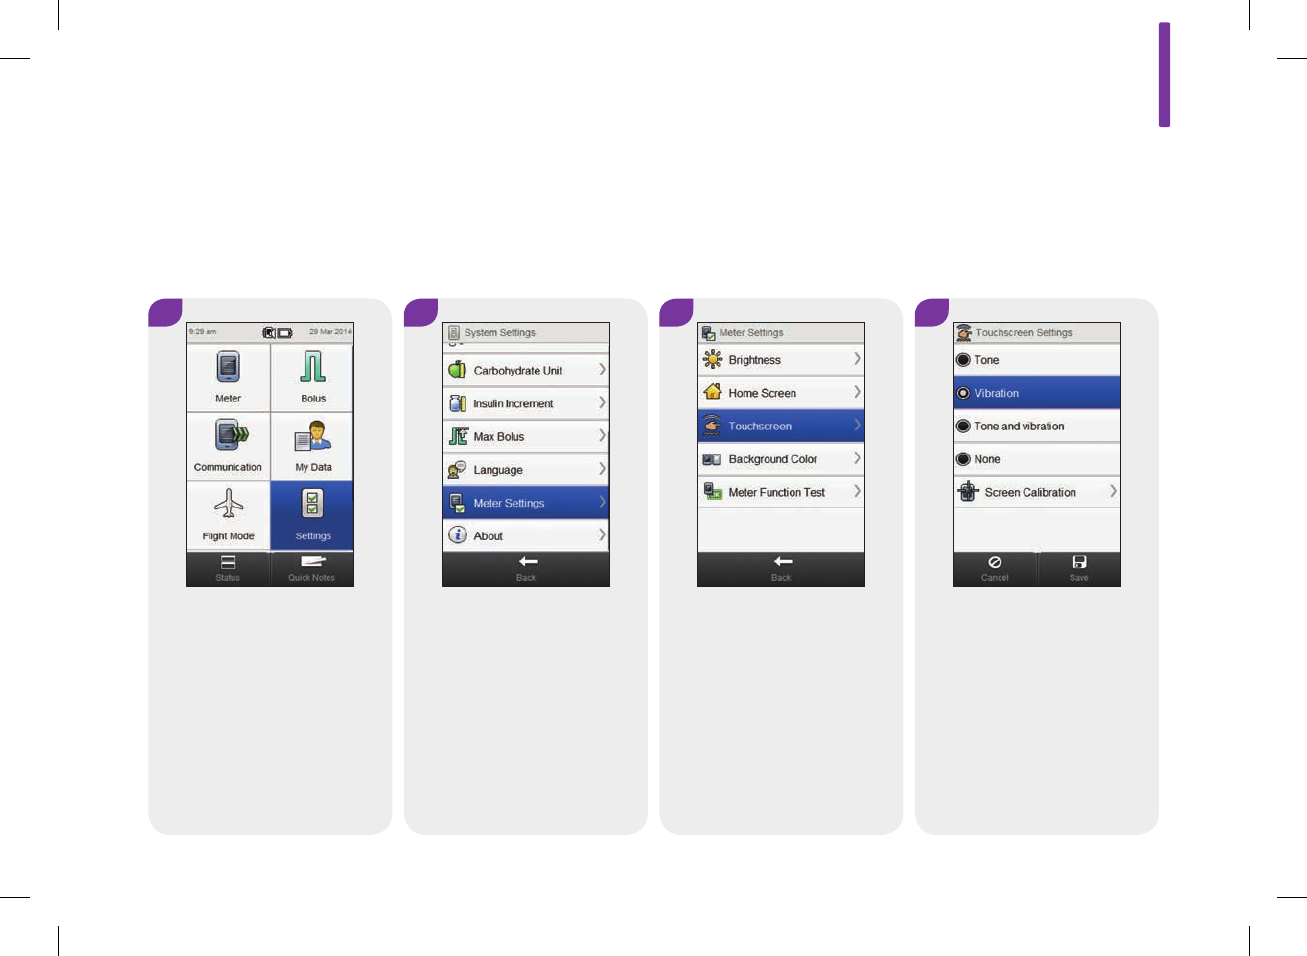
8.6 Touchscreen: Tone, Vibration
1 2
From the Main Menu, select
Settings.
Scroll the screen and select
Meter Settings.
4
Choose the desired
touchscreen setting. Select
Save.
3
Select Touchscreen.
You can choose whether you want the meter to emit a tone, vibrate, do both at the same
time, or do neither when you make a selection on the touchscreen.
Main Menu > Settings > Meter Settings > Touchscreen
8
147
52297_07167776001.indb 147 10/20/14 11:18 AM
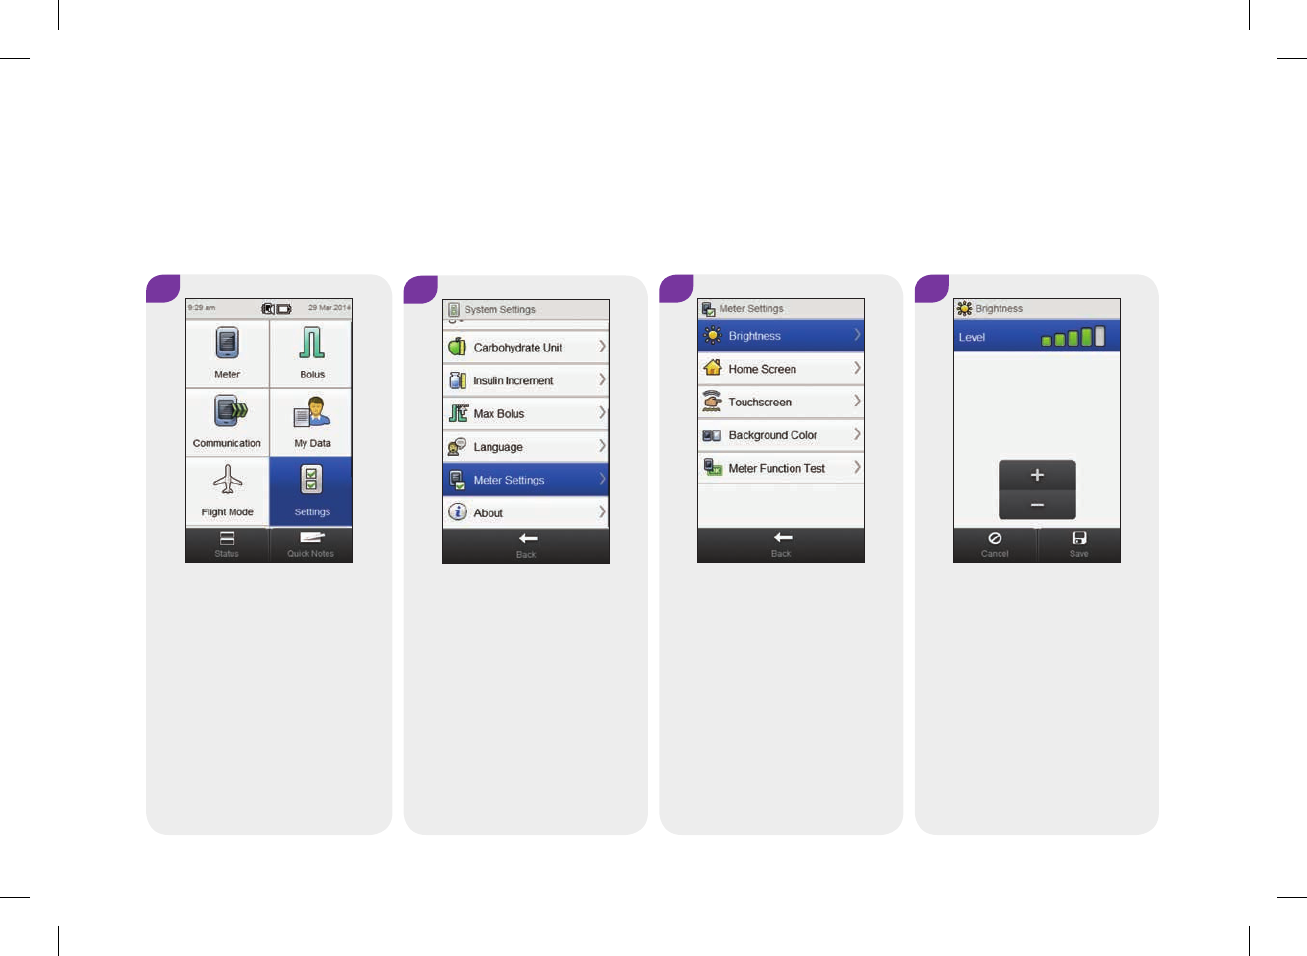
8.7 Brightness
You can adjust the brightness level of the meter display for different lighting conditions.
Main Menu > Settings > Meter Settings > Brightness
12
From the Main Menu, select
Settings.
Scroll the screen and select
Meter Settings.
4
Set the brightness level.
Select Save.
3
Select Brightness.
148
52297_07167776001.indb 148 10/20/14 11:18 AM
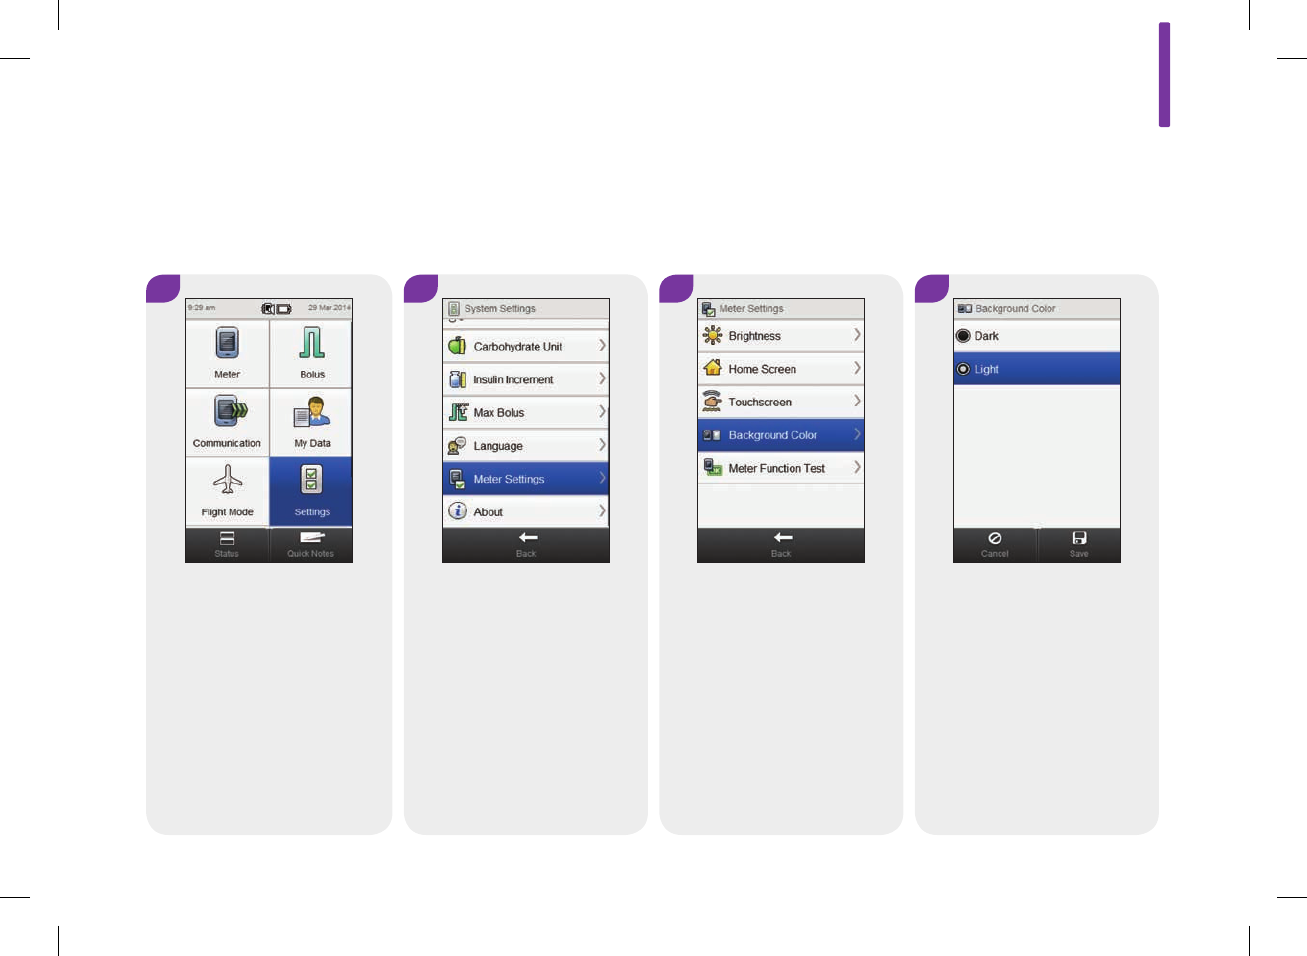
8.8 Background Color
You can choose the background color of the meter display to be either dark or light.
Main Menu > Settings > Meter Settings > Background Color
1 2
From the Main Menu, select
Settings.
Scroll the screen and select
Meter Settings.
4
Choose the desired
background color. Select
Save.
3
Select Background Color.
8
149
52297_07167776001.indb 149 10/20/14 11:18 AM
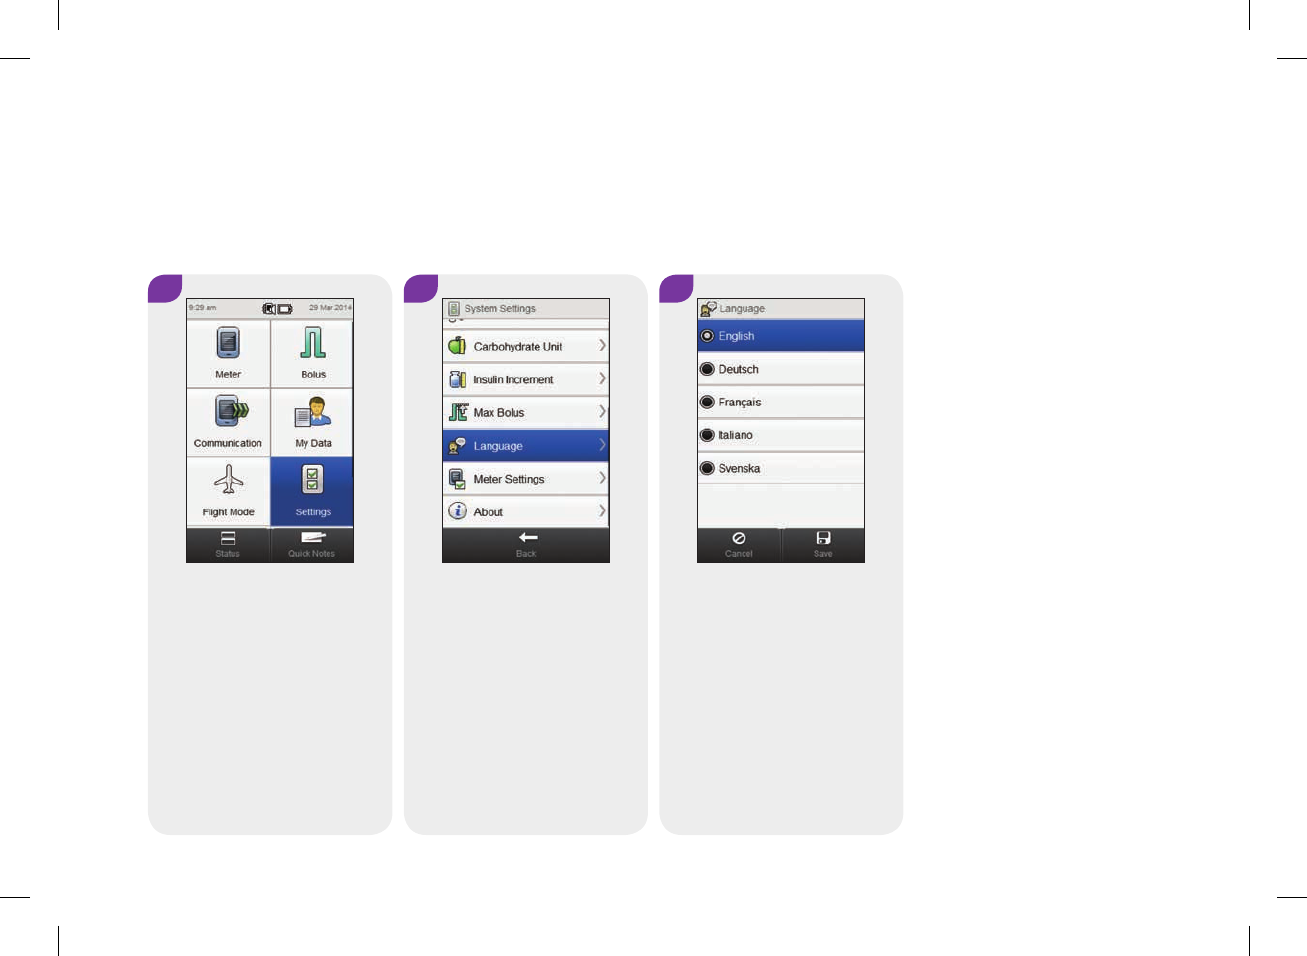
3
Choose the desired language.
Select Save.
8.9 Language
You can select a language for the screen text from a predefined list.
Main Menu > Settings > Language
2
Scroll the screen and select
Language.
1
From the Main Menu, select
Settings.
150
52297_07167776001.indb 150 10/20/14 11:18 AM