Roche Diabetes Care 816 Hand Held Blood Glucose Meter User Manual manual pt 2
Roche Diagnostics Operations, Inc. Hand Held Blood Glucose Meter manual pt 2
Contents
- 1. manual pt 1
- 2. manual pt 2
manual pt 2
1 2
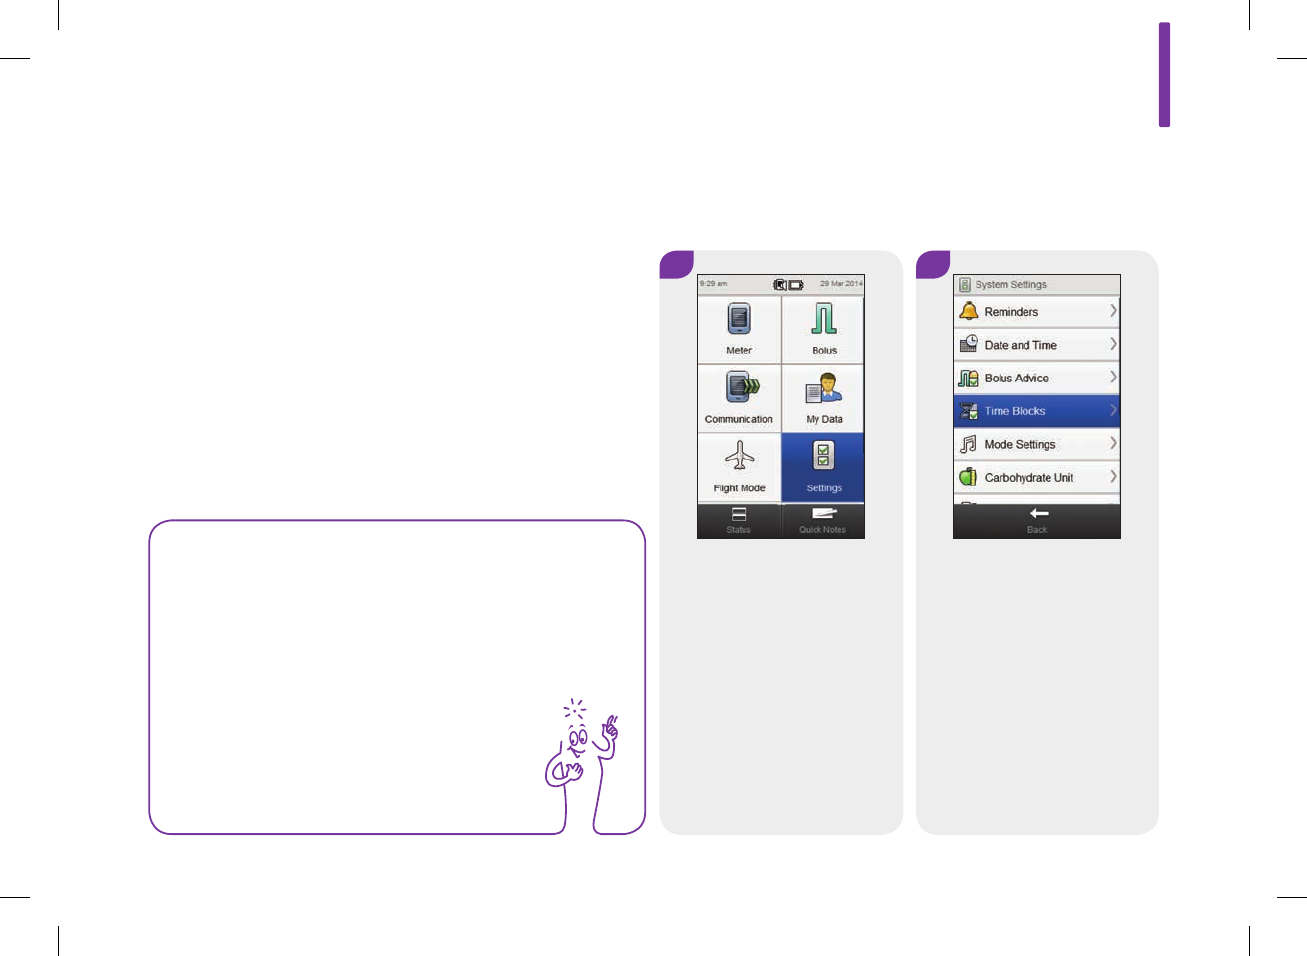
8.10 Time Block Settings
This section is for changing the settings for individual time blocks
when bolus advice is turned off. These time block settings
include:
jStart time
jEnd time
jTarget range
Main Menu > Settings > Time Blocks
NOTE
It is recommended that you discuss possible updates to
your time block settings with your healthcare professional
prior to making changes.
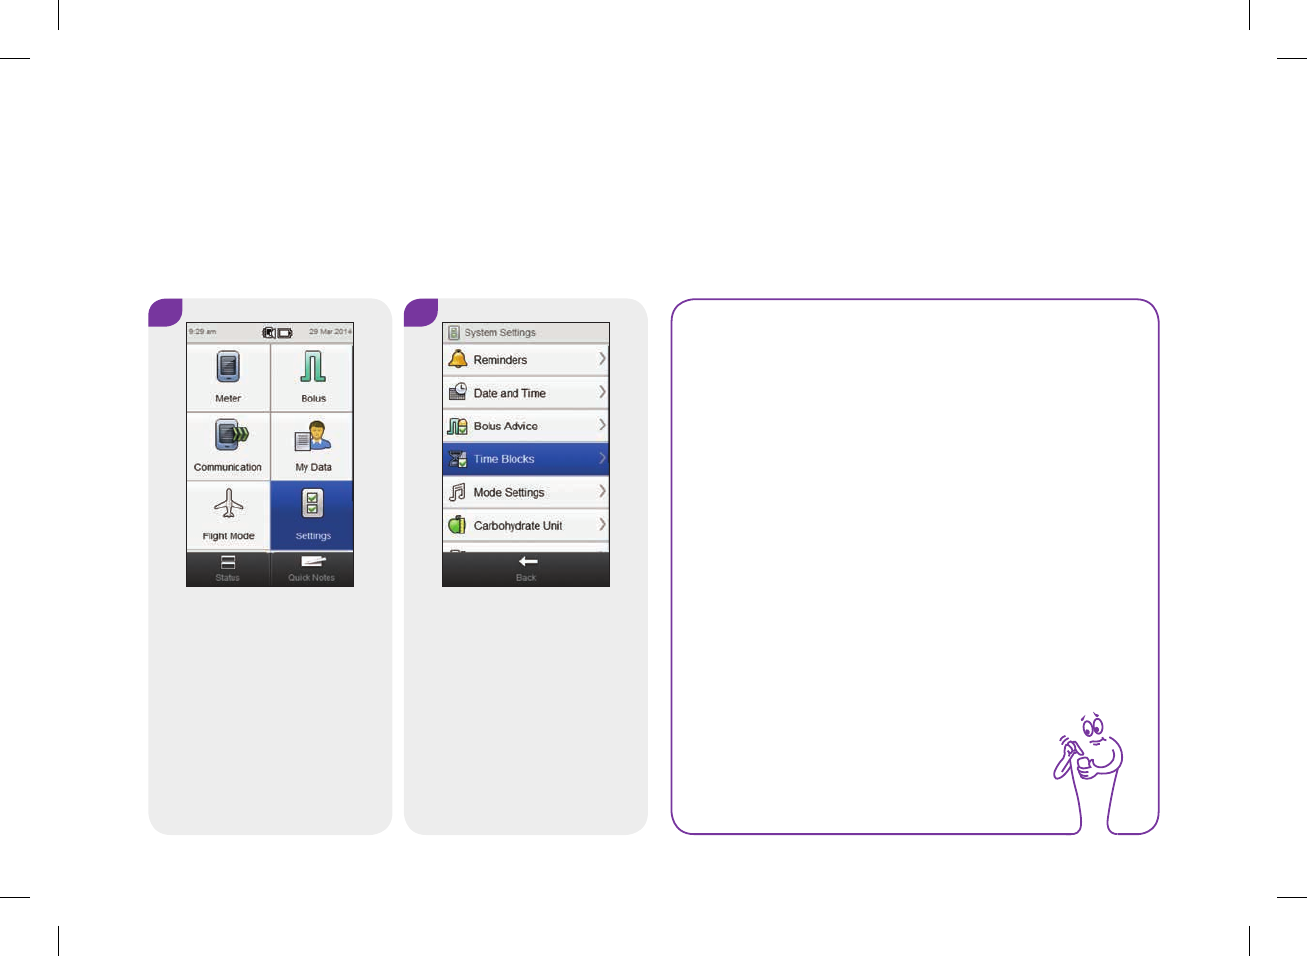
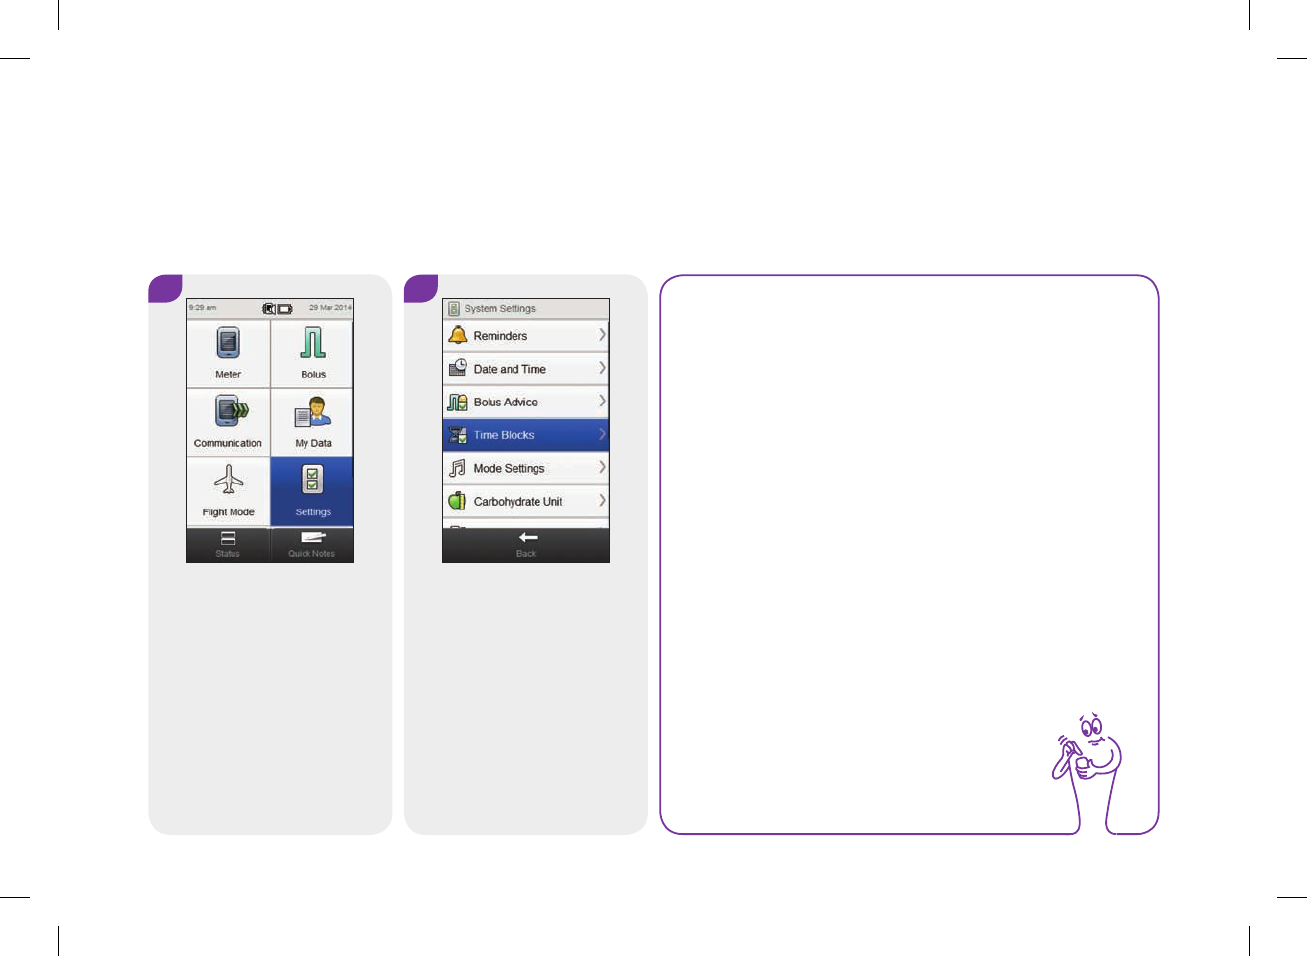
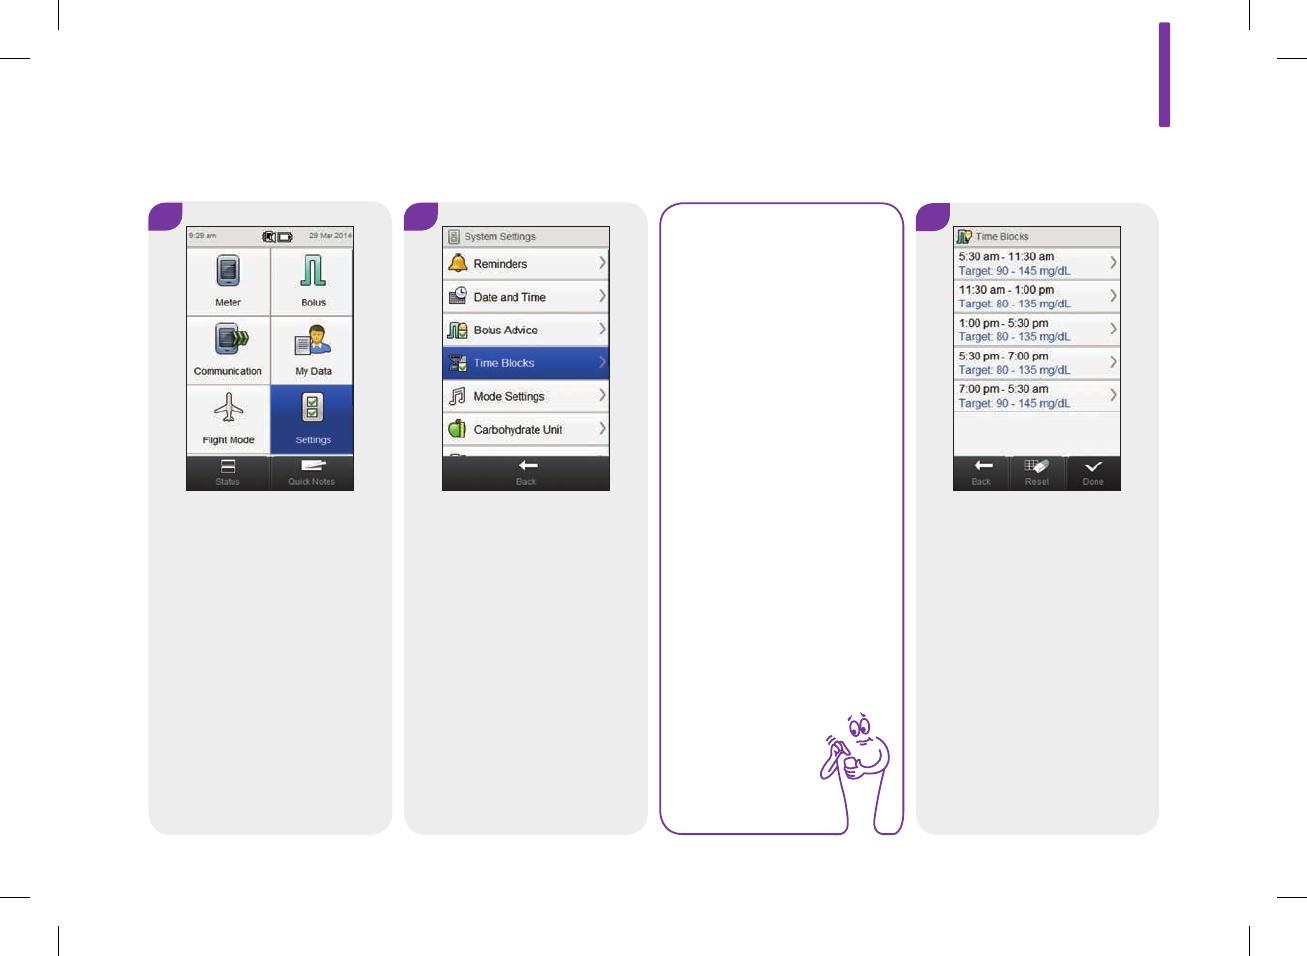
From the Main Menu, select
Settings.
Select Time Blocks.
8
151
52297_07167776001.indb 151 10/20/14 11:18 AM
3
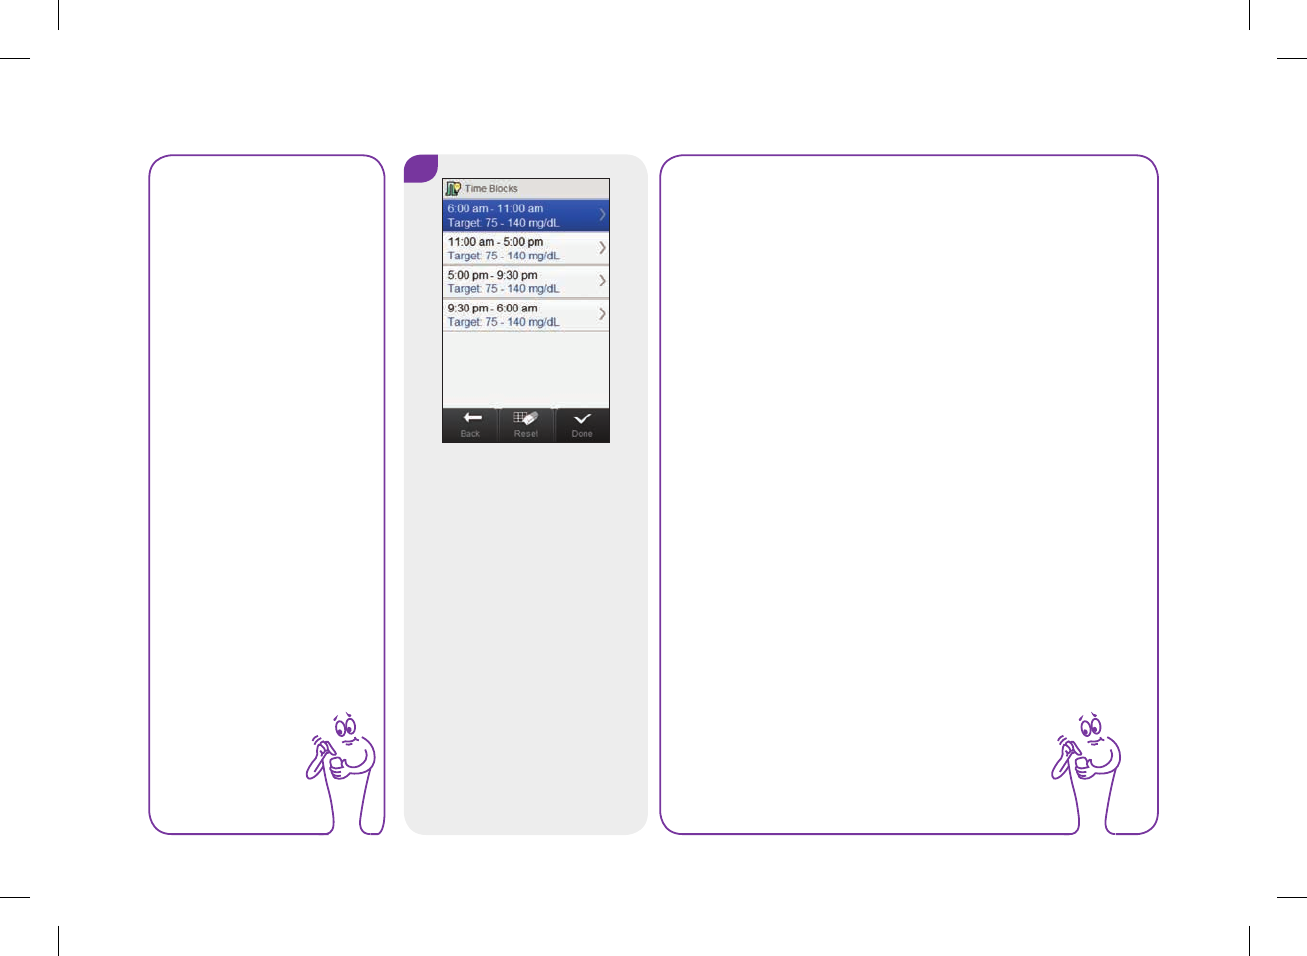
Select a time block to edit.
NOTE
jThe End time of a time block is the same as the Start
time of its following time block. Only an End time
can be changed, which changes the Start time of the
following time block.
jChanging the End time of the last time block does
not change the Start time of the first time block, but
it creates a new time block. See the Adding a Time
Block section in this chapter.
jTo change the Start time of the first time block, the
time blocks must be reset. See the Resetting All
Time Blocks section in this chapter.
jIf the End time of a time block is decreased until it is
the same as its Start time, the time block is deleted.
See the Deleting Time Blocks section in this chapter.
NOTE
Time Blocks cannot be
selected if it is shaded.
The shading means
bolus advice is turned
on. If Time Blocks is
shaded, go to the
Bolus Advice: Time
Block Settings
section in the
Changing Bolus
Advice Settings
chapter in this user’s
manual.
152
52297_07167776001.indb 152 10/20/14 11:18 AM
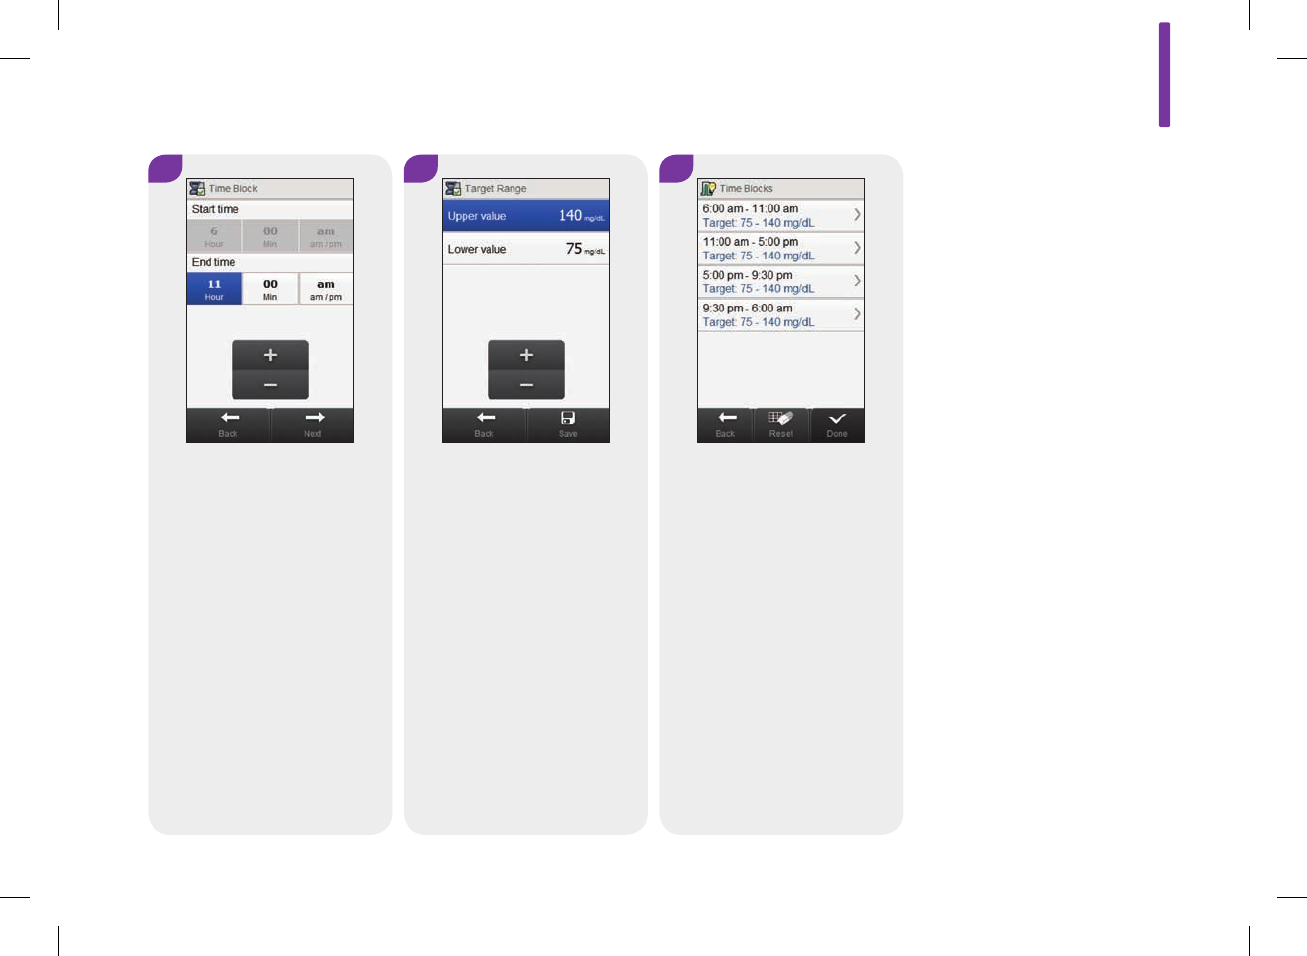
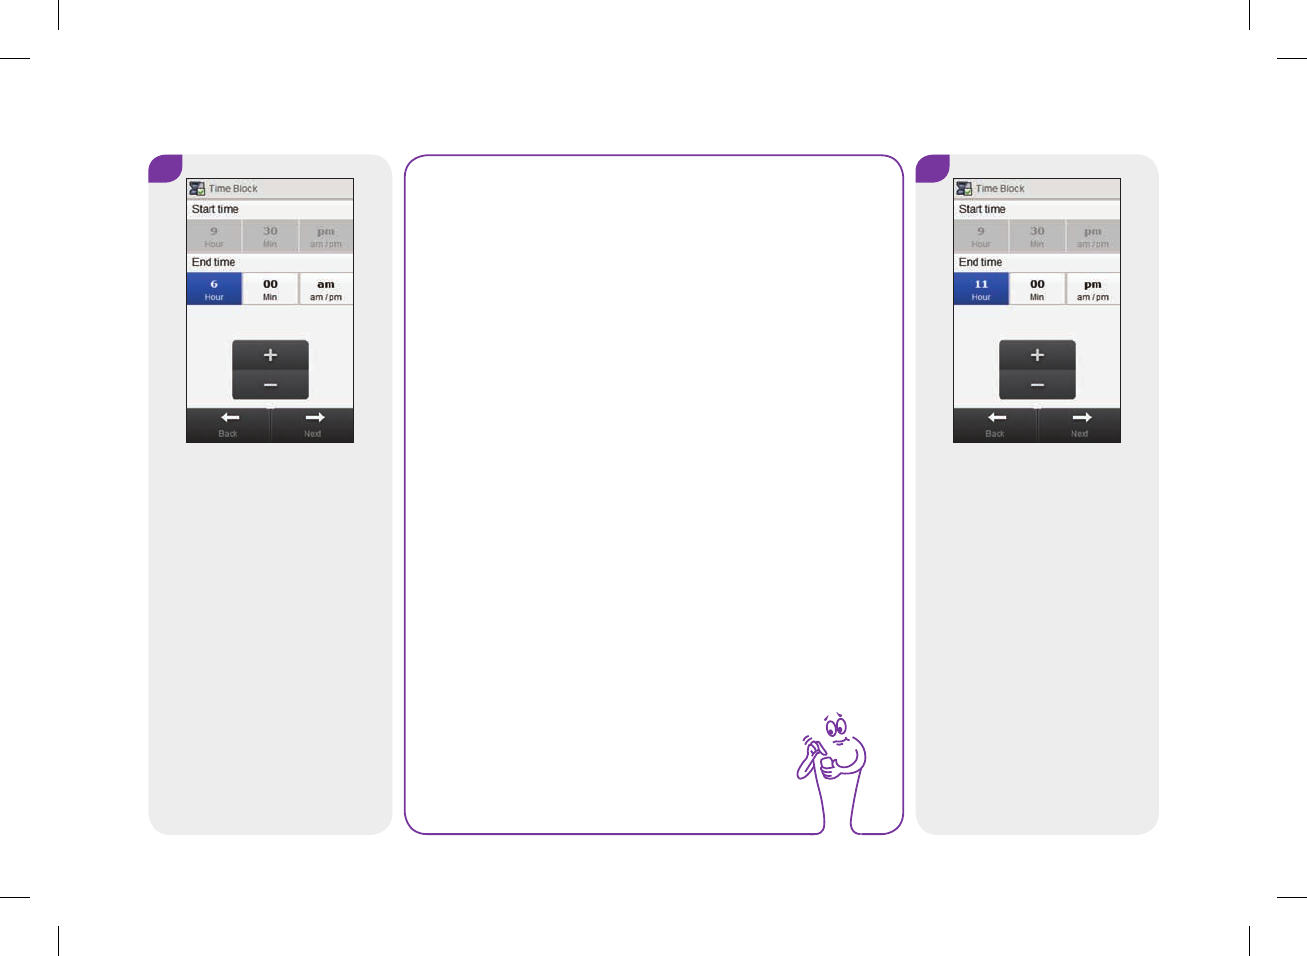
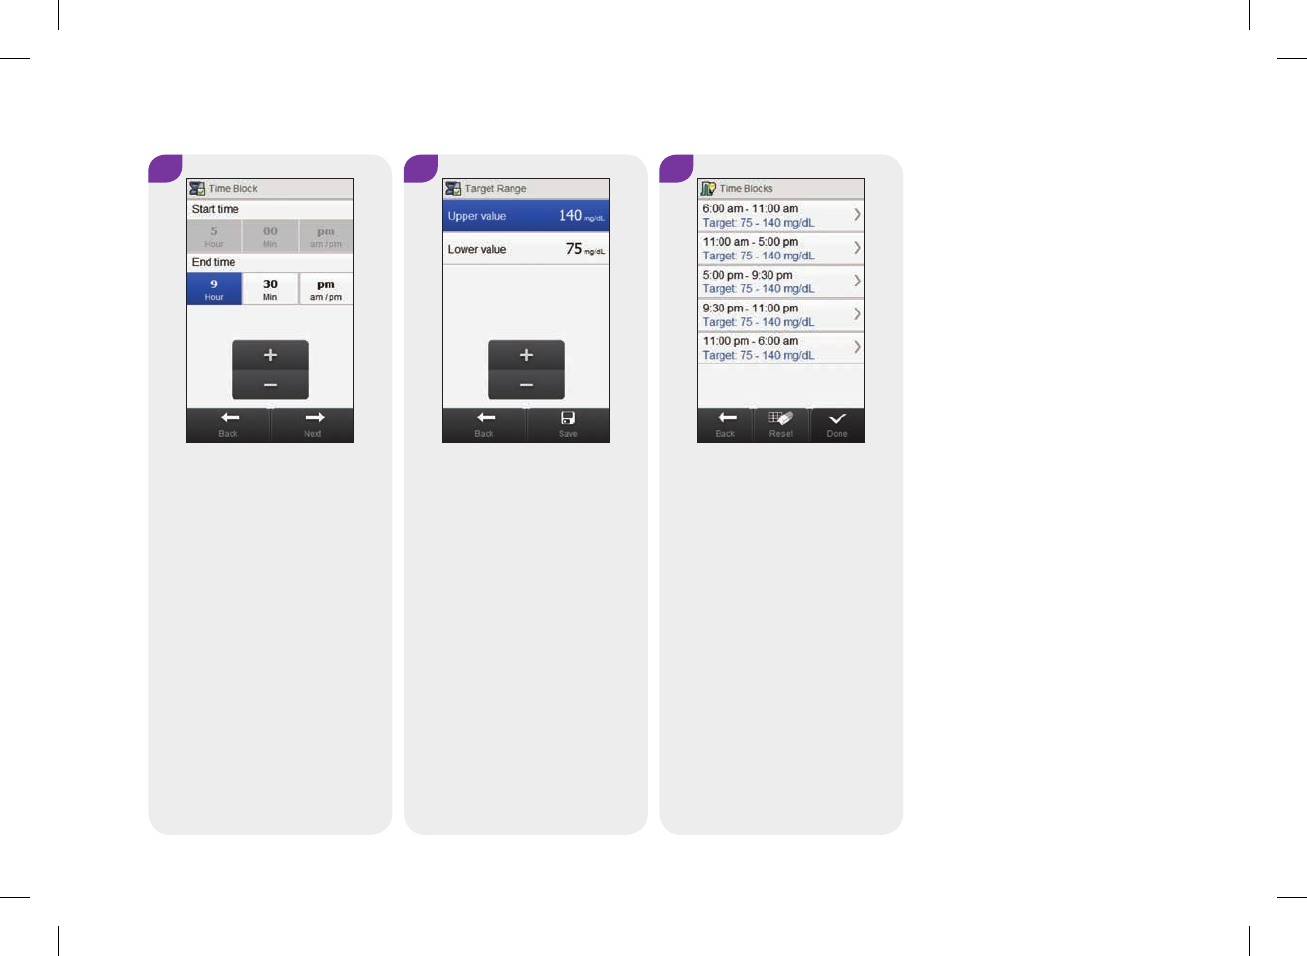
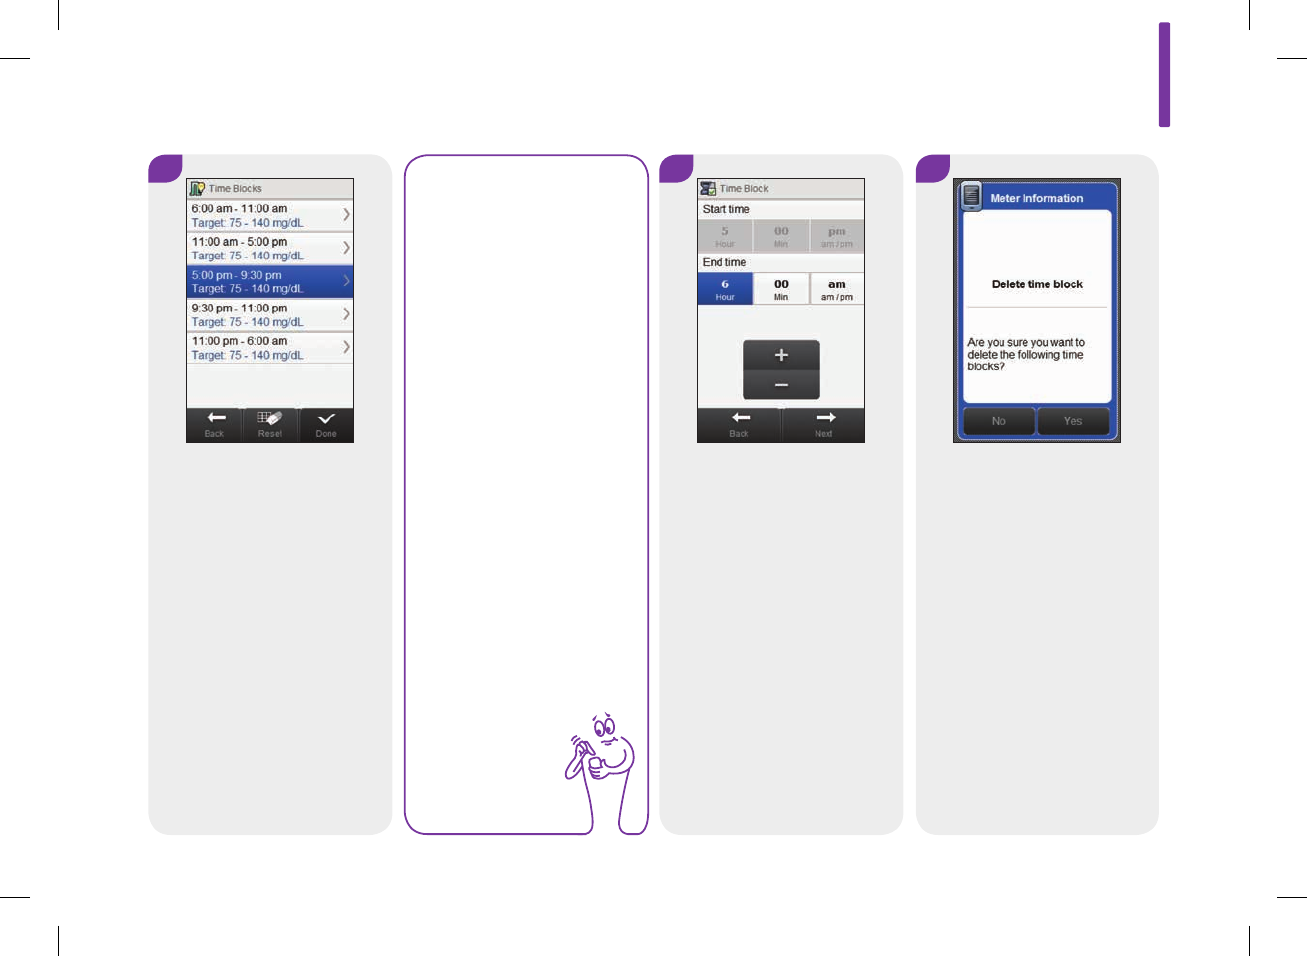
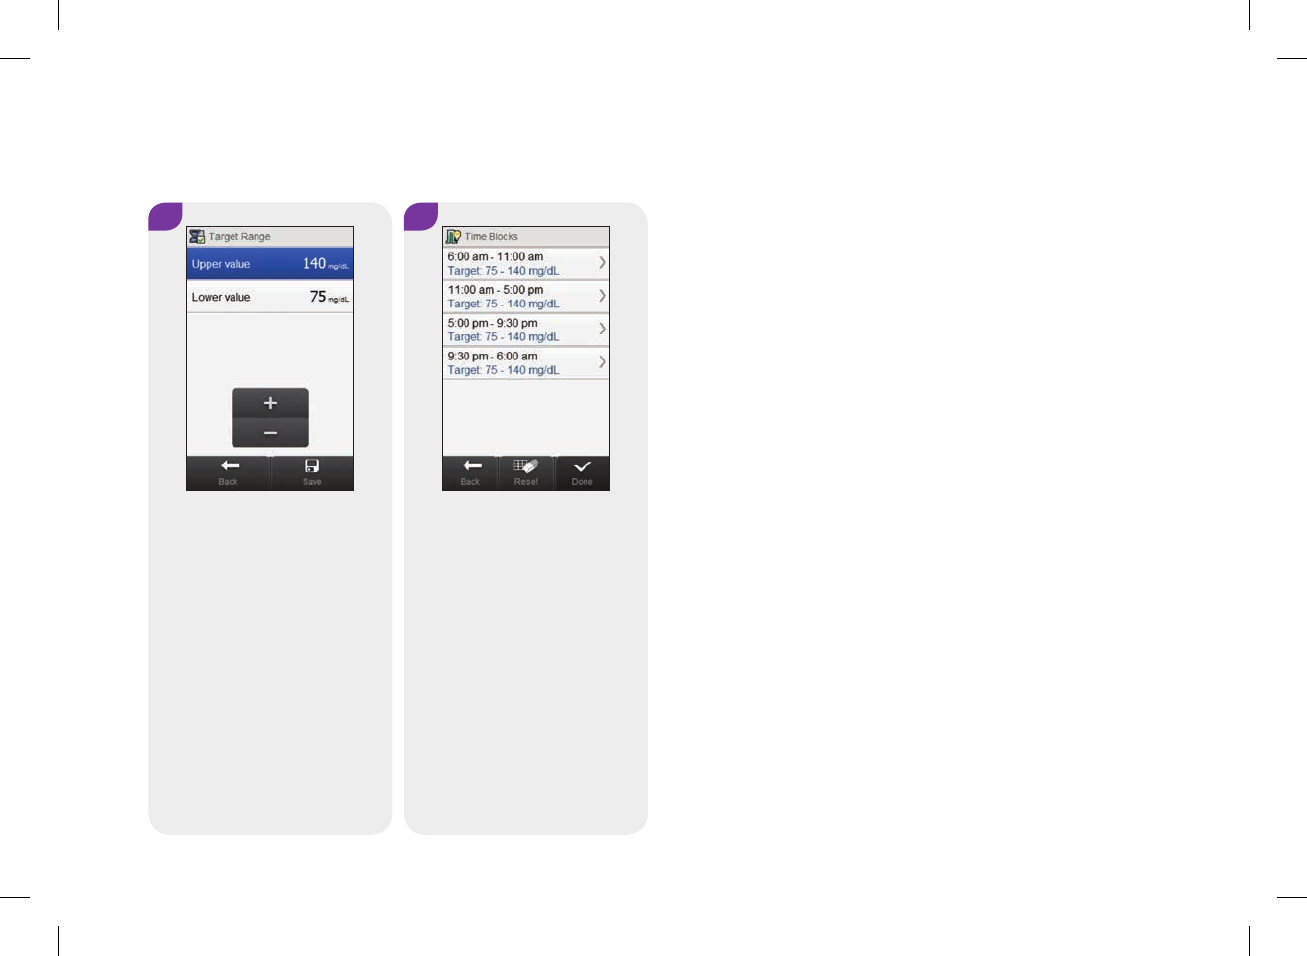
4
Set the End time. Select Next.
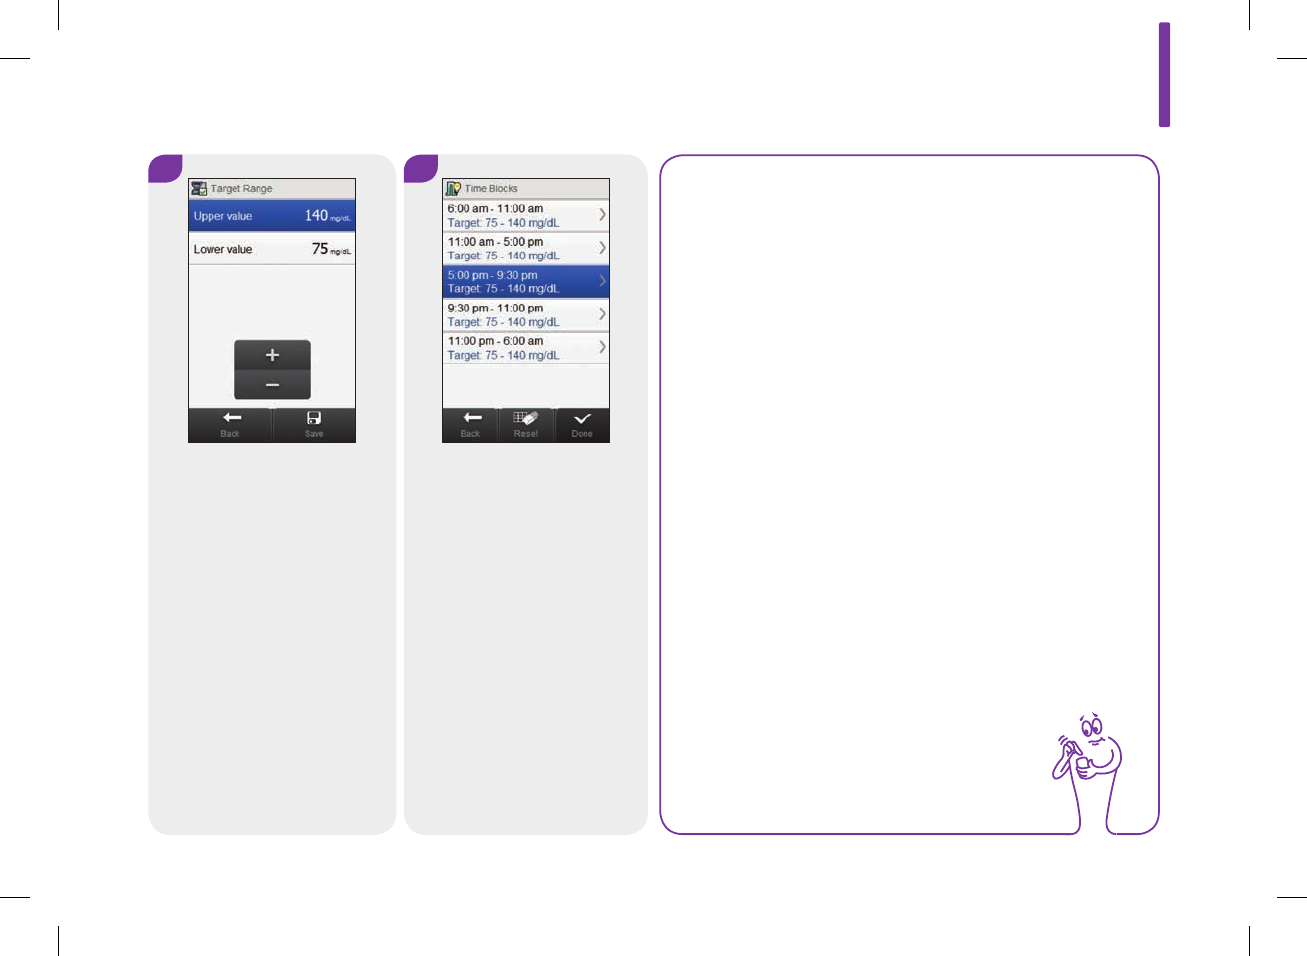
6
Edit any other time block
(reference Step3). Once all
time blocks are complete,
select Done.
5
Set the Upper value and
Lower value. Select Save.
8
153
52297_07167776001.indb 153 10/20/14 11:18 AM

8.11 Adding a Time Block
This section is for adding a time block if bolus advice is turned
off.
Before adding a time block, have the following information
available:
jThe number of time blocks you need with the start and end
times for each
jThe blood glucose target range for each time block
To add a time block, decrease the last time block’s end time.
After the time block is created, it may be necessary to change the
start time, end time, and other information for each time block
until all of the time blocks are set up the way you want them.
NOTE
It is recommended that you discuss possible updates to
your time block settings with your healthcare professional
prior to making changes.
154
52297_07167776001.indb 154 10/20/14 11:18 AM
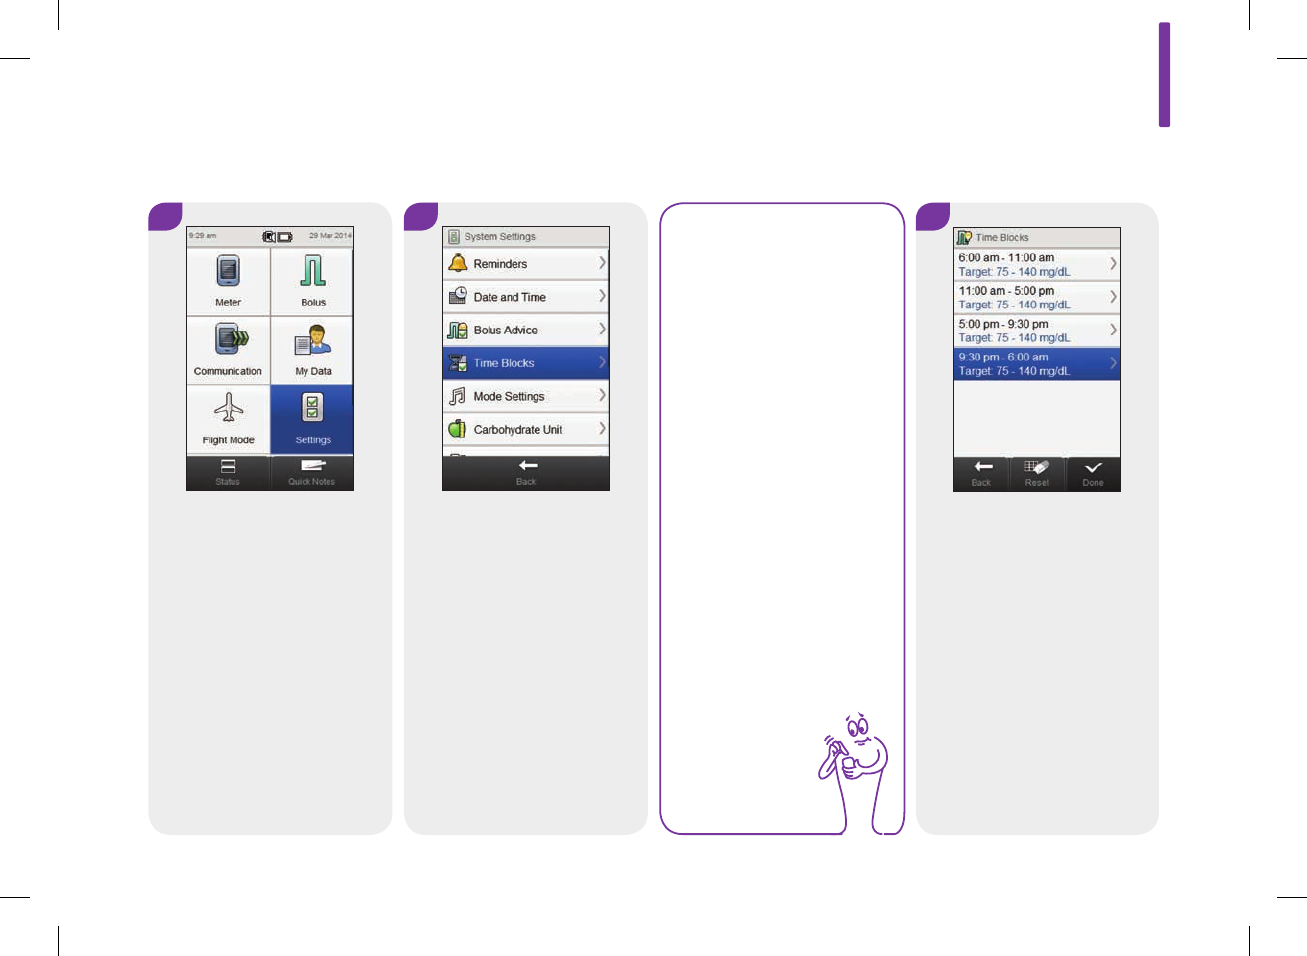
3
Select the last time block.
NOTE
Time Blocks cannot be
selected if it is shaded.
The shading means
bolus advice is turned
on. If Time Blocks is
shaded, go to the Bolus
Advice: Adding a Time
Block section in the
Changing Bolus
Advice Settings
chapter in this user’s
manual.
2
Select Time Blocks.
1
From the Main Menu, select
Settings.
Main Menu > Settings > Time Blocks
8
155
52297_07167776001.indb 155 10/20/14 11:18 AM
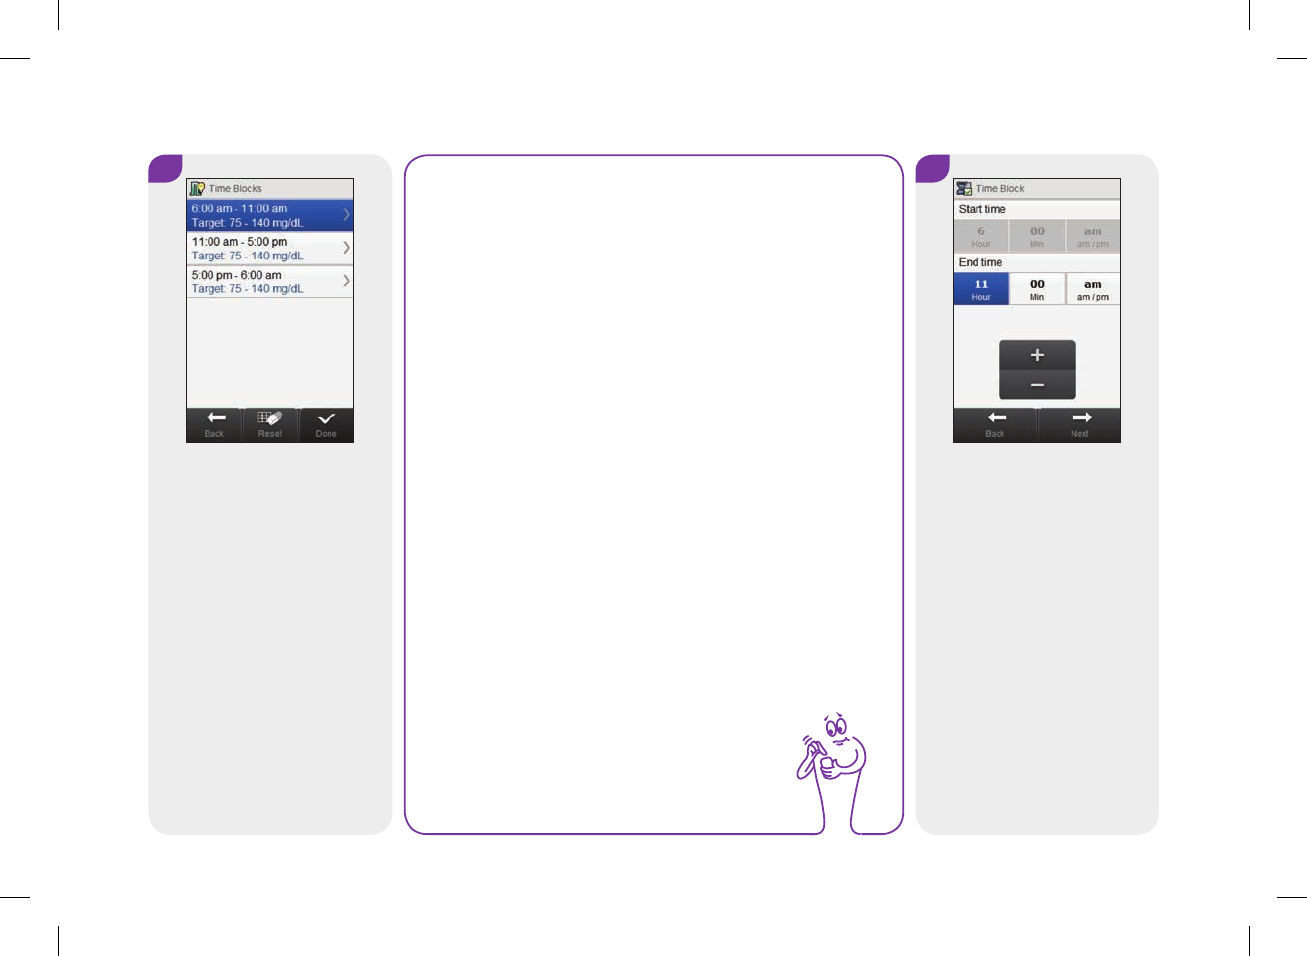
5
Select Next.
4
Decrease the End time.
NOTE
jDecrease the End time for the last time block by any
amount in order to create a new time block. This
creates a time block by splitting the last time block
into 2 time blocks.
jDo not decrease the End time until it equals the Start
time because the meter deletes the time block when
you select Next.
jOnce the new time block is created, you can change
the Start time and End time for all appropriate time
blocks.
jFor this example, a time block is added with a Start
time of 9:30 pm and an End time of 11:00 pm.
156
52297_07167776001.indb 156 10/20/14 11:18 AM
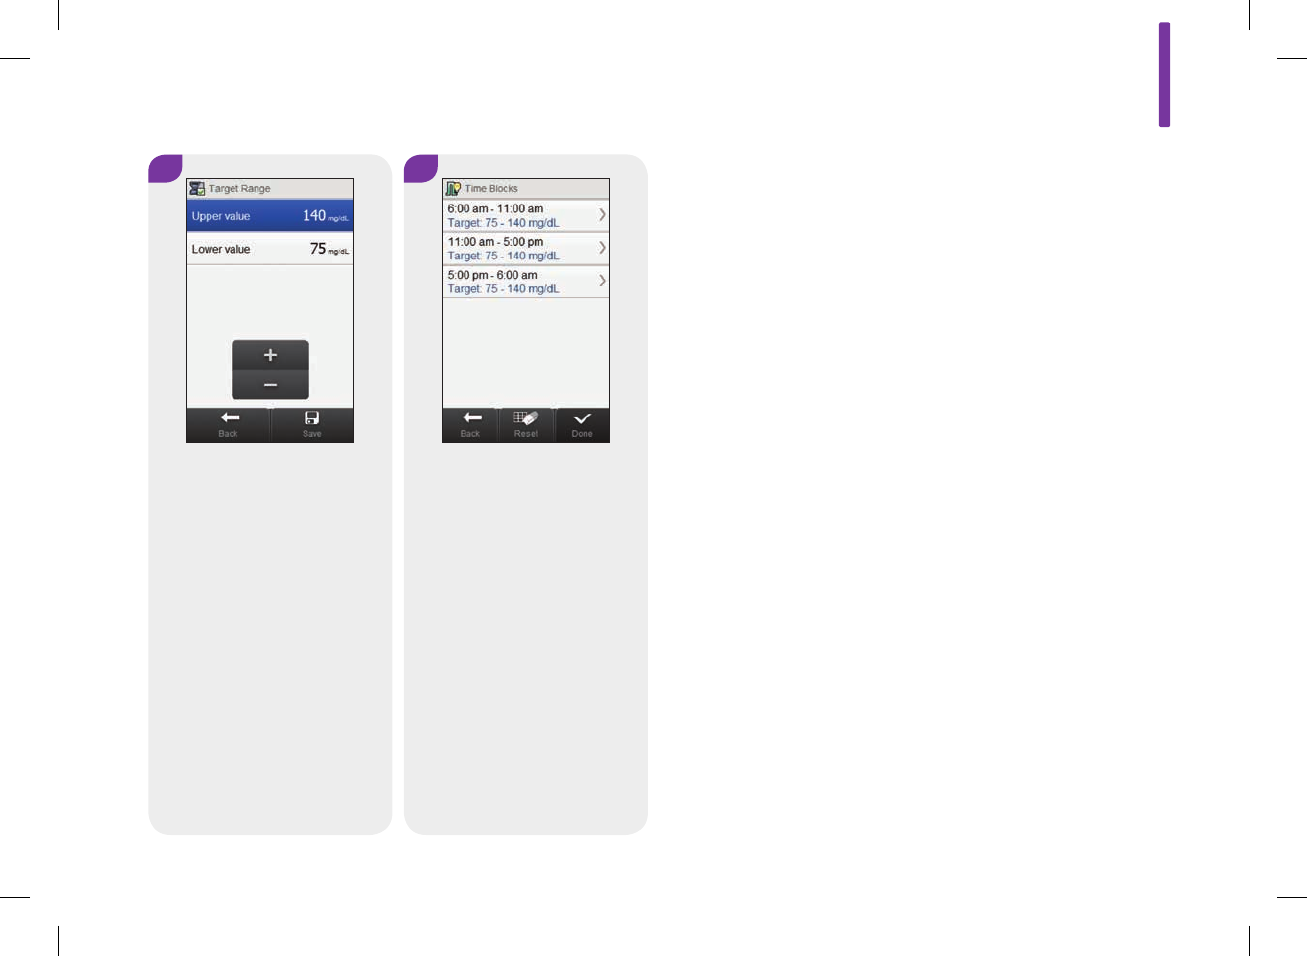
6 7
Set the Upper value and
Lower value for the new time
block. Select Save.
It may be necessary to change
the start times, end times,
and settings of other time
blocks. Select a time block to
edit and continue to Step8. If
you do not need to make any
changes, select Done and the
addition of the time block is
complete.
NOTE
jThe End time of a time block is the same as the Start
time of its following time block. Only an End time
can be changed, which changes the Start time of the
following time block.
jTo change the Start time of the first time block, the
time blocks must be reset. See the Resetting All
Time Blocks section in this chapter.
jIf the End time of a time block is decreased until it is
the same as its Start time, the time block is deleted.
See the Deleting Time Blocks section in this chapter.
8
157
52297_07167776001.indb 157 10/20/14 11:18 AM
8 10
Set the End time. Select Next. Edit any other time block
(reference Step7). Once all
time blocks are complete,
select Done.
9
Set the Upper value and
Lower value. Select Save.
158
52297_07167776001.indb 158 10/20/14 11:18 AM

8.12 Deleting Time Blocks
This section is for deleting time blocks if bolus advice is turned
off. There are 2 different methods for deleting time blocks. The
first method deletes one or more time blocks by combining time
blocks. The alternative method deletes a single time block.
Before deleting time blocks, have the following information
available:
jThe number of time blocks you need with the start and end
times for each
jThe blood glucose target range for each time block
After time blocks are deleted, it may be necessary to change the
start times, end times, and other information for the remaining
time blocks until all of the time blocks are set up the way you
want them.
NOTE
It is recommended that you discuss possible updates to
your time block settings with your healthcare professional
prior to making changes.
8
159
52297_07167776001.indb 159 10/20/14 11:18 AM
8.12.1 Deleting One or More Time Blocks
This method of deleting one or more time blocks is accomplished
by combining time blocks.
Main Menu > Settings > Time Blocks
1 2
From the Main Menu, select
Settings.
Select Time Blocks.
NOTE
Time Blocks cannot be selected if it is shaded. The
shading means bolus advice is turned on. If Time Blocks
is shaded, go to the Bolus Advice: Deleting Time
Blocks section in the Changing Bolus Advice Settings
chapter in this user’s manual.
160
52297_07167776001.indb 160 10/20/14 11:18 AM
3
Select the first time block that
is to be combined.
NOTE
jFor this example,
the last 3 time
blocks are
combined into one
time block.
jThe target range
values in this first
time block selected
are used in the
resulting time
block.
4
Increase the End time until it
equals the End time of the last
time block to be deleted.
Select Next.
5
Select Yes.
8
161
52297_07167776001.indb 161 10/20/14 11:18 AM
6
It may be necessary to change
the start times, end times,
and other information for the
remaining time blocks. Select
a time block to edit and
continue to Step7. If you do
not need to make any
changes, select Done.
NOTE
jThe End time of a time block is the same as the Start
time of its following time block. Only an End time
can be changed, which changes the Start time of the
following time block.
jChanging the End time of the last time block does
not change the Start time of the first time block, but
it creates a new time block. See the Adding a Time
Block section in this chapter.
jTo change the Start time of the first time block, the
time blocks must be reset. See the Resetting All
Time Blocks section in this chapter.
7
Set the End time. Select Next.
162
52297_07167776001.indb 162 10/20/14 11:18 AM
8 9
Set the Upper value and
Lower value. Select Save.
Edit any other time block
(reference Step6). Once all
time blocks are complete,
select Done.
8
163
52297_07167776001.indb 163 10/20/14 11:18 AM
8.12.2 Deleting a Single Time Block
To delete a time block, decrease the time block’s end time until it equals its start time.
Main Menu > Settings > Time Blocks
NOTE
Time Blocks cannot be selected if it is shaded. The
shading means bolus advice is turned on. If Time Blocks is
shaded, go to the Bolus Advice: Deleting Time Blocks
section in the Changing Bolus Advice Settings chapter
in this user’s manual.
1
From the Main Menu, select
Settings.
2
Select Time Blocks.
164
52297_07167776001.indb 164 10/20/14 11:18 AM
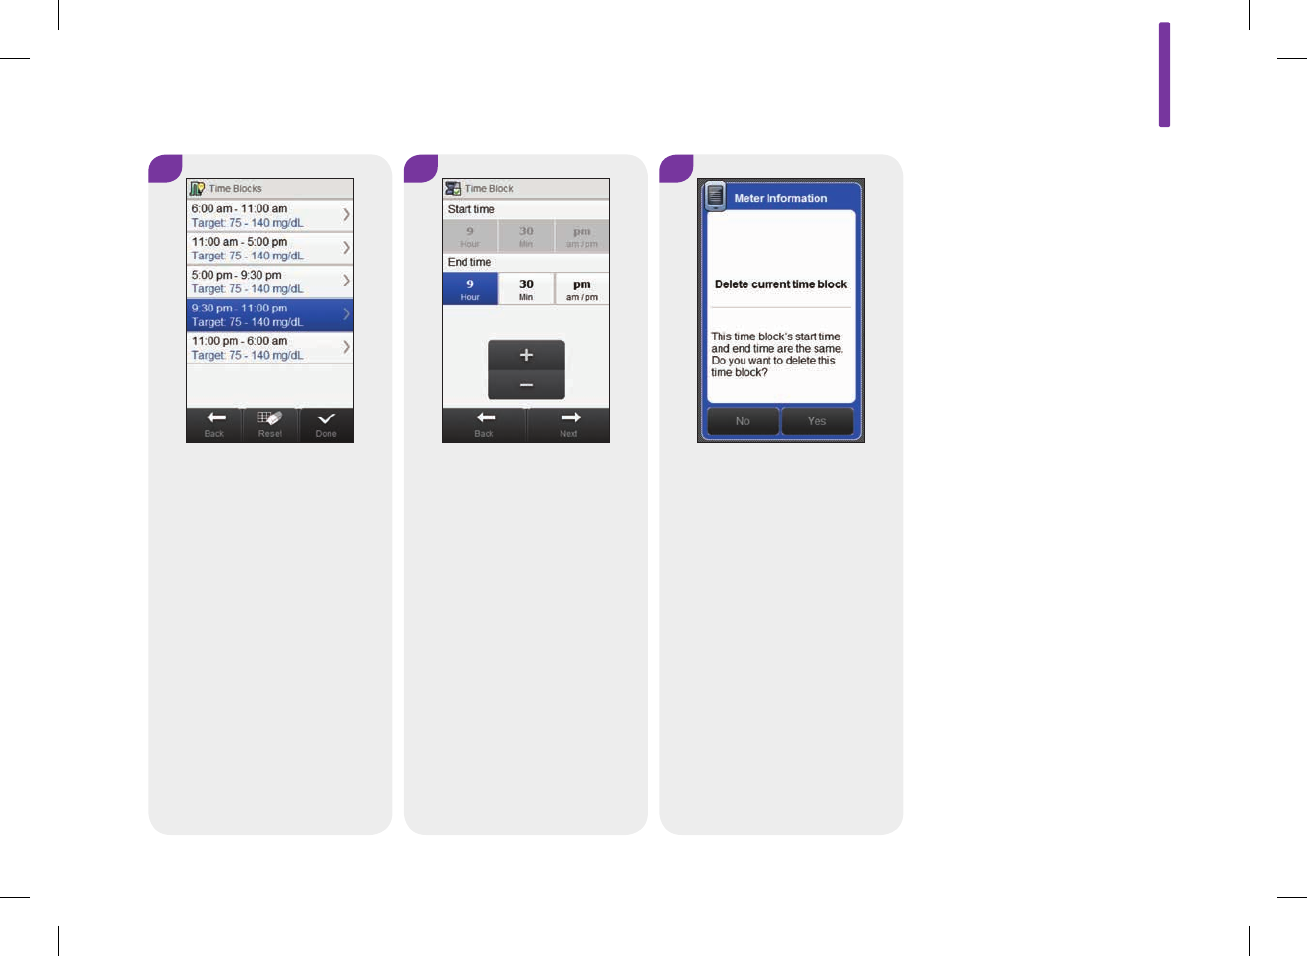
5
Select Yes.
4
Decrease the End time until it
equals the Start time. Select
Next.
3
Select the time block to delete.
8
165
52297_07167776001.indb 165 10/20/14 11:18 AM
6
It may be necessary to change
the start times, end times,
and other information for the
remaining time blocks. Select
a time block to edit and
continue to Step7. If you do
not need to make any
changes, select Done.
NOTE
jThe End time of a time block is the same as the Start
time of its following time block. Only an End time
can be changed, which changes the Start time of the
following time block.
jChanging the End time of the last time block does
not change the Start time of the first time block, but
it creates a new time block. See the Adding a Time
Block section in this chapter.
jTo change the Start time of the first time block, the
time blocks must be reset. See the Resetting All
Time Blocks section in this chapter.
166
52297_07167776001.indb 166 10/20/14 11:18 AM

7
Set the End time. Select Next.
8
Set the Upper value and
Lower value. Select Save.
9
Edit any other time block
(reference Step6). Once all
time blocks are complete,
select Done.
8
167
52297_07167776001.indb 167 10/20/14 11:18 AM

8.13 Resetting All Time Blocks
This section is for resetting and re‑entering the settings for all of
the time blocks if bolus advice is turned off. One reason for
resetting the time blocks is to change the start time of the first time
block.
Before you reset the time blocks, have the following information
available:
jThe number of time blocks you need with the start and end times
for each
jThe blood glucose target range for each time block
NOTE
It is recommended that you discuss possible updates to
your time block settings with your healthcare professional
prior to making changes.
168
52297_07167776001.indb 168 10/20/14 11:18 AM
Main Menu > Settings > Time Blocks
1
From the Main Menu, select
Settings.
3
Select Reset.
2
Select Time Blocks.
NOTE
Time Blocks cannot be
selected if it is shaded.
The shading means
bolus advice is turned
on. If Time Blocks is
shaded, go to the Bolus
Advice: Resetting All
Time Blocks section in
the Changing Bolus
Advice Settings
chapter in this user’s
manual.
8
169
52297_07167776001.indb 169 10/20/14 11:18 AM
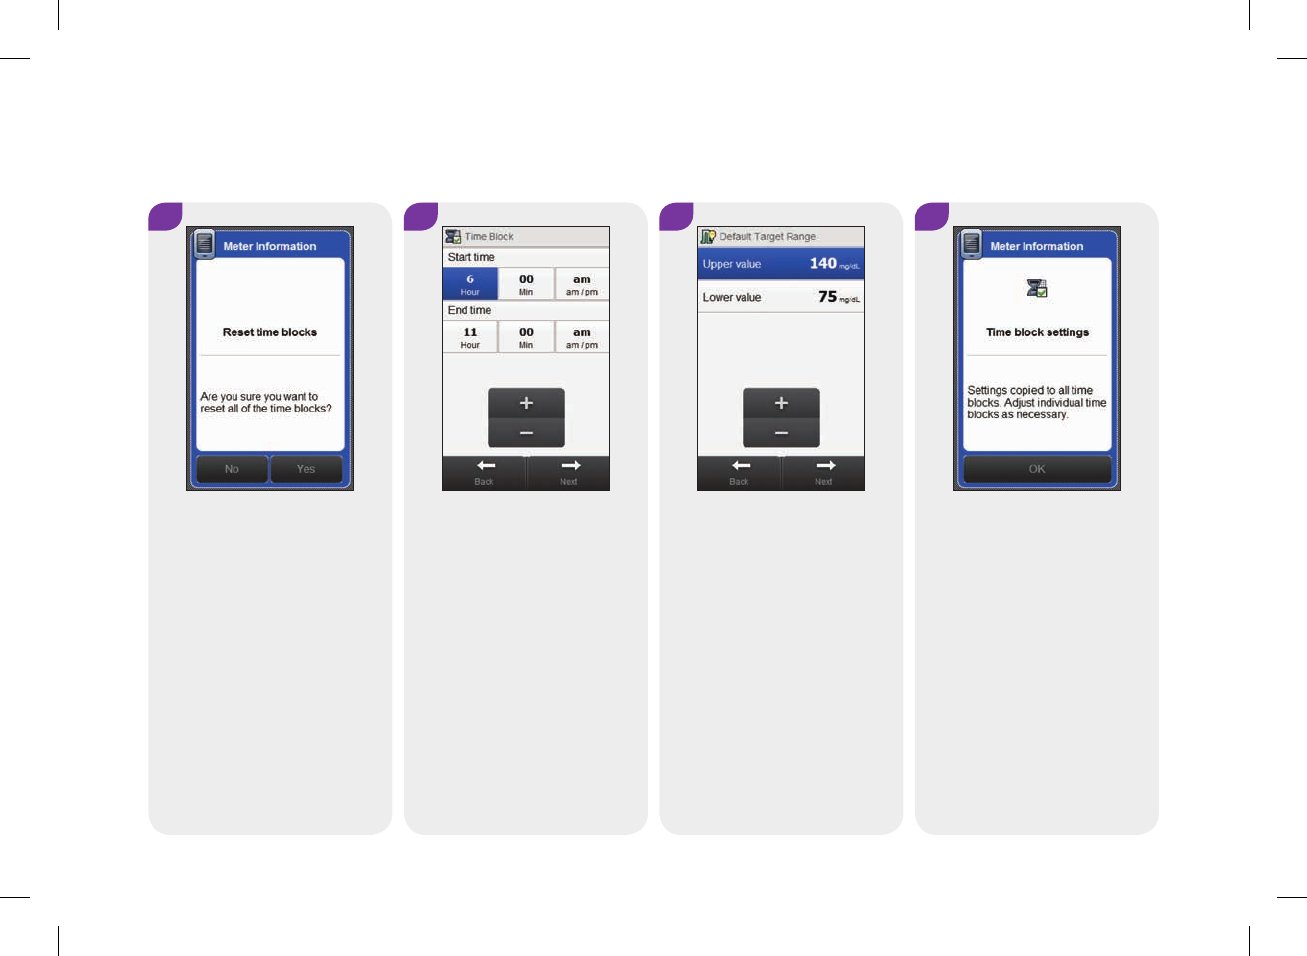
5
Set the Start time and End
time for the first time block.
Select Next.
6
Set the default Upper value
and Lower value. Select Next.
7
Select OK.
4
Select Yes.
170
52297_07167776001.indb 170 10/20/14 11:18 AM

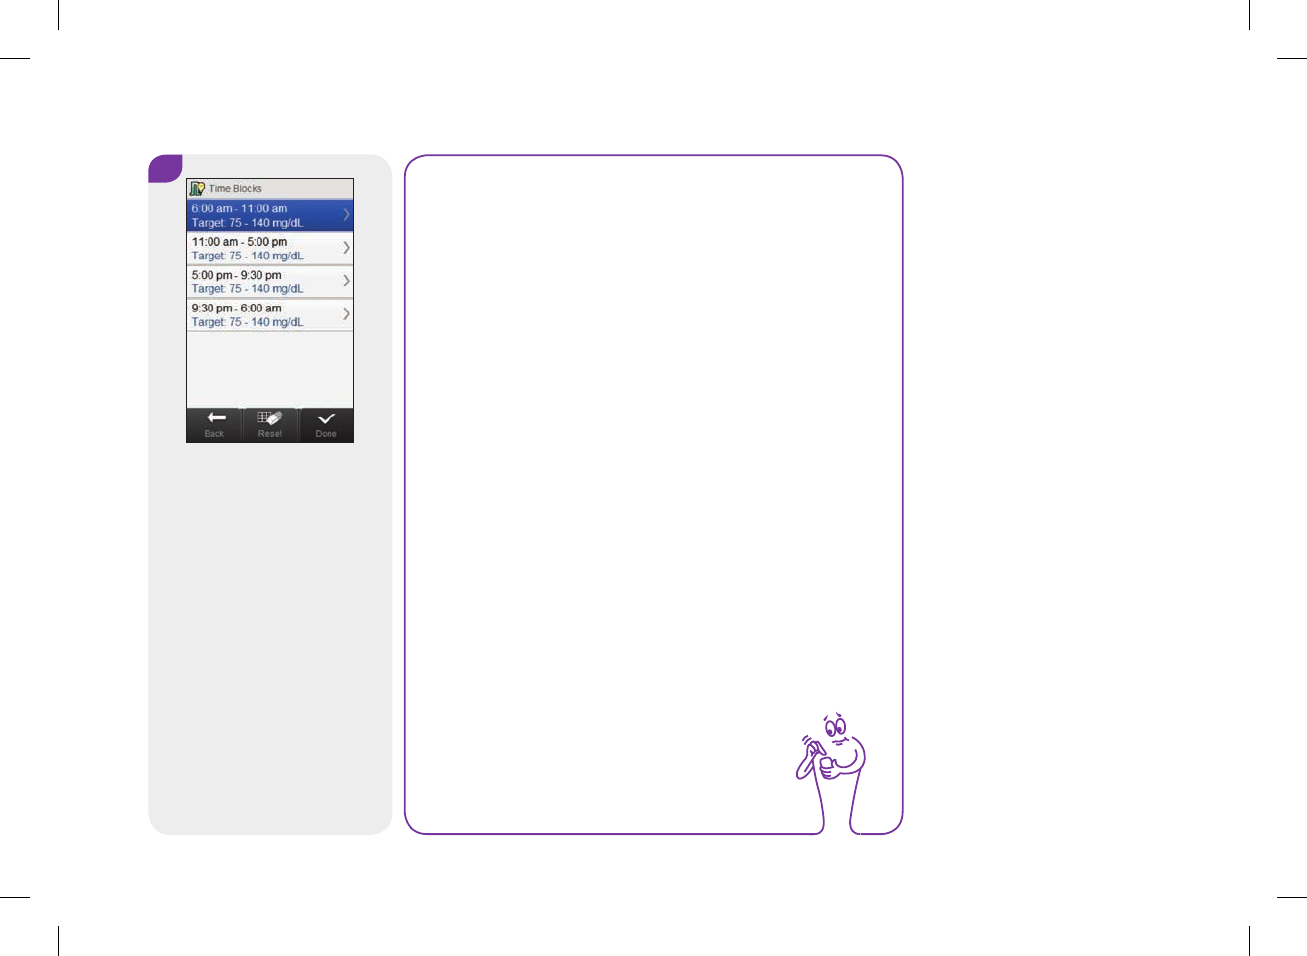
8
Select a time block to edit and
continue to Step9. If you do
not need to make any
changes, select Done and the
resetting of the time blocks is
complete.
9
Set the End time. Select Next.
NOTE
jThe End time of a time block is the same as the Start
time of its following time block. Only an End time
can be changed, which changes the Start time of the
following time block.
jChanging the End time of the last time block does
not change the Start time of the first time block, but
it creates a new time block. See the Adding a Time
Block section in this chapter.
jIf the End time of a time block is decreased until it is
the same as its Start time, the time block is deleted.
See the Deleting Time Blocks section in this chapter.
8
171
52297_07167776001.indb 171 10/20/14 11:18 AM
11
Edit any other time block
(reference Step8). Once all
time blocks are complete,
select Done.
10
Set the Upper value and
Lower value. Select Save.
172
52297_07167776001.indb 172 10/20/14 11:18 AM
8.14 Warning Limits: Hypo, Hyper
You can set blood glucose warning limits for hypoglycemia (hypo)
or hyperglycemia (hyper) conditions. The meter displays the
appropriate warning if your blood glucose result is below the hypo
warning limit or above the hyper warning limit.
w WARNING
Consult with your healthcare professional before changing your
hypo and hyper warning limits.
8
173
52297_07167776001.indb 173 10/20/14 11:18 AM
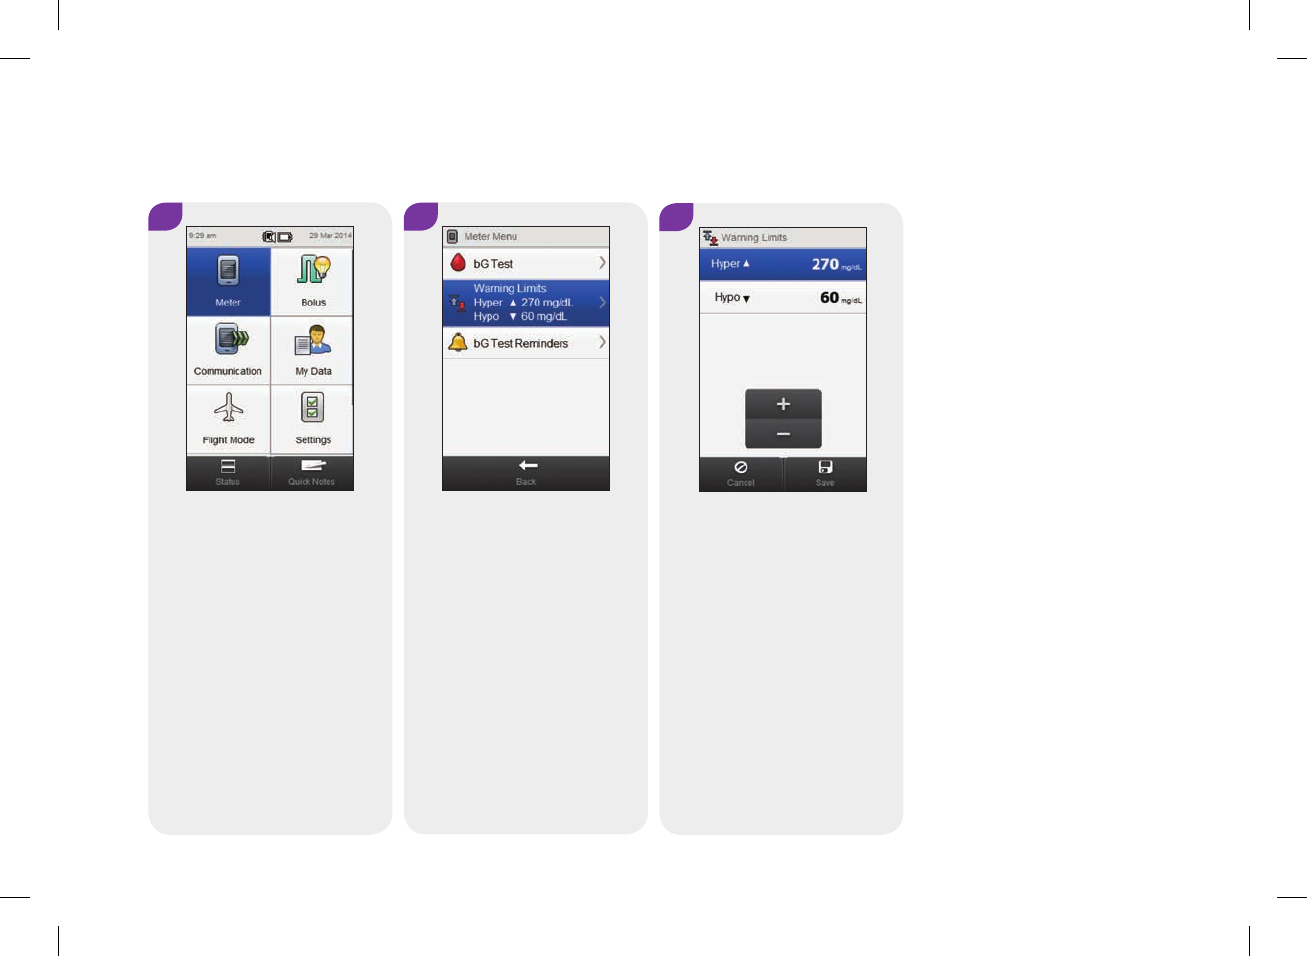
23
Select Warning Limits. Set the Hyper limit and the
Hypo limit. Select Save.
Main Menu > Meter > Warning Limits
1
Select Meter on either the
Main Menu or Status screen.
174
52297_07167776001.indb 174 10/20/14 11:18 AM
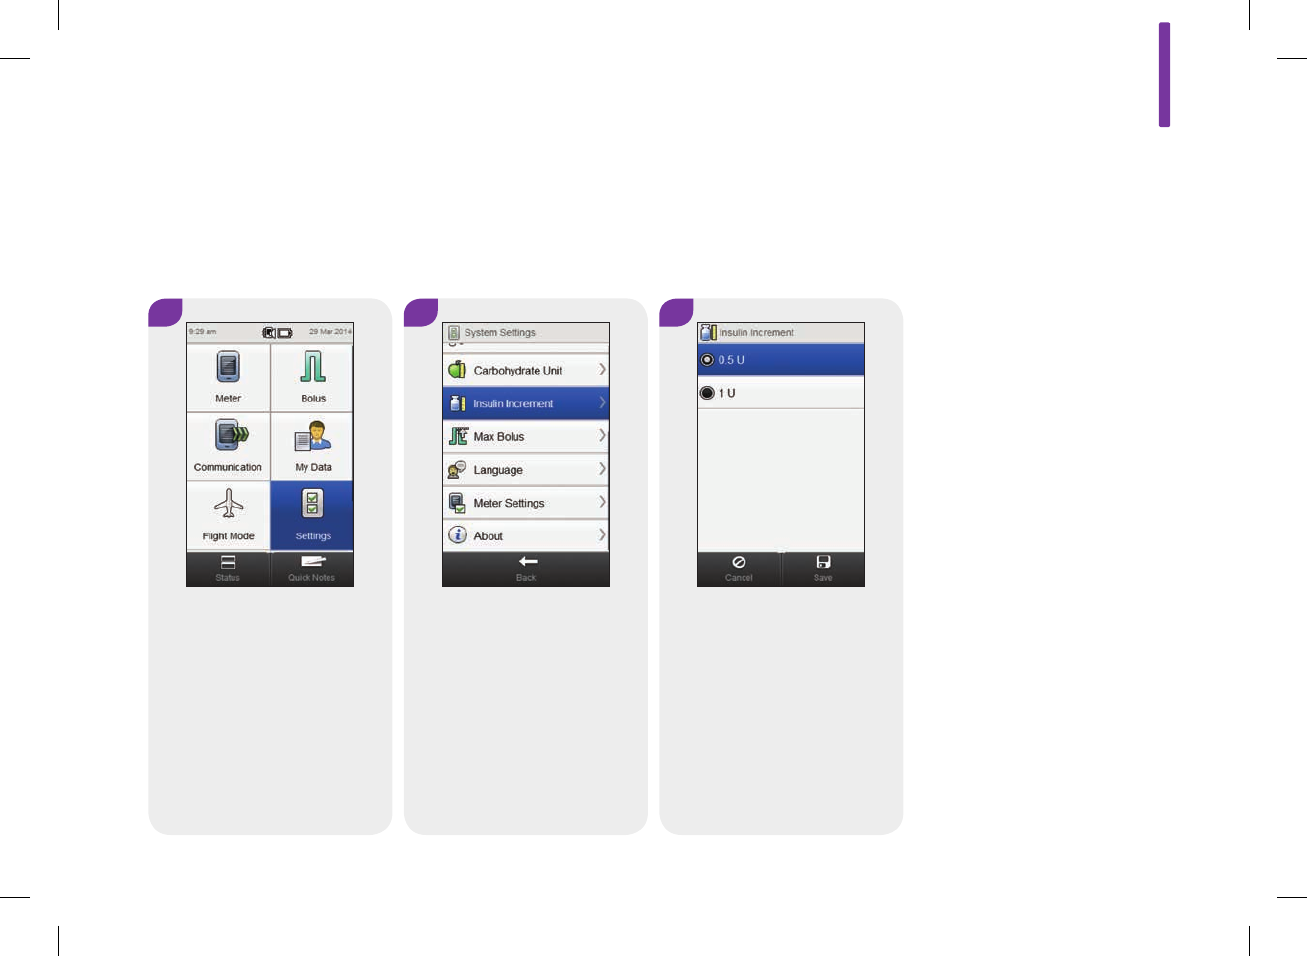
3
Choose the desired Insulin
Increment. Select Save.
8.15 Insulin Increment
Insulin increment is the amount by which your insulin dose is adjusted when programming a bolus or
when entering a manual Logbook entry. The insulin increment can be set to either 0.5 or 1U.
Main Menu > Settings > Insulin Increment
1 2
From the Main Menu, select
Settings.
Scroll the screen and select
Insulin Increment.
8
175
52297_07167776001.indb 175 10/20/14 11:18 AM
8.16 Max Bolus Amount
Max bolus serves as a safety measure against unintended large
boluses. It is a meter setting that specifies a maximum amount of
insulin that can be delivered in any single bolus. A bolus that is
larger than the max bolus amount requires an additional
confirmation. The max bolus can be set between 0 and 25U in
increments of 1U or 0.5U (per the insulin increment value).
w WARNING
Consult with your healthcare professional before changing your
max bolus amount.
176
52297_07167776001.indb 176 10/20/14 11:18 AM

Main Menu > Settings > Max Bolus
1
From the Main Menu, select
Settings.
32
Set the Max Bolus amount.
Select Save.
Scroll the screen and select
Max Bolus.
8
177
52297_07167776001.indb 177 10/20/14 11:18 AM

1 32
From the Main Menu, select
Settings.
Choose the desired
Carbohydrate Unit. Select
Save.
Select Carbohydrate Unit.
8.17 Carbohydrate Unit
You have a choice of different carbohydrate units (Grams, BE, KE, or CC).
Main Menu > Settings > Carbohydrate Unit
NOTE
Grams (g) is the
standard unit of
measure in the U.S.
178
52297_07167776001.indb 178 10/20/14 11:18 AM
9 Meter Reminders
9.1 Overview
NOTE
Blood glucose is sometimes shortened to bG, but it means
the same thing.
w WARNING
The meter will not display reminders while it is connected and
communicating to a Continua Certified® manager.
9
179
52297_07167776001.indb 179 10/20/14 11:18 AM

bG Test Reminders: After Meal, After Low bG, After High bG
jAfter Meal reminds you to test after you mark a blood glucose
result as Before Meal.
jAfter Low bG reminds you to test after your blood glucose result
is less than the low blood glucose threshold setting.
jAfter High bG reminds you to test after your blood glucose result
is greater than the high blood glucose threshold setting.
jAt the scheduled time, the meter turns on and displays the
reminder (if a test strip has not been inserted). However, if the
meter is already on when the reminder is scheduled and no
blood glucose test was performed, the reminder is displayed
when the meter powers down.
jWhen you perform a blood glucose test, the meter dismisses any
blood glucose test reminders which are pending within the next
30minutes. If necessary, a new reminder is scheduled based
upon the blood glucose result.
jAfter Meal Reminder and After Low bG Test Reminder: Select
Snooze to reschedule the reminder in 5minutes, or select
Dismiss to end the reminder.
jAfter High bG Test Reminders: Select Snooze to reschedule the
reminder in 15minutes, or select Dismiss to end the reminder.
Date Reminders: Dr. Visit, Lab Test, Customized
Date reminders are a helpful way to remind you of an upcoming
Dr. visit or lab test. In addition, you can set up a customized date
reminder.
jThese reminders are displayed when you turn the meter on and
a test strip has not been inserted.
jSelect Snooze to reschedule the reminder in 15minutes, or
select Dismiss to end the reminder.
180
52297_07167776001.indb 180 10/20/14 11:18 AM

Alarm Clock Reminders: bG Test, Other, Basal Injection
Alarm clock reminders are a helpful way to remind you to test
your blood glucose, or for any other daily appointment.
jAt the scheduled time, the meter turns on and displays the
reminder (if a test strip has not been inserted). However, if the
meter is already on when the reminder is scheduled and no
blood glucose test was performed for an Alarm Clock bG Test
Reminder, the reminder is displayed when the meter powers
down.
jWhen you perform a blood glucose test, the meter dismisses
Alarm Clock bG Test reminders which are pending within the
next 30minutes.
jYou can set up to 8alarm clock reminders.
jSelect Snooze to reschedule the reminder in 15minutes, or
select Dismiss to end the reminder.
Medication Reminders
A medication reminder can be used to let you know when it is
time to take a medication. A medication reminder can be set to
occur one time or every day at the same time.
jYou can set up to 5medication reminders.
jYou can give each medication reminder a unique name.
jSelect Snooze to reschedule the reminder for 15minutes, or
select Dismiss to end the reminder.
9
181
52297_07167776001.indb 181 10/20/14 11:18 AM
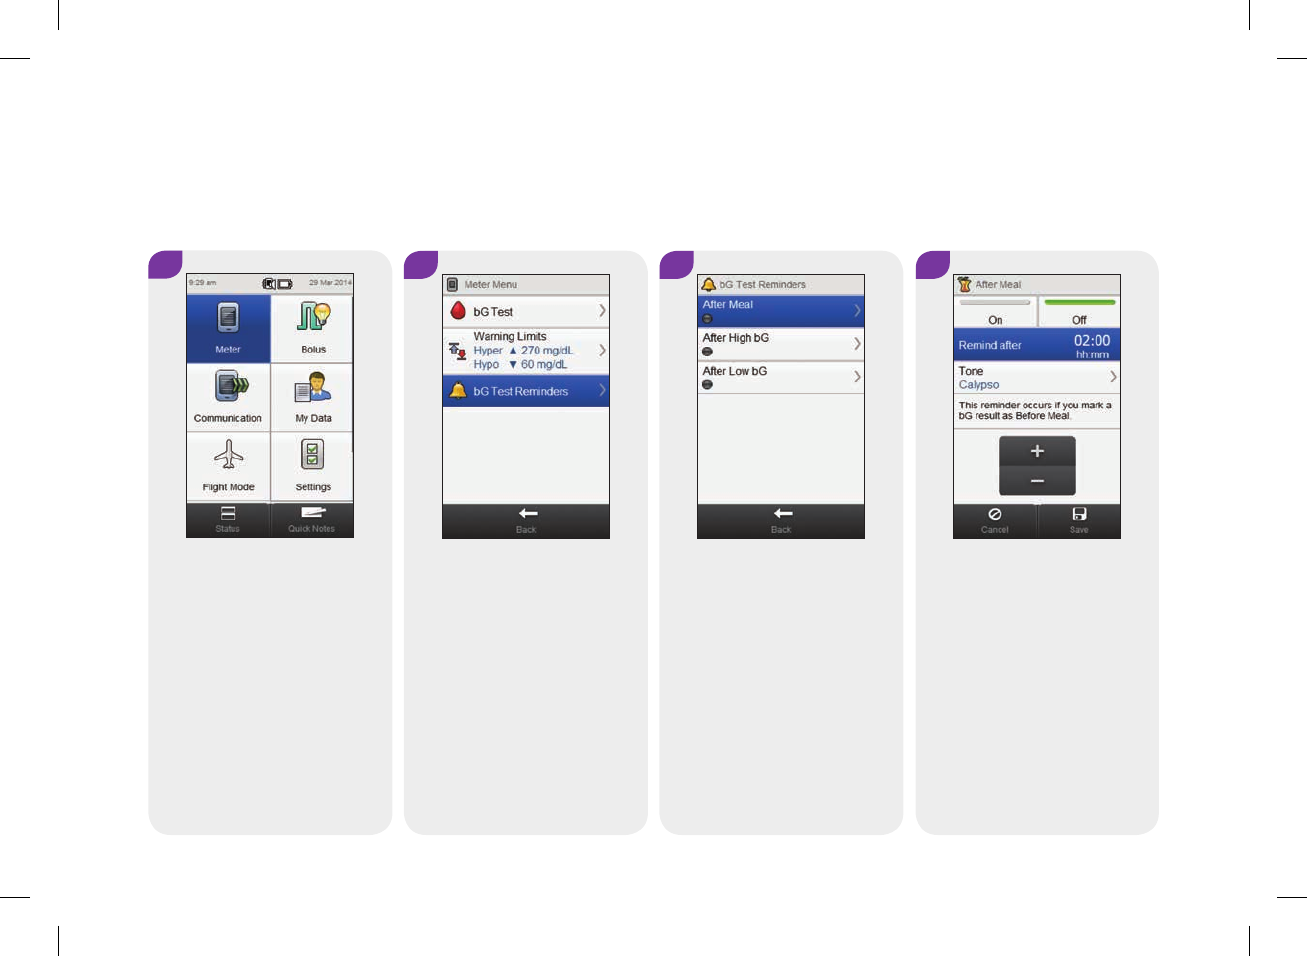
3
Select After Meal.
4
Set the Remind after time. To
change the tone, select Tone
and continue to the next step;
otherwise go to Step6.
9.2 Blood Glucose Test Reminder: After Meal
Main Menu > Meter > bG Test Reminders > After Meal
1
Select Meter on either the
Main Menu or Status screen.
2
Select bG Test Reminders.
182
52297_07167776001.indb 182 10/20/14 11:18 AM
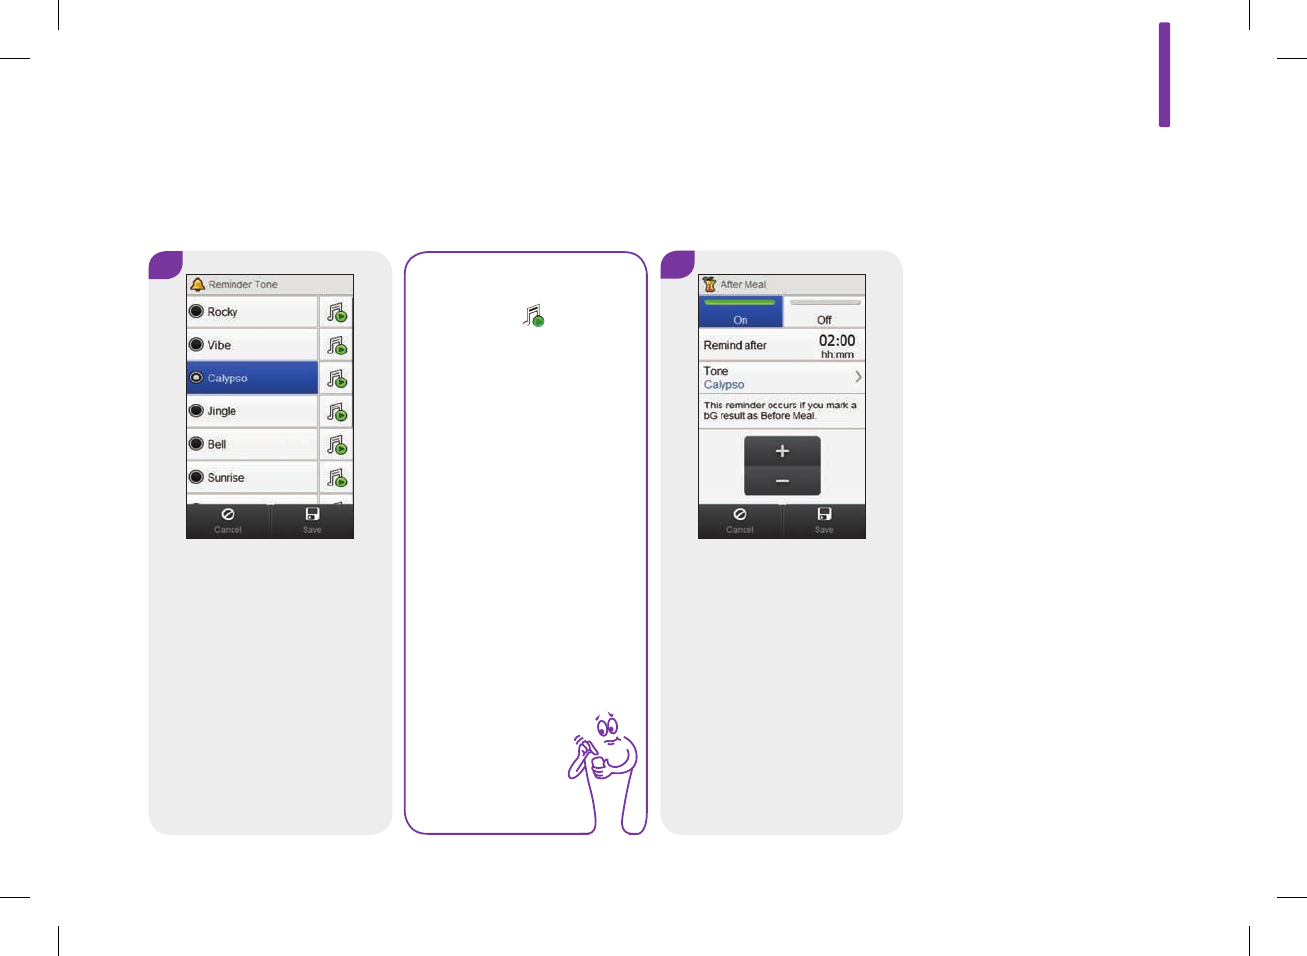
5
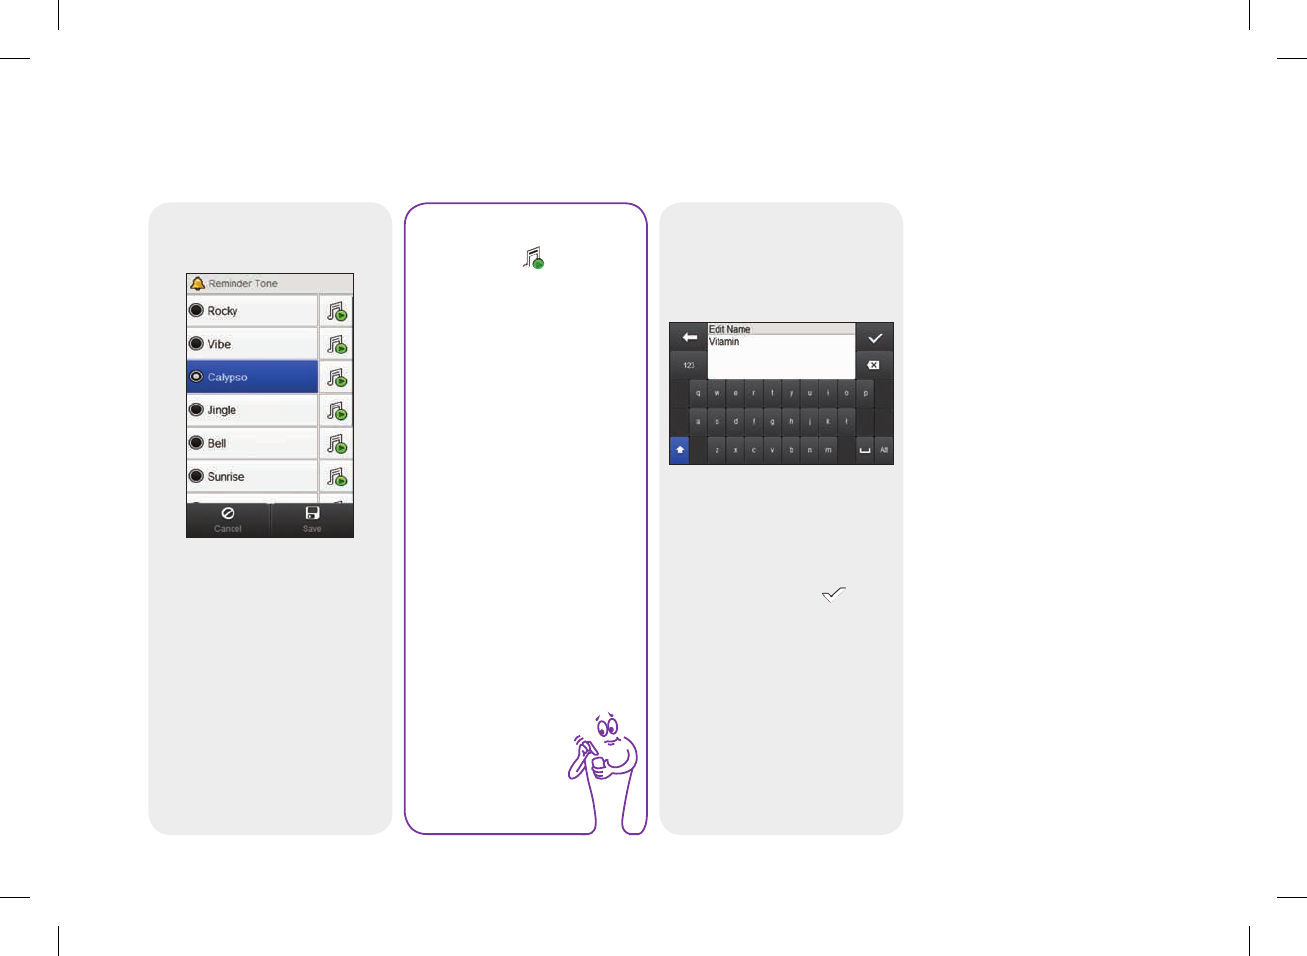
Choose a tone. Select Save.
NOTE
jSelect to hear
the tone.
jScroll the screen
for more tone
choices.
6
Select On to activate the
reminder. Select Save.
9
183
52297_07167776001.indb 183 10/20/14 11:18 AM
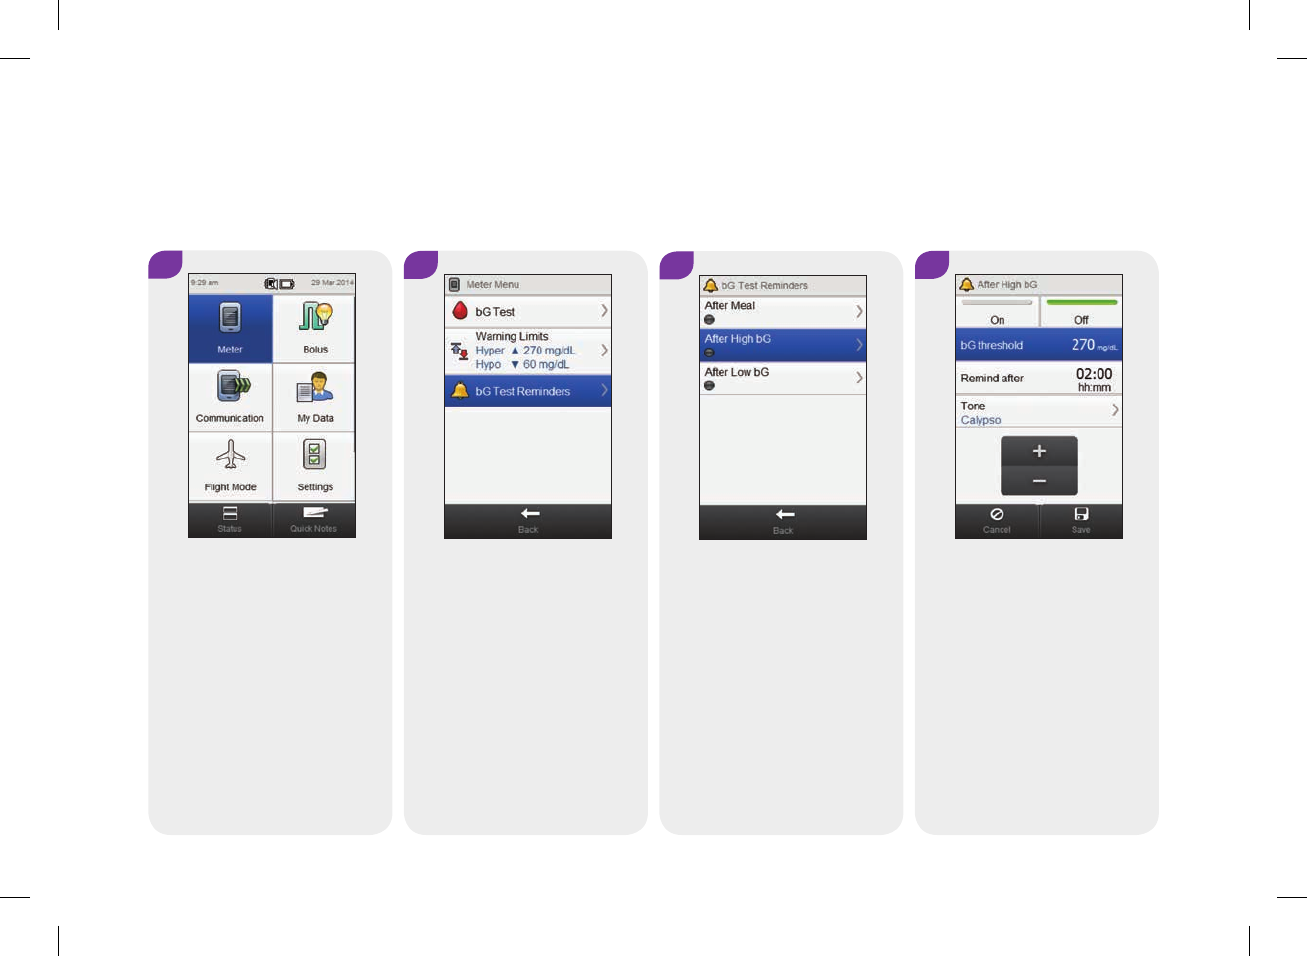
9.3 Blood Glucose Test Reminder: After High Blood Glucose Result
1
Select Meter on either the
Main Menu or Status screen.
2
Select bG Test Reminders.
3
Select After High bG.
4
Set the bG threshold. Set the
Remind after time. To change
the tone, select Tone and
continue to the next step;
otherwise go to Step6.
Main Menu > Meter > bG Test Reminders > After High bG
184
52297_07167776001.indb 184 10/20/14 11:18 AM
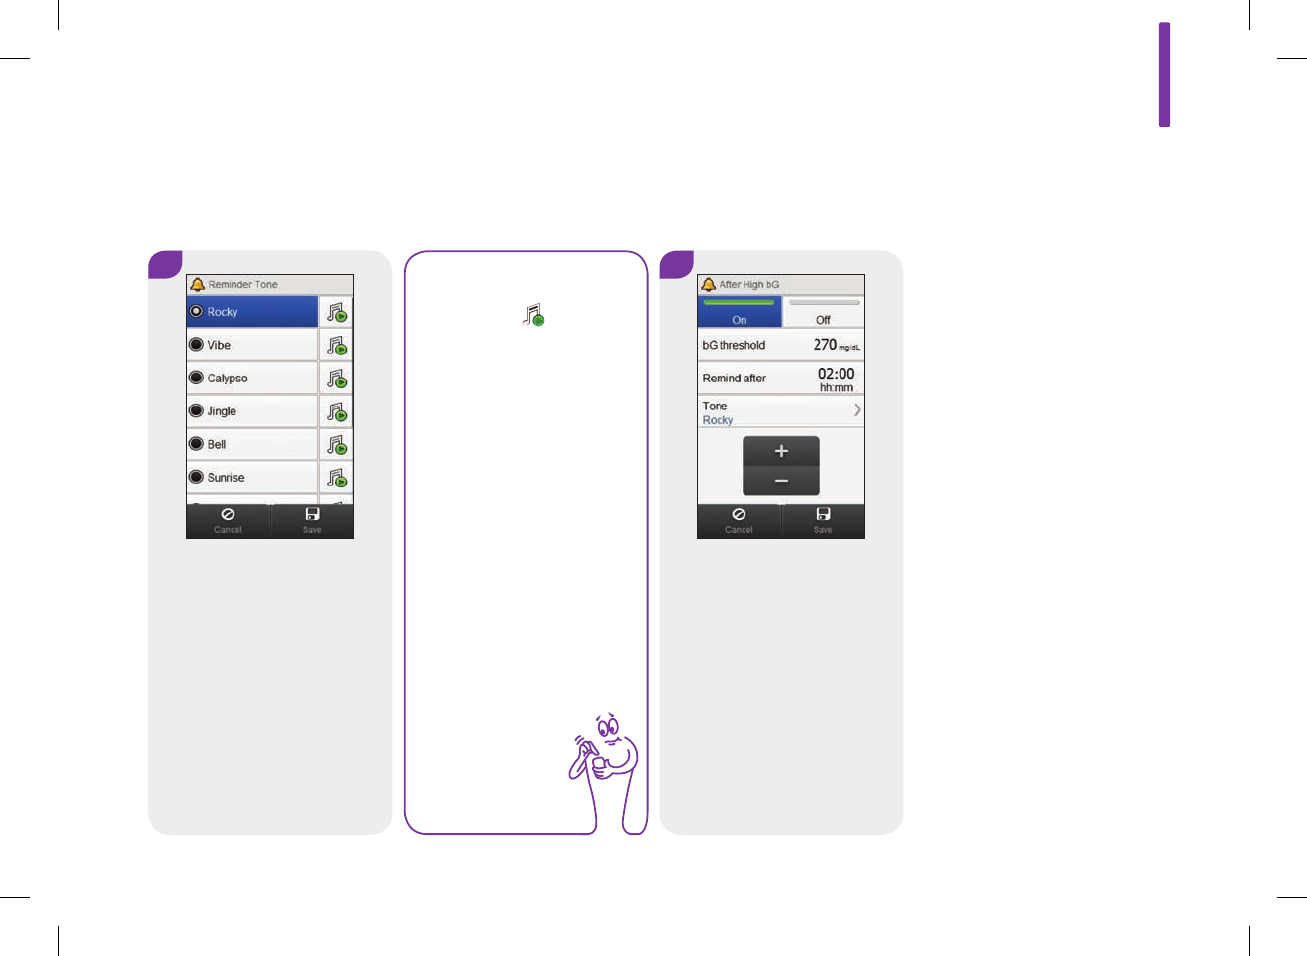
5
Choose a tone. Select Save.
NOTE
jSelect to hear
the tone.
jScroll the screen
for more tone
choices.
6
Select On to activate the
reminder. Select Save.
9
185
52297_07167776001.indb 185 10/20/14 11:19 AM
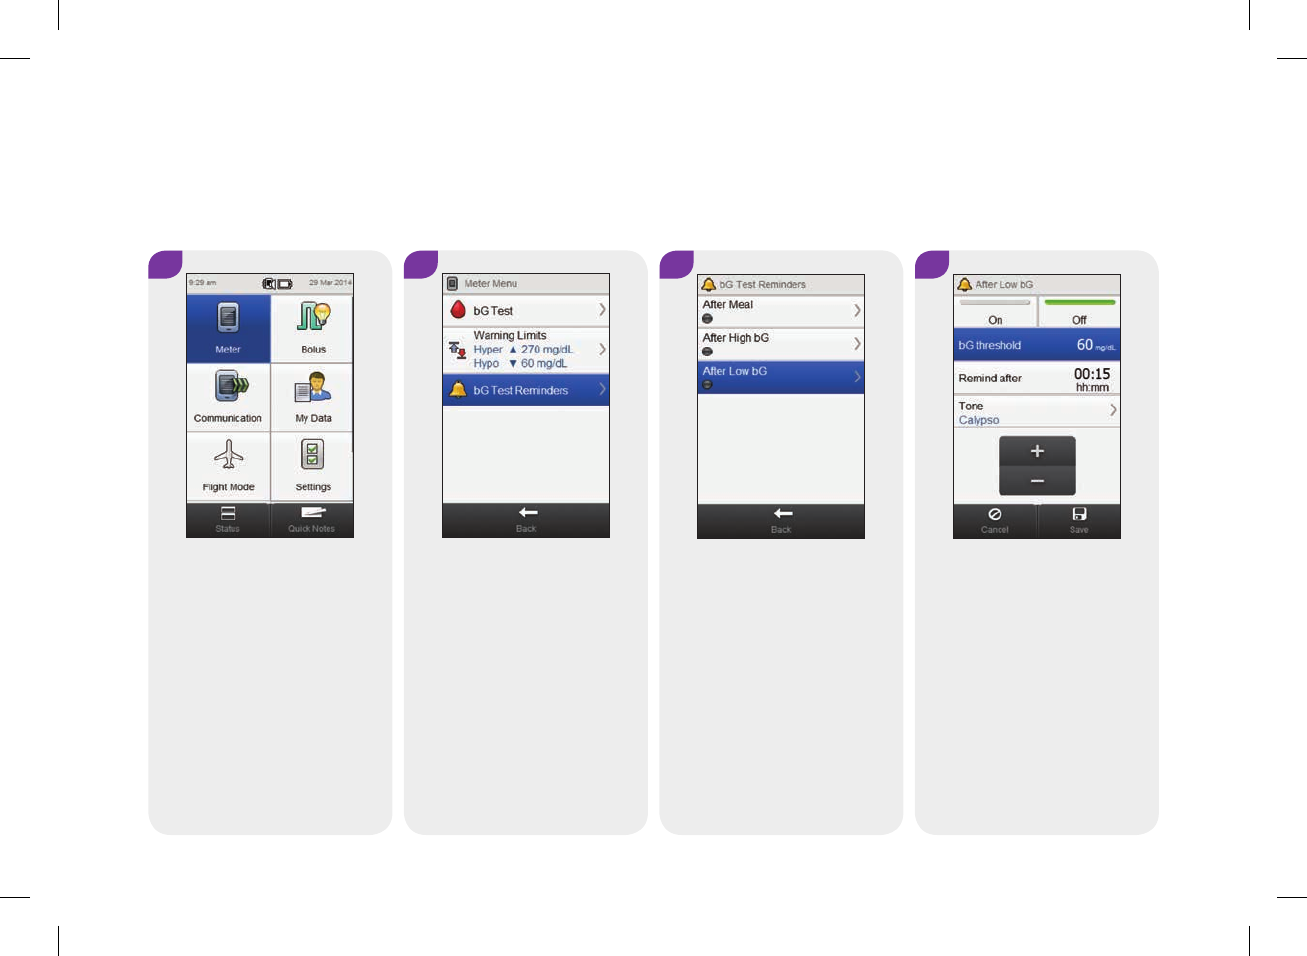
3
Select After Low bG.
4
Set the bG threshold. Set the
Remind after time. To change
the tone, select Tone and
continue to the next step;
otherwise go to Step6.
9.4 Blood Glucose Test Reminder: After Low Blood Glucose Result
1
Select Meter on either the
Main Menu or Status screen.
2
Select bG Test Reminders.
Main Menu > Meter > bG Test Reminders > After Low bG
186
52297_07167776001.indb 186 10/20/14 11:19 AM
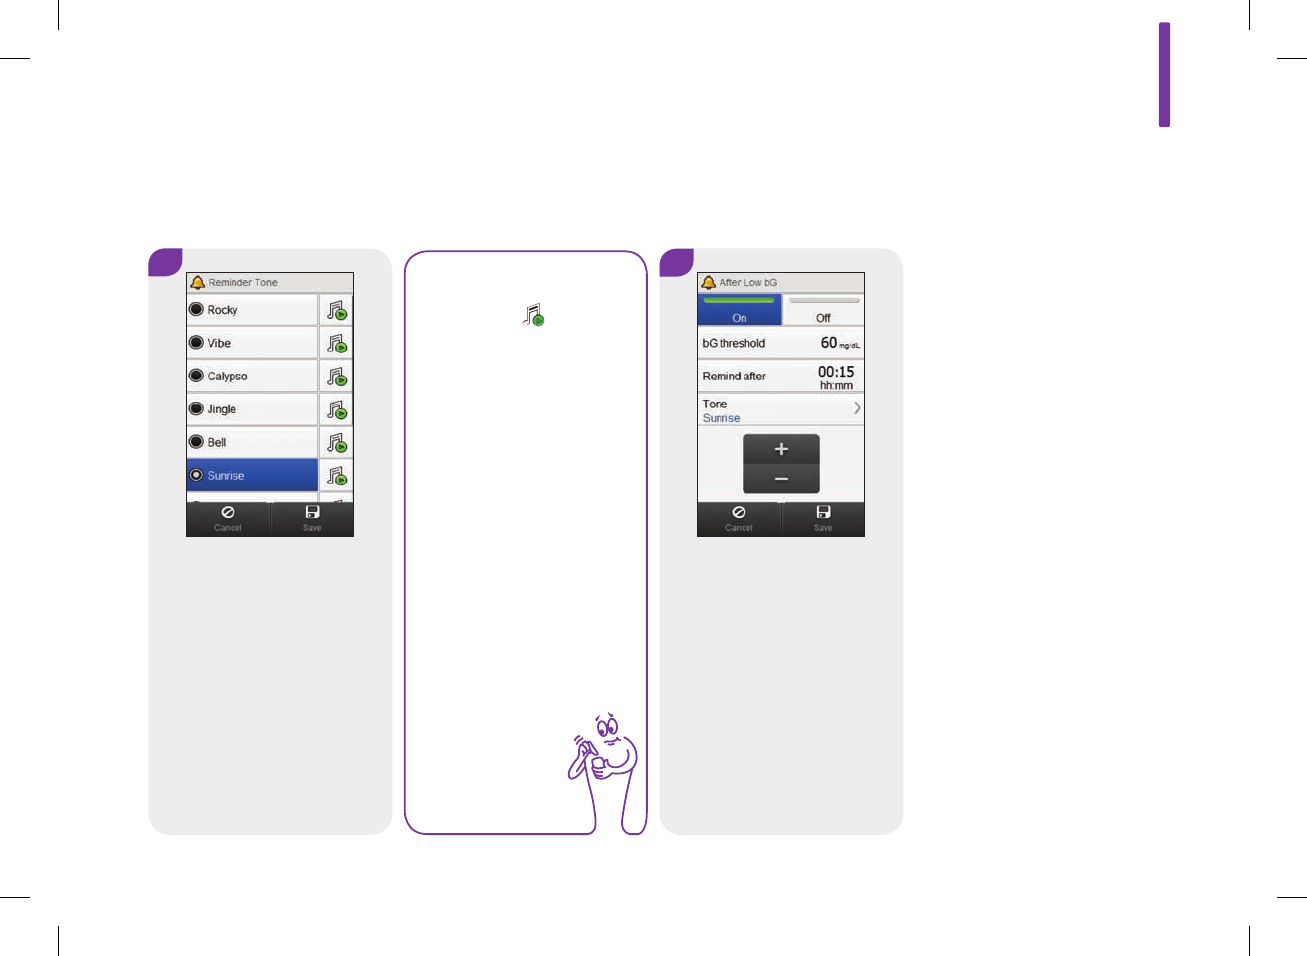
Choose a tone. Select Save.
NOTE
jSelect to hear
the tone.
jScroll the screen
for more tone
choices.
6
Select On to activate the
reminder. Select Save.
5
9
187
52297_07167776001.indb 187 10/20/14 11:19 AM

9.5 Doctor Visit Reminder
Main Menu > Settings > Reminders > Dr. Visit
1
From the Main Menu, select
Settings.
2
Select Reminders.
3
Select Dr. Visit.
4
Set the date and time. To
change the tone, select Tone
and continue to the next step;
otherwise go to Step6.
188
52297_07167776001.indb 188 10/20/14 11:19 AM

5
Choose a tone. Select Save.
NOTE
jSelect to hear
the tone.
jScroll the screen
for more tone
choices.
6
Select On to activate the
reminder. Select Save.
9
189
52297_07167776001.indb 189 10/20/14 11:19 AM

4
Set the date and time. To
change the tone, select Tone
and continue to the next step;
otherwise go to Step6.
9.6 Lab Test Reminder
Main Menu > Settings > Reminders > Lab Test
1 2 3
From the Main Menu, select
Settings.
Select Reminders. Select Lab Test.
190
52297_07167776001.indb 190 10/20/14 11:19 AM
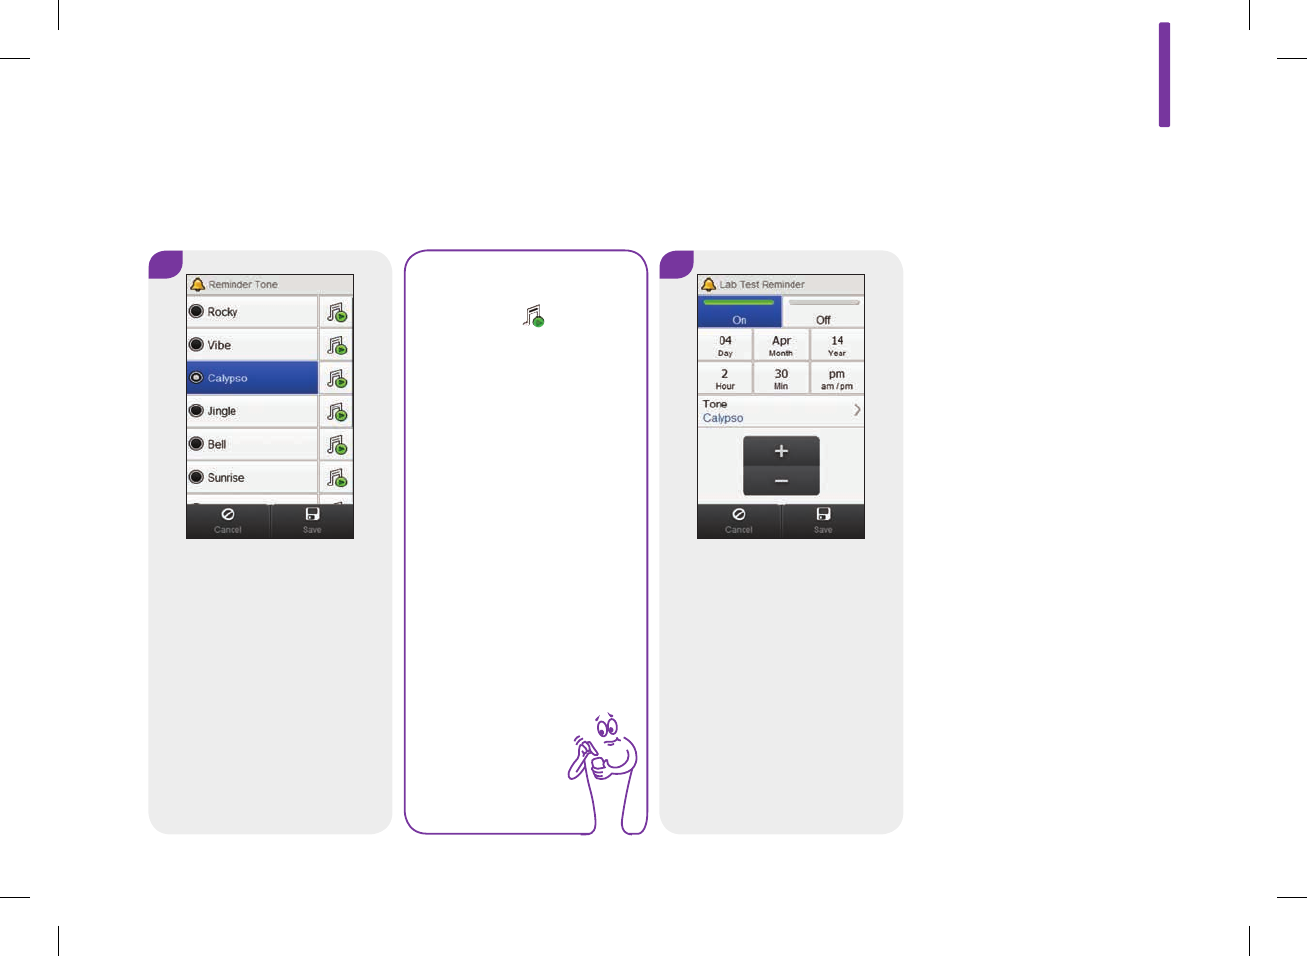
5
Choose a tone. Select Save.
NOTE
jSelect to hear
the tone.
jScroll the screen
for more tone
choices.
6
Select On to activate the
reminder. Select Save.
9
191
52297_07167776001.indb 191 10/20/14 11:19 AM
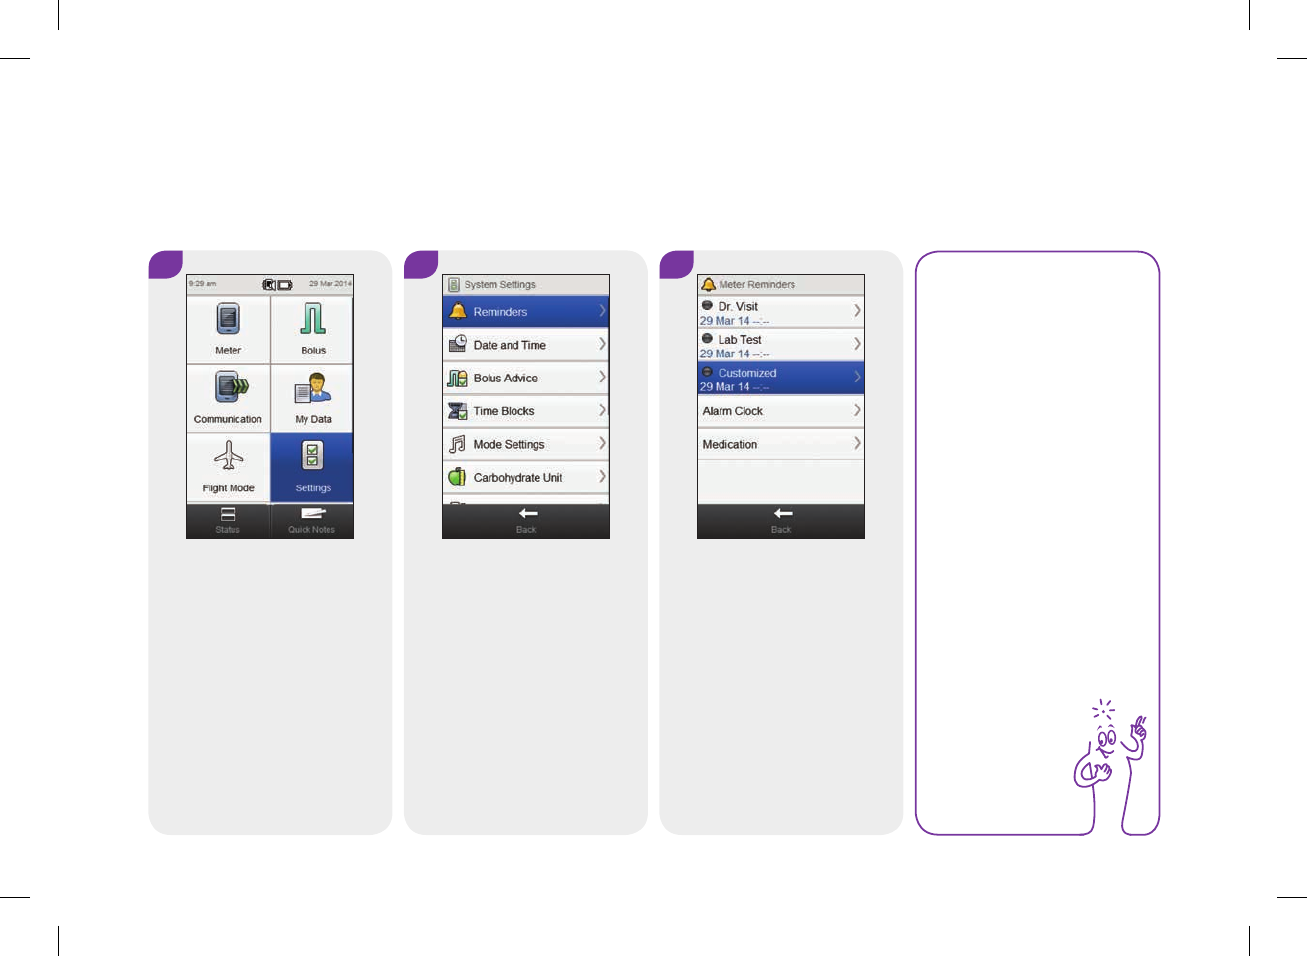
9.7 Customized Reminder
Main Menu > Settings > Reminders > Customized
1 2 3
From the Main Menu, select
Settings.
Select Reminders. Select Customized.
NOTE
If you previously named
the reminder, the name
is displayed instead of
Customized.
192
52297_07167776001.indb 192 10/20/14 11:19 AM
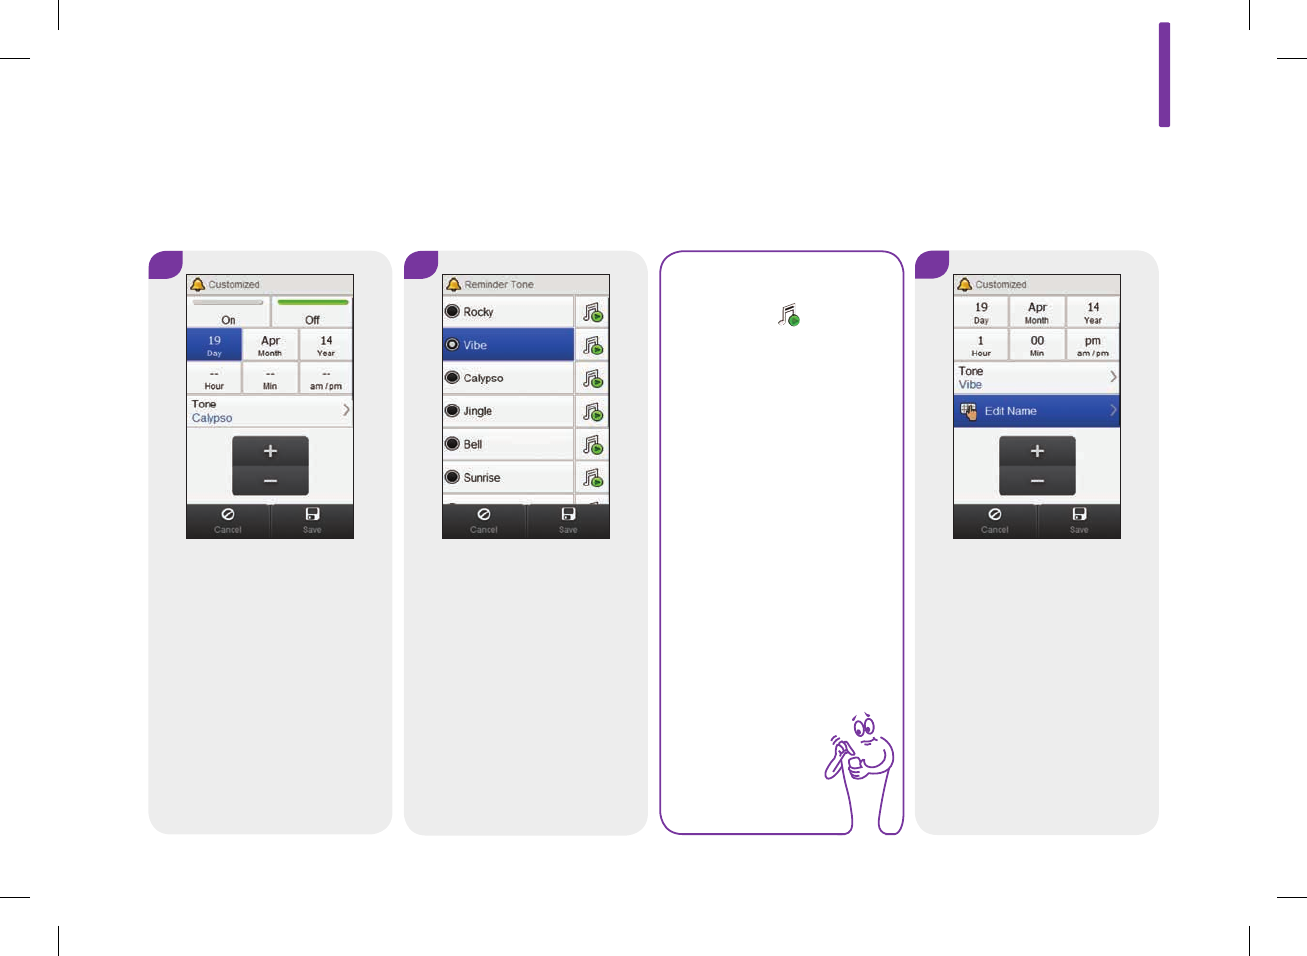
6
To change the reminder
name, scroll the screen and
select Edit Name; otherwise
go to Step8.
4 5
Set the date and time. To
change the tone, select Tone
and continue to the next step;
otherwise go to Step6.
Choose a tone. Select Save.
NOTE
jSelect to hear
the tone.
jScroll the screen
for more tone
choices.
9
193
52297_07167776001.indb 193 10/20/14 11:19 AM
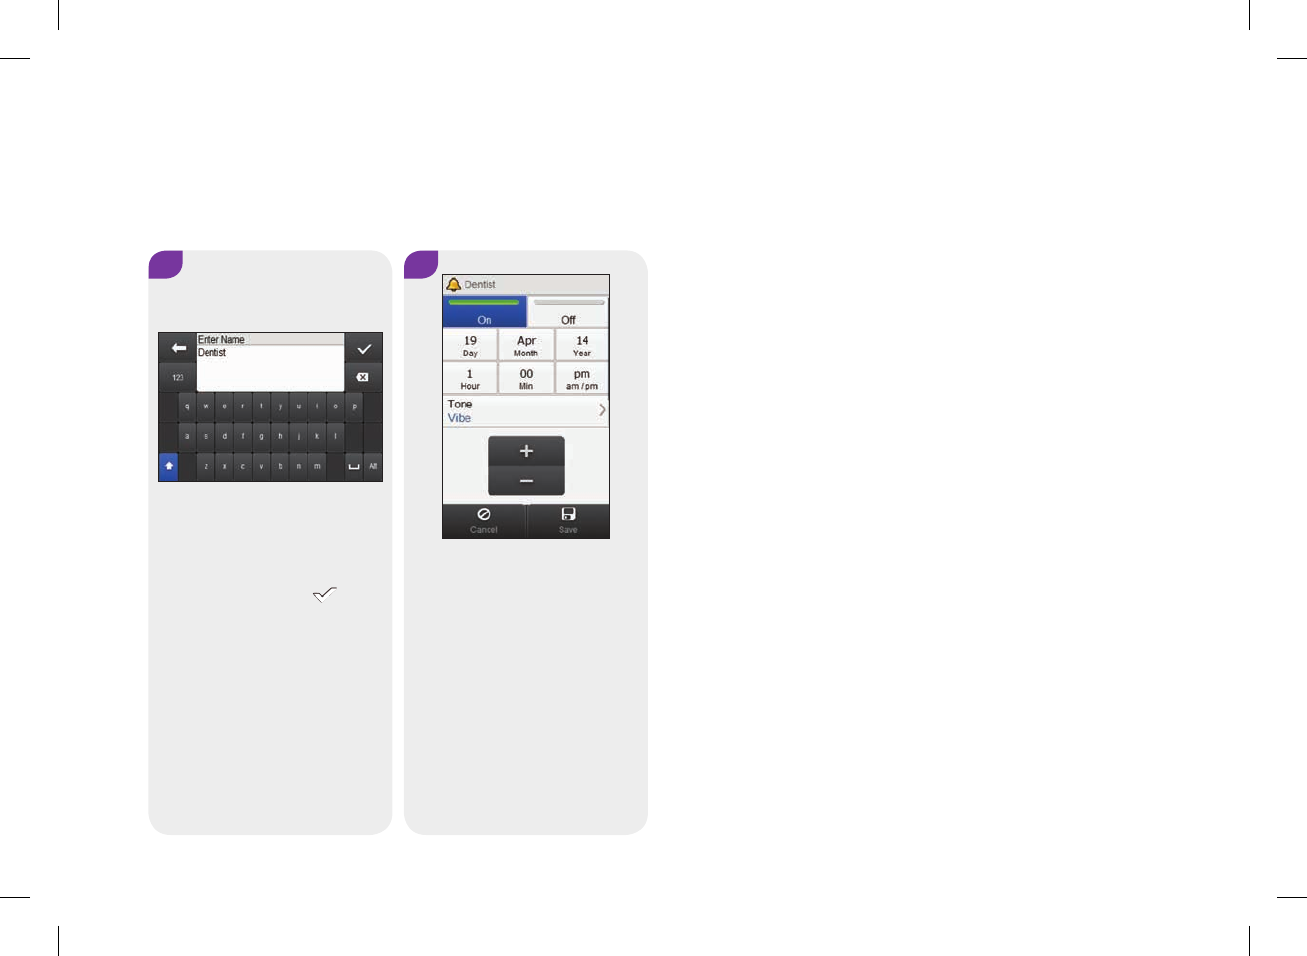
7
Delete the previous name.
Type a name. Select .
8
Select On to activate the
reminder. Select Save.
194
52297_07167776001.indb 194 10/20/14 11:19 AM
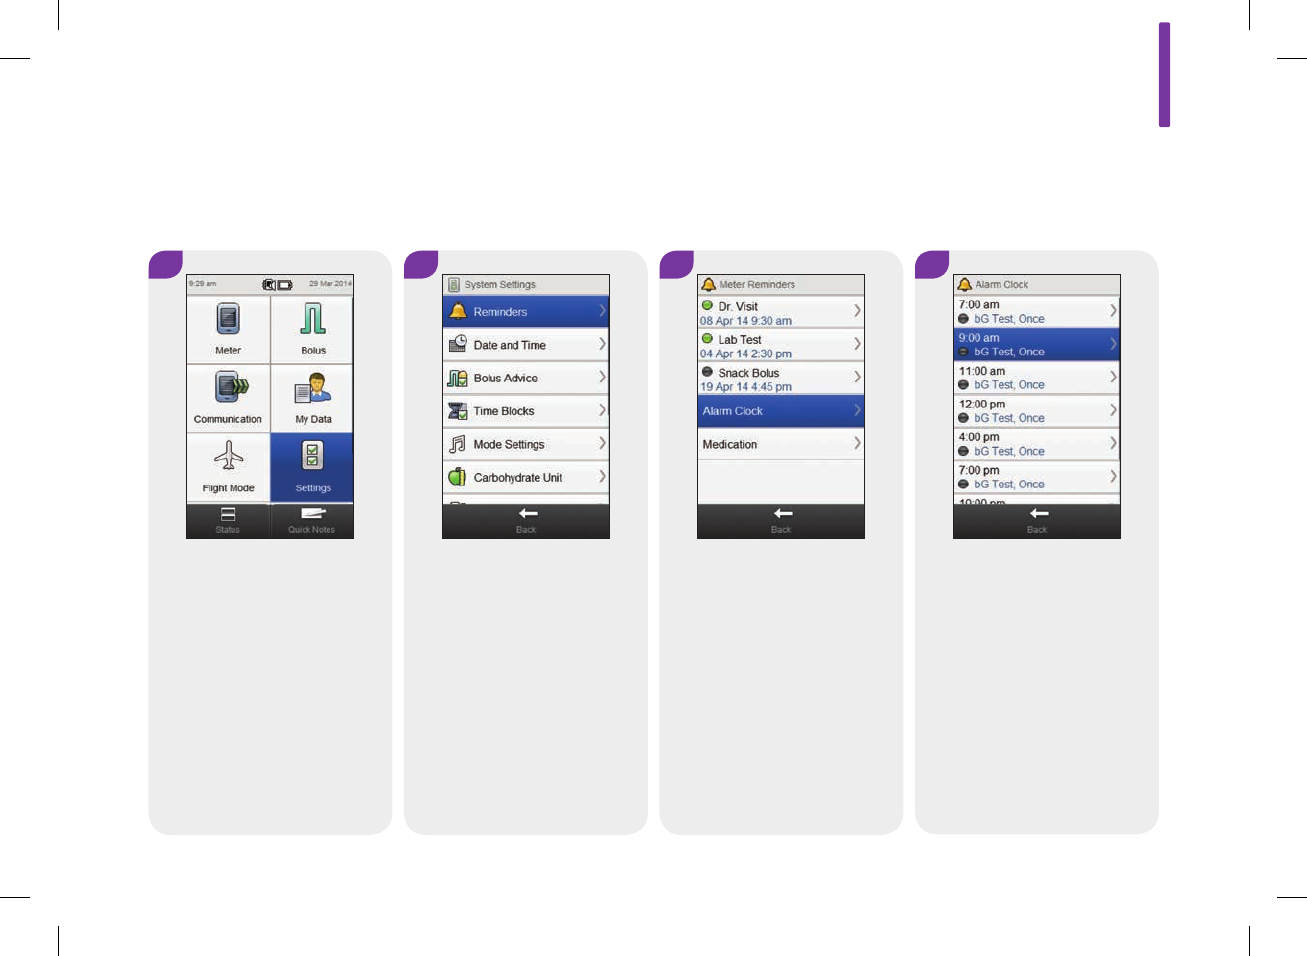
9.8 Alarm Clock Reminder
Main Menu > Settings > Reminders > Alarm Clock
1 2 3
From the Main Menu, select
Settings.
Select Reminders. Select Alarm Clock.
4
Select a reminder.
9
195
52297_07167776001.indb 195 10/20/14 11:19 AM
NOTE
jScroll the screen to
display additional
reminders.
jReminders that are
On are shown with
a green indicator.
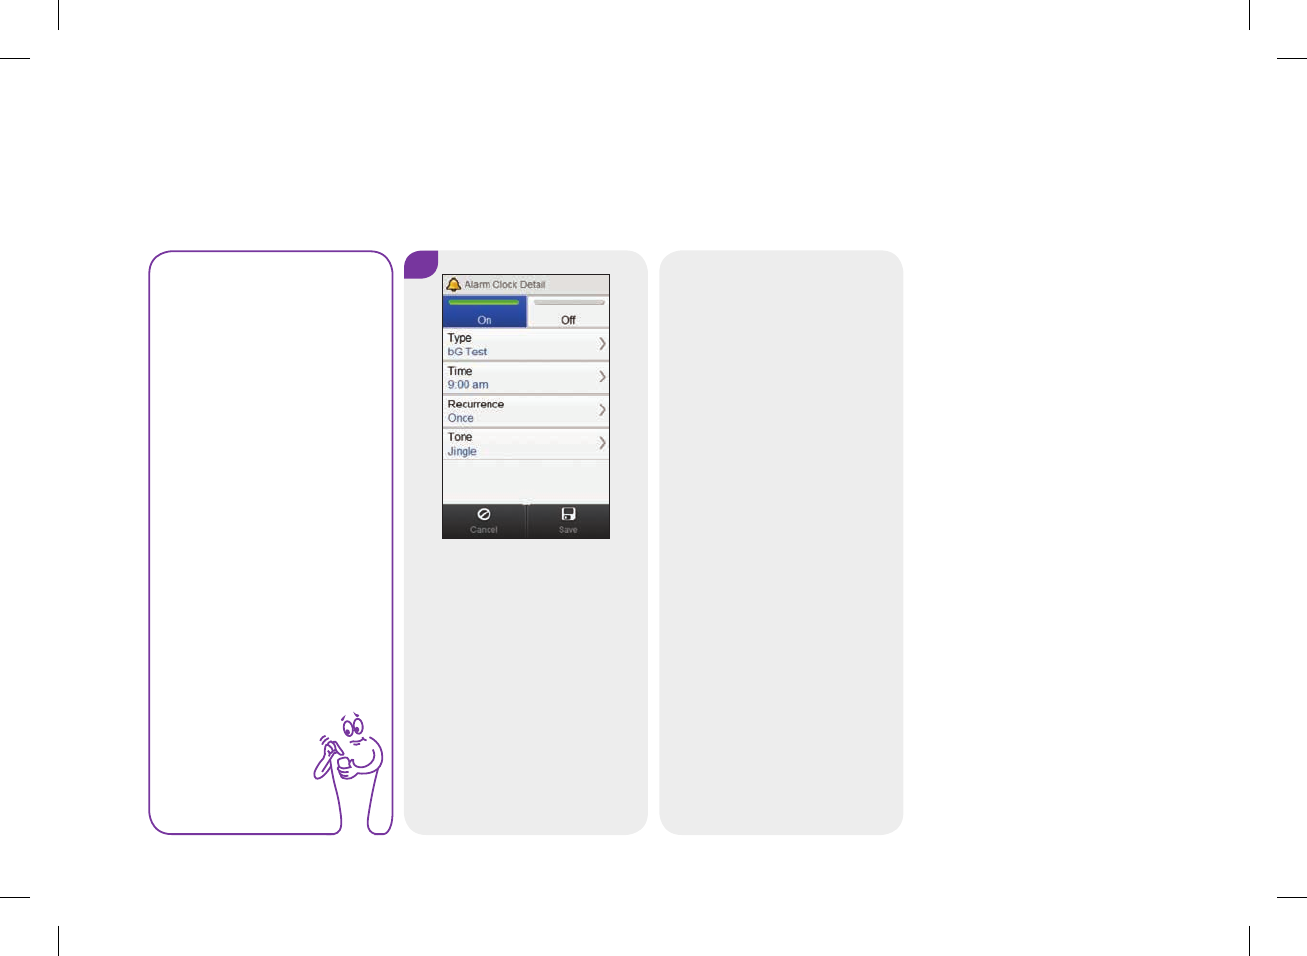
5
Select On to activate the
reminder or select Off to turn
off the reminder.
To change this reminder:
Select the field to change and
refer to the instructions on the
following pages. When setup
is completed, select Save.
196
52297_07167776001.indb 196 10/20/14 11:19 AM
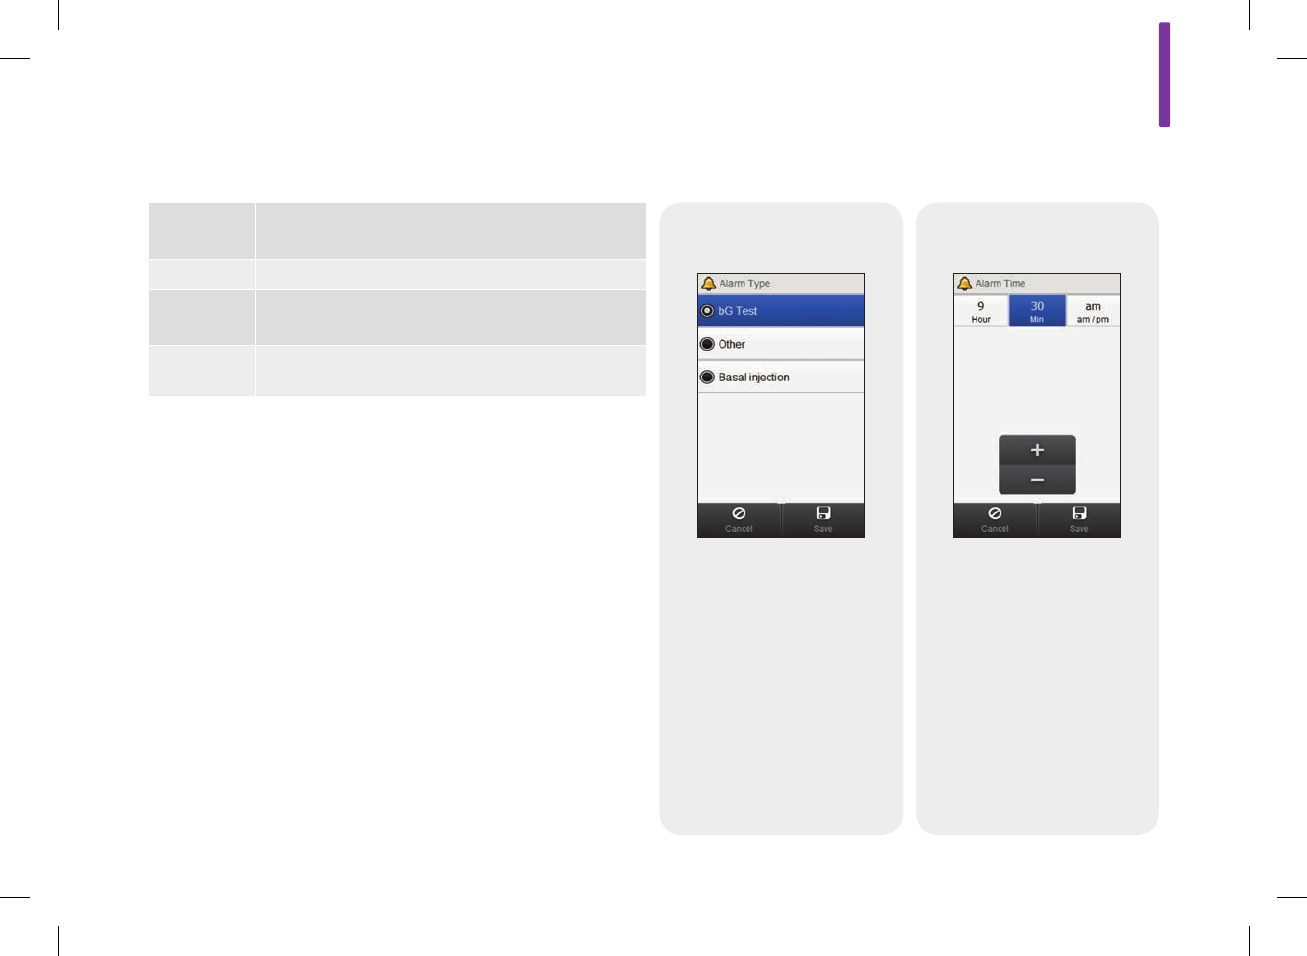
Alarm Clock Detail Entries Screens for Entries of an Alarm Clock Reminder
Type
Choose the type of reminder.
Select Save.
Time
Set the reminder time. Select
Save.
Type The reminder type is displayed when the reminder
occurs.
Time The time of day the reminder occurs.
Recurrence The reminder occurs one time or every day at the
same time.
Tone Choose a unique tone for each reminder.
9
197
52297_07167776001.indb 197 10/20/14 11:19 AM
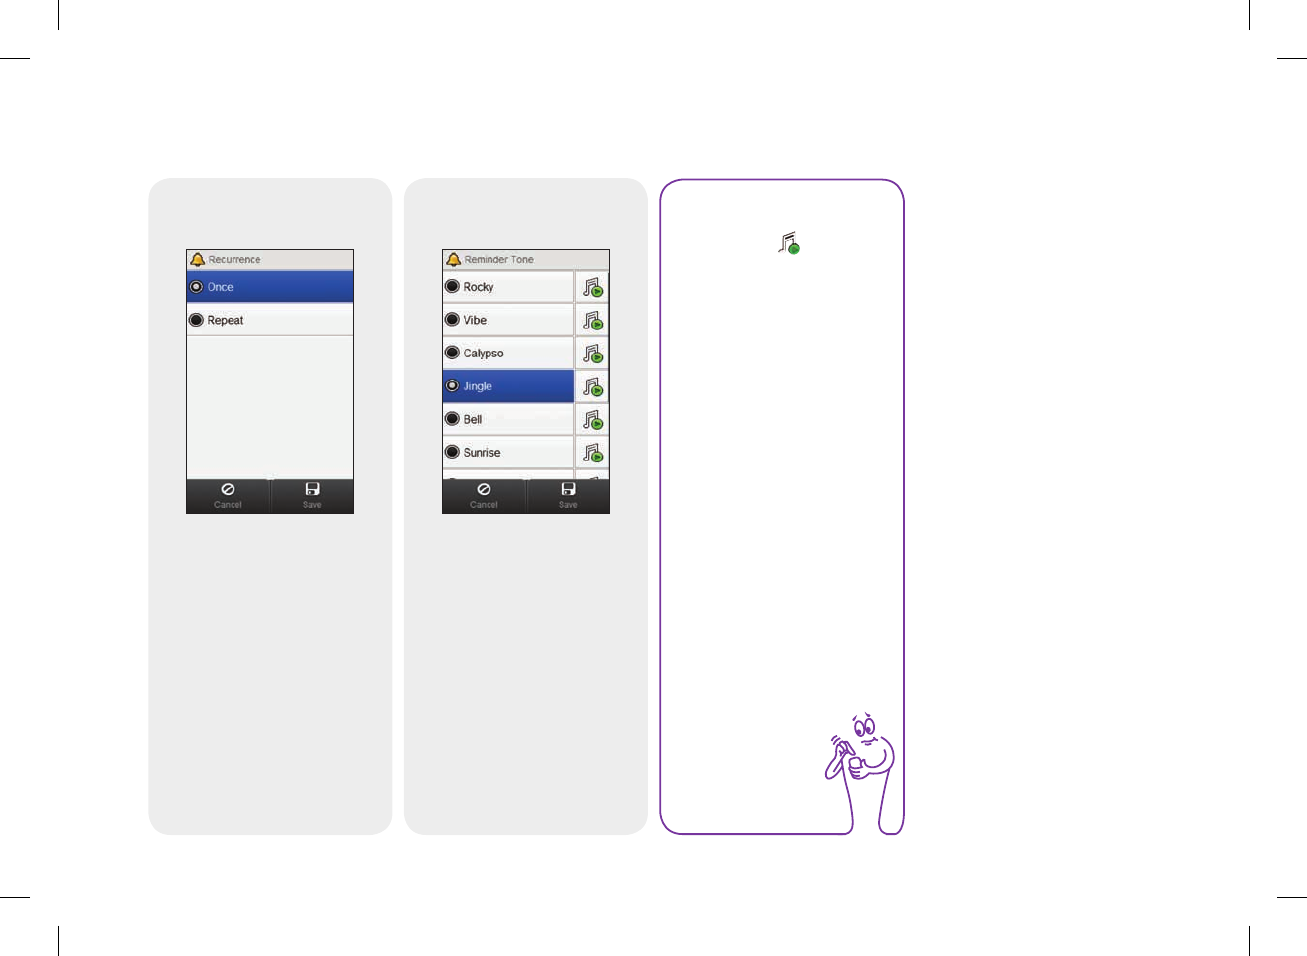
Recurrence
Choose Once or Repeat.
Select Save.
NOTE
jSelect to hear
the tone.
jScroll the screen
for more tone
choices.
Tone
Choose a tone. Select Save.
198
52297_07167776001.indb 198 10/20/14 11:19 AM

9.9 Medication Reminder
Main Menu > Settings > Reminders > Medication
1 2 3 4
From the Main Menu, select
Settings.
Select Reminders. Select Medication. Select a Medication reminder.
9
199
52297_07167776001.indb 199 10/20/14 11:19 AM

5
NOTE
jIf you previously
named the
reminder, the
name is displayed
instead of
Medication.
jReminders that are
On are shown with
a green indicator.
Select On to activate the
reminder or select Off to turn
off the reminder.
To change this reminder:
Select the field to change and
refer to the instructions on the
following pages. When entries
are completed, select Save.
200
52297_07167776001.indb 200 10/20/14 11:19 AM

Medication Reminder Entries
Time The time of day the reminder occurs.
Recurrence Reminder occurs one time or every day at the
same time.
Tone Choose a unique tone for each reminder.
Edit Name Name the reminder.
Screens for Entries of a Medication Reminder
Time
Set the reminder time. Select
Save.
Recurrence
Choose Once or Repeat.
Select Save.
9
201
52297_07167776001.indb 201 10/20/14 11:19 AM
Tone
Choose a tone. Select Save.
NOTE
jSelect to hear
the tone.
jScroll the screen
for more tone
choices.
Edit Name
Delete the previous name.
Type a name. Select .
202
52297_07167776001.indb 202 10/20/14 11:19 AM

10
203
10 Communication
10.1 Overview
The meter can communicate with a PC using a USB connection to
control and share data, as well as send and receive data from
any compatible software.
52297_07167776001.indb 203 10/20/14 11:19 AM
12
204
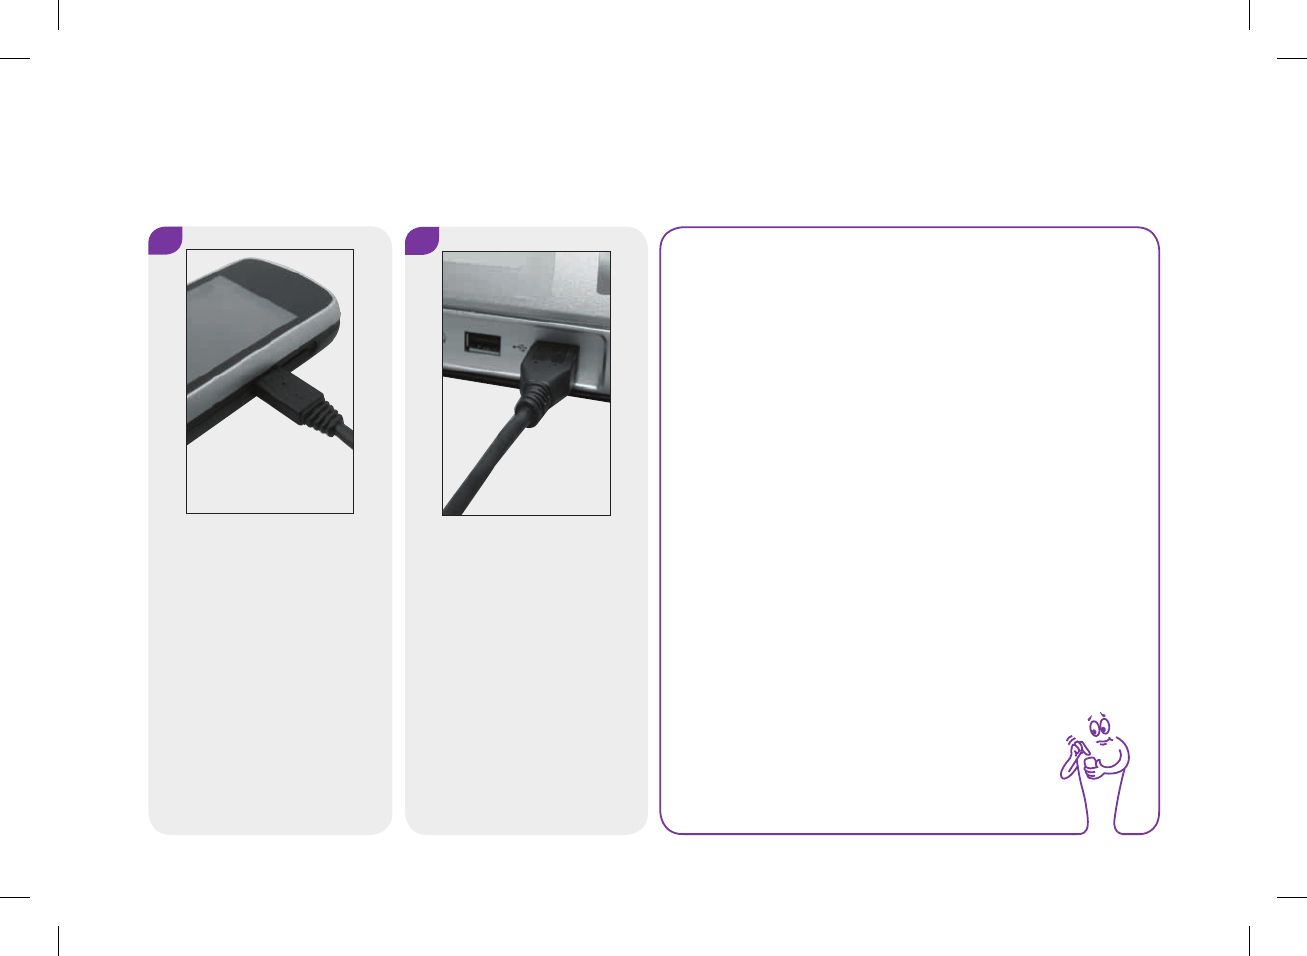
10.2 Connecting the Meter to a PC using a USB Cable
Plug the small end of the USB
cable into the meter.
Plug the large end of the USB
cable into an available USB
port on the PC.
NOTE
jIf the meter is already connected to a PC with a USB
cable but is charging in idle status, you can establish
a data connection. From the Main Menu, select
Communication > Connect to PC.
jThe meter cannot be used to perform a bG test while
connected to a PC.
52297_07167776001.indb 204 10/20/14 11:19 AM
10
205
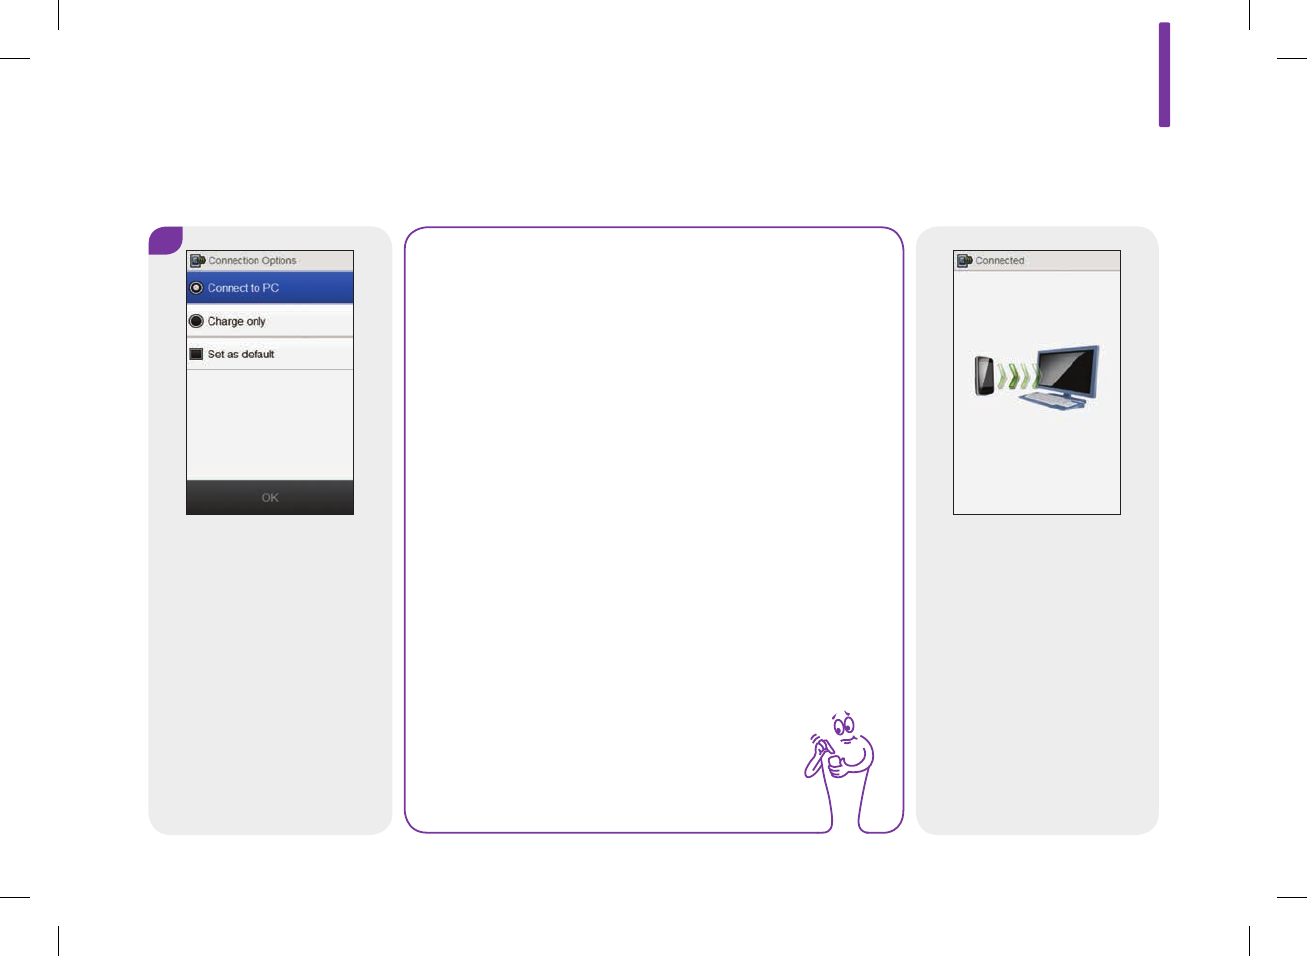
3
Select Connect to PC. Select
OK.
The meter attempts to
connect to the PC.
NOTE
jIf the meter does not respond automatically to being
connected to a PC, select Connect to PC from the
Communication menu.
jBy selecting Charge only, the meter charges its
battery through the USB connection and does not
otherwise communicate with the PC.
jSelect Set as default to not see this screen again in
the future. Every time you connect a USB cable, the
meter automatically performs the selected action.
52297_07167776001.indb 205 10/20/14 11:19 AM
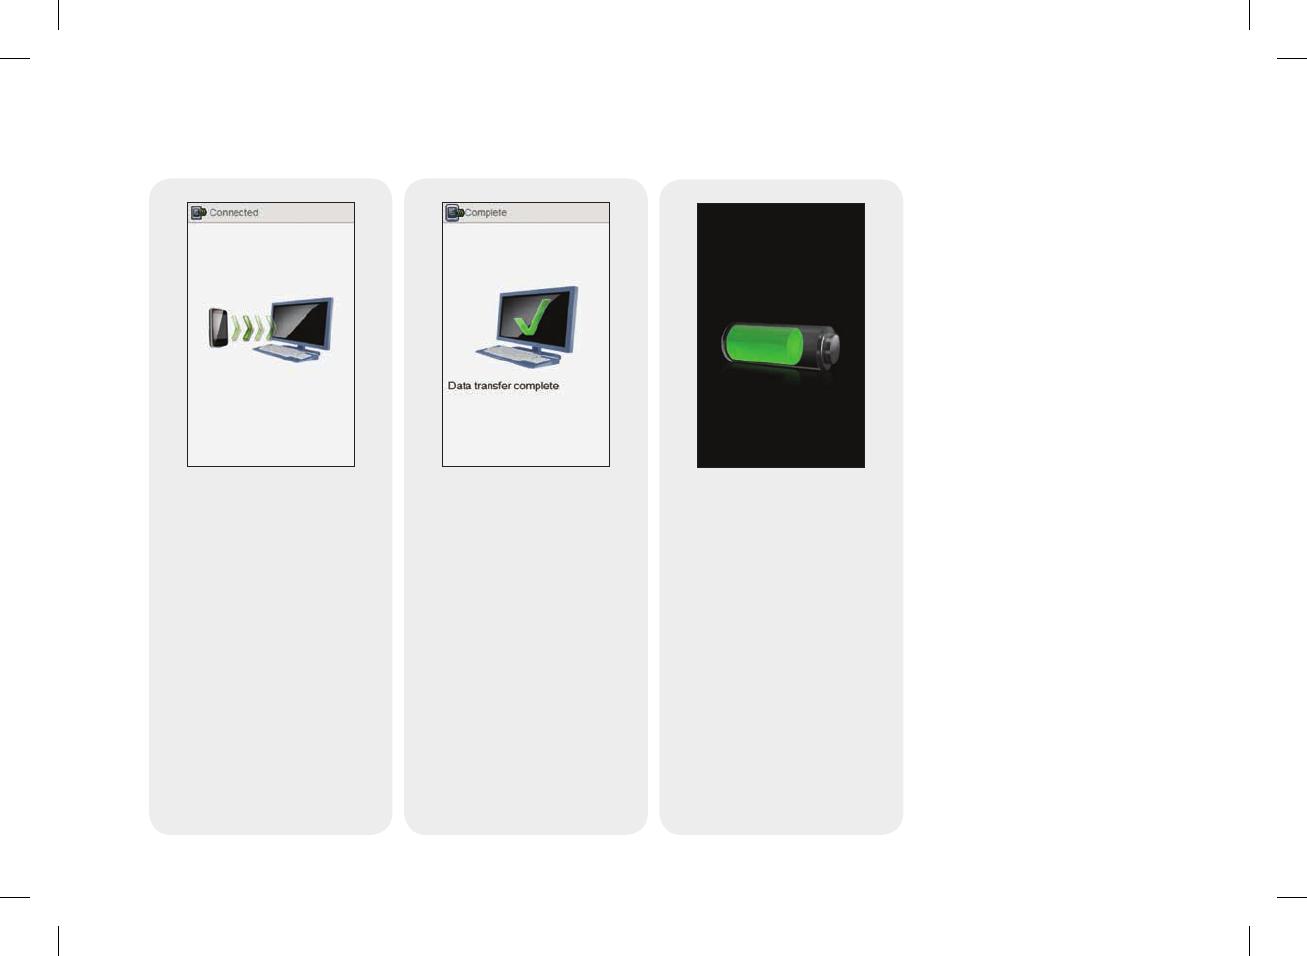
206
The battery charge screen
appears. After about
3seconds, the meter screen
goes blank. Charging
continues.
When the meter successfully
connects to the PC, the
Connected screen appears
and data transfer begins. Do
not disconnect the USB cable
during data transfer.
When the meter has
completed transferring data,
the Complete screen appears.
52297_07167776001.indb 206 10/20/14 11:19 AM
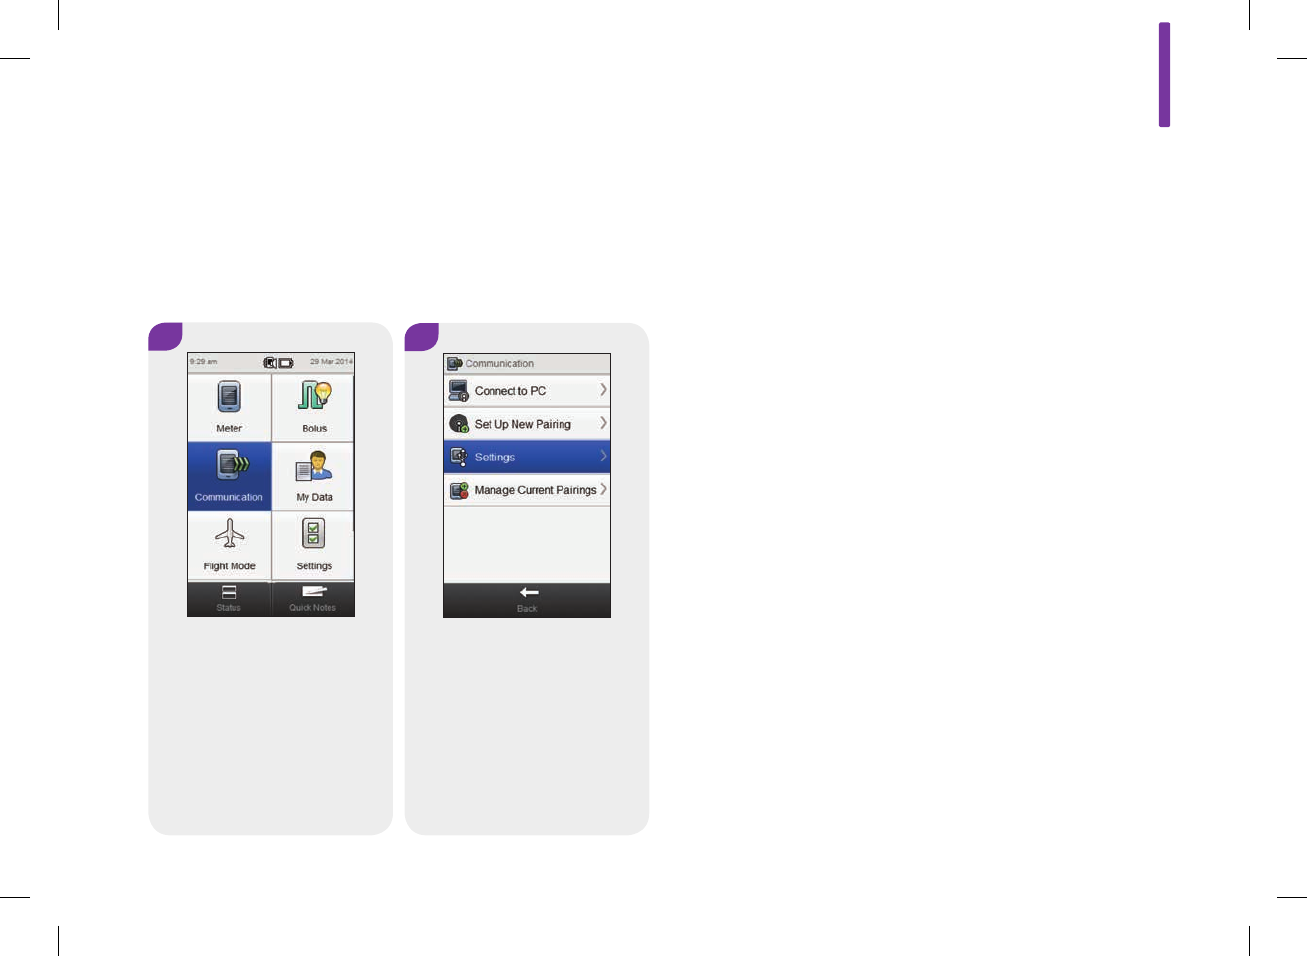
10.3 Changing USB Cable Connection Settings
12
The Communication Settings menu allows you to choose what the meter
does when you connect it to a PC with a USB cable.
Main Menu > Communication > Settings
From the Main Menu, select
Communication.
Select Settings.
10
207
52297_07167776001.indb 207 10/20/14 11:19 AM
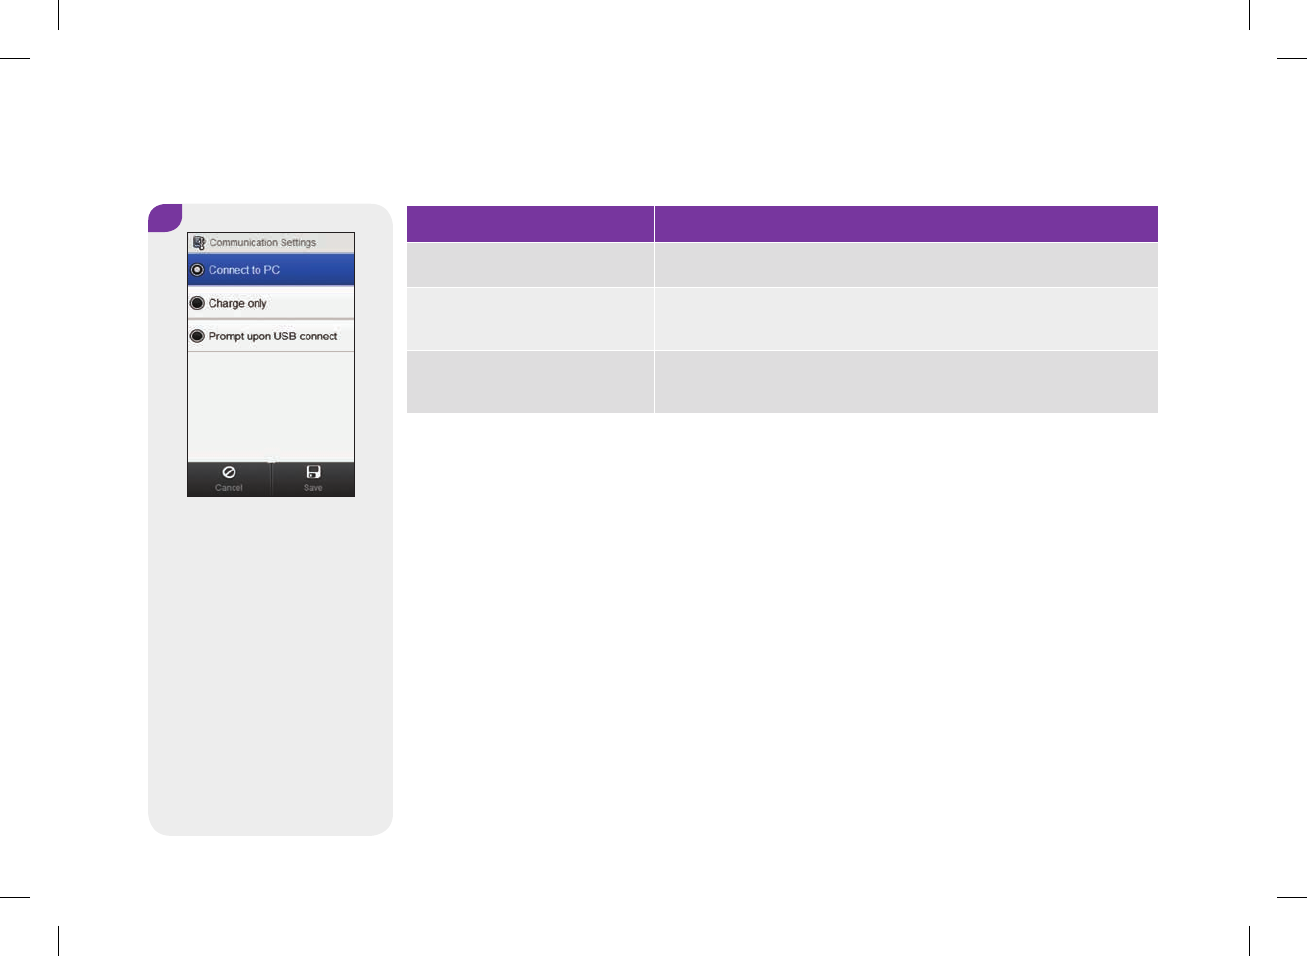
Option Description
Connect to PC The meter automatically connects to the PC.
Charge only The meter takes no immediate action upon being connected and
charges the battery only.
Prompt upon USB connect The meter prompts you to choose your desired communication
setting upon being connected.
3
Select the desired option.
Select Save.
208
52297_07167776001.indb 208 10/20/14 11:19 AM

11 Travel Settings
11.1 Overview
NOTE
Turning the Flight Mode on can also help to conserve
battery power.
Most airlines and many governments ban the use of wireless
radio devices during flight. Flight Mode enables the meter to
comply with these regulations while retaining your ability to safely
use the non‑wireless functions of the meter.
11
209
52297_07167776001.indb 209 10/20/14 11:19 AM
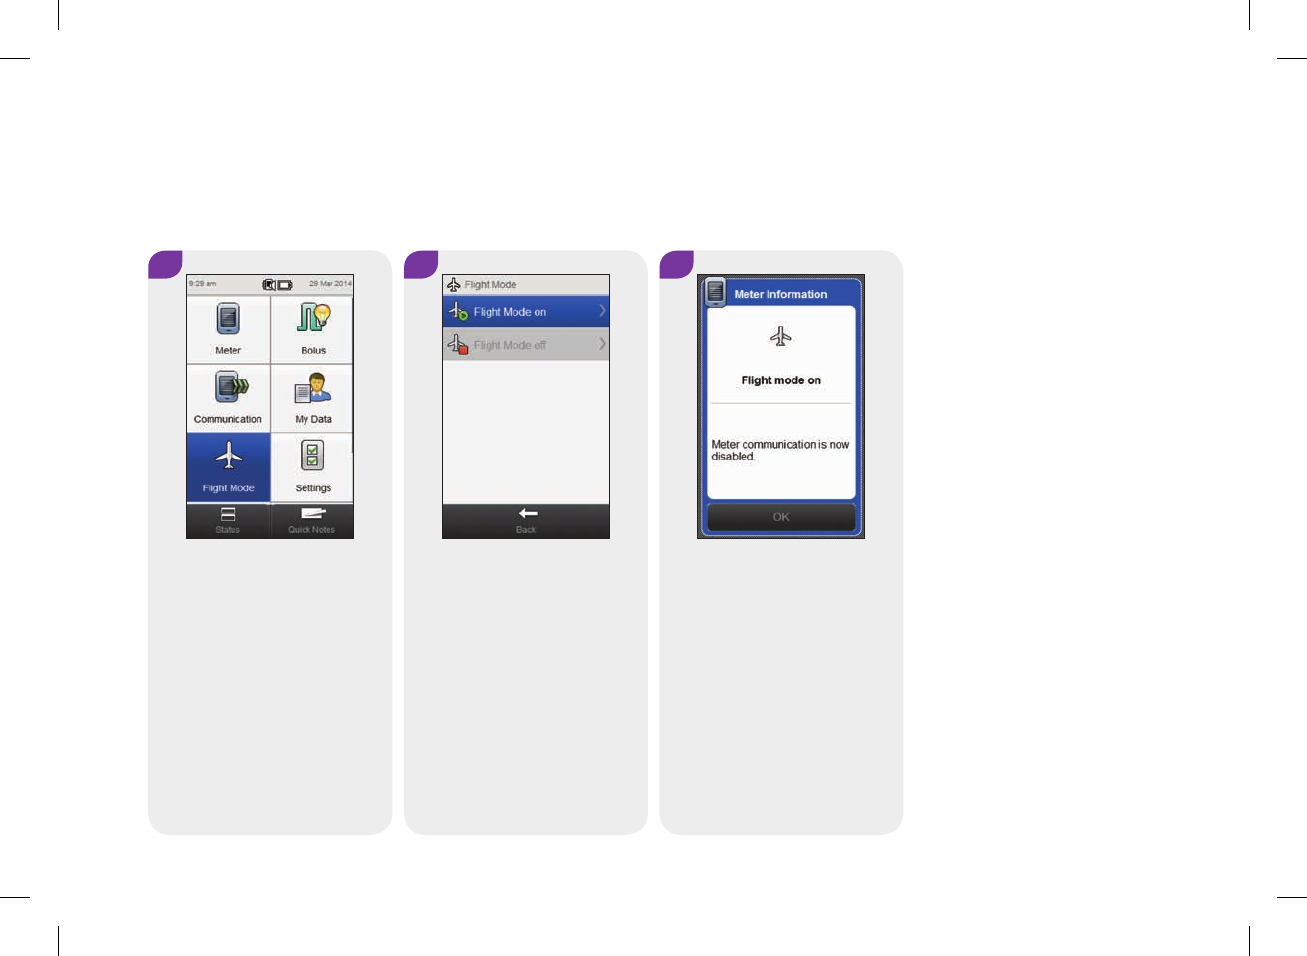
11.2 Turning On Flight Mode
Main Menu > Flight Mode
1 2 3
From the Main Menu, select
Flight Mode.
Select Flight Mode on. Select OK.
210
52297_07167776001.indb 210 10/20/14 11:19 AM
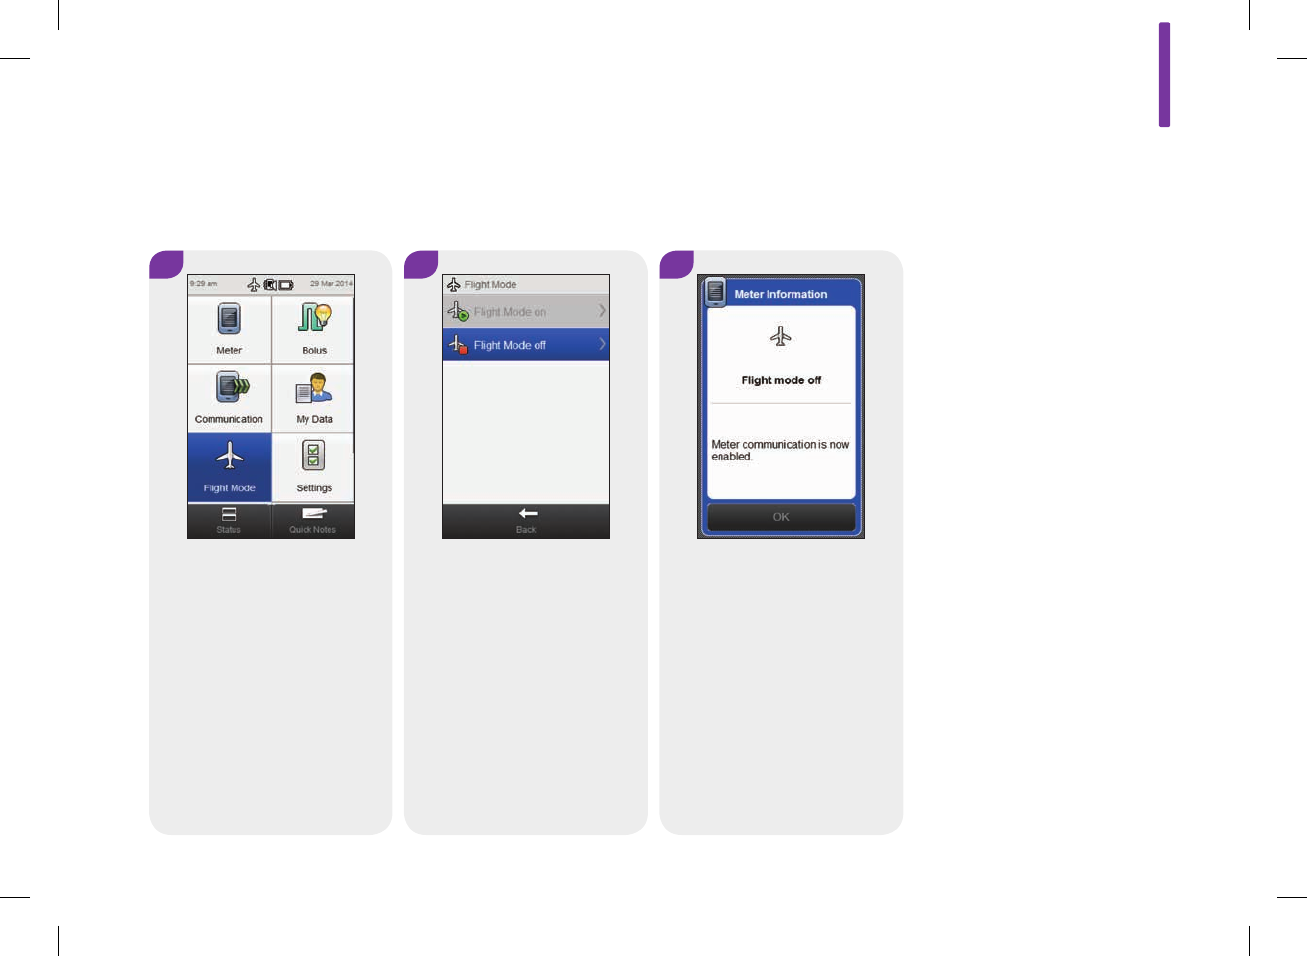
11.3 Turning Off Flight Mode
Main Menu > Flight Mode
1 2 3
From the Main Menu, select
Flight Mode.
Select Flight Mode off. Select OK.
11
211
52297_07167776001.indb 211 10/20/14 11:19 AM

212
52297_07167776001.indb 212 10/20/14 11:19 AM

12
213
12 My Data
12.1 Overview
NOTE
Blood glucose is sometimes shortened to bG, but it means
the same thing.
Analyzing your information stored in the meter is an effective way
for you and your healthcare professional to determine how well
you are controlling your diabetes. This analysis is a valuable tool
for making improvements to your diabetes management. The
reports the meter displays help you get the most from your
ACCU‑CHEK Aviva Insight Diabetes Manager.
The meter generates graphs and reports to help you analyze the
information stored in the meter. Graphs can be a good way to
view your blood glucose results. The meter can display a line
graph to depict the trends of your blood glucose results with other
information, such as your bolus history, a graph showing result
ranges for a standard day or a standard week, and a pie chart
with different colors to illustrate the number of test results within,
above, or below your blood glucose target range.
52297_07167776001.indb 213 10/20/14 11:19 AM

214
12.2 The Logbook
NOTE
jThe logbook on the meter replaces the physical blood
glucose diary you may have kept in the past.
jLogbook data cannot be changed if that data was
used to calculate bolus advice.
The meter automatically stores up to 2,000 logbook records with
the time and date. You can review up to the last 250 logbook
records on the meter or up to 2,000 logbook records using a
computer with compatible software. Logbook records are stored
from the newest to the oldest.
jEach logbook record can contain: Date and time
jBlood glucose result
jMeal time (events)
jCarbohydrate intake
jHealth event
jBolus type
jBolus amount
jNote
jQuick Notes
From the logbook records stored in the meter, you are able to
view a specific blood glucose result with its attributes (e.g., meal
time, carbohydrates, health event, and bolus). In addition, for a
specific logbook record, you are able to change or add to its
attributes.
52297_07167776001.indb 214 10/20/14 11:19 AM

12
215
NOTE
jDo not change your therapy based on one individual record or test result in the logbook.
jThis chapter shows sample screens. The screens may look slightly dierent from the screens on the meter. If you have any
questions about the meter screens, contact ACCU‑CHEK Customer Care Service Center at 1‑800‑688‑4578.
jThe information in the logbook is saved when you replace the meter battery. You should check the time and date after
replacing the battery. For more information on changing the battery, see the Care and Maintenance chapter of this user’s
manual.
jIt is very important to have the correct time and date set. Having the correct time and date setting helps ensure accurate
interpretation of information by you and your healthcare professional.
jOnce 2,000 records are in the logbook, adding a new record causes the oldest logbook record to be deleted.
jControl results are stored in the meter, but cannot be reviewed in the logbook. Control results can be reviewed using a
computer with compatible software.
jBefore reviewing logbook records or control results on a PC, the stored logbook records must first be transferred to a PC
running a compatible software application. For product availability, contact ACCU‑CHEK Customer Care Service Center at
1‑800‑688‑4578.
jControl results are not used in any report or graph on the meter.
52297_07167776001.indb 215 10/20/14 11:19 AM
216
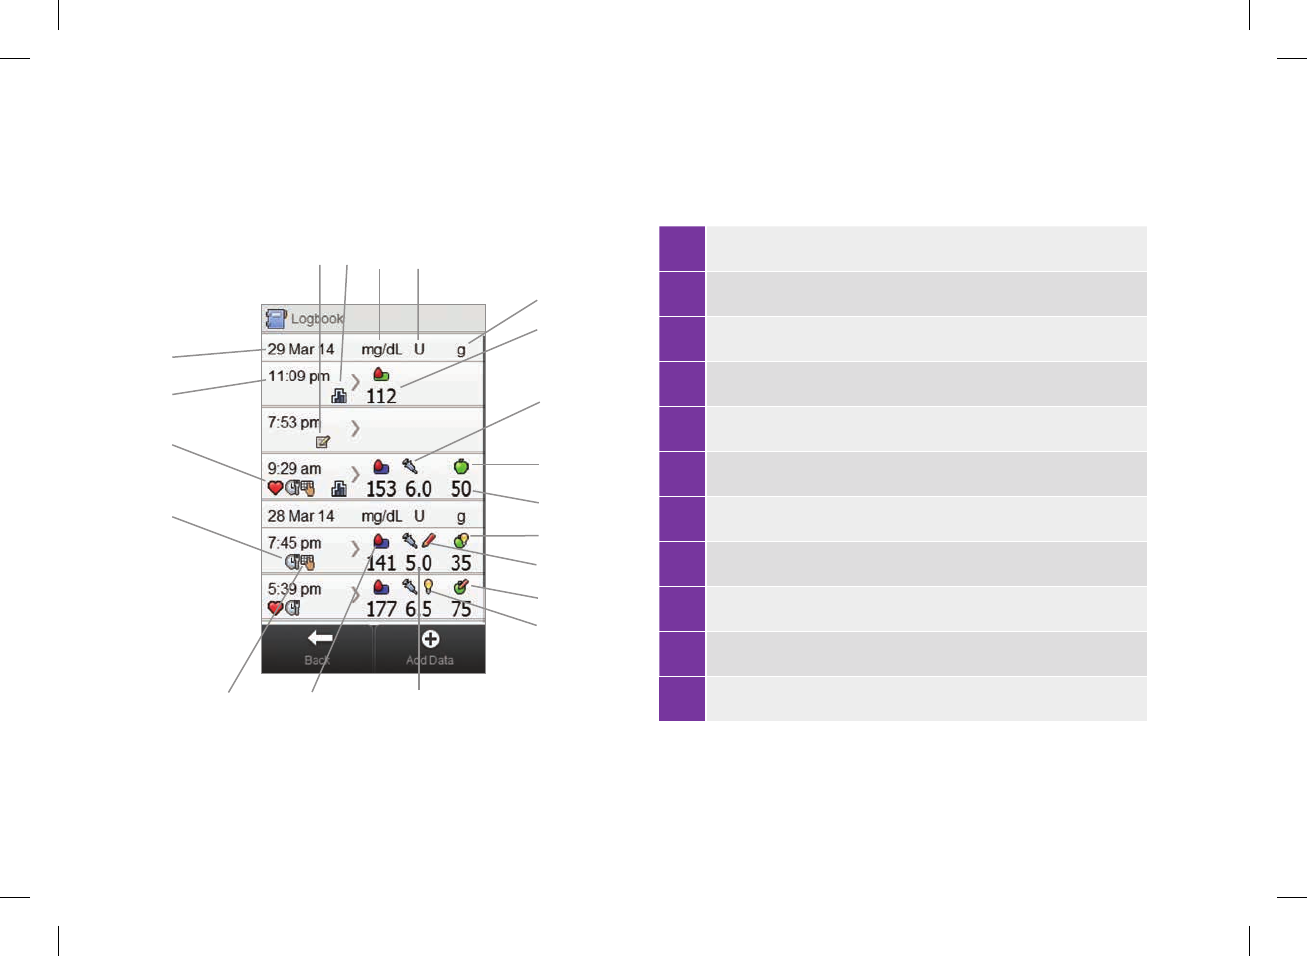
12.2.1 Understanding the Logbook
1 Meal time icon
2 Health event icon
3 Time of record
4 Date of record
5 Quick Notes icon
6 Basal icon
7 Indicates bG column
8 Indicates bolus column
9 Indicates carbohydrate column
10 Blood glucose result
11 Bolus type icon
5 6
4
3
2
1
87
I
F
G
JK
C
D
E
9
A
H
B
52297_07167776001.indb 216 10/20/14 11:19 AM
12
217
NOTE
The Logbook screen displays the records in the order in
which they occurred with the most recent record shown
on top.
12 Carbohydrates icon
13 Carbohydrates amount
14 Carbohydrates advice accepted icon
15 Bolus advice not accepted icon
16 Carbohydrates advice not accepted icon
17 Bolus advice accepted icon
18 Bolus amount
19 bG value range icon
20 Note icon
52297_07167776001.indb 217 10/20/14 11:19 AM
218
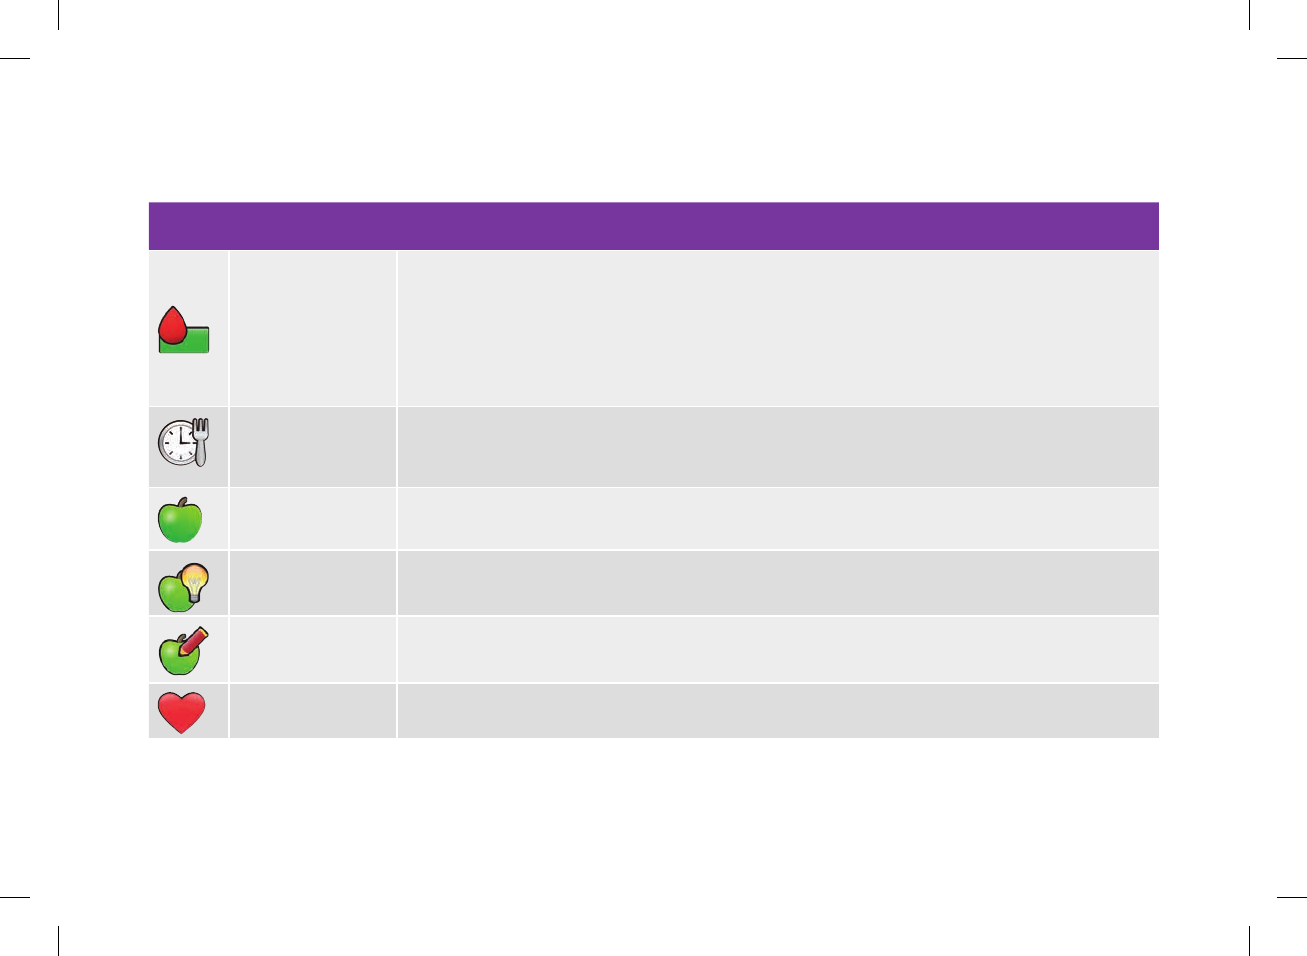
Icon descriptions
Icon Icon name Description
bG Value Range
Indicator
Icon background color indicates where the blood glucose result falls within the target range. The background
colors of this icon represent:
jGreen: within target range
jYellow: below target range
jRed: hypo
jBlue: above target range or hyper
Meal time Icon is displayed when information exists for this record regarding meal time.
Carbohydrates Icon is displayed when information exists for this record regarding carbohydrates.
Carbohydrates advice
accepted
Icon is displayed when the carbohydrate amount from the bolus advice recommendation hypo warning screen
was used.
Carbohydrates advice
not accepted
Icon is displayed when the carbohydrate amount from the bolus advice recommendation hypo warning screen
was changed.
Health event Icon is displayed when information exists for this record regarding health events.
52297_07167776001.indb 218 10/20/14 11:19 AM
12
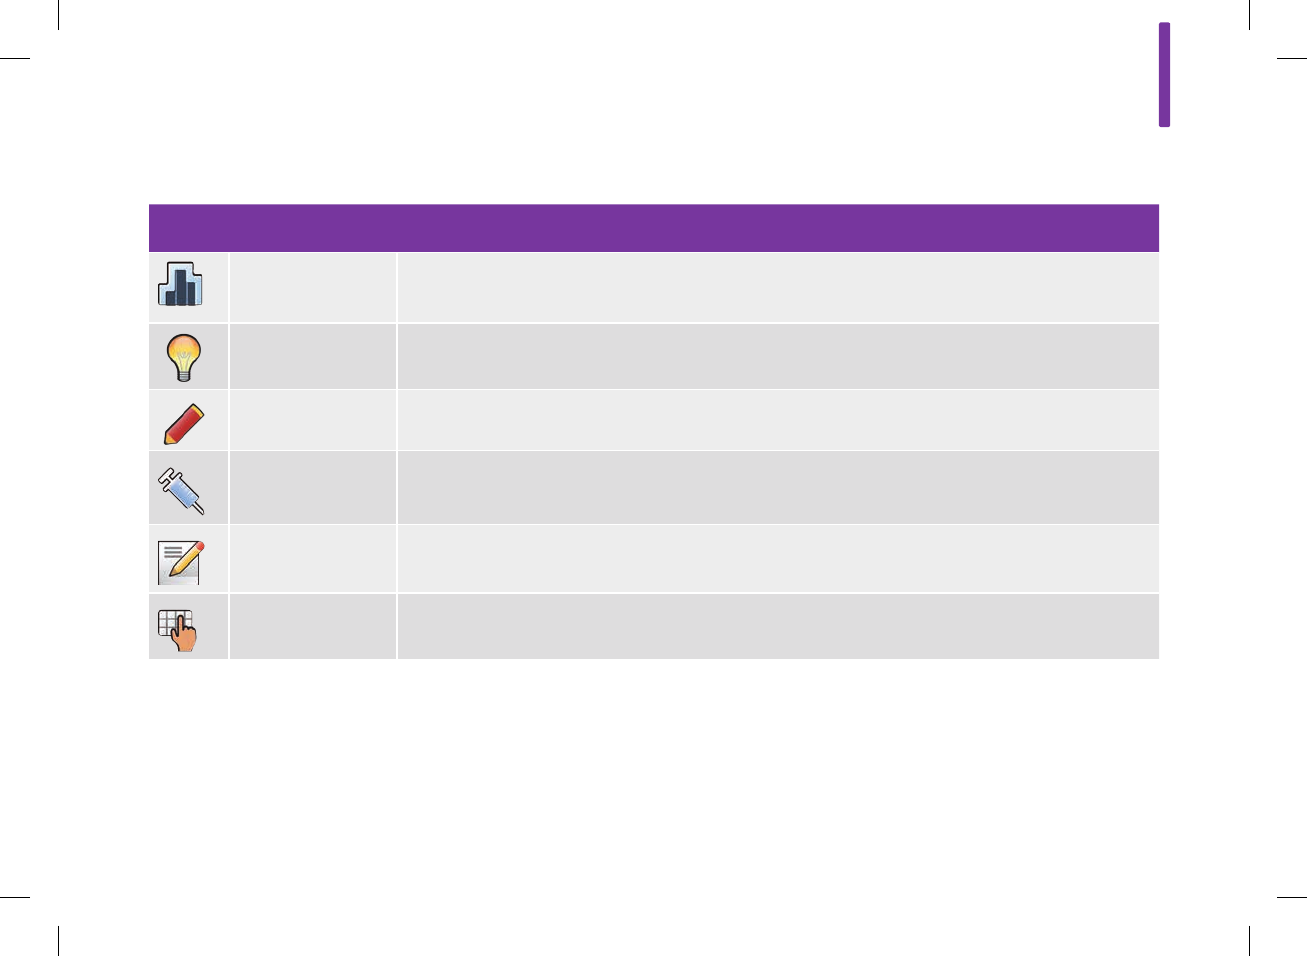
219
Icon Icon name Description
Basal insulin Basal insulin entered into your logbook record.
Bolus advice accepted Bolus advice recommendation from the meter was accepted.
Bolus advice not
accepted Bolus advice recommendation from the meter was changed prior to delivery.
Bolus manually
delivered using pen/
syringe
Bolus delivered using pen/syringe.
Quick Notes Icon is displayed when informaiton exists for this record regarding Quick Notes.
Note Icon is displayed when information exists for this record regarding a Note.
52297_07167776001.indb 219 10/20/14 11:19 AM
220
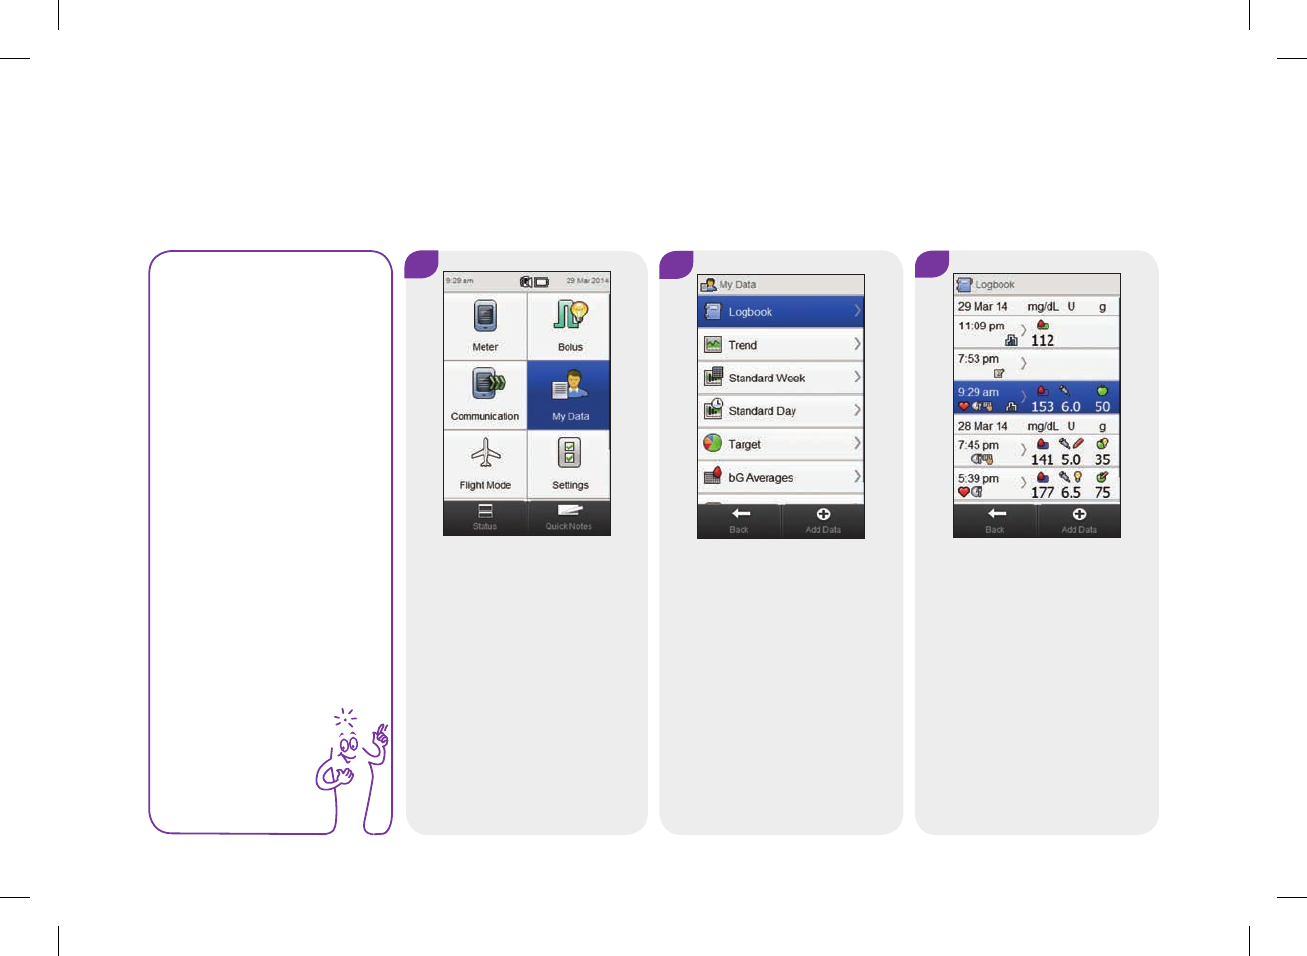
12.2.2 Viewing and Adjusting Logbook Data
NOTE
jLogbook data that
has been used for
bolus advice (with
the exception of
notes) cannot be
adjusted.
jBlood glucose
results cannot be
adjusted.
12
From the Main Menu, select
My Data.
Select Logbook.
Main Menu > My Data > Logbook
3
Select the desired logbook
record.
For a logbook record with
Quick Notes only, go to
Step 5.
52297_07167776001.indb 220 10/20/14 11:19 AM
12
221
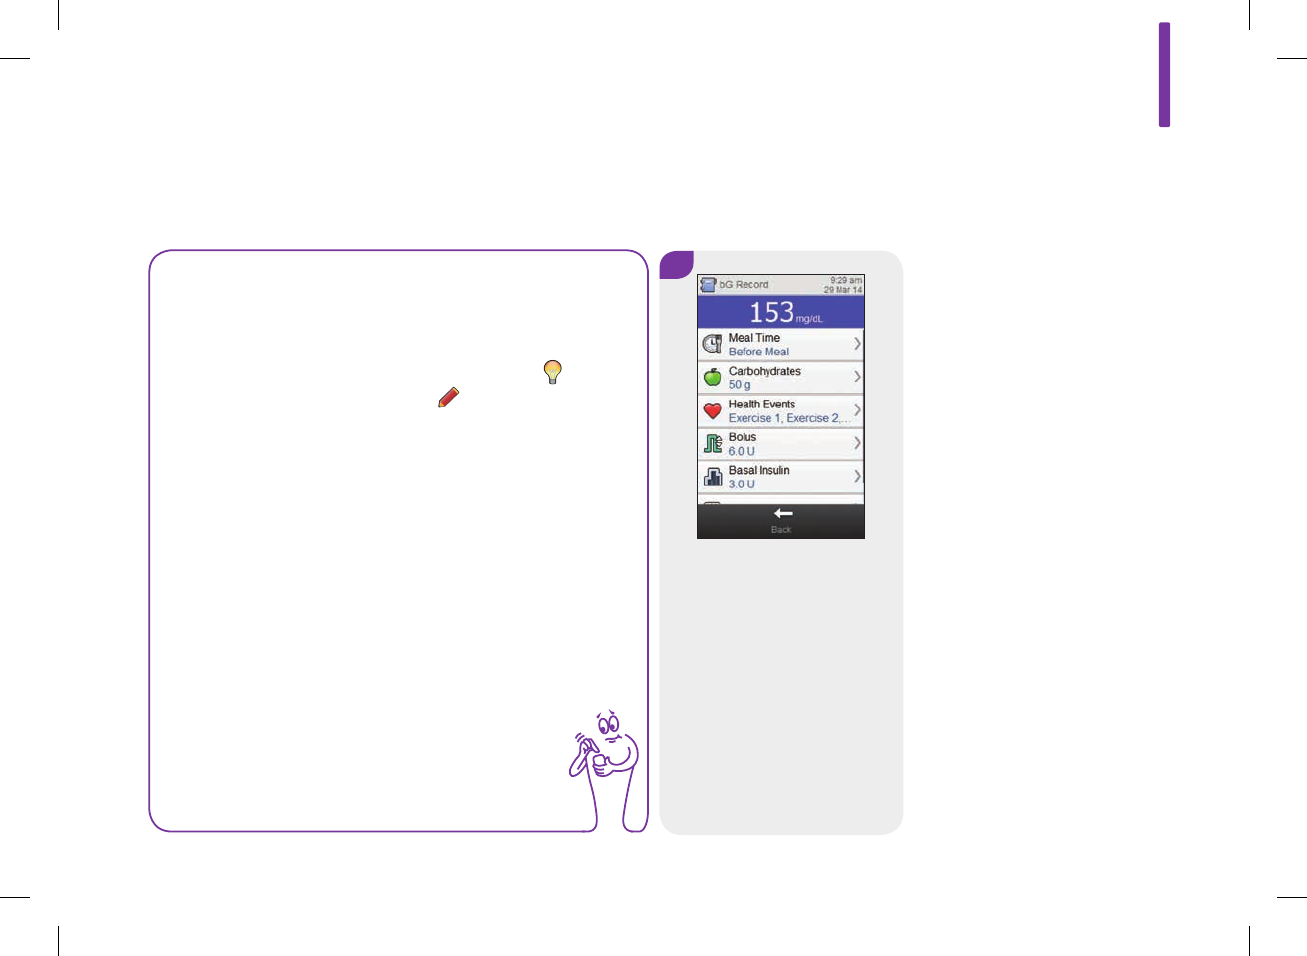
NOTE
jScroll down to view additional records if they are present.
jLogbook records which have been used for bolus advice
contain either the Bolus Advice Accepted icon: or the
Bolus Advice Not Accepted icon: . These records are
locked and can be viewed but not adjusted.
jLocked logbook records do not display the Save button at
the bottom of the individual data item screens. Only the
Back button is displayed.
4
To view and adjust an entry,
select it and refer to the
instructions on the following
pages. When you are finished,
select Back to return to the
My Data menu.
52297_07167776001.indb 221 10/20/14 11:19 AM
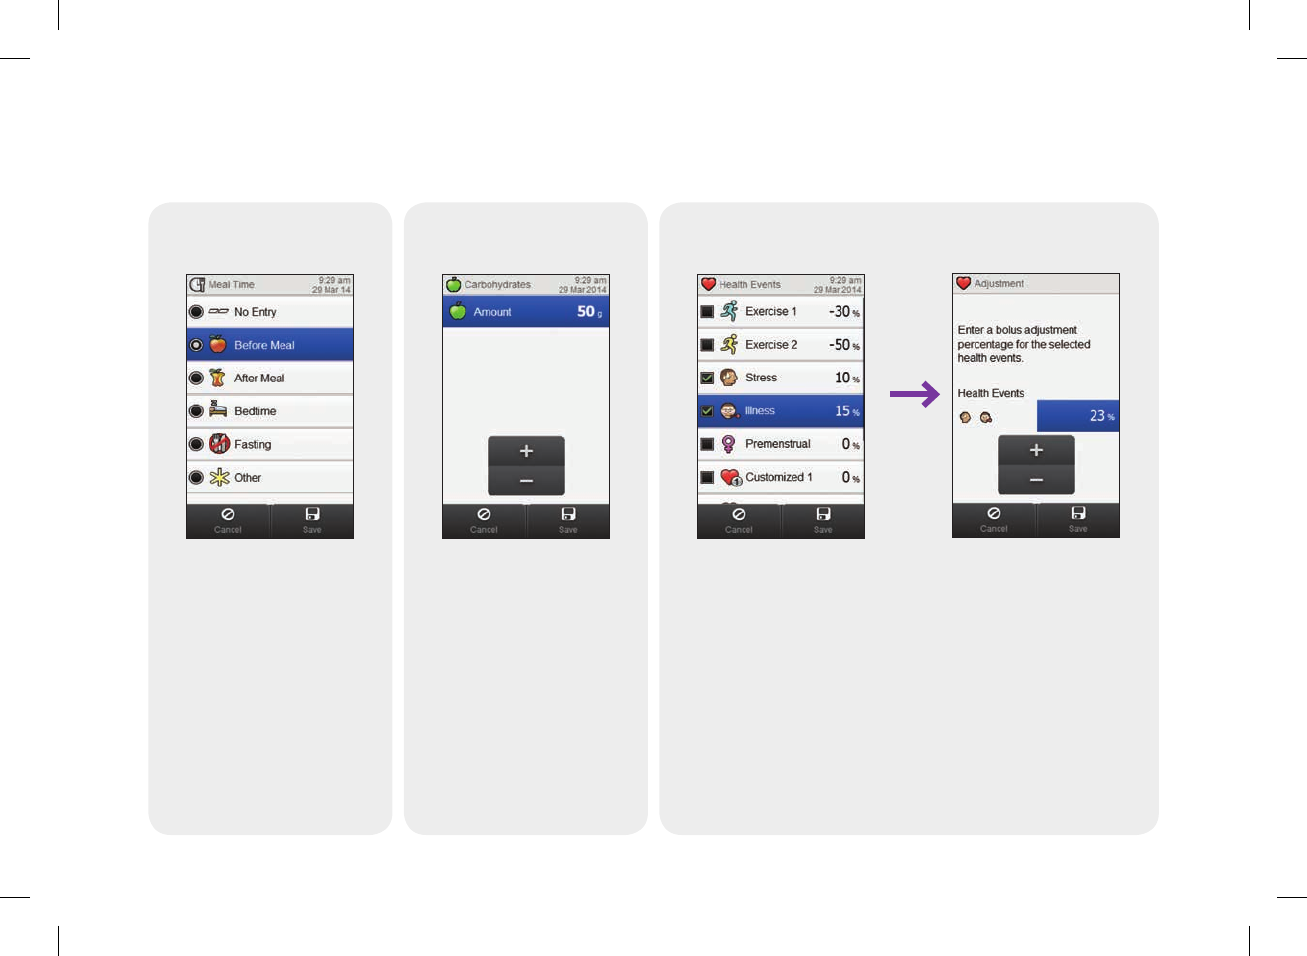
222
Screens for viewing and adjusting entries in the logbook
Meal Time
Choose applicable meal time.
Select Save.
Carbohydrates
Set the amount of
carbohydrates consumed.
Select Save.
Health Events
Choose up to 4 health events.
Select Save.
If bolus advice is turned on
and multiple health events
have been chosen, this
screen is displayed. Set a
single, summarized health
event percentage to cover the
impact of the chosen health
events. Select Save.
52297_07167776001.indb 222 10/20/14 11:19 AM
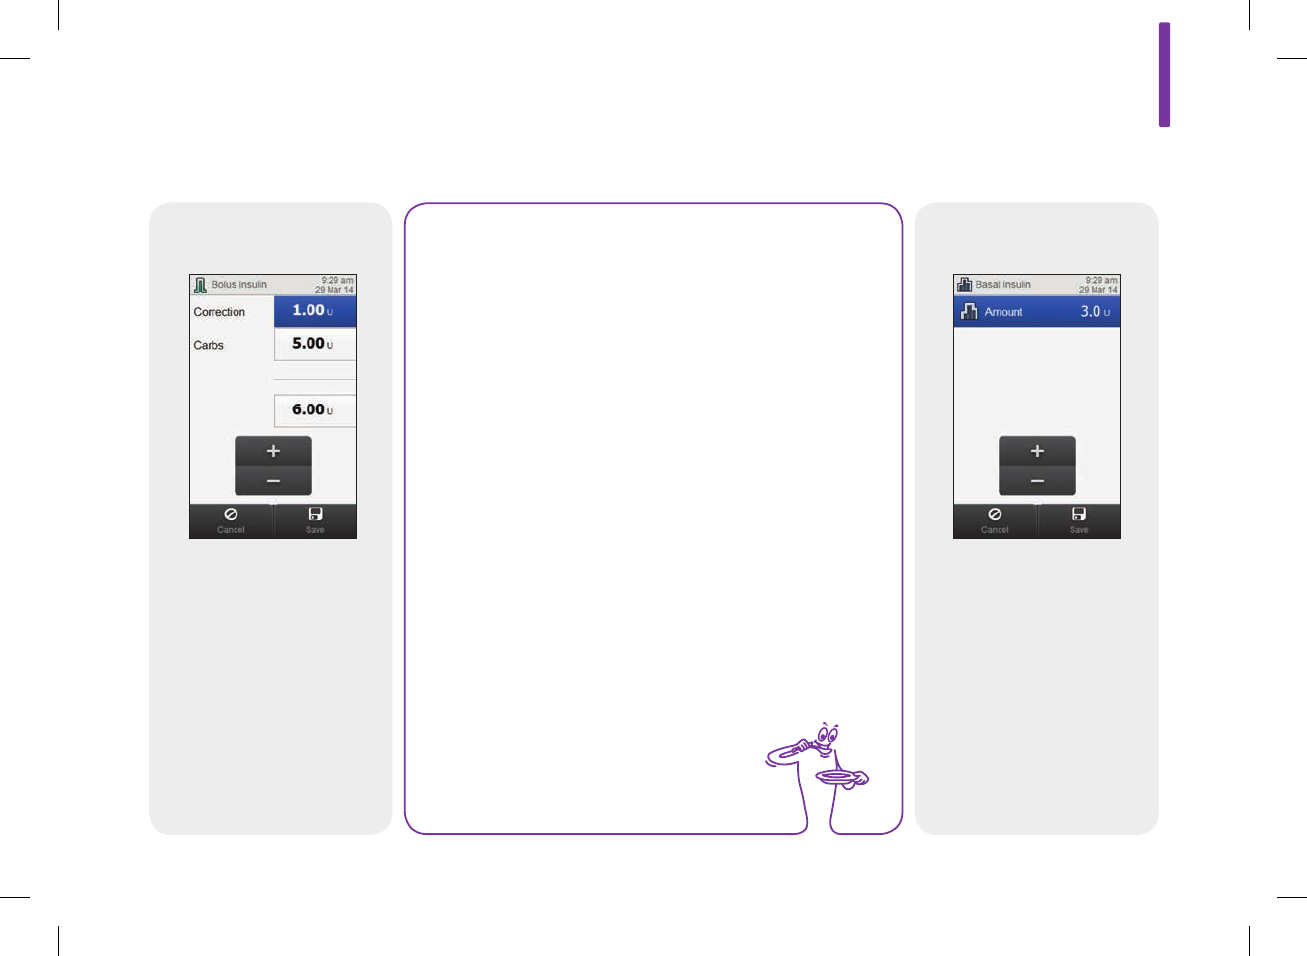
12
223
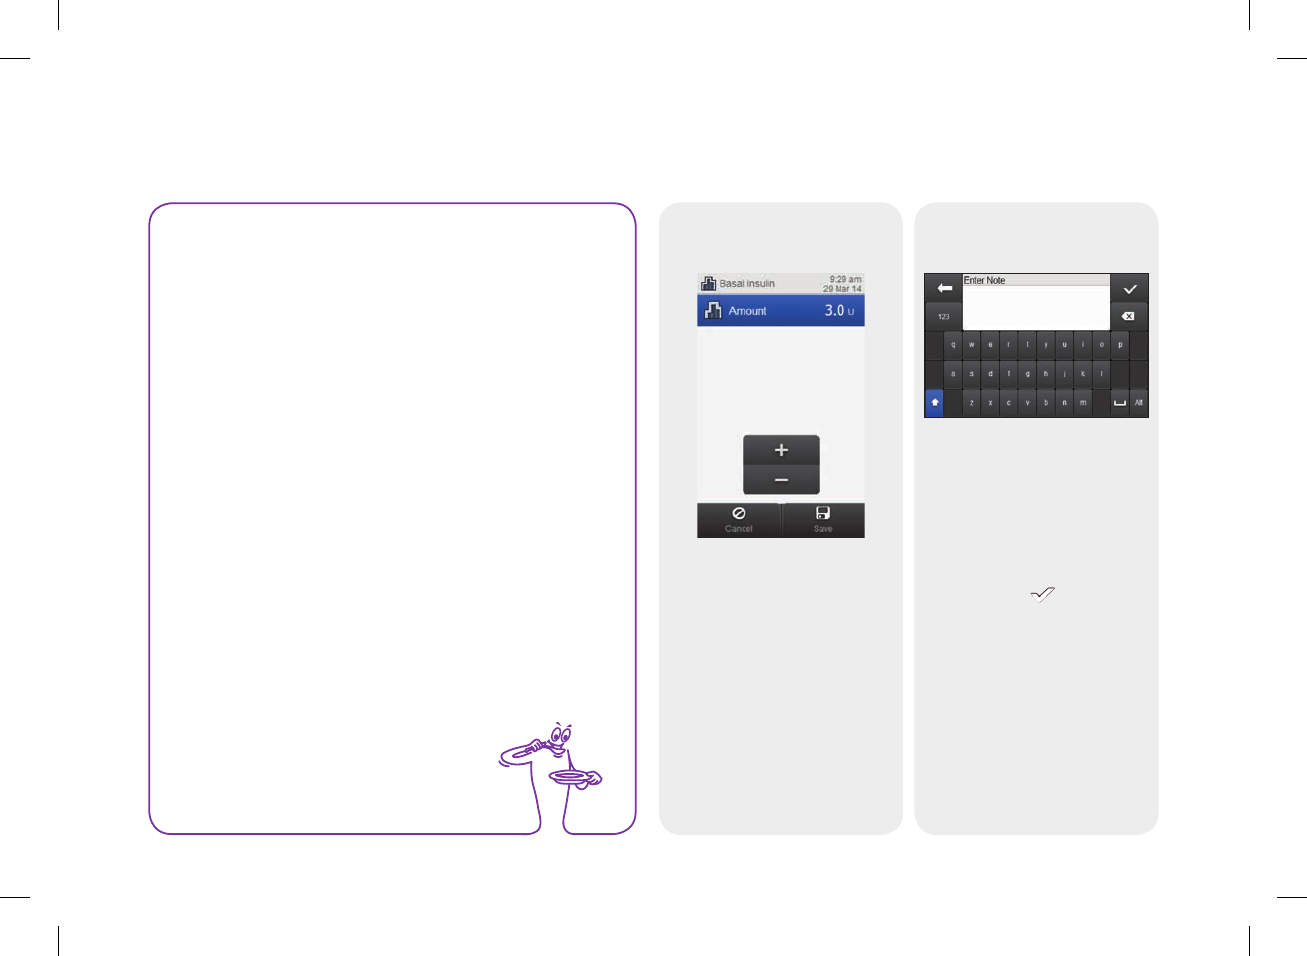
Basal insulin
Set the basal insulin amount.
Select Save.
Set bolus amounts.
Select Save.
NOTE
If a Carbohydrate Bolus is entered and no Carbohydrate
Amount has been entered (Carbohydrates displays
No Entry on the bG Record screen in Step 4), you are
prompted to enter an amount for carbohydrates. An
amount is not required, but the more complete the data
the more accurate any future bolus insulin
recommendations are when using bolus advice.
Bolus
52297_07167776001.indb 223 10/20/14 11:19 AM
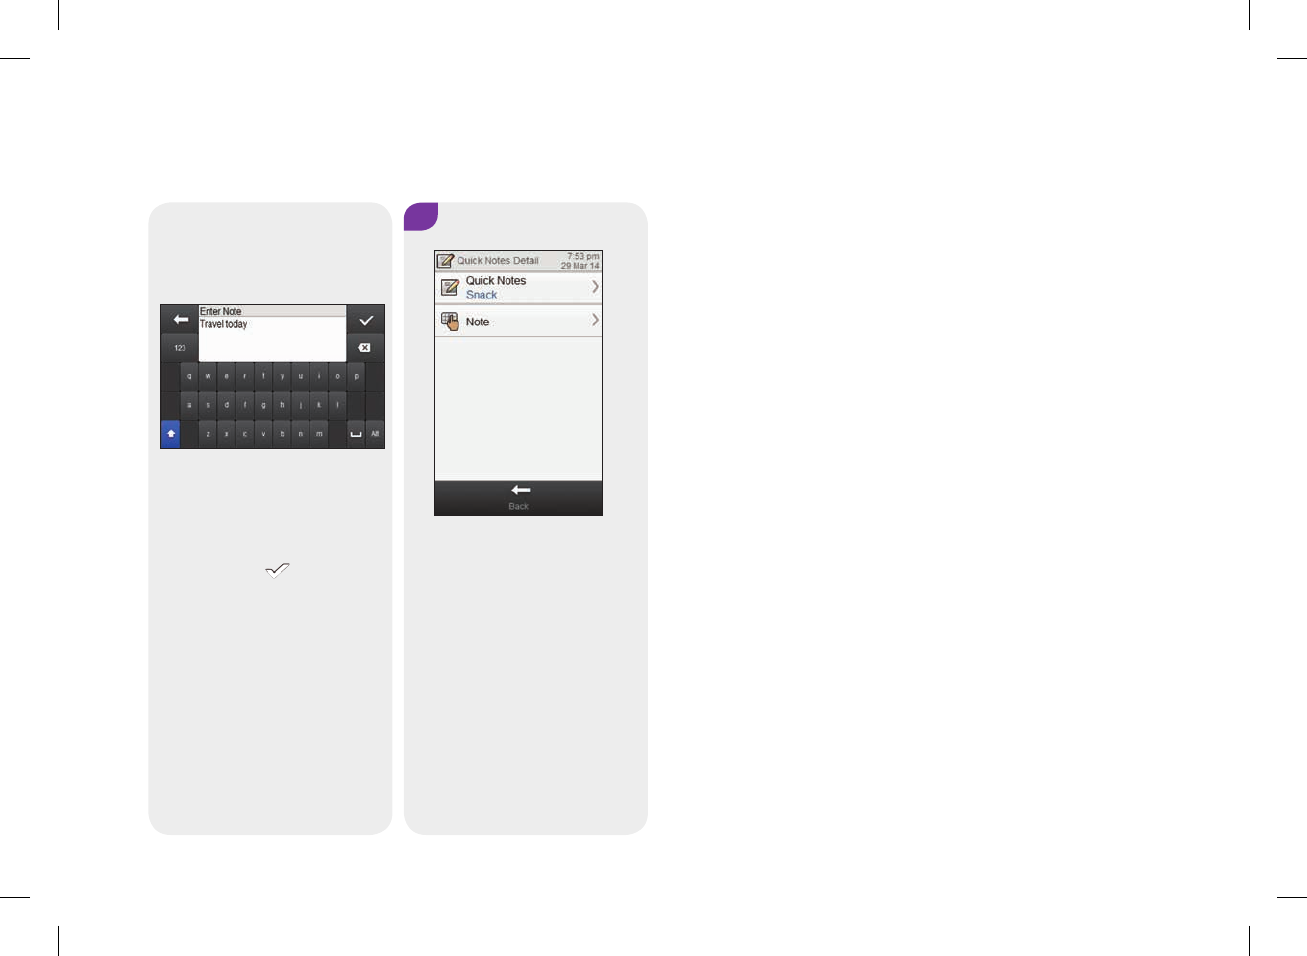
224
Note
Type a note to save with this
record. Select .
5
Select Quick Notes to make
an update. Select Note to type
a note using the keyboard.
Select Back to return to
Step 3.
52297_07167776001.indb 224 10/20/14 11:19 AM
12
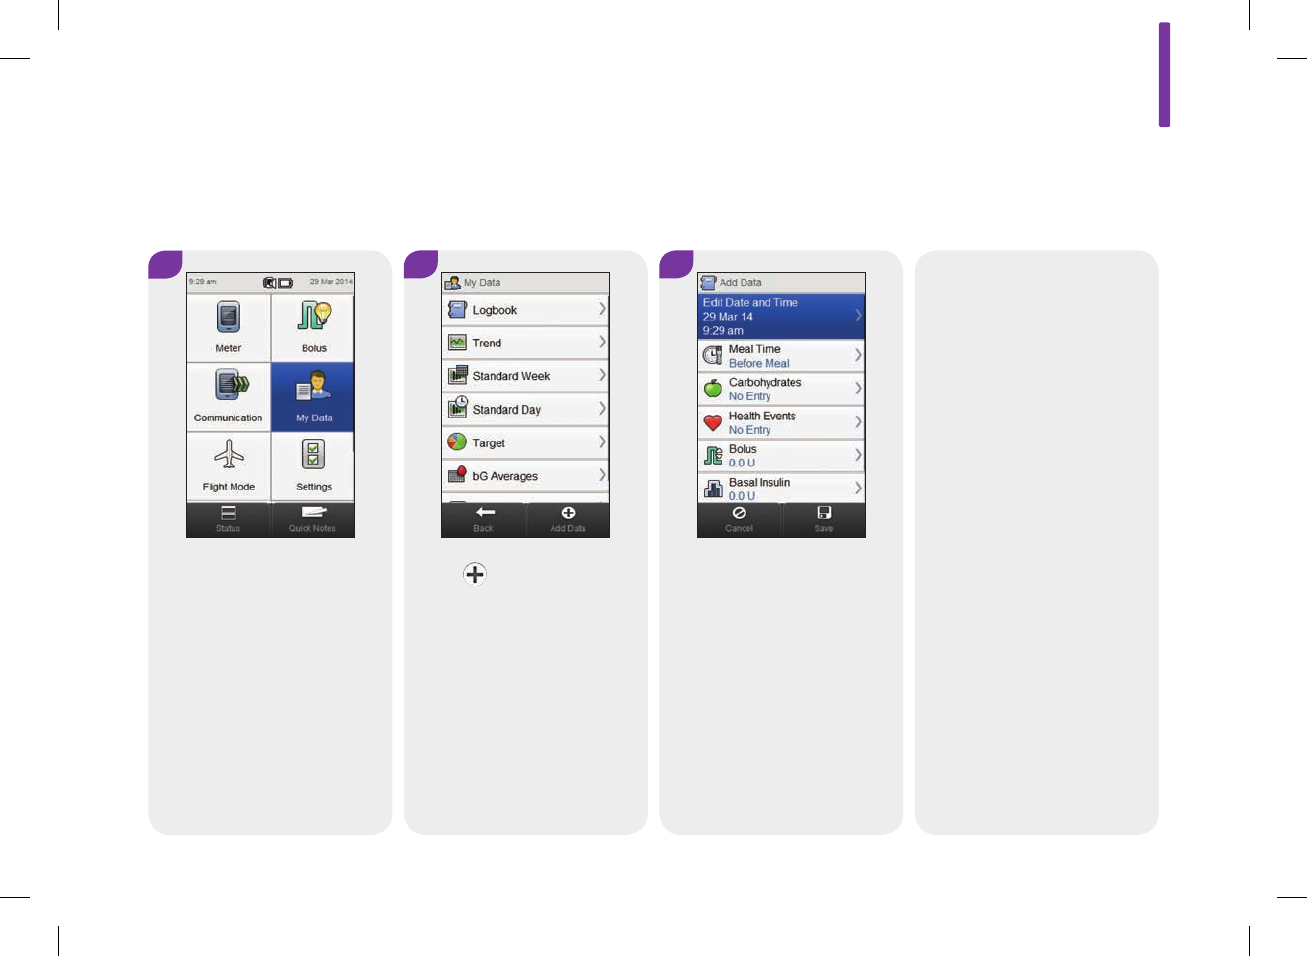
225
12 3
From the Main Menu, select
My Data.
Select Add Data. Select any of the options on
the Add Data screen and refer
to the instructions on the
following pages.
12.2.3 Adding New Data to the Logbook
Main Menu > My Data > Logbook
When you are finished, select
Save to save your entry and
return to the My Data menu.
52297_07167776001.indb 225 10/20/14 11:19 AM
226
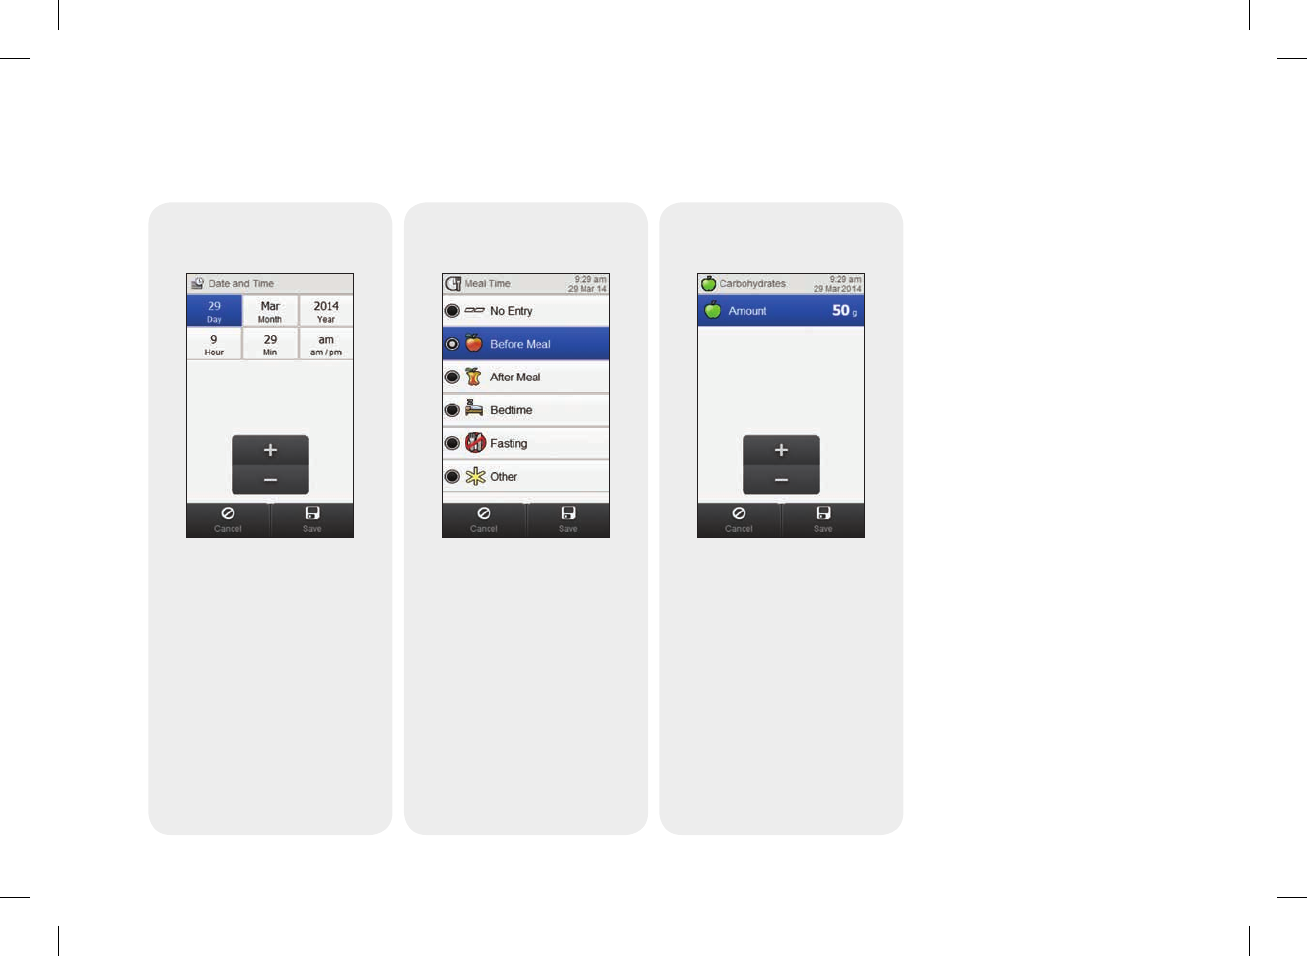
Screens for adding new data
Date and Time
Set the date and time. Select
Save.
Meal Time
Choose an applicable meal
time. Select Save.
Carbohydrates
Set the amount of
carbohydrates consumed.
Select Save.
52297_07167776001.indb 226 10/20/14 11:19 AM
12
227
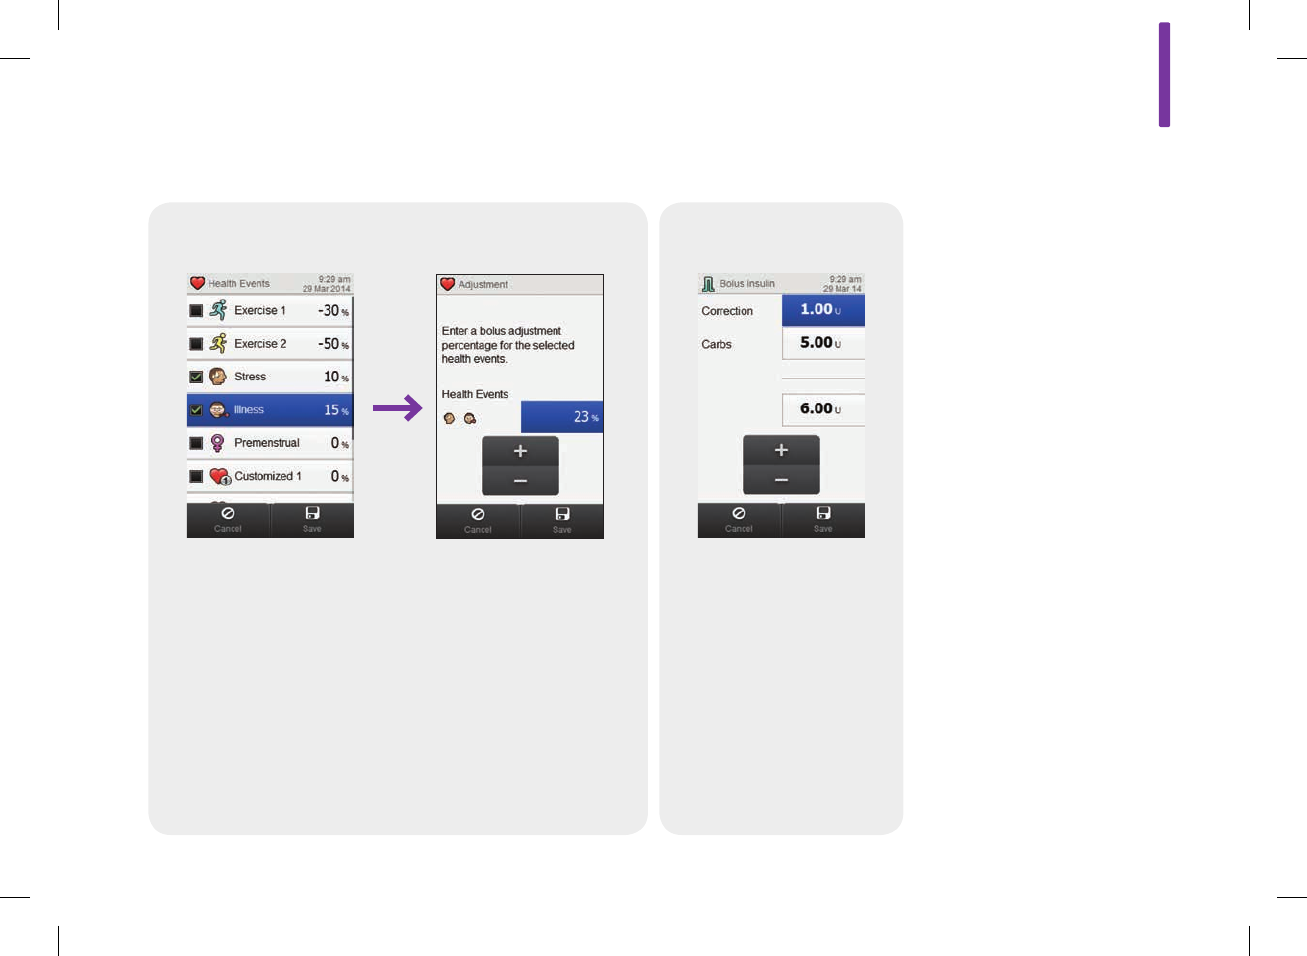
Health Events
Choose up to 4 health events.
Select Save.
Bolus
Set bolus amounts. Select
Save.
If bolus advice is turned on
and multiple health events
have been chosen, this
screen is displayed. Set a
single, summarized health
event percentage to cover the
impact of the chosen health
events. Select Save.
52297_07167776001.indb 227 10/20/14 11:19 AM
228
Basal insulin
Set the basal insulin amount.
Select Save.
Note
Type a note to save with this
record. Select .
NOTE
If a Carbohydrate Bolus is entered and no Carbohydrate
Amount has been entered (Carbohydrates displays No
Entry on the Add Data screen in Step 3), you are
prompted to enter an amount for carbohydrates. An
amount is not required, but the more complete the data
the more accurate any future bolus insulin
recommendations are when using bolus advice.
52297_07167776001.indb 228 10/20/14 11:19 AM

12
229
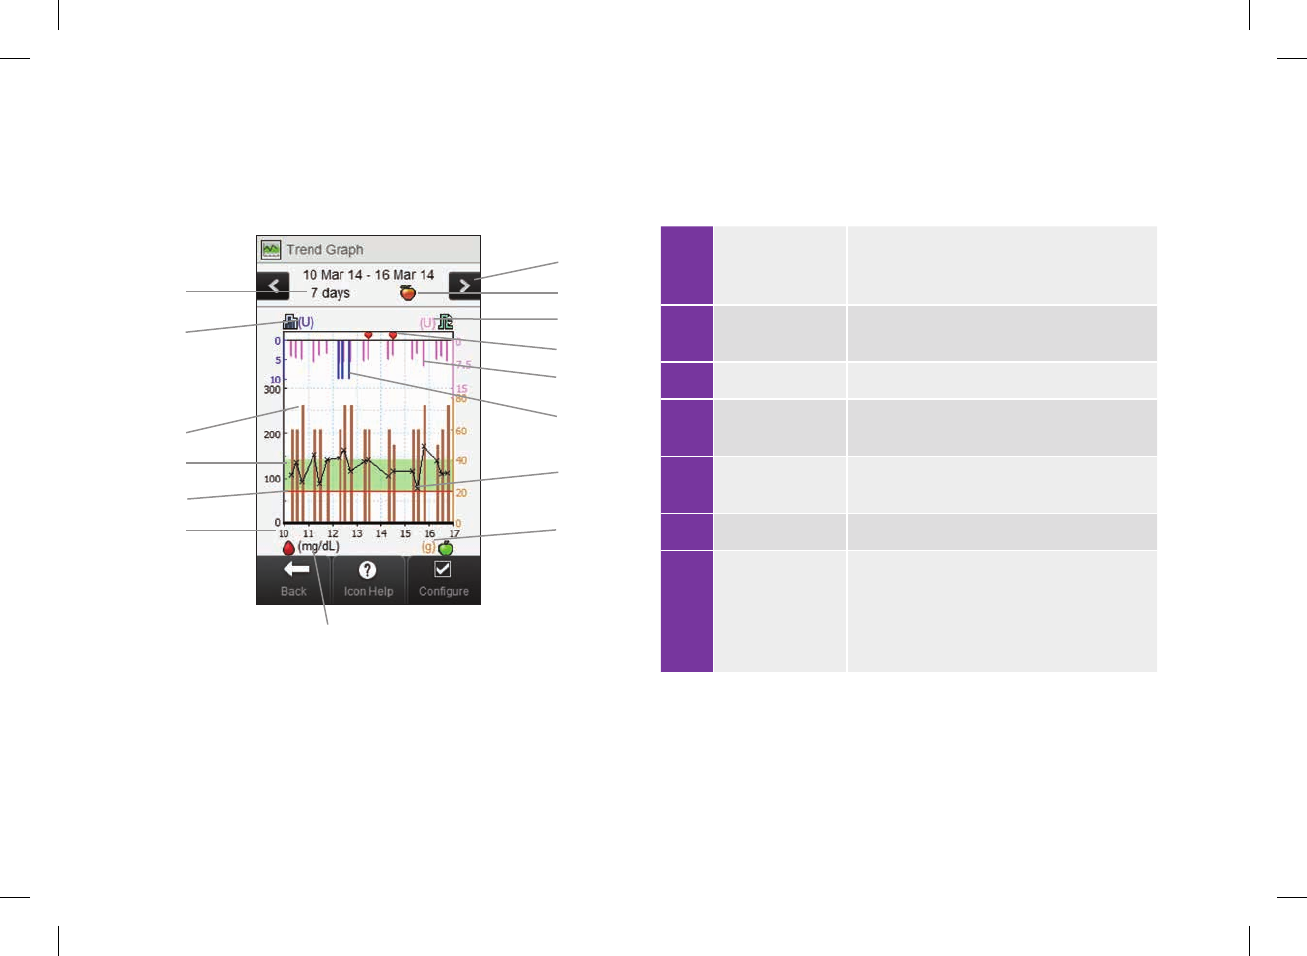
12.3 The Trend Graph
With the trend graph, the meter displays your blood glucose
trends and other information using logbook data for the time
scale and meal time you choose.
52297_07167776001.indb 229 10/20/14 11:19 AM
230
5
1
3
4
68
D
B
C
9
7
A
E
F
2
1
Times of day
or days of the
month
2 Hypo warning
limit Red horizontal line
3 Green area Indicates blood glucose target range
4 Carbohydrate
value
Brown bar: height shown is in relation to
the carbohydrate amount
5 Basal unit of
measurement
6 Time scale
7 Scroll left /
right buttons
Moves forward or back in time by the time
scale chosen. Example: For a 7‑day time
scale, selecting the scroll left icon shows
the data from the 7days before the dates
currently shown.
12.3.1 Understanding the Trend Graph
52297_07167776001.indb 230 10/20/14 11:19 AM

12
231
8 Selected meal
time
9 Bolus unit of
measurement
10 Health Event Indicates a health event exists for this
record
11 Bolus Pink bar: height shown is in relation to the
bolus insulin amount
12 Basal value Blue bar: height shown is in relation to the
basal insulin amount
13 Blood glucose
result Displayed as Xs and connected with lines
14
Carbohydrate
unit of
measurement
15
Blood glucose
unit of
measurement
16 Arrow (Not shown) Indicates blood glucose data
extends beyond screen
52297_07167776001.indb 231 10/20/14 11:19 AM

232
NOTE
jIf data is not available, the No Data Available screen is displayed.
jTrend graphs do not include corrupt results or control results.
jOn the upper right side of the graph, the maximum bolus amount indicator is the pink tick mark with the largest value
shown beside it (on this example screen: 15U). The purpose of this indicator is to adjust the scale for the top portion of
the graph based on the single biggest bolus insulin amount (callout #11) delivered for the time chosen (callout #6). The
maximum bolus amount indicator values available on the meter are 1, 5, 15, 30, and 60U. For example, if the single
biggest amount is 8U, then the meter scales the upper graph to be between 0 and 15U.
52297_07167776001.indb 232 10/20/14 11:19 AM

12
233
NOTE
jOn the lower right side of the graph, the maximum carbohydrates amount indicator is the brown tick mark with the largest
value shown beside it (on this example screen: 80g). The purpose of this indicator is to adjust the scale for the bottom
portion of the graph based on the single biggest carbohydrate amount (callout #4) for the time chosen (callout #6). The
maximum carbohydrates amount indicator values available on the meter are 40, 80, 120, 160, 200, and 240g, or the
equivalent scale for BE, KE, or CC. For example, if the single biggest carbohydrates amount is 76g, then the meter scales
the lower graph to be between 0 and 80g.
jOn the upper left side of the graph, the maximum basal amount indicator is the blue tick mark with the largest value
shown beside it (on this example screen: 10U). The purpose of this indicator is to adjust the scale for the top portion of
the graph based on the single biggest basal insulin amount (callout #12) delivered for the time chosen (callout #6). The
maximum basal amount indicator values available on the meter are 1, 2, 5, 10, 20, and 40U. For example, if the single
biggest amount is 9U, then the meter scales the upper graph to be between 0 and 10U.
52297_07167776001.indb 233 10/20/14 11:19 AM
234
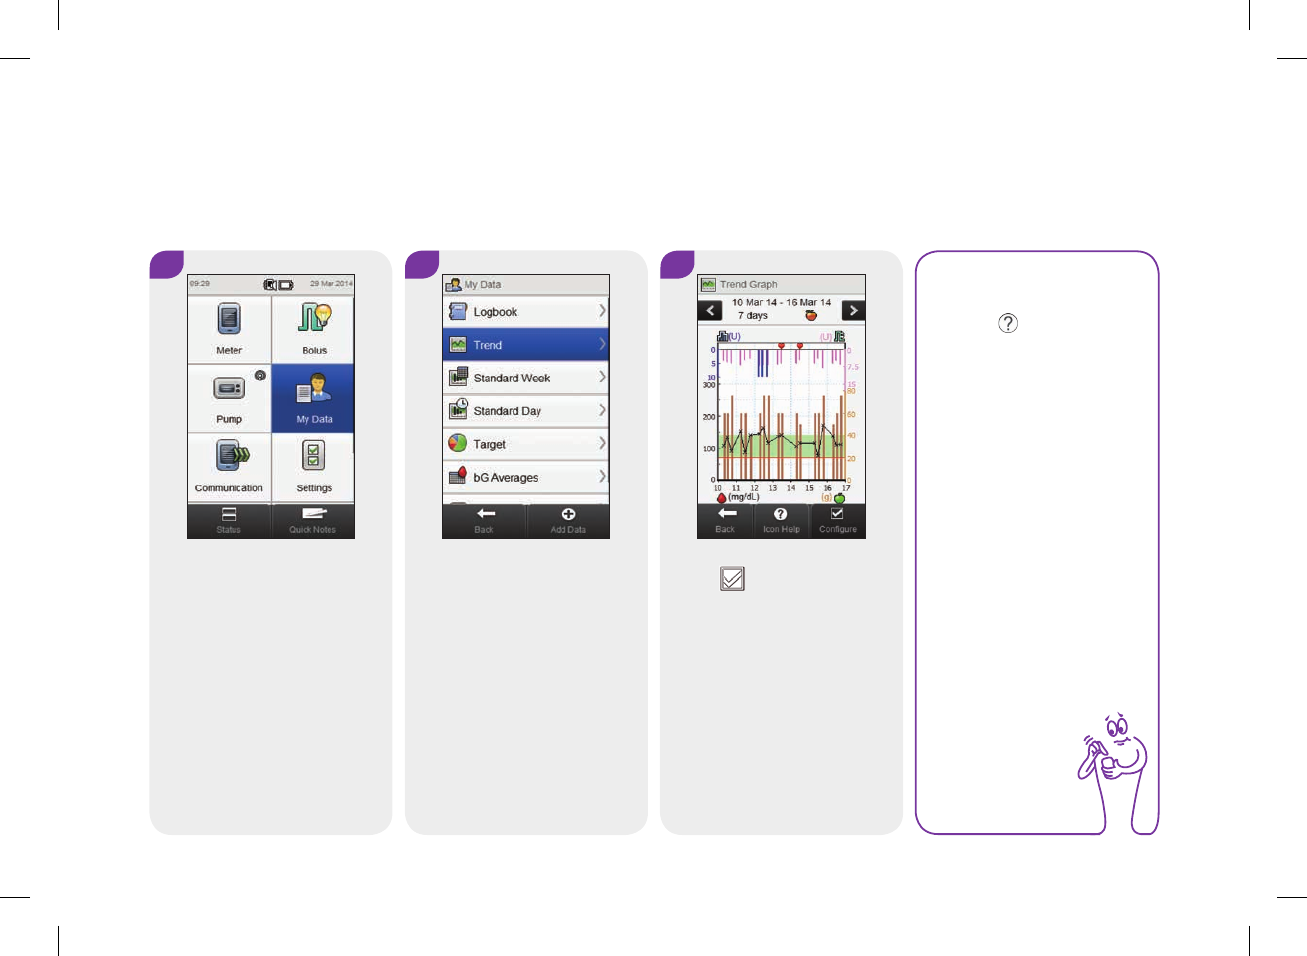
12.3.2 Viewing the Trend Graph
Main Menu > My Data > Trend
1 2 3
From the Main Menu, select
My Data.
Select Trend. Select Configure to
change how the trend graph
displays your trend data.
NOTE
Select to view a list
of trend icons and their
explanations.
52297_07167776001.indb 234 10/20/14 11:19 AM
12
235
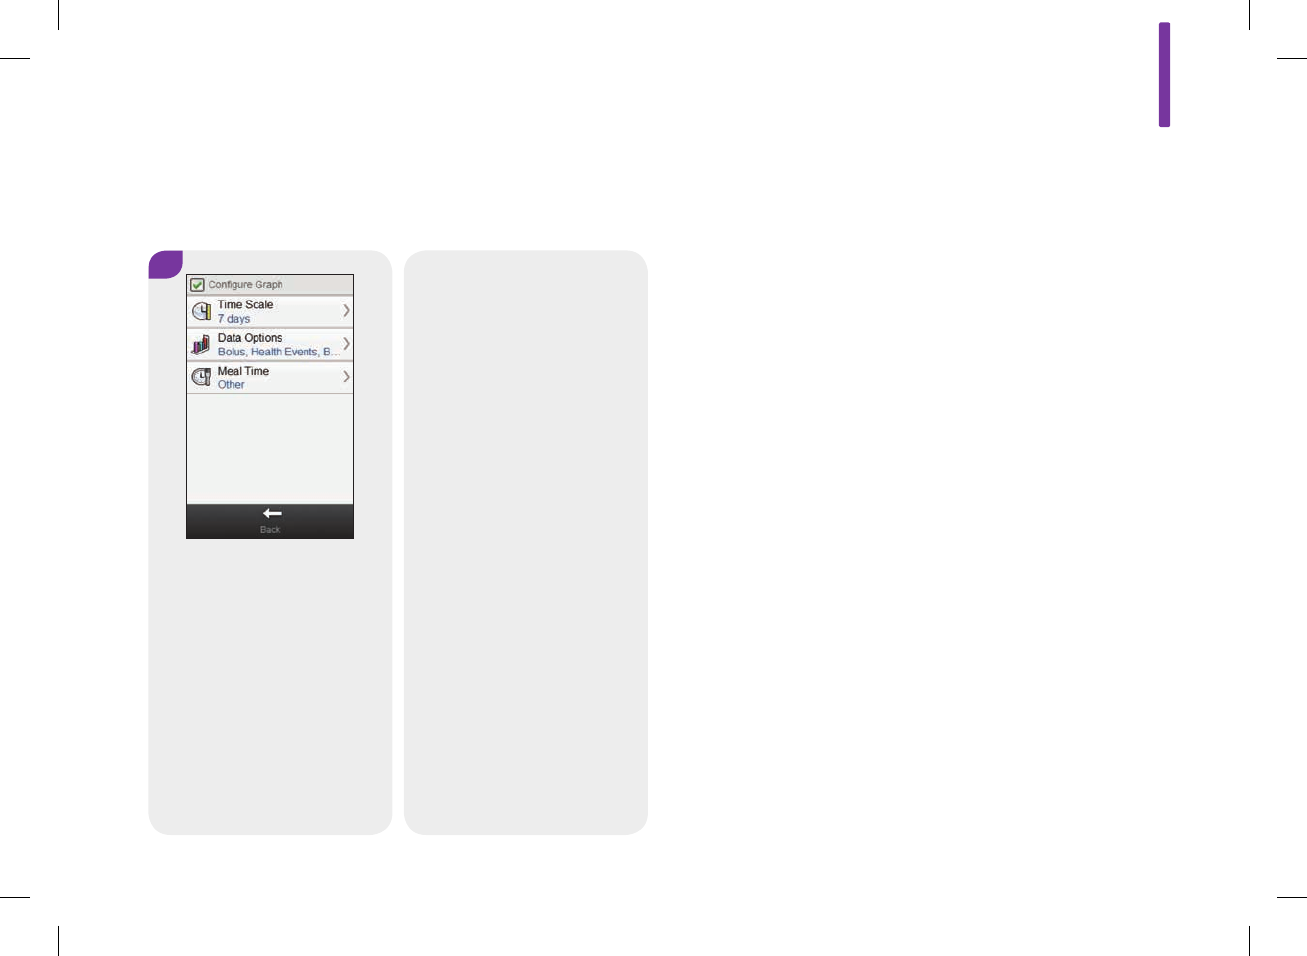
4
Select any of the options on
the Configure Graph screen
and refer to the instructions
in the rest of this section.
When you are finished, select
Back to return to the trend
graph displaying your data in
the manner you selected.
52297_07167776001.indb 235 10/20/14 11:19 AM
236
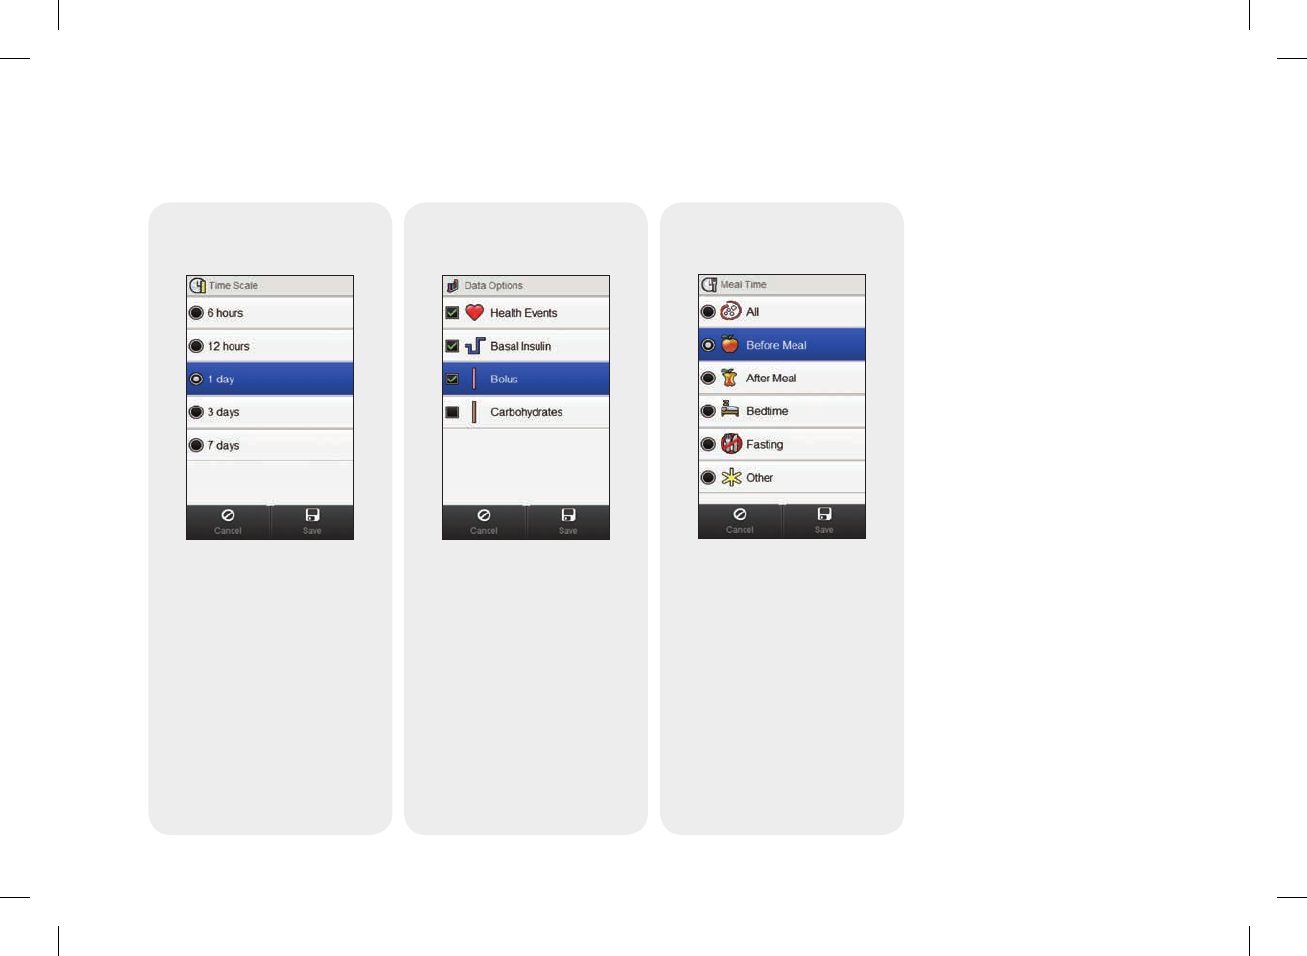
Screens for configuring the trend graph
Time Scale
Select the time scale.
Select Save.
Data Options
Select 1 or more data options.
Select Save.
Meal Time
Select the meal time.
Select Save.
52297_07167776001.indb 236 10/20/14 11:19 AM

12
237
12.4 The Standard Week
NOTE
The standard deviation measures how spread out the
blood glucose results are from the blood glucose average.
A high standard deviation means the blood glucose results
vary greatly around the blood glucose average.
With the Standard Week graph, the meter displays your blood
glucose averages, number of tests, and standard deviations for
each day of an average week, calculated using logbook data from
the time scale and meal time you choose.
52297_07167776001.indb 237 10/20/14 11:19 AM
238
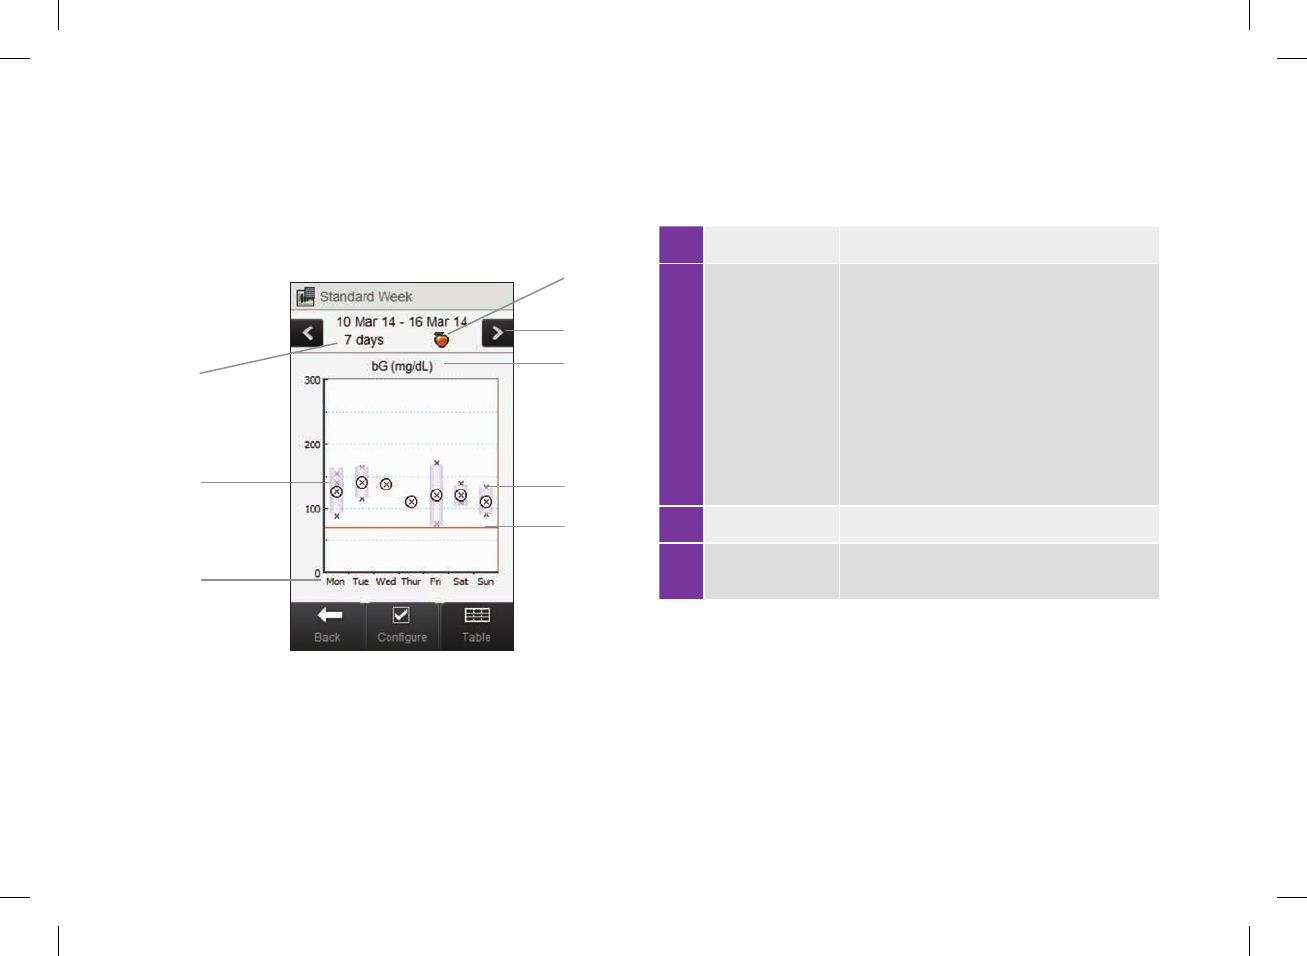
12.4.1 Understanding the Standard Week Graph and Table
Standard Week Graph
1 Days of week
2 Box for each
day
jThe top of the box indicates the standard
deviation above the average and the
bottom of the box indicates the standard
deviation below the average. The box is
not displayed if there is not enough data
to determine standard deviation.
jThe top of the box is open if the standard
deviation is off the top of the graph.
jBox and “X” is not displayed for a day if
no data is found.
3 Time scale
4 Meal time
selection
1
2
3
4
5
6
7
8
52297_07167776001.indb 238 10/20/14 11:19 AM

12
239
5 Scroll left /
right buttons
Moves forward or back in time by the time
scale chosen. Example: For a 7‑day time
scale, selecting the scroll left icon shows
the data from the 7days before the dates
currently shown.
6
Blood glucose
unit of
measurement
7 X
jIndicates each blood glucose result.
j“X” in the center of a circle indicates the
average of all blood glucose results for
the selected criteria.
8 Hypo warning
limit Red horizontal line
9 Arrow (Not shown) Indicates that there is data o
the top of the graph.
52297_07167776001.indb 239 10/20/14 11:19 AM
240
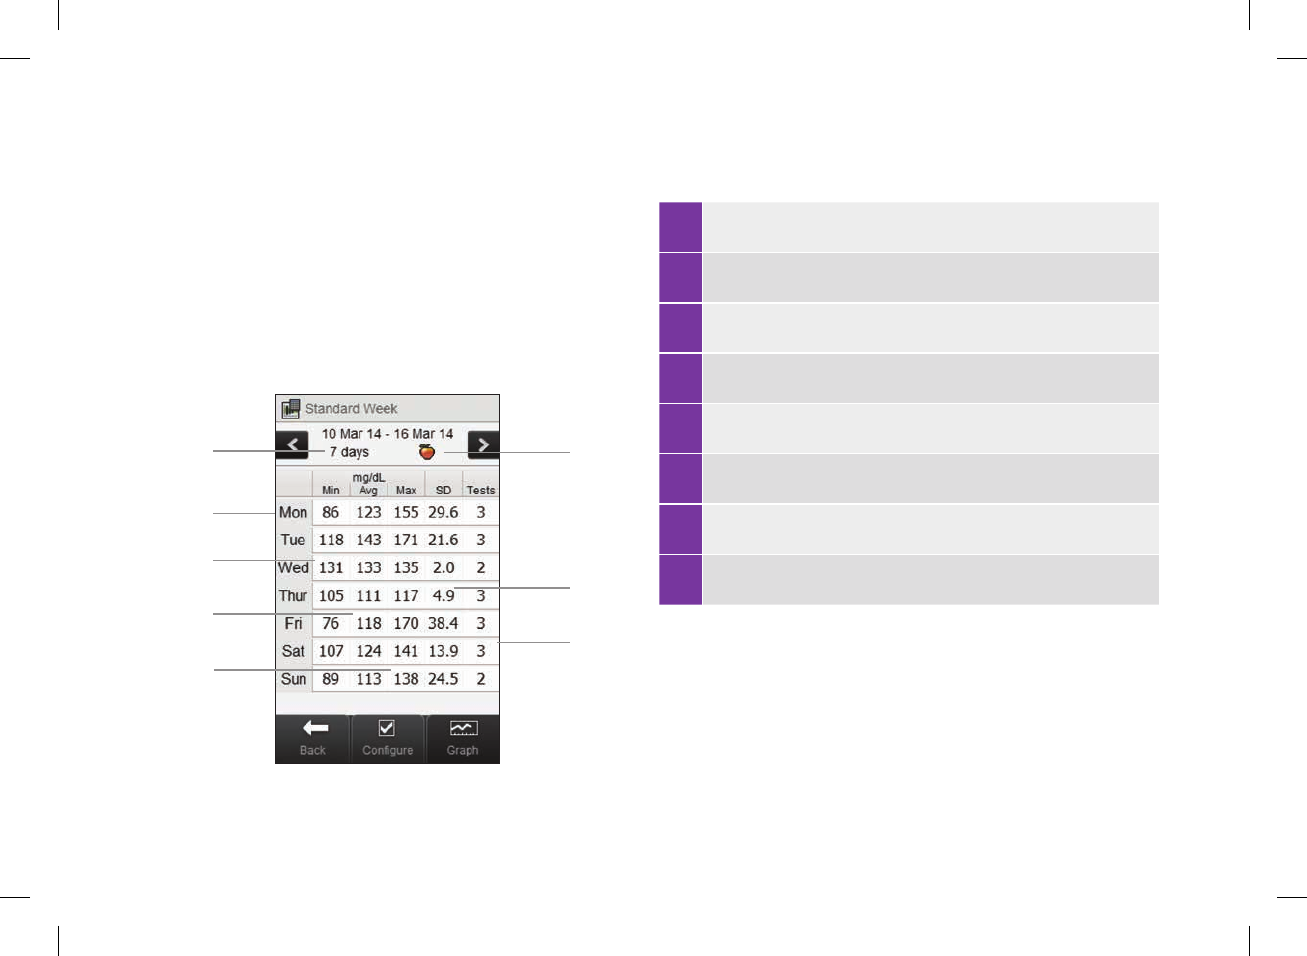
1 Highest blood glucose result for each day of the week
2 Blood glucose average for each day of the week
3 Lowest blood glucose result for each day of the week
4 Day of week
5 Time scale
6 Meal time selection
7 Standard deviation (SD) for each day of the week
8 Number of tests for each day of the week
Standard Week Table
Select Table to switch to the standard week table. The standard
week table displays the same data as the standard week graph in
table format. To return to the standard week graph from the
standard week table, select Graph.
5
4
3
2
18
7
6
52297_07167776001.indb 240 10/20/14 11:19 AM
12
241
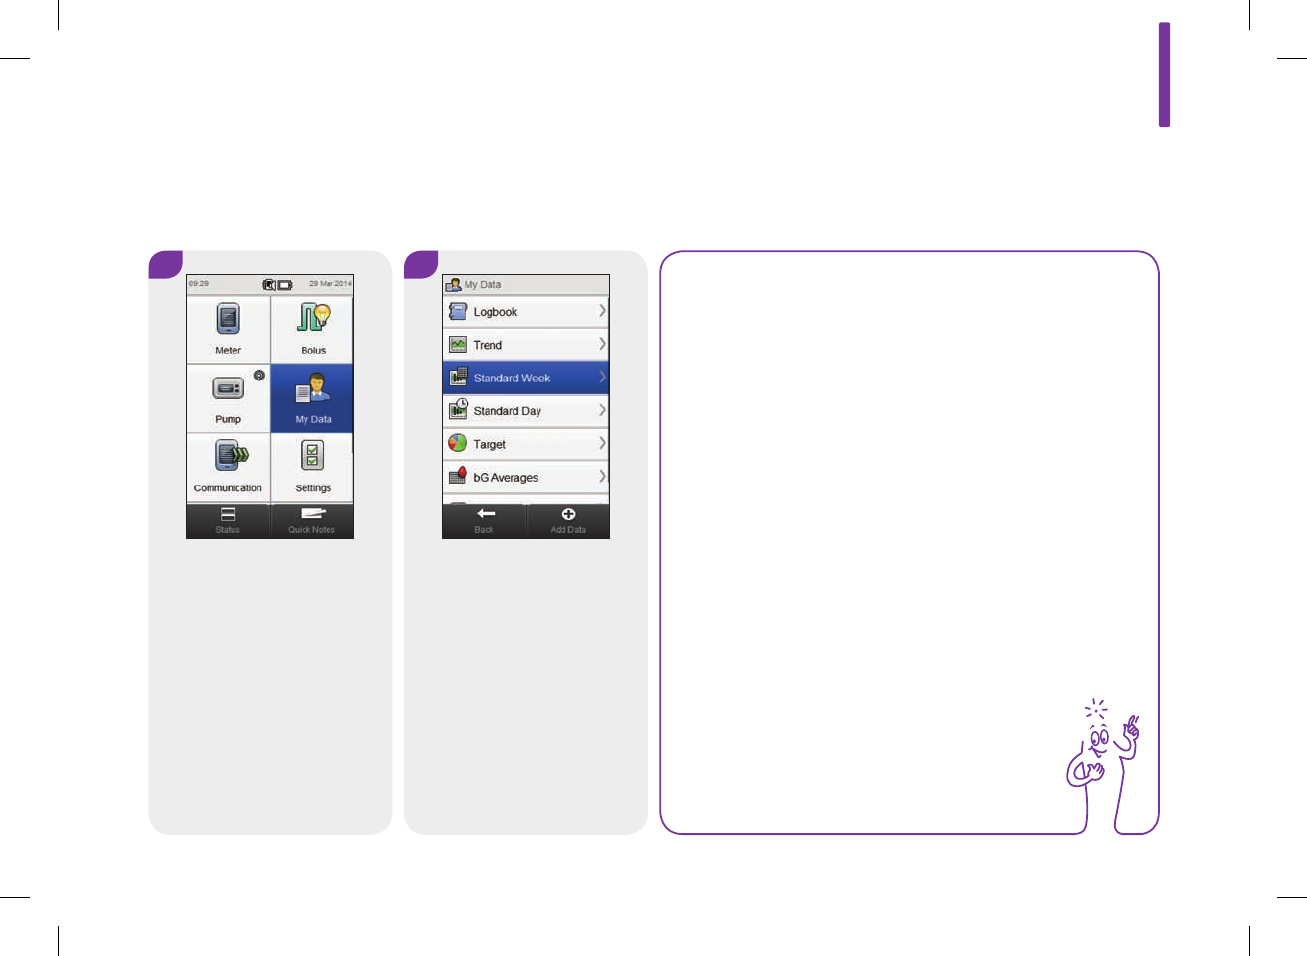
12.4.2 Viewing Standard Week Data
Main Menu > My Data > Standard Week
1 2
From the Main Menu, select
My Data.
Select Standard Week.
NOTE
jIf there is no data available to display the standard
week graph and table for the time scale or meal time
chosen, the No Data Available screen is displayed.
jThe standard week graph and table do not include
corrupt results, control results, HI values, or LO
values.
52297_07167776001.indb 241 10/20/14 11:19 AM
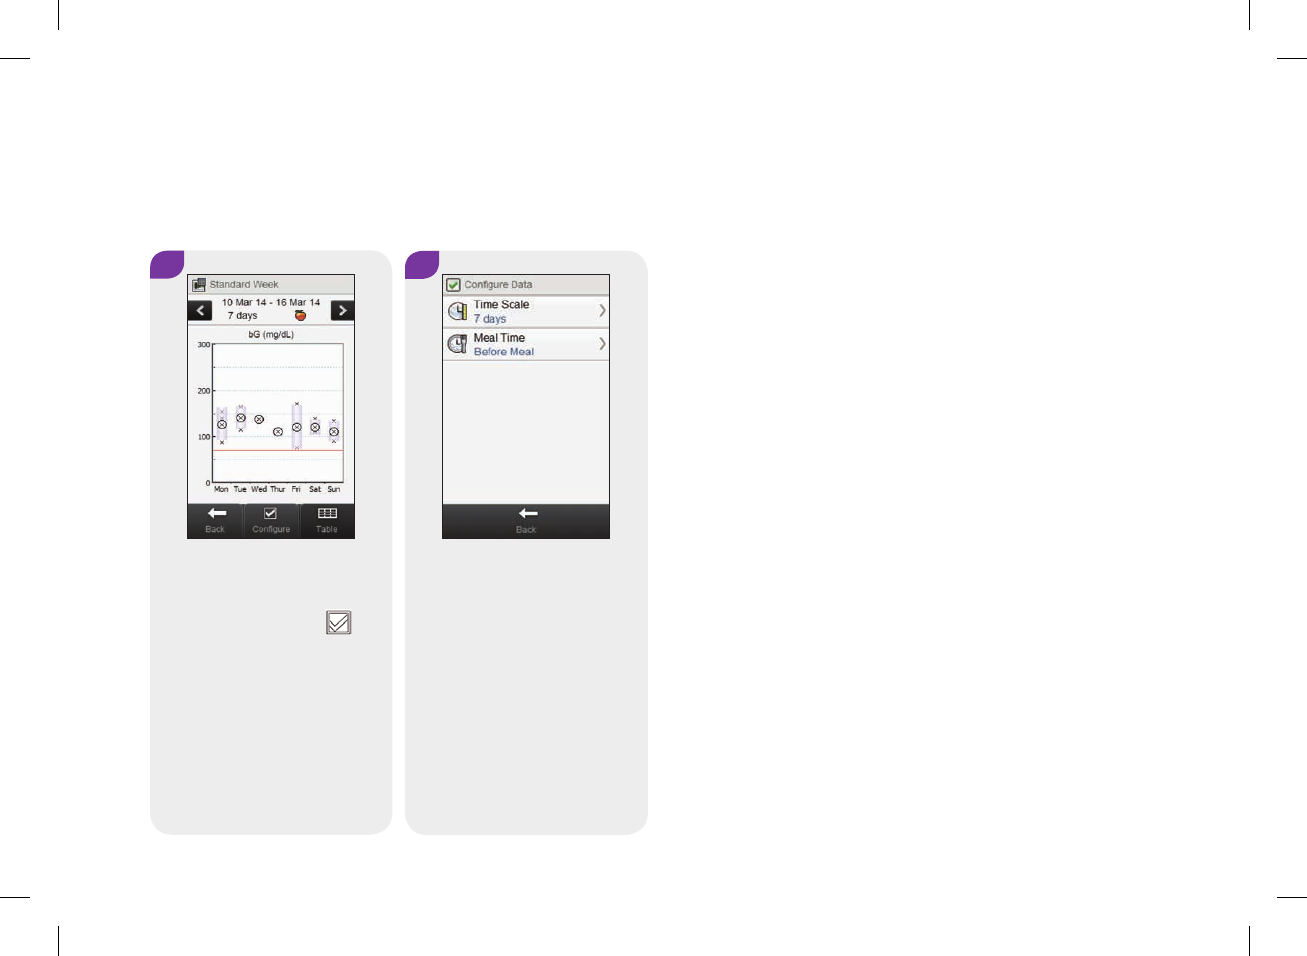
242
3
To change the time scale and
meal time displayed for the
standard week, select
Configure.
4
Select either of the options on
the Configure Data screen and
refer to the instructions in the
rest of this section. Select
Back when finished to return
to the Standard Week graph
or table.
52297_07167776001.indb 242 10/20/14 11:19 AM
12
243
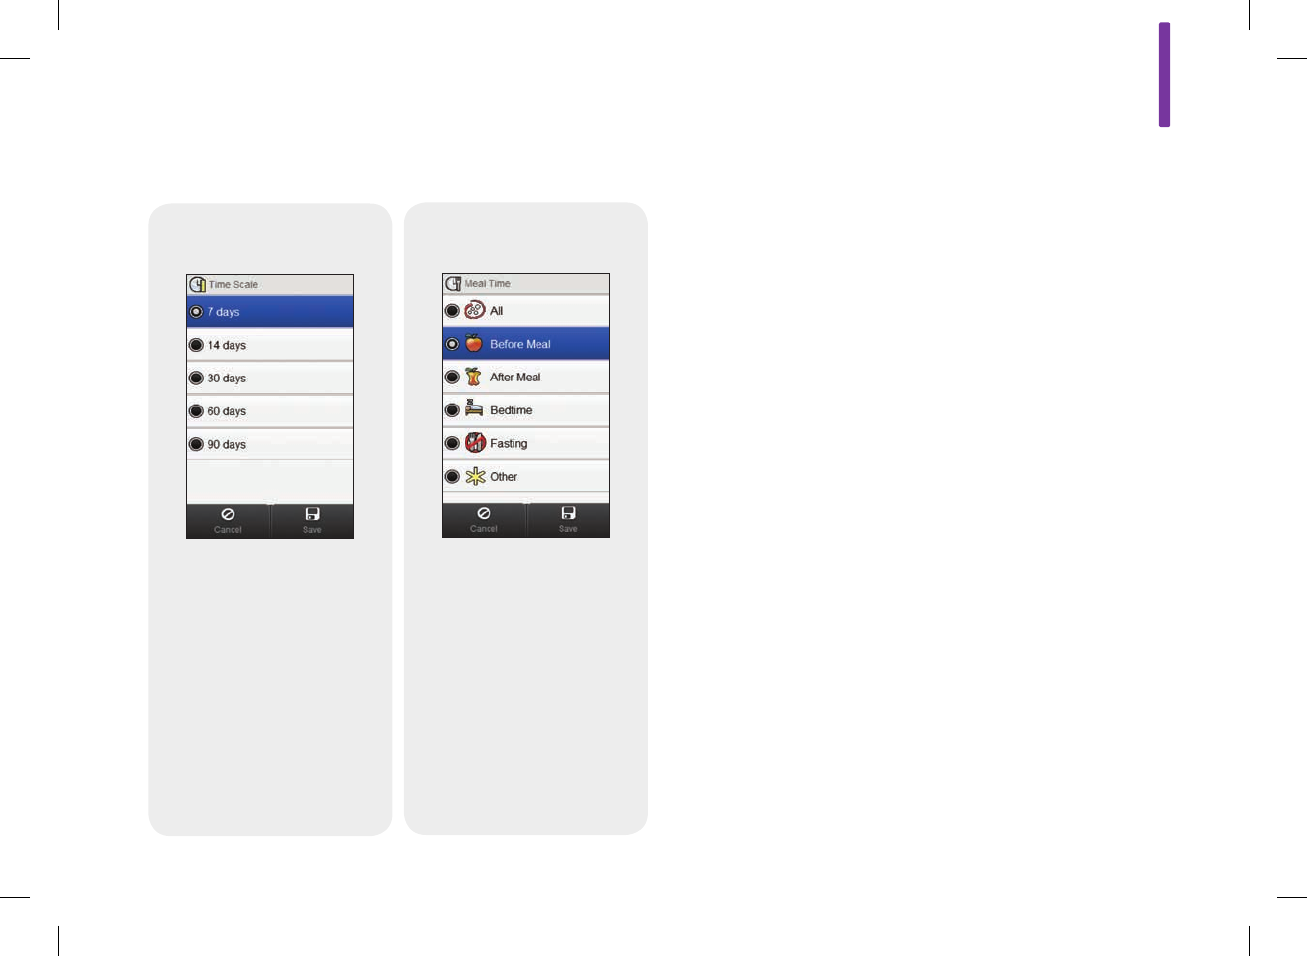
Screens for configuring standard week data
Time scale
Select a time scale.
Select Save.
Meal time
Select a meal time.
Select Save.
52297_07167776001.indb 243 10/20/14 11:19 AM

244
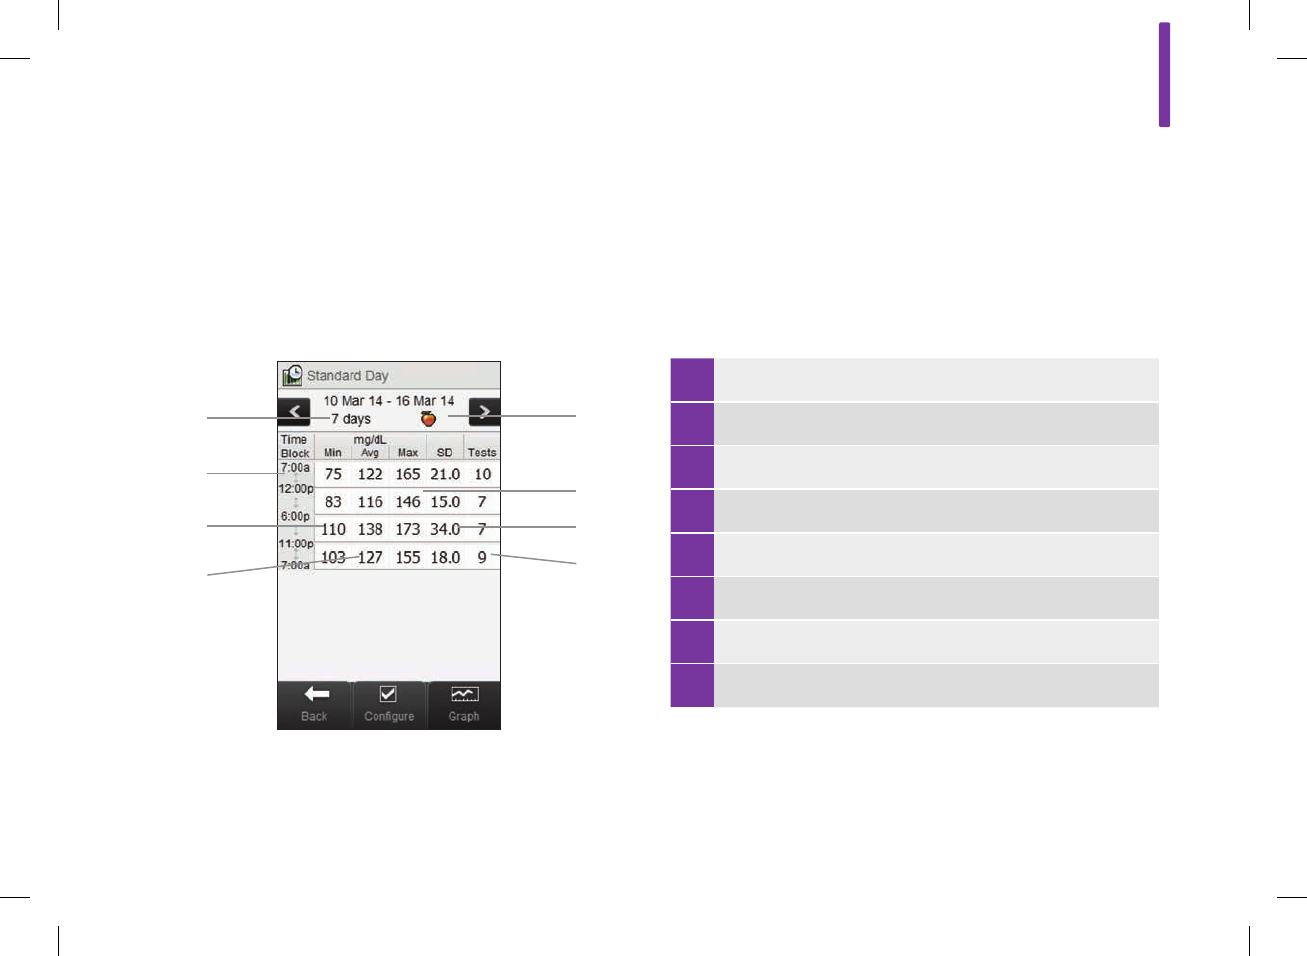
12.5 The Standard Day
With the Standard Day graph, the meter displays your blood
glucose averages, number of tests, and standard deviations for
each time block, calculated using logbook data from the time
scale and meal time you choose.
NOTE
Refer to the Changing Meter Settings chapter in this
user’s manual for instructions on setting up the time
blocks.
NOTE
The standard deviation measures how spread out the
blood glucose results are from the blood glucose average.
A high standard deviation means the blood glucose
results vary greatly around the blood glucose average.
52297_07167776001.indb 244 10/20/14 11:19 AM
12
245
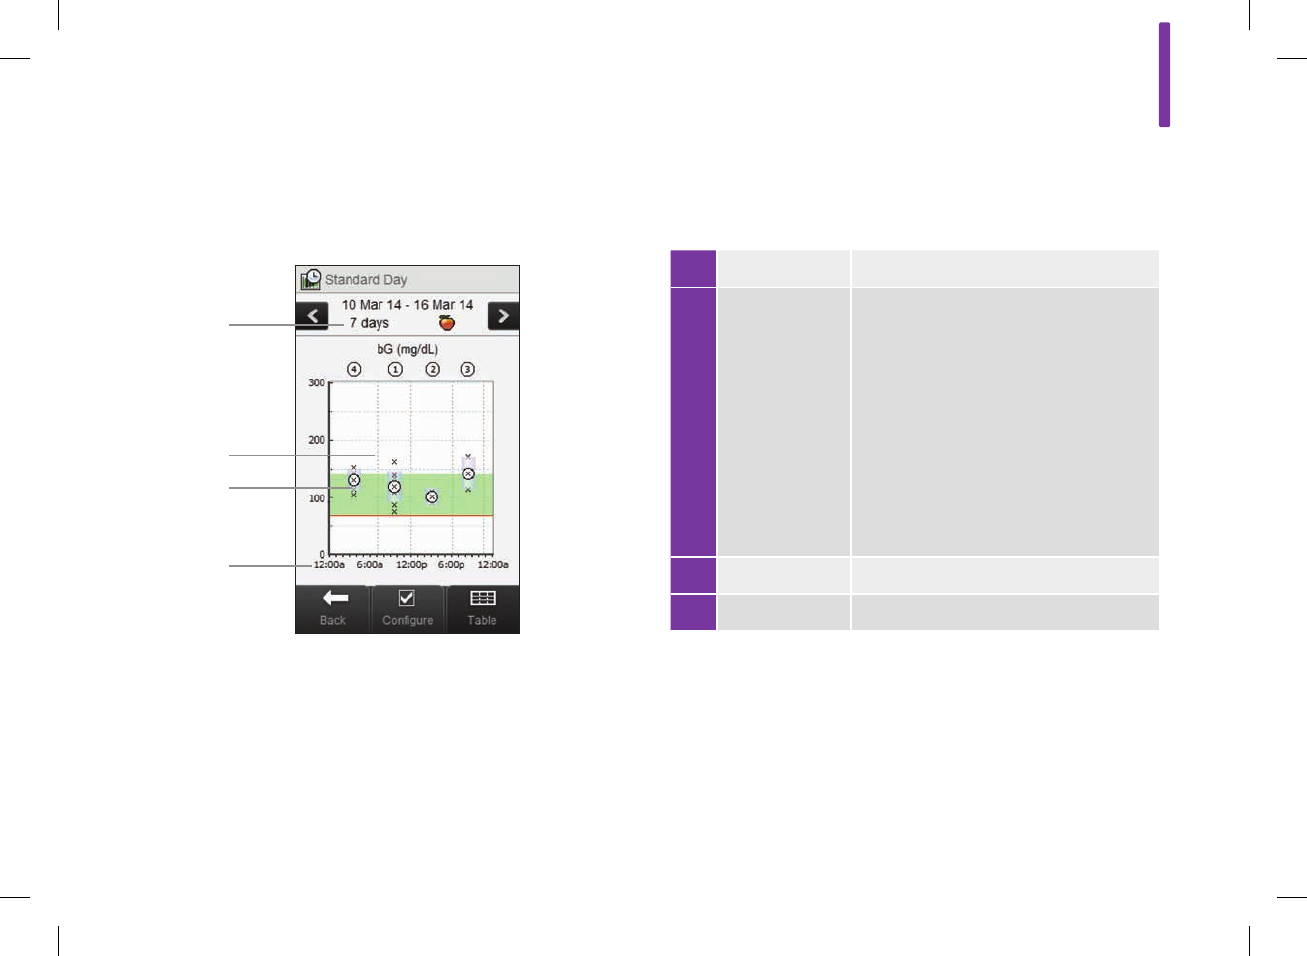
12.5.1 Understanding the Standard Day Graph and Table
Standard Day Graph
1 Time of day
2 Box for each
time block
jThe top of the box indicates 1 standard
deviation above the average and the
bottom of the box indicates 1 standard
deviation below the average. The box is
not displayed if there is not enough data
to determine standard deviation.
jThe top of the box is open if the
standard deviation is off the top of the
graph.
jBox and “X” are not displayed for a time
block if no data is found.
3 Time blocks Separated by the vertical dashed line
4 Time scale
4
1
3
2
52297_07167776001.indb 245 10/20/14 11:19 AM
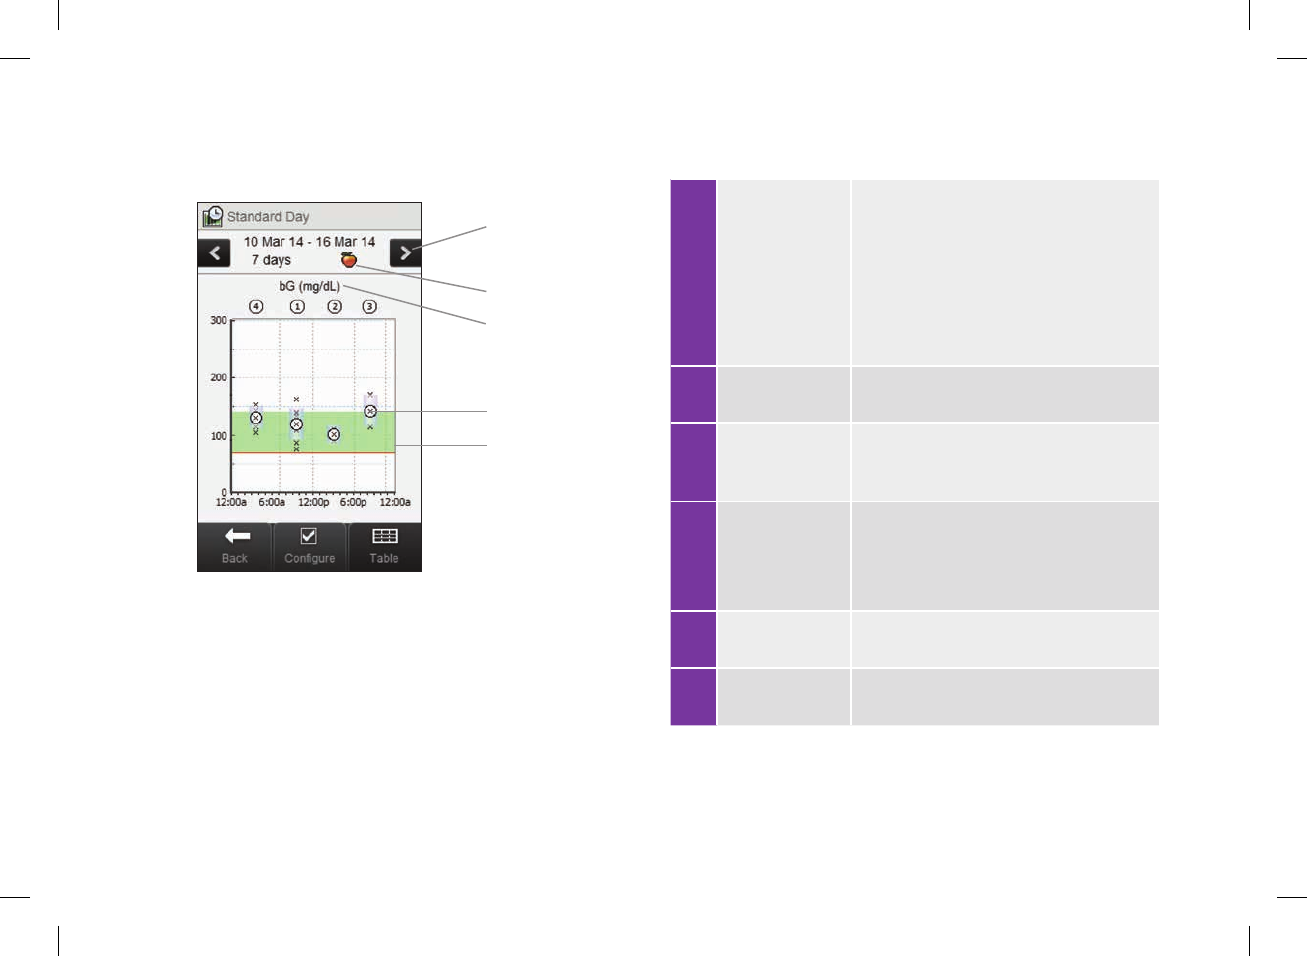
246
5 Scroll left /
right buttons
Moves forward or back in time by the time
scale chosen. Example: For a 7‑day time
scale, selecting the scroll left icon shows
the data from the 7days before the dates
currently shown.
6 Meal time
selection
7
Blood glucose
unit of
measurement
8 X
jIndicates each blood glucose result.
j“X” in the center of a circle indicates
the average of all blood glucose results
for the selected criteria.
9 Hypo warning
limit Red horizontal line
10 Arrow (Not shown) Indicates that there is data off
the top of the graph.
7
5
6
9
8
52297_07167776001.indb 246 10/20/14 11:19 AM
12
247
Standard Day Table
Select Table to switch to the standard day table. The standard day
table displays the same data as the standard day graph in table
format. To return to the standard day graph from the standard day
table, select Graph.
1 Blood glucose average for each time block
2 Lowest blood glucose result for each time block
3 Time block
4 Time scale
5 Meal time selection
6 Highest blood glucose result for each time block
7 Standard deviation (SD) for each time block
8 Number of tests for each time block
4
3
2
1
7
8
6
5
52297_07167776001.indb 247 10/20/14 11:19 AM
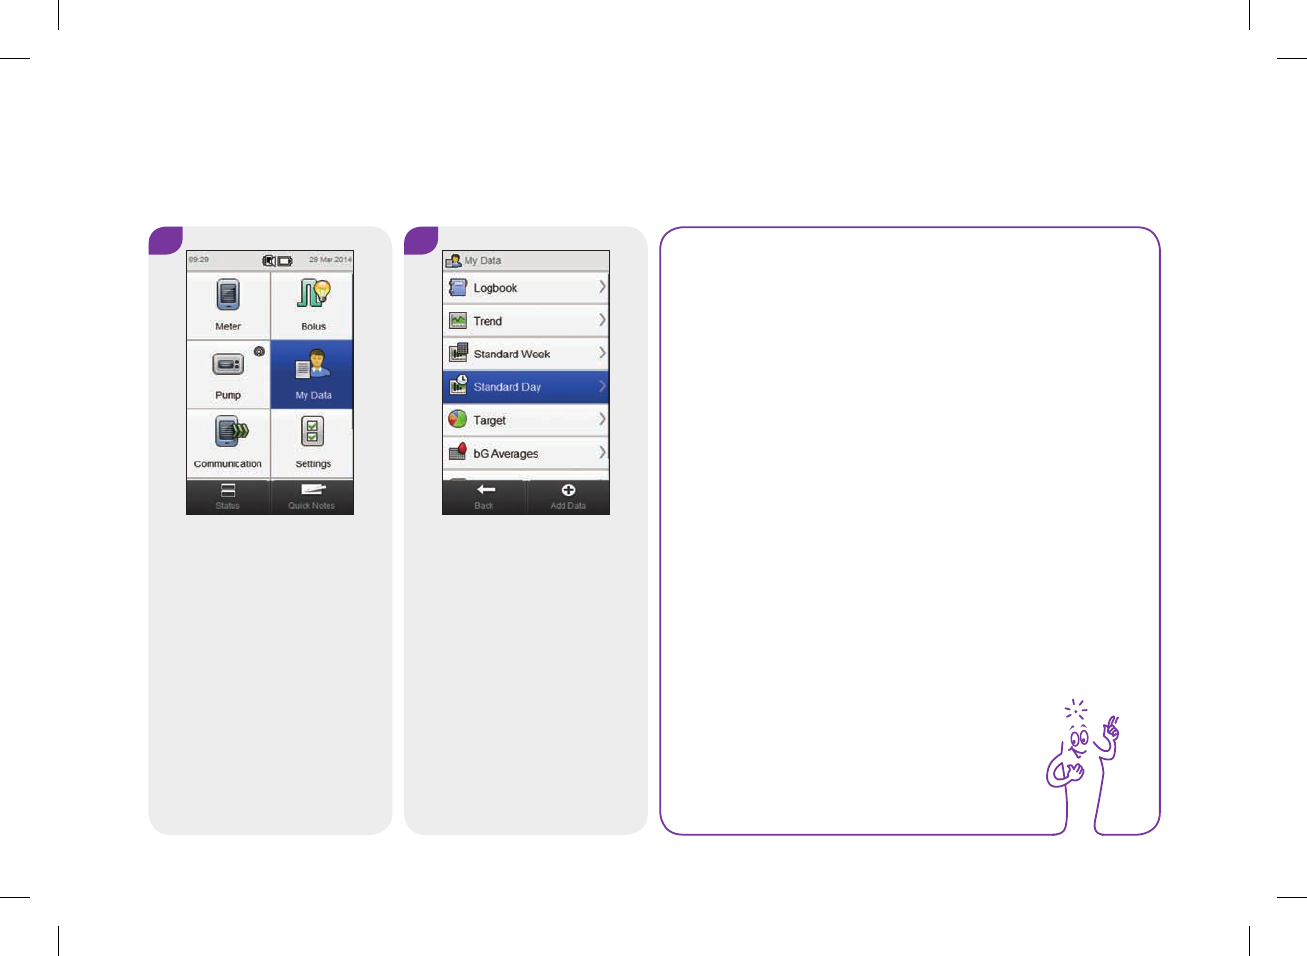
248
Viewing Standard Day Data
Main Menu > My Data > Standard Day
1 2
From the Main Menu, select
My Data.
Select Standard Day.
NOTE
jIf there is no data available to display the standard
day graph and table for the time scale or meal time
chosen, the No Data Available screen is displayed.
jThe standard day graph and table do not include
corrupt results, control results, HI values, or LO
values.
52297_07167776001.indb 248 10/20/14 11:19 AM
12
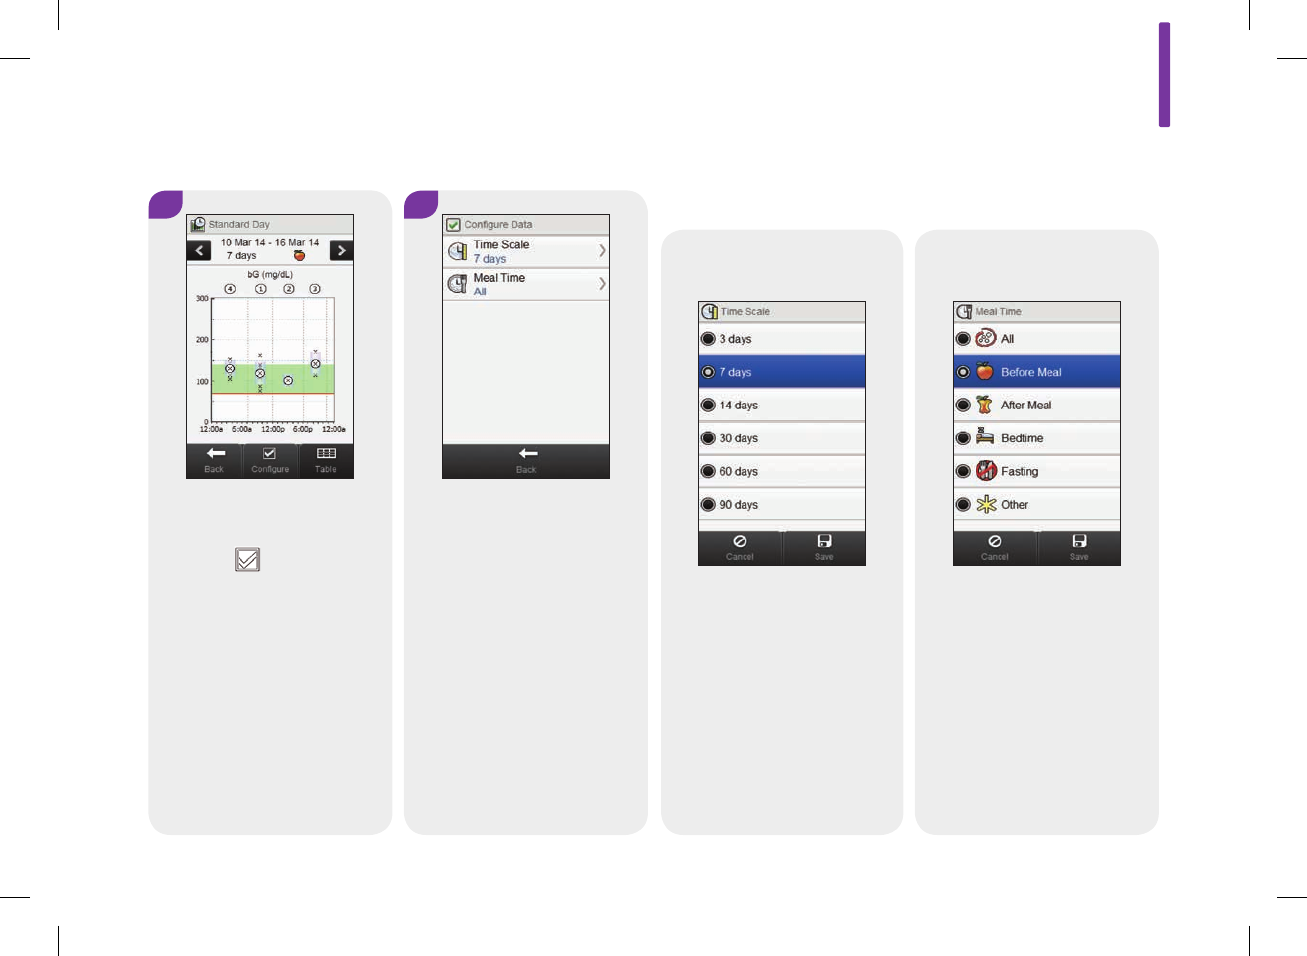
249
4
Select either of the options on
the Configure Data screen and
refer to the instructions in the
rest of this section.
Select Back when finished to
save any changes and return
to the standard day graph or
table.
3
To change the time scale and
meal time displayed, select
Configure .
Screens for configuring standard day data
Time scale
Select a time scale.
Select Save.
Meal time
Select a meal time.
Select Save.
52297_07167776001.indb 249 10/20/14 11:19 AM

250
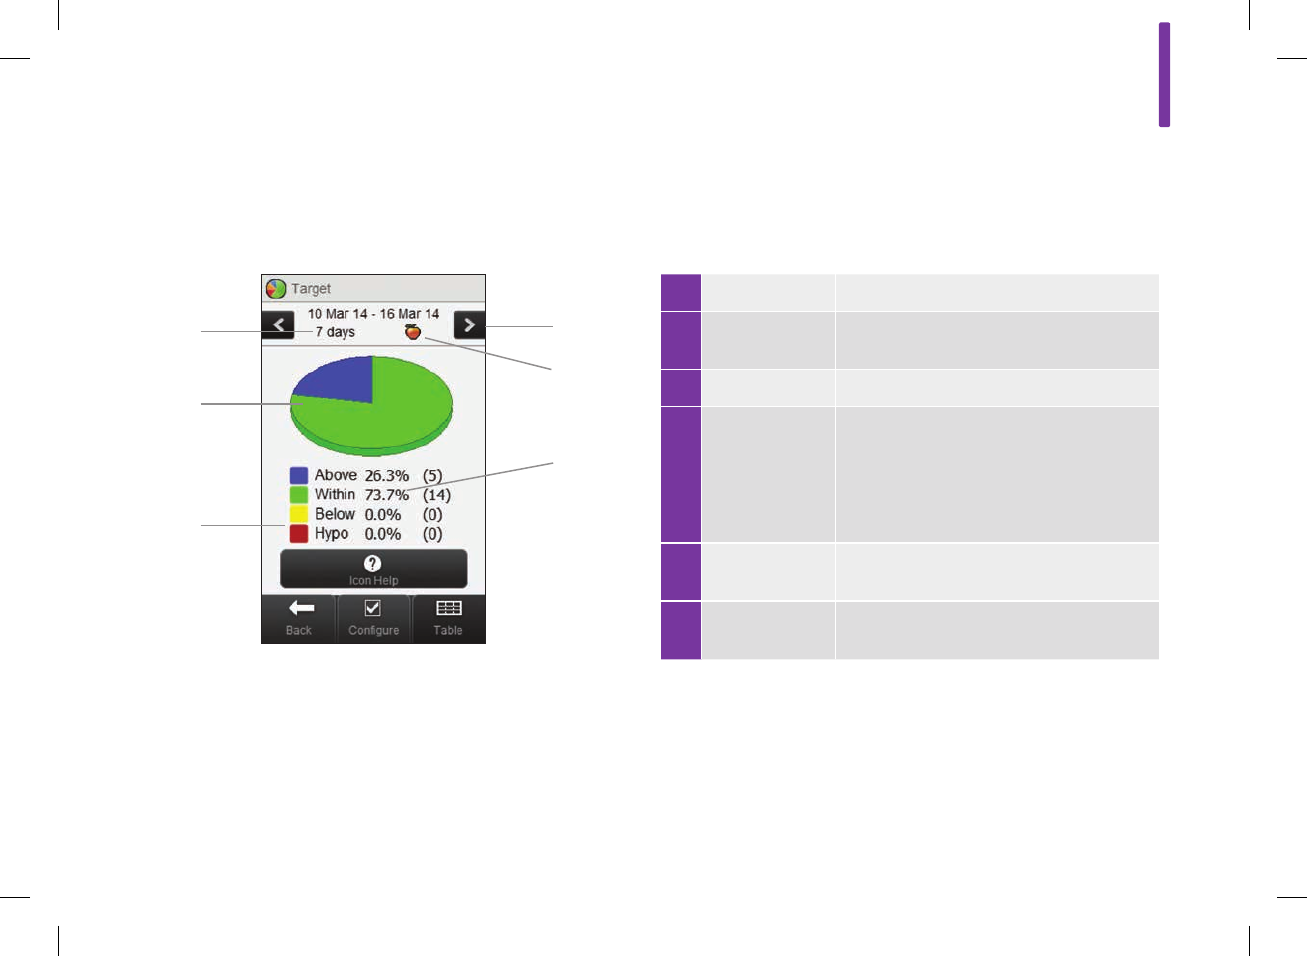
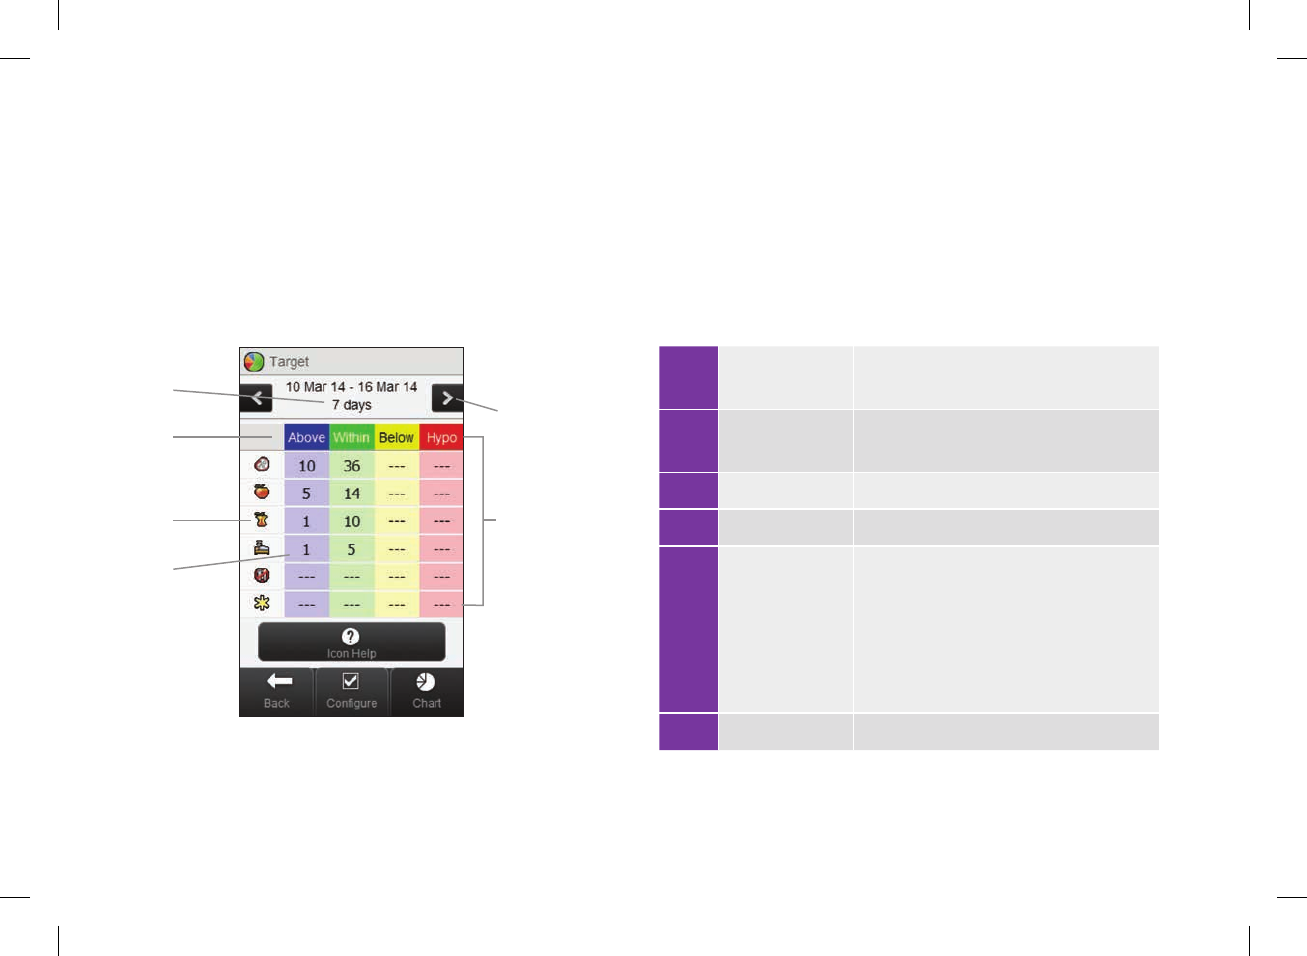
12.6 Target Data
The meter displays a pie chart and table illustrating your blood
glucose results as “Above,” “Within,” “Below,” and “Hypo” for
the time scale and meal time you choose.
52297_07167776001.indb 250 10/20/14 11:19 AM
12
251
12.6.1 Understanding the Target Chart and Target Table
Target Chart
1 Legend Blood glucose result categories
2 Target chart Represents the percentages for the
blood glucose result categories
3 Time scale
4 Scroll left /
right buttons
Moves forward or back in time by the
time scale chosen. Example: For a 7‑day
time scale, selecting the scroll left icon
shows the data from the 7days before
the dates currently shown.
5 Meal time
selection
6 Percentage of
occurrence
(Number shown in parenthesis
represents the number of occurrences)
3
2
1
4
6
5
52297_07167776001.indb 251 10/20/14 11:19 AM
252
Target Table
Select Table to switch to the target table. The target table
displays the same data as the target chart in table format.
To return to the target chart from the target table, select Chart.
1 Number of
occurrences
2 Meal time
selection
3 Legend Blood glucose result categories
4 Time scale
5 Scroll left /
right buttons
Moves forward or back in time by the
time scale chosen. Example: For a
7‑day time scale, selecting the scroll
left icon shows the data from the
7days before the dates currently
shown.
6 Target table
4
3
2
1
6
5
52297_07167776001.indb 252 10/20/14 11:19 AM

12
253
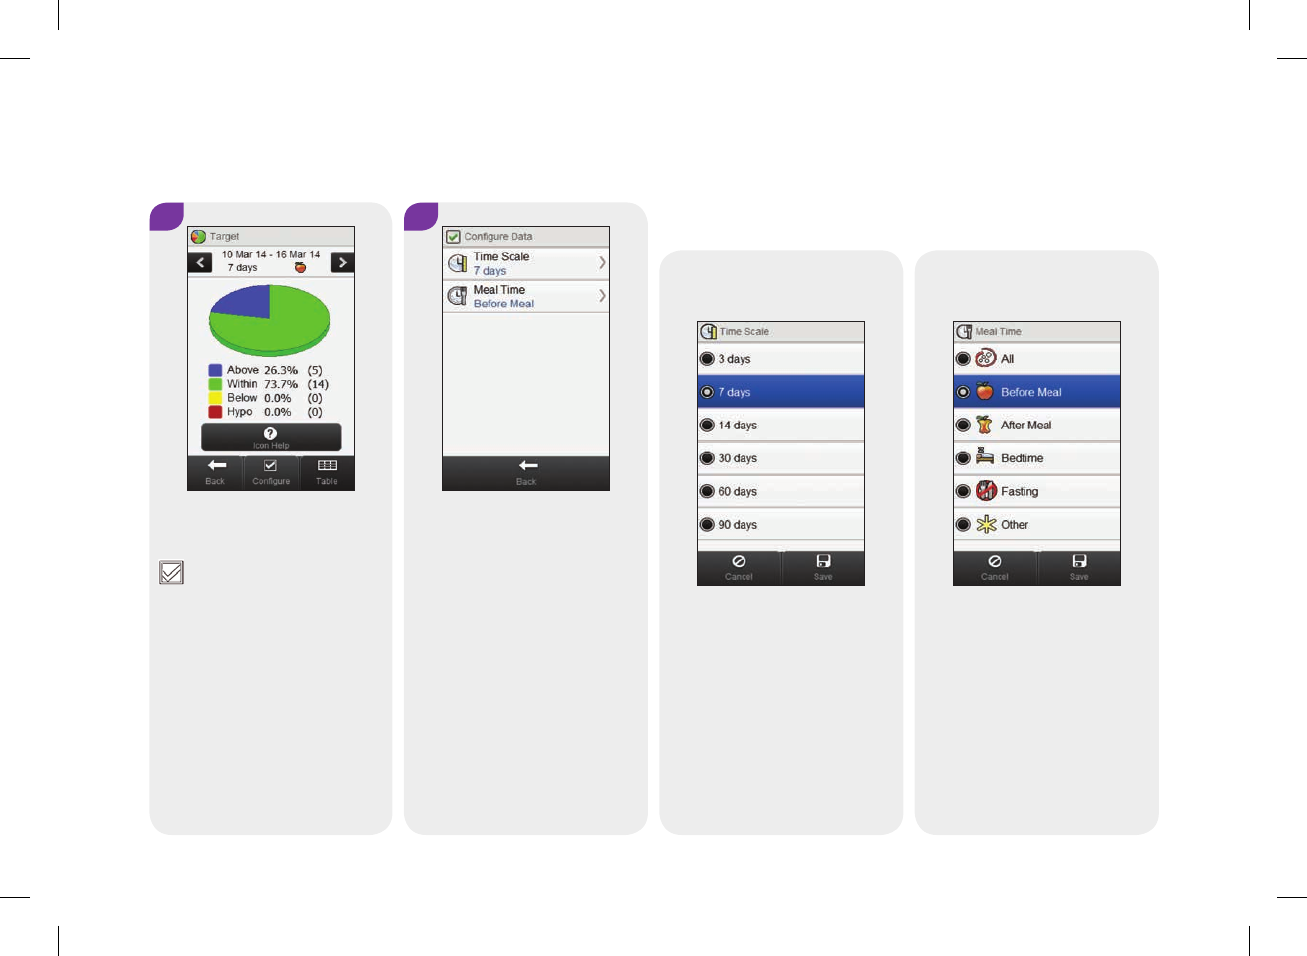
12.6.2 Viewing Target Data
Main Menu > My Data > Target
1 2
From the Main Menu, select
My Data.
Select Target.
NOTE
jIf there is no data available to display the target
chart and table for the time scale or meal time
chosen, the No Data Available screen is displayed.
jThe target chart and table do not include corrupt
results, control results, or HI and LO results.
52297_07167776001.indb 253 10/20/14 11:19 AM
254
4
Select either of the options on
the Configure Data screen and
refer to the instructions in the
rest of this section. Select
Back when finished to save
any changes and return to the
target chart or table.
3
To change the time scale and
meal time displayed, select
Configure.
Screens for configuring target data:
Time scale
Select a time scale. Select
Save.
Meal time
Select a meal time. Select
Save.
52297_07167776001.indb 254 10/20/14 11:19 AM

12
255
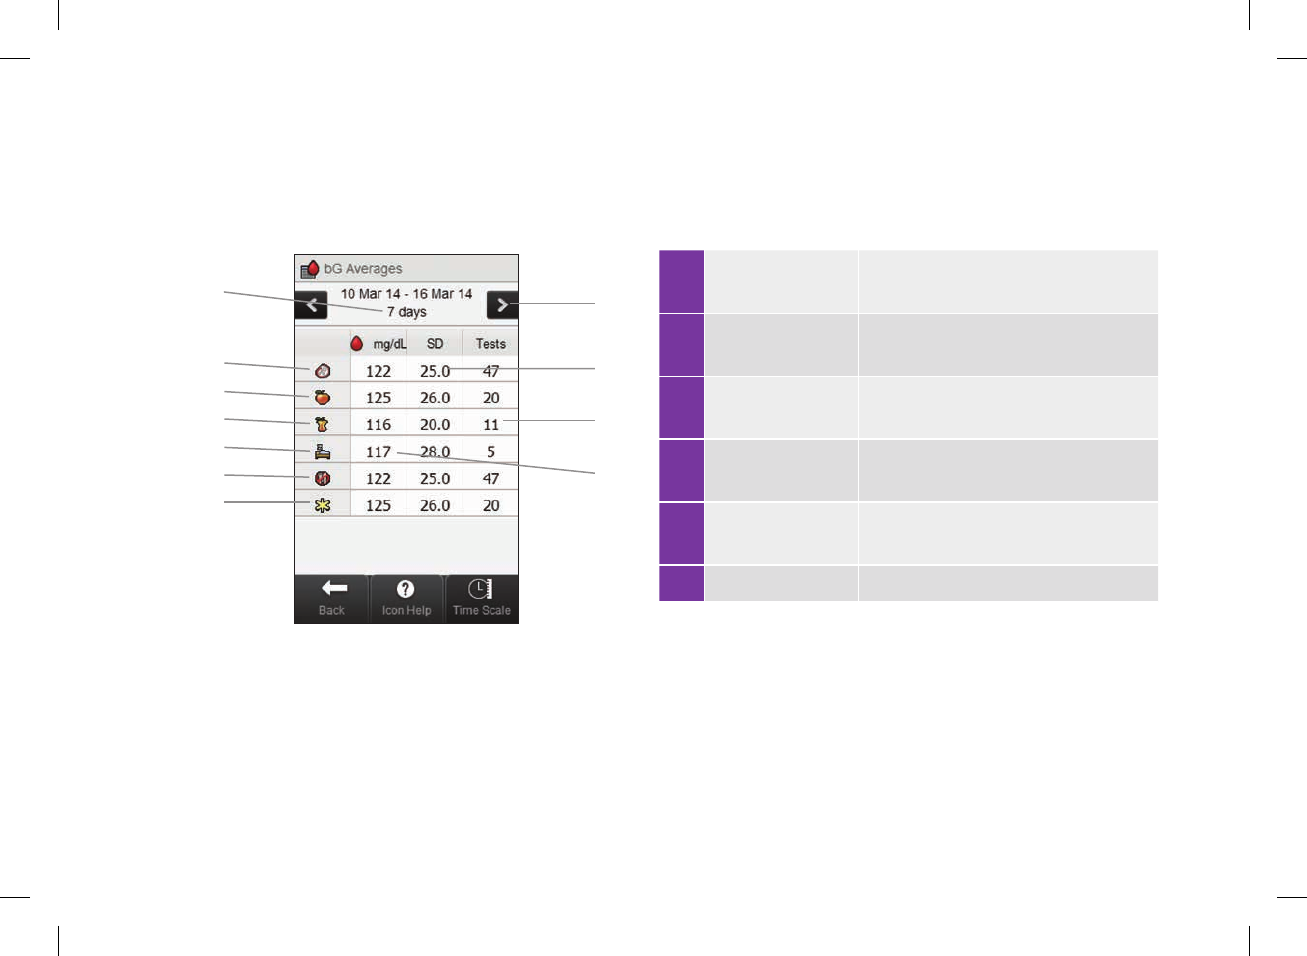
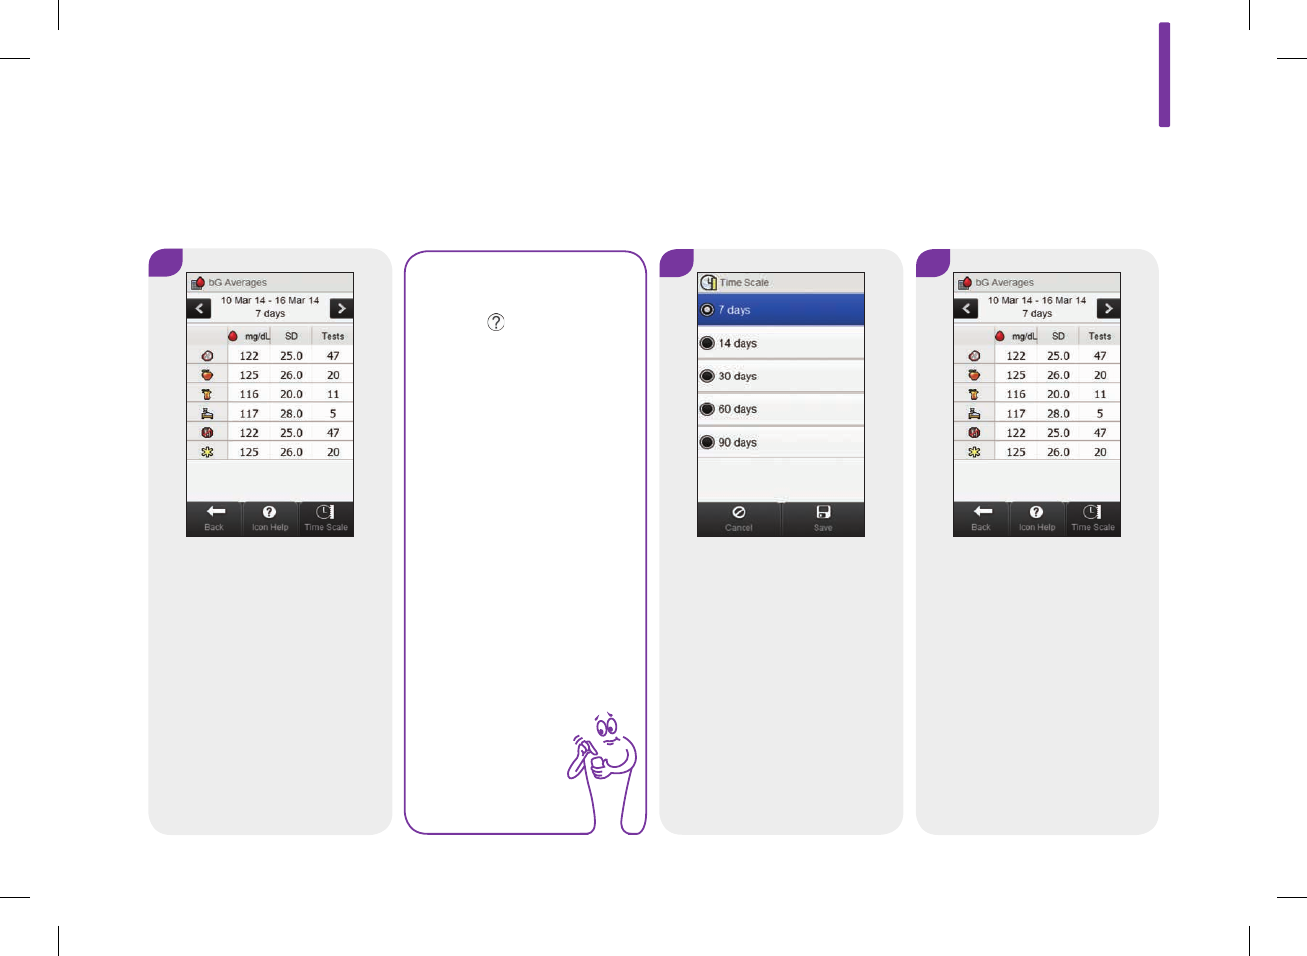
12.7 The bG Averages Table
NOTE
The standard deviation measures how spread out the
blood glucose results are from the blood glucose
average. A high standard deviation means the blood
glucose results vary greatly around the blood glucose
average.
The bG Averages table displays your blood glucose averages and
standard deviations for the time scale and meal time you choose.
52297_07167776001.indb 255 10/20/14 11:19 AM
256
12.7.1 Understanding the bG Averages Table
1 Other icon Data for all test results marked as
Other
2 Fasting icon Data for all test results marked as
Fasting
3 Bedtime icon Data for all test results marked as
Bedtime
4 After meal icon Data for all test results marked as
After meal
5 Before meal
icon
Data for all test results marked as
Before meal
6 All icon Combined data from all meal times
5
4
6
2
1
3
7
9
A
B
8
52297_07167776001.indb 256 10/20/14 11:19 AM

12
257
7 Time scale
8 Scroll left / right
buttons
Moves forward or back in time by the
time scale chosen. Example: For a
7‑day time scale, selecting the scroll
left icon will show the data from the
7days before the dates currently
shown.
9
Blood glucose
standard
deviation
Calculated for the meal time
10 Number of tests Used to calculate the averages and
standard deviation of each meal time
11 Blood glucose
average Calculated for the meal time
52297_07167776001.indb 257 10/20/14 11:19 AM
258
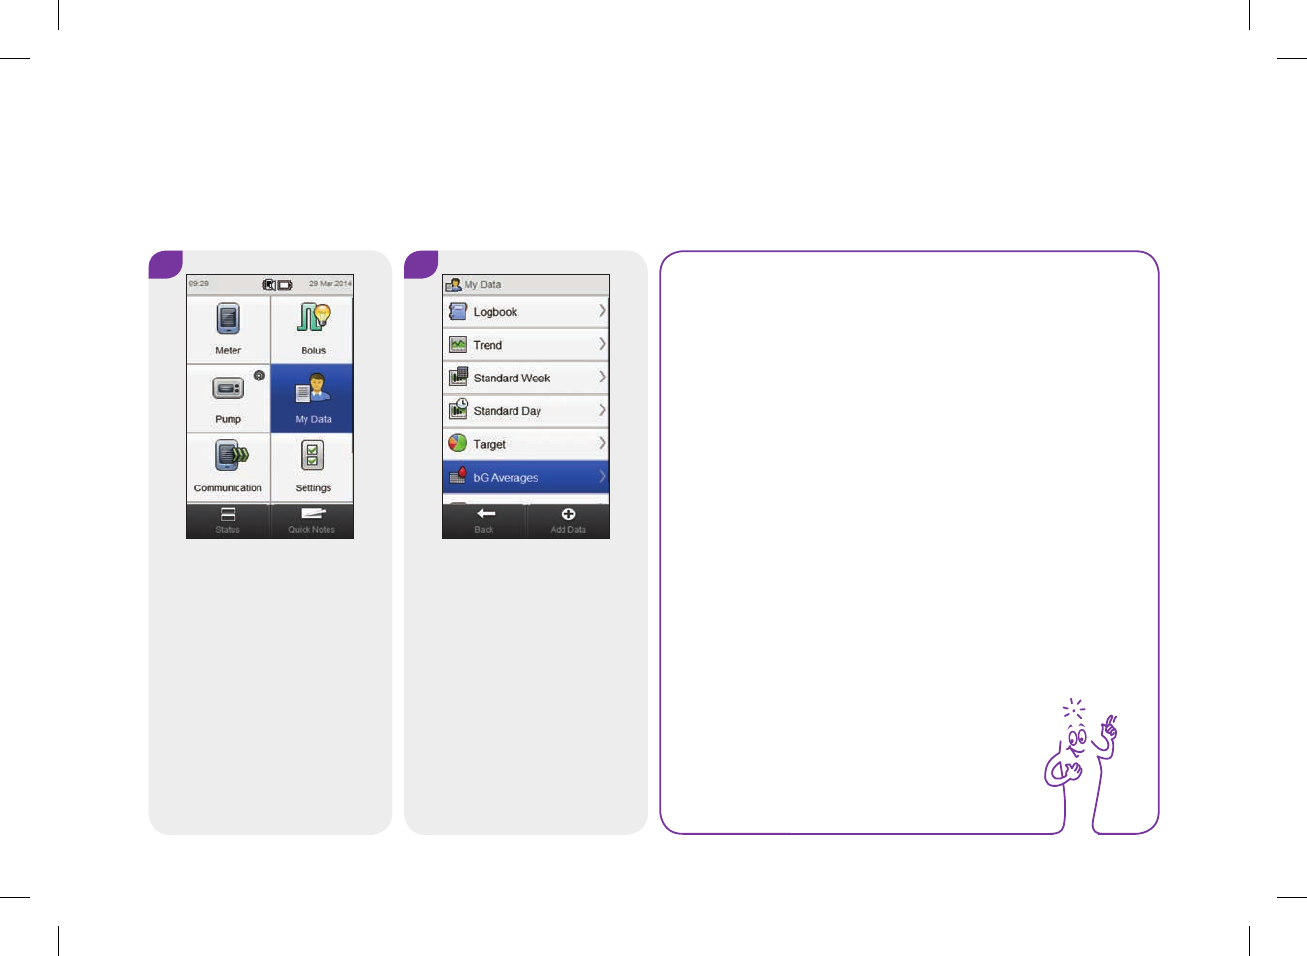
12.7.2 Viewing the bG Averages Table
Main Menu > My Data > bG Averages
1 2
From the Main Menu, select
My Data.
Select bG Averages.
NOTE
jIf there is no data available to display the bG
averages table for the time scale or meal time
chosen, the No Data Available screen is displayed.
jCalculations do not include corrupt results, control
results, HI values, or LO values.
52297_07167776001.indb 258 10/20/14 11:19 AM
12
259
NOTE
Select to view a list
of meal time icons and
their explanations.
4
Choose a time scale. Select
Save.
5
3
Select Time Scale to adjust
the time scale of the bG
Averages table.
Select Back when finished to
return to the My Data menu.
52297_07167776001.indb 259 10/20/14 11:19 AM

260
52297_07167776001.indb 260 10/20/14 11:19 AM

13
261
13 Cleaning and Disinfecting the Meter and Lancing Device
13.1 Overview
What is the difference between cleaning and disinfecting?
jCleaning is the removal of dirt from the meter or lancing
device.*
jDisinfecting is the removal of most, but not all, disease‑
causing and other types of microorganisms (bloodborne
pathogens) from the meter or lancing device.*
* Healthcare Infection Control Practices Advisory Committee (HICPAC),
WilliamA.Rutala,Ph.D.,M.P.H., and DavidJ.Weber,M.D., M.P.H. Centers for
Disease Control and Prevention, 2008. “Guideline for Disinfection and
Sterilization in Healthcare Facilities. Atlanta.”
52297_07167776001.indb 261 10/20/14 11:19 AM
262
NOTE
For technical assistance or questions on cleaning and
disinfecting, contact the ACCU‑CHEK Customer Care
Service Center at 1‑800‑688‑4578.
Approved Cleaning and Disinfecting Product
The following product has been approved for cleaning and
disinfecting the meter and lancing device:
Super Sani‑Cloth (EPA* reg. no. 9480‑4)
jSuper Sani‑Cloth can be purchased from Amazon.com,
Officedepot.com, and Walmart.com. Do not use any other
cleaning or disinfecting solutions. Using solutions other than
the Super Sani‑Cloth could result in damage to the meter and
lancing device.
jThe effect of using more than one product interchangeably to
clean and disinfect the meter and lancing device has not been
tested. Always use Super Sani‑Cloth to clean and disinfect the
meter and lancing device.
*Environmental Protection Agency
52297_07167776001.indb 262 10/20/14 11:19 AM

13
263
13.2 Cleaning and Disinfecting the Meter
To clean and disinfect without damaging the meter, follow these
procedures carefully.
When to Clean and Disinfect the Meter
jClean the meter to remove visible dirt or other material prior to
disinfecting.
jClean and disinfect the meter at least once per week, or when
blood is present on the surface of the meter.
jClean and disinfect the meter before allowing anyone else to
handle the meter. Do not allow anyone else to use the meter
on themselves for testing purposes.
NOTE
Using cleaning and disinfecting products could result in
damage to the meter. If you notice any of the following
signs of deterioration after cleaning and disinfecting your
meter, stop using your meter and contact the ACCU‑CHEK
Customer Care Center at 1‑800‑688‑4578: residue around
buttons, clouding of display, button/touchscreen
malfunction, out‑of‑range results.
52297_07167776001.indb 263 10/20/14 11:19 AM

264
What to Clean and Disinfect
The following parts of the meter should be cleaned and
disinfected:
jThe area around slots and openings (do not get any moisture
in slots or openings)
jThe meter display
jThe entire meter surface
52297_07167776001.indb 264 10/20/14 11:19 AM
13
265
w WARNING
Failure to follow these instructions will damage the meter
and stop it from working properly.
jDO NOT clean or disinfect the meter while performing a
blood glucose or control test.
jDO NOT get any moisture in slots or openings.
jDO NOT spray anything onto the meter.
jDO NOT immerse the meter in liquid.
jAlways use the same product for both cleaning and
disinfecting.
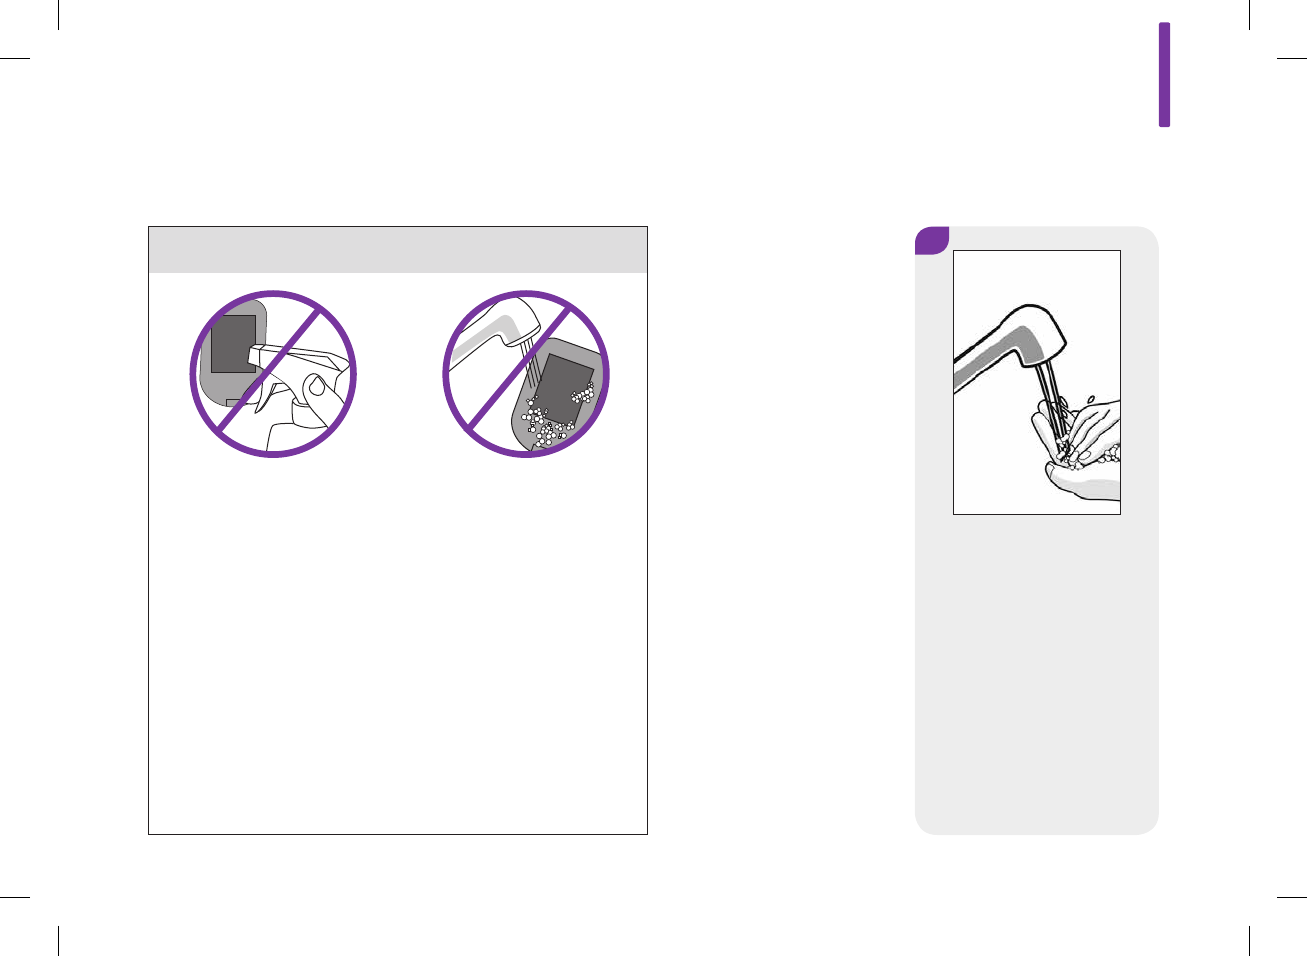
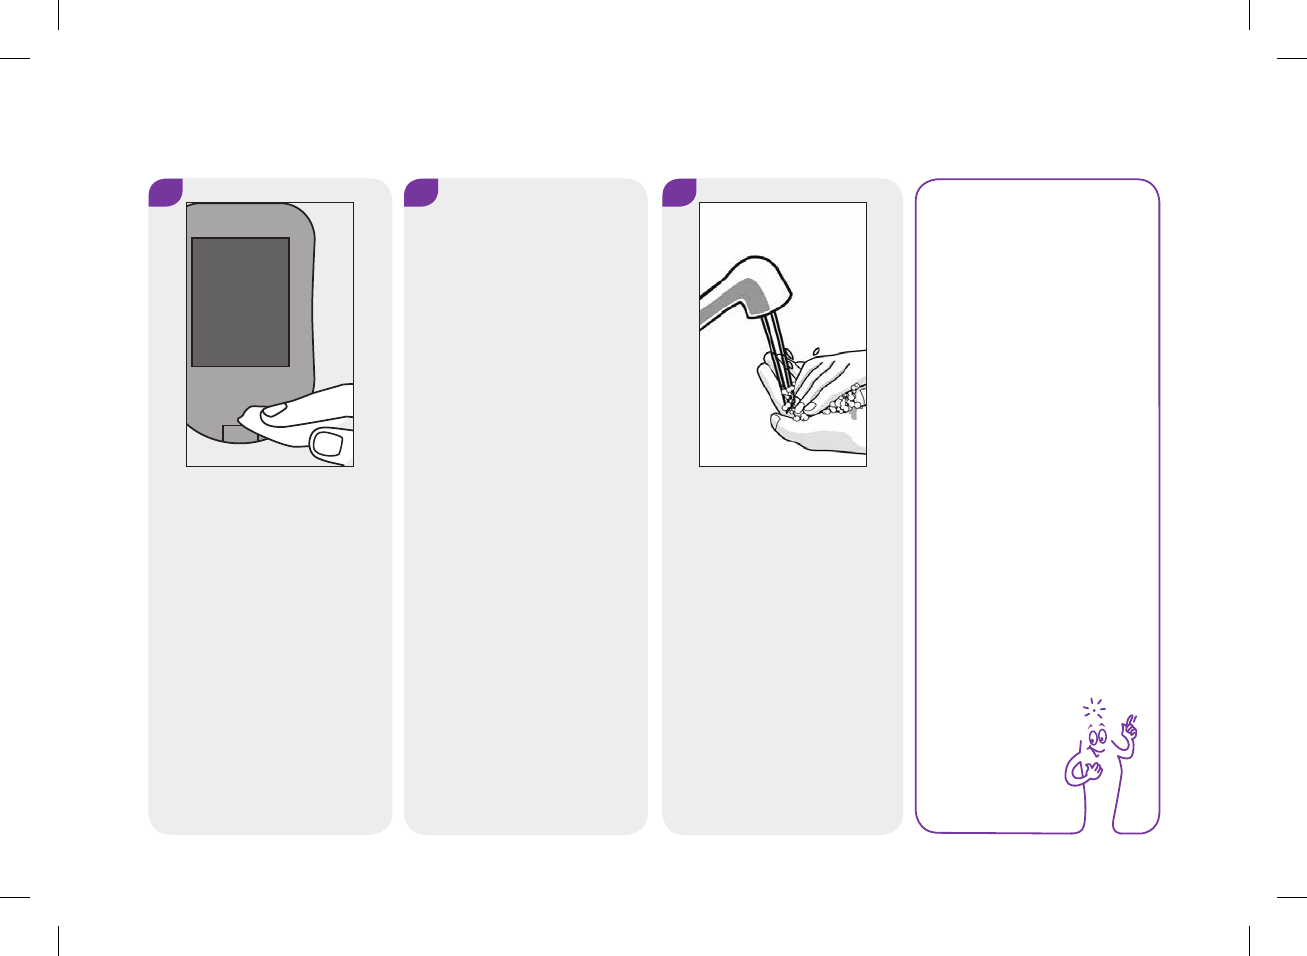
How to Clean and Disinfect the Meter
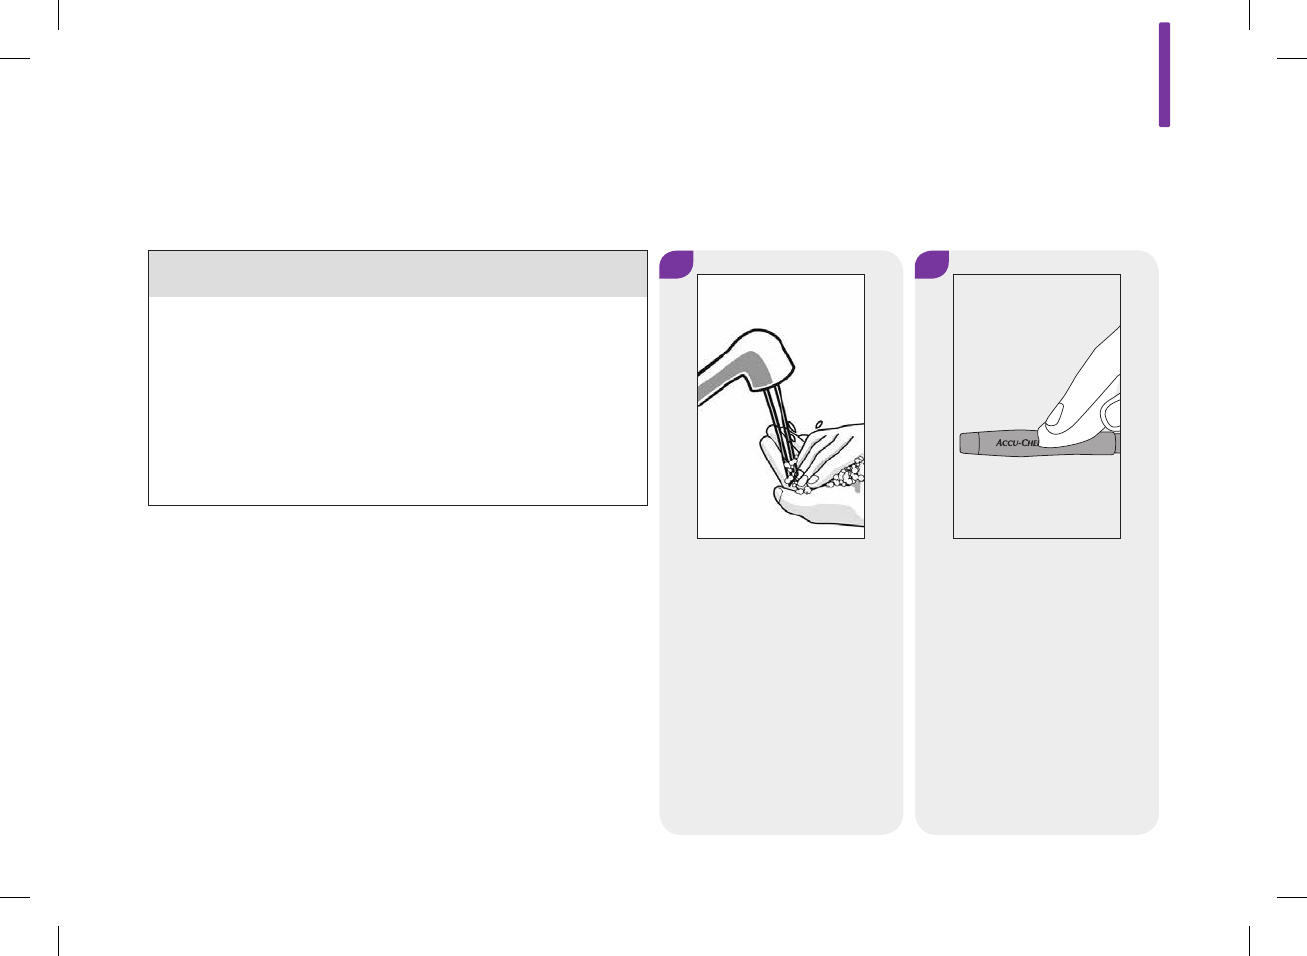
1
Wash hands thoroughly with
soap and water.
52297_07167776001.indb 265 10/20/14 11:19 AM
266
2
Turn the meter off and wipe
the entire meter surface with
a Super Sani Cloth. Carefully
wipe around the test strip slot
and other openings. Make
sure that no liquid enters any
slot or opening.
3
A separate Super Sani‑Cloth
should be used for cleaning
and disinfection. For
disinfecting the meter, get a
new cloth and repeat Step2,
making sure that the surface
stays wet for 2minutes. Make
sure that no solution is seen
in any slot or opening.
Wash hands thoroughly with
soap and water.
4NOTE
Roche has tested the
approved product for a
total of 260 cycles,
which is equal to
cleaning and
disinfecting once per
week for a 5‑year
period.
52297_07167776001.indb 266 10/20/14 11:19 AM
13
267
To clean and disinfect without damaging the lancing device,
follow these procedures carefully.
When to Clean and Disinfect the Lancing Device
jClean the lancing device to remove visible dirt or other material
prior to disinfecting.
jClean and disinfect the lancing device at least once per week
to remove visible dirt or other material for safe handling.
jClean and disinfect the lancing device before allowing anyone
else to handle the lancing device, for instance, if you have
someone assisting you. Do not allow anyone else to use the
lancing device.
13.3 Cleaning and Disinfecting the Lancing Device
NOTE
jDo not throw away the lancing device cap after each
use. Use approved cleaning and disinfecting product
on the cap.
jAlways remove the lancet drum before cleaning or
disinfecting the lancing device.
52297_07167776001.indb 267 10/20/14 11:19 AM
268
NOTE
jUsing cleaning and disinfecting products could result
in damage to the lancing device. If you notice any
of the following signs of deterioration after cleaning
and disinfecting your lancing device, stop using your
lancing device and contact the ACCU‑CHEK Customer
Care Service Center at 1‑800‑688‑4578: residue
around buttons, diculty in priming the device,
diculty in inserting the lancet drum.
jYou might observe a slight discoloration of the
lancing device after multiple cleaning and disinfecting
cycles. This does not aect the functionality of the
lancing device.
What to Clean and Disinfect
The following parts of the lancing device should be cleaned and
disinfected:
jThe entire lancing device surface
jThe cap
52297_07167776001.indb 268 10/20/14 11:19 AM
13
269
w WARNING
Failure to follow these instructions may damage the lancing
device and stop it from working properly.
jDO NOT get any moisture into any openings.
jAlways use the same product for both cleaning and
disinfecting.
1 2
Wash hands thoroughly with
soap and water.
Wipe the entire surface of the
lancing device and the inside
of the cap with the approved
cleaning and disinfecting
product.
How to Clean and Disinfect the Lancing Device
52297_07167776001.indb 269 10/20/14 11:19 AM

270
3 4
A separate Super Sani‑Cloth
should be used for cleaning
and disinfection. For
disinfecting the lancing
device, use a new cloth and
repeat Step2 making sure the
surface stays wet for
2minutes.
Wash hands thoroughly with
soap and water.
NOTE
Roche has tested the
approved product for a
total of 260 cycles,
which is equal to
cleaning and
disinfecting once per
week for a 5‑year
period.
52297_07167776001.indb 270 10/20/14 11:19 AM

14
271
14 Care and Maintenance
14.1 Overview
The meter needs little or no maintenance with normal use. It
automatically tests its own systems every time you turn it on and
lets you know if something is wrong by displaying a message.
If you drop the meter or think it is not giving accurate results,
contact ACCU‑CHEK Customer Care Service Center at
1‑800‑688‑4578. Do not attempt to repair the meter yourself.
If you have any questions about the care and maintenance of the
meter, contact ACCU‑CHEK Customer Care Service Center at
1‑800‑688‑4578.
14.2 Charging the Battery
For instructions on charging the battery, see the Charging the
Battery section in the Startup chapter in this user’s manual.
52297_07167776001.indb 271 10/20/14 11:19 AM

272
14.3 Power‑Saving Tips
To conserve battery life:
jTurn the meter off when you are finished rather than utilizing
the automatic power off feature.
jOnly turn on the vibration feature for mode settings when it is
needed. See the Mode Settings: Sound, Vibration section in
the Changing Meter Settings chapter in this user’s manual.
jOnly turn on the touchscreen tone and vibration features when
they are needed. See the Touchscreen: Tone, Vibration
section in the Changing Meter Settings chapter in this user’s
manual.
jKeep the brightness level of the display at a minimum. See the
Brightness section in the Changing Meter Settings chapter in
this user’s manual.
jTurn on the Flight Mode. See the Turning On Flight Mode
section in the Travel Settings chapter in this user’s manual.
52297_07167776001.indb 272 10/20/14 11:19 AM

14
273
NOTE
When the battery is replaced, all records remain saved in
the logbook.
14.4 Changing the Battery
The rechargeable battery has a limited number of charge cycles.
If you notice that the meter must be charged more often than it
did when it was new, you may need to change the battery. The
meter requires a custom rechargeable battery provided by Roche.
Contact ACCU‑CHEK Customer Care Service Center at
1‑800‑688‑4578 to get a replacement battery and then follow the
steps in this section.
52297_07167776001.indb 273 10/20/14 11:19 AM
274
w WARNING
jFollow these steps to
prevent possible damage
to the meter contacts.
jDo not try to force the
battery into the meter.
The battery only goes in
one way.
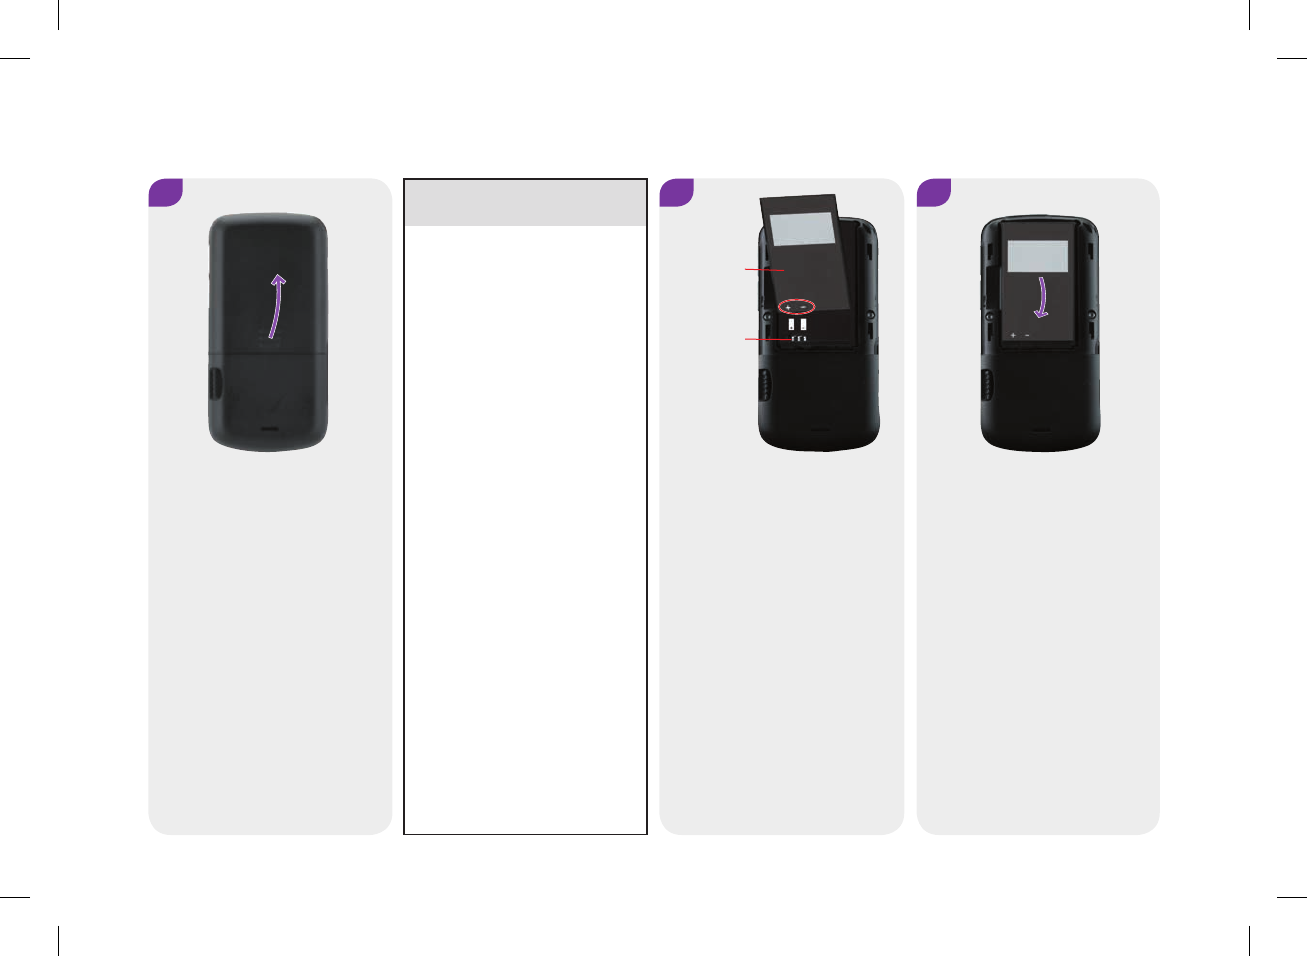
2
Battery
Meter
Contacts
3
Align the new battery by
placing the (+) (‑) end as
shown.
Slide the (+) (‑) end of the
battery against the meter
contacts. Press battery into
meter.
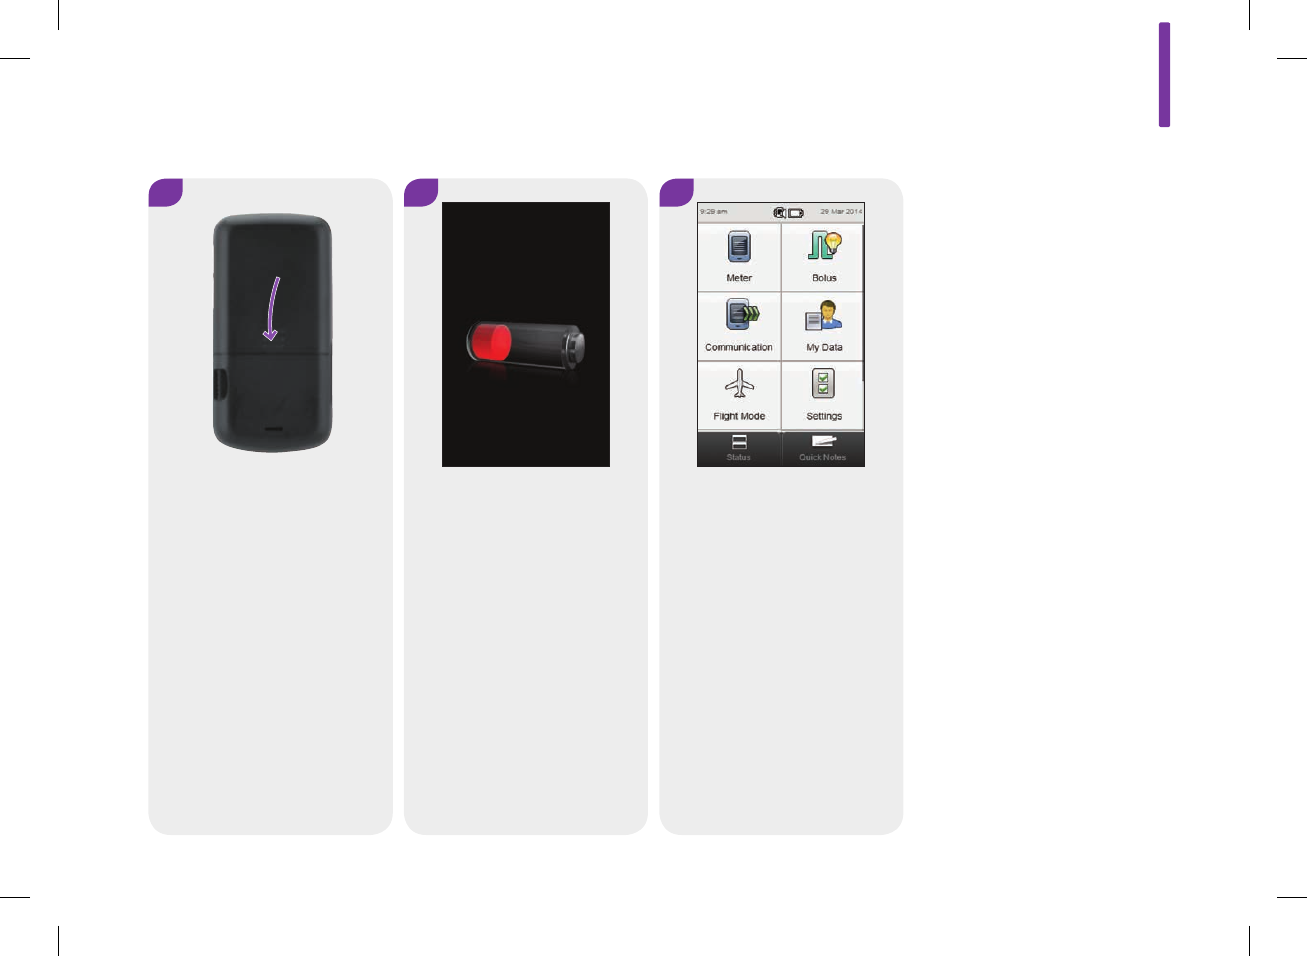
1
Open the battery door on the
back of the meter by pushing
in the direction of the arrow
and pulling up the door.
Remove the old battery.
52297_07167776001.indb 274 10/20/14 11:19 AM
14
275
4
Put the battery door back in
place and snap it closed by
pushing the battery door in
the direction of the arrow.
5 6
Charge the battery. See the
Charging the Battery section
in the Startup chapter in this
user’s manual.
After the battery is fully
charged, confirm the date and
time are correct on either the
Main Menu or the Status
screen. To update the date or
the time, see the Date, Time,
and Time Format section in
the Changing Meter Settings
chapter in this user’s manual.
52297_07167776001.indb 275 10/20/14 11:19 AM
276
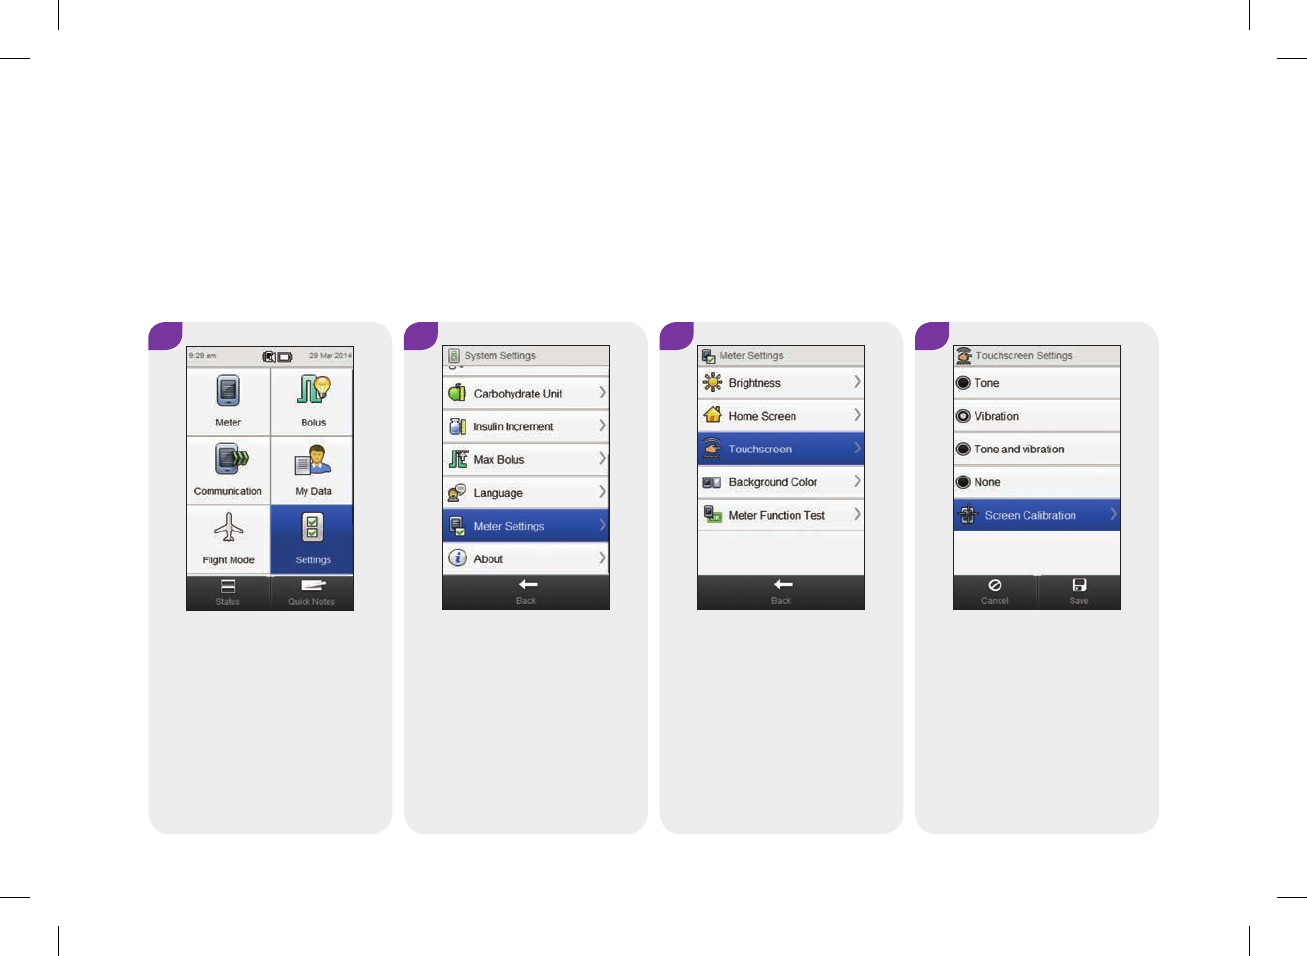
14.5 Touchscreen Calibration
1 2
From the Main Menu, select
Settings.
Scroll the screen and select
Meter Settings.
3 4
Select Touchscreen. Select Screen Calibration.
Calibrating the touchscreen can help improve the meter’s
touch sensitivity.
Main Menu > Settings > Meter Settings > Touchscreen > Screen Calibration
52297_07167776001.indb 276 10/20/14 11:19 AM
14
277
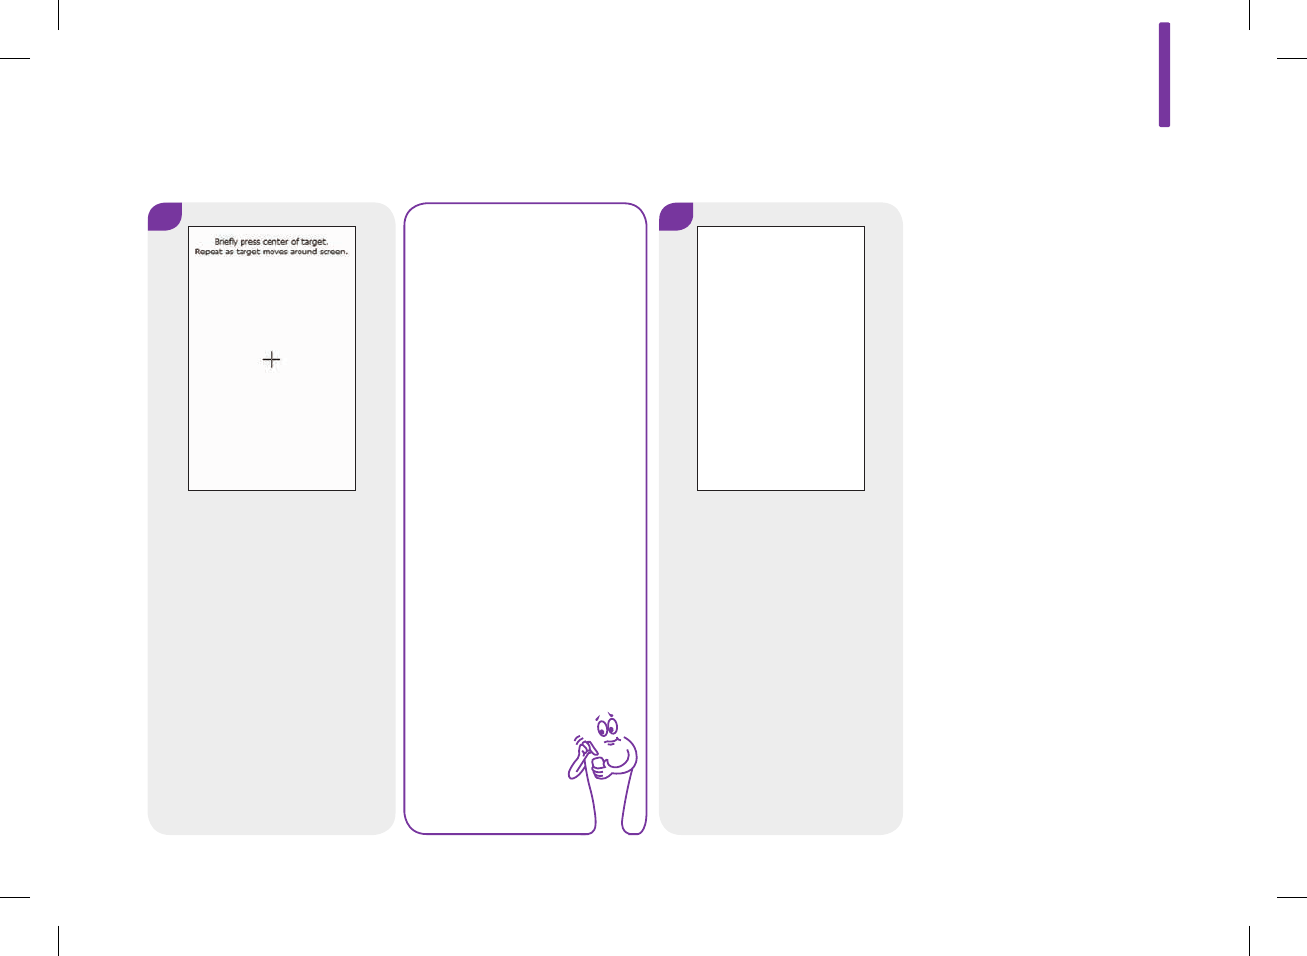
6
Screen text: New calibration
settings calculated. Tap
screen anywhere to use new
settings. Wait for 30 seconds
to keep old settings. Restoring
old settings in : 30 sec
(countdown timer)
NOTE
Touchscreen calibration
instructions only appear
in English.
5
Screen text: Briefly press
center of target. Repeat as
target moves around screen.
New calibration settings calculated.
Tap screen anywhere to use new settings.
Wait for 30 seconds to keep old settings.
Restoring old settings in : 30 sec
52297_07167776001.indb 277 10/20/14 11:19 AM
278
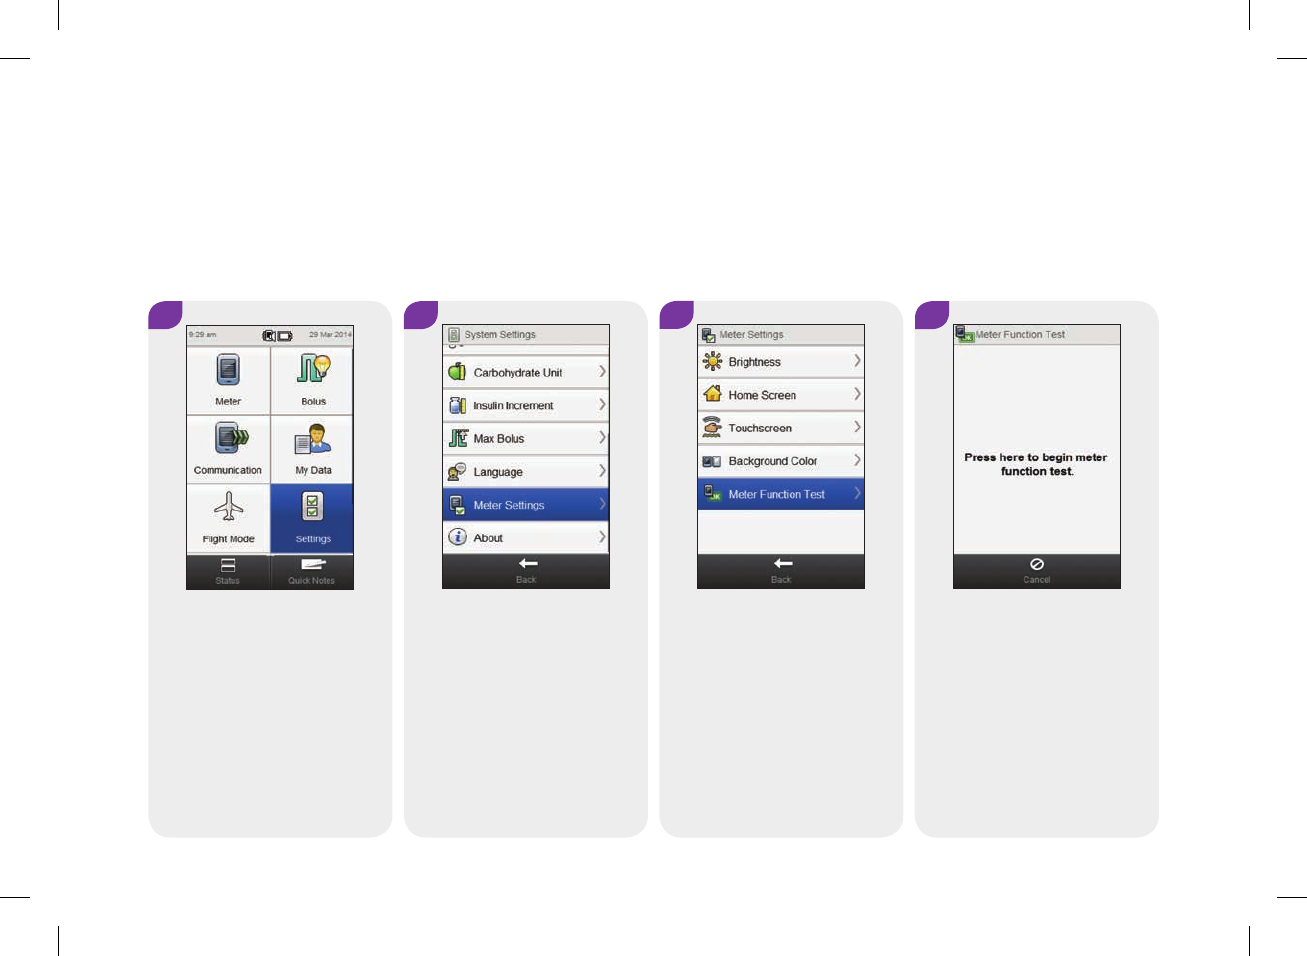
34
Select Meter Function Test. Touch the screen where
indicated.
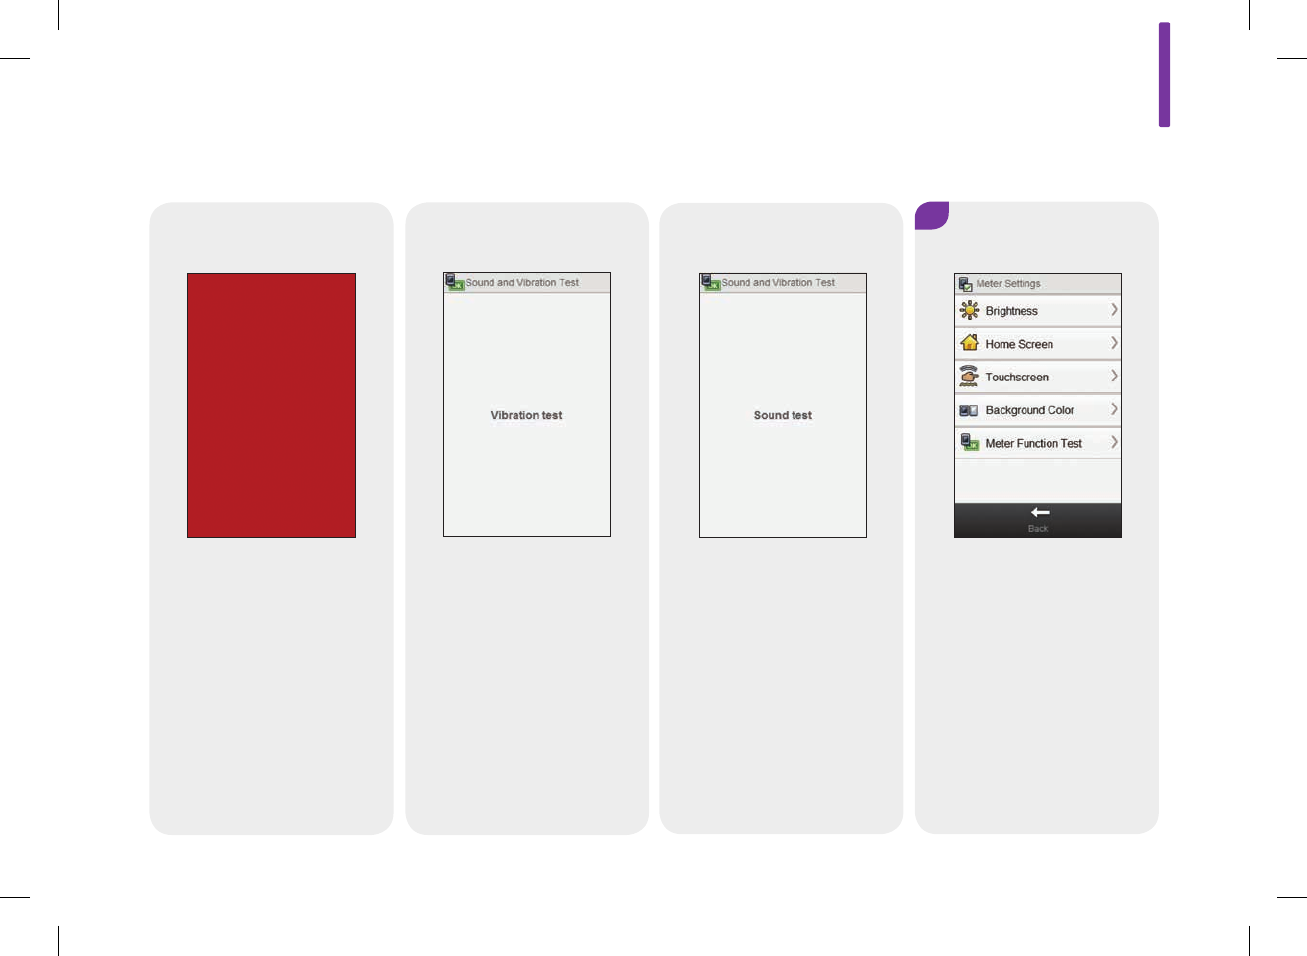
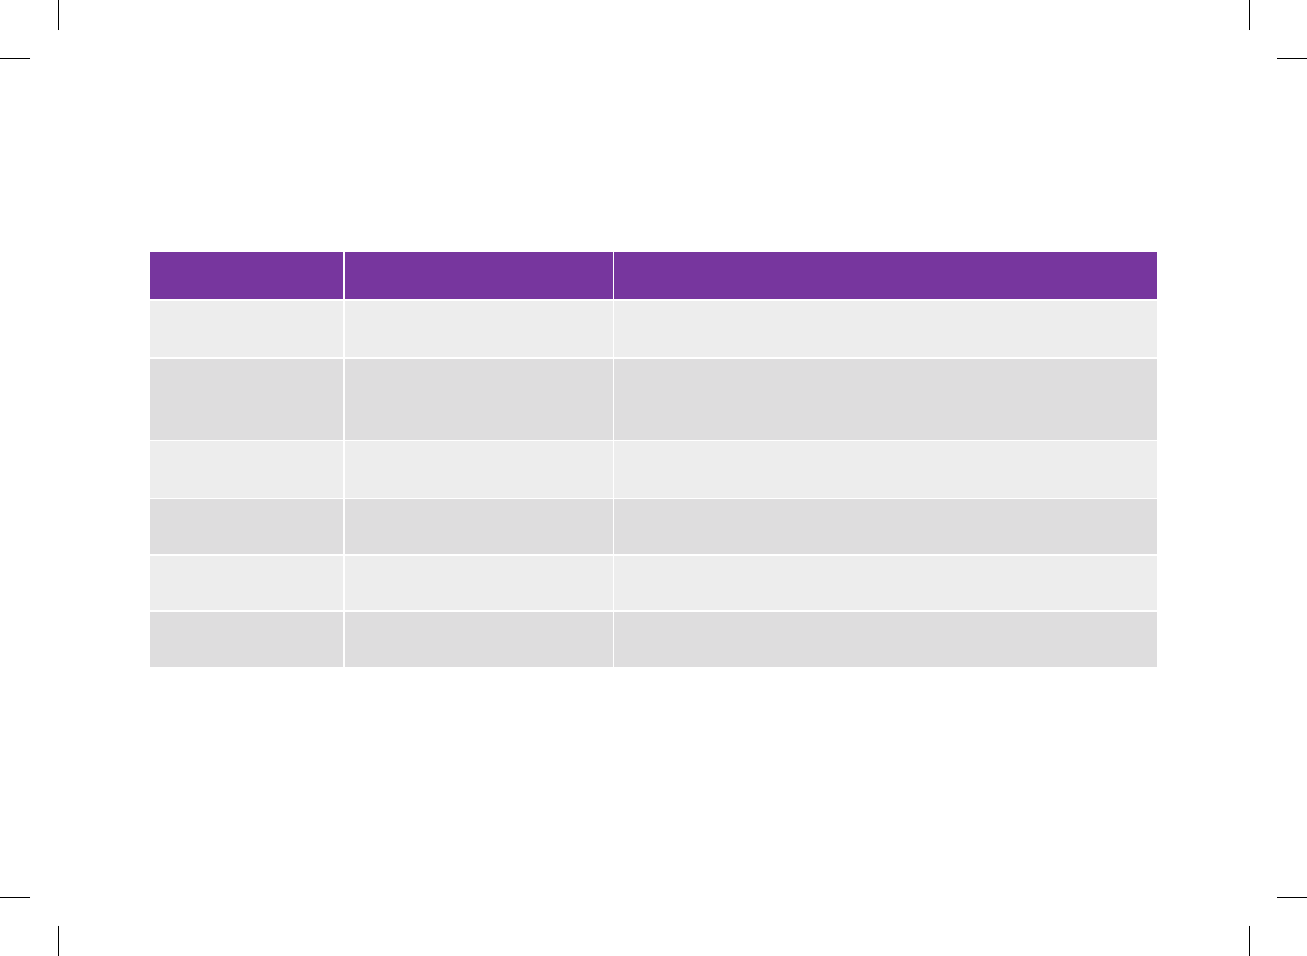
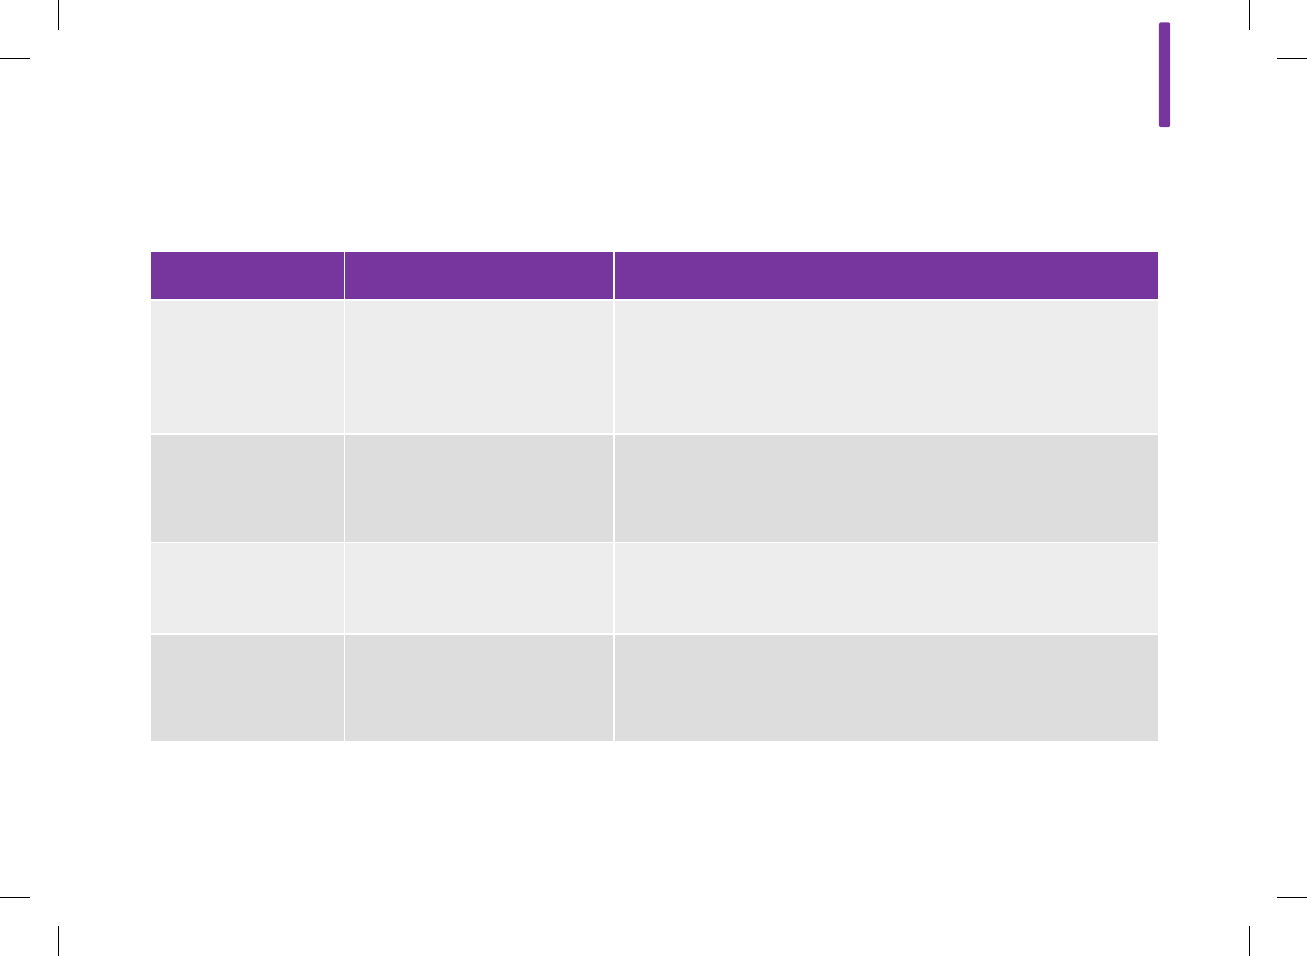
14.6 Meter Function Test
1 2
From the Main Menu, select
Settings.
Scroll the screen and select
Meter Settings.
If the meter display is faulty, or you cannot hear or feel the alerts, you can have the
meter check the display, vibration, and sound functions for proper operation.
Main Menu > Settings > Meter Settings > Meter Function Test
52297_07167776001.indb 278 10/20/14 11:19 AM
14
279
Sound Test
The meter emits a sound.
5
If the meter does not perform
as described in the meter
function test, contact
ACCU‑CHEK Customer Care
Service Center at
1‑800‑688‑4578.
Display Test
The display cycles through
colors (red, blue, green and
white).
Vibration Test
The meter vibrates 3 times.
Screens Displayed During the Meter Function Test
52297_07167776001.indb 279 10/20/14 11:19 AM

280
52297_07167776001.indb 280 10/20/14 11:19 AM

15 Troubleshooting
15.1 Overview
For most problems, the meter displays a message with a short
description of the problem and a proposed solution. This chapter
goes into more detail describing the problem with the possible
cause and suggesting possible solutions. The problems are
grouped by the type of problem or message (for example, Error or
Warning). If the possible solutions do not fix the problem, contact
ACCU‑CHEK Customer Care Service Center at 1‑800‑688‑4578.
NOTE
jIf you have a problem not included here, contact
ACCU‑CHEK Customer Care Service Center at
1‑800‑688‑4578.
jIf you drop the meter or think it is not giving accurate
results, make sure your test strips and control solution
have not expired, and perform a control test.
jBlood glucose is sometimes shortened to bG, but it means
the same thing.
15
281
52297_07167776001.indb 281 10/20/14 11:19 AM
15.2 Troubleshooting the Meter
General Problems
Problem Possible Causes Possible Solutions
Display is blank or the
meter does not turn on.
The battery is low on power. See the Charging the Battery section in the Startup chapter in this
user’s manual.
The battery may be defective. Replace the battery if it does not charge. See the Changing the
Battery section in the Care and Maintenance chapter in this user’s
manual.
The meter has an electronic error. Reset the meter by pressing and holding the power button for at least
5 seconds.
The display is damaged. Contact ACCU‑CHEK Customer Care Service Center at
1‑800‑688‑4578.
The meter is defective. Contact ACCU‑CHEK Customer Care Service Center at
1‑800‑688‑4578.
The temperature may be outside
the meter operating range.
Move the meter to an area with the proper temperature. Wait 5 minutes
before turning the meter on. Do not artificially heat or cool the meter.
282
52297_07167776001.indb 282 10/20/14 11:19 AM
Problem Possible Causes Possible Solutions
Battery does not
recharge while the
meter is plugged into a
computer with a USB
cable.
The computer USB port cannot
charge the meter battery.
Charge the meter battery using a power outlet. See the Charging the
Battery Using a Power Outlet section in the Startup chapter in this
user’s manual.
Battery must be
charged more often
than it did when it was
new.
The rechargeable battery has a
limited number of charge cycles
after which its charge capacity is
reduced.
Replace the battery. See the Changing the Battery section in the Care
and Maintenance chapter in this user’s manual.
Display freezes or does
not respond.
The meter has an electronic error. jReset the meter by pressing and holding the power button for at
least 5 seconds until the meter screen goes blank.
jRemove the battery from the meter and reinsert the battery.
Display is faulty; the
color on the screen is
incorrect.
Perform a meter function test. See the Meter Function Test section in
the Care and Maintenance chapter in this user’s manual. If the meter
function test indicates there is a problem with the display, contact
ACCU‑CHEK Customer Care Service Center at 1‑800‑688‑4578.
15
283
52297_07167776001.indb 283 10/20/14 11:19 AM

Problem Possible Causes Possible Solutions
Sound is faulty; you
cannot hear the alerts.
The sound feature is turned off or
is set too low.
jCheck to see if the active mode setting (Normal, Vibrate, Quiet, Loud)
has sound and if the volume is set at a level that is audible. See the
Mode Settings: Sound, Vibration section in the Changing Meter
Settings chapter in this user’s manual.
jCheck to see if the signal suspension is on and is active. Signal
suspension may need to be turned off or its settings changed. See
the Mode Settings: Signal Suspension section in the Changing
Meter Settings chapter in this user’s manual.
jPerform a meter function test. See the Meter Function Test section
in the Care and Maintenance chapter in this user’s manual. If the
meter function test indicates there is a problem with the sound,
contact ACCU‑CHEK Customer Care Service Center at
1‑800‑688‑4578.
284
52297_07167776001.indb 284 10/20/14 11:19 AM
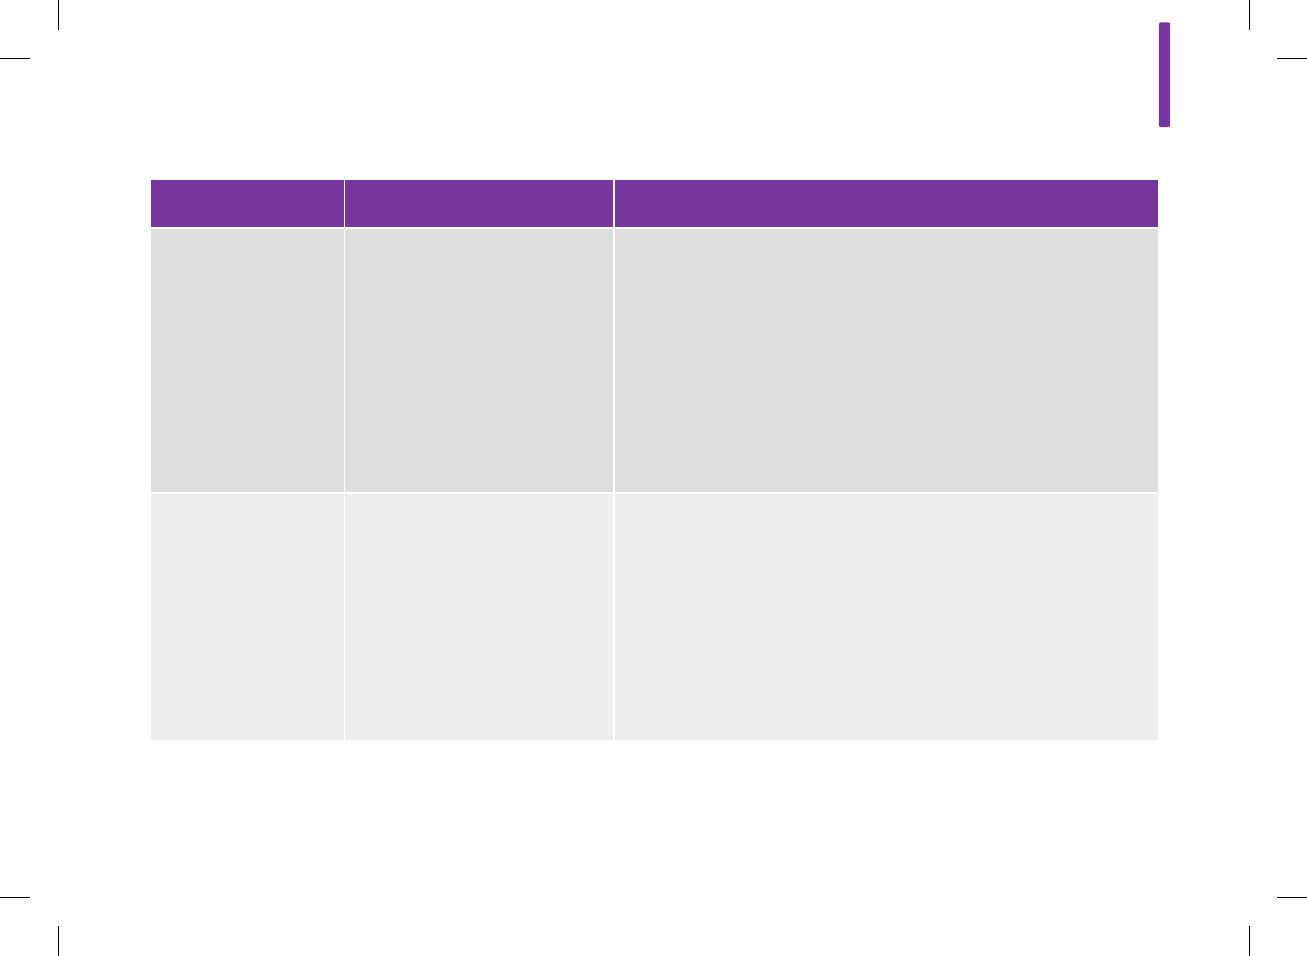
Problem Possible Causes Possible Solutions
Start time: Cannot
change the Start time
for the first time block.
The first time set up (Setup
Wizard) is already complete, and
therefore the start time of the first
time block cannot be changed in
the device settings.
To change the Start time for the first time block, select Reset on the
Time Blocks screen. Once the time blocks are reset, you must re‑enter
all time block information.
jIf bolus advice is turned on, see the Bolus Advice: Resetting All
Time Blocks section in the Changing Bolus Advice Settings
chapter in this user’s manual.
jIf bolus advice is turned off, see the Resetting All Time Blocks
section in the Changing Meter Settings chapter in this user’s
manual.
Touchscreen is not
operating properly.
Touchscreen has not been
calibrated.
jCalibrate the touchscreen. See the Touchscreen Calibration section
in the Care and Maintenance chapter in this user’s manual. If
calibrating the touchscreen does not fix the problem, contact
ACCU‑CHEK Customer Care Service Center at 1‑800‑688‑4578.
jIf the touchscreen is calibrated and you still think it is not operating
properly, the following may help you know when a selection is made:
Set up the touchscreen to emit a tone, vibrate, or do both. See the
Touchscreen: Tone, Vibration section in the Changing Meter
Settings chapter in this user’s manual.
15
285
52297_07167776001.indb 285 10/20/14 11:19 AM
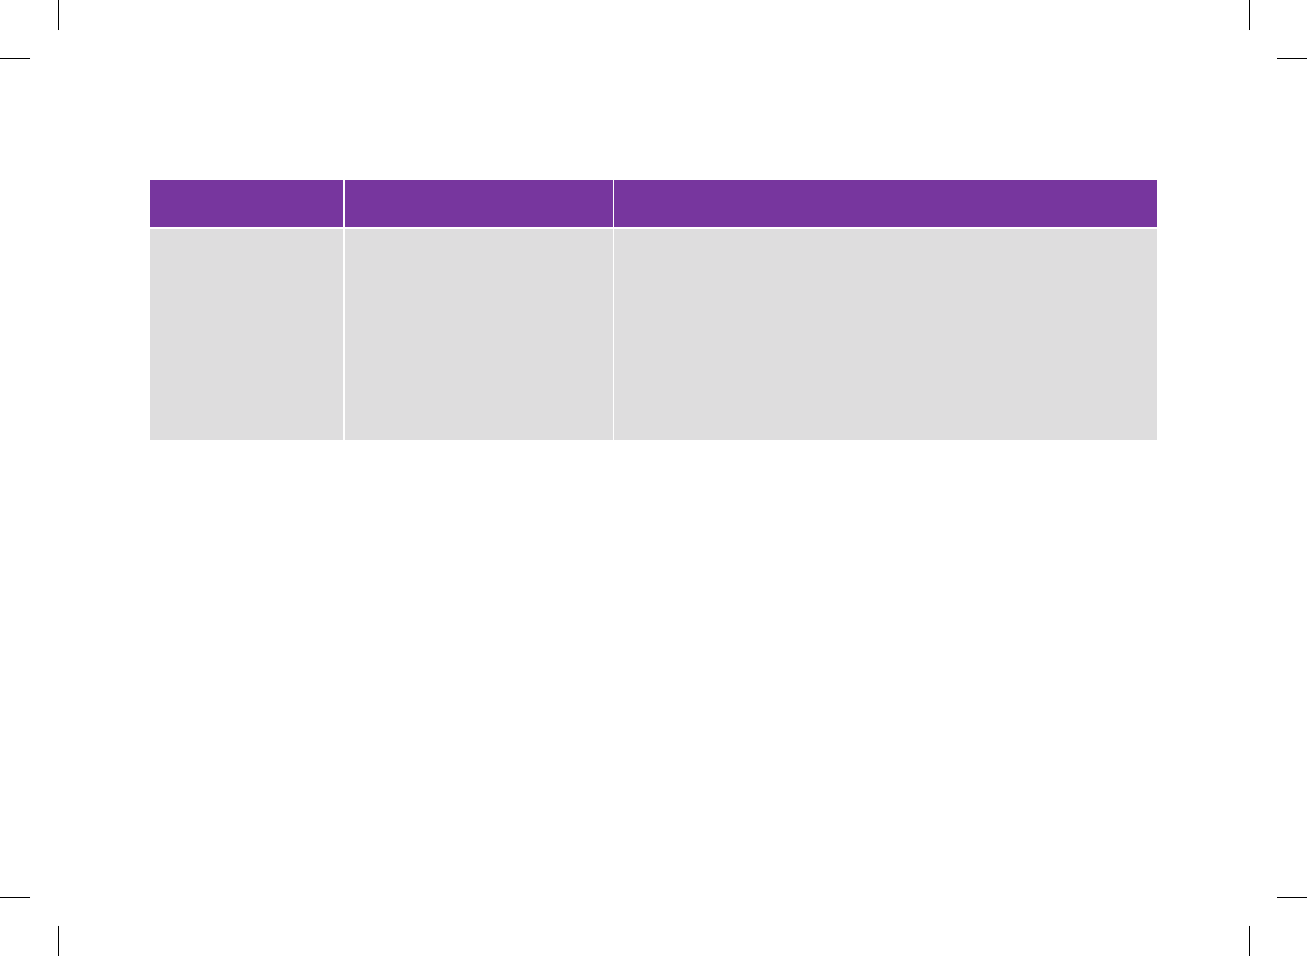
Problem Possible Causes Possible Solutions
Touchscreen calibration
text is not translated.
Touchscreen calibration
instructions only appear in
English.
Refer to the Touchscreen Calibration section in the Care and
Maintenance chapter in this user’s manual.
jFirst English screen: Briefly press center of target. Repeat as target
moves around screen.
jSecond English screen: New calibration settings calculated. Tap
screen anywhere to use new settings. Wait for 30 seconds to keep
old settings. Restoring old settings in : 30 sec (countdown timer)
286
52297_07167776001.indb 286 10/20/14 11:19 AM
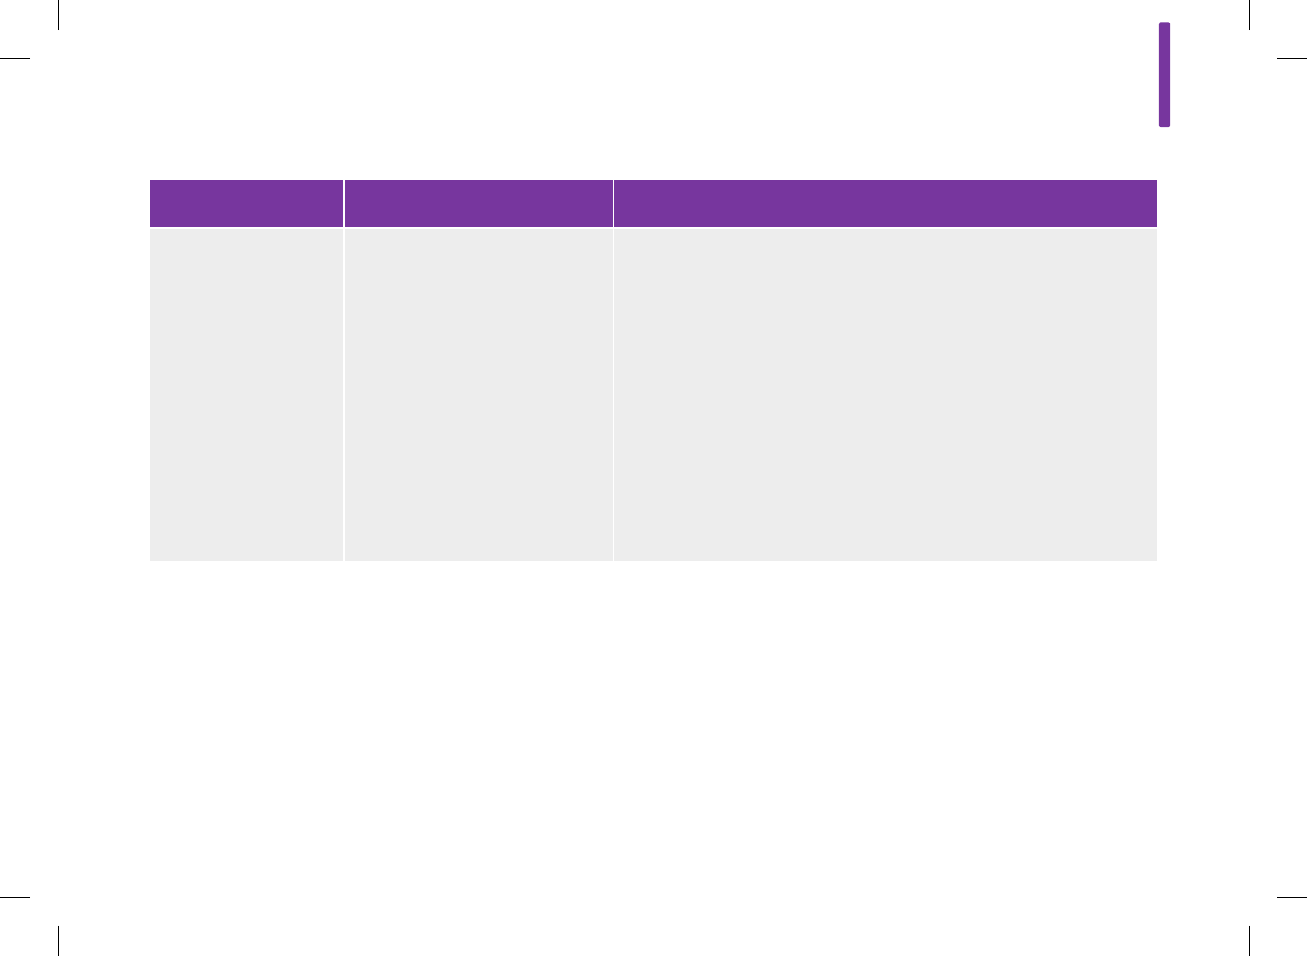
Problem Possible Causes Possible Solutions
Vibration is faulty; you
cannot feel the alerts.
Vibration feature is turned off. jCheck to see if the active mode setting (Normal, Vibrate, Quiet, Loud)
has vibration. See the Mode Settings: Sound, Vibration section in
the Changing Meter Settings chapter in this user’s manual.
jCheck to see if the signal suspension is on and is active. Signal
suspension may need to be turned off or its settings changed. See
the Mode Settings: Signal Suspension section in the Changing
Meter Settings chapter in this user’s manual.
jPerform a meter function test. See the Meter Function Test section
in the Care and Maintenance chapter in this user’s manual. If the
meter function test indicates there is a problem with vibration,
contact ACCU‑CHEK Customer Care Service Center at
1‑800‑688‑4578.
15
287
52297_07167776001.indb 287 10/20/14 11:19 AM
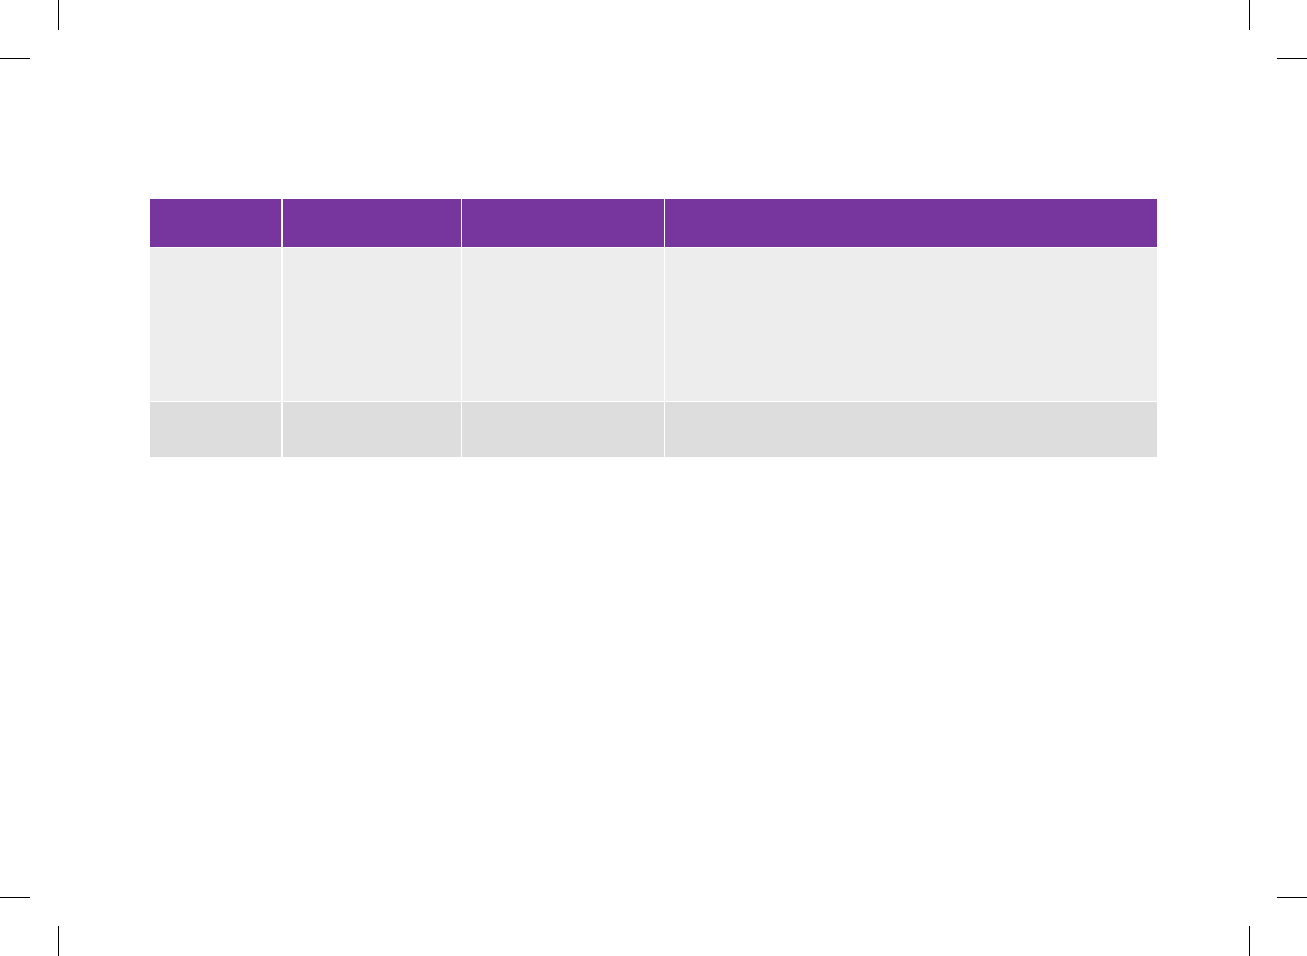
Error Messages
Code Screen Message Possible Causes Possible Solutions
E‑57 Electronic error An electronic error has
occurred or, in rare
cases, a used test strip
was removed and
reinserted.
jPress and hold the power button for at least 5 seconds until
the meter screen goes blank. Release the power button.
jRemove the battery from the meter and reinsert the battery.
jIf this does not fix the problem, contact ACCU‑CHEK Customer
Care Service Center at 1‑800‑688‑4578.
E‑60 Internal clock error Contact ACCU‑CHEK Customer Care Service Center at
1‑800‑688‑4578.
288
52297_07167776001.indb 288 10/20/14 11:19 AM
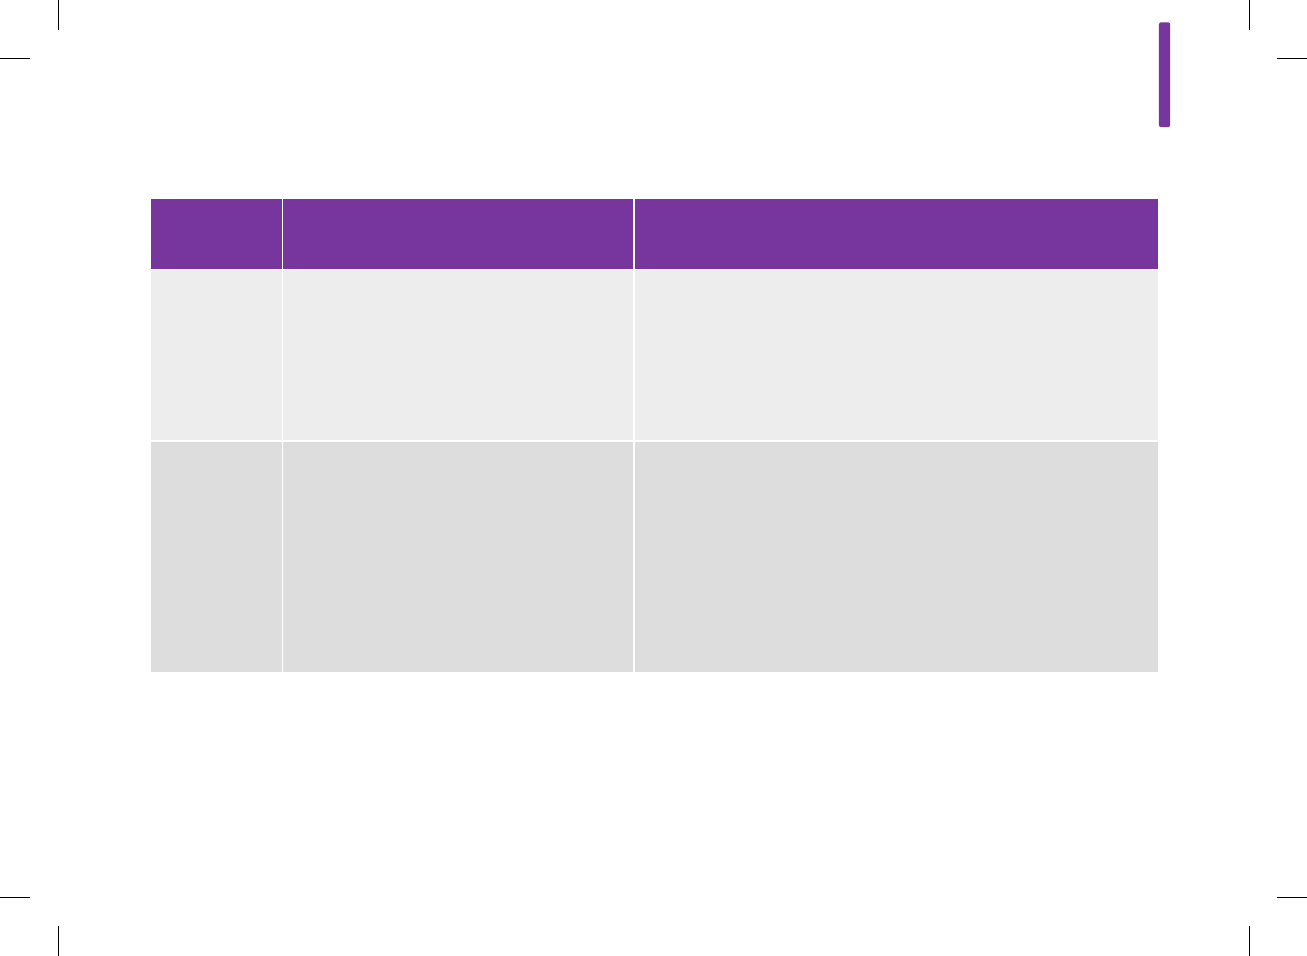
Information Messages
Screen
Message
Possible Causes Possible Solutions
Battery low is
displayed while
the meter is
plugged into a
computer with
a USB cable.
The computer USB port cannot charge the
meter battery.
Charge the meter battery using a power outlet. See the Charging
the Battery Using a Power Outlet section in the Startup chapter in
this user’s manual.
Bolus above
allowed
amount
NOTE: This
message can
only occur if
bolus advice is
turned on.
The recommended total bolus amount is
greater than the maximum allowed total
bolus amount. The meter sets the total bolus
amount to equal the maximum bolus
allowed. The carbohydrate bolus and the
correction bolus are adjusted to equal the
total bolus amount.
Check the accuracy of all entries. If necessary, contact your
healthcare professional.
15
289
52297_07167776001.indb 289 10/20/14 11:19 AM

Screen
Message
Possible Causes Possible Solutions
Bolus too high
NOTE: This
message can
only occur if
bolus advice is
turned off.
The total bolus amount is greater than the
maximum allowed total bolus amount. The
meter sets the total bolus amount to equal
the maximum bolus allowed. The
carbohydrate bolus and correction bolus are
adjusted to equal the total bolus amount.
Check the accuracy of all entries. If necessary, contact your
healthcare professional.
Carbohydrate
ratio not valid
The carbohydrate ratio is outside of the
acceptable meter range.
Check your entries and contact your healthcare professional to
determine the appropriate settings.
Expired bG
record
This message is displayed when the blood
glucose test was performed more than
10 minutes earlier.
Perform a blood glucose test to update your blood glucose result to
receive bolus advice.
290
52297_07167776001.indb 290 10/20/14 11:19 AM
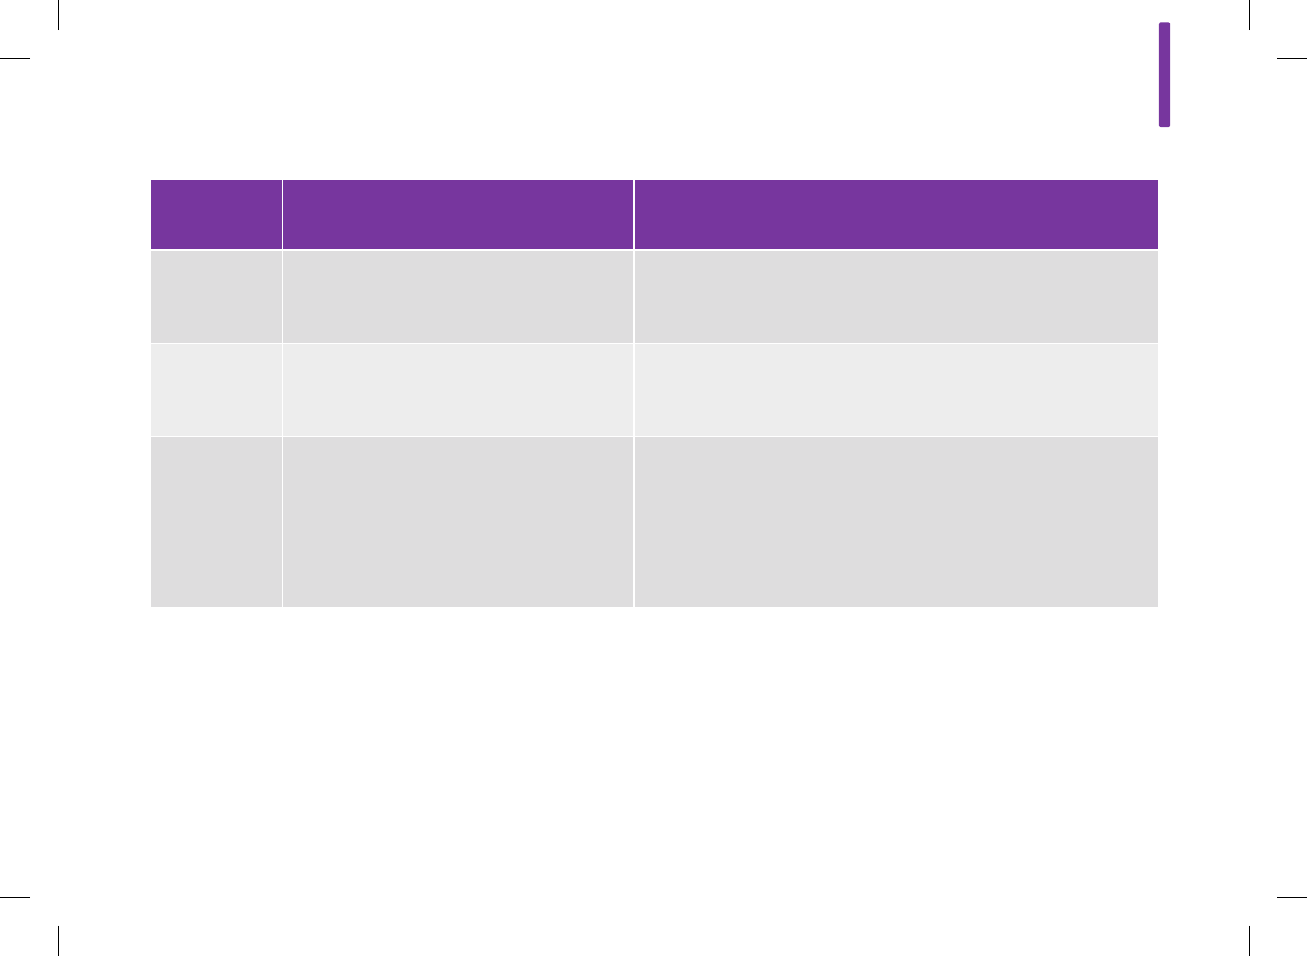
Screen
Message
Possible Causes Possible Solutions
Insulin
sensitivity not
valid
The insulin sensitivity is outside of the
acceptable meter range.
Check your entries and contact your healthcare professional to
determine the appropriate settings.
Invalid bolus
advice times
The acting time value is less than the offset
time value.
The acting time value must be set equal to or greater than the offset
time value. Reset the acting time value or revise the offset time
value.
Invalid setting
with the text
Hypo value
must be less
than time block
target ranges.
The hypo warning limit value must be less
than all of your target ranges in the time
block settings.
Either reset the hypo warning limit so it is below the target ranges of
your time blocks or revise the target ranges for the time blocks. See
the Warning Limits: Hypo, Hyper section in the Changing Meter
Settings chapter in this user’s manual.
15
291
52297_07167776001.indb 291 10/20/14 11:19 AM
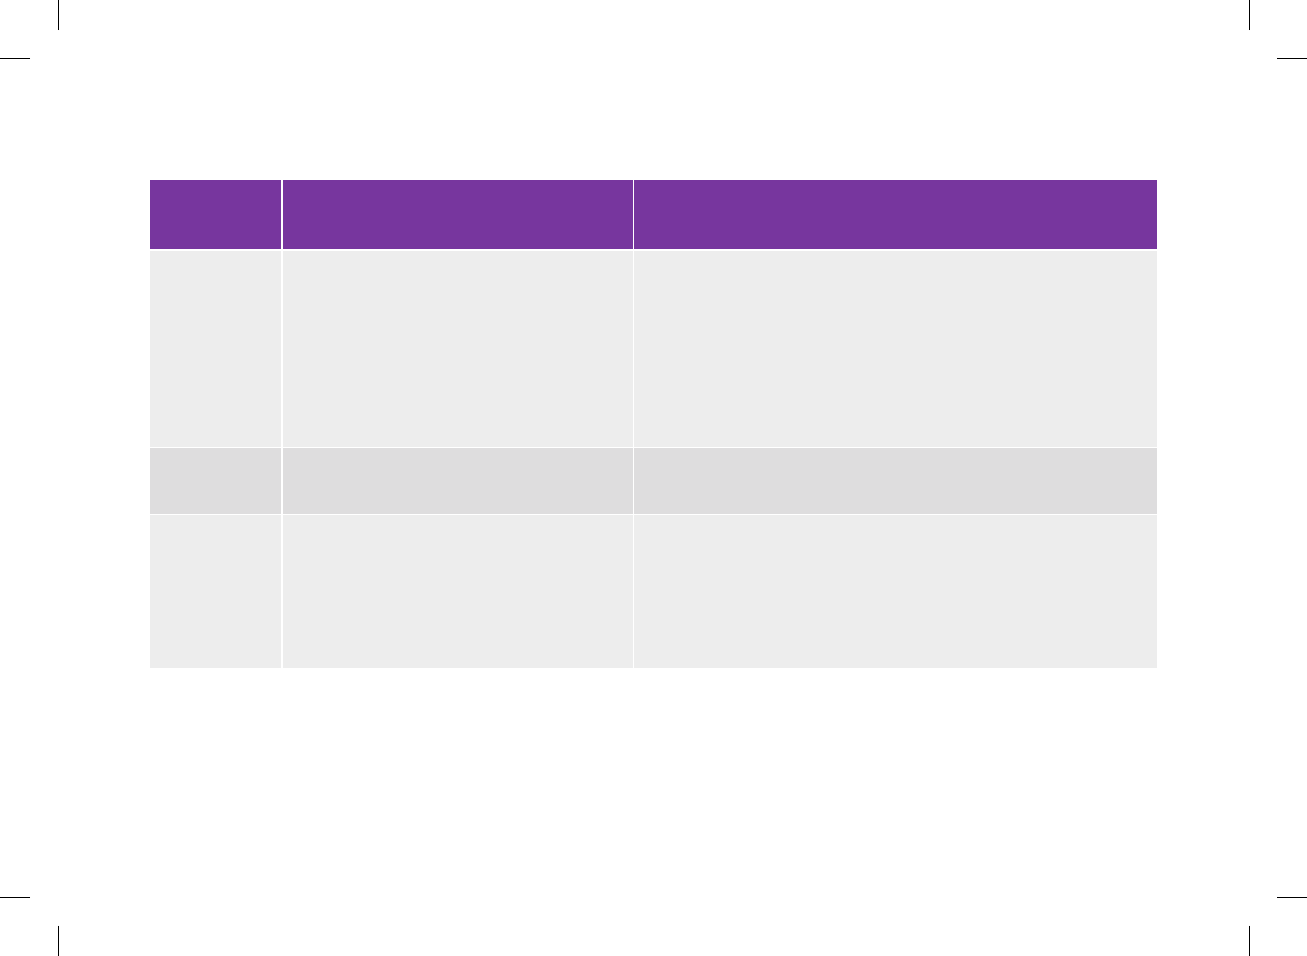
Screen
Message
Possible Causes Possible Solutions
Invalid setting
with the text
Hyper value
must be
greater than
time block
target ranges.
The hyper warning limit value must be
greater than all of your target ranges in the
time block settings.
Either reset the hyper warning limit so it is above the target ranges
of your time blocks or revise the target ranges for the time blocks.
See the Warning Limits: Hypo, Hyper section in the Changing
Meter Settings chapter in this user’s manual.
Invalid date/
time
Re‑enter the date or time.
No carbs
entered with
the text Add a
carbohydrates
amount?
If a Carbs insulin bolus is entered on the
Bolus Insulin screen and no Carbohydrate
Amount has been entered (Carbohydrates
displays No Entry).
Select Yes on the Information screen to enter an amount for
carbohydrates into the logbook. Select No for not adding an amount.
NOTE: An amount is not required, but the more complete the data
the more accurate any future bolus recommendations are if using
bolus advice.
292
52297_07167776001.indb 292 10/20/14 11:19 AM
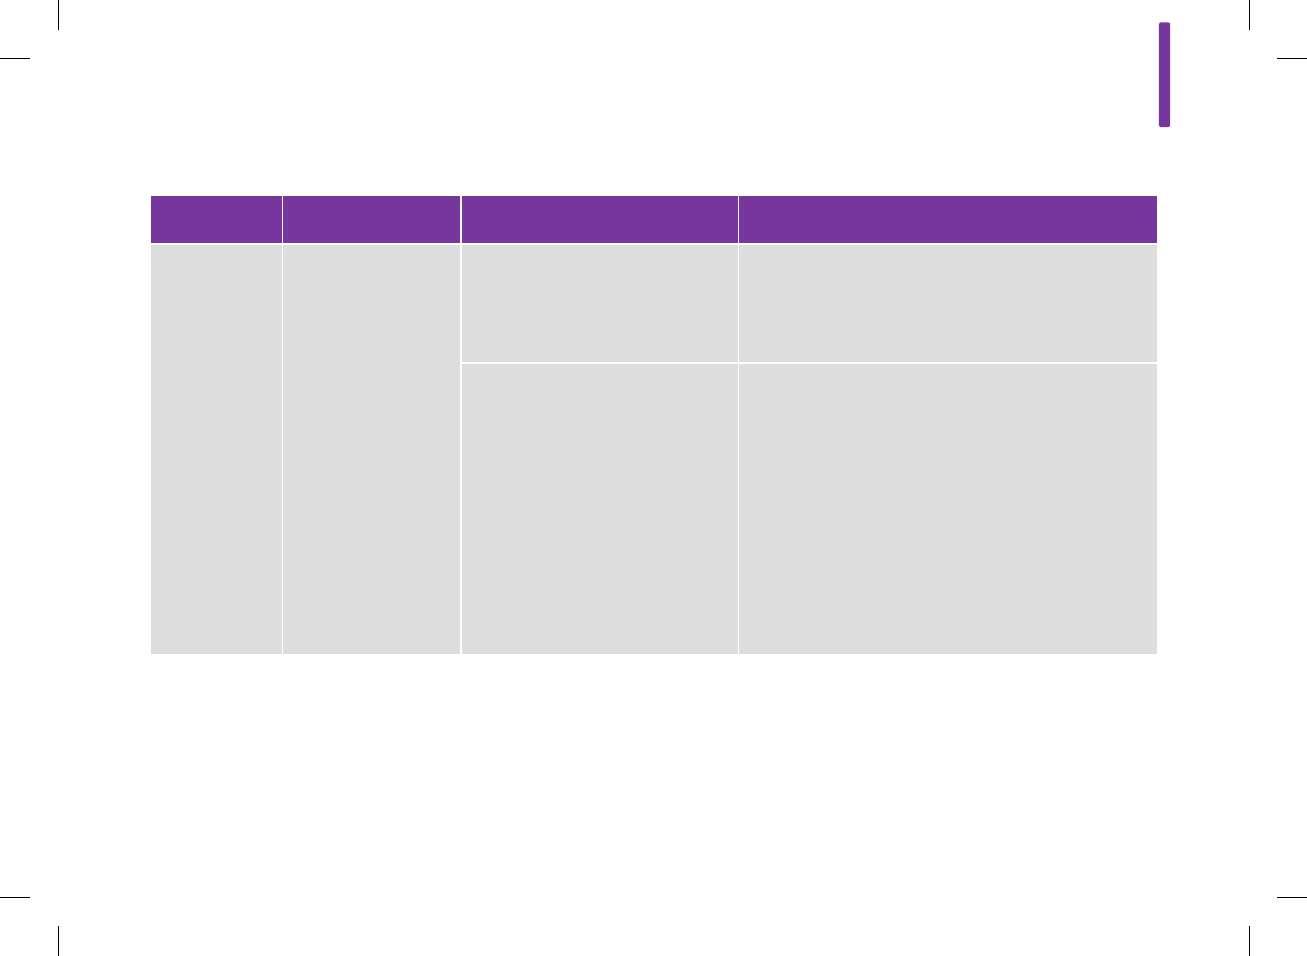
Maintenance Messages
Code Screen Message Possible Causes Possible Solutions
M‑51 Test strip error If you see this message before
you applied a drop to the test strip:
The test strip is damaged or is not
properly inserted into the meter.
jRemove the test strip and reinsert it, or replace it if
damaged.
jIf the message reappears, contact ACCU‑CHEK
Customer Care Service Center at 1‑800‑688‑4578.
If you see this message after you
applied a drop to the test strip, the
cause may be one of the following:
jThe drop is too small.
jYour blood glucose may be
extremely low.
jIf you think the drop was too small, retest with a
new test strip.
jIf you are experiencing any of the common
symptoms of low blood glucose, contact your
healthcare professional immediately.
jTreat low blood glucose as recommended by your
healthcare professional.
jIf this does not match how you feel, repeat the
blood glucose test. See the Testing Your Blood
Glucose chapter in this user’s manual.
15
293
52297_07167776001.indb 293 10/20/14 11:19 AM
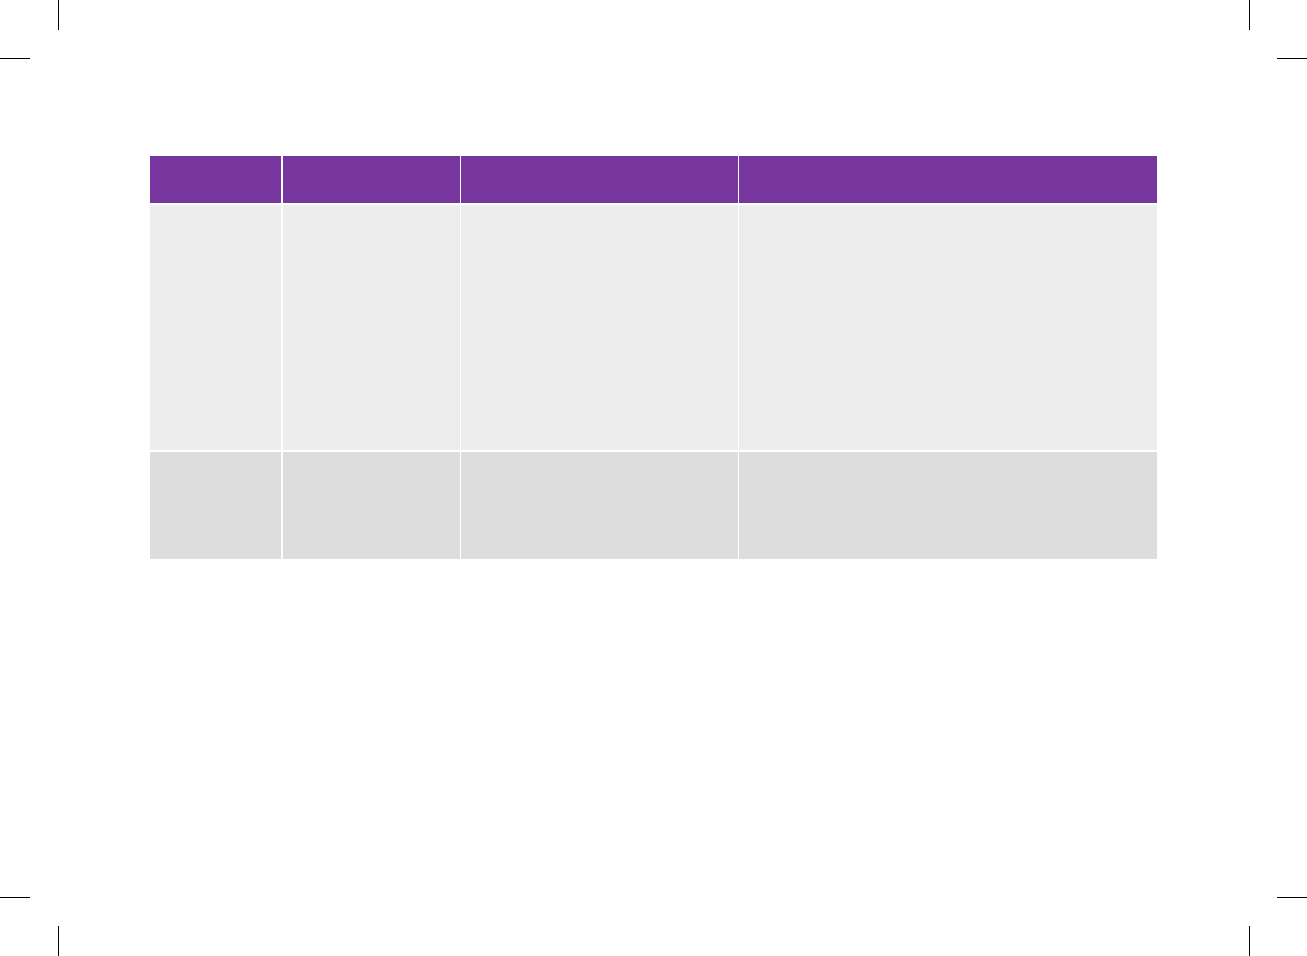
Code Screen Message Possible Causes Possible Solutions
M‑52 Code chip error The code chip is incorrect. jTurn the meter off. Remove and reinsert the code
chip.
jIf you continue to receive this message, contact
ACCU‑CHEK Customer Care Service Center at
1‑800‑688‑4578 to get a replacement code chip.
Turn the meter off and exchange the code chip with
the replacement code chip. If this does not fix the
problem, contact ACCU‑CHEK Customer Care
Service Center at 1‑800‑688‑4578.
M‑54 Drop too small Not enough blood or control
solution was drawn into the test
strip for measurement or was
applied after the test has started.
Discard the test strip and repeat the test with a fresh
test strip and a fresh drop of blood or control solution.
294
52297_07167776001.indb 294 10/20/14 11:19 AM
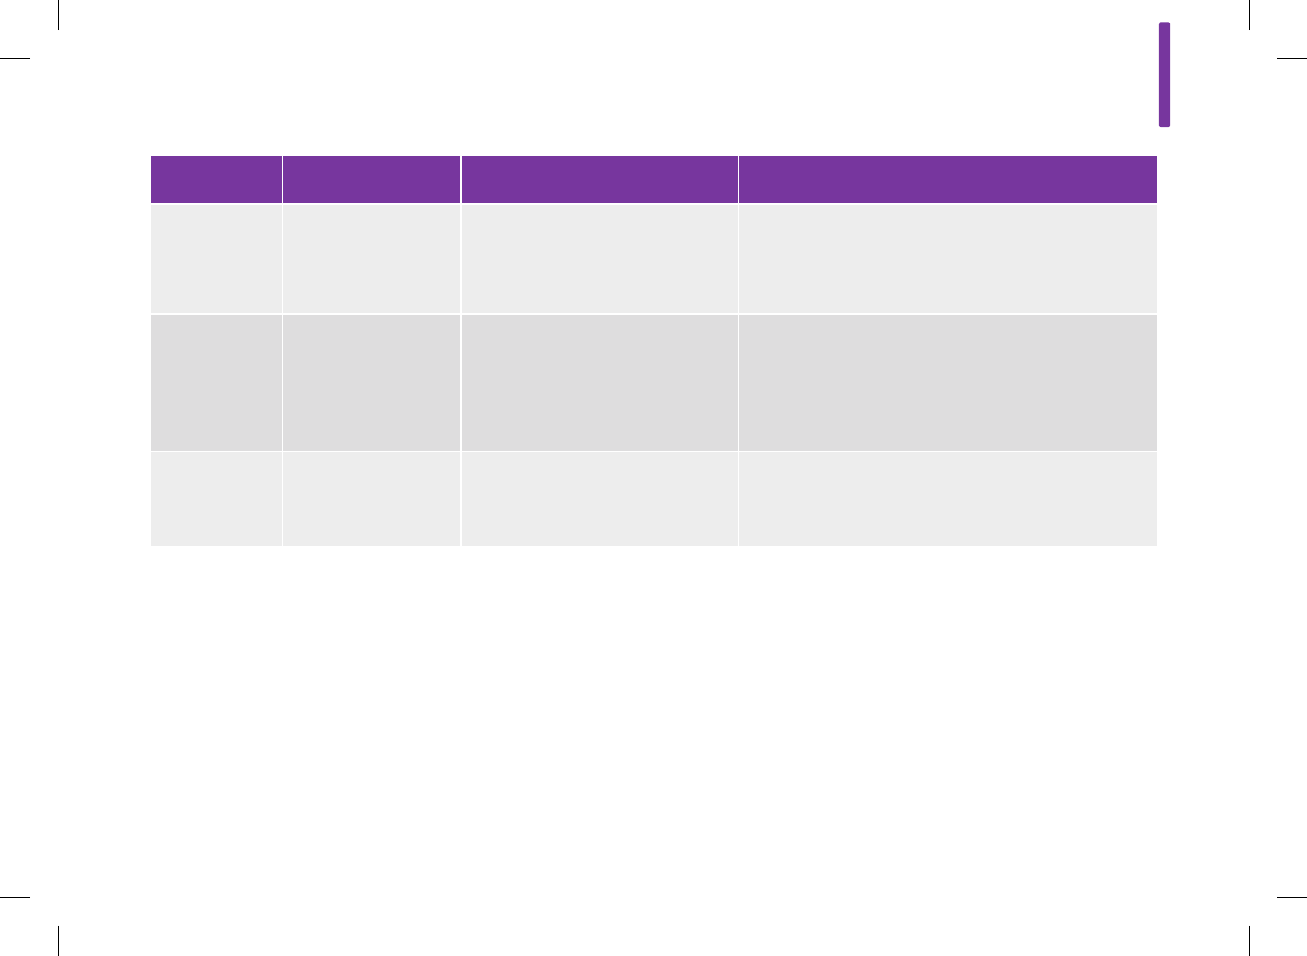
Code Screen Message Possible Causes Possible Solutions
M‑56 Drop applied too soon Blood or control solution was
applied to the test strip before the
Apply Drop screen appeared on the
meter.
Discard the test strip and repeat the test with a fresh
test strip and a fresh drop of blood or control solution.
M‑58 Temperature out of
range
The temperature is above or below
the proper range for performing a
blood glucose test or a control test.
Move the meter to an area within the proper
temperature range indicated for test strip use in the
test strip package insert. Wait 5 minutes before
turning the meter on. Repeat the test. Do not
artificially heat or cool the meter.
M‑63 Code chip missing The code chip is not inserted into
the meter.
Turn the meter off and insert the code chip. If you
need a code chip, contact ACCU‑CHEK Customer Care
Service Center at 1‑800‑688‑4578.
15
295
52297_07167776001.indb 295 10/20/14 11:19 AM
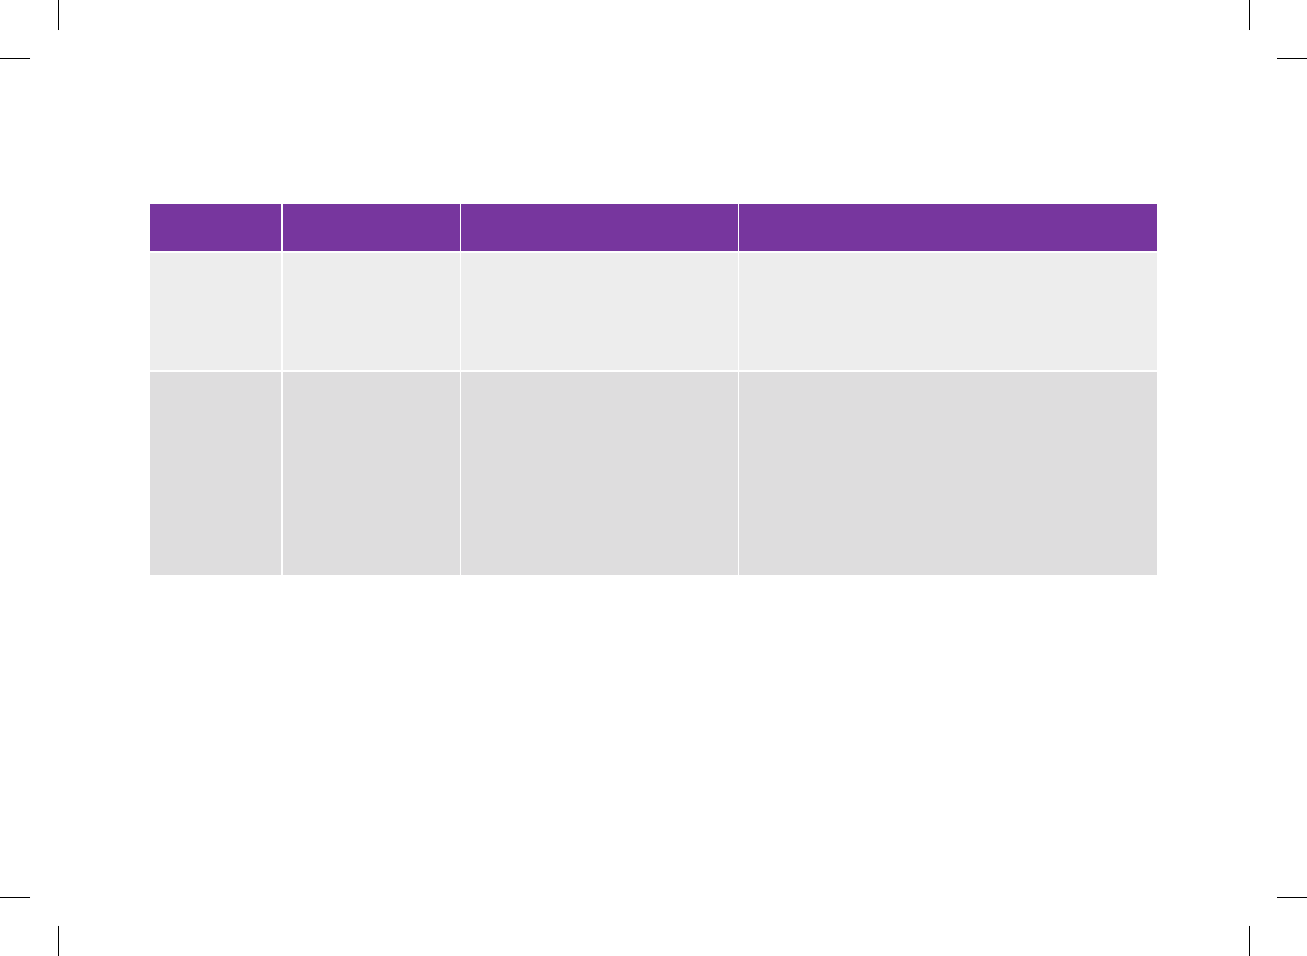
Warning Messages
Code Screen Message Possible Causes Possible Solutions
W‑75 Above hyper warning
limit
Your blood glucose result is above
the hyper warning limit set in the
meter.
jTreat high blood glucose as recommended by your
healthcare professional.
jConsider rechecking blood glucose, ketones, and
insulin.
W‑76 HI bG warning Your blood glucose may be higher
than the measuring range of the
meter.
jIf you are experiencing any of the common
symptoms of high blood glucose, contact your
healthcare professional immediately.
jTreat high blood glucose as recommended by your
healthcare professional.
jConsider rechecking blood glucose, ketones, and
insulin.
296
52297_07167776001.indb 296 10/20/14 11:19 AM

Code Screen Message Possible Causes Possible Solutions
W‑80 Below hypo warning
limit
Your blood glucose result is below
the hypo warning limit set in the
meter.
jTreat low blood glucose as recommended by your
healthcare professional.
jIf bolus advice is turned on, the meter displays a
recommended number of fast carbohydrates for you
to eat. It is recommended you retest your blood
glucose.
W‑81 LO bG warning Your blood glucose may be lower
than the measuring range of the
meter.
jIf you are experiencing any of the common
symptoms of low blood glucose, contact your
healthcare professional immediately.
jTreat low blood glucose as recommended by your
healthcare professional.
jConsider rechecking blood glucose.
15
297
52297_07167776001.indb 297 10/20/14 11:19 AM
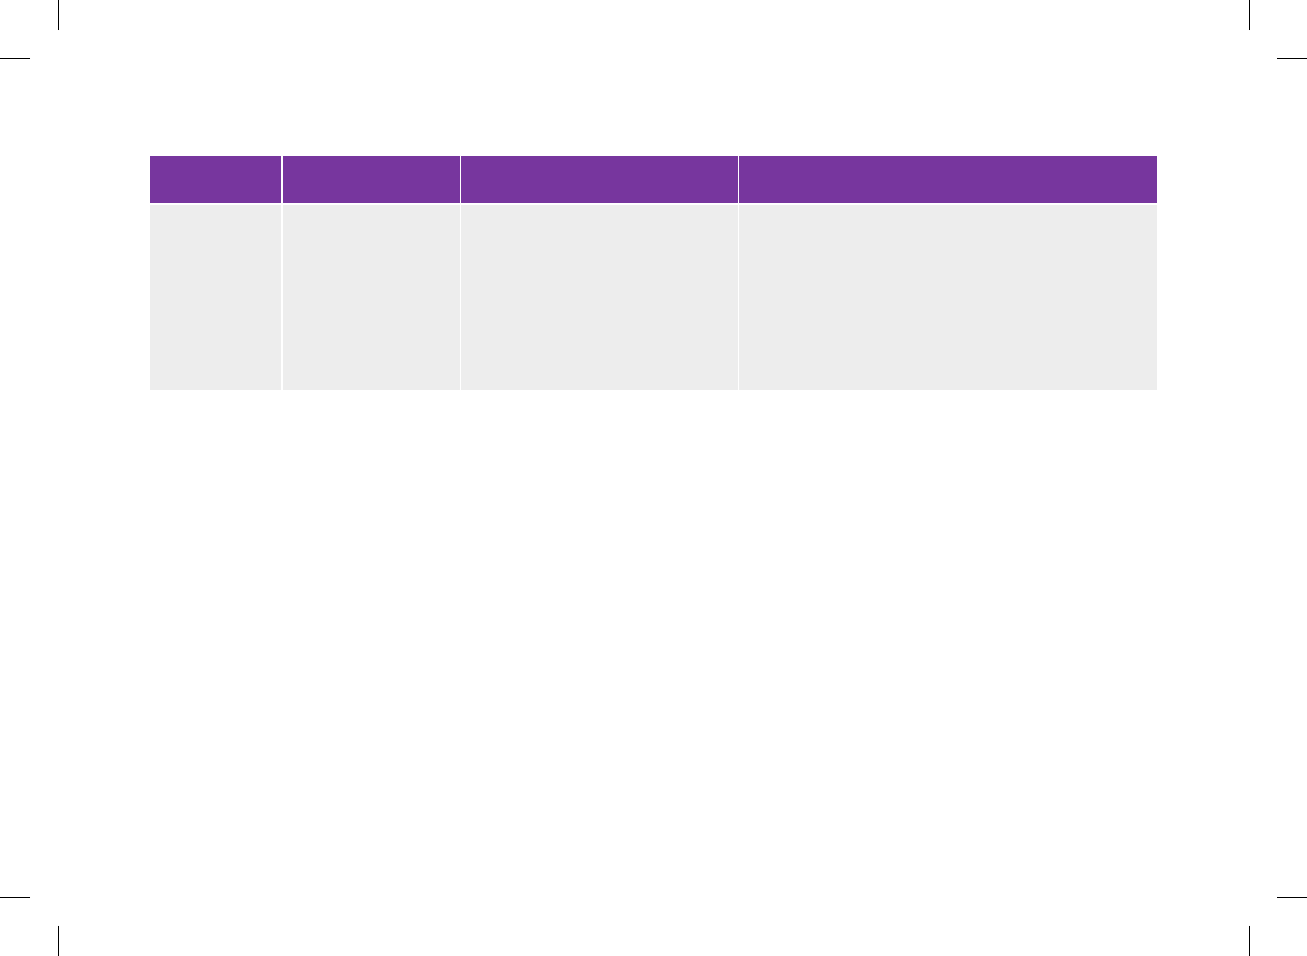
Code Screen Message Possible Causes Possible Solutions
W‑85 Bolus advice data
reset
When bolus advice is enabled, this
warning is displayed when either:
jThe logbook entries have been
deleted, or
jAn Internal clock error E‑60 has
occurred.
Wait 8 hours for accurate bolus advice. For additional
assistance, contact ACCU‑CHEK Customer Care
Service Center at 1‑800‑688‑4578.
298
52297_07167776001.indb 298 10/20/14 11:19 AM

16
299
16 Technical Information
16.1 Product Limitations
Read the literature packaged with the test strips and control
solutions for the latest information on product specifications and
limitations.
16.2 Specifications
Blood volume Refer to the test strip package insert.
Sample type Refer to the test strip package insert.
Test time Refer to the test strip package insert.
Measurement
range Refer to the test strip package insert.
Test strip
storage
conditions
Refer to the test strip package insert.
Meter storage
conditions ‑4 °F to 122 °F
System
operating
conditions
Refer to the test strip package insert.
52297_07167776001.indb 299 10/20/14 11:19 AM
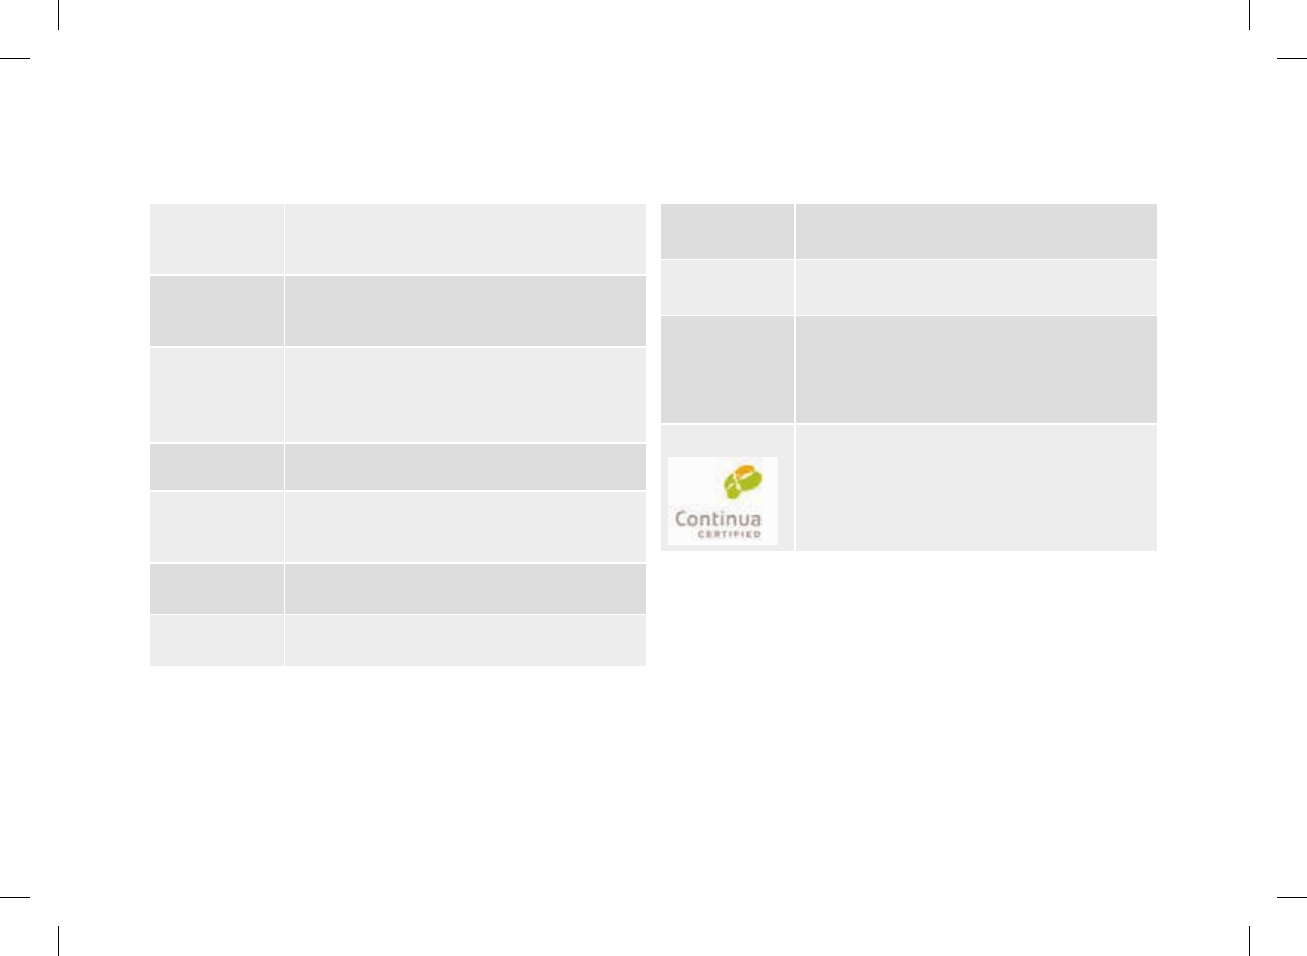
300
Memory
capacity 2000 logbook records
Automatic
power off 2 minutes
Power supply
j1 custom lithium‑ion rechargeable battery
jPower adapter: PHIHONG switching power
supply Model PSC03R‑050
Display 3 inch color TFT touchscreen
Dimensions 4.1 × 2.1 × 0.7 inches LWH
Weight 3.7 ounces
Construction Hand‑held
Protection
class III
Meter type The ACCU‑CHEK Aviva Insight Diabetes
Manager is suitable for continuous operation.
Control
solution
storage
conditions
Refer to the control solution package insert.
Interfaces
USB: micro‑B connector; Continua Certified®
to a Continua Certified manager.
52297_07167776001.indb 300 10/20/14 11:19 AM

16
301
Electromagnetic Compatibility
This meter meets the electromagnetic immunity requirements as
per EN ISO 15197. The chosen basis for electrostatic discharge
immunity testing was basic standard IEC 61000‑4‑2. In addition,
the meter meets the electromagnetic emissions requirements as
per EN 61326. The meter’s electromagnetic emission is thus low.
Interference from the meter to other electrically‑driven
equipment is not anticipated.
Test Principle
Refer to the test strip package insert.
Bluetooth® Wireless Technology
The meter utilizes Bluetooth wireless technology to
communicate and transfer information. Bluetooth wireless
technology is a form of radio frequency (RF) technology that
operates in the unlicensed industrial, scientific, and medical
band at 2.4 to 2.485 GHz. The RF channel utilized for
communication between the meter and another device is not an
open channel.
Performance Analysis
Refer to the test strip package insert.
52297_07167776001.indb 301 10/20/14 11:19 AM

302
Radio Frequency Communication
The device complies with Part 15 of the FCC Rules. Operation is
subject to the following two conditions: (1) This device may not
cause harmful interference, and (2) this device must accept any
inference received, including interference that may cause
undesired operation.
This equipment complies with FCC and IC radiation exposure
limits set forth for an uncontrolled environment. This equipment
is in direct contact with the body of the user under normal
operating conditions. This transmitter must not be co‑located or
operating in conjunction with any other antenna or transmitter.
This equipment has been tested and found to comply with the
limits for a Class B digital device, pursuant to Part 15 of the FCC
Rules. These limits are designed to provide reasonable protection
against harmful interference in a residential installation. This
equipment generates, uses and can radiate radio frequency energy
and, if not installed and used in accordance with the instructions,
may cause harmful interference to radio communications.
However, there is no guarantee that interference will not occur in a
particular installation.
52297_07167776001.indb 302 10/20/14 11:19 AM

16
303
If this equipment does cause harmful interference to radio or
television reception, which can be determined by turning the
equipment o and on, the user is encouraged to try to correct the
interference by one or more of the following measures:
jReorient or relocate the receiving antenna.
jIncrease the separation between the equipment and receiver.
jConnect the equipment into an outlet on a circuit dierent from
that to which the receiver is connected.
jConsult the dealer or an experienced radio/TV technician for
help.
Changes or modifications not expressly approved by the party
responsible for compliance (i.e. the manufacturer) could void the
user’s authority to operate the equipment.
Declaration of Conformity
Roche Diagnostics hereby declares that the ACCU‑CHEK Aviva
Insight Diabetes Manager conforms with the basic requirements
and other relevant regulations of the European Directive 1999/5/
EC. The conformity declaration may be found at the following
Internet address: http://declarations.accu‑chek.com
52297_07167776001.indb 303 10/20/14 11:19 AM

304
16.3 Product Safety Information
w WARNING
jChoking hazard. Small parts. Keep away from children
under the age of 3years.
jStrong electromagnetic fields may interfere with the proper
operation of the meter. Do not use the meter close to
sources of strong electromagnetic radiation.
jTo avoid electrostatic discharge, do not use the meter in
a very dry environment, especially one in which synthetic
materials are present.
52297_07167776001.indb 304 10/20/14 11:19 AM

Roche is committed to recycling and sustainability. Comply with
any laws or ordinances relating to the disposal of sharps and/or
contaminated products. Contact your local health department or
other appropriate authorities for proper handling and disposal of
used meters, used test strips, used lancets, and used batteries.
Consider the following points when discarding used testing
materials:
Consider recycling the meters and batteries at an appropriate
facility. Be aware the meter is potentially hazardous electronics
scrap (e‑scrap) and should be disposed of accordingly. The
batteries are potentially hazardous also and should be discarded
accordingly.
Disinfect the meter before recycling or discarding.
Users in professional environments (i.e., healthcare professionals)
should follow their existing policies and procedures that govern
the proper handling and disposal of potentially infectious waste,
e‑scrap, and batteries.
*29CFR1910.1030 – Bloodborne pathogens
16
305
16.4 Discarding the Meter, Test Strips, Lancing Devices, Lancets, and Batteries
w WARNING
jAny product coming in contact with blood is considered
contaminated (potentially infectious).*
jDuring normal testing, any blood glucose meter may come
in contact with blood.
jLancing devices may also be considered sharps. Disposal of
sharps is regulated by law in many jurisdictions.
52297_07167776001.indb 305 10/20/14 11:19 AM
Explanation of Symbols
These symbols may appear on the packaging, on the type plate,
and in the user’s manual for the meter.
Caution, refer to safety‑related notes in the
instructions for use accompanying this product.
Rx only
Federal law (USA) restricts this device to sale by
or on the order of a physician per
21CFR801.109.*
Custom lithium‑ion rechargeable battery
* Code of Federal Regulations
306
52297_07167776001.indb 306 10/20/14 11:19 AM

Icon Name Icon
All
Analyzing
Background Color
Backspace (Keyboard)
Basal Insulin
Basal Insulin Locked
16.5 List of Icons
The icons and icon names in the meter are:
Icon Name Icon
About or Information
Active
Active Insulin
Add Data
Advice Options (Bolus Advice)
After Meal
16
307
52297_07167776001.indb 307 10/20/14 11:19 AM
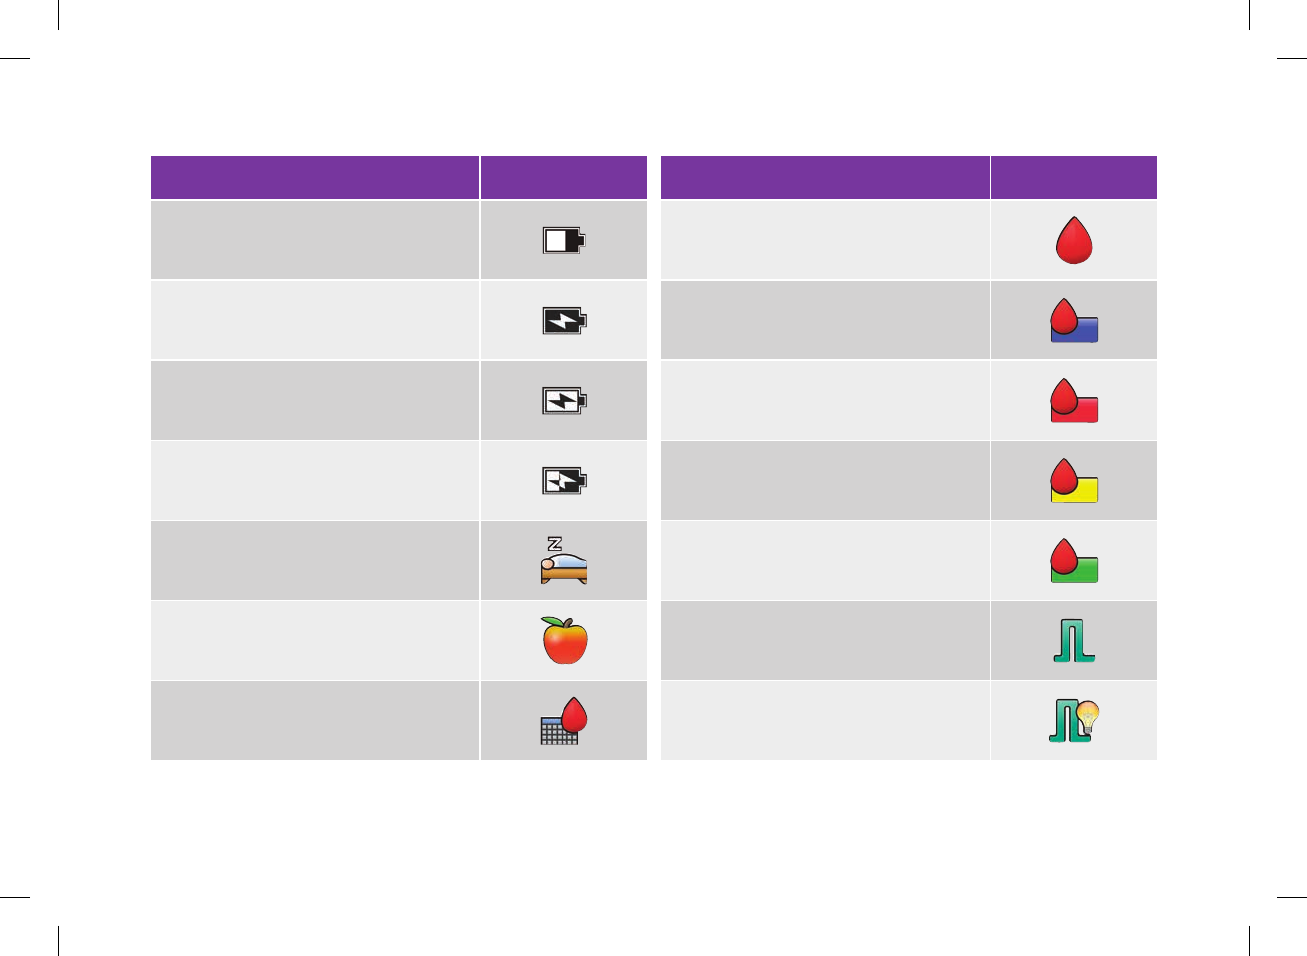
Icon Name Icon
Battery (Power Level)
Battery Charging (Empty)
Battery Charging (Full)
Battery Charging (Partial)
Bedtime
Before Meal
bG Averages
Icon Name Icon
bG or bG Test
bG Value Range Above
bG Value Range Hypo
bG Value Range Low
bG Value Range Normal
Bolus
Bolus Advice
308
52297_07167776001.indb 308 10/20/14 11:19 AM

Icon Name Icon
Bolus Advice Accepted
Bolus Advice Not Accepted
Bolus Advice Setting
Bolus Locked
Bolus Menu
Cancel
Capital Letters (Keyboard)
Icon Name Icon
Carbohydrate Unit
Carbohydrates
Carbohydrates Accepted
Carbohydrates Locked
Carbohydrates Not Accepted
Chart
Communication or Radio Connection
16
309
52297_07167776001.indb 309 10/20/14 11:19 AM
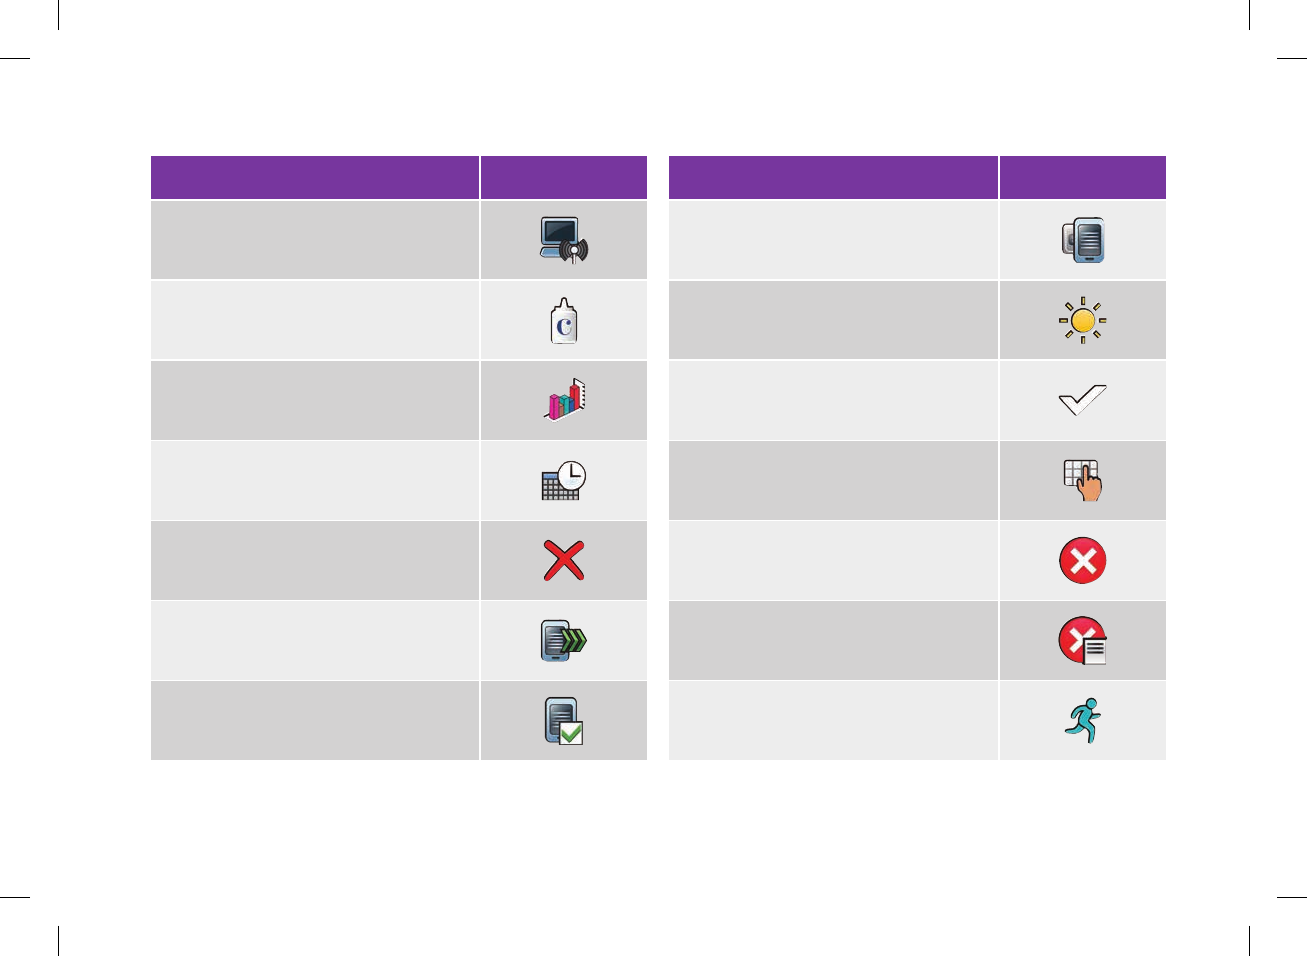
Icon Name Icon
Connect to PC
Control Test
Data
Date and Time
Delete
Device Connect
Device Settings
Icon Name Icon
Devices
Display Brightness
Done
Edit Name
Error
Error Log
Exercise 1
310
52297_07167776001.indb 310 10/20/14 11:19 AM
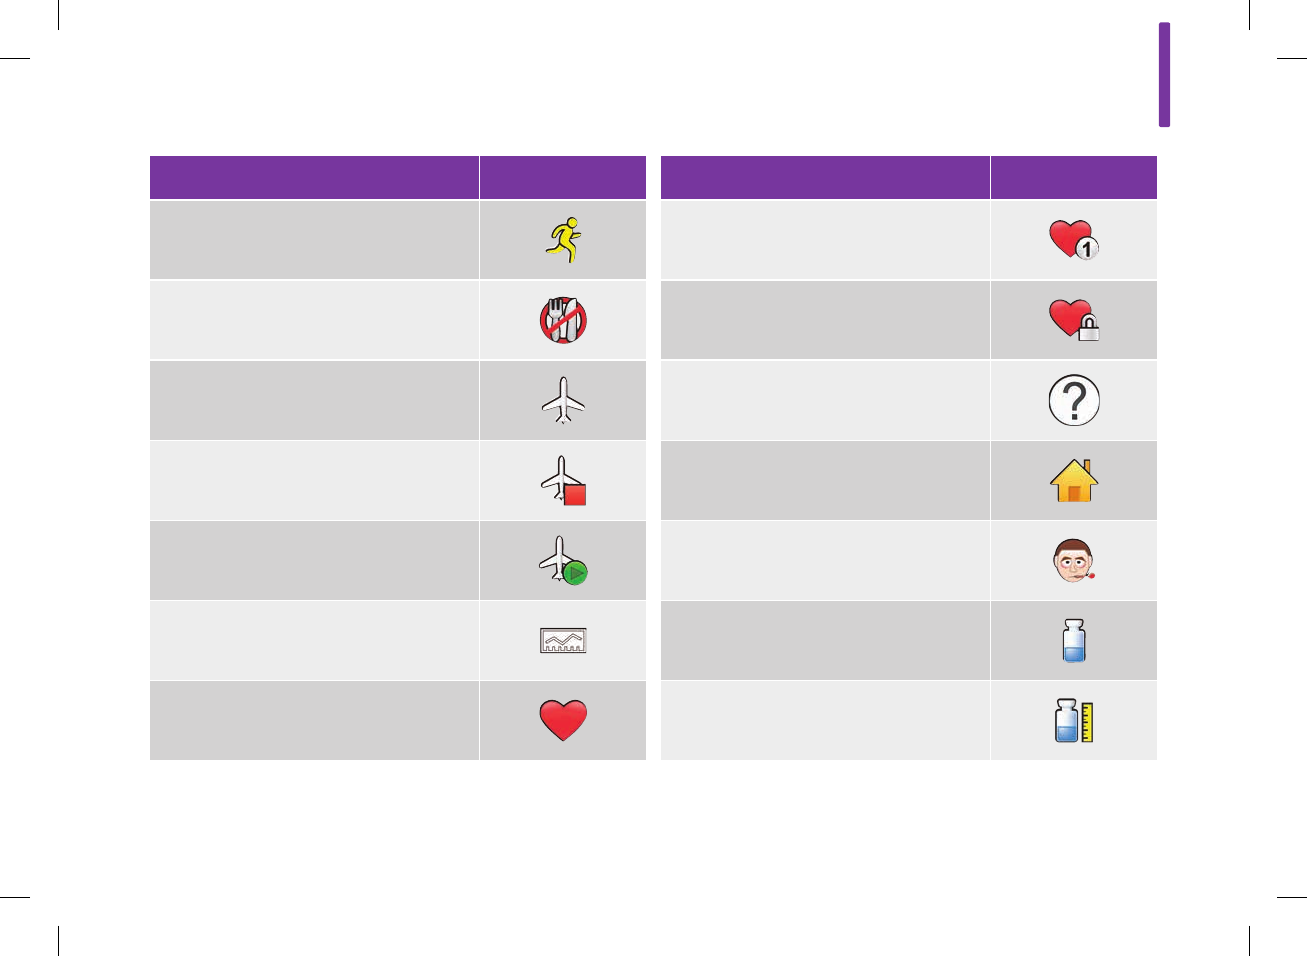
Icon Name Icon
Exercise 2
Fasting
Flight Mode
Flight Mode (Turn Off)
Flight Mode (Turn On)
Graph
Health Event
Icon Name Icon
Health Event (Custom)
Health Event Locked
Help
Home Screen
Illness
Insulin
Insulin Increment
16
311
52297_07167776001.indb 311 10/20/14 11:19 AM
Icon Name Icon
Language
Locked
Logbook
Logbook Locked
Main Menu
Maintenance Message
Manage Devices (Pairings)
Icon Name Icon
Max Bolus
Meal
Meal Time
Meal Time Locked
Meter
Meter Function Test
Meter Information
312
52297_07167776001.indb 312 10/20/14 11:19 AM
Icon Name Icon
Mode Setting
My Data
No Entry (Meal Time)
Note
Note Locked
Other (Meal Time)
Pair (New)
Icon Name Icon
PC (Computer)
Pen / Syringe (Bolus)
Play Tone
Premenstrual
Quick Notes or
Radio Connection
Reminder
16
313
52297_07167776001.indb 313 10/20/14 11:19 AM
Icon Name Icon
Reset Timeblocks
RF (Radio Frequency) Signal
Save
Setup Mode
Snack
Sound (Volume)
Sound and Vibrate
Icon Name Icon
Standard Day
Standard Week
Status Screen
Stress
System Settings
Table
Target Data
314
52297_07167776001.indb 314 10/20/14 11:19 AM
Icon Name Icon
Temperature
Time Scale
Timeblock Settings
Touchscreen Calibration
Touchscreen Settings
Trend Graph
Vibrate
Icon Name Icon
Warning
Warning Limits
16
315
52297_07167776001.indb 315 10/20/14 11:19 AM

16.6 Warranty and Limited License
ACCU‑CHEK Aviva Insight Meter Limited 4‑Year Warranty
Roche Health Solutions Inc. (“Roche”), a member of the Roche Group, warrants to the original purchaser of the meter that your
ACCU‑CHEK Aviva Insight meter will be free from defects in materials and workmanship for 4 years from the date of purchase. If during
this 4‑year period, the meter does not work properly because of a defect in materials or workmanship, Roche will replace it with a new
ACCU‑CHEK Aviva Insight meter or equivalent product free of charge. The warranty on the replacement meter will expire on the date of
the original warranty expiration or 90 days after the shipment of a replacement system, whichever period is longer. The purchaser’s
exclusive remedy with respect to the ACCU‑CHEK Aviva Insight meter shall be replacement.
This warranty does not apply to the performance of an ACCU‑CHEK Aviva Insight meter that has been damaged by accident or has been
altered, misused, tampered with, or abused in any way.
THE PRECEDING WARRANTY IS EXCLUSIVE OF ALL OTHER WARRANTIES, AND ROCHE MAKES NO OTHER WARRANTIES, EXPRESS OR
IMPLIED, INCLUDING WITHOUT LIMITATION, THE IMPLIED WARRANTY OF MERCHANTABILITY OR FITNESS FOR A PARTICULAR PURPOSE.
IN NO EVENT SHALL ROCHE BE LIABLE TO THE PURCHASER OR ANY OTHER PERSON FOR ANY INCIDENTAL, CONSEQUENTIAL, INDIRECT,
SPECIAL, OR PUNITIVE DAMAGES ARISING FROM OR IN ANY WAY CONNECTED WITH THE PURCHASE OR OPERATION OF THE METER OR
ITS PARTS. NO WARRANTY OF MERCHANTABILITY OR FITNESS FOR A PARTICULAR PURPOSE IF ANY IS IMPLIED FROM THE SALE OF THE
METER, SHALL EXTEND FOR A LONGER DURATION THAN FOUR YEARS FROM THE DATE OF PURCHASE.
Some states do not allow limitations on how long an implied warranty will last or the exclusion of incidental or consequential damaged,
so the above limitation and exclusion may not apply to you. This warranty gives you specific legal rights, which vary from state to state.
316
52297_07167776001.indb 316 10/20/14 11:19 AM
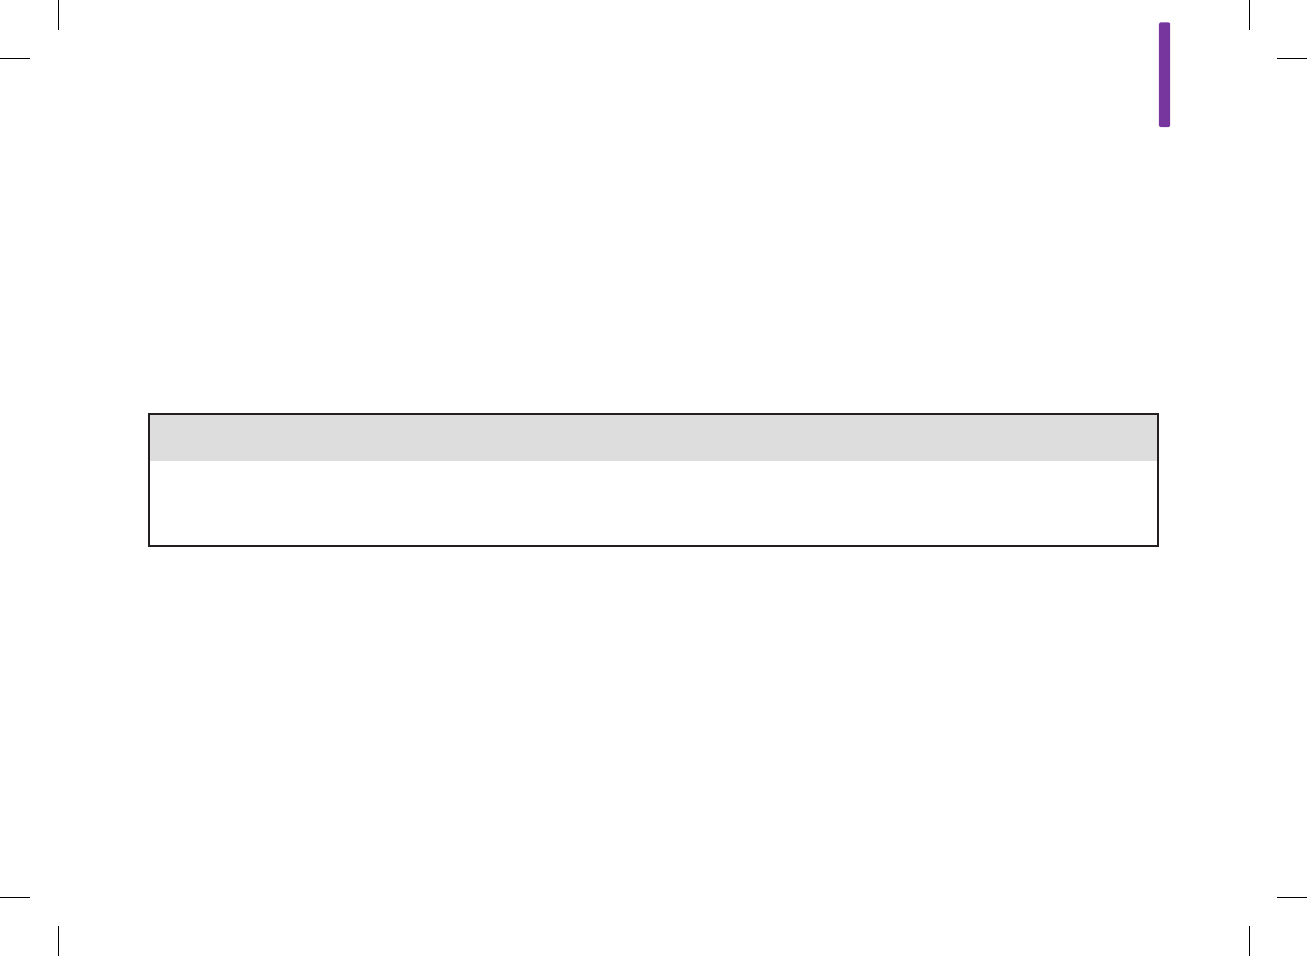
Warranty Instructions
All requests for return of ACCU‑CHEK Aviva Insight meters under the preceding warranty must be made to ACCU‑CHEK Customer Care
Service Center. You will be mailed a return authorization label, which must be affixed to your carton for shipping the system to Roche.
Cartons received without this label will be returned to you at your expense.
Customers experiencing difficulties should review the troubleshooting information in the Troubleshooting chapter in this user’s manual.
Further inquiries should be directed to ACCU‑CHEK customer Care Service Center at 1‑800‑688‑4578.
Be sure to fill out and mail the Warranty Card that comes with the ACCU‑CHEK Aviva Insight meter.
Limited License
w CAUTION
A RESTRICTED LICENSE LIMITS USE OF THE ACCU‑CHEK AVIVA INSIGHT SYSTEM‑‑READ CAREFULLY THE LIMITATIONS RECITED
BELOW.
The ACCU‑CHEK Aviva Insight system (meter, including the code key, and test strips) and its use are protected by US Patent Nos.
6,645,368 (expires 22‑December‑2017; 7,276,146 (expires 4‑October‑2022); 7,276,147 (expires 4‑October‑2022); 7,407,811 (expires
9‑May‑2020); 7,452,457 (expires 2‑May‑2026); 7,488,601 (expires 1‑February‑2026); 7,494,816 (expires 29‑December‑2019);
7,569,126 (expires 28‑December‑2026); 7,604,721 (expires 12‑August‑2026); 8,298,401 (expires 4‑October‑2022); 8,303,801 (expires
4‑October‑2022); and 8,329,026 (expires 4‑October‑2022). A license to use the ACCU‑CHEK Aviva Insight system is required until the
expiration of the last‑to‑expire patent listed above and is only granted when the ACCU‑CHEK Aviva Insight meter is used with the
ACCU‑CHEK Aviva test strips and ACCU‑CHEK Aviva code keys.
16
317
52297_07167776001.indb 317 10/20/14 11:19 AM

ACCU‑CHEK Aviva test strips are provided with a specifically matched ACCU‑CHEK Aviva code key. These test strips and code keys are
specifically manufactured for operation with the ACCU‑CHEK Aviva Insight meter. Use of other test strips with an unmatched code key or
even with the matches code key supplied by another manufacturer may prevent or impair the proper function of the ACCU‑CHEK Aviva
Insight system.
Using the ACCU‑CHEK Aviva Insight system indicates your acceptance of the restricted license to use the ACCU‑CHEK Aviva Insight
system only with the ACCU‑CHEK Aviva test strips and the corresponding ACCU‑CHEK Aviva code key. If you do not agree to the terms
and conditions of th restricted license, you may return, at the place of purchase, the unused ACCU‑CHEK Aviva Insight system for a full
refund. If you have any questions, please call the ACCU‑CHEK Customer Care Service Center at 1‑800‑688‑4578.
Except where prohibited by statute, all warranties covering the ACCU‑CHEK Aviva Insight system are voided by the use of the
ACCU‑CHEK Aviva Insight system with any test strips or code keys other than the ACCU‑CHEK Aviva test strips or code keys.
318
52297_07167776001.indb 318 10/20/14 11:19 AM
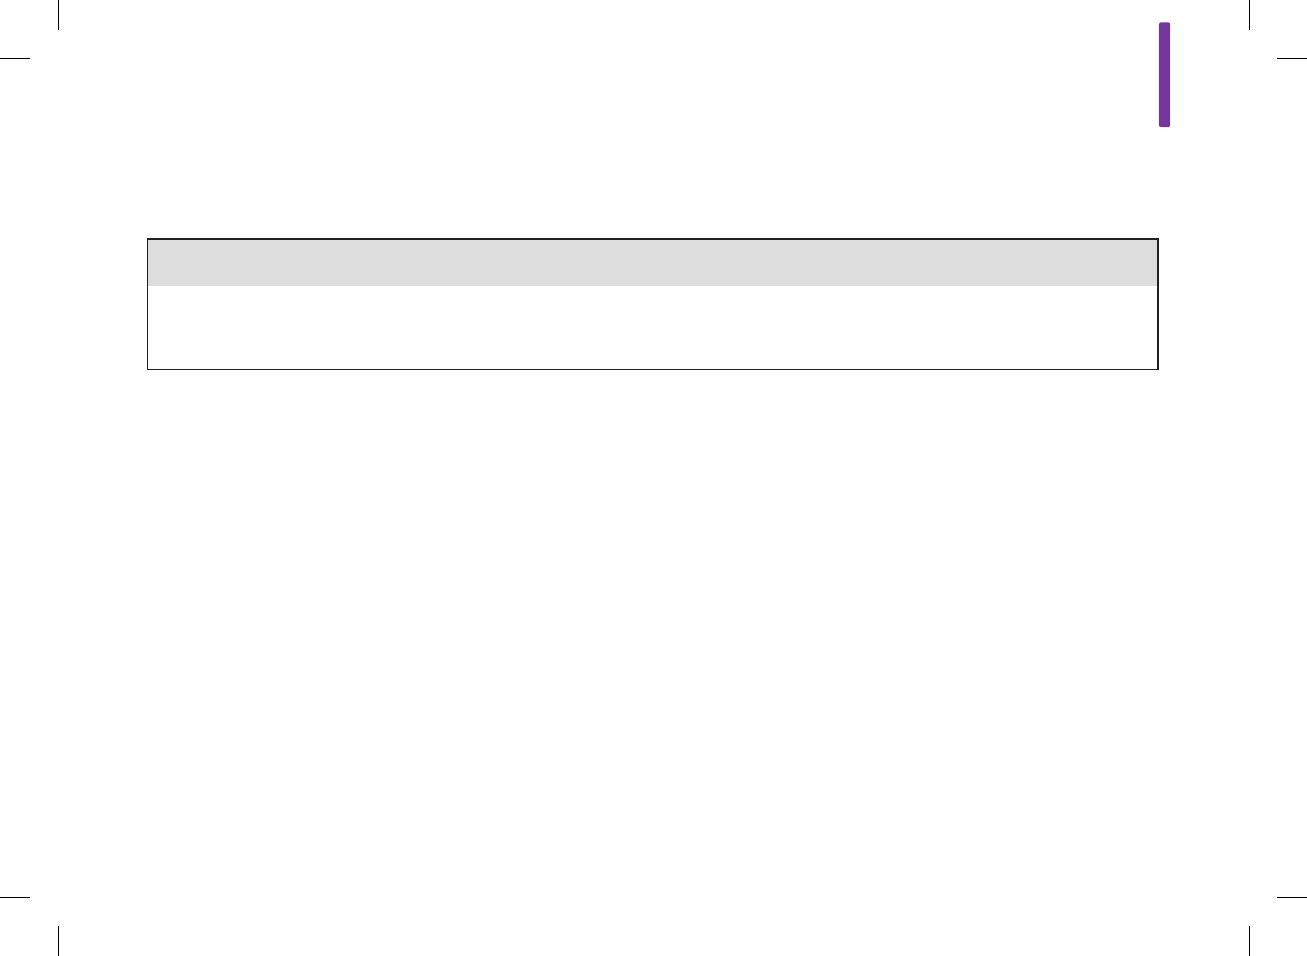
The ACCU‑CHEK FastClix system (device and lancet drums) and its use are protected by U.S. Patent Nos. 7,322,998 (expires
3‑March‑2020) and 7,785,338 (expires 5‑January‑2026). A license to use the ACCU‑CHEK FastClix system is required until the
expiration of the last‑to‑expire patent listed above and is only granted when ACCU‑CHEK FastClix lancet drums are used with the
ACCU‑CHEK FastClix device.
ACCU‑CHEK FastClix lancet drums are high precision components that are produces to the close tolerances required for satisfactory
operation with the ACCU‑CHEK FastClix device. Use of other lancet drums with the ACCU‑CHEK FastClix device may prevent or impair
proper function of the ACCU‑CHEK FastClix device.
Using the ACCU‑CHEK FastClix device indicates your acceptance of the restricted license to use the ACCU‑CHEK FastClix device only with
the ACCU‑CHEK FastClix lancet drums. If you do not agree to the terms and conditions of th restricted license, you may return, at the
place of purchase, the unused ACCU‑CHEK FastClix device for a full refund. If you have any questions, please call the ACCU‑CHEK
Customer Care Service Center at 1‑800‑688‑4578.
Except where prohibited by statute, all warranties covering the ACCU‑CHEK FastClix device are voided by the use of the ACCU‑CHEK
FastClix device with any lancet drums other than ACCU‑CHEK FastClix lancet drums.
Patent Information
US Pat.: http://www.roche‑diagnostics.us/patents
w CAUTION
A RESTRICTED LICENSE LIMITS USE OF THE ACCU‑CHEK FASTCLIX SYSTEM (device and lancet drums). READ CAREFULLY THE
LIMITATIONS RECITED BELOW.
16
319
52297_07167776001.indb 319 10/20/14 11:19 AM

16.7 Additional Supplies
Test Strips: ACCU‑CHEK Aviva test strips
Control Solutions: ACCU‑CHEK Aviva control solutions
16.8 Information for Healthcare Professionals
w WARNING
Healthcare Professionals: Follow the infection control procedures appropriate for your facility. Refer to the test strip package insert
for additional healthcare professional information.
Sample Handling
Always wear gloves when handling blood‑contaminated items. Always adhere to the recognized procedures for handling objects that
are potentially contaminated with human material. Follow the hygiene and safety policy of your laboratory or institution. Prepare the
selected blood collection site per facility policy.
Refer to the test strip package insert for additional information regarding acceptable sample types, anticoagulants, and handling
instructions.
320
52297_07167776001.indb 320 10/20/14 11:19 AM
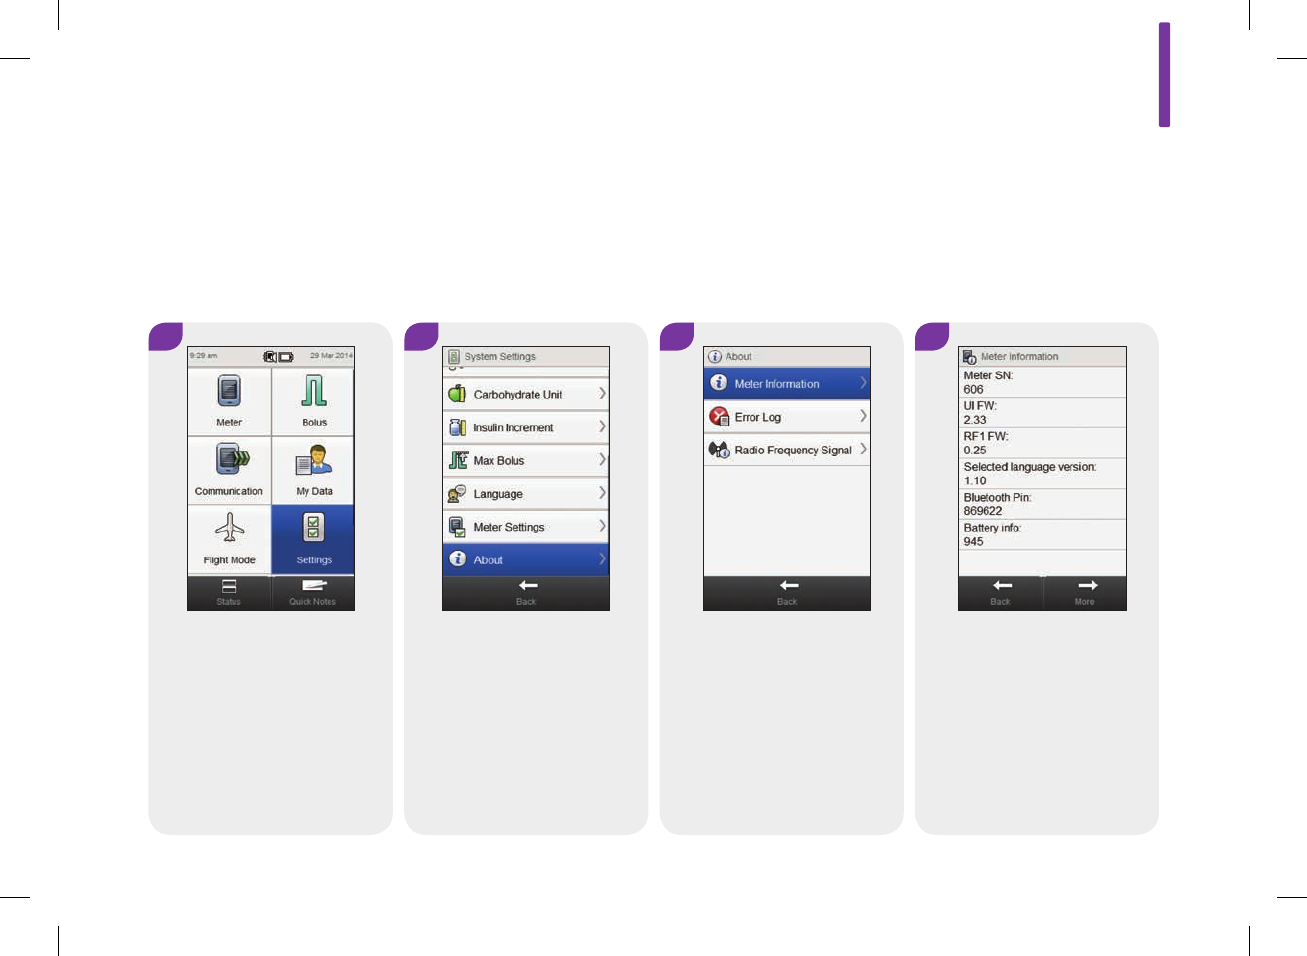
16.9 Meter Information
This information is primarily for technical support purposes and
may be requested by support personnel.
Main Menu > Settings > About > Meter Information
2 31
From the Main Menu, select
Settings.
Scroll screen and select
About.
Select Meter Information.
4
To see additional meter
information, select More.
16
321
52297_07167776001.indb 321 10/20/14 11:19 AM
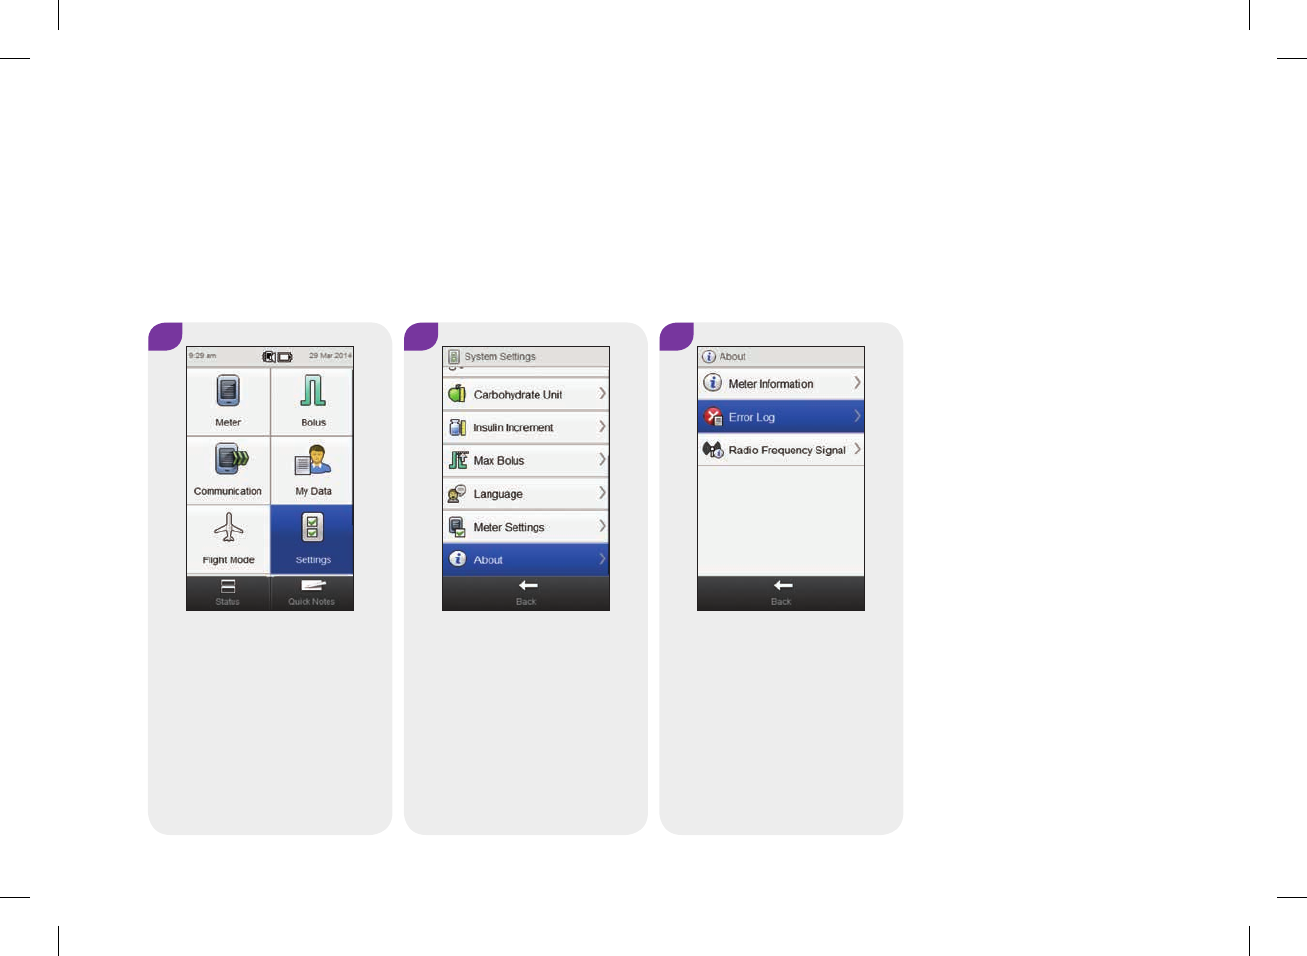
2 31
16.10 Error Log
From the Main Menu, select
Settings.
Scroll the screen and select
About.
Select Error Log.
The Error Log screen displays up to the last 50 Errors and
Maintenance messages starting with the most recent entry.
Main Menu > Settings > About > Error Log
322
52297_07167776001.indb 322 10/20/14 11:19 AM
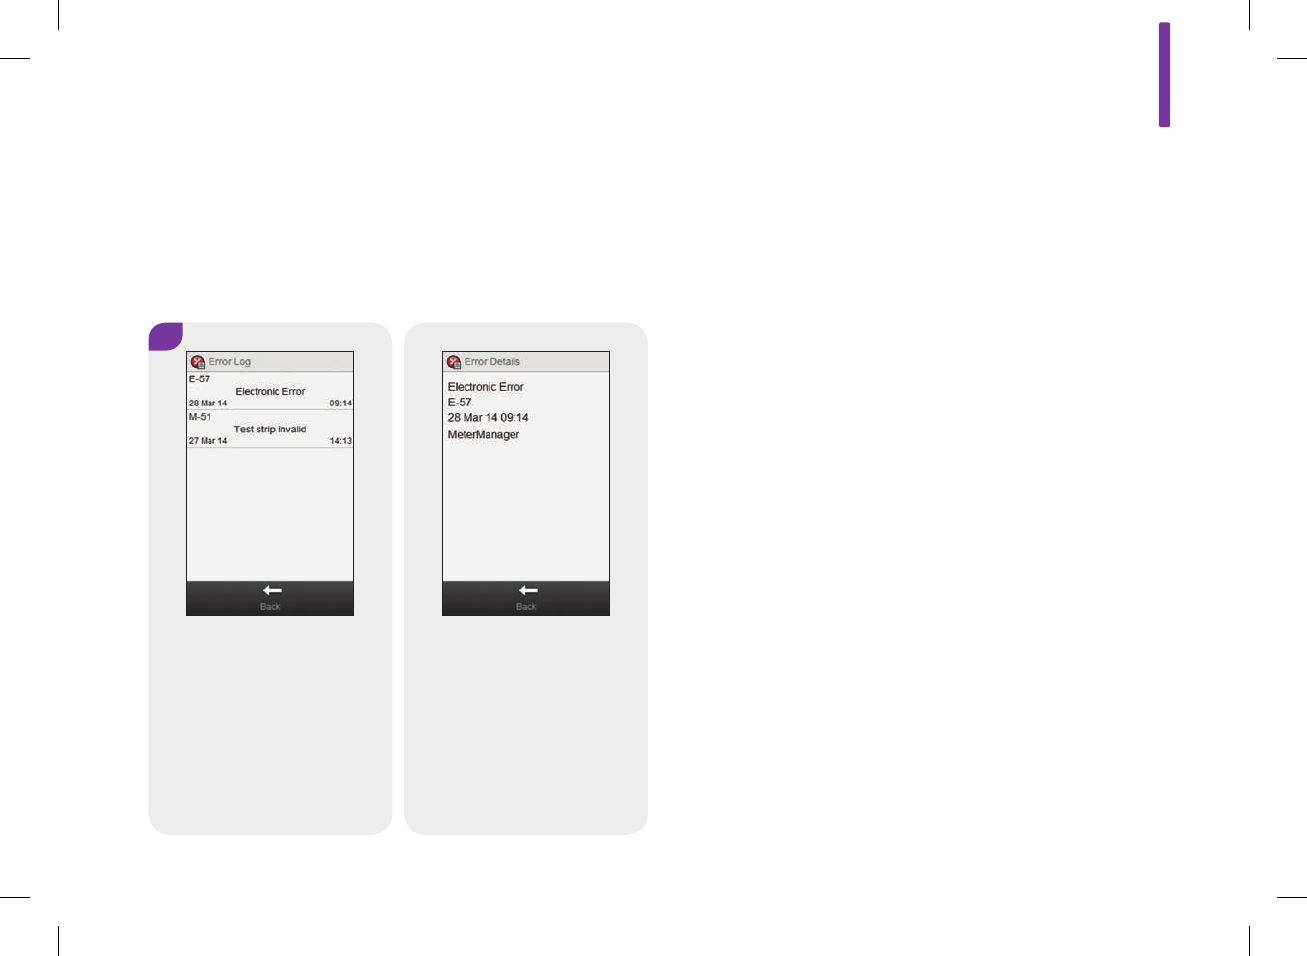
4
Scroll to view all Error Log
records. Select an Error Log
record to see its details.
16
323
52297_07167776001.indb 323 10/20/14 11:19 AM
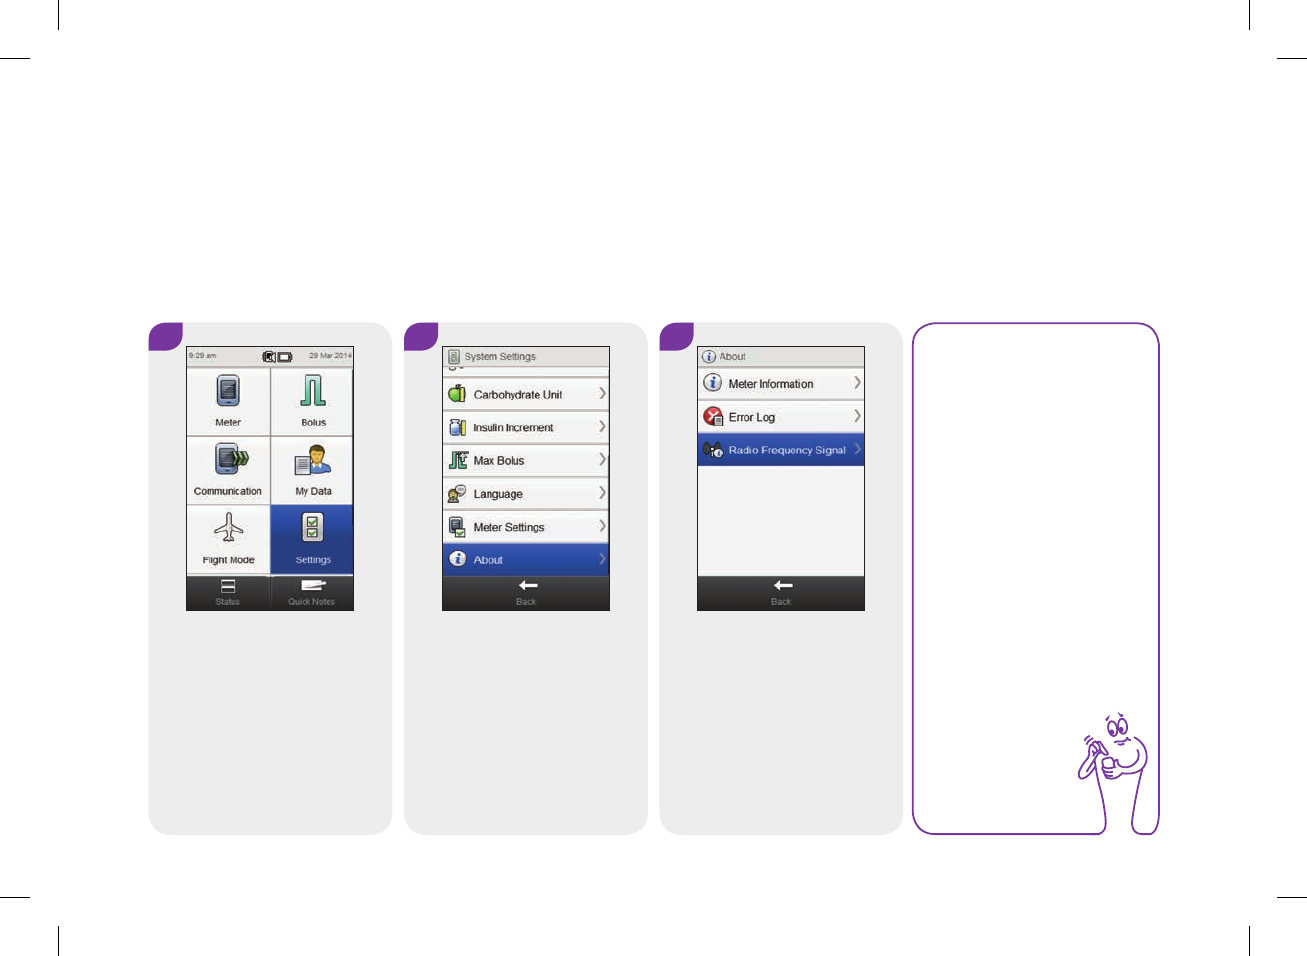
2 31
16.11 Radio Frequency (RF) Signal
From the Main Menu, select
Settings.
Scroll the screen and select
About.
Select Radio Frequency Signal.
NOTE
If the meter is not
paired to a device, the
Radio Frequency Signal
button is disabled.
This information is primarily for technical support purposes and
may be requested by support personnel.
Main Menu > Settings > About > Radio Frequency Signal
324
52297_07167776001.indb 324 10/20/14 11:19 AM
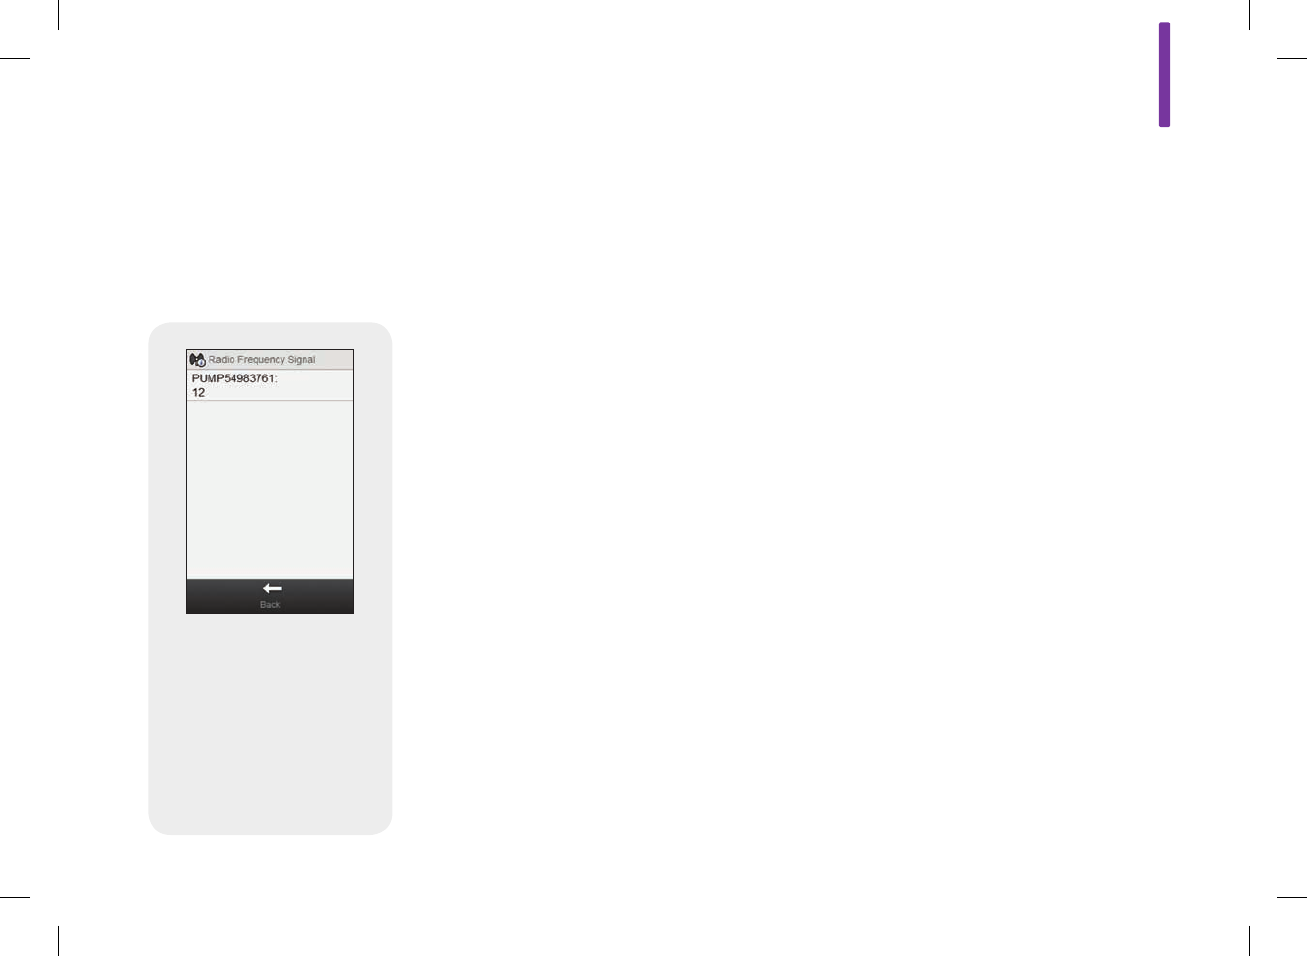
The names of the radio
frequency devices with the
radio frequency signal
strength of each are
displayed.
16
325
52297_07167776001.indb 325 10/20/14 11:19 AM
16.12 Meter Range Limits and Defaults
Data Type Unit of Measurement MIN MAX Increments Default Setting
Acting Time HH:MM 01:30 08:00 00:15 04:00
After High bG
Reminder
Duration
(Remind after)
HH:MM 01:00 06:00 00:15 04:00
After Low bG
Reminder
Duration
(Remind after)
HH:MM 00:05 00:30 00:05 00:15
After Meal Test
Reminder
Duration
(Remind after)
HH:MM 01:00 04:00 00:15 02:00
Basal Insulin U 0 99 Insulin
Increment 0
bG Result mg/dL 10 600 1 No Entry (‑ ‑ ‑ mg/dL)
326
52297_07167776001.indb 326 10/20/14 11:19 AM

Data Type Unit of Measurement MIN MAX Increments Default Setting
bG Threshold
(After High bG
Reminder)
mg/dL 100 350 1 Hyper Warning Limit
bG Threshold
(After Low bG
Reminder)
mg/dL 50 100 1 Hypo Warning Limit
Bolus Insulin U 0 25 Insulin
Increment 0
Carb Ratio
(carbs)
grams
BE
KE
CC
1
0.1
0.1
0.1
240
20
24
16
1
0.1
0.1
0.1
No Entry (‑ ‑ ‑ g)
No Entry (‑ ‑ ‑ BE)
No Entry (‑ ‑ ‑ KE)
No Entry (‑ ‑ ‑ CC)
Carb Ratio
(insulin) U 0.1 50 0.1 1
Carbohydrates
grams
BE
KE
CC
0
0
0
0
240
20
24
16
1
0.1
0.1
0.1
No Entry (‑ ‑ ‑ g)
No Entry (‑ ‑ ‑ BE)
No Entry (‑ ‑ ‑ KE)
No Entry (‑ ‑ ‑ CC)
16
327
52297_07167776001.indb 327 10/20/14 11:19 AM
Data Type Unit of Measurement MIN MAX Increments Default Setting
Control Result mg/dL 10 600 1 No Entry (‑ ‑ ‑ mg/dL)
Customized 1, 2,
and 3 (health
event)
% ‑50 50 1 0
Exercise 1
(health event) % ‑50 50 1 0
Exercise 2
(health event) % ‑50 50 1 0
Hyper Warning
Limit mg/dL 180 350 1 300
Hypo Warning
Limit mg/dL 50 90 1 70
Illness (health
event) % ‑50 50 1 0
Insulin
Increment* U 0.5 1 1
*The insulin increment is used when entering bolus and basal insulin data.
328
52297_07167776001.indb 328 10/20/14 11:19 AM

Data Type Unit of Measurement MIN MAX Increments Default Setting
Insulin Sensitivity
(bG) mg/dL 1 999 1 No Entry (‑ ‑ ‑ mg/dL)
Insulin Sensitivity
(insulin) U 0.1 50 0.1 1
Lower value
(Target Range) mg/dL 50 140 1 70
Max Bolus U 0 25
1 or 0.5 (per the
insulin
increment
value)
No Entry (‑ ‑ ‑ U)
Meal Rise (bG) mg/dL 30 200 1 50
Offset Time HH:MM 00:45 Acting Time 00:15 01:00
Premenstrual
(health event) % ‑50 50 1 0
16
329
52297_07167776001.indb 329 10/20/14 11:19 AM
Data Type Unit of Measurement MIN MAX Increments Default Setting
Snack Size
(carbs)
grams
BE
KE
CC
0
0
0
0
24
2.0
2.4
1.6
1
0.1
0.1
0.1
No Entry (‑ ‑ ‑ g)
No Entry (‑ ‑ ‑ BE)
No Entry (‑ ‑ ‑ KE)
No Entry (‑ ‑ ‑ CC)
Stress (health
event) % ‑50 50 1 0
Upper value
(Target Range) mg/dL 100 300 1 140
330
52297_07167776001.indb 330 10/20/14 11:19 AM

A
331
Appendix A: Bolus Advice Overview
Bolus Calculation
The bolus recommended by the bolus advice feature of the meter
consists of two components: a recommendation for a
carbohydrate bolus that covers your food intake and a
recommendation for a correction bolus to adjust your blood
glucose level if it is not within the target range. The correction
bolus can be positive if your current blood glucose level is above
your target range or negative if it is below your target range.
Carbohydrate Bolus
A carbohydrate bolus is the amount of insulin that needs to be
administered to cover the amount of carbohydrates you are
planning to eat. It is calculated as:
Carbohydrate Bolus = Carbohydrate Intake x Carbohydrate
Ratio
Where:
Carbohydrate Ratio = Insulin ÷ Carbohydrates
52297_07167776001.indb 331 10/20/14 11:19 AM

332
Correction Bolus
If your current blood glucose level is not within your target range,
a correction bolus is recommended.
Blood Glucose Limits
1. bG Result
2. Hyper Warning
3. Upper Target Limit
4. Target
5. Lower Target Limit
6. Hypo Warning
Discuss your blood glucose limits with your healthcare professional.
1
2
3
4
5
6
52297_07167776001.indb 332 10/20/14 11:19 AM
A
333
The calculation for the recommended correction bolus depends on your
current blood glucose result, your insulin sensitivity for the current time
block, and whether you are planning to eat. Health event percentages are
applied to the bolus advice recommendation.
Blood Glucose Level Without Food Intake (No Carbohydrates) Prior to a Meal
Above Upper Target Limit (bG ‑ Target bG) x Insulin Sensitivity (bG ‑ Target bG) x Insulin Sensitivity +
Carbohydrate Bolus
Between Upper and Lower
Target Limit
No correction bolus is necessary. (bG ‑ Target bG) x Insulin Sensitivity +
Carbohydrate Bolus. A correction bolus can be
negative.
Between Lower Target Limit
and Hypo Warning
No bolus recommended. The correction bolus is
negative.
(bG ‑ Target bG) x Insulin Sensitivity +
Carbohydrate Bolus. The correction bolus is
negative.
Below Hypo Warning Hypo warning appears. It is recommended you eat
fast‑acting carbohydrates.
Bolus advice is not available.
Hypo warning appears. It is recommended you
eat fast‑acting carbohydrates.
Bolus advice is not available.
Example Bolus Advice Calculations
52297_07167776001.indb 333 10/20/14 11:19 AM

334
Other Boluses
Subsequent Carbohydrate Boluses
If you are planning to eat several meals or snacks in a short
period of time, you should administer a carbohydrate bolus for
each meal. The calculation is always the same as a carbohydrate
bolus.
Correction Bolus After a Meal
After a meal, it is normal to allow for a rise of your blood glucose
level even if you administered the correct carbohydrate bolus. The
allowed blood glucose level rise is called meal rise. After a certain
period of time (oset time) the meal rise decreases from its
maximum until your blood glucose level has returned to the target
level. The period of time form the start of the meal rise until your
blood glucose level returns to the target level is defined as acting
time. During this time, a correction bolus is only recommended if
your blood glucose level exceeds the current meal rise level.
52297_07167776001.indb 334 10/20/14 11:19 AM
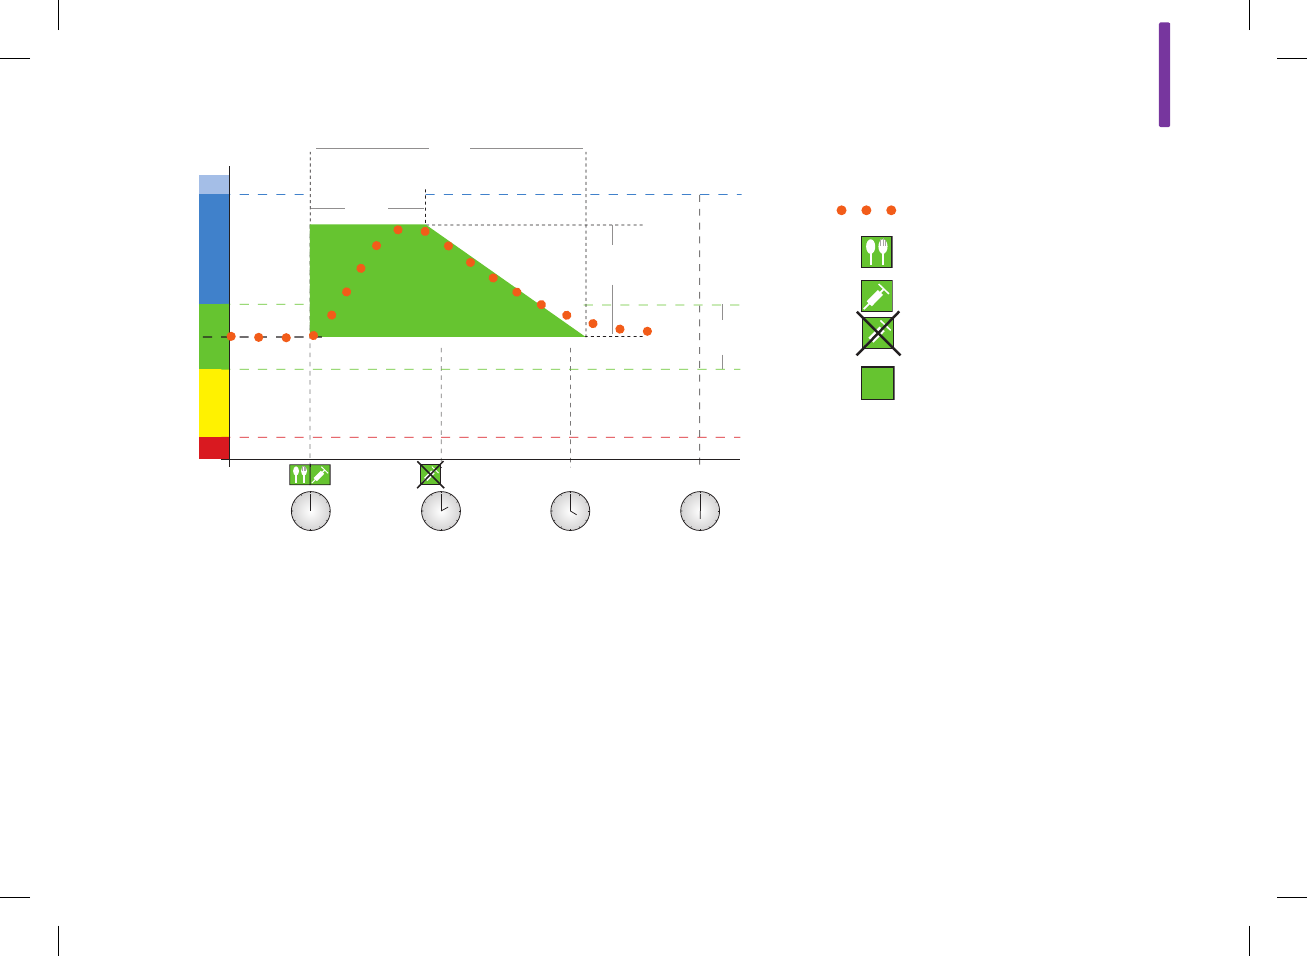
A
335
Current bG Values
Meal
Bolus
Bolus Not Required
Currently Allowed bG Value:
Meal Rise
The dotted line shows how your blood glucose level might change after a
carbohydrate bolus. Bolus advice tolerates an increase in your blood glucose level
within the meal rise range (green) without calculating an extra correction bolus.
When you enter a carbohydrate amount that is greater than the snack size, the meal
rise setting is added to the blood glucose target value. The shape of the meal rise
(the width of the green area) is determined by the oset time and the acting time.
1. bG Level
2. Hyper
3. Oset Time
4. Acting Time
5. Target Value
6. Meal Rise
7. Target Range
8. Hypo
9. Time
1
3
5
2
7
8
6
4
9
52297_07167776001.indb 335 10/20/14 11:19 AM

336
Subsequent Correction Boluses
The dierence between your current blood glucose level and your
target blood glucose level is called DeltabG. A correction bolus
administered according to the previous conditions covers this
dierence for a certain period of time. As the correction bolus
starts to take eect, your current blood glucose level should fall
and the covered DeltabG decreases after the oset time. At the
end of the acting time, your blood glucose level should return to
the target limit. You receive a recommendation for another
correction bolus only if your current blood glucose result exceeds
the current DeltabG level.
52297_07167776001.indb 336 10/20/14 11:19 AM
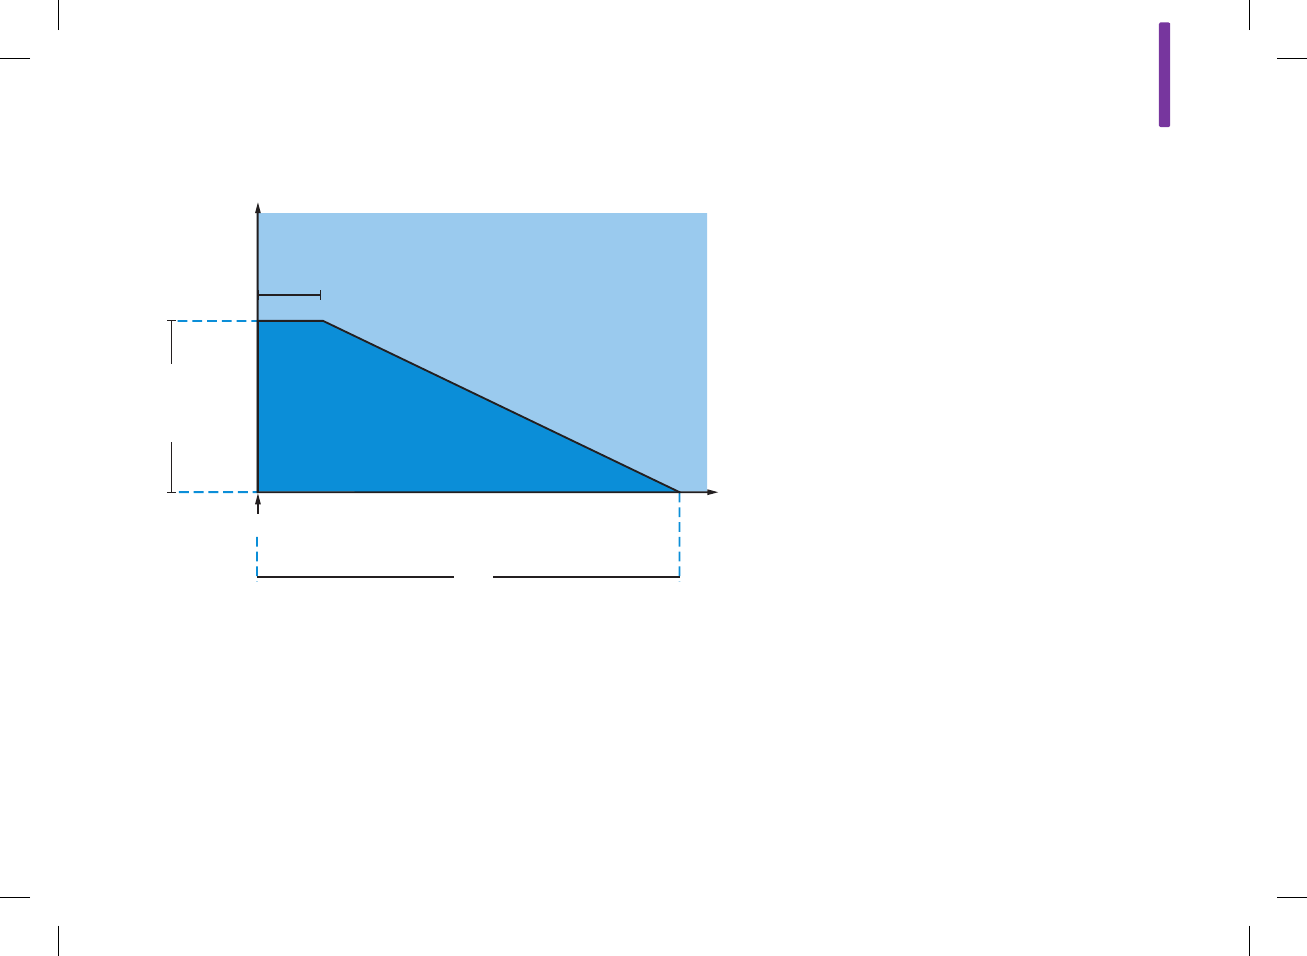
A
337
1. bG Result
2. Oset Time
3. Delta bG (Correction Insulin)
4. Correction Bolus
5. Acting Time
6. Time
Subsequent Correction Boluses: If your blood glucose result
is within SectionA of the graph, a correction bolus is not
recommended. If your blood glucose result is within SectionB of
the graph, a correction bolus is recommended.
1
2
3
4
5
6
A
B
52297_07167776001.indb 337 10/20/14 11:19 AM

338
Examples of Bolus Advice
Recommendations
The following graphs provide diering examples of how bolus
advice considers dierent factors when calculations are made.
The currently allowed blood glucose value considers the
following factors:
jTarget Range Mean Value
jMeal Rise
jCorrection Bolus
52297_07167776001.indb 338 10/20/14 11:19 AM
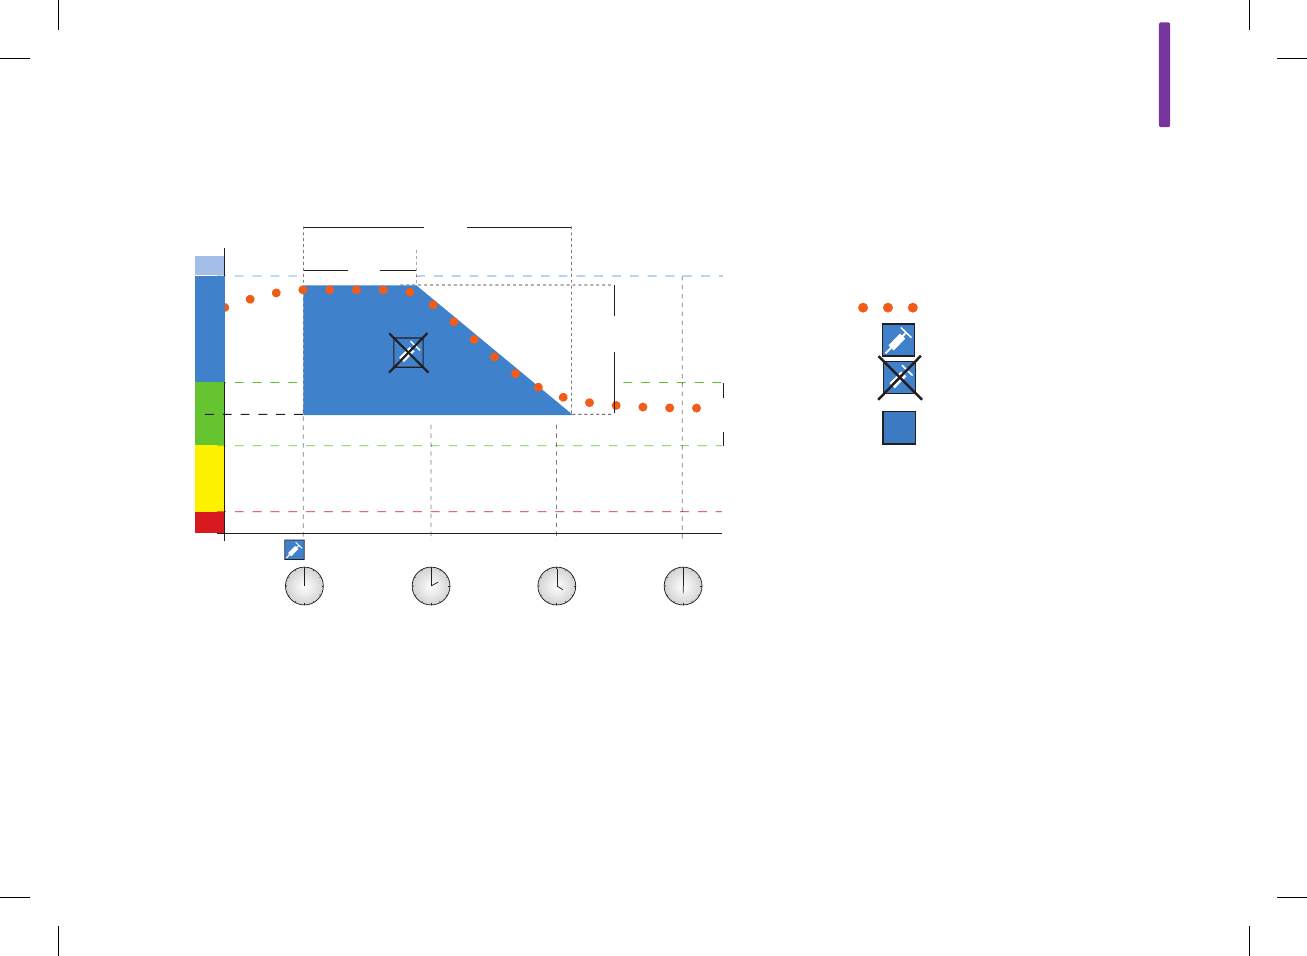
A
339
After a Correction Bolus
Current bG Values
Bolus
Bolus Not Required
Currently Allowed bG Value:
Corrected bG
The above diagram shows an example of the eect of this rule.
The first correction bolus at 12:00 pm remains active during the
acting time (the width of the blue area). If the blood glucose value
at 2:00 pm falls below the currently allowed blood glucose value
(top of the blue area), another correction bolus is not calculated.
1
3
6
2
7
8
5
4
91. bG Level
2. Hyper
3. Oset Time
4. Acting Time
5. Corrected bG
6. Target Value
7. Target Range
8. Hypo
9. Time
52297_07167776001.indb 339 10/20/14 11:19 AM
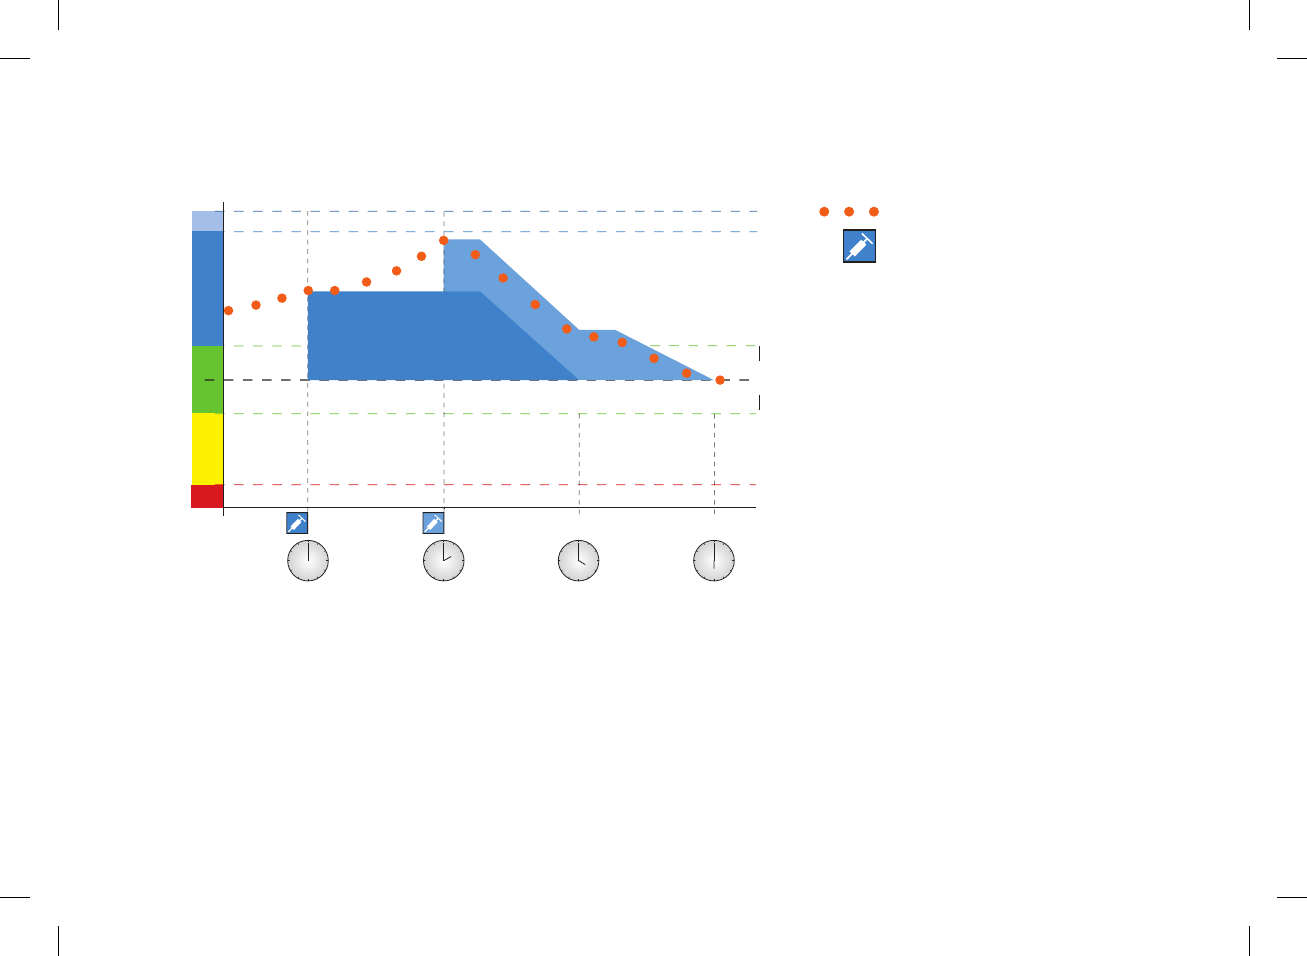
340
When a blood glucose result is greater than the currently allowed
blood glucose value, a bolus is calculated (light blue) that only
considers the dierence between the current blood glucose value
(orange dots) and the currently allowed blood glucose value (the
top of the blue area).
1. bG Level
2. Hyper
3. Target Value
4. Target Range
5. Hypo
6. Time
Current bG Values
Bolus
1
3
2
4
56
52297_07167776001.indb 340 10/20/14 11:19 AM
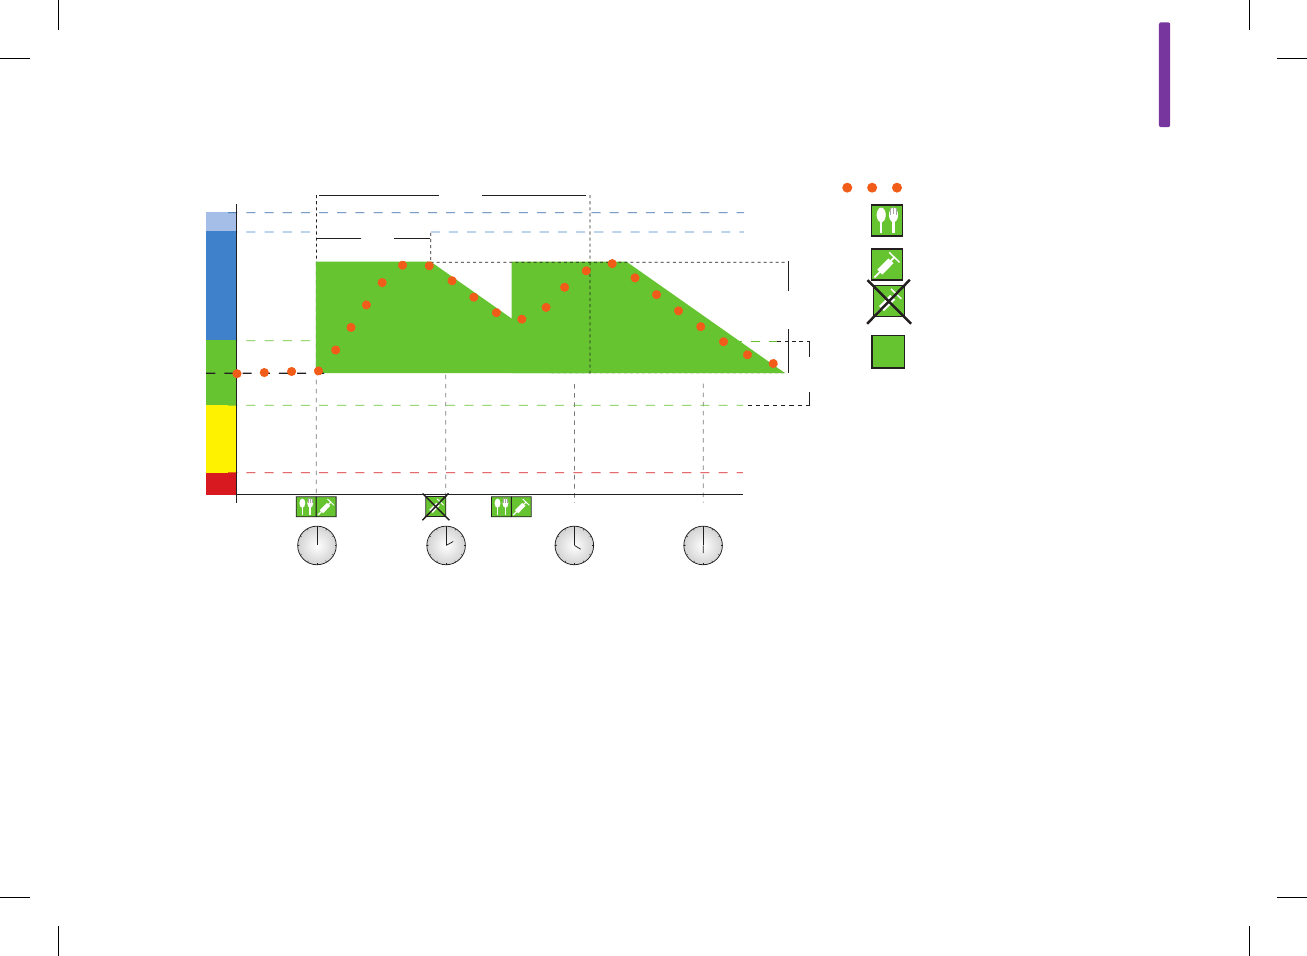
A
341
Subsequent Meals
If you eat several meals in a row, the meal rise is restarted for
each new carbohydrate bolus.
1. bG Level
2. Hyper
3. Oset Time
4. Acting Time
5. Meal Rise
6. Target Value
7. Target Range
8. Hypo
9. Time
Current bG Values
Meal
Bolus
Bolus Not Required
Currently Allowed bG Value:
Meal Rise
1
3
6
2
7
8
5
4
9
52297_07167776001.indb 341 10/20/14 11:19 AM

342
52297_07167776001.indb 342 10/20/14 11:19 AM

B
343
Appendix B: Bolus Advice Calculations
The Mathematical Basis for Bolus
Calculations
The following is a list of the most important formulas and the
calculation principles on which bolus advice is based. It is dicult
to accurately calculate a bolus yourself using these formulas
when the acting time and oset time of recent meals and
correction boluses are considered.
52297_07167776001.indb 343 10/20/14 11:19 AM

344
NOTE
jA minimum amount of 12 g (or equivalent BE, KE, or CC
units) is always given. If the calculated value is below
12 g, then 12 g is used.
jThe carbohydrate advice is displayed in the carbohydrate
unit of measure you have selected (g, BE, KE, or CC).
Carbohydrate Advice
This calculation is made when the blood glucose result falls
below the hypo warning limit. It is based on the other values
defined for the current time block and the result is calculated as a
carbohydrate intake recommendation.
Carbohydrates = (Target Range Mean Value – Current bG)
x Insulin Sensitivity ÷ Carbohydrate Ratio
Where:
Insulin Sensitivity = Insulin ÷ ΔbG
Carbohydrate Ratio = Insulin ÷ Carbohydrates
52297_07167776001.indb 344 10/20/14 11:19 AM

B
345
Carbohydrate Bolus
The following formula is used to calculate the bolus for meals:
Carbohydrate Bolus = Carbohydrate Intake x Carbohydrate
Ratio
Where:
Carbohydrate Ratio = Insulin ÷ Carbohydrates
52297_07167776001.indb 345 10/20/14 11:19 AM

346
Currently Allowed Blood Glucose Value
The target range average value used in the calculation of the
correction bolus, as shown below, changes with the definition for
the time blocks.
Consequently, the currently allowed blood glucose value is
calculated as follows:
Currently Allowed Blood Glucose Value = Target Range Mean
Value + Meal Rise + Sum of Blood Glucose Range Covered by
Correction Bolus
Where:
Meal Rise is from the current active meal
Sum of Blood Glucose Range Covered by Correction Bolus from
currently acting correction boluses
When no meal rise or correction bolus acting time is currently in
eect, a value of “0” is substituted for these parameters in the
formula.
52297_07167776001.indb 346 10/20/14 11:19 AM

B
347
Correction Bolus
Generally, a correction bolus is only calculated if the current
blood glucose value is above the hypo bG warning limit and
outside the target range. If the current blood glucose value is
above the target range, the currently allowed blood glucose value
must also be exceeded. Only correction boluses greater than “0”
trigger a corresponding acting time.
Correction Bolus = (Current bG – Currently Allowed bG)
x Insulin Sensitivity
Where:
Insulin Sensitivity = Insulin ÷ ΔbG
The blood glucose correction portion depends on the following
requirements:
jIf current bG > currently allowed blood glucose value, then blood
glucose correction portion = current bG – currently allowed
blood glucose value
jIf current bG > hypo warning limit and current bG < target range
lower limit, then bG correction portion = current bG – target
range average value
52297_07167776001.indb 347 10/20/14 11:19 AM

348
Active Insulin
A calculated value representing the eective amount of insulin
currently in the body that is working to lower blood glucose. This
amount does not include any insulin that is working to account for
carbohydrate intake. It also does not include basal insulin.
Correction Bolus with Carbohydrate Intake
Whenever carbohydrates have been entered, the related
carbohydrate bolus is always oset against any (even negative)
correction bolus.
When a meal is eaten, the correction bolus is also calculated for
blood glucose results that fall within the target range if:
jThe current blood glucose result falls below the target range
average value, or
jThe current blood glucose result is above the currently allowed
blood glucose value.
Mathematically negative overall boluses are displayed as “0”.
52297_07167776001.indb 348 10/20/14 11:19 AM
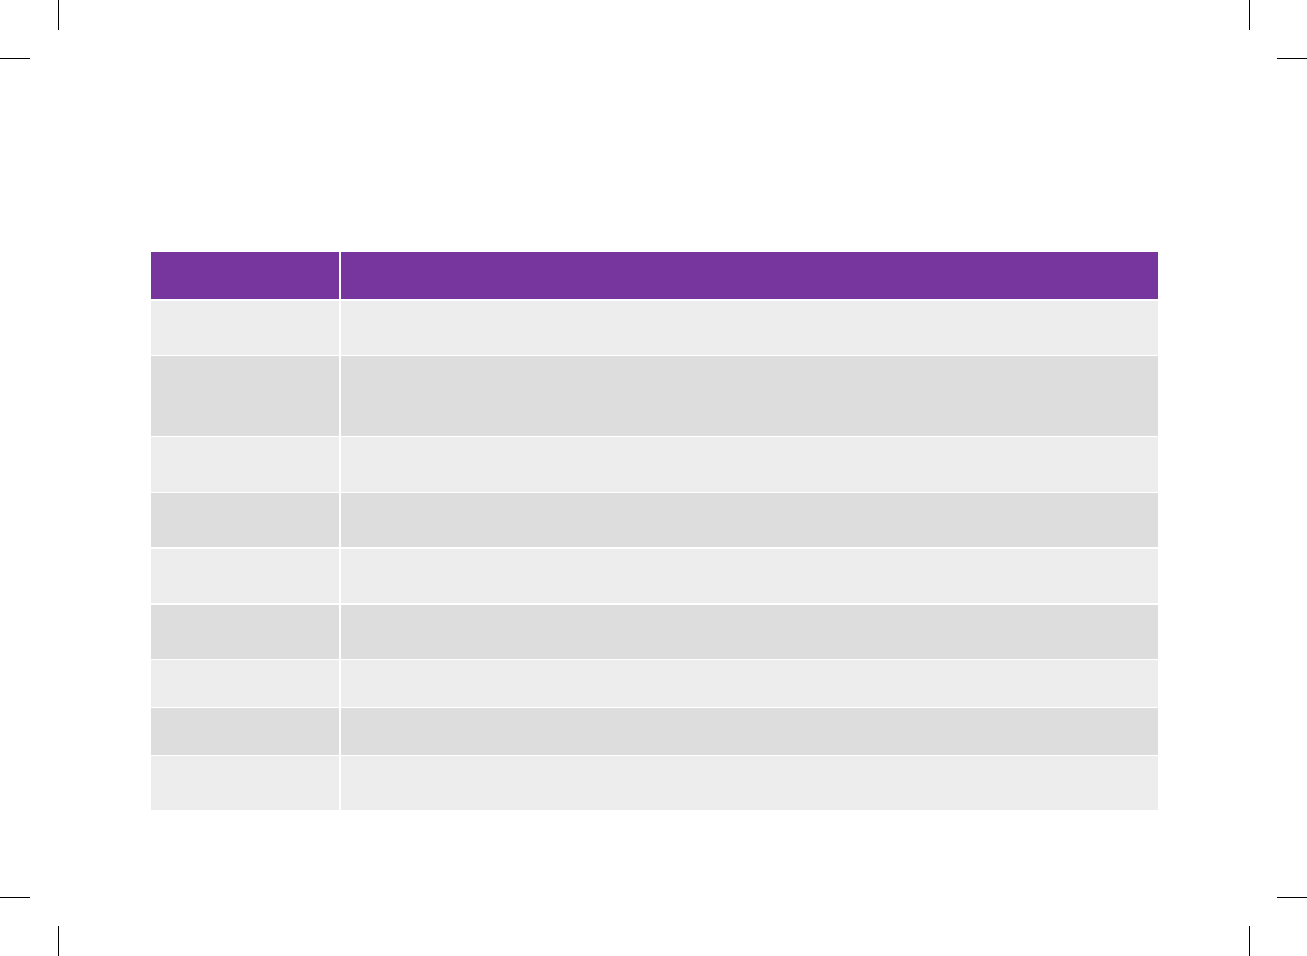
Glossary
Term Definition
Acting time The period of time from the start of a bolus until your blood glucose level is expected to return to the target
level.
Active Insulin
A calculated value representing the effective amount of insulin currently in the body that is working to lower
blood glucose. This amount does not include any insulin that is working to account for carbohydrate intake.
It also does not include basal insulin.
Advice options Factors that influence bolus advice recommendations including meal rise, snack size, acting time, and offset
time.
After high bG reminder A reminder to retest your blood glucose. When enabled, this reminder occurs after a high blood glucose
result.
After low bG reminder A reminder to retest your blood glucose. When enabled, this reminder occurs after a low blood glucose
result.
After meal reminder A reminder to retest your blood glucose. When enabled, this reminder occurs after a meal. For this reminder
to occur, you must enter the meal time of a bG test as before meal.
Alarm Audible or vibrating (silent) notification indicating a reminder, warning, error, or maintenance message.
am Ante Meridiem (12‑hour clock notation for “before noon”)
Basal rate The amount of insulin delivered per hour that is required to cover your basal, meal‑independent insulin
needs.
349
52297_07167776001.indb 349 10/20/14 11:19 AM

Term Definition
BE Bread Equivalent
bG test reminders Reminders to retest your blood glucose after a high blood glucose result, after a low blood glucose result, or
after a meal.
bG threshold A bG test reminder setting; the upper limit is for your blood glucose for a high bG test reminder and the
lower limit is for your blood glucose for a low bG test reminder.
Blood glucose (bG) The level of glucose (sugar) in blood.
Bluetooth Wireless
Technology Wireless short‑range communications technology which connects devices in order to exchange information.
Bolus
The amount of insulin delivered (in addition to the basal rate) to cover the intake of food and to correct high
blood glucose levels. The bolus amount is determined by your doctor or healthcare team’s guidelines, your
blood glucose level, your food intake, your activity level, and other factors.
Bolus advice When enabled, bolus advice provides a suggestion for how much insulin should be delivered for a meal
and/or to correct for a blood glucose level.
°C Degrees Celsius (or Centigrade)
Carbohydrate (or Carb)
ratio The amount of insulin necessary to account for a certain amount of carbohydrates.
Carbohydrates (or
Carbs)
Carbohydrates include sugars and starches. Carbohydrates can increase blood glucose levels slowly or
rapidly. Carbohydrates are generally counted to calculate a bolus insulin dose.
350
52297_07167776001.indb 350 10/20/14 11:19 AM

Term Definition
CC Carbohydrate Choice
Control result Value displayed on meter as the result of a control test. When the control result is within the range shown on
the label of the test strip container, the test strips and the meter are working properly.
Control test A meter test using control solution which lets you know that the meter and test strips are working properly.
Corrupt result A historical result that cannot be displayed by the meter because of an error.
Current time The time you set through the Settings menu and then in the Date and Time screen.
Default The initial settings on the meter before you change or customize them.
Discovery mode When your meter is “discoverable,” other Bluetooth devices can detect it, pair with it, or connect to it.
Dismiss Ends a reminder.
End time The end time of a time block.
°F Degrees Fahrenheit
FCC Federal Communications Commission (United States)
Flight mode This setting disables all wireless communication on the meter to comply with regulations on air travel.
351
52297_07167776001.indb 351 10/20/14 11:19 AM
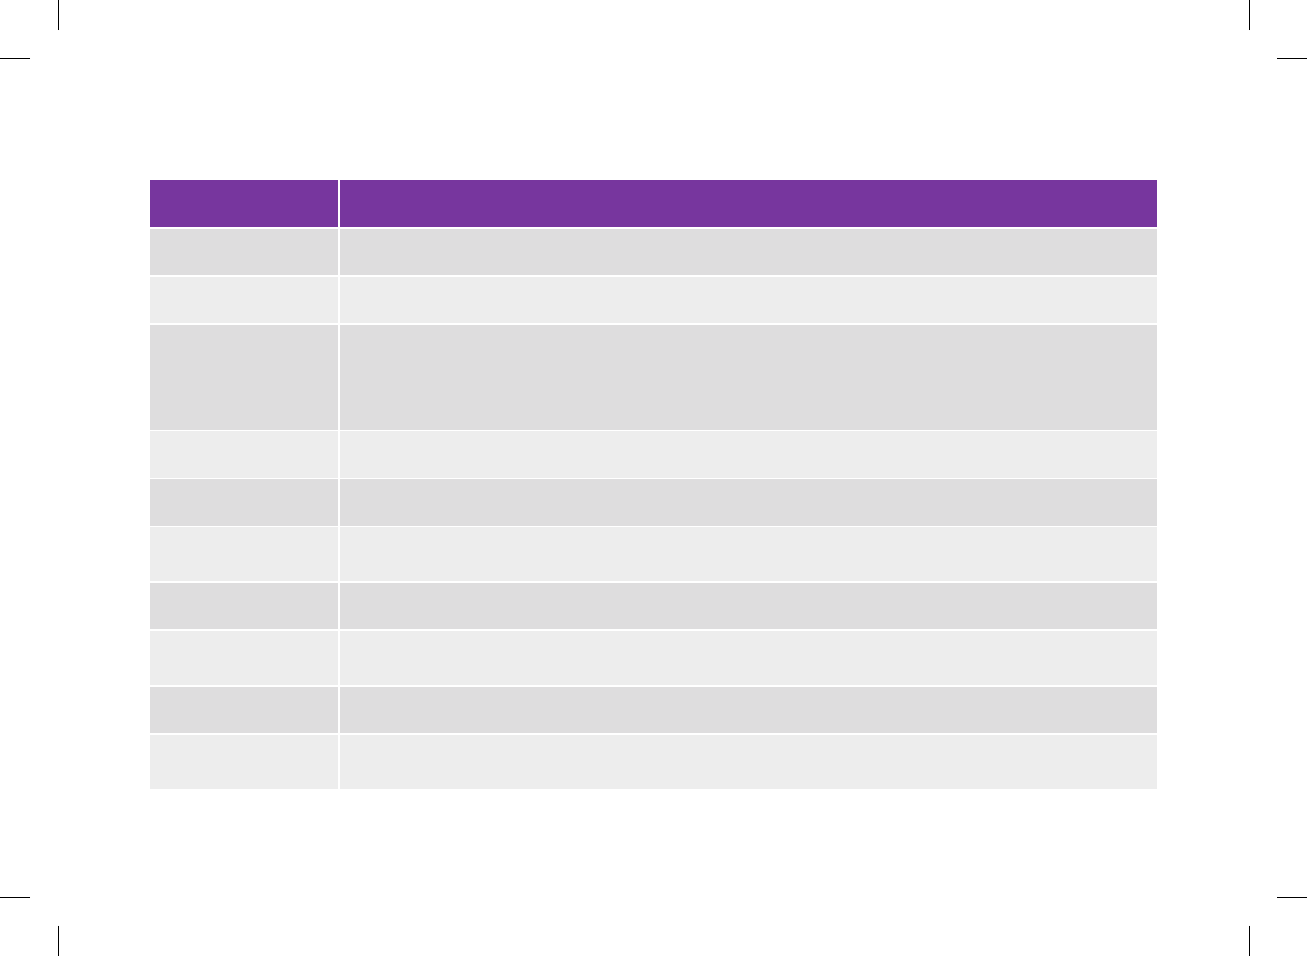
Term Definition
g Grams
GHz Gigahertz
Health event
Information about your current health status or activities (Exercise 1, Exercise 2, Stress, Illness,
Premenstrual, or Customized). Up to 4 health events can be selected and stored with a blood glucose result.
Each status or activity (health event) accounts for a certain percentage according to your settings and is
used to adjust bolus advice recommendations.
HI Appears on the meter’s screen when the test result is above the meter’s measurement range.
Hyper Hyperglycemia: A condition that occurs when the blood glucose level is too high.
Hyper warning limit A limit set in the meter. When your blood glucose result is above the hyper warning limit, a warning is
displayed. The hyper warning limit should be provided by or discussed with your healthcare professional.
Hypo Hypoglycemia: A condition that occurs when the blood glucose level is too low.
Hypo warning limit A limit set in the meter. When your blood glucose result is below the hypo warning limit, a warning is
displayed. The hypo warning limit should be provided by or discussed with your healthcare professional.
IC Industry Canada
Insulin increment The amount in units (U) by which your insulin dose is adjusted when programming a bolus or when entering
a manual Logbook entry.
352
52297_07167776001.indb 352 10/20/14 11:19 AM

Term Definition
Insulin sensitivity The amount of insulin necessary to lower your blood glucose by a certain amount.
ISO International Organization for Standardization
KE Kohlenhydrateinheit (carbohydrate unit)
Lanyard A cord worn around the wrist or neck to carry an object.
LCD Liquid Crystal Display
LO Appears on the meter’s screen when the test result is below the meter’s measurement range.
Max bolus
Max bolus serves as a safety measure against unintended large boluses. It is a meter setting that specifies a
maximum amount of insulin that can be delivered in any single bolus. A bolus that is larger than the max
bolus amount requires an additional confirmation.
Meal rise The increase in blood glucose levels during or after meals that is considered normal within a certain range,
even though a bolus has been delivered.
Meal time Information about the time point of a blood glucose result (before meal, after meal, bedtime, fasting, or
other). It can be selected from a pop‑up menu and is stored with a blood glucose result.
Meter Blood glucose meter.
mg/dL Milligrams per deciliter
353
52297_07167776001.indb 353 10/20/14 11:19 AM
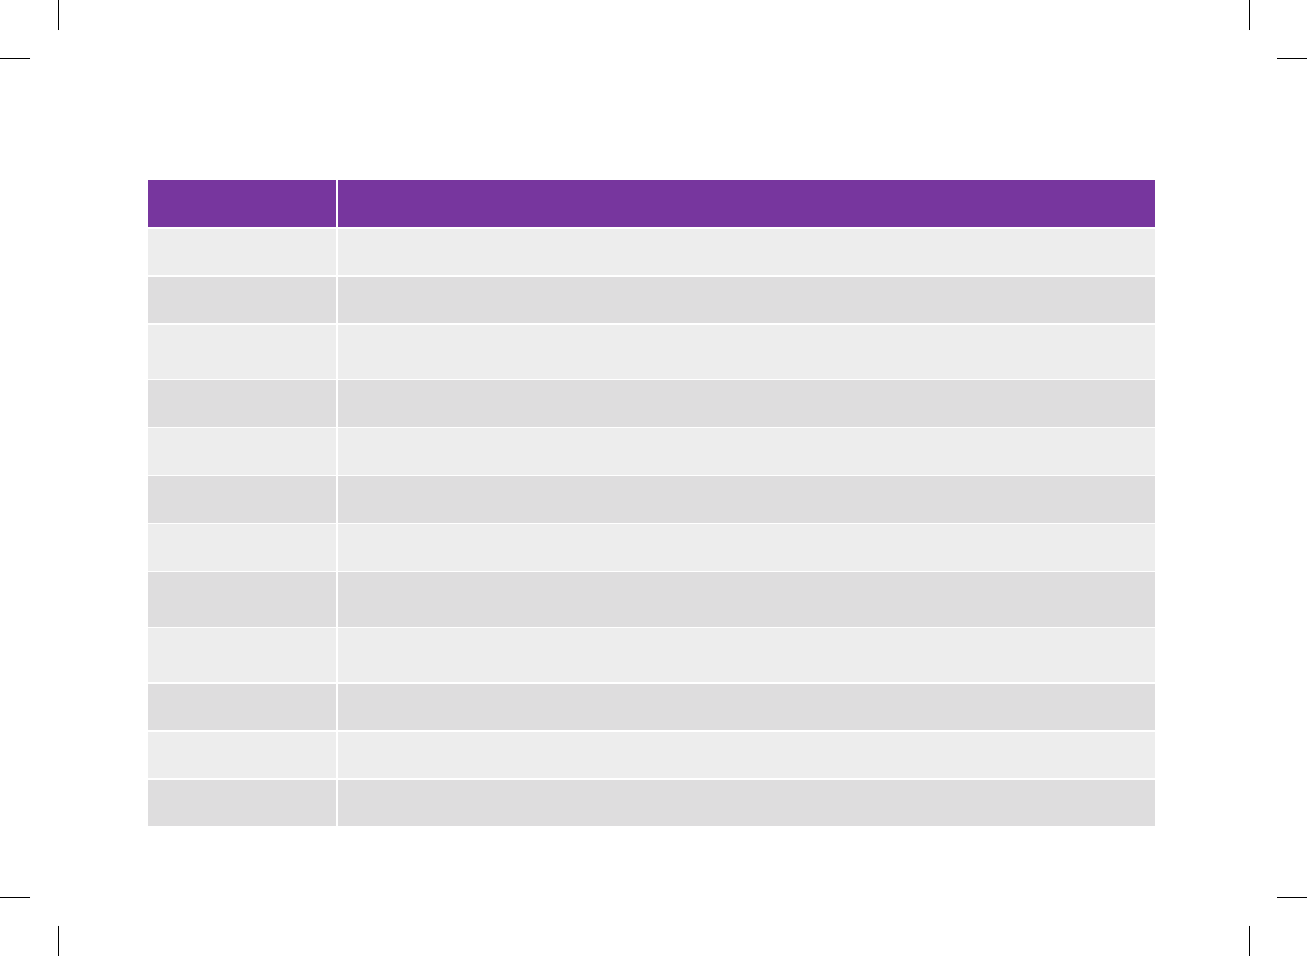
Term Definition
Note Additional information.
Offset time The amount of time before the insulin begins to lower blood glucose levels.
Paired Meter and another device exclusively communicate and transfer information with each other when they are
paired.
Pen/syringe bolus A bolus delivered using a pen or syringe.
PIN Personal Identification Number
pm Post Meridiem (12‑hour clock notation for “after noon”)
Quick Notes A logbook entry that can quickly be saved from the Main Menu or Status screen.
Remind after A bG test reminder setting. The amount of time after a high blood glucose result, after a low blood glucose
result, or after a meal you want the reminder to occur.
Reminder When enabled, reminders occur to remind you to test your blood glucose, to retest your blood glucose, or of
an event or activity.
RF Radio Frequency
SD Standard Deviation
Signal Suspension Suspends meter signals until the suspension period ends or the meter is turned on.
354
52297_07167776001.indb 354 10/20/14 11:19 AM
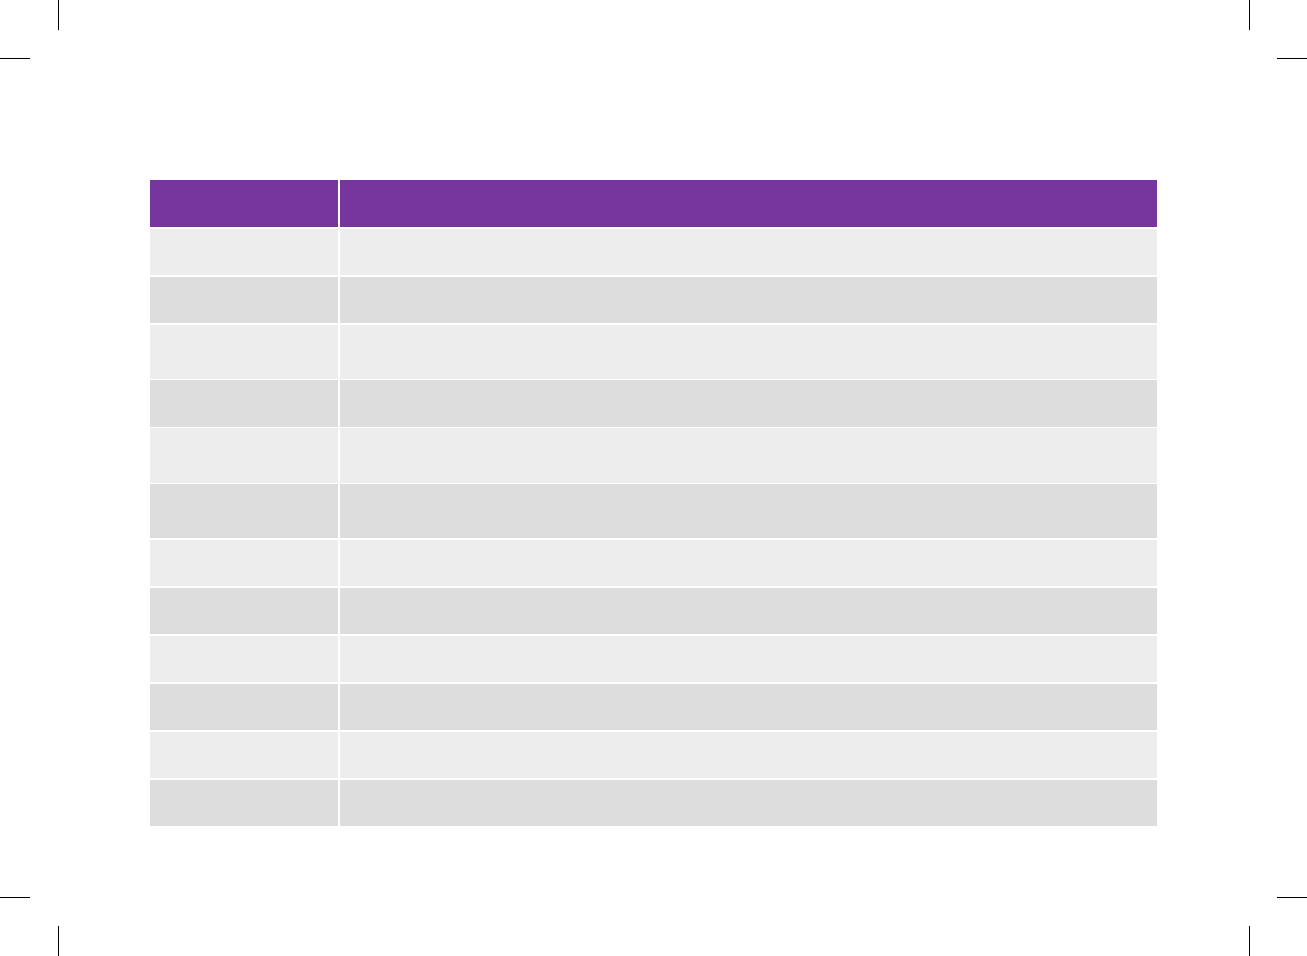
Term Definition
Snack size The snack size defines a threshold of carbohydrates above which a meal rise is triggered.
Snooze Reschedules a reminder to reoccur in a preset amount of time (for example, in 5 minutes).
Standard deviation As it is used in this user’s manual, standard deviation measures how widely spread the bG results are (e.g.,
if the bG results are close to the bG average, then the standard deviation is small).
Start time The start time of a time block.
Target range The desired upper and lower limits of your blood glucose level considered acceptable when fasting or before
a meal as set by your healthcare professional.
Test strip A plastic strip coated with chemicals that, when inserted into a meter, reacts with a blood drop to deliver a
blood glucose reading.
Time block One of up to 8 time periods within one day.
Time scale The user sets the duration of time. There is a start and end time.
Touchscreen A screen that can be touched to interact with the device.
U Units (insulin units)
USB Universal Serial Bus
Warning Describes items and conditions that present hazards and may cause personal injury. 355
52297_07167776001.indb 355 10/20/14 11:19 AM

Term Definition
Warning limit See Hyper Warning Limit or Hypo Warning Limit.
356
52297_07167776001.indb 356 10/20/14 11:19 AM

357
Index
A
acting time
description 55
setting 49, 108, 136
active insulin 97, 348
advice options 49, 55, 136
B
basal insulin, set amount 74, 95, 223, 228
battery
changing 273
charging 36
power‑saving tips 22
battery door 14, 274
bG averages table 258
blood glucose result
adding information 73
detailed result 72, 73
screen 71
status bar descriptions 80
understanding blood glucose results 79
unusual blood glucose results 83
blood glucose testing 67
blue text 11
Bluetooth wireless technology 301
bolus advice
adding a time block 113
advice options 49, 55, 136
deleting time blocks 119
delivering a bolus 91
overview 53, 87
resetting all time blocks 128
setting up 46, 103
time block settings 109
turning o 138
bolus advice calculations
carbohydrate advice 344
carbohydrate bolus 331, 345
correction bolus 332, 347
correction bolus with carbohydrate intake 348
currently allowed blood glucose value 346
examples 333
bolus delivery
with bolus advice 91
without bolus advice 76
52297_07167776001.indb 357 10/20/14 11:19 AM

358
C
carbohydrate
set amount 74, 95, 222, 226
unit description 50
unit setting 45, 178
carbohydrate ratio
description 53
setting 47, 105, 107, 112, 116, 118, 123, 127, 130, 132
charging the battery 36
cleaning and disinfecting 261
code chip 14, 60, 69
connecting meter to a PC with USB cable 204
Continua Certified manager 179, 300
control solution 58, 60
control solution bottle 15
control test
out‑of‑range results 63
performing 59
result 62
correction bolus after a meal 334
countdown timer 98
D
date and time 44, 141
display
setting background color 149
setting brightness 148
timeout 22
troubleshooting 282
E
error log 322
error messages, troubleshooting 288
F
flight mode 210, 211
function test 278
52297_07167776001.indb 358 10/20/14 11:19 AM

H
healthcare professionals 320
health events
choose health event 74, 95, 222, 227
description 54
setting percentages 48, 108, 134
HI 82
high blood glucose symptoms 85
home screen
description 16
set as main menu or status screen 146
hyperglycemia symptoms 85
hyper warning limit 45, 173
hypoglycemia symptoms 85
hypo warning limit 45, 173
I
icon list 218, 307
information messages, troubleshooting 289
insulin increment
description 51
setting 45, 175
insulin sensitivity
description 54
setting 47, 105, 107, 112, 116, 118, 123, 127, 130, 132
K
keyboard 28
L
lancing device, cleaning and disinfecting 267
language 44, 150
lanyard attachment point 13
limited license 317
LO 82
logbook
adding new data 225
adjusting data 220
description 214
record description 214
viewing data 220
low blood glucose symptoms 85
M
main menu screen 17, 146
maintenance messages, troubleshooting 293
maintenance, meter 271
359
52297_07167776001.indb 359 10/20/14 11:19 AM

max bolus
description 51
setting 45, 176
meal rise
description 55
setting 49, 108, 136
meal time 74, 95, 222, 226, 237
memory expansion port 13
meter
cleaning and disinfecting 263
discarding 305
function test 278
information for technical support 321
maintenance 271
range limits and defaults 328
reset 21
safety information 304
specifications 299
summary of features 12, 33
troubleshooting 281
turning on or o 13, 21
micro USB connector 13
mode settings
signal suspension 144
sound and vibration 142
my data 213
N
navigation 24
note, description 11
O
oset time
description 55
setting 49, 108, 136
P
patent information 319
pen/syringe bolus 78, 100
power button 13, 21, 43
power‑saving tips 272
product limitations 299
purple text 11
360
52297_07167776001.indb 360 10/20/14 11:19 AM

R
radio frequency signal 302, 324
reminders
after high blood glucose test 180, 184
after low blood glucose test 180, 186
after meal blood glucose test 180, 182
alarm clock 181, 195
basal injection 181, 197
bG test 181, 197
customized 180, 192
doctor visit 180, 188
lab test 180, 190
medication 181, 199
other 181, 197
overview 180
reset meter 21
S
scroll bar 17, 24
setup wizard 41, 43
signal suspension 144
snack size
description 55
setting 49, 108, 136
sound, mode 142
specifications
Bluetooth wireless technology 301
meter 299
splash screen 43
standard day graph 247
standard day table 247
standard week graph 240
standard week table 240
status screen 19, 146
supplies 320
symbols 306
symptoms, low or high blood glucose 85
361
52297_07167776001.indb 361 10/20/14 11:19 AM

T
target chart 252
target range 46, 107, 112, 116, 123, 127, 130, 132, 153, 157,
158, 163, 167, 170, 172
target table 252
test strip
description 15
using the test strips 30
test strip container 15, 59, 68
test strip slot 13, 59, 68
text color 11
thermometer icon 18
time blocks, bolus advice o
adding a time block 154
changing start time, end time, or target range 151
deleting time blocks 159
resetting all time blocks 168
time blocks, bolus advice on
adding a time block 113
changing start time, end time, target range, carbohydrate ratio,
or insulin sensitivity 109
deleting time blocks 119
resetting all time blocks 128
time blocks, explanation of 52
time format 44
touchscreen
calibration 276
display 13
tone 147
vibration 147
trend graph 230
troubleshooting
meter 281
out‑of‑range control results 63
unusual blood glucose results 83
U
USB
cable 36, 39, 204
cable connection settings 207
connector on meter 13, 300
use by date 30, 58, 59, 68
V
vibration
mode 142
touchscreen 147
volume buttons 13
362
52297_07167776001.indb 362 10/20/14 11:19 AM

W
warning, description 11
warning limits
description 51
setting 45, 173
warning messages, troubleshooting 296
warrranty 316
363
52297_07167776001.indb 363 10/20/14 11:19 AM

364
52297_07167776001.indb 364 10/20/14 11:19 AM

52297_07167776001.indb 365 10/20/14 11:19 AM

07173857001 Last Update: 09‑2014
Rx only
© 2014 Roche Diagnostics
ACCU‑CHEK, ACCU‑CHEK AVIVA, and ACCU‑CHEK AVIVA INSIGHT
are trademarks of Roche.
CONTINUA, the CONTINUA logos and
CONTINUACERTIFIED are trademarks, service marks,
or certification marks of the Continua Health Alliance.
CONTINUA is a registered trademark in some, but not
all countries in which this product is distributed.
The Bluetooth® word mark and logos are registered trademarks
owned by Bluetooth SIG, Inc. and any use of such marks by Roche
is under license.
All other trademarks and product names are the property of their
respective owners.
Assembled in USA.
Distributed by:
Roche Health Solutions Inc.
11800 Exit 5 Parkway, Suite 120
Fishers, IN 46034
Phone: 1‑800‑280‑7801
Fax: 1‑888‑810‑0758
52297_07167776001.indb 366 10/20/14 11:19 AM