Rockwell Collins RVLU User Manual pages
Rockwell Collins, Inc. pages
Exhibit A Instruction and Installation Manuals

Exhibit A
Instruction and Installation Manuals
Sec. 2.1033(b)(3)
Attached are a draft instruction manual for the RVLU and preliminary drawings
and instructions demonstrating typical RVLU and antenna installations, including
wireless LAN antenna installations.
Note: The RVLU’s Part 15 2.4 GHz wireless LAN functionality is not controlled by
the operator through the mobile data terminal. The attached draft instruction
manual covers other RVLU functionality. 2.4 GHz Wireless LAN functionality is
automatic and only operational in the vicinity of a base station which would
typically be located in a garage or depot.
1 June 1999
Welcome aboard
the TransitMaster2001
Advanced Public Transit System.
The TransitMaster2001 automates tasks and provides self-performing features to help you create loyal customers with
quick, regular, and punctual service.
•Instant emergency reporting provides vehicle location to police, fire, and medical emergency agents
• Private line radio linkage to dispatch (if equipped)
•Digital communications with dispatch
•Automatic, hands-off calling of stops (if equipped)
•Computer-assisted transfer management
• Messaged schedule performance
• Accurate time point indication
TransitMaster and TransitMaster2001 are Rockwell Collins Trademarks.
TransitMaster2001TM

Wecome Aboard
2
The TransitMaster system uses the same technology as today’s most sophisticated aircraft to make your job easier and help you better
serve your customers by putting you in command.
The TransitMaster system allows you to easily send and receive data messages for transfer information or to report an
overt emergency. The system includes a covert alarm, door, and wheelchair lift sensors (where applicable) to make your
bus safer and your job easier. The TransitMaster system works for you. Much of what the system does happens without you doing
anything.
The system tracks vital engine operating conditions and senses mechanical alarms (where applicable). The system also tracks bus
mileage to enable the mechanics to schedule maintenance for your bus, making it safer and more comfortable for you and your
passengers.
The TransitMaster mobile data terminal (MDT), shown in the next section, is your “command console.” Its screen shows a number of
different displays. The operation determines how the display appears.

Welcome Aboard
3
This manual covers MDT functions found in the following sections:
Function Refer To
About the keys MDT CONTROLS
Log in to system LOG IN
Fixed route operation MAIN
Route List
Help List
Count
Talk on the radio TALK REQUEST
Public address (PA) control
Request passengers transfer TRANSFER
REQUEST
Read a received message RECEIVED MESSAGE
Send a message to dispatch CANNED
Ten-digit data entry MESSAGE
Send an overt emergency EMERGENCY
message to dispatch MESSAGE
Log out LOG OUT
Paratransit operation PARATRANSIT

Wecome Aboard
4
The MDT is configured for your transit property. This manual explains only MDT displays used by vehicle operators.
Other MDT displays used for system initialization, setup, supervisory, or maintenance are explained in separate
dedicated documentation.
An option that may be included on your vehicle is the American with Disabilities Act (ADA) annunciation system. This system includes a
large display and an interface to the internal and external public address (PA) system. The annunciation system provides visual and/or
audible announcements of routes, stops, and miscellaneous information. This system is preprogrammed and automatic but allows you and
dispatch control for flexibility.
System alert tones heard on your speaker are as follows:
•A series of short beeps is an individual call to your handset.
•A series of longer beeps is an incoming message.
•A single short tone indicates an alarm, such as low oil pressure. Other alarms monitored include: hot engine, low coolant level, low air
pressure, compressed natural gas (CNG) leak or fire, and wheelchair lift.
•A single long tone is an all call or group call.
TransitMaster provides
a valued transit environment
to help you create loyal customers.
Numbered procedures in this manual are for your
convenience. Please follow these procedures in the
order indicated.
Perform all other instructions on an as needed basis.
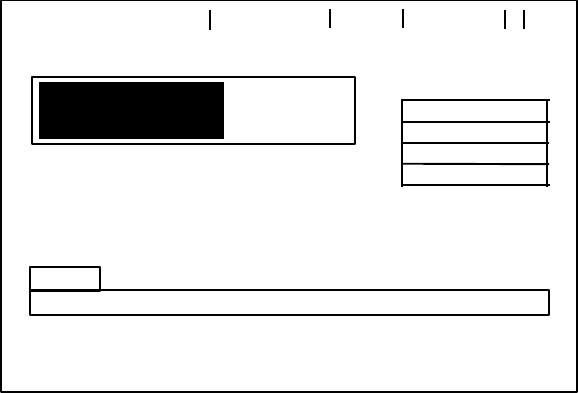
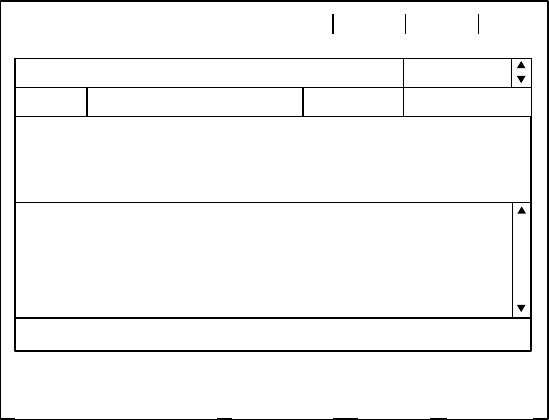
MDT Controls
5
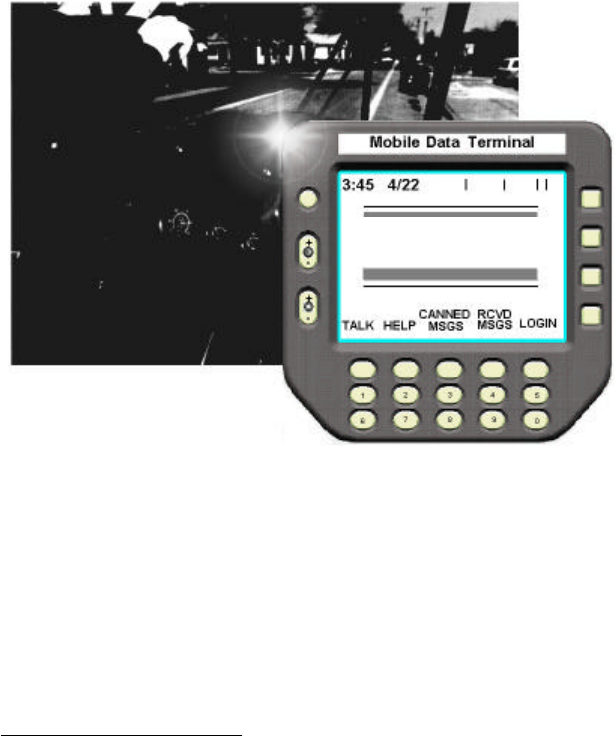
This is the mobile data terminal (MDT). TransitMaster operations are performed using the buttons surrounding the screen
located in areas A through E.
A. Overt emergency message button
B. Contrast and brightness
C. Function buttons
D. Numeric entry keys (0 -9)
E. Select buttons
A. The round button at the top left of the screen is the overt emergency message button. Using this button immediately
sends an emergency code to let dispatch know you are involved in an emergency situation. Depending upon how
your system is configured, after pressing the button, the screen automatically changes to the emergency message
display. The emergency message display allows you to select and send an emergency data message to dispatch with
a description of your situation.
12 3 4 5
67 8 9 0
+
-
+
-
Mobile Data Terminal
A
B
C
D
E
3:45:03 4/22
TALK HELP MSGS
CANNED MSGS
RCVD LOGI
N
Vehicle ID: 478
TransitMaster2001TM
MDT Controls
6
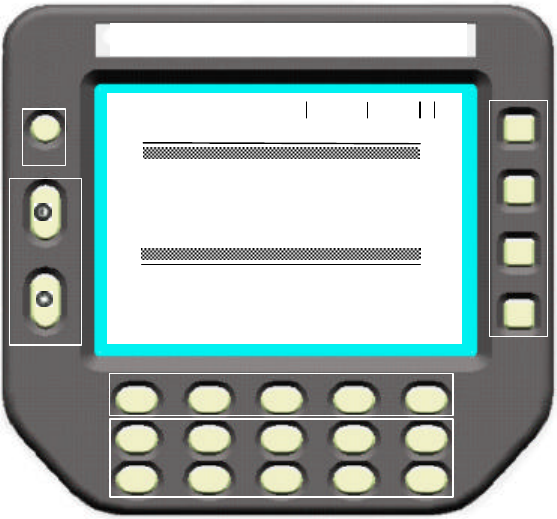
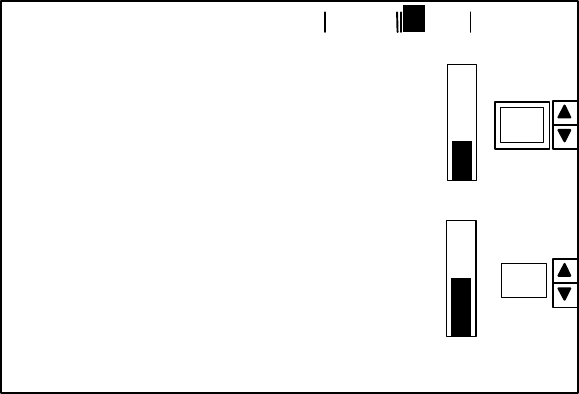
B. Two dedicated contrast and brightness rocker buttons are also on the left side of the MDT. Contrast and brightness are adjusted any
time during operation. The half-blackened circle on the top rocker indicates screen contrast. A circle with radiating lines on the bottom
rocker indicates brightness. Both rocker buttons work the same way. Press the top of the rocker to increase the adjustment and the
bottom of the rocker to decrease the associated adjustment.
C. Five function buttons are directly below the screen and above the numeric entry keys. The five function buttons do whatever the word
on the screen above the button indicates. For example, if you press the function button under the word TALK, the screen changes to
the talk request display.
D. Ten numeric entry keys are along the bottom of the MDT. The numeric entry keys provide an easy way for you to enter your driver
identification number, route-block information, or any other numerical value associated with an adjustment.
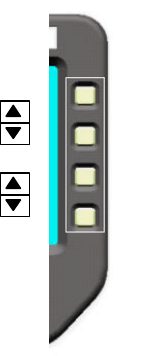
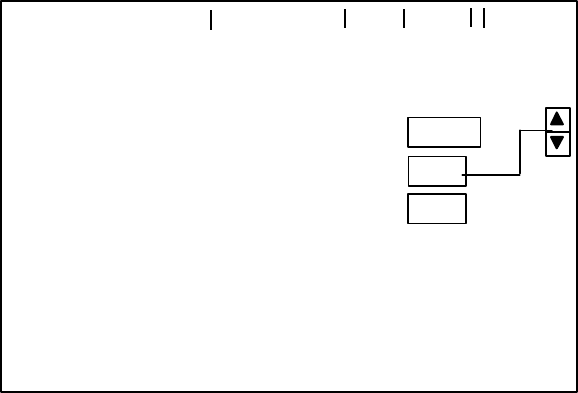
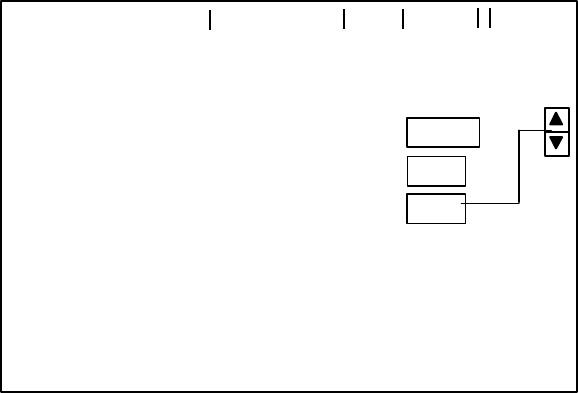
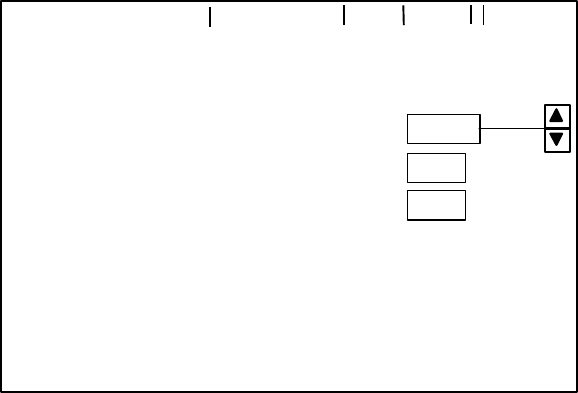
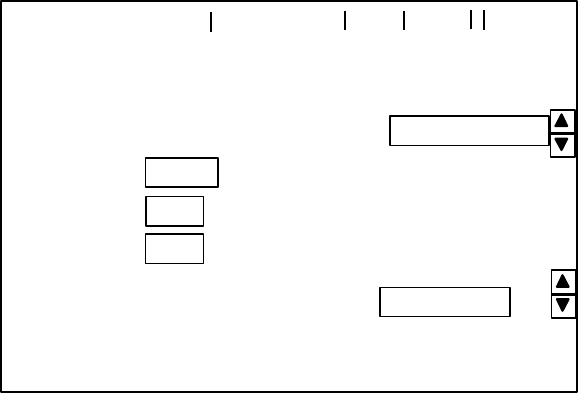
E. Four select buttons are on the right side of the MDT. These four select buttons are used to select an area
on the screen. They allow you to change the value of the selected area using the numeric entry keys. This manual refers
to these select buttons from the top to the bottom as S1, S2, S3, and S4.
The symbol on the actual display representing the select buttons is a box containing up and down arrows. Up is always
S1 and S3. Down is always S2 and S4.
S1
S2
S3
S4

Manual LOG IN
7
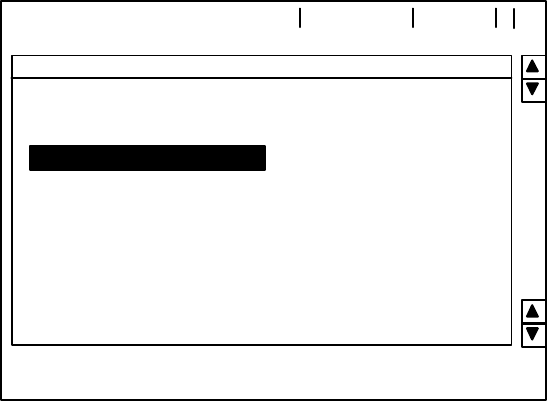
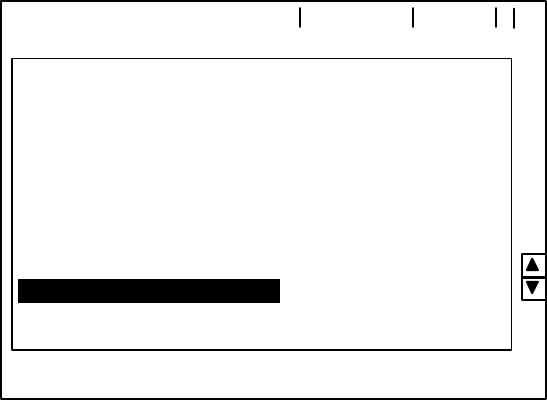
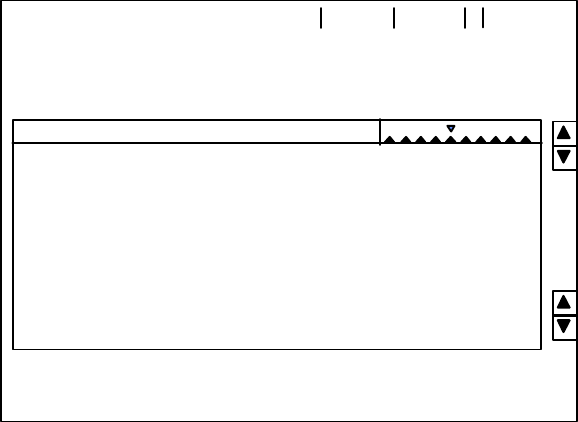
LOG IN
You must log in completely at the beginning of your run. If you do not log in, a theft message is automatically sent to dispatch after the bus
moves a short distance. This is a sample log in display.
If the display looks similar to the picture above, the TransitMaster system is ready for you to enter your driver identification (ID).
1. To enter your driver ID, press S1 until it points to driver ID.
2. Use the numeric entry keys (0-9 under the function buttons) to enter the digits of your driver ID. Press the button under DEL to correct
an entry.
3. Repeat step 2 until your driver ID is correct.
4:12:25 GRP
CALL
TALK SEND HELP DEL ENTRY
SPEAKER MSG
04/22
Driver ID
:
Route:
Block
:
12345
567
890
Manual LOG IN
8
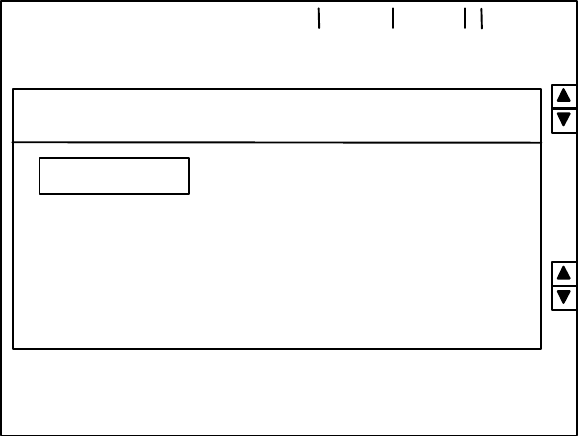
A valid driver ID is defined by your property and assigned to your badge or employee number. The MDT does not accept
numbers outside the range 1 to 65535.
Next you must enter the first half of your current route-block number in the indicated route number area.
1. Press S1 or S2 to activate the route number area as shown.
2. Use the numeric entry keys (0-9 under the function buttons) to choose the digits of your route. Press the button under DEL to correct an
entry. After pressing more than three numeric entry keys, the route area returns to a single digit.
3. Repeat step 2 until your route number is correct.
In the example above, use select buttons S1 and S2 to move the selection pointer up and down. Use S1 to return to the driver ID area.
Use S2 to move the selection pointer to the block number area.
4:12:25 GRP
CALL
TALK SEND HELP DEL ENTRY
SPEAKER MSG
04/22
Driver ID:
Route:
Block:
12345
567
890
LOG IN
9
The last half of your route-block number must also be entered in the indicated block number area.
1. Press S2 to activate the block area.
2. Use the numeric entry keys (0-9 under the function buttons) to choose the digits of your block. Press the button under DEL to correct
an entry. After pressing more than three numeric entry keys, the block area returns to a single digit.
3. Repeat step 2 until your block number is correct.
When the driver ID, route, and block are all correct, press SEND to send the information to dispatch. Messages
appearing on the display indicate the progress of your log in such as WAITING FOR VALIDATION and VALIDATION
TIMEOUT. If a validation timeout occurs, press SEND once more before manually logging in.
When your log in data is accurate and the system acknowledges your login, allow sufficient time for the main display to appear.
4:12:25 GRP
CALL
TALK SEND HELP DEL ENTRY
SPEAKER MSG
04/22
Driver ID:
Route:
Block:
12345
567
890
SENDING LOG IN DATA
Manual LOG IN
10
If the system encounters an error in the login information, a display like the following example appears. Notice both driver ID and block data
are invalid and a message indicates LOG IN DENIED. Reenter correct data for the invalid entries and press SEND again.
An INVALID VEHICLE message indicates you are on the wrong vehicle.
If LOG IN MSG NOT DELIVERED appears, press SEND to reissue your log in data a second time before attempting to log in
manually.
To talk to dispatch, press TALK and refer to the talk request section of this manual.
If a relief driver takes over the route, you must log out first and the relief driver log in and send a proper driver ID. To log out refer to the
LOG OUT section of this manual. The MDT maintains previously entered route and block numbers if the vehicle is not powered down.
Press HELP for a listing of help topics.
Press ENTRY to return to the entry display.
4:12:25 GRP
CALL
TALK SEND HELP DEL ENTRY
SPEAKER MSG
04/22
Driver ID:
Route:
Block:
12345
567
890
INVALID
INVALID
LOG IN DENIED

LOG IN
11
Manual LOG IN
Manual log in is required when the system network is down or your vehicle is out of range of the transmitters. DISPATCH
NOT AVAILABLE indicates the lack of connection to the system network. The message appears when scheduled
maintenance of the system network occurs during operational periods. The message also appears for vehicles in non-
coverage radio areas on inter-regional routes.
It is necessary to log in when the system network is down to collect on-board vehicle data and maintain schedule
adherence, time point crossings, engine alarms, wheelchair cycling, and count capability. This information is retained by
the MDT and transmitted once reconnection to the network is achieved.
When the MDT displays this message, ensure voice communications is operating properly by the method your property
prescribes.
4:12:25
TALK MNL
SEND HELP DEL LOG IN
04/22
Driver ID:
Route
:
Block:
12345
567
890
DISPATCH NOT AVAILABLE
Manual LOG IN
12
When dispatch is not available, the manual log in function appears. Press MNL LOG IN to use the manual log in display.
Use select buttons S1 and S2 to choose the correct operational mode. Other choices are:
Training
Maintenance
Charter
Staged
Special
Paratransit
Use select buttons S3 and S4 to choose the correct service operation. This example shows weekday (WKD).
If the driver ID and route-block information are missing,
press LOG IN and refer to the LOG IN section of this manual to enter driver ID and route-block information.
4:12:25
TALK MAIN HELP LOG IN
04/22
Driver:
Route
:
Block:
12345
567
890
Service:
WKD
Operational Mode:
Fixed Route
LOG IN
13
Once all information is entered correctly, press MAIN to complete the manual log in and enter the main display.
To talk to dispatch, press TALK and refer to the talk request section of this manual.
Press HELP for a listing of help topics.
MAIN
14
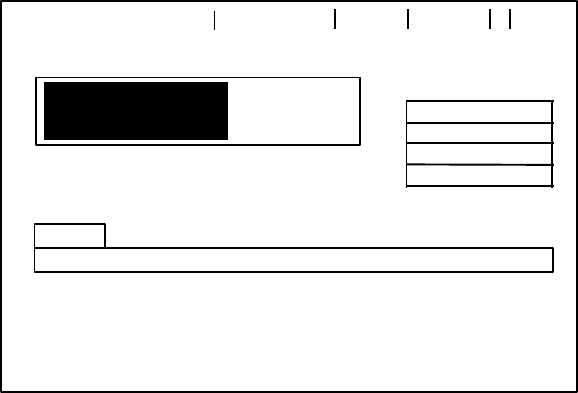
MAIN
This is an example of the main display. The local global positioning system (GPS) time is displayed in the upper-left corner next to the
current date. This time signal is very accurate and is identical in all fleet vehicles to assure all vehicles operate on the same time reference.
The time is either in 12-hour time (ie, 04:12 -- hours: minutes), or in 24-hour time (ie, 16:12). Seconds are optional. Supervisor/setup
determines the type of time displayed.
When the system first “wakes up,” time is not displayed for about 30 seconds while a communication link is established with the GPS
satellites.
If you send a covert alarm, a wave appears above the vertical line behind the date once dispatch acknowledges the alarm. (~ is shown in
the illustration)
Group call (GRP CALL) is a type of call displayed only if the system receives a group call from dispatch. A group call is a call to a
specified group of vehicle operators. A single long tone is audible for an all call or group call.
Other types of calls displayed in this same area are individual call (IND CALL) and all call (ALL CALL). An individual call is a call to an
individual operator with an audible series of short beeps. An all call is a call to all operators. Descriptions such as speaker, handset, or PA
(public address) are included to describe where the call is heard.
4:12:25 GRP
CALL
Route: 247NE
Transfers
25ØS
TALK XFER
REQ COUNT MORE MSG
GTC
6:05
8N
22
1
1
27S
SPEAKER MSG
Veh ID: 478
2
EARLY
04/22
~
!Transfer Accepted
IND CALL TIME OUT

MAIN
15
If IND CALL TIME OUT is displayed, it means dispatch placed a call and you did not answer in the specified time. If you see this
displayed, place a return call to dispatch. Refer to the talk request section of this manual.
The information under the GPS time is called the advisory line. !Transfer Accepted is on the advisory line of the previous display.
Advisories appearing on this line from lowest priority (top) to highest priority (bottom) are listed below.
Advisory Action Required
RF Network Down Test voice mode
Incomplete Route Files Notify dispatch
Off Course Return to route
Resyncing to route No action
Check Wheelchair Cycle wheelchair lift
Login Required Perform log in
Transfer Not Possible Notify passenger
Transfer Accepted Notify passenger
System Hardware Failure Notify dispatch
Only one advisory displays at any one time. If more than one advisory condition exists, the highest priority advisory displays. When the
condition causing the highest priority advisory is corrected, the next lower priority advisory displays.
PARATRANSIT
1 June 1999
MSG is shown at the top of any kind of MDT display when there are unread received messages. When the MDT receives a message, a
series of long beeps is audible and MSG flashes for about 10 seconds. MSG stays on until all messages are read. To read the message,
press MSG, and refer to the received message section of this manual.
The large rectangle in the center of the display tells you how you are doing relative to your schedule. Your current route is shown directly
under the rectangle. In this example, you are on Route 247NE and are ahead of schedule by 2 minutes. Your vehicle ID is under the route
indicator.
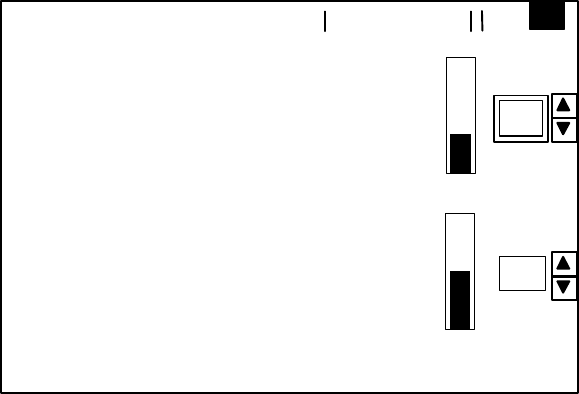
If the location of your vehicle during log in was sunny, you may want to adjust the contrast of the MDT. Contrast and brightness are adjusted
any time with the two rocker buttons on the left of the MDT. The half-blackened circle on the top
rocker indicates screen contrast. A circle with radiating lines on the bottom rocker indicates brightness. Press the top of the rocker to
increase the adjustment and the bottom of the rocker to decrease the adjustment.
4:12:25 GRP
CALL
Route: 247NE
Transfers
25ØS
TALK XFER
REQ COUNT MORE MSG
GTC
6:05
8N
22
1
1
27S
SPEAKER MSG
Veh ID: 478
2
EARLY
04/22

PARATRANSIT
Under the vehicle ID is the arrival time and name of the next stop according to schedule. In this example, you should arrive at 6:05 at GTC.
If transfers are requested for the next stop, the transfers block appears with an audio tone as you approach the stop. The transfer block lists
transfers to your route. The transfer block does not appear if transfers are not requested.
To talk to dispatch, press TALK. Refer to the talk request section of this manual.
To request a transfer for a passenger, press XFER REQ and refer to the transfer request section of this manual.
To perform a passenger count, press COUNT and refer to the count display later in this section.
To read your received messages, press MSG and refer to the received message display section in this manual.
4:12:25 GRP
CALL
Route: 247NE
Transfers
25ØS
TALK XFER
REQ COUNT MORE MSG
GTC
6:05
8N
22
1
1
27S
SPEAKER
MSG
Veh ID: 478
2
EARLY
04/22
ROUTE LIST
18
Repeatedly pressing MORE cycles the functions of the second and third buttons as follows: the second button cycles between XFER
REQ, LOG OUT, and HELP; the third button cycles between COUNT, ROUTE LIST, and MAINT. Pressing COUNT changes the
screen to the COUNT display. Pressing MAINT changes the screen to a maintenance display to let you see the system operational
status.
Pressing ROUTE LIST changes the screen to the route list display. The route list shows the current route of the vehicle and the stops on
that route.
Use select button S2 to choose the next route the vehicle encounters and a listing of the time points on the next route. S1
lists the previous route encountered and the associated time points.
Use select buttons S3 and S4 to scroll through the selected route to view the listing.
3:45:05
MAINTALK
100W Bear Canyon Express
6:49A Tnqe Vrde @ Bear Cyn
6:53A Wrightstown@Pantano
6:55A Tnqe Vrde@ Sbno Cnyn
7:00A Grant @ Craycroft
7:22A Speedway @ Forest
04/22
7:31A Speedway @ Mountain
7:43A Speedway @ Everest
7:55A Speedway @ High View
8:10A Cresant @ Campbell
7:12A Orcale @ Clairmount
7:18A SeyVouge @ Grand Ave
RESYNC HELP
ANNUN
DSABL
COUNT
19
Only at direction of dispatch, press DSABL ANNUN to toggle off and on (ENABL ANNUN) the annunciation system.
Only at the direction of dispatch, when readjusting the vehicle to a change in schedule, press RESYNC to realign the MDT with the closest
stop (in time) for the vehicle.
Pressing HELP when shown changes the screen to the help display. The help function is context sensitive. Pressing HELP on any display
when shown provides a help list with the help topic for that display highlighted. In this example, pressing HELP changes the screen to the
help list with route list highlighted. The help list shows help topics in alphabetical order.
Use select buttons S3 and S4 to choose a help topic. When the topic is highlighted, press READ to read the information on the help topic
selected.
To talk to dispatch, press TALK and refer to the talk request section of this manual.
Maintenance (MAINT) information is explained in the TransitMaster Advanced Public Transit System Mobile Equipment
Maintenance Manual.
Pressing COUNT changes the screen to the count display. Perform your passenger count before leaving the stop.
4:47:25
LIST
TALK
Canned Message
04/22
Emergency Message
MDT Controls
Log In
Log Out
Main
Route List
Public Address
Received Message
Talk Request
Transfer Request
Count
READ
MAINT ROUTE
HELP
20
This display allows you to count up to ten different types of passengers. Press the numeric entry key associated with the appropriate label
once for each type of passenger. Each press of the numeric entry key representing the passenger type increases the count for that
passenger type by one. The count is automatically sent to dispatch after leaving the stop and the system resets the count types for the next
stop.
Supervisor/setup establishes labels for the passenger types, which vary for each property. The labels on your display may vary from the
labels in the example above.
To request a transfer, press XFER REQ and refer to the transfer request section of this manual.
To view a list of help topics, press HELP.
To return to the main display, press MAIN.
4:12:25 GRP
CALL
25ØS
MAIN
8N
22
1
1
27S
SPEAKER MSG
2
EARLY
04/22
2
3
0
4
0
3
1
0
10
2
A
1
B
2
C
3
D
4
E
5
F
6
G
7
H
8
I
9
J
0
XFER
REQ HELP
TALK REQUEST
21
TALK REQUEST
When you press the TALK function, the screen changes to a display similar to the one above.
The local GPS time is displayed in the upper-left corner followed by the current date.
An individual call (IND CALL) displays only if the system receives an individual call from dispatch. In this example, the call is routed to the
handset.
Normally, there is constant data communication between your vehicle and dispatch. If the system detects a lapse in this communication for
longer than a predetermined time, the reverse video “F” is displayed in the top line of your MDT. This stands for fallback mode and places
your radio into voice mode. All audio is routed to your speaker. In fallback mode, or if
the network system fails, voice communication is still possible using your handset.
V in the top line indicates the radio is in voice mode.
E in the top line indicates you pressed the overt emergency message button on the MDT.
12:31:00 IND CALL
COUNT
PRTT PA
RTT HELP
Handset Volume: 2 7
Speaker Volume: 3 9
HANDSET
V
Veh ID: 478
04/22
E
F
TALK REQUEST
22
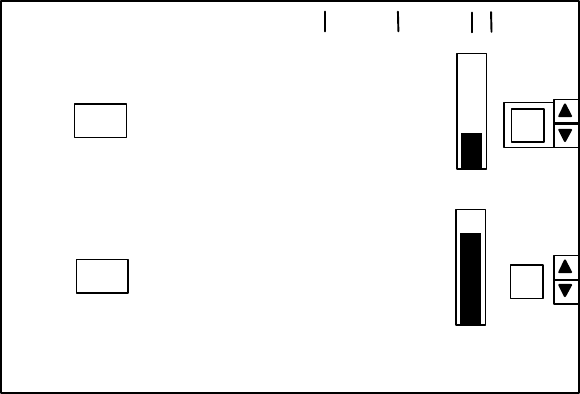
Use select buttons S1 or S2 to select and adjust the level of handset volume or use the numeric entry keys to adjust handset volume after
selection. The slider bar displays the volume change.
Use select buttons S3 or S4 to select and adjust the level of speaker volume or use the numeric entry keys to adjust speaker volume after
selection. The slider bar displays the volume change. The speaker volume has a preset minimum to prevent complete silence.
Acknowledge required (ACK RQD) is displayed if you have received a group call or all call dispatch has requested a receipt of
acknowledgement.
“Tx” in reverse video on the top line displays when the radio is keyed (transmitting), except when the covert microphone audio or a covert
alarm is transmitted.
Press RTT to send a request to talk to dispatch. Use RTT for normal communication. When RTT is pressed, the RTT disappears from
the screen for several seconds or until transmitted to dispatch. Notice the advisory line.
Press PRTT to send a priority request to talk to dispatch. Use PRTT only for urgent communication. If PRTT is pressed, both PRTT
and RTT disappear from the screen for several seconds or until transmitted to dispatch.
12:31:00 Tx
Veh ID: 478
04/22
COUNT
PRTT PA
RTT CALL
ACK
Handset Volume: 2 7
Speaker Volume: 3 9
ACK
RQD
SENDING RTT

TALK REQUEST
23
When dispatch responds, use the handset to talk normally; press the microphone (MIC) key switch to talk, release it to listen. If either RTT
or PRTT fail, press the button again to retry.
Press PA to go to the public address display.
Press ACK CALL when displayed to acknowledge receipt of a call. ACK RQD disappears and reappears only when a new all call or
group call is received.
Press HELP when displayed for a listing of help topics. HELP appears after an ACK CALL is completed.
Press the fifth button to return to the display where you were before you pressed TALK, the count display in this example.
Even if a call is in progress, it is all right to leave the talk request display and go to another display and resume operation.
A review of special symbols appearing across the top line of the MDT indicating a specific condition are:
E The overt emergency button was pressed
The system is in fallback
V The radio is in voice mode
The radio is keyed (transmitting)
F
Tx
Public Address (PA)
24
When you press PA from the TALK display, the MDT displays a screen similar to the one shown.
Use select buttons S1 and S2 to select and adjust the inside PA. Once the choice is outlined with a box, press INSIDE to
toggle the PA on or off. While the inside PA volume is highlighted, adjust the volume up or down with select buttons S1
and S2 or use the numeric entry keys to enter a value. The slider bar displays the volume change. The volume has a
preset minimum.
Use select buttons S3 and S4 to select and adjust the outside PA. Once the choice is outlined with a box, press
OUTSIDE to toggle the PA on or off. While the outside PA volume is highlighted, adjust the volume up or down with
select buttons S3 and S4 or use the numeric entry keys to enter a value. The slider bar displays the volume change. The
speaker volume has a preset minimum.
Press HELP for a listing of help topics.
To talk to dispatch, press TALK and refer to the talk request section of this manual.
12:31:00 IND CALL
TALK
INSIDE OUTSIDE HELP
OFF
ON
70
HANDSET
04/22
Outside Volume:
29
Inside Volume:
TRANSFER REQUEST
25
TRANSFER REQUEST
When you press XFER REQ, the screen changes to a display like this.
This display lists the possible routes and transfer points you will encounter in the next several minutes. The routes are listed in the order you
encounter them.
Use select buttons S3 and S4 to choose a transfer point. The selected route is shown in reverse video (Route 16S at 10:21 in the above
example).
Press SEND REQ to send a request for transfer to dispatch.
The dispatch computer calculates if the requested transfer is possible. The advisory line on the MDT then displays either !Transfer Not
Possible, or !Transfer Accepted. You should notify the passenger whether or not the requested transfer was accepted. If the transfer
was accepted, the dispatch computer sends a message to the bus on the selected transfer route to advise the driver to wait for the transfer.
Refer to the transfer list on the main display.
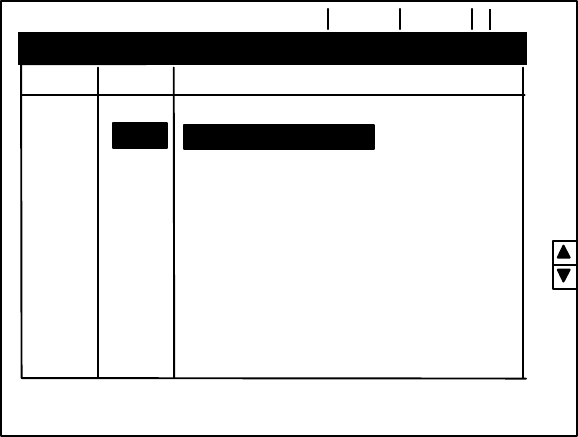
Status codes on the transfer request display are:
8:50:12
COUNT
TALK MAIN
SEND
REQ
Route
9W
Transfer Point
Oracle
@
Campbell
@
Campbell
@
Campbell
@
Oracle
@
16N
9E
15N
16S
04/22
10:21
Stat
F
A
D
4E
Oracle
@
Ollivere
@
Ollivere@
Oracle
@
7S
12S
14E
S
W
HELP
!Transfer Accepted
TRANSFER REQUEST
26
SSending The MDT is sending the request
WWaiting The MDT is waiting for a response
FFailed Dispatch did not receive the request
AAccepted The request was accepted
DDenied The request was denied
To talk to dispatch, press TALK and refer to the talk request section of this manual.
Press HELP for a listing of help topics.
To perform manual passenger count, press COUNT and refer to the count description in the main section of this manual.
To return to the main display, press MAIN.
The TransitMaster system works for you
to make your bus safer
and your job easier.
RECEIVED MESSAGE
27
RECEIVED MESSAGE
If you received a message, heard a series of beeps, and pressed MSG, the screen changes to a display like this.
Use select button S1 to choose a newer message and S2 to choose an older message. Use select buttons S3 and S4 to scroll through the
complete message.
Received messages are shown in the upper-right block (under unread* in the above illustration). Asterisks (*) over triangles (s) are unread
messages, dashes (-) are messages that have been read, and S is a saved message. The pointer (tt) indicates the current selected
message. The time the current selected message was received is shown on the same line (8:45 in the example shown).
To delete the current selected message from the list, press ERASE MSG. When you press ERASE MSG, the function changes to
CANCL ERASE and SAVE MSG changes to CNFRM ERASE. If you pressed ERASE MSG by mistake, press CANCL ERASE.
You will return to the standard received message display shown.
To delete the selected message, press CNFRM ERASE and the message is deleted.
8:50:12
MAIN
Received Message
TALK ERASE
MSG MSG
SAVE CANNED
MSGS
8:45
* * - - *s
Unread*
Traffic accident at 4th Ave and 2nd St. Take
route
04/22
CANNED MESSAGE
28
When dispatch sends a message requiring an acknowledgment, the second button is labeled SEND ACK instead of ERASE MSG
whenever that message is selected. This continues until an acknowledgement is sent. After the message is acknowledged, the function
changes back to ERASE MSG.
In the previous illustration, seven messages have been received. Two have been read, three are unread, one is currently displayed, and
one is saved. The messages are stored in the order they are received. The oldest is to the right and the newest to the left. In this illustration,
the saved message is the oldest message. The MDT can hold 10 received messages. If 10 messages are received and another message is
received (a total of 11), the oldest unsaved message is erased. To prevent a message from being deleted when new messages are
received, save the message. To save a message, press SAVE MSG.
Up to four messages can be saved at any time. After four messages are saved, SAVE MSG disappears until a saved message is erased.
When a saved message is displayed, CANCL SAVE appears to allow the message normal deletion. Saved messages are deleted at
power down of the vehicle.
To send a canned (preprogrammed) data message to dispatch, press CANNED MSGS and turn to the canned message section of this
book.
To talk to dispatch, press TALK and refer to the talk request section of this manual.
To return to the main display, press MAIN.

RECEIVED MESSAGE
29
CANNED MESSAGE
When you press CANNED MSGS, the screen changes to a display like this.
Use select buttons S1 and S2 to select a message category (CAT), then use the select buttons S3 and S4 to select a message within the
category.
To send the selected message, press XMIT MSG.
When an annunciation category is selected, XMIT MSG changes to PLAY MSG. Use S3 and S4 to select a message and press PLAY
MSG to play the message over the internal public address system.
To talk to dispatch, press TALK and refer to the talk request section of this manual.
Press HELP for a list of help topics.
To read received messages, press RCVD MSGS and refer to the received message section of this book.
3:45:28
MAIN
Canned Message
TALK MSGS
RCVDXMIT
MSG
CAT: MAINTENANCE
Vehicle maintenance required at end of
run
04/22
HELP
!Sending
CANNED MESSAGE
30
To return to the main display, press MAIN.
10-Digit Data Entry
31
The CANNED MSGS function provides a 10-digit data entry category as a special purpose utility determined by property policy. Use the
entry for any numeric message sent to dispatch.
Use select buttons S1 and S2 to select the 10-digit data entry category (CAT), then use the numeric entry keys to enter the code.
To send the data entry and return to the canned message function, press SEND.
To clear the data entry, press CLEAR. Retype the code again from the beginning.
To cancel the data entry and return to the canned message function, press CANCEL.
To talk to dispatch, press TALK and refer to the talk request section of this manual.
To list help topics, press HELP.
3:45:34
CANCEL
Canned Message
TALK CLEAR
SEND
CAT: 10-DIGIT DATA ENTRY
1234567890
04/22
HELP

EMERGENCY MESSAGE
32
EMERGENCY MESSAGE
When you press the emergency message button on the left of the MDT, a display looking similar to this appears. Notice the E (emergency)
in the upper right of the top line.
Use select buttons S3 and S4 to select a preprogrammed emergency message, then press XMIT MSG to send the message to dispatch.
To talk to dispatch, press TALK and turn to the talk request section of this manual.
To read received messages, press RCVD MSGS, then refer to the received message section of this manual.
Press HELP for a list of help topics.
To return to the main display, press MAIN.
3:45:56
MAIN
Emergency Messages
TALK MSGS
RCVD
XMIT
MSG HELP
Personal injury traffic accident this location,
bus not involved
04/22 E
LOG OUT
33
LOG OUT
At the end of the shift, you must log out of the MDT to let dispatch know you have completed your run.
1. From the main display, continue to press the MORE function button until LOG OUT displays as shown.
2. Press LOG OUT. When you press LOG OUT, the function changes to CANCL LG OUT to allow you to cancel logging out.
3. Press CNFRM LG OUT to complete the log out.
When you are logged out, the screen returns to the log in display. The values for your route-block information remain. A new driver
continuing the route need only enter the driver ID and complete the log in procedures. Refer to the log in section of this manual.
When the bus is shut off, the MDT remains on for a length of time determined by supervisor/setup. This allows you to log out of the MDT
after the bus is powered down. It prevents loss of MDT data in case of a temporary shutdown on the road and allows dispatch to
communicate with the MDT after the end of a run.
If the bus is off long enough for the MDT to shut off, the driver ID, and route-block information is reset. The MDT automatically logs off. You
must reenter the driver ID, route, and block information and log in again when the bus is restarted.
4:12:25 GRP
CALL
Route: 247NE
Transfers
25ØS
TALK LOG
OUT LIST MORE MSG
GTC
6:05
8N
22
1
1
27S
SPEAKER
MSG
Veh ID: 478
2
EARLY
04/22
ROUTE

LOG OUT
34
TransitMaster helps
you promote accurate and
prompt passenger service.
TransitMaster2001
PARATRANSIT
35
PARATRANSIT Operations
Some paratransit functions are the same as the fixed route, such as TALK, LOG ON, LOG OUT, and MSG. This section describes the
MDT displays unique to paratransit operation.
All paratransit operations are performed from two displays: main, and arrive. This section describes these displays in detail.
When starting a paratransit route, log in as described in the log in section of this manual. The system recognizes the route and block as a
paratransit workpiece and changes to the paratransit main display shown here.
Main
The main display shows the run schedule in the order the activities are expected to occur. Activity times, customer name, status indicator,
and address appear in the center area of the screen. Status indicators are marked with a plus (+) for pick up, and a minus (-) for drop off.
Other status indicators appearing are discussed later.
1:43:25
TALK ARRIVE INFO MORE MSG
04/22
13:45 PO PULL OUT
625, 31ST AV SW
14:00 + IES GROUP
200, 1ST SE, Cedar Rapids, IA
14:30 – FUNKE JIM
DEL MONICO, 1019, 7TH ST SE, Cedar
15:56 + SCHMITT JOAN
IES TOWER; 200, 1ST SE, Cedar
15:00 + COLEMAN KEN
MANOR HOUSE ON THE GREEN; 1019, 7TH

PARATRANSIT
36
Use select buttons S1 and S2 to scroll through the run schedule.
To talk to dispatch, press TALK and refer to the talk request section in this book.
Press INFO to view additional information about a selected activity. When INFO is accessed, the system does not allow you to make
changes. INFO is for information purposes only.
When MORE is pressed, additional options appear as functions across the bottom of the screen. More options are described later.
To read received messages, press MSG and refer to the received message section of this manual.
Both the main and arrive displays provide operations for two types of service: non-revenue and customer service. The following
descriptions detail separately each service.
If the scheduled item on the main display is a non-revenue service (pull out, lunch, etc.), pressing ARRIVE changes the screen to an arrive
display describing the highlighted non-revenue service.
TransitMaster
provides unparalleled paratransit service.

PARATRANSIT
37
From the arrive display, use select buttons S1 and S2 to view detailed information for all the scheduled items on the main display. Notice
placement of S1 and S2 is different from fixed route displays.
Arrive
In the center of the screen, the arrive display shows the service activity, time and status, address of the activity, and
comment box. Additional information displays in the comment box. Be sure to use the bottom select buttons S3 and S4 to
scroll through all the information.
The passenger type line always shows on an arrive display. The system automatically indicates which aid a specific customer
uses. These passenger aids indicate:
A Ambulatory
W Wheelchair
S Scooter or electrical wheel chair
P Personal care attendant
C Companion
LT represents the anticipated time to load the passenger.
1:45:00 04/22
PULLOUT
13:45
$ 0.00
ON TIME
625, 31ST AV SW
TODAY IS THE FIRST DAY OF SCHOOL
AFTER SPRING BREAK.
DRIVE CAREFULLY
A: 0 W: 0 S: 0 P: 0 C: 0 LT: 00
PERFRM
TALK MSG DONE
S1
S2
PARATRANSIT
In the example above, once the driver presses PERFRM the activity title changes to pulled out.
The system allows you to change your mind about performing the activity. Press PERFRM again to toggle or take back the activity. Pulled
out changes back to pull out. A time stamp for the activity is not sent to dispatch until you press DONE.
After pulling out, press DONE to complete the operation. The MDT returns to the main display, a time stamp is recorded by the system for
the activity, and the activity for pullout is removed from the run schedule.
The system, if configured, automatically performs the DONE function after the vehicle moves 200 feet and returns to the main display.
Non-revenue service activities are:
PULL IN
PULL OUT
LUNCH
OUT OF SERVICE
REFUEL
TAKE BREAK
Customer service activities performed are:
PICK UP
DROP OFF
NO SHOW
CANCEL
To talk to dispatch, press TALK and refer to the talk request section in this book.
To read received messages, press MSG and refer to the received message section.
If the next scheduled item on the main display is a customer service listing (pick up, drop off, etc), pressing ARRIVE changes the screen to
the display as shown.
2:57:00 04/22
COLEMAN KEN
000067
14:00
PICK UP
$ 1.25
ON TIME
MANNER HOUSE ON THE GREEN; 1019,
7TH ST SE
MA: EWC
DIALYSIS
A: 0 W: 0 S: 1 P: 0 C: 0 LT: 04
DROP
OFF
TALK MSG DONE
MORE
PARATRANSIT
Arrive
The arrive display shows when ARRIVE or INFO is pressed from the main display. If the INFO button was pressed, MAIN is the only
function provided.
The first line shows the customer’s name and identification. Press S1 or S2 to scroll through the run schedule. The second line shows the
pick up or drop off time, fare charge, and status. The third and fourth lines show the customer’s address.
The comment box displays detailed activity comments. Be sure to use the bottom select buttons (S3 and S4) to scroll through all the
information. If a customer requires a mechanical aid, MA: is specified on the first line followed by the device. This example uses EWC,
electric wheel chair. This information is recapped in the passenger type line including the estimated load time.
Press PICK UP if a customer is to be picked up, or DROP OFF if a customer is to be dropped off.
2:57:09 04/22
COLEMAN KEN
000067
14:00
PICK UP
$ 1.25
ON TIME
MANNER HOUSE ON THE GREEN; 1019,
7TH ST SE
MA: EWC
DIALSIS
A: 0 W: 0 S: 1 P: 0 C: 0 LT: 04
PICK UP
TALK MSG DONEMORE
Arrive
Press PICK UP or DROP OFF when completed with the customer service activity. The pick up changes to picked up. If multiple customers
are serviced at one location, use S1 and S2 to select each and press PICK UP for each before pressing DONE to complete the multiple
operation.
To toggle (or take back) the operation, press PICK UP a second time. Picked up changes back to pick up on the screen.
To complete the operation, press DONE while picked up is displayed to send a time stamp to dispatch. Once the action is performed (eg,
when you have pressed DONE), the record on the roster is deleted and no longer displays. The time between pressing ARRIVE and
pressing DONE is recorded as the time required to load or unload the customer(s).
Press MORE for more options. When MORE is pressed on the arrive display, different options appear: NO SHOW and CANCEL.
2:59:40 04/22
COLEMAN KEN
000067
14:00
PICK UP
$ 1.25
ON TIME
MANNER HOUSE ON THE GREEN; 1019,
7TH ST SE
MA: EWC
DIALSIS
A: 0 W: 0 S: 1 P: 0 C: 0 LT: 04
NO
SHOW
CANCEL DONEMORE
PARATRANSIT
41
Arrive (No Show Option)
Press NO SHOW if you arrive at the pick up location and the customer is unavailable. The pick up changes to no show. This sends a
message to notify dispatch the customer is unavailable. Dispatch will take appropriate action (eg, call the customer on the telephone).
Dispatch will let you know what to do either by sending a message to be displayed on the screen or by calling on the radio. The passenger’s
record remains on the main display with an N status indicator (in place of the + sign) until dispatch removes the record.
Press NO SHOW a second time to toggle (or take back) the operation. The no show changes to pick up again and the + sign replaces the
N status indicator on the main display.
After pressing MORE on the arrive display the first time, press CANCEL to cancel a customer. The following screen displays.
Arrive (Cancel Option)
For example, if you arrive at the pick up location and are informed by a customer representative the customer is
2:59:48 04/22
COLEMAN KEN
000067
14:00
PICK UP
$ 1.25
ON TIME
MANNER HOUSE ON THE GREEN; 1019,
7TH ST SE
MA: EWC
DIALSIS
A: 0 W: 0 S: 1 P: 0 C: 0 LT: 04
NO
SHOW
CANCEL CONFRM DONEMORE
CANCEL CANCEL
PARATRANSIT
42
not available, press CANCEL, the activity changes to canceled, the third button changes to CONFRM CANCEL and the second button
changes to CANCEL CANCEL. Press CONFRM CANCEL to confirm the customer should be canceled or press CANCEL CANCEL
to stop the cancel process. If you cancel the process, the activity indicator returns to pick up. Dispatch will let you know what to do either by
sending a message displayed on the screen or by calling on the radio. Until dispatch cancels the record, the passenger’s record remains on
the main display with a C indicator in place of the + sign.
Press CANCEL a second time to toggle (or take back) the operation. The canceled changes to pick up again and the + sign replaces the
C indicator on the main display.
NOTE
Depending upon your system configuration, when CONFRM CANCEL or NO SHOW is pressed, the screen may
change to the TALK display. If it does, a request to talk (RTT) is automatically sent to dispatch.
Remember to press DONE when you are finished loading and unloading all customers at any stop. Pressing DONE returns the screen to
the paratransit main display as shown. Notice how the main display has changed since the schedule run began.
4:31:25
TALK ARRIVE INFO MORE MSG
04/22
16:30 PI PULL IN
625, 31ST AV SW
14:20 + IES GROUP
200, 1ST SE, Cedar Rapids, IA
14:30 – FUNKE JIM
DEL MONICO, 1019, 7TH ST SE, Cedar
15:56 + SCHMITT JOAN
IES TOWER; 200, 1ST SE, Cedar
16:05 JANICE CUMMINGS
IES TOWER; 200, 1ST SE, Cedar

PARATRANSIT
43
Main
From the main display, press MORE for additional options: RENEW, LOG OUT and HELP.
Main (More Options)
The MORE function on the main display provides additional options. Do not perform the following action unless instructed by dispatch.
Press RENEW to delete the customer database loaded into the MDT and download a new database from dispatch. Pressing RENEW
provides options to CANCEL RENEW and CONFRM RENEW to either cancel operation or confirm you want to perform the renew
operation.
Press LOG OUT to log out. When LOG OUT is pressed, you can either cancel log out or confirm you want to log out.
Press HELP for a list of help topics.
Press MORE to return to the main display.
Press MSG and refer to the received message section to read received messages.
4:32:46
RENEW LOG
OUT
HELP MORE MSG
04/22
16:30 PI PULL IN
625, 31ST AV SW
14:20 + IES GROUP
200, 1ST SE, Cedar Rapids, IA
14:30 – FUNKE JIM
DEL MONICO, 1019, 7TH ST SE, Cedar
15:56 + SCHMITT JOAN
IES TOWER; 200, 1ST SE, Cedar
16:05 JANICE CUMMINGS
IES TOWER; 200, 1ST SE, Cedar
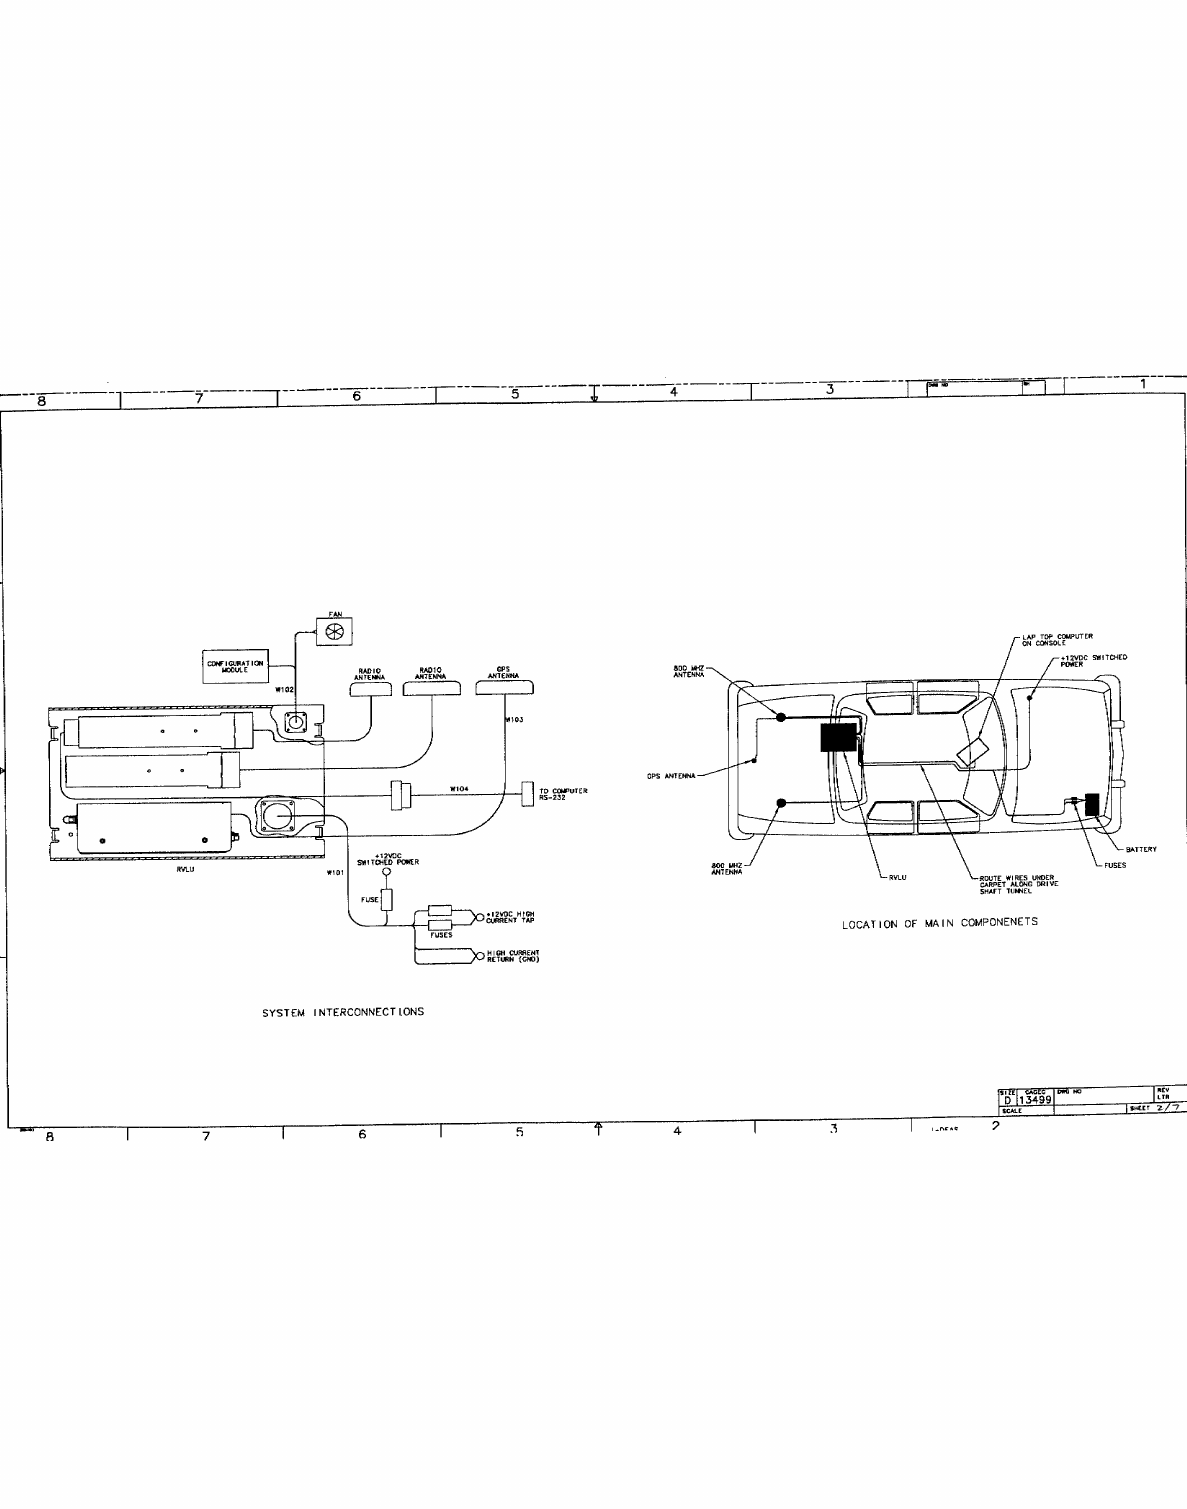
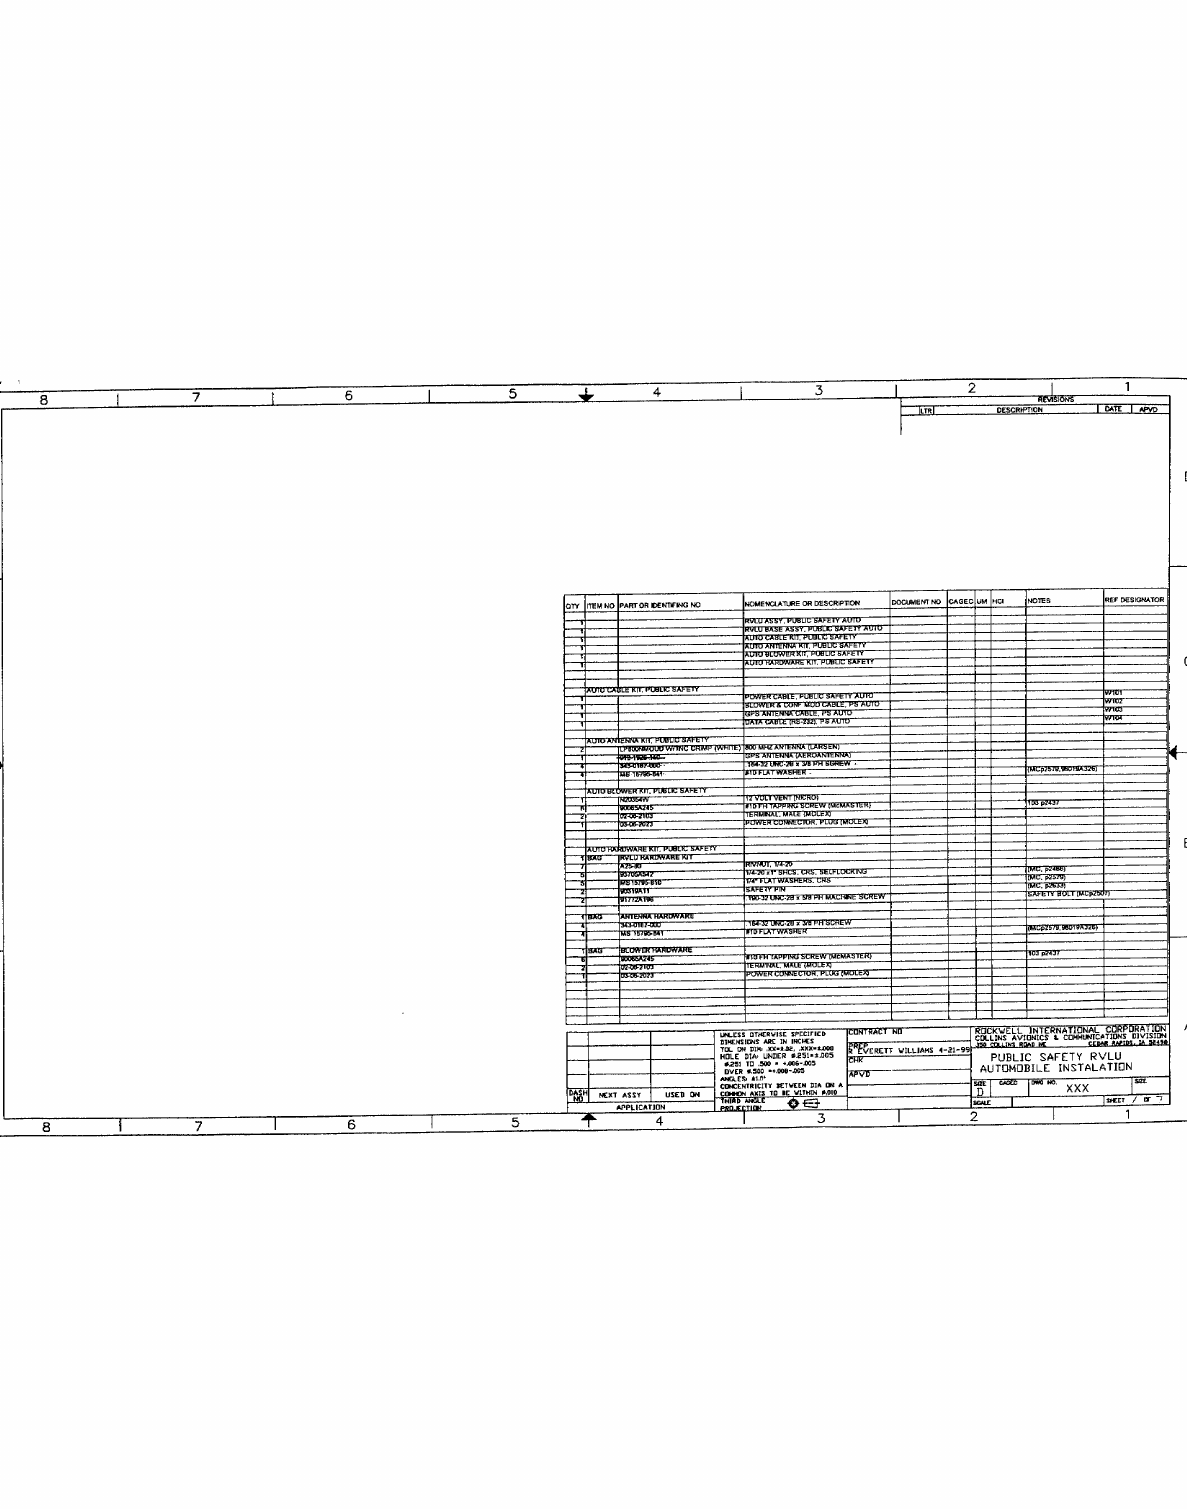
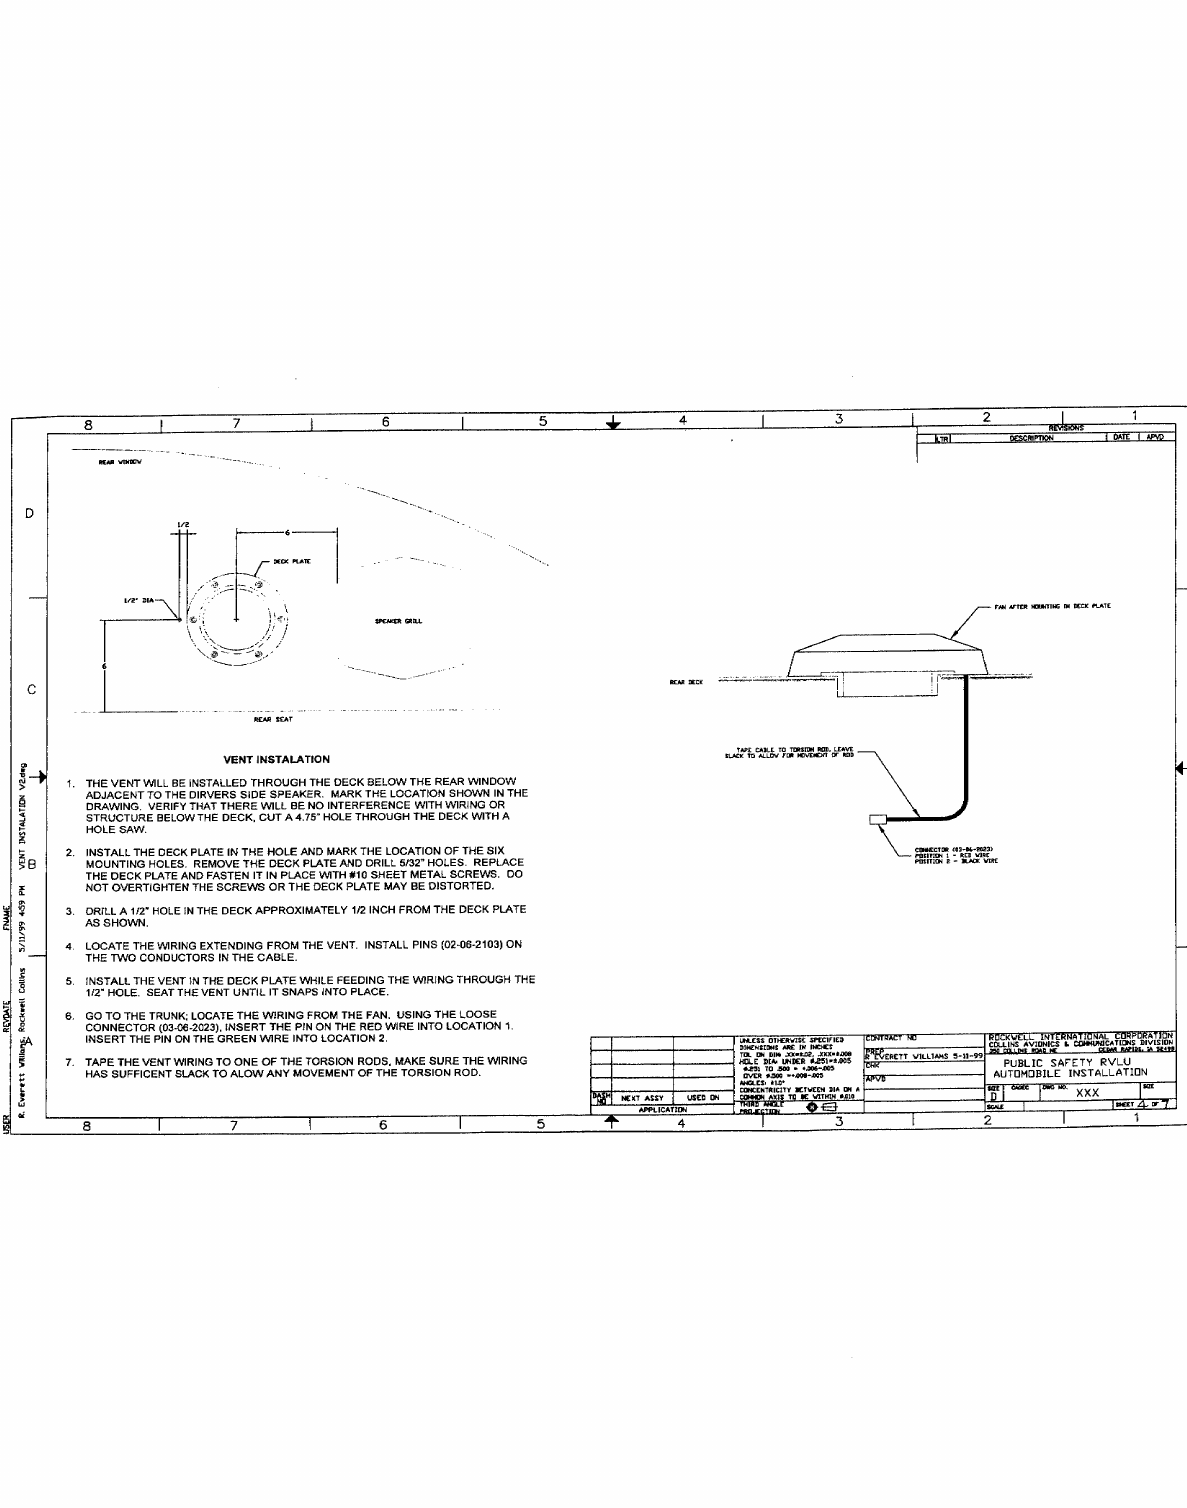
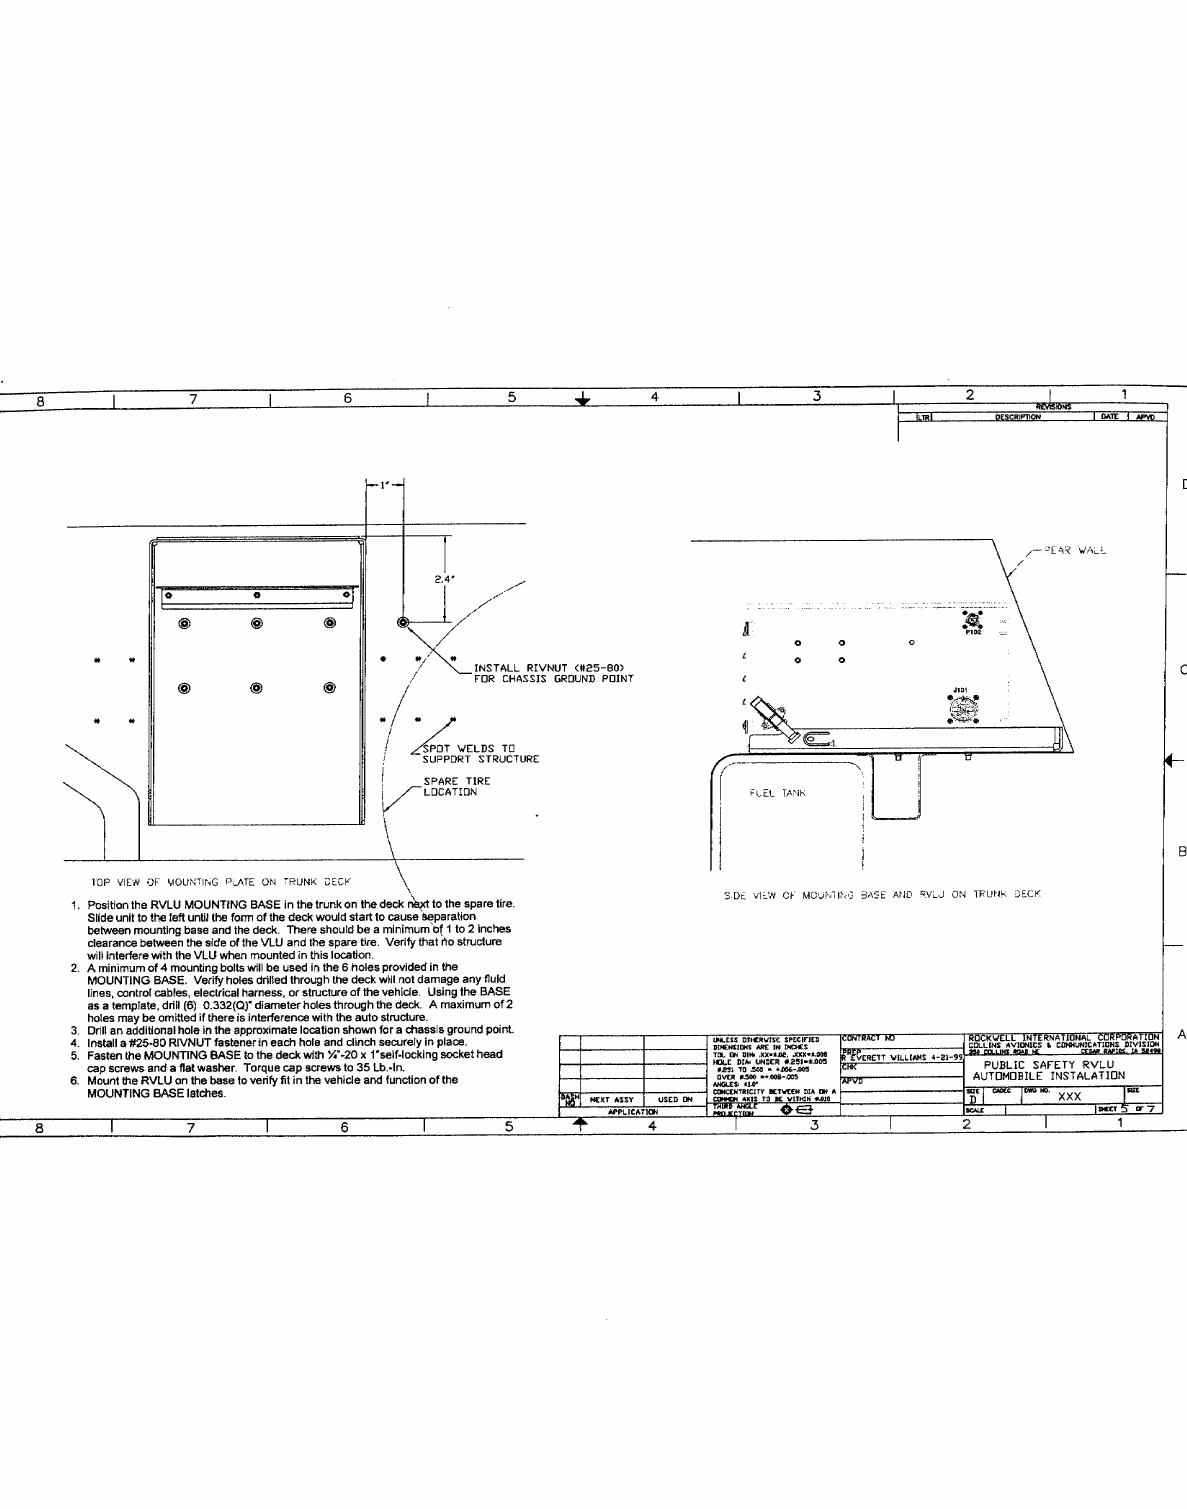
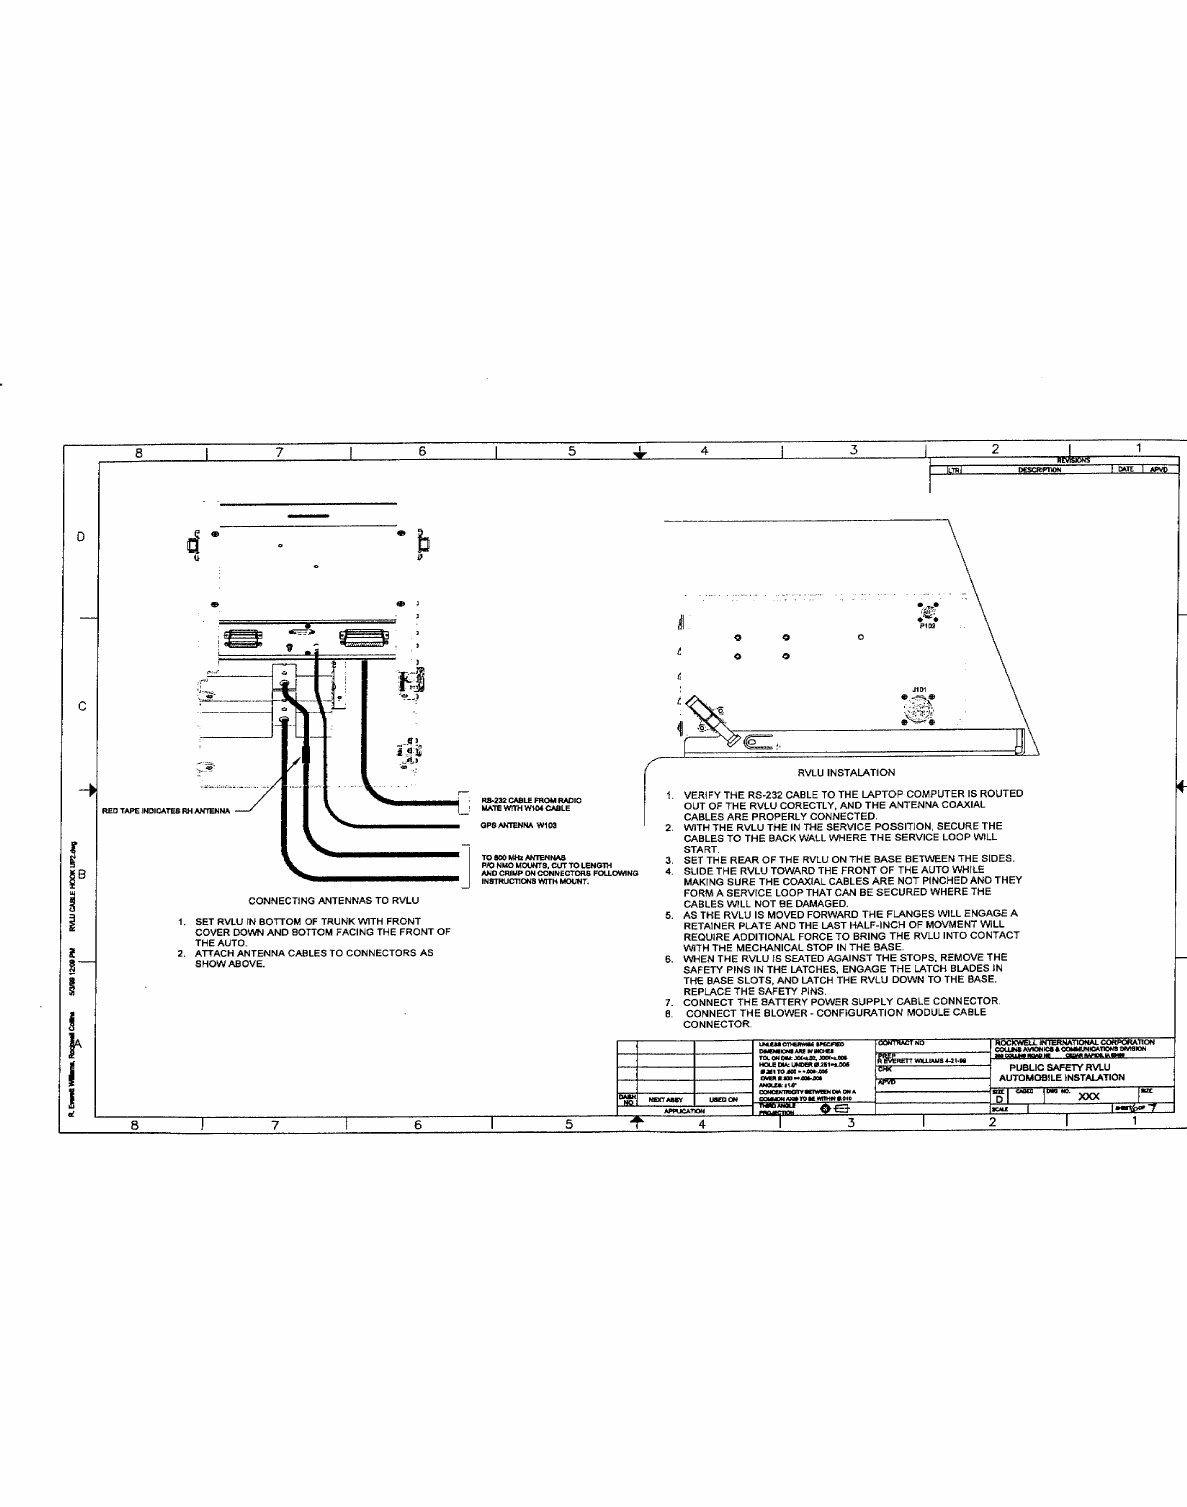
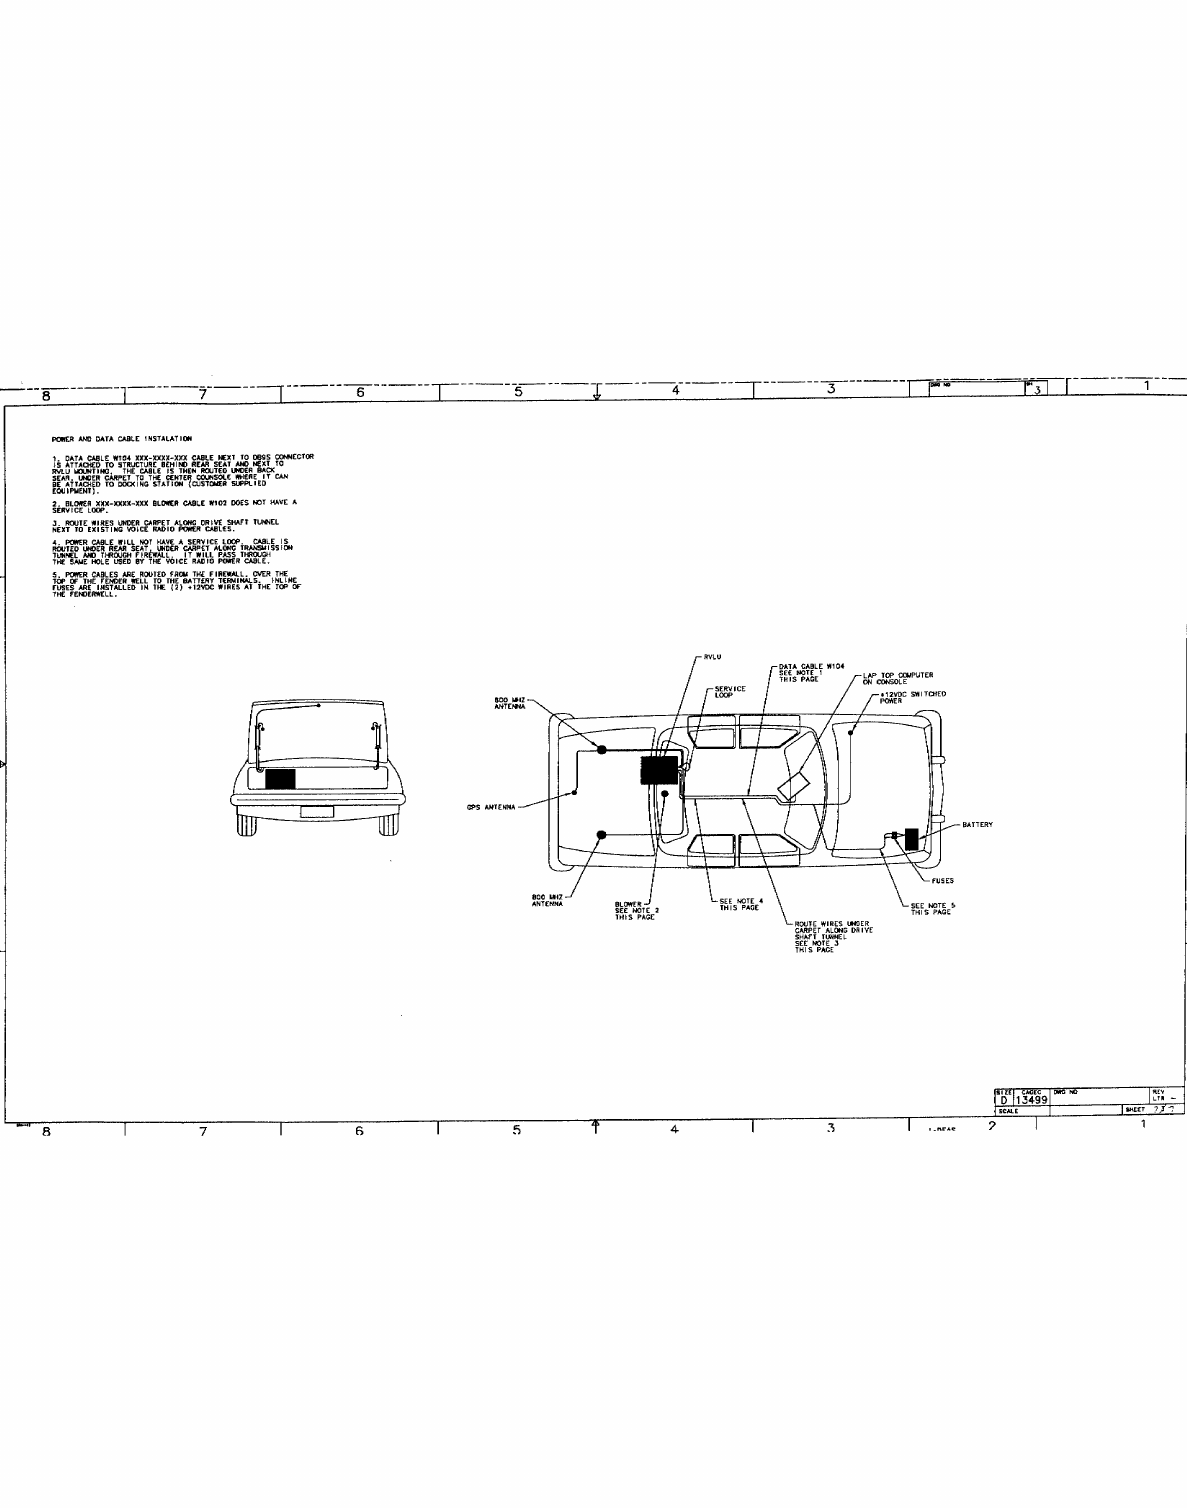


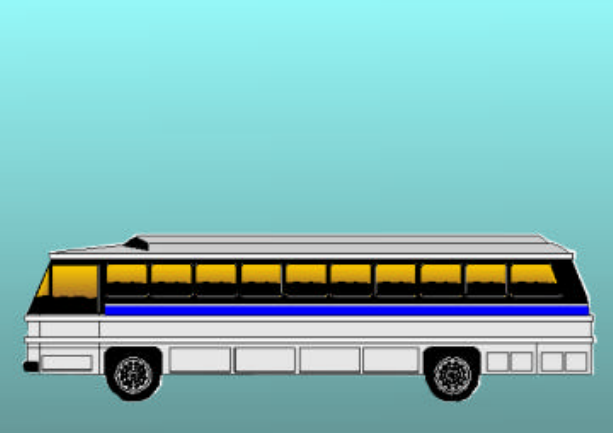
Standard RVLU & Antenna Installations
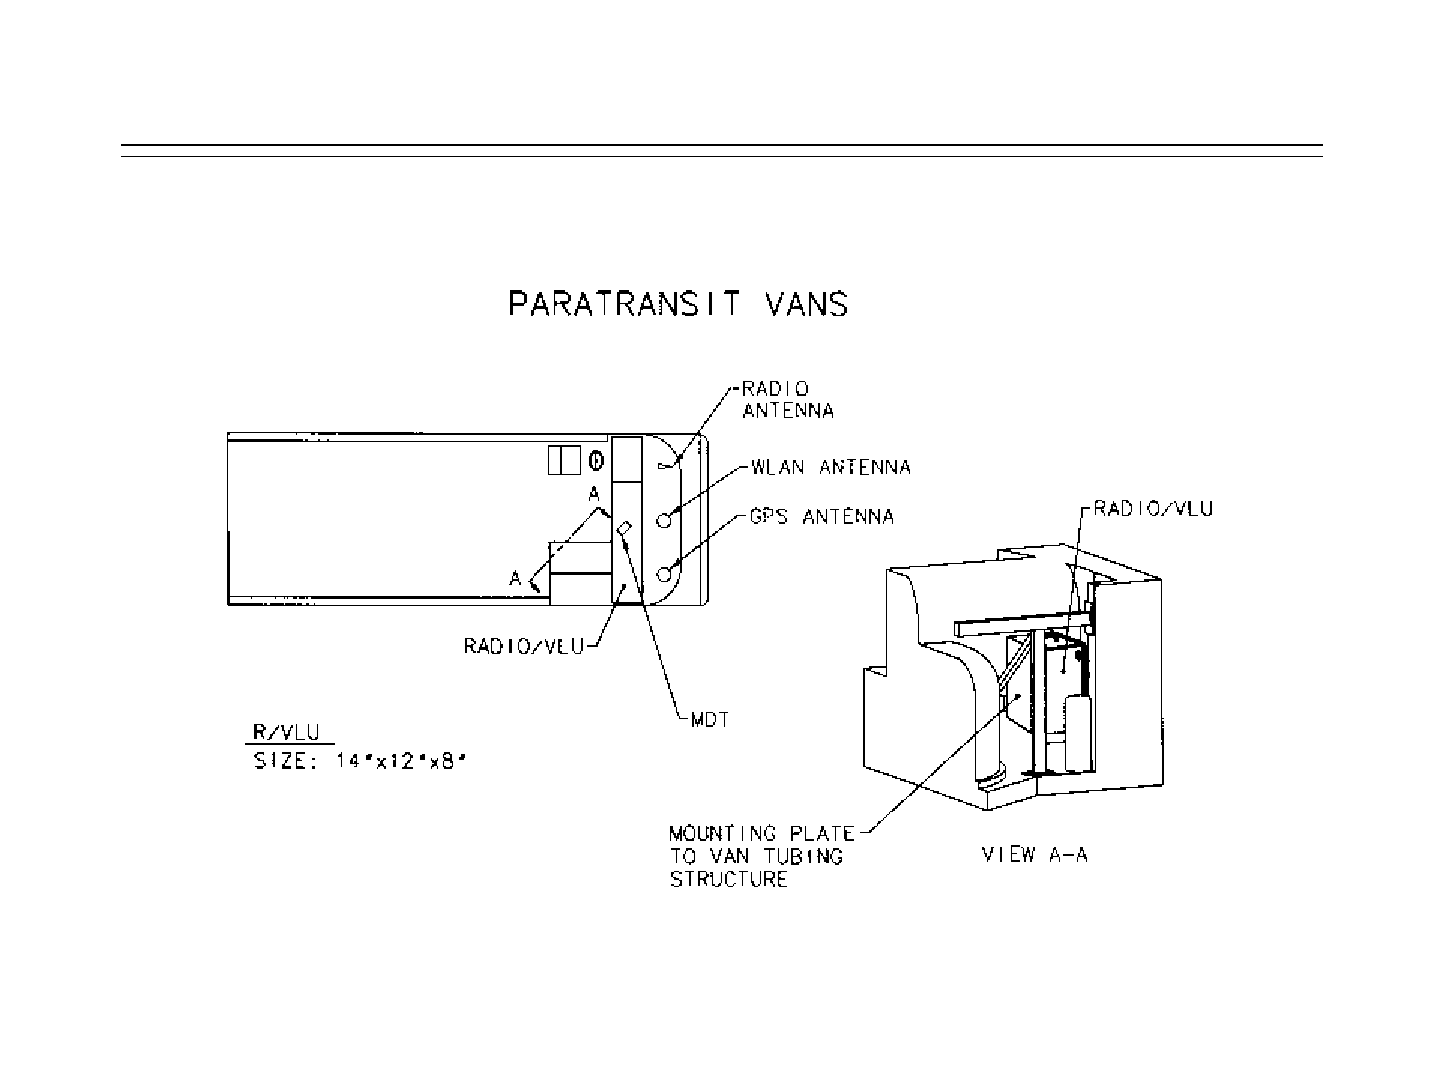
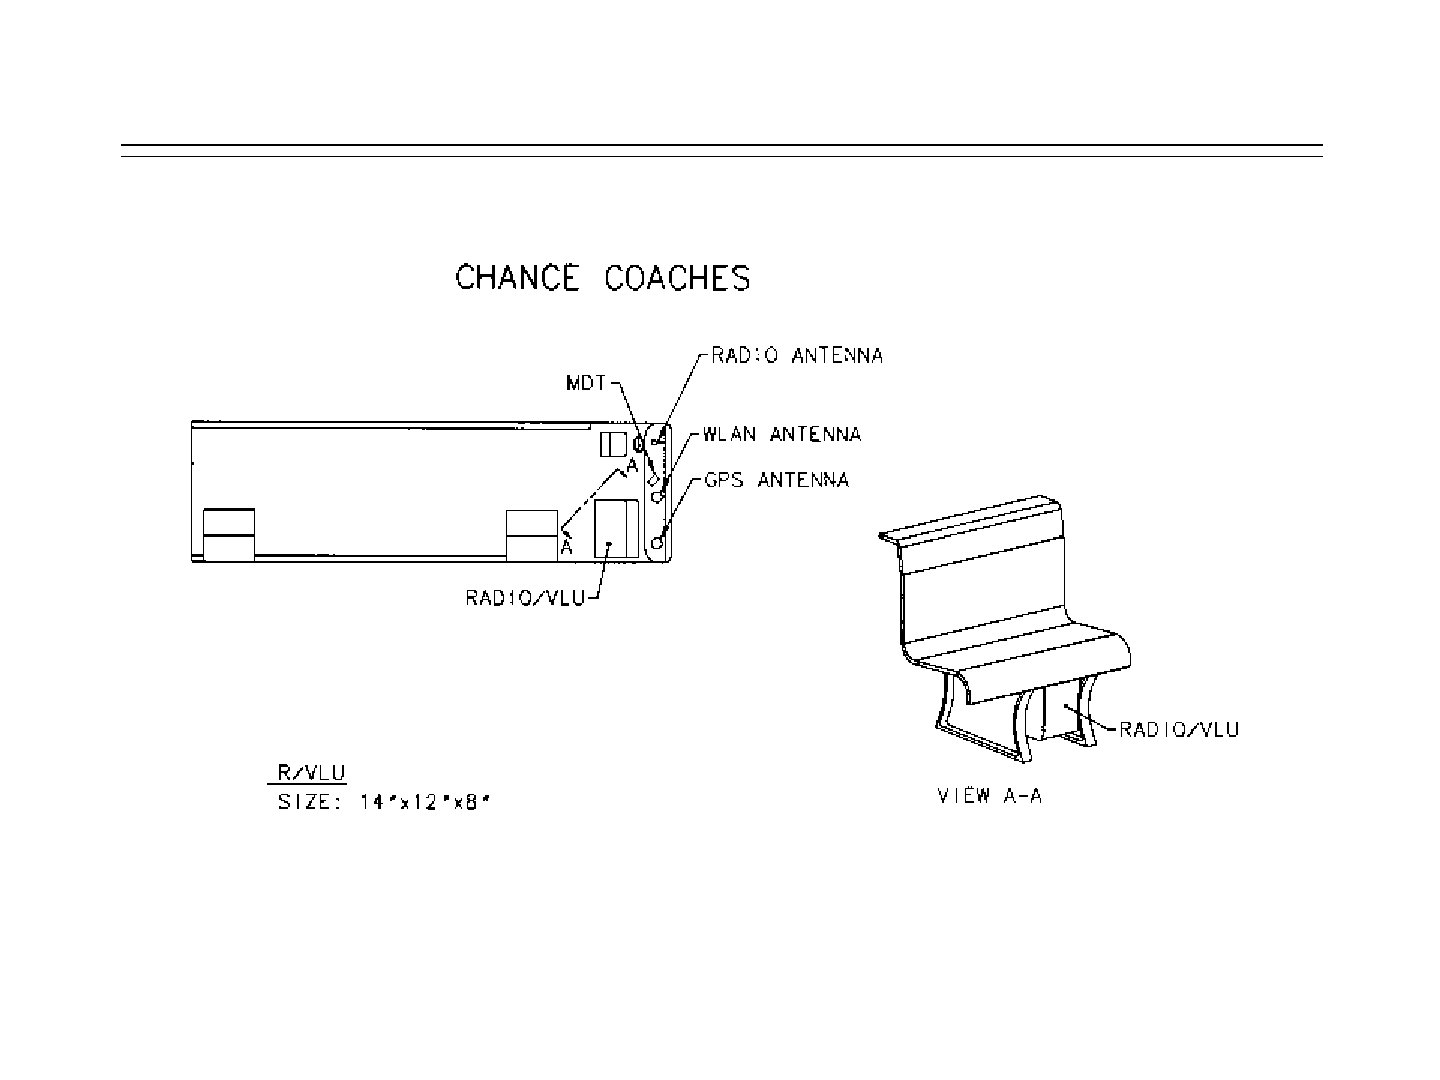
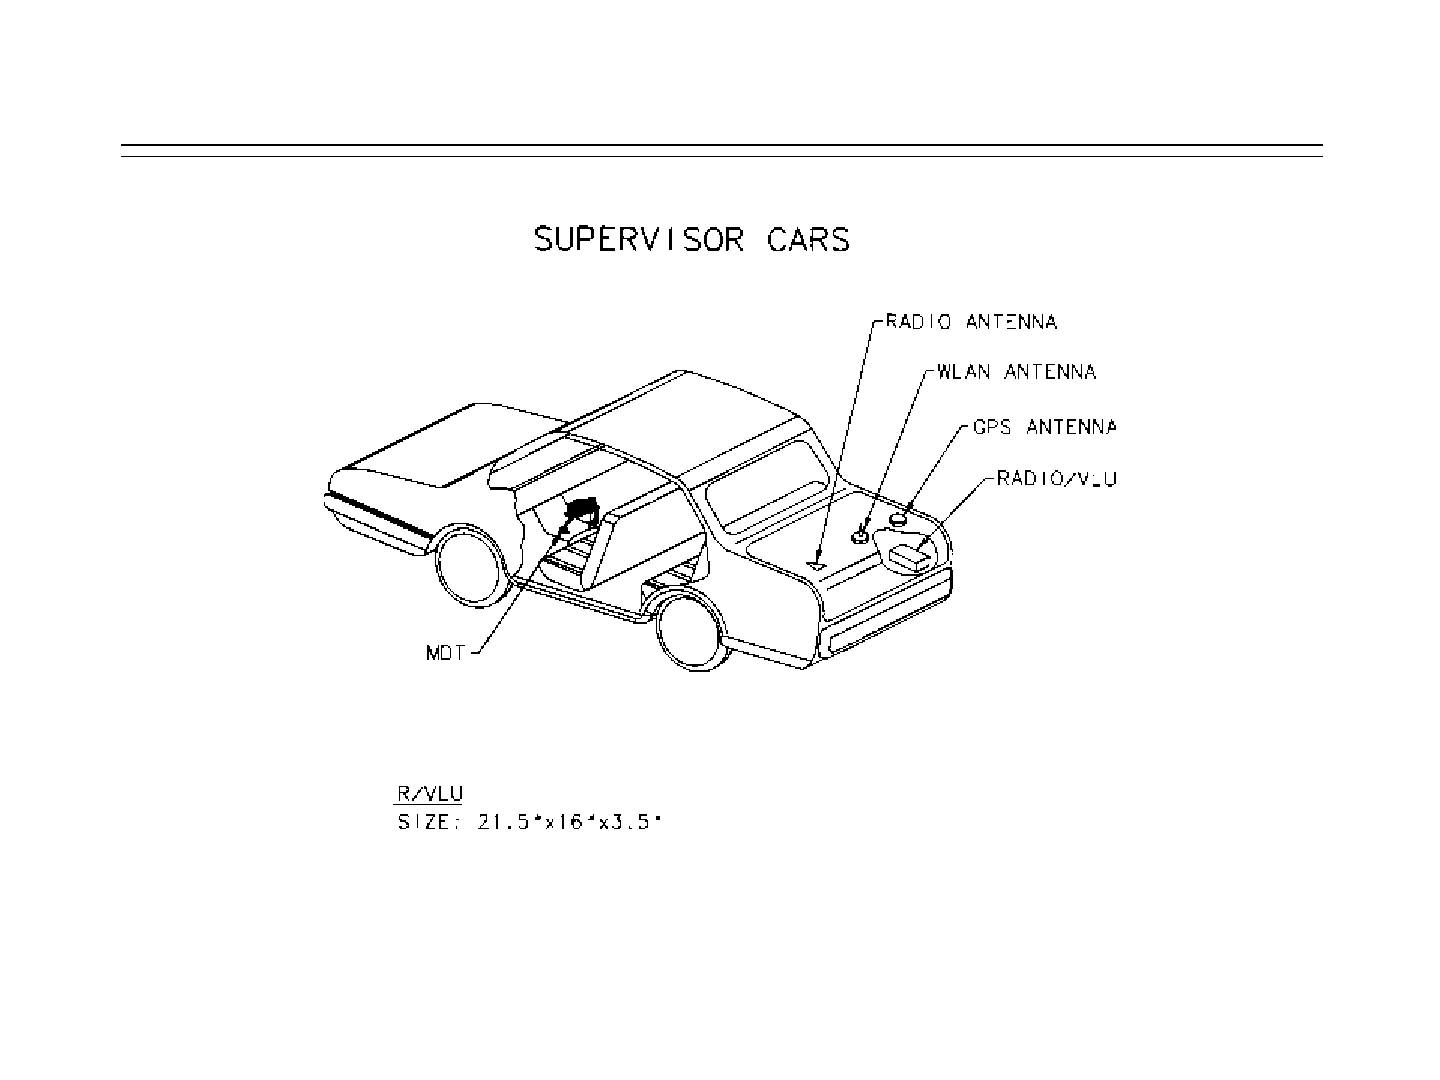
•MECHANICAL INSTALLATION
–Fixed Route Buses
–Paratransit Vans
–Chance Coaches
–Supervisor Cars
–Service Trucks
–Caravans / Voyagers
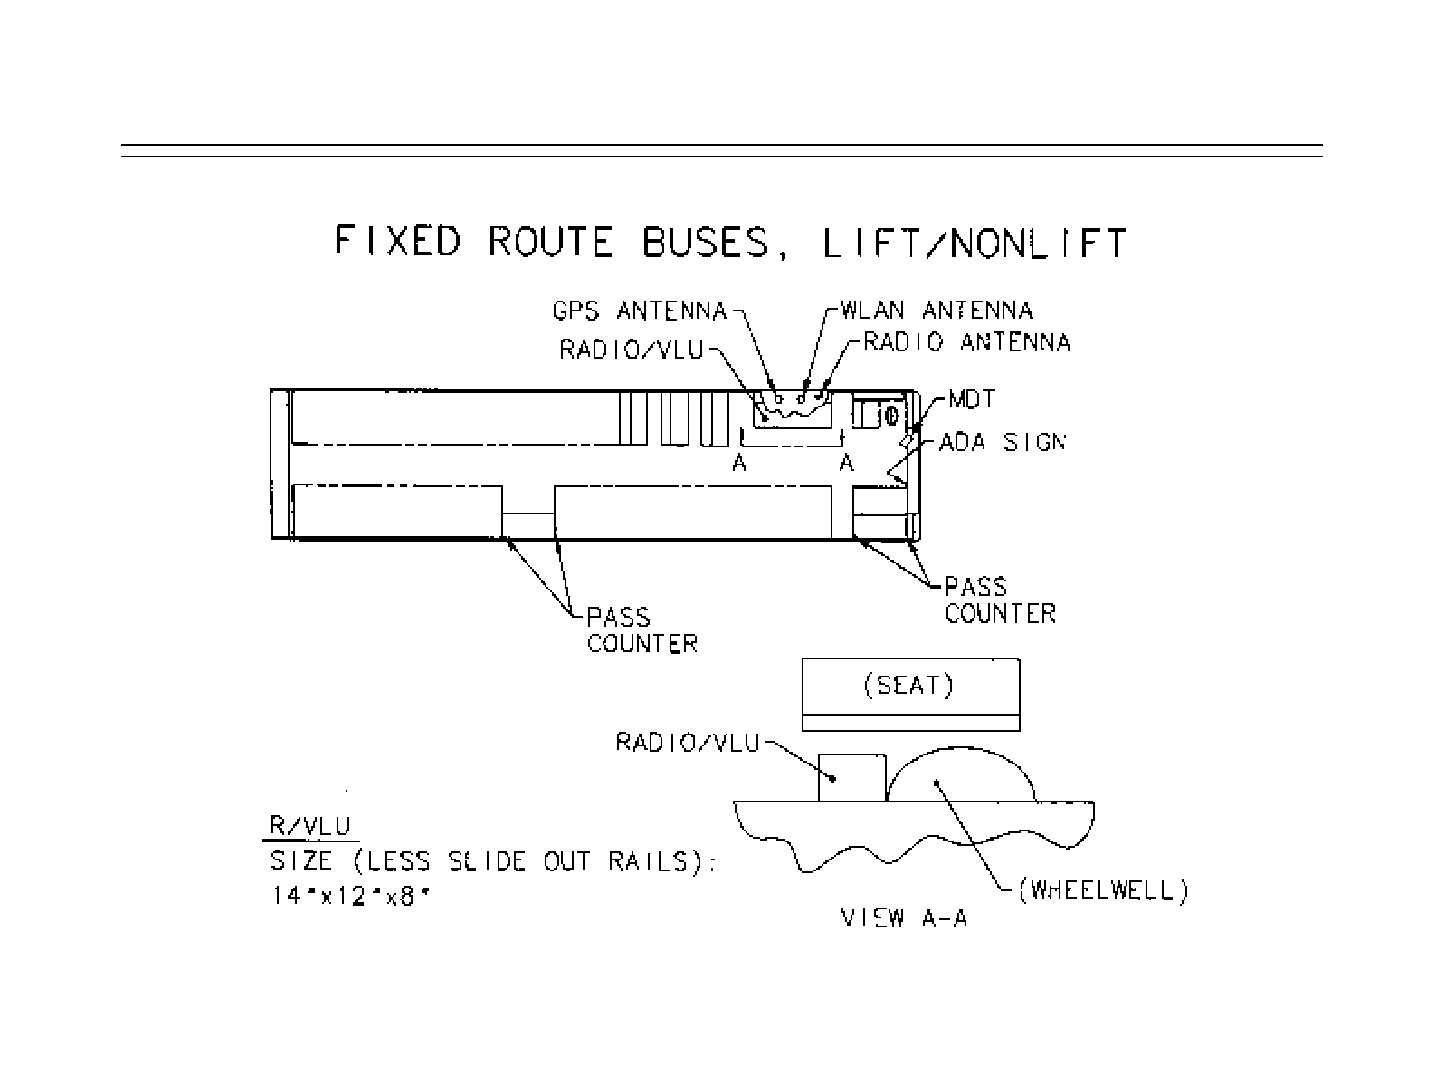
Standard RVLU & Antenna Installations
Standard RVLU & Antenna Installations
Standard RVLU & Antenna Installations
Standard RVLU & Antenna Installations
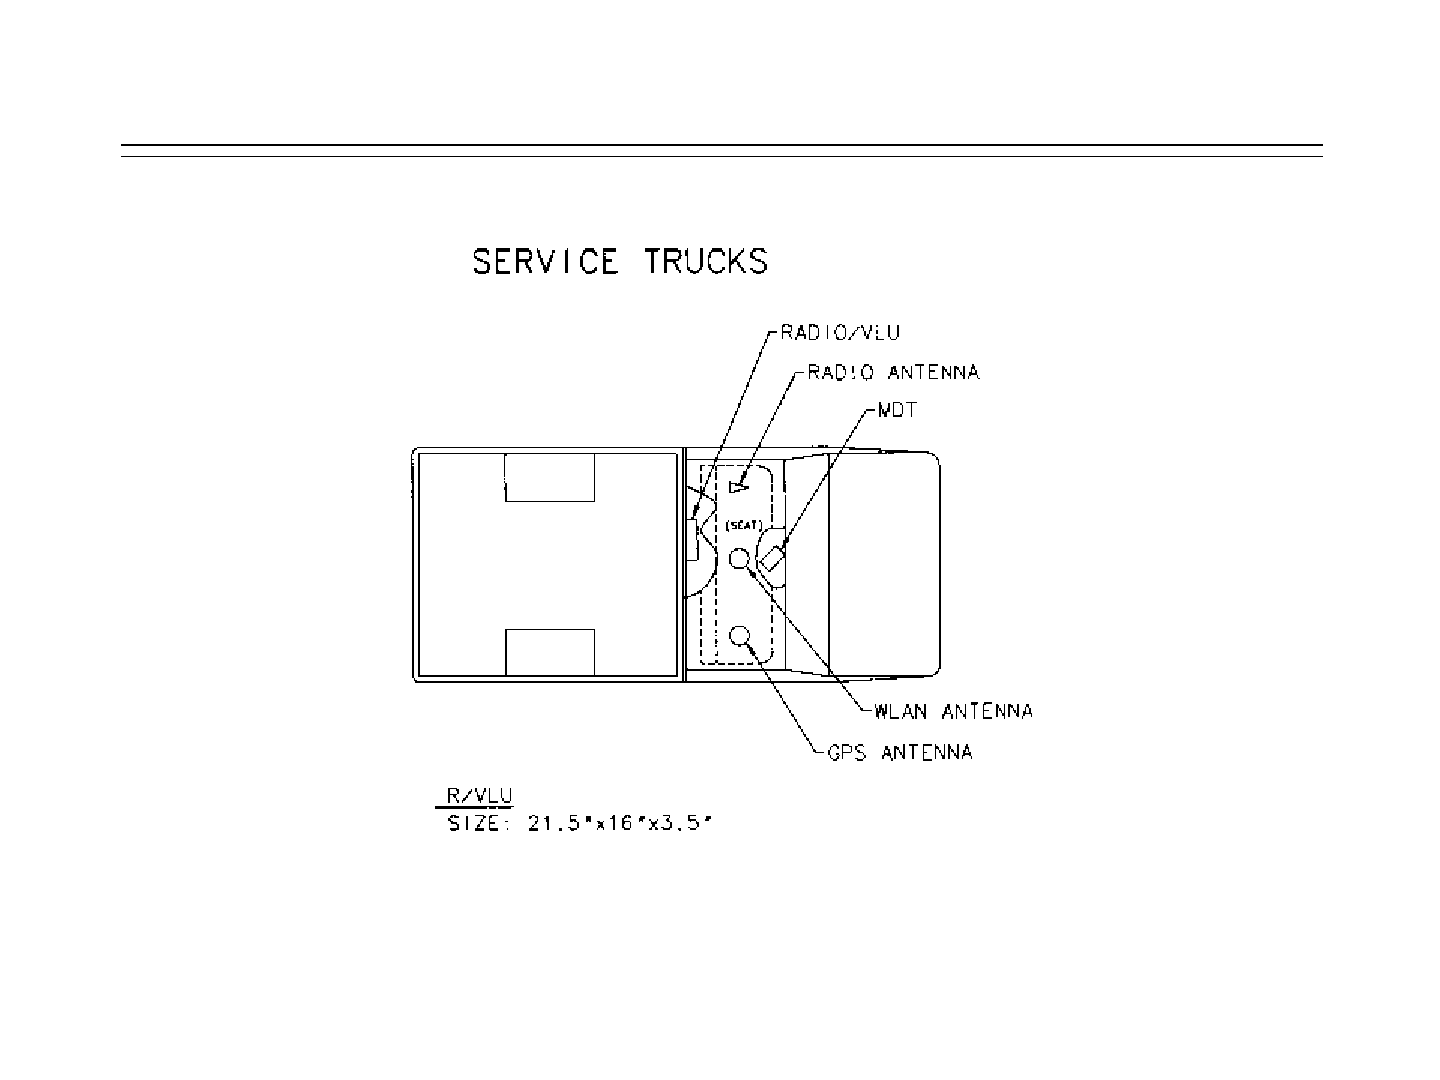
Standard RVLU & Antenna Installations
•
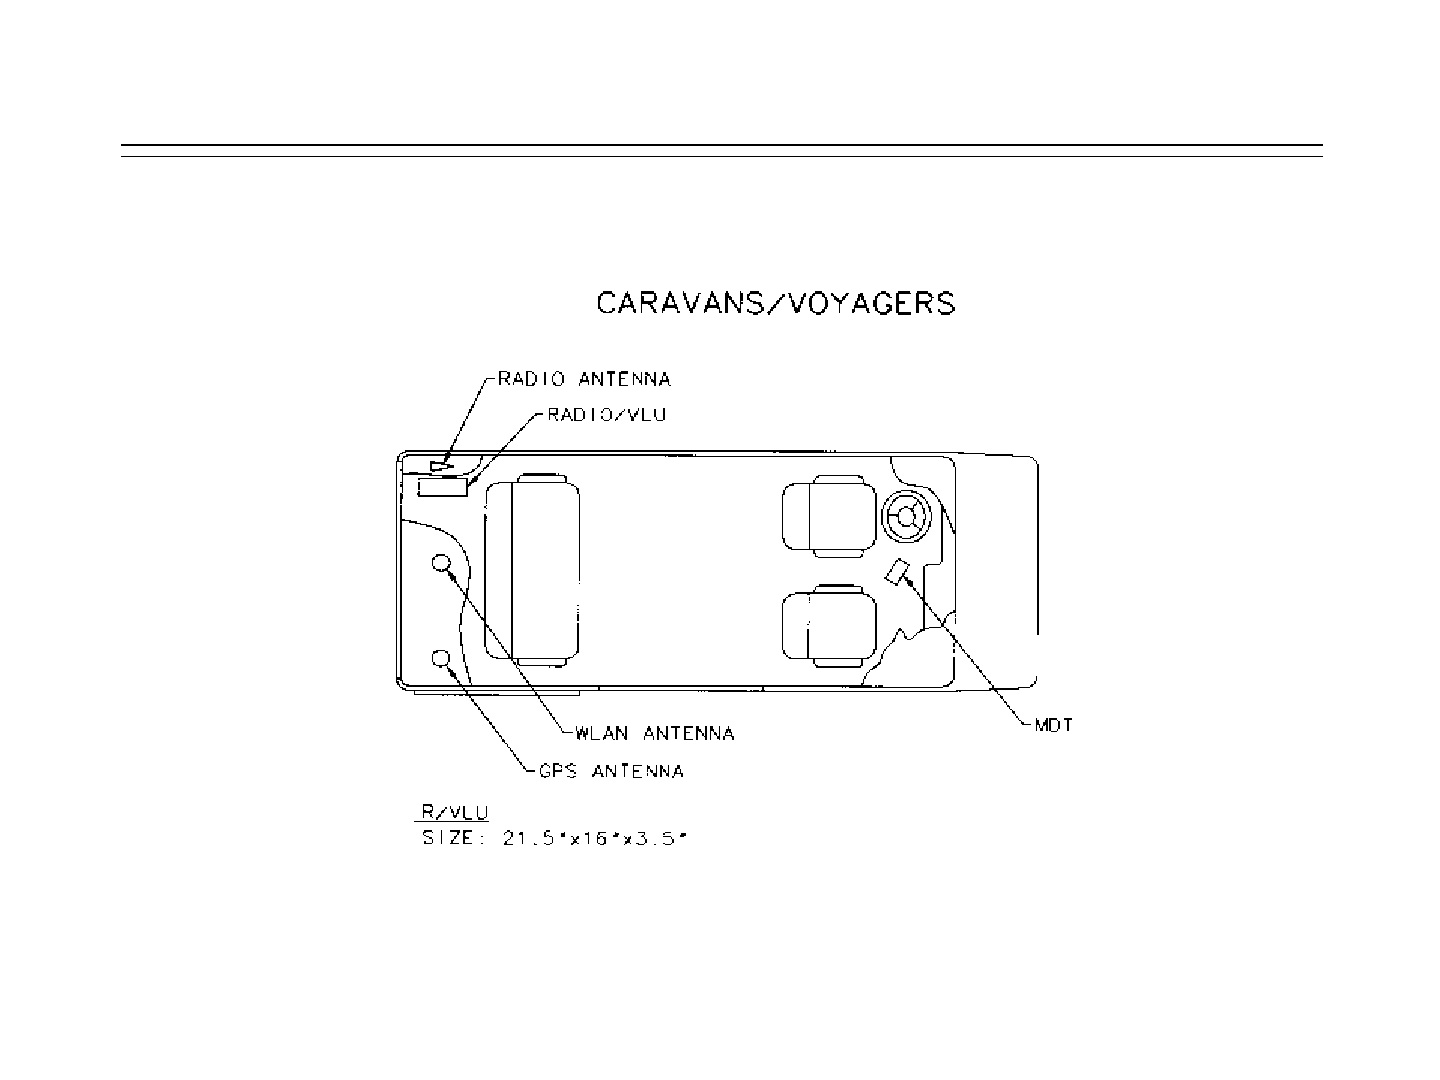
Standard RVLU & Antenna Installations