User Manual
Hi!
Let’s get started.
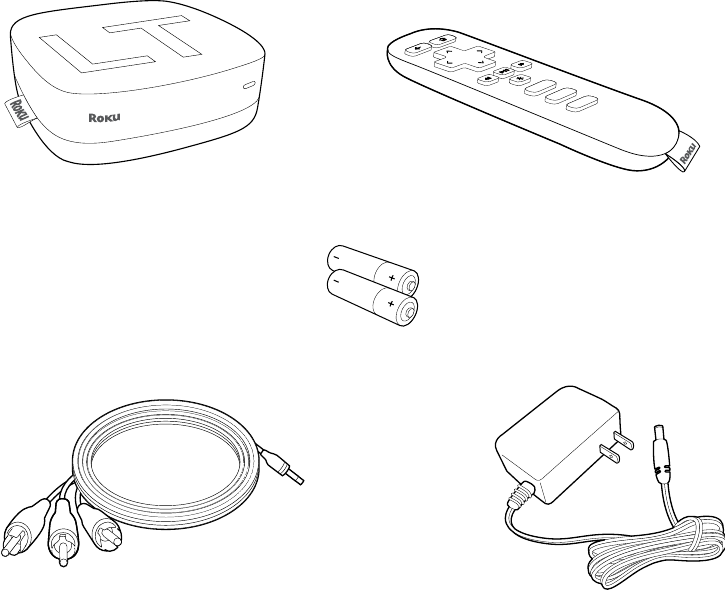
WHAT’S IN THE BOX
Roku player Remote control
2 x AAA
batteries for
remote
A/V cable
RCA to 3.5mm Power adapter
CD
F
E
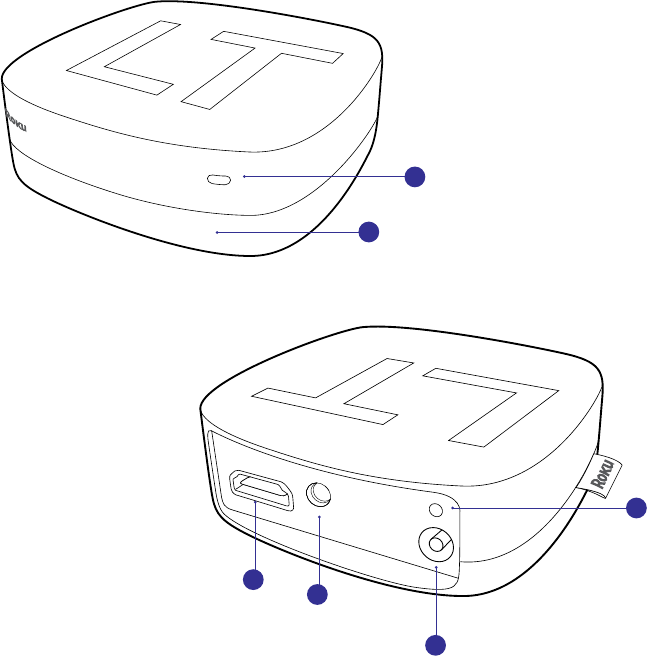
GET TO KNOW YOUR ROKU
B
Front view
Back view
A

E
F
D
AStatus light – Flashes slowly when the Roku player starts up. Glows when
it’s on. Flashes once with each press of the remote control.
IR receiver – Receives signal from the included Roku remote.
HDMI port – Connects your Roku player to an HDTV with an HDMI cable
(not included).
A/V port – Connects your Roku player to a TV with the included A/V
cable (3.5mm to RCA). Provides standard definition quality only.
Power port – Connects your Roku player to a 120V AC power source with
the included power adapter.
Reset button – Resets your Roku player to its original factory settings
when pressed and held for 10 seconds (a feature you’ll rarely, if ever, use).
C
B
DID YOU NOTICE? Your Roku player has no on/o switch. It’s simpler that
way and draws very little power—less than a nightlight! Keep it plugged in so
that it can download the latest software updates automatically.
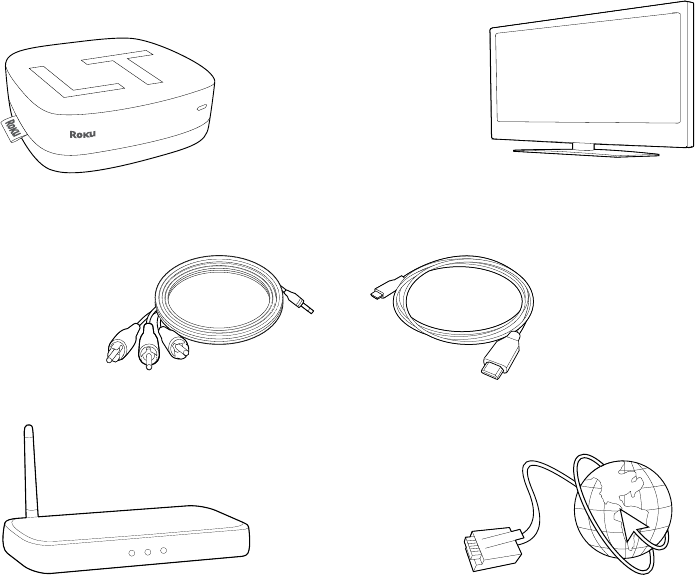
What You NEED
Roku player TV
(HD or standard definition)
High-speed Internet connection
(DSL or cable modem)
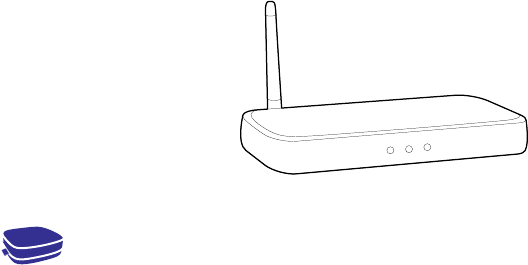
Wireless router
(any Wi-Fi)
A/V cable
(included)
HDMI cable
(sold separately)
OR
WHAT TO DO STEP 1
Ready for the step-by-step? We’ve only got four…
CONNECT YOUR PLAYER
Connect your Roku player to your TV in one of two ways:
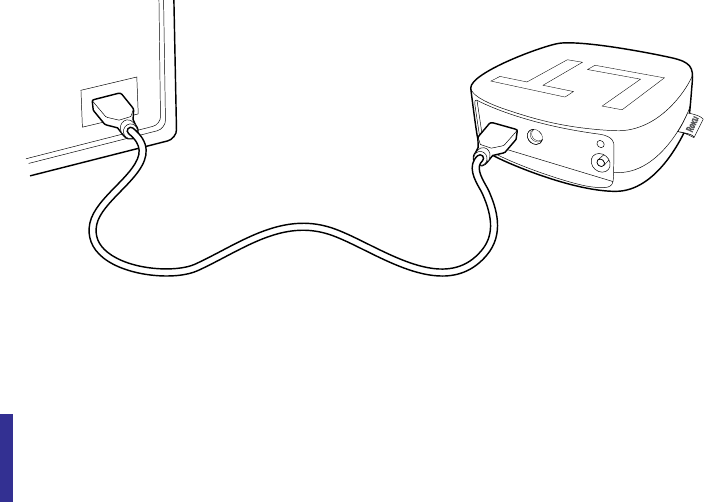
HIGH DEFINITION: If you have an HDTV and want the best picture quality, use an
HDMI cable (not included) to make the connection depicted in the diagram below:
• Connect one end to the HDMI port on the back of your Roku player.
• Connect the other end to an open HDMI port on your TV.
DID YOU KNOW? Because HDMI outputs digital video and audio, you don’t
need a separate audio cable. HDMI also supports 5.1 surround sound (where
available). GOT A RECEIVER? You can also use HDMI to route video and audio
directly through your receiver if it supports HDMI video pass-through.
WHAT TO DO STEP 1 (CONTINUED)
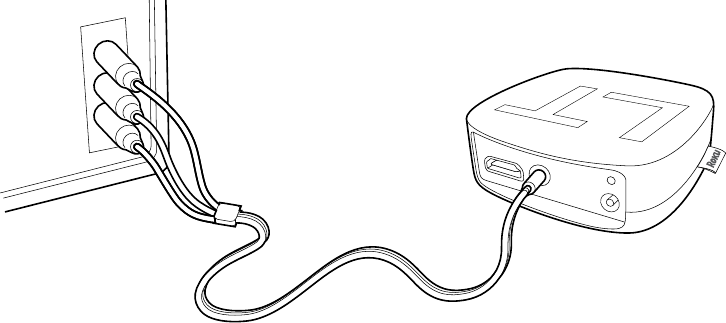
STANDARD DEFINITION: If you have a standard-definition TV, do not have an
HDMI cable or do not have a free HDMI port on your TV, use the included A/V
cable to make the connection depicted in the diagram below:
• Connect one end to the composite video and analog audio ports on the back
of your TV (look for Video IN, then match the Yellow/Red/White ports).
• Connect the other end to the A/V port on the back of your Roku player.
IT’S SPECIAL. The A/V cable included with your Roku player was custom-built
for Roku. Because the Roku LT is so small, we use a single connector into the
Roku player to carry video and stereo audio.
WHAT TO DO STEP 2
POWER UP KEY COMPONENTS
In this step, we’ll make sure all systems are GO!
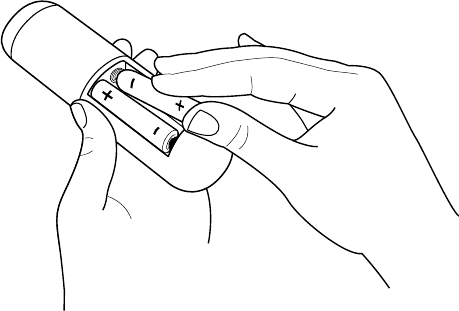
First, power your Roku remote by inserting the included batteries:
• Turn the remote control over and locate the rectangular battery door on
the rear of the unit.
• To remove the battery door, press the top of the door while simultaneously
sliding it down.
• Insert the batteries into their slots, making sure to match the positive (+)
and negative (-) signs.
• Slide the battery door back over the compartment until it snaps securely
into place.
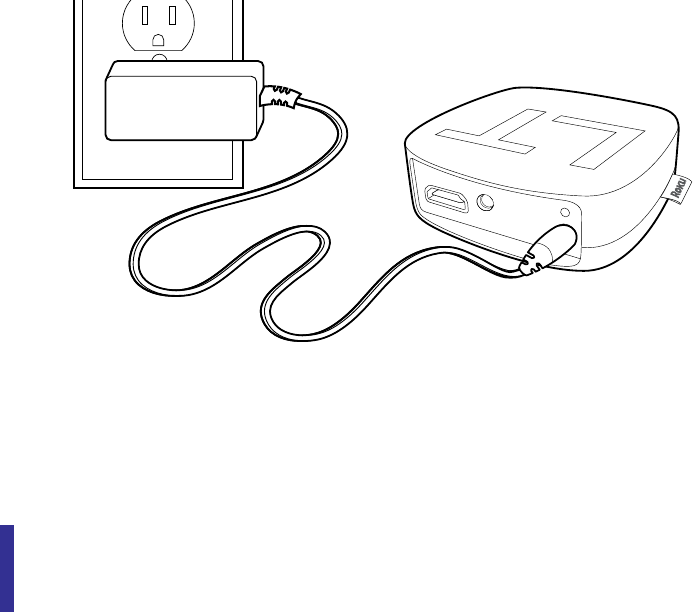
Next, power on your Roku player by connecting it to a wall outlet using the
included power adapter, like this:
Finally, power on your TV and look for a Roku message to fill the screen.
BLANK SCREEN? If your TV does not display a Roku screen, make sure your TV
input matches the physical connection used to connect your Roku player. Press
the Input button (also called Source) on your TV or TV remote to cycle through
the various video inputs available until you see a Roku screen.
WHAT TO DO STEP 2 (CONTINUED)
WHAT TO DO STEP 3
CONFIGURE YOUR NETWORK
Step 3 establishes your network connection and brings out your inner geek.
You can do it!
WIRELESS: The Roku player will automatically detect wireless networks in your
area, so you can grab that Roku remote and jump right into Guided Setup. At
wireless set up, have your network name & password ready and do the following:
• Select your network from the list of available networks.
• Enter your network password, if you use one. Remember, network passwords
are case sensitive.
DOS AND DON’TS ON WHERE TO PLACE YOUR ROKU PLAYER:
• DO place your player within range of your wireless network.
• DON’T place your player in an enclosed cabinet; it may interfere with
the wireless signal.
• DON’T place your player beneath anything; it may cause the player to
overheat. Eeeeks.

WHAT TO DO STEP 4
COMPLETE GUIDED SETUP
It’s the final stretch and hooray—it’s a breeze! Continue following the on-screen
instructions and you’ll:
• Get the latest software.
• Select the video output resolution.
• Link the Roku player to your Roku account on your computer.
And setup is done...congratulations! Continue using that Roku remote, which you
can learn more about on the following pages, to personalize your channel line-up,
stream movies or play games. The fun part has just begun, we promise.
YOUR ROKU ACCOUNT: During Guided Setup, you’ll be prompted to
create your Roku account online at roku.com/link. Your Roku player will
generate a unique code that links your player to your new account. Roku
accounts are free and secure. And while a valid credit card number is
required to create your account, rest assured you will only be charged if
you authorize purchases of apps and games from the Roku Channel Store.
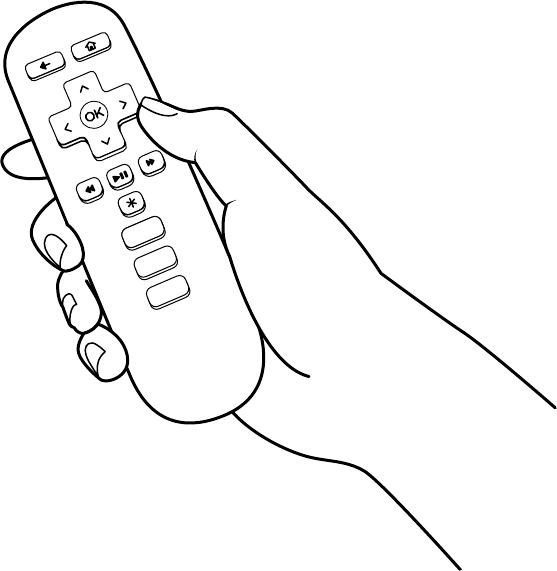
KNOW YOUR ROKU REMOTE
The Roku remote should feel right at home in your hand. We designed it to be
incredibly intuitive for watching TV and navigating on-screen menus.
KNOW YOUR ROKU REMOTE (CONTINUED)
B
G
I
J
K
A
F
D
E
C
H

TIP: Make sure there are no obstructions between the remote and the IR
sensor on the front of the Roku player.
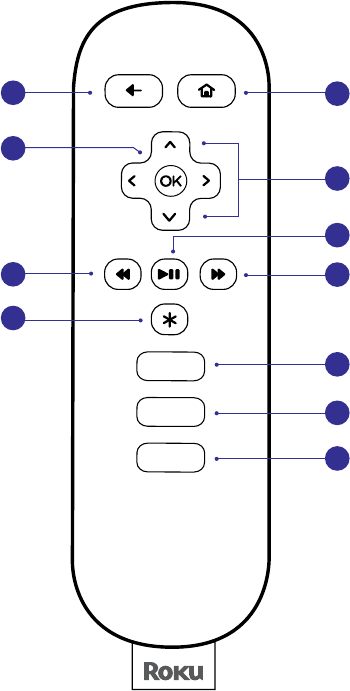
A[BACK] Return to previous screen
[HOME] Return to Roku home screen
[OK] Select an option from a menu
[UP] or [DOWN] Move up or down; [LEFT] or [RIGHT] Move left or right
[REV SCAN] Rewind, scroll left one page at a time
[PLAY/PAUSE] Start or pause playback
[FWD SCAN] Fast forward, scroll right one page at a time
[OPTIONS] View more options
Quick launch button
Quick launch button
Quick launch button
B
D
C
F
E
G
H
I
J
K
If you are having trouble completing Guided Setup, don’t worry: It’s usually an
easy fix.
IF YOU CANNOT SEE A PICTURE ON YOUR TV:
• Make sure your TV is turned on. (This tip could save you some embarrassment.)
• Make sure the connectors on the cables between your Roku player and your
TV or home theater receiver are pushed in all the way.
• Make sure the video input on your TV or home theater receiver is set to match
the output (usually composite video) used with the Roku player. Most TVs
have an Input button on the remote control to change video inputs.
• Make sure the power cable for the Roku player is connected snugly to the
Roku player on one end and to a working power source on the other end. If
the Roku player is powered, the status light on the front of the unit will be on.
• If you are using HDMI with a home theater receiver, make sure the HDMI
cable from your Roku player is connected to an HDMI-in port on your receiver
and the HDMI cable from an HDMI-out port on your receiver is connected to
your TV.
TROUBLESHOOTING
IF YOU CANNOT CONNECT TO YOUR WIRELESS HOME NETWORK
DURING GUIDED SETUP:
• If you are not getting 3 or more signal-strength bars above your wireless
network, adjust the location of your Roku player and/or wireless router.
(See tips on DOs and DON’Ts regarding Roku placement in Step 3.)
• Make sure there are no obstructions, like cement walls, between your Roku
player and your wireless router.
• Make sure you select the correct wireless router on the “Choose wireless
network” screen.
• Make sure you input the correct password, if your network is security-enabled
(password is case sensitive).
• If you have turned o SSID broadcasting on your wireless router, you can
add your network by selecting “Add network” from the “Select wireless
network” screen.
• If security is enabled on your network, temporarily disable it on your router
and try connecting again.
IF YOU CAN’T HEAR SOUND:
• Make sure the connectors on the cables between your Roku player and your
TV or home theater receiver are pushed in all the way.
• Make sure the volume on your TV or home theater receiver is turned up and
isn’t on mute.
• If you connected your Roku player to a home theater receiver, make sure you
receiver is turned on.
• Make sure the input on your TV or home theater receiver matches the output
used with your Roku player.
IF THE ROKU REMOTE CONTROL ISN’T FUNCTIONING:
• Point the remote directly at your Roku player.
• Try moving closer to your Roku player.
• Make sure the batteries are working and inserted properly into the remote
(see Step 2).
• Make sure the front of your Roku player is not obstructed.
• If the status light on the front of your Roku player flashes once each time you
press a remote button, the problem is not with the remote.
IF YOU COULDN’T FIND WHAT YOU NEED:
Visit roku.com/support for more help.
TROUBLESHOOTING (CONTINUED)
Federal Communications Commission Statement
This device complies with FCC Rules Part 15. Operation is subject to the
following two conditions:
‧ This device may not cause harmful interference, and
‧ This device must accept any interference received, including interference
that may cause undesired operation.
This equipment has been tested and found to comply with the limits for a class
B digital device, pursuant to Part 15 of the Federal Communications
Commission (FCC) rules. These limits are designed to provide reasonable
protection against harmful interference in a residential installation. This
equipment generates, uses, and can radiate radio frequency energy and, if not
installed and used in accordance with the instructions, may cause harmful
interference to radio communications. However, there is no guarantee that
interference will not occur in a particular installation. If this equipment does
cause harmful interference to radio or television reception, which can be
determined by turning the equipment off and on, the user is encouraged to try
to correct the interference by one or more of the following measures:
Reorient or relocate the receiving antenna.
‧ Increase the separation between the equipment and receiver.
‧ Connect the equipment into an outlet on a circuit different from that to which
the receiver is connected.
‧ Consult the dealer or an experienced radio/TV technician for help.
Note:
Any changes or modifications not expressly approved by the grantee of this
device could void the user's authority to operate the equipment.
RF exposure warning
This equipment complies with FCC radiation exposure limits set forth for an
uncontrolled environment. This equipment must be installed and operated
in accordance with provided instructions and the antenna(s) used for this
transmitter must be installed to provide a separation distance of at least
20 cm from all persons and must not be co-located or operating in
conjunction with any other antenna or transmitter. End-users and
installers must be provided with antenna installation instructions and
transmitter operating conditions for satisfying RF exposure compliance.
This device complies with Industry Canada licence-exempt RSS standard(s).
Le présent appareil est conforme aux CNR d'Industrie Canada applicables aux
appareils radio exempts de licence.
roku.com/support
Get the most out of your Roku player.
Check out our FAQs, instructional videos and user forums.
© 2009-2011 by Roku, Inc. All rights reserved. Roku and the Roku logo are registered trademarks of Roku, Inc. Other brand and
product names are trademarks or registered trademarks of their respective holders.
NEED MoRE HELP?
©