Roku R1000 SoundBridge Radio Wi-Fi Music System User Manual SB radio preliminary draft
Roku, Inc. SoundBridge Radio Wi-Fi Music System SB radio preliminary draft
UserManual.wiki
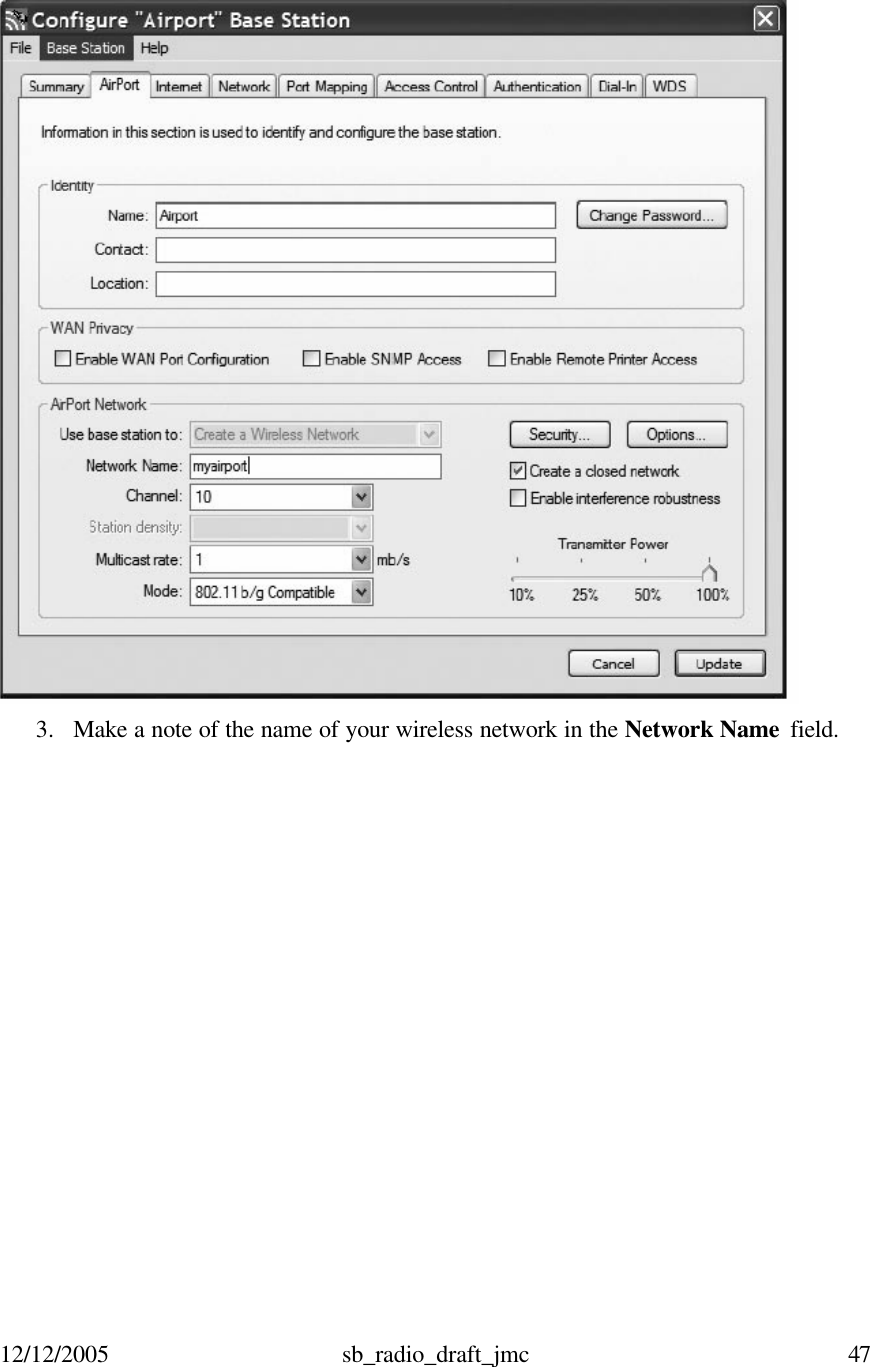
>
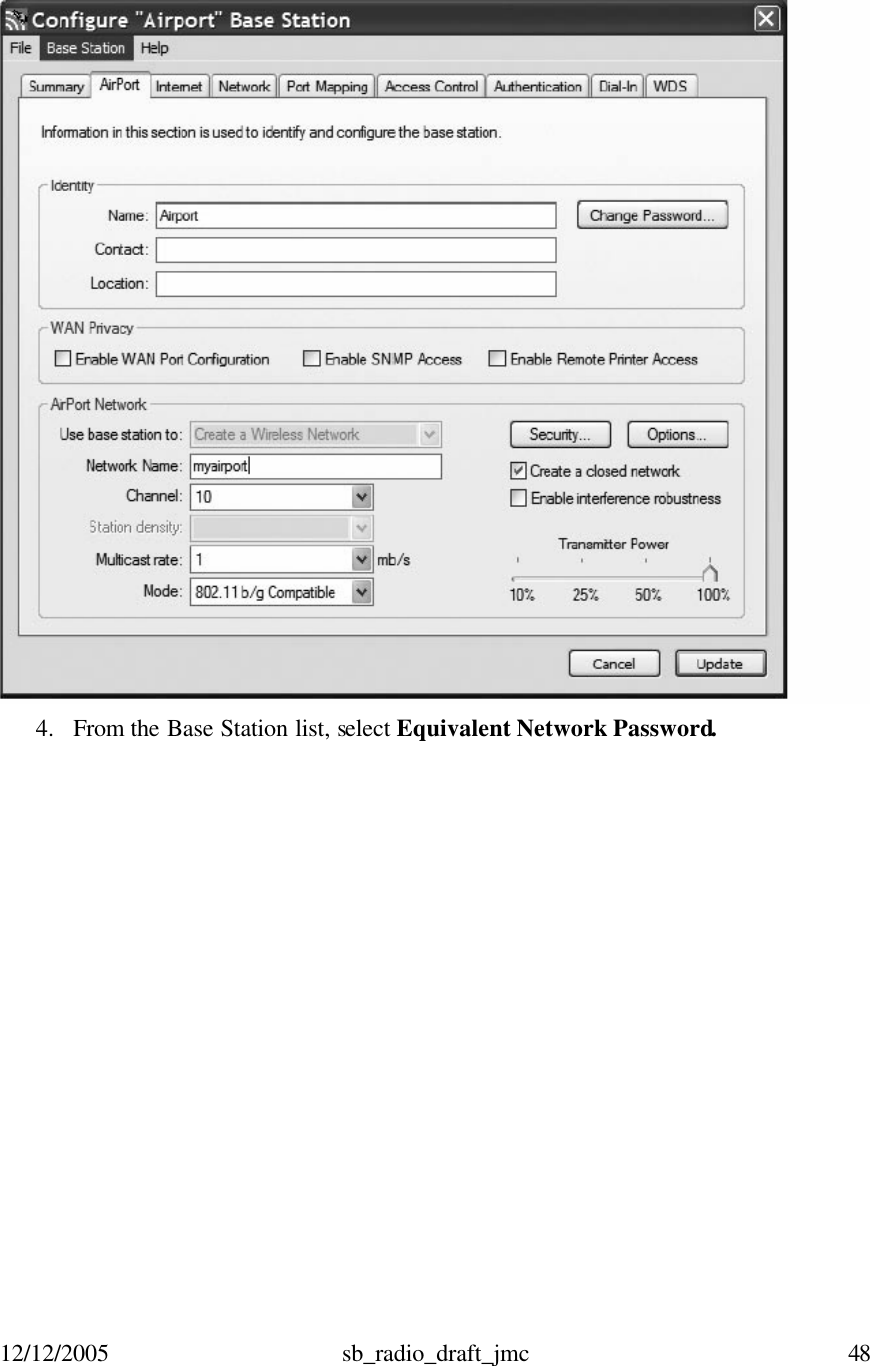
Roku
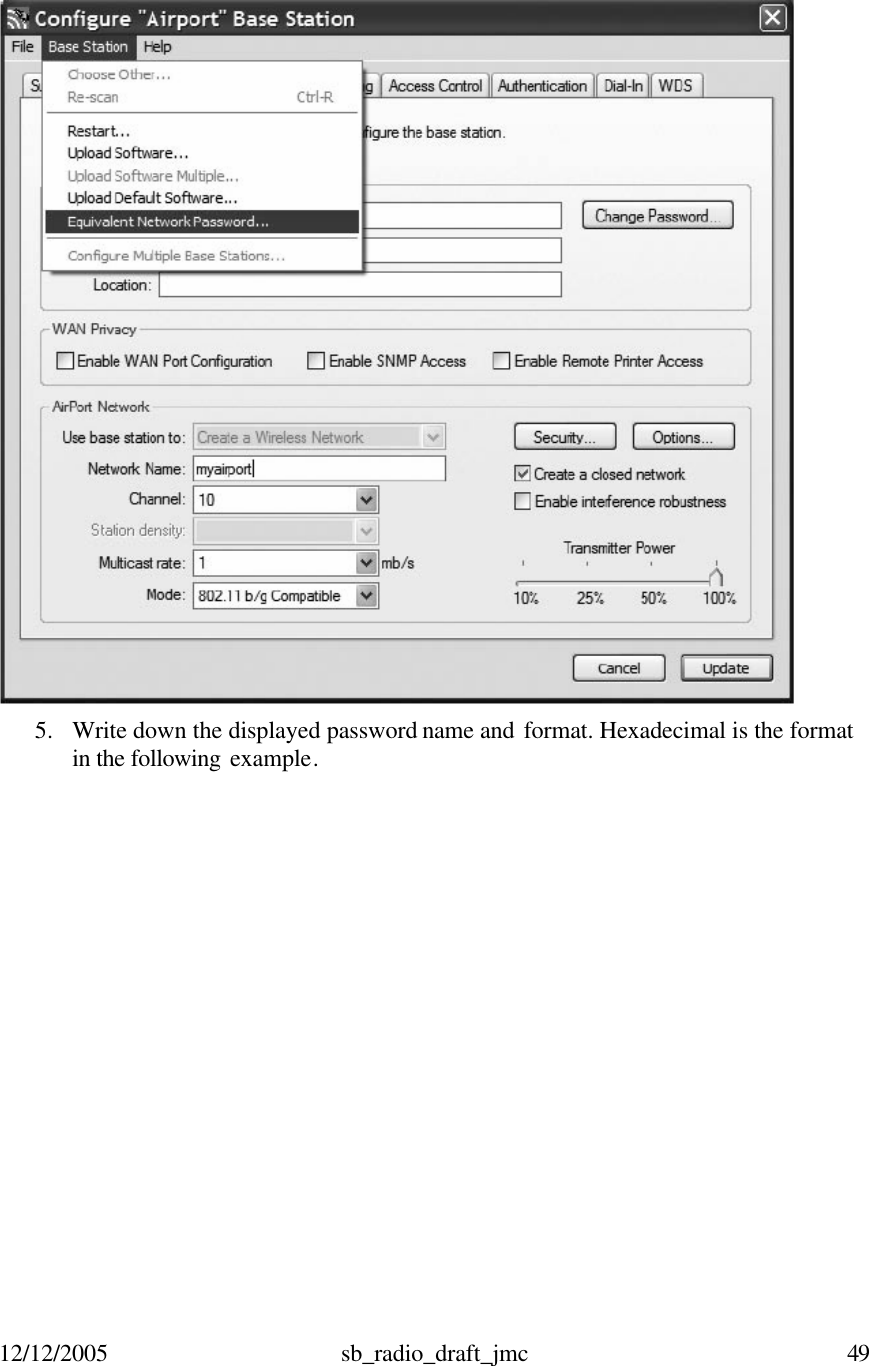
>
R1000 User Manual
Manual
Navigation menu
Upload a User Manual
Namespaces
Wiki Guide
HTML
PDF
Info
Views
User Manual
Discussion / Help
Navigation


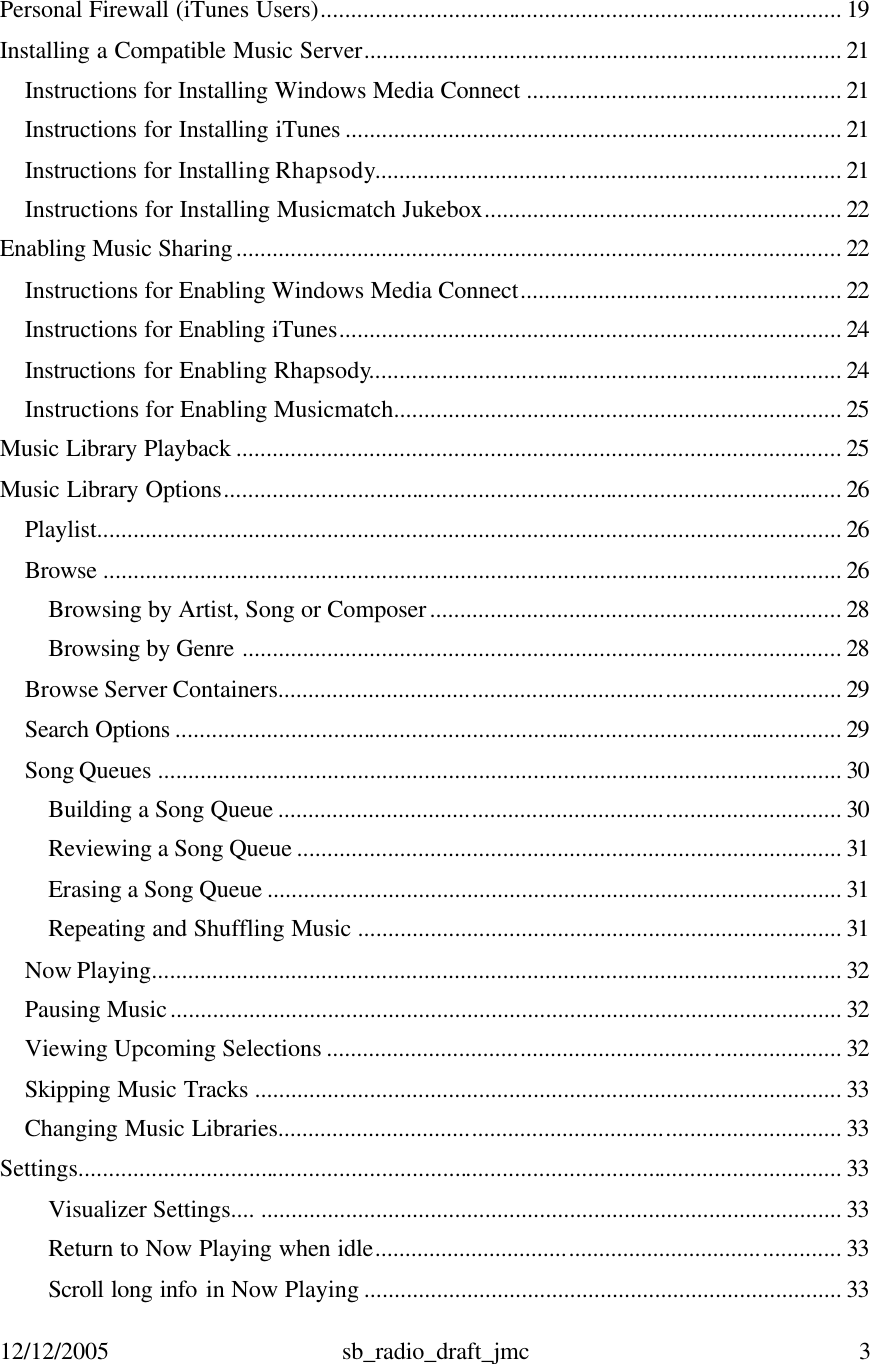

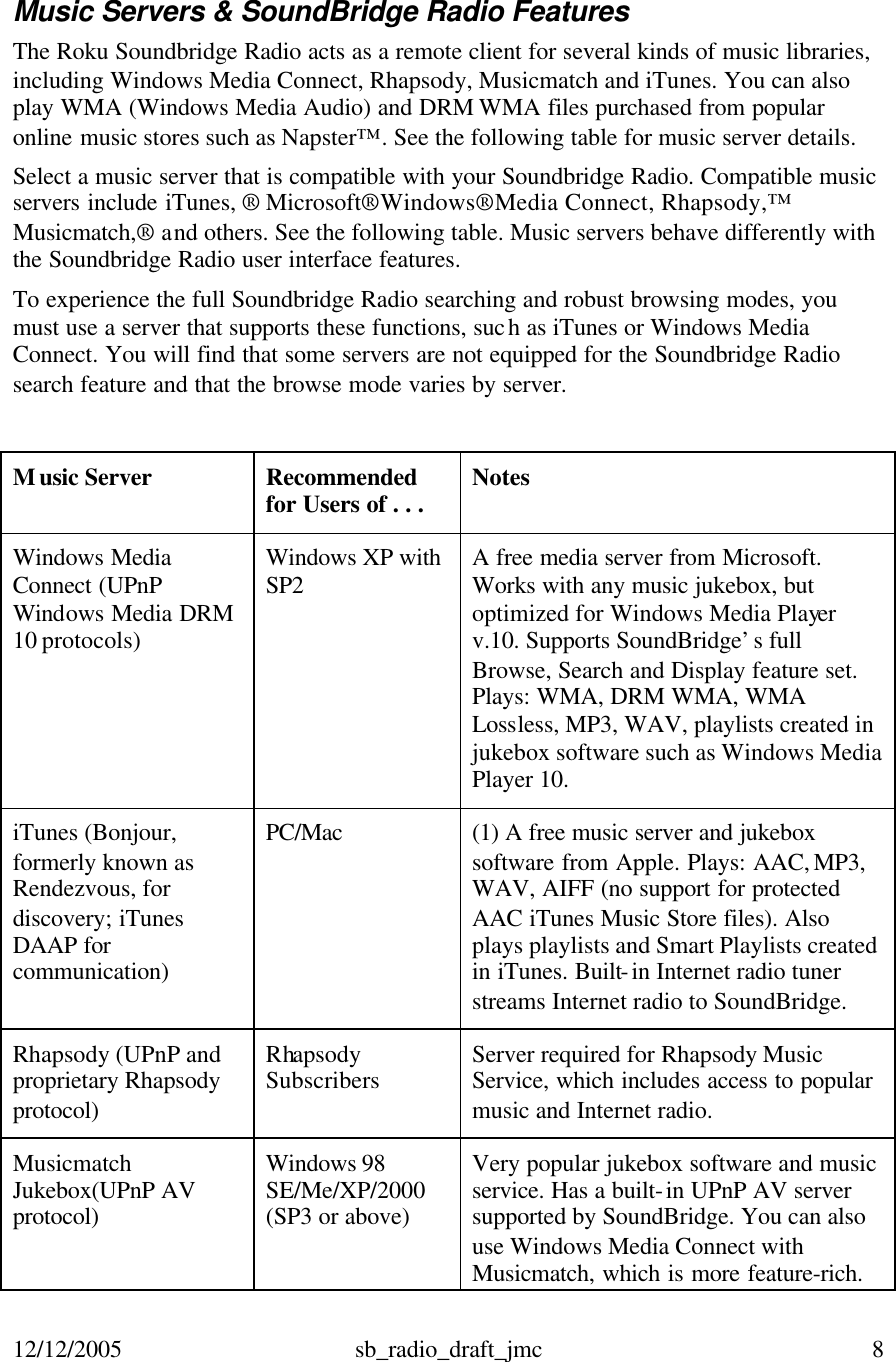
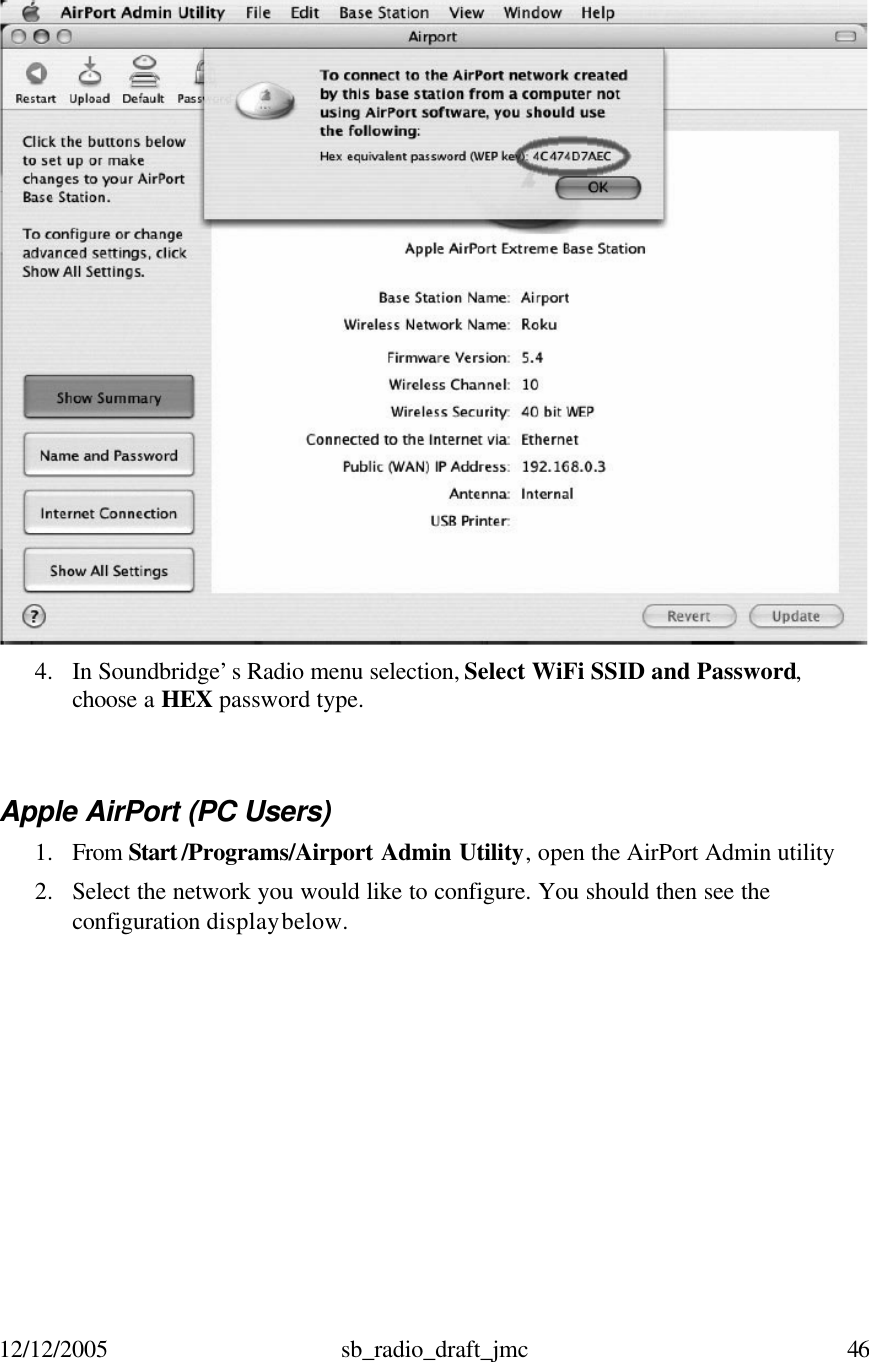
![12/12/2005 sb_radio_draft_jmc 10 Radio Buttons The following table describes the function of the radio buttons. Button Name Action [ ] Use this button to scroll through the Home menu options. Release the button when the display shows the selection you are interested in hearing and the music begins. [ ] Scan Up Use this button to scroll up for hours, minutes, AM, PM, ON or OFF set the alarm on or off. [ ] Scan Down Use this button to scroll up for hours, minutes, AM, PM, ON or OFF set the alarm on or off. [ ] Alarm Press this button to show the alarm settings and to set the alarm. . Radio Display Icons The following table describes the radio display icons. Icon Description è The music note icon denotes a single track as opposed to a collection of tracks. ? The music note icon denotes a single track as opposed to a collection of tracks. 4 The Play icon indicates SoundBridge is in playback mode. The repeat icon indicates continuous playback of your Song Queue.](https://usermanual.wiki/Roku/R1000/User-Guide-613766-Page-10.png)
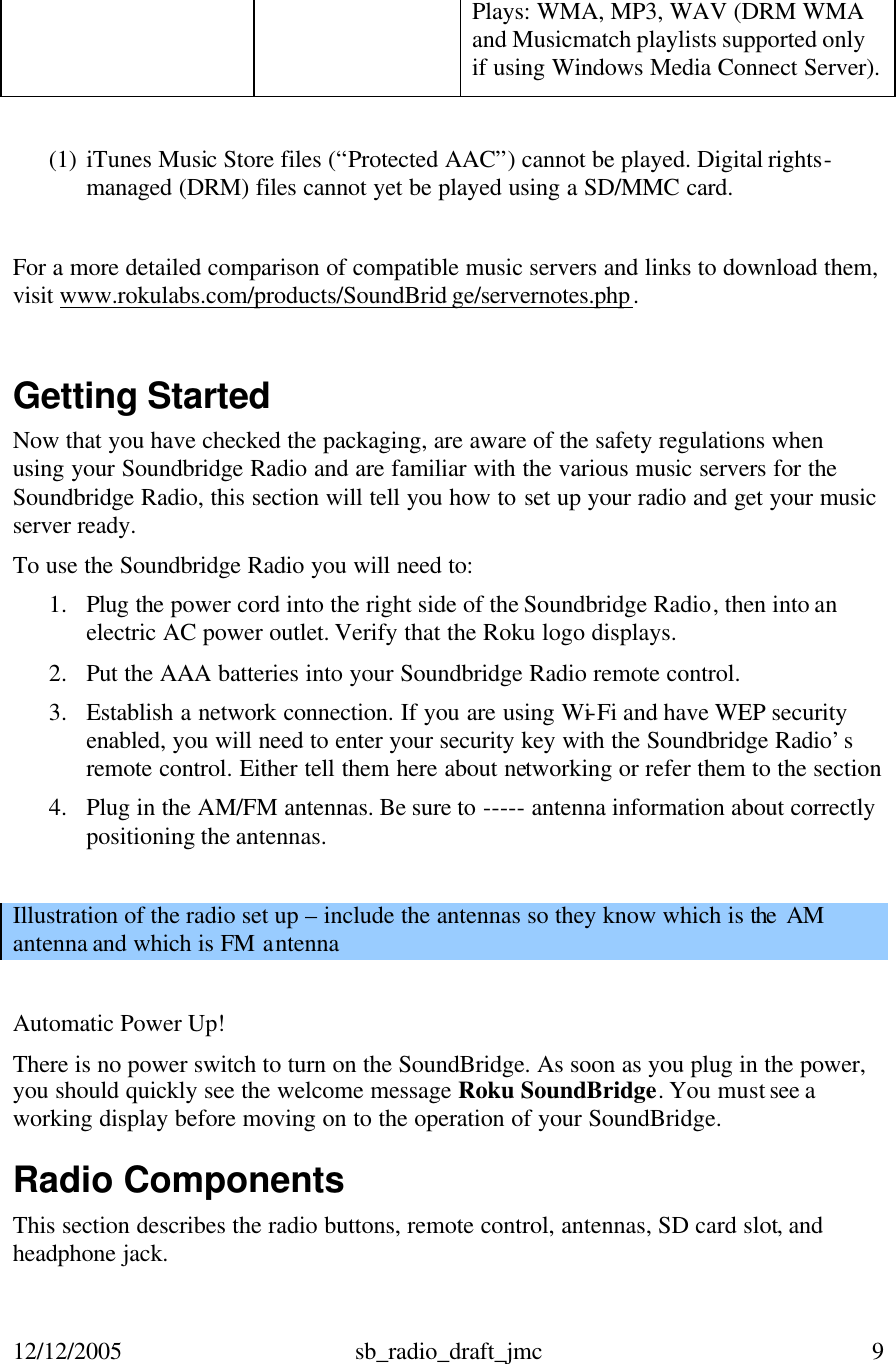
![12/12/2005 sb_radio_draft_jmc 12 Button Name Action browse.” For example, when browsing for an artist alphabetically, you can skip to the next (or previous) letter. If searching in a list that is not arranged alphabetically, you can skip by about 5% either way in the list. è Arrow This icon on your radio display shows which item is selected. [v] Select Pressing this button selects the item displayed on your radio screen. Press this button when prompted to Continue. Pressing the Select button is much like clicking your mouse on a highlighted item. When you can go no lower in your menu structure, the Select button calls up options to start song playback. [4] Play Pressing this button begins playback of your current selection. [;] Pause Pressing this button pauses the playback file currently playing. [+] Add Pressing this button adds your current selectio n to the end of your Song Queue. : 9 Next Track and Previous Track Pressing these buttons advance forward or move backwards one song at a time in your Song Queue. [ ] Home menu Pressing this button takes you to the Home menu. [ ] Search Pressing this button takes you to your text-based search options. [ ] Exit Pressing this button takes you one step backward. The Exit button works much like the BACK button on your Internet browser. Pressing the Exit button repeatedly displays information about the song currently playing (“Now Playing”).](https://usermanual.wiki/Roku/R1000/User-Guide-613766-Page-12.png)
![12/12/2005 sb_radio_draft_jmc 13 Button Name Action [ ] Standby Pressing this button logs you out of the music server software running on your computer. [¤] Adjust Display Pressing this button adjusts brightness and the size of information on the display. This button only works when using music libraries. X)) Volume Press the up icon to increase the volume and the down icon to lower the volume. : 9 Next Track and Previous Track Pressing these buttons advance or retreat playback of your Song Queue one song at a time. Shuffle The Shuffle icon (with two crossed arrows) indicates playback of your Song Queue is happening in random order. q Repeat The repeat icon indicates continuous playback of your Song Queue. Repeat – Single track The repeat single track icon indicates continuous playback of the currently playing track. X Not Available The “X” icon indicates an unsupported file format. Antennas Placeholder - Do you want to tell them any specific thing about the two antennas? SD Card Slot The SoundBridge comes with a SD/MMC (Secure Digital MultiMedia Card) card slot for playing offline digital music files. To play music from an SD card, follow these steps: 1. Insert your SD card in the slot on the right side of the SoundBridge Radio. 2. Press the Source button [ ] on the SoundBridge Radio until the SD Card displays. 3. Use the Scan Up [ ] or Scan Down [ ] buttons on the radio or the Up and Down [56] buttons on your remote control to move between files (tracks).](https://usermanual.wiki/Roku/R1000/User-Guide-613766-Page-13.png)
![12/12/2005 sb_radio_draft_jmc 14 Headphone Jack For private listening, connect headphones to the headphone jack on the back of the SoundBridge. The speakers are automatically muted when you plug in headphones. To change the volume level of the headphones, use the volume knob on your radio or the volume buttons on the remote control. You won’t miss your alarm! The alarm is designed to sound from the built-in speakers even if your headphones are connected. Illustration showing the side view of the radio Configuring Your Radio To personalize your configuration, the SoundBridge Radio display prompts you for answers to a series of questions. See “About Your Remote Control” on page __ to learn how to use your remote control to make configurations selections. Select a Language After seeing the Roku logo, you will be asked to choose a language. Use the remote control Up and Down 56 buttons to find the language of your choice. è English Deutsch Press the Select [v] button. Select Time Zone Next you will see the following; “On the next screen, please select your time zone. Having the correct time zone set will allow the Soundbridge to automatically set its internal clock over the Internet. è Continue ? Press the Select [v] button. You will see the following: è US Eastern Time US Central Time Use the remote control Up and Down56 buttons to find your time zone and then press the Select [v] button.](https://usermanual.wiki/Roku/R1000/User-Guide-613766-Page-14.png)
![12/12/2005 sb_radio_draft_jmc 15 Select Geographic Region You are prompted to select a geographic location. You will see the following: “In order to configure WiFi for your Soundbridge, on the next screen you must specify the geographic region in which it will be operated. Please note that selecting an incorrect location may violate local laws.” è Continue ? Press the Select [v] button. Next, you will see the following è USA Australia Use the Up and Down [56] buttons to find your geographic region and then press the Select [v] button. Confirm Settings Press the Select [v] button to continue and confirm the settings you have selected. A message displays telling you that initial setup is complete. Changing Language, Time Zone, or Geographic Location You will see the following message: “Press the Exit or Back button to make changes to language, time zone or geographic location.” Continue pressing the Exit or Back button to find the screen/display with the selection you wish to change.” At this time, you can change any of the settings you have selected. You can retrace your steps with the Exit [ ] button. The Exit button works much like the BACK button on your Internet browser. You can also reset your personal configurations by resetting your radio to the factory defaults. Press the Select [v] button when you are finished. The network starts, looks for a wireless connection, and then configures your radio. Once completed, the Home menu appears. You are now ready to choose music from your music library. For More Information: See “Restoring Factory Default Settings.” Standby Mode You will see the following message: “In Standby Mode, your SoundBridge can display the time and date. While in Standby Mode, the left and right arrows adjust brightness and the up and down arrows change display formats. Turn brightness down until you see “Standby” to disable the clock.” Use the Left [ ] button to select Yes.](https://usermanual.wiki/Roku/R1000/User-Guide-613766-Page-15.png)
![12/12/2005 sb_radio_draft_jmc 16 Upgrade successful Select OK to reboot Contacting Server Reconfiguring Factory Defaults You can clear all the settings you have by following these steps. Press the Home menu button. Use the Up and Down 56buttons to Reset to Factory Defaults and press the Select [v] button. You are asked if you want to clear stored preferences. Use the Left [ ] button to select Yes. Checking for the Latest Software Updating your software is quick and easy. The home network you are using with your Soundbridge Radio needs to be connected to the Internet through a high-speed connection such as DSL or cable modem. To make sure you have the latest version of the Soundbridge Radio software, Follow these instructions: 1. Make sure your Soundbridge Radio is connected to a home network with Internet access. 2. Press the Home Menu [] button on the remote control. 3. Navigate down to System Configuration and press the Select [v] button. 4. Navigate down to Software Version and Updates and press the Select [v] button You will see your current software version and be given the option to check for a software update. 7. To check for software updates, choose Yes. 8. You should see a display with a progress bar. 9. You will then see one of the following two messages: a. Your software is up to date In that case you don’t need to do anything. Press the Select [v] button to accept this message and return to the previous System Configuration menu. Press Exit [?] to return to the Change Library menu, navigate to the music library you want to play, and press the Select [v] button. b. If your software requires updating, you will be prompted to download the update. Select Yes. After the contacting server message, you will see the following message:](https://usermanual.wiki/Roku/R1000/User-Guide-613766-Page-16.png)
![12/12/2005 sb_radio_draft_jmc 17 Press the Select [v] button. A message displays telling you that your radio is rebooting. Note: Check the Roku website for the latest version of the Soundbridge Radio user guide. When new functions or features are added to the SoundBridge Radio software, Roku updates a PDF version of the user guide for download. Please visit www.rokulabs.com/support for the latest version of the user guide. Establishing a Wireless Network Connection If you have a Wi-Fi network in your home, with no security keys set, Soundbridge Radio will automatically connect to your wireless network. If Soundbridge Radio detects more than one Wi-Fi network, you will be asked to select which SSID (Service Set Identifier) you want to use. You will only be asked to select an SSID if you have more than one wireless network or if your neighbor’s wireless signal is leaking. See “Multiple Wireless Networks” for more information. If you have a security key for your WiFi network, see “Entering a Security Key,” When your connection is not established, your display will look the following: No music libraries found (why?) System Configuration – Identifying your Wireless Network Make sure your server is running and music sharing is enabled. To check your network connection, do the following: 1. From the Home menu, choose System Configuration and press the Select [v] button. 2. Scroll down to Show Wi-Fi Status and press the Select [v] button. If connected, a message displays telling you that your wireless network is connected For More Information: See the “Troubleshooting WiFi Setup” section of this user guide or visit www.rokulabs.com/support for help if you are still having trouble connecting to your music library. Identifying your Wireless Network Before you can begin to access the music you have stored on your network computers, you will need to identify your wireless network. To identify your wireless network, do the following: From the Home menu, use your remote control to scroll down to System Configuration. Play Internet Radio èSystem Configuration](https://usermanual.wiki/Roku/R1000/User-Guide-613766-Page-17.png)
![12/12/2005 sb_radio_draft_jmc 18 Press the Select [v] button. Your display will look like this: Scroll down 56to Select Wi-Fi SSID & password. Press the Select [v] button. The SoundBridge Radio searches for your wireless network as shown below. You will see the following message: The name of your network displays. Multiple Wireless Networks If you have more that one network, scroll down to select which wireless network you choose for the SoundBridge Radio and press the Select [v] button. è< Name of your network> Specify a wireless network… Looking for wireless networks……. Software version & updates Select Wi-Fi SSID & password Show Wired Ethernet status Show Wi-Fi status Software version & updates Select Wi-Fi SSID & password Show Wired Ethernet status Show Wi-Fi status](https://usermanual.wiki/Roku/R1000/User-Guide-613766-Page-18.png)
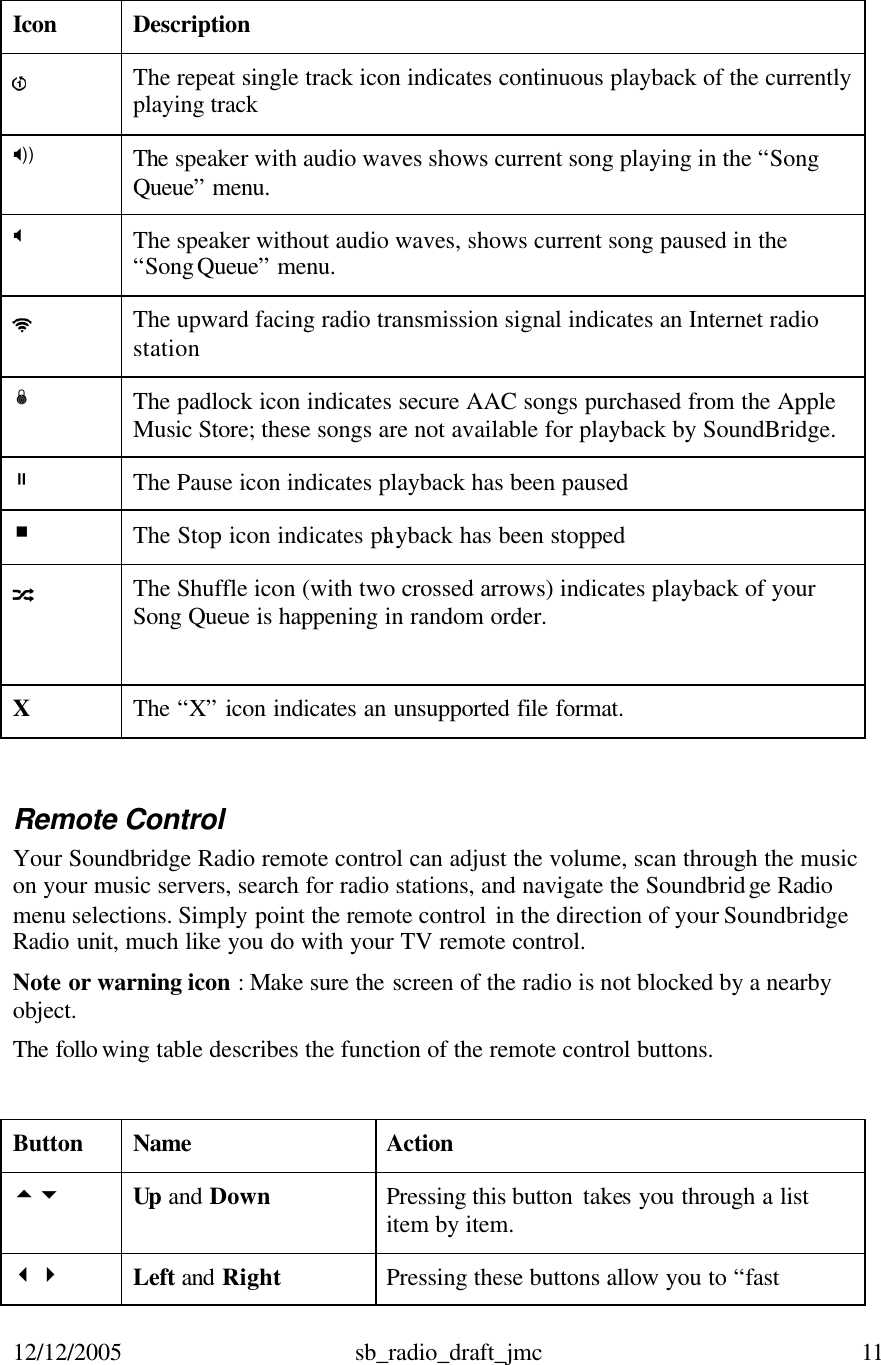
![12/12/2005 sb_radio_draft_jmc 19 You can also enter the name of a wireless network. To enter a network name, follow these steps: 1. From Select WiFi SSID and Password, select Specify a wireless network and press Select [ ]. 2. Use the Right and Left [ ] buttons to find letters, number, spaces in the wireless network name you are entering and then press Select [v] for each letter, number, and space you choose. 3. Use the Up and Down [ ] buttons for OK, space, delete, commas, periods, accent letters, numbers, uppercase or lowercase letter. For More Information: For additional help connecting to your network, including password help, see Obtaining Your Wireless Access Point’s Password. Entering a Security Key If you have a security key, you will need to enter your WEP [Wired Equivalent Privacy (802.11 encryption protocol) ] key. This is the same key you have entered into your Access Point and your computer. To find more information about your Access Point, see “Obtaining Your Wireless Access Point’s Password.” Troubleshooting Wi-Fi Setup If you have problems connecting the Soundbridge Radio to your music library, please check the following: • Is Soundbridge Radio within range of your wireless network signal? • Performance varies depending on wireless network hardware, physical barriers such as walls, and signal interference. • Is your computer on and is your wireless access point plugged in? • Is your music server software running on your computer? Is your music sharing options enabled? See the “Enabling Music Sharing” section for more information. • If you have a password, did you enter your password correctly including case sensitive characters? For more information, visit our FAQ and User Forum at www.rokulabs.com/support Personal Firewall (iTunes Users) If you have trouble connecting and your computer has a firewall installed, make sure your firewall is configured to allow iTunes music sharing by doing the following. Mac user: 1. Open System Preferences. 2. Select Sharing and click the Firewall tab.](https://usermanual.wiki/Roku/R1000/User-Guide-613766-Page-19.png)
![12/12/2005 sb_radio_draft_jmc 20 3. Select the iTunes Music Sharing option. 4. Restart your radio by pressing the radio Power [ ] button or using the remote control. To restart your radio with the Remote control, follow these steps: a. Press the Home Menu [ ] button. b. Scroll down to System Configuration and press Select [v]. c. Scroll down to Restart Soundbridge Radio and press Select [v]... PC user: 1. Refer to your firewall’s documentation for opening incoming ports. 2. Configure your firewall to allow incoming connections on port 3689. WindowsXP Service Pack 2 users: 5. Open Security Center and click on Windows Firewall located on the bottom right of the window. 6. In the window that pops up, click on the Exceptions tab. 7. Verify that iTunes appears in the list of Programs and Services. If iTunes is not listed, select the iTunes check box. 8. Click Add Program and then click OK. 9. After these changes have been made, restart your radio by pushing the Power button [ ] or using your remote control. To restart your radio with the Remote control, follow these steps: d. Press the Home Menu [ ] button. e. Scroll down to System Configuration and press Select [v]. f. Scroll down to Restart Soundbridge Radio and press Select [v].](https://usermanual.wiki/Roku/R1000/User-Guide-613766-Page-20.png)

![12/12/2005 sb_radio_draft_jmc 25 Play Dan’s Music èPlay Joe’s Music Instructions for Enabling Musicmatch 1. Select Options/Settings. 2. Click the CD Lookup/Connectivity tab. 3. Select Enable Music Server and then select Universal. Plug and Play. You can close Musicmatch if you like — the UPnP server will keep running in the background. Music Library Playback Once the Soundbridge Radio is successfully connected to your network and your server’s music sharing options are enabled, Soundbridge Radio will automatically find your computer’s music server and detect any supported music libraries. Soundbridge takes you to the Home menu which lists all the music libraries that are connected to your network. Only the first two lines of the Home Menu are displayed at once. The scroll bar on the right moves as you scroll below your current display view. The Home menu display looks similar to the following: Use the Up and Down [ ] arrows to choose one of the music libraries on your network. The [è] arrow points to each of the available options as you scroll down the list. Once you find the library you are interested in, press the Select [ ] button. A list of options will appear on the display. The following table describes each of the music library options. Option Description Playlist Displays all the playlists available for the selected music library from your network. Browse Browse the music library by artists, album, songs, Music Library Options Home menu Play Dan’s Music èPlay Joe’s Music Playlist Browse Search Show Song Queue Now Playing Settings Change Library or Configuration](https://usermanual.wiki/Roku/R1000/User-Guide-613766-Page-25.png)
![12/12/2005 sb_radio_draft_jmc 26 genres, and composers. Search Search the music library by titles, albums, artists, composers, and keywords. Show Song Queue Shows a list of songs you created in your song Queue. See the “Song Queue” section for more information. Now Playing Shows the current song playing. Settings You can change visualizer settings when music is playing, set how the radio behaves when idle customize the way music information appears on your radio display, display classical composers, skip items unchecked in iTunes, and memorize the radio playlist. Change Library or Configuration Use this option to return to the Home menu where you can switch to another music library, play AM/FM and Internet radio, or change system configurations. Music Library Options This section describes how to use each of the music library options. Still working on this section… Playlist Let’s say you have created a playlist of your favorite Disco hits in your music jukebox software, and named it DISCO INFERNO. Press the Home Menu [ ] button to navigate to the Home Menu. Navigate to Playlists and press the Select [ ] button. Use your Up/Down arrows to browse your playlists one by one, find the one called DISCO △ ▽INFERNO, then press Play [?] to play all songs on the playlist immediately or Add [+] to add the playlist to your Song Queue. Hint: If your playlist was created in Windows Media Player or other software using Windows Media Connect, be sure to save your playlist in the My Music/My Playlist folder on your hard disk. Browse You can browse your music library by artist, album, songs, genres, and composers. To use the Browse option, press the Down button until you see the B▽rowse option](https://usermanual.wiki/Roku/R1000/User-Guide-613766-Page-26.png)
![12/12/2005 sb_radio_draft_jmc 27 highlighted and press Select [ ] on your remote control. You will see a listing of browsing options: ?èBrowse artists Browse album If you scroll down, you will see the other browsing options: Brow se songs Browse genres Browse Composers Browse Server Containers If you navigate to the Browse Albums option and press Select [v], you will see an alphabetical listing of albums found in your music library. The screen will look something like this: è? ?Parachutes ? Paul’s Boutique Navigate to the album that you want to hear using the Up/Down arrow buttons △ ▽ — in our example, “Parachutes.” When the album you want is selected, press the Select [v] button for a listing of songs found on this album. The music note next to each song name indicates the selection is an individual track (and not a playlist, album or other collection of songs). Please note that songs purchased from the Apple Music Store will be denoted in the display with a padlock ?icon. SoundBridge is not able to play back these “locked” files — they will simply be skipped over during playback. è?? Don’t Panic ? Shiver Use the Up/Down arrows again to highlight the song you want to play. Press the △ ▽Play [?] button to start that song playing. When the song begins playback, the display will switch to the “Now Playing” display, which looks something like this: Don’t Panic 0:10/2:17 4 Coldplay Parachutes (2000) (|||------) The artist and album information may be abbreviated, or appear one line at a time, if the total number of characters exceeds what can be displayed at once. For More Information: See the “Settings” section. You can also navigate to an album, artist, or genre selection while browsing, then press Play [4] to start playing the entire contents of the selected category. Note: This feature will not work if using a non-search-capable UPnP music server.](https://usermanual.wiki/Roku/R1000/User-Guide-613766-Page-27.png)
![12/12/2005 sb_radio_draft_jmc 28 Browsing by Artist, Song or Composer From the Home menu, navigate to Browse and press the Select [v] button. Navigate to Browse Artists and press the Select [v] button. Your display will look something like this: ?Annie Lennox | ? <A> Ben Folds Five ? Find the artist you would like to play and press the Select [v] button. You will see a display listing the albums available by that artist: ?<Show all matching songs> | Medusa While the first menu option <All matching songs> is active, press Add [+] to add this selection to your existing Song Queue, or press Play [v ] to play all songs by this artist instead and replace your existing Song Queue. Songs play in the order they appear on each album. Each album plays in alphabetical order. Hint: Artist names starting with the word “the,” such as the Beatles, will be found under the first letter of the word following the word “the” — in this case, “B” for “Beatles.” You can choose specific albums or songs to play by navigating to your desired album and pressing Add [+] to add to an existing Song Queue, or Play to replace an existing Song Queue. Note: if your selected album contains songs by different artists, such as compilation albums or movie soundtracks, only the song(s) by your artist will be played. Hint: To browse faster, instead of using the Up/Down arrows , you can “speed △ ▽browse” through your lists by pressing the Left/Right arrows ? ?. This will browse by the letters of the alphabet. Note: The search function is a string search — “RA” will return not just Radiohead but other words containing the string, such as Shakira and Franz Ferdinand. Browsing by song or composer works the same way as browsing by artist. Browsing by Genre From the Home Menu, navigate down to the BROWSE option and press the Select [v] button. Scroll down to “Browse Genres” and press the Select [v] button. You will see an alphabetical listing of genres that are available in the music library that you are browsing. To add all songs within a Genre to your Song Queue, highlight that Genre and press Add [+] (or the Select [v] button] to open additional options for playback). To browse within a genre, such as Hip Hop/Rap, press the Select [v] button on your desired genre. You will have the option to see all available artists in that genre, and a list of individual albums by those artists. At any point, you can press Add to add that selection to your Song Queue or press the Select [v] button to navigate to the next level of detail.](https://usermanual.wiki/Roku/R1000/User-Guide-613766-Page-28.png)
![12/12/2005 sb_radio_draft_jmc 29 Hint: Information about your music, including Song Name, Artist, Album, and Genre is usually created automatically by the software you used to save your audio CD files on your computer’s hard drive (also know as ripping). This process creates data called “ID3 tags” to describe each track. If this data is missing from your audio files, they will not appear when you browse by that data category. If you need to edit your ID3 tags, or if you are not satisfied with the description of genres (or other data) assigned to your music file, it is possible to edit that data in iTunes, Windows Media Player or other supported music jukebox programs. Note: In iTunes, select the file(s) to edit, click on File/Get info, and then click on the Info tab). Browse Server Containers This in new from when I was in the office. I came across it yesterday. I do not know what this is…placeholder Search Options To search for a specific selection by spelling it out, you can press the Search [?] button on your remote control, or navigate down to the “Search” option from the Home Menu. Either way, you will have the following options: Search for albums Search for artists Search for titles Search keywords Press the Select [v] button on the option you would like to search with. Then, use your Left/Right ? ? arrows on the remote control to enter characters for spelling your selection and then press the Select [v] button. When you are done spelling, use the Down button to go to the OK option and press the ▽Select [v] button. If you make a mistake, use the Down button to go to the Delete option and press the ▽Select [v] button. Hint: Partial spelling is OK — the Search function searches for letters anywhere in the word, as opposed to just at the beginning. For example, to search for Radiohead, you can enter any combination of letters found in the word (“RA,” “DI,” “HE,” etc.), and the results will return all Artists containing those letters (e.g., if you enter “DI” you’ll get Radiohead, India Arie, and Diana Krall). When you find the music you like, use the Add button to add it to your Song Queue. If searching for albums or artists, you can press the Select [v] button to navigate down one level to individual tracks. If an exact match is not found, your results will show an empty search.](https://usermanual.wiki/Roku/R1000/User-Guide-613766-Page-29.png)
![12/12/2005 sb_radio_draft_jmc 30 Song Queues SoundBridge Radio automatically builds a Song Queue every time you select a song or album to play. You can also have the Soundbridge Radio play a set of selections you choose. This section will tell you how to build a song queue, review a song queue and erase a song queue. Building a Song Queue Let’s say you would now like to choose several different songs or selections to play in a row. This is called building a “Song Queue.” SoundBridge automatically builds a Song Queue every time you select a song or album to play. You can add to that list by navigating to your preferred music and pressing Add [+]. The selection will be added to the end of the current Song Queue. You may add a single song, an entire album, all songs by an artist, all songs in a genre, or any search result — just browse to the selection you prefer and press Add. For example, if you would like to play all songs by Coldplay, select the “Browse artists” option from the Home Menu/Browse option. Navigate to Coldplay in your artist list, and press Add. All songs on all albums by Coldplay will be played by album, in the order they appear on each album. For more information about browsing and searching options, see the “Browsing” and “Searching” sections later in this user guide. You have several other options for building a Song Queue. After you press Select while browsing on a song, a “Song” menu appears with the following options: • Play, starting with the selected song (and clear previous Song Queue) • Get information about the selected song • Play the selected song only (and clear previous Song Queue) • Add this song to the Song Queue (same as pressing the Add button) Note that both “play” options 1 and 3 above are “destructive”; they will clear your previously existing Song Queue. The “add” option, however, will add the selected song to the end of your existing queue. The first, “play these songs” option is described in the section above — it starts playing your album (or other browsed list), beginning with the current track. If you choose “Play songs” on any track in your selection, the entire list is added to the Song Queue, but playback starts on the chosen track. If you have the Repeat [] option selected, the earlier tracks in the queue will play after the last song (and so on indefinitely). If you have the Shuffle [] option selected, then the chosen track will play first, followed by all the other tracks in the list in random order. The “Add song to Song Queue” option behaves similarly to the Add button— it places the current song at the end of your playlist. You can add an almost unlimited number of songs to your Song Queue. Each selection will be played in the order it was entered (unless you have chosen to Shuffle your Song Queue).](https://usermanual.wiki/Roku/R1000/User-Guide-613766-Page-30.png)
![12/12/2005 sb_radio_draft_jmc 31 Hint: After you have selected multiple songs to be played in turn, you can use the Next Track ?and Previous Track ?buttons to skip from song to song in your Song Queue. Reviewing a Song Queue At any point, you can review your Song Queue by pressing the down arrow ?from the Now Playing screen, which is the default screen that appears while SoundBridge is playing. The Now Playing screen looks something like this: Don’t Panic 0:10/2:17 Coldplay Parachutes (2000) (|||------) You can also press Exit [?] several times from any point in your browsing; eventually, the Now Playing screen appears. Alternatively, you can press Home Menu [], then select the “Show song queue” option. You will see the entire list of songs in your song queue; refer to the scroll bar on the right side of the screen to determine where in the list you are located. Press the Up/Down arrows to see the entire list of selections in your Song Queue. The cu△ ▽ rrently playing selection is indicated by a speaker ?icon. You cannot save a Song Queue that you have created — it’s only held in memory temporarily and then erased when you build your next Song Queue. If you would like to build a Song Queue that you can save and recall at will, please build a Playlist in your music jukebox software (see “Playing a Saved Playlist” below). Erasing a Song Queue If you change your mind and decide you don’t want to play the Song Queue you’ve just created, simply select something else to play. This will Navigate to another selection (song, playlist, etc.) and press Select [v] instead of Add [+]. This selection immediately replaces your old Song Queue. Repeating and Shuffling Music Pressing Repeat [q] once makes your Song Queue play continuously. You will see the Repeat icon q? on the right side of your display below the Play [4] ?icon. Pressing Repeat again makes the current song play over and over; you will see another Repeat icon [ ], a circle with just one arrow [ ]. Press Repeat a third time and you will remove the repeat command altogether. Pressing Shuffle [ ] while playing a Song Queue will give you the following options: Shuffle On — will play everything in your Song Queue in random order. The shuffled order of songs will be displayed in the Song Queue. An icon with two crossing arrows will appear on your radio display. Shuffle Off — will play everything in your Song Queue in the original order. You can execute the Repeat and Shuffle command from any SoundBridge Radio menu and its icon will appears on your radio display.](https://usermanual.wiki/Roku/R1000/User-Guide-613766-Page-31.png)
![12/12/2005 sb_radio_draft_jmc 32 Now Playing If you want to know what is playing, there are several ways to view “Now Playing” information: Press the Exit [?] button several times until you see the display show “Now Playing” information. Press the Home menu [] button, then scroll down to the “Now Playing” option and press the Select [ ] button. The display shows “Now Playing” information after a few minutes of remote control inactivity. If you press Play [?] on an album track, that track will play, followed by each track remaining on the album. For example, if you press Play on track 5 on an album with 10 tracks total, then tracks 5–10 will play. For continuous playback of the entire album, press Repeat [] on your remote control — the album will play until the end, then start again at the beginning. Pausing Music Press the Pause [;] button to halt music playback. A Pause icon ;will displays at the top right of your display. Pressing the Play [4] button or the Pause button again will resume from where you left off. When the Song Queue has finished all its songs, it will stop. You will see the Stop icon < ?on the right side of your display. To start playing your Song Queue again at the beginning, press the Play button. Hint: Pressing the Pause [;] button to stop playback of your Song Queue will only do so temporarily. If you want to clear the memory of your Song Queue or your selection, you will simply navigate to select something else you want to hear, and press Play [4]. If you want to continue building your Song Queue from where you left off before pressing the Pause [;] button, press the Add [+] button instead of the Select [v] button and your prior selections will be preserved. Viewing Upcoming Selections If you are not sure what you have selected to play, simply press the Down [6] arrow. The music you are currently listening to will continue playing while you view a list of upcoming songs also knows as your Song Queue. The display will automatically return to the Now Playing option. Press Pause [;] at any time to put playback on hold. Press Play [4] or Pause [;] a second time to resume playback. Hint: If you navigate to a new song and press Play [4], the old Song Queue is erased and replaced with your new selection. You should only press Play [4] when you want to](https://usermanual.wiki/Roku/R1000/User-Guide-613766-Page-32.png)
![12/12/2005 sb_radio_draft_jmc 33 erase your existing Song Queue and start a new one. Press the Add [+] button to continue from where you left off and add a song to the existing Song Queue. Skipping Music Tracks If you’d like to skip a song during playback, press the Next Track : button ?on your remote control. Or, navigate to another song through your browsing options and press the Select [v] button. Changing Music Libraries If you have multiple music servers running on your network at once, you can easily navigate between them. 1. Press the Home Menu [ ] button on your remote control. 2. Using the Down arrow button, navigate to Change Library or Configuration and press Select [ ]. All your available libraries are displayed. 3. Press Select to access your desired music library. Settings Need to complete Soundbridge Radio settings can be changed using the Settings option located at the bottom of the Home Menu. Visualizer Settings.... You can change the appearance of the music visualizer such as whether it appears full display during playback, and what kind of information is displayed when a song is playing from the Home menu. Return to Now Playing when idle Scroll long info in Now Playing ?Display composer for classical works Skip items un-checked in iTunes Change Library or Configuration Need to complete](https://usermanual.wiki/Roku/R1000/User-Guide-613766-Page-33.png)
![12/12/2005 sb_radio_draft_jmc 34 Software Version & Updates Select WiFi SSID & Password Show WiFi Status Network Control Reset to Factory Default To reset your configuration of the Soundbridge radio and return the setting to its factory defaults, follow these steps: 1. Press the Home Menu [ ] button. 2. Use the down arrow to select Change Library or Configuration. 3. Use the down arrow to select System Configuration. 4. Use the down arrow to select Reset to Factory Defaults. Restart Soundbridge Radio Exit Play AM & FM Radio Need to complete Play Internet Radio Need to complete Note: To date, there is unfortunately no standard for Internet radio stations, and many different audio formats and streaming techniques are used in the industry. Soundbridge Radio supports many Internet radio stations, but not every one of the many, sometimes proprietary, standards. The only sure way to know if a radio station will play on Soundbridge Radio is simply to try it. Alarm Clock Need to complete ALARM 1 ON 7:00 AM ALARM 2 OFF 7:30 AM](https://usermanual.wiki/Roku/R1000/User-Guide-613766-Page-34.png)
![12/12/2005 sb_radio_draft_jmc 36 To disable the date/time display altogether when Soundbridge Radio is in standby, select the corresponding option on this page. When you are finished, simply close your web page. For More Information: For a complete list of Soundbridge Radio settings, see “Settings.” Turning Off Your SoundBridge Radio When you are finished playing music on your Soundbridge Radio, press the Standby [ ] button on your remote. In Standby mode, your radio will display the date and time or a blank display, depending on your preference. (See page --- for more information about setting these preferences.) If you were playing Internet radio from your “Favorite Radio Stations” library when you pressed Standby [ ] button, then pressing Standby again will resume playback of that station. Otherwise it will return you to the music library that you were most recently connected. If you plan to disconnect the Soundbridge Radio from AC power, be sure to press the Standby button first. This logs you out of the music server software running on your computer. Note: Wait approximately ten seconds after pressing Standby [ ] before unplugging SoundBridge; this gives Soundbridge Radio time to flush its settings for a clean reboot. Caution icon: If you unp lug the Soundbridge Radio from AC power five times without pressing the Standby [ ] button on your remote first, iTunes may lock you out of connecting to the server. This is because iTunes allows a maximum of five users to connect at one time. If you do not first put Soundbridge Radio in standby mode, iTunes thinks you are still connected. To restore your access to the iTunes server, close iTunes and then restart it.](https://usermanual.wiki/Roku/R1000/User-Guide-613766-Page-36.png)

![12/12/2005 sb_radio_draft_jmc 62 Audio Format Support MP3, AAC, WMA, DRM WMA, WAV, AIFF, LPCM, and Rhapsody music files. WMA Lossless is supported only when using Windows Media Connect and transcodes the format to LPCM. Please Note: AAC files purchased from the Apple Music store are not available for playback on the Soundbridge Radio at this time. A padlock [Ï] appears next to AAC files in your playlist. System Requirements Wi-Fi home network (802.11b or 802.11 g) Broadband connection (cable or DSL) Server Requirements for Streaming Music Stored on Your Computer 500MHz Pentium class processor or better (PC) 128 MHz G3 processor or better (Macintosh) 128MB RAM minimum / 256MB RAM recommended iTunes: WindowsXP or 2000; MAC OS X v10.1.5 or later Windows Media Connect: Windows XP with Service Pack 2 Musicmatch: Windows 98/SE/Me/XP/2000 (SP3 or above) Rhapsody: Windows 98 or later Optional Accessories Additional Roku Remote Control](https://usermanual.wiki/Roku/R1000/User-Guide-613766-Page-62.png)