Roku R1000 SoundBridge Radio Wi-Fi Music System User Manual SB radio preliminary draft
Roku, Inc. SoundBridge Radio Wi-Fi Music System SB radio preliminary draft
Roku >
Manual

12/12/2005 sb_radio_draft_jmc 1
Welcome
Thanks for purchasing Roku Soundbridge Radio! We hope you enjoy using it as much as
we’ve enjoyed creating it.
Both the Soundbridge Radio alarms are equipped to awake you gradually while the alarm
starts out softly and progresses to a louder sound. You can hit the snooze button with
either alarm. You can start your day with either one of the three alarm buzzers or your
favorite movie from your PC or Mac at home. Once awake, you can listen to AM/FM
stations, play music you have stored on your PC or Mac, or access many of the thousands
of Internet radio stations that broadcast on the web without turning on your computer.
Enjoy!
Register Your Soundbridge Radio!
It’s quick, easy and allows you to receive the latest software updates for the Soundbridge
Radio. Of course, we won’t share your personal information with anyone else.
Visit www.rokulabs.com/support to register your Soundbridge Radio.
Run the Latest Software!
Roku’s media players are designed to be upgradeable in the field, and we are always
working on improving the software for our products. Your Soundbridge Radio has a
menu option to check for, and automatically install, software updates. We recommend
that you install the latest software updates once your system is set up. You can easily do
this from the comfort of your couch, using the Soundbridge Radio remote control. See
“Checking for the Latest Software” on page ___ for details.
Download the Latest User Guide!
When our software changes, so does our user guide. Visit www.rokulabs.com/support to
download the latest PDF version and learn about the latest features.
FCC important Note
ROKU LLC declares that R1000 ( FCC ID: TC2R1000 ) is limited in CH1~CH11 for
2.4GHz by specified firmware controlled in U.S.A.
12/12/2005 sb_radio_draft_jmc 2
Welcome .............................................................................................................................1
Register Your Soundbridge Radio!.....................................................................................1
Run the Latest Software!.....................................................................................................1
Download the Latest User Guide!.......................................................................................1
Introduction.........................................................................................................................6
Before You Begin ...............................................................................................................6
Package Contents ............................................................................................................6
Important Safety Information..........................................................................................7
Music Servers..................................................................................................................7
Music Servers & SoundBridge Radio Features ..............................................................8
Getting Started ....................................................................................................................9
Radio Components ..............................................................................................................9
Radio Buttons................................................................................................................ 10
Radio Display Icons...................................................................................................... 10
Remote Control............................................................................................................. 11
Antennas........................................................................................................................ 13
SD Card Slot ................................................................................................................. 13
Headphone Jack ............................................................................................................ 14
Configuring Your Radio ................................................................................................... 14
Select a Language ..................................................................................................... 14
Select Time Zone ...................................................................................................... 14
Select Geographic Region......................................................................................... 15
Confirm Settings ....................................................................................................... 15
Changing Language, Time Zone, or Geographic Location...................................... 15
Standby Mode ........................................................................................................... 15
Reconfiguring Factory Defaults................................................................................ 16
Checking for the Latest Software...................................................................................... 16
Establishing a Wireless Network Connection................................................................... 17
Identifying your Wireless Network............................................................................... 17
Multiple Wireless Networks ......................................................................................... 18
Entering a Security Key................................................................................................ 19
Troubleshooting Wi-Fi Setup ....................................................................................... 19
12/12/2005 sb_radio_draft_jmc 3
Personal Firewall (iTunes Users)...................................................................................... 19
Installing a Compatible Music Server............................................................................... 21
Instructions for Installing Windows Media Connect .................................................... 21
Instructions for Installing iTunes .................................................................................. 21
Instructions for Installing Rhapsody............................................................................. 21
Instructions for Installing Musicmatch Jukebox........................................................... 22
Enabling Music Sharing.................................................................................................... 22
Instructions for Enabling Windows Media Connect..................................................... 22
Instructions for Enabling iTunes................................................................................... 24
Instructions for Enabling Rhapsody.............................................................................. 24
Instructions for Enabling Musicmatch.......................................................................... 25
Music Library Playback .................................................................................................... 25
Music Library Options...................................................................................................... 26
Playlist........................................................................................................................... 26
Browse .......................................................................................................................... 26
Browsing by Artist, Song or Composer.................................................................... 28
Browsing by Genre ................................................................................................... 28
Browse Server Containers............................................................................................. 29
Search Options .............................................................................................................. 29
Song Queues ................................................................................................................. 30
Building a Song Queue ............................................................................................. 30
Reviewing a Song Queue .......................................................................................... 31
Erasing a Song Queue ............................................................................................... 31
Repeating and Shuffling Music ................................................................................ 31
Now Playing.................................................................................................................. 32
Pausing Music............................................................................................................... 32
Viewing Upcoming Selections ..................................................................................... 32
Skipping Music Tracks .................................................................................................33
Changing Music Libraries............................................................................................. 33
Settings.............................................................................................................................. 33
Visualizer Settings.... ................................................................................................ 33
Return to Now Playing when idle............................................................................. 33
Scroll long info in Now Playing ............................................................................... 33
12/12/2005 sb_radio_draft_jmc 4
?Display composer for classical works....................................................................... 33
Skip items un-checked in iTunes.............................................................................. 33
Change Library or Configuration...................................................................................... 33
Software Version & Updates ........................................................................................ 34
Select WiFi SSID & Password ..................................................................................... 34
Show WiFi Status ......................................................................................................... 34
Network Control ........................................................................................................... 34
Reset to Factory Default ............................................................................................... 34
Restart Soundbridge Radio ........................................................................................... 34
Exit................................................................................................................................ 34
Play AM & FM Radio ....................................................................................................... 34
Play Internet Radio ............................................................................................................ 34
Alarm Clock...................................................................................................................... 34
Clock Settings ................................................................................................................... 35
Radio Brightness, Contrast and Text Display............................................................... 35
Turning Off Your SoundBridge Radio ............................................................................. 36
Roku Radio Web Interface................................................................................................ 37
Now Playing.................................................................................................................. 38
Presets ........................................................................................................................... 38
Configuration................................................................................................................ 40
Date Format............................................................................................................... 40
Time Format.............................................................................................................. 40
Language ................................................................................................................... 40
Status............................................................................................................................. 41
Safe Mode ......................................................................................................................... 42
Geeks — Read This .......................................................................................................... 43
Obtaining Your Wireless Access Point’s Password ......................................................... 44
Apple AirPort (Mac Users)........................................................................................... 44
Apple AirPort (PC Users)............................................................................................. 46
Linksys WAP54G ......................................................................................................... 50
Netgear WG602 ............................................................................................................ 52
Getting Help...................................................................................................................... 54
CUSTOMER SUPPORT .................................................................................................. 54
12/12/2005 sb_radio_draft_jmc 5
APPENDICES .................................................................................................................. 55
End User Software License Agreement........................................................................ 55
Roku Software License .................................................................................................55
Third Party License Information................................................................................... 55
Roku SoundBridge Limited Warranty.......................................................................... 56
FCC Warnings and Safety Information............................................................................ 57
Canada Class B Statement ................................................................................................ 58
VCCI Class B Statement................................................................................................... 58
Safety ................................................................................................................................ 59
Important Safety Instructions........................................................................................ 59
TECHNICAL SPECIFICATIONS ................................................................................... 61
Audio Format Support .............................................................................................. 62
System Requirements................................................................................................ 62
Server Requirements for Streaming Music Stored on Your Computer .................... 62
Optional Accessories.................................................................................................62

12/12/2005 sb_radio_draft_jmc 6
Introduction
Your Soundbridge radio is equipped to not only let you listen to AM/FM and Internet
radio; it also lets you listen to music libraries connected to your wireless network. There
are two snooze alarms and you can reconfigure the display with your remote control or
through the Roku web page.
Your SoundBridge R1000 is not a typical table-top radio. The advanced speaker system
has been designed by audio legend Dr. Godehard Guenther, and delivers unusually
transparent and powerful audio from a system of this size.
You may find when listening to highly-compressed digital music (like 128kbps MP3or
Internet Radio) that the speaker system reveals the audio limitations in the source
material quite clearly. This is not a flaw of the system, but rather a demonstration of the
accurate audio reproduction possible with the R1000. Higher-bit rate audio (192kbps or
greater) using advanced codecs like AAC and WMA should sound very pleasing.
For specific audio format, stereo speakers, subwoofer, protocols supported and server
requirements please see “Technical Specifications” in the Appendices.
Before You Begin
There are a few things we recommend before you get started using your Soundbridge
Radio. First check the contents in your Soundbridge Radio package, secondly, we
strongly recommend that you read all the safety instructions and lastly, read about music
servers and the SoundBridge Radio software music requirements so you can choose
which server that best meets your needs.
Package Contents
Before proceeding, check your package and verify that you received the following items:
• The Roku Soundbridge Radio
• Remote control (two AAA batteries included)
• Power cord
• External AM antenna
• External FM antenna
• User guide
I placed the following illustration instead of an illustration showing the contents of the
package like they do with Bose documentation – you know best.
12/12/2005 sb_radio_draft_jmc 7
Important Safety Information
We recommend that you read the regulated “S afety Information” in the Appendices of
this user guide.
Music Servers
The Soundbridge Radio is a networked music player. That is, it doesn’t store any music.
It plays files that you have stored on a computer connected to your home network. To
play the music files stored on your computer, the Soundbridge Radio needs to receive
data from software installed on the computer that “serves” the music. This “music server”
is responsible for streaming the music to the Soundbridge Radio. It is also responsible for
sending the list of music you have available to the Soundbridge Radio (when asked), and
performing searches of the music library at SoundBridge’s Radio request.
You probably already have a music server but perhaps didn’t realize it. For example,
iTunes acts as a music server when it shares music to another iTunes user on the network.
Microsoft has released its own music server, Windows Media Connect.
The most common music servers are iTunes, Windows Media Connect, and Rhapsody.
But there are others. If you want to use a PlaysForSure music service, you must use
Windows Media Connect. If you want to use the Rhapsody music service, you must use
Rhapsody as your music server. There is no standard for music servers. They are almost
all different. One of the benefits of Soundbridge Radio is that it supports all the common
servers out there with an easy-to-use interface.
Note: For playing back Internet radio using SoundBridge’s “Radio Favorites” library,
you don’t need a music server, because Soundbridge Radio receives the radio stream
directly from the Internet.

12/12/2005 sb_radio_draft_jmc 8
Music Servers & SoundBridge Radio Features
The Roku Soundbridge Radio acts as a remote client for several kinds of music libraries,
including Windows Media Connect, Rhapsody, Musicmatch and iTunes. You can also
play WMA (Windows Media Audio) and DRM WMA files purchased from popular
online music stores such as Napster™. See the following table for music server details.
Select a music server that is compatible with your Soundbridge Radio. Compatible music
servers include iTunes, ® Microsoft® Windows® Media Connect, Rhapsody,™
Musicmatch,® and others. See the following table. Music servers behave differently with
the Soundbridge Radio user interface features.
To experience the full Soundbridge Radio searching and robust browsing modes, you
must use a server that supports these functions, such as iTunes or Windows Media
Connect. You will find that some servers are not equipped for the Soundbridge Radio
search feature and that the browse mode varies by server.
Music Server Recommended
for Users of . . . Notes
Windows Media
Connect (UPnP
Windows Media DRM
10 protocols)
Windows XP with
SP2 A free media server from Microsoft.
Works with any music jukebox, but
optimized for Windows Media Player
v.10. Supports SoundBridge’s full
Browse, Search and Display feature set.
Plays: WMA, DRM WMA, WMA
Lossless, MP3, WAV, playlists created in
jukebox software such as Windows Media
Player 10.
iTunes (Bonjour,
formerly known as
Rendezvous, for
discovery; iTunes
DAAP for
communication)
PC/Mac (1) A free music server and jukebox
software from Apple. Plays: AAC, MP3,
WAV, AIFF (no support for protected
AAC iTunes Music Store files). Also
plays playlists and Smart Playlists created
in iTunes. Built-in Internet radio tuner
streams Internet radio to SoundBridge.
Rhapsody (UPnP and
proprietary Rhapsody
protocol)
Rhapsody
Subscribers Server required for Rhapsody Music
Service, which includes access to popular
music and Internet radio.
Musicmatch
Jukebox(UPnP AV
protocol)
Windows 98
SE/Me/XP/2000
(SP3 or above)
Very popular jukebox software and music
service. Has a built-in UPnP AV server
supported by SoundBridge. You can also
use Windows Media Connect with
Musicmatch, which is more feature-rich.

12/12/2005 sb_radio_draft_jmc 9
Plays: WMA, MP3, WAV (DRM WMA
and Musicmatch playlists supported only
if using Windows Media Connect Server).
(1) iTunes Music Store files (“Protected AAC”) cannot be played. Digital rights-
managed (DRM) files cannot yet be played using a SD/MMC card.
For a more detailed comparison of compatible music servers and links to download them,
visit www.rokulabs.com/products/SoundBrid ge/servernotes.php.
Getting Started
Now that you have checked the packaging, are aware of the safety regulations when
using your Soundbridge Radio and are familiar with the various music servers for the
Soundbridge Radio, this section will tell you how to set up your radio and get your music
server ready.
To use the Soundbridge Radio you will need to:
1. Plug the power cord into the right side of the Soundbridge Radio, then into an
electric AC power outlet. Verify that the Roku logo displays.
2. Put the AAA batteries into your Soundbridge Radio remote control.
3. Establish a network connection. If you are using Wi-Fi and have WEP security
enabled, you will need to enter your security key with the Soundbridge Radio’s
remote control. Either tell them here about networking or refer them to the section
4. Plug in the AM/FM antennas. Be sure to ----- antenna information about correctly
positioning the antennas.
Illustration of the radio set up – include the antennas so they know which is the AM
antenna and which is FM antenna
Automatic Power Up!
There is no power switch to turn on the SoundBridge. As soon as you plug in the power,
you should quickly see the welcome message Roku SoundBridge. You must see a
working display before moving on to the operation of your SoundBridge.
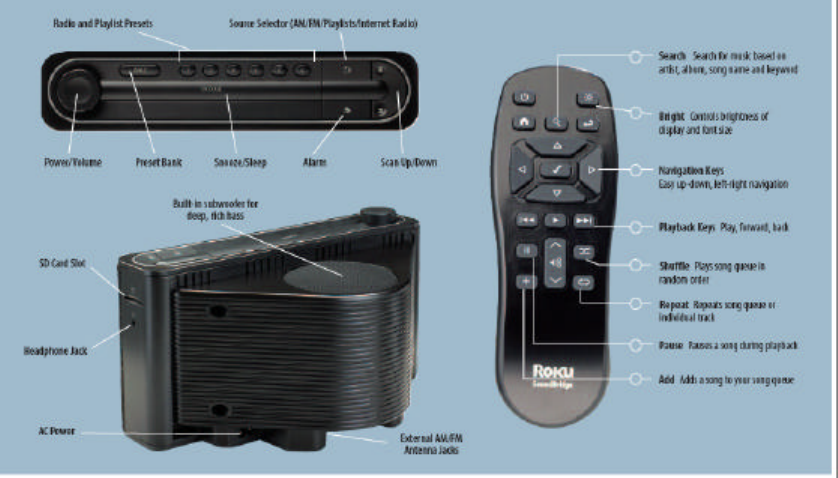
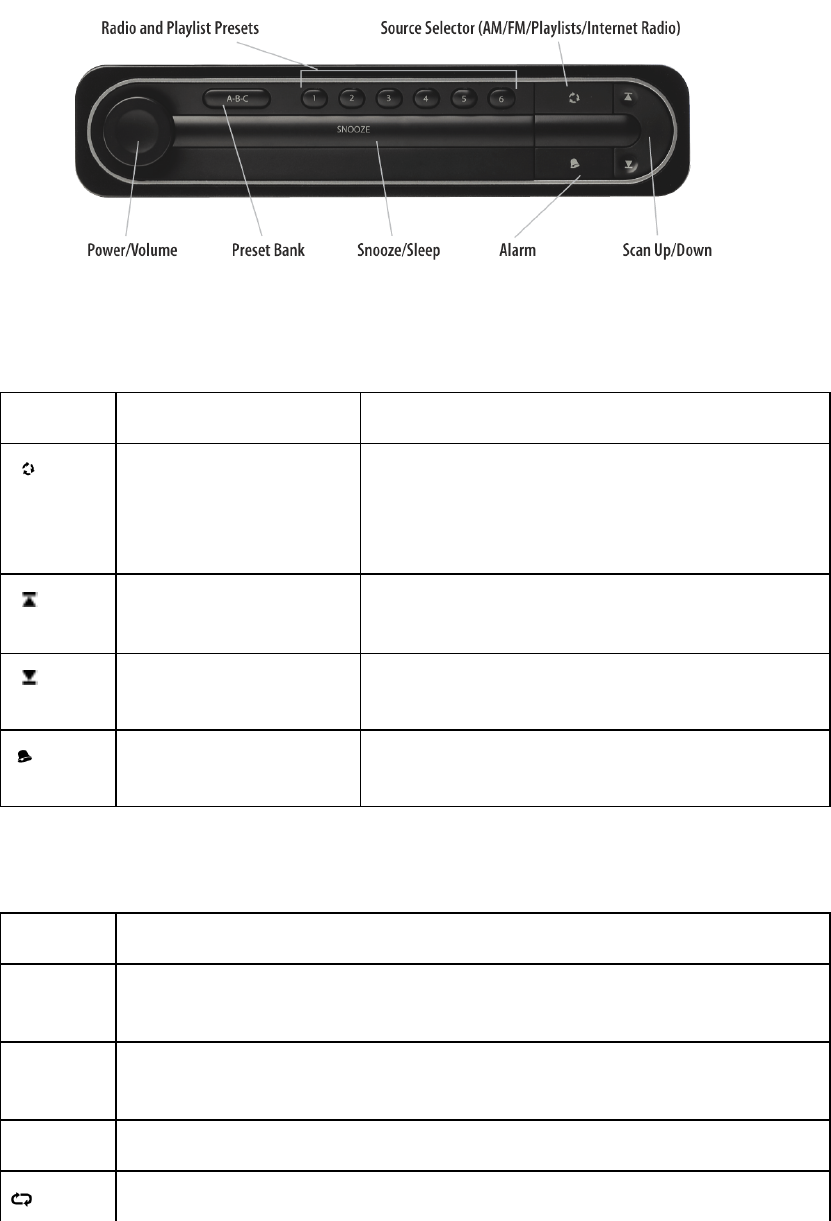
Radio Components
This section describes the radio buttons, remote control, antennas, SD card slot, and
headphone jack.
12/12/2005 sb_radio_draft_jmc 10
Radio Buttons
The following table describes the function of the radio buttons.
Button Name Action
[ ] Use this button to scroll through the Home
menu options. Release the button when the
display shows the selection you are interested in
hearing and the music begins.
[ ] Scan Up Use this button to scroll up for hours, minutes,
AM, PM, ON or OFF set the alarm on or off.
[ ] Scan Down Use this button to scroll up for hours, minutes,
AM, PM, ON or OFF set the alarm on or off.
[ ] Alarm Press this button to show the alarm settings and
to set the alarm. .
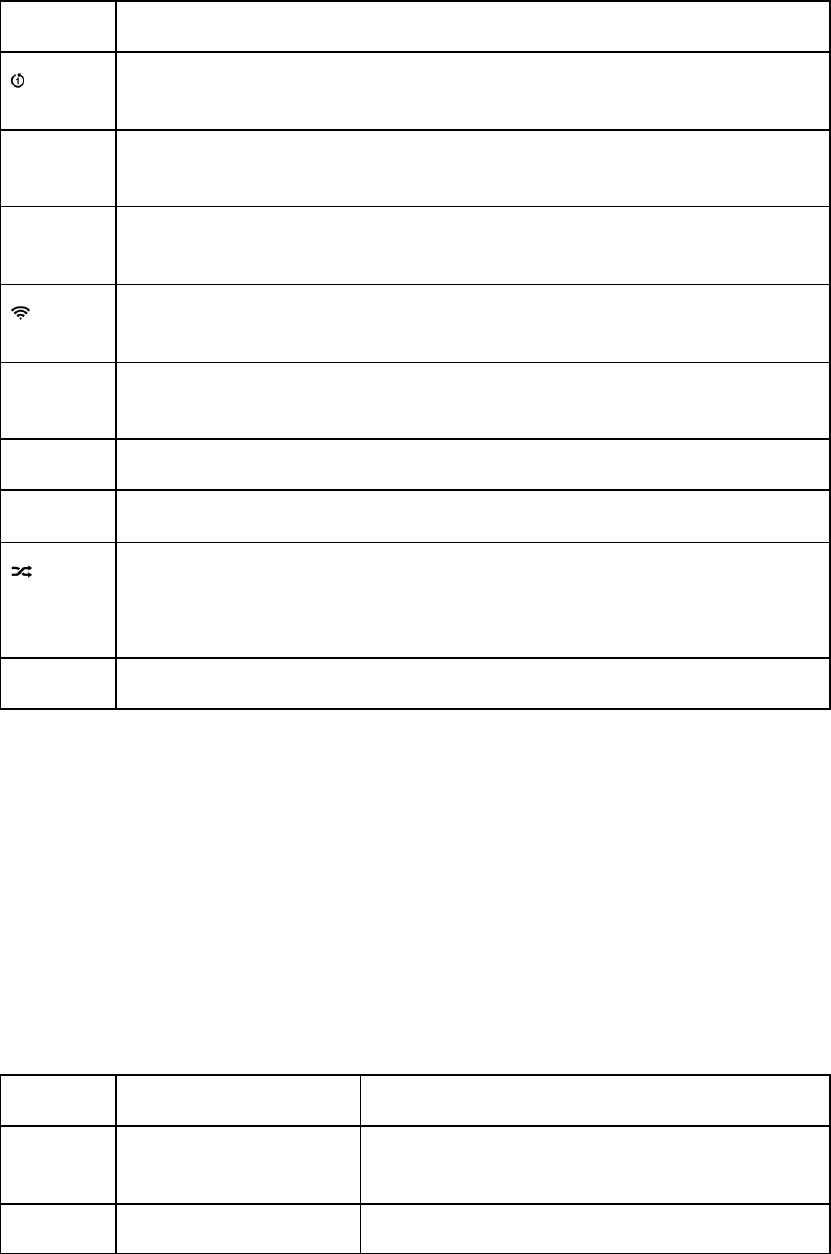
Radio Display Icons
The following table describes the radio display icons.
Icon Description
è The music note icon denotes a single track as opposed to a collection of
tracks.
? The music note icon denotes a single track as opposed to a collection of
tracks.
4 The Play icon indicates SoundBridge is in playback mode.
The repeat icon indicates continuous playback of your Song Queue.
12/12/2005 sb_radio_draft_jmc 11
Icon Description
The repeat single track icon indicates continuous playback of the currently
playing track
X)) The speaker with audio waves shows current song playing in the “Song
Queue” menu.
X The speaker without audio waves, shows current song paused in the
“Song Queue” menu.
The upward facing radio transmission signal indicates an Internet radio
station
Ï The padlock icon indicates secure AAC songs purchased from the Apple
Music Store; these songs are not available for playback by SoundBridge.
; The Pause icon indicates playback has been paused
< The Stop icon indicates playback has been stopped
The Shuffle icon (with two crossed arrows) indicates playback of your
Song Queue is happening in random order.
X The “X” icon indicates an unsupported file format.
Remote Control
Your Soundbridge Radio remote control can adjust the volume, scan through the music
on your music servers, search for radio stations, and navigate the Soundbridge Radio
menu selections. Simply point the remote control in the direction of your Soundbridge
Radio unit, much like you do with your TV remote control.
Note or warning icon : Make sure the screen of the radio is not blocked by a nearby
object.
The follo wing table describes the function of the remote control buttons.
Button Name Action
56 Up and Down Pressing this button takes you through a list
item by item.
34 Left and Right Pressing these buttons allow you to “fast

12/12/2005 sb_radio_draft_jmc 12
Button Name Action
browse.” For example, when browsing for an
artist alphabetically, you can skip to the next (or
previous) letter. If searching in a list that is not
arranged alphabetically, you can skip by about
5% either way in the list.
è Arrow This icon on your radio display shows which
item is selected.
[v] Select Pressing this button selects the item displayed
on your radio screen. Press this button when
prompted to Continue. Pressing the Select
button is much like clicking your mouse on a
highlighted item.
When you can go no lower in your menu
structure, the Select button calls up options to
start song playback.
[4] Play Pressing this button begins playback of your
current selection.
[;] Pause Pressing this button pauses the playback file
currently playing.
[+] Add Pressing this button adds your current selectio n
to the end of your Song Queue.
: 9 Next Track and
Previous Track Pressing these buttons advance forward or
move backwards one song at a time in your
Song Queue.
[ ] Home menu Pressing this button takes you to the Home
menu.
[ ] Search Pressing this button takes you to your text-
based search options.
[ ] Exit Pressing this button takes you one step
backward. The Exit button works much like the
BACK button on your Internet browser.
Pressing the Exit button repeatedly displays
information about the song currently playing
(“Now Playing”).

12/12/2005 sb_radio_draft_jmc 13
Button Name Action
[ ] Standby Pressing this button logs you out of the music
server software running on your computer.
[¤] Adjust Display Pressing this button adjusts brightness and the
size of information on the display. This button
only works when using music libraries.
X)) Volume Press the up icon to increase the volume and the
down icon to lower the volume.
: 9 Next Track and
Previous Track Pressing these buttons advance or retreat
playback of your Song Queue one song at a
time.
Shuffle The Shuffle icon (with two crossed arrows)
indicates playback of your Song Queue is
happening in random order.
q Repeat The repeat icon indicates continuous playback
of your Song Queue.
Repeat – Single track
The repeat single track icon indicates
continuous playback of the currently playing
track.
X Not Available The “X” icon indicates an unsupported file
format.
Antennas
Placeholder - Do you want to tell them any specific thing about the two antennas?
SD Card Slot
The SoundBridge comes with a SD/MMC (Secure Digital MultiMedia Card) card slot for
playing offline digital music files. To play music from an SD card, follow these steps:
1. Insert your SD card in the slot on the right side of the SoundBridge Radio.
2. Press the Source button [ ] on the SoundBridge Radio until the SD Card
displays.
3. Use the Scan Up [ ] or Scan Down [ ] buttons on the radio or the Up and
Down [56] buttons on your remote control to move between files (tracks).
12/12/2005 sb_radio_draft_jmc 14
Headphone Jack
For private listening, connect headphones to the headphone jack on the back of the
SoundBridge. The speakers are automatically muted when you plug in headphones. To
change the volume level of the headphones, use the volume knob on your radio or the
volume buttons on the remote control.
You won’t miss your alarm! The alarm is designed to sound from the built-in speakers
even if your headphones are connected.
Illustration showing the side view of the radio
Configuring Your Radio
To personalize your configuration, the SoundBridge Radio display prompts you for
answers to a series of questions. See “About Your Remote Control” on page __ to learn
how to use your remote control to make configurations selections.
Select a Language
After seeing the Roku logo, you will be asked to choose a language. Use the remote
control Up and Down 56 buttons to find the language of your choice.
è English
Deutsch
Press the Select [v] button.
Select Time Zone
Next you will see the following;
“On the next screen, please select your time zone. Having the correct time zone set will
allow the Soundbridge to automatically set its internal clock over the Internet.
è Continue ?
Press the Select [v] button. You will see the following:
è US Eastern Time
US Central Time
Use the remote control Up and Down56 buttons to find your time zone and then press
the Select [v] button.

12/12/2005 sb_radio_draft_jmc 15
Select Geographic Region
You are prompted to select a geographic location. You will see the following:
“In order to configure WiFi for your Soundbridge, on the next screen you must specify
the geographic region in which it will be operated. Please note that selecting an incorrect
location may violate local laws.”
è Continue ?
Press the Select [v] button. Next, you will see the following
è USA
Australia
Use the Up and Down [56] buttons to find your geographic region and then press the
Select [v] button.
Confirm Settings
Press the Select [v] button to continue and confirm the settings you have selected. A
message displays telling you that initial setup is complete.
Changing Language, Time Zone, or Geographic Location
You will see the following message:
“Press the Exit or Back button to make changes to language, time zone or geographic
location.” Continue pressing the Exit or Back button to find the screen/display with the
selection you wish to change.”
At this time, you can change any of the settings you have selected. You can retrace your
steps with the Exit [ ] button. The Exit button works much like the BACK button on
your Internet browser. You can also reset your personal configurations by resetting your
radio to the factory defaults.
Press the Select [v] button when you are finished.
The network starts, looks for a wireless connection, and then configures your radio. Once
completed, the Home menu appears. You are now ready to choose music from your
music library.
For More Information: See “Restoring Factory Default Settings.”
Standby Mode
You will see the following message:
“In Standby Mode, your SoundBridge can display the time and date. While in Standby
Mode, the left and right arrows adjust brightness and the up and down arrows change
display formats. Turn brightness down until you see “Standby” to disable the clock.”
Use the Left [ ] button to select Yes.

12/12/2005 sb_radio_draft_jmc 16
Upgrade successful
Select OK to reboot
Contacting Server
Reconfiguring Factory Defaults
You can clear all the settings you have by following these steps.
Press the Home menu button.
Use the Up and Down 56buttons to Reset to Factory Defaults and press the Select [v]
button. You are asked if you want to clear stored preferences.
Use the Left [ ] button to select Yes.
Checking for the Latest Software
Updating your software is quick and easy. The home network you are using with your
Soundbridge Radio needs to be connected to the Internet through a high-speed connection
such as DSL or cable modem. To make sure you have the latest version of the
Soundbridge Radio software, Follow these instructions:
1. Make sure your Soundbridge Radio is connected to a home network with Internet
access.
2. Press the Home Menu [] button on the remote control.
3. Navigate down to System Configuration and press the Select [v] button.
4. Navigate down to Software Version and Updates and press the Select [v] button
You will see your current software version and be given the option to check for a
software update.
7. To check for software updates, choose Yes.
8. You should see a display with a progress bar.
9. You will then see one of the following two messages:
a. Your software is up to date
In that case you don’t need to do anything. Press the Select [v] button to accept
this message and return to the previous System Configuration menu. Press Exit
[?] to return to the Change Library menu, navigate to the music library you
want to play, and press the Select [v] button.
b. If your software requires updating, you will be prompted to download the update.
Select Yes. After the contacting server message, you will see the following
message:

12/12/2005 sb_radio_draft_jmc 17
Press the Select [v] button.
A message displays telling you that your radio is rebooting.
Note: Check the Roku website for the latest version of the Soundbridge Radio user guide.
When new functions or features are added to the SoundBridge Radio software, Roku
updates a PDF version of the user guide for download. Please visit
www.rokulabs.com/support for the latest version of the user guide.
Establishing a Wireless Network Connection
If you have a Wi-Fi network in your home, with no security keys set, Soundbridge Radio
will automatically connect to your wireless network. If Soundbridge Radio detects more
than one Wi-Fi network, you will be asked to select which SSID (Service Set Identifier)
you want to use.
You will only be asked to select an SSID if you have more than one wireless network or
if your neighbor’s wireless signal is leaking. See “Multiple Wireless Networks” for more
information.
If you have a security key for your WiFi network, see “Entering a Security Key,”
When your connection is not established, your display will look the following:
No music libraries found (why?)
System Configuration – Identifying your Wireless Network
Make sure your server is running and music sharing is enabled. To check your network
connection, do the following:
1. From the Home menu, choose System Configuration and press the Select [v]
button.
2. Scroll down to Show Wi-Fi Status and press the Select [v] button. If connected,
a message displays telling you that your wireless network is connected
For More Information: See the “Troubleshooting WiFi Setup” section of this user guide
or visit www.rokulabs.com/support for help if you are still having trouble connecting to
your music library.
Identifying your Wireless Network
Before you can begin to access the music you have stored on your network computers,
you will need to identify your wireless network. To identify your wireless network, do
the following:
From the Home menu, use your remote control to scroll down to System Configuration.
Play Internet Radio
èSystem Configuration

12/12/2005 sb_radio_draft_jmc 18
Press the Select [v] button. Your display will look like this:
Scroll down 56to Select Wi-Fi SSID & password. Press the Select [v] button.
The SoundBridge Radio searches for your wireless network as shown below. You will
see the following message:
The name of your network displays.
Multiple Wireless Networks
If you have more that one network, scroll down to select which wireless network
you choose for the SoundBridge Radio and press the Select [v] button.
è< Name of your network>
Specify a wireless network…
Looking for wireless networks…….
Software version & updates
Select Wi-Fi SSID & password
Show Wired Ethernet status
Show Wi-Fi status
Software version & updates
Select Wi-Fi SSID & password
Show Wired Ethernet status
Show Wi-Fi status

12/12/2005 sb_radio_draft_jmc 19
You can also enter the name of a wireless network. To enter a network name, follow
these steps:
1. From Select WiFi SSID and Password, select Specify a wireless network and
press Select [ ].
2. Use the Right and Left [ ] buttons to find letters, number, spaces in the wireless
network name you are entering and then press Select [v] for each letter, number,
and space you choose.
3. Use the Up and Down [ ] buttons for OK, space, delete, commas, periods, accent
letters, numbers, uppercase or lowercase letter.
For More Information: For additional help connecting to your network, including
password help, see Obtaining Your Wireless Access Point’s Password.
Entering a Security Key
If you have a security key, you will need to enter your WEP [Wired Equivalent Privacy
(802.11 encryption protocol) ] key. This is the same key you have entered into your
Access Point and your computer.
To find more information about your Access Point, see “Obtaining Your Wireless Access
Point’s Password.”
Troubleshooting Wi-Fi Setup
If you have problems connecting the Soundbridge Radio to your music library, please
check the following:
• Is Soundbridge Radio within range of your wireless network signal?
• Performance varies depending on wireless network hardware, physical barriers
such as walls, and signal interference.
• Is your computer on and is your wireless access point plugged in?
• Is your music server software running on your computer? Is your music sharing
options enabled? See the “Enabling Music Sharing” section for more information.
• If you have a password, did you enter your password correctly including case
sensitive characters?
For more information, visit our FAQ and User Forum at www.rokulabs.com/support
Personal Firewall (iTunes Users)
If you have trouble connecting and your computer has a firewall installed, make sure
your firewall is configured to allow iTunes music sharing by doing the following.
Mac user:
1. Open System Preferences.
2. Select Sharing and click the Firewall tab.
12/12/2005 sb_radio_draft_jmc 20
3. Select the iTunes Music Sharing option.
4. Restart your radio by pressing the radio Power [ ] button or using the remote
control. To restart your radio with the Remote control, follow these steps:
a. Press the Home Menu [ ] button.
b. Scroll down to System Configuration and press Select [v].
c. Scroll down to Restart Soundbridge Radio and press Select [v]...
PC user:
1. Refer to your firewall’s documentation for opening incoming ports.
2. Configure your firewall to allow incoming connections on port 3689.
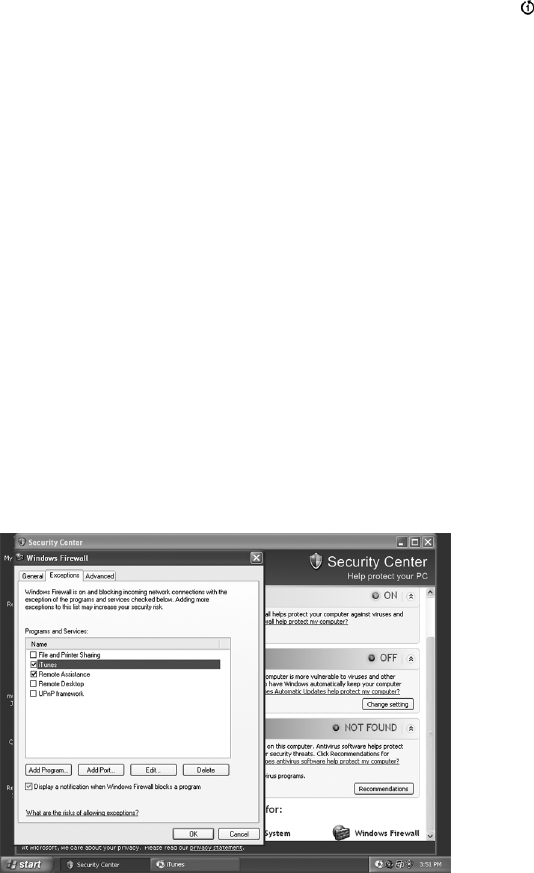
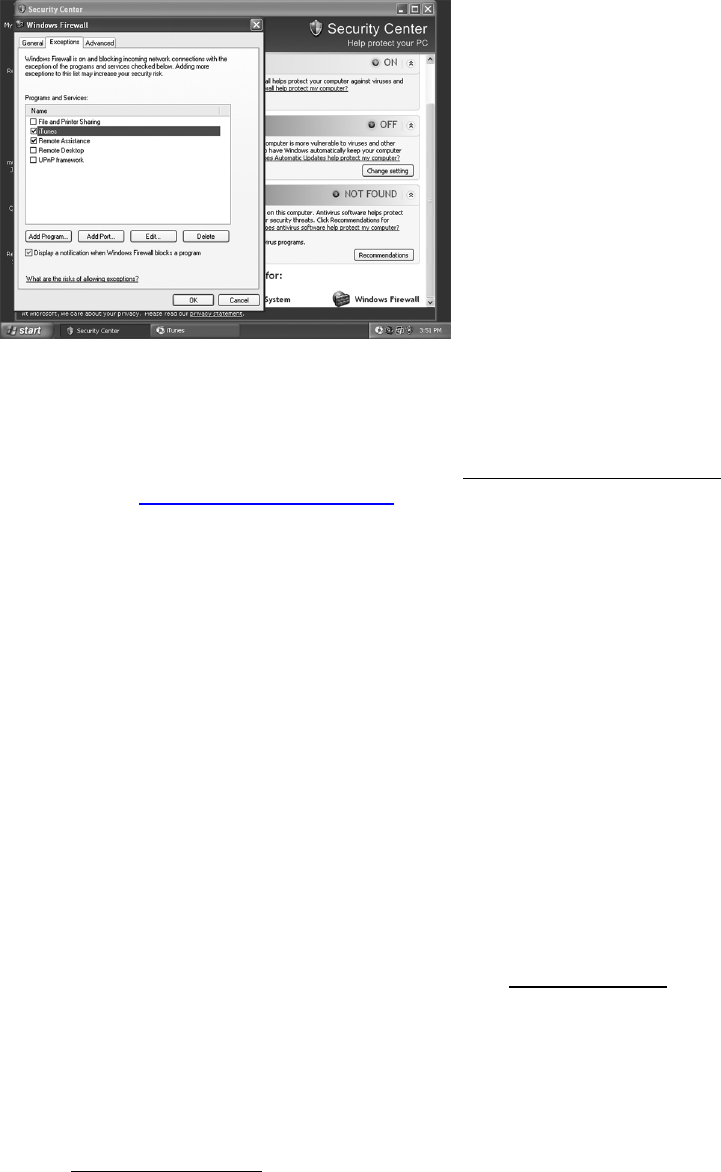
WindowsXP Service Pack 2 users:
5. Open Security Center and click on Windows Firewall located on the bottom right
of the window.
6. In the window that pops up, click on the Exceptions tab.
7. Verify that iTunes appears in the list of Programs and Services. If iTunes is not
listed, select the iTunes check box.
8. Click Add Program and then click OK.
9. After these changes have been made, restart your radio by pushing the Power
button [ ] or using your remote control. To restart your radio with the Remote
control, follow these steps:
d. Press the Home Menu [ ] button.
e. Scroll down to System Configuration and press Select [v].
f. Scroll down to Restart Soundbridge Radio and press Select [v].
12/12/2005 sb_radio_draft_jmc 21
Note: You can also unplug your radio from the electric outlet to restart your radio.
For More Information: For additional help with Firewall troubleshooting, please visit
the troubleshooting section of our support area at www.rokulabs.com/support or visit our
user forums at www.rokulabs.com/forums.
Installing a Compatible Music Server
To access network music sharing, you first need to install a music server.
Instructions for Installing Windows Media Connect
1. If not already installed, download Windows XP Service Pack 2, a free download
from Microsoft or by using Windows Update Installer.
2. If not already installed, download the latest version of Windows Media Player,
v.10, a free download from Microsoft or by using Windows Update Installer.
3. If not already installed, download Windows Media Connect, a free download
from Microsoft, or by using Windows Update Installer.
4. Continue to “Instructions for Enabling Windows Media Connect.”
Instructions for Installing iTunes
1. If not already installed, download iTunes from www.itunes.com. Soundbridge
Radio requires v. 4.0 or later.
2. Continue to “Instructions for Enabling iTunes.”
Instructions for Installing Rhapsody
1. If not already installed, download Real Networks’ Rhapsody client from
www.rhapsody.com.
2. Continue to “Instructions for Enabling Rhapsody.”
12/12/2005 sb_radio_draft_jmc 22
Instructions for Installing Musicmatch Jukebox
1. If not already installed, download a free version of Musicmatch Jukebox 9.0 on
your PC from www.musicmatch.com.
2. Continue to “Instructions for Enabling Musicmatch Junkbox.”
Enabling Music Sharing
After installing a music server, you need to enable your music server so you can access
music library playlists stored on your networked computers.
Instructions for Enabling Windows Media Connect
To authorize the Soundbridge Radio as a permitted client for Windows Media Connect,
follow these steps:
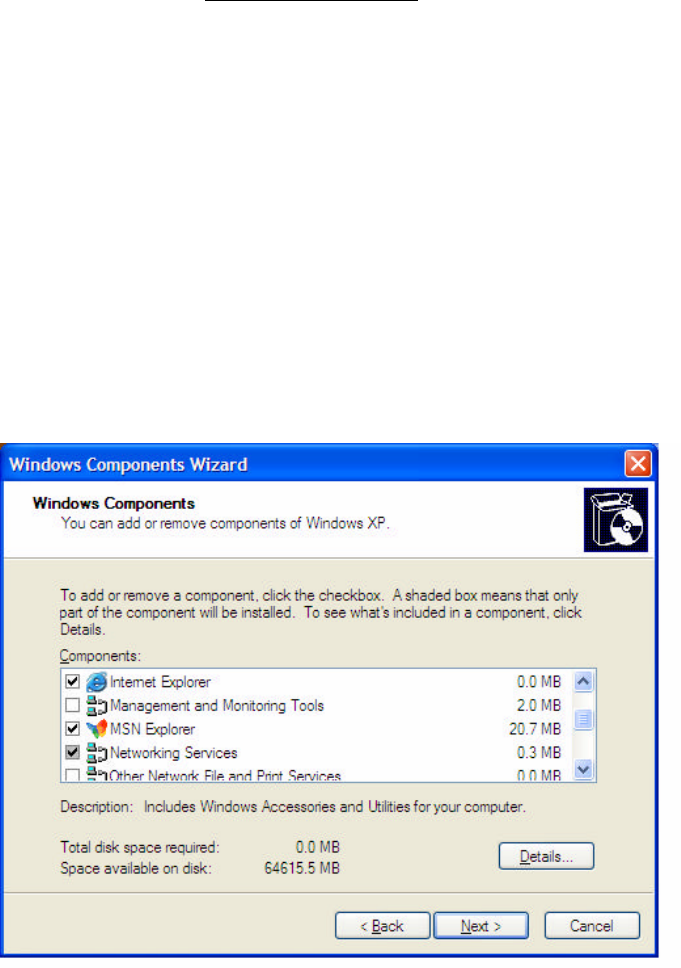
1. From the Control Panel, Click Add or Remove Program.
2. Click Add/Remove Windows Components.
3. From the Windows Component list, select Network Services and then click
Details.
4. Select the UPnP Interface check box.
12/12/2005 sb_radio_draft_jmc 23
5. Click OK and then click Next.
6. The Configuring Window appears. When the configuration is completed, click
Finish. The Soundbridge device appears in the notification area in the bottom-
right corner of the window.
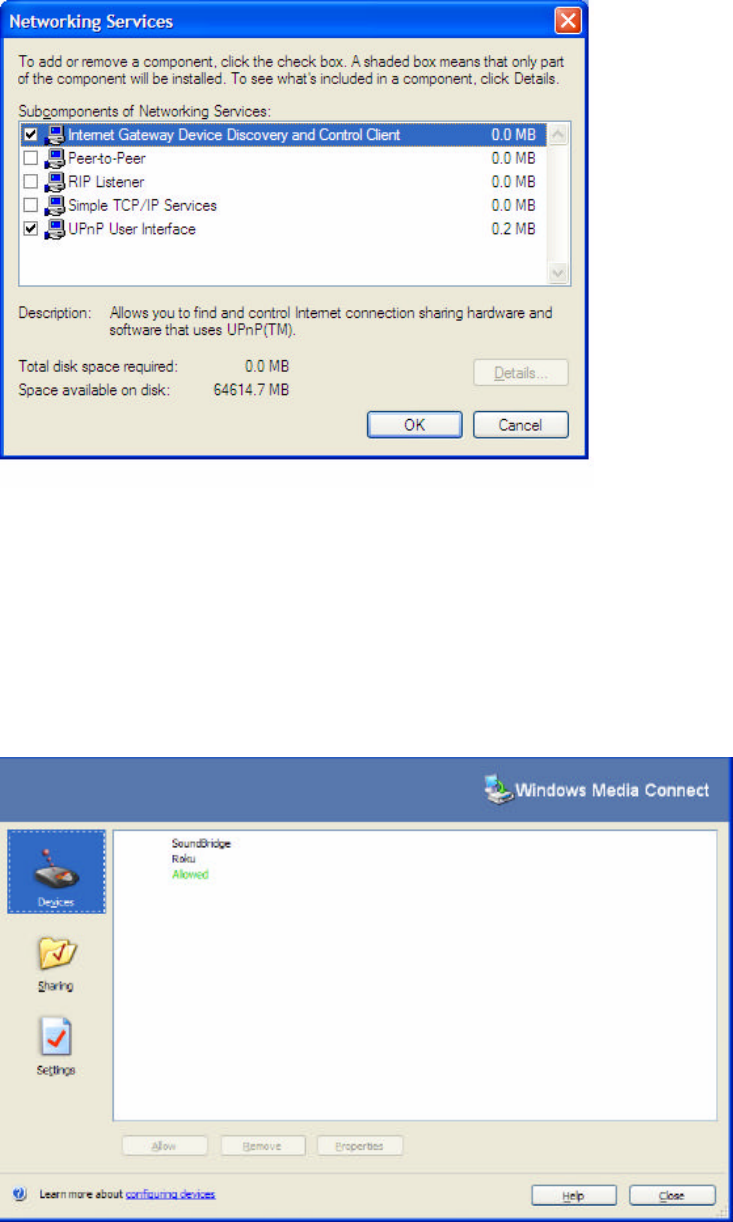
7. Click the Soundbridge icon. Windows Media Connect displays and prompts you
to allow file sharing.
8. Click on Soundbridge Radio (denied) New and then click Allow. Windows
Media Connect authorizes the Soundbridge Radio as shown below.
12/12/2005 sb_radio_draft_jmc 24
9. Click Close.
10. Navigate to My Network Place.
11. Double-click the Soundbridge icon. You can now ready to share music libraries
and access the Roku web pages to control radio functionality.
For More Information: See “Music Library Playback” and “Roku Radio Web Page s”
Instructions for Enabling iTunes
To turn on the Music Sharing option,
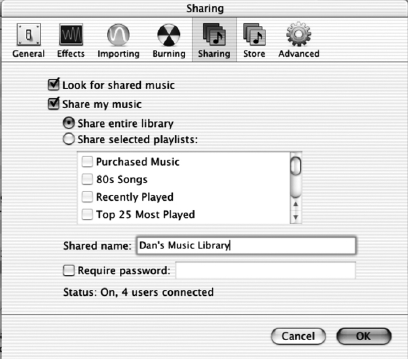
1. Select iTunes/Preferences menu (Mac) or Edit/Preferences (PC).
2. In the dialog box that appears, click the Sharing tab.
3. Verify that the Share My Music option to enable sharing on your local network.
Note: Do not quit iTunes, or you will break SoundBridge’s connection to your iTunes
library.
Instructions for Enabling Rhapsody
1. Make sure the Rhapsody application is running,
2. Select User Settings from the Options menu.
3. Navigate to the UPnP tab, and then click Start to start the server.
4. Select the Start UPnP server once logged in option so that the server start each
time you run the Rhapsody application.
Your Rhapsody server should now appear in your list of music servers on the
SoundBridge, and you will be able to play all your songs and Rhapsody radio stations.
12/12/2005 sb_radio_draft_jmc 25
Play Dan’s Music
èPlay Joe’s Music
Instructions for Enabling Musicmatch
1. Select Options/Settings.
2. Click the CD Lookup/Connectivity tab.
3. Select Enable Music Server and then select Universal. Plug and Play. You can
close Musicmatch if you like — the UPnP server will keep running in the
background.
Music Library Playback
Once the Soundbridge Radio is successfully connected to your network and your server’s
music sharing options are enabled, Soundbridge Radio will automatically find your
computer’s music server and detect any supported music libraries. Soundbridge takes you
to the Home menu which lists all the music libraries that are connected to your network.
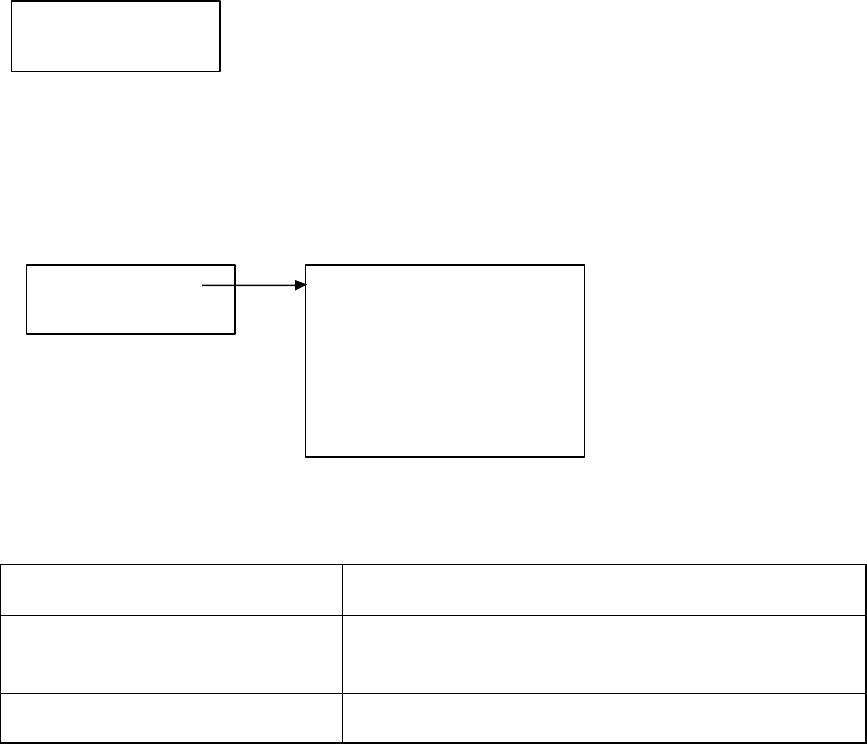
Only the first two lines of the Home Menu are displayed at once. The scroll bar on the
right moves as you scroll below your current display view. The Home menu display
looks similar to the following:
Use the Up and Down [ ] arrows to choose one of the music libraries on your network.
The [è] arrow points to each of the available options as you scroll down the list. Once
you find the library you are interested in, press the Select [ ] button. A list of options will
appear on the display.
The following table describes each of the music library options.
Option Description
Playlist Displays all the playlists available for the selected
music library from your network.
Browse Browse the music library by artists, album, songs,
Music Library Options
Home menu
Play Dan’s Music
èPlay Joe’s Music
Playlist
Browse
Search
Show Song Queue
Now Playing
Settings
Change Library or Configuration

12/12/2005 sb_radio_draft_jmc 26
genres, and composers.
Search Search the music library by titles, albums, artists,
composers, and keywords.
Show Song Queue Shows a list of songs you created in your song
Queue.
See the “Song Queue” section for more information.
Now Playing Shows the current song playing.
Settings You can change visualizer settings when music is
playing, set how the radio behaves when idle
customize the way music information appears on
your radio display, display classical composers, skip
items unchecked in iTunes, and memorize the radio
playlist.
Change Library or Configuration Use this option to return to the Home menu where
you can switch to another music library, play
AM/FM and Internet radio, or change system
configurations.
Music Library Options
This section describes how to use each of the music library options.
Still working on this section…
Playlist
Let’s say you have created a playlist of your favorite Disco hits in your music jukebox
software, and named it DISCO INFERNO. Press the Home Menu [ ] button to navigate
to the Home Menu. Navigate to Playlists and press the Select [ ] button. Use your
Up/Down arrows to browse your playlists one by one, find the one called DISCO △ ▽
INFERNO, then press Play [?] to play all songs on the playlist immediately or Add [+]
to add the playlist to your Song Queue.
Hint: If your playlist was created in Windows Media Player or other software using
Windows Media Connect, be sure to save your playlist in the My Music/My Playlist
folder on your hard disk.
Browse
You can browse your music library by artist, album, songs, genres, and composers. To
use the Browse option, press the Down button until you see the B▽rowse option
12/12/2005 sb_radio_draft_jmc 27
highlighted and press Select [ ] on your remote control. You will see a listing of browsing
options:
?èBrowse artists
Browse album
If you scroll down, you will see the other browsing options:
Brow se songs
Browse genres
Browse Composers
Browse Server Containers
If you navigate to the Browse Albums option and press Select [v], you will see an
alphabetical listing of albums found in your music library. The screen will look
something like this:
è? ?Parachutes
? Paul’s Boutique
Navigate to the album that you want to hear using the Up/Down arrow buttons △ ▽ —
in our example, “Parachutes.” When the album you want is selected, press the Select [v]
button for a listing of songs found on this album.
The music note next to each song name indicates the selection is an individual track
(and not a playlist, album or other collection of songs). Please note that songs purchased
from the Apple Music Store will be denoted in the display with a padlock ?icon.
SoundBridge is not able to play back these “locked” files — they will simply be skipped
over during playback.
è?? Don’t Panic
? Shiver
Use the Up/Down arrows again to highlight the song you want to play. Press the △ ▽
Play [?] button to start that song playing. When the song begins playback, the display
will switch to the “Now Playing” display, which looks something like this:
Don’t Panic 0:10/2:17 4
Coldplay Parachutes (2000) (|||------)
The artist and album information may be abbreviated, or appear one line at a time, if the
total number of characters exceeds what can be displayed at once.
For More Information: See the “Settings” section.
You can also navigate to an album, artist, or genre selection while browsing, then press
Play [4] to start playing the entire contents of the selected category.
Note: This feature will not work if using a non-search-capable UPnP music server.
12/12/2005 sb_radio_draft_jmc 28
Browsing by Artist, Song or Composer
From the Home menu, navigate to Browse and press the Select [v] button. Navigate to
Browse Artists and press the Select [v] button. Your display will look something like
this:
?Annie Lennox | ? <A>
Ben Folds Five ?
Find the artist you would like to play and press the Select [v] button. You will see a
display listing the albums available by that artist:
?<Show all matching songs> |
Medusa
While the first menu option <All matching songs> is active, press Add [+] to add this
selection to your existing Song Queue, or press Play [v ] to play all songs by this artist
instead and replace your existing Song Queue.
Songs play in the order they appear on each album. Each album plays in alphabetical
order.
Hint: Artist names starting with the word “the,” such as the Beatles, will be found under
the first letter of the word following the word “the” — in this case, “B” for “Beatles.”
You can choose specific albums or songs to play by navigating to your desired album and
pressing Add [+] to add to an existing Song Queue, or Play to replace an existing Song
Queue.
Note: if your selected album contains songs by different artists, such as compilation
albums or movie soundtracks, only the song(s) by your artist will be played.
Hint: To browse faster, instead of using the Up/Down arrows , you can “speed △ ▽
browse” through your lists by pressing the Left/Right arrows ? ?. This will browse by
the letters of the alphabet.
Note: The search function is a string search — “RA” will return not just Radiohead but
other words containing the string, such as Shakira and Franz Ferdinand.
Browsing by song or composer works the same way as browsing by artist.
Browsing by Genre
From the Home Menu, navigate down to the BROWSE option and press the Select [v]
button. Scroll down to “Browse Genres” and press the Select [v] button. You will see an
alphabetical listing of genres that are available in the music library that you are browsing.
To add all songs within a Genre to your Song Queue, highlight that Genre and press Add
[+] (or the Select [v] button] to open additional options for playback).
To browse within a genre, such as Hip Hop/Rap, press the Select [v] button on your
desired genre. You will have the option to see all available artists in that genre, and a list
of individual albums by those artists. At any point, you can press Add to add that
selection to your Song Queue or press the Select [v] button to navigate to the next level
of detail.
12/12/2005 sb_radio_draft_jmc 29
Hint: Information about your music, including Song Name, Artist, Album, and Genre is
usually created automatically by the software you used to save your audio CD files on
your computer’s hard drive (also know as ripping). This process creates data called “ID3
tags” to describe each track. If this data is missing from your audio files, they will not
appear when you browse by that data category. If you need to edit your ID3 tags, or if
you are not satisfied with the description of genres (or other data) assigned to your music
file, it is possible to edit that data in iTunes, Windows Media Player or other supported
music jukebox programs.
Note: In iTunes, select the file(s) to edit, click on File/Get info, and then click on the Info
tab).
Browse Server Containers
This in new from when I was in the office. I came across it yesterday. I do not know what
this is…placeholder
Search Options
To search for a specific selection by spelling it out, you can press the Search [?] button
on your remote control, or navigate down to the “Search” option from the Home Menu.
Either way, you will have the following options:
Search for albums
Search for artists
Search for titles
Search keywords
Press the Select [v] button on the option you would like to search with. Then, use your
Left/Right ? ? arrows on the remote control to enter characters for spelling your
selection and then press the Select [v] button. When you are done spelling, use the Down
button to go to the OK option and press the ▽Select [v] button. If you make a mistake,
use the Down button to go to the Delete option and press the ▽Select [v] button.
Hint: Partial spelling is OK — the Search function searches for letters anywhere in the
word, as opposed to just at the beginning. For example, to search for Radiohead, you can
enter any combination of letters found in the word (“RA,” “DI,” “HE,” etc.), and the
results will return all Artists containing those letters (e.g., if you enter “DI” you’ll get
Radiohead, India Arie, and Diana Krall).
When you find the music you like, use the Add button to add it to your Song Queue. If
searching for albums or artists, you can press the Select [v] button to navigate down one
level to individual tracks.
If an exact match is not found, your results will show an empty search.
12/12/2005 sb_radio_draft_jmc 30
Song Queues
SoundBridge Radio automatically builds a Song Queue every time you select a song or
album to play. You can also have the Soundbridge Radio play a set of selections you
choose. This section will tell you how to build a song queue, review a song queue and
erase a song queue.
Building a Song Queue
Let’s say you would now like to choose several different songs or selections to play in a
row. This is called building a “Song Queue.” SoundBridge automatically builds a Song
Queue every time you select a song or album to play. You can add to that list by
navigating to your preferred music and pressing Add [+]. The selection will be added to
the end of the current Song Queue.
You may add a single song, an entire album, all songs by an artist, all songs in a genre, or
any search result — just browse to the selection you prefer and press Add. For example,
if you would like to play all songs by Coldplay, select the “Browse artists” option from
the Home Menu/Browse option. Navigate to Coldplay in your artist list, and press Add.
All songs on all albums by Coldplay will be played by album, in the order they appear on
each album. For more information about browsing and searching options, see the
“Browsing” and “Searching” sections later in this user guide.
You have several other options for building a Song Queue. After you press Select while
browsing on a song, a “Song” menu appears with the following options:
• Play, starting with the selected song (and clear previous Song Queue)
• Get information about the selected song
• Play the selected song only (and clear previous Song Queue)
• Add this song to the Song Queue (same as pressing the Add button)
Note that both “play” options 1 and 3 above are “destructive”; they will clear your
previously existing Song Queue. The “add” option, however, will add the selected song
to the end of your existing queue.
The first, “play these songs” option is described in the section above — it starts playing
your album (or other browsed list), beginning with the current track.
If you choose “Play songs” on any track in your selection, the entire list is added to the
Song Queue, but playback starts on the chosen track. If you have the Repeat [] option
selected, the earlier tracks in the queue will play after the last song (and so on
indefinitely). If you have the Shuffle [] option selected, then the chosen track will play
first, followed by all the other tracks in the list in random order.
The “Add song to Song Queue” option behaves similarly to the Add button— it places
the current song at the end of your playlist.
You can add an almost unlimited number of songs to your Song Queue. Each selection
will be played in the order it was entered (unless you have chosen to Shuffle your Song
Queue).

12/12/2005 sb_radio_draft_jmc 31
Hint: After you have selected multiple songs to be played in turn, you can use the Next
Track ?and Previous Track ?buttons to skip from song to song in your Song Queue.
Reviewing a Song Queue
At any point, you can review your Song Queue by pressing the down arrow ?from the
Now Playing screen, which is the default screen that appears while SoundBridge is
playing. The Now Playing screen looks something like this:
Don’t Panic 0:10/2:17
Coldplay Parachutes (2000) (|||------)
You can also press Exit [?] several times from any point in your browsing; eventually,
the Now Playing screen appears.
Alternatively, you can press Home Menu [], then select the “Show song queue” option.
You will see the entire list of songs in your song queue; refer to the scroll bar on the right
side of the screen to determine where in the list you are located. Press the Up/Down
arrows to see the entire list of selections in your Song Queue. The cu△ ▽ rrently playing
selection is indicated by a speaker ?icon.
You cannot save a Song Queue that you have created — it’s only held in memory
temporarily and then erased when you build your next Song Queue. If you would like to
build a Song Queue that you can save and recall at will, please build a Playlist in your
music jukebox software (see “Playing a Saved Playlist” below).
Erasing a Song Queue
If you change your mind and decide you don’t want to play the Song Queue you’ve just
created, simply select something else to play. This will Navigate to another selection
(song, playlist, etc.) and press Select [v] instead of Add [+]. This selection immediately
replaces your old Song Queue.
Repeating and Shuffling Music
Pressing Repeat [q] once makes your Song Queue play continuously. You will see the
Repeat icon q? on the right side of your display below the Play [4] ?icon. Pressing Repeat
again makes the current song play over and over; you will see another Repeat icon [ ], a
circle with just one arrow [ ]. Press Repeat a third time and you will remove the repeat
command altogether.
Pressing Shuffle [ ] while playing a Song Queue will give you the following options:
Shuffle On — will play everything in your Song Queue in random order. The shuffled
order of songs will be displayed in the Song Queue. An icon with two crossing arrows
will appear on your radio display.
Shuffle Off — will play everything in your Song Queue in the original order.
You can execute the Repeat and Shuffle command from any SoundBridge Radio menu
and its icon will appears on your radio display.
12/12/2005 sb_radio_draft_jmc 32
Now Playing
If you want to know what is playing, there are several ways to view “Now Playing”
information:
Press the Exit [?] button several times until you see the display show “Now Playing”
information.
Press the Home menu [] button, then scroll down to the “Now Playing” option and press
the Select [ ] button.
The display shows “Now Playing” information after a few minutes of remote control
inactivity.
If you press Play [?] on an album track, that track will play, followed by each track
remaining on the album. For example, if you press Play on track 5 on an album with 10
tracks total, then tracks 5–10 will play. For continuous playback of the entire album,
press Repeat [] on your remote control — the album will play until the end, then start
again at the beginning.
Pausing Music
Press the Pause [;] button to halt music playback. A Pause icon ;will displays at the top
right of your display. Pressing the Play [4] button or the Pause button again will resume
from where you left off.
When the Song Queue has finished all its songs, it will stop. You will see the Stop icon
< ?on the right side of your display. To start playing your Song Queue again at the
beginning, press the Play button.
Hint: Pressing the Pause [;] button to stop playback of your Song Queue will only do so
temporarily. If you want to clear the memory of your Song Queue or your selection, you
will simply navigate to select something else you want to hear, and press Play [4]. If you
want to continue building your Song Queue from where you left off before pressing the
Pause [;] button, press the Add [+] button instead of the Select [v] button and your prior
selections will be preserved.
Viewing Upcoming Selections
If you are not sure what you have selected to play, simply press the Down [6] arrow.
The music you are currently listening to will continue playing while you view a list of
upcoming songs also knows as your Song Queue. The display will automatically return to
the Now Playing option.
Press Pause [;] at any time to put playback on hold. Press Play [4] or Pause [;] a
second time to resume playback.
Hint: If you navigate to a new song and press Play [4], the old Song Queue is erased and
replaced with your new selection. You should only press Play [4] when you want to
12/12/2005 sb_radio_draft_jmc 33
erase your existing Song Queue and start a new one. Press the Add [+] button to continue
from where you left off and add a song to the existing Song Queue.
Skipping Music Tracks
If you’d like to skip a song during playback, press the Next Track : button ?on your
remote control. Or, navigate to another song through your browsing options and press the
Select [v] button.
Changing Music Libraries
If you have multiple music servers running on your network at once, you can easily
navigate between them.
1. Press the Home Menu [ ] button on your remote control.
2. Using the Down arrow button, navigate to Change Library or Configuration
and press Select [ ]. All your available libraries are displayed.
3. Press Select to access your desired music library.
Settings
Need to complete
Soundbridge Radio settings can be changed using the Settings option located at the
bottom of the Home Menu.
Visualizer Settings....
You can change the appearance of the music visualizer such as whether it appears full
display during playback, and what kind of information is displayed when a song is
playing from the Home menu.
Return to Now Playing when idle
Scroll long info in Now Playing
?Display composer for classical works
Skip items un-checked in iTunes
Change Library or Configuration
Need to complete

12/12/2005 sb_radio_draft_jmc 34
Software Version & Updates
Select WiFi SSID & Password
Show WiFi Status
Network Control
Reset to Factory Default
To reset your configuration of the Soundbridge radio and return the setting to its factory
defaults, follow these steps:
1. Press the Home Menu [ ] button.
2. Use the down arrow to select Change Library or Configuration.
3. Use the down arrow to select System Configuration.
4. Use the down arrow to select Reset to Factory Defaults.
Restart Soundbridge Radio
Exit
Play AM & FM Radio
Need to complete
Play Internet Radio
Need to complete
Note: To date, there is unfortunately no standard for Internet radio stations, and many
different audio formats and streaming techniques are used in the industry. Soundbridge
Radio supports many Internet radio stations, but not every one of the many, sometimes
proprietary, standards. The only sure way to know if a radio station will play on
Soundbridge Radio is simply to try it.
Alarm Clock
Need to complete
ALARM 1 ON 7:00 AM
ALARM 2 OFF 7:30 AM
12/12/2005 sb_radio_draft_jmc 35
Clock Settings
Need to complete
Needs work
This section describes radio settings that you change.
Radio Brightness, Contrast and Text Display
Not done
When in standby mode, Soundbridge Radio can display the date and time, similar to the
display below.
Insert visual
Use the Up and Down button on your remote control to change the time and date format
on your clock display.
Use the Right and Left buttons on your remote control to adjust the brightness of your
display. Pressing the Left button dims the clock display and pressing the Right button
brightens the clock display.
You can customize the clock display in a number of ways:
1. When in Standby mode, use the Left/Right arrows to adjust the brightness of the
clock display. (This will not affect the brightness settings of the display when in
regular playback mode.)
2. When in Standby mode, use the up/down arrows to cycle through modes of
display. For example, you can display large and small fonts, display the time but
not the date, etc. (Again, these settings will not be applied to your display when
you resume SoundBridge’s regular playback mode.)
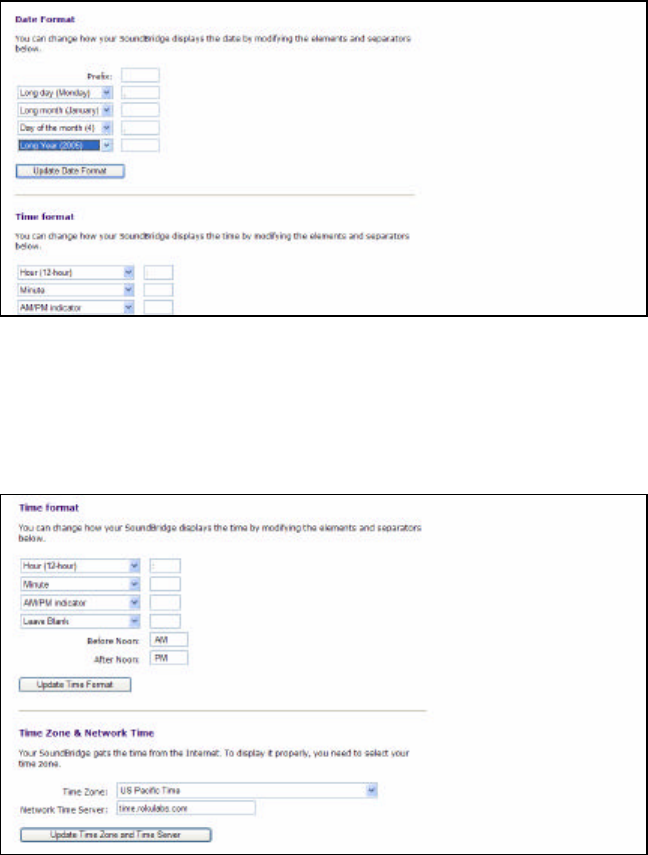
3. Use SoundBridge’s web page to configure the format of the date and time. You
can also turn off the clock display altogether. After your web page is launched,
click on the Configuration tab. Scroll down on the page until you see a display
that looks similar to the one below.
Reword to tell them to see the Roku Web Page section
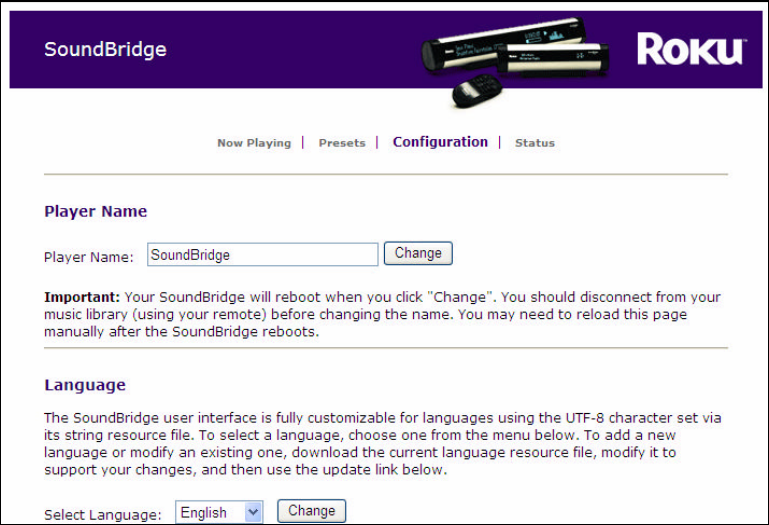
You can customize how your time appears, and correct errors in the display of your date
and time. First, be sure that your time zone is selected correctly. Soundbridge Radio uses
an Internet connection to display the proper time for your time zone. If your Internet
connection is not available, Soundbridge Radio will be unable to display the date and
time in Standby mode.
Format your time display by choosing what to display in each of four fields. Soundbridge
Radio “strings together” all the fields to create the time display. For example, if you don’t
want to see seconds, or don’t want to see “AM/PM”, select the hour and minute format,
then choose the “Leave Blank” in the remaining drop down menus.
The date selection works the same way — you can choose the format that best fits your
geographic standard or your personal preference.

12/12/2005 sb_radio_draft_jmc 36
To disable the date/time display altogether when Soundbridge Radio is in standby, select
the corresponding option on this page.
When you are finished, simply close your web page.
For More Information: For a complete list of Soundbridge Radio settings, see
“Settings.”
Turning Off Your SoundBridge Radio
When you are finished playing music on your Soundbridge Radio, press the Standby [ ]
button on your remote. In Standby mode, your radio will display the date and time or a
blank display, depending on your preference. (See page --- for more information about
setting these preferences.)
If you were playing Internet radio from your “Favorite Radio Stations” library when you
pressed Standby [ ] button, then pressing Standby again will resume playback of that
station. Otherwise it will return you to the music library that you were most recently
connected.
If you plan to disconnect the Soundbridge Radio from AC power, be sure to press the
Standby button first. This logs you out of the music server software running on your
computer.
Note: Wait approximately ten seconds after pressing Standby [ ] before unplugging
SoundBridge; this gives Soundbridge Radio time to flush its settings for a clean reboot.
Caution icon: If you unp lug the Soundbridge Radio from AC power five times without
pressing the Standby [ ] button on your remote first, iTunes may lock you out of
connecting to the server. This is because iTunes allows a maximum of five users to
connect at one time. If you do not first put Soundbridge Radio in standby mode, iTunes
thinks you are still connected. To restore your access to the iTunes server, close iTunes
and then restart it.

12/12/2005 sb_radio_draft_jmc 37
Roku Radio Web Interface
Needs work…
Use SoundBridge’s Web page to control Soundbridge Radio playback remotely,
configure your Soundbridge Radio or reconfigure your preset radio stations directly by
entering the stream URL directly into the web page. There are several ways to access the
web page:
PC/Windows users: You can configure your computer to display UPnP devices
including the Soundbridge Radio in your My Network Places window. If this option is
not already enabled, see “Instructions for Enabling Windows Media Connect.”.
The Soundbridge device appears in the notification area in the bottom-right corner of the
window.
Apple/OSX users:
Follow these steps to access the web page:
1. Launch the Safari web browser. Because Soundbridge Radio uses the Bonjour
protocol (formerly known as Rendezvous), the device automatically announces
itself.
2. In Safari, be sure you have your bookmark list showing as in shown below. If it is
not showing, go to the Bookmark menu and select Show All Bookmarks. Your
screen should look like the one below.
12/12/2005 sb_radio_draft_jmc 38
3. Click on the Rendezvous option in the bookmark list to reveal your SoundBridge
Radio. If more than one device is connected, they will be named SoundBridge,
Soundbridge (2), and so on.
4. Double-click the name of your device to open the Soundbridge web page.
At the Roku Soundbridge web interface, there are four Soundbridge Radio web pages for
radio control. :
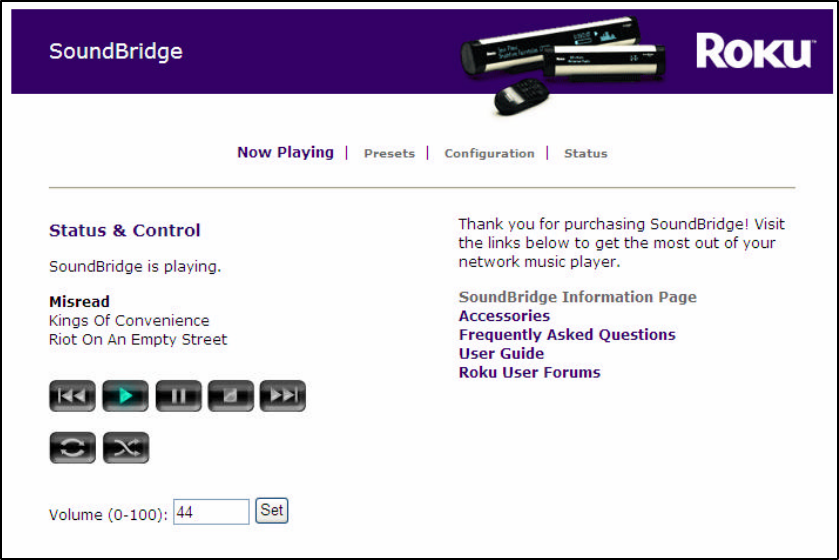
Now Playing
This page allows for control of playback of current music selection, including Pause, Play,
Next/Previous Track, Stop, Repeat and Shuffle. You can also change the volume level.
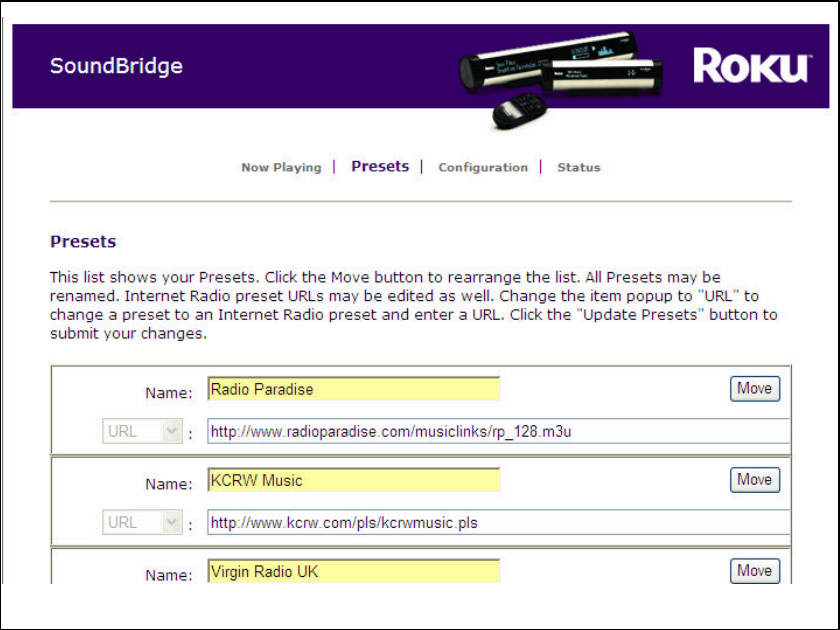
Presets
This page has the 18 preset radio stations you have programmed on your radio. From this
tab, you can easily change and move the 18 preset radio stations. Simply click Move and
navigate where you would like the preset radio station to be positioned. This page allows
you to specify up to twenty of your favorite Internet radio streams, to be stored in the
Favorite Radio Stations” music library.
You can also reprogram your radio preset buttons from this tab. Enter the URL in the
URL field and enter a name for the station in the Name field. Once configured on the
web page, the name and URL will be available from your radio preset buttons and display.
12/12/2005 sb_radio_draft_jmc 39
If you experience problems with an Internet radio stream you copied from a web browser,
make sure that your stream ends with a .pls or .m3u extension. Sometimes copying the
link from your browser will exclude this information and your stream will not play.
Sometimes the .pls or .m3u extension is excluded because it is being redirected behind
the scenes. If you entered the URL http://www.hostname.com:9152, add listen.pls to
the end of the URL, so the entry looks like http://www.hostname.com:9152/listen.pls.
Currently, Soundbridge Radio can stream MP3 and WMA. RealAudio streams (ending
in .ram or .rm) are currently not supported. Stay tuned for additional format support in
future software updates.
When you are finished entering your radio streams, press the Update Radio Streams
button at the bottom of the page.
Hint: If you copy a URL that is too long to fit inside the text field (longer than 250
characters), or if you erase the URL in the URL field, Soundbridge Radio will
automatically revert to the previous URL that was in your list before.
For More Information: See -----for information about accessing and playing your stored
stations from the “Favorite Radio Stations” music library.
12/12/2005 sb_radio_draft_jmc 40
Configuration
Use this page to enter a unique name for your Soundbridge Radio unit, choose a language
other than English, or set options for displaying the time and date on your Soundbridge
Radio when it is in Standby mode.
Date Format
Time Format
Language
Use SoundBridge’s web page to choose a language other than English. Please see page
___ in the Music Playback section of this user guide for instructions on launching your
Soundbridge Radio web page. Then, choose the Configuration tab. You can choose your
language in one of two ways:
12/12/2005 sb_radio_draft_jmc 41
(1) From the drop down menu titled “Select Language”, Choose from the options
available. (Currently, Soundbridge Radio ships with the following language options:
Japanese, German, French, Swedish, and English).
(2) If your language is not listed in the above options, you can upload a Language
Resource File containing the instructions to display another language. To see if a third-
party translation already exists for your desired language, please visit:
www.rokulabs.com/support/international. To download and edit or “translate” this file for
your language, click on the “View Current Language Resource File” link. To upload a
resource file that you or another third party has created, use the Browse button on the
web page to locate the file on your computer’s hard drive, then click “Update” to load it
into SoundBridge.
Hint: You can always revert to SoundBridge’s built-in English language display by
clicking the Revert button on the bottom of the Language settings area.
Close the Roku web page when you are finished editing your language settings, simply
close your web page.
Status
Use this page to view the version of software currently running on your SoundBridge and
review your wireless network name, connection information, including IP address and
MAC addresses and Wi-Fi signal strength.

12/12/2005 sb_radio_draft_jmc 42
Safe Mode
Is this section technically up-to-date?
Soundbridge Radio includes the Safe Mode option which is a mode that enables
automatically when Soundbridge Radio detects that its software has become corrupted.
Safe Mode downloads a new version of software from Roku and to restore factory
settings. When Soundbridge Radio enters Safe Mode, you will view the text “Safe Mode”
displayed on the right side of the display. Your menu will only include options to update
your software and restore factory defaults. (I am not sure what is being communicated
here.)
While in Safe Mode, your stored network settings will not be recalled. Therefore, it is
necessary to connect Soundbridge Radio using Ethernet before Soundbridge Radio can
connect to the Internet to download new software.
Safe Mode can also be entered manually by powering Soundbridge Radio off (by
unplugging it from power) and on again, while at the same time pressing and holding any
button on the remote control.
12/12/2005 sb_radio_draft_jmc 43
Geeks — Read This
I left this alone.
The Soundbridge Radio has a command line interface that you can “telnet” to for
piddling about. You will need to telnet to port 4444. Type “?” at the command prompt for
a list of commands. We will be documenting in more detail how to control a Soundbridge
Radio in the coming months, as well as updating the software in this area. When
documentation is available, it will be posted on the developer section of our web site.
Soundbridge Radio has a built-in UPnP AV “media renderer.” This protocol can be used
to control the Soundbridge Radio from your own software. Please watch the developer
section of our web site for updates on this feature.
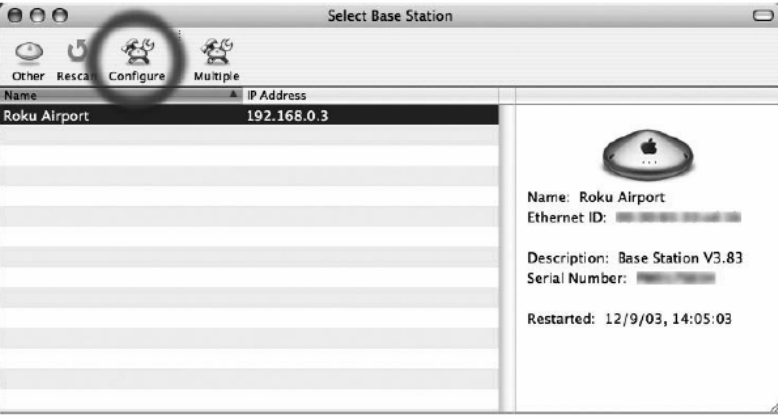
12/12/2005 sb_radio_draft_jmc 44
Obtaining Your Wireless Access Point’s Password
I just revised the wording in this section
Follow these instructions to determine your wireless access point password, and be sure
to have a pen ready to make a note of the case-sensitive password as well as the password
type, either hexadecimal (hex) or ASCII.
Apple AirPort (Mac Users)
The Apple Airport is a very popular access point. To see its configuration, follow these
steps:
1. From the Utilities folder, open your AirPort Admin Utility.
2. Select your AirPort and choose Configure.
You should then see the display below. The line labeled Wireless Network
Name is the name of your network (SSID). You will either select this network on
the Soundbridge Radio display or enter it if your network is not available.
For More Information: See “Establishing A Wireless Network Communication.”
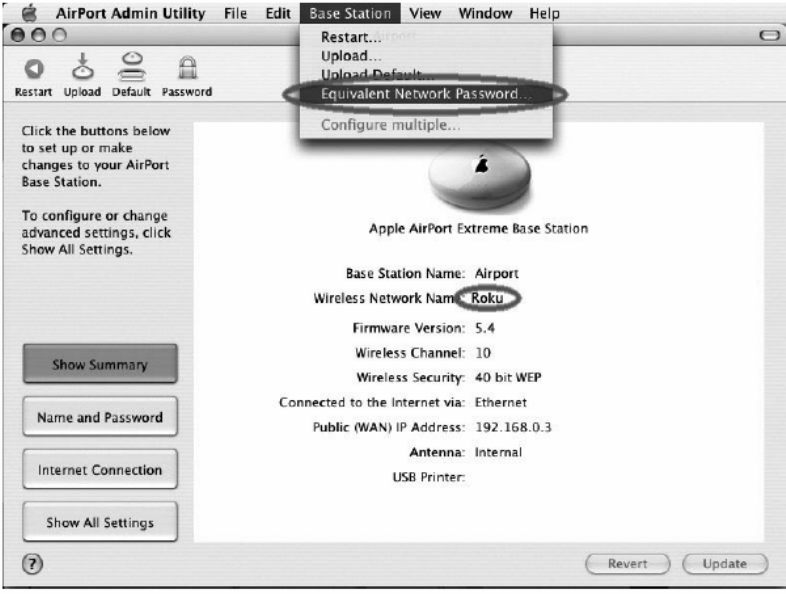
12/12/2005 sb_radio_draft_jmc 45
If your network is password protected, you should choose Equivalent Network
Password from the Base Station menu as shown above.
3. Write down the value that appears in the dialog as shown below. This is the value
you will enter into SoundBridge’s wireless setup password field.
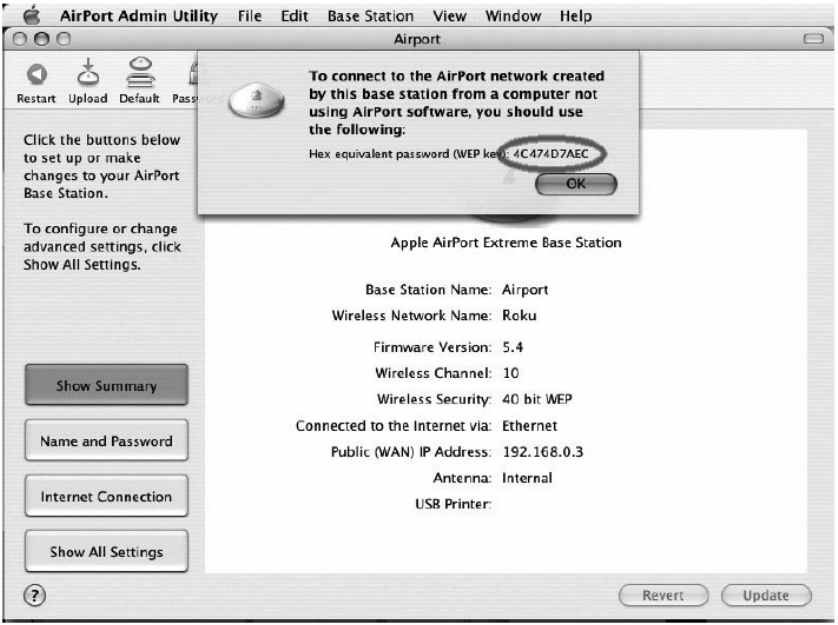
12/12/2005 sb_radio_draft_jmc 46
4. In Soundbridge’s Radio menu selection, Select WiFi SSID and Password,
choose a HEX password type.
Apple AirPort (PC Users)
1. From Start /Programs/Airport Admin Utility, open the AirPort Admin utility
2. Select the network you would like to configure. You should then see the
configuration display below.

12/12/2005 sb_radio_draft_jmc 47
3. Make a note of the name of your wireless network in the Network Name field.
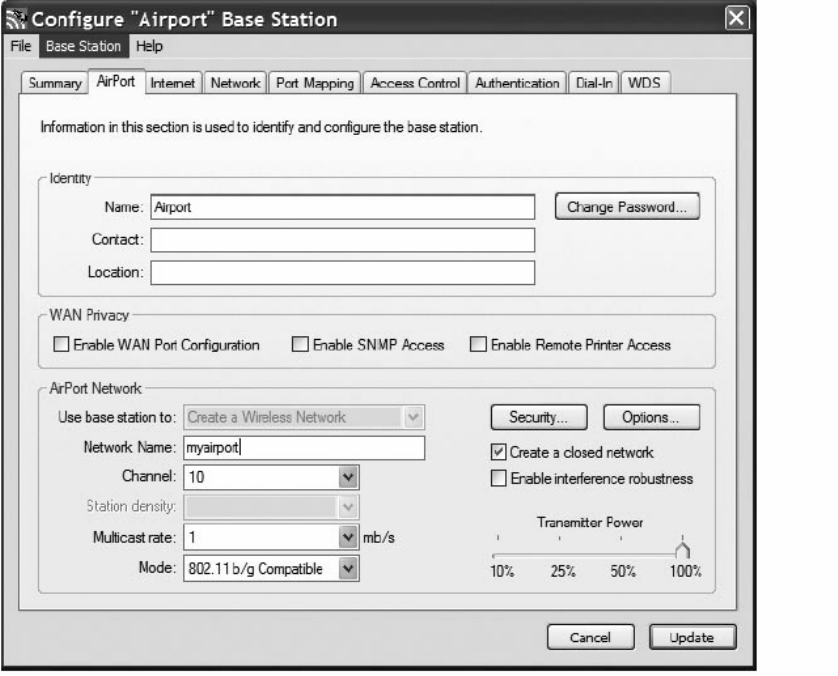
12/12/2005 sb_radio_draft_jmc 48
4. From the Base Station list, select Equivalent Network Password.
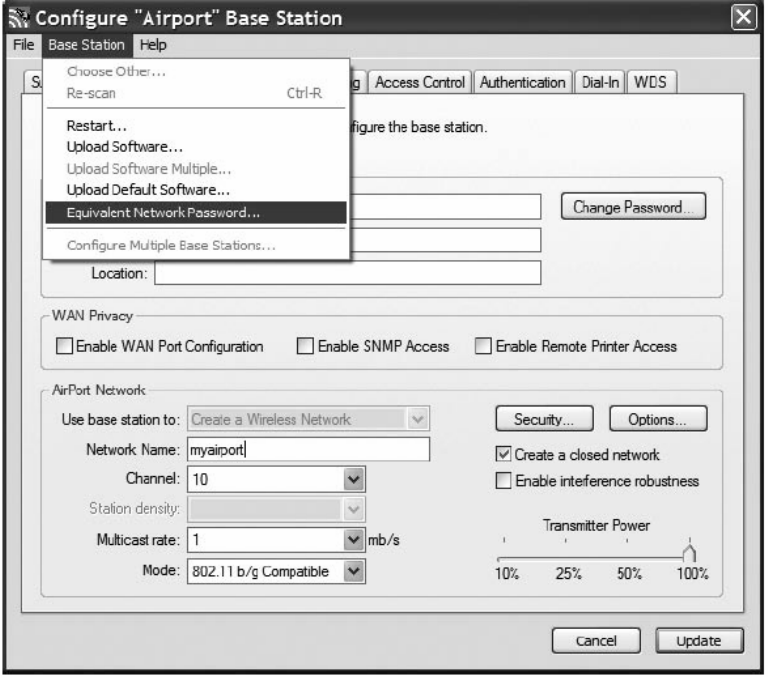
12/12/2005 sb_radio_draft_jmc 49
5. Write down the displayed password name and format. Hexadecimal is the format
in the following example.
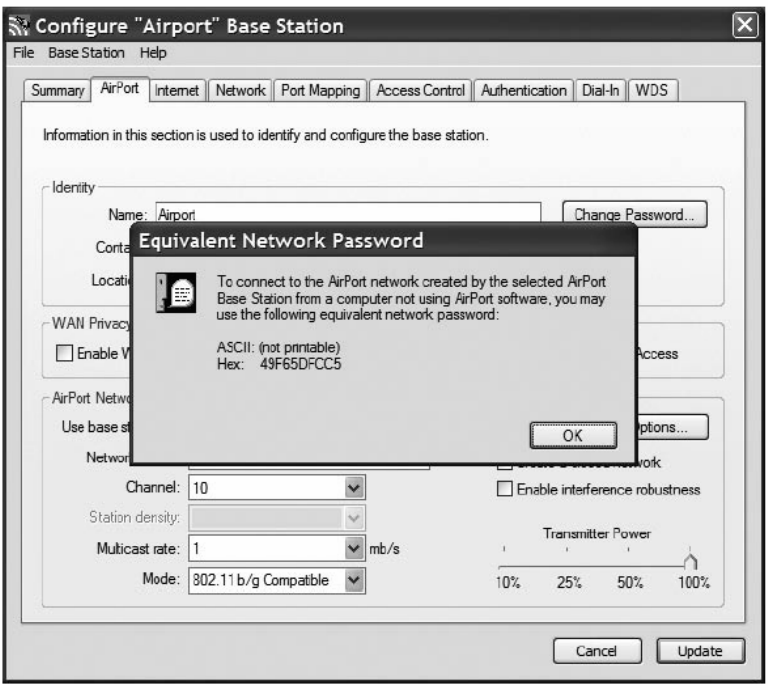
12/12/2005 sb_radio_draft_jmc 50
6. Press OK.
Linksys WAP54G
The Linksys WAP54G access point is a popular 802.11g access point. Getting the
hexadecimal WEP key from the WAP54G is an easy process. Follow these steps:
1. Open a web browser and connect to the access point.
You connect to the access point by entering the access point’s IP address in the
location bar of your web browser. If you do not know the IP address of the access
point, please refer to the software or manual that came with the access point in
order to determine the IP address. After successfully logging in, you will see a
page similar to the following:
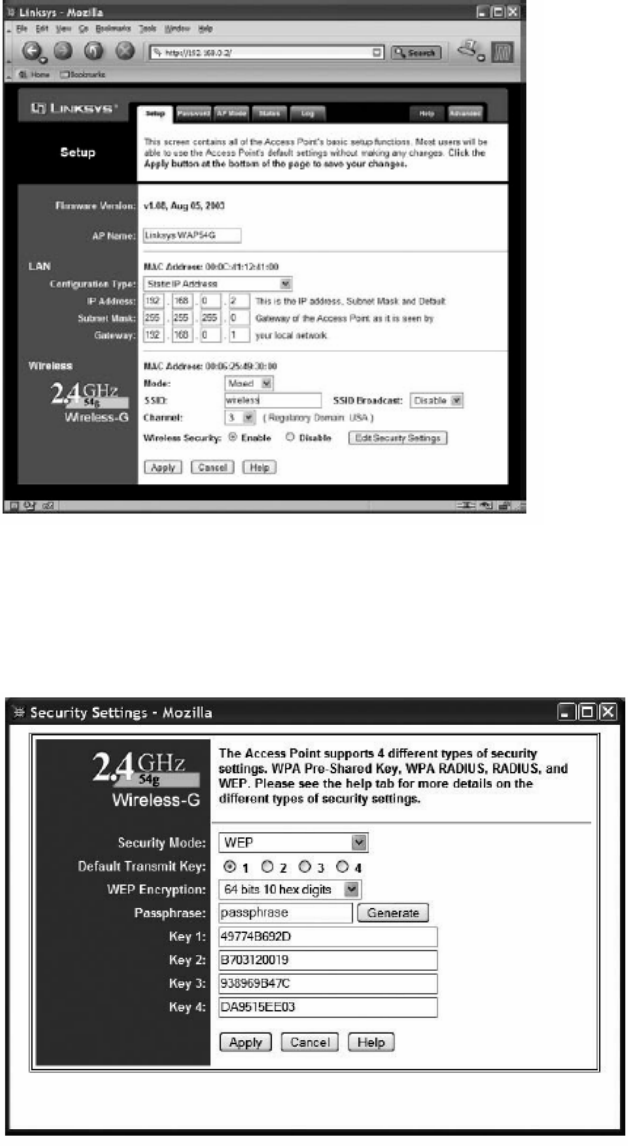
12/12/2005 sb_radio_draft_jmc 51
2. Write down the wireless network name in the MAC Address SSID field. You will
enter the SSID name when specifying the wireless network for the Soundbridge
Radio.
3. Click Edit Security Settings to access the WEP setup page. The following shows
that Wireless Security is enabled.
This Linksys access point allows you to easily view the keys. Key 1 is the default key.

12/12/2005 sb_radio_draft_jmc 52
4. Write down the Key 1 value. In this example, 49774B692D is the key value. You
will enter this value into SoundBridge’s wireless setup’s Password field.
You now have the information necessary to configure your Soundbridge Radio to
connect to your network.
5. Close your web browser.
Netgear WG602
The Netgear WG602 is an 802.11g Wireless Access Point. Its configuration can be
accessed with a web browser. First, open a web browser and connect to the access point
by entering the access point’s IP address in the location bar of your web browser. If you
do not know the IP address of the access point, please refer to the software or manual that
came with the access point in order to determine the IP address. After successfully
logging in, you will see a page similar to the following:
The value of “Wireless Network Name (SSID)” is the SSID that you will enter into the
SoundBridge’s wireless setup. Next, click on “Security Settings” on the left side to access
the WEP settings:
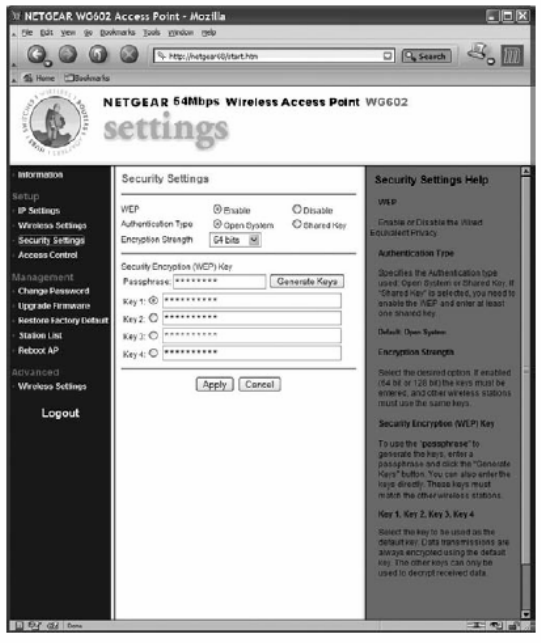
12/12/2005 sb_radio_draft_jmc 53
If “WEP” is set to “Disable,” then you do not need to enter a password to access your
wireless network. If “WEP” is set to “Enable,” you will need to obtain the hexadecimal
key for your network. Netgear unfortunately, does not allow you to view the current
passphrase or keys. However, if you re-enter the known passphrase and press “Generate
Keys,” then it will regenerate the keys as before and allow you to view the keys:
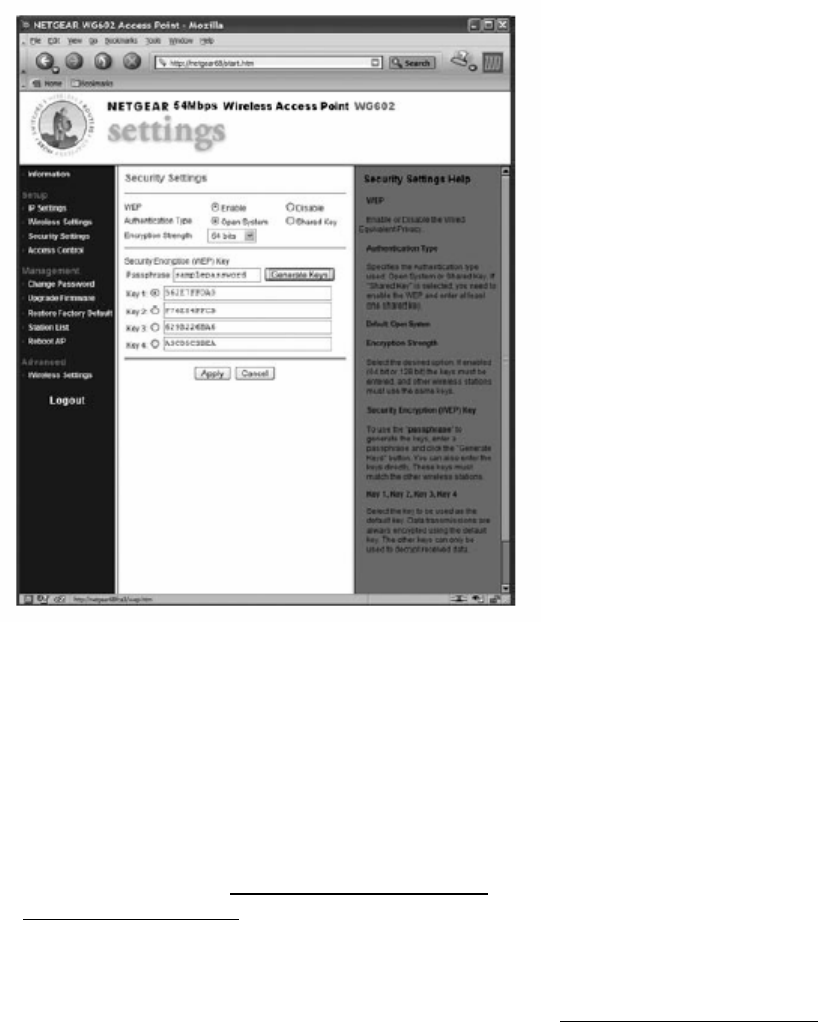
12/12/2005 sb_radio_draft_jmc 54
Make a note of the value of the key with the active radio button (the default key, in this
case “Key 1”: “562E7FF0A0”). This is the password that you will need to enter into your
SoundBridge’s wireless setup “Password” field. You now have the information necessary
to set up your wireless network from your SoundBridge. You may close your web
browser.
Getting Help
If you are still having trouble setting up your wireless connection, please browse our web
site support resources at www.rokulabs.com/support, or send email to Customer Support
at support@rokulabs.com.
CUSTOMER SUPPORT
Please visit our Soundbridge Radio Troubleshooting area at www.rokulabs.com/support
for detailed troubleshooting help. You may also browse our User Forum to see if other
users have posted information that pertains to your situation. Our Forum is monitored by
Roku engineers and customer support staff.
12/12/2005 sb_radio_draft_jmc 55
APPENDICES
End User Software License Agreement
IMPORTANT — READ CAREFULLY: By using the software in your SoundBridge,
you agree to be bound by the license terms and conditions below. If you do not agree to
these terms and conditions, you must immediately return your Soundbridge Radio in its
original condition and packaging to the point of purchase for a refund of your purchase
price (after inspection).
iTunes Disclaimer
Roku Soundbridge Radio interfaces to iTunes using the Apple DAAP protocol, under
license from Apple. This license gives apple the right to terminate the license for any
reason. Roku has no control over this, and is not responsible in the unlikely event Apple
does so. In this event, Roku will use commercially reasonable efforts to provide software
that installs on your PC via a download that provides similar functionality, but Roku
makes no representations or warranties regarding the features available in such a situation.
Roku Software License
Subject to these terms and conditions, ROKU grants you a non-exclusive license, with no
right to sublicense, to execute the software included with the Soundbridge Radio or
subsequently provided to you by ROKU (together, the “Software”) on your Soundbridge
Radio solely for your personal use of the intended features and functions of the
SoundBridge. The license may be transferred only with the transfer of the Soundbridge
Radio on which ROKU has installed the software; any transferee will be subject to the
terms and conditions of this license. This license will terminate automatically, without
notice, if you fail to comply with the terms and conditions, including the restrictions, of
this license.
ROKU and its licensors own and retain all proprietary rights, including all patent,
copyright, trade secret, trademark and other intellectual property rights, in and to the
Soundbridge Radio Software. You acknowledge that the license granted above does not
provide you with title to or ownership of the Software, but only a right of limited use
under these terms and conditions. The Software embodies Roku’s trade secrets and other
proprietary information and materials. Any attempt to modify, enhance, disassemble,
decompile, reverse engineer or otherwise gain access to the source code to the Software,
to remove or unbundle the Software from the SoundBridge, or to sublicense or distribute
the Software is strictly prohibited, except as may be otherwise agreed by ROKU in
writing.
Third Party License Information
Soundbridge Radio includes AES code Copyright © 2003, Dr. Brian Gladman, Worcester,
UK.
61 This product is protected by certain intellectual property rights of Microsoft
Corporation. Use or distribution of such technology outside of this product is prohibited
without a license from Microsoft or an authorized Microsoft subsidiary.
12/12/2005 sb_radio_draft_jmc 56
Roku SoundBridge Limited Warranty
Roku Soundbridge Radio is covered by a one year parts and labor warranty.
Roku Soundbridge Radio Limited Warranty
1. Warranty. ROKU, LLC (“ROKU”) warrants your Soundbridge Radio and any included
accessories against defects in material or workmanship as follows:
For a period of one (1) year from the date of purchase (“Warranty Period”), if ROKU
determines that the Soundbridge Radio is defective, ROKU will repair the unit or replace
the unit (with either a new or rebuilt Soundbridge Radio unit), at its option, at no charge
and, if applicable, will pay the labor charges incurred by any Soundbridge Radio
authorized service facility. If the Warranty Period has expired, the customer is
responsible for the payment of all labor charges and may obtain parts from ROKU
authorized service facilities or a Soundbridge Radio service center at his or her own
expense.
2. Warranty Service Process. To obtain warranty service, you must first obtain an RMA
number (Return Merchandise Authorization) from a Technical Support Representative at
ROKU. A Technical Support Representative may be reached by emailing
support@rokulabs.com or calling our toll free number for customer care (1-866-400-7658
from the US). Once an RMA number is obtained, your Soundbridge Radio must be
shipped freight prepaid; in either its original packaging or packaging affording an equal
degree of protection, to the Soundbridge Radio authorized distribution facility. If ROKU
determines that the returned unit is defective, ROKU will either repair the unit or will
supply, at no charge and within a reasonable period of time, a new or rebuilt Soundbridge
Radio unit in exchange for the defective unit.
In addition, all accessories must be returned with the defective SoundBridge. A new or
factory refurbished set of accessories will be furnished with the replacement
SoundBridge. Failure to return any of the accessory items could result in a delay in
receiving the replacement SoundBridge, and/or result in an invoice for the missing
accessories.
Important: When emailing for an RMA number, please provide the following information:
a. model number
b. serial number
c. problem description
d. software version (located in System Configuration menu)
e. date of purchase
f. place of purchase (dealer or online place of purchase)
g. return shipping address (no P.O. boxes)
Note: Proof of purchase will need to be included in the return shipment in order to ensure
warranty coverage. In addition, we may attempt to further troubleshoot the problem prior
to issuing an RMA number. Please be prepared to provide additional information upon
request.
12/12/2005 sb_radio_draft_jmc 57
3. Scope of and Limitation on Warranty. The warranty on this product is limited to the
repair or replacement of defective units as described in Section 1 above. This warranty
does not cover customer training or education, installation, set up adjustments or signal
reception problems. This warranty does not cover damage due to acts of God, accident,
misuse, abuse, negligence, commercial use or modification of, or to any part of, your
SoundBridge. This warranty does not cover damage due to improper operation or
maintenance, connection to improper voltage supply or attempted repair by anyone other
than a facility authorized by ROKU to service your SoundBridge. This warranty does not
cover consumables (such as fuses and batteries). This warranty is valid only in the
country of purchase from an authorized ROKU distributor or dealer. This warranty is
invalid if the factory-applied serial number and/or “Warranty Void if Removed” sticker
has been altered or removed from the SoundBridge.
REPAIR OR REPLACEMENT AS PROVIDED UNDER THIS WARRANTY IS THE
EXCLUSIVE REMEDY OF THE CONSUMER. ROKU SHALL NOT BE LIABLE
FOR ANY DAMAGES, INCLUDING SPECIAL, INCIDENTAL OR
CONSEQUENTIAL DAMAGES, ARISING OUT OF OR RELATED TO THIS
PRODUCT OR ITS PURCHASE OR USE. EXCEPT TO THE EXTENT PROHIBITED
BY APPLICABLE LAW, ANY IMPLIED WARRANTY OF MERCHANTABILITY
OR FITNESS FOR A PARTICULAR PURPOSE ON THIS PRODUCT IS LIMITED IN
DURATION TO THE DURATION OF THIS WARRANTY.
THE SOUNDBRIDGE RADIO INCLUDES SOFTWARE PROVIDED BY THIRD
PARTIES. ROKU’S WARRANTY DOES NOT APPLY TO THIRD PARTY
SOFTWARE, AND ROKU IS NOT RESPONSIBLE FOR THIRD PARTY
SOFTWARE. ADDITIONAL TERMS AND CONDITIONS, INCLUDING
DISCLAIMERS OF WARRANTY, FOR THIRD PARTY SOFTWARE CAN BE
FOUND ELSEWHERE IN THE PRODUCT DOCUMENTATION.
Some states do not allow the exclusion or limitation of incidental or consequential
damages, or allow limitations on how long an implied warranty lasts, so the above
limitations or exclusions may not apply to you. This warranty gives you specific legal
rights, and you may have other rights which vary from state to state.
FCC Warnings and Safety Information
Communication Regulation & Safety Information
FCC Compliance
This section describes the requirements for compliance with Federal Communications
Commission (FCC) Rules.
FCC Registration and Requirements
The following paragraphs describe requirements and information based on FCC rules.
FCC Rules, Part 15
This equipment has been tested and found to comply with the limits for a class B digital
device, pursuant to Part 15 of the FCC Rules. These limits are designed to provide
reasonable protection against harmful interference in a residential installation. This
12/12/2005 sb_radio_draft_jmc 58
equipment generates, uses and can radiate radio frequency energy and, if not installed and
used in accordance with the instructions, may cause harmful interference to radio
communications. However, there is no guarantee that interference will not occur in a
particular installation. If this equipment does cause harmful interference to radio or
television reception, which can be determined by turning the equipment off and on, the
user is encouraged to try to correct the interference by one or more of the following
measures:
– Reorient or relocate the receiving antenna;
– Increase the separation between the equipment and receiver;
– Connect the equipment into an outlet on a circuit different from that to which the
receiver is connected;
– Consult the dealer or an experienced radio/TV technician for help.
This device complies with Part 15 of the FCC Rules. Operation is subject to the following
two conditions:
1. This device may not cause harmful interference, and
2. This device must accept any interference received, including interference that may
cause undesired operation.
Responsible party (contact for FCC matters only): Roku, LLC, 399 Sherman Ave. #12,
Palo Alto, CA 94306, 650-321-1394. For customer service questions go to:
http://www.rokulabs.com/support.
CHANGES OR MODIFICATIONS NOT EXPRESSLY APPROVED BY THE PARTY
RESPONSIBLE FOR COMPLIANCE COULD VOID THE USER’S AUTHORITY TO
OPERATE THE EQUIPMENT.
Canada Class B Statement
This Class B device meets all requirements of the Canadian interference-causing
equipment regulations. Cet appareil numérique de la Class B respecte toutes les
exigences du Réglement sur le materiel brouilleur du Canada.
VCCI Class B Statement
VCCI Class B Statement
•IMPORTANT NOTE:
•FCC Radiation Exposure Statement:
•This equipment complies with FCC radiation exposure limits set forth for an uncontrolled environment. This
equipment should be installed and operated with minimum distance 20cm between the radiator & your body.
•This transmitter must not be co-located or operating in conjunction with any other antenna or transmitter.
•ROKU LLC declares that R1000 ( FCC ID: TC2R1000 ) is limited in CH1~CH11 for 2.4GHz by specified firmware
controlled in U.S.A.
12/12/2005 sb_radio_draft_jmc 59
Safety
Read the following safety and regulatory information.
Important Safety Instructions
1. Read Instructions. All the safety and operating instructions should be read before the
product is operated.
2. Retain Instructions. The safety and operating instructions should be retained for
future reference.
3. Heed Warnings. All warnings on the product and in the operating instructions should
be adhered to.
4. Follow Instructions. All operating and use instructions should be followed.
5. Ventilation. Do not block any ventilation openings. Install in accordance with the
manufacturer’s instructions.
6. Cleaning. Unplug this product from the wall outlet before cleaning. Do not use liquid
cleaners or aerosol cleaners. Use a dry cloth for cleaning.
7. Water and Moisture . To reduce the risk of fire or electric shock, do not expose this
appliance to rain or moisture. Apparatus shall not be exposed to dripping or splashing and
no objects filled with liquids, such as vases, shall be placed on the apparatus. Do not use
this product near water for example, near a bathtub, wash bowl, kitchen sink or laundry
tub; in a wet basement; or near a swimming pool; and the like.
8. Accessories. Do not place this product on an unstable cart, stand, tripod, bracket or
table. The product may fall, causing serious injury to a child or adult and serious damage
to the product. Use only with a cart, stand, tripod, bracket or table recommended by the
manufacturer, or sold with the product. Any mounting of the product should follow the
manufacturer’s instructions, and should use a mounting accessory recommended by the
manufacturer. A product and cart combination should be moved with care. Quick stops,
excessive force and uneven surfaces may cause the product and cart combination to
overturn. Only use attachments/accessories specified by the manufacturer.
9. Power Sources. This product should be operated only from the type of power source
indicated on the marking label. If you are not sure of the type of power supply to your
home, consult your product dealer or local power company. For products intended to
operate from battery power, or other sources, refer to the operating instructions.
10. Grounding or Polarization. This product may be equipped with a polarized
alternating-current line plug (a plug having one blade wider than the other). This plug
will fit into the power outlet only one way. This is a safety feature. If you are unable to
insert the plug fully into the outlet, try reversing the plug. If the plug should still fail to fit,
contact your electrician to replace your obsolete outlet. Do not defeat the safety purpose
of the polarized plug.
11. Power Cord Protection. Power-supply cords should be routed so that they are not
likely to be walked on or pinched by items placed upon or against them, paying particular
attention to cords at plugs, convenience receptacles and the point where they exit from
12/12/2005 sb_radio_draft_jmc 60
the product. Unplug this product during lightning storms or when unused for long periods
of time.
12. Overloading. Do not overload wall outlets, extension cords or integral convenience
receptacles as this can result in a risk of fire or electric shock.
13. Object and Liquid Entry. Never push objects of any kind into this product through
openings as they may touch dangerous voltage points or short-out parts that could result
in a fire or electric shock. Never spill liquid of any kind on the product.
14. Servicing. Do not attempt to service this product yourself as opening or removing
covers may expose you to dangerous voltage or other hazards. Refer all servicing to
qualified service personnel.
15. Damage Requiring Service. Unplug this product from the wall outlet and refer
servicing to qualified service personnel under the following conditions:
– When the power-supply cord or plug is damaged,
– If liquid has been spilled or objects have fallen into the product,
– If the product has been exposed to rain or water,
– If the product does not operate normally by following the operating instructions. Adjust
only those controls that are covered by the operating instructions as an improper
adjustment of other controls may result in damage and will often require extensive work
by a qualified technician to restore the product to its normal operation,
– If the product has been dropped or damaged in any way, and
– When the product exhibits a distinct change in performance, this indicates a need for
service.
(Remove old 15) Heat. The product should be situated away from heat sources such as
radiators, heat registers, stoves or other products (including amplifiers) that produce heat.

12/12/2005 sb_radio_draft_jmc 61
TECHNICAL SPECIFICATIONS
Size 11" wide x 6" high x 6.5" deep
Weight 4 lbs. 15 oz.
Display 280x32 bitmapped vacuum fluorescent display
(VFD)
Processor 400MHz Blackfin® processor
Memory 16MB of DRAM
Digital/Analog Converter 20-bit DAC
IR Universal 38KHz IR receiver
Power Input 100V–240V, 50/60kHz
Wireless Network Wi-Fi 802.11b (compatible with 802.11g)
Sample Rates Supported
(kHz) 8.0, 11.025, 12.0, 16.0, 22.05, 24, 32, 44.1,
48.0, 96.0
Bit Depth Supported 8 bit, 16 bit, stereo, or mono
Stereo Speaker/Subwoofer System/Protocols Supported
Speakers Two Linear Magnetic Drive (LMD) Full-
Range Speakers, each in its own tuned acoustic
enclosure and each powered by a built-in
20Wrms 3G digital amplifier
Subwoofer One Linear Magnetic Drive (LMD)
Subwoofer, in a proprietary Delta-Tunnel™
tuned acoustic enclosure and powered by a
built-in 30Wrms 3G digital amplifier
Protocols Supported Roku Control Protocol
Bonjour™ (formerly known as Apple
Rendezvous)
UPnP AV and Windows Media DRM 10
WEP, AutoIP, DHCP,TCP,TELNET, HTTP
Rhapsody™ DRM
12/12/2005 sb_radio_draft_jmc 62
Audio Format Support
MP3, AAC, WMA, DRM WMA, WAV, AIFF, LPCM, and Rhapsody music files. WMA
Lossless is supported only when using Windows Media Connect and transcodes the
format to LPCM.
Please Note: AAC files purchased from the Apple Music store are not available for
playback on the Soundbridge Radio at this time. A padlock [Ï] appears next to AAC
files in your playlist.
System Requirements
Wi-Fi home network (802.11b or 802.11 g)
Broadband connection (cable or DSL)
Server Requirements for Streaming Music Stored on Your Computer
500MHz Pentium class processor or better (PC)
128 MHz G3 processor or better (Macintosh)
128MB RAM minimum / 256MB RAM recommended
iTunes: WindowsXP or 2000; MAC OS X v10.1.5 or later
Windows Media Connect: Windows XP with Service Pack 2
Musicmatch: Windows 98/SE/Me/XP/2000 (SP3 or above)
Rhapsody: Windows 98 or later
Optional Accessories
Additional Roku Remote Control