Roland 420321A Wireless Transmitter User Manual KTN AIR multi1225
Roland Corporation Wireless Transmitter KTN AIR multi1225
UserManual.wiki
>
Roland
>
420321A User Manual
05 User Manual
Navigation menu
Upload a User Manual
Namespaces
Wiki Guide
HTML
PDF
Info
Views
User Manual
Discussion / Help
Navigation

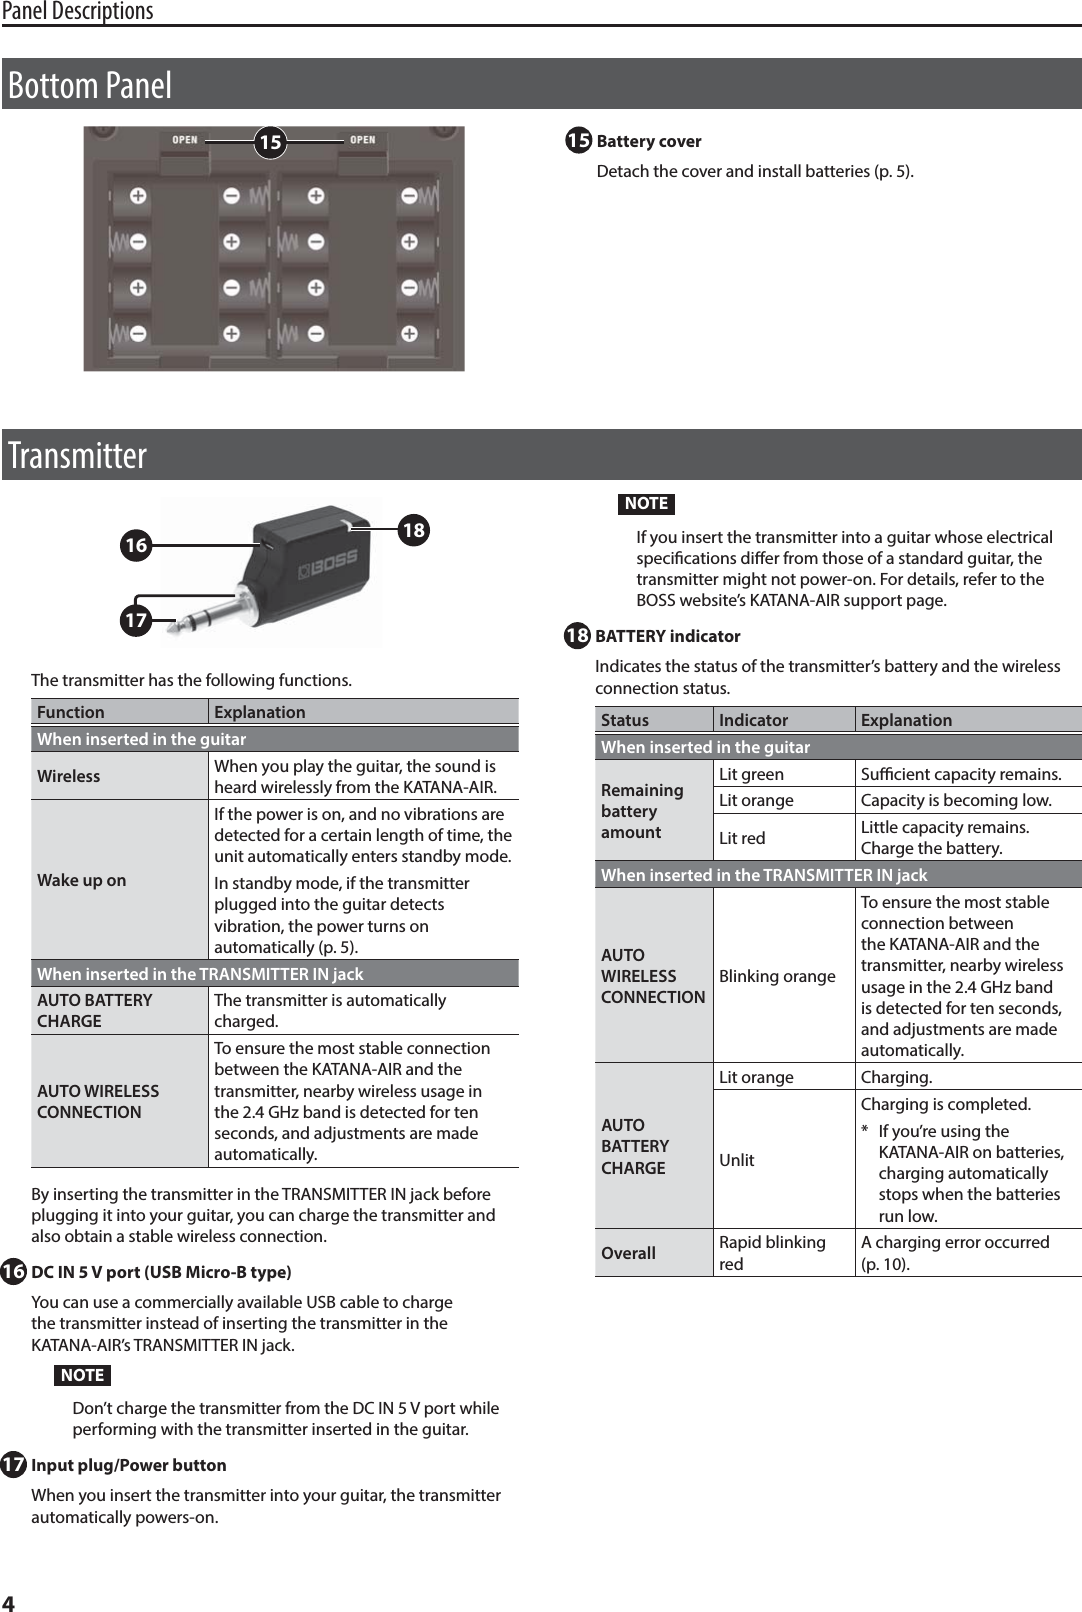
![2Panel DescriptionsTop Panel12 348105 6 7 9111 AMPLIFIER[AMP TYPE] knobSelects the amp type. All provided amp types are original.Type ExplanationBROWN A lead sound with an edge inherited from the BOSS WAZA brown sound.LEAD Dierent gain settings allow this sound to cover a wide range from crunch to high-gain.CRUNCH A fat crunch sound that faithfully responds to the nuances of your picking.CLEAN A clean and natural sound. In conjunction with BST (BOOSTER), it can be used for solo or lead.ACOUSTIC A dedicated acoustic guitar amp that supports connection of an acoustic guitar.[GAIN] knobAdjusts the gain (amount of distortion).[VOLUME] knobAdjusts the volume.2 EQUALIZER[BASS] knobAdjusts the sound level of the low-frequency range.[MIDDLE] knobAdjusts the sound level of middle-frequency range.[TREBLE] knobAdjusts the sound level of the high-frequency range.3 EFFECTSHere you can make settings for the built-in eects. For details on the eect types and settings for each knob, refer to “Using the Eects” (p. 6).[BST/MOD] button/knobControls distortion-type eects and modulation eects.[DELAY/FX] button/knobControls eects such as delay, wah, tremolo, and octave.[TAP] buttonSets the delay time. When you press this button two or more times, the delay time is set to the interval between presses.[REVERB] button/knobControls the reverb.4 [MASTER] knobAdjusts the overall volume.5 [Bluetooth] button/indicatorRegisters a Bluetooth Device (p. 8). And indicates the Bluetooth connection status.Indicator ExplanationLit ConnectedBlinking Pairing modeUnlit Not connected6 [L] (POWER) button/indicatorTurn the power on/o. This also indicates the state of the power supply.Indicator ExplanationLit greenOnTo enter standby mode, long-press the [L] button.To turn the unit o, enter standby mode and then long-press the [L] button.Lit orangeStandby modeTo turn the unit on, press the [L] button.To turn the unit o, long-press the [L] button.Unlit O](https://usermanual.wiki/Roland/420321A/User-Guide-3752254-Page-4.png)
![3Panel DescriptionsMEMOWhen the power is on, and a certain length of time elapses since the unit was last played or operated, the unit automatically enters standby mode. You can use a dedicated app (subsequently referred to as BOSS Tone Studio) to change the time after which the unit enters standby mode (p. 7).In standby mode, the power automatically turns on if the transmitter plugged into the guitar detects vibration (p. 5).7 (Guitar Wireless) indicatorIndicates the status of the connection with the transmitter.Indicator ExplanationLit whiteConnected with the transmitterWhen you play the guitar, the sound is heard from the speaker.UnlitNot connected with the transmitterAlternatively, the guitar is connected to the INPUT jack* If the guitar is connected to the INPUT jack, the sound of the INPUT jack takes priority.8 TONE SETTING[CH A], [CH B] buttonsEach of these buttons stores three sets of settings for all top panel knobs (except the [MASTER] knob) and buttons (p. 6). Each time you press a button, the color alternates between green, red, and orange, and the settings change accordingly. If you hold down a button for one second, the settings of the sound that you’re currently hearing are overwritten onto the previously-stored settings.* You can make the settings back to the factory state by turning the power on while holding down the [PANEL] button (p. 9).[PANEL] buttonMakes the unit sound using the current settings of the panel knobs.9 (PHONES)/REC OUT jackConnect headphones here. You can obtain powerful guitar sounds just as if you were playing through the speaker. By using BOSS Tone Studio you can obtain the sound of dierent micing (LINE OUT AIR FEEL, p. 7). To adjust the volume, use the [VOLUME] knob along with the [MASTER] knob.* If a plug is inserted in this jack, no sound will be output from the KATANA’s own speaker. This is convenient if you don’t want loud sound to be produced from the speaker, such as when you’re practicing at night.10 INPUT jackYou can directly connect your electric guitar here.* To prevent malfunction and equipment failure, always turn down the volume, and turn o all the units before making any connections.11 TRANSMITTER IN jackYou can insert the included transmitter (p. 4) here to charge it.The rst time that you use the unit, power-on the KATANA-AIR and insert the transmitter here to charge it.NOTEDo not insert anything other than a transmitter made by BOSS.If you connect headphones, high-volume sound might be emitted, or the headphones might be damaged.Rear Panel12 13 1412 AUX IN jackHere you can connect a CD player, audio player, electronic musical instrument, or similar audio source, and listen to it while you play your guitar.13 DC IN jackConnect the included AC adaptor (p. 5).* Use only the AC adaptor that was included with the unit.14 O (USB) portYou can use a commercially available USB 2.0 cable to record the sound of the KATANA-AIR into your computer.You must install the USB driver when connecting the unit to your computer.Download the USB driver from the Roland website. For details, refer to Readme.htm which is included in the download.https://www.boss.info/](https://usermanual.wiki/Roland/420321A/User-Guide-3752254-Page-5.png)
![5From Preparations to PerformanceBattery OperationThe KATANA-AIR can be powered with eight AA batteries (sold separately).* If you handle batteries improperly, you risk explosion and uid leakage. Make sure that you carefully observe all of the items related to batteries that are listed in “USING THE UNIT SAFELY” and “IMPORTANT NOTES” (the leaet “USING THE UNIT SAFELY” and the Owner’s Manual (p. 11)).Installing BatteriesThis KATANA-AIR can be used with alkaline batteries or rechargeable Ni-MH batteries. The operating time will depend on the characteristics of the batteries.1. Turn the KATANA-AIR over.* When turning the unit over, be careful so as to protect the buttons and knobs from damage. Also, handle the unit carefully; do not drop it.2. Remove the battery cover.3. Insert the batteries, taking care to orient them as shown in the illustration.AC Adaptor OperationUse only the AC adaptor included with the KATANA-AIR. Use of other AC adaptors may damage the amp or result in other problems.Turning the Power On/O1. Turn the [MASTER] knob and the [VOLUME] knob of the KATANA-AIR to 0.2. Minimize the volume of the devices connected to the KATANA-AIR.3. Turn on the power of the devices that are connected to the INPUT jack and AUX IN jack of the KATANA-AIR.4. Turn on the power of the KATANA-AIR.5. Turn on the power of the device that is connected to the (PHONES)/REC OUT jack.6. Insert the transmitter into the TRANSMITTER IN jack.The wireless status is detected automatically.7. When the BATTERY indicator stops blinking orange, plug the transmitter into your guitar.When turning the power o, turn the volume to 0 for all devices that are connected to the KATANA-AIR and then turn o their power; nally, turn o the power of the KATANA-AIR.Automatically Turning On from Standby Mode (Wake Up On)When the KATANA-AIR and the transmitter are both in standby mode (p. 2, p. 4), and the transmitter detects vibration (for example, because you picked up the guitar), both will automatically power-on (wake up on).StandbyOrangeOnPick up the guitarUnlitGreenLit++++++++](https://usermanual.wiki/Roland/420321A/User-Guide-3752254-Page-7.png)
![6Using the EectsThe KATANA amp lets you switch between various types of eect by using the buttons and knobs. You can use three types of eect simultaneously.Eects assigned to each knob when the unit is shippedKnob Color of the button BST (BOOSTER) MODGreen BLUES DRIVE CHORUSRed OVERDRIVE FLANGEROrange DISTORTION PHASERKnob Color of the button DELAY FXGreen DIGITAL DELAY TREMOLORed ANALOG DELAY T.WAHOrange TAPE ECHO OCTAVEKnob Color of the button REVERBGreen PLATE REVERBRed SPRING REVERBOrange HALL REVERBThis table shows the eects when the [PANEL] button is on. Use BOSS Tone Studio to see the eects that are assigned when the [CH A] or [CH B] buttons are pressed.1. Press the [BST/MOD], [DELAY/FX], or [REVERB] button to select the eect that you want to use.Each time you press the button, its color changes.2. Turn the knob to adjust the depth of the eect.* Either BST or MOD is selected depending on the position of the knob.BST depth MOD depth* Either DELAY or FX is selected depending on the position of the knob.DELAY depth FX depthREVERB depthAbout the Factory-Set EectsEect ExplanationBSTBLUES DRIVEA crunch sound like the BOSS BD-2, creating distortion that faithfully reproduces the nuances of your picking.OVERDRIVE An overdrive sound like the BOSS OD-1, producing sweet and mild distortion.DISTORTION A standard and highly usable distortion sound.MODCHORUSAn eect that adds a slightly modulated sound to the direct signal, creating beautiful spaciousness and depth.FLANGERProduces a anging eect which applies modulation that is reminiscent of a jet airplane.PHASERProduces a phasing eect which applies a sense of rotation to the sound by adding a slightly phase-shifted sound to the direct signal.DELAYDIGITAL DELAY A clear digital delay sound.ANALOG DELAY A mild analog delay sound.TAPE ECHO A sound with the distinctive modulation of a tape echo unit.FXTREMOLO An eect that cyclically modulates the volume.T.WAHA wah eect that modulates a lter according to the volume of the guitar, producing a wah eect.OCTAVE Adds a sound one octave lower than the input, generating a sense of low-frequency solidity.](https://usermanual.wiki/Roland/420321A/User-Guide-3752254-Page-8.png)
![8Listening to Sound via Wireless Connection with a Mobile DeviceBluetooth® AudioBy wirelessly connecting the KATANA-AIR to a mobile device that’s equipped with Bluetooth audio functionality, you can do the following things. 5You can use the speakers of this unit to listen to music or music videos played on your mobile device.Registering a Mobile Device (Pairing)“Pairing” is the procedure by which the mobile device that you want to use is registered on this unit (the two devices recognize each other).Make settings so that music data saved on the mobile device can be played wirelessly via this unit.MEMOThe following explanation of the procedure is only one example. For details, refer to the owner’s manual of your mobile device.1. Turn on the power of the KATANA-AIR.2. Place the mobile device that you want to connect nearby the KATANA-AIR.3. Long-press the KATANA-AIR’s [Bluetooth] button.* The Bluetooth indicator blinks, and the sound is muted.4. Turn on the Bluetooth function of the mobile device.MEMOThe explanation here uses the iPhone as an example. For details, refer to the owner’s manual of your mobile device.5. Tap “KATANA-AIR Audio” that is shown in the Bluetooth device screen of your mobile device.This unit is paired with the mobile device. When pairing succeeds, “KATANA-AIR Audio” is added to the list of “Paired Devices” on your mobile device.Connecting an Already-Paired Mobile Device1. With the KATANA-AIR’s [Bluetooth] indicator o, press the [Bluetooth] button.* The Bluetooth indicator blinks, and the sound is muted.2. Turn on the Bluetooth function of the mobile device.MEMO 5If you were unable to establish a connection using the procedure above, tap “KATANA-AIR Audio” that is displayed in the Bluetooth device screen of the mobile device. 5To disconnect, press the KATANA-AIR’s [Bluetooth] button to make the Bluetooth indicator go dark, or turn o the mobile device’s Bluetooth function.Adjusting the Volume1. Adjust the volume on the mobile device.Adjust the volume of Bluetooth audio.2. Turn the KATANA-AIR’s [MASTER] knob.The [MASTER] knob adjusts the volume of both the Bluetooth audio and the guitar. When you turn the [MASTER] knob, the volume of the Bluetooth audio and the volume of the guitar will both change.Controlling the KATANA-AIR from a Mobile Device AppYou can use the BOSS Tone Studio app to edit sounds and manage the sound library.For details on BOSS TONE STUDIO, refer to the BOSS website.https://www.boss.info/Connecting to the AppHere’s how to make settings in order to use an app on your mobile device.1. Turn on the power of the KATANA-AIR.2. Place the mobile device that you want to connect nearby this unit.3. Turn on the Bluetooth function of the mobile device.MEMOThe explanation here uses the iPhone as an example. For details, refer to the owner’s manual of your mobile device.4. In the app, establish a connection with the KATANA-AIR.NOTEDo not tap the “KATANA-AIR MIDI” that is shown in the Bluetooth settings of the mobile device.](https://usermanual.wiki/Roland/420321A/User-Guide-3752254-Page-10.png)
![9Disabling the Bluetooth FunctionalityIf you want to disconnect the Bluetooth connection between the KATANA-AIR and your mobile device, disable the Bluetooth functionality.1. Press the KATANA-AIR’s [Bluetooth] button.The Bluetooth indicator goes dark.Restoring the Factory SettingsHere’s how the settings stored in the KATANA-AIR can be returned to their factory-set condition (factory reset).1. While holding down the [PANEL] button, turn the power on.Each of the EFFECTS buttons continues blinking consecutively from the left. When the blinking stops, all of the KATANA’s settings return to the factory-set state.* It takes approximately 30 seconds for the factory reset to be completed. Don’t turn o the power while the factory reset is in progress.Block DiagramSPEAKERAUX INUSB -Secondary (Windows)-Input/Output 3,4 (Mac) PREAMP EFFECTS MASTERINPUTPOWER AMPUSB -Primary (Windows)-Input 1,2/Stereo Out(1,2) (Mac) MUTE+WIRELESS +Bluetooth +OFF(PHONES)/REC OUTNote when using an already-paired iOS deviceAfter executing a factory reset, you’ll need to perform the following operations.KATANA-AIR MIDIDisconnect “KATANA-AIR MIDI.”KATANA-AIR MIDI1Turn o.2For details, refer to the owner’s manual of your iOS device.](https://usermanual.wiki/Roland/420321A/User-Guide-3752254-Page-11.png)
!['16. 04. 01 現在(Roland)製品に関するお問い合わせ先050-3101-2555ローランド・ホームページ http://www.roland.co.jp/電話受付時間: 月曜日∼金曜日 10:00∼17:00(弊社規定の休日を除く)※IP電話からおかけになって繋がらない場合には、お手数ですが、電話番号の前に“0000” (ゼロ4回)をつけてNTTの一般回線からおかけいただくか、携帯電話をご利用ください。※上記窓口の名称、電話番号等は、予告なく変更することがありますのでご了承ください。お問い合わせの窓口最新サポート情報製品情報、イベント/キャンペーン情報、サポートに関する情報などローランドお客様相談センターボス・ホームページ http://jp.boss.info/)RUWKH86$)('(5$/&20081,&$7,216&200,66,215$',2)5(48(1&<,17(5)(5(1&(67$7(0(177KLVHTXLSPHQWKDVEHHQWHVWHG DQGIRXQGWRFRPSO\ZLWK WKHOLPLWVIRUD&ODVV % GLJLWDOGHYLFHSXUVXDQWWR3DUW RIWKH)&& 5XOHV 7KHVH OLPLWV DUH GHVLJQHG WR SURYLGH UHDVRQDEOH SURWHFWLRQ DJDLQVW KDUPIXO LQWHUIHUHQFH LQ D UHVLGHQWLDOLQVWDOODWLRQ 7KLV HTXLSPHQW JHQHUDWHV XVHV DQG FDQ UDGLDWH UDGLR IUHTXHQF\ HQHUJ\ DQG LI QRW LQVWDOOHG DQG XVHG LQDFFRUGDQFHZLWKWKHLQVWUXFWLRQVPD\FDXVHKDUPIXO LQWHUIHUHQFHWRUDGLRFRPPXQLFDWLRQV+RZHYHUWKHUH LV QRJXDUDQWHHWKDW LQWHUIHUHQFH ZLOO QRW RFFXU LQ D SDUWLFXODU LQVWDOODWLRQ ,I WKLV HTXLSPHQW GRHV FDXVH KDUPIXO LQWHUIHUHQFH WR UDGLR RUWHOHYLVLRQUHFHSWLRQZKLFKFDQEHGHWHUPLQHGE\WXUQLQJWKHHTXLSPHQWRIIDQGRQWKHXVHULVHQFRXUDJHGWRWU\WRFRUUHFWWKHLQWHUIHUHQFHE\RQHRUPRUHRIWKHIROORZLQJPHDVXUHV²5HRULHQWRUUHORFDWHWKHUHFHLYLQJDQWHQQD²,QFUHDVHWKHVHSDUDWLRQEHWZHHQWKHHTXLSPHQWDQGUHFHLYHU²&RQQHFWWKHHTXLSPHQWLQWRDQRXWOHWRQDFLUFXLWGLIIHUHQWIURPWKDWWRZKLFKWKHUHFHLYHULVFRQQHFWHG²&RQVXOWWKHGHDOHURUDQH[SHULHQFHGUDGLR79WHFKQLFLDQIRUKHOS7KLVGHYLFHFRPSOLHVZLWK3DUWRIWKH)&&5XOHV2SHUDWLRQLVVXEMHFWWRWKHIROORZLQJWZRFRQGLWLRQVWKLVGHYLFHPD\QRWFDXVHKDUPIXOLQWHUIHUHQFHDQGWKLVGHYLFHPXVWDFFHSWDQ\LQWHUIHUHQFHUHFHLYHGLQFOXGLQJLQWHUIHUHQFHWKDWPD\FDXVHXQGHVLUHGRSHUDWLRQ7KLVHTXLSPHQWUHTXLUHVVKLHOGHGLQWHUIDFHFDEOHVLQRUGHUWRPHHW)&&FODVV%OLPLW$Q\XQDXWKRUL]HGFKDQJHVRUPRGLILFDWLRQVQRWH[SUHVVO\DSSURYHGE\WKHSDUW\UHVSRQVLEOHIRUFRPSOLDQFHFRXOGYRLGWKHXVHU·VDXWKRULW\WRRSHUDWHWKHHTXLSPHQW:$51,1*7KLVSURGXFWFRQWDLQVFKHPLFDOVNQRZQWRFDXVHFDQFHUELUWKGHIHFWVDQGRWKHUUHSURGXFWLYHKDUPLQFOXGLQJOHDG)RU&$863URSRVLWLRQ)RU&DQDGD&$1,&(6%10%%)RU.RUHD](https://usermanual.wiki/Roland/420321A/User-Guide-3752254-Page-12.png)