Roland 420981A Digital Piano with Bluetooth User Manual Roland GOPIANO88 Manual G05 181019 ai
Roland Corporation Digital Piano with Bluetooth Roland GOPIANO88 Manual G05 181019 ai
UserManual.wiki
>
Roland
>
420981A User Manual
user manual
Navigation menu
Upload a User Manual
Namespaces
Wiki Guide
HTML
PDF
Info
Views
User Manual
Discussion / Help
Navigation
![Panel DescriptionFront Panel1. [POWER] Switch Turn the power on or off.2. [VOLUME] Knob Adjust the master volume.3. [FUNCTION] Button Press and hold it to access secondary functions of other keys.4. [METRONOME] Button Press it to turn the metronome on or off. Press [METRONOME] and [TWIN PIANO] at the same time to enter Demo mode.5. [TWIN PIANO] Button Press it to turn the Twin Piano function on or off. Press [METRONOME] and [TWIN PIANO] at the same time to enter Demo mode.6. [TONE] Buttons Press one of these buttons to select a preset tone.7. [Bluetooth] Keys Press and hold [FUNCTION], then press one of these keys to disable the related Bluetooth connection.8. [1~9~0] Keys Press and hold [METRONOME], then press these keys to enter a tempo value. Press and hold [METRONOME] and [TWIN PIANO] at the same time, then press one of these keys to select a demo song.9. [VOLUME] Keys Press and hold [FUNCTION] or [METRONOME], then press one of these keys to adjust the metronome volume.10. [BEAT] Keys Press and hold [FUNCTION] or [METRONOME], then press one of these keys to set the metronome time signature.11. [TEMPO] Keys Press and hold [FUNCTION] or [METRONOME], then press one of these keys to edit the tempo value.12. [Reverb] Keys Press and hold [FUNCTION], then press one of these keys to adjust the reverb level.13. [Key Touch] Keys Press and hold [FUNCTION], then press one of these keys to select an appropriate touch level.14. [Tuning] Keys Press and hold [FUNCTION], then press one of these keys to adjust the current tuning.15. [Transpose] Keys Press and hold [FUNCTION], then press one of these keys to adjust the transpose value.04152 43687910 12 13 14 1511CMYCMMYCYCMYKRoland_GOPIANO88_Manual_G05_181019.ai 4 2018-10-19 16:54:37Roland_GOPIANO88_Manual_G05_181019.ai 4 2018-10-19 16:54:37](https://usermanual.wiki/Roland/420981A/User-Guide-4184410-Page-4.png)
![Panel DescriptionSetupRear Panel16. DC IN Jack Connect the specified power adaptor.17. PHONES/OUTPUT Jack Connect a pair of stereo headphones or external audio equipment.18. SUSTAIN Jack Connect an optional pedal.19. USB Jack Connect to a computer.Power Supply 1. Before connecting the power supply, please set the [POWER] switch to “OFF” and set the master volume level to minimum.2. Connect the power adaptor to the DC IN jack on the rear panel.3. Plug the power adaptor into an appropriate AC outlet.4. Press the [POWER] switch. The button LED will light up, indicating the instrument is powered on.5. When you are ready to turn the instrument off, press and hold the [POWER] switch for a second. The button LED will turn off.Note:1. In order to save energy, the instrument will automatically shut down after 30 minutes when not in use. (See Auto Power Off).2. For your safety, please unplug the instrument when it is not in use or during a thunderstorm. Setting the Music RestA music rest is supplied with the instrument. You can easily attach it to the instrument by inserting it into the slots at the rear of the panel. 0516 17 18 19CMYCMMYCYCMYKRoland_GOPIANO88_Manual_G05_181019.ai 5 2018-10-19 16:54:38Roland_GOPIANO88_Manual_G05_181019.ai 5 2018-10-19 16:54:38](https://usermanual.wiki/Roland/420981A/User-Guide-4184410-Page-5.png)
![ConnectionsConnecting a Pair of HeadphonesPlug a pair of standard stereo headphones in the PHONES/OUTPUT jack.Turn on the Phones Sense.Press and hold [FUNCTION], then press the [F7] key to turn on the Phone Sense function. When headphones are connected, the internal speakers system will be muted. Sound can only be heard from the headphones.Turn off the Phone Sense.Press and hold [FUNCTION], then press the [F#7] key to disable the Phone Sense function. When headphones are connected, the sound can be heard from the headphones and speakers.Note: To avoid the risk of hearing loss, do not use headphones at high volume levels for a long period of time. Connecting an Audio Equipment The PHONES/OUTPUT jack delivers the output of the instrument to external audio equipment such as a keyboard amplifier, stereo sound system, mixing console, or recording interface.Use an audio cable to connect the PHONES/OUTPUT jack of the instrument to the INPUT jack of the external audio equipment.Notes: 1. Turn off the power to all devices before connecting or disconnecting external equipment. 2. To avoid damaging the speakers, set the master volume level to minimum before turning on the power.Connecting a PedalAn optional pedal can be plugged into the SUSTAIN jack. When you step on the pedal, the notes you play on the keyboard will have a longer sustain. Connecting a ComputerUse a standard USB cable to connect the USB jack of the instrument to the USB port of a computer. With USB, you can save a keyboard performance to the computer or use the instrument to play back music played on the computer.Note:Do not set the USB MIDI device to be both input and output simultane-ously when configuring the software on your computer. Otherwise, the sound will be overlapped when playing the keyboard.06CMYCMMYCYCMYKRoland_GOPIANO88_Manual_G05_181019.ai 6 2018-10-19 16:54:38Roland_GOPIANO88_Manual_G05_181019.ai 6 2018-10-19 16:54:38](https://usermanual.wiki/Roland/420981A/User-Guide-4184410-Page-6.png)
![Playing Demo SongsThis instrument features 10 wonderful demo songs. Please refer to Demo List for details.Play the demo songs.Press the [METRONOME] and [TWIN PIANO] buttons at the same time to enter Demo mode and start playing the demo songs in a continuous loop. Select a demo song.Press and hold the [METRONOME] and [TWIN PIANO] buttons at the same time, then press one of the keys marked [1~9~0] to select a desired demo song.Stop playing the demo song. Press the [METRONOME] and [TWIN PIANO] buttons at the same time to stop the demo and exit Demo mode.Rotate the [VOLUME] knob clockwise to increase the master volume or counter-clockwise to decrease it. Adjust to set the desired volume level.Note:If the speakers do not produce sound, please check if the mastervolume is set too low. Then check if the speakers are muted because headphones are plugged into the PHONES jack and the Phones Sense function is in use.07Adjusting the Master VolumeCMYCMMYCYCMYKRoland_GOPIANO88_Manual_G05_181019.ai 7 2018-10-19 16:54:38Roland_GOPIANO88_Manual_G05_181019.ai 7 2018-10-19 16:54:38](https://usermanual.wiki/Roland/420981A/User-Guide-4184410-Page-7.png)
![08TonesSelecting a ToneThe instrument features 4 tones. Please refer to Tone List for details.Press one of the [TONE] buttons to select a desired tone. The button LED of the selected tone will be lit.Layering Two TonesThe Dual mode allows two different tones to be layered together, creating a more full and rich sound.Press two [TONE] buttons to enter Dual mode. The first [TONE] button you press will be set as the upper tone (tone 1), and the second [TONE] button you press will be set as the dual tone (tone 2).In Dual mode, if you play the keyboard, you will hear two different tones playing together, just like two different instruments being played at the same time.Key TouchThe Key Touch feature allows you to expressively control the voice level based on your playing dynamics.Press and hold [FUNCTION], then press one of the [Key Touch] keys to select an appropriate touch level. There are 3 types of touch settings (Fix, 1~3). The default setting is “2”. Selecting “Fix” will result in a fixed volume level, no matter how hard or how softly you play the keys.ParameterFix123DescriptionFixedLightMediumHeavyCMYCMMYCYCMYKRoland_GOPIANO88_Manual_G05_181019.ai 8 2018-10-19 16:54:38Roland_GOPIANO88_Manual_G05_181019.ai 8 2018-10-19 16:54:38](https://usermanual.wiki/Roland/420981A/User-Guide-4184410-Page-8.png)
![Press and hold [FUNCTION], then press one of the [Reverb] keys to set the reverb level range from 0 to 10.Press and hold [FUNCTION], then press the black key in the [Reverb] keys to restore the default setting. When the reverb level is set to "0", there will be no reverb effect.Reverb09The metronome provides a steady beat to help you practice at a preset tempo.Turn the metronome on or off.Press the [METRONOME] button to turn the function on or off. When the metronome is in use, the button indicator will flash in sync with the current tempo.Change the metronome beat.The instrument provides 6 beat types: 0, 2~6.Press and hold [FUNCTION] or [METRONOME], then press one of the [BEAT] keys to set the metronome beat.Press and hold [FUNCTION] or [METRONOME], then press the black key in the [BEAT] keys to restore the default setting.Press and hold [METRONOME], then press a key [A0] ~ [D1] to select a beat type. Please refer to List of Operations (Button + Key) for details.Adjust the metronome volume.Press and hold [FUNCTION] or [METRONOME], then press one of the [VOLUME] keys to set the volume range from 1 to 10.Press and hold [FUNCTION] or [METRONOME], then press the black key in the [VOLUME] keys to restore the default setting.MetronomeororCMYCMMYCYCMYKRoland_GOPIANO88_Manual_G05_181019.ai 9 2018-10-19 16:54:38Roland_GOPIANO88_Manual_G05_181019.ai 9 2018-10-19 16:54:38](https://usermanual.wiki/Roland/420981A/User-Guide-4184410-Page-9.png)
![You can set the tempo in the following ways:Press and hold [FUNCTION] or [METRONOME], then press one of the [TEMPO] keys to set the desired tempo.Press and hold [METRONOME], then press the keys marked [1~9~0] to set the tempo value. For example, press [0], [6], [4] in sequence to enter a tempo value of 64.This function adjusts the pitch of the instrument in 0.1Hz increment over a range of 415.3Hz ~ 466.2Hz.Press and hold [FUNCTION], then press one of the [Tuning] keys to adjust the pitch of the keyboard.For example, if you press and hold [FUNCTION], then press the key marked [440], it will set the tuning to 440Hz.Master TuningTempo10The transpose function allows the overall pitch of the instrument to be transposed up or down in semitone steps, over a range of -6 ~ +5.Press and hold [FUNCTION], then press one of the [Transpose] keys to set the transpose value. For example, set the transpose value to -5, you will hear “G” pitch when playing the “C” keys.Press and hold [FUNCTION], then press the black key in the [Transpose] keys to restore the default setting.TransposeParameter+1-1DescriptionTo raise the overall pitch by 1 semitone.To lower the overall pitch by 1 semitone.Parameter+0.1Hz-0.1HzDescriptionTo raise the pitch by 0.1Hz.To lower the pitch by 0.1Hz.orCMYCMMYCYCMYKRoland_GOPIANO88_Manual_G05_181019.ai 10 2018-10-19 16:54:39Roland_GOPIANO88_Manual_G05_181019.ai 10 2018-10-19 16:54:39](https://usermanual.wiki/Roland/420981A/User-Guide-4184410-Page-10.png)
![Bluetooth PairingThe Bluetooth function is turned on by default. You can pair the instru-ment with an external Bluetooth device. The instrument’s Bluetooth Audio name: GO:PIANO88.The instrument’s Bluetooth MIDI name: GO:PIANO88.Disable Bluetooth ConnectionPress and hold [FUNCTION], then press the key marked [AUDIO] to disconnect Bluetooth Audio.Press and hold [FUNCTION], then press the key marked [MIDI] to disconnect Bluetooth MIDI.When Bluetooth connection is disabled, you can enable Bluetooth connection again by pairing.Bluetooth11The Twin Piano function splits the keyboard into two areas with the same pitch and tone, for the convenience of playing together with a friend or instructor. 1. Press the [TWIN PIANO] button to turn on the function. The button LED will be lit. The default split point is E3 (32).2. The upper tone selected before entering Twin Piano will become the default tone for both areas. You can press one of the [TONE] buttons to select a desired tone.3. Press the [TWIN PIANO] button again to turn off the function. The button LED will turn off.Notes: 1. Twin Piano function is not available in Demo mode.2. Dual mode is not available when Twin Piano is in use.Twin PianoPress and hold [FUNCTION], then press a key [C2] ~ [D#3] to assign the MIDI Out channel. Please refer to List of Operations (Button + Key) for details.MIDI Out CMYCMMYCYCMYKRoland_GOPIANO88_Manual_G05_181019.ai 11 2018-10-19 16:54:39Roland_GOPIANO88_Manual_G05_181019.ai 11 2018-10-19 16:54:39](https://usermanual.wiki/Roland/420981A/User-Guide-4184410-Page-11.png)
![ProblemThe speakers produce a pop sound whenever the power is turned ON/OFF.Speakers do not produce sound when the keyboard is played.There is noise when I use a mobile phone.When connecting to computer, the instrument cannot be recognized.The pedal does not respond.It shuts down after a period of time.Possible Cause and SolutionThis is normal and no cause for alarm.1. Check if the master volume is set too low.2. Check if headphones are plugged into the PHONES jack.Using a mobile phone in close proximity to the instrument may produce interference. To prevent this, turn off the mobile phone or use it farther away from the instrument.Check if the USB cable is firmly connected. Try connecting anotherUSB port on the computer. This instrument is plug and play and should work without installing a driver.Check if the pedal cable is firmly connected.The auto power off function will turn off the instrument after a preset period of time when the instrument is not in use. You can configure the Auto Power Off function, please refer to Auto Power Off in this manual.Troubleshooting12The instrument will automatically shut down after 30 minutes of inactivity. You can disable this function or change the time setting. 1. To disable this function: press and hold [FUNCTION], then press the key [C8] (the first key to right side of the keyboard).2. To set the time to 240 minutes: press and hold [FUNCTION], then press the key [B7].3. To set the time to 30 minutes: press and hold [FUNCTION], then press the key [A#7].4. To set the time to 10 minutes: press and hold [FUNCTION], then press the key [A7].Auto Power OffCMYCMMYCYCMYKRoland_GOPIANO88_Manual_G05_181019.ai 12 2018-10-19 16:54:39Roland_GOPIANO88_Manual_G05_181019.ai 12 2018-10-19 16:54:39](https://usermanual.wiki/Roland/420981A/User-Guide-4184410-Page-12.png)
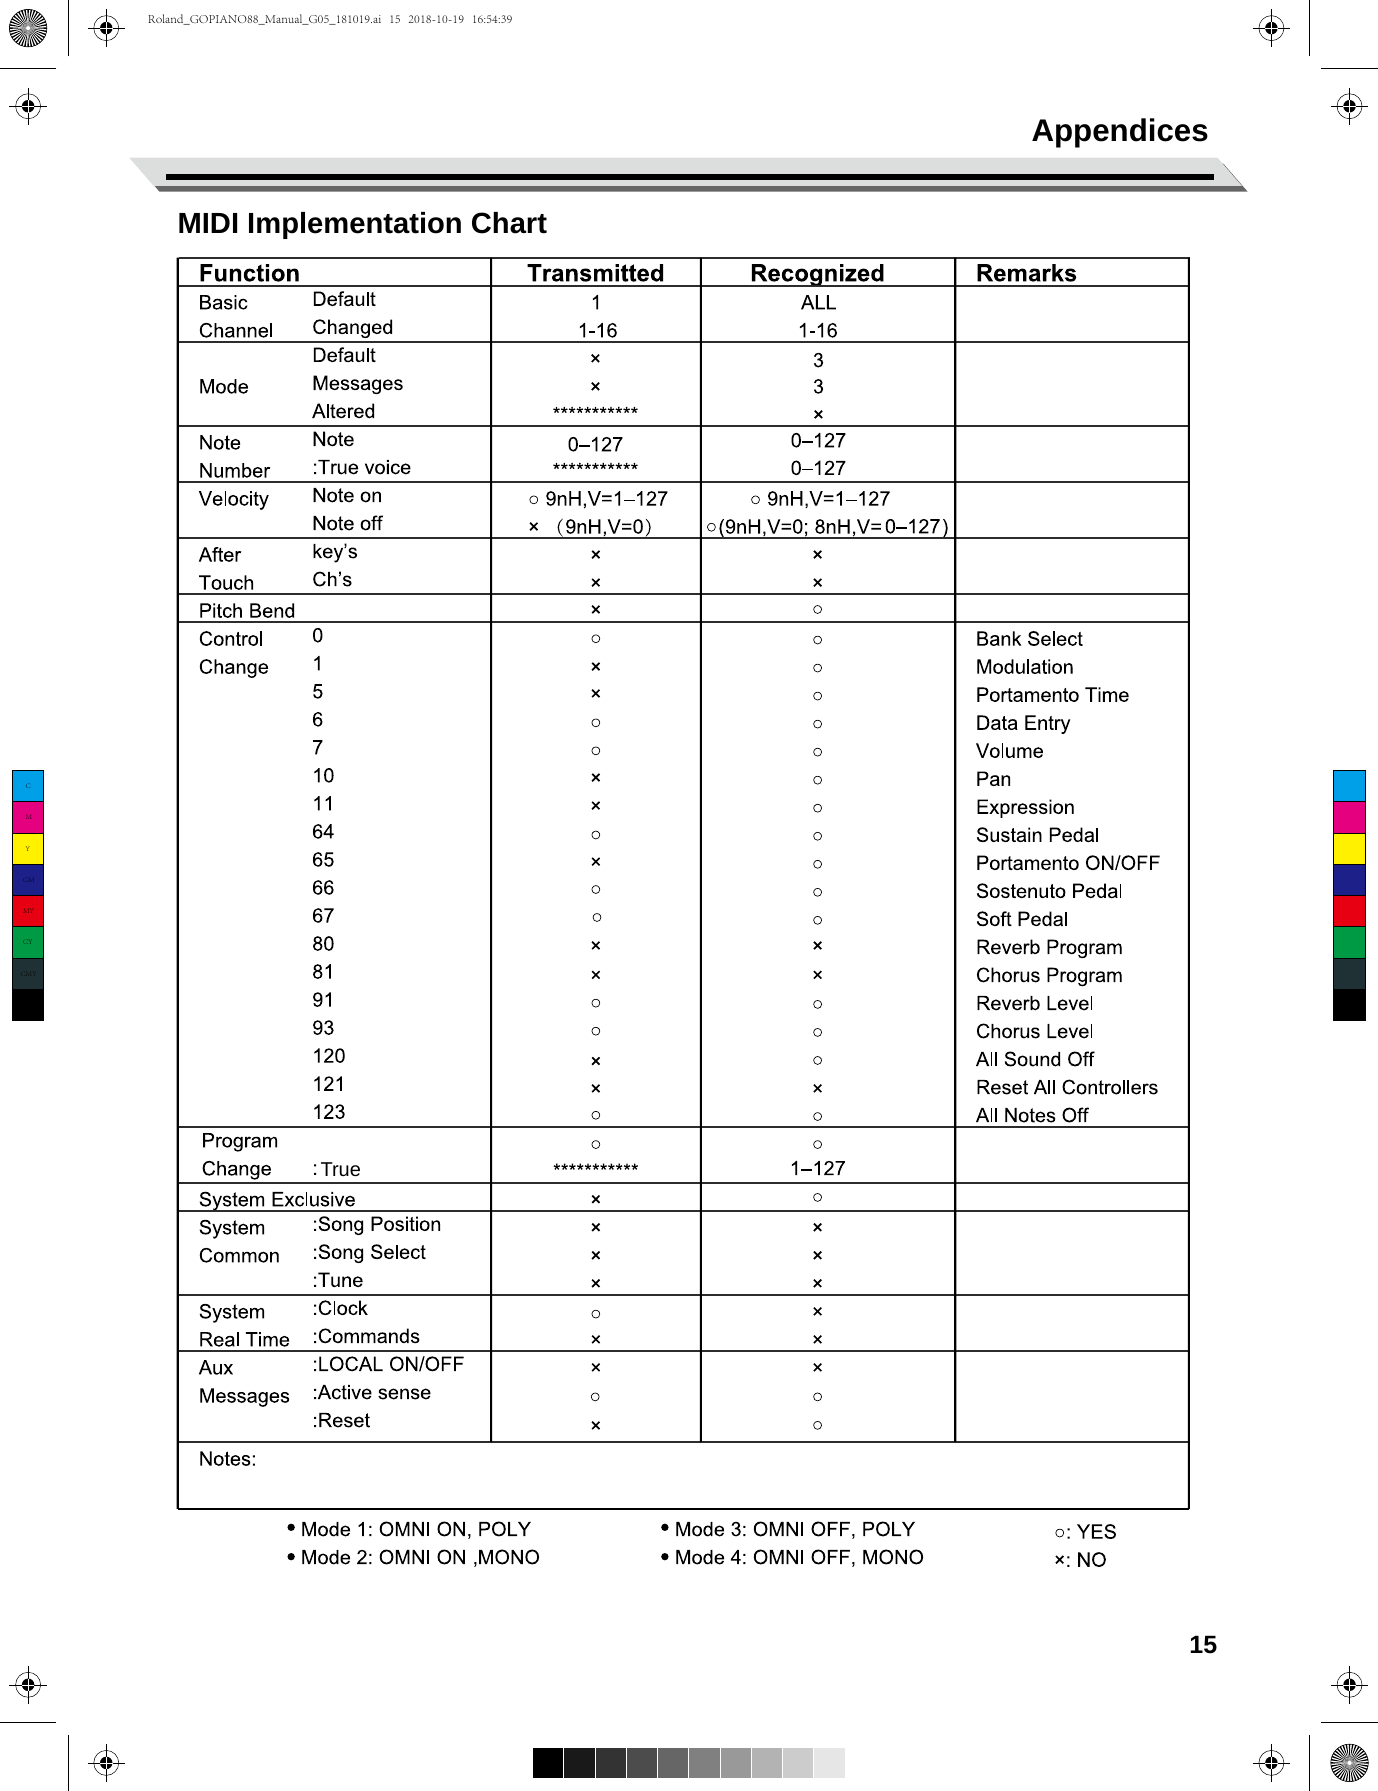
![Appendices13SpecificationsDemo ListKeyboard Keyboard Touch ResponseTones Polyphony (max.) Tones Layer Twin PianoEffects ReverbSong Demo Pitch Adjustment Transpose TuningOther Functions Metronome Tempo Other controlConnections Interaction & Expansion Phones/Output Pedal USBPower Supply Power Power Off ProtectionAmplifiers & Speakers Amplifiers SpeakersDimensions & Weight Dimensions LWH (mm) Weight (kg) 88 Keys with Touch Response 3 types, Off 1284 panel YesYes 1 type, 0 - 10 levels 10 presets -6 - +5 415.3Hz - 466.2Hz Metronome beat: 0, 2 - 6;Metronome volume: 1 - 1030 - 280MIDI Out channel,Bluetooth audio,Bluetooth MIDIUSB MIDI, BluetoothStandard stereoSustainUSB MIDI DC12V / 2AYes 10W x 2[15cm x 6cm] x 2 1283 x 292 x 877.0 No.1234Tone NameAcoustic Grand PianoElectric PianoChurch OrganString EnsemblesNo.12345678910Song NameValse OP.34 NO.1Sonate Nr.16 C DurLiebesträume Nr.3Fantaisie-Impromptu1ère GymnopédieRadetzky MarschTräumereiFrühlingsliedFür EliseMenuett G Dur BWV Anh.114* Specifications and descriptions herein are for information only and are subject to change without prior notice.Tone ListCMYCMMYCYCMYKRoland_GOPIANO88_Manual_G05_181019.ai 13 2018-10-19 16:54:39Roland_GOPIANO88_Manual_G05_181019.ai 13 2018-10-19 16:54:39](https://usermanual.wiki/Roland/420981A/User-Guide-4184410-Page-13.png)
![1. [Audio Disconnect] Key Press to disable Bluetooth Audio connection. [MIDI Disconnect] Key Press to disable Bluetooth MIDI connection.2. [MIDI Channel 1 ~16] Keys Press to select the MIDI output channel.3. [Metro. Volume] Keys Press to adjust the metronome volume.1. [Metro. Beat] Keys Press to select a beat type.2. [Tempo] Keys Press to enter a tempo value.3. [Metro. Volume] Keys Press to adjust the metronome volume.1. [Song Number] Keys Press to select a demo song.4. [Metro. Beat] Keys Press to set the metronome time signature.5. [Tempo] Keys Press to edit the tempo value.4. [Metro. Beat] Keys Press to set the metronome time signature.5. [Tempo] Keys Press to edit the tempo value.6. [Reverb] Keys Press to set the reverb level.7. [Key Touch] Keys Press to select a touch level.8. [Tuning] Keys Press to adjust the current tuning.9. [Transpose] Keys Press to adjust the transpose value.10. [Phones Sense] Keys Press to turn the Phones Sense function on or off.11. [Auto Power Off] Keys Press to change the Auto Power Off setting.Appendices14List of Operations (Button + Key)[FUNCTION] + Key[METRONOME] + Key[METRONOME] + [TWIN PIANO] + KeyA01356121315-1+1-1+1OFFMedium-0.1Hz+0.1Hz-1+1On10 min.240 min.OFF-1+1-1+18102479111416(Default)4/4 (Default)(Default)-10Tempo = 106+10LightHeavy440.0Hz(Default)442Hz0 (Default)Off30 min. (Default)C1 C2 C3 C4 C5 C6 C7 C8B0 B1C1 D1 E1 F1 G1 C2 D2 E2 F2 G2A1 B2 C3 D3 E3A2 F3 G3 A3 B3 C4 D4 E4 F4 G4 A4 B4 C5 D5 E5 F5 G5 A5 B5 C6 D6 E6 F6 G6 A6 B6 C7 D7 E7 F7 G7 A7 B7 C81Bluetooth 2MIDI Channel 3Metro. Volume 4Metro. Beat 5Tempo 6Reverb 7Key Touch 8Tuning 9Transpose 10Phones Sense 11Auto Power OffAudio DisconnectMIDI DisconnectC1 C2 C3 C4 C5 C6 C7 C8C1 C2 C3 C4 C5 C6 C7 C8A00364 (Default)1356-1-1+1-1+1+180225479(Default)4/4 (Default)-10Tempo = 106+10B0 B1C1 D1 E1 F1 G1 C2 D2 E2 F2 G2A1 B2 C3 D3 E3A2 F3 G3 A3 B3 C4 D4 E4 F4 G4 A4 B4 C5 D5 E5 F5 G5 A5 B5 C6 D6 E6 F6 G6 A6 B6 C7 D7 E7 F7 G7 A7 B7 C81Metro. Beat 3Metro. Volume 4Metro. Beat 5Tempo2TempoA013568102479B0 B1C1 D1 E1 F1 G1 C2 D2 E2 F2 G2A1 B2 C3 D3 E3A2 F3 G3 A3 B3 C4 D4 E4 F4 G4 A4 B4 C5 D5 E5 F5 G5 A5 B5 C6 D6 E6 F6 G6 A6 B6 C7 D7 E7 F7 G7 A7 B7 C81Song NumberCMYCMMYCYCMYKRoland_GOPIANO88_Manual_G05_181019.ai 14 2018-10-19 16:54:39Roland_GOPIANO88_Manual_G05_181019.ai 14 2018-10-19 16:54:39](https://usermanual.wiki/Roland/420981A/User-Guide-4184410-Page-14.png)