Roland 420981A Digital Piano with Bluetooth User Manual Roland GOPIANO88 Manual G05 181019 ai
Roland Corporation Digital Piano with Bluetooth Roland GOPIANO88 Manual G05 181019 ai
Roland >
user manual
C
M
Y
CM
MY
CY
CMY
K
Roland_GOPIANO88_Manual_G05_181019.ai 1 2018-10-19 16:54:34Roland_GOPIANO88_Manual_G05_181019.ai 1 2018-10-19 16:54:34
02
Before using this unit, carefully read “USING THE UNIT SAFELY” and “IMPORTANT NOTES” (the leaflet “USING THE UNIT
SAFELY”). After reading, keep the document(s) where it will be available for immediate reference.
Copyright © 2017 ROLAND CORPORATION
Intellectual Property Right
It is forbidden by law to make an audio recording, video recording, copy or revision of a third party’s copyrighted work
(musical work, video work, broadcast, live performance, or other work), whether in whole or in part, and distribute,
sell, lease, perform, or broadcast it without the permission of the copyright owner.
Do not use this product for purposes that could infringe on a copyright held by a third party. We assume no responsi
bility whatsoever with regard to any infringements of third-party copyrights arising through your use of this product.
The copyright of content in this product (the sound waveform data, style data, accompaniment patterns, phrase data,
audio loops and image data) is reserved by Roland Corporation.
Purchasers of this product are permitted to utilize said content (except song data such as Demo Songs) for the
creating, performing, recording and distributing original musical works.
Purchasers of this product are NOT permitted to extract said content in original or modified form, for the purpose of
distributing recorded medium of said content or making them available on a computer network.
Roland is an either registered trademark or trademark of Roland Corporation in the United States and/or other
countries.
Company names and product names appearing in this document are registered trademarks or trademarks of their
respective owners.
C
M
Y
CM
MY
CY
CMY
K
Roland_GOPIANO88_Manual_G05_181019.ai 2 2018-10-19 16:54:37Roland_GOPIANO88_Manual_G05_181019.ai 2 2018-10-19 16:54:37

03
Table of Contents
Panel Description
Front Panel.................................................................................................................................................................4
Rear Panel..................................................................................................................................................................5
Setup
Power Supply..............................................................................................................................................................5
Setting the Music Rest................................................................................................................................................5
Connections
Connecting a Pair of Headphones..............................................................................................................................6
Connecting an Audio Equipment................................................................................................................................6
Connecting a Pedal.....................................................................................................................................................6
Connecting a Computer..............................................................................................................................................6
Adjusting the Master Volume..................................................................................................................................7
Playing Demo Songs................................................................................................................................................7
Tones
Selecting a Tone.........................................................................................................................................................8
Layering Two Tones....................................................................................................................................................8
Key Touch...................................................................................................................................................................8
Reverb.......................................................................................................................................................................9
Metronome...............................................................................................................................................................9
Tempo......................................................................................................................................................................10
Transpose................................................................................................................................................................10
Master Tuning.........................................................................................................................................................10
Twin Piano...............................................................................................................................................................11
Bluetooth.................................................................................................................................................................11
MIDI Out...................................................................................................................................................................11
Auto Power Off.......................................................................................................................................................12
Troubleshooting.....................................................................................................................................................12
Specifications........................................................................................................................................................13
Appendices
Tone List...................................................................................................................................................................13
Demo List.................................................................................................................................................................13
List of Operations (Button + Key)..............................................................................................................................14
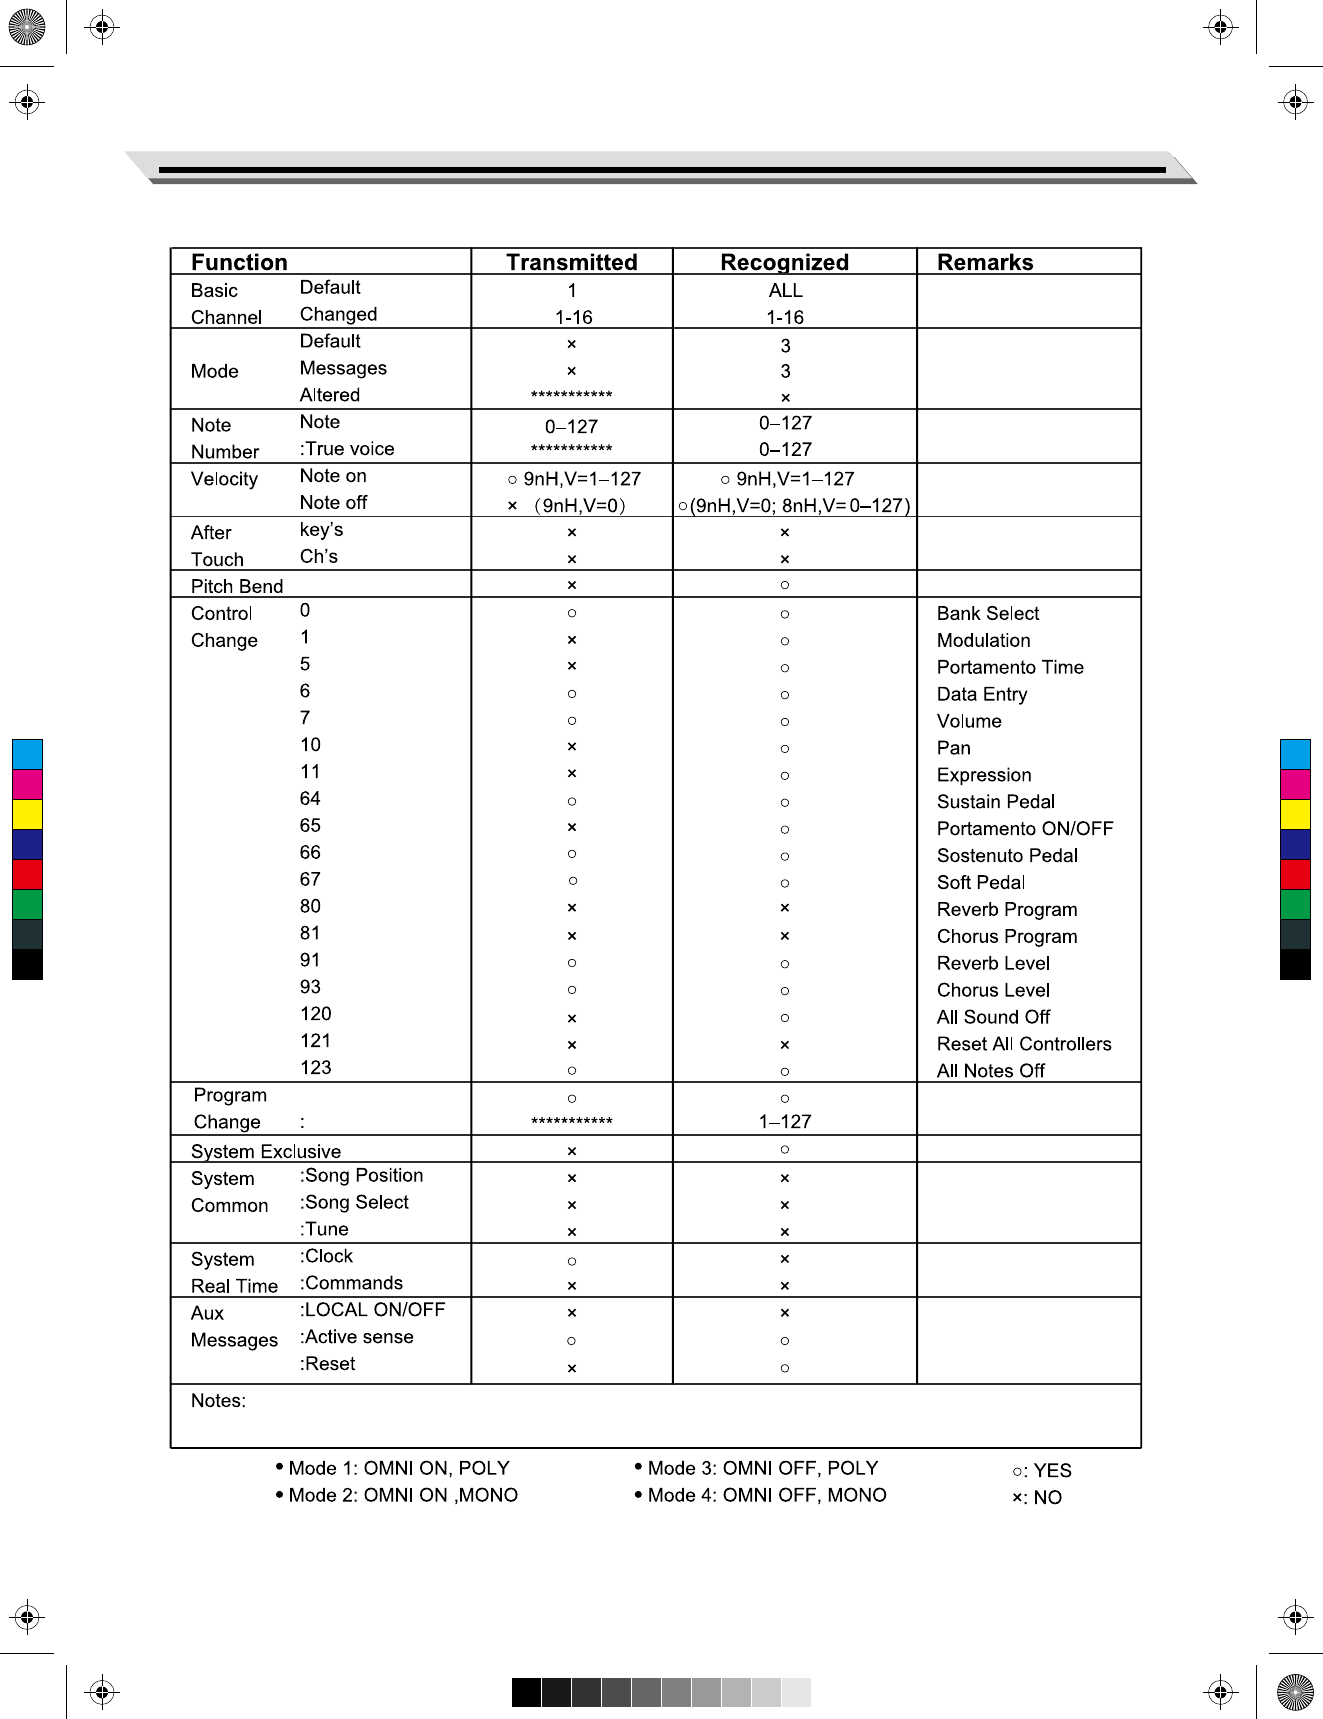
MIDI Implementation Chart.......................................................................................................................................15
C
M
Y
CM
MY
CY
CMY
K
Roland_GOPIANO88_Manual_G05_181019.ai 3 2018-10-19 16:54:37Roland_GOPIANO88_Manual_G05_181019.ai 3 2018-10-19 16:54:37
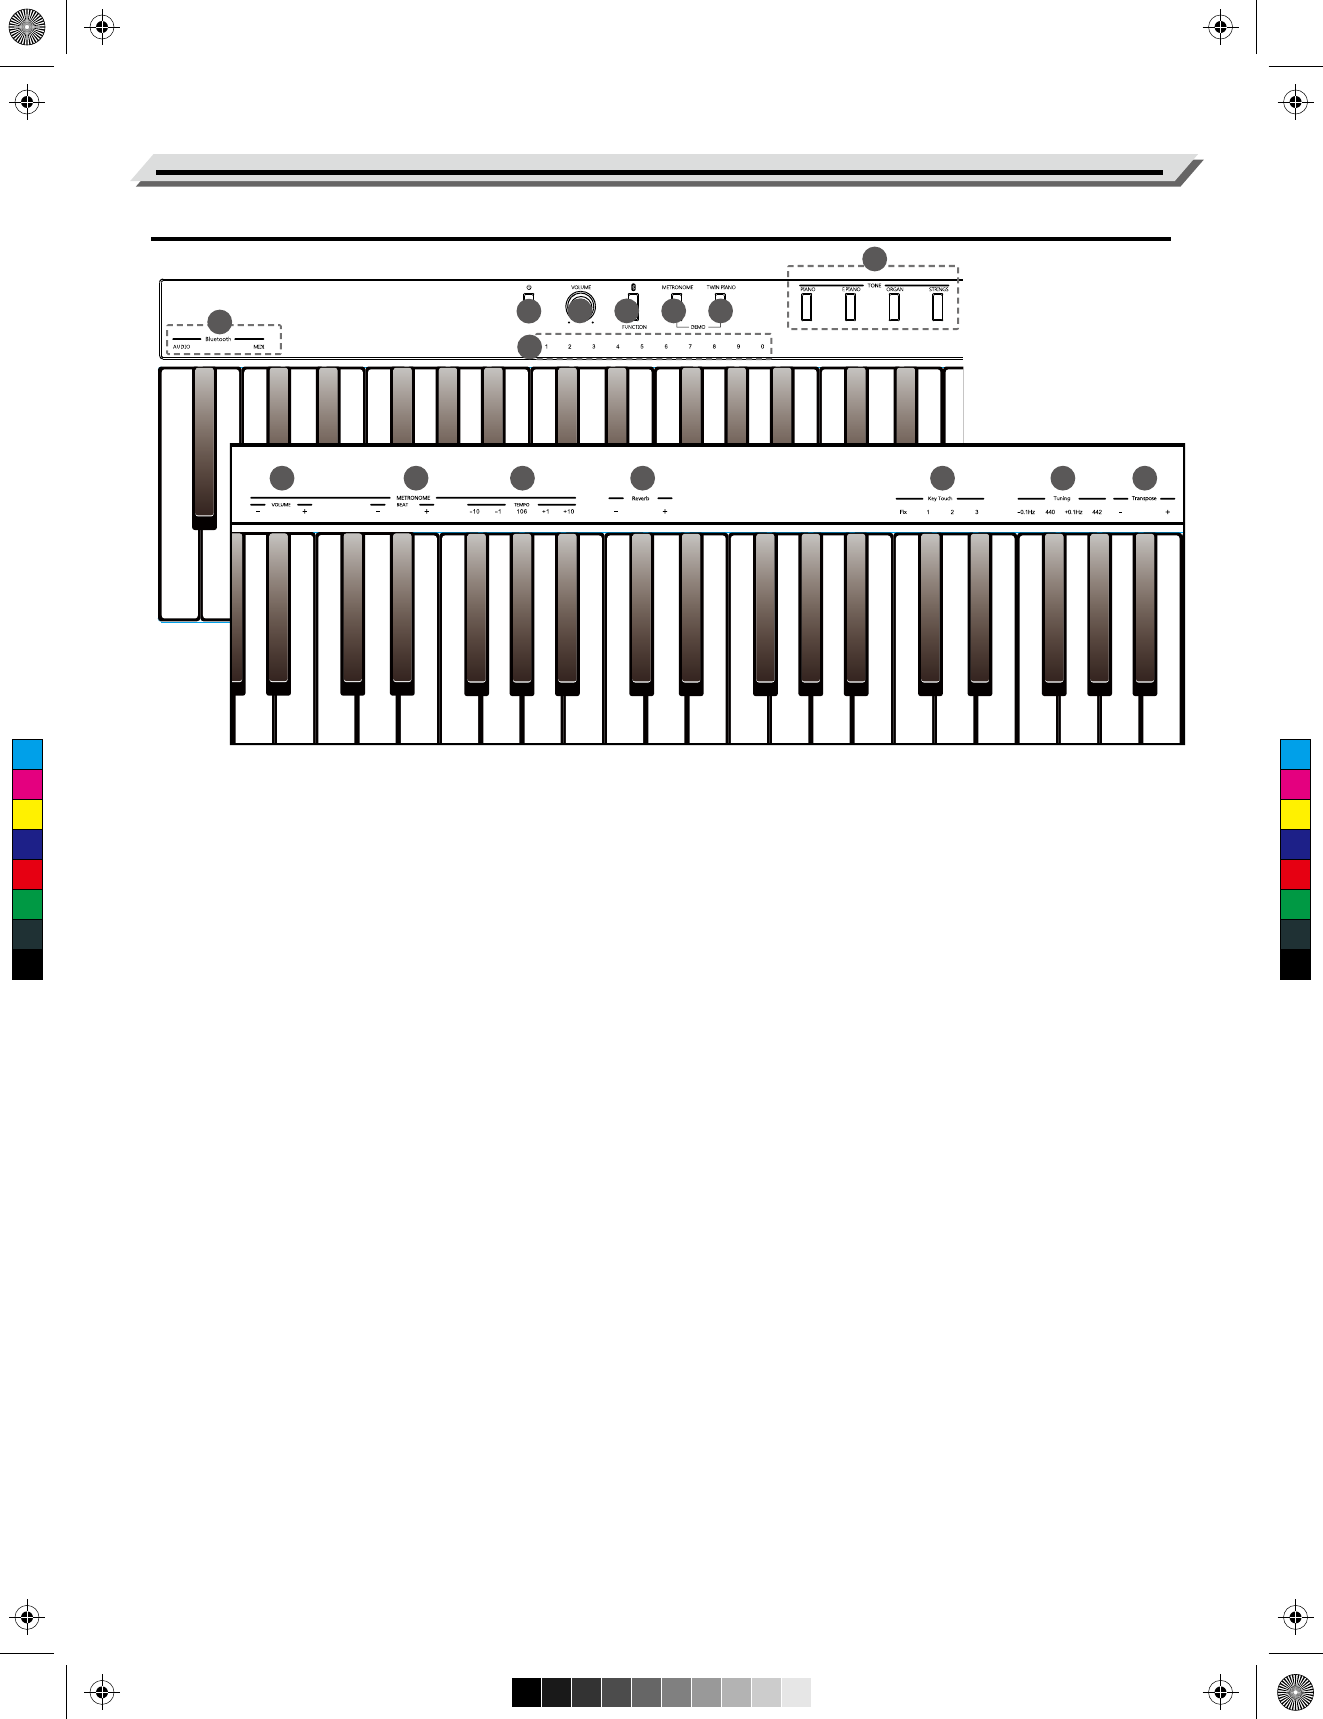
Panel Description
Front Panel
1. [POWER] Switch
Turn the power on or off.
2. [VOLUME] Knob
Adjust the master volume.
3. [FUNCTION] Button
Press and hold it to access secondary functions of
other keys.
4. [METRONOME] Button
Press it to turn the metronome on or off.
Press [METRONOME] and [TWIN PIANO] at the
same time to enter Demo mode.
5. [TWIN PIANO] Button
Press it to turn the Twin Piano function on or off.
Press [METRONOME] and [TWIN PIANO] at the
same time to enter Demo mode.
6. [TONE] Buttons
Press one of these buttons to select a preset tone.
7. [Bluetooth] Keys
Press and hold [FUNCTION], then press one of these
keys to disable the related Bluetooth connection.
8. [1~9~0] Keys
Press and hold [METRONOME], then press these
keys to enter a tempo value.
Press and hold [METRONOME] and [TWIN PIANO]
at the same time, then press one of these keys to
select a demo song.
9. [VOLUME] Keys
Press and hold [FUNCTION] or [METRONOME],
then press one of these keys to adjust the metronome
volume.
10. [BEAT] Keys
Press and hold [FUNCTION] or [METRONOME],
then press one of these keys to set the metronome
time signature.
11. [TEMPO] Keys
Press and hold [FUNCTION] or [METRONOME],
then press one of these keys to edit the tempo value.
12. [Reverb] Keys
Press and hold [FUNCTION], then press one of
these keys to adjust the reverb level.
13. [Key Touch] Keys
Press and hold [FUNCTION], then press one of
these keys to select an appropriate touch level.
14. [Tuning] Keys
Press and hold [FUNCTION], then press one of
these keys to adjust the current tuning.
15. [Transpose] Keys
Press and hold [FUNCTION], then press one of
these keys to adjust the transpose value.
04
15
2 4
3
6
8
7
910 12 13 14 1511
C
M
Y
CM
MY
CY
CMY
K
Roland_GOPIANO88_Manual_G05_181019.ai 4 2018-10-19 16:54:37Roland_GOPIANO88_Manual_G05_181019.ai 4 2018-10-19 16:54:37
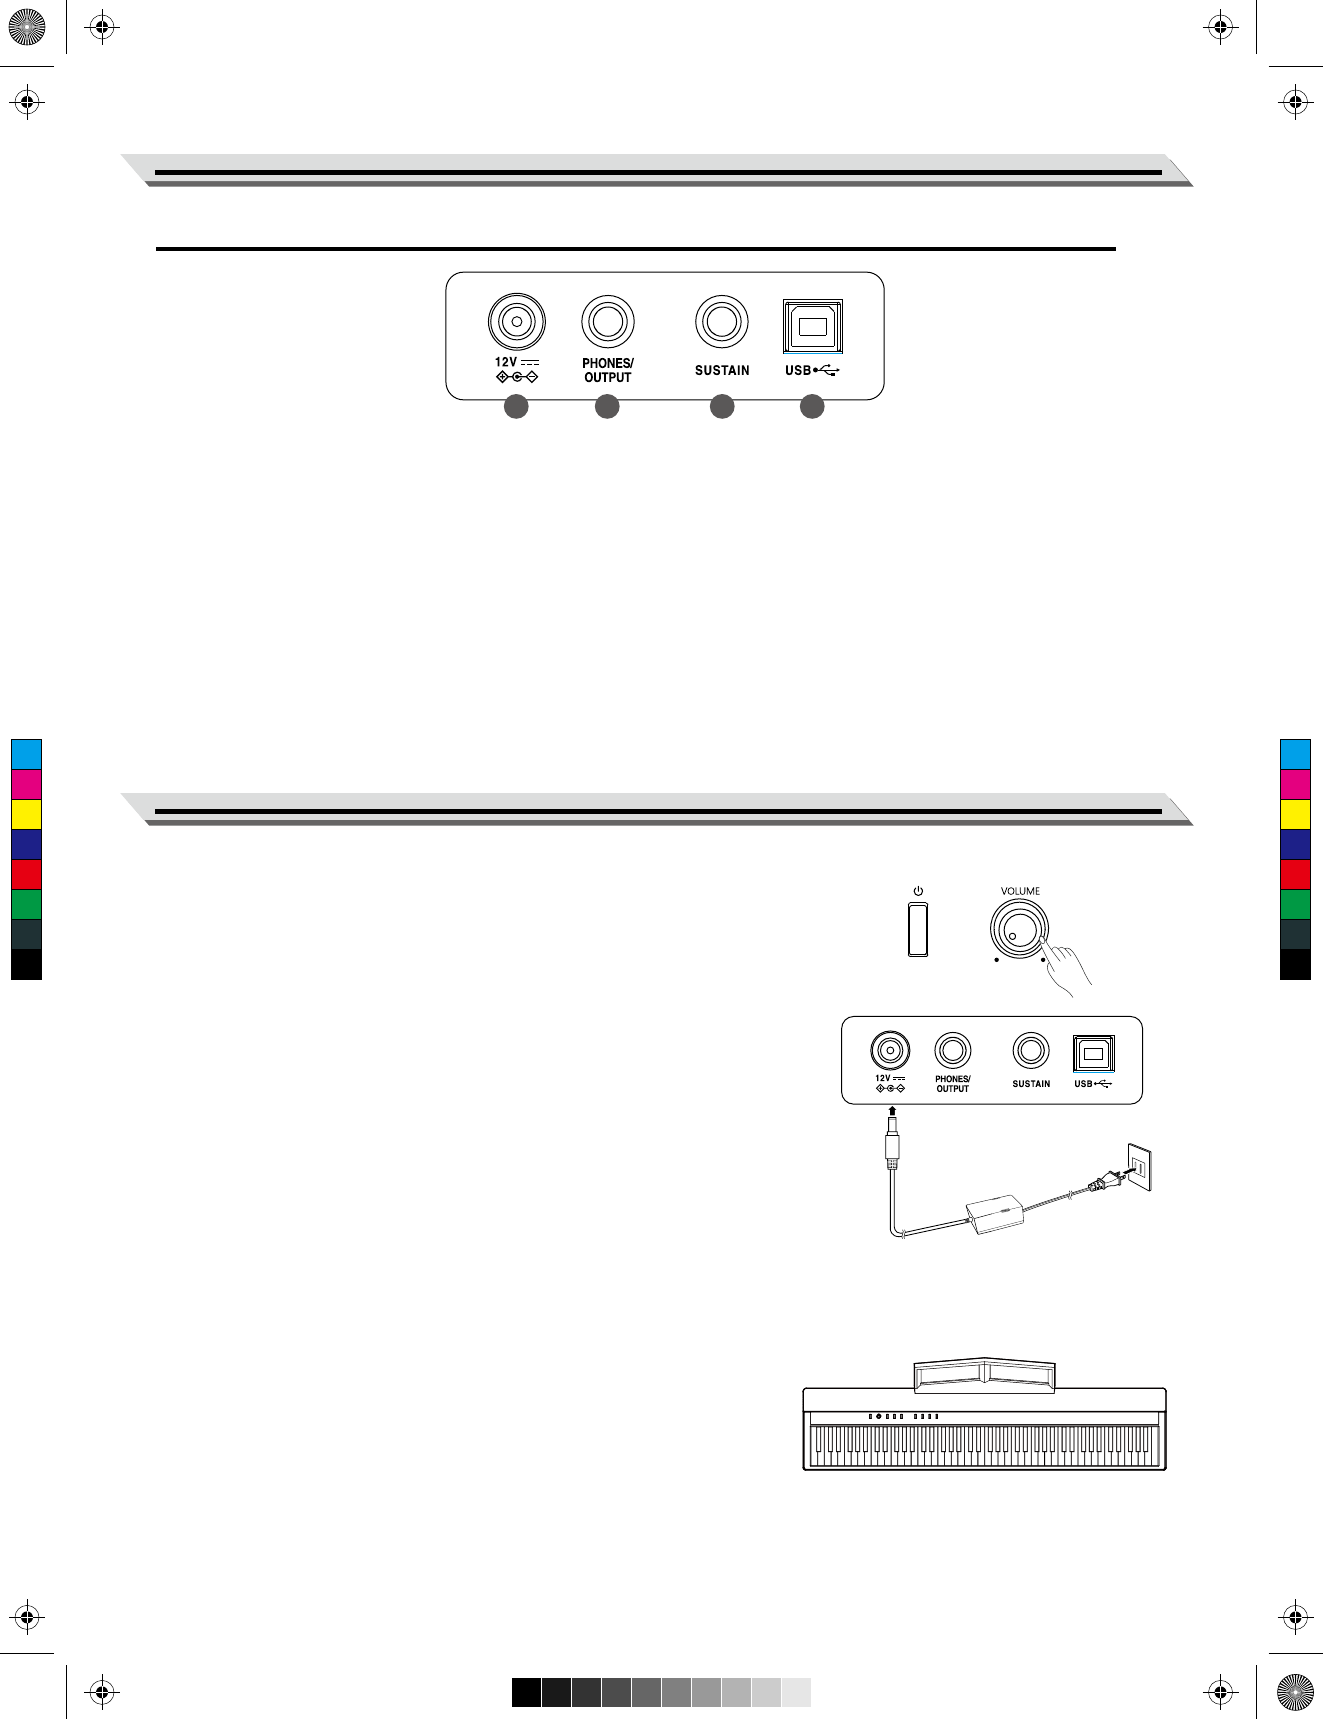
Panel Description
Setup
Rear Panel
16. DC IN Jack
Connect the specified power adaptor.
17. PHONES/OUTPUT Jack
Connect a pair of stereo headphones or
external audio equipment.
18. SUSTAIN Jack
Connect an optional pedal.
19. USB Jack
Connect to a computer.
Power Supply
1. Before connecting the power supply, please set the [POWER] switch to
“OFF” and set the master volume level to minimum.
2. Connect the power adaptor to the DC IN jack on the rear panel.
3. Plug the power adaptor into an appropriate AC outlet.
4. Press the [POWER] switch. The button LED will light up, indicating the
instrument is powered on.
5. When you are ready to turn the instrument off, press and hold the
[POWER] switch for a second. The button LED will turn off.
Note:
1. In order to save energy, the instrument will automatically shut down after
30 minutes when not in use. (See Auto Power Off).
2. For your safety, please unplug the instrument when it is not in use or
during a thunderstorm.
Setting the Music Rest
A music rest is supplied with the instrument. You can easily attach it to the
instrument by inserting it into the slots at the rear of the panel.
05
16 17 18 19
C
M
Y
CM
MY
CY
CMY
K
Roland_GOPIANO88_Manual_G05_181019.ai 5 2018-10-19 16:54:38Roland_GOPIANO88_Manual_G05_181019.ai 5 2018-10-19 16:54:38
Connections
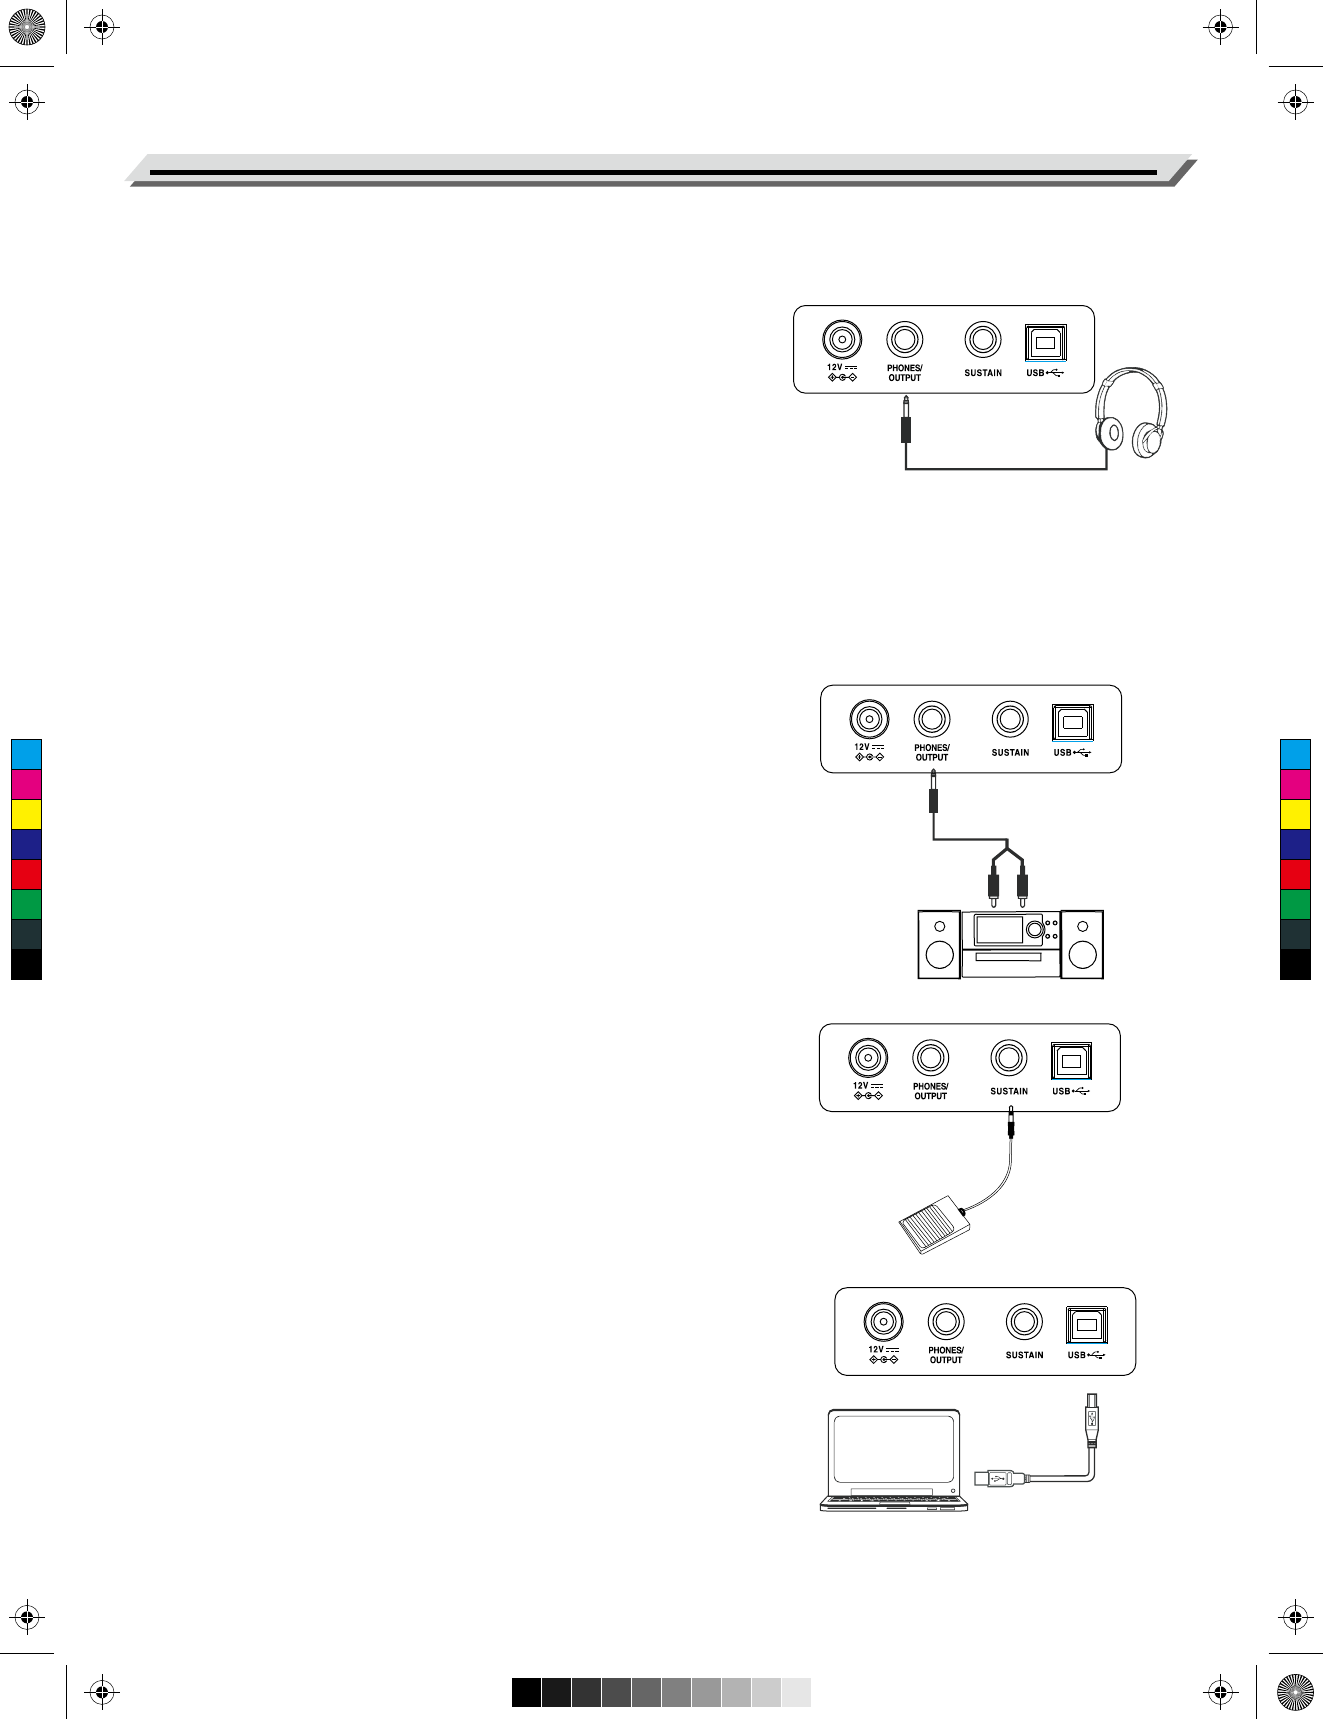
Connecting a Pair of Headphones
Plug a pair of standard stereo headphones in the PHONES/OUTPUT
jack.
Turn on the Phones Sense.
Press and hold [FUNCTION], then press the [F7] key to turn on the
Phone Sense function. When headphones are connected, the internal
speakers system will be muted. Sound can only be heard from the
headphones.
Turn off the Phone Sense.
Press and hold [FUNCTION], then press the [F#7] key to disable the
Phone Sense function. When headphones are connected, the sound
can be heard from the headphones and speakers.
Note:
To avoid the risk of hearing loss, do not use headphones at high
volume levels for a long period of time.
Connecting an Audio Equipment
The PHONES/OUTPUT jack delivers the output of the instrument to
external audio equipment such as a keyboard amplifier, stereo sound
system, mixing console, or recording interface.
Use an audio cable to connect the PHONES/OUTPUT jack of the
instrument to the INPUT jack of the external audio equipment.
Notes:
1. Turn off the power to all devices before connecting or disconnecting
external equipment.
2. To avoid damaging the speakers, set the master volume level to
minimum before turning on the power.
Connecting a Pedal
An optional pedal can be plugged into the SUSTAIN jack. When you
step on the pedal, the notes you play on the keyboard will have a
longer sustain.
Connecting a Computer
Use a standard USB cable to connect the USB jack of the instrument
to the USB port of a computer.
With USB, you can save a keyboard performance to the computer or
use the instrument to play back music played on the computer.
Note:
Do not set the USB MIDI device to be both input and output simultane-
ously when configuring the software on your computer. Otherwise, the
sound will be overlapped when playing the keyboard.
06
C
M
Y
CM
MY
CY
CMY
K
Roland_GOPIANO88_Manual_G05_181019.ai 6 2018-10-19 16:54:38Roland_GOPIANO88_Manual_G05_181019.ai 6 2018-10-19 16:54:38
Playing Demo Songs
This instrument features 10 wonderful demo songs. Please refer to
Demo List for details.
Play the demo songs.
Press the [METRONOME] and [TWIN PIANO] buttons at the same time
to enter Demo mode and start playing the demo songs in a continuous
loop.
Select a demo song.
Press and hold the [METRONOME] and [TWIN PIANO] buttons at the
same time, then press one of the keys marked [1~9~0] to select a
desired demo song.
Stop playing the demo song.
Press the [METRONOME] and [TWIN PIANO] buttons at the same time
to stop the demo and exit Demo mode.
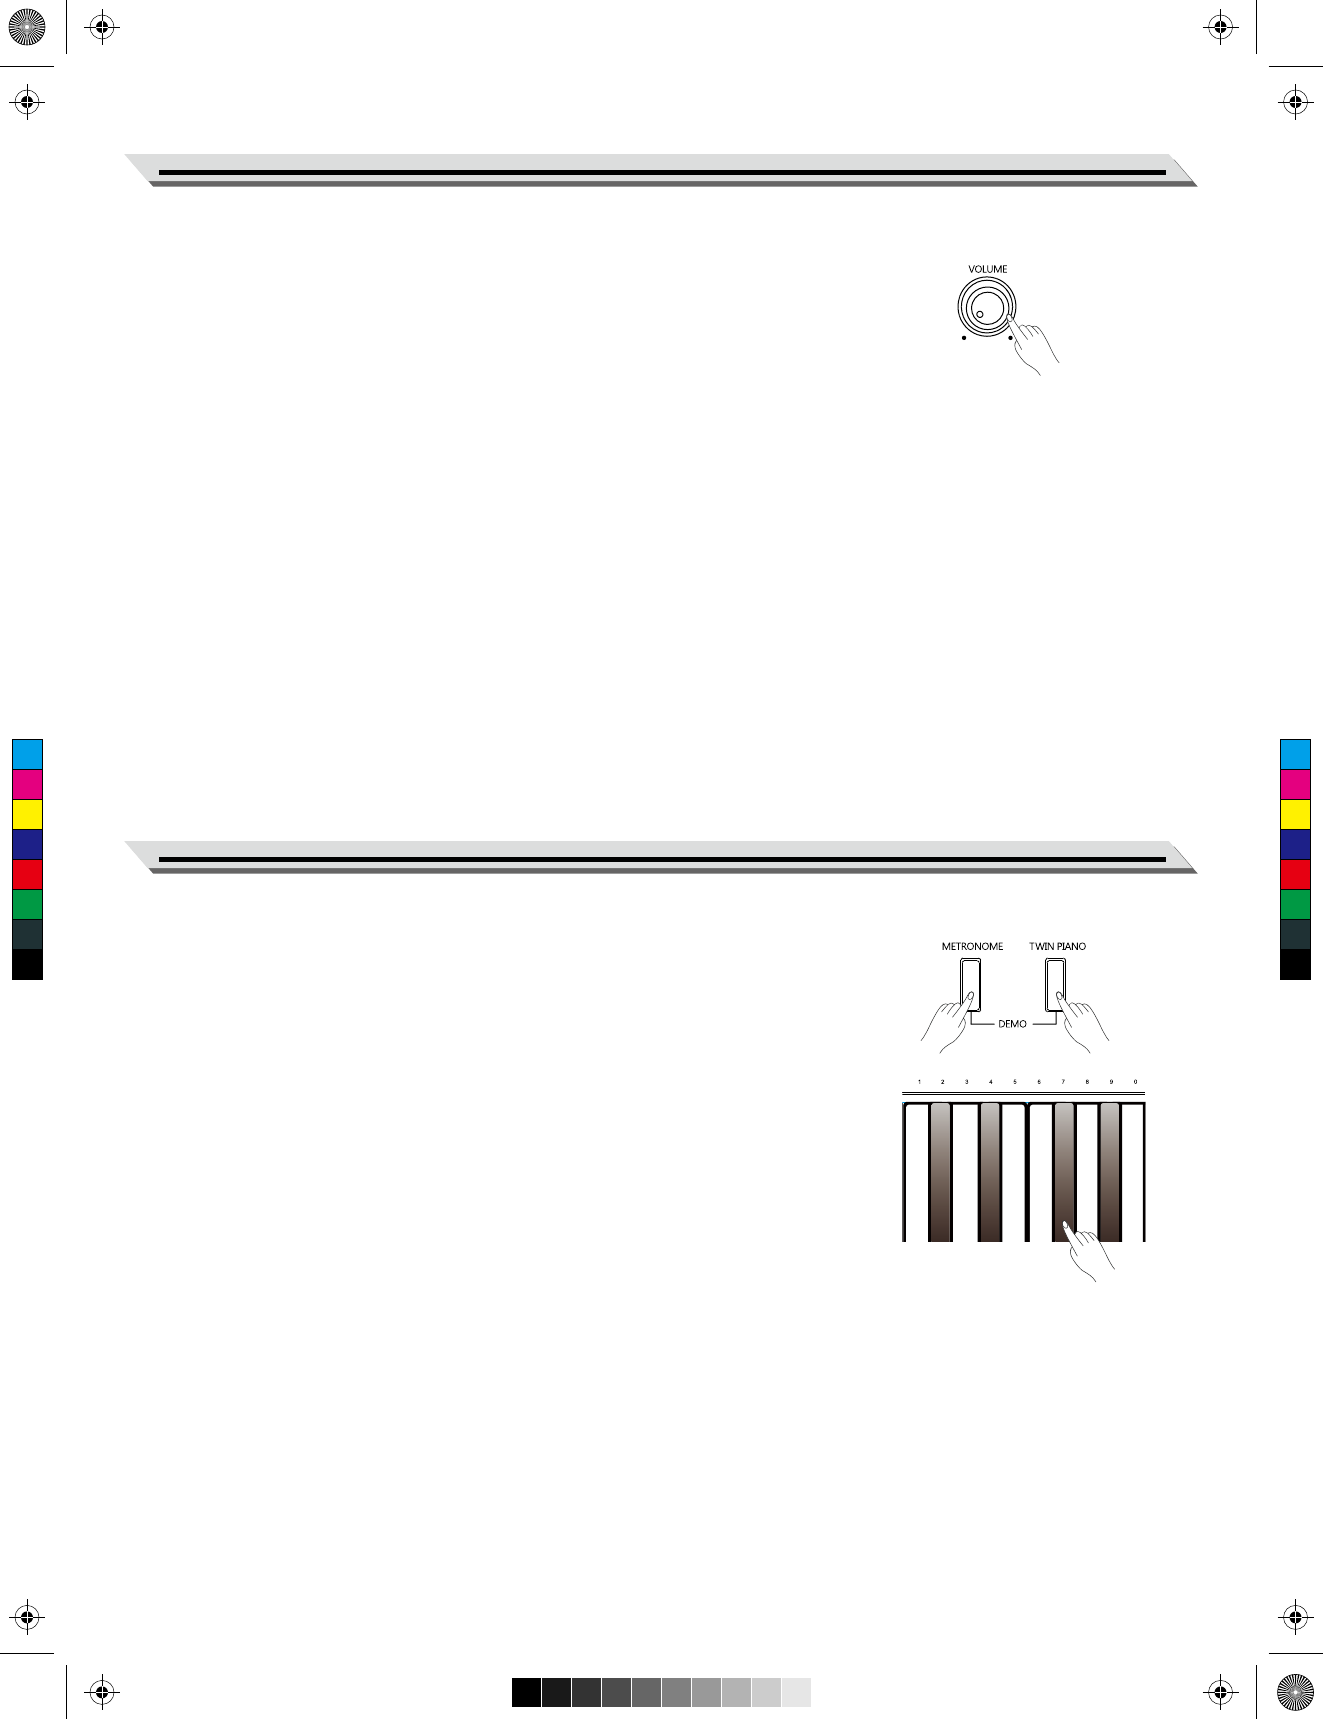
Rotate the [VOLUME] knob clockwise to increase the master volume or
counter-clockwise to decrease it. Adjust to set the desired volume level.
Note:
If the speakers do not produce sound, please check if the master
volume is set too low. Then check if the speakers are muted because
headphones are plugged into the PHONES jack and the Phones Sense
function is in use.
07
Adjusting the Master Volume
C
M
Y
CM
MY
CY
CMY
K
Roland_GOPIANO88_Manual_G05_181019.ai 7 2018-10-19 16:54:38Roland_GOPIANO88_Manual_G05_181019.ai 7 2018-10-19 16:54:38
08
Tones
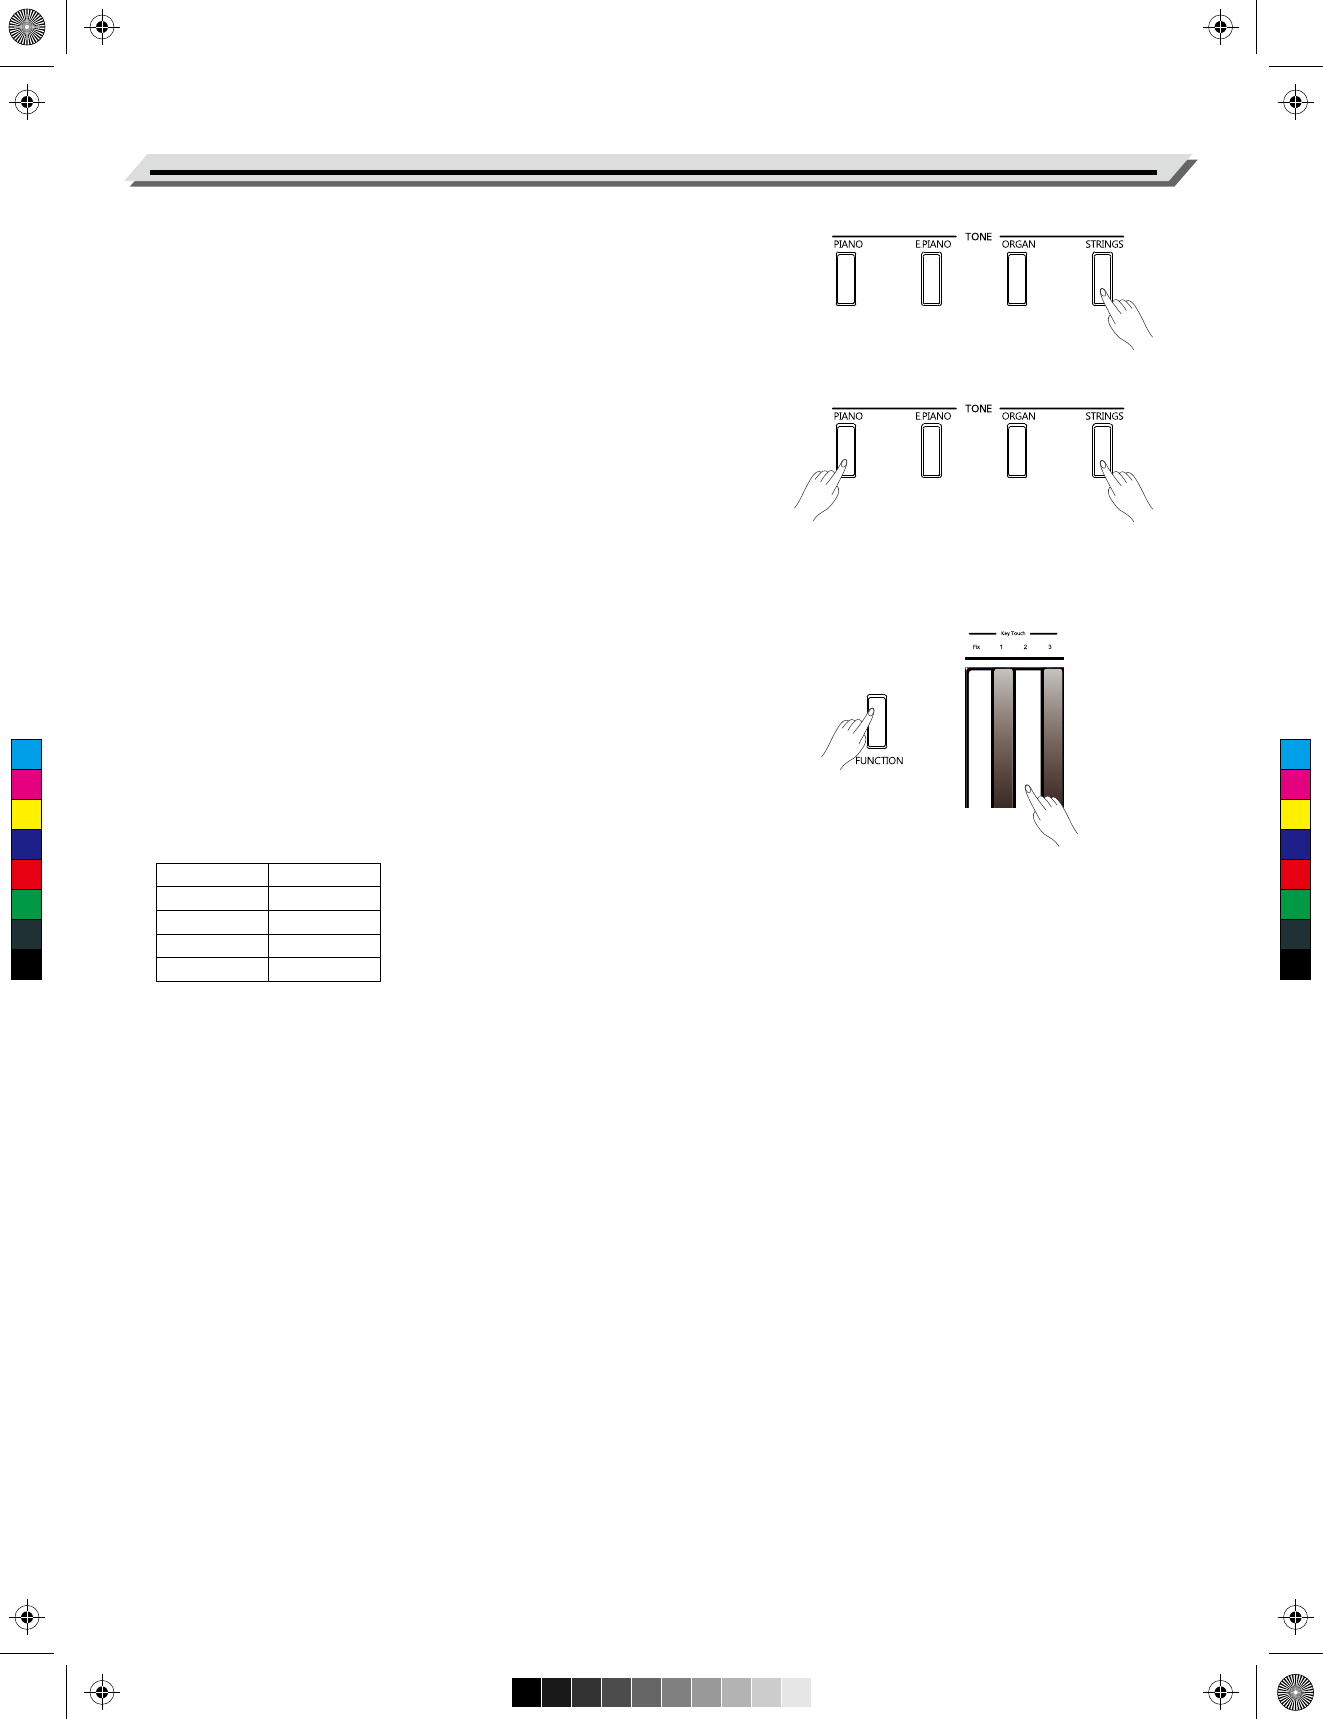
Selecting a Tone
The instrument features 4 tones. Please refer to Tone List for details.
Press one of the [TONE] buttons to select a desired tone. The button
LED of the selected tone will be lit.
Layering Two Tones
The Dual mode allows two different tones to be layered together,
creating a more full and rich sound.
Press two [TONE] buttons to enter Dual mode. The first [TONE] button
you press will be set as the upper tone (tone 1), and the second [TONE]
button you press will be set as the dual tone (tone 2).
In Dual mode, if you play the keyboard, you will hear two different tones
playing together, just like two different instruments being played at the
same time.
Key Touch
The Key Touch feature allows you to expressively control the voice level
based on your playing dynamics.
Press and hold [FUNCTION], then press one of the [Key Touch] keys to
select an appropriate touch level.
There are 3 types of touch settings (Fix, 1~3). The default setting is “2”.
Selecting “Fix” will result in a fixed volume level, no matter how hard or
how softly you play the keys.
Parameter
Fix
1
2
3
Description
Fixed
Light
Medium
Heavy
C
M
Y
CM
MY
CY
CMY
K
Roland_GOPIANO88_Manual_G05_181019.ai 8 2018-10-19 16:54:38Roland_GOPIANO88_Manual_G05_181019.ai 8 2018-10-19 16:54:38
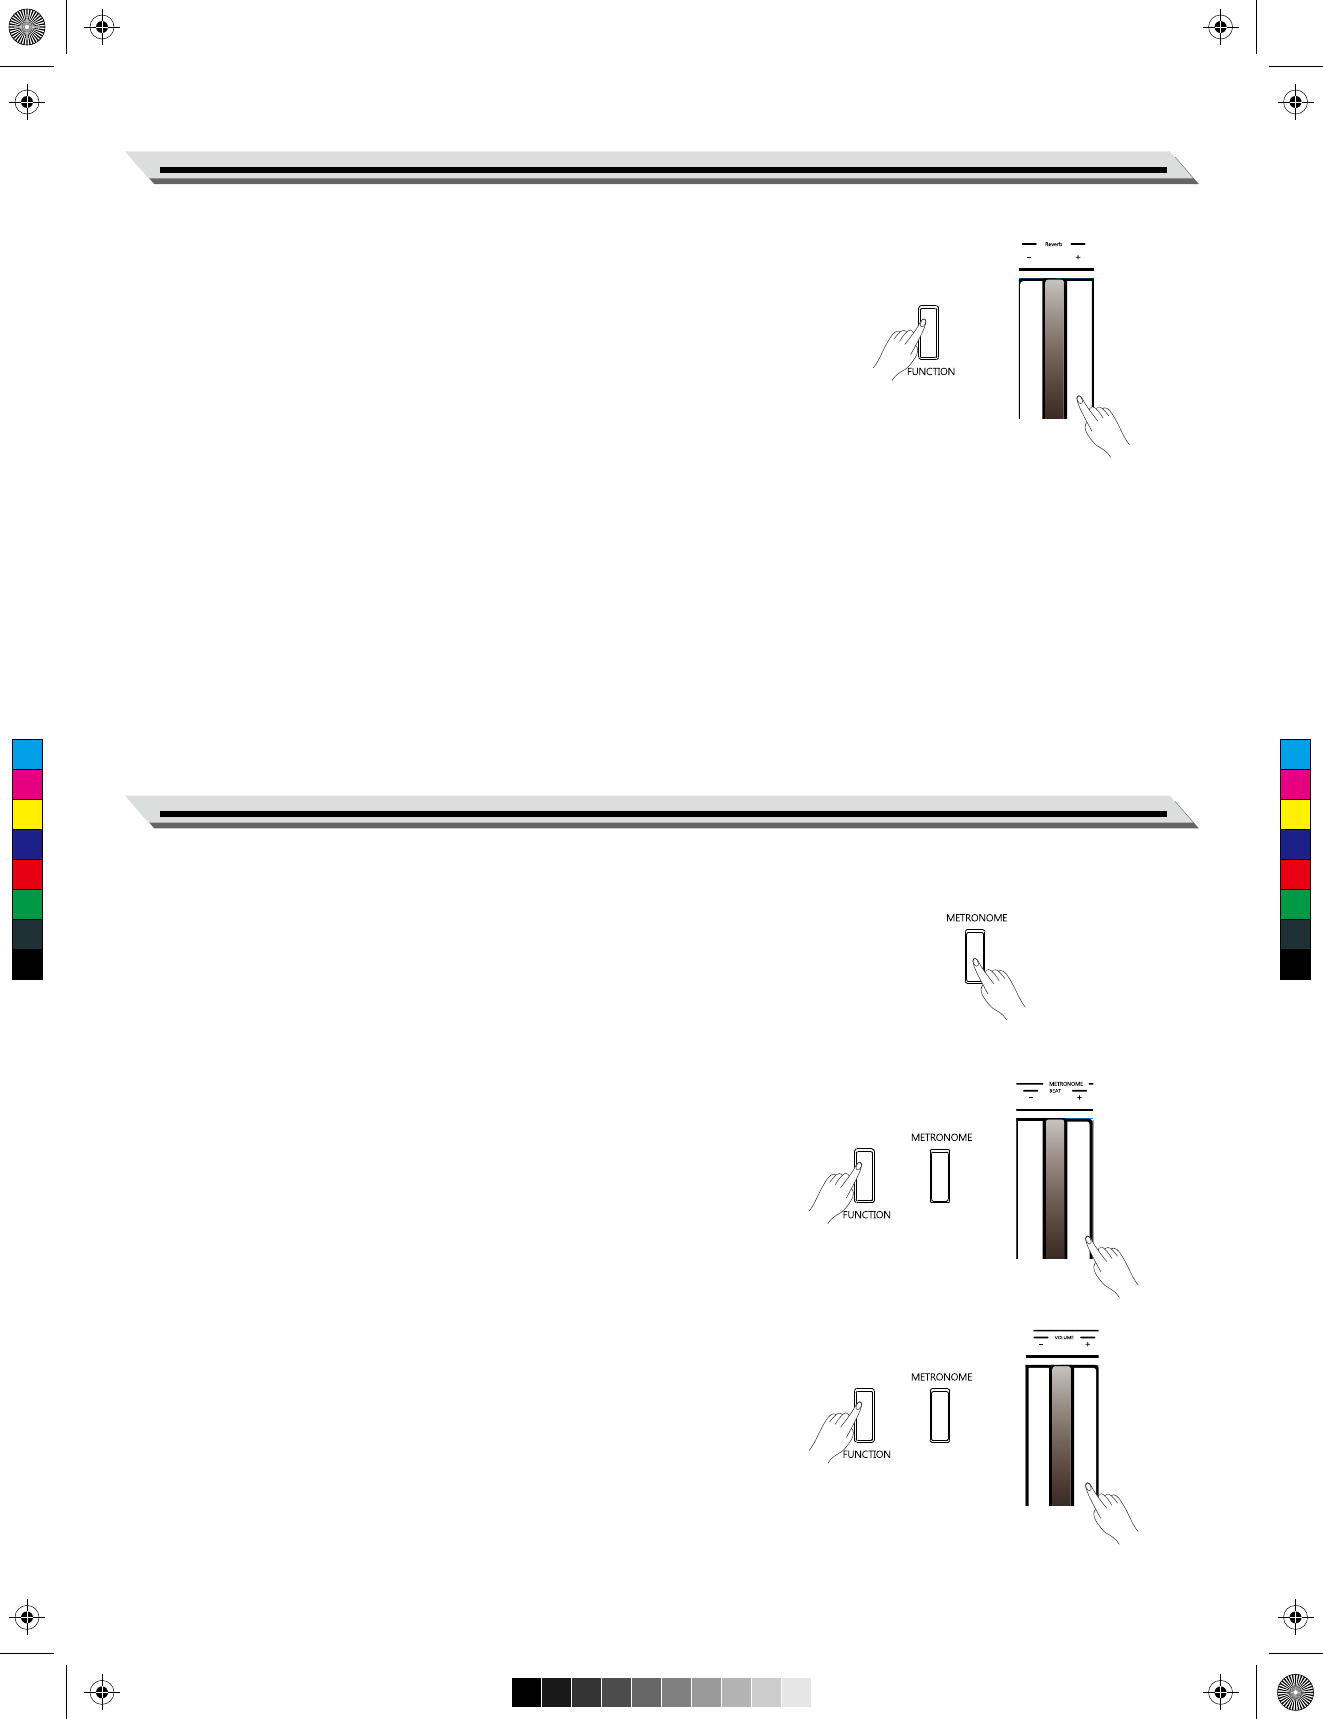
Press and hold [FUNCTION], then press one of the [Reverb] keys to set
the reverb level range from 0 to 10.
Press and hold [FUNCTION], then press the black key in the [Reverb]
keys to restore the default setting. When the reverb level is set to "0",
there will be no reverb effect.
Reverb
09
The metronome provides a steady beat to help you practice at a preset
tempo.
Turn the metronome on or off.
Press the [METRONOME] button to turn the function on or off. When the
metronome is in use, the button indicator will flash in sync with the
current tempo.
Change the metronome beat.
The instrument provides 6 beat types: 0, 2~6.
Press and hold [FUNCTION] or [METRONOME], then press one of the
[BEAT] keys to set the metronome beat.
Press and hold [FUNCTION] or [METRONOME], then press the black
key in the [BEAT] keys to restore the default setting.
Press and hold [METRONOME], then press a key [A0] ~ [D1] to select a
beat type. Please refer to List of Operations (Button + Key) for details.
Adjust the metronome volume.
Press and hold [FUNCTION] or [METRONOME], then press one of the
[VOLUME] keys to set the volume range from 1 to 10.
Press and hold [FUNCTION] or [METRONOME], then press the black
key in the [VOLUME] keys to restore the default setting.
Metronome
or
or
C
M
Y
CM
MY
CY
CMY
K
Roland_GOPIANO88_Manual_G05_181019.ai 9 2018-10-19 16:54:38Roland_GOPIANO88_Manual_G05_181019.ai 9 2018-10-19 16:54:38
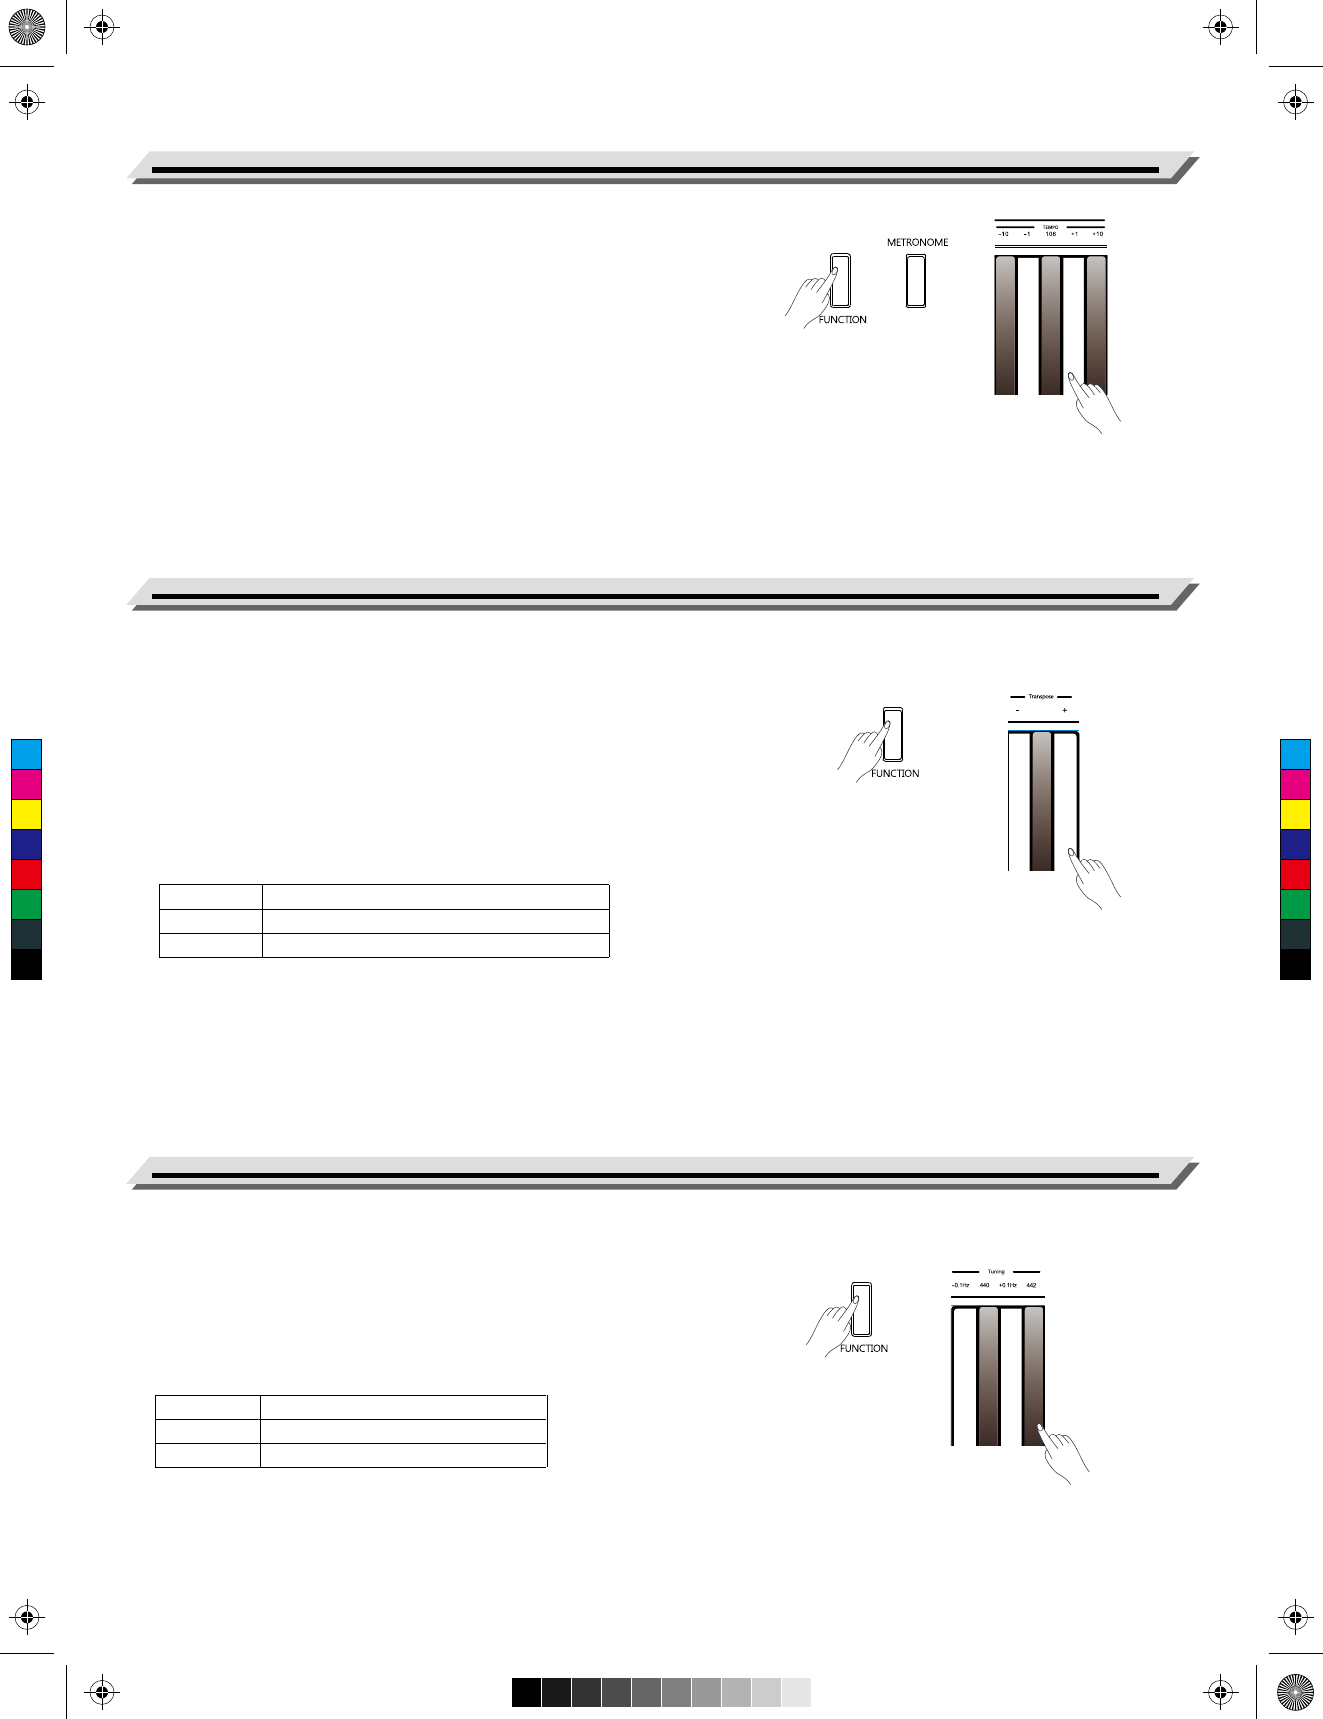
You can set the tempo in the following ways:
Press and hold [FUNCTION] or [METRONOME], then press one of the
[TEMPO] keys to set the desired tempo.
Press and hold [METRONOME], then press the keys marked [1~9~0]
to set the tempo value. For example, press [0], [6], [4] in sequence to
enter a tempo value of 64.
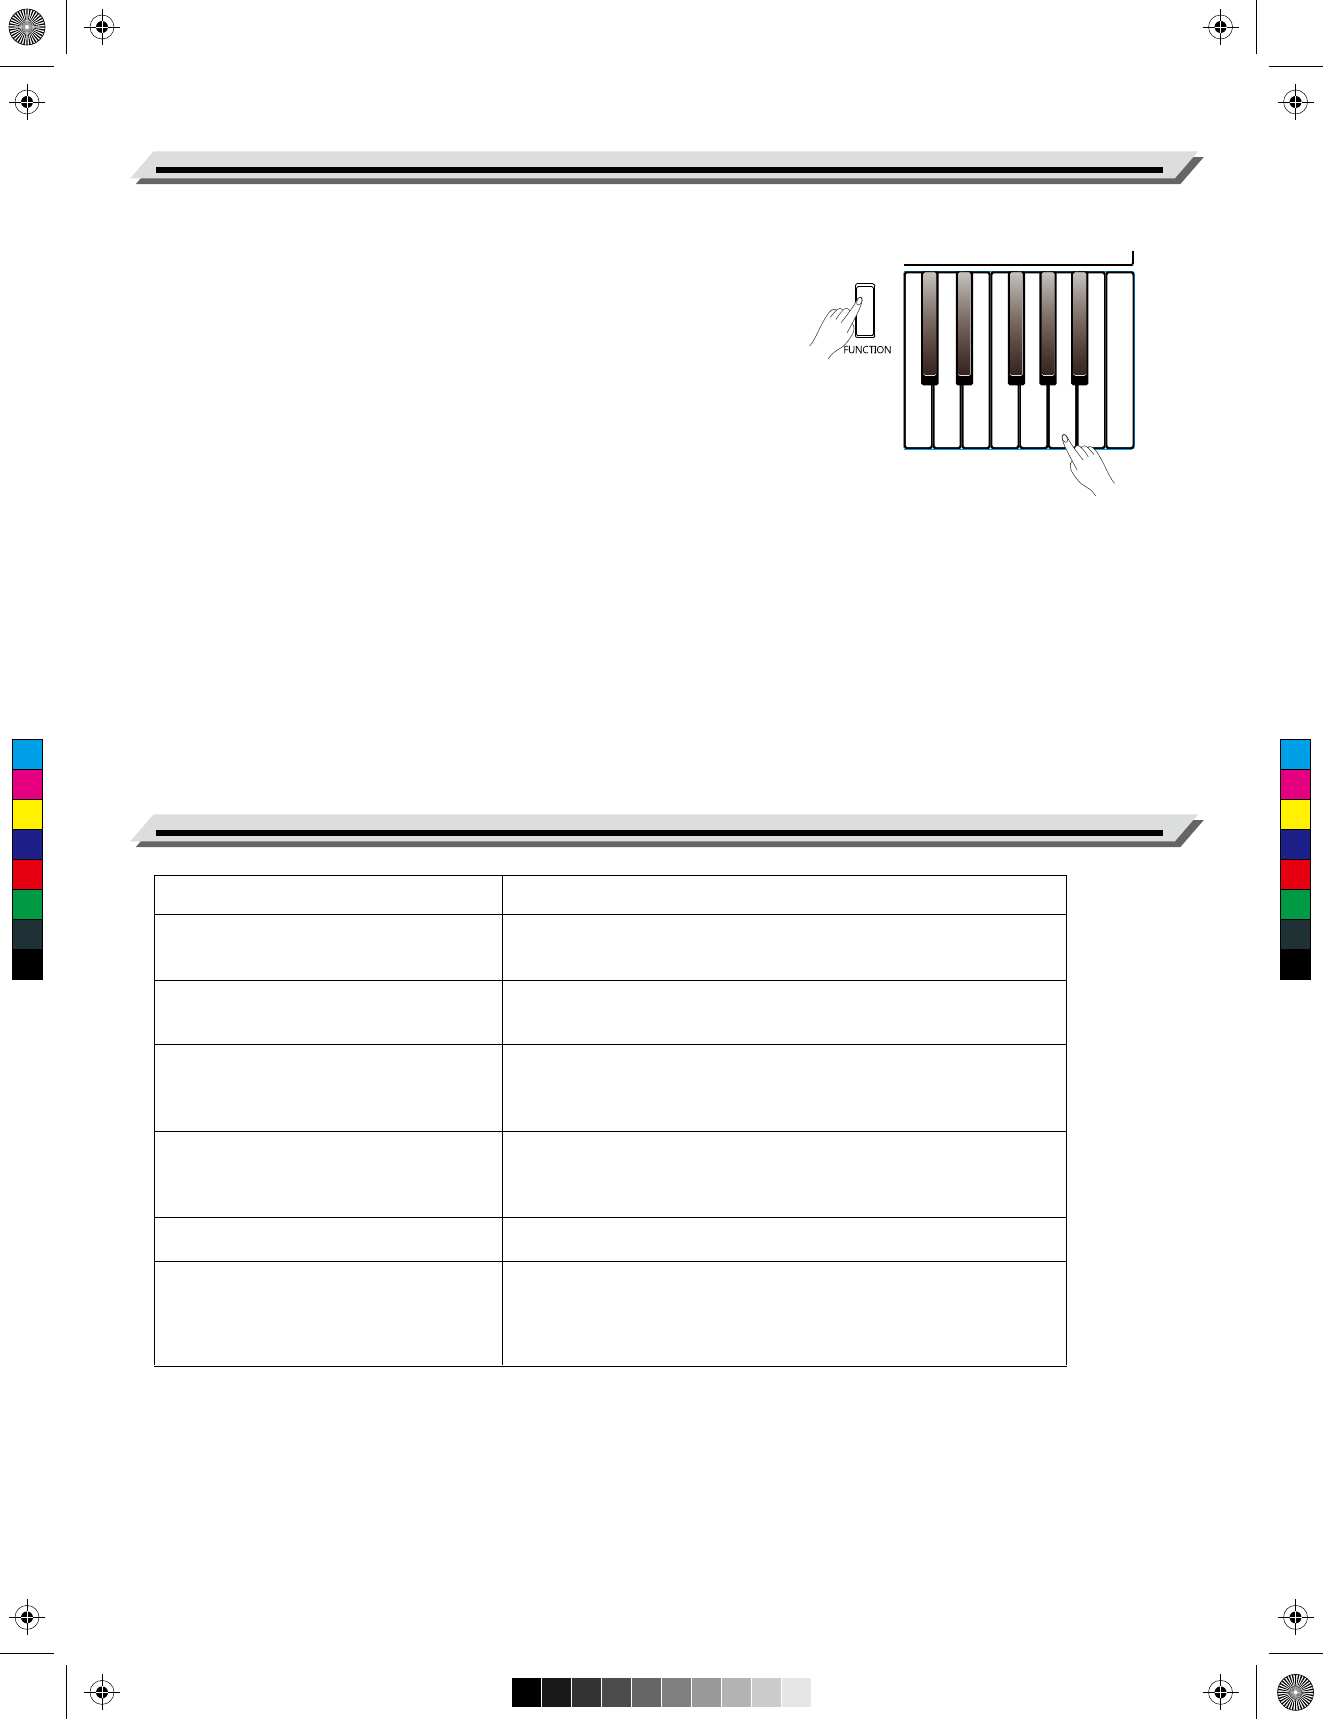
This function adjusts the pitch of the instrument in 0.1Hz increment
over a range of 415.3Hz ~ 466.2Hz.
Press and hold [FUNCTION], then press one of the [Tuning] keys to
adjust the pitch of the keyboard.
For example, if you press and hold [FUNCTION], then press the key
marked [440], it will set the tuning to 440Hz.
Master Tuning
Tempo
10
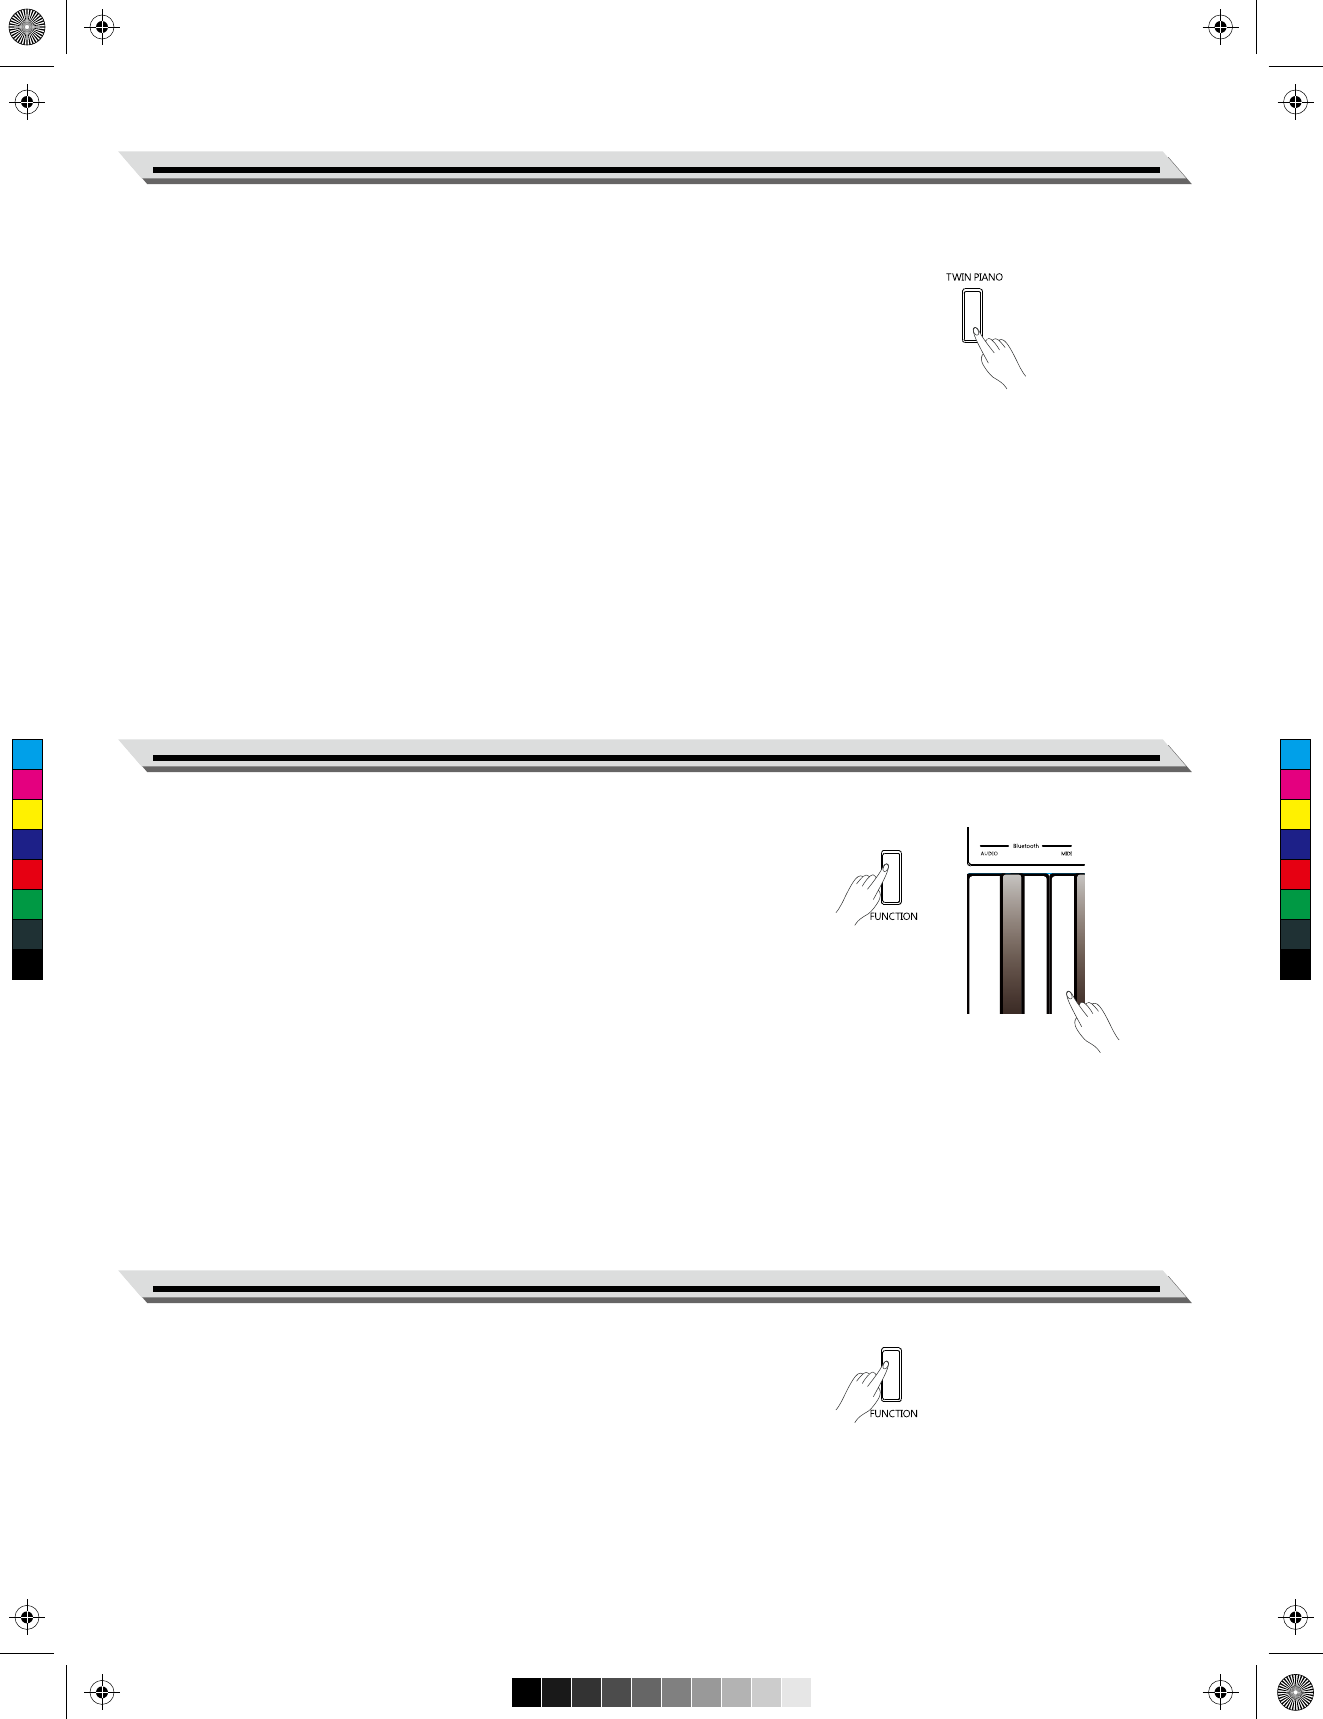
The transpose function allows the overall pitch of the instrument to be
transposed up or down in semitone steps, over a range of -6 ~ +5.
Press and hold [FUNCTION], then press one of the [Transpose] keys to
set the transpose value.
For example, set the transpose value to -5, you will hear “G” pitch when
playing the “C” keys.
Press and hold [FUNCTION], then press the black key in the [Transpose]
keys to restore the default setting.
Transpose
Parameter
+1
-1
Description
To raise the overall pitch by 1 semitone.
To lower the overall pitch by 1 semitone.
Parameter
+0.1Hz
-0.1Hz
Description
To raise the pitch by 0.1Hz.
To lower the pitch by 0.1Hz.
or
C
M
Y
CM
MY
CY
CMY
K
Roland_GOPIANO88_Manual_G05_181019.ai 10 2018-10-19 16:54:39Roland_GOPIANO88_Manual_G05_181019.ai 10 2018-10-19 16:54:39
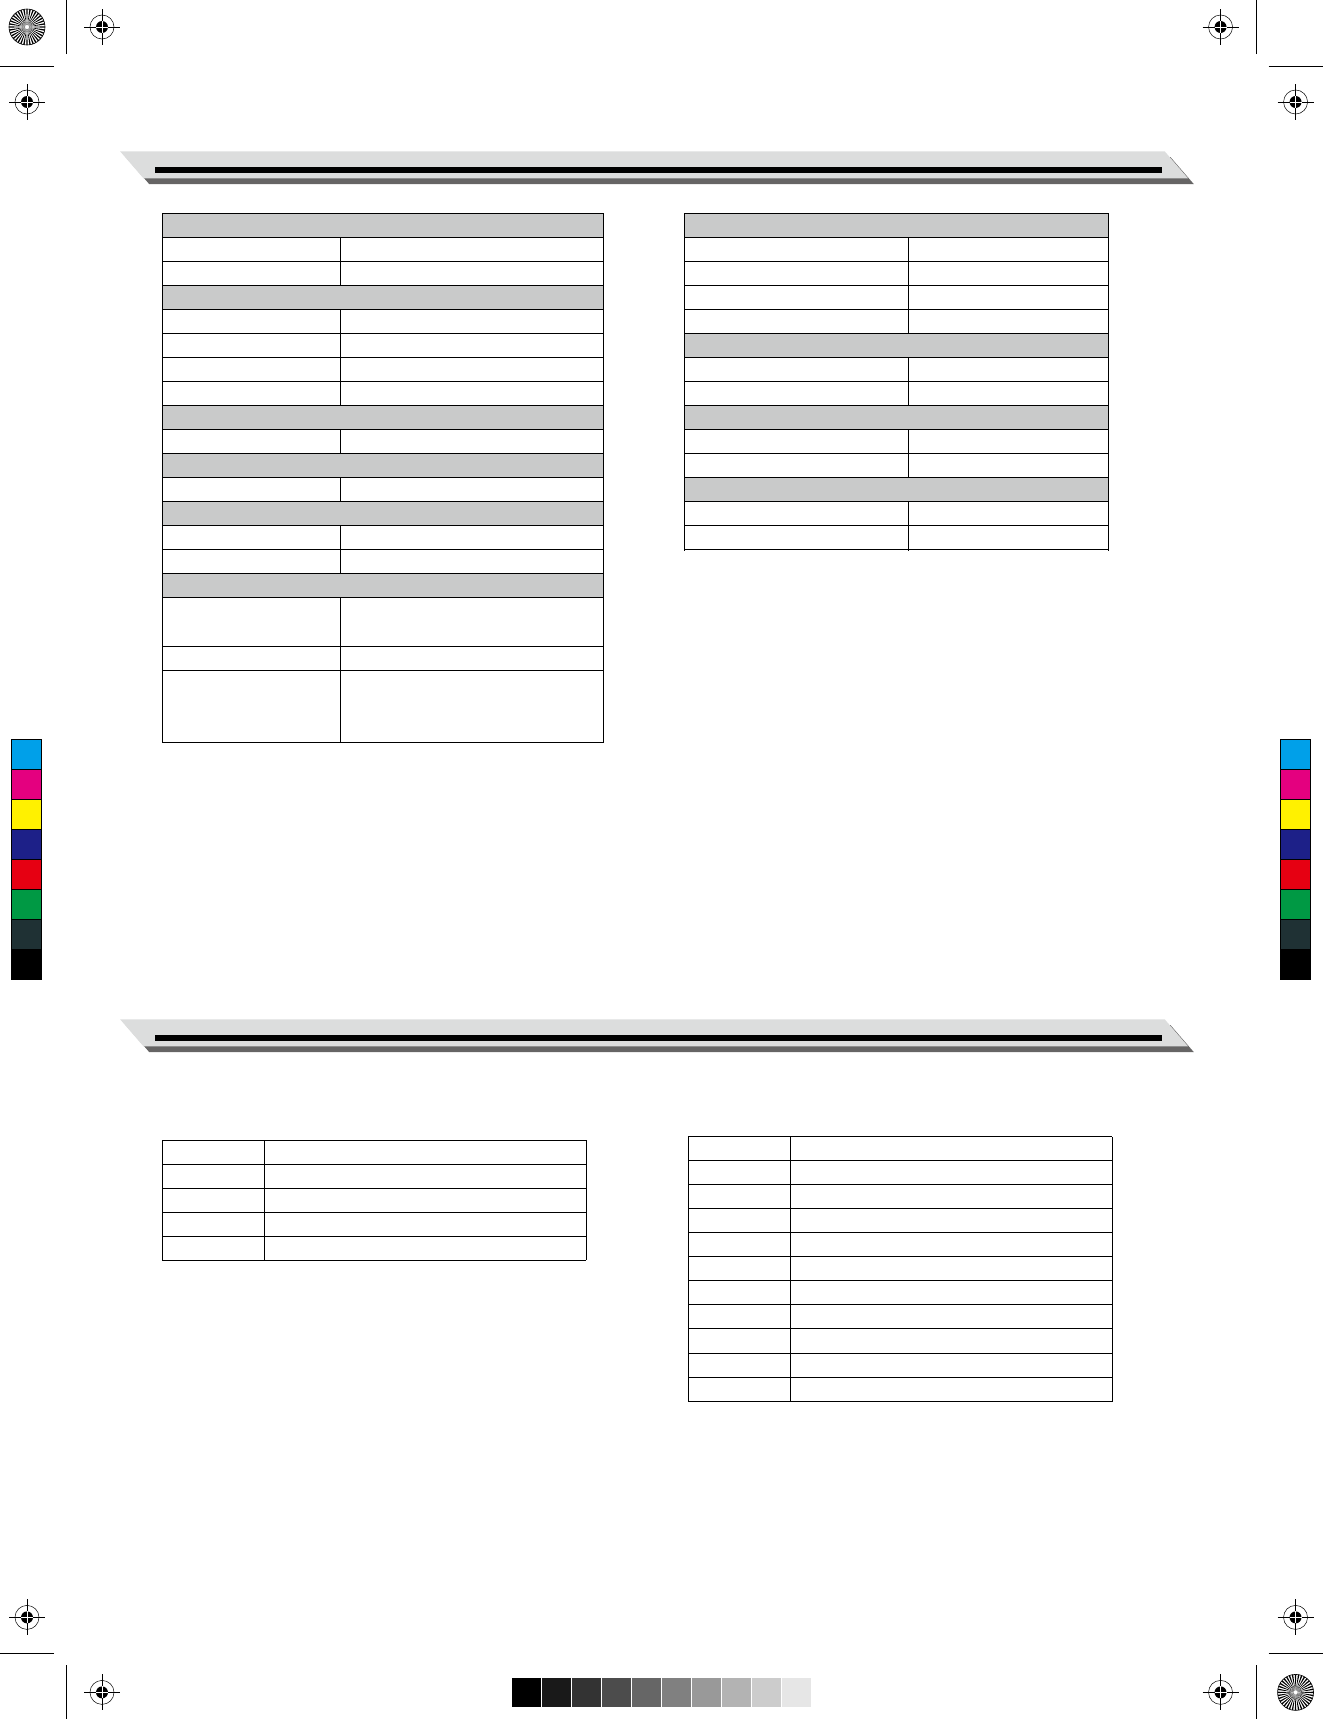
Bluetooth Pairing
The Bluetooth function is turned on by default. You can pair the instru-
ment with an external Bluetooth device.
The instrument’s Bluetooth Audio name: GO:PIANO88.
The instrument’s Bluetooth MIDI name: GO:PIANO88.
Disable Bluetooth Connection
Press and hold [FUNCTION], then press the key marked [AUDIO] to
disconnect Bluetooth Audio.
Press and hold [FUNCTION], then press the key marked [MIDI] to
disconnect Bluetooth MIDI.
When Bluetooth connection is disabled, you can enable Bluetooth
connection again by pairing.
Bluetooth
11
The Twin Piano function splits the keyboard into two areas with the
same pitch and tone, for the convenience of playing together with a
friend or instructor.
1. Press the [TWIN PIANO] button to turn on the function. The button
LED will be lit. The default split point is E3 (32).
2. The upper tone selected before entering Twin Piano will become
the default tone for both areas. You can press one of the [TONE]
buttons to select a desired tone.
3. Press the [TWIN PIANO] button again to turn off the function. The
button LED will turn off.
Notes:
1. Twin Piano function is not available in Demo mode.
2. Dual mode is not available when Twin Piano is in use.
Twin Piano
Press and hold [FUNCTION], then press a key [C2] ~ [D#3] to assign the
MIDI Out channel. Please refer to List of Operations (Button + Key) for
details.
MIDI Out
C
M
Y
CM
MY
CY
CMY
K
Roland_GOPIANO88_Manual_G05_181019.ai 11 2018-10-19 16:54:39Roland_GOPIANO88_Manual_G05_181019.ai 11 2018-10-19 16:54:39
Problem
The speakers produce a pop sound
whenever the power is turned ON/OFF.
Speakers do not produce sound when
the keyboard is played.
There is noise when I use a mobile
phone.
When connecting to computer, the
instrument cannot be recognized.
The pedal does not respond.
It shuts down after a period of time.
Possible Cause and Solution
This is normal and no cause for alarm.
1. Check if the master volume is set too low.
2. Check if headphones are plugged into the PHONES jack.
Using a mobile phone in close proximity to the instrument may
produce interference. To prevent this, turn off the mobile phone or
use it farther away from the instrument.
Check if the USB cable is firmly connected. Try connecting another
USB port on the computer. This instrument is plug and play and
should work without installing a driver.
Check if the pedal cable is firmly connected.
The auto power off function will turn off the instrument after a preset
period of time when the instrument is not in use. You can configure
the Auto Power Off function, please refer to Auto Power Off in this
manual.
Troubleshooting
12
The instrument will automatically shut down after 30 minutes of inactivity.
You can disable this function or change the time setting.
1. To disable this function: press and hold [FUNCTION], then press the
key [C8] (the first key to right side of the keyboard).
2. To set the time to 240 minutes: press and hold [FUNCTION], then
press the key [B7].
3. To set the time to 30 minutes: press and hold [FUNCTION], then press
the key [A#7].
4. To set the time to 10 minutes: press and hold [FUNCTION], then press
the key [A7].
Auto Power Off
C
M
Y
CM
MY
CY
CMY
K
Roland_GOPIANO88_Manual_G05_181019.ai 12 2018-10-19 16:54:39Roland_GOPIANO88_Manual_G05_181019.ai 12 2018-10-19 16:54:39
Appendices
13
Specifications
Demo List
Keyboard
Keyboard
Touch Response
Tones
Polyphony (max.)
Tones
Layer
Twin Piano
Effects
Reverb
Song
Demo
Pitch Adjustment
Transpose
Tuning
Other Functions
Metronome
Tempo
Other control
Connections
Interaction & Expansion
Phones/Output
Pedal
USB
Power Supply
Power
Power Off Protection
Amplifiers & Speakers
Amplifiers
Speakers
Dimensions & Weight
Dimensions LWH (mm)
Weight (kg)
88 Keys with Touch Response
3 types, Off
128
4 panel
Yes
Yes
1 type, 0 - 10 levels
10 presets
-6 - +5
415.3Hz - 466.2Hz
Metronome beat: 0, 2 - 6;
Metronome volume: 1 - 10
30 - 280
MIDI Out channel,
Bluetooth audio,
Bluetooth MIDI
USB MIDI, Bluetooth
Standard stereo
Sustain
USB MIDI
DC12V / 2A
Yes
10W x 2
[15cm x 6cm] x 2
1283 x 292 x 87
7.0
No.
1
2
3
4
Tone Name
Acoustic Grand Piano
Electric Piano
Church Organ
String Ensembles
No.
1
2
3
4
5
6
7
8
9
10
Song Name
Valse OP.34 NO.1
Sonate Nr.16 C Dur
Liebesträume Nr.3
Fantaisie-Impromptu
1ère Gymnopédie
Radetzky Marsch
Träumerei
Frühlingslied
Für Elise
Menuett G Dur BWV Anh.114
* Specifications and descriptions herein are for information
only and are subject to change without prior notice.
Tone List
C
M
Y
CM
MY
CY
CMY
K
Roland_GOPIANO88_Manual_G05_181019.ai 13 2018-10-19 16:54:39Roland_GOPIANO88_Manual_G05_181019.ai 13 2018-10-19 16:54:39
1. [Audio Disconnect] Key
Press to disable Bluetooth Audio connection.
[MIDI Disconnect] Key
Press to disable Bluetooth MIDI connection.
2. [MIDI Channel 1 ~16] Keys
Press to select the MIDI output channel.
3. [Metro. Volume] Keys
Press to adjust the metronome volume.
1. [Metro. Beat] Keys
Press to select a beat type.
2. [Tempo] Keys
Press to enter a tempo value.
3. [Metro. Volume] Keys
Press to adjust the metronome volume.
1. [Song Number] Keys
Press to select a demo song.
4. [Metro. Beat] Keys
Press to set the metronome time signature.
5. [Tempo] Keys
Press to edit the tempo value.
4. [Metro. Beat] Keys
Press to set the metronome
time signature.
5. [Tempo] Keys
Press to edit the tempo value.
6. [Reverb] Keys
Press to set the reverb level.
7. [Key Touch] Keys
Press to select a touch level.
8. [Tuning] Keys
Press to adjust the current tuning.
9. [Transpose] Keys
Press to adjust the transpose value.
10. [Phones Sense] Keys
Press to turn the Phones Sense
function on or off.
11. [Auto Power Off] Keys
Press to change the Auto Power
Off setting.
Appendices
14
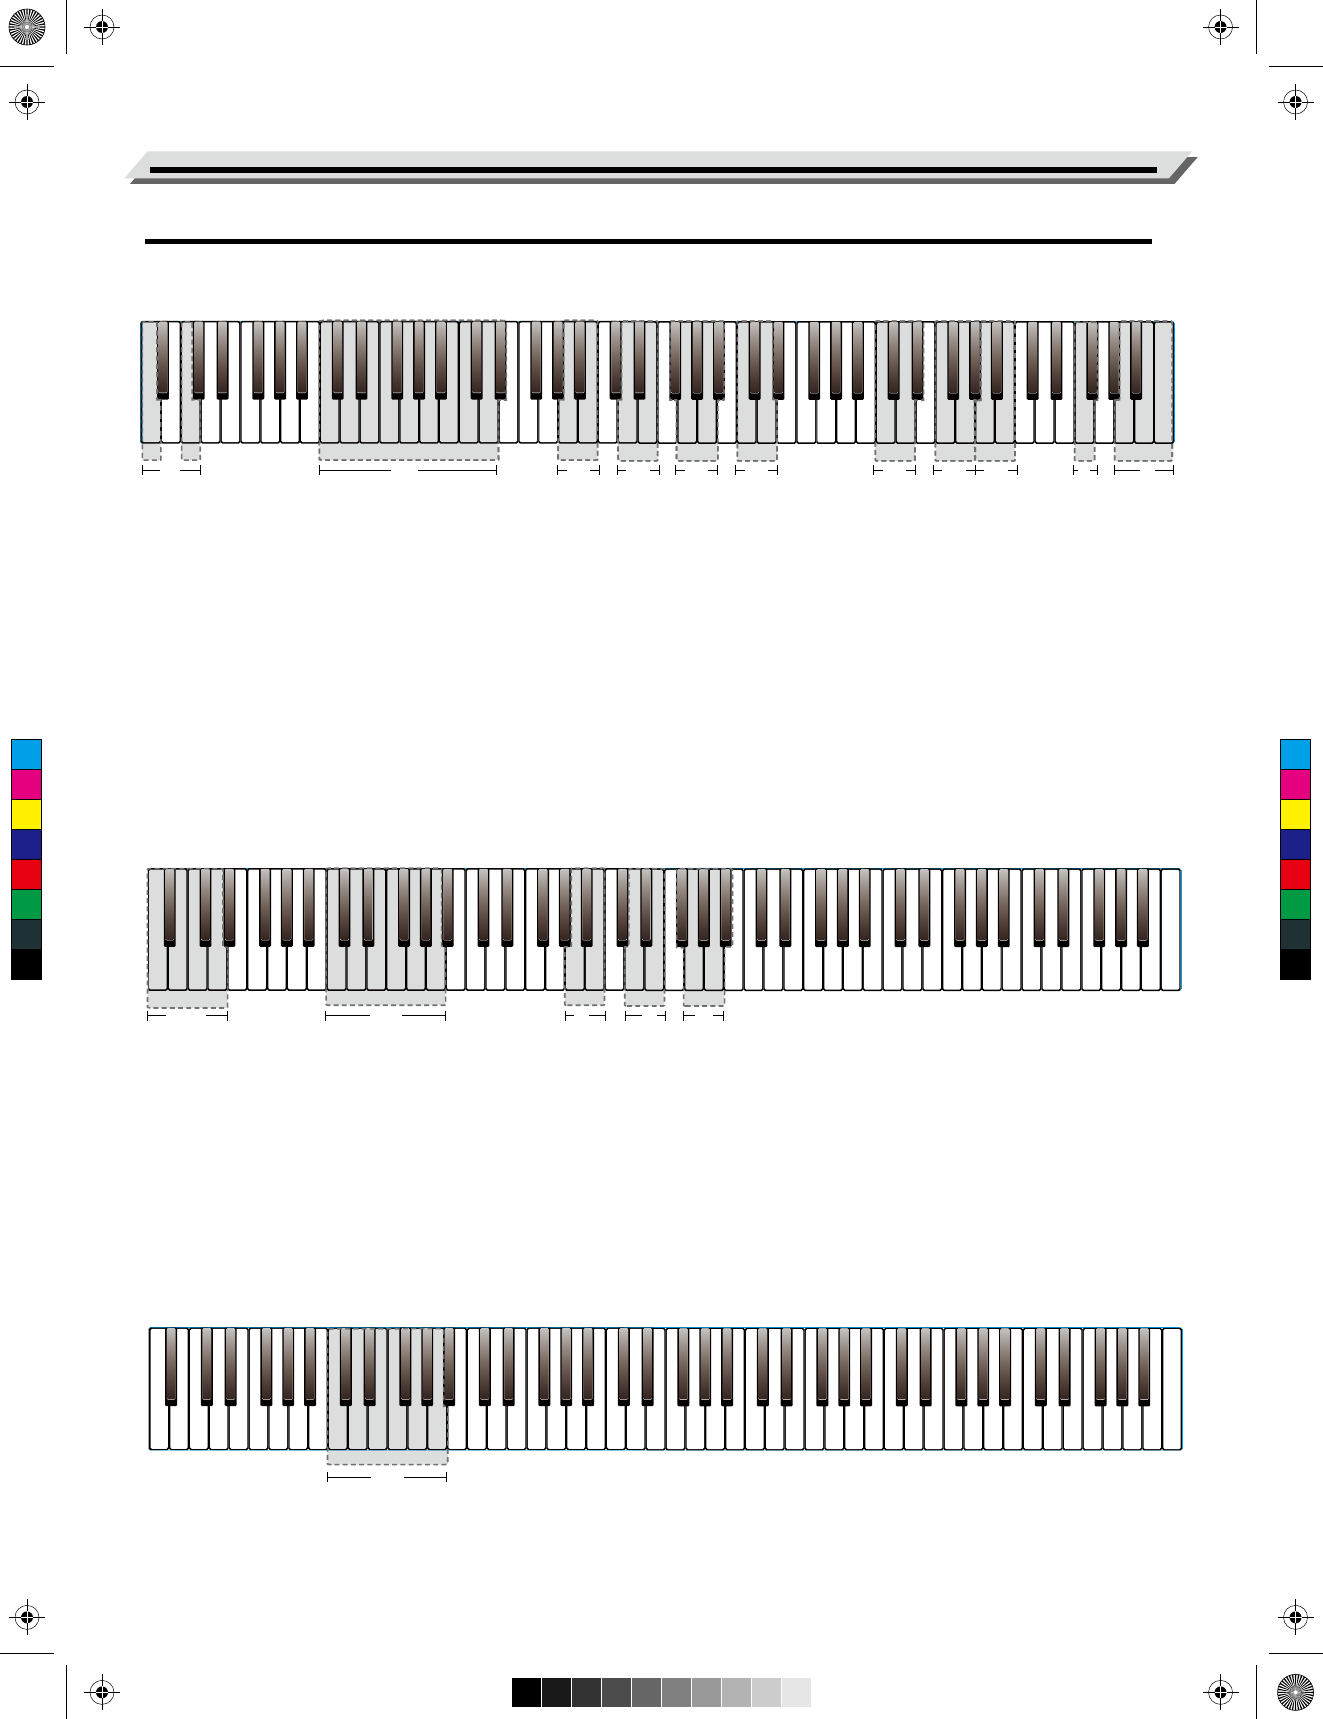
List of Operations (Button + Key)
[FUNCTION] + Key
[METRONOME] + Key
[METRONOME] + [TWIN PIANO] + Key
A0
1
3
5
6
12
13
15
-1
+1
-1
+1
OFF
Medium
-0.1Hz
+0.1Hz
-1
+1
On
10 min.
240 min.
OFF
-1
+1
-1
+1
8
10
2
4
7
9
11
14
16
(Default)
4/4 (Default)
(Default)
-10
Tempo = 106
+10
Light
Heavy
440.0Hz(Default)
442Hz
0 (Default)
Off
30 min. (Default)
C1 C2 C3 C4 C5 C6 C7 C8
B0 B1C1 D1 E1 F1 G1 C2 D2 E2 F2 G2A1 B2 C3 D3 E3A2 F3 G3 A3 B3 C4 D4 E4 F4 G4 A4 B4 C5 D5 E5 F5 G5 A5 B5 C6 D6 E6 F6 G6 A6 B6 C7 D7 E7 F7 G7 A7 B7 C8
1
Bluetooth 2
MIDI Channel 3
Metro. Volume 4
Metro. Beat 5
Tempo 6
Reverb 7
Key Touch 8
Tuning 9
Transpose 10
Phones Sense 11
Auto Power Off
Audio Disconnect
MIDI Disconnect
C1 C2 C3 C4 C5 C6 C7 C8
C1 C2 C3 C4 C5 C6 C7 C8
A0
0
3
6
4 (Default)
1
3
5
6
-1
-1
+1
-1
+1
+1
8
0
2
2
5
4
7
9
(Default)
4/4 (Default)
-10
Tempo = 106
+10
B0 B1C1 D1 E1 F1 G1 C2 D2 E2 F2 G2A1 B2 C3 D3 E3A2 F3 G3 A3 B3 C4 D4 E4 F4 G4 A4 B4 C5 D5 E5 F5 G5 A5 B5 C6 D6 E6 F6 G6 A6 B6 C7 D7 E7 F7 G7 A7 B7 C8
1
Metro. Beat 3
Metro. Volume 4
Metro. Beat 5
Tempo
2
Tempo
A0
1
3
5
6
8
10
2
4
7
9
B0 B1C1 D1 E1 F1 G1 C2 D2 E2 F2 G2A1 B2 C3 D3 E3A2 F3 G3 A3 B3 C4 D4 E4 F4 G4 A4 B4 C5 D5 E5 F5 G5 A5 B5 C6 D6 E6 F6 G6 A6 B6 C7 D7 E7 F7 G7 A7 B7 C8
1
Song Number
C
M
Y
CM
MY
CY
CMY
K
Roland_GOPIANO88_Manual_G05_181019.ai 14 2018-10-19 16:54:39Roland_GOPIANO88_Manual_G05_181019.ai 14 2018-10-19 16:54:39
Appendices
15
MIDI Implementation Chart
True
C
M
Y
CM
MY
CY
CMY
K
Roland_GOPIANO88_Manual_G05_181019.ai 15 2018-10-19 16:54:39Roland_GOPIANO88_Manual_G05_181019.ai 15 2018-10-19 16:54:39
GO PIANO88_G05
C
M
Y
CM
MY
CY
CMY
K
Roland_GOPIANO88_Manual_G05_181019.ai 16 2018-10-19 16:54:40Roland_GOPIANO88_Manual_G05_181019.ai 16 2018-10-19 16:54:40

NCC警語(臺灣)
第十二條
經型式認證合格之低功率射頻電機,非經許可,公司、商號或使用者均不得擅自變更頻率、加大功率或變更原設計之特性及功能。
第十四條
低功率射頻電機之使用不得影響飛航安全及干擾合法通信;經發現有干擾現象時,應立即停用,並改善至無干擾時方得繼續使用。前項合法通信,指
依電信法規定作業之無線電通信。低功率射頻電機須忍受合法通信或工業、科學及醫療用電波輻射性電機設備之干擾。
The NCC Statement on Low Power Radio-frequency Devices (Taiwan)
Article 12
Without permission granted by the NCC, any company, enterprise, or user is not allowed to change frequency, enhance
transmitting power or alter original characteristic as well as performance to an approved low power radio-frequency devices.
Article 14
The low power radio-frequency devices shall not influence aircraft security and interfere legal communications; If found, the
user shall cease operating immediately until no interference is achieved. The said legal communications means radio commu-
nications is operated in compliance with the Telecommunications Act. The low power radio-frequency devices must be suscep-
tible with the interference from legal communications or ISM radio wave radiated devices.
FCC Warning (the USA)
Changes or Modifications not expressly approved by the party responsible could void the user’s authority to operate this device.
This equipment has been tested and found to comply with the limits for a Class B digital device, pursuant to Part 15 of the FCC
Rules. These limits are designed to provide reasonable protection against harmful interference in a residential installation. This
equipment generates, uses and can radiate radio frequency energy and, if not installed and used in accordance with the
instructions, may cause harmful interference to radio communications. However, there is no guarantee that interference will not
occur in a particular installation.
If this equipment does cause harmful interference to radio or television reception, which can be determined by turning the
equipment off and on, the user is encouraged to try to correct the interference by one or more of the following measures:
-- Reorient or relocate the receiving antenna.
-- Increase the separation between the equipment and receiver.
-- Connect the equipment into an outlet on a circuit different from that to which the receiver is connected.
-- Consult the dealer or an experienced radio/TV technician for help.
IC Warning (Canada)
This device contains licence-exempt transmitter(s)/receiver(s) that comply with Innovation, Science and Economic Development
Canada’s licence-exempt RSS(s).
Operation is subject to the following two conditions:
1. This device may not cause interference.
2. This device must accept any interference, including interference that may cause undesired operation of the device.
L’émetteur/récepteur exempt de licence contenu dans le présent appareil est conforme aux CNR d’Innovation, Sciences et
Développement économique Canada applicables aux appareils radio exempts de licence.
L’exploitation est autorisée aux deux conditions suivantes :
1. L’appareil ne doit pas produire de brouillage;
2. L’appareil doit accepter tout brouillage radioélectrique subi, même si le brouillage est susceptible d’en compromettre le
fonctionnement.