Roland HPI-7LE ELECTRONIC PIANO WITH USB PORT User Manual HPi 7 e
Roland Corporation ELECTRONIC PIANO WITH USB PORT HPi 7 e
UserManual.wiki
>
Roland
>
HPI 7LE User Manual
USERS MANUAL
Navigation menu
Upload a User Manual
Namespaces
Wiki Guide
HTML
PDF
Info
Views
User Manual
Discussion / Help
Navigation
![03454423 ’04-07-2N Owner’s Manual To resize thickness, move all items on the front coverand center registration marks to left or right This owner’s manual is printed on recycled paper. Congratulations on your choice of the Roland Digital Piano HPi-7. 201b Before using this unit, carefully read the sections entitled: “IMPORTANT SAFETY INSTRUCTIONS” (p. 2), “USING THE UNIT SAFELY” (p. 3), and “IMPORTANT NOTES” (p. 5). These sections provide important information concerning the proper operation of the unit. Additionally, in order to feel assured that you have gained a good grasp of every feature provided by your new unit, owner’s manual should be read in its entirety. The manual should be saved and kept on hand as a convenient reference. 202 Copyright © 2004 ROLAND CORPORATIONAll rights reserved. No part of this publication may be reproduced in any form without the written permission of ROLAND CORPORATION.Musical Notation Shown In A Large LCD ScreenThe musical notation can be displayed not only for the internal songs, but also for commercially available song files.You can split the screen and change the settings as you view the Notation screen.Lyrics and fingering numbers can also be displayed.* The fingering numbers are displayed only for some of the internal songs.Authentic Piano PerformanceHigh-quality grand piano tones and true piano feel from the keyboard and pedals let you enjoy authentic -piano performance.A “Wonderland” Sure To Please Children“Wonderland” is a world of sound which children can enjoy, with a “Piano,” a “SFX” of sounds, and more. A note-guessing game is also included.A Wealth Of Onboard SongsThe instrument comes with 170 songs, all carefully selected so almost every genre is represented—whether it be piano etudes, or popular tunes.A “Visual Lesson” Convenient Functions For PracticingEnjoy practicing along with song data.You can also check the results of what you play right in the screen.Easy Game-like OperationAfter pressing the button for the desired function, operation consists basically of pressing the cursor buttons, [ ] [ ] buttons and [+] [-] located in the center of the panel. You can enjoy versatile performance with easy operation.](https://usermanual.wiki/Roland/HPI-7LE/User-Guide-501549-Page-1.png)
![7 Contents USING THE UNIT SAFELY.........................................3IMPORTANT NOTES...................................................5 Before You Begin Playing ...........................9 Making the Connections...............................................9Connecting the pedal cable.....................................9Attach the music rest...............................................9Connect the power cord..........................................9Connect headphones ...............................................9Using the Headphone Hook...................................9Opening and Closing the Lid.....................................10Turning the Power On/Off........................................10Adjusting the Volume or Brightness of the Sound ......................................................................10Adjusting the Contrast of the Screen ........................10About the Pedals..........................................................11Disabling Functions Other Than Piano Performance (Panel Lock) ..........................................11Cancelling Auto Demo ...............................................11 Panel Descriptions .....................................12 Front Panel....................................................................12Rear Panel .....................................................................13Bottom Panel ................................................................13Music Rest.....................................................................13 Basic Operation and the Main Screen......14 Basic operation .......................................................141. Notation screen (basic screen)..........................142. List screen............................................................143. Detailed settings screen.....................................14Messages .................................................................14 Playing Along With A Song .......................15 Notation Screen ......................................................15Button Operations..................................................16Playing a Song..............................................................16Playing songs consecutively (All Song Play)........................................................18Playing back at a fixed tempo ..............................19Registering the Songs You Like (Favorites) .......19Removing Songs from Favorites..........................19Using the Metronome .................................................20Adding a Count to Assist Your Timing ...................21Assigning Markers to a Song for Repeated Practice ..........................................................................22Assigning a marker in the middle of a measure (Resolution)..........................................23Changing the Key of the Keyboard or Song Playback (Transpose) ..................................................24Adjusting the Keyboard Touch (Key Touch) ..........25 Adding Variety to Your Performances .....26 Selecting the Sound to Play........................................26Playing percussion instruments or sound effects .......................................................................26Applying Effects to the Sound...................................27Adding reverberation to the sound (Reverb) ...................................................................27Adding richness to the sound (Chorus) .............27Playing Two Sounds Layered Together (Dual).......27Playing Different Sounds in the Right and Left Hand (Split) ..........................................................28Changing from dual performance to split performance............................................................29To switch from split to dual performance..........29 Using the Lesson Function (Visual Lesson) .......................................... 30 Practicing with Internal Songs and Songs on Floppy Disks...........................................................31 Adding an Accompaniment to Your Performance (Pianist Function)................ 32Playing in a Wonderland of Sound........... 33 Explanation of each selection ...............................33 Recording Your Performance ................... 34 Recording Along with a Song....................................34Recording a New Song ...............................................36Re-recording.................................................................38Erasing a Recorded Song............................................39Other Recording Methods..........................................39Recording with an accompaniment (the Pianist function) .............................................39Multitrack recording on five tracks.....................40 Saving Your Performance ......................... 41 Using Floppy Disks .....................................................41Inserting/removing a floppy disk.......................41Formatting a floppy disk ......................................41Saving Songs.................................................................42Deleting Saved Songs ............................................43Copying Songs........................................................44 Playing Back Music Files or a Song that was Saved on Floppy Disk........................ 46Convenient Functions ............................... 47 Changing the Notation Screen Settings....................47Editing Songs................................................................48Undoing Edits (Undo)...........................................49Copying Measures (Copy)....................................49Correcting Timing Discrepancies (Quantize)................................................................49Deleting Measures (Delete) ..................................50Inserting Blank Measures (Insert)........................50Transposing Individual Parts (Transpose).........51Making Measures Blank (Erase) ..........................51Exchanging Parts (Part Exchange).......................51Correcting Notes One by One (Note Edit) .........52Modifying the Tone Changes in a Song (PC Edit) ..................................................................52Saving the Notation Data in BMP Format ...............52Functions that Can be Selected Using the [Function] Button ..................................................54Adjusting the volume balance between accompaniment and keyboard (Balance) ...........55Adjusting the Piano Sounds (Piano Setting) ........................................................55HPi7_e.book 7 ページ 2004年7月5日 月曜日 午後4時20分](https://usermanual.wiki/Roland/HPI-7LE/User-Guide-501549-Page-7.png)
![8Contents Adjusting the depth of the effects (Effect)..........55Setting the reference pitch and temperament (Tuning)...................................................................55Mic Echo..................................................................56Changing the function of the pedals (Pedal)......................................................................56Changing the language displayed in the screen (Language) ...........................................56Selecting Images To Be Shown on the Displays (User Image Display)......................57Setting the Demo (Auto DEMO)..........................57Changing the parts assigned to the track buttons during SMF playback (Track Assign).........................................................57Recording and Playing Back Performances of Specific Instruments (16 Track)............................58Formatting the User Memory (Initialize User Memory).......................................59Remembering the settings even when the power is turned off (Memory Backup).........59Restoring the factory settings (Factory Reset)........................................................60Using the V-LINK function ..................................60Changing the Tone Settings When Playing Back Songs (Play Mode) .........................60Playing the Demos.......................................................60 Connecting External Devices....................61 Connecting Audio Devices.........................................61Connections with MIDI Devices................................61What is MIDI?.........................................................61Connections to a Computer .......................................62Making MIDI-Related Settings ..................................62MIDI settings ..........................................................62Making the Settings for the USB Driver...................63 Appendics ...................................................64 Trouble Shooting .........................................................64If this Message Appears on Screen ...........................66Tone List........................................................................67SFX Set .....................................................................69Drum Set List................................................................70Chord List .....................................................................74Internal Song List.........................................................75Songs for Visual Lesson ........................................76Pianist Style List...........................................................76Music Files That the HPi-7 Can Use .........................77MIDI Implementation Chart ......................................78Main Specifications......................................................79Index..............................................................................80 Conventions Used in This Manual This manual uses the following conventions in the interest of simpler, more concise instructions. • Button names are enclosed in square brackets “[ ]”, as in One Touch Program [Piano] button.•An asterisk (*) at the beginning of a paragraph indicates a note or precaution. These should not be ignored.• (p. **) refers to pages within the manual.• [+] [-], [ ] [ ], [ ] [ ] means that you should press one or the other button.HPi7_e.book 8 ページ 2004年7月5日 月曜日 午後4時20分](https://usermanual.wiki/Roland/HPI-7LE/User-Guide-501549-Page-8.png)
![9 Before You Begin Playing Making the Connections Connecting the pedal cable Insert the pedal cable into the Pedal connector on the rear panel of the HPi-7. fig.pedalcord Attach the music rest The music rest of the HPi-7 contains a liquid crystal display screen.Use the following procedure, and handle the music rest with care. 1 Insert the music rest as shown in the diagram. fig.mrest 2 Connect the cable of the music rest to the LCD Out connector on the rear panel of the HPi-7. * The power must be off when connecting the cable of the music rest. fig.LCDcord-e Connect the power cord Insert the included power cord into the AC inlet on the bottom panel of the HPi-7, and then plug it into an AC power outlet. * Use only the included power cord. fig.ACcord-e Connect headphones Plug the headphones into the Phones jack on the bottom panel of the HPi-7. When you connect headphones, no sound will be output from the internal speakers.The headphone volume is adjusted by the [Volume] knob (p. 12) of the HPi-7. * Please use stereo headphones.* Make sure to use only Roland headphones. Headphones from other manufacturers may be unable to provide sufficient volume. fig.headphones Some Notes on Using Headphones • To avoid damaging or severing the headphone cord, be sure to handle the headphones by holding the phones themselves, and grasping the plug and not the cord when pulling the headphone plug.• The headphones may be damaged if the volume is too high when they are plugged in. Connect the headphones only after turning the volume down completely.• To prevent possible auditory damage, loss of hearing, or damage to the headphones, the headphones should not be used at an excessively high volume. Listen at appropriate levels. Using the Headphone Hook Whenever you are not using the headphones, you can hang them onthe headphone hook at the lower left of the HPi-7. Attaching the Headphone Hook Press and twist the headphone hook included with the HPi-7 intothe hole in the bottom of the HPi-7 (refer to the figure below).Turn the headphone hook thumbscrew to secure the headphone hook.Connecting DisconnectingBottom rear of the HPi-7HPi7_e.book 9 ページ 2004年7月5日 月曜日 午後4時20分](https://usermanual.wiki/Roland/HPI-7LE/User-Guide-501549-Page-9.png)
![10Before You Begin Playing Opening and Closing the Lid To open the lid, use both hands to lift it lightly, and slide it away from yourself.To close the lid, pull it gently toward yourself, and lower it softly after it has been fully extended. fig.futa * Be careful not to get your fingers pinched when opening or closing the lid. If small children will be using the HPi-7, adult supervision should be provided.* To prevent accidents, the lid must be closed when transporting the piano. Turning the Power On/Off 941 *Once the connections have been completed (p. 9), turn on power to your various devices in the order specified. By turning on devices in the wrong order, you risk causing malfunction and/or damage to speakers and other devices. To turn the power on, turn the [Volume] knob all the way down, and then press the [Power On] switch. The power will turn on, and the Power indicator at the left front of the HPi-7 will light.After a few seconds, you will be able to play the keyboard to produce sound. Use the [Volume] knob to adjust the volume. 942 * This unit is equipped with a protection circuit. A brief interval (a few seconds) after power up is required before the unit will operate normally. fig.Power-e To turn the power off, turn the [Volume] knob all the way to the left, and press the [Power On] switch. The Power indicator at the left front of the HPi-7 will go dark, and the power will be turned off. Adjusting the Volume or Brightness of the Sound Turn the [Volume] knob to adjust the overall volume.Turn the [Brilliance] knob to adjust the brightness of the sound. fig.knobs Adjusting the Contrast of the Screen To adjust the contrast of the screen, turn the [Contrast] knob located at the back of the music rest. fig.contrast-e Some Notes on Using the LCD screen •Never remove the liquid crystal display cover at the back of the music rest. By removing it you risk electrical shock and/or malfunction.•You may see vertical lines in the screen, but this is due to the structure of a liquid crystal display, and does not indicate a malfunction. By using the [Contrast] knob to adjust the contrast of the screen, you can minimize these lines.• The contrast of the screen may be affected by the temperature.Power IndicatorMin Max Mellow BrightBack of the music restCoverHPi7_e.book 10 ページ 2004年7月5日 月曜日 午後4時20分](https://usermanual.wiki/Roland/HPI-7LE/User-Guide-501549-Page-10.png)
![11Before You Begin Playing About the Pedals The pedals have the following functions, and are used mainly for piano performance. fig.pedal-e Damper pedal (right pedal) While this pedal is pressed, notes will be sustained even after you take your fingers off the keys. The depth to which you press the pedal will subtly affect the duration of the sustain.On an acoustic piano, holding down the damper pedal will allow the remaining strings to resonate in sympathy with the sounds that you played from the keyboard, adding a rich resonance.The HPi-7 simulates this sympathetic resonance. → You can adjust the amount of sympathetic resonance that occurs when you press the damper pedal. Refer to “Adjusting the depth of the effects (Effect)” (p. 55). Sostenuto pedal (center pedal) This pedal sustains only the sounds of the keys that were already played when you pressed the pedal. Soft pedal (left pedal) When you hold down this pedal and play the keyboard, the sound will have a softer tone.The softness of the tone can be varied subtly by the depth to which you press the pedal. → The Sostenuto pedal and Soft pedal can be given functions other than these. Refer to “Notation Screen” (p. 15) and “Changing the function of the pedals (Pedal)” (p. 56). About the adjuster When you move the HPi-7 or if you feel that the pedals are unstable, adjust the adjuster located below the pedals as follows.•Rotate the adjustor to lower it so that it is in firm contact with the floor. If there is a gap between the pedals and the floor, the pedals may be damaged. In particular when placing the instrument on carpet, adjust this so that the pedals firmly contact the floor. fig.adjust Disabling Functions Other Than Piano Performance (Panel Lock) The “Panel Lock” function locks the HPi-7 in a state where only piano performance can be used, and all buttons will be disabled. This prevents the settings from being inadvertently modified even if children press the buttons accidentally. * In the Panel Lock state, only the grand piano sound can be played. Also, nothing will be displayed in the screen. 1 Turn the volume to the minimum, and press the [Power On] switch to turn off the power. 2 Hold down the [Function] button, and press the [Power On] switch to turn on the power. Continue holding down the button for six or seven seconds.Adjust the volume. When you play the keyboard, the grand piano sound will be heard.To defeat the Panel Lock function, turn the volume down to the minimum, and turn on the power once again. Cancelling Auto Demo The HPi-7 is set at the factory so that it automatically starts playback of the demo songs whenever the keys and controls have been left untouched for a few minutes. You can cancel this setting. 1 Press the [Function] button. fig.d-kihonsettei-e 2 Press the [ ] [ ] [ ] [ ] buttons to select “Auto Demo,” then press [ (Enter)] button. 3 Press the [ ] [ ] buttons to select “Auto Start,” then press the [+] [-] buttons to set this to “Off”. 4 Press the [ (Close)] button to return the Notation screen to the display. → For more details about Auto Demo, refer to p. 57.Soft PedalSostenuto PedalDamper PedalAdjusterHPi7_e.book 11 ページ 2004年7月5日 月曜日 午後4時20分](https://usermanual.wiki/Roland/HPI-7LE/User-Guide-501549-Page-11.png)
![12 Panel Descriptions Front Panel fig.panelfront-e 1 [Power On] switch Pressed to switch the power on and off (p. 10). 2 [Volume] knob Adjusts the overall volume (p. 10). 3 [Brilliance] knob Adjusts the brightness of the sound (p. 10). 4 [Transpose] button Transposes the pitch of the keyboard or the song being played (p. 24). 5 [Tone] buttons Select the type of sound (the tone group) that will be played from the keyboard (p. 26). 6 [Pianist] button You can use the Pianist function to add an accompaniment to your playing (p. 32). 7 [Reverb]/[Intro/Ending] button Adds reverberation to the sound (p. 27).When you are using the Pianist function, this starts/stops the accompaniment with an intro or ending (p. 32). 8 [Chorus]/[Start/Stop] button Adds spaciousness to the sound (p. 27).When you are using the Pianist function, this starts/stops the accompaniment (p. 32). 9 [Split] button Lets you play different sounds in the left and right-hand areas of the keyboard (p. 28). 10 [Key Touch] button Adjusts the touch of the keyboard (p. 25). 11 [Function] button Selects various performance-related functions (p. 41–p. 44, p. 54–p. 63). 12 [+] [-] buttons Used to select the value that you want to set (p. 14). 13 [] [ ] [ ] [ ] buttons (Cursor buttons) Used to select the item that you want to set (p. 14).Depending on the screen, other functions may be assigned. 14 [] [ ] buttons Press the [ ] button to confirm the selections you’ve made using the Cursor buttons ( 13 ) (p. 14).The [ ] cancels the operation, or displays the notation screen.Depending on the screen, other functions may be assigned. 15 [Song] button Use this button to select internal songs or songs from floppy disk (p. 16, p. 46). 16 [Lesson] button You can enjoy your practices with the Lesson function (p. 30). 17 [Notation] button Displays the notation using the entire screen. (p. 15). 18 [Zoom] button This magnifies the notation (zooms in) (p. 16). 19 [ (Metronome)] button Sounds the internal metronome (p. 20). 20 Tempo [Slow] [Fast] buttons Adjust the tempo(p. 16, p. 20, p. 32). Simultaneously pressing the [Slow] and [Fast] buttons will restore the basic tempo. 21 Track buttons Used to play back or record each track of a song (p. 16, p. 37, p. 40). 22 [ (Reset)] button Resets the song playback-start location to the beginning of the song. 23 [ (Play/Stop)] button This starts and stops playback and recording of songs. 24 [ (Rec)] button When pressed, this button places the instrument in recording standby (p. 34–p. 40). 25 [ (Bwd)] button Rewinds the song. 26 [ (Fwd)] button Fast-forwards the song. 27 [Wonderland] button Here you can enjoy the “Drums,” “SFX,” and “Game,” and learn about instruments while having fun (p. 33).234617 8 9 10 11 14 18 20 22 23 24 252627 291915131214 17 28512 16 21HPi7_e.book 12 ページ 2004年7月5日 月曜日 午後4時20分](https://usermanual.wiki/Roland/HPI-7LE/User-Guide-501549-Page-12.png)
![13Panel Descriptions 28 [Marker/Count] button This is also used for setting the count (p. 21).These allow you to add and move markers in the notation as well as repeat playback of song segments simply and easily. 29 Disk Drive You can insert a floppy disk for playing back or saving songs (p. 41, p. 46). Rear Panel fig.panelrear 1 LCD Out Connector Connect the cable of the music rest to this connector (p. 9). 2 Pedal connector Connect the pedal cable of the stand to this connector (p. 9). 3 Input jacks These jacks can be connected to another sound generating device or an audio device, so that the sound of that device will be output from the HPi-7’s speakers (p. 61). 4 Output jacks These jacks can be connected to your audio system to enjoy more powerful sound. They can also be connected to a tape recorder or similar device in order to record your performance on a cassette tape (p. 61). Bottom Panel fig.panelbottom 1 Phones jacks A set of headphones can be connected here (p. 9). 2 Mic Volume knob Adjusts the volume level for the microphone. 3 Mic jacks Used for connecting microphones, so that the sound will be output from the HPi-7’s speakers (p. 56). 4 MIDI Out/In connector An external MIDI device can be connected here to receive performance data (p. 61). 5 USB connector Used for connecting a computer to the HPi-7 using a USB cable (p. 62). Music Rest fig.pmrest 1 Display This screen displays the notation of an internal song or disk song, and also displays various settings. * The explanations in this manual include illustrations that depict what should typically be shown by the display. Note, however, that your unit may incorporate a newer, enhanced version of the system (e.g., includes newer sounds), so what you actually see in the display may not always match what appears in the manual. fig.contrast 2 [Contrast] knob This knob adjusts the contrast of the screen (p. 10).1 2 3 41 2 3 4 512HPi7_e.book 13 ページ 2004年7月5日 月曜日 午後4時20分](https://usermanual.wiki/Roland/HPI-7LE/User-Guide-501549-Page-13.png)
![14 Basic Operation and the Main Screen Basic operation The HPi-7 is operated mainly by using the cursor buttons and [ ] [] [+] [-] buttons while viewing the screen.The every screen shows the functions of the cursor buttons and the [] [ ] [+] [-] buttons.The main functions are as follows. Cursor [ ] [ ] [ ] [ ] buttons: Move to an item to select it, switch pages [] button: Finalize the selected value [] button: Display the notation screen, or return to the previous screen [+] [-] button: change the selected value fig.cursor-e The main screens include the following. 1. Notation screen (basic screen) fig.d-kihonscore-e This is the first screen that will be displayed when you turn on the power.If some other screen is displayed, you can press the [Notation] button, then press the [ ] button to access this screen.For details on the notation screen display, refer to p. 15. 2. List screen fig.list-e This type of list screen will appear when you select songs, tones, or accompaniment styles.In this screen, use the cursor buttons to select the desired item. The selected item will be highlighted. 3. Detailed settings screen fig.d-kihonsettei-e Detailed settings for functions are made in a screen similar to this.The currently selected item will be highlighted, and you can use the [+] [-] buttons to edit the value. An explanation of the selected item is shown below the item. For some items, an explanation of the values will also be displayed.If you simultaneously press the [+] and [-] buttons, the value will revert to the basic setting.When you press the [ ] button the selected value will be finalized, and you’ll then be returned to the screen that was displayed prior to the current screen.When “P.*/*” appears at the upper right of the screen, it indicates that there are other parameters on the previous or next page. Messages Various messages will sometimes be displayed during operation. These messages ask you to confirm an operation, inform you of the results of an operation, or indicate an error when an operation could not be performed.For details on error messages that begin with “Error,” refer to p. 66.When a message like the following is displayed, use the [ ] [ ] buttons to select your response, and press the [ ] button to finalize it. Pressing the [ ] button returns you to the previous screen. fig.msg-eCursor buttons[ ][ ] buttons[+][-] buttonsHPi7_e.book 14 ページ 2004年7月5日 月曜日 午後4時20分](https://usermanual.wiki/Roland/HPI-7LE/User-Guide-501549-Page-14.png)
![16Playing Along With A Song Button Operations The following buttons are used to play back a song. fig.panel1-e Playing a Song The HPi-7 comes with 170 piano songs onboard.All of these can be viewed in the notation screen.They also have orchestral accompaniments, so you can play along with the accompaniment, or adjust the tempo to the desired speed for easier practice. → “Internal Song List” (p. 75) fig.panelsngslct[Volume] knobAdjusts the volume (p. 10).[Transpose] buttonChanges the playback key of the song (p. 24).[Song] buttonSelects the song that will be played (p. 17).[Marker/Count] button Assigns a marker within the song (p. 22).[Tempo] buttonsAdjust the tempo of the song.[Notation] buttonDisplays the notation using the entire screen.[Zoom] buttonMagnifies the notation (zoom in).Track buttonsEach part of the song being played is assigned to a track button.Select parts, or switch them between muted (button’s indicator dark) and playing (button’s indicator lit).[ (Bwd)] [ (Fwd)] buttonsPress this once to go back or forward one measure.Goes back or forward continuously when held down.[ (Rec)] buttonRecords a performance (p. 34).[ (Play)] buttonStarts and stops playback.[ (Reset)] buttonReturns to the beginning of the song.* If you hold down the [ (Play/Stop)] button and press the [ (Fwd)] button, you will move to the end of the song.221HPi7_e.book 16 ページ 2004年7月5日 月曜日 午後4時20分](https://usermanual.wiki/Roland/HPI-7LE/User-Guide-501549-Page-16.png)
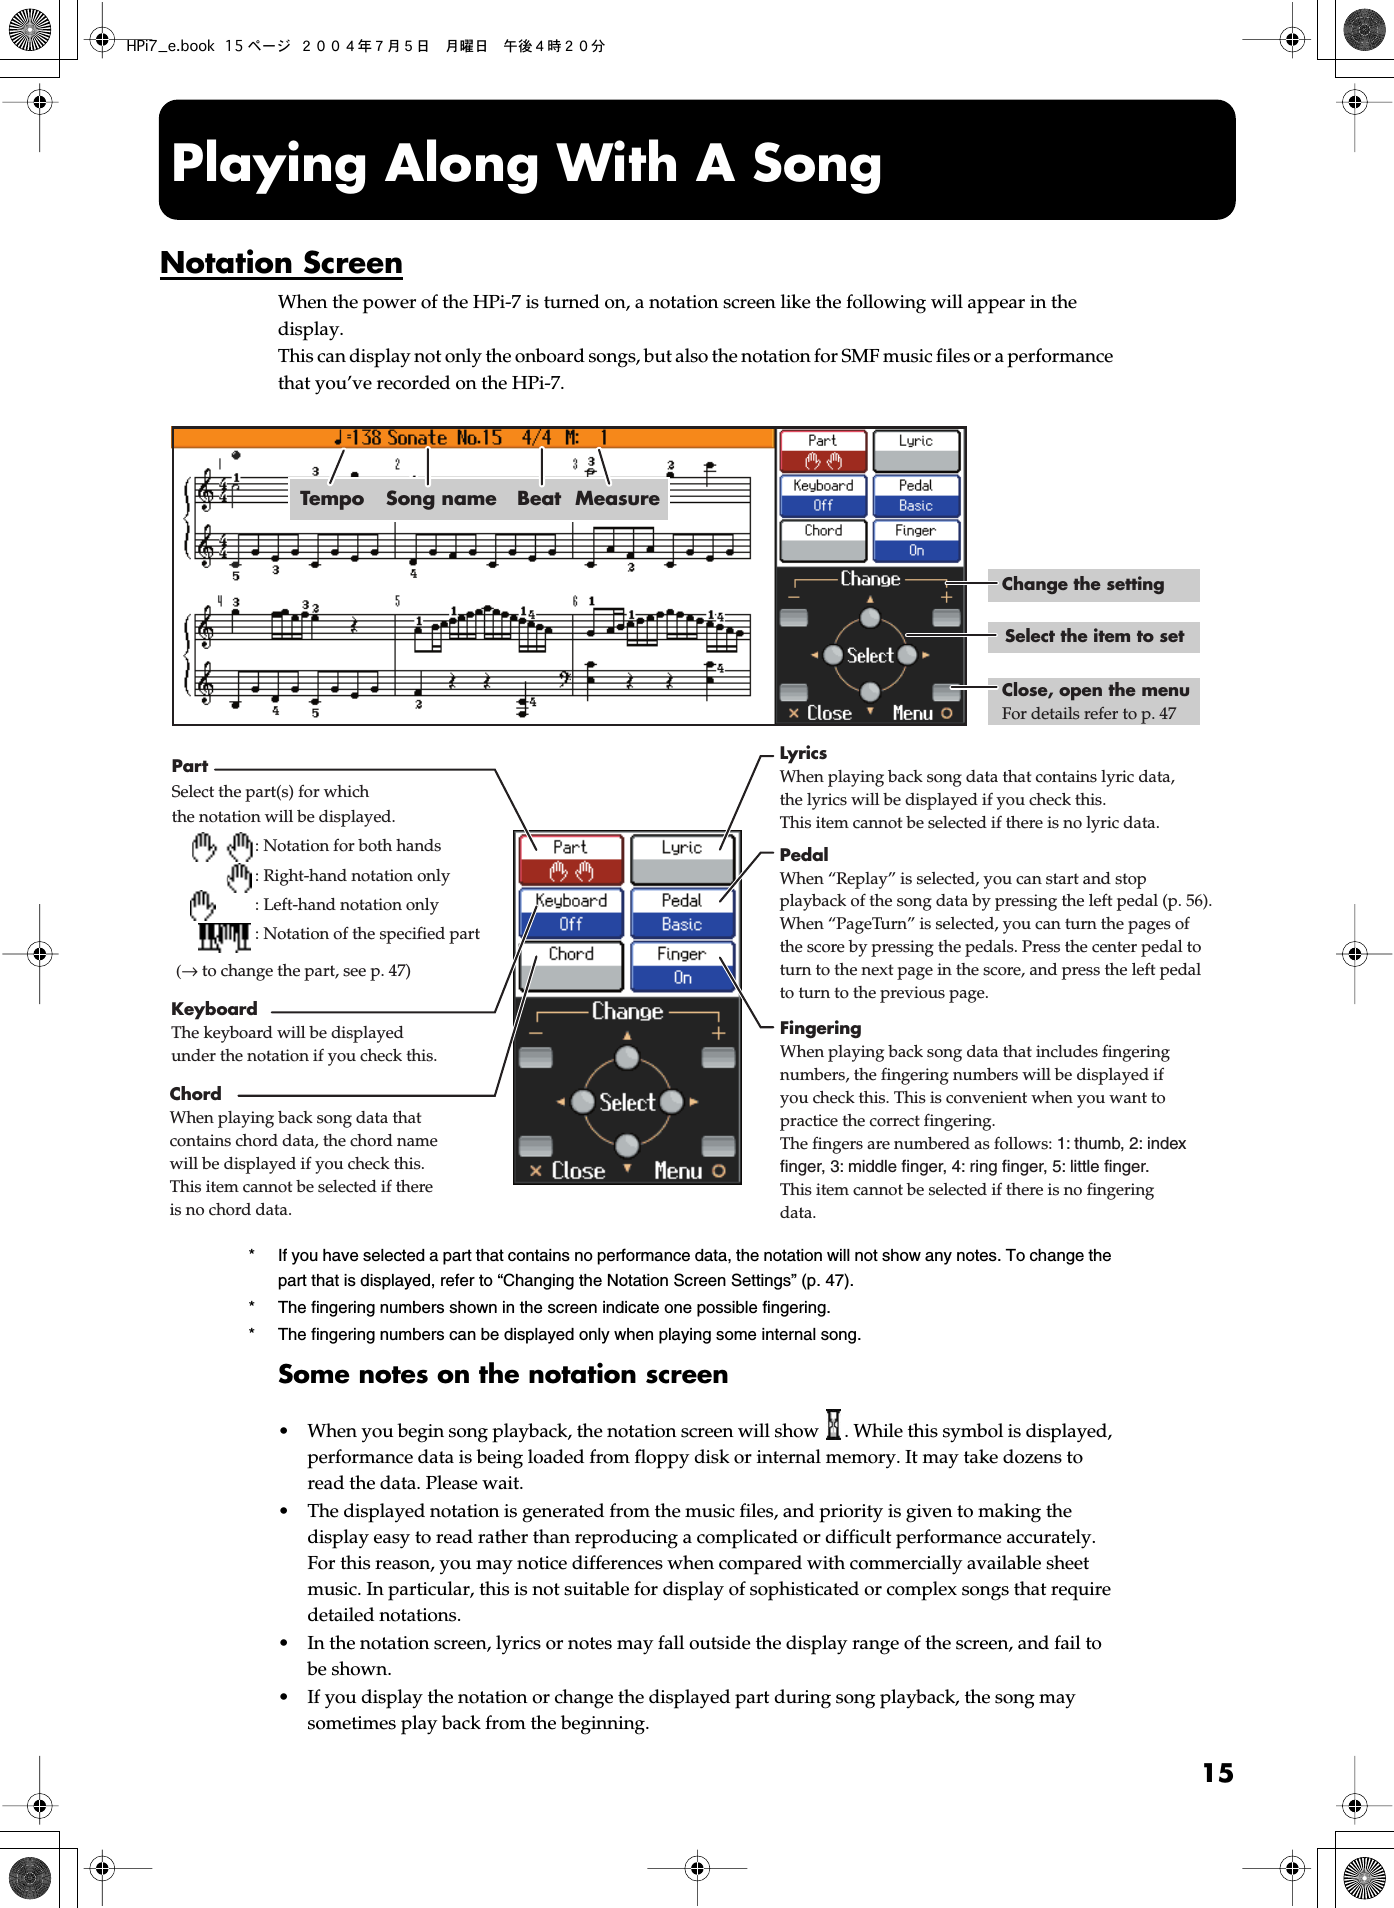
![17Playing Along With A SongSelect a song 1 Press the [Song] button. In the screen, select the song that you want to play. fig.songslcte Play back 2 Press the [ (Play/stop)] button. The button’s indicator will light.The song will begin playing.While the screen shows the symbol, the song data is being loaded. To adjust the tempo Use the Tempo [Slow] [Fast] buttons to adjust the tempo.The tempo is adjusted in terms of the value of a quarter note, with 10-500 being the permissible range. If you press the Tempo [Slow] [Fast] buttons simultaneously, you will return to the basic tempo of the song (the tempo before it was modified). Muting (silencing) parts of the playback You can mute the sound of specific playback parts, and play them yourself.Press a track button to mute a specific track.The indicators of the buttons you pressed will go dark, and the selected track will not be heard.To cancel muting, press the same track button once again to make the indicator light. * When playing back SMF music files for Roland Piano Digital series instruments, and the [3/Left hand] button and [4/Right hand] button do not correctly control the left/right-hand performances, please change the “Track Assign” settings.Please refer to “Changing the parts assigned to the track buttons during SMF playback (Track Assign)” (p. 57). Stop the song 3 Press the [ (play/Stop)] button once again. Playback will stop automatically when it reaches the end of the song.Press the [ (Reset)] button to return to the beginning of the song.GenrePress [ ] [ ] to select the genre.Selectable songs differ for each genre.Song listThe selection will be highlighted in black.Chords, fingerings, and lyrics in songs containing such data are displayed here.Song nameThe name of the currently selected song.DiskSelect songs from disk.For details refer to p. 46.Registor to “Favorites”For details refer to p. 19.Select a songSelect a genreAudition the selected songBack to score screenHPi7_e.book 17 ページ 2004年7月5日 月曜日 午後4時20分](https://usermanual.wiki/Roland/HPI-7LE/User-Guide-501549-Page-17.png)
![18Playing Along With A Song If a screen like the following is displayed fig.d-delete-e If a song has already been selected in the current area (internal memory), it will not be possible to choose another song or record a new performance.If you want to erase the song, use the [ ] [ ] buttons to select “OK,” then press the [ (Execute)] button. If you do not want to erase the song, select “Cancel” and save the song on a floppy disk (p. 42). Playing songs consecutively (All Song Play) The internal songs can be played back consecutively. fig.panelallsng 1 Hold down the track [Song] button and press the [ (Play/Stop)] button. fig.allsonge When you press the [ (Play)] button, all of the internal songs in the selected category are played back. If you want to play back songs on floppy disks you have, select “Disk.”If no operations are performed for dozens of seconds, “Random Play” will start automatically.Songs will be played consecutively.When all selected songs have been played, playback will return to the first song and resume. Stop playback 2 Press the [ (Play/Stop)] button. Playback will stop. item ValueSong Category Random Play, Practice, Masterpieces, Popular, Favorites, Disk (only when the floppy disk is inserted in the floppy disk drive)Change the tempo12Start playbackSelect a categoryBack to previous screenSong categoryThe category for the song being played back is displayed.HPi7_e.book 18 ページ 2004年7月5日 月曜日 午後4時20分](https://usermanual.wiki/Roland/HPI-7LE/User-Guide-501549-Page-18.png)
![19Playing Along With A Song Playing back at a fixed tempo In the case of a song with difficult tempo changes, it is effective to practice initially with a fixed tempo. Playing back at a fixed tempo without allowing tempo changes is called “Tempo Mute.” 1 Hold down the [ (Play/Stop)] button and press either the Tempo [Slow] or [Fast] button. While Tempo Mute is enabled, the indication of the tempo in the screen will be highlighted. fig.tempomutee When you play back the song, it will play at a constant tempo.To defeat Tempo Mute, hold down the [ (Play/Stop)] button and press either the Tempo [Slow] or [Fast] button.Tempo Mute will also be cancelled when you select a different song. Registering the Songs You Like (Favorites) You can register songs you are currently practicing or enjoy playing to “Favorites,” allowing you to select these songs easily. 1 Selecting the Song 2 Press the [+] button. A screen like the one shown below appears. fig.favorite 3 Select “OK” and press the [ (Execute)] button. The selected song is registered to Favorites.Now you can select the registered song by selecting Favorites for the genre in the Song Selection screen. * Never turn off the power while the display indicates “Executing....” Removing Songs from Favorites Select “Favorites” in the song select screen, choose the song you want to delete, then press the [+] button. * Never turn off the power while the display indicates “Executing....”Return to the previous screenFinalise a choiceSelect a choiceHPi7_e.book 19 ページ 2004年7月5日 月曜日 午後4時20分](https://usermanual.wiki/Roland/HPI-7LE/User-Guide-501549-Page-19.png)
![20Playing Along With A Song Using the Metronome The HPi-7 contains a versatile metronome function.While a song or accompaniment (Pianist function, p. 32) is playing, the metronome will sound at the corresponding tempo and time signature (Beat). fig.panelmetro 1 Press the [Metronome] button. The button’s indicator will blink according to the time signature (Beat), and the metronome will sound.To stop the metronome, press the [Metronome] button, getting its indicator to go dark. fig.metroe In this screen you can make the following settings. Item SettingVolume OFF (no sound)-10 Beat 2/2, 0/4, 2/4, 3/4, 4/4, 5/4, 6/4, 7/4, 3/8, 6/8, 9/8, 12/8 * It is not possible to change the “Beat” setting while a song is playing. Sound Click, Electronic, Voice (Japanese) (“1,” “2,” “3” in Japanese), Voice (English) (“1,” “2,” “3” in English), Animal, Wood Block, Triangle & Castanets, Hand Claps Pattern Normal, (dotted half note), (half note), (dotted quarter note), (quarter note), (dotted eighth note), (eighth note), (sixteenth note), Double (note added to back beat of the first beat), Triple (added notes sound the first beat as a triplet), Shuffle (notes added to create a shuffle) Beat LED On (The [Metronome] button’s light flashes in time with the beat.), Off (Dark)1VolumeSet the metronome volume.Beat LEDSet the metronome button’s indicator on or off.BeatSet the beat.SoundSpecify the metronome sound.PatternSpecify the timing interval of the metronome’s weak beats.Select the item to setChange the settingReturn to the previous screenHPi7_e.book 20 ページ 2004年7月5日 月曜日 午後4時20分](https://usermanual.wiki/Roland/HPI-7LE/User-Guide-501549-Page-20.png)
![21Playing Along With A Song Adding a Count to Assist Your Timing “Count-in” means to sound a count before song playback begins.“Countdown” means to sound a count after the end of the song introduction (before you begin playing the keyboard).If you will be playing along with a song, sounding a count will make it easier to match the timing of your performance to the song. fig.panelcnt 1 Press the [Marker/Count] button. fig.count1e Item SettingCount Mode Specify what type of count will be added.Count In (add a count before the performance), Countdown (add a count only before you begin playing), Count In/down (add both a count-in and a countdown) Countdown Sound Specify the count-down sound. Voice (Japanese), Voice (English) Countdown Track Specify the track or part that will determine the beginning of the performance when adding a countdown.Left & Right Track (Right-hand and left-hand parts of a piano song)Left Track (Left-hand part of a piano song)Right Track ( Right-hand part of a piano song ) Part 1-16 Count In Sound Specify the count-in sound.Stick, Click, Electronic, Voice (Japanese), Voice (English), Wood Block, Triangle & Castanets, Hand Clap, Animal Count In Measure Specify the length (number of measures) of the count-in. 1, 2 Count In Repeat When “Repeat” is turned on in the Marker setting screen (p. 22), this specifies whether the count-in will sound each time the range between the markers is repeated, or only the first time.First time,Each time1Select the item to setChange the settingReturn to the previous screenHPi7_e.book 21 ページ 2004年7月5日 月曜日 午後4時20分](https://usermanual.wiki/Roland/HPI-7LE/User-Guide-501549-Page-21.png)
![22Playing Along With A Song Assigning Markers to a Song for Repeated Practice You can add markers within a song so that you can move to a marked measure, or play back repeatedly between two markers. fig.panelmark Before you begin, select the song in which you want to assign markers (p. 17). Access the Marker screen 1 Press the [Marker/Count] button. In the Count screen, press the [ ] button. fig.marke Move to the location at which you want to assign a marker. 2 Use the [ (Bwd)] [ (Fwd)] buttons to move to the measure at which you want to assign a marker. Assign a marker 3 Press the [ ] or [ ] button to assign marker A or B. The screen will indicate the number of the measure at which the marker was assigned.It is not possible to assign marker B at the same location or earlier than marker A. → Markers can also be assigned in units of beats rather than measures. Refer to “Assigning a marker in the middle of a measure (Resolution)” (p. 23).321Return to the previous screenMake detailed settings for the resolutionFor details refer to p. 22.Set marker A, move to marker A.Set marker B, move to marker B.Switch “Repeat” on/offDelete a markerMarker BIndicates the measure number at which marker B was assigned.Marker AIndicates the measure number at which marker A was assigned.RepeatIf this is “On,” playback will repeat between markers.HPi7_e.book 22 ページ 2004年7月5日 月曜日 午後4時20分](https://usermanual.wiki/Roland/HPI-7LE/User-Guide-501549-Page-22.png)
![23Playing Along With A Song Moving an assigned marker After assigning a marker in the song, you can hold down the [ ] button and press the [ (Bwd)] or [ (Fwd)] button to adjust the location at which marker A was assigned. To adjust the location of marker B, hold down the [ ] button and press the [ (Bwd)] or [ (Fwd)] button. Moving to the location of an assigned marker After assigning a marker in the song, press either the [ ] or [ ] buttons to move (jump) to the location of the marker. Playing repeatedly between markers. After assigning both markers A and B, press the [ ] button. In the screen, turn “Repeat” to “On.”When you press the [ (Play/Stop)] button, playback will repeat between the markers. * If “Repeat” in the Marker screen is turned “On,” you can press the [ ] button to display the Notation screen and play back repeatedly.Anything you want to do that involves markers, including moving to a particular marker, is accomplished within the Marker screen. Deleting a marker you’ve assigned Hold down the [ ] button, and press the [ ] button to delete marker A, or press the [ ] button to delete marker B. Assigning a marker in the middle of a measure (Resolution) A marker can be assigned in the middle (at the beginning of a beat) of a measure. 1 Press the [Marker/Count] button. In the Count screen, press the [ (Marker)] button. The screen for setting markers appears. 2 Press the [ (Resolution)] button once more to access the Resolution setting screen. item SettingResolution Measure Markers will be assigned to the beginning of a measure.BeatMarkers will be assigned to the beginning of a beat. → If you want to assign a marker to the beginning of a beat, assign the marker while playing back the song.If you use Repeat Playback without assigning marker A or BThe entire selected song will be played back repeatedly.If you use Repeat Playback when only marker A is assignedThe song will play back repeatedly from marker A to the end of the song.If you use Repeat Playback when only marker B is assignedThe song will play back repeated from the beginning of the song to marker B.HPi7_e.book 23 ページ 2004年7月5日 月曜日 午後4時20分](https://usermanual.wiki/Roland/HPI-7LE/User-Guide-501549-Page-23.png)
![24Playing Along With A Song Changing the Key of the Keyboard or Song Playback (Transpose) By using the “Transpose” function, you can transpose your performance without changing the notes you play. For example, if a song is in a difficult key with numerous sharps ( ) or flats ( ), you can use this function to play it in an easier key.You can also use this function to play back a song in a different key.When accompanying a vocalist, you can easily transpose the key to a range that is comfortable for the singer, while still playing the notes as written (i.e., with the same fingering positions). fig.paneltrns 1 Press the [Transpose] button. fig.transe When you transpose the keyboard, the [Transpose] button’s indicator will light. If the transpose setting is “0,” the button’s indicator will be dark.When set to “Link On,” the values for the keyboard and the song data are the same.When set to “Link Off,” the values for the keyboard and the song data can be set separately. To cancel transposition, press the [Transpose] button, getting its indicator to go dark.The transposition setting returns to “0”, when you choose another song. Item SettingKeyboard Transpose the keys played by the keyboard. This setting can be set by holding down the [Transpose] button and pressing the key to which you want to transpose.-6–0–5 Song Transpose the song playback. -24–0–241For example, if you want the E pitch to sound when you press the C key, set the “Keyboard” transpose setting to “4.”If you play C E G It will sound E G# BReturn to the previous screenSelect the item to setSwitches the link on and offChange the settingLinkSetting this to “Off” allows you to set values separately for the keyboard and the song data.HPi7_e.book 24 ページ 2004年7月5日 月曜日 午後4時20分](https://usermanual.wiki/Roland/HPI-7LE/User-Guide-501549-Page-24.png)
![25Playing Along With A Song Adjusting the Keyboard Touch (Key Touch) You can adjust the touch (playing feel) of the keyboard. fig.panelktch 1 Press the [Key Touch] button. fig.keytouche Item Indicator SettingKey Touch No Light Medium This allows you to play using the most natural touch. This setting is closest to the response of an acoustic piano.Red Light HeavyFortissimo (ff) cannot be produced unless you play more strongly than usual, making the keyboard feel heavier. This setting allows you to add more expression when playing dynamically.Green Light LightFortissimo (ff) can be produced by playing less strongly than usual, making the keyboard feel lighter. This setting makes it easier for children, whose hands have less strength.Orange Light Fixed Sounds at a fixed volume, regardless of your keyboard playing strength.1Return to the previous screenKey TouchPress to switchthe setting.Change the settingHPi7_e.book 25 ページ 2004年7月5日 月曜日 午後4時20分](https://usermanual.wiki/Roland/HPI-7LE/User-Guide-501549-Page-25.png)
![26 Adding Variety to Your Performances Selecting the Sound to Play The HPi-7 contains 600 and more different tones.The tones are organized into six tone groups, which are assigned to the [Tone] buttons. fig.paneltone 1 Press one of the [Tone] buttons, and select the desired tone in the screen. When you press a [Tone] button, the button’s indicator will light. fig.toneslcte The next time you press this [Tone] button, the tone you finalized here will be heard. → “Tone List” (p. 67) Tones indicated by is called an “EX voice.” These voices are especially recommended.Tones indicated by a red mark produce the “Key Off Sound.” What “Key Off Sound” does is recreate the tonal changes produced when the fingers are released from the keys. Playing percussion instruments or sound effects Press the Tone [Others] button.Use the cursor buttons to select a rhythm set such as “DR Standard” or SFX set.Drum set names are indicated by initial “DR.”Each note of the keyboard will play a different sound. → For the sounds that are assigned to each key of a drum set or sound effect set, refer to “Drum Set List” (p. 70).1Tone listThe selection will be highlighted in Orange.Hear a demo of the selected toneReturn to the previous screenSelect a toneHPi7_e.book 26 ページ 2004年7月5日 月曜日 午後4時20分](https://usermanual.wiki/Roland/HPI-7LE/User-Guide-501549-Page-26.png)
![27Adding Variety to Your Performances Applying Effects to the Sound fig.paneleffect Adding reverberation to the sound (Reverb) By applying the reverb effect you can produce a pleasant reverberation, making it sound as though you were performing in a concert hall. 1 Press the [Reverb] button. The button’s indicator will light, and a reverb effect will be applied to the sound.To cancel the reverb effect, press the [Reverb] button, getting its indicator to go dark. * It is not possible to memorize the reverb effect setting for each sound. Adding richness to the sound (Chorus) By applying the chorus effect you can make the sound richer and more spacious. 1 Press the [Chorus] button. The button’s indicator will light, and a chorus effect will be applied to the sound.To cancel the chorus effect, press the [Chorus] button, getting its indicator to go dark. * The chorus setting can be memorized for each sound. Turning off the power restores the original settings. → The depth of the reverb effect and chorus effect can be adjusted. Refer to “Adjusting the depth of the effects (Effect)” (p. 55). Playing Two Sounds Layered Together (Dual) Simultaneously playing two sounds when one key is pressed is called “dual performance.” 1 Simultaneously press two of the [Tone] buttons. Both of the button indicators will light. Of the two buttons, the sound of the left button will be “Tone 1,” and the sound of the right button will be “Tone 2.”11HPi7_e.book 27 ページ 2004年7月5日 月曜日 午後4時20分](https://usermanual.wiki/Roland/HPI-7LE/User-Guide-501549-Page-27.png)
![28Adding Variety to Your Performances fig.duale When the tone names of “Tone 1” or “Tone 2” are highlighted, you can press the [+] or [-] button to select tones within the same tone group (p. 26).To cancel dual performance, press any [Tone] button. Playing Different Sounds in the Right and Left Hand (Split) Dividing the keyboard into right-hand and left-hand areas, then playing different sounds in each is called “split performance.” The boundary key is called the “split point.” fig.splitpoint-e * The split point key is included in the left-hand keyboard area. fig.panelsplit 1 Press the [Split] button. The button’s indicator will light.The tone on the right will be the “Right-hand Tone,” and the tone on the left will be the “Left-hand Tone.”Hear a demo of the selected toneReturn to the previous screenSelect the item to setThe selected item will be highlighted in orange.Change the tone, change the Dual BalanceDual BalanceDisplays the volume ratio of the two selected tones.Tone 1Displays the tone name for the left Tone button that is selected.Tone 2Displays the tone name for the right Tone button that is selected.Split Point (set to F 3, when the power is turned on.)C1 D1 E1 F1 G1 A1 B1A0 B0 C2 C3 C4 C5 C8B7…Left-hand Tone Right-hand Tone1HPi7_e.book 28 ページ 2004年7月5日 月曜日 午後4時20分](https://usermanual.wiki/Roland/HPI-7LE/User-Guide-501549-Page-28.png)
![29Adding Variety to Your Performances fig.splite When the “Right-hand Tone” or “Left-hand Tone” are highlighted, you can use the [Tone] buttons and the [+] or [-] button to select tones.When the “Split Point” is selected, you can press the [+] or [-] button to change the split point.The split point can also be set by holding down the [Split] button and pressing the key for the desired split point.To cancel split performance, press the [Split] button, getting its indicator to go dark. Changing from dual performance to split performance By changing from dual performance to split performance, you can divide the keyboard into right-hand and left-hand areas, and layer two tones in the right-hand area. 1 When using Dual performance, press the [Split] button. The [Split] button’s indicator will light. fig.dualsplite To switch from split to dual performance 1 When using split performance (p. 28), highlight the “Right-hand Tone.” 2 Simultaneously press the two [Tone] buttons that you want to layer.Split PointDisplays the key between the right-hand and left-hand keyboard areas.Left-hand ToneDisplays the name of the tone selected for the left-hand keyboard area.Right-hand ToneDisplays the name of the tone selected for the right-hand keyboard area.Change the tone, change the Split PointSelect the item to setThe selected item will be highlighted in orange.Return to the previous screenHear a demo of the selected toneChange the tone, change the Split Point, change the Dual BalanceReturn to the previous screenSelect the item to setThe selected item will be highlighted in orange.Hear a demo of the selected toneDual BalanceDisplays the volume ratio of the two tones selected for the right-hand area.Tone 2Displays the name of Tone 2 of the Dual performance in the right-hand area.Split PointDisplays the key between the right-hand and left-hand keyboard areas.Left-hand ToneDisplays the name of the tone selected for the left-hand keyboard area.Tone 1Displays the name of Tone 1 of the Dual performance in the right-hand area.HPi7_e.book 29 ページ 2004年7月5日 月曜日 午後4時20分](https://usermanual.wiki/Roland/HPI-7LE/User-Guide-501549-Page-29.png)
![30 Using the Lesson Function (Visual Lesson) You can enjoy your practices with the HPi-7’s Lesson function.Play along with the accompaniment, and a notation indicating how well you have performed appears in the display.You can select the level and practice songs to match your current abilities. You can also supplement your stock of practice songs with additional music data. fig.panelwonder At this point, pressing [ ] advances you to the next screen, and pressing [ ] returns the previous screen to the display. 1 Press the [Lesson] button. A screen like the following will appear. fig.wonder-e 2 Press the [ ] or [ ] button to select a course, then press the [ (Enter)] button. fig.wonder-e 3 Select a practice song, then press the [ (Next)] button.2, 3 1HPi7_e.book 30 ページ 2004年7月5日 月曜日 午後4時20分](https://usermanual.wiki/Roland/HPI-7LE/User-Guide-501549-Page-30.png)
![31Using the Lesson Function (Visual Lesson) A screen like the one below appears when you select the “Repertoire” course. fig.wonder-e Set the tempo and the part you want to practice, then press the [ (Next)] button. 4 Play along with the accompaniment. When you have finished playing, your score appears in the display.Press the [ (Review)] button to display the results of your performance in the notation. fig.wonder-e Practicing with Internal Songs and Songs on Floppy Disks 1 Select “Preset/Disk Song” in the practice song select screen, then press the [ (Next)] button. The song select screen (p. 17) appears. 2 Select a practice song, then press the [ (Enter)] button. If you have selected the “Repertoire” course, set the tempo and the part you want to practice, then press the [ (Next)] button. 3 Play along with the accompaniment. When you have finished playing, your score appears in the display.Press the [ (Review)] button to display the results of your performance in the notation.PartThis selects the part to be practiced.setting: Both Hands, Left Hands, Right HandsTempoThis sets the tempo for your practice.setting: Original Tempo,A Little Slower,Slower,Much SlowerEnd MeasureThis sets the ending measure.Start MeasureThis sets the starting measure.Rhythm (Light Blue)The timing of the accent was off.Sound (Red)The pitch was incorrect.? (Green)A note not in the score was played.HPi7_e.book 31 ページ 2004年7月5日 月曜日 午後4時20分](https://usermanual.wiki/Roland/HPI-7LE/User-Guide-501549-Page-31.png)
![32 Adding an Accompaniment to Your Performance (Pianist Function) The Pianist function automatically adds a suitable accompaniment to your piano performance.You can choose one of 35 different accompaniment styles as suitable for the song that you want to play.You can specify the accompaniment chord in the left-hand keyboard area, or press a single button to play an intro or ending. fig.panelpianist → “Pianist Style List” (p. 76) → “Chord List” (p. 74) 1 Press the [Pianist] button to access the Style Select screen, and select an accompaniment style. The [Pianist] button’s indicator will light, and the [Intro/Ending] button’s indicator will blink.The keyboard will be divided at the Split Point (p. 28) into right-hand and left-hand areas. fig.pianiste Starting the accompaniment 2 Either press the [Start/Stop] button, or play a chord in the left-hand keyboard area. The accompaniment will begin with an intro.If you do not want to add an intro, press the [Intro/Ending] button so its indicator goes dark, then perform step 2.In the left-hand keyboard area, specify the accompaniment chord. Play freely in the right-hand keyboard area.You can press the [ (Chord Finder)] button to display the “Chord Fingering List.” Stopping the accompaniment 3 Press the [Intro/Ending] button or the [Start/Stop] button. If you press the [Intro/Ending] button, the accompaniment will stop after an ending. If you press the [Start/Stop] button, the accompaniment will stop immediately.To cancel the Pianist function, press the [Pianist] button, getting its indicator to go dark. * When using the Pianist function, you cannot select and play a sound in the left-hand keyboard area.* You can change the split point by holding down the [Split] button and pressing a key (p. 29). → You can change the volume balance between the keyboard playing and the accompaniment. Refer to “Adjusting the volume balance between accompaniment and keyboard (Balance)” (p. 55).* The accompaniment data produced by the Pianist function will not be output from the MIDI Out connector.1213Change the accompaniment tempoStyle listThe selection will be highlighted in orange.ChordHPi7_e.book 32 ページ 2004年7月5日 月曜日 午後4時20分](https://usermanual.wiki/Roland/HPI-7LE/User-Guide-501549-Page-32.png)
![33 Playing in a Wonderland of Sound “Wonderland” allows children to experience a variety of sounds and onboard songs with easy operation and enjoyable animation. fig.panelwonder 1 Press the [Wonderland] button, and select the desired item in the screen. After the opening screen is displayed, a screen like the following will appear. fig.wonder-e Explanation of each selection To exit Wonderland, press the [ ] button several times, or press the [Wonderland] button, getting its indicator to go dark. → When using the Wonderland function, you can use the [Reverb] button and [Chorus] button to apply effects to the sound (p. 27).However, buttons other than the buttons used in step 1 above, and the [Reverb], [Chorus], and [Key Touch] buttons will not be operable. Item Content Drums Select a picture of a percussion instrument to hear the sound of that instru-ment. Play the keyboard to play the selected percussion instrument.Piano Learn about how pianos are made.Alphabet Use the keyboard to become familiar with the alphabet.SFX Listen to a wide variety of sound effects.Songs Listen to the onboard songs.Tones Select a picture of an instrument to hear the sound of that instrument. Play the keyboard to play the selected instrument.Flash Card In this game, you play the notes shown on the cards.Game In this game, you try to name the scales, chords, and rhythms that you hear.1Select an item or instrumentProceed to the next screen, audition/stop the selected sound or songReturn to the previous screen, exit WonderlandHPi7_e.book 33 ページ 2004年7月5日 月曜日 午後4時20分](https://usermanual.wiki/Roland/HPI-7LE/User-Guide-501549-Page-33.png)
![34 Recording Your Performance The HPi-7 lets you record your own performances.A recorded performance can be played back to hear your own playing, or to add additional parts.The following types of recording can be done using the HPi-7.• Record along with an internal song or disk song ( → “Recording Along with a Song”)• Recording just your own keyboard performance ( → “Recording a New Song” (p. 36))• Re-recording (p. 38)• Using the Pianist function to record ( → “Recording with an accompaniment (the Pianist function)” (p. 39))• Multitrack recording on five tracks (p. 40) *Songs you record are discarded as soon as you select another song, or turn off the power of the HPi-7. Be sure to save important performances on a floppy disk. Refer to “Saving Songs” (p. 42). Recording Along with a Song You can record a performance that you play along with an internal song or disk song.Here we will explain how you can listen to the accompaniment for an internal song while recording your right-hand performance. fig.panelovrec Before you record, first select a song, and press the [ ] button to display the Notation screen.Refer to p. 17 for details on how to select an internal song, or to p. 46 for how to select a disk song. Make recording settings 1 Press the [ (Rec)] button. * While the measure number is highlighted, the notation screen is being generated. When the highlighted number returns to normal, please try the operation again. fig.recmsg1e 2 Use the [ ] [ ] button to choose “Add On,” then press the [ (Execute)] button. With this setting, you can record while listening to the selected song.4255316,78The selected item will be highlighted in orange. Finalize a choiceReturn to the previous screenSelect a choiceHPi7_e.book 34 ページ 2004年7月5日 月曜日 午後4時20分](https://usermanual.wiki/Roland/HPI-7LE/User-Guide-501549-Page-34.png)
![35Recording Your Performance fig.recmsg2e Select the track that you want to record 3 Press the track button for the track that you want to record (i.e., the track that you want to play yourself). The indicator of the button you pressed will blink, and the HPi-7 enters recording-standby mode.Since in this example we will record the right-hand performance, press the [4/Right] button to make the button’s indicator blink. * Only the sounds of a drum set or SFX set can be recorded in the [R/Rhythm] button. Select the tone that will be recorded 4 Use the [Tone] buttons to select the tone that you want to record. After selecting the Tone, press the [ (close)] button to display the Notation screen. Set the tempo 5 Use the [Tempo] buttons to set the recording tempo. * You can also record using the metronome. In this case, the sound of the metronome will not be recorded. Start recording 6 Press the [ (Play/Stop)] button. After a two-measure count, recording will begin.Note that recording will also begin as soon as you play anything on the keyboard, even if you do not press the [ (Play/Stop)] button. In this case, no count will be heard.When recording begins, the [ (Play/Stop)] button and the [ (Rec)] button indicators will light.Go ahead and perform on the keyboard. Stop recording 7 Press the [ (Play/Stop)] button. Recording will stop, and the [ (Play/Stop)] button and the [ (Rec)] button indicators will go out. Play back the recorded performance 8 Press the [ (Reset)] button, and then press the [ (Play/Stop)] button. You will hear the recorded performance.To stop the playback, press the [ (Play/Stop)] button once again.HPi7_e.book 35 ページ 2004年7月5日 月曜日 午後4時20分](https://usermanual.wiki/Roland/HPI-7LE/User-Guide-501549-Page-35.png)
![36Recording Your Performance Recording a New Song Here’s how to record your own keyboard performance without using an internal song. fig.panelnrec Make recording settings (choose “New Song”) 1 Press the [Song] button. fig.songslct2j 2 Press the [ ] button to return to the first song, then press the [ ] button once more to select “New Song.” When you press any of the [ ] [ ] [ ] [ ] buttons while a song in the HPi-7’s current (the internal memory) is selected, the display will ask “Delete the selected song. OK?” (p. 18). When you delete the song, the “0: New Song” is displayed.The notation will appear when you press the [Notation] button. 3 Press the [ (Rec)] button. The indicators of all Track buttons will blink, and the HPi-7 enters recording-standby mode. * If the display indicates “Close/ New Song/ Add On,” select “New Song.” In this case, steps 1-2 will be omitted.* Be aware that if you select “New Song,” the currently selected song will disappear. Select the tone that will be recorded 4 Use the [Tone] buttons to select the tone that you want to use for recording. After selecting the Tone, press the [ ] button to display the Notation screen. 5 Use the [Tempo] buttons to set the recording tempo. If you want to change the time signature (beat) of the song, press the [Metronome] button and make settings in the Metronome screen.After setting the tempo, press the [ ] button to display the Notation screen. * You can use the metronome while recording. In this case, the metronome sound will not be recorded.4255136,78New SongSelect a songRegist a “Favorites”Return to the previous screenHPi7_e.book 36 ページ 2004年7月5日 月曜日 午後4時20分](https://usermanual.wiki/Roland/HPI-7LE/User-Guide-501549-Page-36.png)
![37Recording Your PerformanceStart recording 6 Press the [ (Play/Stop)] button. After a two-measure count, recording will begin.Note that recording will also begin as soon as you play anything on the keyboard, even if you do not press the [ (Play/Stop)] button. In this case, no count will be heard.Once recording begins, the [ (Play/Stop)] button and the [ (Rec)] button indicators will light.Go ahead and perform on the keyboard. Stop recording 7 Press the [ (Play/Stop)] button. Recording will stop, and the [ (Play/Stop)] button and the [ (Rec)] button indicators will go out.The recorded performance will be recorded on the [1/User] button. Play back the recorded performance 8 Press the [ (Reset)] button, and then press the [ (Play/Stop)] button. You will hear the recorded performance.To stop the playback, press the [ (Play/Stop)] button once gain.Track button assignments for the recorded performanceWhen you record only a keyboard performance, the performance will be assigned to the track buttons as follows.• Normal performance (playing a single sound from the entire keyboard)The performance is recorded to the [1/User] button.• Dual performanceThe performance is recorded to the [1/User] button.• Split performanceThe left-hand performance is recorded to the [3/Left] button, and the right-hand performance to the [4/Right] button.• Dual performance and Split performanceThe left-hand performance is recorded to the [3/Left] button, and the right-hand dual performance to the [4/Right] button.• Drum set or sound effect performanceThe performance is recorded to the [R/Rhythm] button.HPi7_e.book 37 ページ 2004年7月5日 月曜日 午後4時20分](https://usermanual.wiki/Roland/HPI-7LE/User-Guide-501549-Page-37.png)
![38Recording Your Performance Re-recording When you want to re-record, specify the track button whose performance you want to re-record, and then record again.When you select a previously recorded track button and re-record, the performance from the location at which you begin recording up to the location at which you stop recording will be replaced by the newly re-recorded performance. *The tempo of the song is stored within the song that was selected. You can slow down the tempo for recording, but when you play back the performance it will play back at the original tempo. 1 Use the [ (Bwd)] or [ (Fwd)] button to move to the measure that you want to re-record. 2 Press the [ (Rec)] button. fig.recmsg1e 3 Choose “Add On.” With this setting, you can record while listening to the selected song. fig.recmsg2e 4 Press the track button for the track that you want to re-record. The indicators of the button you pressed and of the [ (Play/Stop)] button will blink, and the HPi-7 enters recording-standby mode. 5 Press the [ (Play/Stop)] button to start recording. After a two-measure count, recording will begin.When recording begins, the [ (Play/Stop)] button and [ (Rec)] button indicators will light.Go ahead and perform on the keyboard. 6 Press the [ (Play/Stop)] button to stop recording. The [ (Play/Stop)] button and the [ (Rec)] button indicators will go out.The selected item will be highlighted in orange. Finalize a choiceReturn to the previous screenSelect a choiceHPi7_e.book 38 ページ 2004年7月5日 月曜日 午後4時20分](https://usermanual.wiki/Roland/HPI-7LE/User-Guide-501549-Page-38.png)
![39Recording Your Performance Erasing a Recorded Song A recorded song can be erased in the following two ways: 1 After recording a song, press the [Song] button and select another song in the song-select screen. 2 Hold down the [Song] button and press the [ (Rec)] button.When either of these operations are performed, a display like the following will appear. fig.songdelmsge If you select “OK,” the song will be deleted.If you do not want to erase the song, save it on a floppy disk or Favorite (p. 42). Other Recording Methods Recording with an accompaniment (the Pianist function) You can use the Pianist function to record while adding an accompaniment. → For details on the Pianist function, refer to “Adding an Accompaniment to Your Performance (Pianist Function)” (p. 32). 1 As described in steps 1 and 2 of “Recording a New Song” (p. 36), select “New Song.” 2 Press the [ (Rec)] button. The indicators of all Track buttons will blink, and the HPi-7 enters recording-standby mode. 3 Press the [Pianist] button and select the desired accompaniment style. Adjust the tempo as necessary. 4 Recording will begin at the moment you either press the [Start/Stop] button or begin playing in the left-hand keyboard area. If you press the [ (Play/Stop)] button, the accompaniment will begin with an intro after a two-measure count, and recording will begin simultaneously. 5 When you press either the [Intro/Ending] or [Start/Stop] button to stop the accompaniment, recording will also stop simultaneously. You can also press the [ (Play/Stop)] button to stop recording even in the middle of the accompaniment.The right-hand performance will be recorded on the [4/Right] track, the accompaniment drum sounds will be recorded on the [R/Rhythm] track, and the non-drum accompaniment sounds will be recorded on the [2/Accomp] track.HPi7_e.book 39 ページ 2004年7月5日 月曜日 午後4時20分](https://usermanual.wiki/Roland/HPI-7LE/User-Guide-501549-Page-39.png)
![40Recording Your Performance *If you want to re-record only your own performance after using the Pianist function to record, you must turn off the Pianist function before you record. If you fail to turn off the Pianist function, the Pianist accompaniment will be added to the previously recorded accompaniment.* If you want to re-record the accompaniment of the Pianist function, select the [2/Accomp] track or the [R/Rhythm] track, and re-record. Multitrack recording on five tracks Multitrack recording is a method by which you can record additional tracks while listening to the previously recorded tracks.The HPi-7 provides five tracks, so you can record different sounds on each track to create an ensemble song. → You can also record on 16 tracks (p. 58). Record the first track 1 Record your performance as described in “Recording a New Song” (p. 36). * The song tempo will be remembered as the tempo at which you recorded the first track. Record the second and subsequent tracks 2 Select and record additional tracks one at a time as described in “Re-recording” (p. 38). For the second and subsequent recordings, you can listen to the previously recorded performances while you record.Record additional tracks as desired to complete the song. * Only drum set or SFX set sounds can be recorded in the [R/Rhythm] button.The five track buttons and 16 partsMany songs in commercially available SMF music files consist of 16 parts. The 16 parts are divided among the five track buttons.The track buttons and the 16 parts correspond as follows.Track button Part[R/Rhythm] 10 (D), 11 (S)[1/User] 1[2/Accomp] 2, 5-9, 12-16[3/Left] 3[4/Right] 4HPi7_e.book 40 ページ 2004年7月5日 月曜日 午後4時20分](https://usermanual.wiki/Roland/HPI-7LE/User-Guide-501549-Page-40.png)
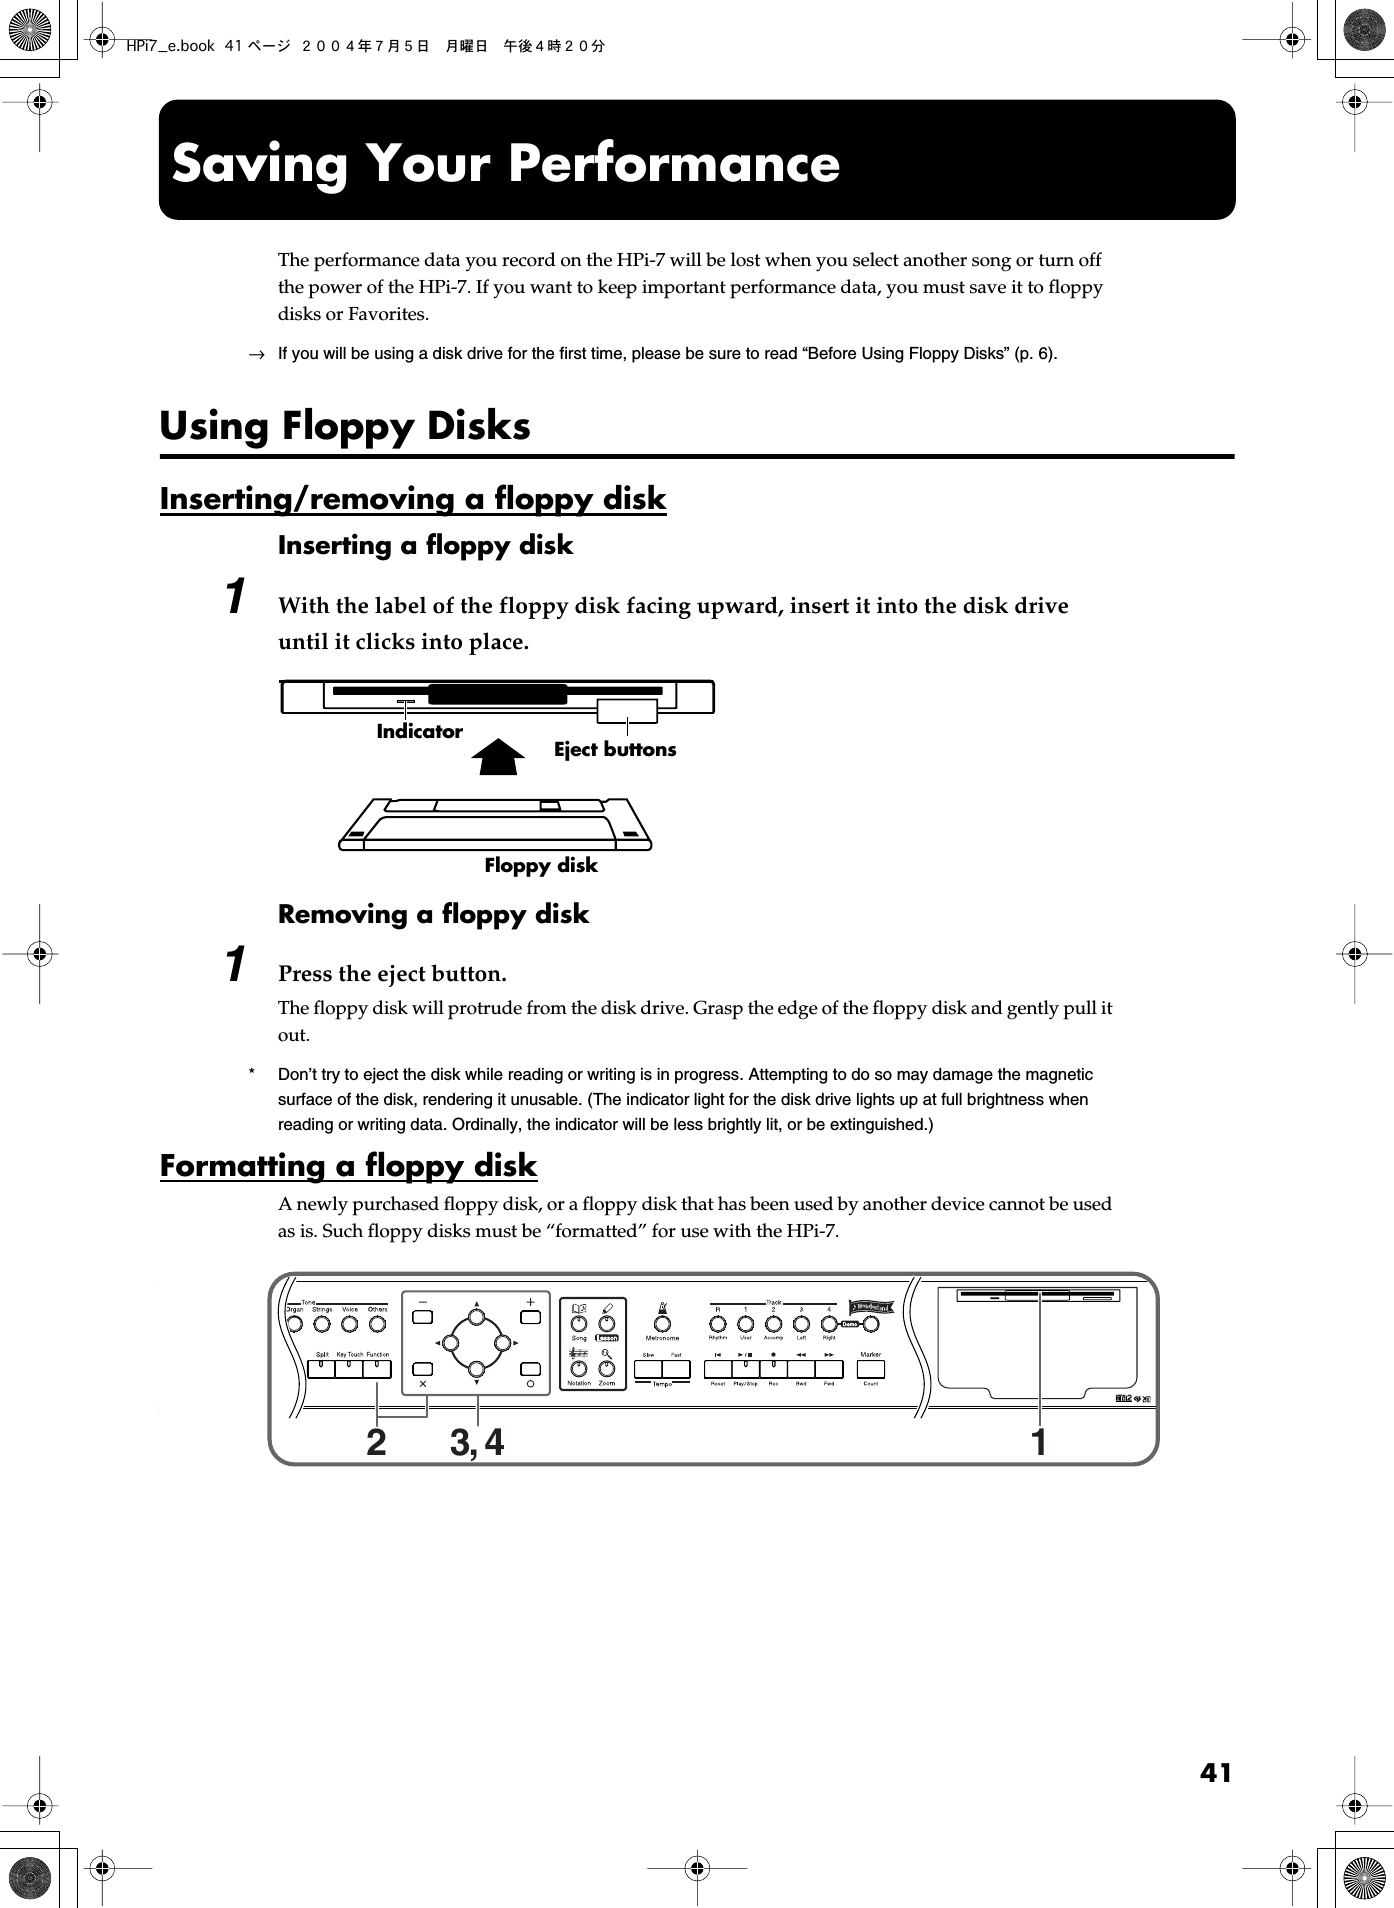
![42Saving Your Performance First make sure that the protect tab of the floppy disk is in the “Write (write enable)” position. fig.DiskProtecte 1 Insert the floppy disk into the disk drive. 2 Press the [Function] button, and select “File” in the screen, and press the [ (Enter)] button. 3 Use the [ ] [ ] buttons to select “Format,” and press the [ (Enter)] button. fig.formate 4 Use the [ ] [ ] buttons to select “OK”, then press the [ (Execute)] button. * Do not remove the floppy disk from the disk drive until formatting is complete. Saving Songs When saving to floppy disks, first make sure that the protect tab of the floppy disk is in the “Write (write enable)” position, then insert the floppy disk in the disk drive. 1 Press the [Function] button, and select “File” in the screen, and press the [ (Enter) ] button. 2 Use the [ ] [ ] buttons to select “Save,” and press the [ (Enter)] button. fig.disksave1eRear side of the diskWrite (can write new data onto disk)Protect (prevents writing to disk)Write Protect TabProceed to the next screenReturn to the previous screenChange the settingChange the itemto setHPi7_e.book 42 ページ 2004年7月5日 月曜日 午後4時20分](https://usermanual.wiki/Roland/HPI-7LE/User-Guide-501549-Page-42.png)
![43Saving Your Performance 3 Select the destination and the format in which to save. * You cannot save recorded songs that use copyrighted music files in SMF format. 4 Specify the song name and the save-destination song number. fig.disksave2e 5 Follow the on-screen directions to begin saving the data. The time required for saving will range from several seconds to half a minute or more. * Never remove the floppy disk from the disk drive until saving is complete. Some notes on saving a song • Due to certain types of handling, the data on a floppy disk can be damaged and become unplayable. We recommend that important song data be saved on two floppy disks.• When a song is played back on some other devices, notes may drop out or may be played differently.• When you are finished saving, set the protect tab of the floppy disk to the “protect” position (p. 42). This will prevent the song from being accidentally erased. Deleting Saved Songs Here’s how to erase a song that was saved on a floppy disk, or to Favorites.To delete a song on a floppy disk, first make sure that the protect tab of the floppy disk is in the “write Item Value ExplanationSave Format i-FormatThe song will be saved in i-format. A song saved in i-format can be listened to on Roland digital pianos (such as those from the HP-G/R/i and KR series), and on units from the MT series.SMFThe song will be saved in SMF (Standard MIDI File) format. A song saved in SMF format can be played on the many devices that are able to play back SMF music files (p. 77). Destination Disk Saves the song to the Floppy Disk.Favorite Saves the song to the Favorites.Return to the previous screenSave DestinationDisplays the save-destination song number.If you select a song number that displays a song name, and save a new song, the previous song will be erased.Change the character, change the song numberWhen the cursor is located at the song name item, change the character at the cursor location.When the save-destination item is highlighted in white, change the save-destination song number.Move the cursor, select an item to setFinalize the setting and proceed to the next screenSong nameDisplays the name of the song to save.Characters that can be input:ABCDEFGHIJKLMNOPQRSTUVWXYZ[\]^_`abcdefghijklmnopqrstuvwxyz{|}~Space !"#$%&'()*+-/0123456789:;<=>?@HPi7_e.book 43 ページ 2004年7月5日 月曜日 午後4時20分](https://usermanual.wiki/Roland/HPI-7LE/User-Guide-501549-Page-43.png)
![44Saving Your Performance (write enable)” position (p. 42), then insert the floppy disk in the disk drive. 1 Press the [Function] button, and select “File” in the screen, and press the [( Enter )] button. 2 Use [ ] [ ] to select “Delete,” and press the [ (Enter)] button. fig.diskdele 3 Select the save destination and the file, then press the [ (Execute)] button. * Do not remove the floppy disk from the disk drive until deleting is complete. Copying Songs You can take songs saved on floppy disks and copy them to Favorites and vice versa. 1 Insert the floppy disk with the song to be copied in the disk drive. 2 Press the [Function] button, and select “File” in the screen, and press the [ (Enter)] button. 3 Use [ ] [ ] to select “Copy,” and press the [ (Enter)] button.Select the song to deleteFinalize the setting and proceed to the next screenReturn to the previous screenSelect the save destinationFinalize a choiceReturn to the previous screenFile name (Song name)Displays the name of the song that will be deletedSave distinationThe location where the song you want to delete is stored is displayed.HPi7_e.book 44 ページ 2004年7月5日 月曜日 午後4時20分](https://usermanual.wiki/Roland/HPI-7LE/User-Guide-501549-Page-44.png)
![45Saving Your Performance fig.songcopye 4 Select the copy type, and press the [ (Enter)] button. The following “Copy Song screen” appears. fig.songcopye 5 Specifying the copy source and the copy destination. If a song name is displayed with a number, a song is already saved to that number.If you select a number with previously saved song data and proceed to copy to that location, the previously saved song will be erased. If you don’t want to erase a previously saved song, choose a number with no song name appears in the destination column.When “All” is selected, all of the songs on the disk are copied to Favorites. 6 Press the [ (Execute)] button. * Do not eject the floppy disk from the disk drive until the copy is finished.Proceed to the next screenReturn to the previous screenChange the settingProceed to the next screenReturn to the previous screenChange the settingCopy destinationCopy sourceChange the item to setHPi7_e.book 45 ページ 2004年7月5日 月曜日 午後4時20分](https://usermanual.wiki/Roland/HPI-7LE/User-Guide-501549-Page-45.png)
![46 Playing Back Music Files or a Song that was Saved on Floppy Disk Here’s how you can play back commercially available music files, or a song that was saved on a floppy disk. You can also play the keyboard along with the song playback. → For details on using the notation screen, refer to p. 15. → If you will be using a disk drive for the first time, please be sure to read “Before Using Floppy Disks” (p. 6). fig.panelhozon 1 Insert the floppy disk into the disk drive. Select a song 2 Press the [Song] button, and select “Disk” as the genre in the screen. fig.songdiske 3 Select the song that you want to play back. If a screen like the following is displayed If a song has already been selected in the current area (internal memory), it will not be possible to select another song or record a new performance.If it is OK to erase the existing song, select “OK.” If you do not want to erase the song, select “Cancel” and save the song on a floppy disk (p. 42). fig.songdelmsge Play back the song Press the [ (Play/Stop)] button.The notation screen will appear, and the song will begin playing.The measure number in the screen will be highlighted the music file is being loaded. Please wait.To stop playback, press the [ (Play/Stop)] button once again.3 2 4,5Select a songRegistor to “Favorites”For details refer to p. 19.Select a genreAudition the selected songBack to Score screenSong listThe selection is highlighted in black.Song nameThe name of the currently selected song.DiskPress [ ] [ ] to select the “Disk” genre.HPi7_e.book 46 ページ 2004年7月5日 月曜日 午後4時20分](https://usermanual.wiki/Roland/HPI-7LE/User-Guide-501549-Page-46.png)
![47 Convenient Functions Changing the Notation Screen Settings You can change the parts shown in the notation screen, and how the notation is displayed. 1 Press the [Notation] button, and press the [ (Options)] button. 2 Press the [ (Menu)] button to display the “Score Menu.” 3 Select “Score Option” and press the [ (Enter)] button. The following screen will appear. fig.scoreopteBack to Score screenChange the settingSelect the item to set Item SettingPitches Specify how note names are displayed when the notation screen is expanded.Off Not displayed.C, D, E The note name will be displayed.Do, Re, Mi(Fixed)The pitch names (fixed Do) are displayed.Do, Re, Mi(Movable)The syllable names (movable Do) are displayed. Item SettingClef L, Clef R Specify whether the notation will be displayed as a G-clef or F-clef.Auto The display will be switched automatically.G clef Select a G-clef notation.F clef Select a F-clef notation. Item SettingUser Select the part that will be displayed when you select for “Part” in the notation screen.User Track, Parts 1-16 Item SettingLower Select the part that will be displayed when you select for “Part” in the notation screen.Lower Track, Parts 1-16 Item SettingUpper Select the part that will be displayed when you select for “Part” in the notation screen.Upper Track, Part 1-16 Item SettingKey Display the notation in the specified key.AutoThe key will be set automatically according to the song file.# x 6-0-b x 5The notation will be displayed in the specified key. Item SettingResolution Sets the minimum note value displayed in the screen.16th Note, 32nd Note Item SettingBouncing Ball Sets whether or not the animation of the ball bouncing in time with the tempo is to be displayed when song data is played back.On, Off Item SettingColor Notation Sets whether or not the note currently being played appears in color in the notation when song data is played back.On, OffHPi7_e.book 47 ページ 2004年7月5日 月曜日 午後4時20分](https://usermanual.wiki/Roland/HPI-7LE/User-Guide-501549-Page-47.png)
![48Convenient Functions Editing Songs There are many ways you can edit performances recorded using the HPi-7 Track button (p. 40) or 16-track sequencer (p. 58). Basic Operation of the Editing Functions 1 Press the [Notation] button, and press the [ (Options)] button. 2 Press the [ (Menu)] button to display the “Score Menu.” 3 Select the “Song Edit”, then press the [ (Enter)] button. fig.songedite 4 Select an editing function to set that function. For more detailed information, refer to the corresponding page for each function. → “PC” stands for “Program Change,” which is a command that tells an instrument to change the sound it’s using. With songs that rely on the use of a variety of sounds, a “PC” needs to be located at every point within the song where the Tone is to be changed.* Some edits can’t be undone, not even by choosing “Undo.” We recommend saving songs to floppy disks or to user memory before editing. For more on how to save songs, refer to “Saving Songs” (p. 42). → You can press the [ (Play/Stop)] button in the “Song Edit screen” to play back the song you want to edit. However, you cannot play back the song while editing in the various edit screens. Function Description PageUndo Undoes editing operations that have been performed. p. 49 Copy Copies measures. p. 49 Quantize Evens out sounds in recorded performances. p. 49 Delete Deletes measures. p. 50 Insert Inserts a blank measure. p. 50 Transpose Transposes parts individually. p. 51 Erase Erases data in measures, creating blank measures. p. 51 Part Exchange Exchanges the sounds in parts. p. 51 Note Edit Allows corrections to be made note by note. p. 52 PC Edit Allows editing of the Tones changes that occur during a song. p. 52Select the item to setChange the settingProceed to the next screenReturn to the previous screenHPi7_e.book 48 ページ 2004年7月5日 月曜日 午後4時20分](https://usermanual.wiki/Roland/HPI-7LE/User-Guide-501549-Page-48.png)
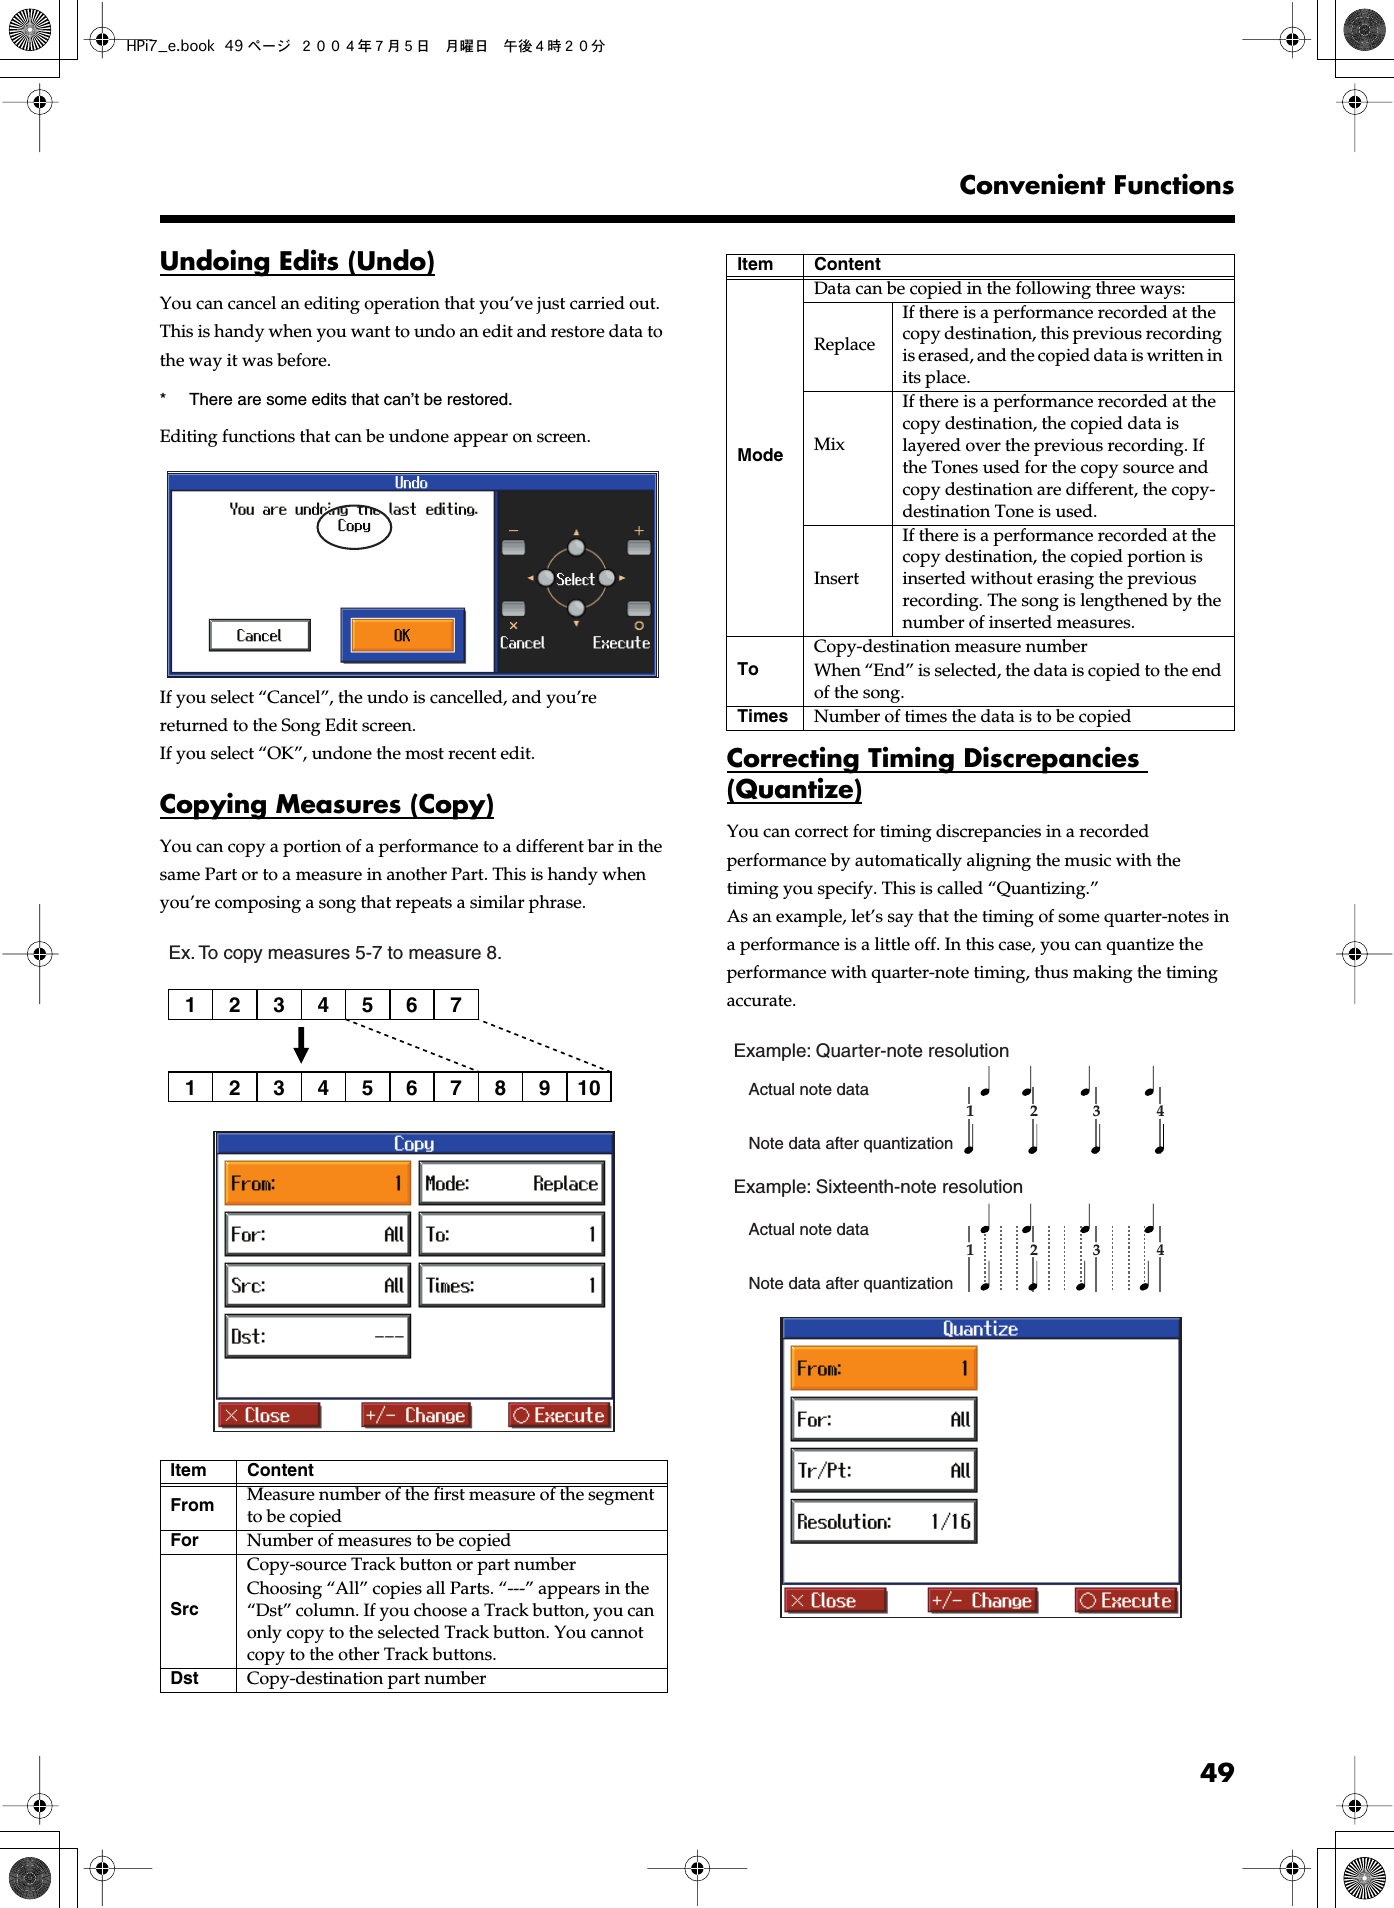
![52Convenient FunctionsCorrecting Notes One by One (Note Edit) You can make corrections in a recorded performance one note at a time. This process of making changes in individual notes is called “note editing.”• You can make these corrections by using note editing:• Deleting misplayed notes• Changing the scale of a single note• Changing the force used in playing a single key (velocity)• Change the fingering. fig.e-note The note-location display uses “Measure: Beat: Tick” as the format. A tick is a unit of time that’s shorter than a beat.Use the [ ] [ ] buttons to select the part with the note to be edited. The Part number appears at the top of the screen.Use the [ (Bwd)] button and the [ (Fwd)] button or use [] [ ] buttons to find the note to be corrected.When you’ve found the note you want to correct, use the [ ] [] buttons to select “Pitch” or “Velocity,” or “Fingering” for the note.Use the [-] [+] buttons to correct the pitch or velocity. If you want to delete the note, press the [ (Delete)] button. Modifying the Tone Changes in a Song (PC Edit) In some songs, the instrument sound changes during the course of the song (that is, the Tone changes in the middle of a Part). In such songs, an instruction to switch the Tone is inserted at the place where you want the sound to change. This instruction is called a “Program Change” (PC), and actions such as deleting program changes, or changing the selected Tone by them are called “PC editing.”It is not possible to insert a program change into a measure or beat that does not contain a program change. fig.d-e-pc The PC-location display uses “Measure: Beat: Tick” as the format. A tick is a unit of time that’s shorter than a beat.Use the [ ] [ ] buttons to select the part with the program change to be edited.The Part number appears at the top of the screen.Use the [ (Bwd)] button and the [ (Fwd)] button or use [] [ ] buttons to find the program change to be edited.When you’ve found the Program Change you want to modify, select “Tone Name” on the screen.Press a Tone button to select a Tone group, then select a Tone with the [-] [+] buttons. When selecting Part 10 or 11, select the drum set or effect sound.If you want to delete the Program Change, press the [ (Delete)] button. Saving the Notation Data in BMP Format You can take notations that are displayed on the HPi-7 and save them to floppy disks. You can also use saved image data to your computer. * You cannot save copyrighted song data.* Other than for your own personal enjoyment, use of the notations that are output without the permission of the copyright holder is prohibited by law. 1 Insert the floppy disk onto which you want to save the image data in the HPi-7’s disk drive. Use a floppy disk formatted on the HPi-7.For more on formatting disks, refer to p. 41.HPi7_e.book 52 ページ 2004年7月5日 月曜日 午後4時20分](https://usermanual.wiki/Roland/HPI-7LE/User-Guide-501549-Page-52.png)
![53Convenient Functions 2 Select the song you want to save (p. 17). 3 Press the [Notation] button, and press the [ (Options)] button. 4 Press the [ (Menu)] button to display the “Score Menu”. 5 Select the “BMP output”, and press the [ (Enter)] button. A screen like the one shown below appears. fig.bmpe The following screen appears when you select a copyrighted song. fig.d-bmpmsge Press the [ (OK)] button or the [ (Close)] button at this point to return to Step 2 and select a different song. 6 Set the range to be saved. 7 Press the [ (Execute)] button. The notation is saved to the floppy disk as image data in BMP (bitmap) format. * Do not remove the floppy disk while “save” is in progress.Select the item to setProceed to the next screenReturn to the previous screenChange the setting Item Setting DescriptionStart Measure Song Top, 2 – Selects the measure from which output starts. End Measure – Song End Selects the measure from which output ends. Direction Portrait, Landscape Selects the orientation for output of the notation.HPi7_e.book 53 ページ 2004年7月5日 月曜日 午後4時20分](https://usermanual.wiki/Roland/HPI-7LE/User-Guide-501549-Page-53.png)
![54Convenient Functions Functions that Can be Selected Using the [Function] Button Here’s how you can easily make changes such as tuning the HPi-7 or changing the function of the pedals. fig.panelfunc 1 Press the [Function] button. fig.functione 2 Use the cursor buttons to select the item that you want to set, and then press the [ (Enter)] button. fig.functione Follow the directions shown in the screen.For details on the contents and settings of each item, refer to p. 55–p. 60. Refer to p. 62 on “MIDI,” and referw to p. 41 on “File.”21Select the item to setProceed to the next screenReturn to the previous screenSelect the item to setReturn to the previous screenChange the settingHPi7_e.book 54 ページ 2004年7月5日 月曜日 午後4時20分](https://usermanual.wiki/Roland/HPI-7LE/User-Guide-501549-Page-54.png)
![55Convenient FunctionsAdjusting the volume balance between accompaniment and keyboard (Balance) You can adjust the balance between the volume of the sound played from the keyboard and the volume of the song playback or Pianist function (p. 32) accompaniment. Setting Press [ ] to change the setting toward “Keyboard”Decreases the volume of the song or accompanimentPress [ ] to change the setting toward “Accomp”Decreases the volume of the keyboard sound Adjusting the Piano Sounds (Piano Setting) The HPi-7 is capable of reproducing a variety of the acoustic piano’s distinctive characteristics. You can also adjust these to suit your own taste and style. * This setting is valid when some piano sounds are selected. Opening/Closing the Piano Lid (Lid) This simulates the actual changes in sound that occur when the lid of a grand piano is set at different heights. Setting 1–6 The lid is opened more as the value is increased. Adjusting Resonance when the damper pedal is depressed (Damper Resonance) You can adjust this resonance (Damper Resonance) when the damper pedal is depressed.On an acoustic piano, holding down the damper pedal will allow the remaining strings to resonate in sympathy with the sounds that you played from the keyboard, adding a rich resonance. The resonance is called “sympathetic resonance.” Setting Off, 1–10 Increasing the value will increase the amount of effect. Changing How Rapidly Sounds Are Expressed According to the Force Used to Play the Keys (Hammer Response) You can adjust the timing with which sounds are produced according to the force used to play the keys. When a key is pressed on an acoustic piano, it causes a hammer to move and strike the strings, producing sound. The hammers move more slowly when the keys are played gently, meaning that sounds are produced just slightly later than when you play the keyboard with greater force. Setting Off, 1–10 Increasing the value will increase the amount of effect. Adjusting the Resonant Sounds when the keys are pressed (String Resonance) When the keys are pressed on an acoustic piano, the strings for keys that are already pressed also vibrate sympathetically. The function used to reproduce this resonance is called “String Resonance.” Setting Off, 1–10 Increasing the value will increase the amount of effect. Adjusting the depth of the effects (Effect) You can adjust the depth of the reverb (p. 27) and chorus (p. 27).Refer to p. 54 for the procedure. Setting 1–10 Increasing the value will increase the amount of effect. * This setting is valid when the [Chorus] button or [Reverb] button is turned on to apply an effect to the sound. → Holding down the [Reverb] or [Chorus] button, press the [+] or [-] button to adjust the depth of each effect. Setting the reference pitch and temperament (Tuning) Refer to p. 54 for the procedure. Master Tune In situations such as when playing in ensemble with other instruments, you can adjust the HPi-7’s reference pitch to that of another instrument. Middle A is used as the reference pitch for tuning instruments.The process of adjusting the reference pitch to match another instrument is called “Tuning.” Setting 415.3 Hz–440.0 Hz–466.2 Hz Stretch Tuning Pianos are generally tuned so that the low range is flatter and the high range is sharper than equal tempered pitches. This method of tuning is unique to the piano, and is known as “stretched tuning.” Setting Description OnThis tuning curve expands the low range and high range. It is suitable for piano solos. This setting is selected when the power is turned on.OffThis is the standard tuning curve. It is suitable when playing in an ensemble with other instruments.HPi7_e.book 55 ページ 2004年7月5日 月曜日 午後4時20分](https://usermanual.wiki/Roland/HPI-7LE/User-Guide-501549-Page-55.png)
![56Convenient Functions Temperament You can play classical styles such as Baroque using historic temperaments (tuning methods).Today, compositions are generally created with equal temperament in mind and are played using equal temperament. However in past ages of classical music, a variety of temperaments were used. By playing in the temperament that was in use when a composition was created, you can experience the sonorities of chords originally intended for that song. Key When playing in a temperament other than equal temperament, you must specify the tonic (the note corresponding to C for a major key, or to A for a minor key) of the key in which you will play.If you have selected equal temperament, it is not necessary to select the tonic. Setting C, C#, D, Eb, E, F, F#, G, Ab, A, Bb, B Mic Echo When you use the mic, you can adds a karaoke-like echo effect to the mic.Refer to p. 54 for the procedure. Setting Off, 1–10 Increasing the value will increase the amount of effect. Changing the function of the pedals (Pedal) You can change the function of the left pedal and center pedal.Refer to p. 54 for the procedure. Changing the language displayed in the screen (Language) You can change the language that is displayed in the screen.Refer to p. 54 for the procedure. Setting English, Japanese, German, French, Spanish * German, French, and Spanish are displayed for some functions. Other screens will be displayed in English. Setting Description EqualThis temperament divides the octave into 12 equal parts. All intervals will be slightly out of tune by the same amount.Just MajorThis temperament makes the 5th and 3rd intervals pure. It is unsuitable for playing melodies and modulation is not possible, but it produces beautifully harmonious chords.Just MinorJust intonation differs between major and minor keys. The same results as major can be obtained in a minor key.Arabic This tuning is suitable for the music of Arabia.KirnbergerThis temperament is a modification of meantone temperament and just intonation, allowing more freedom of modulation. It allows you to play in all keys (third method).Pythagorean This temperament is based on the theories of the Greek philosopher Pythagoras, and has pure fourths and fifths. Chords containing a third will sound impure, but melodies will sound good.Meantone This temperament is a partial compromise of just intonation in order to allow modulation.WerkmeisterThis temperament is a combination of meantone and Pythagorean temperaments. It allows you to play in all keys. (First method, number three.) Setting Description Soft(only left pedal)When you hold down the pedal and play the keyboard, the sound will have a softer tone.Sostenuto(only center pedal)Only the notes that were played while the pedal was held down will be sustained.Tap TempoThe tempo of the song, accompaniment, or metronome will be set by the interval at which you press the pedal. When the pedal to which this function is assigned is pressed several times at the desired rate, the tempo will be set accordingly.Lower DamperWhen using Split performance, the same effect as the damper pedal will be applied to the left-hand keyboard area.ReplayPressing the pedal during playback of a song stops the playback. When the pedal is released, playback resumes from the beginning of the measure that was playing when the pedal was pressed. When the pedal is pressed in rapid succession, the playback will resume backs up the same number of measures as the number of times the pedal is pressed.Page BwdPress the pedal or the Pad turns the notation appearing on the display to the preceding page while the performance of a song is stopped.Page FwdPress the pedal or the Pad turns the notation appearing on the display to the next page while the performance of a song is stopped.ComposerStart/StopPerforms the same function as the [Start/Stop] button.HPi7_e.book 56 ページ 2004年7月5日 月曜日 午後4時20分](https://usermanual.wiki/Roland/HPI-7LE/User-Guide-501549-Page-56.png)
![57Convenient FunctionsSelecting Images To Be Shown on the Displays (User Image Display) You can have image data from computers and other devices shown on the onboard display. 1 Take a floppy disk to which the image data stored in the HPi-7 has been saved, and insert the disk in the disk drive. 2 At Step 2 in p. 54, select “User Image Display” and press the [ (Enter)] button. 3 Select the image you want to be displayed from the list, then press the [+] (Save) button. When you press [ (Preview)] button, you can then show the selected image data on the display. Image Data That HPi-7 can displayTo Delete a Saved Image 4 Press the [ ] button to return to the top of the list, then press the [ ] button once more. The file name for the saved image is highlighted. 5 Press the [+ (Delete)] button. Setting the Demo (Auto DEMO) Sets whether or not Auto mode is started when no action is taken for a set length of time.Refer to p. 54 for the procedure. → If you select “Demo” with an image saved in “User Image Display,” the saved image appears at the beginning of the demo. Changing the parts assigned to the track buttons during SMF playback (Track Assign) Ordinarily, when playing back SMF music files for Roland Piano Digital instruments (p. 77), the left-hand part is assigned to the Track [3/Left] button, and the right-hand part is assigned to the Track [4/Right] button.However, right-hand and left-hand part assignments in certain SMF music files may differ. If these are set to “Auto,” and as a result you are unable to use the track buttons to control the left- and right-hand parts properly, change the setting to “2/1 Part” or “3/4 Part.”Refer to p. 54 for the procedure. * After changing this setting, try selecting the song once again. Size 640 x 240 pixels Color 1/4/8 bit (2/16/256 colors) Format BMP format (The HPi-7 cannot deal with compressed image data). Name 1–8 characters in length (lowercase is ok). A filename extension of “.BMP” (uppercase characters) must be added after the name.The following characters can be used to name an image.A B C D E F G H I J K L M N O P Q R S T U V W X Y Z a b c d e f g h i j k l m n o p q r s t u v w x y z 0 1 2 3 4 5 6 7 8 9 # $% & ` ( ) - @ ~ { } ^ _ ! * If you use a character that cannot be used in a name, it will be replaced by another character when displayed. Item Description SettingAuto Start Sets whether or not Auto mode is started when no action is taken for a set length of time.On, Off Mode Selects the image to be displayed in the screen when Auto mode starts. Select “Demo” to display the demo introducing the piano’s functions. Select “User Image” to display the image saved with “User Image Display.”Demo, User Image BGM Selects whether or not BGM (background music) is played when Auto mode starts. When “On” is selected, all of the songs are played in random order.On, Off Setting Description Auto The part assigned to each track will be determined automatically, depending on the song file.2/1 Part Part 1 will be assigned to the right-hand track, part 2 to the left-hand track, and part 3 to the user track.3/4 Part Part 4 will be assigned to the right-hand track, part 3 to the left-hand track, and part 1 to the user track.HPi7_e.book 57 ページ 2004年7月5日 月曜日 午後4時20分](https://usermanual.wiki/Roland/HPI-7LE/User-Guide-501549-Page-57.png)
![58Convenient FunctionsRecording and Playing Back Performances of Specific Instruments (16 Track) Multitrack recording is a method of recording whereby you listen to what has previously been recorded while recording new parts on top of that material.The HPi-7 lets you record 16 separate parts. By recording a different tone to each part, you can create song data for performances that feature up to 16 different tones layered together.The function used for recording the 16 individual parts one at a time is called the “16-track sequencer.” fig.16track.e 16-Track Sequencer and the Track Buttons In addition to the “16-Track Sequencer” function, the “Track Buttons” (p. 16) are another of the unit’s playing/recording functions.In addition to the “16-track sequencer,” the HPi-7 also features the “track buttons” (p. 16).These “track buttons” group the 16-track sequencer’s 16 parts with five buttons. Using the 16-track sequencer to work with performances recorded with the track buttons allows you to record even more sounds and edit with precision.The track buttons correspond to the 16-track sequencer's parts as shown below.Each of the 16-track sequencer’s parts is used for recording a single tone, so you cannot use it to record tones that combine two tones simultaneously, as in Dual (p. 27) and Split (p. 28) performances.In addition, when recording performances using the Pianist function, you can select only one part to record. If you want to record multiple parts simultaneously with the Pianist function, you should use the track buttons. Refer to “Recording with an accompaniment (the Pianist function)” (p. 39).You can also change the tones in each part, select specific parts for playback (solo), and prevent specified parts from playing (mute). Playback with only a single part muted is called “Minus One.” You can even set solo and muting during playback. → Part 11 of Roland SMF music data that is available for purchase is included with the track button [2/Bass and Accompaniment], but the correspondence of other parts to the track buttons is the same.* Some commercially available SMF music file may contain data that cannot be edited. Basic Procedure First, have the song that you want to edit selected. 1 Press the [Function] button, then use the [ ] [ ] button to select “16 Track” and press the [ ] button. fig.16trke 2 Press the [ ] [ ] [ ] [ ] buttons to select the part you want to edit. 3 Make the settings for the part and record. 4 When you have finished the settings and recording, press the [ ] button The following screen will appear. 5 Press the [ ] [ ] buttons to select “OK,” then press the [ (xExecute)] button. Preventing a Part from Playing (Mute) Press the [+] or [-] button to select Solo or Mute. The number of the muted part is displayed as “M.”Pressing the [+] or [-] button once more cancels Solo or Mute. Changing Tones Select tones by pressing the [Tone] button and the [+] or [-] button. Track button Part[R/Rhythm] D (10), S (11) [1/Whole] 1 [2/Bass Accomp] 2, 5–9, 12–16 [3/Lower] 3 [4/Upper] 4Part 16You can record performances for up to 16 parts,overlaying them part by part, to create a single song.16-Track SequencerPart 4Piano Part (right hand)•••Part 3Piano Part (left hand)Part 2Bass PartPart 1Flute PartHPi7_e.book 58 ページ 2004年7月5日 月曜日 午後4時20分](https://usermanual.wiki/Roland/HPI-7LE/User-Guide-501549-Page-58.png)
![59Convenient Functions Recording Use the [ (Bwd)] or [ (Fwd)] buttons to move to the measure you want to record. Set the recording tempo and metronome. 1 Press the [ (Record)] button. The HPi-7 goes into record standby. 2 Press the [ (Play/Stop)] button to start recording. Two measures of the count-in sound is played, and the recording begins. 3 Press the [ (Play/Stop)] button to stop recording. Making Part Settings This makes more detailed settings for the parts. 1 Select the part you want to edit, then press the [ (Options)] button. The following screen will appear. 2 Press the [ ] or [ ] button to select the parameter, then change the value with the [+] or [-] buttons. Formatting the User Memory (Initialize User Memory) The HPi-7 features an internal storage area where you can save recorded performances and User Styles. This space is called the “User Memory.”The following content is stored to the user memory.• Content registered to the “Favorites”• Image files set with the “User Image Display”To delete all of the content held in the user memory and restore the original factory settings, carry out the following procedure. 1 In step 2 on p. 54, select “Initialize User Memory” and press the [ (Enter)] button, and a message will be displayed. 2 Use the [ ] or [ ] buttons to select “OK,” then press the [ (Execute)] button to carry out the Initializing procedure. * Never turn off the power while the display indicates “ Executing.... ” Doing so will damage the HPi-7’s internal memory, making it unusable. Carrying out this operation does not initialize any settings other than the user memory settings. To restore settings other than those for the user memory to the original factory settings, carry out Factory Reset. Remembering the settings even when the power is turned off (Memory Backup) Normally, the settings of the various variations will revert to their default values when the power is turned off. However, you can specify that the various settings will be remembered even when the power is turned off.This function is called “Memory Backup.” 1 In step 2 on p. 54, select “Memory Backup” and press the [ (Enter)] button, and a message will be displayed. 2 Use the [ ] or [ ] buttons to select “OK,” then press the [ (Execute)] button to carry out the Memory Backup procedure. Display DescriptionVolume Changes the volume level. Reverb Changes the amount of reverb effect applied to the sound. Chorus Changes the amount of chorus applied. Panpot Shifts the direction from which the sound is heard between left and right. Press the [+] button to shift the sound to the right, or press the [-] button to shift it to the left.What’s Panpot?Panpot is the control that determines the placement of the sound in the stereo sound field between left and right speakers. By altering the Panpot setting, you can change the perceived location of the sound between the left and right speakers.HPi7_e.book 59 ページ 2004年7月5日 月曜日 午後4時20分](https://usermanual.wiki/Roland/HPI-7LE/User-Guide-501549-Page-59.png)
![60Convenient Functions Stored contents Master Tune, Stretch Tuning, Temperament, Key (p. 55)Lid, Damper Resonance, Hammer Response, String Resonance (p. 55)Key Touch (p. 25)Metronome Sound (p. 20)Count In Sound, Countdown Sound, Count In Measure (p. 21)Language (p. 56), Track Assign (p. 57), Reverb Switch, Reverb Depth (p. 55) * Never turn off the power while the display indicates “Writing...” Doing so will damage the HPi-7’s internal memory, making it unusable. → The settings for the following parameters are saved even without Memory Backup.Auto Demo (p. 57), USB Driver (p. 63) Restoring the factory settings (Factory Reset) The memory backup settings can be restored to the factory-set condition. This operation is referred to as “Factory Reset.” 1 In step 2 on p. 54, select “Factory Reset” and press the [] button, and a message will be displayed. 2 Use the [ ] or [ ] buttons to select “OK,” then press the [ (Execute)] button to carry out the Factory Reset procedure. Once the Factory Reset has been completed, switch the power off, then on again. * Never turn off the power while the display indicates “ Executing.... ” Doing so will damage the HPi-7’s internal memory, making it unusable. Using the V-LINK function Connecting the HPi-7 to a V-LINK compatible image device allows you to control the images with the HPi-7.V-LINK ( ) is functionality promoted by Roland that allows linked performance of music and visual material. By using V-LINK-compatible video equipment, visual effects can be easily liked to, and made part of the expressive elements of a performance.Refer to p. 54 for the procedure. 921 * To prevent malfunction and/or damage to speakers or other devices, always turn down the volume, and turn off the power on all devices before making any connections. fig.V-LINKkey While V-LINK is switched on, no sound is produced when you press any of the twelve keys at the left end of the keyboard. Changing the Tone Settings When Playing Back Songs (Play Mode) With the normal setting, GS tones (sounds that are compatible with other GS instruments) will normally be used to play back song data. By changing this setting, you can play back song using HPi-7-specific tones for certain portions of the data. Refer to p. 54 for the procedure. * After changing this setting, try selecting the song once again. Playing the Demos You can play demo songs that give you an idea of the HPi-7’s various functions. 1 Hold down the Track [4/Left] button and press the [Wonderland] button. The songs in the “Masterpieces” category are played back, and the screens showing the HPi-7’s functions appear in sequence in the display. 2 To delete a demo song, press the [ ] button. → You can set the HPi-7 so that the demo songs start playing automatically in All Song Play if the instrument is not played or adjusted for several minutes. Setting Description OnSwitches to Image Control mode.You can control images using the twelve keys at the left end of the keyboard.Off Cancels Image Control mode. Setting Description GSPlayback uses GS-compatible tones for performances that sound like other GS instruments.HPi-7Playback uses HPi-7 tones for greater expressiveness. However, differences may appear when playing back using devices other than the HPi-7.C1 D1 E1 F1 G1A0A0 – G1#B0HPi7_e.book 60 ページ 2004年7月5日 月曜日 午後4時20分](https://usermanual.wiki/Roland/HPI-7LE/User-Guide-501549-Page-60.png)
![62Connecting External Devices Connections to a Computer You can use a USB connector to connect the HPi-7 to your computer. Roland’s “Visual MT” is installed, you will be able to play the sound of the software sound generator from the HPi-7’s speakers, or save a recorded HPi-7 song on your computer. For more details, refer to the separate “USB Installation Guide.” 921 * To prevent malfunction and/or damage to speakers or other devices, always turn down the volume, and turn off the power on all devices before making any connections.* Connecting your computer to the HPi-7 for the first time requires installation of the “USB Driver” (on the included CD-ROM) to the computer. For more details, refer to the separate “USB Installation Guide.”* Only MIDI data can be transmitted using USB.* Use a USB cable no longer than 3 meters.* USB cables are not included. Consult your Roland dealer if you need to purchase.* Turn on the power to the HPi-7 before starting up MIDI applications on the computer. Do not turn the HPi-7 on or off while any MIDI application is running.* Do not connect or disconnect the USB cable while the HPi-7’s power is on.* If not using USB, disconnect the USB cable from the HPi-7.* If, during the transmission/reception of data, the computer switches to energy-saving mode or suspended mode, or if the HPi-7’s power is switched on or off, the computer may freeze, or the HPi-7’s operation may become unstable.* When using your computer’s sequencer software to record HPi-7 performances, we recommend setting the sequencer software’s Soft Thru to “OFF.” Making MIDI-Related Settings Here’s how you can set the transmit channel and other MIDI-related settings. 1 Press the [Function] button. 2 Select “MIDI,” and press the [ ] button. Follow the directions that appear in the screen. MIDI settings MIDI transmit channel setting MIDI has sixteen “MIDI channels,” numbered 1–16. Even if a MIDI device is connected, it will not be possible to play or select sounds unless the MIDI channels of the two devices match. * When Dual performance (p. 27) is being used on the HPi-7, only the channel you specify here will be transmitted.* The HPi-7 receives all channels 1–16. Local Control setting If the data that is produced when you play the keyboard is sent to the sound generation section via both routes (1) and (2) as shown in the diagram, notes will be doubled or may be interrupted. To prevent this, use the “Local Off” setting to disconnect route (1).Set Local Off if you have connected the HPi-7 to a MIDI sequencer. fig.locale * When a Roland MT series instrument is connected, it is not necessary to make the Local Off setting. The MT transmits a Local Off message when the power is turned on. If you turn on the power in the order of the HPi-7 → MT series, Local Off will be set automatically. Item Explanation Setting Transmit Channel Select the MIDI transmit channel. 1–16 Item Explanation Setting Local Control Switch the Local Control setting on/off. On, Off(1)MIDIMIDIMIDIMIDI(2)ININ OUTOUTSequencerMemorySoundGeneratorEach note playedis sounded twiceThru function OnLocal OnHPi7_e.book 62 ページ 2004年7月5日 月曜日 午後4時20分](https://usermanual.wiki/Roland/HPI-7LE/User-Guide-501549-Page-62.png)
![63Connecting External Devices Composer Out setting If you want a performance recorded on the HPi-7 to be transmitted to an external MIDI device or computer, turn the “Composer Out” setting “On.” Program Change setting Program changes are a type of message that tell a device to “switch to sound number `x’.” A device that receives this message will select the sound of the corresponding number.When you use this setting to specify a program change (program number), that program number will be transmitted to a MIDI device connected to the HPi-7. A MIDI device that receives the program number will switch to the sound corresponding to that program number.Normally, program changes select from 128 different sounds. However, some MIDI devices have more than 128 sounds. For such devices, Bank Select messages are combined with Program Change messages to select sounds. Bank Select consists of two messages: MSB (controller number 0; value: 0-127), and LSB (controller number 32; value: 0-127). * Some MIDI devices cannot use bank select messages. Alternatively, some devices may use bank select messages, but ignore the LSB message. Making the Settings for the USB Driver If you intend to connect to a computer using the USB connector, you need to make the following setting before you make the connection. 1 Press the [Function] button. 2 Select “USB Driver,” and press the [ ] button. 3 Turn on the power once again. Item Explanation Setting Composer Out Specify whether a recorded performance will be transmitted to a MIDI device.On, Off Item Explanation Setting Bank Select MSB Transmit the bank select MSB. 0 (00h)–127 (7FH) Bank Select LSB Transmit the bank select LSB. 0 (00h)–127 (7FH) Program Change Transmit the program number. 1 (00h)–128 (7FH) Item Setting Explanation USB Driver Selects the USB driver type.VendorSelect this when using the supplied driver with a USB connection.GenericSelect this when using a generic USB driver included with the OS with a USB connection.HPi7_e.book 63 ページ 2004年7月5日 月曜日 午後4時20分](https://usermanual.wiki/Roland/HPI-7LE/User-Guide-501549-Page-63.png)
![64 Trouble Shooting If you think there’s a problem, read this first. Case Cause/Remedy The power doesn’t come on. Is the power cord connected and plugged in correctly? (p. 9) The button doesn’t work. Is the panel locked? (p. 11) Turn the power off, then back on. Nothing appears on screen. The HPi-7 uses a liquid-crystal screen, so text may not be displayed when the ambient temperature is below freezing.Is the music rest (screen) connection cable connected correctly? (p. 9) Vertical lines appear in the screen/Color is “washed out” at the edges of the screen These occur due to the nature of a liquid crystal display, and do not indicate a malfunction. They can be minimized by adjusting the brightness of the screen (p. 10). No sound is heard. Is the volume level of the HPi-7 (p. 10) or connected device turned all the way down?Are headphones plugged in?Has a plug remained connected to the Phones jack? (p. 9)When you connect the headphones, the sound is heard only through the headphones.Could the “Balance” setting be set all the way toward “Accomp” or “Keyboard”? (p. 55) No sound is heard (when a MIDI instrument is connected). Have all devices been switched on? (p. 61)Are the MIDI cables connected correctly? (p. 61)Does the MIDI channel match the connected instrument? (p. 62) No sound is heard when the keyboard is played. Has Local Control been set to “Off”?When Local Control is set to Off, no sound is produced by playing the keyboard, Set Local Control to On (p. 62). Volume of keyboard is too low Could the “Balance” setting be set all the way toward “Accomp”? (p. 55) No sound from left-hand section of keyboard Is the [Pianist] button’s indicator lit? (p. 32) If the [Pianist] button’s indicator is lit, there will be no sound from the left-hand section of the keyboard.No sound from the left side is V-LINK switched on? (p. 60)When V-LINK is switched on, the twelve keys at the left end of the keyboard are used to control images, and no sounds are played with these keys. Sounds are heard twice (doubled) when the keyboard is played. Is the HPi-7 in Dual play? (p. 27)When the HPi-7 is connected to an external sequencer, set it to the Local OFF mode (p. 62). Alternatively, the sequencer could be set so its Soft Thru feature is OFF. Not all played notes are sounded. The maximum number of notes that the HPi-7 can play simultaneously is 128. Frequent use of the damper pedal during automatic accompaniment or when playing along with a song on floppy disk may result in performance data with too many notes, causing some notes to drop out. Can’t select a tone Press the [ ] button several times to return to the notation screen (p. 15), and then select a tone. The tuning or pitch of the keyboard or song is off. Have you set Transpose? (p. 24)Are the settings for the “Temperament” and “Stretch Tuning” correct? (p. 55)Is the setting for the “Tuning” correct? (p. 55) Volume of accompaniment or internal song is too low Could the “Balance” setting be set all the way toward “Keyboard”? (p. 55) Song doesn’t play back Does the screen indicate message, like “Deletes the selected song. OK?” (p. 18) The internal songs cannot be played back while recorded performance data remains in the HPi-7’s memory. Try playing back the song after deleting the performance data. Only the sound of a particular instrument in a song does not play Is the light for the Track button extinguished? (p. 16, p. 58) If the button light is out, the music on that track is not heard. Press the track button so the light is illuminated.Or cancel the mute in the "16 track" screen. Pressing the [ (Reset)] button doesn’t return to the beginning of the song. Some music files may contain settings that stop play at a point partway through the song. Press the [ ( Reset)] button several times more to return to the beginning of the tune. The [ (Fwd)] and [ (Bwd)] buttons don’t work. The [ (Fwd)] and [ (Bwd)] reverse buttons are ignored while music files is being read in. Wait until processing finishes.If you attempt to play back performance data that contains more data than the entire capacity of the HPi-7’s memory, you may find that operations other than playback (such as rewind or fast forward) become unavailable. There is a slight delay before playback of a song on floppy disk starts. There are two types of SMF music files: format 0 and format 1. If the song uses SMF format 1 data, there will be a slight delay until playback starts. Refer to the booklet that came with the music files you’re using to determine the format type. Can’t record Has one of the track buttons for recording been selected? (p. 38)It is not possible to record while the notation is being generated. Once the unit has finished generating the notation (i.e., when the measure number in the screen is no longer highlighted), try the operation once again. Tempo of recorded song or metronome is off If you select an internal song in which the tempo changes during the song, and then record, the tempo will change in the same way for the performances that are recorded on the other tracks. The tempo of the metronome will also change in the same way.If you record additional material without erasing the previously recorded song, the song will be recorded at the first-recorded tempo. Please erase the previously recorded song before you re-record (p. 39). Case Cause/RemedyHPi7_e.book 64 ページ 2004年7月5日 月曜日 午後4時20分](https://usermanual.wiki/Roland/HPI-7LE/User-Guide-501549-Page-64.png)
![65Trouble Shooting The Tone has changed. When a performance made along with a Music Files tune has been recorded, recording the performance to button [1/User] may make the Tones for buttons [3/Left] and [4/Right] change as well. The recorded performance has disappeared. Any performance that has been recorded is deleted when the power to the HPi-7 is turned off or a song is selected. A performance cannot be restored once it’s been deleted. Lyrics are not indicated properly in the display. With some music files, the lyrics cannot be displayed correctly. In the notation screen, some lyrics or notes could extend beyond the edges of the screen, and not be displayed. Notation is not indicated properly in the display. If you select a part that does not contain performance data, notes will not be displayed in the notation. Change the part that is displayed (p. 47).The notation screen feature is particularly unsuitable for the display of difficult, complex musical works that demand accurate notation. Refer to “Some notes on the notation screen” (p. 15).In the notation screen, some lyrics or notes could extend beyond the edges of the screen, and not be displayed. Song becomes unstable In certain cases, such as when playing songs on disks, the song may lag when excessive amounts of performance data are used. Depressing a pedal has no effect, or the pedal effect doesn’t stop. Is the pedal connected correctly? Make sure the pedal cord extending from the stand is securely connected to the pedal jack on the rear of the unit (p. 9).Has a different function been assigned to the pedal? See “Changing the function of the pedals (Pedal)” (p. 56). The pedal rattles Adjust the adjuster underneath the pedal so that the pedal presses firmly against the floor surface (p. 11). Reverberation still audible even with Reverb turned off Since the HPi-7’s piano sounds faithfully reproduce the sense of spaciousness and reverberation of an actual acoustic piano’s sound, a certain amount of reverberation is still perceptible, even with the reverb effect deactivated. In the upper range, the sound changes abruptly beyond a certain key On an acoustic piano, notes in the upper one and a half octaves of the keyboard continue to sound until they decay naturally, regardless of the damper pedal. There is a difference in the timbre as well. Roland pianos faithfully simulate such characteristics of the acoustic piano. On the HPi-7, the range that is unaffected by the damper pedal will change depending on the Key Transpose setting. Case Cause/Remedy A High-pitched whine is producedWhen listening through headphones: Some of the more flamboyant and effervescent piano tones feature an ample high-end component, which may make the sound appear to have metallic reverberation added. Since this reverberation becomes particularly audible when supplemented by heavy reverb, you may be able to diminish the problem by reducing the amount of reverb applied to the sound. When listening through speakers: Here, a different cause (such as resonance produced by the HPi-7) would be suspect. Consult your Roland dealer or nearest Roland Service Center. The bass range sounds odd, or there is a vibrating resonanceWhen listening through speakers: Playing at loud volumes may cause instruments near the HPi-7 to resonate. Resonation can also occur with fluorescent light tubes, glass doors, and other objects. In particular, this problem occurs more easily when the bass component is increased, and when the sound is played at higher volumes. Use the following measures to suppress such resonance. • Place speakers so they are 10–15 cm from walls and other surfaces. • Reduce the volume. • Move the speakers away from any resonating objects. When listening through headphones: Here, a different cause (such as resonance produced by the HPi-7) would be suspect. Consult your Roland dealer or nearest Roland Service Center. The volume level of the instrument connected to Input jacks is too low. Could you be using a connection cable that contains a resistor? Use a connection cable that does not contain a resistor. Titles of songs on floppy disk not being displayed Has the song name data (Sequence/Track Name Meta Event) been entered in the file?Song titles are not displayed if the song name data is blank or consists exclusively of spaces.Is the file name no more than eight single-byte characters?Have any double-byte characters (such as Japanese Hiragana or Kanji characters) been used in the file name? This instrument does not display double-byte characters. For characters that can be used with this instrument, refer to p. 43.Is "MID" used as the extension? The song cannot be treated as song data if a different extension is used. Case Cause/RemedyHPi7_e.book 65 ページ 2004年7月5日 月曜日 午後4時20分](https://usermanual.wiki/Roland/HPI-7LE/User-Guide-501549-Page-65.png)
![66 If this Message Appears on Screen Indication Meaning PU When a song with a pickup (a song that does not start on the first beat) is played back, the measure numbers will be indicated in the display as PU, 1, 2, and so forth. 00: This data cannot be saved in SMF format. You cannot save on this floppy. To protect the copyright, this music file cannot be saved as an SMF. Also, the music file can not be saved. If you want to save it, please save on the same floppy disk. 01: You cannot save this data. You can only read the music file. It can not be saved on a floppy disk or user memory. 02: Write protected. The protect tab on the floppy disk is set to the Protect position (p. 6). Change it to the Write position. Repeat the procedure. 03: This is a master disk. This floppy disk cannot store the format or save any data. Insert a different disk and repeat the procedure. 04: Can’t save to this disk. The data cannot be saved onto this floppy disk because the format is different. Use the floppy disk in the same format. 05: You can’t overwrite this file. A new song cannot be written on this song. Select a different song number or use a different floppy disk, and repeat the procedure. 10: No disk. No floppy disk is connected to the disk drive. Insert the disk correctly, and repeat the procedure. 11: Disk or memory full. There is not sufficient space left on the floppy disk or User memory for the data to be saved. Insert a different floppy disk or delete files on user memory, and repeat the procedure. 12: Disk is not formatted. The floppy disk inserted into the disk drive can’t be read. Be sure you’re using Roland SMF Music Files or other music files compatible with Roland digital pianos (p. 77). Also, if you want to save your work on floppy disk, you need to format the floppy disk first (p. 41). 13: Disk ejected while it was being accessed. The floppy disk was removed from the disk drive while reading or writing was in progress. Insert the floppy disk and repeat the procedure. 14: Corrupt sector found on disk or in memory. This floppy disk is damaged and cannot be used. Insert a different disk and repeat the procedure. 15:Can’t read this data. Be sure you’re using Roland SMF Music Files or other music files compatible with Roland digital pianos (p. 77). 16: Playback is aborted. The HPi-7 cannot read the floppy disk quickly enough. Press the [ (Play/Stop)] button, then press the [ (Reset)] button and [ (Play/Stop)] button to play the song. 17: The selected image data cannot be displayed. The selected image data cannot be displayed. If it cannot be made to appear either on the HPi-7’s display or the external display, you will need to prepare image data that can be used with the HPi-7 (p. 57). 30: Can’t do this function. Memory full. Save the song on a floppy disk (p. 42) to delete the song data stored on the HPi-7 memory. 40: Buffer full. The HPi-7 cannot deal with the excessive MIDI data sent from the external MIDI device. Reduce the amount of MIDI data sent to the HPi-7. 41: MIDI cable disconnected. A MIDI cable has been disconnected. Connect it properly and securely. 42: Can’t record. An excessive amount of performance data has been sent to HPi-7 in one time and therefore could not be recorded. 51: Memory error. There is something wrong with the system. Repeat the procedure from the beginning. If it is not solved after you have tried several times, contact the Roland service center. Indication MeaningHPi7_e.book 66 ページ 2004年7月5日 月曜日 午後4時20分](https://usermanual.wiki/Roland/HPI-7LE/User-Guide-501549-Page-66.png)
![69Tone List Polysynth*Space Voice*Bowed Glass*Metal Pad*Halo Pad*Sweep Pad*Ice Rain*Soundtrack*Crystal*Syn Mallet*Atmosphere*Brightness*Goblin*Echo Drops*Star Theme*Sitar*Banjo*Shamisen*Koto*Kalimba*Bagpipe*Fiddle*Shanai*Tinkle Bell*Agogo*Steel Drums*Woodblock*Taiko*Melo.Tom 1*Synth Drum*ReverseCym.*Fret Noise*BreathNoise*Seashore*Bird*Telephone 1*Helicopter*Applause*Gun Shot* * Tone with a “*” symbol appended to their name may not play back satisfactorily on other GS sound generating devices.* Tone with a “**” symbol appended to their name may produce the Key Off sound (reproduces the tonal change produced when the fingers are released from the keys). SFX Set * -----: No sound.* [EXC]: will not sound simultaneously with other percussion instruments of the same number.2728293133353032342123223940414345474244463638378788848685515253555759545658485049636465676971666870606261757677798183788082727473C2C3C4C5C6 262425------------------------------------------------------------------------------------------High QSlapScratch Push [EXC7]Scratch Pull [EXC7]SticksSquare ClickMetronome ClickMetronome BellGuitar sliding FingerGuitar cutting noise (up)Guitar cutting noise (down)String slap of double bassFl.Key ClickLaughingScreamingPunchHeart BeatFootsteps1Footsteps2ApplauseDoor CreakingDoorScratchWind ChimesCar-EngineCar-StopCar-PassCar-CrashSirenTrainJetplaneHelicopterStarshipGun ShotMachine GunLasergunExplosionDogHorse-GallopBirdsRainThunderWindSeashoreStreamBubbleCatBirdBabyLaughingBoeeeenSOUND EFFECTGlass & GlamIce RingCrack BottlePour BottleCar HornR.CrossingSL 1SL 2SealFancy AnimalElephantBike-----Applause---------------8991939590929499100101103105102104969897C7HPi7_e.book 69 ページ 2004年7月5日 月曜日 午後4時20分](https://usermanual.wiki/Roland/HPI-7LE/User-Guide-501549-Page-69.png)
![70 Drum Set List * -----: No sound.* [EXC]: will not sound simultaneously with other percussion instruments of the same number.R&B Snare Rock Snare Rock Snare Pop Snare m Pop Snare Ghost Pop Snare m Finger Snap 707 Claps Hand Clap [EXC7] Hand Clap2 [EXC7]Hand Clap Pop Pedal HH [EXC1] Gospel Hand Clap Snare Roll Pop Kick Pop Kick Pop Side Stick Pop Sanre s Pop Snare Ghost Pop Snare s Pop Low Tom f Pop CHH 1 [EXC1]Pop Low Tom Pop CHH 2 [EXC1]Pop Mid Tom f Pop OHH [EXC1]Pop Mid Tom Pop High Tom f Pop Crash Cymbal 1 Pop High Tom Pop Ride Cymbal 1 Pop Chinees Cymbal Pop Ride Bell Tambourine 2 Splash Cymbal Cha Cha Cowbell Pop Crash Cymbal 2 Vibra-slap 2 Pop Ride Cymbal 2 High Bongo 2 Low Bongo 2 Mute Conga High Conga 2 Low Conga 2 High Timbale 2 Low Timbale 2 High Agogo Low Agogo Shaker 3 Shaker 4 Short Hi Whistle [EXC2] Long Low Whistle [EXC2] Short Guiro [EXC3] Long Guiro [EXC3] Claves High Wood Block Low Wood Block Mute Cuica [EXC4] Open Cuica [EXC4] Mute Triangle [EXC5] Open Triangle [EXC5] Shaker Jingle Bell Bell Tree Castanets Mute Surdo [EXC6] Open Surdo [EXC6] CanaR&B Snare Pop Snare m Pop Snare m Pop Snare m Pop Snare Ghost Pop Snare m Finger Snap 707 Claps Hand Clap [EXC7] Hand Clap2 [EXC7]Hand Clap Pop Pedal HH [EXC1] Gospel Hand Clap Snare Roll Rock Kick Rock Kick Rock Side Stick Rock Sanre s Rock Snare Ghost Rock Snare s Rock Low Tom f Rock CHH 1 [EXC1]Rock Low Tom Rock CHH 2 [EXC1]Rock Mid Tom f Rock OHH [EXC1]Rock Mid Tom Rock High Tom f Rock Crash Cymbal Rock High Tom Rock Ride Cymbal 1 Pop Chinees Cymbal Pop Ride Bell Tambourine 2 Splash Cymbal Cha Cha Cowbell Chinees Cymbal Vibra-slap 2 Pop Ride Cymbal 3 High Bongo 2 Low Bongo 2 Mute Conga High Conga 2 Low Conga 2 High Timbale 2 Low Timbale 2 High Agogo Low Agogo Shaker 3 Shaker 4 Short Hi Whistle [EXC2] Long Low Whistle [EXC2] Short Guiro [EXC3] Long Guiro [EXC3] Claves High Wood Block Low Wood Block Mute Cuica [EXC4] Open Cuica [EXC4] Mute Triangle [EXC5] Open Triangle [EXC5] Shaker Jingle Bell Bell Tree Castanets Mute Surdo [EXC6] Open Surdo [EXC6] Cana2728293133353032342123223940414345474244463638378788848685515253555759545658485049636465676971666870606261757677798183788082727473C2C3C4C5C6 262425DR POP DR ROCKR&B Snare Pop Snare m Pop Snare m Pop Snare m Pop Snare Ghost Pop Snare m Finger Snap 707 Claps Hand Clap [EXC7] Hand Clap2 [EXC7]Hand Clap Pop Pedal HH [EXC1] Gospel Hand Clap Snare Roll Pop Kick Pop Kick Jazz Snare Swing Jazz Sanre Pop Snare Swing Jazz Sanre Jazz Low Tom f Pop CHH 1 [EXC1]Jazz Low Tom Pop CHH 2 [EXC1]Jazz Mid Tom f Pop OHH [EXC1]Jazz Mid Tom Jazz High Tom f Jazz Crash Cymbal 1 Jazz High Tom Jazz Ride Cymbal 1 Jazz Chinees Cymbal Jazz Ride Cymbal 2 Tambourine 2 Splash Cymbal Cha Cha Cowbell Jazz Crash Cymbal 2 Vibra-slap 2 Pop Ride Cymbal 2 High Bongo 2 Low Bongo 2 Mute Conga High Conga 2 Low Conga 2 High Timbale 2 Low Timbale 2 High Agogo Low Agogo Shaker 3 Shaker 4 Short Hi Whistle [EXC2] Long Low Whistle [EXC2] Short Guiro [EXC3] Long Guiro [EXC3] Claves High Wood Block Low Wood Block Mute Cuica [EXC4] Open Cuica [EXC4] Mute Triangle [EXC5] Open Triangle [EXC5] Shaker Jingle Bell Bell Tree Castanets Mute Surdo [EXC6] Open Surdo [EXC6] Cana DR JAZZBRUSHFalamenco Hi-Timbale Falamenco Lo-Timbale Falamenco Tmbl Flam Shekere 1 Shekere 2 Low Bongo Mute High Bongo Mute ----- ----- ---------- Falamenco HC Falamenco HC Bongo Cowbell ----- Bongo Cowbell ----- Falamenco Hi-Timbale Falamenco Lo-Timbale Falamenco Tmbl Flam Shekere 1 Shekere 2 Low Bongo Mute High Bongo Mute ----- ----- ---------- Falamenco HC Falamenco HC Bongo Cowbell ----- Bongo Cowbell -----Falamenco Hi-Timbale Falamenco Lo-Timbale Falamenco Tmbl Flam Shekere 1 Shekere 2 Low Bongo Mute High Bongo Mute -------------------- Falamenco HC Falamenco HC Bongo Cowbell ----- Bongo Cowbell -----8991939590929499100101103105102104969897C7HPi7_e.book 70 ページ 2004年7月5日 月曜日 午後4時20分](https://usermanual.wiki/Roland/HPI-7LE/User-Guide-501549-Page-70.png)
![71Drum Set List * -----: No sound.* [EXC]: will not sound simultaneously with other percussion instruments of the same number.2728293133353032342123223940414345474244463638378788848685515253555759545658485049636465676971666870606261757677798183788082727473C2C3C4C5C6 262425---------------Bar ChimeSnare RollFinger SnapHigh QSlapScratch Push [EXC7]Scratch Pull [EXC7]SticksSquare ClickMetronome ClickMetronome BellStd Kick 2’Kick 1Side StickStd Snr 1Hand ClapStd Snr 2Low Tom 2Closed Hi-hat 1’ [EXC1]Low Tom 1Pedal Hi-hat 1’ [EXC1]Mid Tom 2Open Hi-hat 1’ [EXC1]Mid Tom 1High Tom 2Crash Cymbal 1High Tom 1Ride Cymbal 1Chinese CymbalRide BellTambourineSplash CymbalCowbellCrash Cymbal 2Vibra-slapRide Cymbal 2High BongoLow BongoMute High CongaOpen High CongaLow CongaHigh TimbaleLow TimbaleHigh AgogoLow AgogoCabasaMaracasShort Hi Whistle [EXC2]Long Low Whistle [EXC2]Short Guiro [EXC3]Long Guiro [EXC3]ClavesHigh Wood BlockLow Wood BlockMute Cuica [EXC4]Open Cuica [EXC4]Mute Triangle [EXC5]Open Triangle [EXC5]ShakerJingle BellBell TreeCastanetsMute Surdo [EXC6]Open Surdo [EXC6]--------------------Bar ChimeSnare RollFinger SnapHigh QSlapScratch Push [EXC7]Scratch Pull [EXC7]SticksSquare ClickMetronome ClickMetronome BellKick1Room KickSide StickRoom Snr 1Hand ClapStd Snr 1Room Low Tom 2’Closed Hi-hat 1’ [EXC1]Room Low Tom 1’Pedal Hi-hat 1’ [EXC1]Room Mid Tom 2’Open Hi-hat 1’ [EXC1]Room Mid Tom 1’Room Hi Tom 2’Crash Cymbal 1Room Hi Tom 1’Ride Cymbal 1Chinese CymbalRide BellTambourineSplash CymbalCowbellCrash Cymbal 2Vibra-slapRide Cymbal 2High BongoLow BongoMute High CongaOpen High CongaLow CongaHigh TimbaleLow TimbaleHigh AgogoLow AgogoCabasaMaracasShort Hi Whistle [EXC2]Long Low Whistle [EXC2]Short Guiro [EXC3]Long Guiro [EXC3]ClavesHigh Wood BlockLow Wood BlockMute Cuica [EXC4]Open Cuica [EXC4]Mute Triangle [EXC5]Open Triangle [EXC5]ShakerJingle BellBell TreeCastanetsMute Surdo [EXC6]Open Surdo [EXC6]--------------------Bar ChimeSnare RollFinger SnapHigh QSlapScratch Push [EXC7]Scratch Pull [EXC7]SticksSquare ClickMetronome ClickMetronome BellStd Kick 2MONDO KickSide StickGated SDHand ClapSnare Drum 2Room Low Tom 2Closed Hi-hat 1 [EXC1]Room Low Tom 1Pedal Hi-hat 1 [EXC1]Room Mid Tom 2Open Hi-hat 1 [EXC1]Room Mid Tom 1Room Hi Tom 2Crash Cymbal 1Room Hi Tom 1Ride Cymbal 1Chinese CymbalRide BellTambourineSplash CymbalCowbellCrash Cymbal 2Vibra-slapRide Cymbal 2High BongoLow BongoMute High CongaOpen High CongaLow CongaHigh TimbaleLow TimbaleHigh AgogoLow AgogoCabasaMaracasShort Hi Whistle [EXC2]Long Low Whistle [EXC2]Short Guiro [EXC3]Long Guiro [EXC3]ClavesHigh Wood BlockLow Wood BlockMute Cuica [EXC4]Open Cuica [EXC4]Mute Triangle [EXC5]Open Triangle [EXC5]ShakerJingle BellBell TreeCastanetsMute Surdo [EXC6]Open Surdo [EXC6]--------------------Bar ChimeSnare RollFinger SnapHigh QSlapScratch Push [EXC7]Scratch Pull [EXC7]SticksSquare ClickMetronome ClickMetronome BellStd Kick 2Elec BDSide StickElec SDHand ClapGated SDElec Low Tom 2Closed Hi-hat 1 [EXC1]Elec Low Tom 1Pedal Hi-hat 1 [EXC1]Elec Mid Tom 2Open Hi-hat 1 [EXC1]Elec Mid Tom 1Elec Hi Tom 2Crash Cymbal 1Elec Hi Tom 1Ride Cymbal 1Reverse CymbalRide BellTambourineSplash CymbalCowbellCrash Cymbal 2Vibra-slapRide Cymbal 2High BongoLow BongoMute High CongaOpen High CongaLow CongaHigh TimbaleLow TimbaleHigh AgogoLow AgogoCabasaMaracasShort Hi Whistle [EXC2]Long Low Whistle [EXC2]Short Guiro [EXC3]Long Guiro [EXC3]ClavesHigh Wood BlockLow Wood BlockMute Cuica [EXC4]Open Cuica [EXC4]Mute Triangle [EXC5]Open Triangle [EXC5]ShakerJingle BellBell TreeCastanetsMute Surdo [EXC6]Open Surdo [EXC6]-----DR STANDARD DR ROOM DR POWER DR ELECTORONICHPi7_e.book 71 ページ 2004年7月5日 月曜日 午後4時20分](https://usermanual.wiki/Roland/HPI-7LE/User-Guide-501549-Page-71.png)
![72Drum Set List * -----: No sound.* [EXC]: will not sound simultaneously with other percussion instruments of the same number.2728293133353032342123223940414345474244463638378788848685515253555759545658485049636465676971666870606261757677798183788082727473C2C3C4C5C6 262425---------------Bar ChimeSnare RollFinger SnapHigh QSlapScratch Push [EXC7]Scratch Pull [EXC7]SticksSquare ClickMetronome ClickMetronome BellStd Kick 2808 Bass Drum 1808 Rim Shot808 Snare DrumHand ClapSnare Drum 2808 Low Tom 2808 CHH [EXC1]808 Low Tom 1808 CHH [EXC1]808 Mid Tom 2808 OHH [EXC1]808 Mid Tom 1808 Hi Tom 2808 Cymbal808 Hi Tom 1Ride Cymbal 1Chinese CymbalRide BellTambourineSplash Cymbal808 CowbellCrash Cymbal 2Vibra-slapRide Cymbal 2High BongoLow Bongo808 High Conga808 Mid Conga808 Low CongaHigh TimbaleLow TimbaleHigh AgogoLow AgogoCabasa808 MaracasShort Hi Whistle [EXC2]Long Low Whistle [EXC2]Short Guiro [EXC3]Long Guiro [EXC3]808 ClavesHigh Wood BlockLow Wood BlockMute Cuica [EXC4]Open Cuica [EXC4]Mute Triangle [EXC5]Open Triangle [EXC5]ShakerJingle BellBell TreeCastanetsMute Surdo [EXC6]Open Surdo [EXC6]--------------------Bar ChimeSnare RollFinger SnapHigh QSlapScratch Push [EXC7]Scratch Pull [EXC7]Dance Snr 1Square ClickMetronome ClickMetronome BellKick 1808 Bass Drum 2808 Rim ShotTR-909 SnrHand ClapDance Snr 2808 Low Tom 2808 CHH [EXC1] 808 Low Tom 1808 CHH [EXC1] 808 Mid Tom 2808 OHH [EXC1]808 Mid Tom 1808 Hi Tom 2808 Cymbal808 Hi Tom 1Ride Cymbal 1Chinese CymbalRide BellTambourineSplash Cymbal808 CowbellCrash Cymbal 2Vibra-slapRide Cymbal 2High BongoLow Bongo808 High Conga808 Mid Conga808 Low CongaHigh TimbaleLow TimbaleHigh AgogoLow AgogoCabasa808 MaracasShort Hi Whistle [EXC2]Long Low Whistle [EXC2]Short Guiro [EXC3]Long Guiro [EXC3]808 ClavesHigh Wood BlockLow Wood BlockMute Cuica [EXC4]Open Cuica [EXC4]Mute Triangle [EXC5]Open Triangle [EXC5]ShakerJingle BellBell TreeCastanetsMute Surdo [EXC6]Open Surdo [EXC6]--------------------Bar ChimeSnare RollFinger SnapHigh QSlapScratch Push [EXC7]Scratch Pull [EXC7]SticksSquare ClickMetronome ClickMetronome BellStd Kick 2Std Kick 1Side StickSnare Drum 1Hand ClapSnare Drum 2Low Tom 2Closed Hi-hat 1 [EXC1]Low Tom 1Pedal Hi-hat 1 [EXC1]Mid Tom 2Open Hi-hat 1 [EXC1]Mid Tom 1High Tom 2Crash Cymbal 1High Tom 1Ride Cymbal 1Chinese CymbalRide BellTambourineSplash CymbalCowbellCrash Cymbal 2Vibra-slapRide Cymbal 2High BongoLow BongoMute High CongaOpen High CongaLow CongaHigh TimbaleLow TimbaleHigh AgogoLow AgogoCabasaMaracasShort Hi Whistle [EXC2]Long Low Whistle [EXC2]Short Guiro [EXC3]Long Guiro [EXC3]ClavesHigh Wood BlockLow Wood BlockMute Cuica [EXC4]Open Cuica [EXC4]Mute Triangle [EXC5]Open Triangle [EXC5]ShakerJingle BellBell TreeCastanetsMute Surdo [EXC6]Open Surdo [EXC6]--------------------Bar ChimeSnare RollFinger SnapHigh QSlapScratch Push [EXC7]Scratch Pull [EXC7]SticksSquare ClickMetronome ClickMetronome BellKick 2Kick 1Side StickBrush TapBrush SlapBrush SwirlBrush Low Tom 2Closed Hi-hat 2 [EXC1]Brush Low Tom 1Pedal Hi-hat 2 [EXC1]Brush Mid Tom 2Open Hi-hat 2 [EXC1]Brush Mid Tom 1Brush Hi Tom 2Crash Cymbal 1Brush Hi Tom 1Ride Cymbal 1Chinese CymbalRide BellTambourineSplash CymbalCowbellCrash Cymbal 2Vibra-slapRide Cymbal 2High BongoLow BongoMute High CongaOpen High CongaLow CongaHigh TimbaleLow TimbaleHigh AgogoLow AgogoCabasaMaracasShort Hi Whistle [EXC2]Long Low Whistle [EXC2]Short Guiro [EXC3]Long Guiro [EXC3]ClavesHigh Wood BlockLow Wood BlockMute Cuica [EXC4]Open Cuica [EXC4]Mute Triangle [EXC5]Open Triangle [EXC5]ShakerJingle BellBell TreeCastanetsMute Surdo [EXC6]Open Surdo [EXC6]-----DR TR-808 DR DANCEDR JAZZDR GS STAND DR BRUSHHPi7_e.book 72 ページ 2004年7月5日 月曜日 午後4時20分](https://usermanual.wiki/Roland/HPI-7LE/User-Guide-501549-Page-72.png)
![73Drum Set List * -----: No sound.* [EXC]: will not sound simultaneously with other percussion instruments of the same number.2728293133353032342123223940414345474244463638378788848685515253555759545658485049636465676971666870606261757677798183788082727473C2C3C4C5C6 262425---------------Bar ChimeSnare RollFinger SnapClose Hi-hat [EXC1]Pedal Hi-hat [EXC1]Open Hi-hat [EXC1]Ride CymbalSticksSquare ClickMetronome ClickMetronome BellConcert BD 2Concert BD 1Side StickConcert SDCastanetsConcert SDTimpani FTimpani F#Timpani GTimpani G#Timpani ATimpani A#Timpani BTimpani cTimpani c#Timpani dTimpani d#Timpani eTimpani fTambourineSplash CymbalCowbellConcert Cymbal 2Vibra-slapConcert Cymbal 1High BongoLow BongoMute High CongaOpen High CongaLow CongaHigh TimbaleLow TimbaleHigh AgogoLow AgogoCabasaMaracasShort Hi Whistle [EXC2]Long Low Whistle [EXC2]Short Guiro [EXC3]Long Guiro [EXC3]ClavesHigh Wood BlockLow Wood BlockMute Cuica [EXC4]Open Cuica [EXC4]Mute Triangle [EXC5]Open Triangle [EXC5]ShakerJingle BellBell TreeCastanetsMute Surdo [EXC6]Open Surdo [EXC6]Applause---------------Bar ChimeSnare RollFinger SnapHigh QSlapScratch Push [EXC7]Scratch Pull [EXC7]SticksSquare ClickMetronome ClickMetronome BellStd Kick 2Std Kick 1Side StickSnare Drum 1Hand ClapSnare Drum 2Room Low Tom 2Closed Hi-hat 1 [EXC1]Room Low Tom 1Pedal Hi-hat 1 [EXC1]Room Mid Tom 2Open Hi-hat 1 [EXC1]Room Mid Tom 1Room Hi Tom 2Crash Cymbal 1Room Hi Tom 1Ride Cymbal 1Chinese CymbalRide BellTambourineSplash CymbalCowbellCrash Cymbal 2Vibra-slapRide Cymbal 2High BongoLow BongoMute High CongaOpen High CongaLow CongaHigh TimbaleLow TimbaleHigh AgogoLow AgogoCabasaMaracasShort Hi Whistle [EXC2]Long Low Whistle [EXC2]Short Guiro [EXC3]Long Guiro [EXC3]ClavesHigh Wood BlockLow Wood BlockMute Cuica [EXC4]Open Cuica [EXC4]Mute Triangle [EXC5]Open Triangle [EXC5]ShakerJingle BellBell TreeCastanetsMute Surdo [EXC6]Open Surdo [EXC6]--------------------Bar ChimeSnare RollFinger SnapHigh QSlapScratch Push [EXC7]Scratch Pull [EXC7]SticksSquare ClickMetronome ClickMetronome BellStd Kick 2Std Kick 1Side StickBrush TapBrush SlapBrush SwirlLow Tom 2Closed Hi-hat 1 [EXC1]Low Tom 1Pedal Hi-hat 1 [EXC1]Mid Tom 2Open Hi-hat 1 [EXC1]Mid Tom 1High Tom 2Crash Cymbal 1High Tom 1Ride Cymbal 1Chinese CymbalRide BellTambourineSplash CymbalCowbellCrash Cymbal 2Vibra-slapRide Cymbal 2High BongoLow BongoMute High CongaOpen High CongaLow CongaHigh TimbaleLow TimbaleHigh AgogoLow AgogoCabasaMaracasShort Hi Whistle [EXC2]Long Low Whistle [EXC2]Short Guiro [EXC3]Long Guiro [EXC3]ClavesHigh Wood BlockLow Wood BlockMute Cuica [EXC4]Open Cuica [EXC4]Mute Triangle [EXC5]Open Triangle [EXC5]ShakerJingle BellBell TreeCastanetsMute Surdo [EXC6]Open Surdo [EXC6]-----DR ORCHESTRA DR GS ROOM DR GS BRUSHHPi7_e.book 73 ページ 2004年7月5日 月曜日 午後4時20分](https://usermanual.wiki/Roland/HPI-7LE/User-Guide-501549-Page-73.png)

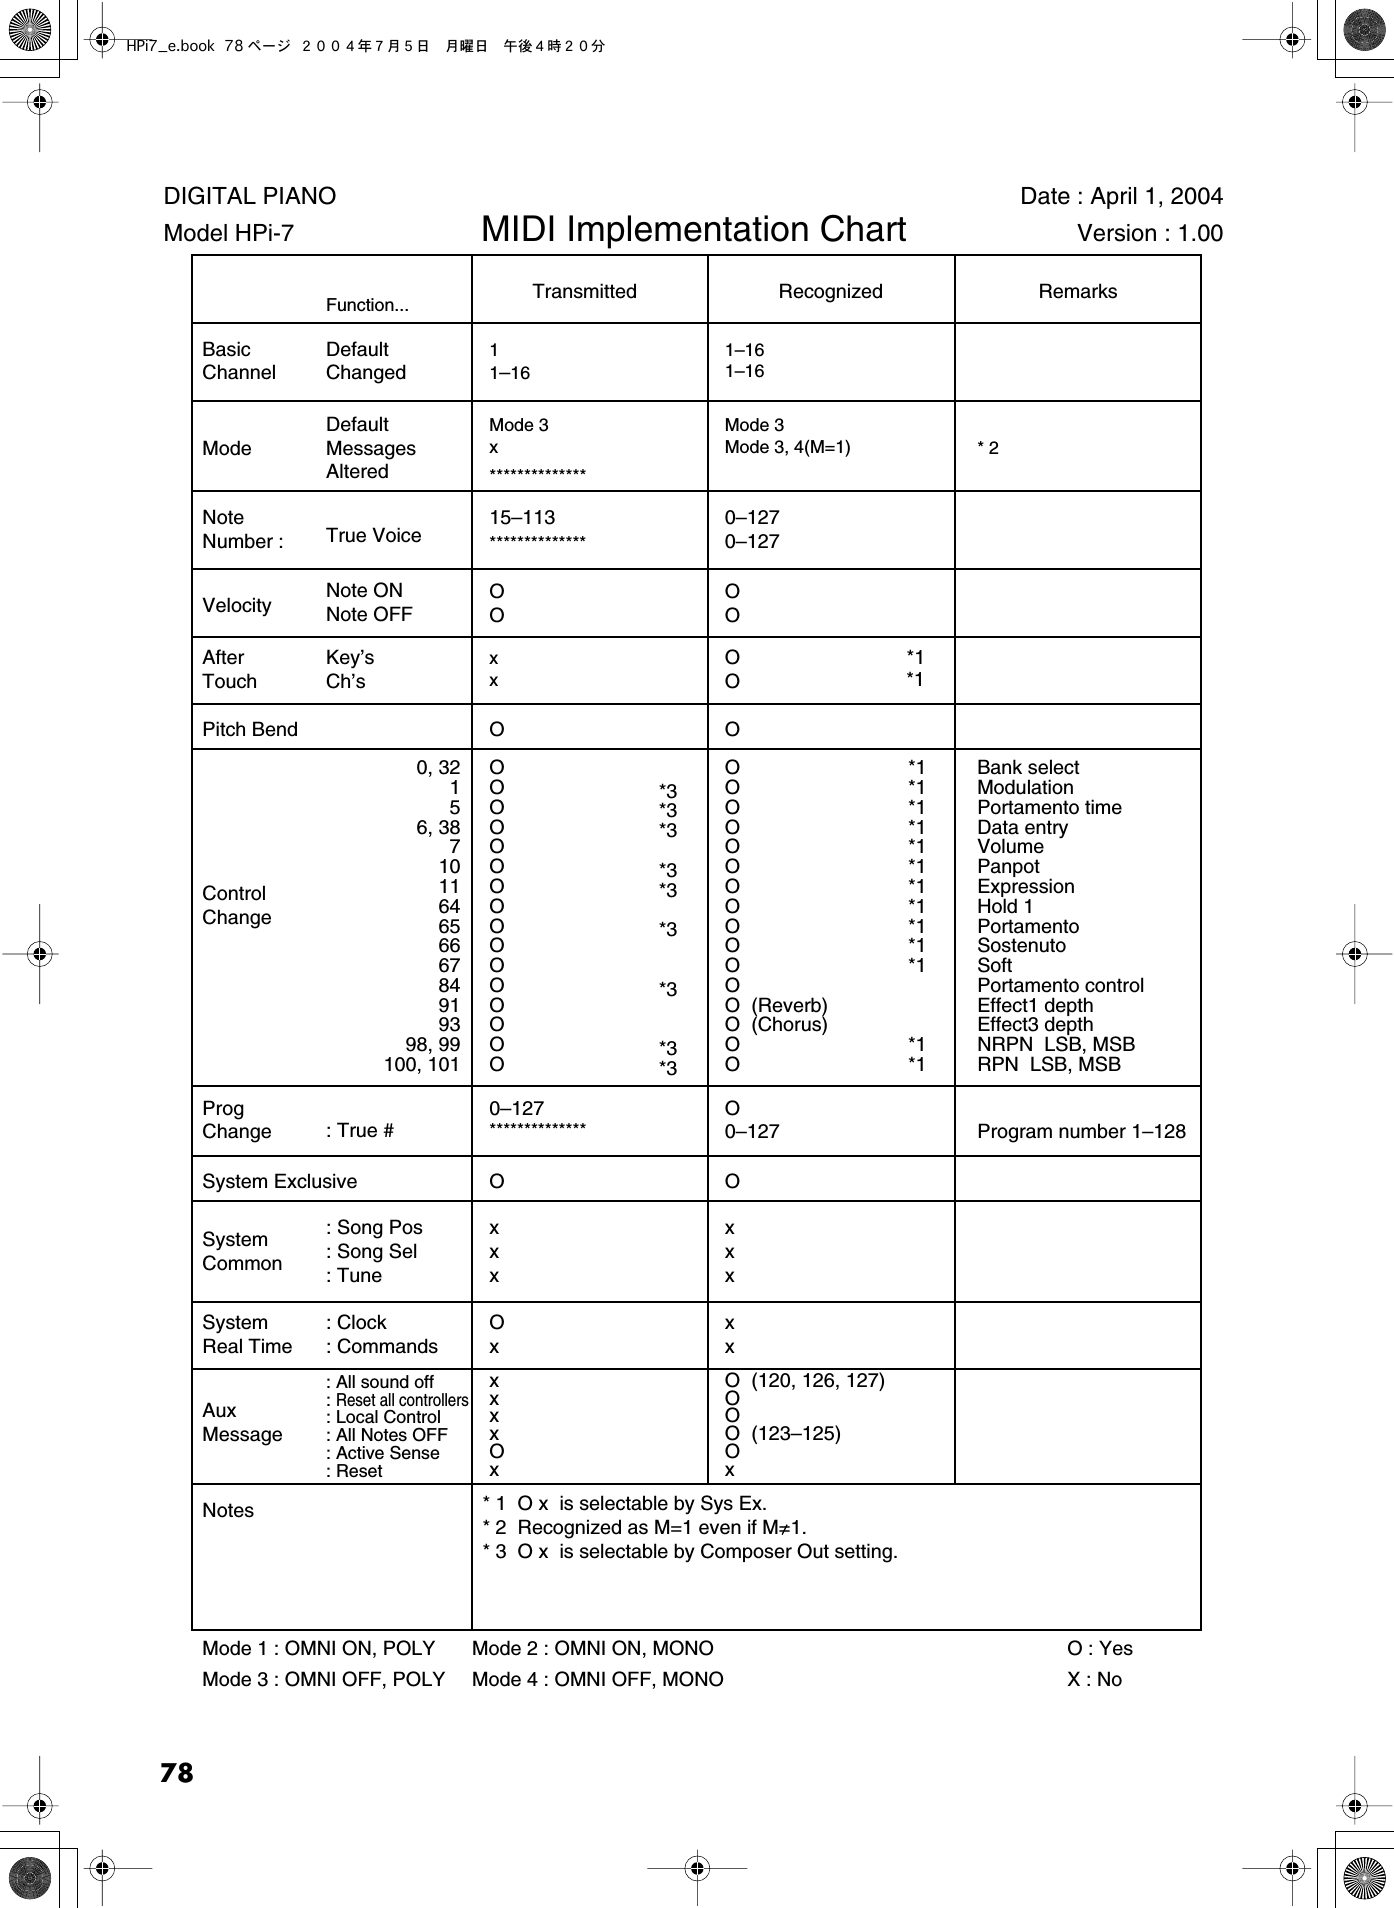
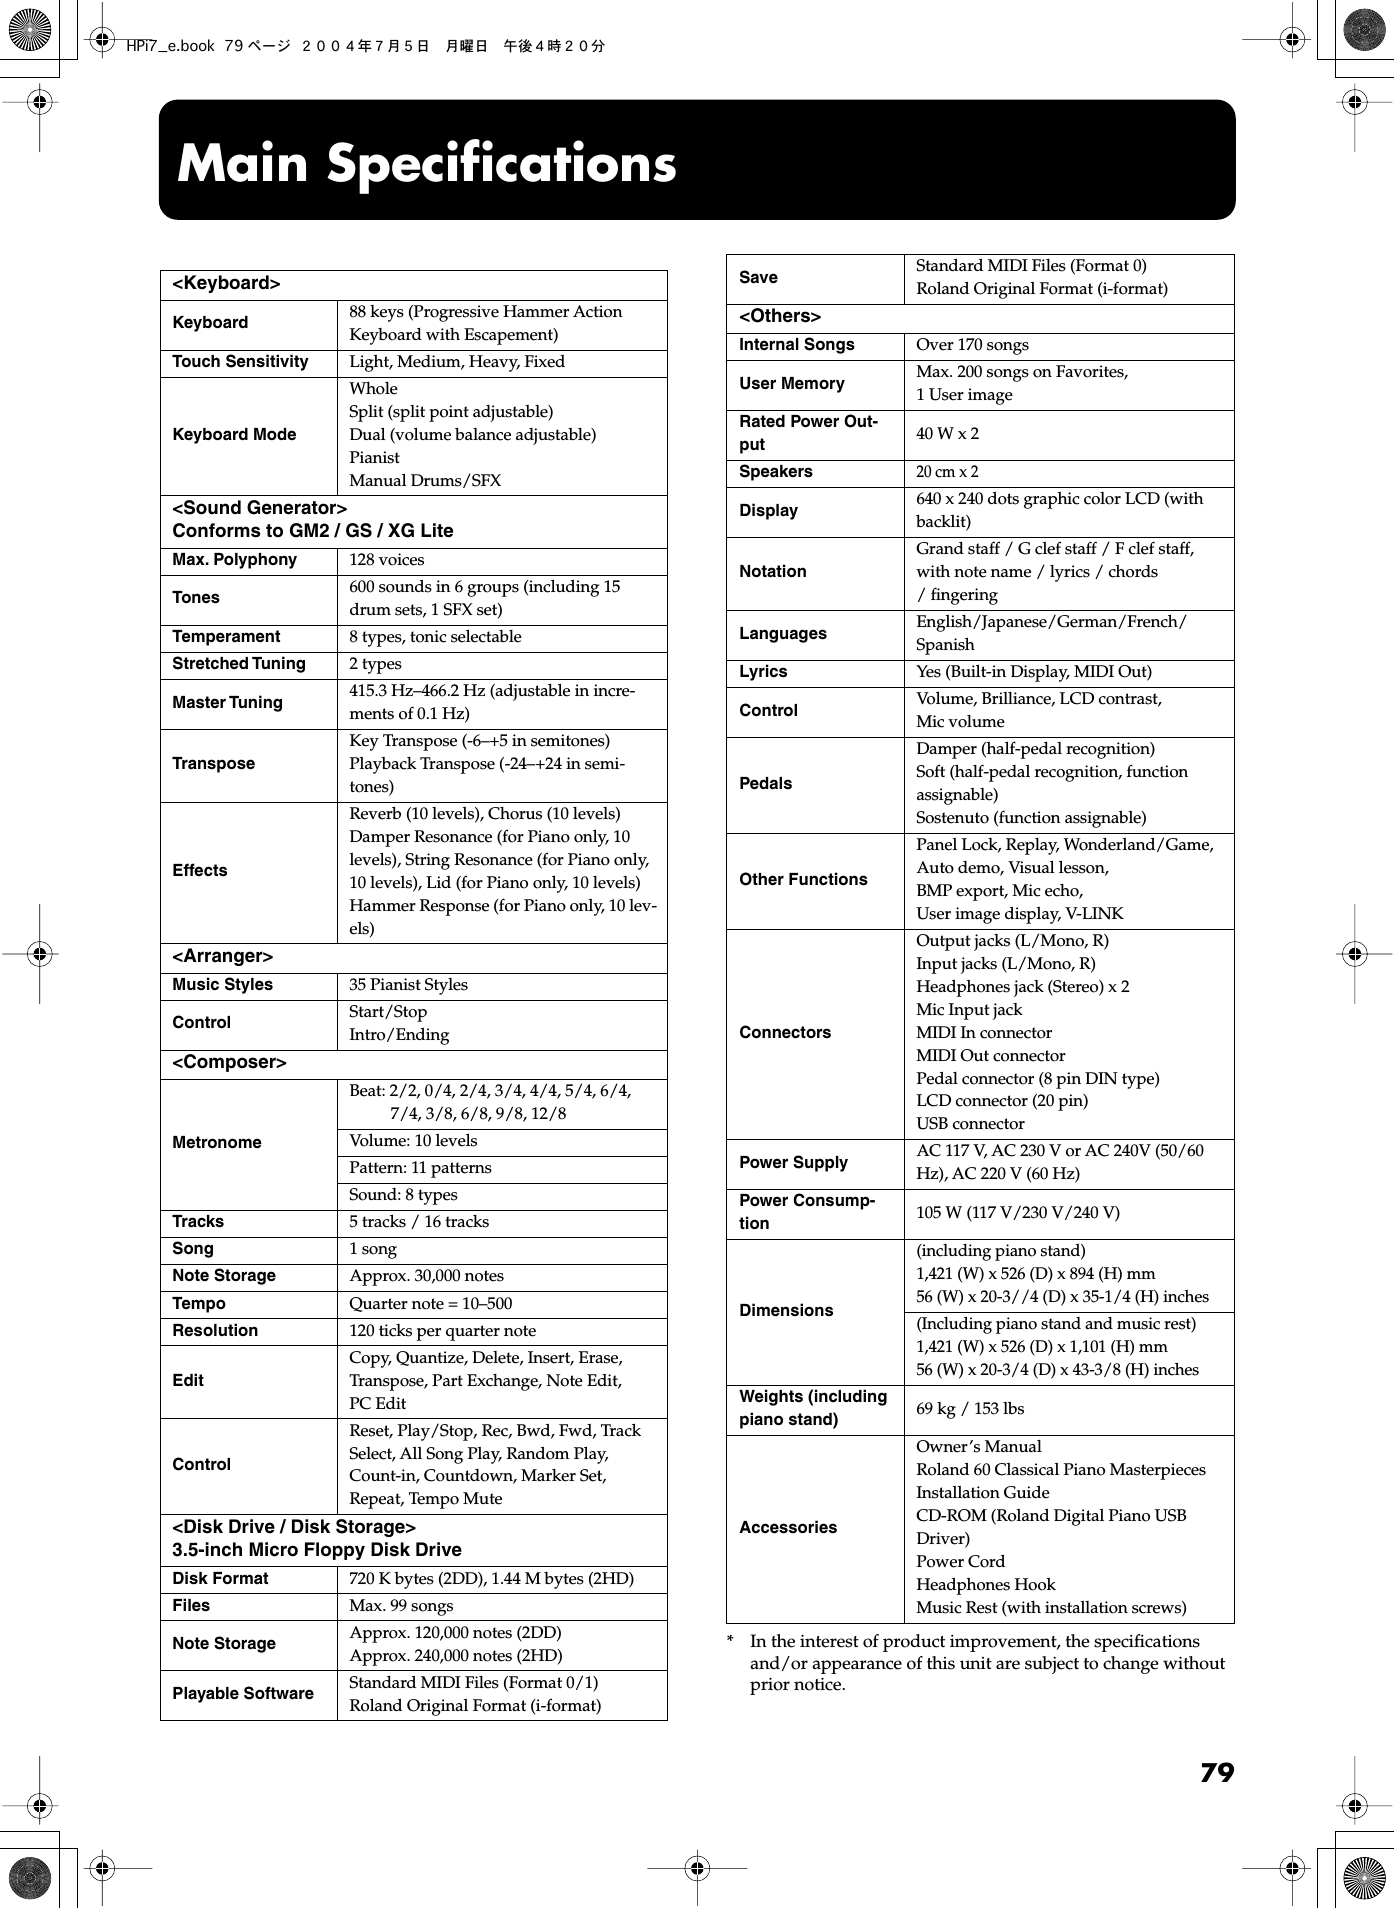

![03454423 ’04-07-2N Owner’s Manual To resize thickness, move all items on the front coverand center registration marks to left or right This owner’s manual is printed on recycled paper. Congratulations on your choice of the Roland Digital Piano HPi-7. 201b Before using this unit, carefully read the sections entitled: “IMPORTANT SAFETY INSTRUCTIONS” (p. 2), “USING THE UNIT SAFELY” (p. 3), and “IMPORTANT NOTES” (p. 5). These sections provide important information concerning the proper operation of the unit. Additionally, in order to feel assured that you have gained a good grasp of every feature provided by your new unit, owner’s manual should be read in its entirety. The manual should be saved and kept on hand as a convenient reference. 202 Copyright © 2004 ROLAND CORPORATIONAll rights reserved. No part of this publication may be reproduced in any form without the written permission of ROLAND CORPORATION.Musical Notation Shown In A Large LCD ScreenThe musical notation can be displayed not only for the internal songs, but also for commercially available song files.You can split the screen and change the settings as you view the Notation screen.Lyrics and fingering numbers can also be displayed.* The fingering numbers are displayed only for some of the internal songs.Authentic Piano PerformanceHigh-quality grand piano tones and true piano feel from the keyboard and pedals let you enjoy authentic -piano performance.A “Wonderland” Sure To Please Children“Wonderland” is a world of sound which children can enjoy, with a “Piano,” a “SFX” of sounds, and more. A note-guessing game is also included.A Wealth Of Onboard SongsThe instrument comes with 170 songs, all carefully selected so almost every genre is represented—whether it be piano etudes, or popular tunes.A “Visual Lesson” Convenient Functions For PracticingEnjoy practicing along with song data.You can also check the results of what you play right in the screen.Easy Game-like OperationAfter pressing the button for the desired function, operation consists basically of pressing the cursor buttons, [ ] [ ] buttons and [+] [-] located in the center of the panel. You can enjoy versatile performance with easy operation.](https://usermanual.wiki/Roland/HPI-7LE/User-Guide-501549-Page-84.png)