Roland RG-7 ELECTRONIC PIANO WITH USB PORT User Manual RG 7 e
Roland Corporation ELECTRONIC PIANO WITH USB PORT RG 7 e
UserManual.wiki
>
Roland
>
RG 7 User Manual
USERS MANUAL
Navigation menu
Upload a User Manual
Namespaces
Wiki Guide
HTML
PDF
Info
Views
User Manual
Discussion / Help
Navigation
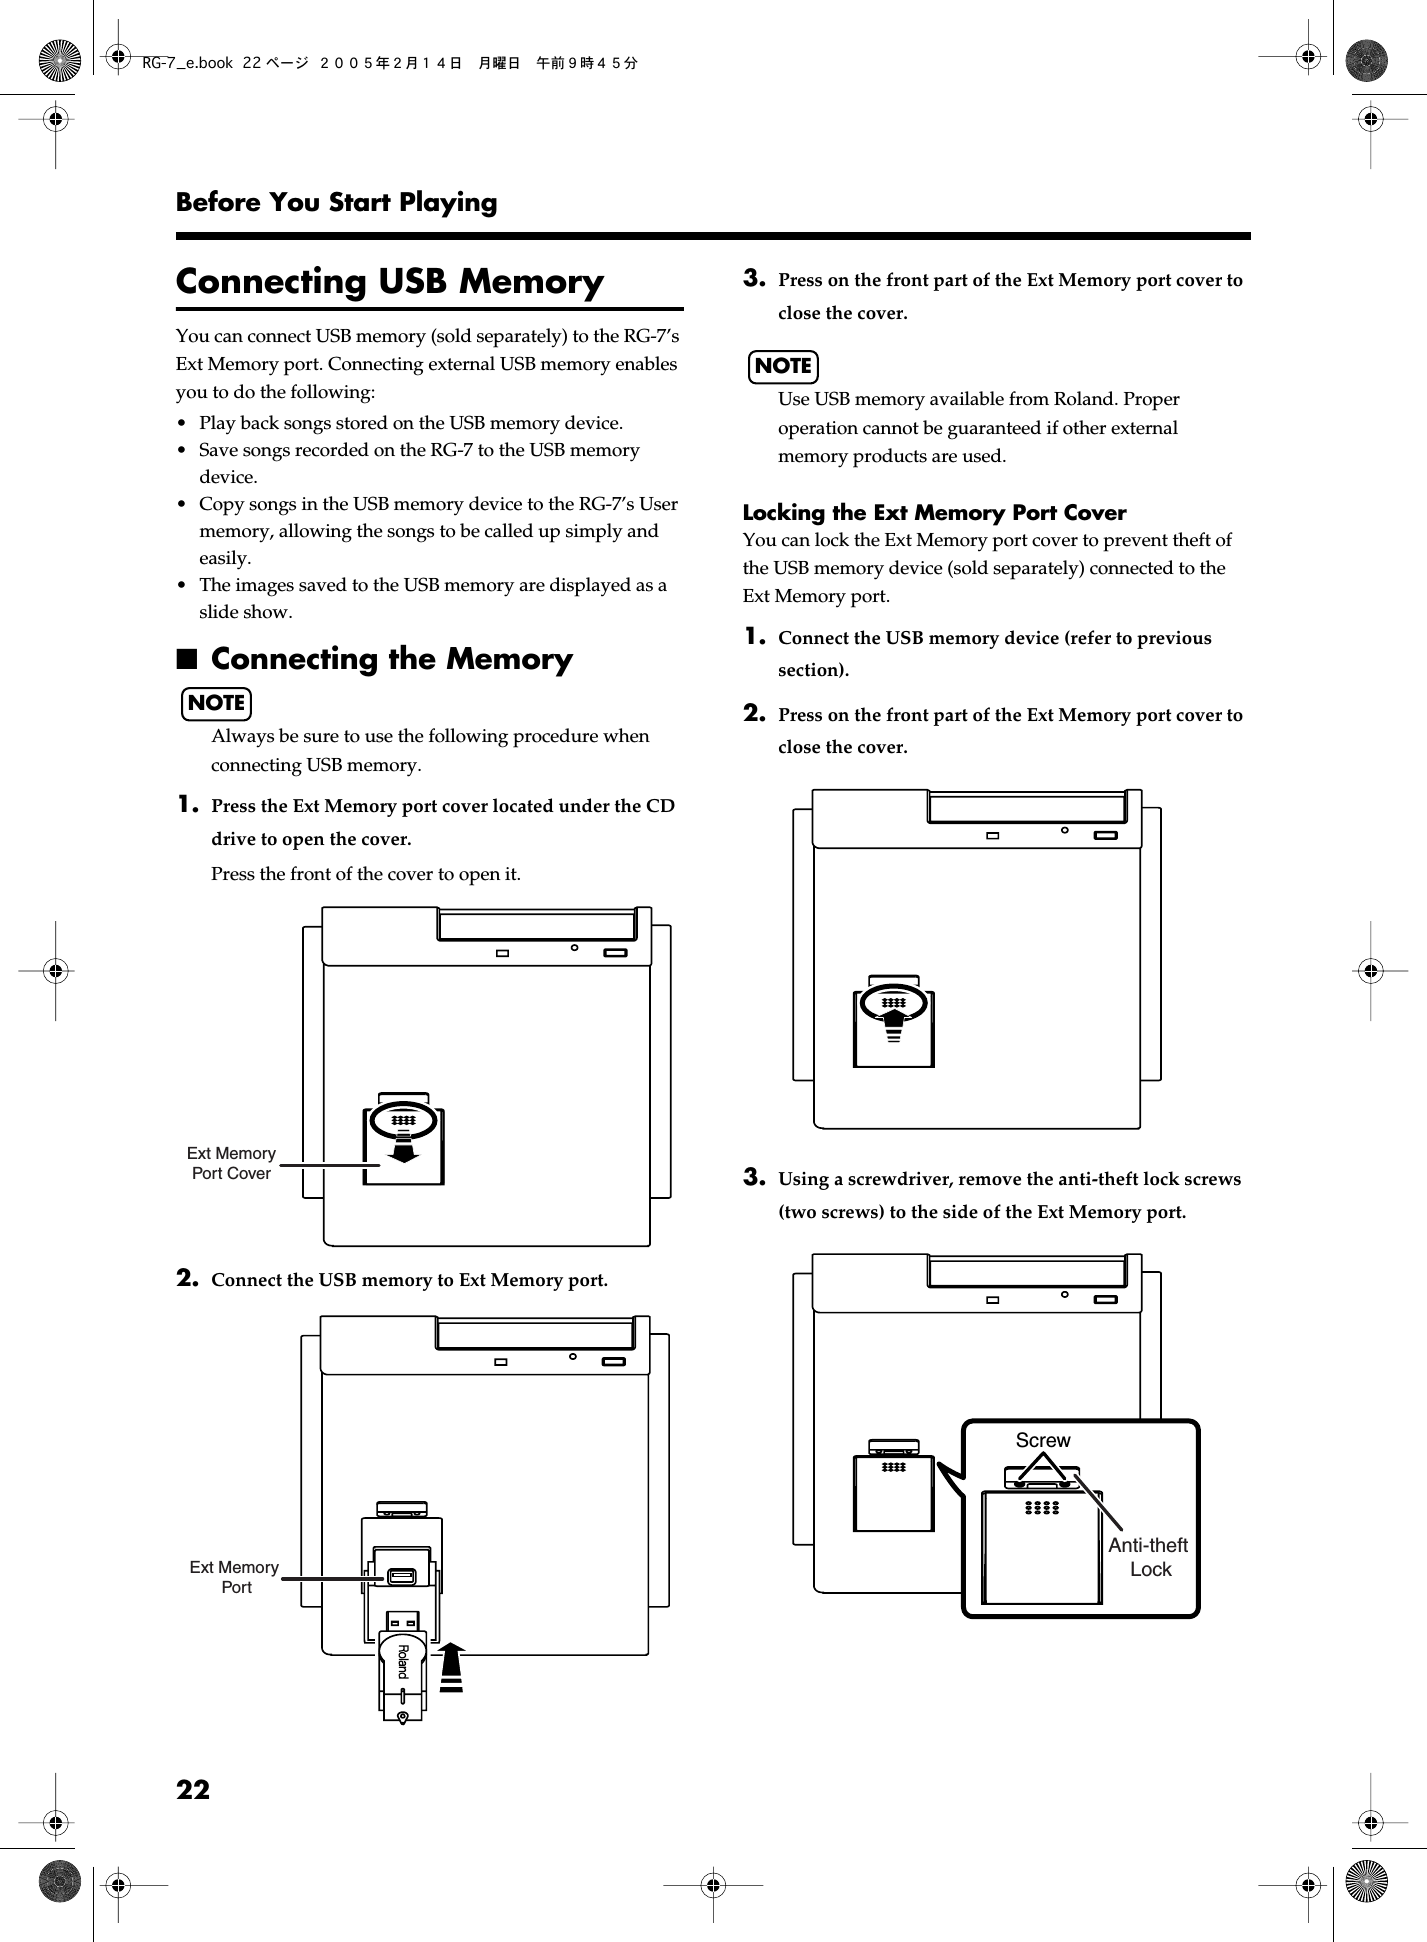
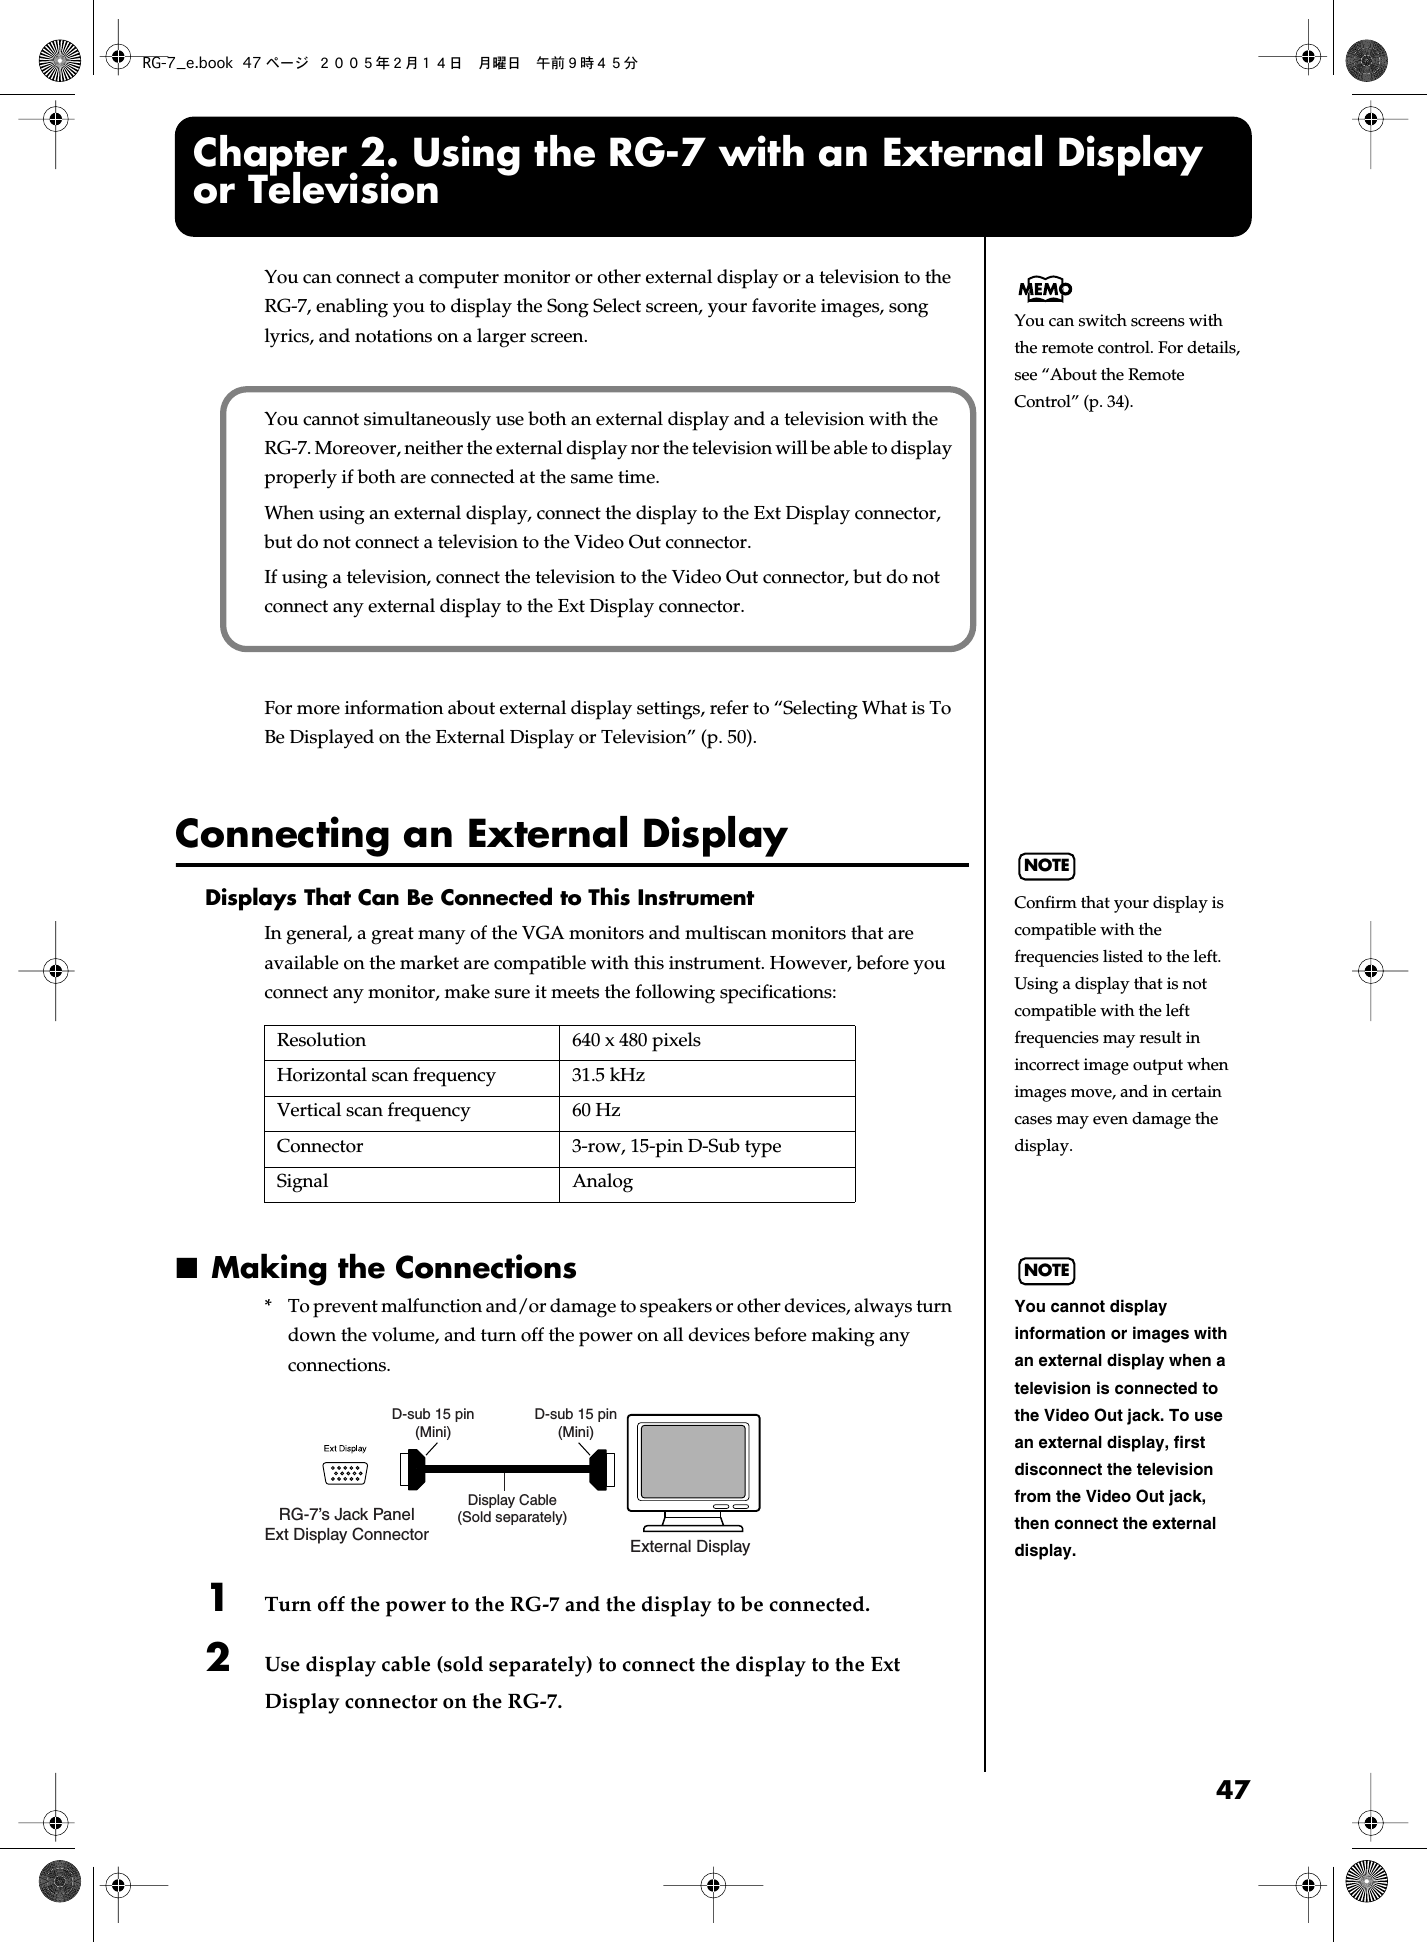
![10Introduction Professional-Level Features and Specifications The instrument features a lid lock to prevent unauthorized operation of the controls or keys while the Moving Key function is in use, and an Ext Memory port lock to prevent theft of connected USB memory.Since the RG-7 is a digital instrument, it has no strings and therefore requires no tuning.You can connect an external display or television to the piano to run slide shows using whatever images you prefer and, with a microphone connected, you can add echo and harmonies to microphone vocals and use the Transformer function to change the sound of the vocals. Connect External Speakers to Produce Concert Hall Presence You can connect an amp and speakers to the RG-7 and play the sounds of the reverb and accompaniment through the external speakers to produce the effect of being enveloped by an orchestra. The RG-7 is equipped with XLR connectors, a very convenient feature when the instrument is used on stage. ■ Conventions Used in This Manual This manual uses the following conventions in the interest of simpler, more concise instructions. • Button names are enclosed in square brackets “[ ]”, as in [Moving Key] button.• An asterisk (*) or a at the beginning of a paragraph indicates a note or precaution. These should not be ignored.• (p. **) refers to pages within the manual.NOTERG-7_e.book 10 ページ 2005年2月14日 月曜日 午前9時45分](https://usermanual.wiki/Roland/RG-7/User-Guide-525080-Page-11.png)
![11 Contents USING THE UNIT SAFELY.......................................................................................................... 3IMPORTANT NOTES ................................................................................................................... 6 Introduction .............................................................................................9 Main Features.............................................................................................................................................. 9Conventions Used in This Manual ............................................................................................. 10 Panel Descriptions................................................................................14 Front Panel................................................................................................................................................. 14Jack Panel (Left Side of Bottom Panel) .................................................................................................. 15CD Drive (Right Side of Bottom Panel)................................................................................................. 16 Before You Start Playing......................................................................17 Opening and Closing the Top ................................................................................................................ 17Raising the Music Rest............................................................................................................................. 18Extending the Music Rest ............................................................................................................ 18Opening and Closing the Lid ................................................................................................................. 18Using the Lid Lock........................................................................................................................ 18Connect the Pedal Cord........................................................................................................................... 19Connecting the Power Cord.................................................................................................................... 19Turning the Power On and Off .............................................................................................................. 19Adjusting the Sound’s Volume and Brilliance.....................................................................................20About the Pedals....................................................................................................................................... 20Connecting Headphones ......................................................................................................................... 21Connecting a Microphone....................................................................................................................... 21Connecting USB Memory........................................................................................................................ 22Connecting the Memory .............................................................................................................. 22About the Screens..................................................................................................................................... 23Main Screens .................................................................................................................................. 23Adjusting the Contrast of the Screen.......................................................................................... 23 Chapter 1. Playing Back Songs ...........................................................24 Look at What You Can Do with the RG-7! ........................................................................................... 24Listening to Songs .................................................................................................................................... 25[Song] Button Functions............................................................................................................... 25Listening to the Tone Demos....................................................................................................... 26Listening to the Internal Songs.................................................................................................... 26Listening to Songs on CDs........................................................................................................... 28Playing Back Songs from USB Memory..................................................................................... 31Using the Remote Control....................................................................................................................... 32Installing Batteries in the Remote Control ................................................................................ 32How to Use the Remote Control................................................................................................. 33About the Remote Control........................................................................................................... 34Using the Aux Input Jack ........................................................................................................................ 36Changing the Song Tempo...................................................................................................................... 37Using the Karaoke Feature...................................................................................................................... 37Changing the Key of the Song Being Played (Playback Transpose)...................................... 38Adding Echo to the Mic Vocals (Mic Echo)............................................................................... 39Adding Harmonies to the Mic Vocals (Harmony)................................................................... 40Altering Vocals (Transformer) .................................................................................................... 41Copying Songs .......................................................................................................................................... 42Copying Songs Saved on CDs and USB Memory to the “Favorites”.................................... 42Deleting Songs Saved to the “Favorites” or USB Memory................................................................. 45 Chapter 2. Using the RG-7 with an External Display or Television..47 Connecting an External Display............................................................................................................. 47Making the Connections .............................................................................................................. 47Changing the Display Settings.................................................................................................... 48RG-7_e.book 11 ページ 2005年2月14日 月曜日 午前9時45分](https://usermanual.wiki/Roland/RG-7/User-Guide-525080-Page-12.png)
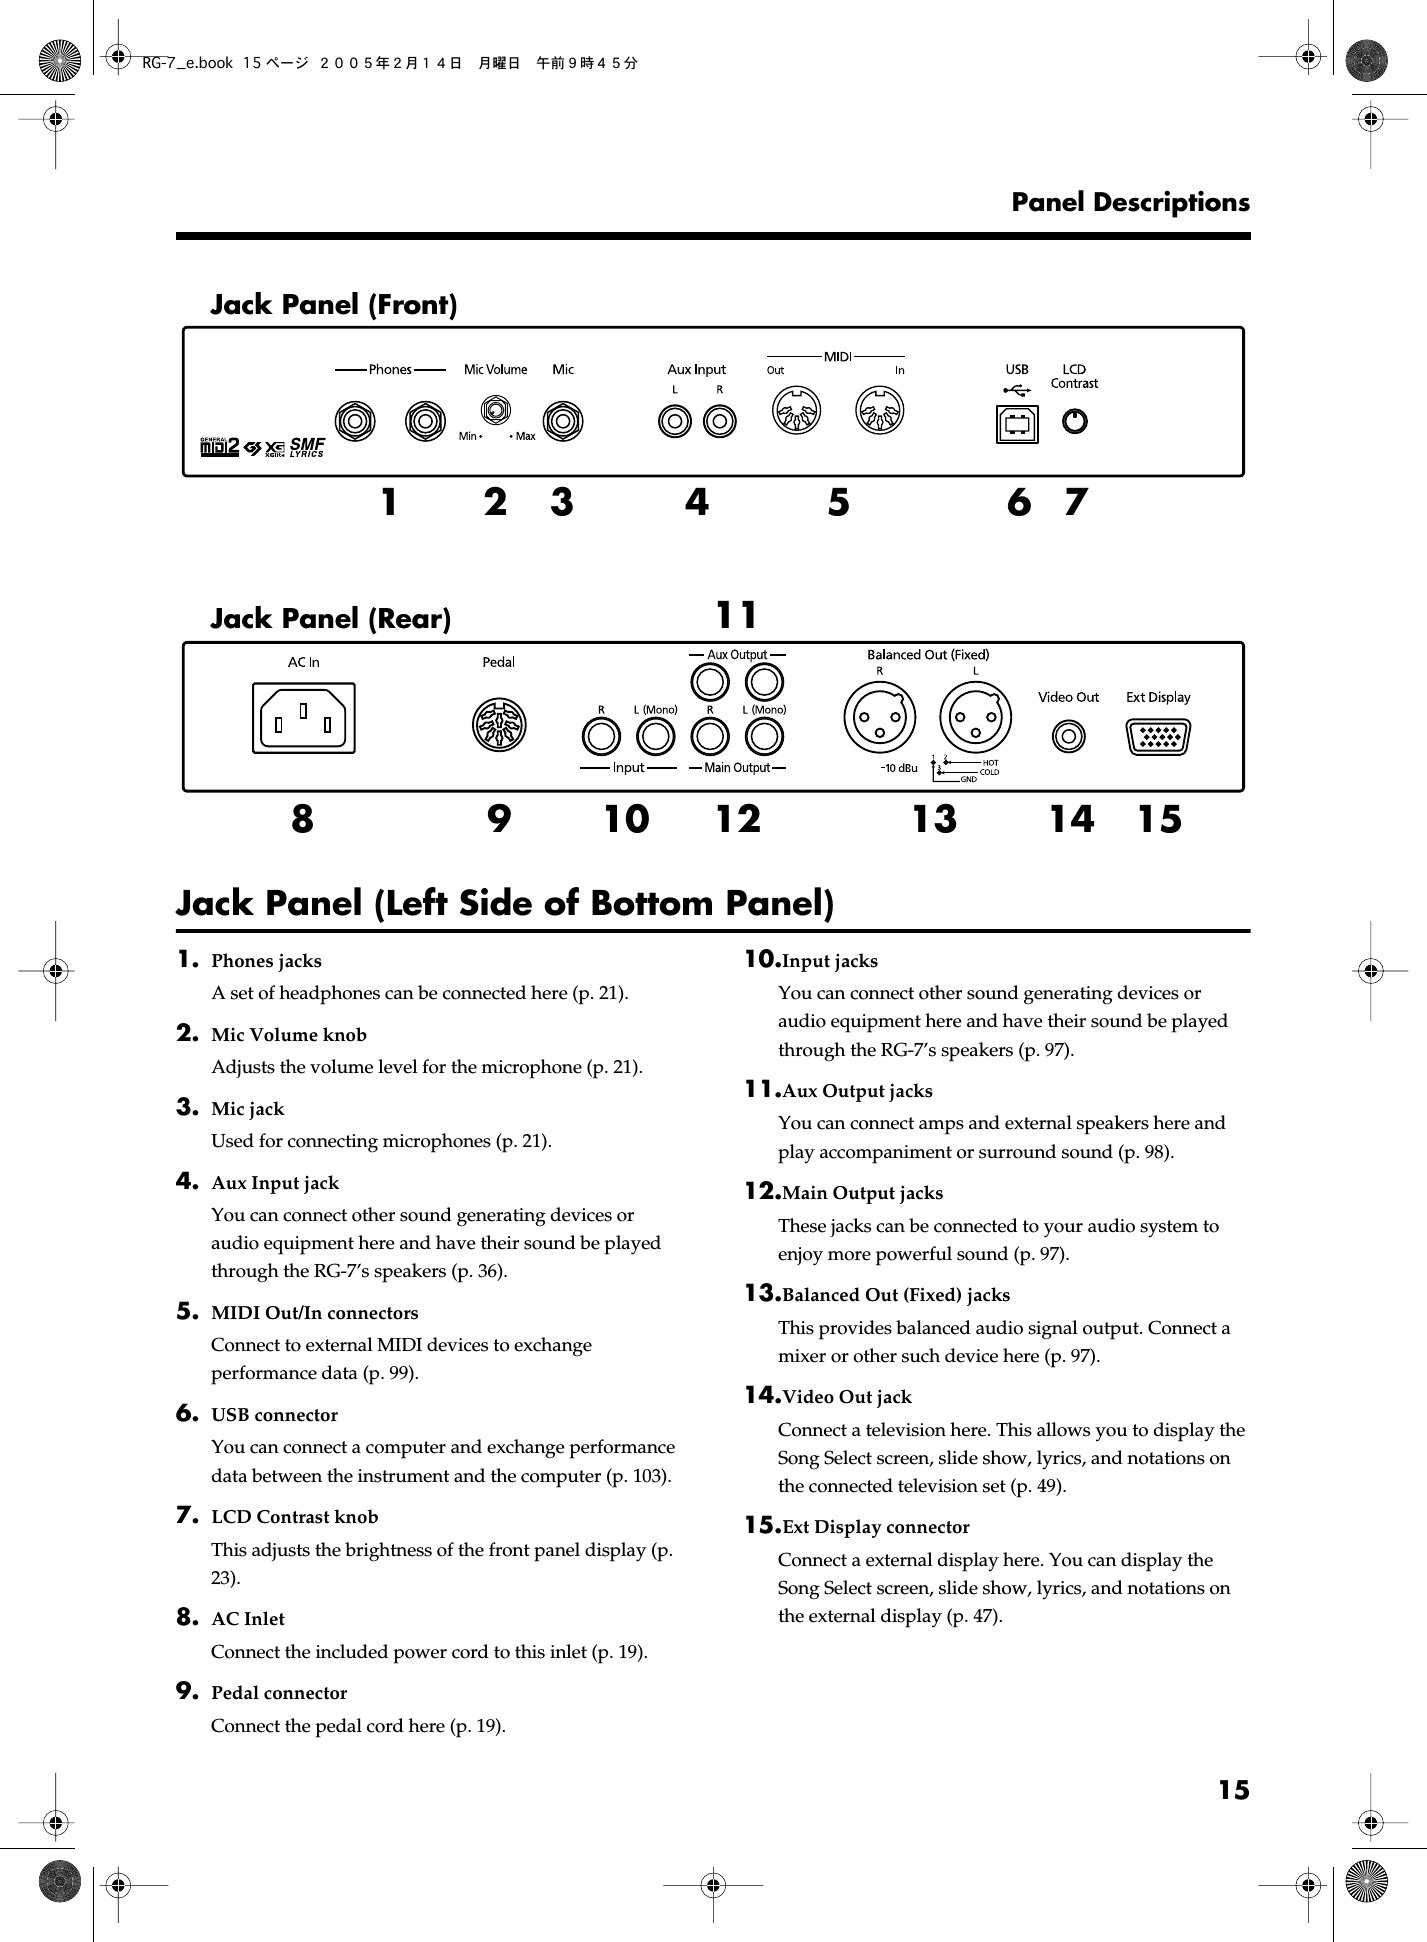
![14 Panel Descriptions Front Panel 1. [Power] switch Turns the power on/off (p. 19). 2. [Volume] knob Adjusts the overall volume level (p. 20). 3. [Brilliance] knob Adjusts the tone brightness (p. 20). 4. Tone Buttons They are used to choose the kinds of tones (tone groups) played by the keyboard (p. 53).[Piano 1] button[Piano 2] button[Harpsichord] button[Vibraphone] button[E.Piano] button 5. Display Tone and song names and the values of various settings are displayed here (p. 23). 6. [Function] (Exit) button This switches the RG-7 to the Function screen (p. 88). You can make various different settings in the Function screen, including settings for the master tuning and temperaments. 7. [Song] (Select -) button This displays the Song Select screen (p. 23). The song genre is switched each time you press this button while the Song Select screen is displayed (p. 25).When the Function screen is displayed, this button is used to select the item for which settings are to be made (p. 88). 8. [] (Select +) button Press this button while the Song Select screen is displayed to select the previous song (p. 26, p. 28, p. 31).When the Function screen is displayed, this button is used to select the item for which settings are to be made (p. 88). 9. [] (Value -) button Press this button while the Song Select screen is displayed to start and stop playback of the song (p. 26, p. 28, p. 31).Press this button while the Function screen is displayed to change the value of a setting (p. 88). 10. [] (Value +) button Press this button while the Song Select screen is displayed to select the next song (p. 26, p. 28, p. 31).Press this button while the Function screen is displayed to change the value of a setting (p. 88). 11. [Moving Key] (Enter) button This switches the automatic keyboard feature on and off (p. 88). This feature provides keyboard movement corresponding to the song being played back.Additionally, press this button when the Function screen is displayed to make even more advanced settings.1523 4678910 11RG-7_e.book 14 ページ 2005年2月14日 月曜日 午前9時45分](https://usermanual.wiki/Roland/RG-7/User-Guide-525080-Page-15.png)
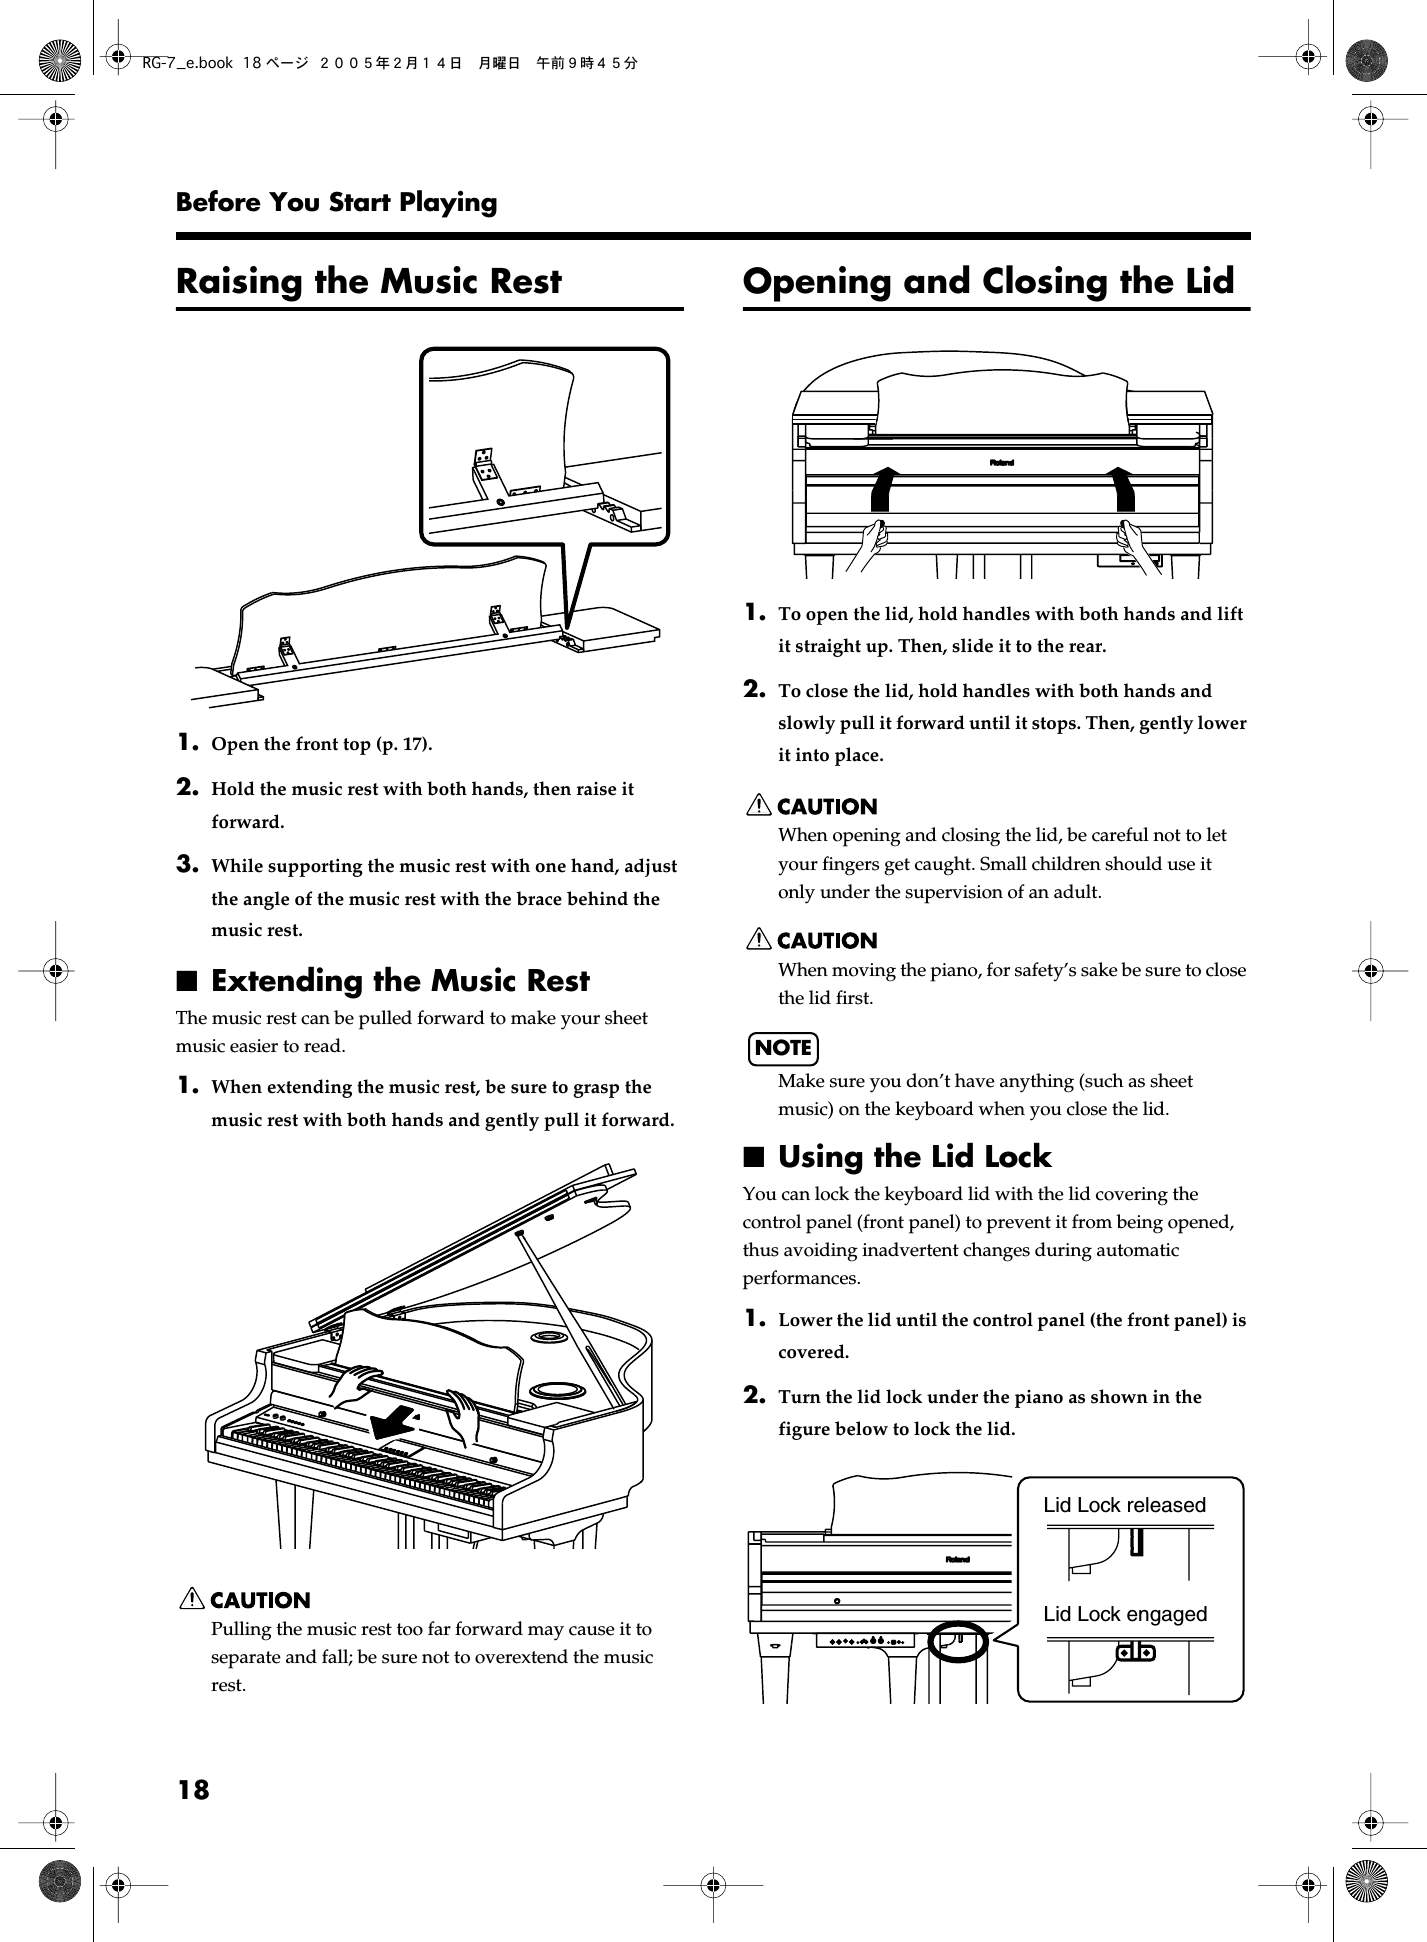
![19Before You Start PlayingNOTE Using undue force to open the lid when it is locked may damage the lid and/or the lock. Turning the lid lock when the lid lock is released while the keyboard lid is open may make the keyboard lid prone to closing. Always confirm that the keyboard lid is covering the control panel before locking the lid. Connecting the Pedal Cord 1. Connect the pedal cord to the Pedal jack located in the jack panel on the lower left of the RG-7. fig.00-01 Connecting the Power Cord 1. Connect the supplied power cord to the AC inlet. 2. Connect the pedal cord to the Pedal connector. 3. Cramp the power cord and pedal cord with Cord Cramp and screw at A, B, and C (see the picture above). 4. Plug the power cord into an AC outlet. Turning the Power On and OffNOTE Turn on power to your various devices in the order specified. By turning on devices in the wrong order, you risk causing malfunction and/or damage to speakers and other devices. To turn the power on, turn the [Volume] knob all the way down, and then press the [Power] switch. When you turn on the power to the RG-7, the front panel display appears as shown below.After a few seconds, you will be able to play the keyboard to produce sound.Use the [Volume] knob to adjust the volume.NOTE This unit is equipped with a protection circuit. A brief interval (a few seconds) after power up is required before the unit will operate normally. To turn the power off, turn the [Volume] knob all the way to the left, and press the [Power] switch. The front panel display goes blank, and the power is turned off. * If you need to turn off the power completely, first turn off the POWER switch, then unplug the power cord from the power outlet. Refer to “Power Supply” (p. 6).baabScrewCord CrampRG-7_e.book 19 ページ 2005年2月14日 月曜日 午前9時45分](https://usermanual.wiki/Roland/RG-7/User-Guide-525080-Page-20.png)
![20Before You Start Playing Adjusting the Sound’s Volume and Brilliance Turn the [Volume] knob to adjust the overall volume.Turn the [Brilliance] knob to adjust the brightness of the sound. fig.00-07.e The mark at the top of the [Volume] knob indicates the volume level typically produced by an acoustic piano. This is usually the most appropriate volume for your piano performances. You can adjust the volume with the remote control. For details, refer to “About the Remote Control” (p. 34). About the Pedals The pedals have the following functions, and are used mainly for piano performance. fig.00-08.e Damper pedal (right pedal) While this pedal is pressed, notes will be sustained even after you take your fingers off the keys.On an acoustic piano, holding down the damper pedal will allow the remaining strings to resonate in sympathy with the sounds that you played from the keyboard, adding a rich resonance.The RG-7 simulates this Damper Resonance. You can change the amount of resonance applied with the damper pedal. Please refer to “Producing the Resonance of the Strings When the Keys Are Played (Damper Resonance)” (p. 59). Sostenuto pedal (center pedal) This pedal sustains only the sounds of the keys that were already played when you pressed the pedal. Soft pedal (left pedal) When you hold down this pedal and play the keyboard, the sound will have a softer tone.The softness of the tone can be varied subtly by the depth to which you press the pedal. You can assign functions to the left and center pedals. Refer to “Assigning Functions to Pedals” (p. 69).Soft PedalSostenuto PedalDamper PedalRG-7_e.book 20 ページ 2005年2月14日 月曜日 午前9時45分](https://usermanual.wiki/Roland/RG-7/User-Guide-525080-Page-21.png)
![21Before You Start Playing Connecting Headphones The RG-7 has two jacks for plugging in headphones. This allows two people to listen through headphones simultaneously, making it very useful for lessons and performing piano pieces for four hands. Additionally, this allows you to play without bothering others around you, even at night. fig.00-04.e 1. Plug the headphones into the Phones jack located in the jack panel on the lower left of the RG-7. Connecting headphones will automatically mute the sound from the internal speakers.The headphone volume is adjusted by the [Volume] knob of the RG-7.NOTE Use Stereo headphones. Some Notes on Using Headphones • To prevent damage to the cord, handle the headphones only by the headset or the plug.• Connecting the headphones when the volume of connected equipment is turned up may result in damage to the headphones. Lower the volume on the RG-7 before plugging in the headphones.•Listening at excessively high volume levels will not only damage the headphones, but may also cause hearing loss. Use the headphones at a moderate volume level. Connecting a Microphone You can connect a microphone into the Mic jack, and enjoy karaoke with the RG-7. fig.00-10 1. Connect a microphone (sold separately) to the Mic jack located in the jack panel on the lower left of the RG-7. 2. Rotate the Mic Volume knob in front of the Mic jack to adjust the volume level for the microphone. 3. Adjust the mic echo (p. 39). Some Notes on Using a Microphone •Be careful of high volume levels when using microphone late at night or early in the morning.• When connecting a microphone to the RG-7, be sure to lower the volume. If the volume control is too high when the microphone is plugged in, noise may be produced by the speakers.• Howling could be produced depending on the location of microphones relative to speakers. This can be remedied by:- Changing the orientation of the microphone.- Relocating microphone at a greater distance from speakers.- Lowering volume levels.RG-7_e.book 21 ページ 2005年2月14日 月曜日 午前9時45分](https://usermanual.wiki/Roland/RG-7/User-Guide-525080-Page-22.png)
![23Before You Start Playing 4. Secure the anti-theft lock with the screws as shown below.NOTE Be sure to replace removed screws when securing the anti-theft lock. About the Screens Immediately after the power is turned on, the Song Select screen like the one below is displayed. ■ Main Screens Song Select Screen When you press the [Song] button, the following screen is displayed. Each time you press the [Song] button in this screen, the song genre is switched. Function Screen Press the [Function] (Exit) button; the indicator lights, and the following screen appears. Tone Screen Press the Tone button; the indicator lights, and the following screen appears. ■ Adjusting the Contrast of the Screen 1. Rotate the LCD Contrast knob on the jack panel at the lower left of the instrument.ScrewsRG-7_e.book 23 ページ 2005年2月14日 月曜日 午前9時45分](https://usermanual.wiki/Roland/RG-7/User-Guide-525080-Page-24.png)
![24 Chapter 1. Playing Back Songs Look at What You Can Do with the RG-7! Listen to the Internal Songs The various internal songs programmed in the RG-7 are categorized into “Jazz” and “Classical” genres. You can play back the songs in these genres in a variety of ways, playing all the songs in sequence or randomly, or just playing songs individually. Listen to the Included CD and Commercial Audio CDs You can use the RG-7’s CD drive to play the included CD, CD-ROMs containing saved SMF music files, commercial audio CDs, and player piano CDs. Listen to Songs Saved to USB Memory Not only can you play CDs, you can also play back SMF music files saved on USB memory. In addition, you can connect USB memory and copy song data recorded with the RG-7 to the USB memory. Store Songs in the “Favorites” The RG-7 is set at the factory with tone demos registered in the “Favorites.” Listen to the tone demos to check out the special characteristics of each tone.Additionally, you can save songs recorded with the RG-7 to the “Favorites” and you can copy songs stored in USB memory to the “Favorites” as well. Songs held in the “Favorites” are not lost when the power is turned off, making this a convenient place to store those songs you listen to often. Easy-to-Use Remote Control Included You can use the included remote control to start and stop the current performance and switch songs. You can also use the remote control to select what is to be displayed on an external screen or television set connected to the RG-7 and assign other functions to the remote control’s buttons to make operating the RG-7 even simpler. Connect a Microphone for Karaoke Performances Connect a microphone to the RG-7, and you are ready to enjoy karaoke. You can change the key of the song to match the singer’s voice and adjust the amount of echo applied to the microphone input. In addition, the RG-7 includes functions for adding harmonies and effects (Transformer) to vocals. Show Your Favorite Images on a Connected Display or Television You can connect an external display or television set to the RG-7 and display the Song Select screen, lyrics and notations, and even slide shows of your favorite images. You can also use the remote control to switch the images appearing in the connected external display or television. The “Moving Key” Feature You can have the RG-7’s keyboard play automatically along with the internal songs, songs recorded with the RG-7, songs on CDs, and songs stored in USB memory. You can switch this feature on and off with the [Moving Key] button on the front panel or with the buttons on the remote control.RG-7_e.book 24 ページ 2005年2月14日 月曜日 午前9時45分](https://usermanual.wiki/Roland/RG-7/User-Guide-525080-Page-25.png)
![25Chapter 1. Playing Back Songs Listening to Songs The RG-7 features a variety of internal songs. The internal songs are categorized into “Jazz” and “Classical” genres.You can also use the RG-7’s CD drive to play back the included CD, CD-ROMs with songs saved in SMF format, commercially available audio CDs, and player piano CDs. Moreover, you can connect USB memory to the Ext Memory port and play back SMF music file that’s been saved on the memory device. ■ [Song] Button Functions Each press of the [Song] button selects the next available song genre, in this order:“Jazz” → “Classical” → “Favorites” → “CD” → “Ext Memory” (songs in the USB memory device connected to the Ext Memory port) fig. The “CD” and “USB” genres appear only when a CD is in the CD drive or when USB memory is connected to the Ext Memory port. “Favorites” is indicated only when there are songs in the Favorites genre.What are the “Favorites?”This is the area of memory where you can save copies of performances recorded with the RG-7, songs saved on CD-ROMs, songs stored in the USB memory connected to the RG-7’s Ext Memory port, and other songs.After copying songs to the “Favorites,” you can then select the copied songs simply by pressing the [Song] button and selecting “Favorites” as the song genre.The RG-7 features a User Memory (the RG-7’s memory) area where the following types of data are stored.• Content registered in the “Favorites”• Content set in User programs (Favorites performance settings) (p. 78)To delete the content of the User Memory and restore the memory to the default factory settings, refer to “Initializing the User Memory or USB Memory” (p. 92).You can select and listen to tone demos (p. 26) from the “Favorites” after initializing the User memory.You can also delete these tone demos and overwrite them with other songs, which can then be saved.RG-7_e.book 25 ページ 2005年2月14日 月曜日 午前9時45分](https://usermanual.wiki/Roland/RG-7/User-Guide-525080-Page-26.png)
![26Chapter 1. Playing Back Songs ■ Listening to the Tone Demos The factory settings have tone demos registered in the “Favorites” (p. 25). 1. Press the [Song] button one or more times to select “Favorites” as the genre. 2. Press the [ ] button to start playback of the tone demos. You can select the tone demo to play back by pressing the [ ] or [ ] button. 3. Press the [ ] button once more to stop playback of the tone demos. You can delete tone demos in the “Favorites” and overwrite them by saving other songs in their place. If you want to play back tone demos after they have been deleted, initialize the User Memory to restore the factory settings (p. 92). ■ Listening to the Internal Songs 1. Press the [Song] button one or more times to select the genre you want. The internal song genres are “Jazz” and “Classical.” fig. If using the remote control, press the remote control’s [INTERNAL] button. The internal song genre selection can be switched between “Jazz” and “Classical” by pressing the [INTERNAL] button.“Jazz” → “Classical” → “Jazz”.... 2. Press the [ ] button to start playback of the internal songs. Songs in the selected genre are played back. When the RG-7 is set to play back all songs (p. 27), once the song currently being played back is finished, the next song starts playing automatically. After all of the songs in the genre have been played, playback automatically resumes from the first song in the genre. When the RG-7 is set to play back a single song (p. 27), playback stops automatically when the song is finished.You can select the next song by pressing the [ ] button, and return to the beginning of the song or the previous song by pressing the [ ] button. 3. Press the [ ] button once more to stop playback of the internal songs.NOTESongs saved to the “Favorites” are deleted when the User Memory is initialized. Save any songs you want to retain by copying them to USB memory (p. 42).For more information on the [Song] button functions, refer to “[Song] Button Functions” (p. 25).NOTEIf any previously recorded song data is present, the message “Delete User Song OK?” appears in the display. If you want to delete the existing song data, press the [Moving Key] (Enter) button. If you do not want the song data to be deleted, press the [Function] (Exit) button, and save the song to the “Favorites” or to your USB memory (p. 76).When playing songs on CDs, refer to “Listening to Songs on CDs” (p. 28).When playing songs from a USB memory device connected to the Ext Memory port, refer to “Playing Back Songs from USB Memory” (p. 31).RG-7_e.book 26 ページ 2005年2月14日 月曜日 午前9時45分](https://usermanual.wiki/Roland/RG-7/User-Guide-525080-Page-27.png)
![27Chapter 1. Playing Back Songs Playing Back One Song To play a single selected song, use the following procedure. 1. Press the [Function] (Exit) button, getting its indicator to light. 2. Press the [Song] (Select -) button or [ ] (Select +) button to display the PLAY screen. fig. 3. Press the [Song] (Select -) button or [ ] (Select +) button to get the value for “Mode” to flash. fig. 4. Press the [ ] (Value -) button or [ ] (Value +) button to select “One Song.” 5. Press the [Function] (Exit) button so the indicator goes out. Value DescriptionAll Song All of the songs in the genre are played back in sequence, starting from the selected song. When the final song in the selected genre is finished playing, playback then automatically resumes from the first song in that genre. One Song Only the selected song is played.Playback stops when the song is finished.You can save this setting in the RG-7’s memory using the Memory Backup function (p. 72).RG-7_e.book 27 ページ 2005年2月14日 月曜日 午前9時45分](https://usermanual.wiki/Roland/RG-7/User-Guide-525080-Page-28.png)
![29Chapter 1. Playing Back Songs Insert the CD in the CD Drive 1. Press the eject button and open a disc tray. fig. 2. Put a CD on a disc tray. 3. Press the eject button again to close the disc tray. Removing a CD 1. Press the eject button and open a disc tray. 2. Remove the CD from the disc tray. Playing Back Songs on CDs You can play back the CD included with the RG-7, CDs with player piano CDs, audio CDs, and CD-ROMs to which SMF music files are saved. 1. Place the CD you want to play in the CD drive. 2. Press the [Song] button one or more times to select “CD” as the genre. If using the remote control, press the remote control’s [EXTERNAL] button, then select “CD” as the genre.Eject ButtonDisc TrayIf a disc tray does not openIf the power is turned off with the disc still in the drive (such as due to a power failure), the disc tray cannot be opened by pressing the eject button. In this case, you can insert a piece of wire to force the tray open.fig.Make sure the RG-7’s power has been turned OFF before attempting to engage the emergency eject hole. If you insert something while the power is on, the disc could be damaged, or unexpected problems may occur.Emergency Eject HoleRG-7_e.book 29 ページ 2005年2月14日 月曜日 午前9時45分](https://usermanual.wiki/Roland/RG-7/User-Guide-525080-Page-30.png)
![30Chapter 1. Playing Back Songs The following screen appears. 3. Press the [ ] button to start playback of the CD’s songs. The songs on the CD are played. When the RG-7 is set to play back all songs (p. 27), once the song currently being played back is finished, the next song starts playing automatically. After all of the songs on the CD have been played, playback automatically resumes from the beginning of the CD. When the RG-7 is set to play back a single song (p. 27), playback stops automatically when the song is finished.You can select the next song by pressing the[ ] button, and return to the beginning of the song or the previous song by pressing the [ ] button. 4. Press the [ ] button once more to stop playback of the songs.NOTEIf any previously recorded song data is present, the message “Delete User Song OK?” appears in the display. If you want to delete the existing song data, press the [Moving Key] (Enter) button. If you do not want the song data to be deleted, press the [Function] (Exit) button, and save the song to the “Favorites” or to your USB memory (p. 76).You can start and stop playback of songs on CDs with the remote control’s [ ] button. You can also use the remote control’s [ ] button to advance to the next song and [ ] button to select the previous song.If you want to playback at each song, refer to “Playing Back One Song” (p. 27).When Selecting Songs in a Folder1. Press the [ ] button or [ ] button to select a folder.2. Press the [ ] button.The first song in the folder is displayed.3. Press the [ ] button or [ ] button to select a song.* Depending on the number of songs contained in a folder, this may take some time.If a Folder Contains Further Folders and Song DataIf yet other folders are contained within a folder, this is indicated in following manner.1. Press the [ ] button to display “Song No. 1.”2. Press the [ ] button.The name of the folder appears in the screen.fig.If a folder contains other folders, press the [ ] button to switch the screens.3. Press the [ ] button.The first song in the folder is displayed.To exit a folder:1. Press the [ ] button one or more times until “ Up” appears in the screen.2. Press the [ ] button.RG-7_e.book 30 ページ 2005年2月14日 月曜日 午前9時45分](https://usermanual.wiki/Roland/RG-7/User-Guide-525080-Page-31.png)
![31Chapter 1. Playing Back Songs ■ Playing Back Songs from USB Memory Not only can you listen to the songs on CDs, but you can also listen to songs saved on USB memory devices connected to the Ext Memory port. 1. Connect the USB memory device containing the songs you want to play to the Ext Memory port. 2. Press the [Song] button one or more times to select “Ext Memory” as the genre. If using the remote control, press the remote control’s [EXTERNAL] button, then select “Ext Memory” as the genre.The following screen appears. fig. 3. Press the [ ] button to start playback of the USB Memory’s songs. The songs stored in the USB memory are played.When the RG-7 is set to play back all songs (p. 27), once the song currently being played back is finished, the next song starts playing automatically. After all of the songs on the USB memory have been played, playback automatically resumes from the beginning of the USB memory.When the RG-7 is set to play back a single song (p. 27), playback stops automatically when the song is finished.You can select the next song by pressing the[ ] button, and return to the beginning of the song or the previous song by pressing the [ ] button. 4. Press the [ ] button once more to stop playback of the songs.NOTEUse USB memory available from Roland. Proper operation cannot be guaranteed if other external memory products are used.NOTEIf any previously recorded song data is present, the message “Delete User Song OK?” appears in the display. If you want to delete the existing song data, press the [Moving Key] (Enter) button. If you do not want the song data to be deleted, press the [Function] (Exit) button, and save the song to the “Favorites” or to your USB memory (p. 76).You can start and stop playback of songs saved on USB memory with the remote control’s [ ] button. You can also use the remote control’s [ ] button to advance to the next song and [] button to select the previous song.If you want to playback at each song, refer to “Playing Back One Song” (p. 27).RG-7_e.book 31 ページ 2005年2月14日 月曜日 午前9時45分](https://usermanual.wiki/Roland/RG-7/User-Guide-525080-Page-32.png)
![34Chapter 1. Playing Back Songs ■ About the Remote Control Button Explanation 1 TRANSFORMThis changes the vocals from the microphone. You can also use this to change vocals on the CD included with the instrument (p. 41). The transform setting switches each time you press the button.“Male” → “Female” → “Kids” → “Off” → “Male” ....HARMONYThis adds harmonies to the mic vocals. You can also add harmonies to vocals on the included CD (p. 40).The harmony setting switches each time you press the button.“Data” → “Oct Up” (1 Octave Up) → “OctDwn” (1 Octave Down) → “Off” → “Data” .... 2 3DAdds expansiveness and depth to the sound when it’s played through external speakers (p. 98).The setting switches each time you press the button.521789101134612Selecting the Song GenreChanging the Tempo of the SongUsing the Function Assigned to the ButtonsSwitches the Surround Function SettingsAdding Effects to Mic VocalsChanging the VolumeMuting the Sound Starting and Stopping Songs, Selecting Previous and Following SongsSelecting the Tone of the Part Activated by the KeysChanging the key of the songRestoring the original [TONE], [HARMONY], and [TRANSFORM] button settingsSwitching the Screen of the External Display or TelevisionInfrared EmitterRG-7_e.book 34 ページ 2005年2月14日 月曜日 午前9時45分](https://usermanual.wiki/Roland/RG-7/User-Guide-525080-Page-35.png)
![35Chapter 1. Playing Back Songs 3 INTERNALSelects the internal song genre.The internal song genre selection changes when the [INTERNAL] button is pressed.“Jazz” → “Classical” → “Jazz” ....FAVORITES Selects the “Favorites” genre.* This group cannot be selected if no songs have been saved to the “Favorites.”EXTERNALSelects the “CD” or “Ext Memory” genre.Pressing this button toggles you between selection of the “CD” and “Ext Memory” genre.* These groups cannot be selected if there is no CD in the CD drive or if no USB memory is connected. 4 MUTE This mutes all of the sounds. The Moving Key function stops at this time. 5 FUNC 1You can use the function assigned to this button. You can also change the function assigned to the button (p. 90).With the factory settings, the Moving Keys On/Off is assigned to this button.FUNC 2You can use the function assigned to this button. You can also change the function assigned to the button (p. 90).With the factory settings, the Random Playback On/Off is assigned to this button. 6 CANCEL This restores the remote control’s [HARMONY] and [TRANSFORM] button settings to their original condition. The [TONE] button is set to piano tone. 7 TONE This changes the tone of the part activated by the keys. The tone is switched each time you press the button. 8 DISPLAYSwitches the images appearing in the connected external display or television screen (p. 50).You can display the Song Select screen, lyrics, slide show (p. 51), and notations in the external display or television. 9 When you press the [ ] button while the song is stopped, the previous song is selected. Pressing the [ ] button while a song is playing returns you to the beginning of that song.This starts and stops playback of the song. Playback alternately starts and stops each time you press the [ ] button.When you press the [ ] button, the next song is selected. 10 VOL [–] [+](Volume)You can adjust the volume.Press the VOL [-] button to decrease the volume, and press the VOL [+] button to increase the volume. 11 TEMPO [–] [+]This adjusts the tempo.Press the TEMPO [-] button to slow down the tempo, and press the TEMPO [+] button to quicken the tempo.* You cannot change the tempos for audio CDs and Player Piano CDs. 12 TRANSPOSE [–] [+]Transposes the key of the song being played.Press the TRANSPOSE [-] button to lower the key; press the TRANSPOSE [+] button to raise the key.You can also assign functions to the button (p. 90). Button ExplanationRG-7_e.book 35 ページ 2005年2月14日 月曜日 午前9時45分](https://usermanual.wiki/Roland/RG-7/User-Guide-525080-Page-36.png)
![36Chapter 1. Playing Back Songs Using the Aux Input Jack1. Press the [Function] (Exit) button so the indicator is lit. 2. Press the [Song] (Select -) button or [ ] (Select +) button to display the AUX INPUT screen. 3. Press the [Song] (Select -) button or [ ] (Select +) button to get the value for “Mode” to flash. fig. 4. Press the [ ] (Value -) button or [ ] (Value +) button to change Aux Input type. Value: Off, Stereo, Decode With the factory settings, this is set to “Off.” When set to “Off,” the Aux Input connector cannot be used.Set this to “Stereo” when using a connected MD player or other such device.“Decode” is employed when inputting encoded signals; it is not normally used in normal situations. 5. Press the [Song] (Select -) button or [ ] (Select +) button to get the value for “Level” to flash. fig. 6. Press the [ ] (Value -) button or [ ] (Value +) button to change the Level of the device connected to Aux Input jack. Value: 0–127 *When the level is set to “0,” sounds from the device connected to the Aux Input jack are not played. 7. Press the [Function] (Exit) button so the indicator goes out.You can save this setting in the RG-7’s memory using the Memory Backup function (p. 72).RG-7_e.book 36 ページ 2005年2月14日 月曜日 午前9時45分](https://usermanual.wiki/Roland/RG-7/User-Guide-525080-Page-37.png)
![37Chapter 1. Playing Back Songs Changing the Song Tempo This changes the song tempo. Changing the tempo has no effect on the pitch of the notes. And you can change the tempo even when the song is in progress. 1. Press the remote control’s TEMPO [-] or TEMPO [+] button to adjust the tempo of the song. The tempo is indicated in the external display.The tempo can be adjusted in a range of =10–500.You can also change the tempo during playback.Pressing the TEMPO [+] button once increases the tempo by one unit. Holding down the button increases the tempo continuously. Pressing the TEMPO [-] button once decreases the tempo by one unit. Holding down the button makes the tempo change (slow down) continuously. Using the Karaoke Feature You can connect a microphone to the RG-7 and enjoy singing along as the music data is played back. 1. Connect the USB memory device containing the songs you want to play to the Ext Memory port (p. 22). 2. Connect a microphone (p. 21). 3. Adjust the volume level and the amount of echo applied. Adjust the microphone echo using the Mic Echo feature (p. 39). You can also use the Harmony function (p. 40) to add harmony to vocals sung through the microphone or the Transformer effect (p. 41) to alter the sound of the microphone vocals. 4. Select a song (p. 26, 28, 31). 5. Adjust the tempo as required with the remote control Tempo [-] [+] buttons. 6. If necessary, change the key of the song (p. 38). 7. The song starts to play when you press the [ ] button. Now sing along with the song. 8. Playback of the song stops when you press the [ ] button again.NOTEYou cannot change the tempos for audio CDs and Player Piano CDs.You can connect an external display or television to the RG-7 and have the lyrics of music data containing lyrics be displayed on the screen as the data is played back. Refer to “Connecting an External Display” (p. 47), “Connecting a Television” (p. 49), and “Selecting What is To Be Displayed on the External Display or Television” (p. 50).RG-7_e.book 37 ページ 2005年2月14日 月曜日 午前9時45分](https://usermanual.wiki/Roland/RG-7/User-Guide-525080-Page-38.png)
![38Chapter 1. Playing Back Songs ■ Changing the Key of the Song Being Played (Playback Transpose) SMF Music files or a performance that you recorded can be transposed for playback.When using the karaoke feature, you can raise or lower the key of the song to match your own pitch. 1. Select a song to play back (p. 26, 28, 31). 2. Press the [Function] (Exit) button so the indicator is lit. 3. Press the [Song] (Select -) button or [ ] (Select +) button to display the TRANSPOSE screen. fig. 4. Press the [Song] (Select -) button or [ ] (Select +) button to get the value for “Link” to flash. fig. 5. Press the [ ] (Value -) button or [ ] (Value +) button to switch the Link setting to “On.” 6. Press the [Song] (Select -) button or [ ] (Select +) button to get the value for “Keyboard/Playback” to flash. fig. 7. Press the [ ] (Value -) button or [ ] (Value +) button to change the key of the song and the notes from the keyboard. Each time you press the [ ] (Value -) button or [ ] (Value +) button, the song and the notes from the keyboard are transposed by one semitone. Pressing the [] (Value -) and [ ] (Value +) buttons simultaneously restores the original value (0).The playback transposition can be set in a range from -6 to 0 to +5 (in semitone increments). 8. Press the [Function] (Exit) button so the indicator goes out. 9. Press the [ ] button to start playing the song. The song is played in the changed key.You can transpose songs using the remote control’s TRANSPOSE [-] and [+] buttons.When Link is set to “Off,” you can transpose the song and the notes from the keyboard separately. With Link set to “Off,” the song can be transposed within the range from - 24 to 0 to +24 (in semitone increments).1. Press the [Song] (Select -) button or [ ] (Select +) button to get the value for “Link” to flash.2. Press the [ ] (Value -) button or [ ] (Value +) button to switch the Link setting to “Off.”3. Press the [Song] (Select -) button or [ ] (Select +) button to get the value for “Plybck” (Playback) to flash.4. Press the [ ] (Value -) button or [ ] (Value +) button to change the key of the song.RG-7_e.book 38 ページ 2005年2月14日 月曜日 午前9時45分](https://usermanual.wiki/Roland/RG-7/User-Guide-525080-Page-39.png)
![39Chapter 1. Playing Back Songs ■ Adding Echo to the Mic Vocals (Mic Echo) This adjusts the microphone echo when a microphone is connected to the RG-7. 1. Press the [Function] (Exit) button so the indicator is lit. 2. Press the [Song] (Select -) button or [ ] (Select +) button to display the MIC ECHO screen. fig. 3. Press the [Song] (Select -) button or [ ] (Select +) button to get the value for “Type” to flash. fig. 4. Press the [ ] (Value -) button or [ ] (Value +) button to change the echo type. 5. Press the [Song] (Select -) button or [ ] (Select +) button to get the value for “Level” to flash. fig. 6. Press the [ ] (Value -) button or [ ] (Value +) button to change the amount of echo applied to the sound. 7. Press the [Function] (Exit) button so the indicator goes out. Value Description1 Adds basic reverberations. 2 Adds reverberations for a karaoke-type echo. Value Description0–9 More echo is applied as the value is increased. No echo is applied to the microphone vocals when the value is set at “0.”RG-7_e.book 39 ページ 2005年2月14日 月曜日 午前9時45分](https://usermanual.wiki/Roland/RG-7/User-Guide-525080-Page-40.png)
![40Chapter 1. Playing Back Songs ■ Adding Harmonies to the Mic Vocals (Harmony) You can sing with a harmony accompaniment, even when you’re playing solo. This is called the “Harmony” function. 1. Press the [Function] (Exit) button so the indicator is lit. 2. Press the [Song] (Select -) button or [ ] (Select +) button to display the VOCAL screen. fig. 3. Press the [Song] (Select -) button or [ ] (Select +) button to get the value for “Harmony” to flash. fig. 4. Press the [ ] (Value -) button or [ ] (Value +) button to change the harmony settings. 5. Press the [Function] (Exit) button so the indicator goes out. Value DescriptionUnison Sounds like two people singing the same melody. Oct Up(Octave Up) Adds another voice one octave higher than the original. OctDwn(Octave Down) Adds another voice one octave lower than the original. 5th Up Adds harmony a fifth above the original. 3rd Up Adds harmony a third above the original. 4thDwn (4th Down) Adds harmony a major fourth below the original. Data As you sing along with the playback of the song data, harmonies consistent with the scale of the specified part are added.Set the part to which harmonies are added in “Setting the Part to Which Harmonies Are Added (Harmony Part)” (p. 95). Off No harmonies are added to the microphone vocals.NOTEUse of the Harmony function may cause changes in the Damper Resonance effect (p. 59).NOTEDepending on the type of harmony, there may be some songs to which harmonies cannot be added.You can change the settings for the Harmony function with the remote control’s [HARMONY] button (p. 34).RG-7_e.book 40 ページ 2005年2月14日 月曜日 午前9時45分](https://usermanual.wiki/Roland/RG-7/User-Guide-525080-Page-41.png)
![41Chapter 1. Playing Back Songs ■ Altering Vocals (Transformer) You can modify the way your voice sounds through the microphone. This is called the “Voice Transformer” function. 1. Press the [Function] (Exit) button so the indicator is lit. 2. Press the [Song] (Select -) button or [ ] (Select +) button to display the VOCAL screen. fig. 3. Press the [Song] (Select -) button or [ ] (Select +) button to get the value for “Transformer” to flash. fig. 4. Press the [ ] (Value -) button or [ ] (Value +) button to change the transformer settings. 5. Press the [Function] (Exit) button so the indicator goes out. Value DescriptionKids Transforms the input into the sound of a child’s voice. Bear Transforms the input sound into the voice of a large animal. Robot Transforms the input into the sound of a robot’s voice. Duck Transforms the input into a duck’s quacking sound. Alien Transforms the input into an alien voice. Computer Transforms the input into a voice like that from a computer. Female Transforms male voices into female voices. Male Transforms female voices into male voices. Off The Transformer effect is not applied to the microphone vocals.You can change the settings for the Transformer function with the remote control’s [TRANSFORM] button (p. 34).RG-7_e.book 41 ページ 2005年2月14日 月曜日 午前9時45分](https://usermanual.wiki/Roland/RG-7/User-Guide-525080-Page-42.png)
![42Chapter 1. Playing Back Songs Copying Songs You can copy performances recorded with the RG-7, songs saved on CD-ROMs, songs on USB memory connected to the RG-7’s Ext Memory port, and other songs to the RG-7’s “Favorites.”Copying songs to the “Favorites” enables you to access these songs easily by pressing the [Song] button to select the “Favorites” as the genre. ■ Copying Songs Saved on CDs and USB Memory to the “Favorites” 1. Connect the USB memory device to the Ext Memory port or place the CD-ROM containing the song or songs you want to copy in the CD drive. 2. Press the [Function] (Exit) button so the indicator is lit. 3. Press the [Song] (Select -) button or [ ] (Select +) button to display the FILE screen. fig. 4. Press the [Song] (Select -) button or [ ] (Select +) button so “COPY” is flashing. fig. 5 Press the [Moving Key] (Enter) button. 6 Press the [Song] (Select -) button or [ ] (Select +) button so that the “COPY From” setting is flashing. fig.NOTEYou cannot copy songs on commercially available audio CDs or Player Piano CDs to the “Favorites.”RG-7_e.book 42 ページ 2005年2月14日 月曜日 午前9時45分](https://usermanual.wiki/Roland/RG-7/User-Guide-525080-Page-43.png)
![43Chapter 1. Playing Back Songs 7 Press the [ ] (Value -) button or [ ] (Value +) button to change the “COPY From” setting. 8. Press the [Song] (Select -) button or [ ] (Select +) button so that the “COPY From” song number is flashing. fig. 9. Press the [ ] (Value -) button or [ ] (Value +) button to select the number of the song you want to copy. 10 Press the [Moving Key] (Enter) button. To copy songs on a CD, continue the procedure from Step 11.To copy songs stored in USB memory and internal songs, carry out Step 10, then continue the procedure from Step 14. 11. When selecting “CD” as the copy source, press the [Song] (Select -) button or [ ] (Select +) button so that the “COPY To” setting is flashing. fig. 12. Press the [ ] (Value -) button or [ ] (Value +) button to select the copy destination. Value DescriptionJazz Internal songs in the “Jazz” genre are copied to the “Favorites.” Classical Internal songs in the “Classical” genre are copied to the “Favorites.” CD Songs in the CD-ROM are copied to the USB memory or the “Favorites.” Ext Memory Songs in the USB memory device are copied to the “Favorites.” Favorites Songs in the “Favorites” are copied to the USB memory device. Value DescriptionFavorites Copies the song to the “Favorites.” Ext Memory Copies the song to the USB memory.RG-7_e.book 43 ページ 2005年2月14日 月曜日 午前9時45分](https://usermanual.wiki/Roland/RG-7/User-Guide-525080-Page-44.png)
![44Chapter 1. Playing Back Songs 13 Press the [Song] (Select -) button or [ ] (Select +) button so that the “COPY To” song number is flashing. fig. 14 Press the [ ] (Value -) button or [ ] (Value +) button to select the copy-destination number. 15 Press the [Moving Key] (Enter) button. The song is copied. 16. Press the [Function] (Exit) button so the indicator goes out.NOTEWhen copying performances saved to USB memory, do not remove the USB memory device until copying is finished.When there is no song assigned to a number, this is indicated in the display in the following form: “4: (Empty).”fig.If you select a number to which a song is already saved and then attempt to copy to that number, the following message appears in the display.fig.To delete the saved song and copy the new song to that number, press the [Moving Key] (Enter) button. If you do not want to delete the saved song, press the [Function] (Exit) button.RG-7_e.book 44 ページ 2005年2月14日 月曜日 午前9時45分](https://usermanual.wiki/Roland/RG-7/User-Guide-525080-Page-45.png)
![45Chapter 1. Playing Back Songs Deleting Songs Saved to the “Favorites” or USB Memory This deletes songs saved to USB Memory (sold separately) and the “Favorites.”If deleting songs saved to USB Memory, connect the USB memory device to the Ext Memory port. 1. Press the [Function] (Exit) button so the indicator is lit. 2. Press the [Song] (Select -) button or [ ] (Select +) button to display the FILE screen. fig. 3. Press the [Song] (Select -) button or [ ] (Select +) button so “DEL” (Delete) is flashing. fig. 4 Press the [Moving Key] (Enter) button. The following screen appears. fig. 5. Press the [Song] (Select -) button or [ ] (Select +) button so that the “Saved Song to Delete” setting is flashing. fig.RG-7_e.book 45 ページ 2005年2月14日 月曜日 午前9時45分](https://usermanual.wiki/Roland/RG-7/User-Guide-525080-Page-46.png)
![46Chapter 1. Playing Back Songs 6. Press the [ ] (Value -) button or [ ] (Value +) button to select “Saved Song to Delete.” 7. Press the [Song] (Select -) button or [ ] (Select +) button to get the “song number” to flash. fig. 8. Press the [ ] (Value -) button or [ ] (Value +) button to select the song to be deleted. 9 Press the [Moving Key] (Enter) button. f A confirmation message appears in the screen.To return to the original screen without deleting the song, press the [Function] (Exit) button. 10 Press the [Moving Key] (Enter) button once more. The song is deleted. 11. Press the [Function] (Exit) button so the indicator goes out. Value DescriptionFavorites Deletes the songs in the “Favorites.” Ext Memory Deletes the songs in the USB memory.NOTEWhen deleting performances saved to USB memory, do not remove the USB memory device until deleting is finished.RG-7_e.book 46 ページ 2005年2月14日 月曜日 午前9時45分](https://usermanual.wiki/Roland/RG-7/User-Guide-525080-Page-47.png)
![48Chapter 2. Using the RG-7 with an External Display or Television 3 Switch on the RG-7. 4 Switch on the connected display. Turning the Power Off After use, turn off the power using the following procedure. 1 Turn the volume all the way down on the RG-7. 2 Turn off the RG-7. 3 Turn off the connected display. ■ Changing the Display Settings 1. Press the [Function] (Exit) button so the indicator is lit. 2. Press the [Song] (Select -) button or [ ] (Select +) button to display the EXT DISPLAY screen. fig. 3. Press the [Song] (Select -) button or [ ] (Select +) button so that the display setting is flashing. fig. 4. Press the [ ] (Value -) button or [ ] (Value +) button to select “VGA.” 5. Press the [Function] (Exit) button so the indicator goes out. Images are now displayed in the screen of the connected external display.When you press the [DISPLAY] button on the remote control, the content being displayed switches to the external display.To change the settings indicated in the display (Song Select screen → Lyrics screen → Slide show → Notation → Song Select screen...), refer to “Selecting What is To Be Displayed on the External Display or Television” (p. 50).For more on handling the external display, refer to your display’s owner’s manual.You can save this setting in the RG-7’s memory using the Memory Backup function (p. 72).RG-7_e.book 48 ページ 2005年2月14日 月曜日 午前9時45分](https://usermanual.wiki/Roland/RG-7/User-Guide-525080-Page-49.png)
![49Chapter 2. Using the RG-7 with an External Display or Television Connecting a Television fig. ■ Making the Connections *To prevent malfunction and/or damage to speakers or other devices, always turn down the volume, and turn off the power on all devices before making any connections. 1 Turn off the power to the RG-7 and the television to be connected. 2 Use a video cable (sold separately) to connect the RG-7’s Video Out jack with the television’s video input jack. 3 Turn on the power to the RG-7. 4 Turn on the power to the television. ■ Switching Television Formats If you find that the image quality of the television is poor, try switching the television format. 1. Press the [Function] (Exit) button so the indicator is lit. 2 Press the [Song] (Select -) button or [ ] (Select +) button to display the EXT DISPLAY screen. 3. Press the [ ] (Value -) button or [ ] (Value +) button to select the television format. fig. Value: PAL, NTSC 4. Press the [Function] (Exit) button so the indicator goes out. When you press the [DISPLAY] button on the remote control, the content being displayed switches to the television.To change the settings indicated in the display (Song Select screen → Lyrics screen → Slide show → Notation → Song Select screen...), refer to “Selecting What is To Be Displayed on the External Display or Television” (p. 50).TelevisionRG-7’s Jack PanelVideo Out jackVideo Cable(Sold separately)NOTEYou cannot display information or images with a television when an external display is connected to the Ext Display connector. To use an television, first disconnect the external display from the Ext Display connector, then connect the television.You can save this setting in the RG-7’s memory using the Memory Backup function (p. 72).RG-7_e.book 49 ページ 2005年2月14日 月曜日 午前9時45分](https://usermanual.wiki/Roland/RG-7/User-Guide-525080-Page-50.png)
![50Chapter 2. Using the RG-7 with an External Display or Television Selecting What is To Be Displayed on the External Display or Television Here’s how you can specify what it is that you want to have displayed on the external display or television connected to the RG-7. 1. Press the remote control’s [DISPLAY] button to switch the content displayed in the external display or television. 2. Press the [Function] (Exit) button so the indicator goes out. Notes When Switching the Display on External Displays and Televisions • Lyrics are not displayed with audio CDs.• You cannot exhibit slide shows on an external display or television screen unless you connect USB memory containing user images to the Ext Memory port.•If no lyrics background image is stored in the USB memory connected to the Ext Memory port, the RG-7’s internal lyrics background image is displayed instead.•You cannot display any lyrics screen when playing back music data that does not include lyrics data.• The internal songs include a number of jazz pieces that are played in an improvised fashion, and you may find notes not conforming to measure lines, odd divisions of the parts played in the left and right hand, and other such features that do not match what is shown in the notation. Screen Displayed DescriptionSong Select Displays the Song Select screen. Selecting songs is made easier when the Song Select screen is displayed on an external display or television set. Lyrics Displays the Song Select screen. However, lyrics are displayed only during playback of music data that includes lyrics data.You can also connect USB memory to the Ext Memory port and display “karaoke background images” saved to the USB memory. For more details, refer to “Changing the Background for the Lyrics Screen” (p. 52). Slide Show You can connect USB memory to the Ext Memory port and display user images saved to the USB memory as slide shows. For more details, refer to “Displaying Favorite Images on an External Display or Television (Slide Show)” (p. 51). Notation Displays the notation.This allows you to check the music as the song is played back.RG-7_e.book 50 ページ 2005年2月14日 月曜日 午前9時45分](https://usermanual.wiki/Roland/RG-7/User-Guide-525080-Page-51.png)
![51Chapter 2. Using the RG-7 with an External Display or Television Displaying Favorite Images on an External Display or Television (Slide Show) With the RG-7, you can take desired image data saved in USB memory and display it on a connected external display or television set.First, you will need to have saved the image data and connected the USB memory to the Ext Memory port. Preparing the Images to be Displayed Prepare the desired image data on your computer and save the data to the USB memory. 1. Prepare the desired image data with your computer. 2. Connect the USB memory to your computer, then create a folder named “_PICTURE” in the USB memory. 3. Place the images you want to display in the “_PICTURE” folder. Setting the Duration for Displaying Images When you have data for multiple images saved to the USB memory and want to display these images on a connected display or television set, you can specify the length of time each image appears. 1. Press the [Function] (Exit) button so the indicator is lit. 2. Press the [Song] (Select -) button or [ ] (Select +) button to display the EXT DISPLAY screen. 3. Press the [Song] (Select -) button or [ ] (Select +) button to get the value for “Slide Interval” to flash. fig. 4. Press the [ ] (Value -) button or [ ] (Value +) button to set the time a single image is to be displayed. Value; 2–60 seconds 5. Press the [Function] (Exit) button so the indicator goes out. Image Data That Can Be Displayed Size 640 x 480 pixelsColor 8 bit (256 colors), 4 bit (16 colors), 1 bit (2 colors)Format BMP Format * The RG-7 cannot deal with compressed image data.Name SCENE***.BMP ***: 001–099The folder named “_PICTURE” is not shown in the Song Select screen.You can save this setting in the RG-7’s memory using the Memory Backup function (p. 72).RG-7_e.book 51 ページ 2005年2月14日 月曜日 午前9時45分](https://usermanual.wiki/Roland/RG-7/User-Guide-525080-Page-52.png)
![52Chapter 2. Using the RG-7 with an External Display or Television Running Slide Shows Through a Connected External Display or Television 1. Make sure the power to the RG-7 is turned off, then connect the external display or television (p. 47, p. 49). 2 Turn on the power to the RG-7 and the external display (or television). 3 Make the settings for the display or television format (p. 48, p. 49). 4 Connect the USB memory containing the saved images you want to display to the Ext Memory port. 5 Pressing the remote control’s [DISPLAY] button, make the settings for the slide show to appear in the external display or television. The slide show appears in the external display or television screen. Changing the Background for the Lyrics Screen You can have the background you prefer shown when displaying lyrics on an external display or television screen. Preparing the Images to be Displayed Prepare the desired image data on your computer and save the data to the USB memory. 1. Prepare the desired image data with your computer. 2 Connect the USB memory to your computer, then create a folder named “_PICTURE” in the USB memory. 3 Copy the image data you have created (KARAOKE.BMP) to the “_PICTURE” folder. 4 Make sure the power to the RG-7 is turned off, then connect the external display or television (p. 47, p. 49). 5 Turn on the power to the RG-7 and the external display (or television). 6 Connect the USB memory containing the saved image you want to display (KARAOKE.BMP) to the Ext Memory port. 7 Pressing the remote control’s [DISPLAY] button, set the external display or television to display the lyrics. The desired background image is shown in the external display or television screen. Image Data That Can Be Displayed Size 640 x 480 pixelsColor 8 bit (256 colors), 4 bit (16 colors), 1 bit (2 colors)Format BMP Format * The RG-7 cannot deal with compressed image data.Name KARAOKE.BMPNOTEYou cannot display any lyrics screen when playing back music data that does not include lyrics data.RG-7_e.book 52 ページ 2005年2月14日 月曜日 午前9時45分](https://usermanual.wiki/Roland/RG-7/User-Guide-525080-Page-53.png)
![53 Chapter 3. Performance Performing with a Variety of Sounds The RG-7 contains 20 different internal tones. The tones are organized into five tone groups, which are assigned to the Tone buttons. fig.01- Selecting a Tone Group 1 Press any Tone button. The indicator of the button you pressed will light.When you play the keyboard, you will hear a sound in the selected tone group. Selecting Variation Tones 2 While holding down the Tone button and the [ ] (Value -) or [ ] (Value +) button to select the tone. The tone name appears in the display. fig.01- The tone you’ve selected is heard when you finger the keyboard.Some tones are assigned a pair of tones, which allow you to perform with two tones layered together. Piano 1 Piano 2 Harpsichord1 Superior Grand 1 Natural Grand 1 Harpsichord 2 Superior Grand + Str 2 Natural Grand + Str 2 Coupled Harpsichord 3 Superior Grand + Pad 3 Natural Grand + Pad 3 Harpsichord + Choir 4 Piano + FM E.Piano 4 Piano + Bell 4 Harpsichord + Str Vibraphone E.Piano1 Vibraphone 1 Electric Piano 2 Bell 2 FM E.Piano 3 Harp 3 '60s Electric Piano 4 Electric Piano + Pad 4 Electric Piano + StrThe factory settings have tone demos registered in the “Favorites” (p. 25). You can check and confirm the internal tones.You can delete tone demos in the “Favorites” and overwrite them by saving other songs in their place. If you want to play back tone demos after they have been deleted, initialize the User Memory to restore the factory settings (p. 92).You can also switch the Split function (p. 66) on and off by holding down a tone button and pressing the [Song] button. The Tone screen appears as shown below when the Split function is on.Pressing a tone button once more cancels the Split function.RG-7_e.book 53 ページ 2005年2月14日 月曜日 午前9時45分](https://usermanual.wiki/Roland/RG-7/User-Guide-525080-Page-54.png)
![54Chapter 3. Performance ■ Changing the Volume Balance of the Layered Tones (Layer Balance) Some tones enable you to perform with two tones layered together. These are called “Layer tones.”When you select a Layer tone, you can also change the balance in the volume of the two Layer tones. 1 Press the [Function] (Exit) button so the indicator is lit. 2. Press the [Song] (Select -) button or [ ] (Select +) button to display the BALANCE screen. fig. 3. Press the [Song] (Select -) button or [ ] (Select +) button to get the value for “Layer” to flash. fig. 4 Press the [ ] (Value -) button or [ ] (Value +) button to adjust the volume balance. Value: 1:9–9:1 The volume increases as the value is raised.The numeral on the left indicates the tone’s original volume level, and the number on the right indicates the volume of the tone as played with the other Layer tone.Example: When Natural Grand+Str (Natural Grand Piano + Strings) are selected as the tones fig. 5. Press the [Function] (Exit) button so the indicator goes out.Volume level of Natural Grand (Natural Grand Piano)Volume level of StringsRG-7_e.book 54 ページ 2005年2月14日 月曜日 午前9時45分](https://usermanual.wiki/Roland/RG-7/User-Guide-525080-Page-55.png)
![55Chapter 3. Performance Making Fine Adjustments to the Piano Sound You can make fine adjustments to the sound of the piano as desired. ■ Adjusting the Keyboard Touch (Key Touch) You can adjust the touch (playing feel) of the keyboard. 1 Press the [Function] (Exit) button so the indicator is lit. 2. Press the [Song] (Select -) button or [ ] (Select +) button to display the KEY TOUCH screen. fig. 3. Press the [Song] (Select -) button or [ ] (Select +) button to get the value for “Touch” to flash. fig. 4 Press the [ ] (Value -) button or [ ] (Value +) button to change the value. 5. Press the [Function] (Exit) button so the indicator goes out. Indicator Settings1–100 The keyboard touch gets lighter as the value decreases, with the touch becoming heavier as the value is increased. Fix The sound plays at a fixed volume, regardless of how forcefully the keys are played.You can save this setting in the RG-7’s memory using the Memory Backup function (p. 72).Fortissimo (ff) can be played with a lighter touch as the value is decreased, making it feel like the keyboard has a lighter touch. This setting makes it easy to play, even for children.Increasing the value gives the instrument a heavier key touch. Fortissimo (ff) cannot be produced unless you play more strongly than usual, making the keyboard feel heavier. Dynamic fingering adds even more feeling to what you play.A value of around 65 provides a standard setting, producing the most natural touch. This is the closest to the touch of an acoustic piano.RG-7_e.book 55 ページ 2005年2月14日 月曜日 午前9時45分](https://usermanual.wiki/Roland/RG-7/User-Guide-525080-Page-56.png)
![56Chapter 3. Performance ■ Changing the Timing of Sounds According to the Force Used to Press the Keys (Hammer Response) This adjusts how your playing strength will affect the timing at which the note sounds. This is called the “Hammer Response” function.On an acoustic piano, pressing a key moves a hammer, which strikes a string to produce sound. If you press the key softly, the hammer will move slowly, meaning that it will take slightly longer (in comparison to a strongly-played note) from the moment you press the key until the sound is produced.If the Hammer Response function is turned on, the time between the moment you press a key until the sound is heard will change depending on the strength with which you play. As you play more softly, this time will become longer. 1 Press the [Function] (Exit) button, getting its indicator to light. 2 Press the [Song] (Select -) button or [ ] (Select +) button to display the KEY TOUCH screen. fig. 3 Press the [Song] (Select -) button or [ ] (Select +) button to get the value for “Hammer” to flash. fig. 4 Press the [ ] (Value -) or [ ] (Value +) button to change the value. 5 Press the [Function] (Exit) button so the indicator goes out. Value DescriptionLight The response is faster when the keys are pressed gently. Medium The regular timing is used when the keys are pressed gently. Heavy The timing of the sounds is delayed when the keys are pressed gently. Off The Hammer Response function is cancelled.The sound is played immediately, regardless of the force with which the keys are played (velocity).You can save this setting in the RG-7’s memory using the Memory Backup function (p. 72).RG-7_e.book 56 ページ 2005年2月14日 月曜日 午前9時45分](https://usermanual.wiki/Roland/RG-7/User-Guide-525080-Page-57.png)
![57Chapter 3. Performance ■ Playing Sounds When the Keys Are Released (Key Off Resonance) You can play the “key off” sound (the subtle sound produced when the keys are released) obtained when playing an acoustic piano. 1 Press the [Function] (Exit) button, getting its indicator to light. 2 Press the [Song] (Select -) button or [ ] (Select +) button to display the RESONANCE screen. fig. 3 Press the [Song] (Select -) button or [ ] (Select +) button to get the value for “KeyOff” to flash. fig. 4 Press the [ ] (Value -) or [ ] (Value +) button to change the value. 5 Press the [Function] (Exit) button so the indicator goes out. Value Description0–9 The volume of the Key Off sound decreases as the value is lowered, while raising the value increases the volume of the Key Off sound.The Key Off Resonance function is not active when the value is set to “0.”You can save this setting in the RG-7’s memory using the Memory Backup function (p. 72).This setting is enabled only with the piano tones (Superior Grand, Natural Grand) and harpsichord tones (Harpsichord, Coupled Harpsichord). You cannot set this for other tones.RG-7_e.book 57 ページ 2005年2月14日 月曜日 午前9時45分](https://usermanual.wiki/Roland/RG-7/User-Guide-525080-Page-58.png)
![58Chapter 3. Performance ■ Producing the Resonance of the Strings When the Keys Are Played (String Resonance) When you play the keys on an acoustic piano, the strings that are already playing resonate as well. The function that reproduces this effect is called “String Resonance.” 1 Press the [Function] (Exit) button, getting its indicator to light. 2 Press the [Song] (Select -) button or [ ] (Select +) button to display the RESONANCE screen. fig. 3 Press the [Song] (Select -) button or [ ] (Select +) button to get the value for “String” to flash. fig. 4 Press the [ ] (Value -) or [ ] (Value +) button to change the value. 5 Press the [Function] (Exit) button so the indicator goes out. Value Description0–9 The resonance level decreases as the value is decreased, while increasing the value increases the amount of resonance.The String Resonance function is not active when the value is set to “0.”You can save this setting in the RG-7’s memory using the Memory Backup function (p. 72).NOTEThis setting is enabled only with the piano tones. You cannot set this for other tones.RG-7_e.book 58 ページ 2005年2月14日 月曜日 午前9時45分](https://usermanual.wiki/Roland/RG-7/User-Guide-525080-Page-59.png)
![59Chapter 3. Performance ■ Producing the Resonance of the Strings When the Keys Are Played (Damper Resonance) You can change the volume of the damper pedal resonance.On an acoustic piano, depressing the damper pedal makes the notes you play resonate with other strings, adding rich reverberations and fatness to the sound. The damper pedal on the RG-7 recreates this resonance (Damper Resonance) when depressed. 1 Press the [Function] (Exit) button, getting its indicator to light. 2 Press the [Song] (Select -) button or [ ] (Select +) button to display the RESONANCE screen. fig. 3 Press the [Song] (Select -) button or [ ] (Select +) button to get the value for “Damper” to flash. fig. 4 Press the [ ] (Value -) or [ ] (Value +) button to change the value. 5 Press the [Function] (Exit) button so the indicator goes out. Value Description0–9 The resonance volume decreases as the value is lowered, while raising the value increases the volume of the Damper Resonance.The Damper Resonance function is not active when the value is set to “0.”You can save this setting in the RG-7’s memory using the Memory Backup function (p. 72).NOTEThis setting is enabled only with the piano tones. You cannot set this for other tones.RG-7_e.book 59 ページ 2005年2月14日 月曜日 午前9時45分](https://usermanual.wiki/Roland/RG-7/User-Guide-525080-Page-60.png)
![60Chapter 3. Performance ■ Adjusting the Sound to Achieve the Preferred Tone Quality (Equalizer) The RG-7 features a built-in, three-band digital equalizer.An equalizer boosts or cuts specific sound pitches (frequency ranges) to adjust the sound balance for the overall performance. For example, you can boost the highs to get a crisper sound, or boost the low end for a more powerful sound.You can also adjust the sound to compensate for the acoustical characteristics of the performance space.If raising the values for separate frequencies causes the sound to distort, you can use the “Master Level” (see below) to control such distortion. 1 Press the [Function] (Exit) button, getting its indicator to light. 2 Press the [Song] (Select -) button or [ ] (Select +) button to display the EQUALIZER screen. fig. 3 Press the [Song] (Select -) button or [ ] (Select +) button so that the value for the range you want to set is flashing. fig. 4 Press the [ ] (Value -) button or [ ] (Value +) button to adjust the range and the overall level. Value: -60 – 0 – +60 5 Press the [Function] (Exit) button so the indicator goes out. Value DescriptionMaster (Master Level) You can temper the distortion in the sound by lowering the level. Raising the level too much may cause the sound to become distorted. L (Low) Low-frequency range. This is the range of frequencies for instruments like drums, bass, organ, guitar and strings. M (Middle) Midrange. This is the range of frequencies where most instrument sounds are concentrated. H (High) High-frequency range. These frequencies add brilliance to the sound.You can save this setting in the RG-7’s memory using the Memory Backup function (p. 72).RG-7_e.book 60 ページ 2005年2月14日 月曜日 午前9時45分](https://usermanual.wiki/Roland/RG-7/User-Guide-525080-Page-61.png)
![61Chapter 3. Performance Changing the Pitch of the Keyboard Sound (Transpose) By using the “Transpose function,” you can transpose your performance without changing the notes you play. For example, even if the song is in a difficult key with numerous sharps ( ) or flats ( ), you can transpose it to a key that is easier for you to play. When accompanying a vocalist, you can easily transpose the pitch to a range that is comfortable for the singer, while still playing the notes as written (i.e., with the same fingering positions). 1. Press the [Function] (Exit) button so the indicator is lit. 2. Press the [Song] (Select -) button or [ ] (Select +) button to display the TRANSPOSE screen. fig. 3. Press the [Song] (Select -) button or [ ] (Select +) button to get the value for “Link” to flash. fig. 4. Press the [ ] (Value -) button or [ ] (Value +) button to switch the Link setting to “On.” 5. Press the [Song] (Select -) button or [ ] (Select +) button to get the value for “Keyboard/Playback” to flash. fig. 6 Press the [ ] (Value -) button or [ ] (Value +) button to select the transposition value. The keyboard is transposed by a semitone each time you press the [ ] (Value -) button or [ ] (Value +) button. Pressing the [ ] (Value -) and [ ] (Value +) buttons simultaneously returns the setting to the original value (0).This can be set in a range of -6–0–+5 (semitone steps).When Link is set to “Off,” you can transpose the song and the notes from the keyboard separately. RG-7_e.book 61 ページ 2005年2月14日 月曜日 午前9時45分](https://usermanual.wiki/Roland/RG-7/User-Guide-525080-Page-62.png)
![62Chapter 3. Performance Cancelling the Transpose Function 1 Press the [ ] (Value -) and [ ] (Value +) buttons simultaneously to select “0.” Tuning to Other Instruments’ Pitches (Master Tuning) In situations such as when playing ensemble with other instruments, you can tune the RG-7’s standard pitch to the pitch of another instrument. The standard pitch generally refers to the pitch of the note that’s played when you finger the middle A key. This tuning of all the instruments to a standard pitch is called “tuning.” 1 Press the [Function] (Exit) button, getting its indicator to light. 2 Press the [Song] (Select -) button or [ ] (Select +) button to display the TUNE screen. fig. 3 Press the [Song] (Select -) button or [ ] (Select +) button to get the value for the Master Tuning setting to flash. fig. 4 Press the [ ] (Value -) button or [ ] (Value +) button to change the standard pitch. Value 415.3 Hz–440.0 Hz–466.2 Hz This is set to “440.0” when the power to the RG-7 is switched on. 5 Press the [Function] (Exit) button so the indicator goes out.Example: Playing a song in E major while playing the keys for C majorIn this example, C is the root note in the key of C major. E, the root of E major, is the third in C major. It is up four keys, including the black keys, so touch, then enter “4” for the setting.fig.If you play C E G It will sound E G# BYou can save this setting in the RG-7’s memory using the Memory Backup function (p. 72).RG-7_e.book 62 ページ 2005年2月14日 月曜日 午前9時45分](https://usermanual.wiki/Roland/RG-7/User-Guide-525080-Page-63.png)
![63Chapter 3. Performance Setting the Tuning Curve (Stretch Tuning) Pianos are generally tuned so that the low range is flatter and the high range is sharper than equal tempered pitches. This method of tuning is unique to the piano, and is known as “stretched tuning.”A graph that shows the changes in pitch of actual tuning compared with the changes in equal temperament pitch is called a tuning curve. Changing the tuning curve produces subtle variations in the reverberations of the chords you play. 1 Press the [Function] (Exit) button, getting its indicator to light. 2 Press the [Song] (Select -) button or [ ] (Select +) button to display the TUNE screen. fig. 3 Press the [Song] (Select -) button or [ ] (Select +) button to get the value for “Stretch” to flash. fig. 4 Press the [ ] (Value -) button or [ ] (Value +) button to change the Stretch Tuning setting. This is set to “2” when the power to the RG-7 is switched on. 5 Press the [Function] (Exit) button so the indicator goes out. Value Description1 This is the standard tuning curve. It is suitable when playing in an ensemble with other instruments. 2 This tuning curve expands the bass and treble ends somewhat. It is suitable for performances such as piano solos.You can save this setting in the RG-7’s memory using the Memory Backup function (p. 72).RG-7_e.book 63 ページ 2005年2月14日 月曜日 午前9時45分](https://usermanual.wiki/Roland/RG-7/User-Guide-525080-Page-64.png)
![64Chapter 3. Performance Changing the Tuning You can play classical styles such as Baroque using historic temperaments (tuning methods).Most modern songs are composed for and played in equal temperament, the most common tuning in use today. But at one time, there were a wide variety of other tuning systems in existence. By playing in the temperament that was in use when a composition was created, you can experience the sonorities of chords originally intended for that song. 1 Press the [Function] (Exit) button, getting its indicator to light. 2 Press the [Song] (Select -) button or [ ] (Select +) button to display the TUNE screen. fig. 3 Press the [Song] (Select -) button or [ ] (Select +) button to get the Temperament setting to flash. fig. 4 Press the [ ] (Value -) button or [ ] (Value +) button to select the temperament. Display QualitiesEqual In this tuning, each octave is divided into twelve equal steps. Every interval produces about the same amount of slight dissonance. Just(Maj) This tuning eliminates ambiguities in the fifths and thirds. It is unsuited to playing melodies and cannot be transposed, but is capable of beautiful sonorities. Just(min) The Just tunings differ from major and minor keys. You can get the same effect with the minor scale as with the major scale. Kirnberger This is an improvement of the Mean Tone and Just tunings that provides a high degree of freedom of modulation. Performances are possible in all keys (III). Pythagorean This tuning, devised by the philosopher Pythagoras, eliminates dissonance in fourths and fifths. Dissonance is produced by third-interval chords, but melodies are euphonious. Mean Tone This scale makes some compromises in just intonation, enabling transposition to other keys.You can save this setting in the RG-7’s memory using the Memory Backup function (p. 72).RG-7_e.book 64 ページ 2005年2月14日 月曜日 午前9時45分](https://usermanual.wiki/Roland/RG-7/User-Guide-525080-Page-65.png)
![65Chapter 3. Performance When playing with tuning other than equal temperament, you need to specify the tonic note for tuning the song to be performed (that is, the note that corresponds to C for a major key or to A for a minor key). 5 Press the [Function] (Exit) button so the indicator goes out. ■ Setting the Tonic When playing with tuning other than equal temperament, you need to specify the tonic note for tuning the song to be performed (that is, the note that corresponds to C for a major key or to A for a minor key).If you choose an equal temperament, there’s no need to select a tonic note. 1 Press the [Function] (Exit) button, getting its indicator to light. 2 Press the [Song] (Select -) button or [ ] (Select +) button to display the TUNE screen. fig. 3 Press the [Song] (Select -) button or [ ] (Select +) button to get the value for “Key” to flash. fig. 4 Press the [ ] (Value -) button or [ ] (Value +) button to select the tonic. fig.Chart_note2.j 5 Press the [Function] (Exit) button so the indicator goes out. Werckmeister This temperament combines the Mean Tone and Pythagorean tunings. Performances are possible in all keys (first technique, III). Arabic This tuning is suitable for the music of Arabia. Display QualitiesC C# D Eb E F F# G Ab A Bb B C C D E E F F G A A B BDisplayLetternameNOTEWhen performing in ensemble with other instruments, be aware that depending on the key, there may be some shifting of the pitch. Tune the RG-7 to the fundamental pitch of the other instruments.You can save this setting in the RG-7’s memory using the Memory Backup function (p. 72).RG-7_e.book 65 ページ 2005年2月14日 月曜日 午前9時45分](https://usermanual.wiki/Roland/RG-7/User-Guide-525080-Page-66.png)
![66Chapter 3. Performance Playing Different Tones with the Left and Right Hands (Split Performance) Dividing the keyboard into right-hand and left-hand areas, then playing different sounds in each is called “Split performance.” The boundary key is called the “split point.”The split point key is included in the left-hand keyboard area. Each time power to the keyboard is turned on, the split point is reset to “F#3.” fig.01- 1 Select a tone (p. 53). 2 Press the [Function] (Exit) button, getting its indicator to light. 3 Press the [Song] (Select -) button or [ ] (Select +) button to display the SPLIT screen. fig. 4 Press the [Song] (Select -) button or [ ] (Select +) button to get the value for “Split” to flash. fig. 5 Press the [ ] (Value -) or [ ] (Value +) button to select “On.” The keyboard is divided into right-hand and left-hand areas.The tone played prior to Split Play is selected for the right hand, and a suitable tone to match that tone is selected for the left hand automatically. 6 To exit Split mode, press the [ ] (Value -) button or [ ] (Value +) button to set the “Split” setting to “Off.”You can change the split point; refer to “Changing the Keyboard’s Split Point” (p. 67).Split Point (Factory setting: F 3)C1 D1 E1 F1 G1 A1 B1A0 B0 C2 C3 C4 C5 C8B7…Left-hand Tone Right-hand ToneYou can switch Split mode on and off by holding down the tone button and pressing the [Song] button. The Tone screen appears as shown below when the Split function is on.Pressing a tone button once more cancels the Split function.For more about the tones with which this setting is enabled, refer to the “Tone List” (p. 107).RG-7_e.book 66 ページ 2005年2月14日 月曜日 午前9時45分](https://usermanual.wiki/Roland/RG-7/User-Guide-525080-Page-67.png)
![67Chapter 3. Performance ■ Changing the Keyboard’s Split Point You can change the location where the keyboard is divided (the split point). 1 Press the [Function] (Exit) button, getting its indicator to light. 2 Press the [Song] (Select -) button or [ ] (Select +) button to display the SPLIT screen. fig. 3 Press the [Song] (Select -) button or [ ] (Select +) button to get the value for “Split Point” to flash. fig. 4 Press the [ ] (Value -) or [ ] (Value +) button to select the split point. You can set the split point within a range of B1 to B6. This is set to “F 3” when the power to the RG-7 is switched on. 5 Press the [Function] (Exit) button so the indicator goes out.RG-7_e.book 67 ページ 2005年2月14日 月曜日 午前9時45分](https://usermanual.wiki/Roland/RG-7/User-Guide-525080-Page-68.png)
![68Chapter 3. Performance Adding Reverberation to the Sound (Reverb) Apply a reverb effect to the notes you play with the RG-7.Reverb makes it sound as if you are playing in a concert hall. 1. Press the [Function] (Exit) button so the indicator is lit. 2. Press the [Song] (Select -) button or [ ] (Select +) button to display the EFFECT screen. fig. 3. Press the [Song] (Select -) button or [ ] (Select +) button to get the value for “Reverb” to flash. fig. 4. Press the [ ] (Value -) button or [ ] (Value +) button to change the amount of reverb applied. 5. Press the [Function] (Exit) button so the indicator goes out. Value Description0–127 Increasing the value results in a deeper reverb effect.No reverb is applied when the value is set to “0.”You can save this setting in the RG-7’s memory using the Memory Backup function (p. 72).RG-7_e.book 68 ページ 2005年2月14日 月曜日 午前9時45分](https://usermanual.wiki/Roland/RG-7/User-Guide-525080-Page-69.png)
![69Chapter 3. Performance Assigning Functions to Pedals You can assign a variety of functions to the left and center pedals.You can call up the assigned functions just by pressing the corresponding pedal. 1. Press the [Function] (Exit) button so the indicator is lit. 2. Press the [Song] (Select -) button or [ ] (Select +) button to display the PEDAL screen. fig. 3. Press the [Song] (Select -) button or [ ] (Select +) button to get the value for “Cent” (Center Pedal) or “Left” (Left Pedal) to flash. fig. 4. Press the [ ] (Value -) button or [ ] (Value +) button to select the function assigned to the pedal. Value DescriptionSostenuto The pedal functions as a sostenuto pedal (p. 20). Soft The pedal functions as a soft pedal (p. 20). Play/Stop Starts and stops playback of the song. LwrDamper(Lower Damper) Applies a damper pedal effect to the sounds in the left-hand side of the keyboard.RG-7_e.book 69 ページ 2005年2月14日 月曜日 午前9時45分](https://usermanual.wiki/Roland/RG-7/User-Guide-525080-Page-70.png)
![70Chapter 3. Performance 5. Press the [Function] (Exit) button so the indicator goes out. Pedal EX If you have a Layer tone (p. 54) selected, the original tone is played whenever the pedal is not being pressed as you perform. When you perform while pressing the pedal, an layer tone is played together with the original tone.The volume of the layer tone is adjusted according to how much you press the pedal.Example: When “Harpsichord + Choir” are selected• Playing the keyboard without pressing the pedalOnly the harpsichord tone is played.• Playing the keyboard while pressing the pedalWhen the pedal is not pressed, only the harpsichord tone is played, while the choir tone gradually comes in as the pedal is pressed.The volume of the choir tone is adjusted according to how much you press the pedal. Octave When you play a key while pressing on the pedal, the note for the key being pressed and the note one octave above it are layered and played together.You can adjust the volume of the sound one octave above the layer tone by changing the pressure used on the pedal. Value DescriptionNOTENo effects will be applied with “Pedal EX” function assigned to the pedal if any tone other than the layer tone is selected.RG-7_e.book 70 ページ 2005年2月14日 月曜日 午前9時45分](https://usermanual.wiki/Roland/RG-7/User-Guide-525080-Page-71.png)
![71Chapter 3. Performance Changing the Volume Balance of the Accompaniment and the Keyboard You can also change the balance in the volume of songs or accompaniment and the volume of the keyboard as you play. 1. Press the [Function] (Exit) button so the indicator is lit. 2. Press the [Song] (Select -) button or [ ] (Select +) button to display the BALANCE screen. fig. 3. Press the [Song] (Select -) button or [ ] (Select +) button to get the value for “Key:Acmp” (Keyboard:Accompaniment) to flash. fig. 4. Press the [ ] (Value -) button or [ ] (Value +) button to adjust the accompaniment and the keyboard volume balance. Value: 1:9–9:1 The volume increases as the value is raised. 5. Press the [Function] (Exit) button so the indicator goes out.RG-7_e.book 71 ページ 2005年2月14日 月曜日 午前9時45分](https://usermanual.wiki/Roland/RG-7/User-Guide-525080-Page-72.png)
![72Chapter 3. Performance Remembering the Settings Even When the Power is Turned Off (Memory Backup) Normally, the various settings revert to their default values when the power is turned off. However, you can specify that the settings will be remembered even when the power is turned off. This function is called “Memory Backup.” 1. Press the [Function] (Exit) button so the indicator is lit. 2. Press the [Song] (Select -) button or [ ] (Select +) button to display the MEMORY BACKUP screen. fig. 3. Press the [Moving Key] button. A confirmation message appears in the screen. fig. Pressing the [Function] (Exit) button at this point returns you to the original screen without the settings being saved. 4. Press the [Moving Key] button once more. Memory Backup is executed.When Memory Backup is finished, the display and buttons return to their normal appearance.For more on the settings stored using Memory Backup, refer to “Parameters Stored in Memory Backup” (p. 109).NOTENever turn off the power while “Executing...” is displayed in the screen. Doing so may corrupt the RG-7’s memory and render it unusable.RG-7_e.book 72 ページ 2005年2月14日 月曜日 午前9時45分](https://usermanual.wiki/Roland/RG-7/User-Guide-525080-Page-73.png)
![73Chapter 3. Performance Restoring the Factory Settings (Factory Reset) You can return the content stored with “Memory Backup” (refer to the previous page) to their original factory settings. This operation is referred to as “Factory Reset.” 1. Press the [Function] (Exit) button so the indicator is lit. 2. Press the [Song] (Select -) button or [ ] (Select +) button to display the FACTORY RESET screen. fig. 3. Press the [Moving Key] button. A confirmation message appears in the screen. fig. Pressing the [Function] (Exit) button at this point returns you to the original screen without Factory Reset being executed. 4. Press the [Moving Key] button once more. Factory reset is executed.When Factory Reset is finished, the display and buttons return to their normal appearance.NOTEWhen you perform a Factory Reset, all settings that have been stored in memory up to then are erased and reset to their factory defaults.When you want to restore the content registered to the RG-7’s User memory to the factory condition, refer to “Initializing the User Memory or USB Memory” (p. 92).NOTENever turn off the power while “Executing...” is displayed in the screen. Doing so may corrupt the RG-7’s memory and render it unusable.RG-7_e.book 73 ページ 2005年2月14日 月曜日 午前9時45分](https://usermanual.wiki/Roland/RG-7/User-Guide-525080-Page-74.png)
![74 Chapter 4. Recording the Performance ■ Notes Regarding Recording You can store your recorded performances to the “Favorites” (p. 25). If not first saved to the “Favorites,” recorded performances are erased when the RG-7’s power is turned off. If you want to retain such performances, be sure to save them to the “Favorites.”You can also record your performances using external audio equipment (p. 97) and save performance data to USB memory (sold separately) connected to the Ext Memory port (p. 76). Recording Performances1 Select the tone you want to perform with (p. 53). 2 Press the [Function] (Exit) button, getting its indicator to light. 3 Press the [Song] (Select -) button or [ ] (Select +) button to display the RECORD screen. fig. 4 Press the [Moving Key] (Enter) button. The following screen appears, and the RG-7 goes into recording standby. fig. Start Recording 5 Play the keyboard to begin recording. Recording starts, and the following screen appears.The text “Recording...” flashes while recording is in progress. fig.RG-7_e.book 74 ページ 2005年2月14日 月曜日 午前9時45分](https://usermanual.wiki/Roland/RG-7/User-Guide-525080-Page-75.png)
![75Chapter 4. Recording the Performance Stopping Recording 6 Press the [Moving Key] (Enter) button. Recording stops.The following screen appears. fig. ■ Play Back the Recorded Performance 1 Press the [ ] button. You will hear the recorded performance.Once again press the [ ] button, and playback will stop. You can save recordings or your performances to the RG-7 itself (p. 76).If you see the following...If you attempt to select a song when another performance has already been recorded, the following appears in the display.fig.disp-delIf it is OK to erase the performance, press the [Moving Key] (Enter) button.If you do not want to erase the performance, press the [Function] (Exit) button.RG-7_e.book 75 ページ 2005年2月14日 月曜日 午前9時45分](https://usermanual.wiki/Roland/RG-7/User-Guide-525080-Page-76.png)
![76Chapter 4. Recording the Performance Saving Recorded Performances If not first saved to the “Favorites” in the RG-7’s memory or to USB memory, recorded performances are erased when the RG-7’s power is turned off. If you want to retain such performances, be sure to save them to the “Favorites” or to USB memory. 1 Press the [Function] (Exit) button, getting its indicator to light. 2 Press the [Song] (Select -) button or [ ] (Select +) button to display the FILE screen. fig. 3 Press the [Song] (Select -) button or [ ] (Select +) button so “SAVE” is flashing. fig. 4 Press the [Moving Key] (Enter) button. 5. Press the [Song] (Select -) button or [ ] (Select +) button to get the value for “Dest” (Save Destination) to flash. fig. 6 Press the [ ] (Value -) button or [ ] (Value +) button to change the “Dest” (Save Destination) setting. 7 Press the [Song] (Select -) button or [ ] (Select +) button to get “save-destination number” to flash. Display DescriptionFavorites The performance data is saved to the “Favorites.” Ext Memory The performance data is saved to the “USB memory.”You can copy performances saved to the “Favorites” to USB memory. You can also take performances saved to USB memory and copy them to the “Favorites” (p. 42).RG-7_e.book 76 ページ 2005年2月14日 月曜日 午前9時45分](https://usermanual.wiki/Roland/RG-7/User-Guide-525080-Page-77.png)
![77Chapter 4. Recording the Performance 8 Press the [ ] (Value -) button or [ ] (Value +) button to select the “save-destination number.” When a performance has already been saved to a number, the name of the performance is indicated.When a number has no performance assigned to it, this is indicated in the display in the following form: “1: (Empty).” 9 Press the [Moving Key] (Enter) button. The performance is saved. 10 Press the [Function] (Exit) button so the indicator goes out. ■ Deleting Performances Saved to the “Favorites” or USB Memory To delete performances saved to the “Favorites” or USB memory, refer to p. 45.NOTEWhen saving performances to the USB memory, do not to remove the USB memory from the Ext Memory port until the save is completed.When a number has no song assigned to it, this is indicated in the display in the following form: “4: (Empty).”fig.The following appears in the screen if you attempt to save a song to a number to which a song has already been saved.fig.To delete the saved song and replace it by saving the current song, press the [Moving Key] (Enter) button. If you do not want to delete the saved song, press the [Function] (Exit) button to cancel saving.RG-7_e.book 77 ページ 2005年2月14日 月曜日 午前9時45分](https://usermanual.wiki/Roland/RG-7/User-Guide-525080-Page-78.png)
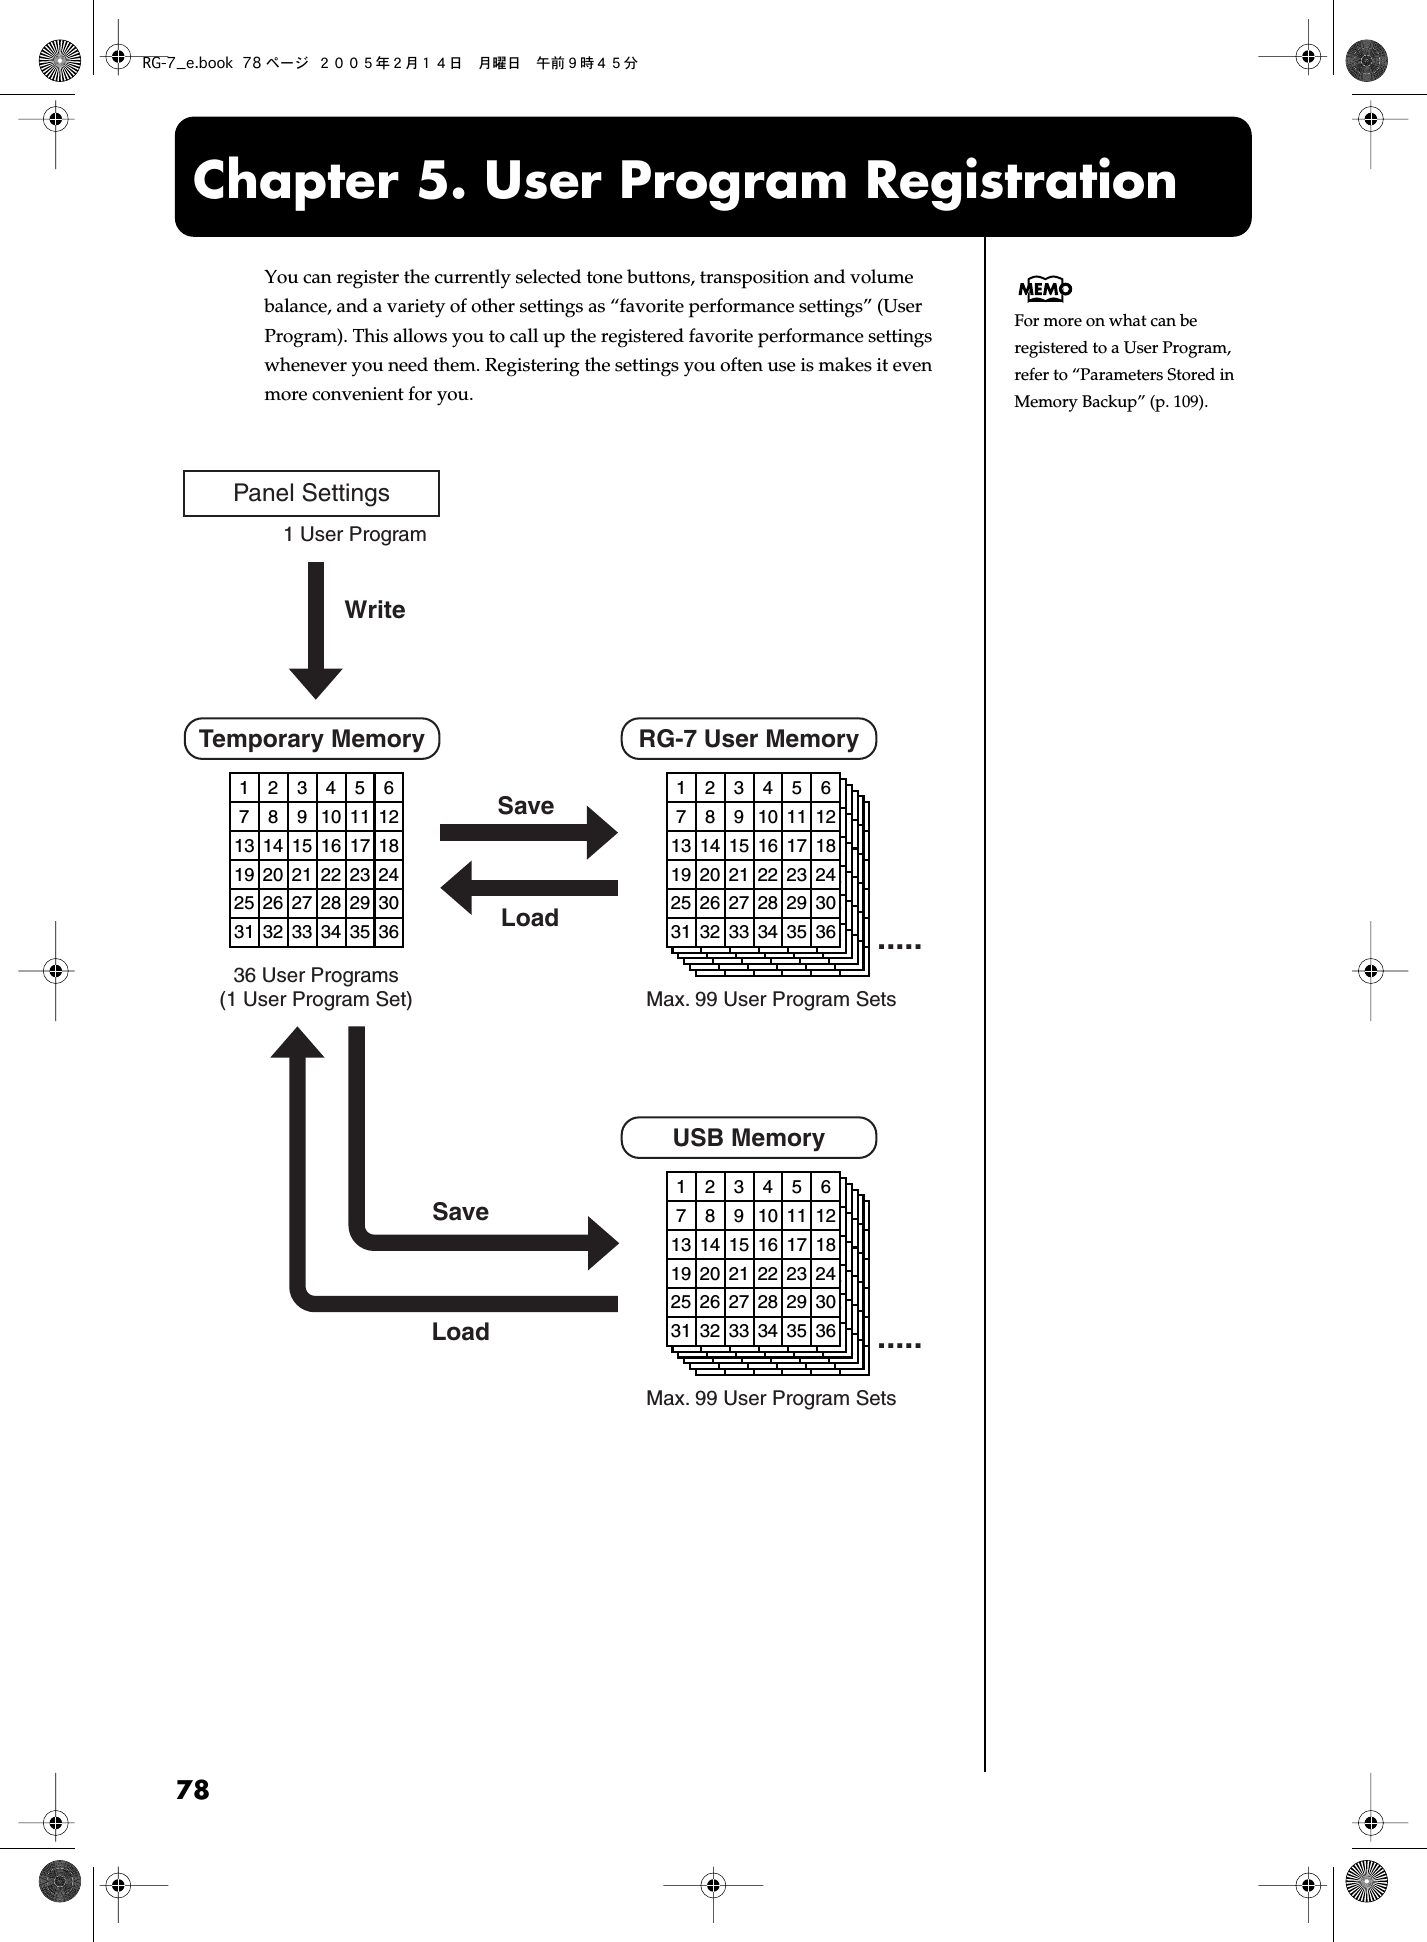
![79Chapter 5. User Program Registration Saving Performance Settings (User Program) You can register up to 36 User Programs to the RG-7. 1 Set the Tone, and other data until the settings are the way you want them. 2 Press the [Function] (Exit) button, getting its indicator to light. 3 Press the [Song] (Select -) button or [ ] (Select +) button to display the USER PROGRAM screen. fig. 4 Press the [Song] (Select -) button or [ ] (Select +) button so “WRITE” is flashing. fig. 5 Press the [Moving Key] (Enter) button. The following screen appears. fig. 6 Press the [ ] (Value -) button or [ ] (Value +) button to select the write-destination number. Select a number from UPG 01 to UPG 36 as the performance settings write destination. fig. 7 Press the [Moving Key] (Enter) button. The currently selected performance settings are registered, and the USER PROGRAM screen returns to the display.RG-7_e.book 79 ページ 2005年2月14日 月曜日 午前9時45分](https://usermanual.wiki/Roland/RG-7/User-Guide-525080-Page-80.png)
![80Chapter 5. User Program Registration Calling Up Saved User Programs You can easily call up User Programs. 1 Press the [Function] (Exit) button so the indicator goes out. 2 Hold down the [Function] (Exit) button and press the [ ] (Value -) button or [ ] (Value +) button to select the User Program you want to call up. fig. The display changes to indicate the registered buttons and other performance settings. The tone name registered in the User Program appears in the lower row of the screen. Restoring the Standard Performance Settings (Settings in Effect When the Power is Turned On) After you have called up User Programs, you can use the following procedure to restore the performance settings that are selected when the power is turned on. 1 Hold down the [Function] (Exit) button and press the [ ] (Value -) button to select “User Program 01.” fig. 2 While holding down the [Function] (Exit) button and the [ ] (Value -) button once again. The following screen appears. fig. The favorite performance settings are cancelled, restoring the settings to their status when the power is turned on.You can use the Pedal as a dedicated switch for selecting User Programs in order. For more details, refer to “Using the Pedal to Switch User Programs” (p. 87).RG-7_e.book 80 ページ 2005年2月14日 月曜日 午前9時45分](https://usermanual.wiki/Roland/RG-7/User-Guide-525080-Page-81.png)
![81Chapter 5. User Program Registration Saving the User Program Sets The 36 separate configurations of User Programs registered in the RG-7 can be saved as sets in User Memory (p. 25) or to USB memory (sold separately).When saving the settings to USB memory, connect the USB memory to the Ext Memory port (p. 22). 1 Press the [Function] (Exit) button, getting its indicator to light. 2 Press the [Song] (Select -) button or [ ] (Select +) button to display the USER PROGRAM screen. fig. 3 Press the [Song] (Select -) button or [ ] (Select +) button so “SAVE” is flashing. fig. 4 Press the [Moving Key] (Enter) button. The following screen appears. fig. 5 Press the [Song] (Select -) button or [ ] (Select +) button so that the “User Program save destination” is flashing. fig. 6 Press the [ ] (Value -) button or [ ] (Value +) button to select the “User Program save destination.” Display DescriptionUser Memory The User Program is saved in User Memory. Ext Memory The User Program is saved in USB Memory.You can restore the content in the User Memory to the original default factory settings. Refer to “Restoring the Factory Settings (Factory Reset)” (p. 73).NOTEUse USB memory available from Roland. Proper operation cannot be guaranteed if other external memory products are used.RG-7_e.book 81 ページ 2005年2月14日 月曜日 午前9時45分](https://usermanual.wiki/Roland/RG-7/User-Guide-525080-Page-82.png)
![82Chapter 5. User Program Registration 7 Press the [Song] (Select -) button or [ ] (Select +) button so that the “User Program save-destination number” is flashing. fig. 8 Press the [ ] (Value -) button or [ ] (Value +) button to select the “User Program save-destination number.” Value: UPG Set 01-UPG Set 99 To return to the original screen without saving the User Program, press the [Function] (Exit) button. 9 Press the [Moving Key] (Enter) button. The User Program is saved to the User memory or USB memory. 10 Press the [Function] (Exit) button so the indicator goes out.NOTEBe sure not to turn off the power as long as “Executing...” is displayed. Turning off the power at this time may corrupt the USB memory and/or User Memory and render them unusable.When deleting the set of saved User Programs, refer to “Deleting Saved User Program Sets” (p. 85).When there is no User Program assigned to a number, this is indicated in the display in the following form: “2: (Empty).”fig.The following appears in the screen if you attempt to save a User Program to a number to which a User Program has already been saved.fig.If you save performance settings to a number that already has User Programs saved to it, the previously saved User Programs are then deleted.To delete the saved set of User Programs and save the new performance settings to that number, press the [Moving Key] (Enter) button. If you do not want to delete the saved User Programs, press the [Function] (Exit) button to cancel the save.RG-7_e.book 82 ページ 2005年2月14日 月曜日 午前9時45分](https://usermanual.wiki/Roland/RG-7/User-Guide-525080-Page-83.png)
![83Chapter 5. User Program Registration Loading Saved User Program Sets You can load sets of User Programs saved in User Memory (p. 25) or to USB memory (sold separately) individually to the RG-7.When loading User Programs from USB memory, connect the USB memory to the Ext Memory port (p. 22). 1 Press the [Function] (Exit) button, getting its indicator to light. 2 Press the [Song] (Select -) button or [ ] (Select +) button to display the USER PROGRAM screen. fig. 3 Press the [Song] (Select -) button or [ ] (Select +) button so “LOAD” is flashing. fig. 4 Press the [Moving Key] (Enter) button. The following screen appears. fig. 5 Press the [Song] (Select -) button or [ ] (Select +) button so that the “User Program to be loaded” is flashing. fig.NOTENote that when User Programs sets are loaded, all of the performance settings stored in the RG-7 are deleted.RG-7_e.book 83 ページ 2005年2月14日 月曜日 午前9時45分](https://usermanual.wiki/Roland/RG-7/User-Guide-525080-Page-84.png)
![84Chapter 5. User Program Registration 6 Press the [ ] (Value -) button or [ ] (Value +) button to select the “User Program to be loaded.” 7 Press the [Moving Key] (Enter) button. 8 Press the [Song] (Select -) button or [ ] (Select +) button so that the “load User Program number” is flashing. fig. 9 Press the [ ] (Value -) button or [ ] (Value +) button to select the number for the User Program to be loaded. 10 Press the [Moving Key] (Enter) button. A confirmation message appears in the screen. fig. To return to the original screen without loading the User Program, press the [Function] (Exit) button. 11 Press the [Function] (Exit) button so the indicator goes out. The selected User Program is loaded to the RG-7. Display DescriptionUser Memory Loads User Programs saved in the User Memory. Ext Memory Loads User Programs saved in USB Memory.NOTEWhen calling up User Programs saved in USB memory, do not to remove the USB memory from the Ext Memory port until the settings have been called up.RG-7_e.book 84 ページ 2005年2月14日 月曜日 午前9時45分](https://usermanual.wiki/Roland/RG-7/User-Guide-525080-Page-85.png)
![85Chapter 5. User Program Registration Deleting Saved User Program Sets You can delete individual User Program sets saved to USB memory (sold separately) or in user memory (p. 25).When deleting User Programs from USB memory, connect the USB memory to the Ext Memory port (p. 22). 1 Press the [Function] (Exit) button, getting its indicator to light. 2 Press the [Song] (Select -) button or [ ] (Select +) button to display the USER PROGRAM screen. fig. 3 Press the [Song] (Select -) button or [ ] (Select +) button so that the “DEL” (Delete) is flashing. fig. 4 Press the [Moving Key] (Enter) button. The following screen appears. fig. 5 Press the [Song] (Select -) button or [ ] (Select +) button so that the “User Program to be deleted” is flashing. fig.RG-7_e.book 85 ページ 2005年2月14日 月曜日 午前9時45分](https://usermanual.wiki/Roland/RG-7/User-Guide-525080-Page-86.png)
![86Chapter 5. User Program Registration 6 Press the [ ] (Value -) button or [ ] (Value +) button to select “save-destination of the User Program to be deleted.” 7 Press the [Song] (Select -) button or [ ] (Select +) button to get “the number of the User Program to be deleted.” to flash. fig. 8 Press the [ ] (Value -) button or [ ] (Value +) button to select the “the number of the User Program to be deleted.” 9 Press the [Moving Key] (Enter) button. A confirmation message appears in the screen. fig. To return to the original screen without deleting the User Program, press the [Function] (Exit) button. 10 Press the [Moving Key] (Enter) button once more. The selected User Program is deleted. 11 Press the [Function] (Exit) button so the indicator goes out. Display DescriptionUser Memory Deletes the User Programs saved in the User Memory. Ext Memory Deletes the User Programs saved in USB Memory.NOTEWhen deleting User Programs saved in USB memory, do not to remove the USB memory from the Ext Memory port until the delete is completed.RG-7_e.book 86 ページ 2005年2月14日 月曜日 午前9時45分](https://usermanual.wiki/Roland/RG-7/User-Guide-525080-Page-87.png)
![87Chapter 5. User Program Registration Using the Pedal to Switch User Programs You can use the Pedal as a dedicated switch for selecting User Programs in order. The User Programs are switched each time the pedal is pressed. 1 Press the [Function] (Exit) button, getting its indicator to light. 2 Press the [Song] (Select -) button or [ ] (Select +) button to display the USER PROGRAM screen. fig. 3 Press the [Song] (Select -) button or [ ] (Select +) button so that the “Pedal Shift” is flashing. fig. 4 Press the [ ] (Value -) button or [ ] (Value +) button to select the pedal to be used for switching the Favorite performance settings. 5 Press the [Function] (Exit) button so the indicator goes out. The User Programs are switched each time you press the pedal to which the function of switching performance settings is assigned. Value DescriptionLeft The left pedal is dedicated to switching User Programs.The function assigned to the left pedal cannot be used. Center The center pedal is dedicated to switching User Programs.The function assigned to the center pedal cannot be used. Off You can use a function assigned to the pedal.You cannot use the Pedal as a dedicated switch for selecting User Programs in order.RG-7_e.book 87 ページ 2005年2月14日 月曜日 午前9時45分](https://usermanual.wiki/Roland/RG-7/User-Guide-525080-Page-88.png)
![88 Chapter 6. Changing Various Settings Changing the Moving Key Settings ■ Stopping the Keyboard Movement Although you can have the keys of the RG-7’s keyboard move in correspondence with songs as they are played back, you can also temporarily stop the movement of the keyboard. 1. Press the [Moving Key] button so the indicator goes out. Now the keyboard will not move in correspondence with the song being played back. Making Detailed Settings You can set the master tuning, temperament, and other settings that make the RG-7 easier to play.The screen in which the settings are changed is called the “Function screen.” How to Enter Function Mode 1. Press the [Function] (Exit) button, getting its indicator to light. The following screen appears. 2. Press the [Song] (Select -) button or [ ] (Select +) button to select the settings screen. 3. Press the [Song] (Select -) button or [ ] (Select +) button so the value of the parameter you want to change is flashing. 4. Press the [ ] (Value -) button or [ ] (Value +) button to change the value. Press the [ ] (Value -) and [ ] (Value +) buttons simultaneously to restore the factory-set values. → If you want to continue making changes to other settings, press the [Song] (Select -) button or [ ] (Select +) button to switch the settings screen. How to Exit Function Mode 1. Press the [Function] (Exit) button so the indicator goes out. [Moving Key] indicator Keyboard FunctionIndicator lit The keys play along with the performance. Indicator off The keys do not move.You can assign the “Moving Key” function to the remote control’s [FUNC 1] button or [FUNC 2] button and use the remote control buttons to switch the Moving Key function on and off (p. 35).RG-7_e.book 88 ページ 2005年2月14日 月曜日 午前9時45分](https://usermanual.wiki/Roland/RG-7/User-Guide-525080-Page-89.png)
![89Chapter 6. Changing Various Settings Changing the Part That Makes the Keys Move With the RG-7, you can set the part to which the keyboard’s movement is to be linked when the keyboard moves automatically along with a song.SMF music files and other such songs are composed of 16 parts (channels), with various performances recorded to the different parts. For example, rhythm performances are often recorded to Part 10, while the right-hand keyboard performance is recorded to Part 4. 1. Press the [Function] (Exit) button, getting its indicator to light. 2. Press the [Song] (Select -) button or [ ] (Select +) button to display the “MISC Moving Key Part” screen. 3. Press the [Moving Key] (Enter) button. 4. Press the [Song] (Select -) button or [ ] (Select +) button to select the part you want to change. From the left, these are “part 1, part 2 ... part 15, and part 16.” 5. Press the [ ] (Value -) button or [ ] (Value +) button to switch the keyboard movement on or off. The part to which the moving keyboard is linked is indicated by “ ” in the screen; parts that do not cause the keyboard to play are indicated by “–” in the screen. When having the keys play automatically to a performance recorded on the RG-7, select Part 1. In Split performances, however, the right-hand performance is recorded to Part “4,” while the left hand is recorded to Part “3.” 6. Press the [Function] (Exit) button so the indicator goes out. Changing the Remote Control Settings ■ Disabling Use of the Remote Control You can prevent the included remote control from controlling the RG-7 by turning the Remote Control function off. This prevents settings from being altered inadvertently if any buttons on the remote control are pressed by mistake. → The remote control’s functions are switched on and off together with the infrared transmission function (p. 96). The remote control’s functions are disabled when infrared transmission is turned off. 1. Press the [Function] (Exit) button, getting its indicator to light. 2. Press the [Song] (Select -) button or [ ] (Select +) button to display the REMOTE screen. 3. Press the [Song] (Select -) button or [ ] (Select +) button to get the value for “Receive” to flash. 4. Press the [ ] (Value -) button or [ ] (Value +) button to switch the Remote Control function on or off. 5. Press the [Function] (Exit) button so the indicator goes out. → You can use the Memory Backup function to store these settings to the RG-7 (p. 72). Value DescriptionOn The RG-7 can be controlled using the remote control. Off The remote control is disabled.* The infrared transmission functions used by external devices are also disabled.RG-7_e.book 89 ページ 2005年2月14日 月曜日 午前9時45分](https://usermanual.wiki/Roland/RG-7/User-Guide-525080-Page-90.png)
![90Chapter 6. Changing Various Settings ■ Changing the Functions of the Remote Control’s Buttons You can change the functions assigned to the remote control’s buttons. → You can use the Memory Backup function to store these settings to the RG-7 (p. 72). 1. Press the [Function] (Exit) button, getting its indicator to light. 2. Press the [Song] (Select -) button or [ ] (Select +) button to display the REMOTE screen. 3. Press the [Song] (Select -) button or [ ] (Select +) button so that the value for the remote control’s button whose function you want to change is flashing. 4. Press the [ ] (Value -) button or [ ] (Value +) button to switch the function assigned to the remote control’s buttons. Functions Assigned to the TEMPO [-] and [+] ButtonsFunctions Assigned to the [FUNC 1] and [FUNC 2] Buttons 5. Press the [Function] (Exit) button so the indicator goes out. Value DescriptionTranspose Remote Control TRANSPOSE [-] [+] buttons F1 Remote Control [FUNC 1] button F2 Remote Control [FUNC 2] button Value DescriptionTranspose Transposes the key of the song being played.Press the TRANSPOSE [-] button to lower the key; press the TRANSPOSE [+] button to raise the key. Bwd/Fwd Fast forwards and rewinds the song. When TEMPO [-] is pressed, the song rewinds; when TEMPO [+] is pressed, the song is fast forwarded. CD Volume Changing the volume of the Song on CDs (p. 91).Press the TEMPO [-] button to decrease the volume, and press the TEMPO [+] button to increase the volume. CD Sync This adjusts the timing of the piano accompaniment during playback of Player Piano CDs (p. 91). When TEMPO [-] is pressed, the piano sound is played earlier; when TEMPO [+] is pressed, the piano sound is played later. Value DescriptionMoving Key Switches Moving Key on and off. Random Plays back the songs in random order. Equalizer Switches the equalizer on and off (p. 60). Minus One Switches the minus one function on and off (p. 93).RG-7_e.book 90 ページ 2005年2月14日 月曜日 午前9時45分](https://usermanual.wiki/Roland/RG-7/User-Guide-525080-Page-91.png)
![91Chapter 6. Changing Various Settings Changing the CD Settings ■ Adjusting the CD Level This adjusts the CD volume during playback of CDs. 1. Press the [Function] (Exit) button, getting its indicator to light. 2. Press the [Song] (Select -) button or [ ] (Select +) button to display the CD screen. 3. Press the [Song] (Select -) button or [ ] (Select +) button to get the value for “Level” to flash. 4. Press the [ ] (Value -) button or [ ] (Value +) button to adjust the CD level. Value: 0–127 Raising the value increases the volume level. 5. Press the [Function] (Exit) button so the indicator goes out. → You can use the Memory Backup function to store these settings to the RG-7 (p. 72). ■ Synchronizing the Timing of the Piano and Accompaniment With certain CDs designed to be used with the player function, the timing of the piano and accompaniment sounds may not be synchronized. However, you can synchronize the piano and accompaniment. 1. Press the [Function] (Exit) button, getting its indicator to light. 2. Press the [Song] (Select -) button or [ ] (Select +) button to display the CD screen. 3. Press the [Song] (Select -) button or [ ] (Select +) button to get the value for “Sync” to flash. 4. Press the [ ] (Value -) button or [ ] (Value +) button to adjust the timing of the piano sound. Value: 0–200 The piano sound is delayed more as the value is increased. 5. Press the [Function] (Exit) button so the indicator goes out. ■ Setting the Type of CD To Be Played Back The RG-7 may be unable to correctly recognize the type of CD being used. In such instances, you can specify the type of CD manually. 1. Press the [Function] (Exit) button, getting its indicator to light. 2. Press the [Song] (Select -) button or [ ] (Select +) button to display the CD screen. 3. Press the [Song] (Select -) button or [ ] (Select +) button to get the value for “Mute” to flash. 4. Press the [ ] (Value -) button or [ ] (Value +) button to select the CD type.NOTE Note that some commercial player piano CDs cannot be played back on the RG-7. 5. Press the [Function] (Exit) button so the indicator goes out. Value DescriptionAuto The CD type is detected automatically. Type A General CDs for Player Piano contain audio and MIDI data, and the data format may vary from one CD to the next. If the CD’s data format does not match the RG-7’s settings, a “beep” will sound. Certain general Automatic Piano CDs may not be playable on the RG-7. Type BOff Commercial Audio CD (CDs other than those designed for use with the player piano)RG-7_e.book 91 ページ 2005年2月14日 月曜日 午前9時45分](https://usermanual.wiki/Roland/RG-7/User-Guide-525080-Page-92.png)
![92Chapter 6. Changing Various Settings Initializing the User Memory or USB Memory You can completely erase the content of the User Memory or USB memory and restore the original default factory settings (initializing).The RG-7 contains an internal memory area to which you can save recorded performances and other data. This area is called the “User Memory.”The following content is stored in the User Memory.• Content registered in the “Favorites” (p. 25)• Content in saved User Program (favorite performance settings) sets (p. 78) 1. To initialize your USB memory, first connect the USB memory to the Ext Memory port. 2. Press the [Function] (Exit) button, getting its indicator to light. 3. Press the [Song] (Select -) button or [ ] (Select +) button to display the FILE screen. 4. Press the [Song] (Select -) button or [ ] (Select +) button so “FORMAT” is flashing. 5. Press the [Moving Key] (Enter) button. 6. Press the [ ] (Value -) button or [ ] (Value +) button to select the memory to be initialized. 7. Press the [Moving Key] (Enter) button. A confirmation message appears in the screen.To return to the original screen without deleting the content of the User Memory or USB Memory, press the [Function] (Exit) button. 8. Press the [Moving Key] (Enter) button once more. The content of the User Memory or USB Memory is deleted * Be sure not to turn off the power as long as “Executing...” is displayed. Turning off the power at this time may corrupt the RG-7’s internal memory and render it unusable. * Executing this procedure does not initialize any settings other than the content of the User Memory. To restore the factory defaults for settings other than the User Memory content, carry out Factory Reset (p. 73). Using the V-LINK Function Connecting the RG-7 to a V-LINK compatible image device allows you to control the images with the RG-7. V-LINK V-LINK ( ) is a function that allows music and images to be performed together. By using MIDI to connect two or more V-LINK compatible devices, you can easily enjoy a wide range of visual effects that are linked to the expressive elements of a music performance. 1. Press the [Function] (Exit) button, getting its indicator to light. 2. Press the [Song] (Select -) button or [ ] (Select +) button to display the MIDI screen. 3. Press the [Song] (Select -) button or [ ] (Select +) button to get the value for “V-LINK” to flash. 4. Press the [ ] (Value -) button or [ ] (Value +) button to switch the V-LINK function on or off. This is set to “Off” when you turn on the power.NOTE While V-LINK is switched on, no sound is produced when you press any of the twelve keys at the left end of the keyboard. 5. Press the [Function] (Exit) button so the indicator goes out. Value DescriptionUser Memory Content of the User Memory Ext Memory Content of the USB memory connected to the Ext Memory port Value DescriptionOn The V-LINK function is switched on. You can control images using the twelve keys at the left end of the keyboard. Off The V-LINK function is switched off.RG-7_e.book 92 ページ 2005年2月14日 月曜日 午前9時45分](https://usermanual.wiki/Roland/RG-7/User-Guide-525080-Page-93.png)
![93Chapter 6. Changing Various Settings Playing the Automatic Demos You can set the RG-7 so that it automatically starts a demo performance when you turn it on.You also can have a slide show of your favorite images play simultaneously in the connected external display or television. Preparing the Songs to Be Played 1. After connecting the USB memory to the computer, create a folder named “AUTODEMO” on the USB memory. 2. Save the songs (SMF data) you want to have played in the “AUTODEMO” folder. 3. Connect the USB memory to the Ext Memory port of the RG-7 (p. 22). 4. Turn on the power to the RG-7. After you turn on the power, the songs saved in the USB memory’s “AUTODEMO” folder are played continuously. In addition, when you have your preferred images saved in the USB memory’s “_PICTURE” folder, a slide show of the images is displayed on the connected external display or television. When Running Slide Shows Through a Connected External Display or Television 5. Make sure the power to the RG-7 is turned off (p. 19), then connect the external display or television (p. 47, p. 49). * You cannot use a television and external display simultaneously. 6. Prepare the images you want to have appear in the slide show and save them to the USB memory (p. 51). Muting a Specific Part (Minus One) You can temporarily mute any specific part. This temporary muting of a specified part is called “Minus One.” 1. Press the [Function] (Exit) button, getting its indicator to light. 2. Press the [Song] (Select -) button or [ ] (Select +) button to display the PLAY screen. 3. Press the [Song] (Select -) button or [ ] (Select +) button to get the value for “Minus One” to flash. 4. Press the [ ] (Value -) button or [ ] (Value +) button to switch the Minus One function on and off. Value DescriptionOn The specified part is muted.Set the part to be muted in “Specifying the Part to Be Muted” (p. 94).* When Moving Keys is in use, it is not applied to the part muted with Minus One. Off Minus One is switched off.RG-7_e.book 93 ページ 2005年2月14日 月曜日 午前9時45分](https://usermanual.wiki/Roland/RG-7/User-Guide-525080-Page-94.png)
![94Chapter 6. Changing Various Settings Specifying the Part to Be Muted 1. Press the [Function] (Exit) button, getting its indicator to light. 2. Press the [Song] (Select -) button or [ ] (Select +) button to display the “MISC Minus One Part” screen. 3. Press the [Moving Key] (Enter) button. 4. Press the [Song] (Select -) button or [ ] (Select +) button to select the part to be muted. 5. Press the [ ] (Value -) button or [ ] (Value +) button to switch the muting on or off. The muted part is indicated by a square brackets ([ ]) next to the part number. Performances recorded on the RG-7 are saved to Part 1. In Split performances, however, the right-hand performance is recorded to Part “4,” while the left hand is recorded to Part “3.” 6. Press the [Function] (Exit) button so the indicator goes out. Changing the Notation Display Settings When displaying notations on a connected external display or television, you can change the parts that appear in the notation and the way the score is displayed. 1. Press the [Function] (Exit) button, getting its indicator to light. 2. Press the [Song] (Select -) button or [ ] (Select +) button to display the NOTATION screen. 3. Press the [Song] (Select -) button or [ ] (Select +) button to select the parameter whose settings you want to change. Value DescriptionR Rhythm Part 1 Parts saved in performances recorded with the RG-7 2 Accompaniment Part 3 Left-hand Part 4 Right-hand Part Menu Value Description Staff L+R Display the right and left hand parts notation. R Display the right hand part notation. L Display the left hand part notation.Clef L AUTO Display is switched automatically. G The left-hand part appears in the G (treble) clef staff. F The left-hand part appears in the F (bass) clef staff.Clef R AUTO Display is switched automatically. G The right-hand part appears in the G (treble) clef staff. F The right-hand part appears in the F (bass) clef staff.RG-7_e.book 94 ページ 2005年2月14日 月曜日 午前9時45分](https://usermanual.wiki/Roland/RG-7/User-Guide-525080-Page-95.png)
![95Chapter 6. Changing Various Settings 4. Press the [ ] (Value -) button or [ ] (Value +) button to change the setting. 5. Press the [Function] (Exit) button so the indicator goes out. Setting the Part to Which Harmonies Are Added (Harmony Part) When “Data” is selected as the Harmony type and you sing along with the playback of the music data, harmonies consistent with the scale of the specified part are added (p. 40).Use the following procedure to set the part to which harmonies are added. 1. Press the [Function] (Exit) button, getting its indicator to light. 2. Press the [Song] (Select -) button or [ ] (Select +) button to display the “MISC Harmony Part” screen. 3. Press the [ ] (Value -) button or [ ] (Value +) button to switch the harmonized part. Value: 1–16 4. Press the [Function] (Exit) button so the indicator goes out. Menu Value Description Key AUTO Key is switched automatically. #x6, #x5, #x4, #x3, #x2, #, 0, b, bx2, bx3, bx4, bx5 Display the notation in the selected key.Part L 1–16 Select the part to be displayed as the left hand part. AUTO Part is switched automatically.Part R 1–16 Select the part to be displayed as the right hand part. AUTO Part is switched automatically.RG-7_e.book 95 ページ 2005年2月14日 月曜日 午前9時45分](https://usermanual.wiki/Roland/RG-7/User-Guide-525080-Page-96.png)
![96Chapter 6. Changing Various Settings Changing the Infrared Transmission Function Settings Some digital devices equipped with an IrDA (infrared) port are able to transfer song data in SMF format to the RG-7. For more detailed information, refer to the owner’s manual for the digital device.NOTE Users are responsible for learning how to use infrared transmissions. The RG-7 is not necessarily compatible with all devices equipped with an IrDA port. Roland cannot answer questions regarding infrared transmissions. ■ Switching Infrared Transmissions On and Off (Infrared Function) You can set whether to have the song data infrared transmission function on (active) or off (disabled). → The infrared transmission function is switched on and off together with the remote control’s functions (p. 89). The infrared transmission function is disabled when remote control’s function is turned off. 1. Press the [Function] (Exit) button, getting its indicator to light. 2. Press the [Song] (Select -) button or [ ] (Select +) button to display the REMOTE screen. 3. Press the [Song] (Select -) button or [ ] (Select +) button to get the value for “Receive” to flash. 4. Press the [ ] (Value -) button or [ ] (Value +) button to switch infrared transmission on or off. 5. Press the [Function] (Exit) button so the indicator goes out. → You can use the Memory Backup function to store these settings to the RG-7 (p. 72). ■ Setting Playback After the Song is Transferred (Infrared Playback) This sets the RG-7 to play back a song automatically following transfer of the song from the digital device.You can also set this so that songs are not played back automatically after the song is transferred. 1. Press the [Function] (Exit) button, getting its indicator to light. 2. Press the [Song] (Select -) button or [ ] (Select +) button to display the iR screen. 3. Press the [Song] (Select -) button or [ ] (Select +) button to get the value for “iR Play” to flash. 4. Press the [ ] (Value -) button or [ ] (Value +) button to switch the infrared playback function setting. 5. Press the [Function] (Exit) button so the indicator goes out. Value DescriptionOn The song data infrared transmission function is enabled. Off The song data infrared transmission function is disabled. Song data cannot be transferred.* The included remote control unit is also disabled. Value DescriptionAuto The song is played back automatically after the song is transferred. Standby Following transfer of the song, the song is ready to play but not played back.RG-7_e.book 96 ページ 2005年2月14日 月曜日 午前9時45分](https://usermanual.wiki/Roland/RG-7/User-Guide-525080-Page-97.png)
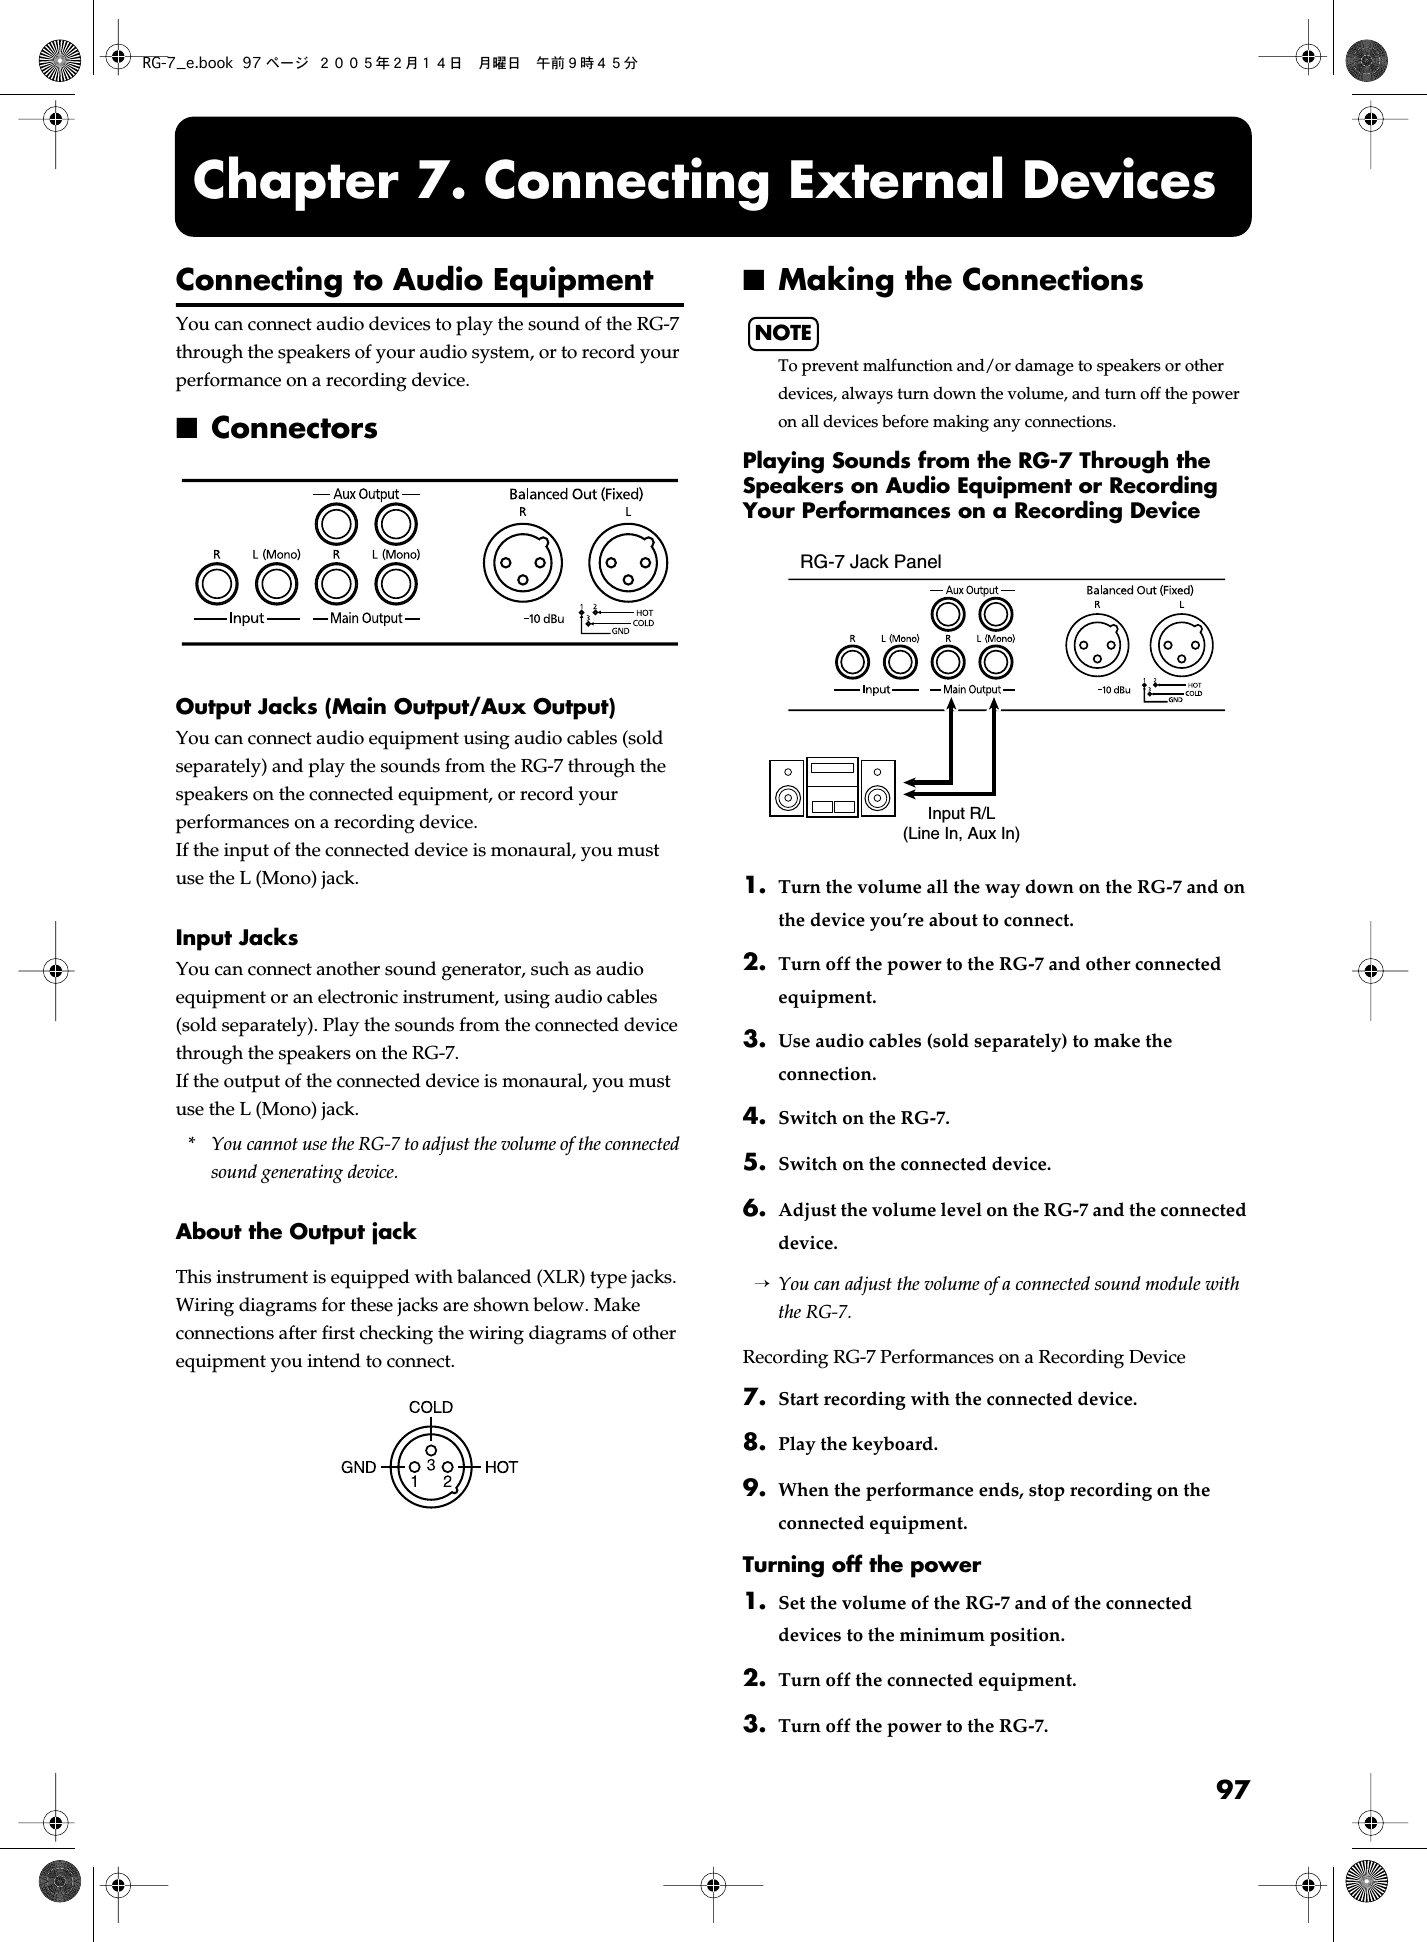
![98Chapter 7. Connecting External Devices Playing Audio Equipment Sounds Through the Speakers on the RG-7 1. Turn the volume all the way down on the RG-7 and on the device you’re about to connect. 2. Turn off the power to the RG-7 and other connected equipment. 3. Use audio cables (sold separately) to make the connection. 4. Turn on the connected equipment. 5. Turn on the RG-7. 6. Adjust the volume level on the RG-7 and the connected device. *You cannot use the RG-7 to adjust the volume of the connected sound generating device. Turning off the power 1. Set the volume of the RG-7 and of the connected devices to the minimum position. 2. Turn off the power to the RG-7. 3. Turn off the connected equipment. Connecting External Speakers You can connect external speakers and have what is played on the keyboard be output through the RG-7’s speakers while the accompaniment is played through the connected external speakers. ■ Changing the Aux Output Jacks Settings 1. Press the [Function] (Exit) button, getting its indicator to light. 2. Press the [Song] (Select -) button or [ ] (Select +) button to display the AUX OUTPUT screen. 3. Press the [Song] (Select -) button or [ ] (Select +) button to get the value for “Mode” to flash. 4. Press the [ ] (Value -) button or [ ] (Value +) button to change the setting. 5. Press the [Function] (Exit) button so the indicator goes out.RG-7 Jack PanelOutput R/L(Line Out, Aux Out) Indication DescriptionEnsemble Select this when playing the keyboard performance through the RG-7’s internal speaker and the accompaniment sound through an amp or speaker connected to the Aux jack. Surround The sounds played with the keyboard and the accompaniment sounds are played through the RG-7’s speakers, and the accompaniment sound with reverb applied is played through the speakers connected to the Aux Output jacks. Playing the accompaniment sound with reverb from external speakers the effect of being enveloped by the performance (Surround effect). Off No sound is heard through an amp or speaker connected to the Aux jack.RG-7_e.book 98 ページ 2005年2月14日 月曜日 午前9時45分](https://usermanual.wiki/Roland/RG-7/User-Guide-525080-Page-99.png)
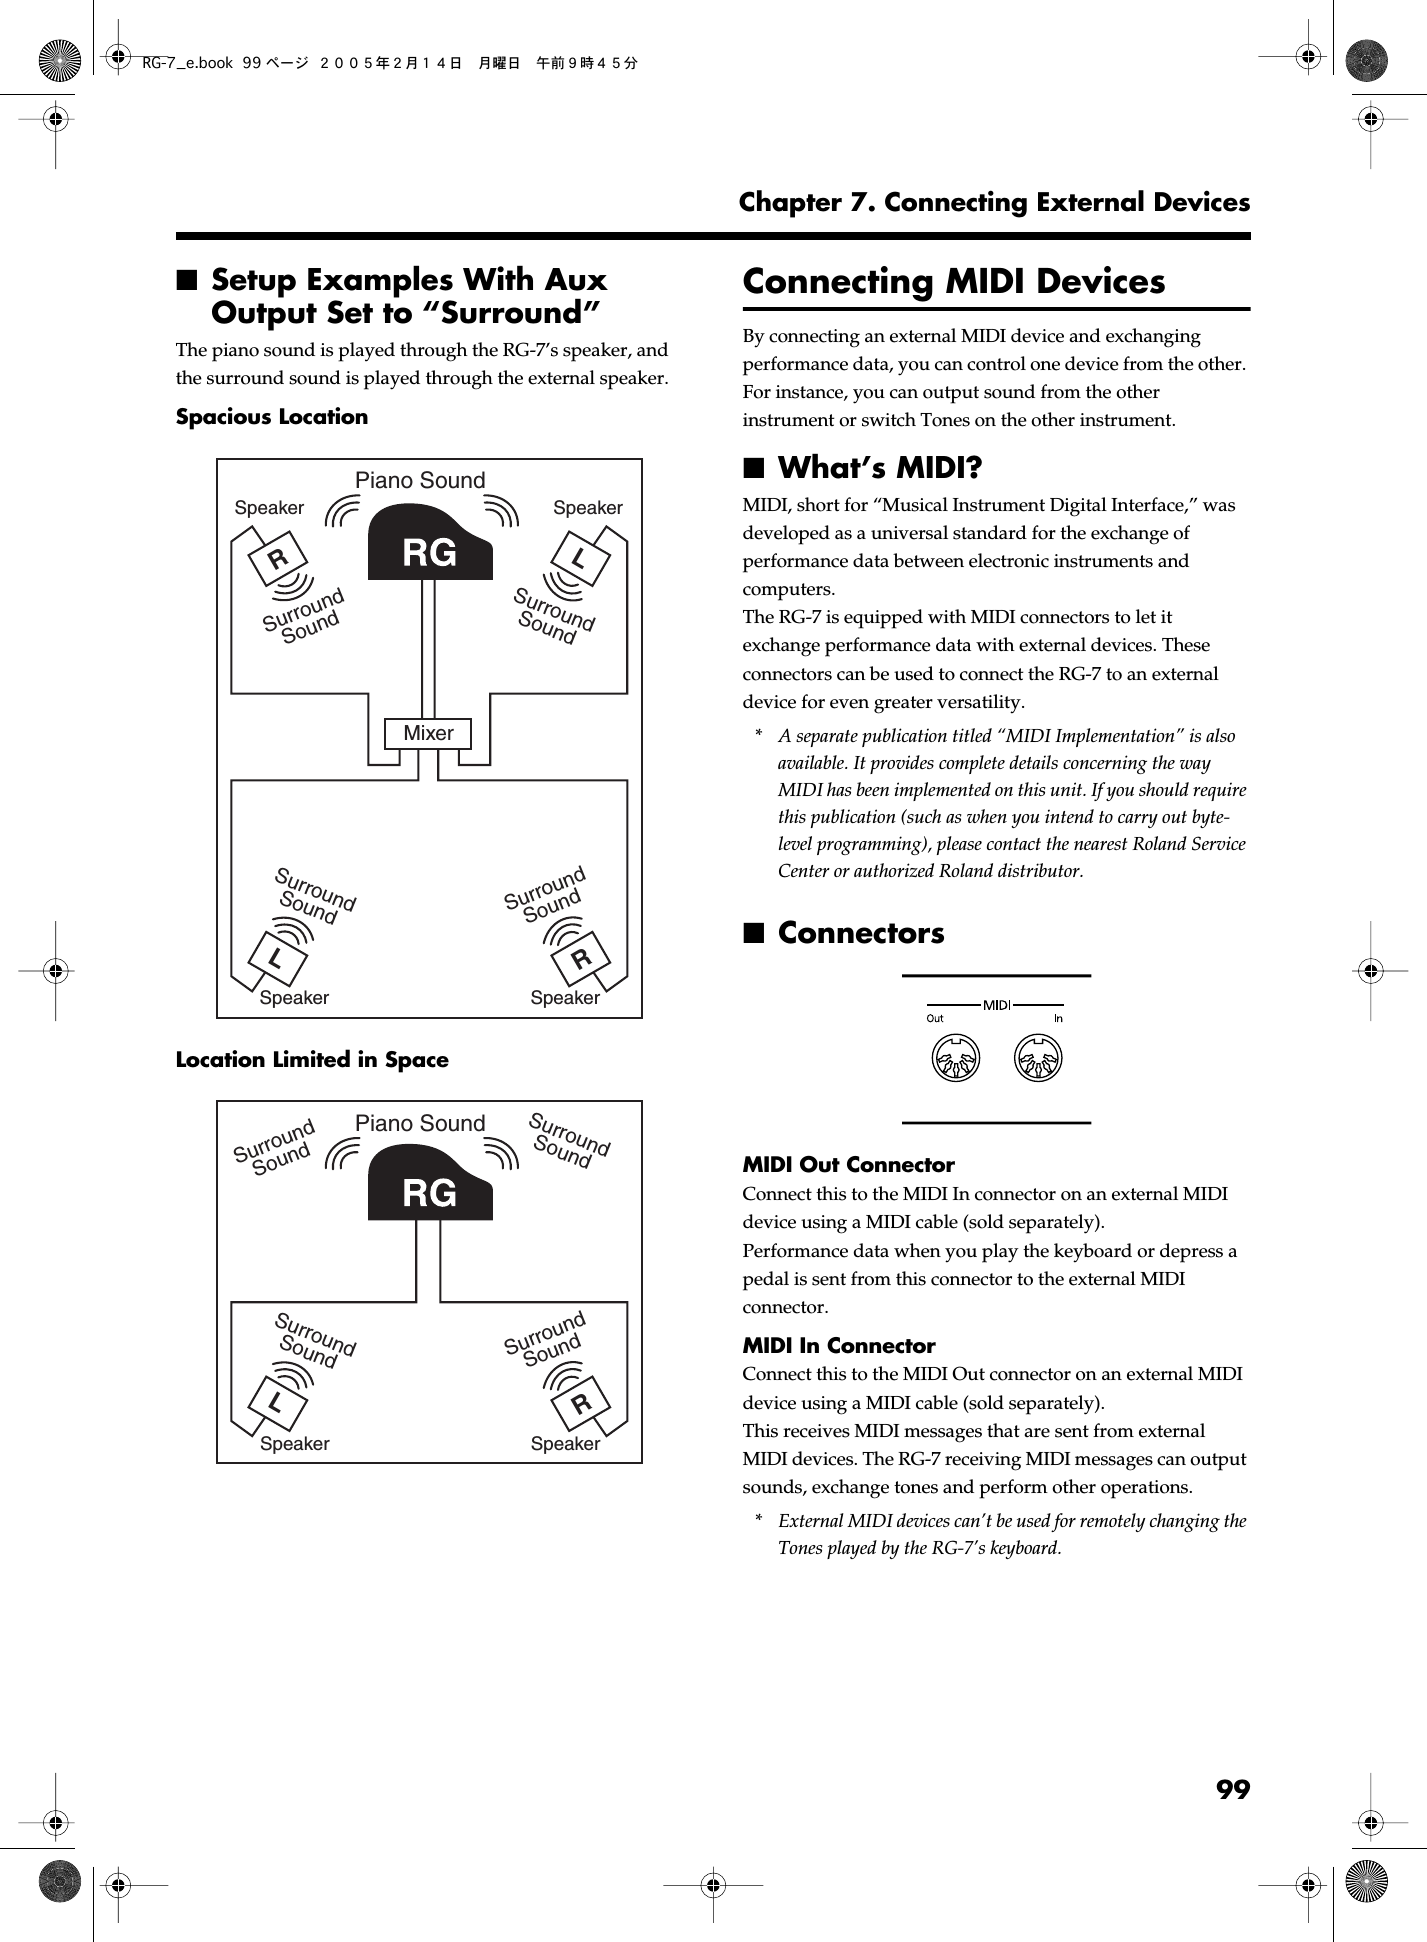
![100Chapter 7. Connecting External Devices ■ Making the ConnectionsNOTE To prevent malfunction and/or damage to speakers or other devices, always turn down the volume, and turn off the power on all devices before making any connections. 1. Turn the volume all the way down on the RG-7 and on the device you’re about to connect. 2. Switch off the power to the RG-7 and the device you’re about to connect. 3. Use a MIDI cable (sold separately) to connect the MIDI connectors to each other. Please refer to the connection examples below. 4. Switch on the power to the RG-7 and the connected device. 5. Adjust the volume level on the RG-7 and the connected device. 6. You should also set the MIDI settings as needed. For details on the MIDI-related settings, refer to previous section. Connection Examples: Setup with a MIDI Sequencer * When the RG-7 is connected to a MIDI sequencer, set it to Local OFF. Refer to “Disconnecting the Internal Sound Generator and Keyboard (Local Control)” (p. 101). Connecting with a MIDI Sound Module Making MIDI-related Settings Here’s how you can set the transmit channel and other MIDI-related settings. ■ MIDI Send Channel Settings MIDI features sixteen MIDI channels, numbered 1–16. Simply connecting a cable is not enough for communication to take place. The connected devices must be set to use the same MIDI channels. Otherwise, no sound will be produced, and no sounds can be selected.The RG-7 receives all channels 1–16. 1. Press the [Function] (Exit) button, getting its indicator to light. 2. Press the [Song] (Select -) button or [ ] (Select +) button to display the MIDI screen. 3. Press the [Song] (Select -) button or [ ] (Select +) button to get the value for “Tx Ch” (Transmit channel) to flash. 4. Press the [ ] (Value -) button or [ ] (Value +) button to set the MIDI Transmit channel. Value: 1–16 5. Press the [Function] (Exit) button so the indicator goes out.Jack Panel of the RG-7InOut MIDIRoland MT SeriesOUTTHRU INMIDISound ModuleJack Panel of the RG-7RG-7_e.book 100 ページ 2005年2月14日 月曜日 午前9時45分](https://usermanual.wiki/Roland/RG-7/User-Guide-525080-Page-101.png)
![101Chapter 7. Connecting External Devices ■ Disconnecting the Internal Sound Generator and Keyboard (Local Control) When connecting a MIDI sequencer, set Local Control to “OFF.” The setting is at “Local Control ON” when the RG-7 is powered up.As illustrated, information describing what has been played on the keyboard is passed to the sound module over two different routes, (1) and (2). As a result, you hear overlapping or intermittent sounds. To prevent this from happening, route (1) must be disabled, by setting the unit to what is known as “Local Off.” Local On : The keyboard and internal sound generator are connected. Local Off : The keyboard and internal sound generator are separated. No sound will be produced by the keyboard when it is played. → When connecting a unit in the Roland MT series, you don’t need to switch off Local Control. MT units transmit Local Off messages when their power is switched on. If you first switch on the RG-7, then the MT-series device, Local Control is automatically switched off on the RG-7. 1. Press the [Function] (Exit) button, getting its indicator to light. 2. Press the [Song] (Select -) button or [ ] (Select +) button to display the MIDI screen. 3. Press the [Song] (Select -) button or [ ] (Select +) button to get the value for “Local” (Local Control) to flash. 4. Press the [ ] (Value -) button or [ ] (Value +) button to switch Local Control on or off. 5. Press the [Function] (Exit) button so the indicator goes out. ■ Sending Tone Change Messages (Program Change/Bank Select MSB/Bank Select LSB) A Program Change is a message that means “change to the Tone of the specified number.” The device that receives this changes to the Tone of the corresponding number.When you choose a Program Change message (Program Number), the Program Number will be transmitted to the MIDI device connected to the RG-7. The MIDI device that receives the Program Number changes the tone to the corresponding Program Number.Normally, the Tone is selected from the 128 Tones available. Some MIDI devices, however, have more than 128 Tones. With such devices, the Tone is selected through a combination of Program Change messages and Bank Select messages. There are two parts of a Bank Select message: the MSB (Controller 0, with a value of 0–127) and the LSB (Controller 32, with a value of 0–127). * Some MIDI instruments can’t handle Bank Select messages. Others can handle Bank Selects, but do not recognize the LSB part.(1)MIDIMIDIMIDIMIDI(2)ININ OUTOUTSequencerMemorySoundGeneratorEach note played is sounded twice Soft Tru OnLocal OnLocal OnSound is emittedSound GeneratorLocal OffNo sound producedSound Generator Value DescriptionOn Local Control is switched on. Off Local Control is switched off.RG-7_e.book 101 ページ 2005年2月14日 月曜日 午前9時45分](https://usermanual.wiki/Roland/RG-7/User-Guide-525080-Page-102.png)
![102Chapter 7. Connecting External Devices → For more information on the tones switched when Program Changes are received, refer to the MIDI Implementation (sold separately). Order the MIDI Implementation from your RG-7 dealer. 1. Press the [Function] (Exit) button, getting its indicator to light. 2. Press the [Song] (Select -) button or [ ] (Select +) button to display the MIDI screen. 3. Press the [Song] (Select -) button or [ ] (Select +) button so that the value set for “Bank Select MSB,” “Bank Select LSB,” or “PC” is flashing. Ch: Setting the MIDI Channel Used for Transmitting Program Change Numbers When Switching User Programs PC: Program Change Number Bank Select MSB: Bank Select MSB Bank Select MSB: Bank Select LSB 4. Press the [ ] (Value -) button or [ ] (Value +) button to set the Program Change number, Bank Select MSB, or Bank Select LSB. 5. Press the [Function] (Exit) button so the indicator goes out. ■ Sending Recorded Performance Data to a MIDI Device (Composer MIDI Out) When Composer MIDI Out is active, you can send performance data recorded with the RG-7 to a connected MIDI device or computer.When you turn on the power, this is set to “Off” (data is not sent).If you want to transmit a performance recorded on the RG-7 to an external MIDI device or computer, turn this setting “On.” If this is “Off,” the data will not be transmitted. 1. Press the [Function] (Exit) button, getting its indicator to light. 2. Press the [Song] (Select -) button or [ ] (Select +) button to display the MIDI screen. 3. Press the [Song] (Select -) button or [ ] (Select +) button to get the value for “Composer MIDI Out” to flash. 4. Press the [ ] (Value -) button or [ ] (Value +) button to switch the song’s MIDI Out setting on or off. 5. Press the [Function] (Exit) button so the indicator goes out. Menu Value Ch(User Program Transmit Channel) -- (Off), 1–16* When set to -- (Off), no Program Change Number is transmitted, even when User programs are switched.PC 1–128 Bank Select MSB 0–127 Bank SelectLSB 0–127Bank Select LSBBank Select MSB Value DescriptionOn The performance data recorded with the RG-7 can be sent to the connected MIDI device or computer. Off The performance data recorded with the RG-7 cannot be sent to the connected MIDI device or computer.RG-7_e.book 102 ページ 2005年2月14日 月曜日 午前9時45分](https://usermanual.wiki/Roland/RG-7/User-Guide-525080-Page-103.png)
![103Chapter 7. Connecting External Devices If you wish to save the performance recorded on the RG-7, use the following procedure. In this situation, your external sequencer is set its MIDI Thru feature to be OFF. For details, refer to the owner’s manual of your MIDI sequencer. 1. Connect a MIDI sequencer such as the MT series (p. 100). 2. Record the performance on the RG-7 (p. 74). 3. Set this setting to “On.” 4. Start recording with the connected MIDI sequencer. 5. Start playback of the recorded song on the RG-7. 6. When playback ends, stop recording with the connected MIDI sequencer. 7. Use a connected MIDI sequencer to save the data on a floppy disk or other media. Connecting to the Computer You can use a USB connector to connect the RG-7 to your computer. For more details, refer to the separate “USB Installation Guide.” * Connecting your computer to the RG-7 for the first time requires installation of the “USB Driver” (on the included CD-ROM) to the computer.* Only MIDI data can be transmitted using USB.* To prevent malfunction and/or damage to speakers or other devices, always turn down the volume, and turn off the power on all devices before making any connections.* USB cables are not included. Consult your Roland dealer if you need to purchase.* Turn on the power to the RG-7 before starting up MIDI applications on the computer. Do not turn the RG-7 on or off while any MIDI application is running.* If not using USB, disconnect the USB cable from the RG-7.* If during the transmission/reception of data, the computer switches to energy-saving mode or suspended mode, or if the RG-7’s power is switched on or off, the computer may freeze, or the RG-7’s operation may become unstable. Making the Settings for the USB Driver If you intend to connect to a computer using the USB connector, you need to make the following setting before you make the connection.In the factory settings, “Original” is selected. Normally, there is no need to change the USB driver settings. 1. Press the [Function] (Exit) button, getting its indicator to light. 2. Press the [Song] (Select -) button or [ ] (Select +) button to display the MIDI screen. 3. Press the [Song] (Select -) button or [ ] (Select +) button to get the value for “USB Driver” to flash. 4. Press the [ ] (Value -) button or [ ] (Value +) button to select the USB driver. 5. Press the [Function] (Exit) button so the indicator goes out.For more on system requirements, refer to the “USB Installation Guide.” However, note that the RG-7 is not compatible with Mac OS 9. Indication DescriptionGeneric Select this when using a generic USB driver included with the OS with a USB connection. Original Select this when using the supplied driver with a USB connection.Under ordinary circumstances, use this mode. Original2 This is an auxiliary mode.It is not normally used.RG-7_e.book 103 ページ 2005年2月14日 月曜日 午前9時45分](https://usermanual.wiki/Roland/RG-7/User-Guide-525080-Page-104.png)
![104 Troubleshooting If you think there’s a problem, read this first. Case Cause/Remedy The power doesn’t come onIs the power cord connected and plugged in correctly? (p. 19)Depressing a pedal has no effect, or the pedal effect doesn’t stopIs the pedal connected correctly?Make sure the pedal cord is securely connected to the pedal connector (p. 19).Has a different function been assigned to the pedal? See “Assigning Functions to Pedals” (p. 69).The volume level of the instrument connected to Input jacks is too lowCould you be using a connection cable that contains a resistor? Use a connection cable that does not contain a resistor.Low hum coming from external deviceDo you have different external devices plugged into different power outlets?When connecting external devices, always draw power from the same outlet.Unable to load properly with USB memoryIs the USB memory you are using one that was produced by Roland?Performance is not guaranteed when other types of USB memory are used.Volume of microphone changesThe microphone volume may change if the [Volume] button is adjusted while the Vocal Effect is on. The microphone volume does not change when the Vocal Effect is switched off. Connected Television or External Display Screen Looks Odd Images not shown on external display or television when external display or television is connectedIs the external display or television properly connected? (p. 47, p. 49)Is the external display’s power turned on?Are you using a display that is compatible with the RG-7?Refer to “Displays That Can Be Connected to This Instrument” (p. 47).Is the television format or display setting correct? (p. 47, p. 49)Thin horizontal lines visible in the television screenWhile narrow horizontal lines may be visible in the television screen, this is a particular characteristic of the television set and does not indicate any problem with the RG-7.Poor-quality of images displayed in televisionEven when all recommended settings are used, images may still not be displayed well with the television set you are using (images may not match the screen size, and may be clustered towards the center of the screen). No sound is heard No sound is heardIs the volume level of the RG-7 (p. 20) or connected device turned all the way down?Are headphones plugged in? (p. 21)Has a plug remained connected to the Phones jack?When headphones or plugs are connected, the keyboard’s speaker stops playing.Could the keyboard volume be turned down completely in the volume balance settings? (p. 71)Could the levels of all frequency ranges be turned down completely in the equalizer settings? (p. 60)Is V-LINK switched on?While V-LINK is switched on, no sound is produced when you press any of the twelve keys at the left end of the keyboard (p. 92).No sound is heard (when a MIDI instrument is connected)Have all devices been switched on?Are the MIDI cables connected correctly? (p. 99)Does the MIDI channel match the connected instrument? (p. 100)No sound is heard when the keyboard is playedHas Local Control been set to “Off”?When Local Control is set to Off, no sound is produced by playing the keyboard. Set Local Control to On (p. 101).Not all played notes are soundedThe maximum number of notes can play simultaneously is 128. Frequent use of the damper pedal during playing along with a song may result in performance data with too many notes, causing some notes to drop out. The sound is strange Sounds are heard twice (doubled) when the keyboard is playedDo you have the Layer tone selected? (p. 54)When the RG-7 is connected to an external sequencer, set it to the Local Off mode (p. 101). Alternatively, the sequencer could be set so its Soft Thru feature is Off.The tuning or pitch of the keyboard or song is offHave you set transpose? (p. 38, p. 61)Are the settings for the “Temperament” and “Stretch Tuning” correct? (p. 63, p. 64)Is the setting for the “Master Tune” correct? (p. 62) Case Cause/RemedyRG-7_e.book 104 ページ 2005年2月14日 月曜日 午前9時45分](https://usermanual.wiki/Roland/RG-7/User-Guide-525080-Page-105.png)
![105 Reverberation still audible even with Reverb turned offSince the RG-7’s piano sounds accurately reproduce the depth and reverberation of the original acoustic piano, you may find that reverberation is audible when the Key Off function is enabled.If you want to eliminate the reverberation, turn off the Key Off function (p. 57).In the upper range, the sound changes abruptly beyond a certain keyOn an acoustic piano, notes in the upper one and a half octaves of the keyboard continue to sound until they decay naturally, regardless of the damper pedal. There is a difference in the timbre as well. Roland pianos faithfully simulate such characteristics of the acoustic piano. On the RG-7, the range that is unaffected by the damper pedal will change depending on the Key Transpose setting.A High-pitched whine is producedWhen listening through headphones: Some of the more flamboyant and effervescent piano tones feature an ample high-end component, which may make the sound appear to have metallic reverberation added. Since this reverberation becomes particularly audible when supplemented by heavy reverb, you may be able to diminish the problem by reducing the amount of reverb applied to the sound.When listening through speakers: Here, a different cause (such as resonance produced by the RG-7) would be suspect. Consult your Roland dealer or nearest Roland Service Center.The bass range sounds odd, or there is a vibrating resonanceWhen listening through speakers: Playing at loud volumes may cause instruments near the RG-7 to resonate. Resonation can also occur with fluorescent light tubes, glass doors, and other objects. In particular, this problem occurs more easily when the bass component is increased, and when the sound is played at higher volumes. Use the following measures to suppress such resonance. o Place speakers so they are 10-15 cm from walls and other surfaces. o Reduce the volume. o Move the speakers away from any resonating objects. When listening through headphones: Here, a different cause (such as resonance produced by the RG-7) would be suspect. Consult your Roland dealer or nearest Roland Service Center. Case Cause/RemedySong doesn’t play back correctly Song doesn’t play backDoes the screen indicate message, like “Delete User Song OK?” (p. 75). The internal songs cannot be played back while recorded performance data remains in the RG-7’s memory. Erase the performance data or play back the song after saving to the “Favorites” or to your USB memory.Pressing the [] button doesn’t return to the beginning of the songSome music files may contain settings that stop play at a point partway through the song. Press the [ ] button several times more to return to the beginning of the tune.The [ ] and [] buttons don’t workThe fast-forward and reverse buttons are ignored while music files is being read in. Wait until processing finishes.Accompaniment not playingIs the accompaniment volume turned down in the volume balance settings? (p. 71) Can’t record The recorded performance has disappearedAny performance that has been recorded is deleted when the power to the RG-7 is turned off or a song is selected. A performance cannot be restored once it’s been deleted. Be sure to save it on a USB memory or User Memory before you turn off the power (p. 92).Unable to play back songsCould you have pressed the remote control’s [MUTE] button and muted the sound? Press the [MUTE] button to cancel the mute (p. 35).Moving Key not workingCould the [Moving Key] indicator be extinguished?Press the [Moving Key] button so its indicator is lit.If using the Moving Key function, which part’s performance is the Moving Key function assigned to play (p. 88)?Does the part to be played with the Moving Key function contain performance data?If a part containing no performance data is selected, the keys will not move when the song is played back. When running Moving Keys for a performance recorded with the RG-7, select Part 1. Case Cause/RemedyRG-7_e.book 105 ページ 2005年2月14日 月曜日 午前9時45分](https://usermanual.wiki/Roland/RG-7/User-Guide-525080-Page-106.png)
![106 Error Messages Indication MeaningError 01: You can only read the music file. It can not be saved. Error 02: An error occurred during writing. The storage media’s protect tab may be in the “Protect” (writing prohibited) position, or the storage media may not yet be initialized. Error 10: No storage media is inserted.Insert the storage media and try again. Error 11: There is not sufficient free memory in the save destination.Either insert other storage media or delete unneeded files and try again. Error 14: An error occurred during writing. The storage media may be corrupted.Insert other storage media and try again. Alternatively, you can initialize the storage media. Error 15: The file is unreadable. The data format is not compatible with the RG-7. Error 16: Data was not called up in time for playback of the song.After waiting several seconds, you may be able to play back the song by pressing the [ ] button again. Error 17: The selected image data cannot be displayed.Prepare image data that can be used with the RG-7 (p. 51). Error 30: The internal memory capacity of the RG-7 is full. Error 40: The RG-7 cannot deal with the excessive MIDI data sent from the external MIDI device.Reduce the amount of MIDI data sent to the RG-7. Error 41: A MIDI cable has been disconnected. Connect it properly and securely. Error 43: A MIDI transmission error has occurred.Check the MIDI cable and connected MIDI device. Error 51: There may be a problem with the system. Repeat the procedure from the beginning. If it is not solved after you have tried several times, contact the Roland service center. Error 60: Moving Key Error. Stop use immediately, and contact the nearest Roland Service Center. Error 61:Error 62:Error 63:Error 65: The Ext Memory port was subjected to excessive current.Check the storage media to confirm that no damage has occurred to it.RG-7_e.book 106 ページ 2005年2月14日 月曜日 午前9時45分](https://usermanual.wiki/Roland/RG-7/User-Guide-525080-Page-107.png)
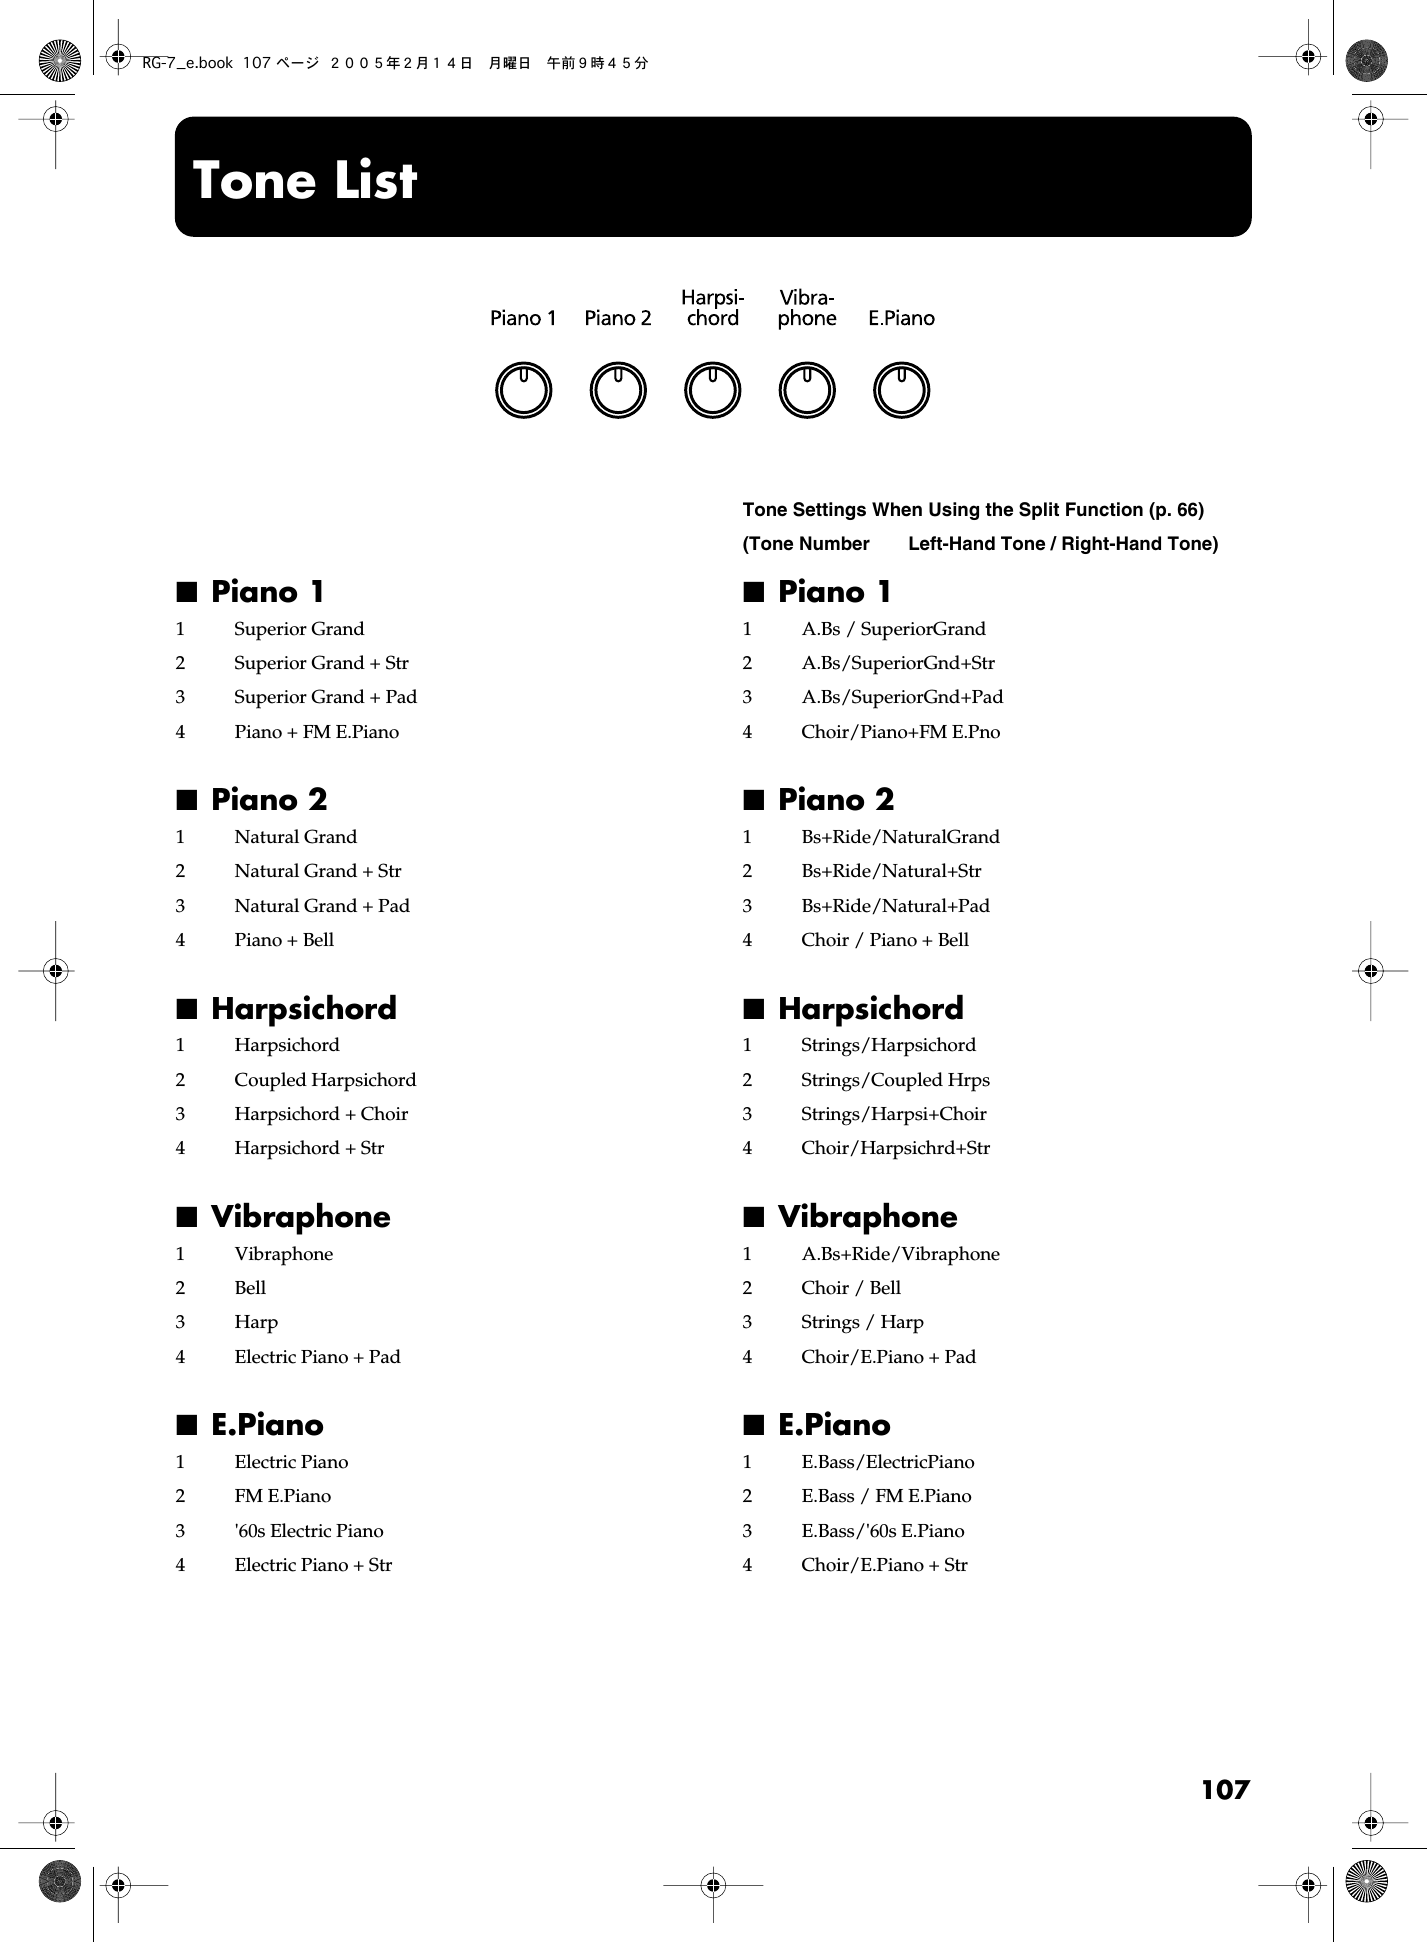
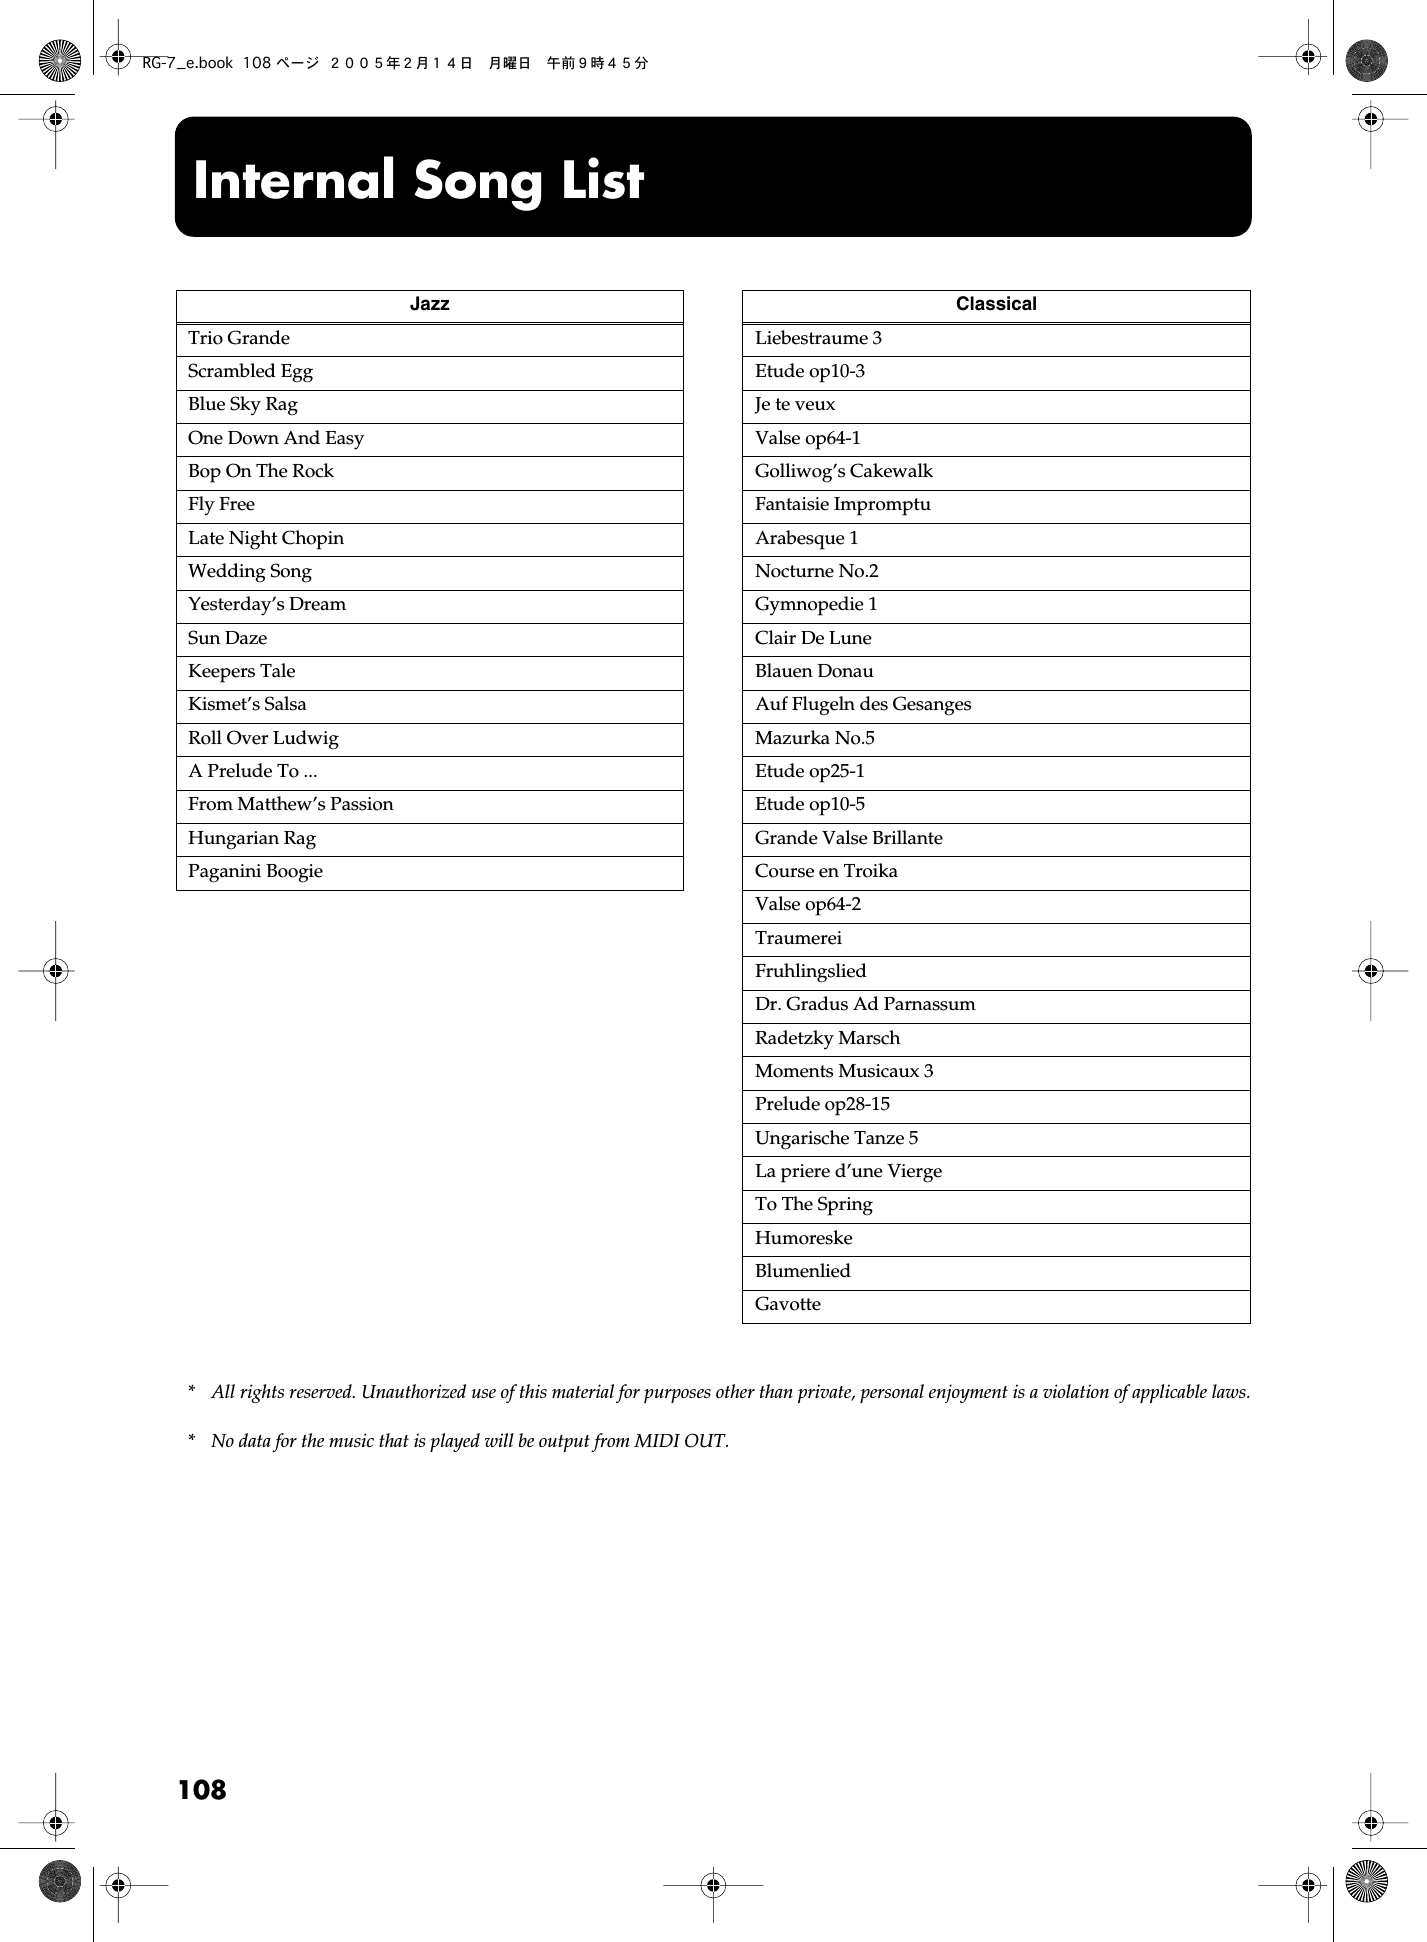
![109 Parameters Stored to Internal Memory ■ Parameters Stored in Memory Backup ■ Parameters Stored in the User Program Screen Display Description Page KEY TOUCH Touch Key Touch p. 55Hammer Hummer Response p. 56RESONANCEKeyOff Key Off Resonance p. 57String String Resonance p. 58Damper Damper Resonance p. 59EQUALIZERMaster Master Level p. 60L Low-frequency Range Level p. 60M Midrange Level p. 60H High-frequency Range Level p. 60TUNE(Master Tune setting) Master Tune p. 62Stretch Stretch Tune p. 63(Tuning Method) Temperament p. 64Key Tonic Note p. 65EFFECT Reverb Reverb Level p. 68REMOTEReceive Remote Control Function On/Off, Infrared Transmission Function On/Off p. 89, p. 96Transpose The Function Assigned to the Remote Control’s [TRANSPOSE] Button p. 90F1 The Function Assigned to the Remote Control’s [F1] Button p. 90F2 The Function Assigned to the Remote Control’s [F2] Button p. 90EXT DISPLAY VGA, NTSC, PAL External Display Setting and Television Format p. 48, p. 49Slide Interval The Duration for Displaying Slide Show Images p. 51AUX INPUT Level AUX INPUT Level p. 36Mode AUX INPUT Mode p. 36PLAY Mode Song Playback Method p. 27CD Level CD Level p. 91 Screen Display Description Page – – – – – – Selected Tone and Variation p. 53EFFECT Reverb Reverb Level p. 68BALANCE Key:Acmp Balance p. 71Layer Layer Balance p. 54SPLIT Split Split Setting p. 66Split Point Split Point p. 67TRANSPOSE Keybrd Keyboard Transpose (When the Link is set to Off) p. 61Keyboard/Playback Keyboard and Playback Transpose (When the Link is set to On) p. 38, p. 61PEDAL Cent The Function Assigned to the Center Pedal p. 69Left The Function Assigned to the Left Pedal p. 69MIC ECHO Type Mic Echo Type p. 39Level Mic Echo Level p. 39VOCAL Harmony Harmony Type p. 40Transformer Transformer Type p. 41MIDICh MIDI Channel used for transmitting Program Change numbers when switching User Programs p. 101PC Program Change Number p. 101Bank Select MSB Bank Select MSB p. 101Bank Select LSB Bank Select LSB p. 101RG-7_e.book 109 ページ 2005年2月14日 月曜日 午前9時45分](https://usermanual.wiki/Roland/RG-7/User-Guide-525080-Page-110.png)
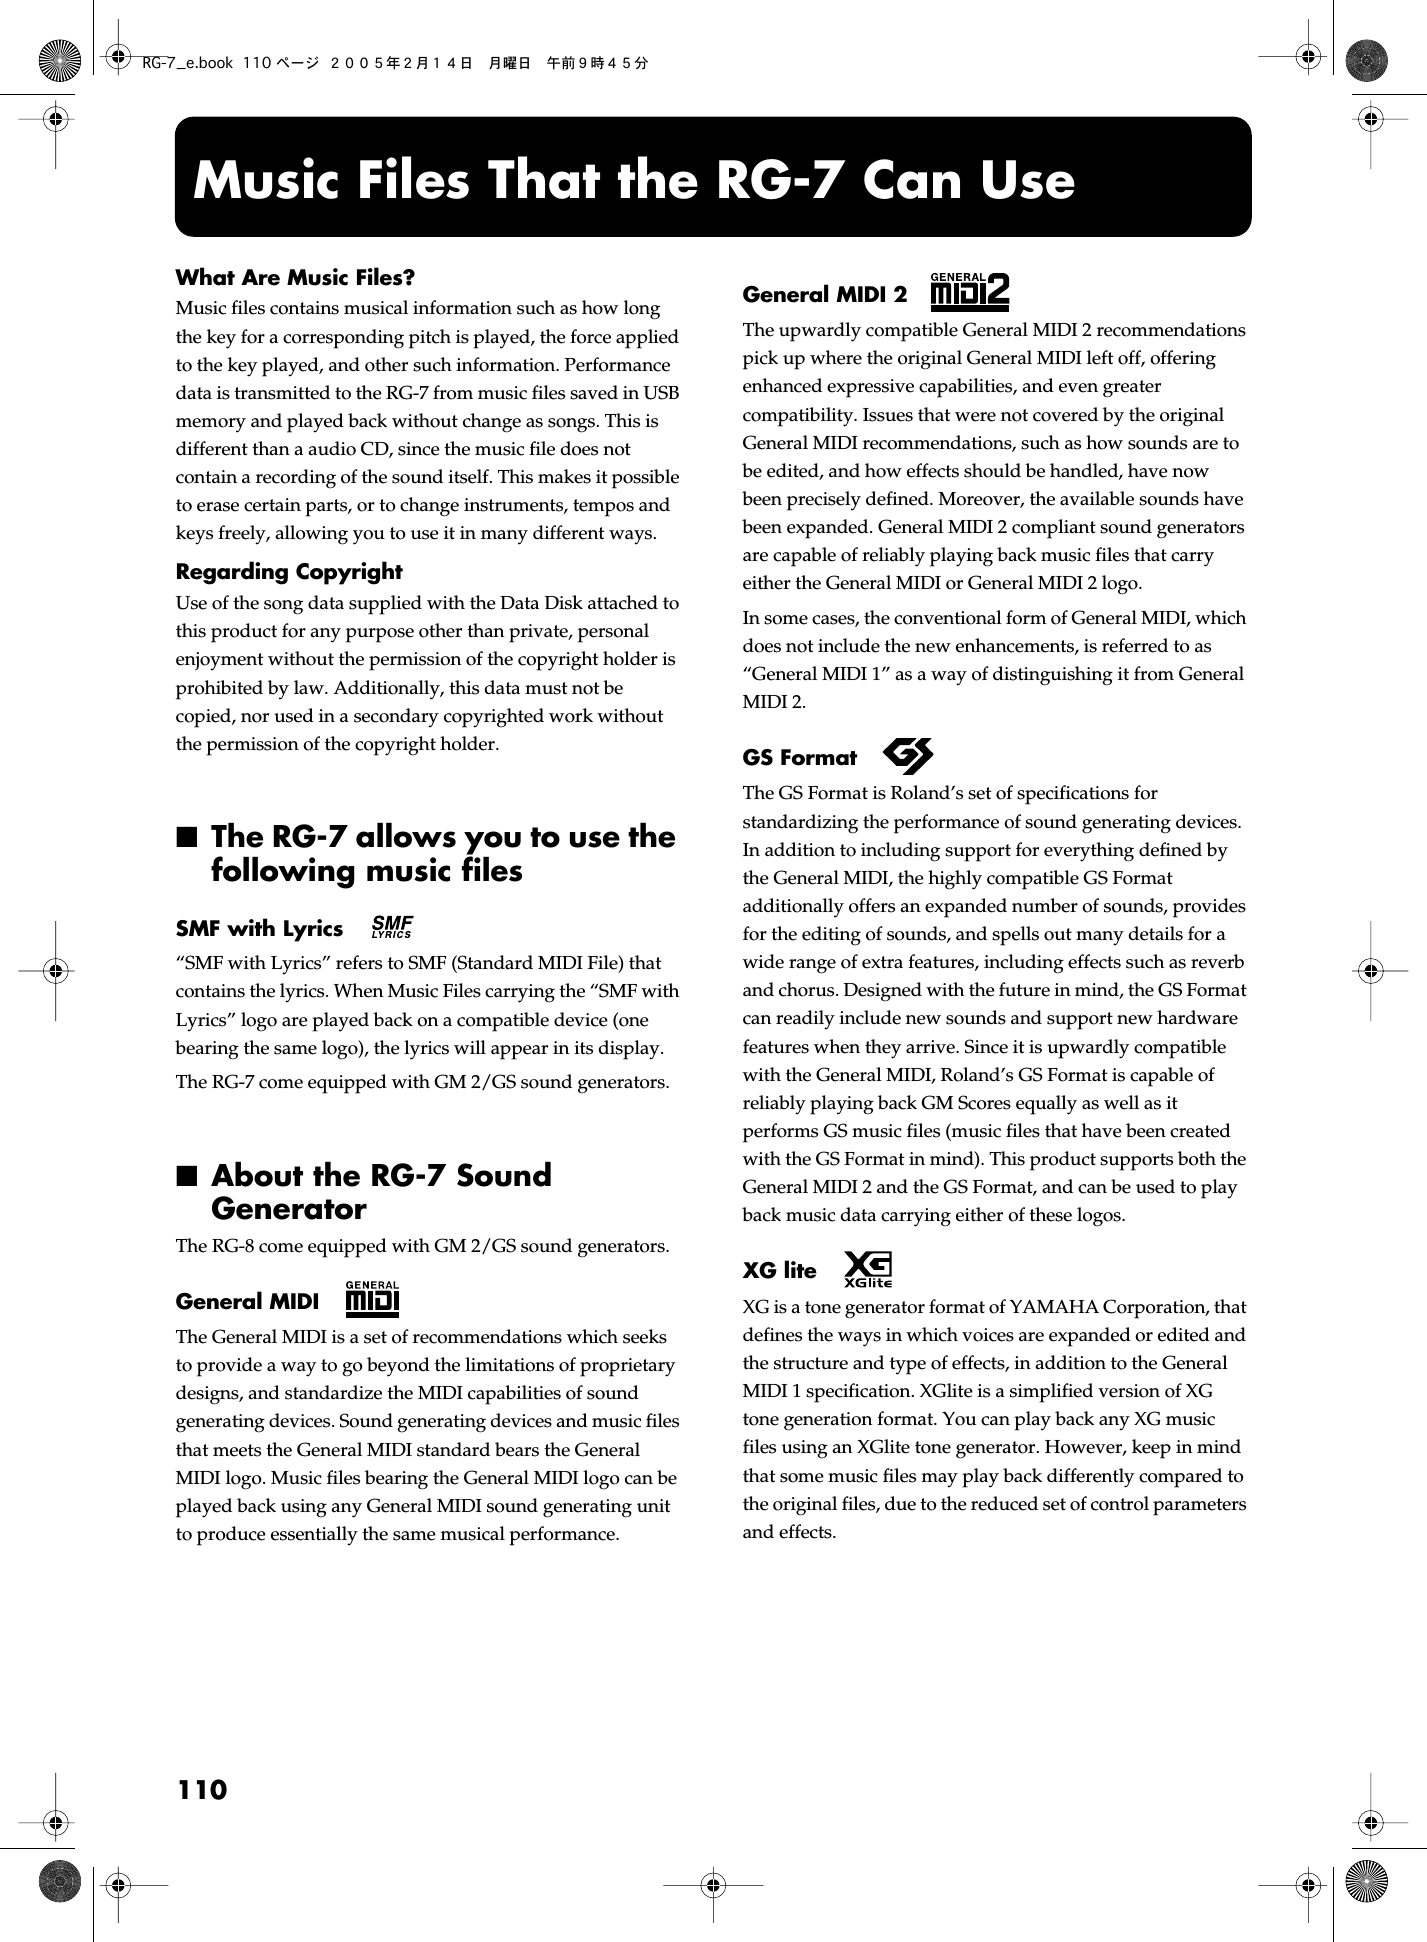
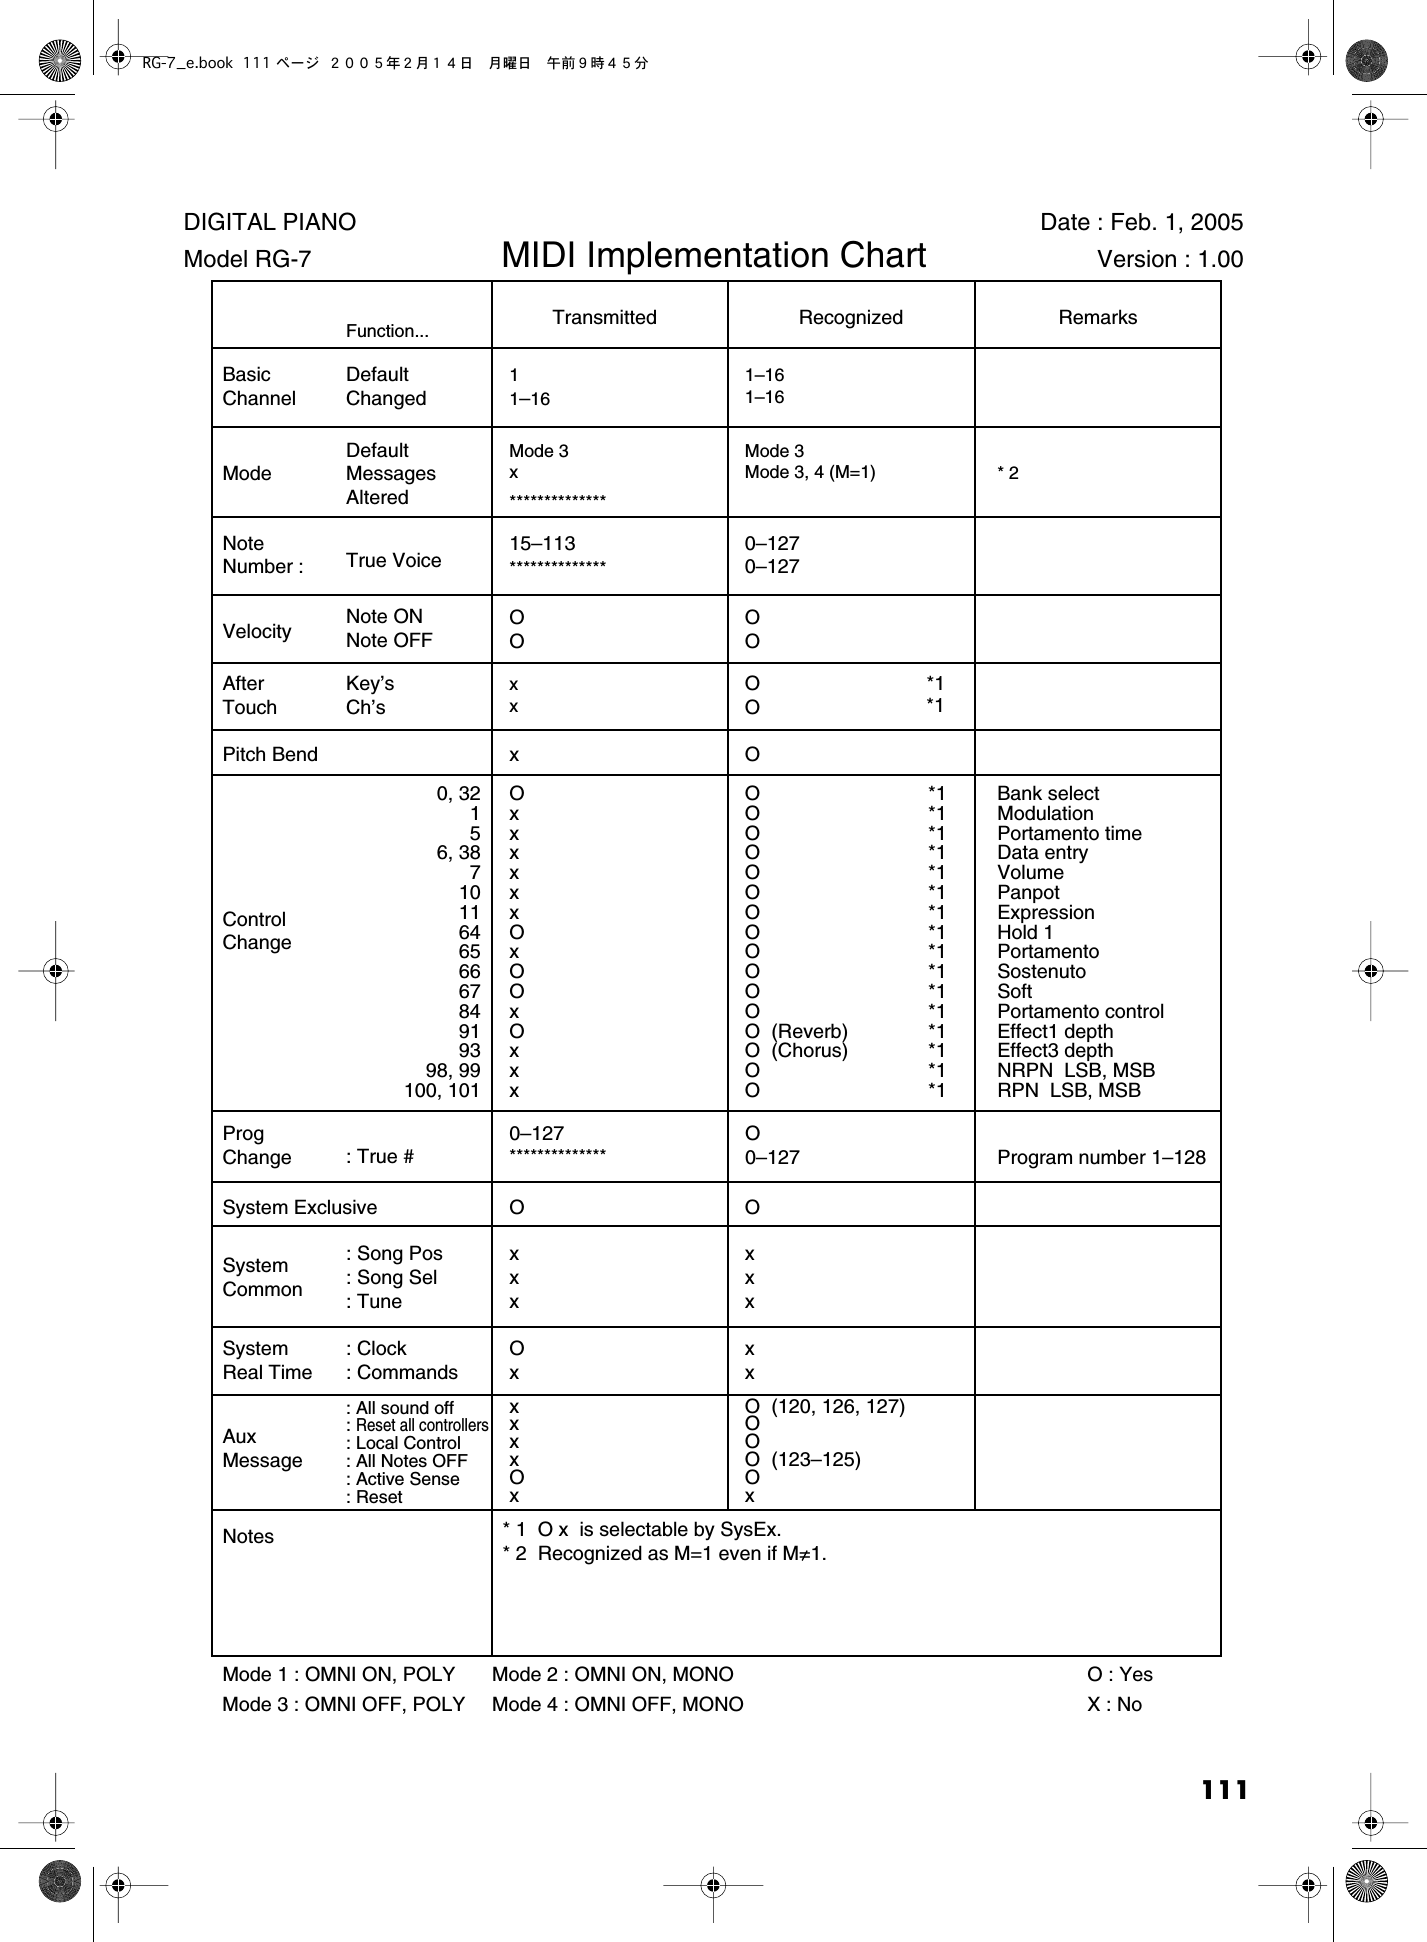
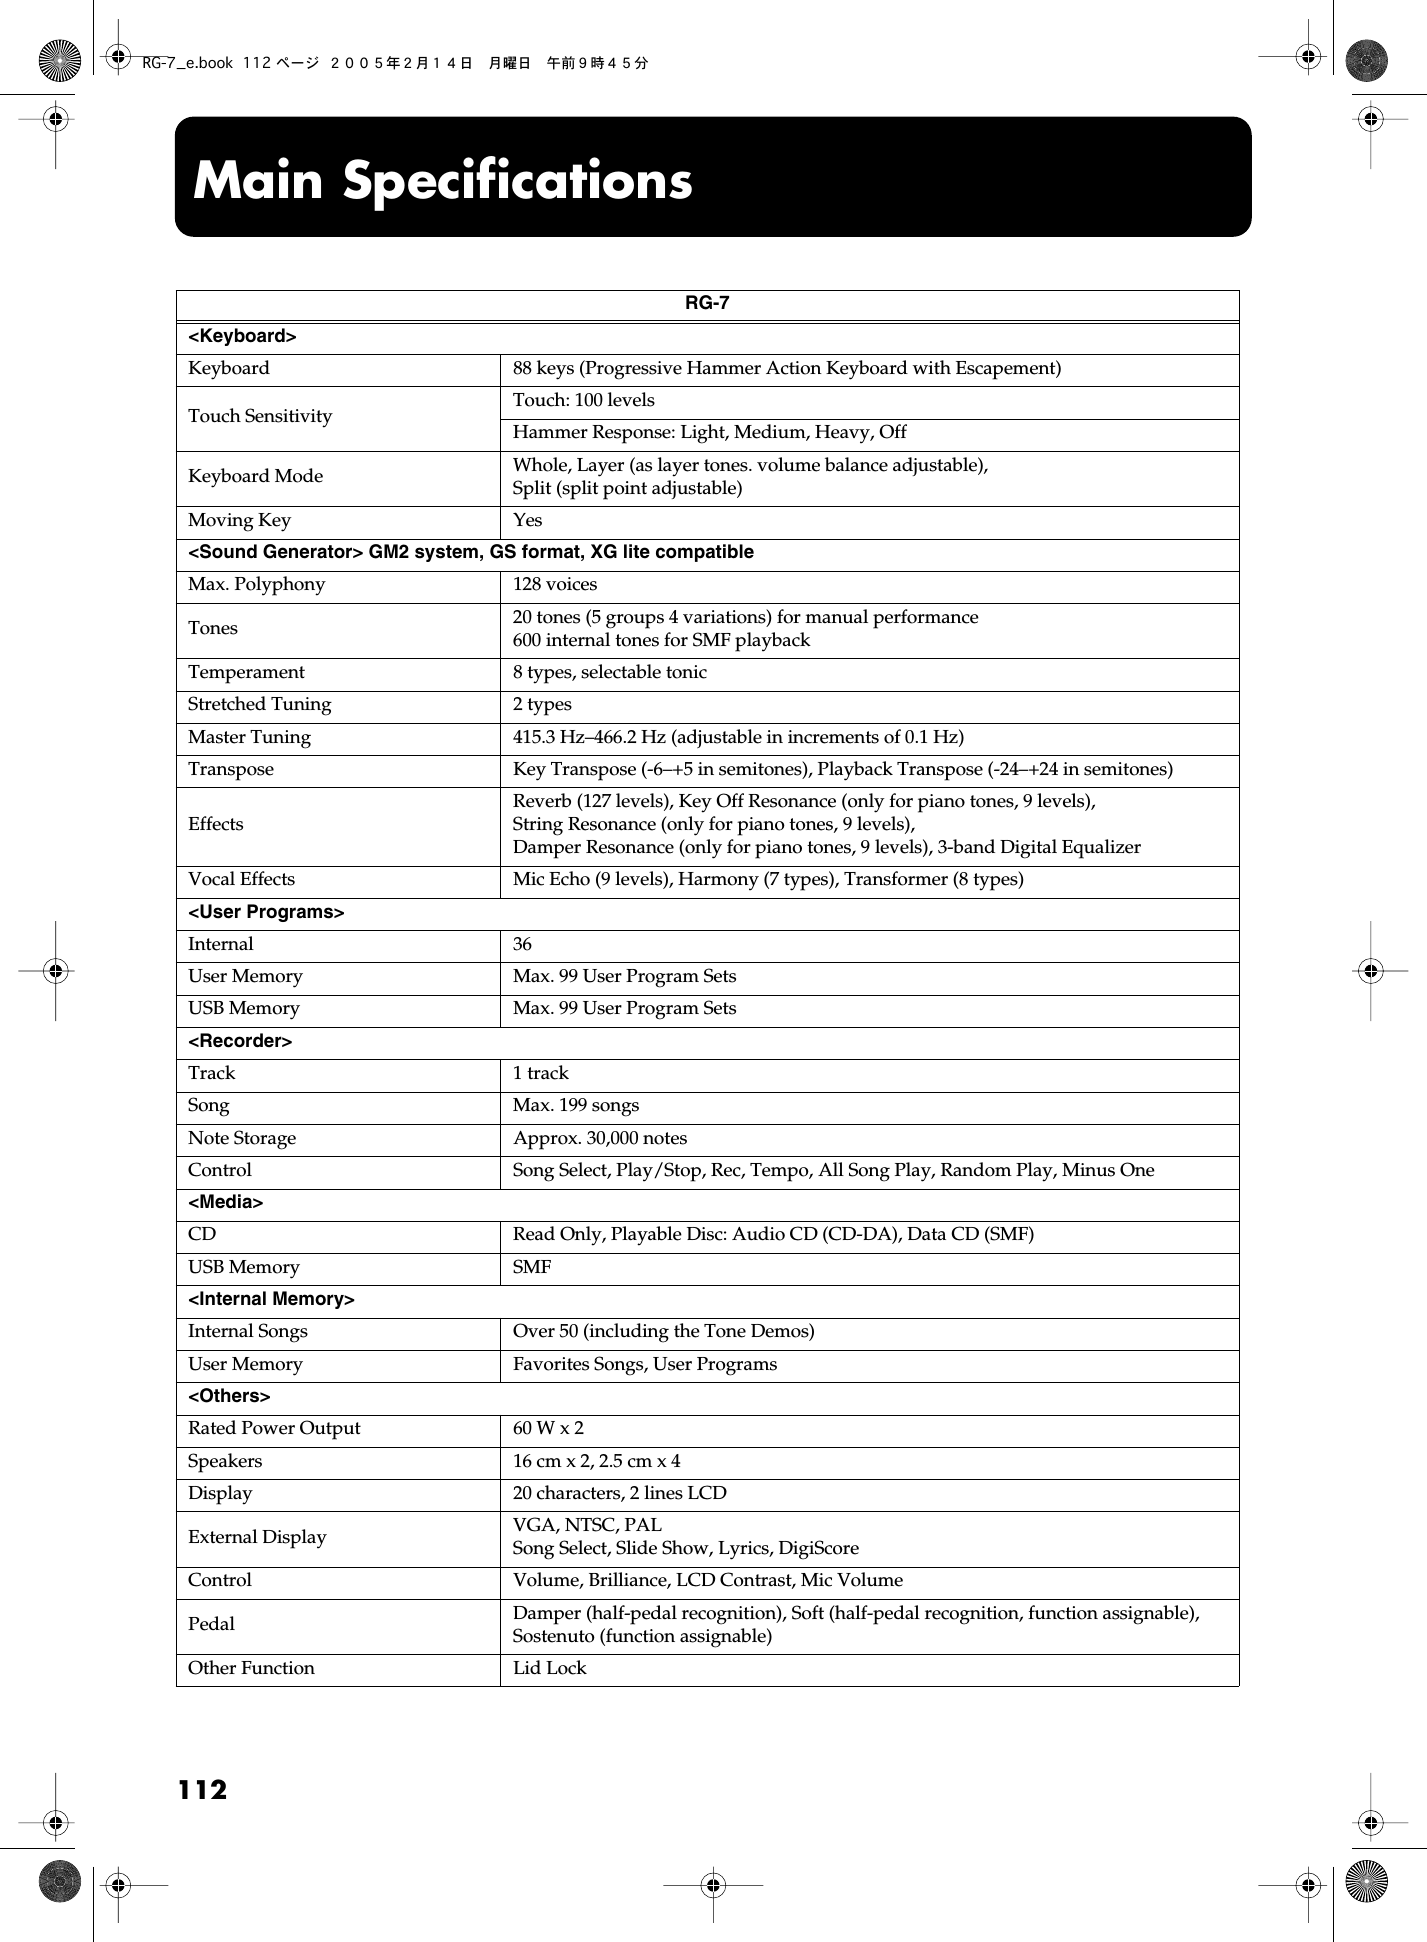
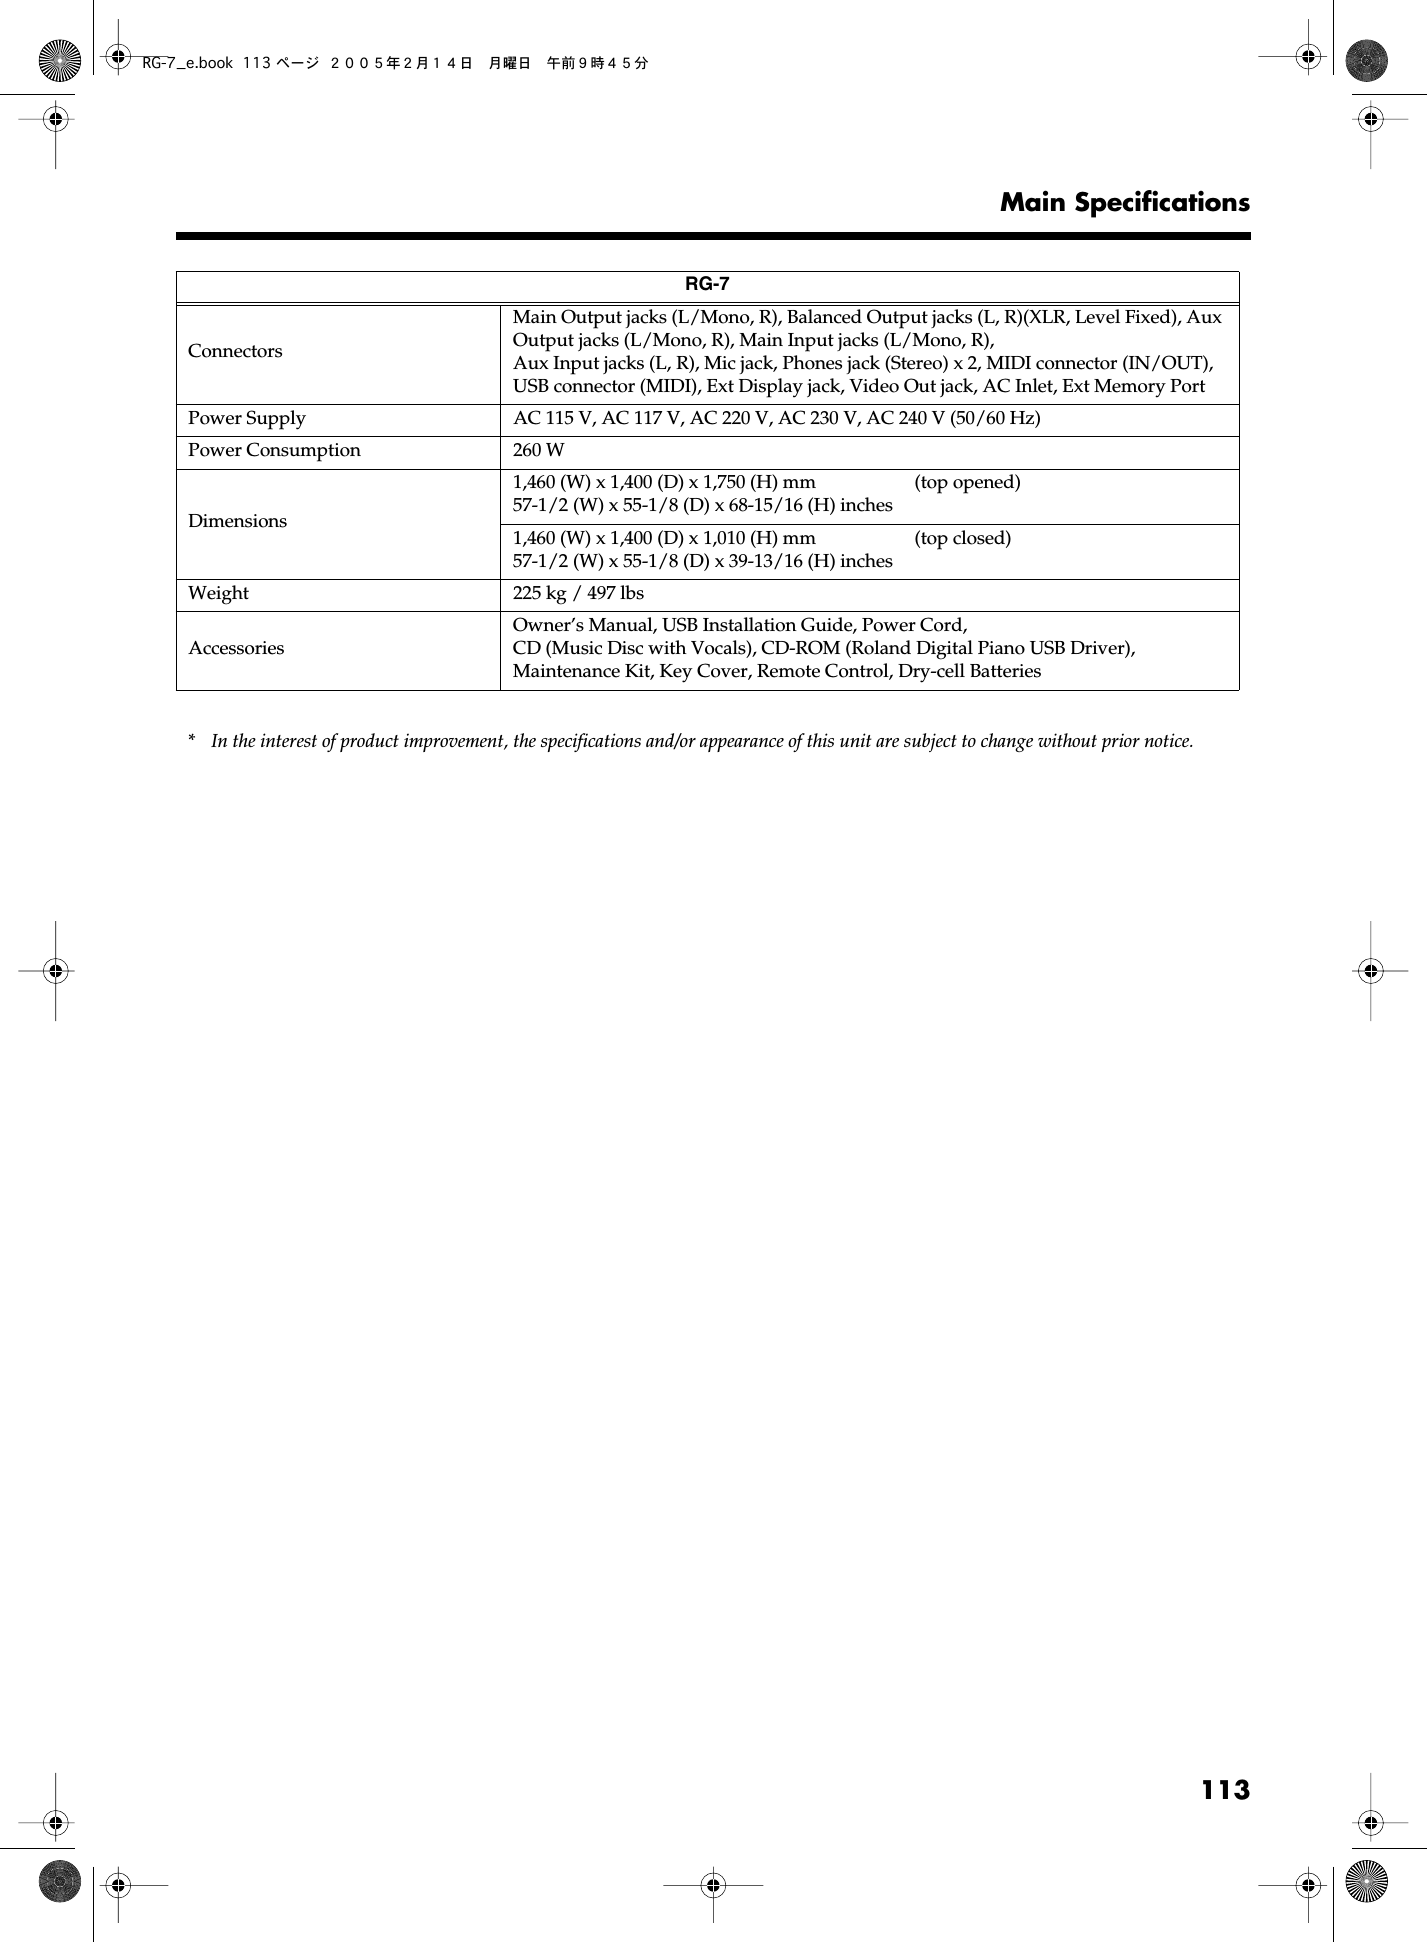
![114 Index [] (Select +) button ................................................ 14[] (Value +) button ................................................ 14[] (Value -) button ................................................ 14 A AC Inlet ..................................................................... 15, 19Access Indicator ............................................................. 16Audio Equipment .......................................................... 97Automatic Demos ......................................................... 93Aux Input Jacks ....................................................... 15, 36Aux Output Jacks .................................................... 15, 98 B Balance ............................................................................ 71Layer Balance ........................................................... 54The Accompaniment and the Keyboard .............. 71Balanced Out (Fixed) Jacks .................................... 15, 97Bank Select LSB ........................................................... 101Bank Select MSB .......................................................... 101Batteries .......................................................................... 32[Brilliance] knob ...................................................... 14, 20Brilliance ......................................................................... 20 C CD Drive ................................................................... 16, 29CD SettingLevel .......................................................................... 91Sync ............................................................................ 91Type ........................................................................... 91CD Settings ..................................................................... 91Composer MIDI Out ................................................... 102Computer ..................................................................... 103ConnectingAudio Equipment .................................................... 97Computer ................................................................ 103External Display ...................................................... 47External Speakers .................................................... 98Headphones ............................................................. 21Microphone .............................................................. 21MIDI Devices ............................................................ 99Pedal Cord ................................................................ 19Power Cord .............................................................. 19Television .................................................................. 49USB Memory ............................................................ 22Contrast .......................................................................... 23CopyingSongs ......................................................................... 42 D Damper Pedal ................................................................ 20Damper Resonance ................................................. 20, 59DeletingSaved User Program Sets ........................................ 85Songs Saved to the “Favorites” or USB Memory 45Disc Tray ................................................................... 16, 29Display ............................................................................ 14Display Settings ............................................................. 48 E Eject Button .............................................................. 16, 29Emergency Eject Hole ............................................. 16, 29Equalizer ......................................................................... 60Ext Display Connector ............................................ 15, 47Ext Memory Port ..................................................... 16, 22Ext Memory Port Cover ......................................... 16, 22Ext Memory Port Cover Lock ...................................... 16External Display ............................................................ 47 F Factory Reset .................................................................. 73Favorites ........................................... 25–26, 42, 45, 76, 92FormatUSB Memory ............................................................ 92User Memory ............................................................ 92Front Panel ..................................................................... 14Front Top ........................................................................ 17[Function] (Exit) button .......................................... 14, 88Function Screen ....................................................... 23, 88 G General MIDI ............................................................... 110General MIDI 2 ............................................................ 110GS ................................................................................... 110GS Format ..................................................................... 110 H Hammer Response ........................................................ 56Harmony ................................................................... 34, 40Harmony Part ................................................................ 95Headphones ................................................................... 21 I Infrared Function ........................................................... 96Infrared Playback .......................................................... 96Infrared Receiver ..................................................... 16, 33Initialize .......................................................................... 92Input Jacks ................................................................ 15, 97Internal Songs ................................................................ 26RG-7_e.book 114 ページ 2005年2月14日 月曜日 午前9時45分](https://usermanual.wiki/Roland/RG-7/User-Guide-525080-Page-115.png)
![115Index J Jack Panel ....................................................................... 15 K Karaoke Feature ............................................................ 37Key Off Resonance ........................................................ 57Key Touch ...................................................................... 55 L Layer Balance ................................................................. 54Layer Tones .................................................................... 54LCD Contrast knob ................................................. 15, 23Lid .................................................................................... 18Lid Lock .......................................................................... 18LoadingSaved User Program Sets ....................................... 83Local Control ............................................................... 101Local Off ....................................................................... 101Local On ........................................................................ 101Lyrics ............................................................................... 50Lyrics Screen .................................................................. 52 M Main Output Jacks .................................................. 15, 97Master Tuning ............................................................... 62Memory Backup ............................................................ 72Parameters Stored ................................................. 109Mic Echo ......................................................................... 39Mic Jack ..................................................................... 15, 21Mic Volume Knob ................................................... 15, 21Microphone .................................................................... 21MIDI ................................................................................ 99MIDI Connectors ..................................................... 15, 99MIDI Devices ................................................................. 99MIDI In Connector ........................................................ 99MIDI Out Connector ..................................................... 99MIDI Transmit Channel ............................................. 100Minus One ...................................................................... 93Moving Key .............................................................. 88–89[Moving Key] (Enter) button ................................. 14, 88Music Files .................................................................... 110Music Rest ...................................................................... 18Mute ................................................................................ 35Specifying the Part .................................................. 94 N Notation .................................................................... 50, 94Notation Settings ........................................................... 94 O Output Jacks ................................................................... 97 P Pedal ................................................................................ 20Pedal Connector ...................................................... 15, 19Pedal Cord ...................................................................... 19Pedal EX .......................................................................... 70Pedal Settings ................................................................. 69Phones Jacks ............................................................. 15, 21Playback Transpose ....................................................... 38PlayingAll Song ..................................................................... 27Internal Songs ........................................................... 26One Song ................................................................... 27Random ..................................................................... 35Recorded Performance ............................................ 75Songs on CDs ........................................................... 28Songs Saved on USB Memory ............................... 31Tone Demos .............................................................. 26Power Cord .................................................................... 19Power On and Off ......................................................... 19[Power] switch ......................................................... 14, 19Program Change .......................................................... 101 R Recording ....................................................................... 74Remote Control ................................ 32–35, 37, 50, 89–90Reverb ............................................................................. 68 S SavingPerformance Settings (User Program) .................. 79Recorded Performances .......................................... 76User Program Sets ................................................... 81ScreensAUX INPUT screen ................................................. 36AUX OUTPUT screen ............................................. 98BALANCE screen .............................................. 54, 71CD screen .................................................................. 91EFFECT screen ......................................................... 68EQUALIZER screen ................................................. 60EXT DISPLAY screen .................................. 48–49, 51FACTORY RESET screen ........................................ 73FILE screen ............................................. 42, 45, 76, 92Function Screen ........................................................ 23iR screen .................................................................... 96KEY TOUCH screen .......................................... 55–56MEMORY BACKUP screen .................................... 72RG-7_e.book 115 ページ 2005年2月14日 月曜日 午前9時45分](https://usermanual.wiki/Roland/RG-7/User-Guide-525080-Page-116.png)
![116Index MIC ECHO screen ................................................... 39MIDI screen .............................................. 92, 100–103MISC Harmony Part screen ................................... 95MISC Moving Key Part screen .............................. 89NOTATION screen ................................................. 94PEDAL screen .......................................................... 69PLAY screen ....................................................... 27, 93RECORD screen ....................................................... 74REMOTE screen ........................................... 89–90, 96RESONANCE screen ........................................ 57–59Song Select screen .................................................... 23SPLIT screen ....................................................... 66–67Tone Screen .............................................................. 53TRANSPOSE screen .......................................... 38, 61TUNE screen ...................................................... 62–65USER PROGRAM screen ................ 79, 81, 83, 85, 87VOCAL screen ................................................... 40–41Slide Show ................................................................ 50–51SMF with Lyrics ........................................................... 110Soft Pedal .................................................................. 20, 69[Song] (Select -) button ........................................... 14, 25Song Select Screen ................................................... 23, 50Sostenuto Pedal ....................................................... 20, 69Sound Generator ......................................................... 110Split ................................................................................. 66Split Point ....................................................................... 67Stretch Tuning ............................................................... 63String Resonance ........................................................... 58 T Television ....................................................................... 49Television Format .......................................................... 49Temperament ................................................................. 64Tempo ............................................................................. 37Tone ................................................................................. 53Tone Buttons ............................................................ 14, 53Tone Demos ................................................................... 26Tone Group .................................................................... 53Tone Screen .................................................................... 23Tonic ................................................................................ 65Topslip ............................................................................ 17Topsticks ......................................................................... 17Transformer ............................................................. 34, 41Transpose ................................................................. 38, 61Tuning ............................................................................. 64Tuning Curve ................................................................. 63 U USB Connector ....................................................... 15, 103USB Driver .................................................................... 103USB Memory ....................................................................... ....................22, 31, 37, 42, 45, 51–52, 76, 81, 83, 85, 92–93User Memory ......................................... 25, 81, 83, 85, 92User Program ................................................................. 78Calling Up ................................................................. 80Deleting ..................................................................... 85Loading ..................................................................... 83Parameters Stored .................................................. 109Pedal Shift ................................................................. 87Saving .................................................................. 79, 81Transmit Channel .................................................. 102 V Variation ......................................................................... 53Video Out Jack ......................................................... 15, 49V-LINK Function ........................................................... 92VolumeCD .............................................................................. 35Microphone .............................................................. 21Overall ....................................................................... 20[Volume] knob ......................................................... 14, 20 X XG lite ............................................................................ 110RG-7_e.book 116 ページ 2005年2月14日 月曜日 午前9時45分](https://usermanual.wiki/Roland/RG-7/User-Guide-525080-Page-117.png)