RuggON PM-522 TABLET PC User Manual PM 522 UM D2 08152014x
RuggON Corporation TABLET PC PM 522 UM D2 08152014x
RuggON >
Contents
User manual_Part 4
Getting Started
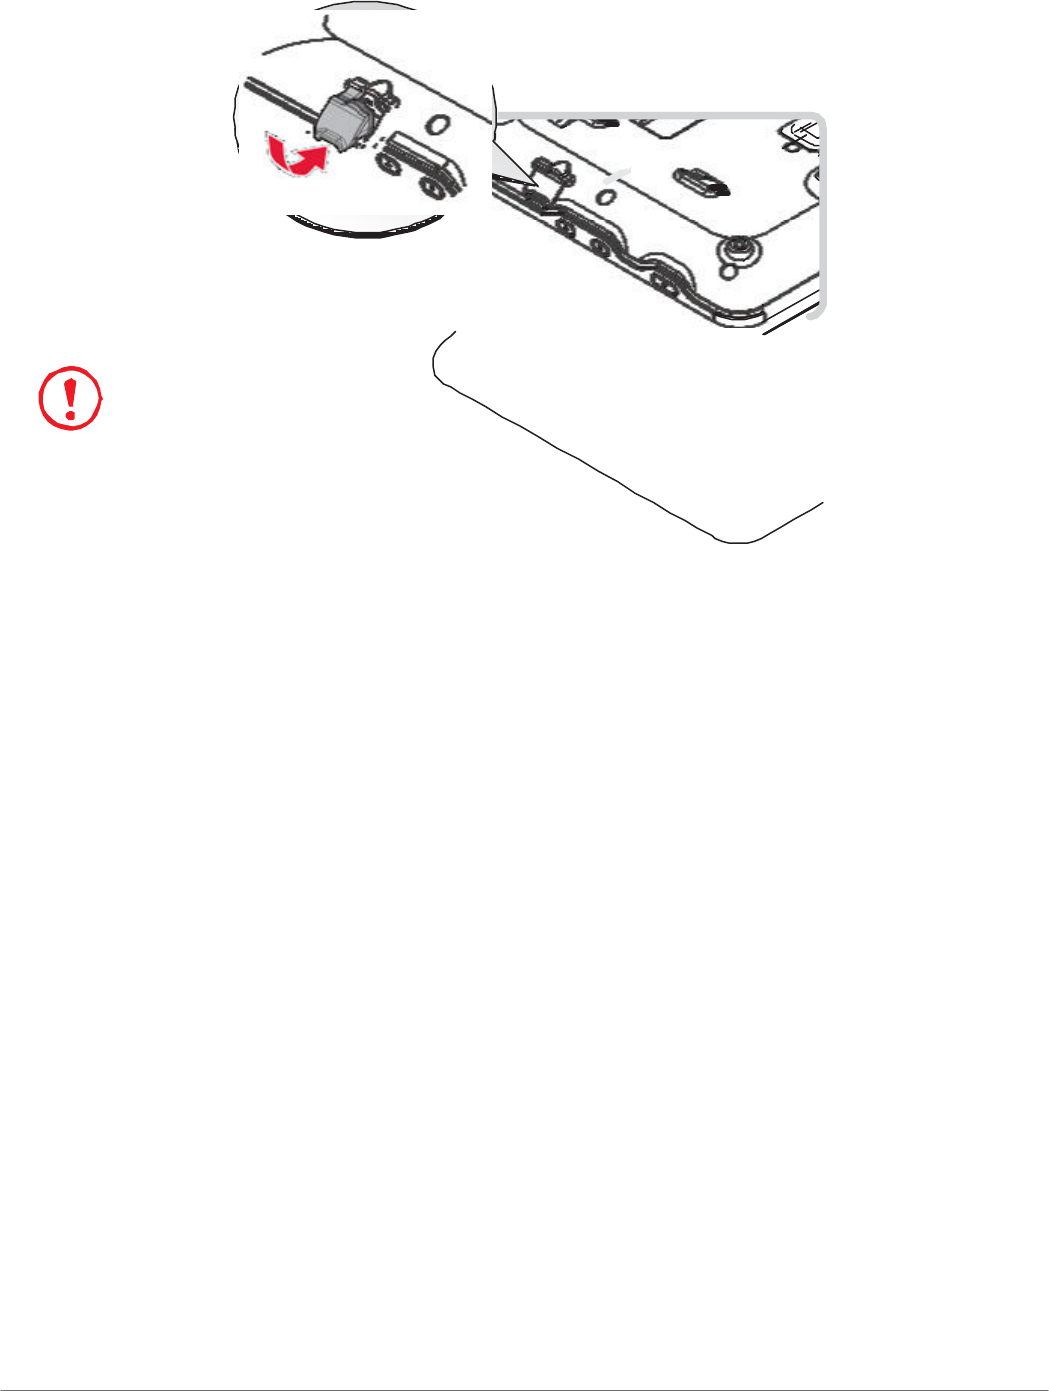
3. Push in the cover to seal the DC-IN compartment.
Figure 42. Installing the DC-IN Cover
The DC-IN cover must be inserted correctly to prevent internal damage to the device.
Removing the Protective Film from the Display
The front display of the PM-522 is protected during transport by a transparent film. This film should
remain on the front display during assembly to avoid damage to the front display surface.
Only remove the film once all of the assembly work has been completed.
32

Chapter 3.
Operation
Before First Time Use
1. Flip up the external battery cover with an angle.
Figure 95. Removing the External Battery Cover
Operation
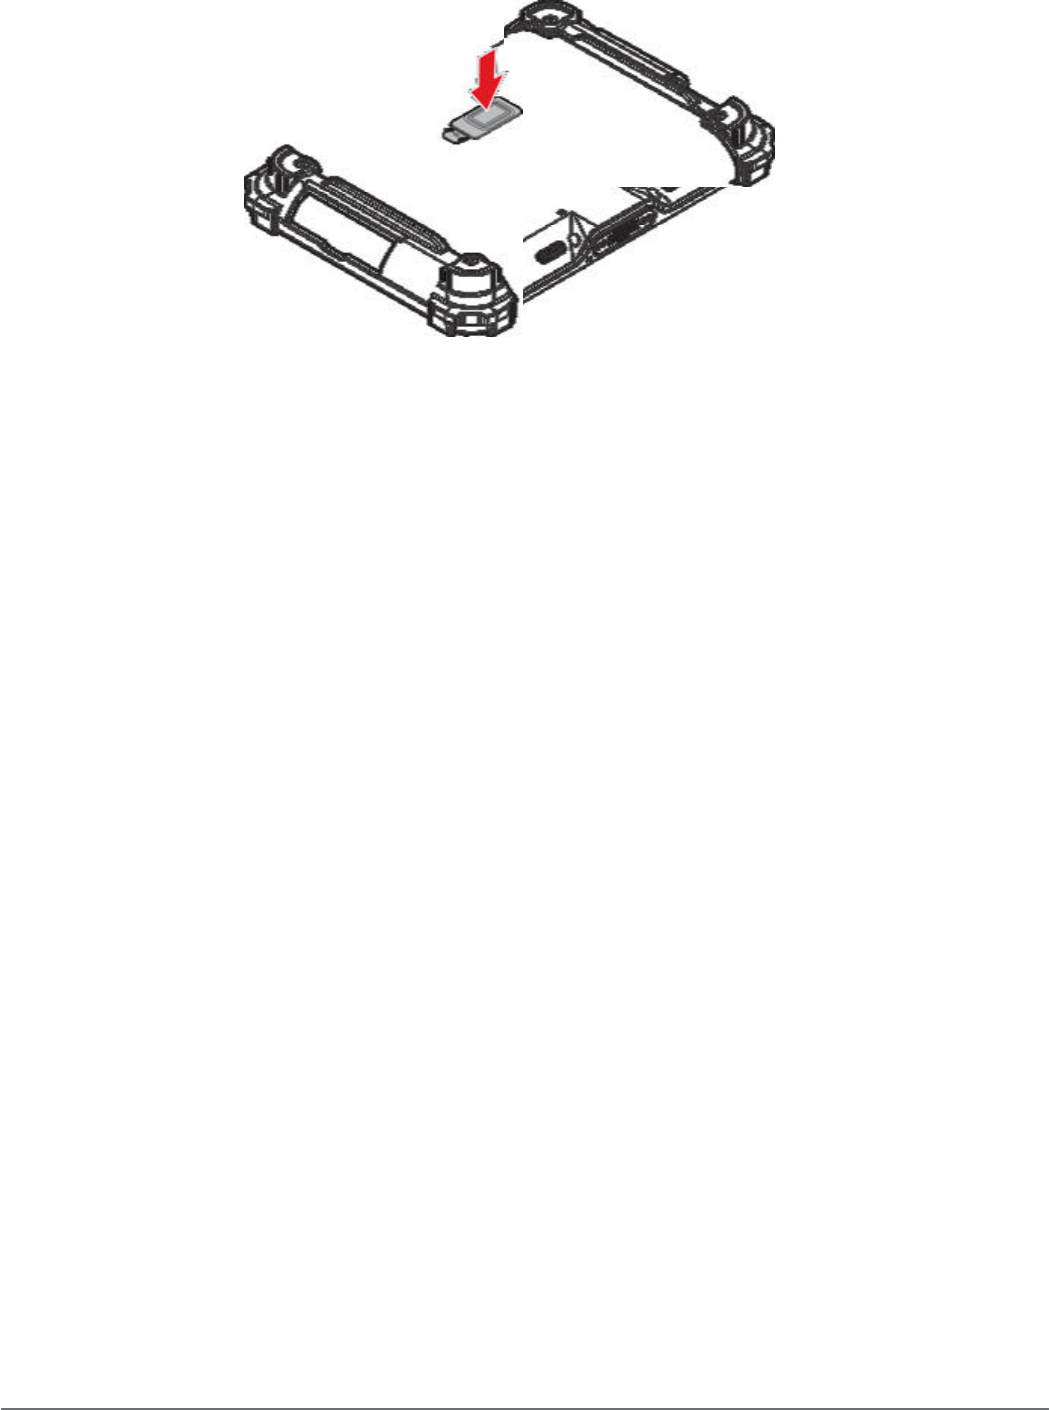
2. Use a tool to switch the DIP switch to ON.
Figure 96. Switching the DIP Switch
ON
OFF
33
Operation
3. Install the external battery cover to the battery cover holder.
Figure 97. Installing the External Battery Cover
Powering Up and Down the Device
Powering Up the Device
Only power up the PM-522 after connecting all of the devices.
1. Press and hold the power switch for 2 seconds.
Figure 98. Power Up the PM-522
Powering Down the Device
1. Press and hold the power switch for 5 seconds.
Figure 99. Power Down the PM-522
34
Connecting to Network
PM-522 Supports two ways to connect to a network: LAN and Wireless
LAN
Wireless
Calibrating the Touch Screen
The touch screens of all PM-522 devices that come delivered with an operating system (Windows
or Linux) are already calibrated.
You may need to calibrate your screen if you tap on one area and it registers in a different area of
the screen. Make sure you use the stylus to complete the alignment process.
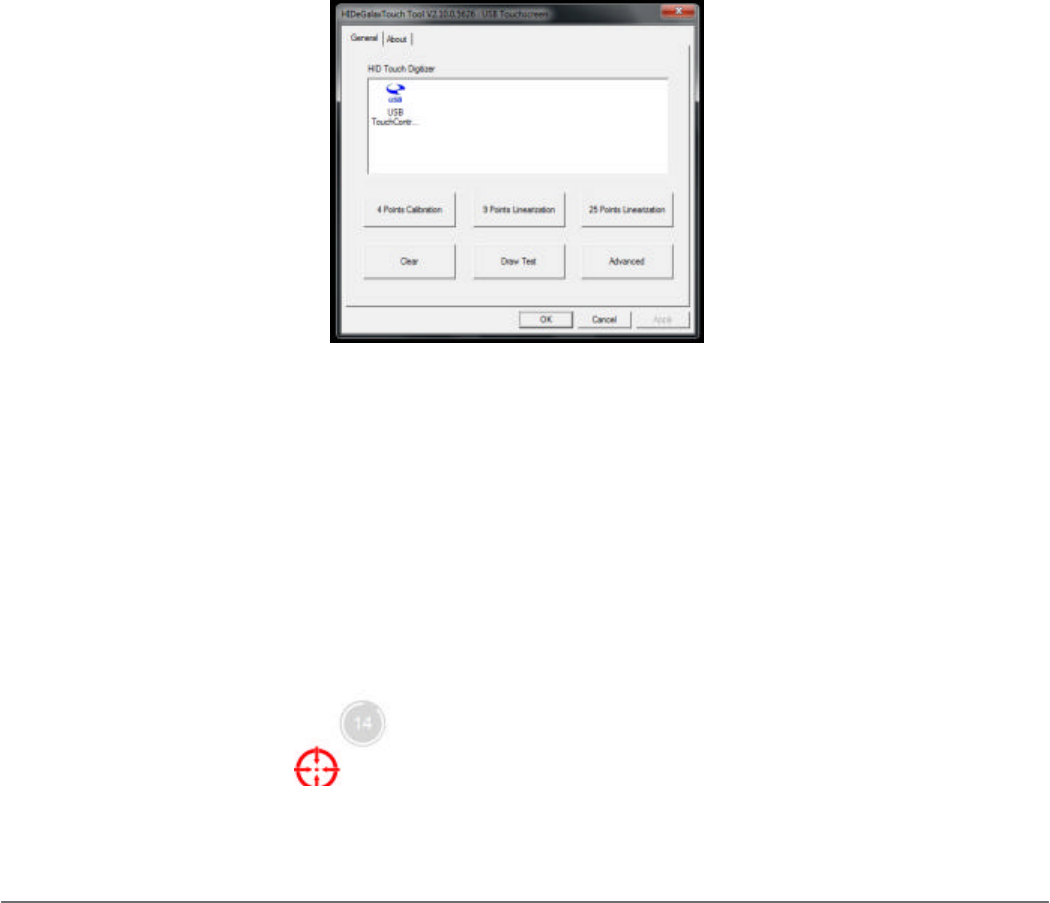
1. Tap Start > All Programs > HIDeGalaxTouch Tool > HIDeGalaxTouch Tool. The
HIDeGalaxTouch Tool appear.
Figure 100. HIDeGalaxTouch Tool
2. Tap 4 Points Calibration, 9 Points Linearization or 25 Points Linearization.
Figure 101. Calibration Screen
35
Operation
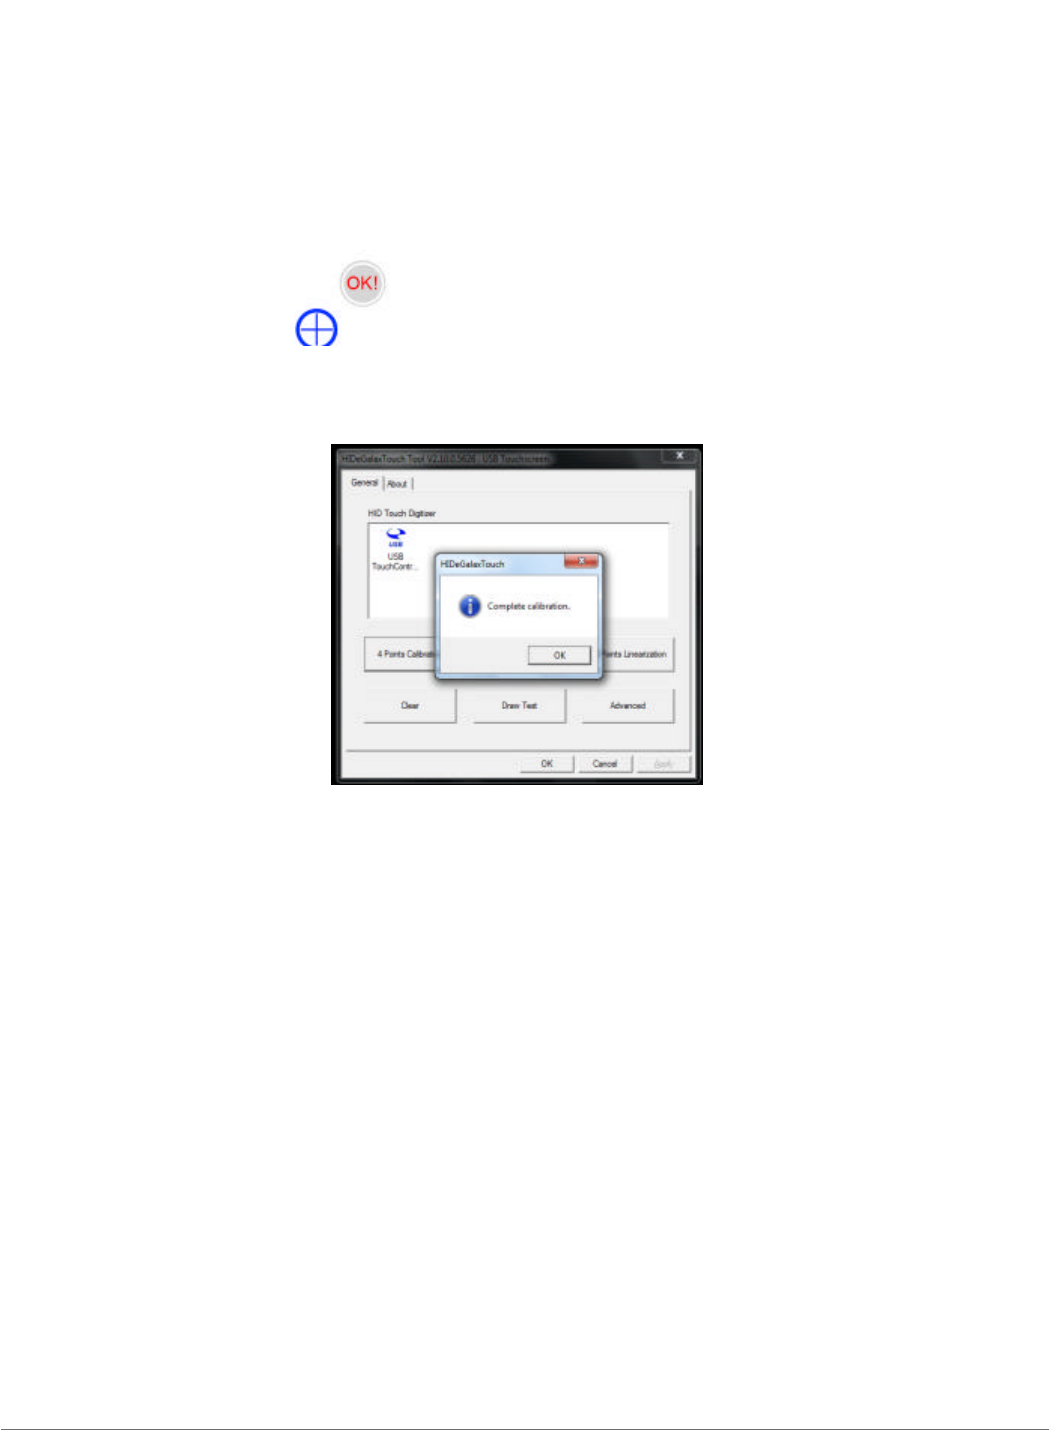
3. Tap and hold until shows OK.
Figure 102. Calibration Screen
4. Tap OK to complete calibrate.
Figure 103. Complete Calibrate
Using the CMOS Setup Utility
Your ruggedized tablet has a CMOS setup utility which allows you to configure important system
settings, including settings for the Boot and AP menus.
This chapter explains how to use the CMOS Setup Utility.
BIOS Setup Menu
The CMOS Setup Utility allows you to configure your device’s basic settings. When you turn
your device on, the system reads this information to initialize the hardware so that it can operate
correctly. You can use the setup utility to change your device’s start-up configuration.
Starting the CMOS Setup Utility
The CMOS Setup Utility is only accessible during boot-up of the device and before the Windows
interface appears.
If the device is already on, shut down the device completely (power off) and restart it.
Accessing the CMOS Setup Menu
You can enter the CMOS Setup Utility menu by following these procedures.
36

Operation
37

Troubleshooting
Chapter 4.
Troubleshooting
Use the troubleshooting tables in this section to fix problems with the Wi-Fi connection, 802.1x
security, or general problems with operating the computer.
If you send the computer in for service, it is your responsibility to save the computer
data and configuration. RuggON is responsible only for ensuring that the hardware
matches the original configuration when repairing or replacing the computer.
Troubleshoot the Wi-Fi Connection
Use this troubleshooting table to help solve problems with your 802.11 radio connection.
Q. When you turn on the computer after it was suspended for a while (10 to 15 minutes or
longer), it can no longer send or receive messages over the network.
A. Host may have deactivated or lost current terminal emulation session. In a TCP/IP direct
connect network, turn off the “Keep Alive” message from host to maintain the TCP session
while the computer is suspended.
Q. The computer is connected to the network and you move to a new site to collect data. Your
computer now shows you are not connected to the network.
A. Move closer to an access point or to a different location to reestablish communications until
you reconnect with the network.
Q. The computer appears to be connected to the network, but you cannot establish a terminal
emulation session with the host computer.
A. There may be a problem with the host computer, or with the connection between the access
point and the host computer. Check with the network administrator to make sure the host is
running and allowing users to log in to the system.
Q. The computer appears to be connected to the network, but the host computer is not receiving
any information from the computer.
A. There may be a problem with the connection between the access point and the host
computer. Check with the network administrator or use your access point user’s manual.
Q. A network connection icon appears in the toolbar, but then disappears.
A. The computer may not be communicating with the intended access point. Make sure the
network name matches the access point network name.
The access point may not be communicating with the server. Ensure the access point is
turned on, properly configured, and has 802.1x security enabled.
38

Troubleshoot 802.1x Security
Troubleshooting
Use the following table to troubleshoot problems with your 802.1x security that will prevent you
from connecting to your network, such as an incorrect password.
Q. The computer indicates it is not authenticated.
A. Make sure that:
„
The User Name and Password parameters on the computer must match the user name
and password on authentication server. You may need to reenter the password on both the
computer and authentication server.
„
On your authentication server, the user and group are allowed and the group policy is
allowed to log into the server. For help, see the documentation that shipped with your
authentication server software.
„
The IP address and secret key for access point must match the IP address and secret key
on the authentication server. You may need to reenter the IP address and secret key on both
your access point and authentication server. • the authentication server software is running
on the server PC.
Q. You receive a message saying “The server certificate has expired or your system date is
incorrect” after you perform a clean boot on the computer.
A. Date and time are not saved when you perform a clean boot. Reenter the date and time, and
then save your changes.
Check 802.11 Network Status
If you have trouble connecting to your 802.11 wireless network:
„
Make sure you have correctly set network parameters on the computer.
„
Check your wireless security settings.
Follow the next procedure to verify available access points and networks, check signal strength,
and view other diagnostics. If you need to contact RuggON Product Support, this information can
be helpful in troubleshooting wireless network connection issues.
1. Tap Start > Programs > Summit Client Utility. The Summit Client Utility application
launches.
The Main tab shows:
„
The current active profile.
„
Network association status.
2. Tap the Profile tab to view the current active profile security settings.
„
Tap the Scan button to view a list of available 802.11 networks. The list includes the
signal strength and security information.
3. Tap the Status tab to view the current active profile status.
The Status tab shows:
„
The current active profile.
„
Network association status.
39

Troubleshooting
„
The IP and MAC addresses.
„
The access point IP and MAC addresses.
„
The DTIM and beacon period.
„
The radio transmit power and signal strength information.
4. Tap the Diags tab to run a ping test to the host.
1. In the text field, enter the IP address of the host.
2. Tap Start Ping. The graph shows the amount of time it takes for the host to return the
ping.
5. Tap the Global tab to view the global property values of the Wi-Fi connection.
Troubleshoot Reading Bar Codes
Use this section to troubleshoot problems that may prevent you from being able to read a bar
code with an RuggON scanner. If you cannot find the solution in the following table, refer to your
scanner user guide for more information.
Q. You cannot see the illumination beam or frame from the scanner when you press the Scan
button and aim the imager at a bar code label.
A.
„
You may be too far away from the bar code label. Try moving closer to the bar code label and
scan it again.
„
You may be reading the bar code label “straight on.” Change the reading angle and try again.
„
The imager hardware trigger might be disabled in RuggON Settings. To check the setting
go to RuggON Settings and select Data Collection > Scanner Settings. Hardware trigger
should be checked.
Q. When you release a Scan button or handle trigger, the Good Read light does not turn off.
A. The Good Read light remains on if you configure the computer to use continuous/edge
triggering. If you configure the computer for level triggering and the Good Read light remains
on, there may be a problem. Press one of the Scan buttons or pull the trigger again without
scanning a bar code label. If the light is still on, contact your local RuggON representative.
Q. The scanner will not read the bar code label.
A.
„
Aim the scanner beam to cross the entire bar code label in one pass. Vary the scanning
angle.
„
Check the quality of the bar code label. Scan a bar code label that you know will scan.
Compare the two bar code labels to see if the bar code quality is too low. You may need to
replace the label that you cannot scan.
„
Make sure the bar code symbology is enabled and configured correctly. Use RuggON
Settings to check the symbologies. Expand Data Collection > Symbologies beneath
devices listed (scanner, virtual wedge) to check and enable symbologies, then scan the bar
code label again.
40

Troubleshooting
„
Make sure the computer application is expecting input from a bar code. You may need to
type this information instead
„
Check to see if the right scanner model is selected. To check the setting go to RuggON
Settings and select Data Collection > Scanner Settings.
„
Check to see if the scanner cable is damaged.
Q. The scanner does not read the bar code labels quickly, or the scanning beam seems to be
faint or obscured.
A. The scanner window may be dirty. Clean the window with a solution of ammonia and water.
Wipe dry. Do not allow abrasive material to touch the window.
Q. When Enable Scanner Port is checked in RuggON Settings, the “COM port is busy. Another
application may be using the port” error message appears.
A. Confirm that no other application is currently using the COM port or select another COM
port for the scanner. If that does not work, try to restart the computer to see if the COM port
becomes available.
Q. The scanner does not read the bar code or is corrupted when it is enabled as an ASCII
scanner.
A.
„
Check to see if the Scanner Port Settings in RuggON Settings match those settings
programmed in the scan engine.
„
The scanner may be in an unknown state. Reset the scanner to the factory default settings
by scanning the manufacturer’s configuration bar code, and reconnect the scanner. For the
SR30 or SR61T (Gen II), scan one of the following bar codes to restore factory defaults:
Q. You scan a valid bar code label to enter data for your application. The data decoded by the
scanner does not match the data encoded in the bar code label.
A. The scanner may have decoded the bar code label in a symbology other than the label’s
actual symbology. Try scanning the bar code label again. Make sure you scan the entire
label.
Q. The input device attached to the computer does not work well or read bar code labels very
quickly.
A. Set the Scanner Model command to the specific attached input device. Check enabled bar
code symbologies and enable only the symbologies being used.
Q. When connected to USB, the SR30 or SR61T (Gen II) does not show up in RuggON
Settings.
A. Make sure that:
„
USB Auto-detect is enabled on the PM-522. For more help, see “Use RuggON Settings on
the Computer” on page 32.
„
Enable the HID profile, by scanning one of the following bar codes.
41

Troubleshooting
Troubleshoot Operating the Computer
Use this section to troubleshoot problems that may prevent you from being able to operate the
computer.
Q. You press the Power button and nothing happens.
A. Make sure that power is connected to the computer.
Q. The computer appears to be locked up and you cannot enter data.
A. Restart the computer. For help, see “Restart Your Computer” on page 63.
Q. You tap the screen and nothing happens.
A. Align your screen. For help, see “Calibrate the Screen” on page 17.
Call Product Support
If you cannot find the answer to your problem in the “Troubleshooting” section, you can visit the
RuggON technical knowledge base (Knowledge Central) at www.ruggon.com to review technical
information or to request technical support. If you still need help after visiting Knowledge Central,
you may need to call Product Support.
To talk to an RuggON Product Support representative, call:
1-800-755-5505
Before you can call RuggON Product Support, make sure you have the following information
ready:
„
Configuration number
„
Serial number
„
Operating system, BIOS, and MCU versions
„
Service pack version
„
System component versions
„
If you are using security, know the type and the full set of parameters
„
If you are using RuggON Terminal Emulator, know the version and protocol. If you are not
using RuggON Terminal Emulator, know the language your custom application was written in
and the tools you used to create it.
You can find most of the information listed above in RuggON Settings. Consult your application
developer for information on your custom application.
Find Your Configuration Number
Use the following procedure to help you find the configuration number of your computer.
„
Look at the label on the side of the computer.
42

Troubleshooting
Find Your System Component Versions
Use the following procedure to find your system component versions on your computer.
„
From the RuggON Settings main menu, tap Device Settings > System Component
Versions. The System Component Version screen appears.
Find Your Operating System, BIOS and MCU Versions
Use the following procedure to find your operating system, BIOS and MCU versions.
„
Tap Start > Control Panel > PM-522 Properties. The OS, BIOS, and MCU versions are
shown in the System Information section of the PM-522 Properties screen.
Find Your Service Pack Version
Use the following procedure to find your Service Pack version.
1. Tap Start > Control Panel. The Control Panel appears.
2. In the View by: drop-down menu, select either Large or Small icons.
3. Tap System. The System screen appears.
Restart Your Computer
If the PM-522 or an application locks up, you may need to restart the computer. There are two
ways to restart the computer:
„
Reboot
„
Reset
Reboot the Computer
If the computer seems to be locked up, try rebooting the computer.
1. Hold down the Power button until the PM-522 turns off.
2. Press the Power button again to turn on the PM-522.
Reset the Computer
If the computer does not reboot, reset the computer. When you reset the computer, the PM-522
does a full shutdown and removes power from the processor.
1. Using a small pointed object such as a paper clip, push in hold the Reset button and the
Power button.
2. Release the Reset button while continuing to hold down the Power button.
3. When the blue Ready-to-Work indicator turns on, release the Power button and your
computer resets.
43

Maintenance
Chapter 5.
Maintenance
Cleaning the Device
Danger to electric shock when cleaning or maintaining the PM-522.
To avoid electric shock, turn the PM-522 off and disconnect it from the power supply before cleaning or
maintaining it.
Housing
„
The housing of the PM-522 is best cleaned with a damp cloth.
„
Use compressed air, a high-pressure cleaner or vacuum cleaner may damage the surface.
„
Use a high-pressure cleaner, the additional risk of water entering the PM-522 may damage
the electronics or touch screen.
Touch Screen
„
Use neutral detergent or isopropyl alcohol on a clean soft cloth to clean the panel surface.
„
Prevent using any kind of chemical solvent, acidic or alkali solution.
Returning the Device
Please put the contents in the original package gently when you need to return the PM-522.
Contacting RuggON
If you experience technical difficulties, please consult your distributor or contact the technical
services department:
www.ruggon.com
44

VMC: