S and O ELECTRONICS CPSW35D ACTIVE SUBWOOFER SYSTEM User Manual
S&O; ELECTRONICS (MALAYSIA) SDN. BHD. ACTIVE SUBWOOFER SYSTEM
UserManual.wiki
>
S and O ELECTRONICS
>
CPSW35D User Manual
User Manual
Navigation menu
Upload a User Manual
Namespaces
Wiki Guide
HTML
PDF
Info
Views
User Manual
Discussion / Help
Navigation
![E-2(OHFWULFLW\LVXVHGWRSHUIRUPPDQ\XVHIXOIXQFWLRQVEXWLWFDQDOVRFDXVHSHUVRQDOLQMXULHVDQGSURSHUW\GDPDJHLILPSURSHUO\KDQGOHG7KLVSURGXFWKDVEHHQHQJLQHHUHGDQGPDQXIDFWXUHGZLWKWKH KLJKHVW SULRULW\ RQ VDIHW\+RZHYHULPSURSHUXVHFDQUHVXOWLQHOHFWULFVKRFNDQGRU¿UH,QRUGHUWRSUHYHQWSRWHQWLDOGDQJHUSOHDVH REVHUYH WKH IROORZLQJ LQVWUXFWLRQV ZKHQLQVWDOO-LQJRSHUDWLQJDQGFOHDQLQJWKHSURGXFW7RHQVXUH\RXUVDIHW\DQGSURORQJWKHVHUYLFHOLIHRIWKLVSURGXFWSOHDVHUHDGWKHIRO-ORZLQJSUHFDXWLRQVFDUHIXOO\EHIRUHXVH 5HDGWKHVHLQVWUXFWLRQV .HHSWKHVHLQVWUXFWLRQV +HHGDOOZDUQLQJV )ROORZDOOLQVWUXFWLRQV 'RQRWXVHWKLVDSSDUDWXVQHDUZDWHU &OHDQRQO\ZLWKGU\FORWK 'RQRWEORFNDQ\YHQWLODWLRQRSHQLQJV,QVWDOOLQDFFRUGDQFHZLWKWKHPDQXIDFWXUHU¶VLQVWUXFWLRQV 'RQRWLQVWDOOQHDUDQ\KHDWVRXUFHVVXFKDVUDGLDWRUVKHDWUHJLVWHUVVWRYHVRURWKHUDSSDUDWXVLQFOXGLQJDPSOL¿HUVWKDWSURGXFHKHDW 'RQRWGHIHDWWKHVDIHW\SXUSRVHRIWKHSRODUL]HGRUJURXQG-LQJW\SHSOXJ$SRODUL]HGSOXJKDVWZREODGHVZLWKRQHZLG-HUWKDQWKHRWKHU$JURXQGLQJW\SHSOXJKDVWZREODGHVDQGDWKLUGJURXQGLQJSURQJ7KHZLGHEODGHRUWKHWKLUGSURQJDUHSURYLGHGIRU\RXUVDIHW\,IWKHSURYLGHGSOXJGRHVQRW¿WLQWR\RXURXWOHWFRQVXOWDQHOHFWULFLDQIRUUHSODFHPHQWRIWKHREVROHWHRXWOHW 3URWHFWWKH SRZHU FRUGIURP EHLQJ ZDONHGRQ RU SLQFKHGSDUWLFXODUO\ DW SOXJV FRQYHQLHQFH UHFHSWDFOHV DQG WKHSRLQWZKHUHWKH\H[LWIURPWKHDSSDUDWXV 2QO\XVHDWWDFKPHQWVDFFHVVRULHVVSHFL¿HGE\WKHPDQX-IDFWXUHU 8VHRQO\ZLWKWKHFDUWVWDQGWULSRGEUDFN-HW RU WDEOH VSHFL¿HG E\ WKH PDQXIDFWXUHURUVROGZLWKWKHDSSDUDWXV:KHQDFDUWLVXVHGXVHFDXWLRQZKHQPRYLQJWKHFDUWDS-SDUDWXVFRPELQDWLRQWRDYRLGLQMXU\IURPWLSRYHU 8QSOXJWKLVDSSDUDWXVGXULQJOLJKWQLQJVWRUPVRUZKHQXQ-XVHGIRUORQJSHULRGVRIWLPH 5HIHUDOOVHUYLFLQJWRTXDOL¿HGVHUYLFHSHUVRQQHO6HUYLFLQJLVUHTXLUHGZKHQWKHDSSDUDWXVKDVEHHQGDPDJHGLQDQ\ZD\VXFKDVSRZHUVXSSO\FRUGRUSOXJLVGDPDJHGOLTXLGKDVEHHQVSLOOHGRUREMHFWVKDYHIDOOHQLQWRWKHDSSDUDWXVWKHDSSDUDWXVKDVEHHQH[SRVHGWRUDLQRUPRLVWXUHGRHVQRWRSHUDWHQRUPDOO\RUKDVEHHQGURSSHGAdditional Safety Information 3RZHU6RXUFHV7KLVSURGXFWVKRXOGEHRSHUDWHGRQO\IURPWKHW\SHRISRZHUVRXUFHLQGLFDWHGRQWKHPDUNLQJODEHO,I\RXDUHQRWVXUHRIWKHW\SHRISRZHUVXSSO\WR\RXUKRPHFRQVXOW \RXU SURGXFW GHDOHU RU ORFDO SRZHU FRPSDQ\ )RUSURGXFW LQWHQGHG WR RSHUDWH IURP EDWWHU\ SRZHU RU RWKHUVRXUFHVUHIHUWRWKHRSHUDWLQJLQVWUXFWLRQV 2YHUORDGLQJ'RQRWRYHUORDGZDOORXWOHWVH[WHQVLRQFRUGVRULQWHJUDOFRQYHQLHQFHUHFHSWDFOHVDVWKLVFDQUHVXOWLQDULVNRI¿UHRUHOHFWULFVKRFN 2EMHFWDQG /LTXLG(QWU\1HYHU SXVKREMHFWVRIDQ\ NLQGLQWRWKLVSURGXFWWKURXJKRSHQLQJVDVWKH\PD\WRXFKGDQ-JHURXVYROWDJHSRLQWVRUVKRUWRXWSDUWVWKDWFRXOGUHVXOWLQD¿UHRUHOHFWULFVKRFN 7RSUHYHQW¿UHRUVKRFNKD]DUGGRQRWH[SRVHWKLVDSSOL-DQFHWRGULSSLQJRUVSODVKLQJ1RREMHFWV¿OOHGZLWKOLTXLGVVXFKDVYDVHVVKDOOEHSODFHGRQWKHDSSDUDWXV 'DPDJH5HTXLULQJ6HUYLFH8QSOXJWKLVSURGXFWIURPWKHZDOORXWOHWDQGUHIHUVHUYLFLQJWRTXDOL¿HGVHUYLFHSHUVRQQHOXQGHUWKHIROORZLQJFRQGLWLRQV D:KHQWKH$&FRUGRUSOXJLVGDPDJHG E,IOLTXLGKDVEHHQVSLOOHGRUREMHFWVKDYHIDOOHQLQWRWKHSURGXFW F,IWKHSURGXFWKDVEHHQH[SRVHGWRUDLQRUZDWHU G,IWKHSURGXFWGRHVQRWRSHUDWHQRUPDOO\E\IROORZLQJWKHRSHUDWLQJLQVWUXFWLRQV$GMXVWRQO\WKRVHFRQWUROVWKDWDUHFRYHUHGE\WKHRSHUDWLQJLQVWUXFWLRQVDVDQLPSURSHUDG-MXVWPHQWRIRWKHUFRQWUROVPD\UHVXOWLQGDPDJHDQGZLOORIWHQUHTXLUHH[WHQVLYHZRUNE\DTXDOL¿HGWHFKQLFLDQWRUHVWRUHWKHSURGXFWWRLWVQRUPDORSHUDWLRQ H,IWKHSURGXFWKDVEHHQGURSSHGRUGDPDJHGLQDQ\ZD\DQG I:KHQ WKH SURGXFW H[KLELWV D GLVWLQFW FKDQJH LQ SHUIRU-PDQFHWKLVLQGLFDWHVDQHHGIRUVHUYLFH 5HSODFHPHQW3DUWV:KHQUHSODFHPHQWSDUWVDUHUHTXLUHGEHVXUHWKHVHUYLFHWHFKQLFLDQKDVXVHGUHSODFHPHQWSDUWVVSHFL¿HGE\WKHPDQXIDFWXUHURUKDYHWKHVDPHFKDUDFWHU-LVWLFVDVWKH RULJLQDO SDUW 8QDXWKRUL]HG VXEVWLWXWLRQV PD\UHVXOWLQ¿UHHOHFWULFVKRFNRURWKHUKD]DUGV 6DIHW\&KHFN8SRQFRPSOHWLRQRIDQ\VHUYLFHRUUHSDLUVWRWKLVSURGXFWDVNWKHVHUYLFHWHFKQLFLDQWRSHUIRUPVDIHW\FKHFNVWRGHWHUPLQHWKDWWKHSURGXFWLVLQSURSHURSHUDWLQJFRQGLWLRQ :DOORUFHLOLQJPRXQWLQJ:KHQPRXQWLQJWKHSURGXFWRQDZDOORUFHLOLQJEHVXUHWRLQVWDOOWKHSURGXFWDFFRUGLQJWRWKHPHWKRGUHFRPPHQGHGE\WKHPDQXIDFWXUHU 3RZHU /LQHV $Q RXWVLGH DQWHQQD V\VWHP VKRXOG QRW EHORFDWHG LQ WKH YLFLQLW\ RI RYHUKHDG SRZHU OLQHV RU RWKHUHOHFWULFOLJKWRUSRZHUFLUFXLWVRUZKHUHLWFDQIDOOLQWRVXFKSRZHUOLQHVRUFLUFXLWV:KHQLQVWDOOLQJDQRXWVLGHDQWHQQDV\VWHPH[WUHPHFDUHVKRXOGEHWDNHQWRNHHSIURPWRXFK-LQJVXFKSRZHUOLQHVRUFLUFXLWVDVFRQWDFWZLWKWKHPPLJKWEHIDWDO 3URWHFWLYH$WWDFKPHQW3OXJ7KHSURGXFWLVHTXLSSHGZLWKDQ DWWDFKPHQW SOXJ KDYLQJ RYHUORDG SURWHFWLRQ 7KLV LV DVDIHW\IHDWXUH 6HH,QVWUXFWLRQ0DQXDOIRUUHSODFHPHQW RUUHVHWWLQJ RI SURWHFWLYH GHYLFH ,I UHSODFHPHQW RI WKH SOXJLVUHTXLUHGEHVXUHWKHVHUYLFHWHFKQLFLDQKDVXVHGDUH-SODFHPHQWSOXJVSHFL¿HGE\WKHPDQXIDFWXUHUWKDWKDVWKHVDPHRYHUORDGSURWHFWLRQDVWKHRULJLQDOSOXJ 6WDQG'RQRWSODFHWKHSURGXFWRQDQXQVWDEOHFDUWVWDQGWULSRG RU WDEOH 3ODFLQJ WKH SURGXFW RQ DQ XQVWDEOH EDVHFDQFDXVH WKH SURGXFWWRIDOOUHVXOWLQJLQVHULRXV SHUVRQ-DO LQMXULHV DV ZHOO DV GDPDJH WR WKH SURGXFW 8VH RQO\ DFDUW VWDQG WULSRG EUDFNHW RU WDEOH UHFRPPHQGHG E\ WKHPDQXIDFWXUHURUVROGZLWKWKHSURGXFW:KHQPRXQWLQJWKHSURGXFWRQDZDOOEHVXUHWRIROORZWKHPDQXIDFWXUHU¶VLQ-VWUXFWLRQV8VHRQO\WKHPRXQWLQJKDUGZDUHUHFRPPHQGHGE\WKHPDQXIDFWXUHUImportant Safety Instructions](https://usermanual.wiki/S-and-O-ELECTRONICS/CPSW35D/User-Guide-2452103-Page-3.png)
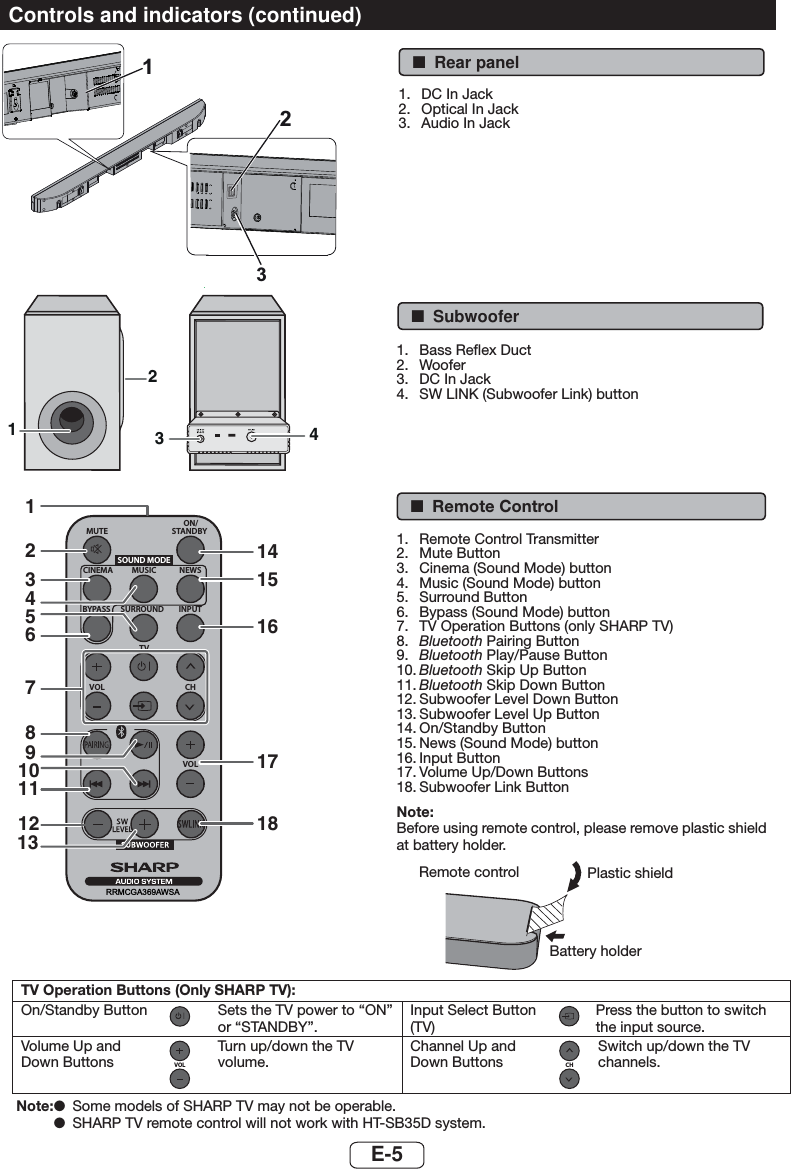
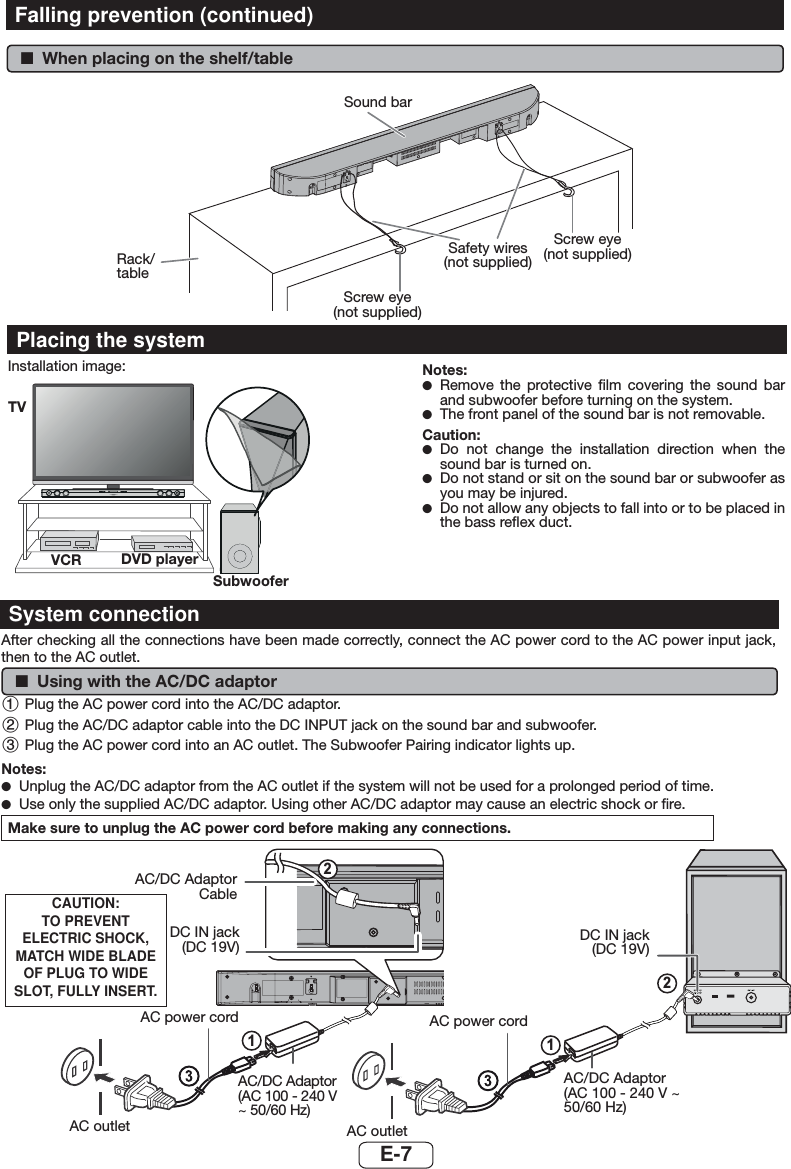
![E-6Make sure to unplug the AC power cord before in-stalling the sound bar or changing the position.Using spike legs1 3HHOWKHGRXEOHVLGHGWDSHVHSDUDWRU2 )L[WKHVSLNHOHJRQWRWKHVRXQGEDUDVVKRZQTo mount the sound bar on the wallCaution: ●%H YHU\ FDUHIXO WR SUHYHQW WKH VRXQG EDU > OEVNJ@IURPIDOOLQJZKHQPRXQWLQJRQWKHZDOO ●%HIRUHPRXQWLQJFKHFNWKHZDOOVWUHQJWK'RQRWSXWRQWKHYHQHHUSODVWHURUZKLWHZDVKHGZDOO7KHVRXQGEDUPD\ IDOO ,I XQVXUH FRQVXOW D TXDOL¿HG VHUYLFH WHFKQL-FLDQ ●0RXQWLQJ VFUHZV DUH QRW VXSSOLHG 8VH DSSURSULDWHRQHV ●&KHFNDOOZDOOPRXQWDQJOHVFUHZVIRUORRVHQHVV ●6HOHFWDJRRGORFDWLRQ,IQRWDFFLGHQWVPD\RFFXURUWKHVRXQGEDUPD\JHWGDPDJHG ●SHARP is not responsible for accidents resulting from improper installation. ■Driving screwsSHARP designed the sound bar so you may hang it on the wall. Use proper screws (not supplied). See below for size and type.1/8” (3.2 mm)3/8” (9 mm)7/8” (Min. 22 mm)3/16”(5 mm) ■Installing the sound bar1 )L[WKHSDWWHUQSDSHUWRWKHZDOOLQKRUL]RQWDOSRVL-WLRQDVEHORZ44 mm509 mmWall surfacePattern paper (supplied)21-5/8” (548 mm)2 0DNH D KROH RQ WKH ZDOO IROORZLQJ WKH VFUHZ SRLQWPDUNVRQWKHSDWWHUQSDSHUE\XVLQJDGULOOWall surface1-1/4” (32 mm)3/8” (8-9 mm)3 )L[DZDOOPRXQWSOXJLQWRWKHKROHXVLQJDKDPPHUXQWLOLWLVÀXVKZLWKWKHZDOOVXUIDFH1-1/4” (32 mm)3/8” (8-9 mm)Wall surface4 )DVWHQWKHVFUHZVWRWKHZDOODVVKRZQEHORZ7RWDOVFUHZLVSLHFHVWall surfaceWall surfaceScrew using screwdriver3/16” (4.5 mm - 5 mm)Gap from wall surface5 +DQJWKHVRXQGEDURQWRWKHVFUHZVBottom of sound barSpike leg Double sided tape separatorSystem preparationFalling prevention ●Safety wires (not supplied) are useful to prevent the sound bar from falling. ■When mounting on the wallSOUND BAR HOME THEATRE SYSTEM HT-SB35DSafety wires (not supplied)Sound barScrew eye (not supplied)Wall](https://usermanual.wiki/S-and-O-ELECTRONICS/CPSW35D/User-Guide-2452103-Page-7.png)