S and O ELECTRONICS CPSW35D ACTIVE SUBWOOFER SYSTEM User Manual
S&O; ELECTRONICS (MALAYSIA) SDN. BHD. ACTIVE SUBWOOFER SYSTEM
User Manual
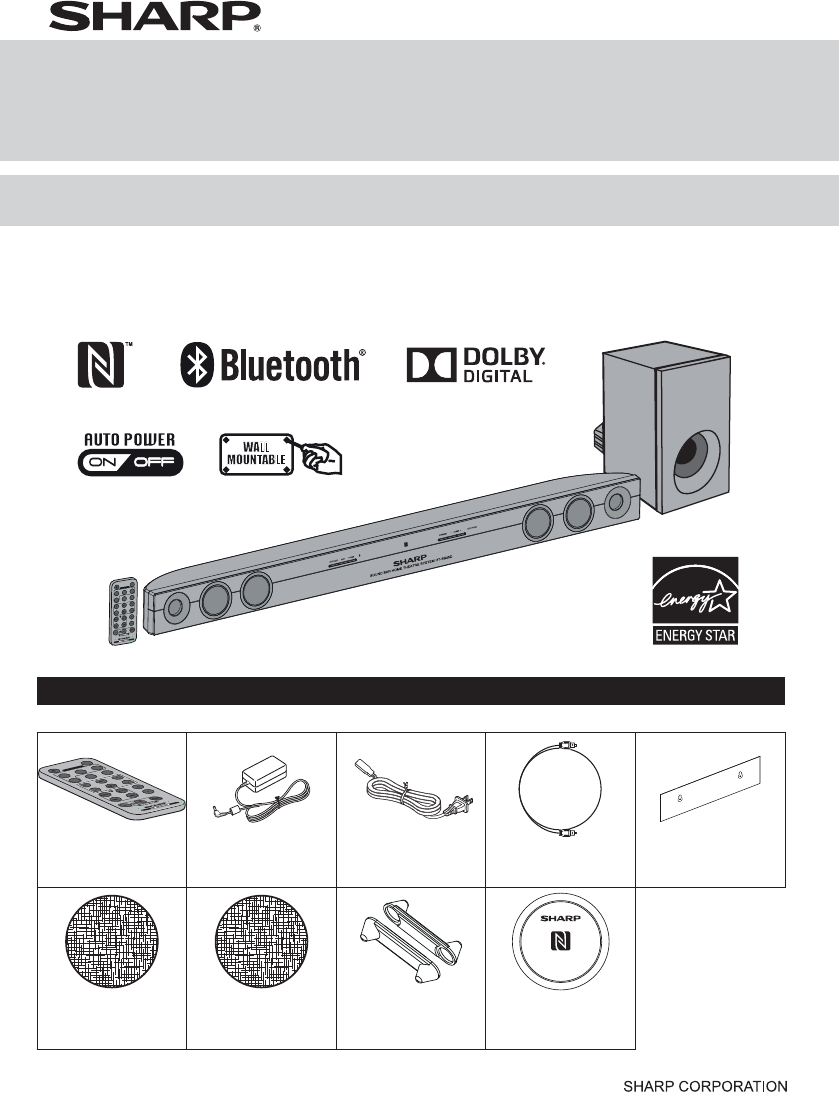
HT-SB35D
OPERATION MANUAL
MODEL
SOUND BAR HOME THEATER SYSTEM
14M R KI 1
Note: 7KLVSURGXFWLVUHFRPPHQGHGIRUÀDWSDQHO79/('/&'DQGSODVPD
TINSZB860AWZZ
*TINSZB860AWZZT&*|
Thank you for purchasing this SHARP product. To obtain the best performance from this product, please read this
manual carefully. It will guide you in operating your SHARP product.
HT-SB35D Sound Bar Home Theater system consisting of HT-SB35D (sound bar system) and CP-SW35D (active
subwoofer system).
The following accessories are included.
MUTE
ON/
STAND-BY
MUSIC
CINEMA NEWS
SURROUND
BYPASS INPUT
TV
CH
VOL
VOL
SOUND MODE
RRMCGA369AWSA
Remote control x 1
(RRMCGA369AW02)
AC/DC adaptor x 2
(RADPAA100AWZZ)
AC power cord x 2
(QACCDA005AWZZ)
Optical cable x 1
(QCNWGA095AWPZ)
Pattern paper x 1
(TCAUHA034AWZZ)
HT-SB35D
Velcro tape
(hook type) x 1
(PSHEZA373AW01)
Velcro tape
(loop type) x 2
(PSHEZA372AW01)
Spike leg x 2
(PCUSGA242AW01)
NFC tag x 1
(GCASP9168AW01)
Accessories
3ULQWHGLQ0DOD\VLD
MUTE
ON/
STAND-BY
MUSIC
CINEMANEWS
SURROUND
BYPASS INPUT
TV
CH
VOL
VOL
SOUND MODE
RRMCGA369AWSA
E-1
Explanation of Graphical Symbols:
7KH OLJKWQLQJ ÀDVK ZLWK DUURZKHDG V\PERO ZLWKLQ
DQHTXLODWHUDOWULDQJOHLVLQWHQGHGWRDOHUWWKHXVHU
WRWKHSUHVHQFHRIXQLQVXODWHG³GDQJHURXVYROWDJH´
ZLWKLQWKHSURGXFW¶VHQFORVXUHWKDWPD\EHRIVXI¿-
FLHQWPDJQLWXGHWRFRQVWLWXWHDULVNRIHOHFWULFVKRFN
WRSHUVRQV
7KHH[FODPDWLRQSRLQWZLWKLQDQHTXLODWHUDOWULDQJOHLV
LQWHQGHGWRDOHUWWKHXVHUWRWKHSUHVHQFHRILPSRU-
WDQWRSHUDWLQJ DQG PDLQWHQDQFHVHUYLFLQJ LQVWUXF-
WLRQVLQWKHOLWHUDWXUHDFFRPSDQ\LQJWKHDSSOLDQFH
CAUTION: TO REDUCE THE RISK OF ELECTRIC SHOCK, DO NOT
REMOVE COVER (OR BACK).
NO USER-SERVICEABLE PARTS INSIDE. REFER SERVICING TO
QUALIFIED SERVICE PERSONNEL.
CAUTION
RISK OF ELECTRIC
SHOCK DO NOT OPEN
)RUXVHUVLQ86
WARNING: TO REDUCE THE RISK OF FIRE OR ELECTRIC SHOCK,
DO NOT EXPOSE THIS APPLIANCE TO RAIN OR MOISTURE.
NOTE
7KLVHTXLSPHQWKDVEHHQWHVWHGDQGIRXQGWRFRPSO\ZLWKWKH
OLPLWV IRU D &ODVV % GLJLWDO GHYLFH SXUVXDQW WR 3DUW RI WKH
)&& 5XOHV 7KHVH OLPLWV DUH GHVLJQHG WR SURYLGH UHDVRQDEOH
SURWHFWLRQ DJDLQVW KDUPIXO LQWHUIHUHQFH LQ D UHVLGHQWLDO LQVWDO-
ODWLRQ7KLV HTXLSPHQWJHQHUDWHVXVHV DQG FDQ UDGLDWHUDGLR
IUHTXHQF\HQHUJ\DQGLIQRWLQVWDOOHGDQGXVHGLQDFFRUGDQFH
ZLWK WKH LQVWUXFWLRQV PD\ FDXVH KDUPIXO LQWHUIHUHQFH WR UDGLR
FRPPXQLFDWLRQV+RZHYHUWKHUHLV QRJXDUDQWHHWKDWLQWHUIHU-
HQFHZLOOQRWRFFXULQDSDUWLFXODULQVWDOODWLRQ,IWKLVHTXLSPHQW
GRHVFDXVHKDUPIXOLQWHUIHUHQFHWRUDGLRRUWHOHYLVLRQUHFHSWLRQ
ZKLFKFDQEHGHWHUPLQHGE\WXUQLQJWKHHTXLSPHQWRIIDQGRQ
WKHXVHULVHQFRXUDJHGWRWU\WRFRUUHFWWKHLQWHUIHUHQFHE\RQH
RUPRUHRIWKHIROORZLQJPHDVXUHV
●5HRULHQWRUUHORFDWHWKHUHFHLYLQJDQWHQQD
●,QFUHDVH WKH VHSDUDWLRQ EHWZHHQ WKH HTXLSPHQW DQG UH-
FHLYHU
●&RQQHFWWKHHTXLSPHQWLQWRDQRXWOHWRQDFLUFXLWGLIIHUHQW
IURPWKDWWRZKLFKWKHUHFHLYHULVFRQQHFWHG
●&RQVXOW WKH GHDOHU RU DQ H[SHULHQFHG UDGLR79 WHFKQLFLDQ
IRUKHOS
Warning: &KDQJHV RU PRGL¿FDWLRQV WR WKLV XQLW QRW H[SUHVVO\
DSSURYHGE\WKHSDUW\UHVSRQVLEOHIRUFRPSOLDQFHFRXOGYRLGWKH
XVHU¶VDXWKRULW\WRRSHUDWHWKHHTXLSPHQW
FCC Radiation Exposure Statement
7KLVGHYLFHFRPSOLHVZLWKWKHOLPLWVIRUD&ODVV%GLJLWDOGHYLFH
SXUVXDQWWR3DUWRIWKH)&&5XOHV,WPXVWQRWEHFRORFDWHGRU
RSHUDWLQJLQFRQMXQFWLRQZLWKDQ\RWKHUDQWHQQDRUWUDQVPLWWHU
2SHUDWLRQLVVXEMHFWWRWKHIROORZLQJWZRFRQGLWLRQV
7KLVGHYLFHPD\QRWFDXVHKDUPIXOLQWHUIHUHQFHDQG
7KLVGHYLFHPXVWDFFHSWDQ\LQWHUIHUHQFHUHFHLYHGLQFOXGLQJ
LQWHUIHUHQFHWKDWPD\FDXVHXQGHVLUHGRSHUDWLRQ
7KLVHTXLSPHQW VKRXOGEH LQVWDOOHG DQGRSHUDWHG ZLWK DPLQL-
PXP GLVWDQFH RI FP EHWZHHQ WKH UDGLDWRU DQG SHUVRQ¶V
ERG\
IC Radiation Exposure Statement (For Users In Canada)
7KLV &ODVV % GLJLWDO DSSDUDWXV FRPSOLHV ZLWK WKH &DQDGLDQ
,&(6&ODVV%VSHFL¿FDWLRQV
7KLVGHYLFHFRPSOLHVZLWK,QGXVWU\&DQDGDOLFHQVHH[HPSW566
VWDQGDUGV
2SHUDWLRQLVVXEMHFWWRWKHIROORZLQJWZRFRQGLWLRQV
WKLVGHYLFHPD\QRWFDXVHLQWHUIHUHQFHDQG
WKLV GHYLFH PXVW DFFHSW DQ\ LQWHUIHUHQFH LQFOXGLQJ LQWHUIHU-
HQFHWKDWPD\FDXVHXQGHVLUHGRSHUDWLRQRIWKHGHYLFH
7KLVHTXLSPHQW VKRXOGEH LQVWDOOHG DQGRSHUDWHG ZLWK DPLQL-
PXP GLVWDQFH RI FP EHWZHHQ WKH UDGLDWRU DQG SHUVRQ¶V
ERG\
Note to CATV system installer:
7KLVUHPLQGHULVSURYLGHGWRFDOOWKH&$79V\VWHPLQVWDOOHU¶V
DWWHQWLRQWR$UWLFOH RI WKH1DWLRQDO (OHFWULFDO &RGH WKDW
SURYLGHVJXLGHOLQHVIRU SURSHU JURXQGLQJ DQG LQ SDUWLFXODU
VSHFL¿HV WKDW WKH FDEOH JURXQG VKDOO EH FRQQHFWHG WR WKH
JURXQGLQJ V\VWHP RI WKH EXLOGLQJ DV FORVH WR WKH SRLQW RI
FDEOHHQWU\DVSUDFWLFDO
FOR YOUR RECORDS
)RU\RXUDVVLVWDQFHLQUHSRUWLQJWKLVXQLWLQFDVHRIORVVRUWKHIW
SOHDVH UHFRUG EHORZ WKH PRGHO QXPEHU DQG VHULDO QXPEHU
ZKLFKDUHORFDWHGRQWKHUHDURIWKHXQLW3OHDVHUHWDLQWKLVLQ-
IRUPDWLRQ
Model number ..............................
Serial number ..............................
Date of purchase ..............................
Place of purchase ..............................
Special notes

E-2
(OHFWULFLW\LVXVHGWRSHUIRUPPDQ\XVHIXOIXQFWLRQVEXWLWFDQ
DOVRFDXVHSHUVRQDOLQMXULHVDQGSURSHUW\GDPDJHLILPSURSHUO\
KDQGOHG7KLVSURGXFWKDVEHHQHQJLQHHUHGDQGPDQXIDFWXUHG
ZLWKWKH KLJKHVW SULRULW\ RQ VDIHW\+RZHYHULPSURSHUXVHFDQ
UHVXOWLQHOHFWULFVKRFNDQGRU¿UH,QRUGHUWRSUHYHQWSRWHQWLDO
GDQJHUSOHDVH REVHUYH WKH IROORZLQJ LQVWUXFWLRQV ZKHQLQVWDOO-
LQJRSHUDWLQJDQGFOHDQLQJWKHSURGXFW7RHQVXUH\RXUVDIHW\
DQGSURORQJWKHVHUYLFHOLIHRIWKLVSURGXFWSOHDVHUHDGWKHIRO-
ORZLQJSUHFDXWLRQVFDUHIXOO\EHIRUHXVH
5HDGWKHVHLQVWUXFWLRQV
.HHSWKHVHLQVWUXFWLRQV
+HHGDOOZDUQLQJV
)ROORZDOOLQVWUXFWLRQV
'RQRWXVHWKLVDSSDUDWXVQHDUZDWHU
&OHDQRQO\ZLWKGU\FORWK
'RQRWEORFNDQ\YHQWLODWLRQRSHQLQJV,QVWDOOLQDFFRUGDQFH
ZLWKWKHPDQXIDFWXUHU¶VLQVWUXFWLRQV
'RQRWLQVWDOOQHDUDQ\KHDWVRXUFHVVXFKDVUDGLDWRUVKHDW
UHJLVWHUVVWRYHVRURWKHUDSSDUDWXVLQFOXGLQJDPSOL¿HUV
WKDWSURGXFHKHDW
'RQRWGHIHDWWKHVDIHW\SXUSRVHRIWKHSRODUL]HGRUJURXQG-
LQJW\SHSOXJ$SRODUL]HGSOXJKDVWZREODGHVZLWKRQHZLG-
HUWKDQWKHRWKHU$JURXQGLQJW\SHSOXJKDVWZREODGHVDQG
DWKLUGJURXQGLQJSURQJ7KHZLGHEODGHRUWKHWKLUGSURQJ
DUHSURYLGHGIRU\RXUVDIHW\,IWKHSURYLGHGSOXJGRHVQRW
¿WLQWR\RXURXWOHWFRQVXOWDQHOHFWULFLDQIRUUHSODFHPHQWRI
WKHREVROHWHRXWOHW
3URWHFWWKH SRZHU FRUGIURP EHLQJ ZDONHGRQ RU SLQFKHG
SDUWLFXODUO\ DW SOXJV FRQYHQLHQFH UHFHSWDFOHV DQG WKH
SRLQWZKHUHWKH\H[LWIURPWKHDSSDUDWXV
2QO\XVHDWWDFKPHQWVDFFHVVRULHVVSHFL¿HGE\WKHPDQX-
IDFWXUHU
8VHRQO\ZLWKWKHFDUWVWDQGWULSRGEUDFN-
HW RU WDEOH VSHFL¿HG E\ WKH PDQXIDFWXUHU
RUVROGZLWKWKHDSSDUDWXV:KHQDFDUWLV
XVHGXVHFDXWLRQZKHQPRYLQJWKHFDUWDS-
SDUDWXVFRPELQDWLRQWRDYRLGLQMXU\IURPWLS
RYHU
8QSOXJWKLVDSSDUDWXVGXULQJOLJKWQLQJVWRUPVRUZKHQXQ-
XVHGIRUORQJSHULRGVRIWLPH
5HIHUDOOVHUYLFLQJWRTXDOL¿HGVHUYLFHSHUVRQQHO6HUYLFLQJ
LVUHTXLUHGZKHQWKHDSSDUDWXVKDVEHHQGDPDJHGLQDQ\
ZD\VXFKDVSRZHUVXSSO\FRUGRUSOXJLVGDPDJHGOLTXLG
KDVEHHQVSLOOHGRUREMHFWVKDYHIDOOHQLQWRWKHDSSDUDWXV
WKHDSSDUDWXVKDVEHHQH[SRVHGWRUDLQRUPRLVWXUHGRHV
QRWRSHUDWHQRUPDOO\RUKDVEHHQGURSSHG
Additional Safety Information
3RZHU6RXUFHV7KLVSURGXFWVKRXOGEHRSHUDWHGRQO\IURP
WKHW\SHRISRZHUVRXUFHLQGLFDWHGRQWKHPDUNLQJODEHO,I
\RXDUHQRWVXUHRIWKHW\SHRISRZHUVXSSO\WR\RXUKRPH
FRQVXOW \RXU SURGXFW GHDOHU RU ORFDO SRZHU FRPSDQ\ )RU
SURGXFW LQWHQGHG WR RSHUDWH IURP EDWWHU\ SRZHU RU RWKHU
VRXUFHVUHIHUWRWKHRSHUDWLQJLQVWUXFWLRQV
2YHUORDGLQJ'RQRWRYHUORDGZDOORXWOHWVH[WHQVLRQFRUGV
RULQWHJUDOFRQYHQLHQFHUHFHSWDFOHVDVWKLVFDQUHVXOWLQD
ULVNRI¿UHRUHOHFWULFVKRFN
2EMHFWDQG /LTXLG(QWU\1HYHU SXVKREMHFWVRIDQ\ NLQG
LQWRWKLVSURGXFWWKURXJKRSHQLQJVDVWKH\PD\WRXFKGDQ-
JHURXVYROWDJHSRLQWVRUVKRUWRXWSDUWVWKDWFRXOGUHVXOWLQ
D¿UHRUHOHFWULFVKRFN
7RSUHYHQW¿UHRUVKRFNKD]DUGGRQRWH[SRVHWKLVDSSOL-
DQFHWRGULSSLQJRUVSODVKLQJ1RREMHFWV¿OOHGZLWKOLTXLGV
VXFKDVYDVHVVKDOOEHSODFHGRQWKHDSSDUDWXV
'DPDJH5HTXLULQJ6HUYLFH8QSOXJWKLVSURGXFWIURPWKH
ZDOORXWOHWDQGUHIHUVHUYLFLQJWRTXDOL¿HGVHUYLFHSHUVRQQHO
XQGHUWKHIROORZLQJFRQGLWLRQV
D:KHQWKH$&FRUGRUSOXJLVGDPDJHG
E,IOLTXLGKDVEHHQVSLOOHGRUREMHFWVKDYHIDOOHQLQWRWKH
SURGXFW
F,IWKHSURGXFWKDVEHHQH[SRVHGWRUDLQRUZDWHU
G,IWKHSURGXFWGRHVQRWRSHUDWHQRUPDOO\E\IROORZLQJWKH
RSHUDWLQJLQVWUXFWLRQV$GMXVWRQO\WKRVHFRQWUROVWKDWDUH
FRYHUHGE\WKHRSHUDWLQJLQVWUXFWLRQVDVDQLPSURSHUDG-
MXVWPHQWRIRWKHUFRQWUROVPD\UHVXOWLQGDPDJHDQGZLOO
RIWHQUHTXLUHH[WHQVLYHZRUNE\DTXDOL¿HGWHFKQLFLDQWR
UHVWRUHWKHSURGXFWWRLWVQRUPDORSHUDWLRQ
H,IWKHSURGXFWKDVEHHQGURSSHGRUGDPDJHGLQDQ\ZD\
DQG
I:KHQ WKH SURGXFW H[KLELWV D GLVWLQFW FKDQJH LQ SHUIRU-
PDQFHWKLVLQGLFDWHVDQHHGIRUVHUYLFH
5HSODFHPHQW3DUWV:KHQUHSODFHPHQWSDUWVDUHUHTXLUHG
EHVXUHWKHVHUYLFHWHFKQLFLDQKDVXVHGUHSODFHPHQWSDUWV
VSHFL¿HGE\WKHPDQXIDFWXUHURUKDYHWKHVDPHFKDUDFWHU-
LVWLFVDVWKH RULJLQDO SDUW 8QDXWKRUL]HG VXEVWLWXWLRQV PD\
UHVXOWLQ¿UHHOHFWULFVKRFNRURWKHUKD]DUGV
6DIHW\&KHFN8SRQFRPSOHWLRQRIDQ\VHUYLFHRUUHSDLUV
WRWKLVSURGXFWDVNWKHVHUYLFHWHFKQLFLDQWRSHUIRUPVDIHW\
FKHFNVWRGHWHUPLQHWKDWWKHSURGXFWLVLQSURSHURSHUDWLQJ
FRQGLWLRQ
:DOORUFHLOLQJPRXQWLQJ:KHQPRXQWLQJWKHSURGXFWRQD
ZDOORUFHLOLQJEHVXUHWRLQVWDOOWKHSURGXFWDFFRUGLQJWRWKH
PHWKRGUHFRPPHQGHGE\WKHPDQXIDFWXUHU
3RZHU /LQHV $Q RXWVLGH DQWHQQD V\VWHP VKRXOG QRW EH
ORFDWHG LQ WKH YLFLQLW\ RI RYHUKHDG SRZHU OLQHV RU RWKHU
HOHFWULFOLJKWRUSRZHUFLUFXLWVRUZKHUHLWFDQIDOOLQWRVXFK
SRZHUOLQHVRUFLUFXLWV:KHQLQVWDOOLQJDQRXWVLGHDQWHQQD
V\VWHPH[WUHPHFDUHVKRXOGEHWDNHQWRNHHSIURPWRXFK-
LQJVXFKSRZHUOLQHVRUFLUFXLWVDVFRQWDFWZLWKWKHPPLJKW
EHIDWDO
3URWHFWLYH$WWDFKPHQW3OXJ7KHSURGXFWLVHTXLSSHGZLWK
DQ DWWDFKPHQW SOXJ KDYLQJ RYHUORDG SURWHFWLRQ 7KLV LV D
VDIHW\IHDWXUH 6HH,QVWUXFWLRQ0DQXDOIRUUHSODFHPHQW RU
UHVHWWLQJ RI SURWHFWLYH GHYLFH ,I UHSODFHPHQW RI WKH SOXJ
LVUHTXLUHGEHVXUHWKHVHUYLFHWHFKQLFLDQKDVXVHGDUH-
SODFHPHQWSOXJVSHFL¿HGE\WKHPDQXIDFWXUHUWKDWKDVWKH
VDPHRYHUORDGSURWHFWLRQDVWKHRULJLQDOSOXJ
6WDQG'RQRWSODFHWKHSURGXFWRQDQXQVWDEOHFDUWVWDQG
WULSRG RU WDEOH 3ODFLQJ WKH SURGXFW RQ DQ XQVWDEOH EDVH
FDQFDXVH WKH SURGXFWWRIDOOUHVXOWLQJLQVHULRXV SHUVRQ-
DO LQMXULHV DV ZHOO DV GDPDJH WR WKH SURGXFW 8VH RQO\ D
FDUW VWDQG WULSRG EUDFNHW RU WDEOH UHFRPPHQGHG E\ WKH
PDQXIDFWXUHURUVROGZLWKWKHSURGXFW:KHQPRXQWLQJWKH
SURGXFWRQDZDOOEHVXUHWRIROORZWKHPDQXIDFWXUHU¶VLQ-
VWUXFWLRQV8VHRQO\WKHPRXQWLQJKDUGZDUHUHFRPPHQGHG
E\WKHPDQXIDFWXUHU
Important Safety Instructions

E-3
CONSUMER LIMITED WARRANTY
SHARP ELECTRONICS CORPORATION warrants to the first consumer purchaser that this Sharp brand product (the
"Product"), when ship in its original container, will be free from defective workmanship and materials, and agrees that it will,
at its option, either repair the defect or replace the defective Product or part thereof with a new or remanufactured equivalent
at no charge to the purchaser for parts or labor for the period(s) set forth below.
This warranty does not apply to any appearance items of the Product nor to the additional excluded item(s) set forth below
nor to any Product the exterior of which has been damaged or defaced, which has been subjected to improper voltage or
other misuse, abnormal service or handling, or which has been altered or modified in design or construction.
In order to enforce the rights under this limited warranty, the purchaser should follow the steps set forth below and provide
proof of purchase to the servicer.
The limited warranty described herein is in addition to whatever implied warranties may be granted to purchasers by law.
ALL IMPLIED WARRANTIES INCLUDING THE WARRANTIES OF MERCHANTABILITY AND FITNESS FOR USE ARE
LIMITED TO THE PERIOD(S) FROM THE DATE OF PURCHASE SET FORTH BELOW. Some states do not allow
limitations on how long an implied warranty lasts, so the above limitation may not apply to you.
Neither the sales personnel of the seller nor any other person is authorized to make any warranties other than those
described herein, or to extend the duration of any warranties beyond the time period described herein on behalf of Sharp.
The warranties described herein shall be the sole and exclusive warranties granted by Sharp and shall be the sole and
exclusive remedy available to the purchaser. Correction of defects, in the manner and for the period of time described
herein, shall constitute complete fulfillment of all liabilities and responsibilities of Sharp to the purchaser with respect to the
Product, and shall constitute full satisfaction of all claims, whether based on contract, negligence, strict liability or otherwise.
In no event shall Sharp be liable, or in any way responsible, for any damages or defects in the Product which were caused
by repairs or attempted repairs performed by anyone other than an authorized servicer. Nor shall Sharp be liable or in any
way responsible for any incidental or consequential economic or property damage. Some states do not allow the exclusion
of incidental or consequential damages, so the above exclusion may not apply to you.
THIS LIMITED WARRANTY IS VALID ONLY IN THE FIFTY (50) UNITED STATES, THE DISTRICT OF COLUMBIA AND
PUERTO RICO.
Model Specific Section
Your Product Model Number & Description:
Warranty Period for this Product:
Additional Item(s) Excluded from Warranty Coverage
(if any):
Where to Obtain Service:
What to do to Obtain Service:
HT-SB35D
SOUND BAR HOME THEATER SYSTEM
(Be sure to have this information available when you need
service for your Product.)
One (1) year parts and labor from the date of purchase.
Non-functional accessories, supplies, and consumable
items.
At a Sharp Authorized Servicer located in the United States.
To find a location of the nearest Sharp Authorized Servicer,
call Sharp toll free at 1-800-BE-SHARP.
Ship prepaid or carry in your Product to a Sharp Authorized
Servicer. Be sure to have Proof of Purchase available. If
you ship the Product, be sure it is insured and packaged
securely.
TO OBTAIN SUPPLY, ACCESSORY OR PRODUCT INFORMATION, CALL 1-800-BE-SHARP
SHARP ELECTRONICS CORPORATION
1 Sharp Plaza, Suite 1, Mahwah, NJ 07495-1123
For U.S. customer only
The Bluetooth®ZRUGPDUNDQGORJRVDUHUHJLVWHUHGWUDGHPDUNVRZQHGE\%OXHWRRWK6,*,QFDQGDQ\XVHRIVXFK
PDUNVE\6+$53LVXQGHUOLFHQVH2WKHUWUDGHPDUNVDQGWUDGHQDPHVDUHWKRVHRIWKHLUUHVSHFWLYHRZQHUV
7KH10DUNLVDWUDGHPDUNRUUHJLVWHUHGWUDGHPDUNRI1)&)RUXP,QFLQWKH8QLWHG6WDWHVDQGLQRWKHUFRXQWULHV
0DQXIDFWXUHGXQGHUOLFHQVHIURP'ROE\/DERUDWRULHV'ROE\DQGWKHGRXEOH'V\PERODUHWUDGHPDUNVRI'ROE\
/DERUDWRULHV
Special Notes
E-4
SOUND BAR HOME THEATRE SYSTEM HT-SB35D
1 2
SOUND BAR HOME THEATRE SYSTEM HT-SB35D
43 5 6 7 98 10 11 12 13
14
■General
●Keep your equipment at least 4” (10 cm) of free space
along the sides, top and back for proper ventilation.
4” (10 cm)
SOUND BAR HOME THEATRE SYSTEM HT-SB35D
4” (10 cm) 4” (10 cm)
4” (10 cm) 4” (10 cm) 4” (10 cm)
4” (10 cm)
●Use the unit on a firm, level surface free from vibration.
●Keep the unit away from direct sunlight, strong magnet-
ic fields, excessive dust, humidity and electronic/electri-
cal equipment (home computers, facsimiles, etc.) which
generate electrical noise.
●Do not place anything on top of the unit.
●Do not expose the unit to moisture, to temperatures
higher than 140°F (60°C) or to extremely low tempera-
tures.
●If the unit does not work properly, unplug and plug it in
again. Then turn on the unit.
●In case of an electrical storm, unplug the unit for safe-
ty.
●Hold the AC power plug by the head when removing
it from the AC outlet, as pulling the cord can damage
internal wires.
●The AC power plug is used as a disconnect device and
shall always remain readily operable.
●Do not remove the outer cover, as this may result in
electric shock. Refer internal service to your local
SHARP service facility.
●This unit should only be used within the range of 41°F
- 95°F (5°C - 35°C).
●SHARP is not responsible for damage due to improper
use. Refer all servicing to a SHARP authorised service
center.
Warning:
●The supplied AC/DC adaptor contains no user ser-
viceable parts. Never remove covers unless qualified to
do so. It contains dangerous voltages, always remove
mains plug from the AC outlet before any service opera-
tion or when not in use for a long period.
●The AC/DC adaptor supplied with the HT-SB35D must
not be used with other equipment.
●Never use an AC/DC adaptor other than the one speci-
fied. Otherwise, problem or serious hazards may be
created.
●The voltage used must be the same as that specified on
this unit. Using a higher voltage is dangerous and may
result in a fire or other type of accident causing damage.
SHARP will not be held responsible for any damage re-
sulting from such usage.
●In case of repairing, please bring the entire system set
to the service center.
■Volume control
The sound level at a given volume setting depends on
speaker efficiency, location and various other factors. It is
advisable to avoid exposure to high volume levels, which oc-
curs while turning the unit on with the volume control setting
up high, or while continually listening at high volumes.
Precautions
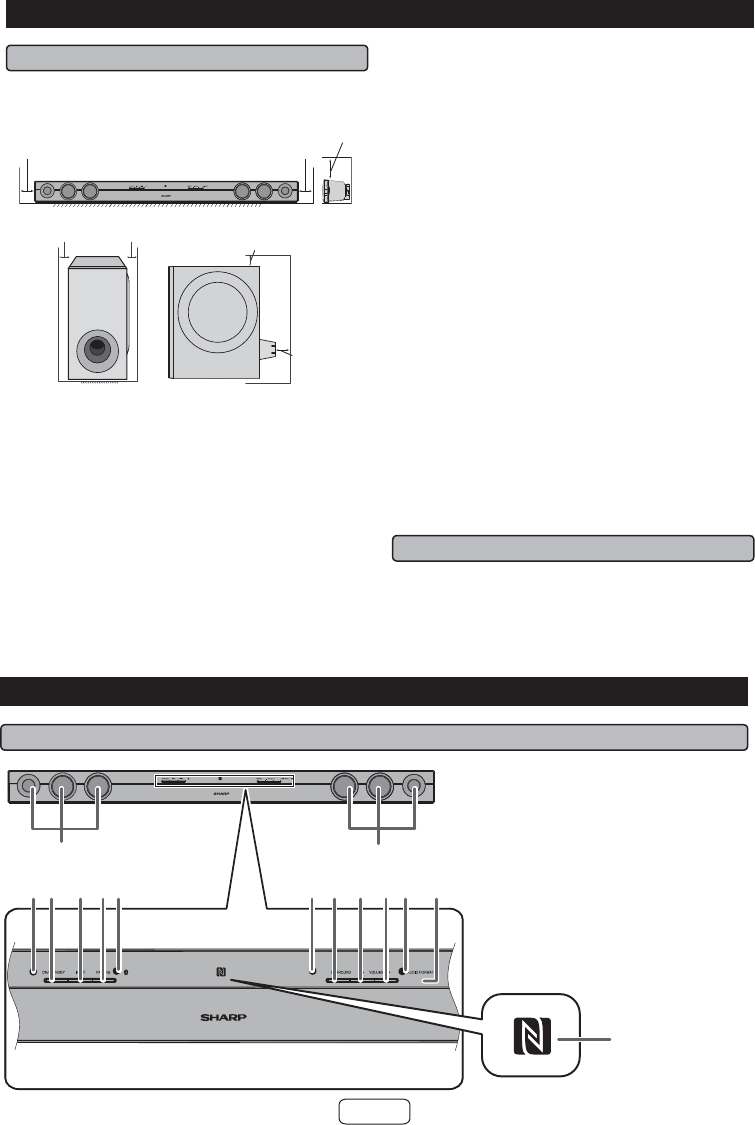
Controls and indicators
1. Left Channel Speakers
2. Right Channel Speakers
3. On/Standby/Input/Bluetooth
Pairing Indicator
4. On/Standby Button
5. Input Button
6. Pairing Button
7. Subwoofer Pairing Indicator
8. Surround Indicator
9. Surround Button
10. Volume Down Button
11. Volume Up Button
12. Audio Format Indicator
13. Remote Sensor
14. NFC detection area
■Front Panel
E-5
1. DC In Jack
2. Optical In Jack
3. Audio In Jack
1
3
2
TV Operation Buttons (Only SHARP TV):
On/Standby Button Sets the TV power to “ON”
or “STANDBY”.
Input Select Button
(TV)
Press the button to switch
the input source.
Volume Up and
Down Buttons VOL
Turn up/down the TV
volume.
Channel Up and
Down Buttons CH
Switch up/down the TV
channels.
Note: ● Some models of SHARP TV may not be operable.
● SHARP TV remote control will not work with HT-SB35D system.
■Remote Control
MUTE
ON/
STANDBY
MUSICCINEMA NEWS
SURROUND
BYPASS INPUT
TV
CHVOL
VOL
RRMCGA369AWSA
SOUND MODE
10
1
4
1
5
1
6
1
7
2
7
8
9
11
12
1
5
3
4
6
13
1
8
Remote control Plastic shield
Battery holder
Note:
Before using remote control, please remove plastic shield
at battery holder.
1. Remote Control Transmitter
2. Mute Button
3. Cinema (Sound Mode) button
4. Music (Sound Mode) button
5. Surround Button
6. Bypass (Sound Mode) button
7. TV Operation Buttons (only SHARP TV)
8. Bluetooth Pairing Button
9. Bluetooth Play/Pause Button
10. Bluetooth Skip Up Button
11. Bluetooth Skip Down Button
12. Subwoofer Level Down Button
13. Subwoofer Level Up Button
14. On/Standby Button
15. News (Sound Mode) button
16. Input Button
17. Volume Up/Down Buttons
18. Subwoofer Link Button
■Subwoofer
1. Bass Reflex Duct
2. Woofer
3. DC In Jack
4. SW LINK (Subwoofer Link) button
2
134
Controls and indicators (continued)
■Rear panel
E-6
Make sure to unplug the AC power cord before in-
stalling the sound bar or changing the position.
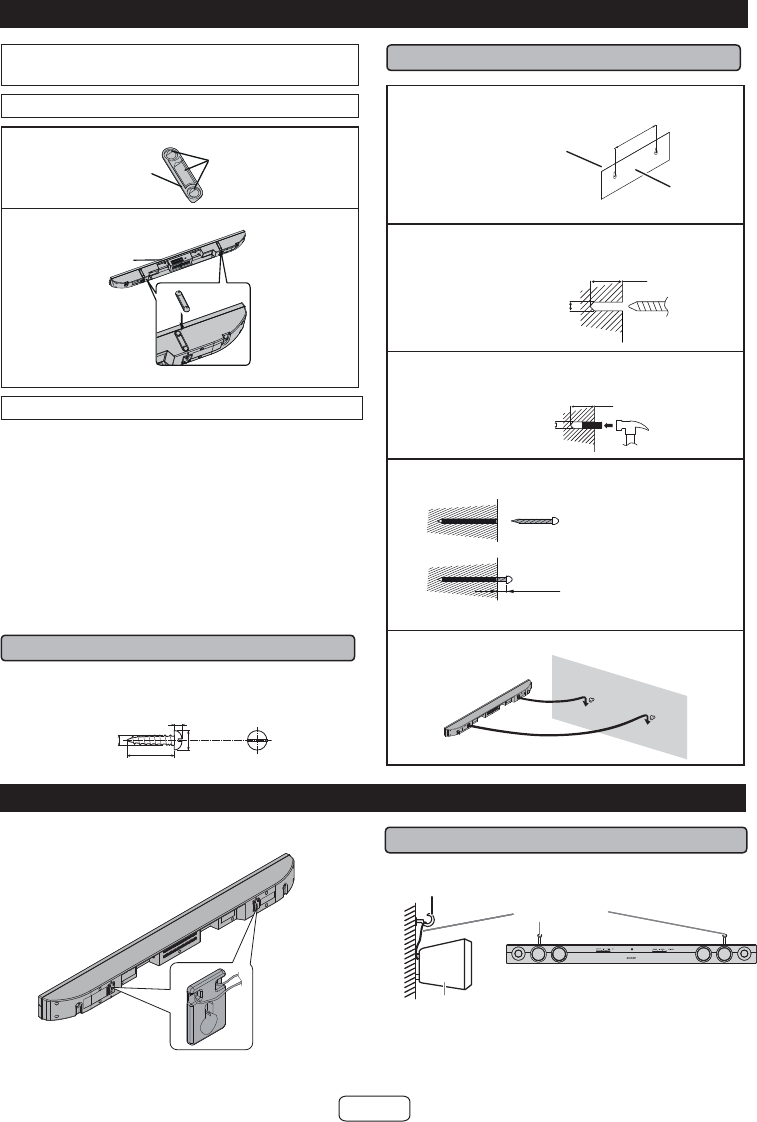
Using spike legs
1 3HHOWKHGRXEOHVLGHGWDSHVHSDUDWRU
2 )L[WKHVSLNHOHJRQWRWKHVRXQGEDUDVVKRZQ
To mount the sound bar on the wall
Caution:
●%H YHU\ FDUHIXO WR SUHYHQW WKH VRXQG EDU > OEV
NJ@IURPIDOOLQJZKHQPRXQWLQJRQWKHZDOO
●%HIRUHPRXQWLQJFKHFNWKHZDOOVWUHQJWK'RQRWSXWRQ
WKHYHQHHUSODVWHURUZKLWHZDVKHGZDOO7KHVRXQGEDU
PD\ IDOO ,I XQVXUH FRQVXOW D TXDOL¿HG VHUYLFH WHFKQL-
FLDQ
●0RXQWLQJ VFUHZV DUH QRW VXSSOLHG 8VH DSSURSULDWH
RQHV
●&KHFNDOOZDOOPRXQWDQJOHVFUHZVIRUORRVHQHVV
●6HOHFWDJRRGORFDWLRQ,IQRWDFFLGHQWVPD\RFFXURUWKH
VRXQGEDUPD\JHWGDPDJHG
●SHARP is not responsible for accidents resulting
from improper installation.
■Driving screws
SHARP designed the sound bar so you may hang it on the
wall. Use proper screws (not supplied). See below for size
and type.
1/8” (3.2 mm)
3/8” (9 mm)
7/8” (Min. 22 mm)
3/16”
(5 mm)
■Installing the sound bar
1 )L[WKHSDWWHUQSDSHUWRWKHZDOOLQKRUL]RQWDOSRVL-
WLRQDVEHORZ
44 mm
509 mm
Wall surface
Pattern paper
(supplied)
21-5/8” (548 mm)
2 0DNH D KROH RQ WKH ZDOO IROORZLQJ WKH VFUHZ SRLQW
PDUNVRQWKHSDWWHUQSDSHUE\XVLQJDGULOO
Wall surface
1-1/4” (32 mm)
3/8” (8-9 mm)
3 )L[DZDOOPRXQWSOXJLQWRWKHKROHXVLQJDKDPPHU
XQWLOLWLVÀXVKZLWKWKHZDOOVXUIDFH
1-1/4” (32 mm)
3/8” (8-9 mm)
Wall sur
face
4 )DVWHQWKHVFUHZVWRWKHZDOODVVKRZQEHORZ7RWDO
VFUHZLVSLHFHV
Wall surface
Wall surface
Screw using
screwdriver
3/16” (4.5 mm - 5 mm)
Gap from wall
surface
5 +DQJWKHVRXQGEDURQWRWKHVFUHZV
Bottom of sound
bar
Spike leg Double sided tape
separator
System preparation
Falling prevention
●Safety wires (not supplied) are useful to prevent the
sound bar from falling. ■When mounting on the wall
SOUND BAR HOME THEATRE SYSTEM HT-SB35D
Safety wires
(not supplied)
Sound bar
Screw eye
(not supplied)
Wall
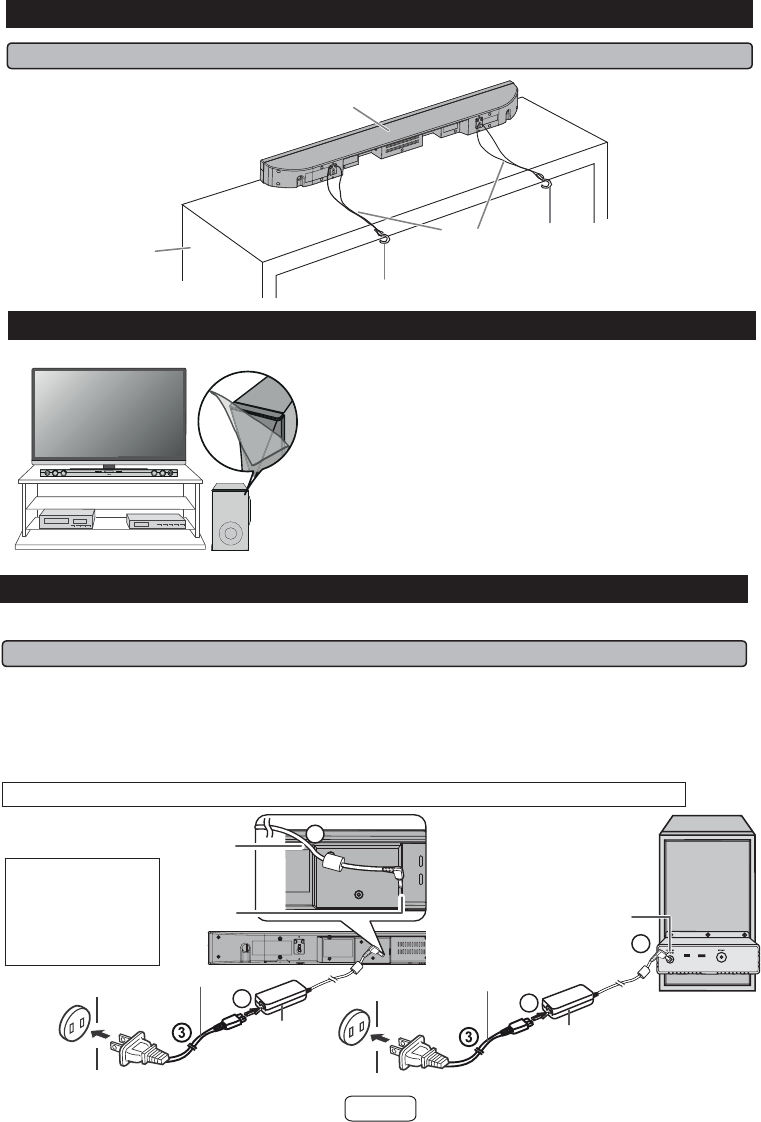
E-7
■When placing on the shelf/table
Rack/
table
Screw eye
(not supplied)
Safety wires
(not supplied)
Screw eye
(not supplied)
Sound bar
Placing the system
Installation image:
Place the system as shown.
Notes:
●Remove the protective film covering the sound bar
and subwoofer before turning on the system.
●The front panel of the sound bar is not removable.
Caution:
●Do not change the installation direction when the
sound bar is turned on.
●Do not stand or sit on the sound bar or subwoofer as
you may be injured.
●Do not allow any objects to fall into or to be placed in
the bass reflex duct.
SOUND BAR HOME THEATRE SYSTEM HT-SB35D
TV
VCR DVD player
Subwoofer
Falling prevention (continued)
After checking all the connections have been made correctly, connect the AC power cord to the AC power input jack,
then to the AC outlet.
■Using with the AC/DC adaptor
1 Plug the AC power cord into the AC/DC adaptor.
2 Plug the AC/DC adaptor cable into the DC INPUT jack on the sound bar and subwoofer.
3 Plug the AC power cord into an AC outlet. The Subwoofer Pairing indicator lights up.
Notes:
●Unplug the AC/DC adaptor from the AC outlet if the system will not be used for a prolonged period of time.
●Use only the supplied AC/DC adaptor. Using other AC/DC adaptor may cause an electric shock or fire.
Make sure to unplug the AC power cord before making any connections.
System connection
2
1
2
1
AC/DC Adaptor
Cable
DC IN jack
(DC 19V)
AC power cord
AC/DC Adaptor
(AC 100 - 240 V
~ 50/60 Hz)
AC outlet AC outlet
AC/DC Adaptor
(AC 100 - 240 V ~
50/60 Hz)
AC power cord
DC IN jack
(DC 19V)
CAUTION:
TO PREVENT
ELECTRIC SHOCK,
MATCH WIDE BLADE
OF PLUG TO WIDE
SLOT, FULLY INSERT.
E-8
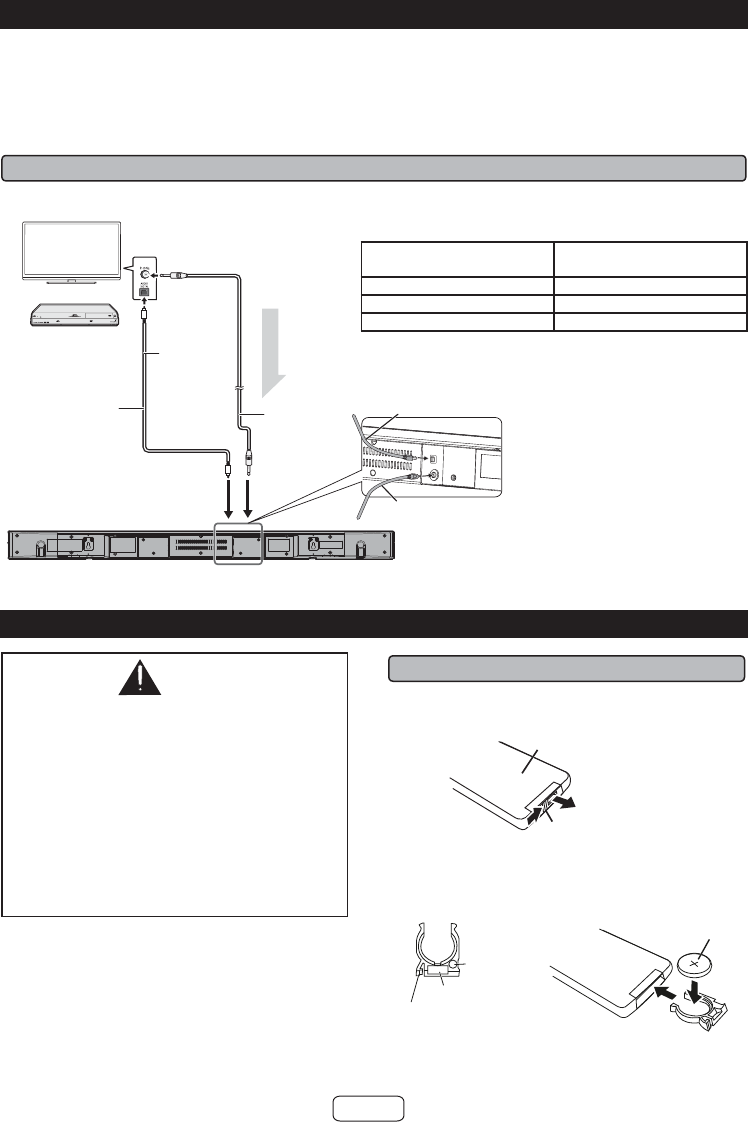
Caution:
Turn off all other equipment before making any connections.
Notes:
● To connect to TV/player, use AUDIO IN or OPTICAL IN terminals located at the rear of the sound bar.
● Refer the operation manual of the equipment to be connected.
● Fully insert the plugs to avoid fuzzy pictures or noises.
● If the TV volume is continuously at low level, the sound bar will automatically power off. Increase the TV output volume
to enjoy the sound from the system.
■Connecting a TV, or DVD player, etc.
If the TV/monitor has an audio or optical output, connect it to the AUDIO IN jack or OPTICAL IN jack on the rear of the
sound bar.
Sound bar connections to TVs
Optical digital audio cable
(supplied)
Audio cable
(commercially
available)
To AUDIO IN
input terminal
Audio signal
To audio output terminals
TV
or
Blu-Ray/DVD player/
Digital Tuner
Sound bar
To OPTICAL IN
(optical) input
terminal
To optical
digital audio
output
terminal
Optical digital audio
cable
Press the INPUT button repeatedly to select:
Function On/Standby/Input/
Bluetooth Pairing Indicator
OPTICAL IN Turns green
AUDIO IN Turns cyan
Bluetooth Turns blue
Remote control
WARNING
DO NOT INGEST BATTERY,
CHEMICAL BURN HAZARD
●7KH UHPRWH FRQWURO VXSSOLHG ZLWK WKLV SURGXFW
FRQWDLQVDFRLQEXWWRQFHOOEDWWHU\,IWKHFRLQEXWWRQ
FHOO EDWWHU\ LV VZDOORZHG LW FDQ FDXVH VHYHUH
LQWHUQDO EXUQV LQ MXVW WZR KRXUV DQG FDQ OHDG
WRGHDWK
●.HHSQHZ DQG XVHG EDWWHULHV DZD\IURPFKLOGUHQ
,IWKHEDWWHU\FRPSDUWPHQWGRHVQRWFORVHVHFXUHO\
VWRS XVLQJ WKH SURGXFW DQG NHHS LW DZD\ IURP
FKLOGUHQ
●,I\RXWKLQNEDWWHULHVPLJKWKDYHEHHQVZDOORZHGRU
SODFHGLQVLGHDQ\SDUWRIWKHERG\VHHNLPPHGLDWH
PHGLFDODWWHQWLRQ
This product contains a CR Coin Lithium Battery which con-
tains Perchlorate Material – special handling may apply.
California residents, see
www.dtsc.ca.gov/hazardouswaste/perchlorate/
■Battery installation
1 While pushing the locking tab toward the center of the
remote control, slide out the battery holder.
Locking tab
Back of remote control
2 Remove the old battery from the battery holder, insert
the new battery and then slide the battery holder back
into the remote control.
Battery type
Battery holder
Locking tab
Polarity (+)
symbol
Positive (+) side up
Audio cable
E-9
Remote control (continued)
Precautions for battery use:
Remove the battery if the sound bar will not be used for
a long period of time. This will prevent potential damage
due to battery leakage.
Caution:
●Do not use rechargeable battery (nickel-cadmium bat-
tery, etc.).
●Danger of explosion if battery is incorrectly replaced.
●Replace only with the same or equivalent type.
●Batteries (battery pack or batteries installed) shall not
be exposed to excessive heat such as sunshine, fire
or the like.
●Installing the battery incorrectly may cause the sound
bar to malfunction.
Notes concerning use:
●Replace the battery if the operating distance is re-
duced or if the operation becomes erratic. Purchase
“CR 2025”, coin lithium battery.
●Periodically clean the transmitter on the remote control
and the sensor on the sound bar with a soft cloth.
●Exposing the sensor on the sound bar to strong light
may interfere with operation. Change the lighting or the
direction of the sound bar if this occurs.
●Keep the remote control away from moisture, heat,
shock, and vibrations.
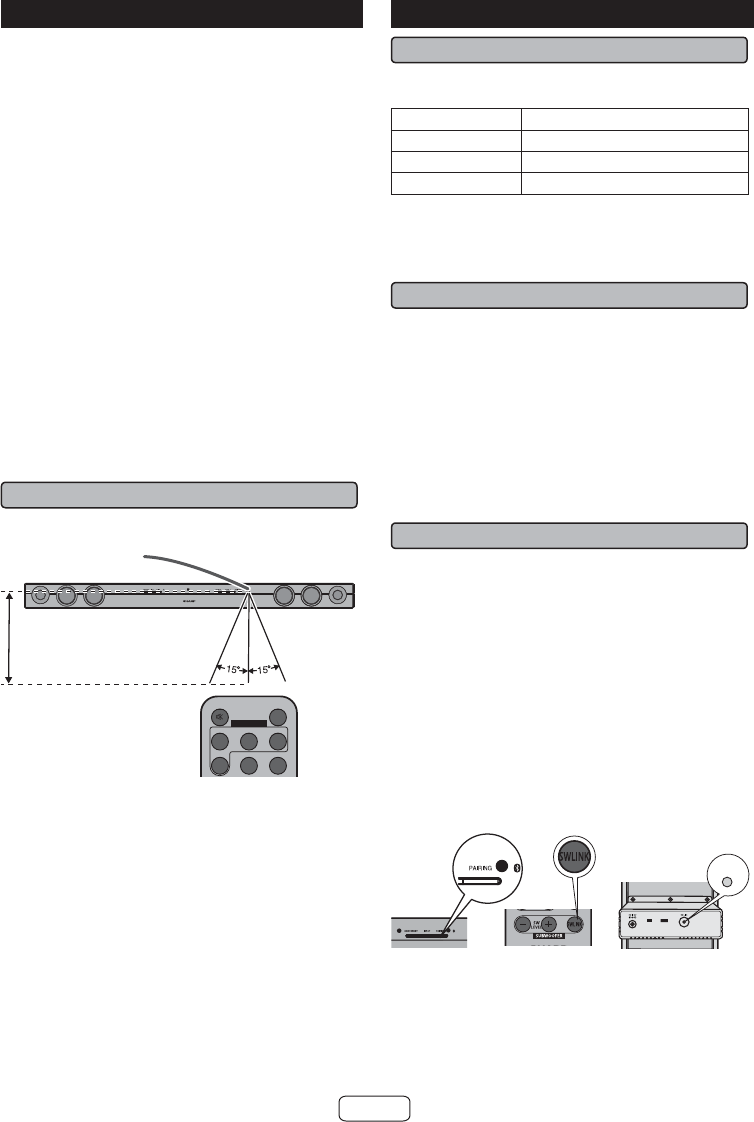
■Test of the remote control
The remote control can be used within the range shown
below:
MUTE
ON/
STANDBY
MUSICCINEMA NEWS
SURROUND
BYPASS INPUT
SOUND MODE
SOUND BAR HOME THEATRE SYSTEM HT-SB35D
Remote sensor
8” - 20’
(0.2 m - 6 m)
General control
■To turn the power on
Press the ON/STANDBY button.
The On/Standby/Input/Bluetooth Pairing indicator lights
up according to input source:
Input source Indicator
OPTICAL IN Turns green
AUDIO IN Turns cyan
Bluetooth Turns blue
Note:
If the power does not turn on, check whether the power
cord is plugged in properly.
To set the sound bar to standby mode:
Press the ON/STANDBY button again. The Subwoofer
Pairing indicator lights up.
■Bluetooth standby mode
●The first time the sound bar is plugged in, it will enter
the Bluetooth standby mode (Subwoofer Pairing indi-
cator lights up).
●To cancel the Bluetooth standby mode, press and hold
the ON/STANDBY button during Bluetooth standby
mode. The sound bar will enter the low power con-
sumption mode (Subwoofer Pairing indicator turns off).
The subwoofer will enter the low power consumption
mode approximately 3 minutes later.
●During low power consumption mode, to return to the
Bluetooth standby mode, turn the sound bar on and
off again.
●During Bluetooth standby condition, NFC function is
activated once your device touches the NFC detection
area or the supplied NFC tag.
■Connecting the wireless Subwoofer
The sound bar and subwoofer will link automatically (wire-
lessly) when turned on as it is already pre-linked at the
factory. If the link cannot be established, please set the
connection by the following method.
●During pairing process:
Subwoofer Pairing indicator will blink.
●When pairing is successful:
Subwoofer Pairing indicator lights up.
During sound bar standby and subwoofer power off mode
(AC power lead unplugged):
1. Press and hold the PAIRING button on the sound bar
or SW LINK button on the remote control for more than
3 seconds. Subwoofer Pairing indicator will blink.
2. Within 3 minutes, plug in the AC power cord of the
subwoofer and turn it on. Subwoofer pairing indicator
will light up.
●In case the link is still not established (Subwoofer Pair-
ing indicator blinks), press and hold the SW LINK button
at the back of the subwoofer until Subwoofer Pairing
indicator lights up.
SW LINK
Remote control
Sound bar Subwoofer
Notes:
●If a device such as microwave oven, wireless LAN
card, Bluetooth device or any other device that uses
the same 2.4GHz frequency near the system, some
sound interruption may be heard due to interference.
●The maximum transmission distance of the wireless
signal between the subwoofer and sound bar is about
32” (10 m), but may vary depending on your operating
environment.
E-10
General control (continued)
●If a steel-concrete or metallic wall is between the sub-
woofer and the sound bar, the system may not oper-
ate at all, because the wireless signal cannot penetrate
metal.
Caution:
●Keep the subwoofer away from water and moisture.
●To get the optimum listening performance, make sure
the area around the sound bar and subwoofer is clear
of any obstacles.
■Volume auto fade-in
If you turn off and on the sound bar again, volume will start
at lower level and gradually increase to the last set level.
■Volume control
Sound bar operation:
Press volume up (VOLUME + ) to increase the volume and
press volume down (VOLUME – ) to decrease the volume.
Remote control operation:
Press the VOL + button to increase the volume and the VOL
– button to decrease the volume.
Notes:
●When volume is maximum or minimum the SURROUND
indicator blinks 3 times
●To increase or decrease the volume continuously, press
and hold the VOLUME +/- buttons (main unit) or VOL
+/- buttons (remote control).
■Muting
The volume is muted temporarily when pressing the MUTE
button on the remote control (SURROUND indicator blink-
ing). Press again to restore the volume.
■Surround
When the SURROUND button is pressed, the SURROUND
sound is ON. (SURROUND indicator lights up (orange))
■Subwoofer level control
The output level of the subwoofer can be adjusted with
SW LEVEL buttons.
To increase the level, press the SW LEVEL + button.
To decrease the level, press the SW LEVEL - button.
Notes:
●When the level is maximum or minimum the SUR-
ROUND indicator blinks 3 times.
■Sound Mode
Remote control operation:
Press the desired sound mode button on the remote
control.
The SURROUND indicator blinks once.
CINEMA (for cinema sound effect)
MUSIC (for standard sound effect)
NEWS (for news)
BYPASS (for flat sound effect)
■Function
When the INPUT button is pressed, the input source will
change.
1 Optical In Function - the On/Standby/Input/Bluetooth
Pairing indicator turns green.
2 Audio In Function - the On/Standby/Input/Bluetooth
Pairing indicator turns cyan.
3 Bluetooth Function - the On/Standby/Input/Bluetooth
Pairing indicator turns blue.
Note:
The backup function will protect the memorized function
mode for a few hours should there be a power failure or
the AC power cord becomes disconnected.
■Auto power on function
●Auto power on function works only during Bluetooth
standby mode (Subwoofer Pairing indicator lights up). It
will not work if the sound bar is in low power consump-
tion mode (Subwoofer Pairing indicator is off).
Optical In: Turn off the external source. The sound bar
will automatically power ON if the external source is
turned ON again.
Audio In/Bluetooth: The sound bar will automati-
cally power ON if it detects audio signal from connected
equipment.
■Auto power off and auto detect signal
●The sound bar will automatically go to standby mode
(Subwoofer Pairing indicator lights up) if:
Optical In: No audio signal is detected after approxi-
mately 15 minutes.
Audio In: No audio signal is detected after approxi-
mately 15 minutes.
Bluetooth:
- No connection after approximately 1 minute.
- In the pause or stop mode and no incoming signal
from device after approximately 15 minutes.
■Audio format
During the OPTICAL IN function the AUDIO FORMAT
indicator will light up to indicate the audio format.
Audio format Audio format
indicator
Dolby
Digital
One of the digital audio
systems for theatrical use.
You can also enjoy the
stereophonic effect in the
home theater system.
Lights up when detecting
Dolby Digital signal.
Blue
PCM
(Pulse Code
Modulation)
This is a general term for
digitally encoded audio
signals on a CD or DVD.
This sound bar lets you
enjoy playback of digital
signals from sources such
as CD or DVD.
Violet
Note:
This product supports “Dolby Digital” and “PCM” signal
format for Optical Input. If there is no output from optical
input, please set your optical source equipment to “Dolby
Digital” or “PCM” signal format.
E-11
SOUND BAR HOME THEATRE SYSTEM HT-SB35D
SOUND BAR HOME THEATRE SYSTEM HT-SB35D
HT-SB35D
NFC detection area
Switch ‘ON’
Bluetooth
Search/scan
A Bluetooth audio
source device
(smartphone/tablet).
Pairing
Connect
Bluetooth one touch connection via NFC
■About NFC technology
Near Field Communication (NFC) is a set of standards for
devices (smartphones/tablets) to establish radio communi-
cation with each other by touching/tapping them together
or bringing them into close proximity.
Using NFC in this product simplifies the pairing method of
Bluetooth connectivity.
Notes for Android devices
●This audio system supports NFC-enabled device with Android
4.1, Jelly Bean and higher.
●For device with a lower Android version, refer the operation
manual of the device for recommended app (application).
Unlike other wireless technology, NFC requires no
discovery or pairing.
Simply tap the source device to NFC detection area on
the main unit or the NFC tag to instantly enjoy seam-
less connectivity between your smart device and the
audio system.
■NFC detection area
NFC detection area location may vary depending on the
device (smartphone/tablet). Refer operation manual of the
device for detail.
or
NFC tag
■NFC tag set up
The NFC tags can be placed anywhere convenient to you.
The velcro tapes supplied will help to secure the tags onto
the desired location.
Caution:
●Make sure that the NFC tag is placed on a flat and level
surface.
●If you choose not to use the velcro tape, do not pla-
ce the NFC tag near metal surface to avoid connec-
tion interference during tagging.
Important:
●NFC tag has unique ID for each sound bar.
●SHARP will not be held liable for the damages caused
by rewriting the tags.
Keep all small parts away from children as they may
be accidentally swallowed.
1 Peel the separator off the velcro tape (loop type)
and stick it on a desired surface.
Separator
Velcro tape
(loop type)
2 Peel the separator off the velcro tape (hook type)
and stick it to the rear of the NFC tag. Then place
the tag onto the desired location.
Separator
rear view of the NFC tag
Velcro
tape
(hook
type)
(during Bluetooth standby mode)
M
a
n
u
a
l
B
l
u
e
t
o
o
t
h
s
e
t
t
i
n
g
E-12
Bluetooth one touch connection via NFC (continued)
Notes:
●This product switches to Bluetooth function automati-
cally when NFC tagging was done by your device.
●If your device does not support NFC, or if you wish to
listen to audio via Bluetooth connectivity without NFC
tag; refer “Pairing with other Bluetooth source de-
vices” on the next page.
●Some Bluetooth devices will connect to this product
automatically when the device or its Bluetooth mode
was turned on. In such case, it will also change the
function selection of this product. If you do not want
it to connect automatically, please disable Bluetooth
on your device.
●It takes about 6-8 seconds for a Bluetooth enabled de-
vice (eg. smartphone) to establish Bluetooth connec-
tion with this unit via NFC or manual connection.
●If “Empty tag” or similar message appears on your de-
vice, touch the device again to the NFC detection area
on the main unit or supplied NFC tag.
Listening to Bluetooth enabled devices
Bluetooth wireless technology is a short-range radio
technology that enables wireless communication between
various types of digital devices, such as mobile phone or
computer. It operates within a range of about 30 feet (10
meters) without the hassle of having to use cables to con-
nect these devices.
This sound bar supports the following:
Communication System: Bluetooth Specification version
2.1 Bluetooth + Enhanced Data Rate (EDR).
Support Profile : A2DP (Advanced Audio Distribution Profile)
and AVRCP (Audio/Video Remote Control Profile)
Notes when using unit with a mobile phone
●This unit cannot be used to talk over the telephone even
when there is a Bluetooth connection made to a mobile
phone.
●Please refer to the operating manual supplied with the
mobile phone for details on operation of your mobile
phone while transmitting the sound using a Bluetooth
connection.
■Pairing Bluetooth devices
Bluetooth devices need to be initially paired first before they
can exchange data. Once paired, it is not necessary to pair
them again unless:
●pairing is made with more than 99 devices.
Pairing can only be made one device at a time. This
sound bar can be paired to a maximum of 99 devices.
If subsequent device is paired, the oldest device paired,
will be deleted and replaced with the new one.
●pairing information is deleted while repairing, etc.
Bluetooth connection status
Status INPUT indicator (blue)
Unconnected Blinks
Pairing mode Blinks quickly
Connected Lights up
However, the indicator status is not displayed during low
power consumption mode.
■NFC connection for audio playback
Check that:
●Your device (smartphone/tablet) has an NFC function.
●NFC function on your device is enabled.
●Screen lock function of the device is off.
●This unit is not in low power consumption mode.
●Your device and NFC tag must be within 30 feet (10 meters) from the unit.
1 Touch your device to the NFC detection area on the main unit or supplied NFC tag. (NFC detection area of
your device must touch to the NFC detection area of the main unit or supplied NFC tag.)
SOUND BAR HOME THEATRE SYSTEM HT-SB35D
NFC
detection
area or
NFC tag
Device
Main
unit
2 A pop-up window asking whether to proceed with the Bluetooth connection appears on the device. Select
<YES>.
●The ‘connected’ message appears when the connection is complete.
3 Playback will start automatically, otherwise press play (on remote control or source device).
●Sound will be heard from the speakers of this unit via audio streaming.
●Your device and NFC tag must be within 30 feet (10 meters) from the unit.
●To disconnect, simply touch your device to the NFC detection area on the main unit or the NFC tag again.
Bluetooth operation buttons (remote control only)
Press the button to play or pause.
Press the button to skip up.
Press the button to skip down.

E-13
■Pairing with other Bluetooth source device
1 Press the ON/STANDBY button to turn the power
on.
2 Press the INPUT button to select Bluetooth func-
tion. (INPUT indicator blinks in blue.)
3 Press and hold the PAIRING button on the remote
control for 3 seconds or more.
INPUT indicator blinks quickly. The sound bar is now
in pairing mode and is ready to be paired with other
Bluetooth source device.
4 Perform pairing procedure on the source device
to detect this sound bar. “HT-SB35D SHARP” will
appear in the detected devices list (if available) in
the source device. (Refer the source device oper-
ating manual for details).
Notes:
● Place the devices to be paired within 3 feet (1 me-
ter) of each other when pairing.
● Some source devices are unable to display lists of
detected devices. To pair this sound bar with the
source device, refer to the source device operating
manual for details.
5 Select “HT-SB35D SHARP” from the source list. If
Passcode* is required, enter “0000”.
* Passcode may be called PIN Code, Passkey, PIN
number or Password.
6 INPUT indicator (blue) will stop blinking once the
sound bar is successfully paired with the source
device. (Pairing information is now memorized in
the sound bar.)
Some audio source devices may connect with the
sound bar automatically after pairing is completed,
otherwise follow the instructions in the source device
operating manual to start connection.
7 Press the play button on remote control or source
device to start Bluetooth streaming playback.
Notes:
●If a device such as microwave oven, wireless LAN card,
Bluetooth device or any other device that uses the same
2.4 GHz frequency is placed near the system some
sound interruption may be heard.
●The transmission maximum distance of the wireless
signal between the device and the sound bar is about
32‘ (10 m), but may vary depending on your operating
environment. If a steel concrete or metallic wall is be-
tween the device and the sound bar, the system may
not operate at all, because the wireless signal cannot
penetrate metal.
●If this sound bar or the source device is turned off be-
fore Bluetooth connection is completed, pairing will
not be completed and the pairing information will not
be memorized. Repeat step 1 onward to start pairing
again.
●To pair with other devices, repeat steps 1 - 5 for each
device.
This sound bar can be paired to a maximum of 99 de-
vices. If subsequent device is paired, the oldest device
paired, will be deleted and replaced with the new one.
●Once a device is ousted or deleted from the pairing list,
the pairing information for the device is also deleted. To
listen to the sound from the device again, it needs to be
re-paired. Perform steps 1 - 5 to pair the device again.
●HT-SB35D supports Bluetooth profile AVRCP 1.4. If
your device supports the same profile (refer to device
manufacturer’s specification), HT-SB35D is able to con-
trol the volume of the device.
Note:
Some music applications do not support this feature,
hence there will be no volume synchronisation between
your device and the sound bar even if your Bluetooth
device supports such profile.
■Listening to the sound
Check that:
●The source device Bluetooth functionality is ON.
●Pairing of this sound bar and the source device is com-
pleted.
●Sound bar is in connected mode (INPUT indicator (blue)
lights up.)
●Any device connected to the AUDIO IN or OPTICAL IN
jack is turned off.
1 Press the ON/STANDBY button to turn the power
on.
2 Press the INPUT button to select Bluetooth func-
tion.
3 Start the Bluetooth connection from the Blue-
tooth stereo audio source device.
4 Playback will start automatically, otherwise
press play (on the remote control or the source
device).
Notes:
●For various Bluetooth operations, refer “NFC
connection for audio playback” on page 12.
●If the source device has an extra bass function or
equalizer function, set them to off. If these functions
are on, sound may be distorted.
Notes:
●Make the Bluetooth connection again if the source de-
vice is not turned on, or its Bluetooth functionality is off
or is in sleep mode.
■To disconnect the Bluetooth device
Perform any of the followings.
- Disconnect the Bluetooth connection on the audio source
device.
Refer the operating manual supplied with the device.
- Turn off the Bluetooth stereo audio source device.
- Turn off this sound bar.
Note:
The volume of this sound bar may not be controlled as
intended depending on the device.
Listening to Bluetooth enabled devices
(continued)

E-14
Many potential problems can be resolved by the owner
without calling a service technician.
If something is wrong with this product, check the fol-
lowing before calling your authorised SHARP dealer or
service center.
■General
Symptom Possible cause
No sound is heard. ●Is the input signal (selection)
set properly?
●Is the volume level set to
minimum?
●Is muting activated?
●Are the connections made
correctly?
Noise is heard
during playback.
●Move the sound bar away
from any computers or mobile
phones.
Sound is distorted. ●TV output sound is distorted.
Reduce the TV volume or
sound bar volume.
When a button
is pressed, the
sound bar does
not respond.
●Set this sound bar to the
standby mode and then turn it
back on.
●If the sound bar still
malfunctions, reset it.
(Refer to “Factory reset,
clearing all setting”.)
The power is not
turned on.
●Is the sound bar unplugged?
(Refer to page 7.)
●The protection circuit may be
activated. Unplug and plug in
the power cord again after 5
minutes or more.
No sound is heard
at subwoofer.
●Is the AC for subwoofer
plugged in?
●The subwoofer is not
connected with the sound bar.
●Is the sound bar in mute?
●If the subwoofer still
malfunctions reconnect it to the
sound bar. (Refer page 9.)
■NFC / Bluetooth
Symptom Possible cause
NFC-enabled de-
vice cannot con-
nect to Bluetooth
via NFC tag.
●Main unit is not in Bluetooth
pairing mode. Perform
“NFC connection for audio
playback”. (Refer page 12.)
No sound is heard. ●Is the sound bar too far from
the Bluetooth stereo audio
source device?
●Is the sound bar paired with the
Bluetooth stereo audio source
device?
●Is the Bluetooth stereo audio
source device in playback
condition?
●Is a headphone plugged to the
Bluetooth stereo audio source
device?
Bluetooth sound
is interrupted or
distorted.
●Is the sound bar too near
to a device that generates
electromagnetic radiation?
●Is there any obstacle between
the sound bar and the
Bluetooth stereo audio source
device?
■Remote control
Symptom Possible cause
The remote control
does not operate
properly.
●Is the battery polarity correct?
●Is the battery dead?
●Is the distance or angle
incorrect?
●Are there any obstructions in
front of the sound bar?
●Is there a strong light shining
on the remote sensor?
●Is the remote control for
another equipment used
simultaneously?
The sound bar
cannot be turned
on with the remote
control.
●Is the AC power cord of the
sound bar plugged in?
●Is the battery inserted?
●Has the plastic shield at the
remote control battery holder
been removed?
■Condensation
Sudden temperature changes, storage or operation in an ex-
tremely humid environment may cause condensation inside
the cabinet or on the transmitter on the remote control.
Condensation can cause the sound bar to malfunction. If
this happens, leave the power on until normal operation
is possible (about 1 hour). Wipe off any condensation
on the transmitter with a soft cloth before operating the
sound bar.
■Factory reset, clearing all setting
Make sure to disconnect all audio input cables attached to
the sound bar before performing the factory reset.
1. Press ON/STANDBY button to enter the power
standby mode.
2. While pressing down the PAIRING button on the main
unit, press the ON/STANDBY button.
3. Press the ON/STANDBY button again. (Subwoofer
Pairing indicator will turn blue.)
Caution:
This operation will erase all data stored in memory.
■If problem occurs during operation
When this product is subject to strong external interference
(mechanical shock, excessive static electricity, abnormal
supply voltage due to lightning, etc.) or if it is operated
incorrectly, it may malfunction.
If such a problem occurs, do the following:
1 Set the sound bar to the standby mode and turn the
power on again.
2 If the sound bar is not restored in the previous
operation, unplug and plug in the sound bar, and
then turn the power on.
Troubleshooting chart
E-15
Maintenance
■Cleaning the cabinet
Periodically wipe the cabinet with a soft cloth.
Cautions:
●Do not use chemicals for cleaning (gasoline, paint thin-
ner, etc.). It may damage the cabinet finish.
●Do not apply oil to the inside of each component. It may
cause malfunctions.
SOUND BAR HOME THEATRE SYSTEM HT-SB35D
6SHFL¿FDWLRQV
As part of our policy of continuous improvement, SHARP
reserves the right to make design and specification changes
for product improvement without prior notice. The perform-
ance specification figures indicated are nominal values of
production unit. There may be some deviations from these
values in individual unit.
■Sound bar
Power source DC IN 19V 3.42A: AC/DC
adaptor
(AC 100 - 240V ~ 50/60Hz)
Power
consumption
10 W
Maximum output
power
RMS: Total 60 Watts
30 Watts per channel into 6 ohms
at 1 kHz, 10% total harmonic
distortion
FTC: Minimum 23 watts per
channel into 6 ohms at 100 Hz to
20 kHz, 1% total harmonic
distortion
Speaker 2-way Speaker System
2-1/4” (5.7cm) Woofer
1” (2.5cm) Soft Dome
Input terminals Analog input (AUDIO IN):
Stereo mini jack Ø 3.5mm
500mV / 47kohms
Optical digital input (OPTICAL):
Square type x 1
Bluetooth
Frequency Band
2.400GHz - 2.480GHz
Compatible
Bluetooth Profile
A2DP (Advanced Audio
Distribution Profile), AVRCP (Audio/
Video Remote Control Profile)
Bluetooth 2.1 +EDR
Dimensions Width: 37” (940mm)
Height: 2-7/8” (73mm)
Depth: 3-1/4” (83mm)
Weight 5.1 lbs. (2.3 kg)
■Subwoofer
Power source DC IN 19V 3.42A: AC/DC
adaptor
(AC 100 - 240V ~ 50/60Hz)
Power
consumption
Power on: 10 W
Output power RMS: Total 60 Watts
30 Watts per channel into 6 ohms
at 1 kHz, 10% total harmonic
distortion
FTC: Minimum 23 watts per
channel into 6 ohms at 100 Hz to
20 kHz, 1% total harmonic
distortion
Speaker 5-1/8”(13 cm) Woofer
Dimensions Width: 7-3/8” (188 mm)
Height: 11-1/8” (282 mm)
Depth: 11-3/4” (299 mm)
Weight Weight: 6.4 lbs. (2.9 kg)