S and O ELECTRONICS CPSW603 ACTIVE SUBWOOFER SYSTEM User Manual HT SB603 SEC EN 181215
S&O; ELECTRONICS (MALAYSIA) SDN. BHD. ACTIVE SUBWOOFER SYSTEM HT SB603 SEC EN 181215
User Manual
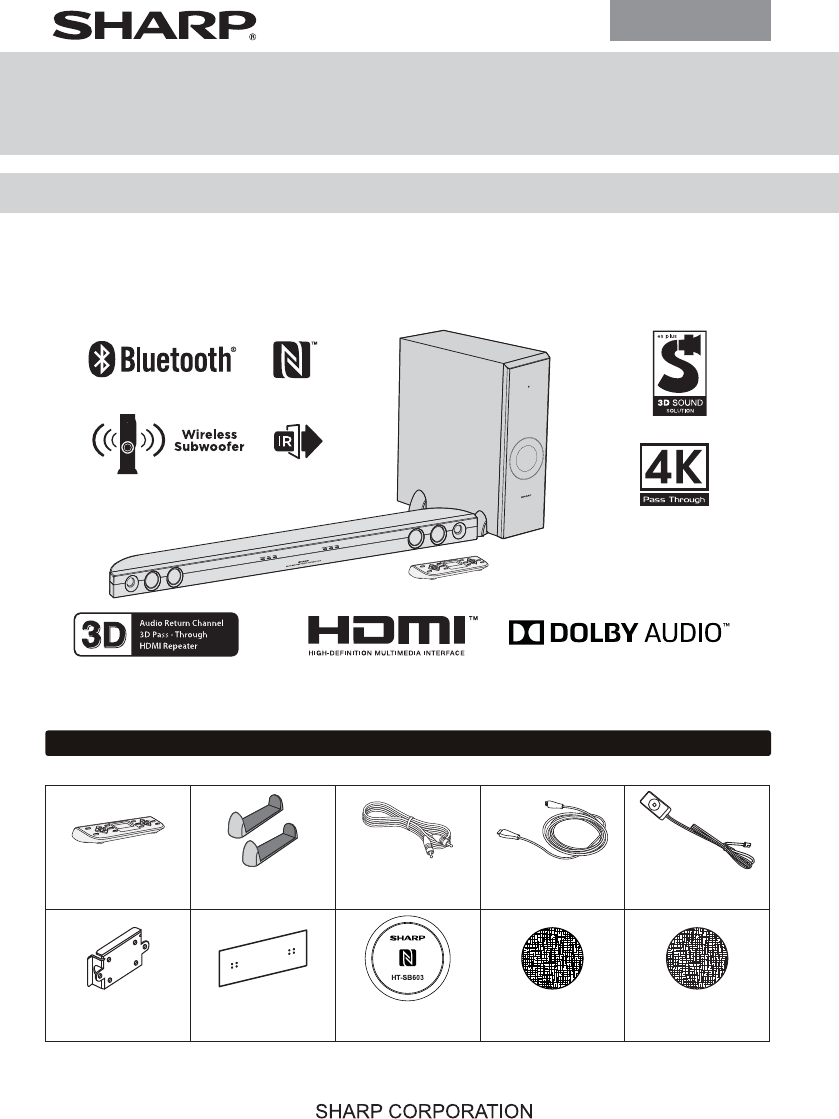
ENGLISH
MODEL
HT-SB603
SOUND BAR HOME THEATER SYSTEM
OPERATION MANUAL
Thank you for purchasing this SHARP product. To obtain the best performance from this product, please
read this manual carefully. It will guide you in operating your SHARP product.
Note:
This product is recommended for 60" or larger flat panel TV (LED, LCD and Plasma).
HT-SB603 Sound Bar Home Theater system consisting of HT-SB603 (sound bar system) and CP-SW603
(active subwoofer system).
Accessories
The following accessories are included.
Remote Control
(RRMCGA388AW01)
Subwoofer Stand x 2
(GITAUA022AW01)
Audio Cable x 1
(QCNWGA108AWPZ)
HDMI Cable x 1
(QCNWGA078AWPZ)
IR Transmitter x 1
(QCNWNC605AW01)
Wall Mount Angle x 2
(LANGKA167AW01)
Pattern Paper
(TCAUHA036AWZZ)
NFC tag x 1
(GCASP9347AW01)
Velcro tape (hook type) x 1
(PSHEZA373AW01)
Velcro tape (loop type) x 2
(PSHEZA372AW01)
TINSEA504AWZZ
Printed in Malaysia
16A R KI 1
*TINSEA504AWZZUL*|
E-1
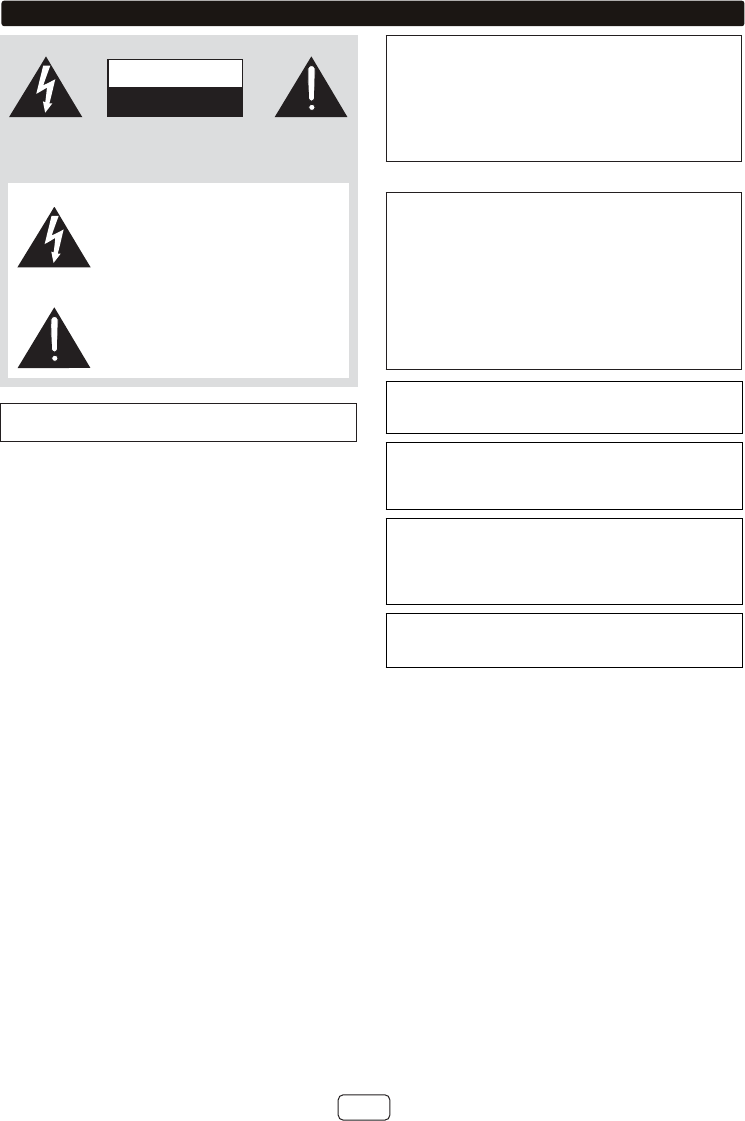
Explanation of Graphical Symbols:
7KH OLJKWQLQJ ÀDVK ZLWK DUURZKHDG V\PERO ZLWKLQ
DQHTXLODWHUDOWULDQJOHLVLQWHQGHGWRDOHUWWKHXVHU
WRWKHSUHVHQFHRIXQLQVXODWHG³GDQJHURXVYROWDJH´
ZLWKLQWKHSURGXFW¶VHQFORVXUHWKDWPD\EHRIVXI¿-
FLHQWPDJQLWXGHWRFRQVWLWXWHDULVNRIHOHFWULFVKRFN
WRSHUVRQV
7KHH[FODPDWLRQSRLQWZLWKLQDQHTXLODWHUDOWULDQJOHLV
LQWHQGHGWRDOHUWWKHXVHUWRWKHSUHVHQFHRILPSRU-
WDQWRSHUDWLQJ DQG PDLQWHQDQFHVHUYLFLQJ LQVWUXF-
WLRQVLQWKHOLWHUDWXUHDFFRPSDQ\LQJWKHDSSOLDQFH
CAUTION: TO REDUCE THE RISK OF ELECTRIC SHOCK, DO NOT RE-
MOVE COVER (OR BACK).
NO USER-SERVICEABLE PARTS INSIDE. REFER SERVICING TO
QUALIFIED SERVICE PERSONNEL.
CAUTION
RISK OF ELECTRIC
SHOCK DO NOT OPEN
)RUXVHUVLQ86
WARNING: TO REDUCE THE RISK OF FIRE OR ELECTRIC SHOCK,
DO NOT EXPOSE THIS APPLIANCE TO RAIN OR MOISTURE.
NOTE
7KLVHTXLSPHQWKDVEHHQWHVWHGDQGIRXQGWRFRPSO\ZLWKWKH
OLPLWVIRUD&ODVV%GLJLWDOGHYLFHSXUVXDQWWR3DUWRIWKH)&&
5XOHV7KHVHOLPLWVDUHGHVLJQHGWRSURYLGHUHDVRQDEOHSURWHF-
WLRQDJDLQVWKDUPIXOLQWHUIHUHQFHLQDUHVLGHQWLDOLQVWDOODWLRQ7KLV
HTXLSPHQW JHQHUDWHV XVHV DQG FDQ UDGLDWH UDGLR IUHTXHQF\
HQHUJ\DQGLIQRWLQVWDOOHGDQGXVHGLQDFFRUGDQFHZLWKWKHLQ-
VWUXFWLRQVPD\FDXVHKDUPIXOLQWHUIHUHQFHWRUDGLRFRPPXQLFD-
WLRQV+RZHYHUWKHUHLVQRJXDUDQWHHWKDWLQWHUIHUHQFHZLOOQRW
RFFXU LQ D SDUWLFXODU LQVWDOODWLRQ ,I WKLV HTXLSPHQW GRHV FDXVH
KDUPIXOLQWHUIHUHQFHWRUDGLRRUWHOHYLVLRQUHFHSWLRQZKLFKFDQ
EHGHWHUPLQHGE\WXUQLQJWKHHTXLSPHQWRIIDQGRQWKHXVHULV
HQFRXUDJHGWRWU\WRFRUUHFWWKHLQWHUIHUHQFHE\RQHRUPRUHRI
WKHIROORZLQJPHDVXUHV
●5HRULHQWRUUHORFDWHWKHUHFHLYLQJDQWHQQD
●,QFUHDVH WKH VHSDUDWLRQ EHWZHHQ WKH HTXLSPHQW DQG UH-
FHLYHU
●&RQQHFWWKHHTXLSPHQW LQWR DQ RXWOHWRQD FLUFXLW GLIIHUHQW
IURPWKDWWRZKLFKWKHUHFHLYHULVFRQQHFWHG
●&RQVXOW WKH GHDOHU RU DQ H[SHULHQFHG UDGLR79 WHFKQLFLDQ
IRUKHOS
Warning: &KDQJHV RU PRGL¿FDWLRQV WR WKLV XQLW QRW H[SUHVVO\
DSSURYHGE\WKHSDUW\UHVSRQVLEOHIRUFRPSOLDQFHFRXOGYRLGWKH
XVHU¶VDXWKRULW\WRRSHUDWHWKHHTXLSPHQW
FCC Radiation Exposure Statement
7KLVGHYLFHFRPSOLHVZLWKWKHOLPLWVIRUD&ODVV%GLJLWDOGHYLFH
SXUVXDQWWR3DUWRIWKH)&&5XOHV,WPXVWQRWEHFRORFDWHG
RURSHUDWLQJLQFRQMXQFWLRQZLWKDQ\RWKHUDQWHQQDRUWUDQVPLWWHU
2SHUDWLRQLVVXEMHFWWRWKHIROORZLQJWZRFRQGLWLRQV
7KLVGHYLFHPD\QRWFDXVHKDUPIXOLQWHUIHUHQFHDQG
7KLVGHYLFHPXVWDFFHSWDQ\LQWHUIHUHQFHUHFHLYHGLQFOXGLQJ
LQWHUIHUHQFHWKDWPD\FDXVHXQGHVLUHGRSHUDWLRQ
7KLV HTXLSPHQW VKRXOG EH LQVWDOOHG DQG RSHUDWHG ZLWK D PLQL-
PXPGLVWDQFHRIFPEHWZHHQWKHUDGLDWRUDQGSHUVRQ¶VERG\
Note to CATV system installer:
7KLVUHPLQGHULVSURYLGHGWRFDOOWKH&$79V\VWHPLQVWDOOHU¶V
DWWHQWLRQWR$UWLFOH RI WKH 1DWLRQDO (OHFWULFDO &RGH WKDW
SURYLGHVJXLGHOLQHV IRU SURSHU JURXQGLQJ DQGLQSDUWLFXODU
VSHFL¿HV WKDW WKH FDEOH JURXQG VKDOO EH FRQQHFWHG WR WKH
JURXQGLQJ V\VWHP RI WKH EXLOGLQJ DV FORVH WR WKH SRLQW RI
FDEOHHQWU\DVSUDFWLFDO
FOR YOUR RECORDS
)RU\RXUDVVLVWDQFHLQUHSRUWLQJWKLVXQLWLQFDVHRIORVVRUWKHIW
SOHDVHUHFRUGEHORZWKHPRGHOQXPEHUDQGVHULDOQXPEHUZKLFK
DUHORFDWHGRQWKHUHDURIWKHXQLW3OHDVHUHWDLQWKLVLQIRUPDWLRQ
Model number ..............................
Serial number ..............................
Date of purchase ..............................
Place of purchase ..............................
Manufactured under license from Dolby Laboratories.
Dolby, Dolby Audio, Pro Logic, and the double-D symbol
are trademarks of Dolby Laboratories.
The terms HDMI and HDMI High-Definition Multimedia
Interface, and the HDMI Logo are trademarks or
registered trademarks of HDMI Licensing LLC in the
United States and other countries.
The Bluetooth
®
word mark and logos are registered
trademarks owned by Bluetooth SIG, Inc. and any
use of such marks by SHARP is under license. Other
trademarks and trade names are those of their
respective owners.
The N Mark is a trademark or registered trademark
of NFC Forum, Inc. in the United States and in other
countries.
Special Notes

E-2
Important Safety Instructions
(OHFWULFLW\LVXVHG WR SHUIRUP PDQ\ XVHIXO IXQFWLRQV EXW LW FDQ
DOVRFDXVHSHUVRQDOLQMXULHVDQGSURSHUW\GDPDJHLILPSURSHUO\
KDQGOHG7KLVSURGXFWKDVEHHQHQJLQHHUHGDQGPDQXIDFWXUHG
ZLWKWKH KLJKHVW SULRULW\RQVDIHW\+RZHYHU LPSURSHU XVHFDQ
UHVXOWLQHOHFWULFVKRFNDQGRU¿UH,QRUGHUWRSUHYHQWSRWHQWLDO
GDQJHU SOHDVH REVHUYHWKHIROORZLQJLQVWUXFWLRQVZKHQLQVWDOO-
LQJRSHUDWLQJDQGFOHDQLQJWKHSURGXFW7RHQVXUH\RXUVDIHW\
DQGSURORQJWKHVHUYLFHOLIHRIWKLVSURGXFWSOHDVHUHDGWKHIRO-
ORZLQJSUHFDXWLRQVFDUHIXOO\EHIRUHXVH
5HDGWKHVHLQVWUXFWLRQV
.HHSWKHVHLQVWUXFWLRQV
+HHGDOOZDUQLQJV
)ROORZDOOLQVWUXFWLRQV
'RQRWXVHWKLVDSSDUDWXVQHDUZDWHU
&OHDQRQO\ZLWKGU\FORWK
'RQRWEORFNDQ\YHQWLODWLRQRSHQLQJV,QVWDOOLQDFFRUGDQFH
ZLWKWKHPDQXIDFWXUHU¶VLQVWUXFWLRQV
'RQRWLQVWDOOQHDUDQ\KHDWVRXUFHVVXFKDVUDGLDWRUVKHDW
UHJLVWHUVVWRYHVRURWKHUDSSDUDWXVLQFOXGLQJDPSOL¿HUV
WKDWSURGXFHKHDW
'R QRW GHIHDW WKH VDIHW\ SXUSRVH RI WKH SRODUL]HG RU
JURXQGLQJW\SHSOXJ$SRODUL]HGSOXJKDVWZREODGHVZLWK
RQH ZLGHU WKDQ WKH RWKHU $ JURXQGLQJ W\SH SOXJ KDV WZR
EODGHVDQGDWKLUGJURXQGLQJSURQJ7KHZLGHEODGHRUWKH
WKLUGSURQJDUHSURYLGHGIRU\RXUVDIHW\,IWKHSURYLGHGSOXJ
GRHV QRW ¿W LQWR \RXU RXWOHW FRQVXOW DQ HOHFWULFLDQ IRU UH-
SODFHPHQWRIWKHREVROHWHRXWOHW
3URWHFWWKH SRZHU FRUG IURP EHLQJ ZDONHG RQRU SLQFKHG
SDUWLFXODUO\ DW SOXJV FRQYHQLHQFH UHFHSWDFOHV DQG WKH
SRLQWZKHUHWKH\H[LWIURPWKHDSSDUDWXV
2QO\XVHDWWDFKPHQWVDFFHVVRULHVVSHFL¿HGE\WKHPDQX-
IDFWXUHU
8VHRQO\ZLWKWKHFDUWVWDQGWULSRGEUDFNHWRUWDEOHVSHFL-
¿HGE\WKHPDQXIDFWXUHURUVROGZLWKWKHDSSDUDWXV:KHQ
DFDUWLVXVHGXVHFDXWLRQZKHQPRYLQJWKHFDUWDSSDUDWXV
FRPELQDWLRQWRDYRLGLQMXU\IURPWLSRYHU
8QSOXJWKLVDSSDUDWXVGXULQJOLJKWQLQJVWRUPVRUZKHQXQ-
XVHGIRUORQJSHULRGVRIWLPH
5HIHUDOOVHUYLFLQJWRTXDOL¿HGVHUYLFHSHUVRQQHO6HUYLFLQJ
LVUHTXLUHGZKHQWKHDSSDUDWXVKDVEHHQGDPDJHGLQDQ\
ZD\VXFKDVSRZHUVXSSO\FRUGRUSOXJLVGDPDJHGOLTXLG
KDVEHHQVSLOOHGRUREMHFWVKDYHIDOOHQLQWRWKHDSSDUDWXV
WKHDSSDUDWXVKDVEHHQH[SRVHGWRUDLQRUPRLVWXUHGRHV
QRWRSHUDWHQRUPDOO\RUKDVEHHQGURSSHG
Additional Safety Information
3RZHU 6RXUFHV 7KLV SURGXFW VKRXOG EH RSHUDWHG RQO\
IURPWKHW\SHRISRZHUVRXUFHLQGLFDWHGRQWKHPDUNLQJOD-
EHO,I\RXDUHQRWVXUHRIWKHW\SHRISRZHUVXSSO\WR\RXU
KRPHFRQVXOW\RXUSURGXFWGHDOHURUORFDOSRZHUFRPSDQ\
)RU SURGXFW LQWHQGHG WR RSHUDWH IURP EDWWHU\ SRZHU RU
RWKHUVRXUFHVUHIHUWRWKHRSHUDWLQJLQVWUXFWLRQV
2YHUORDGLQJ 'R QRW RYHUORDG ZDOO RXWOHWV H[WHQVLRQ
FRUGVRULQWHJUDOFRQYHQLHQFHUHFHSWDFOHVDVWKLVFDQUH-
VXOWLQDULVNRI¿UHRUHOHFWULFVKRFN
2EMHFWDQG/LTXLG(QWU\1HYHUSXVKREMHFWV RIDQ\NLQG
LQWRWKLVSURGXFWWKURXJKRSHQLQJVDVWKH\PD\WRXFKGDQ-
JHURXVYROWDJHSRLQWVRUVKRUWRXWSDUWVWKDWFRXOGUHVXOWLQ
D¿UHRUHOHFWULFVKRFN
7RSUHYHQW¿UHRUVKRFNKD]DUGGRQRWH[SRVHWKLVDSSOL-
DQFHWRGULSSLQJRUVSODVKLQJ1RREMHFWV¿OOHGZLWKOLTXLGV
VXFKDVYDVHVVKDOOEHSODFHGRQWKHDSSDUDWXV
'DPDJH5HTXLULQJ6HUYLFH8QSOXJWKLVSURGXFWIURPWKH
ZDOORXWOHWDQGUHIHUVHUYLFLQJWRTXDOL¿HGVHUYLFHSHUVRQQHO
XQGHUWKHIROORZLQJFRQGLWLRQV
D:KHQWKH$&FRUGRUSOXJLVGDPDJHG
E,IOLTXLGKDVEHHQVSLOOHGRUREMHFWVKDYHIDOOHQLQWRWKH
SURGXFW
F,IWKHSURGXFWKDVEHHQH[SRVHGWRUDLQRUZDWHU
G,IWKHSURGXFWGRHVQRWRSHUDWHQRUPDOO\E\IROORZLQJWKH
RSHUDWLQJLQVWUXFWLRQV$GMXVWRQO\WKRVHFRQWUROVWKDWDUH
FRYHUHGE\WKHRSHUDWLQJLQVWUXFWLRQVDVDQLPSURSHUDG-
MXVWPHQWRIRWKHUFRQWUROVPD\UHVXOWLQGDPDJHDQGZLOO
RIWHQUHTXLUHH[WHQVLYHZRUNE\DTXDOL¿HGWHFKQLFLDQWR
UHVWRUHWKHSURGXFWWRLWVQRUPDORSHUDWLRQ
H,IWKHSURGXFWKDVEHHQGURSSHGRUGDPDJHGLQDQ\ZD\
DQG
I:KHQ WKH SURGXFW H[KLELWV D GLVWLQFW FKDQJH LQ SHUIRU-
PDQFHWKLVLQGLFDWHVDQHHGIRUVHUYLFH
5HSODFHPHQW3DUWV:KHQUHSODFHPHQWSDUWVDUHUHTXLUHG
EHVXUHWKHVHUYLFHWHFKQLFLDQKDVXVHGUHSODFHPHQWSDUWV
VSHFL¿HGE\WKHPDQXIDFWXUHURUKDYHWKHVDPHFKDUDFWHU-
LVWLFVDV WKH RULJLQDO SDUW8QDXWKRUL]HGVXEVWLWXWLRQVPD\
UHVXOWLQ¿UHHOHFWULFVKRFNRURWKHUKD]DUGV
6DIHW\&KHFN8SRQFRPSOHWLRQRIDQ\VHUYLFHRUUHSDLUV
WRWKLVSURGXFWDVNWKHVHUYLFHWHFKQLFLDQWRSHUIRUPVDIHW\
FKHFNVWRGHWHUPLQHWKDWWKHSURGXFWLVLQSURSHURSHUDWLQJ
FRQGLWLRQ
:DOORUFHLOLQJPRXQWLQJ:KHQPRXQWLQJWKHSURGXFWRQD
ZDOORUFHLOLQJEHVXUHWRLQVWDOOWKHSURGXFWDFFRUGLQJWRWKH
PHWKRGUHFRPPHQGHGE\WKHPDQXIDFWXUHU
3RZHU /LQHV $Q RXWVLGH DQWHQQD V\VWHP VKRXOG QRW EH
ORFDWHG LQ WKH YLFLQLW\ RI RYHUKHDG SRZHU OLQHV RU RWKHU
HOHFWULFOLJKWRUSRZHUFLUFXLWVRUZKHUHLWFDQIDOOLQWRVXFK
SRZHUOLQHVRUFLUFXLWV:KHQLQVWDOOLQJDQRXWVLGHDQWHQQD
V\VWHPH[WUHPHFDUHVKRXOGEHWDNHQWRNHHSIURPWRXFK-
LQJVXFKSRZHUOLQHVRUFLUFXLWVDVFRQWDFWZLWKWKHPPLJKW
EHIDWDO
3URWHFWLYH$WWDFKPHQW3OXJ7KHSURGXFWLVHTXLSSHGZLWK
DQ DWWDFKPHQW SOXJ KDYLQJ RYHUORDG SURWHFWLRQ 7KLV LV D
VDIHW\IHDWXUH 6HH,QVWUXFWLRQ0DQXDO IRUUHSODFHPHQWRU
UHVHWWLQJ RI SURWHFWLYH GHYLFH ,I UHSODFHPHQW RI WKH SOXJ
LVUHTXLUHGEHVXUHWKHVHUYLFHWHFKQLFLDQKDVXVHGDUH-
SODFHPHQWSOXJVSHFL¿HGE\WKHPDQXIDFWXUHUWKDWKDVWKH
VDPHRYHUORDGSURWHFWLRQDVWKHRULJLQDOSOXJ
6WDQG'RQRWSODFHWKHSURGXFWRQDQXQVWDEOHFDUWVWDQG
WULSRG RU WDEOH 3ODFLQJ WKH SURGXFW RQ DQ XQVWDEOH EDVH
FDQFDXVH WKHSURGXFWWRIDOOUHVXOWLQJ LQVHULRXVSHUVRQ-
DO LQMXULHV DV ZHOO DV GDPDJH WR WKH SURGXFW 8VH RQO\ D
FDUW VWDQG WULSRG EUDFNHW RU WDEOH UHFRPPHQGHG E\ WKH
PDQXIDFWXUHURUVROGZLWKWKHSURGXFW:KHQPRXQWLQJWKH
SURGXFWRQDZDOOEHVXUHWRIROORZWKHPDQXIDFWXUHU¶VLQ-
VWUXFWLRQV8VHRQO\WKHPRXQWLQJKDUGZDUHUHFRPPHQGHG
E\WKHPDQXIDFWXUHU

E-3
For U.S. customer only
CONSUMER LIMITED WARRANTY
SHARP ELECTRONICS CORPORATION warrants to the first consumer purchaser that this Sharp brand product (the
"Product"), when ship in its original container, will be free from defective workmanship and materials, and agrees that it will,
at its option, either repair the defect or replace the defective Product or part thereof with a new or remanufactured equivalent
at no charge to the purchaser for parts or labor for the period(s) set forth below.
This warranty does not apply to any appearance items of the Product nor to the additional excluded item(s) set forth below
nor to any Product the exterior of which has been damaged or defaced, which has been subjected to improper voltage or
other misuse, abnormal service or handling, or which has been altered or modified in design or construction.
In order to enforce the rights under this limited warranty, the purchaser should follow the steps set forth below and provide
proof of purchase to the servicer.
The limited warranty described herein is in addition to whatever implied warranties may be granted to purchasers by law.
ALL IMPLIED WARRANTIES INCLUDING THE WARRANTIES OF MERCHANTABILITY AND FITNESS FOR USE ARE
LIMITED TO THE PERIOD(S) FROM THE DATE OF PURCHASE SET FORTH BELOW. Some states do not allow
limitations on how long an implied warranty lasts, so the above limitation may not apply to you.
Neither the sales personnel of the seller nor any other person is authorized to make any warranties other than those
described herein, or to extend the duration of any warranties beyond the time period described herein on behalf of Sharp.
The warranties described herein shall be the sole and exclusive warranties granted by Sharp and shall be the sole and
exclusive remedy available to the purchaser. Correction of defects, in the manner and for the period of time described
herein, shall constitute complete fulfillment of all liabilities and responsibilities of Sharp to the purchaser with respect to the
Product, and shall constitute full satisfaction of all claims, whether based on contract, negligence, strict liability or otherwise.
In no event shall Sharp be liable, or in any way responsible, for any damages or defects in the Product which were caused
by repairs or attempted repairs performed by anyone other than an authorized servicer. Nor shall Sharp be liable or in any
way responsible for any incidental or consequential economic or property damage. Some states do not allow the exclusion
of incidental or consequential damages, so the above exclusion may not apply to you.
THIS LIMITED WARRANTY IS VALID ONLY IN THE FIFTY(50) UNITED STATES, THE DISTRICT OF COLUMBIA AND
PUERTO RICO.
Model Specific Section
Your Product Model Number & Description:
Warranty Period for this Product:
Additional Item(s) Excluded from Warranty Coverage
(if any):
Where to Obtain Service:
What to do to Obtain Service:
HT-SB603 Sound Bar Home Theater System
(Be sure to have this information available when you need
service for your Product.)
One (1) year parts and labor from the date of purchase.
Non-functional accessories, supplies, and consumable
items.
At a Sharp Authorized Servicer located in the United States.
To find a location of the nearest Sharp Authorized Servicer,
call Sharp toll free at 1-800-BE-SHARP.
Ship prepaid or carry in your Product to a Sharp Authorized
Servicer. Be sure to have Proof of Purchase available. If
you ship the Product, be sure it is insured and packaged
securely.
TO OBTAIN SUPPLY, ACCESSORY OR PRODUCT INFORMATION, CALL 1-800-BE-SHARP
SHARP ELECTRONICS CORPORATION
1 Sharp Plaza, Suite 1, Mahwah, NJ 07495-1123
E-4
Precautions
General
4" (10 cm)
4" (10 cm)
4" (10 cm)
Use the unit on a firm, level surface free from vibration.
4" (10 cm)
4" (10 cm)
4" (10 cm)
0" (0 cm)
4" (10 cm)
Table/floor
Keep the unit away from direct sunlight, strong
magnetic fields, excessive dust, humidity and
electronic/electrical equipment (home computers,
facsimiles, etc.) which generate electrical noise.
Do not place anything on top of the unit.
Hold the AC power plug by the head when removing
it from the AC outlet, as pulling the cord can damage
internal wires.
The AC power plug is used as a disconnect device
and shall always remain readily operable.
Do not remove the outer cover, as this may result
in electric shock. Refer internal service to your
local SHARP service facility.
This unit should only be used within the range of 41°F -
95°F (5°C - 35°C).
SHARP is not responsible for damage due to improper
use. Refer all servicing to a SHARP authorised
service center.
Warnings:
The voltage used must be the same as that specified
on this unit. Using a higher voltage is dangerous and
may result in a fire or other type of accident causing
damage. SHARP will not be held responsible for any
damage resulting from such usage.
In case of repairing, please bring the entire system set
to the service center.
Volume control
The sound level at a given volume setting depends on
speaker efficiency, location and various other factors.
It is advisable to avoid exposure to high volume levels,
which occurs while turning the unit on with the volume
control setting up high, or while continually listening at
high volumes.
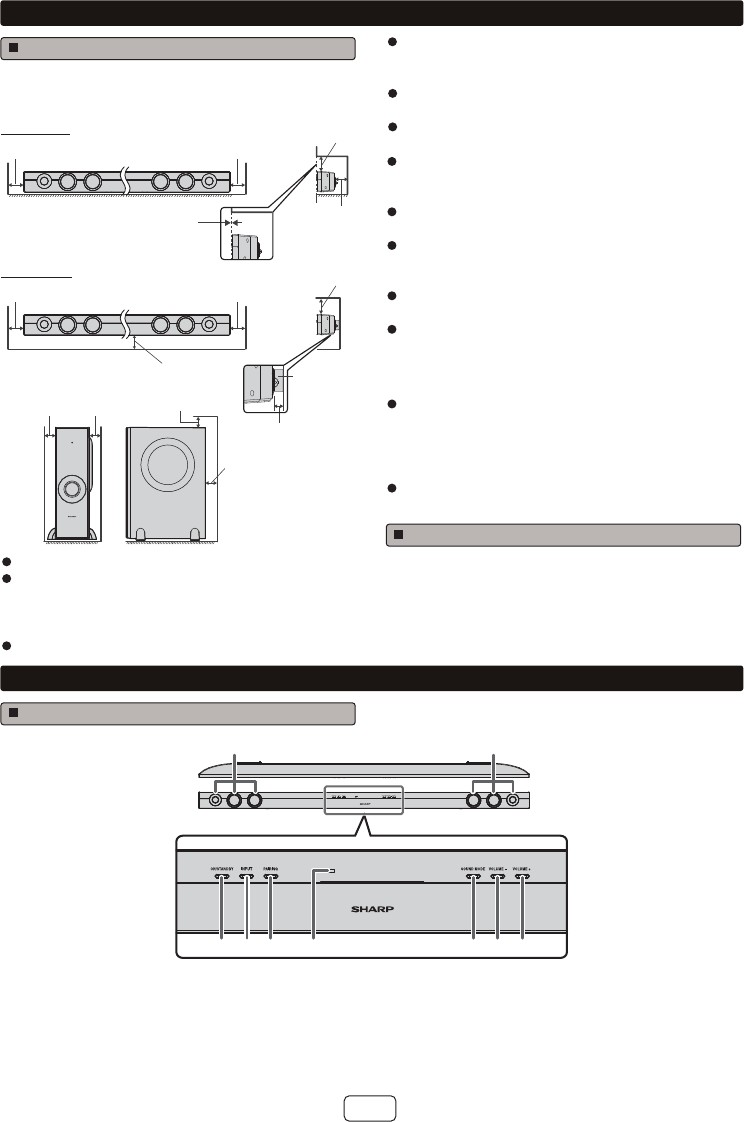
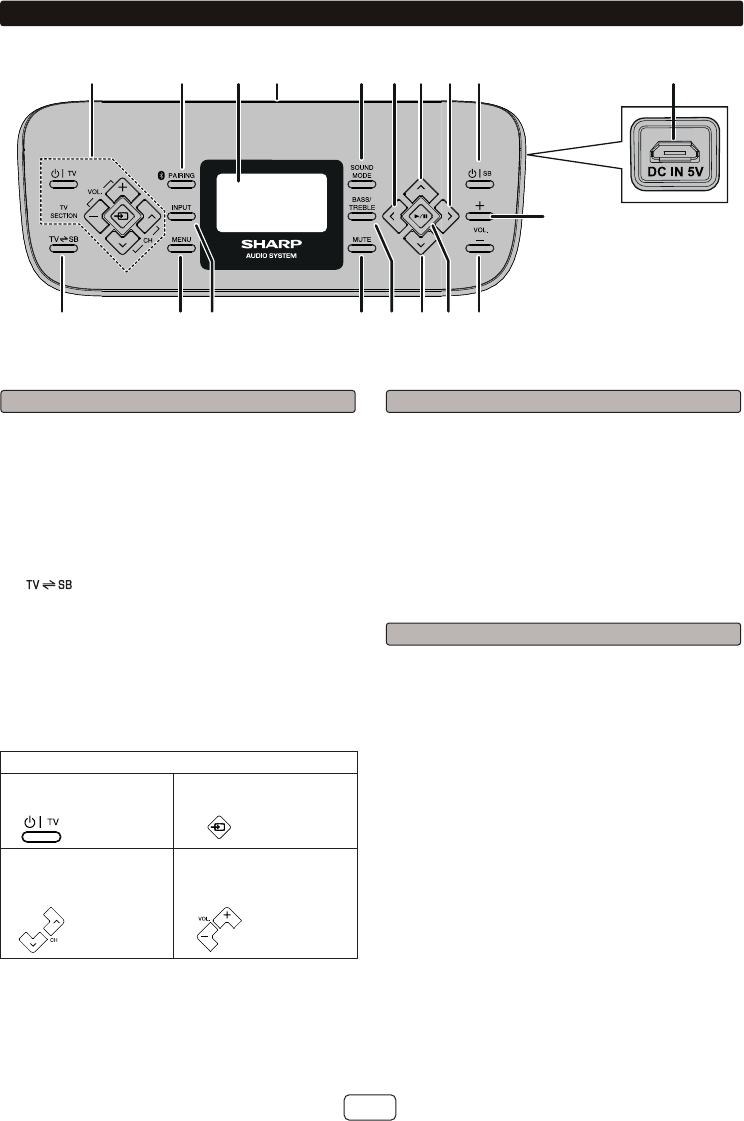
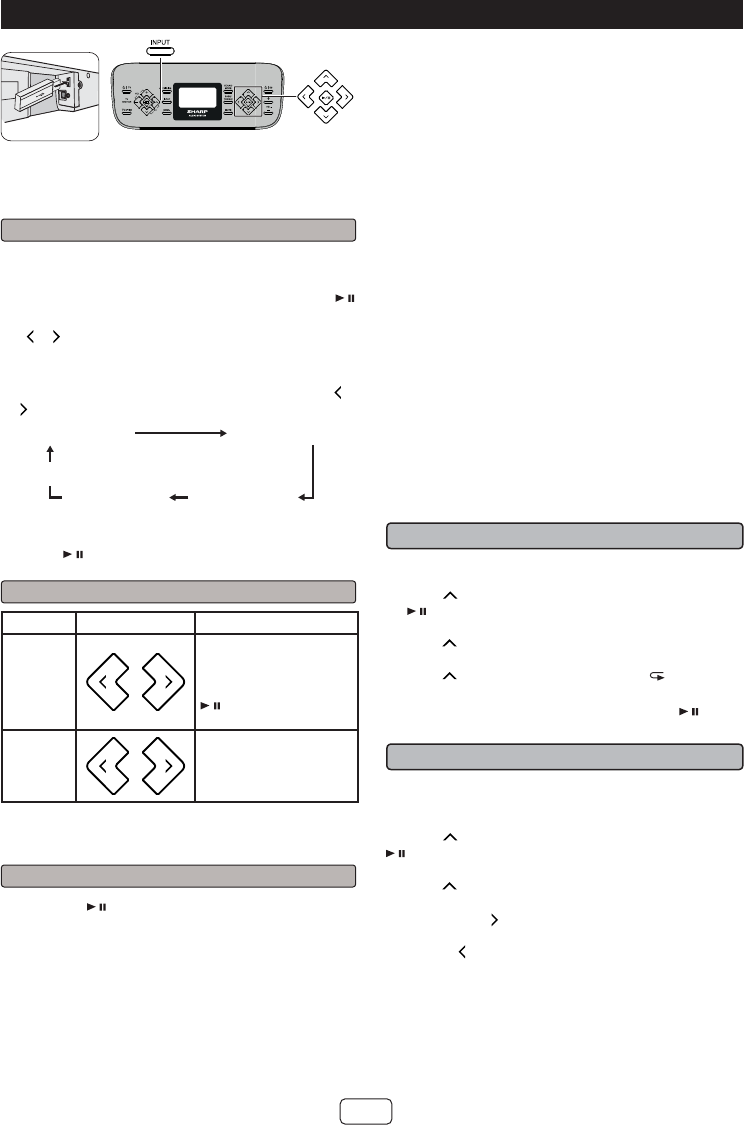
Controls and indicators
Sound Bar Front Panel
SOUND BAR HOME THEA TER SYSTEM HT -SB603
SOUND BAR HOME THEA TER SYSTEM HT -SB603
1
34 5 76 8 9
2
1. Left Channel Speakers
2. Right Channel Speakers
3. On/Standby Button
4. INPUT Button
5. Pairing Button
6. Remote Sensor
7. Sound Mode Button
8. Volume Down Button
9. Volume Up Button
Do not expose the unit to moisture, to temperatures
higher than 140°F (60°C) or to extremely low
temperatures.
If the unit does not work properly, unplug and plug it in
again. Than turn on the unit.
In case of an electrical storm, unplug the unit for
safety.
z Please ensure that the equipment is positioned in a well
ventilated area and ensure that there is a free space
along the sides, top and back of the equipment as below.
4" (10 cm)
9/16" (1.5 cm)
Wall mount
bracket
4" (10 cm)
4" (10 cm)
4" (10 cm)
Wall mount
E-5
4
2
3
1
5
FRONT VIEW REAR VIEW
1. Power/Pairing Indicator
2. Bass Reflect Duct
3. Woofer
4. SW LINK (Subwoofer Link) button
5. AC Power Cord
Front view Rear view
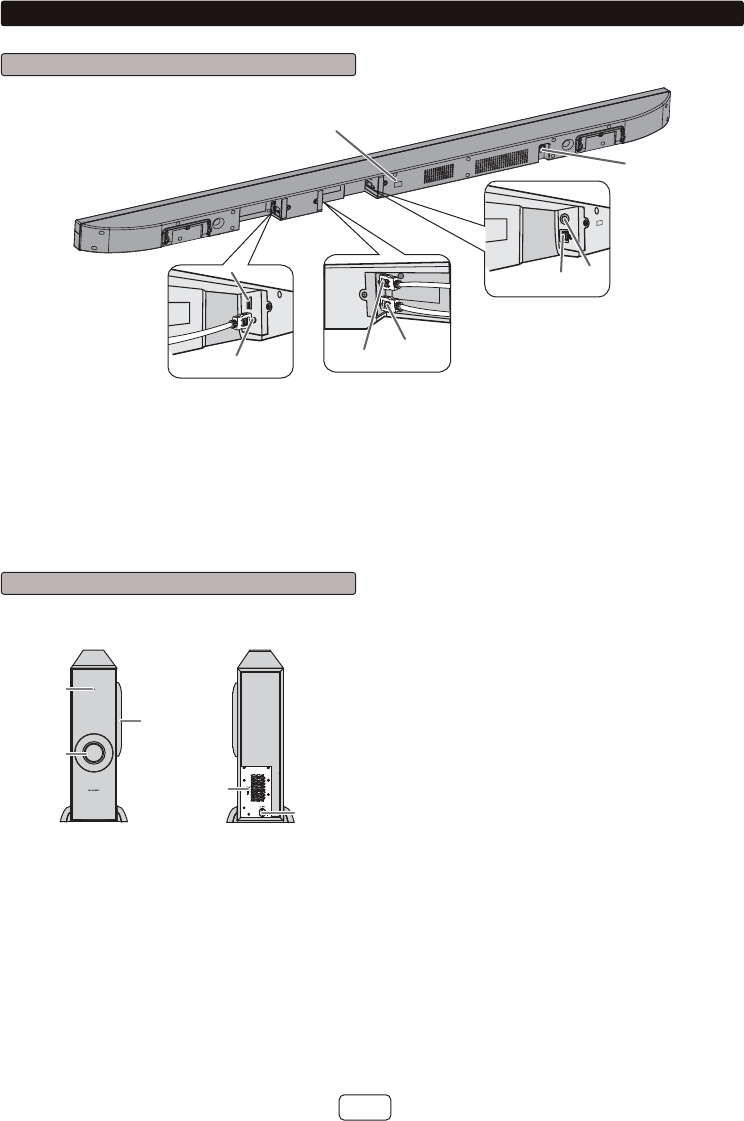
Controls and indicators (continued)
Sound Bar Rear Panel
8
7
6
5
4
2
1
3
1. IR OUT Terminal
2. HDMI OUT (TV ARC) Jack
3. USB terminal
4. HDMI IN 1 Jack
5. HDMI IN 2 Jack
6. Optical IN Jack
7. Audio IN Terminal
8. AC Power Cord
Subwoofer
E-6
Controls and indicators (continued)
10
18171615131211
12
34 56789 19
14
Remote Control
1. TV Operation Button
2. Bluetooth Pairing Button
3. Display
4. Remote Control Transmitter
5. Sound Mode Button
6. Cursor Left/Fast Reverse/Skip Down button
7. Cursor Up/Play Mode Button
8. Cursor Right/Fast Forward/Skip Up Button
9. ON/STANDBY Button
10. Volume Up Button
11. Speaker Select Button
12. Menu Button
13. Input Select Button
14. Mute Button
15. Bass/Treble Button
16. Cursor Down Button
17. Play/ Pause Button
18. Volume Down Button
19. DC IN Terminal
TV Operation Buttons (Only SHARP TV):
On/Standby
Button
Sets the
TV power
to “ON” or
“STANDBY”.
Input Select
Button (TV)
Press the
button to
switch the
input source.
Channel Up
and Down
Buttons
Switch up/
down the TV
channels.
Volume Up
and Down
Buttons
Turn up/
down the TV
volume.
Note:
Some models of SHARP TV may not be operable.
Display remote control
HT-SB603 comes with a wireless display remote control
which uses Bluetooth to communicate instead of infra red
which requires direct line of sight. You can control the
sound bar from any direction or angle within 32 feet (10
meters).
NOTE:
zThis remote control still uses infra red to control
SHARP TV.
zIn case the remote control is lost or needs repairing,
bring the entire system set to the service center.
Connecting the remote control
The remote control and sound bar will link automatically
(wirelessly) as it is already pre-linked at the factory.
E-7
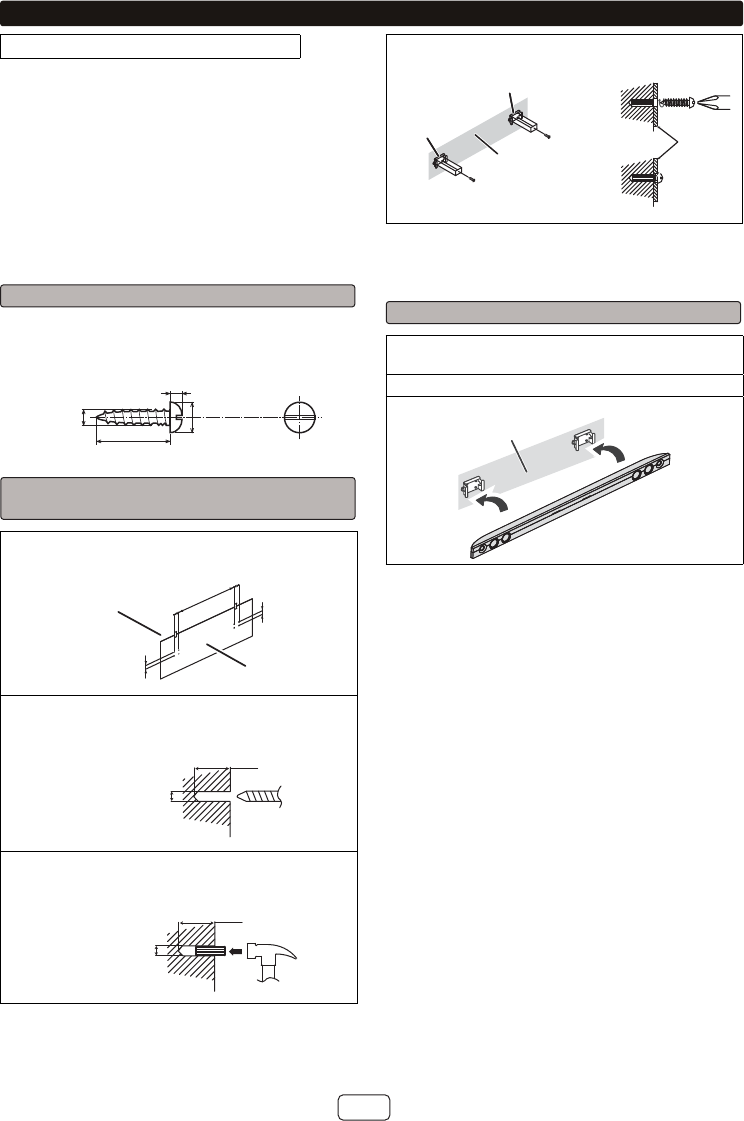
Sound bar preparation
To mount the sound bar on the wall
Caution:
z
Be very careful to prevent the sound bar [7.9 lbs. (3.7 kg)]
from falling when mounting on the wall.
z
Before mounting, check the wall strength. (Do not put on
the veneer plaster or whitewashed wall. The sound bar
may fall.) If unsure, consult a qualified service technician.
z
Mounting screws are not supplied. Use appropriate ones.
z
Check all wall mount angle screws for looseness.
z
Select a good location. If not, accidents may occur or the
sound bar may get damaged.
z
SHARP is not responsible for accidents resulting
from improper installation.
Driving screws
SHARP designed the sound bar so you may hang them
on the wall. Use proper screws (not supplied). See below
for size and type.
1/8" (3.2 mm)
3/8" (9 mm)
7/8" (Min. 22 mm)
3/16"
(5 mm)
Fixing wall mount angle
(Horizontal position)
1 Fix the pattern paper to the wall in horizontal
position as below.
Wall surface
Pattern paper
44 mm
44 mm
29 mm
29 mm
926 mm
2 Make a hole on the wall following the screw
point marks on the pattern paper by using a
drill.
Wall surface
1-1/4" (32 mm)
3/8" (8-9 mm)
3 Fix a wall mount plug (not supplied) into the
hole using a hammer, until it is flush with the
wall surface.
Wall surface
1-1/4" (32 mm)
3/8" (8-9 mm)
4 Screw the wall mount angle to the wall as shown
in the illustration. (Total screw is 8 pieces)
Wall mount angle
Wall mount
angle Wall
mount
angle
(screws x 4)
(screws x 4)
Wall surface
Wall surface
Wall
surface
Note:
Make sure all screws are fully tightened. (screws are not
supplied)
Installing the sound bar
1 Align the wall mount slot at the sound bar to the
wall mount angle.
2 Slot the sound bar into the wall mount angle.
3 Fix them securely.
Wall surface
E-8
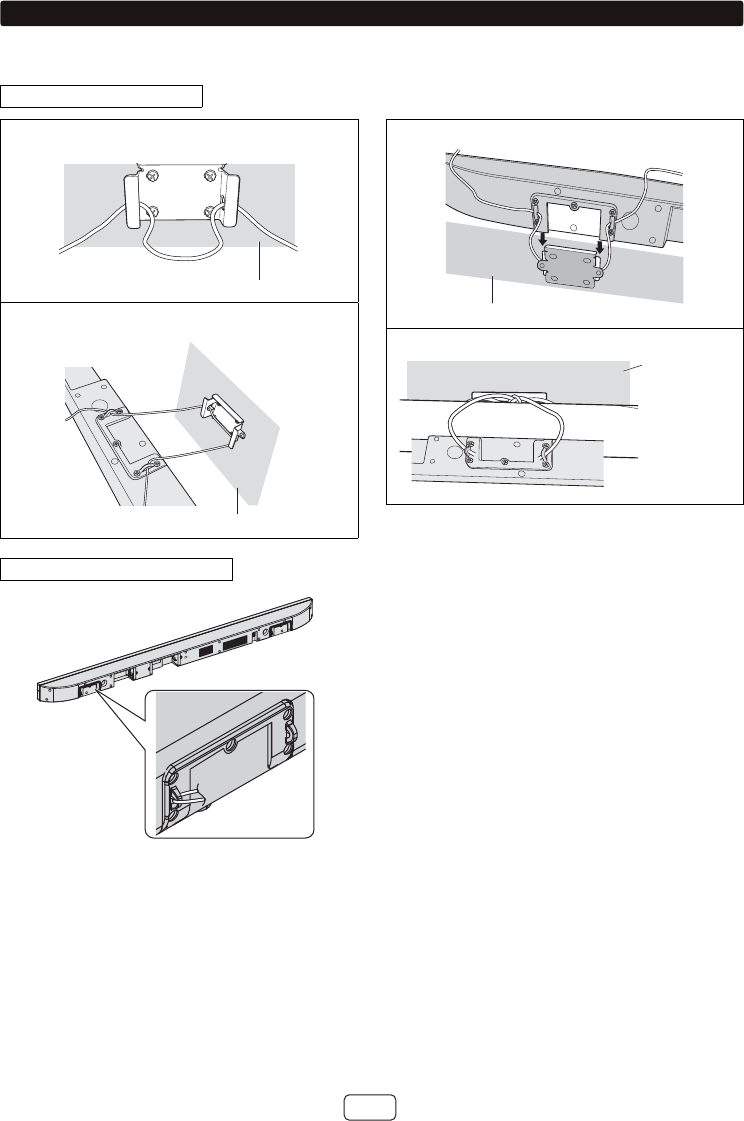
Falling prevention
zSafety wires (not supplied) are useful to prevent the sound bar from falling off.
z2 persons are required to perform this procedure.
When mounting on the wall
1 Loop the safety wires (not supplied) into each
hole of the wall mount angle as shown.
Wall surface
2 Loop the safety wires from wall mount angle
into each hole of sound bar as shown.
Wall surface
3 Align and fix the sound bar to wall mount angle.
Wall surface
4 Tie the safety wires tightly.
Wall surface
When placing on the shelf/table
Loop the safety wires (not supplied) into each hole as shown
and tie the safety wires to the LCD TV stand.
E-9
Placing the system
Installation image:
SOUND BAR HOME THEATER SYSTEM HT-SB603
TV
Digital Tuner DVD player Subwoofer
Sound Bar
Place the system as shown.
Remove the protective film covering the sound bar and
subwoofer before turn on the system.
Notes:
zThe front panel of the sound bar is not removable.
zThe transmission distance of the wireless signal
between the subwoofer and sound bar is about 32
feet (10 meters), but may vary depending on your
operating environment. If a steel-concrete or metallic
wall is between the subwoofer and the sound bar, the
system may not operate at all, because the wireless
signal cannot penetrate metal.
Caution:
zDo not change the installation direction when the
sound bar is turned on.
zDo not stand or sit on the sound bar and subwoofer as
you may be injured.
zDo not allow any objects to fall into or to be placed in
the bass reflex duct.
Placing the stand
Place the stand as shown.
Stand
System connections
Make sure to unplug the AC power cord before making any connections.
AC outlet
100 - 240 V ~ 50/60Hz
AC outlet
100 - 240 V ~ 50/60Hz
Sound Bar
Subwoofer
CAUTION:
TO PREVENT ELECTRIC SHOCK, MATCH WIDE BLADE OF PLUG TO WIDE SLOT, FULLY INSERT.
E-10
System connections (continued)
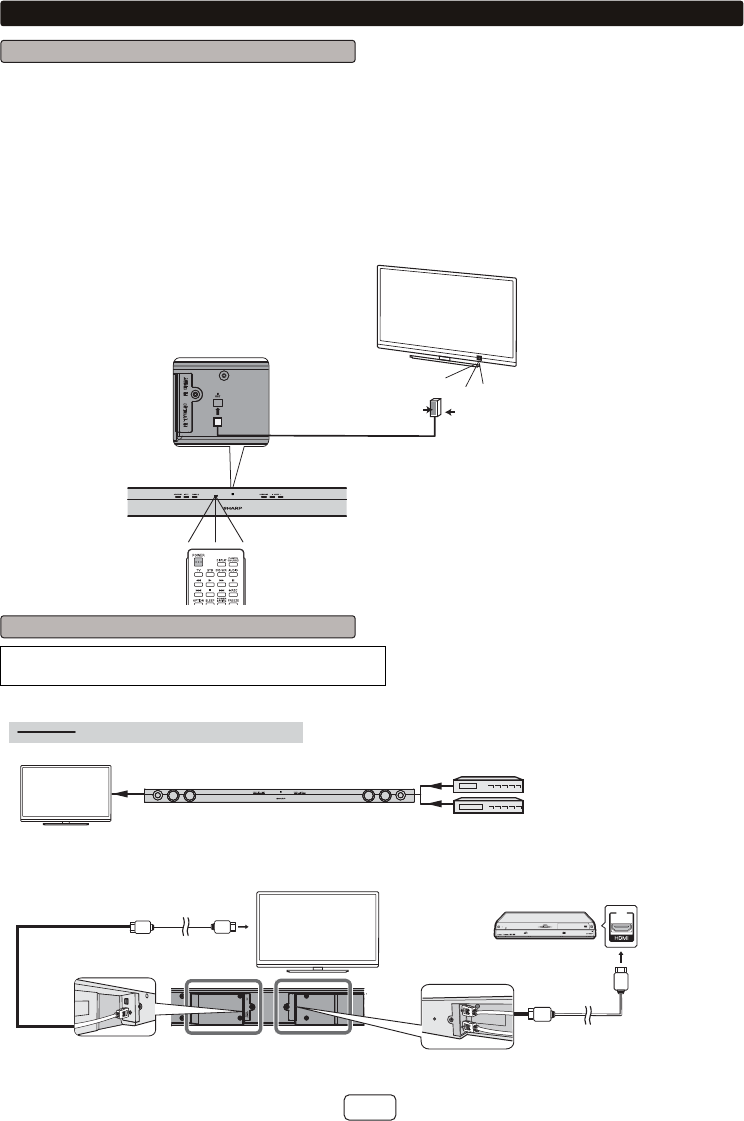
IR (Infrared) transmitter connection
If the TV’s remote sensor is blocked by the sound bar, use the IR transmitter to relay the signal to the TV.
1. Connect the IR transmitter to IR out terminal to allow the TV’s remote signal to pass through.
2. Place the infrared emitter near TV’s remote sensor (refer the operation manual of the TV for the location of the
sensor ).
Point the TV’s remote control at the sound bar remote sensor and operate the TV.
You may need to move the IR transmitter until the TV operates correctly.
Then secure the IR transmitter onto the sound bar using the double sided tape provided.
Note:
zDo not use the IR transmitter if the TV’s remote control sensor is not blocked by the sound bar.
SOUND BAR HOME THEATER SYSTEM HT-SB603
TV remote sensor
Infrared emitter
TV
remote
control
Double sided tape
(Peel off the double sided
tape separator before fixing)
Rear view
TV
HDMI Connection
Caution:
Turn off all other equipment before making this connection.
The illustration below shows the flows of the signals.
SOUND BAR HOME THEATER SYSTEM HT-SB603
HDMI IN 2 HDMI IN 1
Audio and Video signal
TV
TV
DVD/Blu-ray
1. Method 1
This connection is for HDMI TV with ARC (Audio Return Channel).
To HDMI input terminal
Sound Bar
To HDMI output
terminal
To HDMI (TV ARC) input terminal
To HDMI OUT (TV ARC) output terminal
DVD, Blu-ray disc
player or similar
Digital tuner
E-11
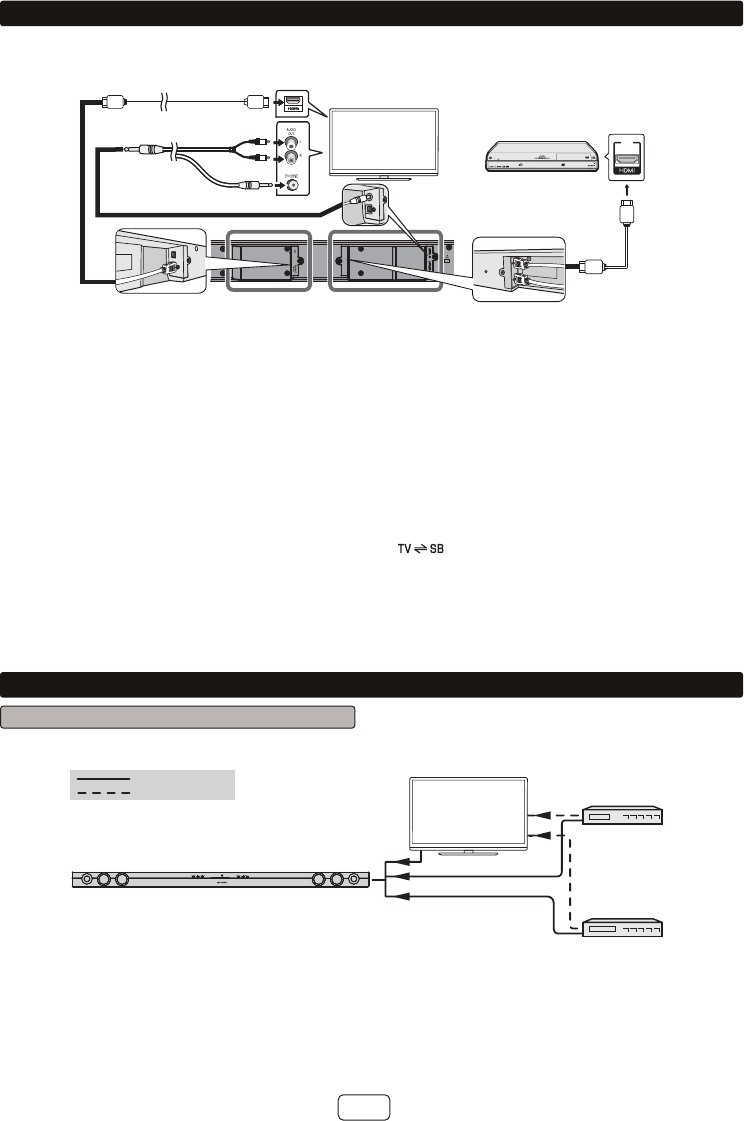
System connections (continued)
HDMI IN 2 HDMI IN 1
TV
To HDMI input terminal
To audio output terminal
To Headphone
terminal
2. Method 2
This connection is for HDMI TV without ARC (Audio Return Channel).
To HDMI input terminal
Sound Bar
To HDMI output
terminal
To HDMI OUT (TV ARC) output terminal
DVD, Blu-ray disc
player or similar
To select HDMI 1, 2 or TV ARC function (Source):
Press INPUT button repeatedly on the sound bar or remote control until “HDMI 1”, “HDMI 2” or “TV ARC” appears on the display.
Notes:
z
This sound bar supports HDMI which enables ARC (Audio Return Channel).
z
To enable ARC make sure to use High Speed HDMI™ cable (with ARC).
z
This ARC feature requires TV that supports ARC. Refer the operation manual of the TV to determine which terminal supports ARC.
z
To listen to the sound from a non-ARC-compatible TV, connect the audio output from TV to this system’s. (refer this page)
z
This sound bar can be operated (power on/off or volume up/down) via a TV or similar component which supports HDMI CEC
(Consumer Electronics Control). If this does not work, it does not mean this system is faulty. Refer to the operation manual of the
respective component on how to activate the CEC.
Example: Go to the Menu of the component to search and enable the CEC. Different brands may have different naming for the CEC.
For SHARP LCD TV, it is named as AQUOS LINK.
z
The system will automatically power off if TV or similar component which supports HDMI CEC, is turned off.
z
CEC is not available during Low power consumption mode.
z
To listen to the sound from this system, you will need to select
menu (refer page 15) or adjust the speaker
output settings within the TV menu.
For details, refer to the operation manual of the TV.
z
If you are unable to select external speaker setting from the TV menu (E.g. For SHARP LCD TV, it is named as AQUOS
AUDIO SP), turn the CEC OFF and ON again.
z
To enjoy 3D images or 4K content, this system must be connected to a 3D or 4K-compatible TV and components (3D BD player,
etc.) via High Speed HDMI cables. Put on the 3D glasses, otherwise 3D images or 4K content may not be viewed properly.
z
If you want to use HDMI IN 1 jack, please use the supplied HDMI cable.
Audio connections to TVs, DVD players, VCRs, etc.
Other connection (without HDMI)
The illustration below shows the flows of audio and video signals.
SOUND BAR HOME THEATER SYSTEM HT-SB603
DVD/Blu-ray
Disc Player
Digital tuner, etc.
TV
Audio signal
Video signal
Notes:
zRefer to the operation manual of the equipment to be connected.
zFully insert the plugs to avoid fuzzy pictures or noises.
zConnecting via this method may disable TV internal speakers.
zIn some cases, a small background noise could emit from the sound bar, when you use the RCA audio output
terminal connection from a TV-Set/DVD/Blu-ray Disc Player. In such case, please change the connection to the
HDMI/ARC or headphone terminal connection. This effect depends on the used TV/DVD/Blu-ray Disc Player-
Brand, model and age, and it is not a quality matter from the sound bar.
E-12
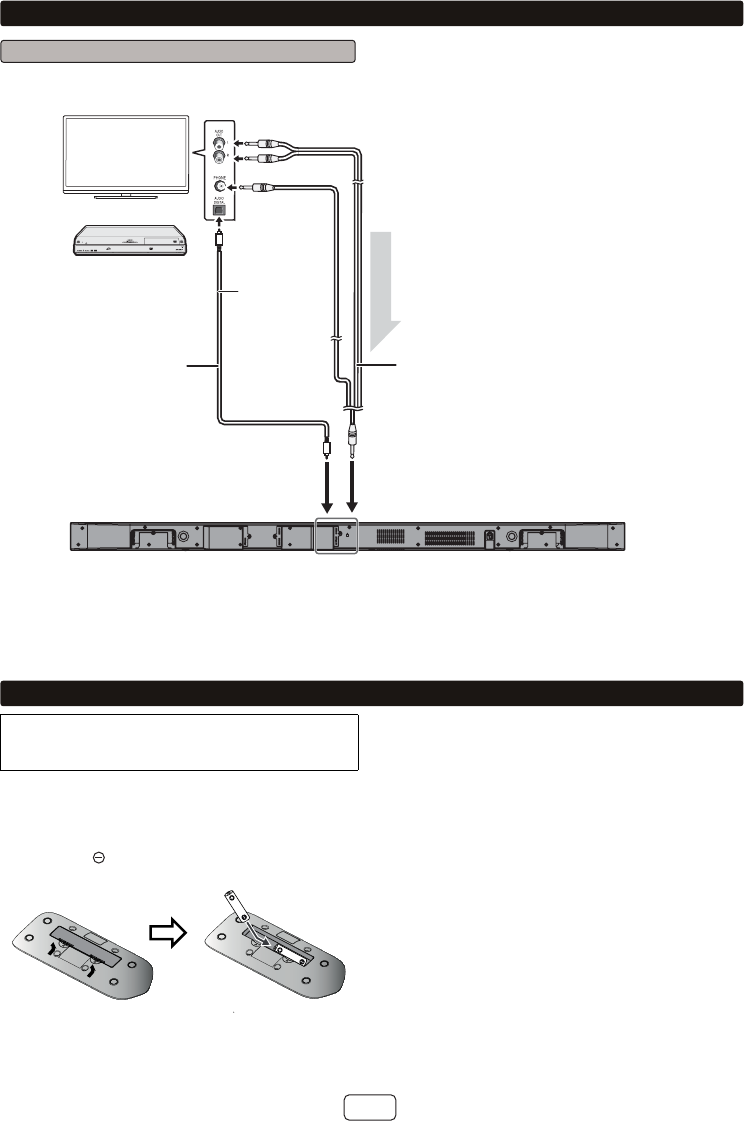
Audio connections to TVs, DVD players, VCRs, etc. (continued)
Connecting a TV, or DVD player, etc.
Connect to the TV using an optical digital cable or an audio cable.
To audio output terminals
Sound Bar
TV
or
Audio cable
(commercially
available)
To AUDIO IN
input terminals
To OPTICAL
IN (optical)
input terminal
Blu-Ray/
DVD player/Digital
Tuner
Optical digital
audio cable
(commercially
available)
To
HEADPHONE
terminal
To optical
digital audio
output
terminal
Audio signal
To select OPTICAL function:
Press the INPUT button repeatedly on the sound bar or remote control until “OPTICAL” appears on the display.
To select AUDIO IN function:
Press the INPUT button repeatedly on the sound bar or remote control until “AUDIO IN” appears on the display.
Remote control
Use 2 “AA” size battery (UM/SUM-3, R6, HP-7 or
similar).
Batteries are not included.
1 Open the battery cover.
2 Insert the batteries according to the direction
indicated in the battery compartment.
When inserting or removing the battery, push them
toward the battery terminals.
3 Close the battery cover.
Caution:
zRemove the battery if the sound bar will not be used
for a long period of time. This will prevent potential
damage due to battery leakage.
zDo not use rechargeable battery (nickel-cadmium
battery, etc.).
zInstalling the battery incorrectly may cause the sound
bar to malfunction.
zBatteries (battery pack or battery installed) shall not
be exposed to excessive heat such as sunshine, fire
or the like.
Notes concerning use:
zReplace the battery if the operating distance is reduced
or if the operation becomes erratic.
zPeriodically clean the transmitter on the remote control
and the sensor on the sound bar with a soft cloth.
zExposing the sensor on the sound bar to strong light
may interfere with operation. Change the lighting or the
direction of the sound bar.
zKeep the remote control away from moisture, heat,
shock, and vibrations.
E-13
Remote control (continued)
USB connection
To operate the remote control without battery power,
connect a Micro USB cable (not supplied) to the remote
control DC IN terminal.
zConnection of the USB cable to the remote control
disconnect the batteries.
To power
source
Caution:
The USB connection cannot be used to charge the
remote control or as a media playback.
Test of the remote control (TV operation)
Point the remote control directly at the remote sensor on
the TV.
The remote control can be used within the range
shown below:
15°15°
Remote
sensor
8” - 20’
(0.2 m - 6 m)
General control
SOUND BAR HOME THEATER SYSTEM HT-SB603
Make sure to enable the HDMI CEC when making
HDMI connection. For details, refer to the operation
manual of the TV.
To turn the power on
Press the ON/STANDBY button on the sound bar or the
button on the remote control.
zThe power turns on and the sound bar on/standby/
pairing/input indicator lights up according to the input
source. If the power does not turn on, check whether
the AC power cord is plugged in properly.
Input source Indicator
Bluetooth Tur ns blue.
Others Turns violet.
zThe system will automatically power on if TV or similar
component which supports HDMI CEC, is turned on.
To set the sound bar to standby mode:
Press the ON/STANDBY button on the sound bar or the
button on the remote control. The the sound bar on/
standby/pairing/input indicator turns red.
Notes:
zA slight audio delay after TV is turned ON does not
mean that the system is faulty. This is normal.
z“AQUOS speaker is enabled” message will be
displayed if SHARP LCD TV does not detect HT-SB603
during power on. However the message “AQUOS
audio with AQUOS LINK is enabled” will be displayed
soon as HT-SB603 is detected. These messages may
vary for other TV model.
Eco mode
zThe first time the unit is plugged in, it will enter the
STANDBY (eco) mode on.
zTo turn off/on the mode, select ECO MODE from the
remote control menu.
zDuring STANDBY condition, NFC function is activated
once your device touches the supplied NFC tag when
there is no HDMI connection.
E-14
General control (continued)
Connecting the wireless Subwoofer
The sound bar and subwoofer will link automatically
(wirelessly) when turned on as it is already pre-linked at
the factory. If the link cannot be established, please set the
connection by the following method.
zDuring pairing process:
On remote control: “SW LINK” will appear.
On sound bar: indicator will blink in violet.
On subwoofer: indicator will blink in blue.
zWhen pairing is successful:
On remote control: “SW LINK” disappears.
On sound bar: indicator turns red.
On subwoofer: indicator turns blue.
During sound bar standby and subwoofer power off
mode (AC power cord unplugged):
1. Press and hold the PAIRING button on the sound bar
or PAIRING on the remote control for more than 3
seconds.
2. Within 2 minutes, press and hold the SW LINK button
on the subwoofer for more than 3 seconds.
zIn case the link is still not established (Sound bar
indicator blinks), press and hold the SW LINK button
at the back of the subwoofer until sound bar indicator
lights up.
SW LINK
SW LINK
Sound bar Remote
Control
Subwoofer
Notes:
zIf a device such as microwave oven, wireless LAN card,
Bluetooth device or any other device that uses the
same 2.4GHz frequency near the system, some sound
interruption may be heard due to interference.
zThe transmission distance of the wireless signal
between the subwoofer and sound bar is about 32 feet
(10 meters), but may vary depending on your operating
environment. If a steel-concrete or metallic wall is
between the subwoofer and the sound bar, the system
may not operate at all, because the wireless signal
cannot penetrate metal.
Caution:
zKeep the subwoofer away from water and moisture.
zTo get the optimum listening performance, make sure
the area around the sound bar and subwoofer is clear
of any obstacles.
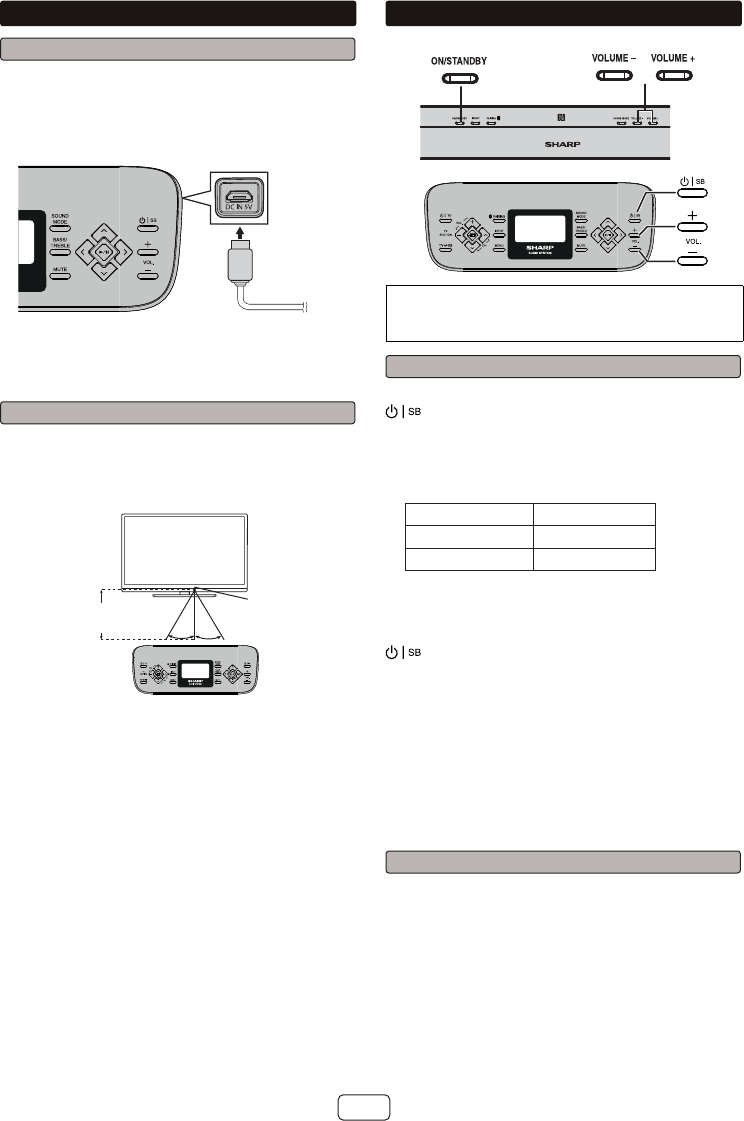
To select a menu on the remote control
1. Press MENU button.
2. To select a menu, press or button, then press
button.
3. Press or button to select an option in the desired
menu.
4. To select another menu, press button and
repeat steps 2 to 3 above.
Menu/
Function
Level/Mode
3D AUDIO
3D AUDIO 1 2 OFF
AV SYNC
AV SYNC 0 1 2 3
APC
5 MIN 10 MIN 15 MIN 20 MIN
SW LEVEL
-5 -4 ..... +4 +5
ECO MODE ON OFF
VERSION SOUND BAR REMOTE CONTROL
Volume auto fade-in
If you turn off and on the sound bar with the volume set
to 80 or higher, the volume starts at 40 and fades in to
the last set level.
Volume control
Sound bar operation:
Press the VOLUME +
button to increase the
volume and the VOLUME –
button for decreasing.
MIN MAX
2 99
.....
1
Remote control operation:
Press the VOL. + button to increase the volume and the
VOL. – button to decrease the volume.
Sound Mode
To change to a different mode, press the SOUND MODE
button repeatedly on the sound bar or remote control
until the desired sound mode is displayed.
CINEMA (for cinema sound effect)
MUSIC (for standard sound effect)
GAME (for game sound effect)
SPORT (for sport broadcasting)
NEWS (for news)
NIGHT (for night)
BYPASS (for flat sound effect)
Muting
The volume is muted temporarily when pressing the
MUTE on the remote control. Press again to restore the
volume.
Note:
When the sound bar is turned off and back on again,
muting is canceled.
Bass and Treble Control (remote control)
Bass and Treble control is applicable during BYPASS
mode only.
Bass Control
1. Press the BASS/TREBLE button to select bass.
2. Within 5 seconds, press the VOL. (+ or –) button to
adjust the bass.
E-15
General control (continued)
Treble Control
1. Press the BASS/TREBLE button repeatedly to select
treble.
2. Within 5 seconds, press the VOL (+ or –) button to
adjust the treble.
Subwoofer level control (remote control)
To increase or decrease
the Subwoofer level, select
SW LEVEL from the remote
control menu.
+5–5 –4 +4
.....
Notes:
zWhen sound from the speaker is distorted, decrease
the subwoofer level.
zWhen changing the subwoofer level, the output level
of the subwoofer is also changed.
AV SYNC level control (remote control)
To increase or decrease
the AV sync level, select
AV SYNC from the remote
control menu. 0+1 +3
.....
Speaker output selection
(HDMI connection) (remote control)
Press button on the remote control until “TV
SPEAKER” or “SB SPEAKER” appears on the display to
toggle sound output between this sound bar or TV.
Function
TV ARCHDMI 2 OPTICAL
AUDIO IN
HDMI 1
BLUETOOTH USB
Press the INPUT button repeatedly on the sound bar or
remote control to select the desired input source.
Note:
The backup function will protect the memorized function
mode for a few hours should there be a power failure or
the AC power cord becomes disconnected.
Auto power on
During the stand by mode, the unit will automatically
power on if it detects audio signal from AUDIO IN,
OPTICAL IN or when the BLUETOOTH connection has
been set up between the sound bar and your device.
They will remain connected if there is no HDMI
connection.
Note:
This function is not applicable during eco mode off.
APC (Auto Power Off Control) (remote
control)
This sound bar can be set to turn off automatically if
no signal or connection is detected. (During Audio In,
Optical In or USB function)
1. Select APC from the remote control menu to adjust
the time.
2. The sound bar will enter the power standby mode
automatically if no signal is detected after the preset
time has elapsed.
Auto power off function
The unit will enter standby mode if:
BLUETOOTH: No connection for 60 seconds.
USB: In the stop mode or no media for 20 minutes.
Audio In: No detection of input signal after 20 minutes.
Audio Return Channel (ARC)
(Audio Return Channel submenu)
The audio return channel (ARC) function enables an
HDMI ARC-capable TV to send the audio stream to the
HDMI OUT jack of the receiver. To use this function, you
must select the TV ARC input and your TV must supports
the ARC.
3D sound mode
S+ 3D technology creates 3D sound through speakers
regardless of the type of sound source, whether it is
monaural, stereo or multichannel. It simulates sound
transmission characteristics using digital signal
processing to create a widening effect on the sound in
the ambient space around the sound source.
By using this technology, multichannel surround sound
can be produced from 2.1ch source.
Select the desired 3D sound from the menu
3D AUDIO 1 :
3D AUDIO 2 :
3D AUDIO OFF :
Sound effect that emphasizes 3D
sound.
Sound effect that maintains the 3D
sound and improve vocal clarity.
3D sound effect off.
This product incorporates decoders supporting the
Dolby Audio system.
Dolby Audio One of the digital audio systems for
theatrical use. You can also enjoy
the stereophonic effect in the home
theater system.
Lights up when detecting Dolby Audio
signal.
PCM
(Pulse Code
Modulation)
This is a general term for digitally
encoded audio signals on a CD or
DVD.
This sound bar lets you enjoy playback
of digital signals from sources such as
CD or DVD.
E-16
Bluetooth one touch connection via NFC
About NFC technology
Near Field Communication (NFC) is a set of standards for
devices (smartphones/tablets) to establish radio communi -
cation with each other by touching/tapping them together or
bringing them into close proximity.
Using NFC in this product simplifies the pairing method of
Bluetooth connectivity.
zThis audio system supports NFC-enabled device
with Android 4.1, Jelly Bean and higher.
zFor device with a lower Android version, refer the
operation manual of the device for recommended
app (application).
Unlike other wireless technology, NFC requires no
discovery or pairing.
Simply tap the source device to the NFC detection
area on the sound bar to instantly enjoy seamless
connectivity between your smart device and the audio
system.
NFC detection area
NFC detection area location may vary depending on the
device (smartphone / tablet). Refer operation manual of the
device for detail.
The NFC tag can be placed anywhere convenient to you.
The velcro tapes supplied will help to secure the tag onto
the desired location.
Caution :
z
Make sure that the NFC tag is placed on a flat and level
surface.
z
If you choose not to use the velcro tape, do not place
the NFC tag near metal surface to avoid connection
interference during tagging.
Important:
z
NFC tag provided has unique ID for each sound bar.
z
SHARP will not be held liable for the damages caused
by rewriting the tags.
Keep all small parts away from children as they may be
accidentally swallowed.
1 Peel the separator off the velcro tape (loop type)
and stick it on a desired surface.
Separator
Velcro
tape (loop
type)
2 Peel the separator off the velcro tape (hook type)
and stick it to the rear of the NFC tag. Then place
the tag onto the desired location.
Separator Velcro tape
(hook type)
Rear view of the NFC tag
NFC tag set up
SOUND BAR HOME THEATER SYSTEM HT-SB603
SOUND BAR HOME THEATER SYSTEM HT-SB603
HT-SB603
A Bluetooth audio
source device
(smartphone /
tablet).
Switch ‘ON’
Bluetooth
Search /
scan
Pairing
Connect
M
a
n
u
a
l
B
l
u
e
t
o
o
t
h
s
e
t
t
i
n
g
NFC
detection area
NFC tag
(during standby mode)
Or
E-17
Bluetooth one touch connection via NFC (continued)
NFC connection for audio playback
Check that:
zYour device (smartphone / tablet) has an NFC function.
zNFC function on your device is turned on.
zScreen lock function of the device is off.
zThis unit is not in Eco mode.
1 Touch your device to the NFC detection area on the
sound bar or supplied NFC tag.
NFC detection area
SOUND BAR HOME THEATER SYSTEM HT-SB603
Or
NFC tag
2 A pop-up window asking whether to proceed with the
Bluetooth connection appears on the device. Select
<YES>.
zThe ‘connected’ message appears when the connec-
tion is complete.
3 Playback will start automatically. Otherwise, press
play (on remote control or source device).
zSound will be heard from the speakers of this unit via
audio streaming.
zYour device must be within 32 feet (10 meters) from
the sound bar.
Bluetooth operation buttons (remote control only)
Press to play or pause.
Press to skip up.
Press to fast forward.
Press to skip down.
Press to fast reverse.
Notes:
zTo disconnect, simply touch your device to the NFC
detection area on the subwoofer or NFC tag again.
zTo listen to audio via Bluetooth connectivity without
NFC tag - refer “Pairing with other Bluetooth source
devices” on page 18.
zIt takes about 6-8 seconds for a Bluetooth enabled device
(eg. smartphone) to establish Bluetooth connection with
this unit via NFC or manual connection.
Listening to Bluetooth enabled devices
Bluetooth
Bluetooth wireless technology is a short-range radio
technology that enables wireless communication between
various types of digital devices, such as mobile phone
or computer. It operates within a range of about 32 feet
(10 meters) without the hassle of having to use cables to
connect these devices.
This unit supports the following:
Communication System: Bluetooth Specification version
2.1 Bluetooth + Enhanced Data Rate (EDR).
Support Profile : A2DP (Advanced Audio Distribution Profile)
and AVRCP (Audio/Video Remote Control Profile)
Notes when using unit with a mobile phone
zThis unit cannot be used to talk over the telephone even
when there is a Bluetooth connection made to a mobile
phone.
zPlease refer to the operating manual supplied with the
mobile phone for details on operation of your mobile
phone while transmitting the sound using a Bluetooth
connection.
SOUND BAR HOME THEATER SYSTEM HT-SB603
Pairing Bluetooth devices
Bluetooth devices need to be initially paired first before they
can exchange data. Once paired, it is not necessary to pair
them again unless:
zPairing is made with more than 8 devices. Pairing can
only be made one device at a time. This unit can be
paired to a maximum of 8 devices. If subsequent device
is paired, the oldest device paired, will be deleted and
replaced with the new one.
zThis unit is reset. All pairing information is deleted when
unit is reset.
zPairing information is deleted while re-pairing, etc.
E-18
Listening to Bluetooth enabled devices (continued)
Indicators on the remote control display:
Indicator Condition Bluetooth status
Blinks In waiting or pairing mode
Lights up Connected
No indication Unconnected
However, the indication status is not displayed during
standby mode.
Pairing with other Bluetooth source devices
1 Press the ON/STANDBY button on the sound bar or
button on the remote control.
2 Select the Bluetooth function (on the sound bar or
remote control). “BLUETOOTH ” appears on the
display.
3 Press PAIRING button on the sound bar or remote
control.
Notes:
zPlace the devices to be paired within 3 feet (1 meter)
of each other when pairing.
zSome source devices are unable to display lists of
detected devices. To pair this unit with the source
device, refer to the source device operating manual
for details.
4 Select “
HT-SB603
SHARP” from the source device
list. If Passcode* is required, enter “0000”.
* Passcode may be called PIN Code, Passkey, PIN
number or Password.
5 “CONNECTED” appears on the display once the
unit is successfully paired with the source device.
(Pairing information is now memorized in the unit.)
Some audio source devices may connect with the unit
automatically after pairing is completed, otherwise
follow the instructions in the source device operating
manual to start connection.
6 Start Bluetooth streaming playback.
Notes:
zIf a device such as microwave oven, wireless LAN card,
Bluetooth device or any other device that uses the
same 2.4 GHz frequency near the system some sound
interruption may be heard.
zThe transmission distance of the wireless signal
between the device and the sound bar is about 32 feet
(10 meters), but may vary depending on your operating
environment. If a steel concrete or metallic wall is
between the device and the sound bar, the system may
not operate at all, because the wireless signal cannot
penetrate metal.
zIf this unit or the source device is turned off before
Bluetooth connection is completed, pairing will not
be completed and the pairing information will not be
memorized. Repeat step 1 onwards to start pairing again.
zTo pair with other devices, repeat steps 1 - 5 for each
device. This unit can be paired to a maximum of 8
devices. If subsequent device is paired, the oldest device
paired, will be deleted and replaced with the new one.
zOnce a device is ousted or deleted from the pairing list,
the pairing information for the device is also deleted. To
listen to the sound from the device again, it needs to be
re-paired. Perform steps 1 - 5 to pair the device again.
Listening to the sound
Check that:
zThe source device Bluetooth functionality is ON.
zPairing of this unit and the source device is completed.
zUnit is in connected mode.
1 Press the ON/STANDBY button on the sound bar or
the button on the remote control.
2 Select the Bluetooth function (on the sound bar or
remote control).
3 Start the Bluetooth connection from the Bluetooth
stereo audio source device.
4 Start Bluetooth streaming playback.
Notes:
zFor various Bluetooth operations, refer “NFC
connection for audio playback” on page 17.
zIf the source device has an extra bass function or
equalizer function, set them to off to avoid sound
distortion.
Note:
zMake the Bluetooth connection again if the source device
is not turned on, or its Bluetooth functionality is off or is
in sleep mode.
To disconnect the Bluetooth device
Perform any of the followings.
– Disconnect the Bluetooth connection on the audio source
device. Refer the operating manual supplied with the
device.
– Turn off the Bluetooth stereo audio source device.
– Turn off this unit.
Note:
The volume of this unit may not be controlled as intended
depending on the device.
E-19
Listening to USB mass storage device/MP3 player
zUSB cable is not recommended for use in this audio system
to connect to USB memory device. Use of the USB cable
will affect the performance of this audio system.
zThis USB memory cannot be operated via USB hub.
zThe USB terminal in this unit is not intended for a PC
connection but is used for music streaming with a USB
memory device.
zExternal HDD-storage cannot be played back via USB
terminal.
zIf the data inside the USB memory is large, it may take
longer time for the data to be read.
zThis product can play WMA and MP3 files. It will
automatically detect the file type being played. If unplayable
file is played on this product, the file will be automatically
skipped. This will take a few seconds.
zThis product relates to USB mass storage devices and
MP3 players. It may however face some irregularities due
to various unforeseen reasons from some devices. Should
this happen, turn off the unit and then turn it on again.
zThis unit only supports “MPEG-1 Audio Layer-3” format.
(Sampling Frequency is 32, 44.1, 48kHz)
zPlayback order for MP3 files may differ depending on the
writing software used during file download.
zBitrate which is supported by MP3 is 32~320 kbps, WMA
is 64~160 kbps.
zFor MP3/WMA files, please put “.MP3” “.WMA” extension.
Files cannot be played back if there is no MP3/WMA
extension.
zCopyright protected WMA files cannot be played back.
zMaximum total number supported for MP3/WMA files is
65025. However, it is advisable to playback a media with
a small amount of MP3/WMA files to maximize playability.
■Repeat play
Repeat play can play one track or all tracks.
To repeat one track:
Press the button repeatedly to select “REPEAT ONE”. Press
the / button.
To repeat all tracks:
Press the button repeatedly to select “REPEAT ALL”.
To cancel repeat play:
Press the button to select “NORMAL” and “ ” disappears.
Caution:
After performing repeat play, be sure to press the / button.
Otherwise, the device will play continuously.
■Random play
The tracks on the device can be played in random order
automatically.
To random play all tracks:
Press the button repeatedly to select “RANDOM”. Press the
/ button.
To cancel random play:
Press the button to select “NORMAL”.
Notes:
●,I\RXSUHVVWKH EXWWRQGXULQJUDQGRPSOD\\RXFDQPRYHWR
WKHWUDFNVHOHFWHGQH[WE\WKHUDQGRPRSHUDWLRQ2QWKHRWKHU
KDQGWKH EXWWRQGRHVQRWDOORZ\RXWRPRYHWRWKHSUHYLRXV
WUDFN7KHEHJLQQLQJRIWKHWUDFNEHLQJSOD\HGZLOOEHORFDWHG
●,QUDQGRPSOD\WKHXQLWZLOOVHOHFWDQGSOD\WUDFNVDXWRPDWLFDOO\
<RXFDQQRWVHOHFWWKHRUGHURIWKHWUDFNV
Note:
This product is not compatible with MTP and AAC file
systems from USB mass storage device or MP3 player.
To play back USB/MP3 player
1 Select the USB function (on the sound bar or remote
control. “USB” appears on the display).
2 Playback will start automatically. Otherwise press / .
3 Select desired file to be played back by pressing the
or button.
zTitle, Artist and Album name are displayed if they are
recorded in the USB memory device.
zDisplay content can be changed by pressing the or
button.
&RXQWHUGLVSOD\
$OEXPGLVSOD\
7LWOHGLVSOD\)LOHQDPHGLVSOD\
$UWLVWGLVSOD\
Note:
To pause playback:
Press the / button.
Various USB functions
Function
Remote control Operation
Track up/
down
Press in the playback
or pause mode. If you
press the button in the
pause mode, press the
/ button to start the
desire track.
Fast
forward/
reverse
Press and hold down in
the playback mode.
Release the button to
resume playback.
Note:
Fast forward/reverse is invalid when playing back a
variable bitrate file.
To remove USB memory device
1 Press the button to pause playback.
2 Unplug USB memory device from the USB terminal.
Notes:
zSHARP will not be held liable for the loss of data while the
USB memory device is connected to the audio system.
zFiles compressed in MP3 and/or WMA format can be
played back when connected to the USB terminal.
zThis USB memory’s format supports FAT 16 or FAT 32.
zSHARP cannot guarantee that all USB memory devices will
work on this audio system.
E-20
Many potential problems can be resolved by the owner without
calling a service technician.
If something is wrong with this product, check the following
before calling your authorized SHARP dealer or ser vice center.
General
Symptom Possible cause
z
No sound is heard.
z
Is the input signal (selection) set
properly?
z
Is the volume level set to “MIN”?
z
Is muting activated?
z
Is HDMI compliant equipment
being used?
z
Is the HDMI cable connected
correctly?
Connect the HDMI cable correctly
and then perform the reset
procedure. (refer page 20)
z
Do not connect or disconnect
an HDMI cable while power is
on. This may lead to operation
problems.
z
The sound from
subwoofer is not
well balanced.
z
Is the subwoofer level set to the
minimum or maximum level?
z
Power turns off
suddenly.
z
Is the HDMI cable connected
correctly? Connect the HDMI
cable correctly and then perform
the reset procedure.
z
Noise is heard
during playback.
z
Move the speaker away from any
computers or mobile phones.
z
When a button
is pressed, the
sound bar does not
respond.
z
Set the sound bar to the standby
mode and then turn it back on.
z
The power is not
turned on.
z
Is the sound bar unplugged?
z
The protection circuit may be
activated. Unplug and plug in the
power cord again after 5 minutes
or more.
z
3D images and
4K content not
displayed on the
TV.
z
Depending on the TV and Video
component, 3D images and 4K
content may not be displayed.
Check the operation manual of the
respective component.
z
HDMI cable not support 3D
images and 4K content.
z
Background noise
appears when
connecting with
RCA audio output
terminal connection
from a TV-set/
DVD/Blu-ray Disc
Player.
z
Please change to HDMI/ARC or
headphone terminal from TV-Set/
DVD/Blu-ray Disc Player. This
effect may occur depending on
TV/DVD/Blu-ray Disc Player-
Brand, model and age, and it is
not the sound bar problem.
z
Wireless
connection cannot
be established.
z
Check the distance between the
sound bar and subwoofer (less
than 32 feet (10 meters)).
z
Make sure there is no other
wireless devices near the unit.
Symptom Possible cause
z
Wireless
connection cannot
be established.
z
Make sure there is no obstacles
(especially metal) blocking
between the sound bar and
subwoofer.
z
Manually re-link the sound bar and
subwoofer (refer page 13).
Remote control
Symptom Possible cause
z
The remote control
does not operate
properly.
z
Is the battery polarity correct?
z
Is the battery dead?
z
Is the distance or angle incorrect?
z
Are there any obstructions in front
of the sound bar?
z
Is there a strong light shining on
the remote sensor?
z
Is the remote control for another
equipment used simultaneously?
z
The sound bar
cannot be turned
on with the remote
control.
z
Is the AC power cord of the sound
bar plugged in?
z
Is the battery inserted?
NFC / Bluetooth
Symptom Possible cause
z
No sound is heard.
z
The unit is too far from the
Bluetooth stereo audio source
device.
z
The unit is not paired with the
Bluetooth stereo audio source
device.
z
Bluetooth sound
is interrupted or
distorted.
z
The unit is too near to a device
that generates electromagnetic
radiation.
z
There is an obstacle between
the unit and the Bluetooth stereo
audio source device.
z
NFC-enabled
device cannot
connect to
Bluetooth via NFC
tag.
z
Sound bar is not in Bluetooth
pairing mode. Perform “NFC
connection for audio playback”.
(Refer page 17.)
USB
Symptom Possible cause
z
Device cannot be
detected.
z
Playback does not
start.
z
There is no MP3/WMA file inside
the device.
z
The device is not properly plugged
in.
z
A MTP device is plugged in.
z
The device contains AAC file only.
z
A copyright-protected WMA or
false MP3 file is being played
back.
Troubleshooting chart
E-21
Troubleshooting chart (continued)
Condensation
Sudden temperature changes, storage or operation in an
extremely humid environment may cause condensation
inside the cabinet or on the transmitter on the remote
control. Condensation can cause the sound bar to
malfunction. If this happens, leave the power on until
normal playback is possible (about 1 hour). Wipe off any
condensation on the transmitter with a soft cloth before
operating the sound bar.
If problem occurs during operation
When this product is subject to strong external interference
(mechanical shock, excessive static electricity, abnormal
supply voltage due to lightning, etc.) or if it is operated
incorrectly, it may malfunction.
If such a problem occurs, do the following:
1. Set the sound bar to the standby mode and turn the
power on again.
2. If the sound bar is not restored in the previous operation,
unplug and plug in the sound bar again, and then turn
the power on.
Factory reset, clearing all memory
Make sure to disconnect all output and input cables attached
to the sound bar before performing the factory reset.
1. Press the ON/STANDBY button on the sound bar l to
enter the power standby mode.
2. While pressing the SOUND MODE button, press and
hold the ON/STANDBY button.
Caution:
This operation will erase all data stored in memory.
Maintenance
Cleaning the cabinet
Periodically wipe the cabinet with a soft cloth.
Caution:
zDo not use chemicals for cleaning (gasoline, paint
thinner, etc.). It may damage the cabinet finish.
zDo not apply oil to the inside of each component. It
may cause malfunctions.
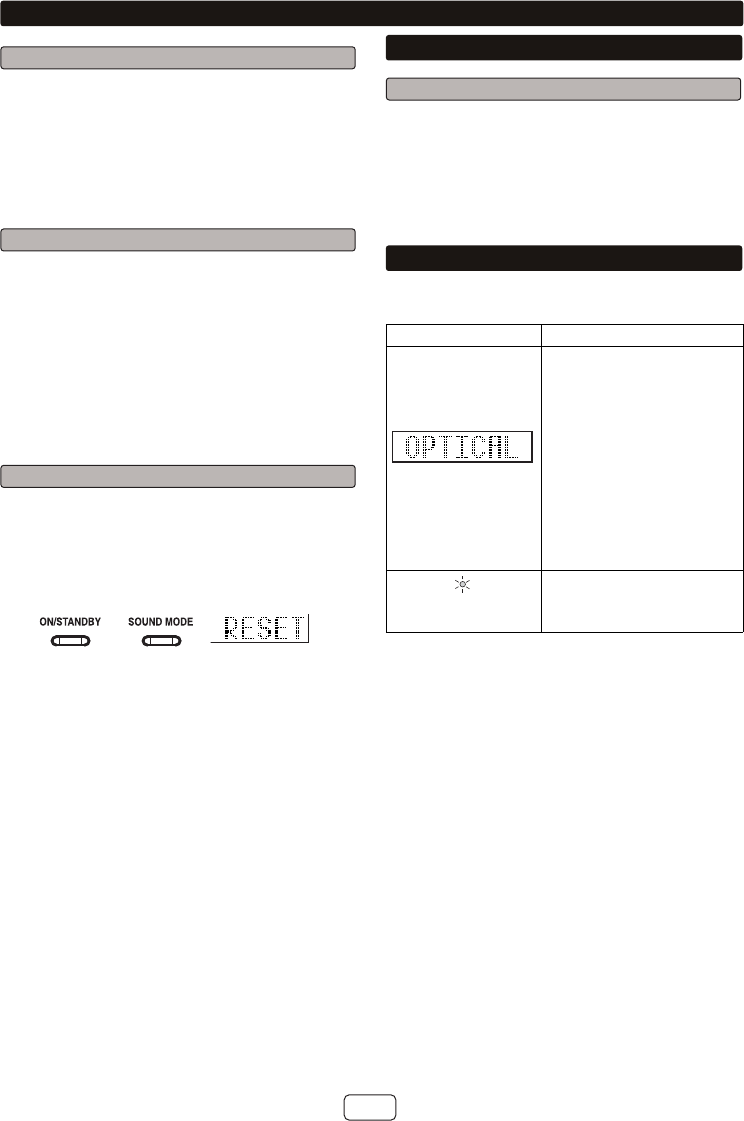
Error indicators and warnings
When you fail to perform operations properly, the
following messages are displayed on the remote control.
Display Meaning
(Display blinks)
zWhen there is no input signal.
Play back the connected
equipment.
zNonstandard signal. Cannot
be recognized.
zSignals other than DOLBY
AUDIO and Linear PCM
cannot be recognized.
zPoor connection of the digital
audio input terminal.
zTurn off the sound bar
and check if the cable is
connected properly.
Error indicator
(blinks red)
zWhen the protection circuit is
activated.
(*): Should the same message appear even if the
speaker is unplugged and plugged in, or is set to
the standby mode and on again, contact your local
dealer where you purchased the sound bar.
E-22
As part of our policy of continuous improvement, SHARP
reserves the right to make design and specification
changes for product improvement without prior notice.
The performance specification figures indicated are
nominal values of production unit. There maybe some
deviations from these values in individual unit.
Sound Bar
Power source AC 100 - 240 V ~ 50/60Hz
Power
consumption
37 W
Dimensions Width: 37” (940mm)
Height: 2-7/8” (73mm)
Depth: 3-1/4” (83mm)
Weight 7.9 lbs. (3.7 kg)
Output power RMS: Total 160 watts
RMS:
Front Left/Right:
80 watts per channel into 6 ohms at
1 kHz, 10% total harmonic distortion
FTC:
Front: (Left/Right):
Minimum 50 watts per channel into
6 ohms at 120 Hz to 20 kHz, 1% total
harmonic distortion
Output
terminal
HDMI™ output: (audio/video support
up to 4K) x 1
Input terminal 500 mV / 47 kȍ$8',2,1
Optical digital input (OPTICAL):
Square type x 1
HDMI input: (audio/video support up
to 4K) x 2
Type 2 Way speaker system
2 -1/4” (5.7 cm) woofer
1” (2.5 cm) Soft Dome
Bluetooth
Frequency
band
2.400GHz - 2.480GHz
Compatible
Bluetooth
Profile
A2DP (Advanced Audio Distribution
Profile), AVRCP (Audio/Video
Remote Control Profile)
Bluetooth 4.0 BLE (Remote Control)
Bluetooth 2.1 +EDR
Maximum
input power
160 W
Rated input
power
80 W
Impedance 6 ȍ
USB (MP3 / WMA)
USB host
interface
z Complies with USB 1.1 (Full
Speed)/2.0 Mass Storage Class.
z Support Bulk only and CBI
protocol.
Support file z MPEG 1 Layer 3
z WMA (Non DRM)
Bitrate
support
z MP3 (32 ~ 320 kbps)
z WMA (64 ~ 160 kbps)
Other z Maximum total number of MP3/
WMA files is 65025.
z Maximum total number of folders
is 999 INCLUSIVE of root directory.
File system
support
z Support USB devices with
FAT 16/ FAT 32.
Subwoofer
Power source AC 100 - 240 V ~ 50/60 Hz
Power
consumption
30 W
Output power RMS:
150 watts per channel into 3 ohms
at 100 Hz, 10% total harmonic
distortion
FTC:
Minimum 110 watts per channel into
3 ohms at 100 Hz, 1% total harmonic
distortion
Type Subwoofer system
6 - 5/16” (16 cm) woofer
Dimensions Width: 7-3/8” (188 mm)
Height: 11-1/8” (282 mm)
Depth: 11-3/4” (299 mm)
Weight 13.4 lbs. (6.1 kg)
Specifications