S and O ELECTRONICS HTSB31D SOUND BAR HOME THEATER SYSTEM User Manual HT SB31D OM USA EN
S&O; ELECTRONICS (MALAYSIA) SDN. BHD. SOUND BAR HOME THEATER SYSTEM HT SB31D OM USA EN
UserManual.wiki
>
S and O ELECTRONICS
>
HTSB31D User Manual
User Manual
Navigation menu
Upload a User Manual
Namespaces
Wiki Guide
HTML
PDF
Info
Views
User Manual
Discussion / Help
Navigation

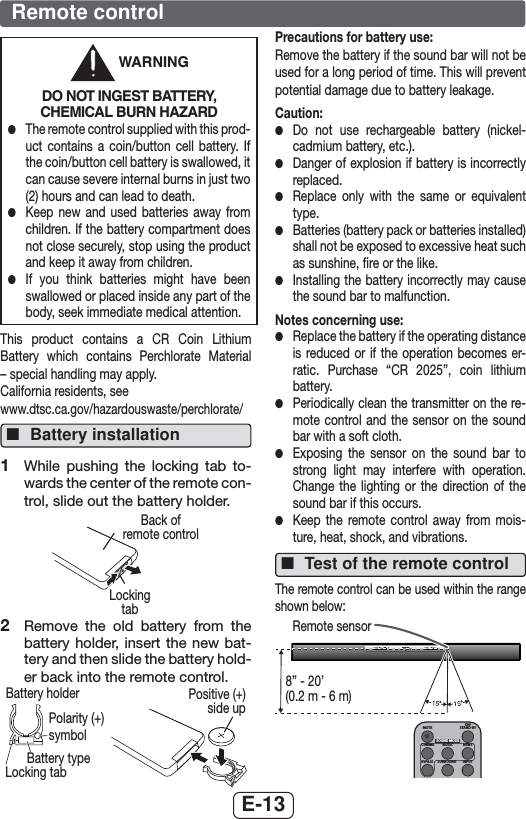
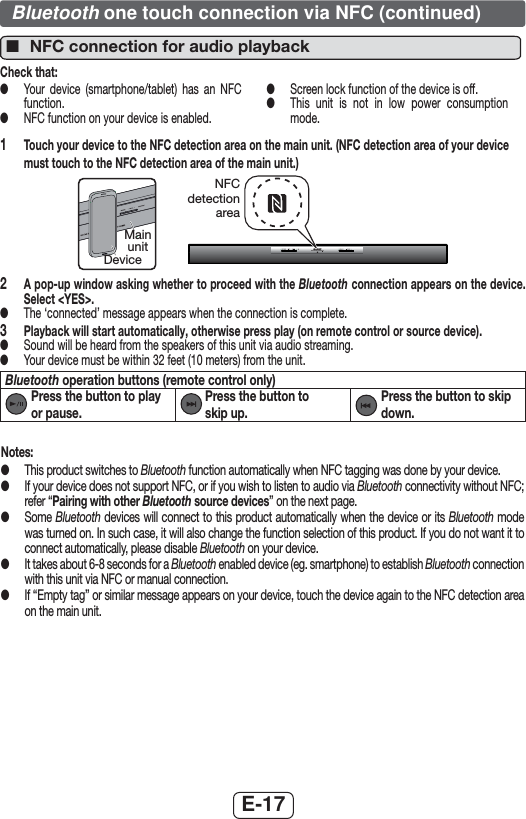
![E-2IMPORTANT SAFETY INSTRUCTIONSElectricity is used to perform many useful functions, but it can also cause personal injuries and property damage if improperly handled. This product has been engineered and manufactured with the highest priority on safety. Ho-wever, improper use can result in electric shock and/or ¿UH,QRUGHUWRSUHYHQWSRWHQWLDOGDQJHUSOHDVHREVHUYHthe following instructions when installing, operating and cleaning the product. To ensure your safety and prolong the service life of this product, please read the following precautions carefully before use. 5HDGWKHVHLQVWUXFWLRQV .HHSWKHVHLQVWUXFWLRQV +HHGDOOZDUQLQJV )ROORZDOOLQVWUXFWLRQV 'RQRWXVHWKLVDSSDUDWXVQHDUZDWHU &OHDQRQO\ZLWKGU\FORWK 'R QRW EORFN DQ\ YHQWLODWLRQ RSHQLQJV ,QVWDOO LQaccordance with the manufacturer’s instructions. 'R QRW LQVWDOO QHDU DQ\ KHDW VRXUFHV VXFK DV UD-diators, heat registers, stoves, or other apparatus LQFOXGLQJDPSOL¿HUVWKDWSURGXFHKHDW 'RQRWGHIHDWWKHVDIHW\SXUSRVHRIWKHSRODUL]HGRUJURXQGLQJW\SHSOXJ$SRODUL]HGSOXJKDVWZREOD-des with one wider than the other. A grounding type plug has two blades and a third grounding prong. The wide blade or the third prong are provided for \RXU VDIHW\ ,I WKH SURYLGHG SOXJ GRHV QRW ¿W LQWRyour outlet, consult an electrician for replacement of the obsolete outlet. 3URWHFW WKH SRZHU FRUG IURP EHLQJ ZDONHG RQ RUpinched particularly at plugs, convenience re-ceptacles, and the point where they exit from the apparatus. 2QO\XVHDWWDFKPHQWVDFFHVVRULHVVSHFL¿HGE\WKHmanufacturer. 8VH RQO\ ZLWK WKH FDUW VWDQGWULSRGEUDFNHWRUWDEOHVSHFL¿HGby the manufacturer, or sold with the apparatus. When a cart is used, use caution when moving the cart/apparatus combination to avoid injury from tip-over. 8QSOXJ WKLV DSSDUDWXV GXULQJ OLJKWQLQJ VWRUPV RUwhen unused for long periods of time. 5HIHU DOO VHUYLFLQJ WR TXDOL¿HG VHUYLFH SHUVRQQHOServicing is required when the apparatus has been damaged in any way, such as power-supply cord or plug is damaged, liquid has been spilled or objects have fallen into the apparatus, the apparatus has been exposed to rain or moisture, does not operate normally, or has been dropped.Additional Safety Information 3RZHU6RXUFHV7KLVSURGXFWVKRXOGEHRSHUDWHGonly from the type of power source indicated on the marking label. If you are not sure of the type of power supply to your home, consult your pro-duct dealer or local power company. For product intended to operate from battery power, or other sources, refer to the operating instructions. 2YHUORDGLQJ'RQRWRYHUORDGZDOORXWOHWVH[WHQ-sion cords, or integral convenience receptacles as WKLVFDQUHVXOWLQDULVNRI¿UHRUHOHFWULFVKRFN 2EMHFW DQG /LTXLG (QWU\ 1HYHU SXVK REMHFWV RIany kind into this product through openings as they may touch dangerous voltage points or short-out SDUWVWKDWFRXOGUHVXOWLQD¿UHRUHOHFWULFVKRFN 7RSUHYHQW¿UHRUVKRFNKD]DUGGRQRWH[SRVHWKLVDSSOLDQFHWRGULSSLQJRUVSODVKLQJ1RREMHFWV¿OOHGwith liquids, such as vases, shall be placed on the apparatus. 'DPDJH 5HTXLULQJ 6HUYLFH 8QSOXJ WKLV SURGXFWIURPWKHZDOORXWOHWDQGUHIHUVHUYLFLQJWRTXDOL¿HGservice personnel under the following conditions: a. When the AC cord or plug is damaged, b. If liquid has been spilled, or objects have fallen into the product, c. If the product has been exposed to rain or wa-ter, d. If the product does not operate normally by following the operating instructions. Adjust only those controls that are covered by the operating instructions as an improper adjustment of other controls may result in damage and will often re-TXLUHH[WHQVLYHZRUNE\DTXDOL¿HGWHFKQLFLDQWRrestore the product to its normal operation, e. If the product has been dropped or damaged in any way, and f. When the product exhibits a distinct change in performance - this indicates a need for service. 5HSODFHPHQW3DUWV:KHQUHSODFHPHQWSDUWVDUHrequired, be sure the service technician has used UHSODFHPHQWSDUWVVSHFL¿HGE\WKHPDQXIDFWXUHURUhave the same characteristics as the original part. 8QDXWKRUL]HGVXEVWLWXWLRQVPD\UHVXOWLQ¿UHHOHF-WULFVKRFNRURWKHUKD]DUGV 6DIHW\&KHFN8SRQFRPSOHWLRQRIDQ\VHUYLFHRUrepairs to this product, ask the service technician to perform safety checks to determine that the pro-duct is in proper operating condition. :DOO RU FHLOLQJ PRXQWLQJ :KHQ PRXQWLQJ WKHproduct on a wall or ceiling, be sure to install the product according to the method recommended by the manufacturer.](https://usermanual.wiki/S-and-O-ELECTRONICS/HTSB31D/User-Guide-3066070-Page-3.png)
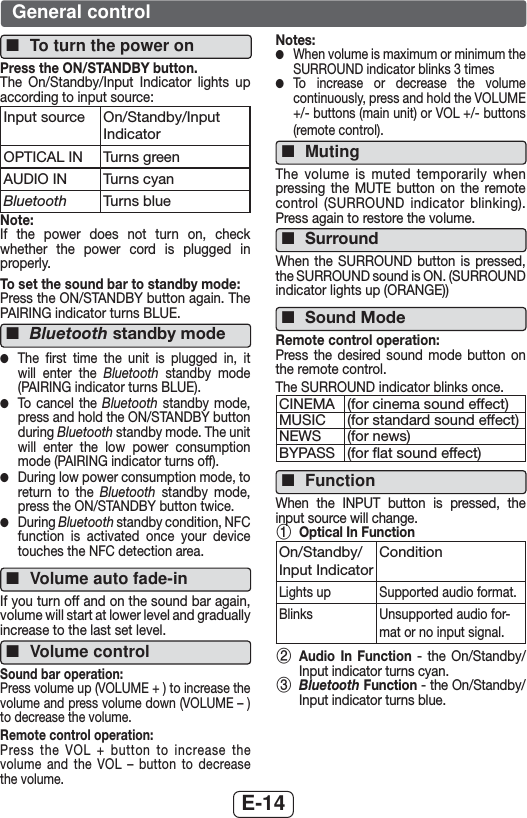
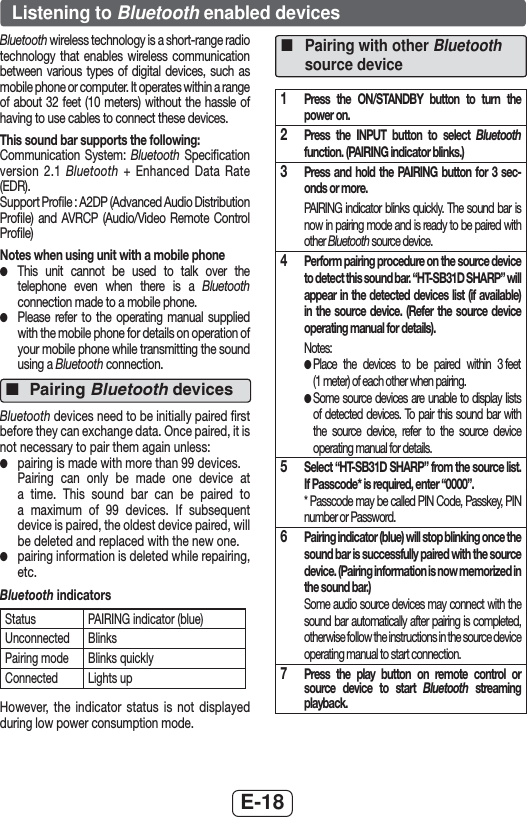
![E-4Precautions ■General ●Please ensure that the equipment is positioned in a well ventilated area and ensure that there is a free space along the sides, top and back of the equipment as below.4" (10 cm)4" (10 cm)4" (10 cm)0" (0 cm)4" (10 cm)Table/floor4" (10 cm)9/16" (1.5 cm)Wall mountbracket4" (10 cm)4" (10 cm)4" (10 cm)Wall mount ●8VH WKH XQLW RQ D ¿UP OHYHO VXUIDFH IUHH IURPvibration. ●.HHS WKH XQLW DZD\ IURP GLUHFW VXQOLJKW VWURQJPDJQHWLF ¿HOGV H[FHVVLYH GXVW KXPLGLW\ DQGHOHFWURQLFHOHFWULFDOHTXLSPHQWKRPHFRPSXWHUVIDFVLPLOHVHWFZKLFKJHQHUDWHHOHFWULFDOQRLVH ●'RQRWSODFHDQ\WKLQJRQWRSRIWKHXQLW ●'R QRW H[SRVH WKH XQLW WR PRLVWXUH WRWHPSHUDWXUHV KLJKHU WKDQ ) & RU WRextremely low temperatures. ●If the unit does not work properly, unplug and plug it in again. Then turn on the unit. ●In case of an electrical storm, unplug the unit for safety. ●Hold the AC power plug by the head when removing it from the AC outlet, as pulling the cord can damage internal wires. ●The AC power plug is used as a disconnect device and shall always remain readily operable. ●Do not remove the outer cover, as this may result in electric shock. Refer internal service to your local Hisense service facility. ●This unit should only be used within the range of ))&& ●SHARP/Hisense are not responsible for damage due to improper use. Refer all servicing to a +LVHQVHDXWKRUL]HGVHUYLFHFHQWHUWarning: ●7KH VXSSOLHG $&'& DGDSWRU FRQWDLQV QR XVHUserviceable parts. Never remove covers unless TXDOL¿HGWRGRVR,WFRQWDLQVGDQJHURXVYROWDJHValways remove mains plug from the main outlet jack before any service operation or when not in use for a long period. ●7KH$&'&DGDSWRUVXSSOLHGZLWKWKH+76%'must not be used with other equipment. ●1HYHUXVHDQ$&'&DGDSWRURWKHUWKDQWKHRQHVSHFL¿HG2WKHUZLVHSUREOHPRUVHULRXVKD]DUGVmay be created. ●The voltage used must be the same as that VSHFL¿HG RQ WKLV XQLW 8VLQJ D KLJKHU YROWDJH LVGDQJHURXVDQGPD\UHVXOWLQD¿UHRURWKHUW\SHof accident causing damage. SHARP/Hisense will not be held responsible for any damage resulting from such usage. ■Volume controlThe sound level at a given volume setting depends on speaker efficiency, location and various other factors. It is advisable to avoid exposure to high volume levels, which occurs while turning the unit on with the volume control setting up high, or while continually listening at high volumes.](https://usermanual.wiki/S-and-O-ELECTRONICS/HTSB31D/User-Guide-3066070-Page-5.png)
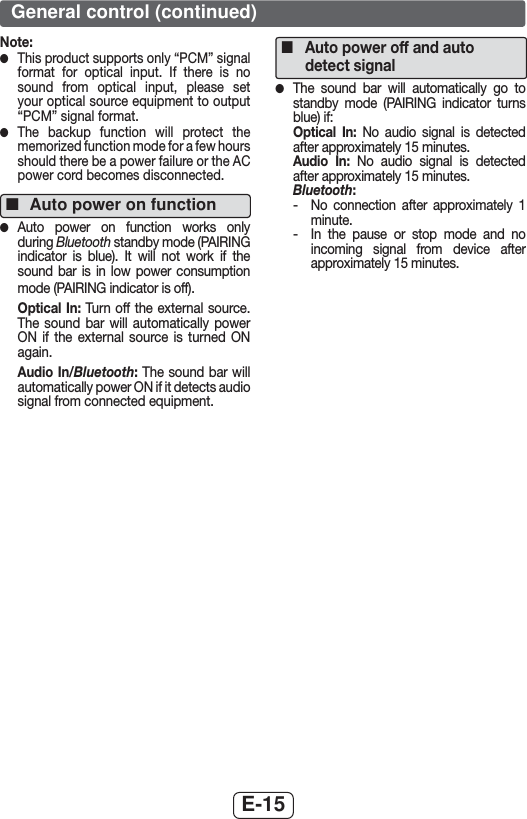
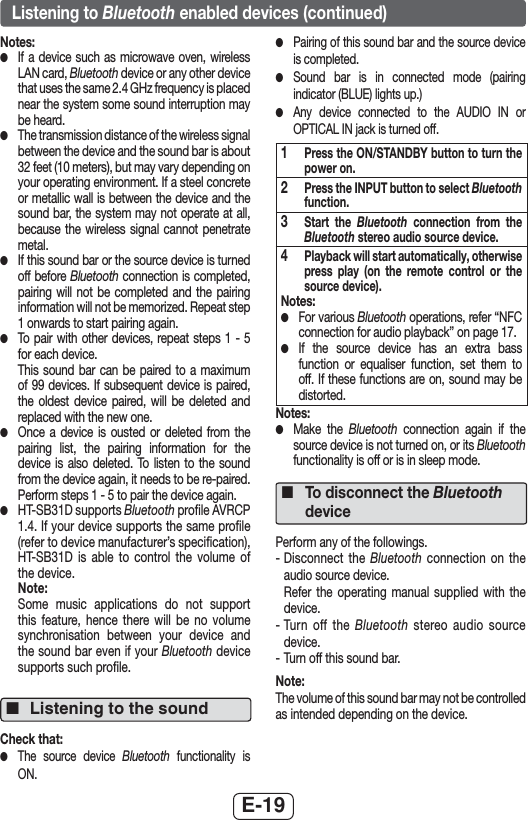
![E-8Make sure to unplug the AC power cord before installing the sound bar or changing the position.To mount the sound bar on the wallCaution: ●%HYHU\FDUHIXOWRSUHYHQWWKHVRXQGEDU>3OEV3NJ@IURPIDOOLQJZKHQPRXQWLQJRQWKHZDOO ●%HIRUHPRXQWLQJFKHFNWKHZDOOVWUHQJWK'RQRWput on the veneer plaster or whitewashed wall. The VRXQGEDUPD\IDOO ,IXQVXUHFRQVXOWD TXDOL¿HGservice technician. ●Mounting screws are not supplied. Use appropri-ate ones. ●Check all wall mount angle screws for looseness. ●Select a good location. If not, accidents may occur or the sound bar may get damaged. ●SHARP/Hisense are not responsible for acci-dents resulting from improper installation. ■Driving screwsSHARP designed the sound bar so you may hang it on the wall. Use proper screws (not supplied). See below for size and type.1/8” (3.2 mm)3/8” (9 mm)Min. 7/8” (22 mm)3/16”(5 mm) ■Installing the sound bar1 Fix the pattern paper to the wall in hori-]RQWDOSRVLWLRQDVEHORZ44 mm509 mmWall surfacePattern paper (supplied)21-5/8” (548 mm)2 Make a hole on the wall following the screw point marks on the pattern paper by using a drill.Wall surface1-1/4” (32 mm)3/8” (8-9 mm)3 Fix a wall mount plug into the hole using D KDPPHU XQWLO LW LV ÀXVK ZLWK WKH ZDOOsurface.1-1/4” (32 mm)3/8” (8-9 mm)Wall surface4 Fasten the screws to the wall as shown below. 7RWDOVFUHZLVSLHFHVWall surfaceWall surfaceScrew using screwdriver3/16” (4.5 mm - 5 mm)Gap from wall surface5 Hang the sound bar onto the screws.System preparation](https://usermanual.wiki/S-and-O-ELECTRONICS/HTSB31D/User-Guide-3066070-Page-9.png)