SAGEMCOM BROANDS PPX3610 Pocket Projector User Manual Part 3
SAGEMCOM SAS Pocket Projector Part 3
Contents
- 1. Part 1
- 2. Part 2
- 3. Part 3
- 4. Addendum
Part 3

Android 30
9 Android
Your Pocket Projector uses the Android operating sys-
tem.
Calling Android
1Switch the device on using the on/off switch on the
side.
2After the initial screen the main menu appears.
3Use the navigation keys to select Android.
4Confirm with à.
Exiting Android
Press the | key to return to the main menu.
Software Reset
Resetting Android
If your Pocket Projector does not work properly, a
reset to factory defaults may solve the problem in many
cases.
All Settings and Data Will be Deleted!
This procedure erases all your settings and
data that is stored on the device.
Apps need to be reinstalled.
YOZO Office
By resetting Android YOZO Office will be
deleted. The reinstallation of YOZO Office
will start automatically when connecting the
device to the internet via WiFi.
Installing Android-Apps
Trusted Sources!
Apps from third party sources may be mali-
cious. Only use installation packets from
trusted sources.
You can install other apps. Use the APK installation
packets.
Compatibility
The manufacturer does not guarantee the
compatibility of third party apps.
Volume
In some apps, the volume may only be con-
trolled via the remote control.
Youtube
You need to install the latest version of the
Adobe Flash Player in order to play Youtube
videos (see also Install Adobe Flash Player,
page 31).
Calendar
There is no calendar pre-installed on the
Pocket Projector.
DANGER!
Notice
CAUTION!
Notice
Notice
Notice
Notice
31 Philips · PPX3610
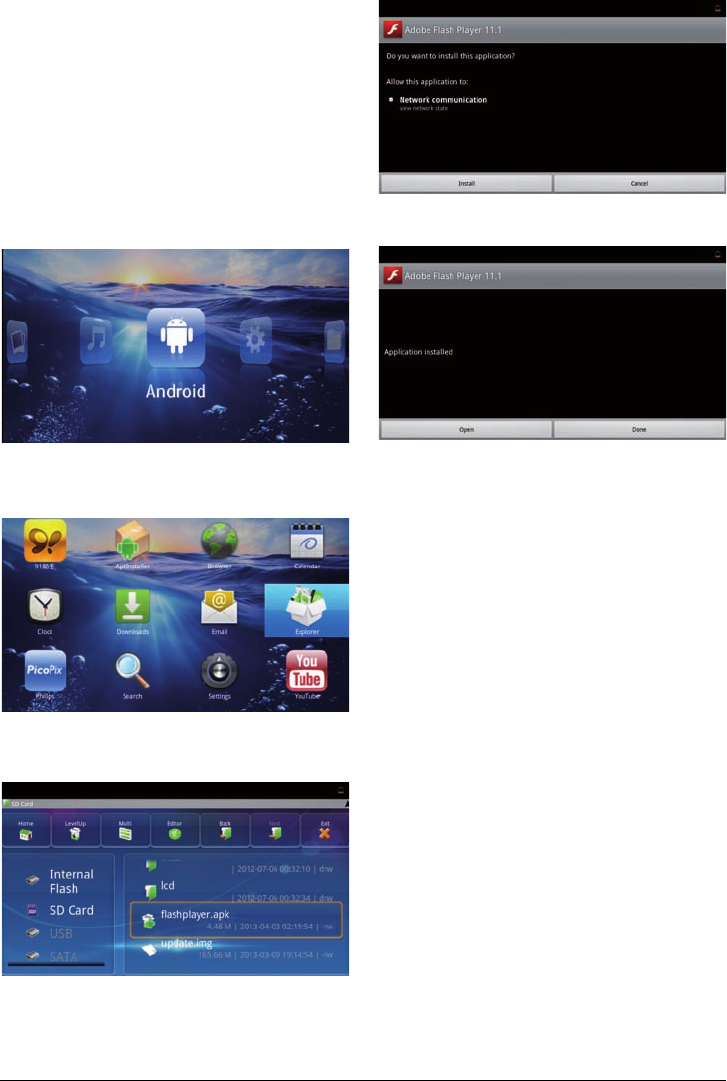
Install Adobe Flash Player
You need to install the latest version of the Adobe Flash
Player in order to play Youtube videos.
1Download the latest version of Adobe Flash Player
installation package (flashplayer.apk) for Android.
For further information visit www.philips.com/sup-
port.
2Save the package onto a memory card.
3Insert the memory card into the device (see also
Inserting a Memory Card, page 18).
4Switch the device on using the on/off switch on the
side.
5After the initial screen the main menu appears.
6Use the navigation keys to select Android.
7Confirm with à.
8Use the navigation keys to select Explorer.
9Confirm with à.
10 Navigate to the memory card and select flash-
player.apk.
11 Press à to execute the installation package.
12 Use the navigation keys to select Install.
13 Press à to start the installation.
14 Use the navigation keys to select Done.
15 Confirm with à.
16 The latest version of Adobe Flash Player is installed.
Android 32
Adjust Browser Mode
Change the browser mode to display websites contain-
ing flash elements.
1Switch the device on using the on/off switch on the
side.
2After the initial screen the main menu appears.
3Use the navigation keys to select Android.
4Confirm with à.
5Use the navigation keys to select Browser.
6Confirm with à.
7Press the menu key tto call the menu.
8Use the navigation keys to select More.
9Confirm with à.
10 Use the navigation keys to select Settings.
11 Confirm with à.
12 Use the navigation keys to select User agent.
13 Confirm with à.
14 Use the navigation keys to select Desktop.
15 Confirm with à.
16 Websites containing flash elements can be displayed.

33 Philips · PPX3610
Reset Browser Mode
1Proceed as described in the adjust browser mode
chapter (see also Adjust Browser Mode, page 32).
2Use the navigation keys to select iPad.
3Confirm with à.
Settings 34
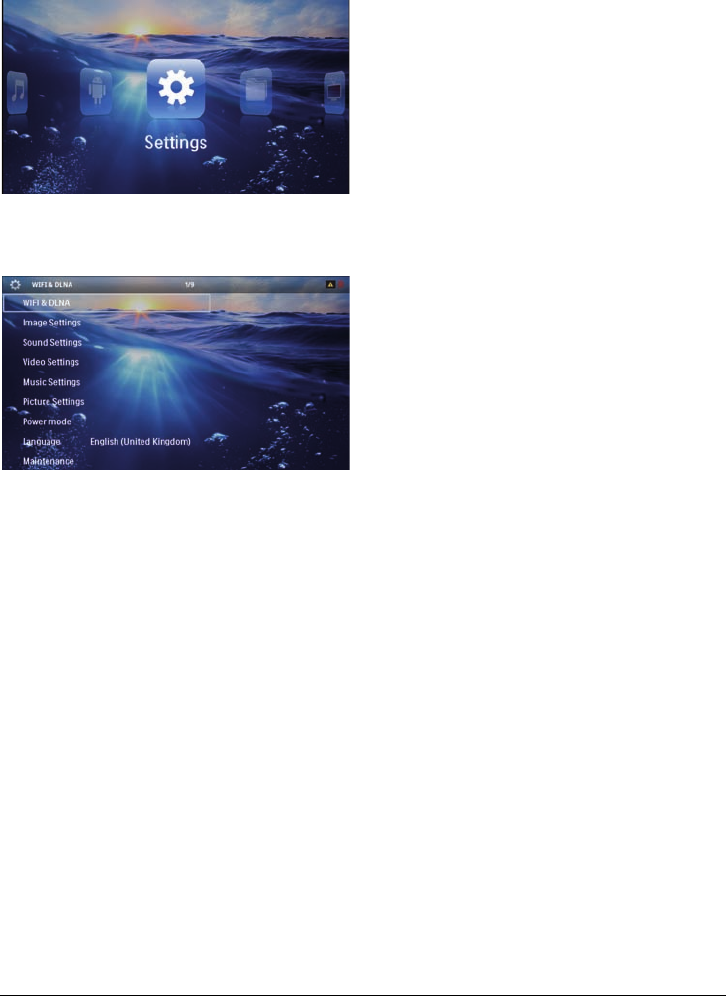
10 Settings
1Switch the device on using the on/off switch on the
side.
2After the initial screen the main menu appears.
3Use the navigation keys to select Settings.
4Confirm with à.
5Use ¡/¢ to select from the following settings.
6Confirm with à.
7Modify the settings using à, ¡/¢,
8Confirm with à.
The ¿ key takes you one step back in the menu.
Overview of the Menu
Functions
WIFI & DLNA
WIFI Network – switching the wireless network
(WLAN) off and on
Network Selection – select the wireless network with
which the device is to connect
DLNA Sharing – switching DLNA off and on
WIFI Hot Spot – activate and deactivate WLAN teth-
ering
Image settings
Wall paper – Select background images
Fit Screen – Convert videos and images to 4:3 resolu-
tion
Projection mode
Front – Normal projection; the device is located in
front of the projection surface/screen
Rear – Rear projection; the device is located behind
the projection surface; the image is reflected hori-
zontally.
Ceiling – The device is hanging from the ceiling in an
upside-down position; the image is rotated through
180 degrees.
Rear ceiling – The device is located behind the pro-
jection surface, hanging from the ceiling in an upside-
down position; the image is rotated through 180
degrees and reflected horizontally.
Wall color correction – Colour correction of the pro-
jected image to adjust to coloured projection surfaces
Smart Settings – Select predefined settings for bright-
ness / contrast / colour saturation. If you modify these
settings, the setting is switched to Manual.
Brightness – Adjust brightness
Contrast – Adjust contrast
Sound Settings:
Volume – Adjust the volume
Bass – Set the playback of the low frequencies
Treble – Set the playback of the high frequencies
Key beep – Turn key tones on and off
Video settings
View – Display all videos in a list or a corresponding
folder structure on the drive.
Repeat – Set the repeat type for video files: Repeat
deactivated (Off), repeat all videos in a directory
(Directory), repeat only the current video (Movie),
repeat all videos (All).
Resume play – If this function is activated, playback will
continue at the position it was last stopped. If deacti-
vated, playback will always start at the beginning of the
video.
Fit Screen – Convert videos to 4:3 resolution
Music settings
View – Show all tracks in a list or a corresponding folder
structure on the drive.
Screen – Activate or deactivate the projection during
playback.
Repeat – Set the repeat type for music files: Repeat
deactivated (Off), repeat all songs in a directory (Direc-
tory), repeat only the current song (Song), repeat all
songs (All).
Shuffle – Activate this function for random playback.
Otherwise, playback will take place in sequence.

35 Philips · PPX3610
Picture settings
View – Display the images as a thumbnail or as a list
during selection in the main menu.
Time per slide – Image viewing time during slide show
Repeat – Set the type of repeat for slide show photos:
Repeat off (Off), repeat all photos in the directory
(Directory), repeat all stored photos (All).
Slide transition – Set image transitions
Slideshow order – Play slide show in order or ran-
domly
Power mode
Brightness mode – This function reduces the light out-
put in order to increase the operating time for the built-
in battery. When operating from the power supply, the
energy saving mode is always deactivated in order to
ensure the best-possible image display.
Sleep mode – With this function, the projector auto-
matically shuts down after a specified period of time or
at the end of a movie.
Language
Select the desired language for the menu.
Maintenance
Reset settings – Reset settings to factory defaults.
Firmware Update – Update Firmware
Connect for the duration of the firmware
update the power adapter.
Information – Display free space in the internal mem-
ory and information on the device (Capacity: / Free
space: / Firmware version: / Device name: / Model:)
Notice
Service 36
11 Service
Care Instructions for the
Battery
The capacity of the battery diminishes with time. You
can prolong the life of the battery if you observe the fol-
lowing points:
• Without a power supply, the device operates
from the built-in battery. When the battery does
not have sufficient capacity, the device turns off.
Connect the device to the power supply.
• When the battery does not have sufficient capac-
ity, the battery symbol in the display and turns
red.
• When the device is running for a long period of
time, the surface becomes hot and a warning
symbol appears on the projection (see also Sym-
bols in the Statusbar, page 10). The device
behaves as follows:
1 The fan turns to maximum level.
2 At maximum level of brightness the overheat
symbol appears in the status bar and the device
turns automatically to minimum level of bright-
ness.
3 At minimal level of brightness the overheat
symbol shows for three seconds in the middle
of the screen. Then the device turns off auto-
matically.
After the device has cooled down, you can con-
tinue playback.
• Use the device at least once a week.
• Charge the battery regularly. Don’t store the
device with a completely discharged battery.
• If the device is not used for several weeks, dis-
charge the battery a little by using the device
before storing it.
• If the device only works using the USB connec-
tion or with the power supply, the battery is
defective.
• Keep the device and the battery away from
sources of heat.
Do not Replace the Battery Yourself
Do not try to replace the battery yourself.
Incorrect handling of the battery or using the
wrong type of battery can cause damage to
the device or cause injury.
Battery deep discharge
When the battery is in deep discharge or the device is
not used for a longer period, proceed as followed:
1Connect the device to the power supply (see also
Connect Power Supply / Charge Battery, page 11).
The device behaves as follows:
Device off Device on
Connect
to a com-
puter
The indicator light
on the side of the
device turns red.
Slow charging
Connect to a com-
puter (see also
Connect to a Com-
puter (USB),
page 19)
No charging
Connect
to the
power
adapter
The indicator light
on the side of the
device turns red.
Fast charging
Device remains
turned on.
Slow charging
2The device can be turned on and is ready to use after
approximately five minutes of charging time.
Battery recharge time with device off
Turning on
possible
Completely
charged
Slow charging 5 minutes 10 hours
Fast charging 5 minutes 2 hours
DANGER!
37 Philips · PPX3610
Cleaning
Instructions for Cleaning!
Use a soft, lint-free cloth. Never use liquid or
easily flammable cleansers (sprays, abrasives,
polishes, alcohol, etc.). Do not allow any
moisture to reach the interior of the device.
Do not spray the device with any cleaning flu-
ids.
Wipe over the surfaces gently. Be careful that
you do not scratch the surfaces.
Cleaning the Lens
Use a brush or lens cleaning paper for cleaning the lens
of the projector.
Do not use any Liquid Cleaning Agents
Do not use any liquid cleaning agents for
cleaning the lens, to avoid damaging the coat-
ing film on the lens.
Device Overheated
A overheat symbol appears if the device is overheated
(see also Symbols in the Statusbar, page 10). The device
behaves as follows:
1The fan turns to maximum level.
2At maximum level of brightness the symbol appears
in the status bar and the device turns automatically
to minimum level of brightness.
3At minimal level of brightness the symbol shows for
three seconds in the middle of the screen. Then the
device turns off automatically.
After the device has cooled down, you can continue
playback.
Update Firmware with
Memory Card
Connect for the duration of the firmware
update the power adapter (see also Connect
Power Supply / Charge Battery, page 11).
1Format the memory card in the file system FAT16 or
FAT32.
All Data will be Deleted!
This procedure erases all your data that is
stored on the memory card.
2Save the latest firmware update file to the memory
card.
3Insert the memory card (see also Inserting a Memory
Card, page 18) and switch the device on.
4Use the navigation keys to select Settings.
5Confirm with à.
6Use ¡/¢ to select Maintenance.
7Confirm with à.
8Use ¡/¢ to select Firmware Update.
9Confirm with à.
10 Use ¡/¢ to select Install.
11 Confirm with à.
12 The device turns off and on again. After around 5
minutesthe Language Selection screen appears.
The firmware update is now completed.
Inserting a Memory Card!
Never pull out the memory card while the
device is accessing it. This could cause data
to be damaged or lost.
Power!
Do nut unplug the power adapter during
the firmware update.
If an error occurs during the firmware update
process retry the procedure or contact your
dealer.
DANGER!
DANGER!
Notice
DANGER!
DANGER!
DANGER!
Notice

Service 38
Troubleshooting
Power Cycling
If a problem occurs that cannot be corrected with the
instructions in this user manual (see also the help
below), follow the steps given here.
1Switch the device off using the on/off switch on the
side.
2Wait at least ten seconds.
3Switch the device on using the on/off switch on the
side.
4If the problem repeats, please contact our technical
customer service or your retailer.
Problems Solutions
The Pocket Projector is unresponsive or hung up • Insert a slim, pointy object into the reset hole to trig-
ger a hardware reset (see also Side View, page 5)
The Pocket Projector cannot be switched on • Connect the supplied power supply to recharge the
internal battery.
No sound • Adjust the volume using the ¬/ key on the
remote control.
No sound from the external connected device • Check the cables to the external device
• Set the volume on the external device
• Only the original cables from the device manufac-
turer may function
Bad sound quality with your computer connection • Check if the audio cable is connected to the comput-
ers headphone socket or the line-out socket.
• The volume setting on the computer should not be
too high.
Only the initial screen appears and not the image from
the external device
• Check if the cables are connected to the right sock-
ets.
• Please check that the external device is switched on
• Check if the video output of the external device is
switched on.
Only the initial screen appears and not the image from
the connected computer
• Please check that the VGA-output of the computer
is switched on.
• Check if the resolution of the computer is set to
800x600.
Device switches turns off • When the device is running for a long period of time,
the surface becomes hot and a warning symbol
appears on the projection (see also Symbols in the
Statusbar, page 10). The device automatically turns
off when it gets too hot. After the device has cooled
down, you can continue playback.
• When the battery does not have sufficient capacity,
the device turns off. Connect the device to the
power supply.
The device is connected to the power supply and
switches to stand-by mode
• The battery is in deep discharge. The device can be
turned on and is ready to use after approximately
five minutes of charging time (see also Battery deep
discharge, page 36).

39 Philips · PPX3610
Devices changes from maximum level of brightness to
minimum level of brightness when the device is connect-
ed over USB to play videos.
• When the environment temperature is too high, the
devices turns automatically from maximum level of
brightness to minimum level of brightness in order to
protect the high power LED.
• Use the device with lower environment tempera-
tures.
Device cannot connect with an Android device (for ex-
ample a mobile phone/smartphone with the Android op-
erating system) when connected via USB.
• Deactivate the function „USB debugging“ in the set-
tings menu of your Android device before connect-
ing the Pocket Projector via USB; your Android
device should be recognized as USB storage medium.
Bad image or color quality when connecting with HDMI • Use the supplied HDMI cable (PPA1290). Third-
party cables may cause signal distortions.
Problems Solutions

Appendix 40
12 Appendix
Technical Data
Dimensions (L¦×¦H¦×¦W).......................105¦× 32¦×¦105¦mm
Weight ....................................................................... 0,284¦kg
Recommended Ambient........................................5¦–¦35¦ºC
Relative Humidity ..................15¦–¦85¦% (non-condensing)
File format................... *.mp4, *.avi, *.mov, *.mkv, *.mpg,
..................................*.mpeg, *.flv, *.ts, *.m2ts, *.3gp
Photo formats ................................. JPEG, BMP, PNG, GIF
Music formats........................................MP3, WAV, WMA
Video Standard (CVBS)................... PAL, SECAM, NTSC
Video Standard (YPbPr)....480i/p, 576i/p, 720p, 1080i/p
Video connection ................................. Mini-HDMI socket
Headphone connection..........Stereo - jack plug: 3,5¦mm
Internal speaker ...................................................mono 1¦W
Internal memory......................................................... 2.5¦GB
Compatible Memory Cards ......SD/SDHC/SDXC/MMC
USB connection max. power .........................5V, 500mA
Technology / optical
Display technology..................................WVGA 0,3" DLP
Light source ........................................................... RGB LED
Resolution .......................................... 854¦x¦480¦Pixel¦(16:9)
Supported Resolutions..................... VGA/SVGA/WVGA
..............................................XGA/WXGA/FULL HD
Brightness (Bright Mode)........................up to 100 lumen
Contrast ratio .............................................................1000:1
Projected image size....................................... 12¦–¦120¦inch
Screen distance ...........................................0,5¦m up to 5¦m
Horizontal Scan Rate.........................................31¦–¦69¦kHz
Vertical Scan Rate ................................................56¦–¦85¦Hz
Power supply
Model No................................................................ MPA-630
Input .............................100¦–¦240V~, 50¦–¦60 Hz, max. 1A
Output ...................................................................12V', 2A
Manufacturer ............................. Wanlida Group Co., Ltd.
Built-in rechargeable battery
Battery type.................................................................... LiPol
Capacity.........................................................1800mAh 7.4V
Charging time..................................................................... 2¦h
Operating time................................................................... 1¦h
Operating time (ECO mode) ......................................... 2¦h
Manufacturer ................................................... Great Power
Accessories
Following accessories are available for your device:
Pico Station with battery and speakers
................................................ PPA7300 / 253529749
Pico Station mit battery, speakers and DVB-T adapter
..................................................PPA7301 / 253532895
USB DVB-T Stick ...........................PPA8301 / 253529757
YUV/YPbPr cable ........................ PPA1210 / 253447083
Video-(CVBS) cable.......................PPA1320 / 253526178
VGA cable .................................... PPA1250 / 253447070
iPhone/iPad/iPod-HDMI cable .. PPA1280 / 253447091
iPhone/iPad/iPod-A/V cable ...... PPA1160 / 253372471
MHL cable .................................... PPA1240 / 253520048
All data are provided for reference purposes only.
Sagemcom Documents SAS reserves the right to
make any changes without prior notice.

41 Philips · PPX3610
The CE marking certifies that the product meets the
main requirements of the European Parliament and
Council directives 1999/5/CE, 2006/95/CE, 2004/108/
CE and 2009/125/CE on information technology equip-
ment, regarding safety and health of users and regarding
electromagnetic interference.
The declaration of compliance can be consulted on the
site www.picopix.philips.com.
Preservation of the environment as part of a sustainable
development plan is an essential concern of Sagemcom
Documents SAS. The desire of Sagemcom Documents
SAS is to operate systems observing the environment.
The desire of Sagemcom Documents SAS is to operate
systems observing the environment and consequently it
has decided to integrate environmental performances in
the life cycle of this products, from manufacturing to
commissioning use and elimination.
Packaging: The presence of the logo (green dot)
means that a contribution is paid to an approved
national organisation to improve package recovery and
recycling infrastructures. Please respect the sorting
rules set up locally for this kind of waste.
Batteries: If your product contains batteries, they
must be disposed of at an appropriate collection point.
Product: The crossed-out waste bin stuck on the
product means that the product belongs to the family of
electrical and electronic equipment. In this respect, the
European regulations ask you to dispose of it selectively;
• At sales points in the event of the purchase of
similar equipment.
• At the collection points made available to you
locally(drop-off centre, selective collection, etc.).
In this way you can participate in the re-use and upgrad-
ing of Electrical and Electronic Equipment Waste, which
can have an effect on the environment and human
health.
The paper and cardboard packaging used can be dis-
posed of as recyclable paper. Have the plastic wrapping
recycled or dispose of it in the non-recyclable waste,
depending on the requirements in your country.
Trademarks: The mentioned references in this man-
ual are trademarks of the respective companies. The
lack of the trademarks É and Ë does not justify the
assumption that these dedicated terminologies are free
trademarks. Other product names used herein are for
identification purposes only and may be trademarks of
their respective owners. Sagemcom Documents SAS
disclaims any and all rights in those marks.
Neither Sagemcom Documents SAS nor its affiliates
shall be liable to the purchaser of this product or third
parties for damages, losses, costs, or expenses incurred
by the purchaser or third parties as a result of accident,
misuse, or abuse of this product or unauthorized mod-
ifications, repairs, or alterations to this product, or fail-
ure to strictly comply with Sagemcom Documents SAS
operating and maintenance instructions.
Sagemcom Documents SAS shall not be liable for any
damages or problems arising from the use of any
options or any consumable materials other than those
designated as original Sagemcom Documents SAS /
PHILIPS products or Sagemcom Documents SAS /
PHILIPS approved products.
Sagemcom Documents SAS shall not be held liable for
any damage resulting from electromagnetic interference
that occurs from the use of any interface cables other
than those designated as Sagemcom Documents SAS /
PHILIPS products.
All rights reserved. No part of this publication may be
reproduced, stored in a retrieval system or transmitted
in any form or by any means, electronic, mechanical,
photocopying, recording, or otherwise, without the
prior written permission of Sagemcom Documents SAS.
The information contained herein is designed only for
use with this product. Sagemcom Documents SAS is not
responsible for any use of this information as applied to
other devices.
This user manual is a document that does not represent
a contract.
Errors, printing errors and changes are reserved.
Copyright È 2013 Sagemcom Documents SAS

Appendix 42

Sagemcom Documents SAS
Documents Business Unit
Headquarters : 250, route de l’Empereur
92500 Rueil-Malmaison Cedex · FRANCE
Tel: +33 (0)1 57 61 10 00 · Fax: +33 (0)1 57 61 10 01
www.sagemcom.com
Simplified Joint Stock Company · Capital 8.479.978 € · 509 448 841 RCS Nanterre
PPX3610
EN
253520035-B
PHILIPS and the PHILIPS’ Shield Emblem are registered trademarks of Koninklijke Philips Electronics N.V.
and are used by Sagemcom under license from Koninklijke Philips Electronics N.V.