SBO Hearing A S WLP021 Wireless programmer for hearing aids User Manual
SBO Hearing A/S Wireless programmer for hearing aids
User Manual
INSTRUCTIONS FOR USE
Thank you
Thank you for choosing our product as your means to fast, reliable fitting. To support
your efforts, we have put great care and attention into making sure that FittingLINK
is of the highest quality and is easy to use and maintain.
FittingLINK ensures a fast and reliable connection between the PC and the client’s
hearing instruments via Bluetooth technology.
In the fitting software you will find instructional videos on how to use FittingLINK.
We recommend that you read this manual carefully before you start to use FittingLINK,
in order to achieve the maximum benefit. This manual describes the most frequently
used functions, which must be understood before you start to use FittingLINK. The
manual also contains instructions and important information about the handling of
your FittingLINK and FittingLINK charger.
If you have any questions about the use, care, or maintenance of FittingLINK, please
contact your supplier’s support function.
Indications for Use
FittingLINK is an accessory to fitting software used when programming wireless hearing
instruments. FittingLINK is intended for wireless transfer of fitting data between the
hearing instruments and the device running the fitting software. FittingLINK can be
connected to the device running the fitting software through the provided Bluetooth
adaptor or USB cable.
FittingLINK is intended to be used by Hearing Care Professionals and
hearing instrument users.
168436CA-US / 05.16
168436CA-US / 05.16

Contents
Instrument view 7
Package content 8
Warnings 10
Basic functions — first-time use 14
Turning FittingLINK ON/OFF 15
How to charge FittingLINK 16
Charging FittingLINK with the charger and charging cradle 18
Charging FittingLINK with the charging cradle and USB cable 19
Charging FittingLINK without the charging cradle 21
Battery low indicator 22
Connect to a PC 24
Connect to a PC via the Bluetooth adaptor 25
How to re-establish pairing between FittingLINK and the Bluetooth adaptor 26
Connect to a PC via the USB cable 29
FittingLINK and your fitting software 30
How to use FittingLINK 31
IMPORTANT NOTICE
Please familiarize yourself with the entire content of this booklet before using your
FittingLINK. It contains instructions and important informa tion about the use and
handling of your FittingLINK.

6 7
How to use FittingLINK on children 38
How to use FittingLINK for coupler-based verification using
hearing instrument analyzers 40
Overview of the LED indicators 42
Cleaning and maintenance 46
Technical information FittingLINK 47
Technical information Bluetooth adaptor 50
Technical data 52
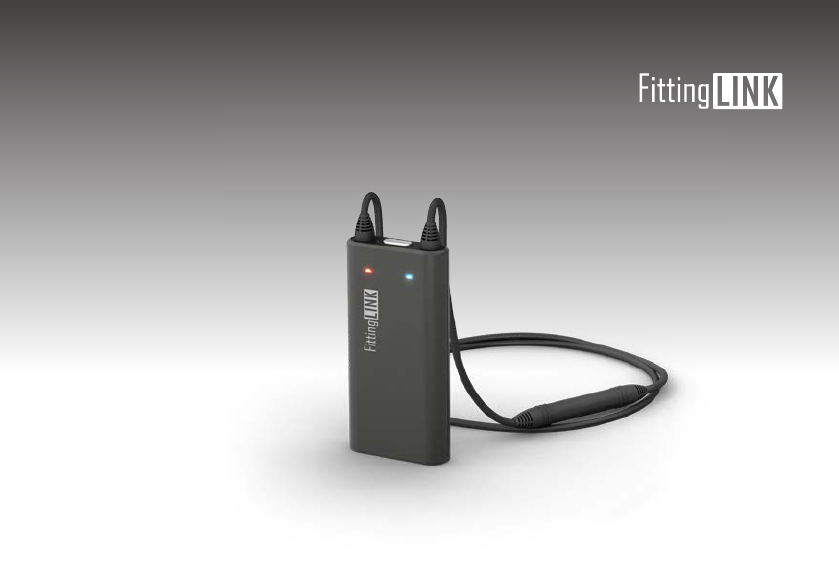
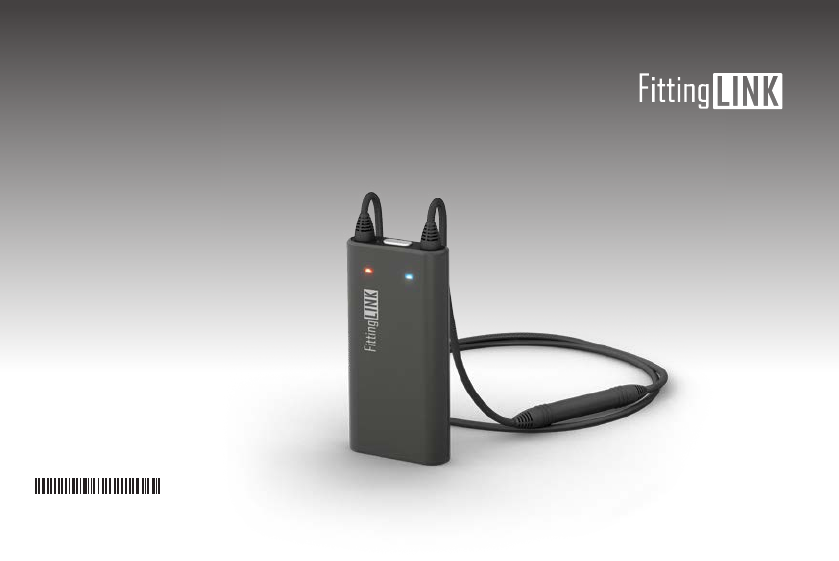
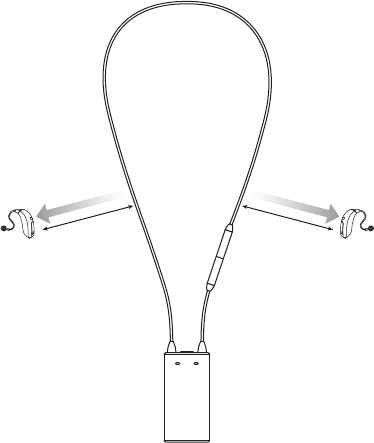
Instrument view
Neck loop
Front LED
indicator — blue
Front LED
indicator — red
Top LED indicator
Power supply
(and USB port)
ON/OFF button
ON/OFF

InstructIons for use
8 9
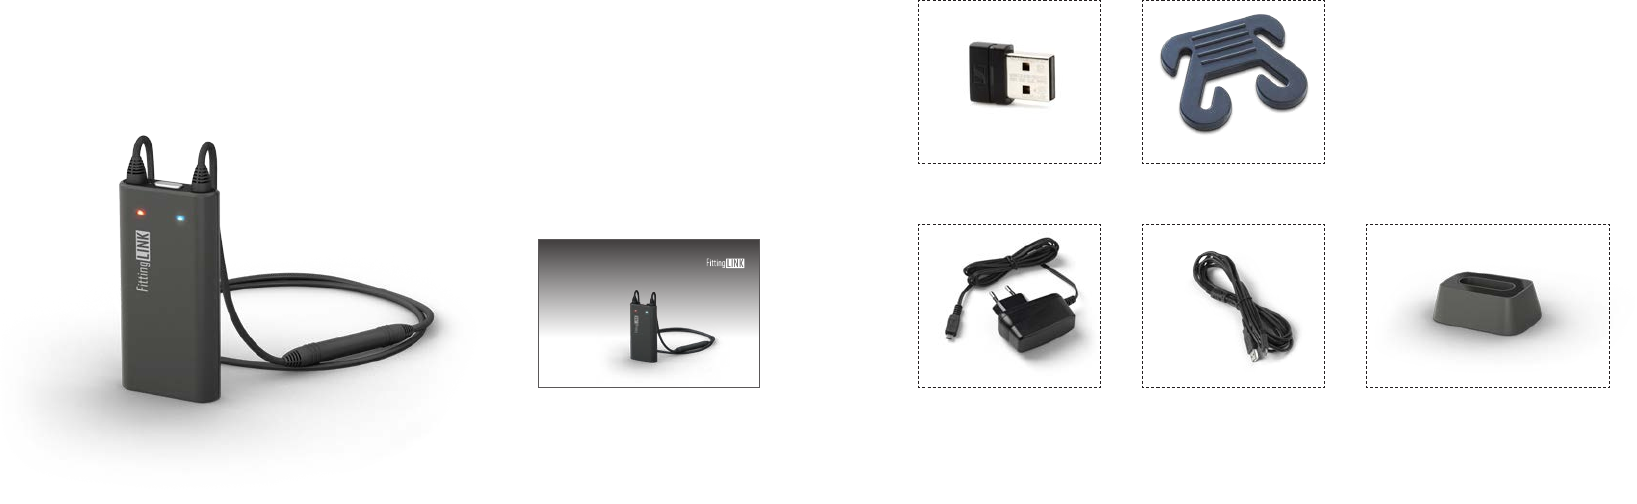
Package content
FittingLINK — what is in the box?
The FittingLINK box consists of the following elements:
USB cable 3m
Box 1 Box 3Box 2
Bluetooth adaptor
Charging cradle
Clip
Charger*
* Contents may vary
depending on country.
This guide (Instructions for Use)

10 11
You should familiarize yourself with the following general warnings and the entire
contents of this booklet before using your FittingLINK.
Products to be connected to external equipment
When using the USB cable always insert the cable into FittingLINK before connecting
the cable to other equipment.
The safety of recharging batteries with the USB cable is determined
by the external equipment. When the USB cable is connected to
mains-operated equipment, this equipment must comply with IEC
60065, IEC 60950-1, IEC 60601-1 or equivalent safety standards.
For safety reasons, only recharge the battery with original FittingLINK accessories.
If third party equipment is used, safety cannot be guaranteed.
Warnings
Explosives and heat exposure
There is a risk that the battery will explode and cause serious injury if FittingLINK is
exposed to excessive heat. Never expose FittingLINK to extreme heat by putting it
in the oven, microwave, burning it or leaving it inside a parked car in the sun.
The operating temperature for FittingLINK is between 5 and 40 °C.
Choking hazards
FittingLINK is not a toy and therefore should be kept out of the reach of children and
anyone else who might swallow parts or otherwise cause injury to themselves.
If a part is swallowed, see a doctor immediately.
Interference and active implants
FittingLINK is designed to comply with the most stringent Standards of International
Electromagnetic Compatibility. However, FittingLINK might cause interference with
other medical devices, such as defibrillators and pacemakers.
Warnings

12 13
• Please contact the manufacturer of your implantable device for information about the
risk of disturbance.
• Immediately remove FittingLINK if interference is suspected and seek medical advice.
Interference can also be caused by power line disturbances, electromagnetic fields from
other devices, radio signals and electrostatic discharges.
Please note that other active FittingLINK devices and wireless hearing instrument
accessories in proximity may create interference and should be turned off.
Use of the neck loop
The neck loop is an antenna for the magnetic induction link to the hearing instruments.
If the neck loop should accidentally get caught on something while the client is wearing
it, the neck loop is constructed to release automatically. Therefore, never try to shorten
or modify the neck loop in an unauthorized way.
Always use the provided clip to shorten the length of the neck loop.
If the neck loop breaks, it cannot be repaired and must be replaced immediately.
Consult your local supplier for replacement.
Please refer to “How to use FittingLINK on children”.
Battery safety and replacement
Do not attempt to open FittingLINK, as it may damage the battery.
Never attempt to replace the battery. If battery replacement is needed, please return
your device to the supplier. The service guarantee is void if there are signs of tampering.
The battery is tested and in compliance with IEC 62133.
Warnings Warnings
POWER
14 15
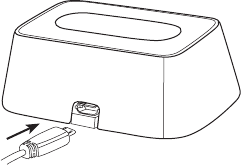
Basic functions — first-time use
Insert the USB cable in the bottom of the charging cradle and the charger is ready for use.
Turning FittingLINK ON/OFF
Power on
Press the ON/OFF button on top of FittingLINK for approx. 2 seconds until you see a
green steady light from the top LED and a short red and blue flash from the front LED
indicators. The LED lights indicate that FittingLINK is powered on and you can release
the ON/OFF button.
If FittingLINK cannot power on, make sure it is charged.
If the top LED shows a red light instead of the green light the battery is running low
(steady red light) or very low (flashing red light) and FittingLINK should be charged.
Please refer to “See how to charge FittingLINK”.
Power off
Press and hold the ON/OFF button on top of FittingLINK for approx. 2 seconds until
the top LED indicator turns off.
16 17
How to charge FittingLINK
FittingLINK uses an internal rechargeable battery.
FittingLINK can be charged either by using the provided charger and charging cradle or by
using the USB cable provided.
When charging FittingLINK for the first time, it should be left to charge for at least two
hours even if the top LED indicator on the device shows that the battery is fully charged.
We recommend that you turn off and store FittingLINK in the charging cradle whenever it
is not in use, to ensure the best possible performance.
It is safe to leave FittingLINK in the charging cradle overnight — the battery
cannot be overcharged.
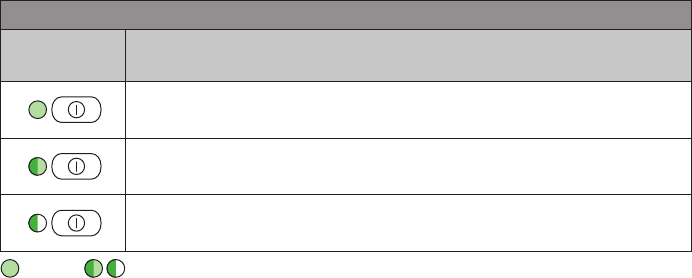
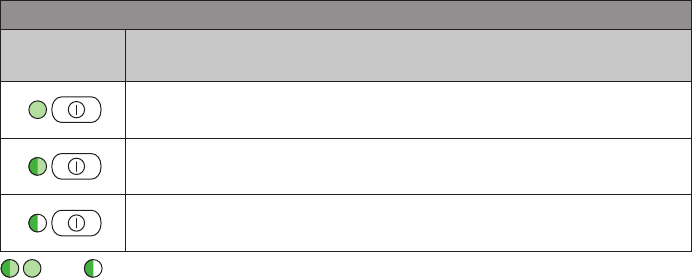
FittingLINK charging indicator
Charging
Top LED
indicator
Description
Device on and fully charged
Device on and charging
Device off and charging
Once fully charged, the LED will be off
Steady Flash

18 19
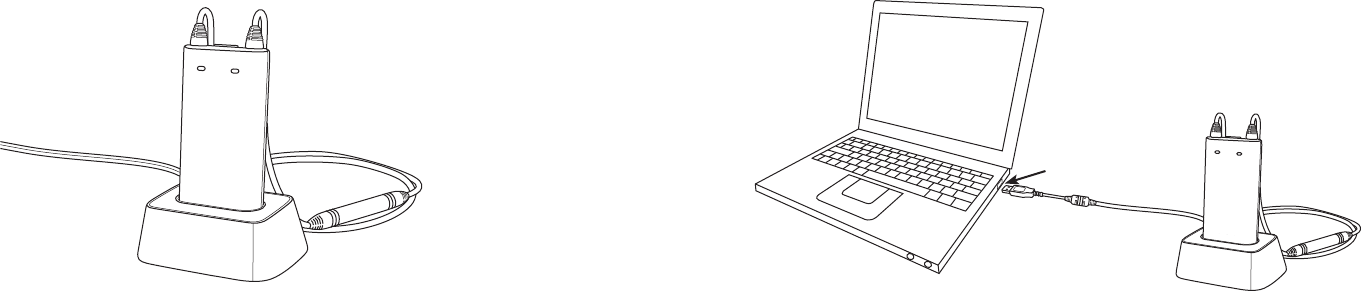
Charging FittingLINK with the charger and
charging cradle
Simply place FittingLINK in the charging cradle when you want to charge FittingLINK with
the provided charger and charging cradle. Remember to connect the charger to a power
outlet. As soon as the power is switched on, FittingLINK will start charging.
Charging FittingLINK with the charging cradle
and USB cable
When charging FittingLINK with the provided charging cradle and the USB cable, place
FittingLINK in the charging cradle and connect the USB cable to a USB port on your PC.

20 21
Please note that if you charge via a USB hub, some hubs do not
deliver enough power to actually charge FittingLINK. In this case
we recommend use of the provided charger instead.
Only recharge FittingLINK using the provided charger or a stabilized
USB hub/charger that provides 5VDC and ≥500 mA.
IMPORTANT INFORMATION
When using the USB cable, always insert the USB cable into FittingLINK before
connecting the cable to other equipment.
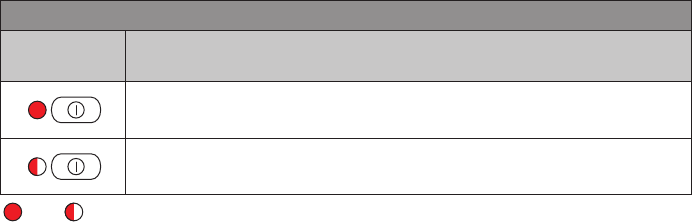
Charging FittingLINK without the charging cradle
If you prefer not to use the charging cradle when charging FittingLINK, you have the
option to insert the USB cable directly into FittingLINK instead of the charging cradle.
22 23
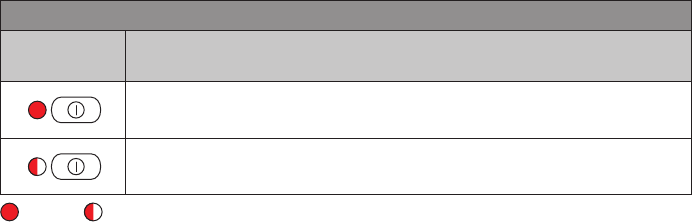
Battery low indicator
FittingLINK will indicate low battery (approx. 20 minutes programming capacity left)
with a steady red light, and very low battery (approx. 5 minutes programming capacity
left) with a flashing red light.
Battery low indicator
Top LED
indicator
Description
Low battery – approx. 20 minutes capacity left
Very low battery – approx. 5 minutes capacity left
Steady Flash
To ensure the best possible performance, we recommend that you turn off and store
FittingLINK in the charging cradle whenever it is not in use.
The battery should not be drained completely. Keeping the battery fully charged
will prolong the capacity of the battery. The battery cannot be replaced by the user.
The battery capacity is up to 8 hours of typical daily use.
Battery charge time is 2 hours for complete charge, using the provided power supply.
24 25
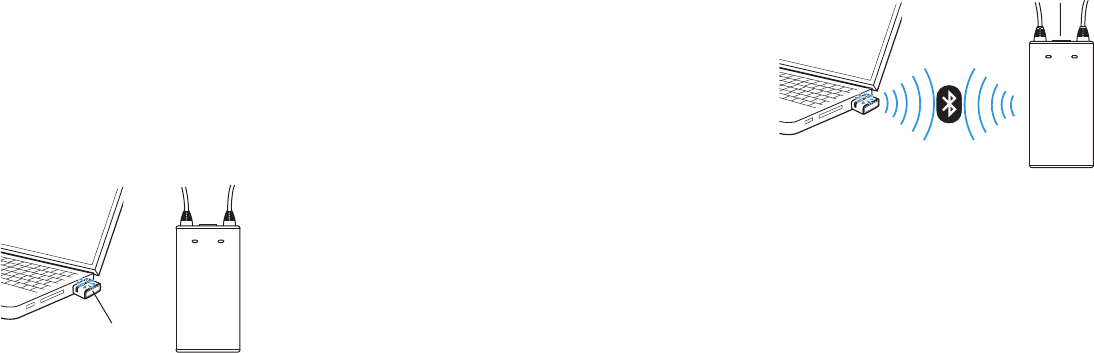
Connect to a PC
You can connect FittingLINK to your PC either by using the
provided Bluetooth adaptor or the USB cable.
The Bluetooth adaptor enables you to connect FittingLINK wirelessly to your computer.
However, in some locations Bluetooth technology is not allowed. When this is the case,
simply connect FittingLINK with the computer via the provided USB cable.
Before you start connecting FittingLINK to a PC for the first time, please make sure that
you have the latest version of your fitting software installed on the PC. Please also make
sure that FittingLINK is fully charged. See “How to charge FittingLINK”.
Please note that the provided Bluetooth adaptor connects only to FittingLINK and that
FittingLINK only connects to the Bluetooth adaptor provided.
Connect to a PC via the Bluetooth adaptor
Make sure that FittingLINK is turned OFF.
To obtain wireless connection between FittingLINK and
your PC, simply plug the provided Bluetooth adaptor into
a USB port on your PC and turn the PC ON.
FittingLINK has already been paired by the manufacturer
with the Bluetooth adaptor provided in the box set.
However the first time you connect to a PC, a
message may appear on the screen and inform
you that the applicable driver is being
installed. Allow the installation to run
before you proceed.
Now turn ON FittingLINK. See "Turning
FittingLINK ON/OFF".
FittingLINK is now ready for programming
compatible wireless hearing instruments.

26 27
How to re-establish pairing between FittingLINK
and the Bluetooth adaptor
FittingLINK has been paired by the manufacturer with
the adaptor provided in the box set.
If for some reason the PC running your fitting software does not recognize FittingLINK,
you may have to re-establish the pairing between FittingLINK and the Bluetooth adaptor.
In this case please close the fitting software before you continue.
1. Press and hold the pairing button on the Bluetooth
adaptor for five seconds until the LED lights up with
a flashing blue light.
2. Press the ON/OFF button on FittingLINK
for five seconds and the top LED will light
up with a flashing blue light. The pairing
will begin automatically. FittingLINK must
be close to the Bluetooth adaptor (approx.
10 cm) while the pairing takes place.
3. When the pairing is successfully completed
the adaptor LED will show steady blue
(until the fitting software is turned on)
while the top LED on FittingLINK shows
steady blue for approximately 10 seconds.
Please note that FittingLINK can only be
paired to a single Bluetooth adaptor at a
time and vice versa.
ON/OFF
Pairing button
28 29
Pairing
Top LED
indicator
Description
FittingLINK in pairing mode
Pairing complete
Flash Steady
When the pairing is finished, open your fitting software, detect and select FittingLINK
as your programming device. It is necessary to perform and complete this selection
procedure only once.
FittingLINK is now ready for programming the hearing instruments.
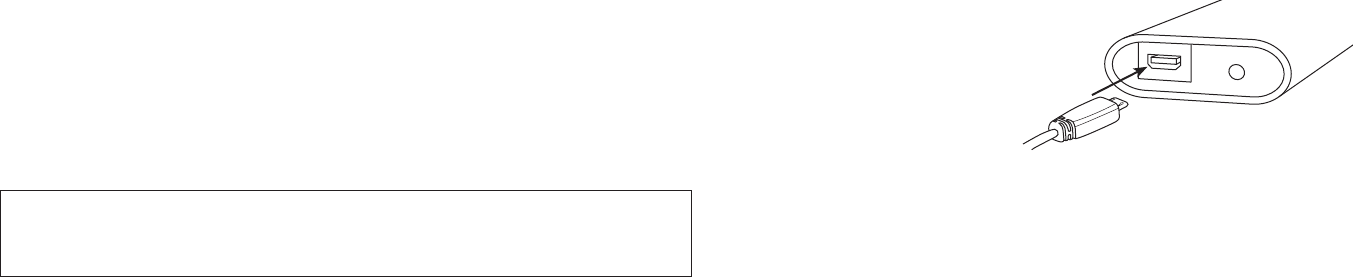
Connect to a PC via the USB cable
To connect FittingLINK to your PC with the USB cable, insert the USB cable in the
USB port in the bottom of FittingLINK and then insert the other end of the cable in a
USB port on your PC.
Turn ON your PC and then turn ON FittingLINK. Open your fitting software, detect and
select FittingLINK as your programming device. It is only necessary to perform and
complete this selection procedure the first time.
FittingLINK is now ready for programming wireless hearing instruments.
Please note, you can leave the Bluetooth adaptor in your
PC while connecting via the USB cable.
IMPORTANT NOTICE
If you connect the USB cable to a non-powered USB hub, FittingLINK may not charge.
It is recommended to connect the USB cable directly to your PC.

30 31
How to use FittingLINK
FittingLINK has been designed to offer
you the best possible daily use during
programming sessions with and without
your clients.
Programming without a client
When you want to program hearing
instruments without a client wearing
them, turn ON FittingLINK.
Place FittingLINK with the neck loop flat
on a table and the hearing instruments
on each side of the neck loop as shown
in the drawing.
When you program hearing instruments,
the neck loop must always be closed as
shown in the drawing.
5—10 cm/
2—4 in.
5—10 cm/
2—4 in.
FittingLINK and your fitting software
Prior to first use, FittingLINK must be detected as a programming device within your
fitting software.
To detect FittingLINK, open your fitting software, select "Preferences" from the menu.
You can now detect and select FittingLINK as your programming device.
32 33
Make sure that the neck loop is not curled or touching any electrical wires or equipment
and that the hearing instruments are not touching the neck loop.
The optimal placement of the hearing instruments is on the outside of the neck loop,
between 5–10 cm/2–4 in. from the neck loop as shown in the drawing.
The distance between FittingLINK and the Bluetooth adaptor in your PC can be no more
than 10 metres (in direct line of sight).
Devices and installations such as power cables, TVs, PC monitors, LED light bulbs and
other devices emitting magnetic noise might decrease the programming performance if
placed too close to FittingLINK. Likewise a table made of or containing a lot of metal, may
lead to decreased performance.
Please note that other active FittingLINK devices and wireless hearing instrument
accessories in proximity may create interference and should be turned OFF.
If you experience decreased performance, we recommend that you relocate FittingLINK
or turn off possible sources of interference.
At the end of the session and before disconnecting or removing FittingLINK make sure
that you have saved your programming to the hearing instruments.
Please consult the fitting software for further guidance.
34 35
Programming with a client
When you want to program hearing instruments while your client is wearing them, please
make sure that FittingLINK is sufficiently charged.
For easy placement, the neck loop can be opened, as shown on the drawing below,
while placing FittingLINK around the client's neck.
When opening the neck loop, pull the connectors
apart. Do not pull the neck loop antenna.
When you program hearing instruments, the
neck loop must always be closed as shown in the
drawing to the right.
The distance between FittingLINK and the
Bluetooth adaptor in your PC can be no more than
10 metres (in direct line of sight).
Devices and installations such as power cables,
TVs, PC monitors, LED light bulbs and other
devices emitting magnetic noise might decrease
the programming performance if placed too close
to FittingLINK. Please note that other active
FittingLINKs and wireless hearing instrument
accessories in proximity may create interference
and should be turned off.
36
If you experience decreased performance, we recommend that you turn off possible
sources of interference.
At the end of the session and before disconnecting or removing FittingLINK make
sure that you have saved your programming to the hearing instruments.
Please consult the fitting software for further guidance.

38 39
How to use FittingLINK on children
For children who are old enough to provide verbal feedback regarding
their hearing instrument, it will be possible to use FittingLINK
for programming, real-ear verification or fine-tuning.
It is also possible to use FittingLINK with babies or small children. However, the
programming process with infants and small children differs from adults since they
are not able to provide verbal feedback on their hearing instruments’ sound quality.
Therefore, it is recommended that the actual verification of the hearing instrument
be done using the coupler-based verification method. See below for instructions.
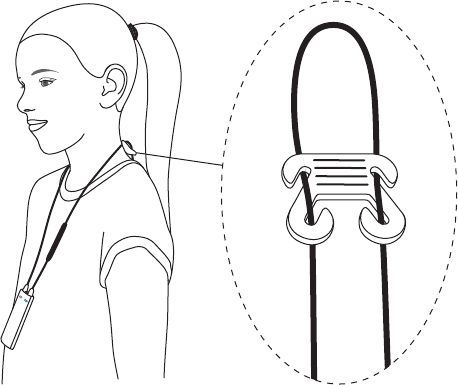
When working with children, it can be necessary to shorten the neck loop. Always use
the provided clip to shorten the neck loop. Do not shorten or modify the neck loop in
an unauthorized way. Please refer to the drawing on how to place the clip.

40 41
How to use FittingLINK for coupler-based
verification using hearing instrument analyzers
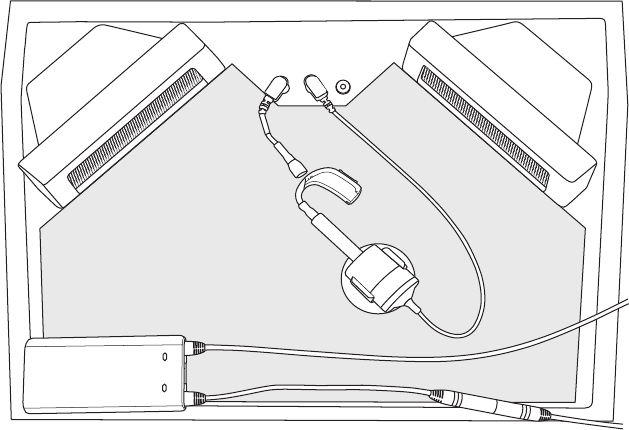
Place FittingLINK in the test chamber. Connect the hearing instrument to the 2cc coupler
and place the hearing instrument 5–10 cm away from the outside of the neck loop, as
shown here.
Close the lid of the test chamber and proceed with the coupler-based verification.
Please note that FittingLINK will not work in some test chambers, due to the chambers
being too small to ensure the 5–10 cm distance, or due to electromagnetic interference.
If this is the case, programming must be done using the hearing instrument programming
cables and a non-wireless programming interface (e.g., EXPRESSlink).
42 43
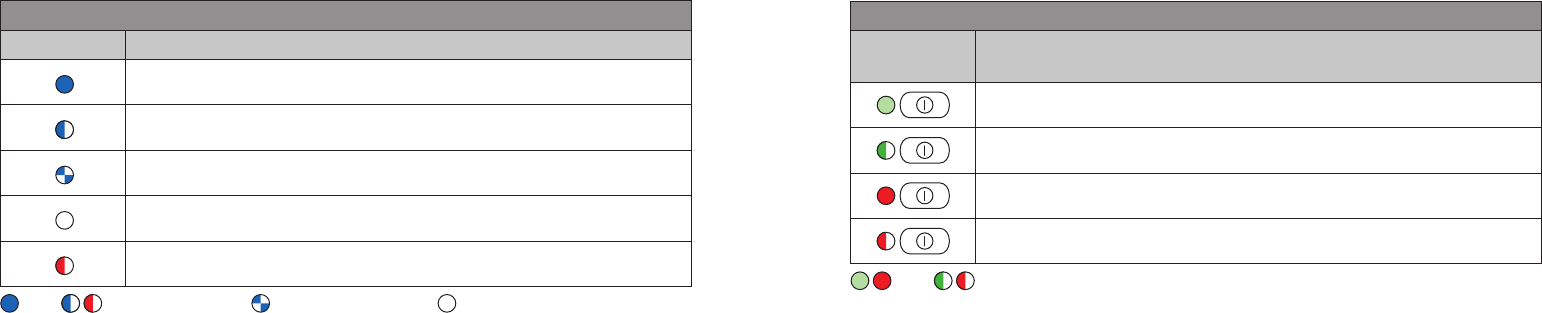
Overview of the LED indicators
How to read the Bluetooth adapter LED indicator.
Bluetooth adapter
LED
indicator
Description
Bluetooth adapter active
Bluetooth adapter searching for in-range FittingLINK
Bluetooth adapter pairing
Bluetooth adapter inactive
Self test error — contact your supplier
Steady Slow flash Fast flash LED off
How to read FittingLINK LED indicators.
The top LED indicator is the battery status indicator.
Battery status
Top LED
indicator
Description
FittingLINK on and battery fully charged
Battery charging
Low battery
Very low battery
Steady Flash

44 45
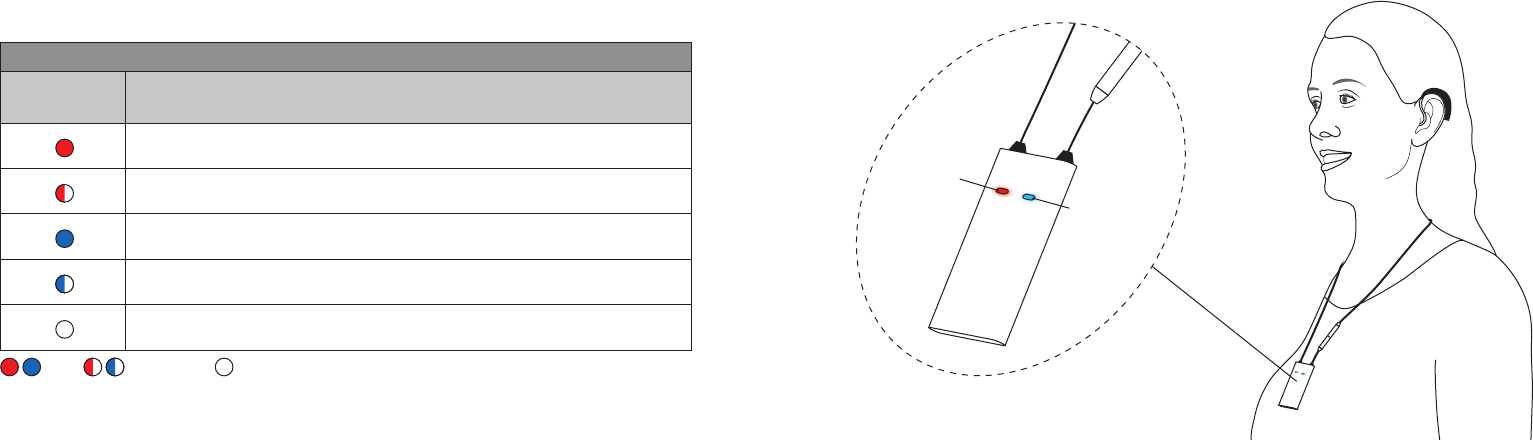
Front LED
indicator - blue
Front LED
indicator - red
The front LED indicators are programming status indicators.
Programming status
Front LED
indicator
Description
Connected to right hearing instrument
Communicating with right hearing instrument
Connected to left hearing instrument
Communicating with left hearing instrument
Not connected to the hearing instruments
Steady Flash LED off
46 47
Cleaning and maintenance
FittingLINK is a sealed device that requires minimum maintenance.
To ensure high levels of hygiene always disinfect FittingLINK
before a programming session begins.
To disinfect, wipe FittingLINK and the neck loop with a 70%
alcohol / 30% water solution. FittingLINK and the neck loop must
never be washed or immersed in water or other liquids.
The power supply, the charging cradle and the Bluetooth adaptor must be kept free of
dirt or debris. These parts are to be cleaned with a soft, dry cloth only.
When FittingLINK is not in use, turn it OFF and store it in the charging cradle in order for
it to be sufficiently charged and ready for the next fitting session.
Technical information FittingLINK
FittingLINK contains a radio transmitter using short-range magnetic induction
technology, working at 3.84 MHz and a Bluetooth radio operating at 2.4 GHz.
The magnetic field strength of the transmitter at 3.84 MHz is
< -15 dBμA/m @10m (measured in 10 kHz bandwidth) and the
radiated power of the Bluetooth radio is < +8 dBm EIRP.
The emission power from FittingLINK is below international emission limits for
human exposure. FittingLINK complies with international
standards concerning electromagnetic compatibility.
Due to the limited size available on the device, many of the relevant approval markings
are found in this document.
This device is certified under:
FCC ID: 2ACAHWLP021
IC: 11936A-WLP021
48 49
The device complies with Part 15 of the FCC rules and RSS-210 of Industry Canada.
Operation is subject to the following two conditions:
1. This device may not cause harmful interference.
2. This device must accept any interference received, including interference that may
cause undesired operation.
Changes or modifications not expressly approved by the party responsible for compliance
could void the user’s authority to operate the equipment.
NOTE: This equipment has been tested and found to comply with the limits for a Class B
digital device, pursuant to Part 15 of the FCC rules.
These limits are designed to provide reasonable protection against harmful interference
in a residential installation. This equipment generates, uses and can radiate radio
frequency energy and, if not installed and used in accordance with the instructions, may
cause harmful interference to radio communications. However, there is no guarantee
that interference will not occur in a particular installation.
If this equipment does cause harmful interference to radio or television reception,
which can be determined by turning the equipment off and on, the user is encouraged
to try to correct the interference by one or more of the following measures:
• Reorient or relocate the receiving antenna.
• Increase the distance between the equipment and the receiver.
• Connect the equipment to an outlet on a circuit different from that to which the
receiver is connected.
• Consult your supplier for help.
50 51
Technical information Bluetooth adaptor
This device contains a module with:
FCC ID: DMOCBBSKE
IC: 2099D-BTD800
The device complies with Part 15 of the FCC rules and RSS-210 of Industry Canada.
Operation is subject to the following two conditions:
1. This device may not cause harmful interference.
2. This device must accept any interference received, including interference that may
cause undesired operation.
NOTE: This equipment has been tested and found to comply with the limits for a Class B
digital device, pursuant to Part 15 of the FCC rules.
These limits are designed to provide reasonable protection against harmful interference
in a residential installation. This equipment generates, uses and can radiate radio frequency
energy and, if not installed and used in accordance with the instructions, may cause
harmful interference to radio communications. However, there is no guarantee that
interference will not occur in a particular installation.
If this equipment does cause harmful interference to radio or television reception, which
can be determined by turning the equipment off and on, the user is encouraged to try to
correct the interference by one or more of the following measures:
• Reorient or relocate the receiving antenna.
• Increase the distance between the equipment and the receiver.
• Connect the equipment to an outlet on a circuit different from that to which the
receiver is connected.
• Consult your supplier for help.
Changes or modifications made to this equipment not expressly approved by the party
responsible for compliance may void FCC authorization to operate this equipment. This
Class B digital apparatus complies with Canadian ICES-003.
RF Radiation Exposure Information
Since the radiated output power of this device is far below the FCC radio frequency limits,
it is not subjected to routine RF exposure evaluation as per Section 2.1093 of the FCC
rules. This device complies with the US and Industry Canada portable device RF exposure
limits set forth for an uncontrolled environment and is safe for intended operation as
described in the user manual.
E2831
52 53
Technical data
FittingLINK model WP-2
Bluetooth adapter model BTD 800 USB
Bluetooth adapter version WP-3
Operating conditions Temperature: +5 °C to +40 °C
Humidity: 15% to 93%, non-condensing
Atmospheric pressure: 700 hPa to 1060 hPa
Storage and transportation
conditions
Temperature: -25 °C to +70 °C
Humidity: 15% to 93%, non-condensing
SBO Hearing A/S hereby declares that FittingLINK is in compliance with the essential
requirements and other relevant provisions of Directive 1999/5/EC. Declaration of
conformity is available at SBO Hearing A/S.
Manufactured by: Distributed by:
SBO Hearing A/S Oticon Canada
Kongebakken 9 1-6950 Creditview Rd.
DK-2765 Smørum Mississauga, ON L5N 0A6
www.sbohearing.com www.oticon.ca
0682
Waste from electronic
equipment must be
handled according to
local regulations.
MODE D'EMPLOI
0000168436000001
Merci
Merci d'avoir choisi notre produit an de bénécier d'un appareillage rapide et able.
Nous avons mis le plus grand soin et la plus grande attention à nous assurer de la qualité
de votre solution FittingLINK et de sa facilité d’utilisation et d’entretien.
Grâce à la technologie Bluetooth, le FittingLINK garantit une connexion directe, rapide
et able entre l'ordinateur et les appareils auditifs du client.
Vous trouverez dans le logiciel d'adaptation des vidéos de présentation de l'utilisation
du FittingLINK.
Nous vous invitons à lire attentivement ce mode d'emploi avant de commencer à utiliser
votre FittingLINK an de bénécier pleinement de tous ses avantages. Le mode d'emploi
décrit les fonctions usuelles du FittingLINK et il est important de bien les comprendre
avant de commencer à l’utiliser. Le mode d'emploi contient également des instructions
et des informations importantes au sujet de la manipulation de votre FittingLINK et de
son chargeur.
Si vous avez des questions relatives à l'utilisation, à l'entretien ou à la maintenance de
votre FittingLINK, veuillez consulter notre service d'assistance.
Instructions d’utilisation
FittingLINK est un accessoire du logiciel d'adaptation utilisé lors de la programmation
d'appareils auditifs sans l. FittingLINK est destiné au transfert sans l de données
d'adaptation entre les appareils auditifs et votre ordinateur. Vous pouvez le connecter
avec l’adaptateur Bluetooth ou le câble USB fournis.
168436CA-FR / 05.16
168436CA-FR / 05.16

Sommaire
Aperçu de l’appareil 7
Contenu de la boîte 8
Avertissements 10
Fonctions de base — Première utilisation 14
Mise hors et sous tension du FittingLINK 15
Comment charger le FittingLINK 16
Charger le FittingLINK à l’aide du chargeur et du socle de chargement 18
Charger le FittingLINK avec le socle de chargement et le câble USB 19
Charger le FittingLINK sans le socle de chargement 21
Indicateur de batterie faible 22
Connexion à un ordinateur 24
Connexion à un ordinateur avec l’adaptateur Bluetooth 25
Comment rétablir l’appairage entre le FittingLINK et l’adaptateur Bluetooth 26
Connexion à un ordinateur avec le câble USB 29
FittingLINK et votre logiciel d’adaptation 30
Comment utiliser le FittingLINK 31
REMARQUE IMPORTANTE
Veuillez vous familiariser avec l’ensemble de ce mode d'emploi avant d’utiliser
votre FittingLINK. Il contient des instructions et des informations importantes sur
l’utilisation et la manipulation de votre FittingLINK.

6 7
Comment utiliser le FittingLINK sur des enfants 38
Comment utiliser le FittingLINK pour une vérication par coupleur
à l’aide d’une chaine de mesure 40
Vue d’ensemble des voyants 42
Nettoyage et entretien 46
Informations techniques sur le FittingLINK 47
Informations techniques sur l’adaptateur Bluetooth 50
Données techniques 52
Aperçu de l'appareil
Tour de cou
Voyant
avant bleu
Voyant
avant rouge
Voyant supérieur
Alimentation
(et port USB)
Bouton Marche / Arrêt
Marche / Arrêt
InstructIons for use
8 9
Contenu de la boîte
FittingLINK — Que contient la boîte?
La boîte du FittingLINK contient les accessoires suivants:
Câble USB de 3mètres
Kit 1 Kit 3Kit 2
Adaptateur Bluetooth
Socle de chargement
Clip
Chargeur*
* Le contenu est susceptible
de varier selon le pays.
Ce guide (mode d'emploi)

10 11
Il est indispensable de vous familiariser avec les recommandations générales exposées
ci-dessous et avec le contenu de ce manuel avant d’utiliser votre FittingLINK.
Produits à connecter à des équipements externes
Lors de l'utilisation du câble USB, insérez toujours le câble dans le FittingLINK avant de
relier le câble aux autres équipements.
Le rechargement sécurisé des batteries au moyen du câble USB dépend entièrement
de l'équipement externe. Quand le câble USB est raccordé à un équipement alimenté
sur le secteur, cet équipement doit être conforme aux normes de sécurité IEC 60065,
IEC 60950-1, IEC 60601-1 ou à des normes équivalentes.
Pour des raisons de sécurité, veuillez ne recharger la batterie qu'à l'aide d'accessoires
FittingLINK d'origine. Votre sécurité ne peut pas être garantie en cas d'utilisation
d'équipements de d’autres marques.
Avertissements
Explosifs et exposition à la chaleur
Si le FittingLINK est exposé à une chaleur excessive, un risque d'explosion,
susceptible de causer de graves dommages corporels, ne doit pas être exclu.
Ne jamais exposer le FittingLINK à des chaleurs extrêmes, en le mettant dans
un four, dans un four à micro-ondes, en le brûlant ou en le laissant à l'intérieur
d'une voiture stationnée en plein soleil.
La température d'utilisation du FittingLINK est comprise entre 5et 40°C.
Risque d’étouement
FittingLINK n'est pas un jouet et ne doit donc pas être laissé à la portée des enfants
et de toute personne susceptible d'avaler des pièces ou de se blesser avec l'appareil.
Si une pièce est avalée, veuillez consulter immédiatement un médecin.
Interférences et implants actifs
De par sa conception, le FittingLINK satisfait aux normes les plus strictes de
Compatibilité Électromagnétique Internationale. Il se peut toutefois que le FittingLINK
cause des interférences avec d'autres dispositifs médicaux, tels que les débrillateurs
Avertissements

12 13
et les stimulateurs caridaques.
• Veuillez contacter le fabricant de votre dispositif implantable pour obtenir des
informations sur le risque de perturbation.
• En cas de suspicion d'interférence, retirez immédiatement le FittingLINK et
consultez un médecin.
Les interférences peuvent aussi avoir pour cause des perturbations sur les lignes
électriques, les champs électromagnétiques créés par d'autres dispositifs, les signaux
radio et les décharges électrostatiques.
Veuillez noter que d'autres appareils actifs et accessoires pour appareils auditifs sans l
situés à proximité du FittingLINK sont susceptibles de créer des interférences et doivent
donc être éteints.
Utilisation du tour de cou
Le tour de cou est une antenne à induction magnétique pour les appareils auditifs.
Si le tour de cou s'accroche ou se prend accidentellement quelque part pendant que le
client le porte, sa conception est telle qu'il se détache automatiquement. En conséquence,
n'essayez jamais de le raccourcir ou de le modier d'une façon qui n'est pas autorisée.
Utilisez toujours le clip fourni pour raccourcir le tour de cou.
Si le tour de cou se brise, il ne peut être réparé et doit être remplacé immédiatement.
Consultez le service commercial Oticon pour en commander un nouveau.
Veuillez également vous reporter à la section «Comment utiliser le FittingLINK sur les enfants».
Sécurité et remplacement de la batterie
Ne tentez pas d'ouvrir le FittingLINK car cela pourrait endommager la batterie.
N'essayez jamais de remplacer la batterie. S'il est nécessaire de
remplacer la batterie, veuillez nous renvoyer votre appareil. La garantie
deviendra nulle en cas de présence de signes d'altération. La batterie
est testée en vertu de la norme IEC 62133 et conforme à celle-ci.
Avertissements Avertissements

POWER
14 15
Fonctions de base — Première utilisation
Insérez le câble USB dans le bas de la station de charge et le chargeur est prêt à l’emploi.
Mise hors et sous tension du FittingLINK
Allumer
Appuyez sur le bouton Marche / Arrêt en haut du FittingLINK pendant environ 2secondes
jusqu'à ce que le voyant supérieur ache une lumière verte en continu et que les voyants
avant clignotent en rouge et en bleu. Les voyants indiquent que le FittingLINK est
alimenté et vous pouvez relâcher le bouton Marche / Arrêt.
Si le FittingLINK ne s'allume pas, assurez-vous qu'il est chargé.
Si le voyant supérieur s'allume en rouge et non en vert, le niveau de charge de la batterie
est bas (voyant rouge continu) ou très bas (voyant rouge clignotant) et le FittingLINK doit
être rechargé. Veuillez-vous reporter à la section «Comment charger le FittingLINK».
Mise hors tension
Appuyez sur le bouton Marche / Arrêt situé en haut du FittingLINK et maintenez-le
enfoncé pendant environ 2 secondes jusqu'à ce que le voyant supérieur s'éteigne.
16 17
Comment charger le FittingLINK
FittingLINK utilise une batterie interne rechargeable.
FittingLINK peut être chargé à l'aide du chargeur fourni et du socle de chargement ou à
l'aide du câble USB fourni.
Lors du premier chargement de votre FittingLINK, chargez l'appareil pendant au moins
deux heures, même si le voyant supérieur de l'appareil indique que la batterie est
entièrement chargée. Lorsque vous ne l'utilisez pas, nous vous recommandons d'éteindre
et d'installer votre FittingLINK dans le socle de chargement pour bénécier de la meilleure
performance possible.
FittingLINK peut être laissé sur son socle de chargement toute la nuit en toute sécurité:
la batterie ne peut pas être surchargée.
Témoin de charge du FittingLINK
En charge
Voyant LED
supérieur
Description
Appareil en marche et entièrement chargé
Appareil en marche et en cours de chargement
Appareil éteint et en cours de chargement
Une fois que l'appareil est chargé, le voyant s'éteint
Fixe Clignotant
18 19
Charger le FittingLINK à l'aide du chargeur
et du socle de chargement
Il vous sut de placer votre FittingLINK sur le socle de chargement lorsque vous souhaitez
le charger. N'oubliez pas de brancher le chargeur sur une prise murale. La mise en charge
de votre FittingLINK débutera dès que le chargeur sera alimenté.
Charger le FittingLINK avec le socle de
chargement et le câble USB
Pour charger votre FittingLINK à l'aide du socle de chargement et du câble USB, placez-le
sur le socle de chargement et connectez le câble USB à un port USB de votre ordinateur.
20 21
Veuillez noter qu'en cas d'utilisation d'un répartiteur USB pour le chargement, certains
répartiteurs ne dispensent pas assez d'énergie pour charger le FittingLINK. Dans ce cas,
nous vous recommandons d'utiliser le chargeur fourni à la place.
Pour recharger votre FittingLINK, utilisez uniquement le chargeur fourni ou un
répartiteur / chargeur USB stabilisé délivrant 5VCC et ≥500mA.
INFORMATION IMPORTANTE
Lors de l'utilisation du câble USB, insérez toujours le câble USB dans votre FittingLINK
avant de relier le câble aux autres équipements.
Charger le FittingLINK sans le socle de chargement
Si vous préférez ne pas utiliser le socle de chargement pour charger votre FittingLINK,
vous pouvez insérer le câble USB directement dans votre FittingLINK au lieu de le
brancher sur le socle de chargement.
22 23
Indicateur de batterie faible
FittingLINK émet un signal de batterie faible (quand la charge restante correspond à 20
minutes de programmation maximum) : un voyant rouge s'allume et reste xe. Quand la
charge restante est très faible (5 minutes de programmation maximum : le voyant rouge
se met à clignoter).
Indicateur de batterie faible
Voyant LED
supérieur
Description
Batterie faible — capacité restante d'environ 20minutes
Batterie très faible — capacité restante d'environ 5minutes
Fixe Clignotant
Pour garantir la meilleure performance possible, nous vous recommandons d'éteindre et
d'installer votre FittingLINK dans le socle de chargement.
Il ne faut pas laisser la batterie se vider entièrement. Si la batterie est toujours pleine,
elle fonctionnera plus longtemps. L'utilisateur ne doit pas remplacer la batterie lui-même.
La batterie est dotée d'une capacité maximale de 8heures d'utilisation quotidienne.
La durée de chargement de la batterie est de 2heures pour un chargement complet au
moyen de l'alimentation électrique fournie.

24 25
Connexion à un ordinateur
Vous pouvez connecter votre FittingLINK à votre ordinateur à l'aide de l'adaptateur
Bluetooth fourni ou du câble USB.
L'adaptateur Bluetooth vous permet de créer une connexion sans l entre votre
FittingLINK et votre ordinateur. Cependant, la technologie Bluetooth n'est pas autorisée
dans certains lieux. Si tel est le cas, il vous sut de connecter votre FittingLINK à
l'ordinateur au moyen du câble USB fourni.
Avant de débuter le branchement de votre FittingLINK sur un ordinateur pour la première
fois, assurez-vous d'avoir installé la version la plus récente de votre logiciel d'appareillage
sur l'ordinateur en question. Assurez-vous également que votre FittingLINK est
complètement chargé. Voir «Comment charger le FittingLINK».
Veuillez noter que l'adaptateur Bluetooth fourni permet uniquement une connexion au
FittingLINK et que le FittingLINK se connecte uniquement à l'adaptateur Bluetooth fourni.
Connexion à un ordinateur avec
l'adaptateur Bluetooth
Assurez-vous que votre FittingLINK est à l'arrêt.
Pour obtenir une connexion sans l entre le FittingLINK
et votre ordinateur, il vous sut de brancher l'adaptateur
Bluetooth fourni dans un port USB de votre ordinateur et
de mettre l'ordinateur en marche.
FittingLINK est déjà appairé avec l'adaptateur
Bluetooth fourni dans le boîtier. Cependant, lors
de votre première connexion à un ordinateur,
il se peut qu'un message apparaisse à l'écran
et vous informe que le pilote applicable est
en cours d'installation. Laissez l'installation
s'eectuer avant de poursuivre. Mettez
maintenant en marche FittingLINK. Voir « Mettre FittingLINK ON / OFF » .
FittingLINK est maintenant prêt pour la programmation des appareils
auditifs sans l.
26 27
Comment rétablir l'appairage entre le
FittingLINK et l'adaptateur Bluetooth
Le fabricant a appairé le FittingLINK à l'adaptateur fourni dans le boîtier.
Si pour une raison quelconque le PC qui opère votre logiciel de programmation ne
reconnaît pas FittingLINK, vous pouvez avoir à rétablir l’appariement entre FittingLINK
et l’adaptateur Bluetooth. Dans ce cas, s’il vous plaît fermez le logiciel de montage
avant de continuer.
1. Appuyez sur le bouton d'appairage de l'adaptateur
Bluetooth et maintenez-le enfoncé pendant cinq
secondes jusqu'à ce que les voyants s'allument en
bleu et clignotent.
2. Appuyez sur le bouton Marche / Arrêt de
votre FittingLINK pendant cinq secondes
et attendez que le voyant supérieur
clignote en bleu. L'appairage commencera
automatiquement. Maintenez votre
FittingLINK près de l'adaptateur Bluetooth
(environ 10cm) pendant l'appairage.
3. Lorsque le jumelage est terminé avec
succès, le voyant de l’adaptateur ache
bleu (jusqu’à ce que le logiciel approprié
soit mis en marche) tandis que le LED sur le
dessus du FittingLINK ache bleu pendant
environ 10 secondes.
Veuillez noter que le FittingLINK ne peut être
appairé qu'à un seul adaptateur Bluetooth à la
fois et vice versa.
Marche / Arrêt
Bouton
d'appairage

28 29
Appairage
Voyant LED
supérieur
Description
FittingLINK en mode appairage
Appairage actif
Clignotant Fixe
Lorsque le jumelage est terminé, ouvrez votre logiciel de programmation, détecter et
sélectionner FittingLINK en tant que périphérique de programmation. Il est nécessaire
d’exécuter et de terminer cette procédure de sélection qu’une seule fois.
FittingLINK est maintenant prêt à programmer des appareils auditifs sans l.
Connexion à un ordinateur avec le câble USB
Pour connecter votre FittingLINK à votre ordinateur à l'aide du câble USB, insérez le câble
USB dans le port USB à la base de votre FittingLINK puis insérez l'autre extrémité du câble
dans un port USB de votre ordinateur.
Allumez votre PC, puis allumez FittingLINK. Ouvrez votre logiciel de programmation,
détecter et sélectionner FittingLINK comme votre dispositif de programmation. Il est
nécessaire d’exécuter et compléter la procédure de sélection pour la première fois.
FittingLINK est maintenant prêt à programmer des appareils auditifs sans l.
Veuillez noter que vous pouvez laisser l'adaptateur Bluetooth dans votre ordinateur lors
d'une connexion à l'aide du câble USB.
REMARQUE IMPORTANTE
Si vous connectez le câble USB à un répartiteur USB non alimenté, il se peut que
votre FittingLINK ne se recharge pas. Il est recommandé de brancher le câble USB
directement sur votre ordinateur.
30 31
Comment utiliser
le FittingLINK
FittingLINK est conçu pour vous orir
la meilleure expérience d'utilisation
quotidienne au cours de vos sessions de
réglage, que ce soit avec ou sans vos clients.
Programmation sans client
Si vous souhaitez programmer des
appareils auditifs sans qu'un client ne les
porte, mettez le FittingLINK en marche.
Posez votre FittingLINK et le tour de cou
à plat sur une table et ajoutez les aides
auditives de chaque côté du tour de cou
comme indiqué sur le schéma.
Lorsque vous programmez des appareils
auditifs, le tour de cou doit toujours être
fermé, comme indiqué sur le schéma.
5–10 cm /
2–4 pouces
5–10 cm /
2–4 pouces
FittingLINK et votre logiciel d'adaptation
Avant la première utilisation, votre logiciel d'adaptation doit détecter le FittingLINK en
tant qu'appareil de programmation.
Pour détecter FittingLINK, ouvrez votre logiciel de programmation et choisir “préferences”
du menu. Vous pouvez maintenant détecter et sélectionner FittingLINK en tant que votre
dispositif de programmation.
32 33
Assurez-vous que le tour de cou ne soit pas enroulé ou ne touche pas de câbles ou
d'équipements électriques et que les aides auditives ne touchent pas le tour de cou.
La position optimale des aides auditives se trouve à l'extérieur du tour de cou, à une
distance de 5 à 10 cm du tour de cou, comme indiqué sur le schéma.
La distance entre le FittingLINK et l'adaptateur Bluetooth de votre ordinateur ne peut pas
dépasser 10 mètres (en ligne de vision directe).
Les appareils et installations tels que les câbles d'alimentation, les téléviseurs, les écrans
d'ordinateurs, les ampoules à DEL et autres appareils émettant du bruit magnétique
sont susceptibles de réduire la performance de programmation s'ils se trouvent trop
près du FittingLINK. De même, une table en métal ou contenant de nombreux éléments
métalliques peut réduire la performance de l'appareil.
Veuillez noter que d'autres appareils actifs et accessoires pour appareils auditifs sans l
situés à proximité de votre FittingLINK sont susceptibles de créer des interférences et
doivent donc être éteints.
En cas de performance réduite, nous vous recommandons de changer l'emplacement de
votre FittingLINK ou d'éteindre toute source potentielle d'interférences.
À la n de la session et avant de débrancher ou de retirer votre FittingLINK, assurez-vous
de sauvegarder votre programmation des appareils auditifs.
Veuillez consulter le logiciel d'adaptation pour plus d'informations.

34 35
Programmation avec un client
Si vous souhaitez programmer des aides auditives pendant que votre client les porte,
assurez-vous que FittingLINK est susamment chargé.
Pour en faciliter le positionnement, vous pouvez ouvrir le tour de cou, comme illustré
ci-dessous, pour placer FittingLINK autour du cou du client.
Lors de l'ouverture du tour de cou, tirez
doucement pour débrancher les connecteurs.
Ne tirez pas sur l'antenne du tour de cou.
Lorsque vous programmez des appareils auditifs, le tour
de cou doit toujours être fermé, comme indiqué sur le
schéma de droite.
La distance entre FittingLINK et l'adaptateur Bluetooth de
votre ordinateur ne peut pas dépasser 10 mètres (en ligne
de vision directe).
Les appareils et installations tels que les câbles
d'alimentation, les téléviseurs les écrans d'ordinateurs,
les ampoules à DEL et autres appareils émettant du
bruit magnétique sont susceptibles de réduire la
performance de programmation s'ils se trouvent
trop près de FittingLINK. Veuillez noter que d'autres
appareils FittingLINK actifs et accessoires pour
appareils auditifs sans l situés à proximité sont
susceptibles de créer des interférences et doivent
donc être éteints.
36
En cas de performance réduite, nous vous recommandons d'éteindre toute source
potentielle d'interférences.
À la n de la session et avant de débrancher ou de retirer votre FittingLINK, assurez-vous
de sauvegarder votre programmation des appareils auditifs.
Veuillez consulter le logiciel d'adaptation pour plus d'informations.
38 39
Comment utiliser le FittingLINK sur des enfants
Si les enfants sont assez âgés pour s'exprimer au sujet de leur
appareil auditif, il est possible d’utiliser le FittingLINK à des ns de
programmation, de vérication REM ou de réglages ns.
Il est également possible d'utiliser le FittingLINK sur des nourrissons ou des enfants
en bas âge. Cependant, la procédure de programmation pour les nourrissons et les
enfants en bas âge dière de celle des adultes car ils ne sont pas en mesure de fournir
des informations verbales au sujet de la qualité sonore de leurs appareils auditifs. Il est
donc recommandé de procéder au contrôle de l'appareil auditif à l'aide de la méthode de
vérication à partir d'un coupleur. Veuillez-vous reporter aux instructions ci-dessous.
Lors d'une utilisation avec des enfants, il est parfois nécessaire de raccourcir le tour de
cou. Utilisez toujours le clip fourni pour raccourcir le tour de cou. Ne tentez jamais de le
raccourcir ou de le modier d'une façon qui n'est pas autorisée. Veuillez-vous reporter
au schéma de positionnement du clip.
40 41
Comment utiliser le FittingLINK pour une vérication
par coupleur à l'aide d'une chaine de mesure
Mettez votre FittingLINK dans la chambre de test. Connectez l'appareil auditif au coupleur
2cc et placez l'appareil auditif à 5–10cm de l'extérieur du tour du cou, comme illustré ici.
Fermez le couvercle de la chambre de test et procédez à la vérication par coupleur.
Veuillez noter que votre FittingLINK ne fonctionne pas dans certaines chambres de test
qui sont trop petites pour permettre de placer les appareils auditifs à une distance de
5–10cm ou encore en raison d'interférences électromagnétiques. Si tel est le cas, la
programmation doit être eectuée au moyen des câbles de programmation des appareils
auditifs et d'une interface de programmation laire (ex. EXPRESSlink).
42 43
Vue d’ensemble des voyants
Comment lire les voyants de l’adaptateur Bluetooth.
Adaptateur Bluetooth
Voyant Description
Adaptateur Bluetooth actif
Adaptateur Bluetooth à la recherche d’un FittingLINK à portée
Adaptateur Bluetooth en appairage
Adaptateur Bluetooth inactif
Erreur d’auto-test — contacter votre fournisseur
Fixe Clignotement lent Clignotement rapide Voyant éteint
Comment lire les voyants du FittingLINK.
Le voyant supérieur est le voyant d'état de la batterie.
État de la batterie
Voyant
supérieur
Description
FittingLINK en marche et batterie entièrement chargée
Batterie en cours de charge
Batterie faible
Batterie très faible
Fixe Clignotant
44 45
Voyant
avant bleu
Voyant
avant rouge
Les voyants avant sont des voyants d'état de programmation.
État de programmation
Voyant
avant
Description
Connecté à l'appareil auditif droit
En cours de communication avec l'appareil auditif droit
Connecté à l'appareil auditif gauche
En cours de communication avec l'appareil auditif gauche
Non connecté aux appareils auditifs
Fixe Clignotant LED arrêt
46 47
Nettoyage et entretien
FittingLINK est un appareil étanche qui ne nécessite qu'un entretien minimum.
Pour garantir un niveau d'hygiène élevé, nettoyez toujours votre FittingLINK avant
d'entamer une session de programmation.
Essuyez votre FittingLINK et le tour de cou avec une solution de 70% d'alcool et 30% d'eau.
Votre FittingLINK et le tour de cou ne doivent jamais être lavés ni immergés dans de l'eau
ou dans d'autres liquides.
La prise d'alimentation, le socle de chargement et l'adaptateur Bluetooth doivent être
dénués de saletés ou de débris. Ces pièces doivent être nettoyées uniquement à l'aide
d'un chion sec et doux.
Lorsque vous n'utilisez pas votre FittingLINK, veillez à l'éteindre et à le placer sur son
socle de chargement an qu'il soit susamment chargé et prêt pour la session
d'appareillage suivante.
Informations techniques sur le FittingLINK
FittingLINK contient un émetteur radio utilisant une technologie d'induction magnétique
de proximité fonctionnant à 3,84MHz et une radio Bluetooth fonctionnant sur 2,4GHz.
La puissance du champ magnétique de l'émetteur à 3,84MHz est de < -15dBμA / m à
10m (mesuré sur une bande passante de 10kHz) et la puissance rayonnée de la radio
Bluetooth est de < +8 dBm EIRP.
La puissance d’émission du FittingLINK est inférieure aux limites internationales
prescrites pour l'exposition humaine. FittingLINK est conforme aux normes
internationales relatives à la compatibilité électromagnétique.
En raison du peu de place disponible sur l'appareil, la mention de nombreux agréments
et approbations dont il fait l'objet se trouvent dans le présent document.
Cet appareil est certifié selon les normes suivantes :
FCC ID: 2ACAHWLP021
IC: 11936A-WLP021
48 49
L'appareil est conforme à la Partie 15 des règles FCC et RSS-210 d'Industrie Canada.
Le fonctionnement est soumis aux deux conditions suivantes:
1. Cet appareil ne risque pas de causer d'interférences dommageables.
2. Cet appareil doit accepter les interférences reçues, y compris les interférences pouvant
entraîner un fonctionnement indésirable.
Les changements ou les modications non expressément approuvés par la partie
responsable de la conformité pourraient annuler l'autorité de l'utilisateur à faire
fonctionner l'appareil.
REMARQUE: Cet équipement a été testé et s'est avéré conforme aux limites relatives à
un appareil numérique de classe B, conformément à la Partie 15 des règles FCC.
Ces limites sont destinées à fournir une protection raisonnable contre les interférences
nocives dans une installation résidentielle. Cet équipement génère, utilise et peut
rayonner de l'énergie en radiofréquence et, s'il n'est pas installé et utilisé selon les
instructions, peut provoquer des interférences nocives avec les radiocommunications.
Cependant, il n'est pas garanti que des interférences ne se produisent pas dans une
installation particulière.
Si cet équipement provoque des interférences nocives avec la réception de la
radio ou de la télévision, ce qui peut être déterminé en éteignant et en rallumant
l'équipement, l'utilisateur est invité à tenter de corriger les interférences en prenant
l'une des mesures suivantes:
• Réorienter ou déplacer l'antenne de réception.
• Augmenter la distance entre l'équipement et le récepteur.
• Brancher l'équipement à une prise électrique placée sur un circuit diérent de celui
sur lequel le récepteur est branché.
• Consulter votre fournisseur local pour obtenir un remplacement.
50 51
Informations techniques sur l'adaptateur Bluetooth
Cet appareil contient un module comportant :
FCC ID: DMOCBBSKE
IC: 2099D-BTD800
L'appareil est conforme à la Partie 15 des règles FCC et RSS-210 d'Industrie Canada.
Le fonctionnement est soumis aux deux conditions suivantes:
1. Cet appareil ne risque pas de causer d'interférences dommageables.
2. Cet appareil doit accepter les interférences reçues, y compris les interférences pouvant
entraîner un fonctionnement indésirable.
REMARQUE: Cet équipement a été testé et s'est avéré conforme aux limites relatives à un
appareil numérique de classe B, conformément à la Partie 15 des règles FCC.
Ces limites sont destinées à fournir une protection raisonnable contre les interférences
nocives dans une installation résidentielle. Cet équipement génère, utilise et peut
rayonner de l'énergie en radiofréquence et, s'il n'est pas installé et utilisé selon les
instructions, peut provoquer des interférences nocives avec les radiocommunications.
Cependant, il n'est pas garanti que des interférences ne se produisent pas dans une
installation particulière.
Si cet équipement provoque des interférences nocives avec la réception de la radio ou de la
télévision, ce qui peut être déterminé en éteignant et en rallumant l'équipement, l'utilisateur est
invité à tenter de corriger les interférences en prenant l'une des mesures suivantes:
• Réorienter ou déplacer l'antenne de réception.
• Augmenter la distance entre l'équipement et le récepteur.
• Brancher l'équipement à une prise électrique placée sur un circuit diérent de celui sur
lequel le récepteur est branché.
• Consulter votre fournisseur local pour obtenir un remplacement.
Tout changement ou toute modication apportés à cet équipement sans l'approbation
expresse de la partie responsable de la conformité peut rendre l'autorisation d'utilisation
de cet équipement émise par la FCC nulle et non avenue. Ce dispositif numérique de
Catégorie B est conforme à la norme canadienne ICES-003.
Informations relatives à l'exposition aux rayonnements RF
Puisque la puissance de sortie rayonnée de cet appareil est bien inférieure aux
limites de fréquences radio de la FCC, celui-ci n'est pas soumis à une évaluation
routinière de l'exposition aux rayonnements RF comme indiqué dans la Section
2.1093 des règles de la FCC. Cet appareil respecte les limites d'exposition RF
stipulées pour les appareils portatifs dans un environnement non contrôlé par
les États-Unis et Industrie Canada. Il peut être utilisé en toute sécurité pour
l'usage auquel il est destiné, comme décrit dans le manuel de l'utilisateur.
E2831
52
Données techniques
Modèle du FittingLINK WP-2
Modèle de
l’adaptateur Bluetooth
BTD 800 USB
Version de
l’adaptateur Bluetooth
WP-3
Conditions de fonctionnement Température : +5 à +40 °C
Humidité : 15 % à 93 %, sans condensation
Pression atmosphérique : 700 hPa à 1 060 hPa
Conditions de stockage
et de transport
Température : -25 à +70 °C
Humidité : 15 % à 93 %, sans condensation
SBO Hearing A / S certie par les présentes que FittingLINK est en accord avec les
exigences essentielles et autres dispositions pertinentes de la Directive 1999 / 5 / CE.
Déclaration de conformité disponible auprès de SBO Hearing A / S.
Fabriqué par : Distribué par :
SBO Hearing A/S Oticon Canada
Kongebakken 9 1-6950 Creditview Rd.
DK-2765 Smørum Mississauga, ON L5N 0A6
www.sbohearing.com www.oticon.ca
0682
Les déchets électroniques
doivent être traités selon
la législation locale.