SD Biosensor 01GM40 SD GlucoNavii® NFC Blood Glucose Meter User Manual GlucoNavii NFC User Guide cover 20130116
SD Biosensor, Inc. SD GlucoNavii® NFC Blood Glucose Meter GlucoNavii NFC User Guide cover 20130116
UserManual.wiki
>
SD Biosensor
>
01GM40 User Manual
User manual
Navigation menu
Upload a User Manual
Namespaces
Wiki Guide
HTML
PDF
Info
Views
User Manual
Discussion / Help
Navigation

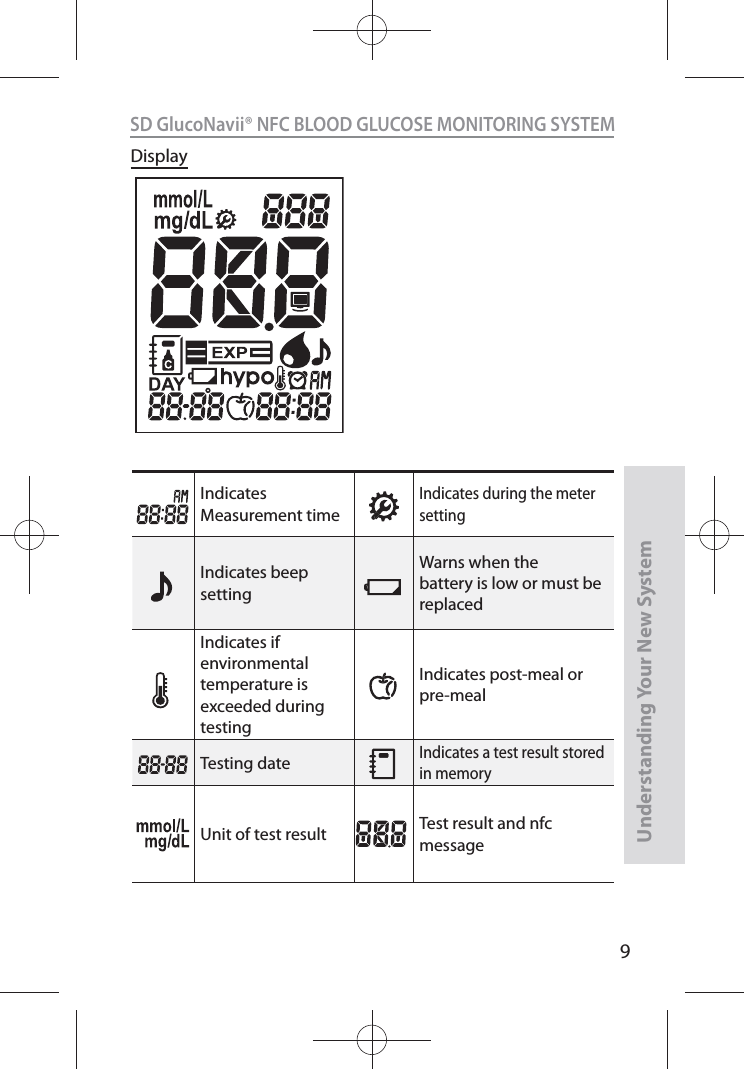
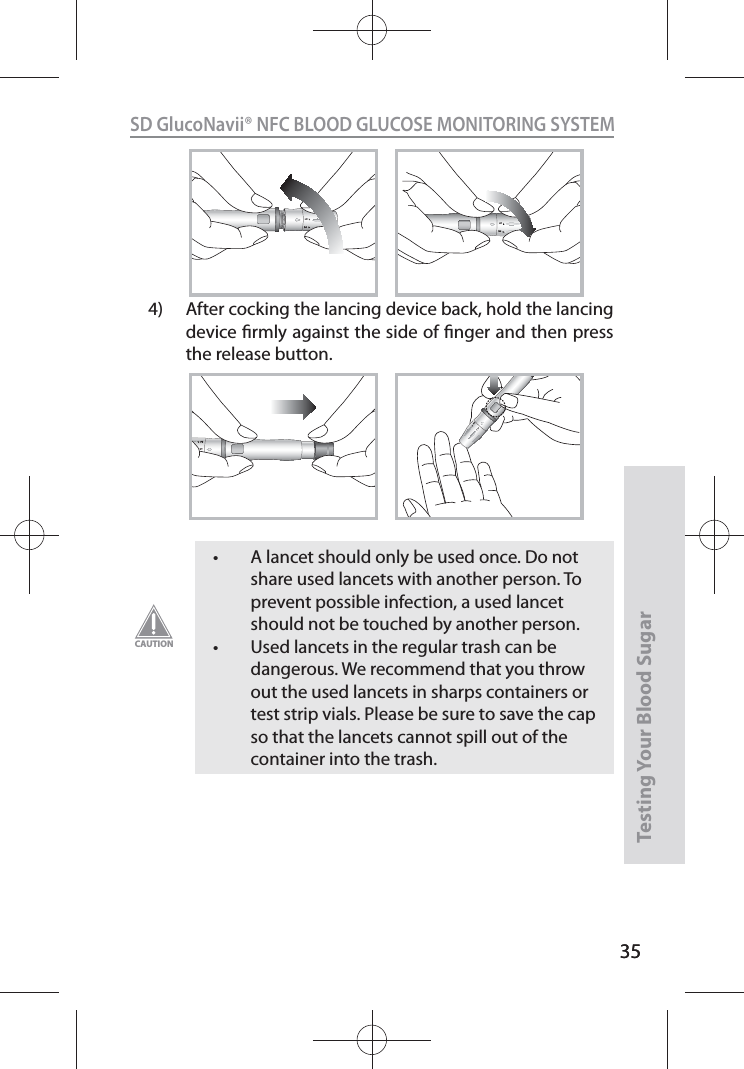
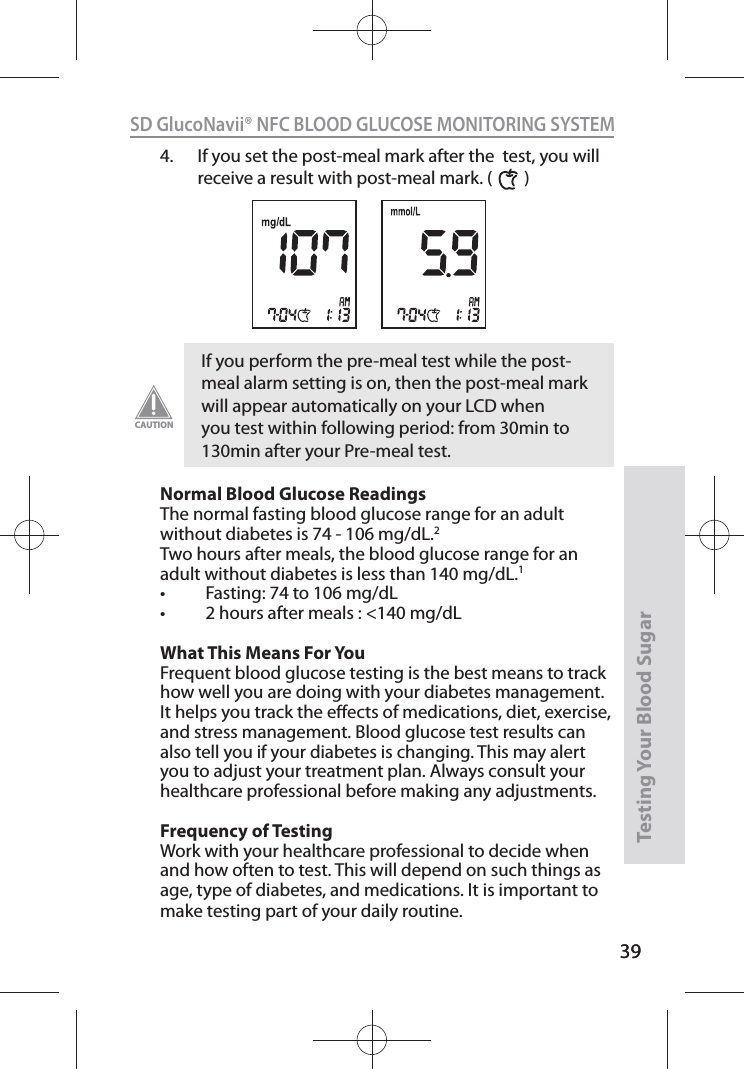
![16SD GlucoNavii® NFC BLOOD GLUCOSE MONITORING SYSTEMUnderstanding Your New System10. Meter Set upSTEP-1 : Setting the Audible Beep1. In Strip Stand-by Display, if you press the ON/OFF button during 3 seconds, the display for setting the beep will appear, the rst step of the setting mode.2. Set the beep mode on or o by pressing either the left or the right button and then selecting the preferred feature by pressing the ON/OFF button. If you select the beep on feature, a ‘beep’ sound is made at the same time; otherwise, if you select the beep o feature, no sound is made. [ During 3 sec. ][ Left or right button ][ ON/OFF button ]](https://usermanual.wiki/SD-Biosensor/01GM40/User-Guide-1881835-Page-17.png)
![18SD GlucoNavii® NFC BLOOD GLUCOSE MONITORING SYSTEMUnderstanding Your New SystemSTEP3: Setting the date and time[ Date Setting ]1. The third step of setting mode is the Date & Time setting. After setting the hypo warning, the display for setting Date & Time will appear, the third step of the setting mode. Set the correct year by pressing either the left or the right button and then select the correct year by pressing the ON/OFF button. Your new meter comes with a preset time and date. You may need to change the time to your time zone. Having the right time and date in your meter is important if you use the meter memory. It also helps your healthcare team interpret your results.NOTE](https://usermanual.wiki/SD-Biosensor/01GM40/User-Guide-1881835-Page-19.png)
![19SD GlucoNavii® NFC BLOOD GLUCOSE MONITORING SYSTEMUnderstanding Your New System[ Left or right button ][ ON/OFF button ]2. Next will appear the setting display for month and day format. The meter can display the month and day in either a Month-Day (m-d) format or a Day-Month (d-m) format. Set the preferred format on the display by pressing either the left or the right button and select by pressing the ON/OFF button.3. Set the correct month or day on the display by pressing either the left or the right button and select by pressing the ON/OFF button.](https://usermanual.wiki/SD-Biosensor/01GM40/User-Guide-1881835-Page-20.png)
![20SD GlucoNavii® NFC BLOOD GLUCOSE MONITORING SYSTEMUnderstanding Your New System[ Time Setting ]1. Next will appear the display for setting the 12 or 24 Hour clock format. The meter can display the time in either the 12h format or the 24h format. Set the preferred format on the display by pressing either the left or the right button and select by pressing the ON/OFF button. 2. Next will appear the setting display for time format. Set the correct hour and minute on the display by pressing either the left or the right button and select the correct time by pressing the ON/OFF button.[ Left or right button ][ ON/OFF button ]](https://usermanual.wiki/SD-Biosensor/01GM40/User-Guide-1881835-Page-21.png)
![21SD GlucoNavii® NFC BLOOD GLUCOSE MONITORING SYSTEMUnderstanding Your New SystemSTEP4: Post-meal alarmYou can use the meter’s post-meal alarm function to remind you to test your blood glucose after meal.1. After day and time setting, the display for setting the post-meal alarm will appear, the fourth of setting mode.2. Set the post-meal alarm mode ‘2h’ or ‘o’ by pressing either the left or the right button and then select the preferred feature by pressing the ON/OFF button. [ Left or right button ][ ON/OFF button ]](https://usermanual.wiki/SD-Biosensor/01GM40/User-Guide-1881835-Page-22.png)
![23SD GlucoNavii® NFC BLOOD GLUCOSE MONITORING SYSTEMUnderstanding Your New SystemSTEP5: Setting the alarmYou can use the meter’s alarm function to remind you to test your blood glucose.1. After Post-meal alarm setting the display for setting the alarm will appear, the fth of setting mode. 2. Set the rst alarm on or o by pressing either the left or the right button and then select the preferred feature by pressing the ON/OFF button.[ Left or right button ][ ON/OFF button ]t If you select the alarm o feature, next will appear the Strip Stand-by Display. t If you select the alarm on feature, you can set the alarm up to four times a day at any time you want.NOTE](https://usermanual.wiki/SD-Biosensor/01GM40/User-Guide-1881835-Page-24.png)
![24SD GlucoNavii® NFC BLOOD GLUCOSE MONITORING SYSTEMUnderstanding Your New System3. If you select the alarm on feature in rst alarm mode, the clock will blink. Set the correct time and minute you want to set an alarm on the display by pressing either the left or the right button and then select the preferred feature by pressing the ON/OFF button.4. If you nish setting the rst alarm, next will appear the second alarm setting mode. Set the alarm with the same way as above. [2, 3]5. You can set the third and fourth alarm mode with the same way as above. [2, 3][ Left or right button ][ ON/OFF button ]If you select the alarm o feature in rst (also second, third and fourth) alarm mode, next will appear the Strip Stand-by Display.NOTE](https://usermanual.wiki/SD-Biosensor/01GM40/User-Guide-1881835-Page-25.png)
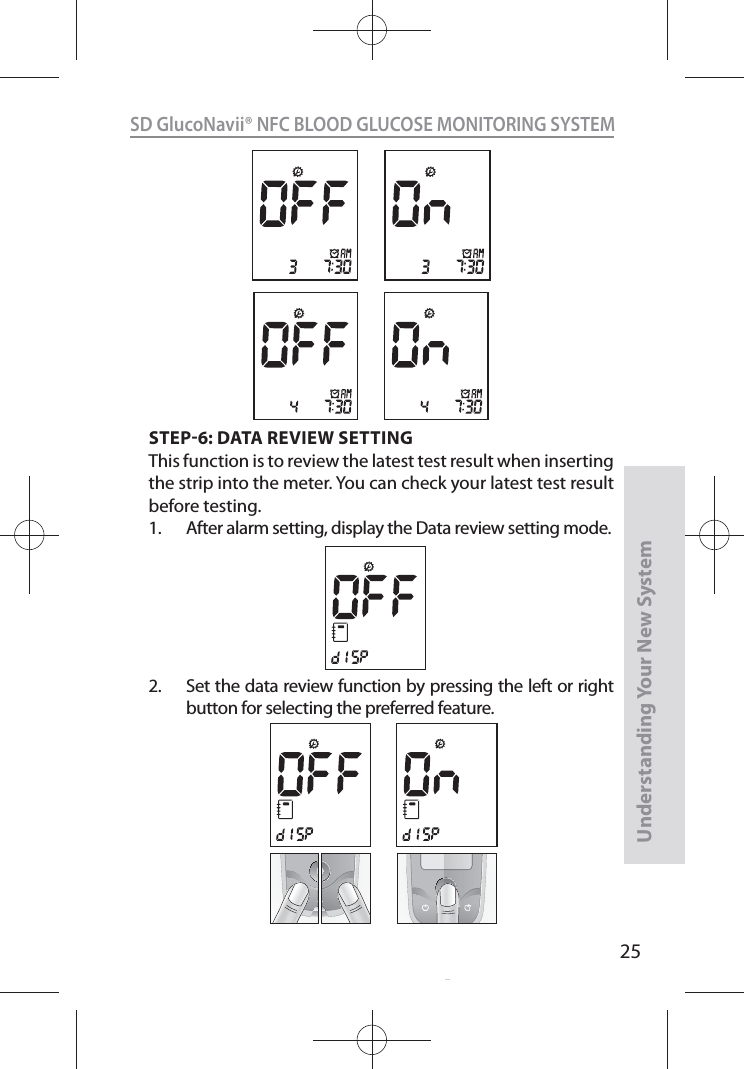
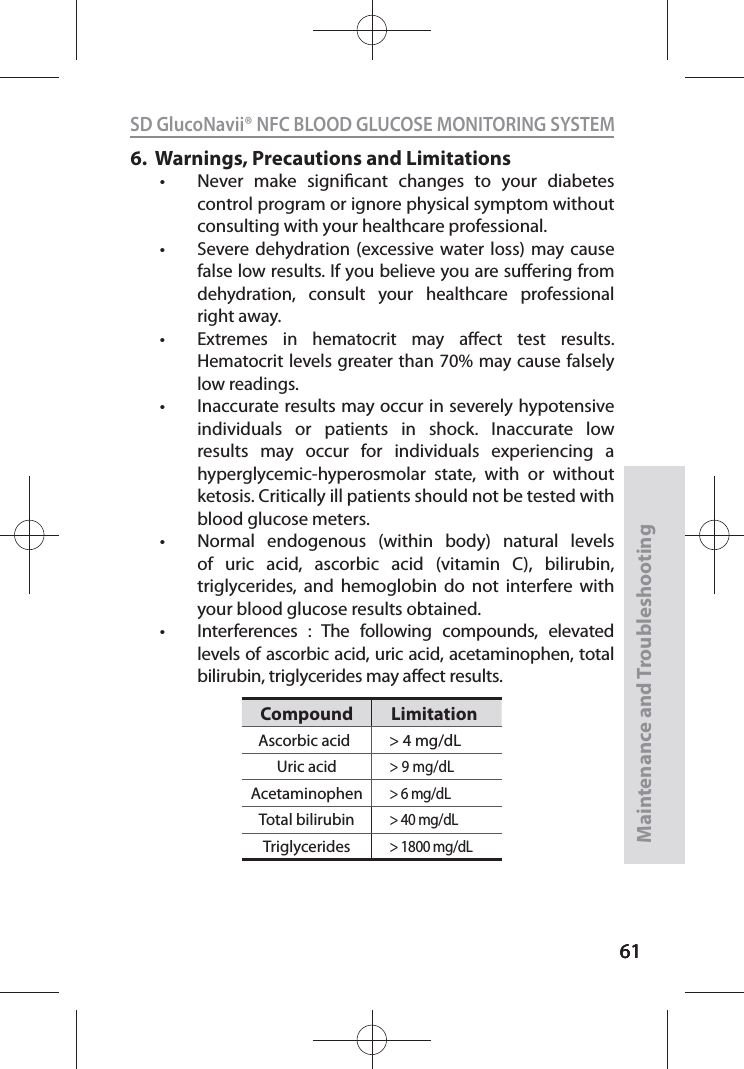
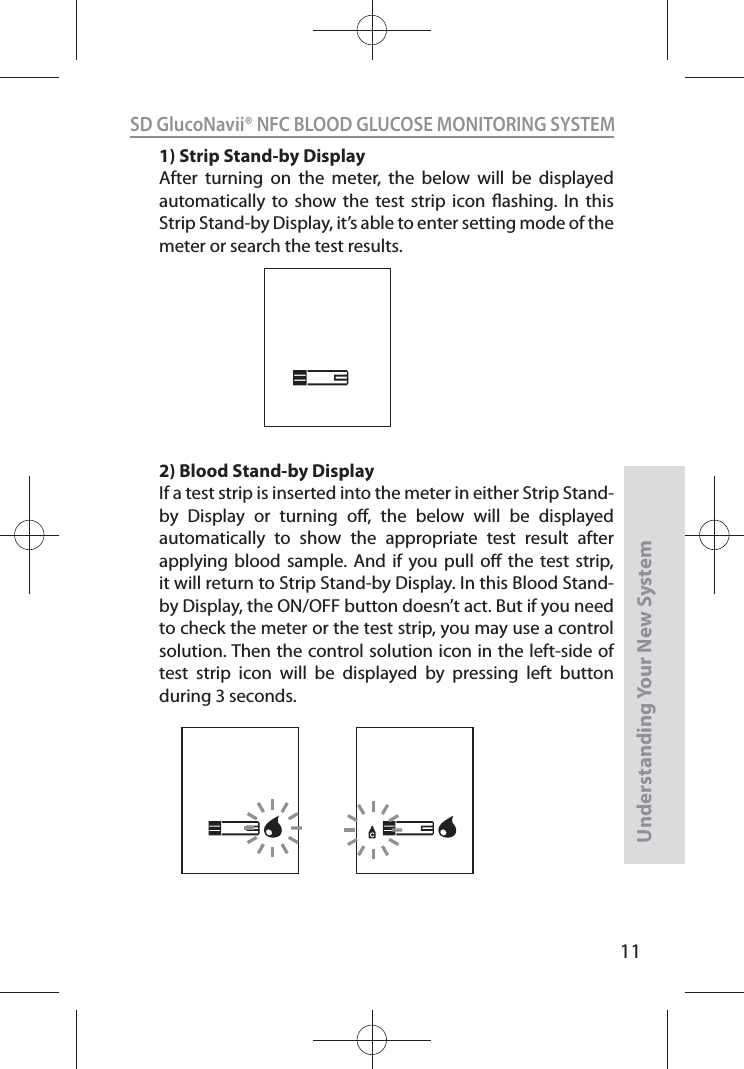
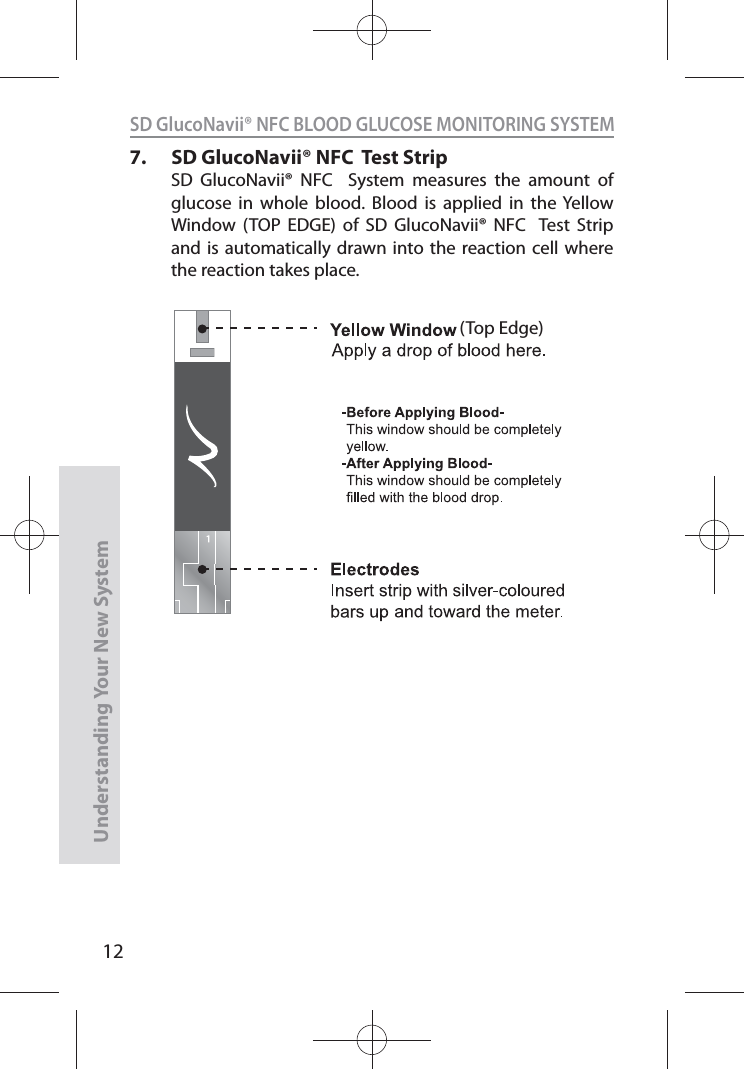
![26SD GlucoNavii® NFC BLOOD GLUCOSE MONITORING SYSTEMUnderstanding Your New System3. If you nish data review setting mode, next appear at the strip-stand by display. 11. Using SD GlucoNavii® NFC Test Strips[ Important Test Strip Information ]t SD GlucoNavii® NFC blood glucose test strip should be used with SD GlucoNavii® NFC meter. Using other glucose test strip can cause inaccurate the result or ‘E-1’ error message.t After removing a test strip from the container, replace the container cap immediately and close it tightly. t Use the test strip within three minutes after you take it out of the container. t Store test strip containers in a cool, dry place at 2-32°C(36-90°F). Keep away from direct sunlight and heat. Do not refrigerate test strips. t Do not expose strips to heat, moisture or humidity. Temperatures outside the required range, as well as moisture and humidity (e.g. bathroom, kitchen, laundry room, car, or garage) can damage your test strips and lead to inaccurate results. t Store test strips in their original container only to avoid damage or contamination. Do not transfer test strips to any other storage device, and do not store outside of their original container. t Do not use test strips from any container that is damaged or left open to air.](https://usermanual.wiki/SD-Biosensor/01GM40/User-Guide-1881835-Page-27.png)
![SD GlucoNavii® NFC BLOOD GLUCOSE MONITORING SYSTEMControl Solution Test30STEP-1:1) Remove a new test strip from container. Be sure to tightly replace container cap after removing test strip. 2) Insert a test strip (yellow window printed ‘ ’ facing up) into test strip slot. The meter turns on automatically.STEP-2:1) Press the left button for 3 seconds to check the testing system using a control solution in Blood Stand-by Display. If you don’t want a control solution test, press the left button again.2) Shake the control solution container and discard the rst drop of solution. Gently squeeze the container to form one small drop. Bring the drop to the edge of the strip, and allow the strip to automatically draw the control solution into the yellow window. When control solution is applied to the test strip, the meter counts down from 5 to 1 second on the display. Tightly replace the cap on control solution. NFC[ Left button ]](https://usermanual.wiki/SD-Biosensor/01GM40/User-Guide-1881835-Page-31.png)
![SD GlucoNavii® NFC BLOOD GLUCOSE MONITORING SYSTEMControl Solution Test313) The control solution result appears on the screen in just 5 seconds. 4) Compare control solution result with the range printed on the test strip container. If the results are not within the control range printed on the test strip container, then the meter and strips may not be working properly. Repeat the control solution test.5) Remove the used test strip for control solution from the meter and discard it.mg/dLmmol/LNFCNOTE The control solution range printed on the test strip container is for SD GlucoNavii® Control Solution only. It is not a recommended range for your blood glucose level. [This is an example. Refer to the ranges on your test strip container.]Control RangeLevel M Level H90-140 mg/dL 170-240 mg/dL5.0-7.8 mmol/L 9.4-13.3 mmol/Lmg/dLmmol/L[Example]](https://usermanual.wiki/SD-Biosensor/01GM40/User-Guide-1881835-Page-32.png)

![4646SD GlucoNavii® NFC BLOOD GLUCOSE MONITORING SYSTEMUsing the Meter Memory461. Searching Test Results1) In Strip Stand-by Display, press the left arrow button to review in sequence from the most recent test result to the last test results stored in memory.[Normal result][Pre-meal result][Post-meal result][ Left button ]](https://usermanual.wiki/SD-Biosensor/01GM40/User-Guide-1881835-Page-47.png)
![4747SD GlucoNavii® NFC BLOOD GLUCOSE MONITORING SYSTEMUsing the Meter Memory47[Control Solution result]3) If there aren’t the stored test results, the following display appears for 1 second, and then the meter will display Strip Stand-by Display automatically. 2) After the result with date and time display for 1 second, the date will change into the appropriate memory number automatically.](https://usermanual.wiki/SD-Biosensor/01GM40/User-Guide-1881835-Page-48.png)
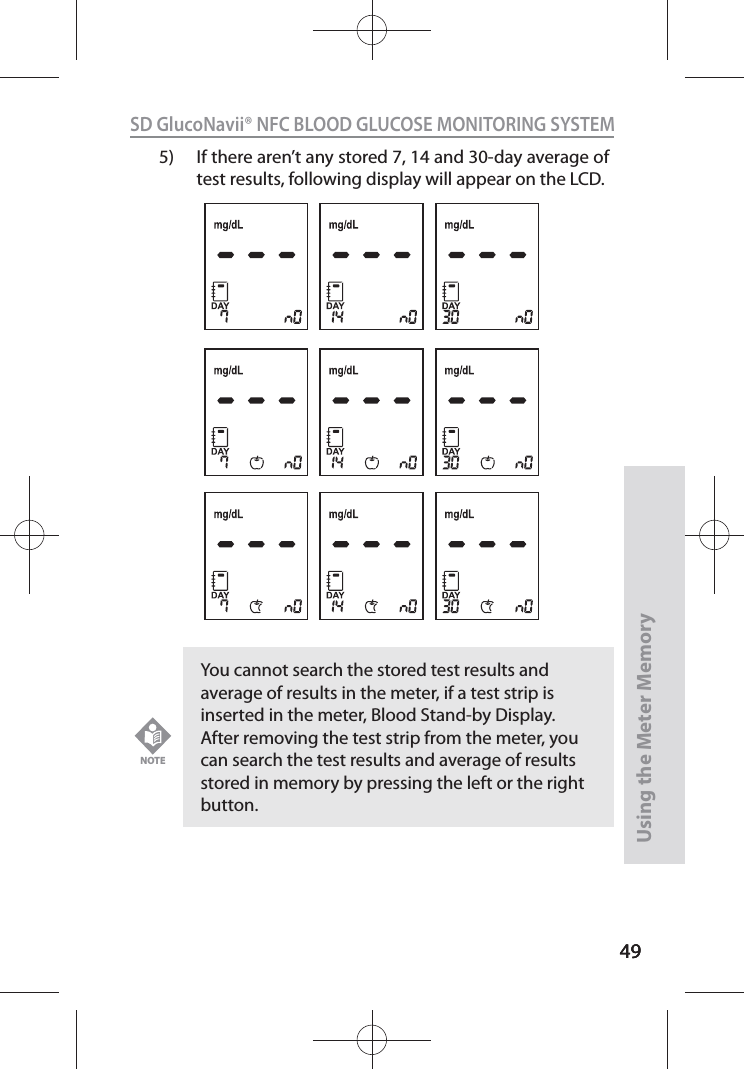
![4848SD GlucoNavii® NFC BLOOD GLUCOSE MONITORING SYSTEMUsing the Meter Memory484) In Strip Stand-by Display, press the right arrow button to review three kinds of 7,14 and 30 day averages of test result stored in memory in sequence. (normal, pre-meal and post-meal state) You can also review the number of results at each average in the right bottom of the LCD window. If you press the right arrow button once more after displaying the 30 day average(with post-meal mark), the 7-day average result appear again. [Post-meal average][ Normal average ][Pre-meal average]](https://usermanual.wiki/SD-Biosensor/01GM40/User-Guide-1881835-Page-49.png)

![525252SD GlucoNavii® NFC BLOOD GLUCOSE MONITORING SYSTEMMaintenance and Troubleshooting523. The check result appears on the screen in 5 seconds. ‘OK’ message appears on the screen if there isn’t any problem for the meter. If not, ‘EEE’ message appears on the screen.2. Cleaning the meterCaring for SD GlucoNavii® NFC meter is easy. Just keep it free of dust. If you need to clean it, follow these guideline carefully to help you get the best performance possible. To prevent malfunction of the meter, keep the test strip port free of blood, moisture, dirt, or dust. Use a lint-free cloth dampened with water to clean meter. Thoroughly wring out cloth before use. Do not use an abrasive cloth or antiseptic solution, as these may damage the display screen.[ ‘OK’ Message ][ ‘EEE’ Message ]](https://usermanual.wiki/SD-Biosensor/01GM40/User-Guide-1881835-Page-53.png)
![555555SD GlucoNavii® NFC BLOOD GLUCOSE MONITORING SYSTEMMaintenance and Troubleshooting555. Screen Messages and TroubleshootingMessage Descriptiont The meter turns on normally. [Strip Stand-by Display]t The meter is ready for you to insert a test strip.[Blood Stand-by Display]t The meter is ready for a drop of blood.t The meter is ready for a drop of blood with pre-meal mark.](https://usermanual.wiki/SD-Biosensor/01GM40/User-Guide-1881835-Page-56.png)
![565656SD GlucoNavii® NFC BLOOD GLUCOSE MONITORING SYSTEMMaintenance and Troubleshooting56t The meter is ready for a drop of blood with post-meal mark.t The meter shows the test result.t The meter shows three kinds of average of results.[Normal Results Average][Pre-meal Results Average]](https://usermanual.wiki/SD-Biosensor/01GM40/User-Guide-1881835-Page-57.png)
![575757SD GlucoNavii® NFC BLOOD GLUCOSE MONITORING SYSTEMMaintenance and Troubleshooting57t The meter shows the saved results of blood glucose.t The meter is ready for a drop of control solution. [Post-meal Results Average]](https://usermanual.wiki/SD-Biosensor/01GM40/User-Guide-1881835-Page-58.png)
![585858SD GlucoNavii® NFC BLOOD GLUCOSE MONITORING SYSTEMMaintenance and Troubleshooting58[Low battery]t At this time, battery is getting low but you can still perform about 50 tests. Replace the battery soon. See Chapter 1 “9. Changing the Battery”.[Replace battery]t Battery power is low. Replace the battery immediately. See Chapter 1 “9. Changing the Battery”. If you press the ON/OFF button after discharging of the battery, the battery icon will ash and then after ten seconds the meter will turn o automatically.[HI message]t Blood glucose may be higher than the measuring range of the system. See chapter 3 “4. Understanding Test Results”.](https://usermanual.wiki/SD-Biosensor/01GM40/User-Guide-1881835-Page-59.png)
![595959SD GlucoNavii® NFC BLOOD GLUCOSE MONITORING SYSTEMMaintenance and Troubleshooting59[Lo message]t Blood glucose may be lower than the measuring range of the system. See chapter 3 “4. Understanding Test Results”.[Internal Error Message for a meter]t Turn o a meter. Then turn on the meter again. If there is still error message, please contact SD Biosensor, Inc. TEL: +82-31-300-0400. [Strip Error]t Defective test strip or the test strip is damaged or inserted improperly. Discard this test strip and test again using new test strip. See Chapter 3 “2. Performing a Blood Glucose Test”.](https://usermanual.wiki/SD-Biosensor/01GM40/User-Guide-1881835-Page-60.png)
![606060SD GlucoNavii® NFC BLOOD GLUCOSE MONITORING SYSTEMMaintenance and Troubleshooting60[Blood Sample Error]t An insucient amount of blood was applied. Discard this test strip and test again using new test strip and a larger sample, making sure blood is placed to the narrow channel in the top edge of the test strip. See Chapter 3 “2. Performing a Blood Glucose Test”.[Temperature Error]t If the environmental temperature is above or below the operating range of a meter, a thermometer icon will appear on the display. Move to an area between 8-45°C (46-113°F), wait for 30 minutes, and perform a test. Do not articially heat or cool the meter. See Chapter 6. “Product Technical Information”.[Communication Error]t The communication between meter and computer is failed. Connect again between meter and PC.](https://usermanual.wiki/SD-Biosensor/01GM40/User-Guide-1881835-Page-61.png)