SDI Technologies ISB04 WiFi Door & Window Sensor User Manual iSB04 Door Window Sensor QSG v10
SDI Technologies Inc. WiFi Door & Window Sensor iSB04 Door Window Sensor QSG v10
User Manual
Intelligent Home Solutions
Model: iSB04
Monitor your home from anywhere with your smartphone
Wi-Fi DOOR/WINDOW SENSOR
Quick Start Guide
WHAT YOU’LL NEED
Apple device running iOS 9.3 or later or Android device running KitKat 4.4
or later connected to your preferred WiFi network
WiFi network transmitting at 2.4GHz; WPA2 security type
NOTE: If you intend to use a mix of devices (iOS AND Android), please set up
the Sensor using your iOS device and then share to your Android device(s).
Questions? 1.800.288.2792 www.ihome.com
Overview: About Your Door/Window Sensor
Flashing Green: Sensor is ready to
connect to a Wi-Fi
network
Solid Green: Sensor is connected
to a Wi-Fi network
(appears briefly
after setup)
Flashing Red: Sensor failed setup,
please try setup again.
1
What’s in the Box
Sensor Overview
• iSB04 Door/Window Sensor (main body and magnet)
• Adhesive Mounting Strip (see page 4 for mounting instructions)
• 2 AA batteries (see page 2 for battery installation instructions)
Battery Access Tab
Action Button
Main Body
Magnet
Status LED
Wi-Fi Status Indicators
Installing Batteries
Your sensor comes with 2 AA batteries which must be installed before use.
Gently pull the front of the sensor forward using the battery
access tab on top of the sensor to release the front of the
main unit.
Place the batteries in the battery compartment as shown.
Make sure polarity (+/–) matches the markings in the
product.
Press the front and back cabinet together.
1
2
3
23
Wi-Fi Setup
NOTE: We recommend performing setup in the same location you intend to
place your sensor.
Download and open the iHome Control app from the App Store or Google Play.
Login to or create an iHome account
Press sensors icon and then the Add Device Button.
Press and hold the Action Button on your sensor for 5 seconds until green LED is
flashing, then release.
Enter the following setup code when prompted in the app.
NOTE: If you see a solid or flashing RED LED, press and hold the Action Button
for 5 seconds and then repeat steps 2 and 3
1
2
3
4
NOTE: When typing, dashes are not required
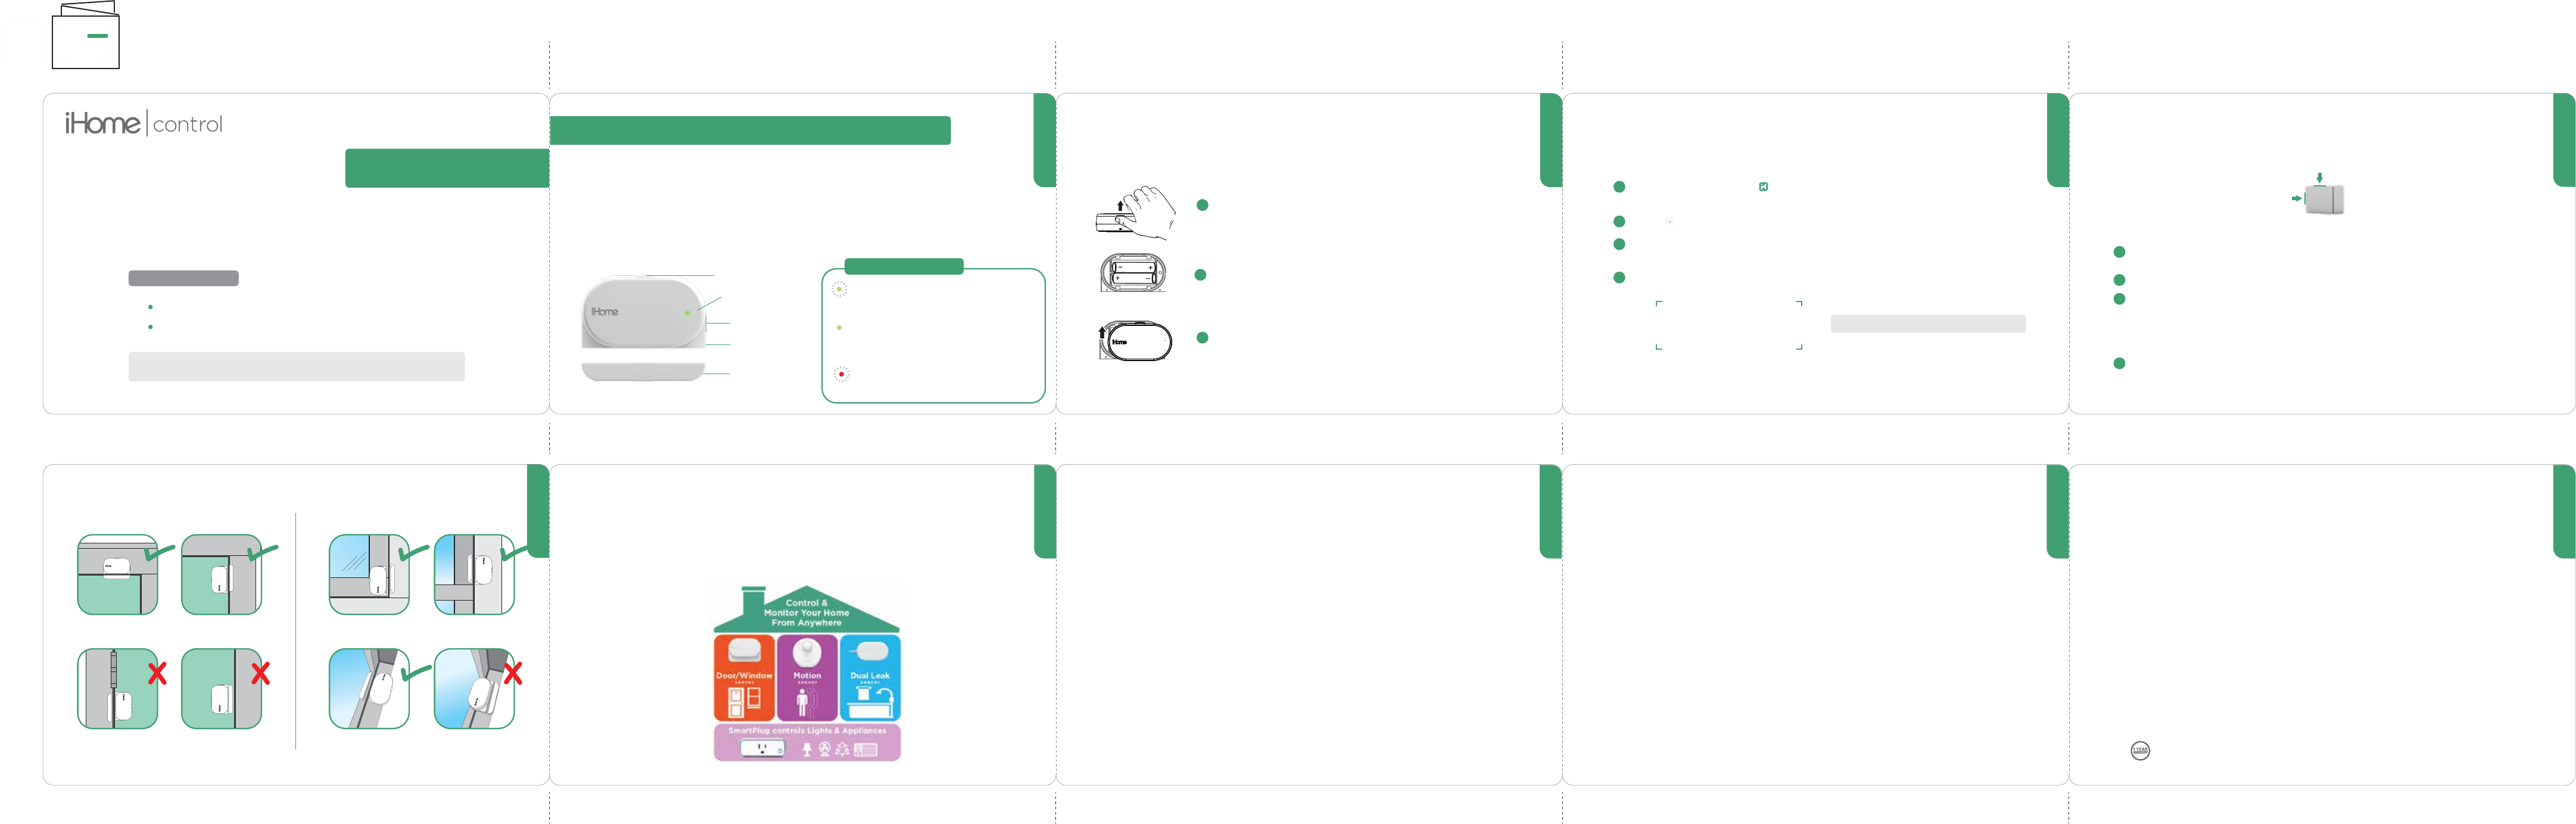
Sensor Placement Suggestions* 5
Doors Windows
Do not mount
on hinge side.
Main piece
mounted on frame.
Main piece
mounted on door.
Do not mount
both pieces on door.
Do not block path
of sliding parts.
Mount pieces on
dierent sashes.
Main piece mounted
on window sash.
Main piece mounted
on moulding.
door
frame glass
moulding
glass
*Mounting options are not limited to the suggestions in these images
iHome Control provides 24-7 remote home monitoring from anywhere. The free iHome
Control app keeps you aware of changes in your home environment even when you’re
not home. For information about compatible products and to purchase Sensors and
SmartPlugs, visit iHome.com.
Meet the iHome Control family of
Intelligent Home solutions 67
Notices
FCC
This device complies with Part 15 of the FCC Rules. Operation is subject to the following two conditions:
(1) this device may not cause harmful interference, and (2) this device must accept any interference received, including
interference that may cause undesired operation.
To assure continued FCC compliance:
1. Any changes or modifications not expressly approved by the grantee of this device could void the user's authority to
operate the equipment.
2. This equipment complies with FCC radiation exposure limits set forth for an uncontrolled environment. This equipment
should be installed and operated with minimum distance 20cm between the radiator & your body.
FEDERAL COMMUNICATIONS COMMISSION
INTERFERENCE STATEMENT
This equipment has been tested and found to comply with the limits for a Class B digital device, pursuant to Part 15 of the
FCC Rules. These limits are designed to provide reasonable protection against harmful interference in a residential
installation. This equipment generates, uses and can radiate radio frequency energy and, if not installed and used in
accordance with the instructions, may cause harmful interference to radio communications. However, there is no guarantee
that interference will not occur in a particular installation. If this equipment does cause harmful interference to radio or
television reception, which can be determined by turning the equipment o and on, the user is encouraged to try to correct
the interference by one or more of the following measures:
- Reorient or relocate the receiving antenna.
- Increase the separation between the equipment and receiver.
- Connect the equipment into an outlet on a circuit dierent from that to which the receiver is connected.
- Consult the dealer or an experienced radio/TV technician for help.
IC
This device complies with Industry Canada license-exempt RSS standard(s). Operation is subject to the following two
conditions: (1) this device may not cause interference, and (2) this device must accept any interference, including
interference that may cause undesired operation of the device.
This equipment complies with IC radiation exposure limits set forth for an uncontrolled environment. This equipment should
be installed and operated with minimum distance 20cm between the radiator and your body.
Cet appareil radio est conforme au CNR-247d’Industrie Canada. L’utilisation de ce dispositif est autorisée seulement aux
deux conditions suivantes : (1) il ne doit pas produire de brouillage, et (2) l’utilisateur du dispositif doit être prêt à accepter
tout brouillage radioélectrique reçu, même si ce brouillage est susceptible de compromettre le fonctionnement du
dispositif.
Cet équipement est conforme aux limites d’exposition aux rayonnements IC établies pour un environnement non contrôlé.
Cet équipement doit être installé et utilisé avec un minimum de 20 cm de distance entre la source de rayonnement et votre
corps.
CAN ICES-(B)/NMB-3(B)
8
For warranty information:
visit https://www.ihomeaudio.com/support/
GENERAL BATTERY PRECAUTIONS
• Never use or charge a battery if it appears to be leaking,
discolored, deformed, or in any way abnormal.
• Do not mix old and new batteries
• Use onlynew batteries of the type recommended
• Avoid charging a rechargeable battery when the temperature is not within
5°C - 35°C (41° - 95° Fahrenheit).
• Never expose a battery to any liquid.
• Never expose a battery to excessive heat such as direct sunlight or fire. Never use a battery
pack in an unventilated vehicle
where excessive internal temperatures may be encountered.
• Always keep batteries out of the reach of infants and small children.
• Remove batteries if device will not be used for a prolonged period to avoid corrosion which
can damage the unit
• Dispose of batteries that are leaking
Dispose of batteries in accordance with local regulations
9
Sensor Mounting
4
The main sensor body includes mounting tape. A separate strip of tape is provided to mount
the magnet.
The strip of tape can be applied to the side OR top of the magnet body, whichever works best
for your particular setup.
"The two hand test"
(Perform this test before mounting your sensor).
Use one hand to position the main sensor body against the intended mounting surface
(we recommend a flat surface such as the door itself).
Use another hand to position the magnet body on the intended mounting surface.
Pull the sensor body away from the magnet to simulate opening the door/window.
If you hear 2 beeps your proposed mounting location is GOOD and you can proceed to
mount your sensor with the adhesive tape. If no sound is heard you must try an alternate
positioning.
Ensure the door/window can open/close freely without interfering with your sensor. Peel
back the adhesive strip and press sensor against the surace for 20 seconds to ensure a
good bond. NOTE: tape should be adhered to a clean/dry surface. We strongly recom-
mend wiping with rubbing alcohol or soapy water to allow for the strongest bond.
1
2
3
4
Magnet Body (side view)
Model: iSB04 QSG (English)
Size: 153mm x 98mm
Date : August 16,2017
Pages:
Version:
Accordian style
Quick Start Guide
FRONT
BACK