SEGI ANB300-2WLS Keyless Entry System User Manual
SEGI LIMITED Keyless Entry System Users Manual
SEGI >
Users Manual
2-WAY REMOTE STARTING SYSTEM
WITH 1 BUTTONS
FOR AUTOMATIC TRANSMISSION
RED301-2WAY / ANT-2WDSS
User Guide For Key
This equipment complies with the FCC RF radiation exposure limits set forth for an uncontrolled environment.
This equipment should be installed and operated with a minimum distance of 20cm between the radiator and any part of your body.

Using the remote control
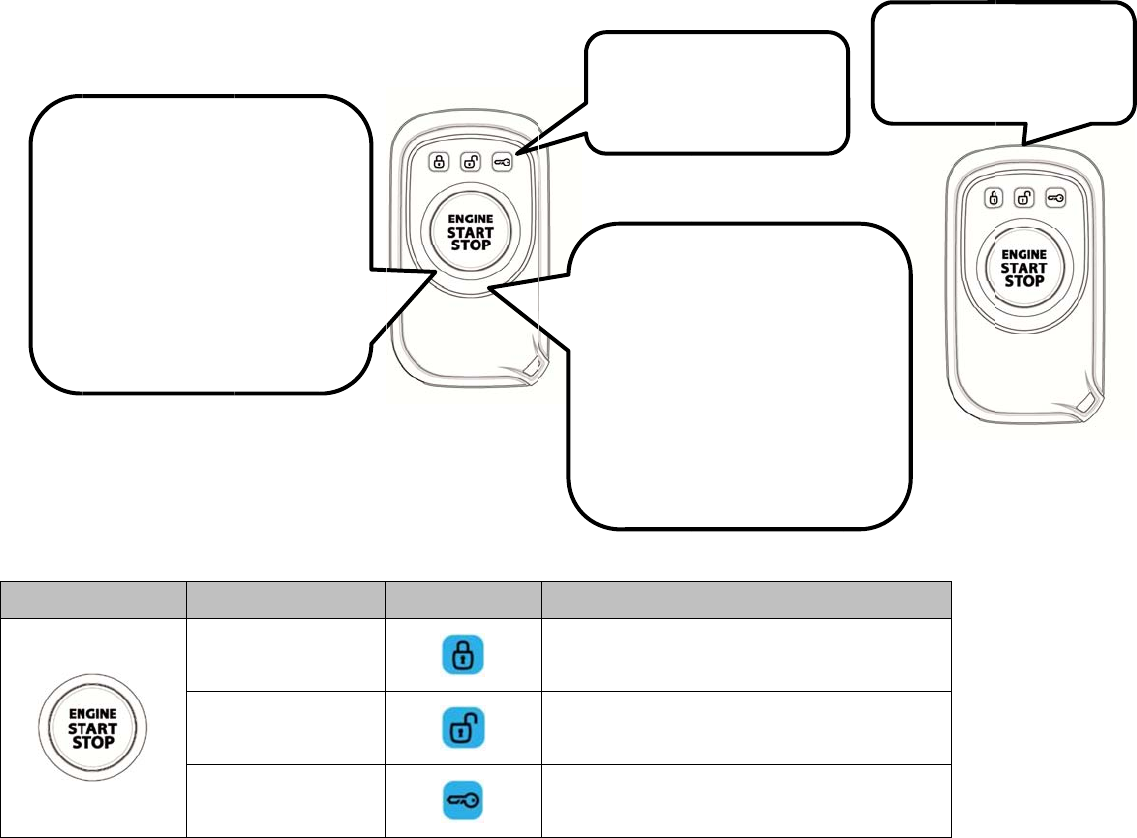
Description of Remote Appearance
WARNING
It is the responsibility of the vehicle operator to ensure that their vehicle is parked in a safe and responsible manner.
1. When leaving the vehicle, it is the user’s responsibility to ensure that the gearshift lever is in “Park” in order to
avoid accidents upon remote starting. (Note: Make sure that the automatic vehicle cannot start in “Drive”.)
2. It is the user’s responsibility to ensure that the remote starter is disabled or put into valet mode before servicing.
FCC COMPLIANCE
This device complies with part 15 of the FCC Rules. Operation is subject to the following two conditions:
(1) This device may not cause harmful interference, and
(2) This device must accept any interference received, including interference that may cause undesired operation.
CAUTION: Changes or modifications not expressly approved by the party responsible for compliance could void the
user’s authority to operate this device.
AVERTISSEMENT
Il est de la responsabilité du conducteur de s’assurer que son véhicule est stationné de façon sécuritaire et responsable.
1. En quittant le véhicule, le conducteur doit s’assurer que le levier de boite est à la position P (stationnement) afin d'éviter tout accident lord d'un démarrage à
distance. (Note : Assurez-vous que le véhicule ne peut pas démarrer alors que le levier de boite est à la position D (Drive).
2. Il est de la responsabilité du conducteur de s’assurer que le démarrage à distance est désactivé ou que la télécommande est en mode Valet lorsque son véhicule
est au service mécanique.
CONFORMITÉ FCC
Ce dispositif est conforme à l’article 15 de la réglementation du FCC. Le fonctionnement est assujetti aux deux conditions suivantes :
(1) Ce dispositif ne causera pas d’interférences dommageables, et
(2) Ce dispositif doit pouvoir être soumis à toute interférence, y compris des interférences pouvant causer son mauvais fonctionnement.
ATTENTION : Des changements ou modifications non approuvés expressément par la partie responsable de la conformité pourraient faire en sorte qu’il soit interdit
par l’utilisateur d’utiliser ce dispositif.
Usin
g
Descri
p
Button
F
B
u
Note: Y
o
Lo
c
No
re
m
ve
h
unl
ti
m
g
the remot
e
p
tion of Remo
t
F
unctions
u
tton Pr
e
P
P
Pr
e
o
u make sure pre
s
c
k/Unlock
te: Press the button
m
ote control transmi
t
h
icle. Press the butt
o
ock the driver’s doo
m
es to unlock all doo
r
e
control
t
e Appearance
e
ss buttons for
P
ress 1time
P
ress 2 times
e
ss 2times x 2
2 seconds
s
s button only aft
e
1 time on the
t
ter to lock the
o
n 2 times to
r, 2 additional
r
s.
2Way Remote
LED
e
r LED lighting en
Unl
o
U
R
e
ds to activate ea
c
Lock, Unlo
c
Starting ico
n
Two LED c
o
START/STO
Note : Rem
o
Press the bu
t
within 3 sec
o
the button fo
r
Remote En
g
the button fo
r
Function
Lock
o
ck driver’s door
nlock all doors
e
mote start/stop
c
h feature properl
y
c
k and Remote
n
is displaying with
o
lor.
P:
o
te Engine Start -
t
ton 1 time and then,
o
nds, press and hold
r
2 seconds
g
ine Stop - Press
r
2 seconds
1Wa
y
y
.
Lock, Unlock
a
Starting icon i
s
One LED colo
y
Remote
a
nd Remote
s
displaying with
r.

Vehicle Presets
Heater
When leaving the vehicle it is recommended to preset the accessory controls in preparation for the Next remote start. Settings for the blower motor(fan),front and rear (if
equipped),should not be left on HIGH. It is recommended to leave the settings on LOW or MEDIUM instead.
Windshield Wipers, Headlights
Certain vehicles require the windshield wipers and headlights circuits to become energized while running under remote start. When leaving the vehicle you must ensure that
the windshield wipers and headlights switches are OFF. Leaving the headlights switch ON on certain types of vehicles could cause them to remain ON even after remote
starter shutdown, resulting in a dead battery.
Leave Windshield Wipers off to avoid damage wipers/motor with remote start.
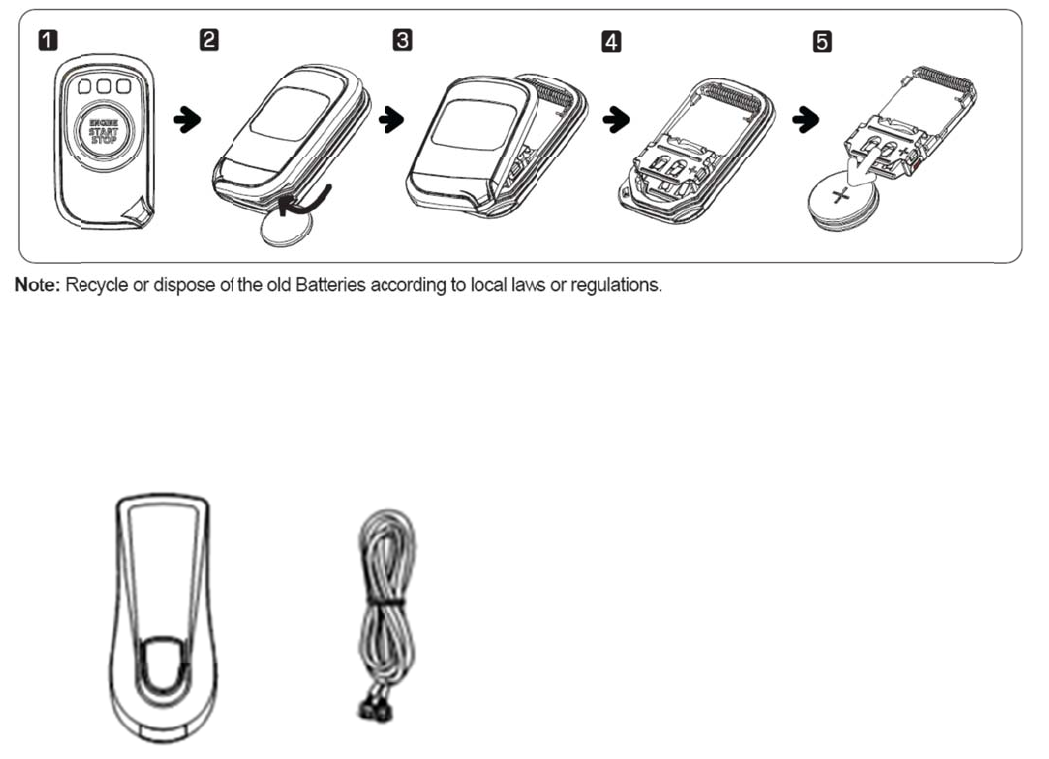
Changing the Remote Control Transmitter Battery
Remote transmitter should be provided with two 3-volt lithium battery (Model: CR-2025).
Please pay attention that with low battery LED in the remote might not work and the remote start distance might get shorter.
Batteries can be purchased at any electronic device stores.
Following the instructions below to change the remote control battery
1. You may use a coin to pry the remote control halves apart
2. Remove the old battery and replace with a new one
3. Be sure to observe the (+) sign when inserting the new battery.
4. Before assembling transmitter case, you should test the remote control.
Note: LE
D
n
e
Descri
p
Note: U
s
D
icon of 2way tr
a
e
wl
y
p
tion of Ante
n
2Way Antenna
s
e the power of th
e
a
nsmitter indicate
s
n
na A
pp
earanc
e
Antenna
e
antenna car ba
t
s
firstly blue colo
r
e
Harness
t
tery 12volts.
r
and then chang
e
e
to “RED” color
w
w
hen you press a
n
n
y button. In this
c
c
ase, it’s time to change CR2025 b
a
a
ttery

Remote-
Remote-
For the
2
1. Press
t
display t
h
2. 5 sec
o
For the
1
1. Press
2. Remo
t
If your v
e
system g
Note: Pl
e
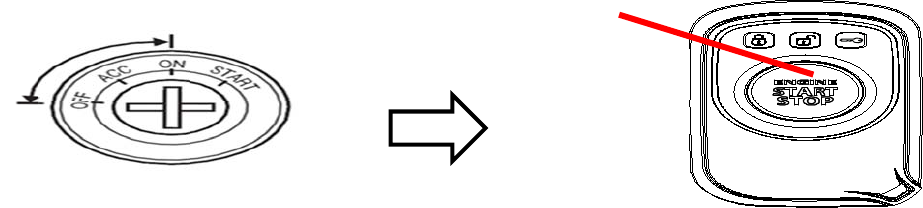
Driving
O
With the
v
following
:
1. Turn t
h
(Do not t
u
brake)
Starting your V
e
Starting
2
-way remote:
t
he butt
o
h
e KEY icon.
o
nds later, the re
m
1
-way remote:
button one
t
e Stop - Press b
u
e
hicle does not st
a
ives up.
e
ase make sure p
r
O
ff (Steps from
R
v
ehicle running r
e
:
h
e ignition key to
t
u
rn the key to the
e
hicle
o
n one time. The r
m
ote will activate
s
time and Lock L
E
u
tton for 2 second
a
rt at the first atte
m
r
ess to button onl
y
R
emote Start to
D
e
motely, press
t
he IGNITION O
N
CR
A
NK position
emote will beep
o
s
tarter. The Key i
c
E
D will be display
e
s.
m
pt, the system
w
y
after LED lighti
n
D
riving)
button 2 tim
e
N
(RUN) position.
while the engine
o
nce and display
t
c
on will be shown
e
d. Then press
w
ill shut down, w
a
n
g ends to activat
e
e
s to disarm the
O
is running. This
w
t
he Lock icon. Th
e
with 3 different t
o
button for 2 s
e
a
it a few seconds
a
e
each feature pr
o
O
EM Starter Kill a
n
w
ould cause the s
t
e
n, press the
nes of beeping t
h
e
conds within 3 s
e
a
nd try to start th
e
o
perly.
n
d/or the OEM al
a
t
arter motor to re
e
button within
h
en the LED Icon
w
e
conds.
e
engine again. T
h
a
rm and unlock t
h
e
ngage. Disarm t
h
2 seconds. The
r
w
ill be scrolled..
h
ere will be 3 sta
r
h
e doors. Enter th
e
h
e remote starter
r
emote will beep
o
r
t attempts before
e
vehicle and do
t
mode by pressin
g
o
nce and
the
t
he
g
the foot
2. Press
t
turn to re
Note: In
r
- Open t
h
- Press b
Engine
Y
our R
e
Note :
R
To che
c
After p
r
engi
Remote
S
Remote
S
If remote
Number
o
1
2
3
4
5
6
t
he brake pedal t
o
ady status to driv
e
r
emote engine st
a
h
e door and 30 s
e
rake pedal witho
u
Run Time
e
mote Car Start
e
R
un time is set b
c
k the amount o
f
r
essing bu
ne is turned on,
S
tarter Features
S
tart Error Diag
n
engine starter fai
o
f Horn times
o
disengage the r
e
e
.
a
rt status, engine
w
e
conds is passed.
u
t key is in IGNITI
e
r can be progra
m
y installer.
f
runtime remain
i
tton once, if yo
u
the remote will
r
n
ostic
ls, the vehicle wil
Remote St
Hood ope
n
KEY IN or
Valet mod
e
Brake pre
s
Trunk ope
n
Door open
e
mote starter uni
t
w
ill be deactivate
ON ON position.
m
med to run the
i
ng (2-way only)
:
u
press bu
t
r
eceive signal a
n
l not be started a
n
art Error
n
IG1 ON
e
s
s
n
t
. With the vehicl
e
d according to fol
engine for 10 o
r
:
t
ton 2 times wit
h
n
d shows the re
m
n
d the horn will s
o
e
key is in the IG
N
lowing conditions
r
5 minutes (10
m
h
in 3 seconds, r
e
m
aining remote
s
o
und accordingly
t
ITION ON positi
o
.
m
inutes by defa
u
e
mote starter wi
s
tarter time as a
t
o the table belo
w
o
n, press the brak
e
u
lt).
ll be operated.
O
START LED ico
n
w
.
e
pedal or wait 3
0
O
nce remote sta
r
n
.
0
seconds for the
v
r
ter is succeede
d
v
ehicle to
d
and the

V
alet/Se
r
For RE
M
Valet/Se
r
When yo
u
engine fr
o
A
ny of th
e
Remote
V
To Enga
g
1) Insert
t
2) Press
3) Press
To take t
h
1) Insert
t
2) Press
3) Press
To verif
y
If system
Advanc
e
The Re
m
your vehi
Caution:
r
vice Mode
M
OTE Start KEY
F
r
vice mode is use
d
ur vehicle is in V
a
o
m being remote
-
e
following featur
e
V
ale
t
:
This feature allo
w
g
e Valet Mode/Se
r
t
he vehicle’s key
t
and hold the vehi
and hold the rem
o
h
e system out of
V
t
he vehicle’s key
t
and hold the vehi
and hold the rem
o
y
whether the sy
s
is in Valet mode,
e
d Features: Inst
m
ote Car Starter
w
cle.
The programmin
F
ob
d
to prevent the s
a
let Mode, the re
m
-
started accident
a
e
s will put your r
e
w
s you to put you
r
r
vice Mode: (App
r
t
o the IGNITION,
cle brake.
o
te button f
o
V
alet Mode (Retu
r
t
o the IGNITION,
cle brake.
o
te button f
o
s
tem is in Valet
M
buzzer sounds s
allation-progra
m
w
as designed with
g of your system
ystem from unex
p
m
ote starter functi
o
a
lly.
e
mote car starter i
r
system into Vale
t
r
oaching to Func
t
turn to the ON p
o
o
r 2 seconds, the
r
n the system to i
t
turn to the ON p
o
o
r 2 seconds, the
M
ode using the
2
hortly when lock
o
m
mable Options
flexibility and OE
should be left to
a
p
ectedly starting
t
o
nalities are disa
b
nto Valet Mode :
t
Mode by using t
t
ion stop mode)
o
sition.
key LED will flas
h
t
s normal operati
n
o
sition.
key LED will flas
h
2
-way remote:
o
r unlock button i
s
M integration in
m
a
professional.
t
he engine while
b
b
led. If the vehicl
e
he transmitter.
h
and the vehicle’
s
n
g mode): (Disar
m
h
and the vehicle’
s
s
pressed.
m
ind. With its pro
g
b
eing serviced.
e
needs to be ser
v
s
indicator will fla
s
m
ing “Function St
o
s
indicator will fla
s
g
rammable option
v
iced, or if you pa
s
h 1 time. Valet m
o
p Mode”)
s
h 2 times, Valet
m
s, this unit can vi
r
rk it indoors, the
V
ode is engaged.
m
ode is cancelle
d
r
tually control ne
a
V
alet Mode will pr
e
d
.
a
rly any electrical
s
e
vent the
s
ystem in

Changing any one of the settings may affect the operation of your Remote Car Starter.
Engine Run Time setting
Option Setting Condition
Disarm the vehicle with remote control transmitter.(Unlock)
Driver s door must be physically Open, Engine Stop, Ignition ON, Trunk Open and Hood Open.
Option Setting Instruction
- Under option setting condition, press button for 2 seconds.
Light and Horn of vehicle will activate according to Engine Run Time option.
Number of Indicator+ Horn Settings
1 Time 10 Mins (Default)
2 Times 5 Mins
Light Blinking during remote engine start
Option Setting Condition
Disarm the vehicle with remote control transmitter.(Unlock)
Driver s door must be physically Open, Engine Stop, Ignition ON, Trunk Open and Hood Open.
Option Setting Instruction
- Under option setting condition, press button for 2 seconds.
Light and Horn of vehicle will activate according to Light Blinking during remote engine start.
Number of Indicator+ Horn Status
1 Time Blink OFF (Default)
2 Times Blick ON
Pairing Remote Start Fob
The Remote Start Fobs in Remote Start Kit are already paired with the main module at the time of production.
There is no need to pair the Fobs at the time of the first installation.
1. When a new registration is needed
- When replacing a remote due to loss or malfunction of a remote.
- When r
e
- When
a
2. Pairin
g
1) Open
d
2) Insert
t
3) After s
4) After r
e
5) Verify
t
.
NOTE:
1) A syst
e
2) If a ne
w
Trouble
s
Many fa
c
5
X
e
placing the main
a
dding or changin
g
g
procedure
d
river’s door and
t
he key into the i
g
tep 2), within 5 s
e
e
gistering the 1st
t
hat all Fobs are
f
e
m can recogniz
e
w
Fob, or additio
n
s
hooting Poor T
r
c
tors may affect t
h
X
controller install
e
g
the remote upo
n
trunk.
g
nition. Turn the k
e
conds, Press bu
t
Remote Start Fo
b
f
unctioning corre
c
e
up to 3 remotes
n
al Fob, is neede
d
r
ansmitting Ran
g
h
e operating rang
e
e
d in the vehicle.
n
user’s need.
ey from OFF to
O
t
ton on the 1st R
e
b
, within another
5
c
tly by performing
maximum.
d
later, the Fob p
a
g
e
e
of the transmitt
e
R
O
N position 5 time
e
mote Start Fob 1
5
seconds, Press
Lock / Unlock fu
n
a
iring process sh
o
e
r. Some of these
R
S Fob X
1
s within 5 second
time.
button on the ne
x
n
ction.
o
uld be done with
are:
1
s.
x
t 2nd Remote St
a
the original Fob
o
a
rt Fob 1 time.
o
r oldest availabl
e
e
Fob.
-The condition of the batteries in the transmitter.
-The operating environment (for example: downtown radio-frequency noise, airports, cellular phone towers, etc).
-Metal in the area of the vehicle of transmitter. This includes the vehicle itself.
-The shape of the vehicle can affect range as well. Vans in general have greater interference.
The shape of the roof and A-pillars causes considerable radio-frequency interference.
Demonstrate to users that the best range is facing the vehicle's front.
The worst range is facing the vehicles right or left side.
Please inform the users that facing the vehicle’s front offers the best range.
The worst range is experienced facing the R or L side.
-The amount of other vehicles in the area of the target vehicle.
-The method of using the transmitter. Always hold the transmitter high, approximately at shoulder height.
Automatic Engine Start Repeat
Remote Start is programmed to repeat the engine start sequence two (2) more times after ten (10) seconds if the engine start fails because of low vehicle battery.